HOLIDAY DONATION DRIVE - SUPPORT MSW - DO YOUR PART TO KEEP THIS GREAT FORUM GOING! (Only 13 donations so far - C'mon guys!)
×


rcmdrvr
-
Posts
420 -
Joined
-
Last visited
Content Type
Profiles
Forums
Gallery
Events
Everything posted by rcmdrvr
-
Very nice looking model. I think I would have liked the build.
-
Length is not the only issue. I could probably display a 36 inch model of a modern day destroyer but not a 36 inch model of a British ship of the line. The mast height would be a killer.
-
I would love to see the Maine back in production.
-
Thanks for the info. I have ordered the kit and will attempt a waterline presentation.
- 97 replies
-
- 5
-

-
- Curtis Wilbur
- I Love Kit
- (and 2 more)
-
Question, do you think you could have cut the hull to make a waterline model?
- 97 replies
-
- 3
-
-
- Curtis Wilbur
- I Love Kit
- (and 2 more)
-
Those seam liines are pesky. Pop up where you least expect them.
- 97 replies
-
- 3
-
-
- Curtis Wilbur
- I Love Kit
- (and 2 more)
-
Very impressed with your work to date. I have ruined quite a few Trumpeter decals when applying them to aircraft carrier decks. Never tried cutting them up. I have this model on my list of to-do's. Looking forward to following your build.
- 97 replies
-
- 2
-
-
- Curtis Wilbur
- I Love Kit
- (and 2 more)
-
I have just completed a plastic model that I have mounted in a seascape. I have photos of this completed model that I would like to post to get some suggestions from readers of the forum. It is not a build log but I want to ask questions, especially about my finishing and the seascape. Where should I put this?
-
Just found your build which I will follow. I have moved over to the "dark side" and started a couple of plastic ship models. Not as complicated as your Mikasa but still full of very tiny parts. I am interested in waterline presentations which I think shows off the model in a more "active" setting. Hope to learn more about plastic ship building by following your build.
- 143 replies
-
- 3
-
-
- Mikasa
- Merit International
- (and 1 more)
-
Whose ropes are you using. They do not look like the rope provided for in the kit. I tend to listen to audible books when working on models. Right now I am taking a "course" in Criminal and Civil Law for dummies. Interesting.
- 144 replies
-
- 3
-
-

-
- Harriet Lane
- Model Shipways
- (and 1 more)
-
I have to agree with Bob Cleek. Often the instructions in wood ship model kits amount to "assemble the enclosed wood into a structure that looks like the photo on the box" whereas plastic models tend to have good illustrations. I also agree the the Model Shipways three shipwright kits are a great way to start. They are challenging to the new comer but can be completed in a reasonably short time so you can enjoy the statisfaction of completed wood model boat. Regardless of what you chose; go after something you think you will enjoy.
-
I have actually been moving in an opposite direction (i.e. wood to plastic). I like the selection of more modern ships such as aircraft carriers, LSTs, etc. I have found that the tools I accumulated for wood have served me well in plastic.
-
Would you buy pre-owned wooden kits?
rcmdrvr replied to Frank Burroughs's topic in Wood ship model kits
I am going to add a bit of a curve ball to this thread. I have built a few wooden ship models from kits and have enjoyed every minute of the process. I hit a point where I looked at many wooden ship kits that were within my price range and found that many were very similar; i.e. ships of sail with masts and rigging and usually some cannons. My last build, the Harriet Land, added steam power and that piqued my interest in more modern ship designs; especially warships. The wooden ship manufacturers do not cater to engine powered warships. While I have stumbled on some wooden kits of these subjects; they are prohibitively expensive and quite large. This has led me to 1/350 scale plastic. Wow, this is a wholly different ship modelling world. I purchased an inexpensive kit that contained some photo-etch as a practice project. It turned out to be a dismal, never to be completed project but I did learn that there is a whole bunch of new skills that I will need to learn to build good looking models in plastic. Puts some new excitement back into the hobby. I have learned, however, that the common skill required for wooden and plastic ship models is PATIENCE! I hope this is not stealing a thread. -
Your work continues to demonstrate you are a craftsman.
- 144 replies
-
- 3
-
-
-
- Harriet Lane
- Model Shipways
- (and 1 more)
-
Welcome back. Post some photos or better yet a build log.
-
I should probably start another topic but here we go with another question. I am toying around with a build of Revelle's New Jersey (premium edition). I have been roaming about the internet looking for New Jersey photos (quite plentiful) and I cannot find any that show the wooden decks unpainted. Most show the wooden decks painted a fairly dark grey. Raises the question, should I paint the wooden decks? Has anyone ever painted wooden decks provided in a plastic model?
-
Your build is really moving along. Very impressed with the details you are adding.
- 144 replies
-
- 2
-
-
-
- Harriet Lane
- Model Shipways
- (and 1 more)
-
DocRob, I just read you Arizona build. The finished model looks great. Your build log is very thorough and really helpful in my planning my build. The New Jersey I am building does not contain the same level of PE that you encountered in the Eduard build but I thing there is enough to give me an education using PE in model building. Thanks for the help.
-
I have just started working on the Revelle kit if the New Jersey (premium edition). I contains alot of photo etch and also wooden deck. I have spent time with the directions; which are the old kit directions for basic model build order and assembly and a separate set for the wooden deck and photo etch). You have to bounce back and forth between the two sets of instuctions. I have come across my first question. When assembling a module which contains wooden decking would your order of build be (1) assemble and glue all the components of that module (including photo etch railings), (2) paint and finally (3) install the wooden decks. An alternative order of build would be (1) assemble and glue all the components of the module but exclude the railings, (2) paint, (3) install the wooden decks, (4) form the railings to the proper shapes (5) paint railings and finally (6) install the railings. I hope this question makes some sense. I have roamed this forum and other internet sources looking for guidance but have not had a bunch of luck. Hopefully one of you skilled plastic modelers out there finds this and lends a hand. I will start a build log when I get a bit further down the road. Thanks for the help.
-
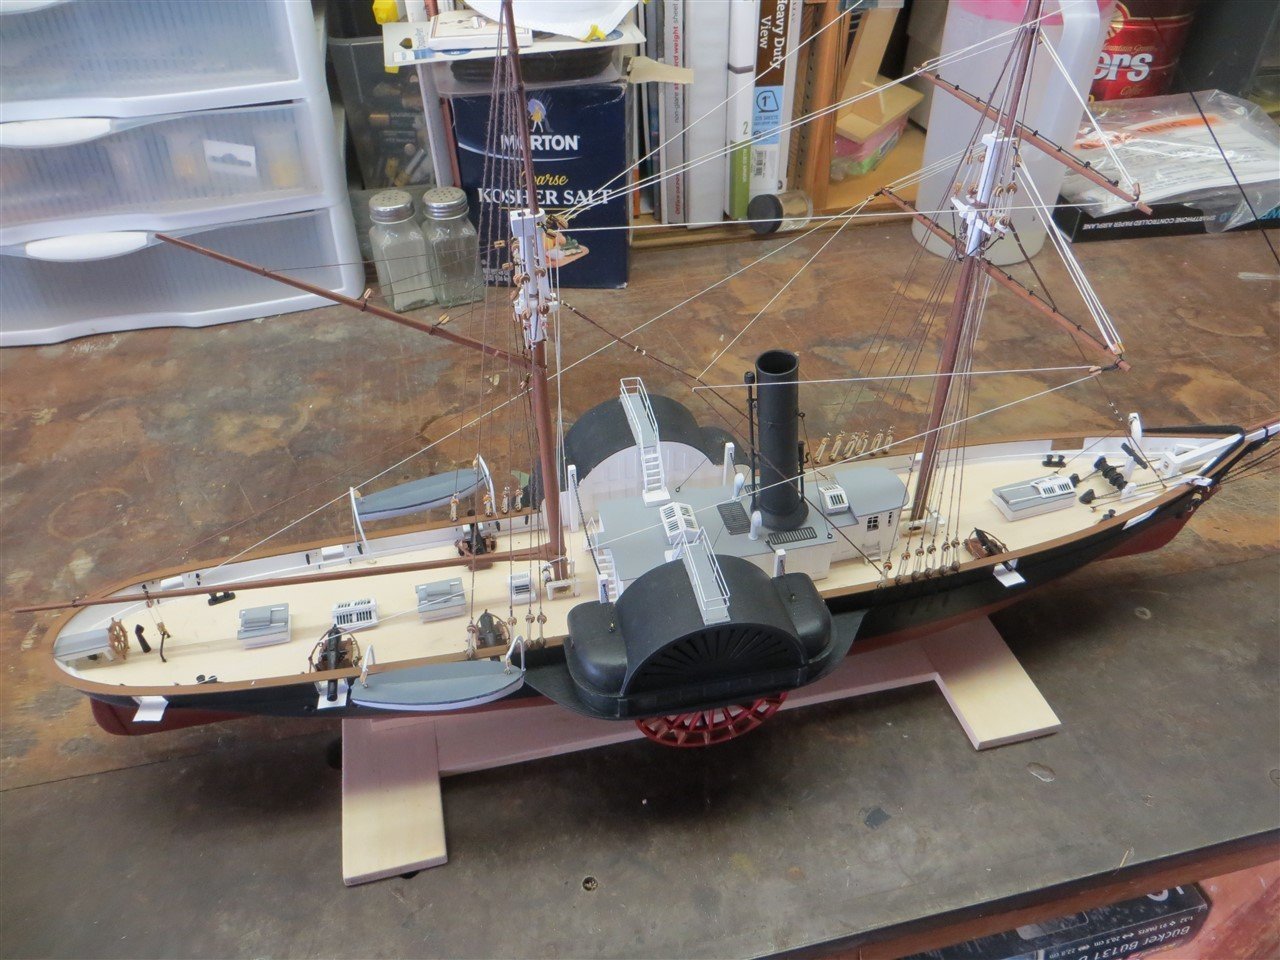
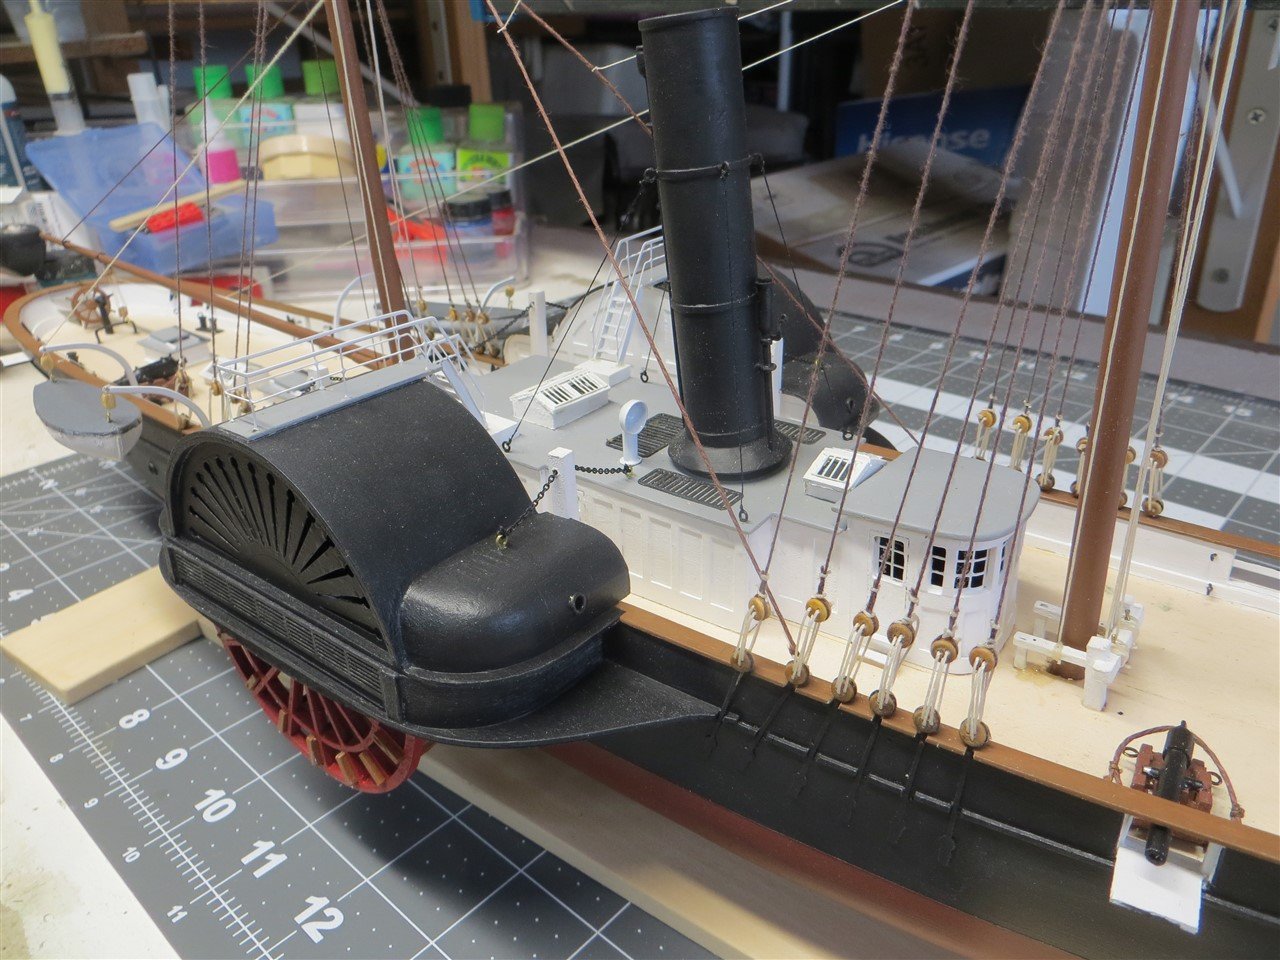
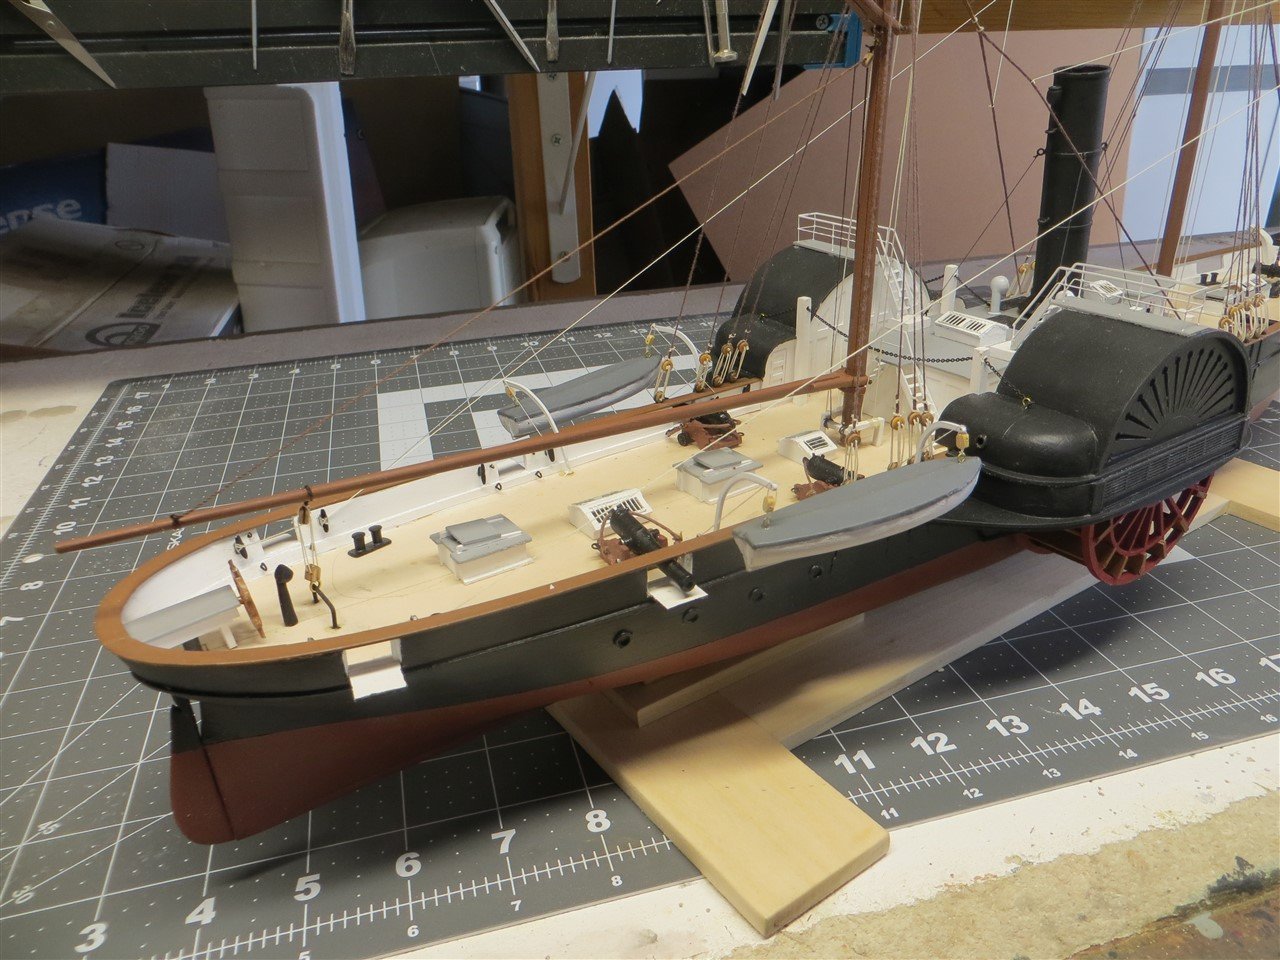
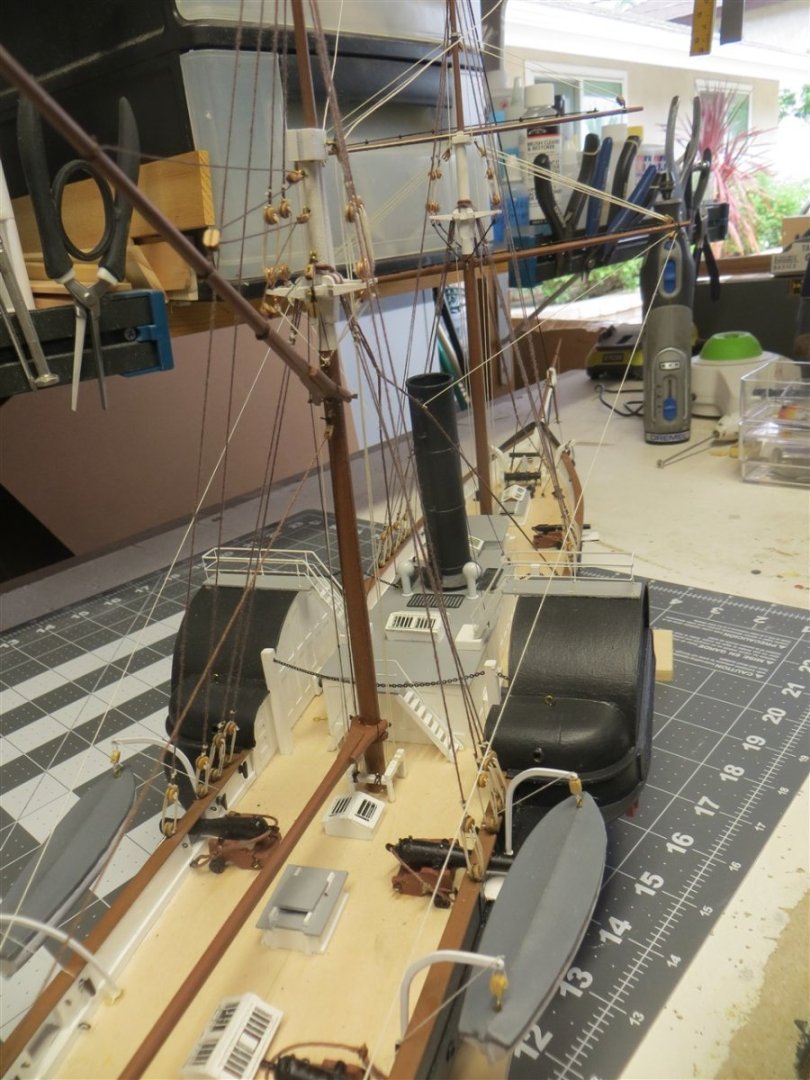
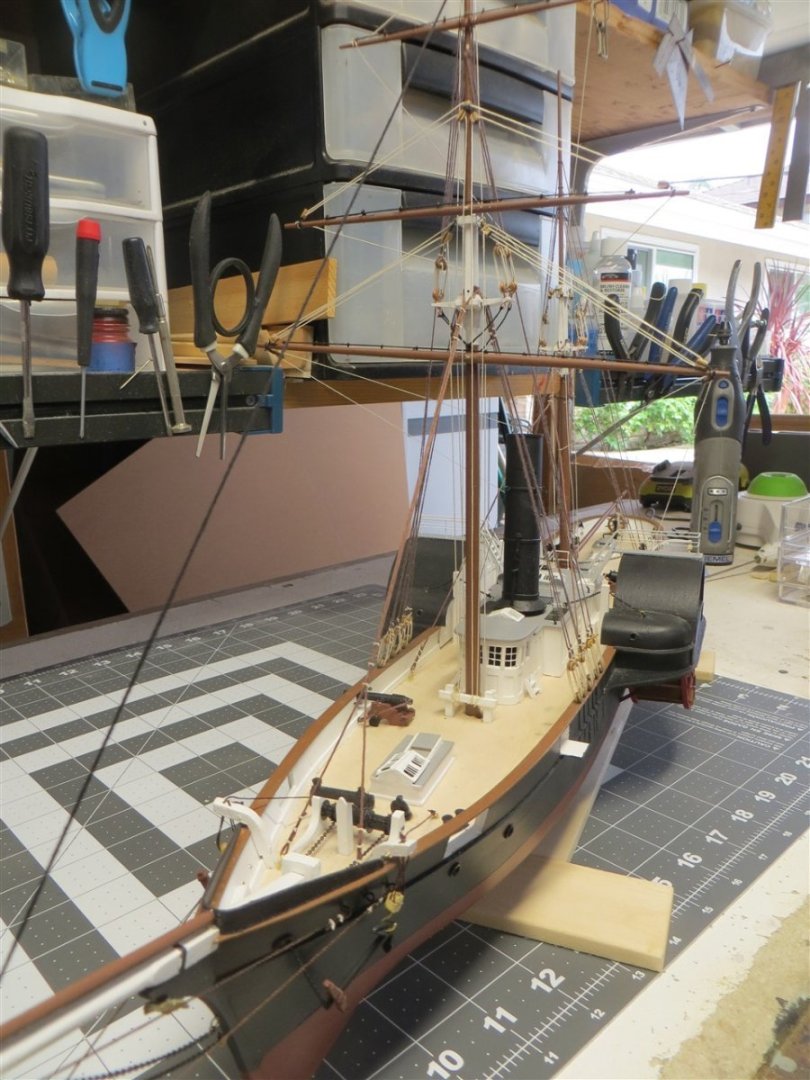
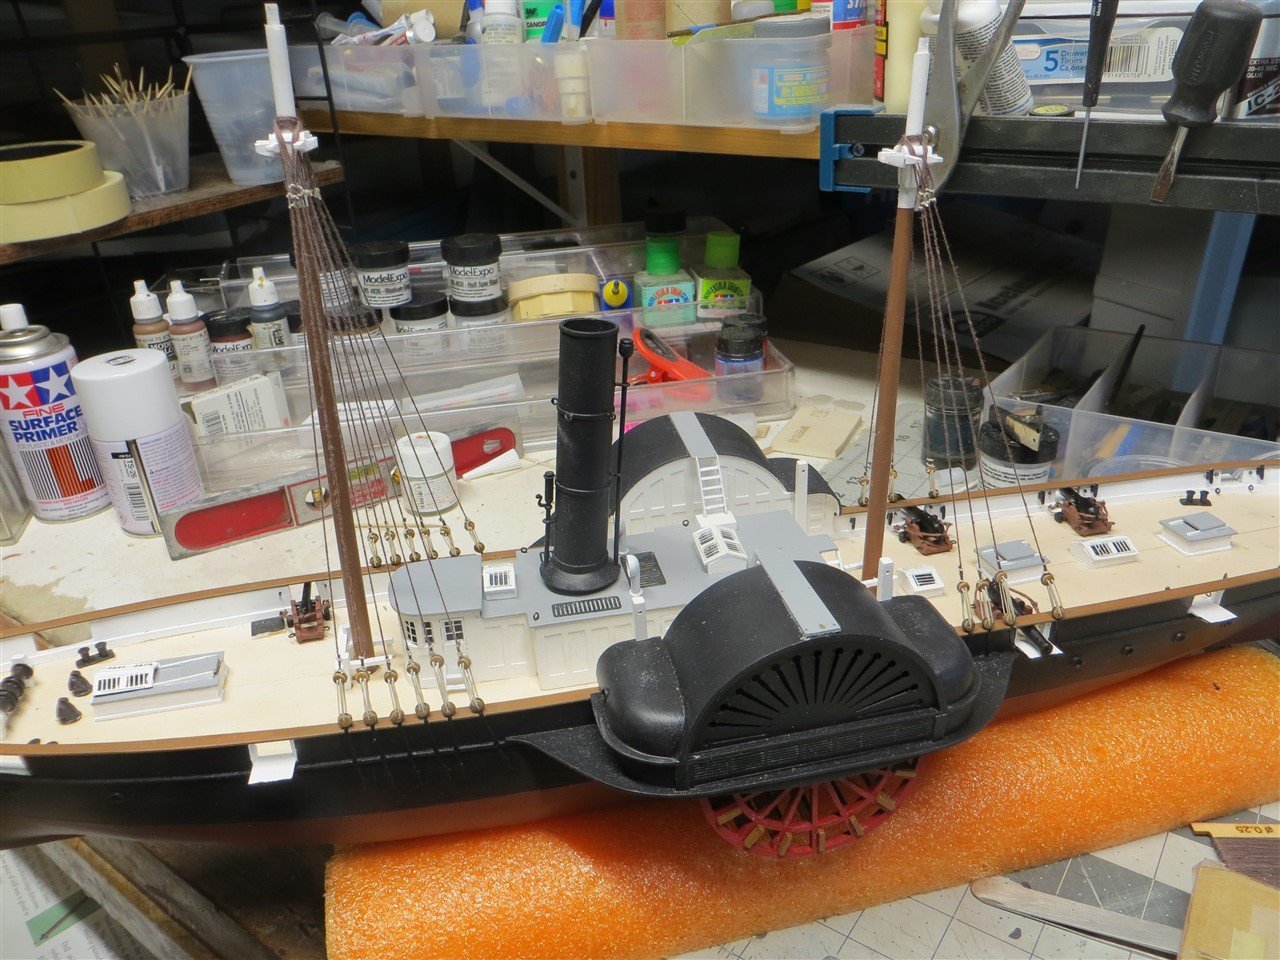
I have completed my Harriet Lane model. I have to apologize, however, that my photo taking and postings to this build have been somewhat ignored in the process. I want to thank Cathead for his rigging suggestions. I spent some time on this site reading other postings and builds that focused on rigging. I learned quite abit. As I read, the plans and rigging views provided with the kit began to make more sense. Where possible I did some re-rigging and I think I managed to get most of the standing rigging where it belongs. Looking at the completed model, it is not a museum piece but it will be a nice addition to my shop. I will continue to follow SalD's build because he is taking a more meticulous approach to the model that I admire and will use in the future. Finally, I want to thank the designer of this kit. It is a fairly complex build; but, for the most part, the plans and instructions lead the builder thru the process without too much difficulty. I very much like the photographic approach in the instructions; I would recommend even more. If any of the readers have wanted a model of an early steamer; this would be a nice addition. I have to decide on my next project. I have a few kits of various sailing vessels sitting around; but I think I would like to try a model of a more modern ship. Looking at some of Bluejacket's offerings of WWII ships. Any suggestions. Thanks to all that read and commented on this build. Here are photos of the completed model:

- 25 replies
-
- 10
-
-

-
- Harriet Lane
- Model Shipways
- (and 1 more)
-
Thank you bobandlucy for the comment. As I fashioned the upper sections of the masts I began to realize that this was a good way of shaping the masts and yards. I did find, however, that you have to remove material slowly (both when planning and sanding) and inspect the wood often or you can easily end up with an oblong cross section. I will look for the mast shaping threads you mentioned.
- 25 replies
-
- 1
-
-
- Harriet Lane
- Model Shipways
- (and 1 more)
-
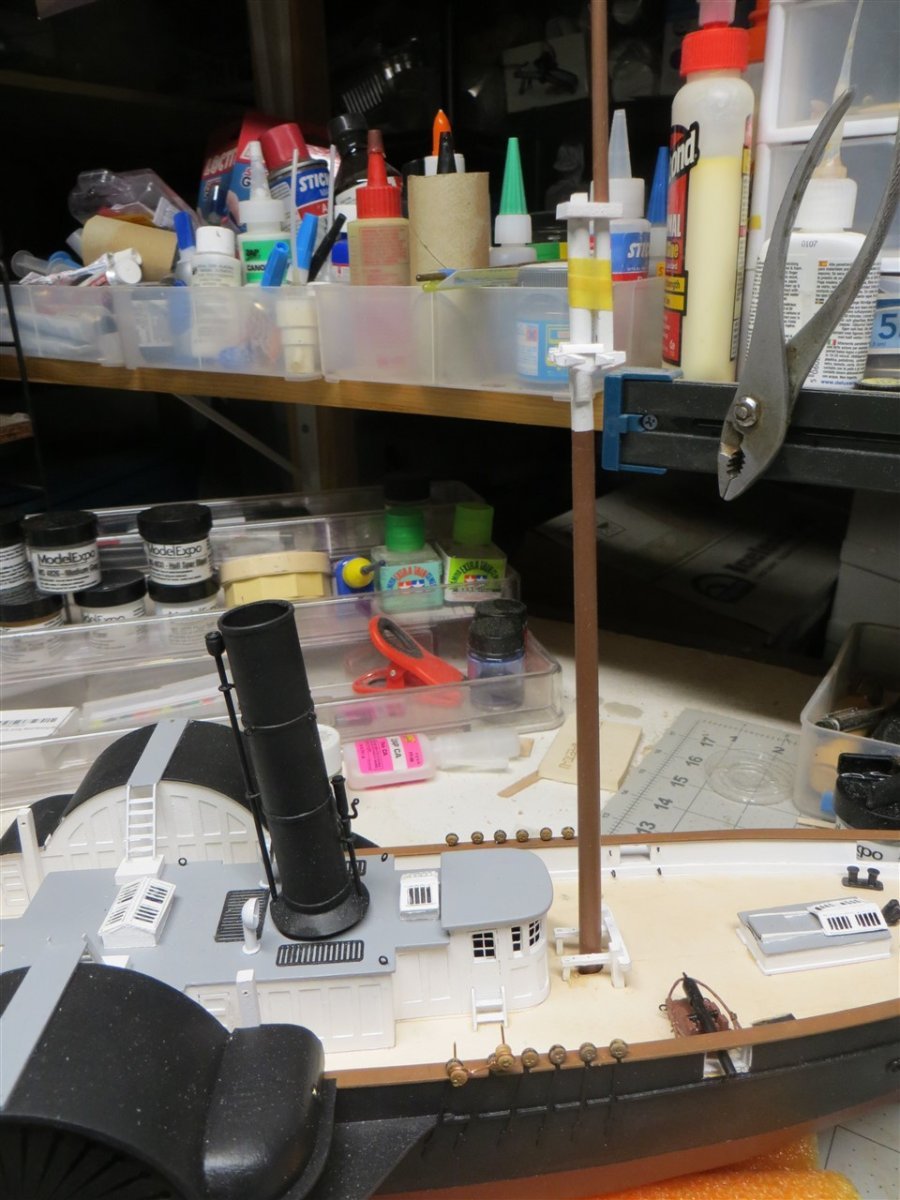
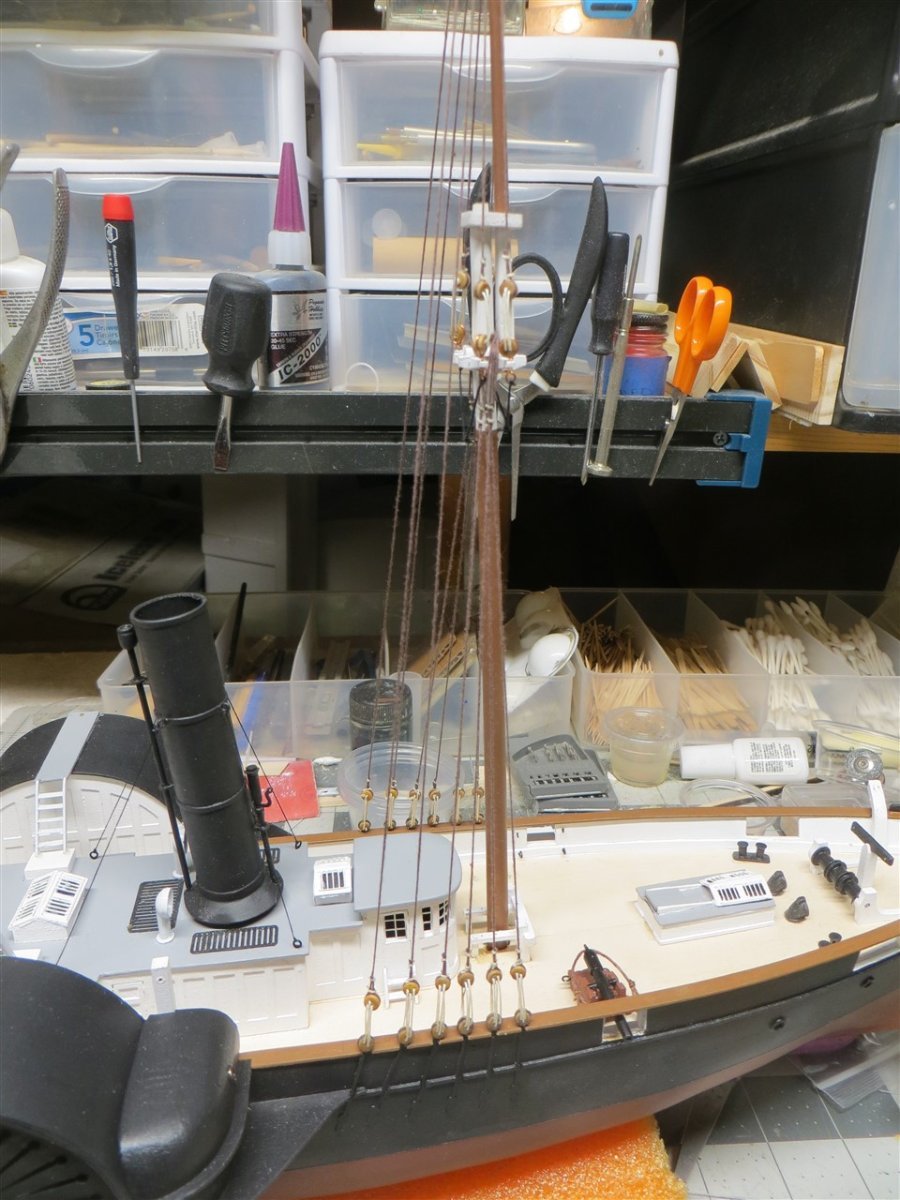
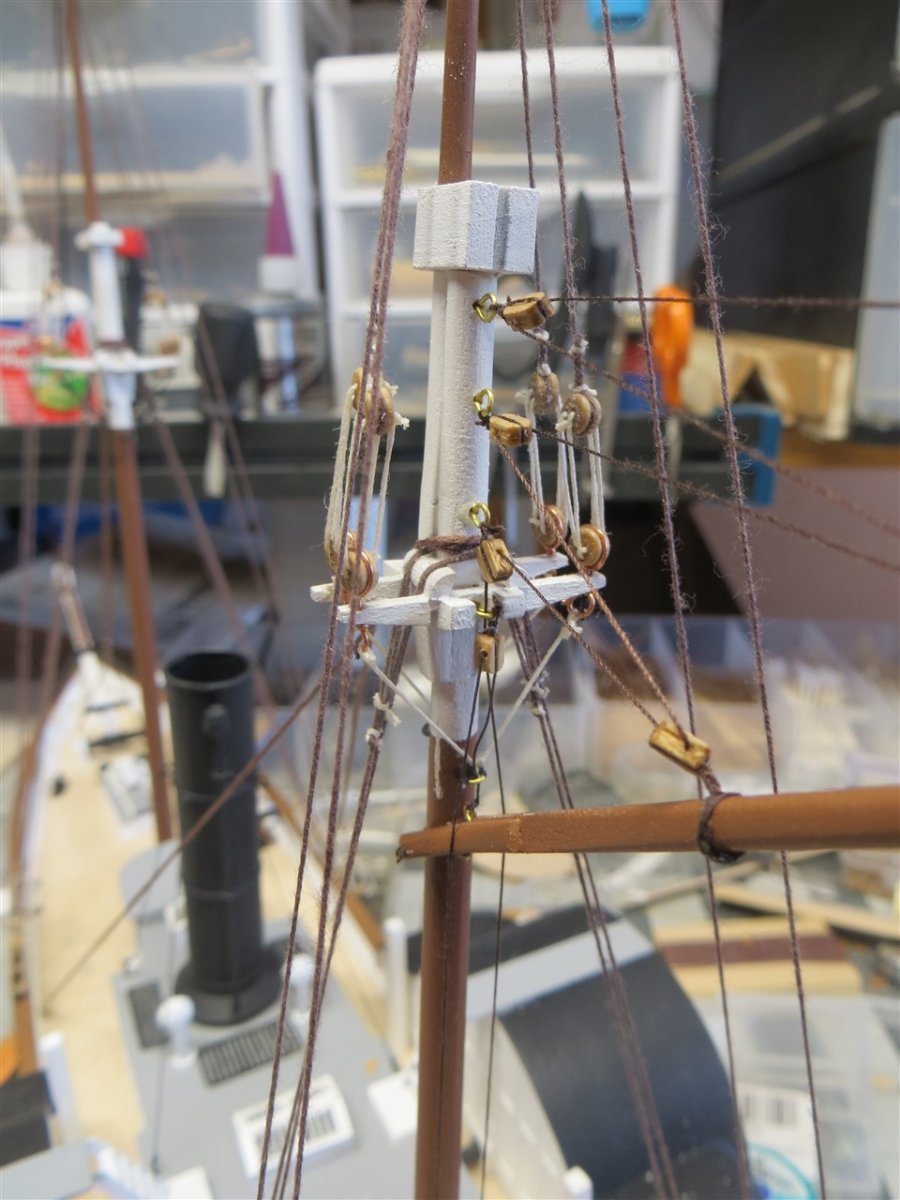
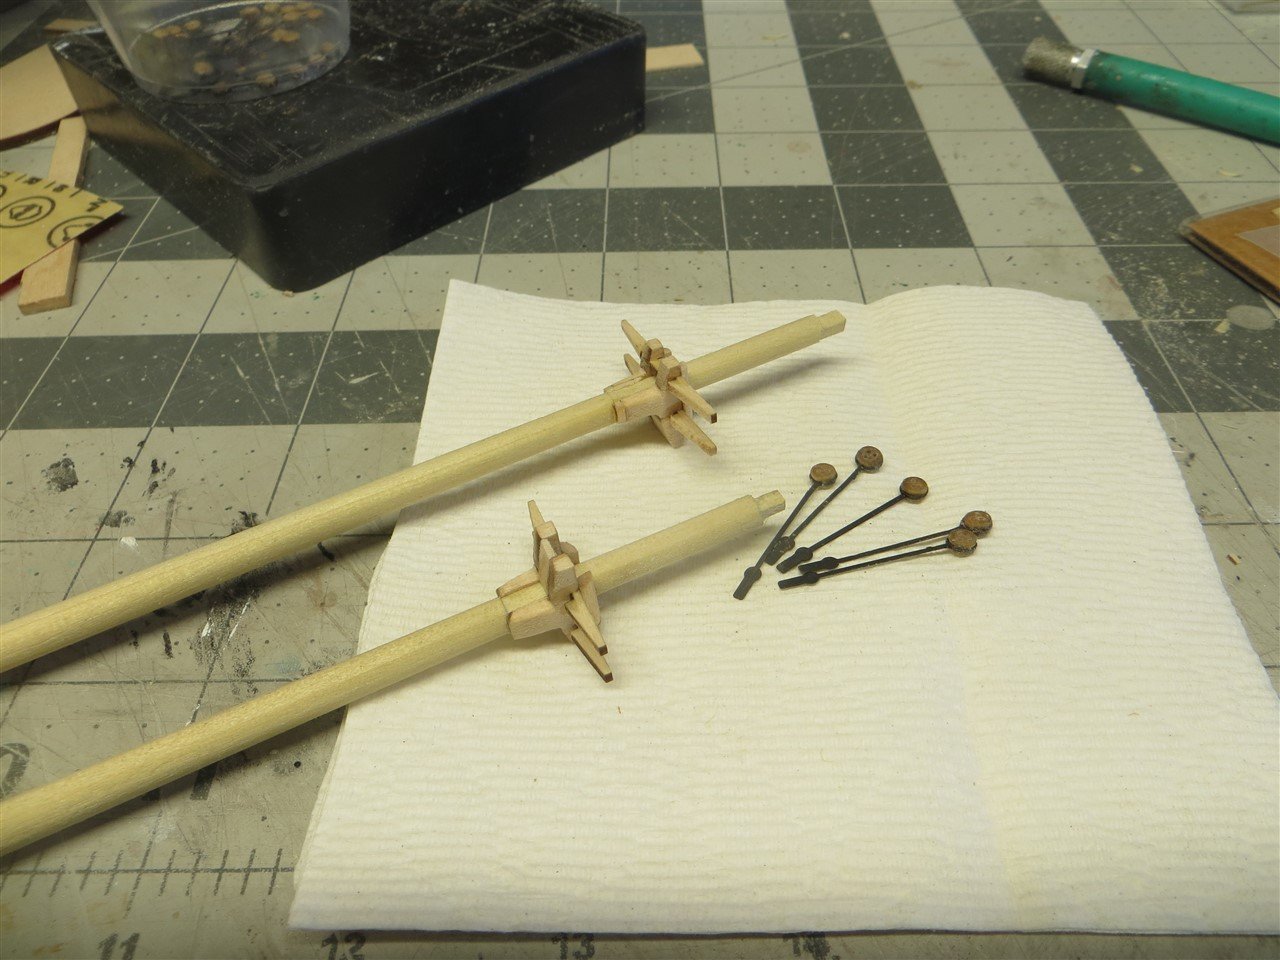
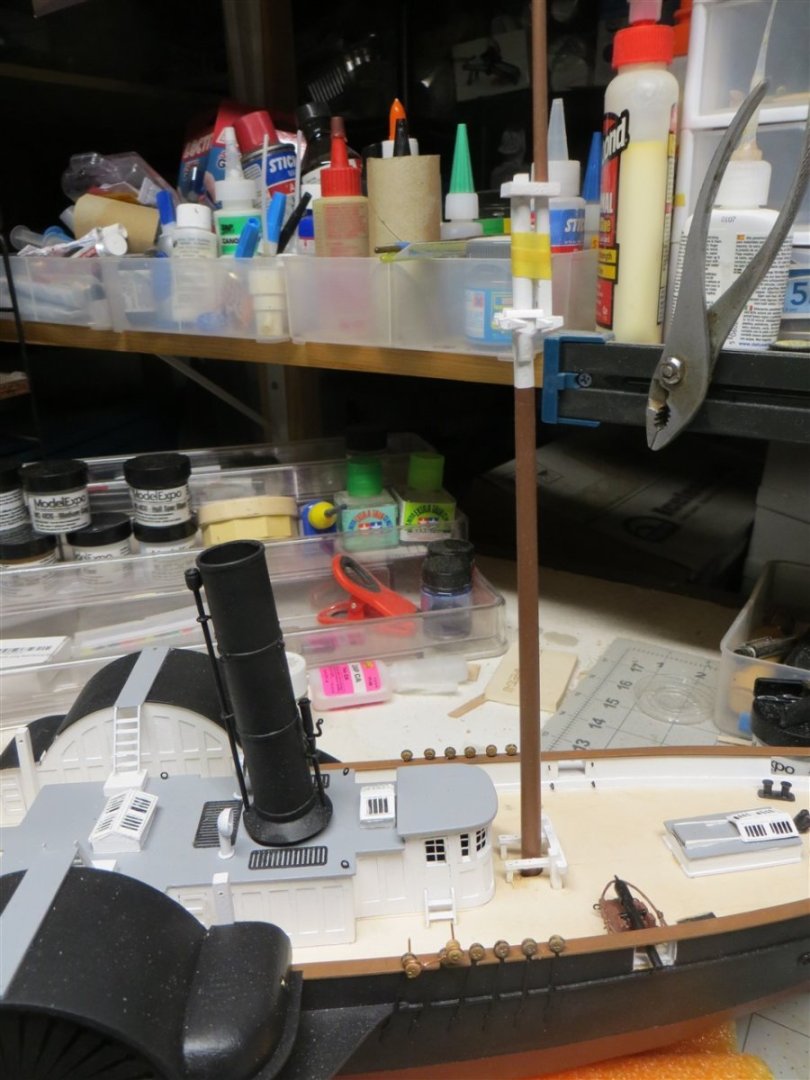
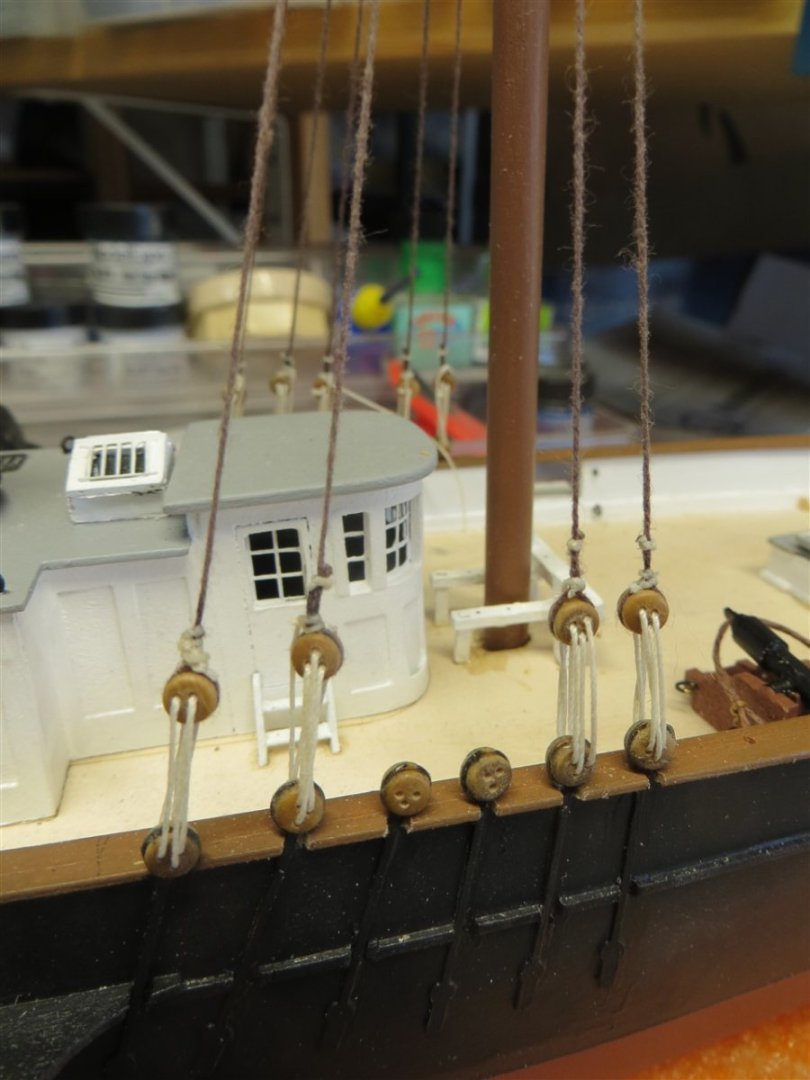
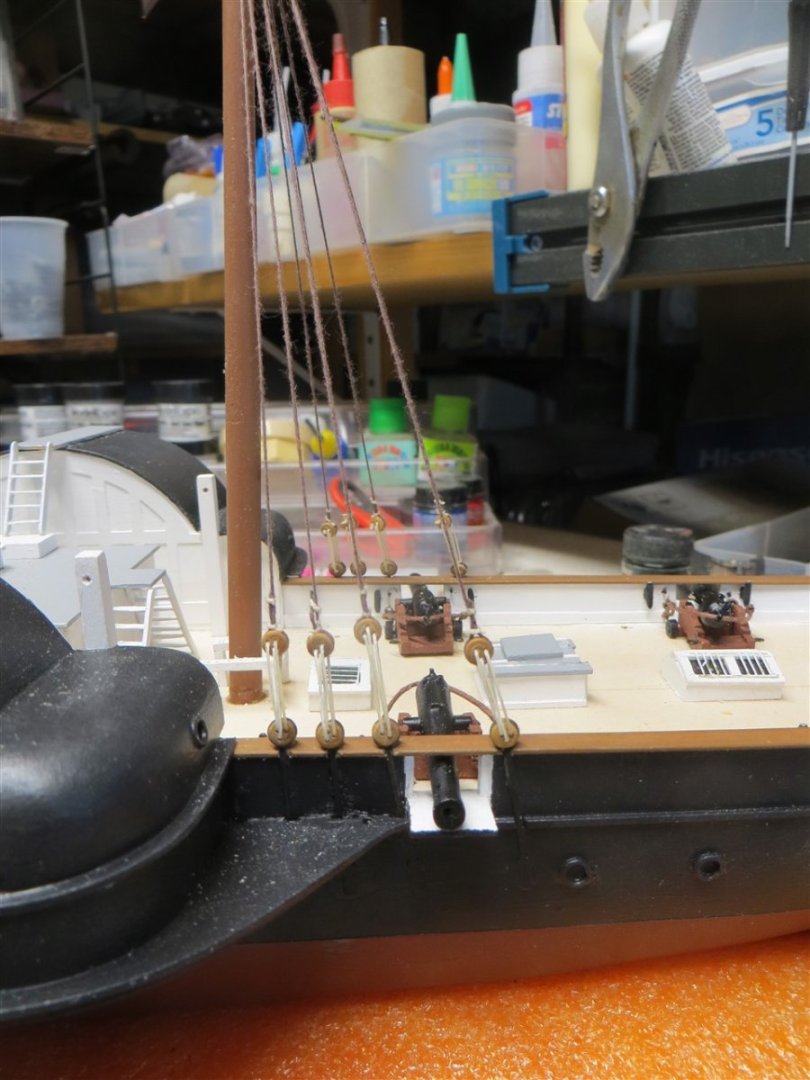
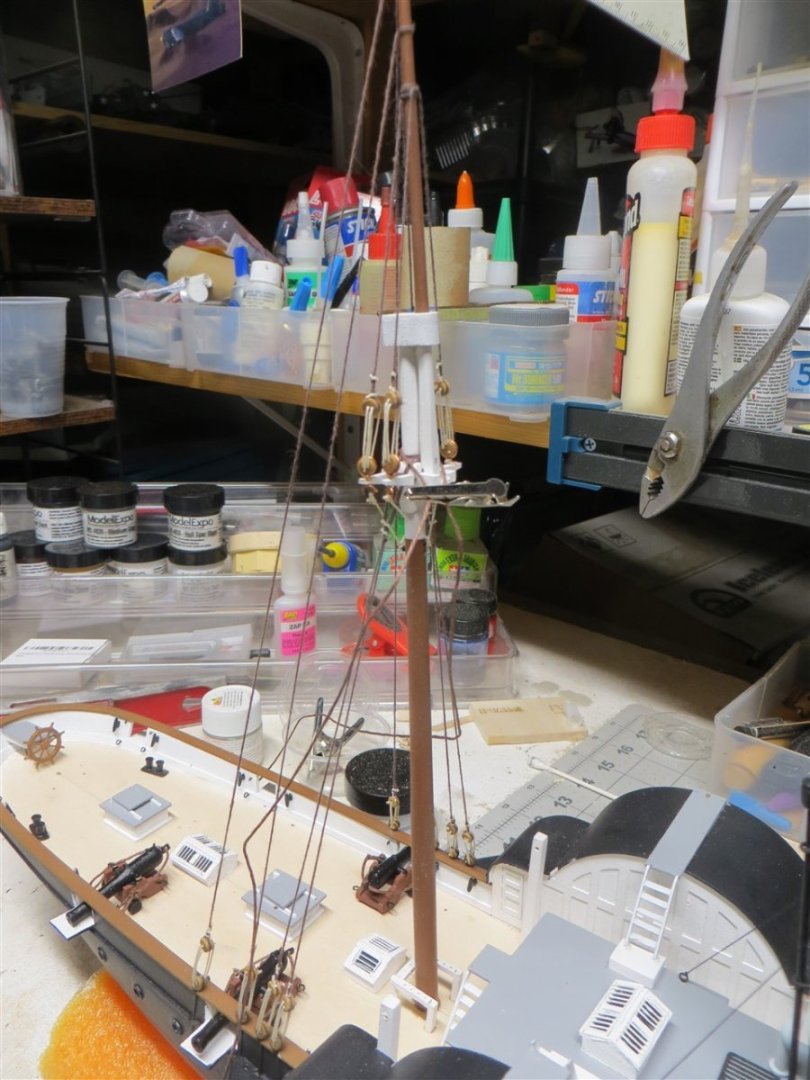
Well again, a few weeks have passed since my last post. During that time I have worked on the masts and rigging. In my last post I mentioned that the material for the masts are cut from the basswood sheets and then sanded round. I kind of cheated. I fashioned the lower portion of each mast from dowelling purchased from the local hardware store and then, using a drill motor and sandpaper, I tapered the dowels so they pretty much matched the dimensions on the plans. The other sections of the masts were fashioned from the provided material. Turning tapered square pieces into tapered round pieces actually was easier than I thought. First, I built a jig to hold the square pieces on edge. The edge was then flattened by sanding and then the piece was rotated 90 degrees. Four rotations and you have a tapered octagon stick. Next I sanded lightly while rolling the octagon stick on my work table. Soon you have a tapered round stick you can use for a mast section. You do have to be careful when rolling and sanding because it is easy to end up with an elliptical stick (I know). Since all the mast pieces were made from light woods; I opted for painting. A coat of primer; light sanding and then a few color coats completed the masts. I then epoxied the lower sections of each mast into their appropriate locations on the deck. Next comes rigging. The first step is constructing the chains and dead eyes. The chains are photo ech brass. I purchased some blackening agent and soaked the pieces for about 15 minutes. I then epoxied the deadeyes into the "slot" on the chains. I followed the instructions to affix the chains to the hull. I did, however, have to touchup the chains with black paint as much of the blacken surface rubbed off. Next came the shrouds. Again I followed the instructions. I did build a jig from music wire which I used to maintain the same spacing between each dead eye in the chain and the dead eye in the shroud. Look at the side view of the model provided in the plans when working on this task. Most of the shrouds are secured around the top of the lower section of the mast; but a few are secured around higher sections. I didn't discover this until I had mislocated a few and had to undue my handywork. With the shrouds in place I am now working the the rigging. The best way to describe my efforts is I AM LOST. I find the written directions difficult to follow so I am using the side view on the plans and the photos on the box to get thru this task. I am sure I have rigging running to places that rigging is not supposed to go and I am sure that I am not using the correct attachments; but, it looks pretty authentic to some who knows little about sailing ships. I have a lot to learn about how to rig a model. Here are a few more images of the build.


- 25 replies
-
- 8
-
-
- Harriet Lane
- Model Shipways
- (and 1 more)