palmerit
-
Posts
1,090 -
Joined
-
Last visited
Content Type
Profiles
Forums
Gallery
Events
Everything posted by palmerit
-
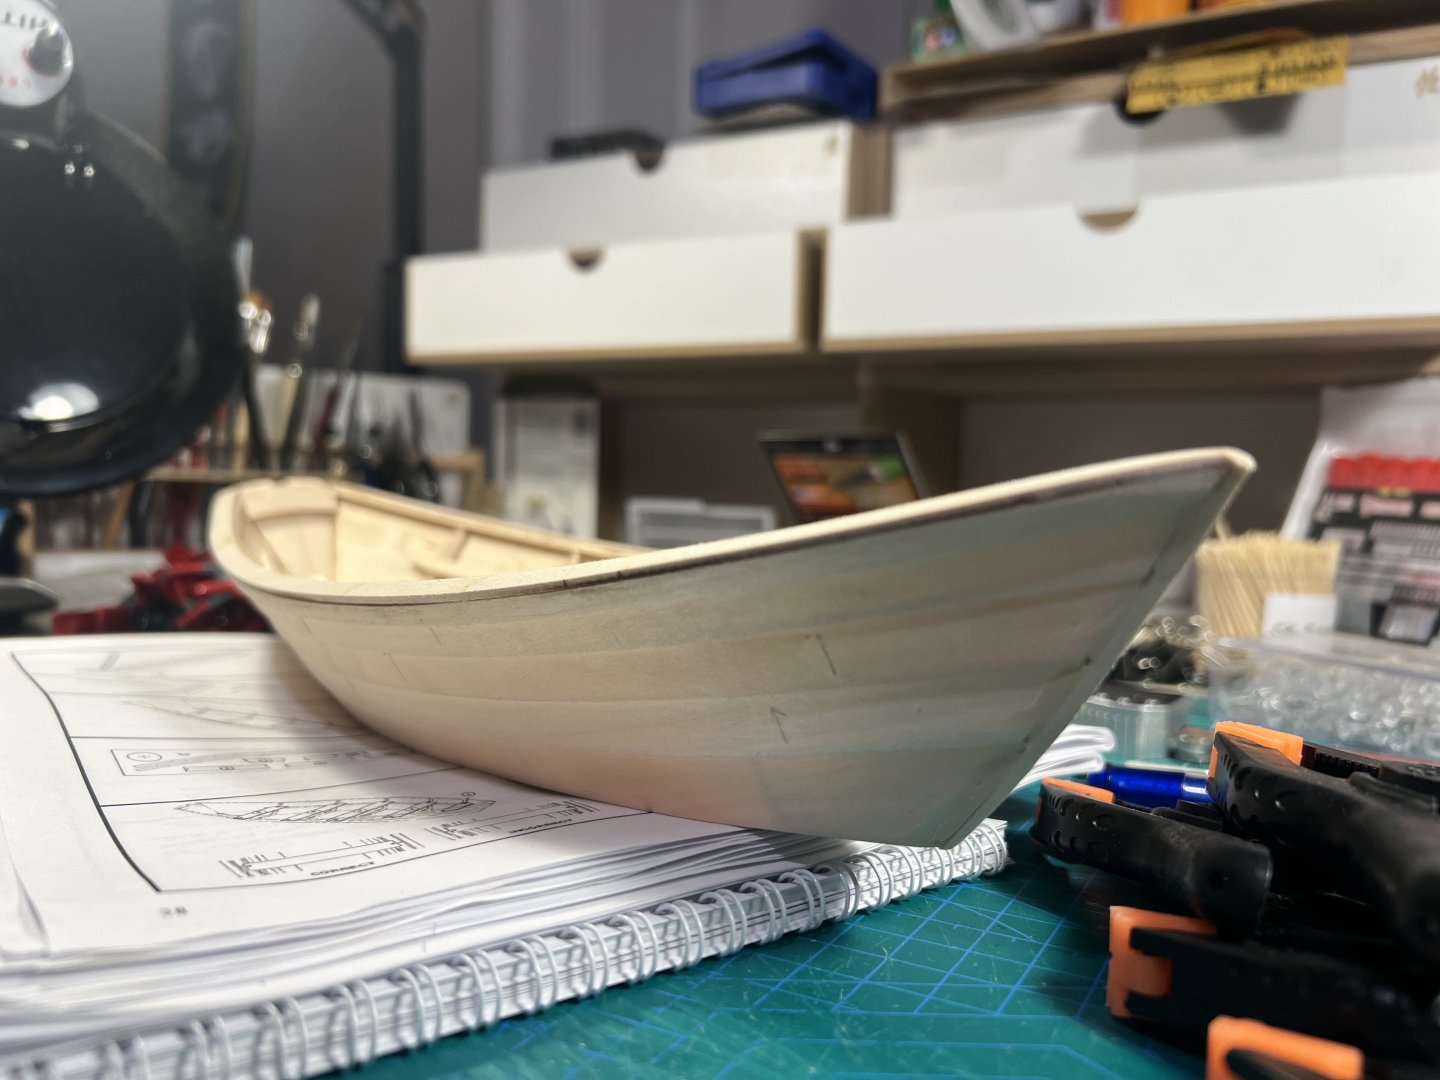
Painted the lower plank and bottom of the Dory.

- 71 replies
-
- 3
-

-
- grand banks dory
- midwest products
- (and 2 more)
-
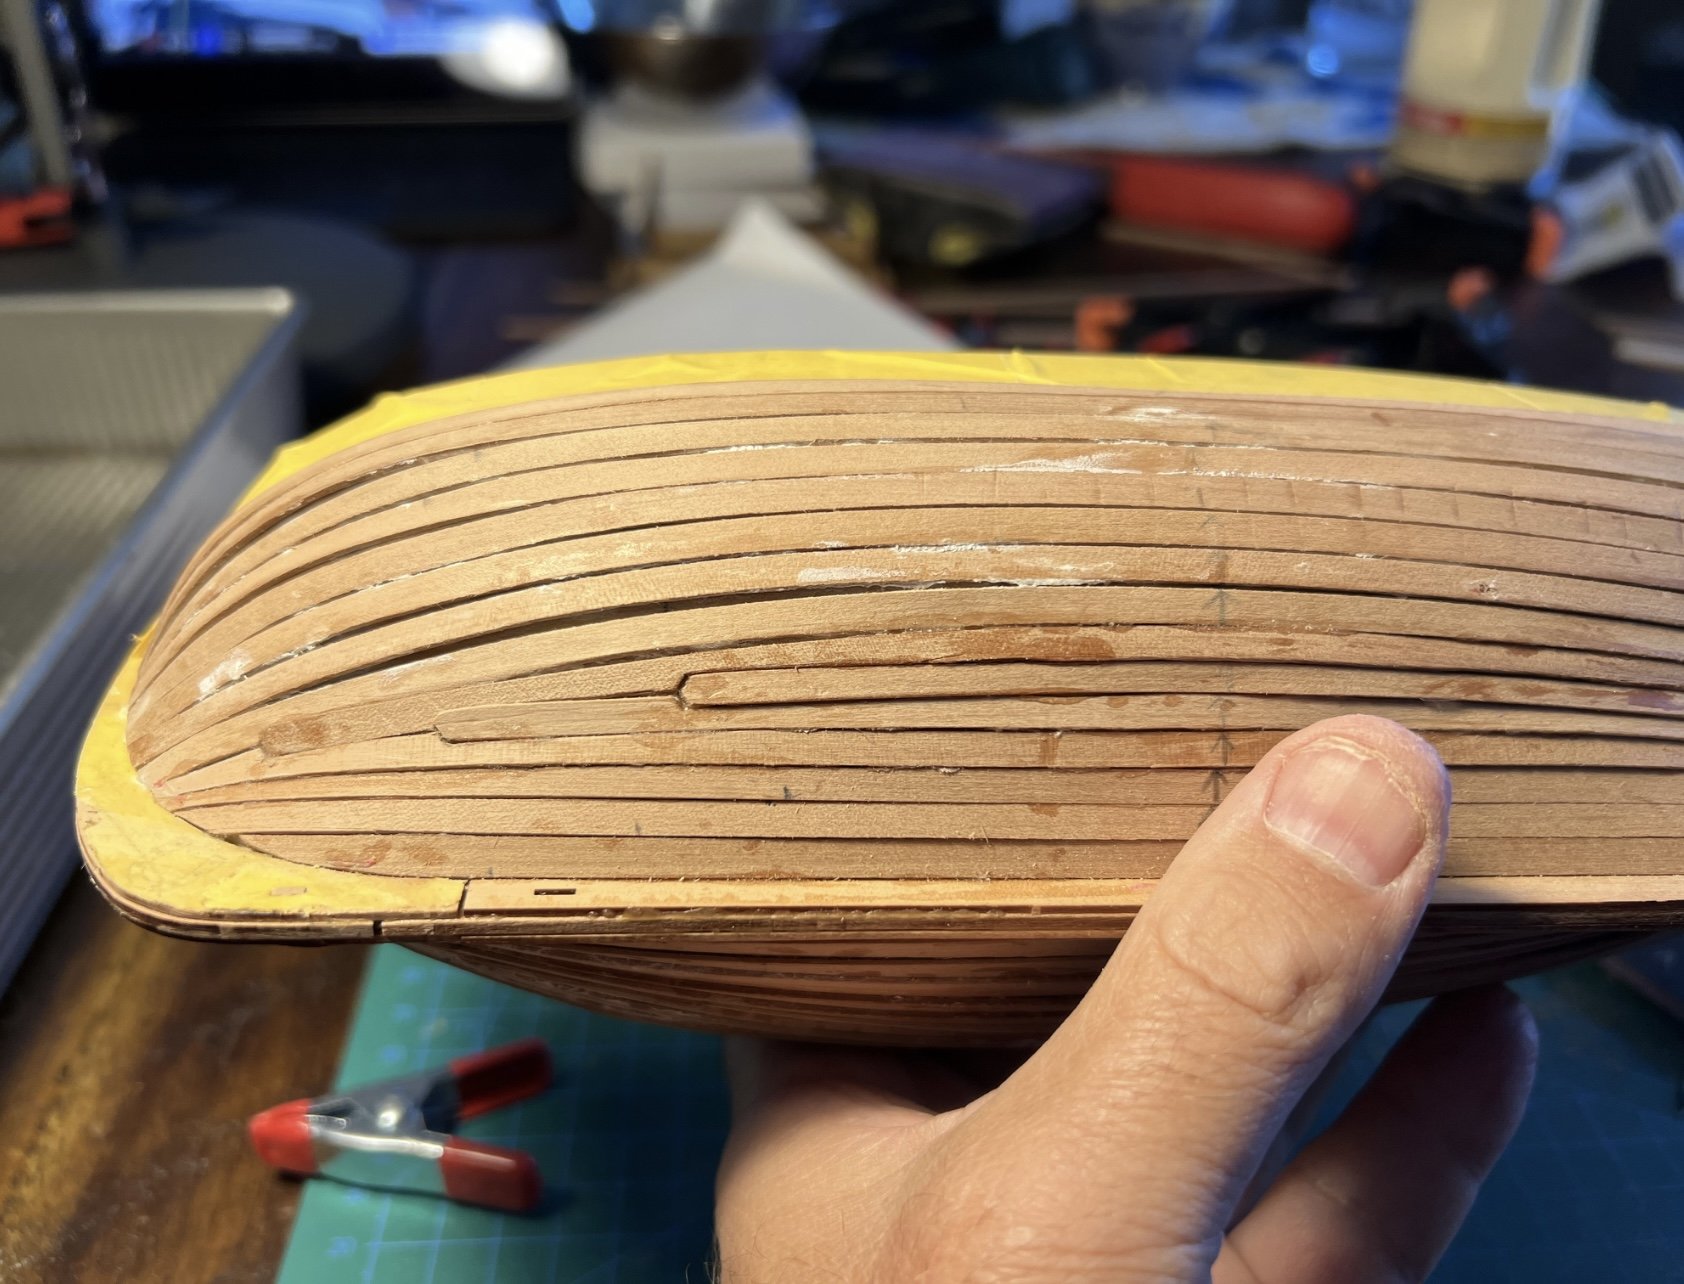
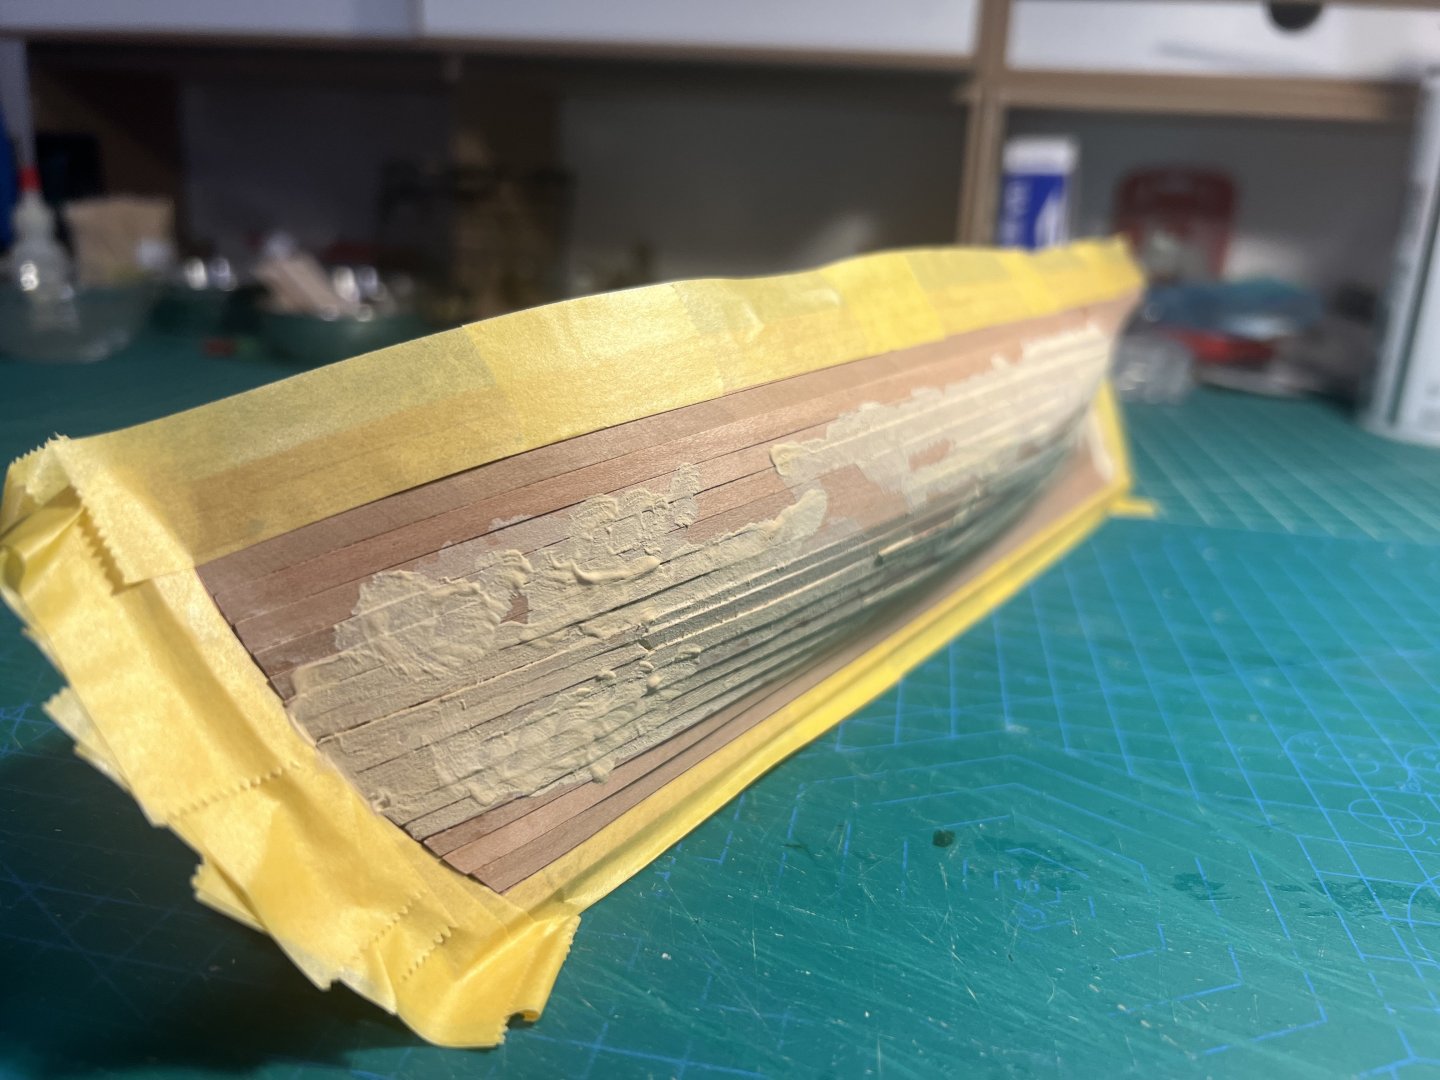
Finished the 2nd layer of planking. Just needed filler in a few spots. Definitely a better job overall than my Sherbourne. It’ll take several more models before I feel remotely competent. We’ll see how it looks after sanding. It’s taped to protect the engraved pear wood pieces while sanding the hull.


- 133 replies
-
- 5
-
-
- Ranger
- vanguard models
- (and 1 more)
-
I definitely do multiple coats. Better to do multiples of diluted paint - especially for this thick MS paint - to get a nice flat pant job. With an airbrush, you have to do many coats. If you see color variation that’s likely because the primer layer is showing through a thick layer of paint. I’ve seen for painting plastic models, especially figures, that having a dark primer underneath show through a top layer of thin paint can be done to create highlights and lowlights. I suppose you could do the same on a model ship, but those highlights and lowlights wouldn’t be on flat stretches of hull.
- 86 replies
-
- 2
-
-
- Model Shipways
- Norwegian Sailing Pram
- (and 3 more)
-
I couldn’t have got the mast on my Pram without having Quadhands. I’m sure there’s some way to do it without those, and the instructions describe it, but there was just no was I could do it. I suppose I could have the mast with my mouth or a nostril. I started with the single line going to the front, then did the two lines on the sides.
- 167 replies
-
- 1
-
-
- Norwegian Sailing Pram
- Model Shipways
- (and 1 more)
-
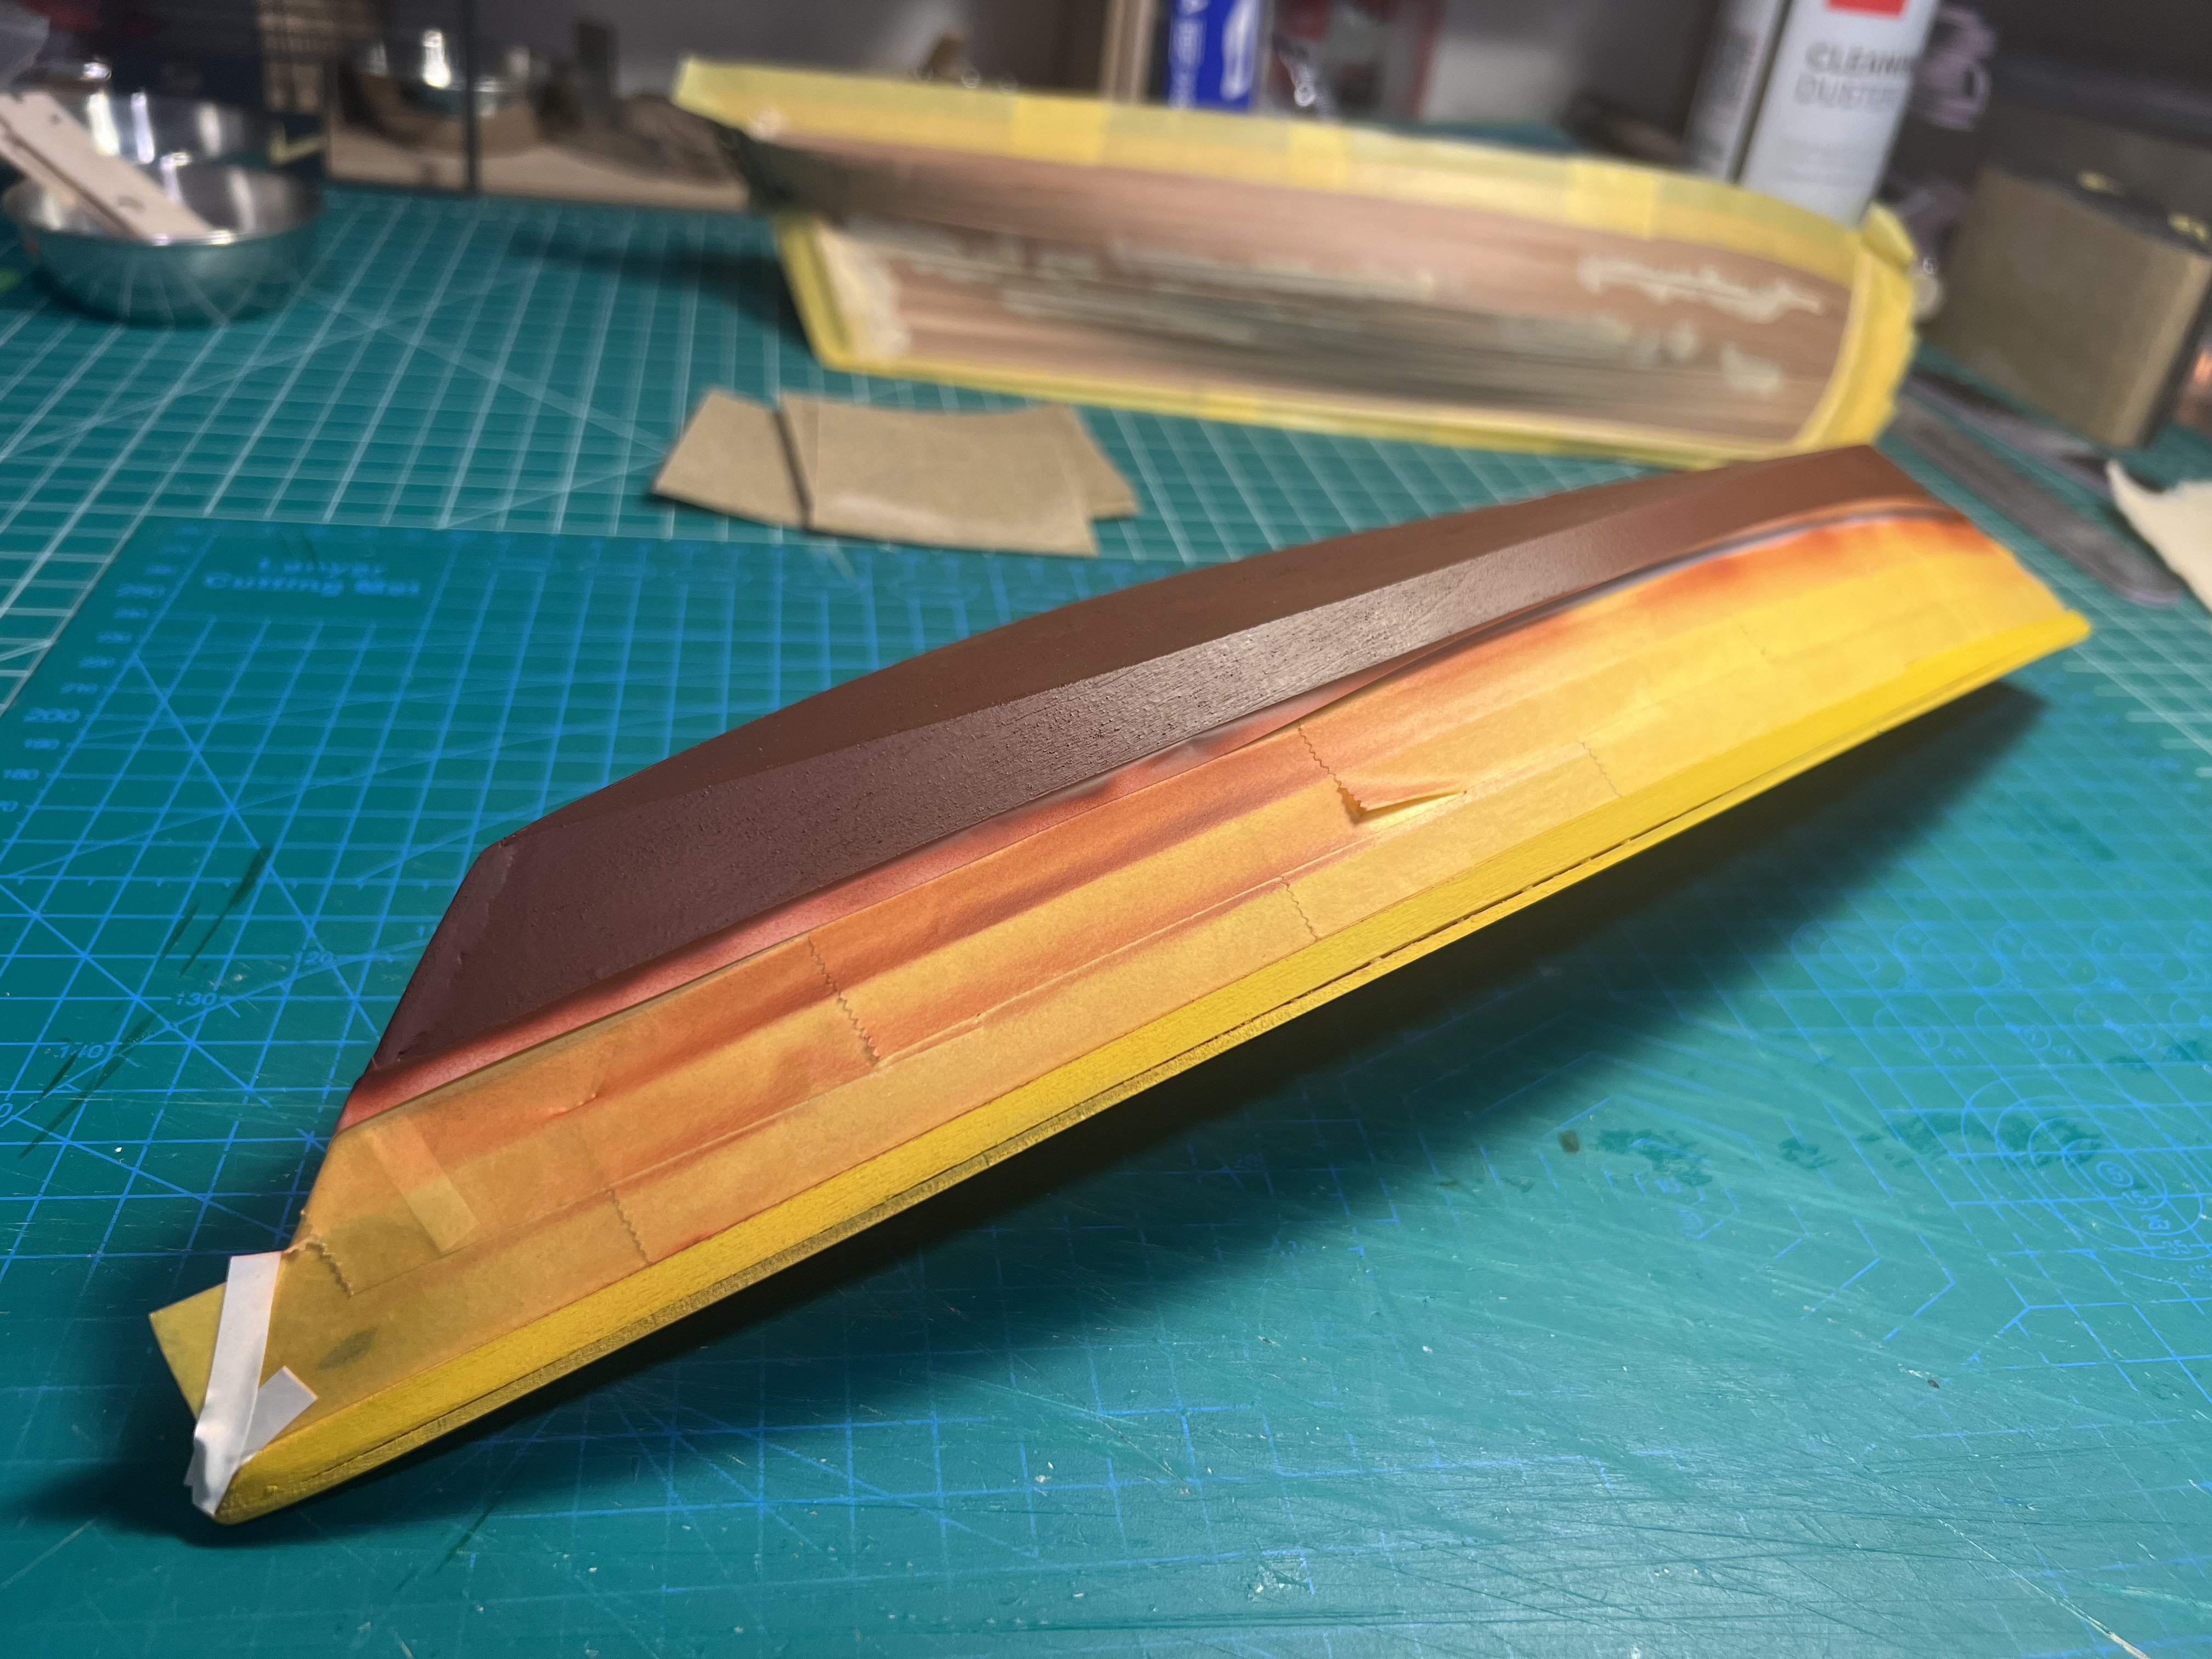
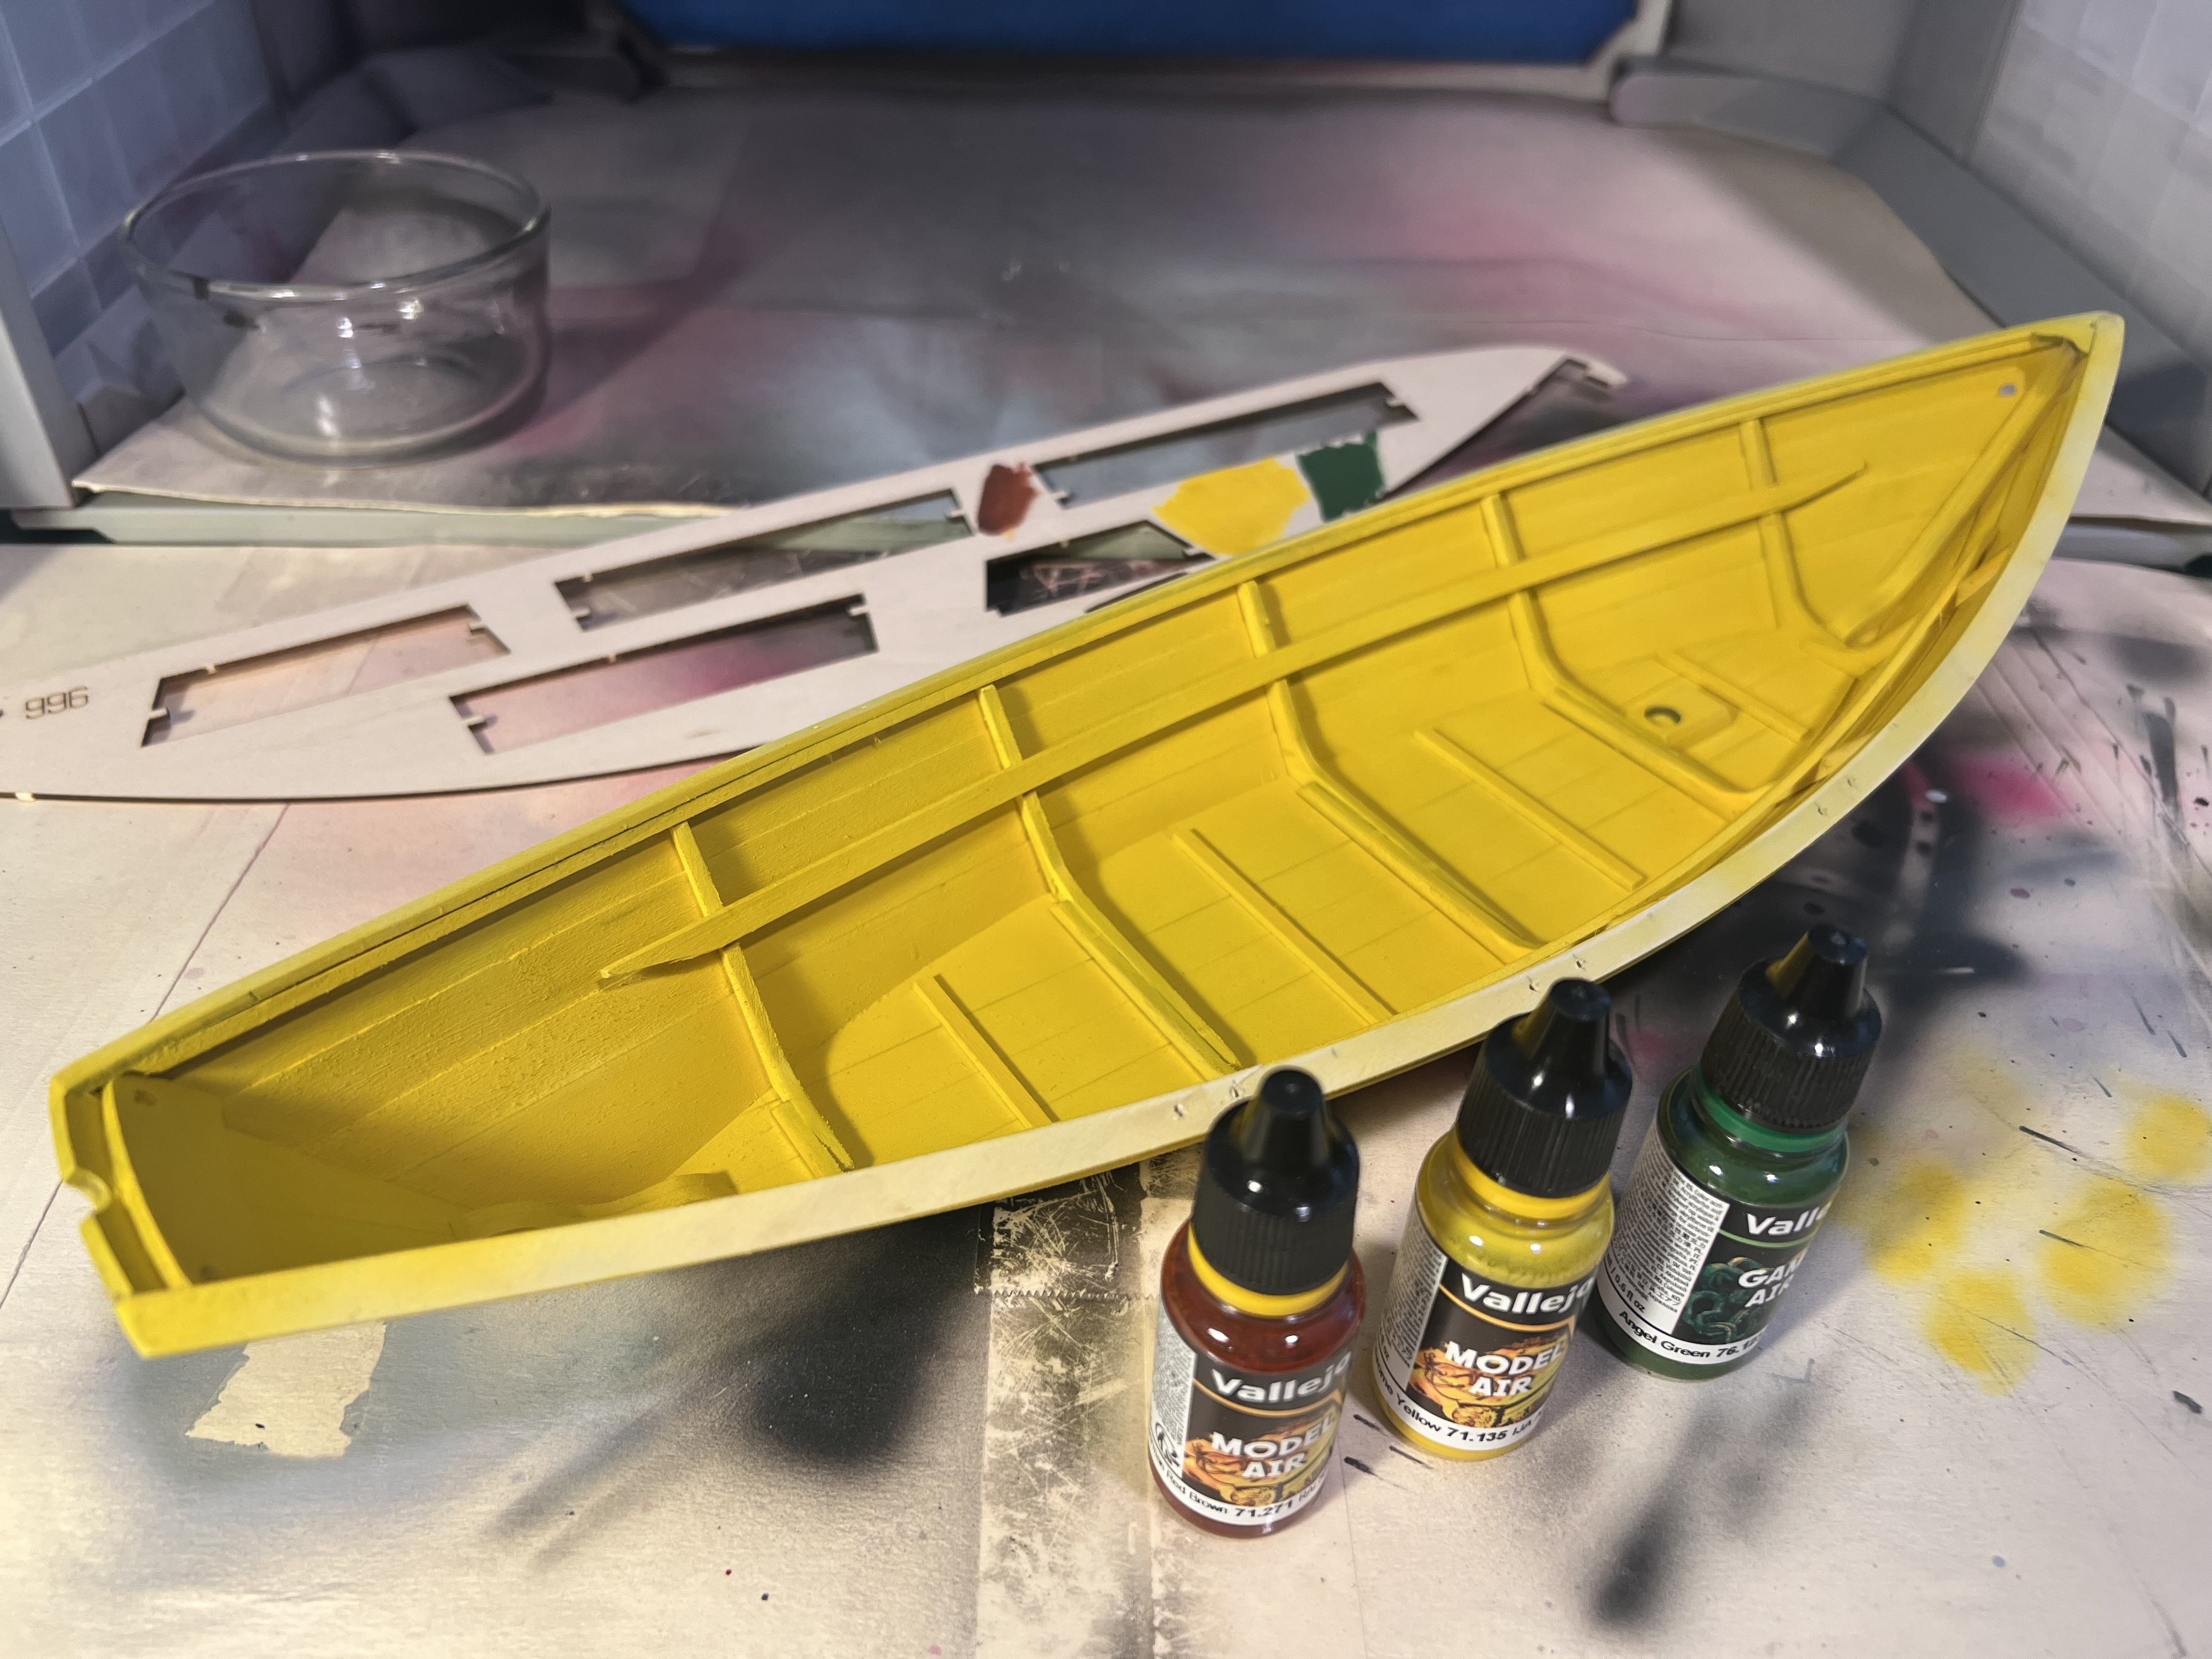
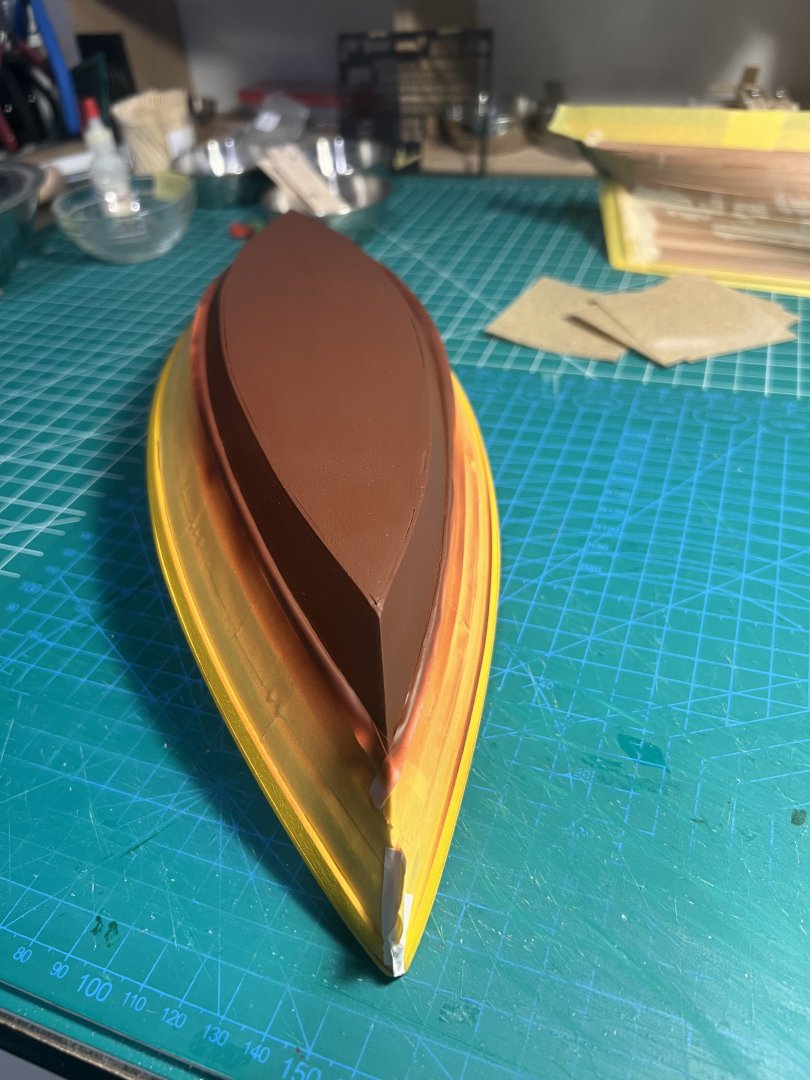
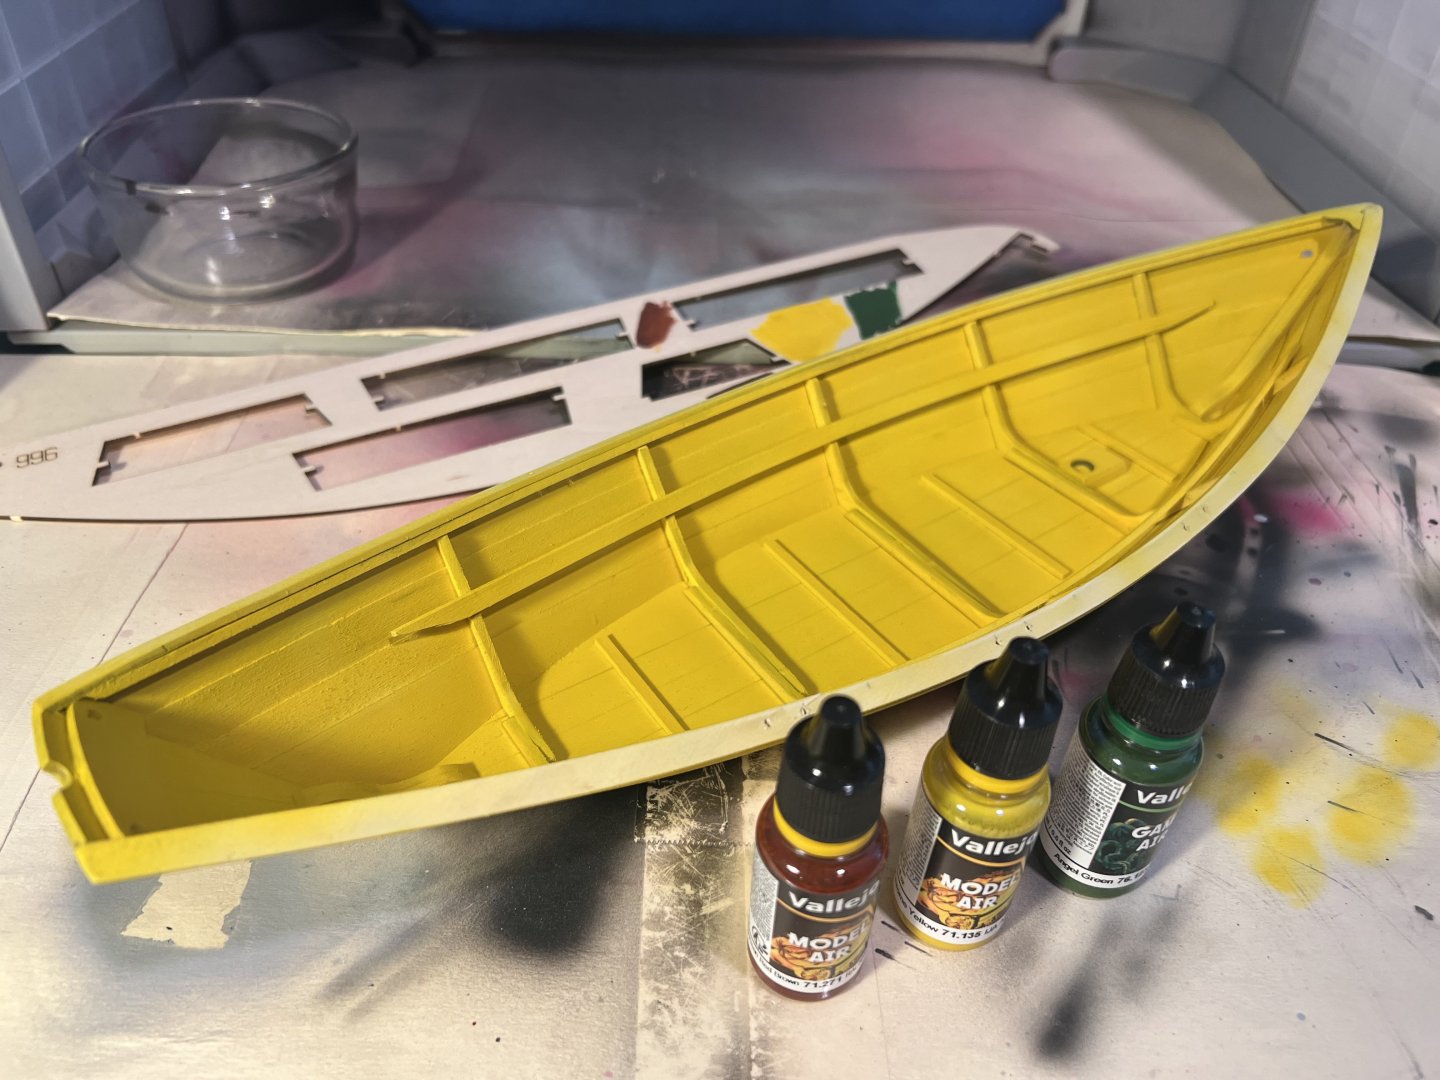
I know that yellow is not quite Dory Buff color, it was the closest I had in my paint staff. The green was in the ballpark. I think I saw some photos of some Dorys with some reddish undercoat on the garboard and bottom and just went with it.
- 71 replies
-
- 1
-
-
- grand banks dory
- midwest products
- (and 2 more)
-
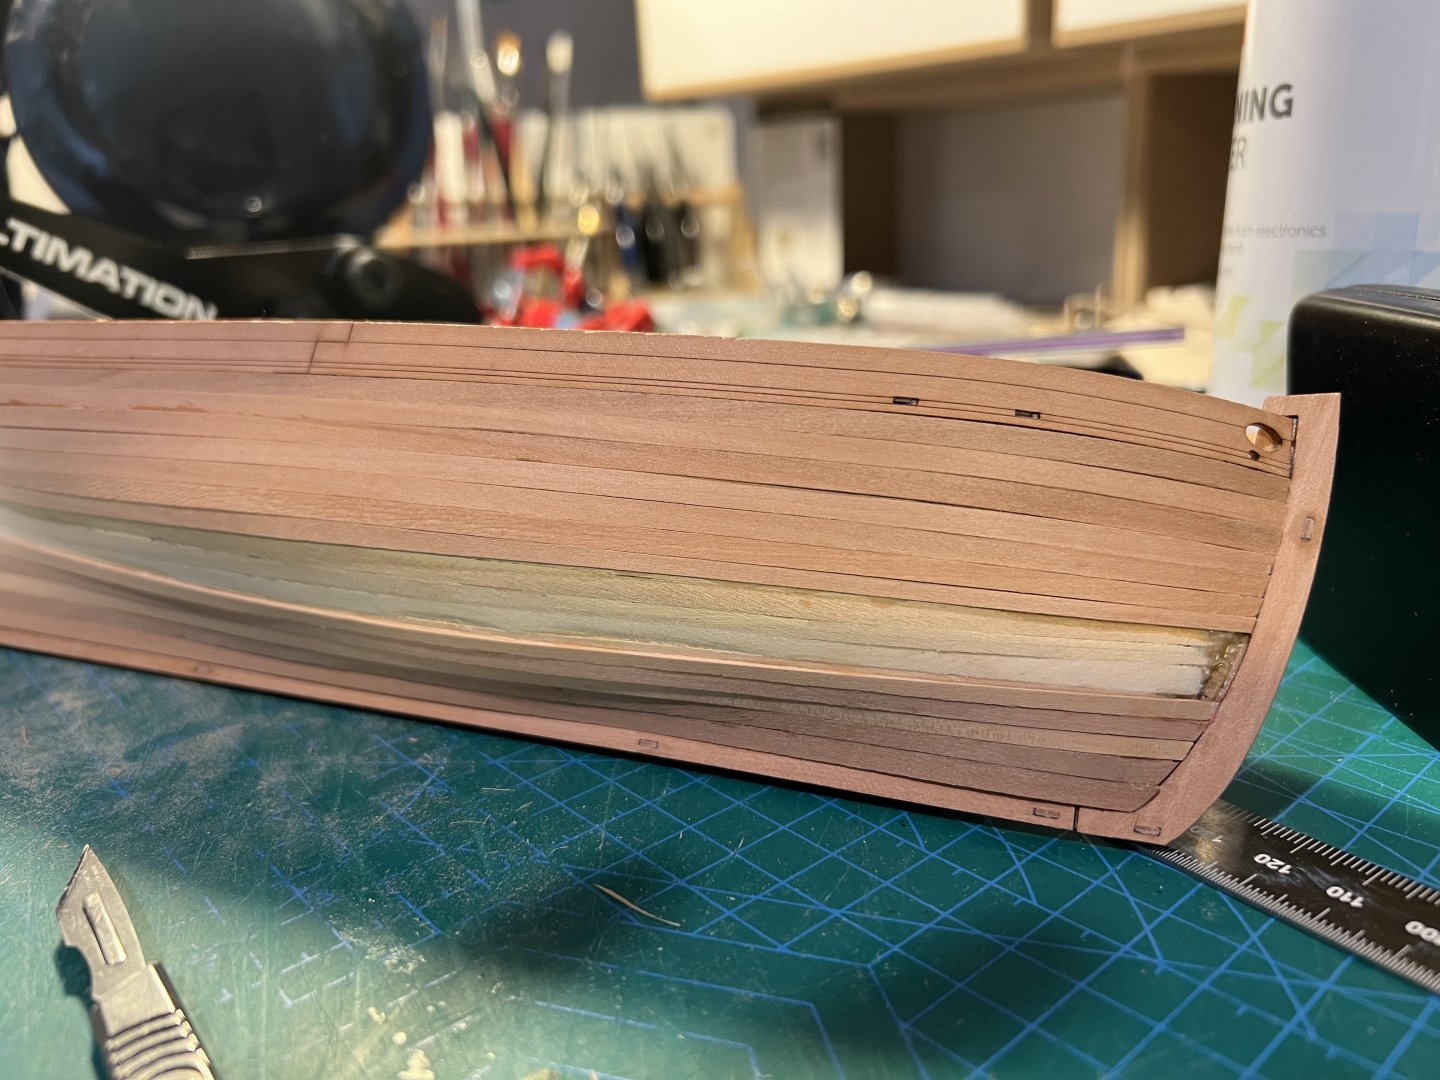
Next Vanguard fisher I do I might try using shorter planks. I was just following the instructions. I have been trying to sand a bevel but I think sometimes I need to do a bit more and put the planks tighter together.
- 133 replies
-
- 3
-
-
- Ranger
- vanguard models
- (and 1 more)
-
This is my mess I made on my 2nd planking of my Sherbourne. You don’t need a keen eye to see that my Ranger is better.

- 133 replies
-
- 2
-
-
- Ranger
- vanguard models
- (and 1 more)
-
Making progress on the 2nd (pear) planking of the Ranger. This is only my second model with strip wood planking. Not great but way better than the (2nd) pear planking on the Sherbourne - I’ll post a photo of that mess (which turned out fine with lots of filler, sanding, and paint) in the next post. A lesson on practice. I figured out how to use CA glue. I first just glue the front 1/5 or so of the plank to the bow and then slowly glue down the rest. I think when I tried with my Sherbourne I tried doing all the glue at once and that was a complete mess. It wasn’t until reading more build logs that I discovered this approach. One thing I realized late is that I should err on the side of having the stern end of the plank a tiny bit (fraction of a mm) to long so that I can sand it down a tiny bit for a (more) perfect fit. Since this is a painted hull, I can use filler. I’ll need a fraction of what I needed for the Sherbourne.
- 133 replies
-
- 2
-
-
- Ranger
- vanguard models
- (and 1 more)
-
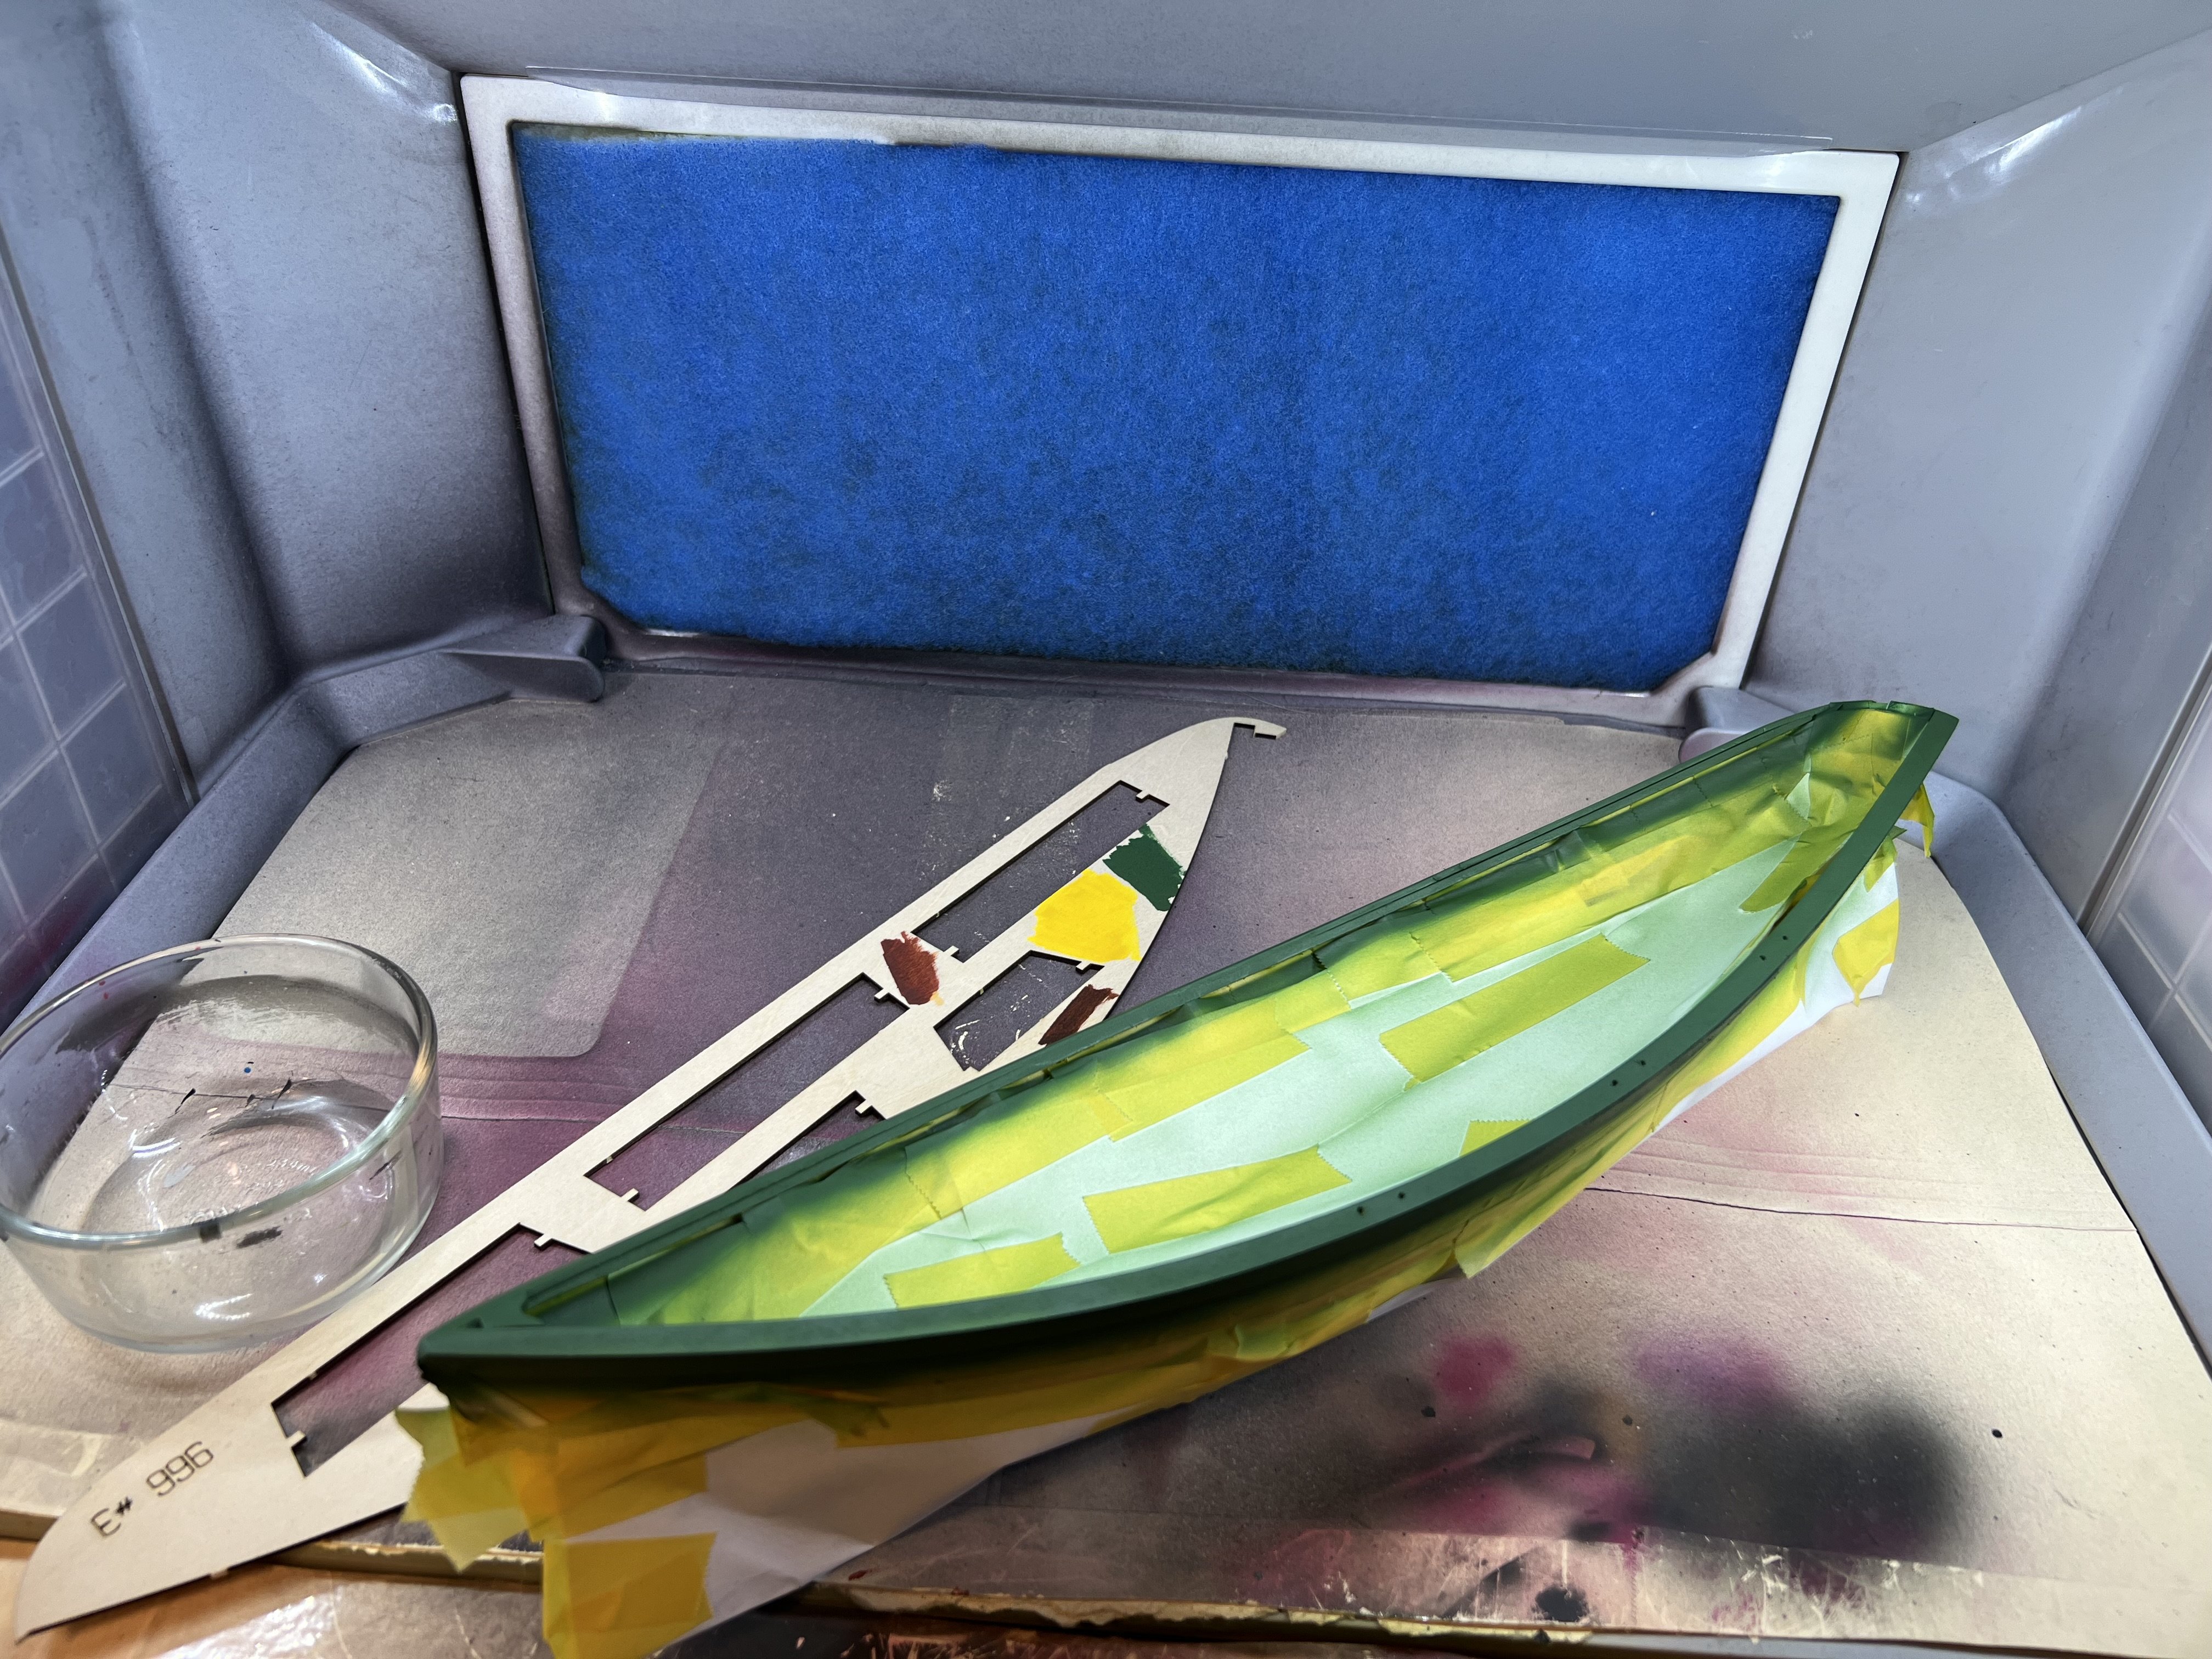
I started airbrushing the Dory. I found a couple sources for some colors and after playing around with some colors in my stash I decided on Vallejo Model Air 71.135 Chrome Yellow for the inside and most of the outside, Game Air 76.123 Angel Green for the gunwale, and I’m doing the garboard and bottom in Model Air 71.271 German Red Brown. I don’t know if it’s a combination of airbrushing and the model being basswood but it’s been hard to paint over pencil marks I had made. With my Sherbourne (offwhite Vallejo Air on pear wood) I didn’t have trouble covering the pencil marks I made). I ended up painting with a brush to get a thicker covering over the pencil marks and I will do more airbrush coats. https://goodmorninggloucester.com/2009/03/22/dory-buff-dory-paint/

- 71 replies
-
- 4
-
-
- grand banks dory
- midwest products
- (and 2 more)
-
Your first order on www.casemateacademic.com (if you sign up for their newsletter and get a code) takes 30% your first purchase. So instead of $60, it's $42.
-
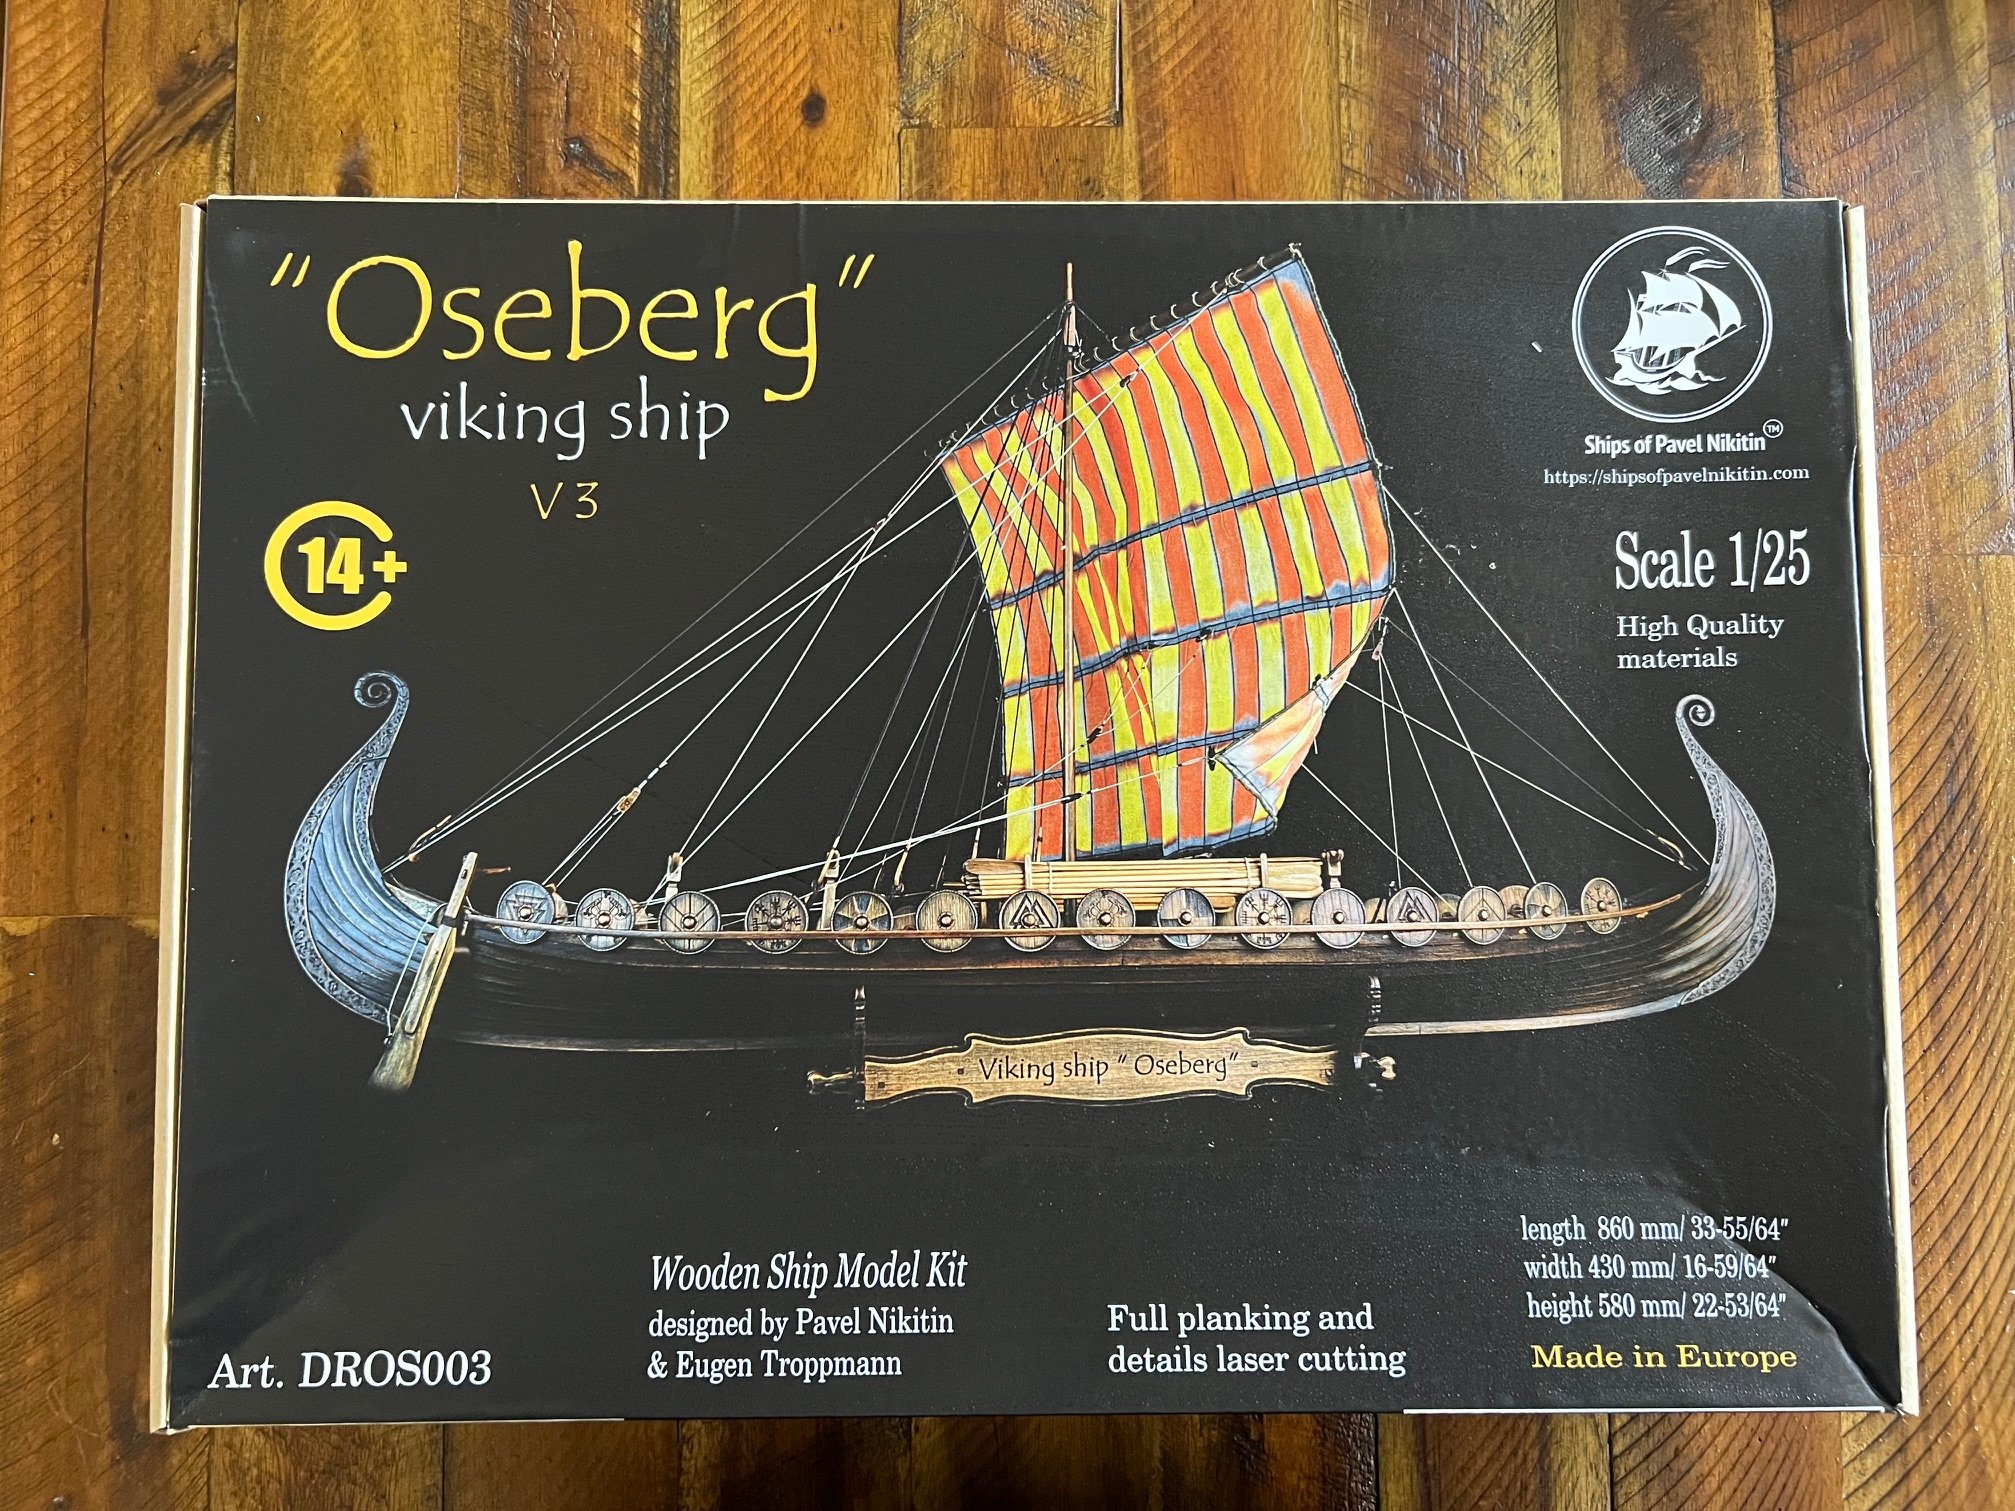
Seems that book can be ordered from here for $60: https://www.casemateacademic.com/9788785180773/the-oseberg-ship/
-
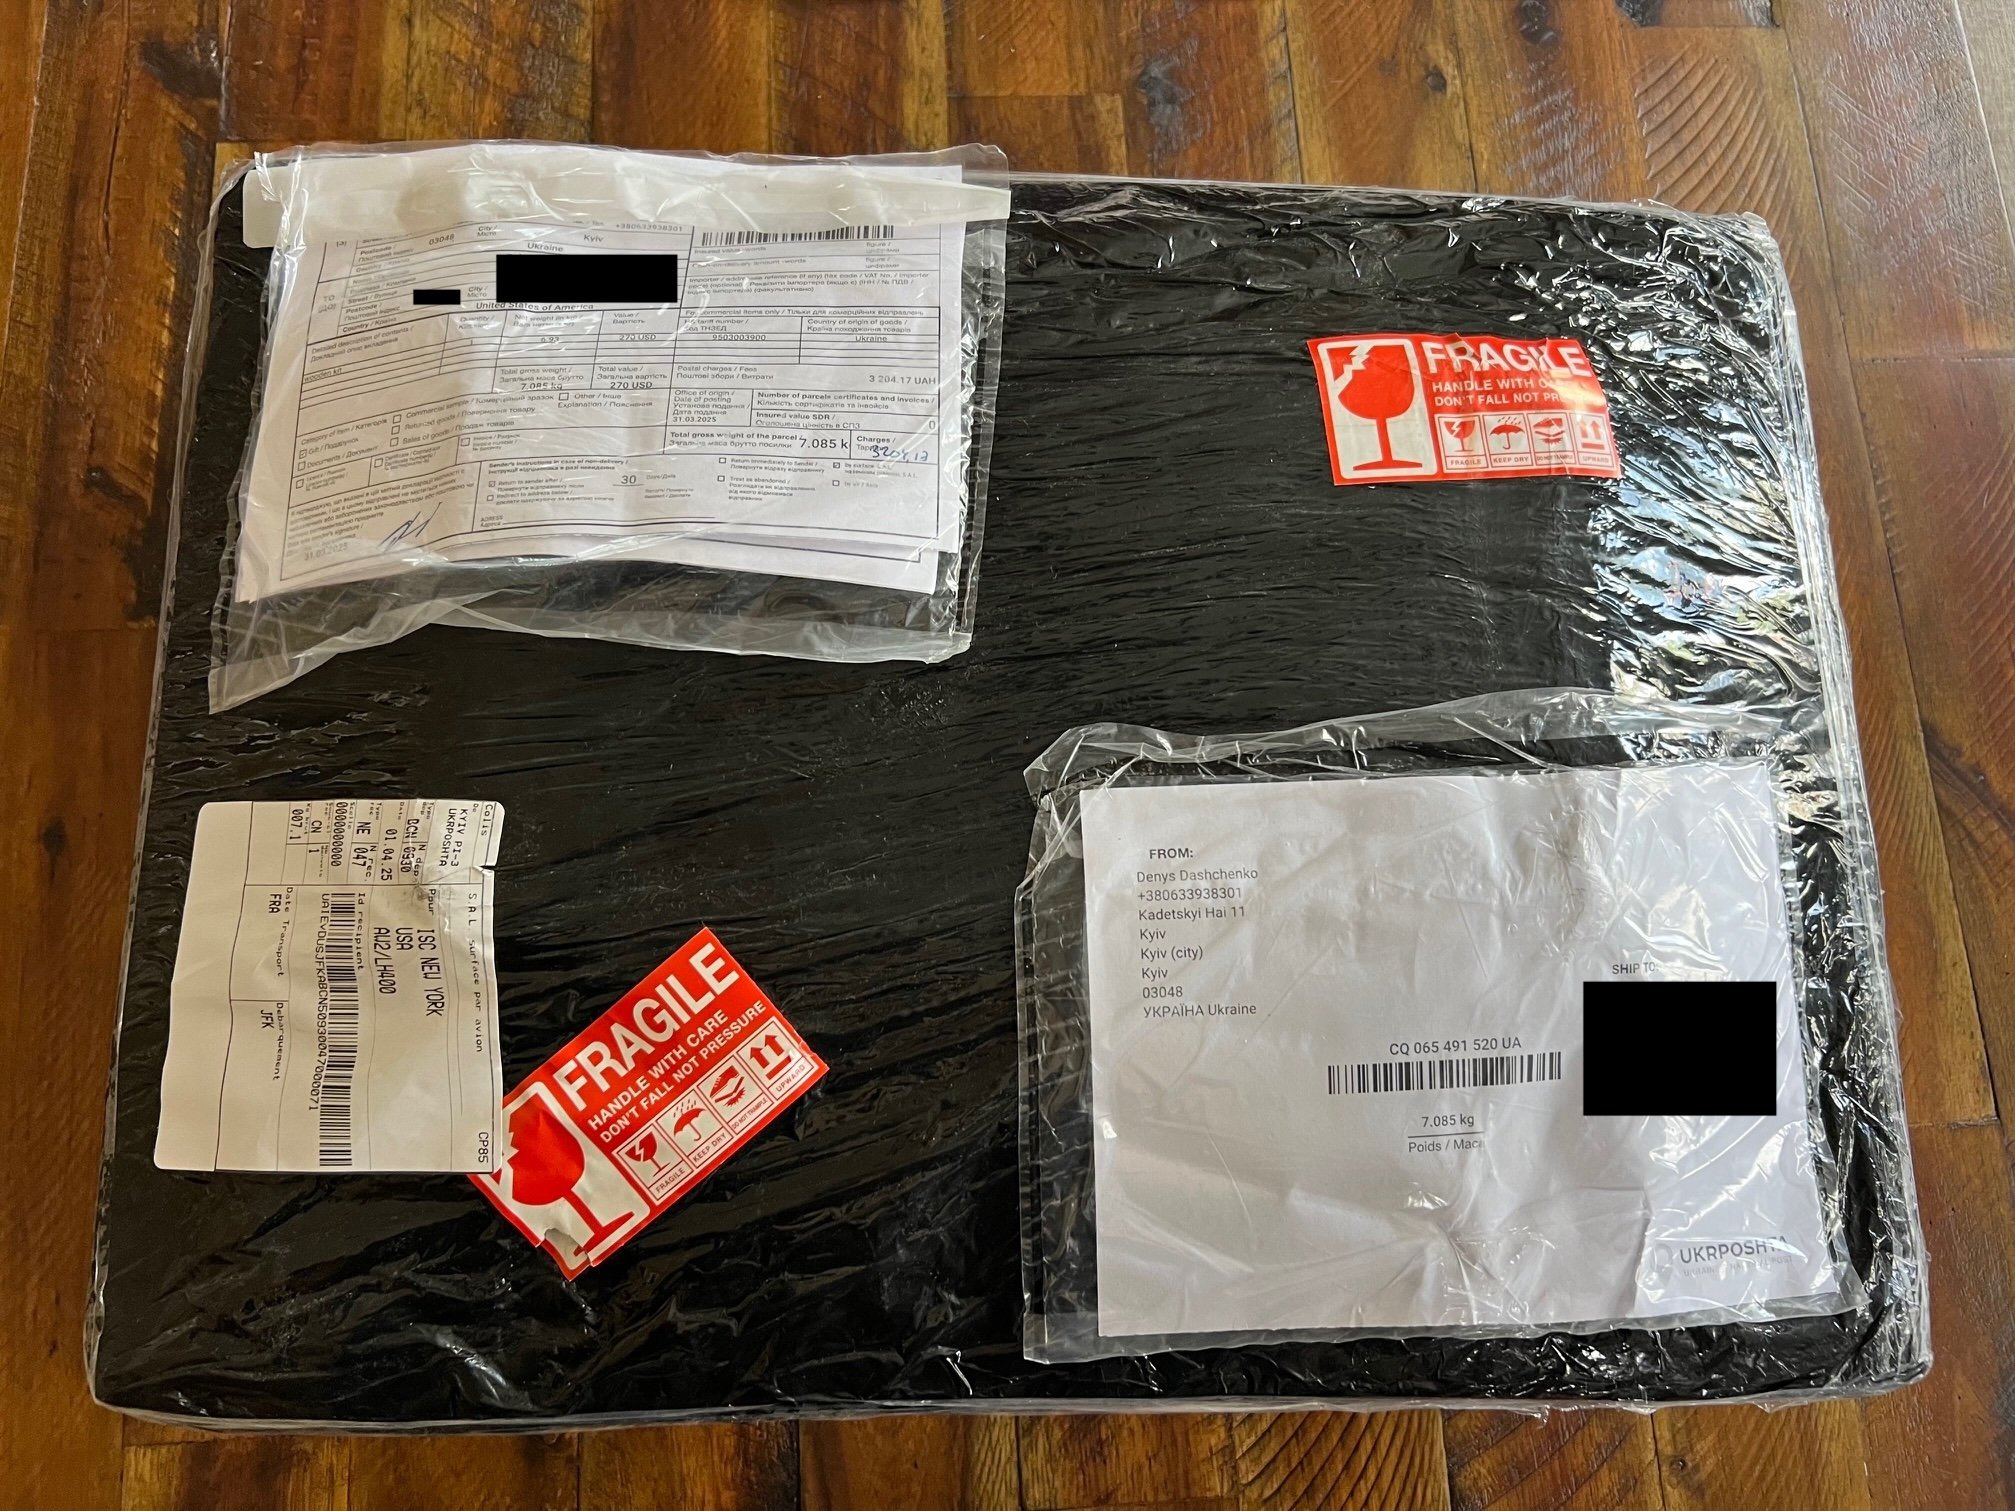
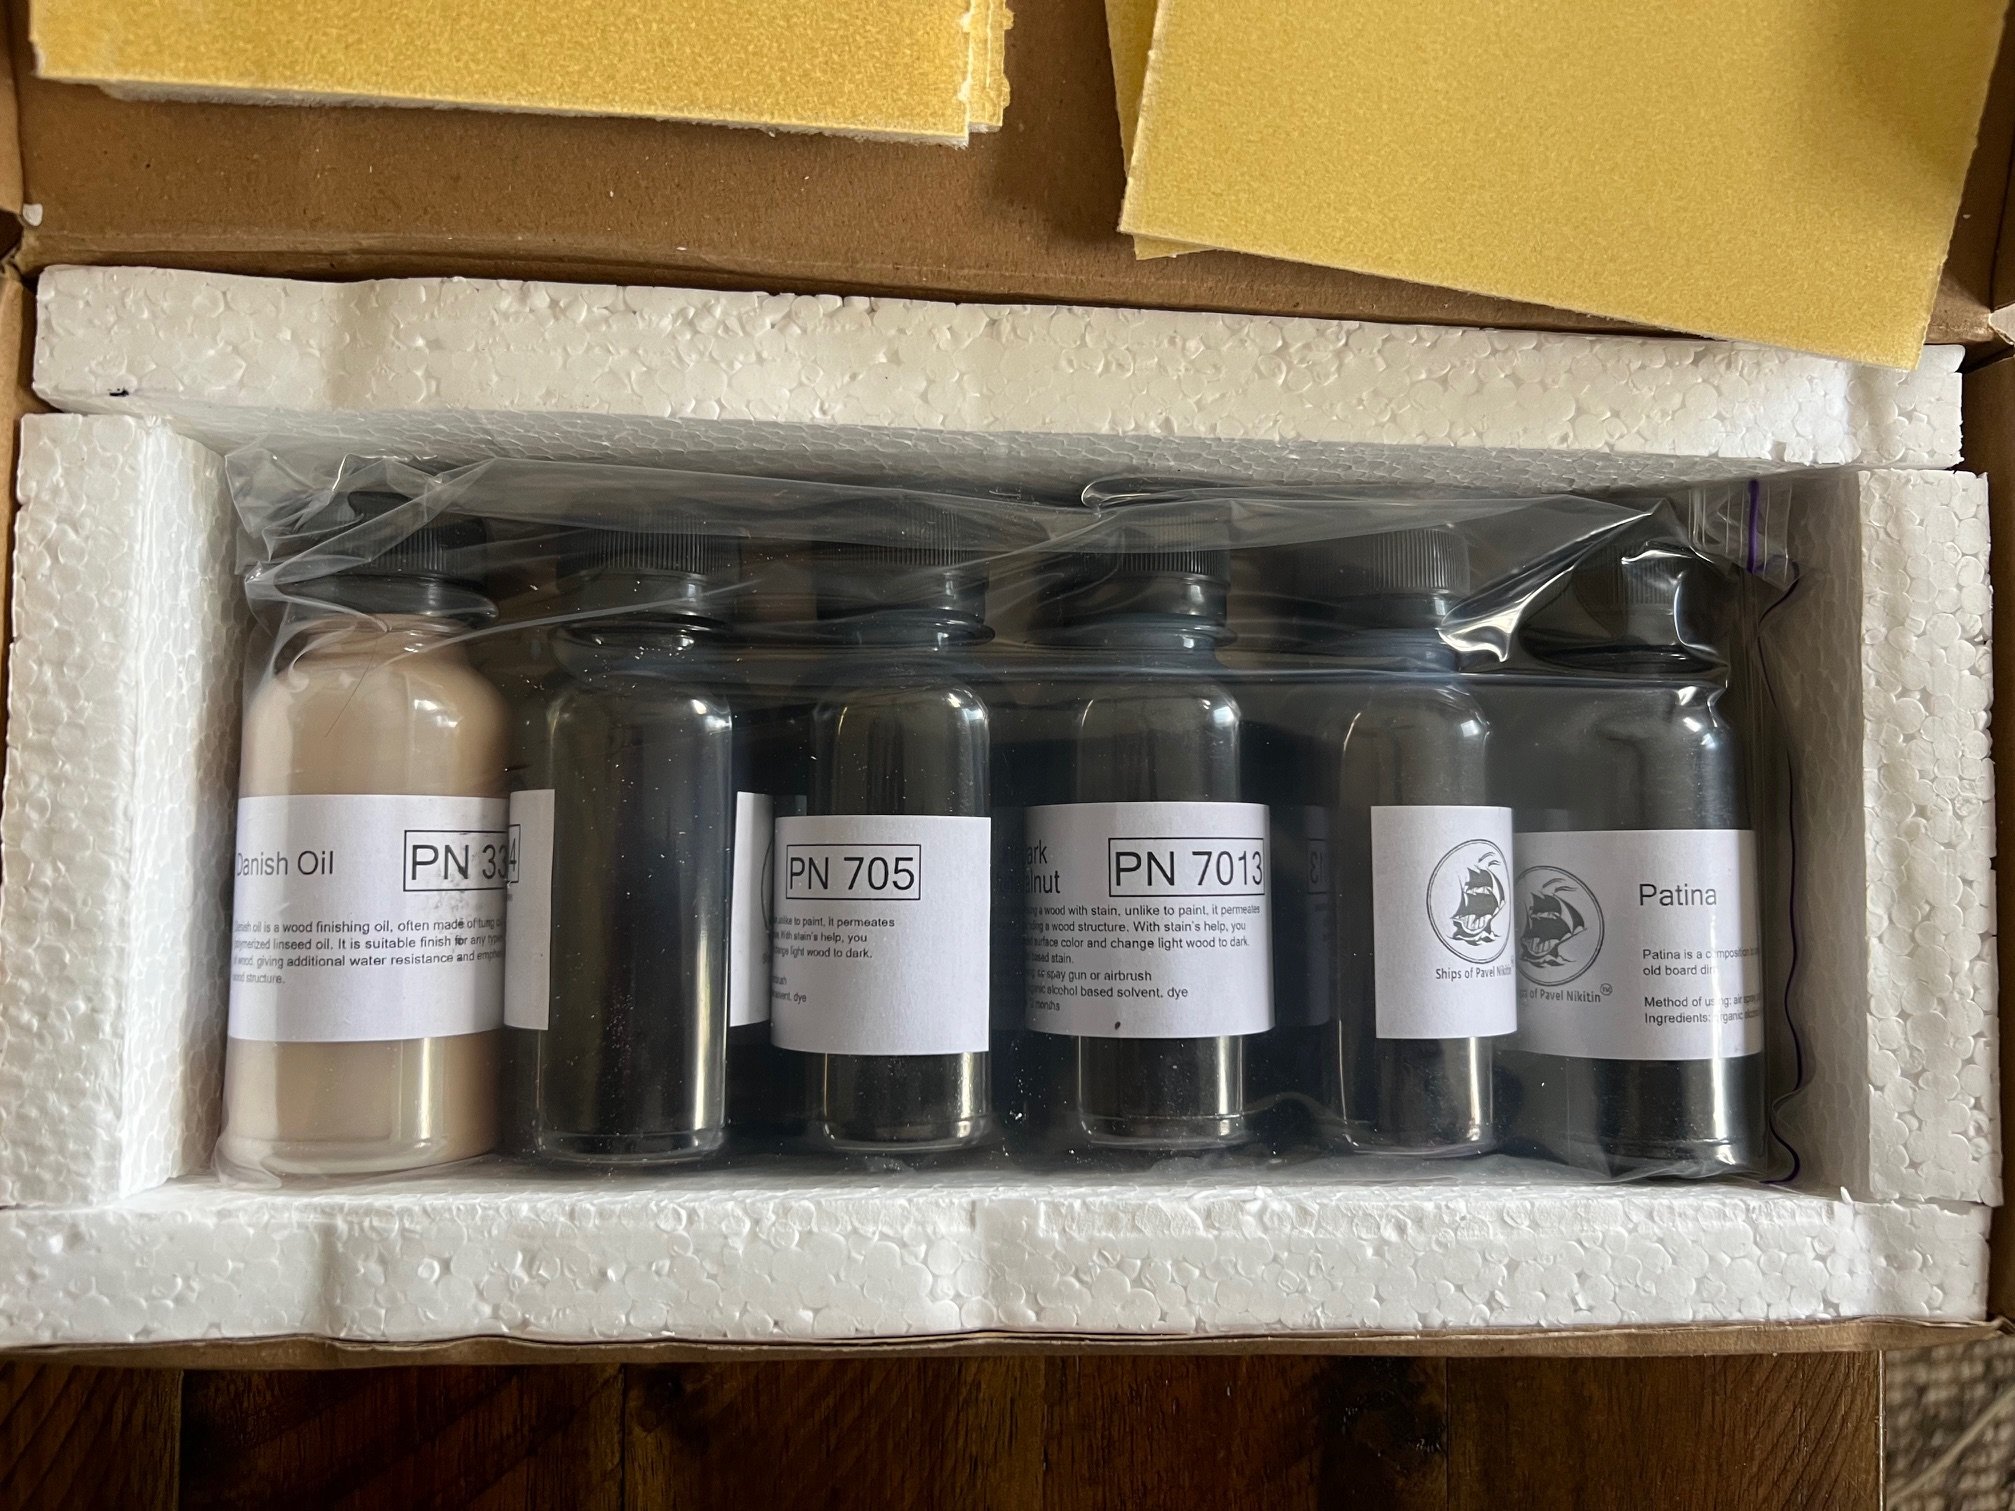
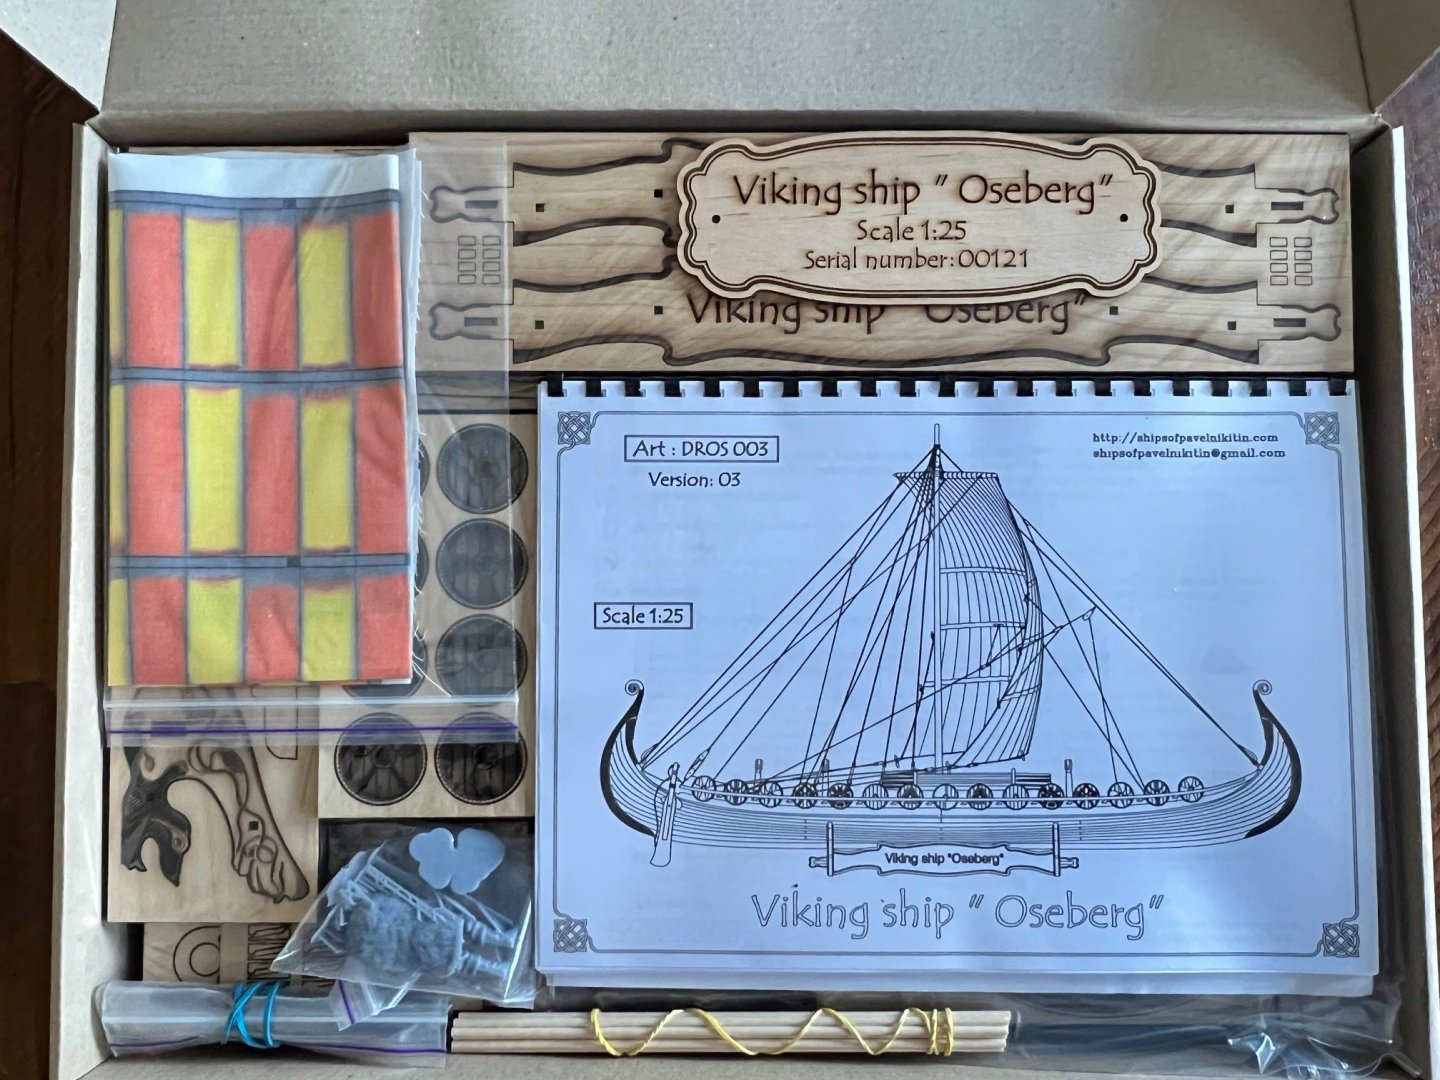
After a couple months, my Pavel Nikitin "Oseberg" (v3) Viking Ship kit (with the paint kit for the model) arrived from Ukraine. My wife asked "what the heck did you buy" when seeing all the cellophane wrapping around the box and Cyrillic writing on the shipping labels. After I opened it, she said "oh cool". It was packed really well. And heavy. I think the packing slip says over 7kg. I'm not going to get to this for a while. So I'll park this build log under "In the Queue" for now. Can't wait.


-
Definitely useful to read ahead on a number of build logs - and flagging the most detailed ones for future reference. Note that sometimes people will add a "I wish I would have ..." or "I realized I made a mistake earlier ..." noting something that they should have done or done differently many many posts (and build steps) after the step you are on in a model. Good to read through a bunch and take notes (or give yourself reminders to check out someone's log once you get to a particular step). There were times I thought I was following the instructions (and often the instructions aren't all that clear) and then realize that I didn't quite get a part positioned right because some later step (many pages later) doesn't fit quite right. If only I (and the instructions) had told me to test fit this later part, I might have added that earlier part in a different place (or faired the hull in a different way or whatever it is). Then again, you can always just plug ahead and learn from your mistakes. That's actually more of what I do since I often don't have enough time to read the details of every build log. The nice thing about wooden model ships is that there is rarely ever a mistake you can't correct with some more wood or wood filler (especially when painting) or by removing a piece (with an application of alcohol for PVA glue or acetone for CA glue).
-
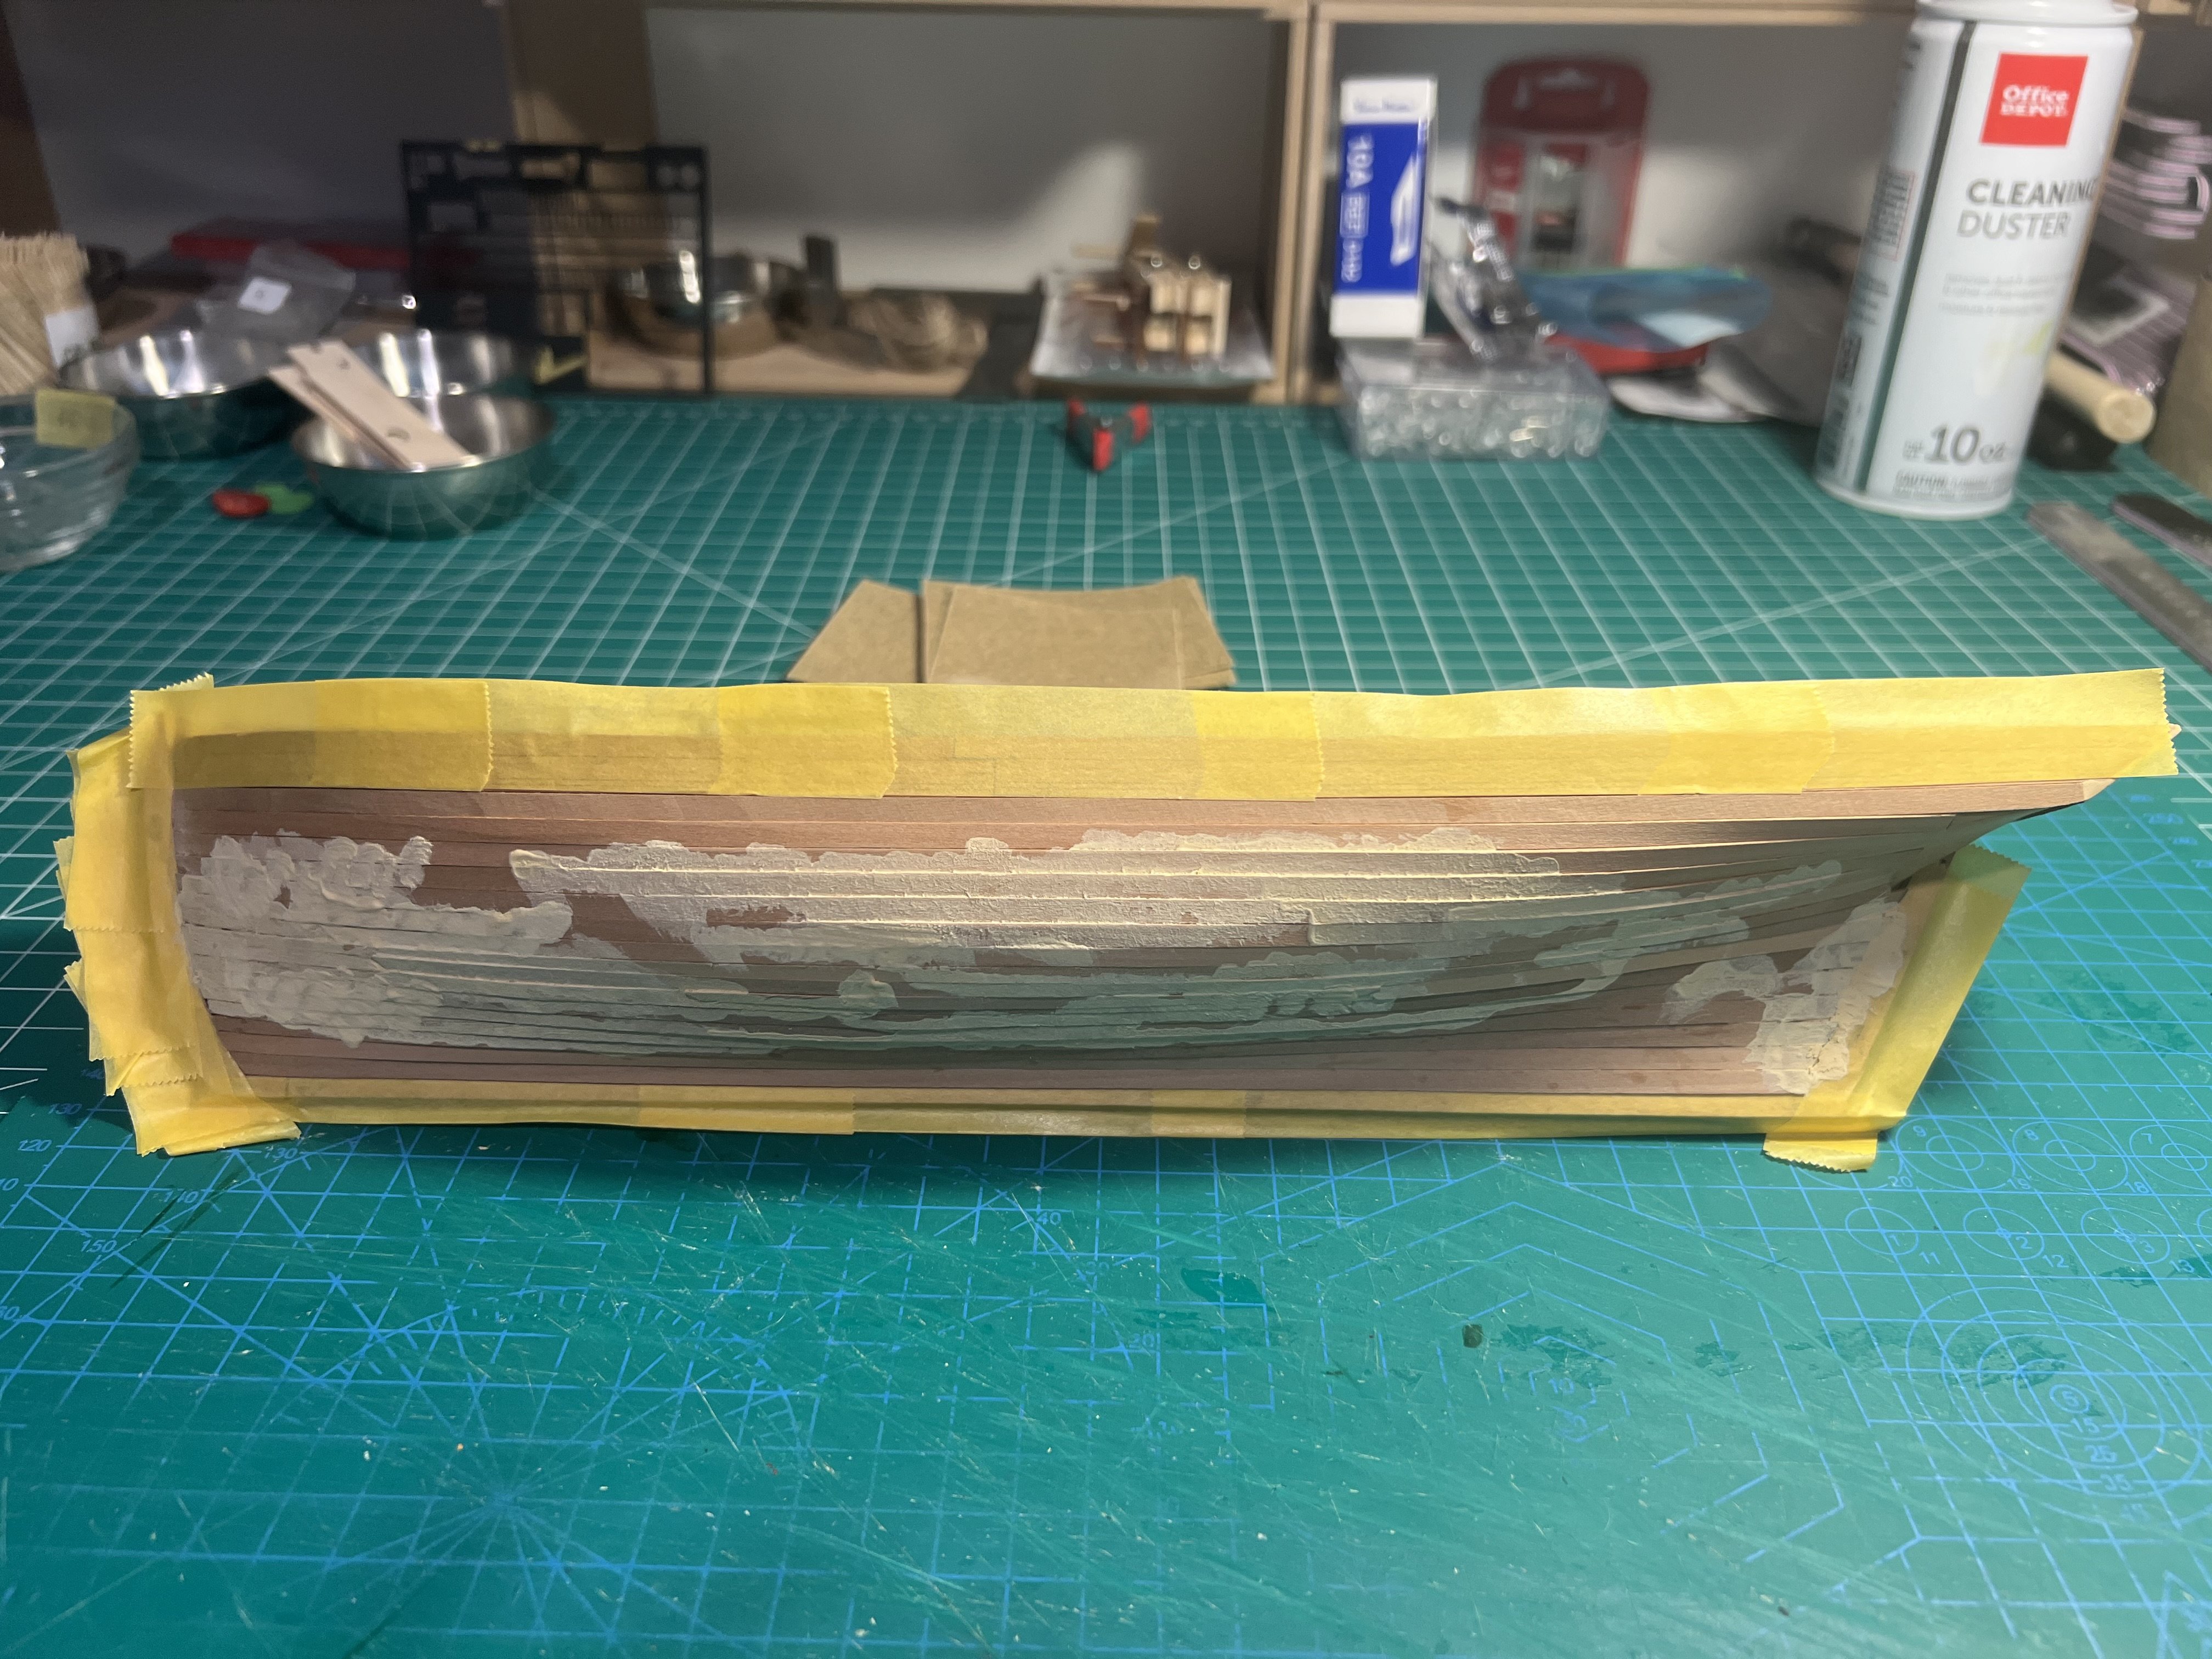
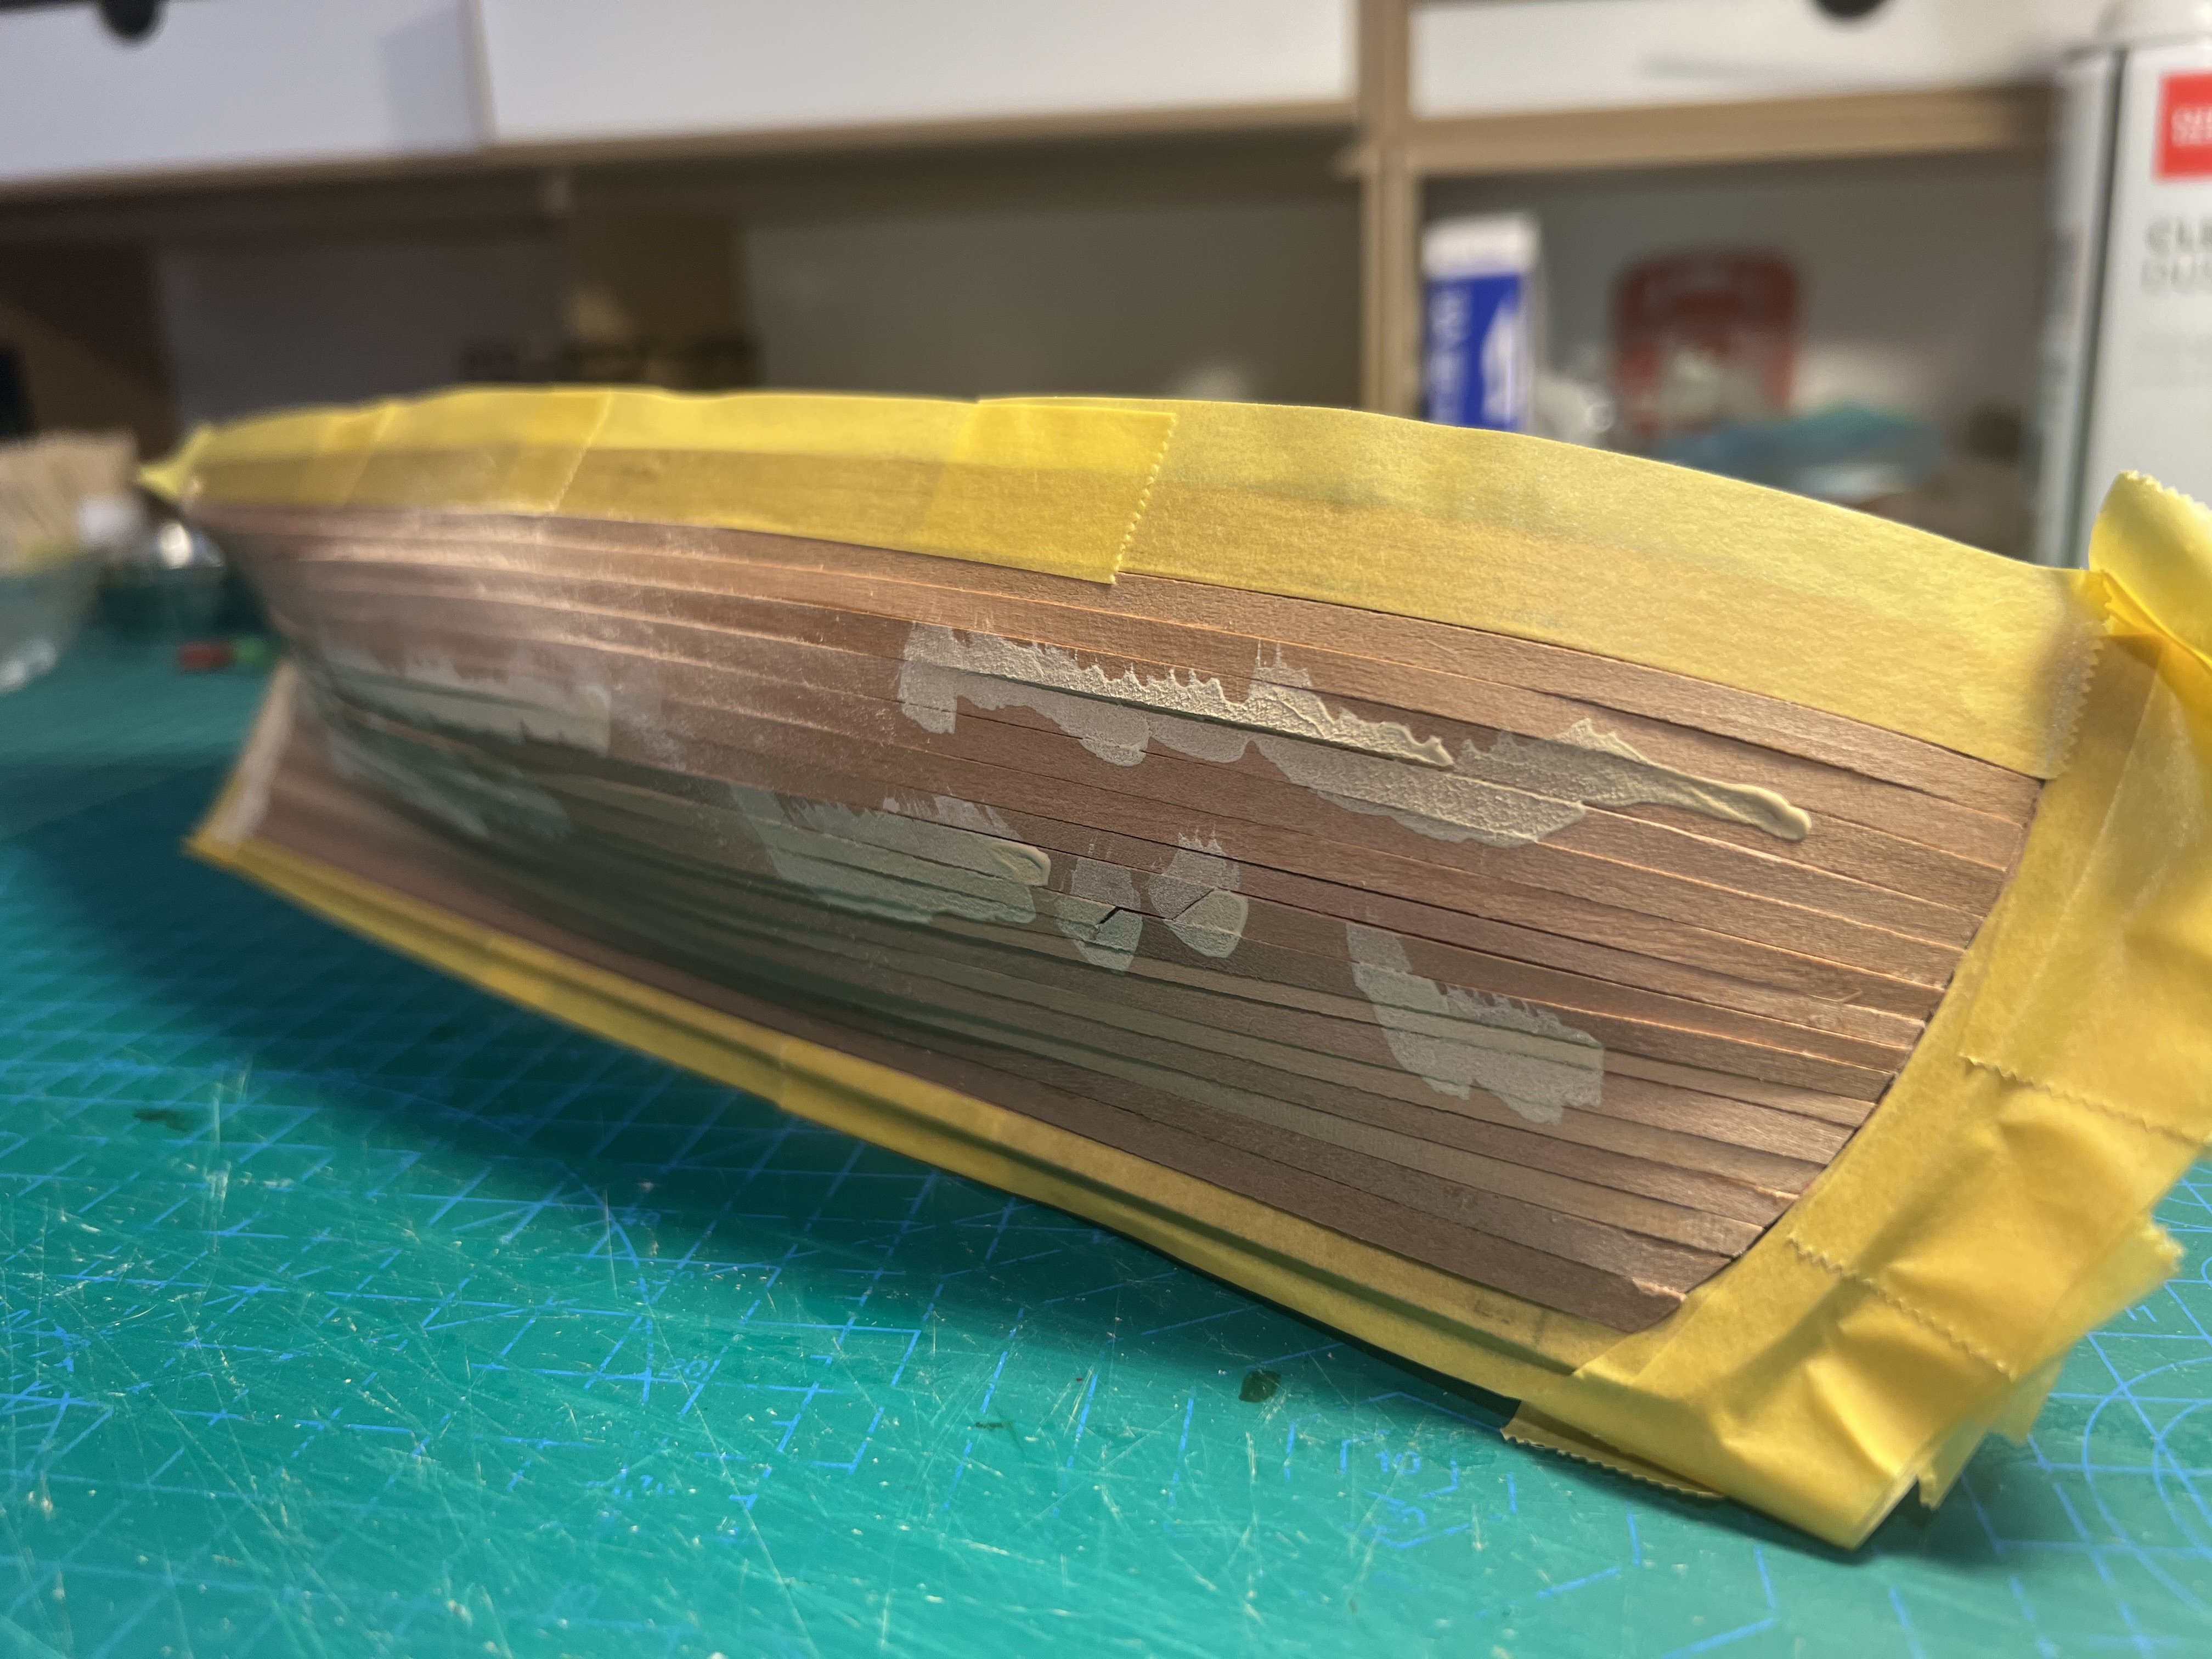
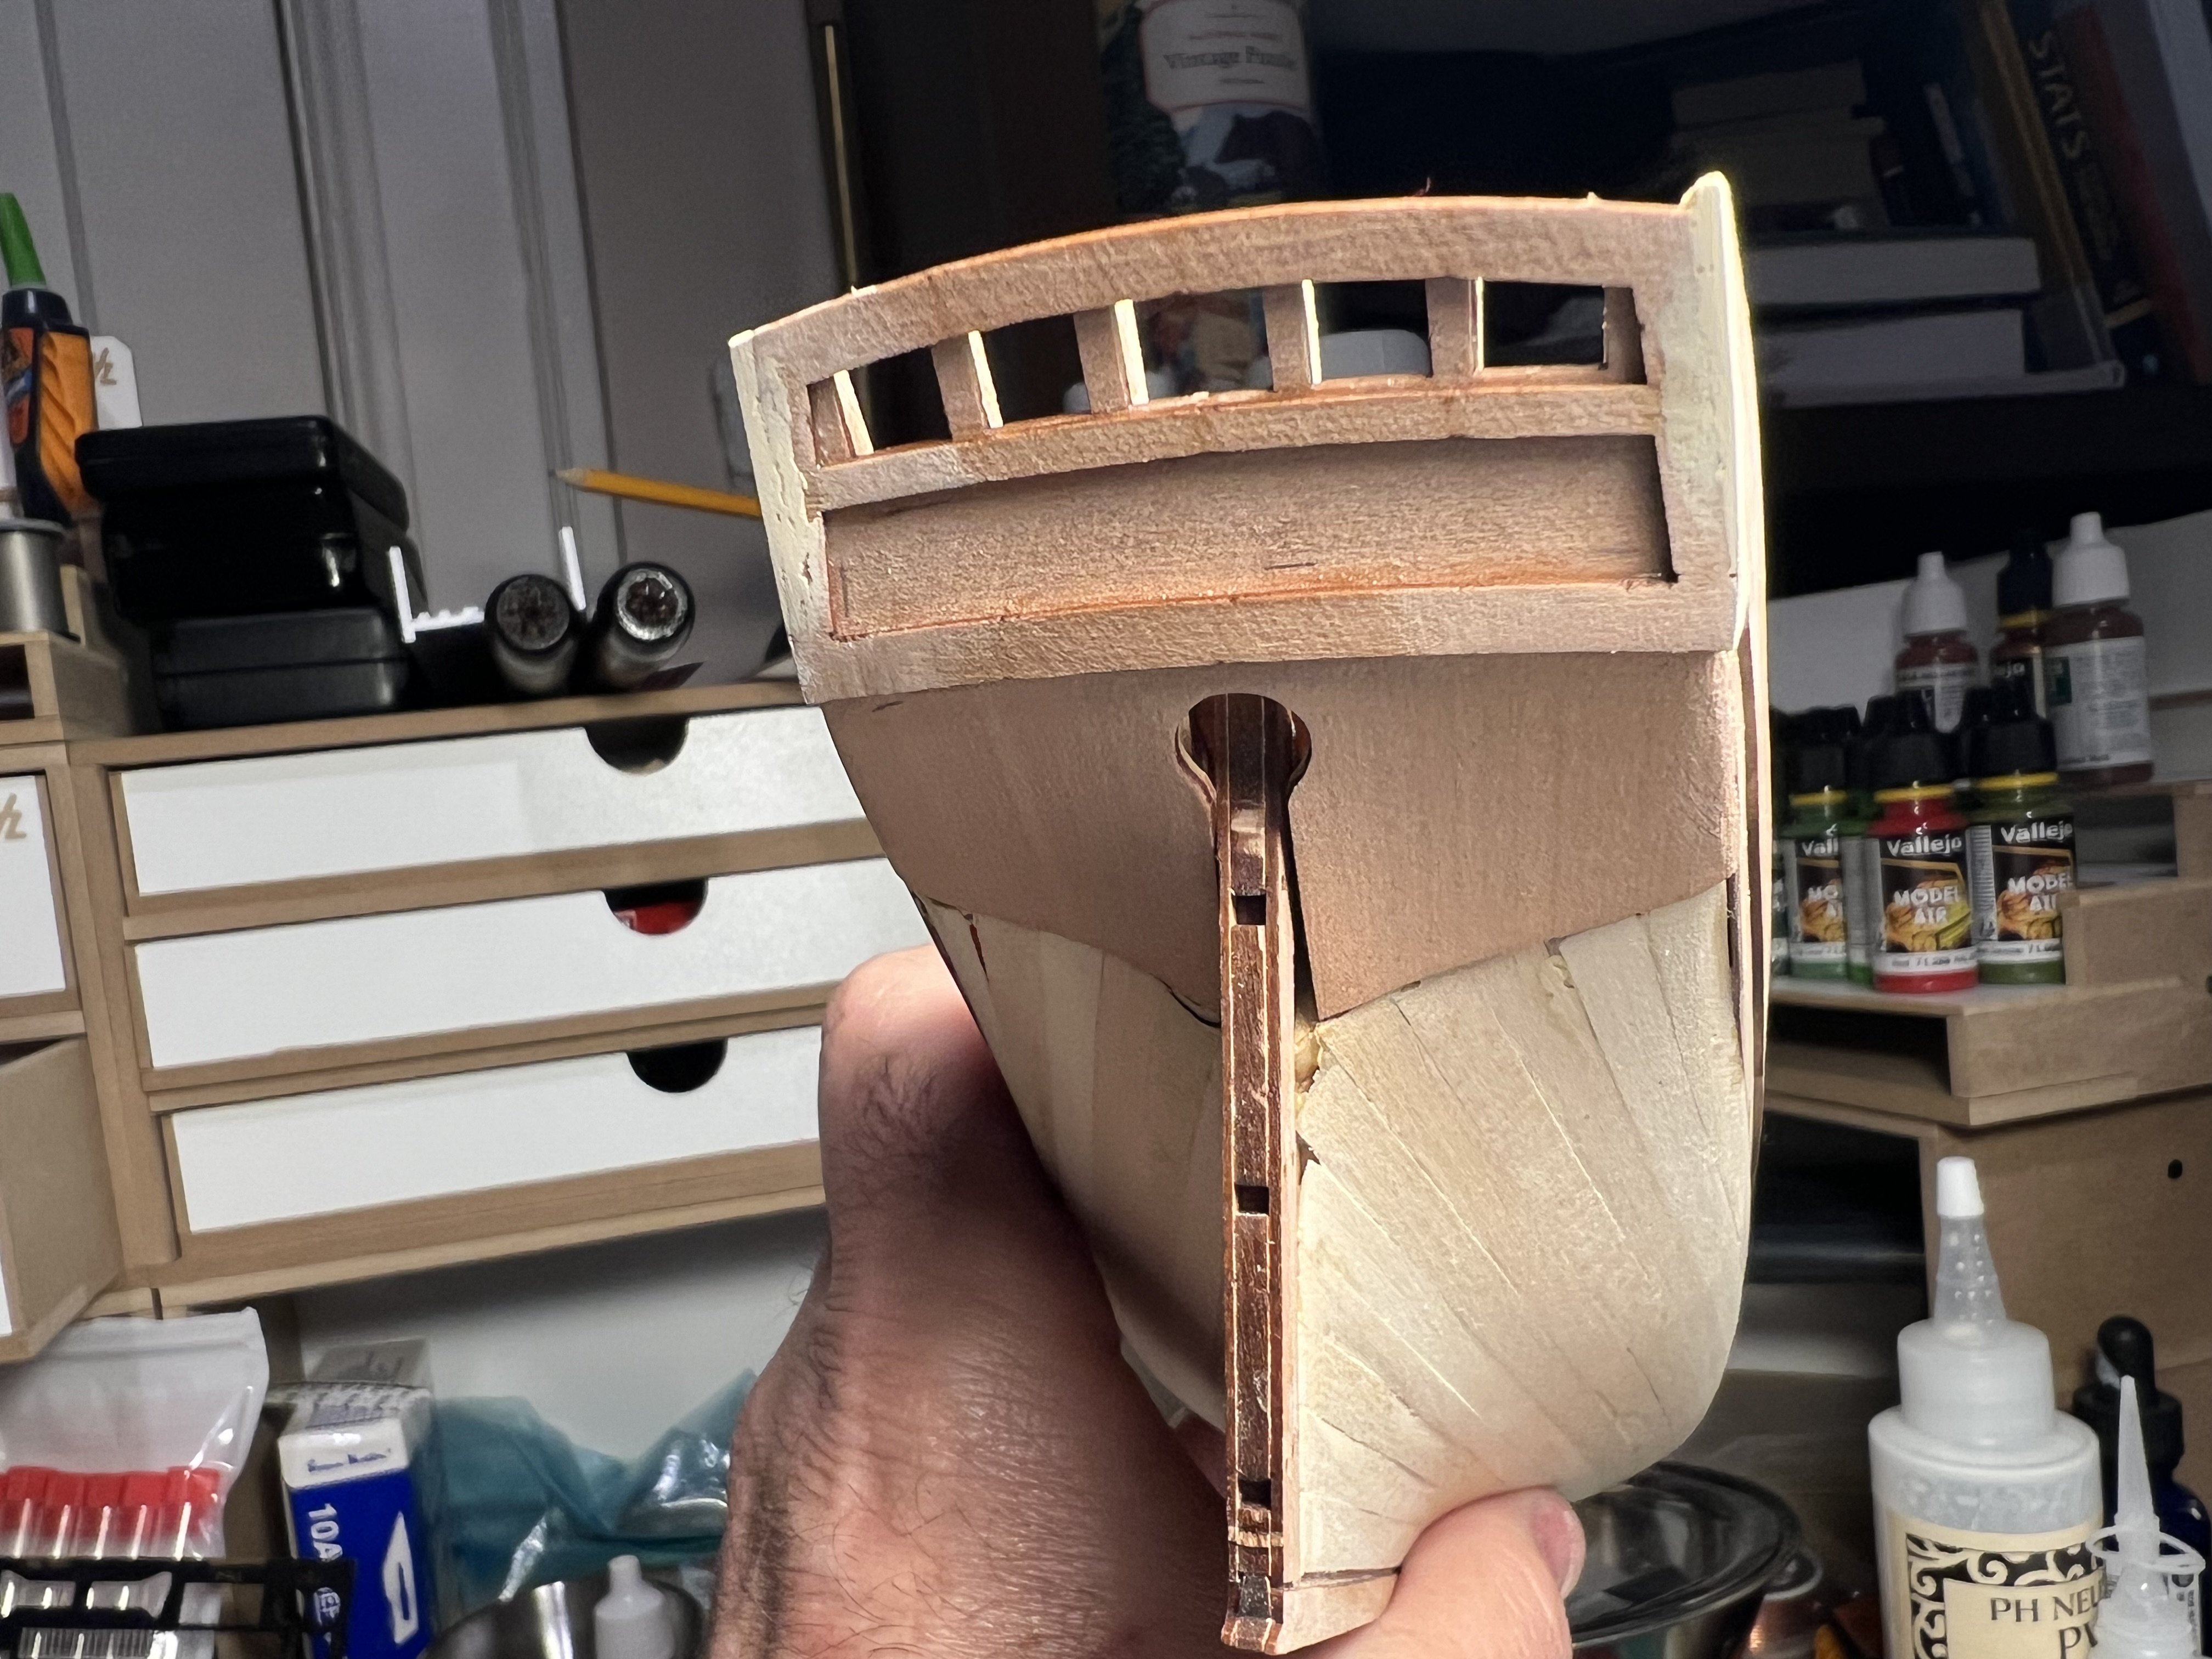
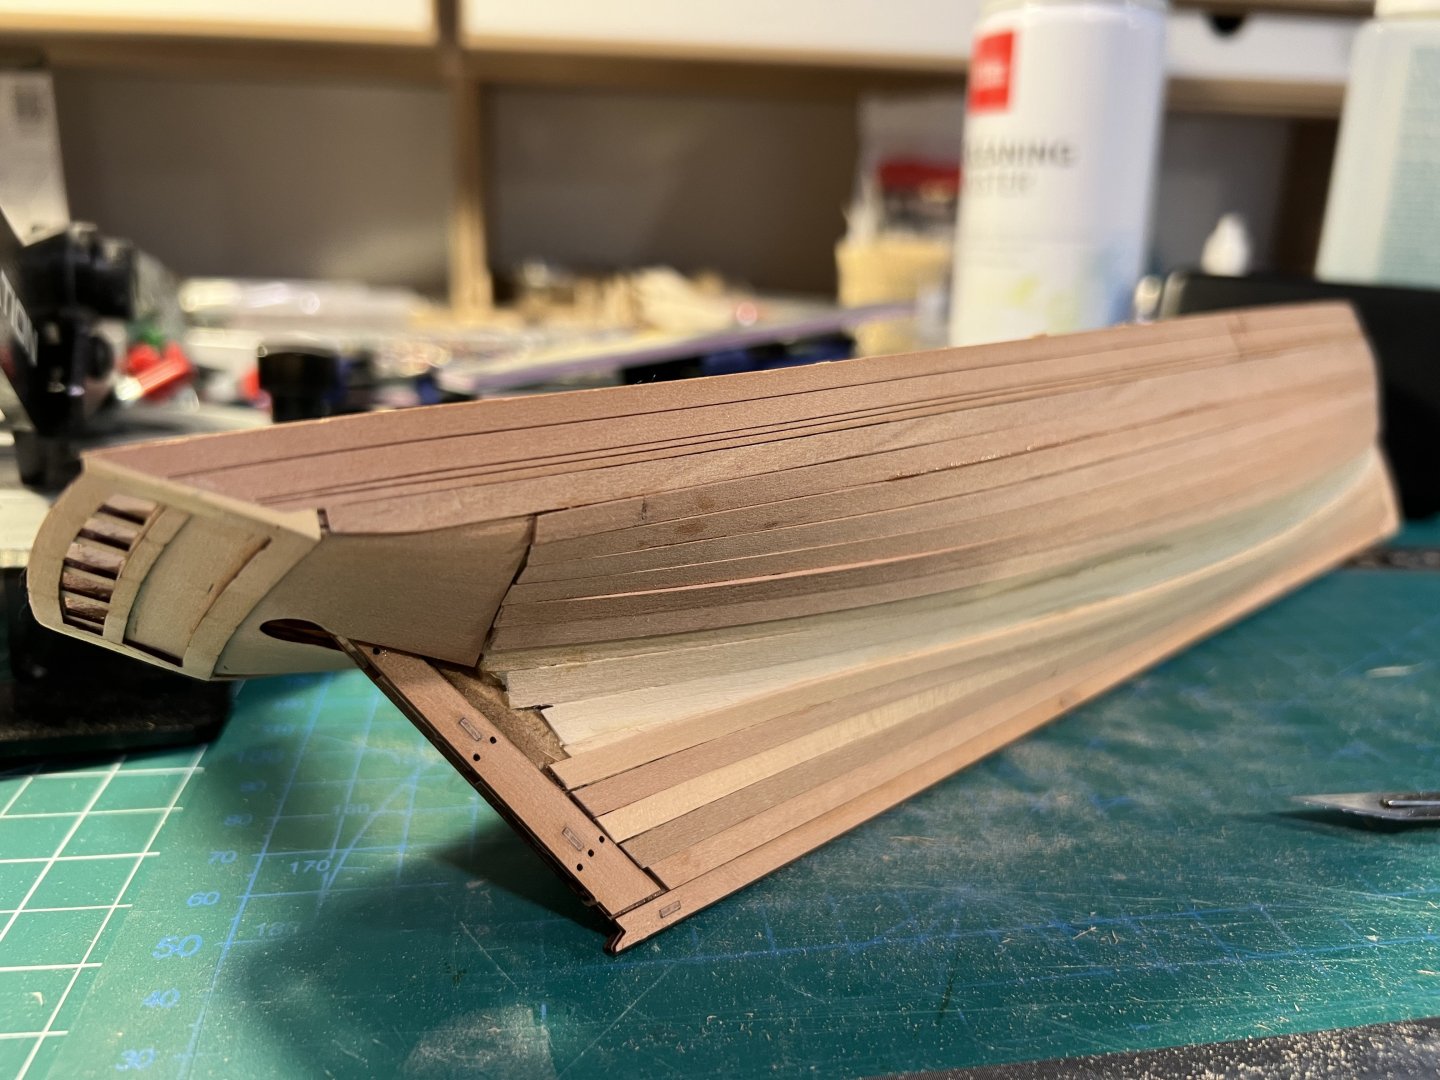
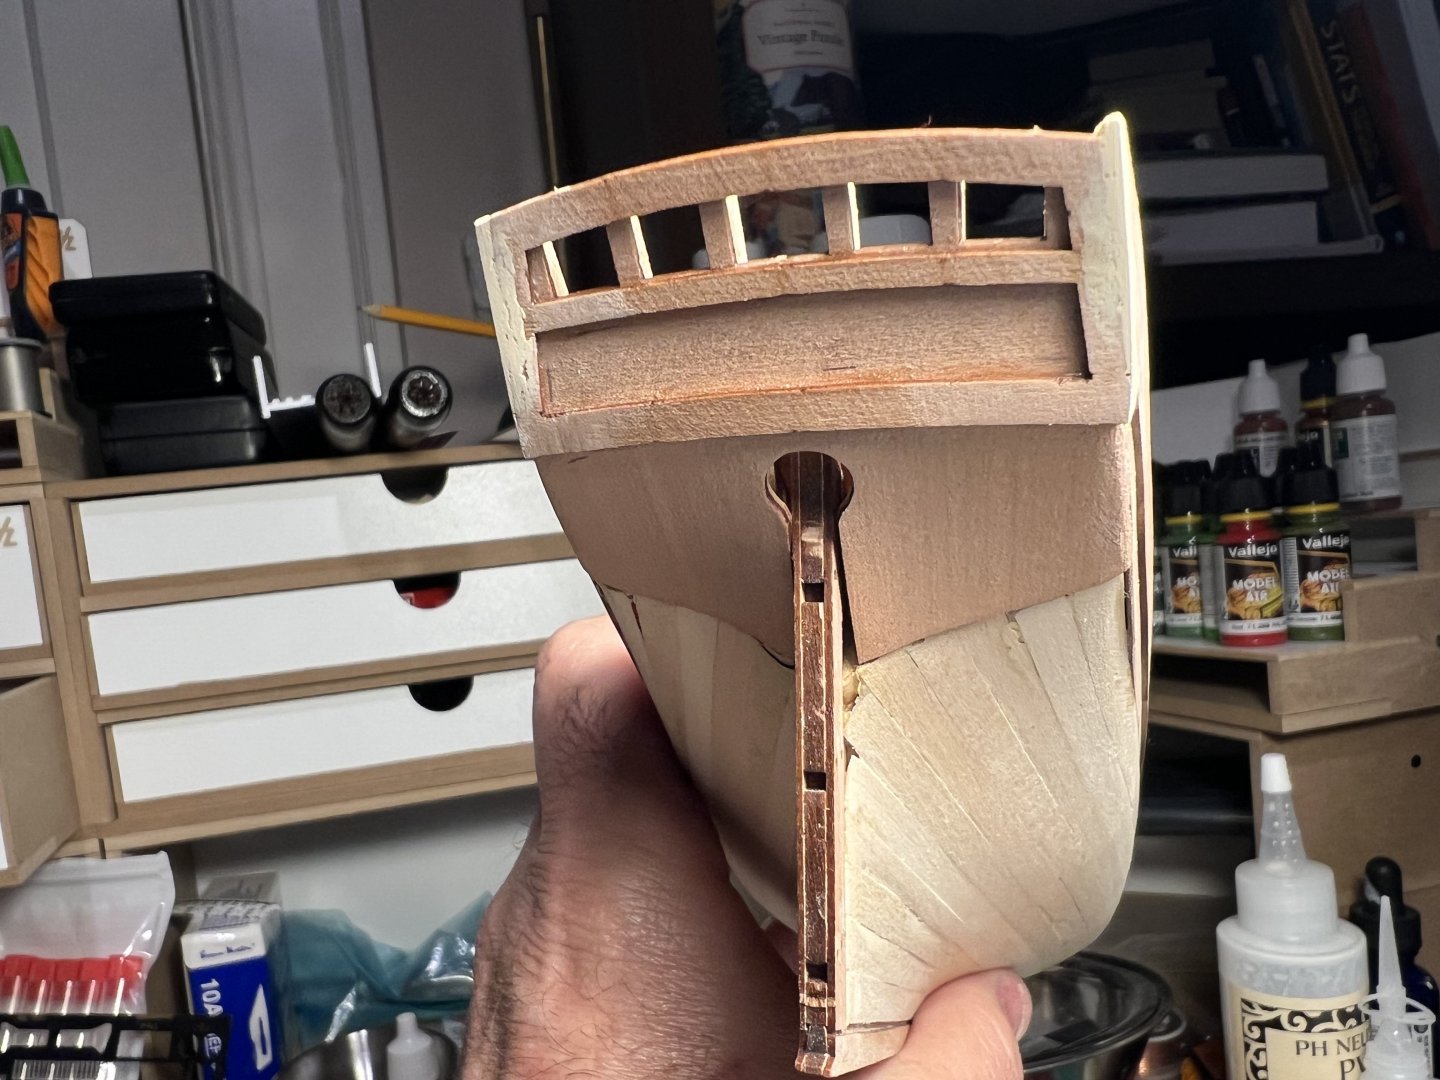
Here is my effort to use wood filler to shape the stern transom. Sorry I didn’t take any clear before photos. In the before, there was a pretty big gap between the transom pieces and the side of the hull. Should look better after a paint job.
- 133 replies
-
- 5
-
-
- Ranger
- vanguard models
- (and 1 more)
-
For those who don't know the differences (like I wouldn't have a year ago): This NRG Half Hull model doesn't use bent planks. It doesn't use planks. You create your own planks, each of which has a custom shape you determine: You cut out the pieces to shape (usually by first tracing a template from something like a manilla envelope - at least that's what I used) from a large blank sheet of basswood, so the pieces are shaped to the right edge bend by virtue of cutting them to that (often curved) shape. The Dory, Pram and Smack from Model Shipways (and the Dory from Midwest) had laser cut planks that had their "edge bends" in the shape of the pieces (so the only bend is in the direction the wood wants to bend) - unlike the Vanguard models I'm working on, the Sherbourne and Ranger, which have narrow strips of planking all the same width that need to be (sometimes) edge bent in that way. The Half Hull is more like the Dory, Pram, and Smack in this regard than the others (and most models) where you do need to edge bend planks. What's especially useful - at least it was to me - about the Half Hull project is that you get a better sense of why you even do "edge bending". You're trying to get via edge bending what you would get if you created a template (from a manilla folder). What looks at first blush like a straight plank actually becomes a curved plank because of the 3D geometry when you have curves in multiple dimensions. When you cut the pieces out from the template, they're curved. When dealing with straight strips you need to achieve that curve by edge bending. I know I'm not saying anything here that lots of people know about already (and I probably don't have the language quite right) - it's if someone new(ish) finds this to help them better understand some of the differences (I've discovered over the past year) between different kinds of models.
-
Parts an parts # building the norske love 1:75
palmerit replied to joebgame's topic in Wood ship model kits
No experience with that kit, but I’m working on a Midwest kit (from Model Expo / Model Shipways) and it had a bunch of mismatches between instructions and sheets. I later found in the box a supplemental sheet with an updated map to how the parts were laid out on the sheets. -
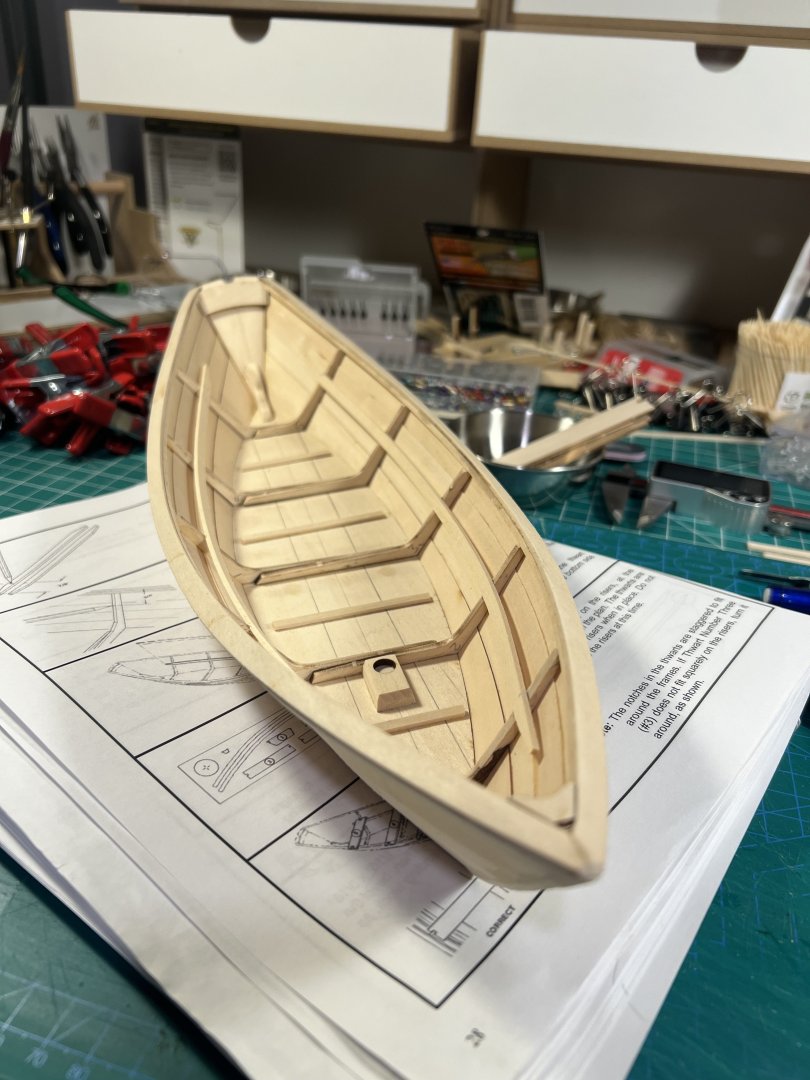
Thwarts (seats) dry fitted. They’ll be glued in place later, after painting the interior. Not sure if I’ll paint or stain the thwarts or just seal them.

- 71 replies
-
- 3
-
-
- grand banks dory
- midwest products
- (and 2 more)
-
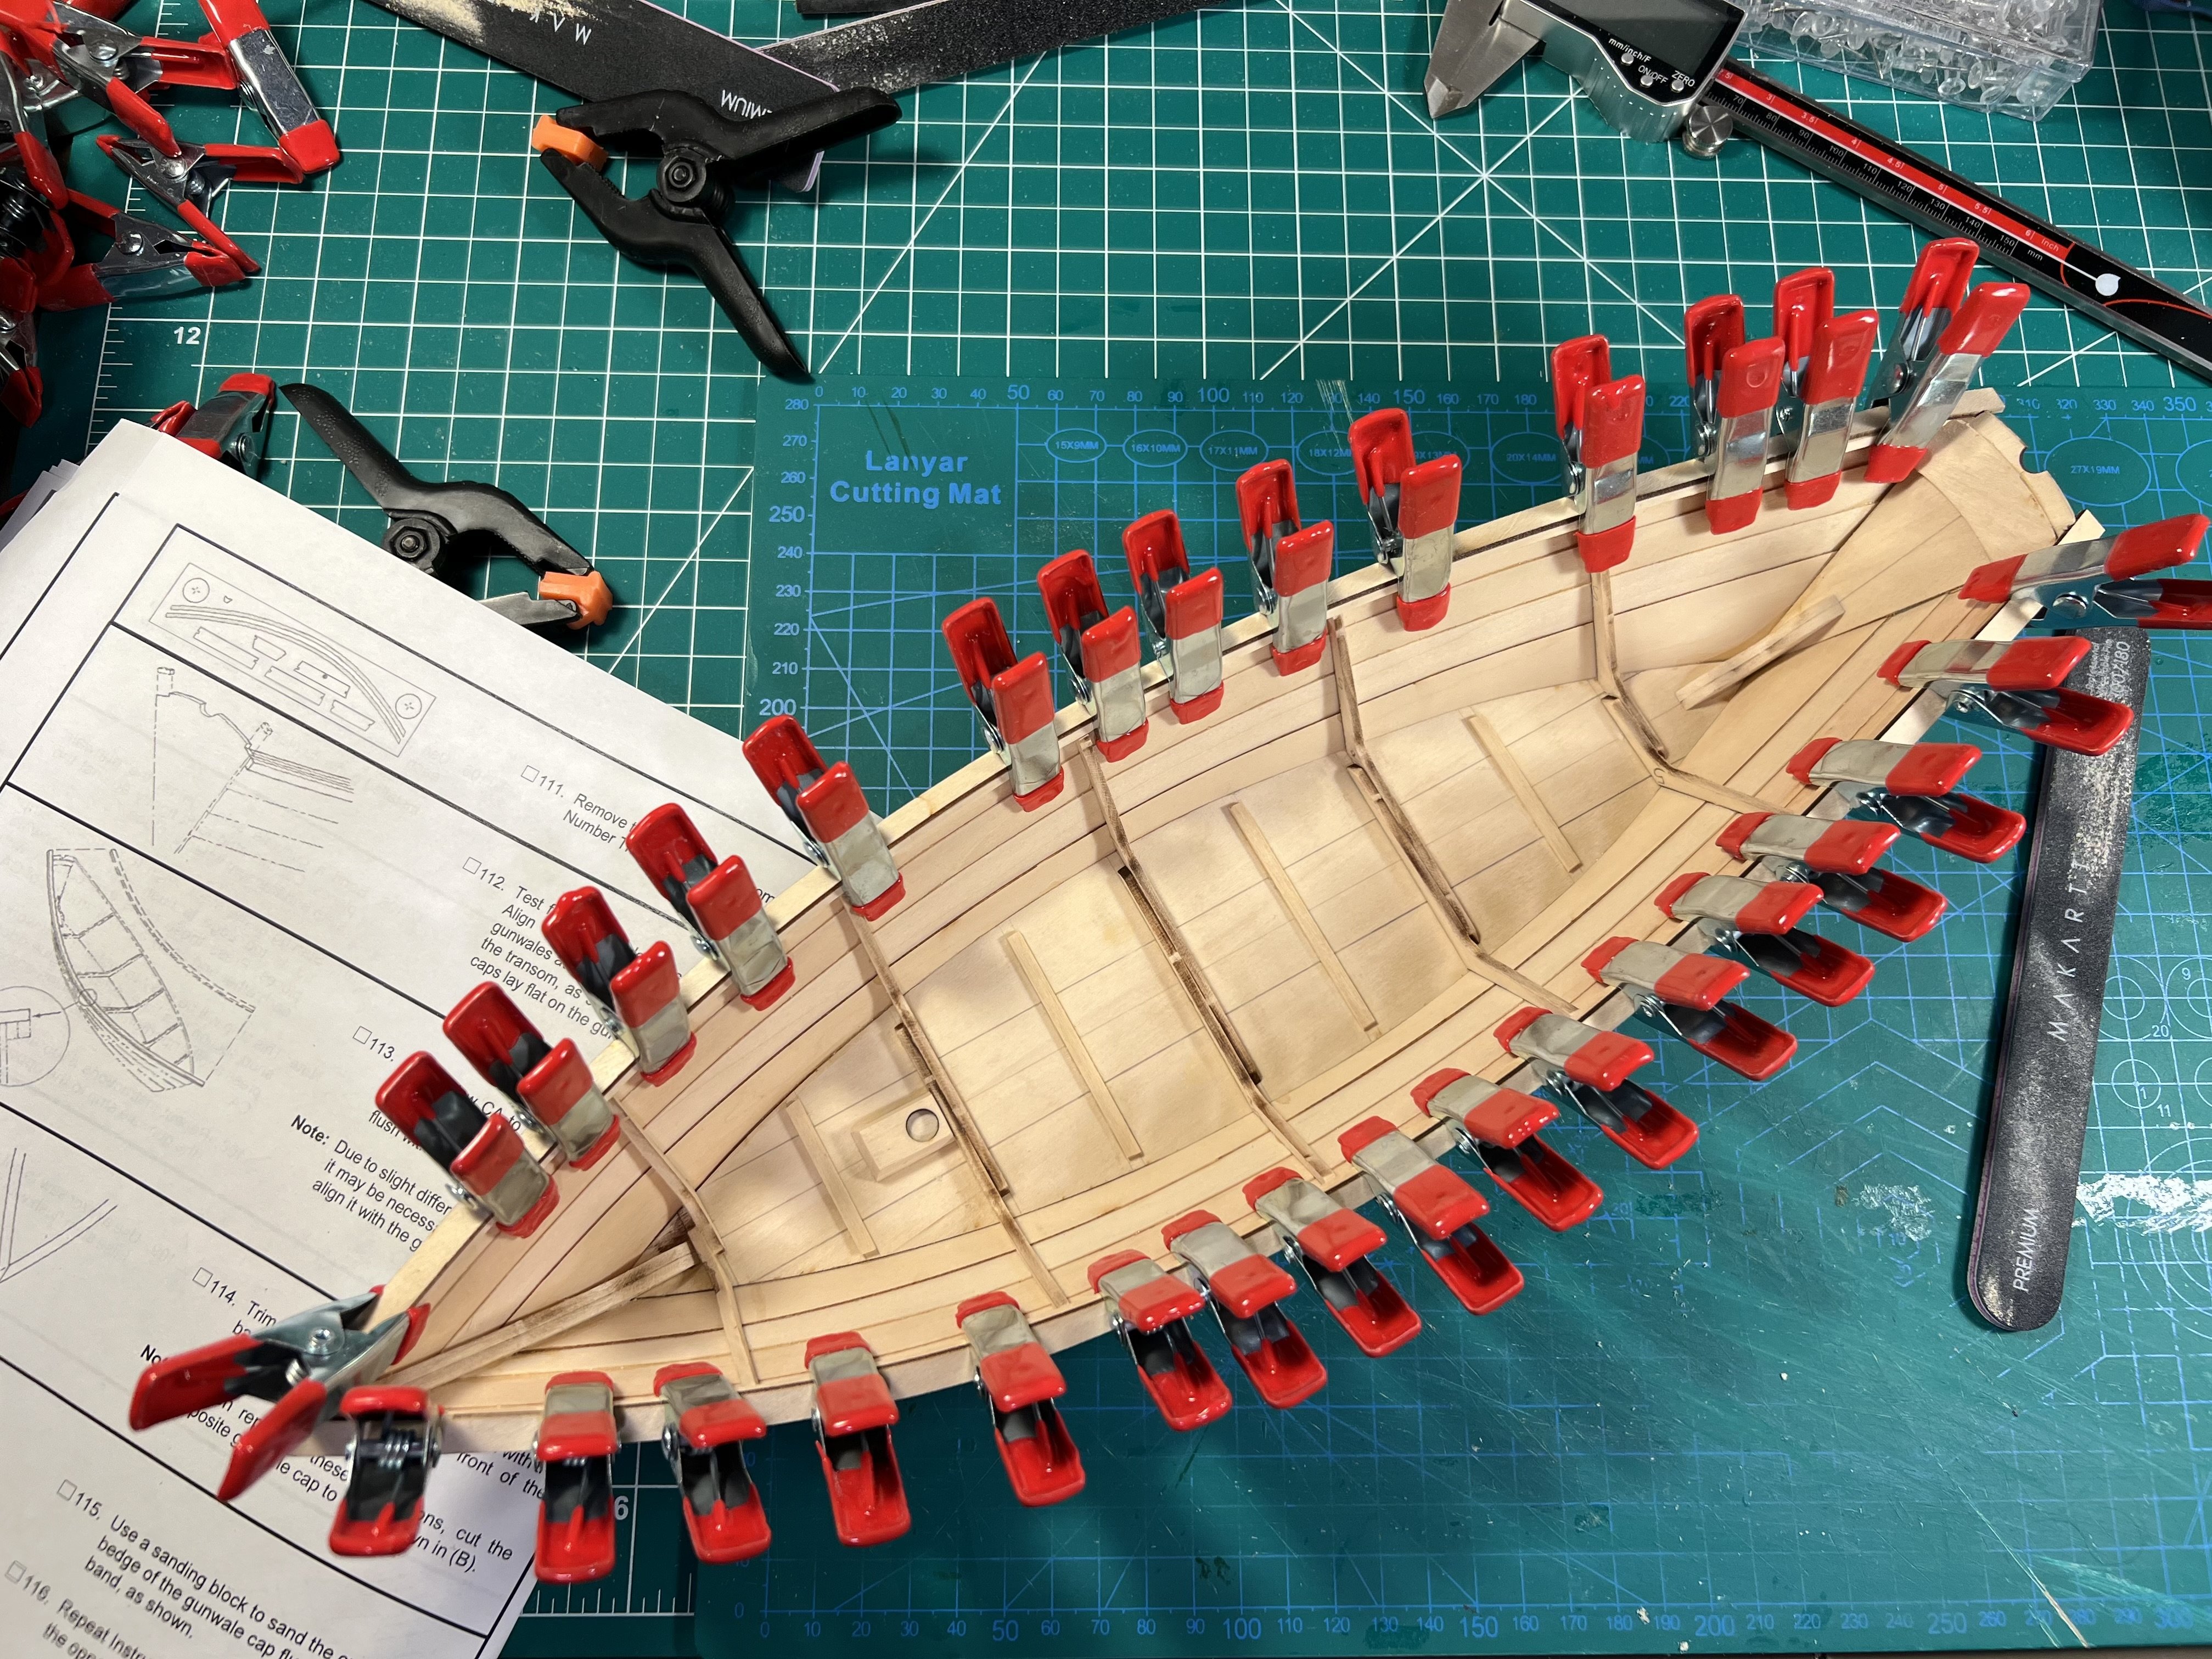
Finished the gunwales and added the risers.

- 71 replies
-
- 5
-
-
- grand banks dory
- midwest products
- (and 2 more)
-
While I found the Half Hull an interesting model and it exercised a different set of modeling skills - and gave me a good appreciation for how hulls can be planked - it is quite different from the other kits I've attempted. My attempt wasn't a complete success by any means.
-
Check to see if you might have a part sheet in your box that has a map of the parts. I'm building a Midwest model (made by Model Expo too) and discovered that the instructions were quite different from the actual layout of the parts on the sheets and only then realized that there was another sheet in the box that in addition to having a parts list at the top had a map to a couple of the laser cut sheets at the bottom. I also used the wrong knee when building the Pram. Good practice to undo some glue and try again. It's definitely a skill you'll use again - and just know that you can do it with a bunch of alcohol (if using PVA) or acetone (if using CA) with a few applications and some patience is a good skill to have. Also learn from my mistake and be careful using a scalpel or other sharp blade to remove a glued piece - on my Smack I had to remove a piece and it removed all at once and a blade went into my hand (just barely escaped with just a nasty scar without needing stitches).
- 55 replies
-
- 2
-
-
- Norwegian Sailing Pram
- Model Shipways
- (and 2 more)
-
I assume since you have a selfie that you’ll be sending that to Model Expo to get a credit towards a future purchase.
- 16 replies
-
- 1
-
-
- dory
- Model Shipways
- (and 2 more)
-
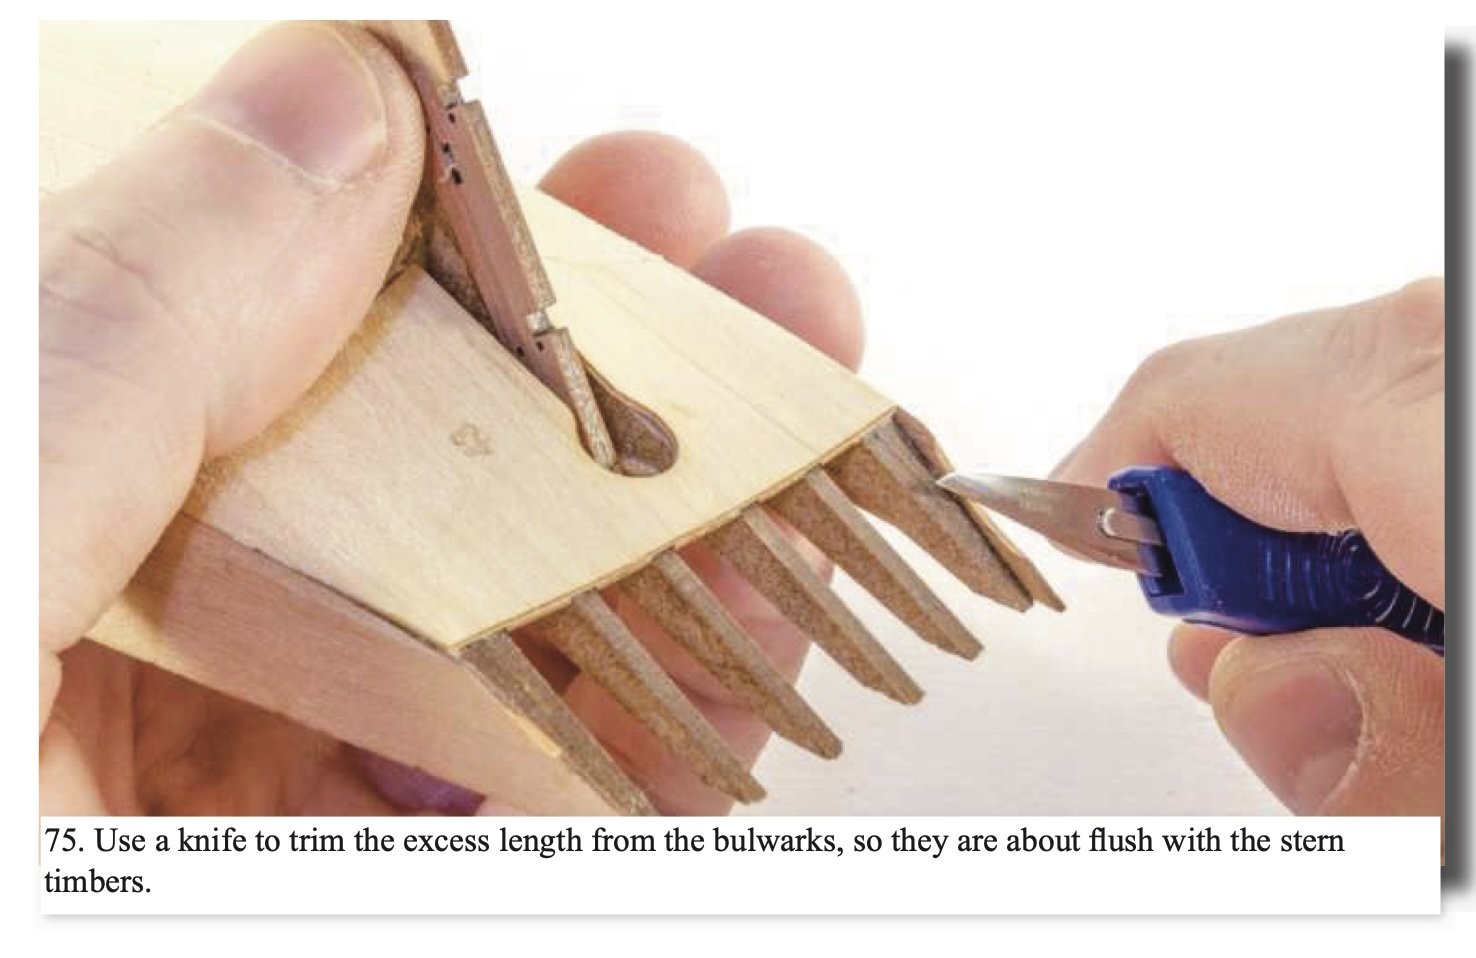
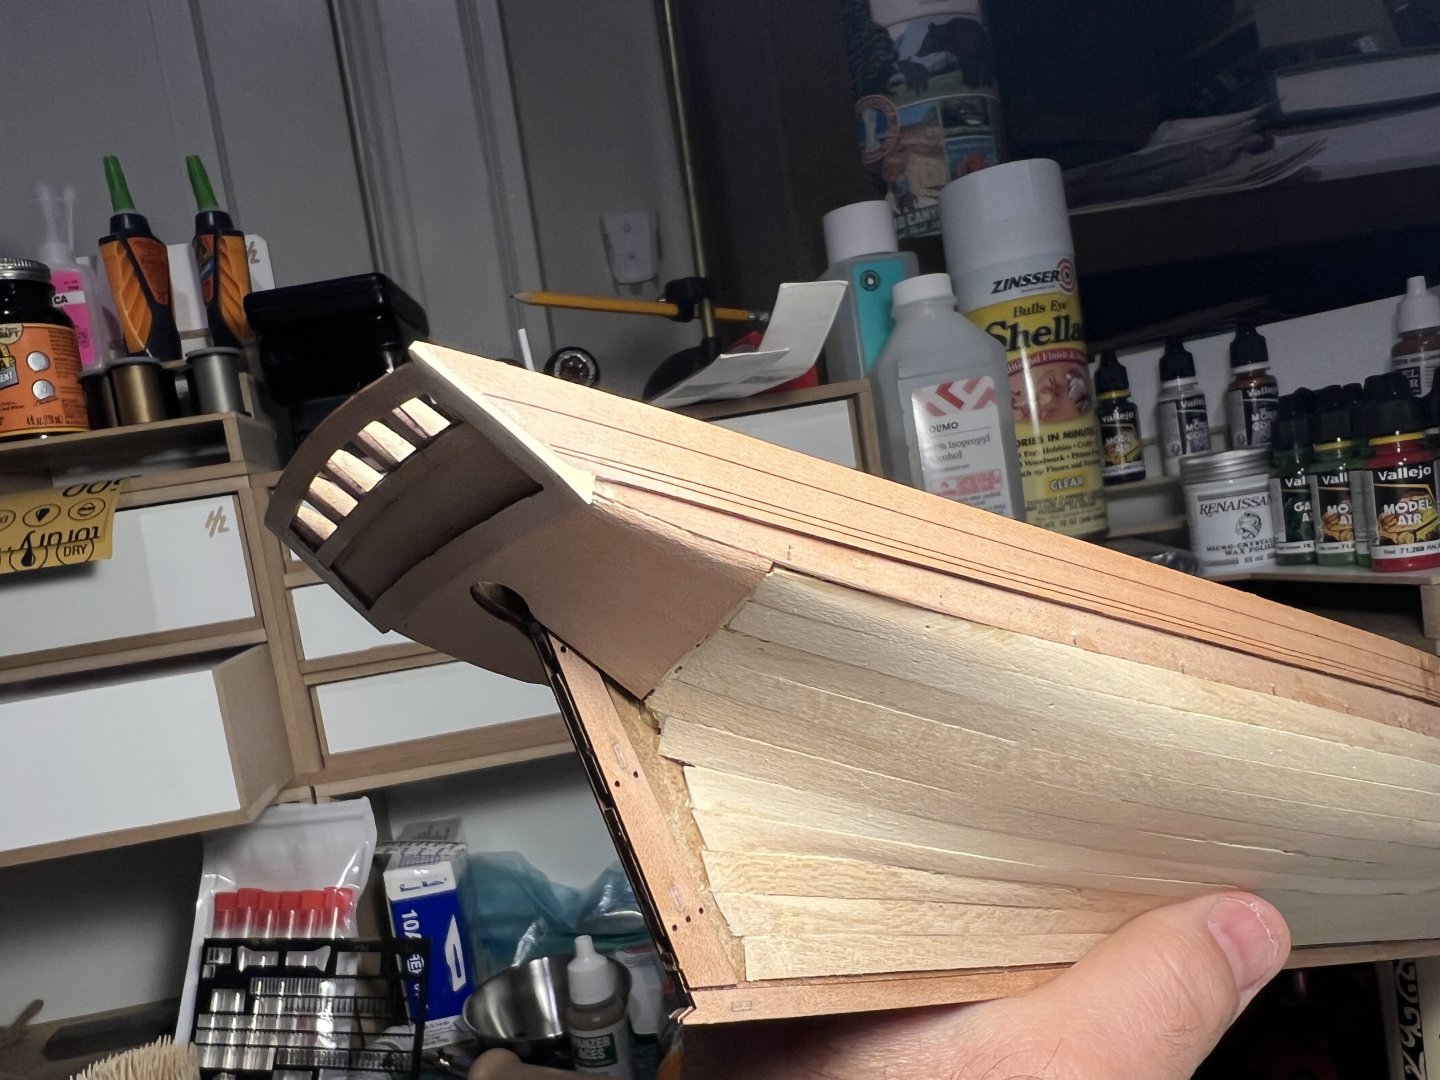
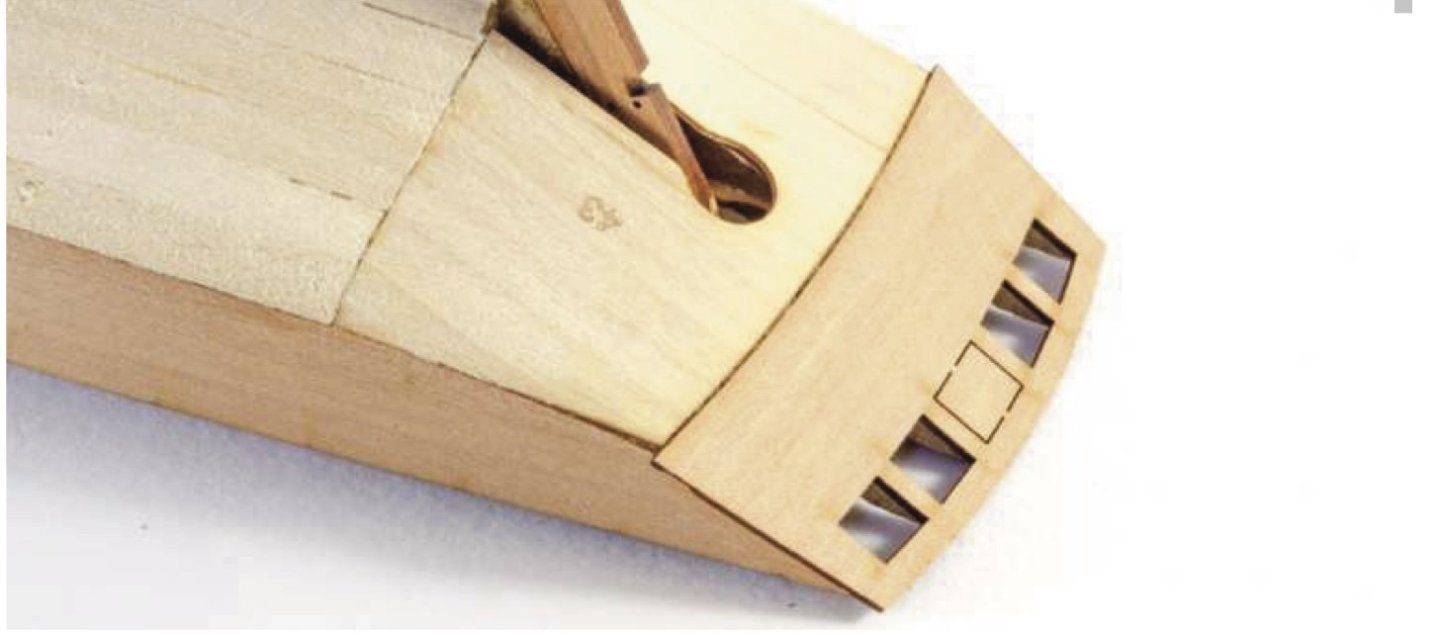
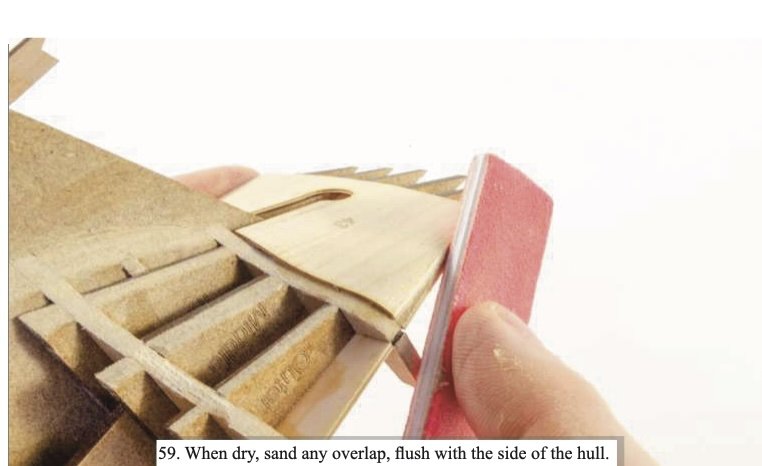
A note for future Ranger builders: (Below are screen shots from the instructions.) One thing I did not fully appreciate when fairing the hull was how much sanding needed to be done on the triple-thickness pieces at the stern end. As I noted above, I ended up having to unglue the first (interior facing) bulwark to sand some more. But I still didn't sand them enough. I now see with close inspection of some of the photos in the instructions how much those triple-thickness pieces are sanded down - it's nearly sanded down to the thickness of a single piece at the far stern end of the ship. I was certainly conservative in how much I sanded off assuming that surely it could not mean sanding through an entire piece, let alone nearly two pieces. I only really discovered how much I still needed to sand off when I attached the two transom pieces and saw (unlike the photo in the manual) that the piece did not reach the outside of the hull (as shown in the photos). It was then I realized that I had sanded a fraction of how much needed to be sanded down. I'm learning to look ahead, but this was something I missed. I'd recommend future builders take out those transom pieces to help guide how much you really need to fair the stern around the transom. I ended up adding some wood filler (filler, sanding, some more filler, sanding) to try to mimic having the right shape of the transom pieces. I'm not with my model so I'll try to post the end result later when I can. Especially since these pieces will all be painted, filling and sanding (or adding a new piece of wood, filling, and sanding) will work fine and barely be noticeable.

- 133 replies
-
- 6
-
-
- Ranger
- vanguard models
- (and 1 more)
-
Lee Valley Veritas micro tools have been recommended (also not cheap): https://www.leevalley.com/en-us/tools/brand/veritas/miniature-tools