


Ryland Craze
-
Posts
1,436 -
Joined
-
Last visited
Content Type
Profiles
Forums
Gallery
Events
Posts posted by Ryland Craze
-
-
Originally Posted November 12, 2009
Hello Everyone,
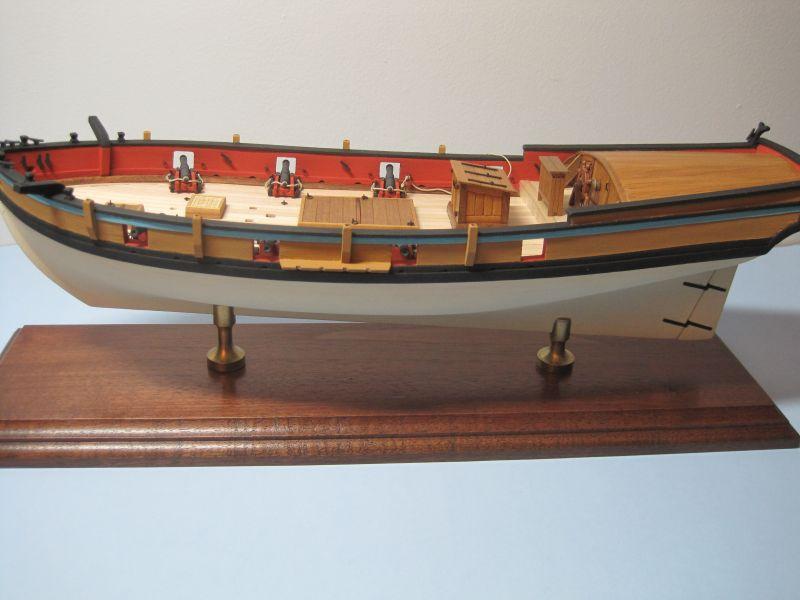
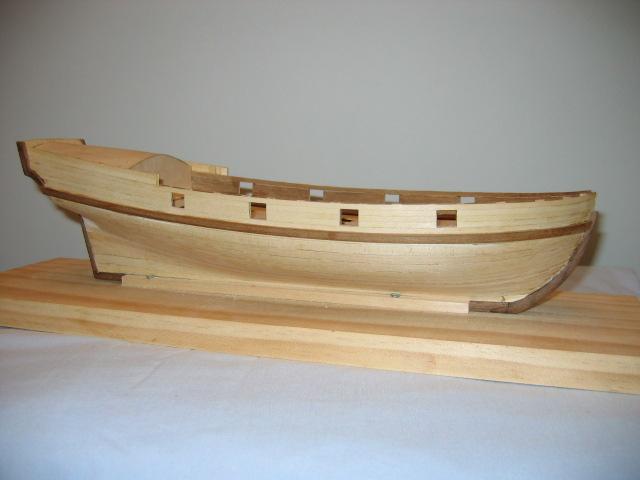
I have finally gotten to a point where I can show some progress on my AVS. I have completed all of the deck furniture and only have the rigging of the train block and tackle on the cannons to complete. I even found time to finish the display board.
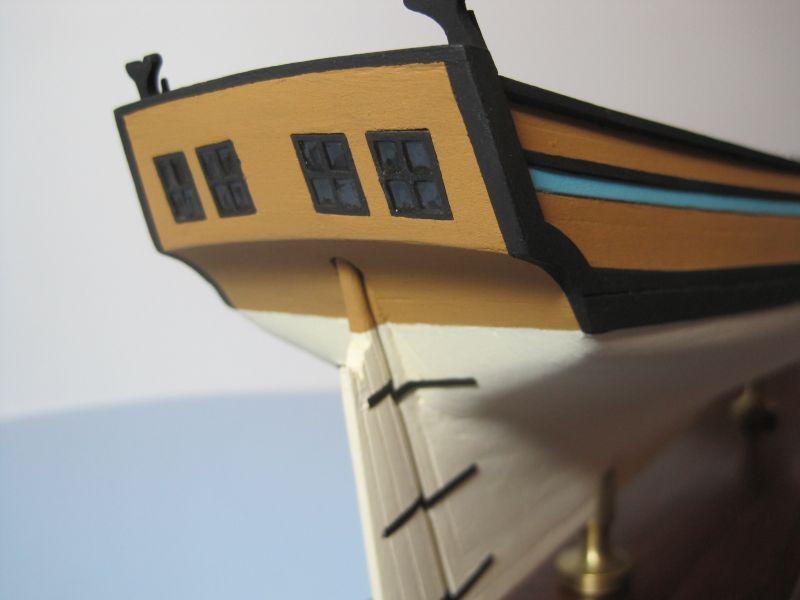
After I had attached the cleats, swivel cannon mounts, catheads and boom crutches to the hull, I sealed the hull with Testors Dull Coat. This will help to protect the hull. After sealing the hull, I made the stern windows using Micro Kristal Clear. It looks like a white glue and dries clear. I was satisfied with the results of this.
I am using MoRope for the rigging and Warner Woods West blocks. I am extremely satisfied with both of these products. I was going to use 3mm blocks for the cannon tackle, but I could not get them to work. They were just too small for me to work with using the Practicum instructions. I wound up using 3.5mm blocks, which were still much smaller than the kit supplied blocks.
Getting this far has been a major hurdle for me. I feel that I have been stuck in Chapter 5 of the Practicum for years. I have received a lot of support from fellow forum members on this build log and through PM's from others.
Another incentive for me to finish my AVS is that I have on order the MS Brig Syren. I want to participate in the Syren Community Build as this is the kind of support that I need. Chuck has developed a super kit and supplements it with a detailed practicum. With his support on the forum and the support of the other Syren Build members, I know that I will complete a ship model that I will be proud of.
Here are some pictures of my AVS. I will try to post some more progress pictures after I finish attaching all of the deck details and finish the cannon rigging.
-
Originally Posted April 30, 2009
In this post, I will be updating my build log to the point where I resumed building my AVS in January, 2009, after three and a half years of no work on her.
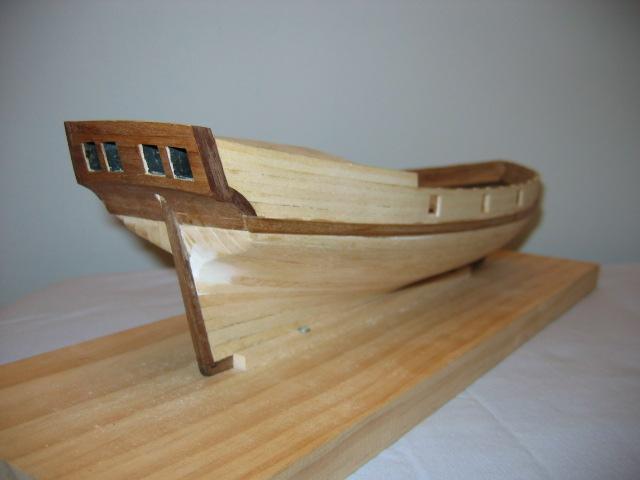
Chapter Three of the practicum has you doing the remaining planking. I started out planking the inside of the bulwarks. When planking over the gun ports, I would trim the planking to open up the gun ports. After I completed the bulwark planking, I placed thin strips of wood in the upper and lower opening of the gun ports to fill the gap between the first layer outer planking and the inside bulwark planking. I took care to make sure that my gun ports openings were uniform.
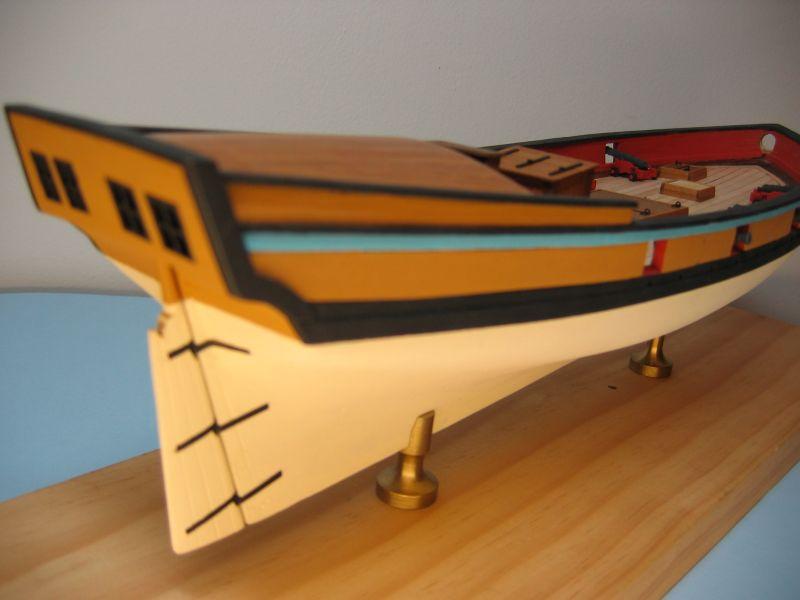
Then it was on to the second layer of planking. The planking above the wales worked out fine as there was very little tapering. For the planking below the wales, the practicum had you install the planks in scale lengths in a four butt pattern. This was a different method than what was taught on the first layer of planking. After completing the second layer, I sanded everything and applied several coats of MinWax Wipe On Poly, sanding with 0000 steel wool between coats. I was real happy with the finish. However, I changed my mind, sanded down the poly finish and painted my AVS using Model Shipways paint. For the AVS, I really like the painted version as it is a very colorful ship.
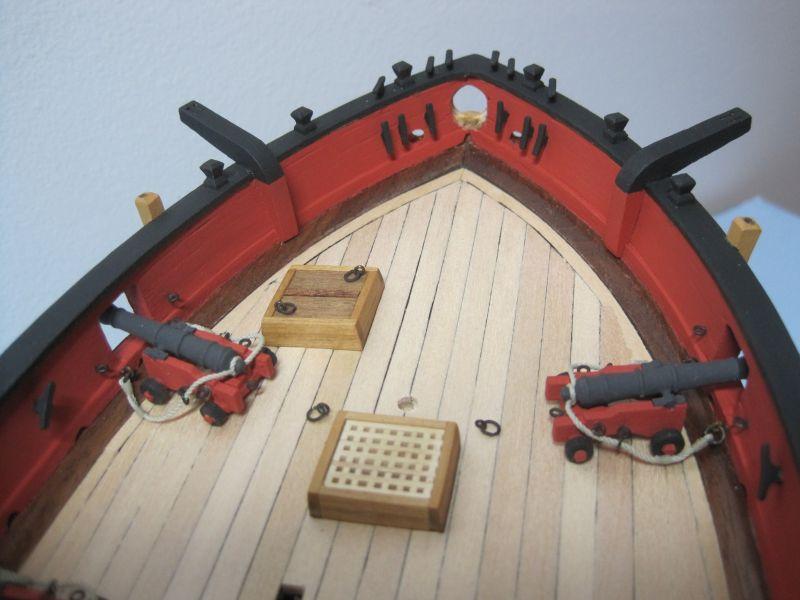
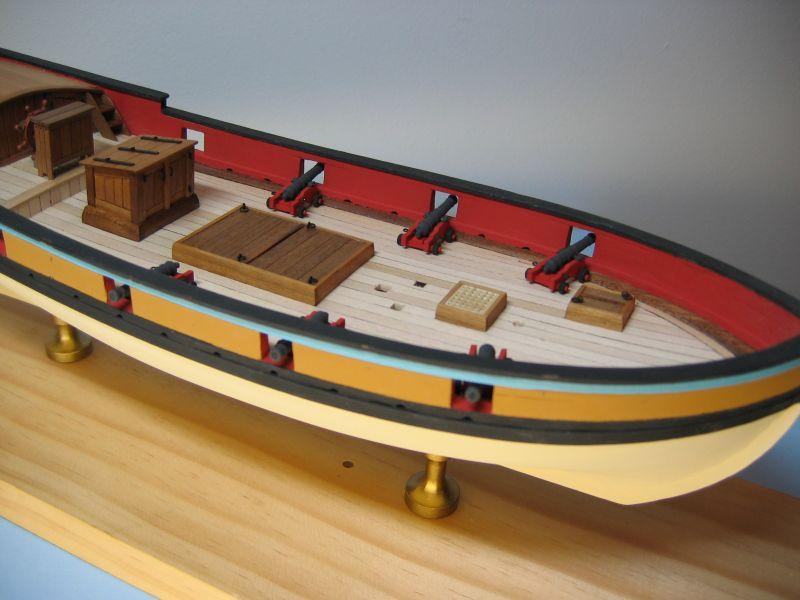
Chapter Four has you completing the deck details. I started building the hatches, companionway and scuttle. These were built first as you plank the deck around the deck furnishings. I followed the deck planking as per the practicum. If I were doing it over again, I would have used a four butt pattern for the deck planking, where the practicum had you just using one long plank with no butts. I also completed the quarter deck wall planking and the poop deck planking. In this section, I also built the cannons. I made a jig so that all of the cannons would be uniform. The practicum called for the installation of the oar sweeps, but I elected not to install them. This basically completed the hull of the AVS.
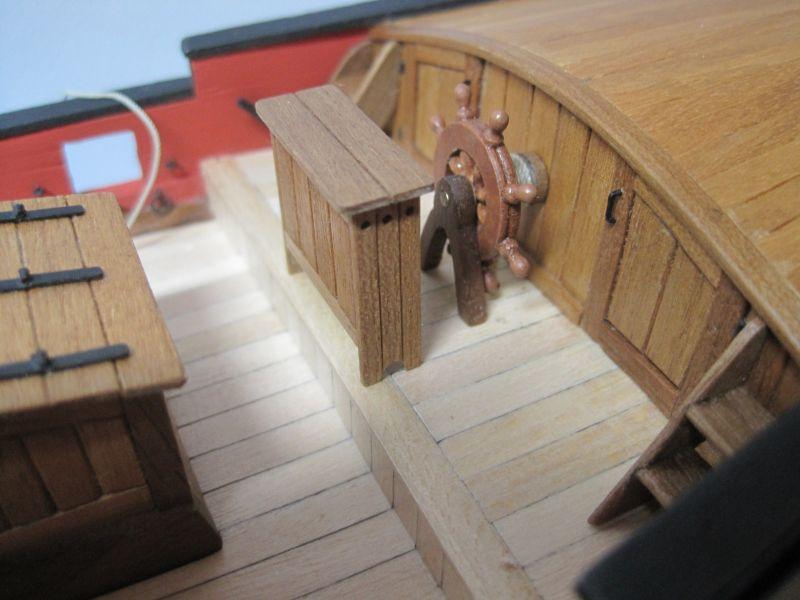
Chapter Five is where I got bogged down and construction came to a halt. This chapter is where you complete all of the smaller deck details, eyebolt and cleat installation, ships wheel, swivel cannons and rigging of the cannons. For the ships wheel, I ordered a wooden one from Model Expo. The wheel was too thick, so I sanded down both sides and am happy with the outcome. This is where I stopped construction. Following are pictures of my AVS at this stage of construction.

-
Hello Everyone,
I am pleased to reload my build log of my Armed Virginia Sloop. I was able to find some of my early posts on the internet and some word documents that I had saved, but will have to recreate some of the later posts.
As I commented on in this first post, I want to thank those AVS builders and forum members who offered encouragement and advise on this build. Also, a special thanks to Alistair who sent me many PM's and pictures in the last six months encouraging me to complete this build.
Originally Posted April 25, 2009
There seems to be a lot of activity on MSW with building the Armed Virginia Sloop by Model Shipways. I thought that I might as well jump in and show my progress on my AVS. I know that I will get a lot of support and encouragement by the forum members and this should help me complete my AVS.
One thing that I want to say up front is that I have learned so much from the AVS builders that had build logs that I studied. I especially enjoyed the build logs of people like Bahamas Diver, Pete Jaquith, Bob Riddoch, John Smith and others. Their build logs inspired me to do a better job on my AVS and I thank them for taking the time to post their builds.
This is the second ship model that I have attempted. The first was an Enterprise of 1799 by Constructo. This kit had one and a half pages of instructions in English. I completed the hull but felt that I needed more experience to complete her. Around this time, I heard about Bob Hunt’s Lauck Street Shipyard practicum on the Armed Virginia Sloop. The practicum is a course that covers every aspect of building this kit. It has nine chapters and contains 386 pages of text, pictures and drawings and is supported by a private forum at Lauck Street Shipyard. I know that by following the practicum to build my AVS, I would expand my skills and return to finish up my Enterprise.
I read the practicum and realized that I could build the AVS. So I ordered the kit on January 23, 2003, and eagerly started construction when it arrived.
When the kit arrived, I was impressed with how much wood was in the box. It was so many pieces and different sizes that had to be organized. I bought some paper tags that had string on them and sorted and labeled my wood. This is a must for this kit as there are so many different sizes of wood.
Chapter One of the practicum had you install the bulkheads on the false keel. The practicum goes in great detail on how to cut the rabbet and has many illustrations on the relationship of the angle of the rabbet to the false keel. In addition, the practicum explains how to make the bow and stern filler blocks. I followed the practicum and had no problems.
In Chapter Two, I installed the first layer of planking. Again, the practicum has very clear and concise instructions with many drawings and pictures on how to do the planking. After completing Chapter Two, this is what my AVS looks like.
- DPhilbrick, MikeB4, semorebutts and 2 others
-
 5
5
-
-
Peter,
Check out this topic. It works very well.
http://modelshipworld.com/index.php?/topic/718-adding-photos-to-private-message/
-
Absolutely beautiful! Your high level of craftsmanship shows again. Thanks for sharing this build with us.
-
Alistair,
I am sorry to hear of the loss of all of your pictures and files when your computer crashed. I am glad these pictures got posted to MSW before your PC failure.
I just want to let the AVS builders know that you will be there to comment on their build logs and offer them encouragement and guidance. You have been inspirational and motivating on my AVS build and I appreciate it. You have a lot to offer these AVS builders and I thank you for your support.
-
Very nice build. Thanks for posting this. I have kit #19 of this series and hope to build it some day. When I do, I will definitely use your build log as a reference.
-
Dave,
Your new keel looks really great. It looks like the place to be in two weeks is the Echo workshop. I wish that I could have attended that one. Thanks for supporting the IPMS Show in Richmond this past Saturday. Maybe you can enter your Echo cross section in next year's show.
-
Tim,
You are making good progress on your Elco. The hull lines look great and I also like the cradle you made to hold the hull. Keep up the good work. -
Ken,
You are doing a great job on your AVS. There used to be quite a fleet of AVS models on MSW. I hope they all come back.
-
David,
I am glad to see your build log back online. Your Niagara is really looking nice and I will be following your build.
-
Thanks for putting this build log back online. The pictures show a lot more detail in MSW 2.0 than on the older version of MSW. Absolutely a beautiful model.
-
Excellent job as always. I really enjoy this build.
-
Alistair,
Glad to see your AVS build log back online. As I said on MSW 1.0, this has to be one of the best crafted Armed Virginia Sloops that I have ever seen. Your build log will definitely help those of us that are still building the AVS. The pictures of your AVS on this new version of MSW show way more detail than what was on the old version of MSW. Thanks for posting them.
-
Thanks maaaslo,
I do my mast and spars the same way except I use sanding sticks, the type that women use for filing their nails. I pick them up from the local beauty shop supply store. They come in various grades.
-
I have this tool and I am in agreement with what Jay says. I have used it for ship modeling and many household chores. Never had a problem with it and like Jay says, "Let the sander do the work".
-
Pasi,
Glad to see your Rattlesnake build log back on line. I have enjoyed following all of your build logs over the years. Look forward to more pictures.
Take care.
-
Glad to see you build log back up and running. I will be following it.
-
Tim,
Glad to see your PT Boat build log up and running. You are doing a good job on this kit and I look forward to following the build. Also, thanks for bringing this model to the meetings to share your progress with the members.
-
Augie,
Glad to see your Syren build log back online. I have the Syren and am looking forward to starting to build this kit after I complete my Armed Virginia Sloop. Your build will be definitely a guide for me to follow. Keep up the good work and thanks for getting the pictures up so fast.
-
Glad to see this log back up and running. You are doing a very nice job on the Cross Section and I hope to see the other Triton build logs back online.
-
Beautiful work. I am sorry to say that I was not following this build on MSW 1.0, but I will be following it from now on. This is going to turn out to be one fine model.
-
Thanks Toni for posting your build. It is a great help for us that are building this kit.
Armed Virginia Sloop by Ryland Craze - Model Shipways - 1:48
in - Kit build logs for subjects built from 1751 - 1800
Posted
Originally Posted January 10, 2010
Happy New Year everyone! I hope that 2010 is the best year yet.
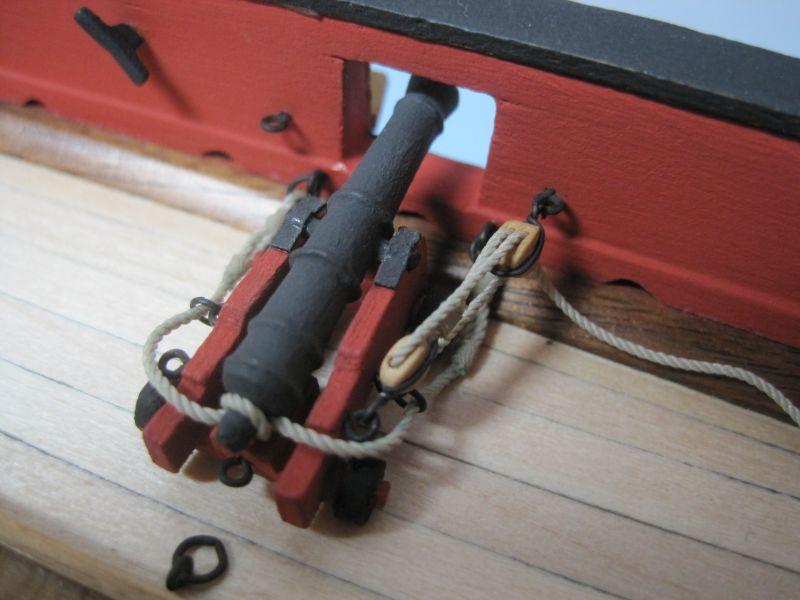
It has been a while since I last posted an update on my AVS Build Log. I have been working trying to finish up all of my deck furnishings. The part of the build I thought would give me the most problems was rigging my cannons and making the rope coils. Having never done this, I checked into the many ways of making the rope coils. I am using MoRope and did not want to cut my rigging line, so I opted to make the coils on the deck.
This is the procedure that I went with. I started with Elmer’s White glue thinned with water (75% glue to 25% water) and added a couple of drops of dish detergent to help absorb the glue into the rigging line. I placed a piece of double sided tape next to the cannon and then cut a small square of wax paper and laid it on top of the double sided tape. This is where I would construct my rope coils. I took and stretched out the line to be coiled and give it a good coating of my glue mixture. I then coiled the line around an Xacto aluminum knife handle and keep working it on the wax paper. Eventually the rigging line would lay right, but you have to keep adding glue. When the glue dries, you will not see any evidence of the glue residue. I gave the line a heavy coat of glue where I was going to cut off the excess line. MoRope will unravel quickly if you do not have the area glued where you cut the line. Here is a picture of the rope coils drying on my deck.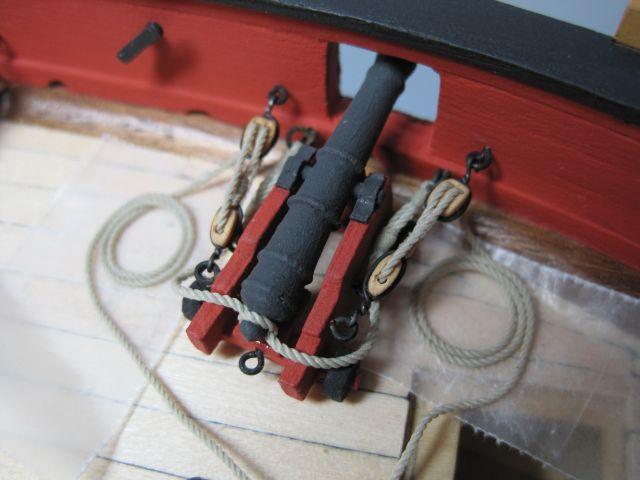
After the rope coils dried, I carefully removed them from the wax paper. I then discarded the wax paper and tape that was on the deck. I placed an old Xacto knife blade under the MoRope where I was making the cut so that I would not damage the deck. I cut the excess line off and placed some undiluted glue on the underside of the coils and positioned them on the deck.
This was the first time that I have made rope coils. I felt I had better practice making them, as I did not want to mess up my cannon tackle rigging. I practiced making many coils using the kit supplied materials, but was not having much success. I finally practiced with the same thickness of MoRope and this worked great. After two practice coils, I was ready to go live.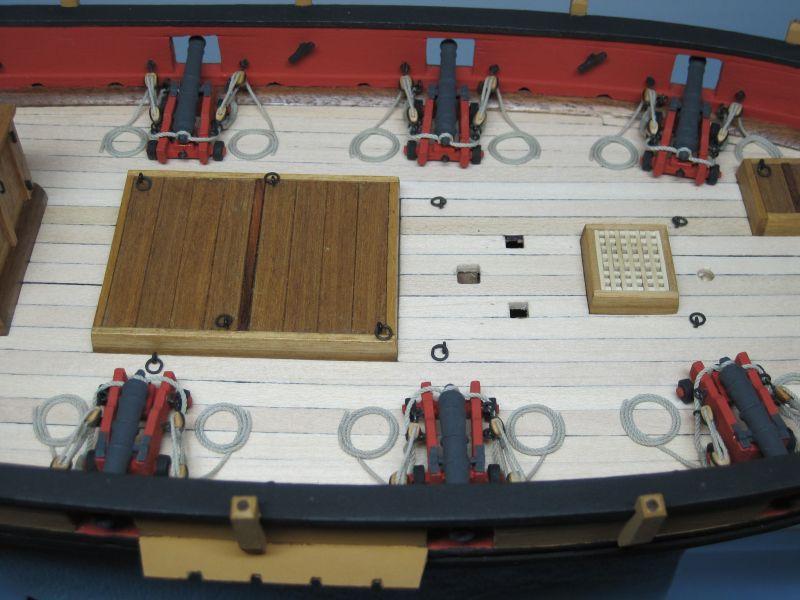
The first coil on my AVS took over an hour, with the last coils taking about 20 minutes each. I am happy with the outcome. Here is a picture of all of the cannons rigged.
I used 0.6mm MoRope for the train tackle and rope coils and 0.8mm for the breeching rope. I think that the 0.6mm line may have been slightly too heavy of line to use as the kit supplied line came out to 0.5mm. However, MoRope only comes in either 0.4mm or 0.6mm line as they do not make 0.5mm line. I also used 3.5mm Warner Woods blocks, which I think was a good fit for the 0.6mm MoRope.
I finally feel that I can now move forward on my AVS build. I have completed all of the deck furnishings and only have to install them. I will post some pictures when I complete this step.