


Ryland Craze
-
Posts
1,540 -
Joined
-
Last visited
Content Type
Profiles
Forums
Gallery
Events
Posts posted by Ryland Craze
-
-
Welcome Sea Hoss to MSW. We look forward to seeing your Syren build. If you finish it by the end of April, maybe you could bring it to the annual Northeast Joint Clubs Ship Model Conference and Show held in New London, Connecticut. I have seen several well done Syren's on display there over the years.
- Mirabell61 and mtaylor
-
 2
2
-
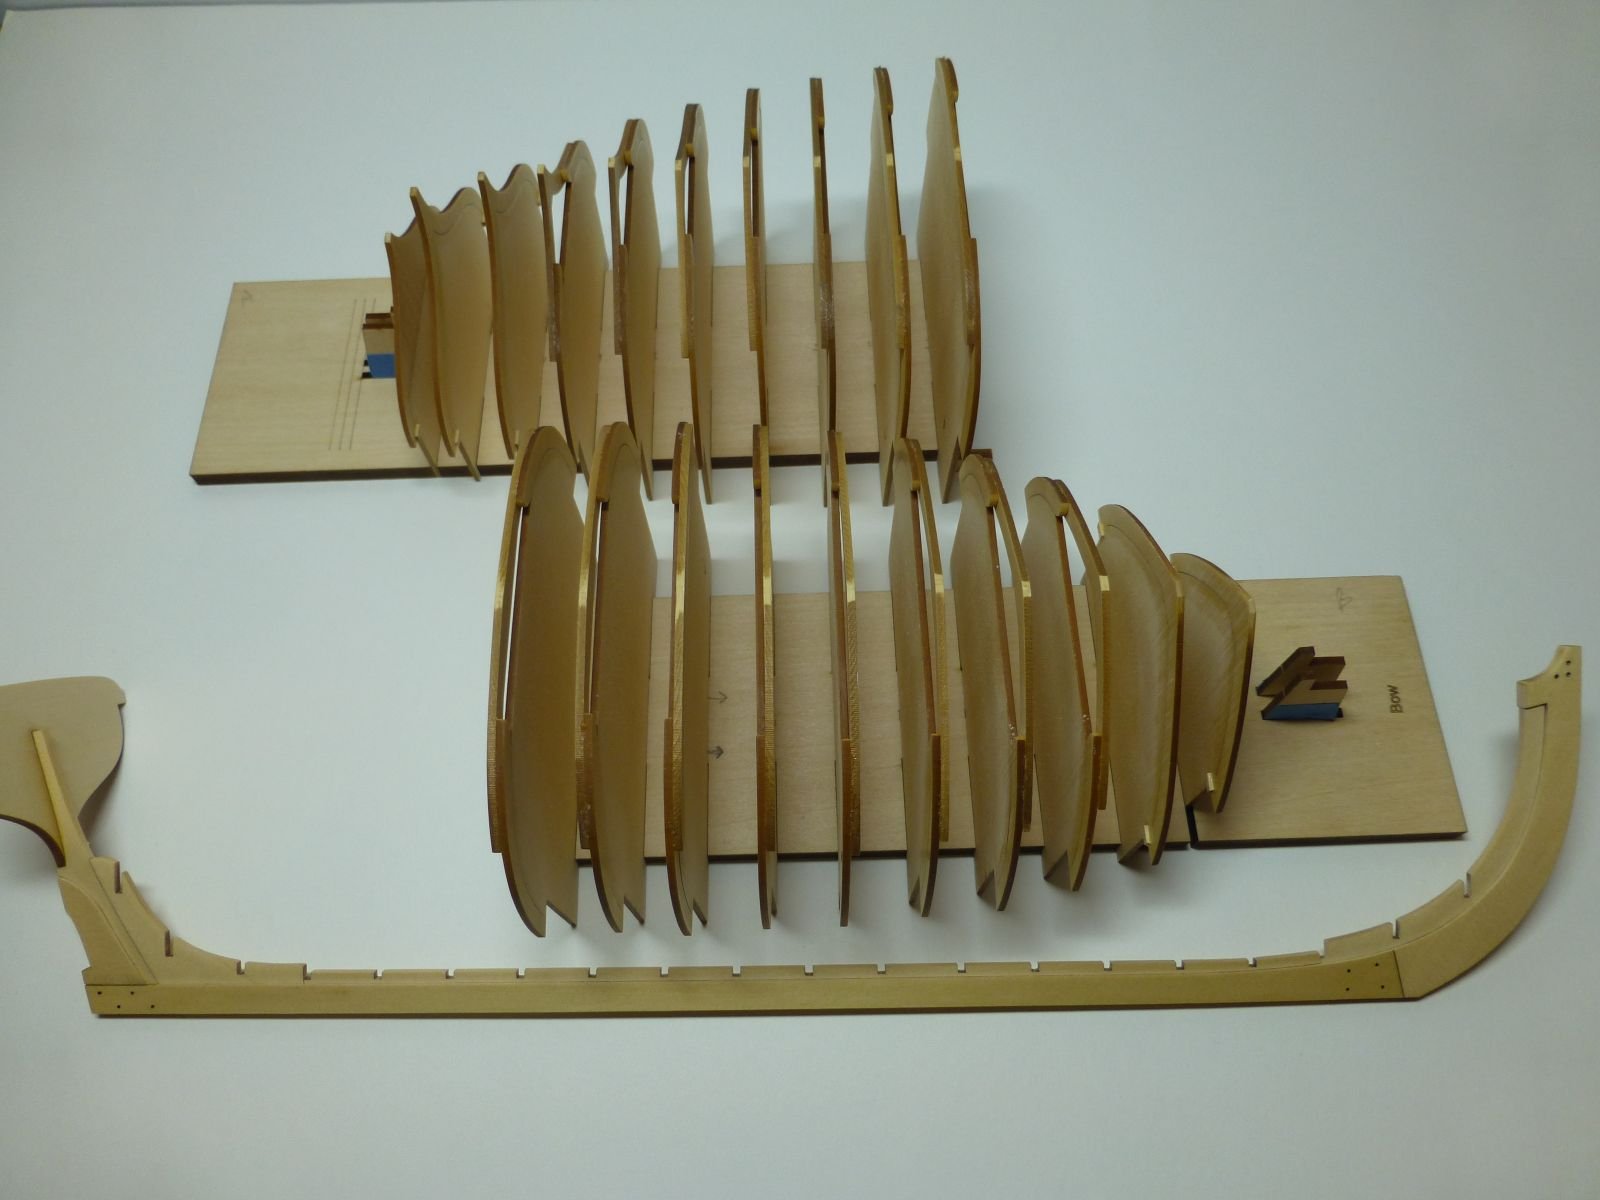
Thanks for the "Likes" and to Ken for his comment. I have completed the frames by following the instructions. I sanded them with 600 grit flexible nail files. I had to do very little sanding to get the frame tabs to fit into the slots on the build board. I also had to do a little filing of the slots in the keel to get the frames to fit.

Once completed, I test fitted the keel assembly to the frames and everything fit perfectly with some minor adjustments.

Next up is to get the frames properly aligned and glue the keel to the frames.
- Chuck Seiler, MEDDO, Rustyj and 11 others
-
14
-
Question on gluing the keel on top of the frames. The slots for the frames on the build board allow for some side to side movement for adjustment purposes. I am concerned that if the frames are not exactly centered on the keel, then this will cause problems when it comes to planking the hull. Does anyone have any suggestions that would help to make sure that the frames are properly aligned on the keel?
-
Chuck, should I put a coat of wipe-on-poly on the sides of the frames before I attach the keel to them? If not, when should the wipe-on-poly, if any, be applied to the interior?
Thanks
-
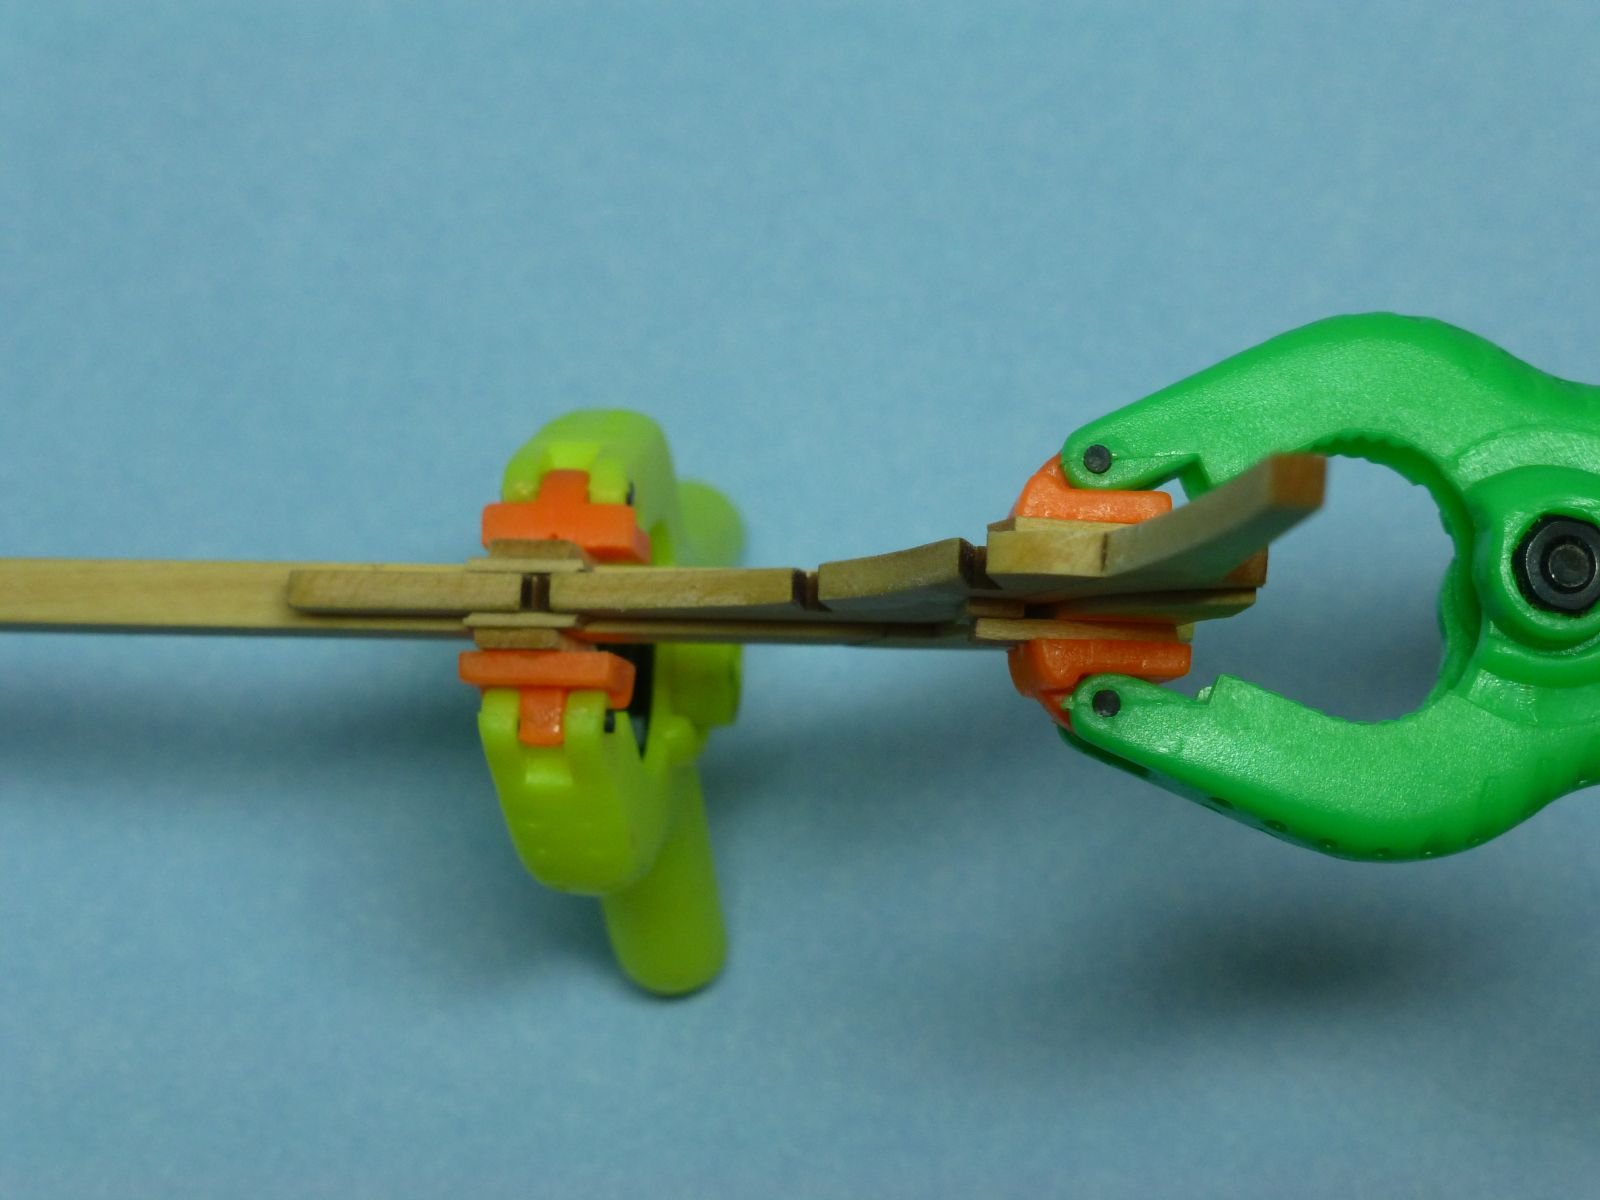
Thanks guys for the comments and for the "Likes". I cannot take credit for the spacing jig as this was Doug McKenzie's idea. I am also participating in the Ship Model Society of New Jersey Group Build of this kit and Doug had emailed members a drawing of this spacing jig. I just put his jig idea into pictures.
I left a little gap between the keel and the 1/32" spacer so that any glue that would seep between the 3/32" notched piece and the keel would not glue the jig to the keel. After a few minutes of set time of the Titebond II glue, I removed the jig and cleaned up any excess with a small dental scraper and a paint brush dipped in water.
-
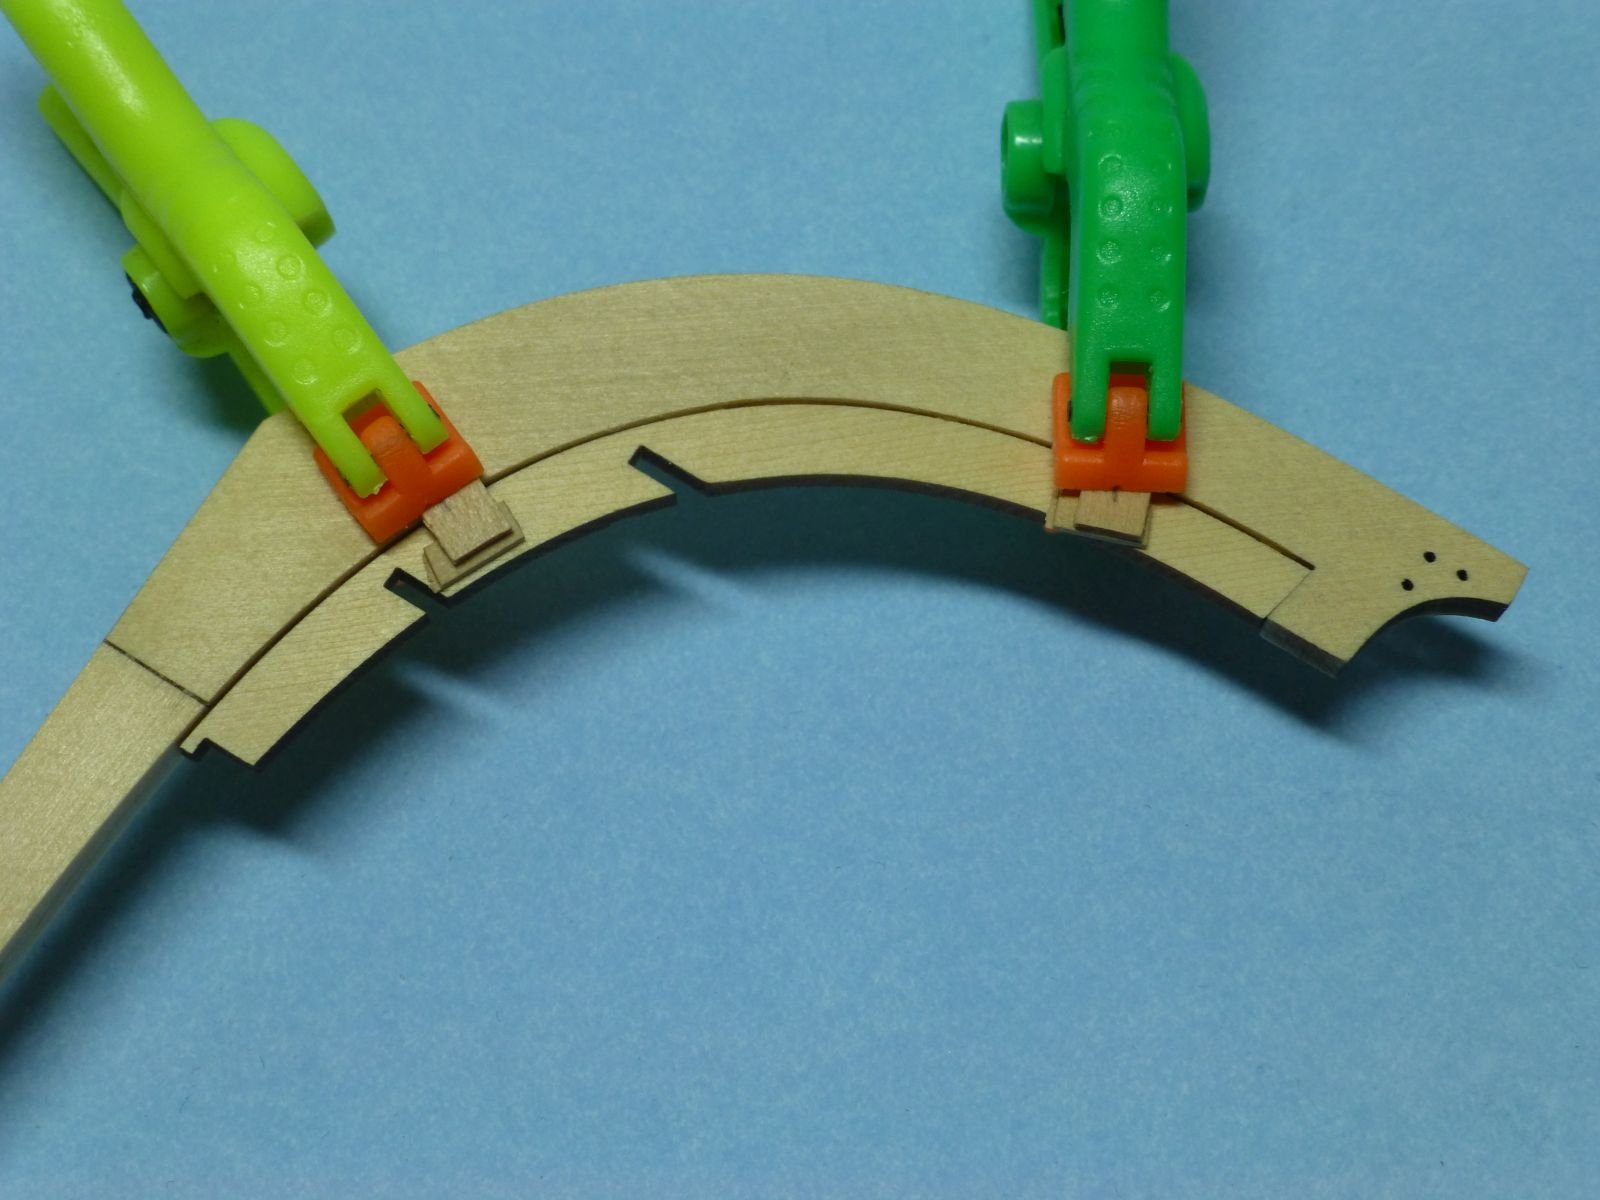
Thanks for the comments and the "Likes". It has been awhile since I posted and thought that I would give an update on my progress. The instructions call for a 1/32" rabbet along the keel. This is accomplished by centering the four 3/32" notched pieces on the 5/32" keel. I used a method that Doug McKenzie used on his Longboat build to center the notched pieces. I created a small jig by gluing a 1/32" thick piece of wood to some scrap wood and used this jig to center the notched pieces. Here are some photos of my construction process:


The remaining long jointed piece fit almost perfectly between the stem and stern jointed pieces. All I had to do to get a perfect fit was to run a couple of passes with a sanding stick on the stem end of the long piece to remove some laser char. This shows the precision of the laser cut pieces in this kit.


I put a coat of wipe on poly on the keel assembly, inserted the simulated bolt pieces using the the supplied fishing line, sanded the bolts smooth and finished it off with another coat of wipe on poly.
Next up is assembling the frames.
-
IIiya,
Welcome to Model Ship World. I have attached a copy of the Phantom Practicum by Chuck Passaro. This looks like a very nice model.
Good luck on your build.
- mtaylor, JeffT, FingerSticker and 4 others
-
7
-
-
Jeff,
Take your time and you will be OK. I realized early on that the sanding sticks that I was using (flexible nail files) were rounding off the edges. I cut some 1/8" plywood into strips and made my own sanding sticks using sandpaper and rubber cement. The hard plywood kept the edges from being the rounded off. I also used a chisel to remove a lot of wood. I constantly measured my lap joints to make sure that I did not remove too much wood. Also, you have to keep the work area clean as the yellow cedar attracts the laser burn dust. I also taped a paper towel to my work area to serve as a small cushion as the yellow cedar is soft. Good luck, you will do OK.
-
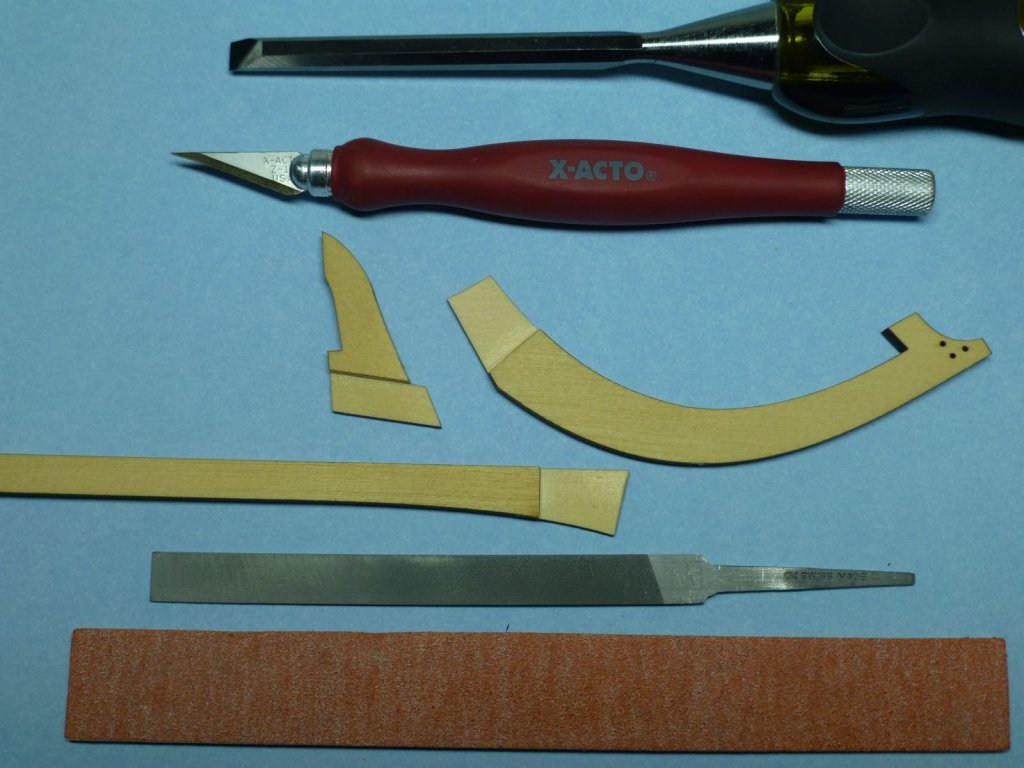
Thanks guys for the comments and for the "Likes". The kit comes with two types of keel assemblies. One is a simplified version which has scarf joints. The other is a complex version that has lap joints that requires some carving and sanding. I decided to go with the complex keel assembly knowing that if I messed up, I still had a simplified version. I took it slow and easy, taking many measurements with my caliper, to get a good fit. I cut and filed each joint so that it was half as thick as the keel. I am pleased with the results as the joints are tight and lay flat on a piece of glass. Here is a picture of the tools that I used. I failed to put my digital caliper in the picture.
-
Very nice and crisp. I like everything you have done. Thanks for the updates.
-
Thanks Michael and Jim. At 1:24 scale, this model allows you to add a lot of detail. On the down side, mistakes will be harder to hide. Chuck and Mike (Stuntflyer) have set the bar high with their quality work and I am sure Rusty will be building one. I am no where close to their skills but will do the best that I can. I am looking forward to this build.
-
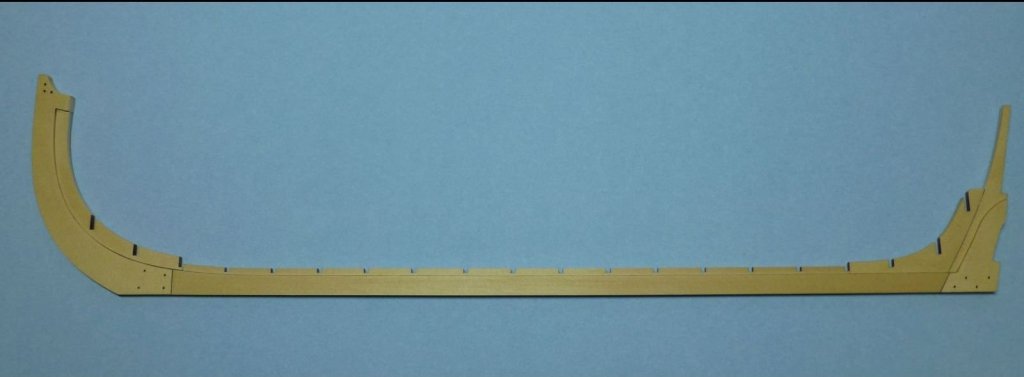
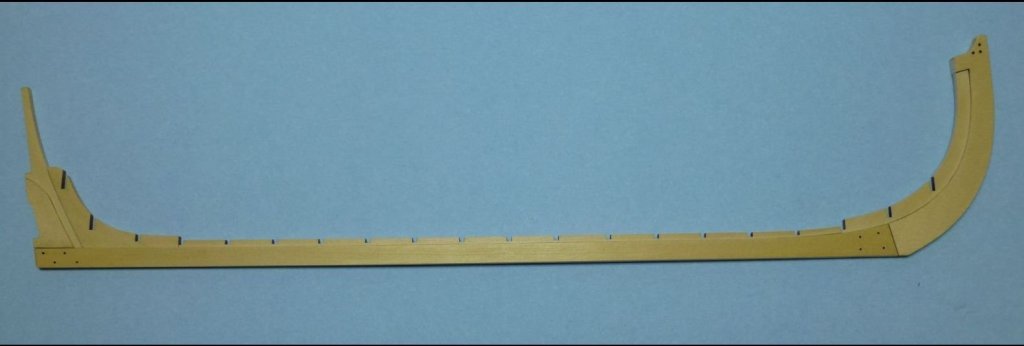
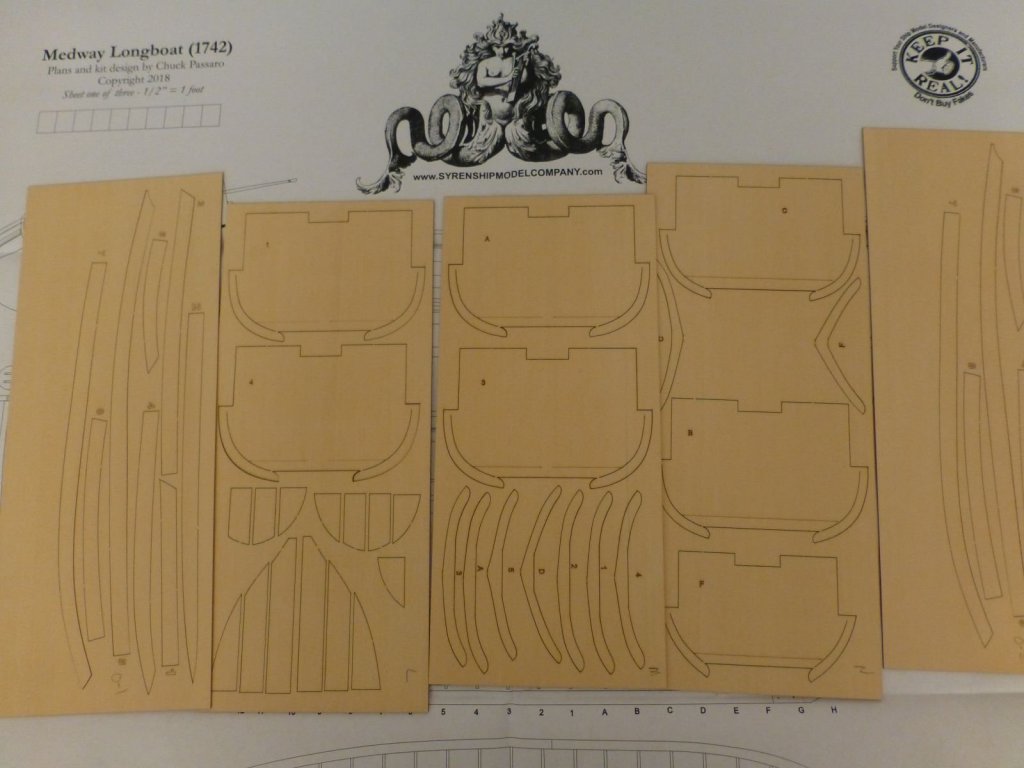
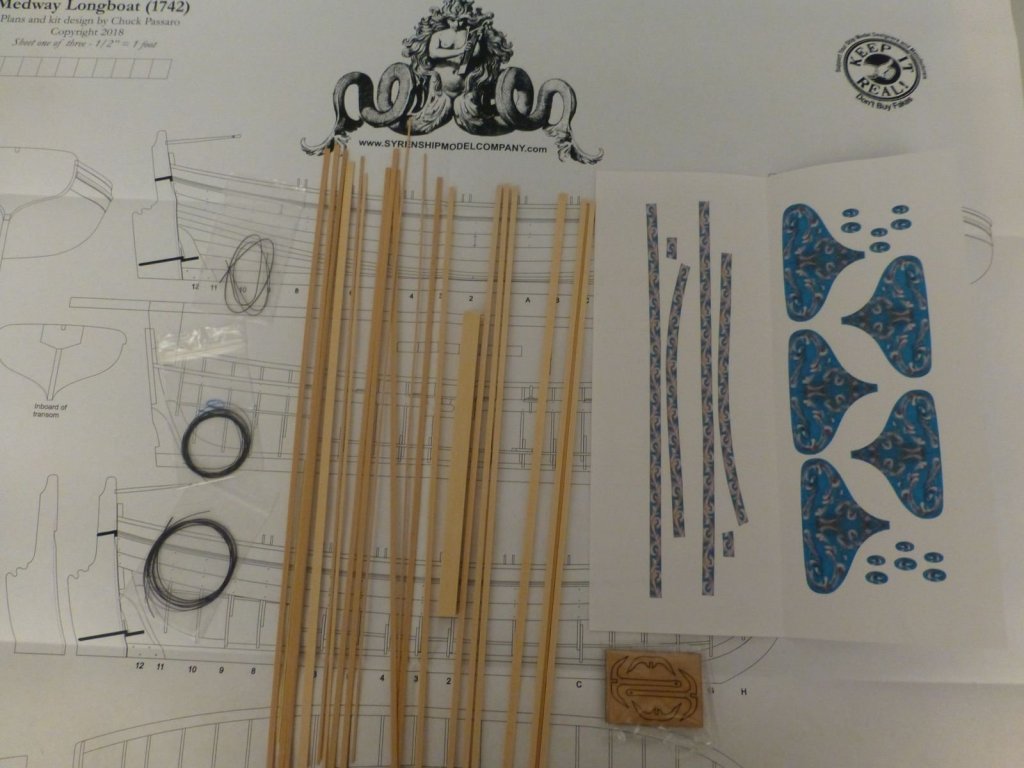
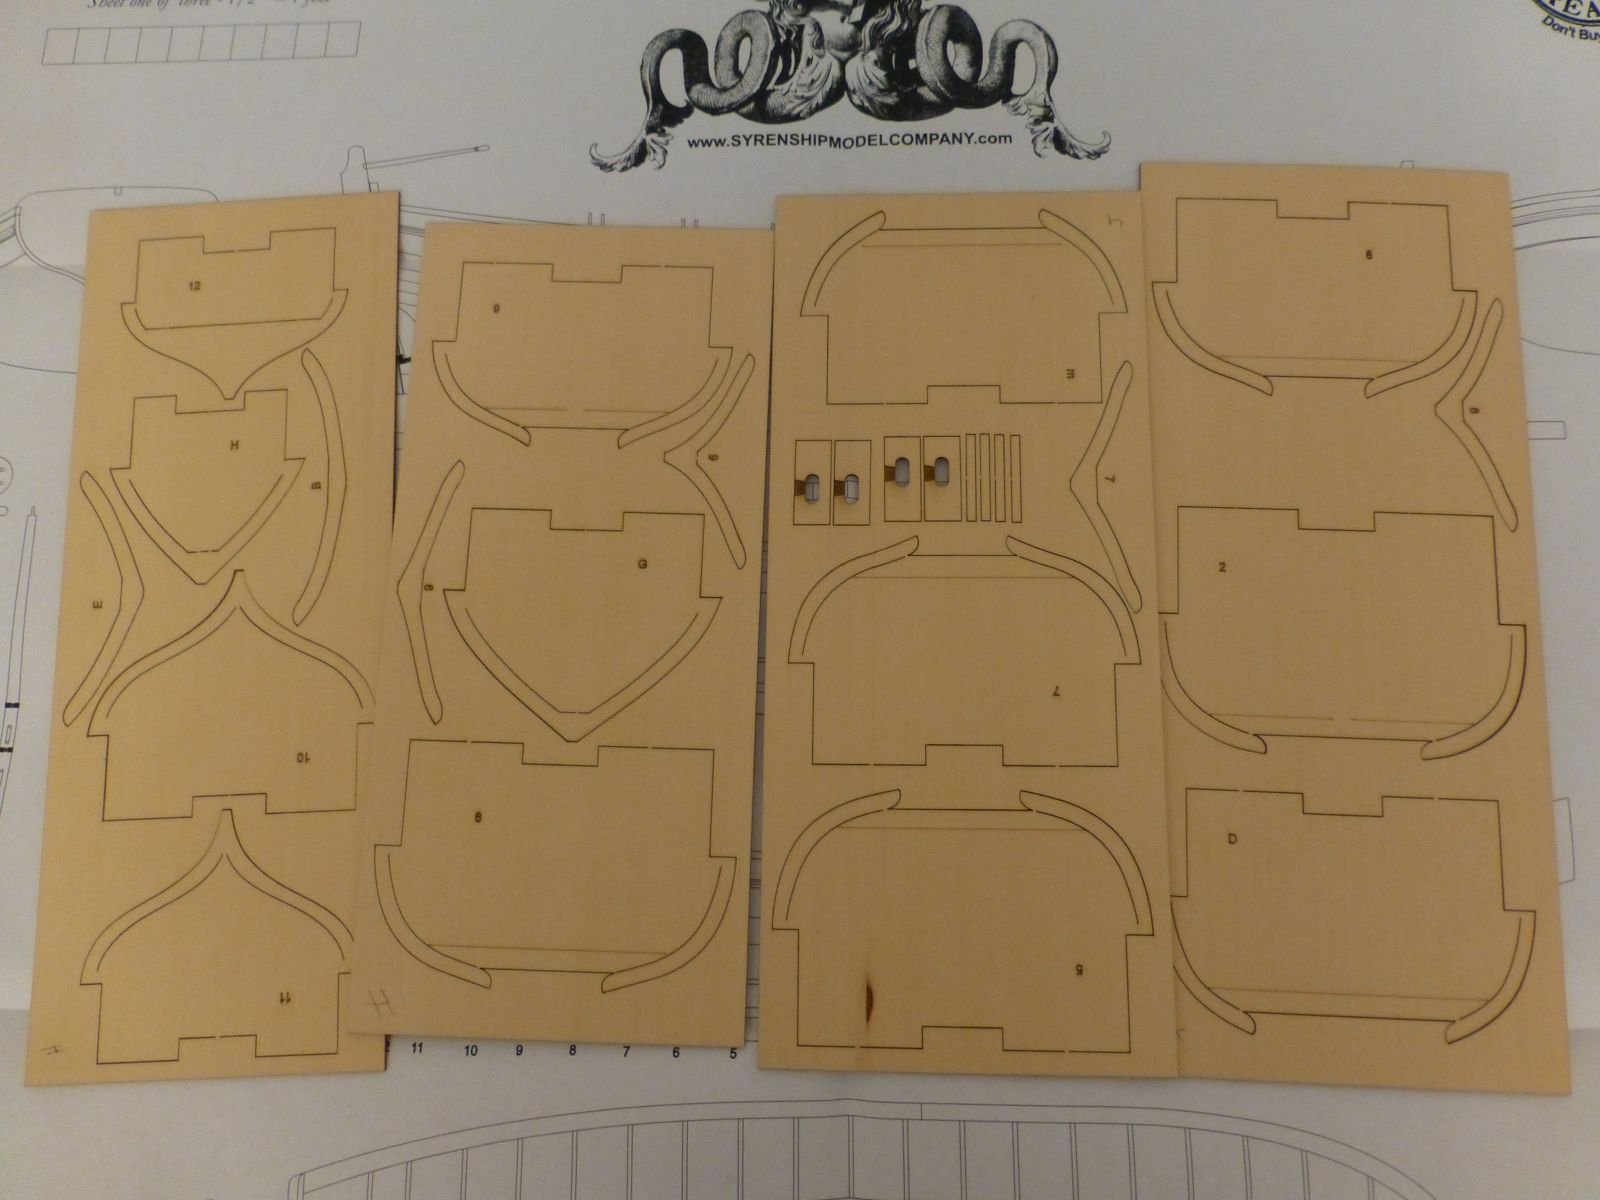
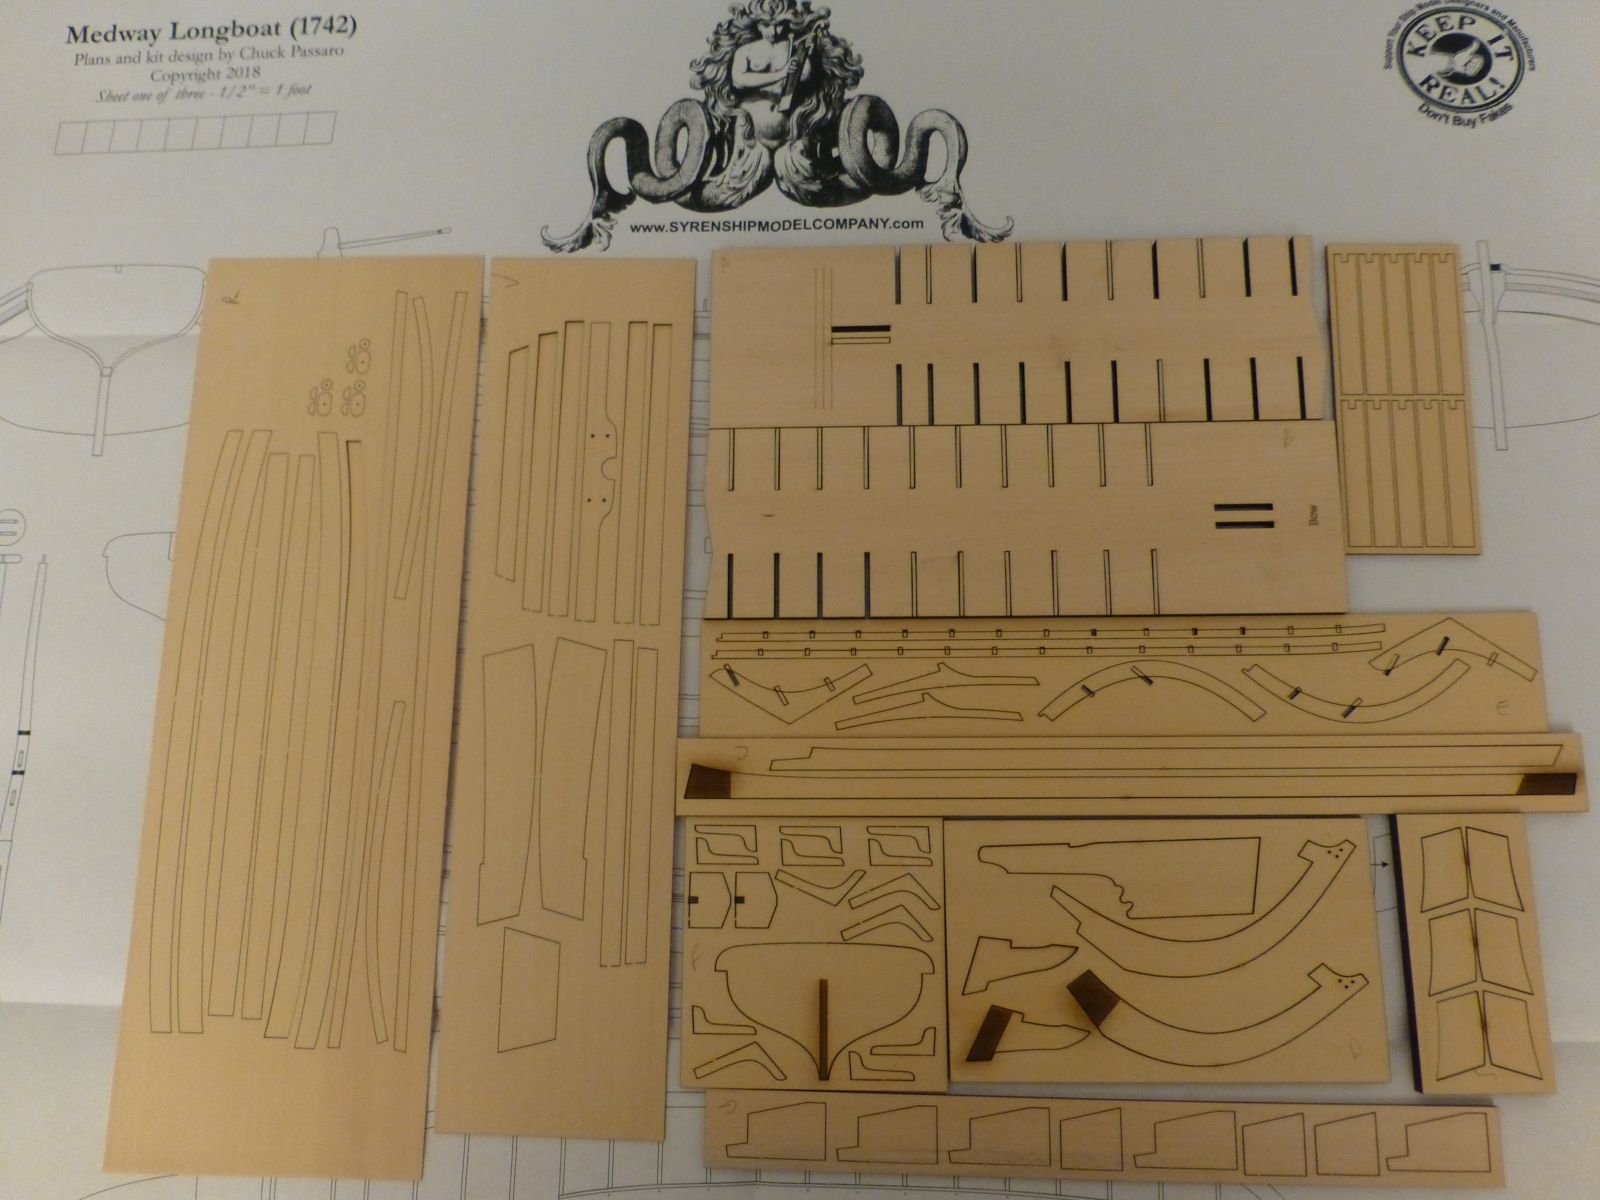
I was one of the lucky ones who was able to obtain one of the first run kits of the Medway Longboat from Syren Ship Model Company. I ordered it Thursday morning and it made its way from New Jersey to Virginia and was in my mailbox Saturday afternoon. Upon opening the box, I could tell the quality of this kit that we have seen produced and designed by Chuck. I have attached pictures of the kit's contents. The laser cutting is some of the best that I have seen and there is very little laser char on the backside of the wooden sheets. The boxwood and yellow cedar strip wood is milled very nicely and has clean, crisp edges. All of the laser cut parts are easily identified and some have their part numbers etched on them or adjacent to the part.
I am glad to be part of this group build and I look forward to following the build logs of other Medway Longboat builders. I also welcome suggestions from MSW members throughout this build on how to improve my model.


-
I applied Minwax Pre-Stain Wood Conditioner to my basswood and then stained it with three parts of Minwax Natural to one part Minwax Golden Oak. I explained this in my build log here:
Always test this on a piece of scrap basswood.
-
I am looking forward to following your build. I enjoy reading the current builds of our MSW plastic modelers and the photo etch really intrigues me. I also like the weathering of these plastic models. It brings them to life.
-
Congratulations on finishing your Ice Yacht. You did a beautiful job on this model and I like all of the details you added. I hope to see this model at the Northeast Joint Clubs Conference in April.
-
-
This will be the start of my Medway Longboat kit once I receive it. I have been following the development of this kit and it will be fun building it in a Group setting. I have watched projects being developed over the years by Chuck and each one gets better and more innovative than the one that preceded it.
The first step in this build is to visit the downloads page which has all of the chapters of the build plus other information that will help you in the building of your Longboat. It can be accessed by going to the link below:
-
-
-
The planking looks very nice. You did a great job lining out the hull.
-
-
12 minutes ago, Thedeacon said:
How do I message Ken W?
At the top of the page, the message icon is next to the globe. Click on this and it will open the Inbox window. Then click on the Compose New button. In the To area, type KenW and complete this section with your message to him. Then hit Send and Ken will receive an email that he has a message. Definitely bring the model to the meeting next week as you will get plenty of help on solving the issue with the bulkheads.
-
Your work looks nice. I am going to enjoy following your build log.
- Seventynet and Canute
-
2


Medway Longboat 1742 by Ryland Craze - FINISHED - Syren Ship Model Company - 1:24 Scale
in Medway Long Boat - 1742 - Public group project.
Posted
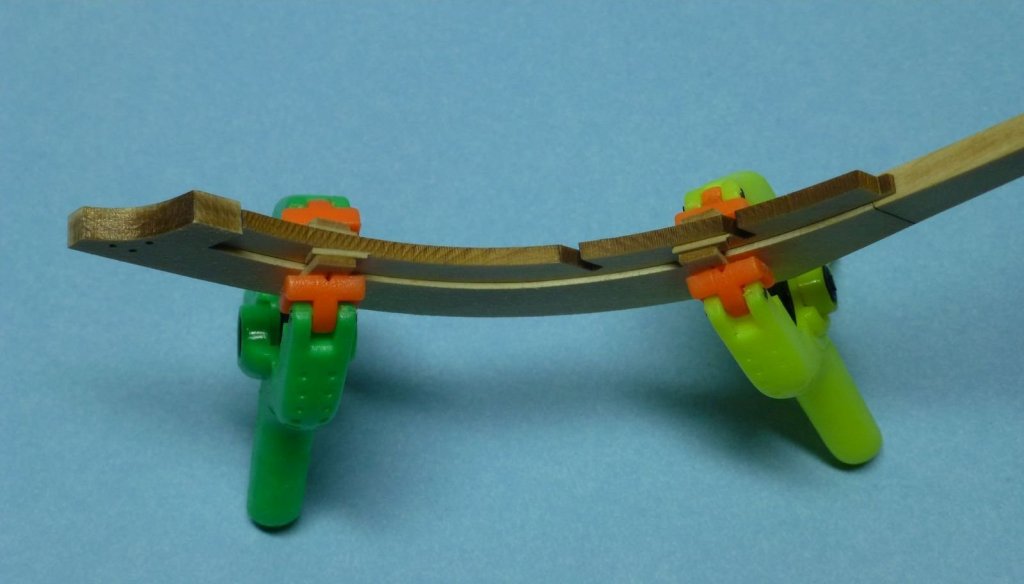
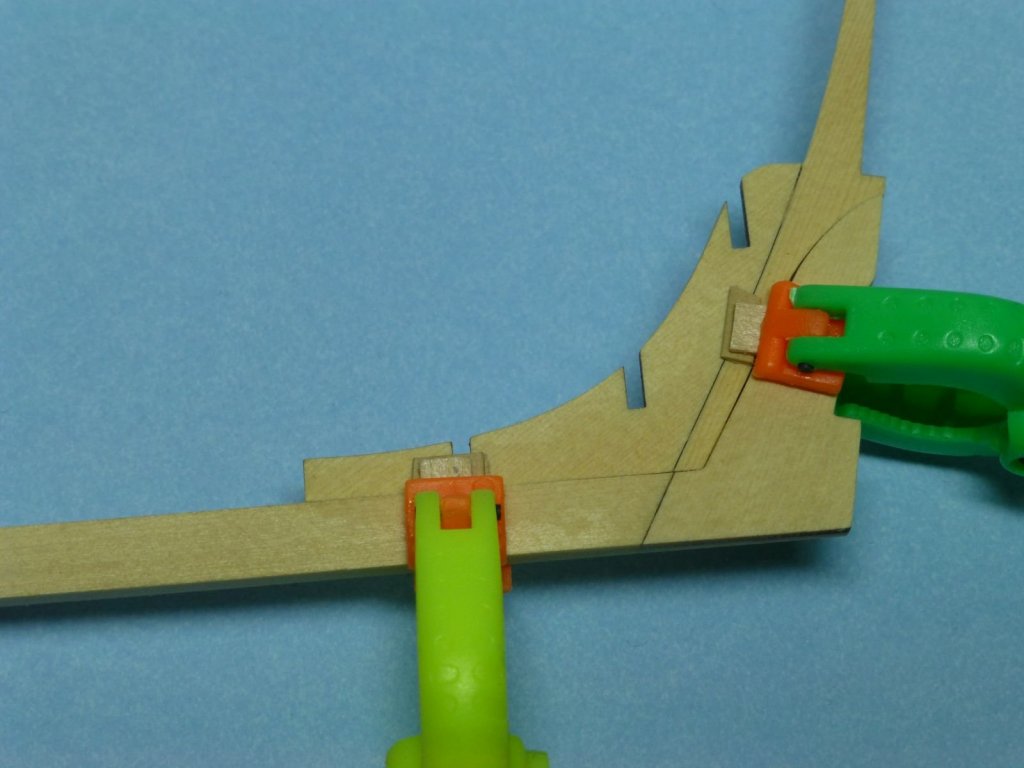
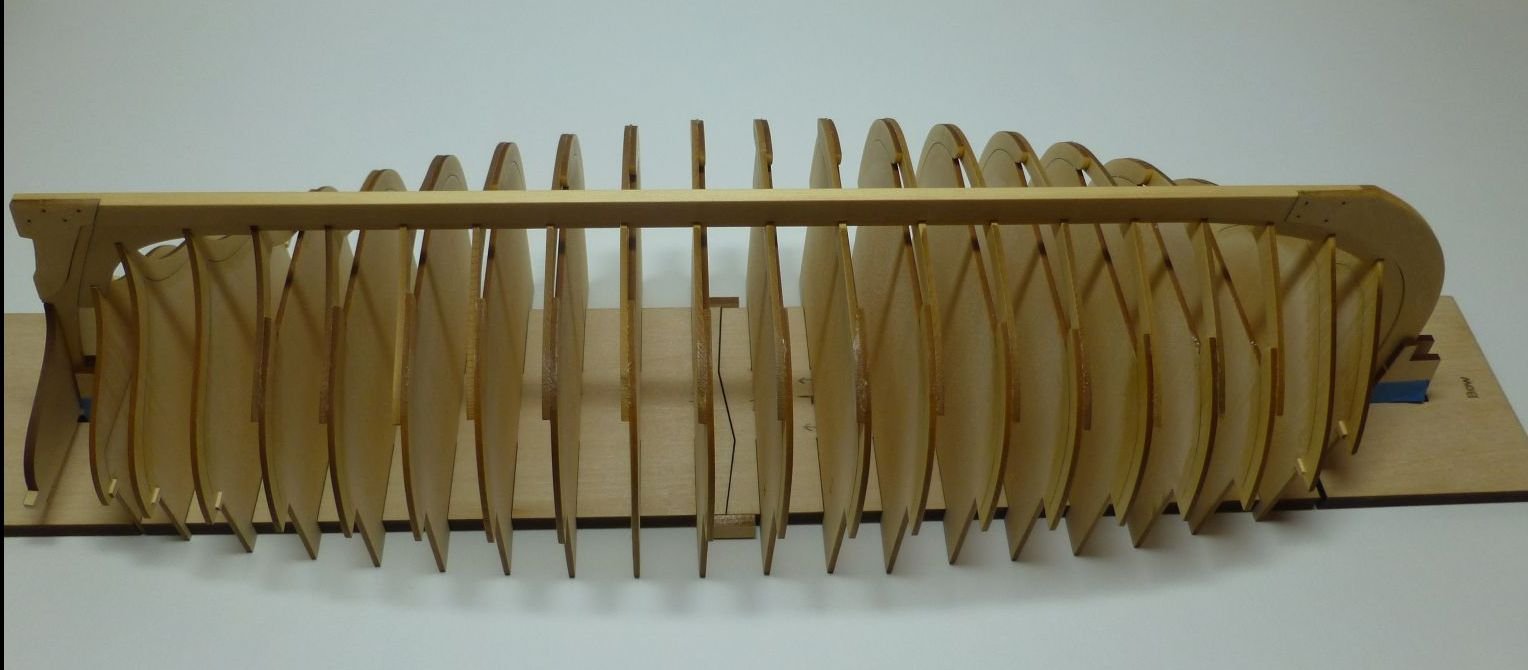
Thanks everyone for the "Likes". In preparing the frames for gluing the keel to them, I took care to make sure that they were properly aligned. The design of the kit gives you a little "wiggle" room for adjusting the frames from side to side. With the keel dry fitted to the frames, I used a 1/32" thick piece of flexible planking material as a batten and kept adjusting the frames from side to side until all the frame edges touched the batten. I taped some of the frames to the build board using painters tape so that they would not move when I removed the dry fitted keel. I also marked the frame where the edge of the keel was so that I would have a reference point to place my glue. When it came time to glue the keel to the frames, I followed the kit instructions and placed a generous dab of glue on the frame pieces. After aligning the keel, I used a damp paint brush to remove any excess glue. I glued the stern half of the frames to the keel and let them set up for 24 hours and then glued the forward half of frames to the keel. Here are photos of my progress to date:
Next step is to "gently " fair the frames and to line off the hull. I hope everyone has a safe and Happy New Year!