Bob Blarney
-
Posts
467 -
Joined
-
Last visited
Content Type
Profiles
Forums
Gallery
Events
Everything posted by Bob Blarney
-
Using a moulding scraper tool?
Bob Blarney replied to alde's topic in Modeling tools and Workshop Equipment
"...dip a short length guitar string of the desired size in automotive valve grinding compound..." It occurred to me that this method works with bone, because I can wash off the oil-vehicle that carries the grit of the valve grinding compound. This would be a problem with wood. Maybe lapping/polishing powder can be used - an alternative would be to dip the wire string in glue and then dip it in the powder and let it dry to make a fine abrasive saw. -
Using a moulding scraper tool?
Bob Blarney replied to alde's topic in Modeling tools and Workshop Equipment
Hmm, have a look at this prototype of a saw based on the chevalet concept. So far as I know, it's not in production yet at Knew Concepts (which makes outstanding saw frames for jewelry and woodworking). Btw, the author of the blog is Don Williams, who is an expert conservator and has worked at the Smithsonian. http://donsbarn.com/report-from-wia-a-silent-clap-of-thunder/ http://www.knewconcepts.com/index.php -
Using a moulding scraper tool?
Bob Blarney replied to alde's topic in Modeling tools and Workshop Equipment
Hmm, I've sometimes wondered if a (miniature?) chevalet would be useful for modeling: -
Using a moulding scraper tool?
Bob Blarney replied to alde's topic in Modeling tools and Workshop Equipment
A length of double-stick tape will hold the wood in place for 'planing'. Alternatively, glue one end of the stock (~1 inch longer than needed) to a backer board, and then cut off the needed length after thicknessing. -
Using a moulding scraper tool?
Bob Blarney replied to alde's topic in Modeling tools and Workshop Equipment
Here's a chart of blade thicknesses- the kerf will usually be a little bit wider than the blade. https://www.gesswein.com/p-12889-super-pike-swiss-saw-blades-gross.aspx Here's a vendor of blades in the US (Michigan) http://www.crhill.com/pikesawblades.aspx -
Using a moulding scraper tool?
Bob Blarney replied to alde's topic in Modeling tools and Workshop Equipment
Have you tried jeweler's saw blades in a saw frame? Guitar files might work. But I haven't used them when slotting bone nuts for strings on guitars. What I've done is to dip a short length guitar string of the desired size in automotive valve grinding compound and saw the bone with that. I can also clamp the string in a jeweler's saw. http://www.rings-things.com/Products/Tool-Saw-Frame-4-Swiss.html?gclid=CjwKCAjwhqXbBRAREiwAucoo-xVMV0WS0RNOCEnUAFj5QGfyun2ghCMzrhB4zECZZCzKsY_SbVY0VRoC73sQAvD_BwE -
Using a moulding scraper tool?
Bob Blarney replied to alde's topic in Modeling tools and Workshop Equipment
Druxey - fine work there. I do think the profiled microscrapers will work for a time - the duration is determined by the metal's qualities and the nature of the wood. Hacksaw and reciprocating saw blades are excellent material for making small cutting tools. With a small butane torch, they can be annealed for shaping with file and grindstone, and then rehardened and tempered for use. -
Using a moulding scraper tool?
Bob Blarney replied to alde's topic in Modeling tools and Workshop Equipment
Ah, it seems to me that there is a fundamental problem with these scrapers. While they may be quite sharp when they come from manufacturer, I don't see a practical way to resharpen them to a keen edge. >The cutting action of a scraper is achieved by a tiny burr on the edge of the steel<, and over time the burr is abraded away by the scraping action on the wood. A cabinetmaker uses scrapers of relatively simple shapes - a straight edge or a broad curve. The process of sharpening these scrapers is to file the edge flat (i.e. 90d to the broad planar surface of the scraper), and then draw a burr on the filed edge with a hard steel burnisher (e.g. a screwdriver shaft or router bit) at about a 5-15d angle. -
Bob, I just got a line on an Emmert K1, complete, for $200. Is that a reasonable price?
-
Yes, clamping a bench hook in the vise works very well. (That one has seen much use!) It's at the best (elbow) height for close work, and it can be rotated to suit the type of saw - whether a western style push-saw, or an asian style pull-saw. I've come to prefer the pull-saws, and for the larger ones I've copied and fitted western style pistol grips because I've never liked the stick handles.
-
Here's a link to a video.
-
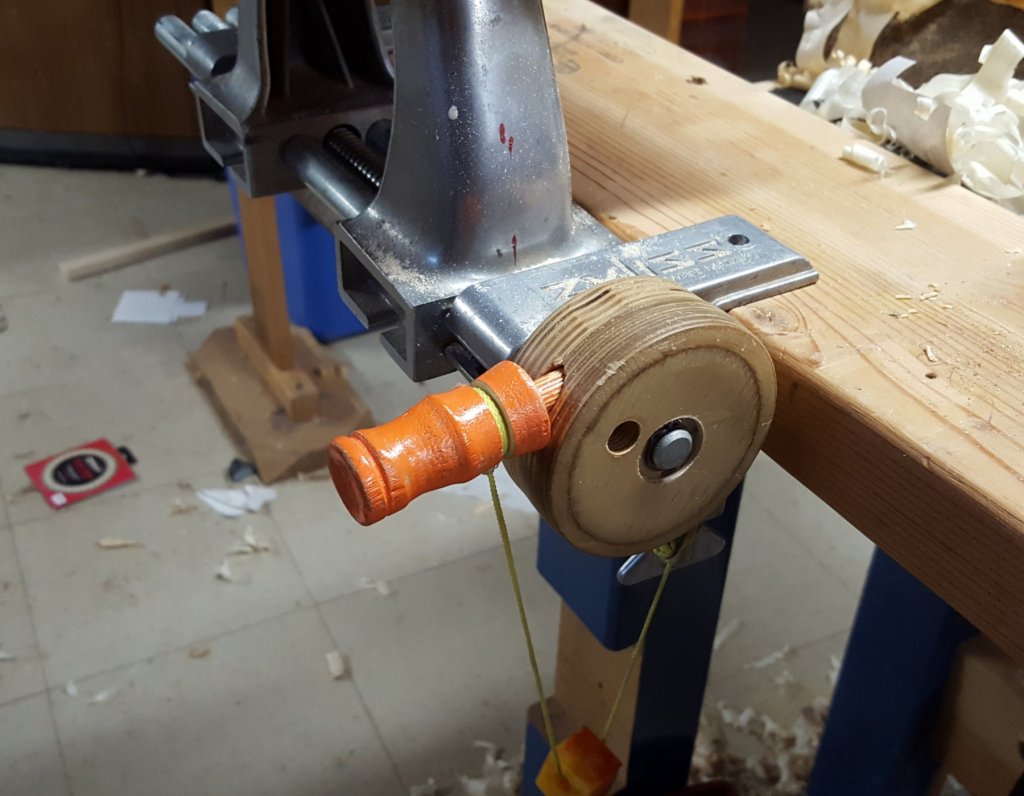
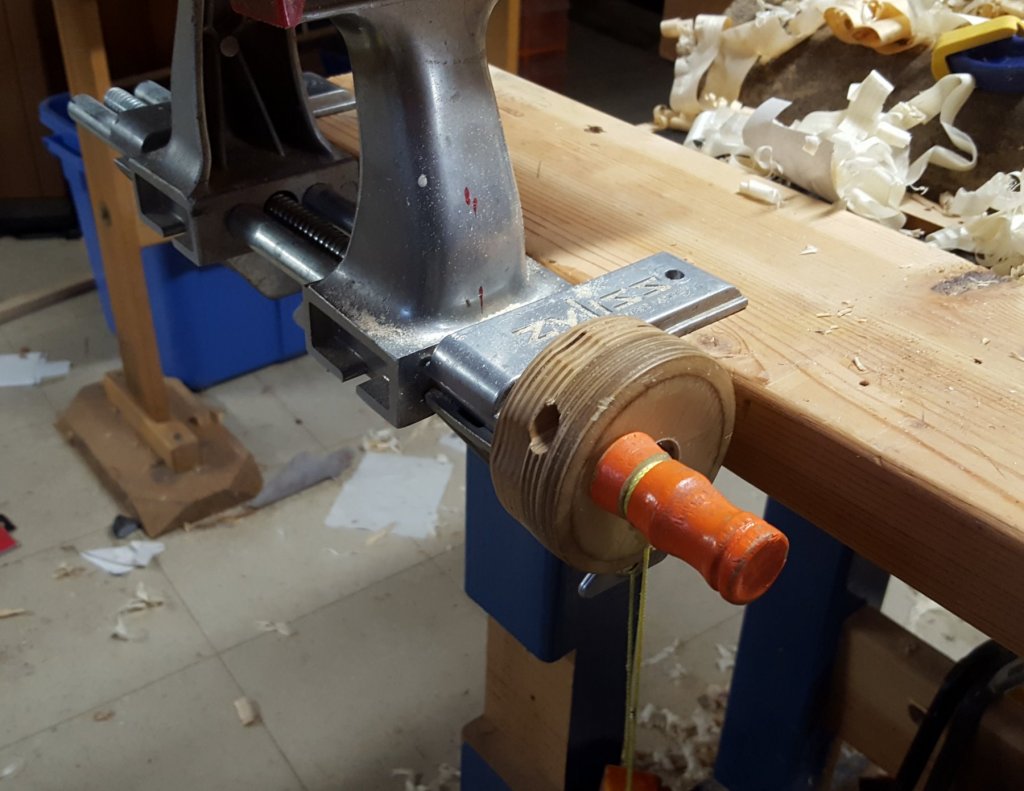
Pat - Sorry for the delay. Here are pics that should be informative. The knob was made from two 3" disks of 3/4" baltic birch ply. On the face of the knob is a hole for the peg to quickly close the vise. Then the peg is inserted in one of the holes in the circumference to cinch the vise jaws. (120d apart and angled at 60d to point at the next hole). The peg gives plenty of leverage to tighten the vise. The peg is attached to a string with a small weight to keep it from getting lost or tangled in the screw. Also, you might notice that I drilled holes in the clamps, so as to drive 1/4" lag screws into a bench or 2x sawhorse top.


-
You might try some jewelers' supply houses. Here's one that I visit occasionally. crhill.com tweezers - the Dumont are excellent. The tips are very fine, and they should always be covered when not in use. http://www.crhill.com/tweezers.aspx
-
Bob, I came very close to shelling out $$$ for an Emmert turtleback, but I'd have to build a hefty bench to support the 90lb vise plus whatever it might hold! Oh, and I made a 'speed knob' with a peg for my Zyliss to replace the crank. It's ~3" in diameter with a peghole in the knob's face to rapidly open & close, and there are also peg3 holes drilled around the circumference for snugging it down.
-
Quick and Thick Titebond glue problems
Bob Blarney replied to Kurt Johnson's topic in Modeling tools and Workshop Equipment
perhaps you might try one of the modern CA glues that are specifically formulated for wood. http://www.rockler.com/adhesives/ca-glue -
Laying out plans in a smaller workshop
Bob Blarney replied to alde's topic in Modeling tools and Workshop Equipment
Hmm, that gives me an idea to make a frame that will support 4-5 roller blinds, similar to the Overlay Roller Map Holder mentioned above by John Allen. -
I have a Record 3.5" bench vise that I like very much. It has two hefty guide bars in addition to the acme screw. The (rotating) fixed part has an anvil surface, and the front jaw and be removed and repositioned on the back side of the fixed part to give about 6" of span. I also have a Zyliss vise, which is somewhat unusual but occasionally very useful. Do not buy the modern version -it's junk. Also, you might consider what was known as a Versa-Vise or Parrot vise. ShopFox makes one that is ok. https://www.amazon.com/dp/B01N7F6N20/ref=asc_df_B01N7F6N205507072/?tag=hyprod-20&creative=395033&creativeASIN=B01N7F6N20&linkCode=df0&hvadid=270628659547&hvpos=1o6&hvnetw=g&hvrand=12839276205461272235&hvpone=&hvptwo=&hvqmt=&hvdev=c&hvdvcmdl=&hvlocint=&hvlocphy=9016943&hvtargid=pla-451693552537
-
A good quality psychrometer is indeed difficult to find these days. For this purpose, I use a lab-grade digital thermometer, but a traditional alcohol (or mercury) thermometer works well too.
-
Over time, many mechanical or electronic hygrometers become inaccurate, or there may be areas in your shop where the humidity is higher or lower than the overall environmental humidity. Here's a way to get an accurate overall value. 1. Obtain an accurate thermometer, a shopvac, a jar of water, and a small piece of cloth. 2. Leave a jar of water to stand in the shop so that it equilibrates with the ambient temperature. 3. Measure and note the temperature of the air 4. Wet the cloth in the jar, and then place it over the thermometer's sensing area (bulb or probe). 5. Place the covered thermometer at the mouth of the shop vac intake hose, turn on the shop vac and note the lowest observed temperature. 6. Determine the difference between the dry and wet temperatures. 7. Consult published humidity tables such as: https://www.pharmaguideline.com/2013/09/principle-of-hygrometer-and-its-use-in-manufacturing.html
-
By the way - the elm is ~0.10" thick, and the mahogany is veneer - 0.024" I think. The elm is quite lively and porous but is very resistant to splitting because of its interlocking grain, whereas the mahogany veneer is stable. Thus the mahogany constrains the expansion and contraction of the elm. The hide glue is somewhat sensitive to humidity changes as well. As a side note, the elm is an offcut from my first guitar - made from a giant elm tree that grew in my front yard.
-
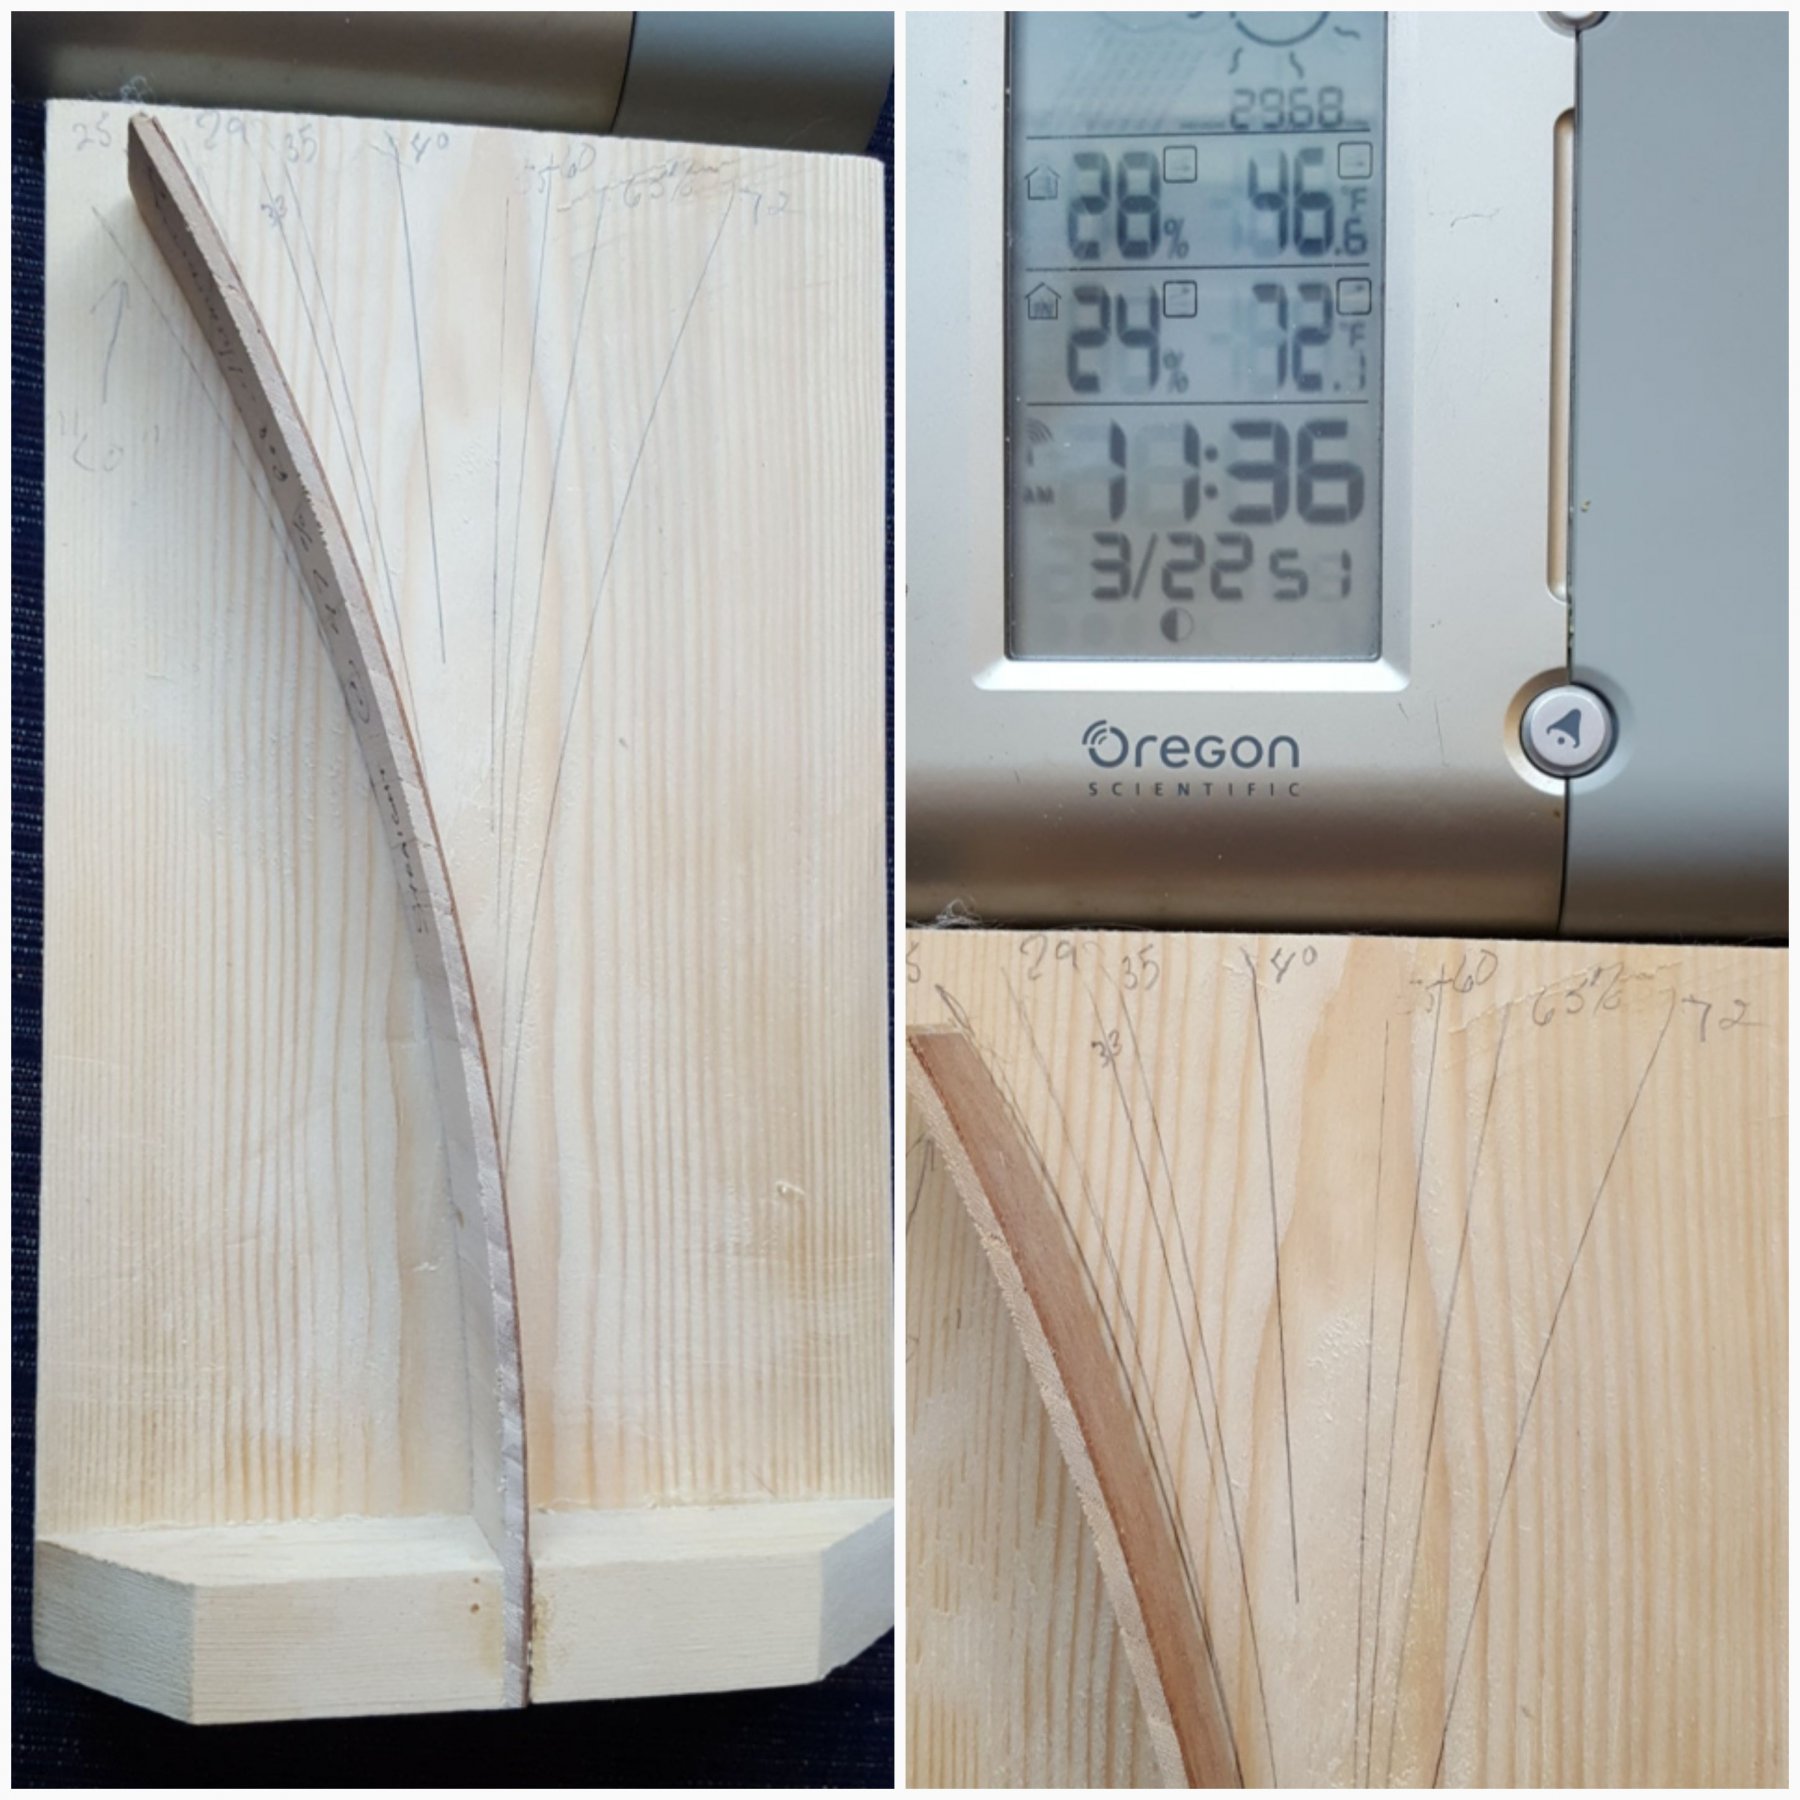
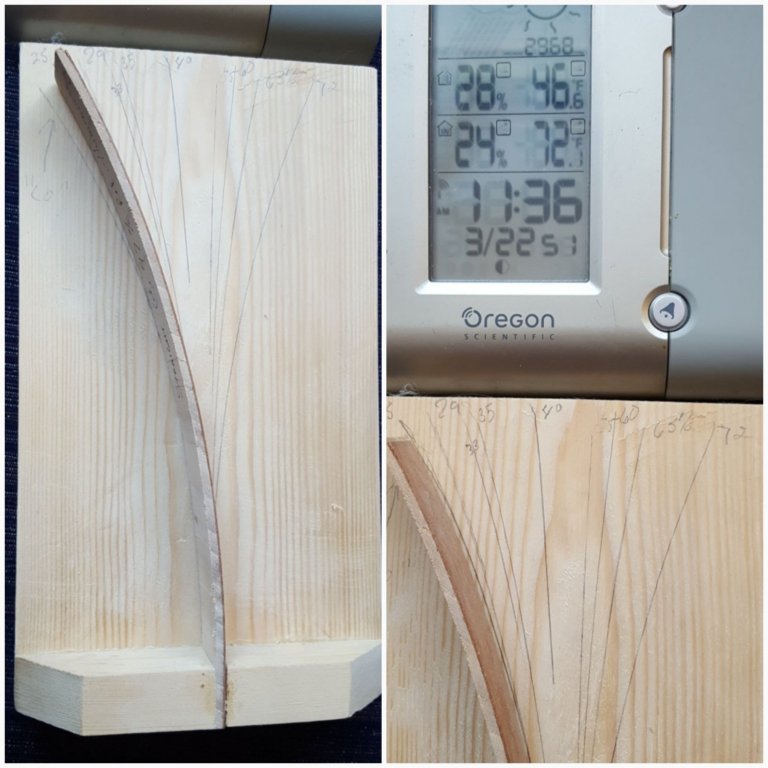
I'm inclined to agree that residual water from the glue and ambient humidity changes would account for the dimensional changes. I would suggest some testing. 1. Dry some pieces of stock in an oven at 225F until the weight is stable. 2. Note the relative humidity in the shop, and try to keep it constant. 3.Glue some pieces together as you usually do, and then weigh and measure the pieces. 4. Weigh the pieces daily until the weight and dimensions are stable. 5 Dry them again in the oven, then weigh and measure. This will give you some idea of how the glue and ambient relative humidity effect changes of dimensions. I don't know if I published this pic in this forum of a 'shopbuilt humidity indicator', but here it is. To demonstrate how extreme changes in humidity can adversely affect acoustic guitars, I glued a 1" width of crosscut elm to a 1" width of longrain mahogany with hide glue at 47% RH (about ideal RH for acoustic guitars). Then I 'calibrated' it against a hygrometer over several seasons. To my surprise, it's accurate enough for practical work in the shop.
- 17 replies
-
- 10
-

-
Hello, here's a link to a Popular Science article from September 1933. Capt. McCann describes his toolkit that he used to build the models for the publication. https://books.google.com/books?id=_CcDAAAAMBAJ&lpg=PP1&pg=PA60#v=twopage&q&f=true
- 1 reply
-
- 8
-
-
Miter boxes----What is the best one.
Bob Blarney replied to roach101761's topic in Modeling tools and Workshop Equipment
Guitars do not sound well if the frets are misplaced or loose, and there are people who certainly can detect pitch that is only 5 cents (1 cent =1/100th of a semi-tone) off. Try the magnetic fence-guide idea with the Japanese pullsaw-one of the very fine flush-cutting blades. It's cheap & easy. -
Miter boxes----What is the best one.
Bob Blarney replied to roach101761's topic in Modeling tools and Workshop Equipment
This may be oversized for your needs. The essential features are the adjustable fence that can be set according to a paper template or with a digital protractor, and a Japanese saw that is magnetically coupled to the fence by a self-adhesive magnetic strip. http://www.mimf.com/phpbb/viewtopic.php?f=12&t=4058&hilit=fixture+jig+slot -
Hmm, there's quite a wide range of opinions & suggestions. Here's mine. When applying any glue to a small piece, I place a drop on a 3x5 notecard and apply it with a disposable plastic toothpick that has both a pointed end and a feather end. The texture of the pointed end can hold sufficient glue, and the feathered end can spread it around if needed. A small gauge needle also works well. For securing knots, I think either CA or diluted white glue works ok. For diluting white PVC (Elmers) glue, I think you'll find that 50% dilution is probably far too much- I'd make up a series of dilutions by adding water at 10%, 20%, & 30% then test on scrap for both securing knots and stiffening. A few other things- keeping CA glue tightly capped and in the freezer will prolong shelf life. One other glue that hasn't been mentioned above, is UV-cured adhesive. There are many formulations, but the common ones are crystal clear and will remain wet until exposed to sunlight or a UV- light source, and some can be cured by heat as well. Here's one: http://www.orvis.com/p/bug-bond/1Y59?item_code=1Y590400&adv=127748&cm_mmc=plas-_-FlyFishing-_-1Y59-_-127748&gclid=EAIaIQobChMIheCE3dyW2wIVgcDACh1-1AeDEAQYBCABEgKQLfD_BwE