


Bob Blarney
-
Posts
467 -
Joined
-
Last visited
Content Type
Profiles
Forums
Gallery
Events
Everything posted by Bob Blarney
-
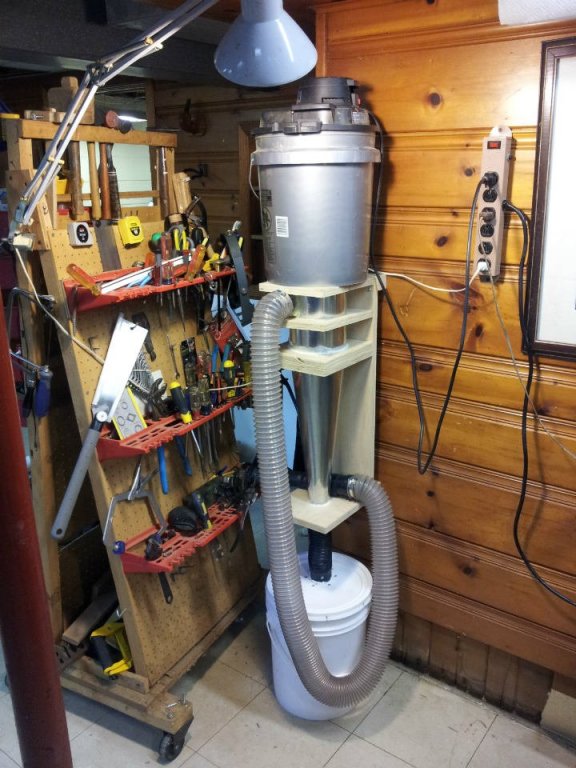
Here's my homebrew HEPA system that needs ~1 square foot of floor space. From bottom to top: 5 gallon collection bucket, shopbuilt cyclone, bucket-head vac with a HEPA filter. It's attached to the wall for structural integrity and stability, and it has a very slinky 12' hose to reach around the place. The only thing that I would add, is to make a sound-muffling enclosure. Here's a description of it: http://www.mimf.com/phpbb/viewtopic.php?f=12&t=3467&p=33108&hilit=cyclone#p33108
-
Jet or Dewalt scroll saw
Bob Blarney replied to Anguirel's topic in Modeling tools and Workshop Equipment
In the USA, the DeWalt 778 has an excellent reputation. It is the choice of the scrollsaw artist Steve Garrison https://www.youtube.com/channel/UCYhLxb3n4JeuZrrgejr8cWw To minimize vibration, I placed my cheapo Ryobi on vibration dampeners made by sandwiching a layer of cork between two layers of carpet padding. -
I think I can come up with something pretty quickly. I have several handplanes that are not worth tuning up, and so I can use one or two to imagineer a planing fixture, probably by using the frog mechanism to make an adjustable fixture.
- 12 replies
-
- 4
-

-
- dowel plate
- splitter
- (and 2 more)
-
I was a bit concerned that it might be too far off-topic, but I was impressed by the woman's efficiency of cutting the strips to width and then thinning them. I would suppose that a small-holed dowel plate could be made as a custom order. About the thicknessing planer, I remember seeing illustrations of similar machine using a blade from a hand plane blade mounted in a stationary fixture. Half the width of the blade was ground back at a slight angle bit so that a thick piece could be inserted and drawn through to shave down progressively, and then passed through the other half to the final thickness.
- 12 replies
-
- 4
-
-
- dowel plate
- splitter
- (and 2 more)
-
Hello, Aside from being generally entertaining and culturally informative. I think you'll see some tools and techniques that could be adapted for dimensioning think strips of wood, e.g. the 'planer', the 'bender', the 'splitter'.
- 12 replies
-
- 9
-
-
- dowel plate
- splitter
- (and 2 more)
-
Swann-Morton Scapel
Bob Blarney replied to Landlocked123's topic in Modeling tools and Workshop Equipment
There is another way to instrument tie other than as shown in the video. It involves passing the longer end of the thread alternatively over and then under the jaws of the instrument. It is also useful when space is restricted. I'll see if I can find a video that shows it, or maybe I'll make a vid if I have some time to set up a 'studio'. -
Swann-Morton Scapel
Bob Blarney replied to Landlocked123's topic in Modeling tools and Workshop Equipment
while we're discussing using surgical instruments - here's a video about using an instrument to tie a knot. This can be very useful when you only have a short length of line/thread to work with. But generally, a surgeon uses only fingers to tie, because the fingers will tension the know better than with an instrument and a finger. -
Swann-Morton Scapel
Bob Blarney replied to Landlocked123's topic in Modeling tools and Workshop Equipment
I'd also use needlenose pliers instead of a hemostat too, if I didn't have needleholders. I think that small hemostats are just too delicate for comfortable and safe handling. Also, if you don't use the blade extractor, collect your sharps as we did in the bad old days, in a bottle with a screw cap for disposal - something like a softdrink bottle. -
Swann-Morton Scapel
Bob Blarney replied to Landlocked123's topic in Modeling tools and Workshop Equipment
and this -
Swann-Morton Scapel
Bob Blarney replied to Landlocked123's topic in Modeling tools and Workshop Equipment
just found these: -
Swann-Morton Scapel
Bob Blarney replied to Landlocked123's topic in Modeling tools and Workshop Equipment
You installed it on the correct side. -
Swann-Morton Scapel
Bob Blarney replied to Landlocked123's topic in Modeling tools and Workshop Equipment
I've fitted many scalpel blades over the years. Peel open the package enough to expose the heel, a bit further than slot of the blade. Avoid picking up the blade with your fingers - use the hemostat. I usually grasp the blade at a more acute angle along the spine, i.e. not perpendicular. Then slide it onto the groove of the handle To remove, you can grasp the heel of the blade with the hemostat and slide it off. I've never used the removal device, but I'm sure you can figure that out or find directions online. Oh, and see if you can find a pair of Mayo-Hegar needleholders; they'll work much better. Needleholders have long handles and short heavy serrated jaws, often with carbide inserts. Another highly useful instrument is a right angle artery forcep (a Mixter, or Crile style) - similar to a hemostat, but with longer handles and as the name implies, the jaws are bent in a right angle. They're very useful for manipulating things. And generally, I always prefer curved hemostats to straight hemostats, and the same for thumb forceps (tweezers). -
Hmm, an endmill can plunge, or router bits can be used, although they are designed for much higher speeds. You might try a spiral router bit, although I don't know if an up- or down- spiral bit would be better. But if I were to do it, I'd use a very fine pullsaw and a bench hook or V-block to define the sides of the notch, and then clean up with a chisel or knife. Here's a link to a jig that I made for cutting guitar fret slots with high precision to a specific depth. The principal feature is the magnetic fence that guides the sawblade. http://www.mimf.com/phpbb/viewtopic.php?f=12&t=3378#p32164
-
What grit for disc sander?
Bob Blarney replied to clifforddward's topic in Modeling tools and Workshop Equipment
The results are dependent not only upon the grit. One factor is the speed of rotation or linear travel of the sanding media, then the material that is being sanded. There are different types of grit material that are used for different work materials. I use silicon carbide belts for sharpening tools, micromesh for plastics and very hard woods. My favorite abrasive for hand sanding wood is: https://www.3m.com/3M/en_US/company-us/all-3m-products/~/3M-Ultra-Flexible-Sanding-Sheets-and-Rolls?N=5002385+3293390774&rt=rud , and there are analogs for disc sanding. The pressure applied to the workpiece should not be heavy, and worn out 220 is not a substitute for 320 or 400 grit. -
Hello, I just ran across my daughter's copy of Ashley's Book of Knots by Clifford W. Ashley. It is probably the definitive work of knots for rigging ships and other ropework. It is an excellent reference work for modellers, but if you intend to apply the knowledge in everyday life, be very very careful to form the knots correctly. https://archive.org/details/TheAshleyBookOfKnots
-
Hello, If you live within a reasonable distance of Youngstown, Ohio, I saw this ad for a Hammond Trim-O-Saw at a very reasonable price. These saw were built for printers to trim lead type, are very precise, and have a cult following. The design is unique and are of sturdy battleship grade construction. I suggest that you do some background reading first, but these saws are legendary. This one appears to be decontaminated of lead, but I would carefully inspect it to be sure if you are not prepared to manage that contingency. https://youngstown.craigslist.org/tls/6174340983.html
-
I usually go to a copy service and have the plans copied and then laminated with plastic film. The originals are filed, and the copies are used. It is important to check that copies are not over or undersized.
-
Jim Byrnes sliding table by Kevin Kenny
Bob Blarney replied to Kevin Kenny's topic in Modeling tools and Workshop Equipment
In the introduction of the video, please also note the strip of polycarbonate that Mr. Ng has placed, that spans the front and rear fences, to shield the operator from the blade and ejected dust and chips.- 2 replies
-
- 2
-
-
- table saws
- jim byrnes
- (and 1 more)
-
Jim Byrnes sliding table by Kevin Kenny
Bob Blarney replied to Kevin Kenny's topic in Modeling tools and Workshop Equipment
A well designed and well construction sled is a most useful accessory that adds precision and safety to your work. One caution about using a sled concerns the emergence of the blade through the rear fence. This presents a danger to thumbs because there is a tendency for the operator to push the sled past the blade. I see that you have a protective block on your sled and you stop the sled, but I have also placed a leash on my sled that stops the sled's travel, so that the blade can not emerge from the block. By the way, here is a link to a video that shows a method to set the fence with precision- 2 replies
-
- 3
-
-
- table saws
- jim byrnes
- (and 1 more)
-
Adjustable height table.
Bob Blarney replied to Ulises Victoria's topic in Modeling tools and Workshop Equipment
A good working range for me is between my shoulders and elbows, either sitting or standing. But i think the option to adjust the height is a good idea - it will be easier on your back and lower joints to shift the position occasionally. -
Proxxon DB250 with three jaw chuck
Bob Blarney replied to bryanc's topic in Modeling tools and Workshop Equipment
It seems unnatural to sell a perfectly good tool, unless you have three of it. -
Carbatec 10" Bandsaw any good?
Bob Blarney replied to Eddie's topic in Modeling tools and Workshop Equipment
Here's the tiny reindeer that Mr. Snodgrass cut during the live demonstration, and that he gave to my daughter. As mentioned above, I cringed as he cut it out while giving his spiel.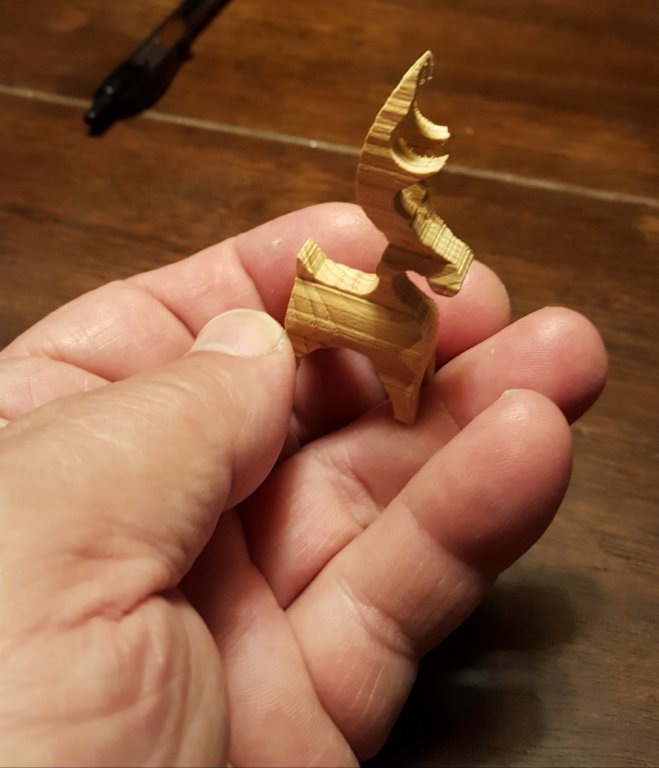
-
Proxxon Micro MBS 240/E Band Saw Review
Bob Blarney replied to Blue Ensign's topic in Modeling tools and Workshop Equipment
On my last post (#23), there are several points that do not agree with those presented in a bandsaw demonstration video by Alex Snodgrass of Carter Products. I'm not disputing his views, and in fact I think it would be a good idea for others to watch the video, because there is certainly useful information there. -
Carbatec 10" Bandsaw any good?
Bob Blarney replied to Eddie's topic in Modeling tools and Workshop Equipment
I kinda like the looks of this one for a guy on a budget: http://www.machineryhouse.com.au/W952# -
Carbatec 10" Bandsaw any good?
Bob Blarney replied to Eddie's topic in Modeling tools and Workshop Equipment
great vid above. My daughter was given a 1.5" tall reindeer by Mr. Snodgrass at a demo (watching him cut it out while lecturing terrified me). As for the bandsaw size, I wouldn't go with anything smaller than a 12". I have both a 12" Craftsman (KIng Sealy) and a 14" Delta/Milwaukee with a riser block to resaw up to 12" depth, and I prefer to use the Delta almost everything. And if you missed it in another thread, here's a safe way to resaw wood:


