


Bob Blarney
-
Posts
467 -
Joined
-
Last visited
Content Type
Profiles
Forums
Gallery
Events
Everything posted by Bob Blarney
-
Oscillating Spindle Sander to get one or not.
Bob Blarney replied to Eddie's topic in Modeling tools and Workshop Equipment
well, you'll do well with the Jet or the Triton. I'd pick the one that vibrates less, which is usually the heavier one, mounted on a soft polyurethane mat. -
Oscillating Spindle Sander to get one or not.
Bob Blarney replied to Eddie's topic in Modeling tools and Workshop Equipment
It's also a spindle sander. The changeover is easy. -
Oscillating Spindle Sander to get one or not.
Bob Blarney replied to Eddie's topic in Modeling tools and Workshop Equipment
There is a feature of the Rigid machine that I forgot to mention - the table. It is large and has a standard 3/8" x 3/4" slot for a miter gauge or for custom fixtures. I have also drilled a few holes here and there for securing fixtures to the table and sheet metal deflectors for more efficient dust extraction. (Oh, and to make sharp edges of shopbuilt sheet metal fixtures safe, run a bead of hotmelt glue along the edge.) -
Oscillating Spindle Sander to get one or not.
Bob Blarney replied to Eddie's topic in Modeling tools and Workshop Equipment
Both the Jet and Triton are very good machines, I'm sure. I have a Rigid EB4424 Oscillating/Belt sander ($200US) which I've been very happy with its features. It's a bit bigger than the others, but here in the USA, Rigid offers lifetime warranties on parts, service, (and batteries if so equipped). It is available in Australia. By the way, it's a good idea to buy the rubber stick to clean the sleeves and belts. -
about handplaning to thin stock
Bob Blarney replied to Bob Blarney's topic in Modeling tools and Workshop Equipment
Here's a picture of a block plane fitted with 2mm thick craft sticks. They're stuck on with double-stick Scotch tape, but they could be glued on with CA glue. This might be all that you need for modeling work. Looking at the pic again, I'd probably move them all the way forward to the toe, or find longer sticks for the entire length of the plane. I would place the stock on a sheet of sandpaper, say 60-100 grit, that was glued on a piece of MDF.
-
about handplaning to thin stock
Bob Blarney replied to Bob Blarney's topic in Modeling tools and Workshop Equipment
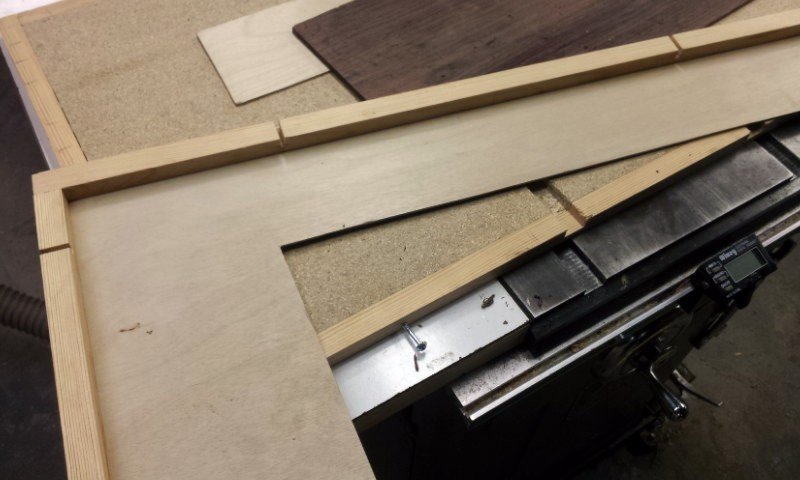
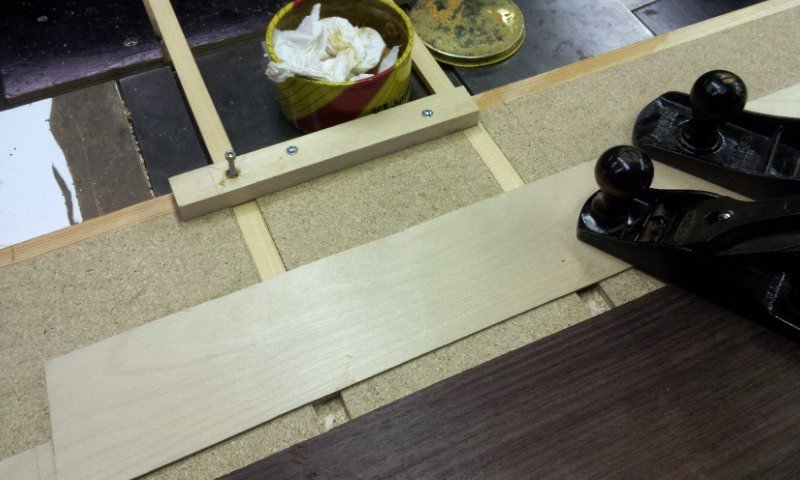
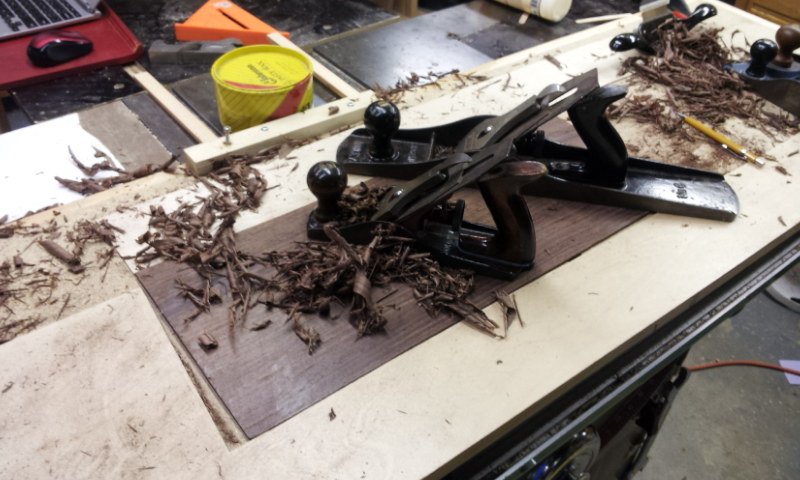
Joe, Ah, I see what might be confusing you. In the first pic, the L-shaped piece is pictured lying upside down, and you can see some cleats glued on around the edges. In use, the L-shape is flipped over and placed on the baseboard with the cleats against base board's edges, and then screws are run through the slots to clamp the L to the baseboard. When done this way, there are no screw heads on the top surface that I might strike with the plane. But the plywood can also be screwed down in the corners, away from the plane's path. In the second pic, you can see that I glued the rectangular piece to two runners that are set in dados, so that I can quickly accommodate different widths of stock, such as the side ribs of the guitar that are 6"x 36". But again, the piece can be simply screwed down to the base board, keeping in mind to avoid striking them with the plane. The setup is shown the second picture, where the process is about half-completed and the rosewood is underneath the two planes. The rosewood is prevented from moving by the L-shape plywood and rectangular plywood. First, I planed with the bench plane across and diagonally to hog off large amounts until the rosewood was near to the desired thickness, and then I used the foreplane with the blade skewed in a longitudinal direction. The foreplane is spanning the rosewood, with its toe on the rectangular piece and the heel on the L-shaped piece. The two pieces of plywood prevent the foreplane from dipping farther than desired (note: the blade is projecting only a few thousandths.) T If the pieces still slip, then try gluing a few sheets of sandpaper to the base board. It's essential that the planes are sharp. -
about handplaning to thin stock
Bob Blarney replied to Bob Blarney's topic in Modeling tools and Workshop Equipment
I forgot to mention that you could attach dimensioned thin strips to the outside edges of a plane, which would limit the cut as happens above, with the large pieces of plywood. This would work for planing strips almost to the width of the blade. The strips can be attached with double-stick tape or with epoxy. Incidentally, for tapering masts, you might look at how bamboo flyrods are made with block planes and a grooved base board. -
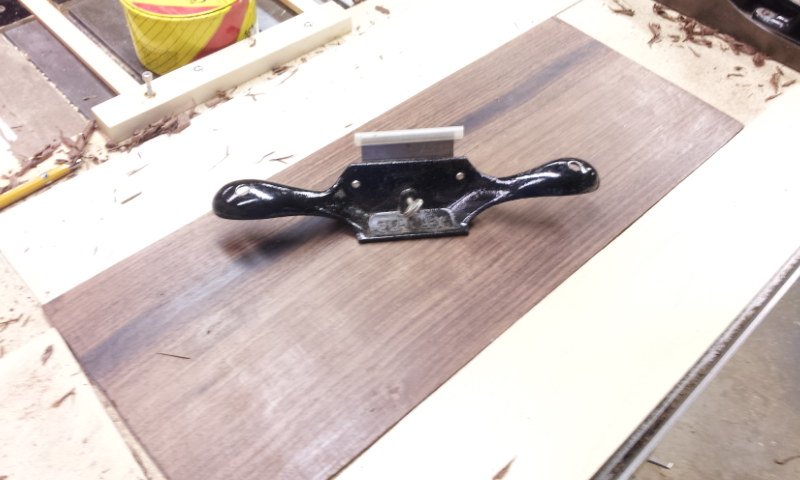
Hello, here's a method for thinning stock that might be scaled down and adapted to your needs. The pictures show a 10" x 20" piece of rosewood that I'm planing down to about a 2mm thickness for the back of an acoustic guitar. I have made a base board from particle board and placed it on the flat top of the table saw. Then I cut an L-shape from 1/8" or 7/64" baltic birch plywood, and a rectangular piece (attached to the runners). The stock is laid on the base board, and prevented from moving by the short leg of the L-shape (acting as a stop) and the rectangular piece that is butted against it. Then I use the Stanley No. 4 to scrub off most of the stock, and then I use a No.6 foreplane for uniform thicknessing, and then finish up with a cabinet scraper. The No.6 foreplane is 18" long and so it can bridge the stock and it will plane off material until its sole rests on the 7/64" plywood. By the way, waxing or oiling the sole of the plane greatly eases the effort of handplaning (and sawing as well) and does not interfere with finishing. With practice, you will find that planing is much faster and more pleasant than sanding. For most general woodwork, I would say that 80% of the work can be done with a No.4 bench plane and a No. 60-1/2 low angle block plane (not shown here), and these planes should be in any woodworker's armamentarium.
-
Strips from a Band Saw
Bob Blarney replied to Sgt Mike's topic in Modeling tools and Workshop Equipment
If you wish to cut thin strips the other way, such as cutting 3/4" strips from a 1x6 board, then there are several ways to do that. You could simply use a fence, either a single point fence or one that traverses the table. For pieces of stock that are small or thin, I would make a sled that engages the miter slot or side of the table, and the stock would be held by a clamp or double-stick tape, with or without a fence. By the way, usually thin strips are cut from the outboard edge of a board, i.e. the majority of the board's width is against the fence. -
Strips from a Band Saw
Bob Blarney replied to Sgt Mike's topic in Modeling tools and Workshop Equipment
Hello, as mentioned by Jaager, your question is a bit unclear. We'll assume that you're resawing, i.e. cutting slices that are wide but not thick. Here's video about resawing that I think shows the safest way possible: About the blade, the TPI should not be too fine because the gullets much carry the sawdust out of the kerf. Generally, when using a bandsaw for resawing, you'll need fewer teeth rather than more. In the video, you can see that the blade is very wide and has only 2-3 teeth per inch. -
measuring two part epoxy with graph paper
Bob Blarney replied to AON's topic in Modeling tools and Workshop Equipment
That seems like a good way. Another common cause of incomplete curing is incomplete mixing. There are couple of other ways. You can buy small quantity tubes with a mixing nozzle, but they're a bit expensive. I usually use a twinned resin/hardener syringe to get the proper ratio, and I squeeze it into a baggie and seal it and then mix it thoroughly. Work the mixed epoxy into a corner of the baggie and then snip off the corner. Use it like a baker's pastry bag.- 1 reply
-
- 4
-

-
Precision Router Base
Bob Blarney replied to Nirvana's topic in Modeling tools and Workshop Equipment
I believe there are others as well, but this suits the purpose. Incidentally, you might watch Dan Erlewine (the owner of Stewart McDonald) use it to route inlays. He recommends setting the depth of cut to no more than 1/2 the diameter of the bit. -
If it's 2AM and you're running low on clamps, try cutting rings off PVC pipe and then cut the rings to form a "C". A 10ft length will provide ~200 x 1/2" wide clamps, or many 1/4" wide clamps. You can also nibble the 'jaws' with diagonal wirecutters to a narrower profile if needed.
-
Ugly, but functional. Baltic birch or MDF would be a much better choice for the materials, or melamine-coated particle board. I think the pine plywood will warp, and it has a lot of friction too. I do like the feed mechanism. The guide tracks could use improvemen too, maybe aluminum and skateboard bearings.
-
That seems like a good solution. One thing you might try is making the cams with a 'nautilus' spiral shape - they may be easier to set, and without cinching down the wingnuts. Here's a place to find some templates:
-
Proxxon Micro MBS 240/E Band Saw Review
Bob Blarney replied to Blue Ensign's topic in Modeling tools and Workshop Equipment
My 2 cents about band saws in general (I use a 14" and a 12"). 1. The wheels on band saws should always be co-planar. To check this, remove the blade and covers, and place a straightedge across both wheels - with no or very light pressure the straightedge should touch both wheels across their diameters, on both sides of the axles. If it doesn't, then one or both wheels will need to be shimmed with washers to correct the misalignment. 2. Next, the wheels and tires are crowned, and the blade should ride on the peak of the crown with the teeth just forward of the crown. This is usually set by a knob that tilts a yoke that carries the upper axle. 3. Considering the thicknesses (thinnensses?) of wood that you are usually cutting, the tension on the blades is not extremely critical. Tension the blades so that they do not make a barrelled/bowed cut, but do not over-tension them because it's hard on the bearings and frame. Once you have determined the tension for a particular blade, at the end of the day loosen the tension by 5 turns so that the tires and wheels do not develop flat spots. Note: the Timberwolf brand of blades require a lower tension that most, and their installation instructions say to install the blade at 'normal' tension and then loosen it until it just starts to flutter, and then increase the tension until it lessens or stops. Again, at the end of use, loosen the tension by a known number of turns. (Here's maybe more than you'd like to know: http://timberwolfblades.com/blade-tension.php ) 4. If the blade cuts in a skewed direction, the cause may be a misaligned guides or more likely the blade's teeth are dull on one side. 5. The guides should be adjusted so that there is a very slight gap between the blade and guide, and it may skip along the guides when it's run without cutting. The side guides should be set behind the tooth gullets. (In the perfect world, no guides should be necessary.) 6. If possible, mount a toothbrush inside that brushes and cleans the tire(s) of sawdust. By the way, I like the idea of placing material on the covers to reduce noise. I think I'll try it with 6mm polyurethane craft foam instead of cardboard. -
Homemade Air Purifier
Bob Blarney replied to jay913's topic in Modeling tools and Workshop Equipment
It's hard to suggest solutions without knowing much about the workspace. Generally, dust and fume collection is most effective when the inlet is close to the source of contaminants, but then the noise of the fan can be annoying or even fatiguing. For a tabletop modeling setup, it would not be too difficult to make a ducted system that allows remote location of a box fan or a bathroom vent fan. On one of my workbenches for sanding small items and letting painted items dry, I use a furnace register box with a 4" fitting as an inlet, connected with dryer duct (rigid Sch 30 PVC pipe would be better here) to a box that contains the filters and the fan. The fan exhaust can be directed out of the building by conventional dryer ducting. But a word of caution is in order here: Although letting painted articles dry is ok, >>DO NOT spray paints or varnishes<< with volatile vehicles with this exhaust system. Although the danger of explosion is probably remote in a hobby installation, it's still possible and the consequences could possibly be severe. -
Homemade Air Purifier
Bob Blarney replied to jay913's topic in Modeling tools and Workshop Equipment
How many filtration layers, and what pulls the air through it? -
Hello, many persons are interested in learning machining skills but don't have an instructor available. Here's an exceptionally attractive instructional video about turning brass to make a tool. The machinist is a clockmaker and has a Youtube channel called Clickspring. I think you will find his videos interesting, useful, and visually stunning.
-
Couple questions of Sherline Mill purchase
Bob Blarney replied to sfotinos's topic in Modeling tools and Workshop Equipment
If you happen to own a Sherline lathe already, then check the website. Last night I saw that the vertical milling columns were on sale from $160-300. They fit the lathe - remove the headstock and mount it on the vertical column, and then mount the vertical column at the headstock position. About inch vs. metric, it really doesn't matter - the inch screws are 20TPI, so one revolution of the wheel is 0.050", and the wheels are graduated in 0.001 increments. -
Hmm, this has started me thinking about making the X-Y mechanism and fitting a toolpost for light duty metal turning on my midi-lathe. Recently, I equipped my midi lathe with a 2HP DC motor from a treadmill. Now the lathe can spin over a continuous speed range of ~50 to 2500 RPM and it can be reversed as well. This would also be an excellent motor for small shopbuilt lathe. If you wish to learn about configuring such a DC motor and electronic controller for tool use, I can offer some advice.
- 13 replies
-
- 3
-
-
- dremel
- rotary tool
- (and 1 more)
-
A Sherline lathe or mill with 20 TPI lead screws can achieve quite acceptable precision for small work - the handwheels are graduated in 0.001" or 0.01mm. For this shopbuilt machine, the precision would be determined by the quality of the initial fitting of the parts and the wear over time due to friction and accumulation of dirt and chips. If it is built with adjustable gibs and smooth bearing surfaces as discussed above, then compensation for wear is possible. I think the greatest problem for this machine would be the fixation and alignment of the rotary tool, and this is the part which I think needs improvement. It would be better to have a screw-in socket for the tool than the cradle & clamp shown in the plans. Finally, the mass of the machine and a secure fixation on a stable, level bench is necessary, just as it is for any precision tool. What might be of greater interest is the precision of a completed model, which would depend upon the scale. Commercial models of sailing ships are often scaled at 1/350, which may be expressed as 0.0028 inches per foot, and so 0.01" imprecision would translate to about 3.6 ft at scale. Larger scale models would suffer less.
- 13 replies
-
- 4
-
-
- dremel
- rotary tool
- (and 1 more)
-
" " One simple improvement would to add adjustable gibs on the dovetails slides." So noted in the original post. The gibs for the Sherline are a plastic, probably Delrin, and they're held in place with a simple "L" shaped pin and a setscrew. To build a lathe, one could use 8mm I.D. x 22mm O.D. skate wheel bearings for headstock bearings, and 8 mm drill rod could used for the spindle. As a matter of fact, the wheels themselves might do for the first handwheels.
- 13 replies
-
- 4
-
-
- dremel
- rotary tool
- (and 1 more)
-
Grainger is one of the most expensive places for buying anything if you don't have a high-volume corporate account. I would shop elsewhere, e.g. McMaster-Carr (mcmaster.com) . A casual search shows 3/8-16 LH thread rod at about $6.24 per 6 ft length. (By the way, I would use 1/4-20 rod, because each full turn of the handwheel would be 0.050") That said, I find it difficult to believe that the cost of the hardware parts would amount to several hundred dollars. Most of them could be found in a hardware store or scavenged, and the knobs & handwheels could be shopmade easily. MDF could be used for the base and arm, and likely would be better than plywood anyway because it is heavy, and at these dimensions it won't warp if varnished/shellaced. A little ingenuity goes a long way. It would also be helpful to go to the Sherline website (sherline.com) and read through some of the thoughts about precision and manual & methods of setup of their tools.
- 13 replies
-
- 5
-
-
- dremel
- rotary tool
- (and 1 more)