


Bob Blarney
-
Posts
467 -
Joined
-
Last visited
Content Type
Profiles
Forums
Gallery
Events
Everything posted by Bob Blarney
-
Hello, here's my favorite abrasive for sanding wood: https://www.3m.com/3M/en_US/company-us/all-3m-products/~/3M-Ultra-Flexible-Sanding-Sheets-and-Rolls/?N=5002385+3293390774&rt=rud It lasts a long time, and is quite flexible and stretchy. It's more heat resistant and doesn't clog as fast as any other abrasive that I've used. I haven't tried gluing it to sticks and rods yet, but I expect that it will adhere with contact cement. When using any kind of abrasives for power sanding, it's important that the surface speed (ft/sec or m/sec) is controlled and not excessive. When abrasives are used beyond a certain speed (depending on the abrasive or material), the heat generated from friction will cause the abrasive particles to separate from the backing or will clog with material. Although this 3M abrasive is not particularly recommended for power sanding, it seems to have a wider tolerance than many other abrasives, such as for tapering masts and spars. But as always - test for yourself.
-
Chop Saw from Harbor Freight - Review
Bob Blarney replied to mtaylor's topic in Modeling tools and Workshop Equipment
I'm not particularly hung up on name brands. Often a less expensive tool can be very useful with minor modifications. That said, I think that I would certainly compare HF with Grizzly before buying. Grizzly sells tools with a full range of features, for hobbyists and industrial manufacturers. They also stock a full line of replacement parts and their customer support is excellent. Most of their machinery is probably from Taiwan, and their quality control is quite good. -
Chop Saw from Harbor Freight - Review
Bob Blarney replied to mtaylor's topic in Modeling tools and Workshop Equipment
Hmm, for this tool and other operations, a Wixey digital protractor could be very useful. http://wixey.com/products.html In the old days, I calculated the angles trigonometrically and then used a 12" hundredths' ruler to lay out the angles and cut lines. This was tedious at times. The precision required for a larger object, e.g. a kitchen cabinet door, is likely greater than for a smaller object such as the parts of a model (since the greater the distance, the greater the inaccuracy (error)). But for starters, this item might be ok: http://wixey.com/digitalprotractor/index.html#rule -
Poor Man's Lathe disasters
Bob Blarney replied to stevenmh's topic in Modeling tools and Workshop Equipment
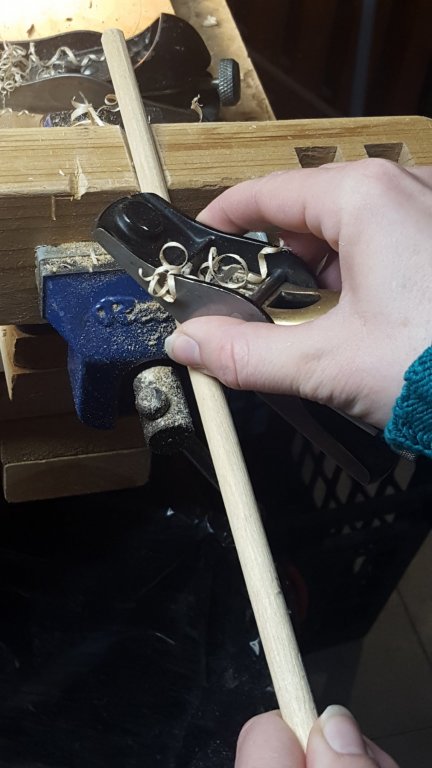
Hmm, your description of the 'lathe' and technique aren't quite enough for a more thorough discussion of what happened. Were both ends supported? Were you sanding or cutting with a tool? It is possible that wood had a hidden defect or was simply a species with poor grain structure. Speed could have been an issue if the piece was thinner in the center than at the ends. But it looks as though the distal end was caught and arrested suddenly by a tool or abrasive sheet and then the torque applied by the drill sheared it apart. in the other current thread about choosing a lathe, you'll see a technique that I posted, where a softwood block with a V notch is used with a cloth-backed abrasive. A finger is used to apply pressure, to both steady the stock and feel what's happening to the wood. Let the abrasive do the work - don't try to hurry it by applying too much pressure or too high a speed. The block plane is optional, but it will save time and reduce dust in the air. -
A lathe for masts and spars
Bob Blarney replied to Don Quixote's topic in Modeling tools and Workshop Equipment
A few points about the trembleur video - a) the mass and smooth running of the lathe are important for preventing vibration a soft start and stop of the motor prevents excessive torque on the trembleur workpiece that would tear it apart c) I don't know if the composition of the yarn is important. d) I believe that these are cut with a tool called a bedan, which is traditional in France but just gaining popularity here. Here's another video showing skillful spindle tapering technique with an 'oval' skew that is far faster than sanding and that produces a better finish, but other tools work too. As always, practice. -
A lathe for masts and spars
Bob Blarney replied to Don Quixote's topic in Modeling tools and Workshop Equipment
-
A lathe for masts and spars
Bob Blarney replied to Don Quixote's topic in Modeling tools and Workshop Equipment
Just a few words if you wish to buy a lathe (it's a versatile and fun tool!). Movement and vibration cause mis-shapened and rough-surfaced parts. Mount the lathe on a substantial base, such as piece of a granite countertop or several layers of MDF, and then place that assembly on a soft foam mat on a level bench top. (My Delta is bolted to a platform that 'floats' in a 4-inch deep sandbox that effectively dampens vibrations.) -
A lathe for masts and spars
Bob Blarney replied to Don Quixote's topic in Modeling tools and Workshop Equipment
I should have mentioned that when sanding, one should start from the round end nearest the chuck. This will make it easier to smooth out the irregularities. Also, keep the speed down on the drill, because a high speed may melt resins in woods and thus clog the abrasive and fill/burnish the wood. That said, it might be a good idea to combine Vaddoc's dril & bearing technique with the plane technique. I would build a dedicated fixture for the bearing (scavenged from a skateboard or rollerblade wheel (they're usually 8x20mm). The planing off of excess would go a long way to reducing the amount of dust thrown into the air. Finally, I have both a Sherline lathe and a modified Delta Midi-lathe, but I'd rather use the handplane & drill sanding technique - it's likely faster. But the Sherline or the Delta could be used too - I use the 102 block plane on the lathe to produce smooth cylinders and tapers. On the Delta, I've replaced the standard motor with a smooth-running 2HP DC motor scavenged from an exercise treadmill so that it can turn from 50 to 2200 rpm, and spin in reverse too (using a chuck that has a retention grub screw to prevent it from flying off the spindle!). -
A lathe for masts and spars
Bob Blarney replied to Don Quixote's topic in Modeling tools and Workshop Equipment
I've been wondering what' 'long' means. With longer pieces spinning on a lathe, the tendency for the stock to whip can result in significant variations in thickness and shape. This can be controlled by steady rests. Examples of suitable steady rests for a mast or spar can be found by searching for a decorative turning called a 'trembleur', which is done as a competition in France. Depending upon the length, an alternative to a lathe is a drill press, which you could think of as a lathe turned upright. The mast or spar would secured in the chuck at one end, and then to a center point or a steadyrest in the table hole. Penturners occasionally use this technique. But I would be inclined to use hand methods. Here's one method. 1. Cut a v-notch or two in a block and secure it in a vise. 2. Use a block plane (a 102 or 60-1/2) to start roughing out the taper. Place the dowel rod in the a notch for support and then plane off wood while rotating the rod to maintain as much symmetry as possible. Holding the plane at a skewed angle will make it easier to cut. 3. Occasionally, refine the cross-section and taper by chucking the rod in a drill and sanding it with sandpaper (80 grit cloth-backed abrasive on this birch rod works well.) You can also loop the cloth around the rod. A file might be useful too. Then return to the planing and repeat as you go up the shaft, checking for dimensions as you go. For double-ended spars, leave some extra length on the ends to be trimmed away later. Of course, practice improves performance. Use scrap first. I'd like to acknowledge my lovely handmodel Margaret.externalfile:drive-7fcc864980590d1222bde1852ad1ffbbb981d5dc/root/Pics /IMG_20180210_094035 - Edited.jpg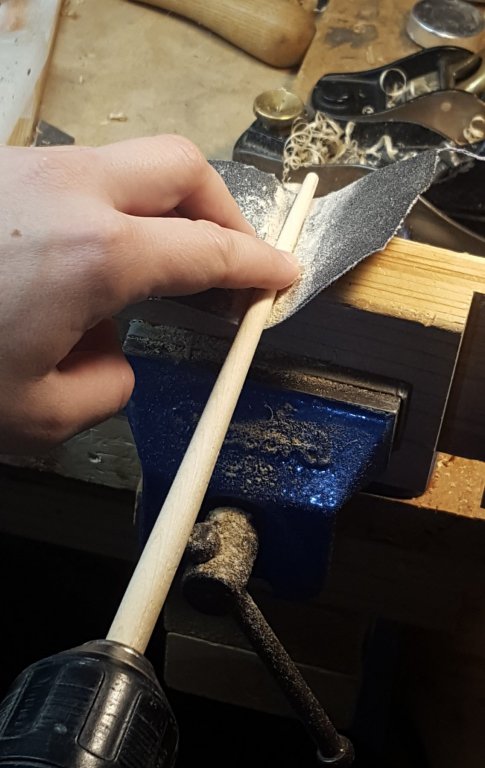
-
a 30x30cm granite floor tile has the necessary weight, flatness, and heat resistance. (they're also good as a surface plate and for sharpening handplane & chisel blades). One could use contact cement to attach a working surface that could be released by heat or spirits of naptha.
-
Hello, there are some very nice fixtures and jigs shown here. But is a metal base essential to your need? The base could be made from MDF with an overlay of cement backerboard for kitchen or bath tiles. It would also have a perimeter of aluminum t-track for anchoring hold-downs or thirdhands. I could also imagine a second jig for assembling delicate things. Instead of the cement board, it would have a thick cork or wood tile overlay to hold pins or screws for hold-downs anywhere on the board (with a sheet of wax paper or baking parchement paper laid down to prevend glue adhesion.)
-
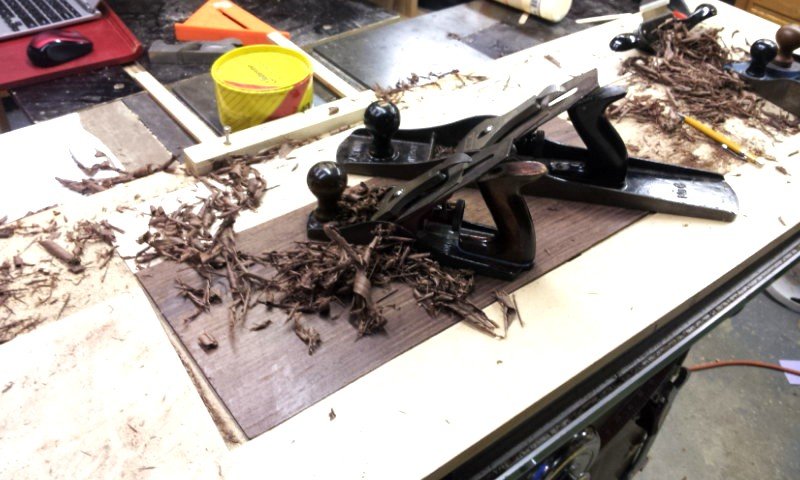
Maybe you might be interested in seeing this pic. Here I'm planing down a ~9" x 24" piece of bandsawn East Indian rosewood from about 4 or 5mm to about 2.5 mm for a guitar back. Note that the rosewood was bordered with 7/64" model aircraft plywood. The plywood controlled the depth of cut of the planes' strokes. Most of the excess rosewood thickness was hogged off in diagonal strokes with the No.4 bench plane. When it got down to about 3mm, then the No.6 foreplane was used. It rested on the 7/64 plywood - on the sides or bridging the rosewood, and it shaved off the rosewood a little at a time. Final cleanup was done with a No. 80 scraper and a L-N 112 scraper plane. Note the can of Johnson paste wax that was used to lubricate the soles of the planes - I want my energy to go into planing wood, not lost as heat generated by friction. It's quite possible to do this on a smaller scale with smaller planes. Remember to put a small radius on the corners of the plane blade so as not to carve grooves. Generally, a heavier and longer plane will produce more uniform and smoother thickness, but a sharp blade is most important of all. In the long run, you'll find that it's much quicker to plane to thickness than to sand, and the surface feels wonderful. Actually, sometimes you might need to sand a planed piece to achieve a good adherence of glue. >As always - practice on scrap to prevent savaging a beautiful bit of wood<
-
L-N also made the 102 in ductile iron - just a functional at 3/4 the cost of bronze. Maybe you could ask about that. Also, keep your eye out at flea markets & yardsales (or Ebay) for a Stanley 60-1/2 low-angle block plane, or one of its analogues from Millers Falls or Sargent. It might be a better choice for your arsenal since you already have the Violin Plane. One more thing - an occasional swipe or two (not a coating) with a block of canning wax with make that plane glide, and won't make problems with finishing - try it on scrap - you'll like it.
-
The 'big brother' 102 is handy too, and bedded at 12d. The Model Maker's Block Plane looks interesting too.
-
Sherline has chucks on sale for 20% off in Jan
Bob Blarney replied to Ben752's topic in Modeling tools and Workshop Equipment
Hmm, a four-jaw independent chuck is something that is very useful.- 1 reply
-
- 2
-

-
Hello, while rummaging through a drawer, I found a long-lost tool set -- a linoleum cutter and interchangeable blades for incising lino blocks for contact printing. The price is right at less than $10US, the blade steel is acceptable and they can be re-sharpened , the handle holds the blades securely, and there are a variety of blade shapes available. It works for me. https://www.artistsupplysource.com/product/804451/inovart-lino-cutter/
-
A typical factory bevel for chisels is 25 degrees (not percent), but considering that pear wood is fairly hard, I would be inclined to go with a steeper angle. This is easily accomplished by creating a secondary bevel to 27-30 degrees. But between you, me, and the mainmast, I would worry about a degree here and there. As for sharpening rigs, there is no shame in using a fixture to hold the angle (I do). For a long time, I used a 12x12 polished granite floor tile, with strips of good quality (3M or Norton) silicon carbide wet/dry autobody papers that were fixed to granite with sprayed on contact adhesive (spirits of naptha will dissolve it), with grits from 400 to 2000. I lubricated with Windex window cleaner. Now I use DMT diamond stones, but I think Trend diamond stones would be a better choice. (I prefer to use diamond stones over natural stones because they never need flattening, although they will need occasional scrubbing to remove minute metal bits.) For final honing, I use a leather strop with a polishing compound. If you don't have a leather strop, try a piece of MDF with compound. If an edge is severely damaged, I grind it on a white aluminum oxide wheel or a 1x30 silicon carbide belt (Klinspor). You can occasionally dip the chisel in water to keep it cool. You can also shove it through a piece of potato and then grind - the potato will absorb the heat, but don't cook it (or eat it).
-
Model Shipway Ratline tool
Bob Blarney replied to fnkershner's topic in Modeling tools and Workshop Equipment
Pic? -
Heat sealing iron question
Bob Blarney replied to bigcreekdad's topic in Modeling tools and Workshop Equipment
Perhaps you might consider a hair straightener iron. I modified one for the purpose of removing acoustic guitar bridges. It would heat wood from both sides, and many if not most straighteners have at least a rudimentary heat control on them, or you could use an ordinary incandescent lamp dimmer. -
I had assumed that others were aware of Mr. Pentz' site, but perhaps that was a dubious assumption. On this site you will probably find more than you wish to know about the subject, including wood toxicities and design tools if you wish to design and build your own system. This site provided me with ideas for my wall-mounted separator with the bucket-head vac. http://billpentz.com/woodworking/cyclone/index.cfm#index.cfm
-
If you've got the jingles, this may be the system for you. http://www.bridgecitytools.com/default/tools/what-s-new/gyro-air.html
-
Power tools produce the greatest and finest airborne dust, and I've started to avoid their use whenever possible. For dimensioning larger boards into smaller stock for model building, hand sawing and hand planing are efficient enough once the techniques are learned, and actually can be quite enjoyable. There's some physical exercise, and it's possible to listen to music or radio discussions, and work at any hour of the day or night. Hand tools do not blow dust everywhere, are less expensive to buy, do not need many replaceable parts and maintenance, and do not occupy a large amount of bench and floor space. Also, hand planing produces a better surface than sanding as well. What's not to like?
-
I think that exposure to hazardous amounts of wood dust is minimal in building models. It's probably more of a nuisance than danger, if no pre-existing sensitivity is known. A bit of mindfulness about what you're doing, what you're cutting, and how to prevent inhalation of dust, and then how to tidy up will usually suffice.
-
What brand of #11 blades do you use
Bob Blarney replied to bigcreekdad's topic in Modeling tools and Workshop Equipment
I prefer Bard Parker Rib-Back - they have a strengthening spine. https://us.vwr.com/store/product/4637618/bard-parker-rib-back-carbon-steel-scalpel-blades-nos-1015-sterile-aspen-surgical -
As a cardiovascular physiologist and former med school research prof, I'll say generally that there's a few things to keep in mind. From a mechanical aspect, the respiratory tract can deal with most of the visible dust that you can see - it's the very fine dust in the micron range that is dangerous in the long run. That said, the chemical nature of the dust may cause problems - e.g. the irritant in cedars (mentioned above) is common, and many exotic species (such as cocobolo) are potentially hazardous. They may trigger a mild or a serious allergic response on the first exposure or any exposure thereafter, and so it's better to reduce exposure and control dust as much as possible.


