Bob Blarney
-
Posts
467 -
Joined
-
Last visited
Content Type
Profiles
Forums
Gallery
Events
Everything posted by Bob Blarney
-
Workshop Essentials - Favorite Features
Bob Blarney replied to Justin P.'s topic in Modeling tools and Workshop Equipment
Planning the utilities is the first job, and for you I think that electric service and dust collection ducts are most important. For electric service. one or two 4ft outlet strips will serve your need. Below is a link to a 4ft strip with 18 outlets for $31, and this will likely serve your need. So far as dust collection, I recommend 2.5 inch tube with swept elbows and blast gates as needed (link below), however a 'plumber's special' from PVC sch 40 is perfectly ok, but adapting to various machines might be difficult under some circumstances. Also, include a Thien-type dust separator on a 5 gallon bucket in your dust collection system, and put a HEPA filter on your vac. You can built a separator, or buy a 'Dust Stopper' at Home Depot for $40. outlet strip: https://www.globalindustrial.com/p/electrical/power-strips/surge-protectors/global-8482-48-18-outlet-aluminum-power-strip-with-15-cord?infoParam.campaignId=T9F&gclid=EAIaIQobChMI4Y-Ux9-a5wIVA9vACh3I3gMMEAQYASABEgIUtfD_BwE dust collection starter kit https://www.rockler.com/2-1-2-dust-collection-starter-kit Home Depot Dust Stopper for 5 gallon bucket https://www.homedepot.com/p/Dustopper-High-Efficiency-Dust-Separator-12-in-Dia-with-2-5-in-Hose-36-in-Long-HD12/302643445 -
Homemade thickness sander
Bob Blarney replied to vitorcampos's topic in Modeling tools and Workshop Equipment
That looks stoutly built. The ability to vary the speed of the drill is also an asset because different materials and grits often require different speeds to achieve the best surface and minimize wear on the abrasive A backerboard that carries the stock through the sander may give you better results for making very thin stock. However, beware of throwbacks! Fine sawdust can act as a lubricant on your fingers. By the way, a good source for abrasives is through Klingspor's retail outlet - https://www.woodworkingshop.com/ -
UV light activated glue
Bob Blarney replied to BETAQDAVE's topic in Modeling tools and Workshop Equipment
I've used UV cure glues in the course of my job some years back. There are a few considerations. 1. The materials to be glued must be transparent to UV light, otherwise the cure will only be on the surface. Some materials are transparent to visible light but not UV (e.g. eyeglasses), and vice versa. That said, there are glues that can be cured by both UV light and heat, and so UV exposure can be used to initially stabilize a joint and then a full cure can be achieved in an oven. 2. An intense UV light source may be required, and precautions must be taken to prevent skin and eye exposure to the UV light. 3. There were a few times when I couldn't get enough light on the parts, and so I waited until that bright UV source in the sky was out, and even used a magnifying glass a few times to finish the cure with heat (judiciously done). -
I didn't mean to be harsh.
-
By the way, if you're experiencing kickbacks often, then I think you might need to review your technique. Kickbacks occur when the wood is caught by teeth behind the apex of the cutting blade, is drawn into or away from the fence, and then it is picked up off the table and flung back towards the operator. It may occur during a cut due to releasing invisible internal tension in the wood's grain structure such that it warps as it is being cut, but usually, a kickback is due to the operator choosing to cut 1) warped wood, 2) wood that has an irregular or curved edge against the fence, or 3) misalignment of the fence to the blade (i.e. they're not parallel). On small modelers' saws, a kickback may have unpleasant consequences, but I remember a 2"x6"x8' board that I cut on a 9 inch saw that was flung back and shattered against a wall behind me. It was a sobering and thought provoking event, and has not been repeated.
-
Well, it seems this method is worth further evaluation. Umm, how about trying a paper blade on the Proxxon?
-
Vaddoc, Did you use two pieces of abrasive paper glued back to back as suggested? I think it would be a good idea to determine the minimum speed of a particular grit, that will give a clean cut. I'm not sure this is relevant, but when I sand woodturnings on my lathe, I keep the speed down to 400-700 rpm for workpieces 2-4 inches in diameter, so as to prevent clogging of the paper or actually melting the resin that retains the grit on the paper. And for metal, I wonder if silicon carbide autobody paper might be more suitable, although as I recall, brass is usually cut, turned, or drilled without lubricants. But a lubricant might help.. Bacon grease is useful as a lubricant for cutting metals, and I've cut 1/8 aluminum on my scrollsaw using petroleum jelly as a lube.
-
The bandsaw friction cutting method was described somewhere in a wartime issue - sorry, I don't remember which one. Popular Mechanics and Popular Science are available online now - free to view and searchable within an issue or all issues. Go here: https://books.google.com/books?id=ytoDAAAAMBAJ&lr=&rview=1&source=gbs_navlinks_s and here: https://books.google.com/books?id=wzsEAAAAMBAJ&as_pt=MAGAZINES&ei=QVtqTfSyLIf6zAThl82MBg&source=gbs_other_issues
-
Hello, While browsing, I saw this idea and thought it might be of interest to modelers. During WWII, metal was not sawn with a toothed blade. It was bandsawn by friction against the edge of a metal band that was moving at very high speed. You be the judge, and I suggest that you make a shield and/or wear safety glasses. You might find the rest of the mag interesting too. https://books.google.com/books?id=XCYDAAAAMBAJ&lpg=PP1&pg=PA229#v=onepage&q&f=true
-
timing belts and pulleys
Bob Blarney replied to Kurt Johnson's topic in Modeling tools and Workshop Equipment
those are cogged pulleys & belts. In the US, go to McMaster-Carr ( mcmaster.com) - they have everything imaginable in mechanical items and materials. For belts of any kind or size, go to Beltsforanything.com They will make a belt to your specifications if a stock belt won't work. -
Exactly so, as mine works also. It is possible to increase the resolution of adjustments by lengthening the taper of the wedges, but limitations arise about the overall working length of the contraption. I settled on a 1:4 ratio as an acceptable compromise between resolution and overall size. As is, it's quite possible to make adjustments down to 1/256th of inch.
-
Use a thinner blade, cut the groove, determine the error, and then paste paper or precision metal shims to the fence and cut again as necessary. So far as the desired measurement system goes (inches, mm, or furlongs), I would use digital calipers to make adjustments and forget about making a scale for the fence.
-
Jaager, Generally I'm a fan of Wixey digital measuring devices, but that particular device isn't one of my favorites. It was just at hand when I made the video. There are miter slot mounts for digital calipers that are easier to use. At this writing, I'm busy with a domestic job for Management, making new kitchen drawers and cabinets for her. The fence allows me to make quick and repetitive sawing adjustments by just laying down masking tape and then making index marks for dadoing the lock joints for the drawers. It's also excellent for fitting tenons - bumping a fence back & forth by a few thousandths is tedious.
-
That looks like a fine well-made tool. What is the range of adjustment? I had something similar in mind. Is this a Byrnes product, and what's the cost?
-
The fence that is shown in the video is built to be very sturdy because as workpieces get bigger, so do the loads on the equipment. That is not the case for modeling. So I'm trying to create a miniature version for you (and me) with a much simpler design for the lock mechanism, such that a modeler could make one with tools and material they may have on hand --- a layout ruler (the small Incra-rule), a table saw, a Dremel, and a drill. Of course, a sturdy workbench with workholding features (a vise, clamps, dogholes, etc.) is a given. If you have suggestions with respect to capacity, overall length, or resolution, please post them below.
-
Hello, here's a link to an easy-to-set high precision fence that I made for my cabinet saw. I think the concept may be adapted to smaller saws, and done with a less complicated locking scheme. It employs parallel (identical) wedge with a 1:4 pitch. Thus, a 1/32nd inch displacement fore/aft results in a port-starboard displacement of 1/128th of and inch. The wedges were made from clear pine, with blue aluminum t-track screwed to the edges. For ease of adjustment, It could be fitted with a linear scale graduated in inches, mm, or fractional inches, or a digital instrument could be used as well. Note: the camera view is from the side of the saw, with the front of the table to the right in the view. https://youtu.be/vXyb3p7TNcY
-
Can't find your tools?
Bob Blarney replied to reklein's topic in Modeling tools and Workshop Equipment
This video might be useful. And you might have a look at his video about making small knives. -
A consistent method would be to make a 'micro' jointer with a block plane and an adjustable fence. For those who do not sharpen their own blades, a razor-blade plane might be an option. https://www.leevalley.com/en-us/search?query=miniature+planes https://www.leevalley.com/en-us/shop/tools/hand-tools/planes/block/56750-razor-blade-block-plane Here's a review of different razor planes. https://jeffpeachey.com/2011/08/17/razor-blade-planes-an-overview/
-
Cheap Chinese Table Saw...
Bob Blarney replied to tmj's topic in Modeling tools and Workshop Equipment
Perhaps the membership could start a separate discussion about safe cutting techniques for modelmakers' saws. I have methods that I employ on my full-size cabinet saw, but I'm not certain that they're applicable to small saws. Generally, a sled that carries stock has several advantages. But in the meantime, here's a video for you to view, about how to safely resaw thin veneer slices on a bandsaw. I believe the technique can be scaled down: -
Cheap Chinese Table Saw...
Bob Blarney replied to tmj's topic in Modeling tools and Workshop Equipment
It looks like you've thought this through. Until you put a decent sharp blade on it, I'm not sure you'll have an assessment of the runout/slop in the arbor bearings. One thing you could do that would probably help is to make/buy some stiffener-stabilizers to place on the arbor beside the blade. Another thing that you might do instead of screwing down some perfectly good walnut to the table, would be to put down a thin layer of baltic birch with plastic laminate (or just acrylic window glazing) on top for a smooth surface. A sled would improve performance too, and maybe a better fence is a good idea. Oh, and if those miter slots are 3/4" wide, then you might be interested to know that US pennies are exactly 3/4" in diameter. I've glued them to sticks used as runners for sleds on my full-sized table saw. -
That's $20 worth of my time. And that looks like an extrusion of standard dimensions that I might be able to find i a longer length. And if I couldn't, I suppose a carefully dressed piece of wood or baltic birch ply would be adequate.
-
Hello, I hope you might find this useful. I really prefer to use a blade on wood instead of sanding. It's quicker, gives a better surface, and doesn't produce airborne dust or noise. But this necessitates keeping the irons and chisels sharp. Here's a link about how I do it, using a shopmade wooden plane, a granite floor tile and abrasive autobody papers (100-2000 grit), and/or an optional diamond stone. I neglected to discuss stropping on a leather-covered board charged with abrasive compound. https://www.mimf.com/phpbb/viewtopic.php?f=12&t=6105
- 1 reply
-
- 9
-

-
Proxxon Planer DH40 Issue
Bob Blarney replied to ChrisLBren's topic in Modeling tools and Workshop Equipment
I'm not familiar with this particular jointer, but It's possible to make or buy a block of wood with neodymium magnets embedded in the surface. These will hold the blade at the correct height while cinching down the locking screws. Another source of very powerful magnet is from disassembling an old computer hard disk. You'll also obtain a very very flat mirror-polished disk that is an excellent front-surface mirror. I use it for various things, but that's another story. -
Proxxon Planer DH40 Issue
Bob Blarney replied to ChrisLBren's topic in Modeling tools and Workshop Equipment
Here is a handplaning jig that may be more applicable and convenient for you. It's possible to make this type of jig adjustable for any thickness that you desire. https://woodworkingmasterclasses.com/videos/thickness-planing/ The easily adjustable jig: https://www.popularwoodworking.com/projects/aw-extra-72513-precision-planing-jig/ -
Proxxon Planer DH40 Issue
Bob Blarney replied to ChrisLBren's topic in Modeling tools and Workshop Equipment
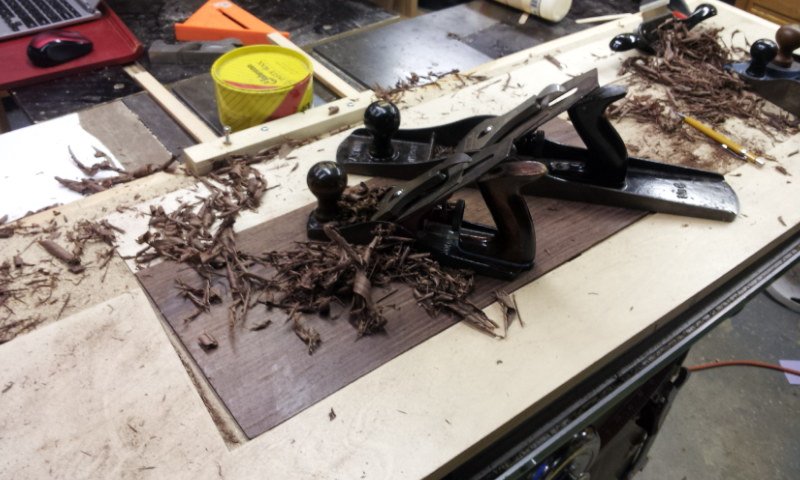
If it sounds like hammering, the blades are dull. (By the way, never plane wood that has any kind of finish on it - that will destroy blades.) If there are longitudinal lines on the wood, then the blades are nicked. It may be possible to shift one blade slightly to one side so that that blade will compensate for the defect. It's possible to hand plane to thickness. Below, you can see how I planed a guitar backplate to 3/32" (2.3 mm) by this technique. I placed 3/32" plywood on either side of the rosewood, roughed it down with the No.4 plane, and then used the No.6 plane to plane to final thickness by riding the toe and heel of the plane on the plywood, with the blade cutting only the rosewood. The paste wax on the soles of the planes greatly reduces friction and allows me to put most of the work into cutting the hard rosewood. The wax does not cause any problems with finishing or gluing. I've also planed to 1/16" by placing plastic laminate (e.g. for kitchen countertop) on either side of the stock and then passing the plane over all with the blade cutting the only the stock. Thus the laminate controls the final thickness.