
HOLIDAY DONATION DRIVE - SUPPORT MSW - DO YOUR PART TO KEEP THIS GREAT FORUM GOING! (Only 24 donations so far out of 49,000 members - C'mon guys!)
×


jbelwood
-
Posts
217 -
Joined
-
Last visited
Content Type
Profiles
Forums
Gallery
Events
Everything posted by jbelwood
-
 Welcome aboard Dan. I'm really looking forward to your build especially when you get to the hurricane deck. John Elwood
 -
Norm, Correction needed on my part. You have apparently read Clarence Borgmeyers Portland build from back in 2015. I mentioned there that it took me about 10 hours to form the hull. That seems more reasonable.
-
Norm, My decks are spray painted with Floquil Canadian National Gray. I first primed them with Rust-Oleum, 2X Ultra Cover Flat Gray. I'm a firm believer in rattle cans. Used them on all large exterior surfaces. I did not do a full deck mock-up. Positioned and screw attached the decks as I proceeded. I did not proceed with any sub assemblies from the start. Although I believe I built the paddle boxes early on. Dry placed them on the deck but don't believe I glued them down until later. Suggest you hold off building the wheel house until you get to that point in the build. It's your call on the other subs. Walking beam has me baffled.
-
Norm, I had the very same issue. Profiles should be identical. I simply added a small piece of deck material and shaped it to fit. Another thing...I did not glue any of the decks down until I was darned sure everything fit correctly. I assume that you will be adding the sponsons and painting the hull prior to working on the levels above the main deck. Also, now is the time you'll want to pick out the deck color.
-
Hi Norm, you can refer to me as John, if you please. I used the spacers as suggested but two more on the main deck in no particular area. As to the hull shaping, I used the one from the older kit. It was beautifully shaped right out of the box. Since I don't have a Dremel I did all of the shaping with a sanding stick and X-acto #11 blade. Also used HobbyLite filler. Over all it took me about 3 hours to finish shaping the hull. I was able to get an accurate, I thought, center line on each of the various decks. However, as I went along, they didn't quite match up with the one below. I wound up measuring from the sides, where needed, to get a more precise fit. I don't have near the amount of photos that you have Norm. Didn't anticipate a build log from the start. Will pass along what I have and comment where needed. You seem to be off to a much better start than I. Up next, those blasted sponsons. Will try to post my approach later today. John
-
As to the port holes on the bow, I used gallery glass. Of the more than 100 windows on the ship, I used acetate exclusively. The openings are too large to accept any "liquid" formula that I am familiar with. Also, you will be painting red curtains on each window. Mine came out perfect. You'll see as we go along. As to the sponsons, I'll respond with photos and comments when you are ready. I did not plank-on-frame as outlined in the instructions.
.thumb.JPG.05e116741a08ba3219fe3017fbb1e33f.JPG)
-
Hello there Norm, Really looking forward to your build log. My Portland has been sitting, unattended, in the shipyard for well over a year. I'm hoping that you will give me the needed kick in the butt to continue toward the finish. I took many photos of my model as I went along. With your permission, I can share them with you on this thread and provide comments where appropriate. When you get to the hurricane deck, where my build ran into a snag, I'll surely need your input where I can follow you to get me through this. This should be fun, John
-
Is anyone working on Bluejacket's 'Portland?'
jbelwood replied to RFP's topic in Wood ship model kits
Norm, That whale boat looks super. Two members in our marine model club have built that kit with fantastic results. Seeing your work you should have little trouble with Portland. Can't believe we'll eventually have to rig 16 davits for her life boats. I used some of the larger pieces of wood that separates the decks found in the older kit. The new kit has enough but I added some extras here and there. Bluejackets kit is quite complete. John -
Is anyone working on Bluejacket's 'Portland?'
jbelwood replied to RFP's topic in Wood ship model kits
Hi Norm, I made several oversights when forming my hull. As a newbie I just had at it and used the old mark1 eyeball to get the appropriate shape of the hull. As a result, I could not get the center line equi distance from the sides of the hull at each station point. It looked good enough not realizing the problems ahead. Thus far I have been able to deal with it. You'll notice that there is a slight camber in the hulls deck. I asked Nic about this and he said he did not concern himself with it. Looking back, I should have removed that camber. The build went quite smoothly until I set the hurricane deck in place. It was then that I noticed the camber caused the paddle boxes to angle outward ever so slightly. I apparently glued the main deck to the hull following the camber. There is now a noticeable gap between the paddle boxes and the hurricane deck. Easy to fix but something of note. When you get to the sponsons, let me know. I came up with a much simpler and quicker approach to this part of the build. Looking forward to your suggestions as you proceed. John -
Is anyone working on Bluejacket's 'Portland?'
jbelwood replied to RFP's topic in Wood ship model kits
Rob and Norm, I'm sure you'll be interested in this video about the Portland. -
Is anyone working on Bluejacket's 'Portland?'
jbelwood replied to RFP's topic in Wood ship model kits
Hi Norm, Here's a photo of the 1/2 inch section installed and faired to the hull. The main deck is also glued on. Used a piece of 1/2 inch stock that came with the older kit. John '][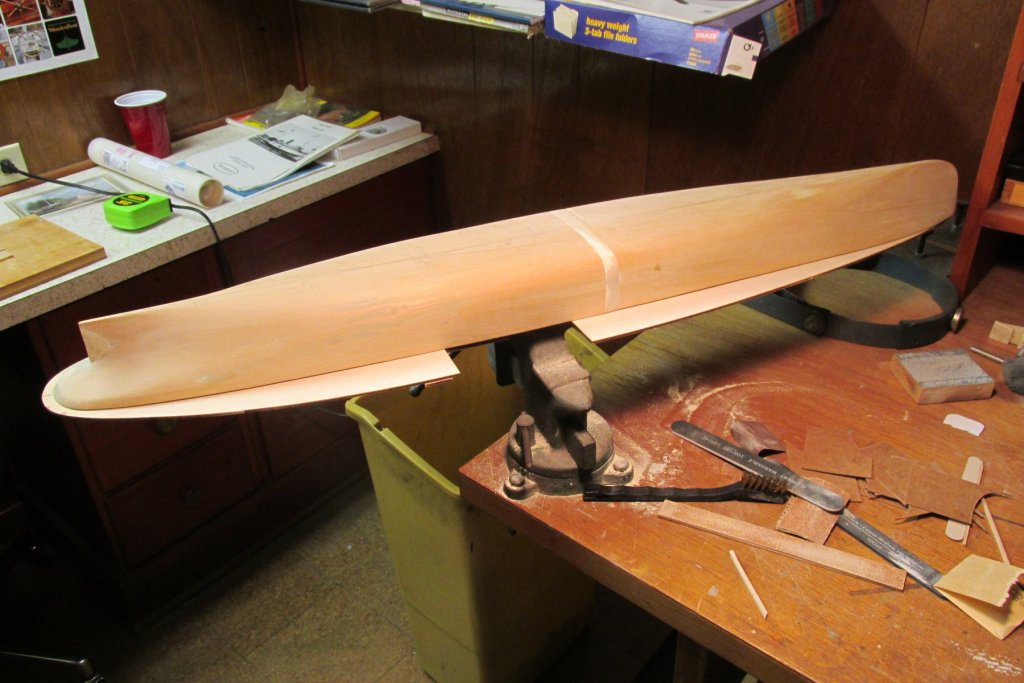
-
Is anyone working on Bluejacket's 'Portland?'
jbelwood replied to RFP's topic in Wood ship model kits
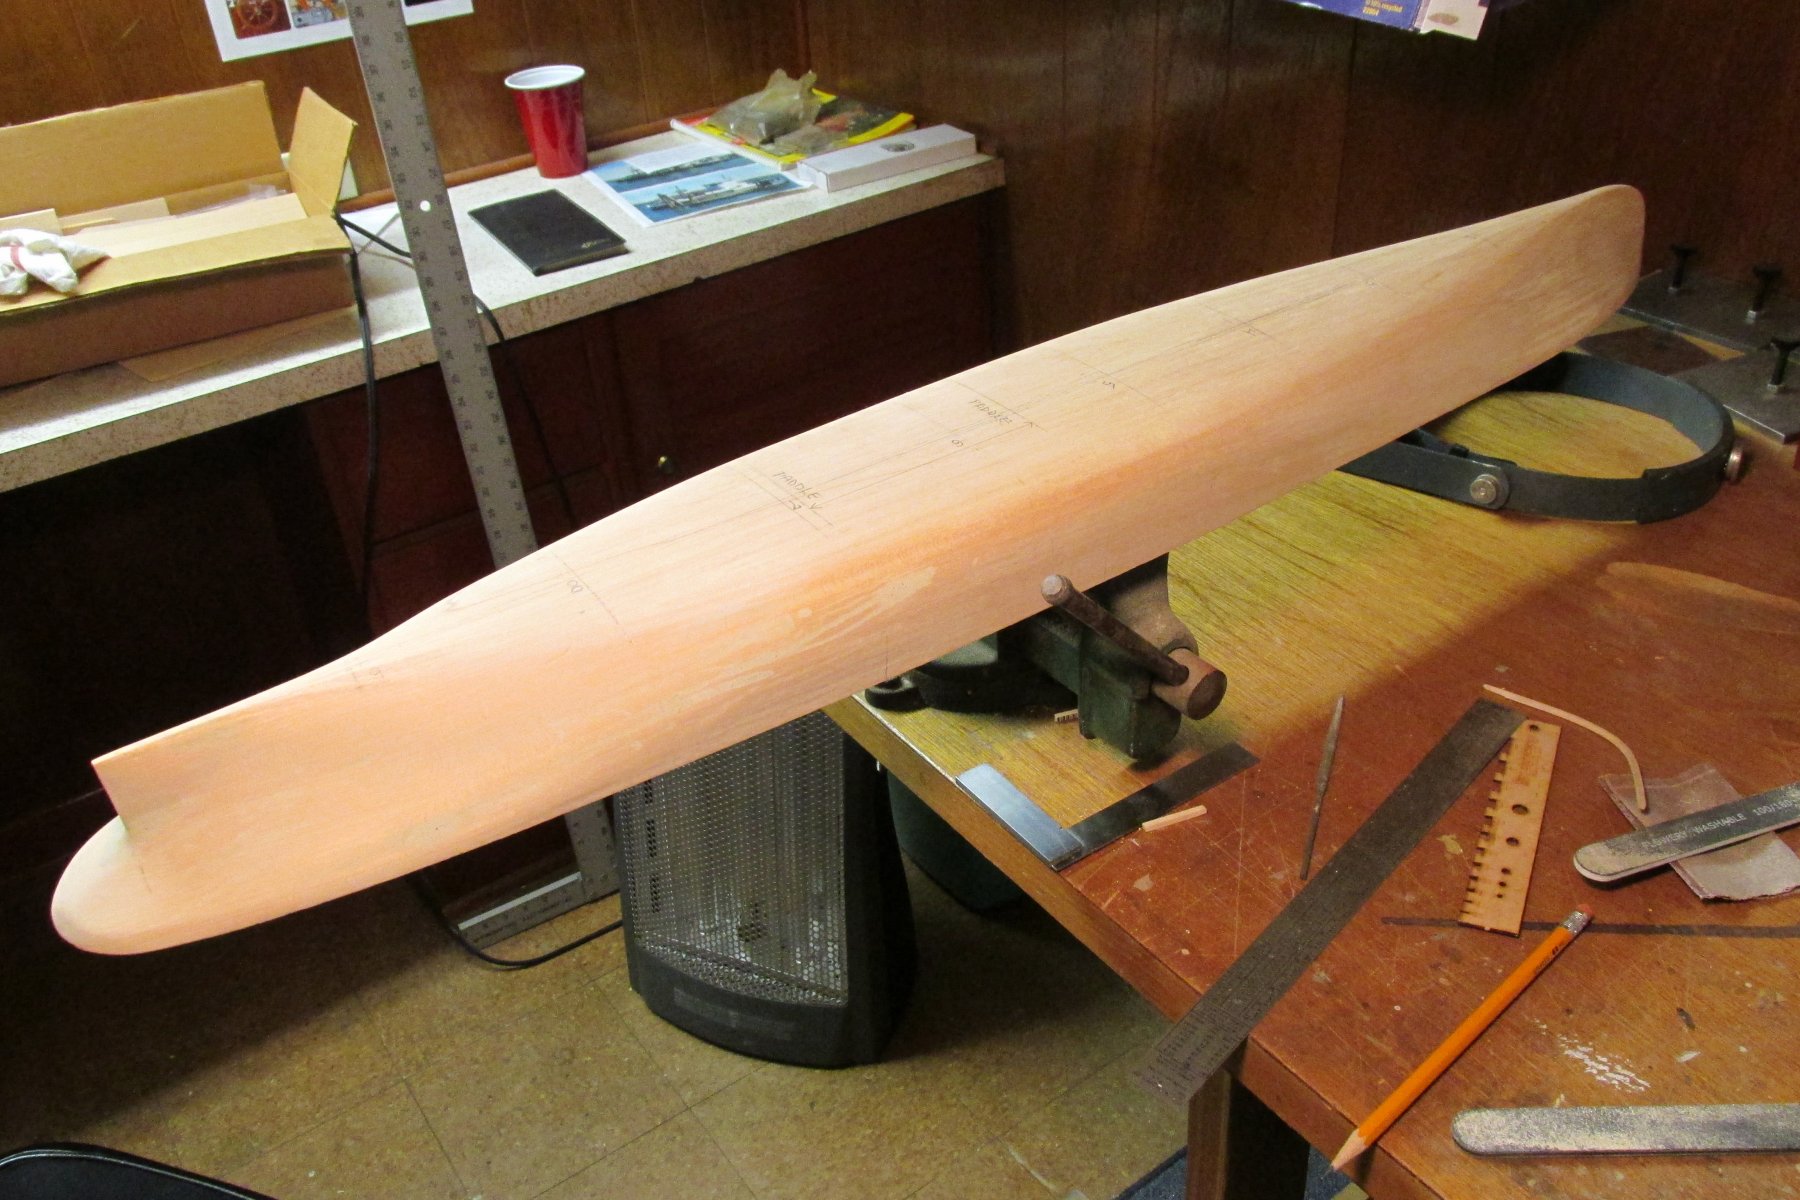
Hi norm1116, Unfortunately my Portland still sits as pictured above. I also have both kits. The older kit was a gift from a friend who didn't want to build it. Had it sitting around for years. I then opted to get the newer version with all the laser cut parts. In comparing both hulls, the older one seemed to be of another type of wood so I started with that. Someone told me that the new kit hull was 1/2 inch longer than the original so I cut the old one in half and added a 1/2 inch piece. This was probably a mistake as I had to make some concessions as the build went along. The newer hull is correct. My biggest issue was shaping the hull correctly. This was my first solid hull model and I really didn't understand the correct procedure that an experienced model would have used. As a result, the center line was a bit off from the start. This error has followed me through the build although I have been able to compensate here and there. Guess I've rambled on enough. Here's a start up photo for you. John
-
Is anyone working on Bluejacket's 'Portland?'
jbelwood replied to RFP's topic in Wood ship model kits
Hi again Rob, Thought you might like this, my favorite painting of the PORTLAND. I spoke with Mr. Muller on the phone a few years back to see if prints were available. No prints, only the original was offered. Go to his thumbnails for other spectacular paintings of these beautiful side wheelers. Enjoy. http://www.jrusselljinishiangallery.com/pages/muller-pages/mullerimage-boston-bay-1898.htm -
Is anyone working on Bluejacket's 'Portland?'
jbelwood replied to RFP's topic in Wood ship model kits
Here's another build for you to reference. See my comments and photos on page 2. -
Is anyone working on Bluejacket's 'Portland?'
jbelwood replied to RFP's topic in Wood ship model kits
Here is Jim Finans build on the PORTLAND. I've referred to it many times. https://www.facebook.com/media/set/?set=a.10152720184325928.1073741831.593315927&type=1&l=8d5b89f0c5 -
Is anyone working on Bluejacket's 'Portland?'
jbelwood replied to RFP's topic in Wood ship model kits
Hi Rob, I started working on the PORTLAND (updated version) back on April 1, 2016. Two years later, when I got to the officers quarters and walking beam assemblies, I ran into a roadblock. Couldn't quite figure out how to approach building either one. She has been sitting since then as pictured below. I did build two other boat models from other manufacturers in the past 12 months. Had to keep my mind afloat. I did take several photos during the build process so if you have any questions I'd be glad to help. John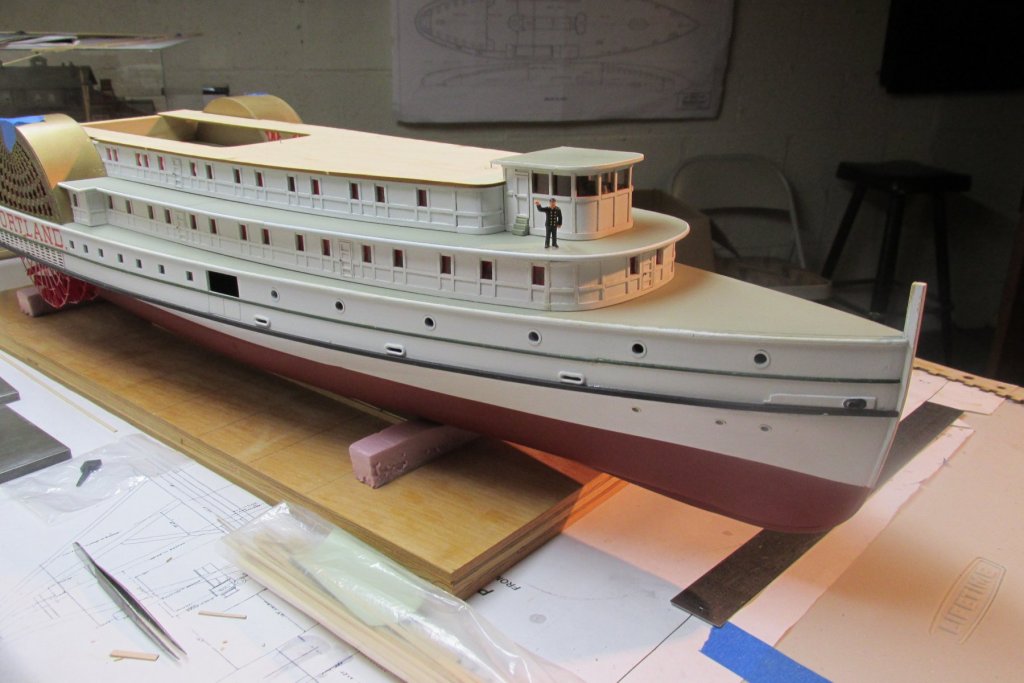
-
Hi Nick, This appears to be the kit of the "Rangeley" put out by Freedom Song Boatworks in Edgecomb, Maine. I built their "Nelly G" back in the early 90's. Construction very similar. John Elwood
-
Hi there FAA. Welcome to the forum. I also live in Connecticut. Born here some 78 years ago. You might want to let us know your name and where bouts you live. I am currently a member of the Connecticut Marine Model Society. We just celebrated our 50th anniversary. CMMS gets together once a month in the new annex of the University of New Haven in Orange, CT. Several of our members have built many of the models mentioned in your intro. If you live in this area you might want to attend our next meeting on October 13. Perhaps you'll see one of your models in our show-and-tell. Might be a real eye opener. If interested I'll get back to you with more details. John Elwood Stratford, CT
-
15' Dinghy by Bedford - FINISHED - 1:1 scale
jbelwood replied to Bedford's topic in Non-ship/categorised builds
I love the looks and beautiful lines of your boat. Is she scratch built from plans? -
Thanks Jack. Would love to row the full size boat on the Housatonic River near where I live. Was on the 8 man Marietta College crew team back in the late 50's. Haven't been in a shell since. John Elwood
-
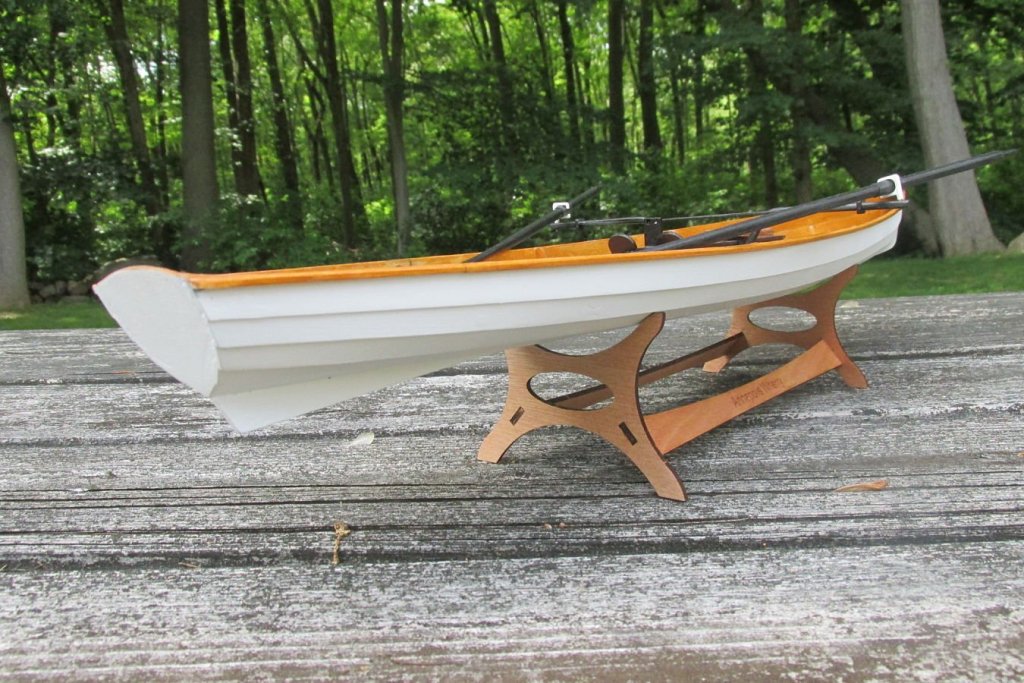
In case you haven't noticed, we have a new sponsor, Chesapeake Light Craft. They are introducing a series of model kits that are a scale rendition of their full scale, stitch and glue, boats. Needing a break from building Bluejacket's Portland, I decided to build CLC's Annapolis Wherry. Took about 20 hours to build as seen in finished boat below. John Elwood
.jpg.ca71015e4ed2f5277f321a6de6c4cc46.jpg)
-
Taking a break from building Bluejacket's Portland, I decided to build Chesapeake Light Craft's Annapolis Wherry. I hadn't seen any of their models on MSW so this might be a first showing. The model is 26.5 inches long and uses CA glue exclusively throughout. Every part is laser cut. This is a stitch and glue model following their technique on the full size wherry. Was a pleasure to build but not for a beginner. Their web site explains it more thoroughly and even points to a fast frame video for reference. John Elwood
.jpg.7958b2ae2cc14e2cf5cb15e2b99de496.jpg)
.jpg.1886edb3fc839f2d8f060c7c1da1cc10.jpg)
.thumb.jpg.fa75610cec6db020f523c9b87fdffca6.jpg)
- 3 replies
-
- 11
-

-
You might want to visit this gallery http://www.jrusselljinishiangallery.com/ located in Fairfield, CT. Great collection of marine art of all types. John Elwood Stratford, CT
-
This question has come up many time in the model railroad hobby. The most common answer is to charge 10 times the cost of the kit plus the cost of the kit it self if not supplied by the customer. Therefore, a $300 kit (not uncommon in this hobby) would render $3300. There are many exceptions to this depending on the complexity of the build. Just my two cents worth. John
-
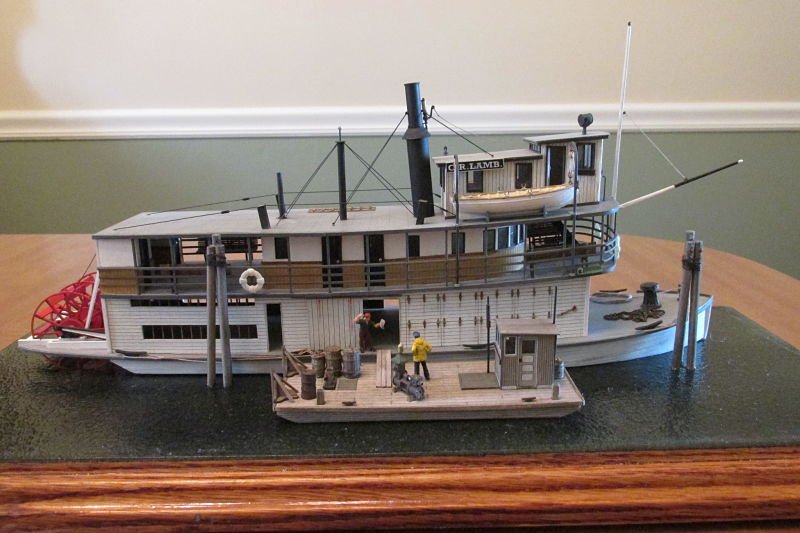
Jaeon, Nils is correct. Here is a photo of my HO scale stern wheeler with HO figures from Preiser. They sell a ships crew (figure in yellow slicker) along with others that may fill the bill. Also, go onto the Seaport Model Works site, they may have some also. John
.JPG.0f63c6ee78de81a73513268173965c99.JPG)


.jpg.f4692cb33133cc6ac50276637c4590f3.jpg)
