HOLIDAY DONATION DRIVE - SUPPORT MSW - DO YOUR PART TO KEEP THIS GREAT FORUM GOING! (Only 24 donations so far out of 49,000 members - C'mon guys!)
×


toms10
-
Posts
929 -
Joined
-
Last visited
Content Type
Profiles
Forums
Gallery
Events
Everything posted by toms10
-
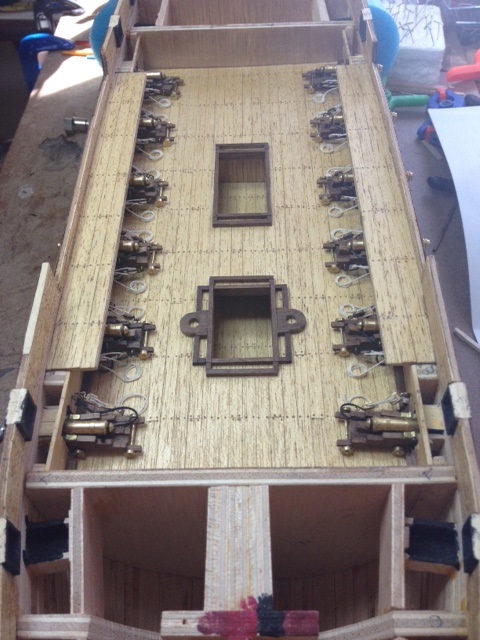
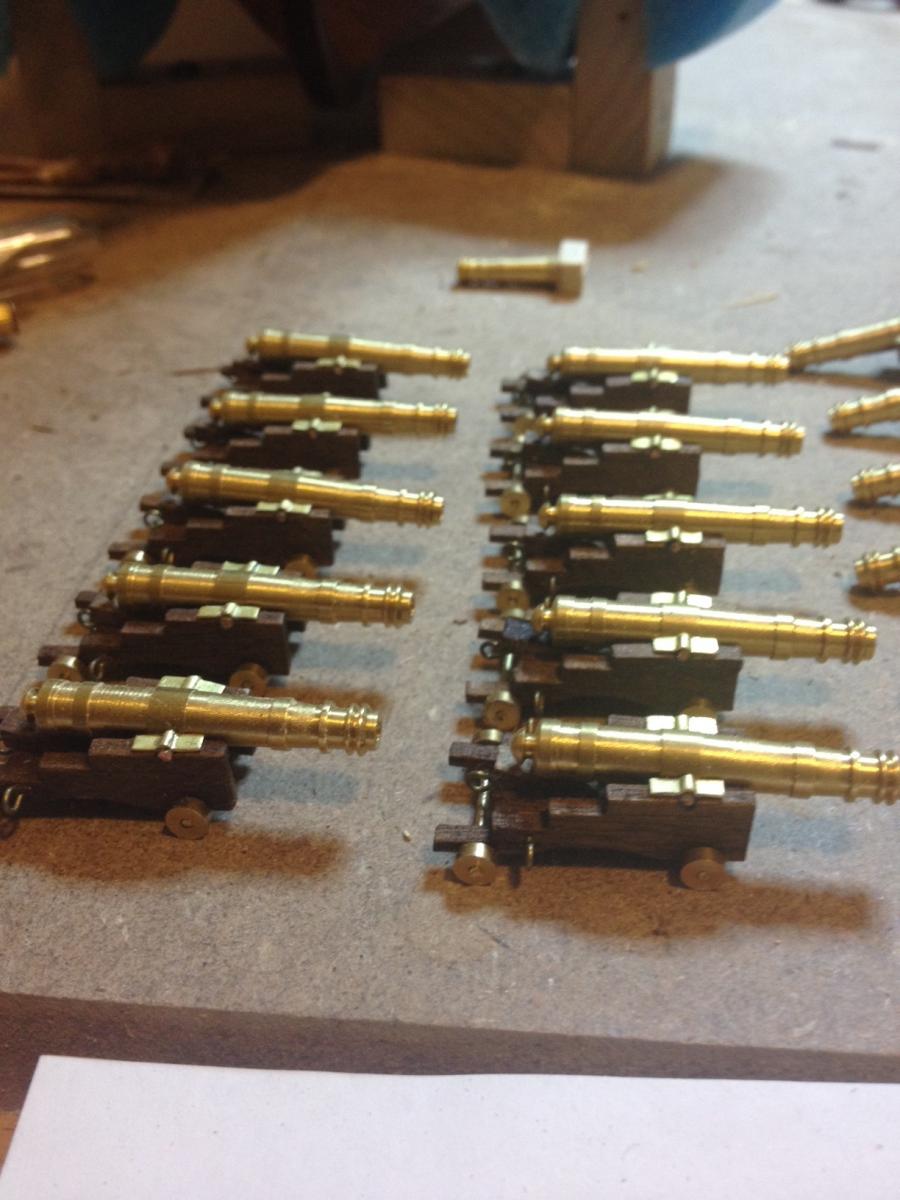
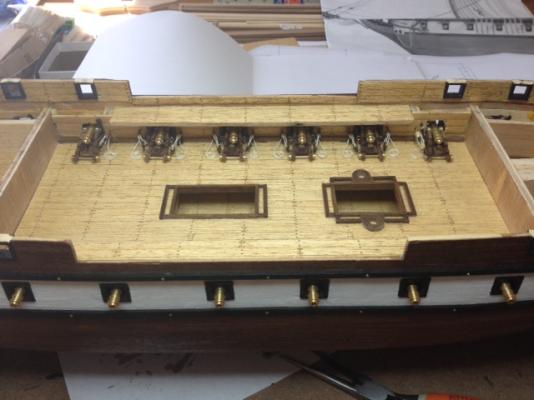
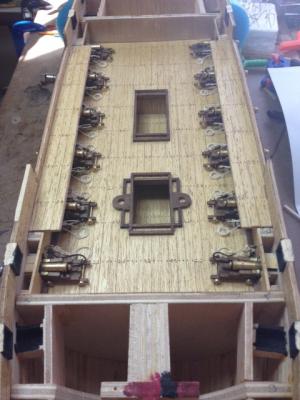
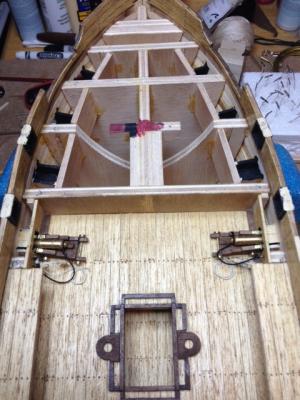
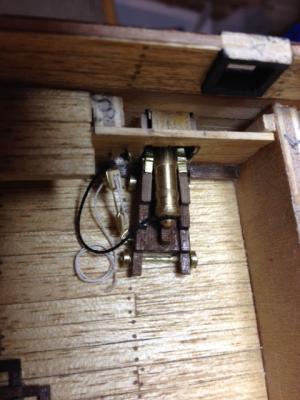
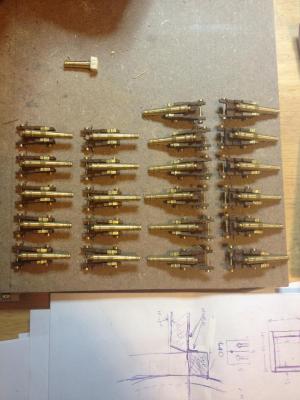
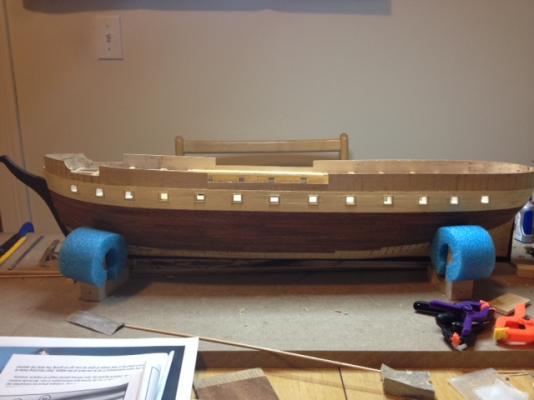
 Reached what I consider a milestone on this project this weekend. Added some fire power this weekend! Also got my first taste of rigging. Now that the main deck cannons are rigged and secured, I can go back and finally put the upper decks on and work on the waterways and other trim work details. It kind of feels like a weight has been lifted off my chest all be it a small weight a weight none the less. I noticed one of the pin cannons was not machined at the end where you would see it... naturally. It is a bit frustrating but luckily I work in a manufacturing facility where I can have it finished up.
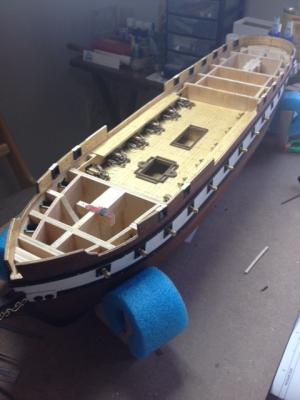
- 212 replies
-
- 2
-

-
- constellation
- artesania latina
- (and 2 more)
-
Hipexec, Thanks for compliments. Its all in how you take the pics. I take them far enough away as not to see the "learning opportunities". The AL instructions were less than wonderful. As I and other members mentioned, the order of there instructions doesn't make sense and they are quite vague. I am doing most of the work by looking at the black & white pictures of each step and what is upcoming. My engineering background helps a lot. It seems as if the instructions assume you have made models before and the instructions are more just suggestions than an actual guide. To be fair, this is not a beginner's model so the assumption on AL's part of prior experience is not wrong. Tom
- 212 replies
-
- 1
-
-
- constellation
- artesania latina
- (and 2 more)
-
jParsely, Nice to hear from another Constellation builder. It has been an enlightening ride so far. I don't know how far you are into the build. If you are just starting out do not follow the AL instructions in the order they are presented or you will be in for some frustrating times. If it wasn't for this forum I am not sure I would be still working on it. Thank you all for the info and the likes.
- 212 replies
-
- 1
-
-
- constellation
- artesania latina
- (and 2 more)
-
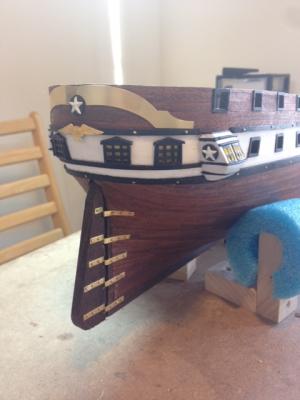
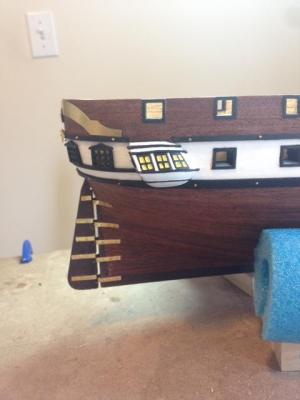
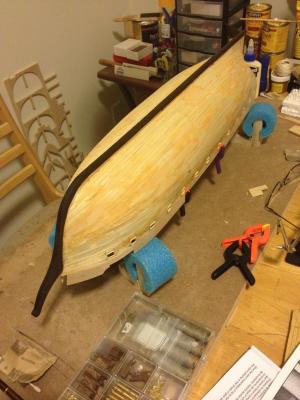
Made some visual progress the past few days. Managed to salvage the cast quarter galleries enough to use them. They are not museum quality but then again, neither is the rest of the model. As the model grows with rigging tons of other details, they will hopefully just blend into everything and not be the proverbial "sore thumb" that sticks out. I am pleased with the overall results so far. The first one is always the hardest. So many techniques to learn. Hopefully, after a few more I will be able to look back at this one and see a marked improvement. Here are some pics of the stern details.

- 212 replies
-
- 1
-
-
- constellation
- artesania latina
- (and 2 more)
-
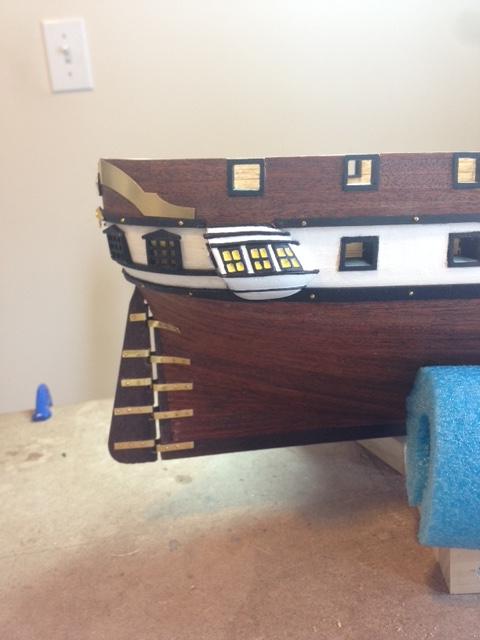
Worked on some of the detail work on the hull this weekend. Added the scroll work, anchor chain holes and upper and lower rubs. I went with gold color scrolls instead of black just to add some color. Not sure if I like it yet. Actually it is kind of late now, trying to paint that detail after they are mounted would be next to impossible... at least for me. I guess I can learn to like it. I am trying to decide if I can salvage the castings for the quarter decks on the sides of the stern. They are pretty lousy quality. Hopefully with some filing and painting I can use them. Otherwise, I need to figure out how I am going to build them from scratch. Not something I was planning on. Seeing some of the quality in this kit makes me nervous about putting down a lot of cash for the next one someday if I end up remaking some of the components anyway. I don't think I am ready for a scratch build so I am stuck in that somewhere in between land. I will post a pic of the quarter decks after I work on them.
- 212 replies
-
- 2
-
-
- constellation
- artesania latina
- (and 2 more)
-
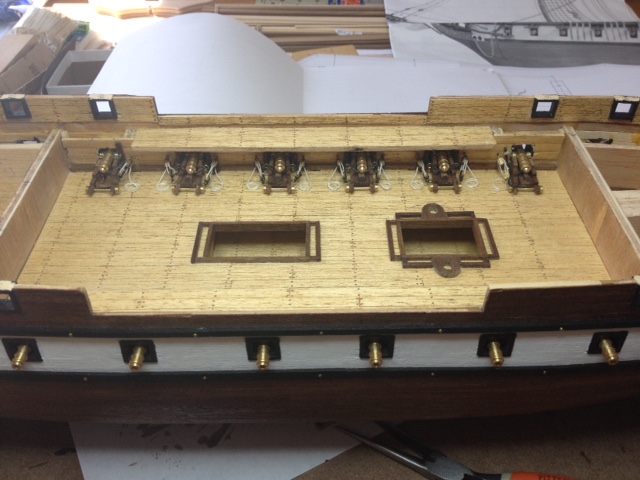
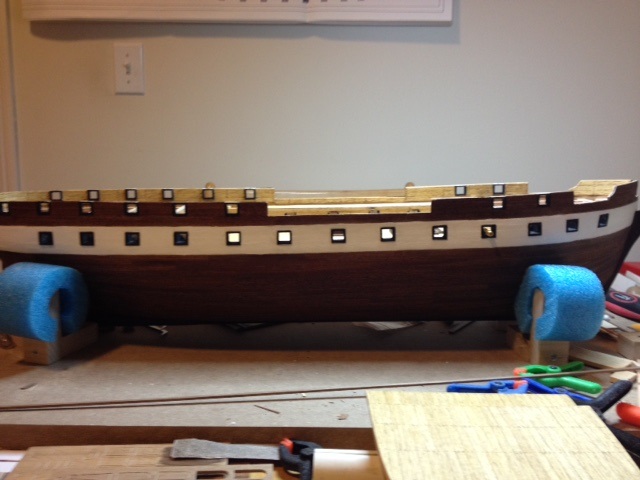
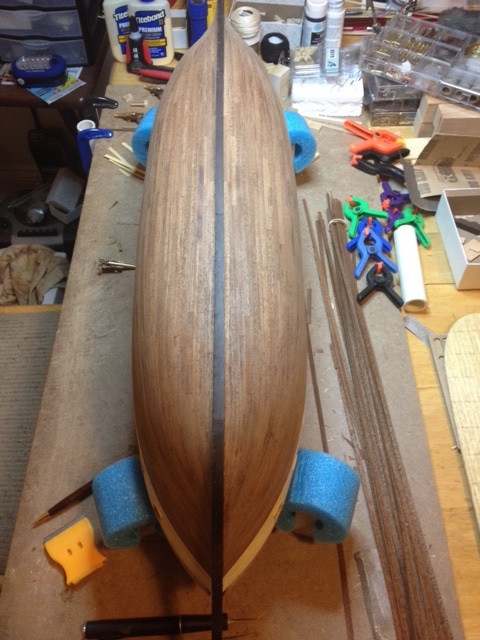
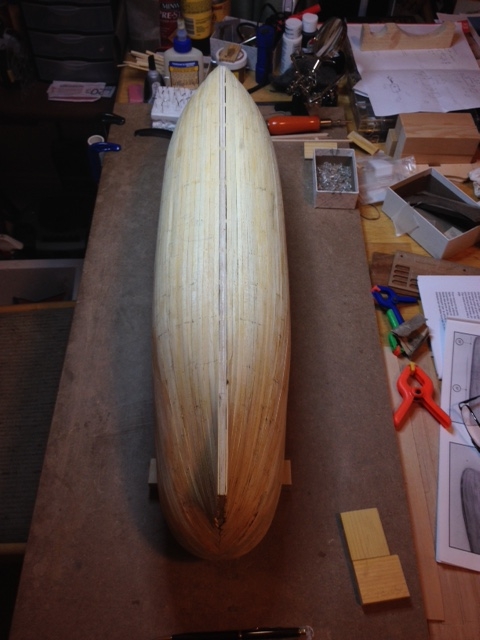
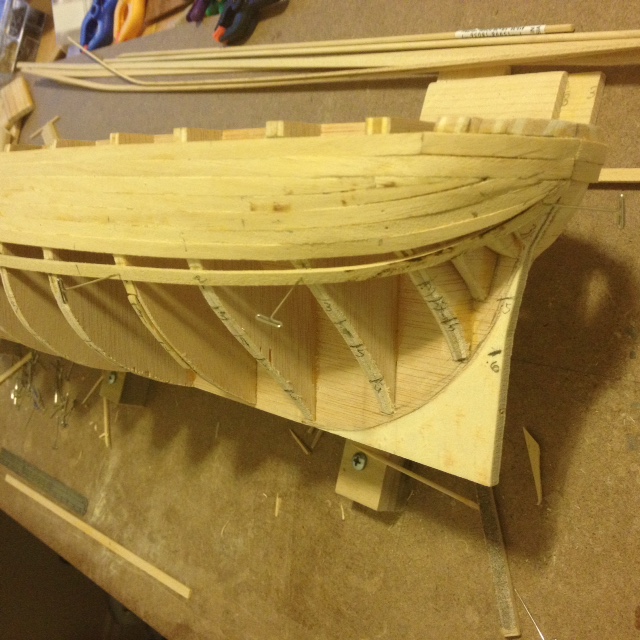
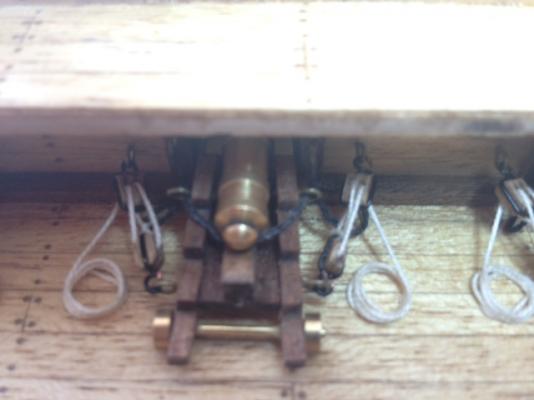
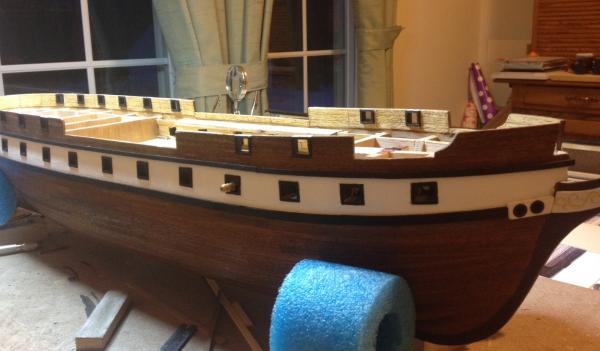
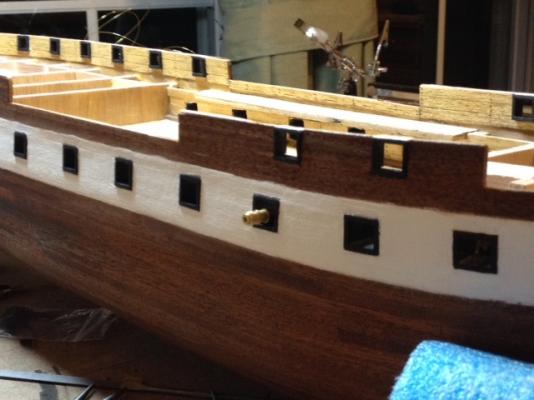
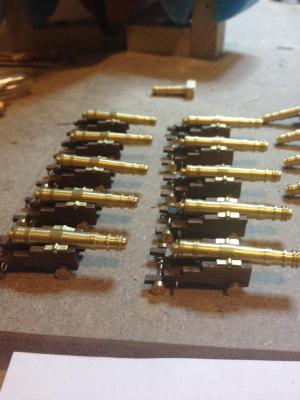
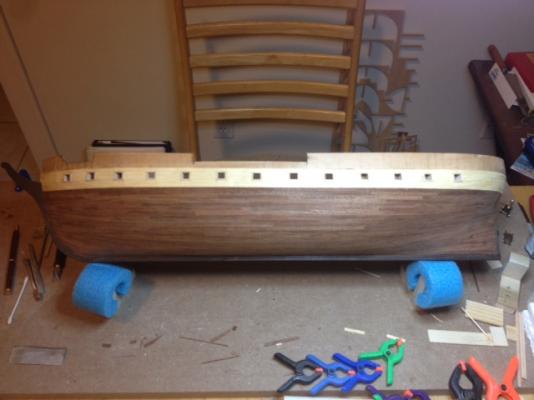
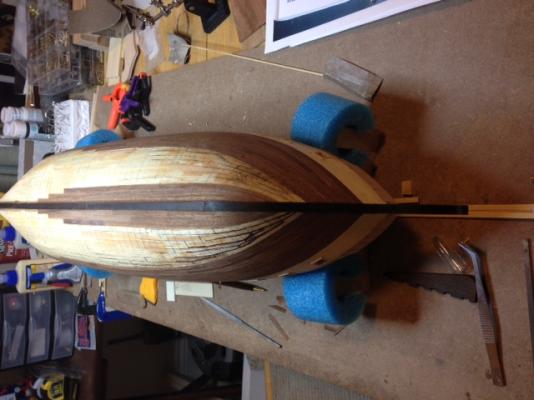
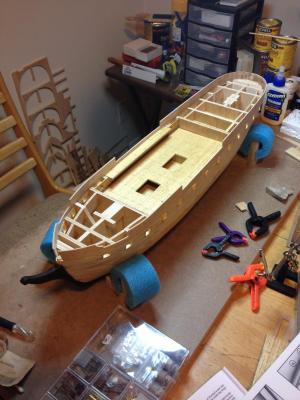
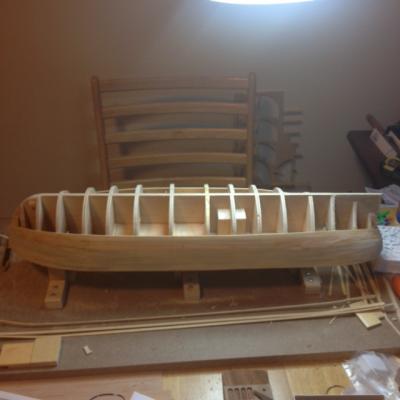
Just an update, I finished the hull with a coat of satin urethane and painted around the gun ports. I am starting to put the cannons on the main deck so I can then put the fore and aft decks on and trim them up. Since you really can't see the cannons in the corners of the main deck because of the overhanging upper decks, I only rigged one side of them. You would have to really down underneath the decks to see the rigging on these four cannons. I thought that this is the perfect opportunity to practice rigging since this is my first attempt at it. If it didn't come out that well it would be hidden anyway. Here is a profile of the hull as it stands today. ... with the first cannon in place. One of the "half-rigged" cannons. I am not sure if the blocks might be a bit large. They are 2mm, the smallest I could find. I also am not sure if instead of rigging both sides of the gun as shown, I should instead put just one setup from the back of the carriage. I have also seen pics with a block and tackle set up on both sides and the back. I need to research the actual setup on this ship. Sometimes it also helps just to stare at it for bit...

- 212 replies
-
- 2
-
-
- constellation
- artesania latina
- (and 2 more)
-
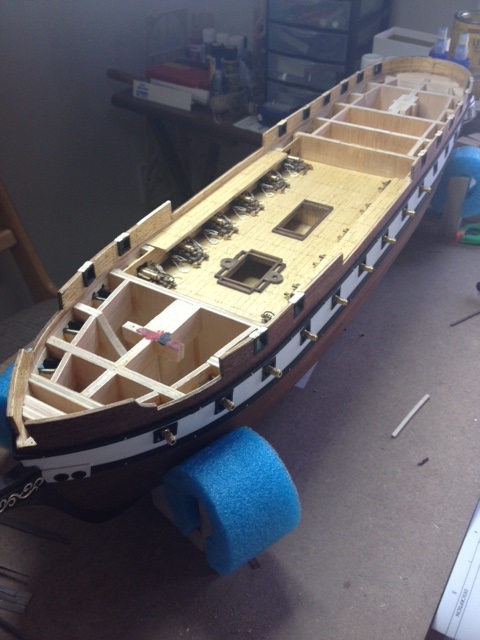
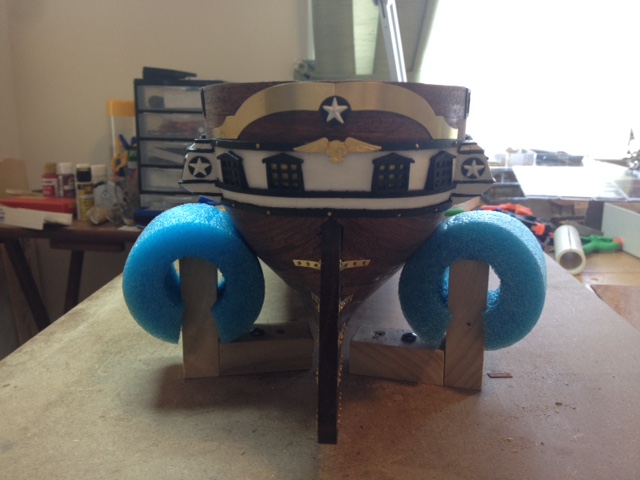
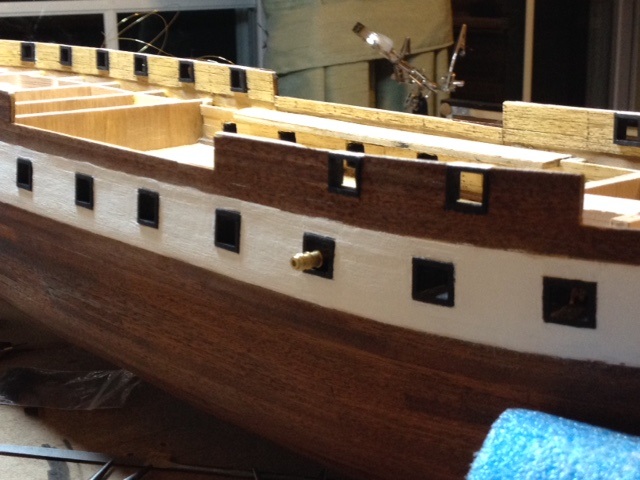
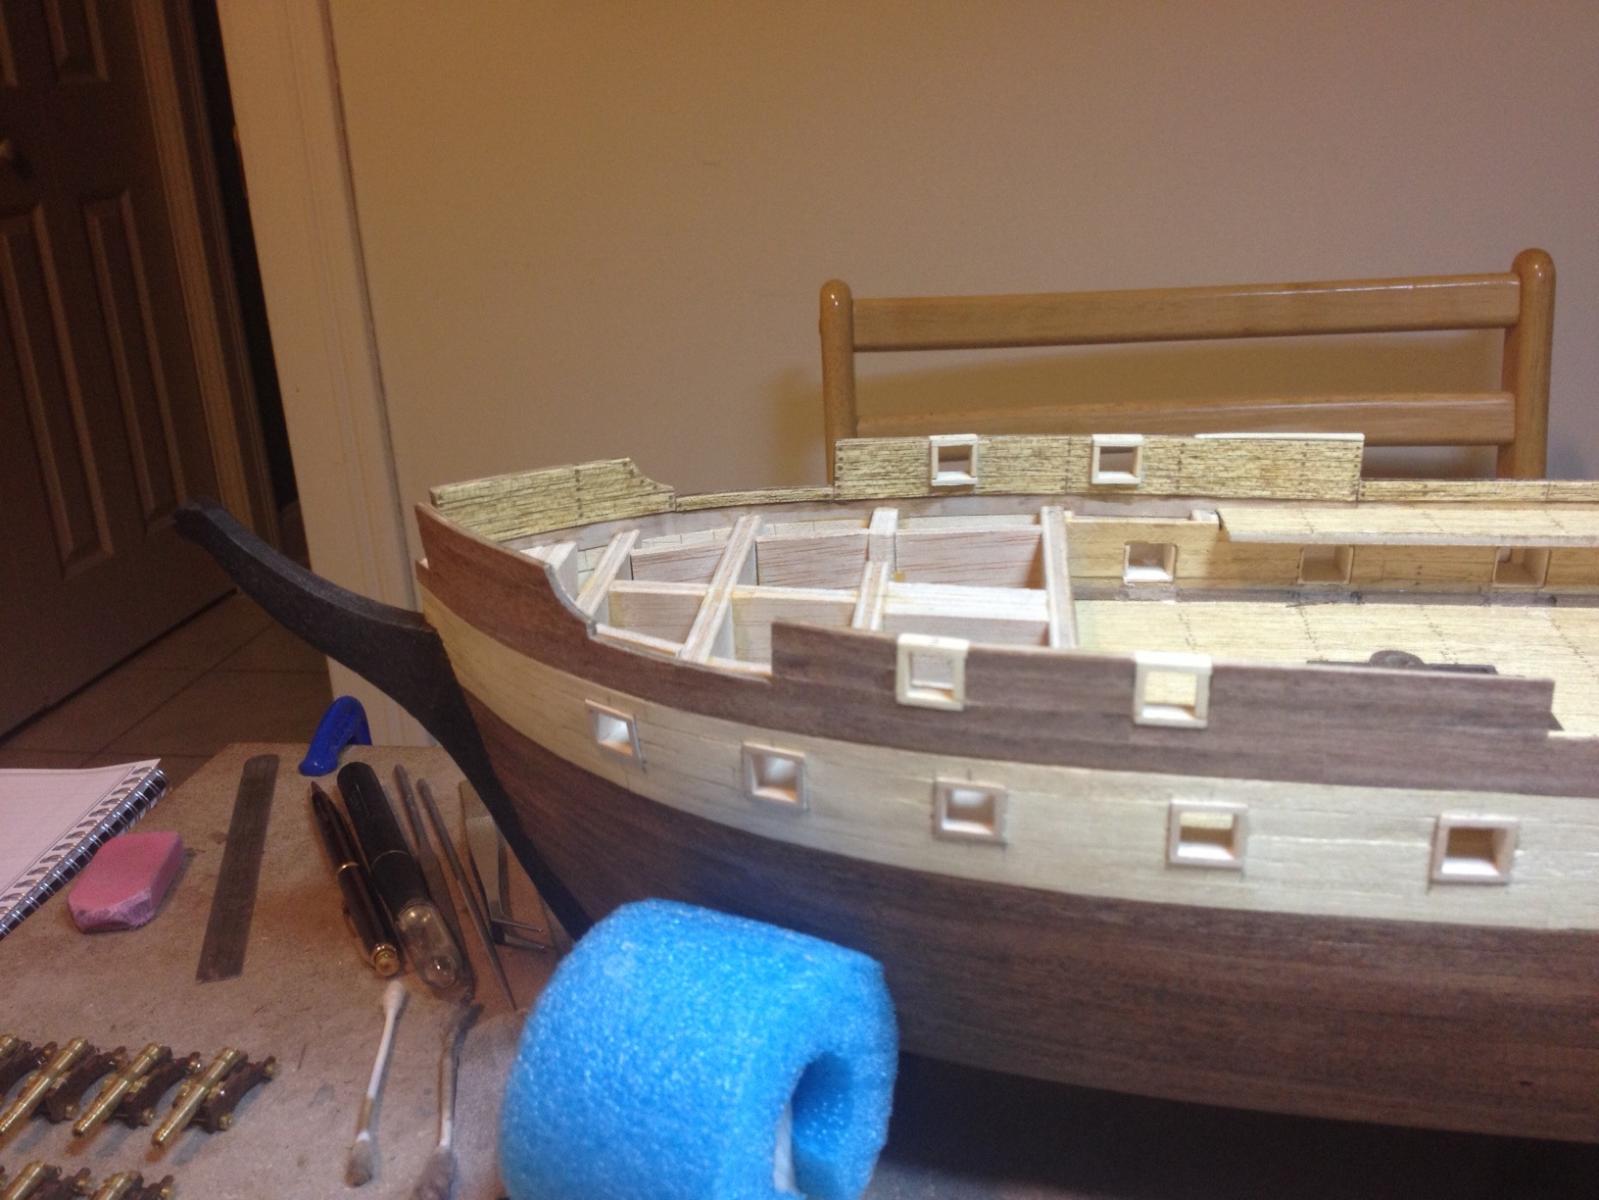
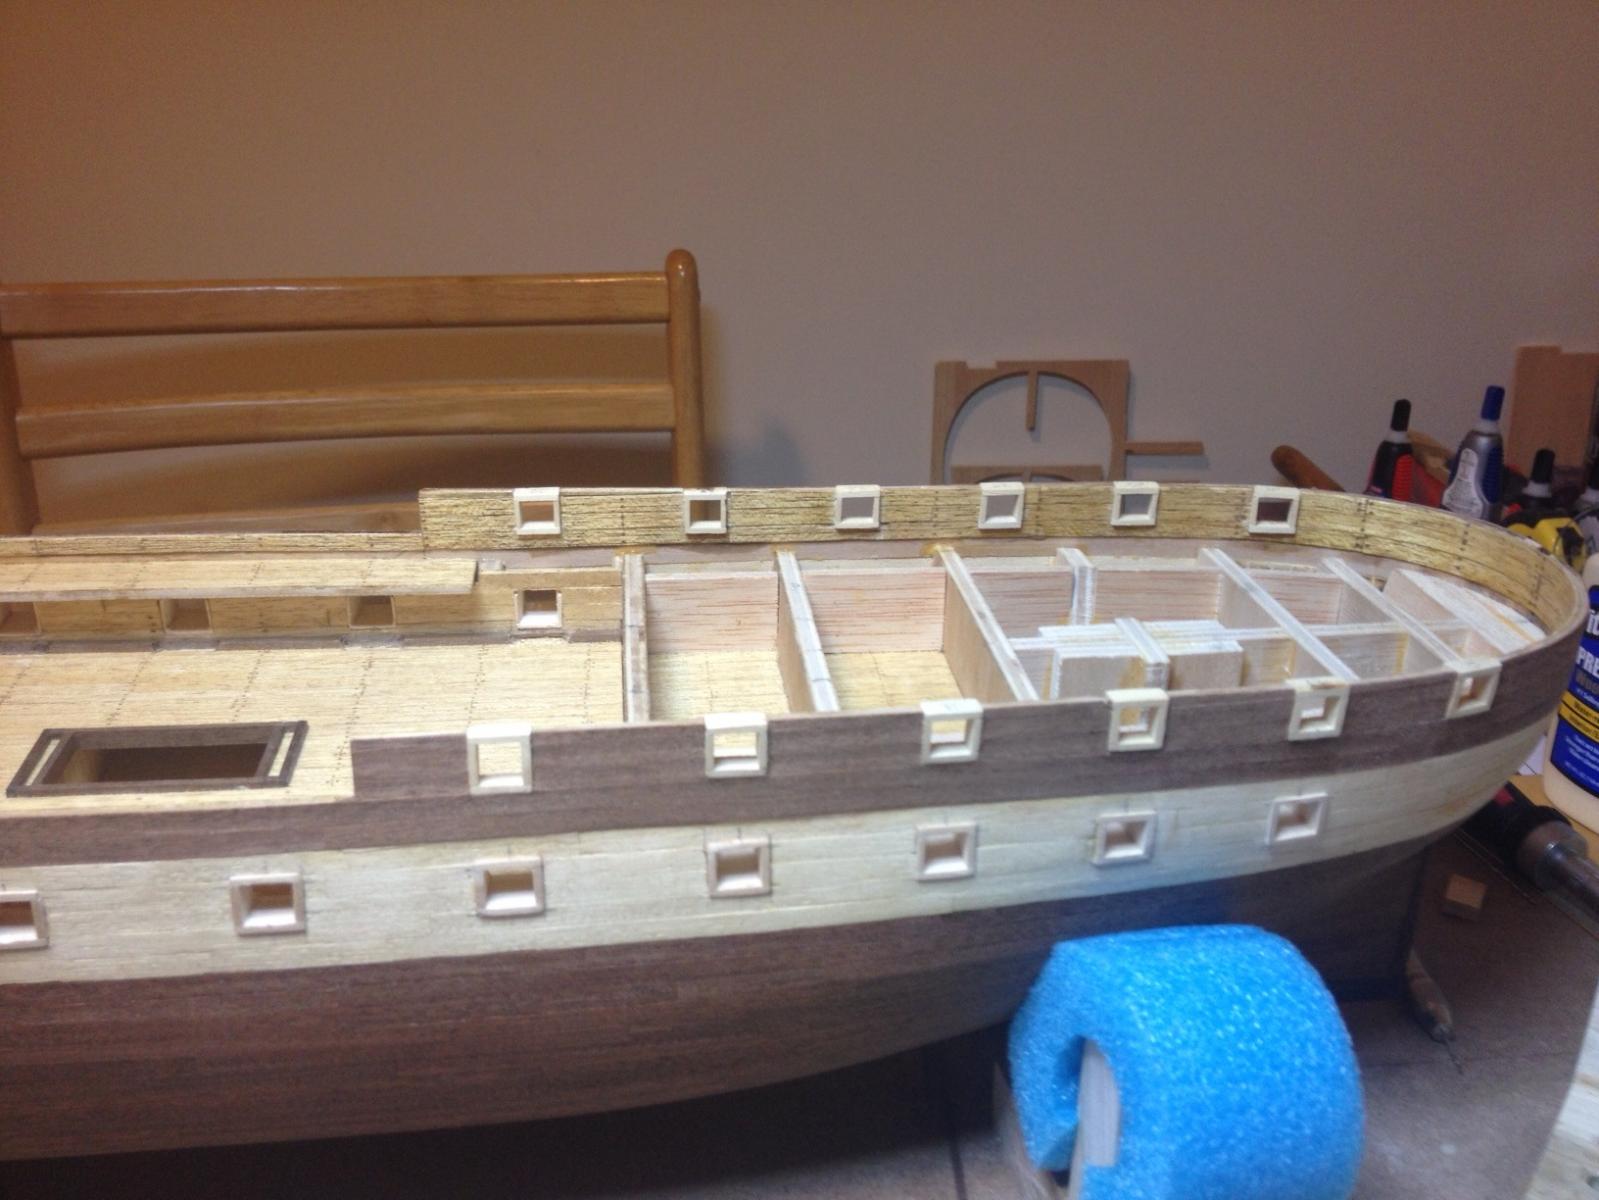
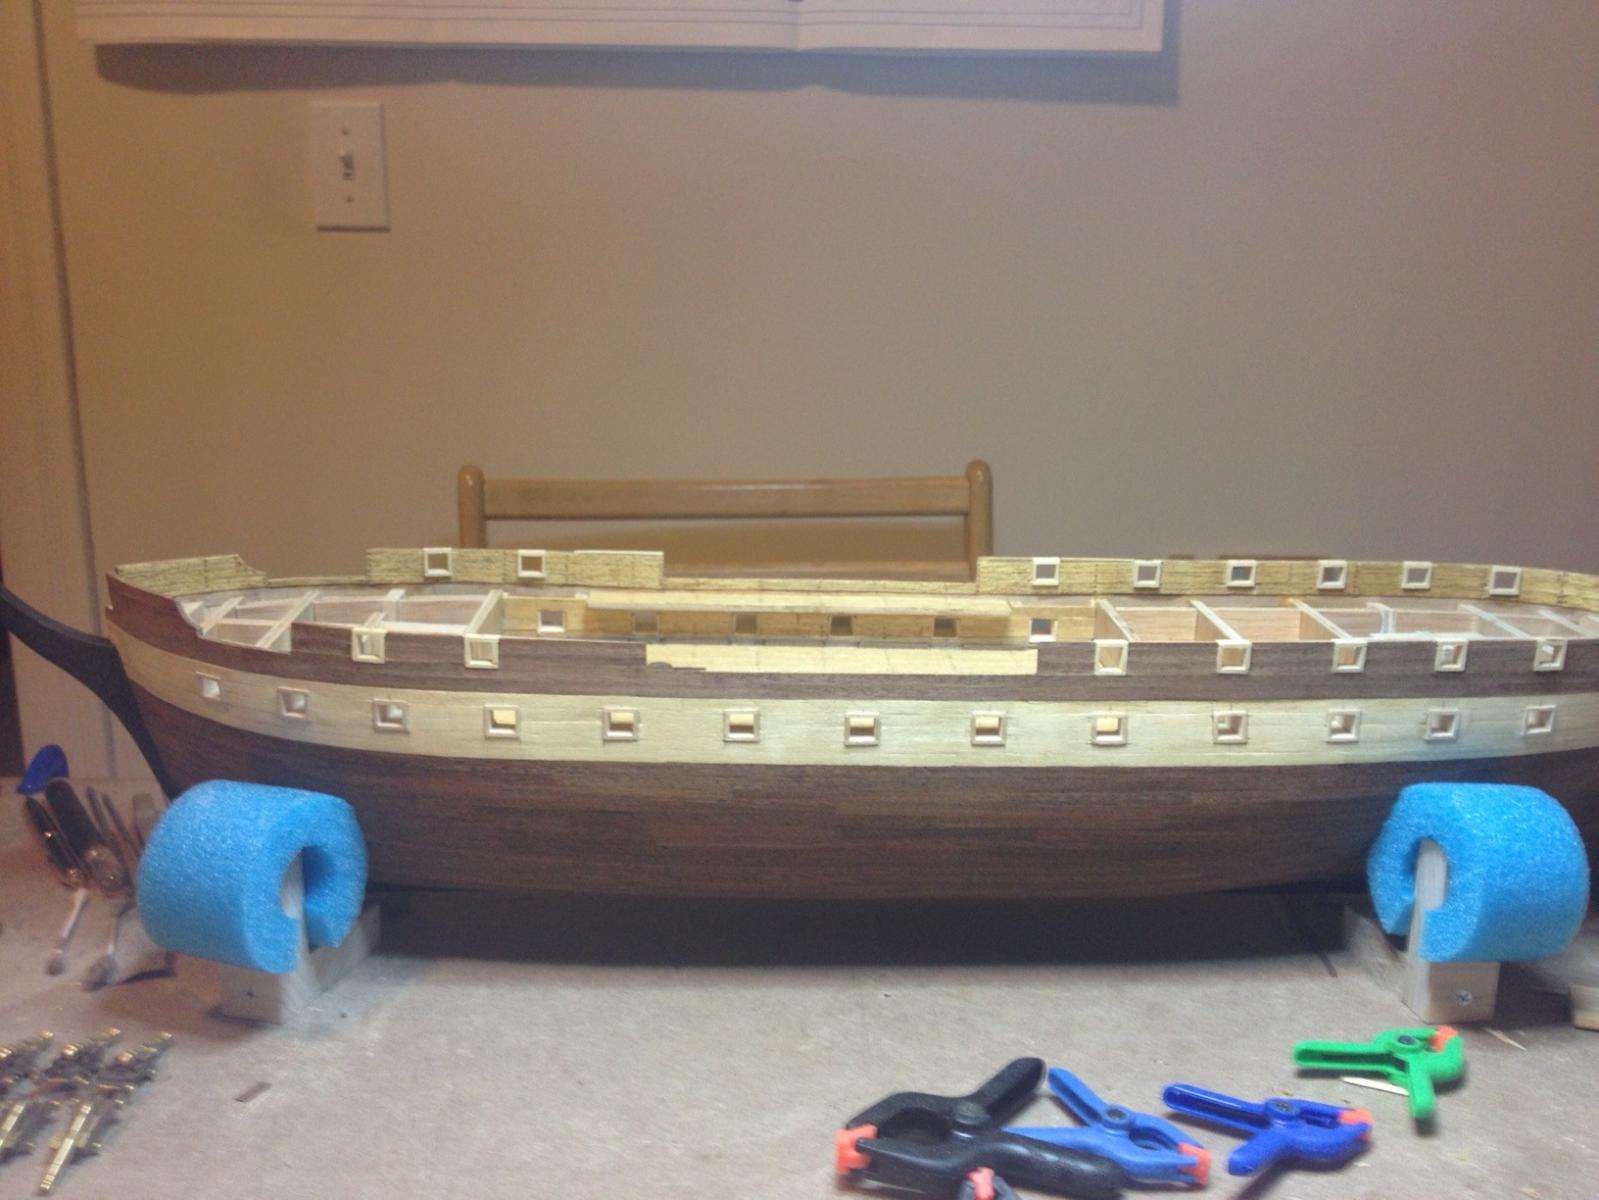
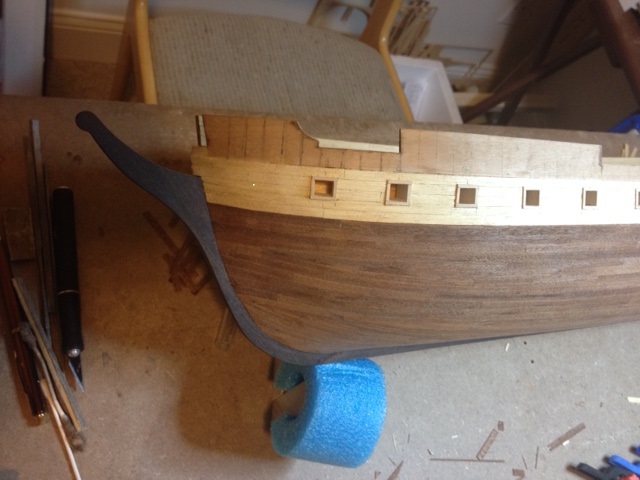
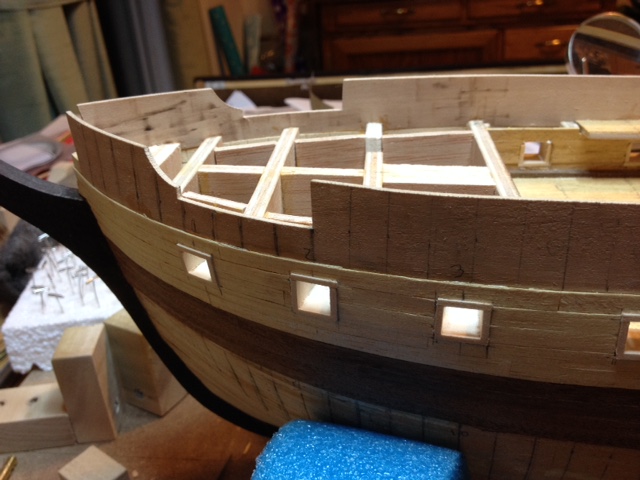
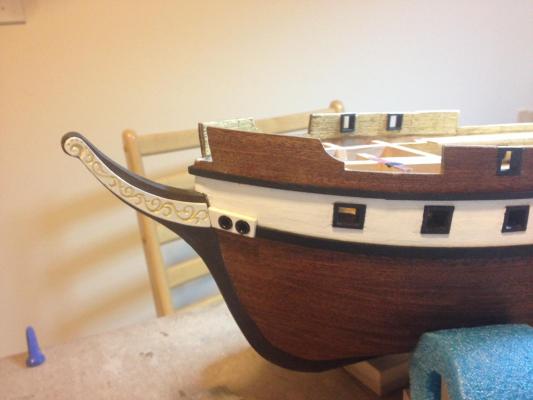
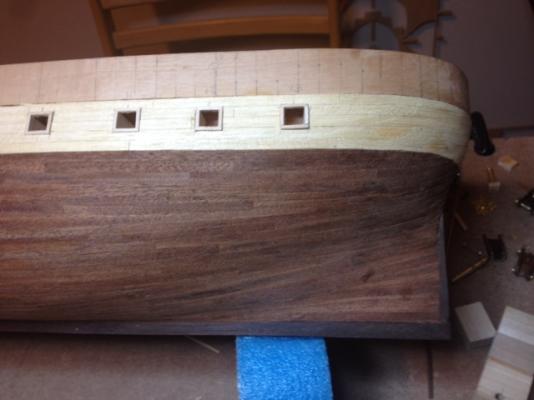
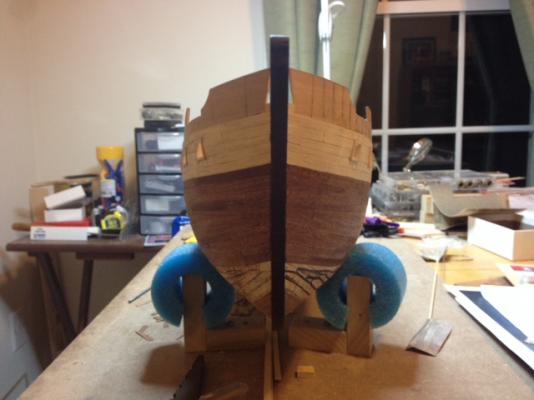
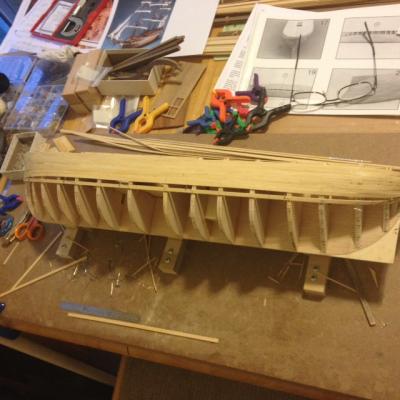
Hi Jason, Yes, that has been the main focus for this whole build so far. How much can I do before the decks get mounted. I want to do as much to the hull as I can to lessen the chance of knocking loose one of the main deck cannons. Pretty much tossed the instructions (at least the order of steps) at this point. I should be able to follow them after the decks are mounted. I planked both the inside and outside of the bulwarks and framed the gun ports on the upper decks because I thought it would give it a more finished look. The instructions make no mention of this. One of the bulwarks also had a strange taper to one end so I had to put a spacer on it to level it out as you can see below. Also my main deck cannons did not really stick out far enough where you can see them after the gun port lids would be installed. To fix this I altered the gun carriages for the main deck (filed out a small notch in the front to clear the walnut trim and pushed the barrel forward slightly). I also ground out the walnut trim to nestle the cannon a bit closer to the hull. You can kind of see this in the first picture. I know this is not practical in real life and the cannon would only be pushed out far enough to clear the hull when firing, but with the lids on you could barely see the cannons. My boat, my rules... You can see the little tapered spacer I needed to add. It will not be visible once the top rail is in place. I think my next step is to paint the gun port frames then the white strip around them. Some of the armaments. The cannons on the right are the altered ones. The alterations were enough to make the assembly front heavy but that is nothing a little CA can't fix.


- 212 replies
-
- 1
-
-
- constellation
- artesania latina
- (and 2 more)
-
Marsalv, The only thing I can think of to say is "WOW". Thanks for doing such a nice job posting the pics. They make a great reference for those of us just starting out. Tom
-
So I made some progress this weekend. Finished planking the hull and inside of bulwarks. Next I need to locate where the gun ports are going to be cut on the bulwarks next, cut them out then plank the outside. I noticed also that the gun carriages don't really fit well in terms of height. They seem to be kind of high and don't come out past the outer hull enough on the main deck. I see some minor alterations in my not to distant future. I have been logging my time just to see how many actual working hours I spend on this model. The outer planking took 41 hours! Included in that however, are hours just spent staring (planning ) trying to figure out the best layout. Overall there are about 170 hours. As this is my first build, much of it is spent absorbing and learning. Thanks to all my MSW friends for the help. I also played with some of the main deck trimming just to do something other than planking.


- 212 replies
-
- 3
-
-
- constellation
- artesania latina
- (and 2 more)
-
Thanks for the compliment John. At the rate I am going I should be about 150 years old when I start my 10th!
- 212 replies
-
- 2
-
-
- constellation
- artesania latina
- (and 2 more)
-
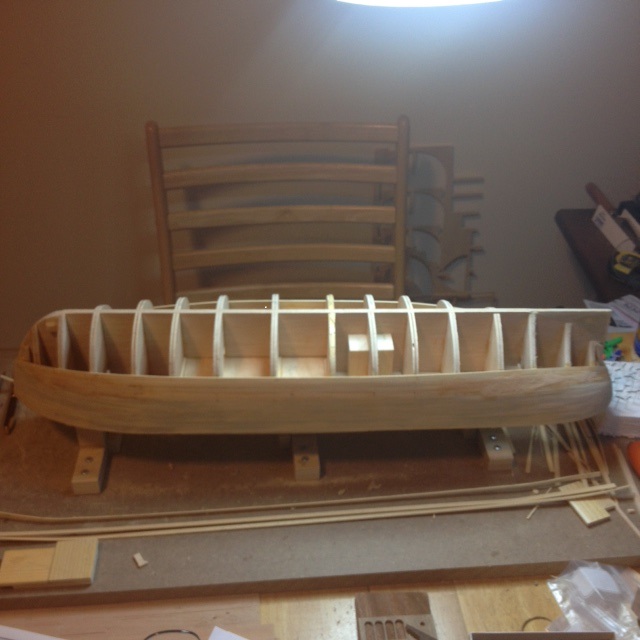
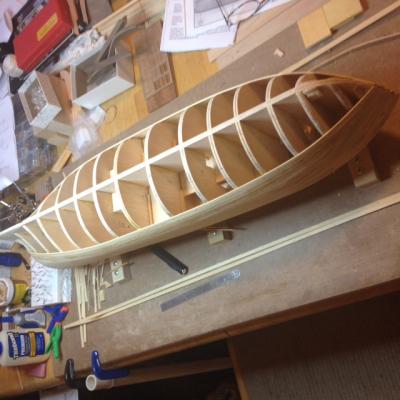
Well the last week has not panned out like I had hoped. I spent more time battling snow storms and blizzards than working at the shipyard. I did make a some progress with the outer planking. I decided to sketch out the general pattern for meshing all the merging planks together at the bow on the hull itself. Since this is my first build, I find it helps to have a plan since I keep starting and stopping for snow events. I am also able to better maintain some symmetry between both sides of the hull. I am pretty happy with the way it is coming out even though it may be taking a while. Learning as I go. Next steps will be to plank the inside and outside of the bulwarks, paint the gun ports and outer planking between the upper and lower rubs (wales).... I think.
-
So I have gotten a bit further. I did not like the way the original gun port linings looked per the AL plans. It was time for my first "do-over". Instead of using the 0.6mm thick basswood as suggested, I opened up the holes replaced the liners with 1.5mm thick basswood to make them look more framed. My intent is to paint them black with the planking between the rubs painted white. The rubs will also be black. The rest of the planking will be done with the walnut that was supplied. I need to lower the 12 cannon carriages on the gun deck a bit. When they are assembled the are a bit high in the port hole. Should not be a big deal, I will probably skim a bit (1.5mm) off the top of the sides where the cannon barrel mounts. The deck in relation to where the upper rub and bulwark meet seems to be a bit high. Either the bulkheads were not cut down far enough for the deck or the cannon carriages aren't quite right. Once the outer layer of planking is done, I will plank the bulwarks both inside and out, place the 4 cannons that go under the top decks and then put the decks in place. I figure this order will produce the least amount of chances to knock off one of the 4 cannons that need to be placed early. Here is where I am right now. Expecting a blizzard to bury us tonight and tomorrow with 2 - 2 1/2 feet of snow. I guess that just means less time at work and more time in the shipyard.


- 212 replies
-
- 3
-
-
- constellation
- artesania latina
- (and 2 more)
-
That has got to feel good. Nice job on a kit with some tricky issues.
-
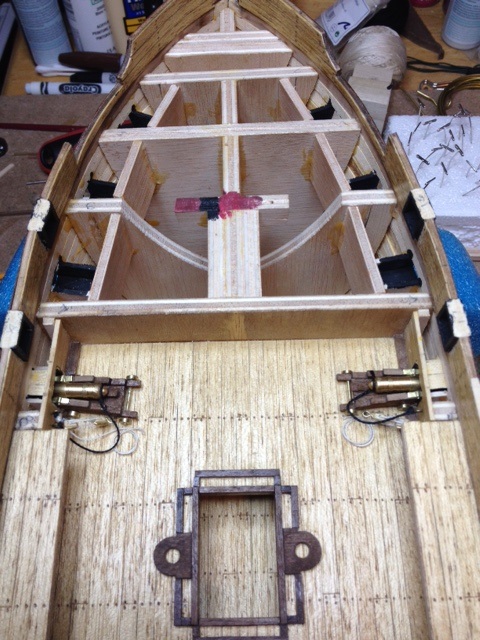
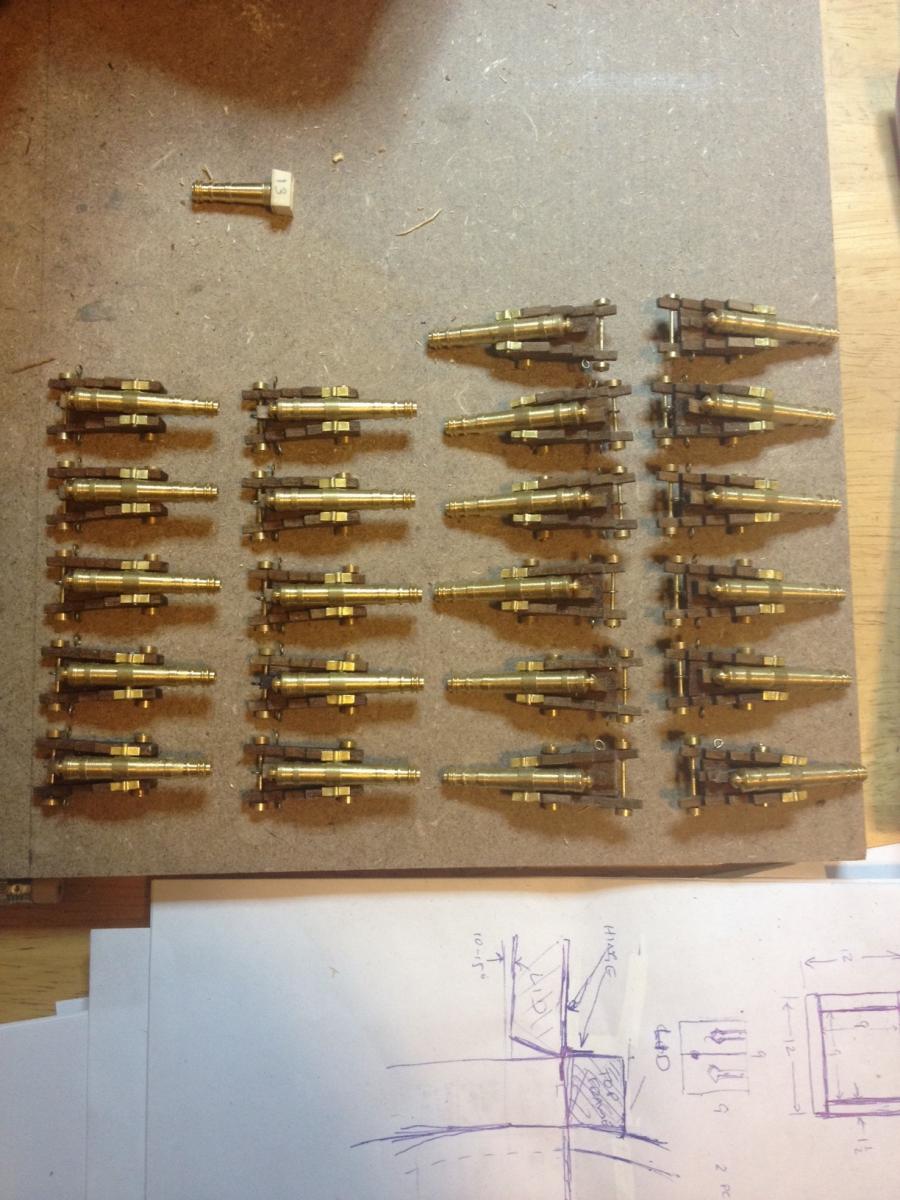
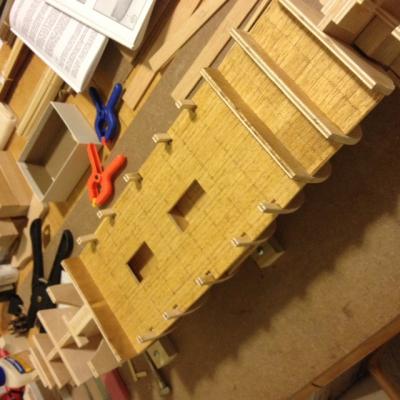
So I have been making a bit of progress since my last post. I cut out the gun ports and framed them. My plan is to put the 2nd layer of planking up to the liners and sills and then file the liners and sills flush with the planking. I think I can get a cleaner look that way. In the end, the planks surrounding the gun ports will be painted white and the liners and covers black. I am not really following the building order laid out in the instructions. I am trying to do as much as I can prior to putting in the 4 cannons that are underneath the upper fore and aft decks. I don't think that is the right terminology for the deck names. The more I can do now, the less chance I will have of dislodging a cannon while working on the hull. This kit does not plan on rigging the cannons either. I decided that was something I wanted to give the model a bit more detail. So now I am waiting for the blocks and some other stuff I ordered to make its way to my door. I was going to make the blocks but after making a couple and having them split I decided for the number of them I will need it would be much easier to buy them. I did end up making 200 eye hooks from some wire I had. That was relatively easy with the right pair of pliers. I managed to put in the keel and bulwarks while I am waiting. Next I plan to start the 2nd layer of hull planking, then rig the 4 cannons in the corners of the main deck and finally place the remaining decks.
- 212 replies
-
- 2
-
-
- constellation
- artesania latina
- (and 2 more)
-
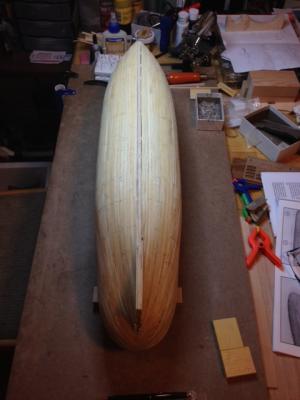
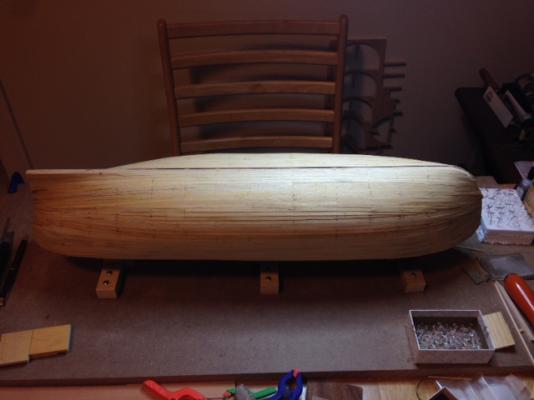
1st layer of planking is finally done. After some sanding I think we will be in good shape. Next I will probably trim the edges where the walnut keel pieces will fit and continue on with the bulwarks. Looking back I am wondering if it would have been easier to put these in before the 1st layer of planks and fit the plank lengths. Like everything there are good and bad points with either way. That is what makes this hobby fun... there is absolute right or wrong. It is up to each person's creativity.
- 212 replies
-
- 1
-
-
- constellation
- artesania latina
- (and 2 more)
-
Nice job on the sails. They really look like they are billowing in the wind. I am sure I will be bothering your when I get to the rigging stage which will probably be next spring. I am just getting close to closing up the hull with the first layer of planking.
-
Still moving forward with the 1st layer of planking. About halfway there. Both sides are coming out pretty symmetric so I am happy with the progress so far.
- 212 replies
-
- 2
-
-
- constellation
- artesania latina
- (and 2 more)
-
Thanks, Gundorf, It is kind of a tricky build in that the order of everything with regards to assembling what to what when needs a lot of forethought. The first thing that jumps out at you is do not install the fore and aft decks until the cannons on both ends of the main deck are installed. You will not be able to fit fingers or work in the space where they go. The AL instructions are a bit vague but you should have no trouble as this is your second build. This is my first and with the help of MSW I am finding my way through it. I plan on changing a few things as I go. When I get to these items I would like to replace the metal quarter galleys with wood and the same with the small boat (not sure what the correct term is). I did find that going through the parts list the way they have it laid out is somewhat "challenging" I seem to be short a few belaying pins, dead eyes and blocks but these are things I can make or buy when I get there. Enjoy your build. Looking forward to seeing pics and info so I can sponge some knowledge from you. I am learning as I go and that is half the fun. Tom
-
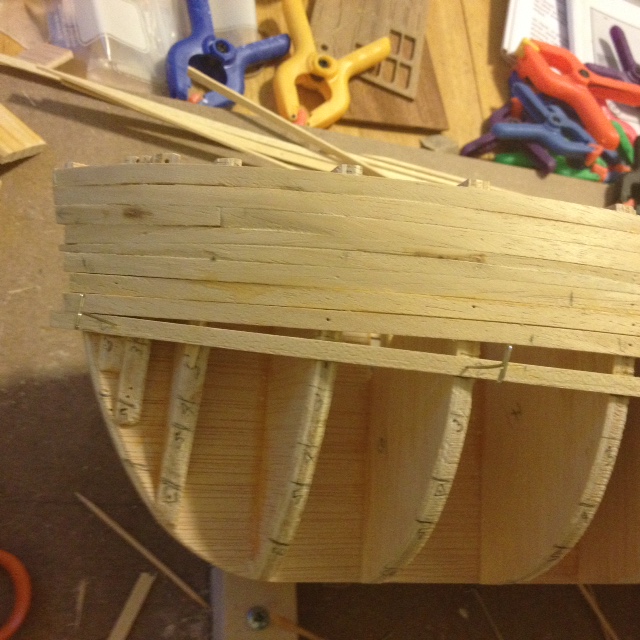
So I started the first layer of planking. It is the first time I have done this and have read many tutorials which have helped greatly. A few planks a night so it should take a while but I am in no rush. Knowing that this will be covered up with a second layer definitely takes a lot of pressure off. Each one gets a little better. I am trying to approach it as if it will be the only layer so I can learn how to do it correctly i.e. not tapering the ends down to more than half the width, where and when to insert drop planks or stealers. I end up dry fitting a couple and attaching with t-pins to try to figure out if I will need stealer before I actually glue. This seems to work best for me. There is one plank that needs some sanding as it is a bit high. It has a seam because it "had an accident" and broke after I shaped and fitted. I also need to trim them all to length when I fit the front keel piece in. This one here that has a low spot so I will be using some filler. Again, good thing this is the underlay planking as this is definitely not worthy of display. Overall progress. I did try the plier type plank bender and found it to be more hassle and less effective than it's worth. I am soaking and using an old modified soldering iron and homemade form tool to bend and found it to be much easier. If you go a bit too deep with the pliers the plank ends up snapping when it bends. That is the "accident" I was referring to in the first pic.


- 212 replies
-
- 3
-
-
- constellation
- artesania latina
- (and 2 more)
-
That is a real nice job. I just started with the first hull planks.. someday I hope mine comes out as good as yours.
-
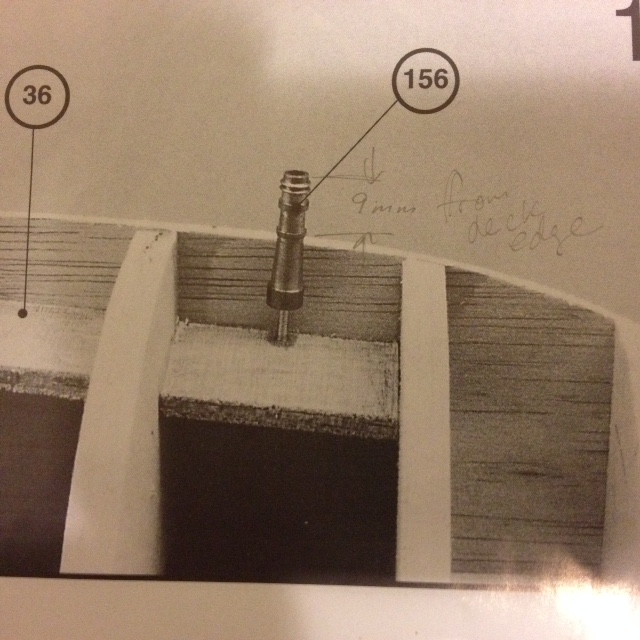
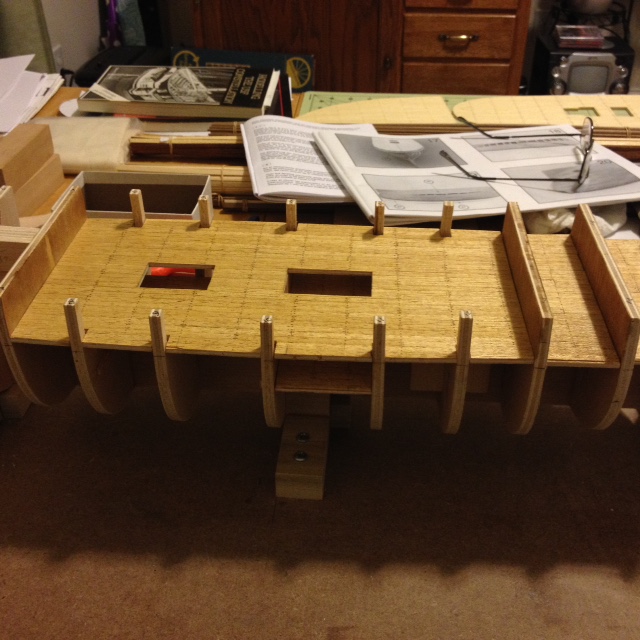
Thanks Marku. It was tedious but I like the way it came out. I put the catwalks in and fared the bulkheads and catwalks. The pic shows the fore deck just held on with clamps for now. I think I figured out a way to install the cannons on main deck that are under the fore and aft decks. I need to think it through but right now I am thinking about temporarily putting the decks in place while I plank the hull. I am going to pin or screw the deck to the bulkhead where the mast is going to be located. The hold the ends with clamps as shown. The hole where the screw will be will disappear when the hole is enlarged for the mast. I am hoping that this will lessen the chances of knocking off the cannon while doing the planking. The next step is to put the supports for the "pin" cannons. I am a bit confused by the directions. The picture for step 15 shows the cannon with the pin not set into the support yet. The written instructions say that after the pin is "nailed" the end of the cannon should stick out 9mm past the edge of the deck. I would take the written instructions as the pin inserted into the drilled hole but the picture shows something else. I am thinking the picture is wrong because once the pin is inserted into the support the cannon would only stick out about 3mm ( the pin is 6mm long). With the gun port covers raised you would barely see the cannons after the planking is on. I suppose if the supports were too far in, I could put another piece on top of the support to bring the cannon out more. That might just be a good idea anyway because I think it would be easier to fix the cannon to the spacer piece that would fit through the gun port and glue that sub-assembly to the original support. Any thoughts? Tom


- 212 replies
-
- 1
-
-
- constellation
- artesania latina
- (and 2 more)
-
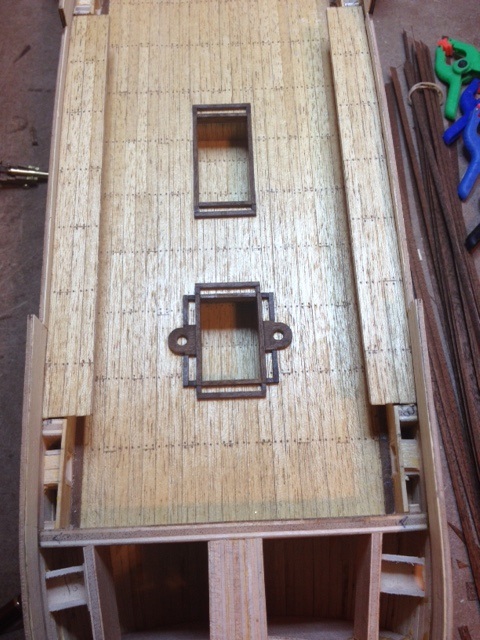
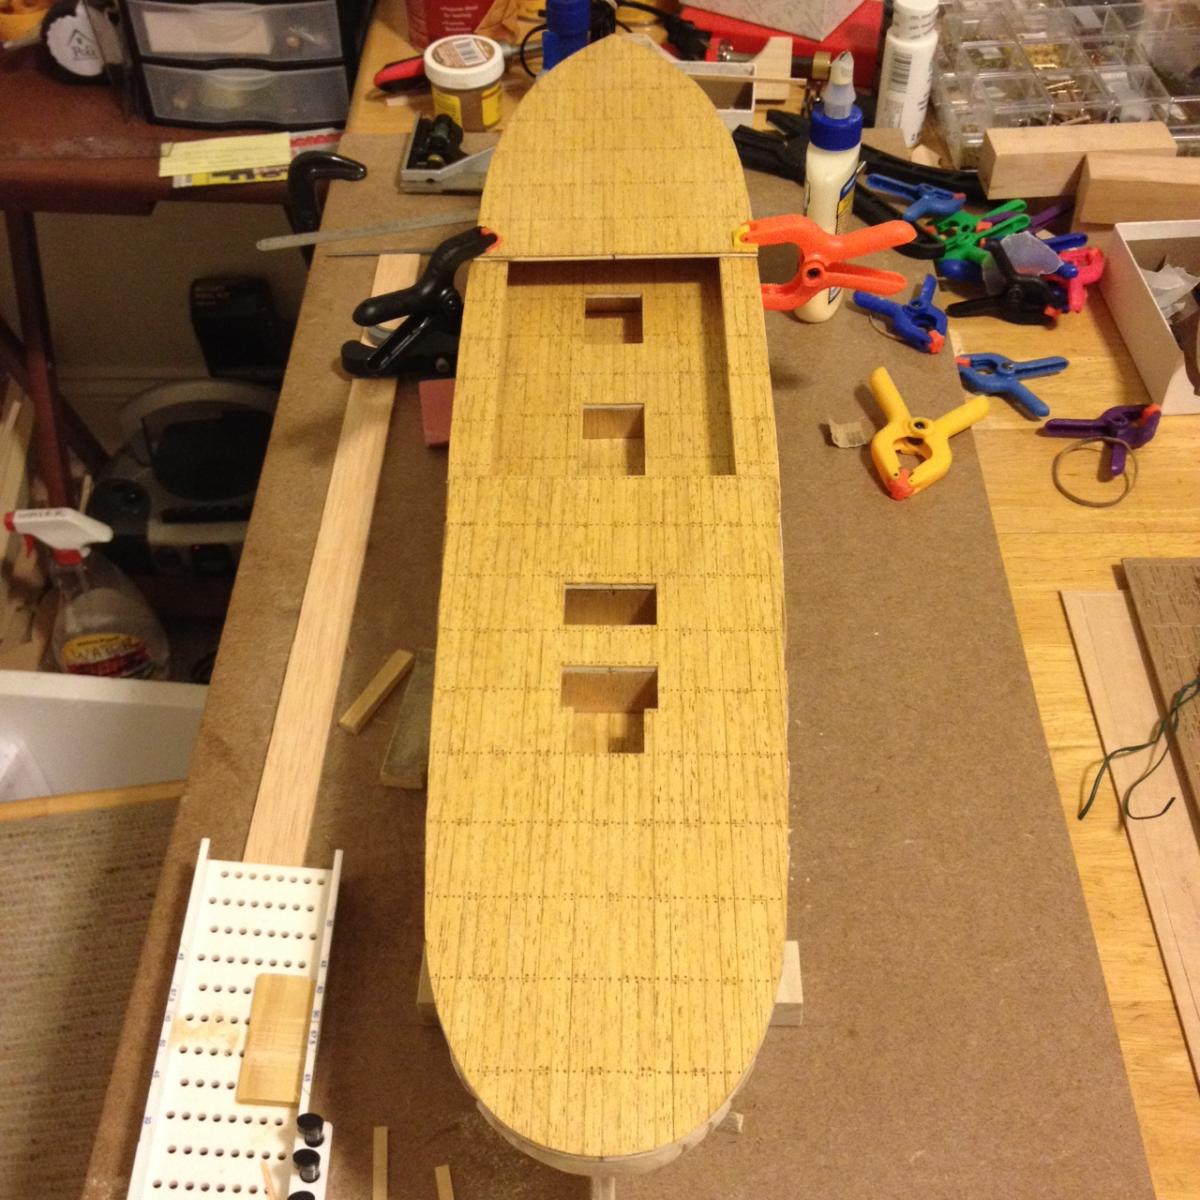
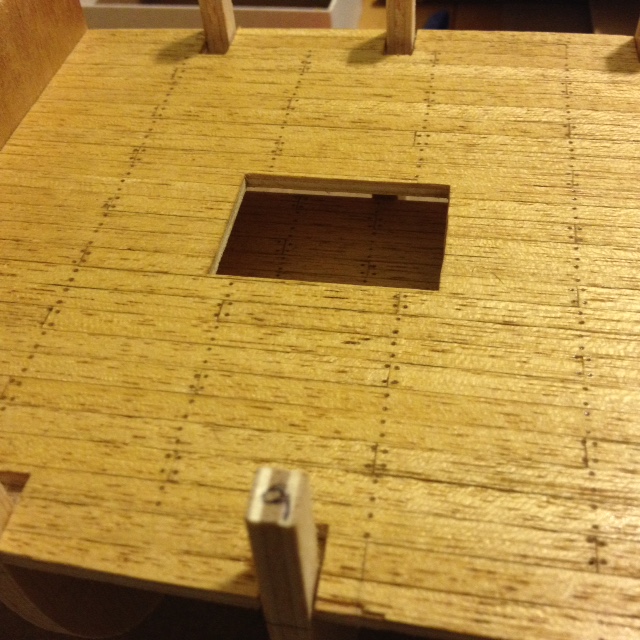
So I did a little more work on the main deck. I was trying to decide whether to put the trunnels in or not. According to the research all the planking is 9" wide. That puts it at about 1/8" wide at my 1:85 scale. The actual planks supplied are about 0.2". I decided to go with the supplied width and make the planks 24' (2 3/8") long I then added some detail with the trunnels. Naturally putting them in a plank 1/8" wide did not seem practical. I don't think I will do them on the hull planks because the walnut planks (2nd layer) are very dark and they would not show up that well... just not worth the effort in this case. Below is the finished deck. I did the holes with a pin drill (#77 drill) and touched them up with a "T" pin then smeared in some darker wood putty. Stained and put on a coat of satin urethane. I am sure many of the trunnels will be covered by the "deck clutter" but I like the way they break up the plain look of the deck itself. Will start to work on the cat rails next. This will give me time to ponder the cannon and hull planking situations that are coming soon.


- 212 replies
-
- 1
-
-
- constellation
- artesania latina
- (and 2 more)
-
SgtSki, you are one busy modeler. Likewise, good luck with the Niagra. I am currently planking decks right now. It is pretty straight forward, kind of like the calm before the storm...
-
Thanks Richard, I am writing in book now. I will probably by 6 spools because I am sure rigging will take some practice.
-
Mark, Thanks for the info about the AL rigging. I am a bit nervous about trying to match the colors so I will probably buy an extra spool of each before I start just to make sure. That is still quite a ways off but something to think about. I did find much more of a selection at Model Expo with regards to different sizes of various rigging components. AL uses 8mm belaying pins in the kit and this was the only place I could find them. The kit shorted me about 10 pins. I checked out your Constellation build... INCREDIBLE JOB. The AL kit claims to be the original 1794 design and everyone claims it to be fantasy. It might very well be but the part that confuses me about the whole discussion is that there are no original plans available to verify what anyone is saying. I did come across a book called "Modeling the USF Constellation" by Gilbert Ardle. He did quite a bit of research and raises many interesting points and makes a good reference and read. Together with Mastini's "Ship Modeling Simplified", I have quite of bit of information from which to draw from, fact or fiction. Of course they don't match the wealth of knowledge shared on the MSW forums. After reviewing the kit, I did plan on "enhancing" it a bit even though it is my first wooden ship model. What I think is going to make this build fun is I am only in it make an interesting a good looking ship model for my living room, not a an actual replica for a museum. I am not that much of a purist at this point; it's all about fun for me. Thanks again, Tom
- 212 replies
-
- 2
-
-
- constellation
- artesania latina
- (and 2 more)