


ca.shipwright
-
Posts
483 -
Joined
-
Last visited
Reputation Activity
-

 ca.shipwright got a reaction from Piet in Syren by JesseLee - FINISHED - Model Shipways - scale: 1:64
Jesse,
I used to do furniture building and other macro wood projects. I made 3 foot blanket chest with hand cut dovetails. A most rewarding project for my wife. I also find the Dremel to "strong" for freehand use. I found more use for it mounted in a drill press or some other contraption.
Regards
-
 ca.shipwright got a reaction from EJ_L in HMB Endeavour by ca.shipwright - Corel - 1:60
Two items that I have found useful.
1st is a rollerball paper cutter. It will cut strips down to 1 mm. The scale is too far away from the blade, so I put on a fence using masking tape. Worked like a charm.
The second item is an x-y table that mounted on my Dremel Drill press. Works great for drilling a straight series of holes.
Inexpensive. About $40 from eBay in China.
Photos attached
-
 ca.shipwright got a reaction from cristikc in HMB Endeavour by ca.shipwright - Corel - 1:60
Two items that I have found useful.
1st is a rollerball paper cutter. It will cut strips down to 1 mm. The scale is too far away from the blade, so I put on a fence using masking tape. Worked like a charm.
The second item is an x-y table that mounted on my Dremel Drill press. Works great for drilling a straight series of holes.
Inexpensive. About $40 from eBay in China.
Photos attached
-
 ca.shipwright got a reaction from dgbot in Syren by JesseLee - FINISHED - Model Shipways - scale: 1:64
Jesse,
I used to do furniture building and other macro wood projects. I made 3 foot blanket chest with hand cut dovetails. A most rewarding project for my wife. I also find the Dremel to "strong" for freehand use. I found more use for it mounted in a drill press or some other contraption.
Regards
-
 ca.shipwright got a reaction from mtaylor in Syren by JesseLee - FINISHED - Model Shipways - scale: 1:64
Jesse,
I used to do furniture building and other macro wood projects. I made 3 foot blanket chest with hand cut dovetails. A most rewarding project for my wife. I also find the Dremel to "strong" for freehand use. I found more use for it mounted in a drill press or some other contraption.
Regards
-
ca.shipwright got a reaction from Piet in Syren by JesseLee - FINISHED - Model Shipways - scale: 1:64
Jesse,
Beautiful work. Are you using a milling machine or Sheerline for all the close drilling? Or, are you doing this freehand with a pin vise or Dremel?
Regards
Michael
-
ca.shipwright got a reaction from mtaylor in Syren by JesseLee - FINISHED - Model Shipways - scale: 1:64
Jesse,
Beautiful work. Are you using a milling machine or Sheerline for all the close drilling? Or, are you doing this freehand with a pin vise or Dremel?
Regards
Michael
-
 ca.shipwright got a reaction from dashi in HMB Endeavour by ca.shipwright - Corel - 1:60
Folks an observation:
We always seem to find a few parts missing from the kits we buy. When we find them depends on where in the construction process they are needed. Then we call and wait for the part to arrive. BTW Model Expo is just awesome in filling replacement orders for missing, lost, or broken parts for their kits ( no commercial interest.............).
This being said. How many of us have the discipline to inventory a new kit from the enclosed parts list before beginning to build. Or, for that matter, read the instructions start to finish to see how construction progresses.
I know I would save myself an awesome amount of time and reduce my frustration level significantly if I would only follow this simple dictum.
Maybe next time for the Syren.
Regards
-
ca.shipwright got a reaction from mtaylor in La Couronne by EJ_L - FINISHED - Corel - 1:100 - 1637 Version
E.J.,
That's why I build masts or deck furniture when the work gets to repetitive. Ships boats are also a nice diversion.
Regards
-
 ca.shipwright got a reaction from Elijah in La Couronne by EJ_L - FINISHED - Corel - 1:100 - 1637 Version
E.J.,
That's why I build masts or deck furniture when the work gets to repetitive. Ships boats are also a nice diversion.
Regards
-
ca.shipwright got a reaction from EJ_L in US Brig Syren by hervie - Model Shipways - Scale 1:64
Nice work Hervie.
Acetone will debond CA glue. Just keep dripping it into the joint, wiggle gently and it will open the glued piece. Much less damaging to the adjoining piece also.
Regards
-
 ca.shipwright got a reaction from Overworked724 in HMB Endeavour by ca.shipwright - Corel - 1:60
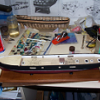
Greetings again,
A lot of progress to report since the last post. I have finished the hull with the exception of the 3 large port covers (3 each P&S).
All of the deck furniture, pin rails, gangway stairs, rubbing boards, light and air port covers have all been installed. The paint has been tidied up. This appears to be an ongoing project. A coat of Wipe on Poly applied to everything above the wales.
I am thinking about stringing all of the chain plate parts on a thin line and spray painting them with Model Master flat black aerosol. I don't know how this will work for the britainia metal. Any ideas would be welcome.
It was a very good week. I even figured out how to turn the pictures right side up- no more having to stand on your head.
Photos to follow
Looks like I have some more tidying up to do.
Regards
-
ca.shipwright got a reaction from Elijah in Syren by JesseLee - FINISHED - Model Shipways - scale: 1:64
Jesse,
Your killing me. Every time I walk past the Syren box, it feels like something is grabbing me by the throat. As soon as I finish my Endeavour, or probably while I am still rigging which begins in a day or so, I will start my Syren. I hope I enjoy the build because everything I do will have to measure up to your Syren, (not a chance), the Gold Standard of Syren building.
A joy to watch your ship take shape
By the way, what are you using to take your great photos, especially the close ups?
Regards
-
ca.shipwright got a reaction from Elijah in Syren by JesseLee - FINISHED - Model Shipways - scale: 1:64
Hi Jesse,
I built a home made mini lathe using a electric hand drill. I am having trouble getting decent cuts with the miniature cutting tools that I have. Did you make some custom cutters to get those fine lines? If so, care to share?
Regards
-
 ca.shipwright reacted to Cabbie in HMB Endeavour 1768 by Cabbie - Artesania Latina - 1:60 - Kit Fiddle
Good Evening Hof
Time does get by before you know, its months later.
I was just thinking, its time to get on with it. I have done a little bit lately, been
making the rudder hinges and soldering them. I think they are going to look
pretty good. I need to get the deck furniture sorted out and start making it.
One thing that has been taking time lately, apart from all sorts of things around home,
is that i have a new kitchen designing software, and I have
been learning to use it. That and all the usual one person, small business, book work.
Looking forward to seeing some pics of the new deck .
Cheers Chris
-
ca.shipwright reacted to hervie in US Brig Syren by hervie - Model Shipways - Scale 1:64
Chapter 5 - Planking
Positioning the first wale
The reference marks on the bulkheads have long since disappeared. So I have to find another way to position the first wale.
I’ll skip the preliminary step of placing a temp batten just to draw the reference marks, and work instead directly with the wale plank. The plan is as follows:
1) temporarily nail the wale plank to the hull (it’s OK to drill holes in it because it eventually will be covered by another plank to make the wale thicker).
2) glue the first 1/8 plank above the wale.
3) remove the wale, and complete the upper planking without it.
Repeat for both sides.
Postponing gluing the wale will allow staining the upper planking without affecting the wale. Later, the wale will be painted before installing.
One question remains: how to position the wale?
Looking at other logs, an in particular Sal’s (_SalD_), it seems to me the most important thing is to reach the correct sheer/profile of the hull. For that the position of the 7th plank is crucial.
Looking at the instructions photos, it seems there are three places along the hull that must be touched in specific ways. These are shown in the following two pictures. If these positions are maintained, the rest of the wale in relation to each gun port can be eyeballed.
Here we go.
First the planking jig to shape all planks.
Preparing to build the jig.
The completed jig with pegs from a 5/16 (7.95mm) dowel. The pegs are long enough to bend multiple planks at once.
After reading Dubz frustration with the uneven size of planks, I made sure I had 14 planks of the same width. However I measured the width of about half the number of planks in the kit, and they all came up at 1/8. Possibly the kit has gotten better since Dirk time.
But then, I haven't yet taken a close look at the castings …
After selecting 14 planks, I cut a small piece from the end of each and used the pieces to make a measuring tool. The pieces are glued on paper to make the tool flexible.
Here’s the little tool used at the bow to begin placing the wale.
First, the second gun port from the bow. I made sure there are two plank above the port, and one plank below the port.
Then I made sure there is just one plank above the bow sprit, (notice the wale is not tucked into the rabbet at this point. Later it will be) Next I went to the stern and put one plank below the port and two above. Then I went to the port between bulkheads 4 and 8 and ‘placed’ two planks below the port and one above, taking into consideration the rabbet around the port for the lid. Here is a picture of progress so far. More adjustments were needed.
Before continuing with the fotos, the second side was done like the first … or almost. For a final adjustments I put the model on a ‘Lazy Susan’ platform to quickly be able to look at both sides of the hull. I temporarily attached the transom to the stern, and temporarily attached the stern to the ship. Then I did more adjustments, but still not satisfied. Not all gunport are touched by the planks exactly the same on both sides … however for now that’s the way the cookie crumbles (like my British friend is fond of saying)
One thing must be the same on both sides: the distance from the top of the wale to the bottom of the transom.
Finally, here’s the view from the bow. (Looking at the photo, it appears the port side wale meets the bow sprit slightly higher than the starboard side. Unfortunately it is not an optical illusion, so more tweaks are needed).
The next step is to glue the first plank. Then I will remove the wale and set it aside until the upper planking is done.
———-
In case you’re wondering, I produce all photos with a Panasonic model DMC-FZ50 camera. It is very easy to use.
I take several shots of the same subject and choose the best. Most without a tripod.
All this takes time, and I think I spend more time with the camera and log than with the build. But I like both equally well, so no complaints.
And even though there is not a lot of feedback compared to other logs, the ‘likes’ are sufficient for me to keep on going. (Hint hint)
——-
Finally in closing a confession: the apparent lack of clatter in the photos masks the reality of the shipyard. Here is a picture of it.
Thanks for reading.
-
ca.shipwright got a reaction from dashi in HMB Endeavour by DaveRow - FINISHED - Corel - Scale 1:60 - First Build Kit
Dash,
I enlarged the scale of the AOS drawings to 1:60. The Corel plans are 1:1. There is still a considerable difference 4-6 cm depending on the mast; fore, main, or mizzen.
Thanks
-
ca.shipwright got a reaction from Elijah in US Brig Niagara by 6ohiocav - FINISHED - Model Shipways - Scale 1:64
Great work! Love the coils.
-
 ca.shipwright got a reaction from edmay in HMB Endeavour by ca.shipwright - Corel - 1:60
Greetings again,
A lot of progress to report since the last post. I have finished the hull with the exception of the 3 large port covers (3 each P&S).
All of the deck furniture, pin rails, gangway stairs, rubbing boards, light and air port covers have all been installed. The paint has been tidied up. This appears to be an ongoing project. A coat of Wipe on Poly applied to everything above the wales.
I am thinking about stringing all of the chain plate parts on a thin line and spray painting them with Model Master flat black aerosol. I don't know how this will work for the britainia metal. Any ideas would be welcome.
It was a very good week. I even figured out how to turn the pictures right side up- no more having to stand on your head.
Photos to follow
Looks like I have some more tidying up to do.
Regards
-
ca.shipwright got a reaction from EJ_L in HMB Endeavour by ca.shipwright - Corel - 1:60
Thanks Don and EJ
Don the blue is the third iteration. The other 2 had too much purple. It's amazing what $1.99 will get you in the craft store.
Regards
-
 ca.shipwright got a reaction from Homebrew in HMB Endeavour by ca.shipwright - Corel - 1:60
Greetings again,
A lot of progress to report since the last post. I have finished the hull with the exception of the 3 large port covers (3 each P&S).
All of the deck furniture, pin rails, gangway stairs, rubbing boards, light and air port covers have all been installed. The paint has been tidied up. This appears to be an ongoing project. A coat of Wipe on Poly applied to everything above the wales.
I am thinking about stringing all of the chain plate parts on a thin line and spray painting them with Model Master flat black aerosol. I don't know how this will work for the britainia metal. Any ideas would be welcome.
It was a very good week. I even figured out how to turn the pictures right side up- no more having to stand on your head.
Photos to follow
Looks like I have some more tidying up to do.
Regards
-
 ca.shipwright got a reaction from GrantGoodale in HMB Endeavour by ca.shipwright - Corel - 1:60
Greetings again,
A lot of progress to report since the last post. I have finished the hull with the exception of the 3 large port covers (3 each P&S).
All of the deck furniture, pin rails, gangway stairs, rubbing boards, light and air port covers have all been installed. The paint has been tidied up. This appears to be an ongoing project. A coat of Wipe on Poly applied to everything above the wales.
I am thinking about stringing all of the chain plate parts on a thin line and spray painting them with Model Master flat black aerosol. I don't know how this will work for the britainia metal. Any ideas would be welcome.
It was a very good week. I even figured out how to turn the pictures right side up- no more having to stand on your head.
Photos to follow
Looks like I have some more tidying up to do.
Regards
-
ca.shipwright got a reaction from dashi in HMB Endeavour by ca.shipwright - Corel - 1:60
Greetings again,
A lot of progress to report since the last post. I have finished the hull with the exception of the 3 large port covers (3 each P&S).
All of the deck furniture, pin rails, gangway stairs, rubbing boards, light and air port covers have all been installed. The paint has been tidied up. This appears to be an ongoing project. A coat of Wipe on Poly applied to everything above the wales.
I am thinking about stringing all of the chain plate parts on a thin line and spray painting them with Model Master flat black aerosol. I don't know how this will work for the britainia metal. Any ideas would be welcome.
It was a very good week. I even figured out how to turn the pictures right side up- no more having to stand on your head.
Photos to follow
Looks like I have some more tidying up to do.
Regards
-
 ca.shipwright got a reaction from BANYAN in HMB Endeavour by ca.shipwright - Corel - 1:60
Greetings again,
A lot of progress to report since the last post. I have finished the hull with the exception of the 3 large port covers (3 each P&S).
All of the deck furniture, pin rails, gangway stairs, rubbing boards, light and air port covers have all been installed. The paint has been tidied up. This appears to be an ongoing project. A coat of Wipe on Poly applied to everything above the wales.
I am thinking about stringing all of the chain plate parts on a thin line and spray painting them with Model Master flat black aerosol. I don't know how this will work for the britainia metal. Any ideas would be welcome.
It was a very good week. I even figured out how to turn the pictures right side up- no more having to stand on your head.
Photos to follow
Looks like I have some more tidying up to do.
Regards
-
ca.shipwright got a reaction from mtaylor in Syren by JesseLee - FINISHED - Model Shipways - scale: 1:64
Jesse,
Your killing me. Every time I walk past the Syren box, it feels like something is grabbing me by the throat. As soon as I finish my Endeavour, or probably while I am still rigging which begins in a day or so, I will start my Syren. I hope I enjoy the build because everything I do will have to measure up to your Syren, (not a chance), the Gold Standard of Syren building.
A joy to watch your ship take shape
By the way, what are you using to take your great photos, especially the close ups?
Regards