


KeithAug
-
Posts
3,867 -
Joined
-
Last visited
Reputation Activity
-

 KeithAug got a reaction from KORTES in Altair 1931 by KeithAug - FINISHED - Scale 1:32 - schooner
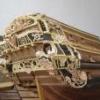
Deck planking complete - but as yet not sanded:-
A quick post this time consisting mainly of photographs.
Yesterday afternoon / evening and earlier today I completed the deck planking the initial photographs show where i started yesterday.
The accurate marking and positioning of the deck edge planks paid dividends and by the time I reach the deck centre line the symmetry was virtually spot on. No doubt an element of luck played its part.
Deck sanding tomorrow...........
-
KeithAug got a reaction from KORTES in Altair 1931 by KeithAug - FINISHED - Scale 1:32 - schooner
More deck planking:-
I made a start on the planking which follows the contour of the deck edge. As explained previously these planks are much narrower. I made the planks .108 inch wide x 10 inch long which is 3.5 inch by 26 foot at full size.
It's probably worth posting a few images of the real thing at this point:-
I wanted the deck to be representative of the real thing but accepted that absolute accuracy wasn't quite achievable.
So here are a few images of progress to date:-
I was progressing well until my helper arrived and demanded some exercise!
-
 KeithAug got a reaction from Nirvana in Altair 1931 by KeithAug - FINISHED - Scale 1:32 - schooner
Mark / Pete - thank you. The deck varnish is still tacky some 18 hours after application so I don't think I am going to be making much progress today. Modern oil based varnishes don't seem to dry as quickly as they seemed to when I was younger. I keep thinking I should try water based varnishes which claim to dry much quicker. I wonder what you all use?
-
 KeithAug got a reaction from Keith Simmons in Help my boat is bent !
Hi Andy
What stage are you at with hull. If its finished I can understand why you would want to accept the bow and try to make the best of it when planking the deck. The best solution is always to try to remove the bow. If you don't want to do this then working from a straight centre line is probably going to be easier than trying to follow the bend.
Keith
-
KeithAug got a reaction from KORTES in Altair 1931 by KeithAug - FINISHED - Scale 1:32 - schooner
Slow progress but I did finish sanding the deck. I started with 120 grit emery cloth and removed all the plank thickness irregularities. I then used 400 grit wet and dry paper (used dry) to give a silky smooth finish. I used a damp cloth wiped over the deck to raise the nap and when dry I again used the 400 grit wet and dry. I repeated this twice.
I also sorted out the stern planking detail.
Time is drawing near when I will need to address the bulwarks so I decided to mount the plank required for inverted handling of the hull. To protect the deck rubber pads are attached to the bearers where they bolt to the hull. The plank is mounted parallel to the waterline so that the setting out of hull details (portholes etc) will be easier later on.
Having completed the deck sanding I wanted to protect the deck from workshop grime. I decided to give it a few coats of satin finish varnish. I need to glue ribs etc to the deck edge once the bulwarks are in place so I masked the deck edge mahogany planks so that gluing would not be a problem at a later stage. The photos were taken with the 1st coat of varnish still wet.
-
 KeithAug got a reaction from cabrapente in Altair 1931 by KeithAug - FINISHED - Scale 1:32 - schooner
Slow progress but I did finish sanding the deck. I started with 120 grit emery cloth and removed all the plank thickness irregularities. I then used 400 grit wet and dry paper (used dry) to give a silky smooth finish. I used a damp cloth wiped over the deck to raise the nap and when dry I again used the 400 grit wet and dry. I repeated this twice.
I also sorted out the stern planking detail.
Time is drawing near when I will need to address the bulwarks so I decided to mount the plank required for inverted handling of the hull. To protect the deck rubber pads are attached to the bearers where they bolt to the hull. The plank is mounted parallel to the waterline so that the setting out of hull details (portholes etc) will be easier later on.
Having completed the deck sanding I wanted to protect the deck from workshop grime. I decided to give it a few coats of satin finish varnish. I need to glue ribs etc to the deck edge once the bulwarks are in place so I masked the deck edge mahogany planks so that gluing would not be a problem at a later stage. The photos were taken with the 1st coat of varnish still wet.
-
 KeithAug reacted to mtaylor in Altair 1931 by KeithAug - FINISHED - Scale 1:32 - schooner
What an astounding looking deck, Keith. I think you've captured a big part of the beauty of these boats.
-
 KeithAug got a reaction from Tecko in Altair 1931 by KeithAug - FINISHED - Scale 1:32 - schooner
Thanks Pete
I stayed at Coeur d'Alene once on the way to visit the Scablands and Glacier NP. A nice part of the world.
Progress of a different kind!
Having glued the deck in place and strengthened the areas unsupported by frames (g clamps in photo), I thought I had better take stock.
For the deck edge planks I needed to cut .040" x .130" mahogany strips from a 40"x12"x7/8" former table top. This involved planing and sawing operations on my full size wood machines as well as sawing on the Byrnes saw using TCT and slitting saw blades. Multiple operations and setting on different machines is always something I am inclined to put off. This instance was no different and I found myself looking for something else to do. My diversion project started out as cleaning up the workshop (photos attached) but very quickly expanded into clearing out my tool draws. I set myself the challenge of throwing out all the tools that I couldn't remember having used in the last 20 years. It was quite a haul but I failed with a few items that I thought might come in useful some day!!! They will probably be thrown out by the kids when they come to sort out my affairs in another 20 years time. The up side though is that I discovered stuff that would be useful if I had only remembered that I had it.
Having exhausted all my diversionary jobs I made the 6 deck edge planks, yawn!
I have a question for all you experienced posters. I see that when you sign off your posts you frequently attach reference to all your past, ongoing an future builds. I assume that you don't type this stuff out every time and that somehow you have set it up automatically. How do you do this please?
Keith
-
KeithAug got a reaction from KORTES in Altair 1931 by KeithAug - FINISHED - Scale 1:32 - schooner
Starting the deck planking:-
I decided to make the deck planking .045 inch thick. This is thicker than the previous build (Endeavour) which was circa .030 thick. The additional thickness should make the caulking easier.
The mahogany deck edge planks were glued in place taking great care to make sure they were equidistant from the centre line. It's really easy for the deck planking to become unsymmetrical about the centre line and this can look pretty bad.
I wanted something that looked like teak for the deck planks and the nearest thing I had were slats recovered from a broken wooden venetian blind. The deck planking is a bit unusual in design in that the centre line planks on the fore deck are greater in number than over the remainder of the deck. The centre line planks are also wider than the other deck planks. I decided to go for a width of 0.188 inch for the centre line planks which equates to a scale width of 6 inch.
I decided to caulk between the planks using .008 inch thick black card. This equates to a thickness of 1/4 inch which is about right fro deck caulking.
The caulking was accurately cut into strips .045 inch wide using a set up on the mill. This consists of a MDF board clamped to the mill table with a steel bar clamped into the chuck to form a guide. With the card taped to the MDF the steel bar is positioned a couple of thou above the card and this forms the back stop for the set square. The mill table is then indexed in .045 inch steps and at each step a strip is cut from the card using a craft knife.
The centre line planks are then glued in place - making sure they are symmetrical about the centre line. In the photos below you can see one of the caulking strips laid on the deck and the tail of one of the installed strips.
The centre line planks are now complete but at this stage not sanded.
The caulking effect looks pretty good.
-
KeithAug got a reaction from Nirvana in Altair 1931 by KeithAug - FINISHED - Scale 1:32 - schooner
Thank you Michael and Michael. As I explained the deck planking isn't exactly to scale - I find it difficult to achieve this at 1:32 scale but I still need to get comfortable with the compromise. May be I will have to move to larger scales at some time.
-
KeithAug got a reaction from Nirvana in Altair 1931 by KeithAug - FINISHED - Scale 1:32 - schooner
Slow progress but I did finish sanding the deck. I started with 120 grit emery cloth and removed all the plank thickness irregularities. I then used 400 grit wet and dry paper (used dry) to give a silky smooth finish. I used a damp cloth wiped over the deck to raise the nap and when dry I again used the 400 grit wet and dry. I repeated this twice.
I also sorted out the stern planking detail.
Time is drawing near when I will need to address the bulwarks so I decided to mount the plank required for inverted handling of the hull. To protect the deck rubber pads are attached to the bearers where they bolt to the hull. The plank is mounted parallel to the waterline so that the setting out of hull details (portholes etc) will be easier later on.
Having completed the deck sanding I wanted to protect the deck from workshop grime. I decided to give it a few coats of satin finish varnish. I need to glue ribs etc to the deck edge once the bulwarks are in place so I masked the deck edge mahogany planks so that gluing would not be a problem at a later stage. The photos were taken with the 1st coat of varnish still wet.
-
KeithAug reacted to michael mott in Herreshoff Buzzards Bay 14 by michael mott - 1:8 scale - SMALL
build part 36
I have begun working on the aft deck substucture, I will build this deck as a sheet that can be finished off the boat then glued in. I have also lowered the aft end of the floorboards.
I am thinking of having some gentlemanly fun with the small lazarette
For now I am going to leave the deck with a couple of coats of Tung oil.
Michael
-
KeithAug reacted to michael mott in Herreshoff Buzzards Bay 14 by michael mott - 1:8 scale - SMALL
Thanks everybody for the comments and likes they are appreciated.
Ed thanks for the tip regarding the shellac I shall see if I can locate some the next time I am in the city.
I am pleased that you like the clamps. here is a drawing of the ones I have made they can obviously be fabricated to a lot of sizes.
small hook clamps.pdf
The smaller ones in the top left will be followed up with some more using 2x56 threaded steel rod or even 1x72.
The spring version which I made first is not as useful, and more difficult to place I found. I am converting them all to the spacer type. I had thought about using some square rod in order to keep the rod aligned with the wood block, however in some cases it would be difficult to get them into tight spots. the ability to rotate the block adds a lot of flexibility.
and with some different spacers, The hex brass stock is rounded on the ends to be easier on the fingers.
Michael
-
 KeithAug got a reaction from Julie Mo in Altair 1931 by KeithAug - FINISHED - Scale 1:32 - schooner
Slow progress but I did finish sanding the deck. I started with 120 grit emery cloth and removed all the plank thickness irregularities. I then used 400 grit wet and dry paper (used dry) to give a silky smooth finish. I used a damp cloth wiped over the deck to raise the nap and when dry I again used the 400 grit wet and dry. I repeated this twice.
I also sorted out the stern planking detail.
Time is drawing near when I will need to address the bulwarks so I decided to mount the plank required for inverted handling of the hull. To protect the deck rubber pads are attached to the bearers where they bolt to the hull. The plank is mounted parallel to the waterline so that the setting out of hull details (portholes etc) will be easier later on.
Having completed the deck sanding I wanted to protect the deck from workshop grime. I decided to give it a few coats of satin finish varnish. I need to glue ribs etc to the deck edge once the bulwarks are in place so I masked the deck edge mahogany planks so that gluing would not be a problem at a later stage. The photos were taken with the 1st coat of varnish still wet.
-
 KeithAug got a reaction from GuntherMT in Altair 1931 by KeithAug - FINISHED - Scale 1:32 - schooner
Slow progress but I did finish sanding the deck. I started with 120 grit emery cloth and removed all the plank thickness irregularities. I then used 400 grit wet and dry paper (used dry) to give a silky smooth finish. I used a damp cloth wiped over the deck to raise the nap and when dry I again used the 400 grit wet and dry. I repeated this twice.
I also sorted out the stern planking detail.
Time is drawing near when I will need to address the bulwarks so I decided to mount the plank required for inverted handling of the hull. To protect the deck rubber pads are attached to the bearers where they bolt to the hull. The plank is mounted parallel to the waterline so that the setting out of hull details (portholes etc) will be easier later on.
Having completed the deck sanding I wanted to protect the deck from workshop grime. I decided to give it a few coats of satin finish varnish. I need to glue ribs etc to the deck edge once the bulwarks are in place so I masked the deck edge mahogany planks so that gluing would not be a problem at a later stage. The photos were taken with the 1st coat of varnish still wet.
-
KeithAug got a reaction from Nirvana in Altair 1931 by KeithAug - FINISHED - Scale 1:32 - schooner
More deck planking:-
I made a start on the planking which follows the contour of the deck edge. As explained previously these planks are much narrower. I made the planks .108 inch wide x 10 inch long which is 3.5 inch by 26 foot at full size.
It's probably worth posting a few images of the real thing at this point:-
I wanted the deck to be representative of the real thing but accepted that absolute accuracy wasn't quite achievable.
So here are a few images of progress to date:-
I was progressing well until my helper arrived and demanded some exercise!
-
KeithAug got a reaction from KORTES in Altair 1931 by KeithAug - FINISHED - Scale 1:32 - schooner
Having completed and finish sanded 1st planking I had a few things to sort out about future stages. After some thought I decided on the following sequence:-
1 Drill the hole to take the prop shaft.
2 Mark the waterline.
I wanted to compete items 1 and 2 while the hull was still attached to the building board - so that I had a reference datum for the 2 operations.
The sequence continues with:-
3 Remove the hull from the building board.
4 Trim the frames to size at deck level.
5 Mount the 1/16th inch ply sub deck, with cut outs for the deck house, skylights and hatches.
6 Plank and finish sand the deck.
7 Mount the 3 layers of 1/32 inch ply which form the bulwarks and the sculpturing of the hull sides.
8 2nd plank the hull. (Having manufactured the planks from mahogany).
This lot should take care of the next few months.
Staring with the prop shaft which is asymmetric - sitting on the port side of the hull.
The prop tube is 3/8 inch diameter, angles downwards at an angle of 6 deg and outward from the centre line at an angle of 8.5 degrees. See Photo.
I didn't feel comfortable trying to drill this by eye, so I manufactured a simple jig consisting of 2 parallel MDF boards, separated by 3 inch, drilled with offset holes the alignment of which gave the compound angle necessary for drilling. I did have to revert to a bit of school room trigonometry which taxed the brain cells more than I expected (a bit worrying). See Photo.
Having positioned the jig so that the drill intersected the hull at the correct point I then clamped it in place and drilled the hull with a 3/8 inch by 18 inch long auger drill. To keep things under control I took my time and hand drilled using a woodworking brace. The photographs illustrate the procedure.
-
 KeithAug got a reaction from Mfelinger in Altair 1931 by KeithAug - FINISHED - Scale 1:32 - schooner
More deck planking:-
I made a start on the planking which follows the contour of the deck edge. As explained previously these planks are much narrower. I made the planks .108 inch wide x 10 inch long which is 3.5 inch by 26 foot at full size.
It's probably worth posting a few images of the real thing at this point:-
I wanted the deck to be representative of the real thing but accepted that absolute accuracy wasn't quite achievable.
So here are a few images of progress to date:-
I was progressing well until my helper arrived and demanded some exercise!
-
KeithAug got a reaction from Nirvana in Altair 1931 by KeithAug - FINISHED - Scale 1:32 - schooner
Hi Pete / Michael,
I'm not really very quick - I just stuck at it, all day and some of the night. Putting the caulking in makes it quite fiddly and slow. Their must be a better way of simulating caulking but I don't know what it is. I bet their is a thread somewhere. Thank you for the comments.
-
KeithAug reacted to Mirabell61 in SS Kaiser Wilhelm der Grosse 1897 by Mirabell61 - FINISHED - scale 1:144 - POF - first German four stacker of the Norddeutscher Lloyd line
Update
Prototyp winch is now complete (requires a few paint touch ups)
Two of these winches go on the forecastle deck and one on the forward waist deck, behind the foremast
Two reciprocating steam drives mounted, also outer winding drums and brake. The framework was chemically blackend.
2 of these winches go on the forecastle deck and one on the forward waist deck, behind the foremast
Nils
-
 KeithAug got a reaction from mtaylor in Altair 1931 by KeithAug - FINISHED - Scale 1:32 - schooner
Hi Pete / Michael,
I'm not really very quick - I just stuck at it, all day and some of the night. Putting the caulking in makes it quite fiddly and slow. Their must be a better way of simulating caulking but I don't know what it is. I bet their is a thread somewhere. Thank you for the comments.
-
KeithAug got a reaction from Tecko in Altair 1931 by KeithAug - FINISHED - Scale 1:32 - schooner
Deck planking complete - but as yet not sanded:-
A quick post this time consisting mainly of photographs.
Yesterday afternoon / evening and earlier today I completed the deck planking the initial photographs show where i started yesterday.
The accurate marking and positioning of the deck edge planks paid dividends and by the time I reach the deck centre line the symmetry was virtually spot on. No doubt an element of luck played its part.
Deck sanding tomorrow...........
-
KeithAug got a reaction from Tecko in Altair 1931 by KeithAug - FINISHED - Scale 1:32 - schooner
Having completed and finish sanded 1st planking I had a few things to sort out about future stages. After some thought I decided on the following sequence:-
1 Drill the hole to take the prop shaft.
2 Mark the waterline.
I wanted to compete items 1 and 2 while the hull was still attached to the building board - so that I had a reference datum for the 2 operations.
The sequence continues with:-
3 Remove the hull from the building board.
4 Trim the frames to size at deck level.
5 Mount the 1/16th inch ply sub deck, with cut outs for the deck house, skylights and hatches.
6 Plank and finish sand the deck.
7 Mount the 3 layers of 1/32 inch ply which form the bulwarks and the sculpturing of the hull sides.
8 2nd plank the hull. (Having manufactured the planks from mahogany).
This lot should take care of the next few months.
Staring with the prop shaft which is asymmetric - sitting on the port side of the hull.
The prop tube is 3/8 inch diameter, angles downwards at an angle of 6 deg and outward from the centre line at an angle of 8.5 degrees. See Photo.
I didn't feel comfortable trying to drill this by eye, so I manufactured a simple jig consisting of 2 parallel MDF boards, separated by 3 inch, drilled with offset holes the alignment of which gave the compound angle necessary for drilling. I did have to revert to a bit of school room trigonometry which taxed the brain cells more than I expected (a bit worrying). See Photo.
Having positioned the jig so that the drill intersected the hull at the correct point I then clamped it in place and drilled the hull with a 3/8 inch by 18 inch long auger drill. To keep things under control I took my time and hand drilled using a woodworking brace. The photographs illustrate the procedure.
-
KeithAug got a reaction from Nirvana in Altair 1931 by KeithAug - FINISHED - Scale 1:32 - schooner
Hi Pete - thanks for the positive feedback.
1st Planking the hull continues. After completing 9 parallel planks the curvature was getting a little excessive so it was time for a change in strategy. I started looking for a natural plank line and then dithered for hours wondering which line would be best. After drawing many options on the hull I decided to be undecided and just ploughed on regardless - reasoning that I'd make the best of whatever line I chose. I marked a line using a stiff plank and used pins to form location points for positioning the first of the next stage of planks.
Having marked out the plank line on one side of the hull I used dividers to transpose an identical line on the other side of the hull. So far the planking on either side of the hull is identical and I want to keep it this way - silly really as it will be over planked. (My OCD kicking in again).
I have now completed 3 of the new phase of planking and all is well - so far!!!
-
KeithAug got a reaction from Nirvana in Altair 1931 by KeithAug - FINISHED - Scale 1:32 - schooner
Deck planking complete - but as yet not sanded:-
A quick post this time consisting mainly of photographs.
Yesterday afternoon / evening and earlier today I completed the deck planking the initial photographs show where i started yesterday.
The accurate marking and positioning of the deck edge planks paid dividends and by the time I reach the deck centre line the symmetry was virtually spot on. No doubt an element of luck played its part.
Deck sanding tomorrow...........