


kurtvd19
-
Posts
3,048 -
Joined
-
Last visited
Content Type
Profiles
Forums
Gallery
Events
Everything posted by kurtvd19
-
 Richard: I believe that Liver of Sulfur works on copper but not on brass - no personal experience with Liver of Sulfur, so I may be wrong. I use Birchwood Casey Brass Black but there are other solutions for blackening brass available (Blue Jacket is one source). I first clean and then pickle the brass part in heated Sparex 2 till shiny and then thoroughly rinse with water. I dilute the Brass Black solution up to 50-50 and immerse the part in the solution for a short time - 15 to 30 seconds - and then lift the part out of the solution with tweezers to check the blackening process. Repeat as many times as necessary to get a good black color agitating the solution often. Do not leave the part in the Brass Black solution for an extended time w/o checking the progress of the blackening as a crust can develop that will need to be removed with unacceptable results underneath requiring one to start over. When blackened to your liking rinse thoroughly under running water and I then give the part a short rinse in distilled water and let the part air dry. When dry take a cloth like an old t-shirt and lightly buff the part. Some of the blackening will come off on the cloth and if you don't rub too much or too long the part will be a satin finish ready for display. If a flat finish is desired use an airbrushed flat finish. I hope this is helpful, Kurt
 -
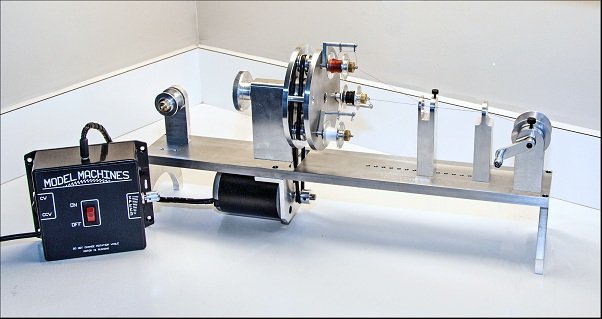
BYRNES – MODEL MACHINES - ROPE WALK This machine is complete with Instructions, extra Take-up Reels, Belts, Centering Dies and Feed Spools. Used but not abused. Available for $300 or Best Offer. Will package and ship for the cost of shipping – will provide quotes for USPS, UPS and FED-X – you pick the shipper. Located 26 miles west of Chicago if you want to pick it up. Reply here if interested. Not my photo - from instructions.
-
- 1
-

-
Richard: I switched to Stay-Brite solder at Ken's urging when I quit making radio control boats where the strength was needed to resist the action of water against the rudder and in control arms controlling rudders to turn. Some shafts required strength - like the rudder shaft. There is nothing on a static ship model that requires the strength of silver solder. Stay-Brite is a high silver content solder so it blackens nicely using various blackening agents just like regular silver solder. With the various attachments you had to make on the ram, silver solder might still have been necessary but I would have tried Stay-Brite and some heat sinks just for the ease of not messing with silver solder. Since switching to Stay-Brite and using Yyllow ochre (again from Ken) I find it so much easier and a lot less cleaning up of excess solder. The ram will not be left as bare brass so fillets could be made with any type of filler. I am sure you will find Ken's book well worth the cost. Take care, Kurt
-
Absolutely! To good effect - when that's the wanted result.
-
Eric: I hope you made a note of the colors used for the mixture to get the color in case it is needed later to match a repair. I am assuming your text mention of "mix" refers to the finished color but realize it could refer to the mix of colors on the building as a whole. I have found that keeping a record of paints used on any build is a good idea for later reference of what color was used for a particular build or part. Kurt
-
Cutters, Choppers, Guillotines, Slicers
kurtvd19 replied to MintGum's topic in Modeling tools and Workshop Equipment
Harbor Freight sells this saw for about 1/3 or 1/4 of the cost of the Micro Mark version - from the same mfg. Identical except labels - the last time I compared them. I purchased my say several years ago thinking if it got me through the project I was working on with a delivery deadline it was worth it - the tool would pay for itself. I completed the job on time and I still have this little workhorse and it's now at least 10 years old. If it ever dies, I will replace it with another from HF. -
Cutters, Choppers, Guillotines, Slicers
kurtvd19 replied to MintGum's topic in Modeling tools and Workshop Equipment
They are an exact copy - ripped off after they were selling the original choppers - stopped ordering from NWSL and substituted their ripped off copies. Not the only instance of copying by MM. -
Cutters, Choppers, Guillotines, Slicers
kurtvd19 replied to MintGum's topic in Modeling tools and Workshop Equipment
NW Short line is the OEM for the Chopper I, II and III Have a Chopper I for at least 25 years. When the base gets a groove from use, I fill the groove with epoxy and level it - good for another 5 years. -
Brian: Congratulations on completing a very beautiful model. River towboats are my favorite subject to model and I have been very happy to follow your build. Take care, Kurt
-
I highly recommend that the paint manufacturers instructions be followed regarding thinning and only use the recommended thinner. There are way too many suggested alternatives floating around. You don't want to risk your time and effort in building a model to be ruined by an incompatible paint/thinner combination being used. Always test your paint/thinner application on an identical material before committing to your model. I highly recommend airbrushing for best appearances - an airbrush with the proper paint selection provides a scale like appearance much better than a paint brush. A properly thinned paint from an airbrush provides a near scale thickness of paint to the subject. An additional coat of paint just like in real life may be needed to cover thoroughly with much less chance of obscuring details. Take care, Kurt
-
The sign looks great Keith.
-
I understand that all contestant's have received their judges evaluation sheets. Also, as to a earlier question of showing the non-winning entries it was decided not to show them. Kurt
-
Richard: Yellow Ochre powder can be mixed with water or alcohol and "Painted" onto the surfaces where you do not want solder to flow onto during soldering operations. Let it dry and then apply your flux and solder the part. I always use alcohol because the alcohol / yellow ochre solution dries much quicker than when water is used. Yellow Ochre is a flux repellent and where the flux won't go neither will the solder. The solution can be kept in a small jar or other lidded container and if it dries between uses just add water or alcohol to make it liquid again. This will greatly reduce the amount of clean up needed after soldering. I learned about this from Ken Foran's book Modeling With Brass - the 2nd edition has an added section on ship modeling using brass. In my opinion this book belongs in every serious modelers collection - but only after it has been read cover to cover. Take care, Kurt
-
I was referring to the lack of free-board. A decent wave would have swamped the ship. I have seen photos of lumber boats on the Great Lakes loaded even higher and there are a lot of them on the bottom to prove they loaded it too high this time.
-
I bet those aboard are hoping for clear weather.
-
I worked as a Mechanical Engineer back in the late 60s and early 70s in record change and tape recorder mechanisms. We used one of the earliest C/A glues, Eastman 910, to secure rubber parts to metal. I have samples that are as strong as the day they were glued up. Some of the rubber has started to deteriorate, but not adjacent to the glue joint. I have a model ship that was made back in 1988 or 1989 using Bob Smith C/A glue and their accelerator that is here in my house that is in perfect condition. We used C/A for the quick setting as the models were built in Manila and the humidity there is always very high - about 90% - the only time it doesn't feel like 90% is when it is raining and you haven't experienced rain until you experience a SE Asia Monsoon. I trust good C/A especially the Bob Smith brand and don't hesitate to use it where applicable. I do prefer to use Titebond glues due to a longer working time but when I need something to stick right away I reach for the C/A. Kurt
-
Not the other day, but when I talked with Donna a few weeks back she gave me the name of a guy looking for a rope walk that contacted her using the contact us option. I don't know if she looks at it every day, but it does get looked at. She most likely has your name on the list for whatever you used the form for.
-
Use the "CONTACT US" feature on the web site. She has no stock and I looking to see who wants what when available. When you say extension table to you mean the larger table top? It is a replacement for the stock top that comes with the saw and includes the fence to fit the larger table top. I talked to Donna on Wednesday and she does monitor the website Contact Us area. Kurt
-
Just coming aboard a long way into this build. Very interesting as usual. I love the one of a kind builds you do Keith. As to the wrinkles at the top of the aft sign, I think they might be paint blisters almost ready to flake off. Can't be a fabric - the line through the name is a separation gap between two boards - in my opinion. Kurt
-
Good 'Hobby Quality' Metal Lathes
kurtvd19 replied to tmj's topic in Modeling tools and Workshop Equipment
The all metal Unimat that YT showed certainly isn't what you can buy today. That's the version I was always saving up for (1960 to 1965) but something else always was needed first. When I got back to modeling it was no longer available like it had been and I went in another direction and eventually got a Taig and then a Sherline. -
Good 'Hobby Quality' Metal Lathes
kurtvd19 replied to tmj's topic in Modeling tools and Workshop Equipment
I have owned both a Taig and a Sherline lathe. Both are excellent machines. The Taig will do all you want - the only reason I got the Sherline though was because the price was just about free - couldn't turn it down, but I can't do anything with the Sherline I can't do with the Taig. I am not a machinist and only a machinist can use a Sherline to it's full capacity. Kurt -
Surprisingly good and cheap mini tools
kurtvd19 replied to Johnny Mike's topic in Modeling tools and Workshop Equipment
What is the brand and where did you purchase it? Also, did you make the disc sander? If not who made it and where did you buy it? I can check out the sources and see if they are interested in becoming MSW sponsors. Take care, Kurt -
I don't know. I judged but wasn't involved in the management of it. I will ask.
-
Winners of the NRG's 2025 Photographic Ship Model Contest are listed below. The winning models will be featured in the Winter issue of the Nautical Research Journal due out in December. Look for photos here in January. 2025 Photo Contest Medal Winners Master’s Class GOLD Steve Anderson “Victory” Oceano, CA SILVER (Tied) Walter Zimmerman “Essex” State College, PA Ron Neilson “Camilla” Warrington, PA BRONZE William “Mike” McFadden “German Patrol Boat” Scottsdale, AZ Journeyman’s Class GOLD T. R. Mayer “Fort Valley” Brunswick, ME SILVER Richard Fernandez “L’Unite” Freehold, NJ BRONZE Dan Pacholski “Katy of Norfolk” South Elgin, IL Apprentice’s Class GOLD Matthew Bergman “Norwegian Sailing Pram” Alton, ON Canada SILVER Eamonn Bermingham “Ballahoo” Arklow, CO Wicklow, Ireland BRONZE Vaidas Guogis “Kurenkahn” Vilnius, Lithuania Best in Show Steve Anderson “Victory” Oceano, CA
- 9 replies
-
- 22
-
-

-

-
Congratulations Keith. Another great build. Very realistic load on the barge. The two builds look good together. Can't wait for the next build. Kurt
- 457 replies
-
- 2
-
-
-
- sternwheeler
- Hard Coal Navy
- (and 1 more)

