
Lt. Biggles
-
Posts
346 -
Joined
-
Last visited
Content Type
Profiles
Forums
Gallery
Events
Everything posted by Lt. Biggles
-
 Looking great so far! Got to love the look of the spitfire and that instrument panel looks amazing!
 -
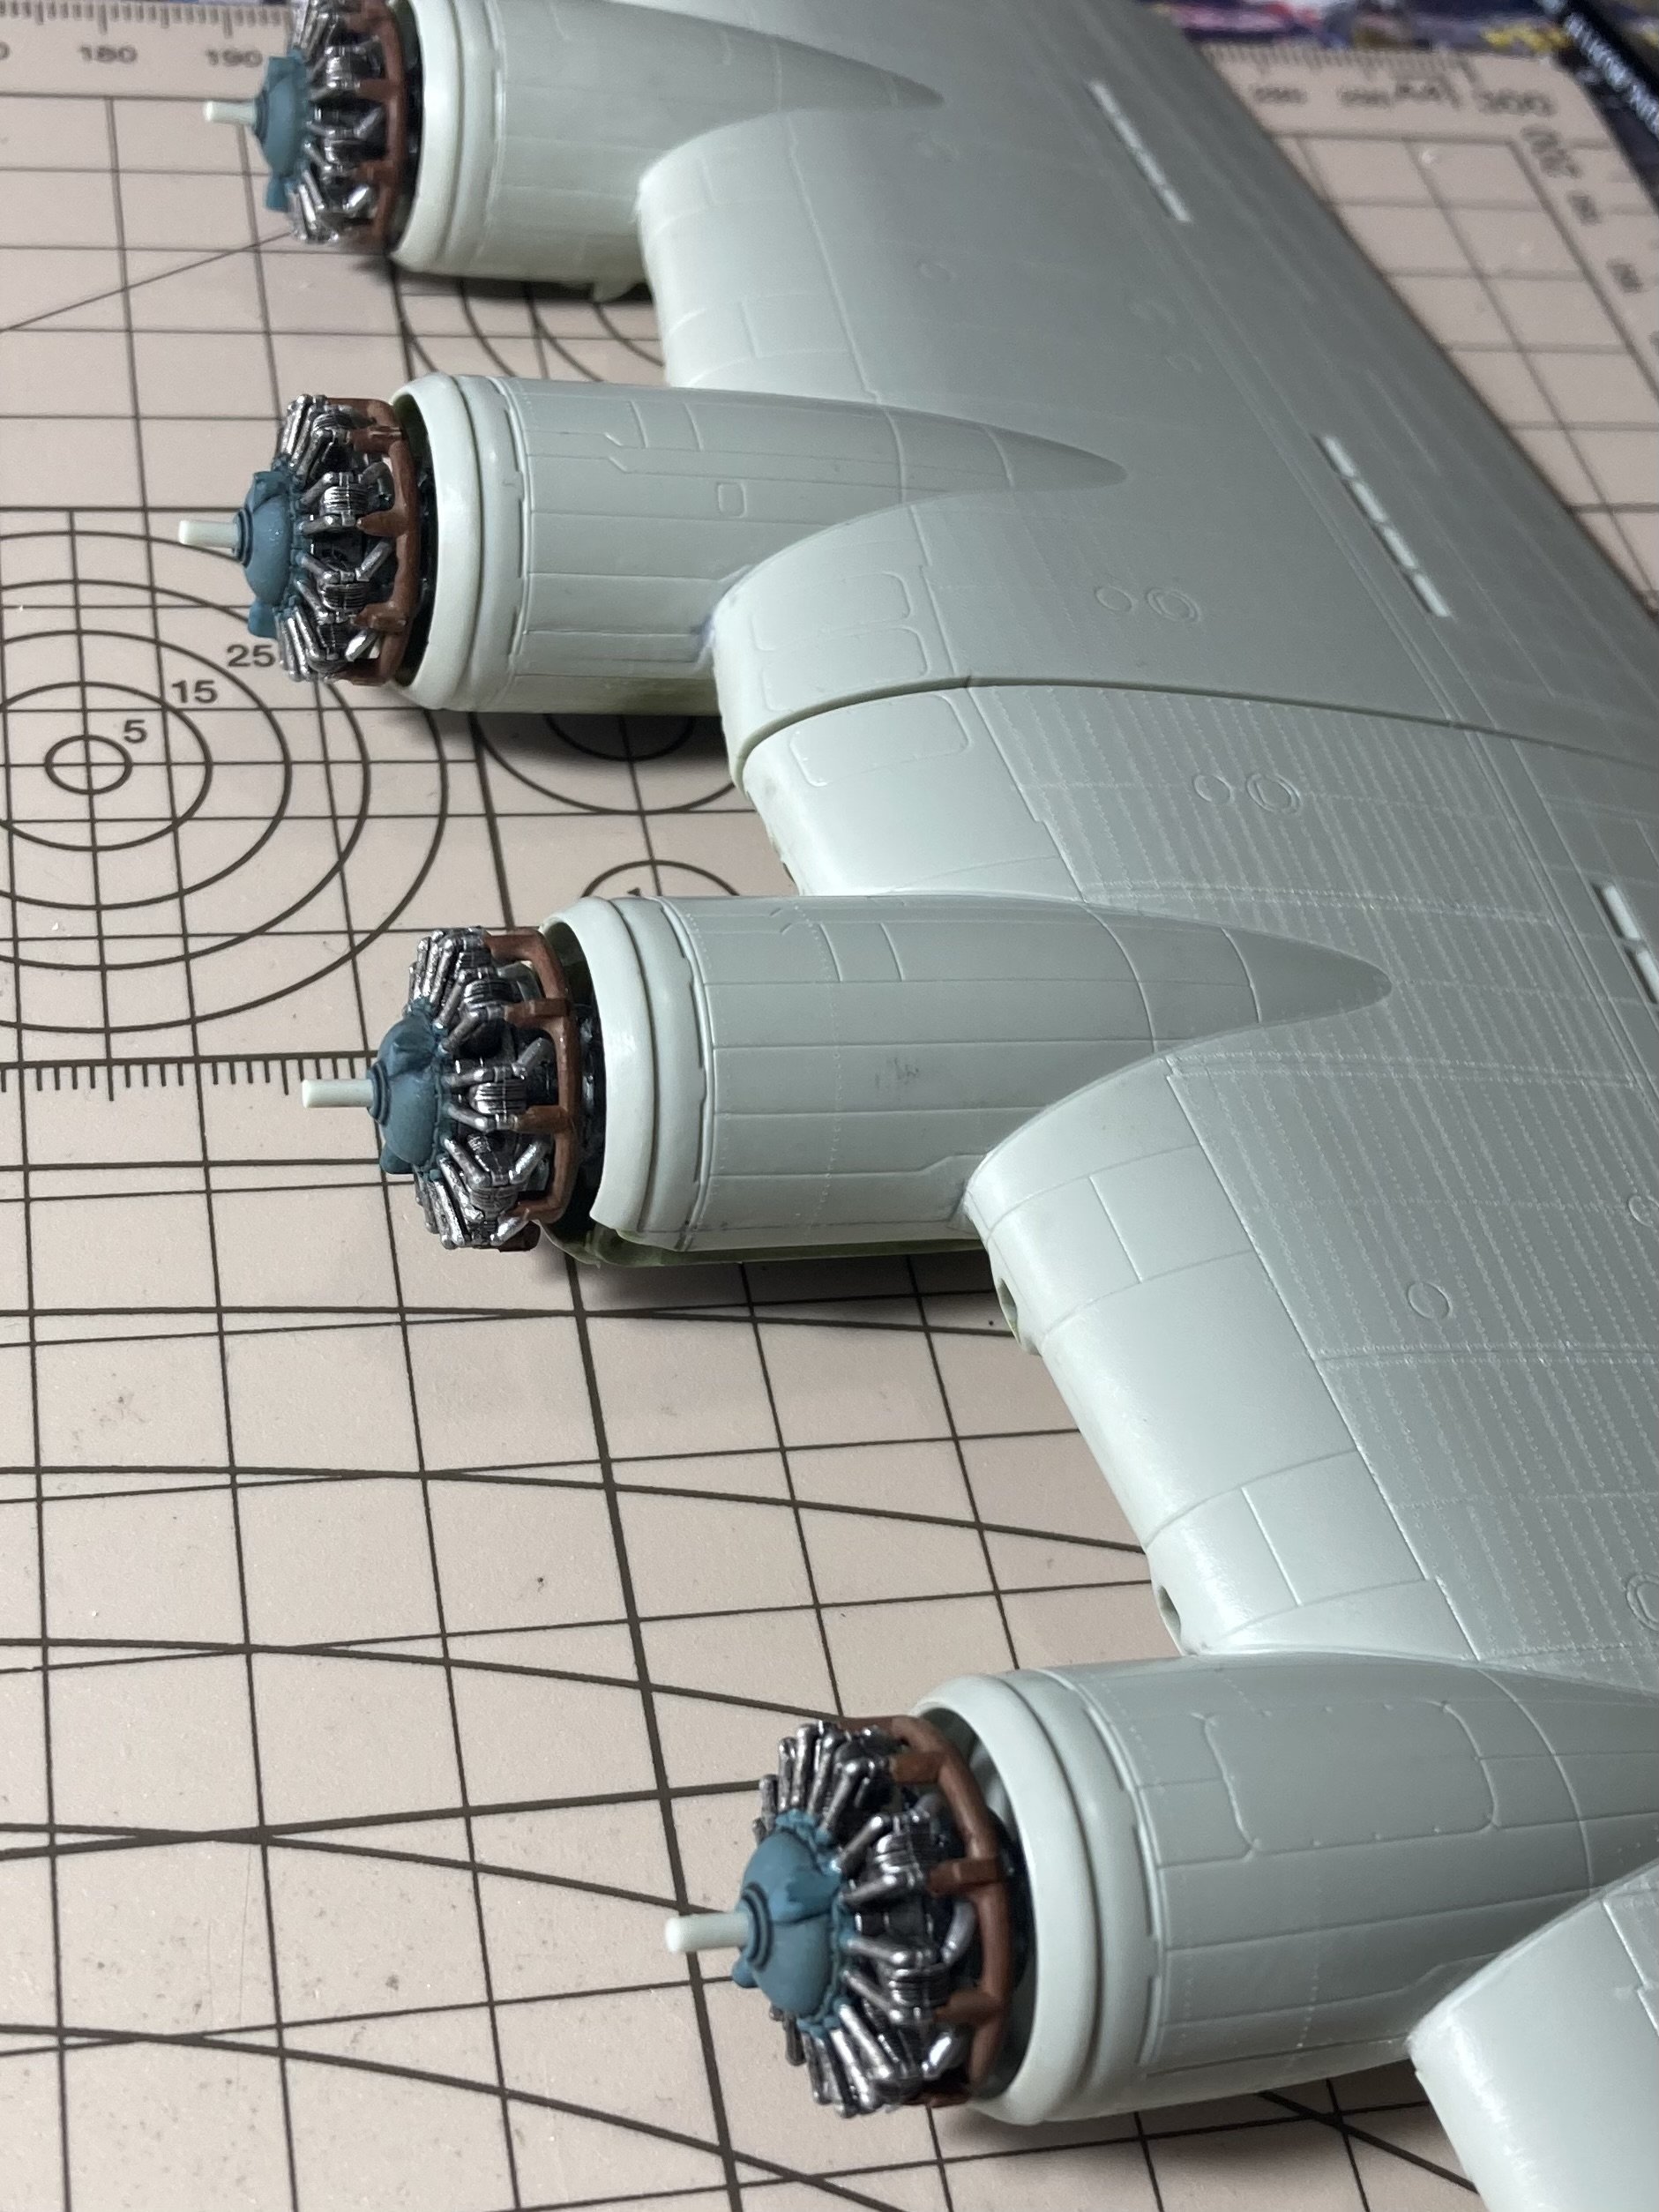
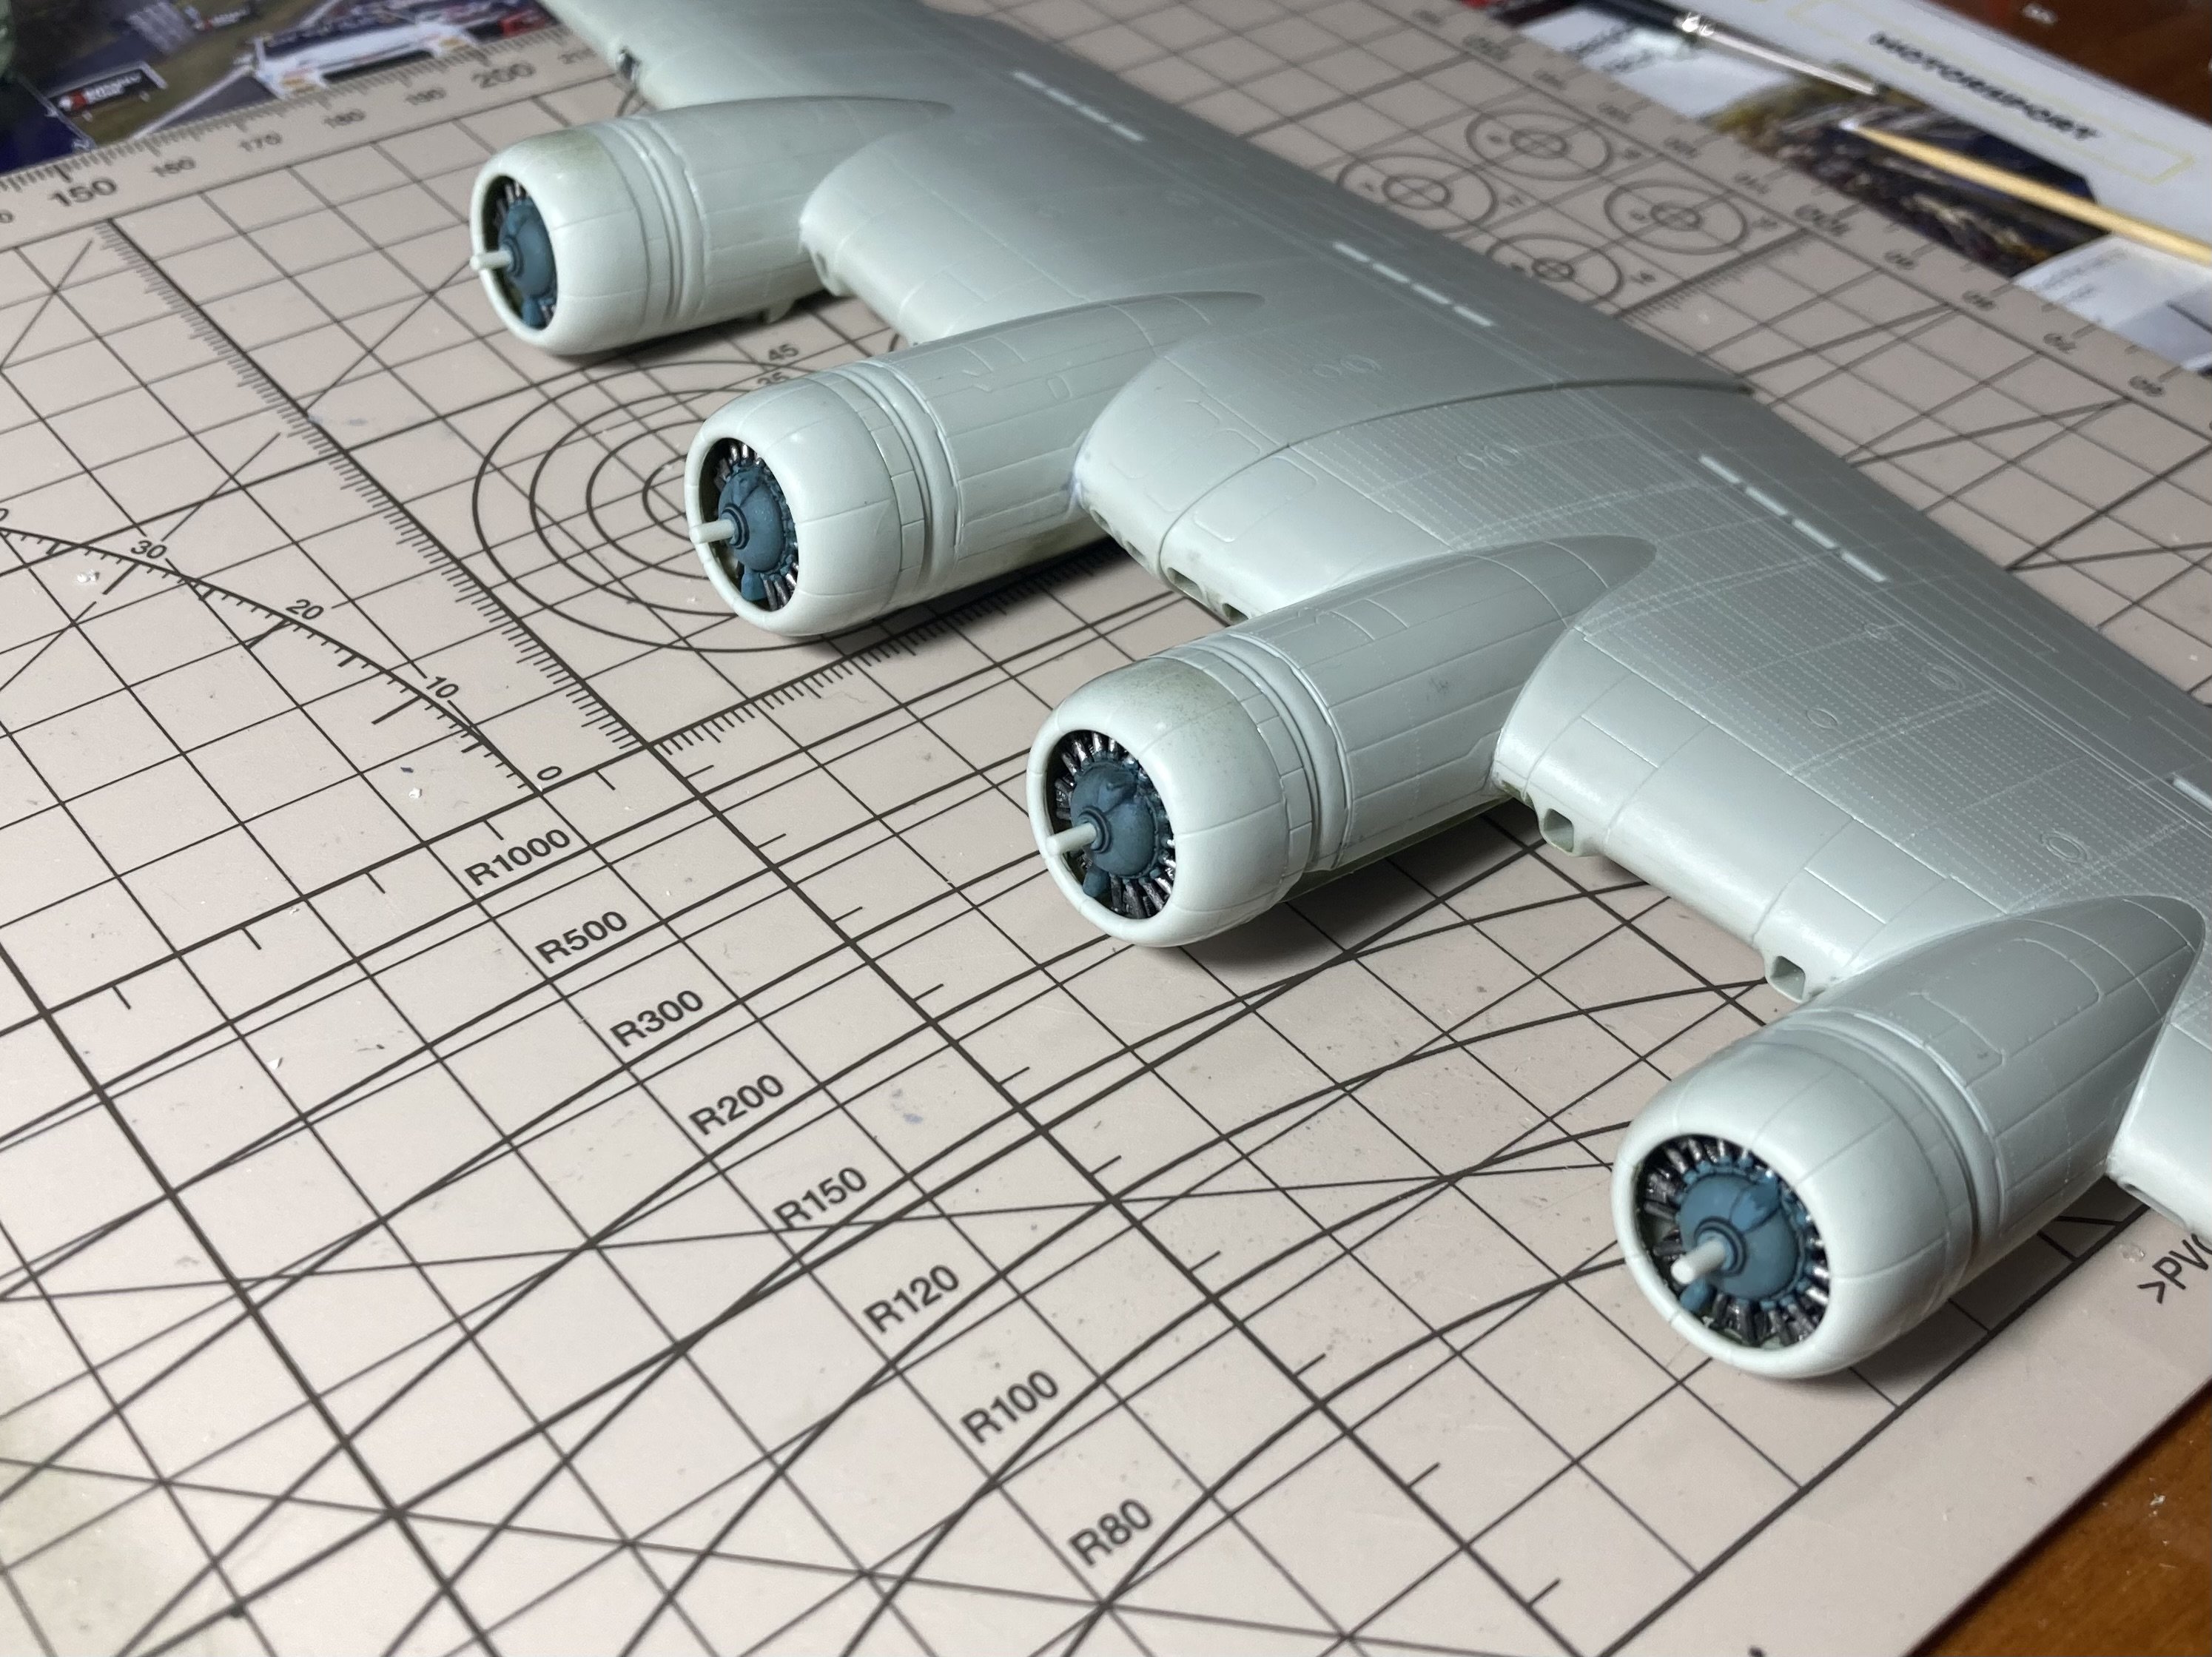
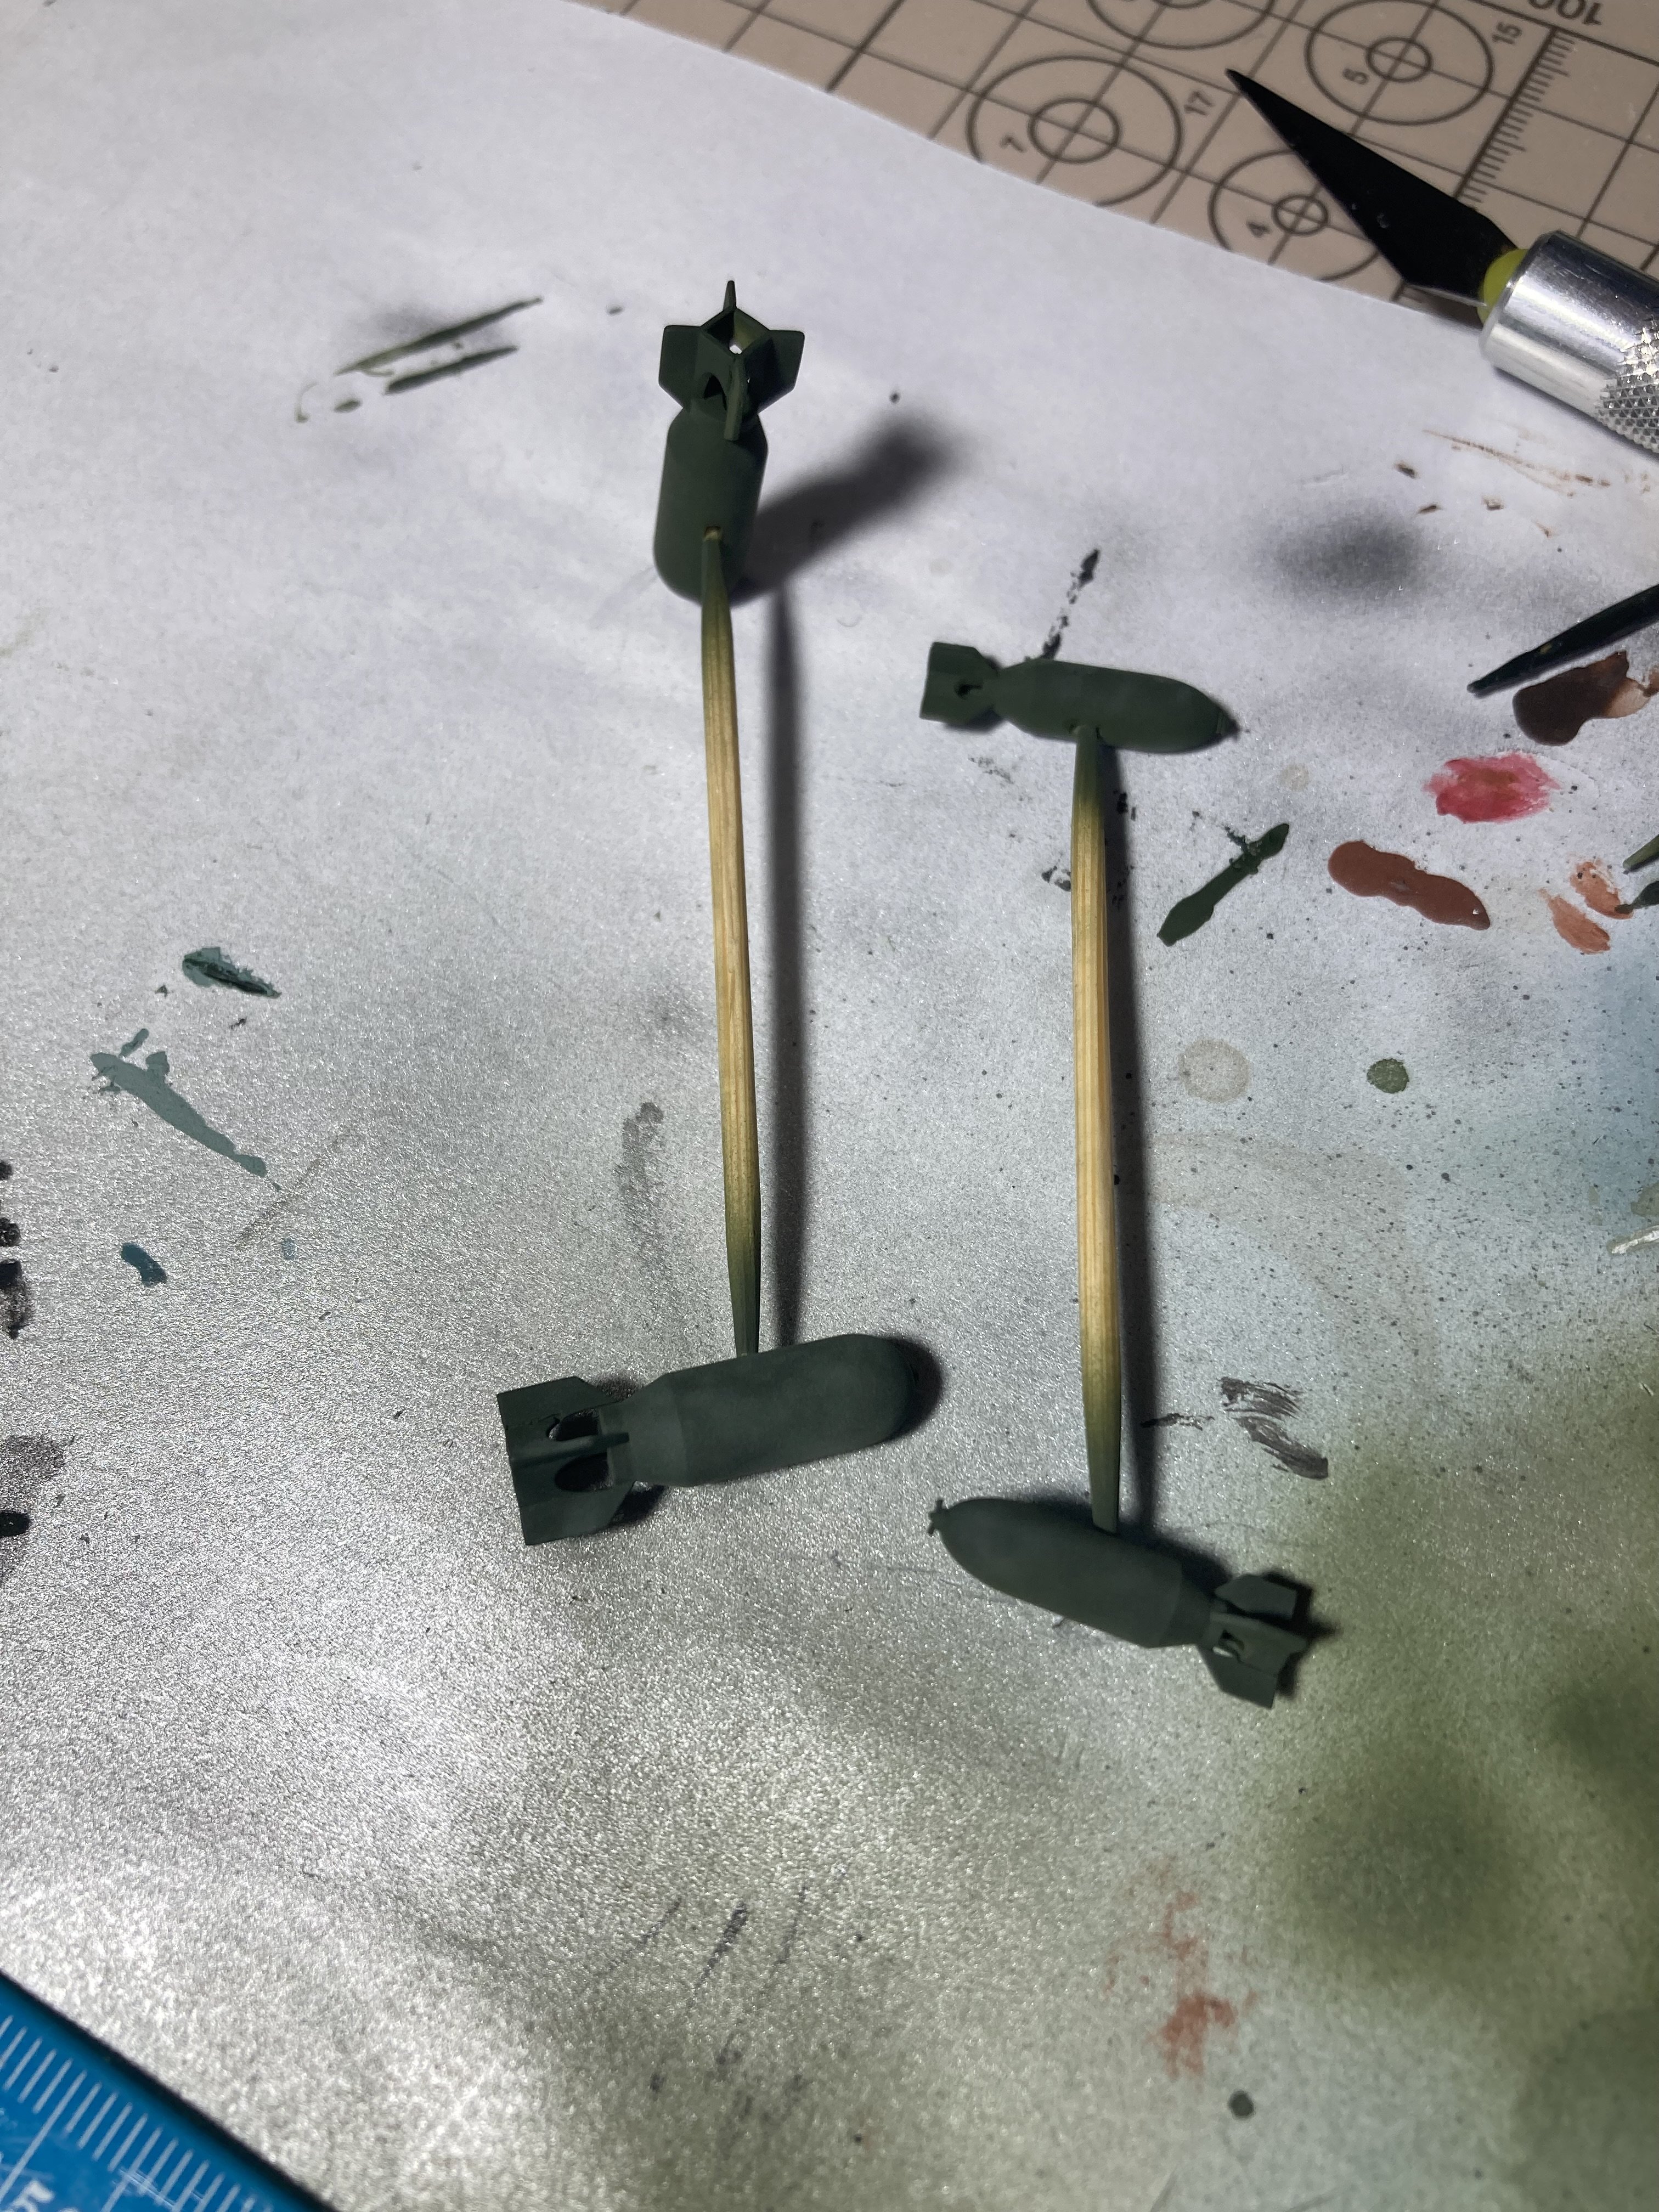
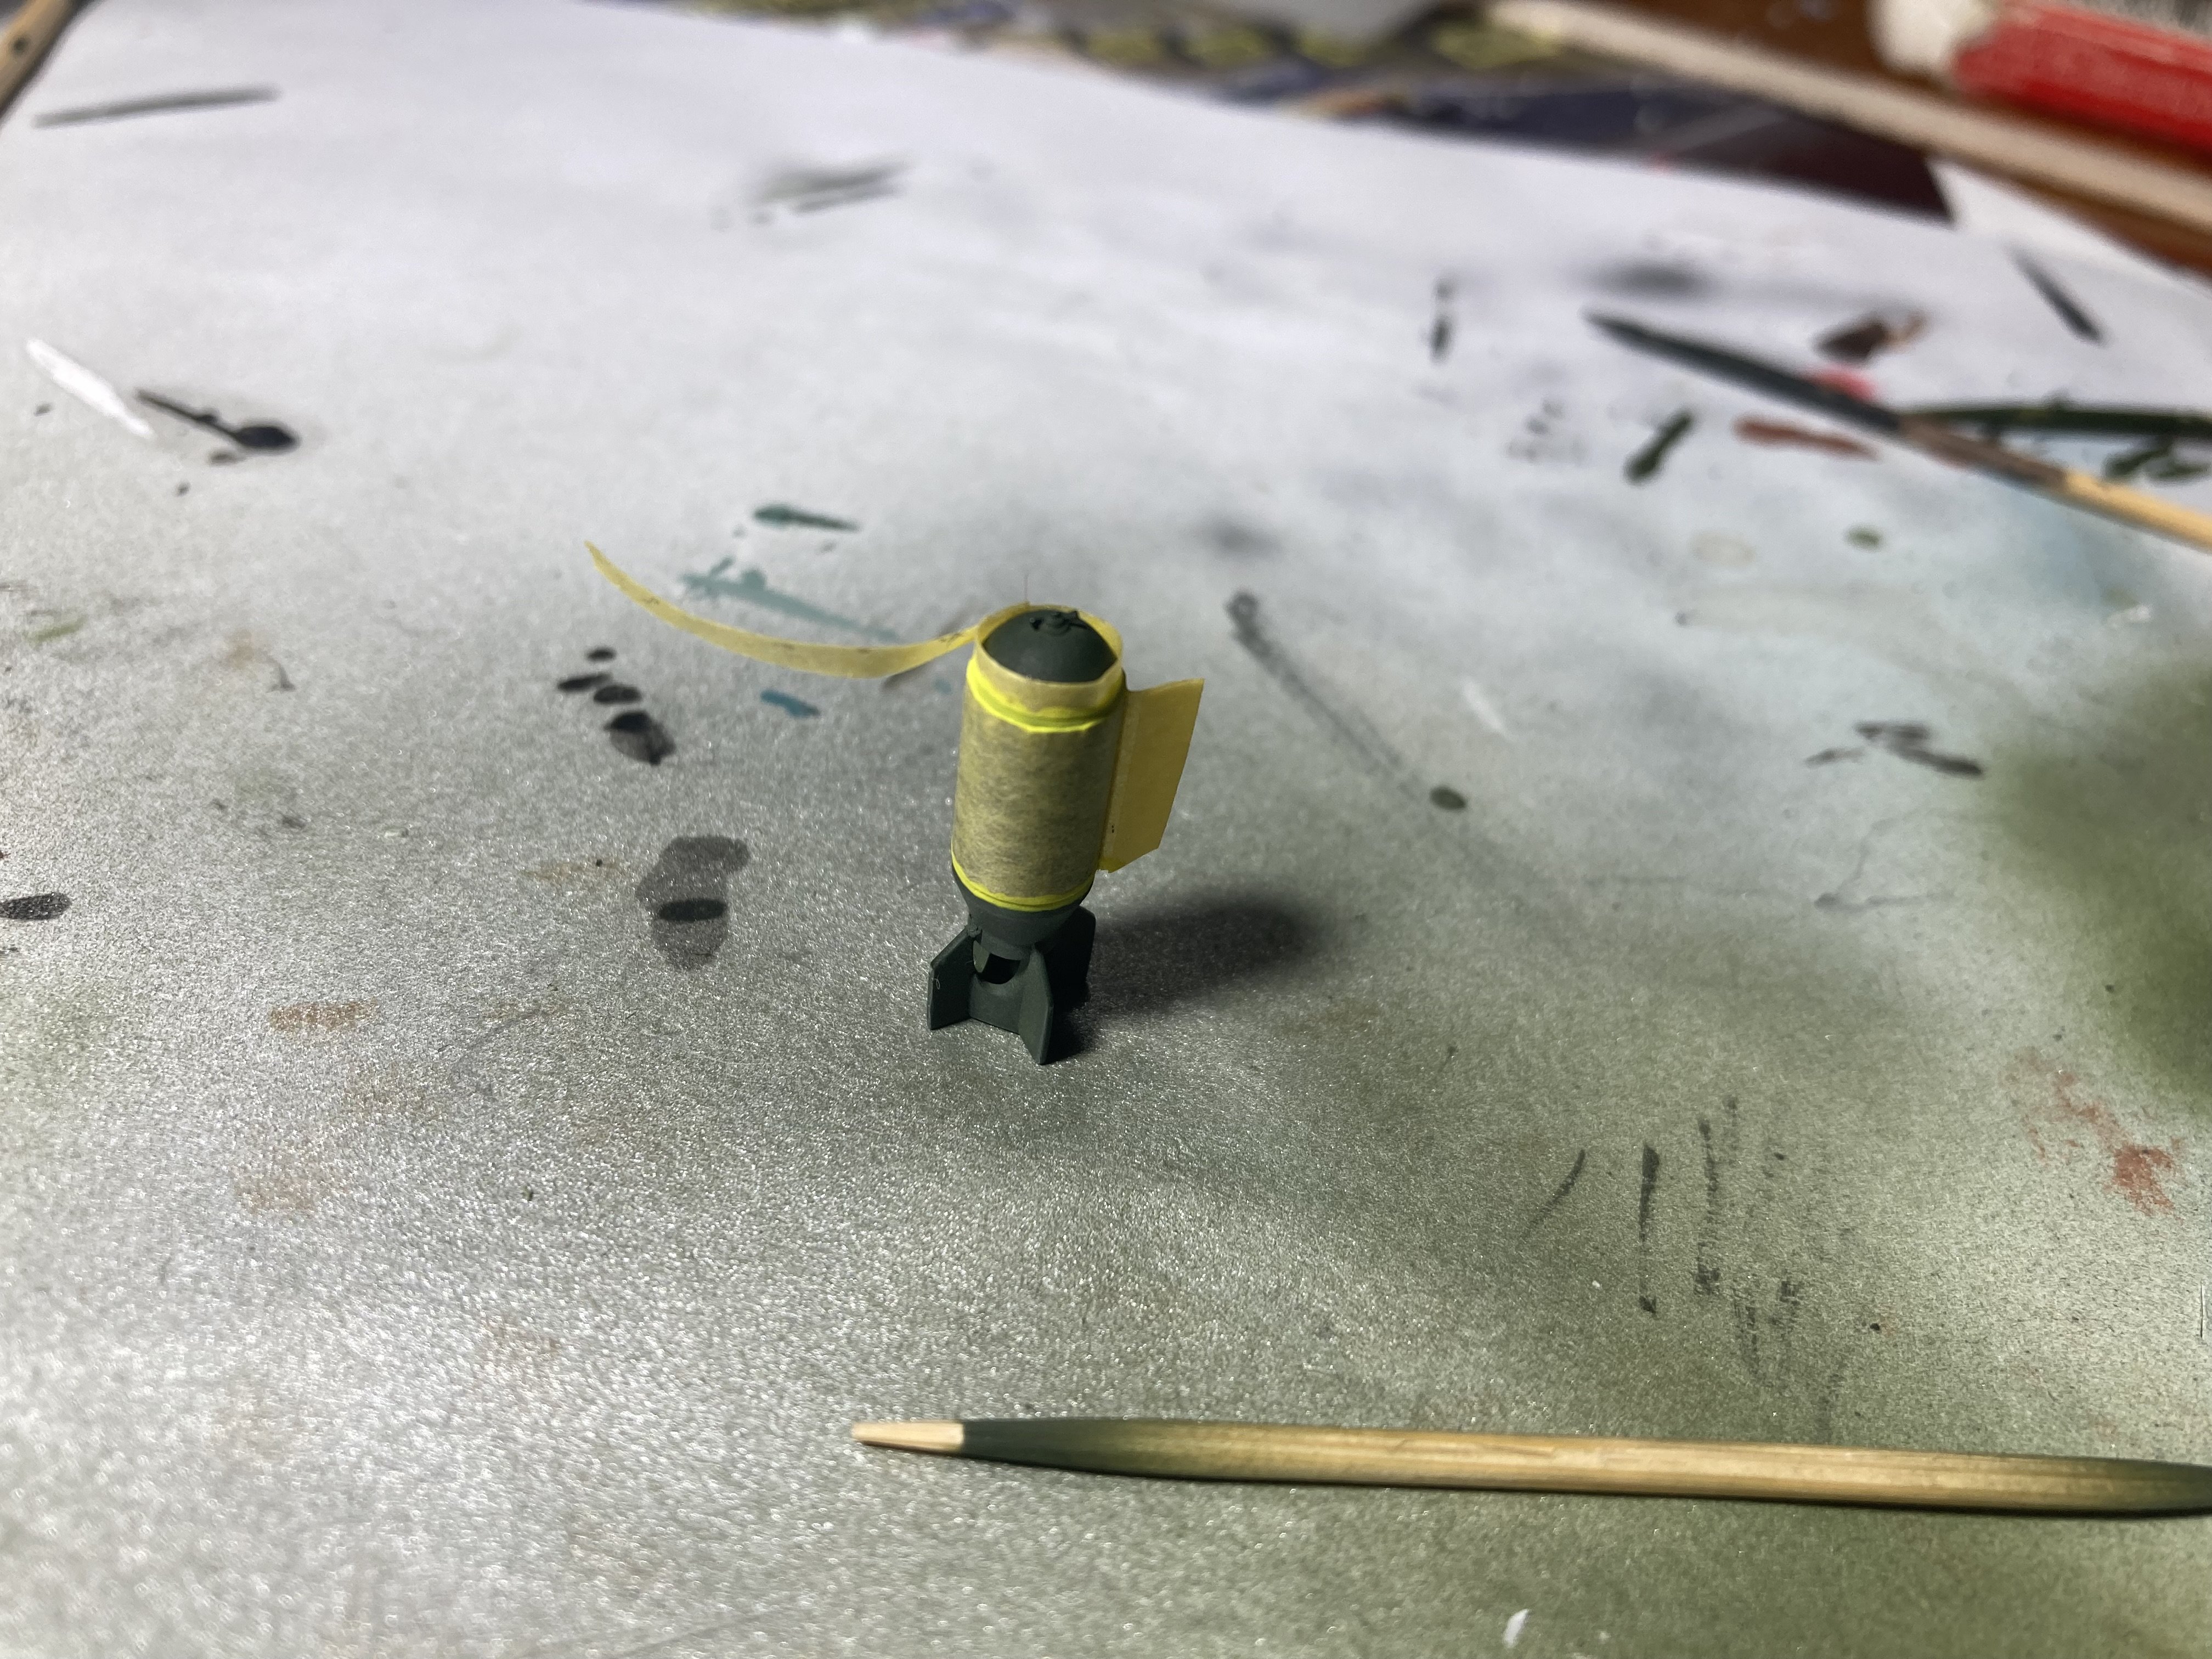
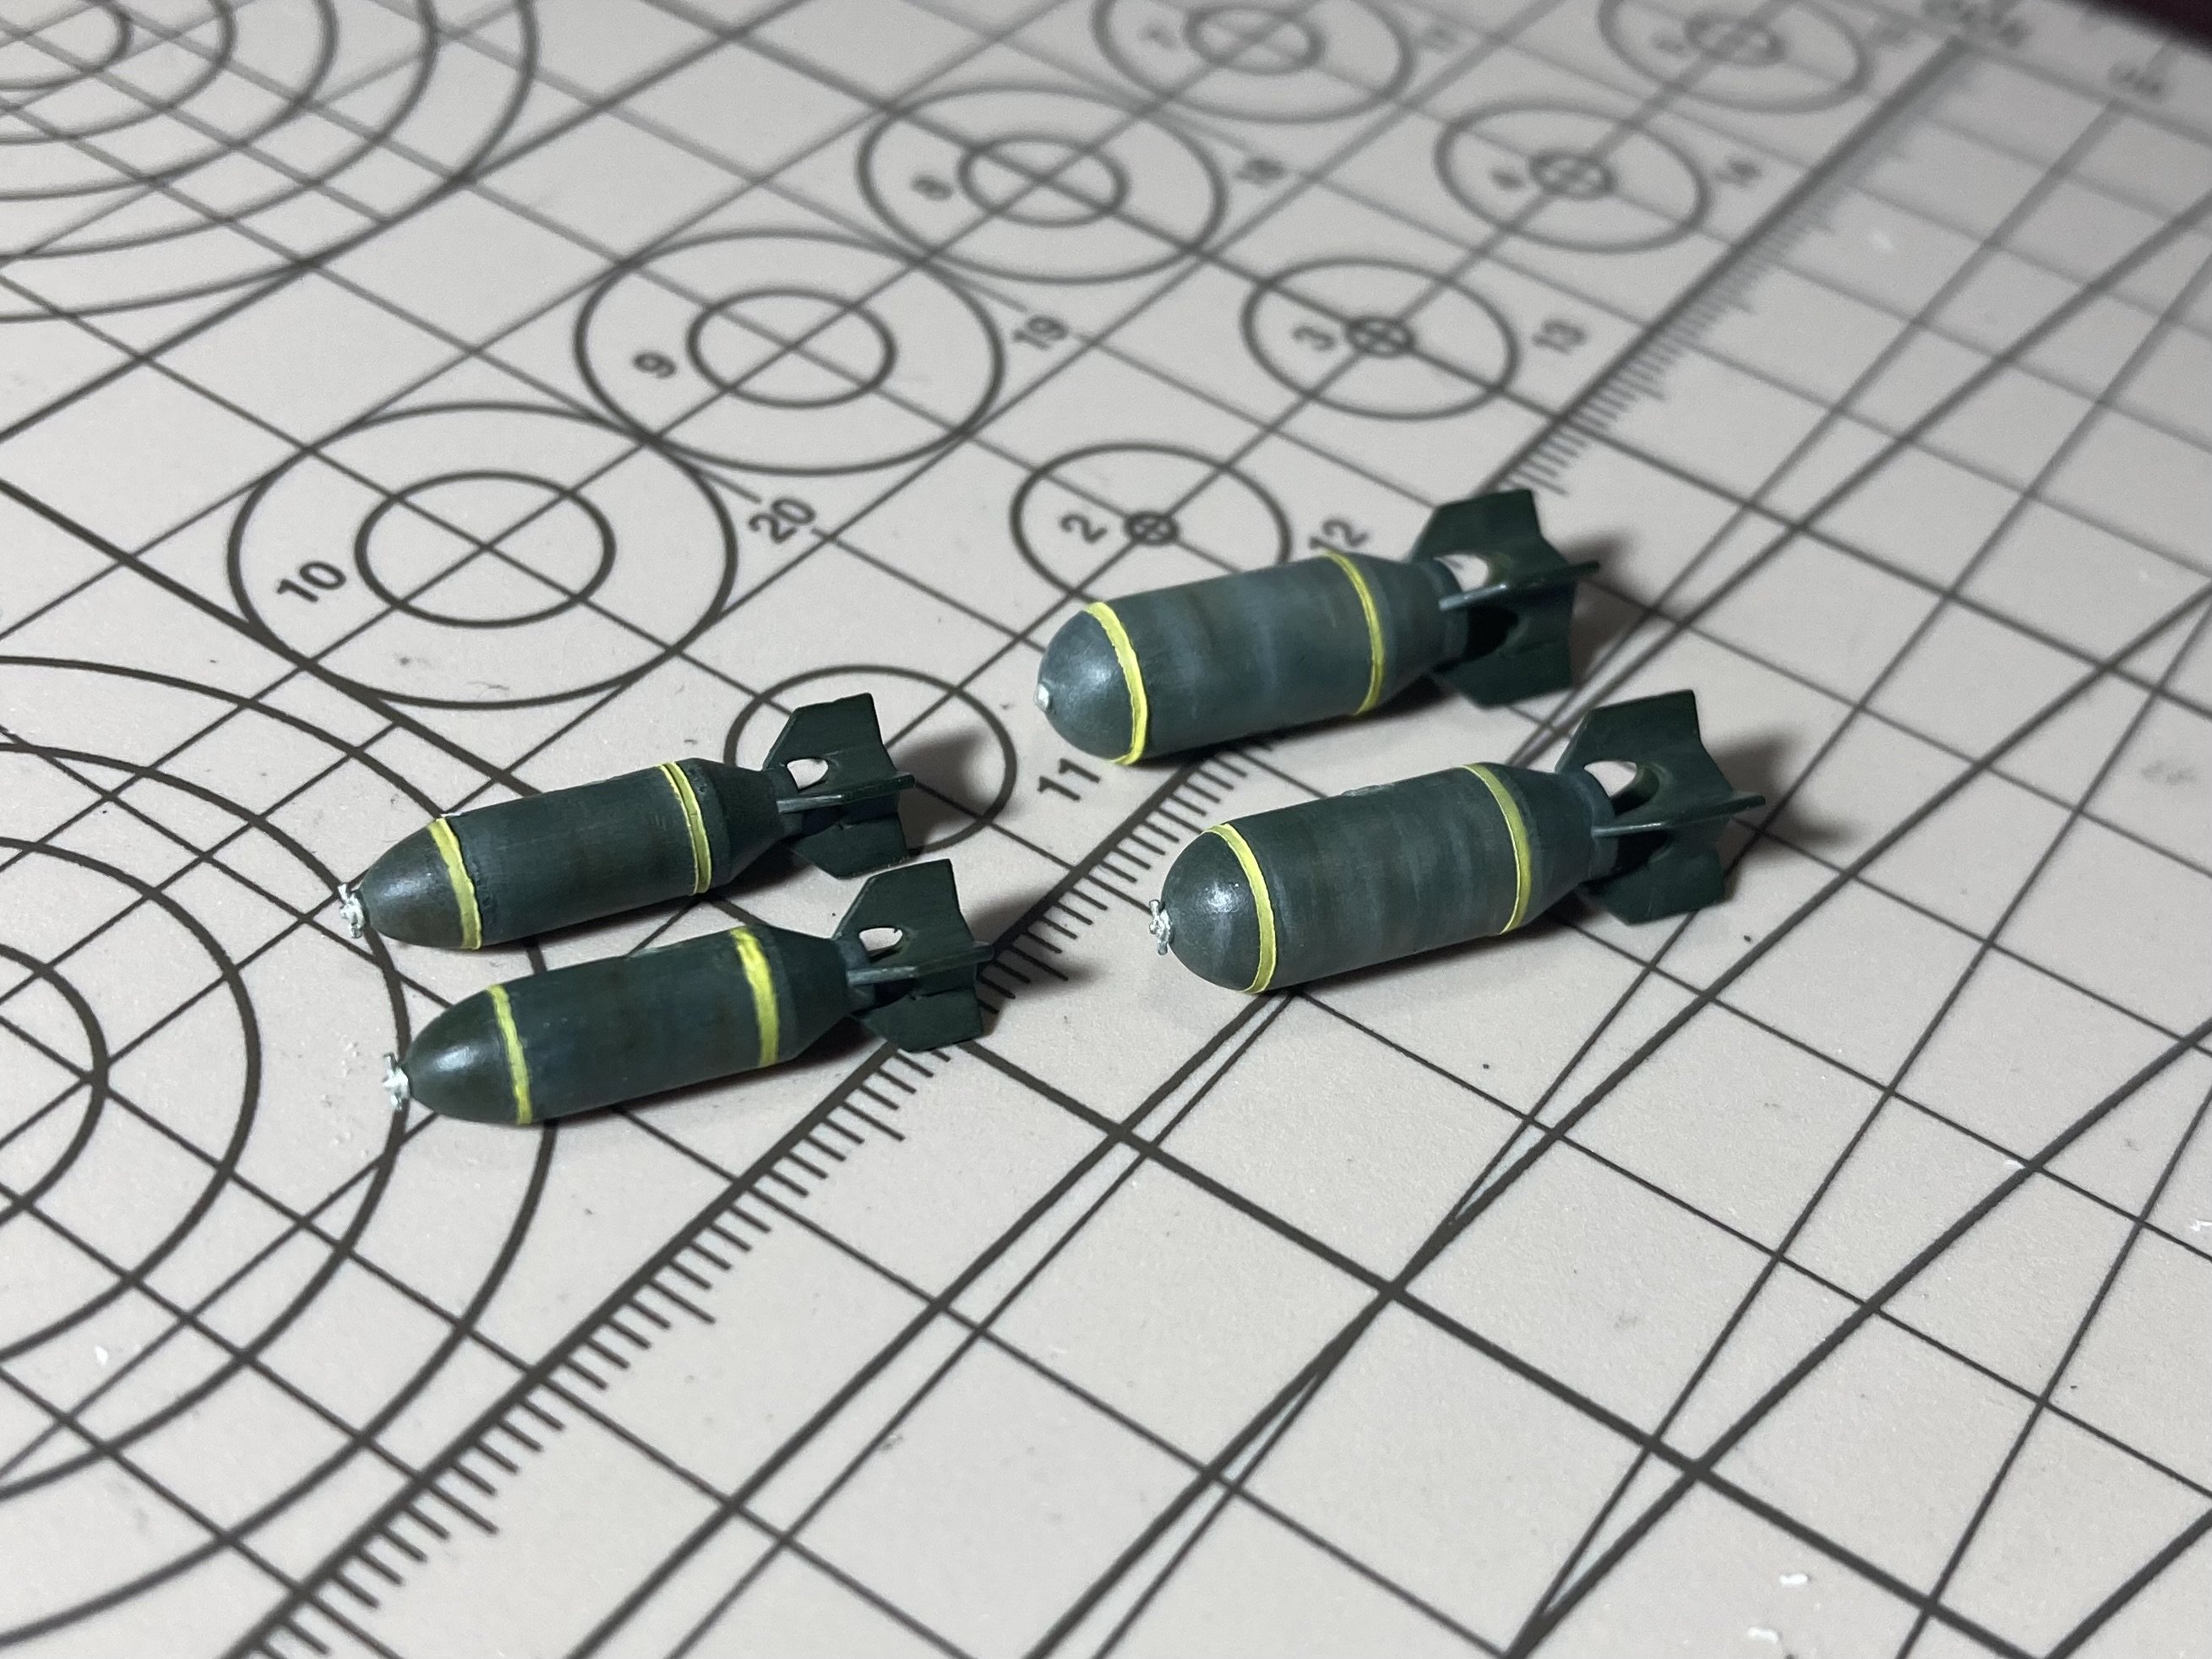
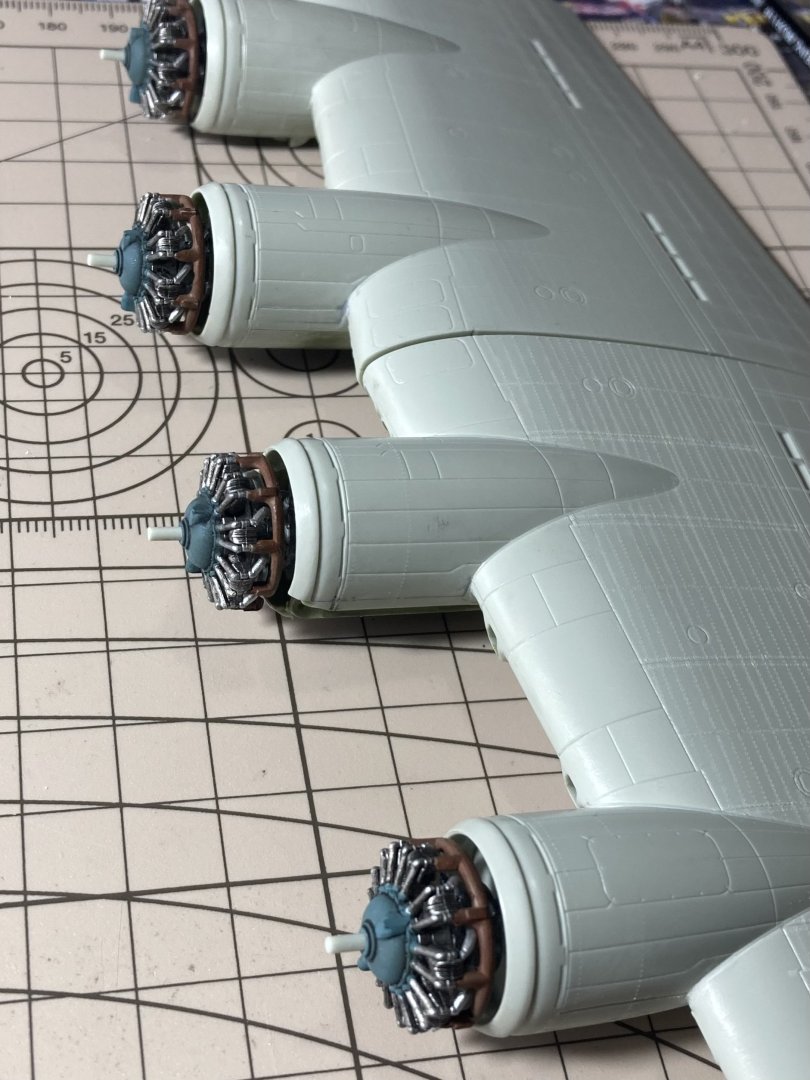
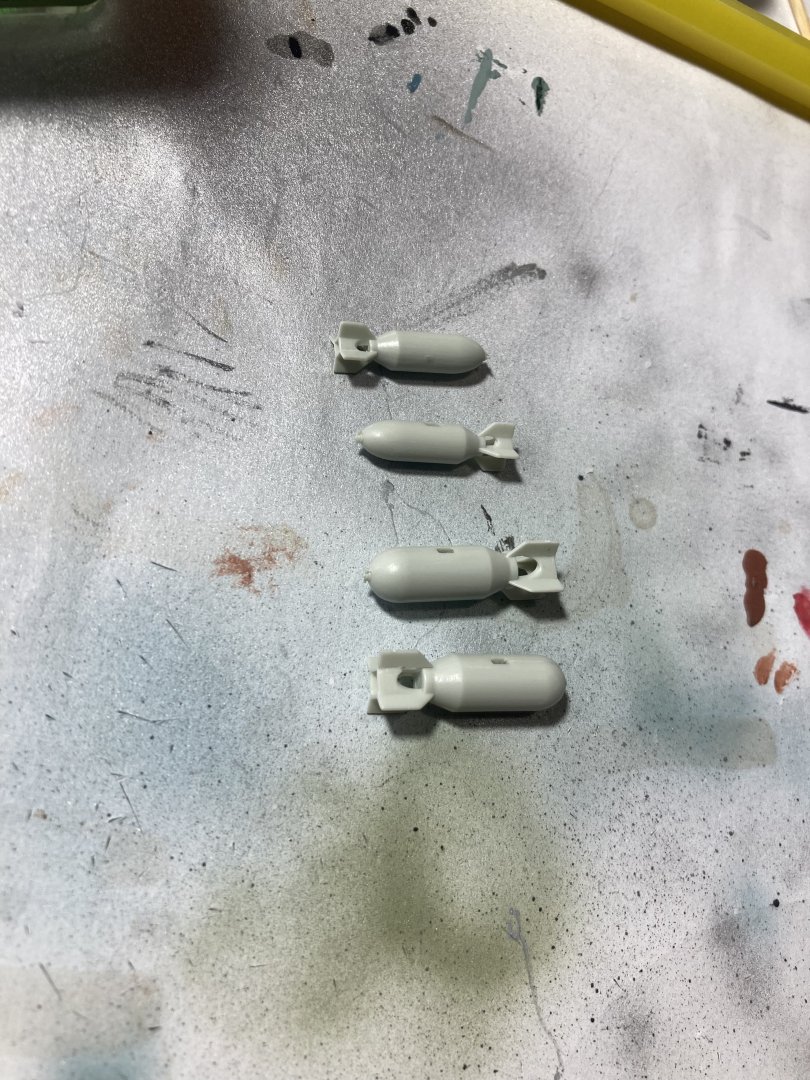
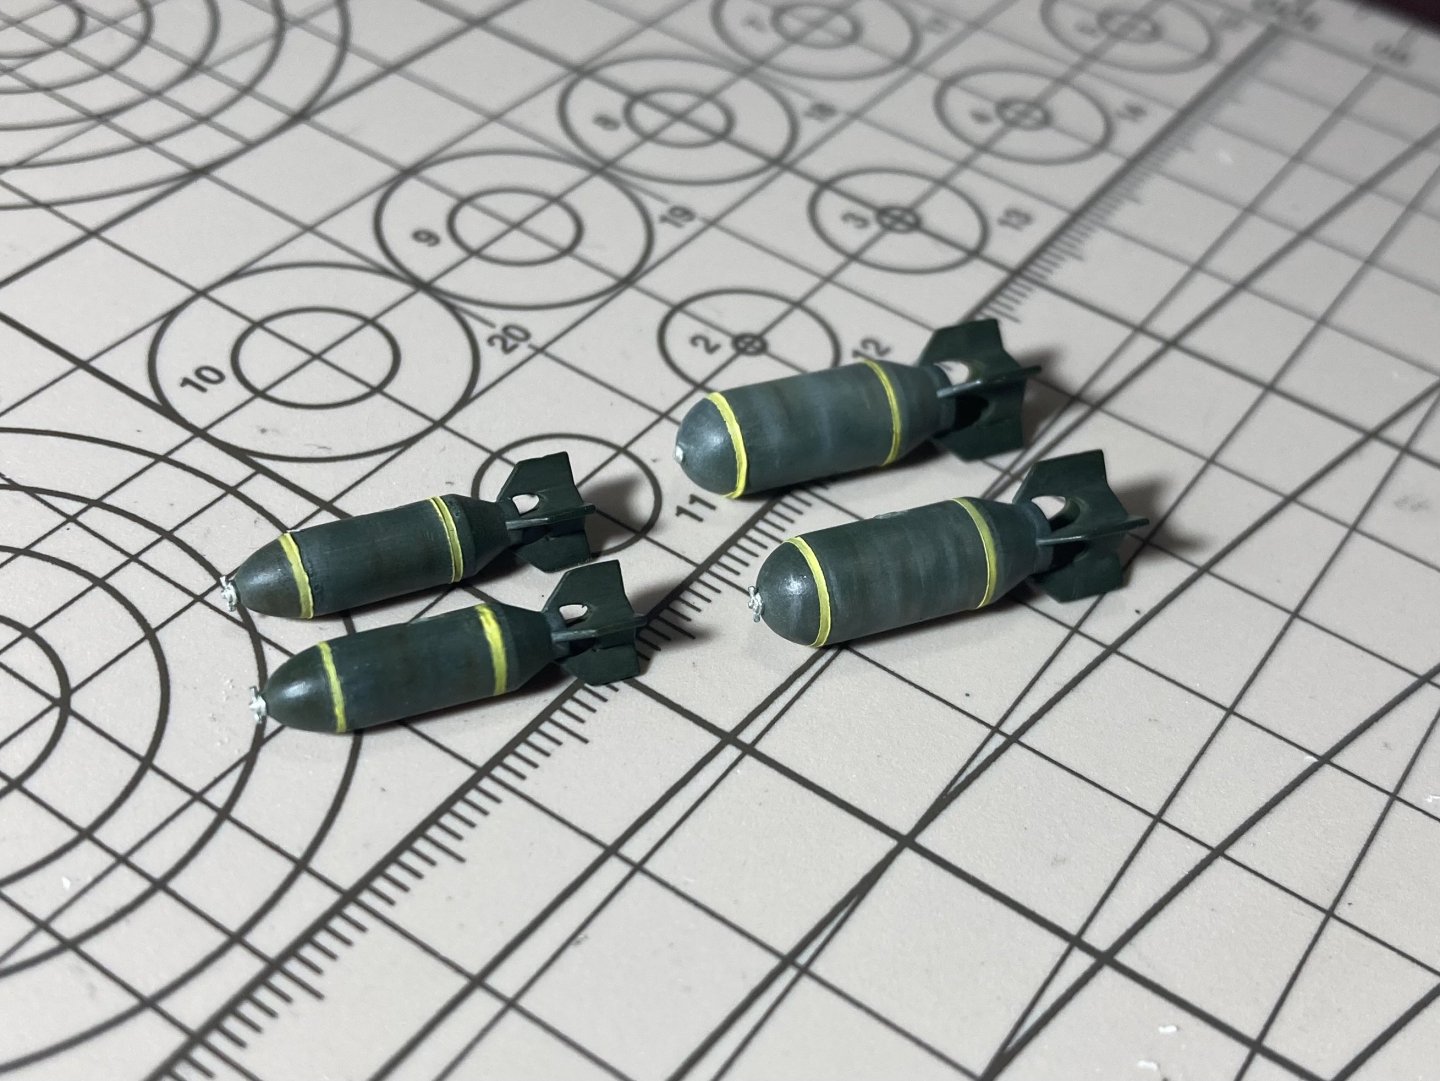
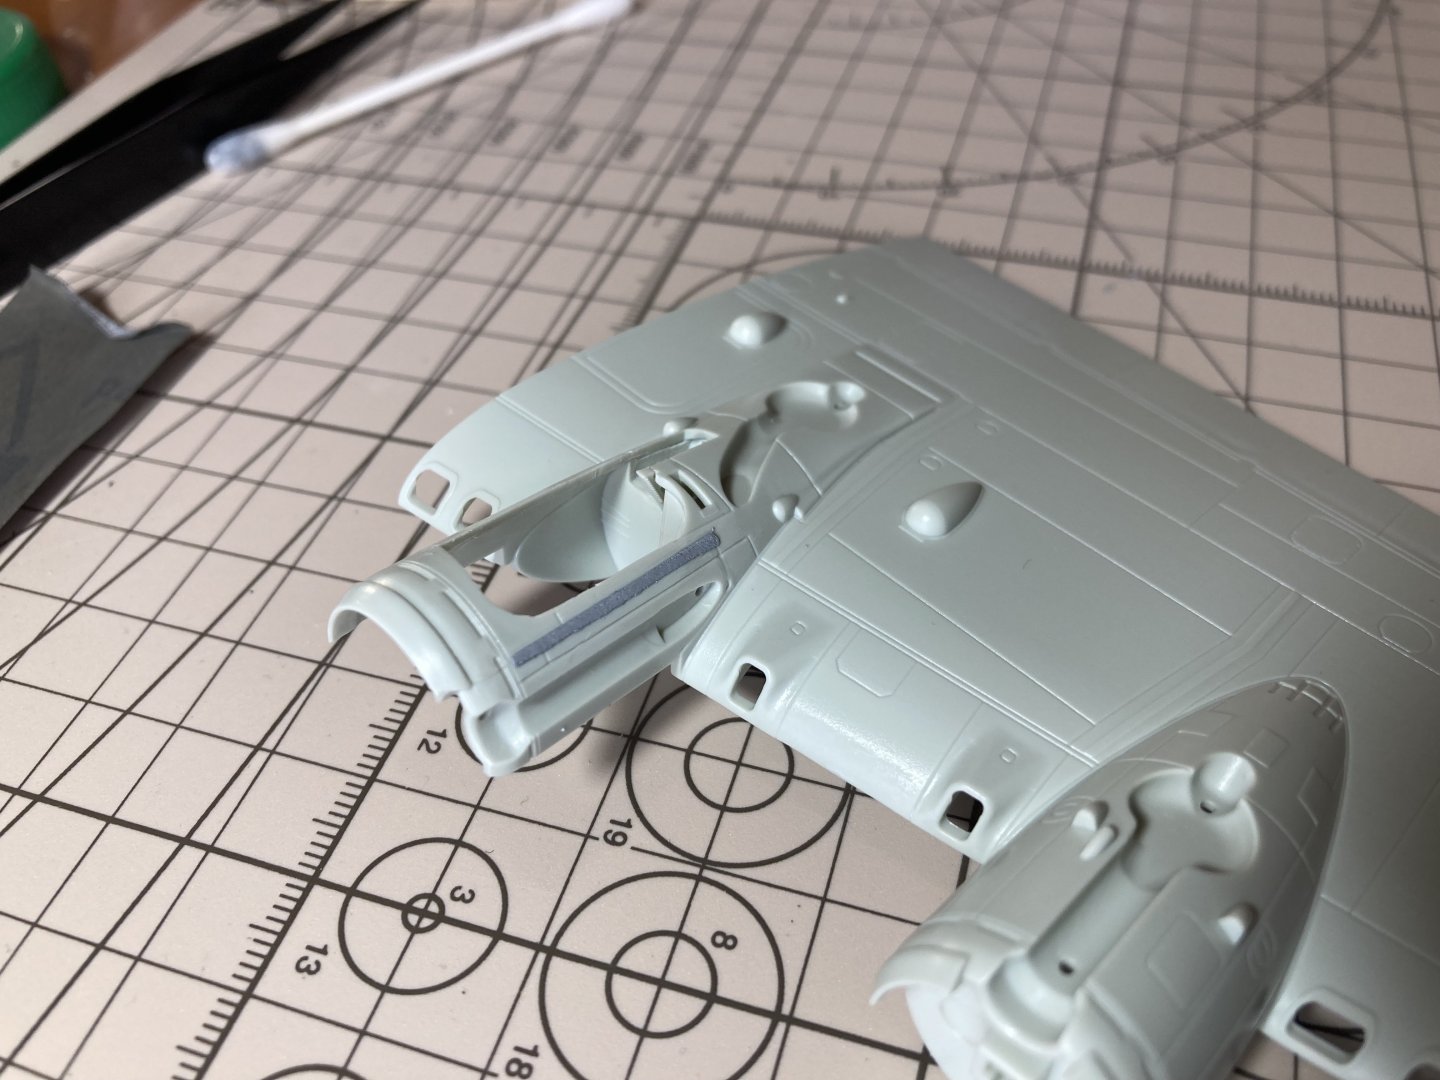
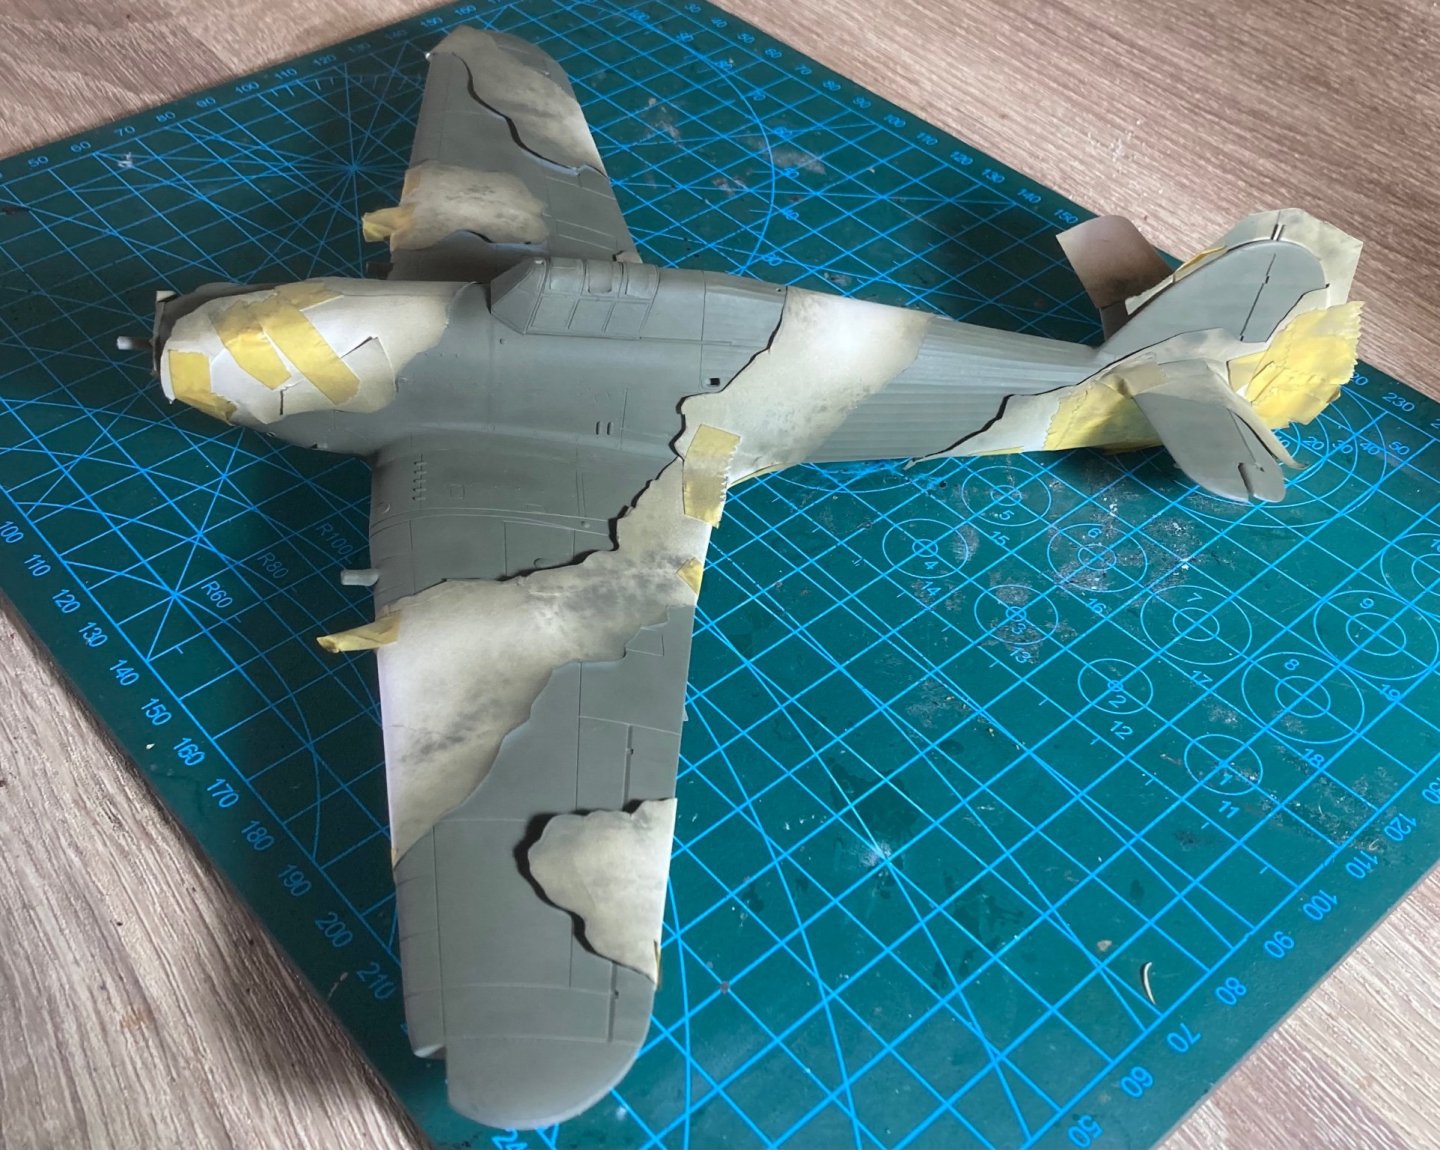
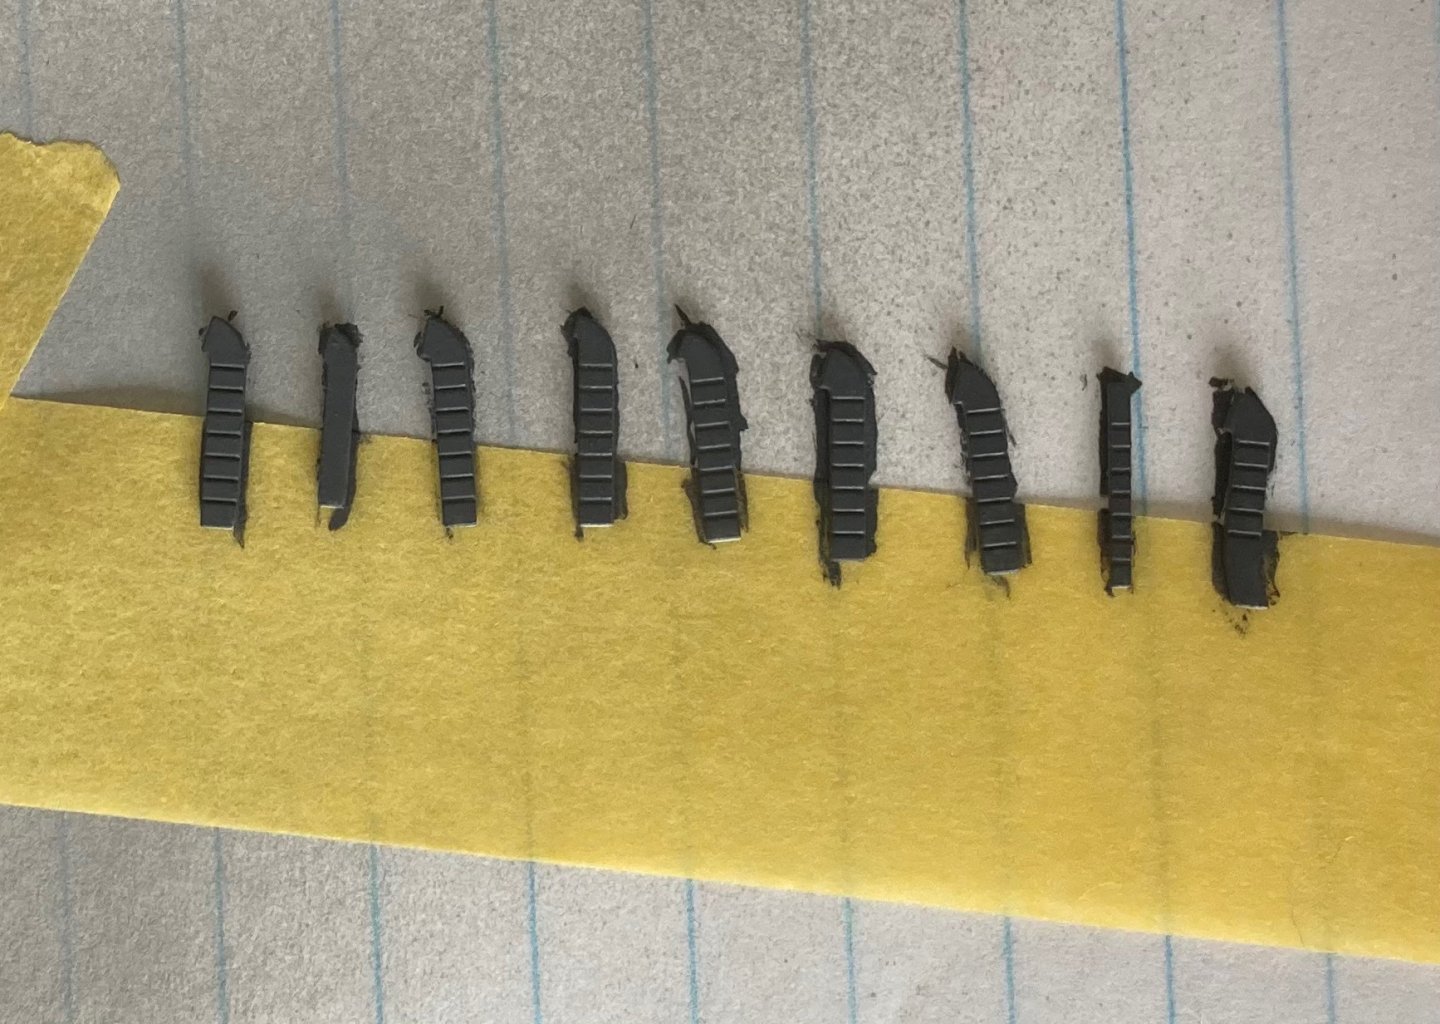
Engines are now attached and I’m liking how they look. Now the engines are covered. At first I wanted to do the cowl flaps open. But they just didn’t look right. So closed them up. Decided to start on the bombs next. luckily there are only 4 in the kit! Making 10 or 20 of these guys would really reduce the fun factor! Painted them in olive green so they are abit different than olive drab. And a few lighter shades in there too. Learnt for HE there were two 1 inch yellow lines, one at the front and one at the back. Masking on a curved surface was interesting! But decided to cut the mask to fit between the two lines at the required width then I just had to mask each end with a thin piece of mask and hope for the best! Let them dry over night and then did some weathering to liven them up abit. Left the tail fairly clean, and they will do. Now I really have no choice but to begin on the internals! Let’s hope the Eduard aftermarket PE internals arrives this coming week and on Monday I’ll go get some more paints so I can mix together some green zinc chromite


- 77 replies
-
- 10
-

-
Sounds like “Operation Upgrade” might be needing to get that smile back on your dial! Technology is nice until it starts to misbehave
-
Thanks, yea it is a shame the engines and interior will be all invisible. Always so many great details hidden! maybe a future build I’ll do with the engine cowls open. But not on a B-17! I’ll do that when there is only one engine and engine bay to do haha!
-
I can’t find that first on here in NZ, but I can get Vallejo. I’ve been doing a lot of research and a lot of people saying tamiya 2 parts xf3 yellow and 1 part xf5 green is a good option. So I have got an empty jar and will mix that into its own jar and that can be my cockpit green. I can then add some dark grey or black to darken it and make a bronze green. it would be easier if a company could just make the right shades haha. I have spent hours trying to read things and work out equivalent colours. It’s abit of a nightmare with all the conflicting info. some places say inside is all green others say aluminium and others a mix of the two 😅 It is the part I really enjoy but sometimes there is no answer to be found.
-
Thanks mate. It’s been awhile! Hope you are doing well
-
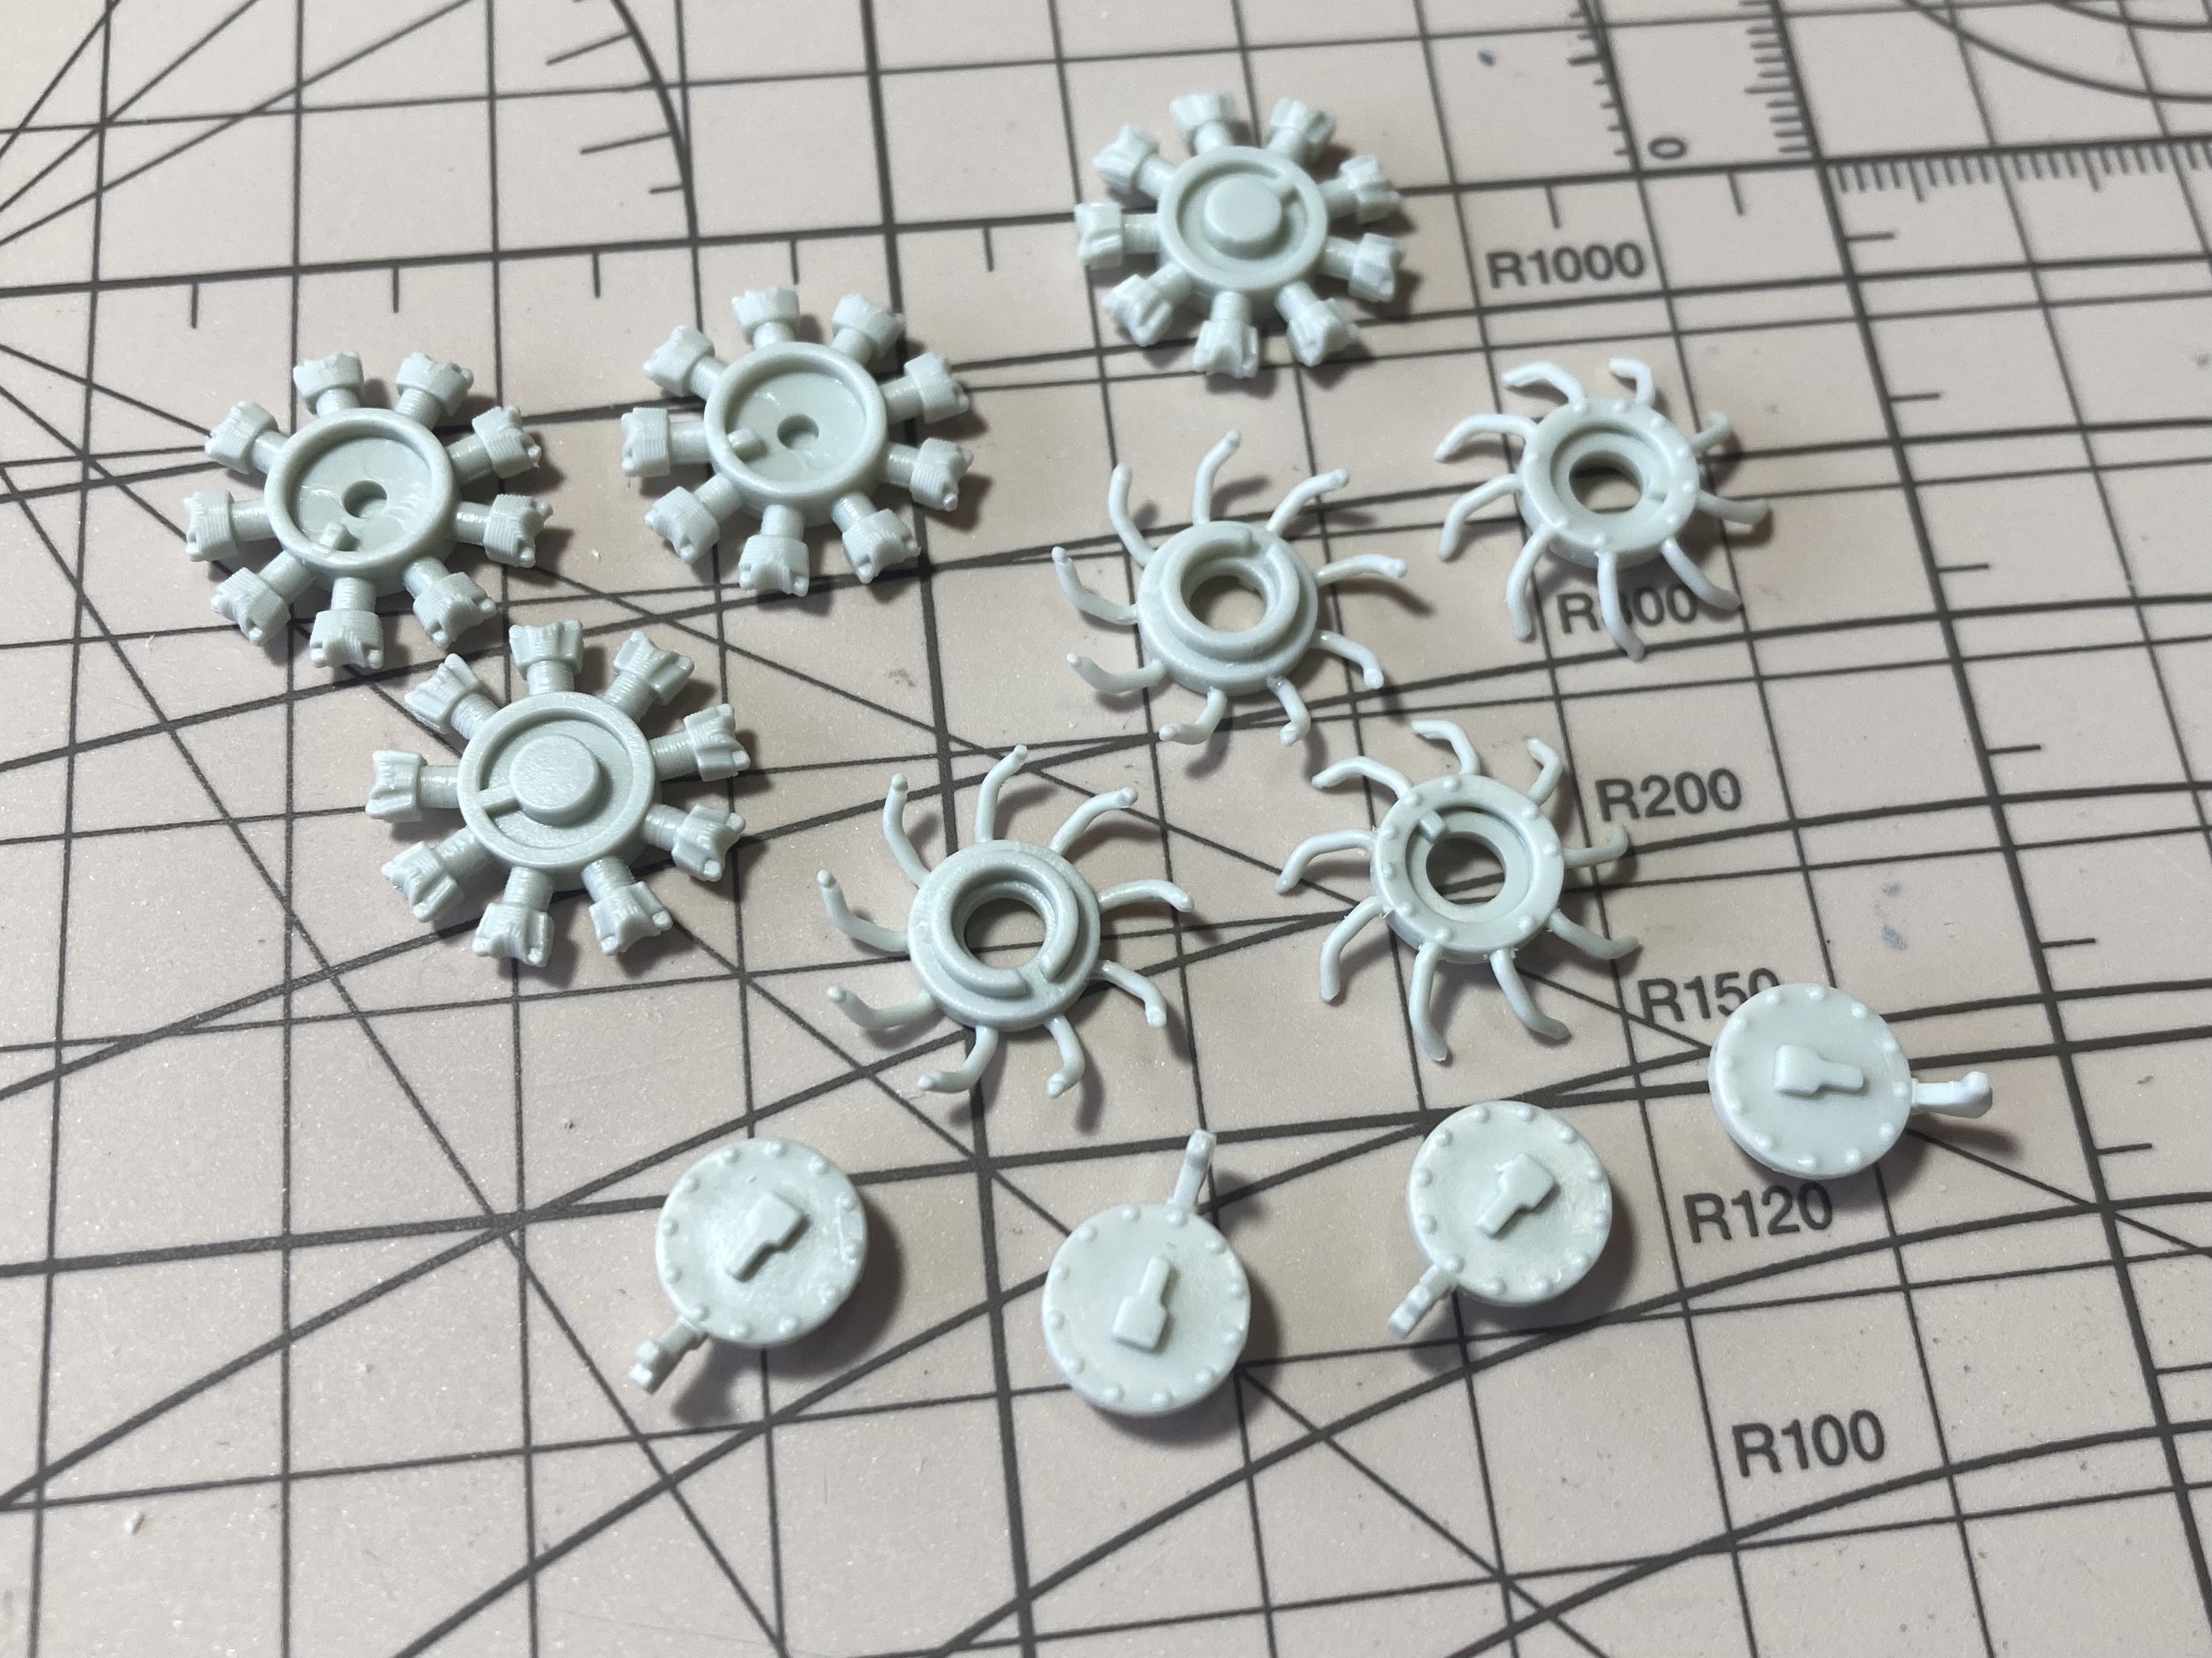
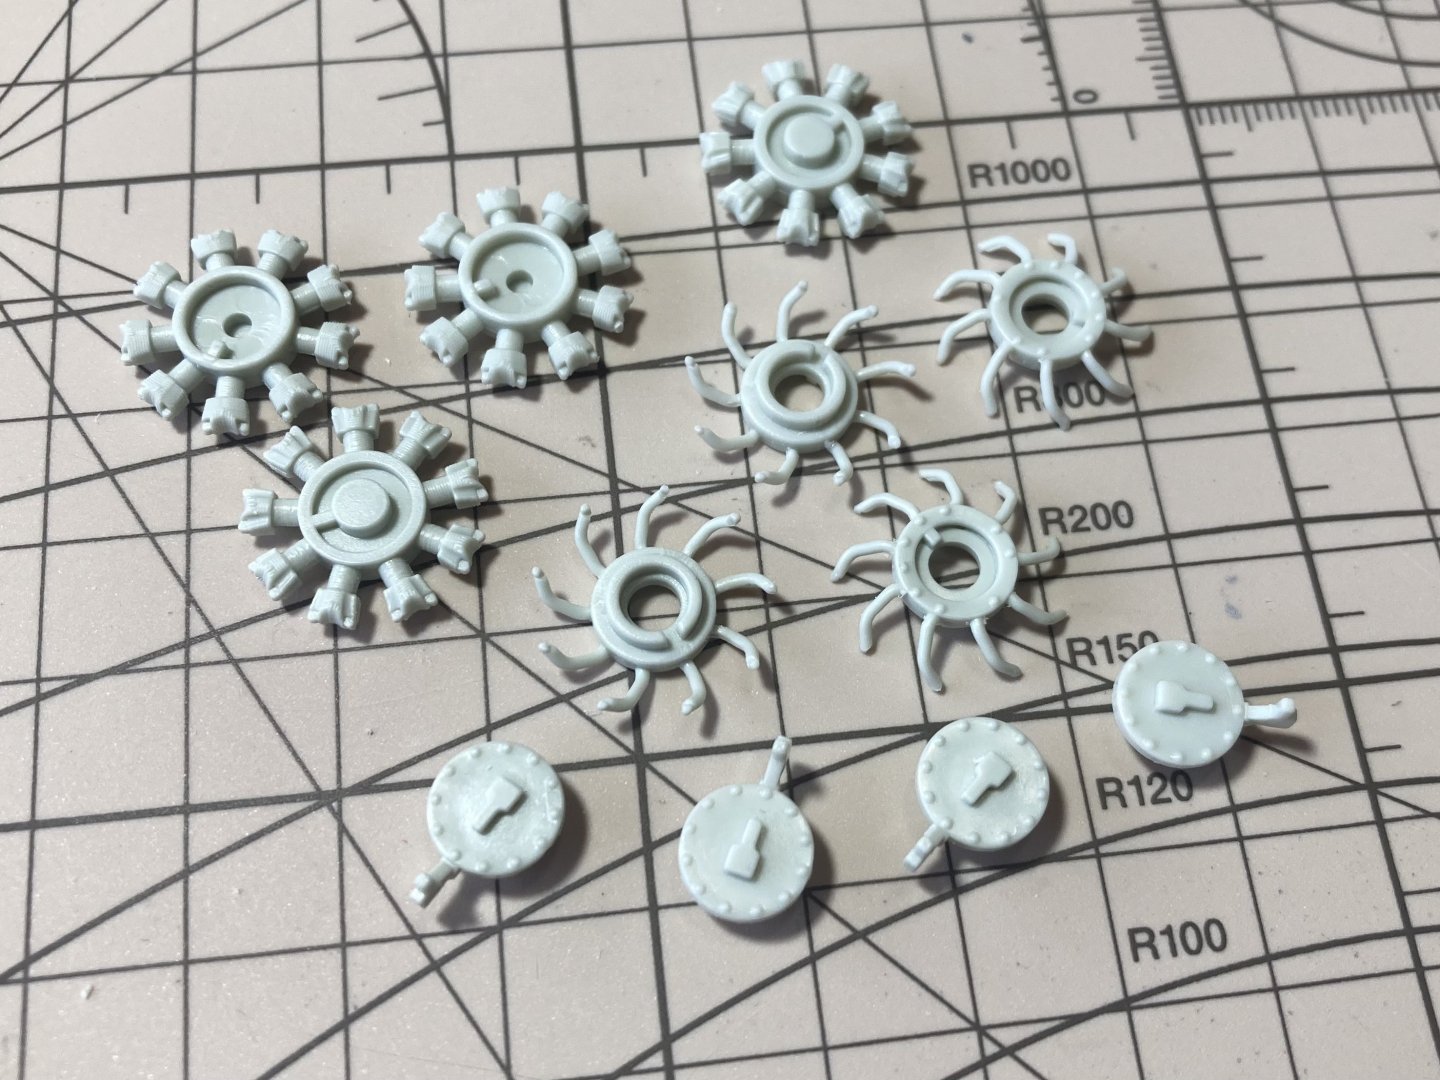
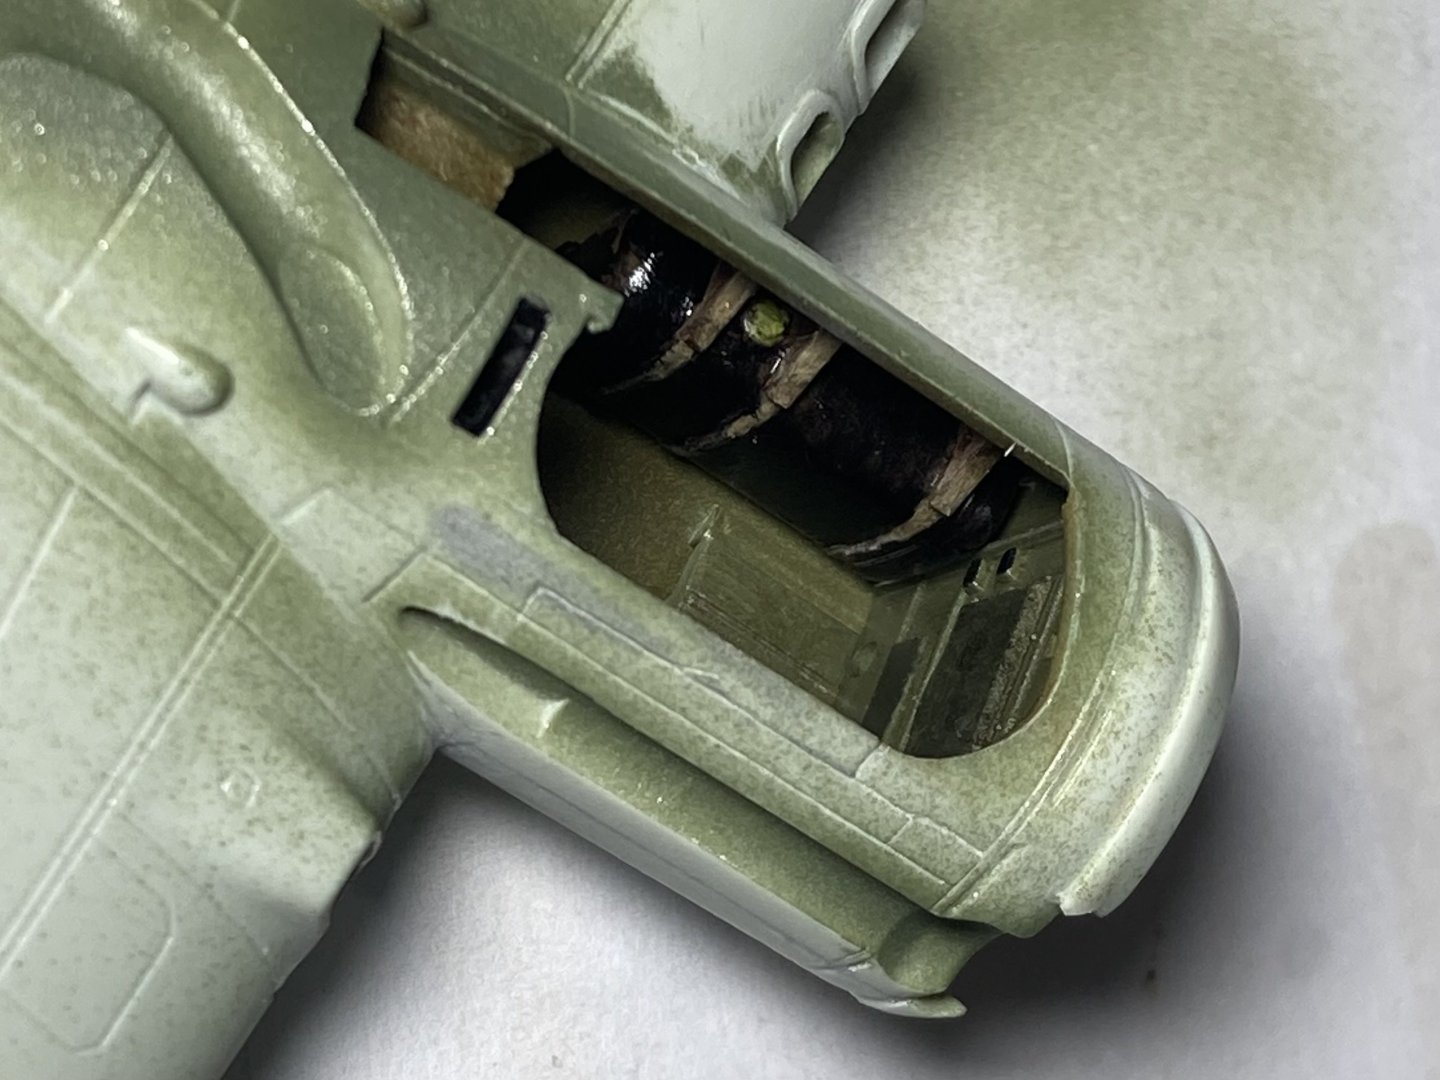
While I wait for the internal aftermarket kits to arrive I’ve begun on the engines. they are not to bad out of the kit. But they are pretty much all hidden under the cowls, otherwise I’d have enjoyed adding details to them. painted them silver and gun metal to give some variety and then a black oil wash. Here are two with the wash and two about to have theirs and it makes a big difference. I don’t have any blue paints apart from my sky blue so decided to try add some dark blue from my acrylic paint set that I use for bits and pieces. I’ve a set of oil paints for all my oil washes and a set of acrylics for all the colours I want to add but don’t need to buy a Tamiya paint for. so used sky blue and nato black with some of my dark blue paint and thinned it all down and tried it through my airbrush. And it worked pretty well! I was expecting the cheaper paint to splatter or something but maybe had it thin enough and mixed with tamiya hopefully gives it some strength. once dry I’ll clean up and give a slight grime to stop it all looking brand new. After all it’s meant to be a plane that’s done many missions, but I’m sure the engines were well looked after so will be just a slight grime up.

-
I really does! And that’s a good way to word it “adding interest” Hope your refurbishment goes well! I’d give you some tips… if I had any but this is a new area for me. But I’m pleased I gave it a go.
-
It was a solid 2 days to get the plane riveted. I wonder how many real b-17s they could rivet in the factory in 2 days!! Even a tiny bit off the line is really noticeable because they are so close together! But for my first attempt I’m happy with it!
-
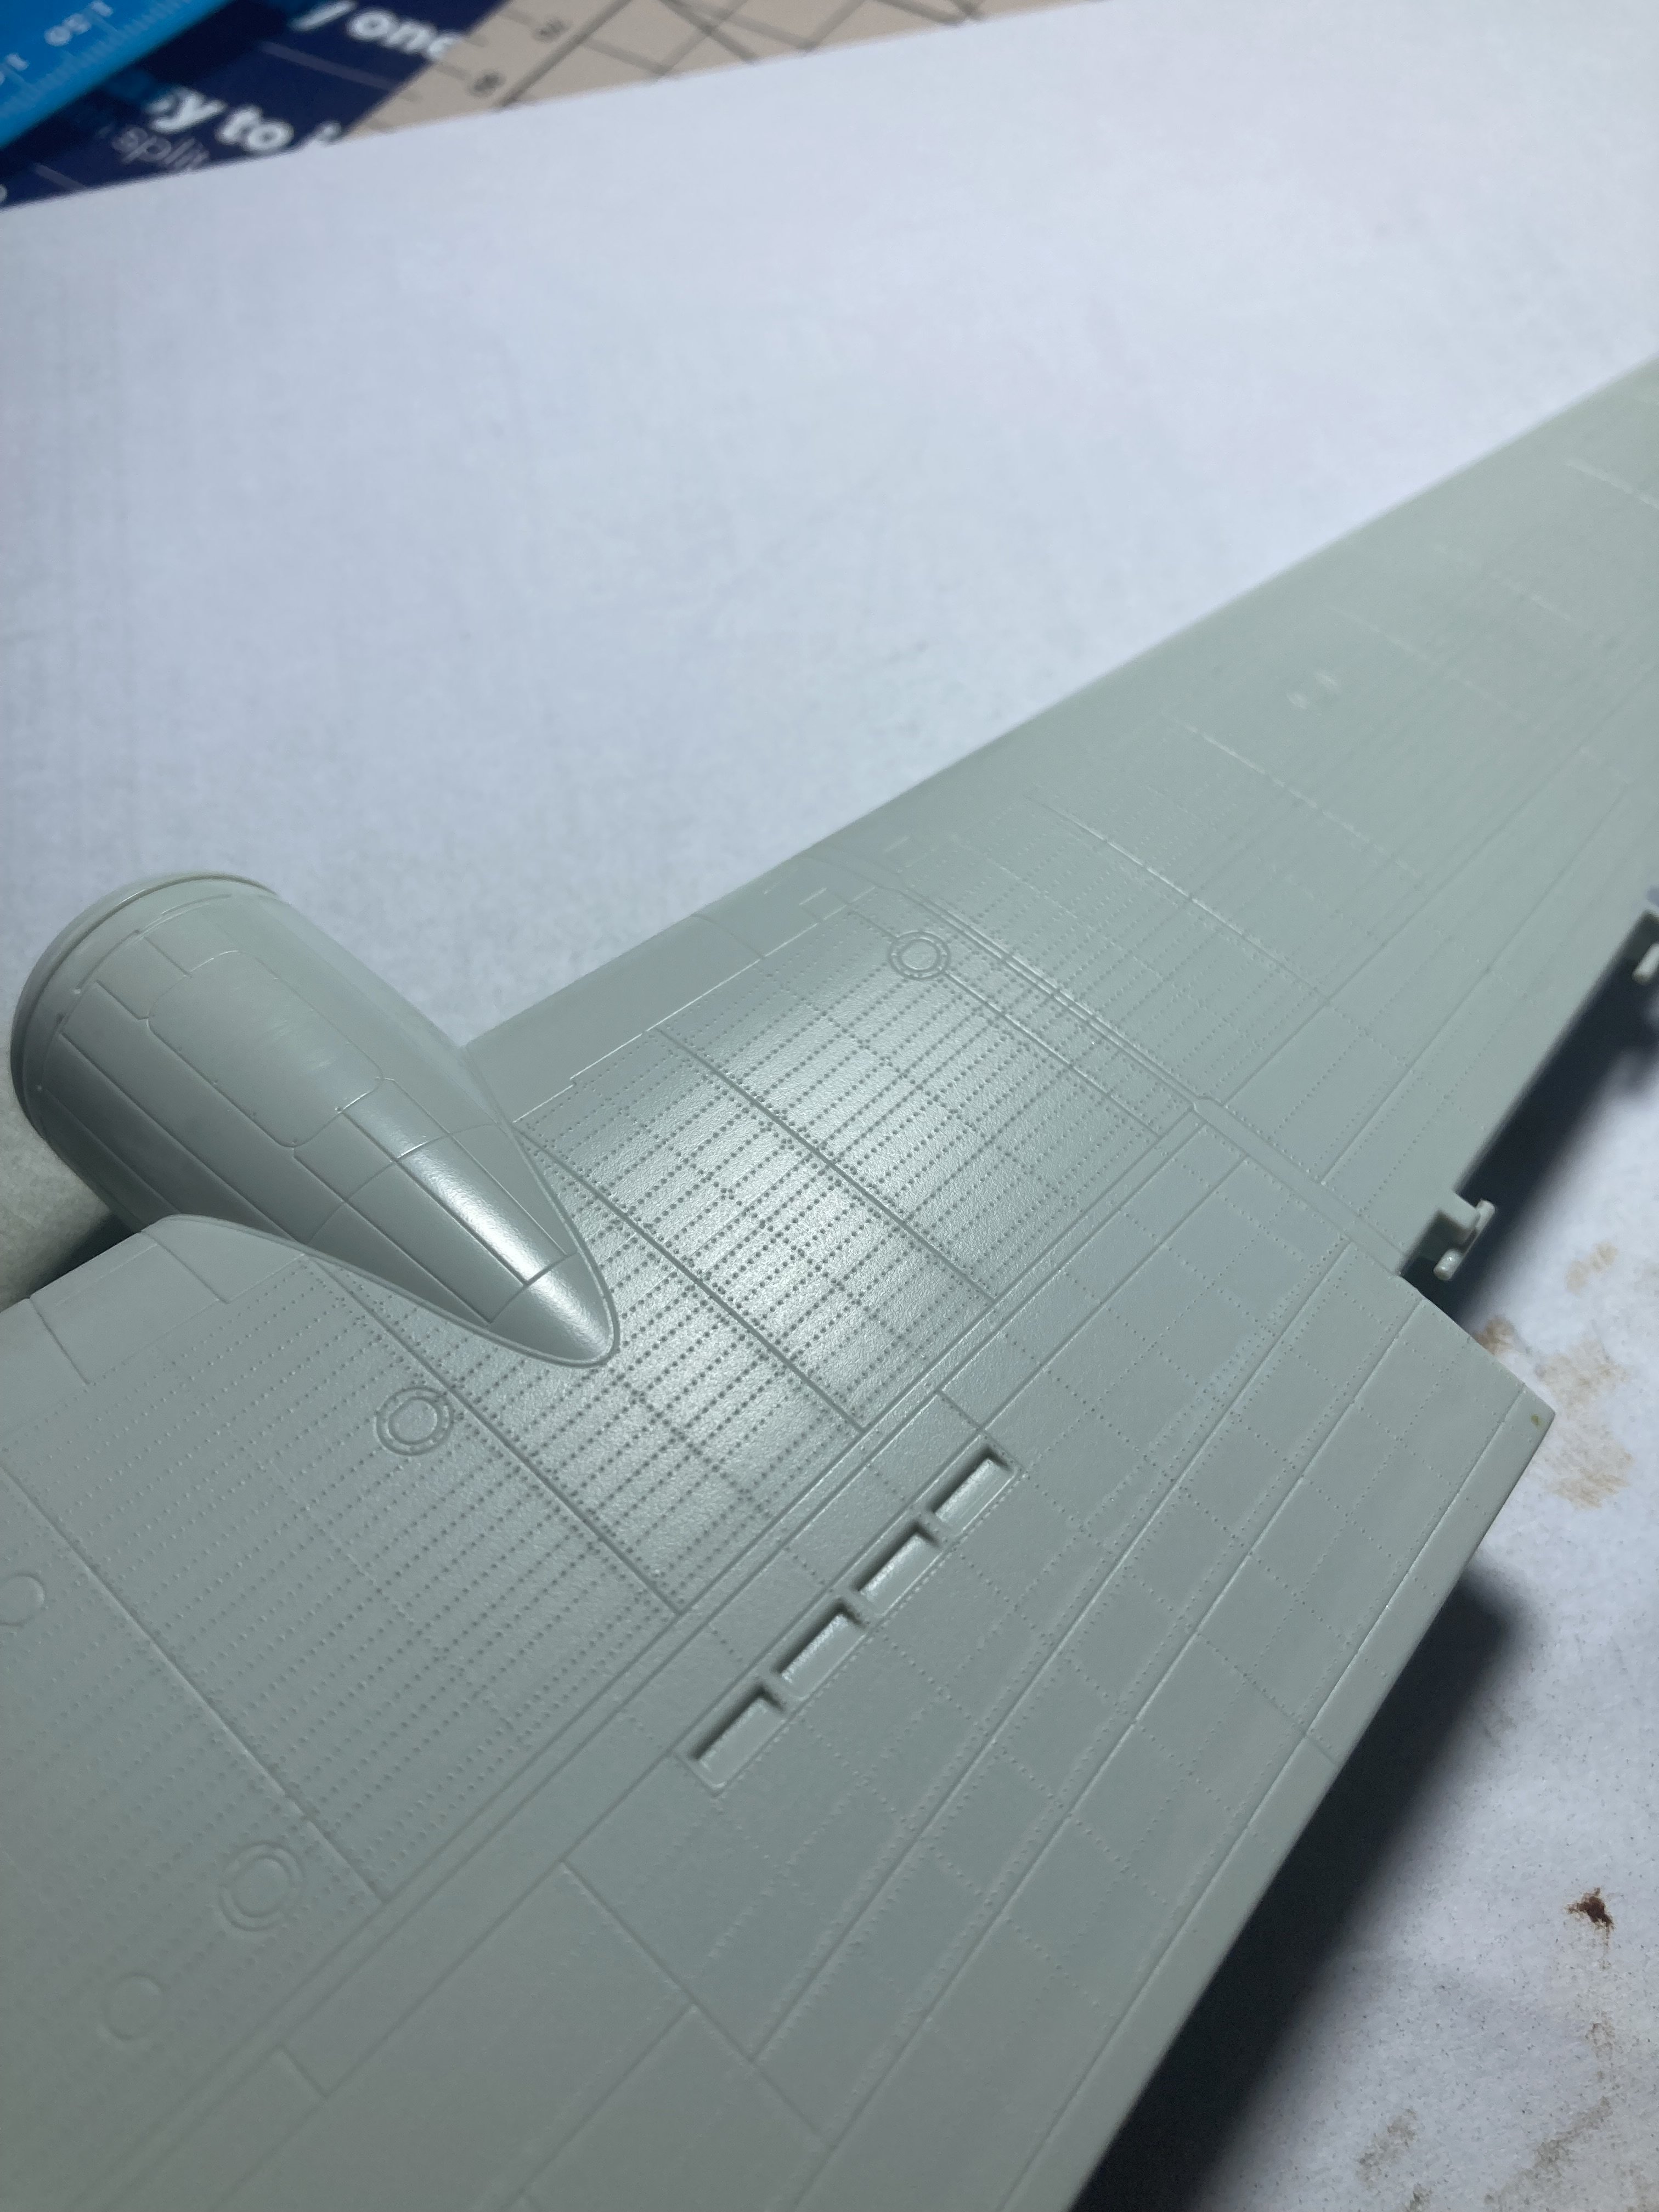
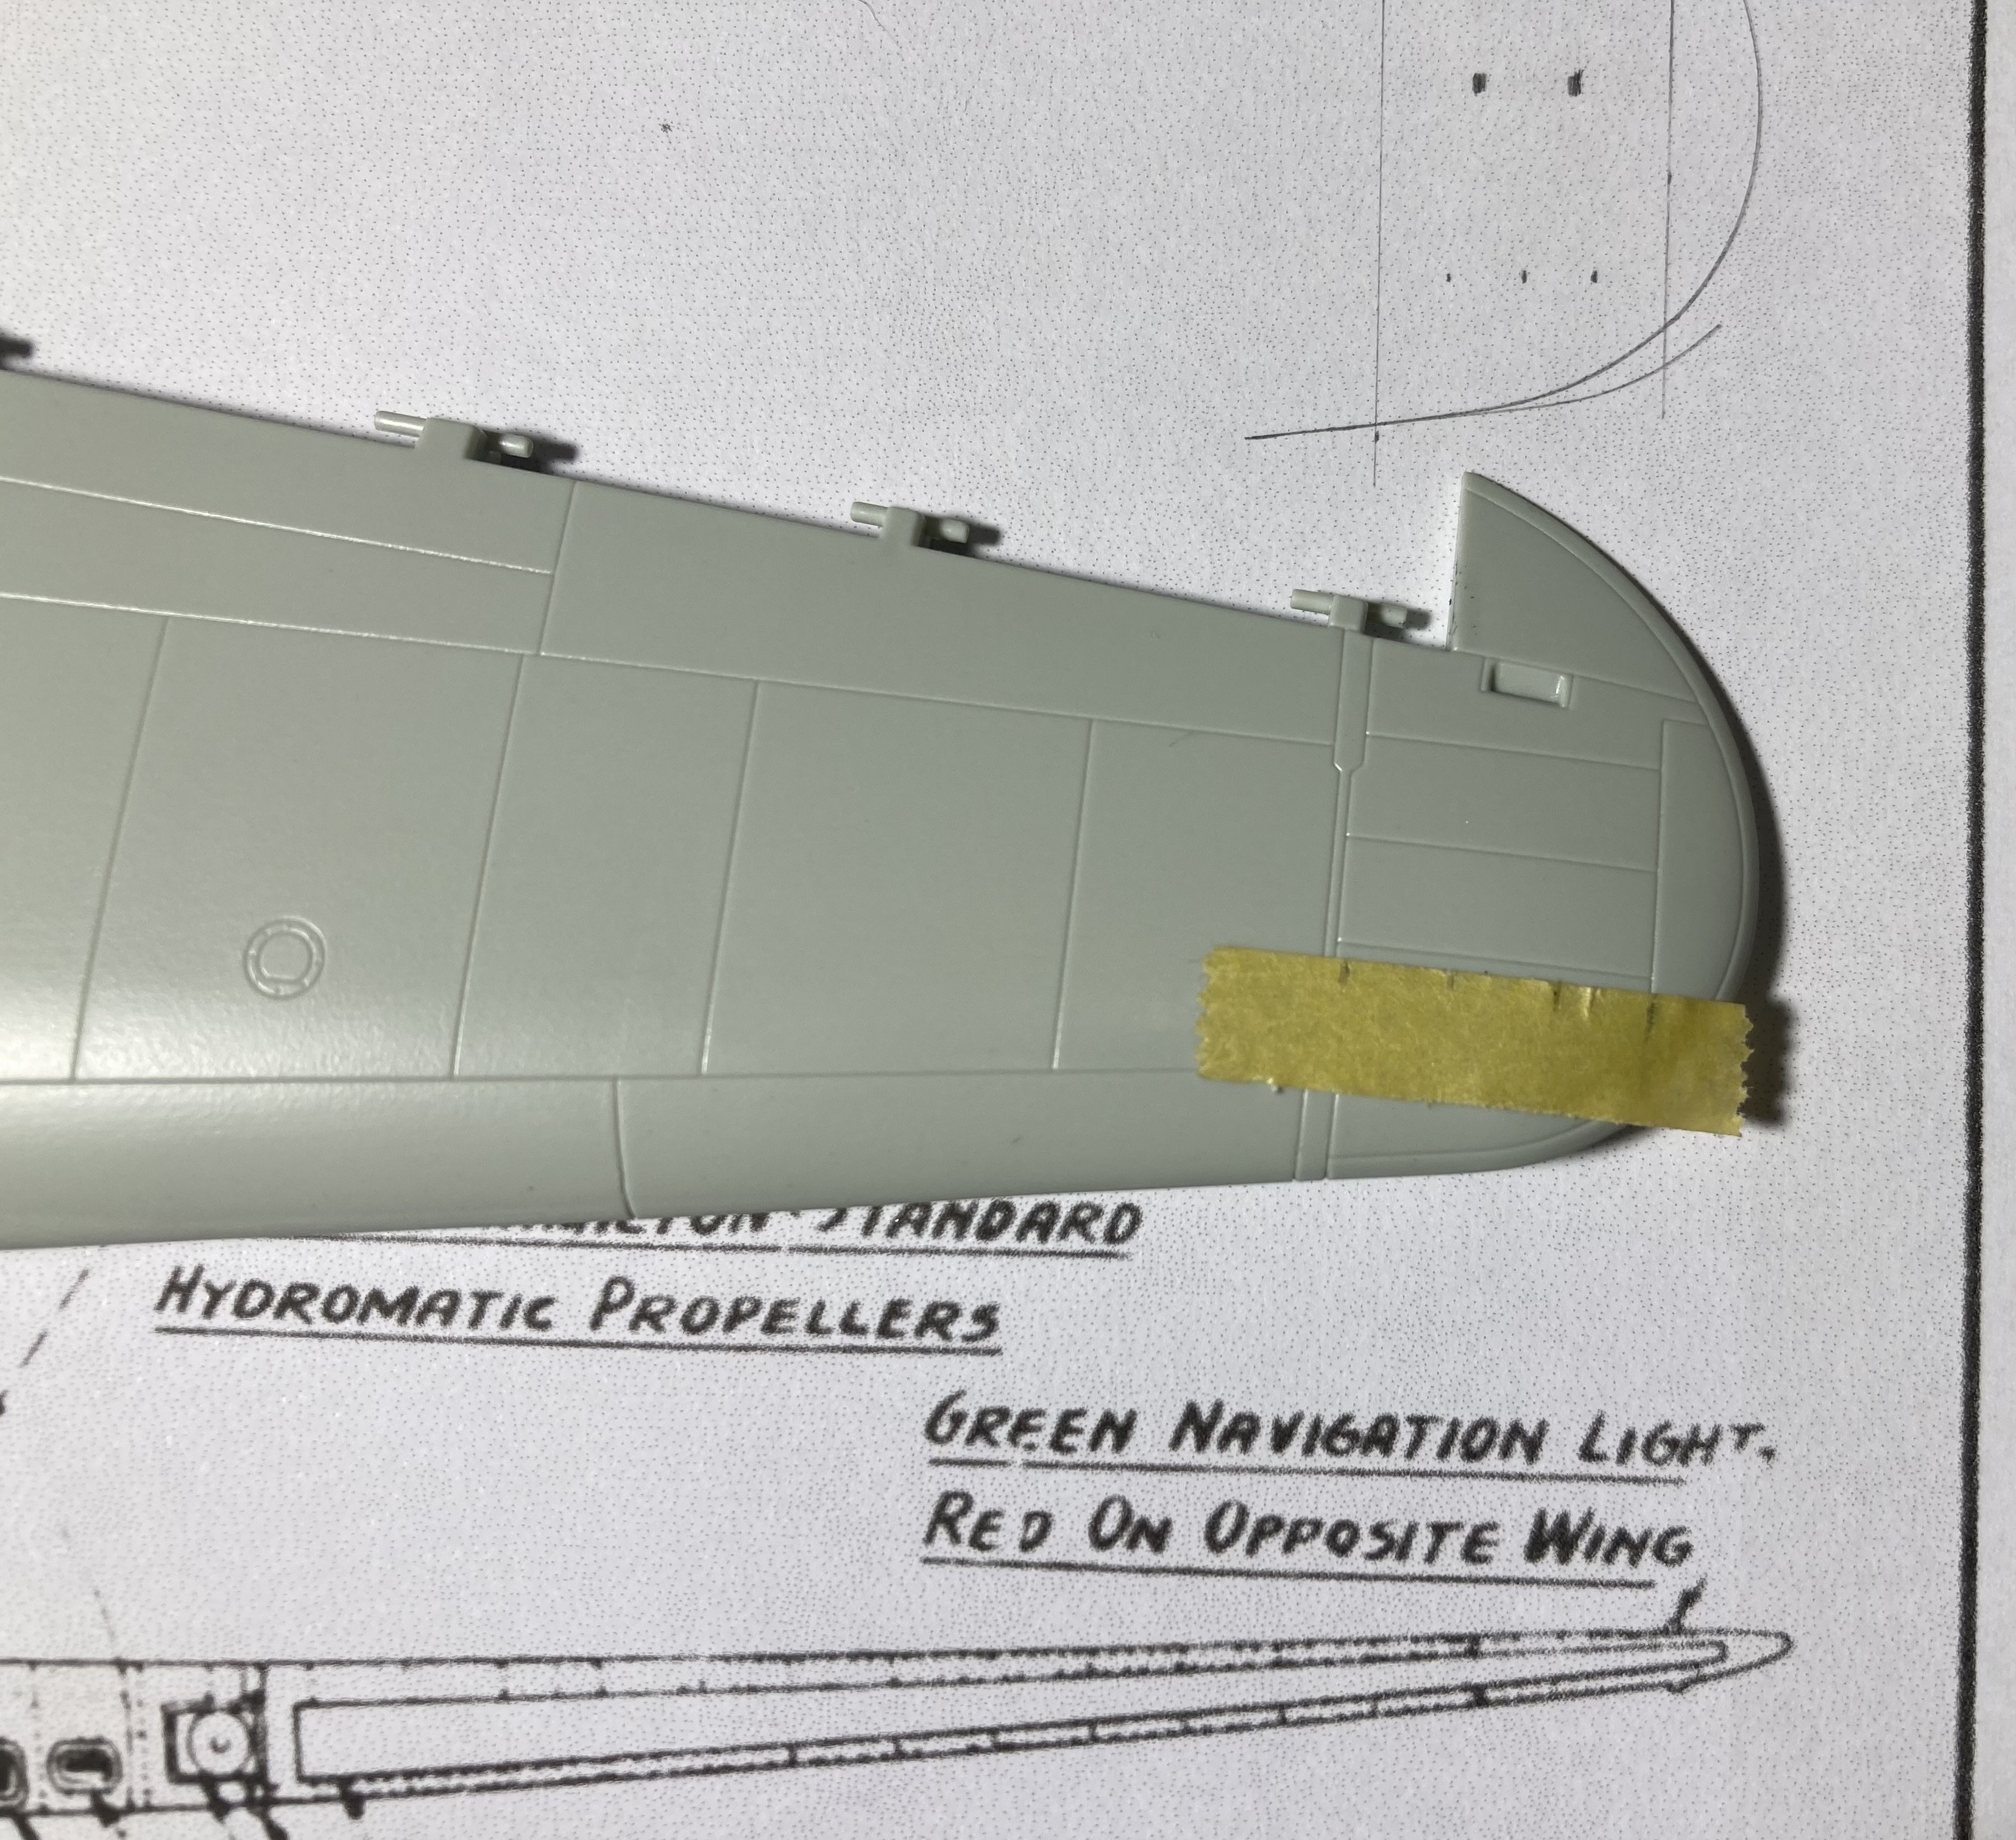
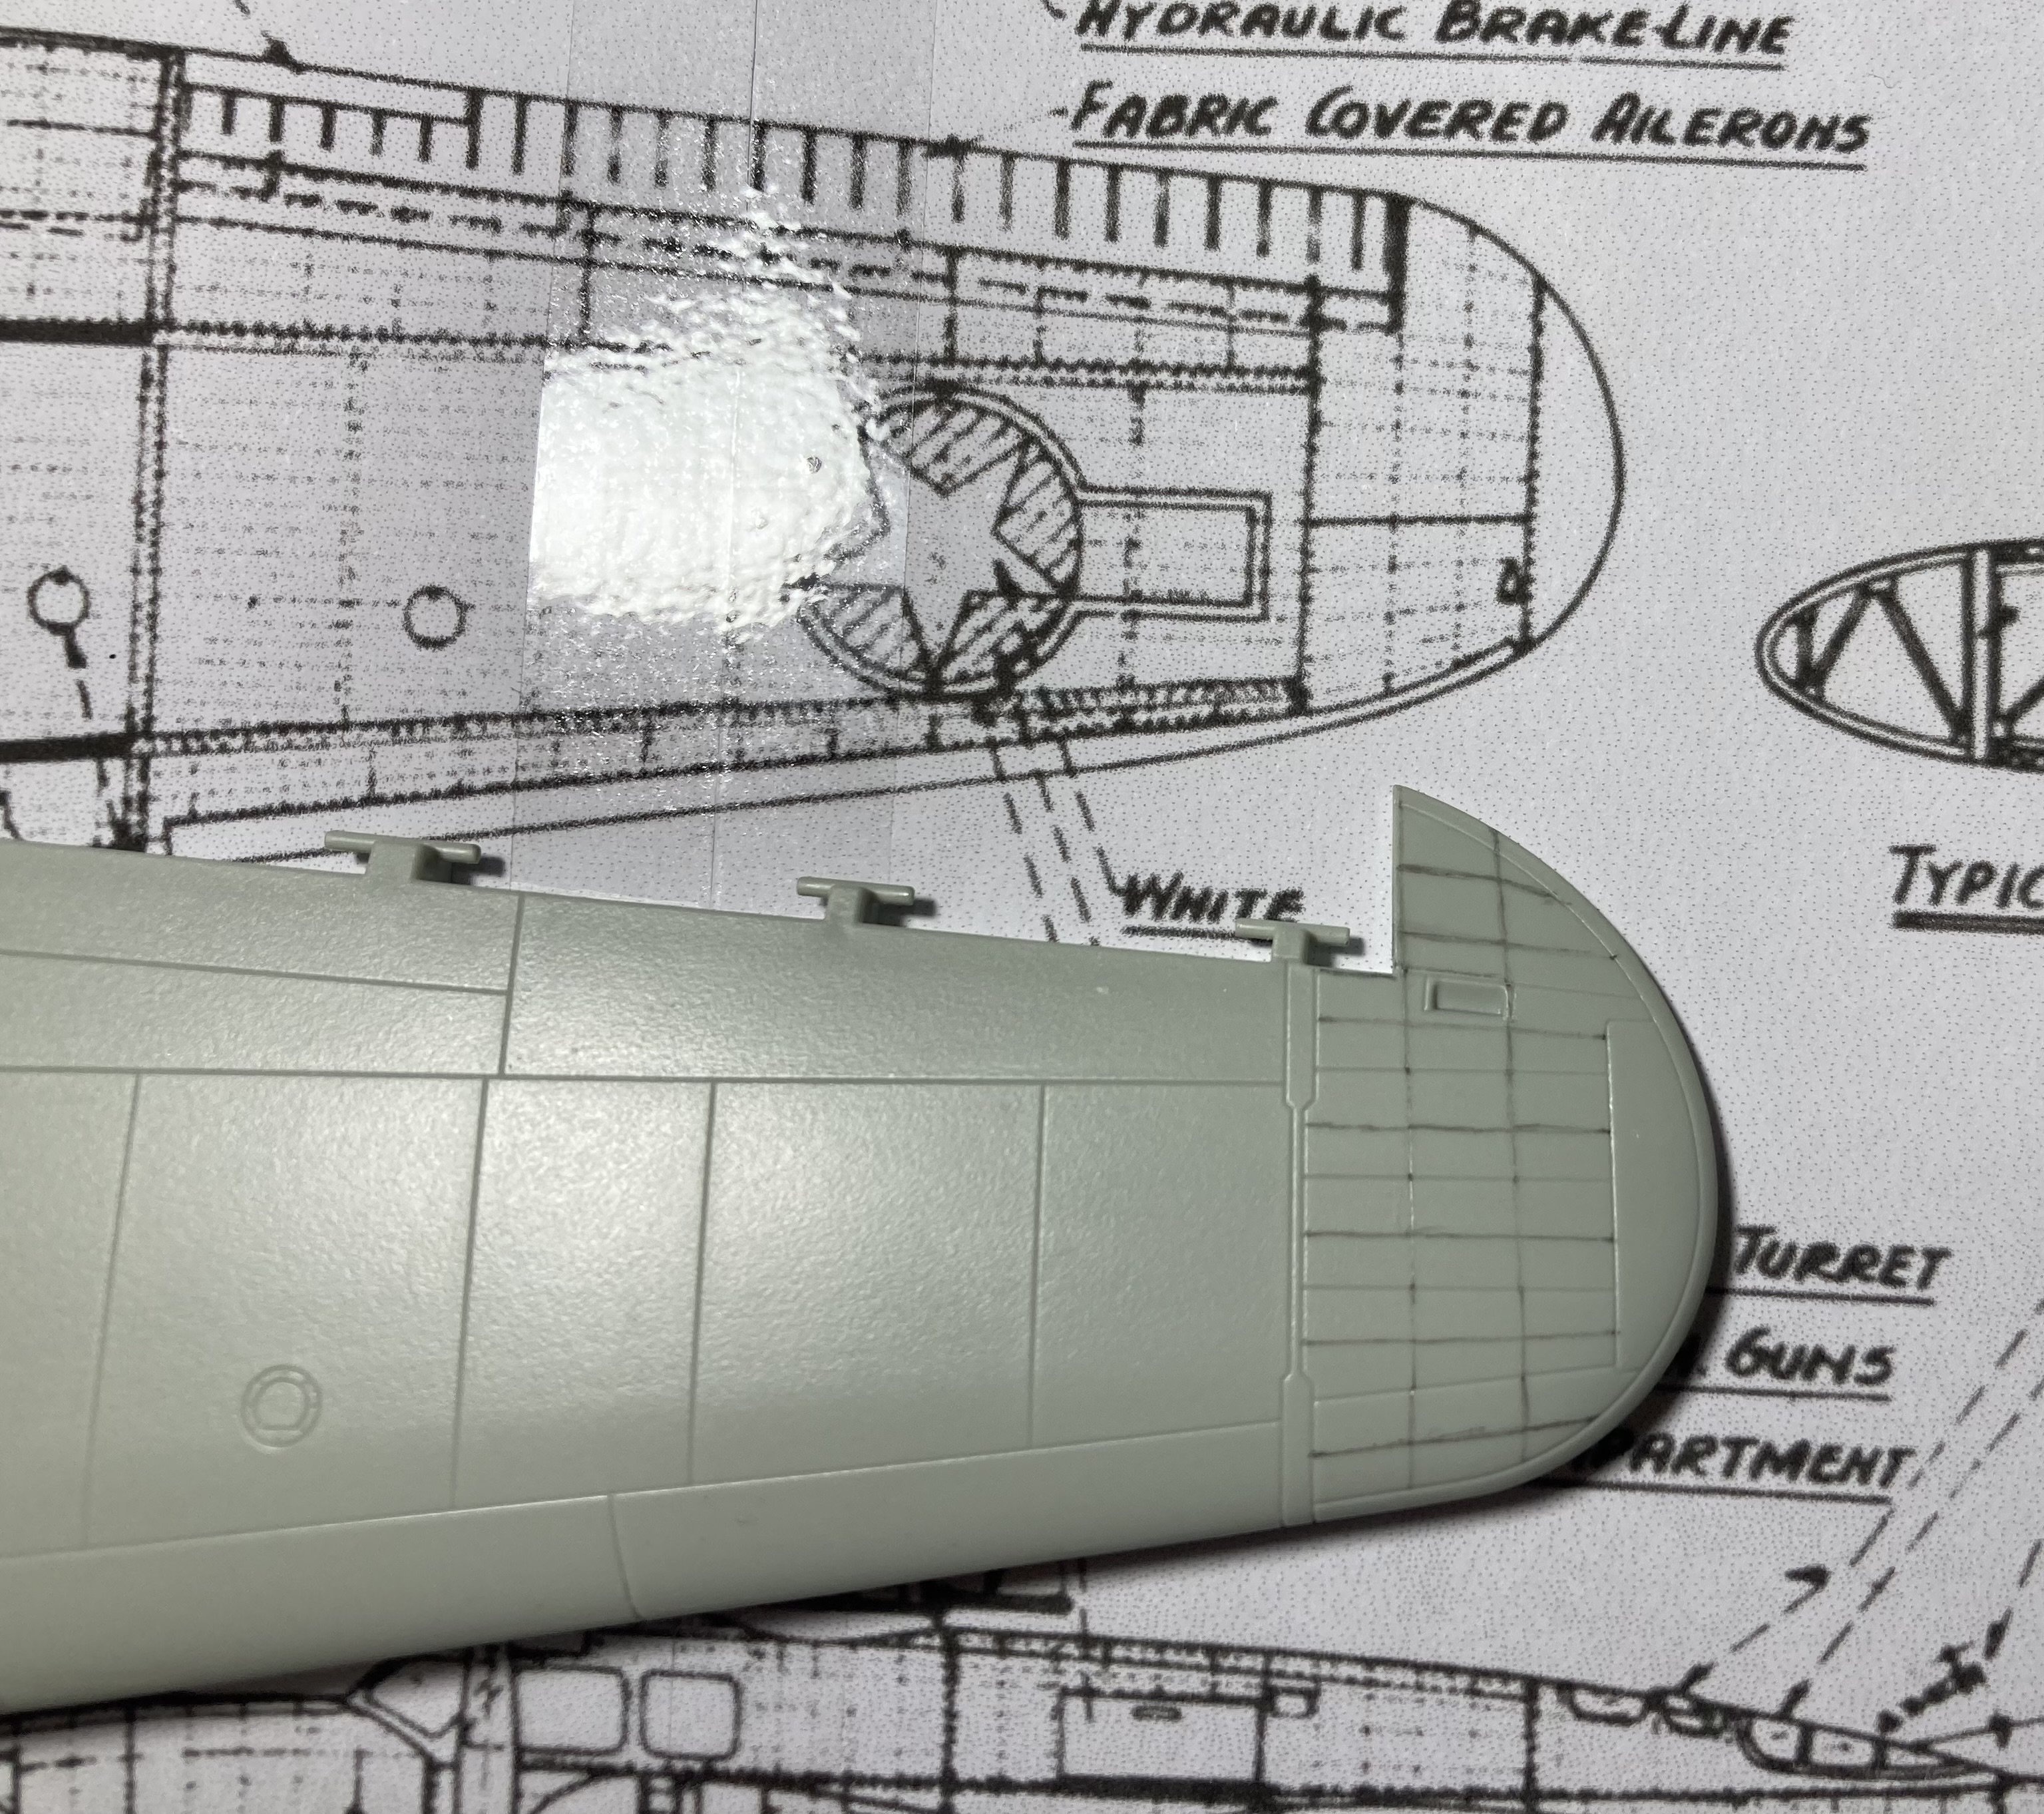
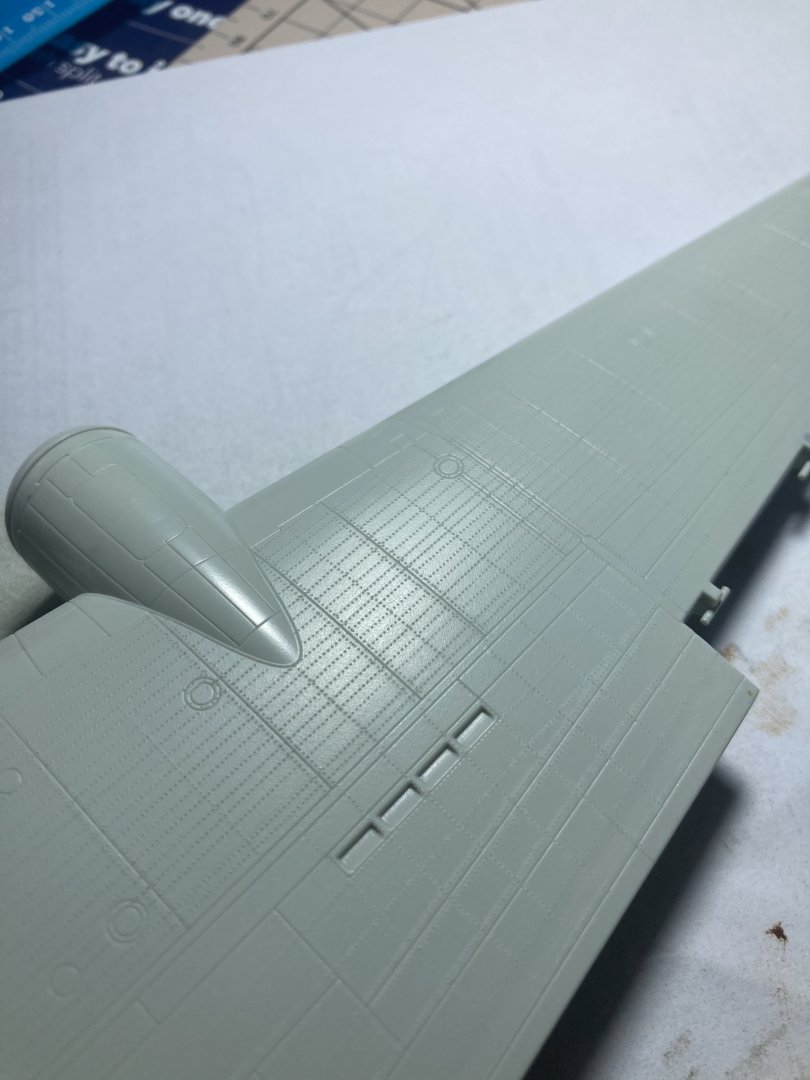
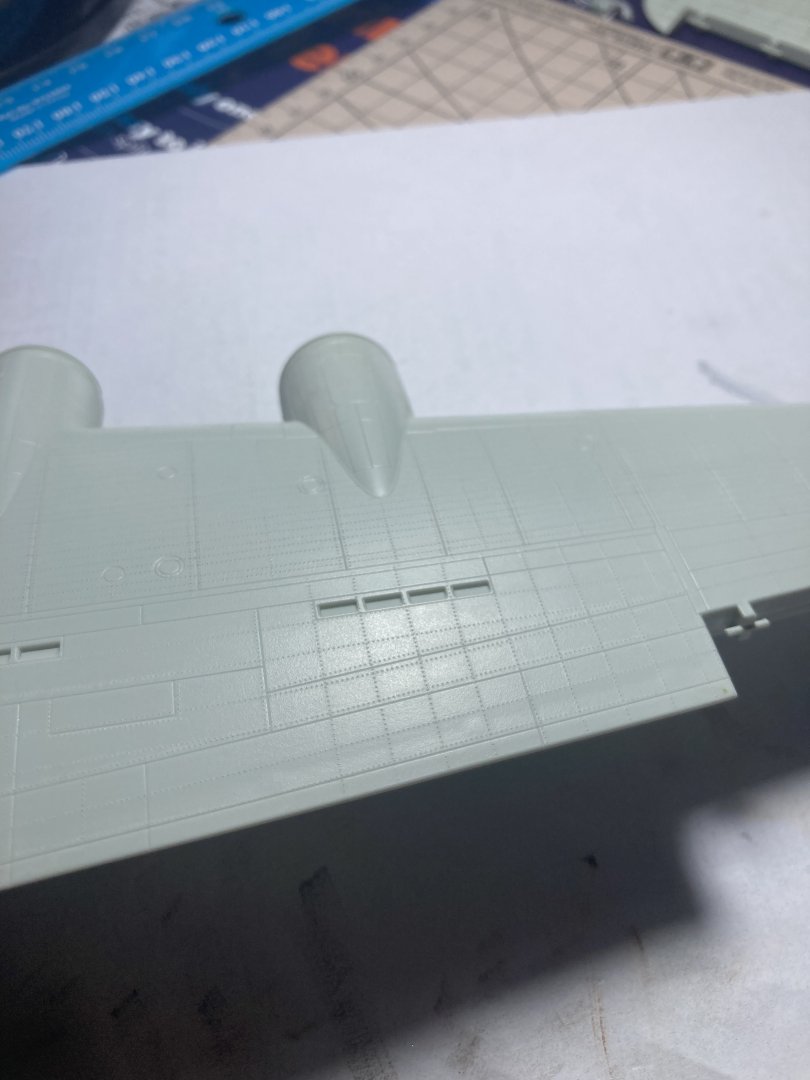
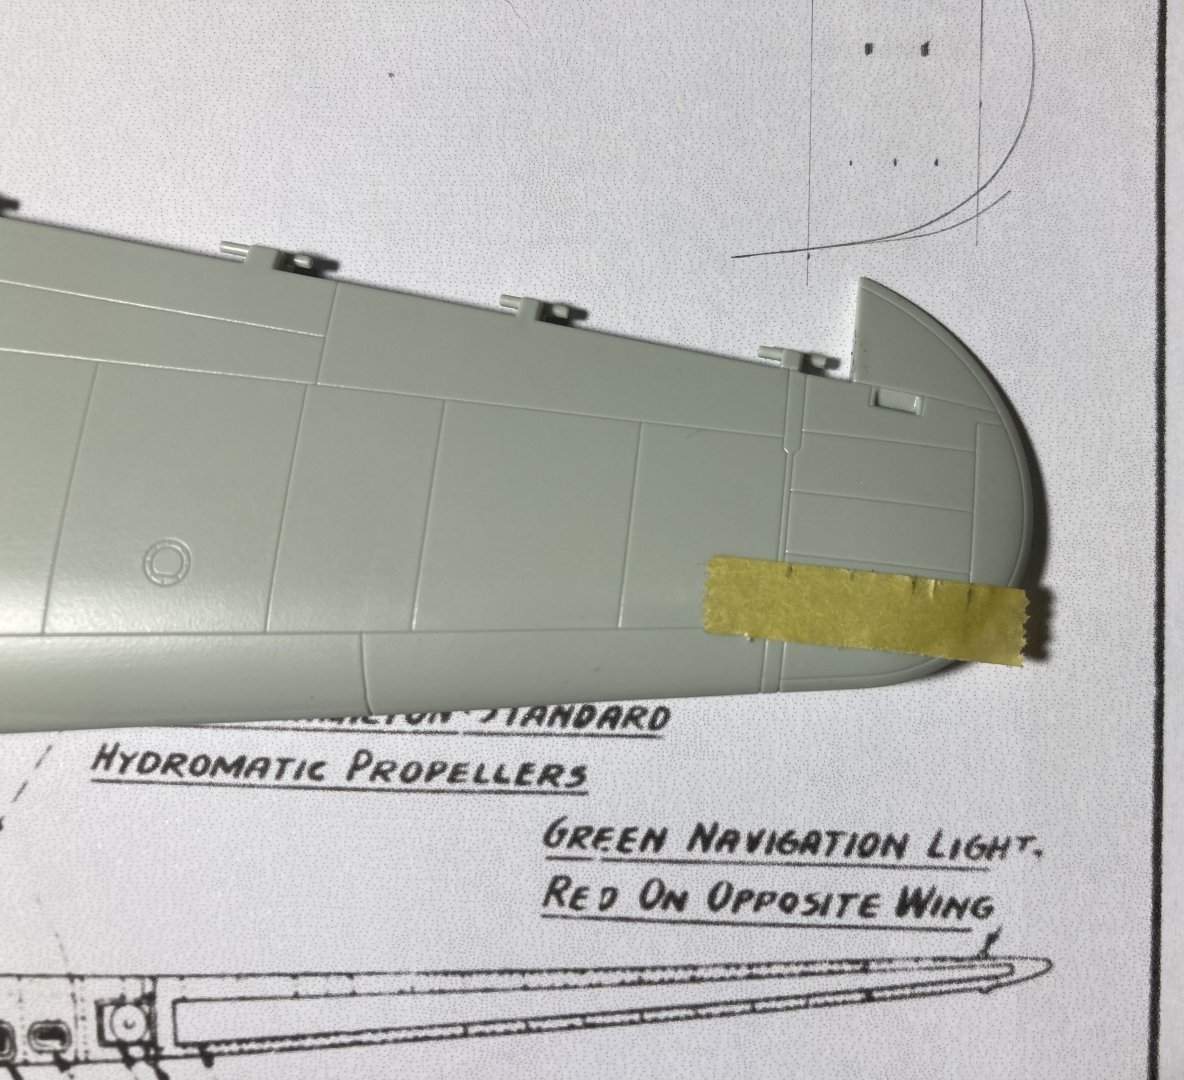
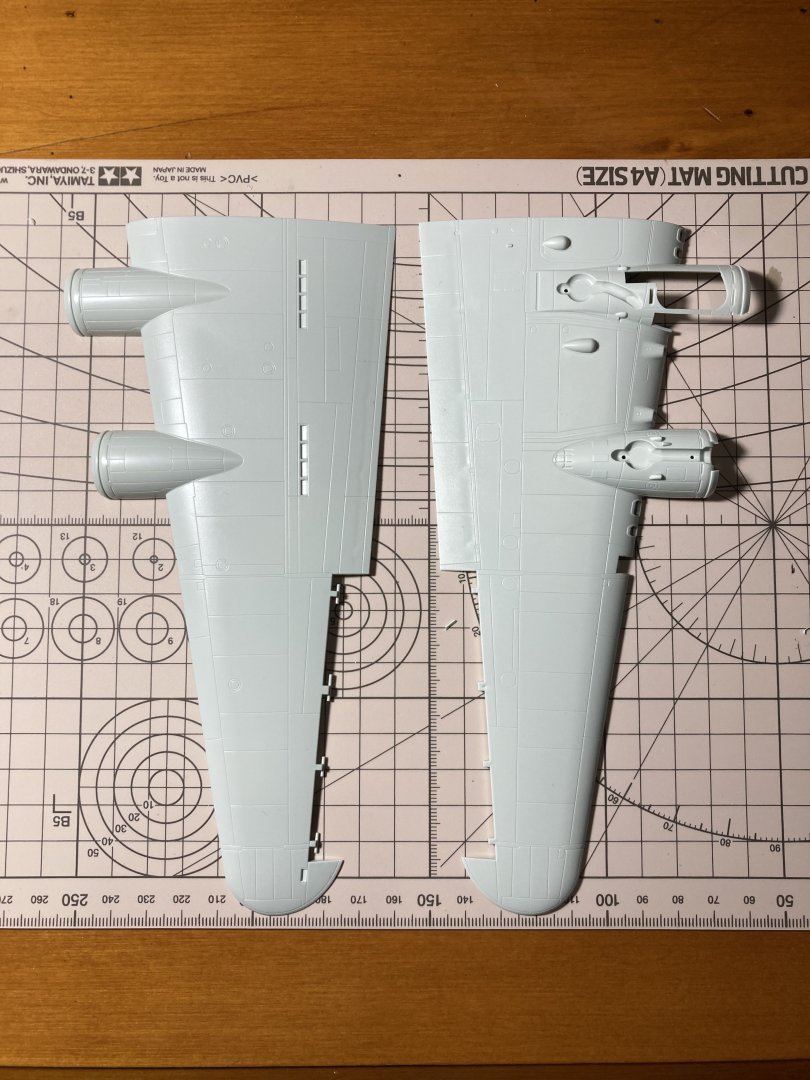
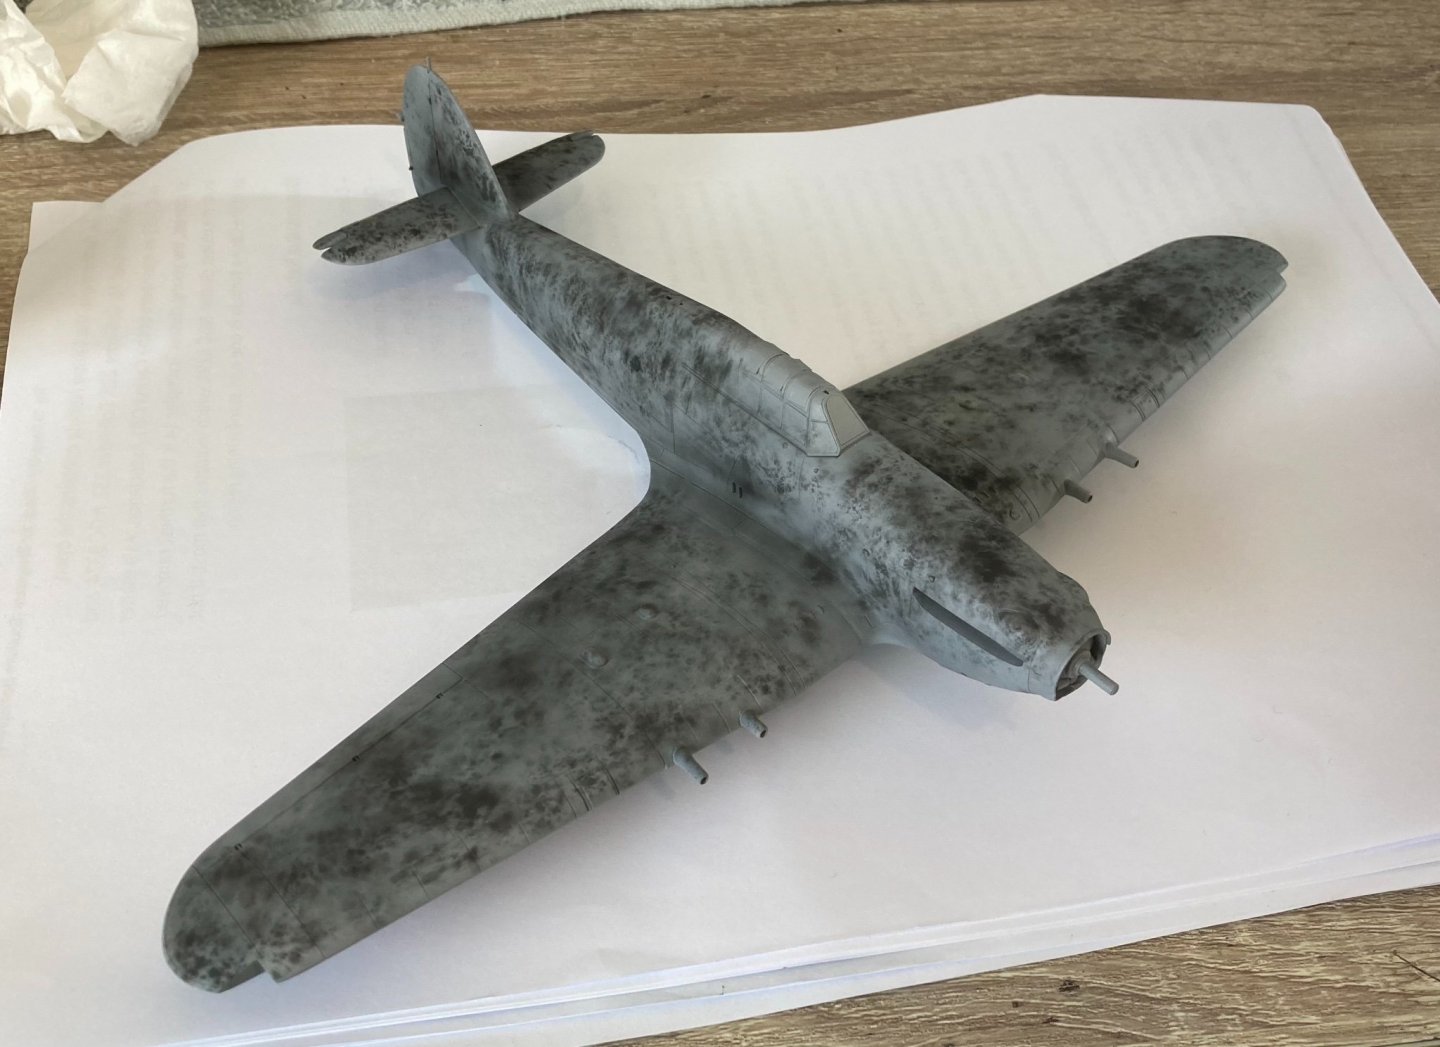
My riveting tool arrived today, and after some research and practice on spare parts I begun! I read up online that a lot of people recommended 0.55mm tool for 1/72 scale so jumped in with that and made some good progress. Roughly followed my plans and got the upper surfaces of both wings competed. i think that blade may be abit blunt now! Might have to use the 0.50 for the rest, will see tomorrow. I don’t know how much will be visible after painting a dark colour on it but I’m hoping it’s not too strong nor totally invisible. It does add a nice effect to it though and looks much nicer than just smooth. It just gives it a bit of life. Over the next few days I’d like to get the fuselage riveted before the it gets glued together. The tail, horizontal stabiliser and under the wings to go. It’s a slow process but hope to get a bit complete over the next few days. By then maybe the internal parts are here and I can begin on the cockpit.
- 77 replies
-
- 11
-
-

-
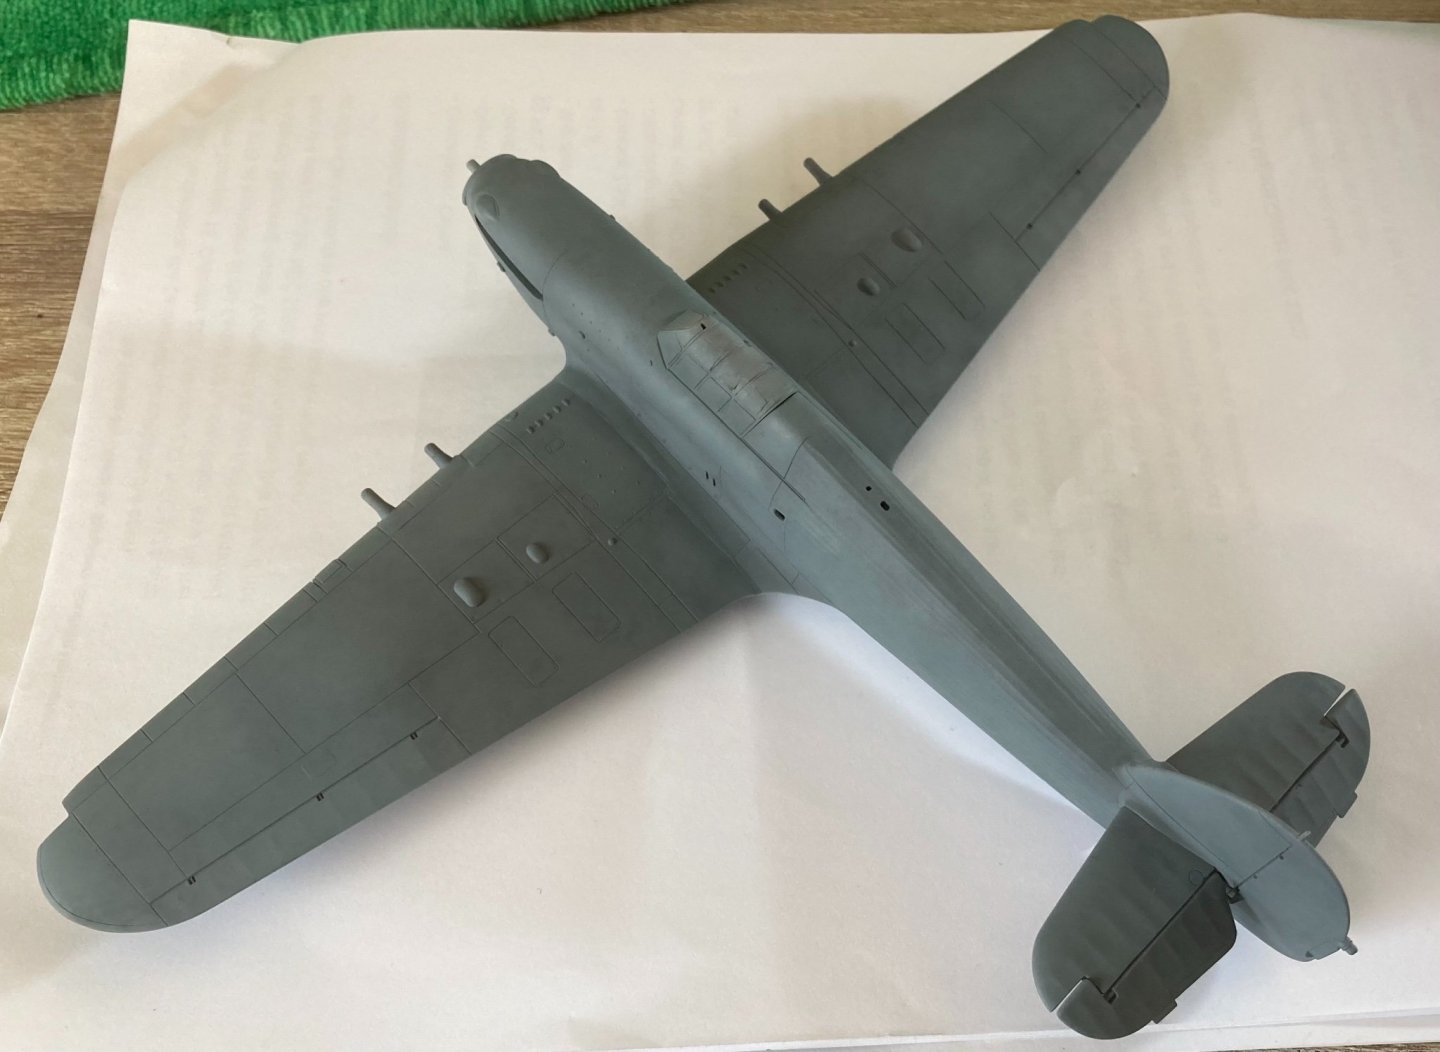
The wing halves are glued together, filled, sanded and panel lines re scribed. I have never used a scribing tool before so decided I should get one and was able to give it a go. Seems the days of sanding away panel lines are forever over! So next step is preparing for adding rivets, which will take some time! I ordered a tool so will be here in a week or 2 so plenty of time to get things going. The Tamiya tape is ok but a bit too soft for a nice unmoving edge so some experiments will be needed. A good test of patience!


- 77 replies
-
- 10
-
-
Thanks for the info. I can get “Mr Color Zinc Chromate FS34151” here pretty easy. Is that the one you were saying? After this b17 I’ve got a P51D to make so I can get a chromite paint that I can just use for both. Is there a brand and type of paint that is the best option to just look right for both and I can use straight out of the bottle? I prefer to not have to mix paint when it’s going on things that will constantly be painted so a one off mix just doesn’t work.
-
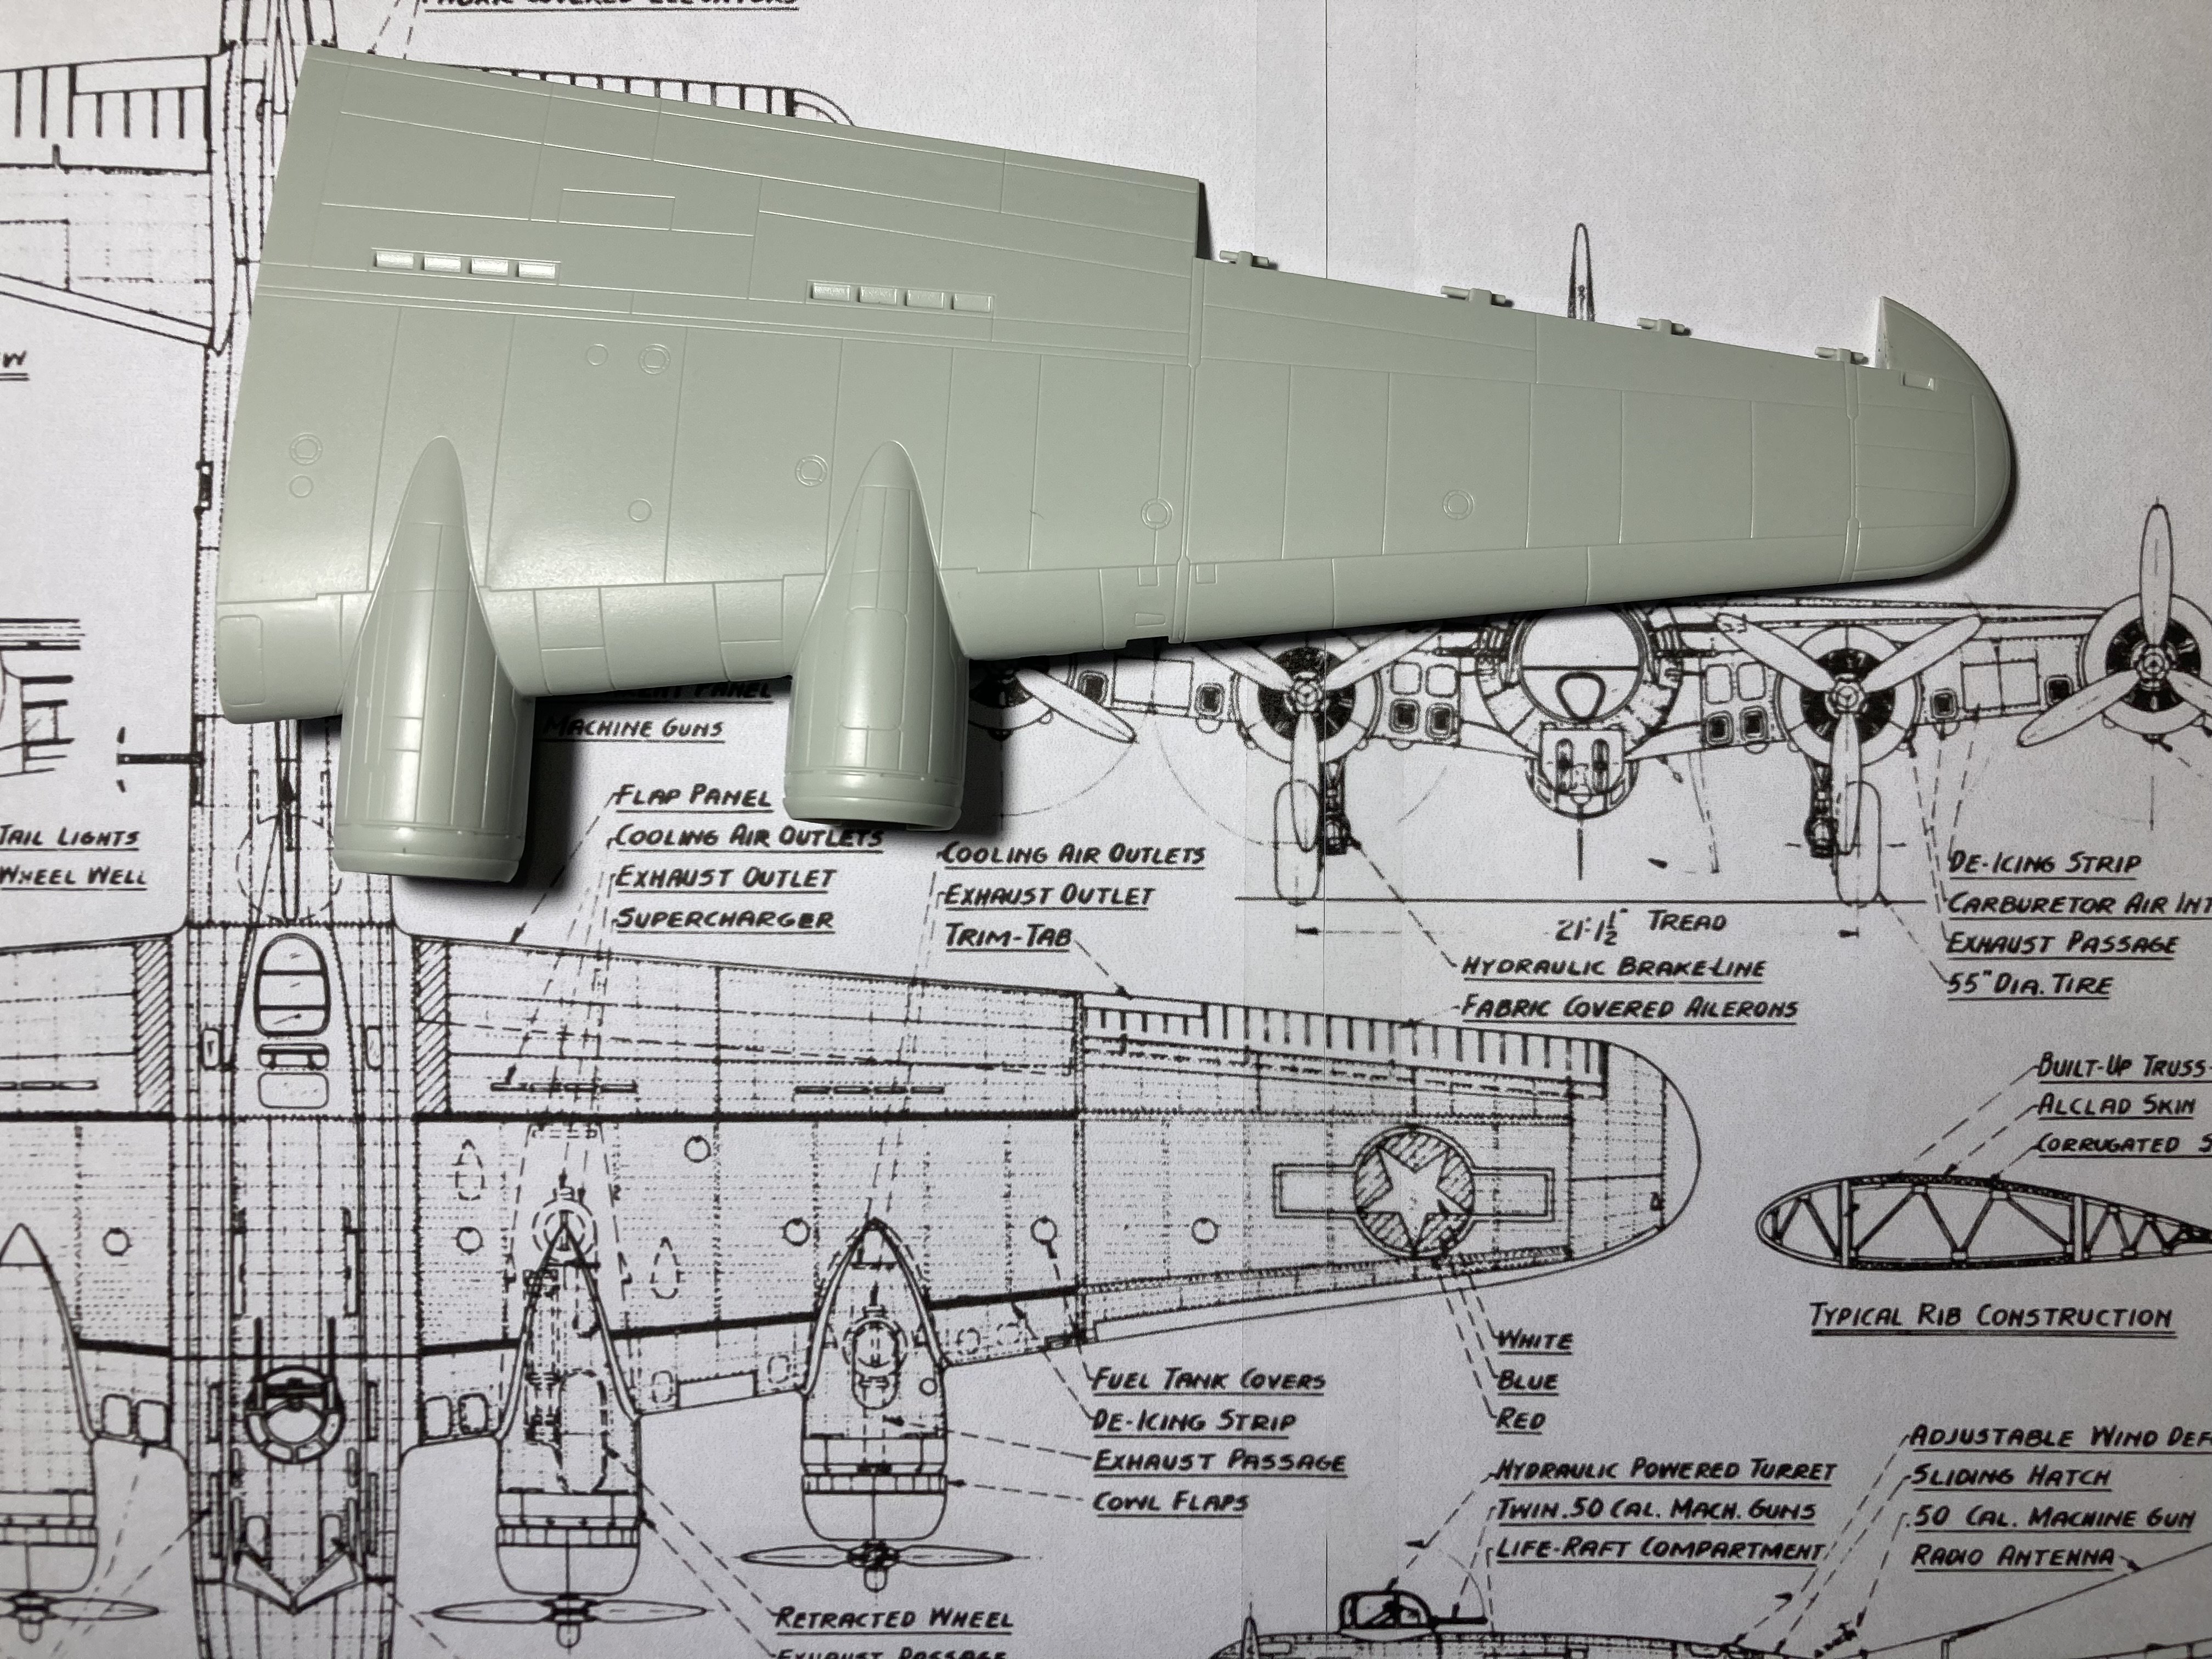
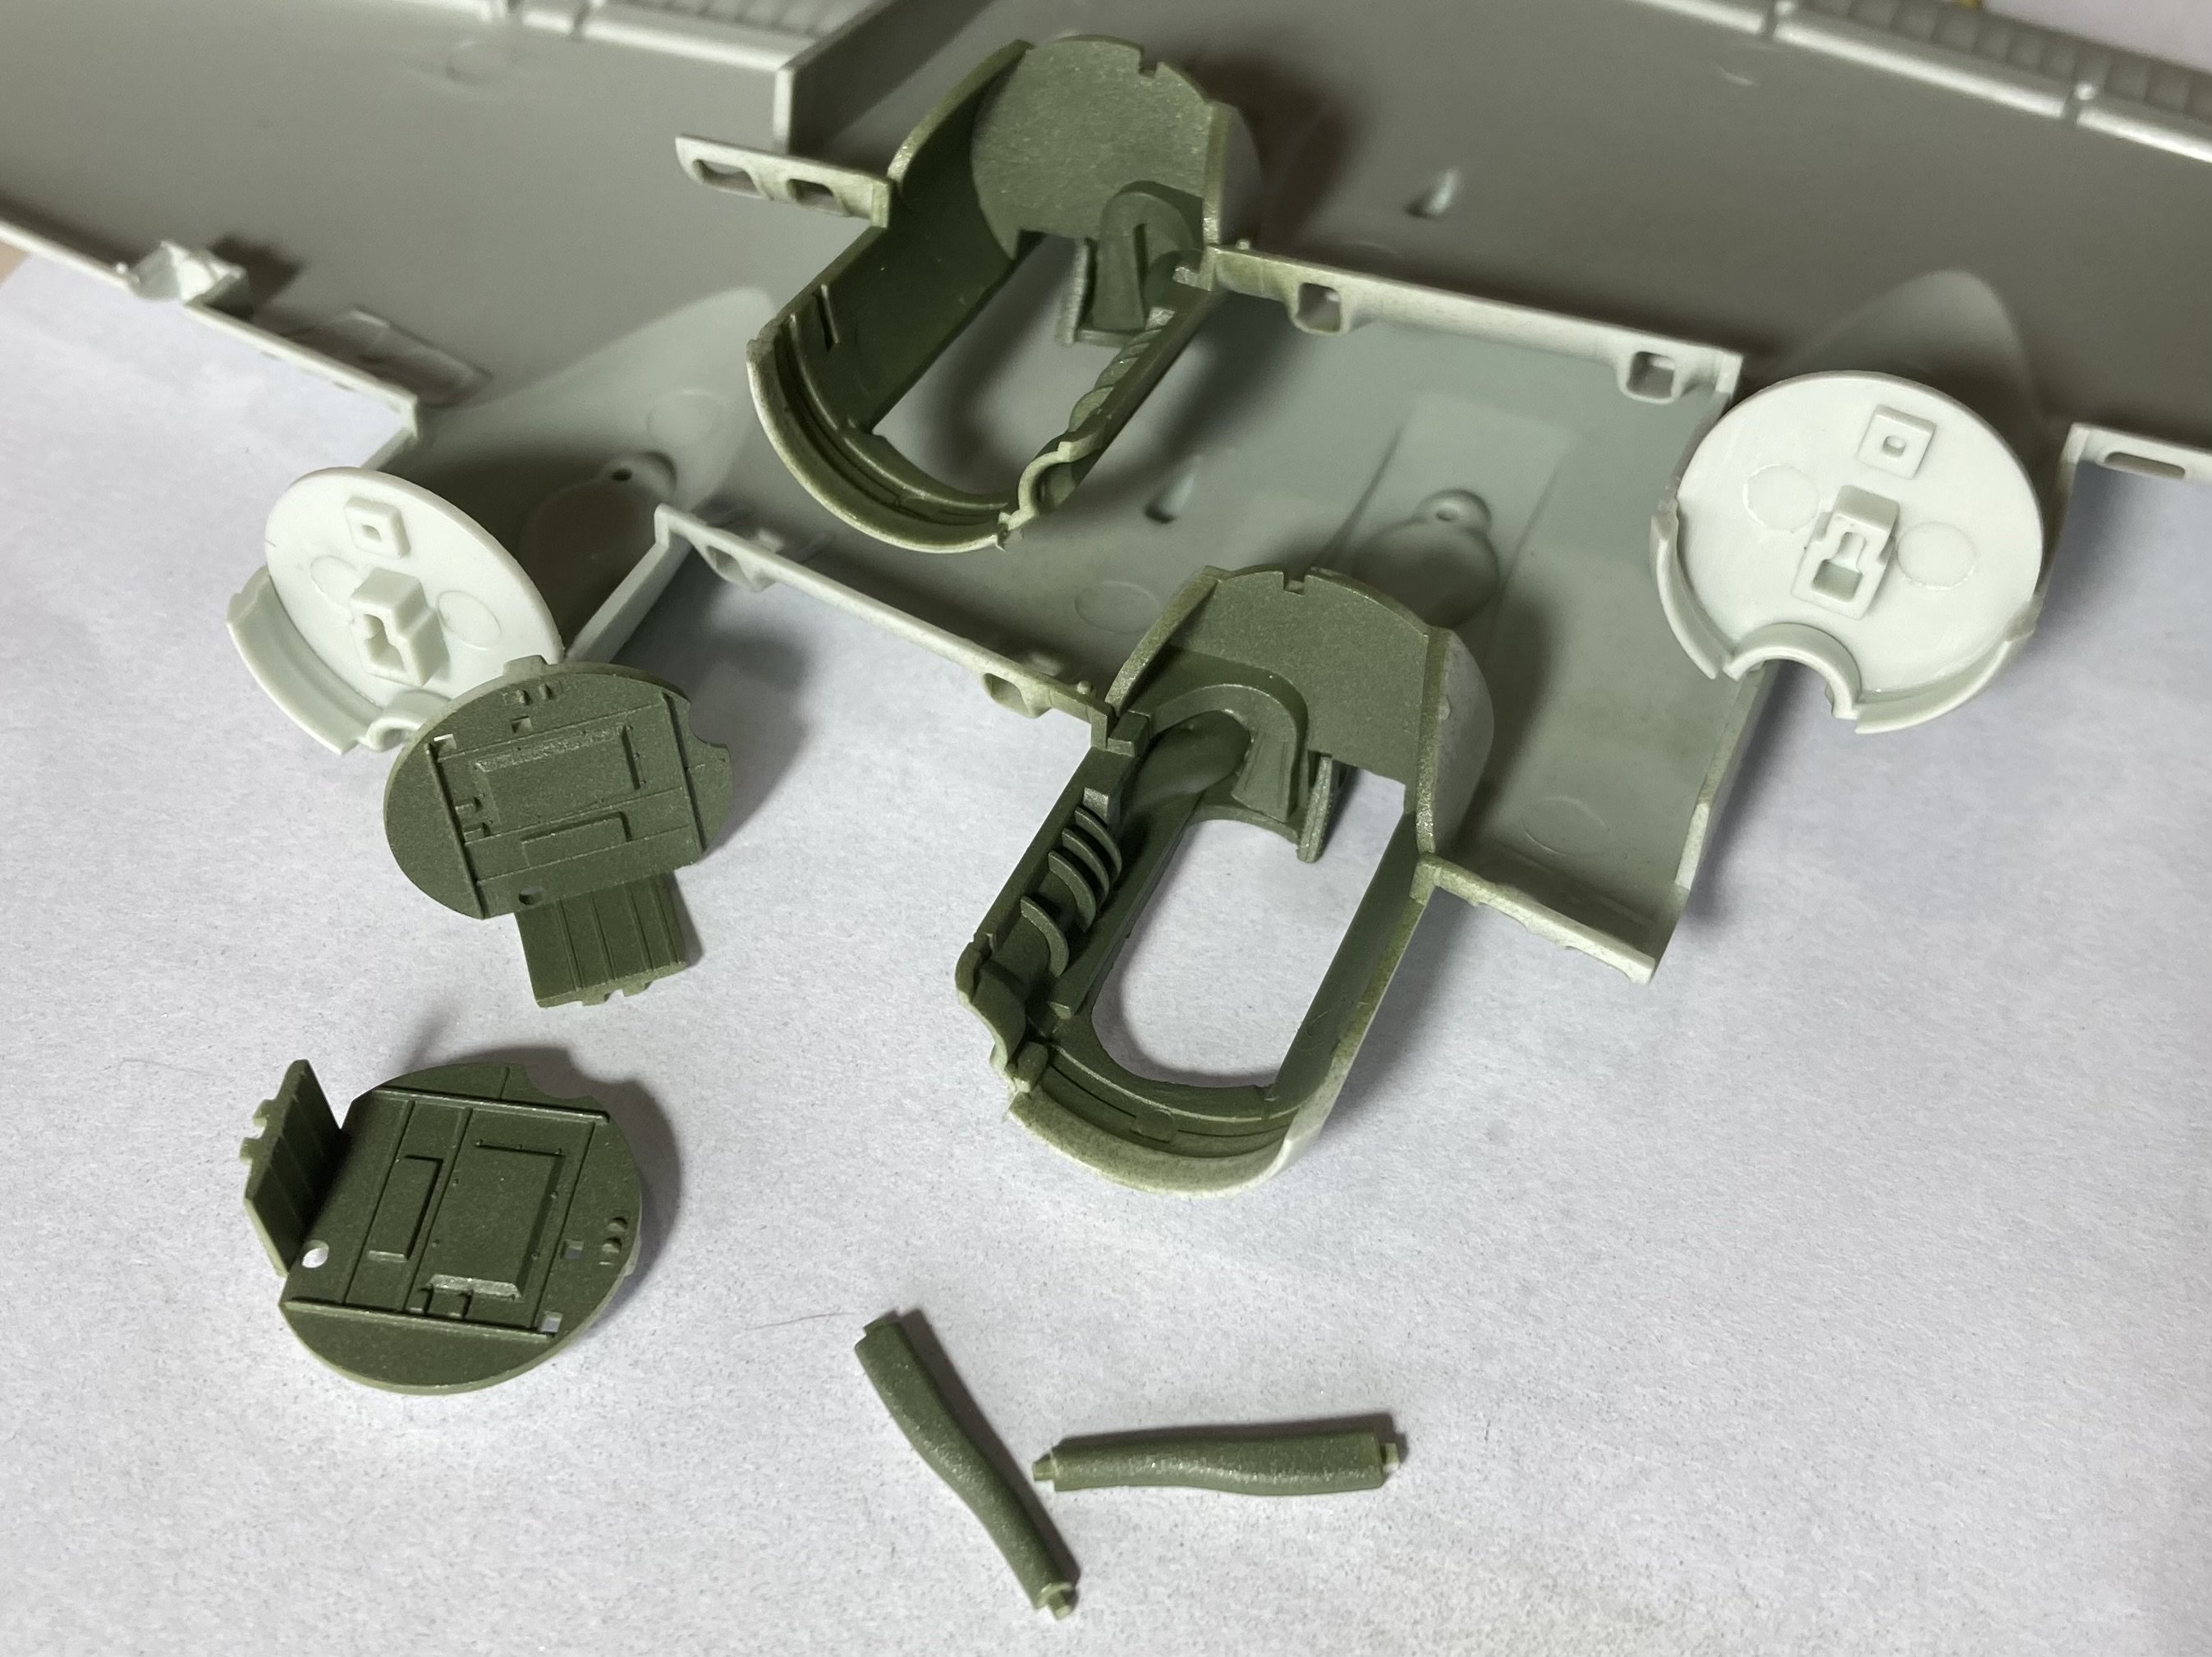
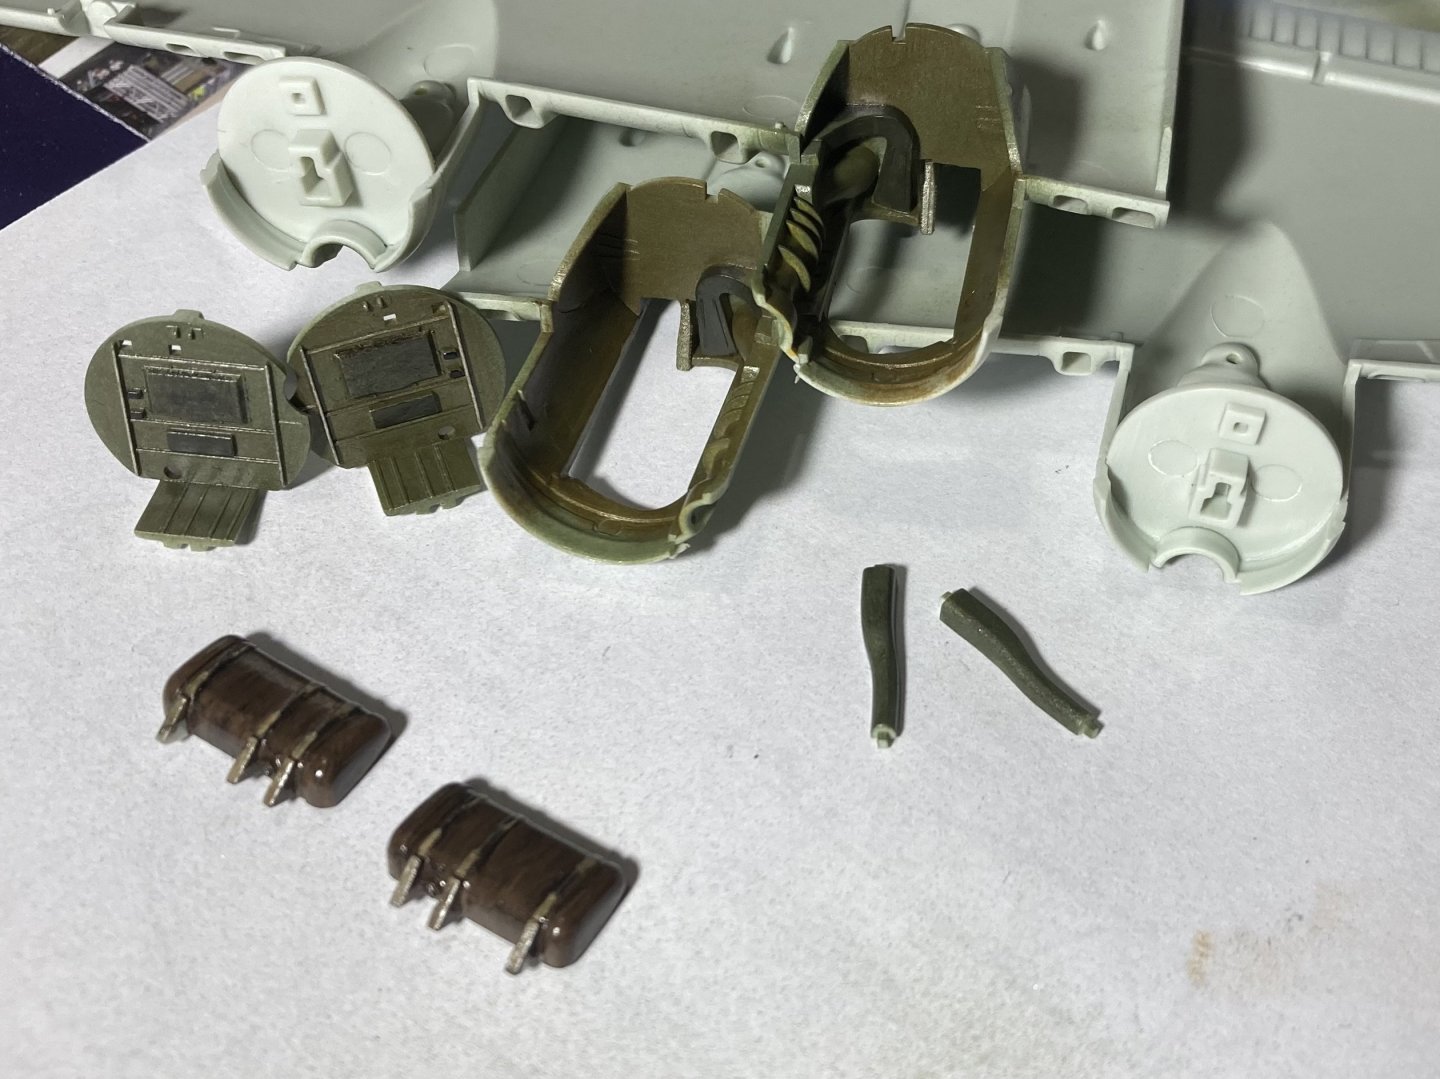
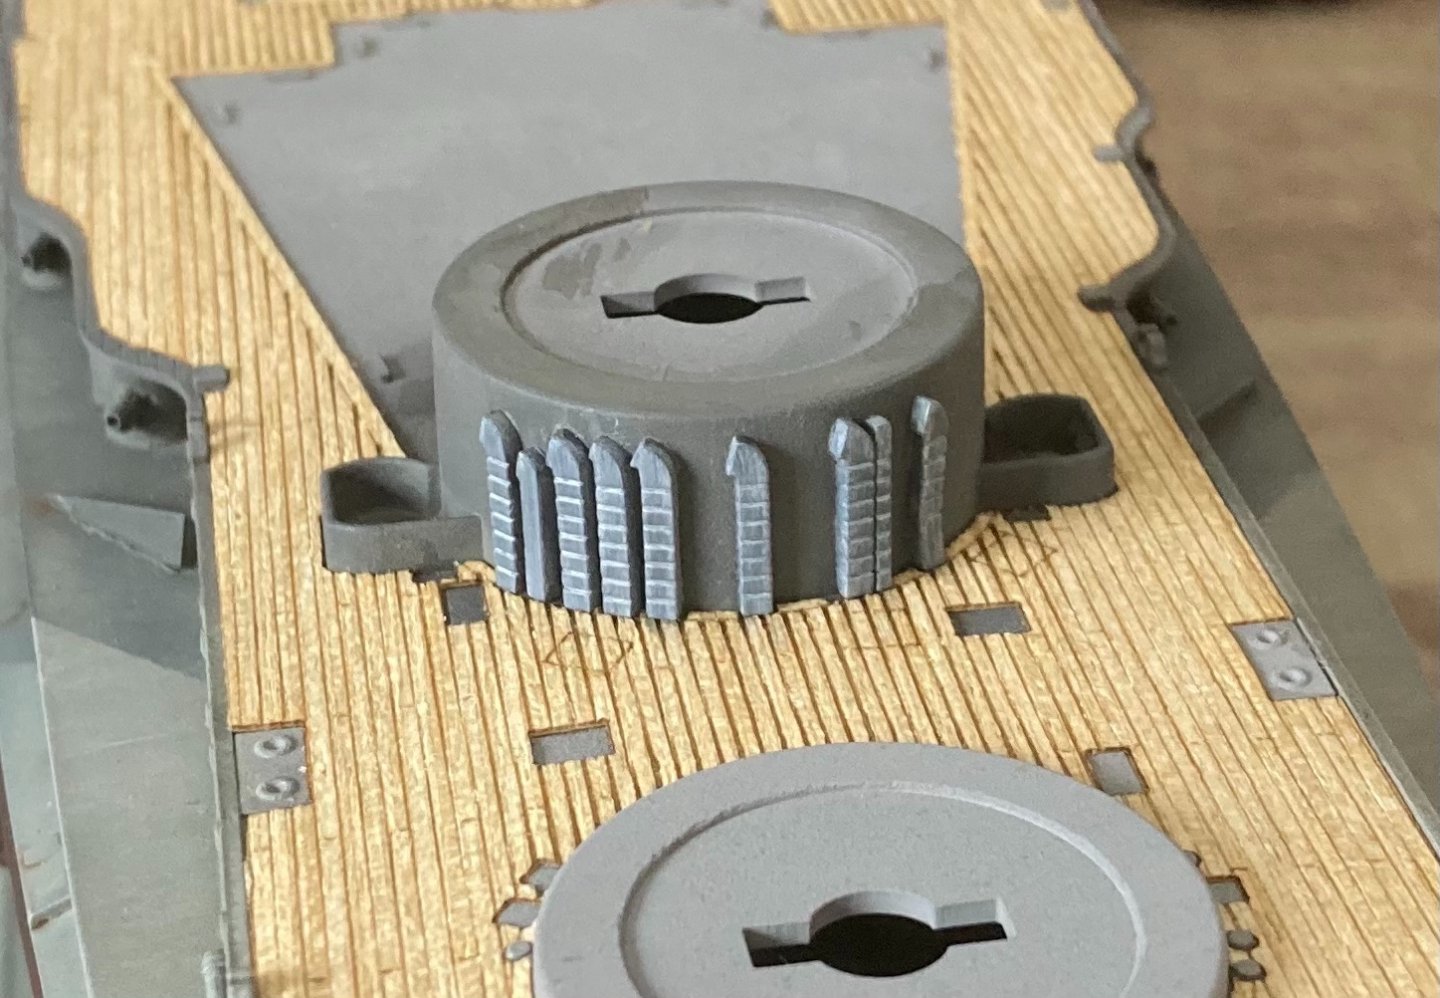
I’ve ordered the cockpit and front internal upgrade sets from Eduard so they will take a few weeks to arrive. I thought most of the other internal areas won’t be visible so just focusing on the parts that can be seen. So I’ve made a start on the wings. The wheel wells will not be really visible either so will paint them up but won’t add any extra details, but they don’t seem to bad and have a good amount of detail so will be all good. I am usually abit scared to use putty as Tamiya basic putty always seems too thick and sanding it back removes so much detail. So I looked into it and found out I can thin it with tamiya cement but to be careful as it will shrink lots. To try save loosing details I tried masking the area and only filling in the desired place. I’m yet to sand it but so far I’m happy with how it’s looking. Wheel wells painted with a mix of Tamiya cockpit green, gold and black green. I thought straight cockpit green didn’t seem right and from reading around it sound be a bronze green to represent zinc chromate. Brushed oils over the paints with a dry brush to dirty it up and try give it some life. Maybe I’ll do an oil wash also if it still needs something more.

- 77 replies
-
- 10
-
-
Hey, thanks for the info. I’d never have guessed that was what those tools are called. I’ll see if there is anything around here.
-
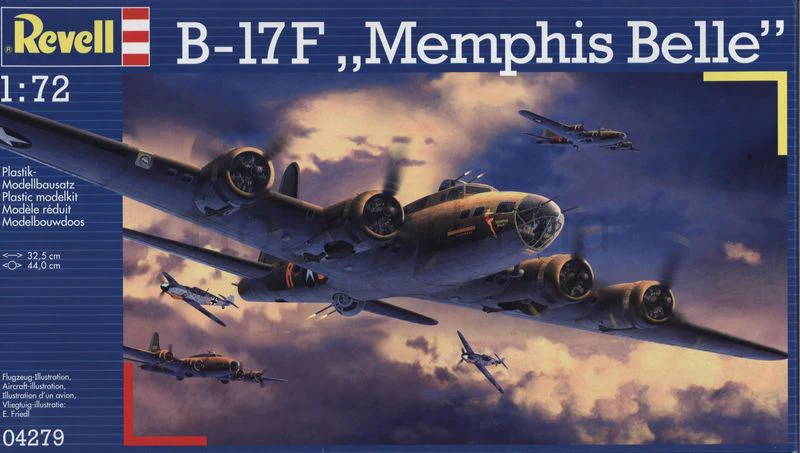
Hello, It has been awhile since I've been able to do any models, but I have completed what I was doing and now have some free time again which I need to fill. I sold all my modeling equipment in 2022 when i left the country so over the last few weeks I have started from scratch and slowly getting all the supplies again. I enjoy building and love all the research that goes into a project but I don't like keeping them once finished.. I know someone who has always wanted a B-17 model to display so said I would build it for him. We decided 1/72 scale would be the best size and the F model best suited the time frame for a 1943 type build as olive drab colour scheme was wanted and no remote controlled chin gun. The weathering and any damage is up to me so id like to go for a well used look, maybe in the 20-25 missions area so not fresh off the line. Not sure about damage as ill have to look at some pics and see how noticeable replaced panels are and that sort of thing. Its a project that is still in the planning stages and will develop with time. So after some research it seemed that the newish Revell B-17F was a good option. I've got the kit here and given it a nice clean, also finding plans online and watching other build logs. I've got a lot of aftermarket parts on the way from about 6 different places around the world, but should arrive within the next 4 weeks! No specific aircraft has been selected yet to build, so dont know what decals I will end up getting or using (any recommended aftermarket decal brands that I should look at getting would be appreciated) but id like to build a fairly accurate representation if I can of one in late 1943. But saying that I don't mind some artistic license as long as its not totally silly. I like to try new things each build and so this time I'm thinking I'd like to have a go at adding rivets, I know 1/72 scale is a bit small and in reality they would be invisible, but I'd still like to do them subtly so if i do a larger scale build ill have some experience. I hope doing this isn't classed as one of the "silly things" i want to avoid! Any tips, tricks or letting me know I've built something wrong (Like painted something aluminum that should be plywood) is more than welcome. I think learning and the research involved is the part of this hobby I enjoy the most.
- 77 replies
-
- 11
-
-
Thanks everyone. Im leaving the country for a year or 2 so might be awhile before I get to start my next project! take care
-
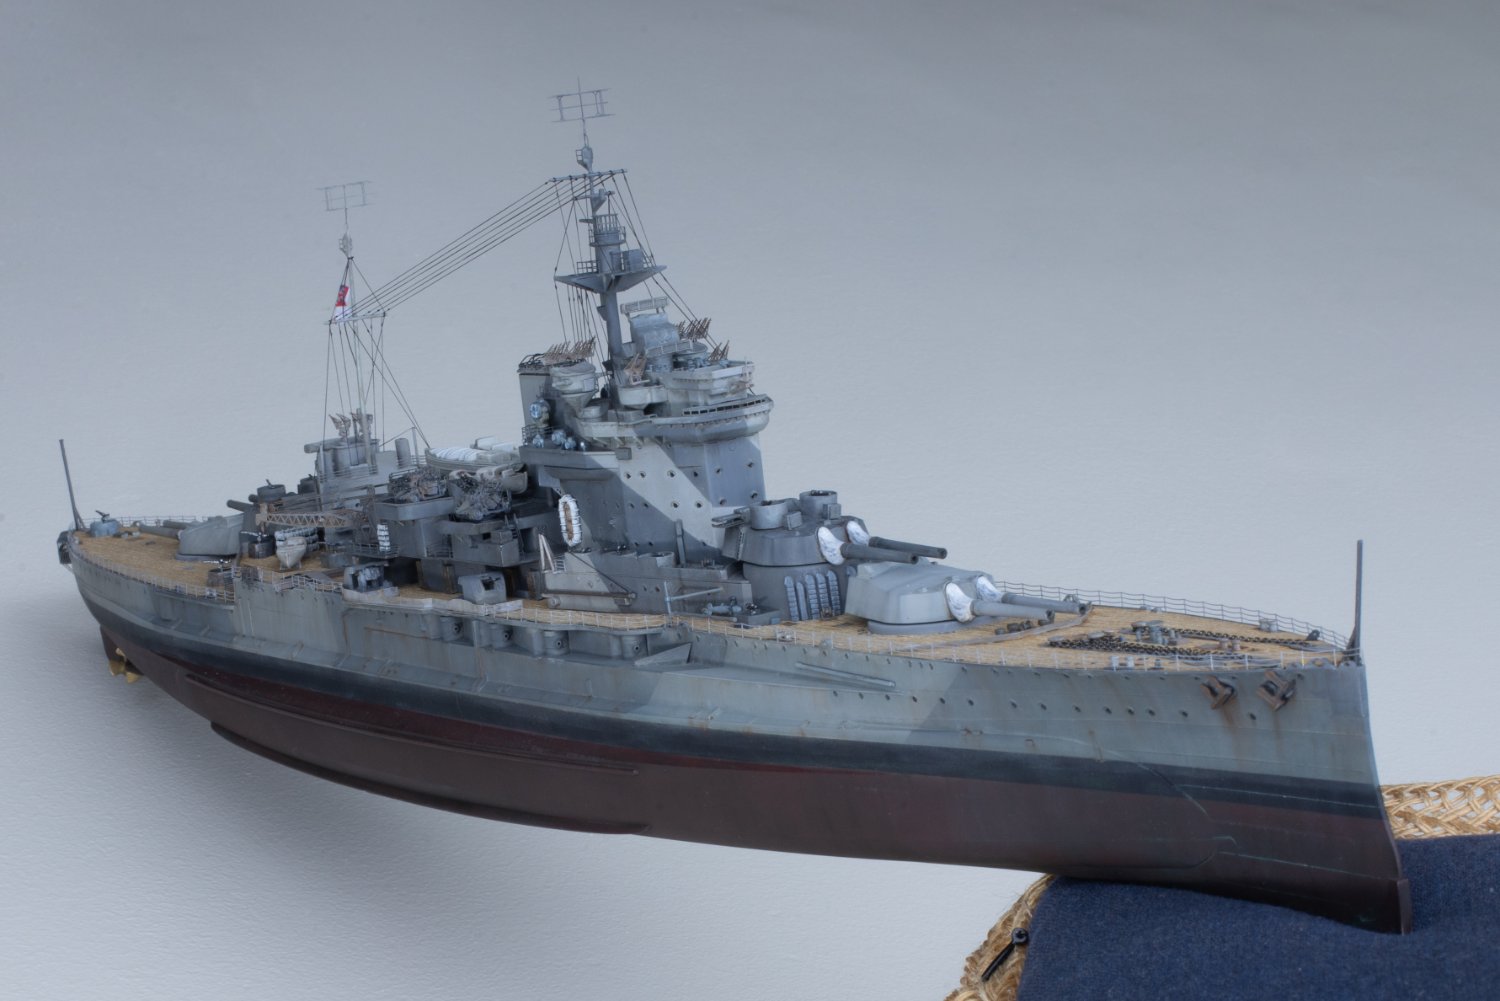
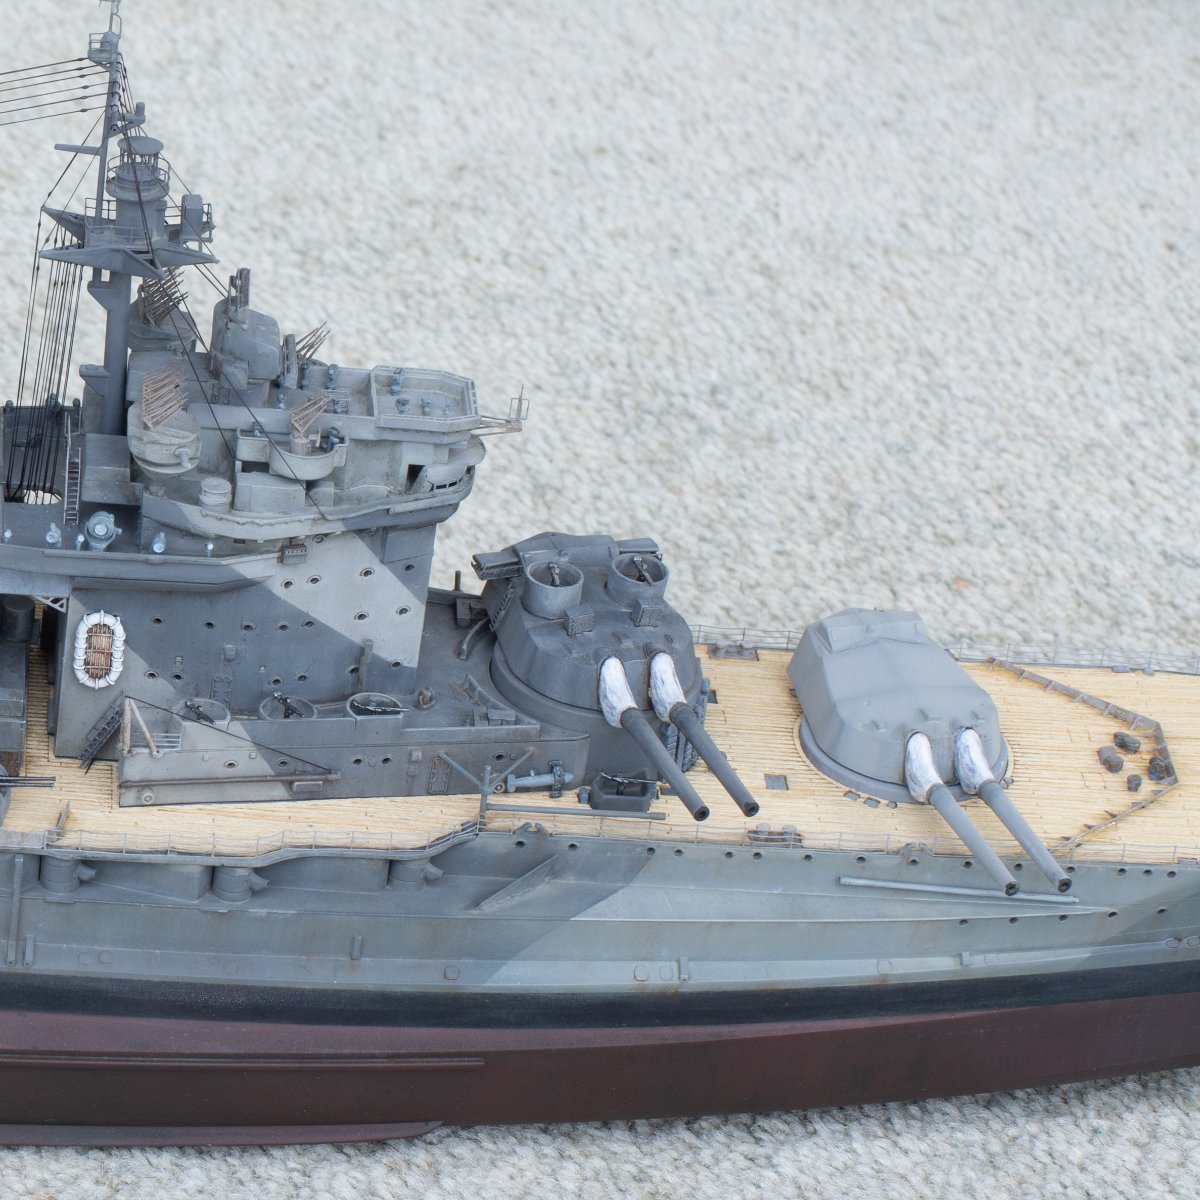
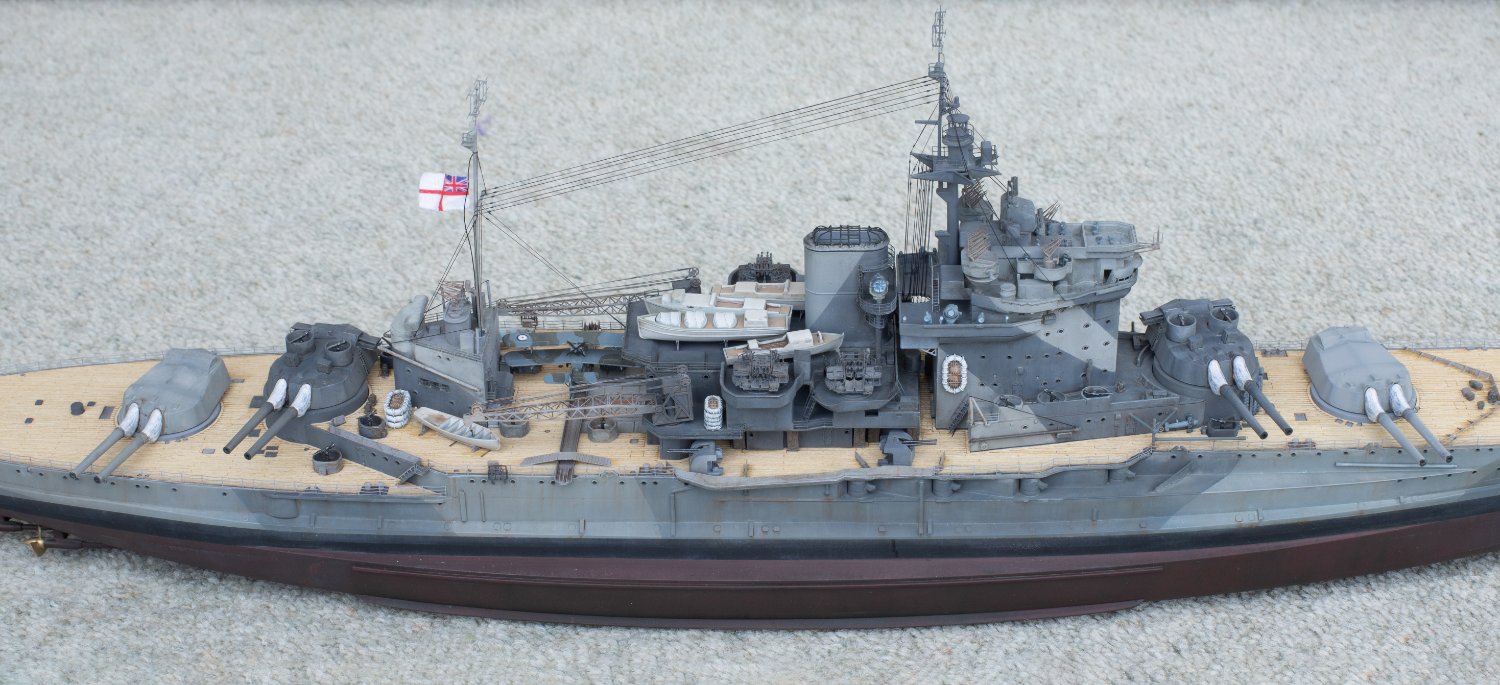
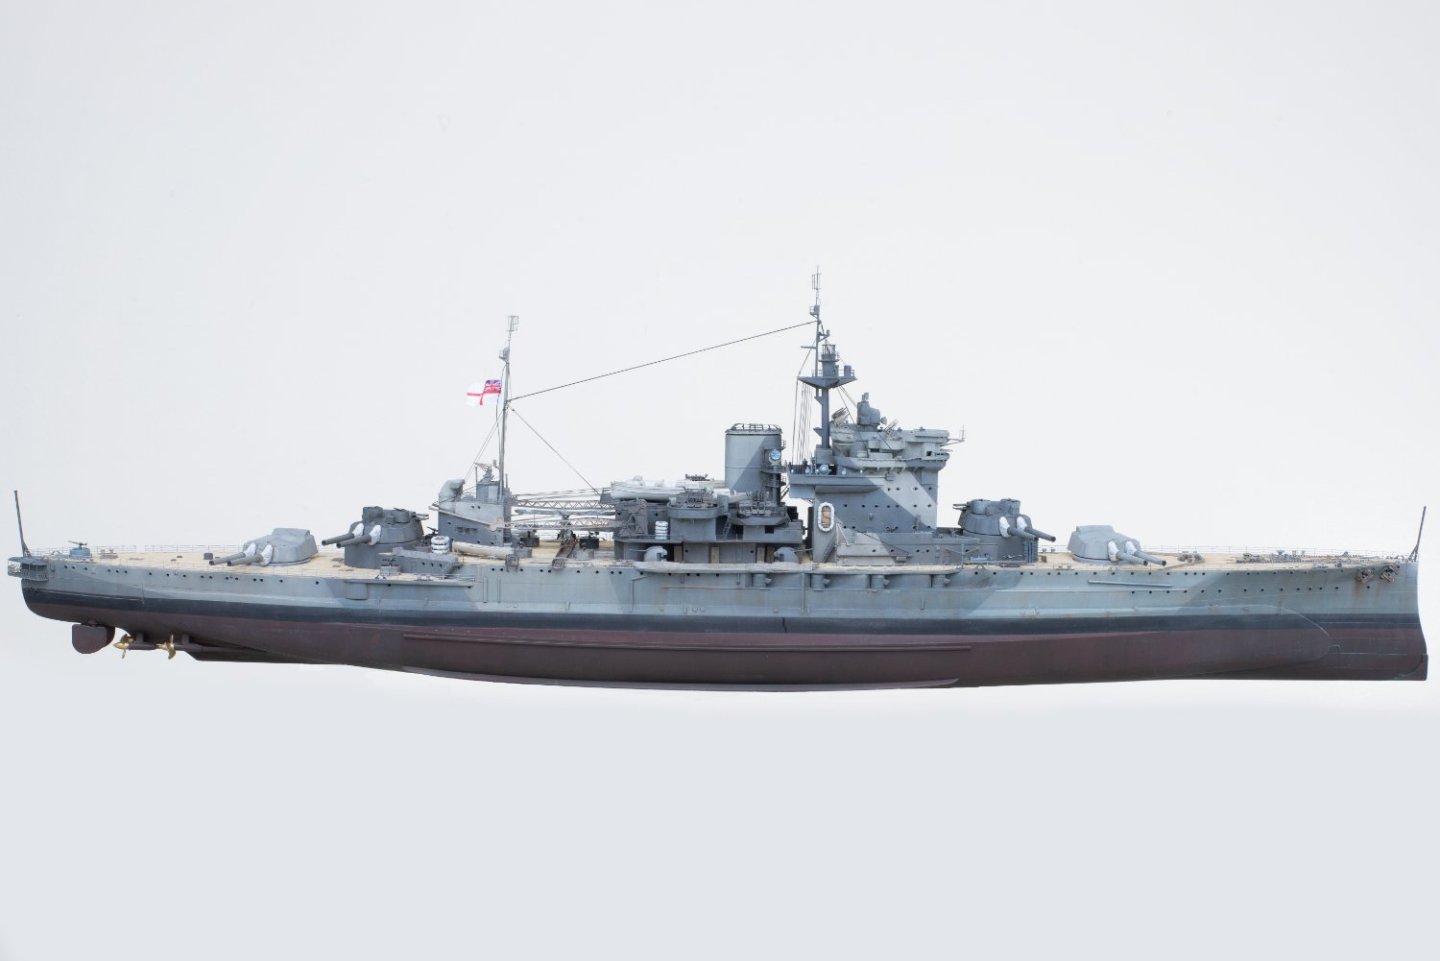
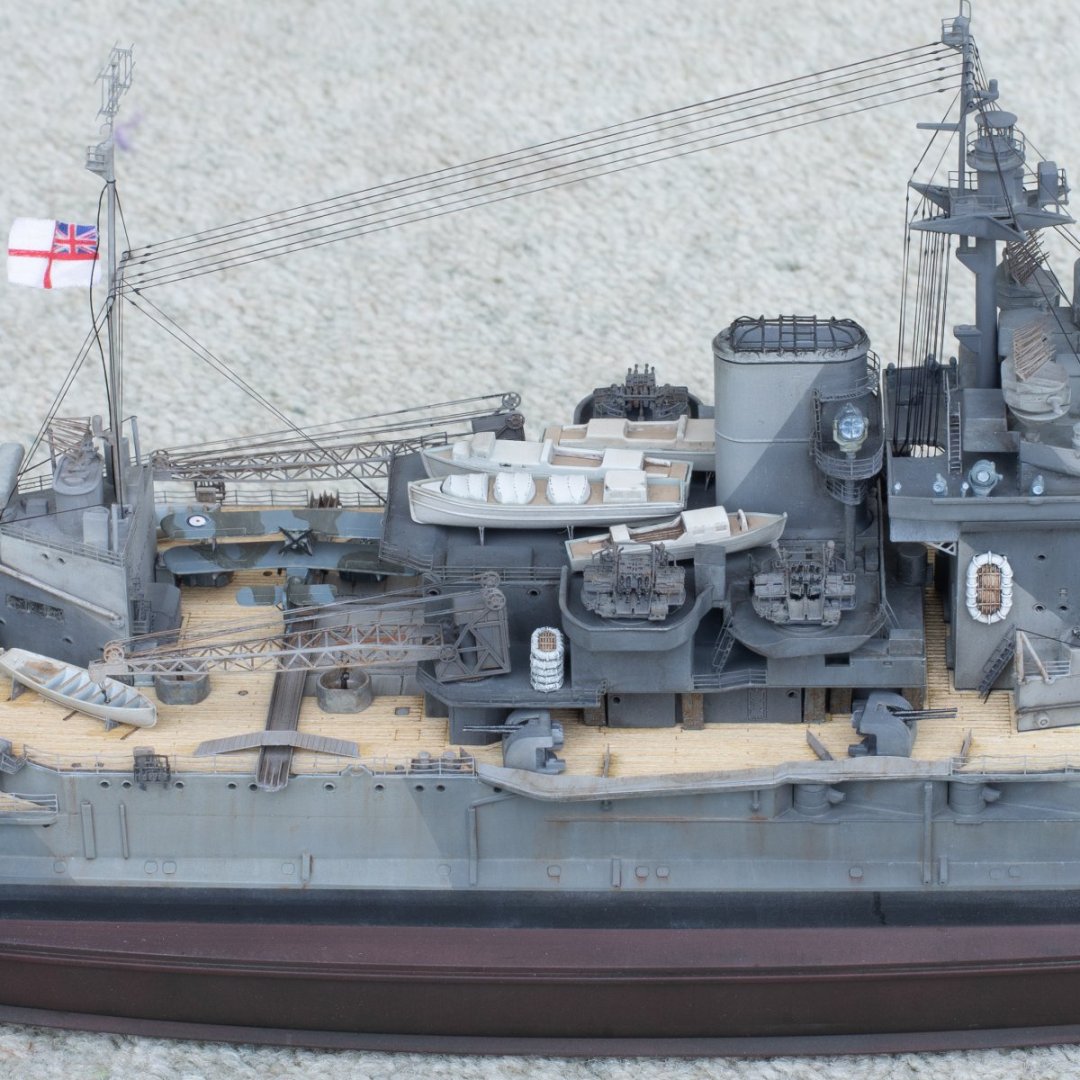
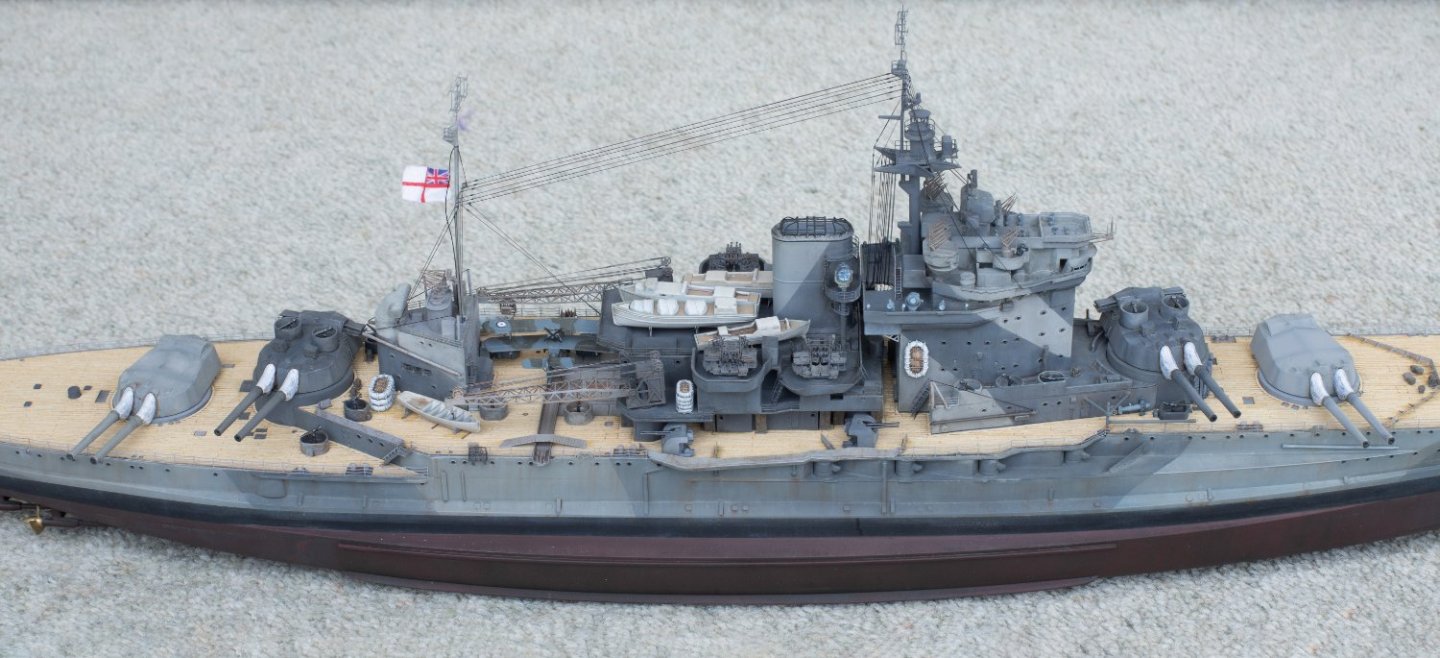
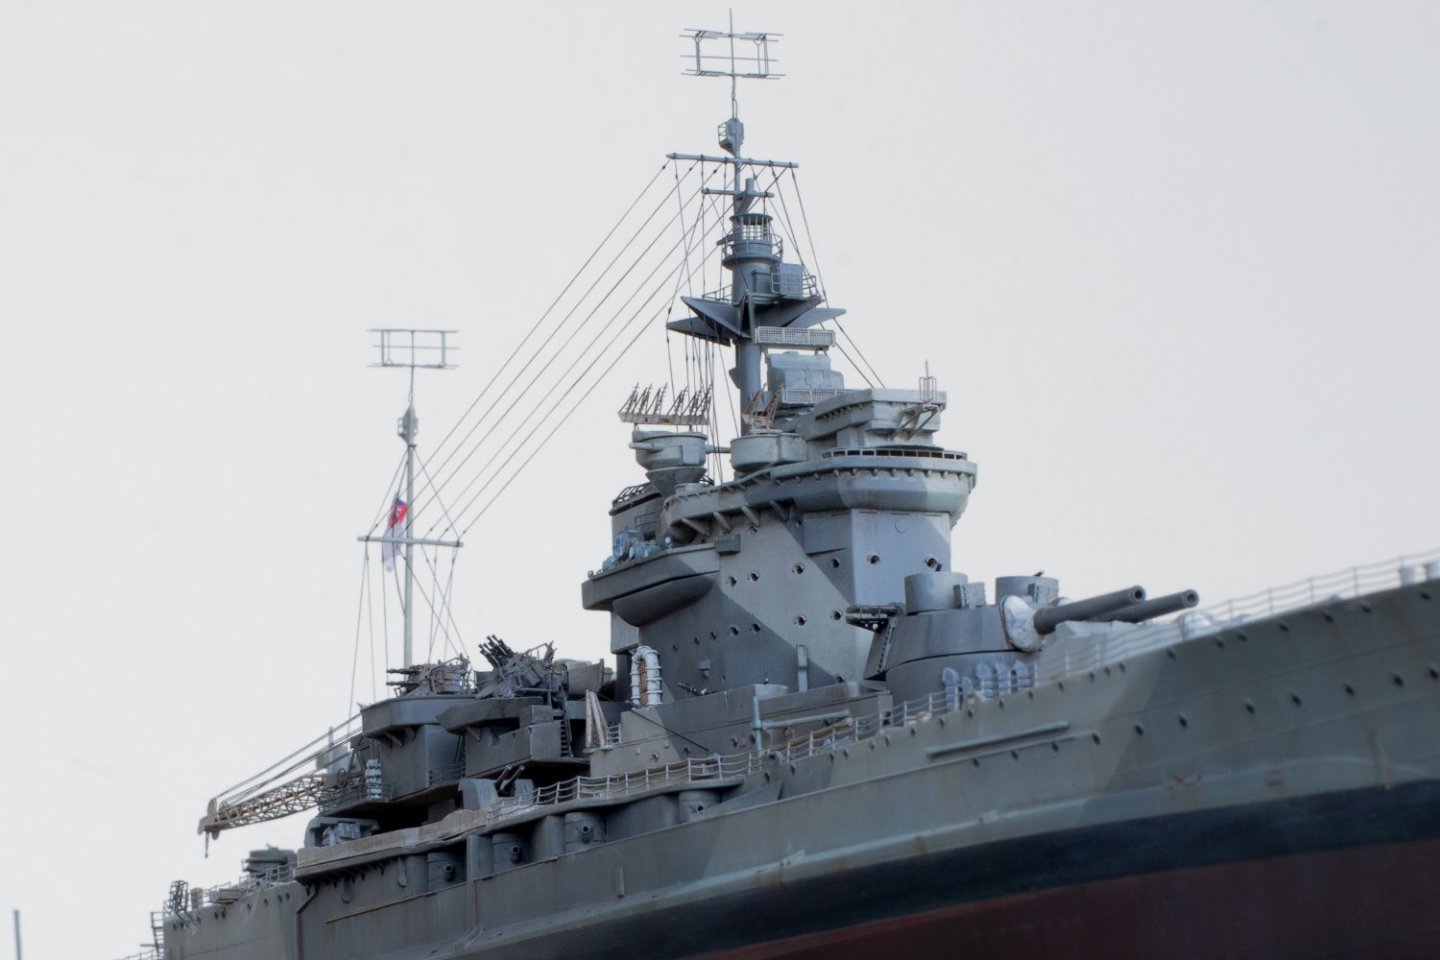
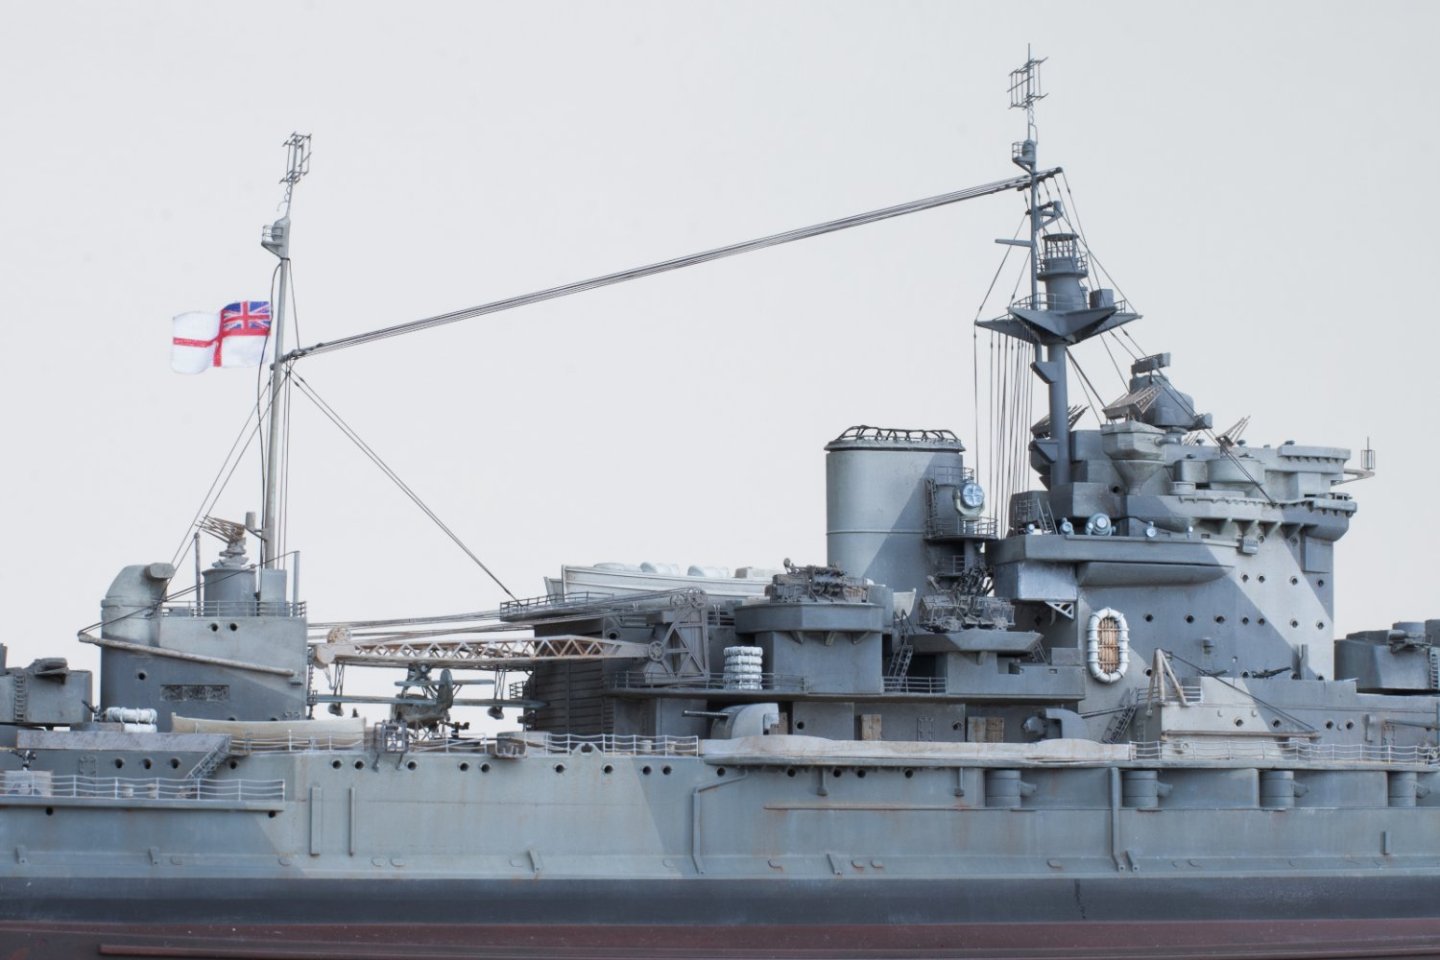
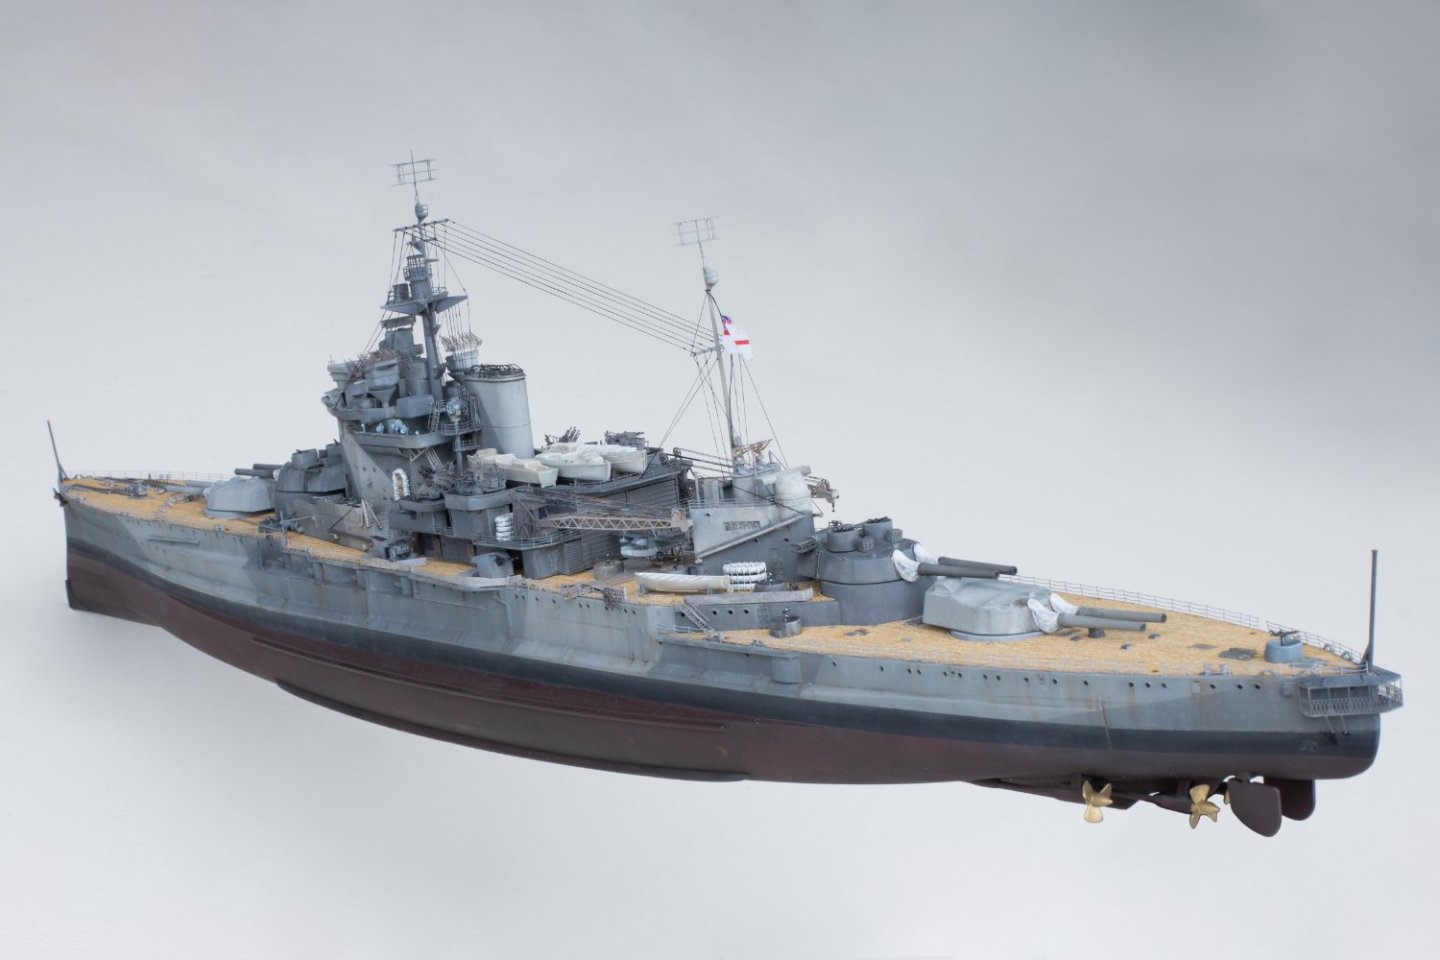
Hello, hope you are all well! Its taken me a lot longer than i thought but I've been slowly working on her. Sorry I've not continued with the build log but there were a few disasters in the build and I had to just leave it and come back to it when i was ready. First one was when the shelf it was being kept on fell over during the night and it fell over 1.5m to the ground and across the room, many hours in the carpet finding as many parts as I could and was quite disheartening... it sat in a sad state for awhile. Then I slowly repaired it and continued with the build and was going pretty well, painted the superstructures and was doing the weathering and instead of using white spirits to remove excess and blend for some unknown reason I used Isopropyl alcohol!! and not just a little bit because when i first started to notice the paint being stripped right off I for some unknown reason thought the washes were causing the damage and decided in a hurry to clean the wash off everything as fast as I could to reduce further damage of course using the Isopropyl so everything (apart from the hull which was already complete) was totally stripped back to the primer or worse... so it kinda feels like I've built the ship twice. had a few other mishaps but none as bad as the 2 major ones. So it wasn't touched for most of the last year until I was back in the mindset to continue. After all it is a hobby so meant to be a fun and enjoyable in the whole right. So here She is all complete. I did enjoy the build a lot and thanks again to you all for the help and advise, in a way you guys helped me get back on the horse and keep going.


- 162 replies
-
- 14
-
-
-

-
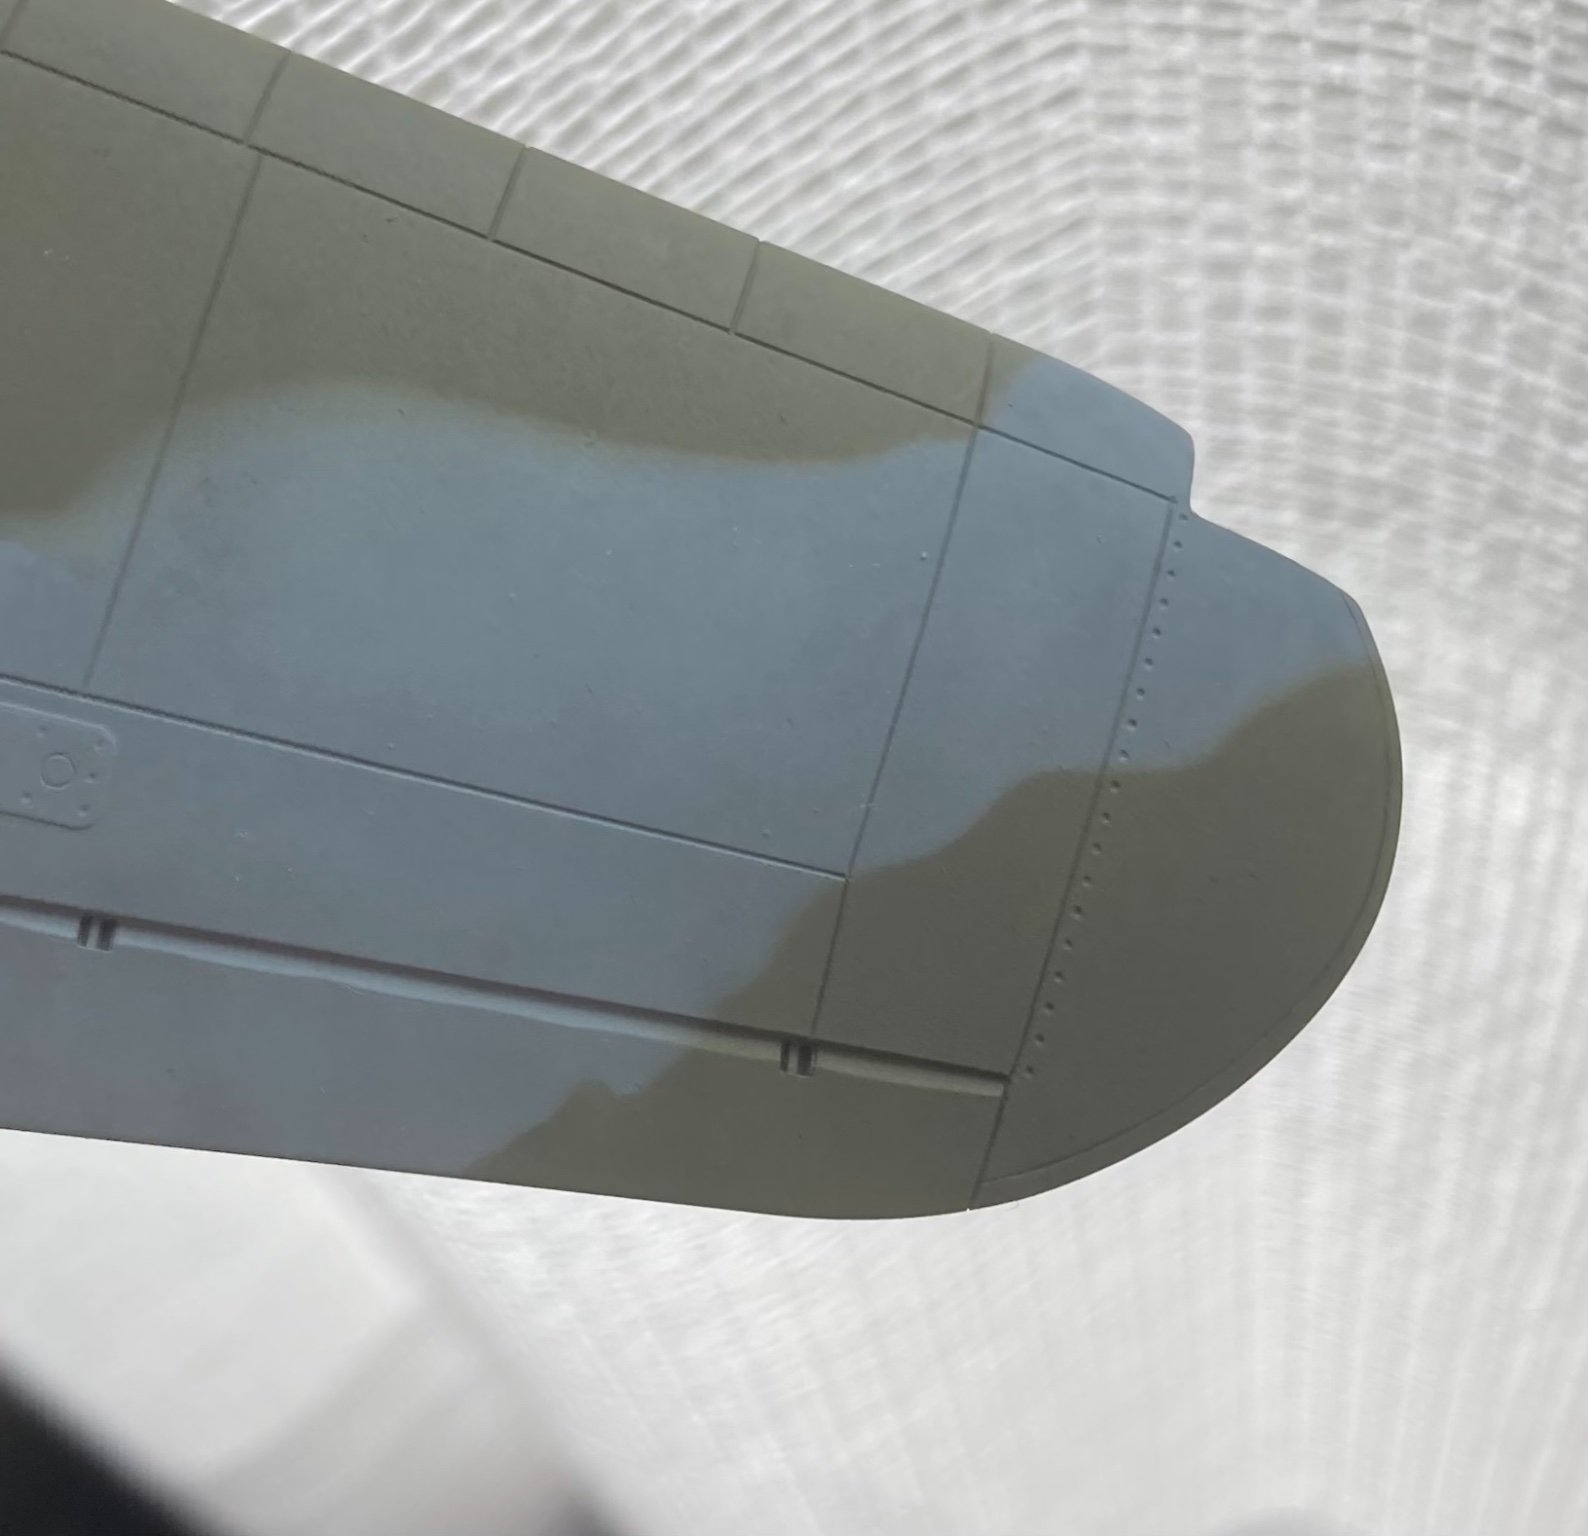
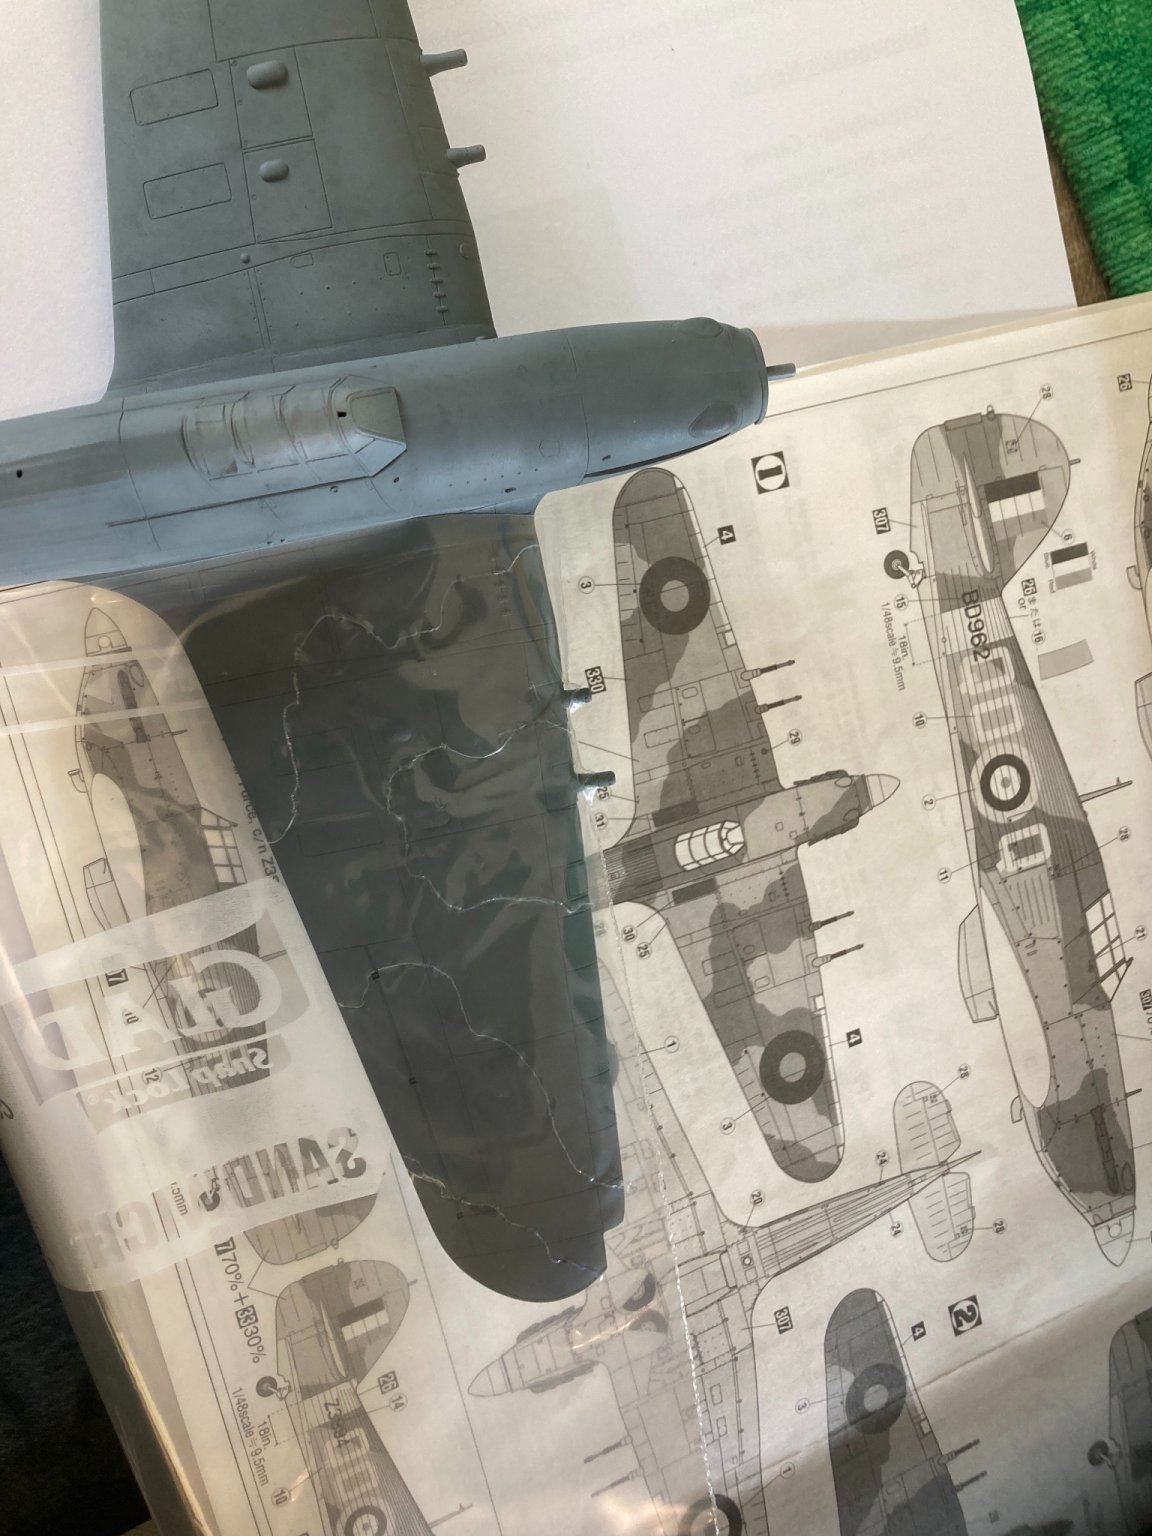
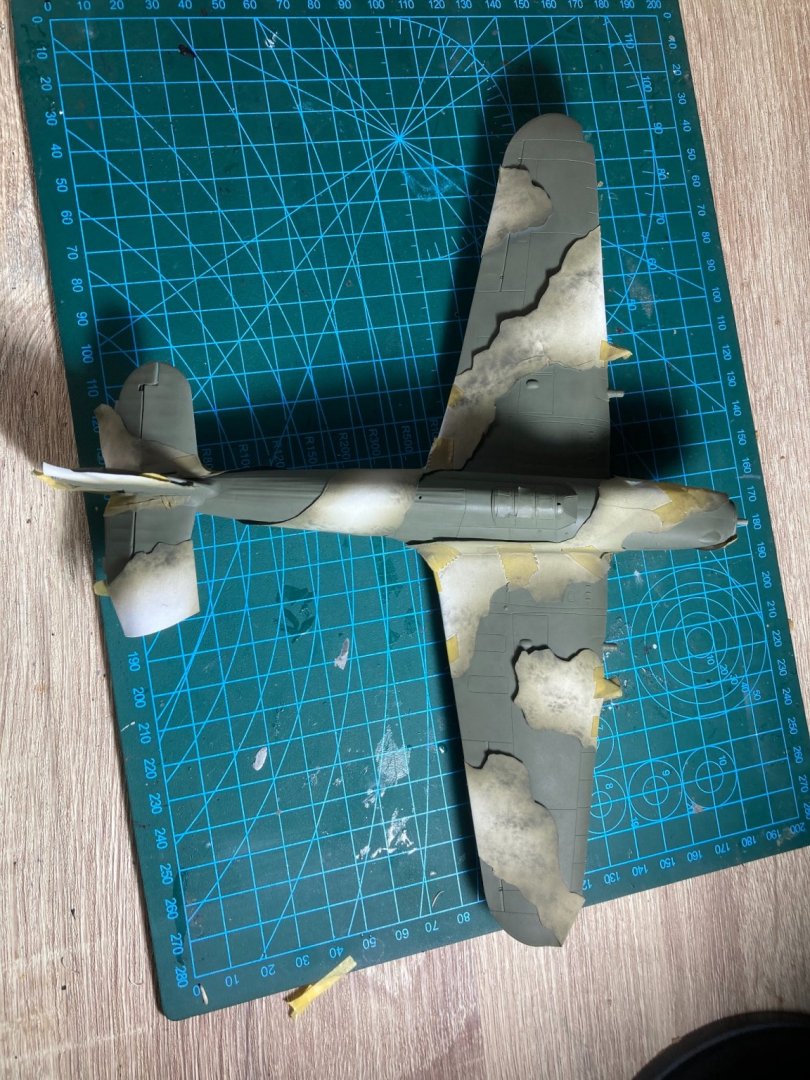
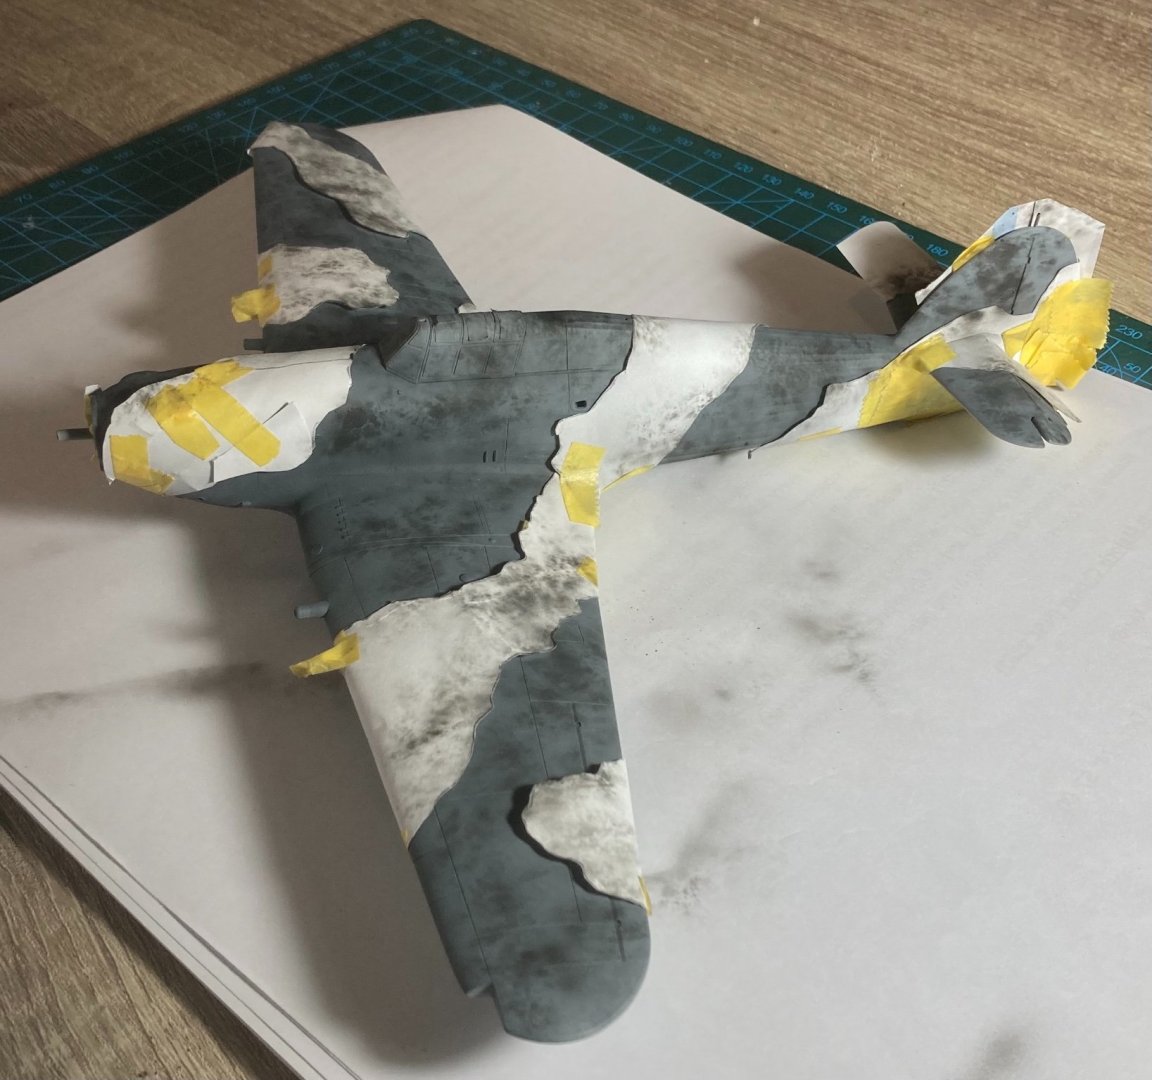
Thanks mate, yea you are right they did have hard edges it’s more a personal like. Just found a hard edge in the small scale was to violent. I went for a very subtle feather and seeing as it’s the base coat will get a few more layers to soften it all up. Here is the feather it has. the blue shade really pops out against the green. Thanks for the info on the rubber mats as a mask!

- 107 replies
-
- 11
-
-
Hey, yea I had seen bluetak used before but was worried it would rip the paint off! It can be really sticky!! I have been thinking how best to do it for many many weeks! Just bit the bullet
-
Hey mate, yes all going well. Lots of Astro really enjoying it. Thought I better pop in for a little update. Hope all is well with you too?
-
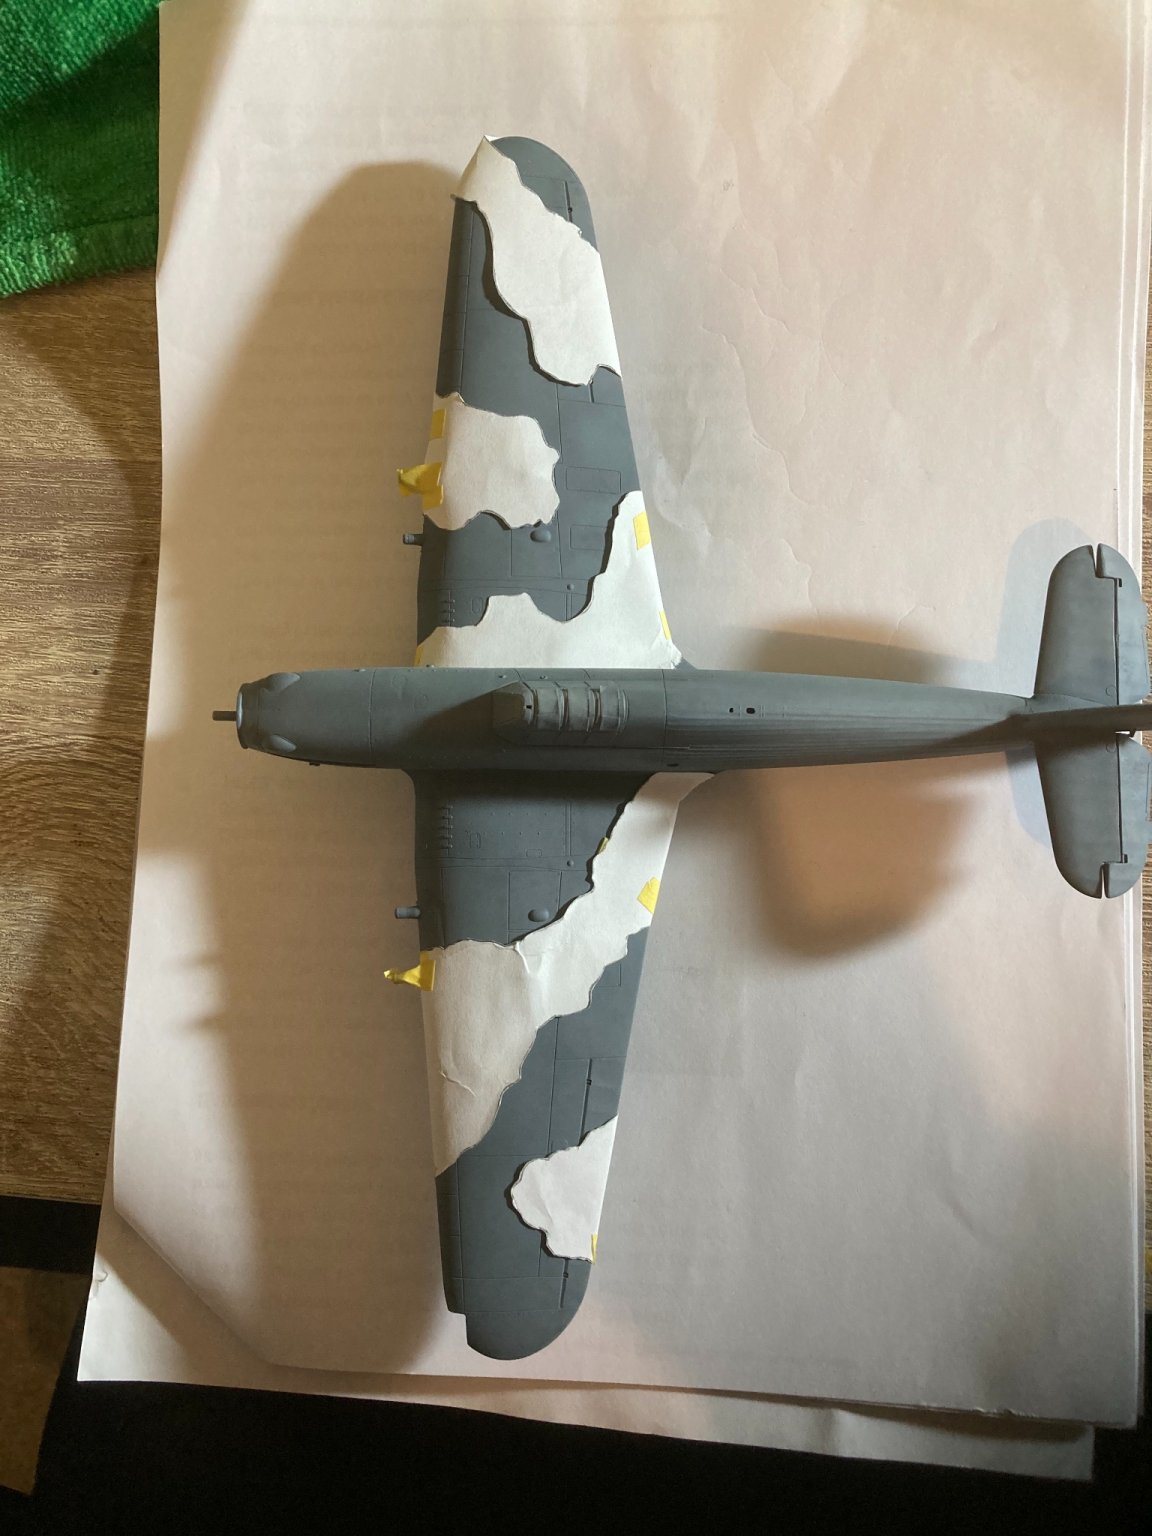
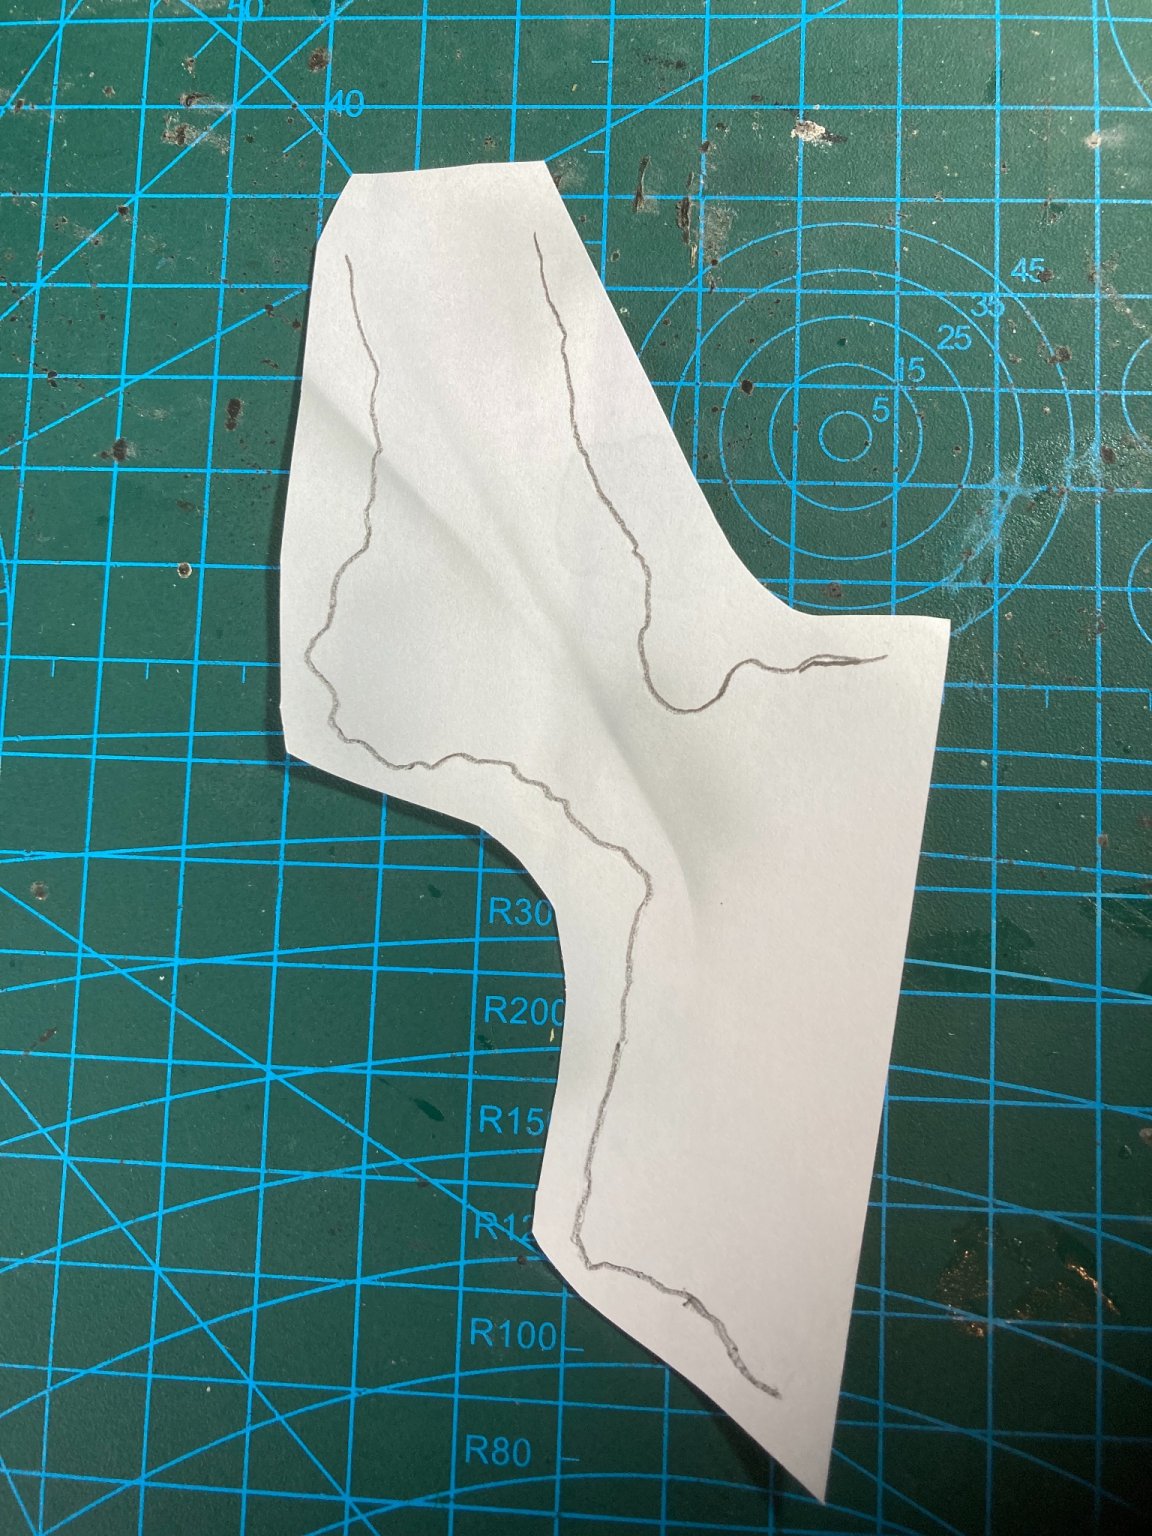
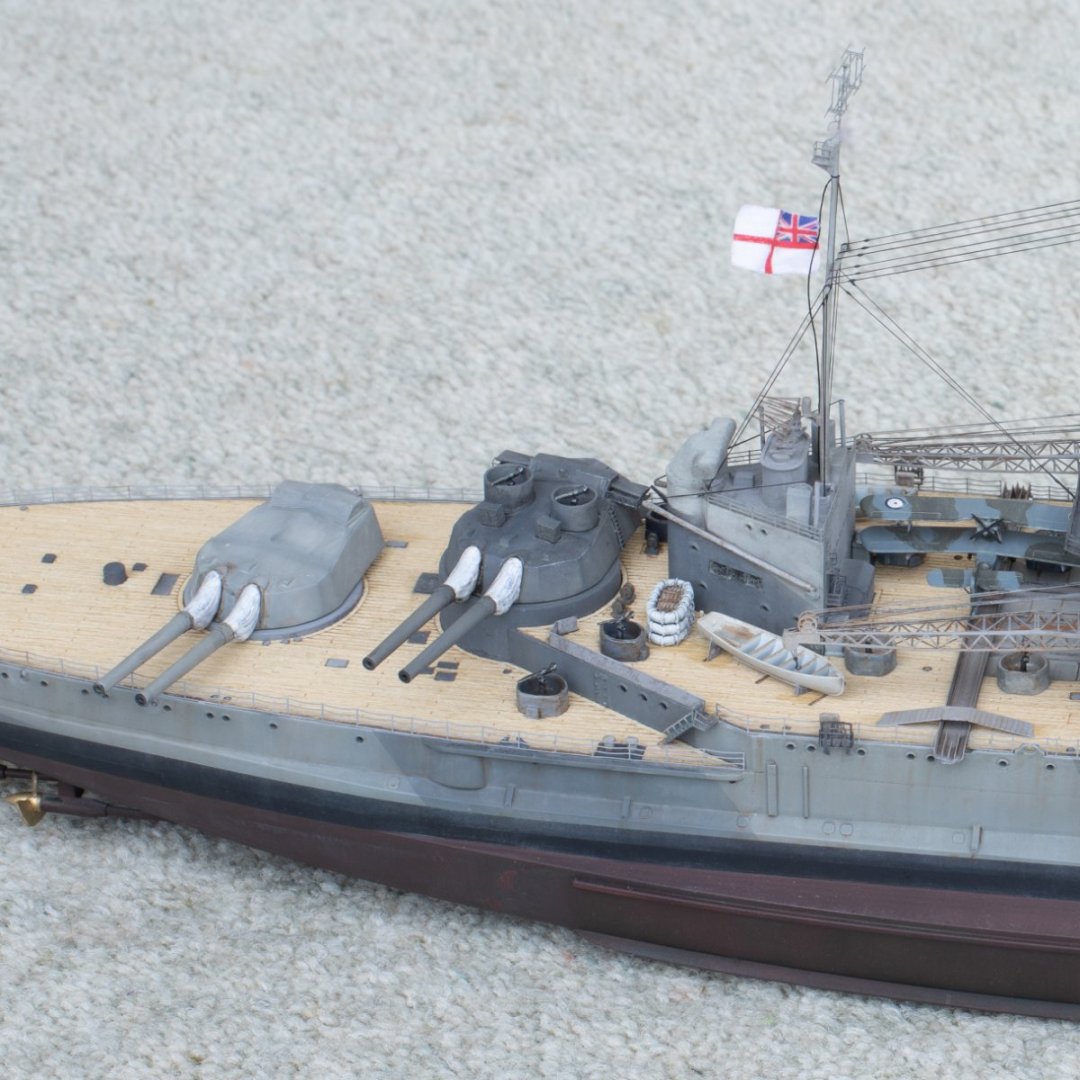
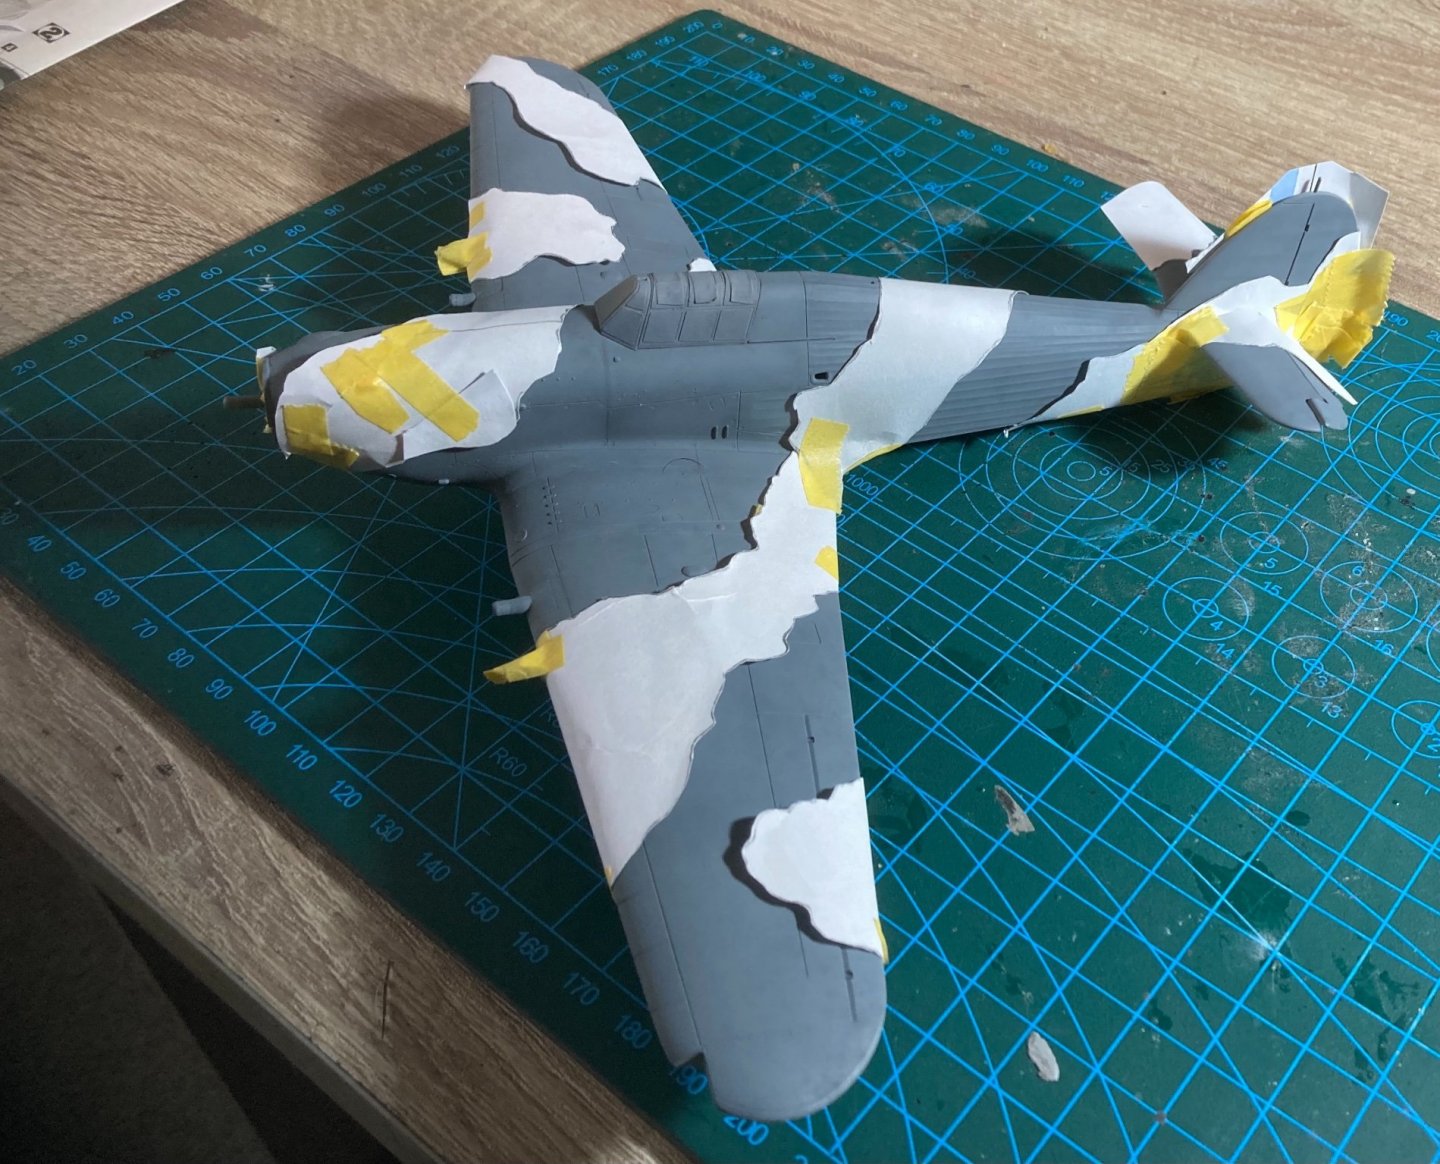
So it’s been awhile since my last update, she says in my cupboard for a while between little bits and pieces. So thought I’d do an update. planning how to do the camo was what caught me out and it just sat there. primed and then some base work by airbrushing through a sponge. then grey coat of paint. took awhile how to work out the best way to mask so it has a slight feathered edge. Tape would have been a last resort. So using ziplock bags traced the camo with a pencil. then traced it to paper cut them out and stuck them on with Tamiya tape turned on itself to be double sided, took a few days! I then redid the base effects and applied the green top coat


-
Thanks, Just doing a bit here and there. With the camo It will change how I put it together so will build the lot and paint it as one rather than sections. A good chunk of the initial parts done just a few more levels and the PE
-
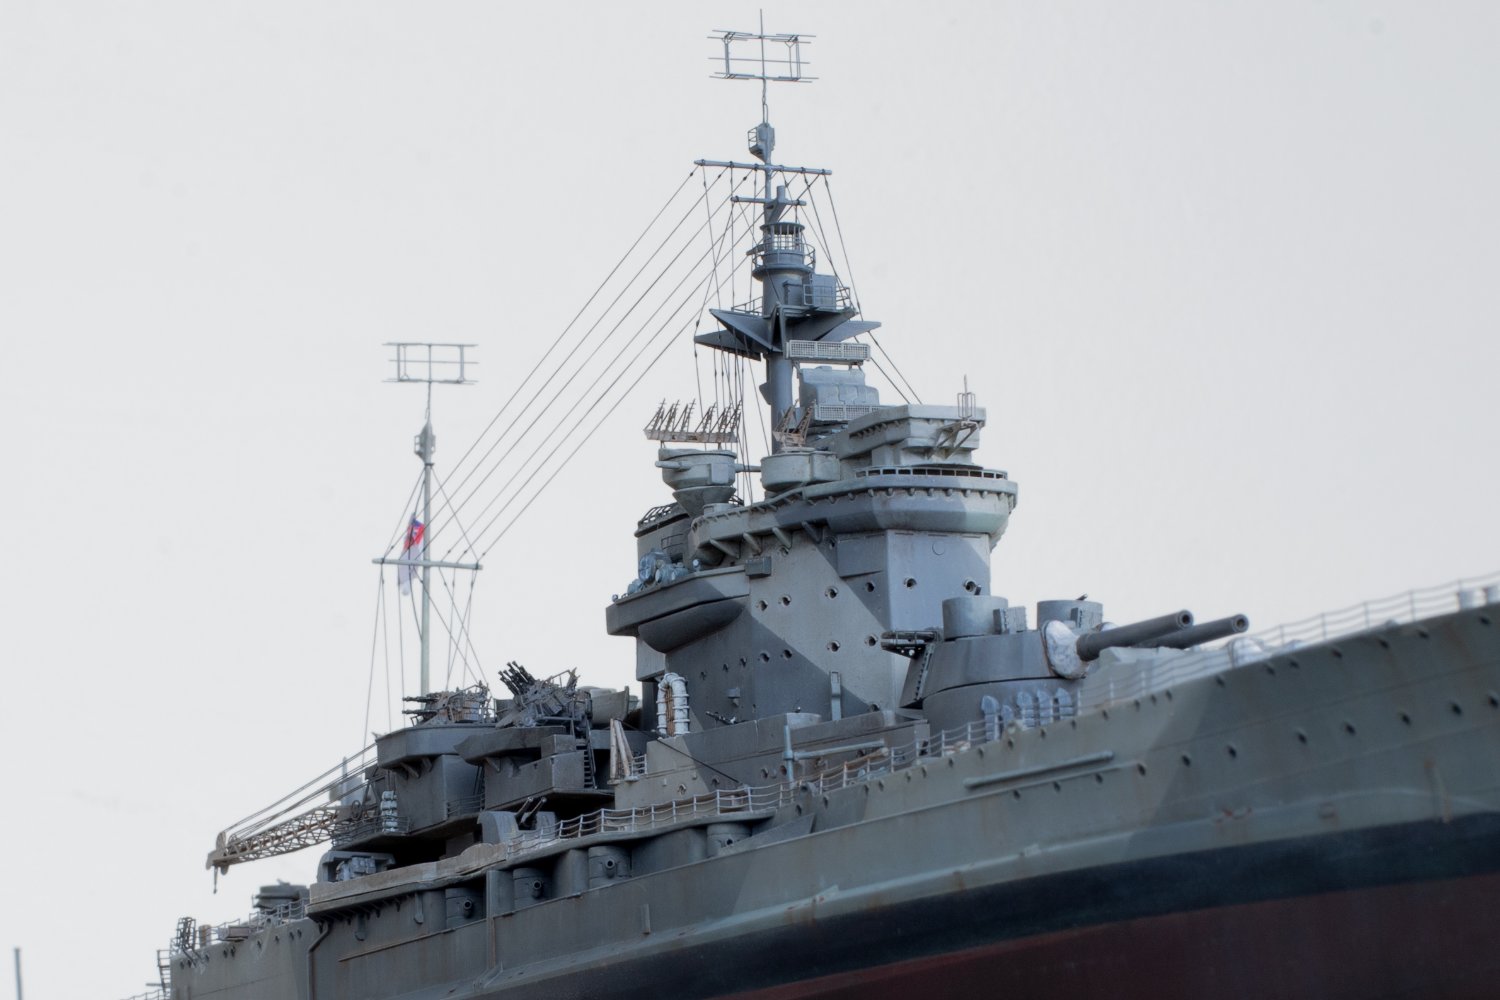
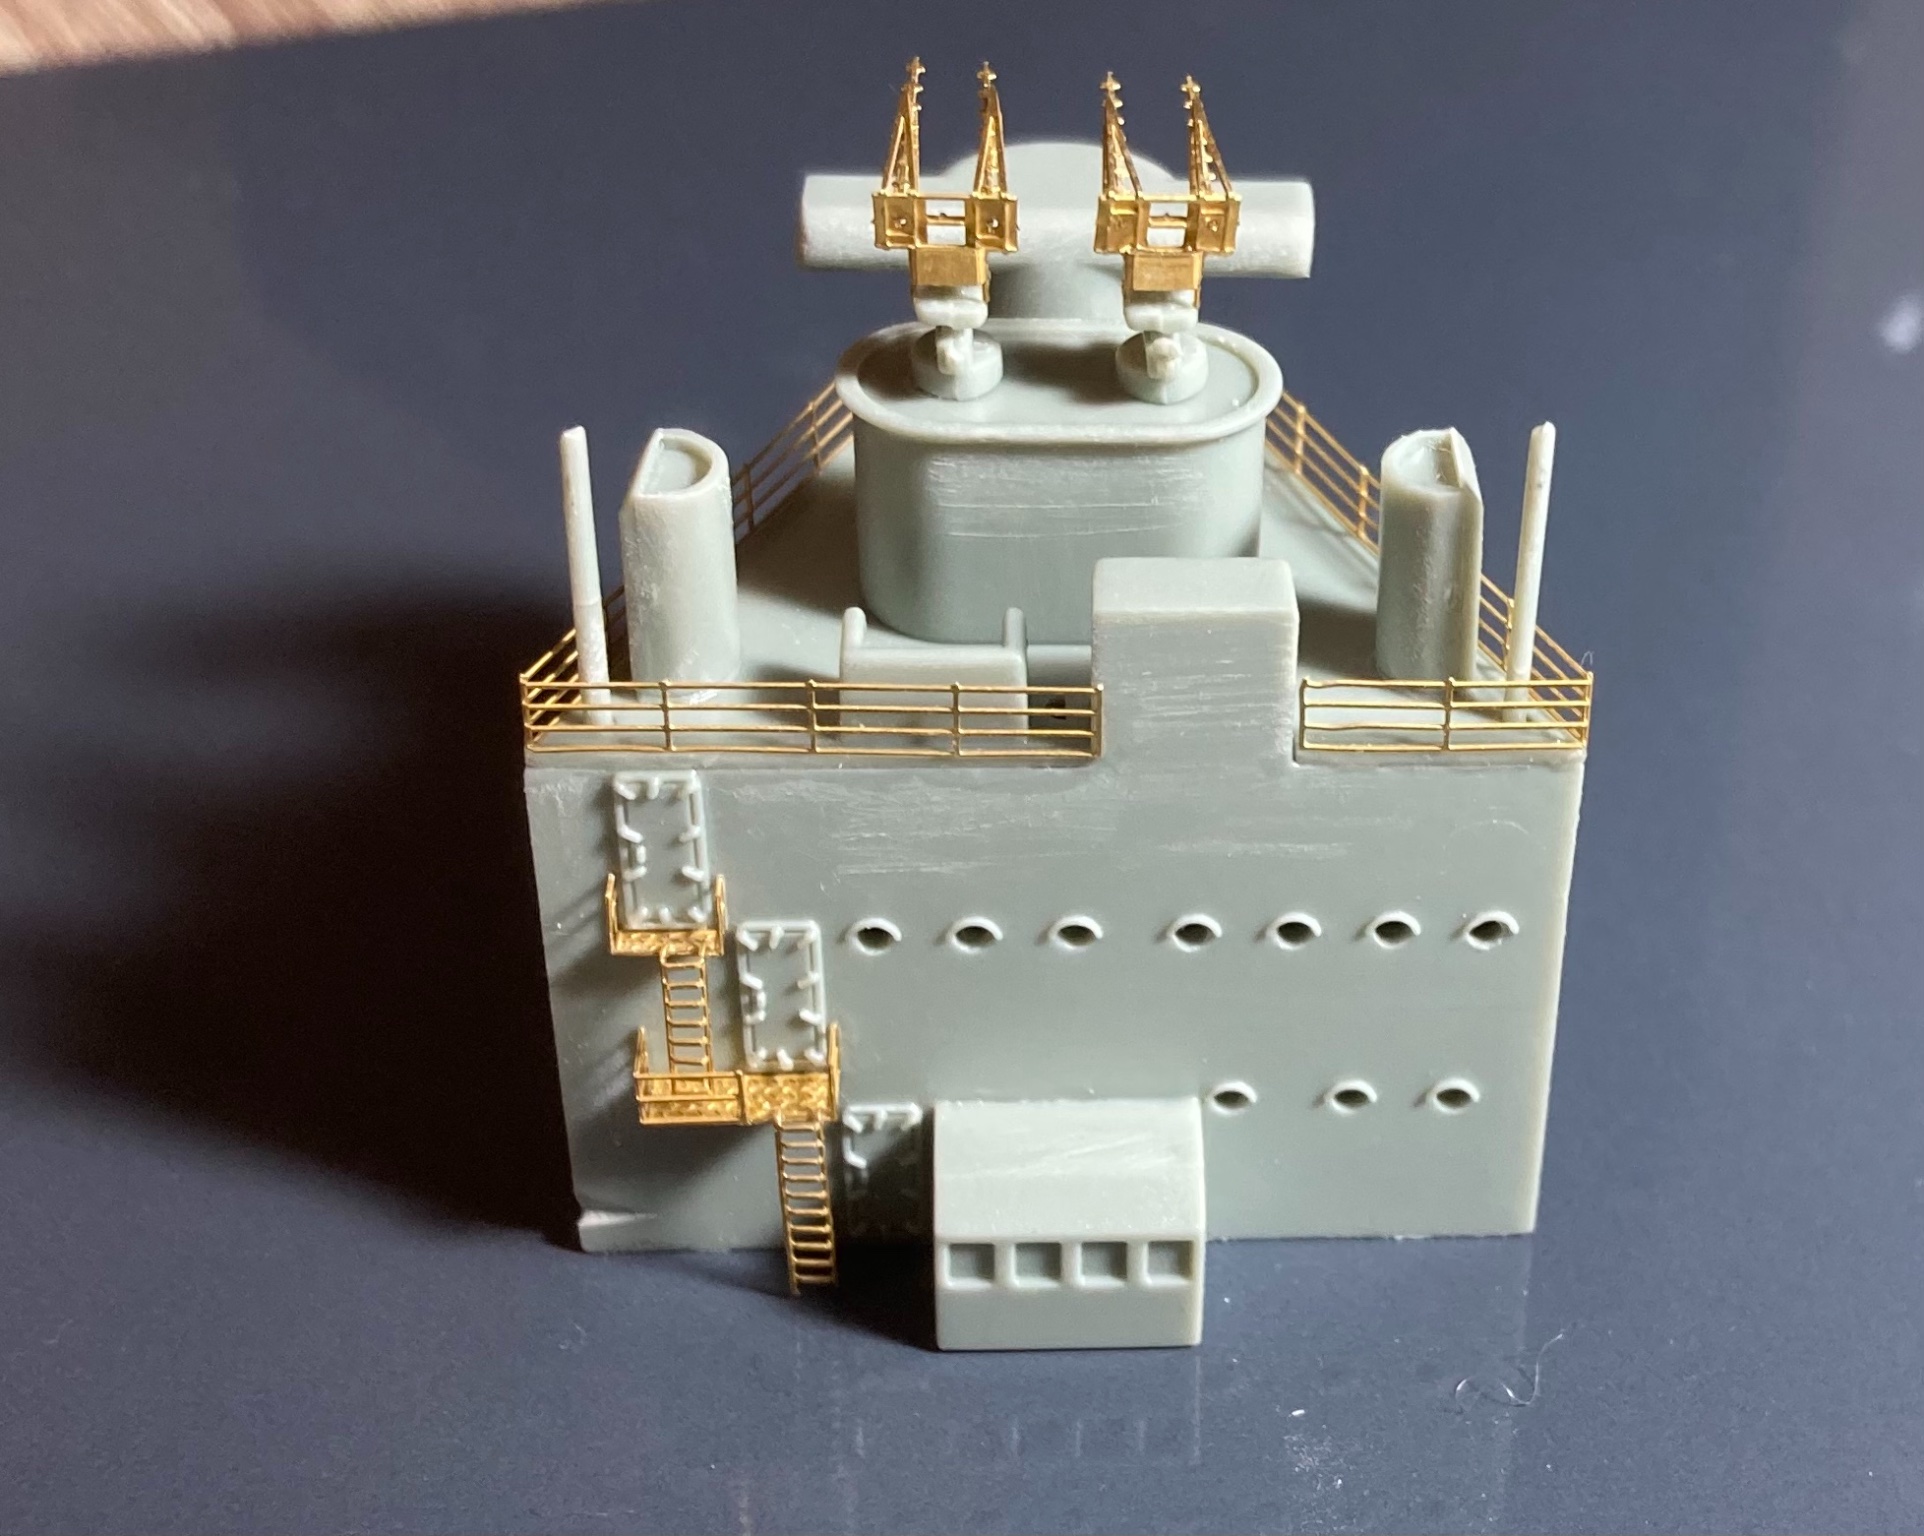
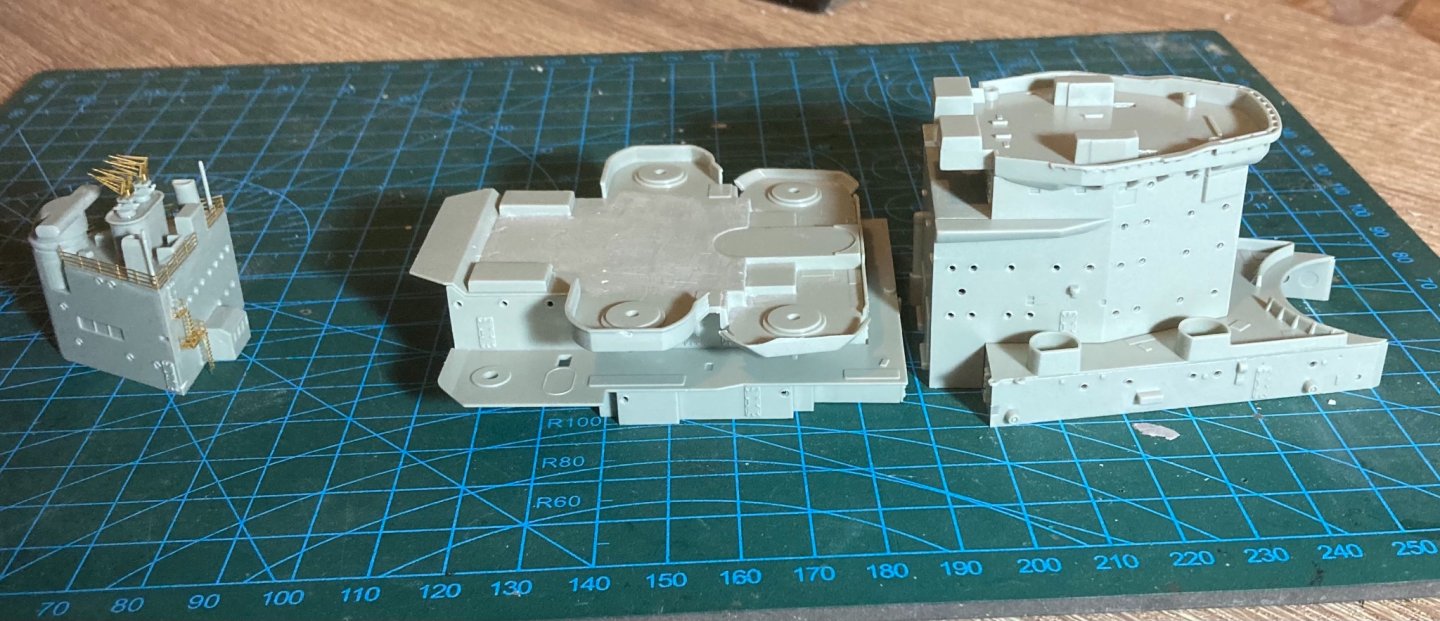
Hello, it’s been awhile! But had some time and in the right frame of mind to do some work on her. Started working on some of the super structure. Took only alittle bit to get back into the swing of things. Glad I’ve already done a ships PE set otherwise I’d not have a clue how things went together! They sure don’t make it easy! Haha The ships Woden deck only needed re glueing in 3 places where it had bubbled up so was quite pleased. The CA glue is new as my last lot got way too thick over the summer so it’s now stored in the vegetable fridge but it’s so thin I really struggled to get anything on my glue device (a thinned out tooth pick) so took awhile and lots of re glueing happened!

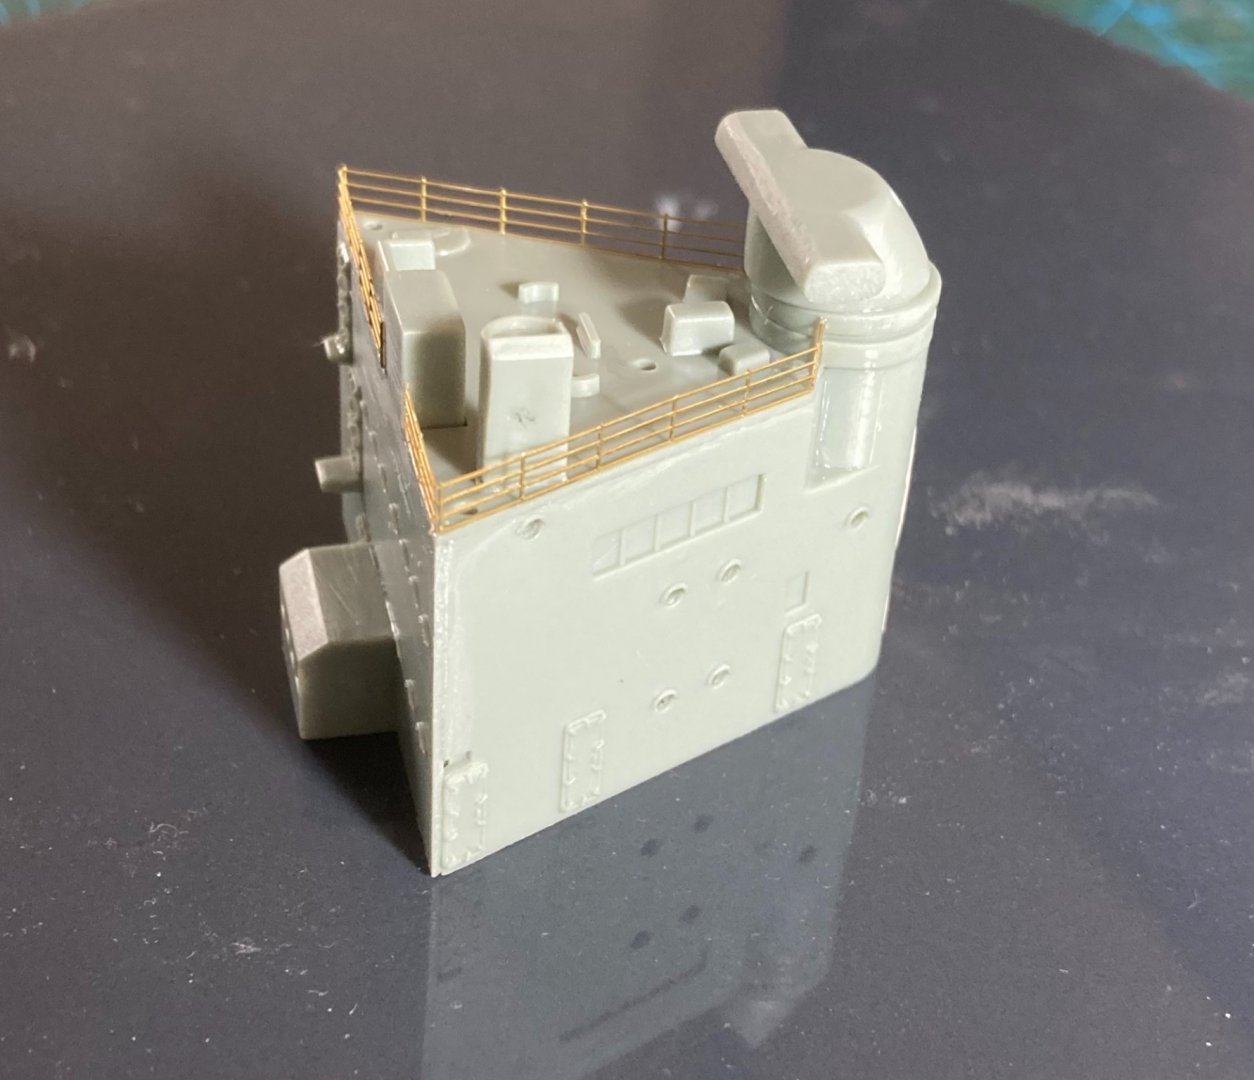


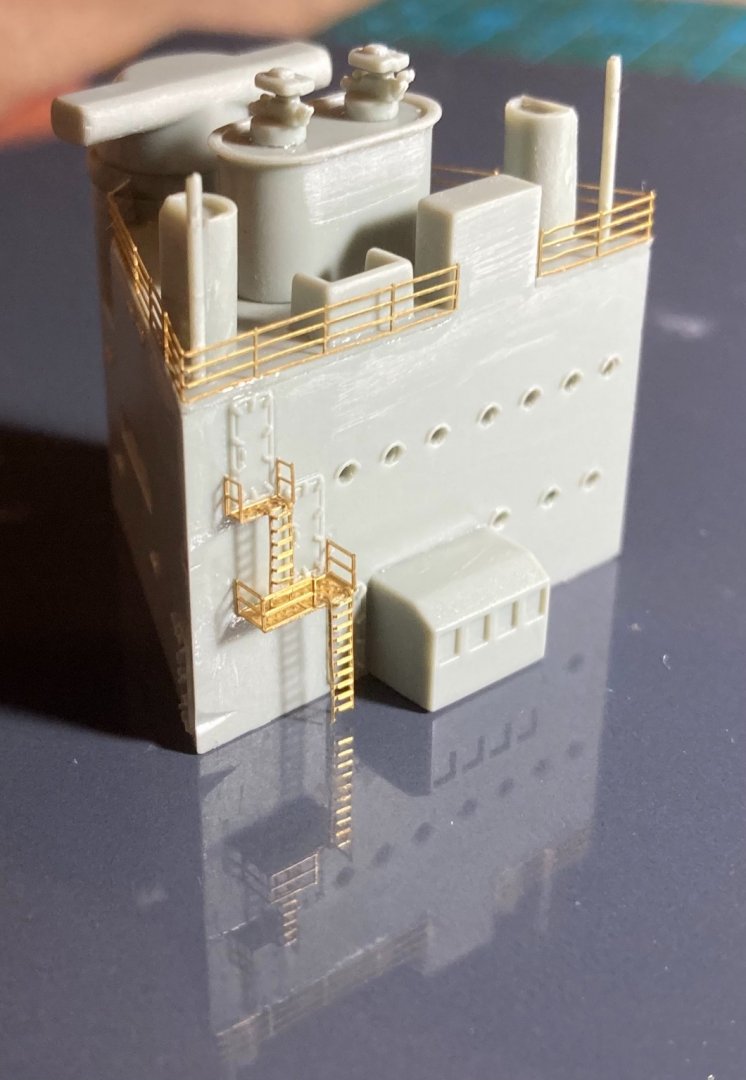
-
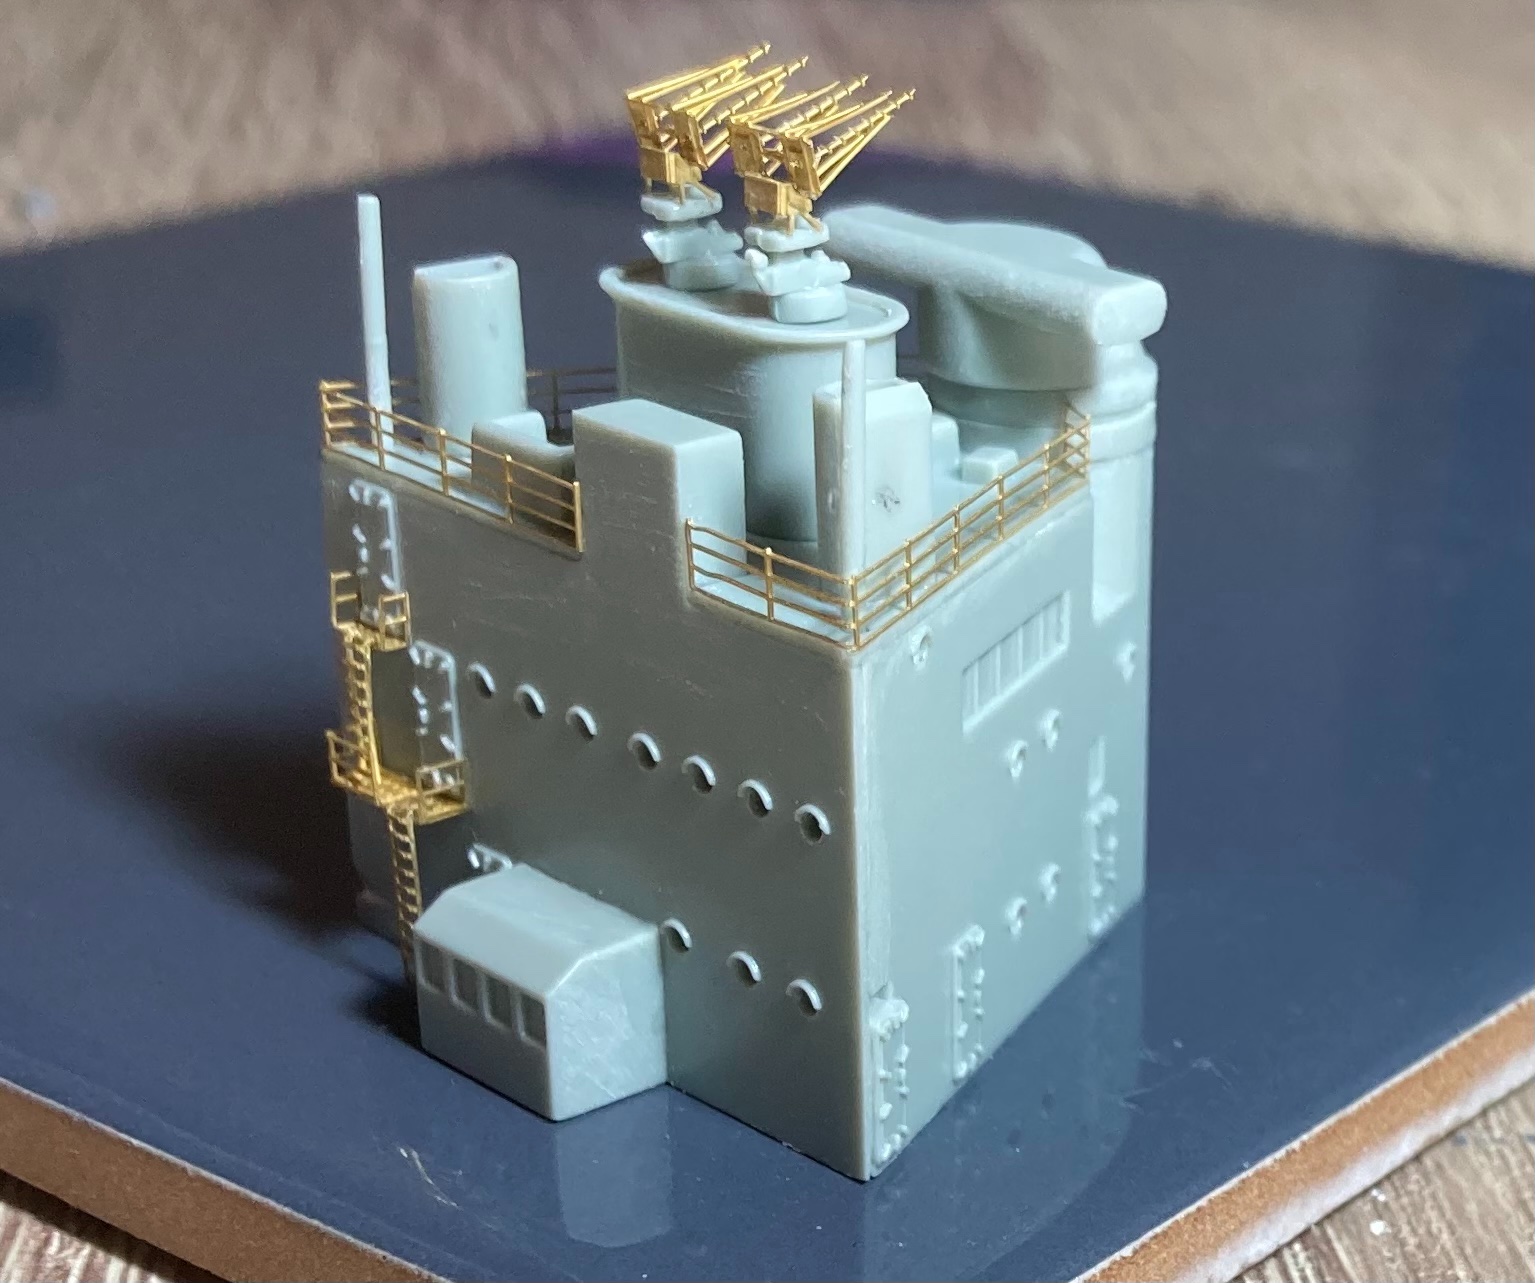
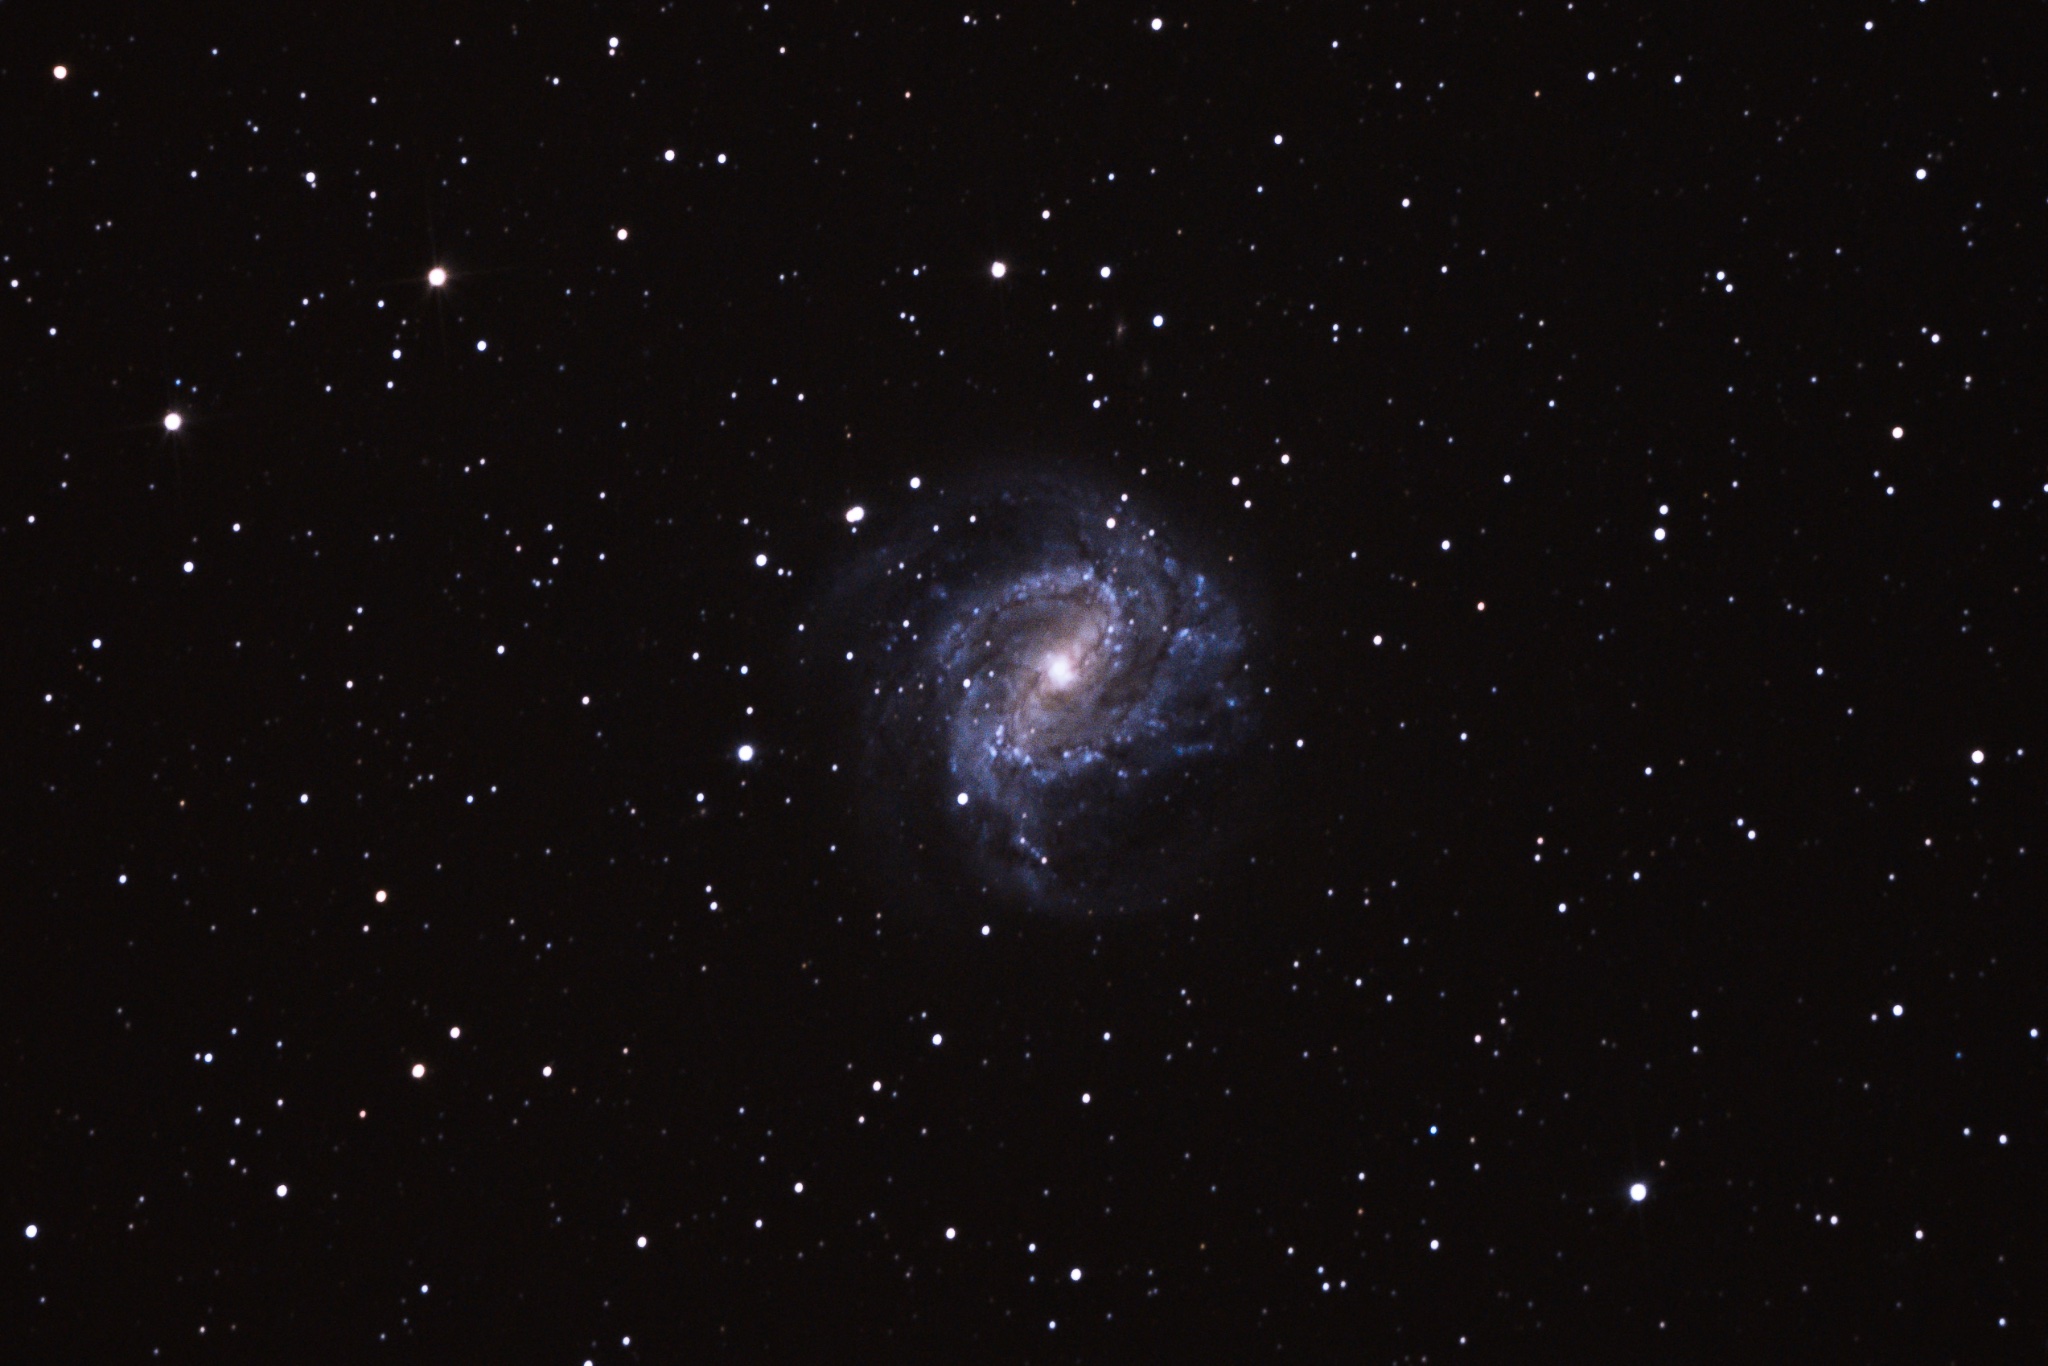
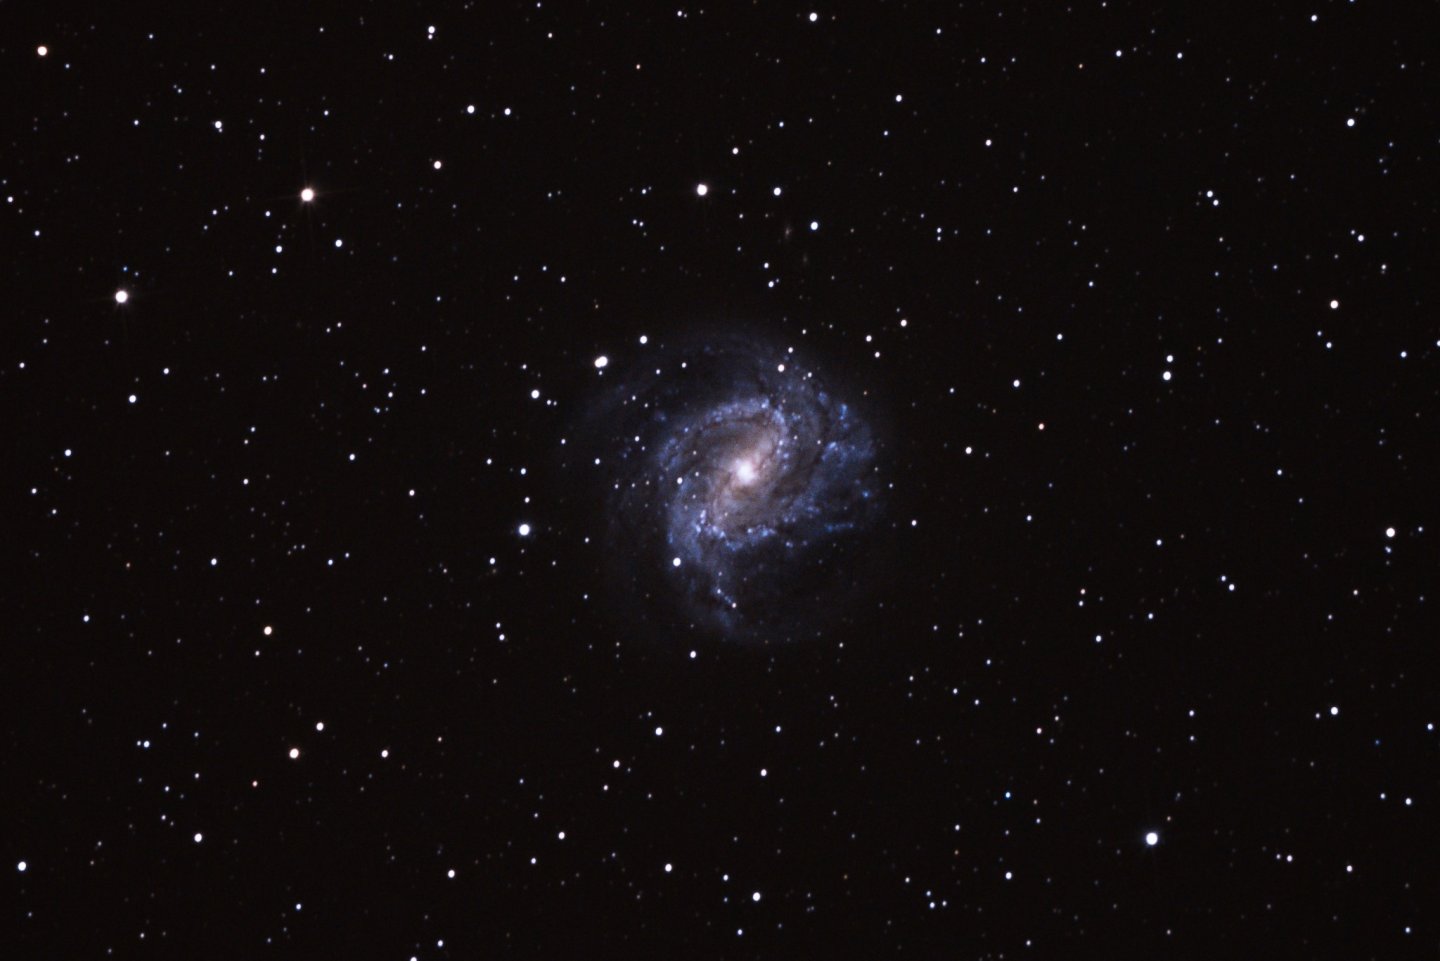
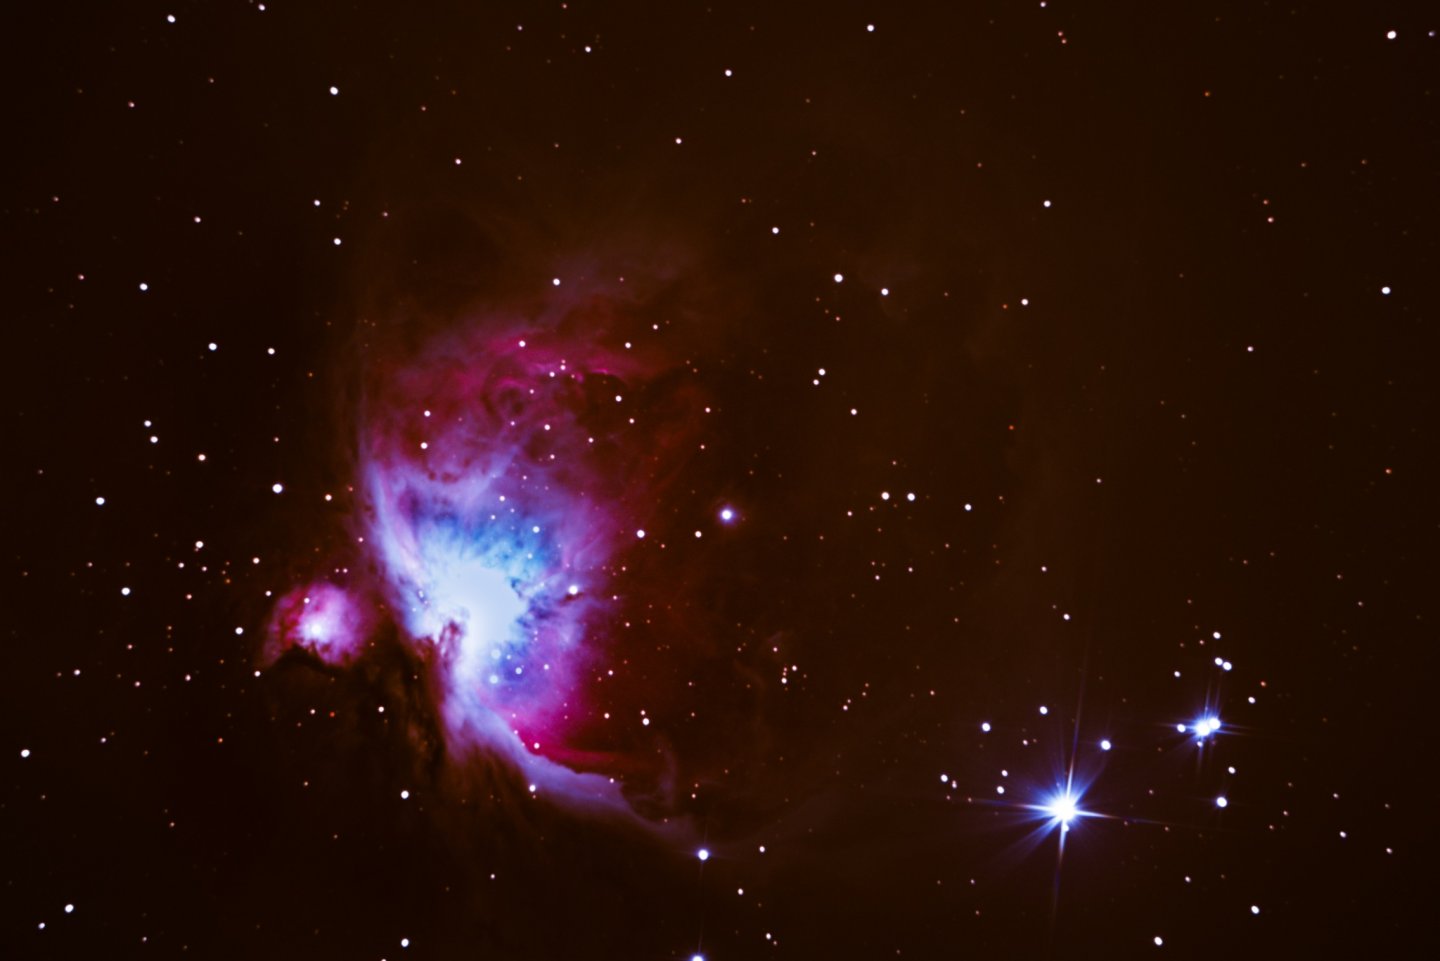
I’ve been super slack at the moment. But generally doesn’t take too long of a break to get back into it. Been spending more of my time doing Astrophotography and will have to knuckle down and keep going with the ship soon... it’s a hobby after all! I did add some more details to the deck, just got to get into the PE mindset and get the superstructure underway. will blend them in once the rest of the deck furniture is complete too. The wood deck is glued well and I’m happy with the hull so it’s been fun. here are some of my Astro shots I’ve been taking and distracting me from my build haha! I shall be back into the ship building in the next little while though
-
Yes that’s great thanks. I’m still just pondering how to attach the chain. Might drill a hole and feed it through otherwise it will not look right just glued to the outside