HOLIDAY DONATION DRIVE - SUPPORT MSW - DO YOUR PART TO KEEP THIS GREAT FORUM GOING! (Only 24 donations so far out of 49,000 members - C'mon guys!)
×


ken3335
-
Posts
314 -
Joined
-
Last visited
Content Type
Profiles
Forums
Gallery
Events
Everything posted by ken3335
-
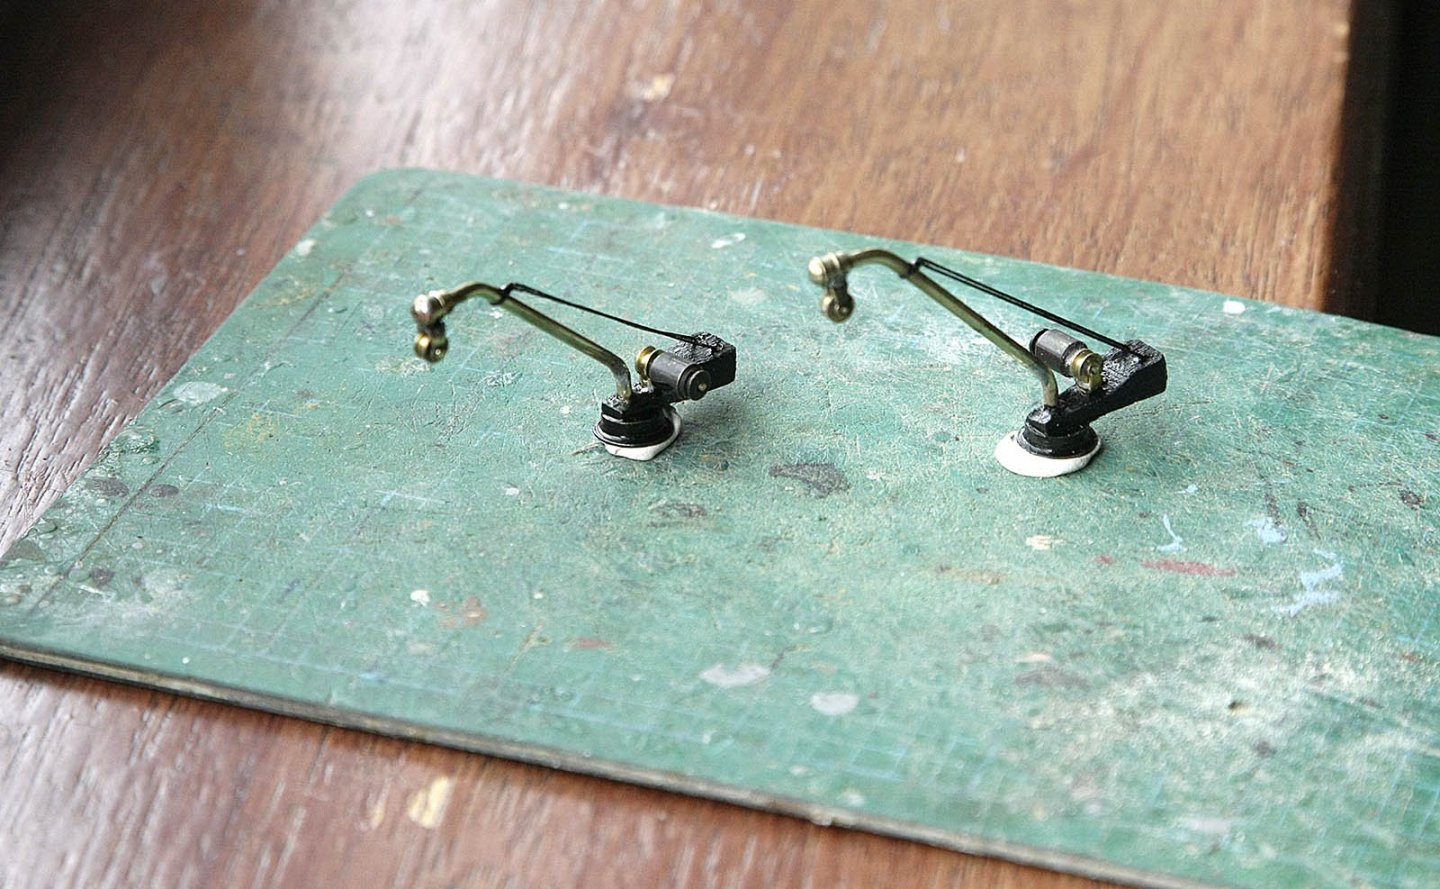
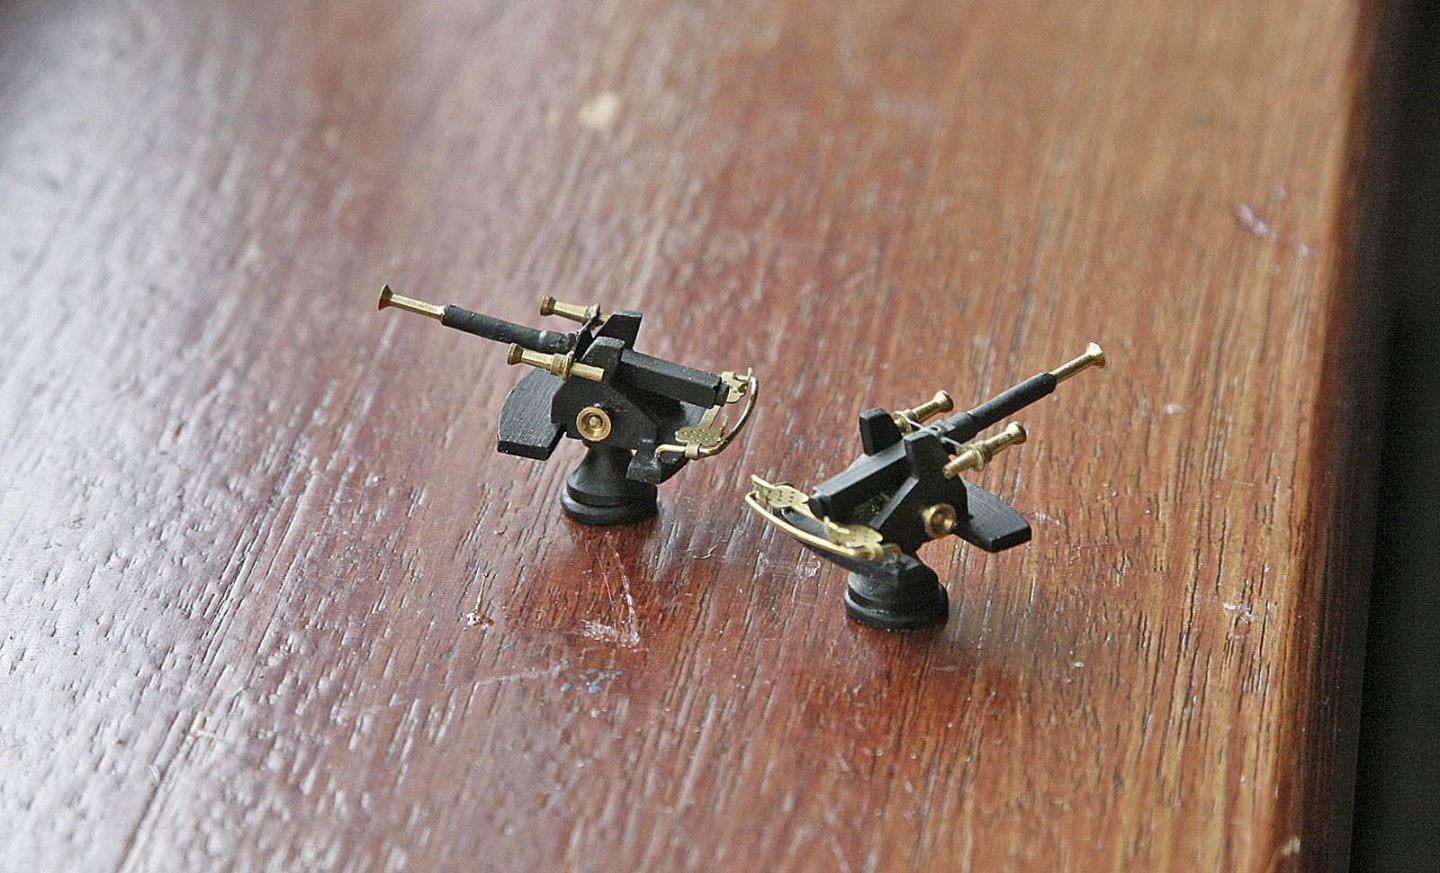
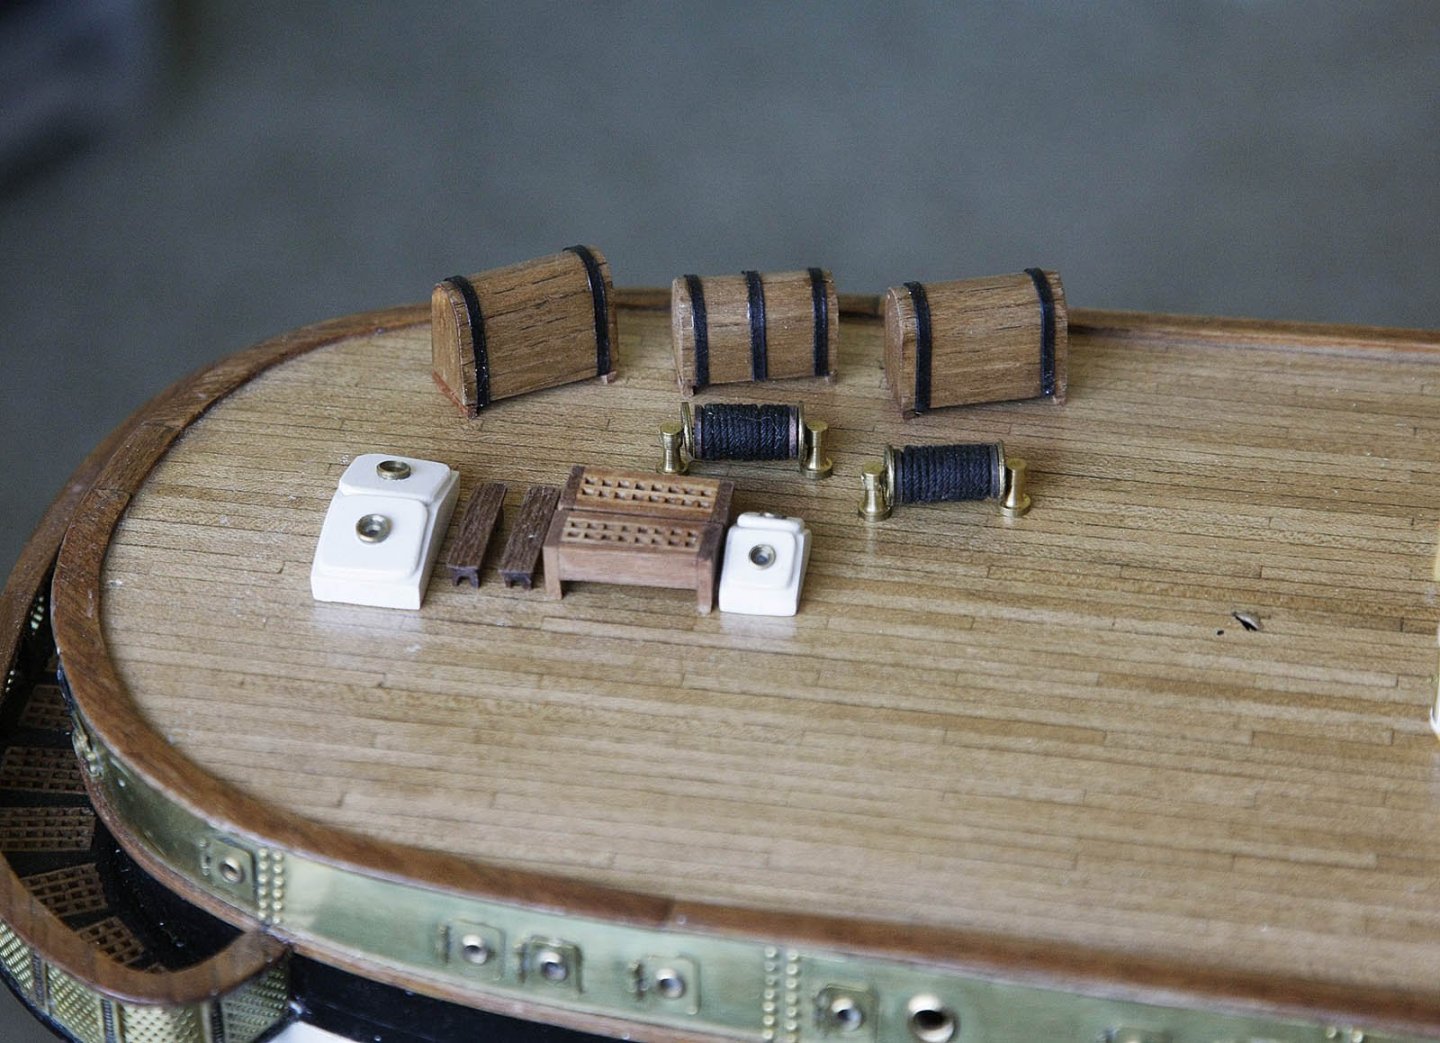
 Hi, Just to keep you interested, here’s pictures of some of the smaller detailed deck items that I’ve been making for later placement. They are some pin rails, the training guns and the small cranes. I think that they came out well and along with all the other stuff will look good on the deck. Ken
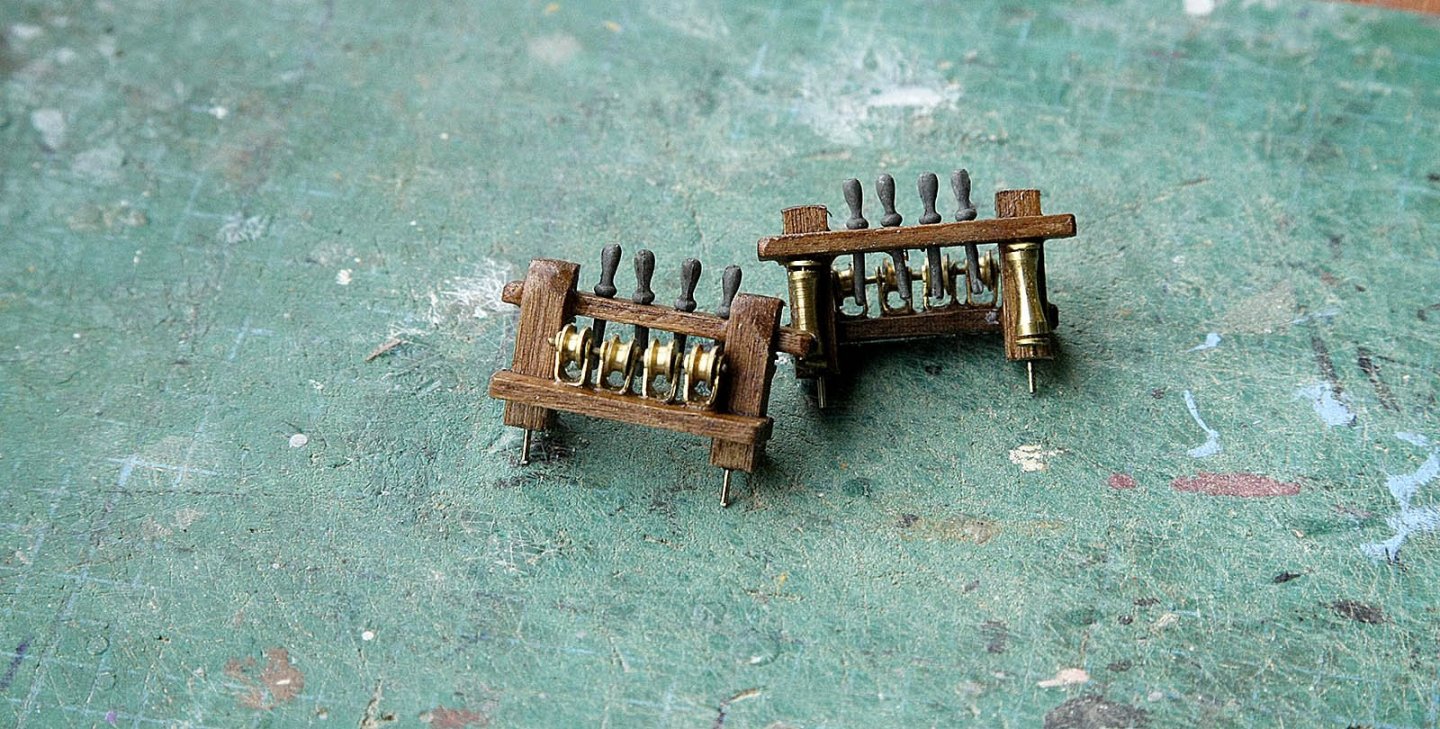
-
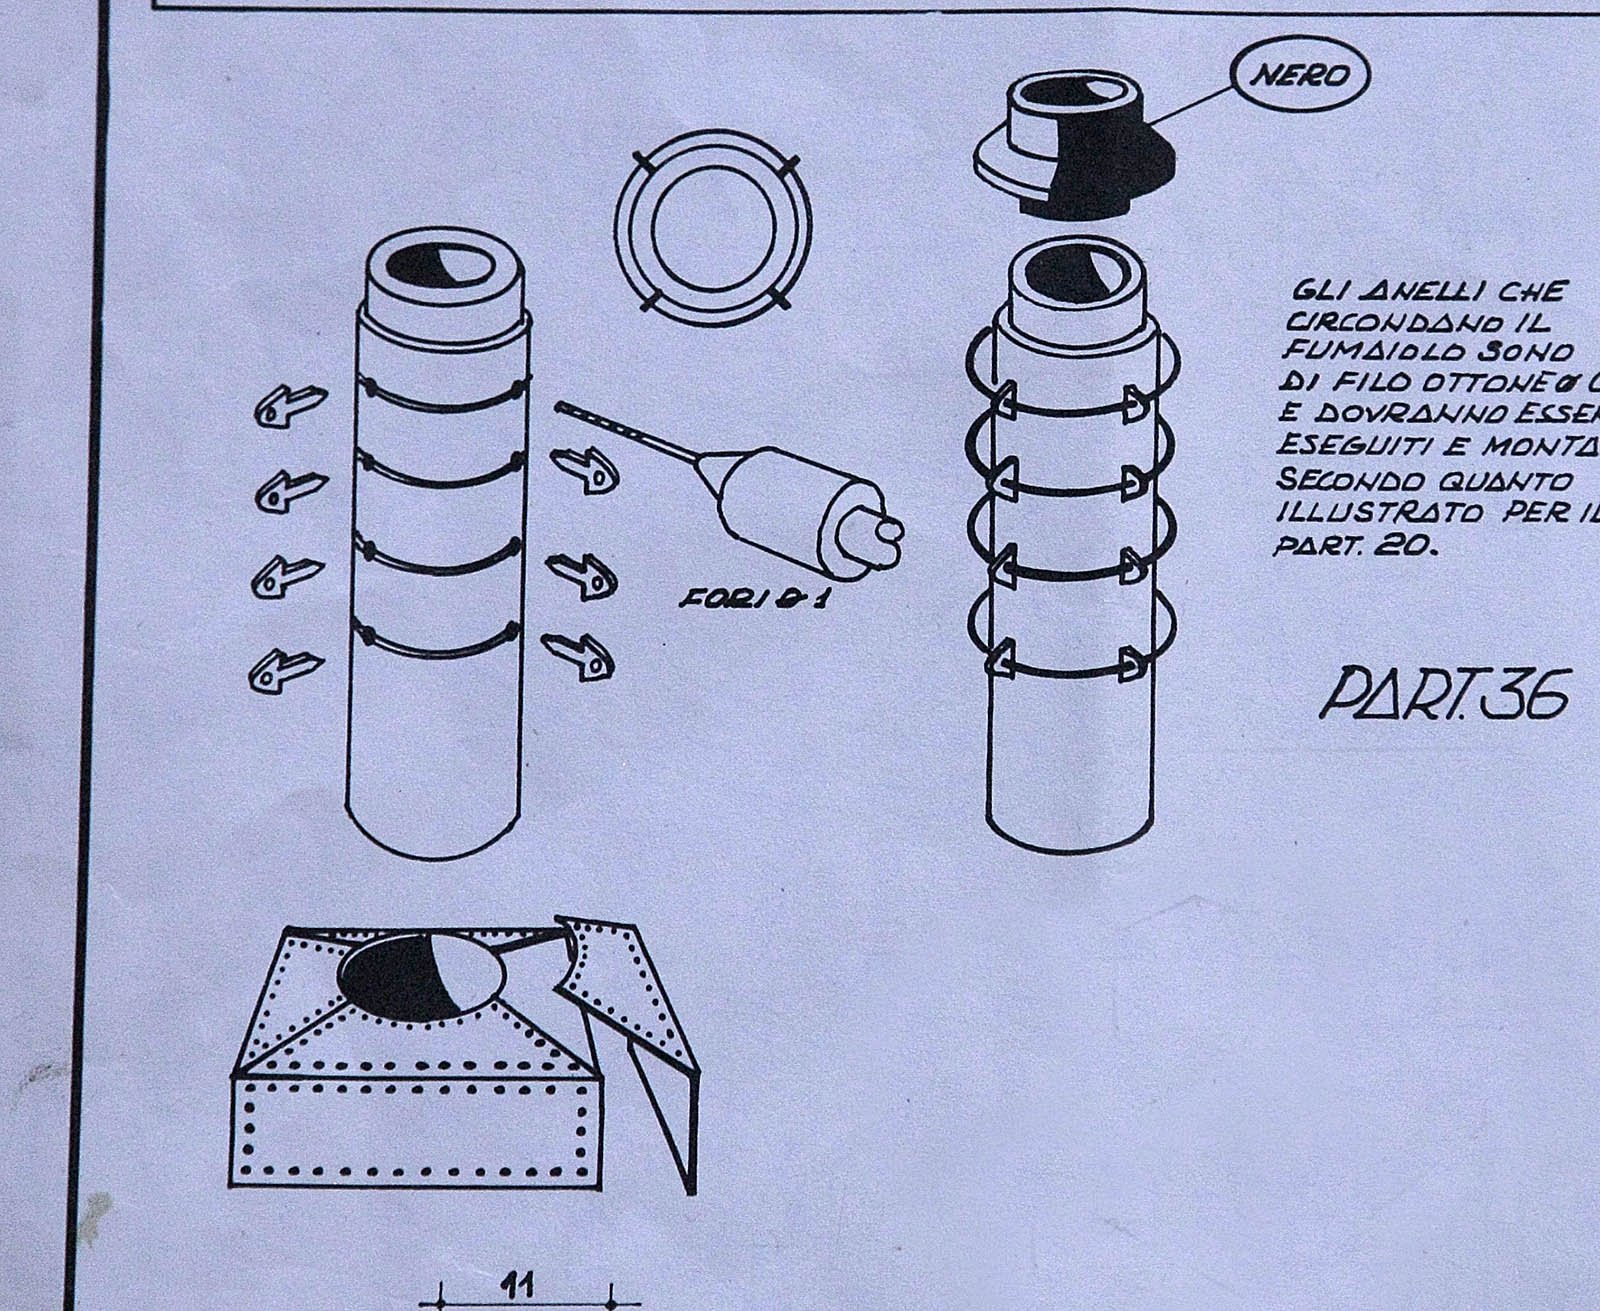
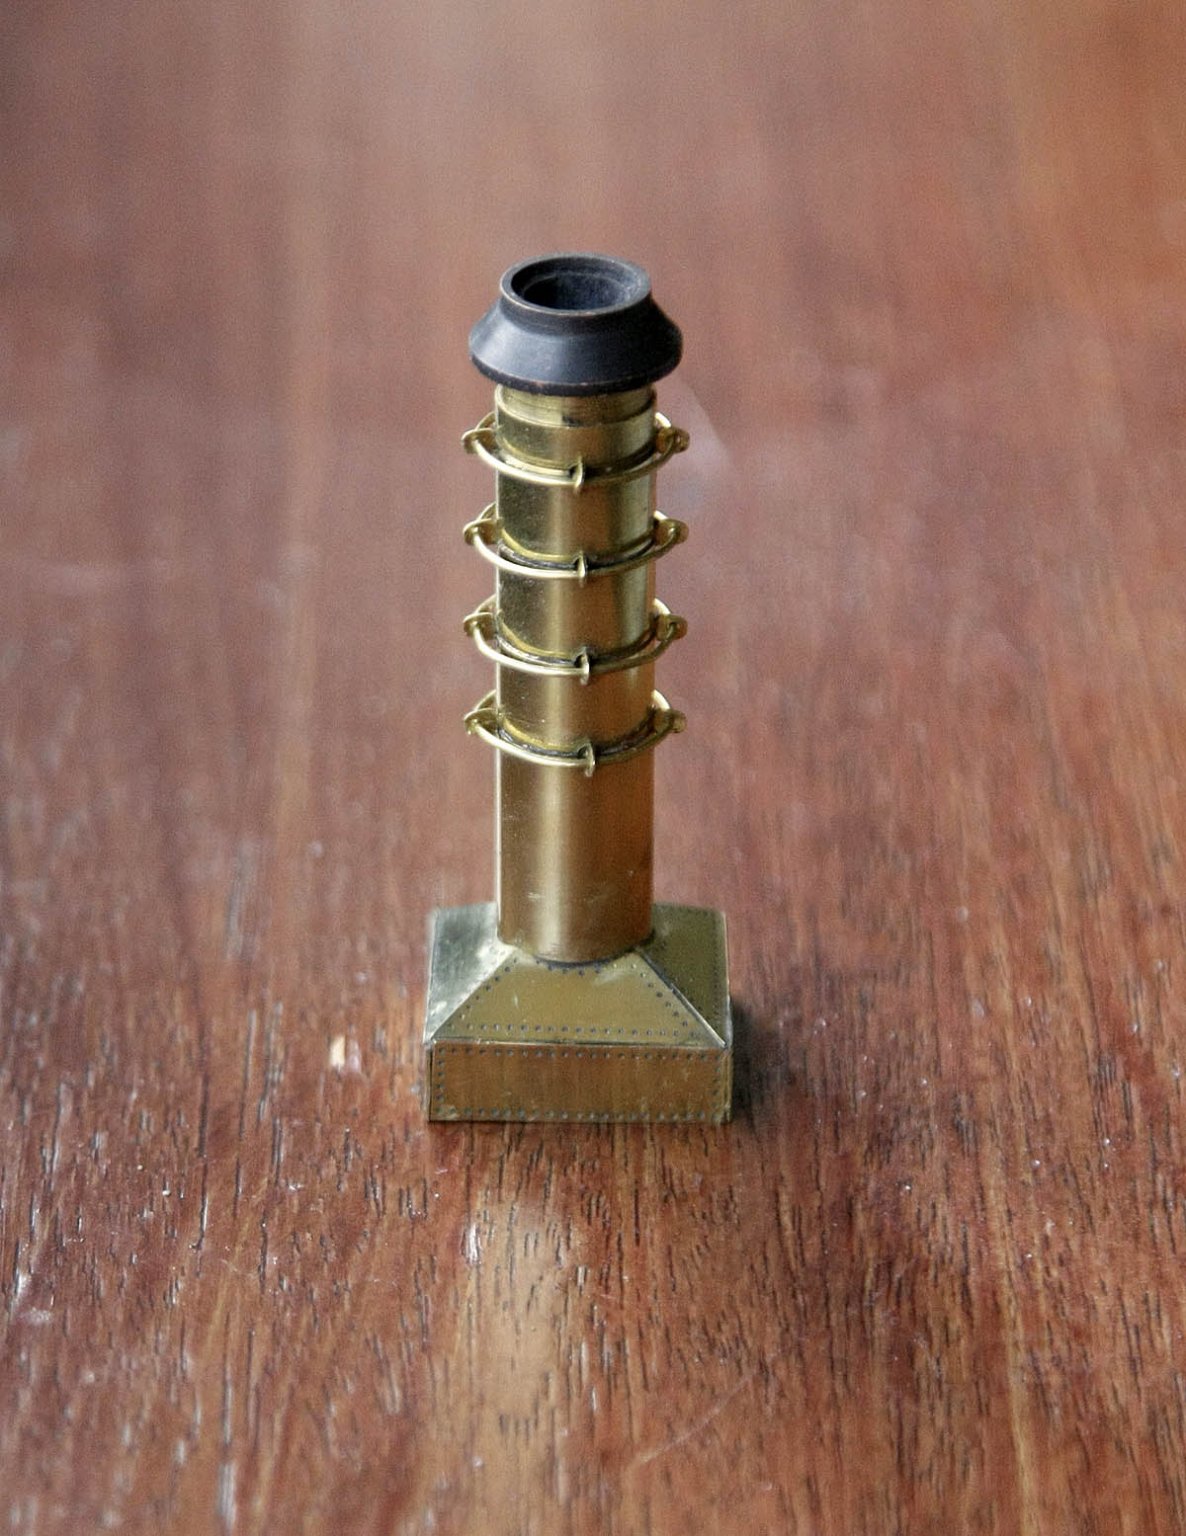
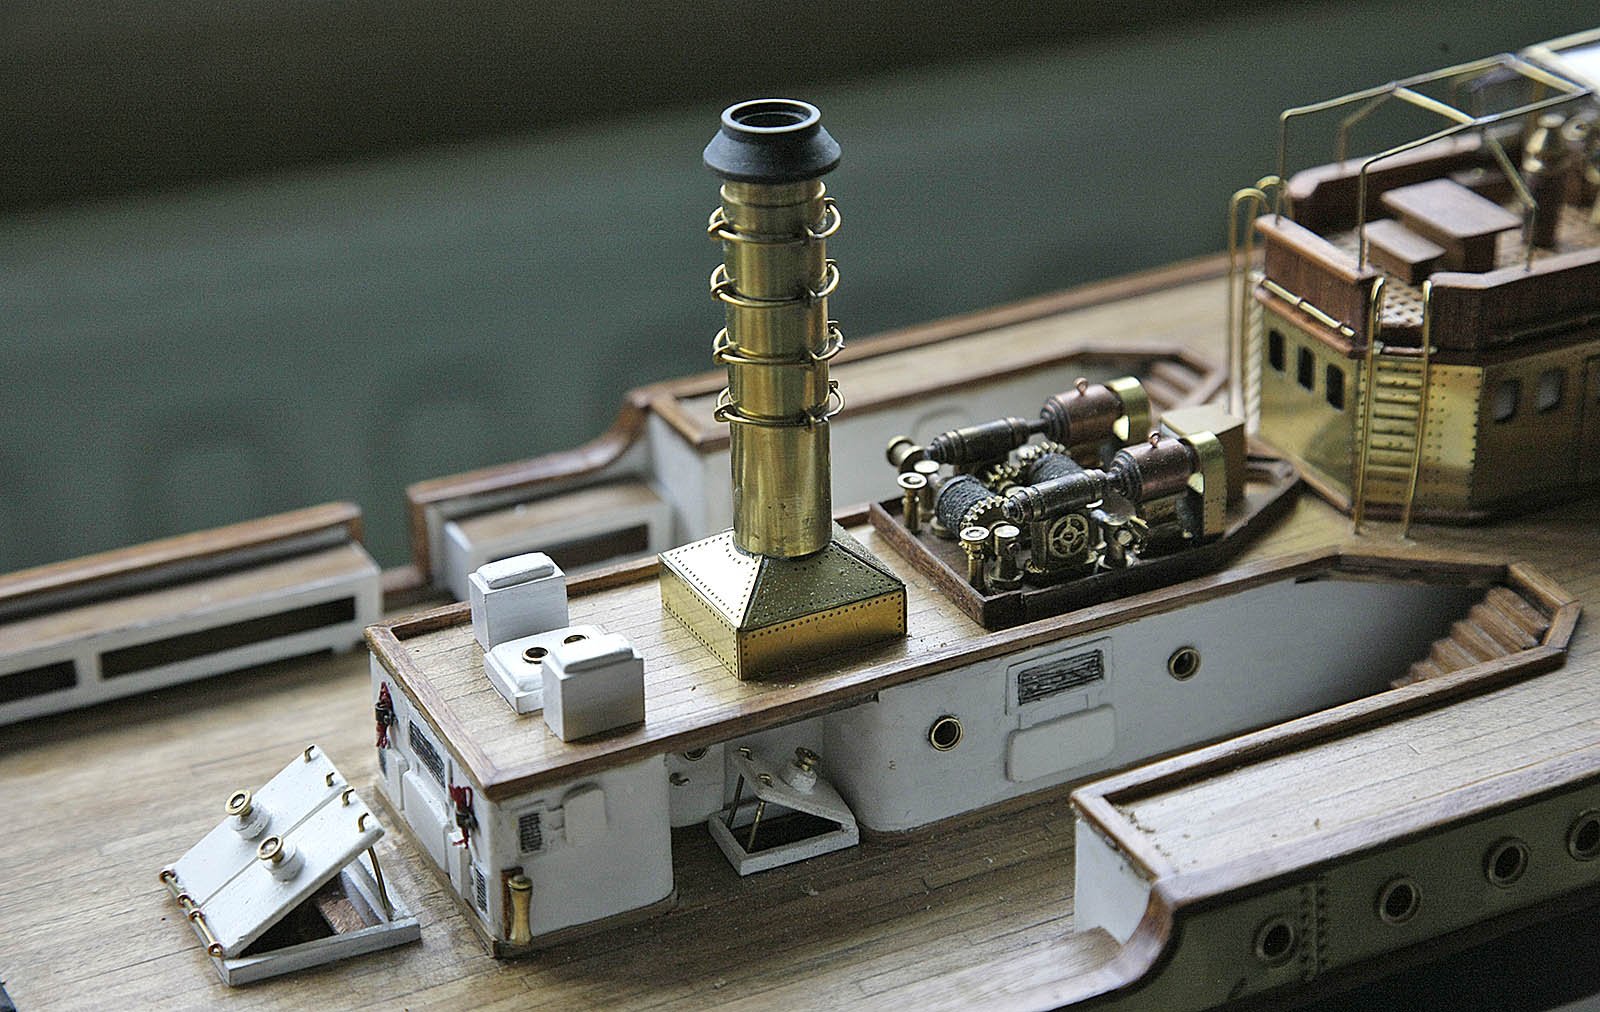
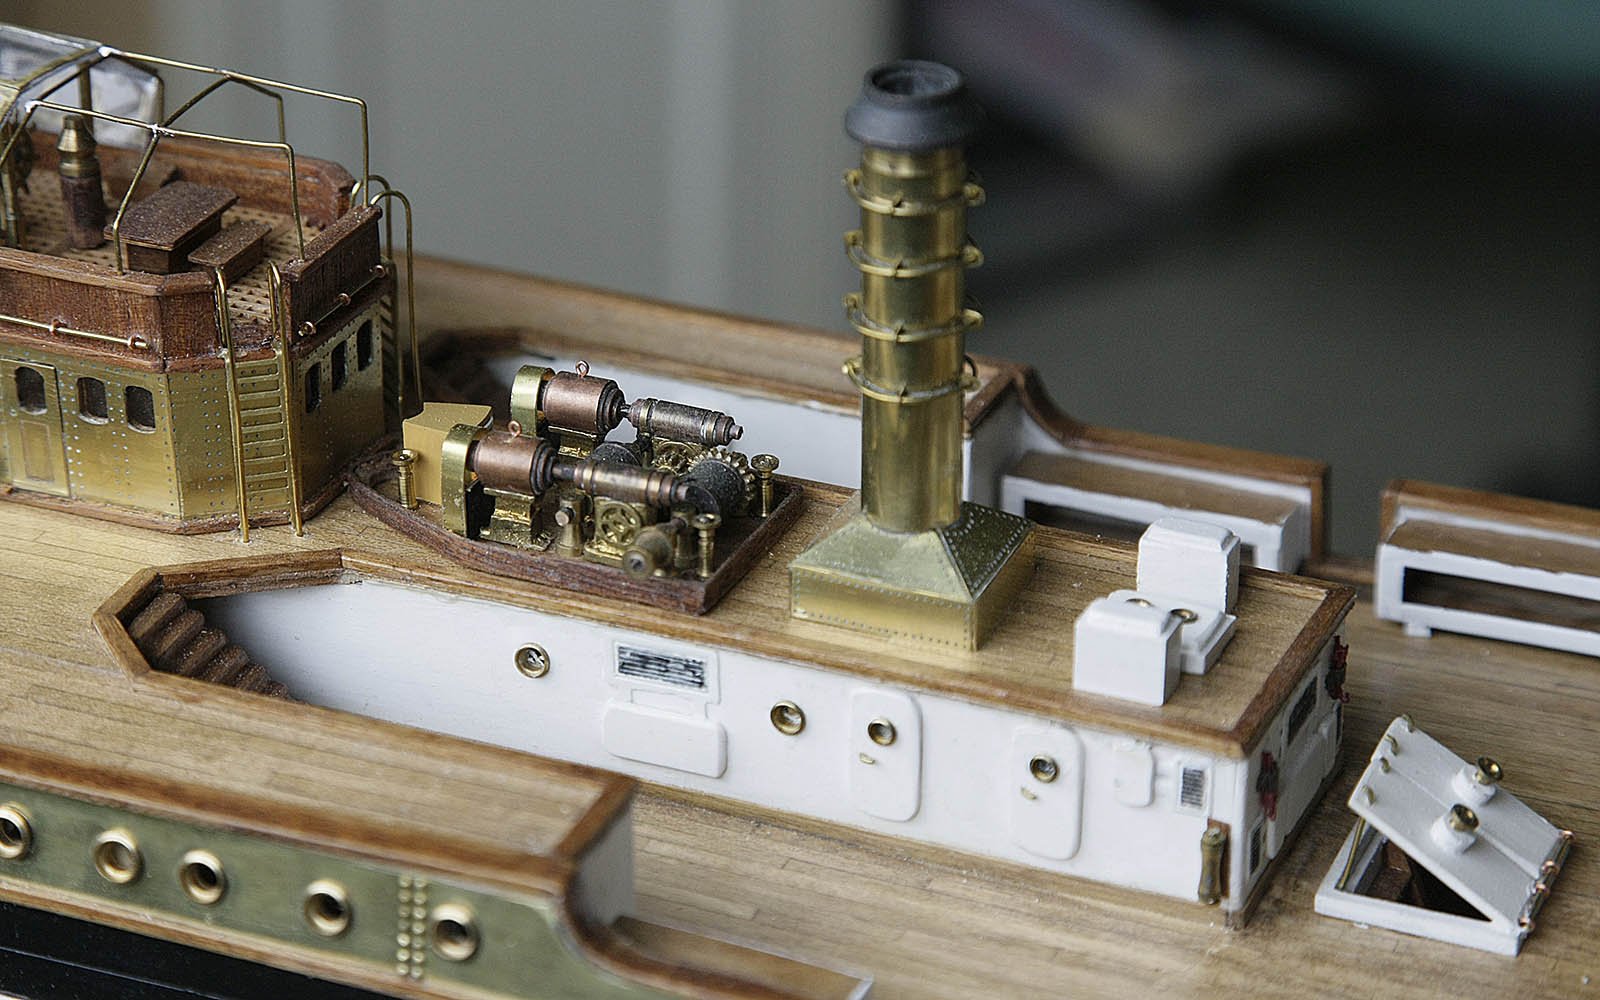
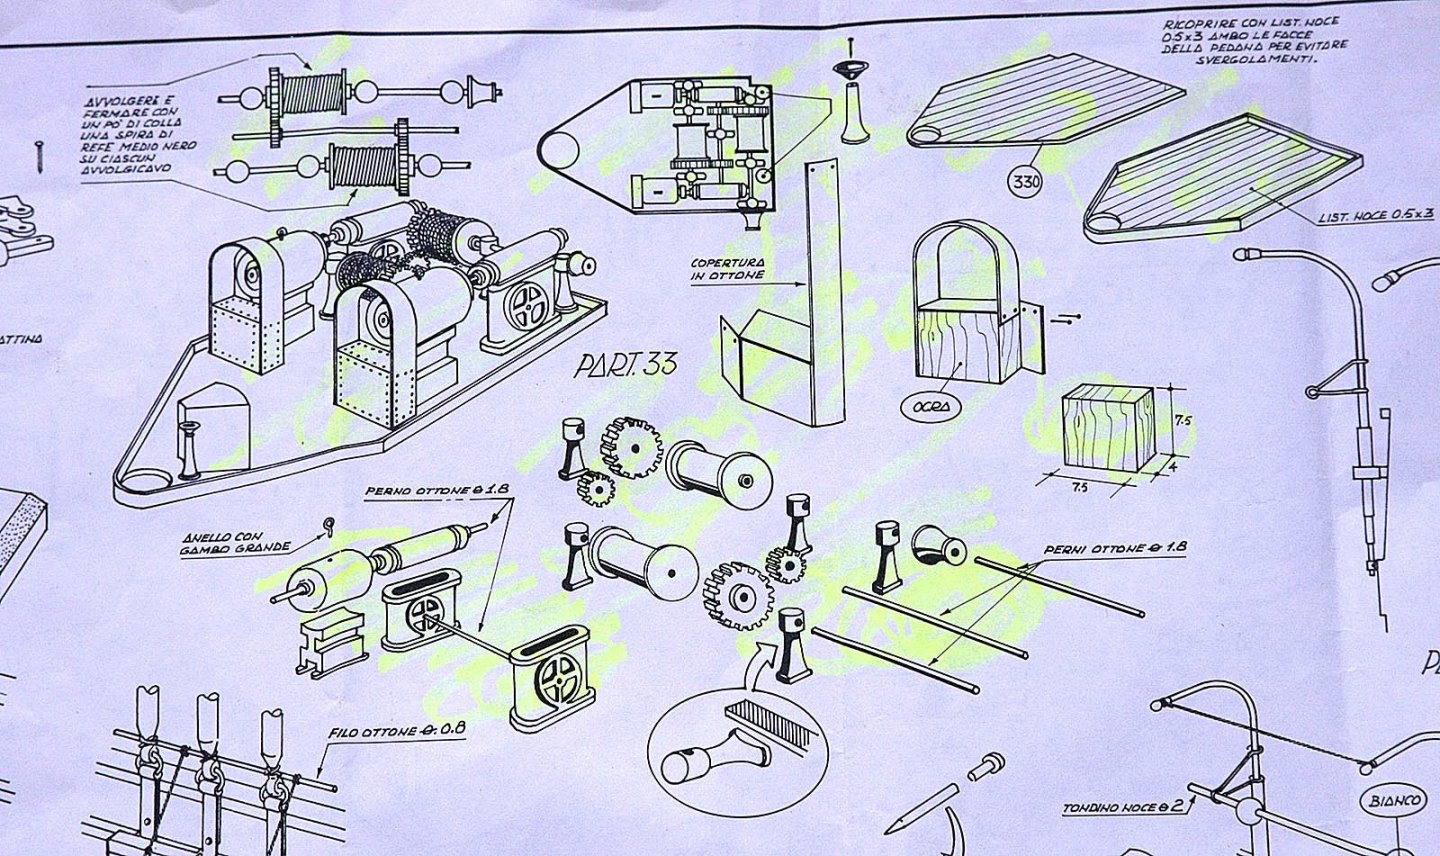
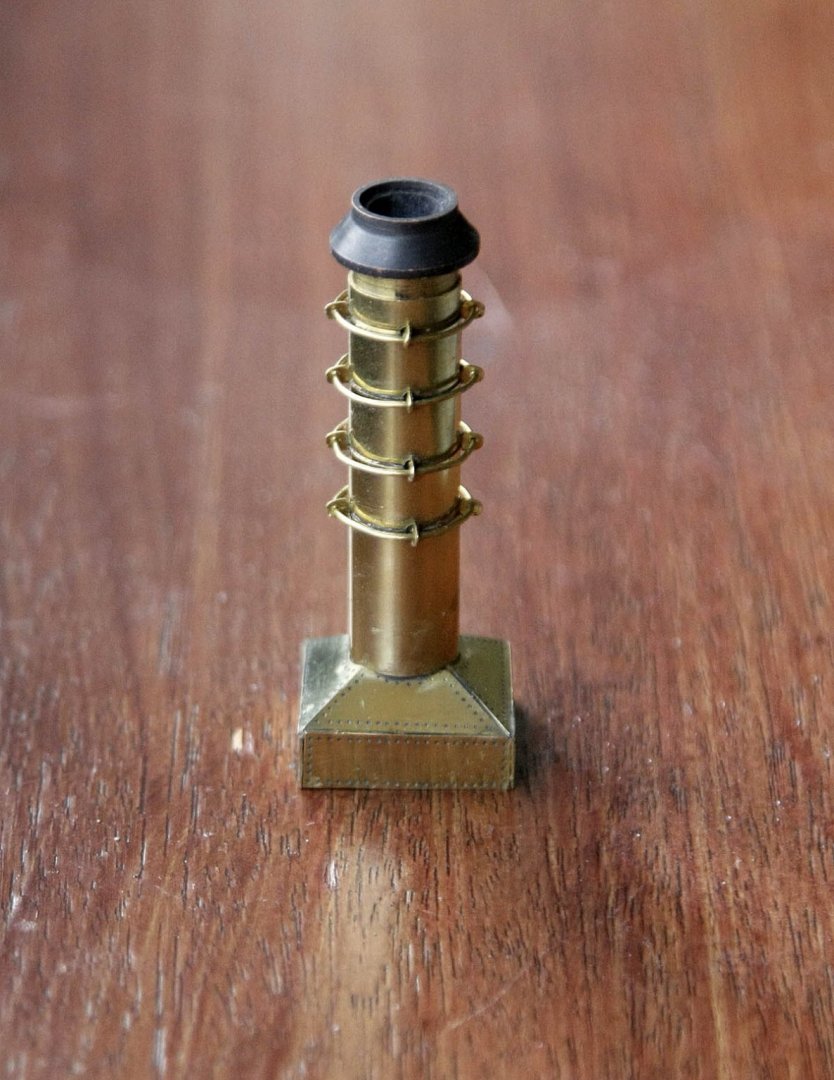
Hi, Again thanks for your likes. I’ve been putting in the hours on the build over the last few days and have got quite a bit done. The powered winch, the funnel structure and a few deck fittings were made up and fitted in place. I took quite a few photos as I built them up but unfortunately deleted them before I had downloaded them, a senior moment, so I only have the finished items to show. I’ll try and do better, as I used to say to my teachers. I made the winch platform then worked out how to assemble the many metal parts. This looked simple on the plan but caused much head scratching, like those silly impossible puzzles you got for Xmas. I wanted the individual parts to have contrast with each other rather than just brass or plain black, more detail gets noticed that way so I blackened each part differently and got the effect that I wanted, I then assembled them. Again to get contrast rather than leave the platform a deck colour I stained it light teak. Next was the funnel assembly. The funnel was a very nice brass one with a separate brass piece as the head, I left the funnel brass as that’s my theme but again for contrast I blackened the head. There are four sets of brass rings around the funnel and these are held in place with eyelets. Gluing the eyelets into the thin sided funnel wasn’t a good option so I glued a wooden dowel inside to give them more of a hold, I could also cut off the dowel and that would leave a good substantial area for fixing later. The funnel housing is made up from brass sheet, I first made up the housing to the correct size from a block of wood then glued the exterior brass sheet to that before finally fixing the funnel to it. I’ve fixed these and the wheelhouse into place on the deck. I have made up a few deck fittings as well as the wheelhouse ladders and put these into place. Ken


-
Hi Kevin, two things come to mind, the first what an amazingly comprehensive kit, the second, it didn’t take you long to get started! I suppose you were like a child at Xmas, good luck with it. Ken
- 312 replies
-
- 5
-

-
- enterprise
- caf
- (and 1 more)
-
Hi Kevin. looks terrific, as I said I’m envious but I can only cope with one build at a time. It looks like your Amerigo is going to have to wait another ten years leaving me to Battle on alone. ken
- 312 replies
-
- 3
-
-
- enterprise
- caf
- (and 1 more)
-
Hi Kevin, I really envy you on your Enterprise, it looks like a kit to die for, look forward to your impressions of it. Enjoy your canopy moment, it would have had my wife and myself in stitches. Moments like that although a bit of a disaster at the time are really funny on reflection. Ken
- 273 replies
-
- 3
-
-
- panart
- amerigo vespucci
- (and 1 more)
-
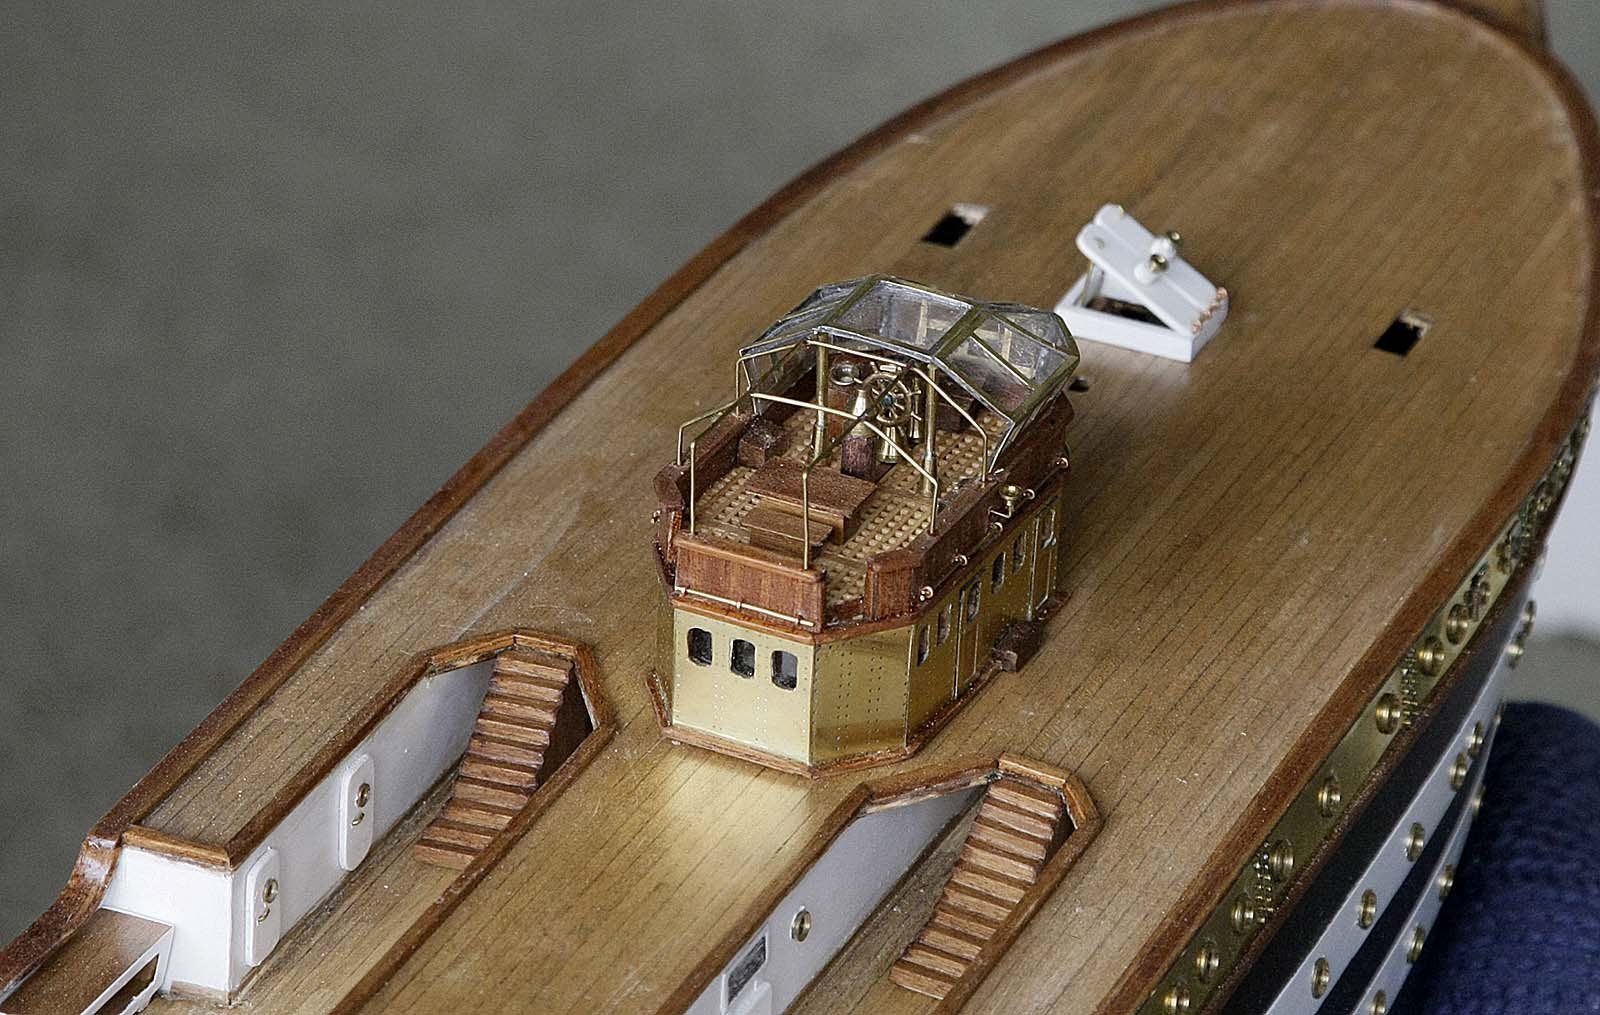
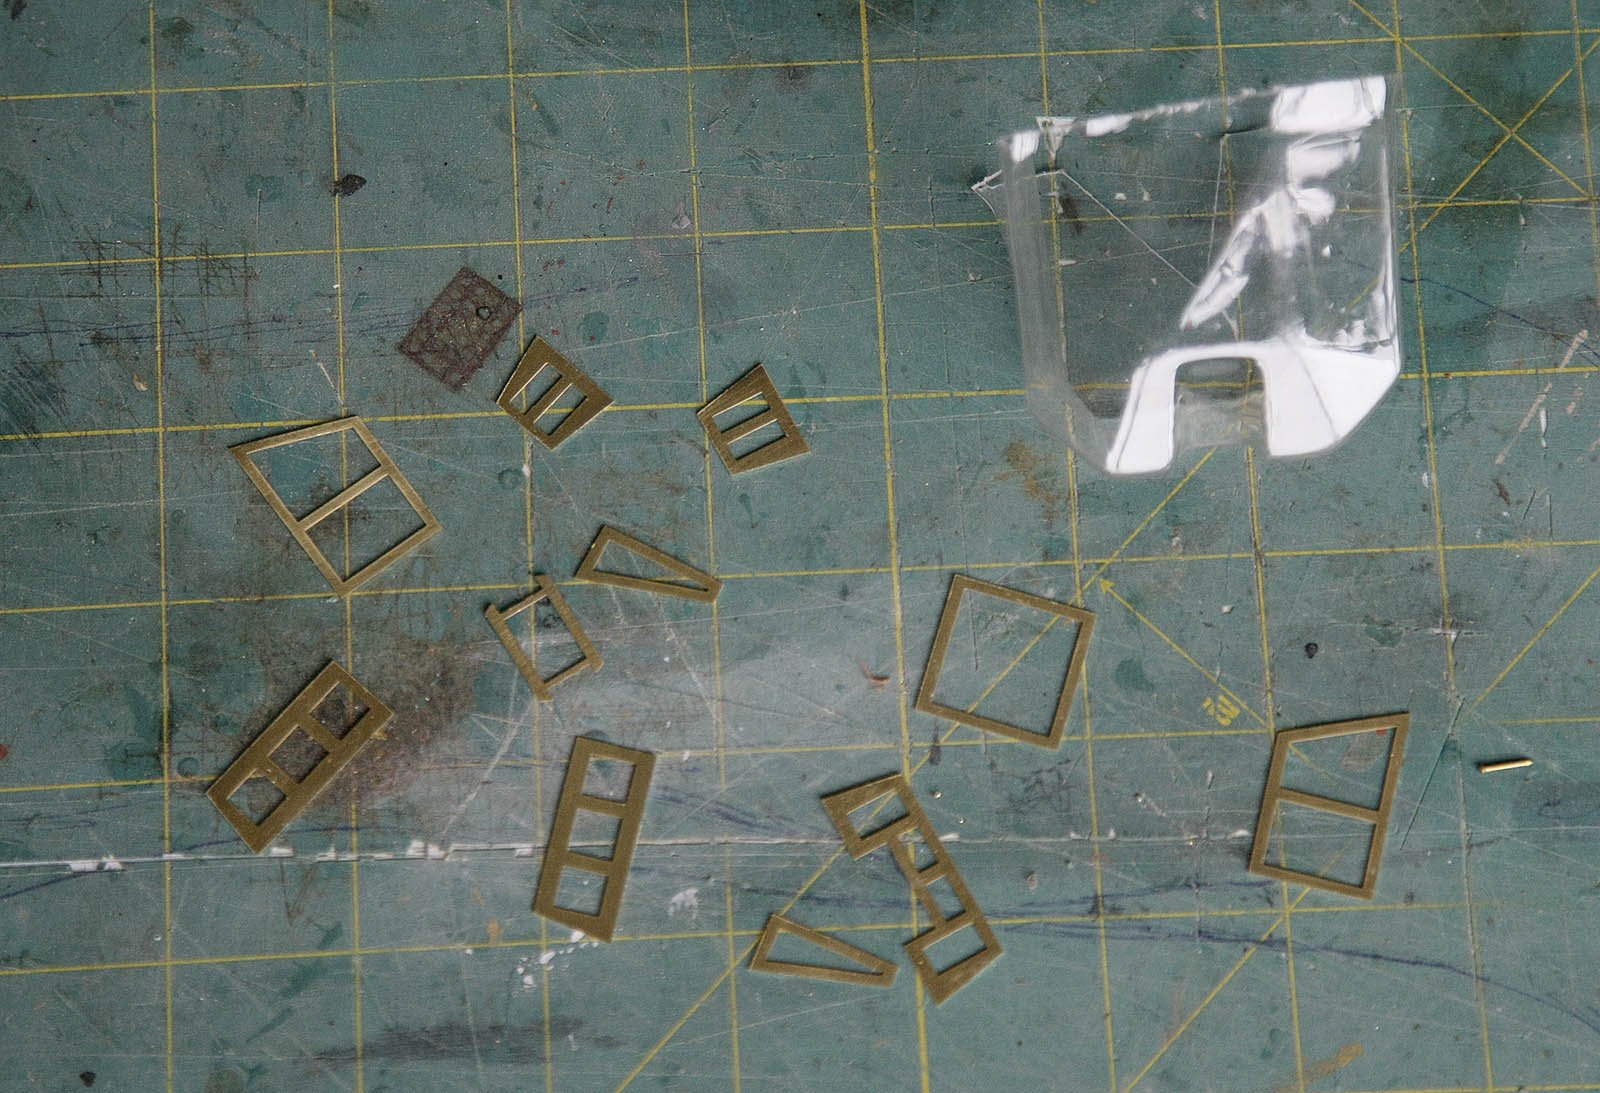
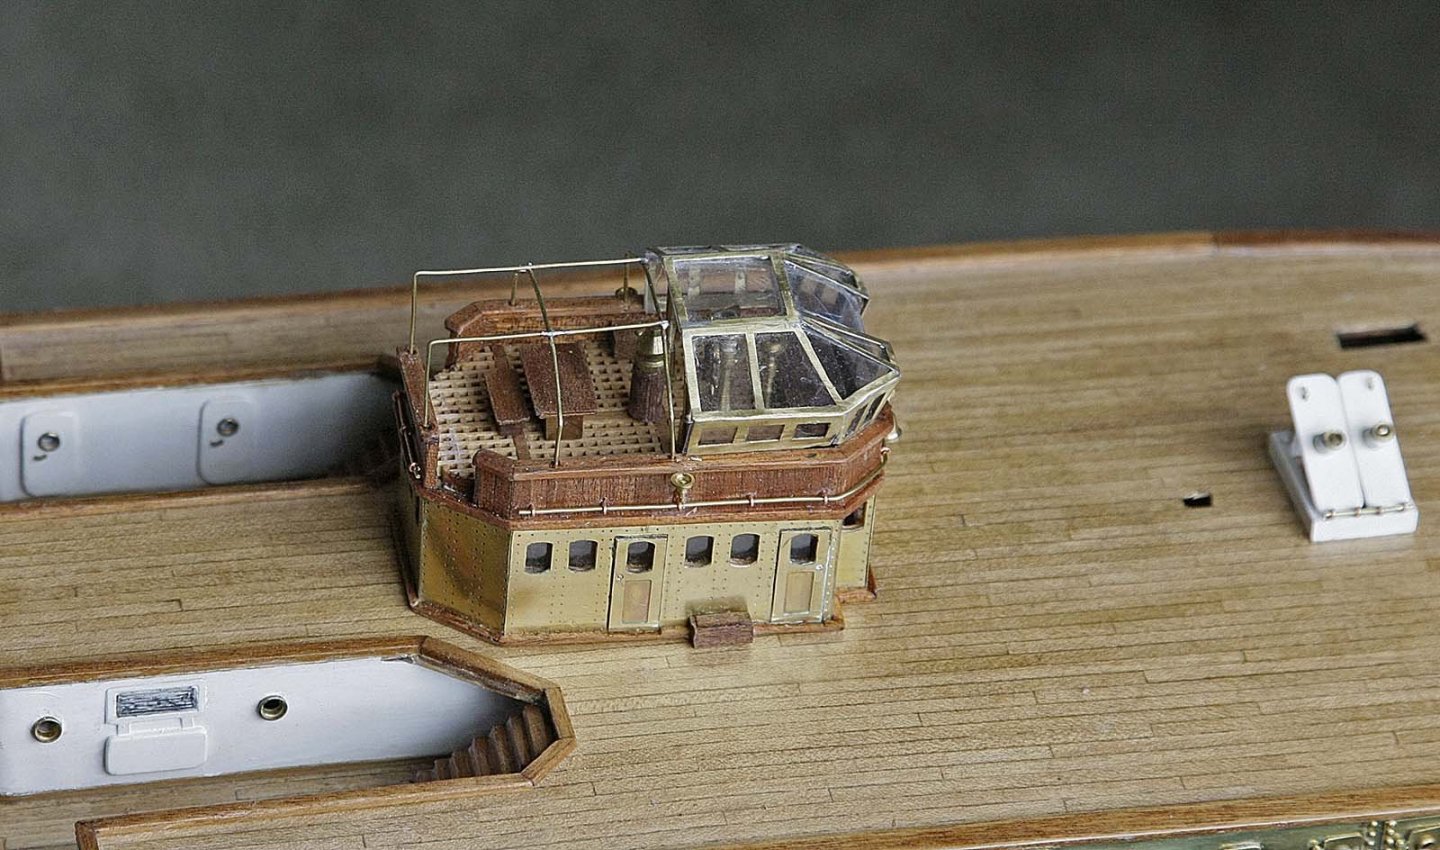
Hi, Thanks again for your likes on my build. As you know I was unhappy with what Panart wanted me to use as a canopy for the wheelhouse. I decided that I would make up my own frame and use acetate sheet to glaze the individual windows. I used a mixture of the kit photo etch brass for the top and sides and some brass strip for the rest, soldering them together. The outcome was successful but was far from easy. My soldering skills are very basic and leave a lot to be desired. It looked easy but in the end it took about four hours to solder together. Making up a 3D structure with many differing angles by eye proved a challenge, with many solder, de-solder, re-solder and swear moments, it was only with the help of my wife’s extra pair of hands that I managed. It was messy and needed a great deal of filing to get a decent finish, it was worth the effort. You can see the difference with the kit version from the photos. On reflection it would have been easier to make a wooden mock up and use that to rest the pieces against as you solder, you would end up with the correct shape and fit first go, hind sight is wonderful. Ken

-
Hi Kevin, She’s coming along really well, you can see the improvements in each new post. I was sceptical about the eyebrows at first but I’m won over now, they’ve come out really well. Regarding the colour, just go with what you like at the time, I have with mine and I feel that I’m not restrained and feel more relaxed about the build. Seeing your kit It’s surprising how the same company can come up with another kit of the same ship yet are so very different, plans, parts etc from their work previous one, I’m not sure if it’s in any way an improvement. I’ve just finished my canopy and you were right in thinking that soldering was the way to go.
- 273 replies
-
- 3
-
-
- panart
- amerigo vespucci
- (and 1 more)
-
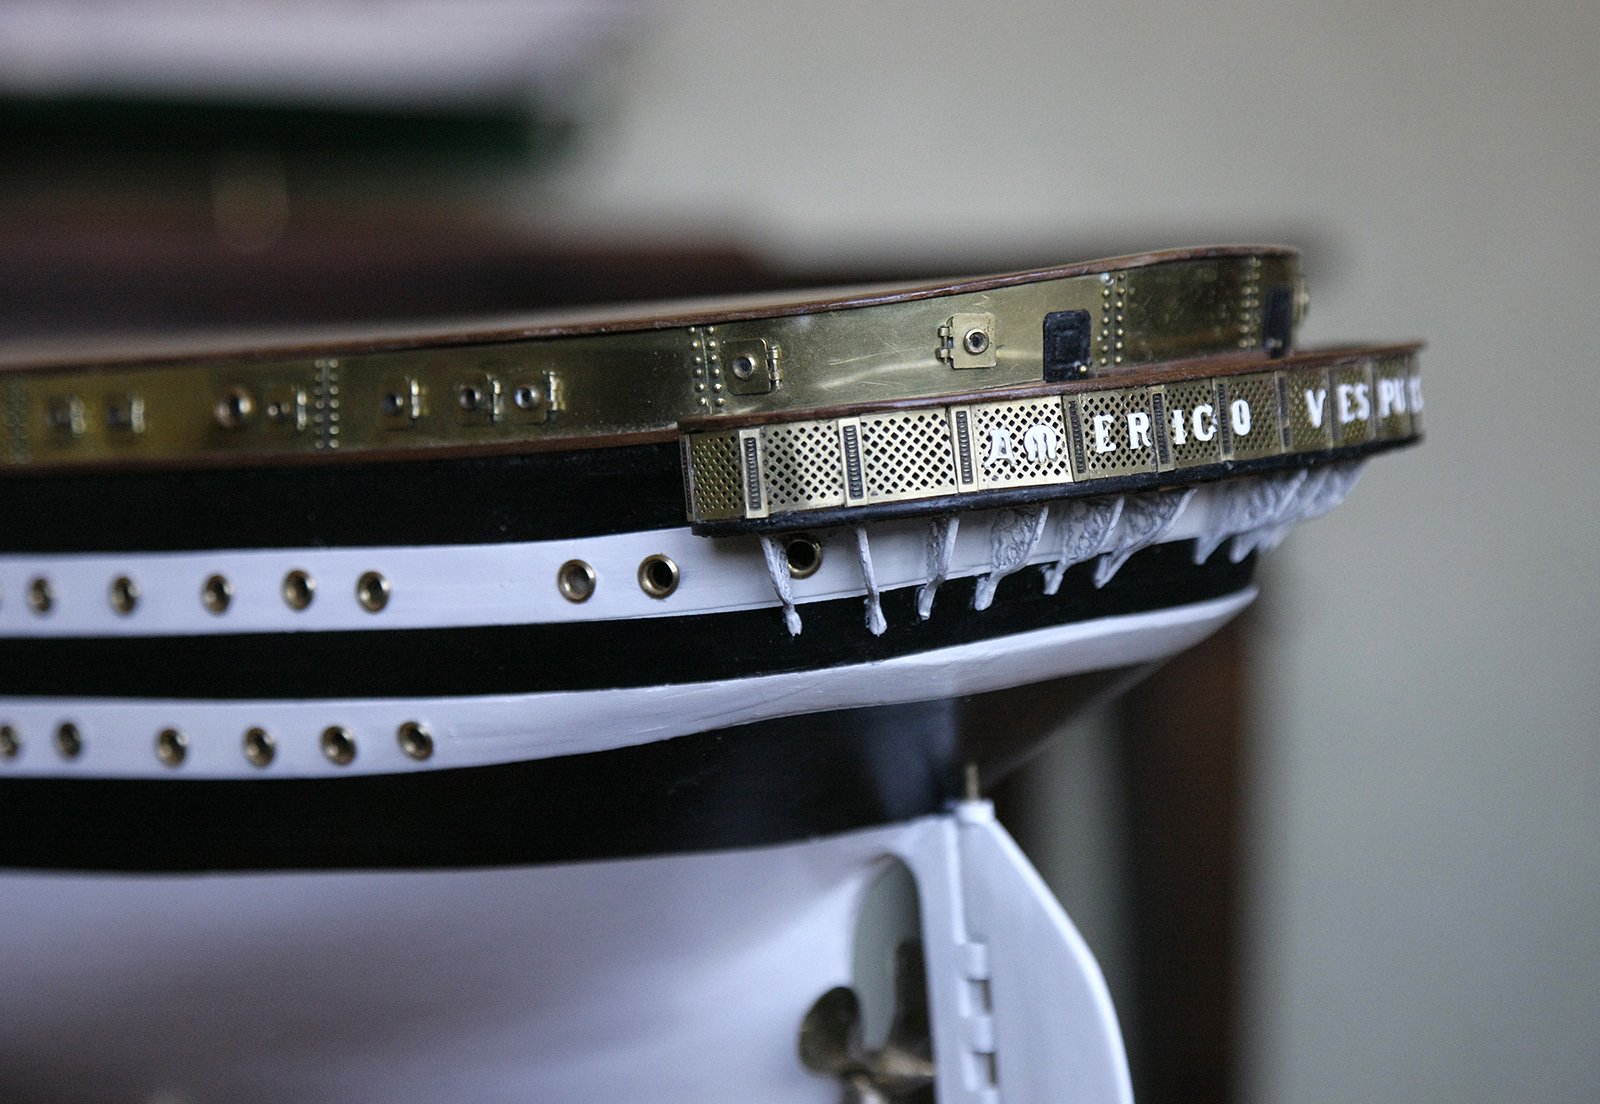
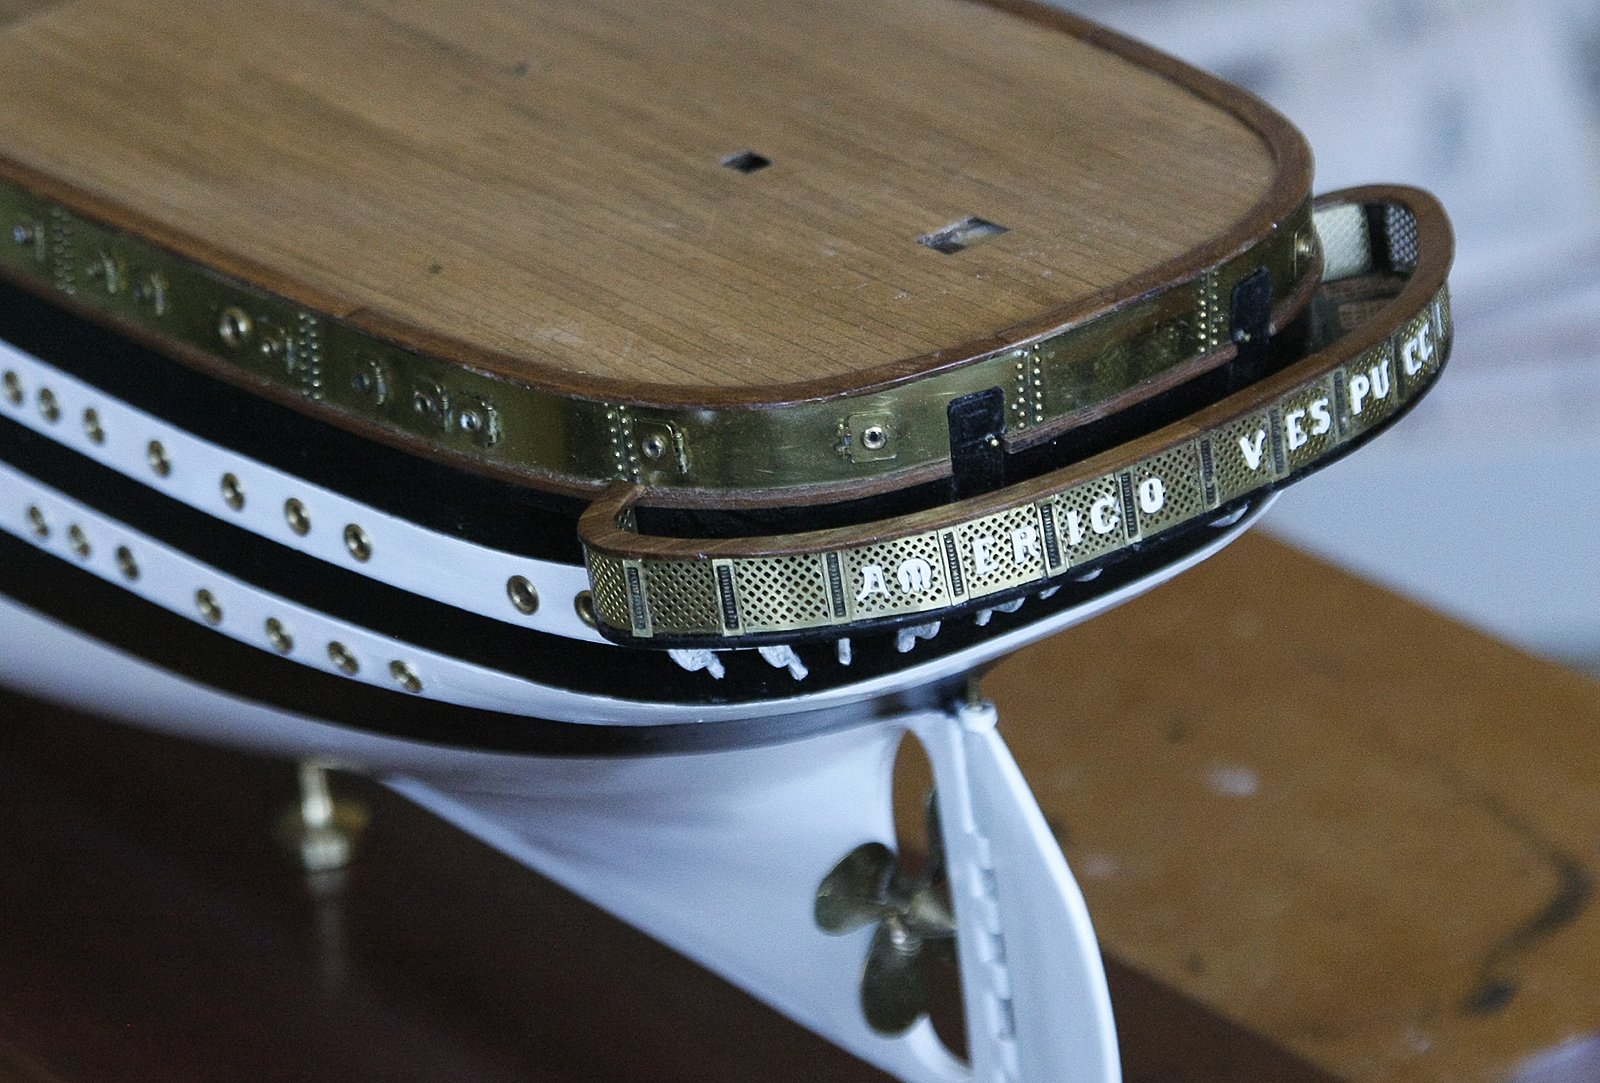
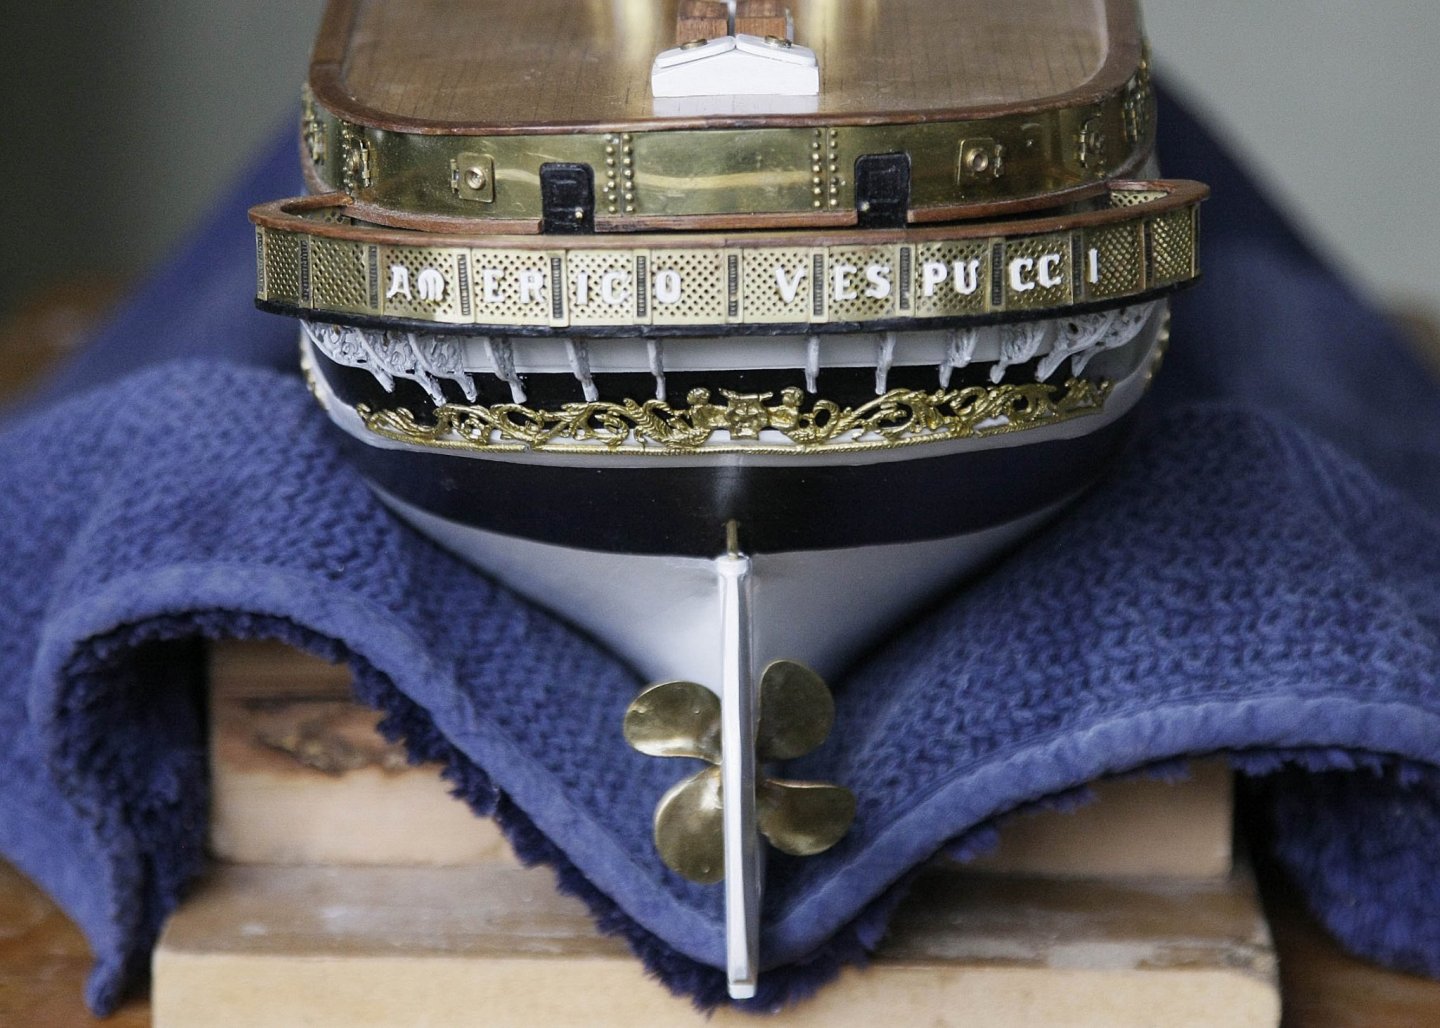
Hi, Just a small post. I just couldn't resist putting on the stern decoration piece. It is a detailed casting made from a soft metal which molded easily to the hull shape, I nailed it on. It put a smile on my face, a couple of minutes work for a noticeable improvement. Ken
-
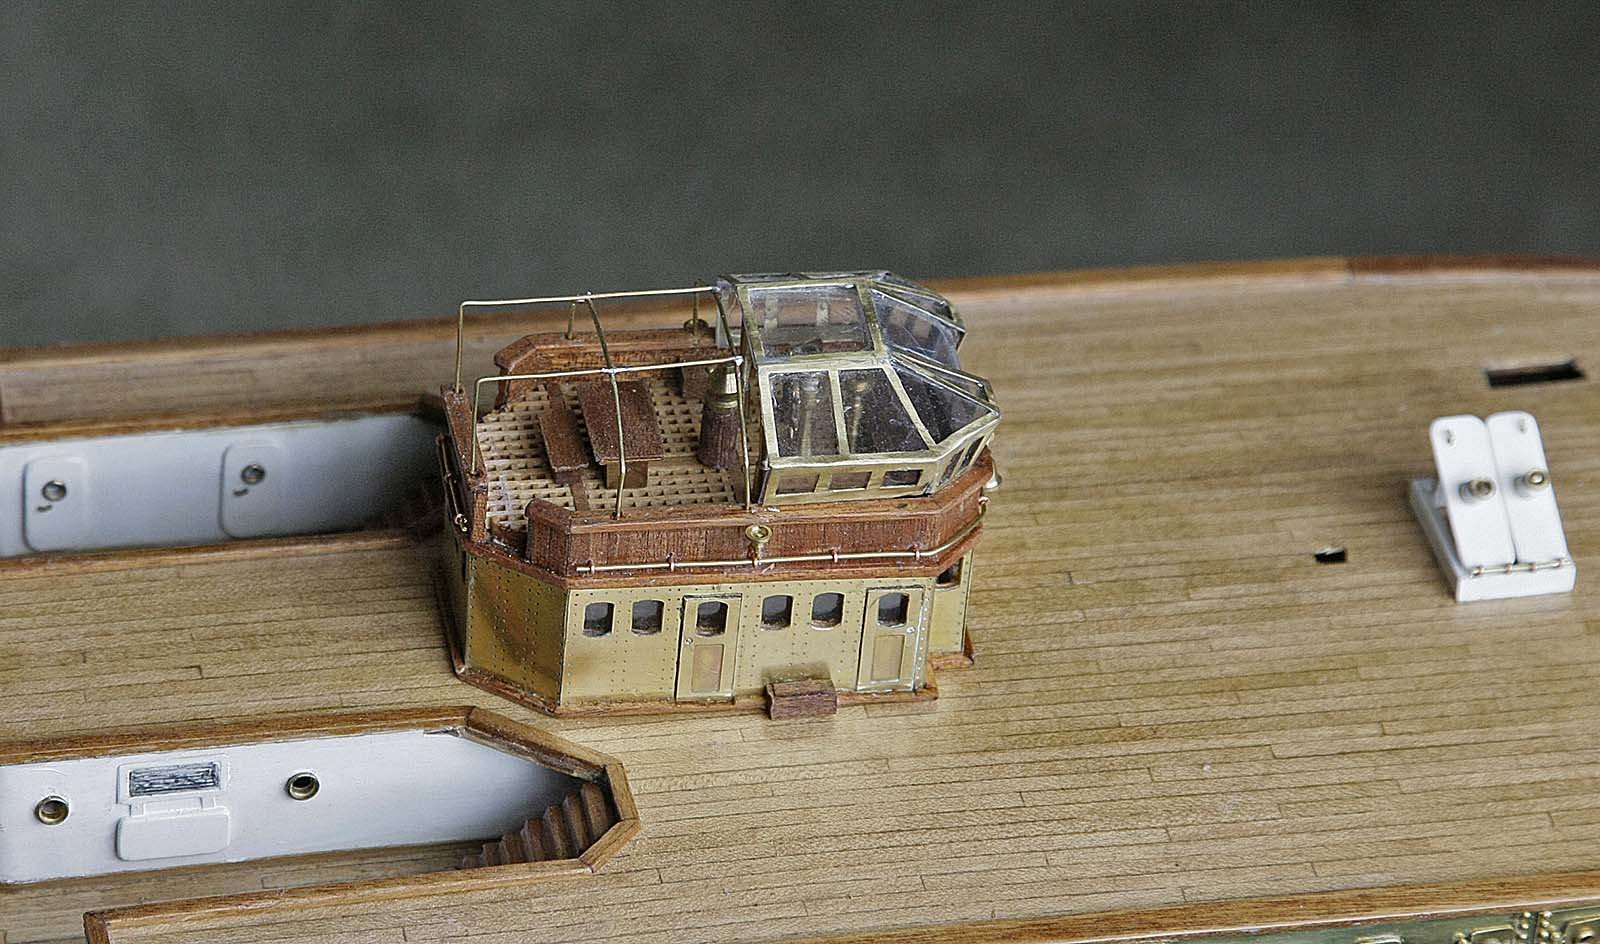
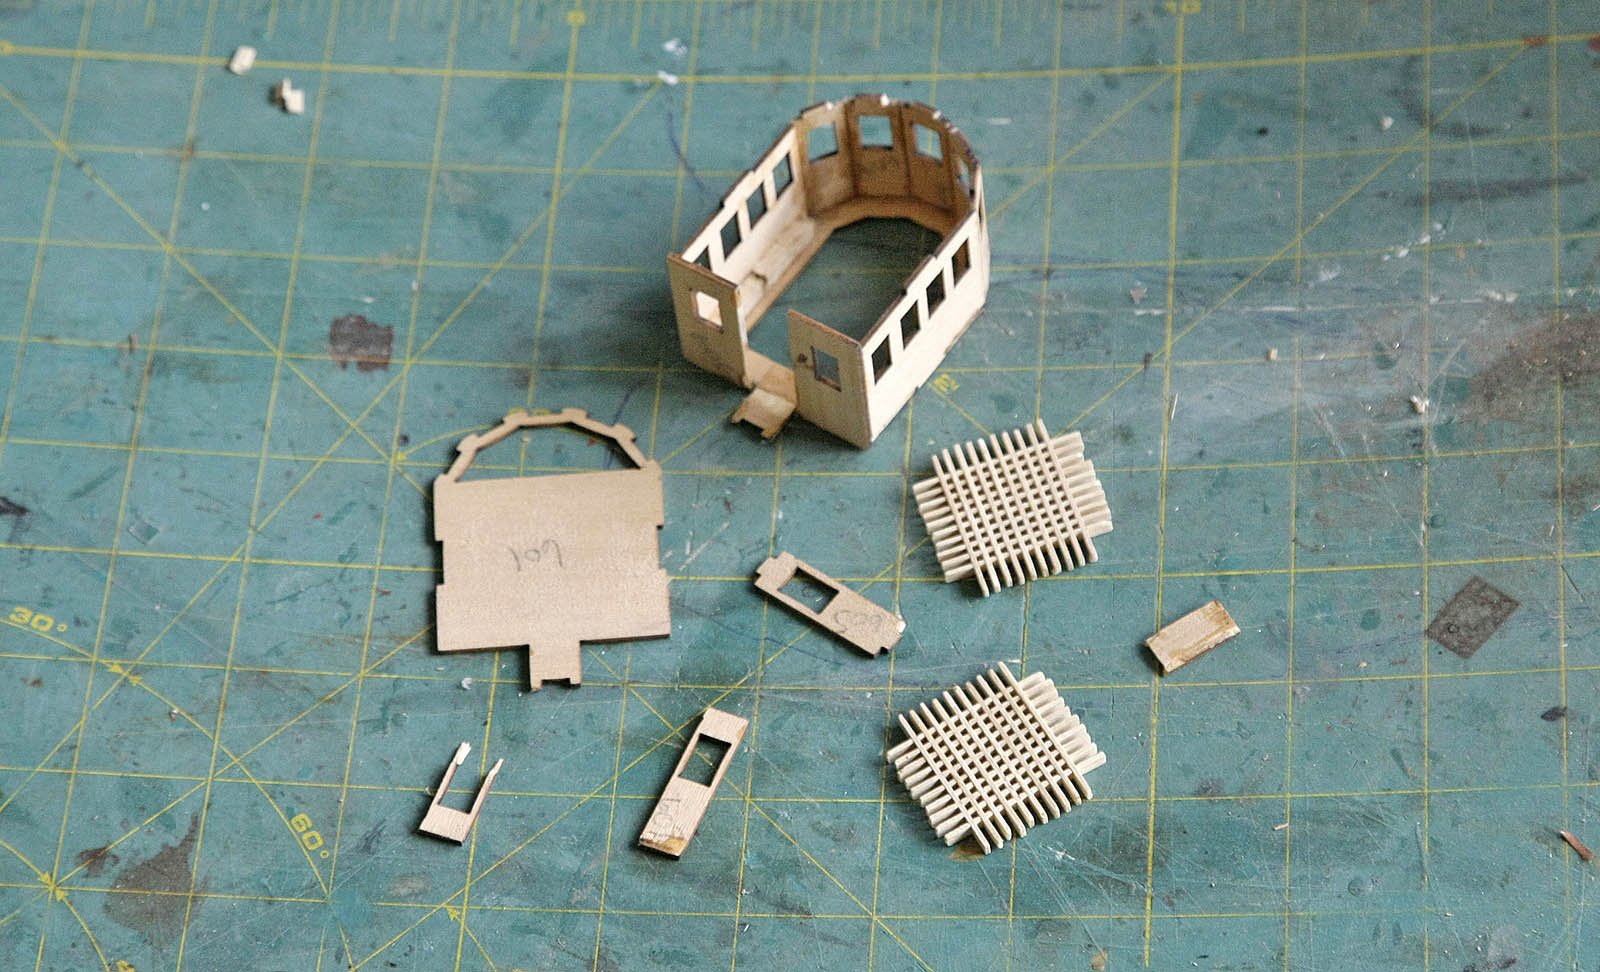
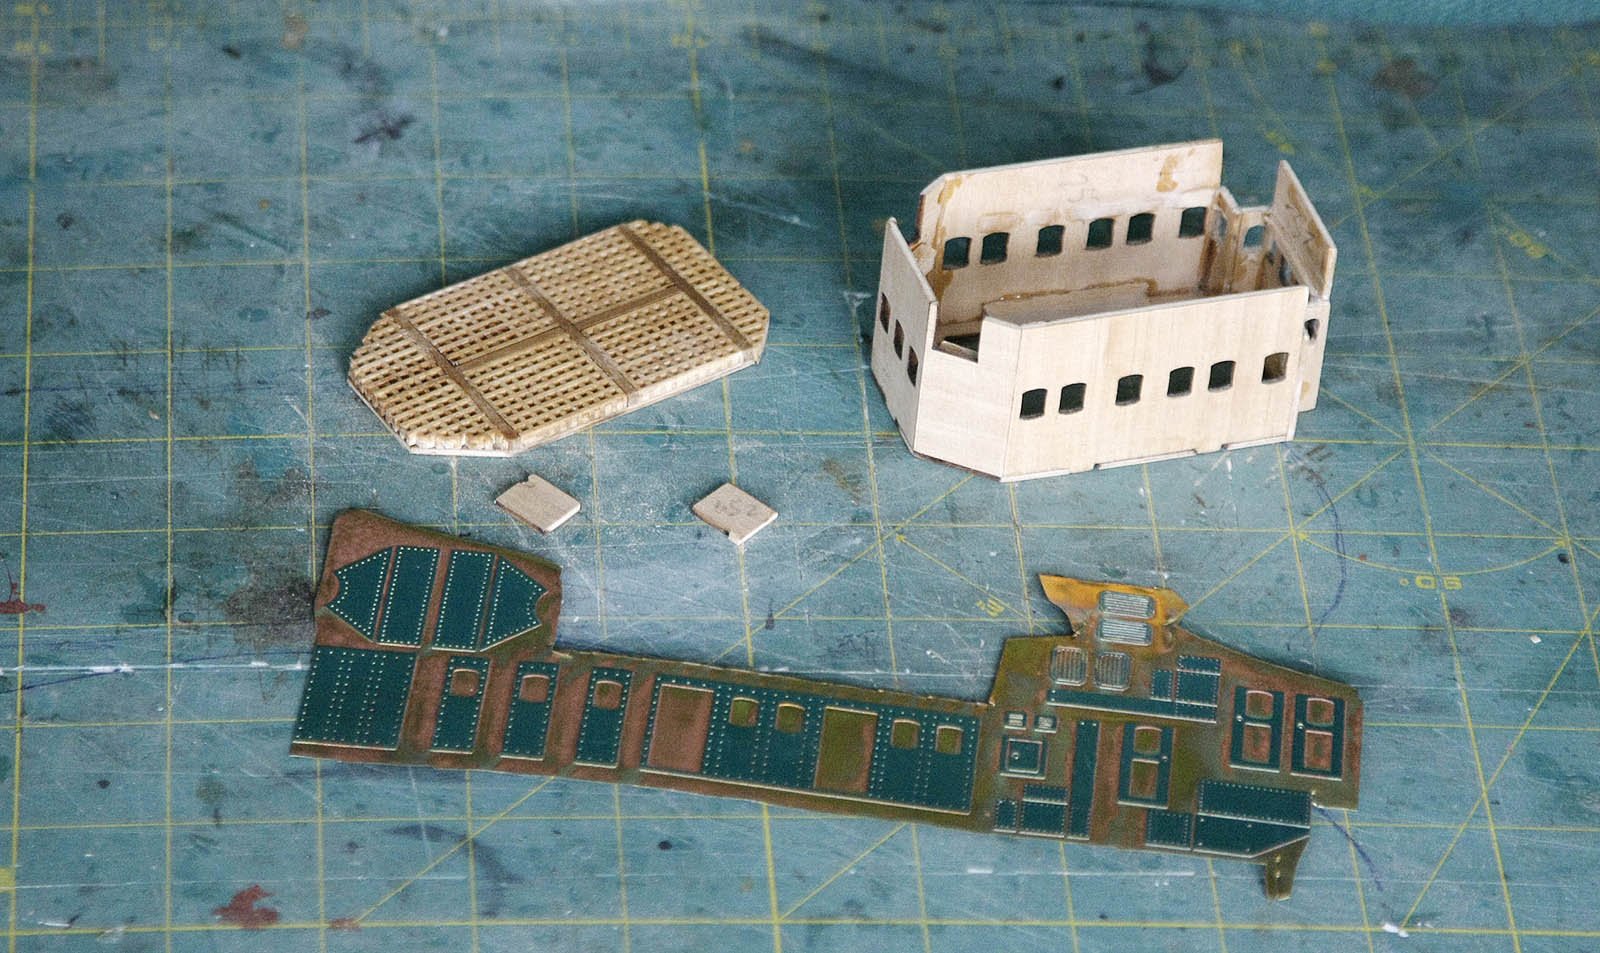
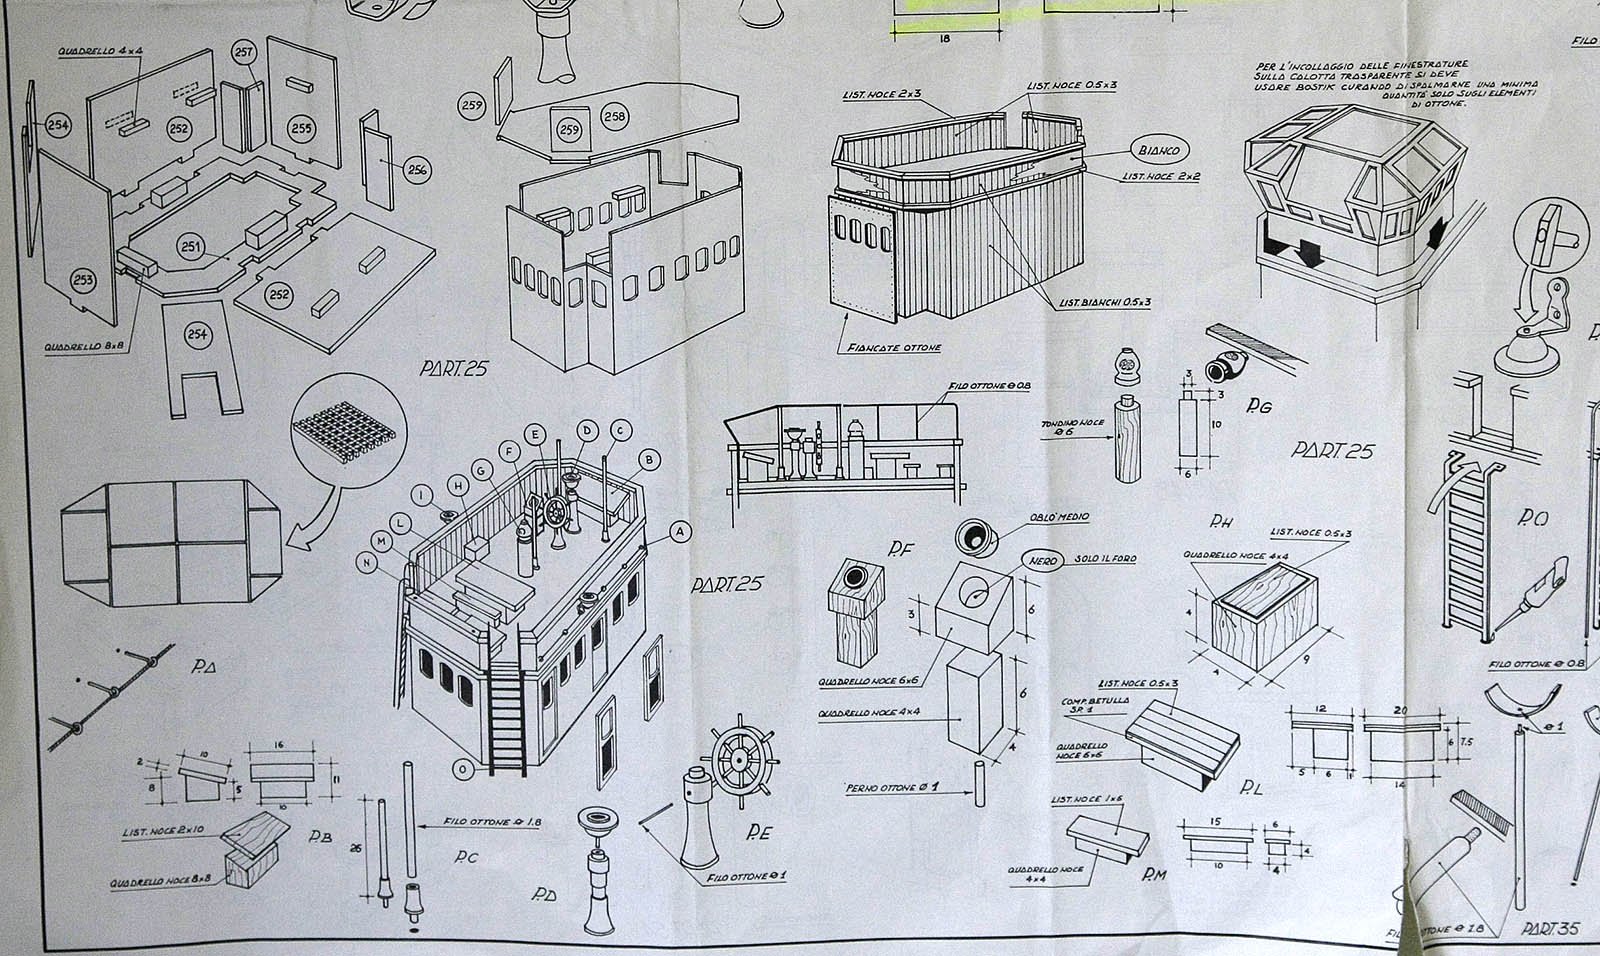
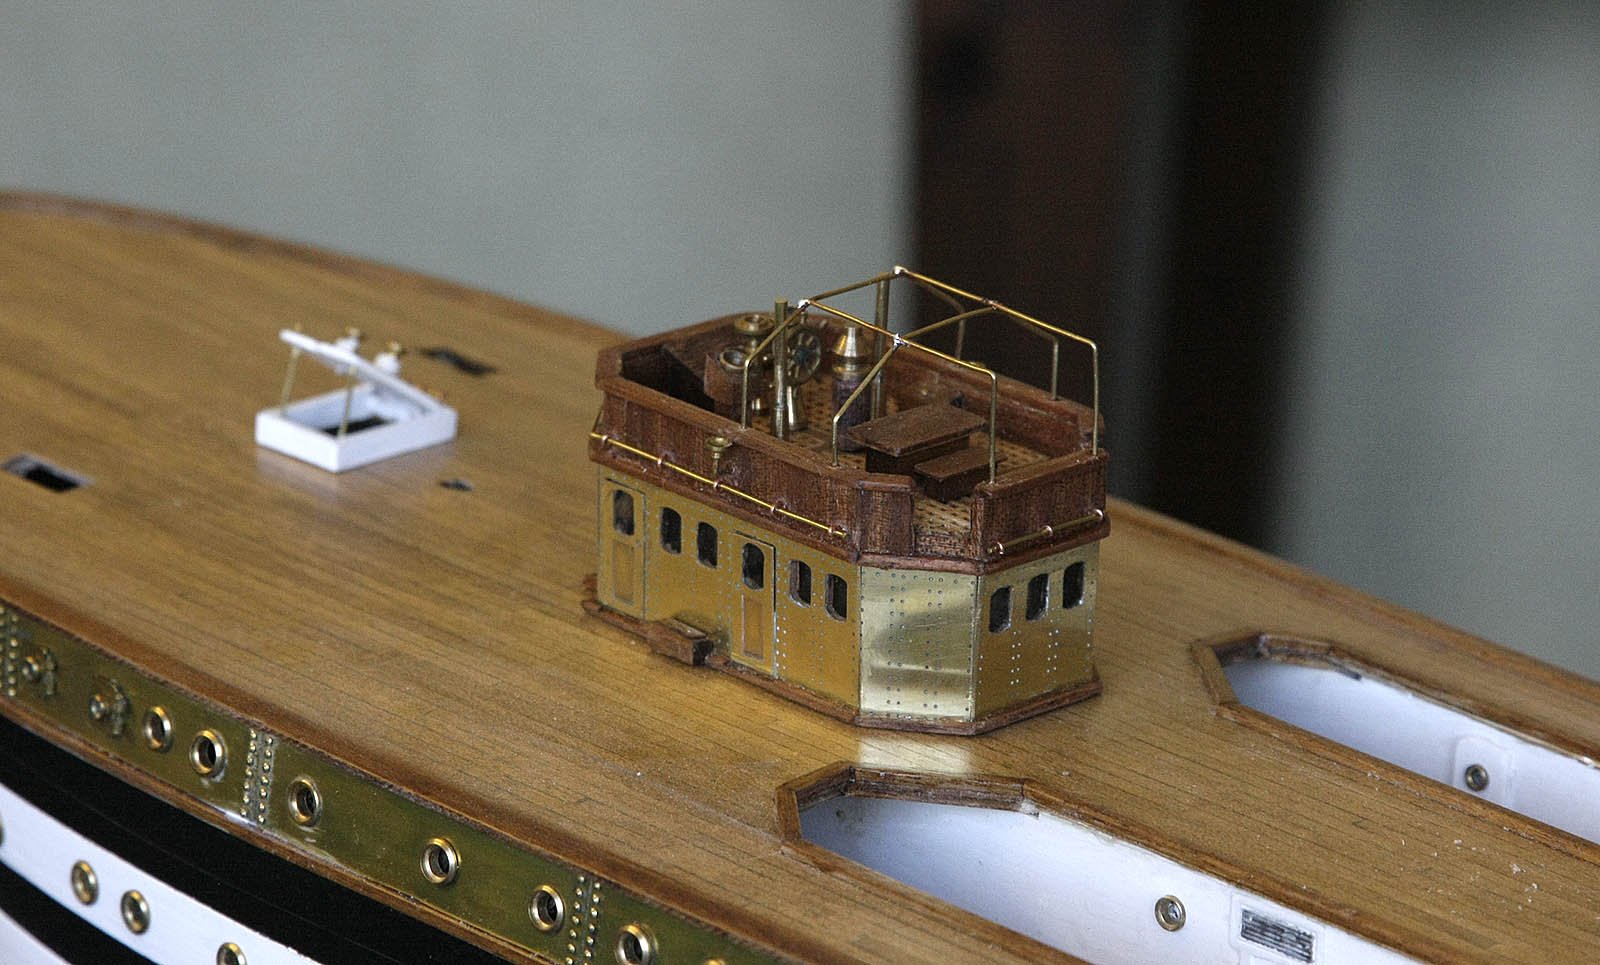
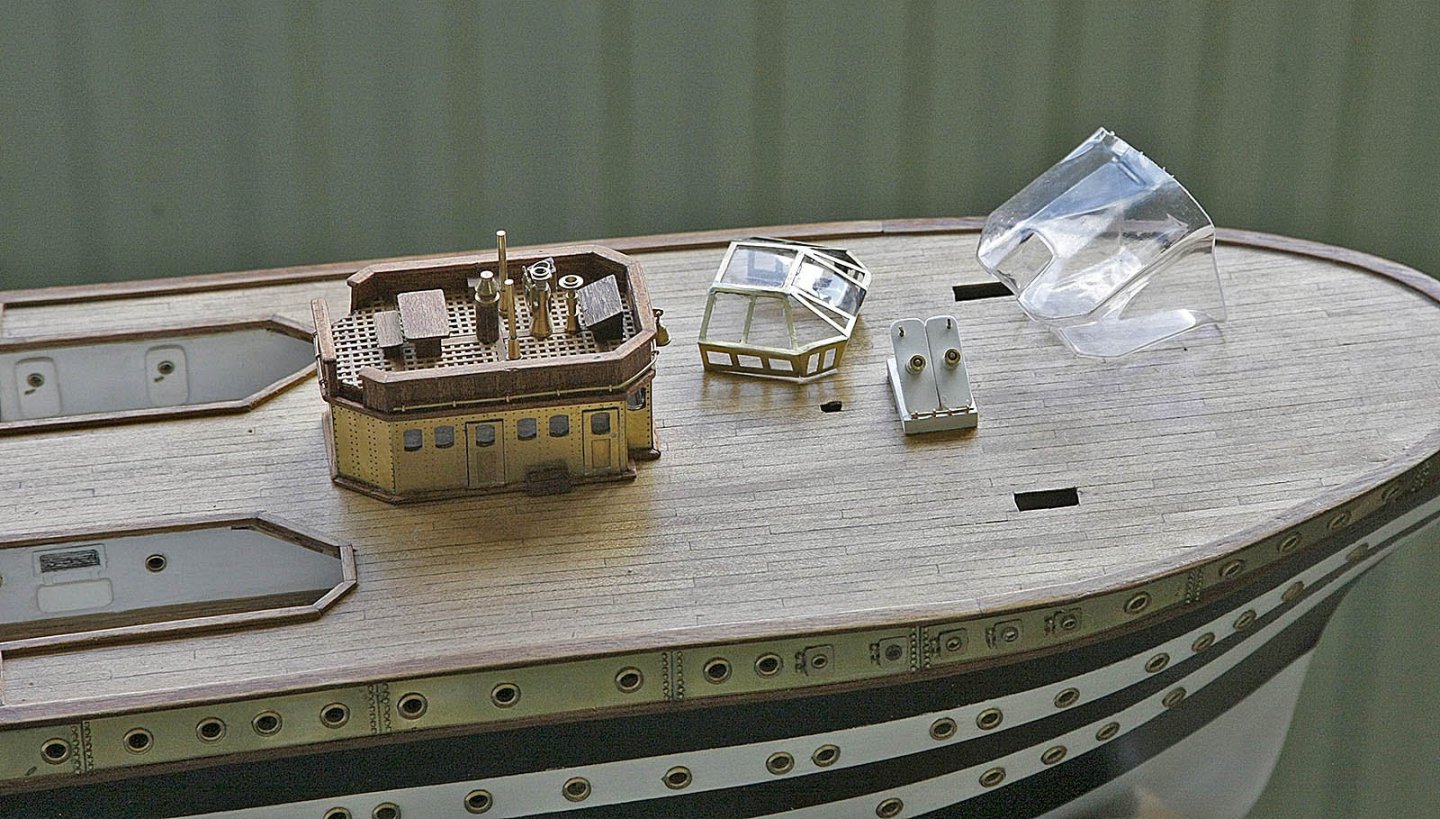
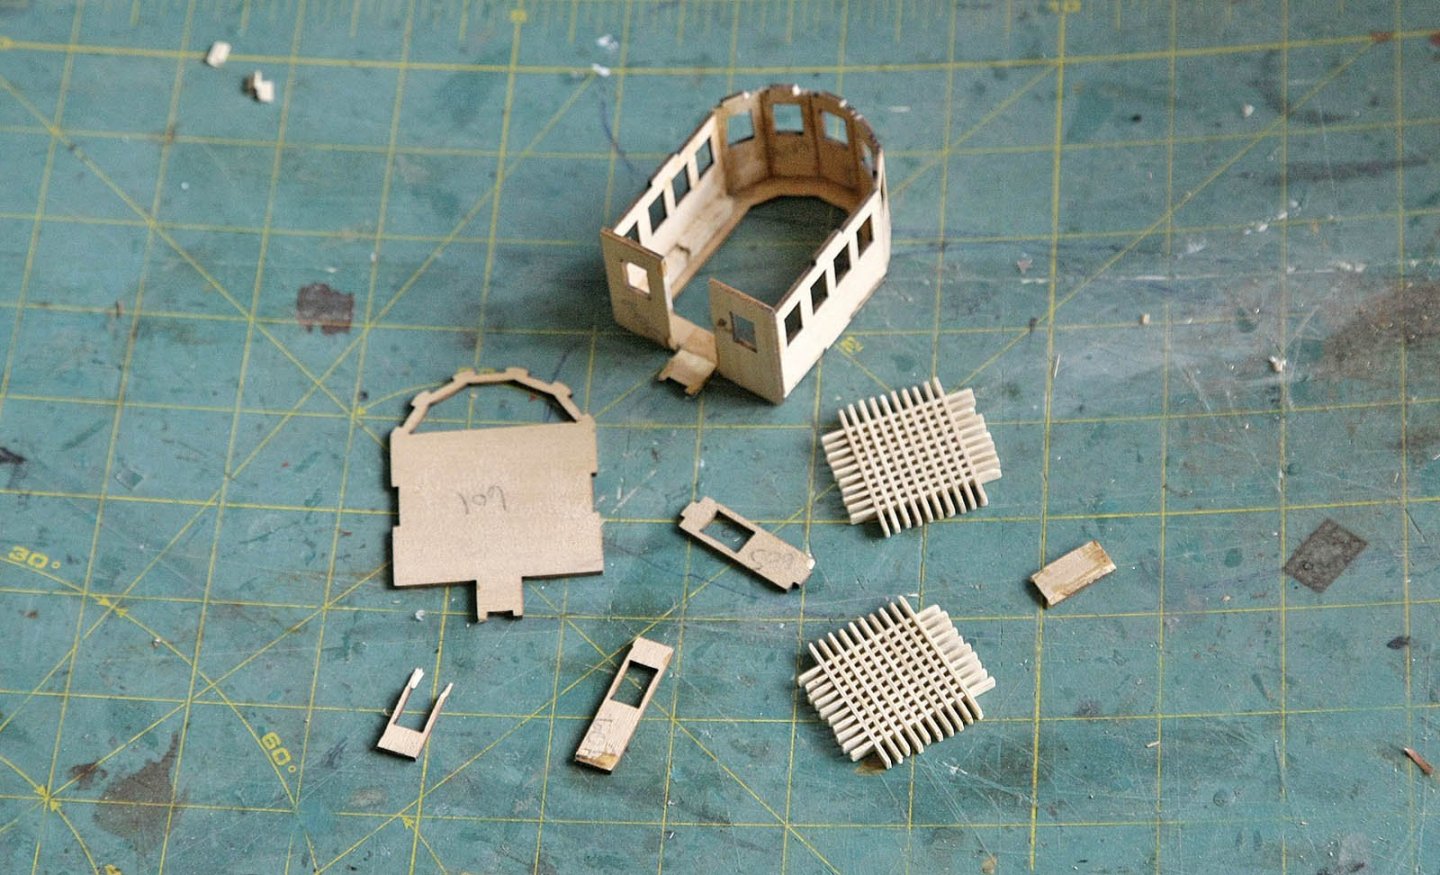
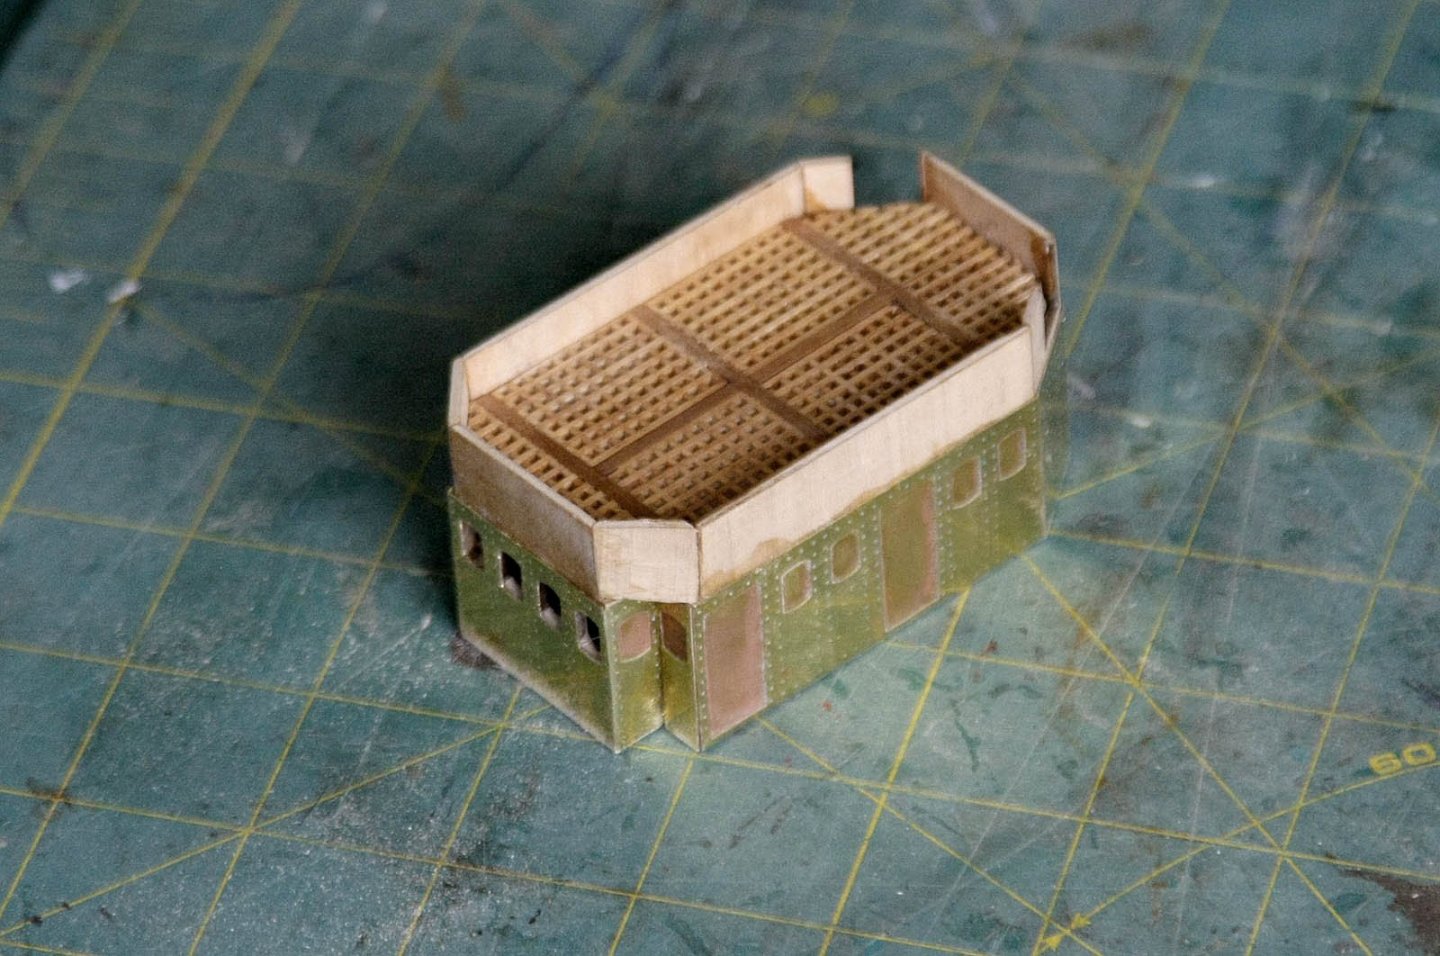
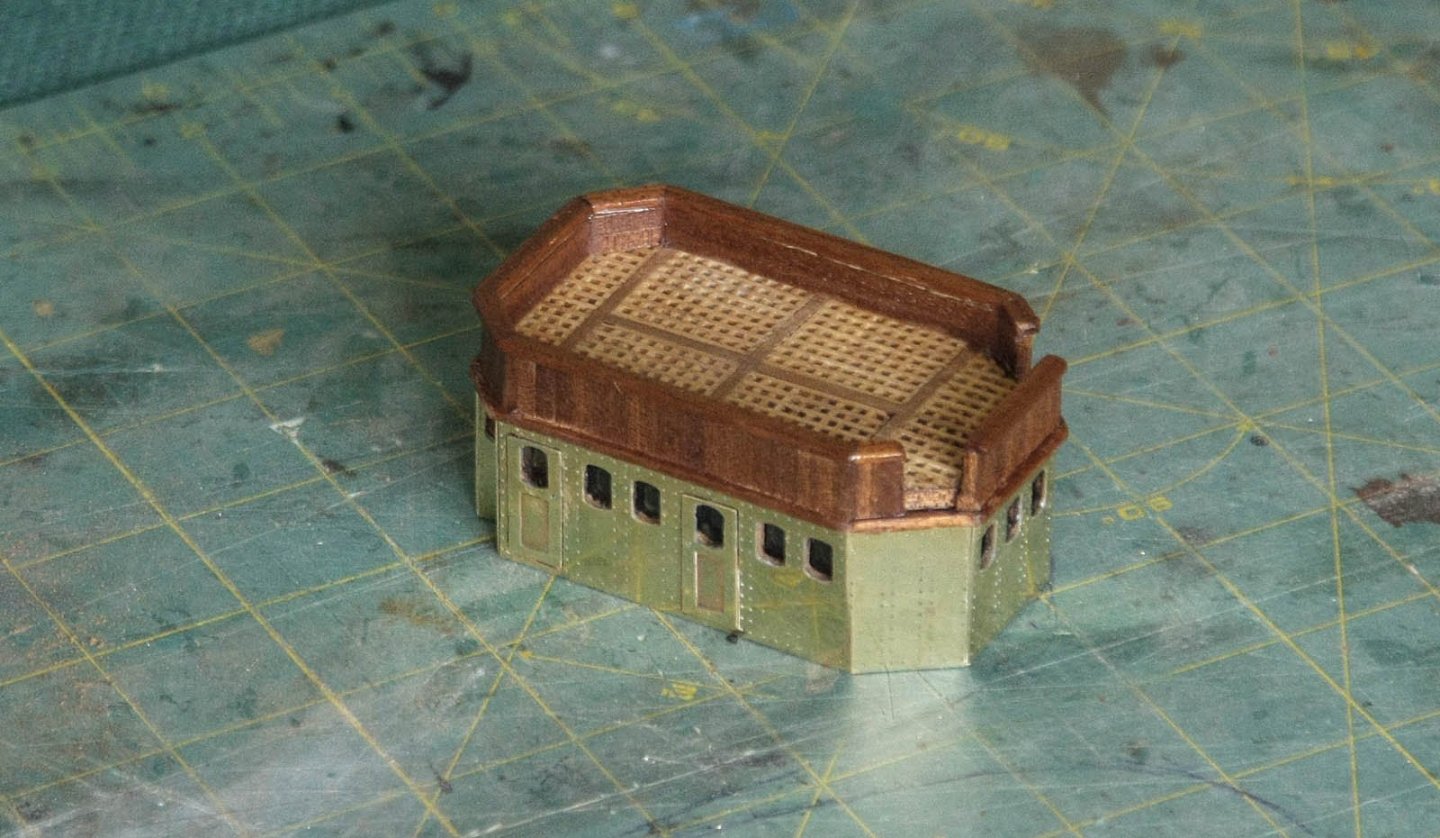
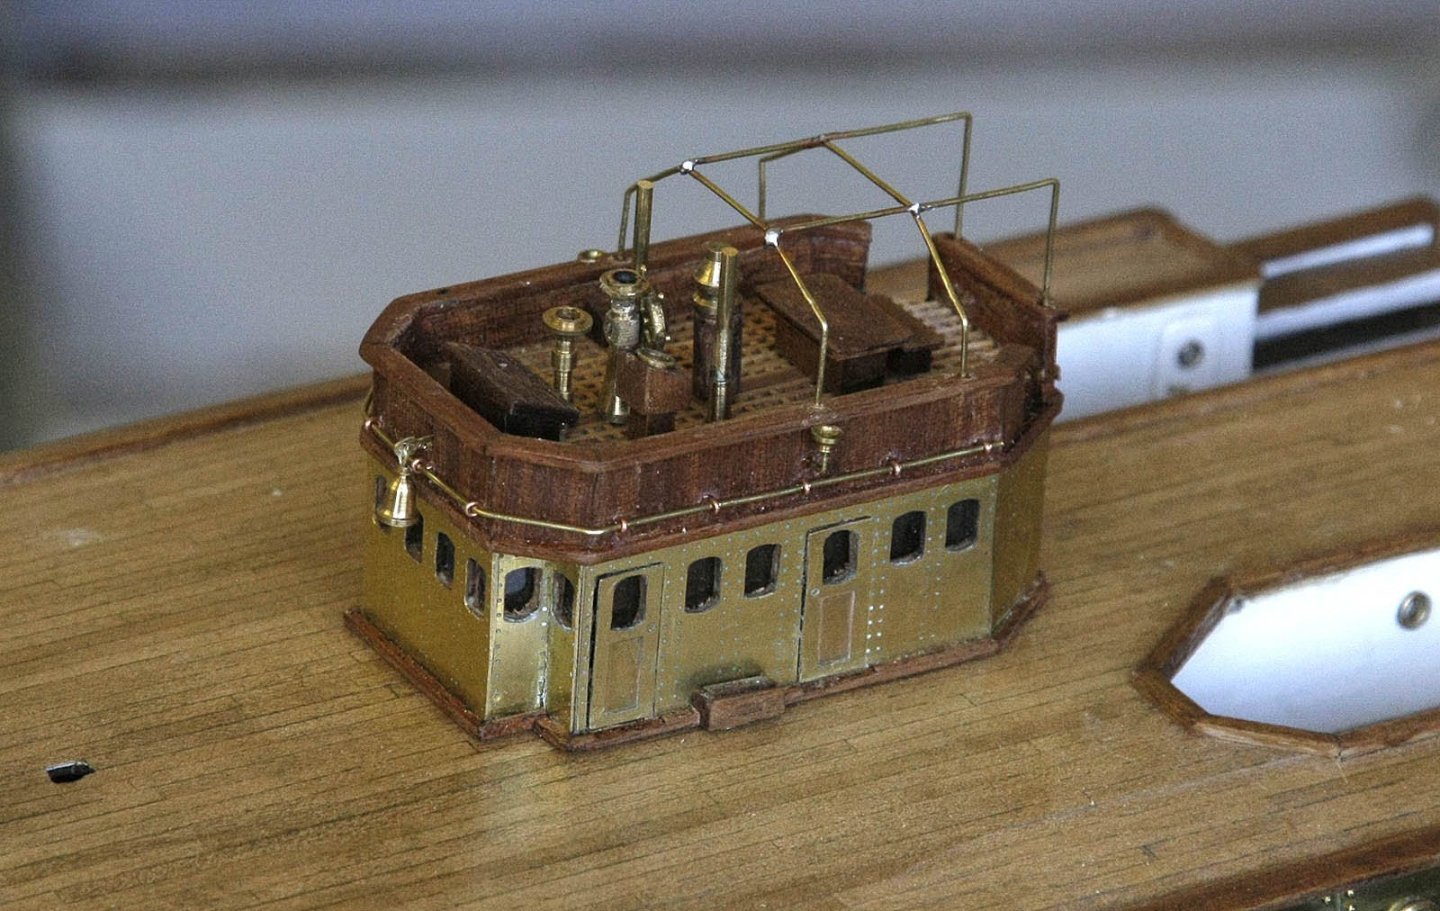
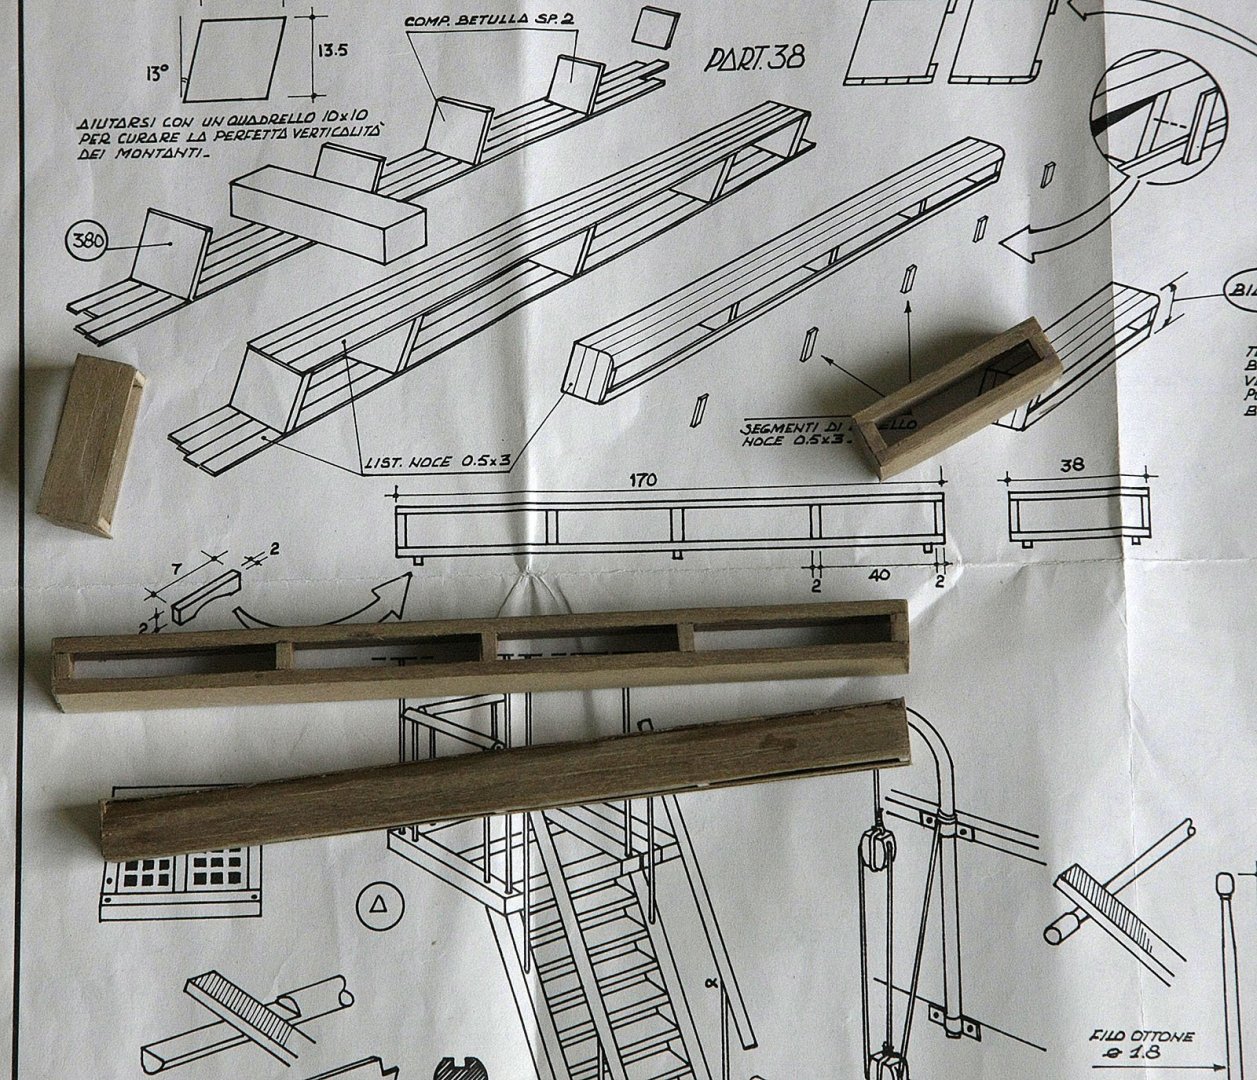
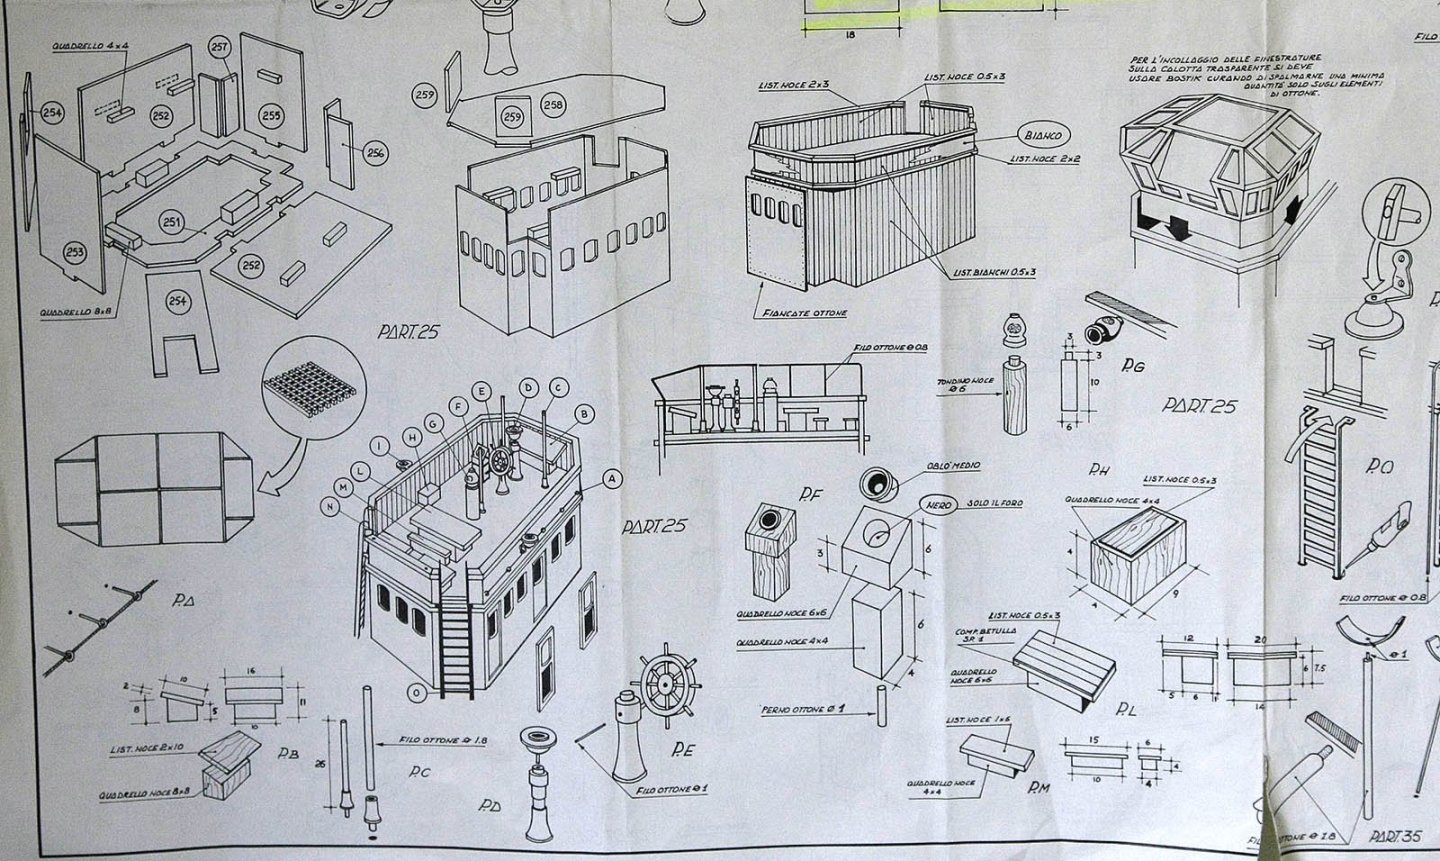
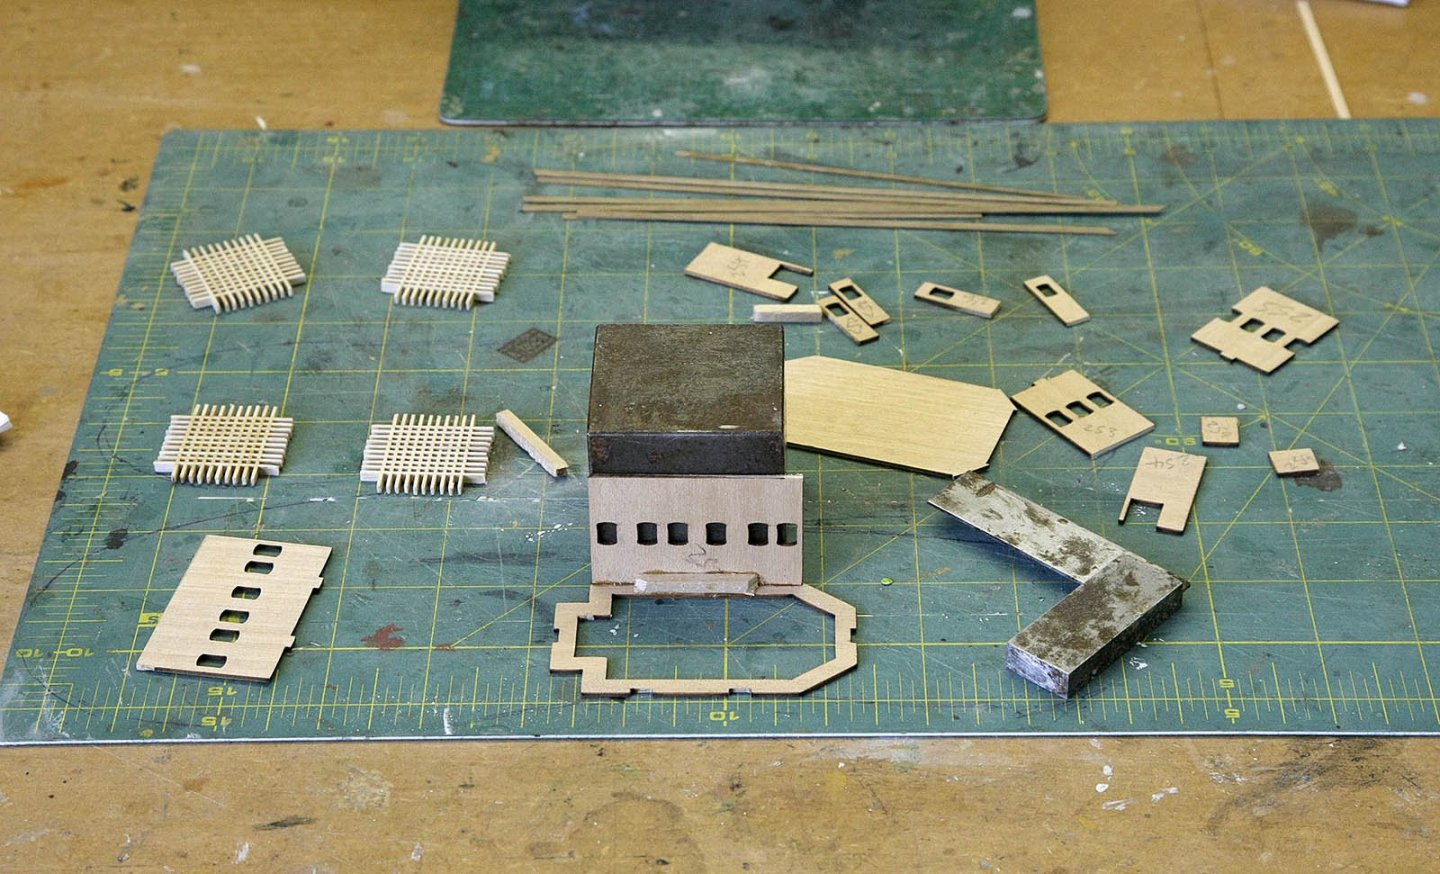
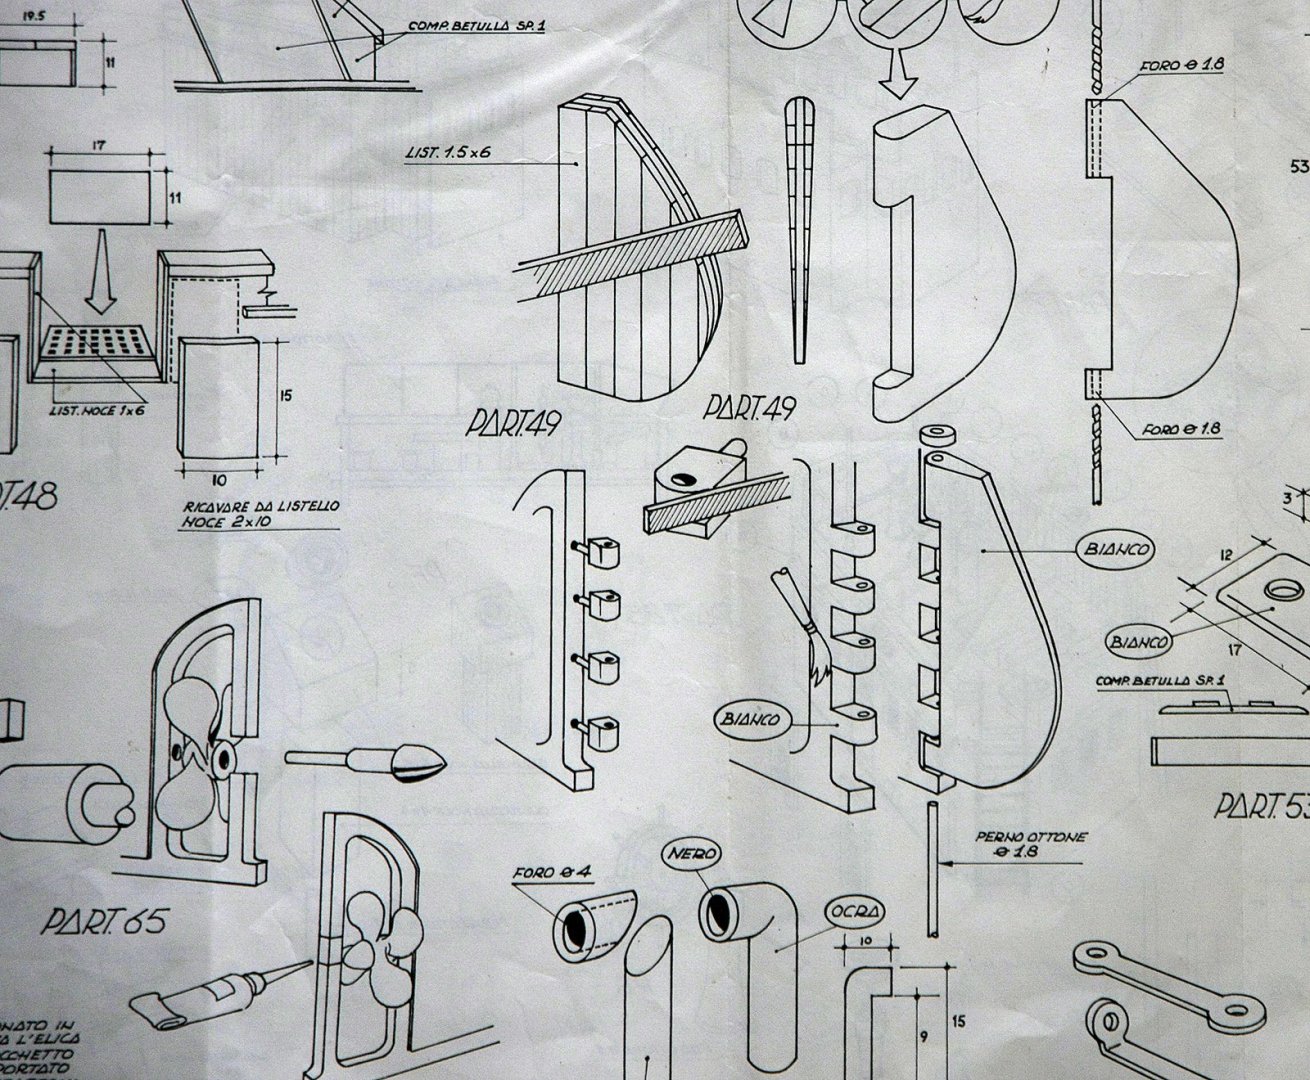
Hi, Again thanks for the many likes and comments on my build, as I’ve said they are encouraging. Here we go on to something that I’ve been looking forward to making, the wheelhouse. It’s one of the main detailed features on the deck and it gives me the chance to see how my brass and mahogany theme looks. Whilst the plans looked simple enough I found them hard to follow. All the detail and measurements were present but because they were spread out over three sheets like a mad woman’s diary and not shown to scale they were confusing, many of the small parts that were made up were not shown where they actually went. In spite of that the wheelhouse turned out better looking than I had expected, I put quite a bit of work and thought into it and I’m rather pleased with myself. I’ve shown the process in pictures as I think that this explains better than words. The glass canopy is another issue. A moulded acetate plastic one is supplied, with photo etch pieces meant to be stuck to the outside to look like the frame, that’s always going to end up messy. The moulded piece is misshapen, the wrong size with rounded and not defined edges, I’ve seen better jelly moulds. I think that I will have to make my own so watch this space. Ken


-
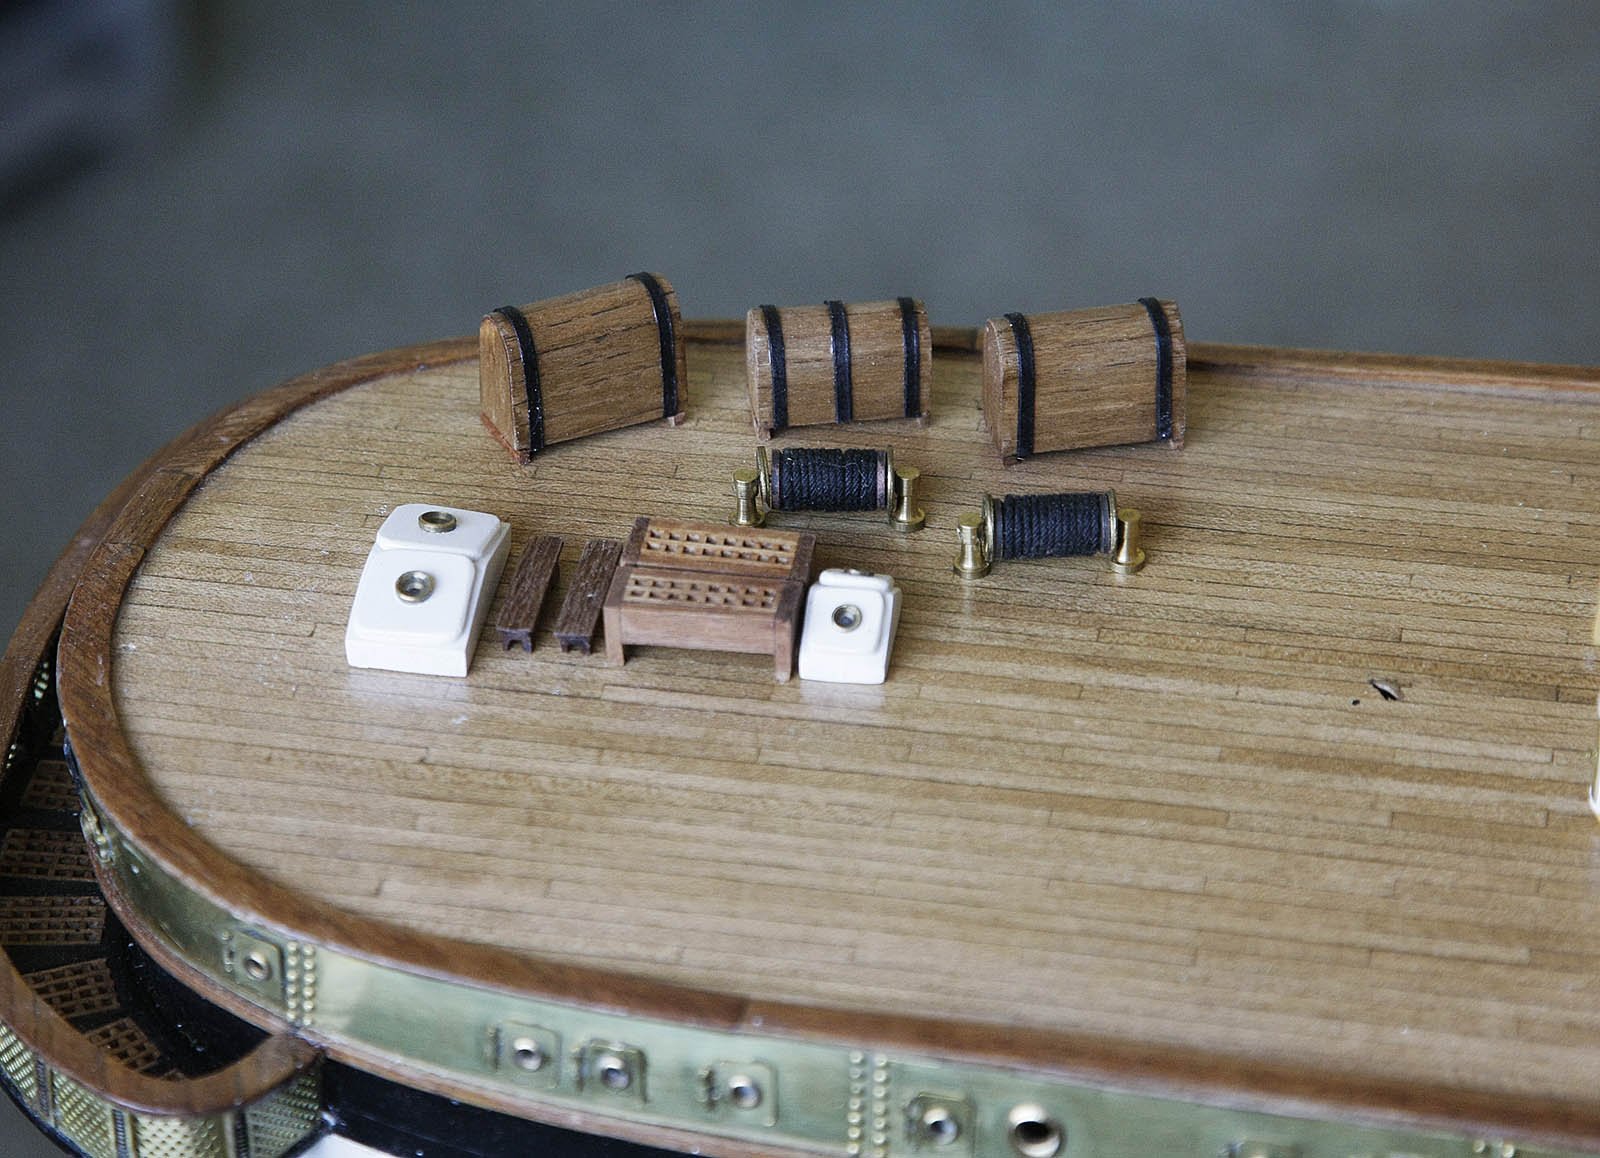
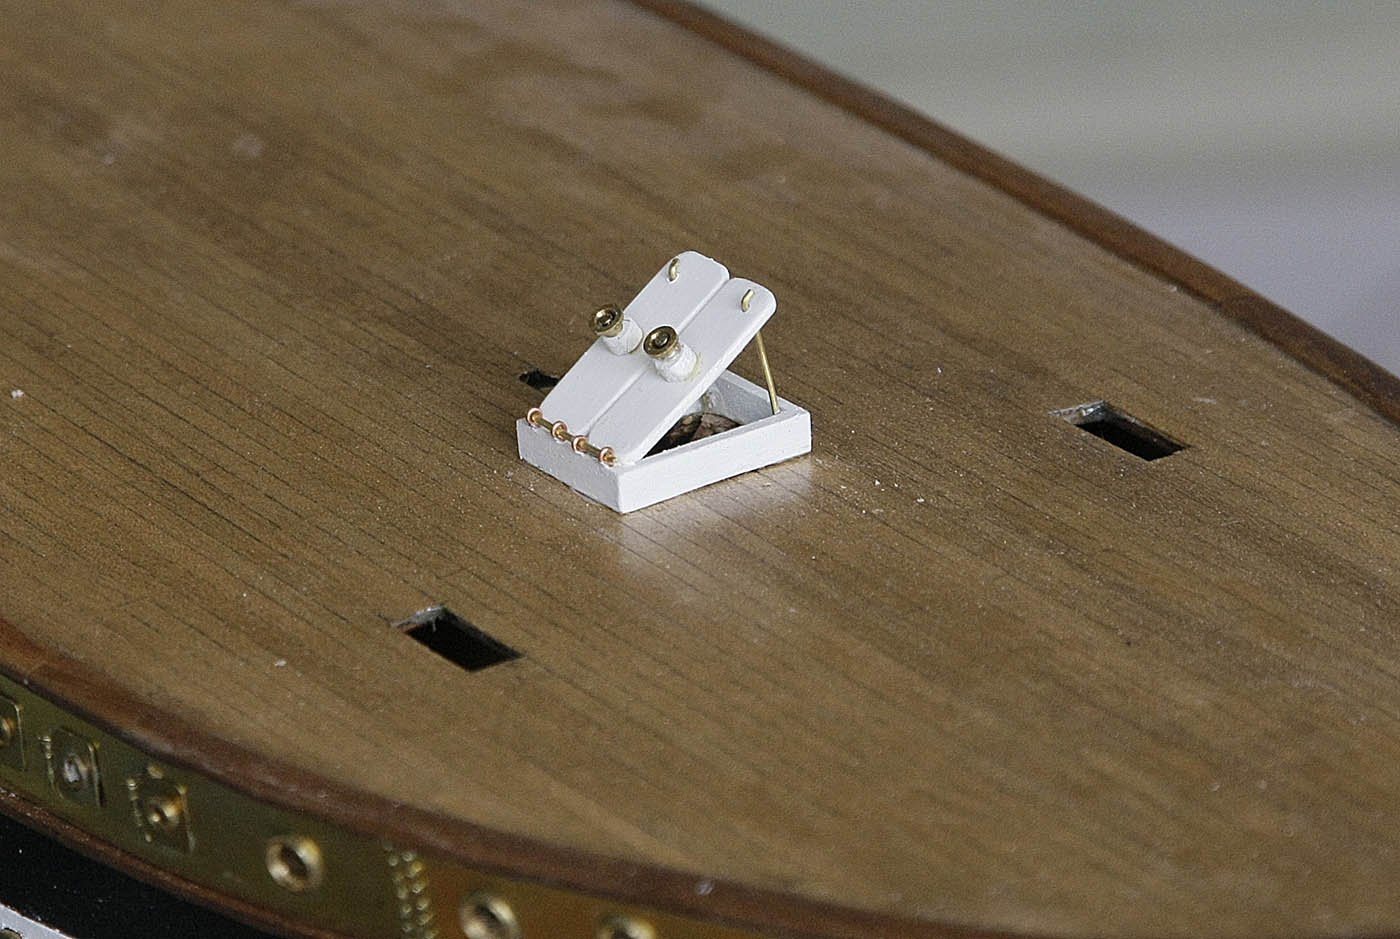
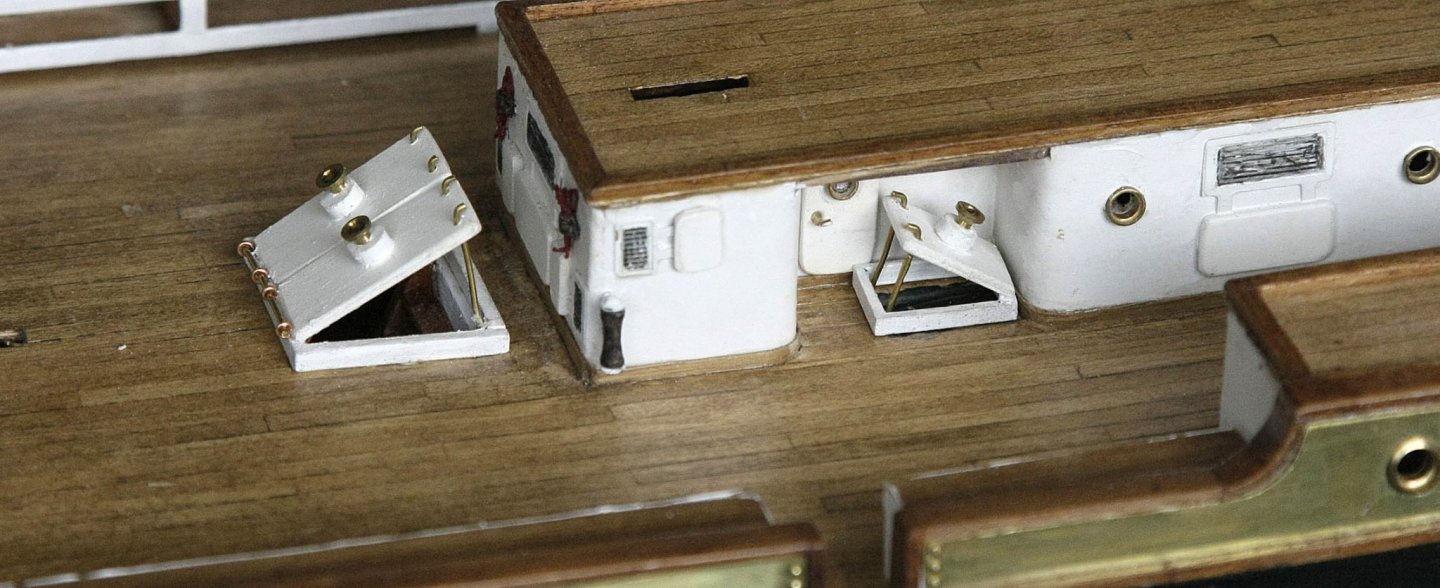
Hi, The build continues at a good pace. Today’s post shows some of the smaller projects that I’ve made up whilst waiting for paint/glue to dry, they include some hatches, waist lockers, deck storage units, skylights etc. I’ve shown my start on the wheelhouse, I’ll continue showing this soon, I’ve done more of it but I haven’t sorted the photos out yet, it’s coming out better than expected Ken
-
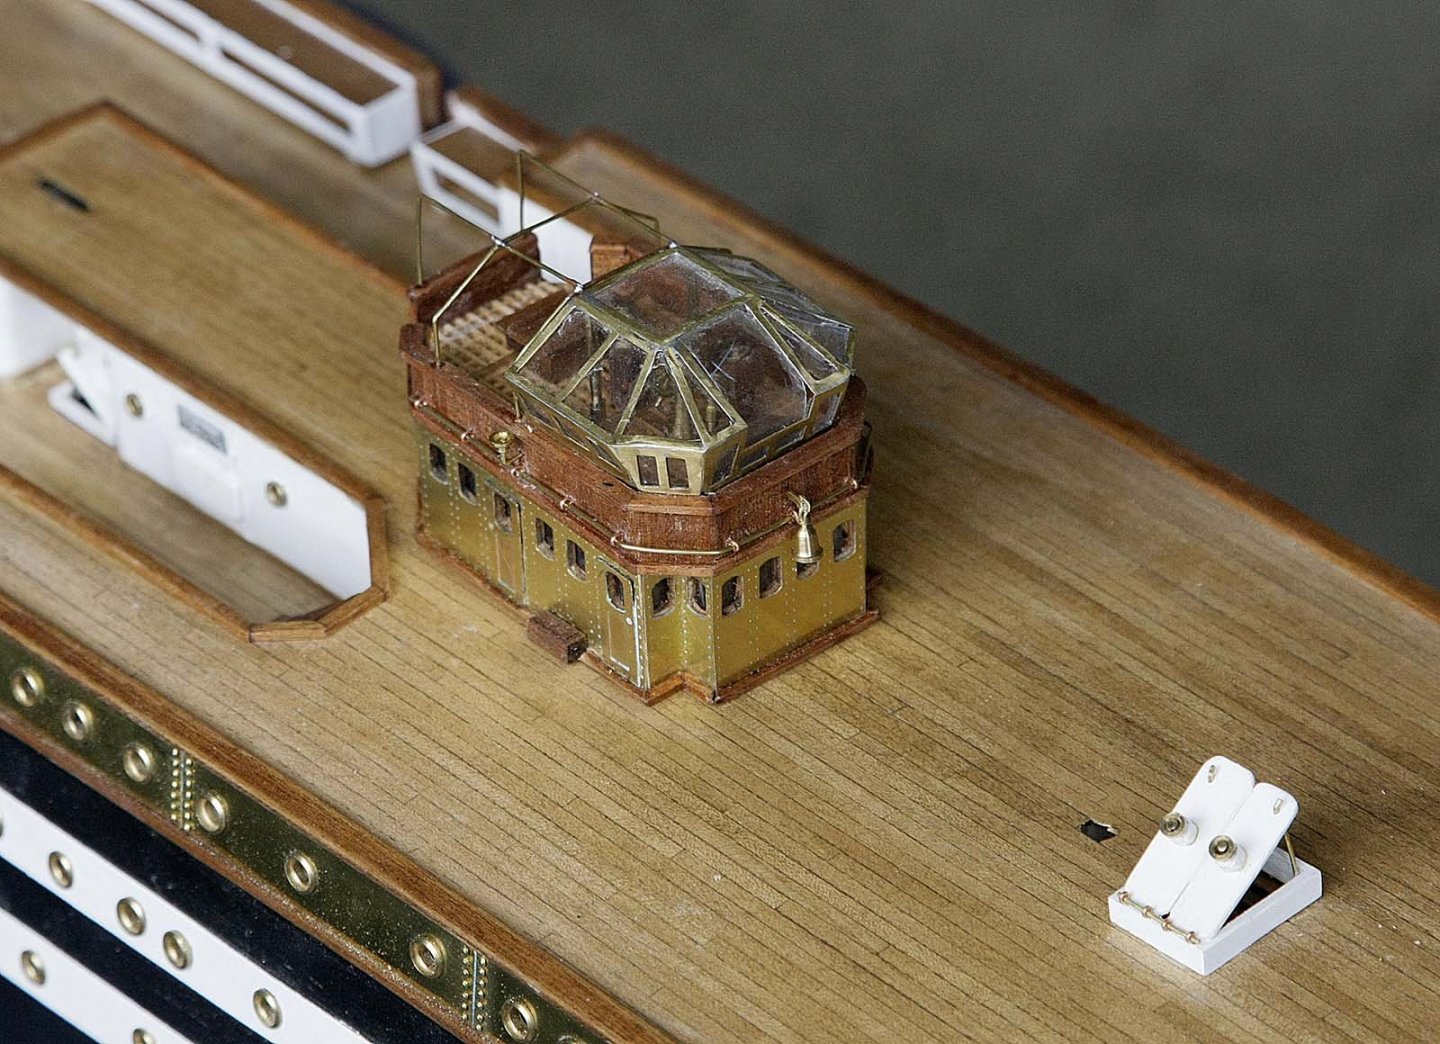
Hi Kevin, She's coming along just fine. I applaud you on the extra detail you are putting in but don't envy you in choosing to do the eyebrows, a lot of extra work there. I don't intend to do them myself as I don't want to get too involved in scale accuracy, I think that there is already a great amount of fine detail on this model and I would be afraid of the build taking forever with me losing interest. Thanks for the mention by the way. Ken Here's a picture of some detail coming up soon

- 273 replies
-
- 6
-
-
- panart
- amerigo vespucci
- (and 1 more)
-
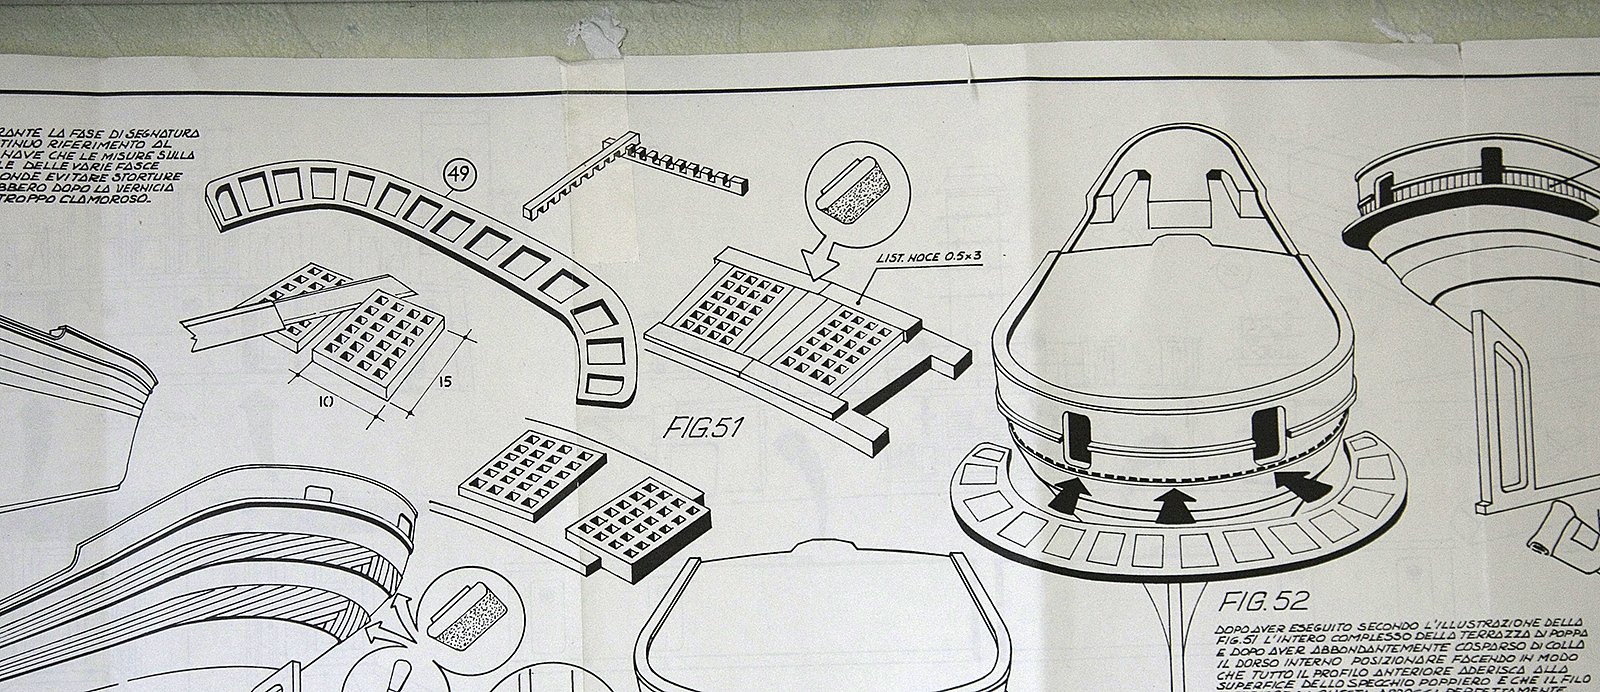
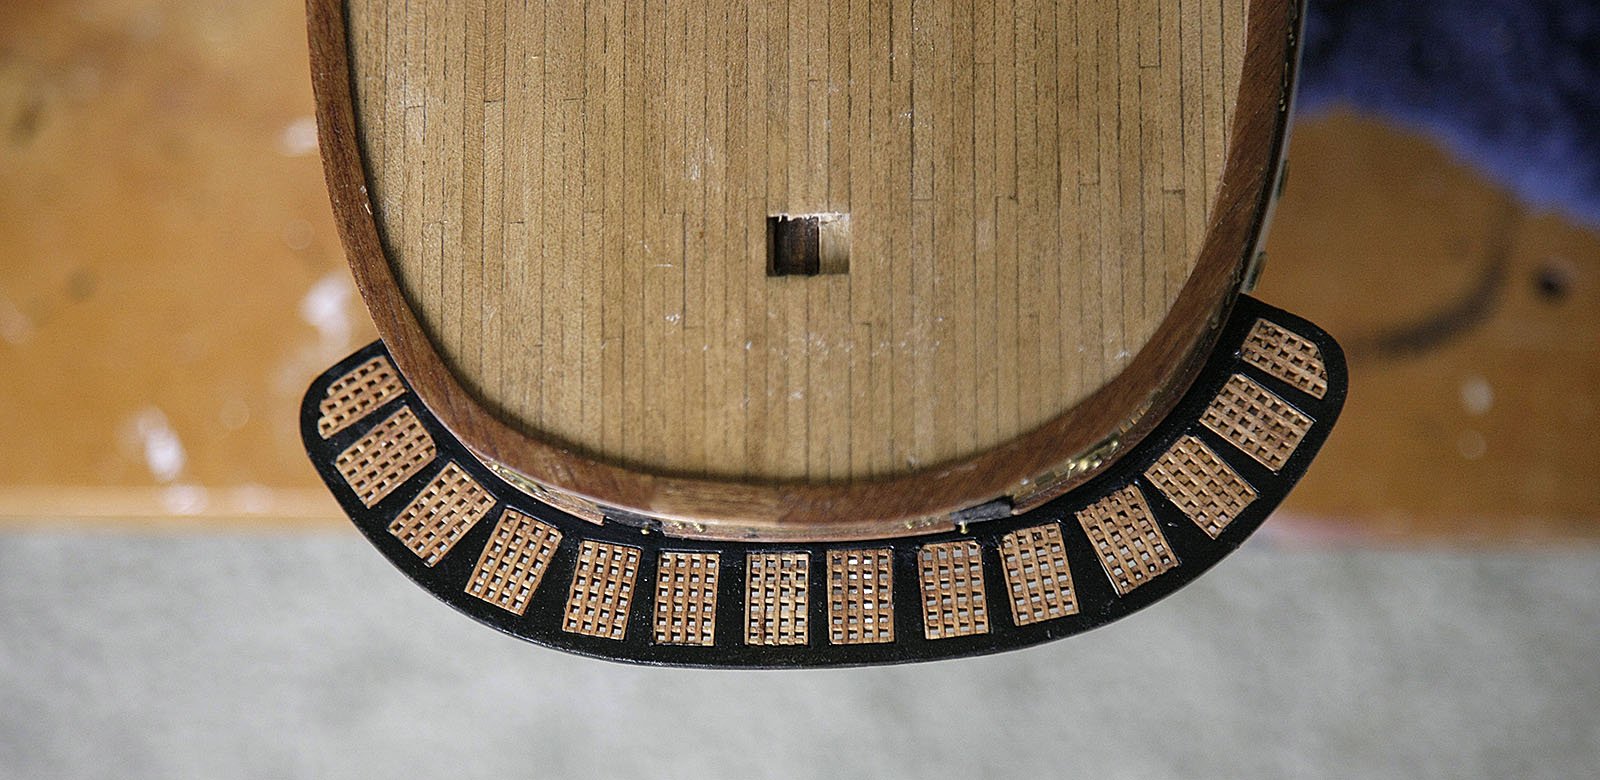
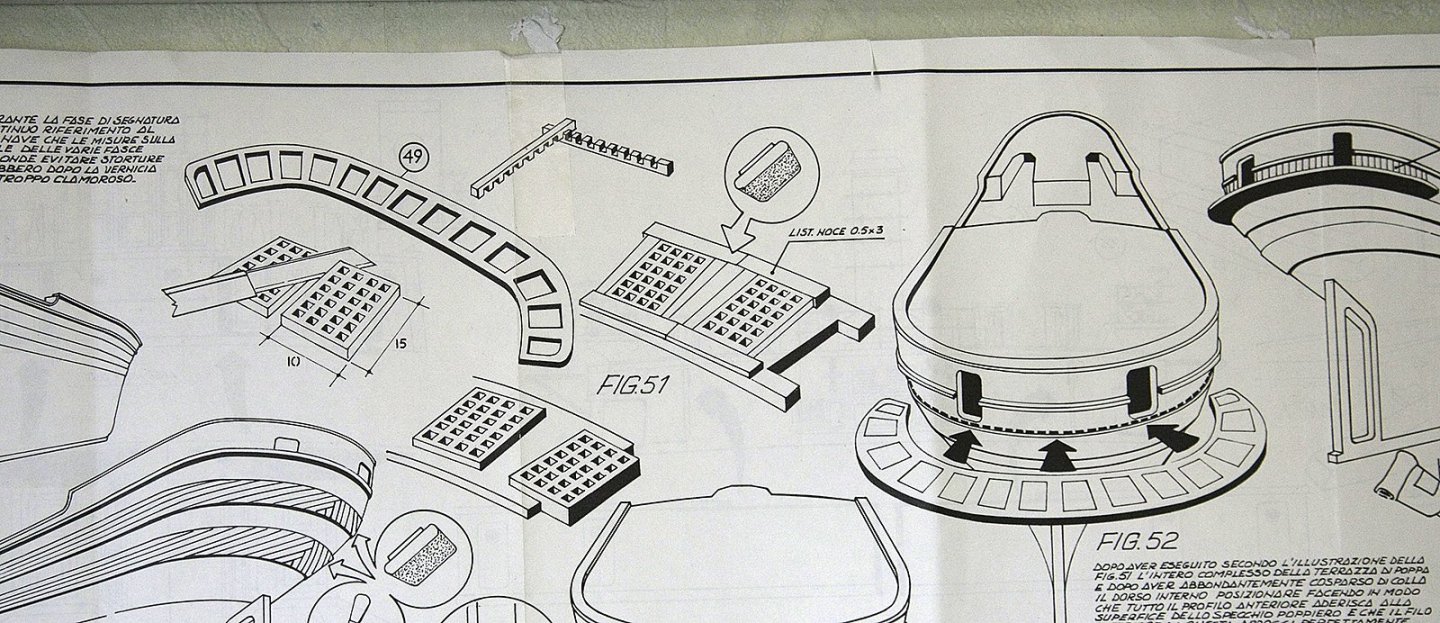
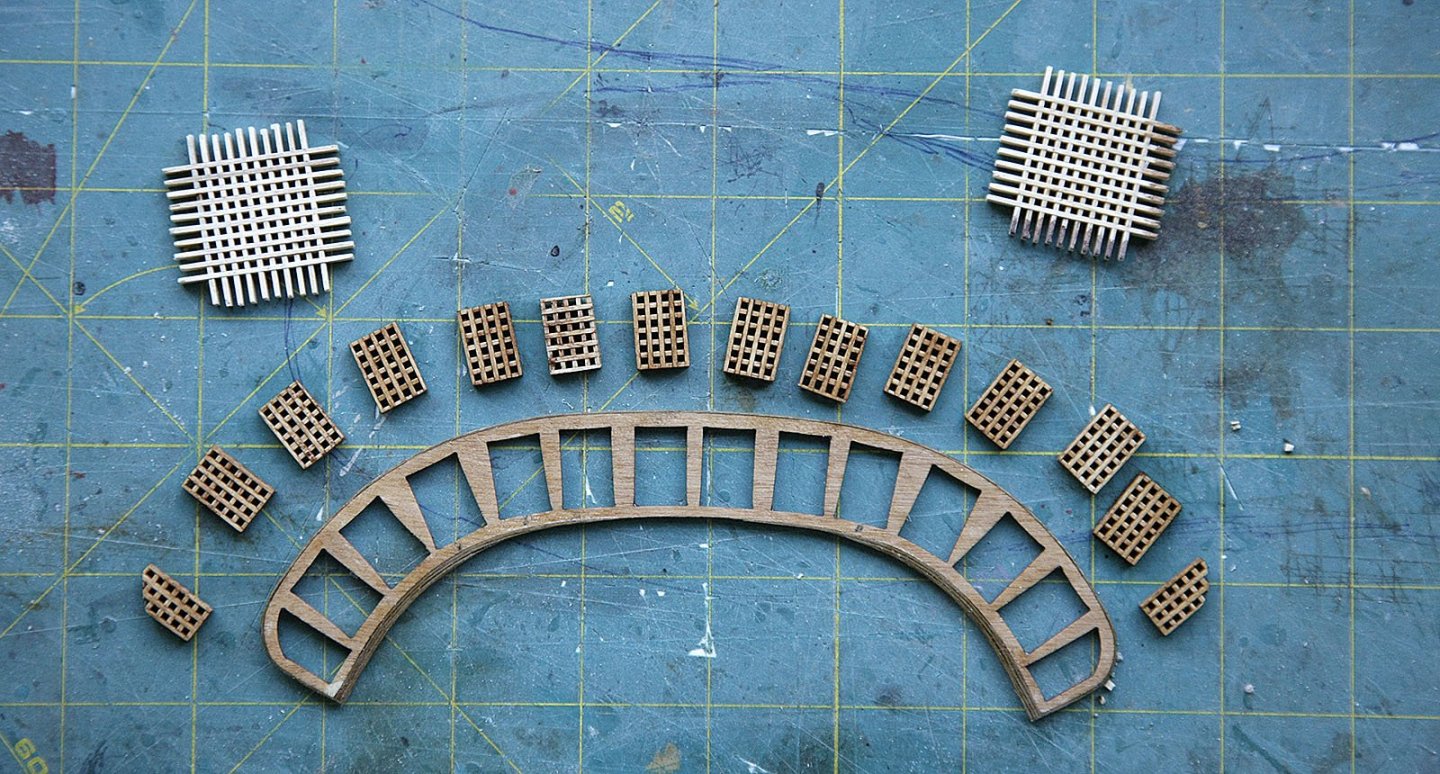
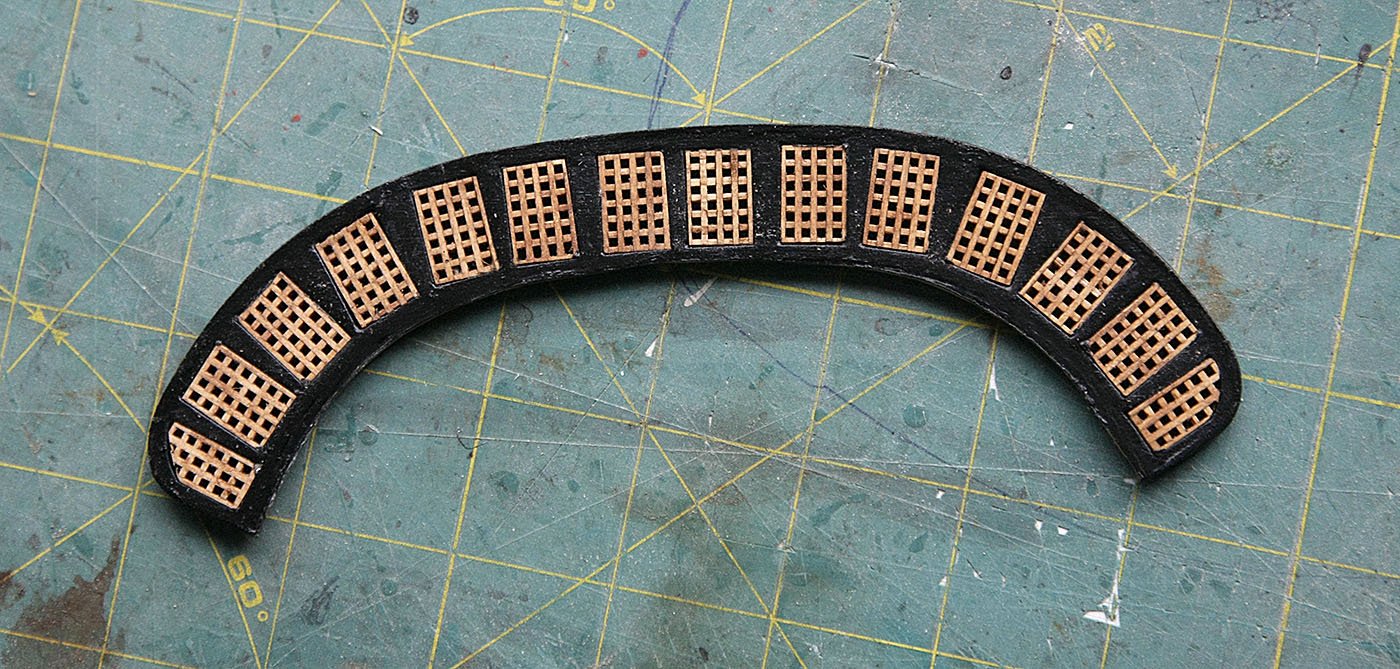
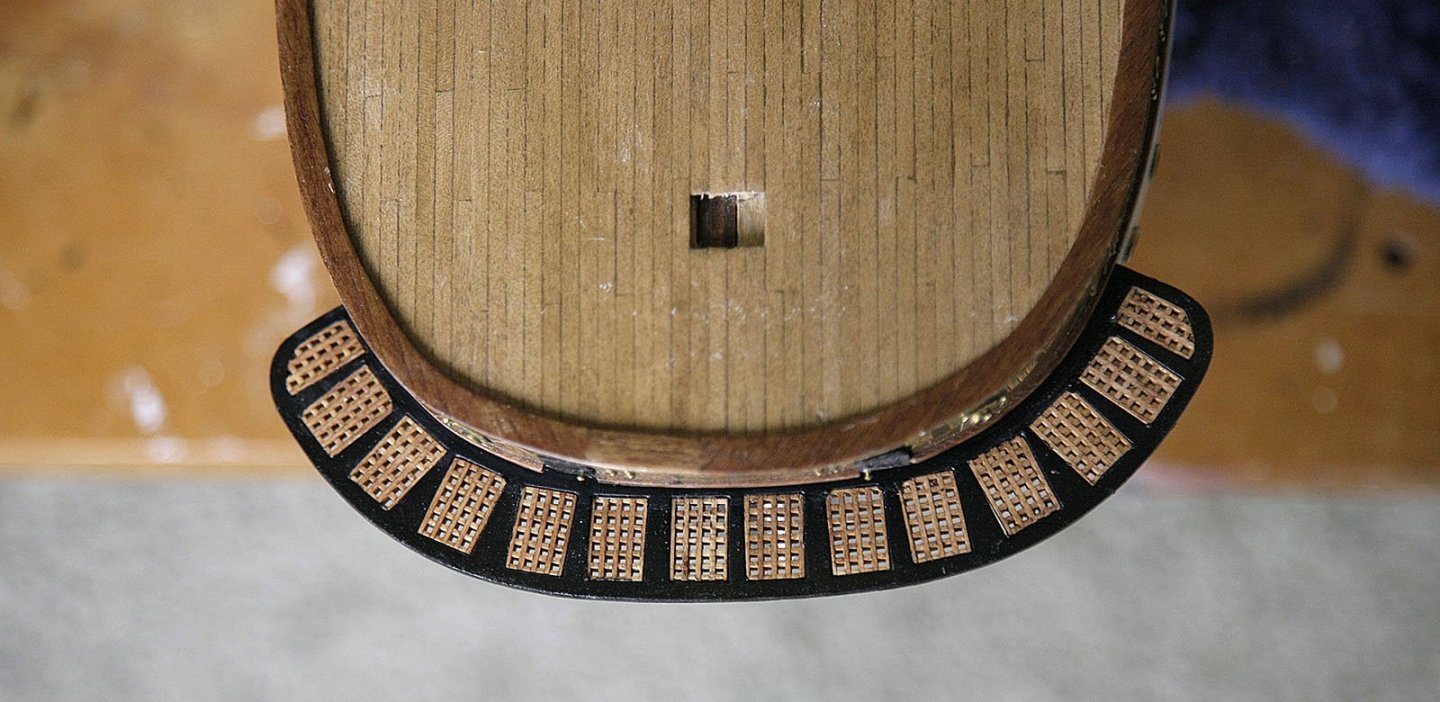
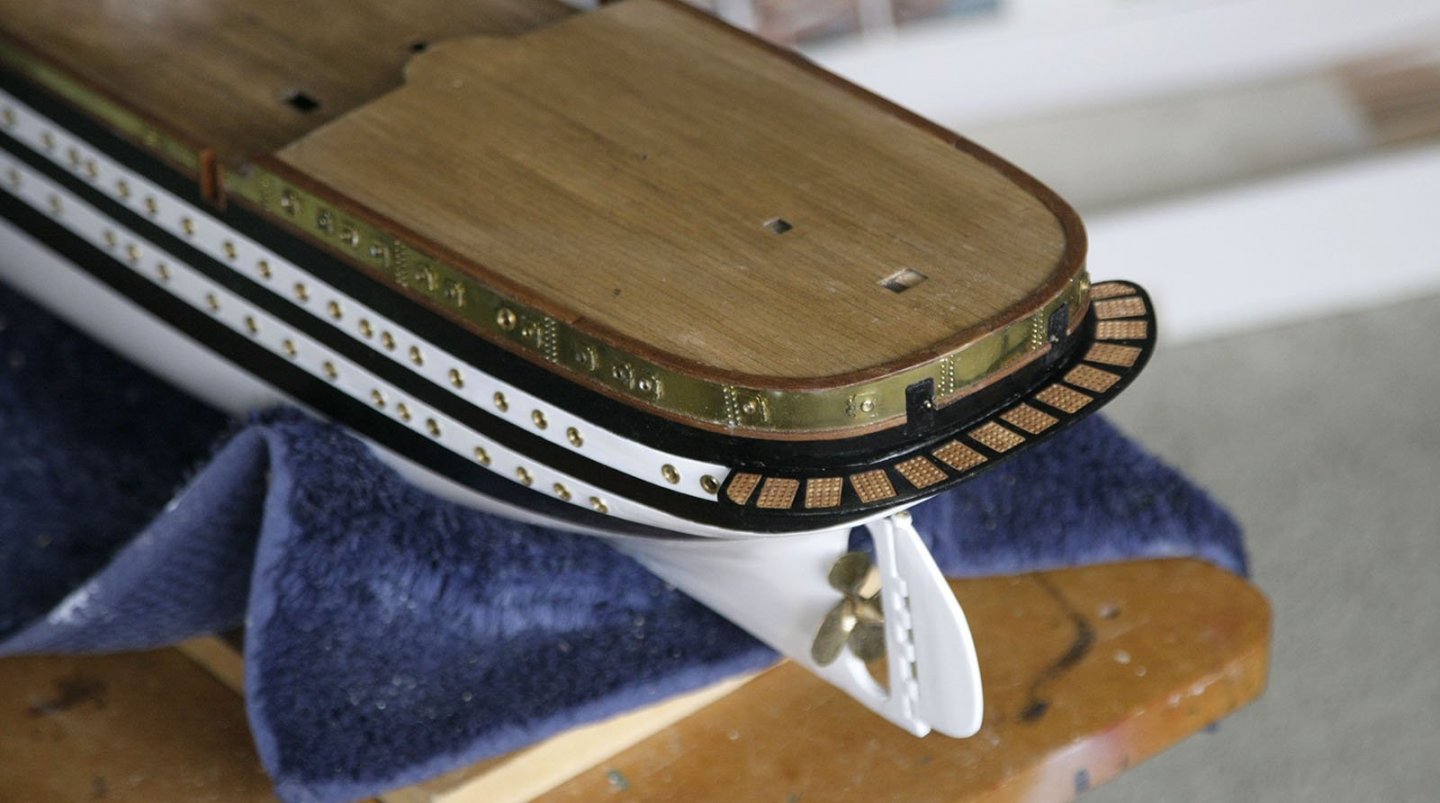
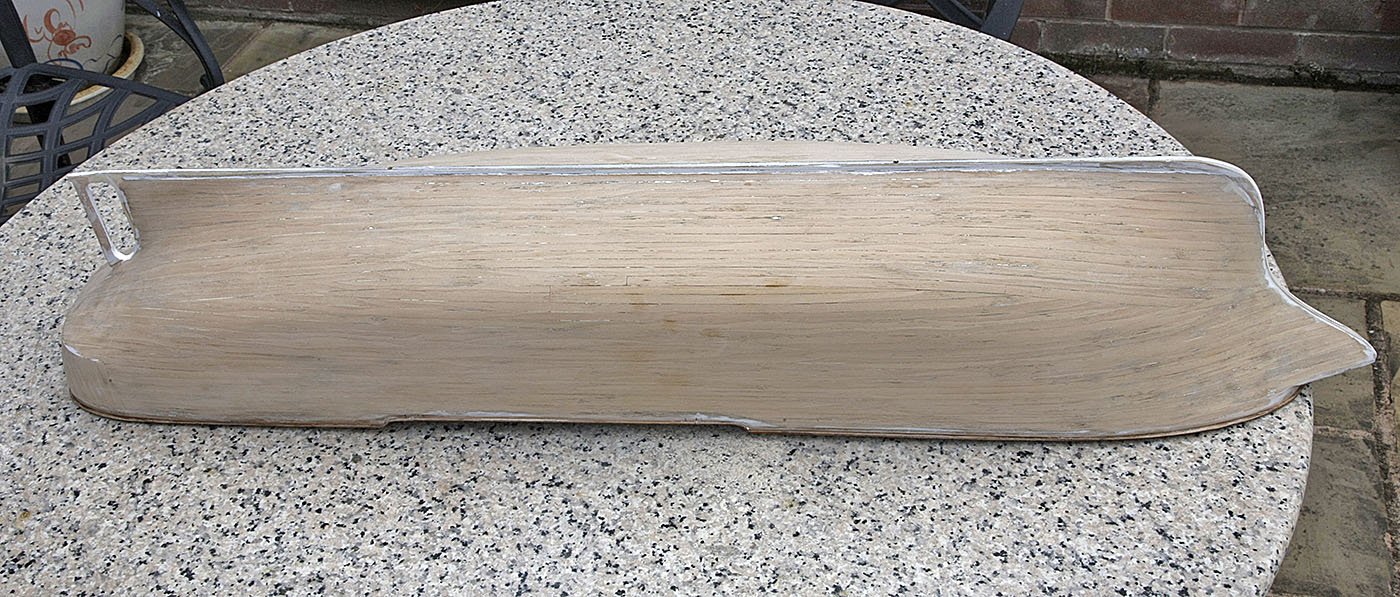
Hi, First thanks again to those of you who are following my build and for your likes and comments. My build is progressing nicely and I have just completed the stern gallery, it went well with no issues. I kept the construction as simple as I could and have not kept to its proper colour scheme again choosing just black and varnished wood, some staining was applied. The pre cut ply was too large to fit the hull properly so I added three planking strips to the inner edge, with the extra meat I was the able to sand it back to get an exact fit to the hull. I made up the several gratings then using the plans as a guide only, assembled it, painted and varnished then added the name. The only disappointment was that one of the cast supports was missing, I left the gap at the centre to keep it symmetrical and hope that the ships boat which will eventually hang over the stern will hide the omission, apart from that it came out well. Ken

-
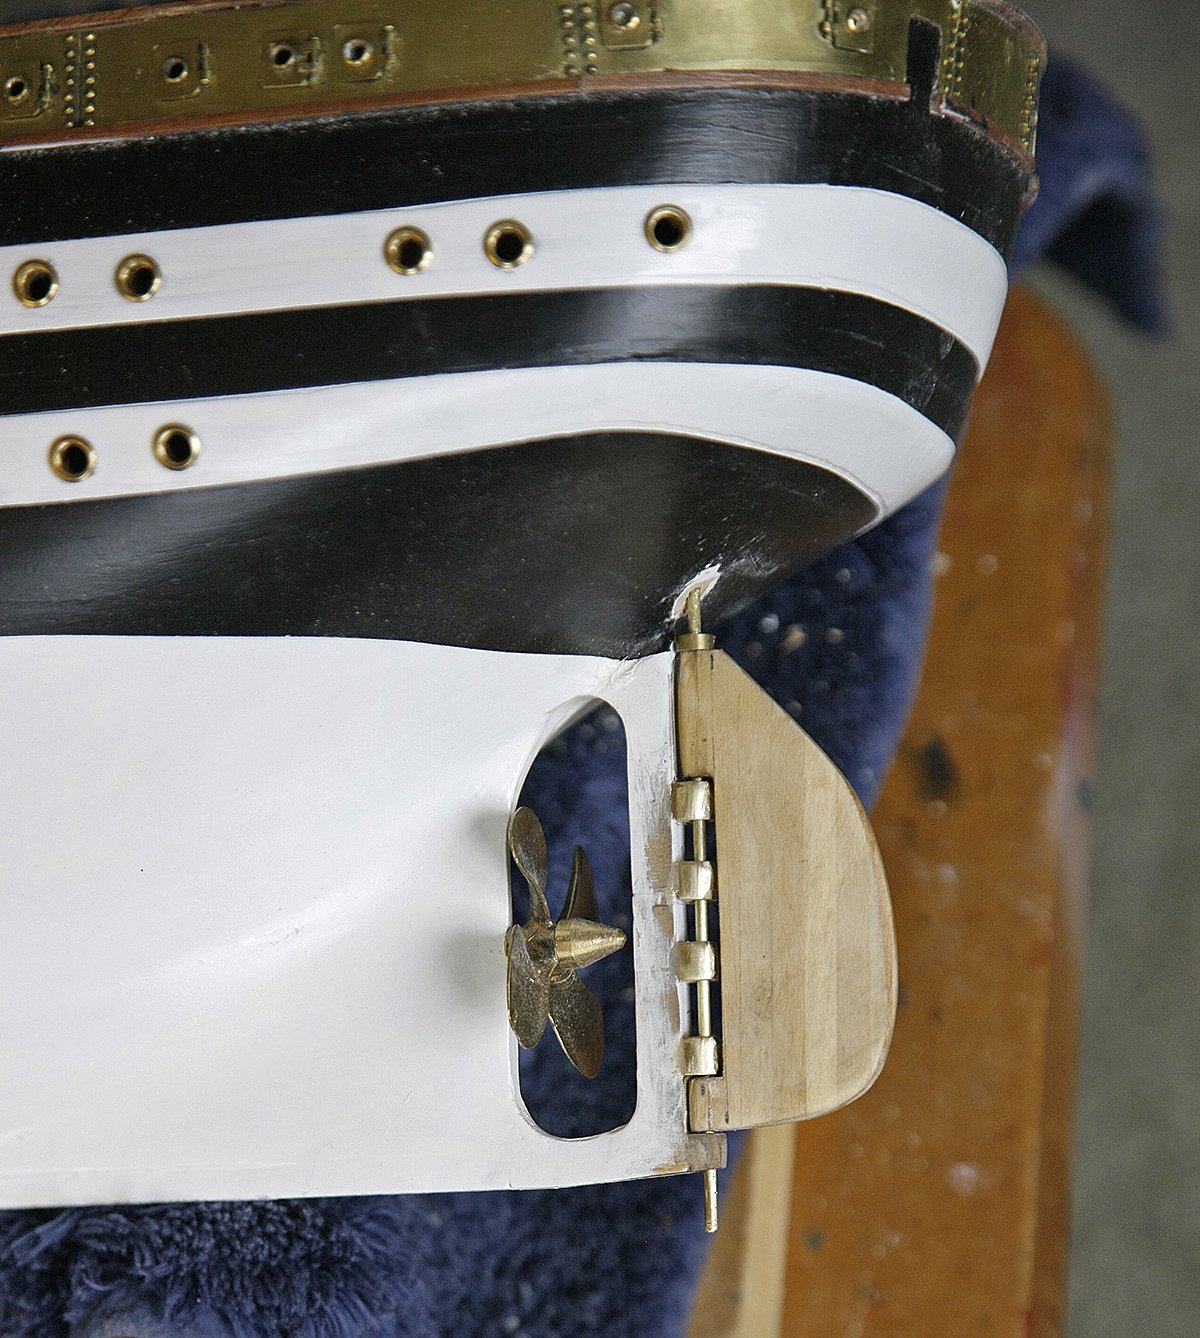
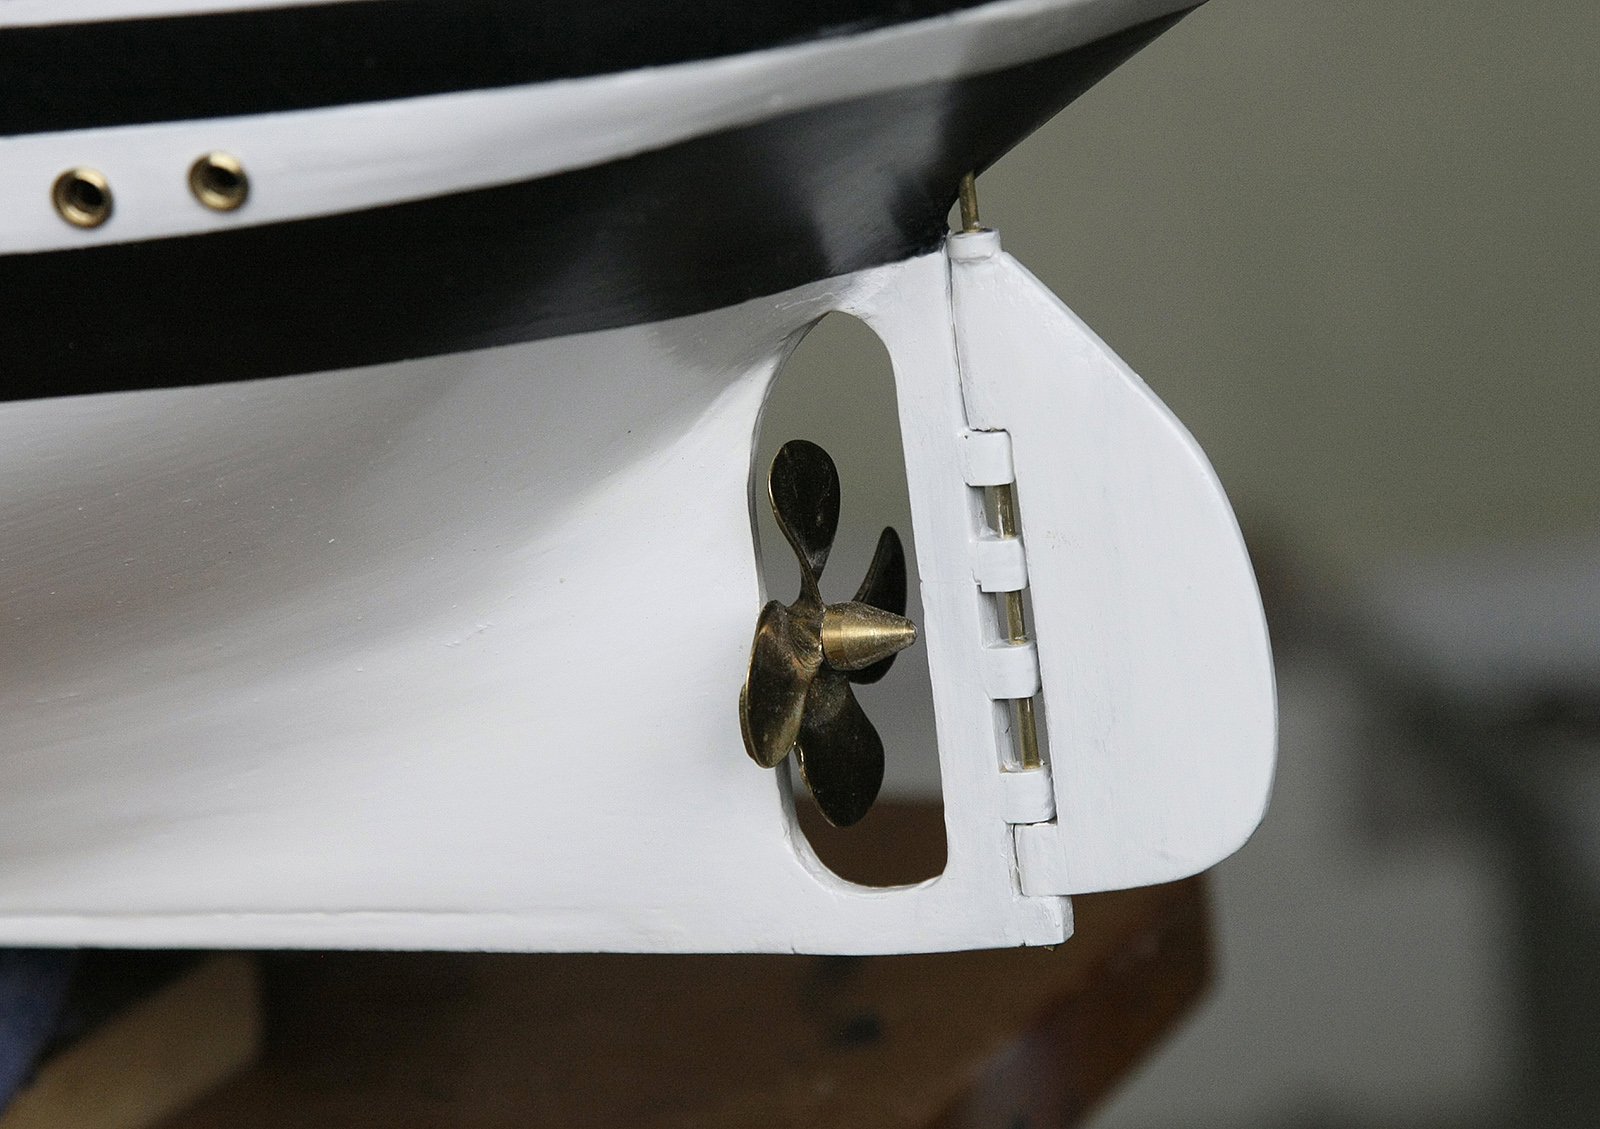
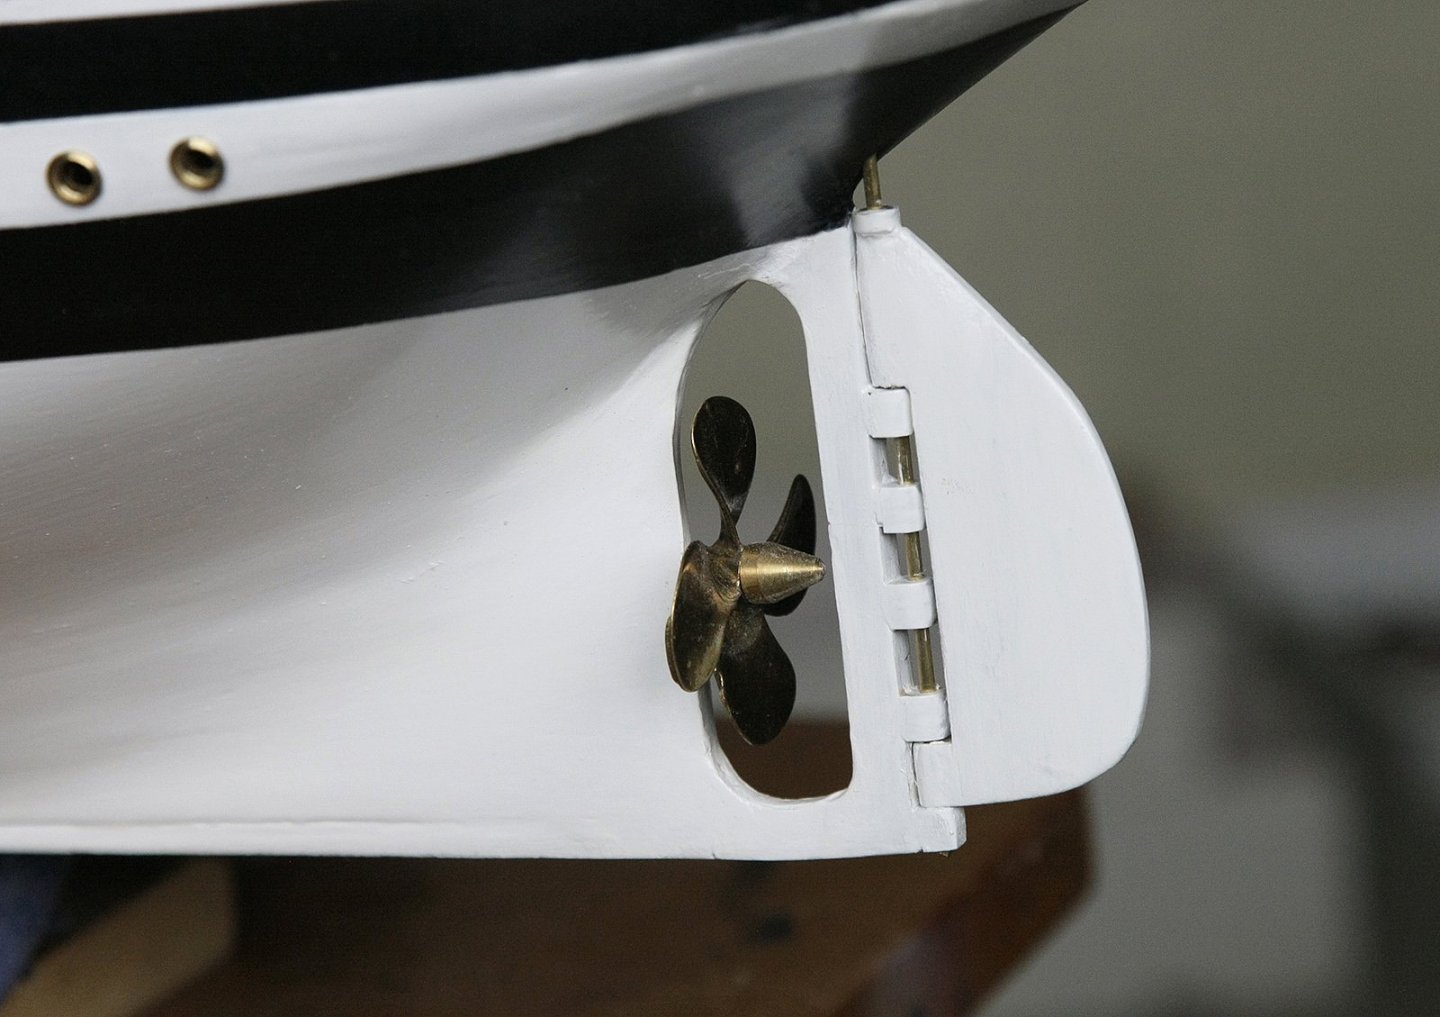
.Hello All. Just a small update, moving on with the build I have just completed the rudder assembly, no need for an explanation as the pictures tell all. Ken

-
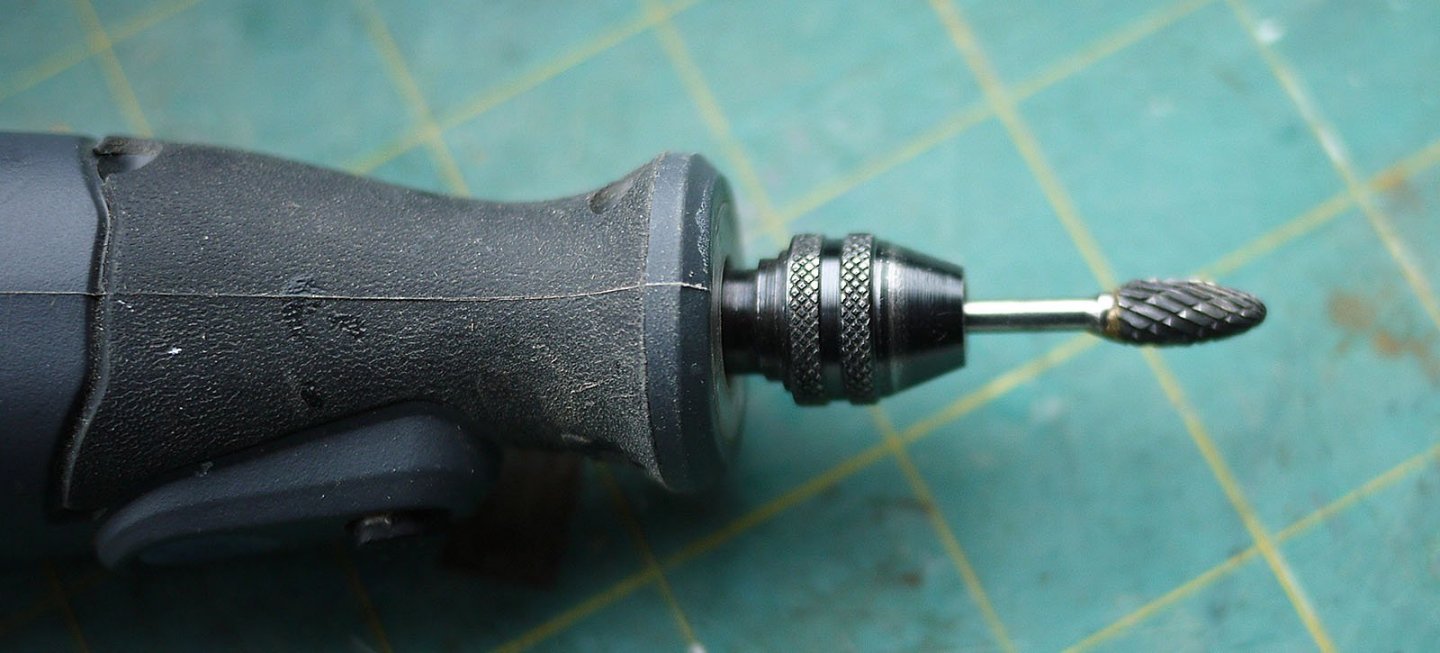
Hi Kevin, I bought a set of ten off ebay a few months ago, I thought that they may be useful at some point. The quality far exceeded my expectations for the price, they are true, very sharp and look well made. When I first tried cutting out the ports I hadn't thought of using these, in fact I'd forgotten about them as I had never used them. After trying and failing with just about every method I could think of to get a clean cut I tried these and what a revelation. I first drilled a pilot hole then used the domed router, using the lightest of pressure it cut through the three layers in about three seconds leaving a very sharp edged apeture with no need of touching up, the bonus was that router was the exact size for the brass porthole. Job done. Ken I've tried showing a screen shot of my ebay purchase but can't seem to be able to. They are described as tungston carbide, they cost £7 inc PP. there seem to be quite a lot of sellers for these so check them out. screen print.doc
-
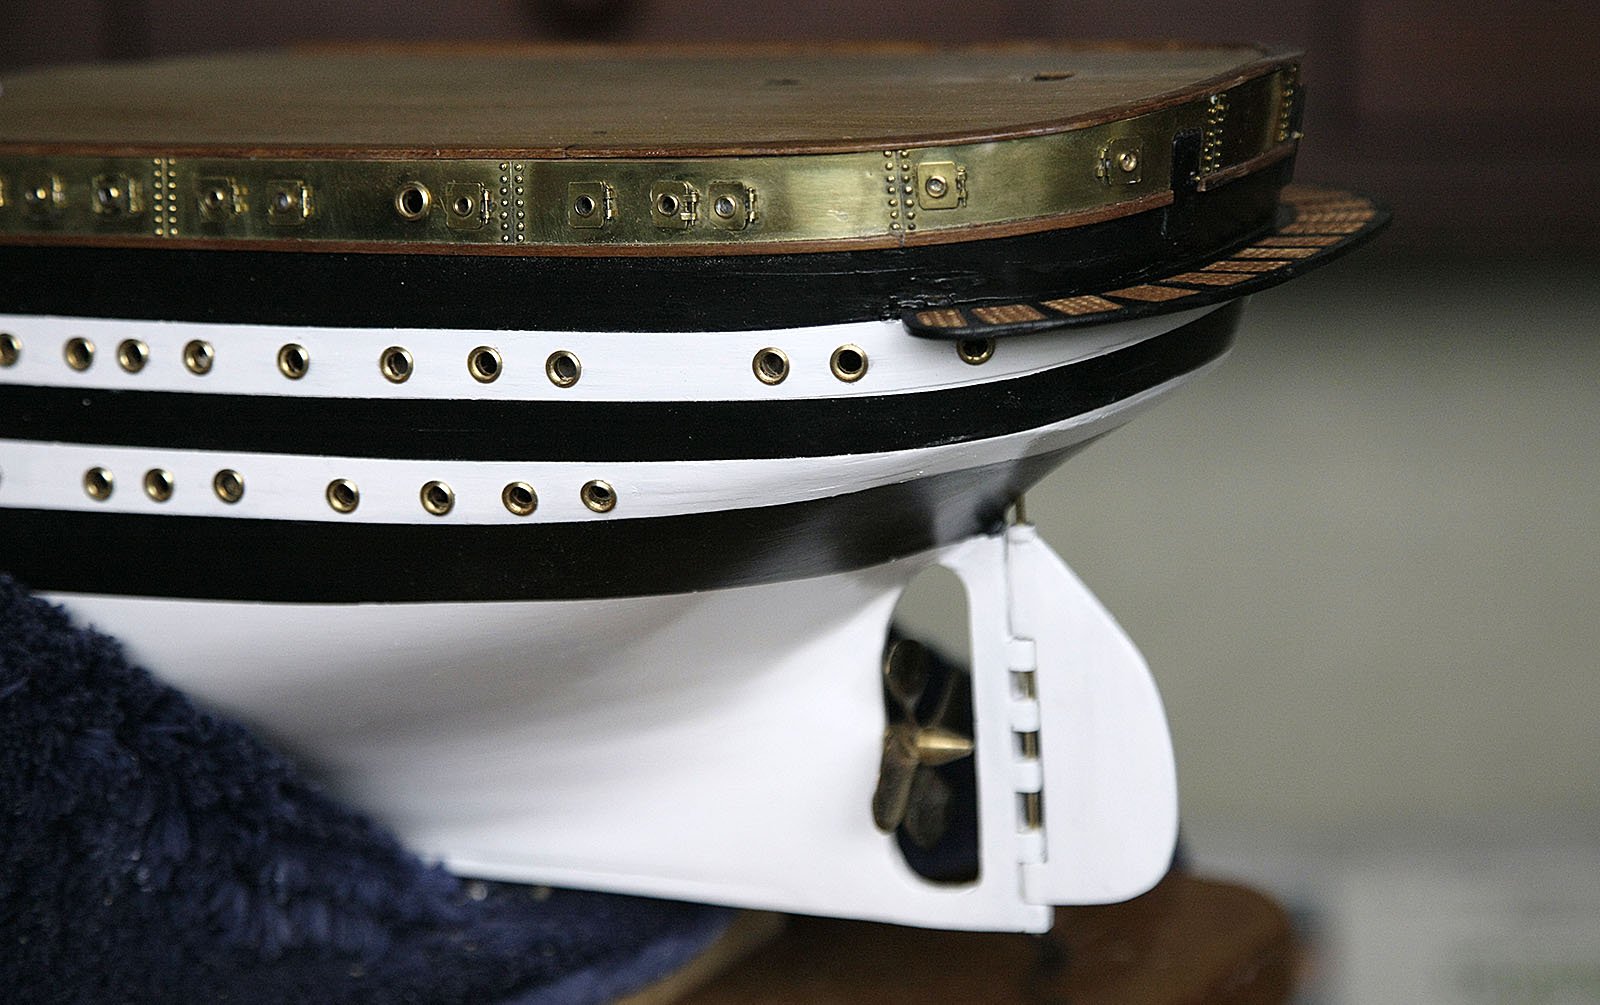
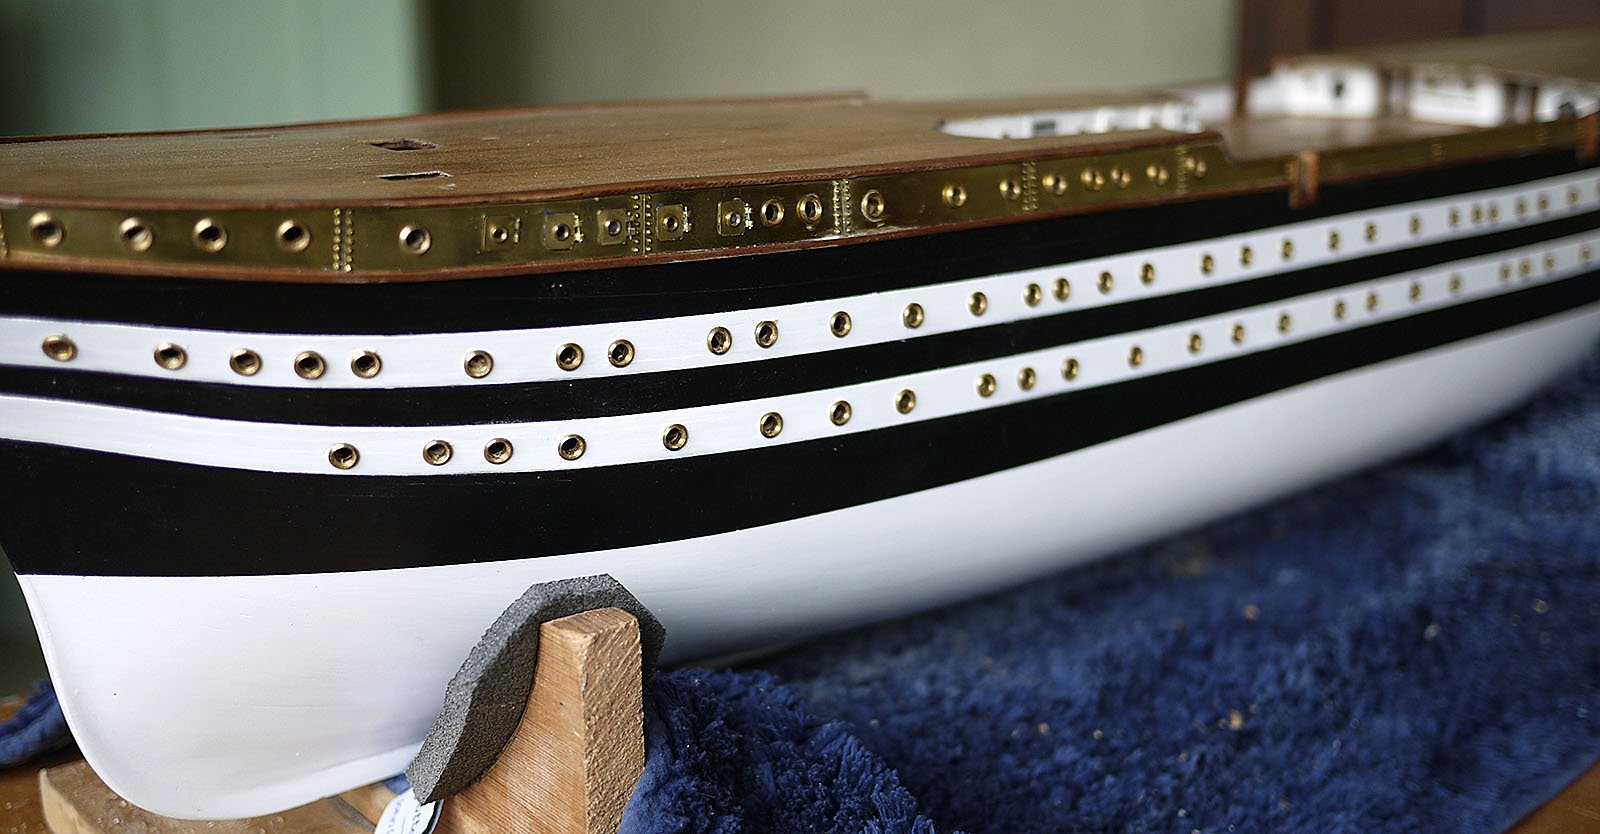
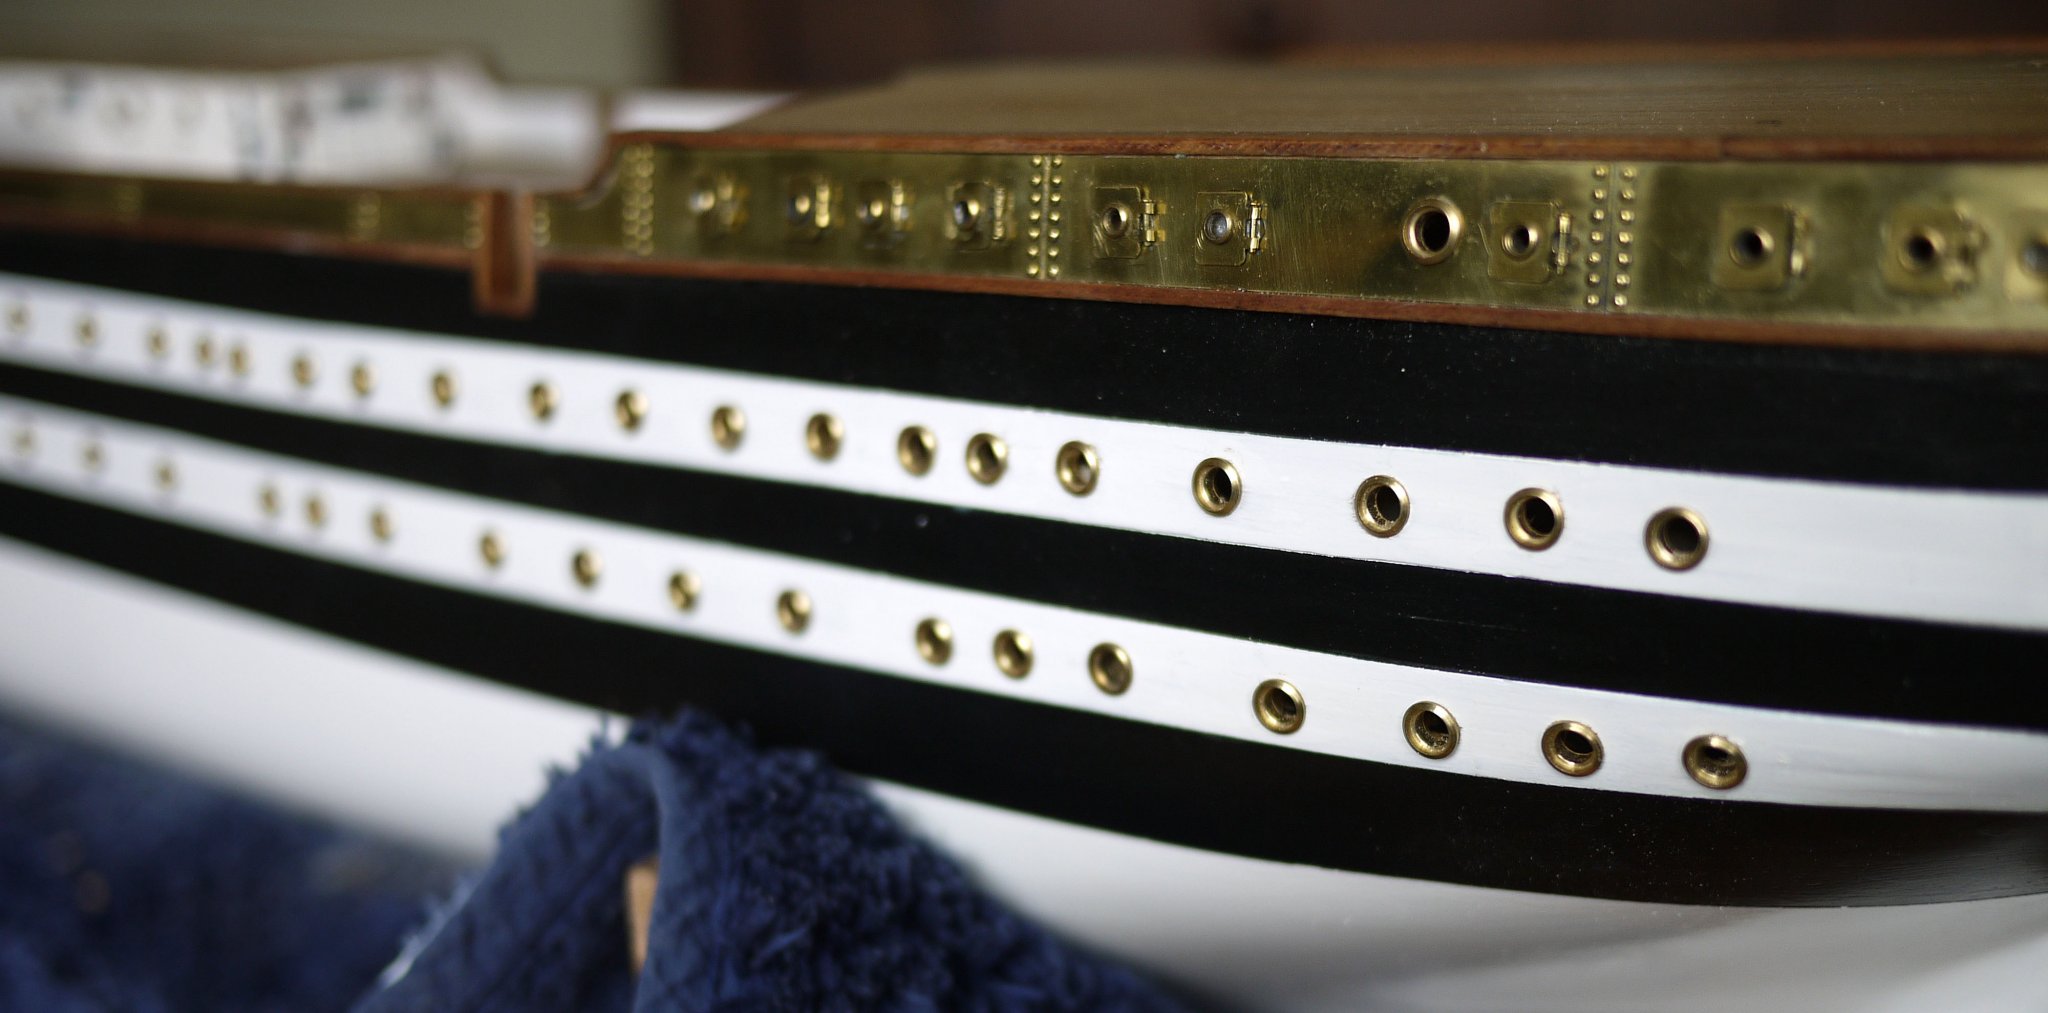
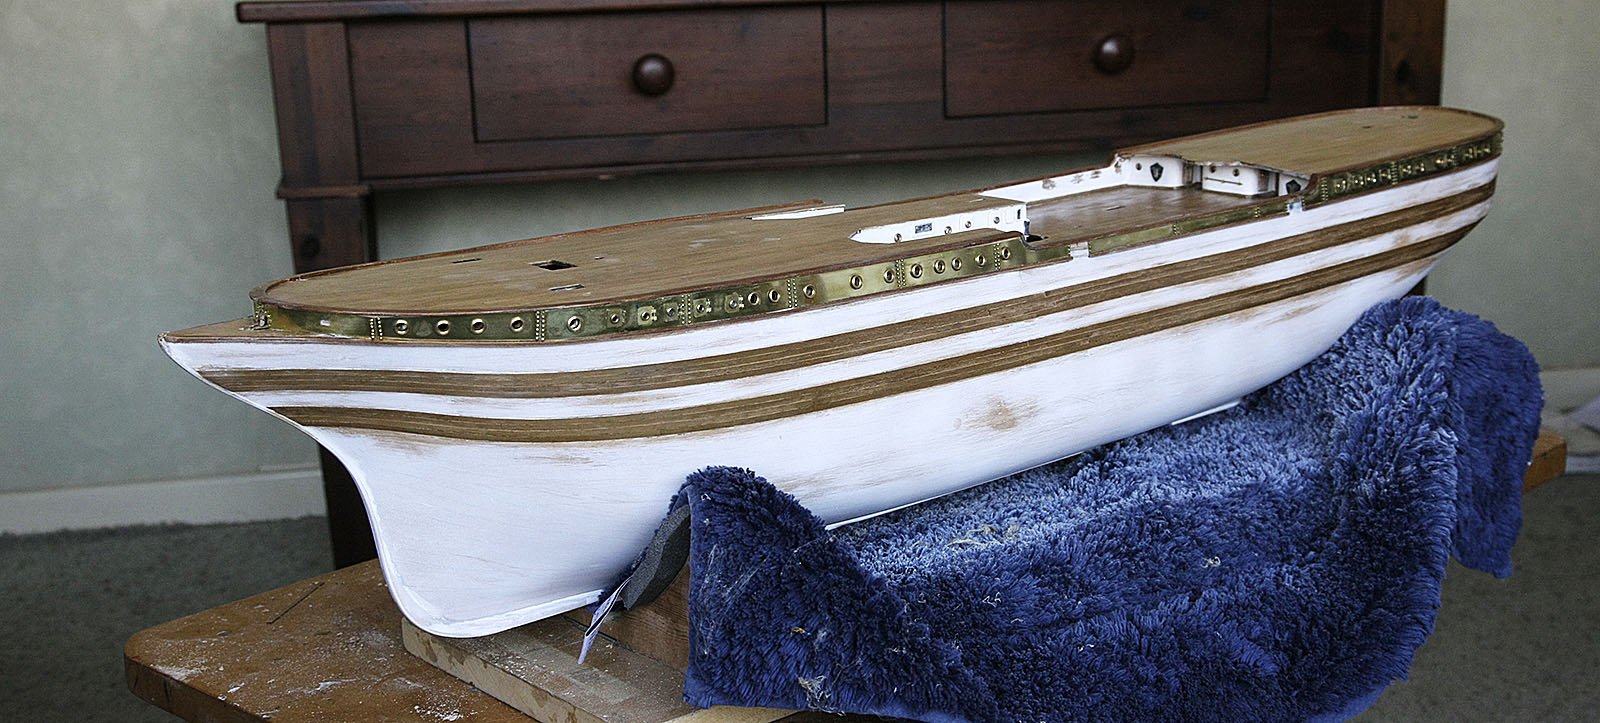
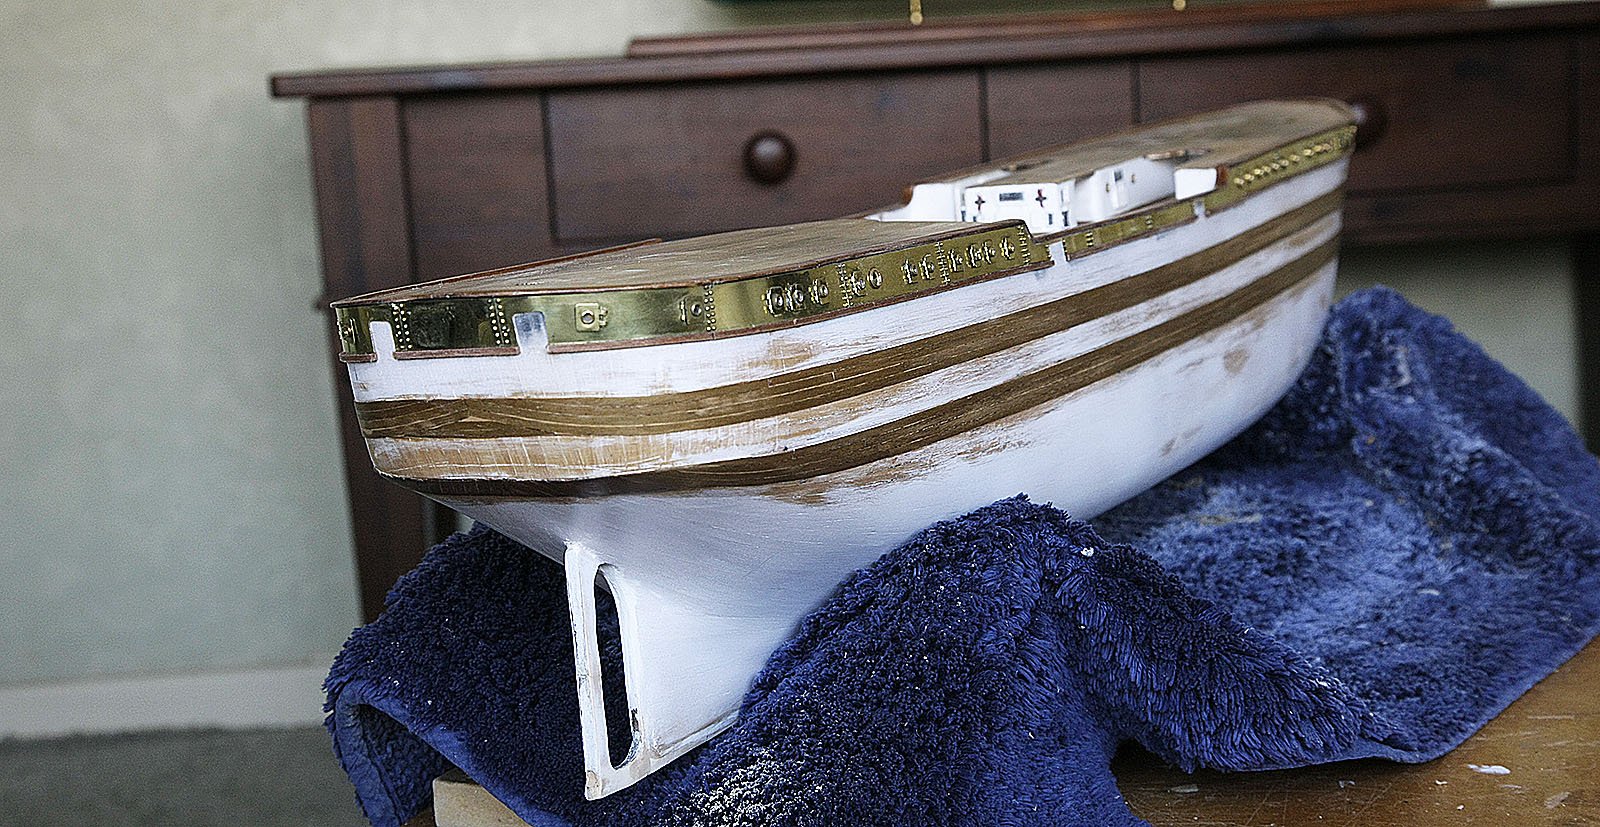
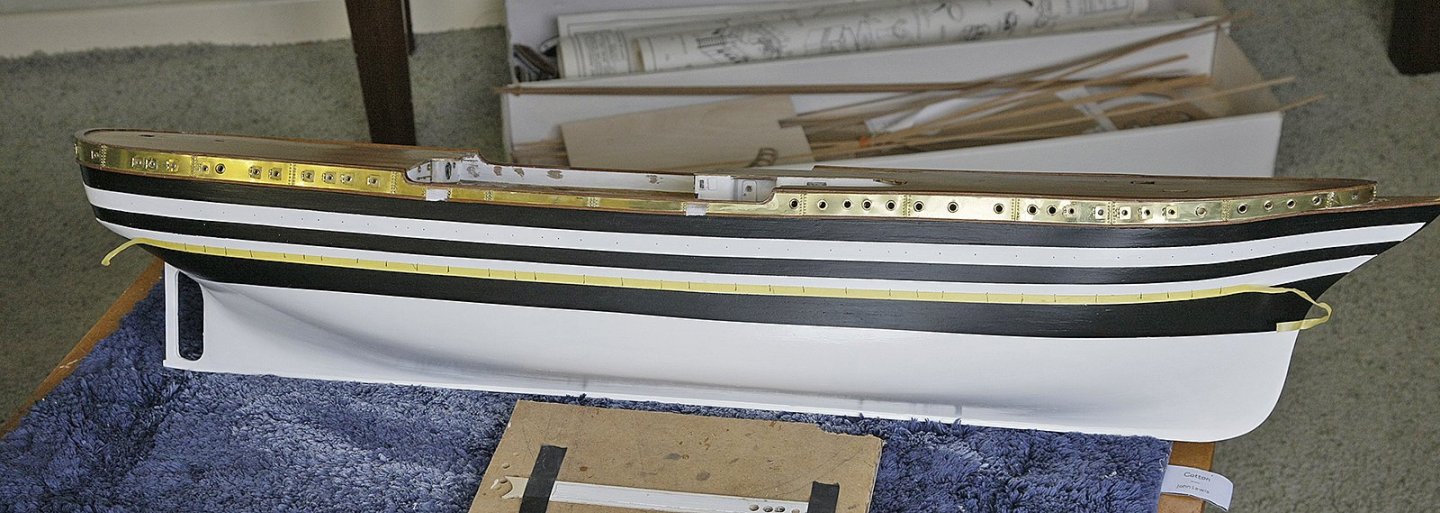
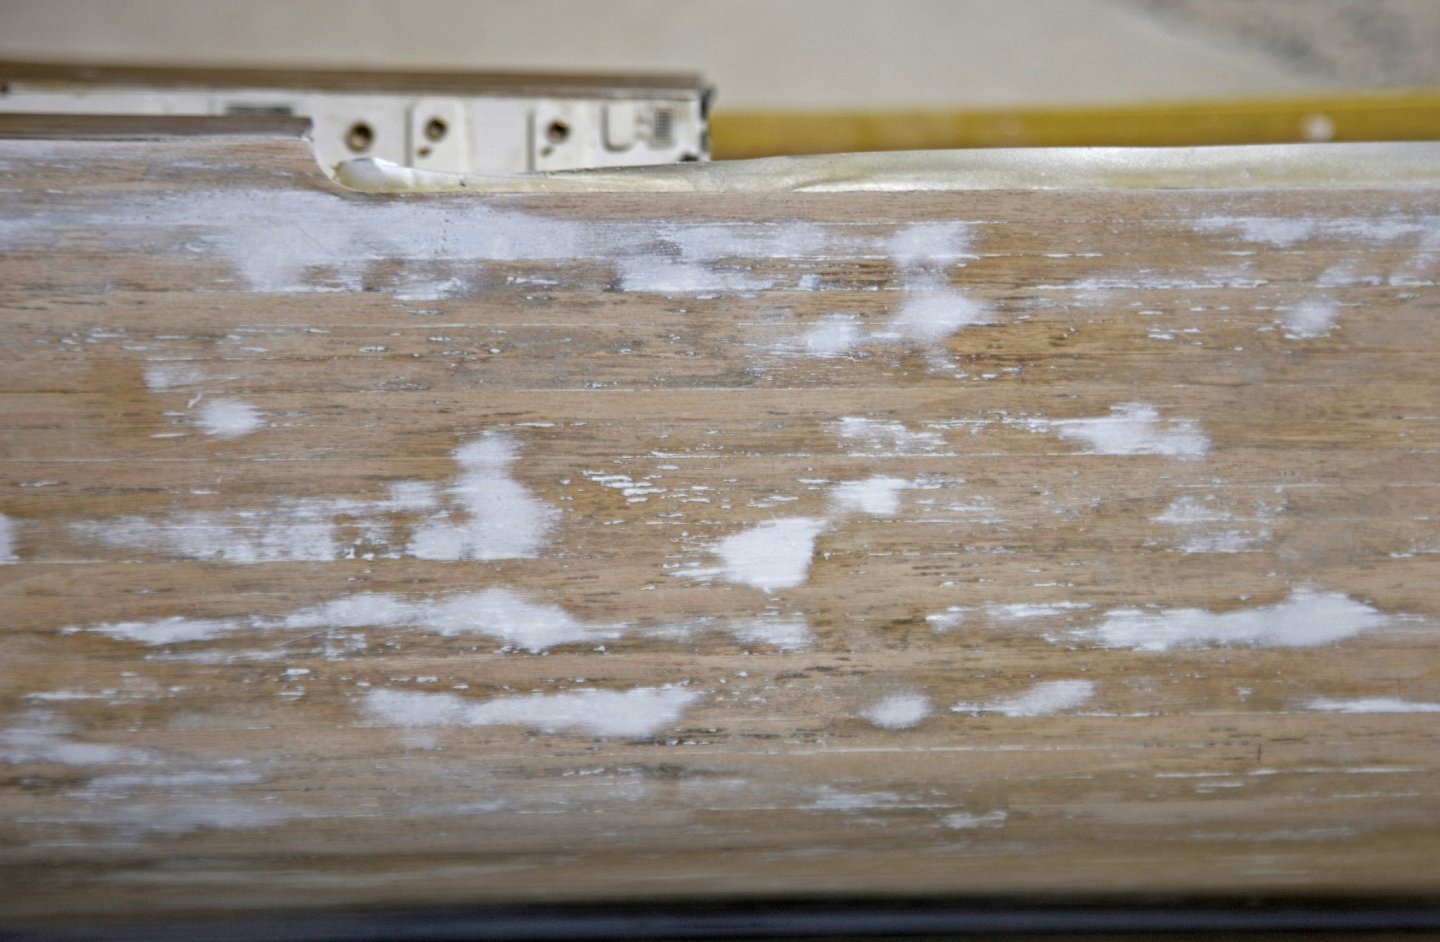
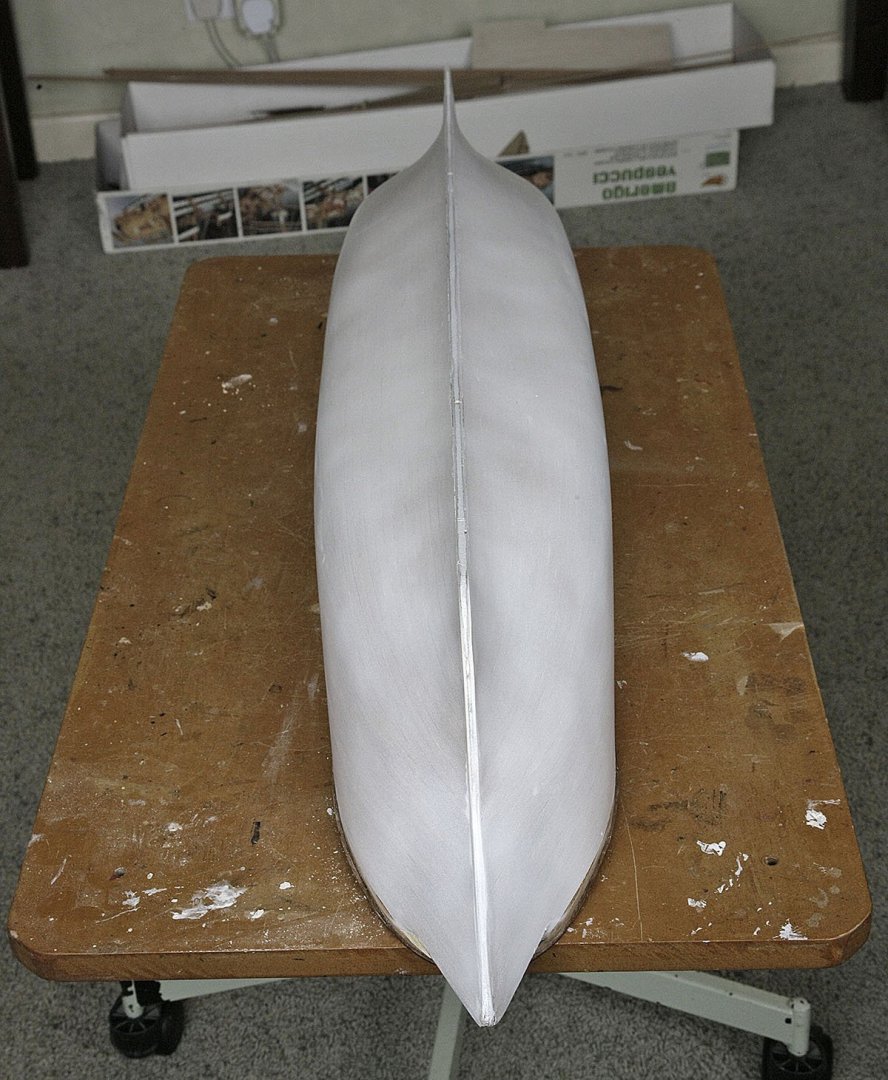
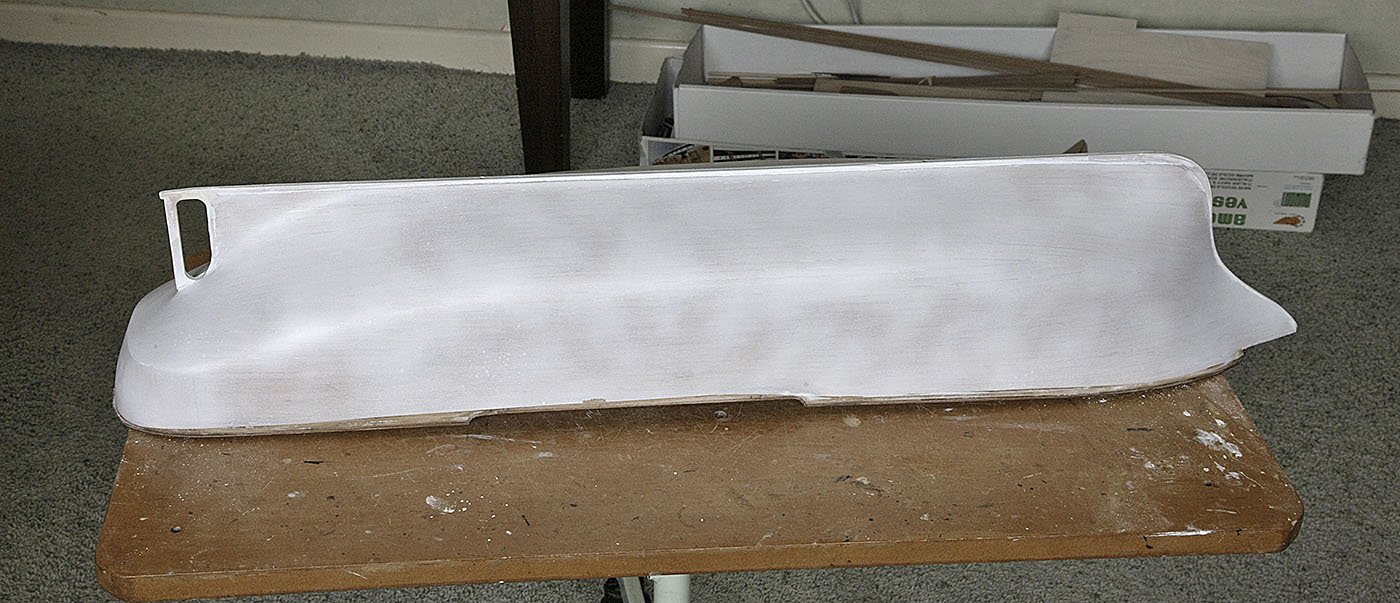
Hi, Again thanks for your likes. It was now time to decide how I was going to present the model with regards to its finished look. I’ve decided not to go with an authentic appearance, ie colour scheme and fittings, but go my own way for an aesthetic but none authentic display. I like the unpainted look of the brass plating and just the black and white hull, no anti foul bottom. I’ll also leave the rails and stations in brass and introduce as much mahogany as I can get away with, who doesn’t like brass and mahogany on a boat. I have made quite some progress recently; I have finished painting the hull and fitted all the port holes, though not without issues. I sprayed the hull with an acrylic undercoat then used Humbrol satin enamel for the white and Caldercraft dull black acrylic for the rest. I did two coats of white using a 1\2 in flat brush, I find that the enamel is self levelling and the finish looks perfect for this type of hull, I thin the black about 50-50 with water and put on about 7 coats, being this thin the coats dry quickly and leave no sign of brush strokes. I used Tamika masking tape, after putting the tape on I paint a watered down acrylic varnish along the edge, this seals it and there is no paint seep so the edge is perfect. I’m delighted with the finish that I achieved I don’t think that I could have improved on it. Then came the portholes, I transferred their position from the plans. To start with the drilling out of these was a disaster, the side strips being only .5mm thick just tore at the edges and split, I tried small, large, blunt, sharp drills, I tried filing them out, all with the same result, it wasn’t until I tried using a cone shaped router then things improved, a perfect aperture with ease every time, it ground it’s way in rather than cut so no tares or splits thank goodness. I repaired the ruined strip and painted them again, after that things went well which was a good job as there were well over 100 to be done. I fitted the brass portholes to finish off. I’m sorry that I didn’t photograph the actual progress but I got too involved with the job in hand so all you have is the end result Ken


-
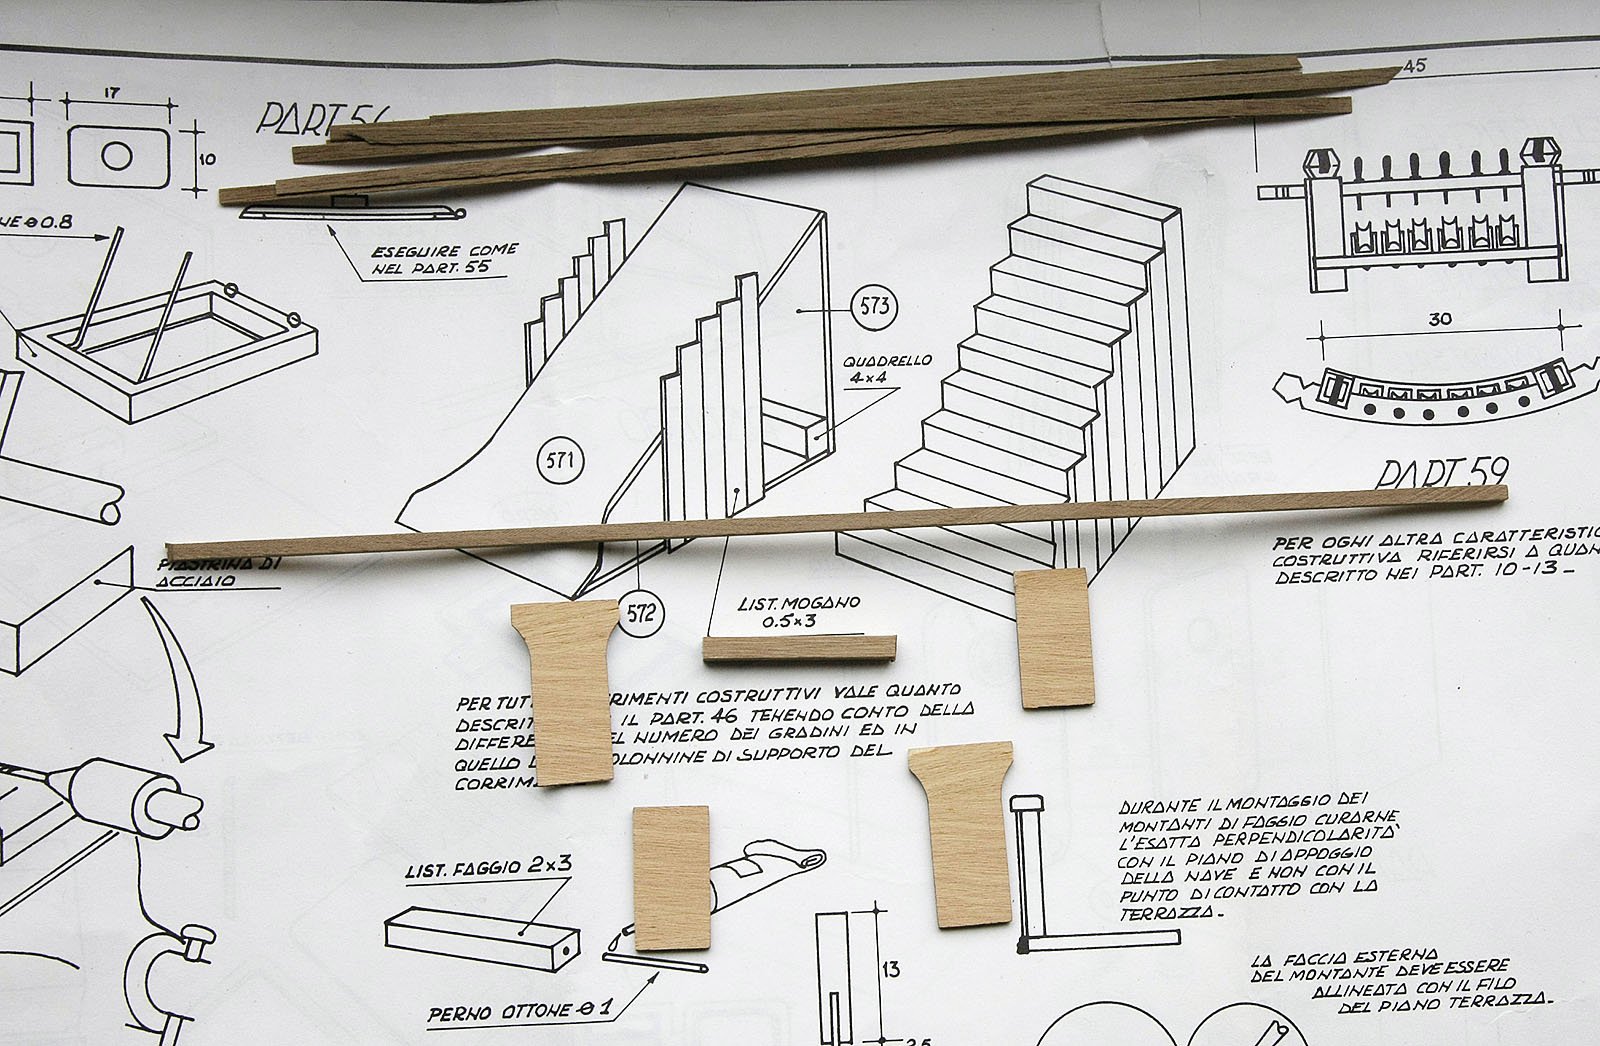
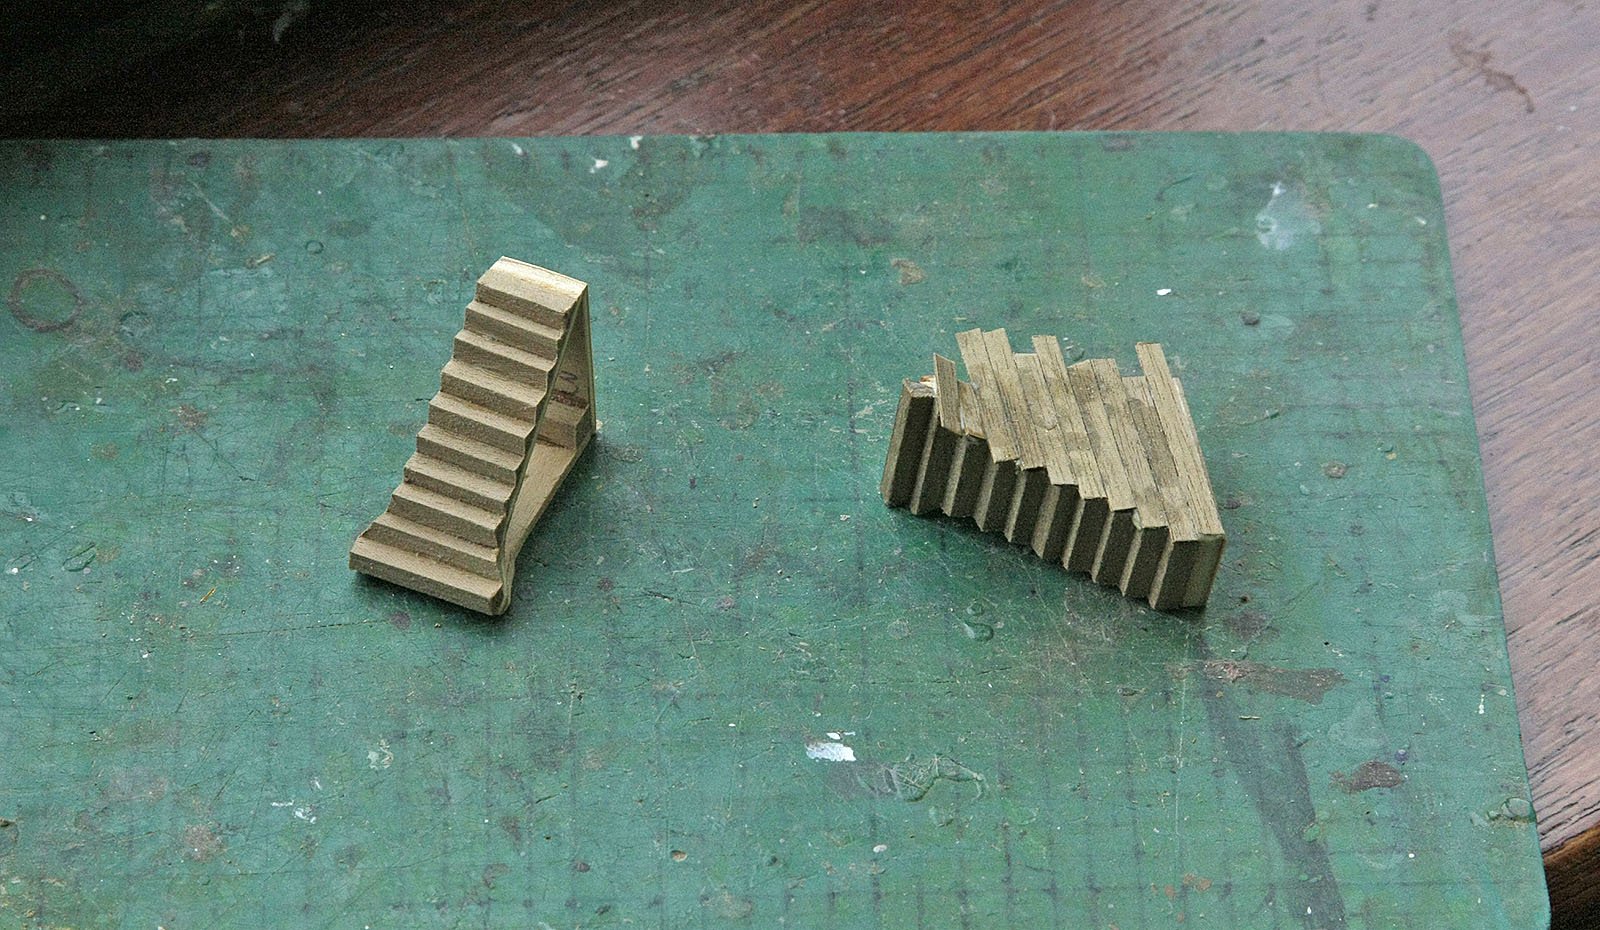
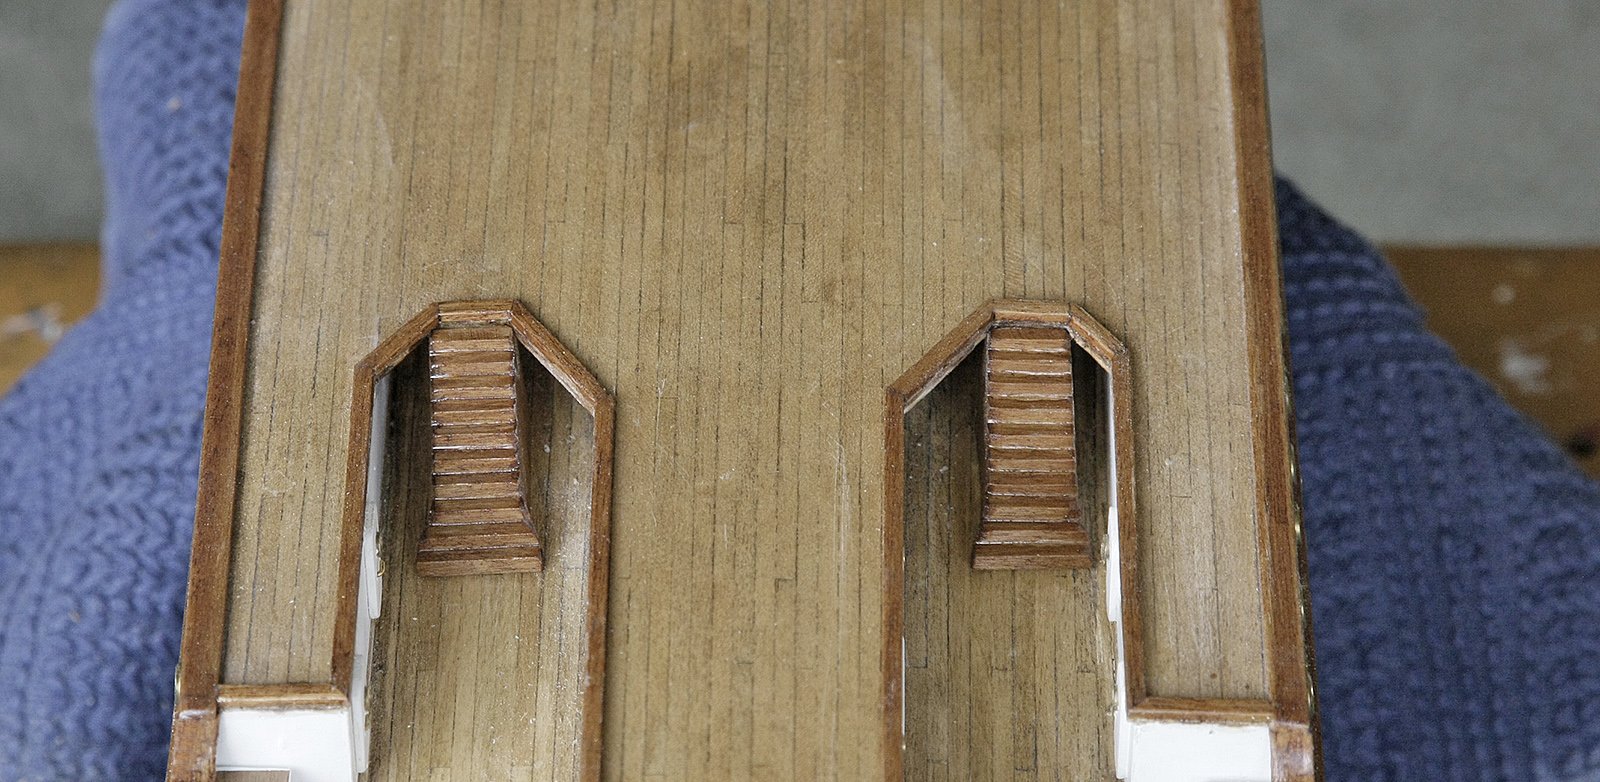
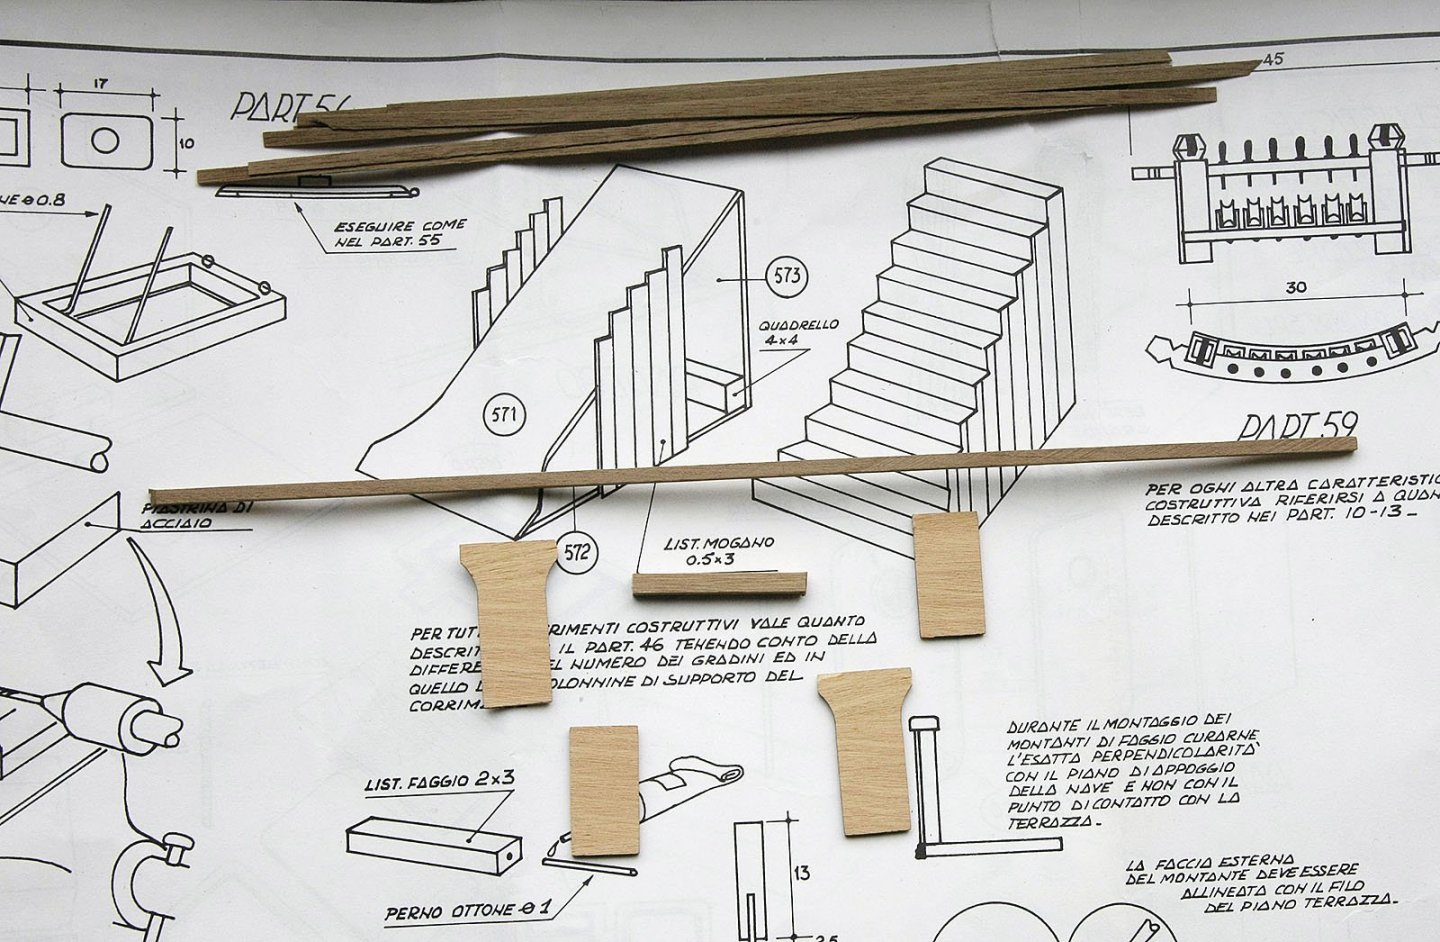
Hi, Another short update on my build. I was going to start painting the hull but again got sidetracked. I decided to make up the staircases, a small, not difficult project. I don’t think that any explanation is needed as the pictures show the whole process. I’ll add the handrails once they are fitted in place on the deck. Ken


-
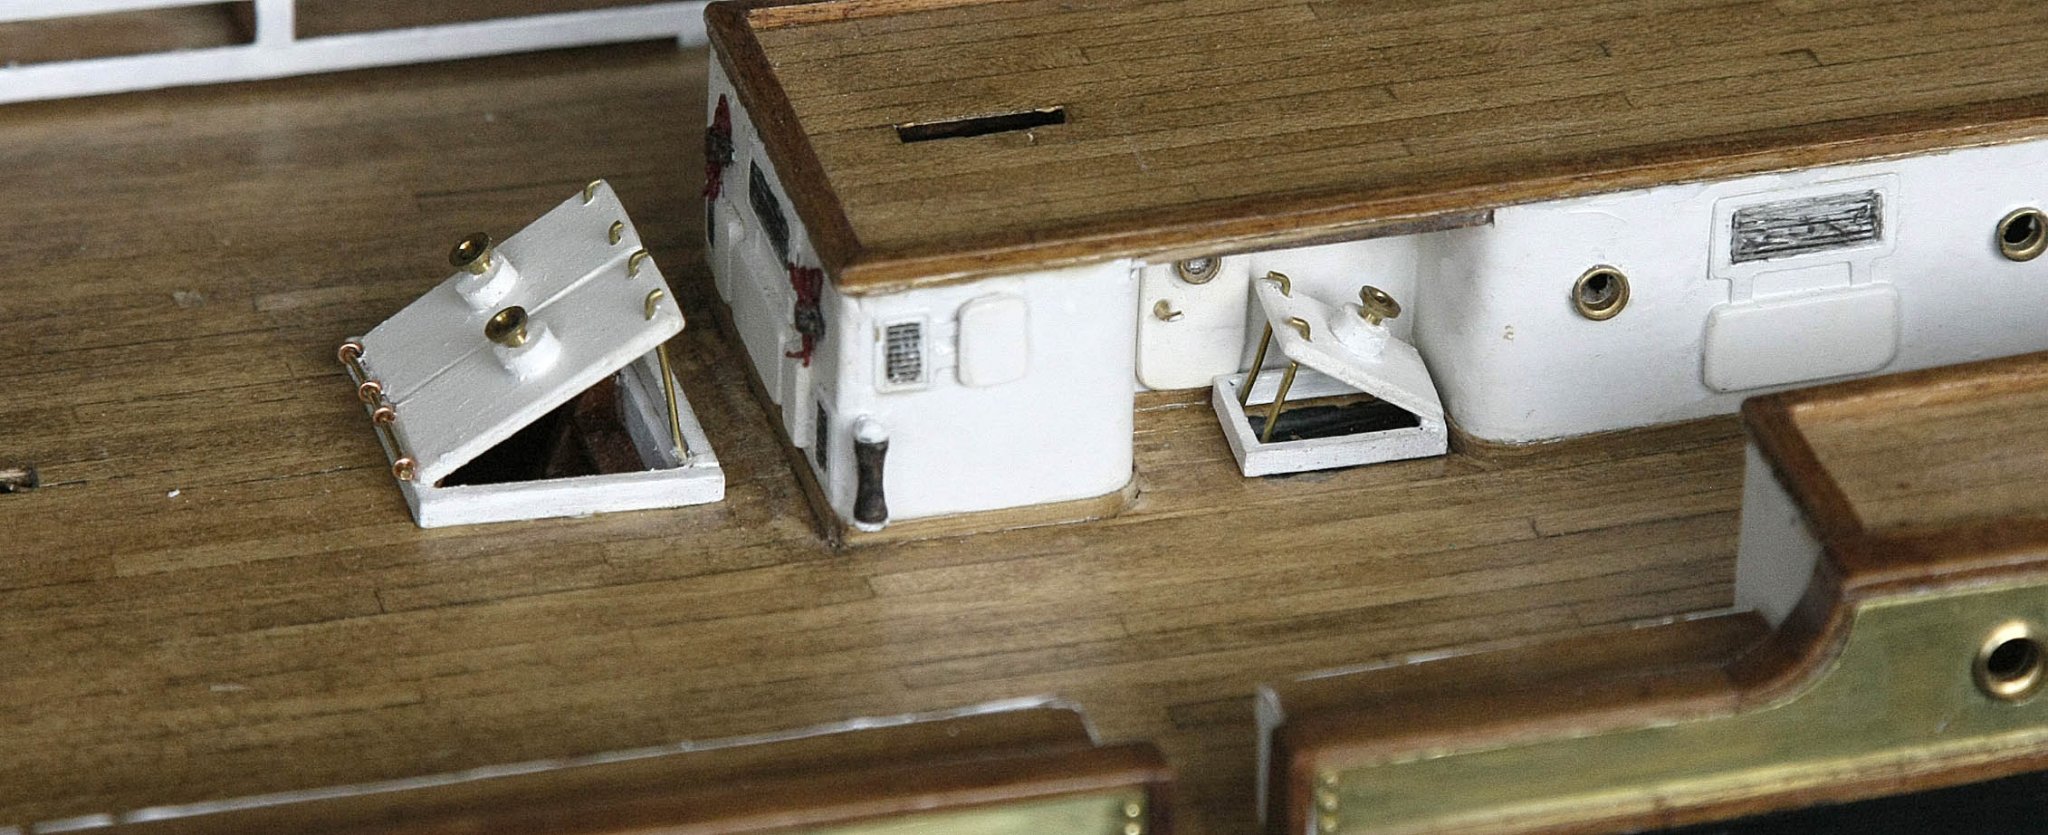
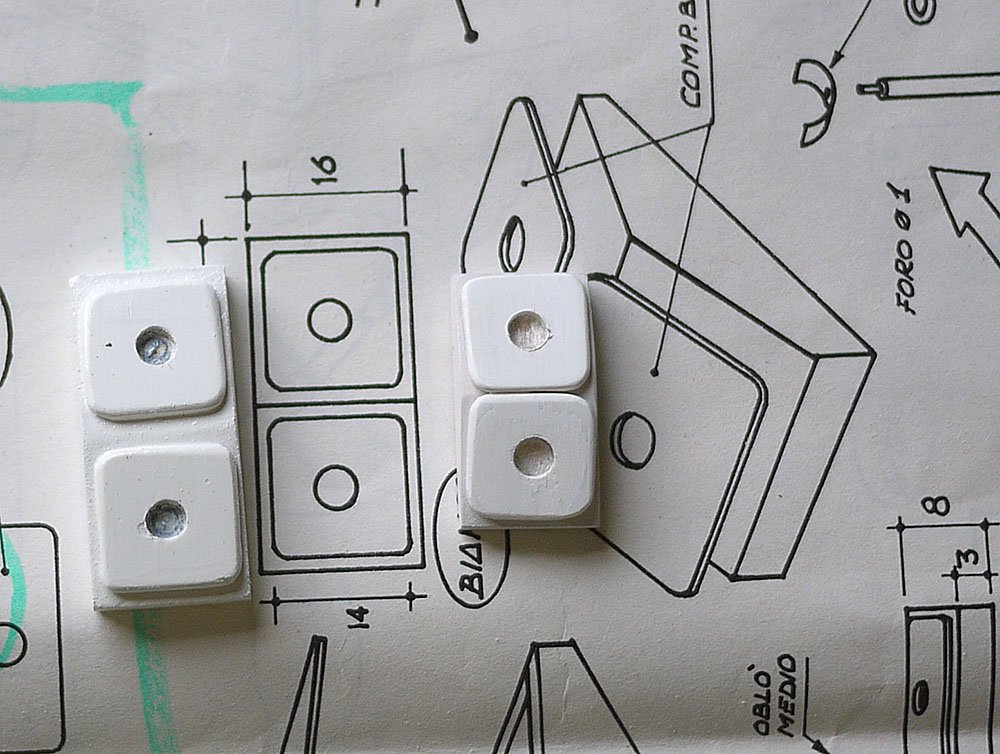
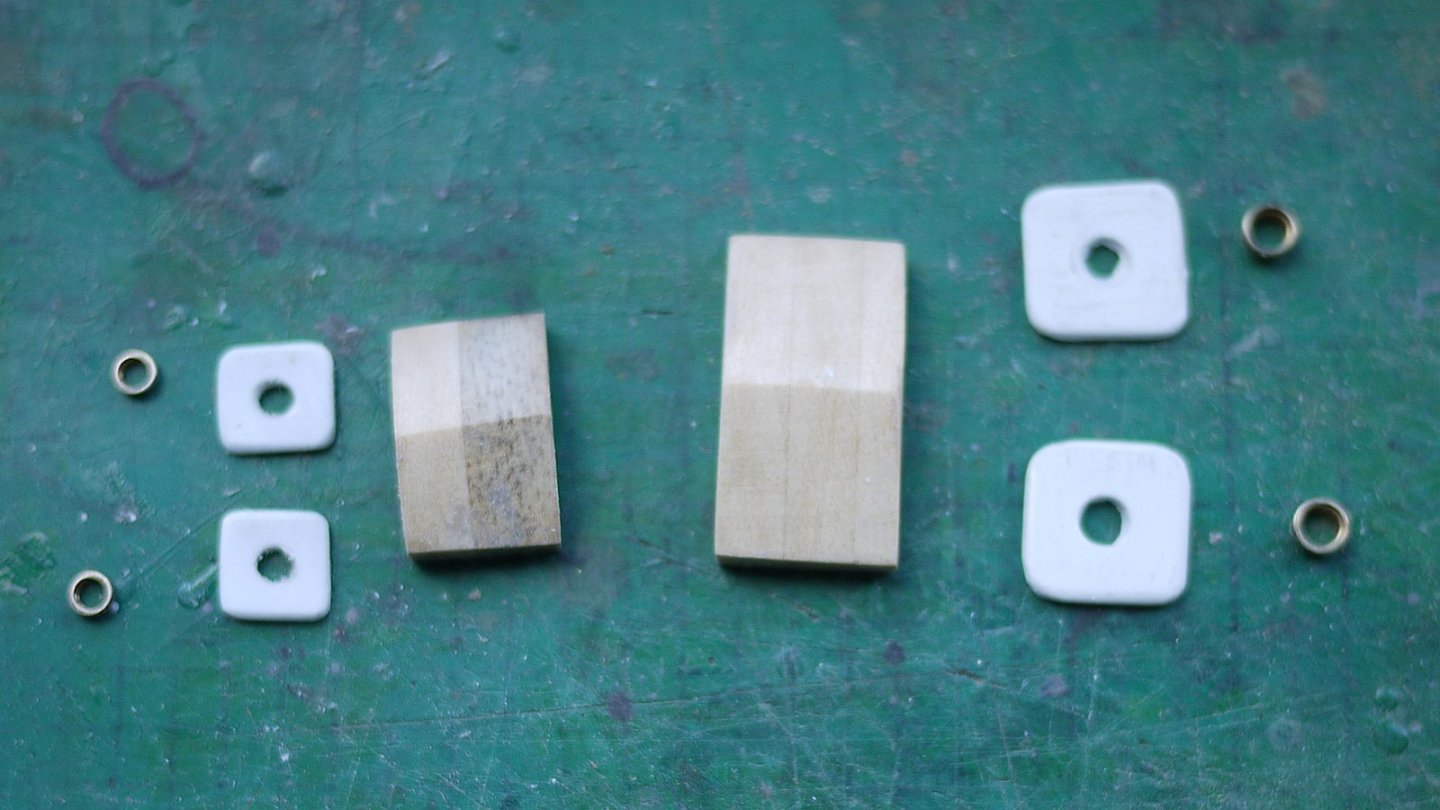
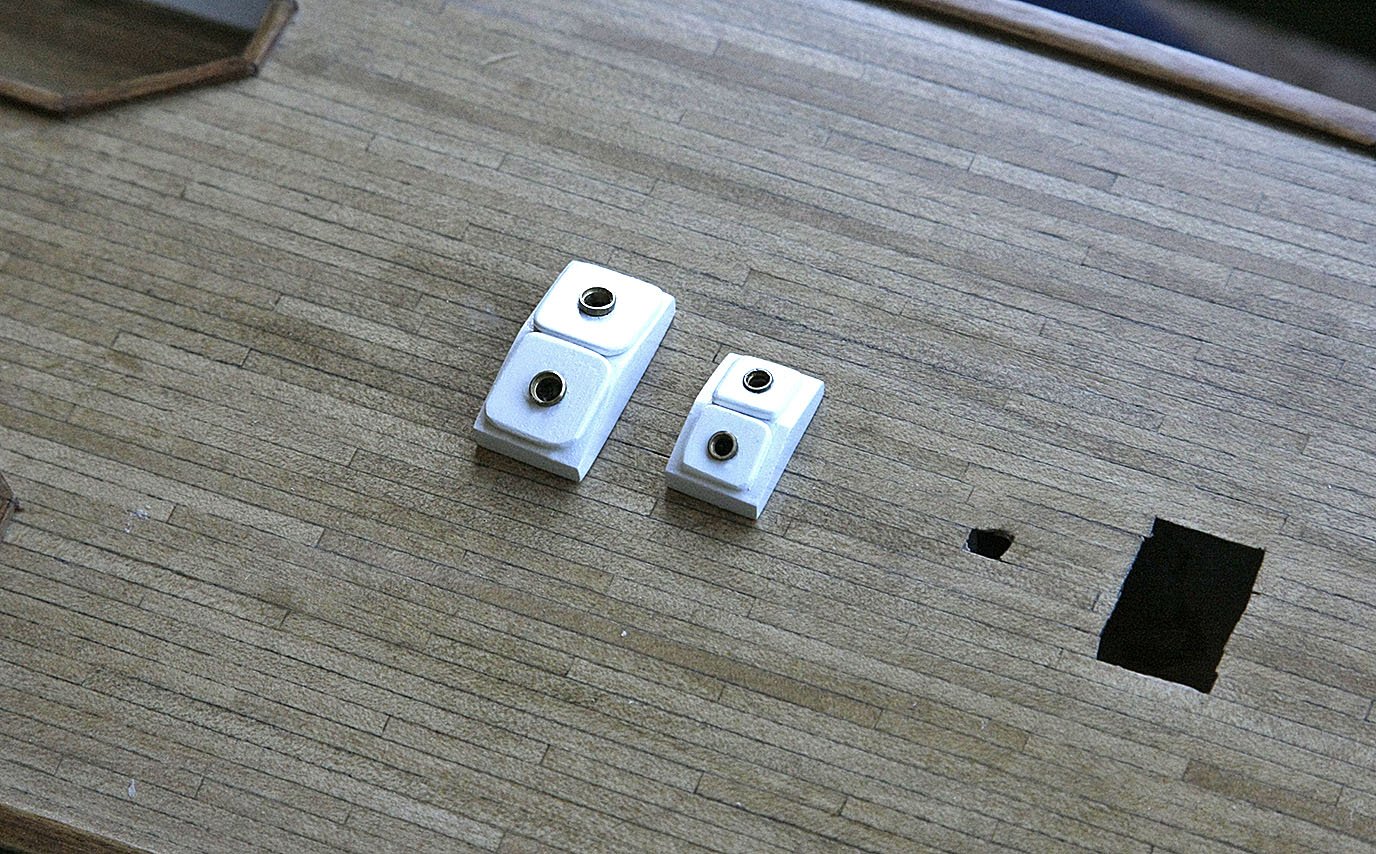
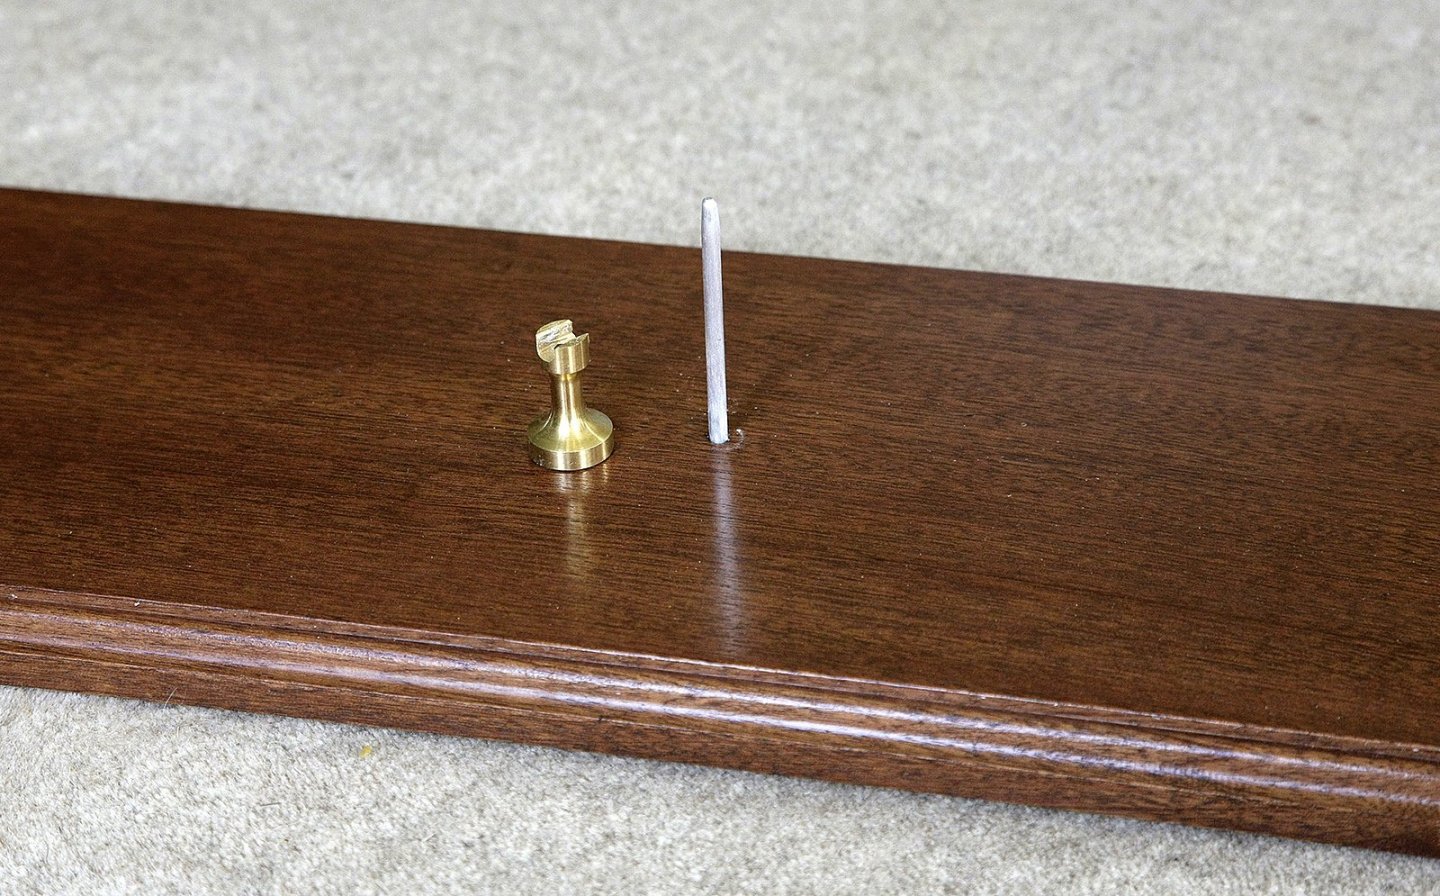
Hi, Thanks for your likes and comments. As a slight change to doing the hull I thought that I would try and do one of the many small parts that make up this boat, a skylight. I learned what could well be a valuable lesson. The plans are entirely in Italian with no translation but they seemed simple enough. I made the skylight over the plan, I thought that I had made a good job until I placed it on the deck, it looked too big. On checking I found that not all parts of the plans are to scale!! I had to make it again but this time using the measurements given. The picture shows on the left the skylight that I made over the plan and the one on the right shows it made using the given measurements, quite a size difference but a warning to be more aware during the rest of the build. I've now finished the first of the many deck fittings, a couple of skylights, ( the correct size ) The hull has been prepared for painting and I'll do that soon. I feel that the model is starting to become interesting. I have also been preparing the base for displaying the model for a few days, mainly waiting for the sealer and varnish to dry. I got a piece of sapele from my local wood yard, and routed the edge. After sanding I tried some dyes on the underside to get the shade that I wanted, light teak was my preferred, I sealed it then a couple of coats of poly finished it off. The columns are Amati which I got from Cornwall Model Boats, they were quite cheap, they are pre drilled, the rod is from one of my wife’s knitting needles, she doesn’t know yet! Ken
-
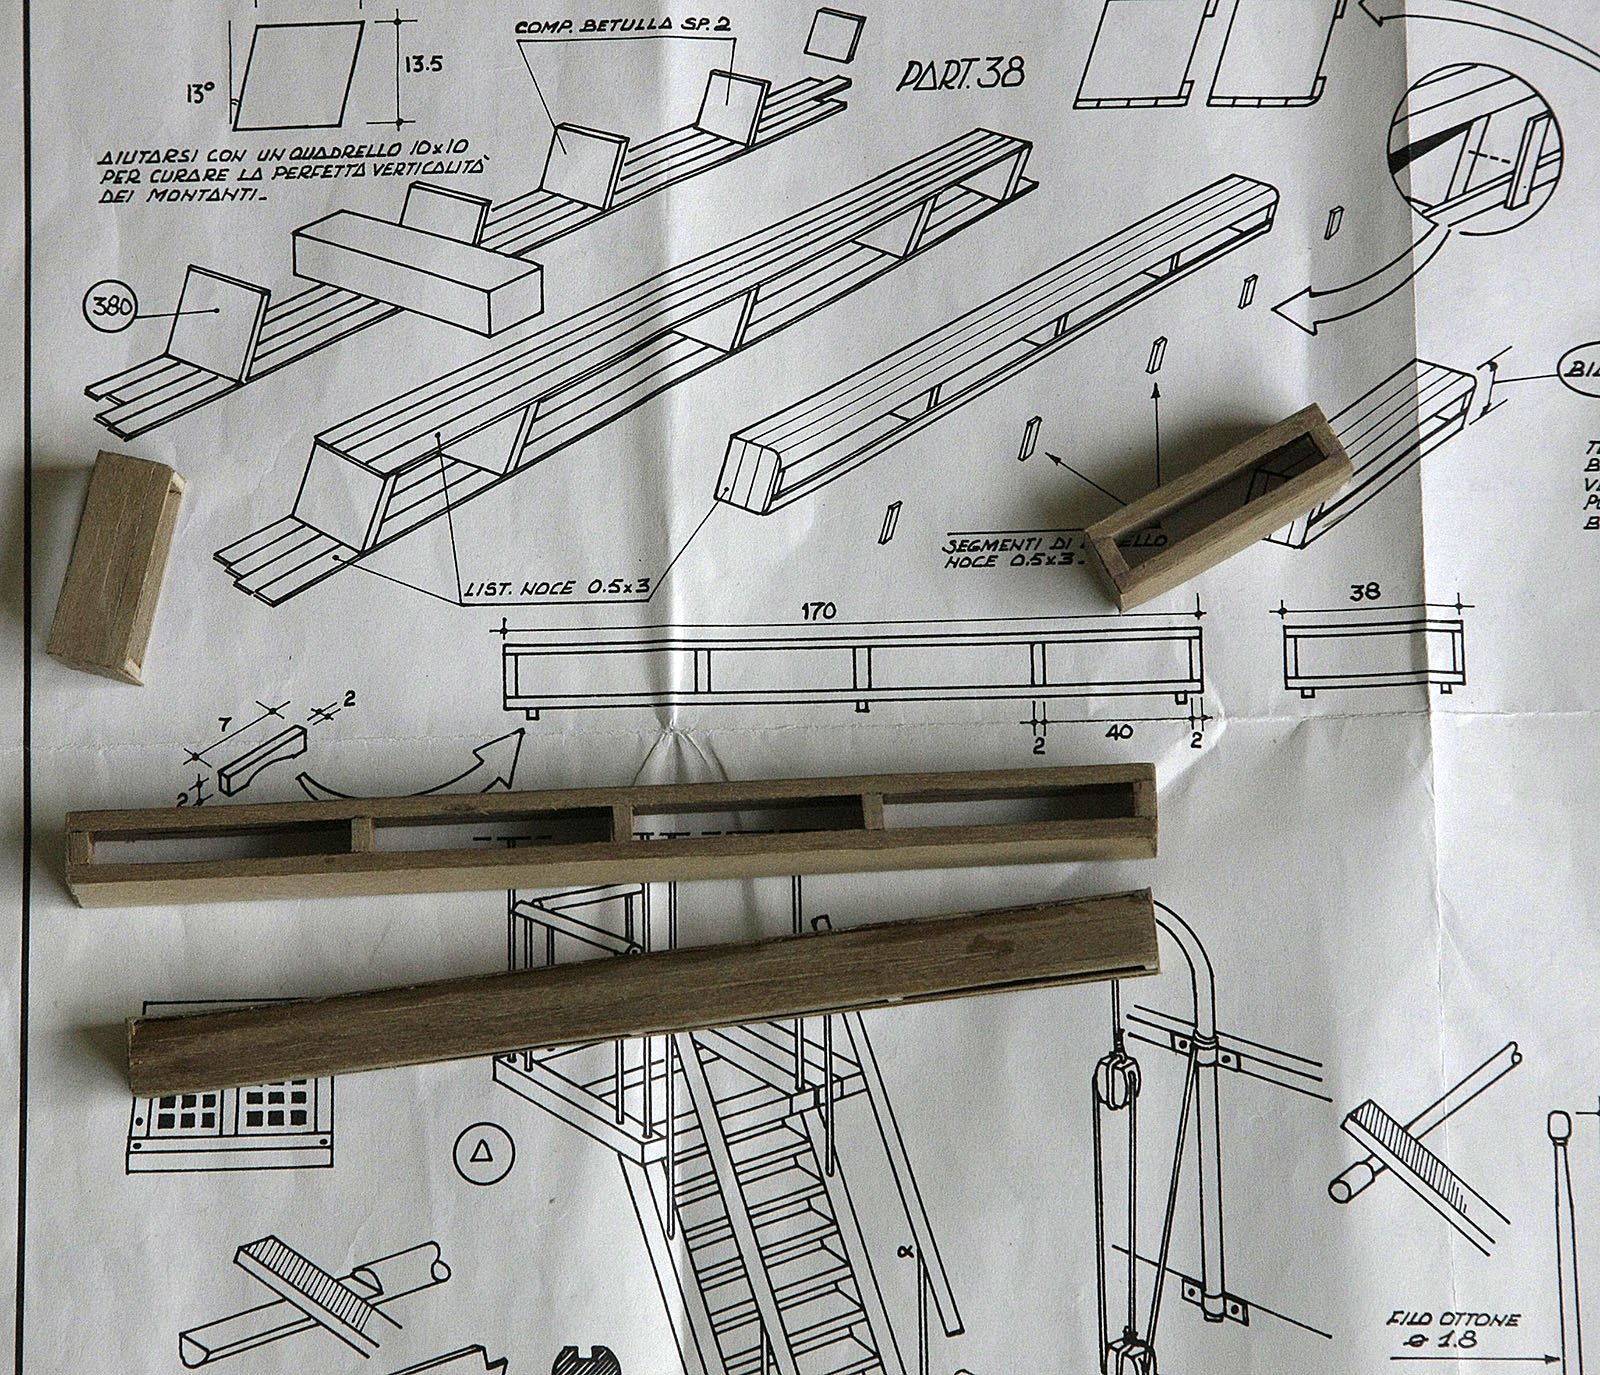
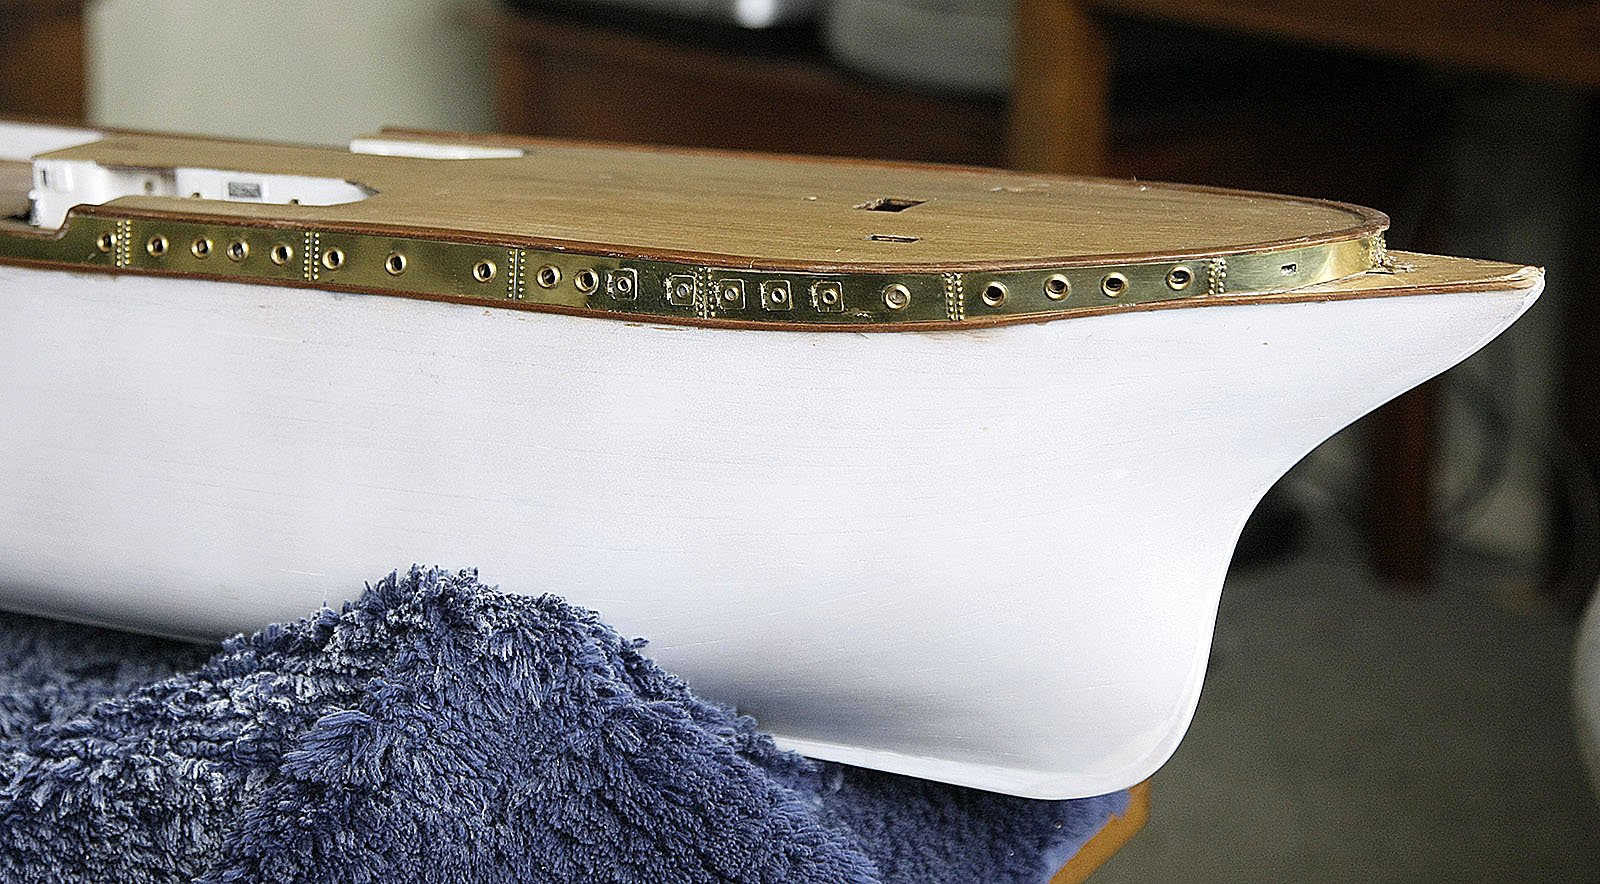
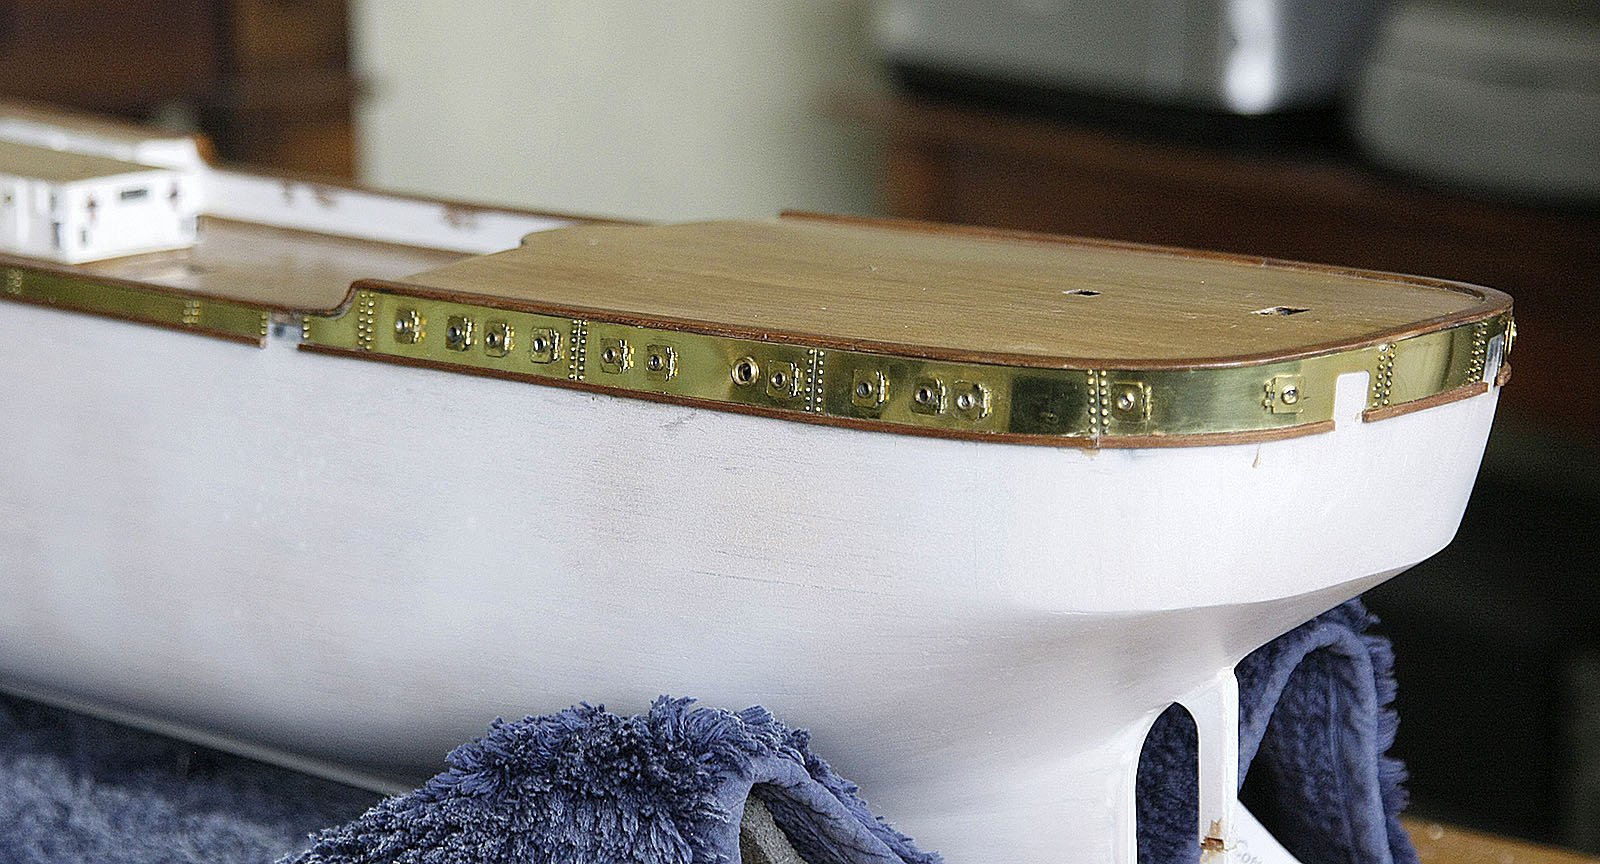
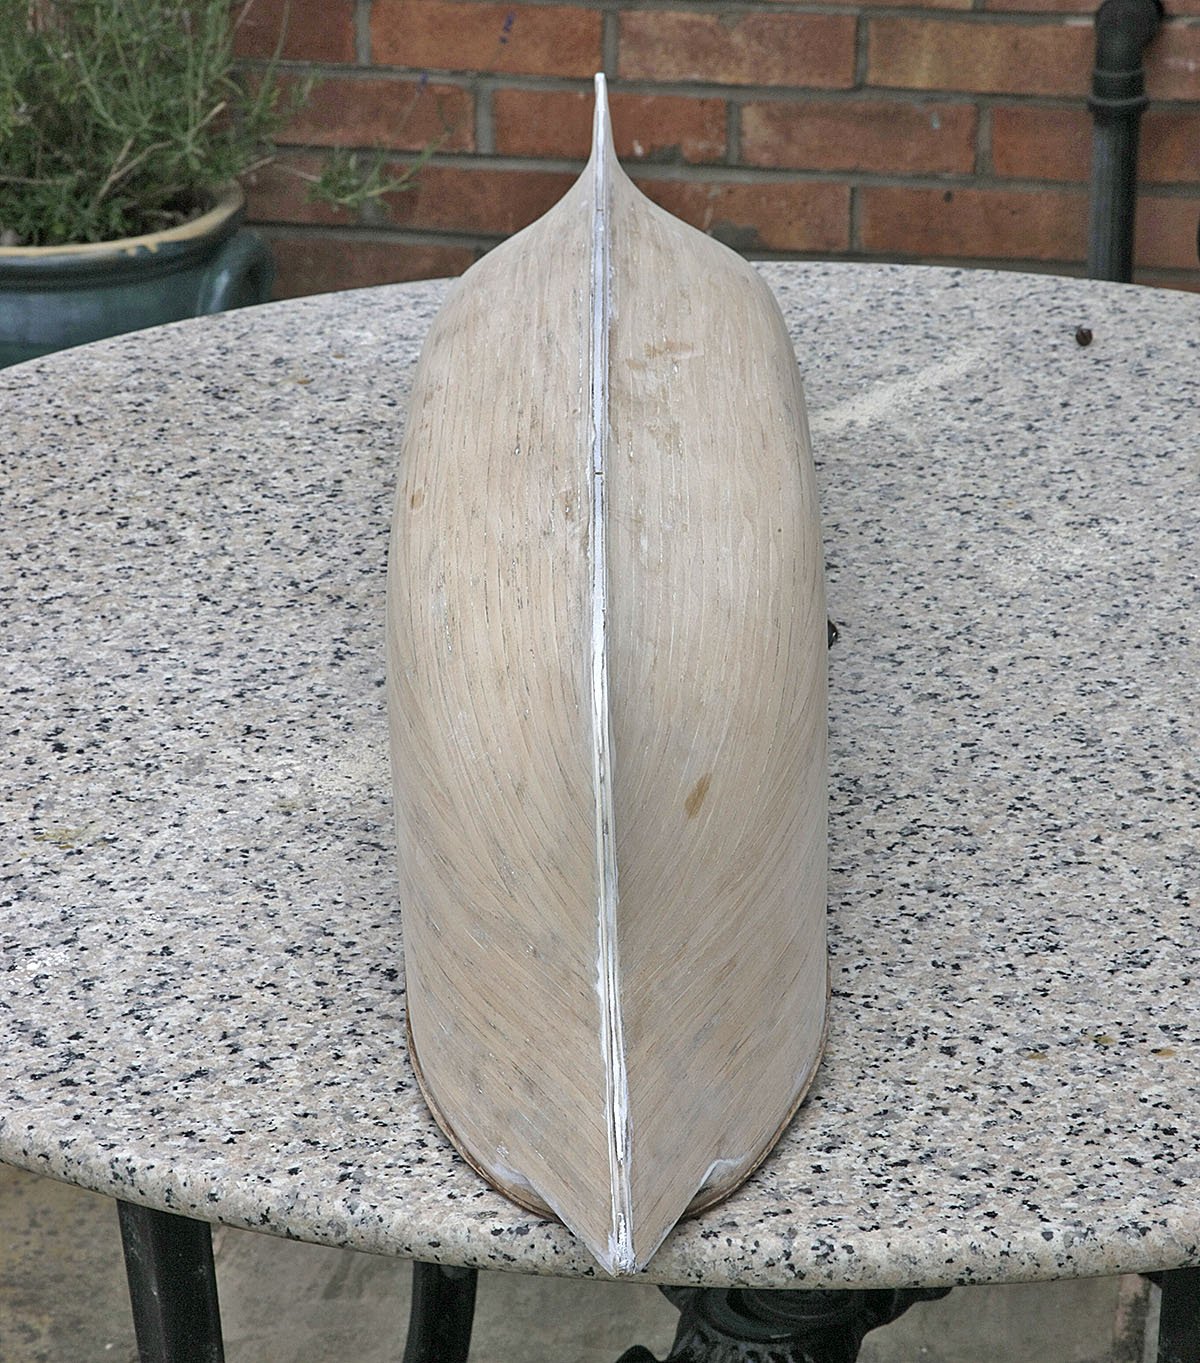
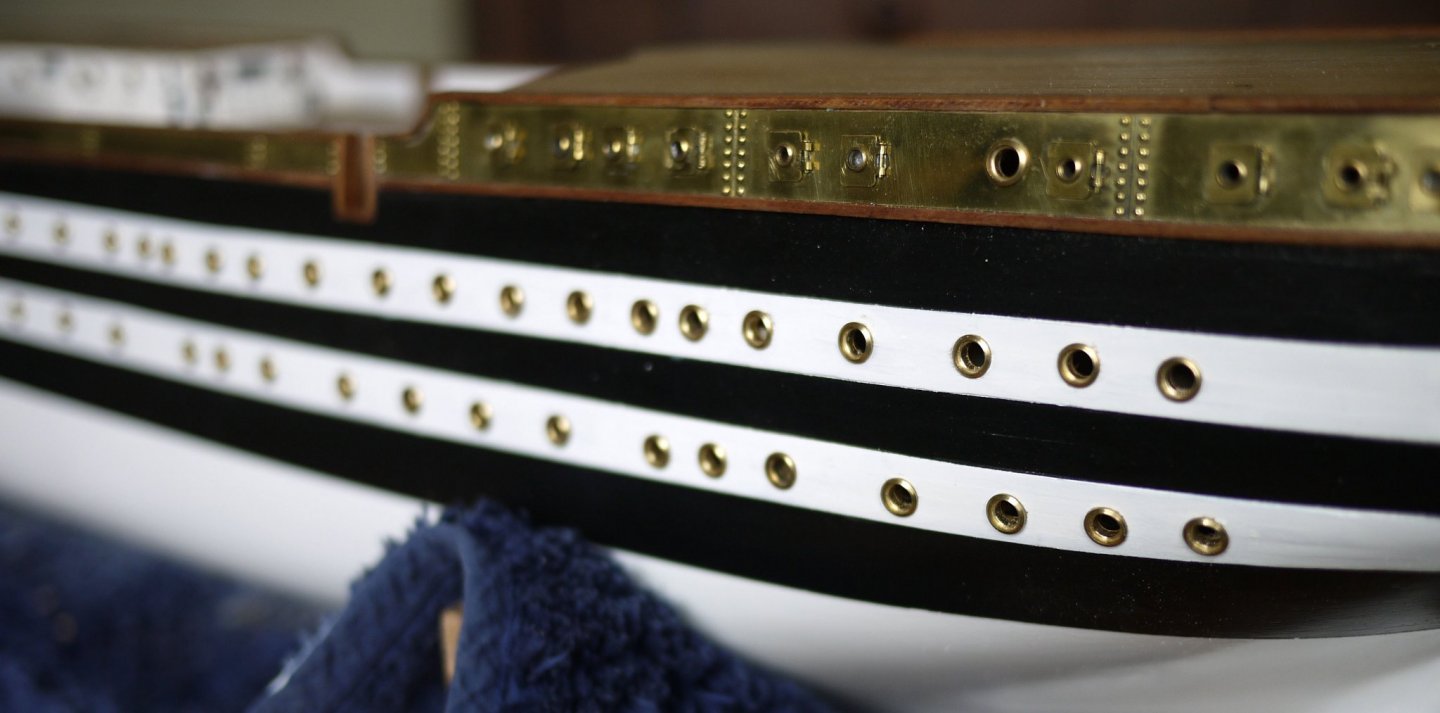
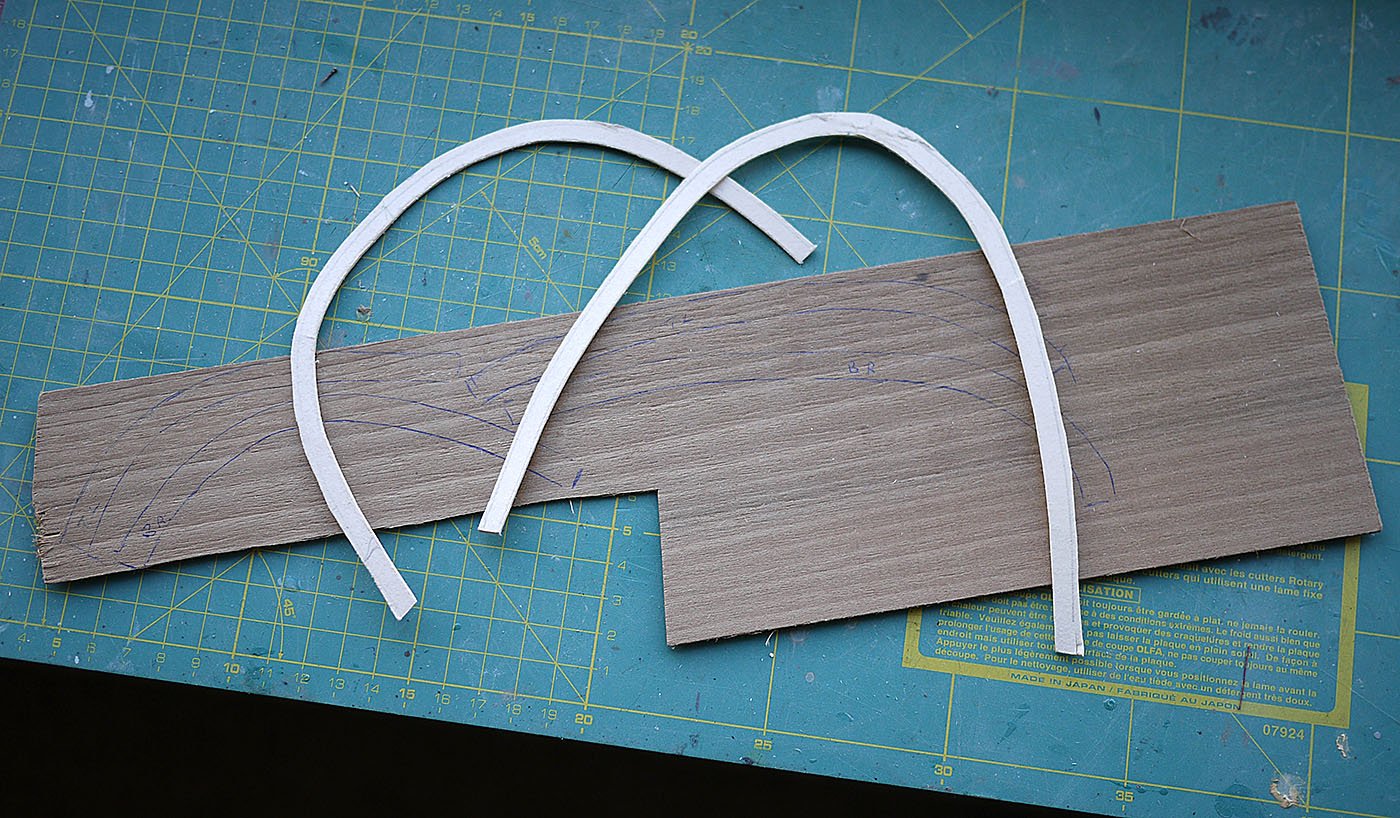
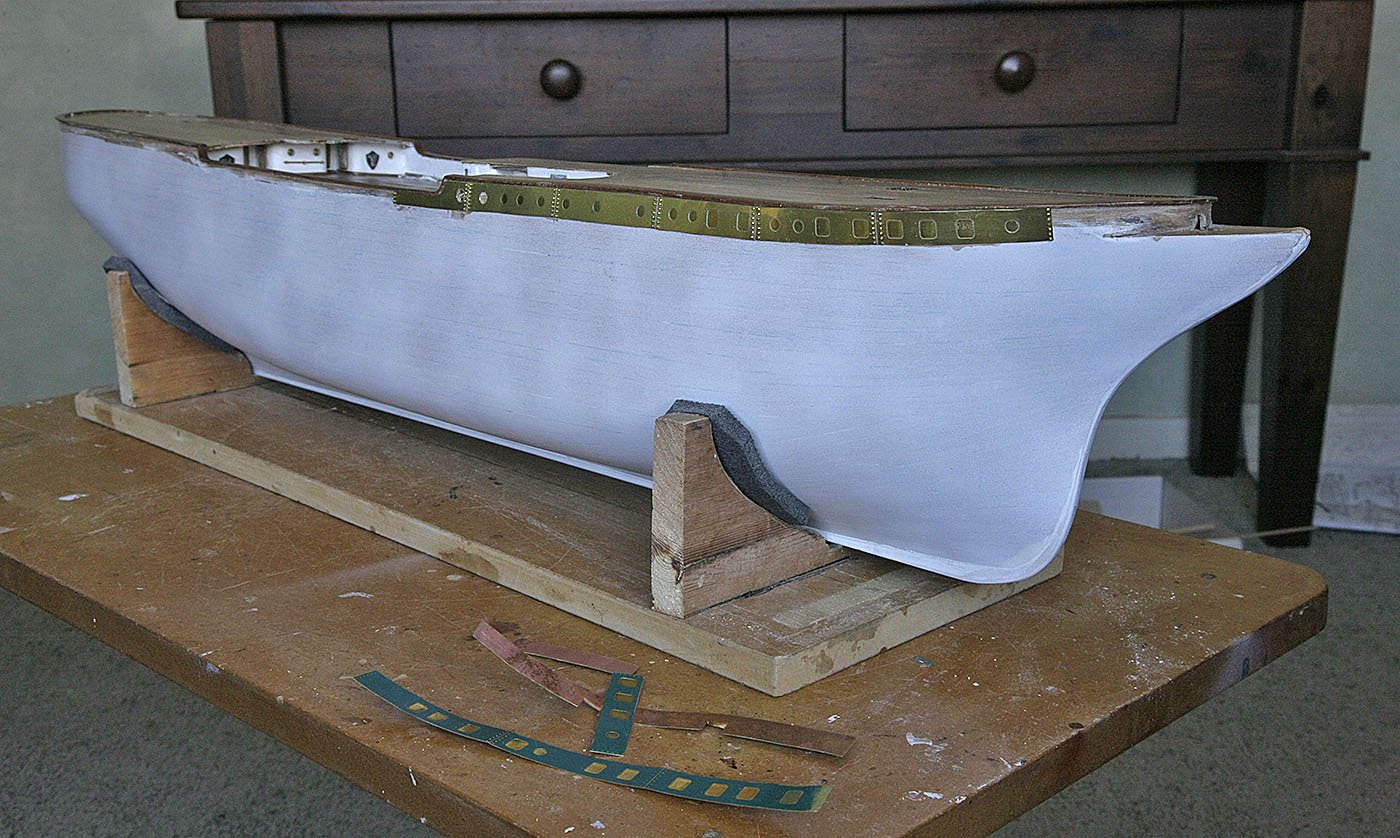
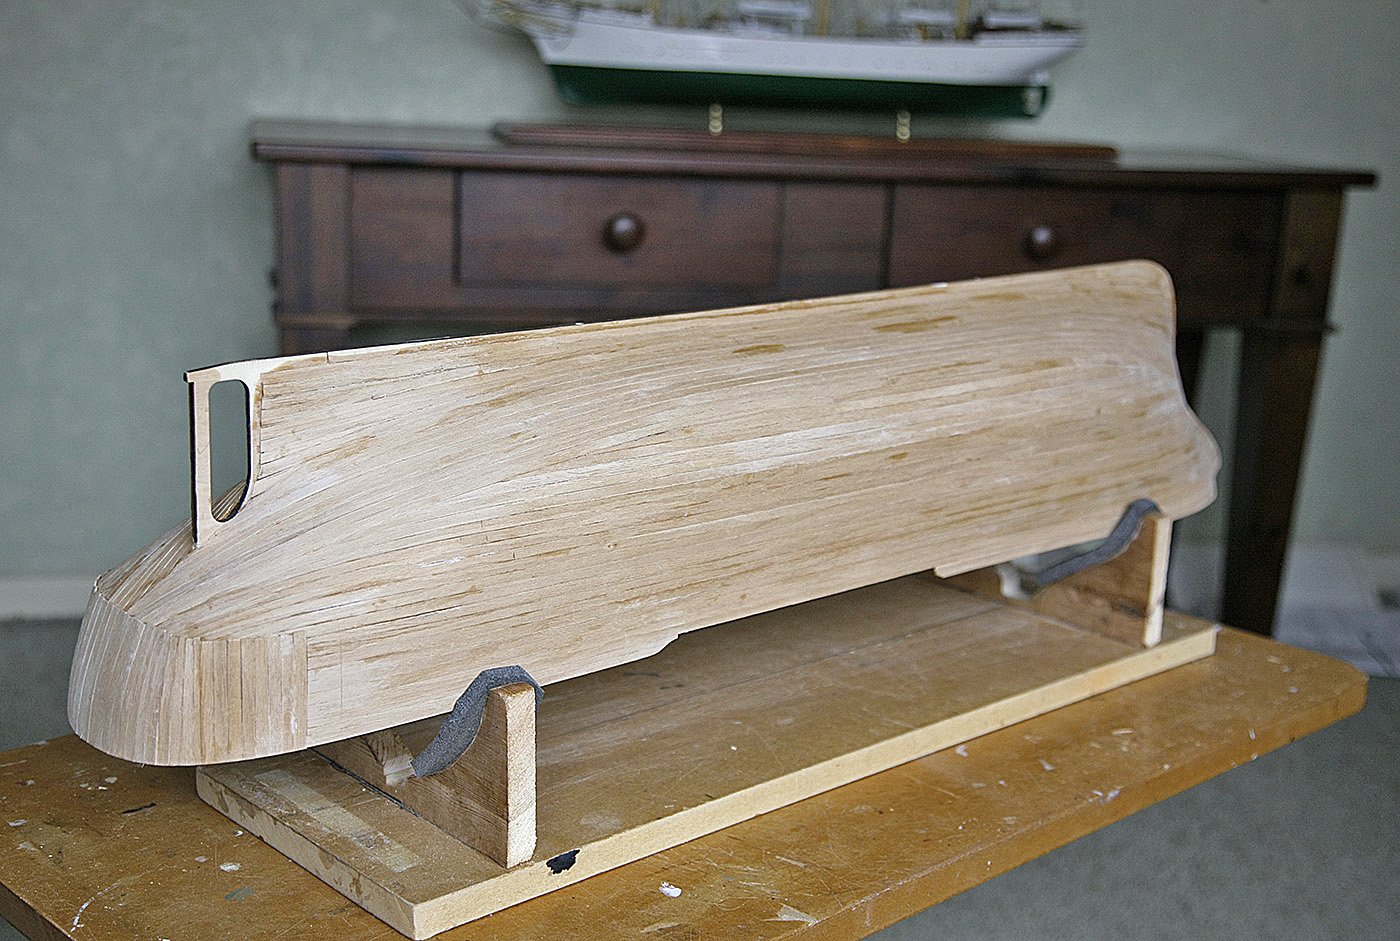
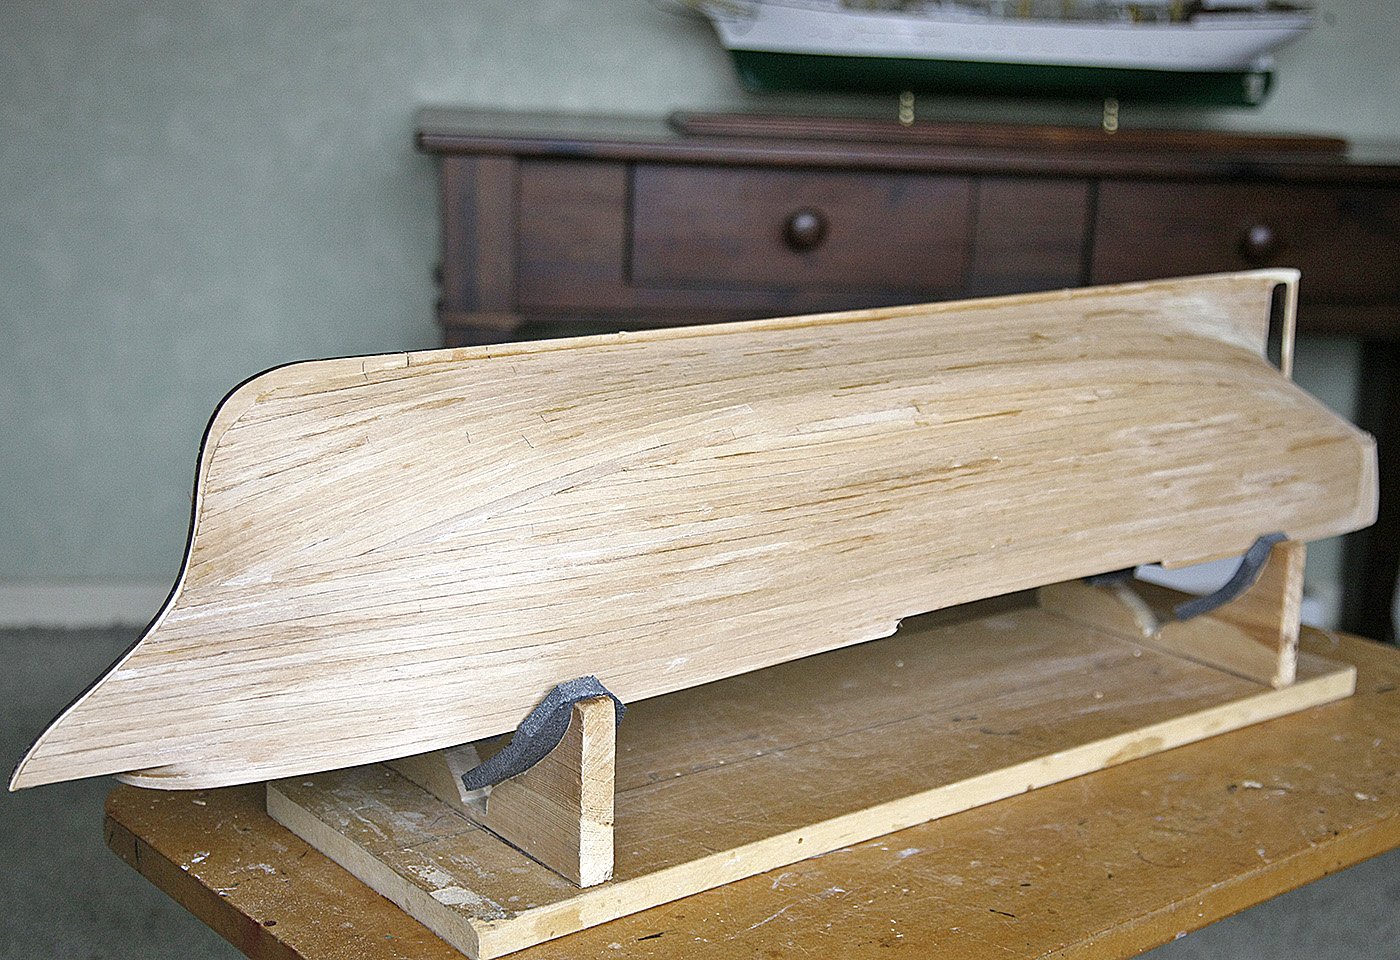
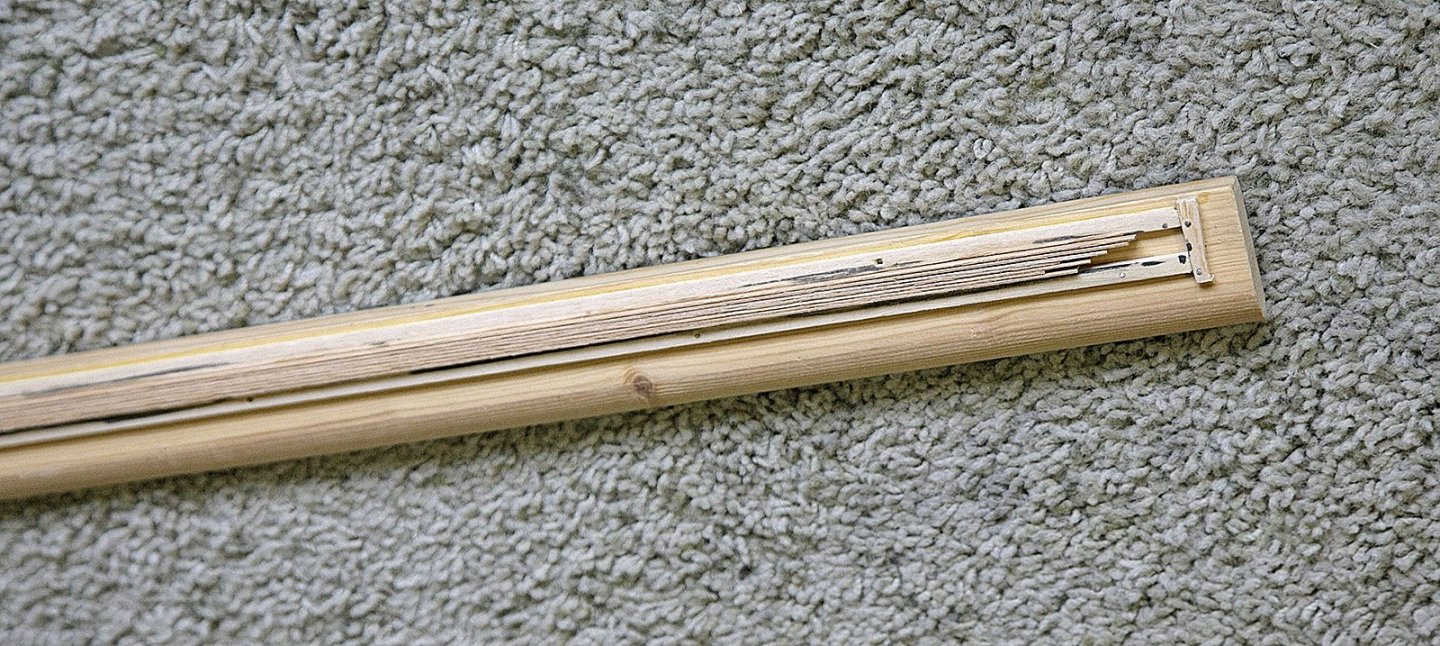
Hi, I’m making good progress on the hull at the moment and all is going along quite well. I’ve not been keeping the log exactly up to date but here is a catch up. I’ve put the capping on the edge of the decks, the instructions suggested the fore and aft curves should be done in small sections from the strip provided, I didn’t think that this would look too good. I had a small piece of walnut in my stash, not enough to do all of capping but if careful, enough for the curves. I made up a cardboard template first as I only had enough for one shot at it. I put the curved sections on then added strips along the straight part. The brass platings along the upper part of the hull were then cut to shape, drilled where the portholes were needed and glued into place. I drilled holes for the riveting and used brass nails for them, I then put the wooden 2x2 strip bellow. Lastly I put the brass ports and scuttles in. I gave the brass a good polish to finish it off. The two raised strips like wales were added next, these were made up of 4 x .5x 3mm walnut strips. It was quite time consuming getting the curves at the stern to sit flat, the picture of the plan shows this. The newer kits supply these wales as pre cut ply with the ports cut out, I believe that this version just does not work as they won’t curve and stay flat against the stern, most builders just leave them off and just paint the stripes on. Ken Sorry about the order of the pictures, I'm not too good at doing it


-
Hi Kevin, That really is a major rebuild your taking on. I think that in many ways it’s more difficult than starting from scratch, I wouldn’t want to so congrats on making a go of it. I think that that you’re doing a very good job of it, the deck planking looks good, much better than your original, the cabins too look like they’re taking shape nicely. It will be interesting to see the difference between our two kits, same make but different eras. Anyway keep up your enthusiasm for this build and good luck with it. ken
- 273 replies
-
- 3
-
-
- panart
- amerigo vespucci
- (and 1 more)
-
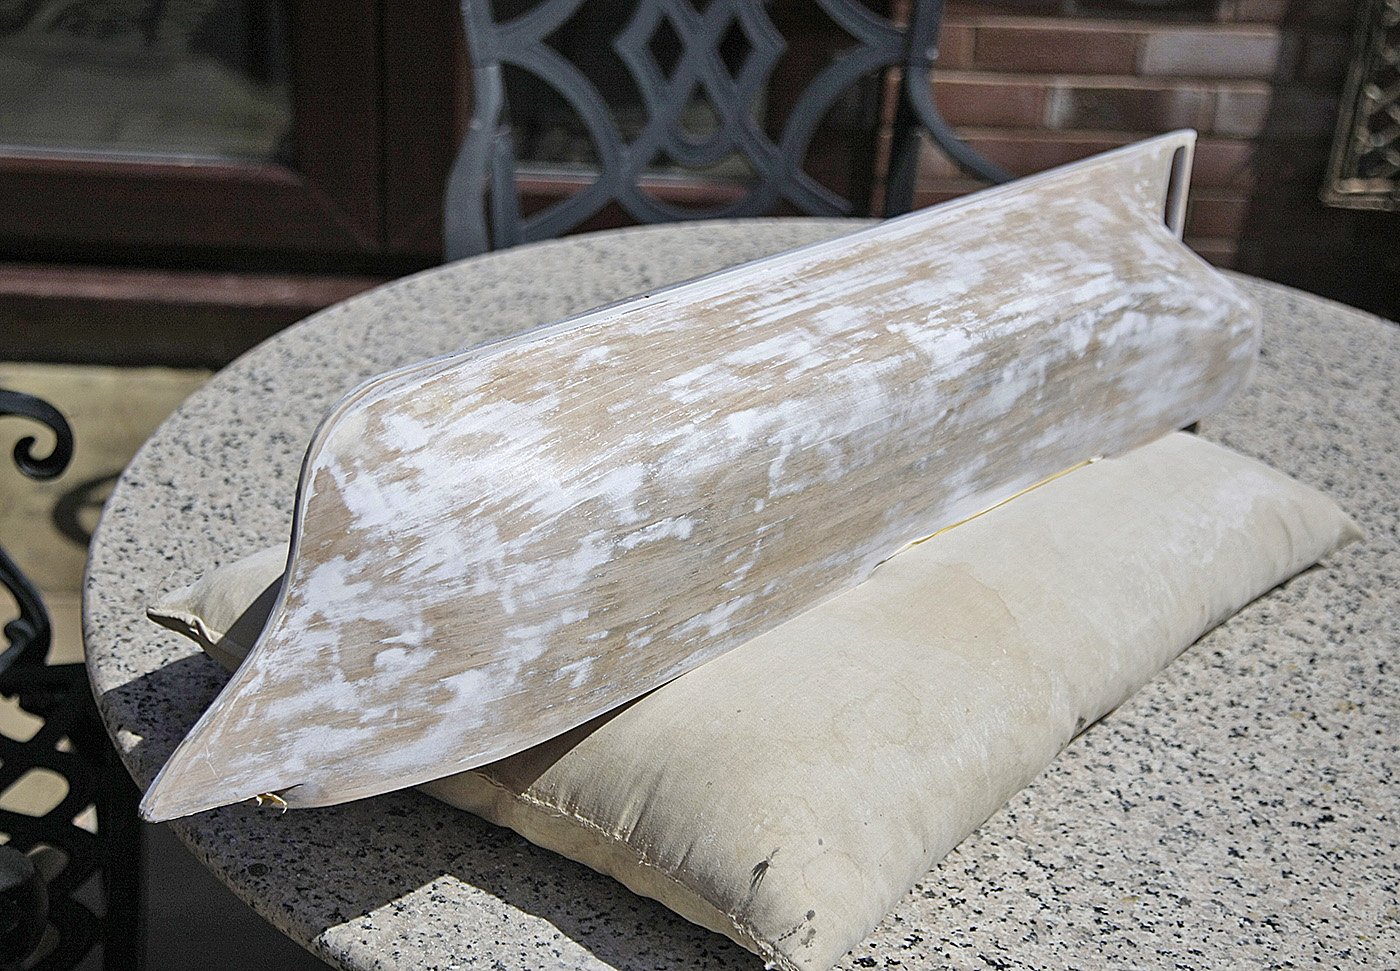
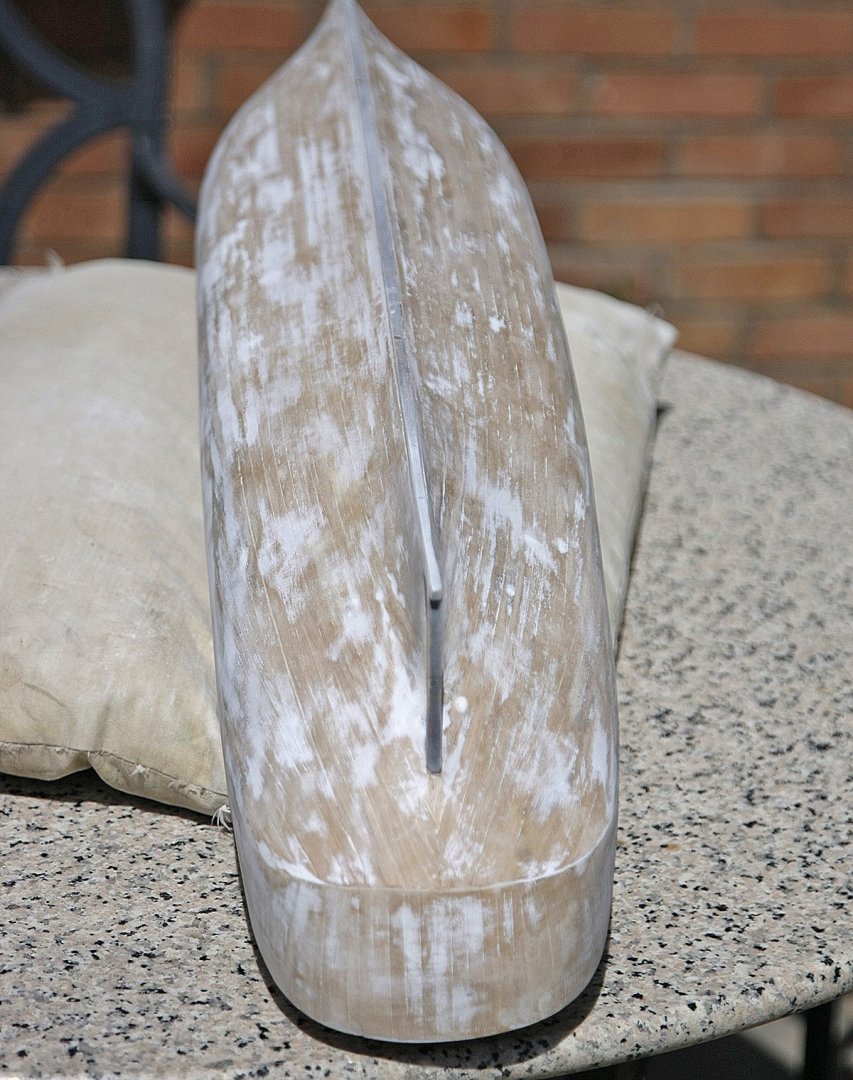
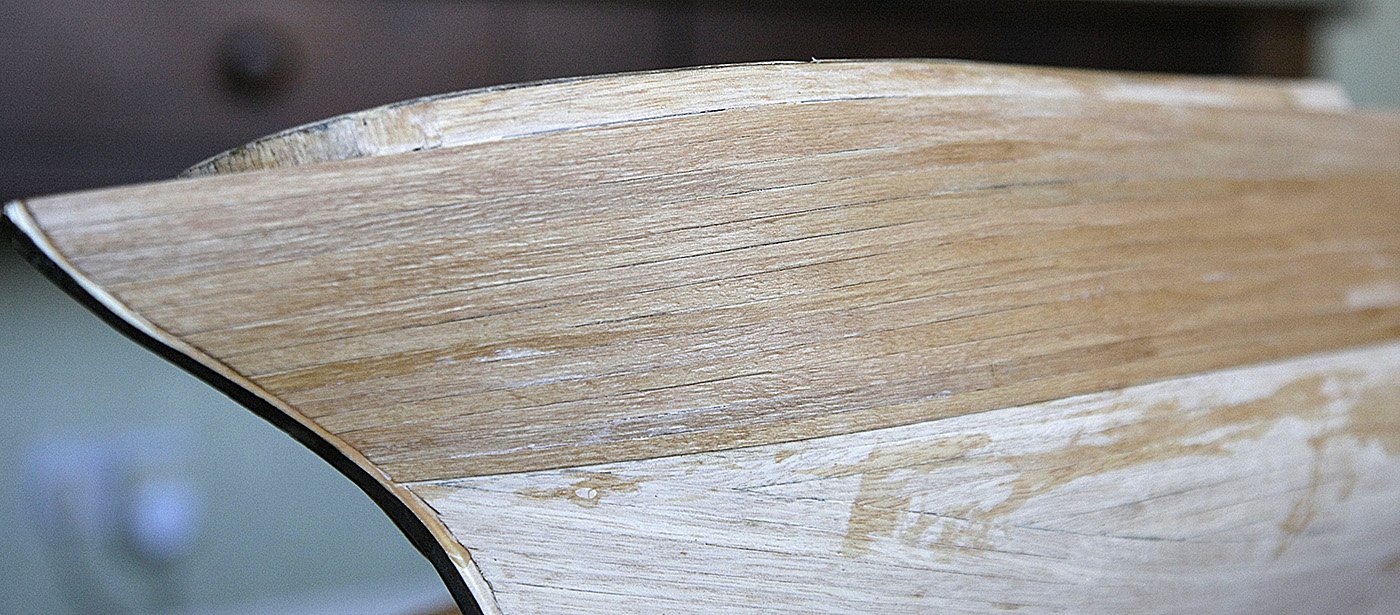
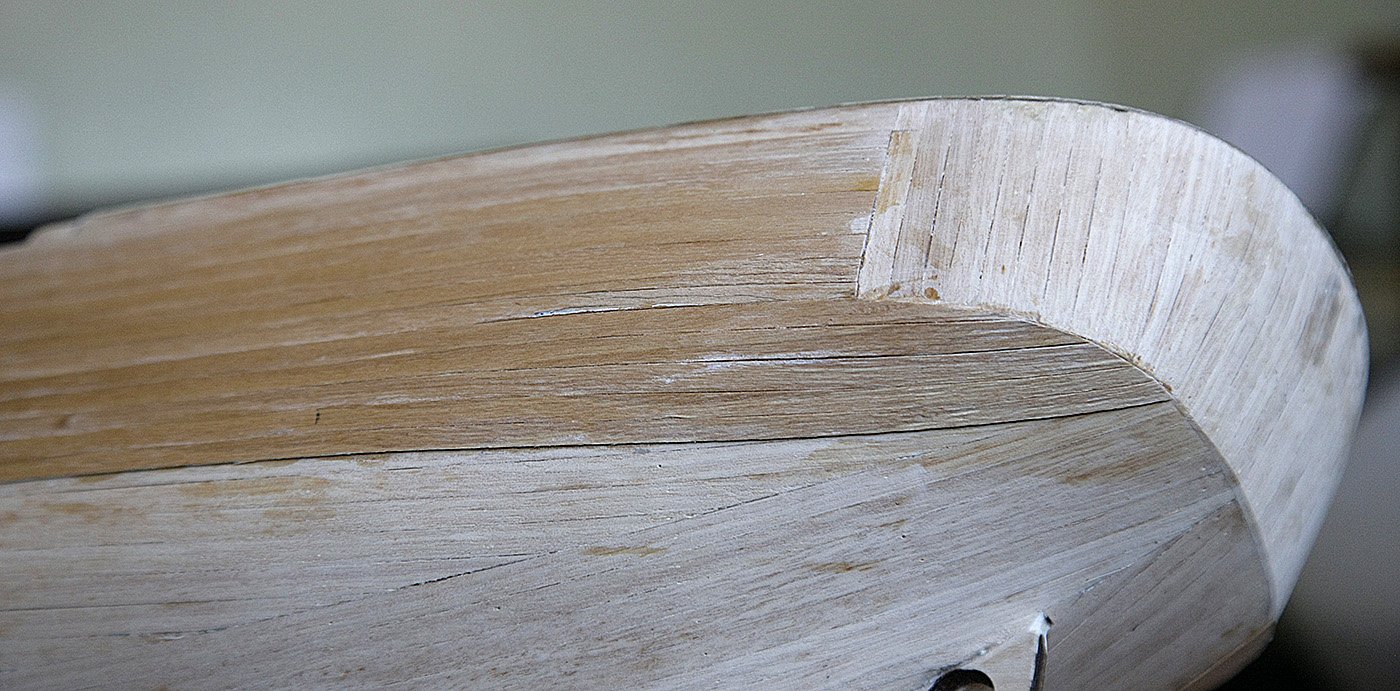
`Hi, Thanks again for the likes, it's good to know someone out there is watching. More progress on the hull. I finished the second planking without encountering any difficulties except for the state of the wood which I have already mentioned. My first thoughts were that I would never get rid of the grain and achieve a smooth enough surface for a painted finish but I set about it and the end result was so good that it surprised me, although it took longer than the actual planking. I first gave it a thorough sanding, taking away about half the planks depth. I then spread a thinned water based filler over the entire hull and when dry sanded that right back. I gave it a very light coat of spray primer, this highlight any imperfections and shows where the seams will show fine cracks. I worked in filler again to the imperfect areas, sanded and again sprayed, I did this twice. I was then left with an acceptable surface but after spraying again I had to use a fine acrylic filler intended for hiding the seams on plastic models before getting a perfect surface. A fine sanding and another light spray completed the job. A lot of work but in the end well worth the extra effort. I’ve attached some pictures of each stage so that you can see the progress. Ken


-
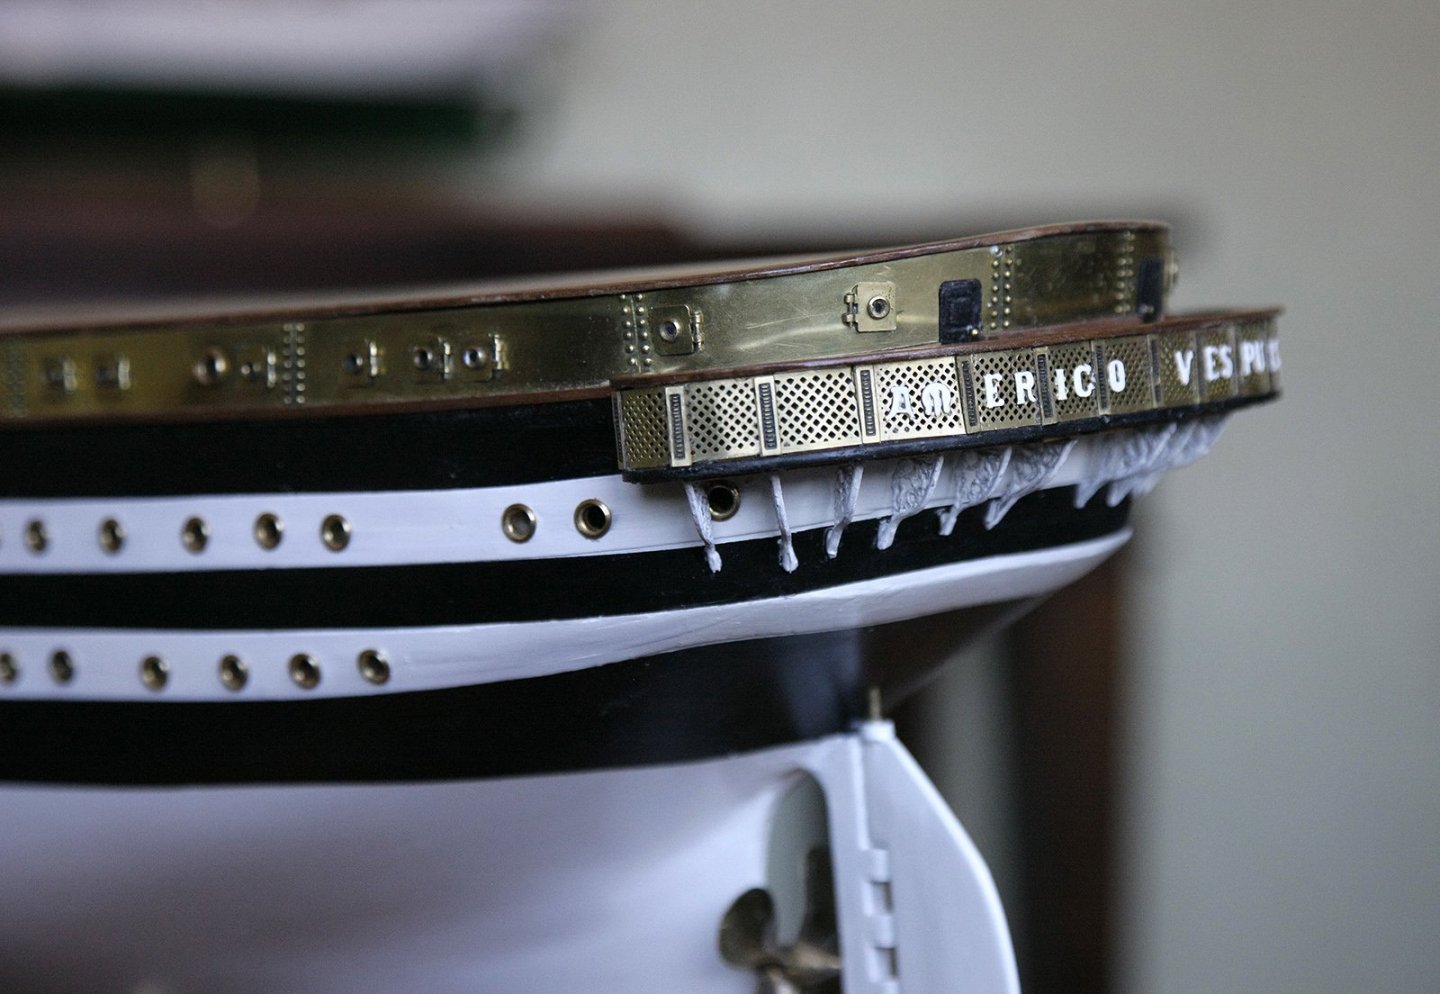
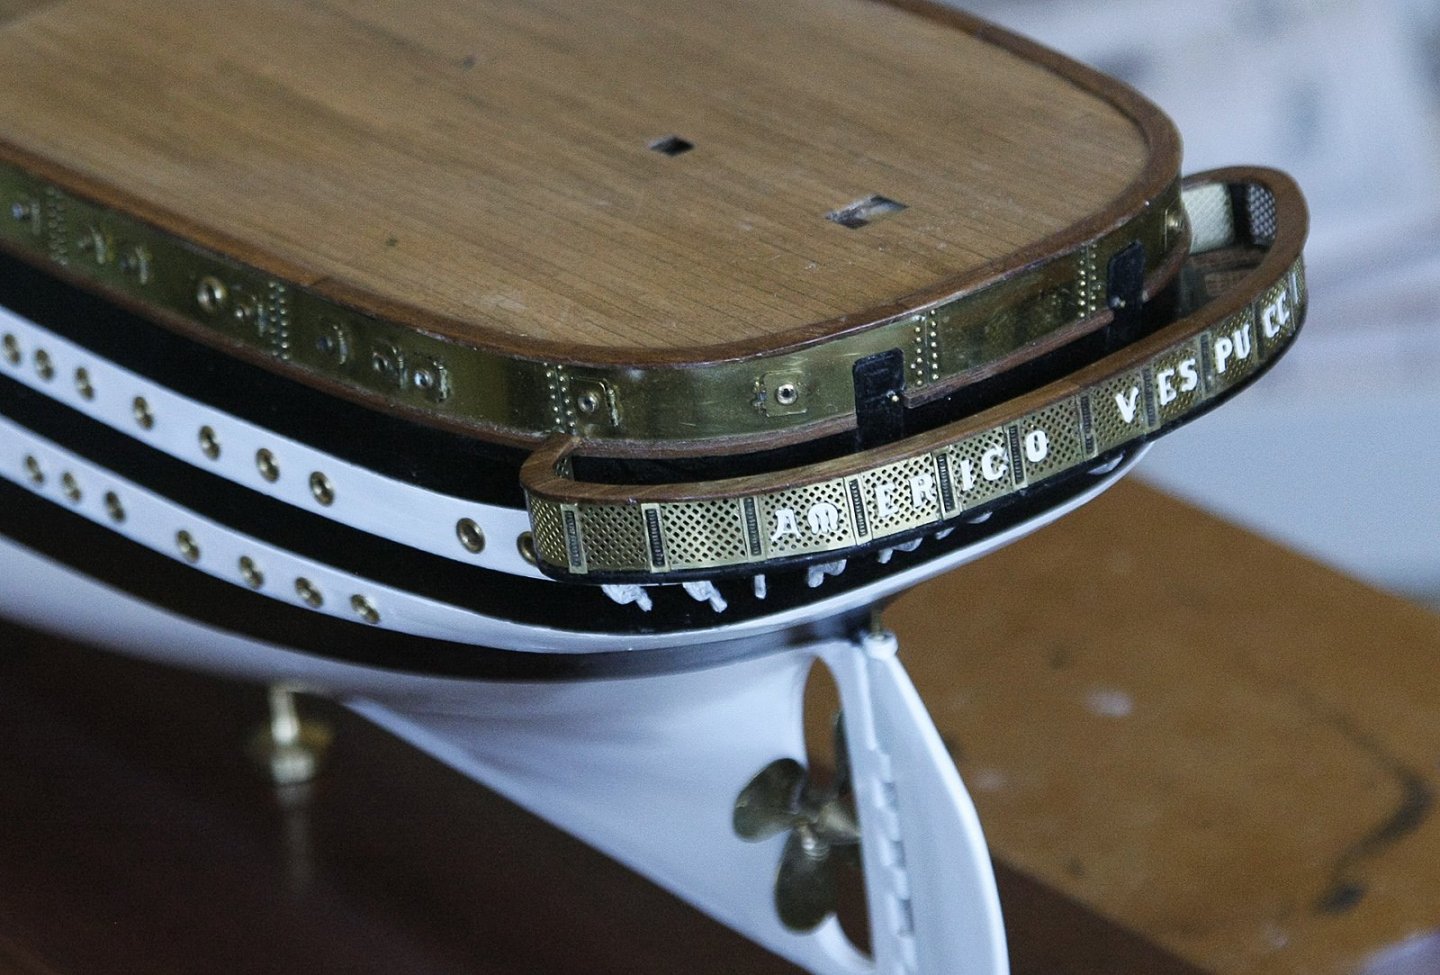
Hi, I’m going to paint the hull as it’s displayed on the box, I know that it should have a red lower part but as it’s only for show at home I prefer the contrast that the white gives. I’m also going to leave the brass plating and ports as well as the rails unpainted and leave them natural Polished brass as a feature. ken
-
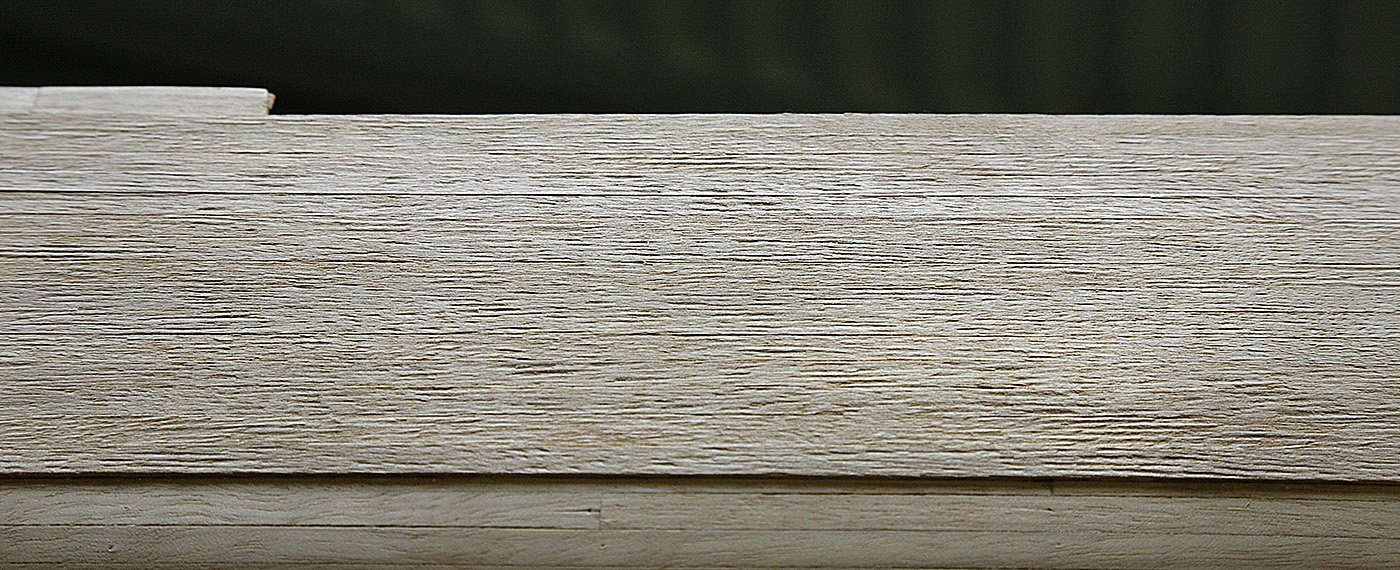
Hi, Continuing, I’ve made a start on the second planking. This planking is done using 1x6mm lime wood strips, in my opinion far from the best wood for a good finish. I unpacked the bundle of strips and found that unlike the first planks they were of quite poor quality, they were very course grain and the edges were roughly cut and looked prone to splintering. To tidy them up a bit I sanded the edges, I held about six at a time in a sort of simple jig and sanded them as a block. Photo. It’s a big hull and there are rather a lot of planks to do so being able to do many at a time helped. I started the planks from the top of the waist deck and continued down. My fears about the edges splintering happened, a lot of very fine ones occurred spoiling what I had hoped would be well butted seams. The very rough grain was even more noticeable seen with many of the planks fitted, I’ve shown a photo of this, it really is bad and as this will be a smooth painted hull I can see a lot of work will need to be done to make it acceptable. At the moment I think that it would have been better left as single planked, just another challenge. Ken
-
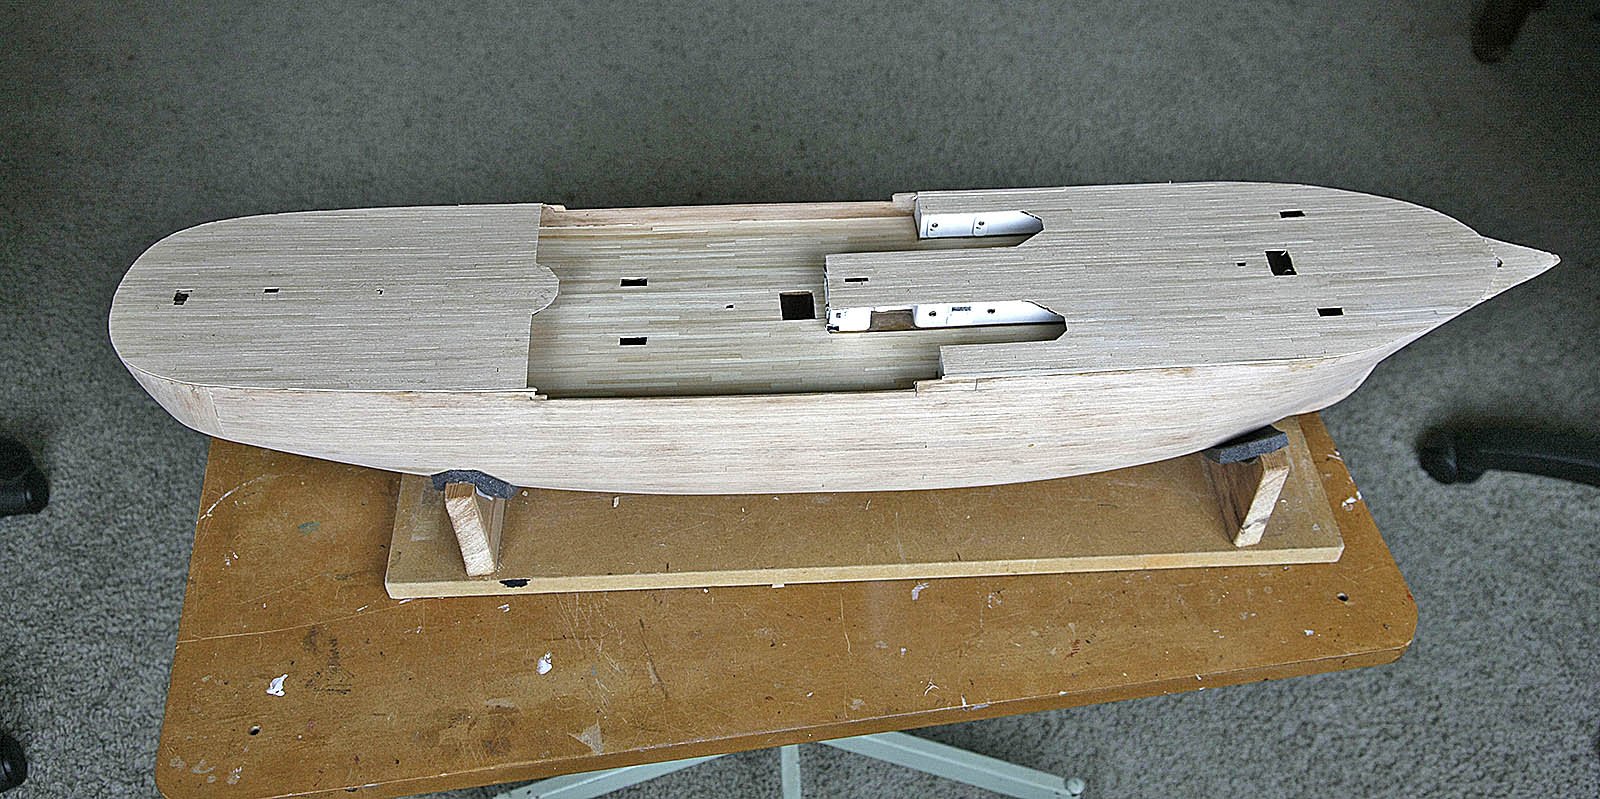
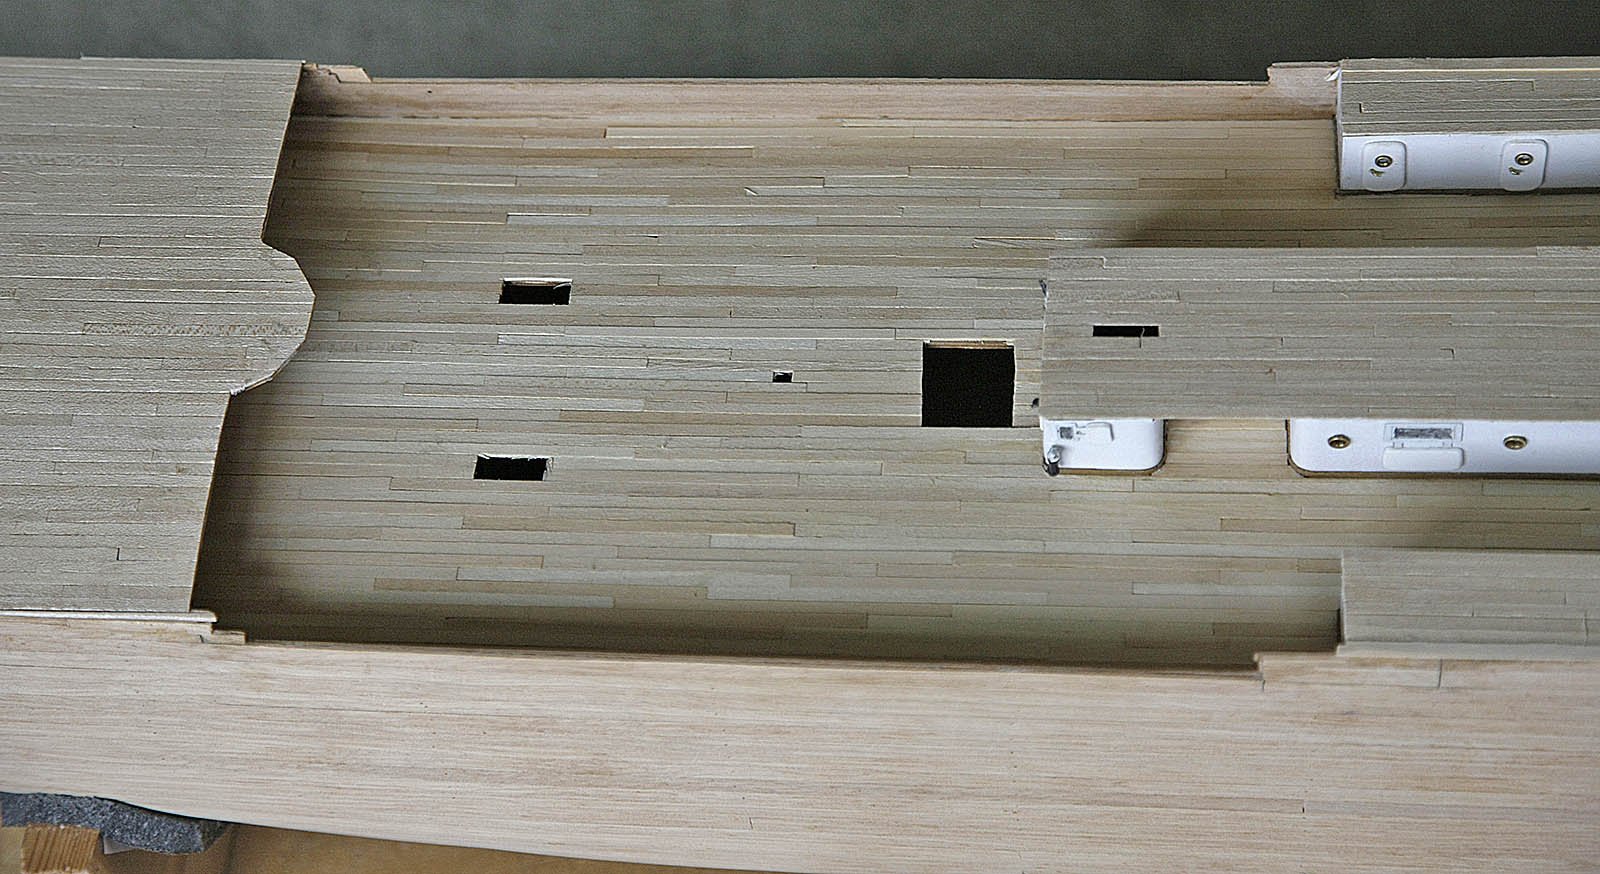
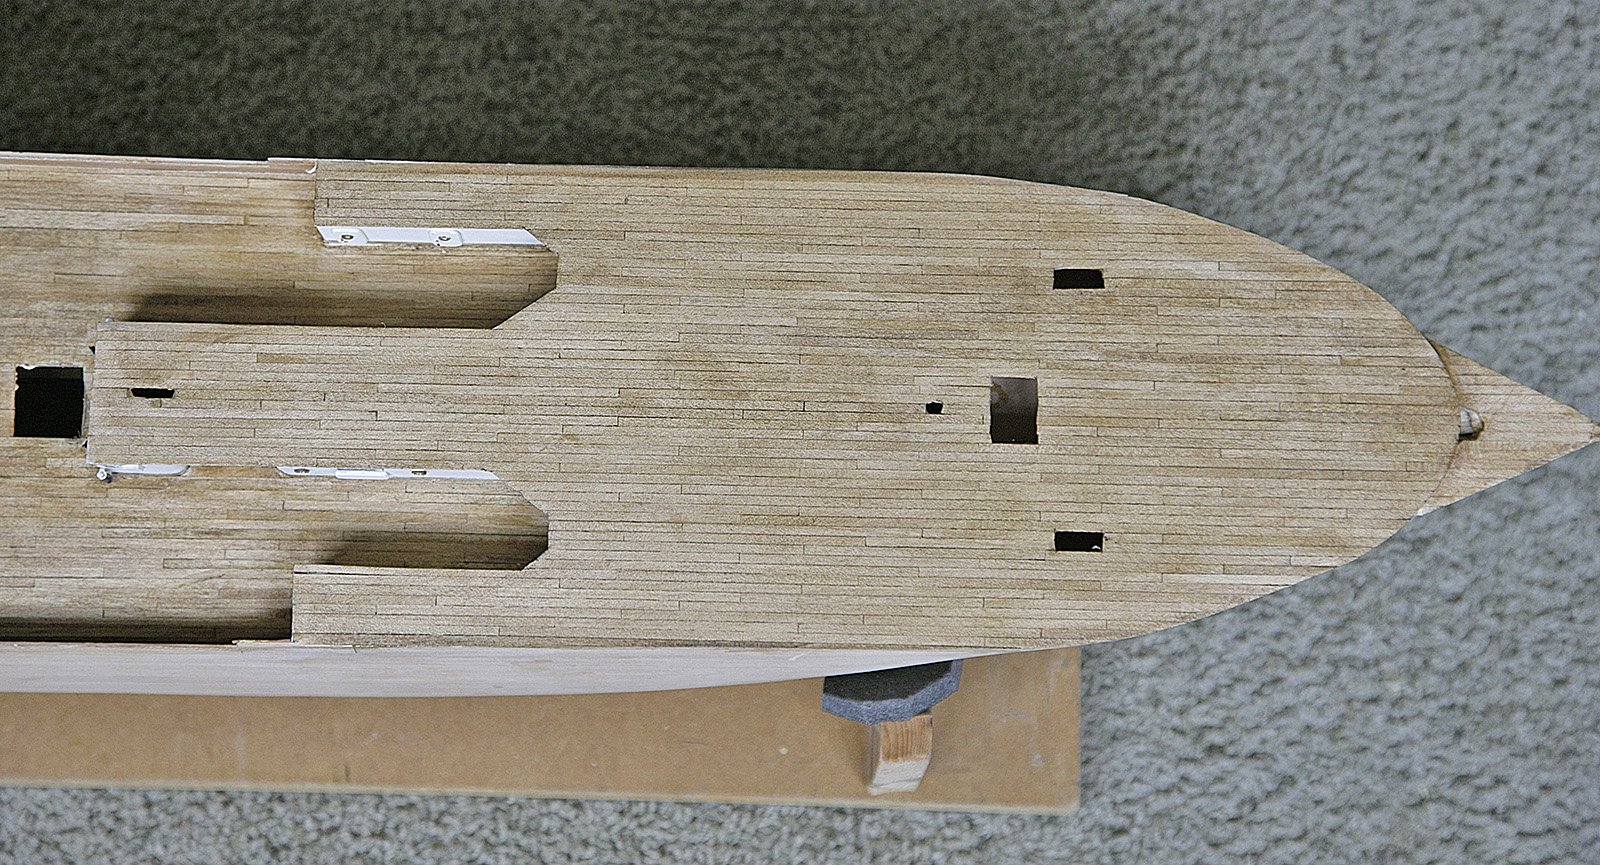
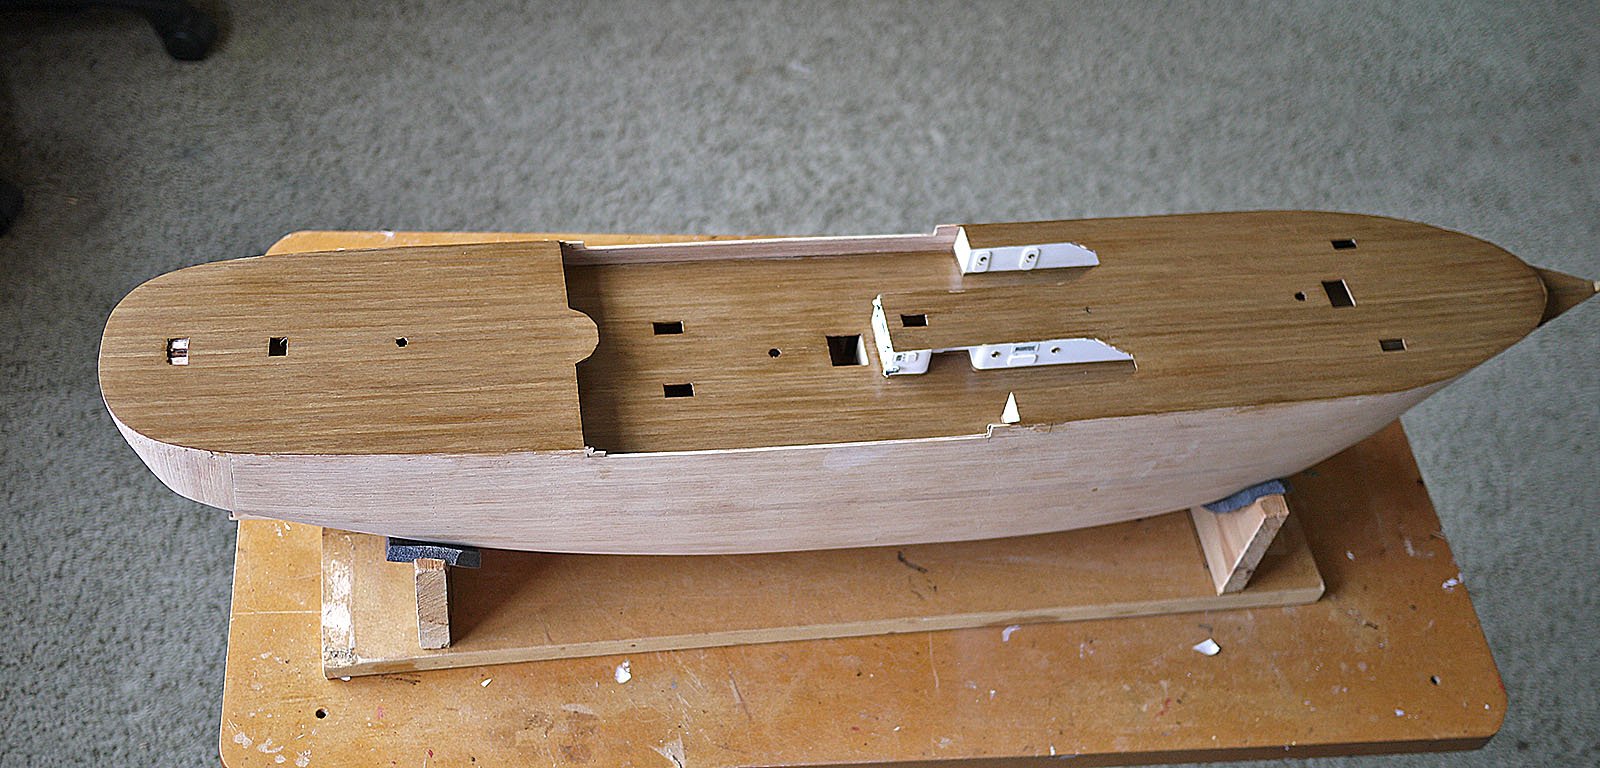
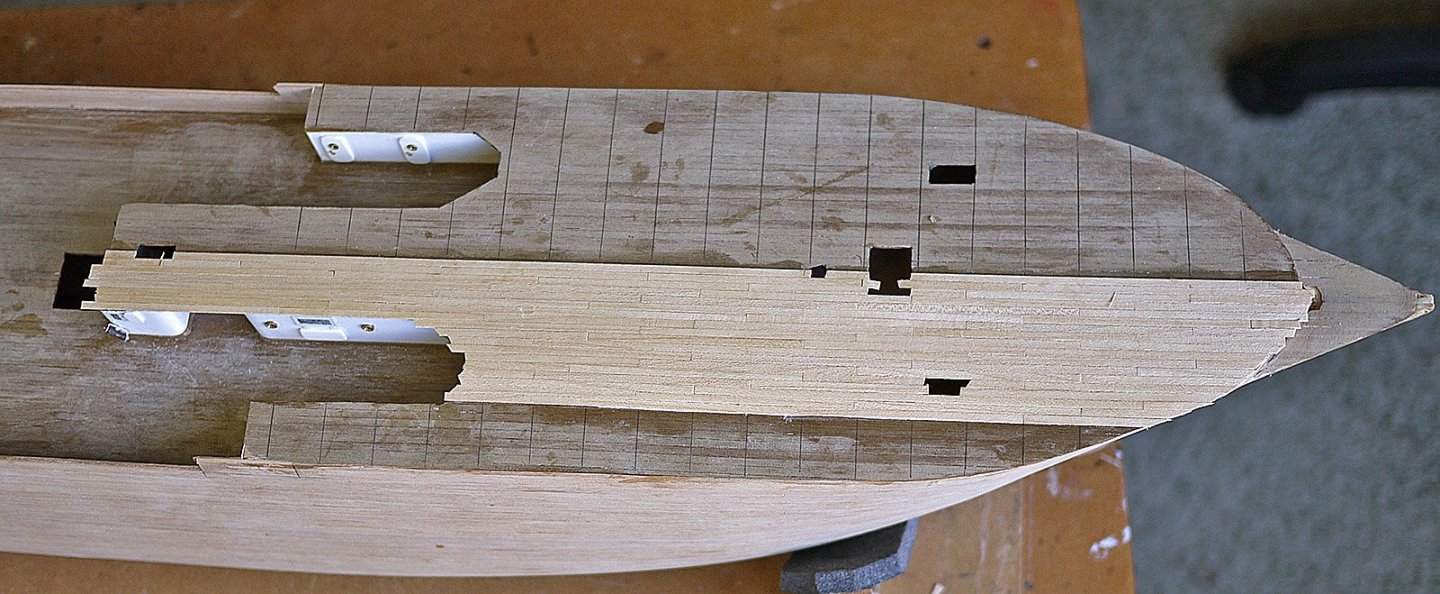
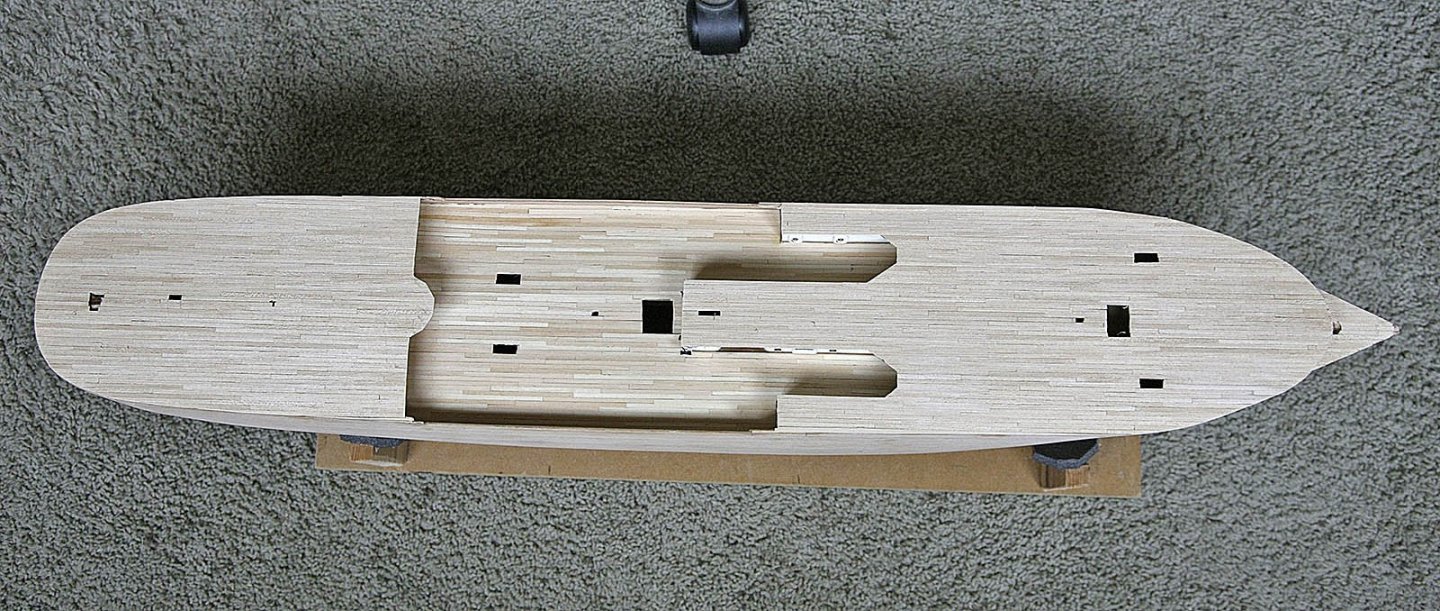
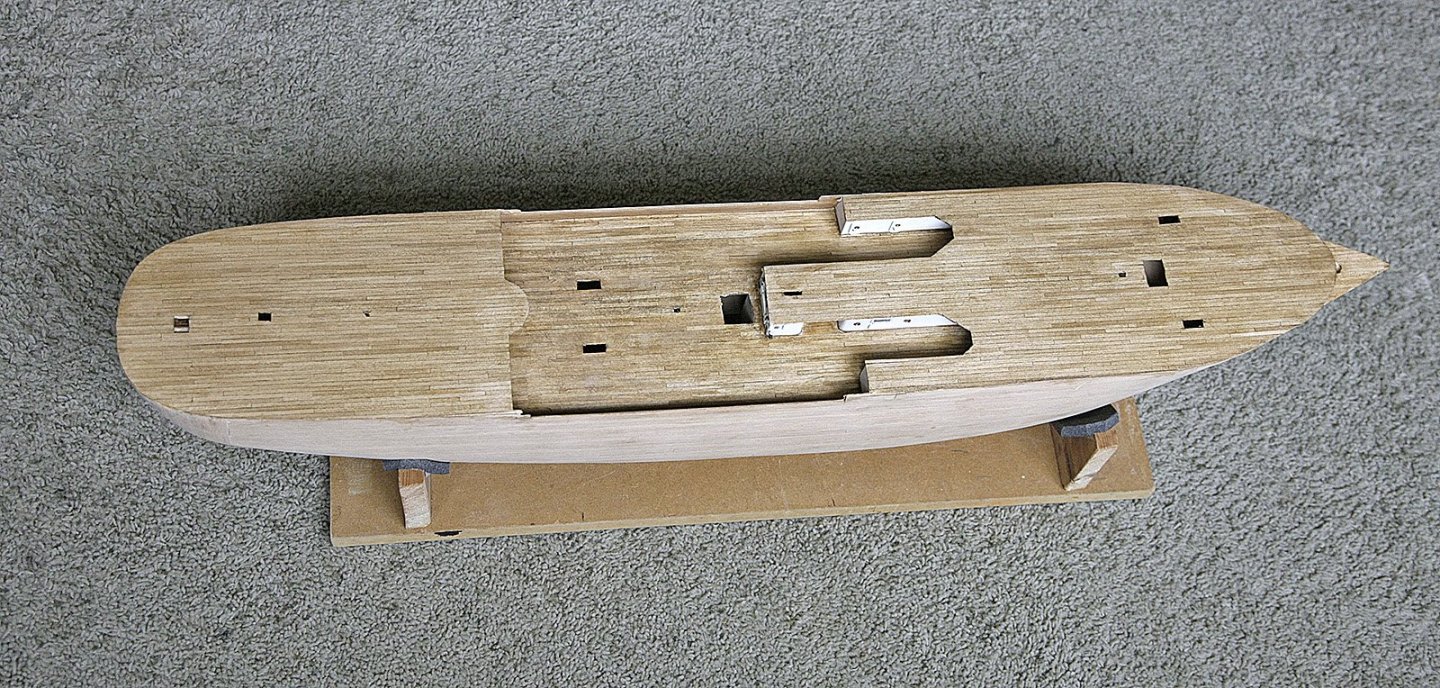
Hi, As you know I was unhappy with the decking and was in the process of having another go at it. I had made the same mistake on my Royal William build so why I didn’t learn from my mistake I don’t know, anyway it’s now completed and I’m delighted with the result, it was well worth the extra effort. I used a mouse type sander and sanded off all the walnut planking, the waist deck proved quite difficult and I only managed a slight reduction here, I also removed the skirting from around the cabins in preparation for the re planking. Like most of you I have a small stash of wood left over from other builds but I didn’t have enough of the same type to complete the decks, I didn’t want to have to buy any so I used what I had. I had enough light coloured wood but it was of different types in different widths and thickness, four in all. I used my small Proxxon table saw and cut them to the same width 3mm. I was quite surprised at how clean it cut lengths of planks, the edges didn’t even need sanding. I didn’t mind the different thickness as once laid I could sand them down to a uniform height. I cut them into 8cm lengths for a four butt pattern. I tried some dyes on test pieces to see if I could get their colour and texture similar, I ended up choosing a light oak. I had no problem laying the planks although it was now awkward working around the cabins with the upper decks in place, I used white PVA to fix them. I sanded them back, rubbed some walnut filler into the seams then rubbed in the oak dye. I find that the filler soaks up the dye like end grain, slightly darker and gives a very slight appearance of corking, enough to take the plainness off. I re fitted the skirting then finished off with a coat of sanding sealer. I am now much happier with the look of the deck, I think it was well worth the effort. Ken


-
Hi, Thanks to all who gave me the thumbs up on my build, much appreciated. This build is moving on nicely and it’s starting to take shape. I have recently added the upper decks and planked them. Around the upper edge of the hull will be metal plating, it’s very hard brass/copper and will not be forgiving like wood so now was the time to ensure that the top of the hull was perfectly level and as per the plan. I kept it simple because I just couldn’t find the enthusiasm using the supplied wood to spend a lot of time on it, the colour really is awful. I sealed, sanded and varnished it when done. I was hoping that the amount of stuff on the decks would detract from noticing the colour/texture and that I would be able to come to terms with it, but after coming back to it the next day I knew that I would never be happy and in years to come regret it being done like this and just leaving it, so I decided to bit the bullet and re do it, so watch the next episode. Ken

-
Hi Kevin, Thanks for your kind comment about the hull, I’m sure your the same as myself and find that these comments motivate you. I can understand you stopping your build, it really is a daunting undertaking, hopefully you’re fired up for a second go at it, good luck with that. It looks like we’ll be doing our builds in unison so I’ll be keeping an eye on yours. Ken