ken3335
-
Posts
314 -
Joined
-
Last visited
Content Type
Profiles
Forums
Gallery
Events
Everything posted by ken3335
-
 Hi John, Thanks for your comments they're very much appreciated. If you look back through my log you'll see quite a few more pictures of my area, I'll also post more when there's nothing much to report, I need to keep followers entertained.
 -
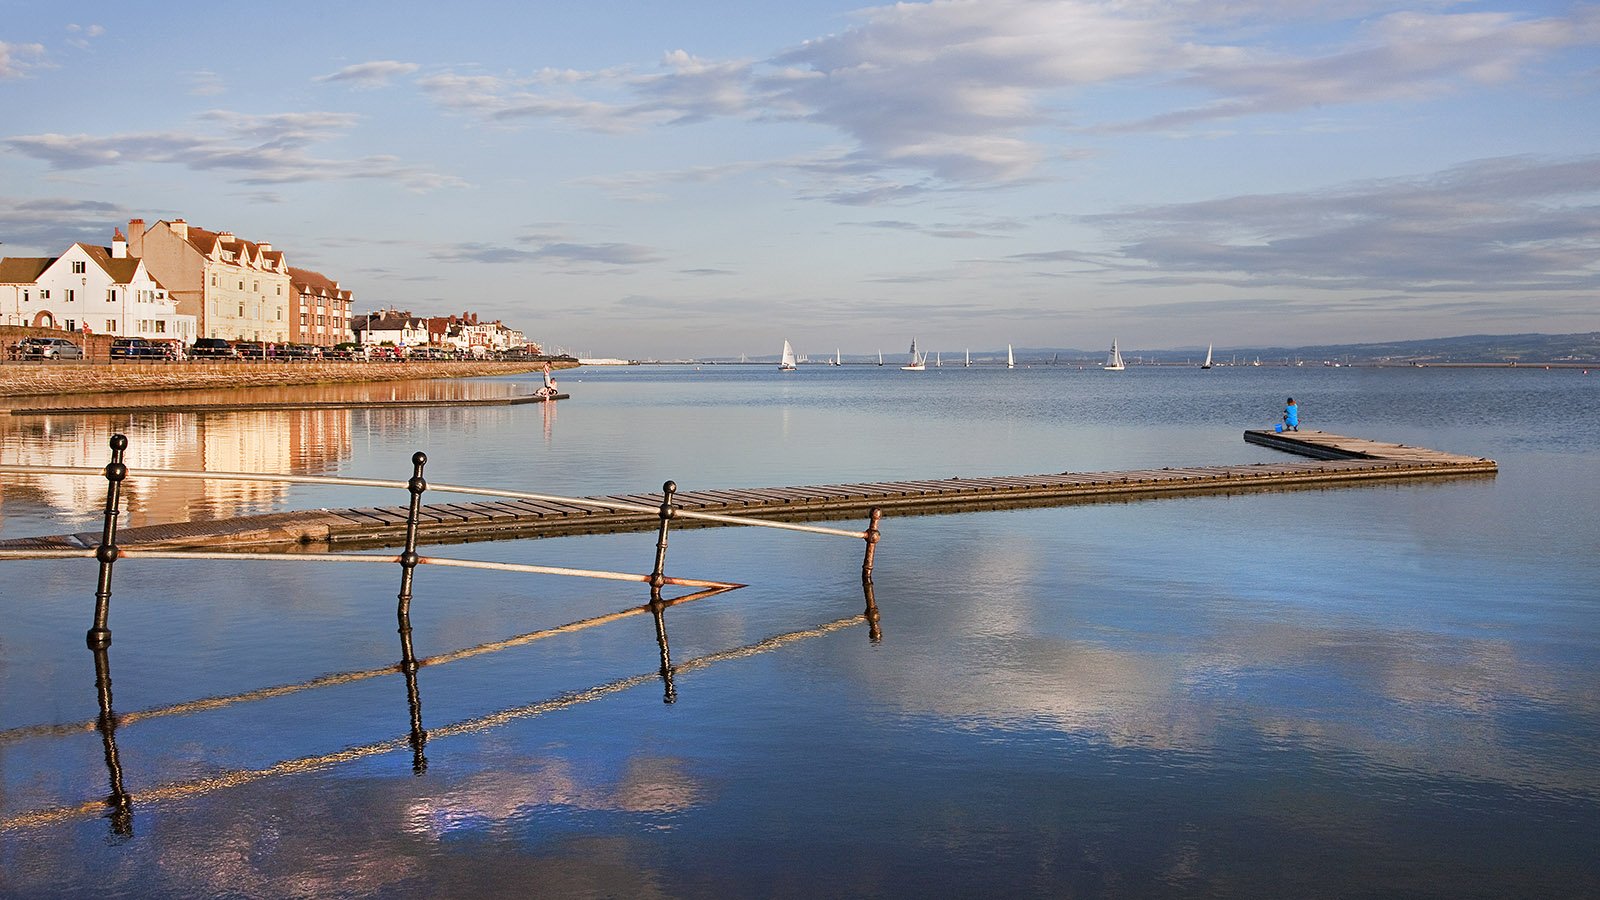
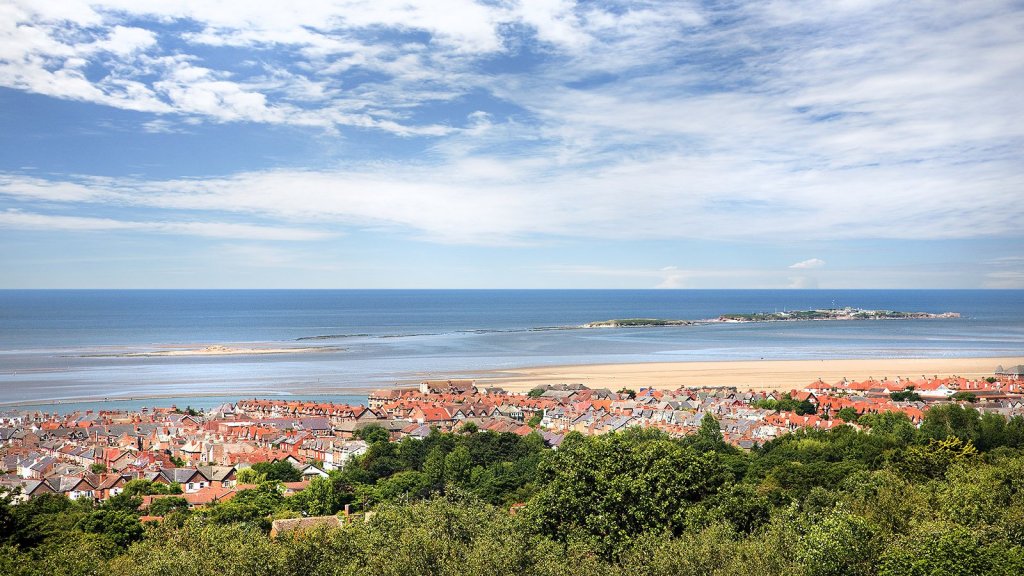
Hello Everyone, I've been working on fitting the dead eyes to the shrouds today, it's a slow process, I've done eight and I'm just getting the hang of it. There's only another 42 to do! I don't think that I'll have much to report for a short while so in the meantime I'll throw in some of my local photos. The first is of my home town, West Kirby taken from an elevated position. It shows the estuary and a small island, Hilbry about half a mile out, this a bird sanctuary and when the tide is out makes a pleasant walk across the sandy beach to picnic there. To the left of the town you'll see that a marine lake has been made which makes the area very popular for sailing and wind surfing. I have already shown a picture of this lake but here is another from the other direction, the children on the jetty are catching crabs. Dillbert, another one for your friend. Who wouldn't like living here. Enjoy Ken

-
Hi Michael, Welcome aboard. Thanks very much for those kind words, coming from you that's that's praise indeed. I've followed your progress on the Wasa from its early stages and am blown away with every detail of your build, in fact it was a straight toss up whether I would start the Royal William or try and follow your example with the Vasa. Anyway pull up your chair and have a beer on me. Ken
-
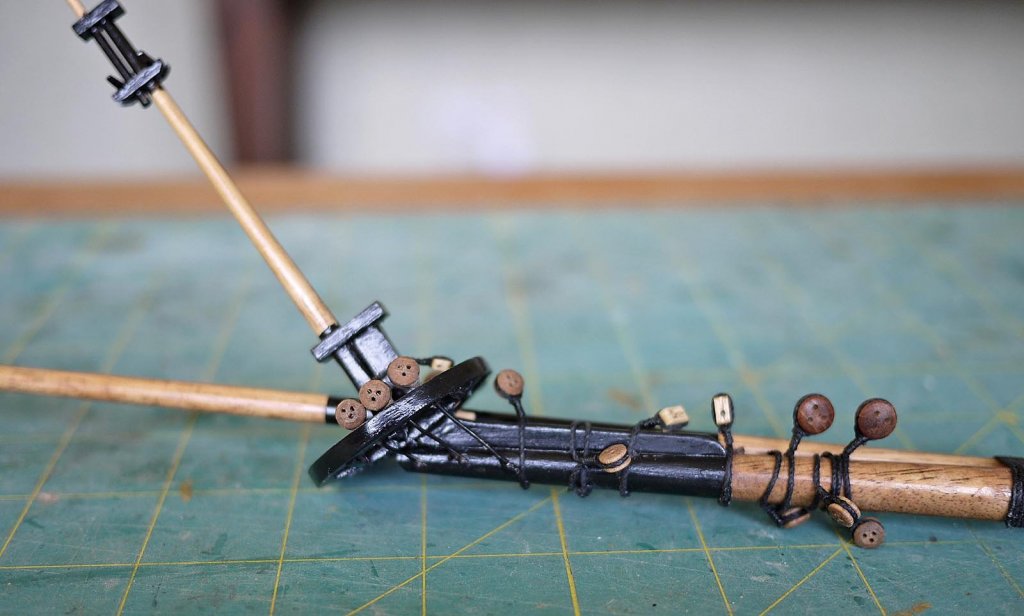
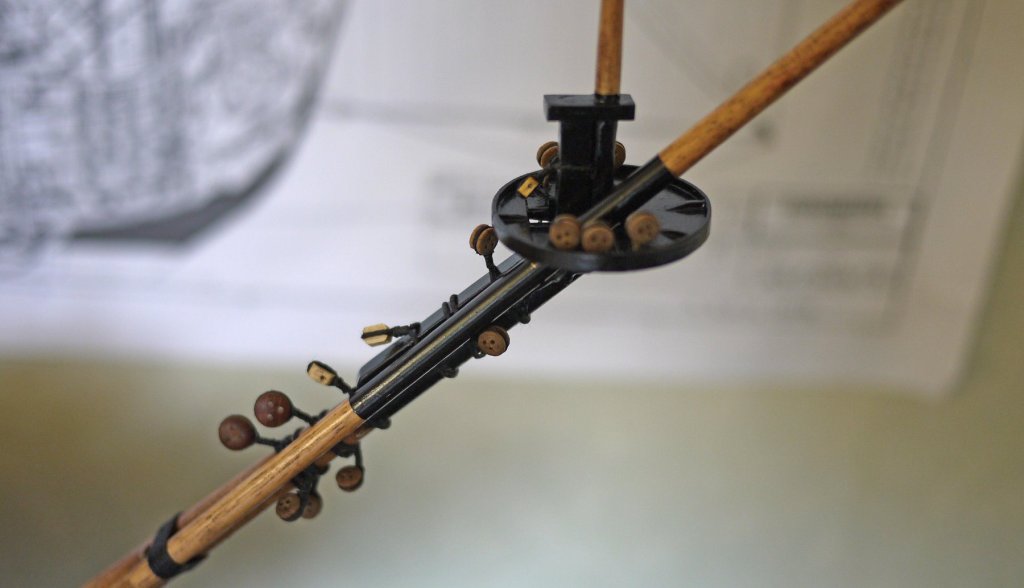
Hello Everyone, Today's update. First I blackened the supplied rope with a suede leather dye, this gives a deep rich black. I stretch the rope, put some dye on a small piece of rag and rub it in. The rope is one of the best that I've had from any kit but there was nowhere near enough, I needed about half the amount again which I had to take from another Euromodel kit so that it matched. I've done the gammoning on the bowsprit, this was quite difficult as I'd made the lower part of the head rails too close to the prow and there wasn't enough room to get the forward lower rope through its opening. After quite a bit of frustration I managed an acceptable solution. I've also made a good start on the rigging, I've put in the shrouds, deadeyes and ratlines on the bowsprit and fitted the shrouds for the other masts. So quite a bit of progress. Next I will do all the deadeyes then start on the ratlines Ken

- 424 replies
-
- 10
-

-
Hi Sjors, Coming along nicely. I like the finish that the oil gives and have thought of using it myself in the past, I was unsure though if it affected glueing parts onto the surface later. What's your experience on this, also will it sand ok. Ken
-
Hi Mark, Yours is such an impressive build, I can only concur with what other members have said. It has inspired me throughout my build and whilst I can't match the quality and attention to detail of yours it gives me a standard to try and get close to. Brilliant! Ken
- 652 replies
-
- 3
-
-
- royal william
- euromodel
- (and 1 more)
-
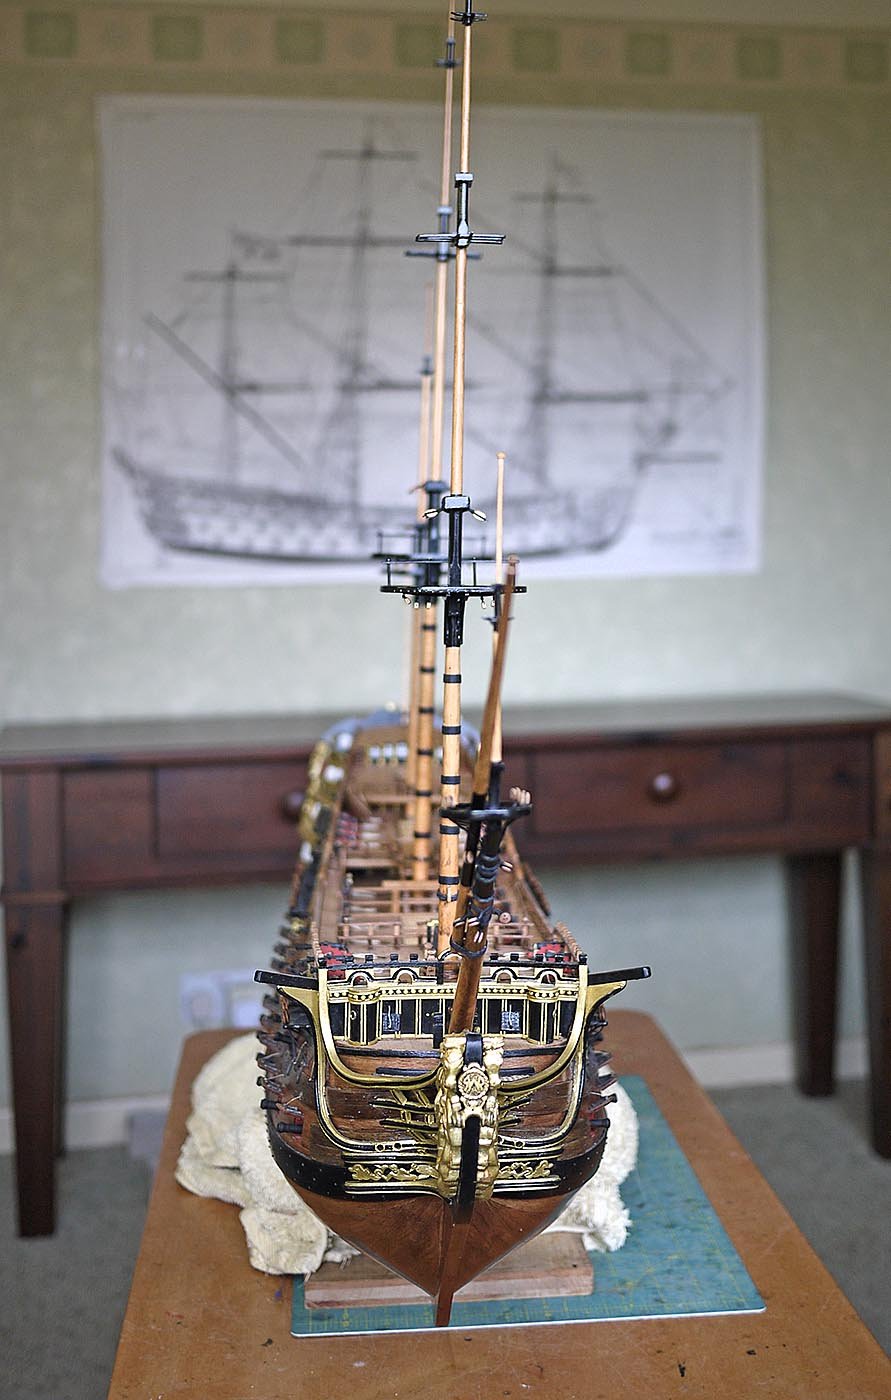
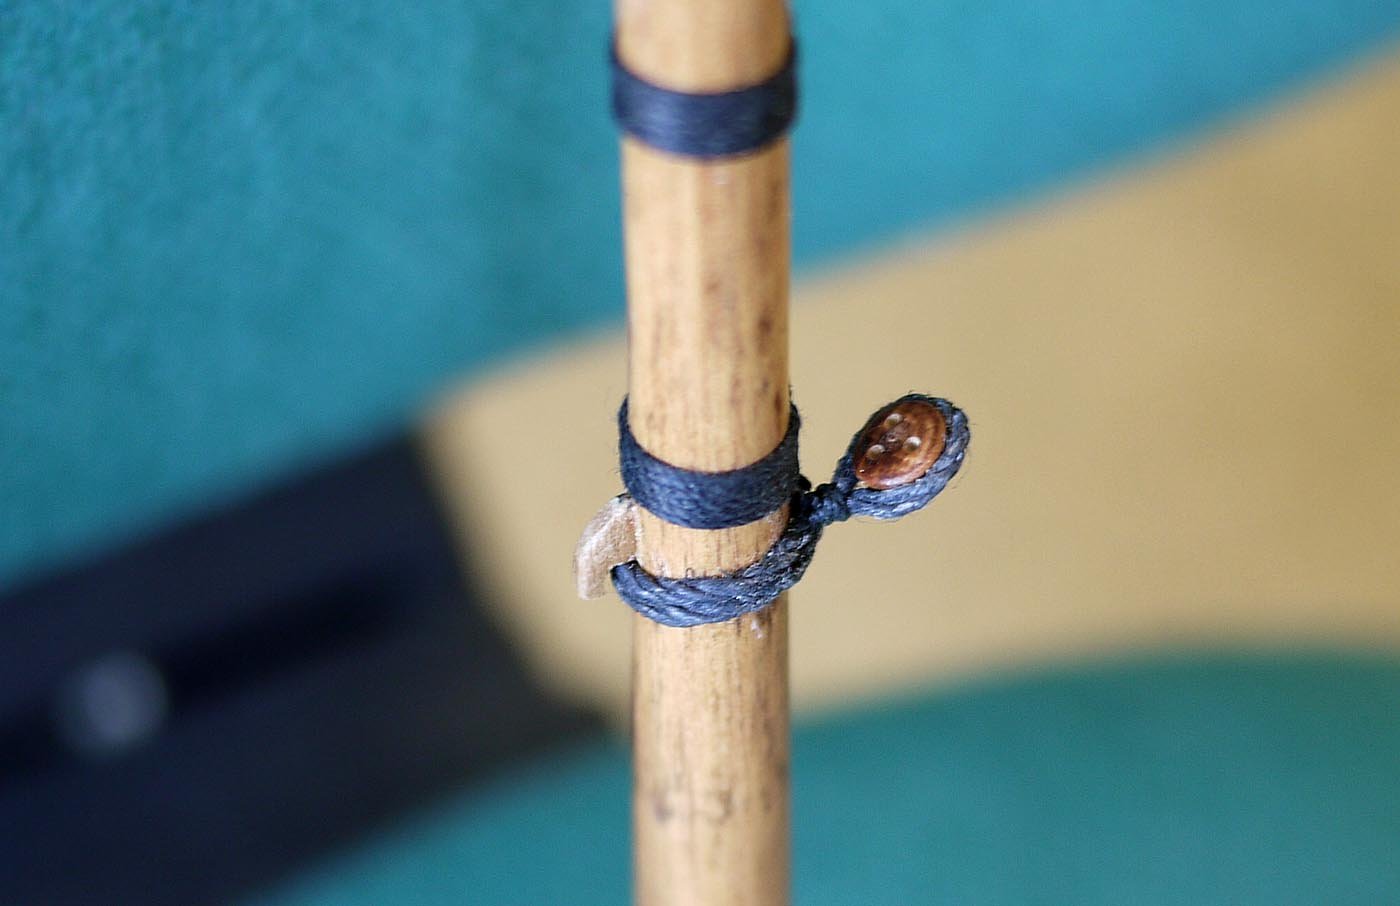
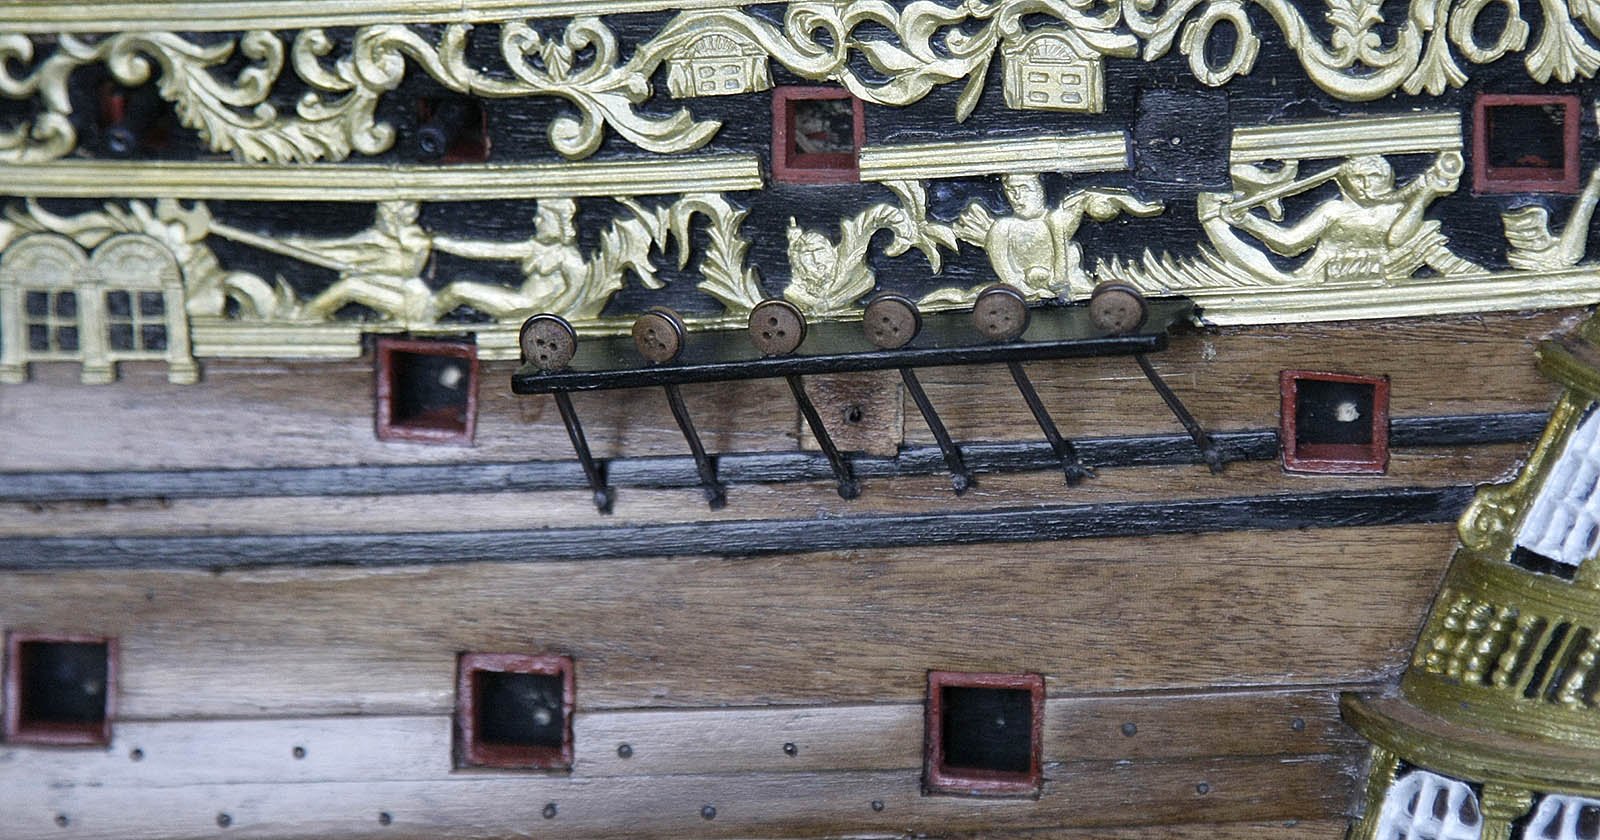
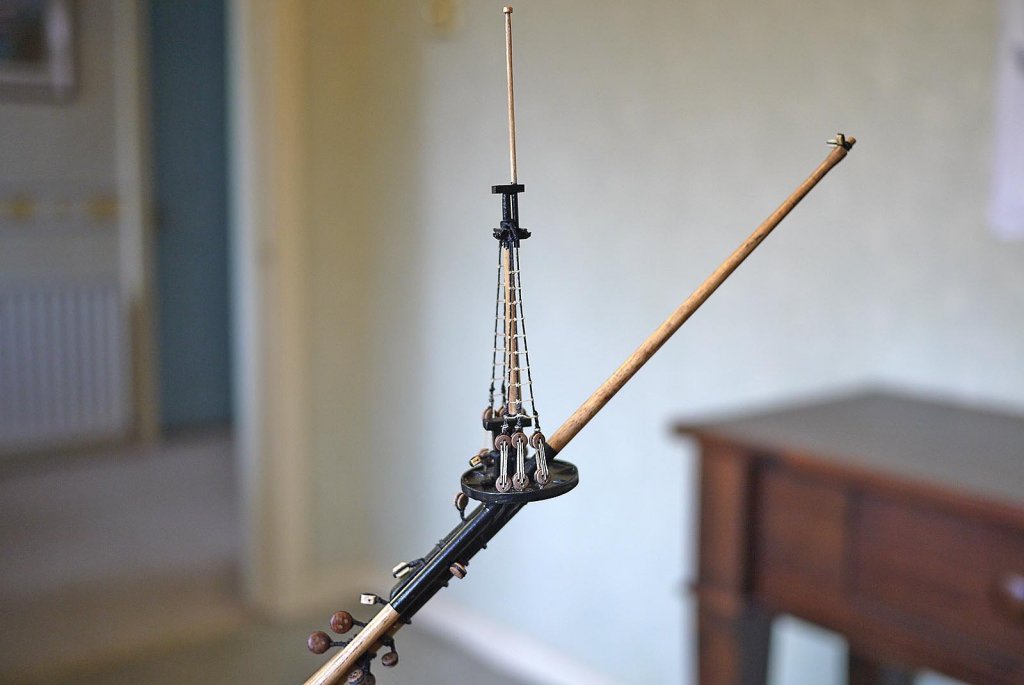
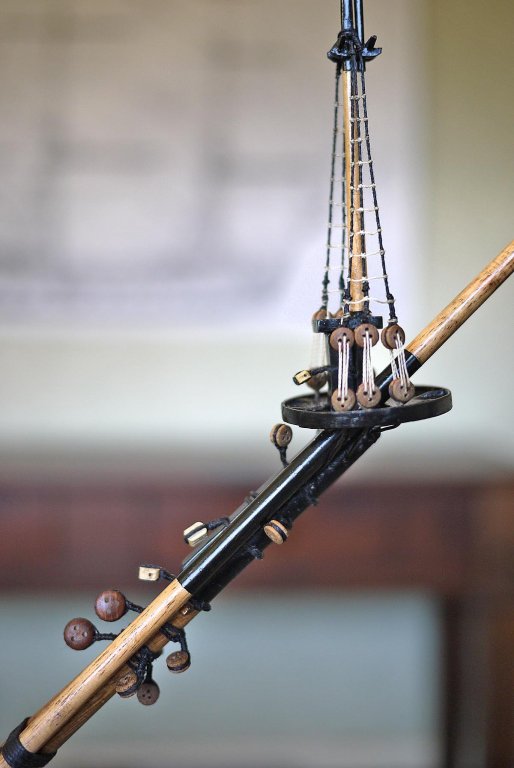
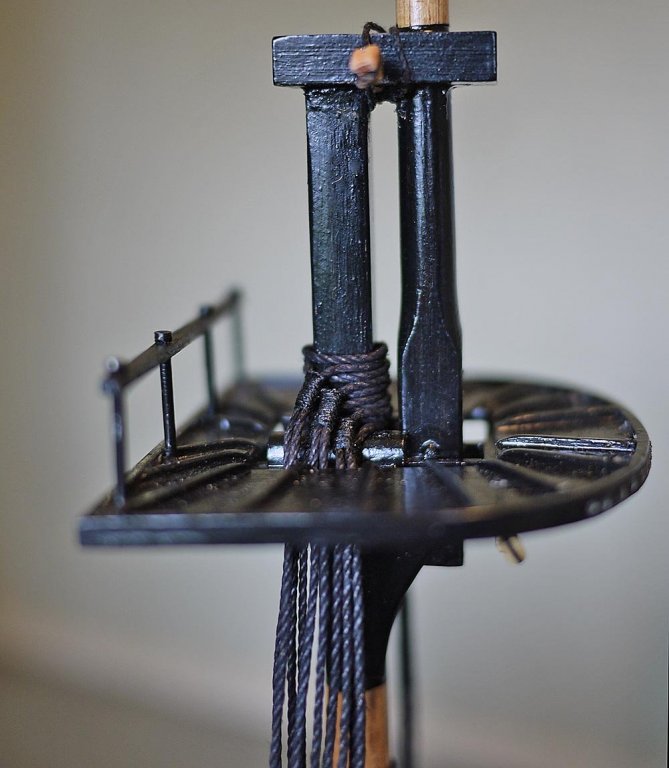
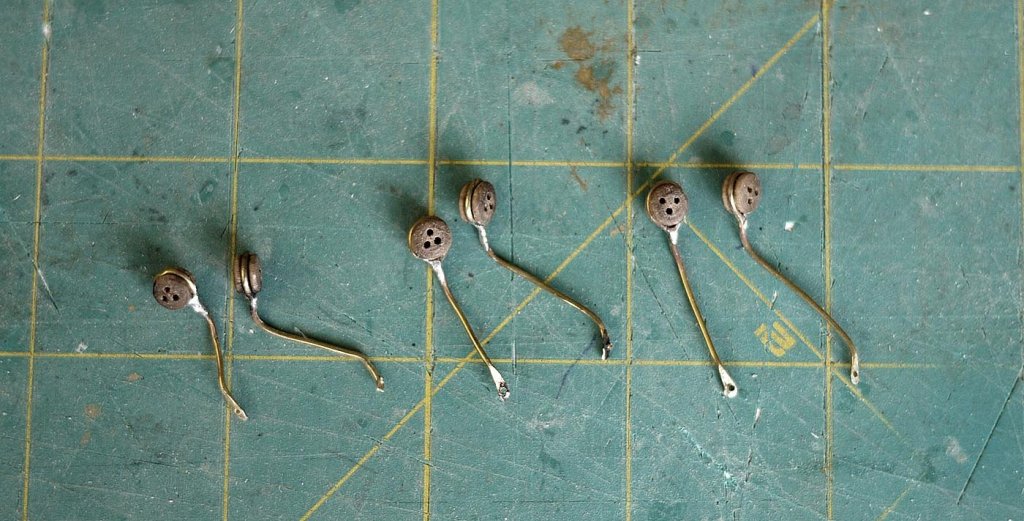
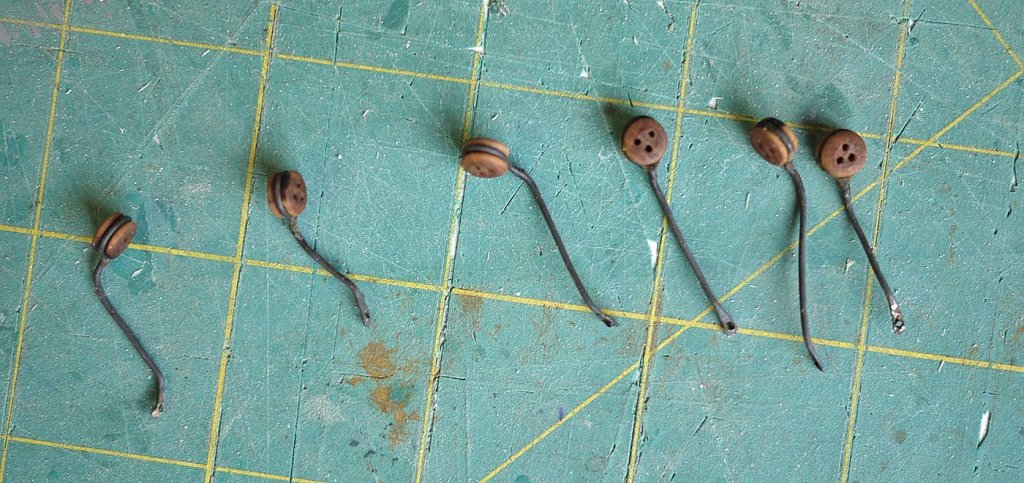
Hello Everyone, Again there's been lots of likes, thanks, it's encouraging to know that the effort I'm putting into my log is worth it. Quite a bit of progress today. It felt that making up the blocks etc. I wasn't going forward much but I suppose that it's a necessary evil but once made they were fairly quick to attach and suddenly you get your rewards for the effort. I've now fitted the masts and bowsprit and as you can see made up the dead eye strops needed. This was Mark and Pete's way of doing them so who was I to do them differently. After blackening they were fitted, this method works well, it wasn't difficult and I would recommend it. Now I'm into the rigging, the shrouds I think will be next then I'll need to get my head around the rat lines. Ken


- 424 replies
-
- 12
-
-
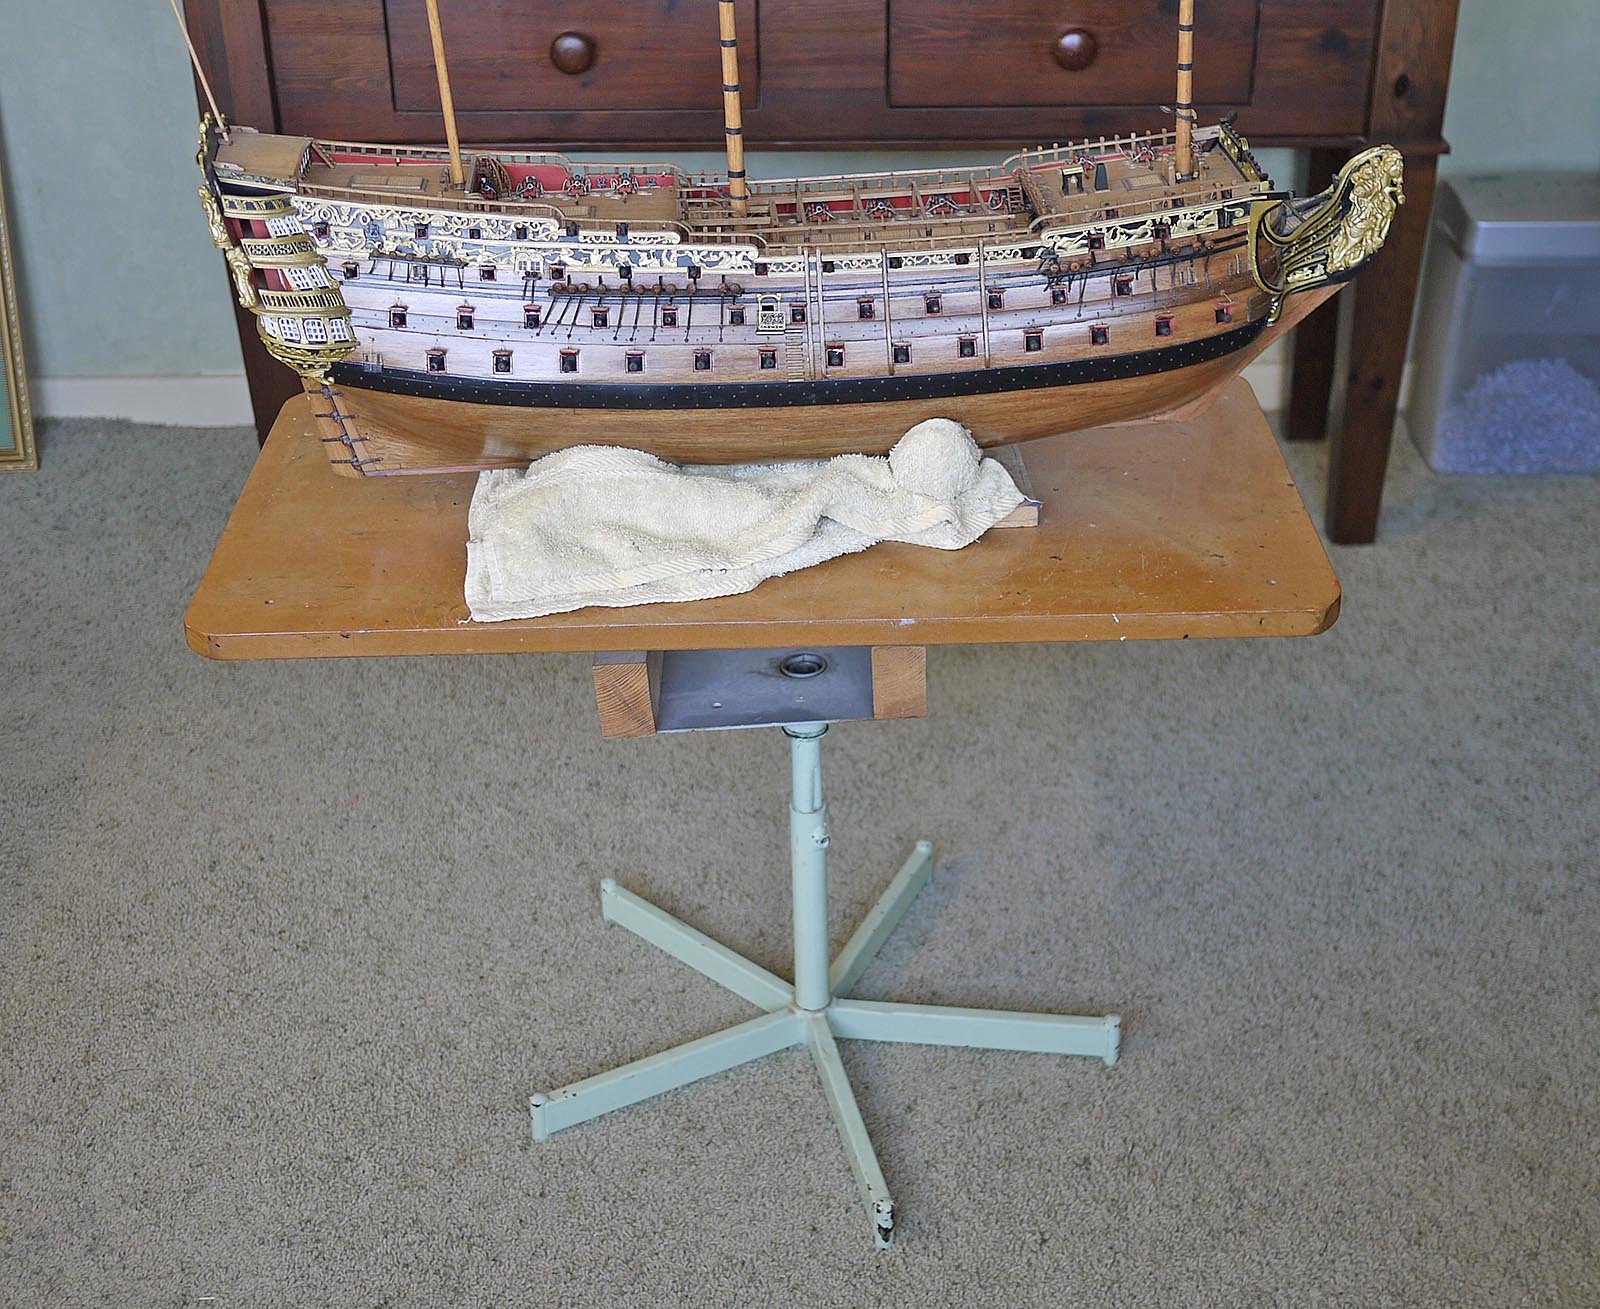
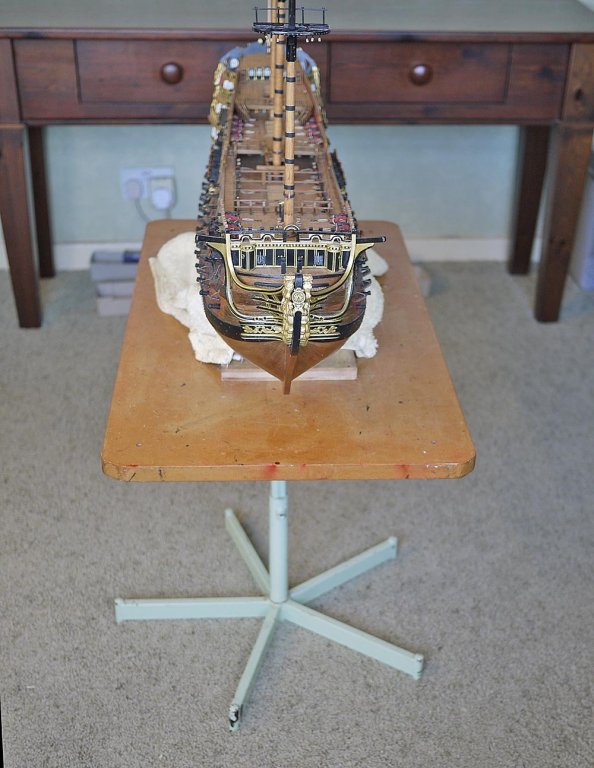
Hello, Welcome aboard Archie and thanks for your thumbs up. Not much to show yet as I'm just making up the blocks and dead eyes for the bowsprit so I thought I'd show you my small secondary work table. I couldn't fit models on my bench and use it for a work area at the same time so I made this table up from an old office chair that I found at the tip. I took the seat off and replaced it with a 20mm piece of MDF, it's suitably heavy and stable but unlike a fixed table I can spin it around like a turntable and raise or lower it, it's especially useful for when rigging, oh and it didn't cost anything. Ken

- 424 replies
-
- 13
-
-
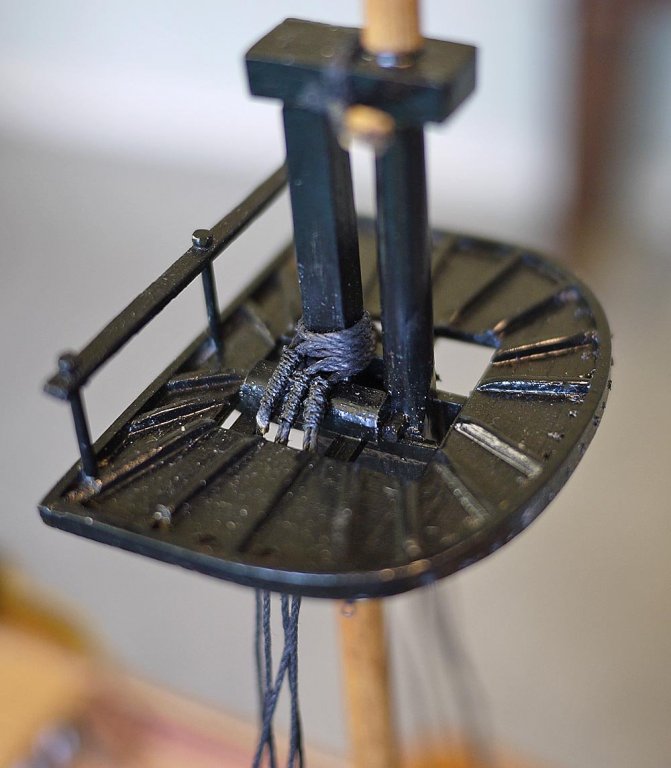
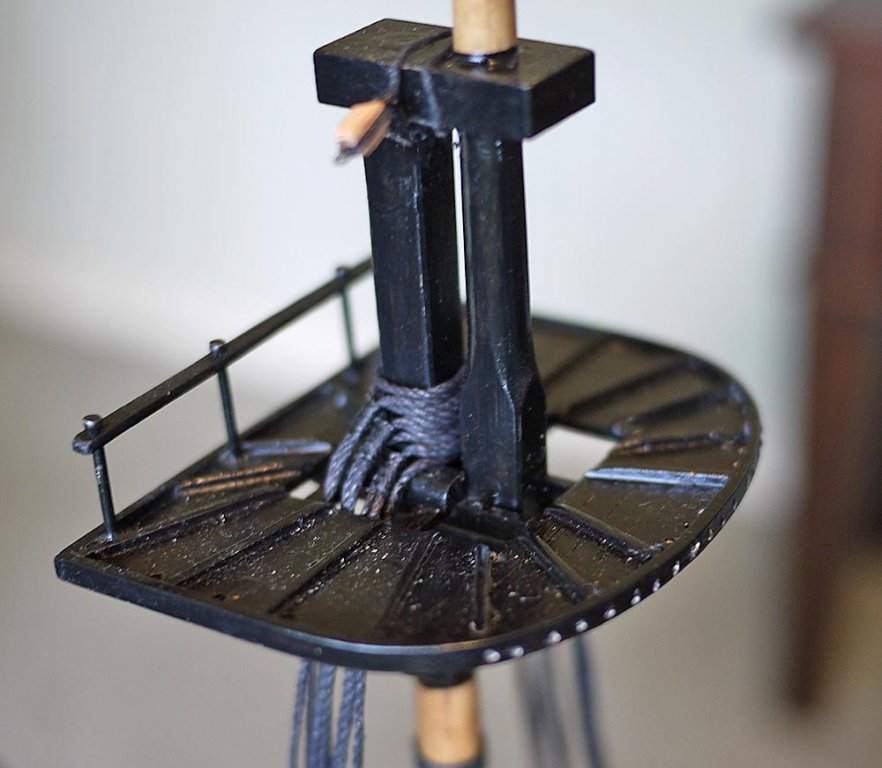
Hello Everyone, Again thanks for your likes. Mark, thanks very much for posting those pictures, they helped quite a bit. I've been quite busy and although I've put in a few hours it doesn't seem like I've achieved a great deal. I've put in the blocks and rings needed on the deck prior to fitting the masts, I've fitted the masts with what I think is needed, blocks, dead eyes and made up some rails on the tops, ( Can't have the crew falling off.) That's it, it doesn't sound much but it was time consuming. Next I'll fit out the bowsprit and glue everything into place, Ken


-
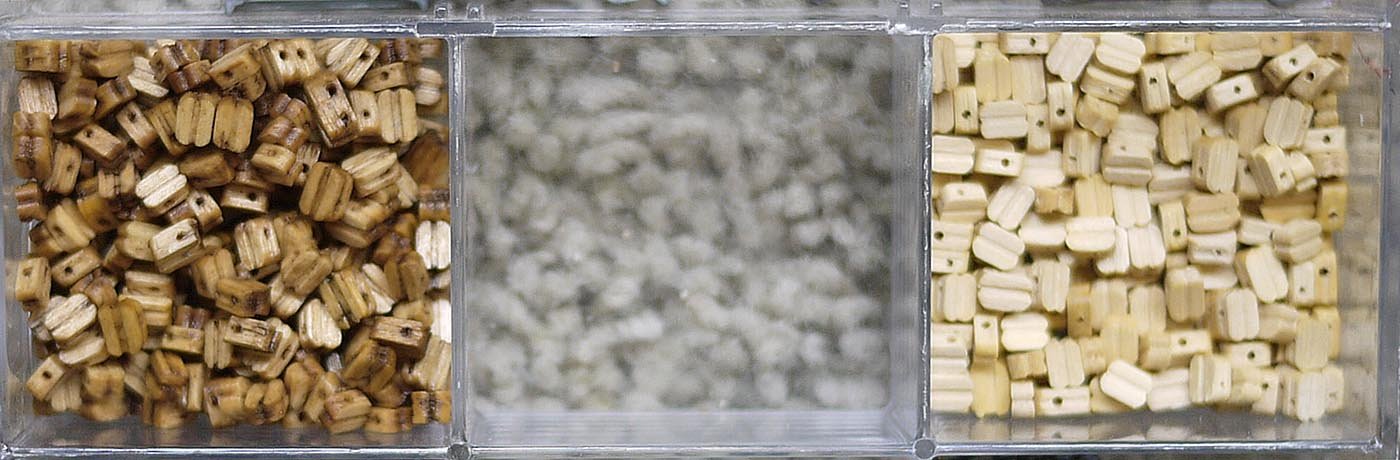
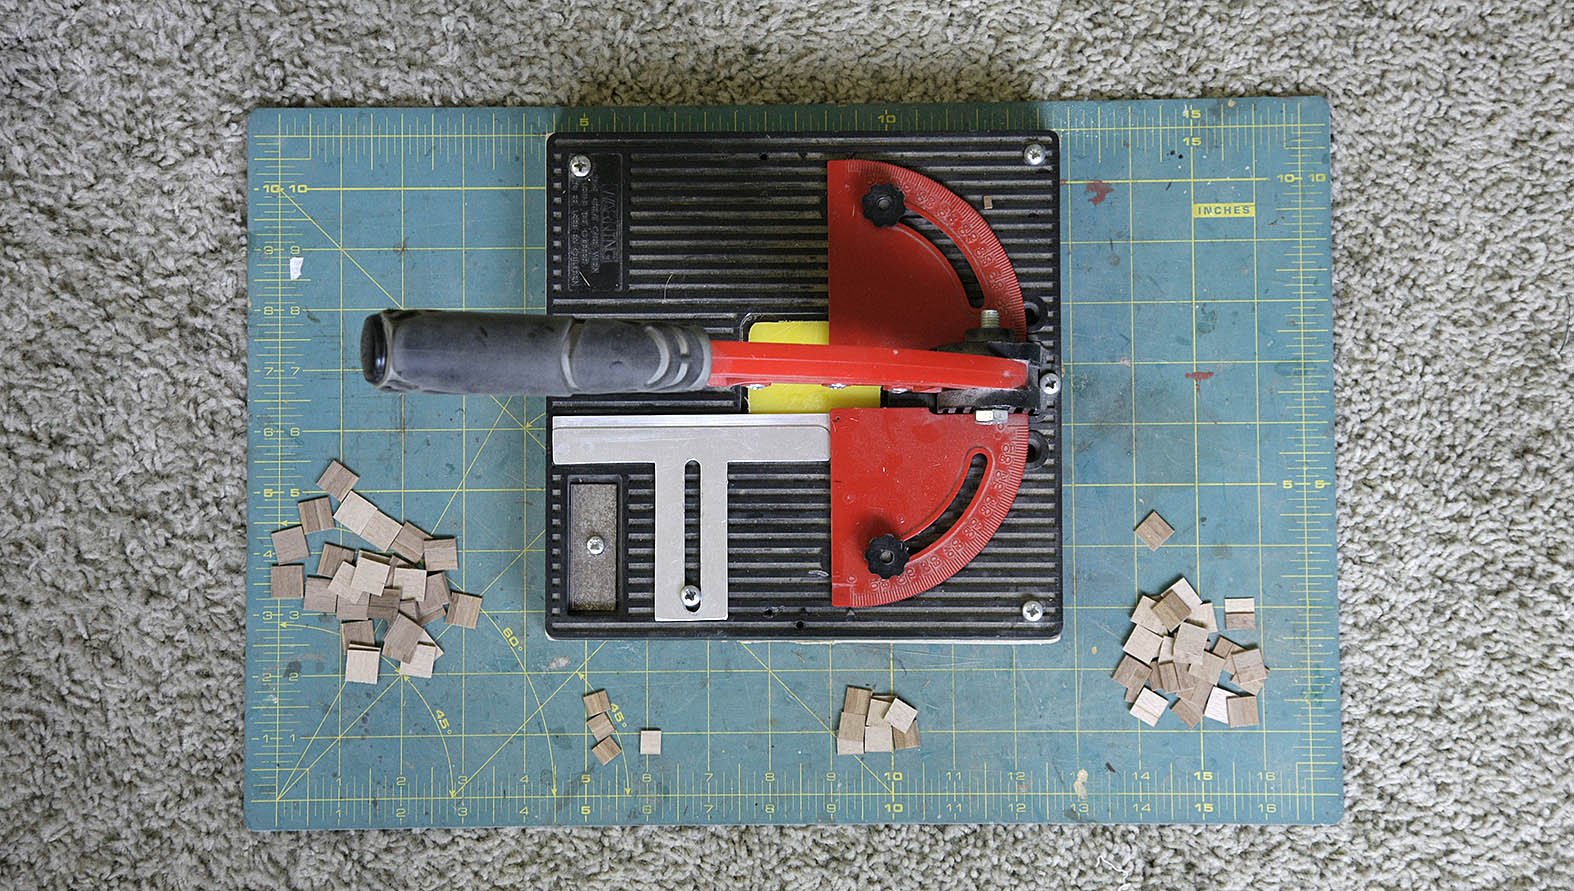
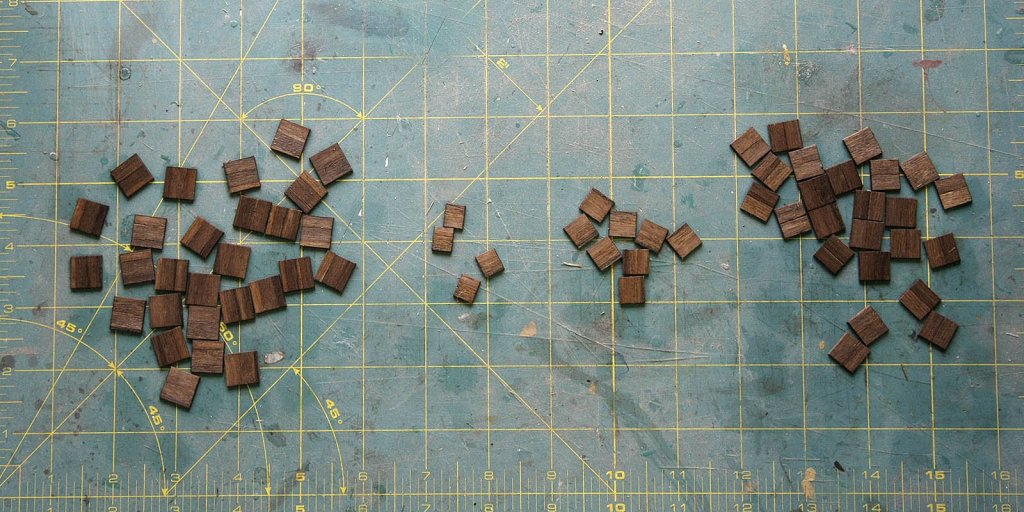
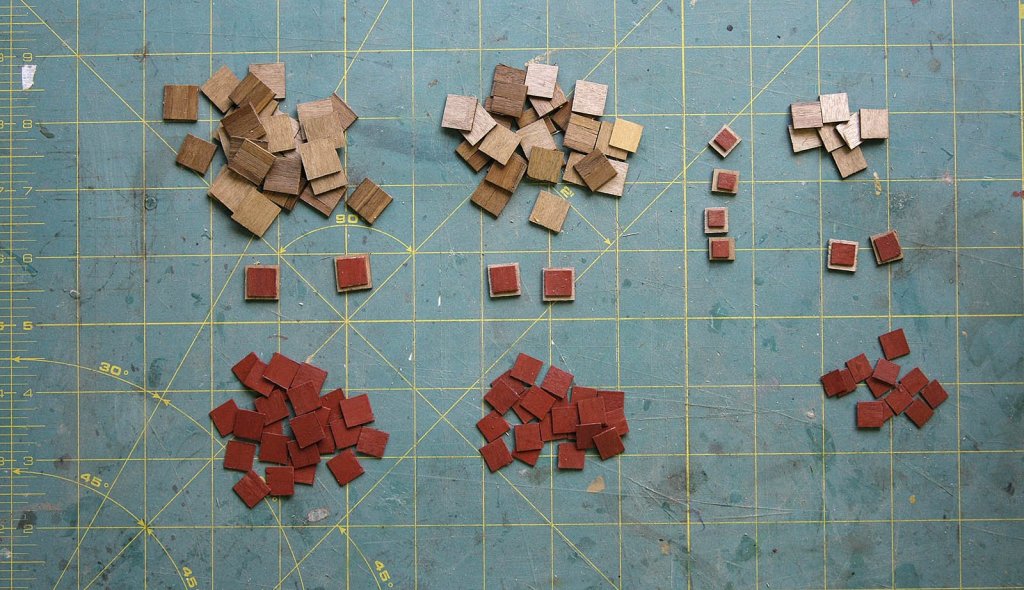
Hello Everyone, Again thanks for your likes and kind comments. Just a small update, I sealed the masts, put on two coats of Caldercraft Admiralty acrylic dull black then finished off by putting on a coat of satin poly, looks good. I'm now giving attention to the fitting of the deck mounted blocks and eyelets. I thought that the blocks supplied were quite good quality but I felt that they were too light coloured to look right so I soaked them in my light oak stain and am pleased with how they came out, they look a bit weathered. The picture shows the original compared with the dyed blocks. Mark could I ask you to post pictures showing what blocks/eyelets you've fitted at the base of each mast, it would help a great deal and would be appreciated. Ken

-
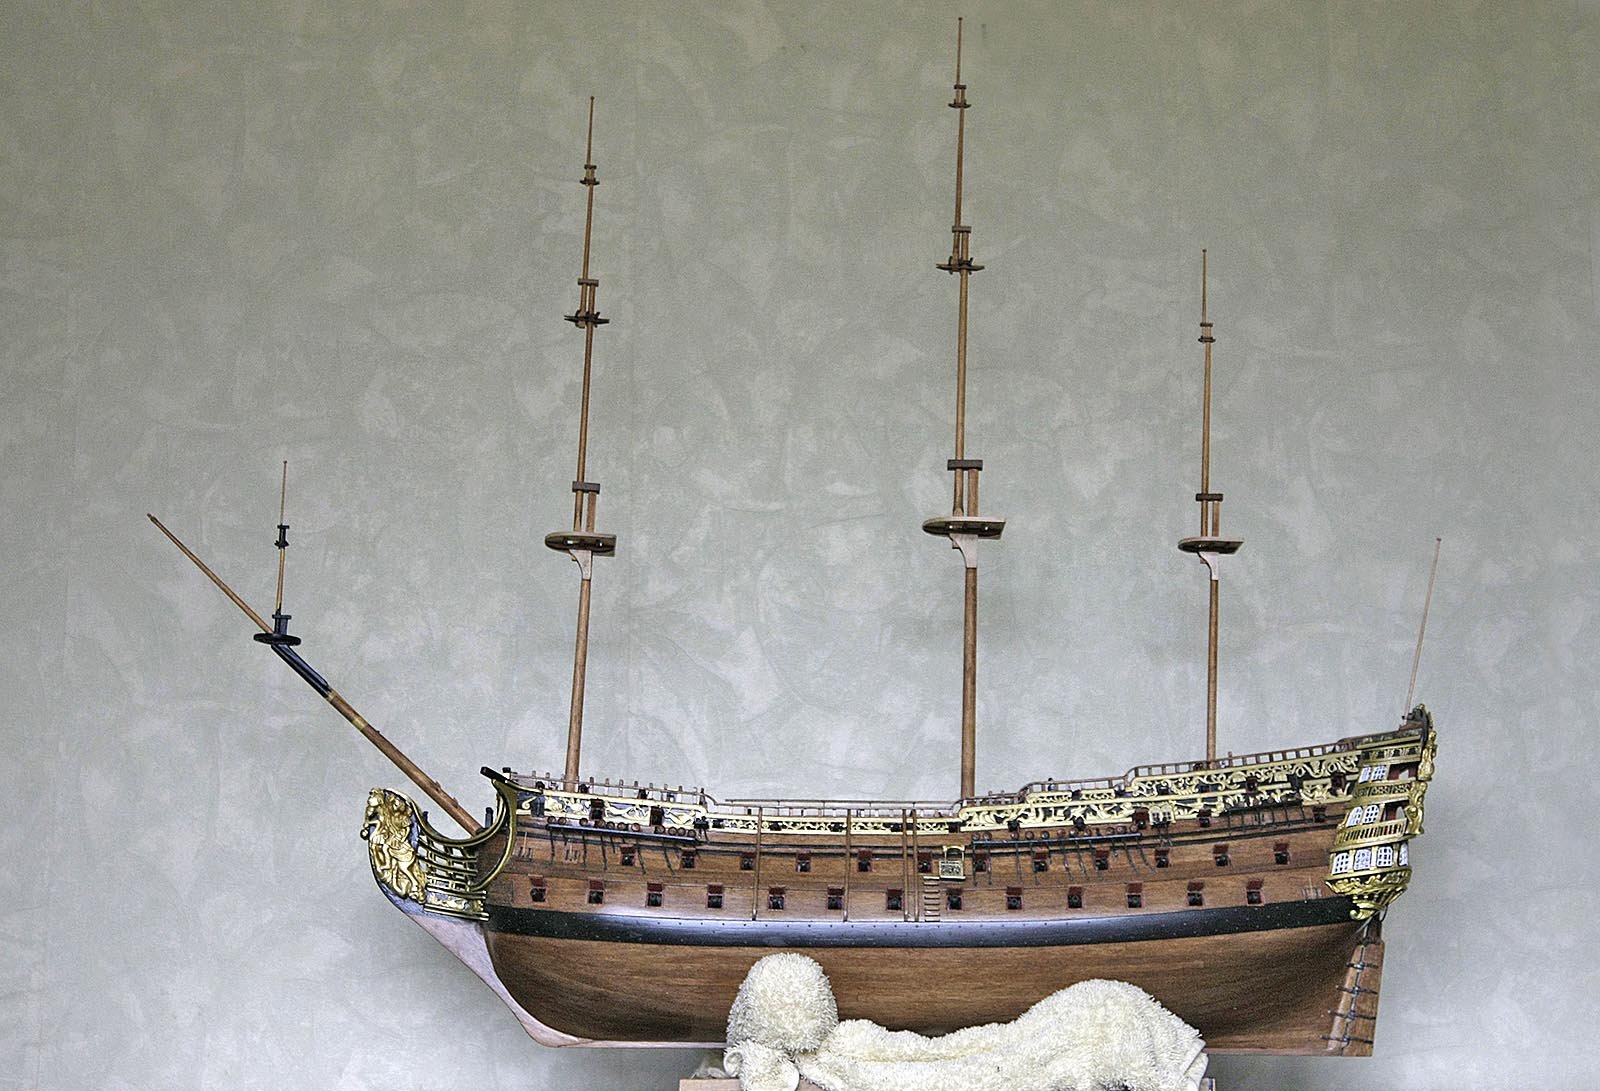
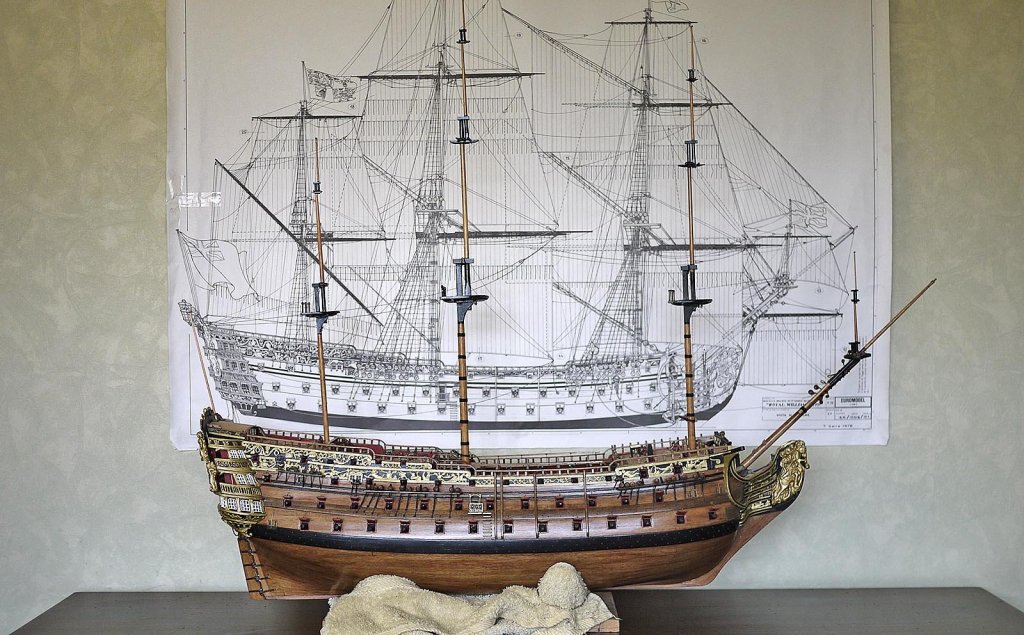
Hello Again, Yes Dillbert I know what you mean. I used to hate doing the tapering of the masts and spars, this was my first build using my small lathe and I found that it's actually fun now and it's done in no time. The building of the masts went smoothly without any of the difficulties that I had imagined. I made all the separate pieces as shown on the plan and then assembled them. The only thing that I needed to get right was the alignment of the mast sections. I mounted them loosely in the ship and they appear ok to me. Next I'll paint and varnish them before fitting them out with the necessary blocks. I'll need to put some blocks and eyelets on the deck prior to fitting them permanently. Ken


- 424 replies
-
- 14
-
-
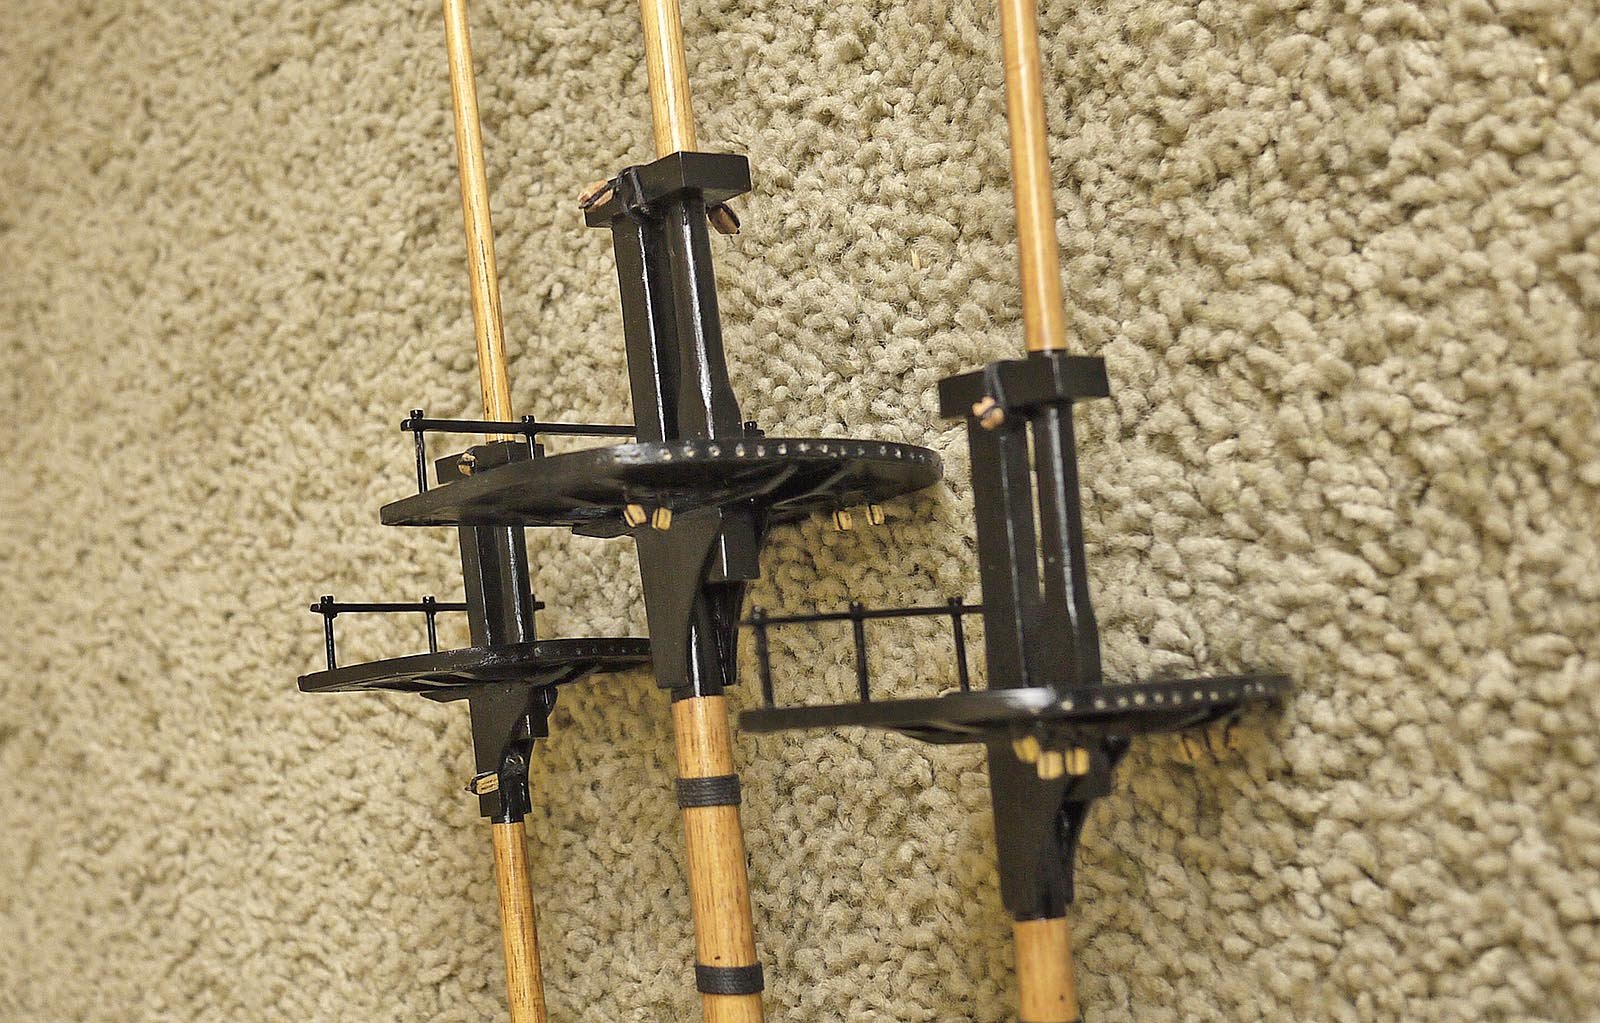
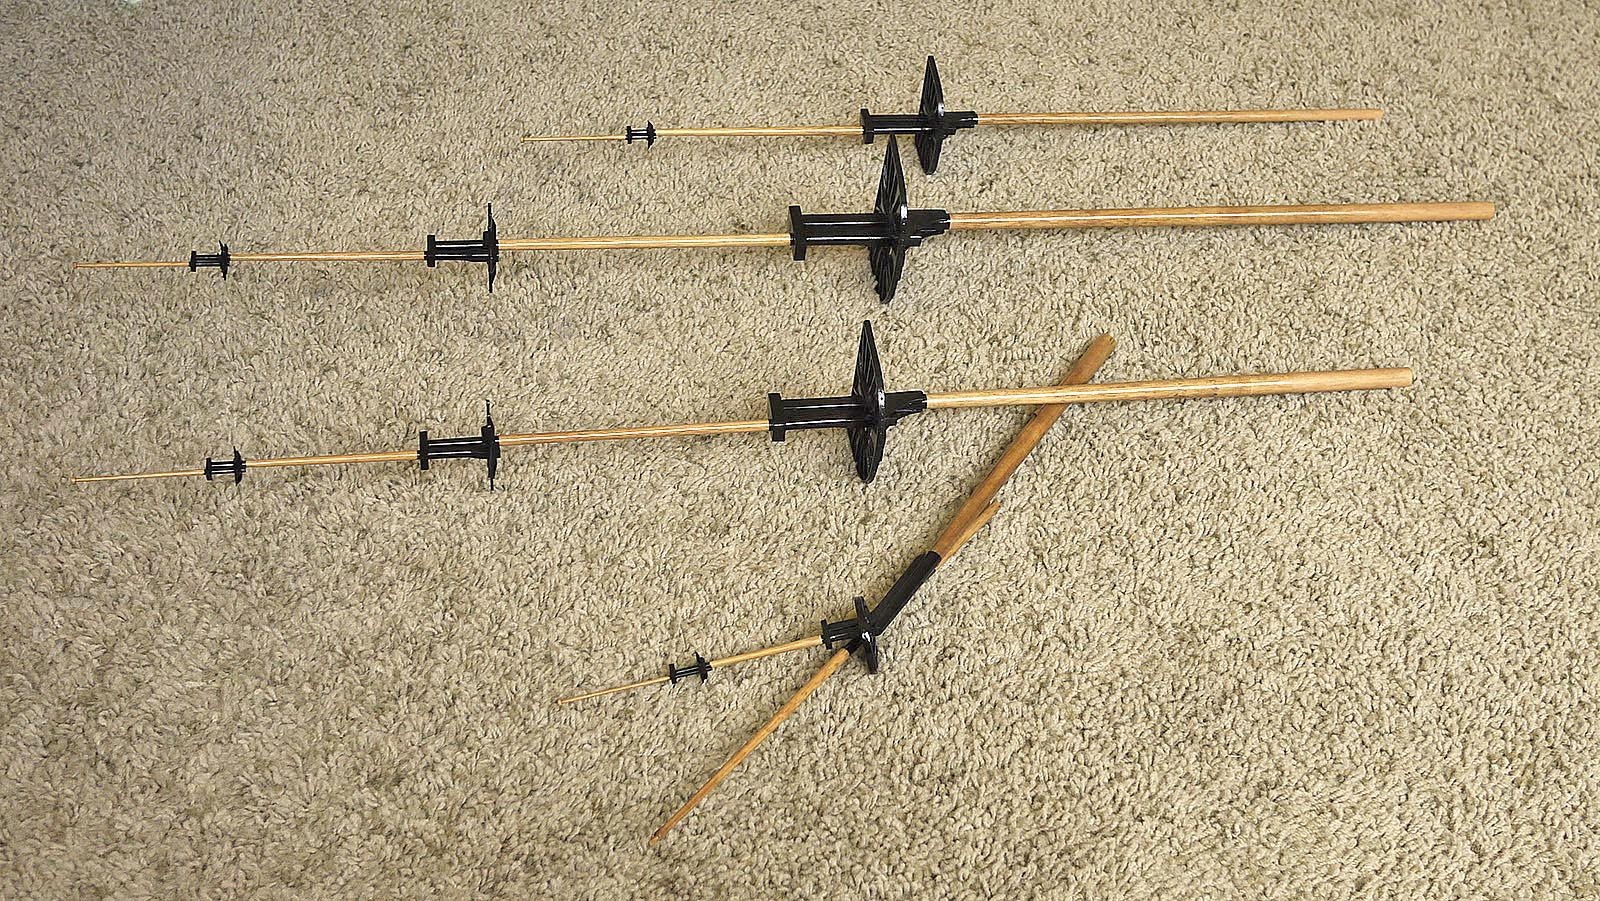
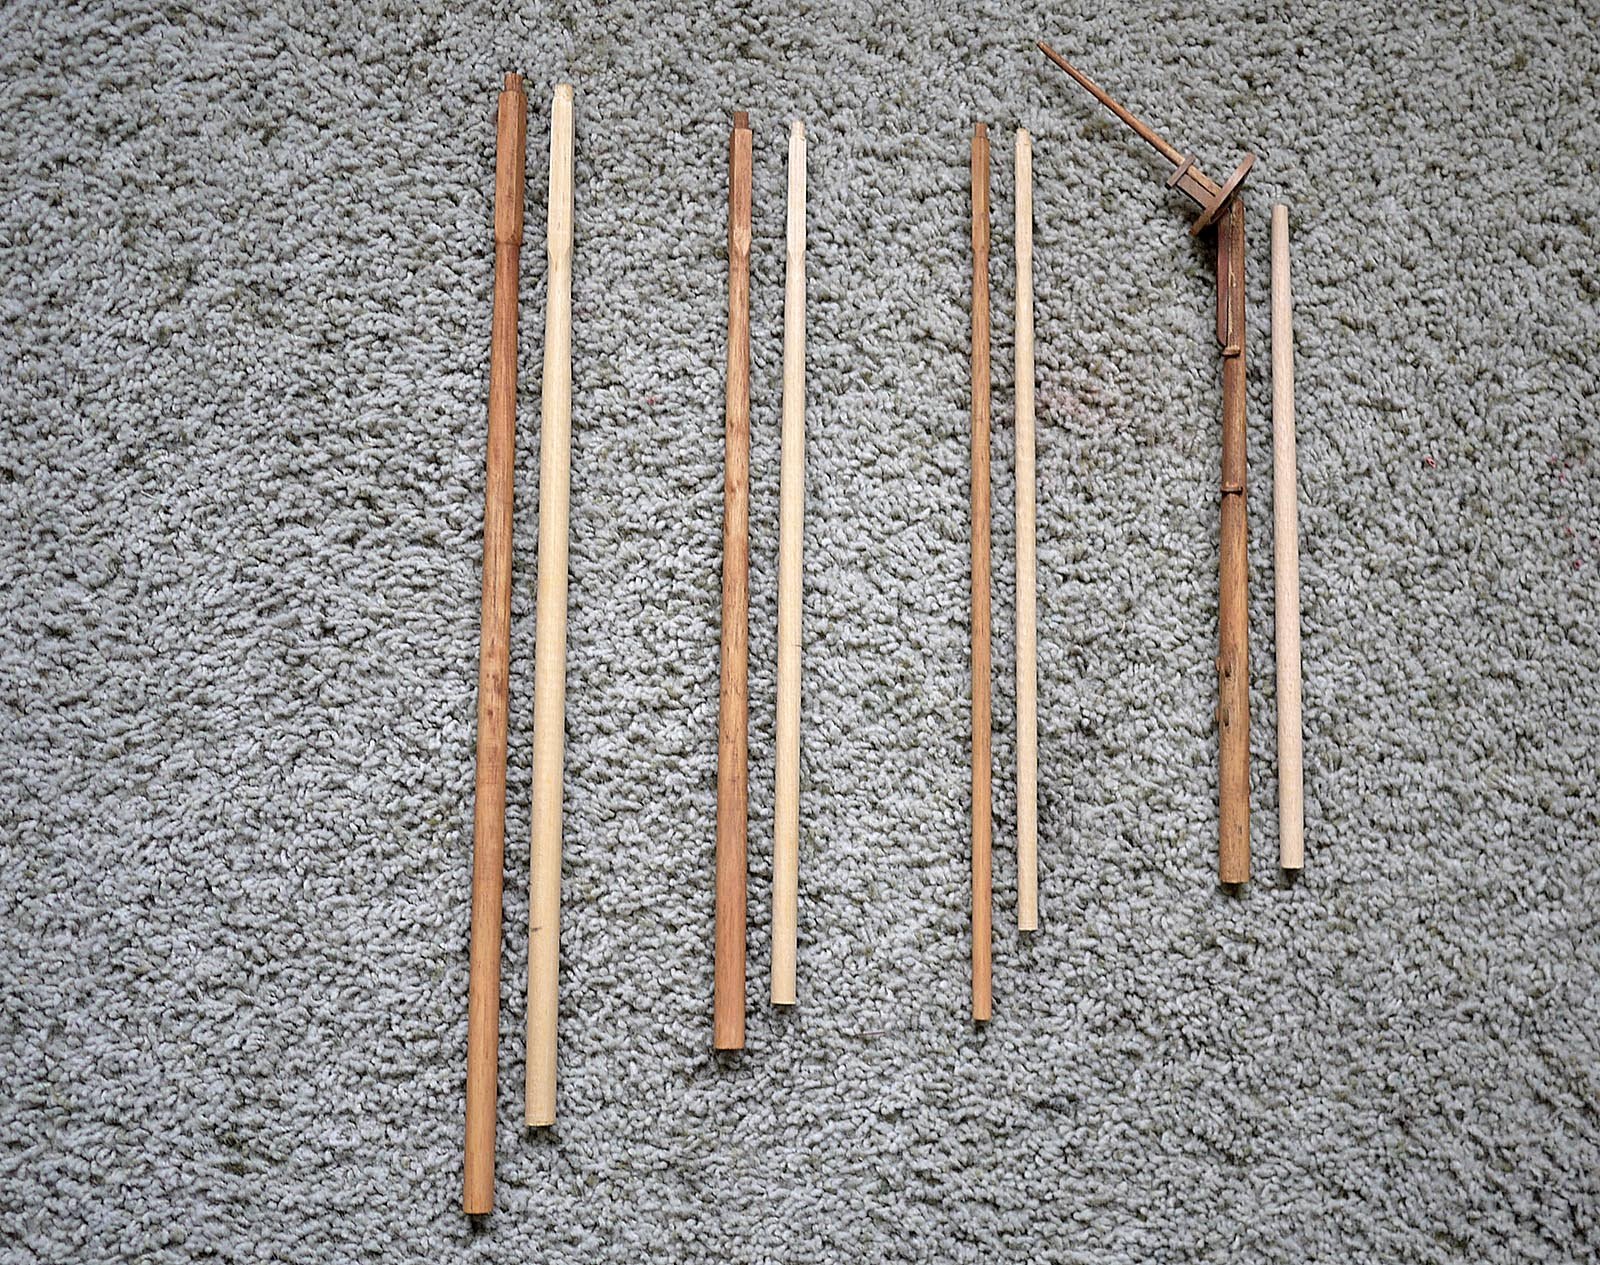
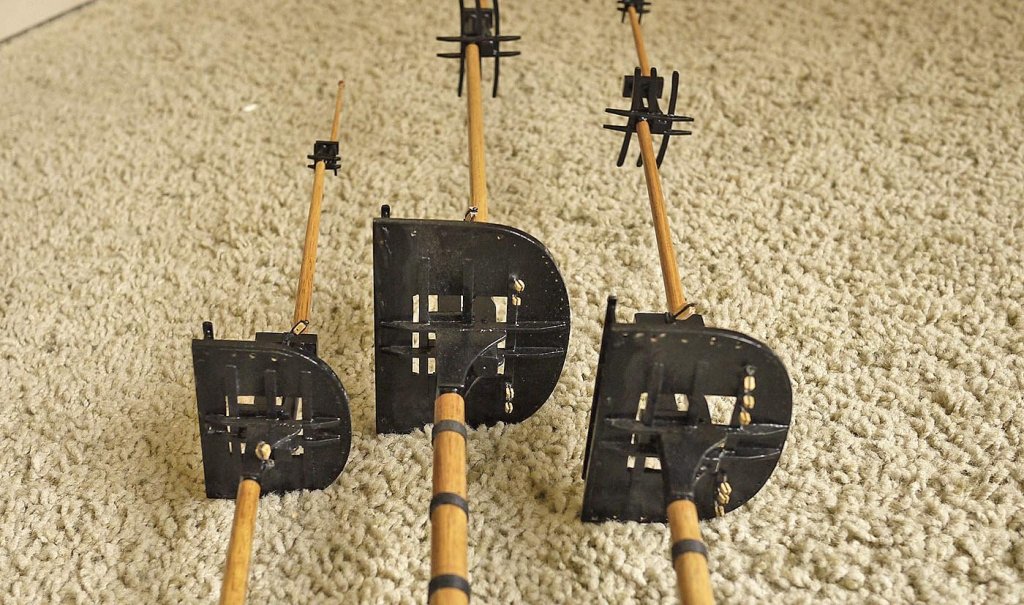
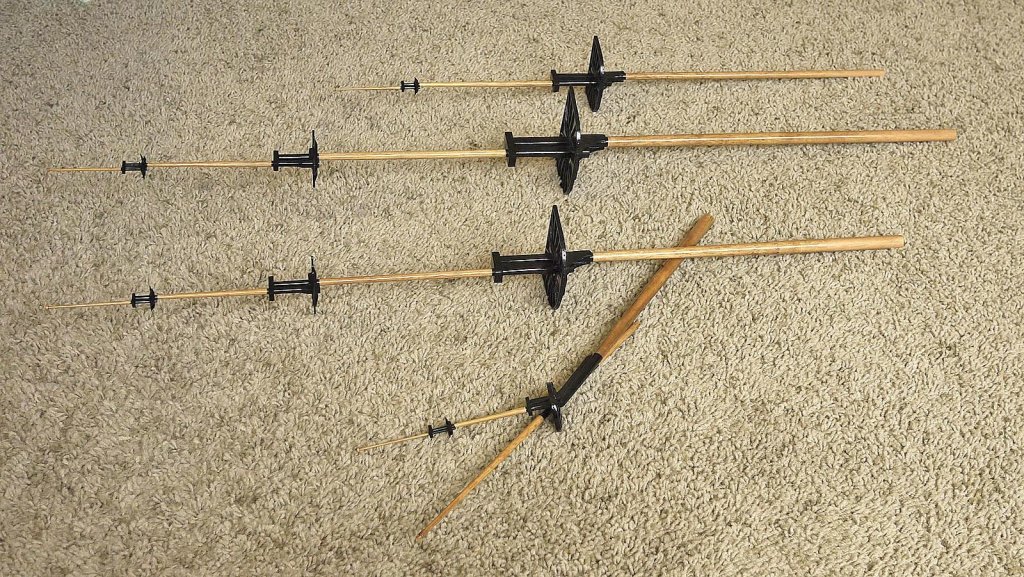
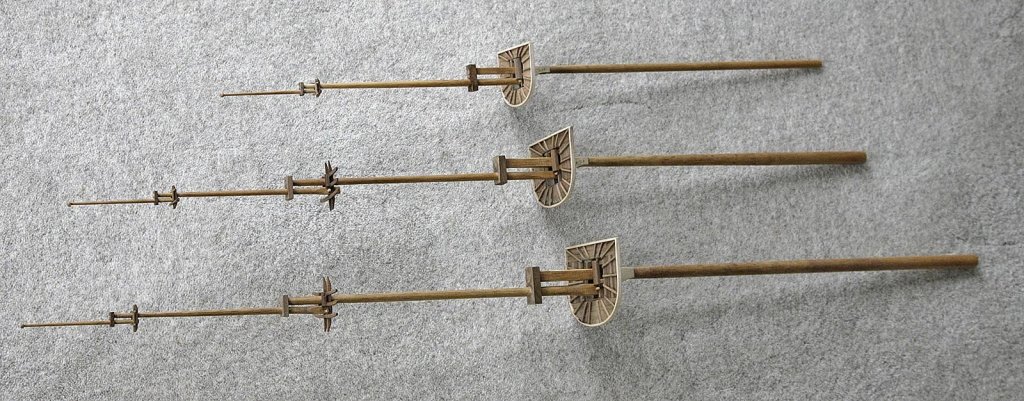
Hello Everyone. Just a short update. As many of you know I acquired a much older kit that had pre shaped masts and spars, being lazy I thought that I'd use these for my current build. Seemed like a good idea that would save me quite a bit of work but no! On checking them against the plans It was quickly obvious that they were not made to the right sizes and to correct them would take more time than making new ones from my supplied dowelling. Using my Proxxon lathe it took no time to make up the lower mast sections, I've shown pictures of these alongside the pre shaped ones, which are the lighter unstained ones. I've got my mind around the plans now that I'm working off them and I'm understanding them much better. I'm making all the mast parts first then I'll build them up. I'm well into finishing these and have not yet encountered any issues. My initial thoughts regarding the plans were probably as a result of previous builds where you didn't have to think too hard as you were guided through the process whereas here you are left to your own method, I'm now of the opinion that the plans for the masts are very good. Ken

-
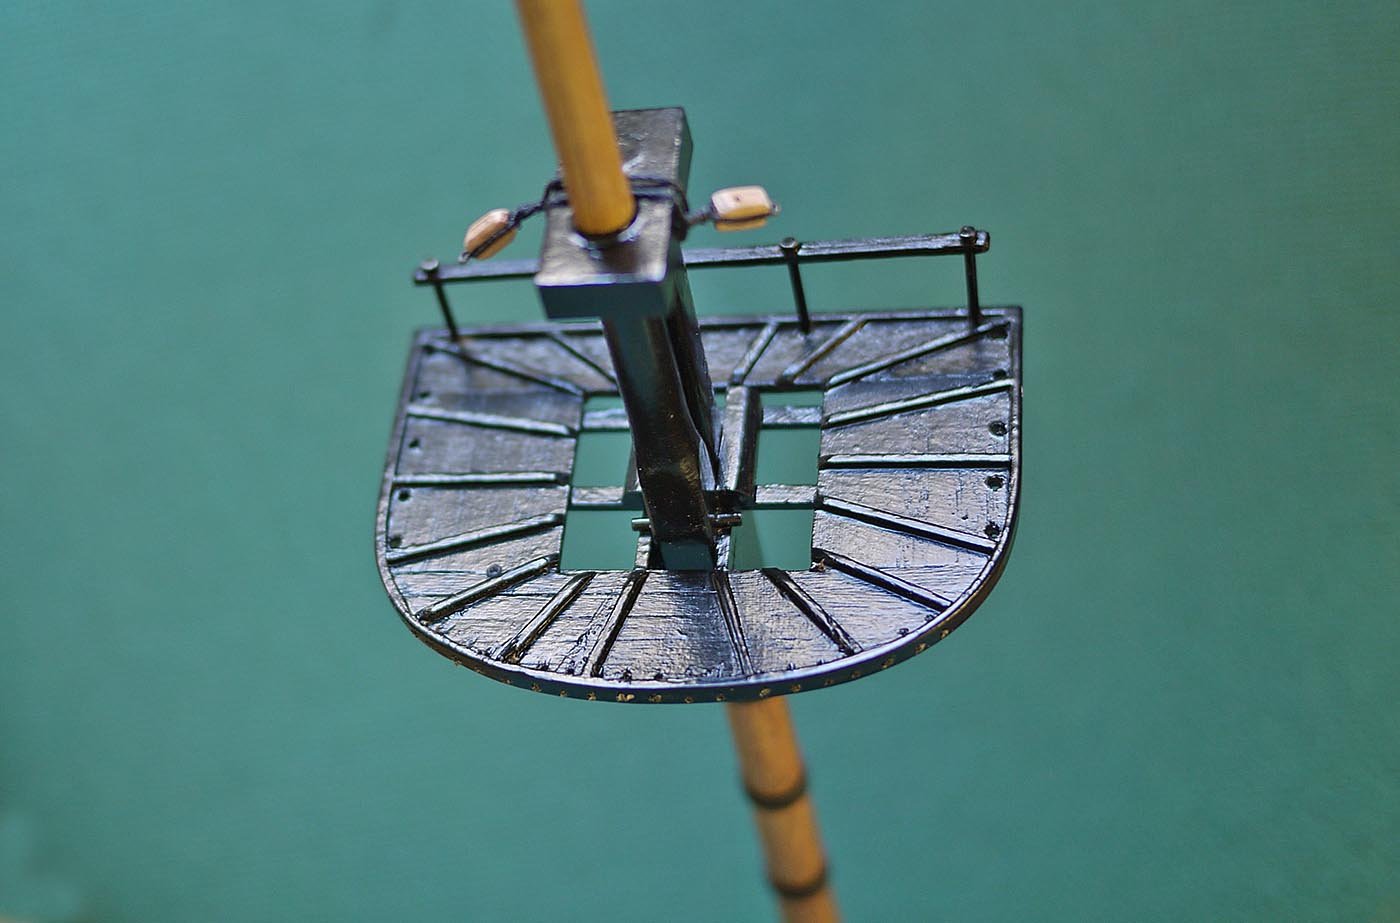
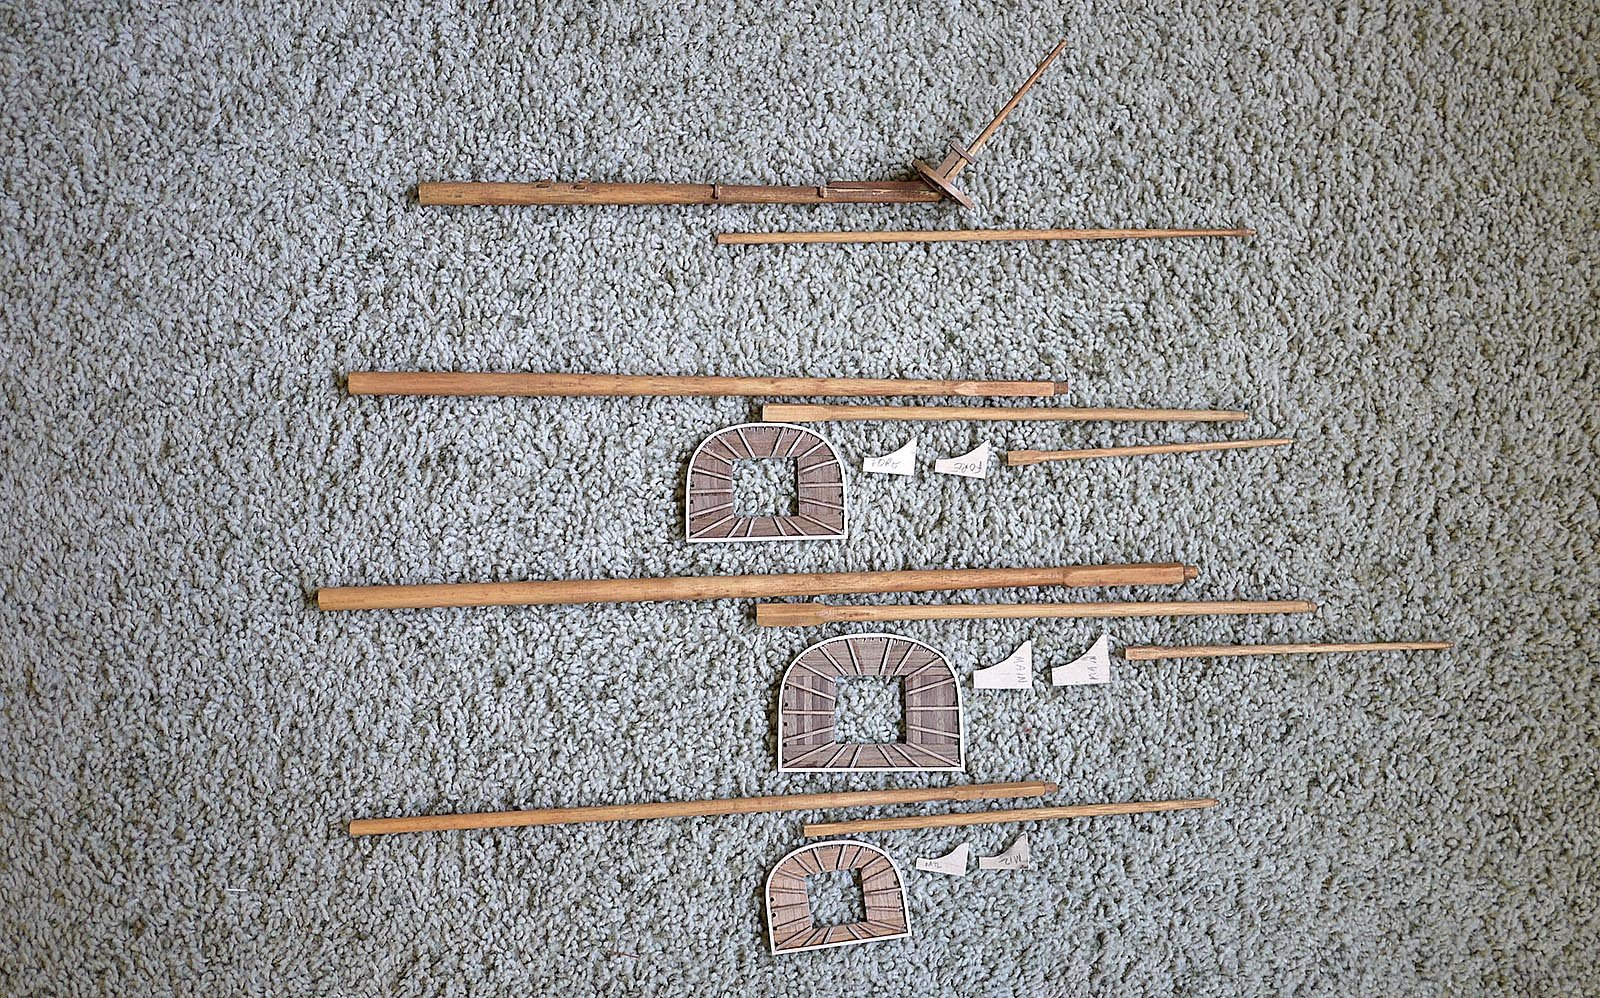
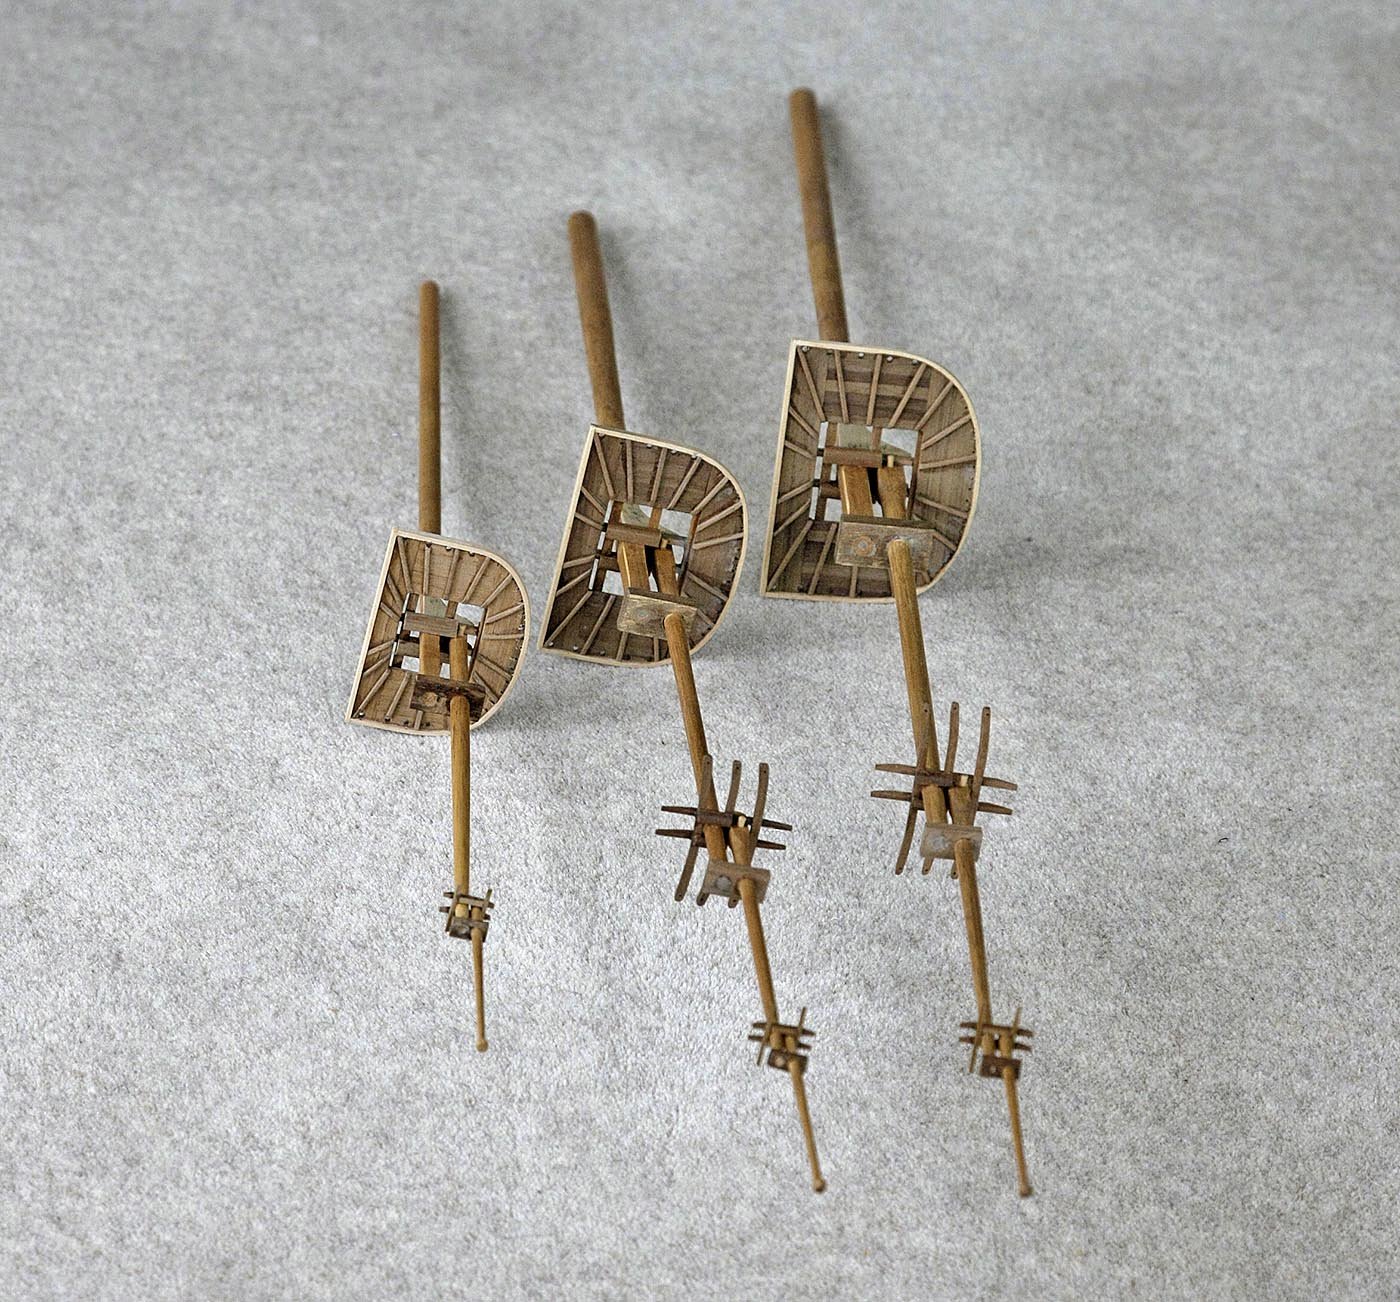
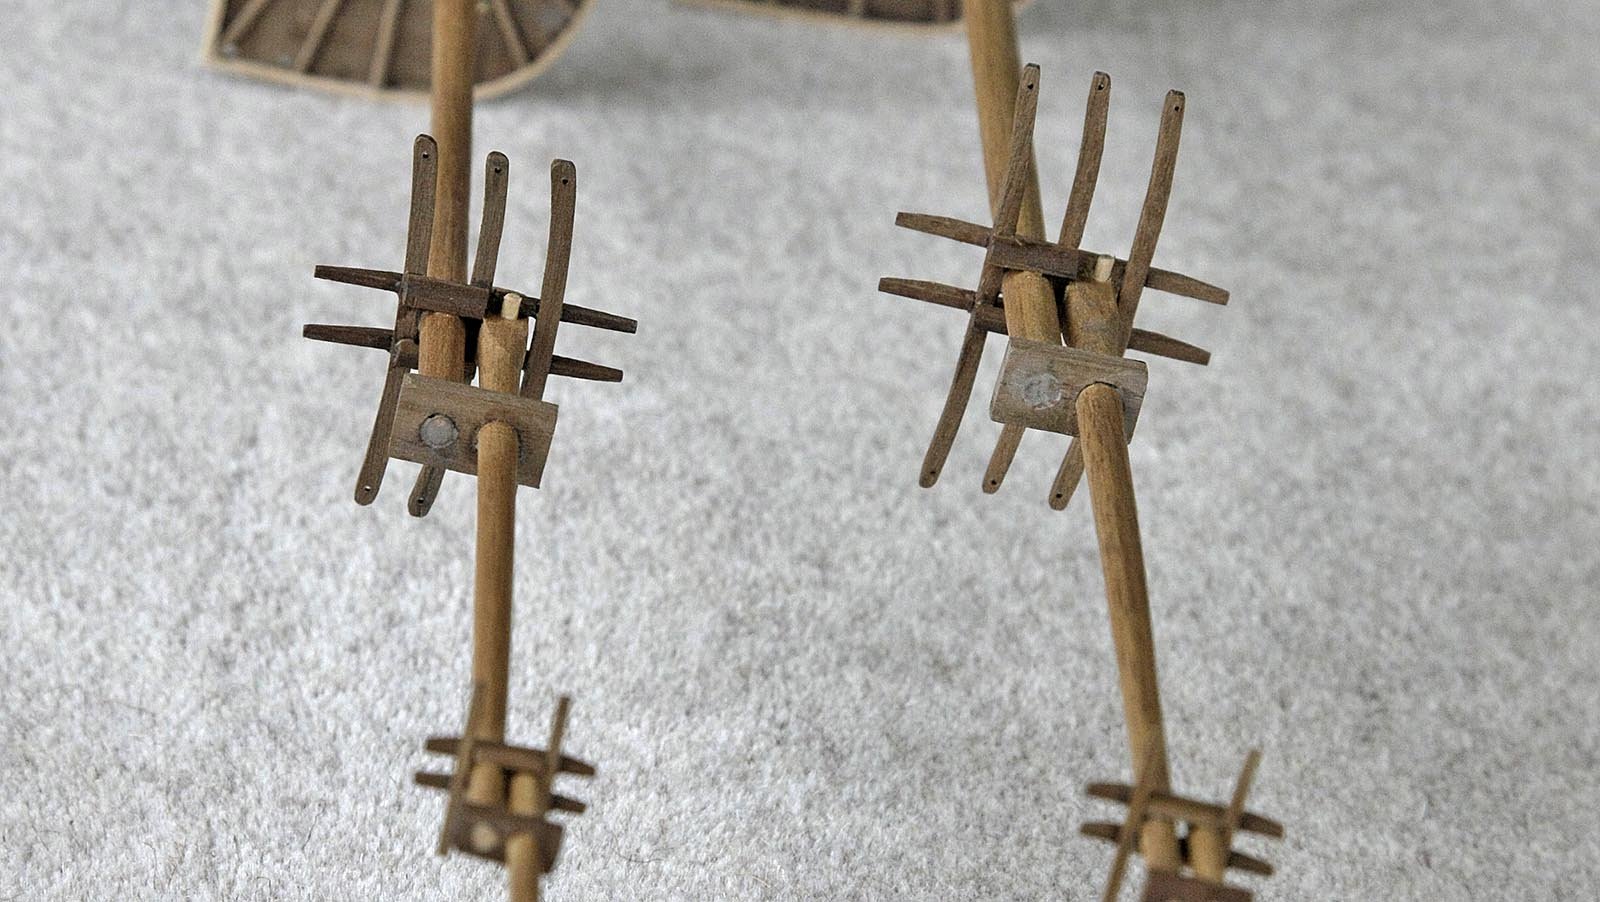
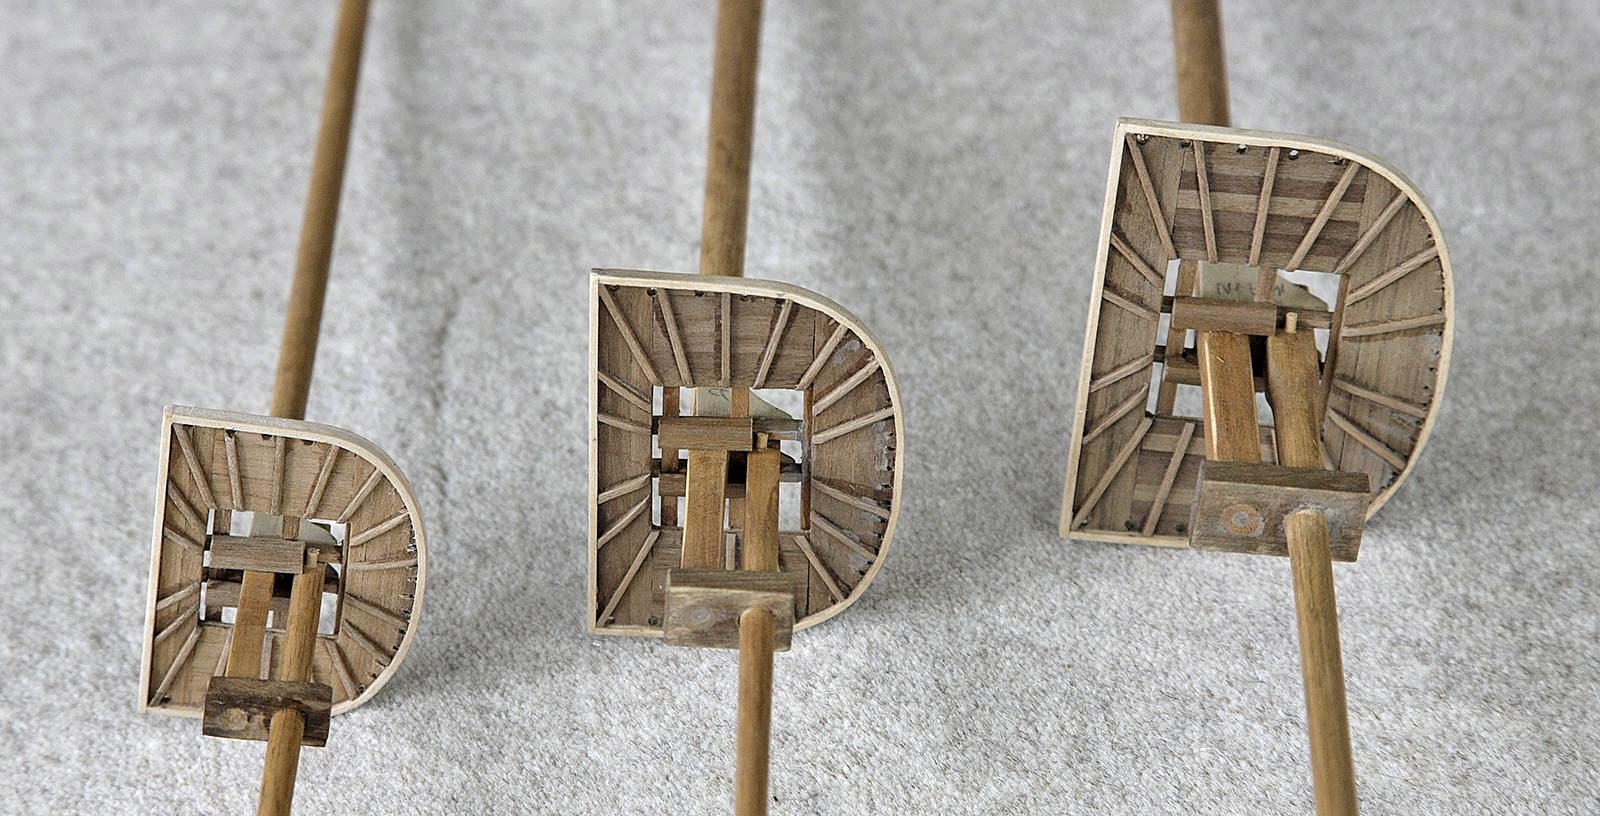
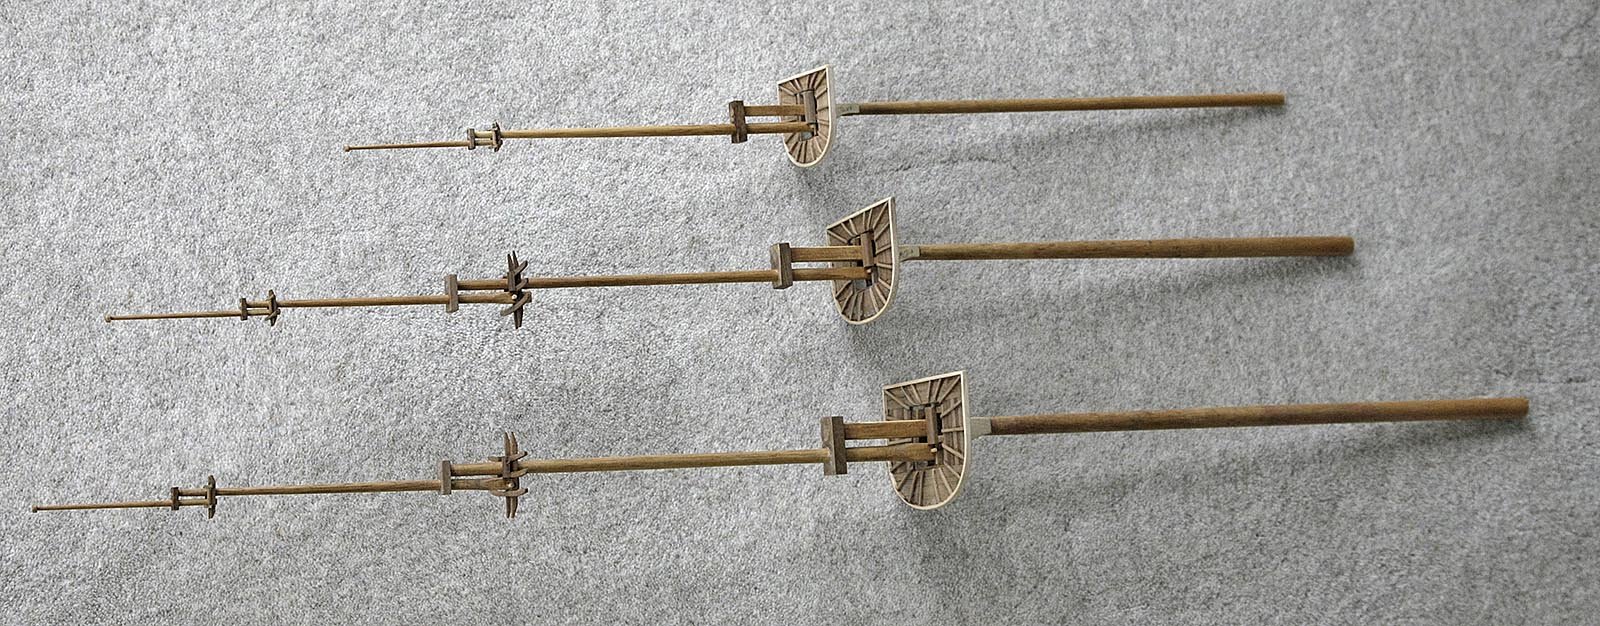
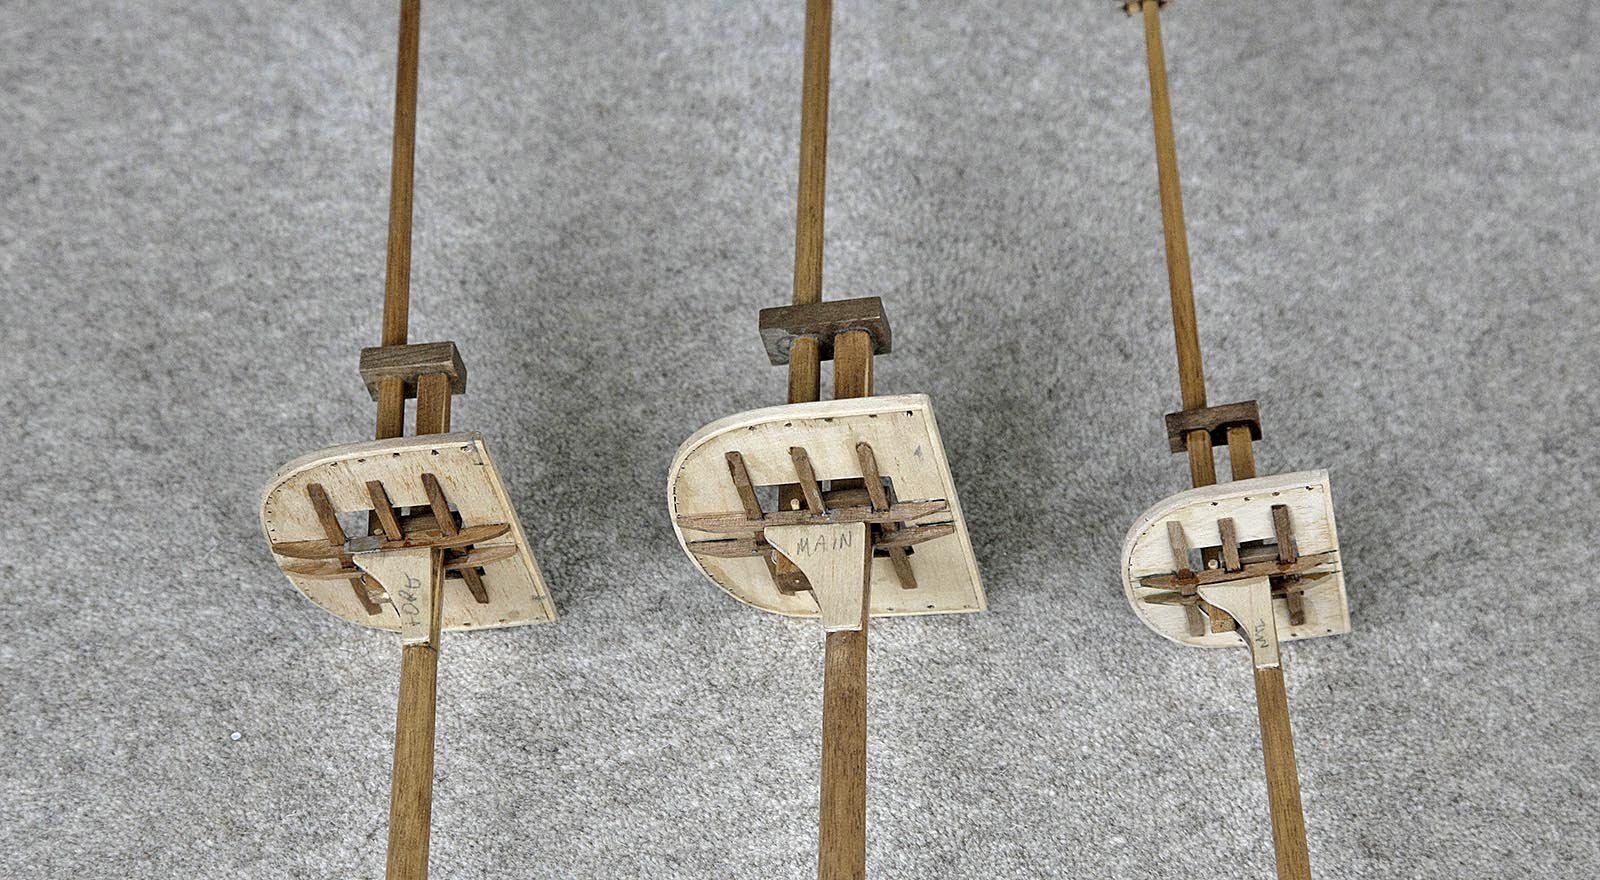
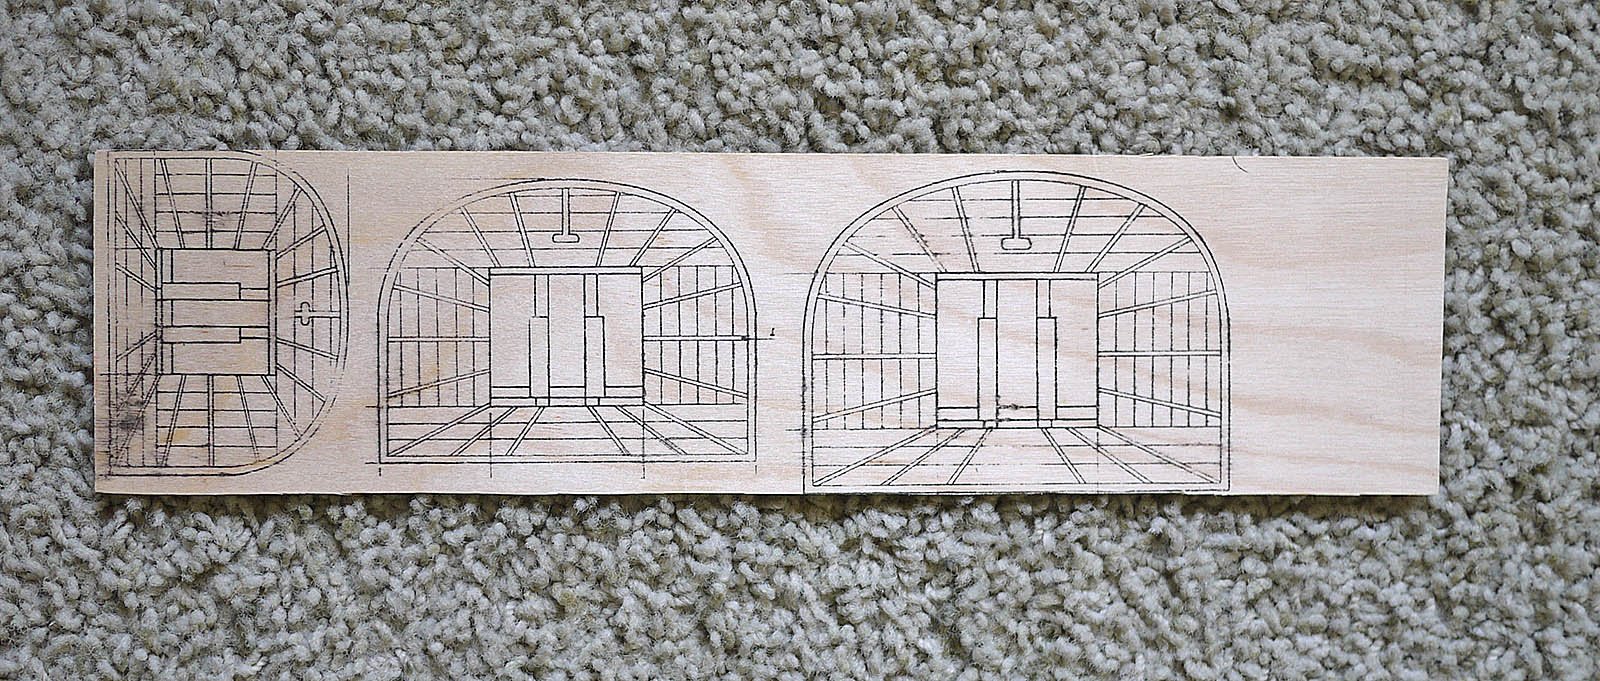
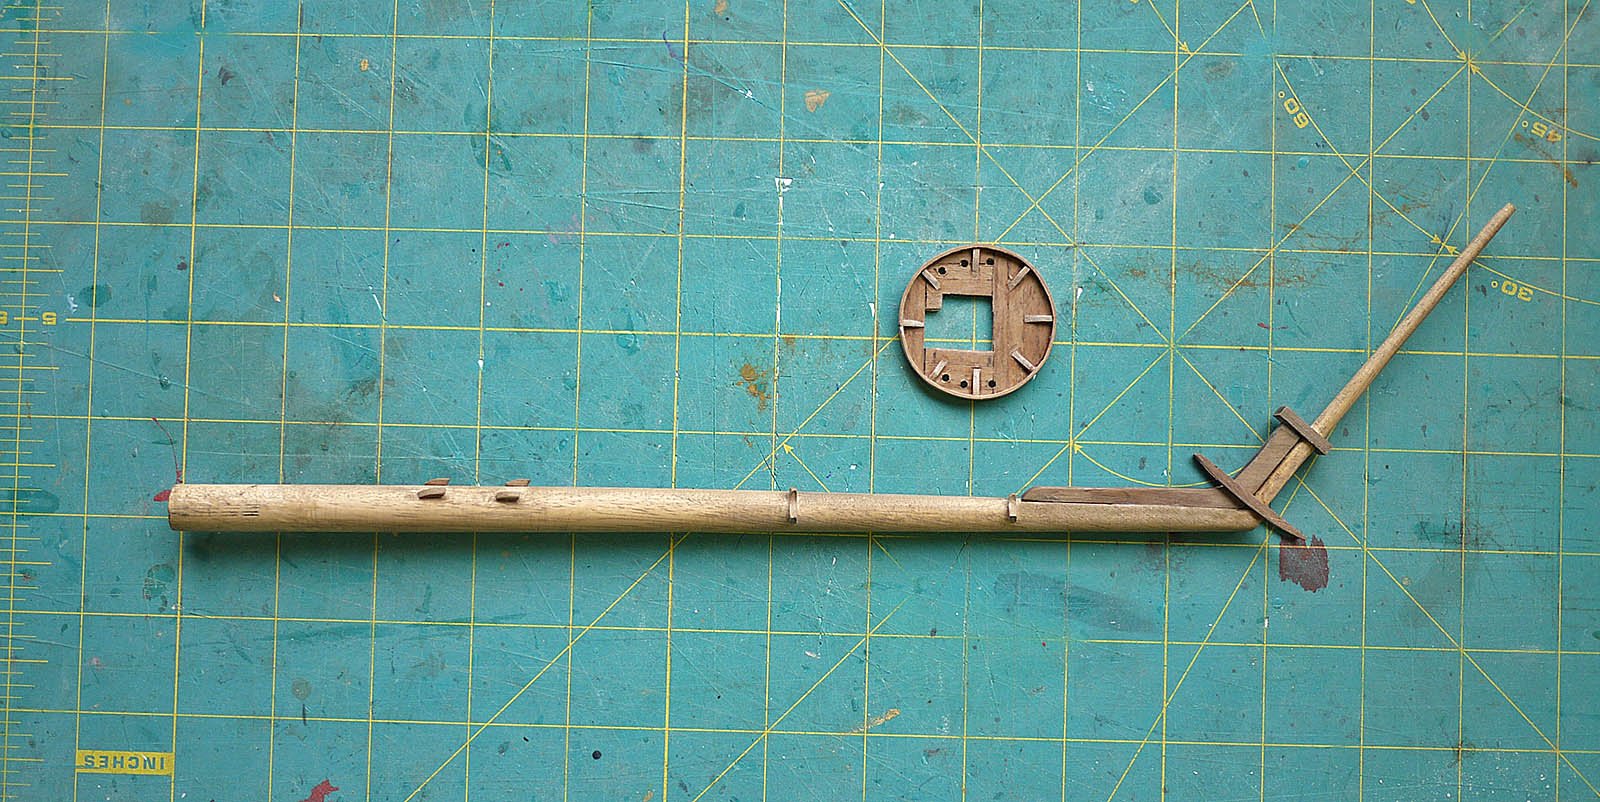
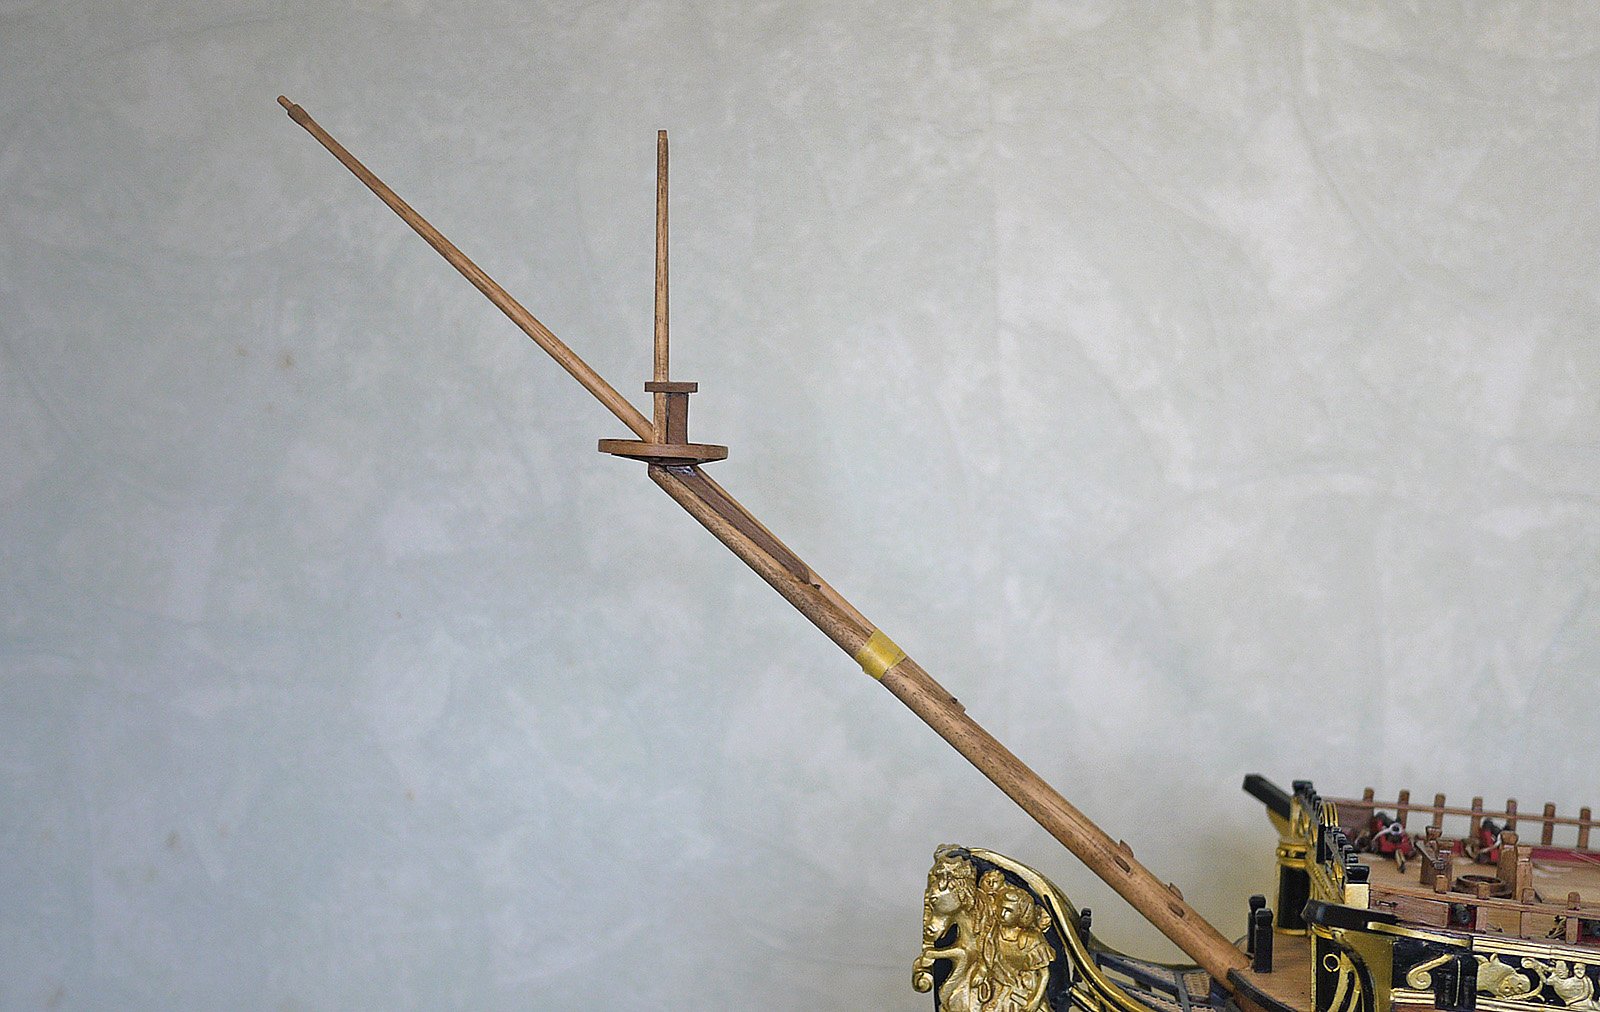
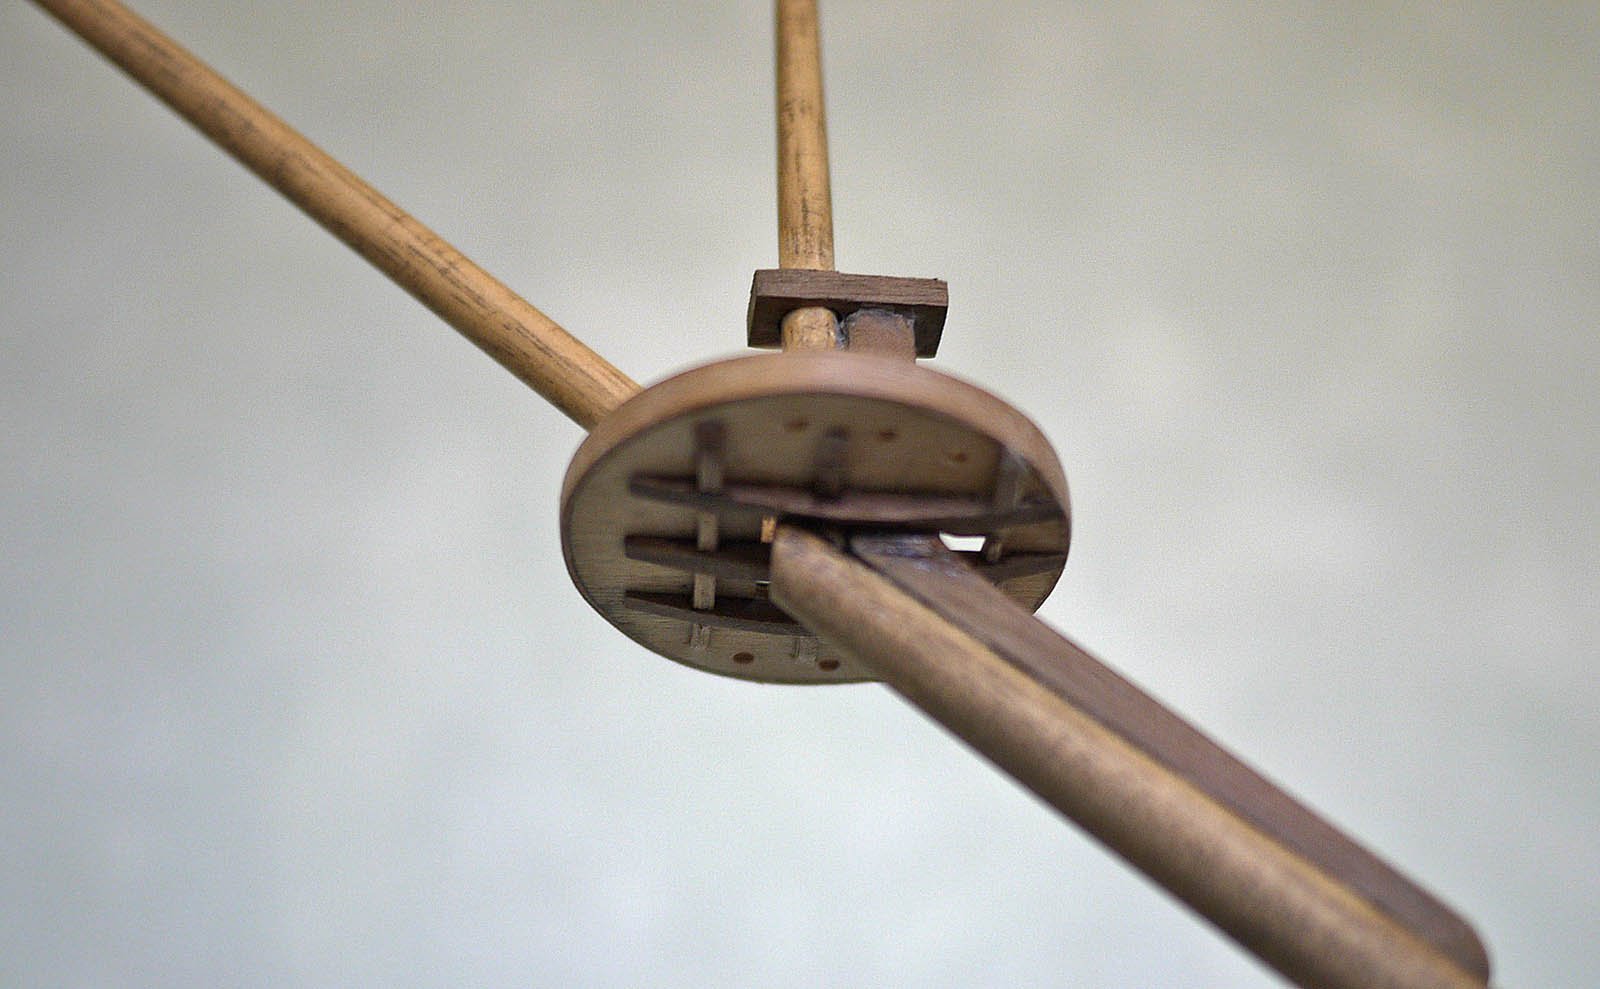
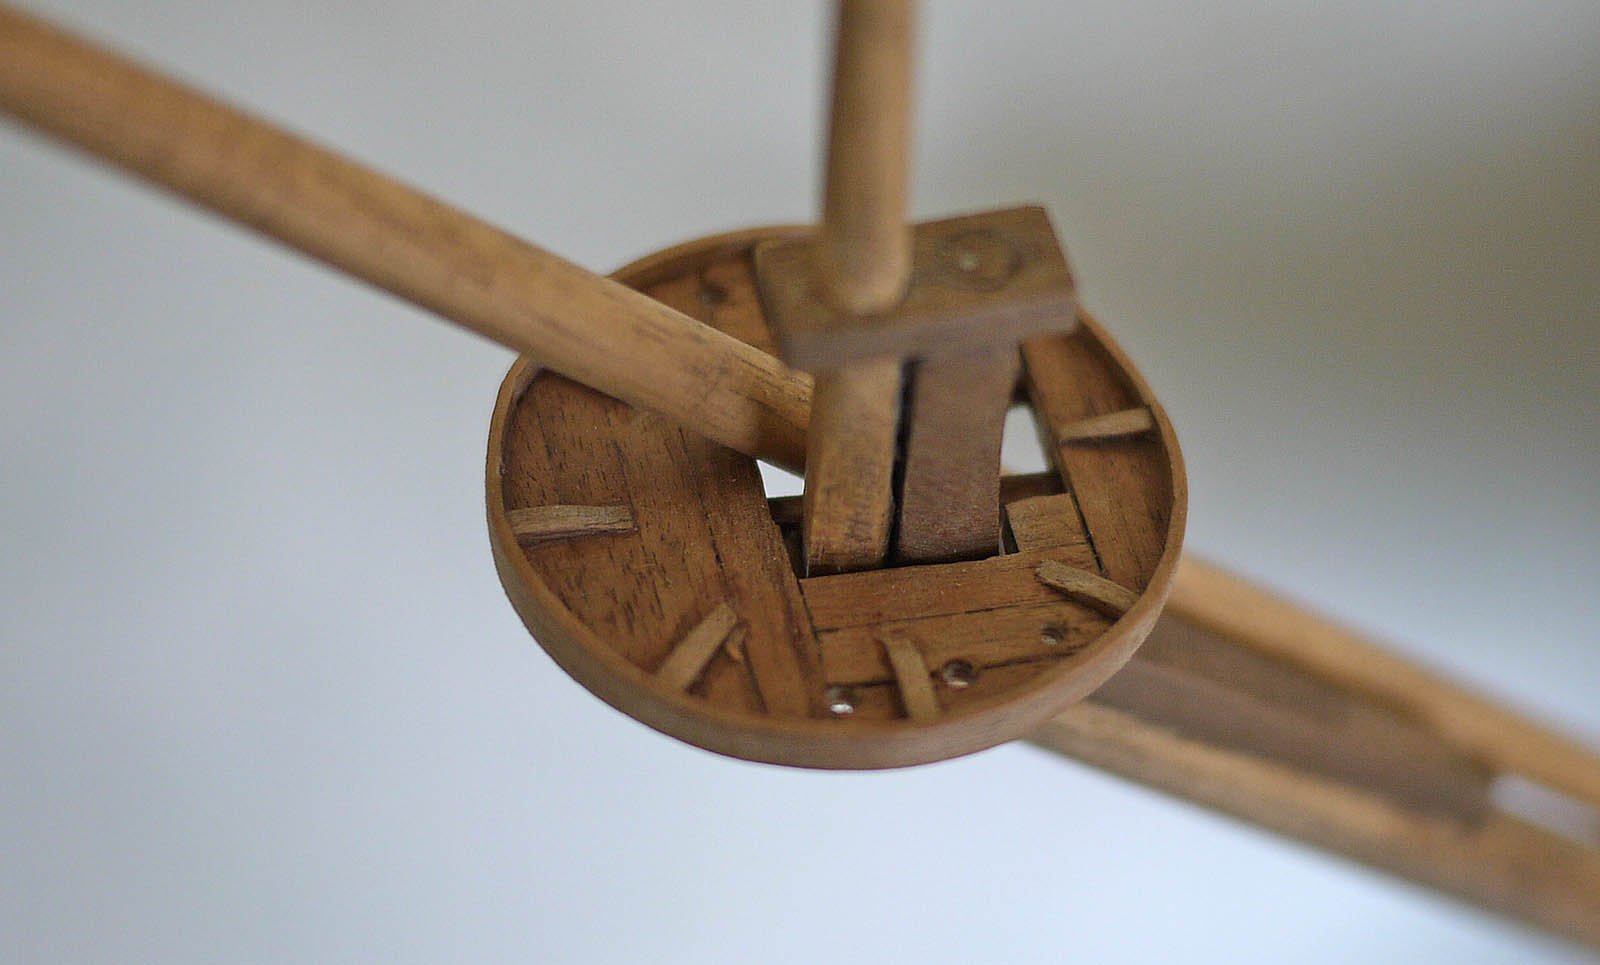
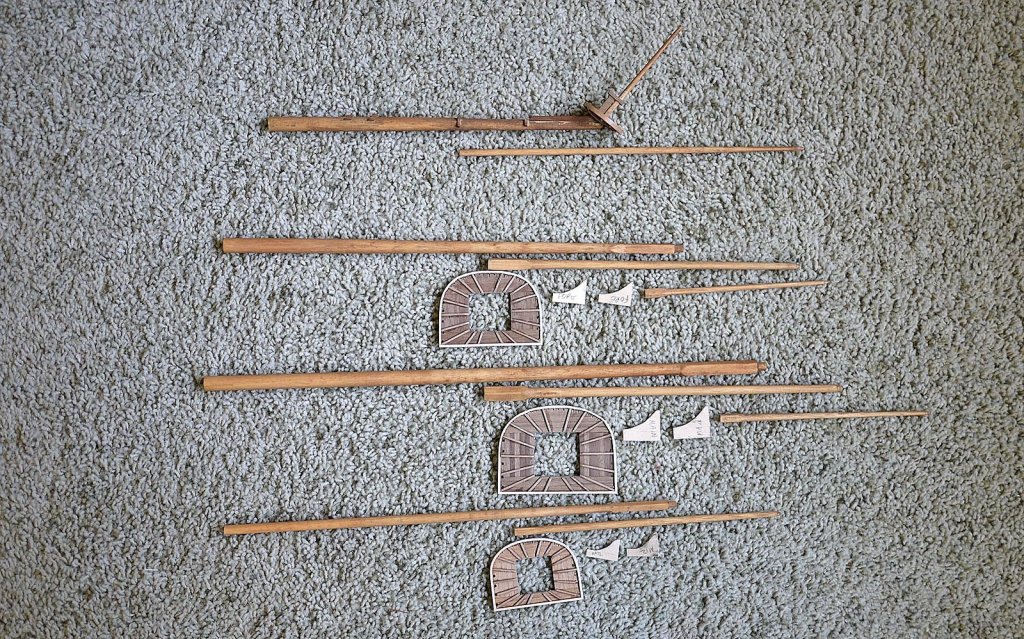
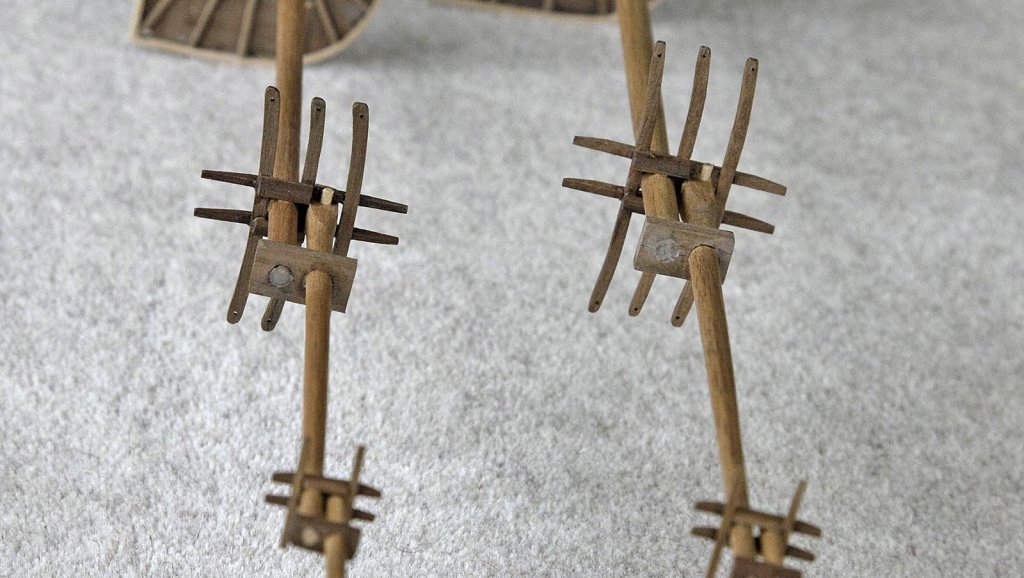
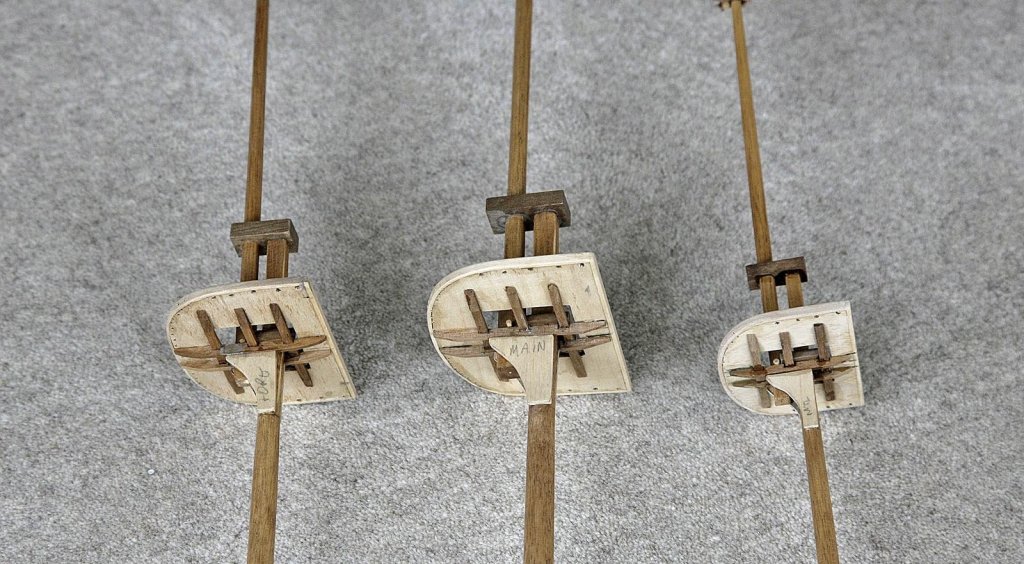
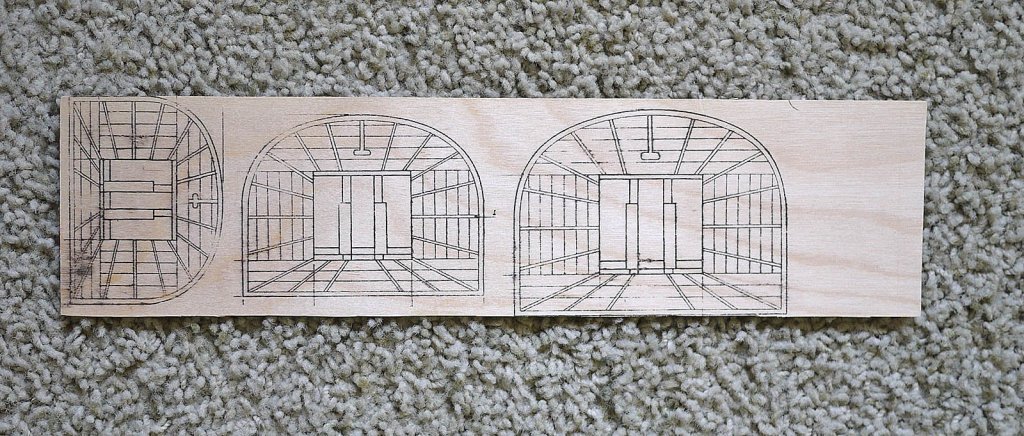
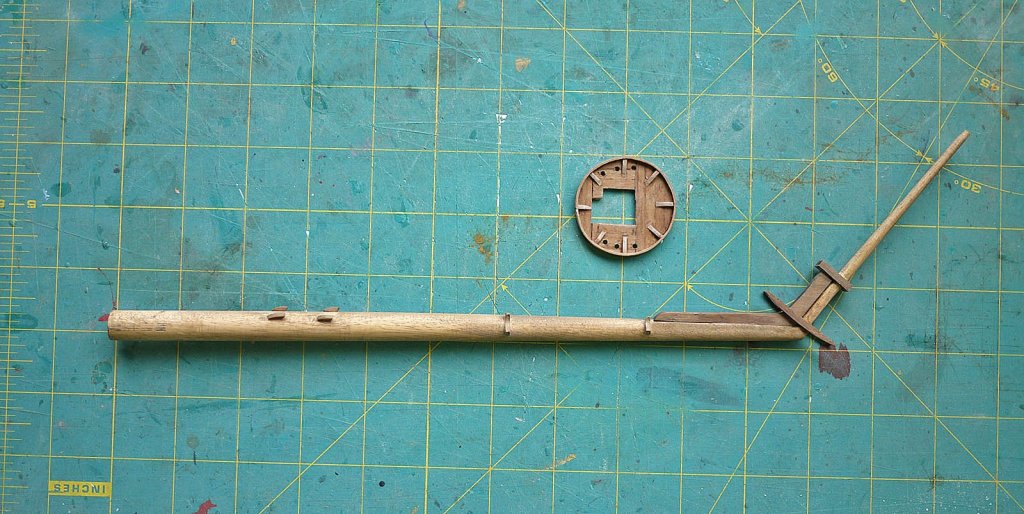
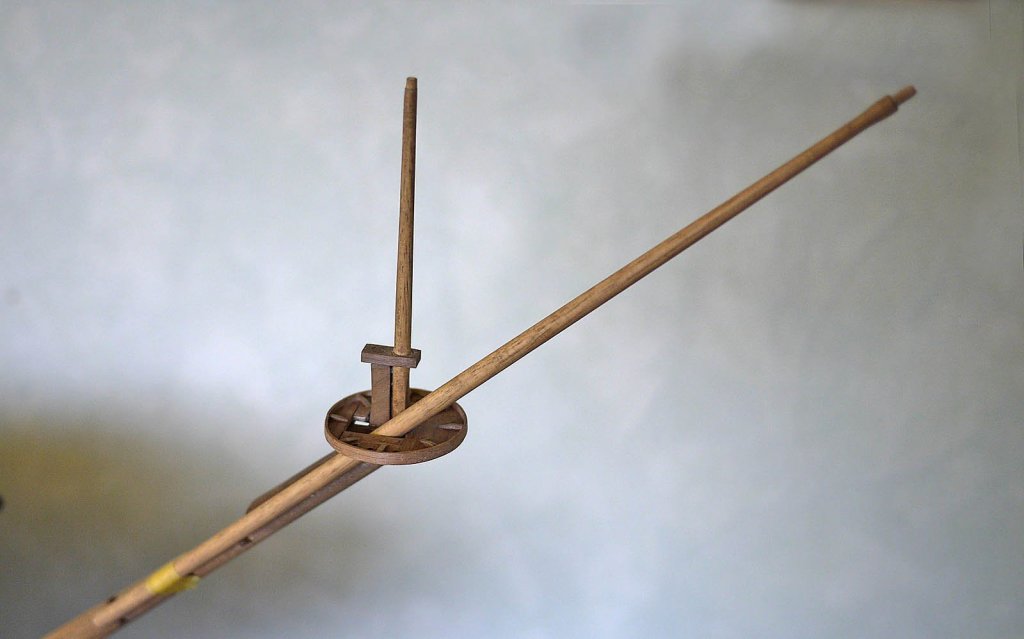
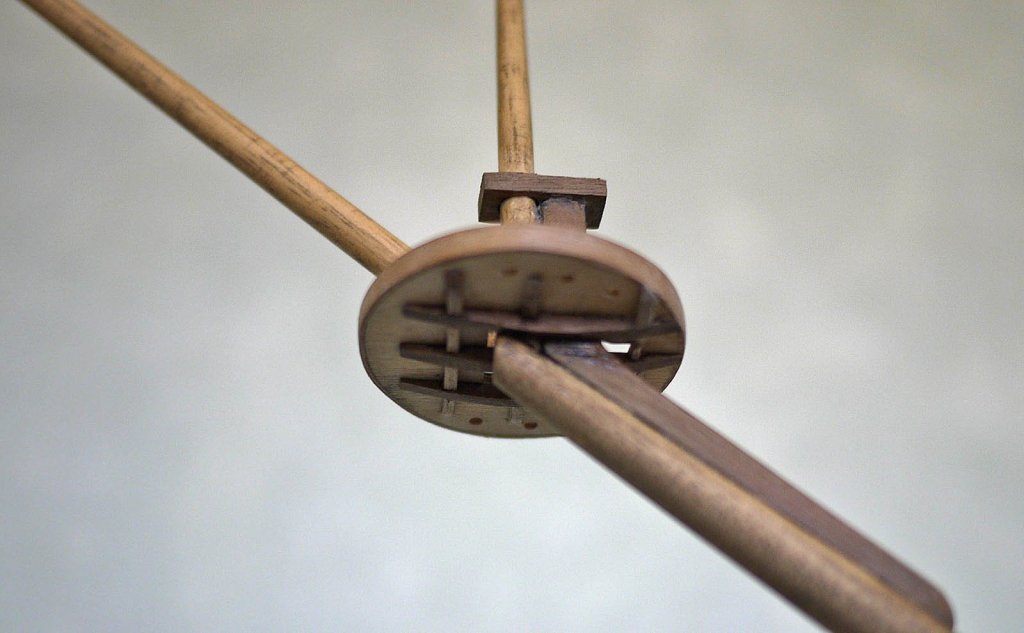
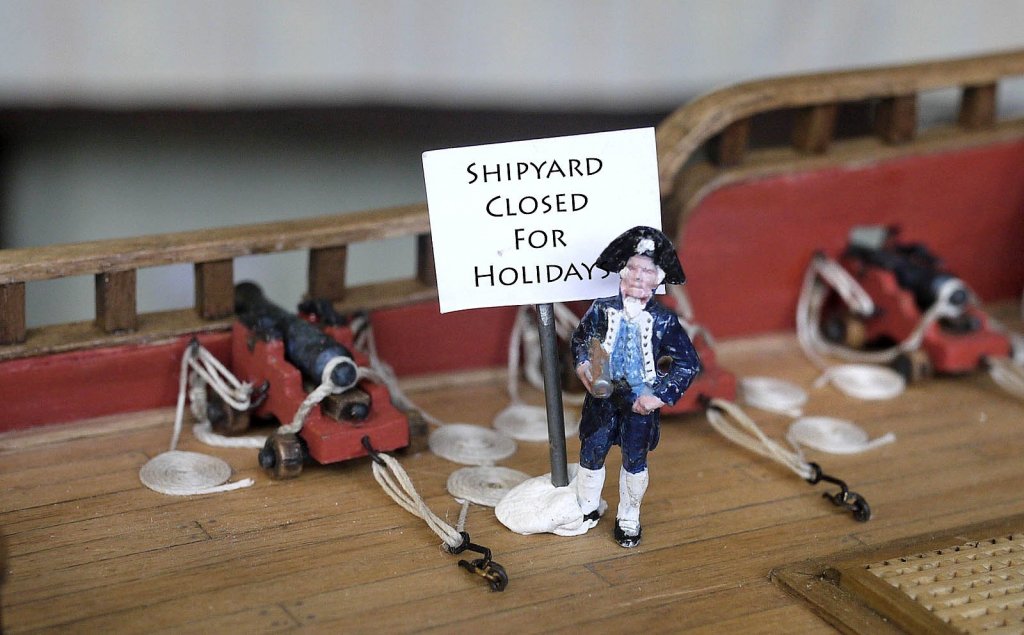
Hello Folks, The shipyard has now re opened and is fully operative again. I've done all my maintenance, decorating and the usual prep for the coming winter. I've taken my wife on a holiday that she wanted so I now have her approval to spend lots of my time building RW. I don't know if this happens to you but I initially found it difficult to fire up my motivation, for a couple of days I just browsed through the plans looking for inspiration as to how I should proceed, I've now found my mojo so it's full speed ahead. I've started on the masting. I think that the plans for these could be arranged better, all the info and measurements are there but they are in no particular sequence, a bit like a mad woman's diary. Whilst all the individual pieces are there to be made there isn't any guidance as to how they should be assembled into complete masts, the views of the completed masts are shown in the rigging plans and much of the necessary details are masked by the rigging, I think that it is assumed that at this level you should already know. I am confident though that I'll manage ok as once again although I'll try and get things as correct as I can I shan't worry about perfect accuracy, as long as they look about right and are neat that's all I'm setting out to achieve, I'll leave the super fine detailing to others that strive to achieve perfection. I've made up the platforms, starting with my usual method of copying the plans to ply before cutting them out and planking them. I fitted them out as close to the plan as I could, they came out ok. Moving on I made up the bowsprit as per plan with all the pieces needed, my Proxxon lathe made the shaping easy and fun to do. I stained the pieces light oak. I've shown pictures of these made up, I think that their build will be self explanatory. Ken


- 424 replies
-
- 10
-
-
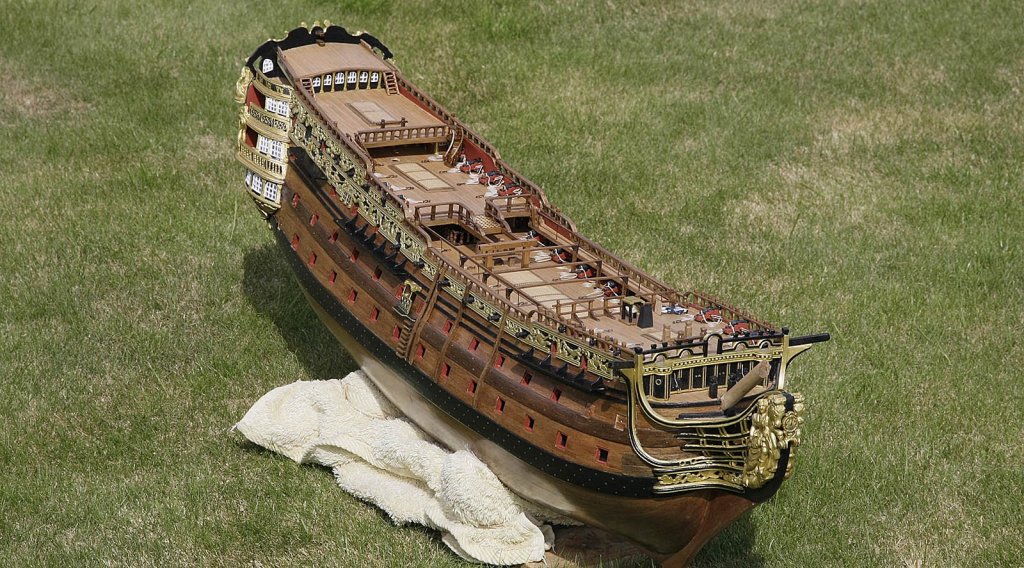
Hello Everyone, Again thanks for all your likes and for some very complimentary comments on my build, as I've said before it really does motivate me and does make the effort I'm putting into my log worthwhile. The re supply of hinges from Euromodel arrived and pretty quick too, I was sent enough and with quite a few spare. These were put on the lids and attached to the ports, all the lids were then roped and varnished. The hull is now finished. I'm not sure what part to do next. Before I continue though I'd like to fix as many of the blocks and eyelets in place that are on the decks whilst I still have easy access. I've looked at the rigging plans and I'm finding that without a good deal of study they are difficult to determine, if anyone can help me out on this I'd really appreciate it The shipyard will now be closing for a few weeks. I promised my wife that when the hull was finished I would do some decorating and renovate my bathroom. We're also taking a holiday to Madeira for a couple of weeks. Life does get in the way of modelling so that's it for now folks see you late September. Ken
-
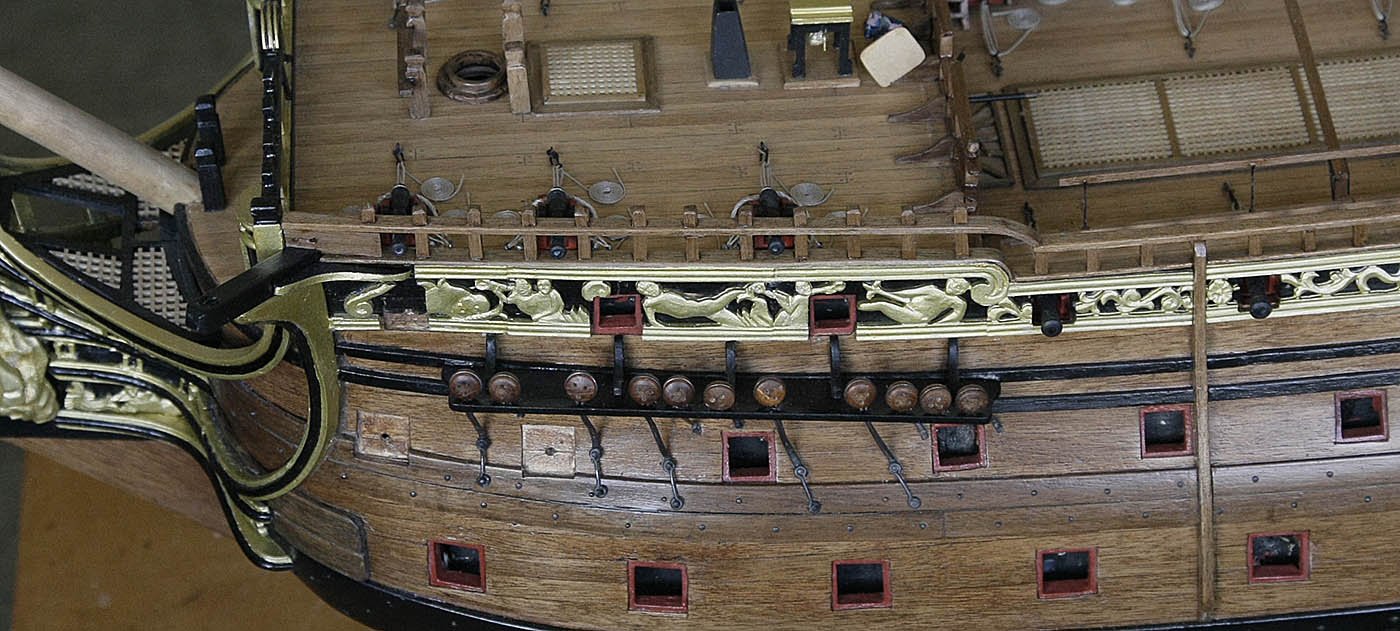
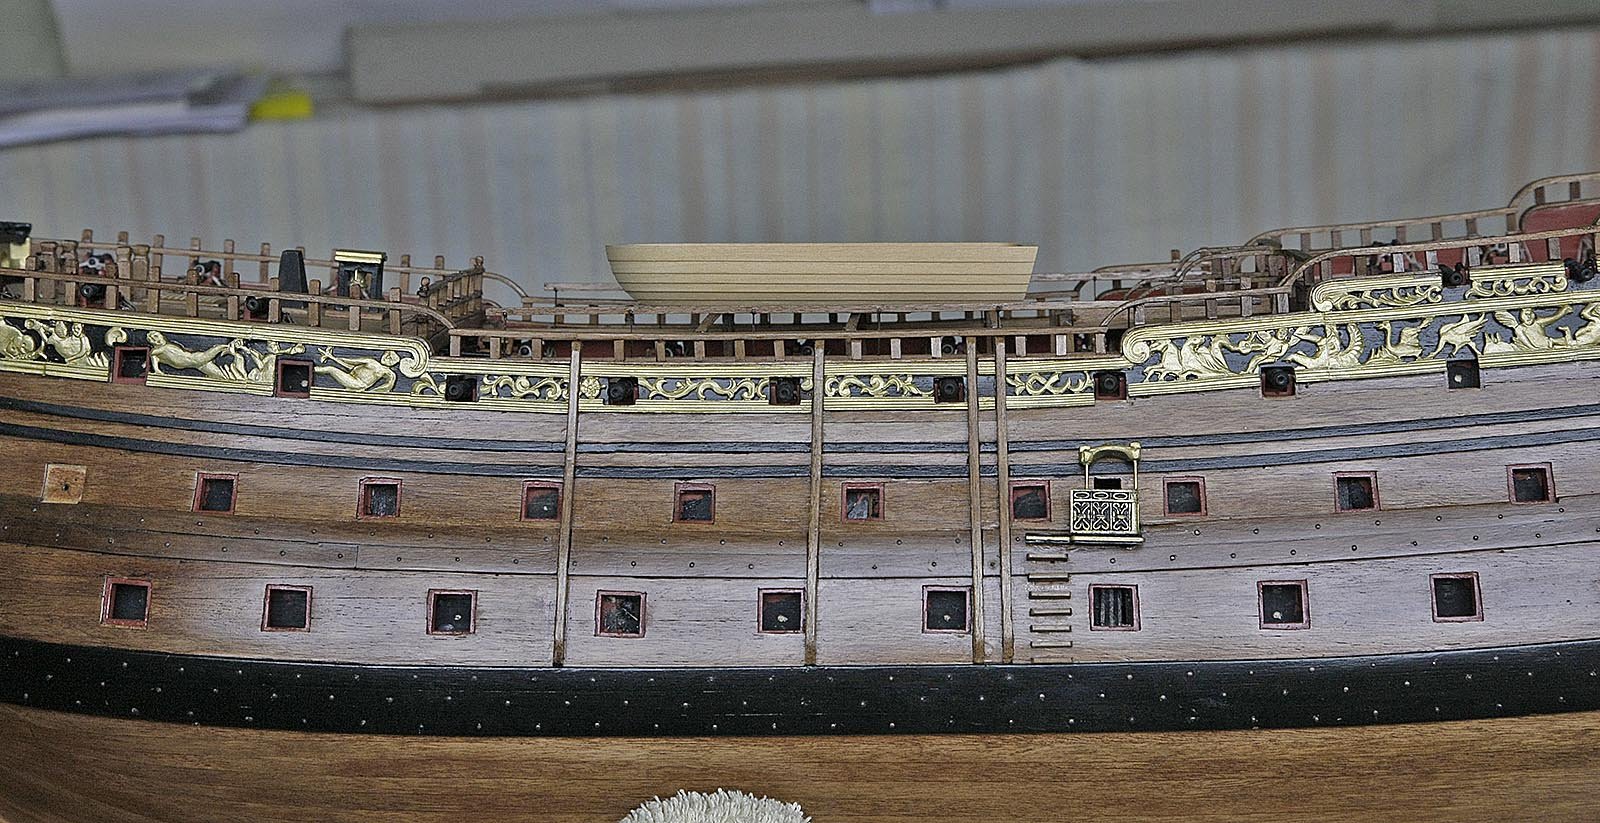
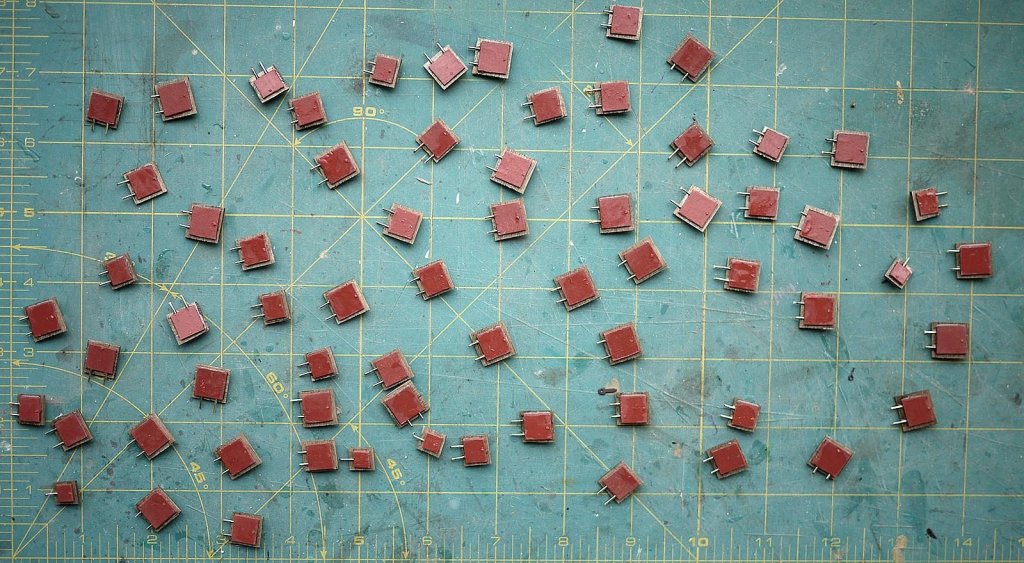
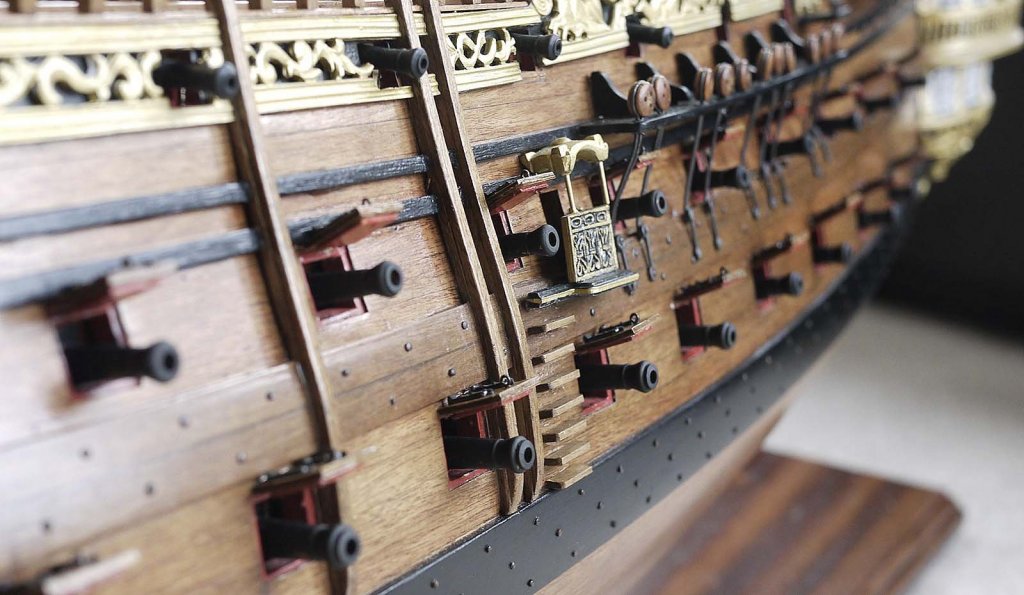
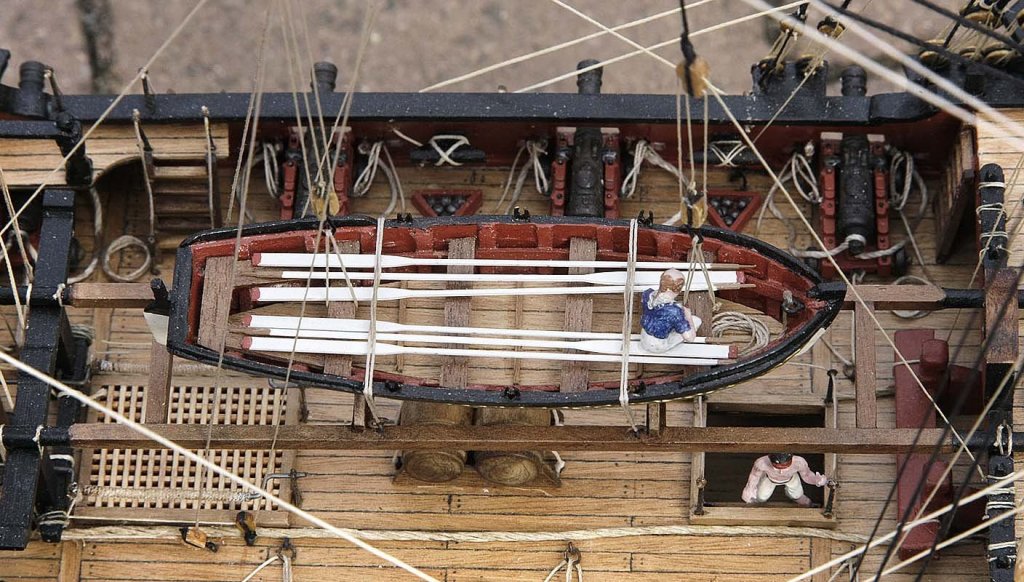
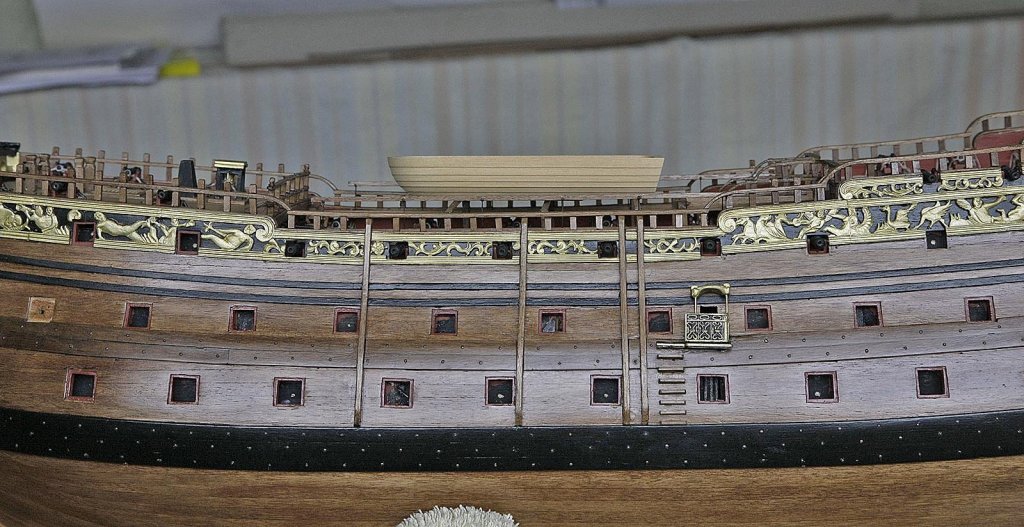
Hello Everyone, The shipyard has been at full speed and quite a bit of progress has been made. The hinges supplied I think look good but the tab for securing to the hull is too fat and would need about 3mm holes drilled, they are also very brittle and snap easily. I have found to my cost that port lids are very vulnerable to being knocked and broken off so I decided that this time I would pin them securely in place. I drilled and inserted a couple of pins into each lid, I'm glad that I did as I found them much easier to fit than relying on the hinges to hold them in place. I cut the hinges to size and glued them on the lids using cyno, then I gave them a coat of poly. I was amused when I saw the picture I'd taken showing the lids, I thought that they looked like a colony of beetles! I tried the canons for fit, all looked ok so I removed them prior to fitting the lids. I was pleased to see that there were enough canons with some to spare. After fixing the lids I glued the canons into place then painted them a matt black. I had previously tried blackening them but the results were inconsistent. I've only managed to do the one side as I'm waiting for my re-supply of hinges that are coming by post. I also put on the security chain on the rudder and the supports, dead eyes and strops for the upper backstays. As I mentioned in a previous post I had put the three skid beams in the wrong places. Having looked at them for a while I felt that they looked a bit out of balance, they would have been difficult to replace without quite a bit of work so I made an extra one and put it in front of the others where there was too much of a gap. It's not correct but they now look as if they're spaced correctly and unless you were an expert you wouldn't know. I like the detail that can easily be added to the ships boats so I've decided to have a pinnace as well as a launch on these beams as an added distraction. I've shown a picture of one that I scratch built on my HMS Fly and I think that I could probably improve on it now. It's the 2017 re-fit by the master builder, Ken. During this building stage I felt somewhat overwhelmed by the sheer amount of work involved, the enormity of what is required to complete this model I think is starting to sink in, but nothing that a few beers can't put right. All the pictures were taken with my Panasonic G1 compact at ISO 400 Ken


- 424 replies
-
- 14
-
-
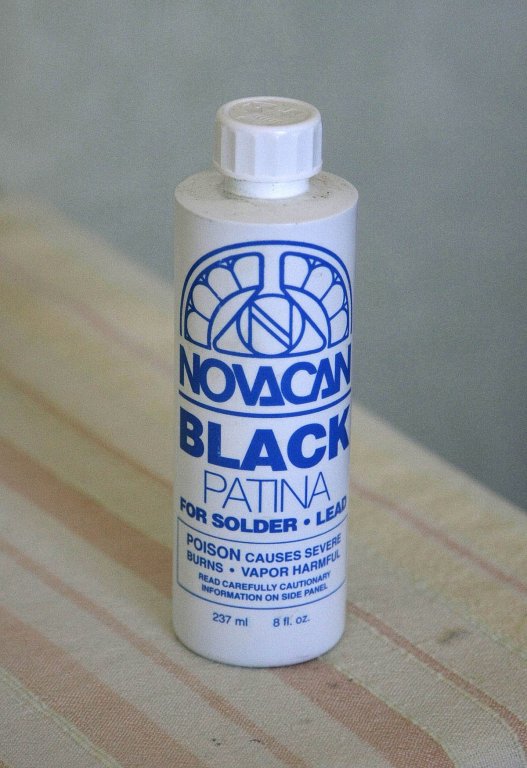
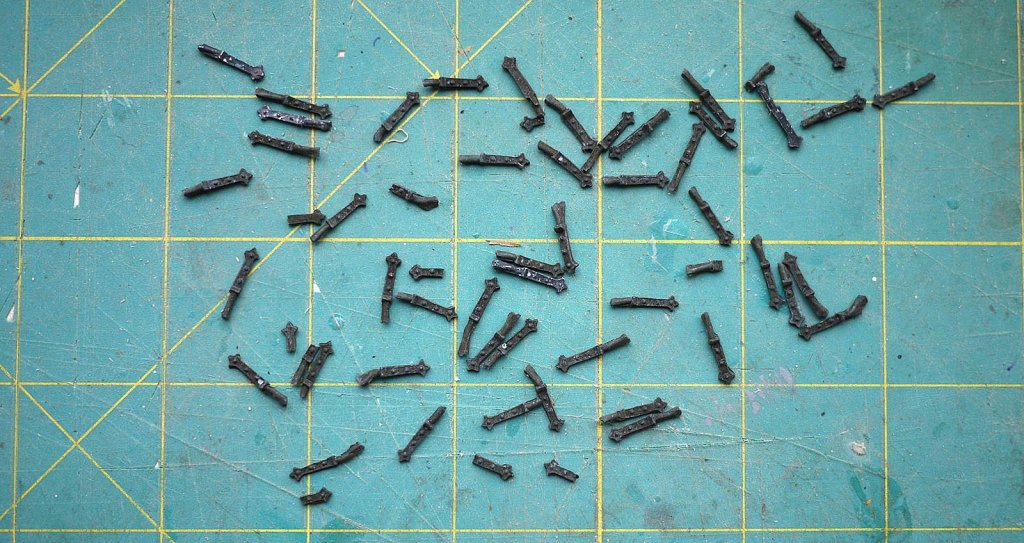
Hi Pete, You're like me, I've read so many logs and picked up many good tips but trying to remember where they were or trying to find them again is a challenge too far so I've copied it here for you. I've shown a picture of what it did for the hinges after about 10 secs. I think you can see why I like the cast ones. The stuff below is what I use. It's what I first bought so I can't compare it with anything else. I dilute about 2-3 part water and keep in a jar, it seems to stay usable for quite a while. It doesn't work on everything though, good on Amati and Caldercraft nails but not on some others, is ok on most photo etch, worked well on my white meta castings, ( see my rudder hinges ) but is a bit hit and miss on cannon barrels. Ken

-
Hi Mike, I'll go along with Vince on this. I changed the deck strips for Tanganyika out of preference for colour, all the wood in my kit was of excellent quality more than I can say of some other kits that I've built. I stained my hull light oak and this made the wood slightly more amber and brought out a very nice wood grain. I applied sanding sealer before a light coat of poly. Other than using a few pieces of scrap ply I have only used what was supplied in the kit. Ken
- 593 replies
-
- 3
-
-
- royal william
- euromodels
- (and 1 more)
-
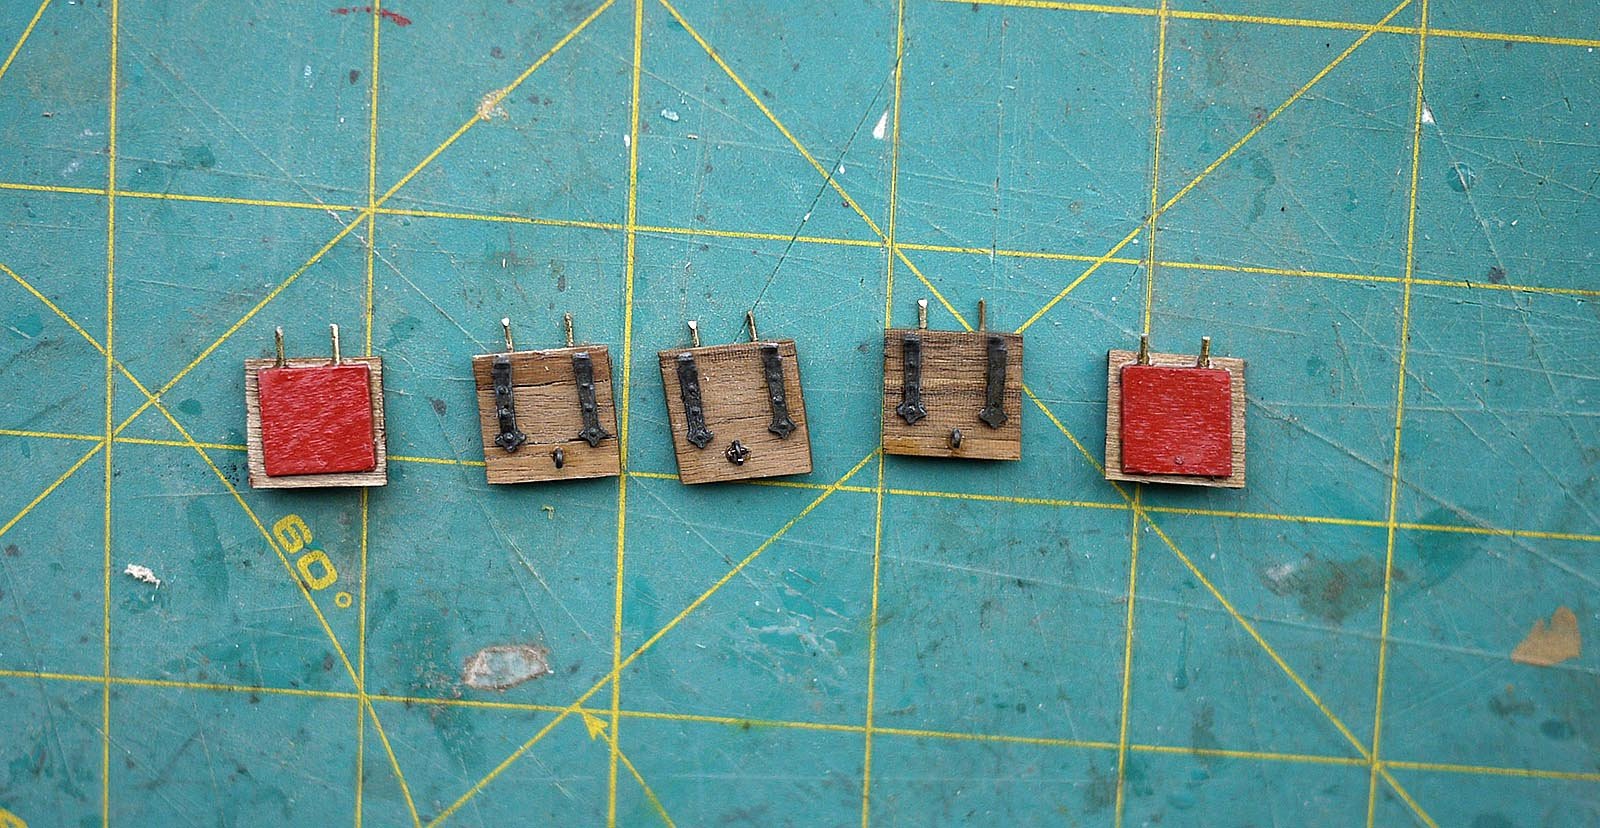
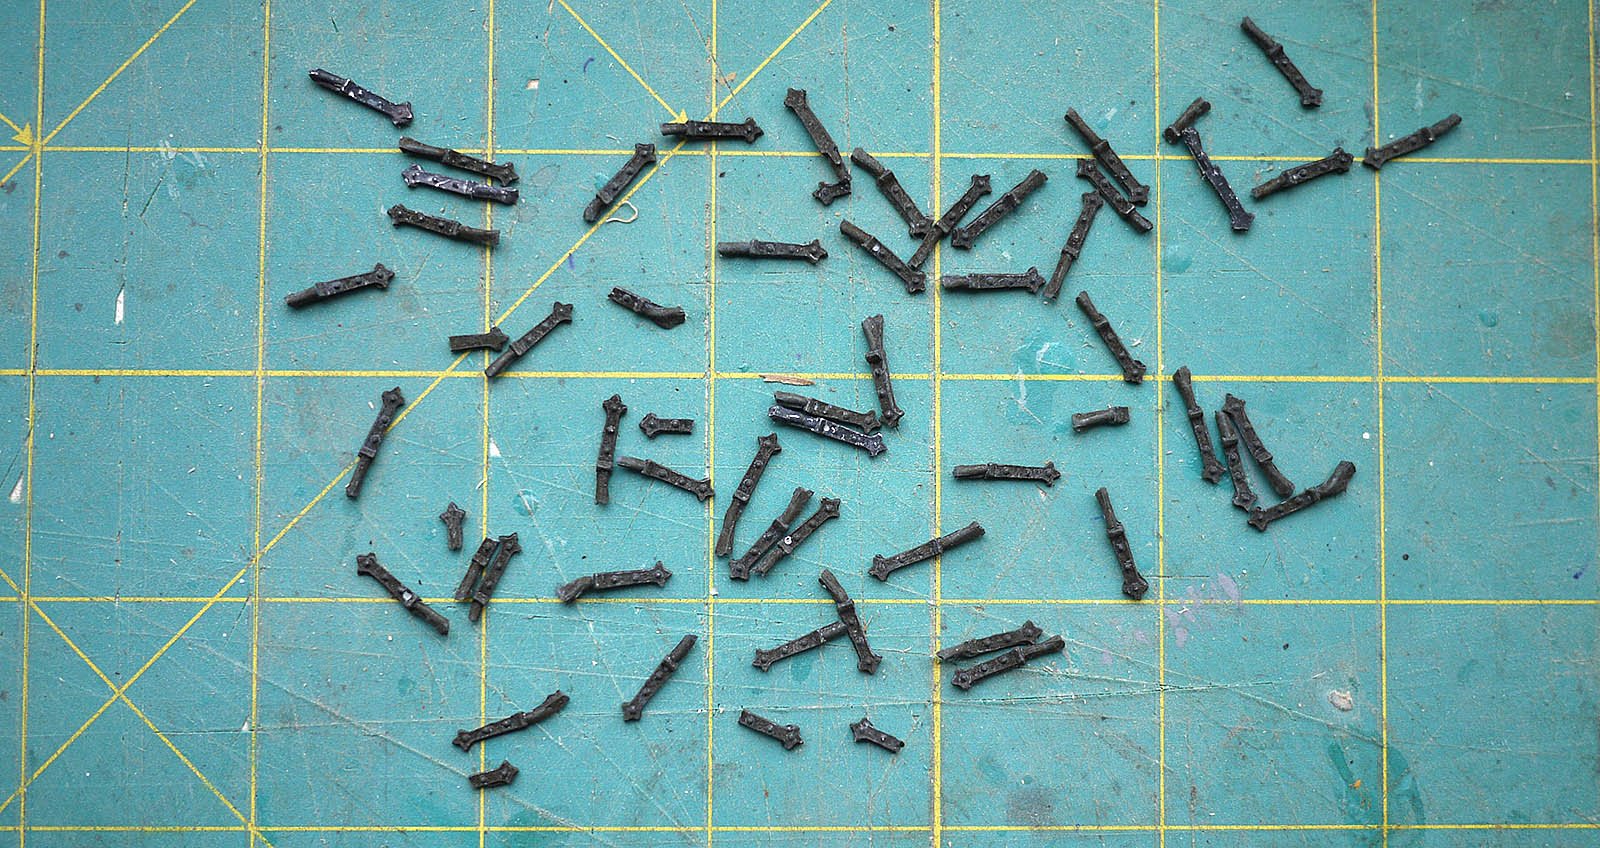
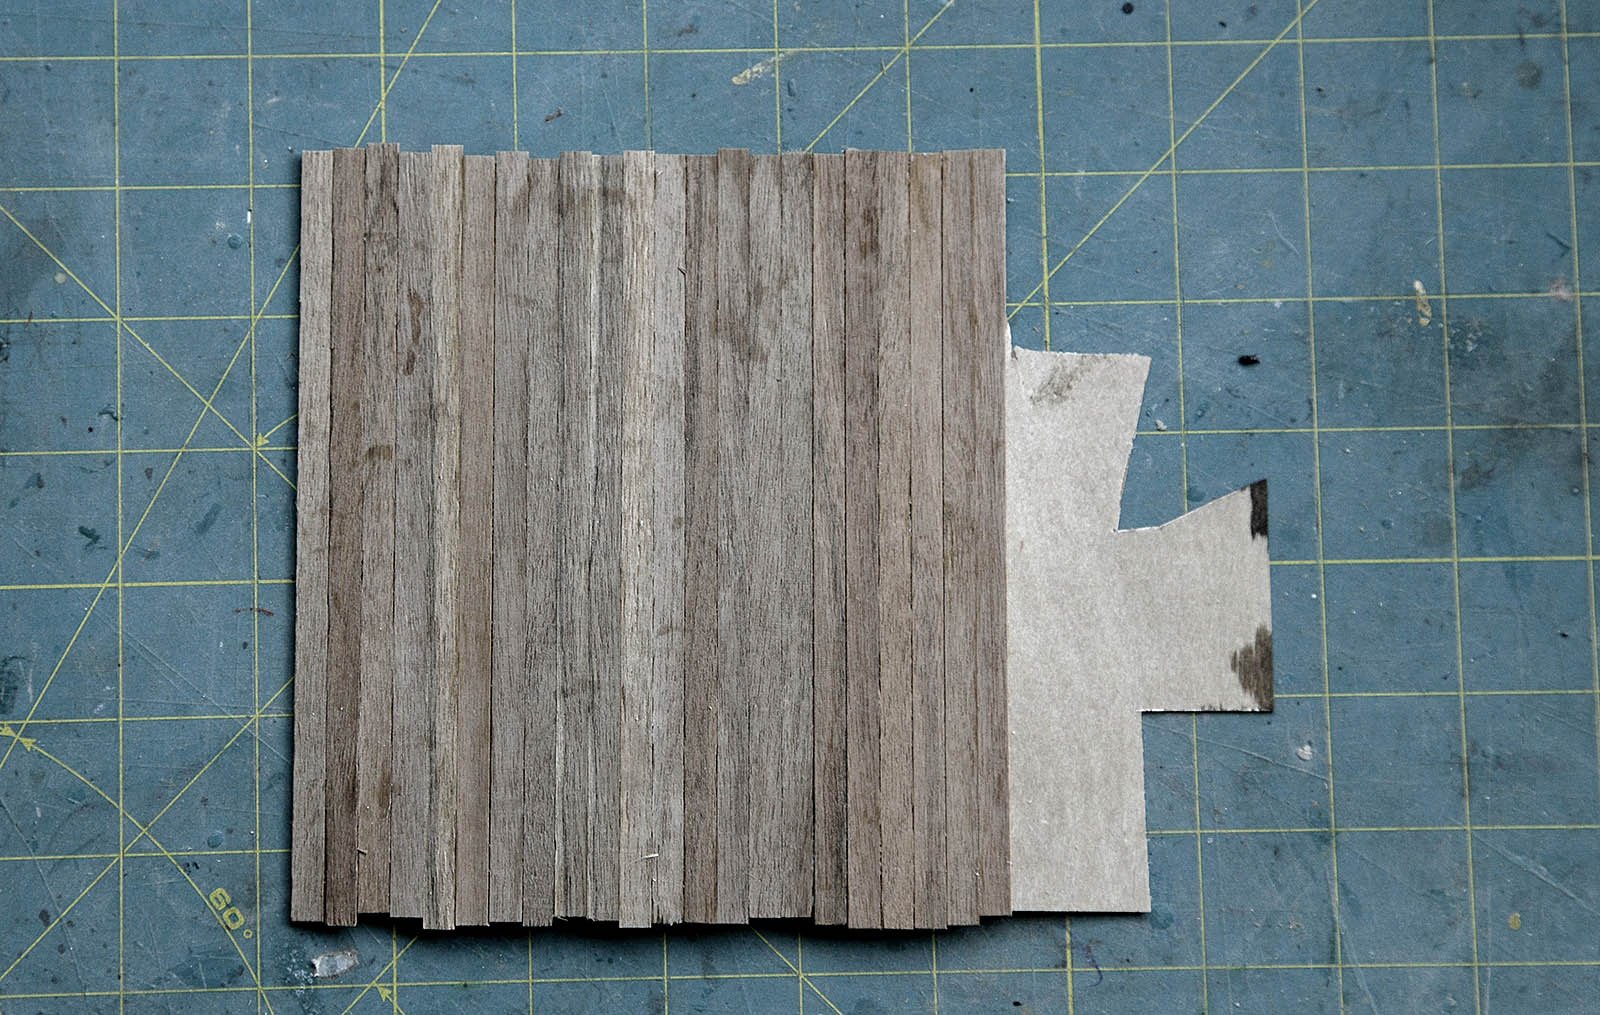
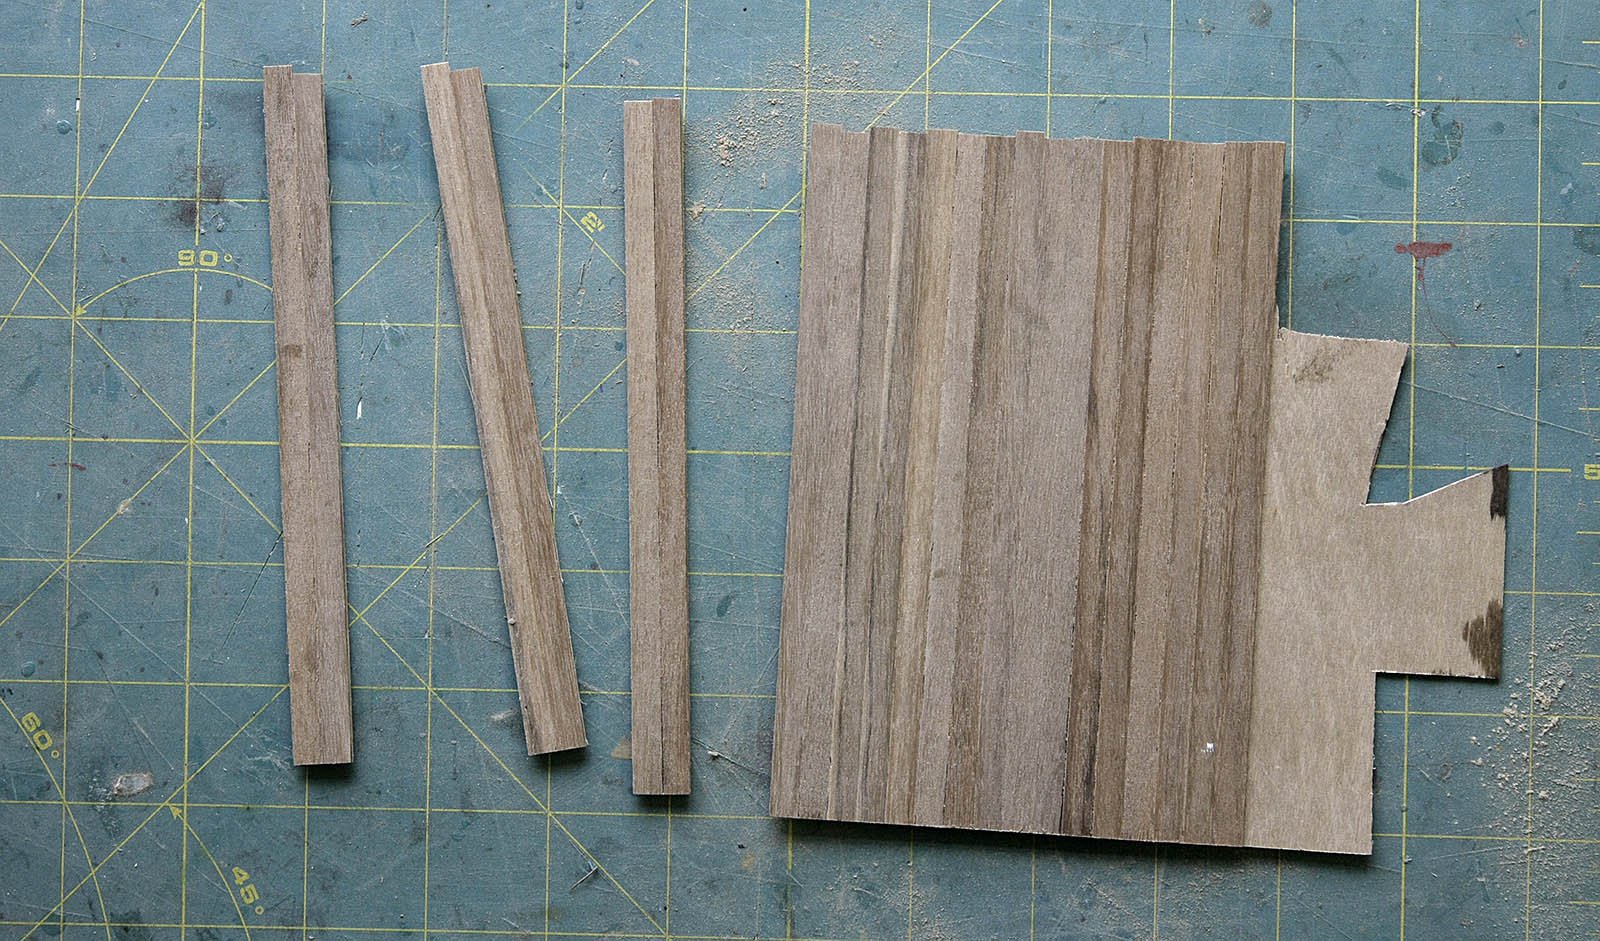
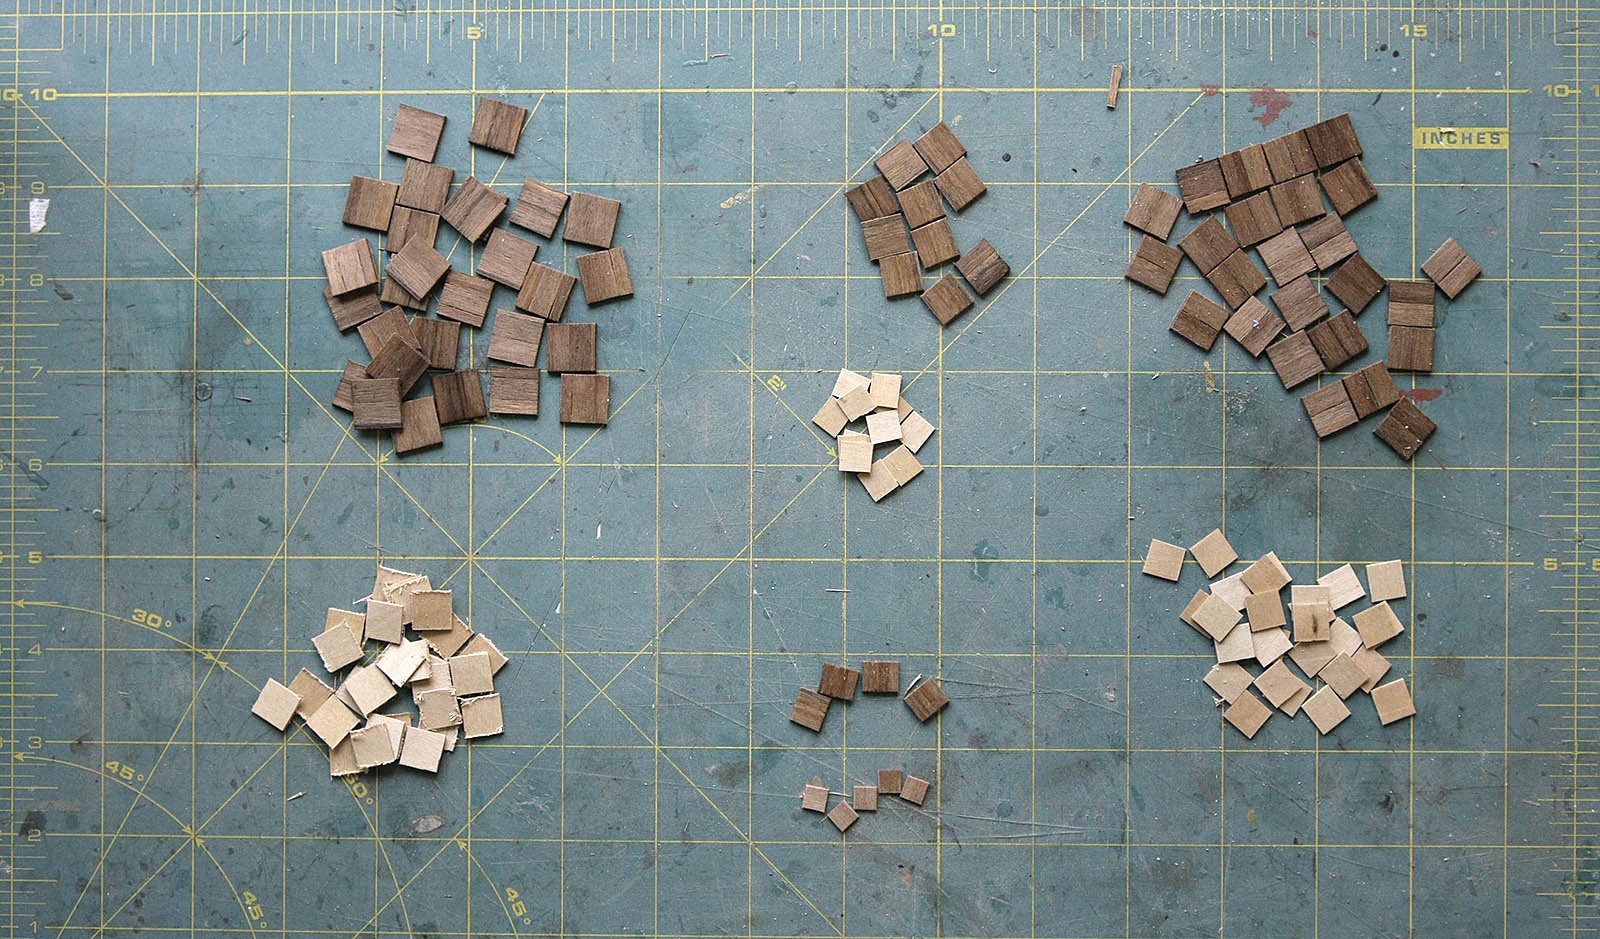
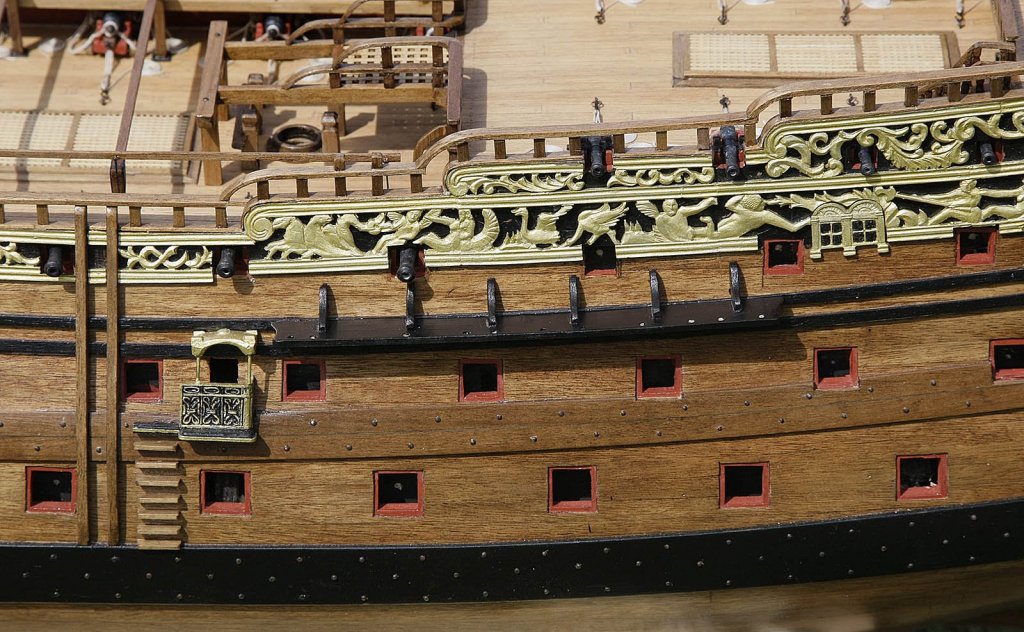
Hello Everyone. A little more progress. As I mentioned in my last update it was time to make up the port lids. I blackened the supplied cast hinges, they only needed a few seconds in the solution to turn them a very nice deep dull black, I know they are not really to scale like quality photo etch would be but I like the look of them they suit my model well and like most of the ship a bit larger than life but with character. A bit more about these hinges. When I sorted them into pairs and counted them I found that I was quite a few short of the amount needed and was at first a bit disappointed. I could easily buy some photo etch ones which wouldn't cost much but as I mentioned I preferred the look of the cast ones. I recalled that members had commented on the very helpful after sales service that Euromodel offer and thought that I would put it to the test. I Emailed their help line explaining my issue and was very surprised at the immediate and positive response that I received and a set of hinges were put in the post to me the following day. Well done Euromodel for having in place a dedicated customer service arrangement. Meanwhile this is how I made up my port lids. I used a piece of .5mm ply and planked it using the 1mm walnut strips that I had used for the hull. I sanded prior to cutting it into strips. I cut strips the correct depth for each of the different size ports. I set my guillotine to the correct width and cut enough pieces for each width. I then stained them a light oak to match the hull and put on some sanding sealer. For the inner pieces I used 1mm ply, again first cut into strips then chopped to size on the guillotine, these were painted red and glued to the inner side of the lids. By doing it like this it didn't take very long so didn't get monotonous. I'll varnish them after I put the hinges on so they'll stick better to the wood, I'm now just waiting for the postman. Ken


-
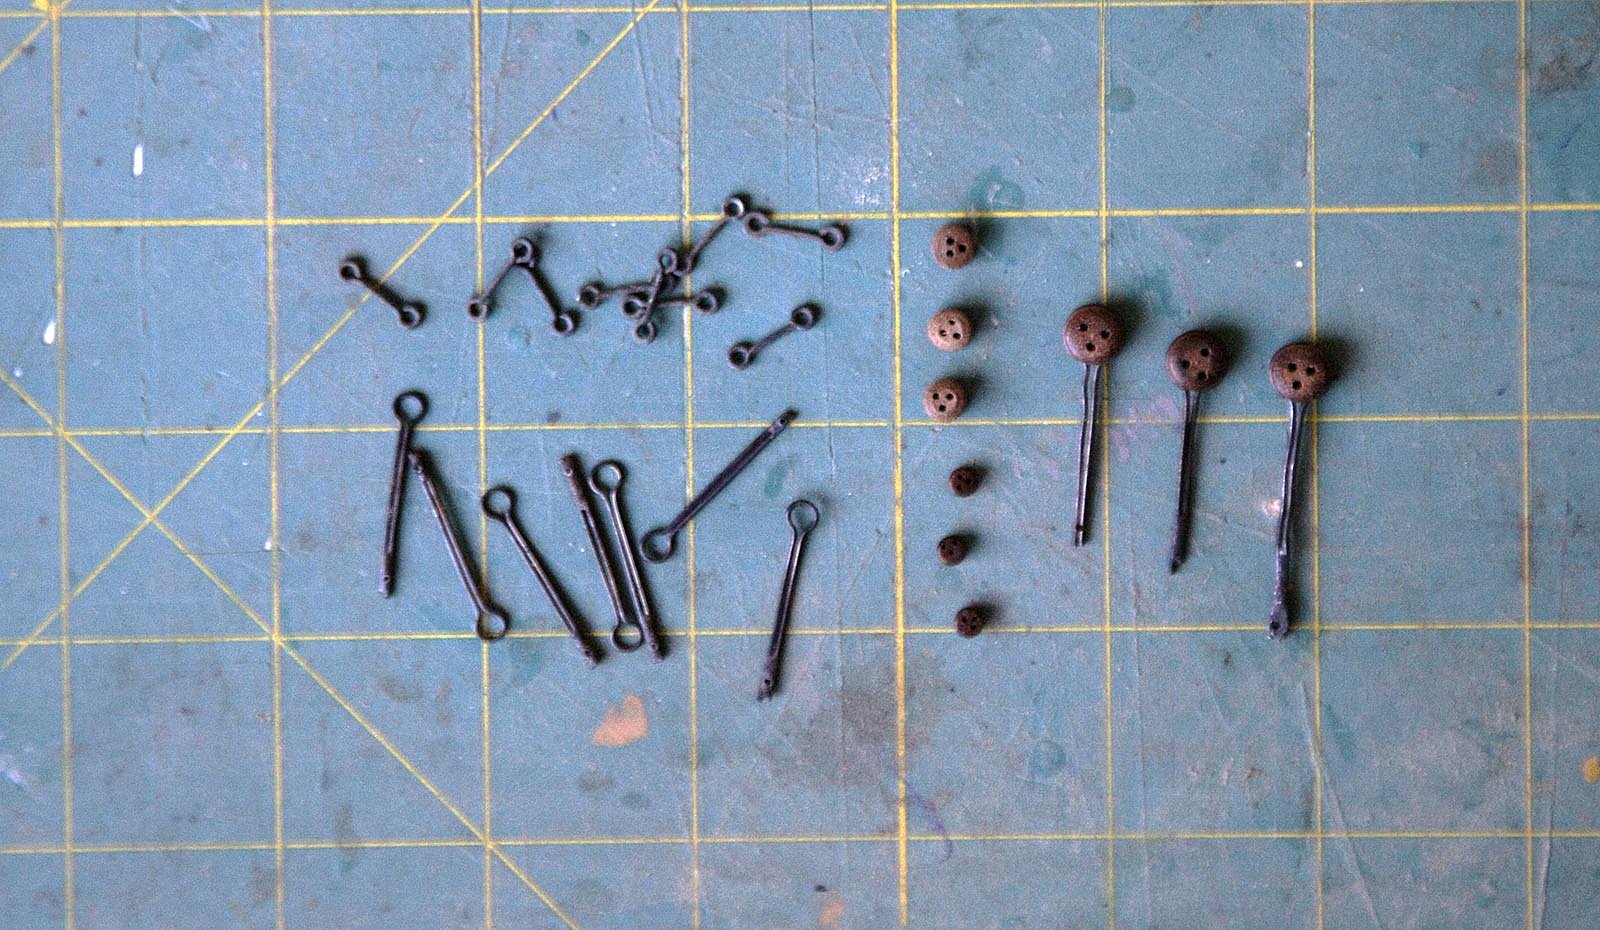
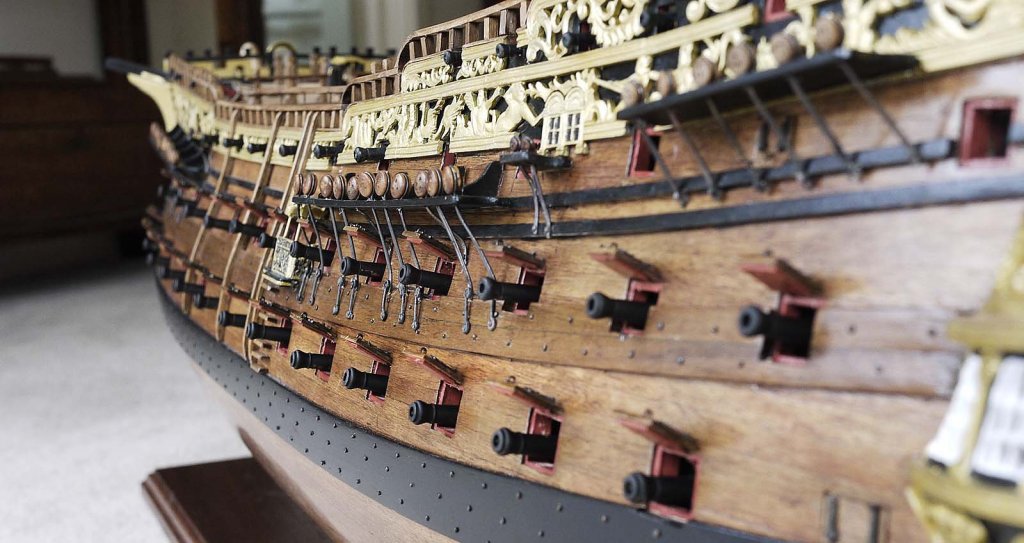
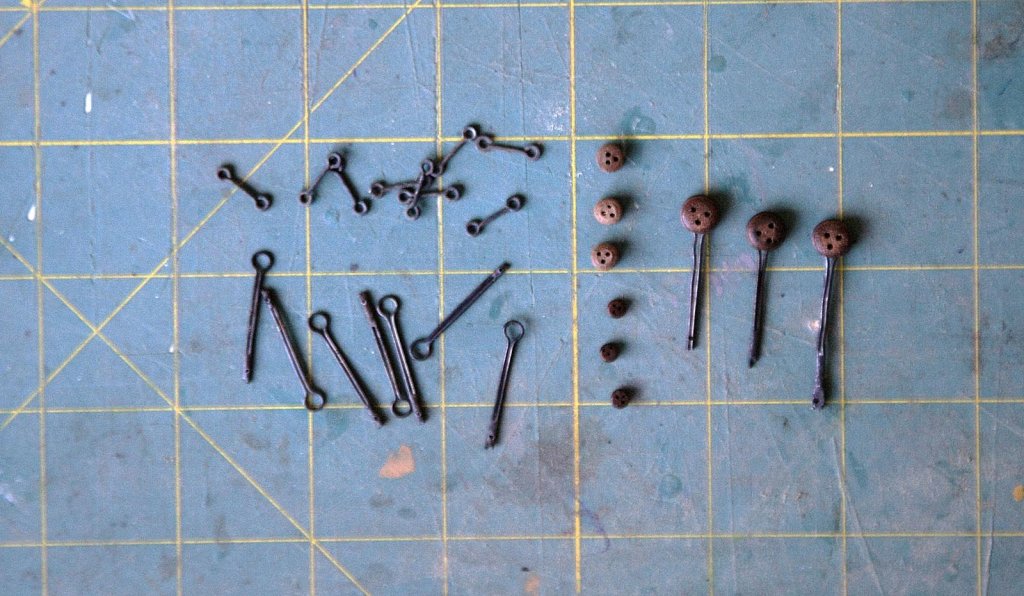
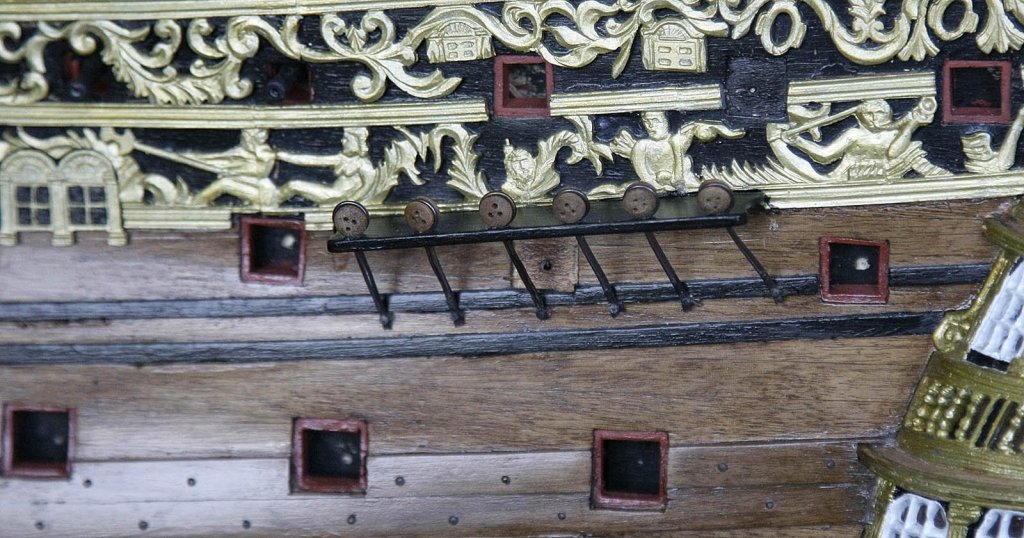
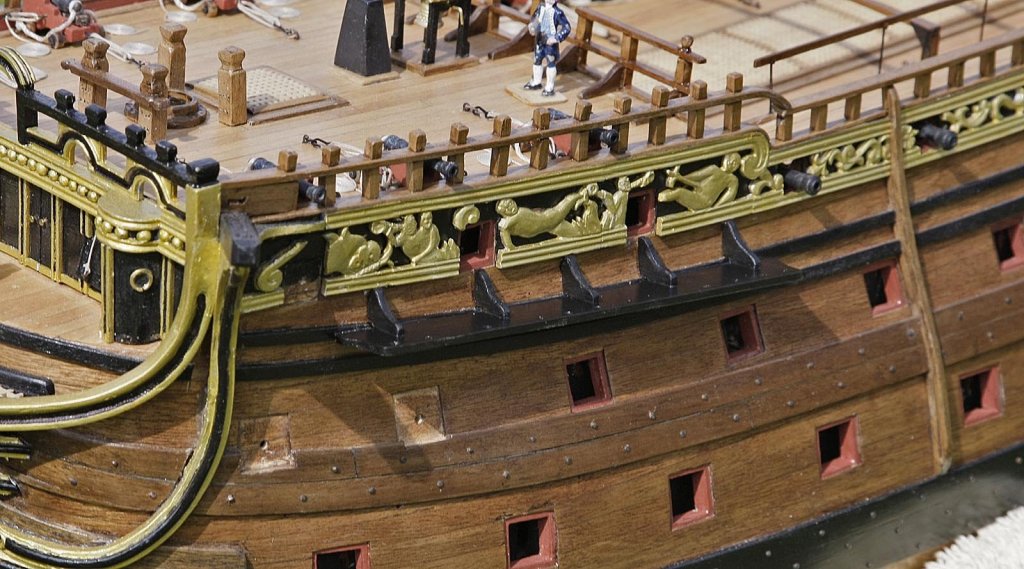
Hello All, Another small update on RW. Today I made up and fitted the dead eyes. The material supplied with the kit was pretty good stuff, the dead eyes were very good quality ones, the ready made strops were nice to use, they were made from a very malleable copper wire and were a nice colour, the eyelet straps were perhaps too thick if you were concerned about scale, I used them and thought that once in place they looked ok. I found that not all the strops cleared the gun ports and I had to fill in a few holes that I had made in the channels and drill new ones to get a better fit. This was I think my fault, a little out with the ports plus a little out with the channel adds up. I think that if I were to do it again I would wait until the channels were in place before drilling the holes for the strops, or improve the accuracy of my building. My next job will be to start making up the port lids. Ken


- 424 replies
-
- 11
-
-
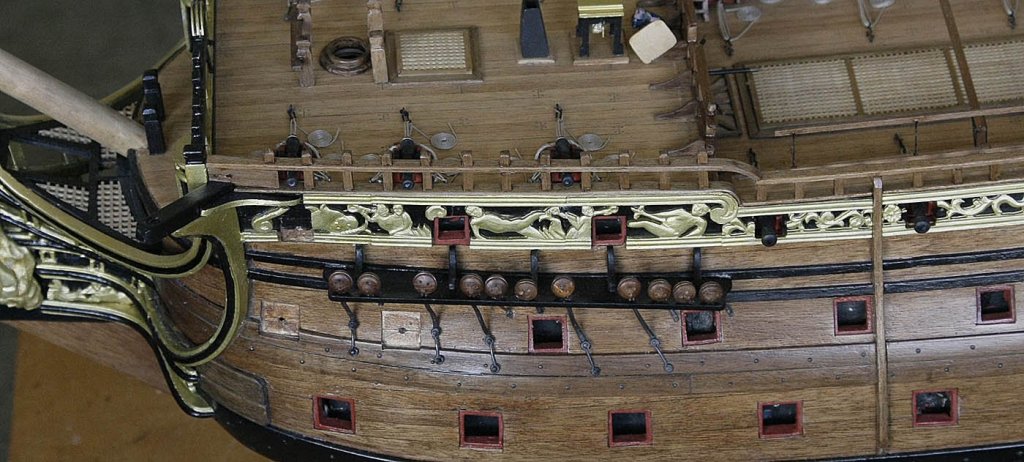
Hello everyone Just another progress report. The channels are now in place and painted, I also made up and fitted the support brackets. If you want to see how they should be done you need to see Mark's excellent version, accurate and very well made. Mine are a simple generic version, simple to make with only a nod to accuracy but in keeping with the rest of the build. I think that as they will be masked by the dead eye lanyards my eyes won't focus on them so they should look ok. Next will be the fitting of the strops and dead eyes. Ken
- 424 replies
-
- 14
-
-
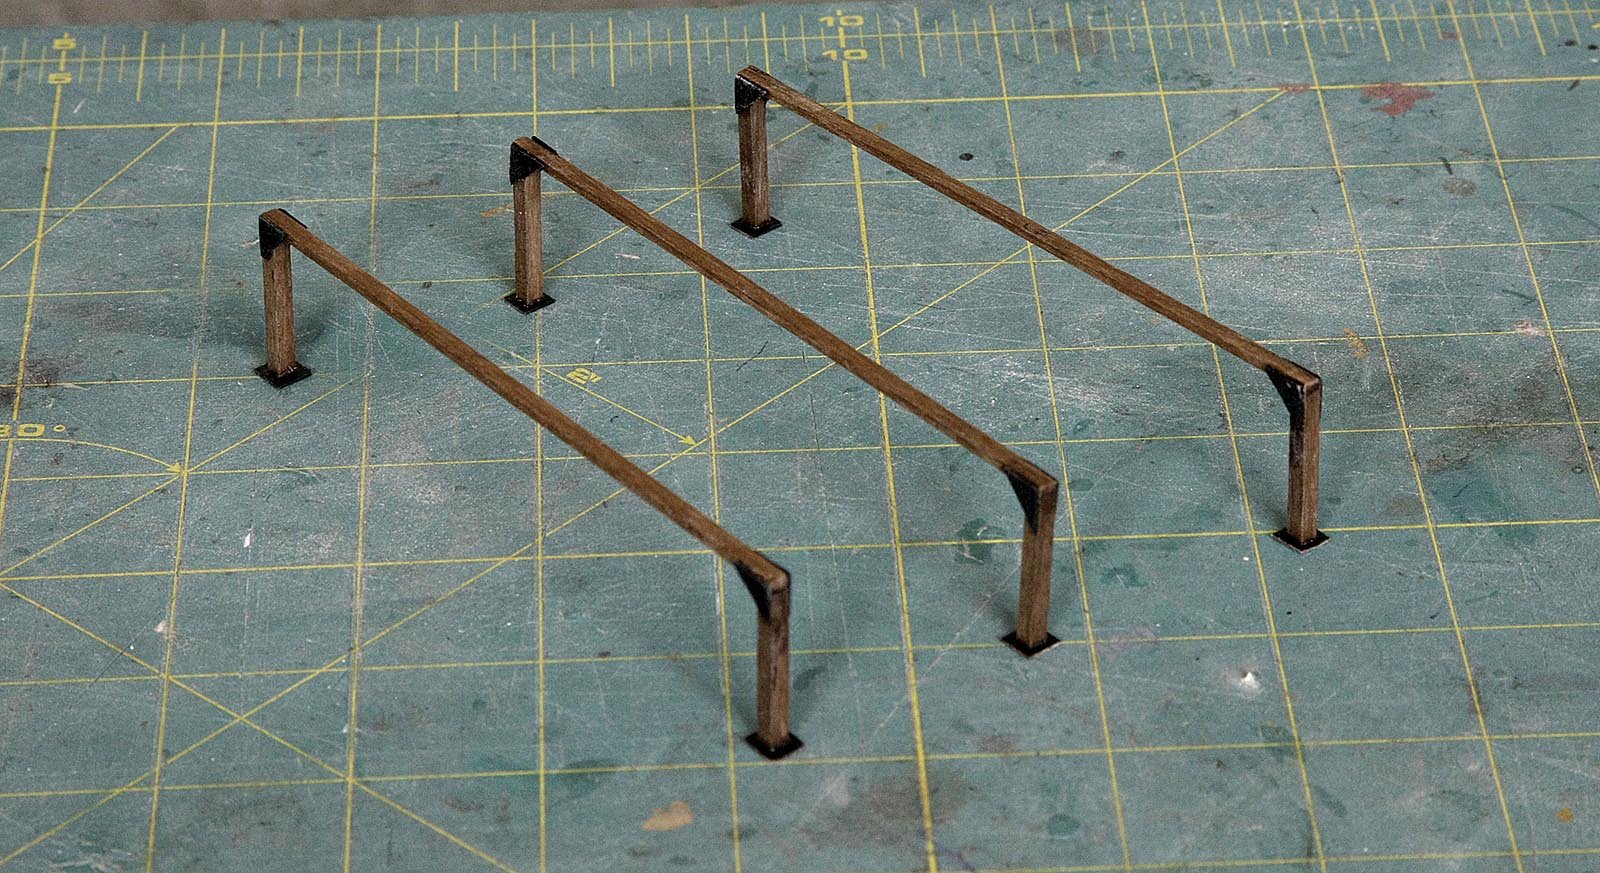
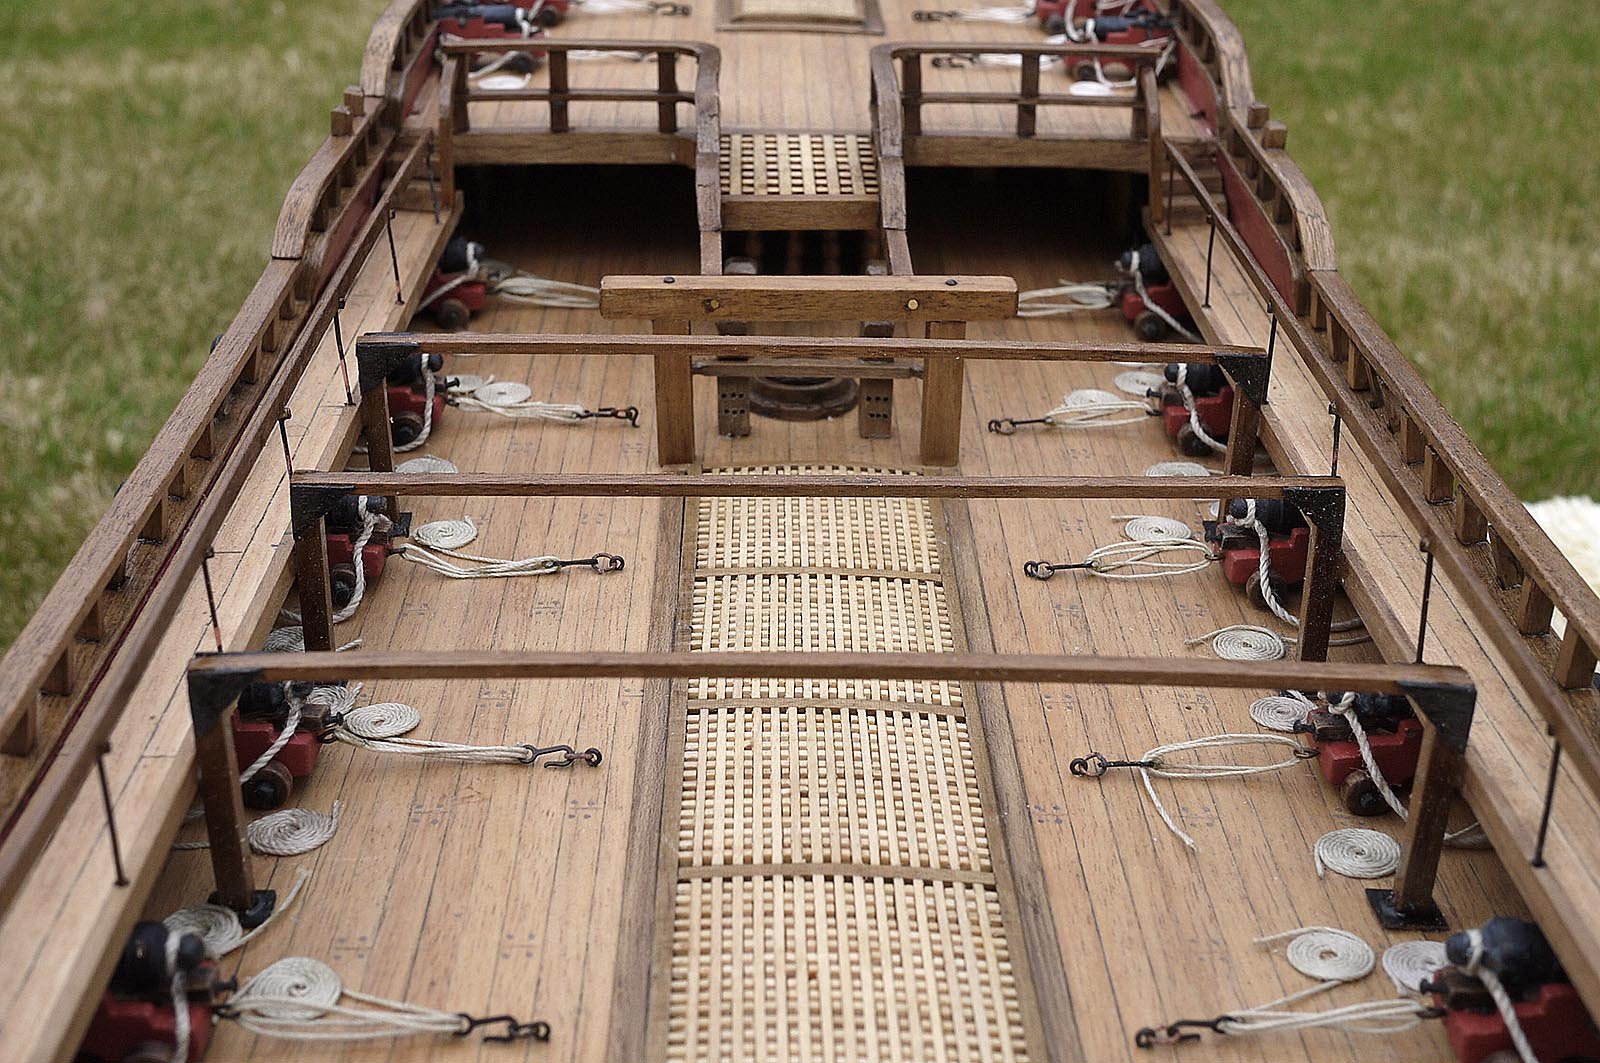
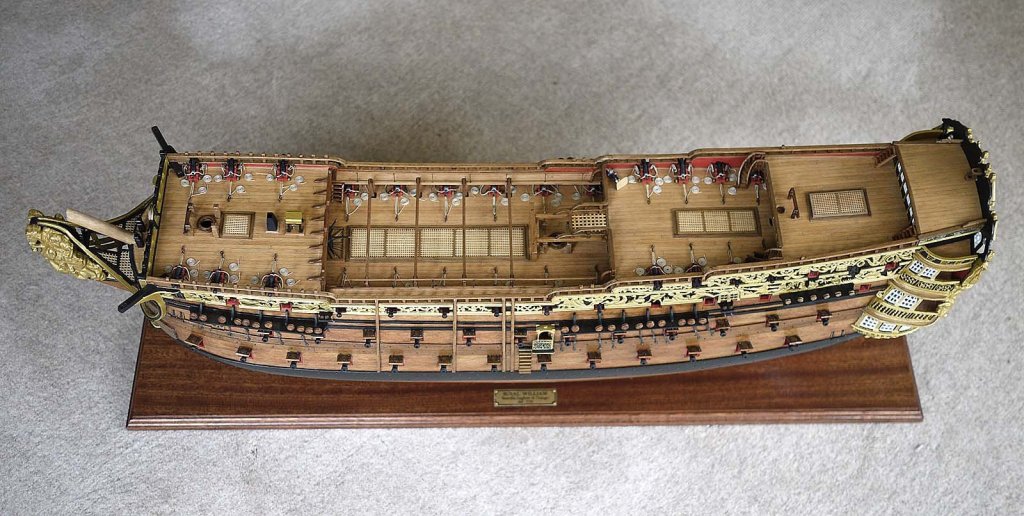
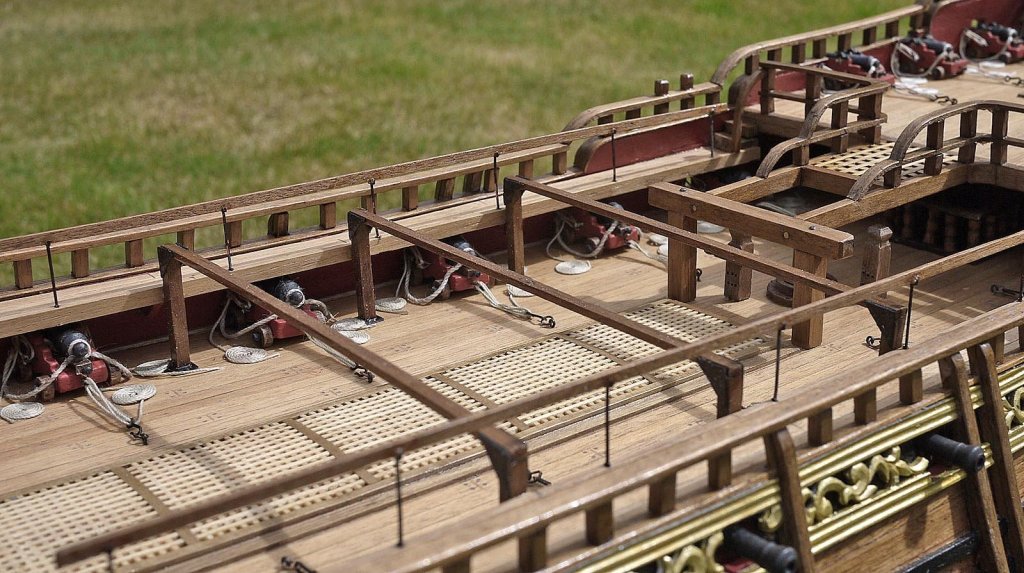
Hello Everyone, Thanks to you all for your likes and very kind words, they are very welcome and much appreciated especially after putting my heart into this build. I'm still making good progress, I have completed the aft bitts, the flagstaff support. the sledge beams for the ships boat and I have made but not yet fitted the channels. I made the uprights for the beams from 3 x 3mm strip and the crossbars from 2 x 3mm, the gussets were cut out of .5mm ply sheet and stained black before gluing on. Needless to say that the coiled rope on the deck fouled the feet, I had to remove and remake eight of them, the sticky tape that I'd used for holding them down was like trying to get chewing gum off the soles of your shoes, I had to use white spirits to get the gunge off then re varnish the deck. I glued the bars in the wrong positions about 25mm too rearward at the front and the rear one about 5mm too rearward. I didn't check the plans prior to fitting, just too many plans to wade through and I can't keep them all out, I guessed but on checking later saw that they were wrong. I think that they look ok where they are so I'm not ripping them out, well not yet anyway. The last picture is a snapshot of where the ships boat will sit as it is at the moment. I made the channels from 2mm ply, I'll be painting them black so they didn't need to be made from wood. I made the front one wider to take into account the curvature of the hull. I inserted some panel nails to add strength to the joint. I have always cut slots for the strops then after fitting line the front with a wood strip but this time I just drilled holes for the strops, I found that the ones that were supplied fitted through nicely so why bother with extra work for the same result. I'll be fitting these next. Ken


- 424 replies
-
- 10
-
-
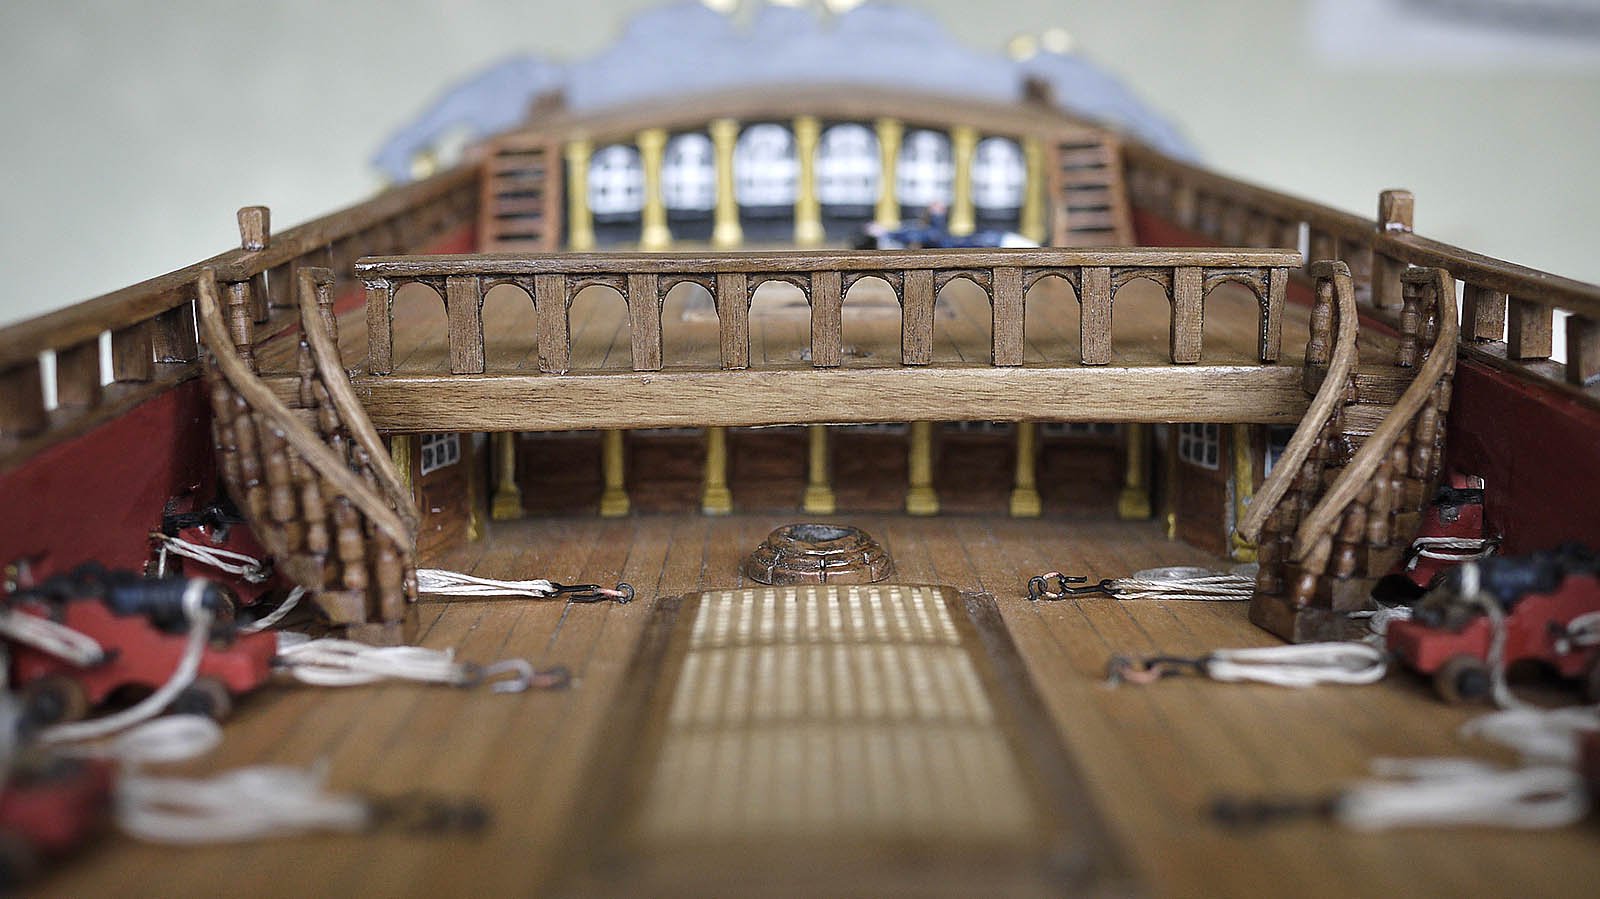
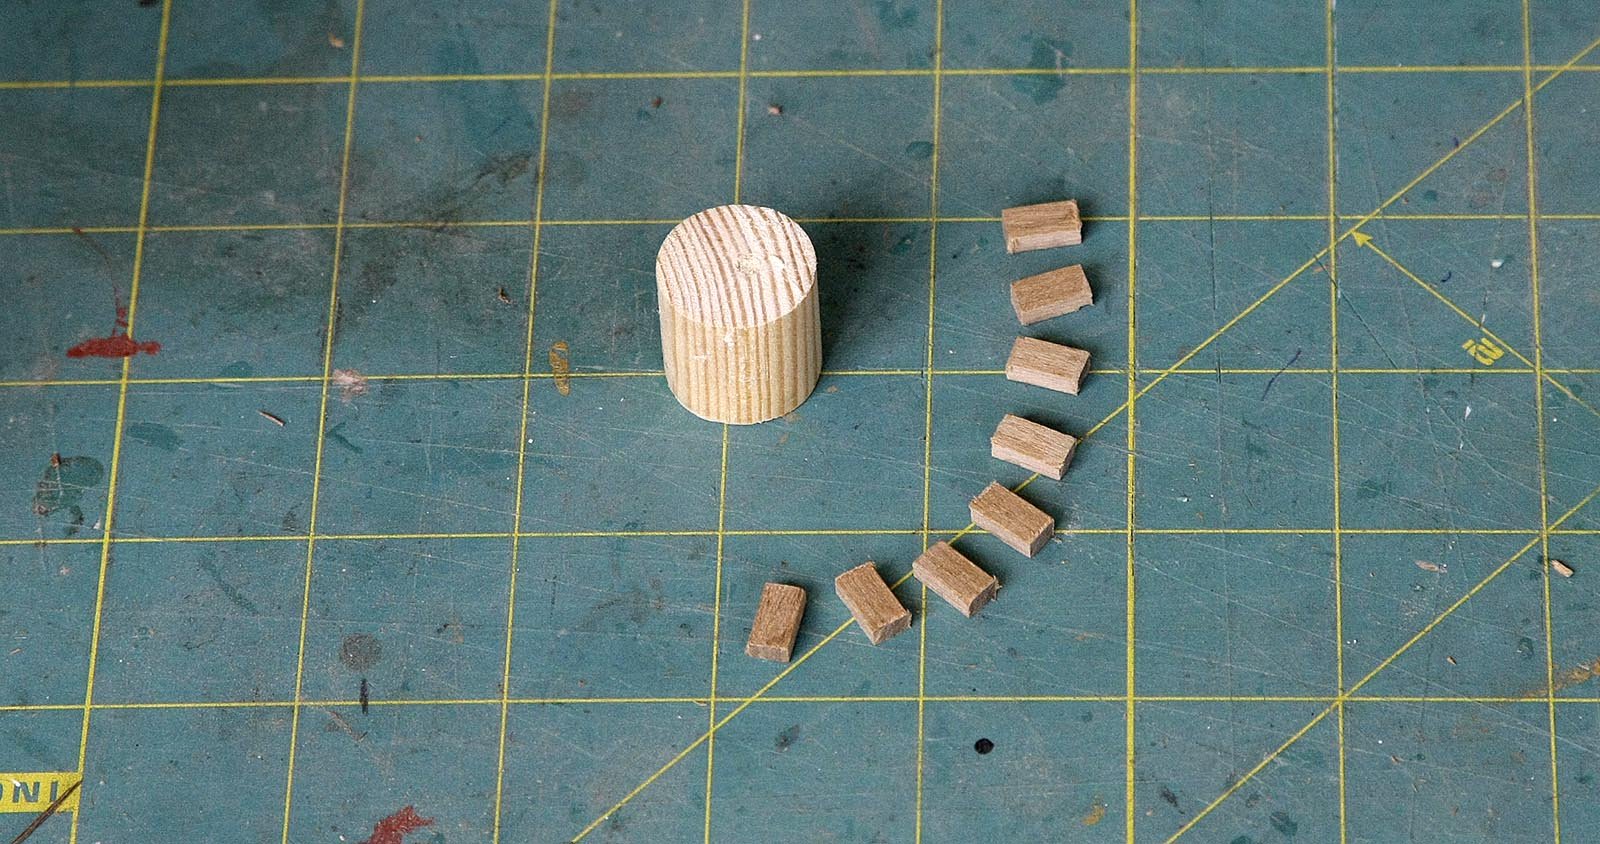
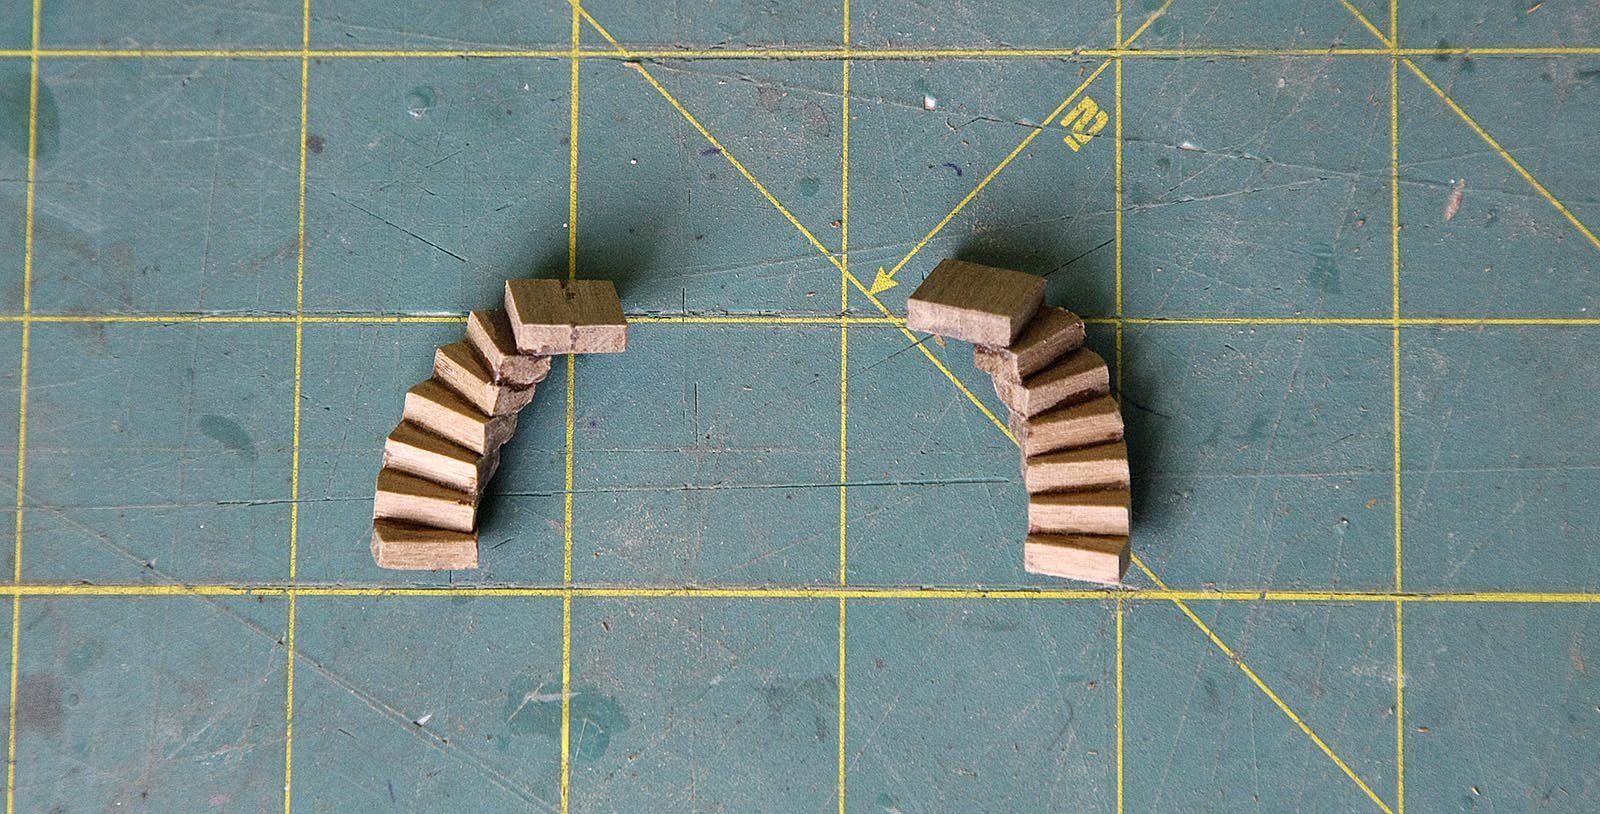
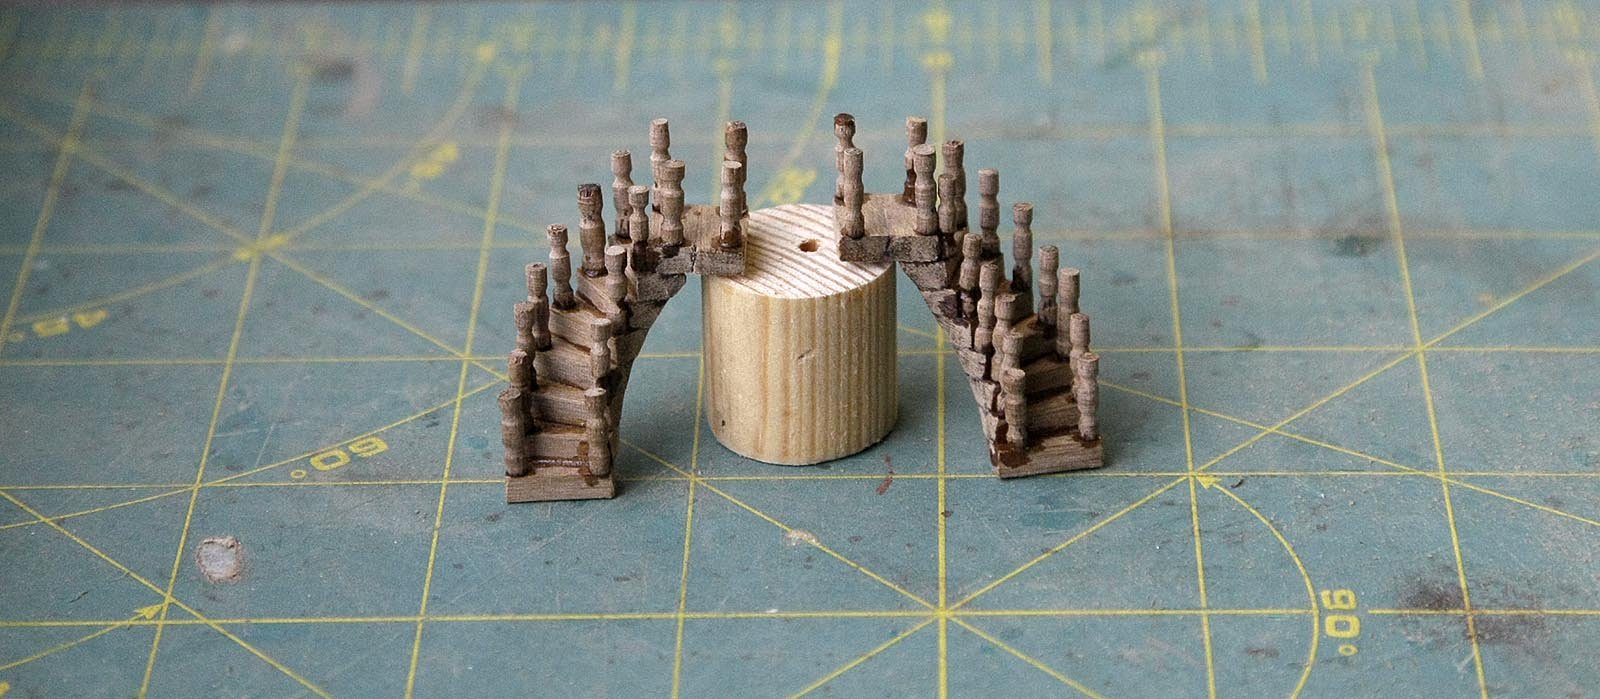
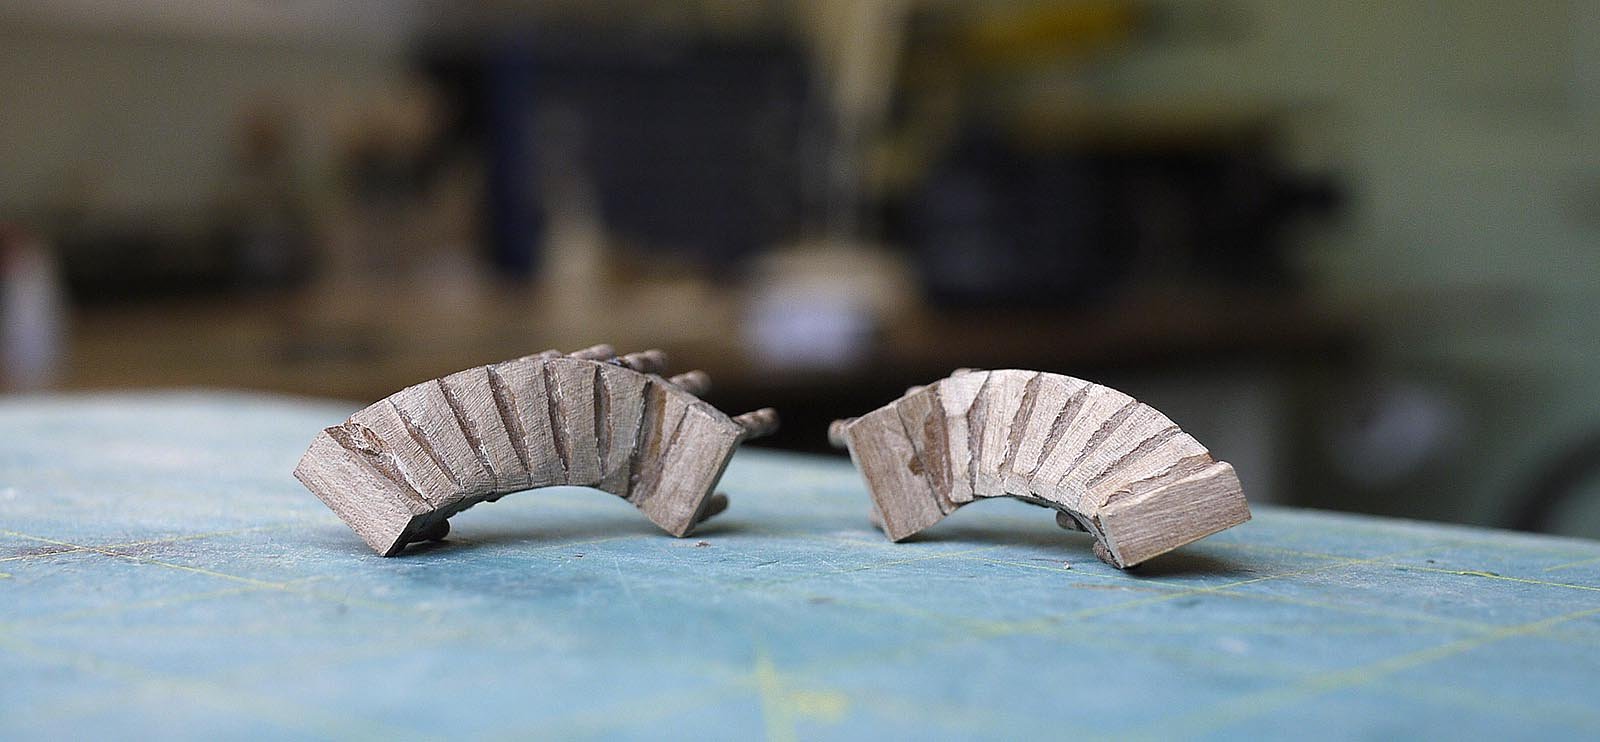
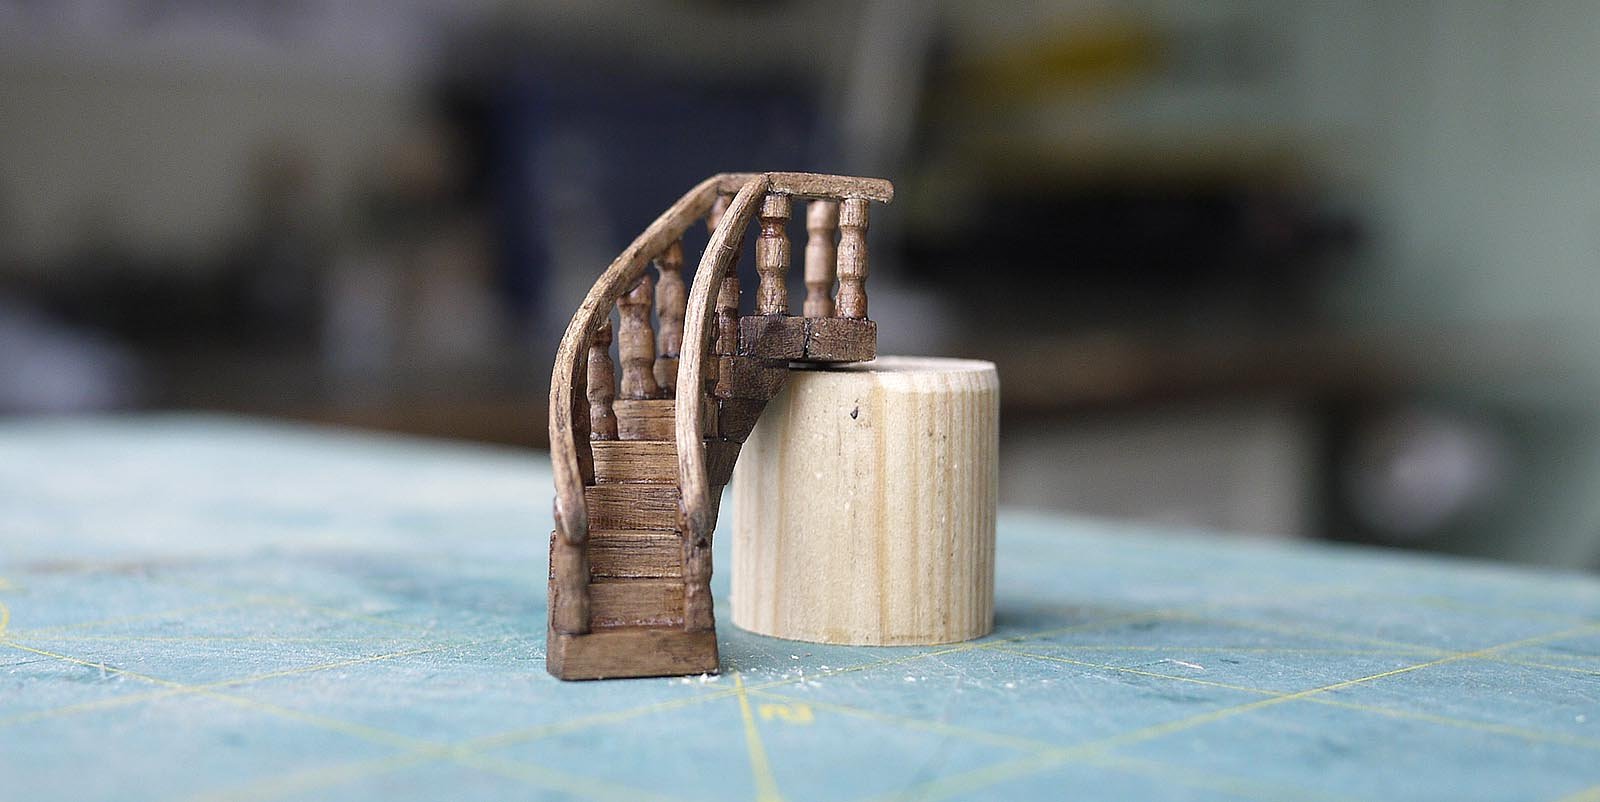
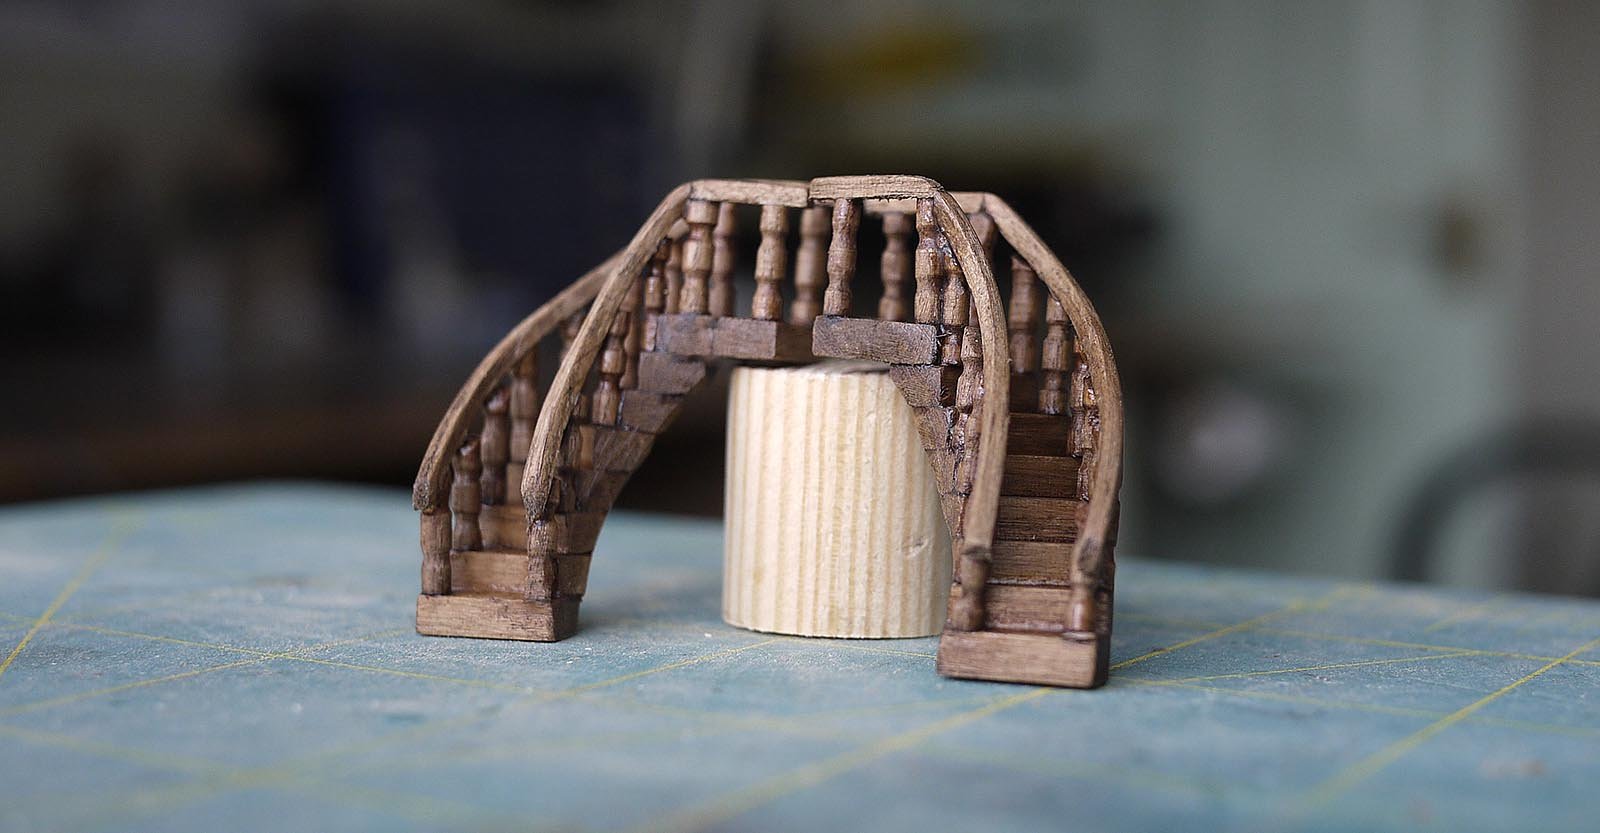
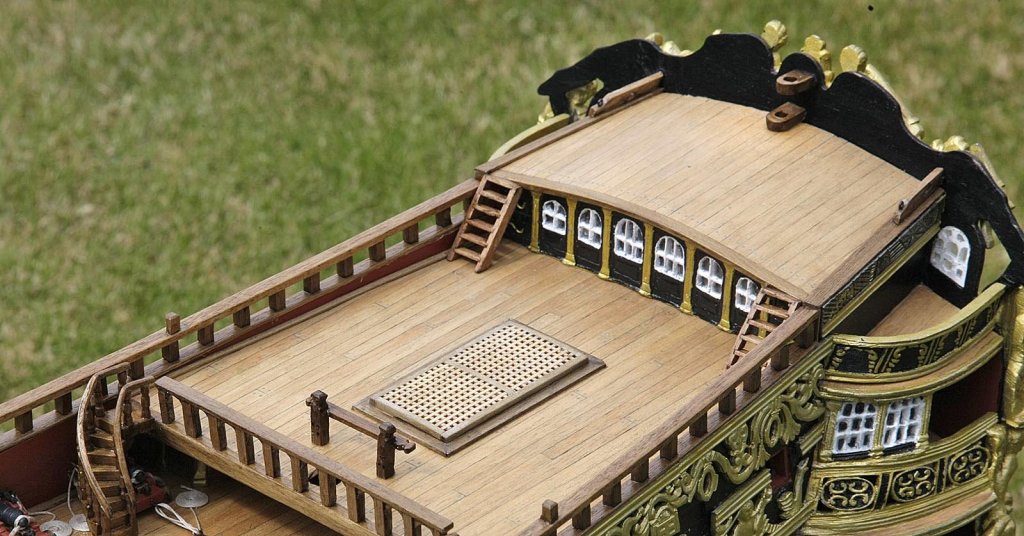
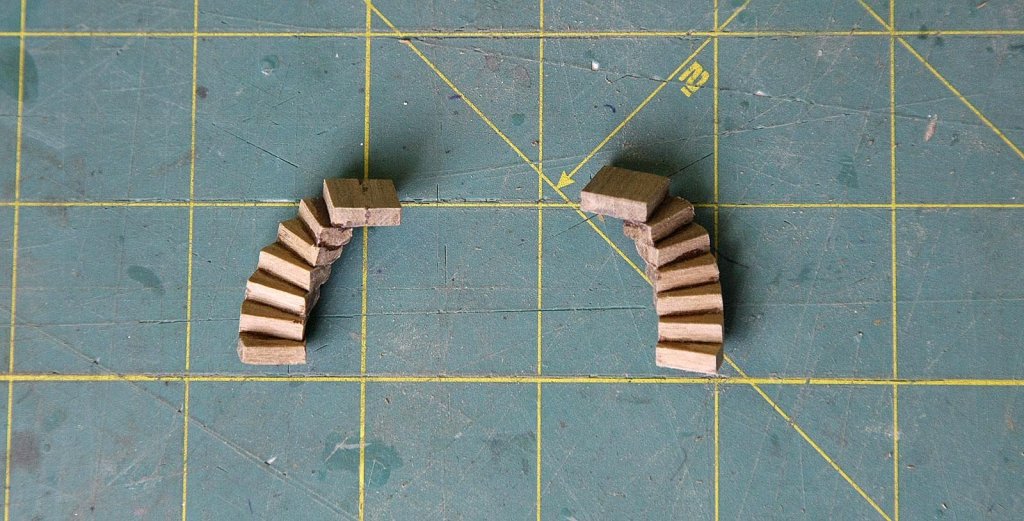
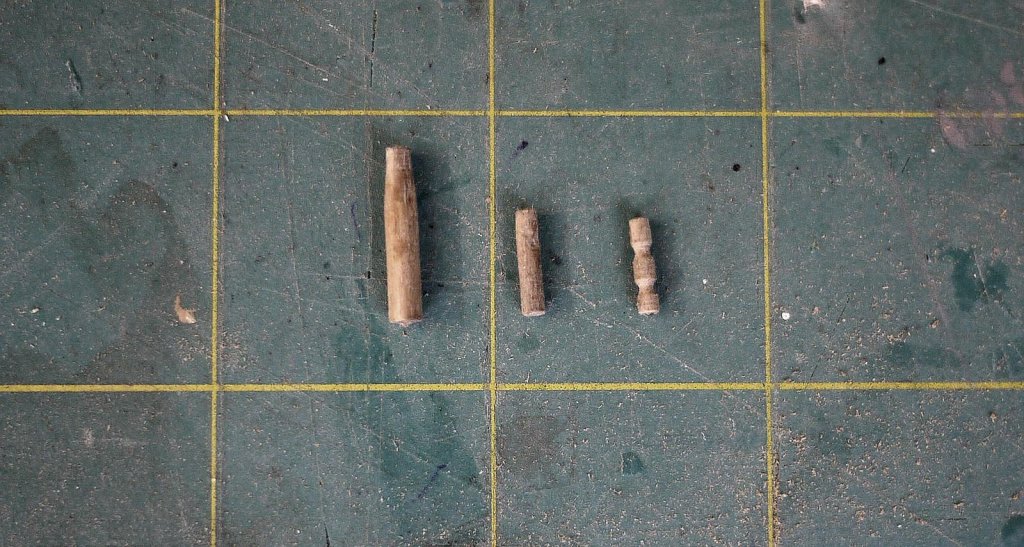
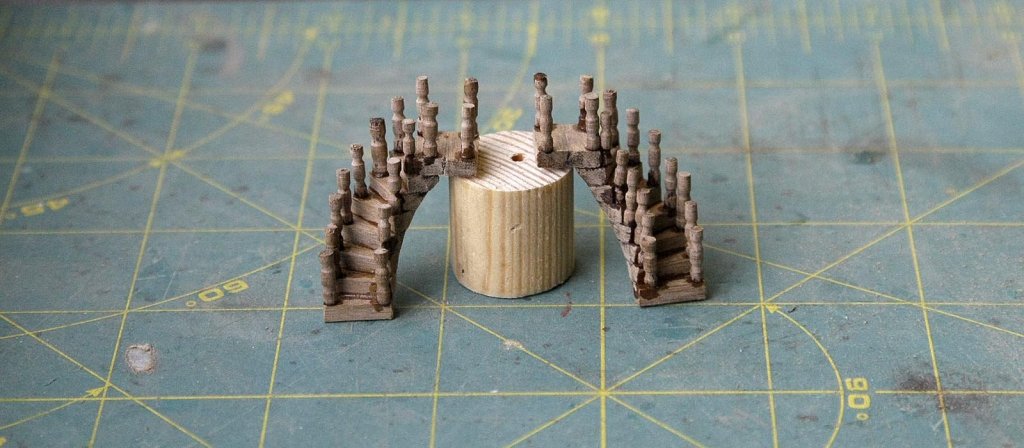
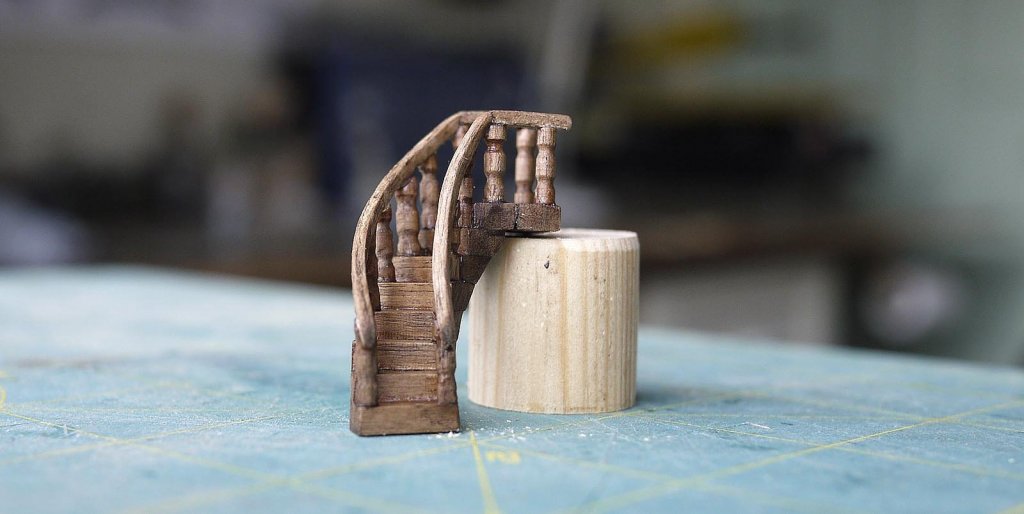
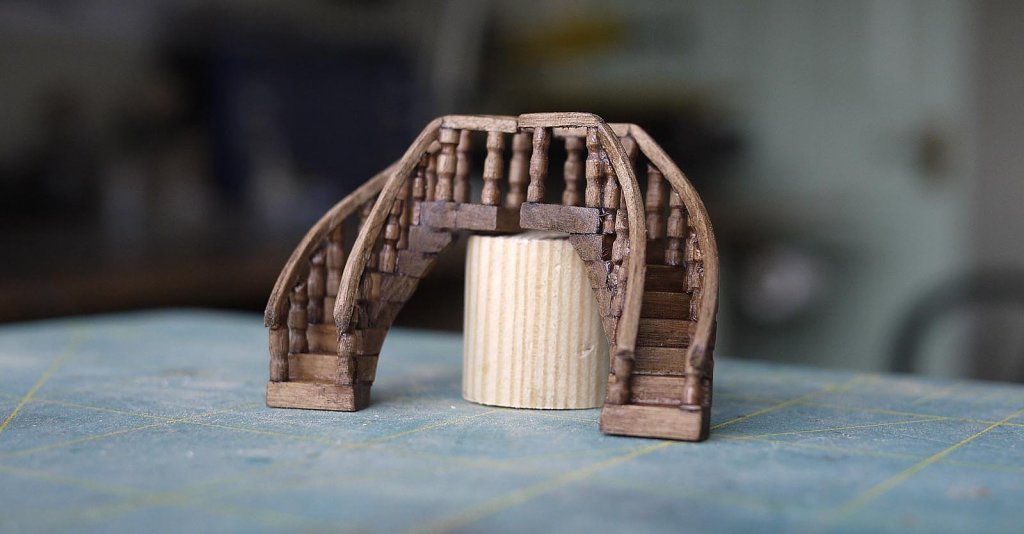
Hello everyone. Another good day at the shipyard, the curved staircases are completed and just need varnishing. These were something that I wasn't looking forward to building and approached with great trepidation. Again as with much of the RW build it's reputation for being overly difficult did not bear out in practice, I think that it's as difficult as you want to make it with options open to all levels of experience and ability. I looked at several methods for making them and thought that Marks was the right one for me. I cut the steps from 3 x 5mm strip, I found that seven gave me the correct height. Using a dowel to get a uniform curve I glued the steps on top of each other, I used a double width one at the top to form a small platform.The most difficult and time consuming part was making the 32 spindles, I didn't have a thin enough walnut dowel so I had to reduce the thickness of one that I had and add some shape to each spindle. I did this using my recently acquired Proxxon lathe. Isn't it fun when you can play with your new toys. I glued each spindle in place using cyno, I used an accelerator to set them quicker so that I wouldn't nudge them out of place as I fixed others. I then sanded the sides and underneath to get an even curve having used squared pieces for steps. I bent well soaked 1.5 x 1.5mm strip for the rail with my solder iron. I glued the rail on one spindle at a time, again with cyno, when set I glued and held it onto the next and so on until all were attached. I sanded, stained and sealed them before attaching. Job done, it took a day, not accurate or historically correct but as with other none accurate parts of my build they look ok to me and at least the captain can now get onto his quarter deck. Ken All photos were taken with my Panasonic Lumix G1 20mm 1.7 lens. Hand held indoors


- 424 replies
-
- 14
-
-
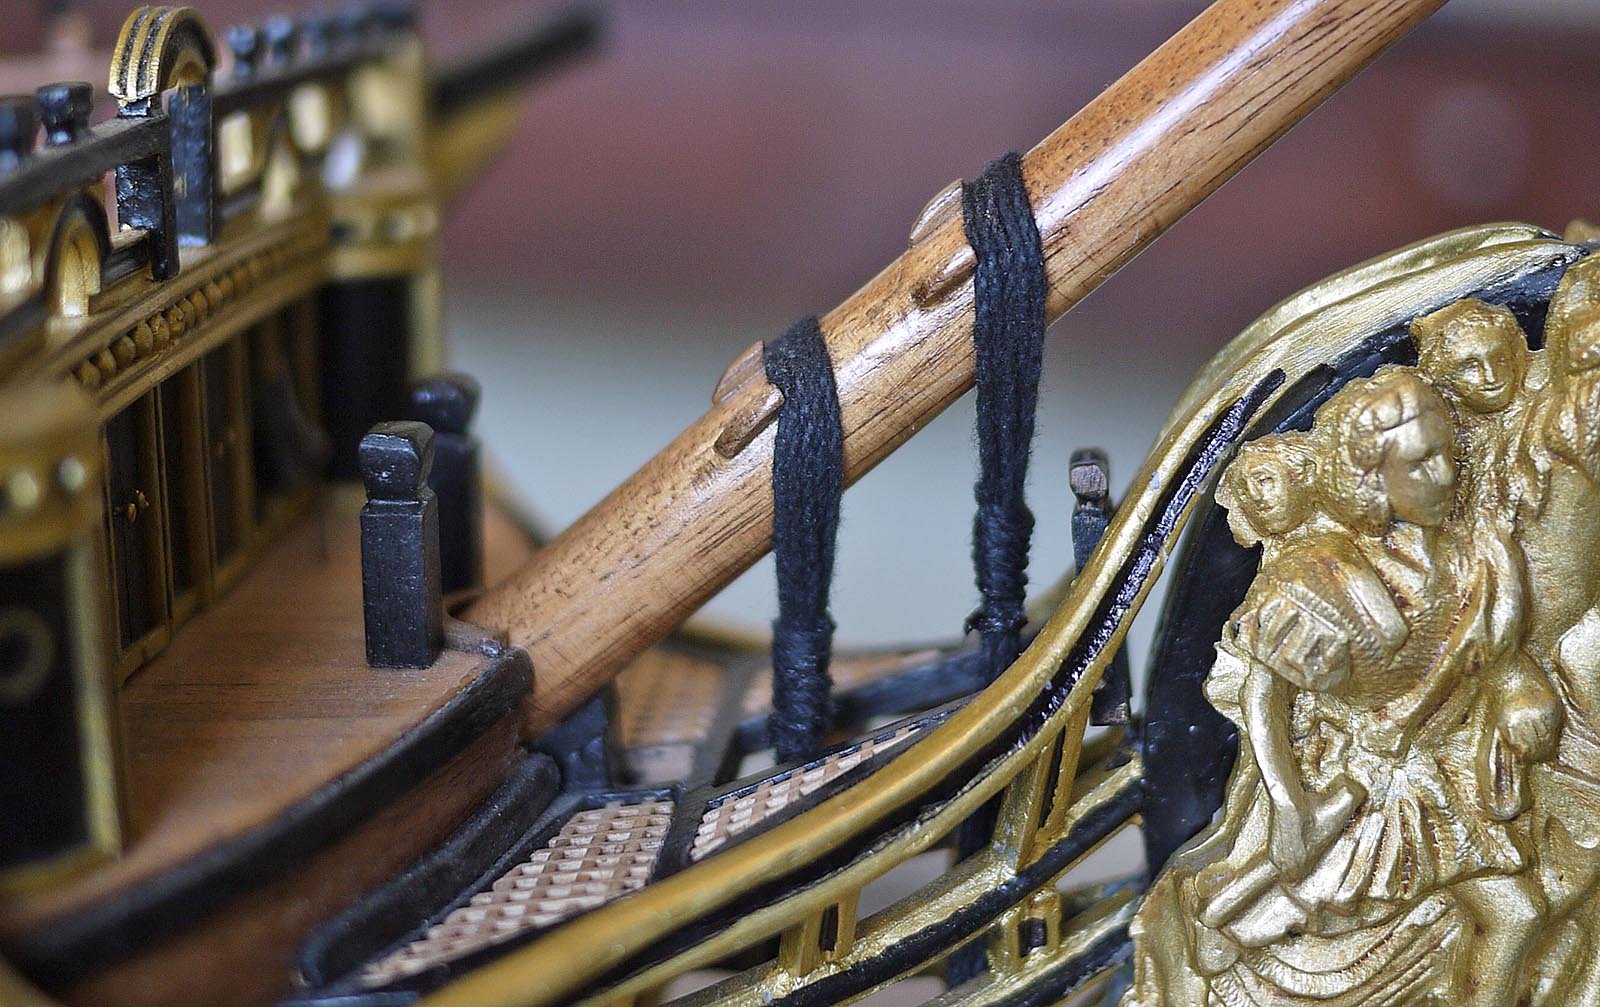
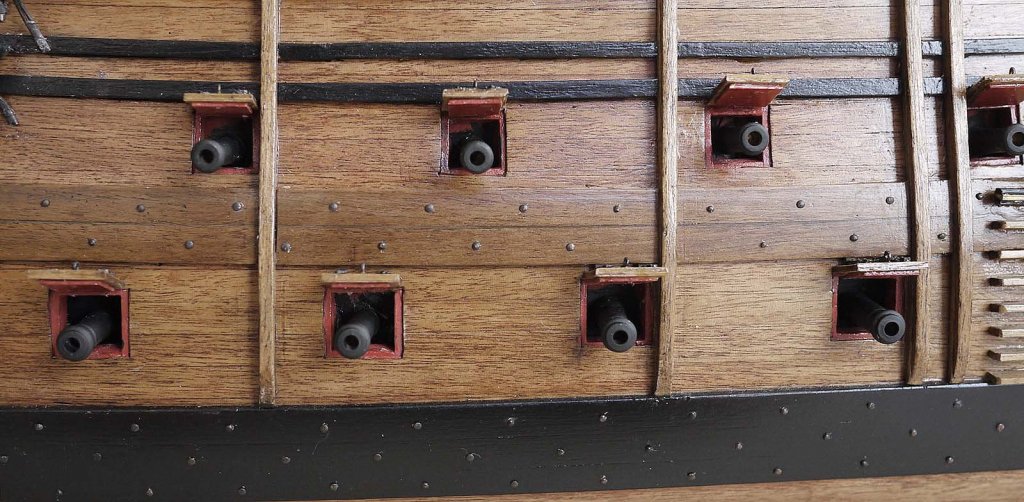
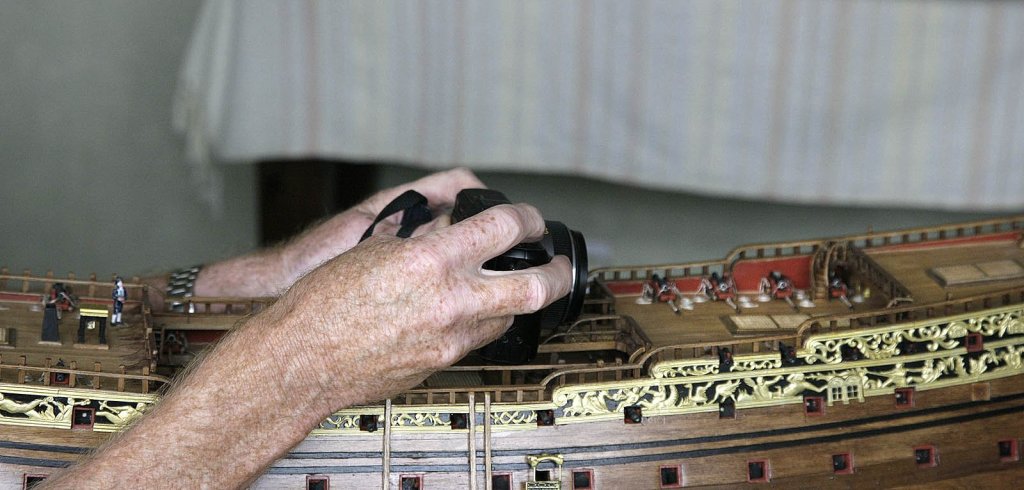
Hi Jack, Here's one for you. I've just finished the staircase and I'm in the process of photographing it, I'll put it all in my build log but here's how I did them. The first picture was taken by my wife, it is me taking the close up using my compact, the second is the result of my shot. The first is my Canon 1Ds with 24-105L lens. ISO 1250 F5.6 1/200 aperture priority with -1/2 stop compensation. I can't use this lens for close up as it has no macro facility. The close up was with my Panasonic Lumix G1 with their 20mm F1.7 fixed lens. I rested my hands on the rails and used aperture priority set at ISO 200 F 4 at 1/50 As you can see the G1 with that lens produces superb results, it has an automatic macro function. It's not cheap but it is the best small camera I have ever used, in many cases you can't see the difference between that and my very expensive canon except that it doesn't have the versatility. The 20mm lens equates to a 35mm in use, I don't need a zoom for it as it produces very good quality large images that can be cropped. I carry it with me on holiday and I've had good success in competitions using it. I hope this helps. Ken

-
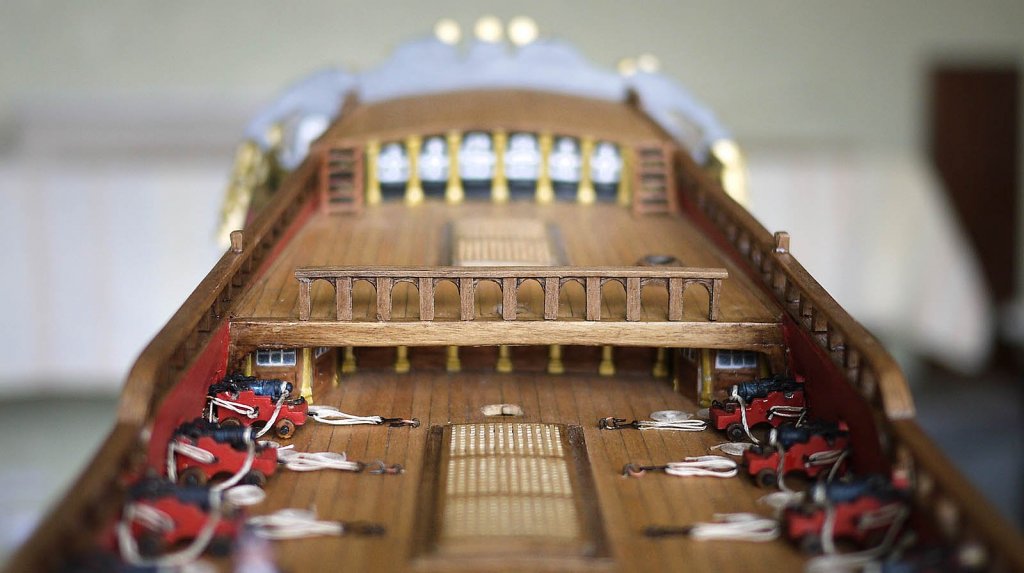
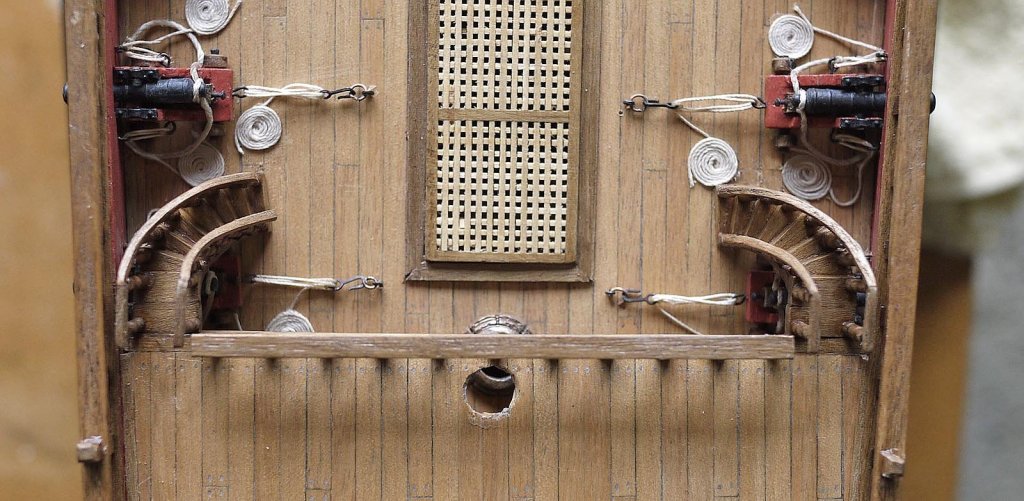
Hi Jack, I've just had a thought, you might be mistaken in thinking that some of my pictures are close up macro type shots when in fact they are taken from a distance then just cropped to show the relevant area. Below is an original, then the one that I cropped and put in my log, as you can see it looks like a close up. Ken Then cropped
-
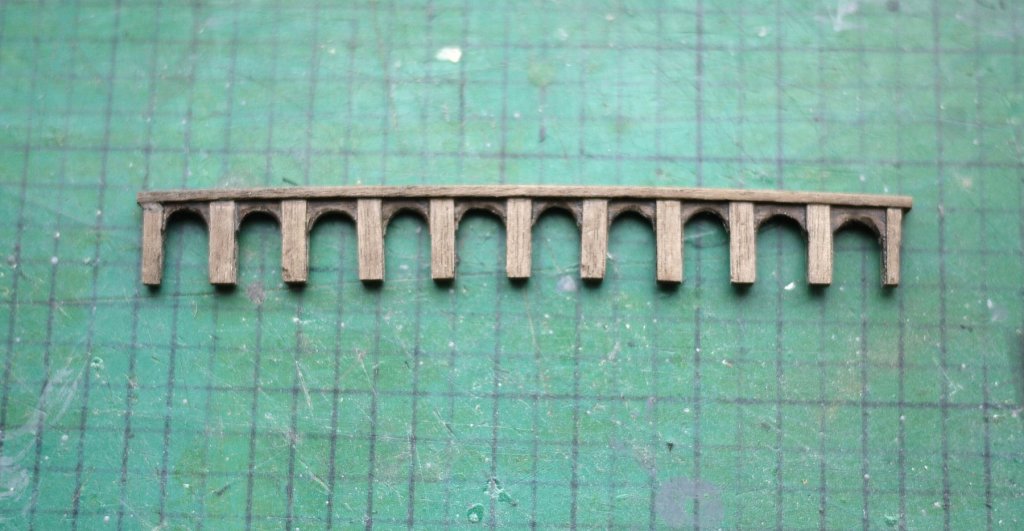
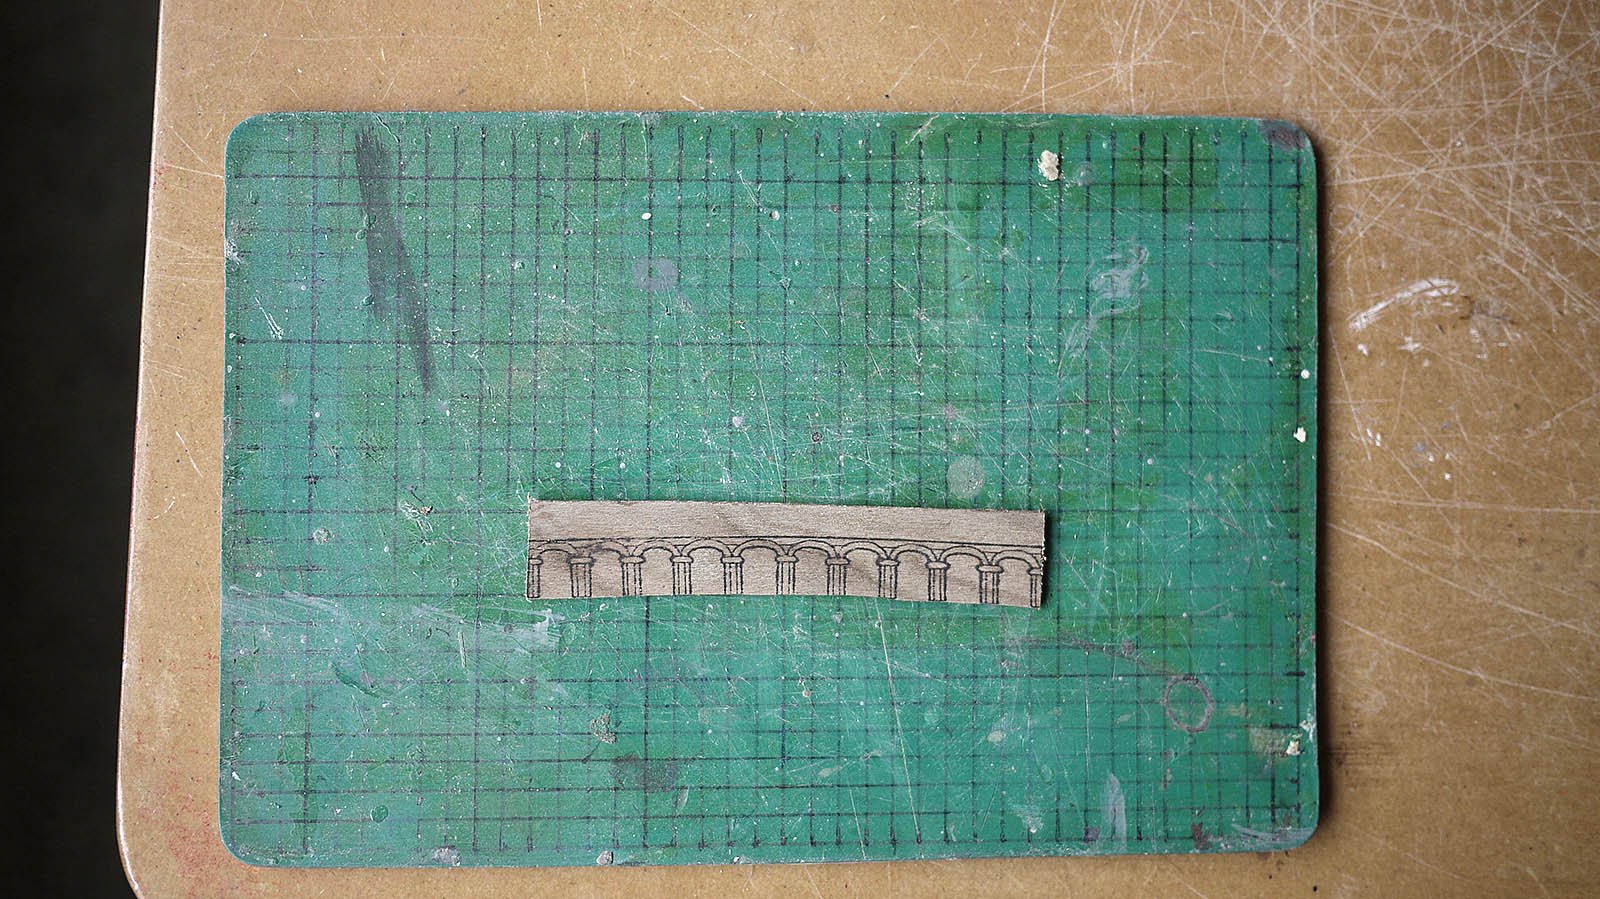
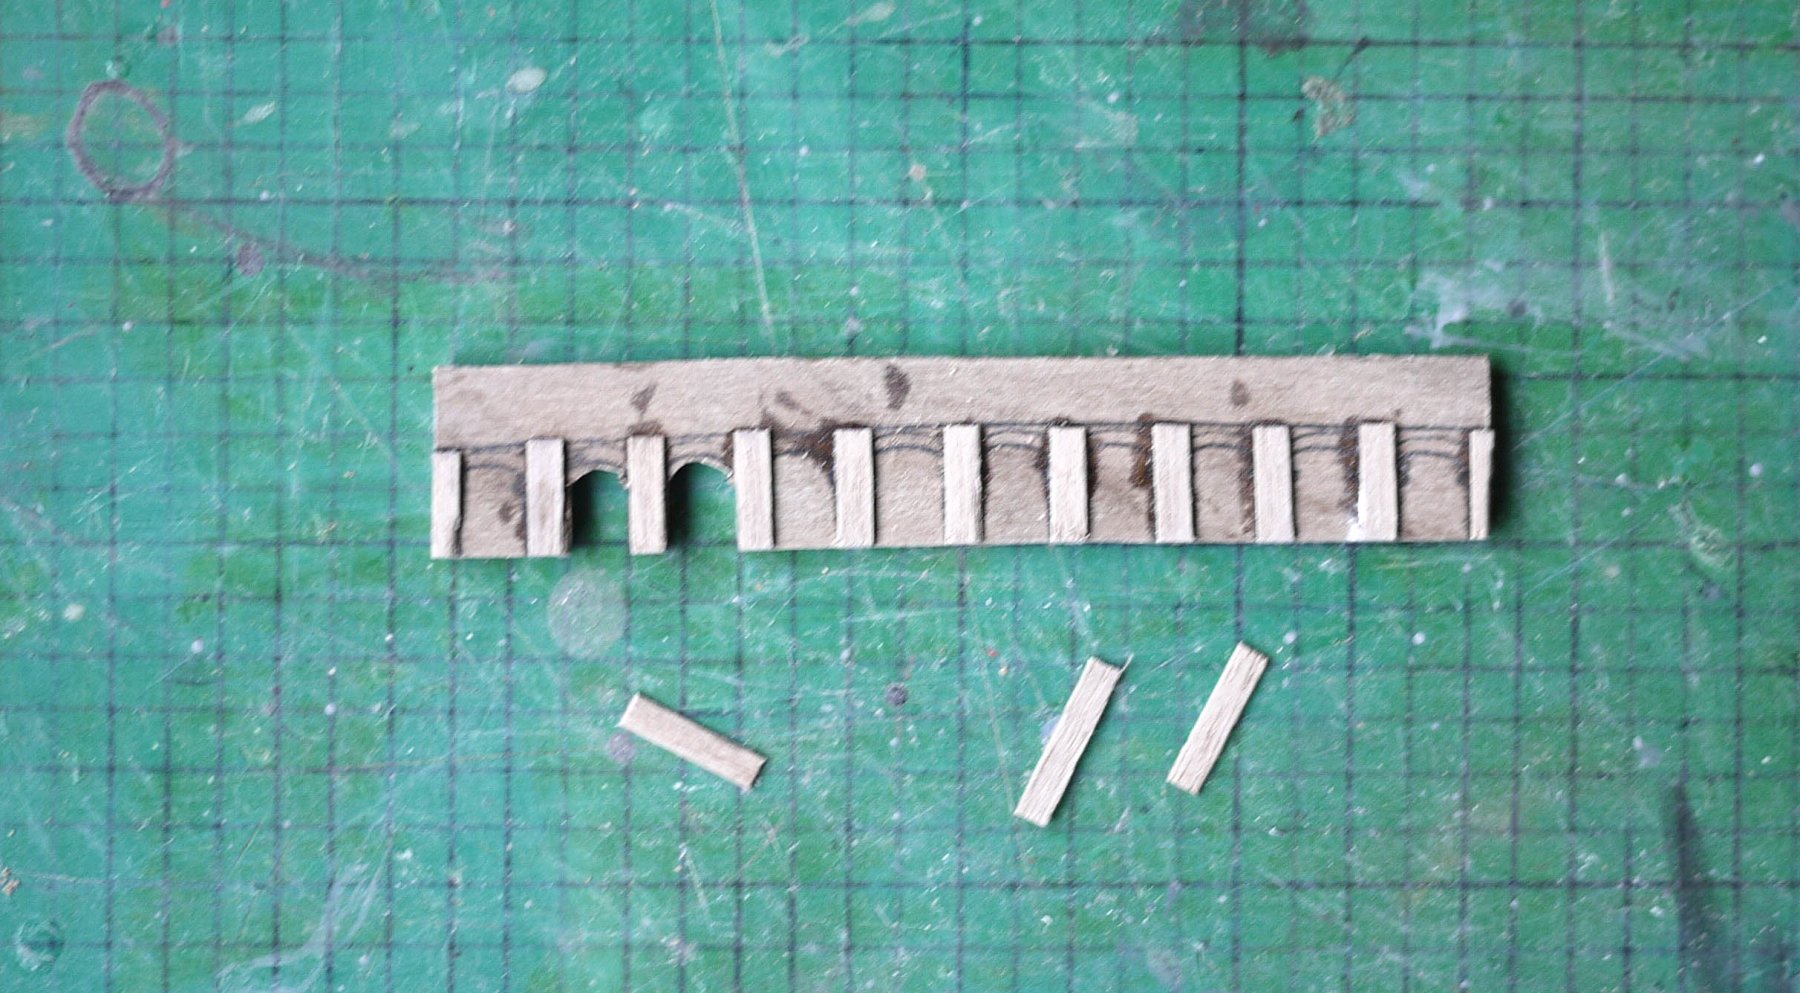
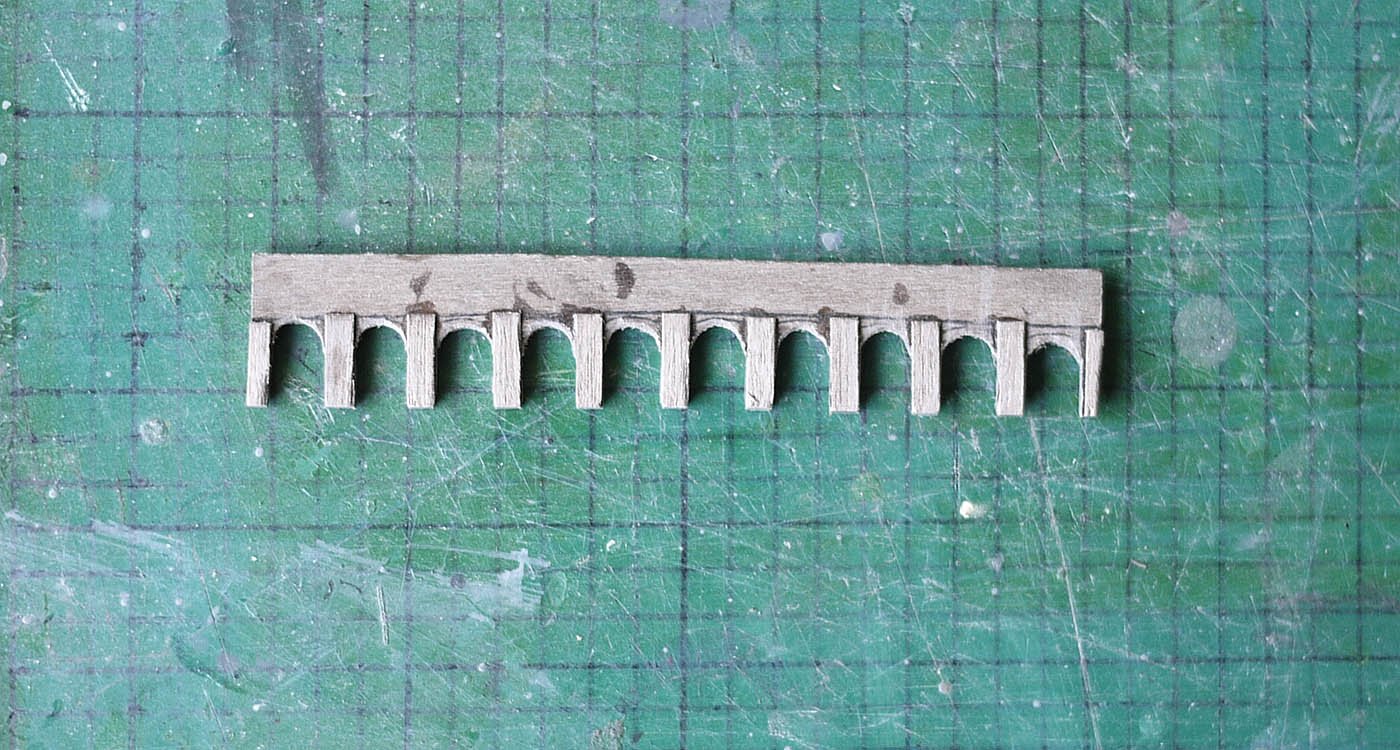
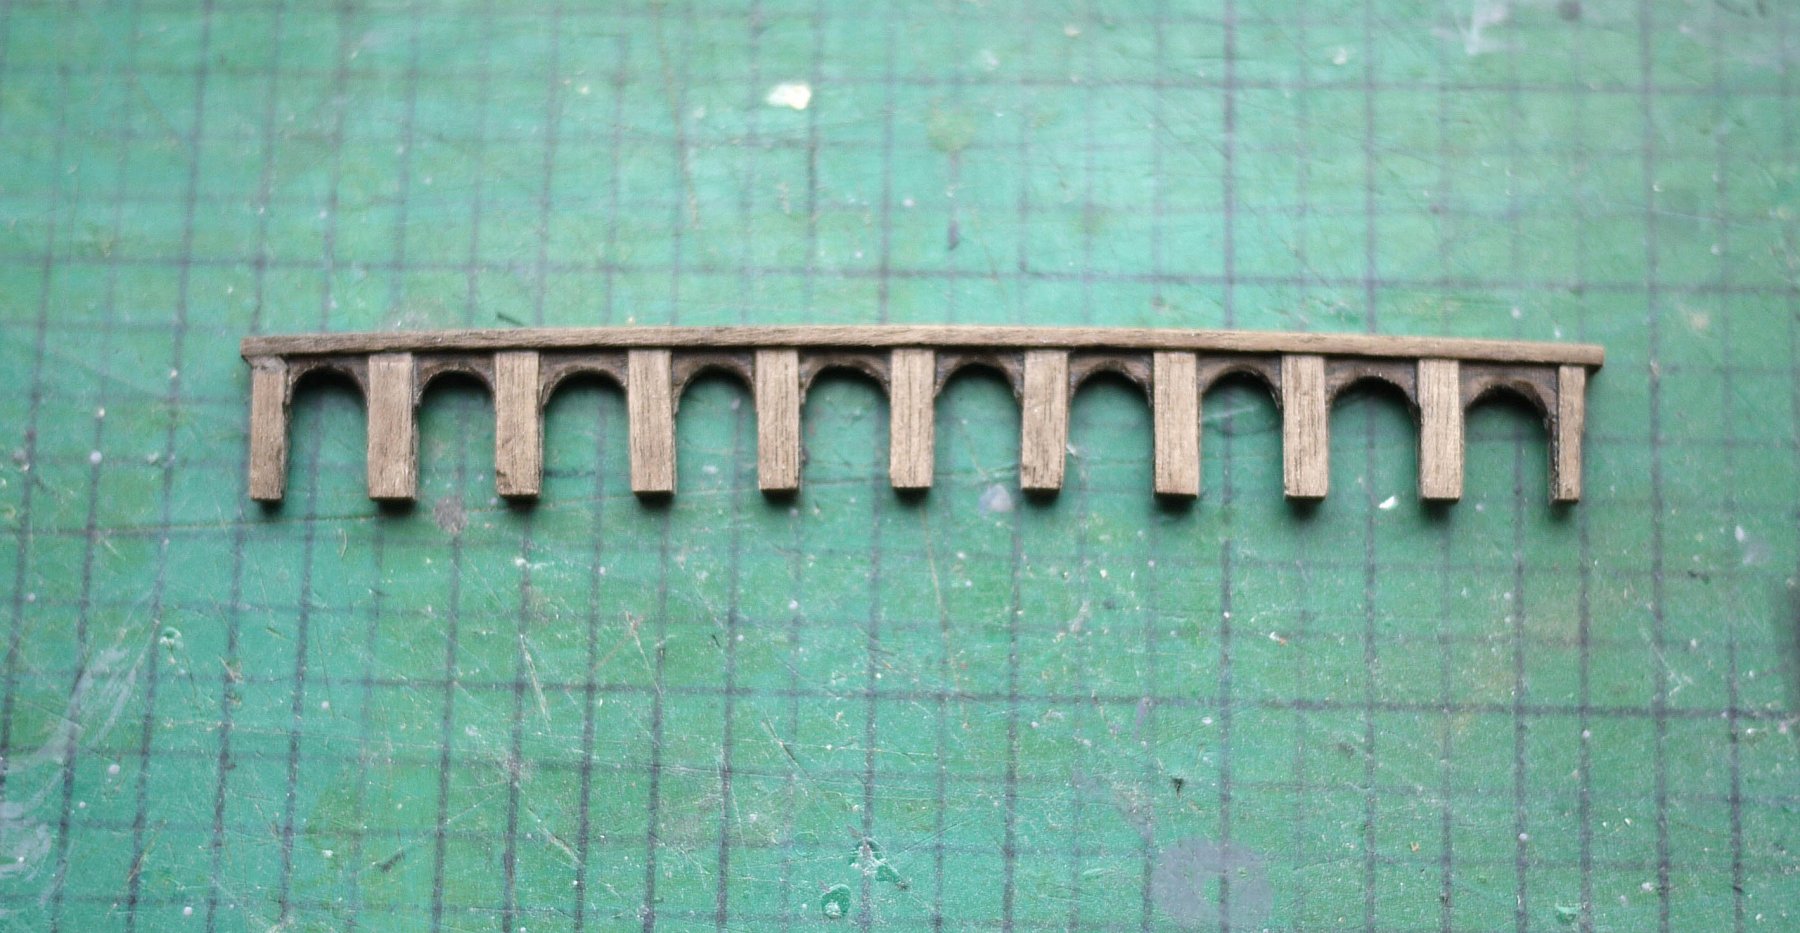
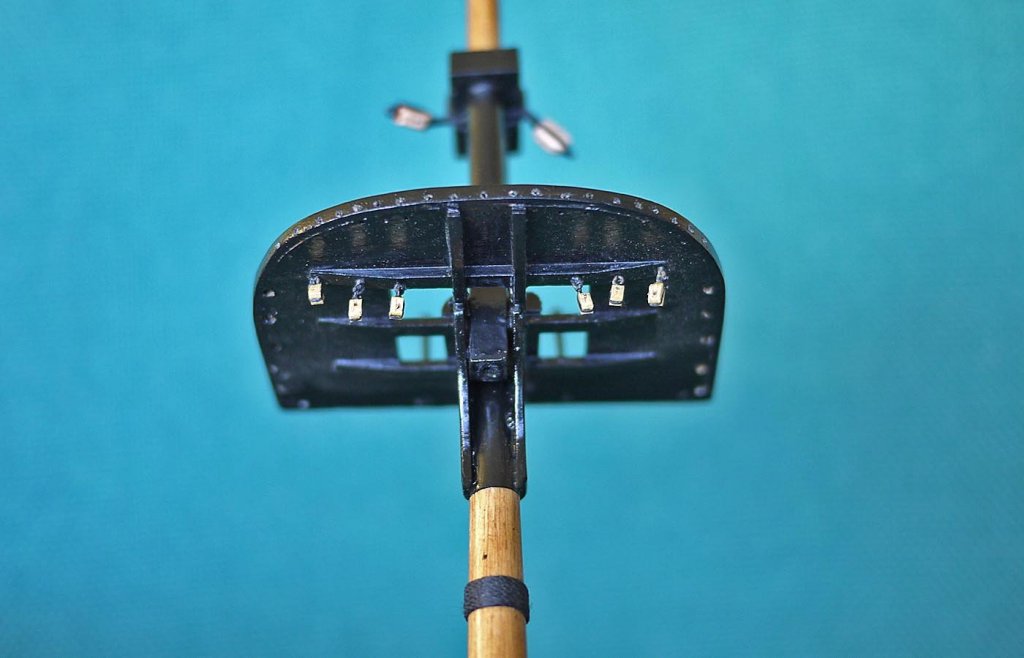
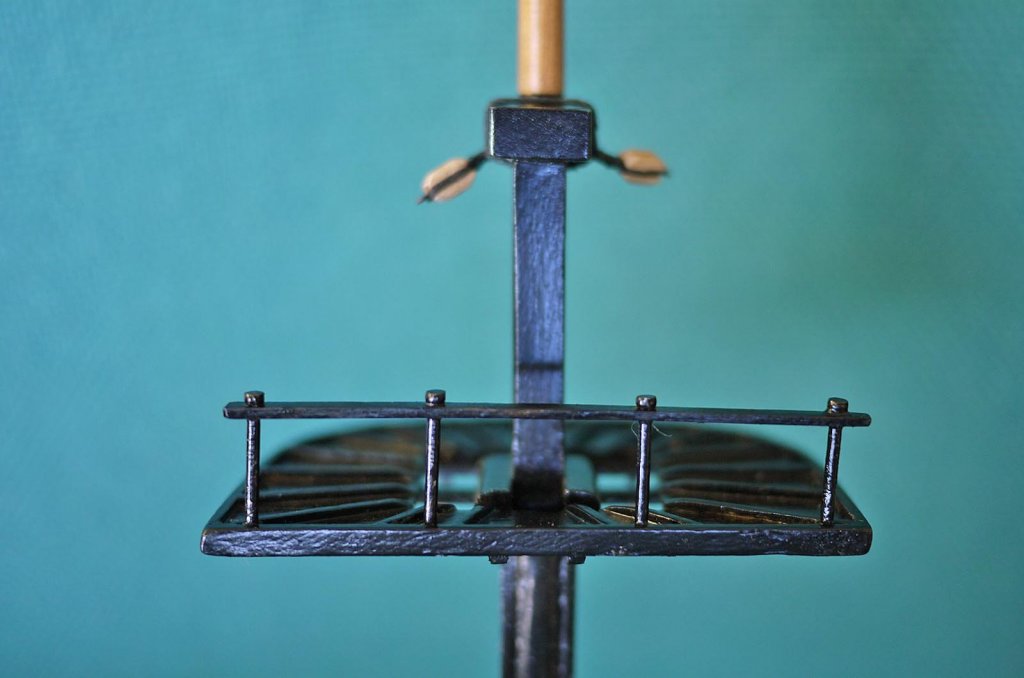
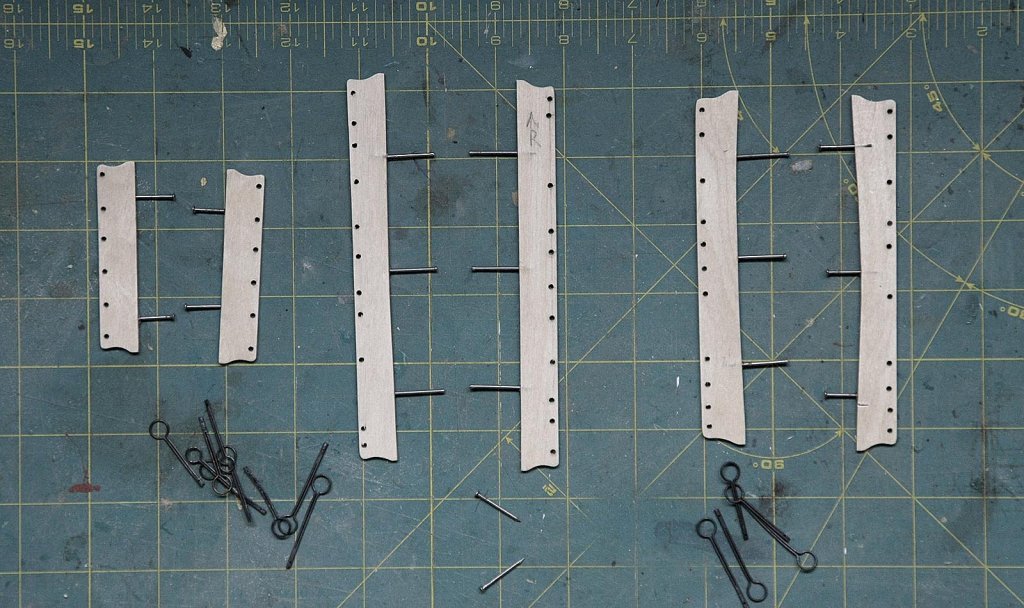
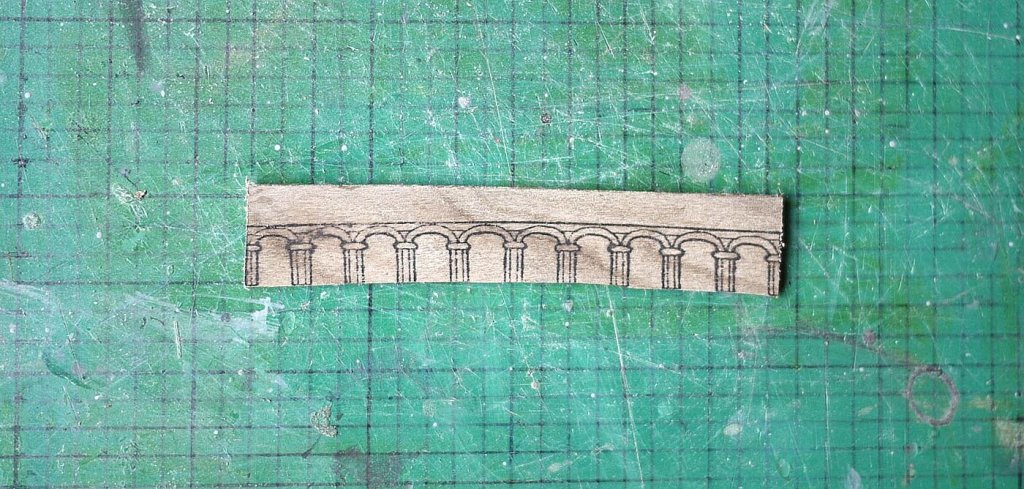
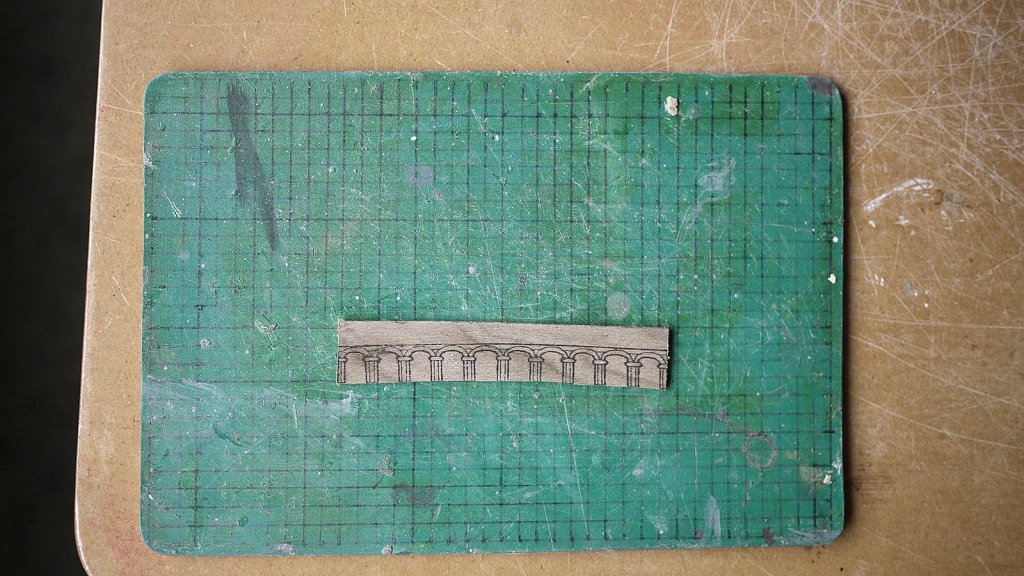
Hello again. Following up from yesterdays success I moved on to making up the upper quarter deck rails. Again I went for easy and my method proved easier than expected, from start to mounting on the deck took only an hour. I've shown step by step in my pics. I copied the plan onto a piece of 1.5mm walnut ply, I put 3 x 0.5mm strips on both sides of the ply for the uprights then cut the arches and filed them to shape. I cut these out as a unit then added the 4 x 1.5mm rail at the top and glued the finished rails into place. They have been primed and need to be varnished. Now for the dreaded curved staircase, I can't put it off much longer, not sure how I'm going to tackle it, it seems that everyone approaches these differently, I suppose I'll be the same. The photos were taken with my small Panasonic Lumix, a 20mm 1.7 lens, handheld on auto. Ken