HOLIDAY DONATION DRIVE - SUPPORT MSW - DO YOUR PART TO KEEP THIS GREAT FORUM GOING! (Only 24 donations so far out of 49,000 members - C'mon guys!)
×


ken3335
-
Posts
314 -
Joined
-
Last visited
Content Type
Profiles
Forums
Gallery
Events
Everything posted by ken3335
-
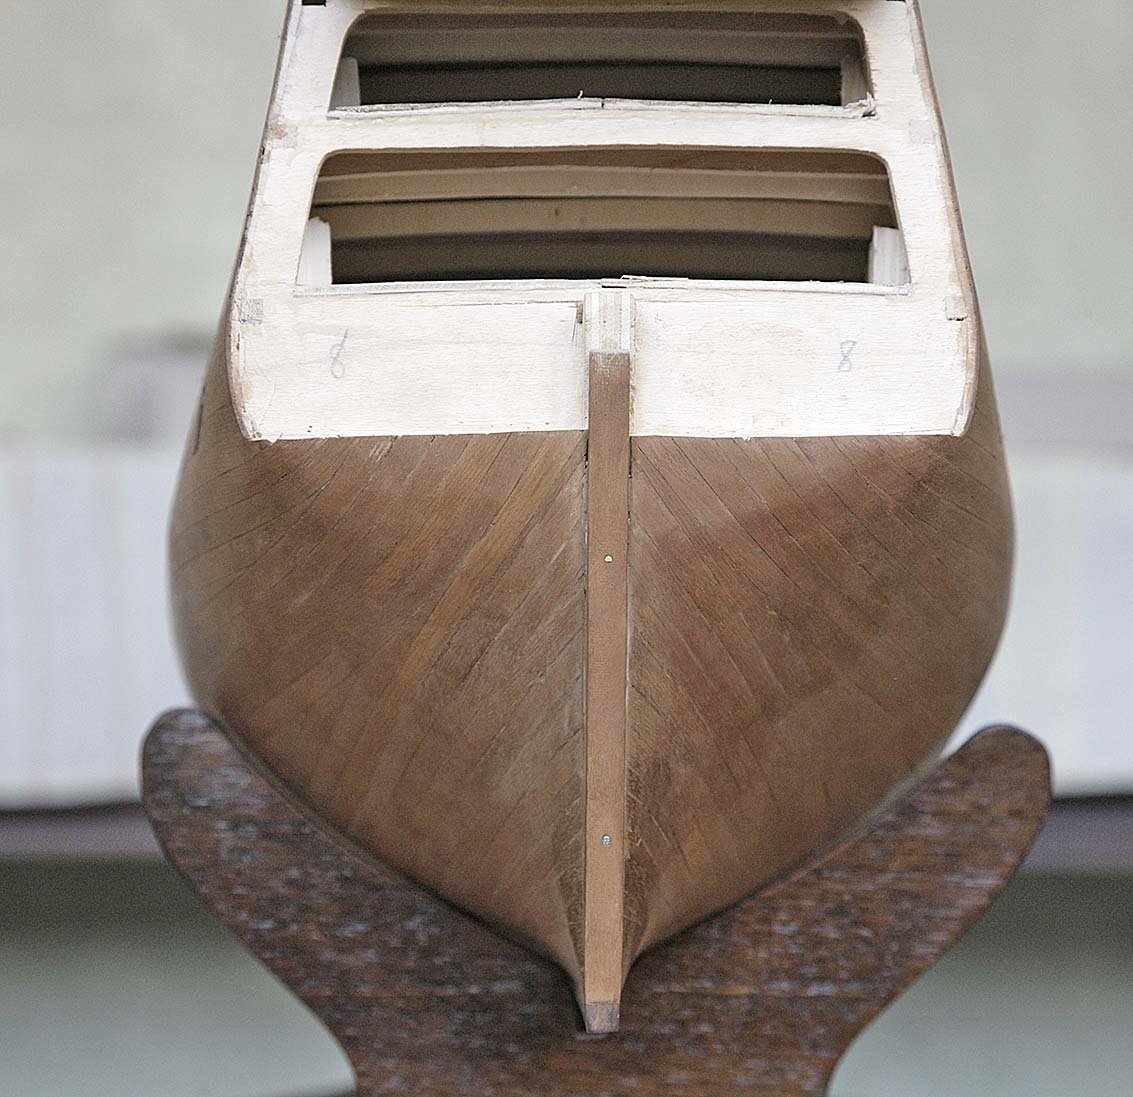
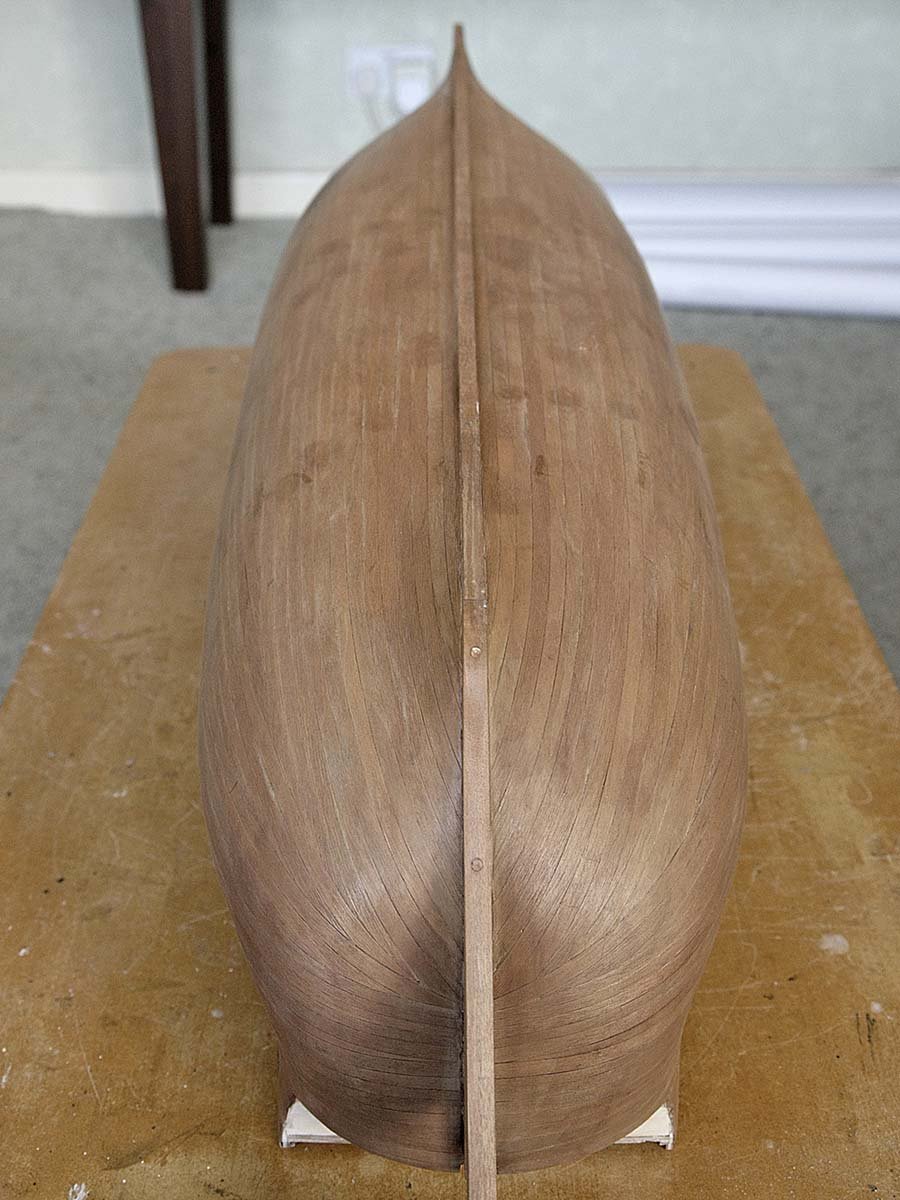
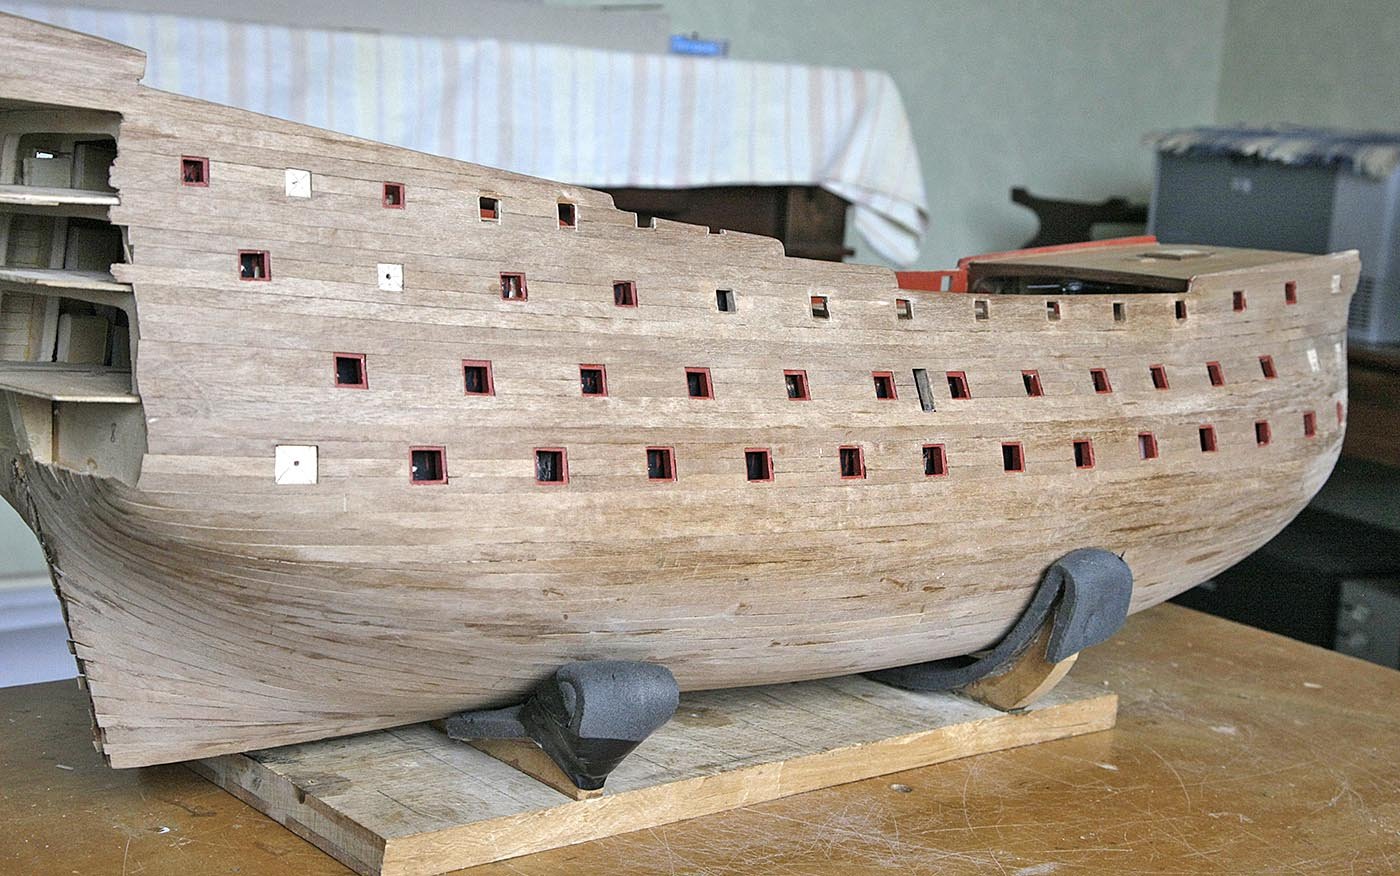
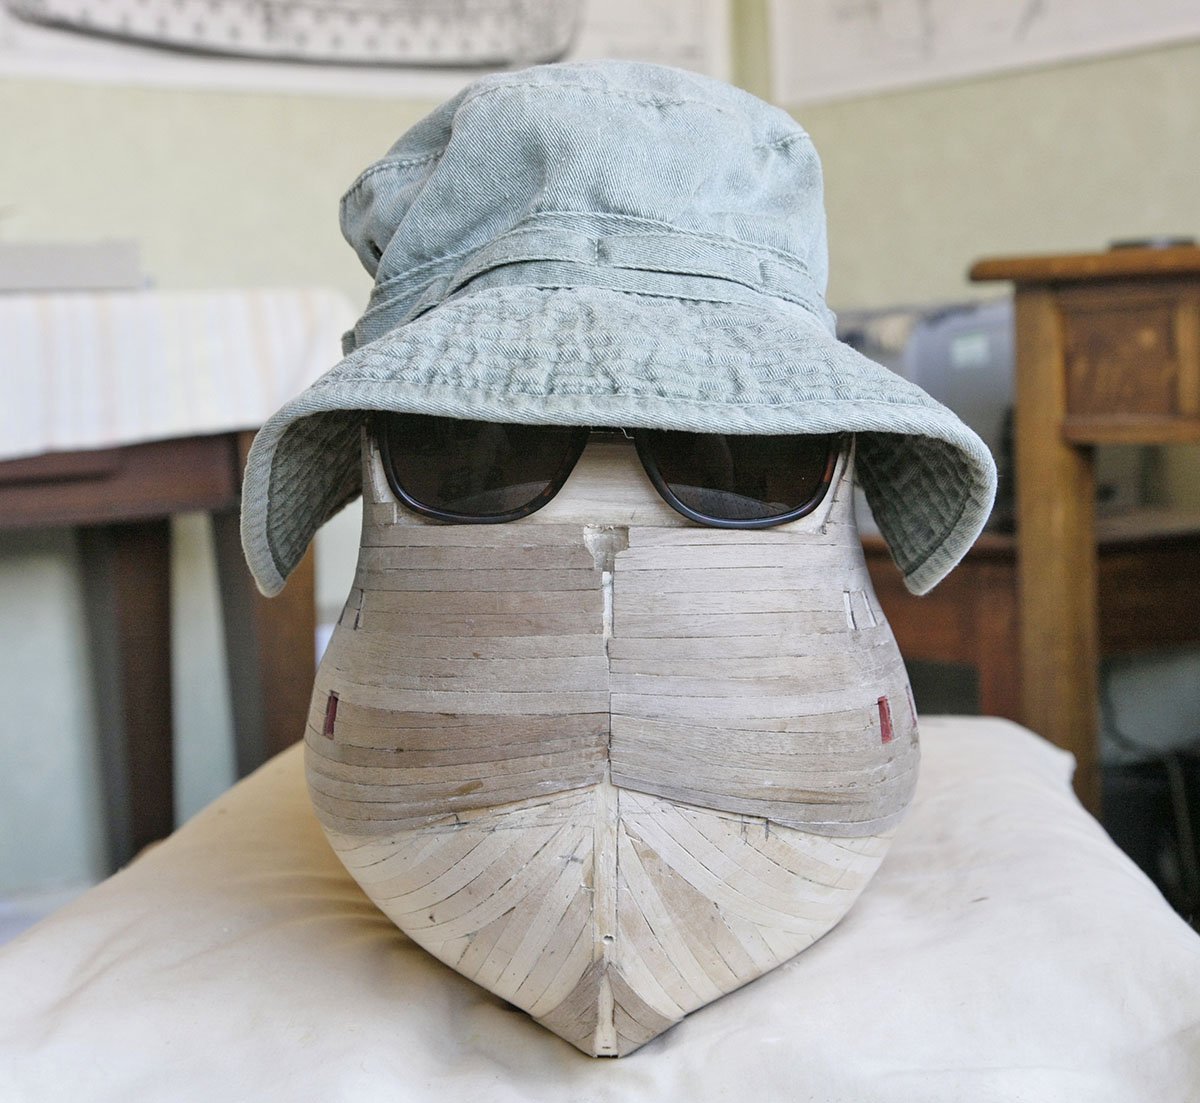
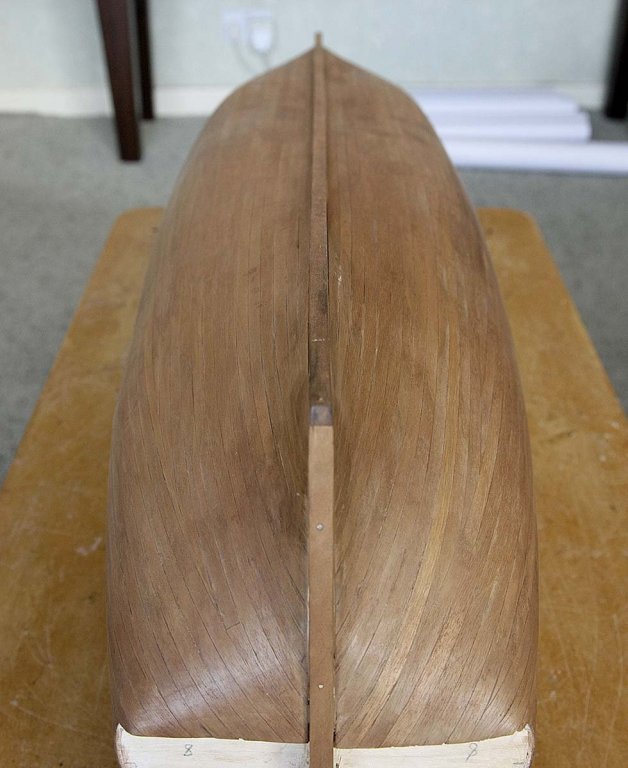
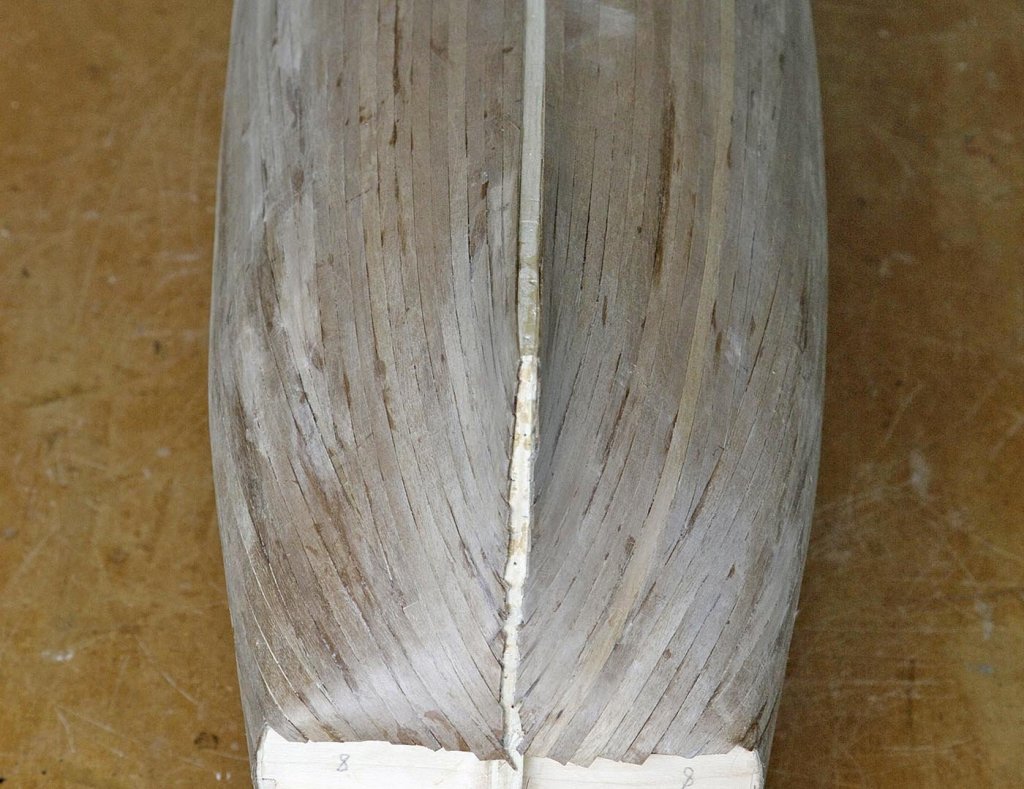
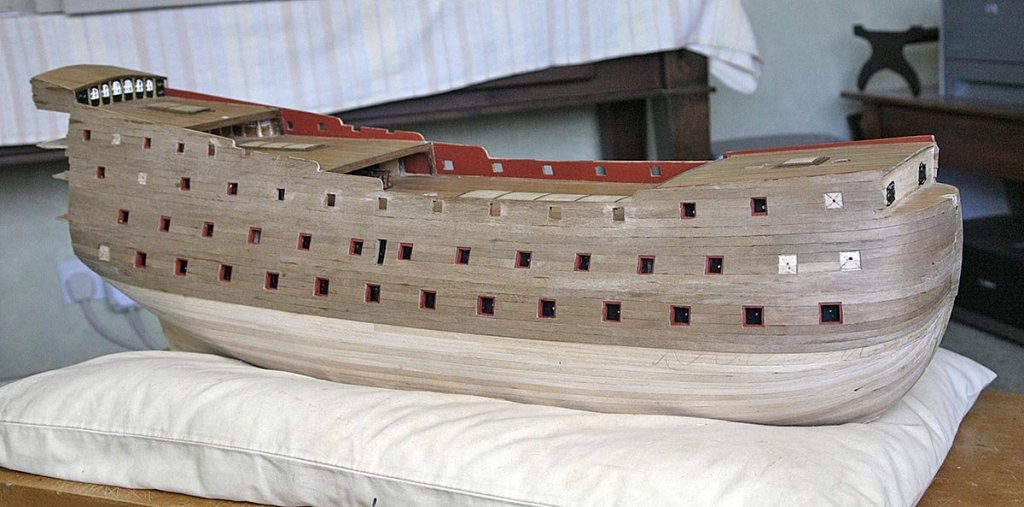
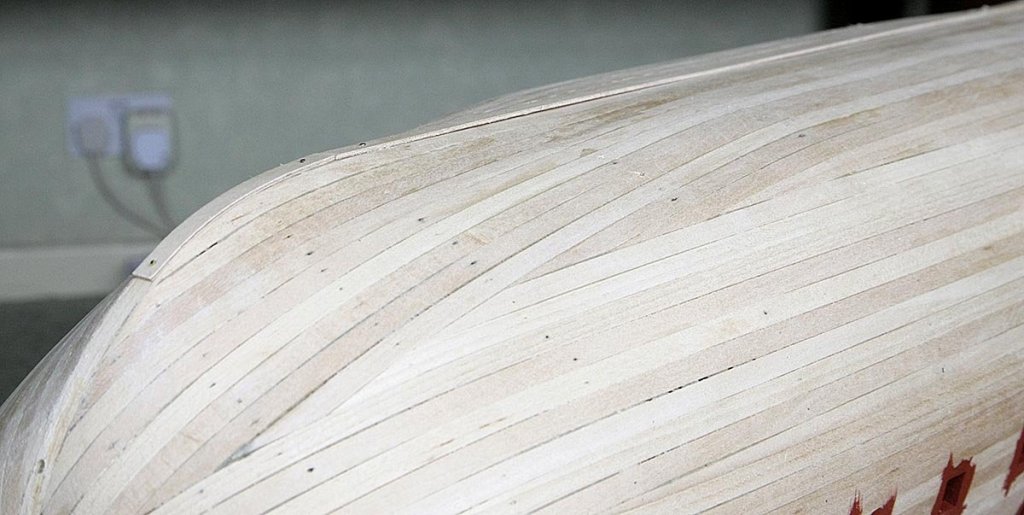
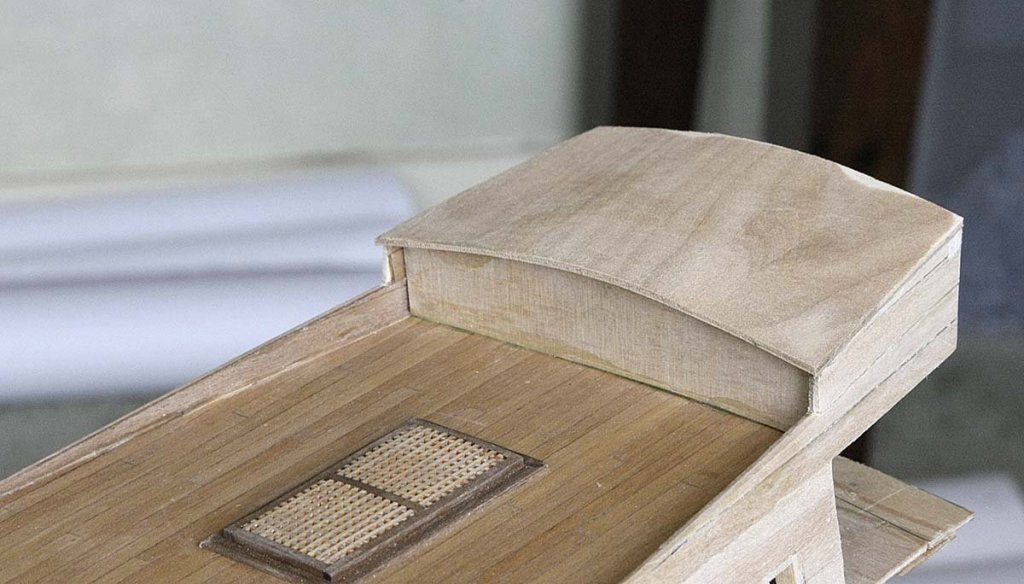
 Hello Everyone. As you'll see I've had another busy time at the shipyard. It's come along so well that I'm actually grinning at the thought of showing it off. As I mentioned earlier, until the hull is sanded it looks a bit rough and you don't get that thrill of seeing what it's eventually going to look like, but now! I gave it a good sanding, there were a few seams that I rubbed some filler in to try and get it as good as I could. I cut out the grooves for the stem, keel and sternpost, made them up and fitted them. I'd not done it like this before but had a good feeling that it was the way to go. I'm delighted at the result and don't think that I could have had as neat a result if I had tried to butt the planks against the prow and stern. I decided to stain the hull to give the wood a slightly warmer than walnut look. I rubbed in some light teak stain, this gave it a slight honey coloured tone a bit like pear, it also brought out the grain so again I was pleased. I think that I'll give it a coat of sanding sealer so that the nice surface doesn't get any stains on it that I won't be able to remove. I am now in a dilemma, whilst I realise that it will never be used as an example of how a model ship should be planked I am so pleased with the way it looks that I am now undecided whether to leave it bare showing off the wood or to paint it as had originally intended. Hmm! thoughts on this please. I am now nearing the part of the build that I am dreading most, The stern gallery support and the galleries themselves. Mark in his log gives an excellent account with good pictures of how he accomplished his galleries but until I start I have doubts on how I'm actually going to get this done, I've got a couple of pre shaped pieces of wood, the third and thinnest was missing so I made one up off the plan and I'm now wondering where to start? Ken


- 424 replies
-
- 12
-

-
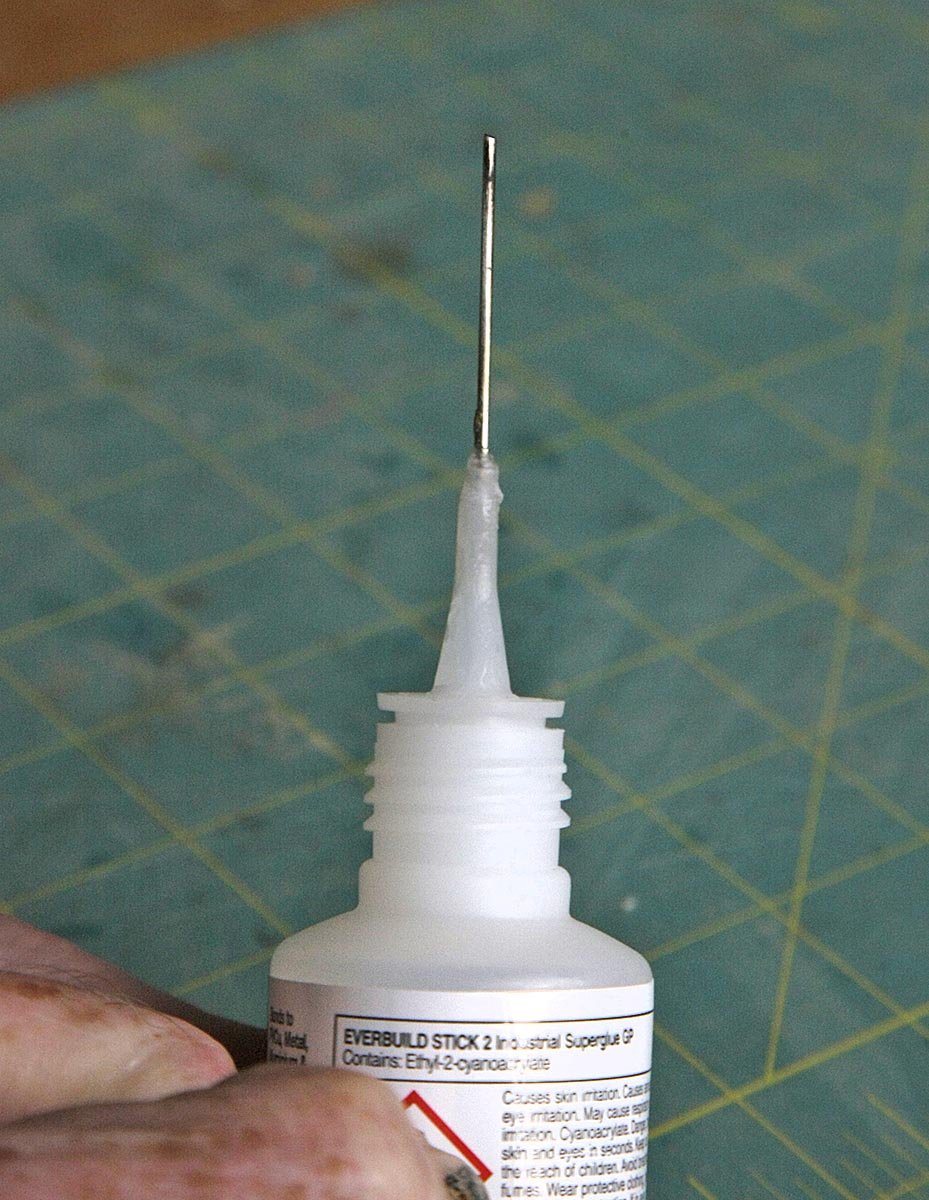
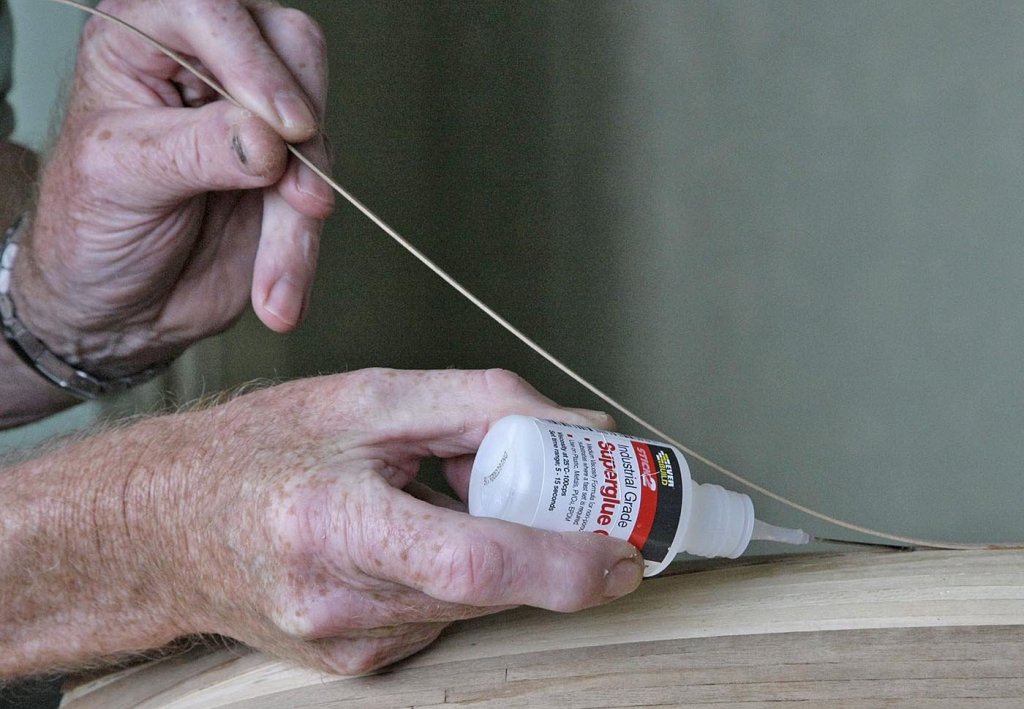
Hi Pete, Good luck with your cyanoacrylate, I think that you'll like it. Do remember to only glue fairly short lengths that you can press down at a time. It's great to use on curves and irregular bends, no pinning or clamping and waiting to dry, on a tight curve just glue a 10 mm section, hold down then when dry glue down another small section of the curve. The stern of the RW was done like this without even soaking the plank first, just a crimp with the Amati bender. You'll know that it is air moisture activated so you'll find that it will stick even if the plank is wet only quicker. By using the needle you get a small even amount just where it's needed and no excess which seems to reduce the amount of fumes that appears to cause problems. Ken
-
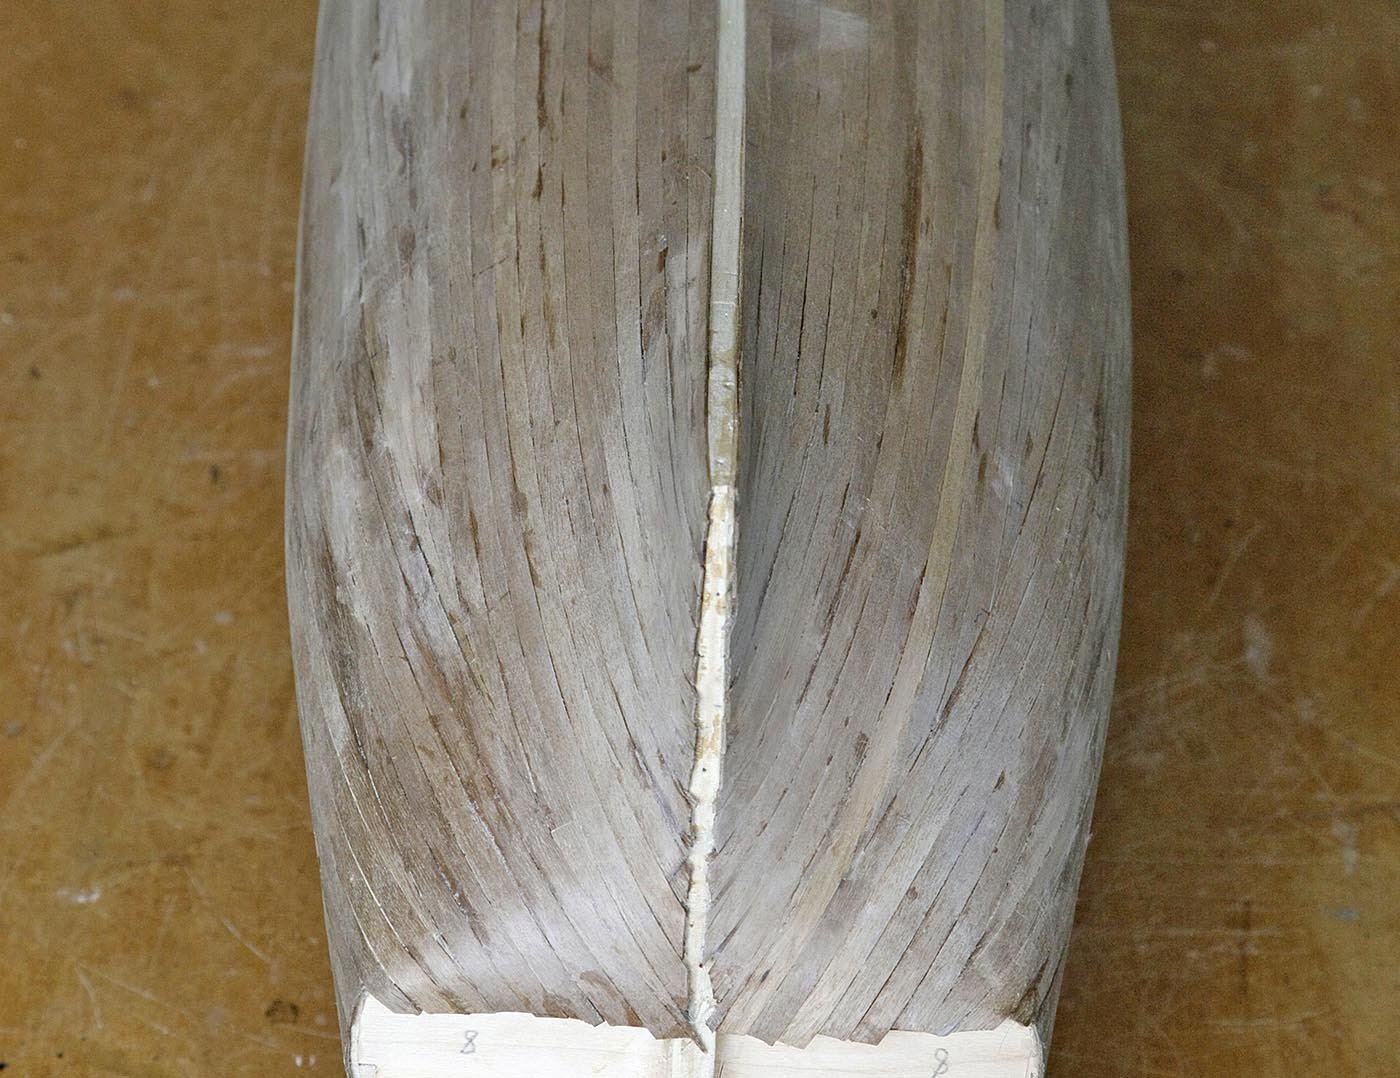
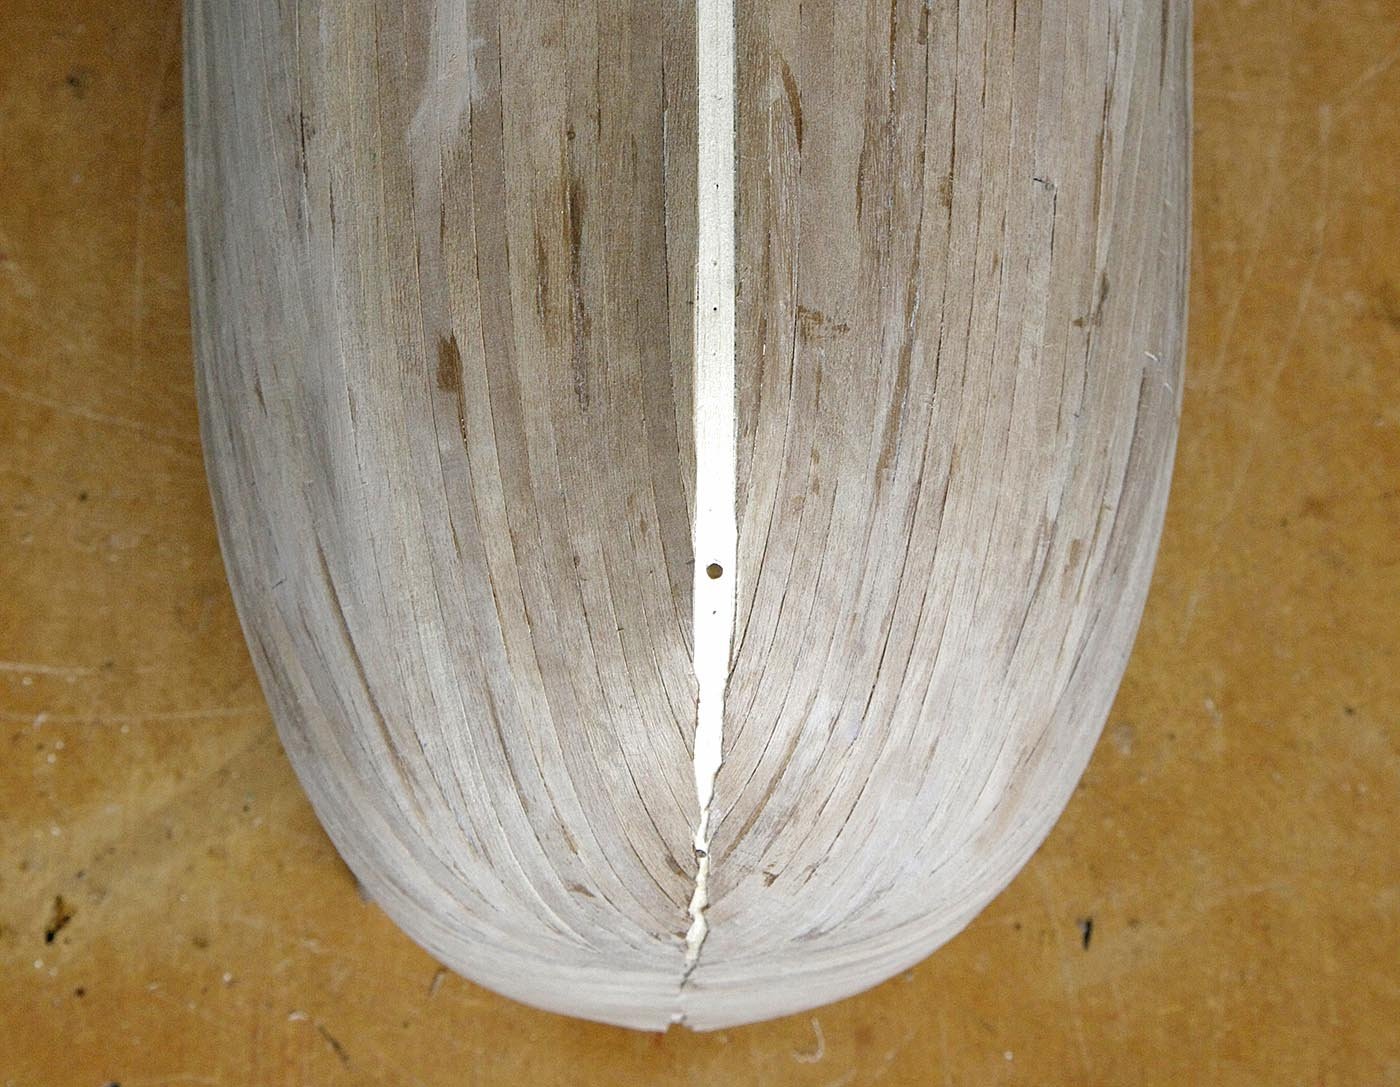
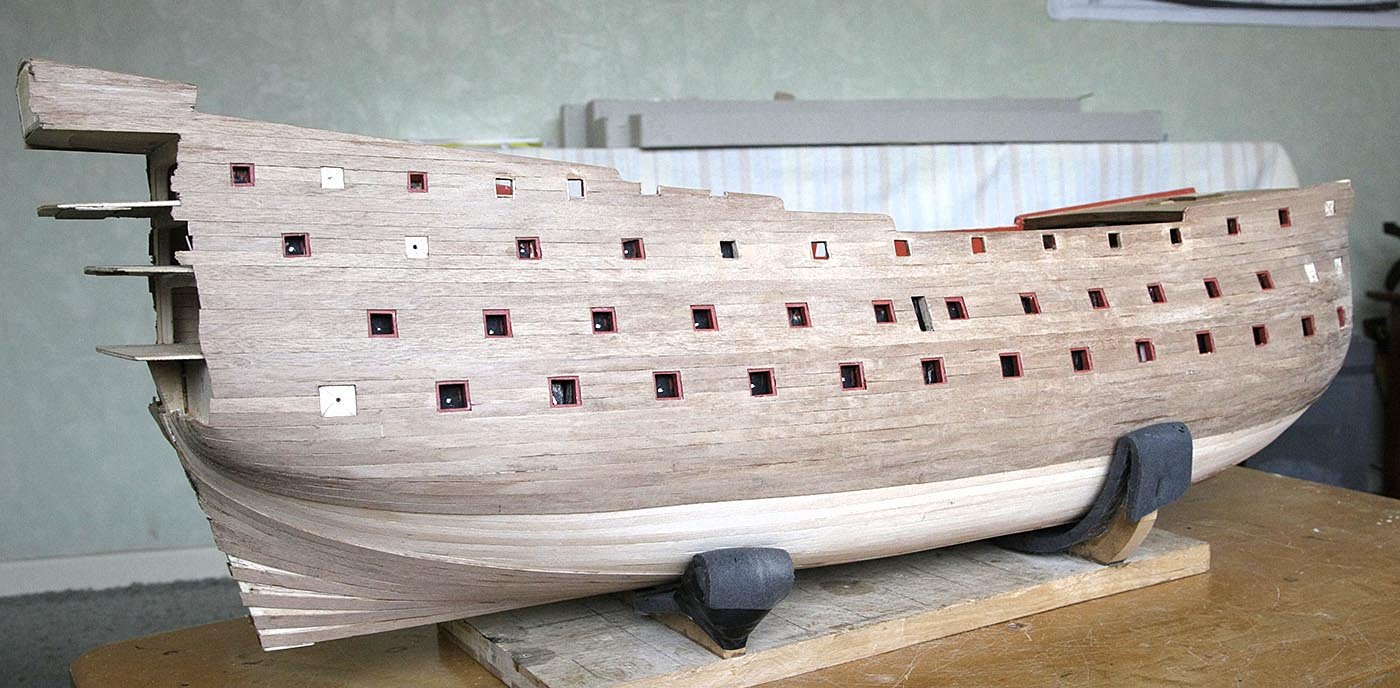
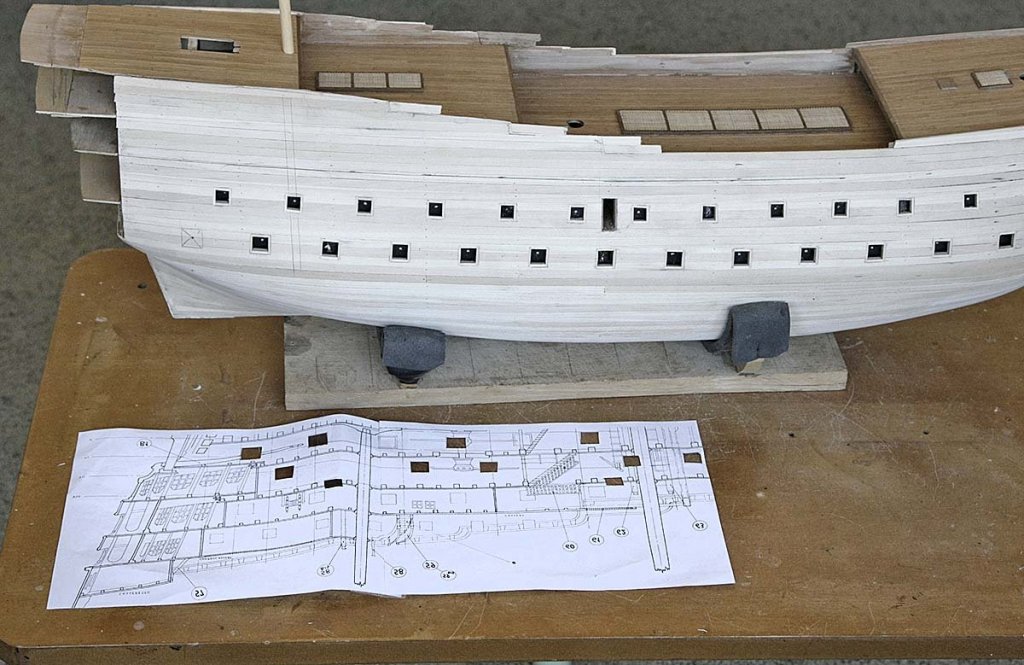
Hello Everyone, Again thanks for your likes and Anton thank you for your kind words. Another progress report. The planking has now been completed. Newly laid planks prior to sanding never look particularly good especially in a sharp photograph but I am very pleased with the result so far. Using cyno glue as described and not getting hung up regards technical correctness resulted in this planking being done with just three days work, albeit long days. Next I'll cut the grooves out for the prow and stern, give it a trim around all the edges and a good sanding, then hopefully it will look a lot better. Ken


-
Hi Pete, Yes it works best of all on wood. I press it down for about 10 secs to make sure that it's flat, after that you won't get it off other than carving it off, that's why I only do small sections at a time. As for strength it's as good as it gets, I used cyno most of the time on my aircraft and they took a lot of stress. The wing spars, leading edge and ribs would be assembled dry and pinned down on a flat surface directly over the plans, then the cyno was used and it leached into the joint. After a short while the whole structure was lifted off the plan and would be straight and true. That's just an insight as to the different techniques but really those large aircraft which were heavy stood up to much engine vibration and flying stresses, and my poor landings! and I never had a failed joint. Ken
-
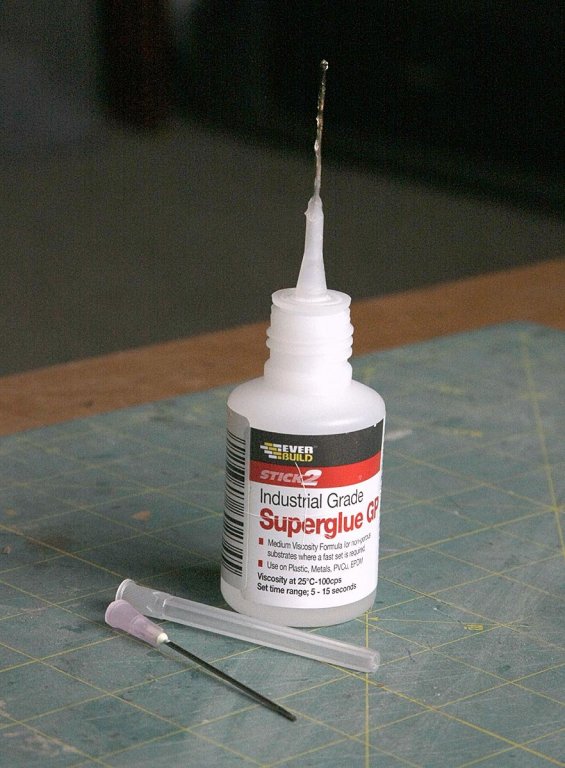
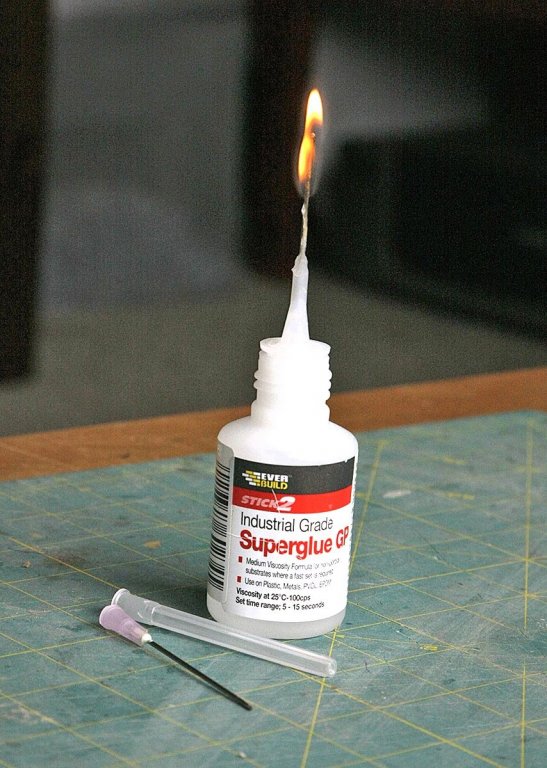
Hello Everyone, Thanks for your likes, keep them coming. In answer to your question about the glue that I am using on my second planking, it's medium Cyno, I'll explain how I use it. As I said I use Cyno. I found that this horrid stuff got everywhere, made a mess and stuck everything to everything else, mostly to fingers and the fumes were not very pleasant. The nozzles quickly clogged up an I was only ever able to get through half a bottle before throwing it away. I don't know if you already do what I do and use a syringe needle but it's a simple and very affective way of using the stuff without any of the mentioned problems. In the pictures you'll see that I insert the needle into the bottle, I let it make its own hole, it makes a good seal that way, I find that you get a nice thin flow that can be accurately controlled with your fingers well out of the way. When the needle starts to get a build up of dried glue or clogs just hold a light to it, as it is very flammable the excess rapidly burns off and you are quickly left with the needle that's like new with no effort. I find that a needle will last almost indefinably and the whole bottle stays usable to its end. I bought the needles on EBay for very little, a five pack will last a lifetime. As you see I glue the planks in about 2" - 3" lengths using the needle to put a line of glue under them as I go. I was careful with the upper planks as they won't be painted. I use white glue when I put the fillets in as it's easier to wipe clean. I also use white glue for the first planking and most other wooden parts. I also find that it's quite good at putting a very tiny amount of glue on knots to hold them. Ken

-
Hi, Not much of interest to show I'm afraid, just some pictures of my planking progress. It's going ok, a lot of planks to do and I'm not finding it easy but I'm sure you'll understand that. Ken


-
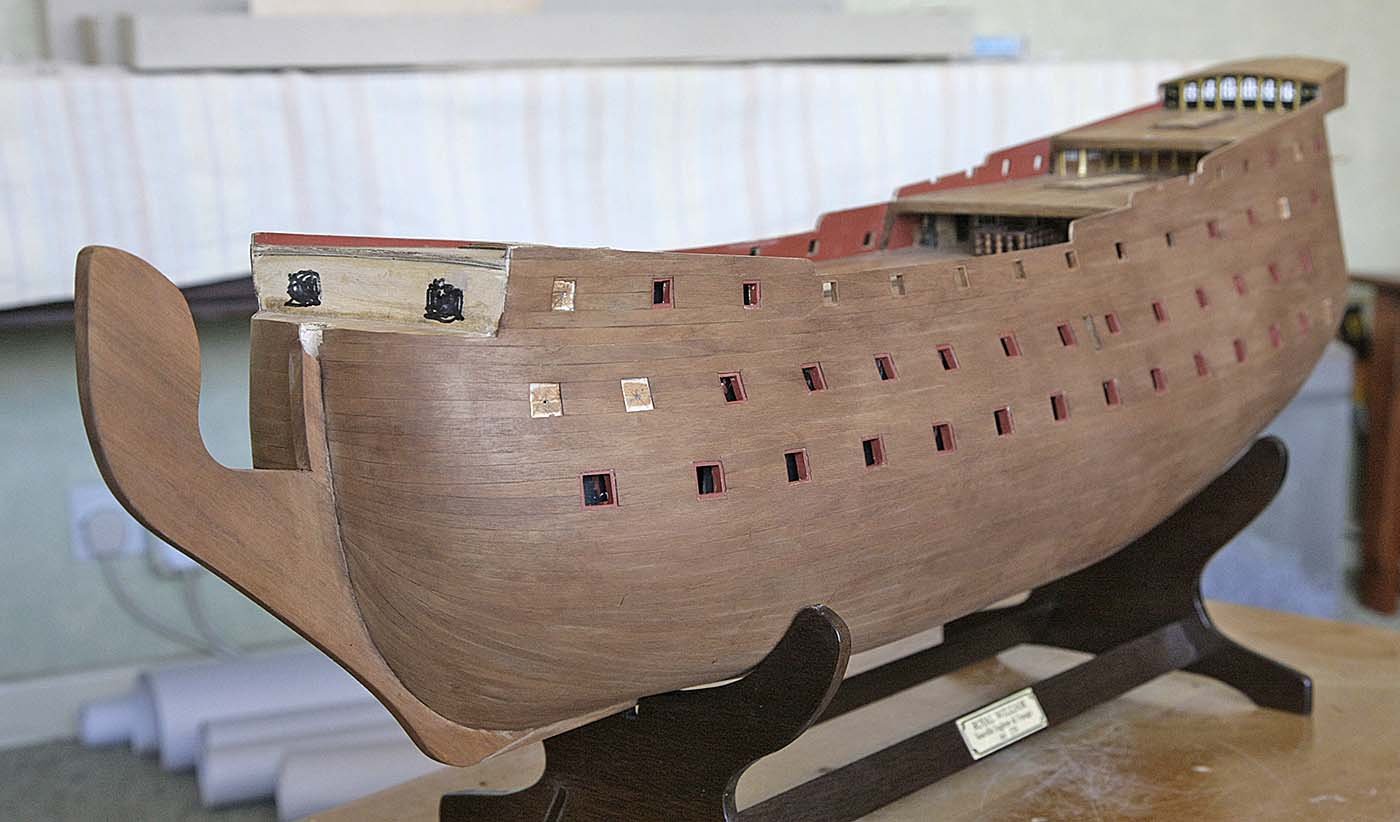
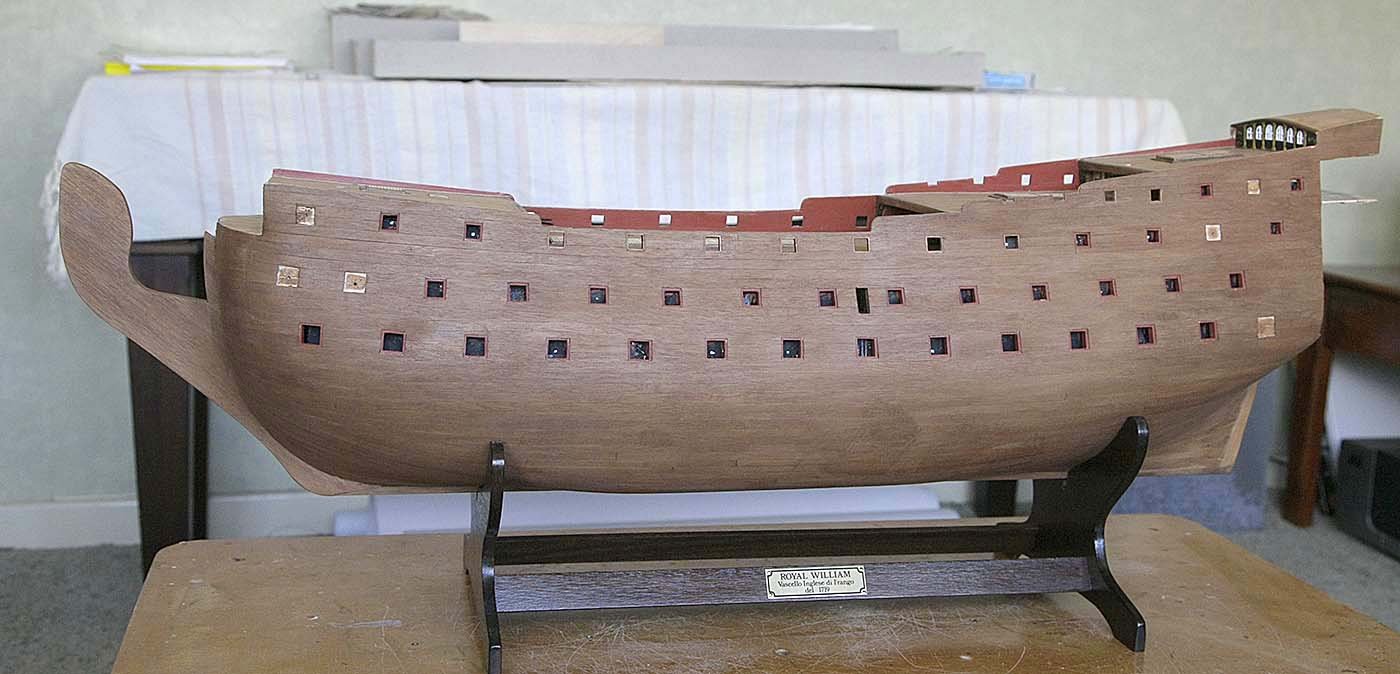
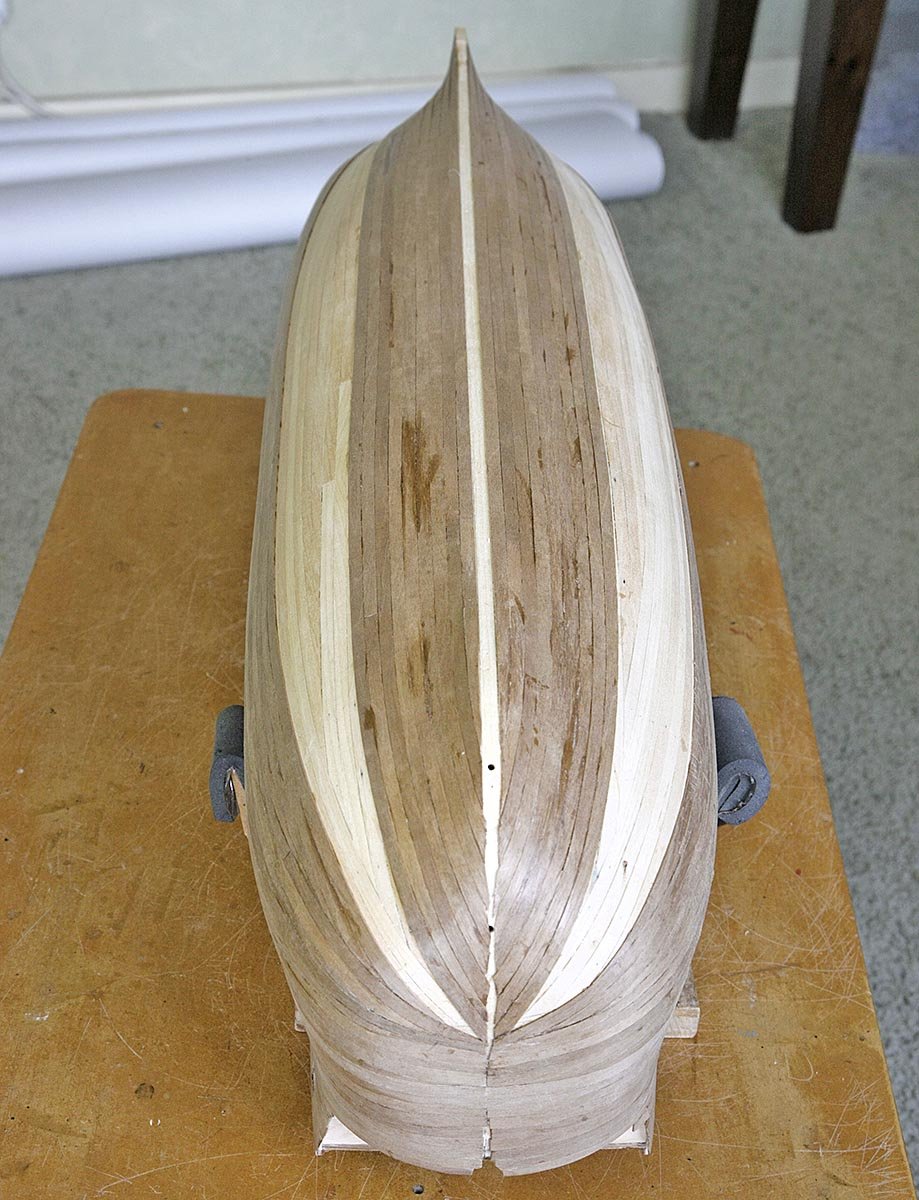
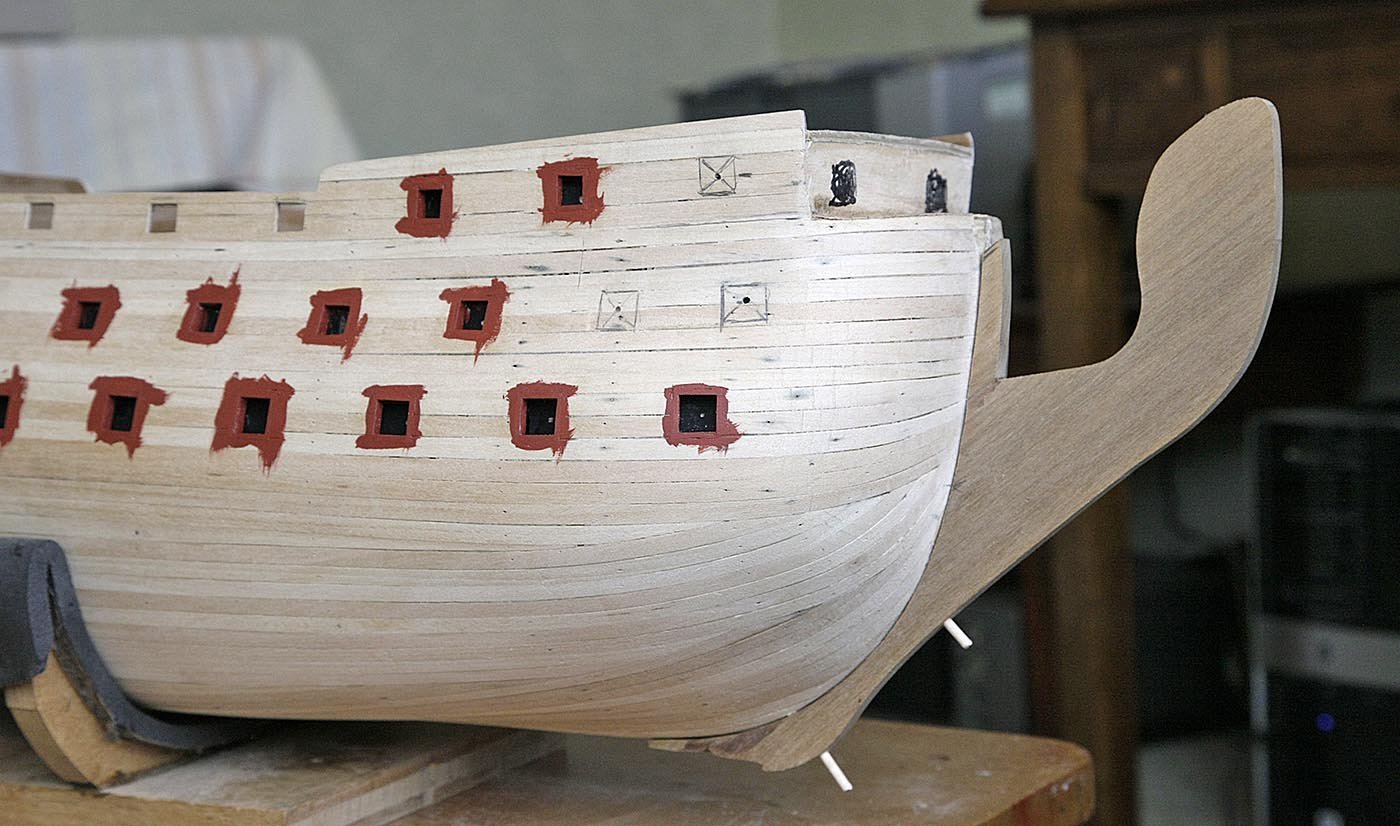
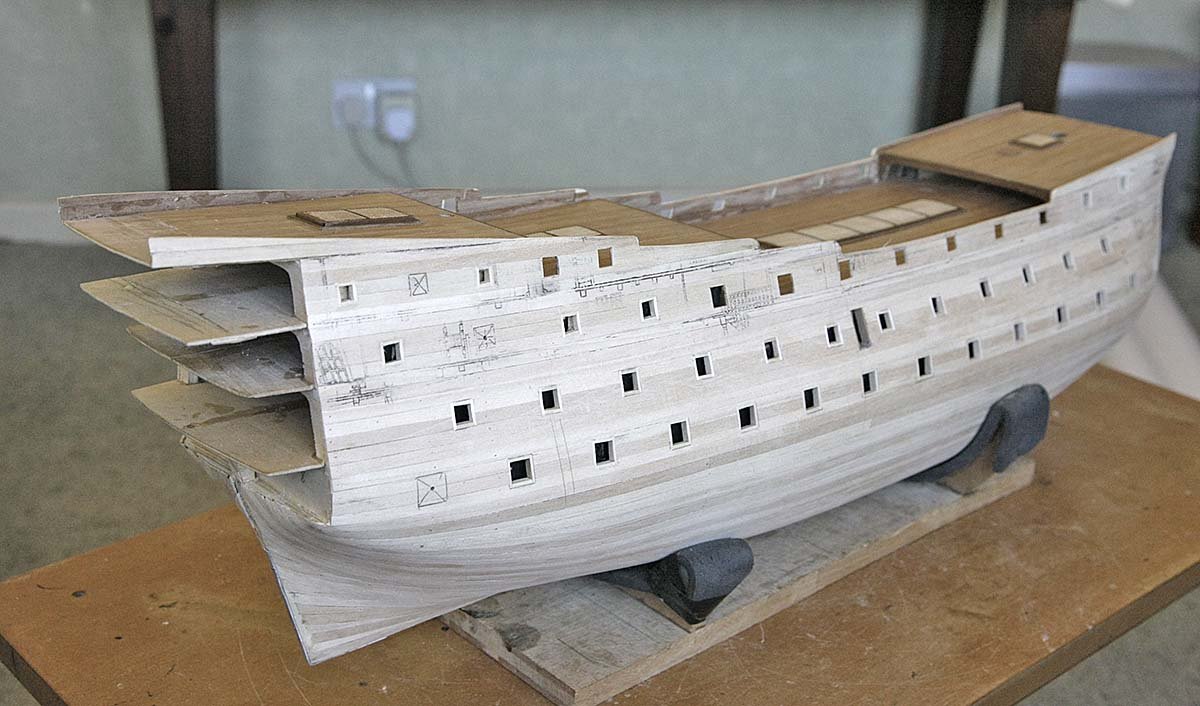
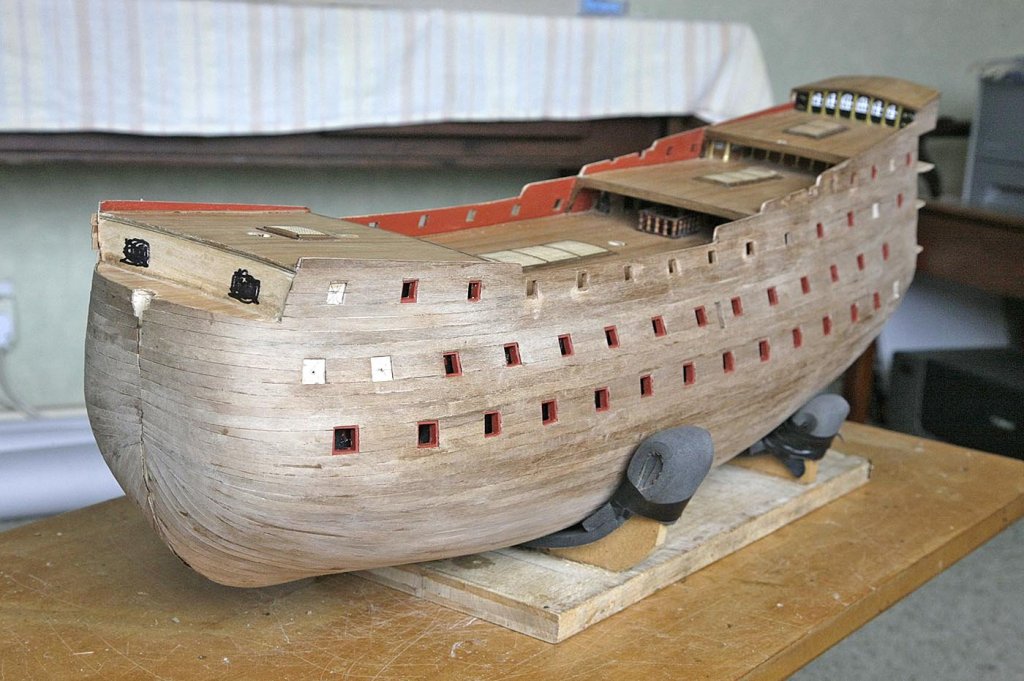
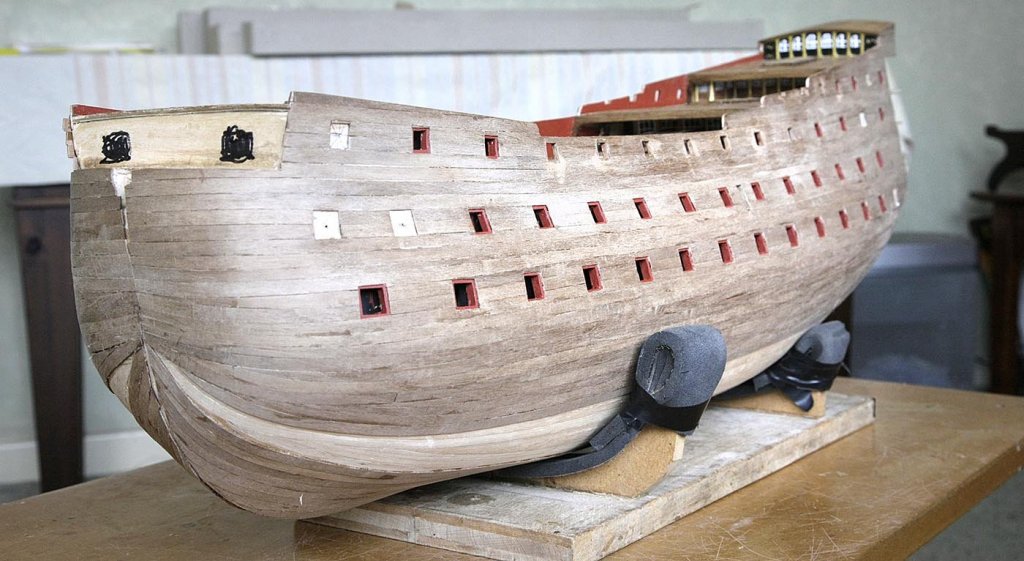
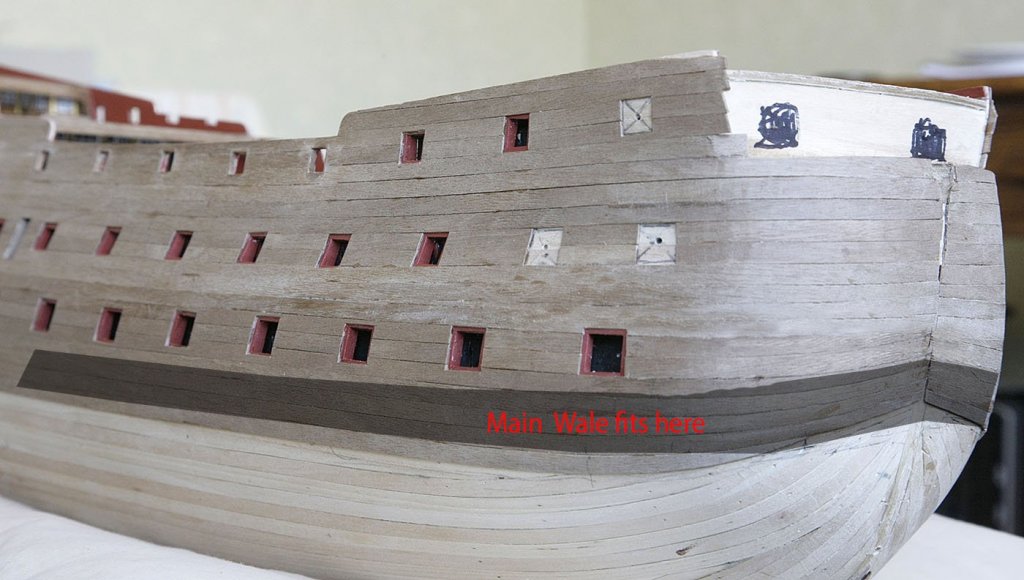
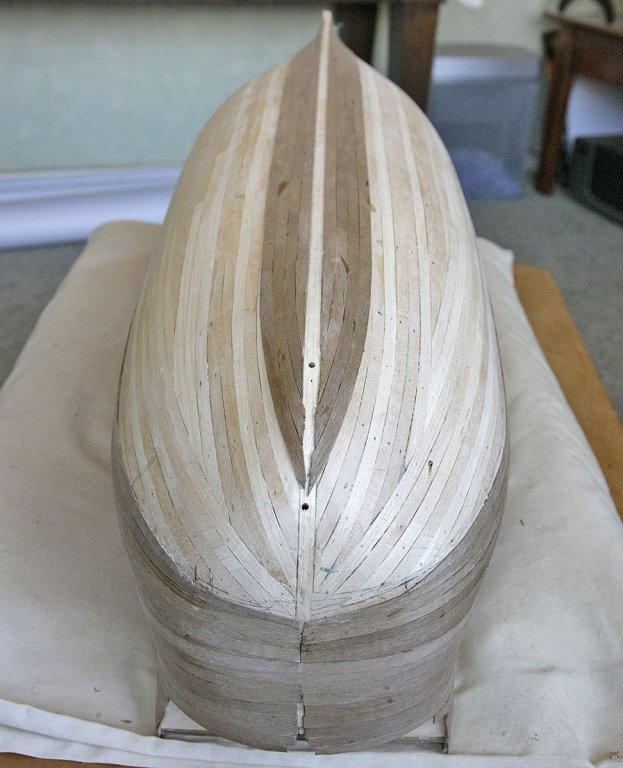
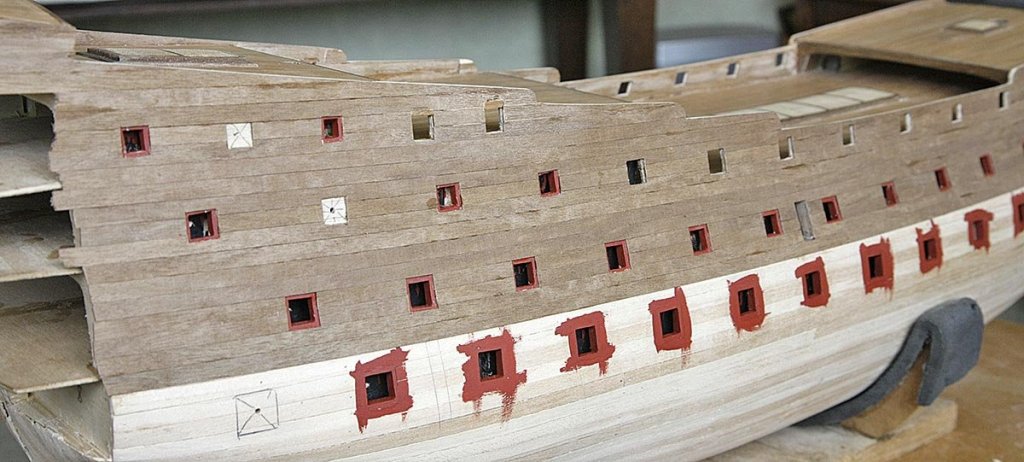
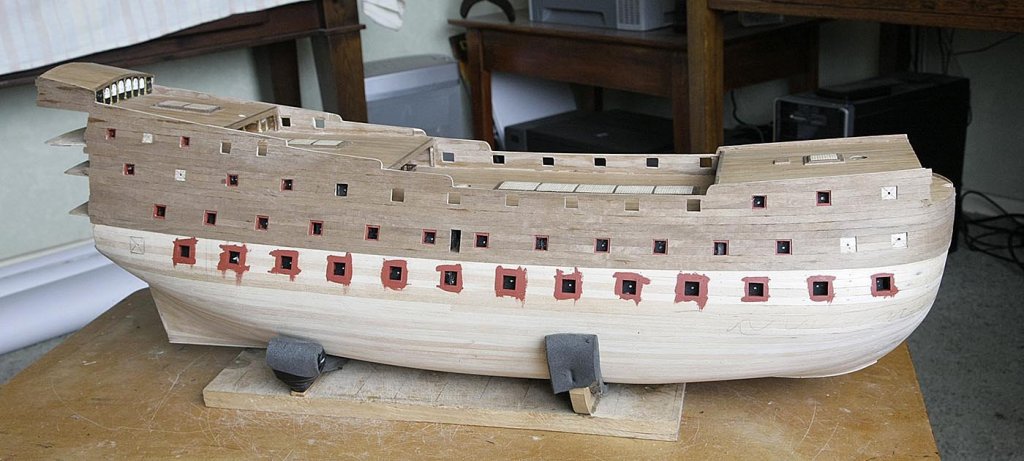
Hello Everyone. All ok here, got back into the groove so here's the latest update. I've got quite a bit done, I lined, sanded and painted the inner bulwarks and open ports. I made and fitted the capstan, this needed reducing in size quite a bit, I think that it must have been a general stock part. I have got a fair way with the planking, well past the fiddly bits around the ports, I was very pleased that the method I had used produced very clean, neat results. I have now started from the keel upwards and that too looks to be going ok. I have shown an estimation of where the main wale will go, it is hoped that I can hide the transition from the top planking to the upswept planking behind it. With painting the lower hull and the fitting of the ornamentation around the bow I think that my not very correct planking pattern may not be much noticed and if I can keep my joints tight it will look quite good. I have seen some perfect planking patterns that because of poor joins look not so good, so again I just want it to be simple and neat. Ken
- 424 replies
-
- 13
-
-
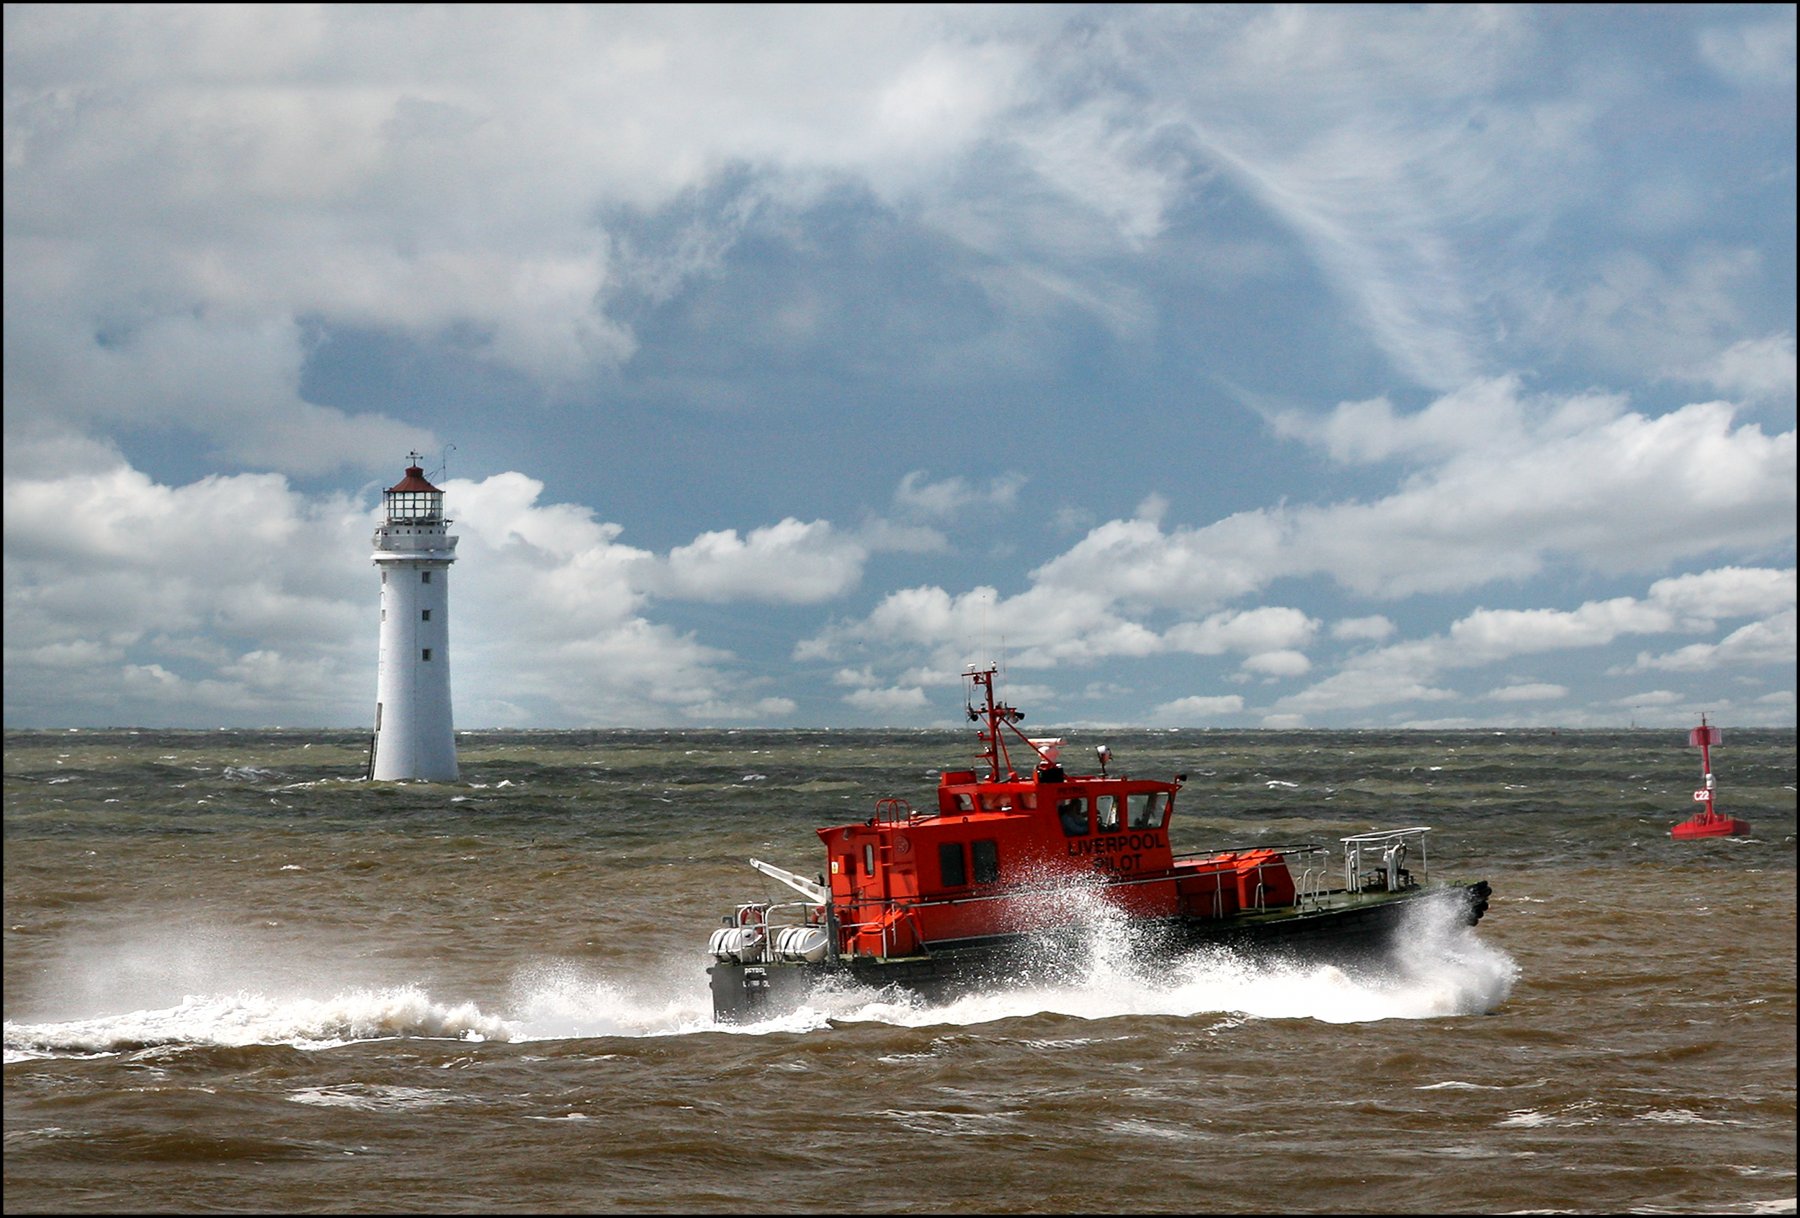
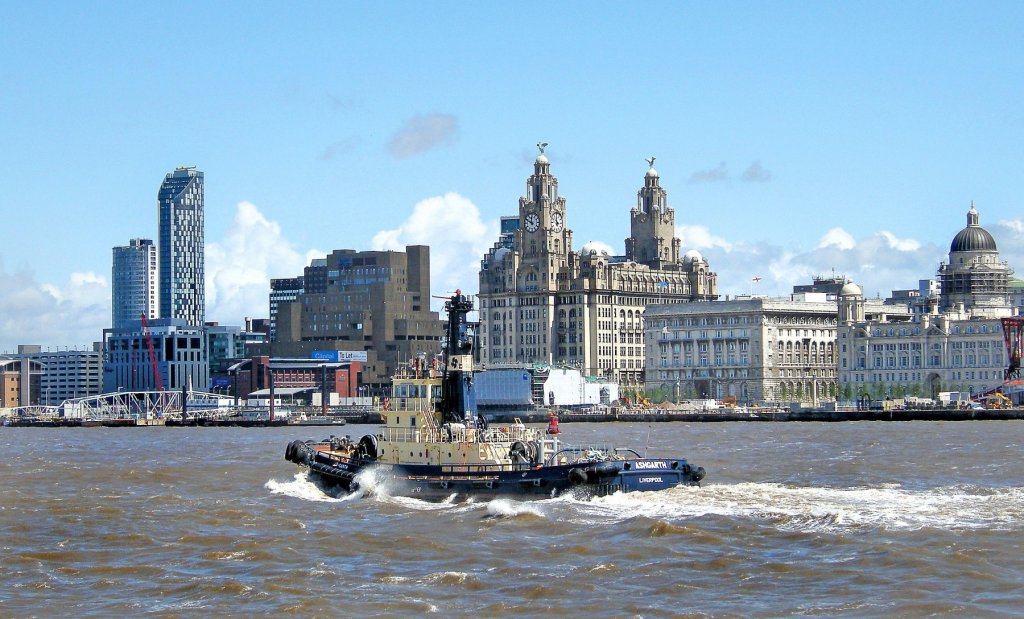
Hi, Just finished my spell in hospital all went ok. now at home for a couple of weeks recovery, and modelling. I've been instructed to take plenty of liquids and beer is included so I'm happy to oblige. I've done a bit on RW to try and get back into it but don't really have any updates so I'll just post a couple more pictures of ships on the Mersey estuary. Some sailing boats and the river pilot. Ken


-
Hi, JPAM, Welcome to my log, thanks for liking my pics, great to know that it's someones screensaver but please only for yourself and just for that. Ken
-
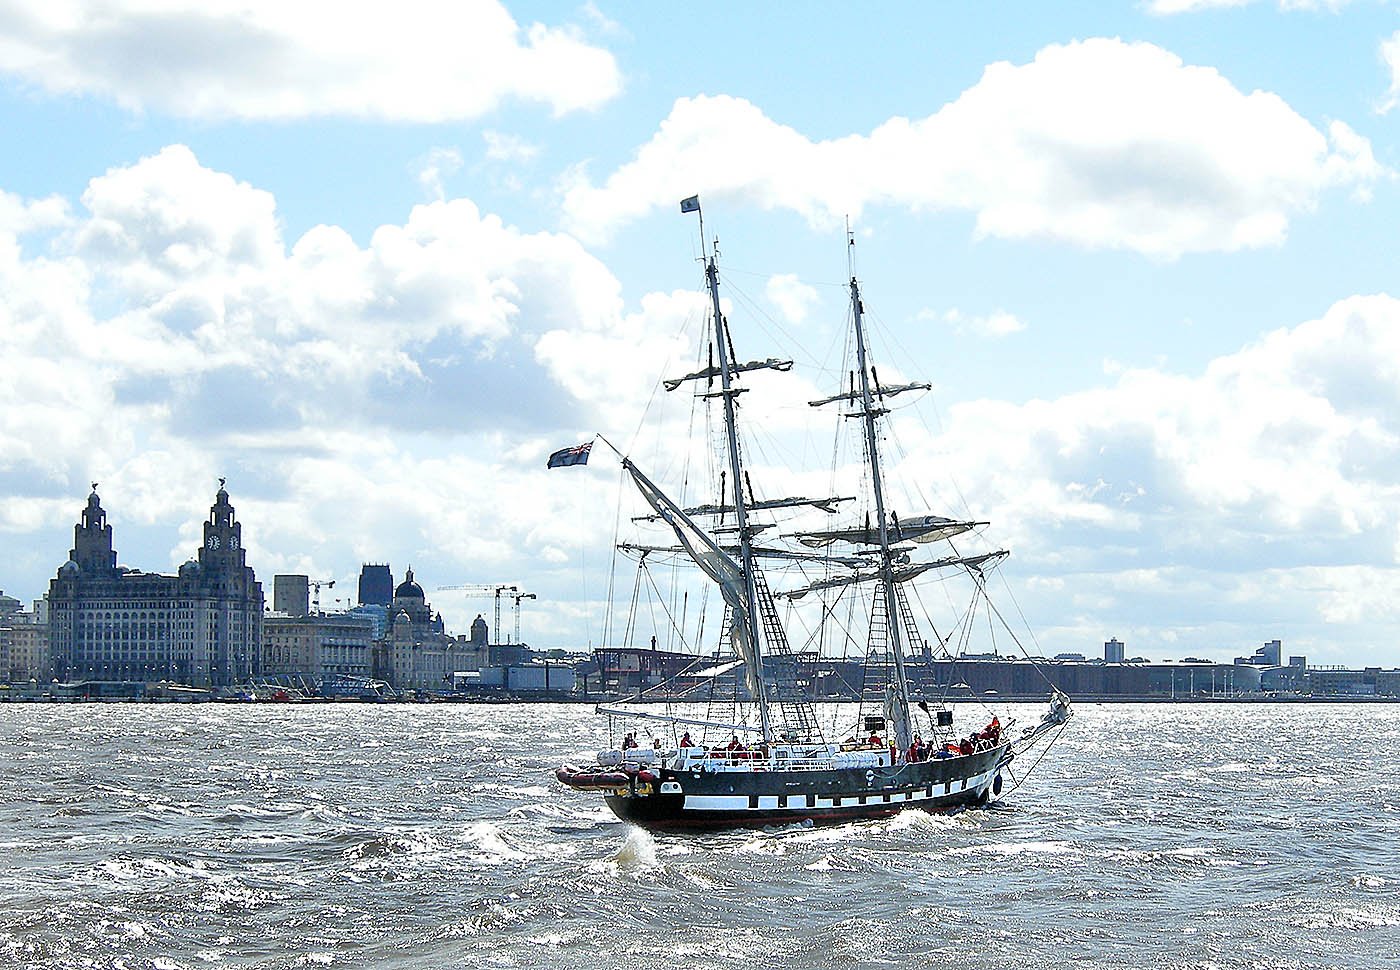
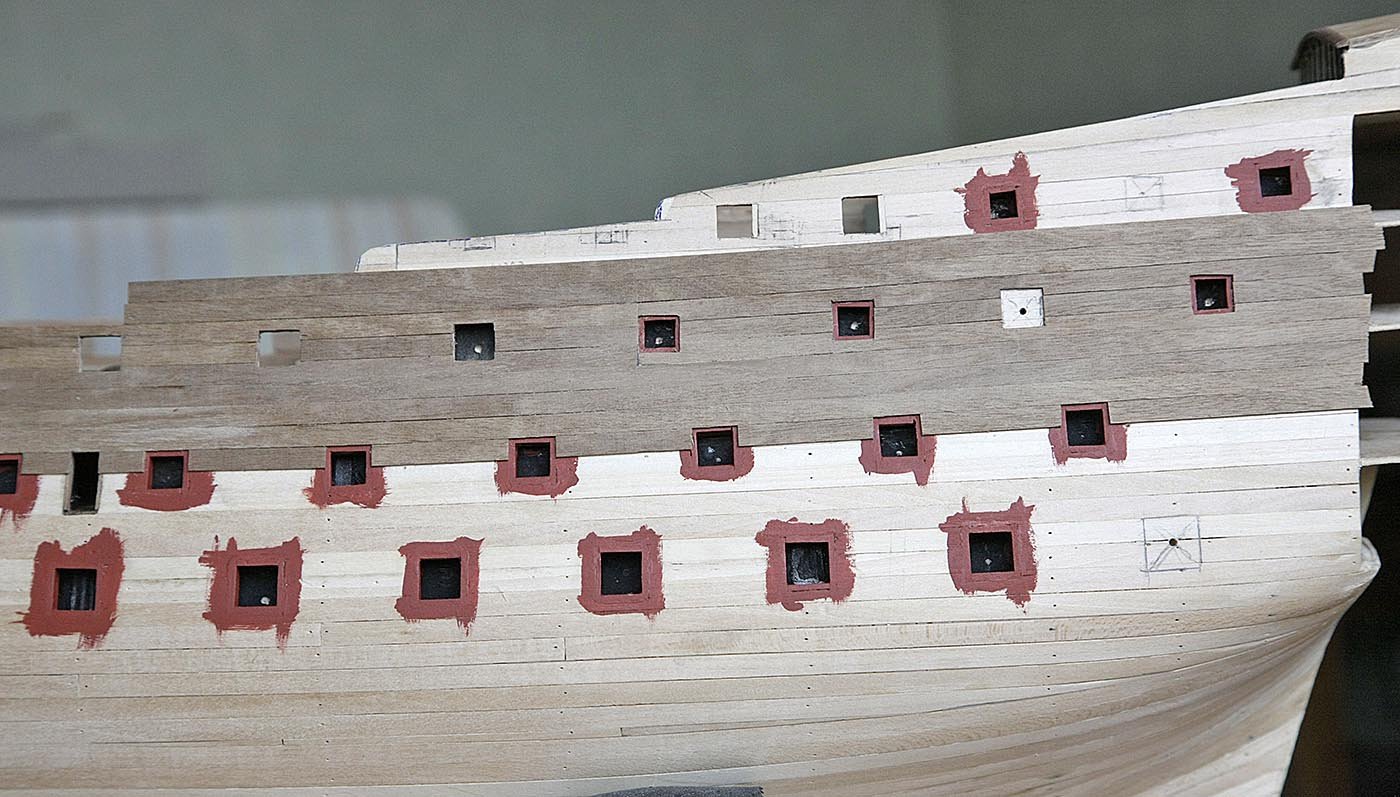
Hi, Just a small update showing my progress with the second planking. So far it's going as I hoped that it would, the gun port method is working well and I'm quite pleased at how it's going. I have just arrived at the point where I must taper the planks at the bow, I really will have to give it a bit more thought than I first intended. I've roughly marked where the wales will go and I think that I'll be able to arrange it so as to hide the transition from straight planks to upward swept planks behind them. I'll divide the hull into sections of about five planks and try to taper the planks evenly between each section. As basic as that sounds at least it's a plan, as I intend to paint the lower hull I think that it will look ok. Here's a couple more pictures of Liverpool. Ken.

-
Hi, Thanks Pete. As for entertainment here's another picture. It's the same lighthouse that appears in my other pictures but this time the view is from the shore and hey, everyone likes a lighthouse. Enjoy, Ken

-
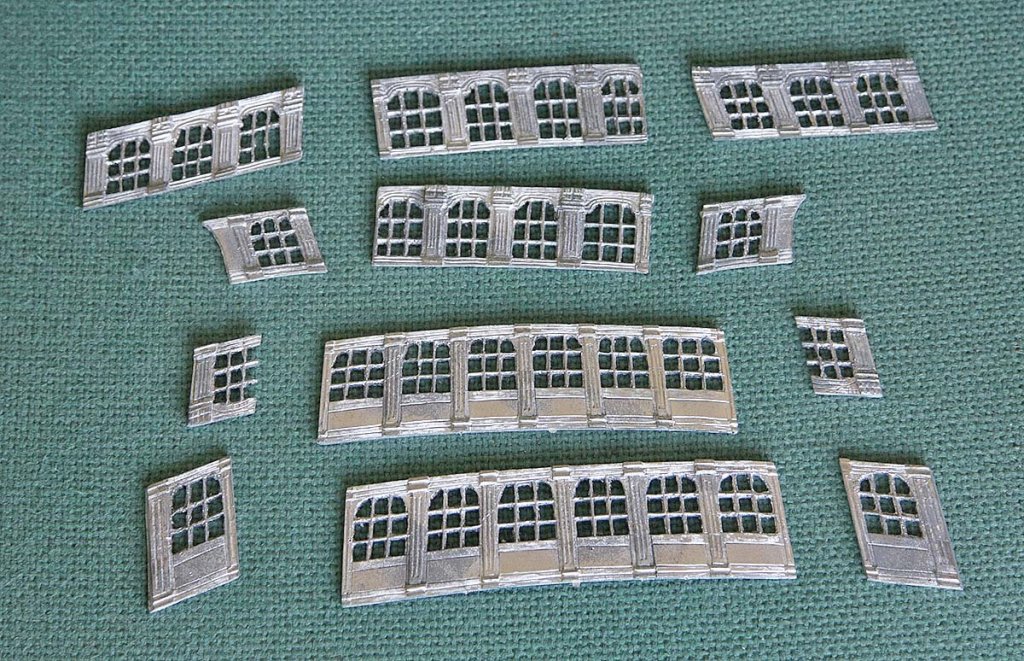
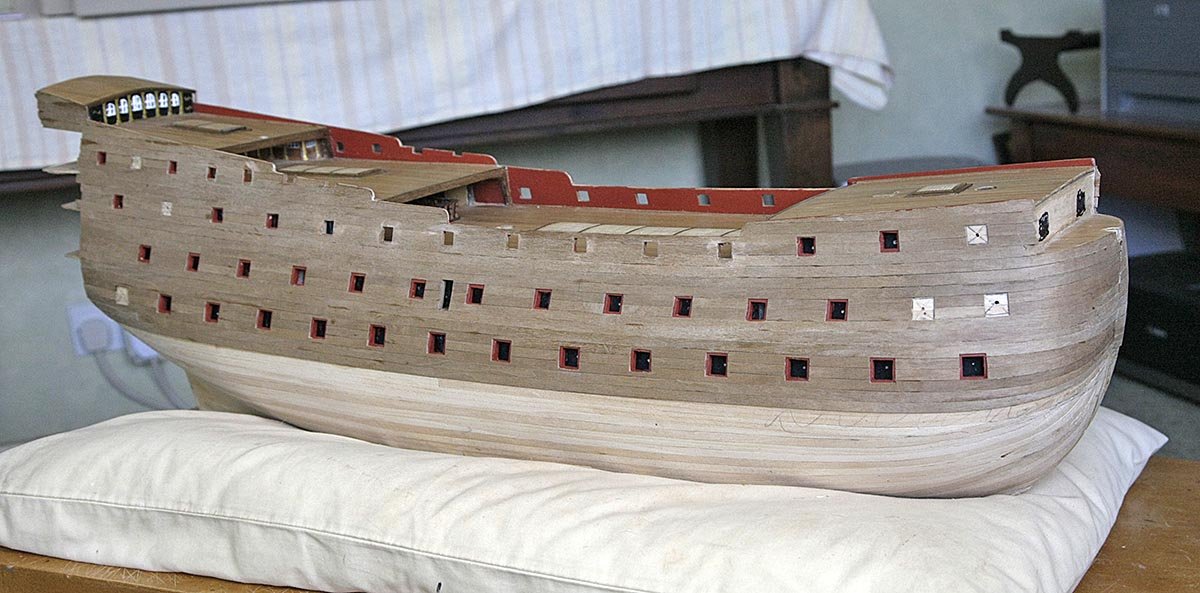
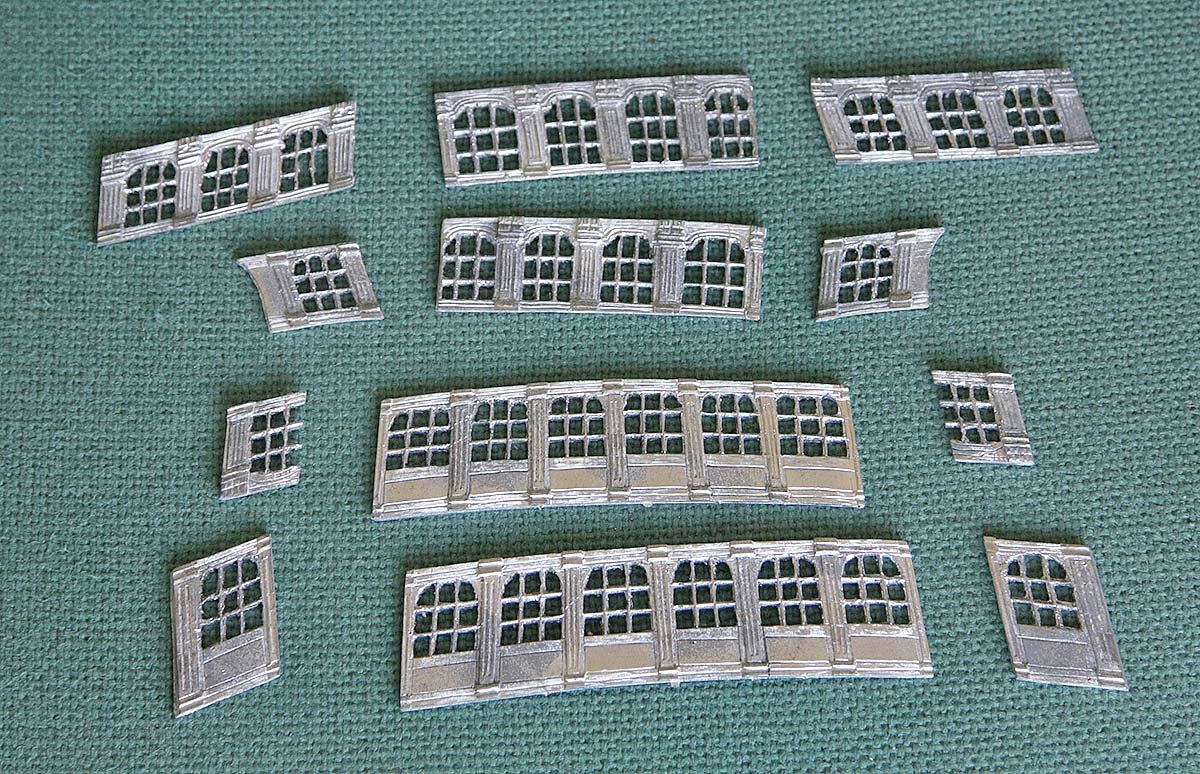
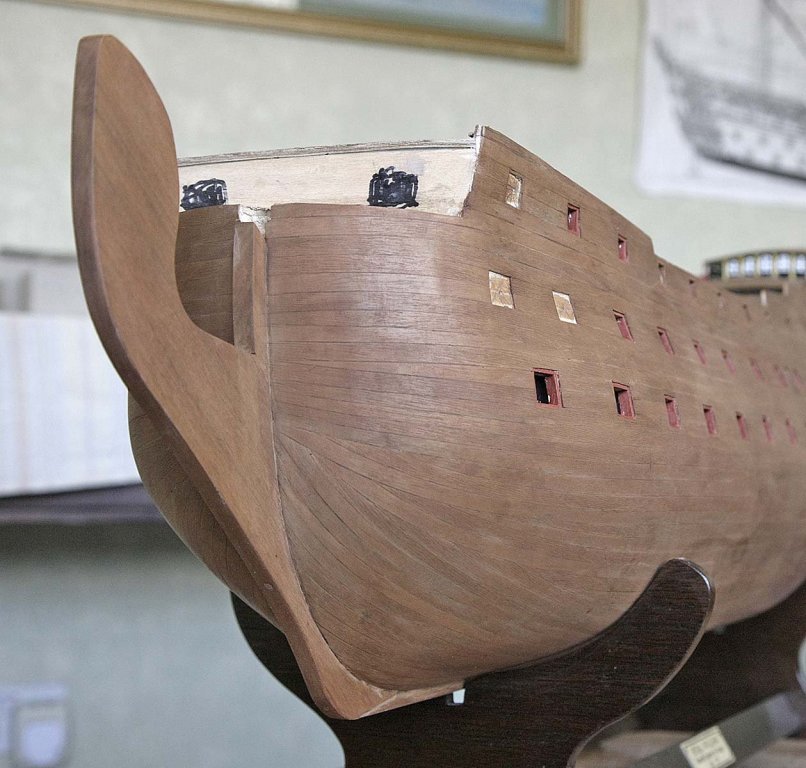
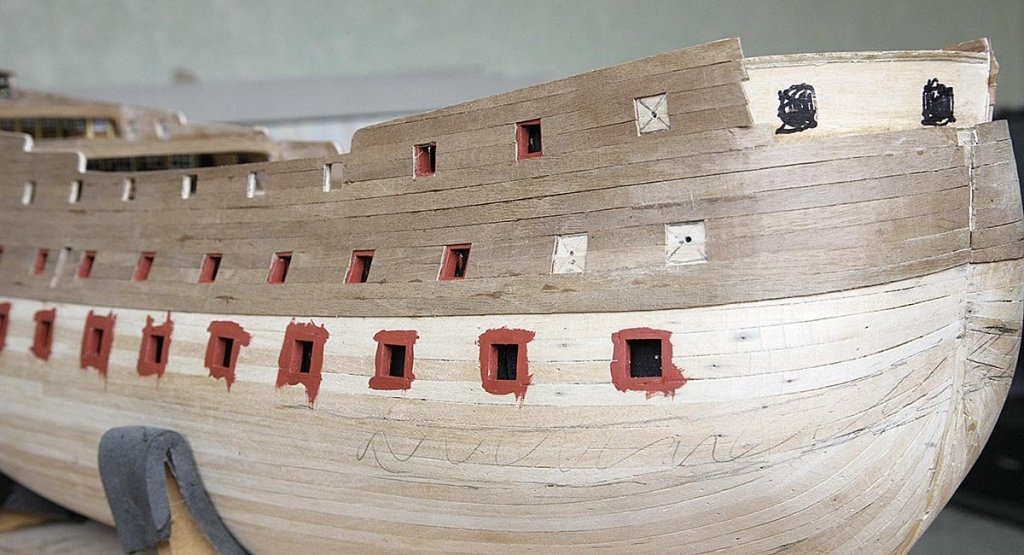
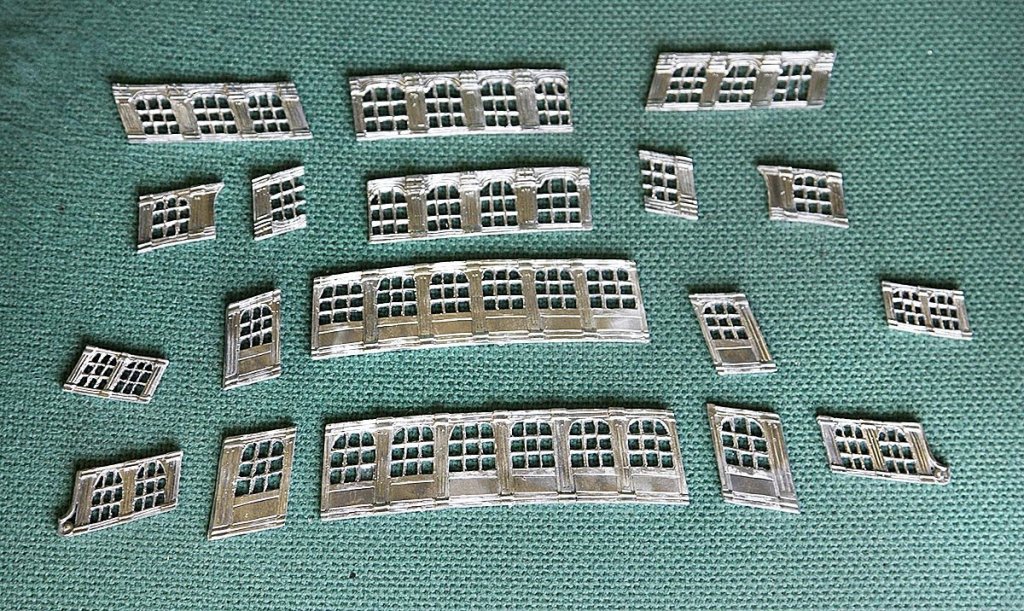
Hello again. Thanks for your likes and comments. Just in case you were wondering, I much prefer building boats to aircraft. The good news for me is that I've finally finished filing out all the window frames. This was my most hated modelling job that I have ever done. I started out doing half hour sessions then quickly reduced the time spent on them, I ended up doing just 5min sessions, I eventually couldn't bear the thought of even picking them up, Grrrr! I shall never again complain about doing ratlines. On to more pleasant aspects. I cleaned up the hull ready for the second planking, I sealed and painted the area around the gun ports as this will now be a finished surface. I shaped the stem to fit the hull, and fitted a couple of dowels for attaching it later, these will determine the exact location and add strength to the joint. I saw this idea on one of your logs and thought that it made sense. Once in place I was able to determine the correct angle for the bowsprit, I drilled out the 10mm hole for it. I am not going to fit the stem, keel or sternpost until after the planking is complete. I have temporarily attached a ply strip the same size as the keel to give me the correct width to butt up to, when the planking is finished I'll remove it and hopefully slot the keel into its place. At the bow I'll cut a slot in the planks and fit the stem into that. I know that this doesn't seem to be the normal way of doing it but I fancy that it might work quite well for me. The purists out there will probably wring your hands when I say that I have no planking plan or sequence that I am going to adhere to I'll just put one plank down and work it out from there one plank at a time. My aim is to have neat good tight joins with no unseemly gaps between the planks and hopefully a reasonable flow. I will fit the planks exactly between the ports leaving the appropriate recess so that there will be no need for trimming later. I intend to paint the lower hull when finished. To that end I started with the first un tapered plank and fitted it just above the middle gun deck ports, this formed a neat top to the ports and seemed to me a good place to start, I am working both upwards and downwards from here. On Thursday I'm going into hospital for what is now just a routine operation, I'll be back home within a week so no worries but it means a short building break. The good news is, no housework, shopping or gardening for a couple of weeks, I'm thinking lots of modelling time with my wife bringing me loads of tea and cake. I think that this might be a good time to buy stuff that I would like whilst the sympathy lasts. Any ideas. Ken


-
Hi Sjors, Like most people I just let my wife get fish from the supermarket whilst I stay at home and build models, no more fishing. Ken
-
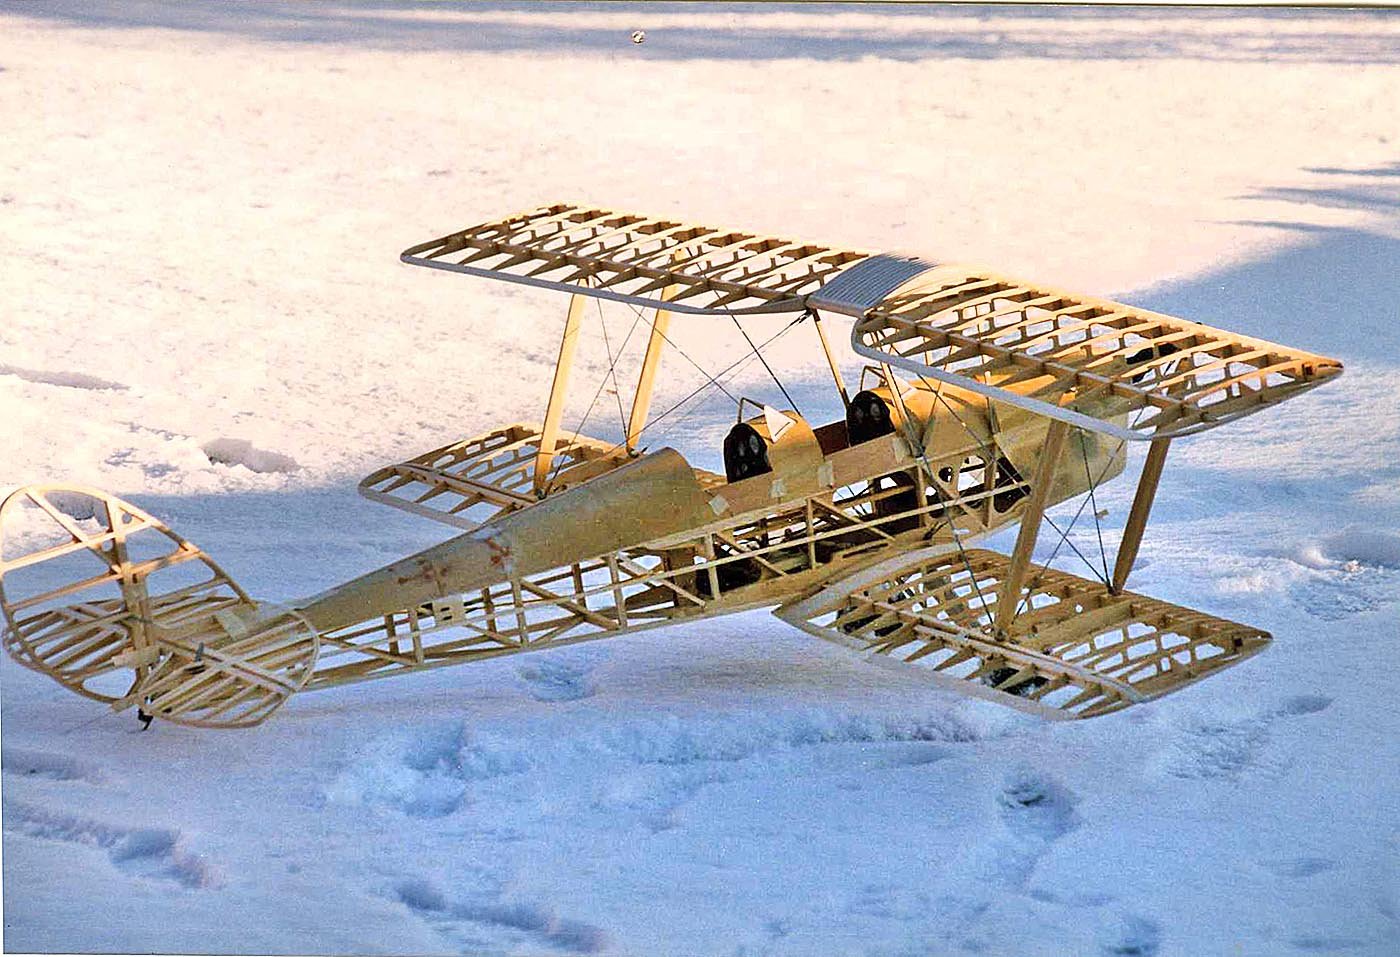
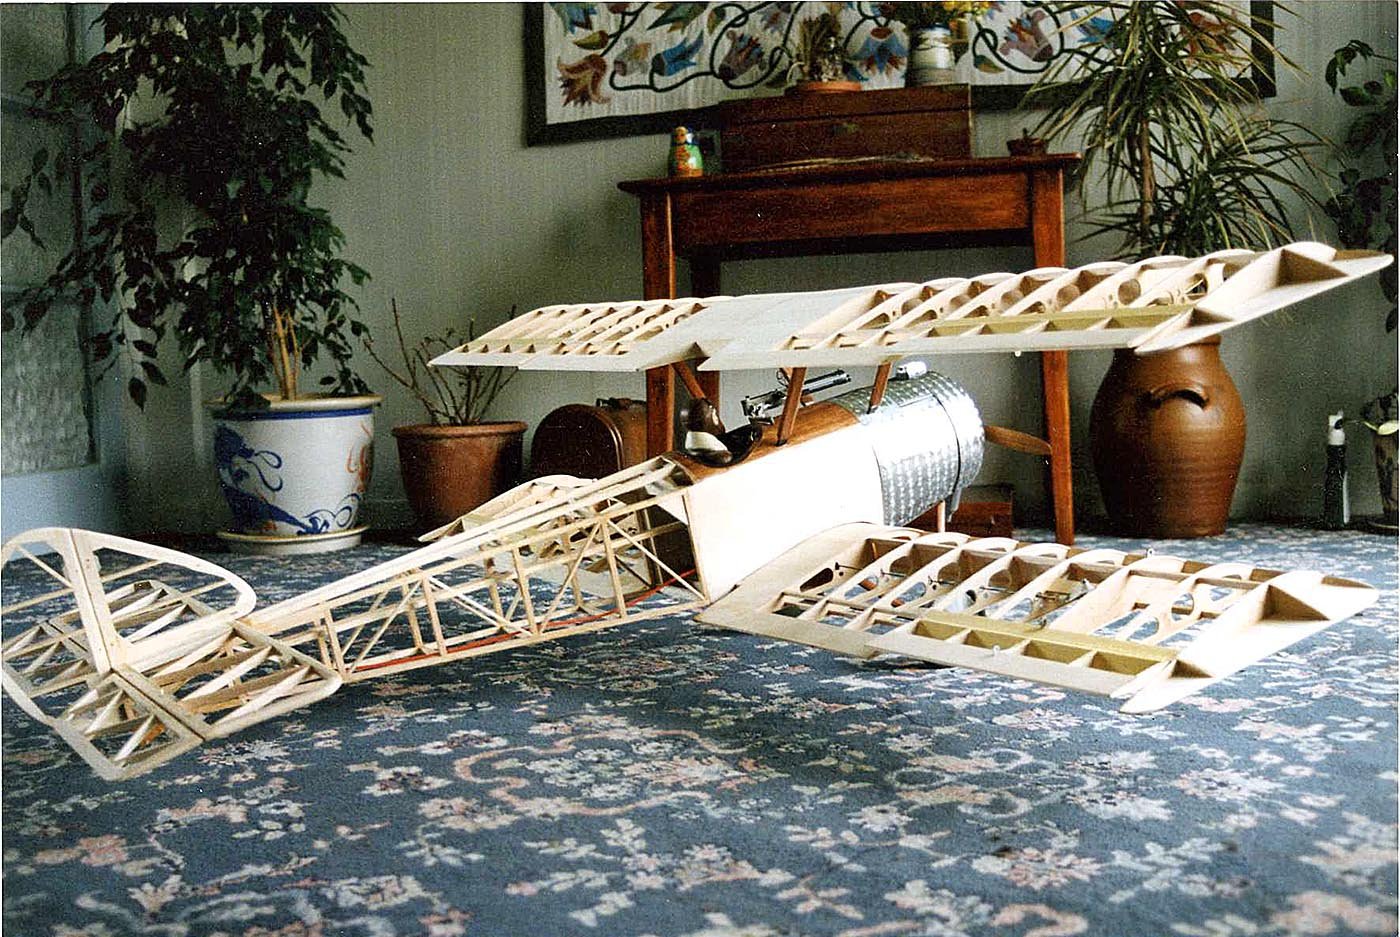
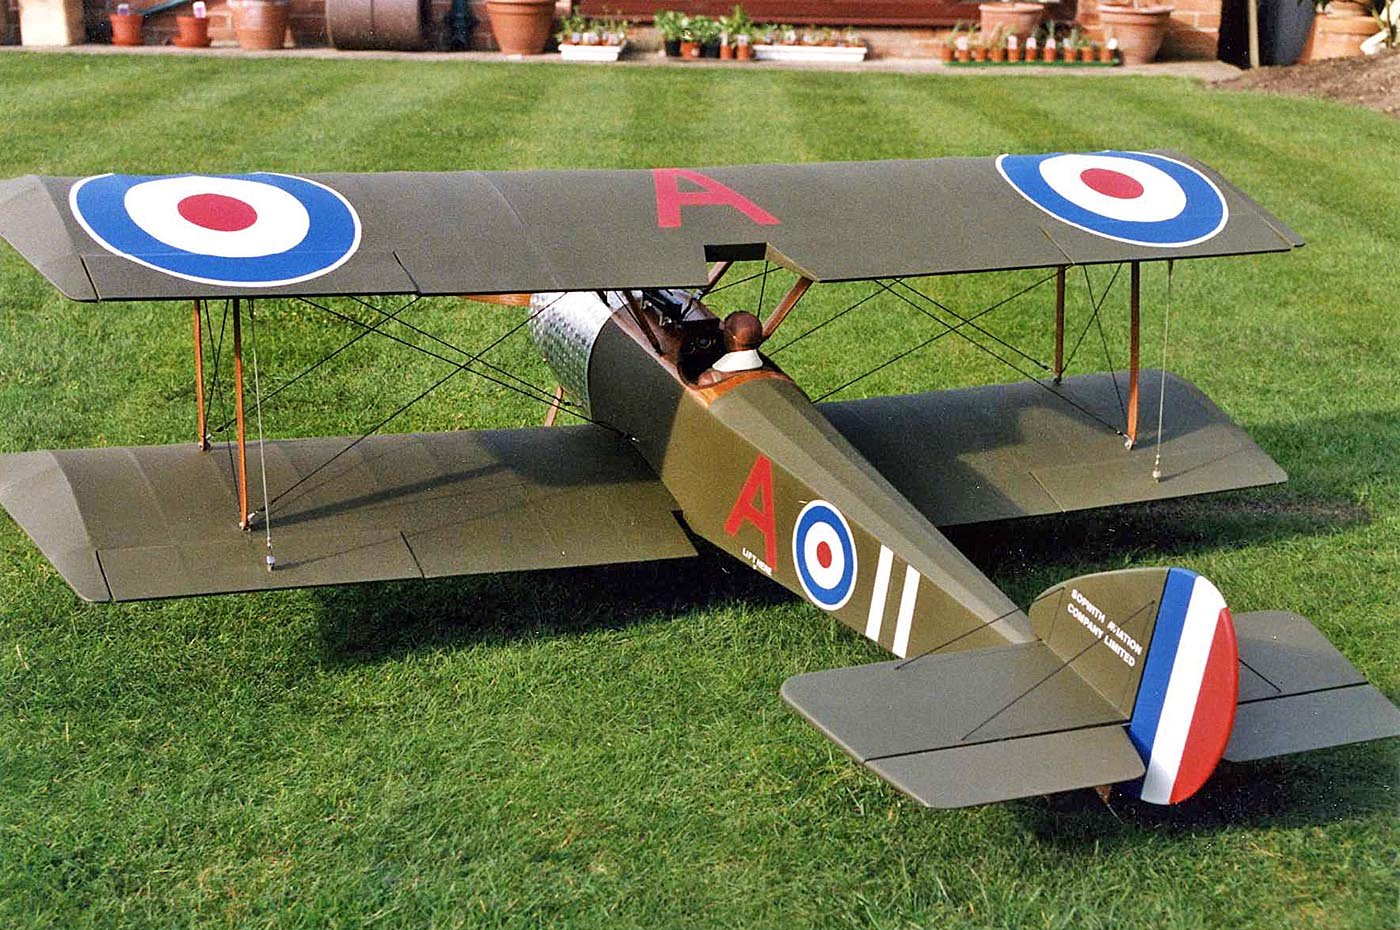
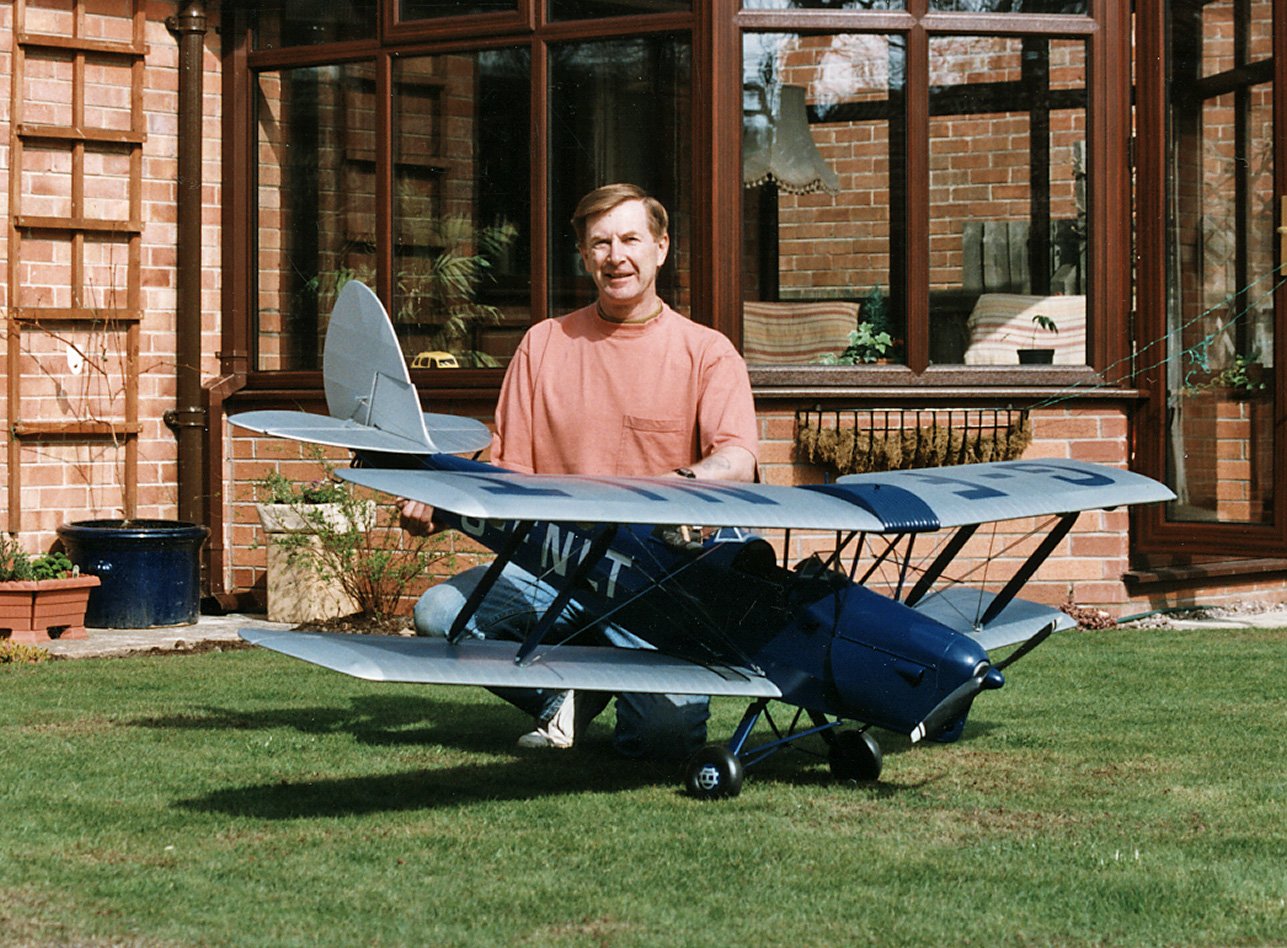
Hello again. Thanks for your likes and comments on my last post. Nothing to report on R.W. today, just getting my mind around preparations for the second planking. My modelling experience is mainly building and flying model aircraft. For numerous reasons I gave up just over fifteen years ago when I was probably on top of my game. When I started to build boats about five years ago I found that the skills required were quite different, aircraft being more technical and boats being much finer detailed but both require a certain dedication, ingenuity and quite a bit of patience. Just a thought! This is not a boat post but as everyone loves looking at pictures here's a few of my models from that time. They were scratch built were 1/4 scale and flew very successfully, even at air shows. Ken


- 424 replies
-
- 15
-
-
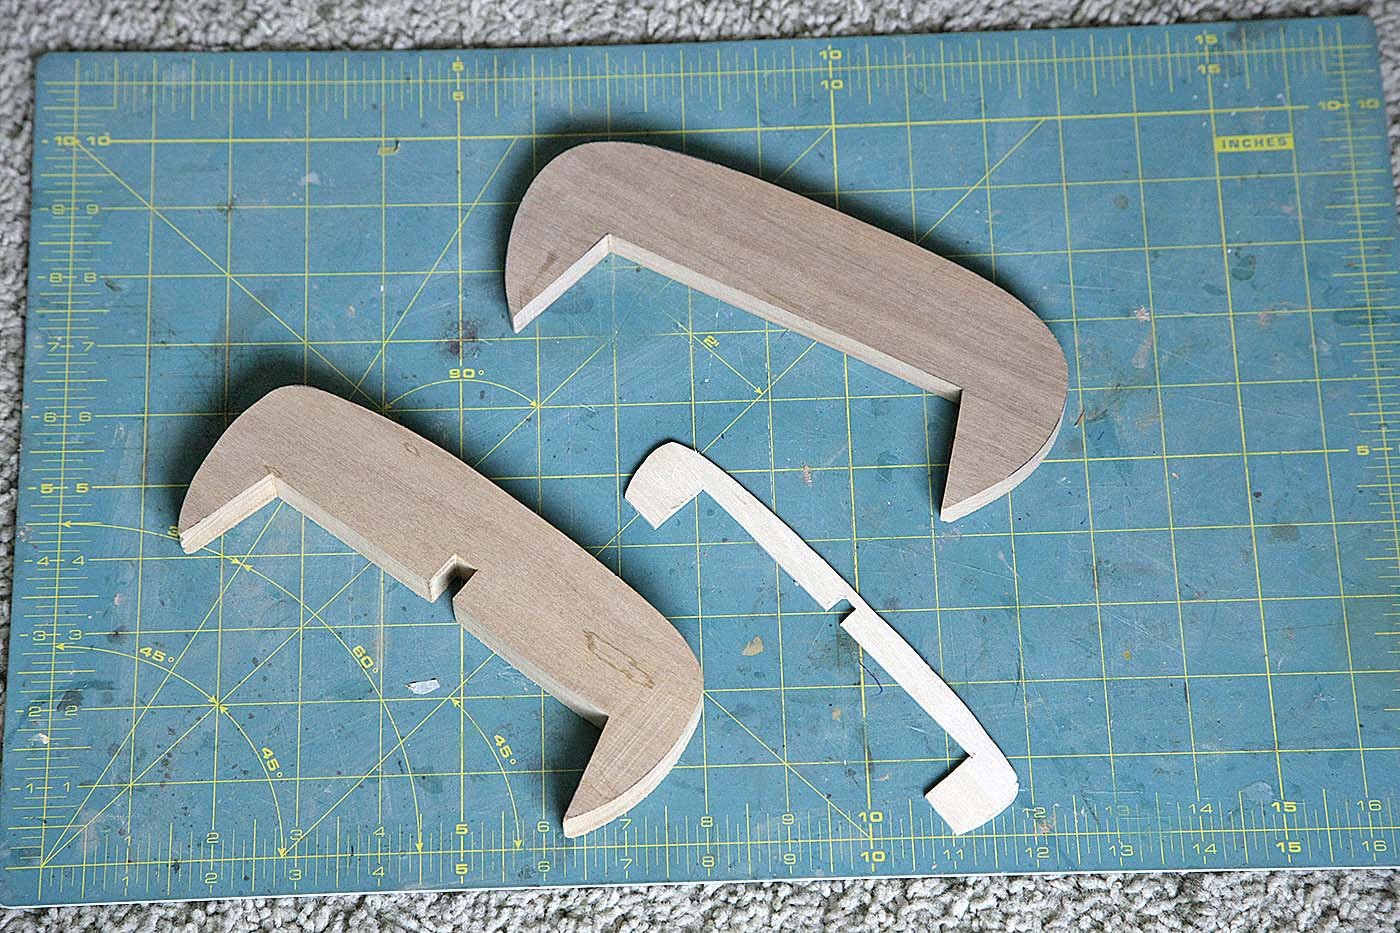
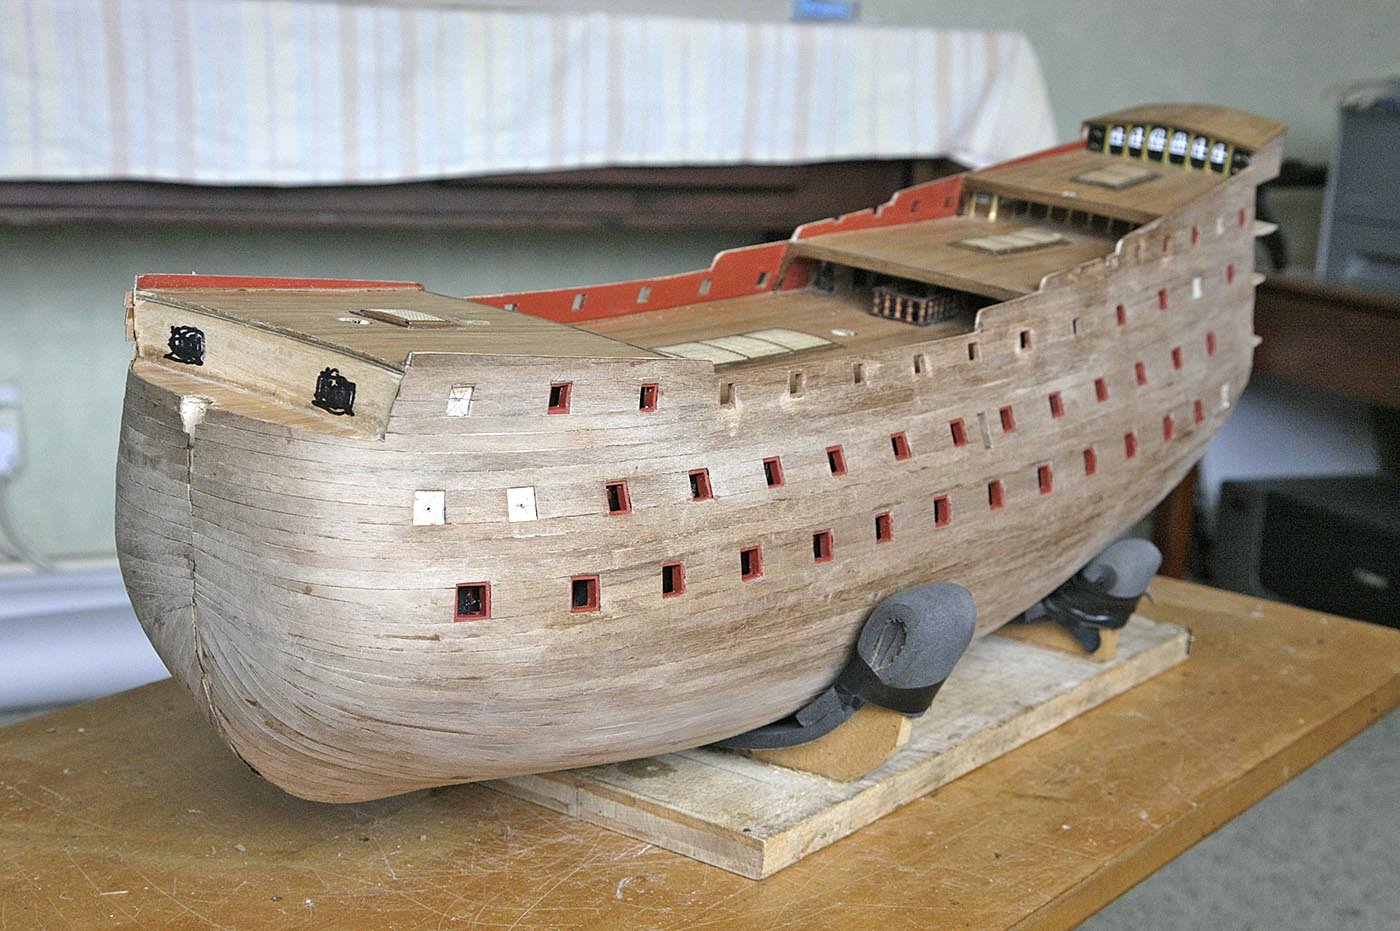
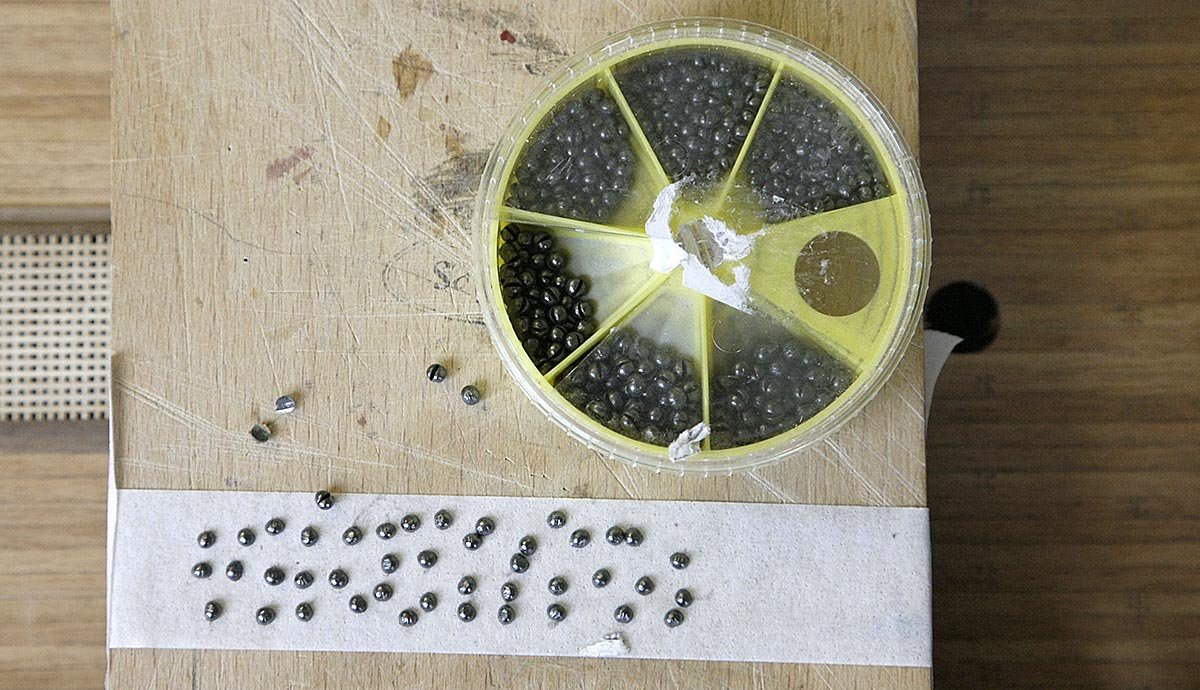
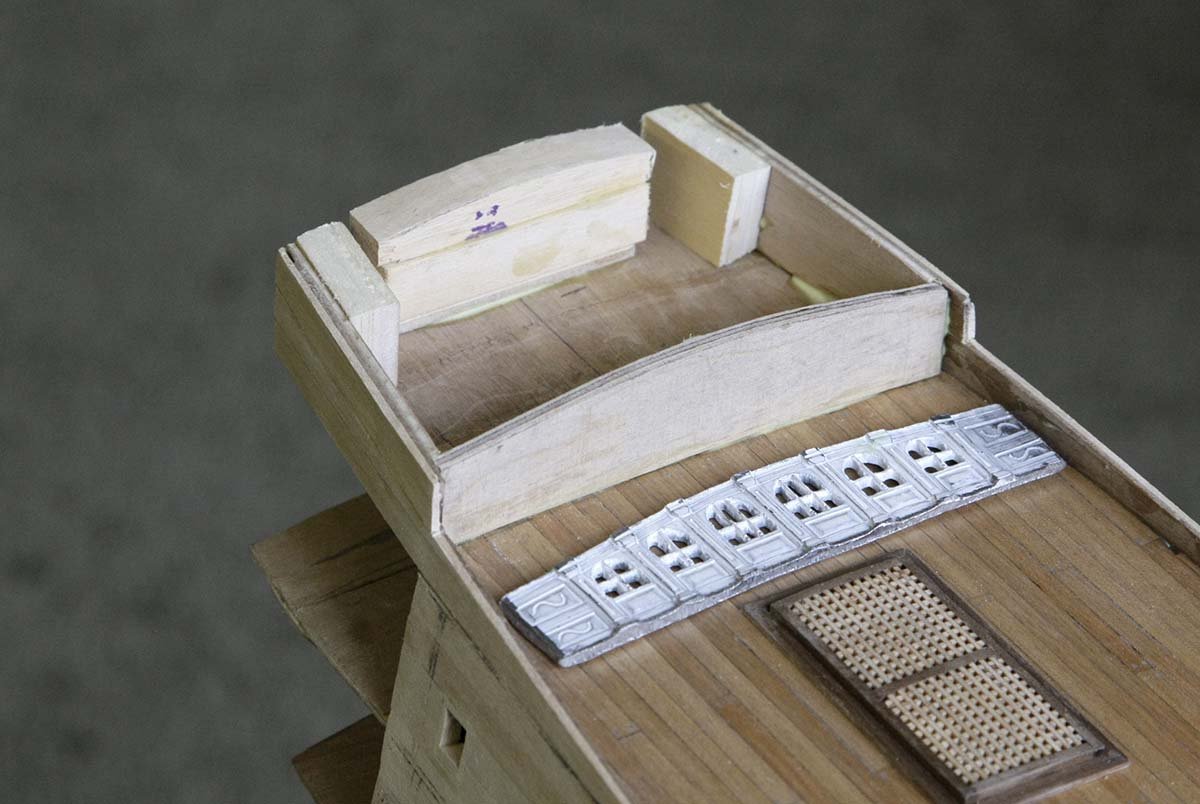
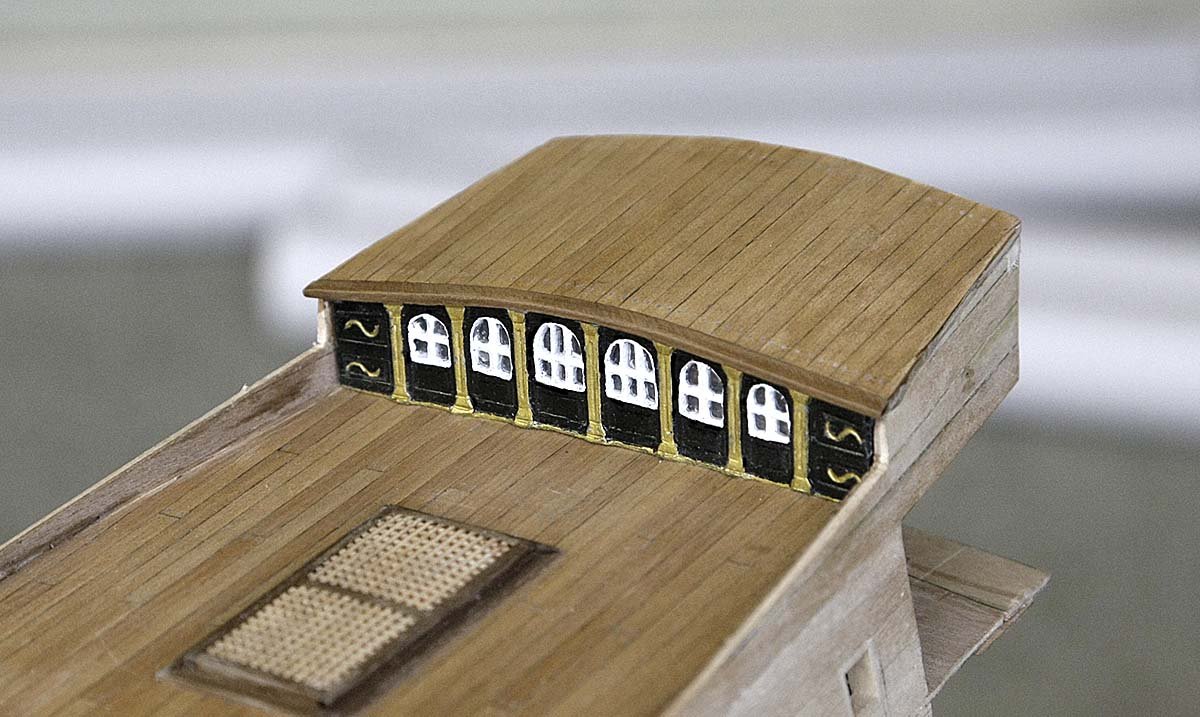
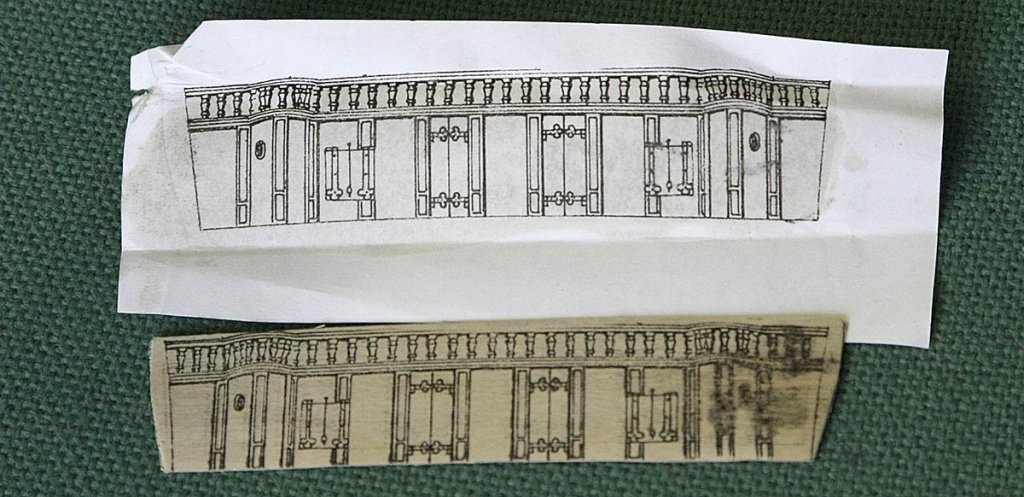
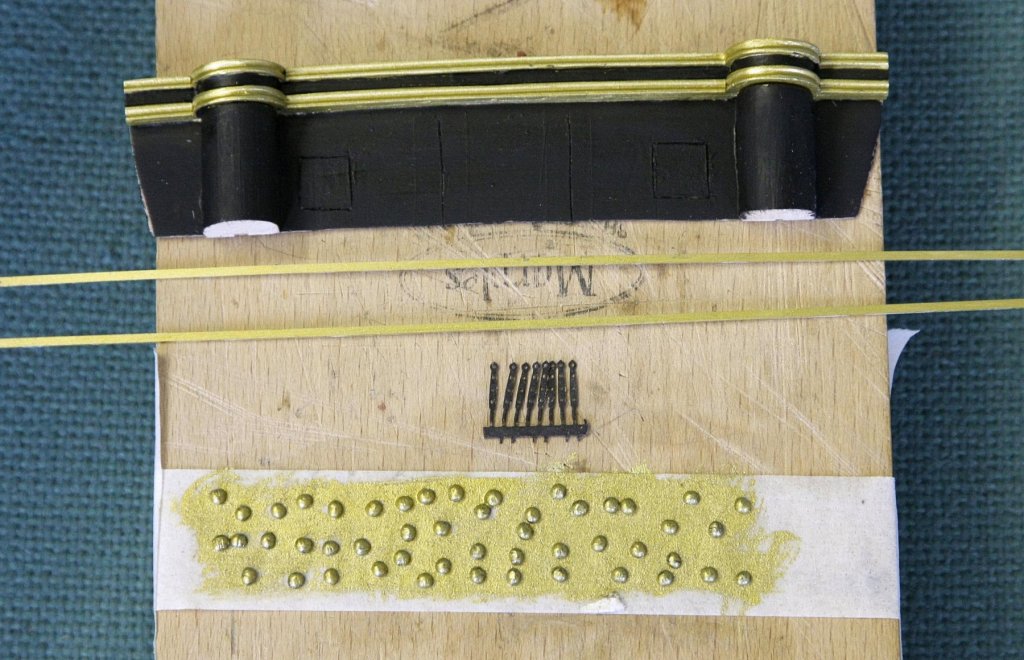
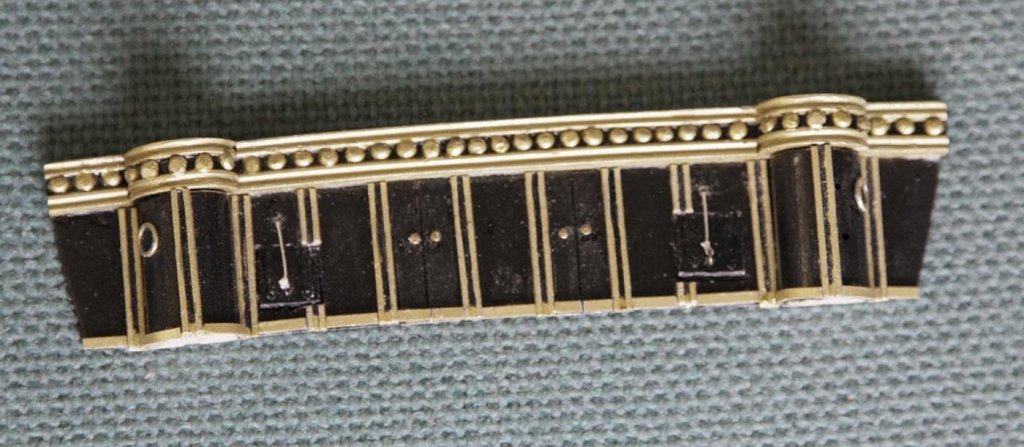
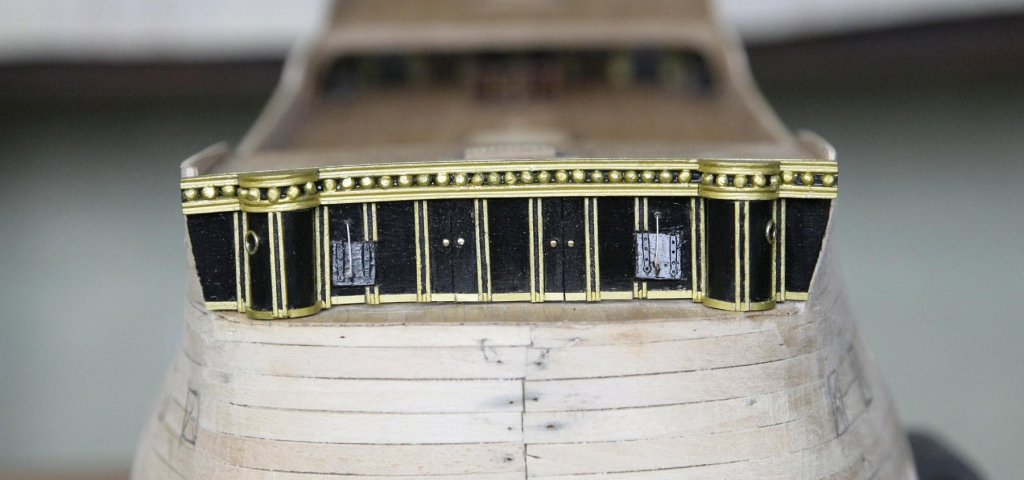
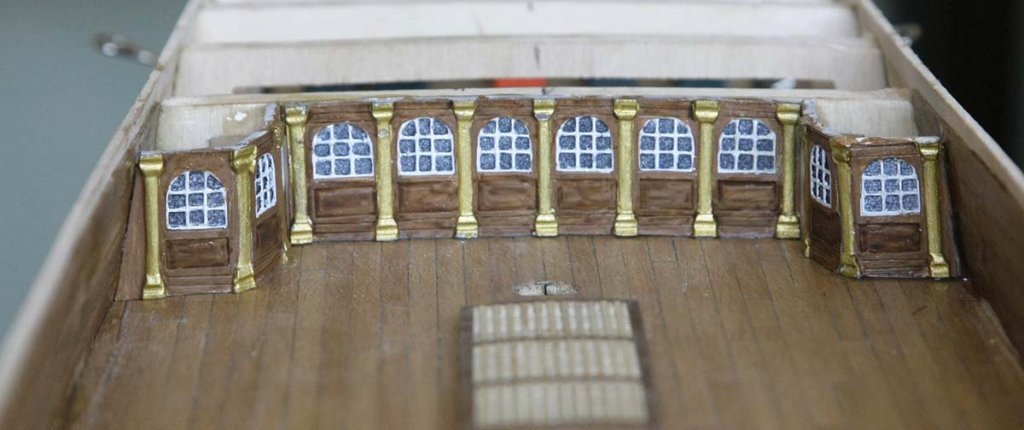
Hello again. Here's my next update. When I started this build I was told that due to the nature of this kit no two builds would be the same, well true to form here's another version. As you are aware I am not concerned with historical build accuracy, I just want to end up with a nice looking ship that resembles the Royal William, I just want to use the materials that I have available and to simplify the build as much as I can so to that end here's my version of the bow facia. First I copied the plan version on to 0.5 ply then cut it to shape, I intended to build it off the model to be added later. I cut a length if 12mm dowel and halved it to be used for the roundhouses, I glued them into place along with the top casting and painted them. I wasn't going to use turned columns for the decor but I didn't want to leave the casting as plain as it was so I decided to bead across the top. I have a selection of shot weights used for fishing, I got these for canon balls on a previous build, these were ideal as they came in many different sizes, they are split for attaching to fishing line so were easily halved. I painted them gold and glued them into place, I think that they worked quite well. The upright pillars were made from 2x3mm walnut strip with the centre groove filed out, they were painted and fitted into place. I just glued on leftover deck planking to simulate the doors and used brass nails for the handles, I thought adding hinges would crowd the space so omitted them. I cut into the ply to make the gunports and prised them open a little to give them more definition before adding some hinges and rope. I painted some plastic strips and added them to the bottom of the facia to give it a finished look. Although it doesn't look like it I did use Bills, Marks and Petes' images as a guide, it was knowing how it should finally look that lets you adapt it to how you want your build to appear without creating problems for yourself. So thanks guys. Ken


- 424 replies
-
- 16
-
-
Hi Bill, Again you've come up trumps. Not only is your build and interpretation very good but also the way you have photographed it. Not only a good angle showing your build detail but the light and definition makes it like I'm actually there looking at it. Many thanks again, Ken
-
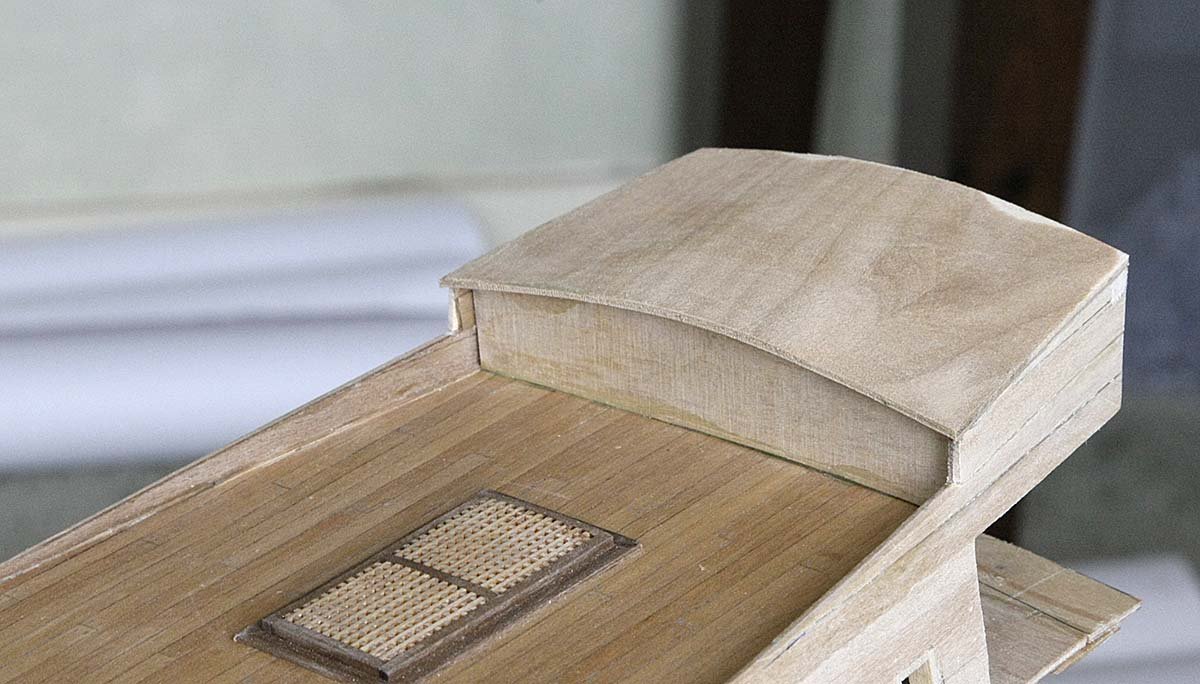
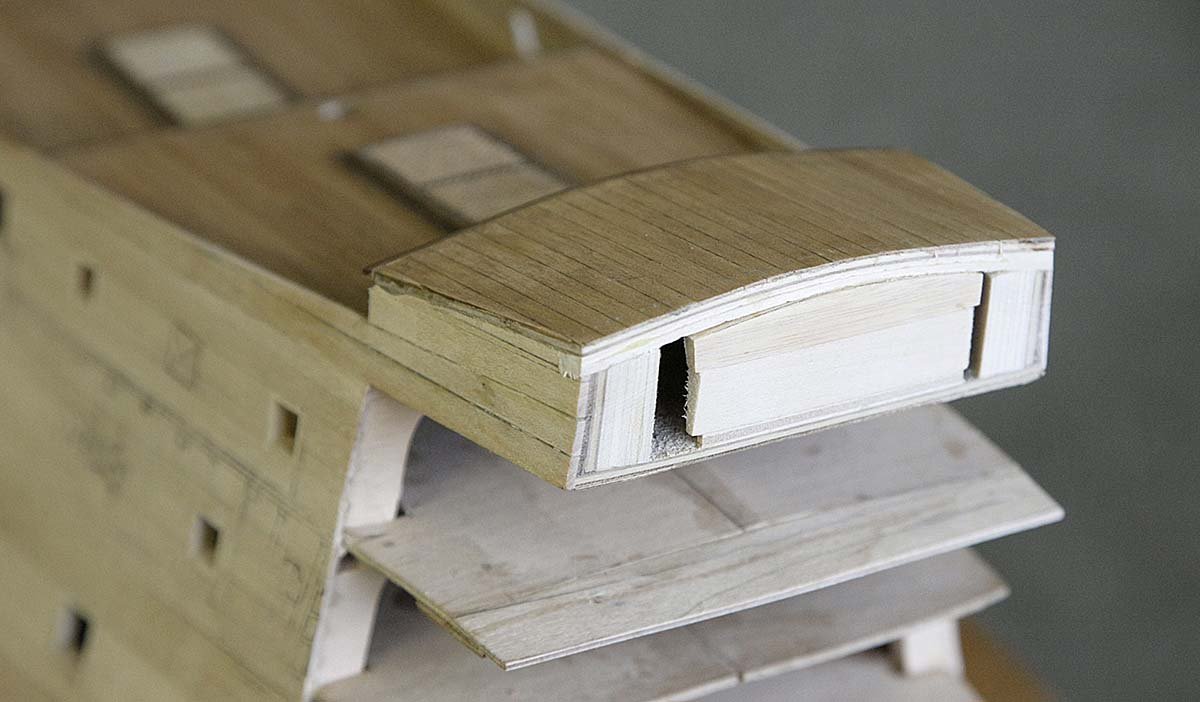
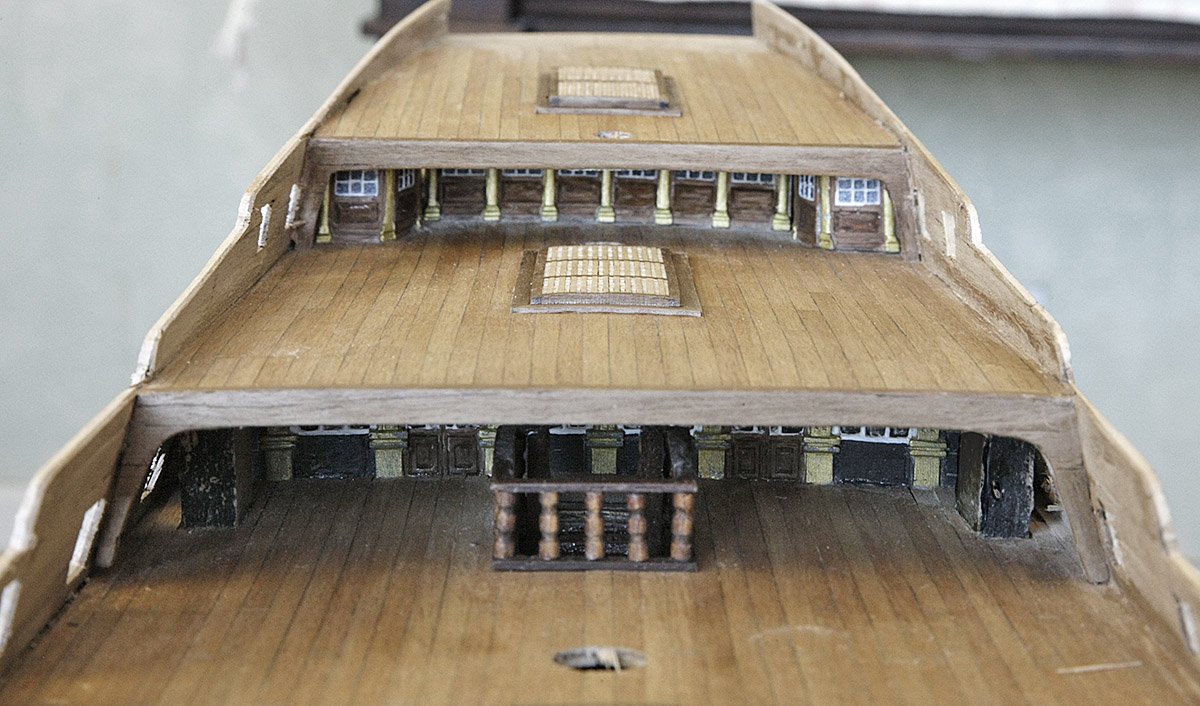
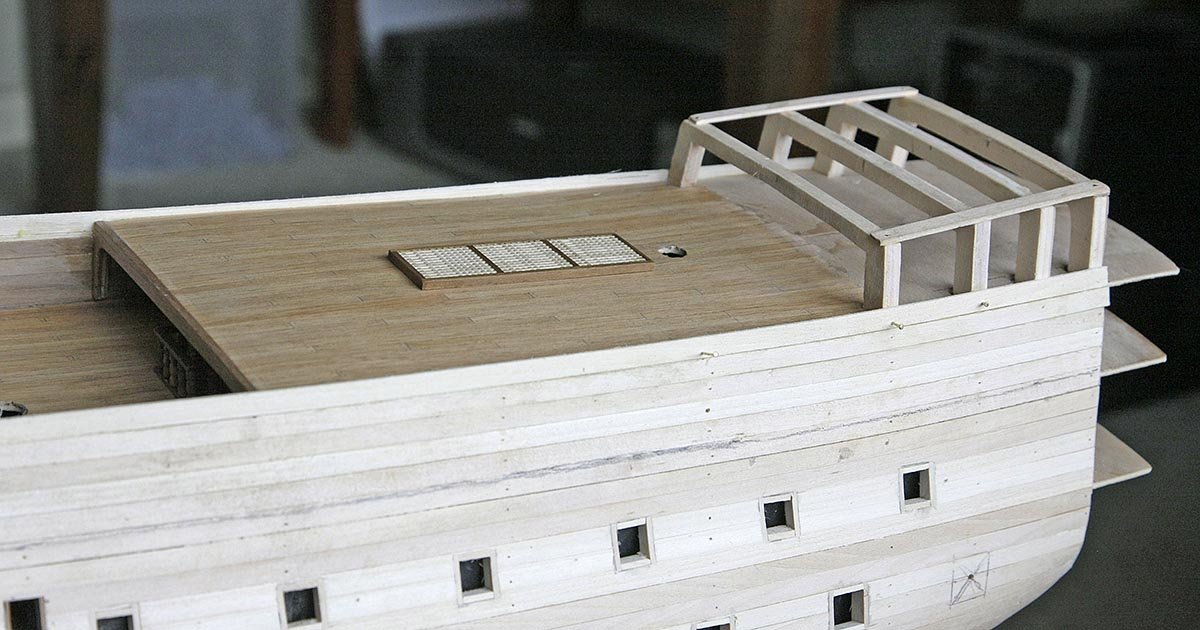
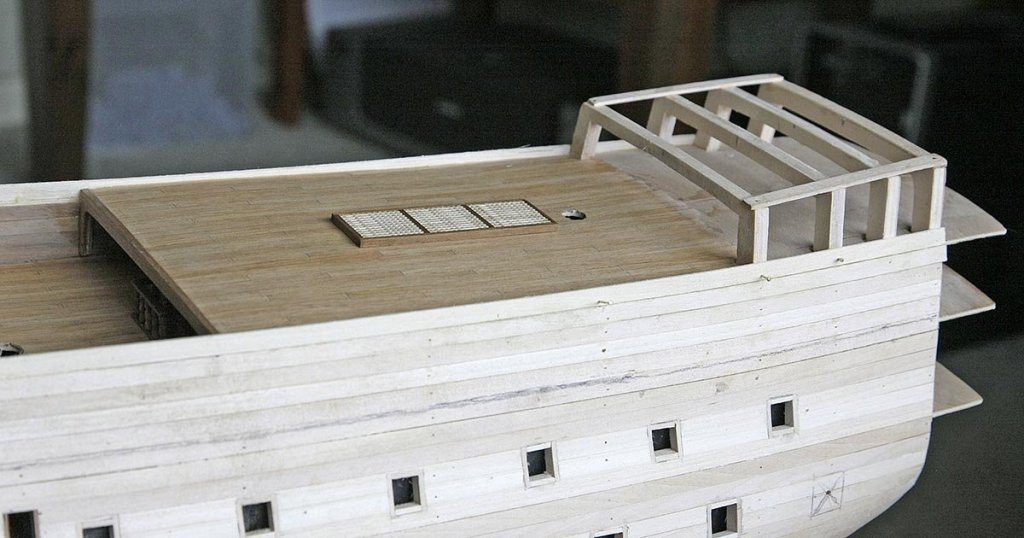
Hello Everyone. Another update. They say that a picture is better than a thousand words, well in this case it was true. Until I got that excellent photo of the poop area from Bill I couldn't get from the plan an image in my mind as to what I needed to make. After seeing that picture, Petes' notes made more sense and there was then no issues building that area. I made it up with a false facia to fit the casting to once it had been painted, I also used blocks on the inside so that it would be easier to fit the deck and give a larger surface area for the transom to be glued to. I soaked the ply deck and nailed it down onto the pre shaped blocks, when dry I planked it and fitted a small walnut beam. As I already had some I thought that I'd try Zap canopy glue for the window glazing. This is made for attaching clear plastic canopies to model aircraft. It is a creamy white glue that dries crystal clear, it worked perfectly and is probably the same stuff as Micro Krystal Clear. I notice that a 1oz bottle of the Micro was more expensive than a 2oz bottle of Zap. I painted the facia and attached that. I realised that all the filing of the window frames was worth the effort. Next I will make the facia at the bow. Bill could I impose on you again for another of your excellent quality photographs. Ken


-
Hi Bill, That's perfect, exactly what I was hoping for, thanks very much. Ken
-
Hi Vivian, Thanks for the nice comments, Welcome aboard. Ken
-
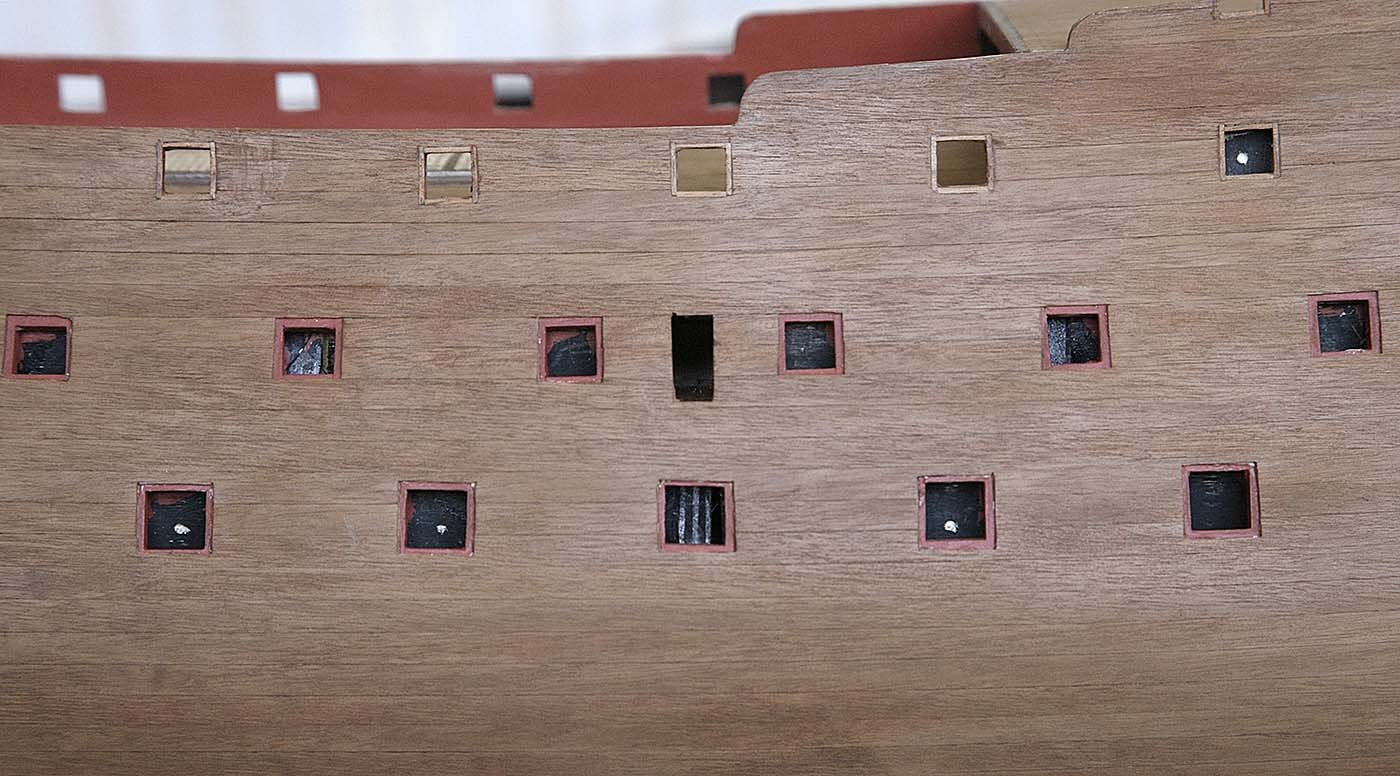
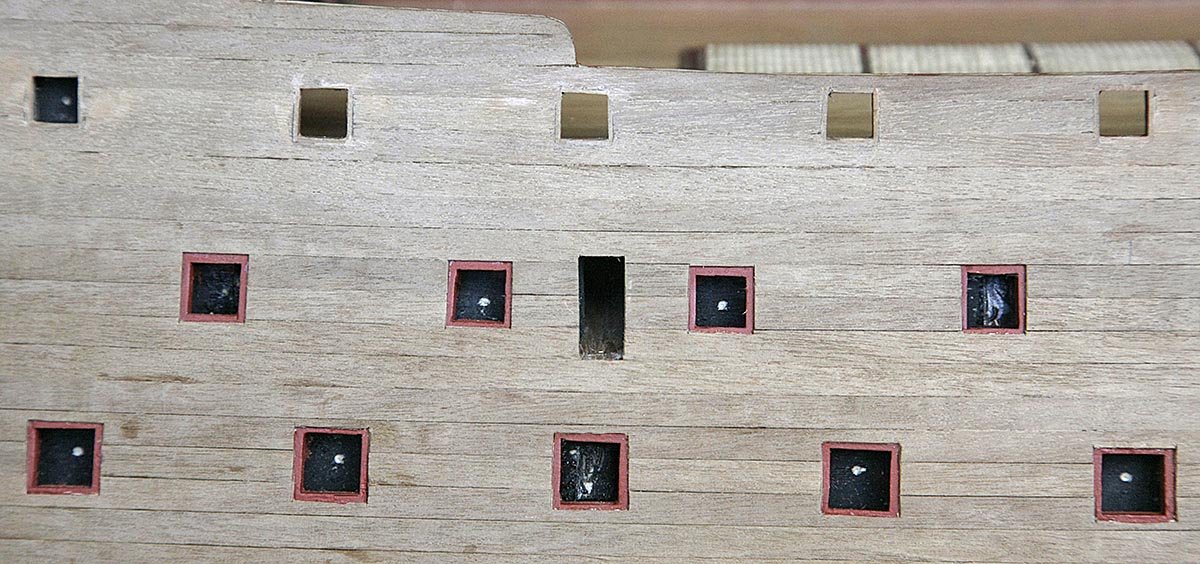
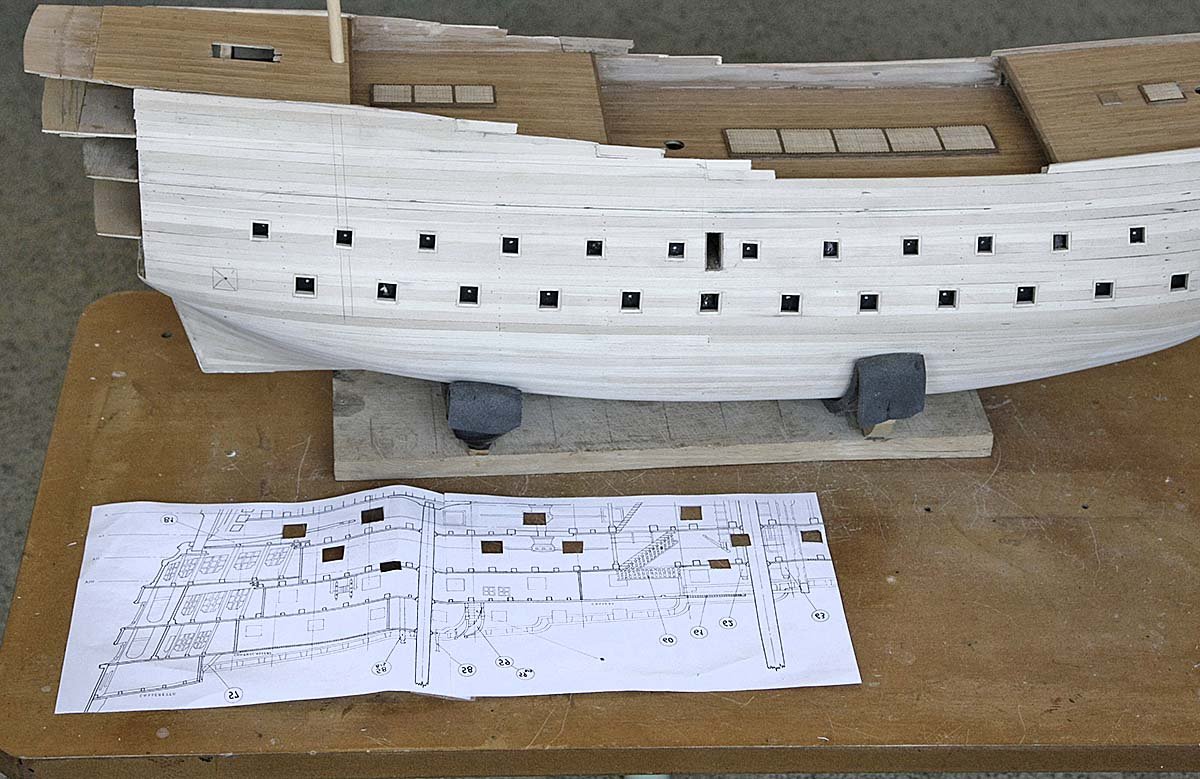
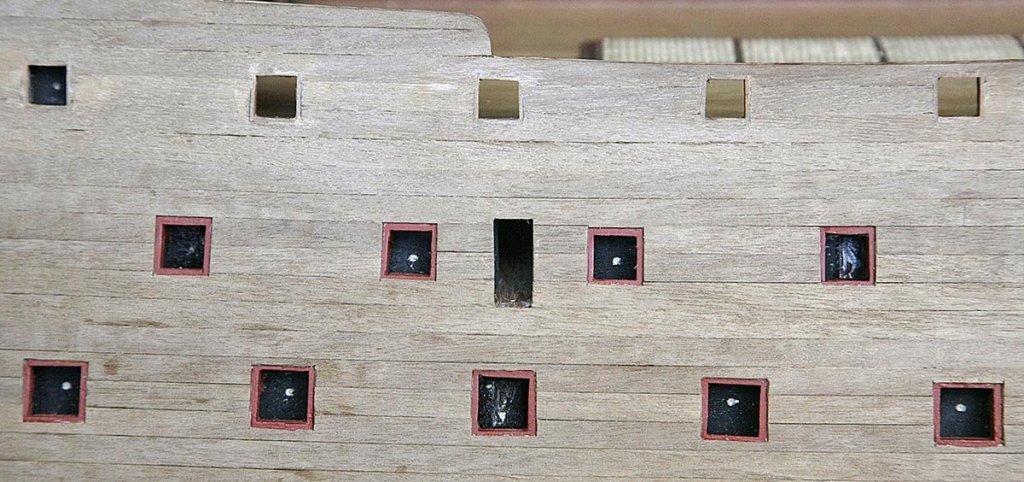
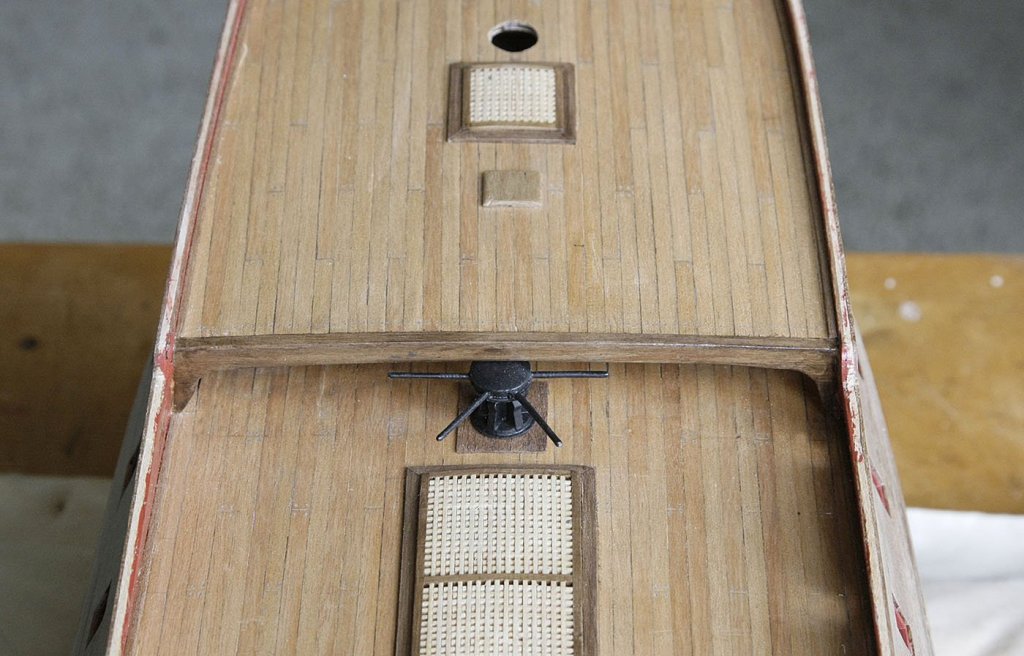
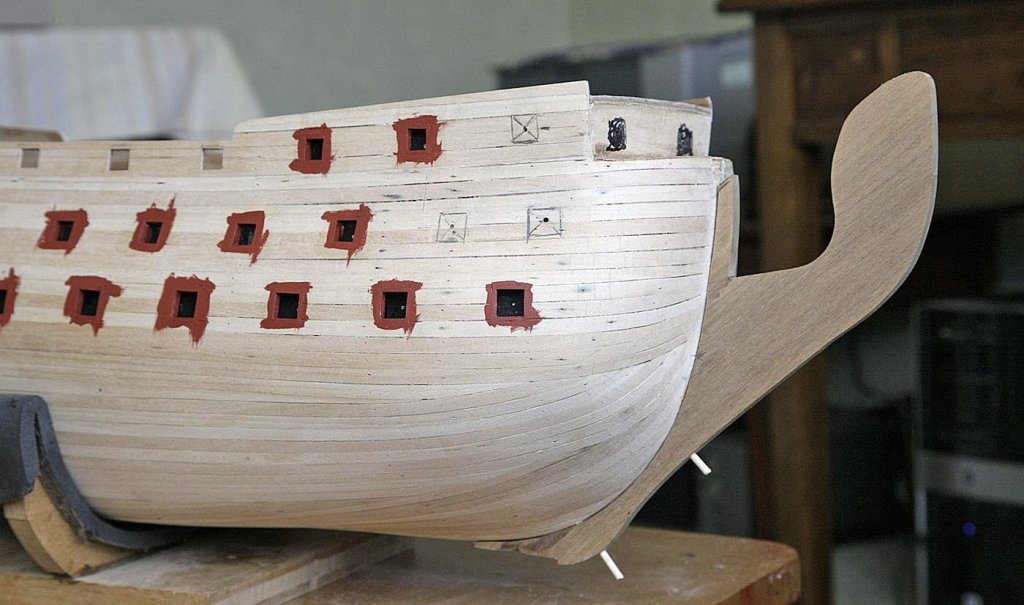
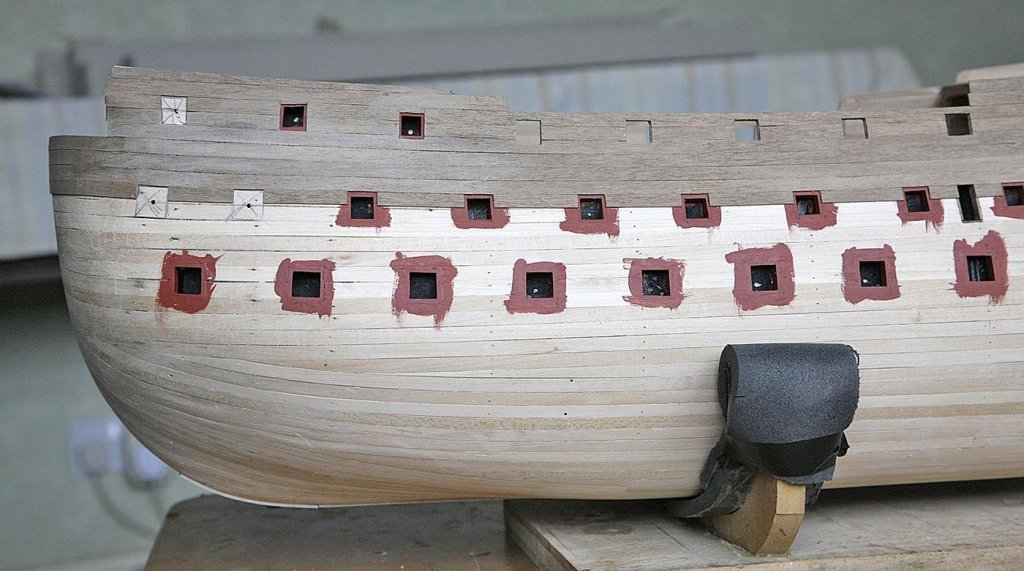
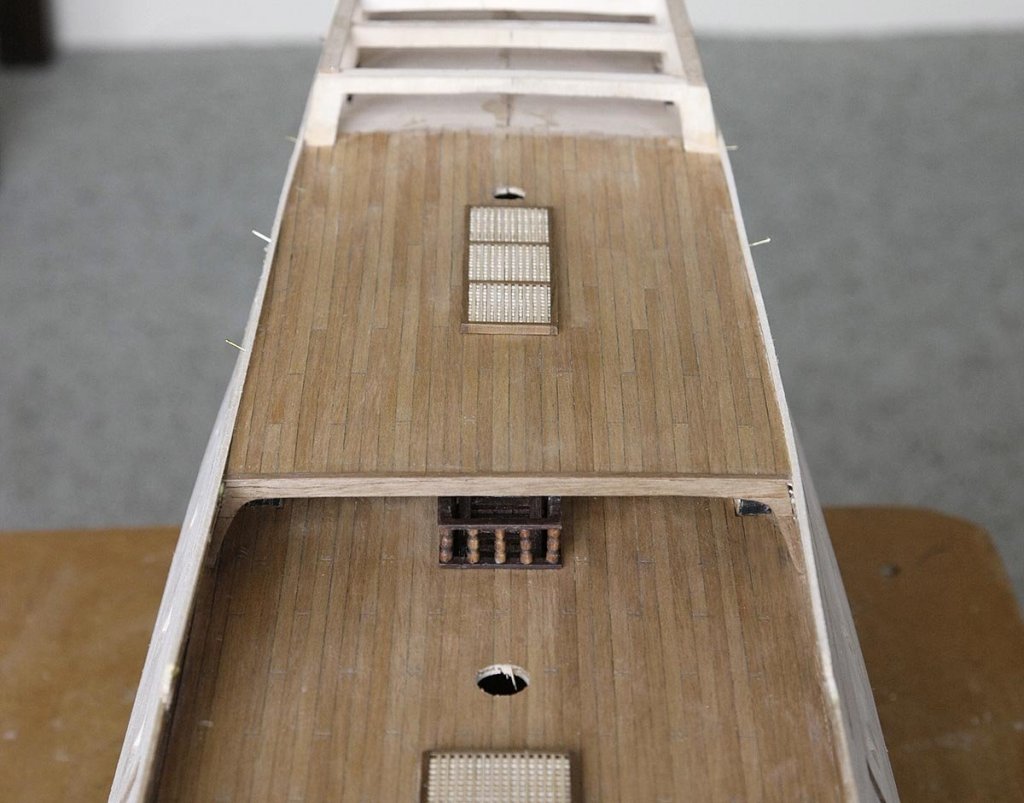
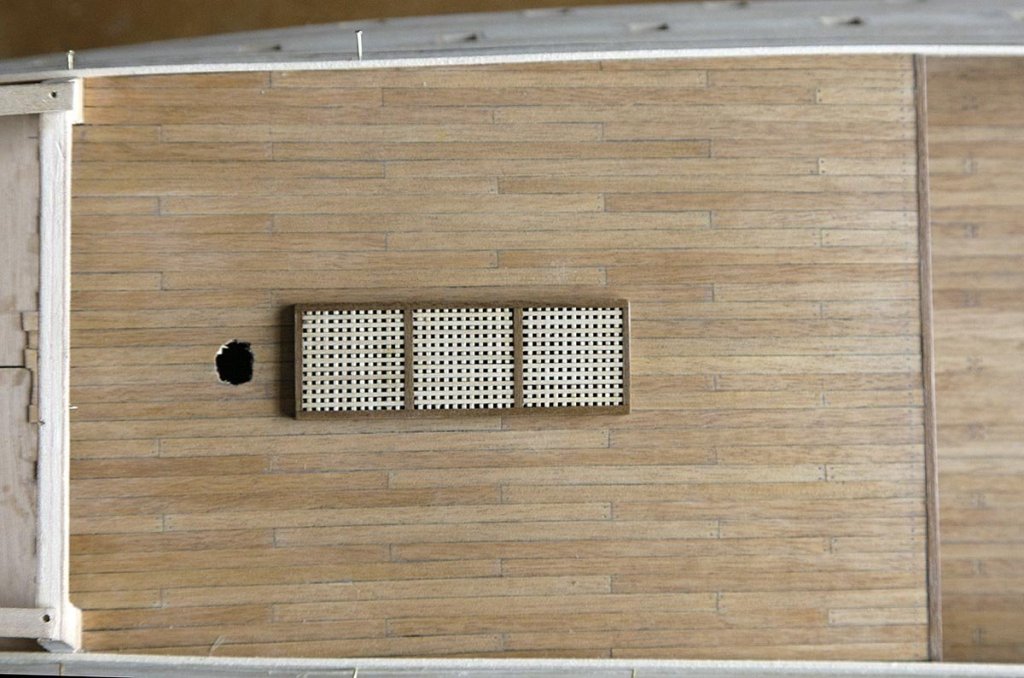
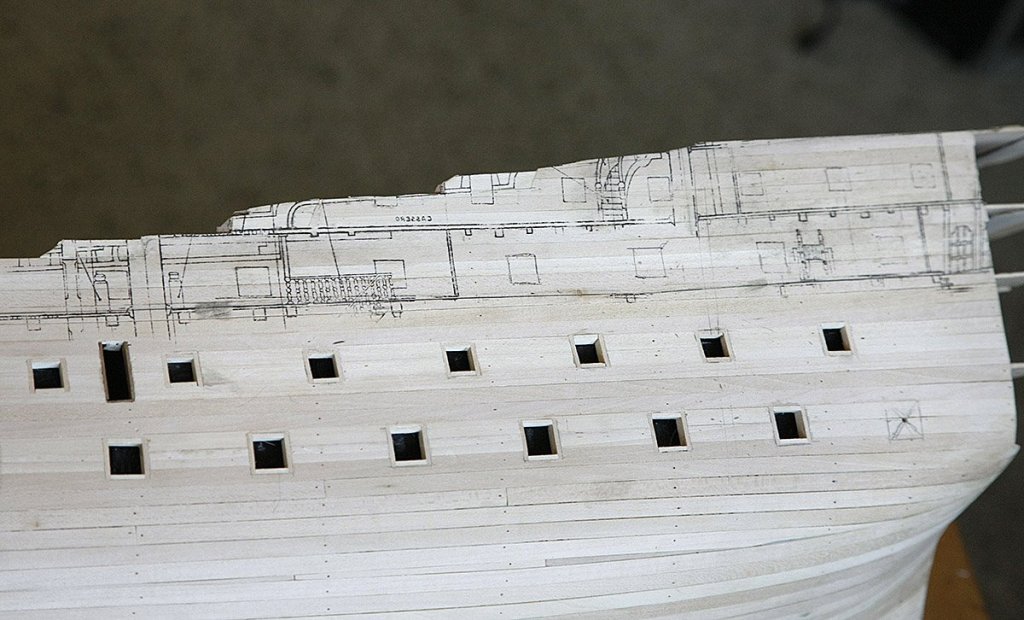
Hi, Just a small update. After marking out the ports I cut them out and lined them. The ones without lids I will line with 1mm walnut after the 2nd planking and sand them flush. I have left the ports in the waist not at their finished height, there would not be much strength at the top so I'll size them after the second planking. I cut the sides to their required profile and sanded them to shape. I planked the upper quarter deck, made and fitted the gratings. I was disappointed with the amount of grating material, There was nowhere near enough, I had to use some that I had left from other kits and there are still gratings left to make. I am scratching my head as to what to do next. I don't intend to fit the prow or keel until after the second planking when I will cut a channel for it to slot into. I'm thinking of doing the rear upper of the poop deck and maybe the front facia before planking but I will take any advice on this. The poop deck is a cause for concern as the only pictures that I can find are side or head on views, nothing that gives any view of a 3D type image, if anyone has a picture of the area from a little above and at an angle from the front fairly close up I would be most obliged if they could put it in a post. Well that's it so just a few pictures.


-
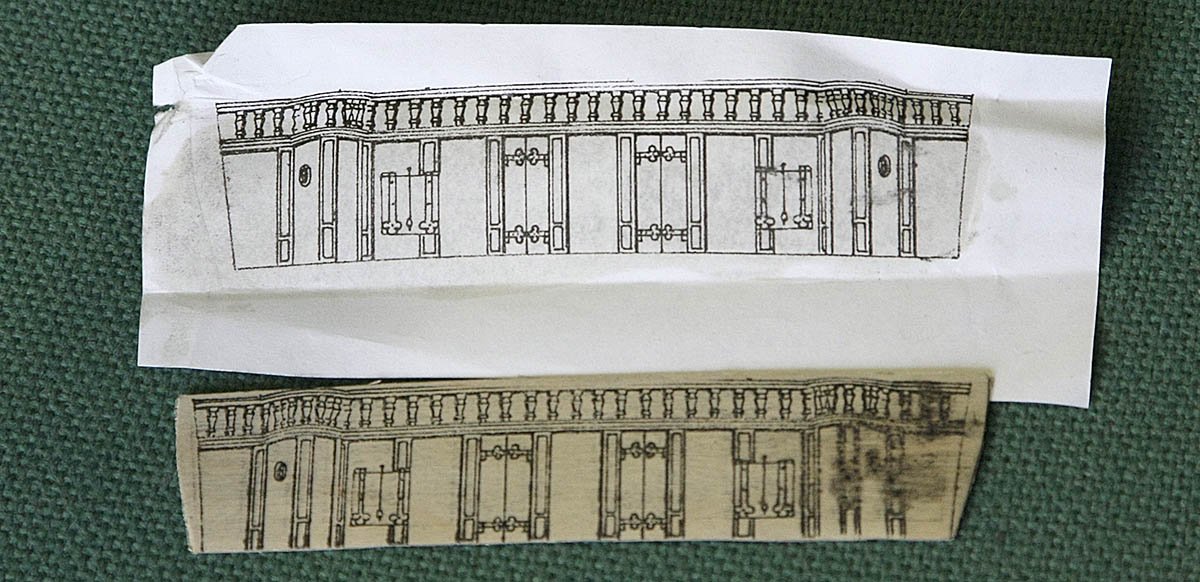
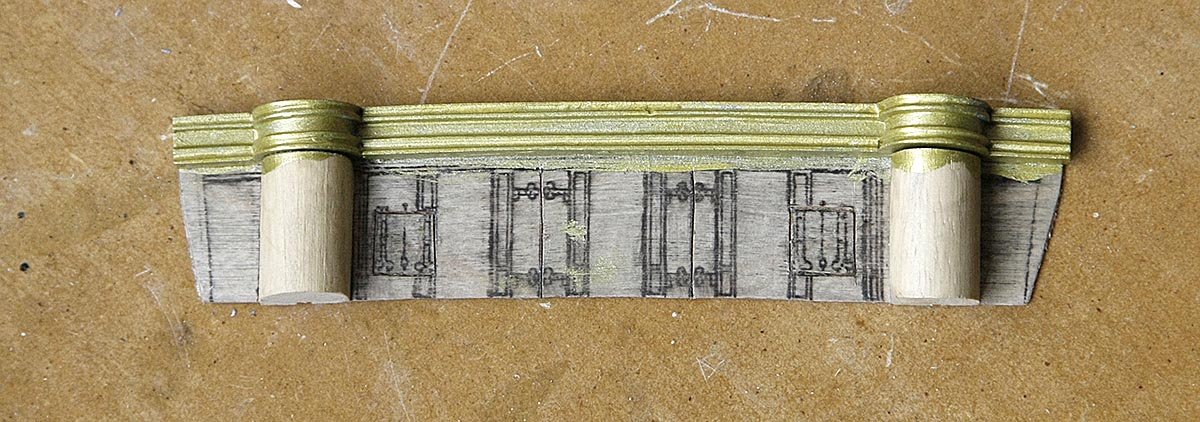
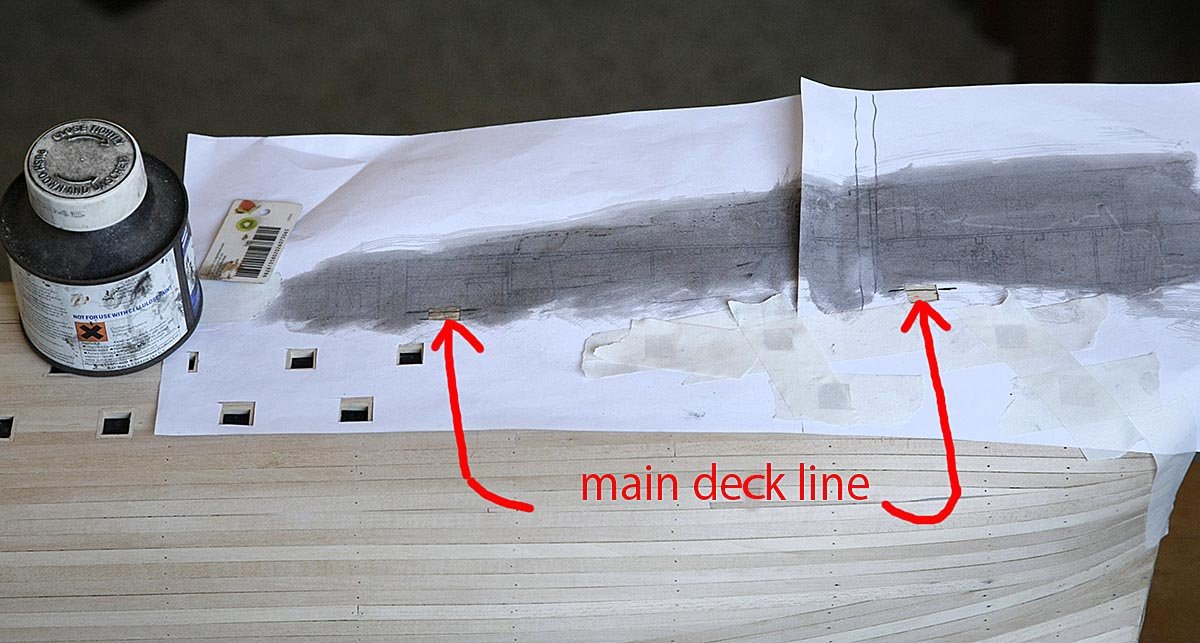
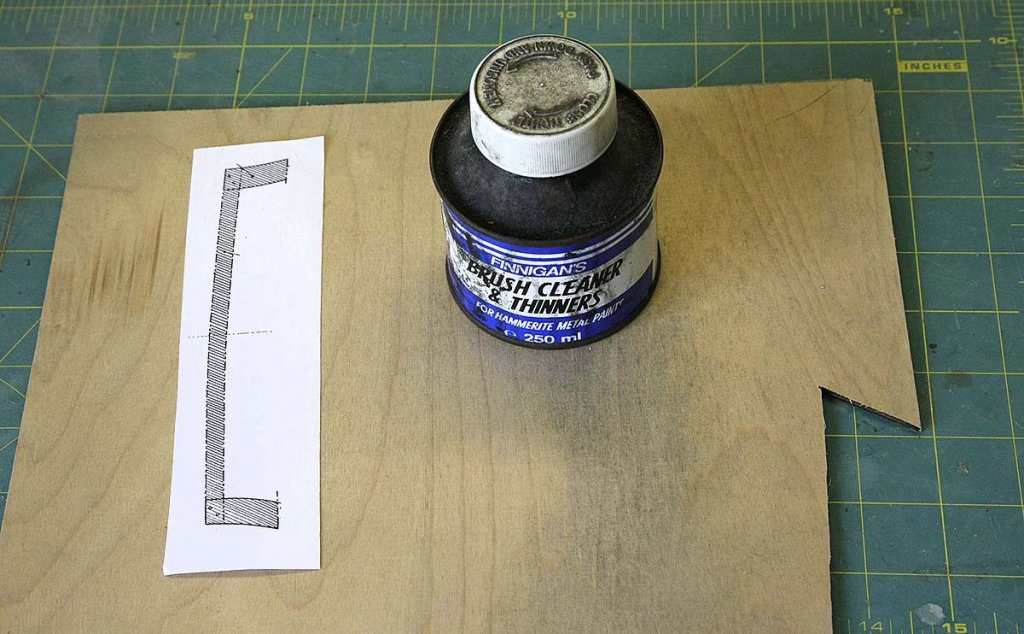
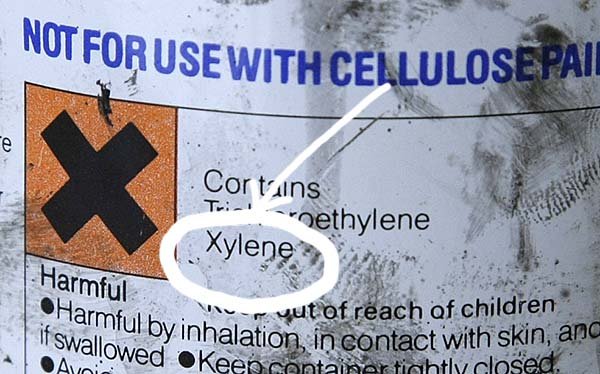
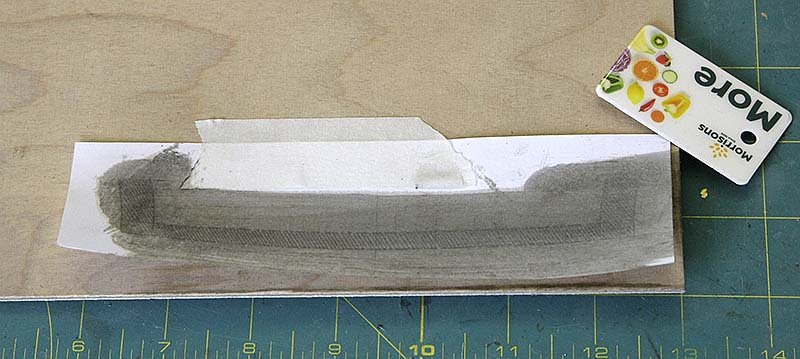
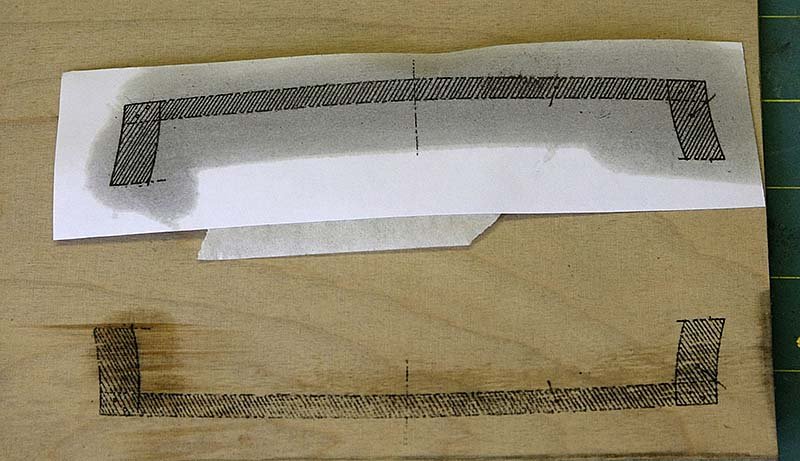
Hello, Thanks again for your likes and kind comments, keep them coming, as I'm sure that you know they really do motivate. Vince and any others who may be interested here's my method of transferring the plan to wood, it's more simple than you may imagine. You need to copy the plan and print it using a Laser printer, it won't work with an inkjet! You need to get something with Xylene in it. Looking through my shed I found that I had some thinners that was for Hammerite metal paint so I use that, I believe it is also in ink eraser pens, and other products, just check the label. Place the printed side to the wood, I tape mine down so that it doesn't move, dampen the back with xylene then with a hard edge, I use an old plastic card scrape it over the print, this transfers the laser ink onto the wood every bit as sharp and clear as the original, works like magic every time. Here's how I copied for my deck beams.
-
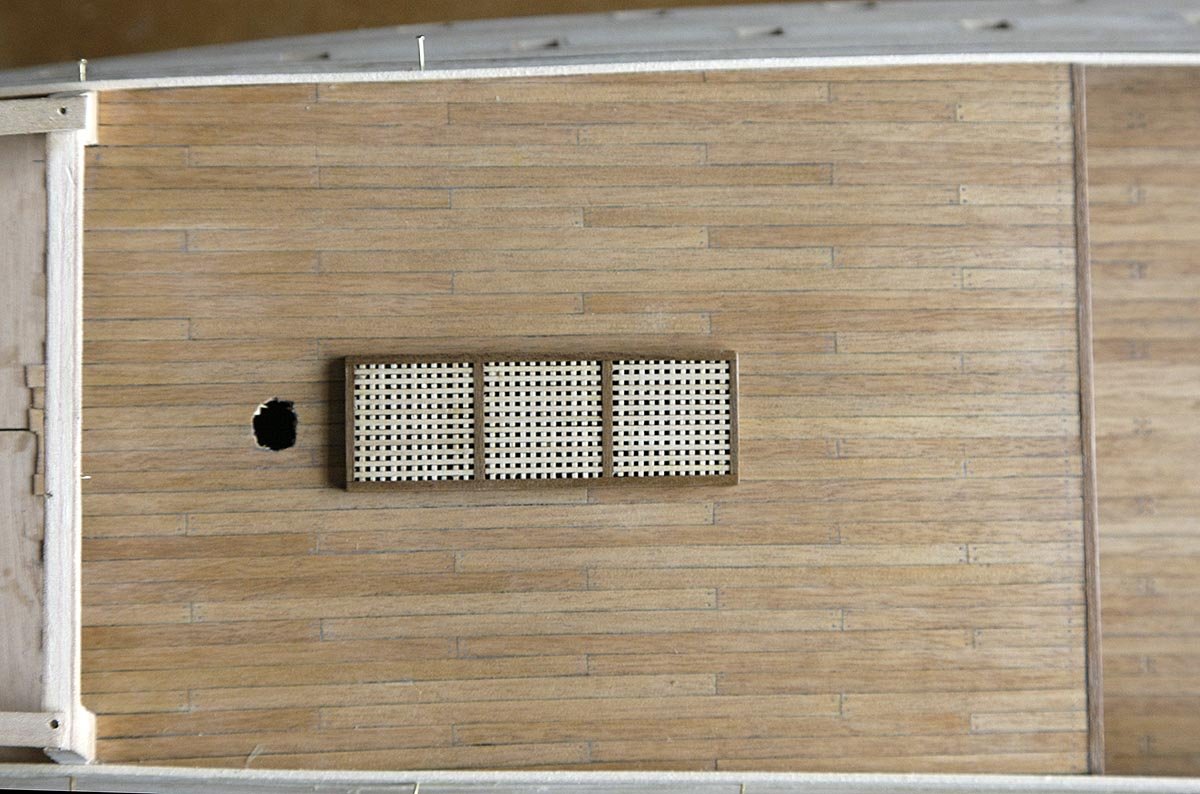
Hello Everyone. Here's my progress update. Some steps forward and quite a few back but I'm getting there. I fitted the quarter deck, planked and tree nailed it. I made up the deck beam as I had earlier and fitted that. I fitted all the dummy gun carriages and continued up with the first hull planking. I made and fitted the quarter deck gratings. I have been finding difficulties filing out all the windows so for the panels screens on the quarter deck I just painted them, they can hardly be seen so I'll accept the compromise there. After I had planked high enough I roughly shaped the profile for the top edge but having done it I found that I had taken away too much so, annoyed with myself I had to re-do a fair bit of the upper planking. I fitted the upper quarter deck, planked and nailed it. I decided to mark the gun port positions next. Up until about fifteen years ago I built and flew model aircraft and from that I learned how to transfer the image from plans onto the surface of wood so I tried that method and it worked well, see what you think. I am now ready to cut out those ports. Ken

-
Hi Mark, I know exactly what you mean. I have a hard rubber insert in the face of the vice jaws and a large handle on the file, I'm only doing about 20 min sessions so not too bad. I am having difficulty with the smaller frames, those that are part of the bulkhead above the quarter deck, as they aren't very visible instead of struggling I will probably just paint them. I am pleased though that I tackled the main gallery windows. I'll be glazing them as you did yours. Ken
-
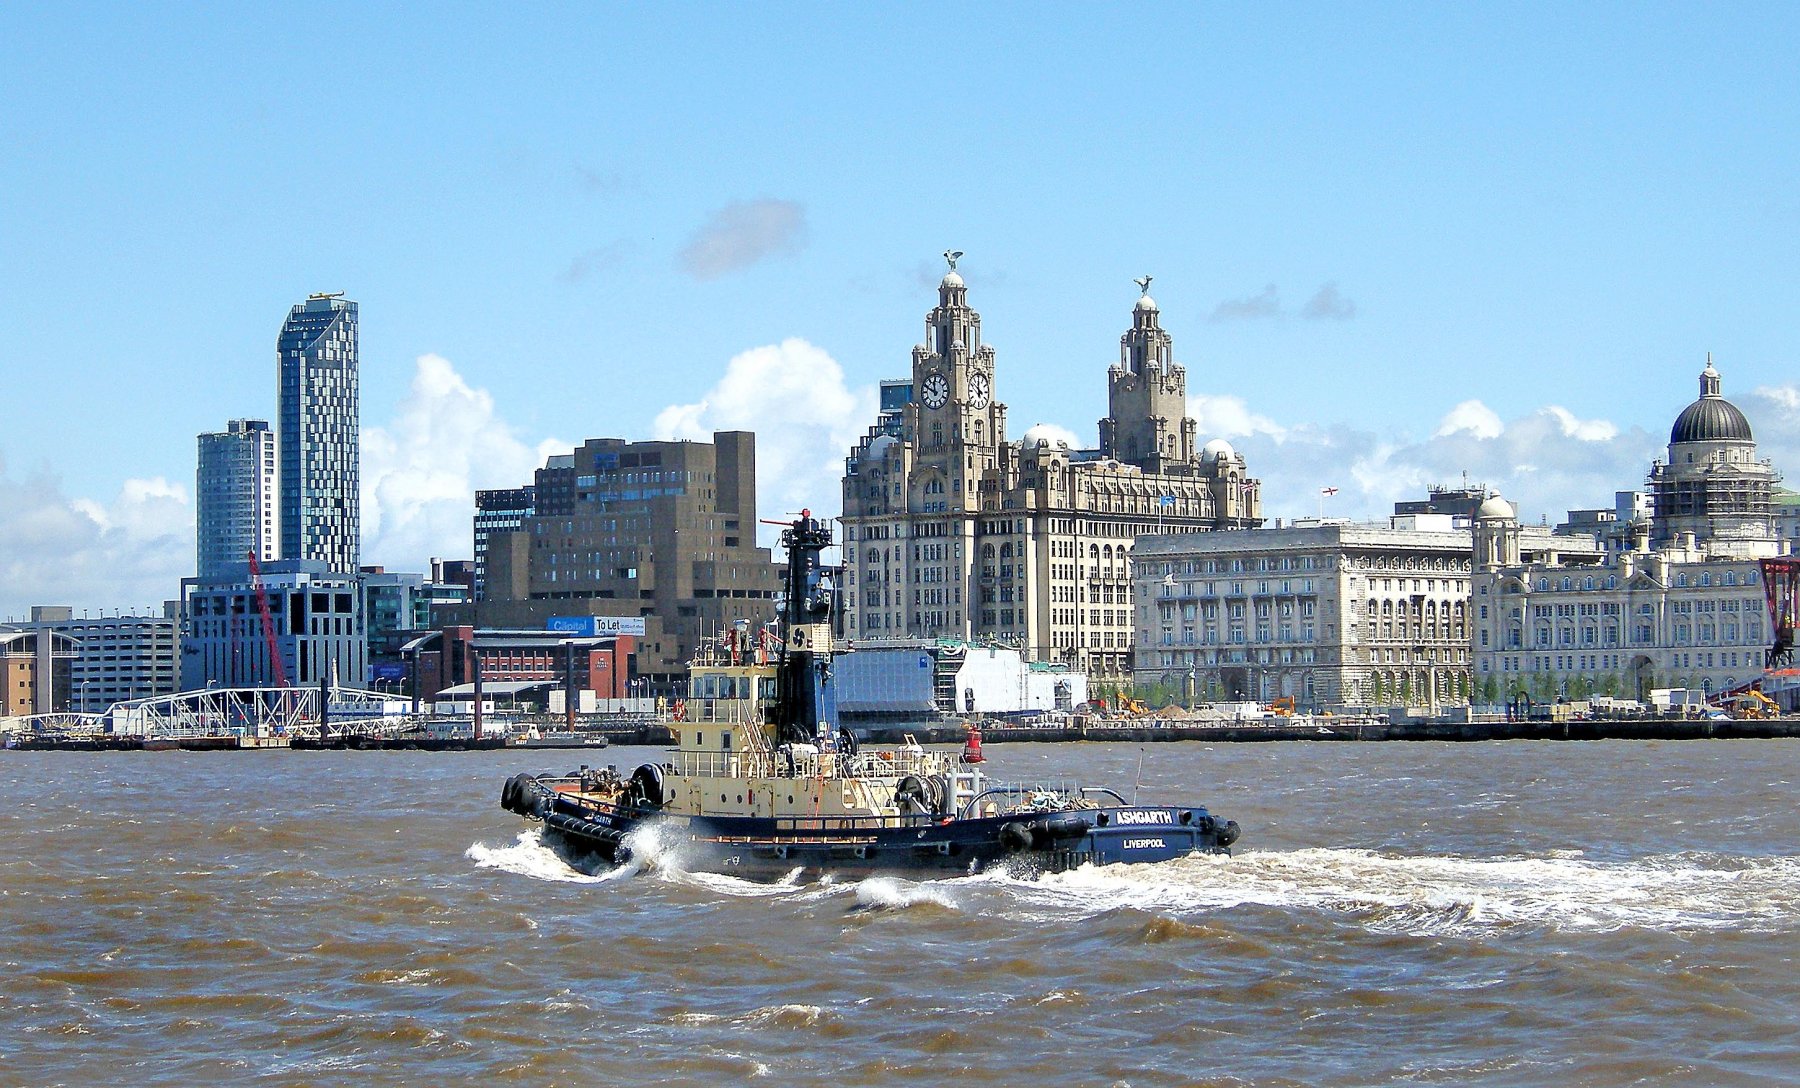
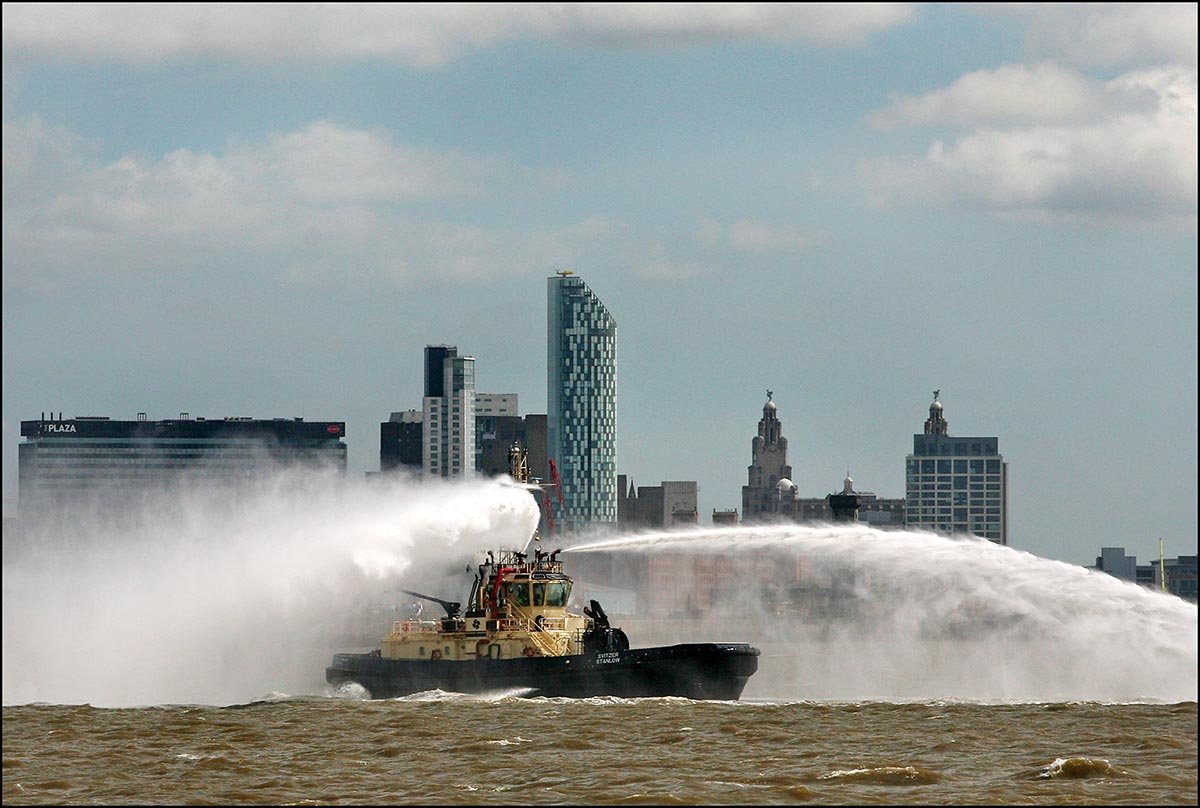
Hi, Another picture This is the Svitzer, A Mersey fire tender, a common sight on the river. I think that this is what happens when the captain has had a few beers with lunch. I'm also making progress on the window frames, only another twelve pieces to go, but getting there. Ken