HOLIDAY DONATION DRIVE - SUPPORT MSW - DO YOUR PART TO KEEP THIS GREAT FORUM GOING! (Only 24 donations so far out of 49,000 members - C'mon guys!)
×


ken3335
-
Posts
314 -
Joined
-
Last visited
Content Type
Profiles
Forums
Gallery
Events
Everything posted by ken3335
-
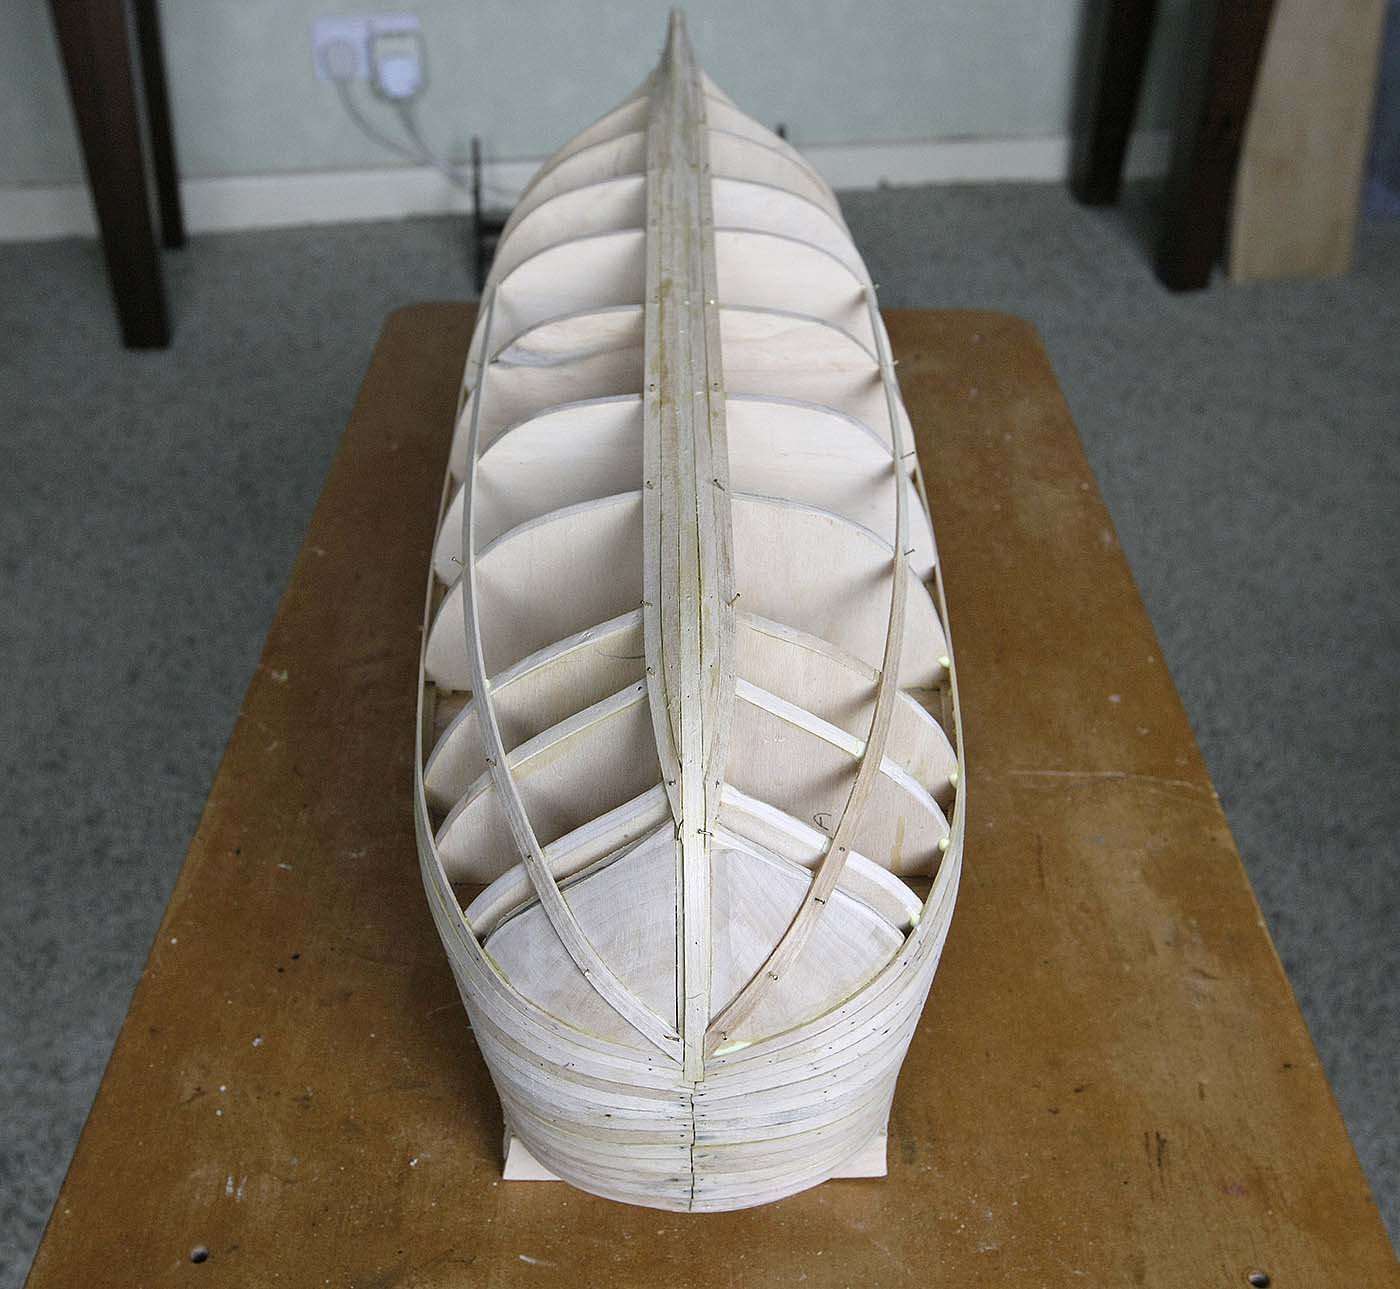
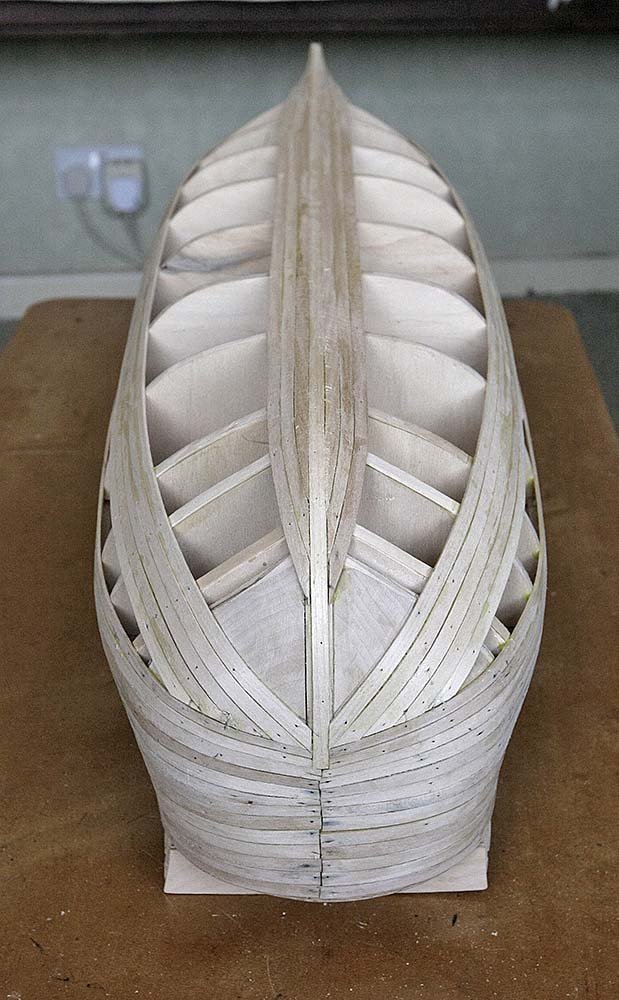
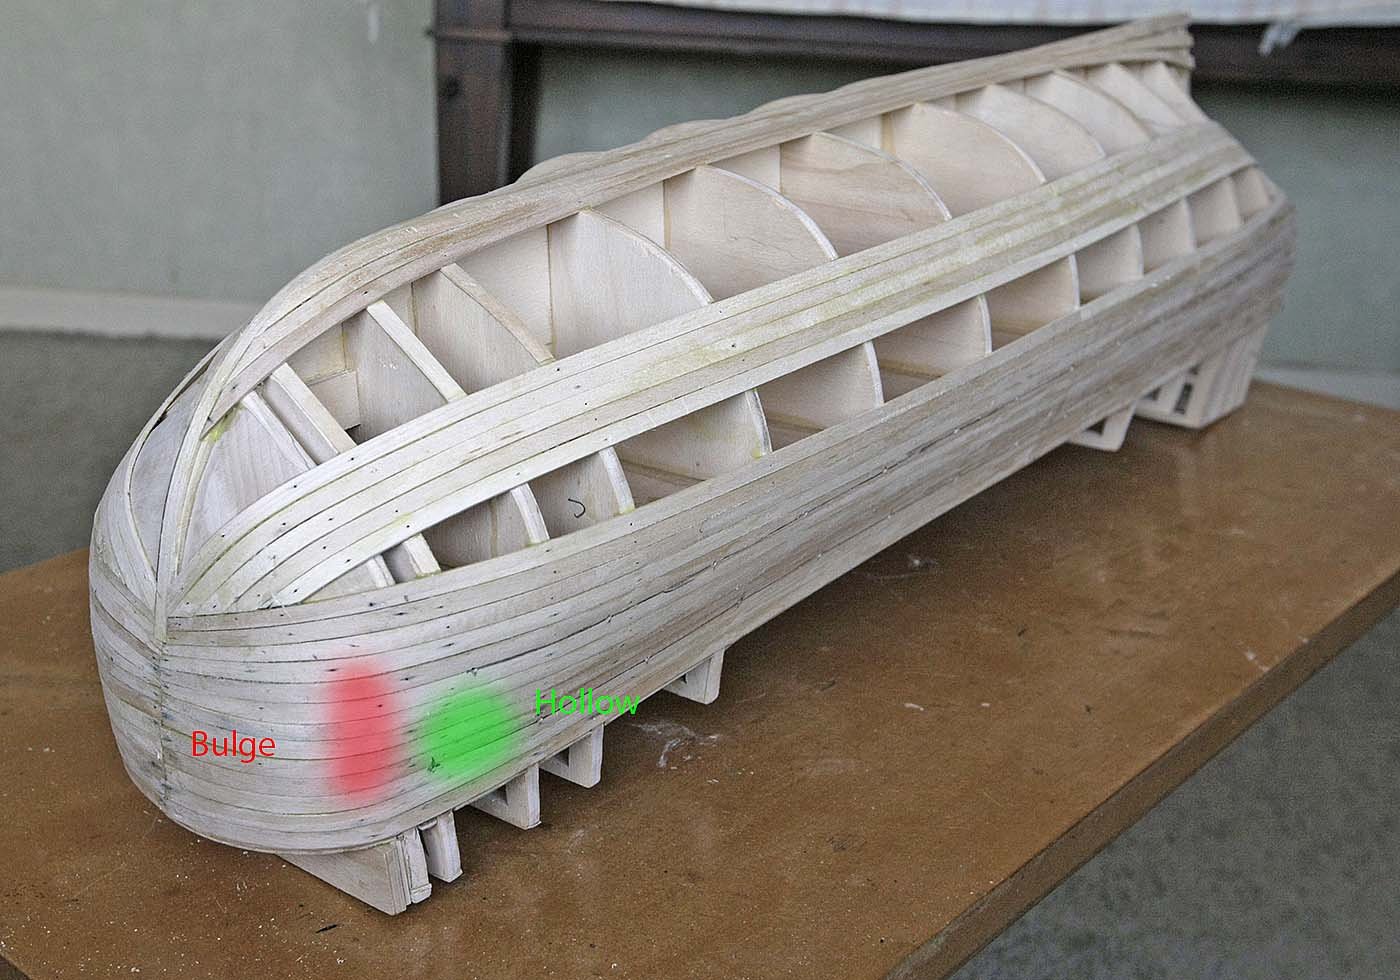
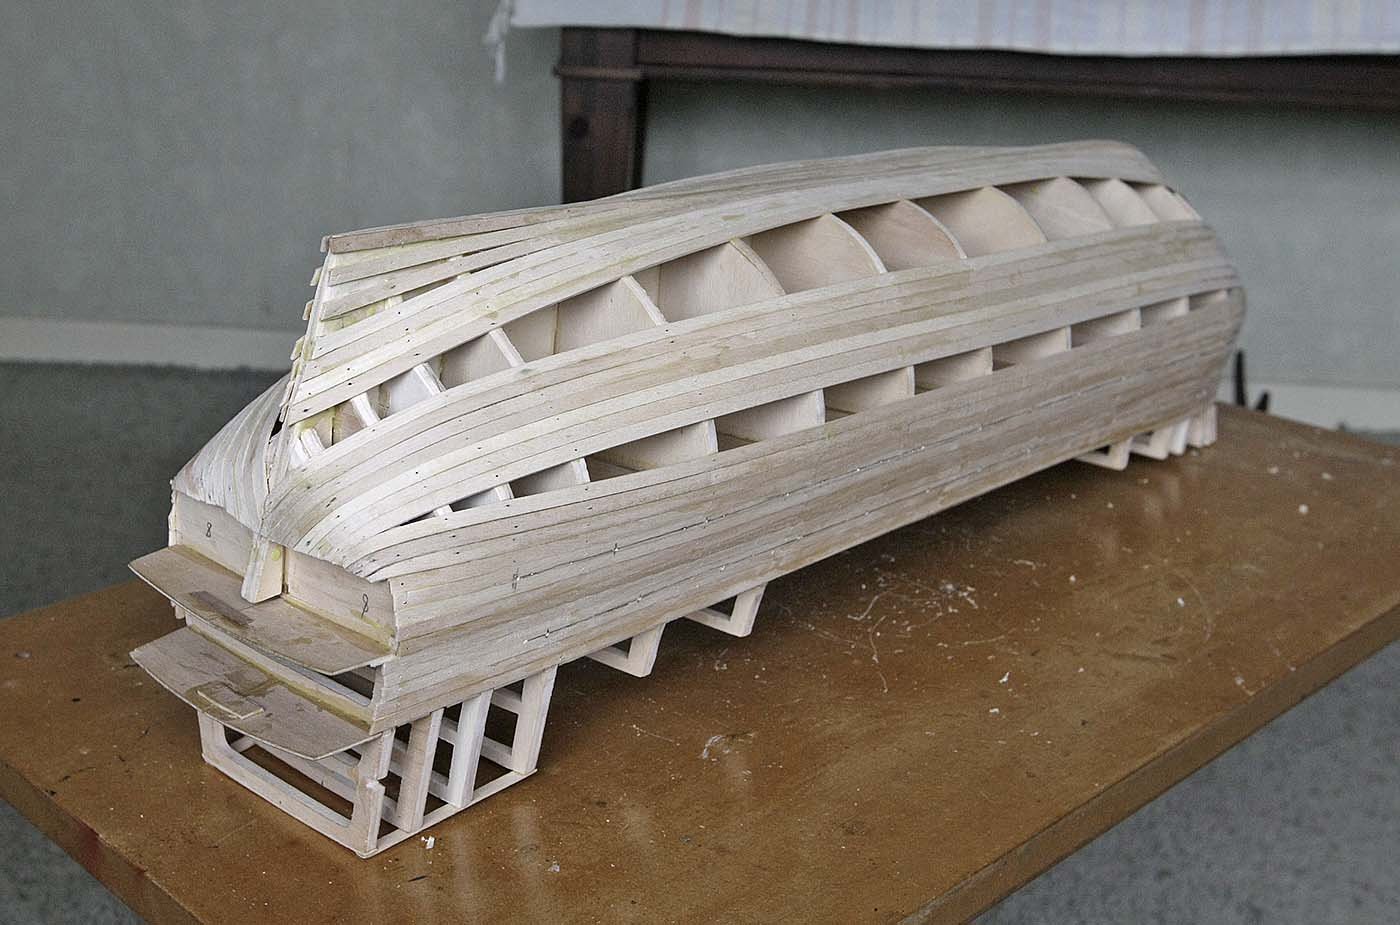
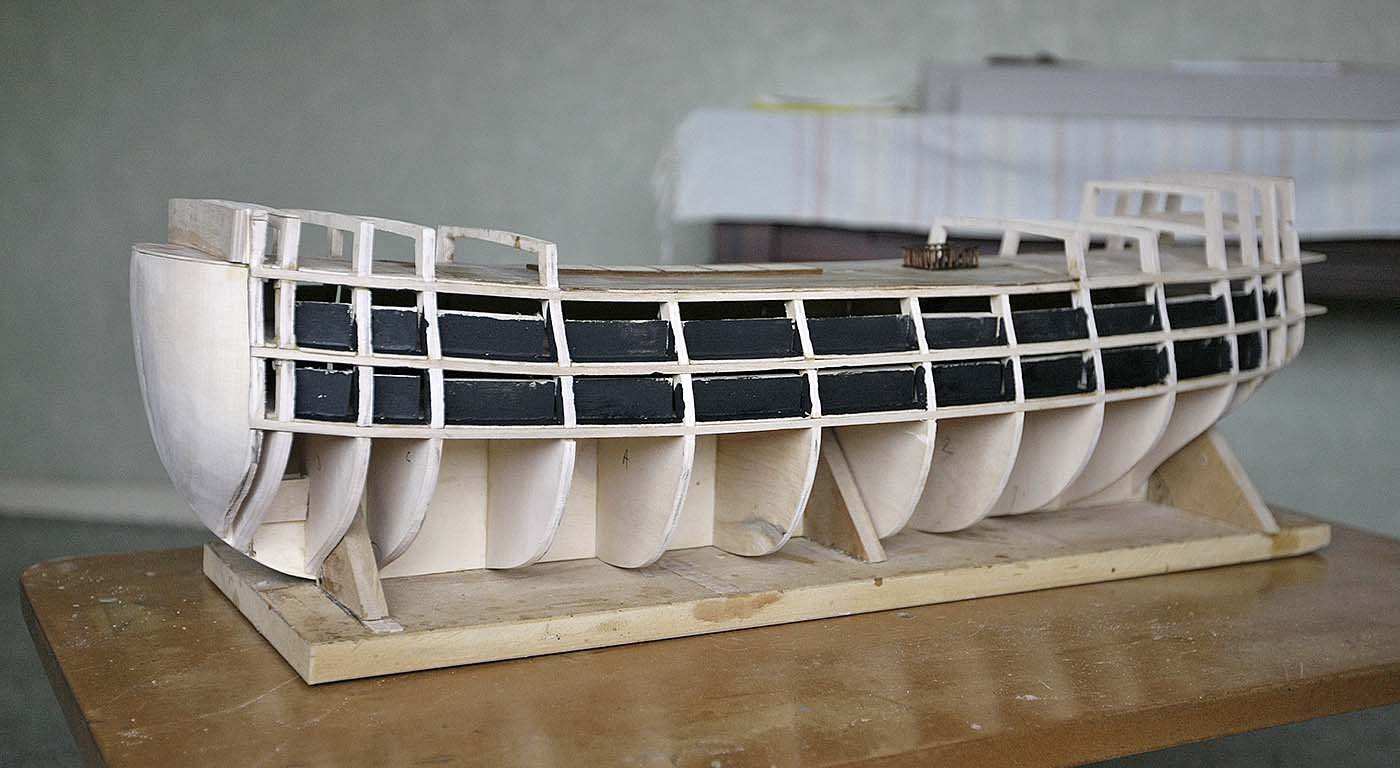
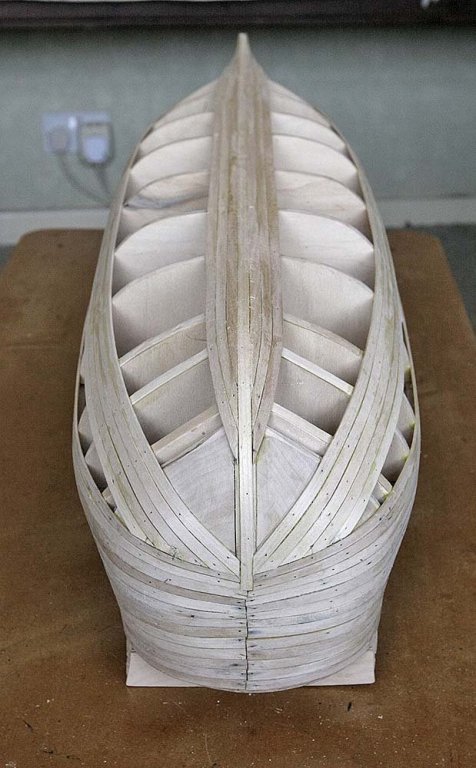
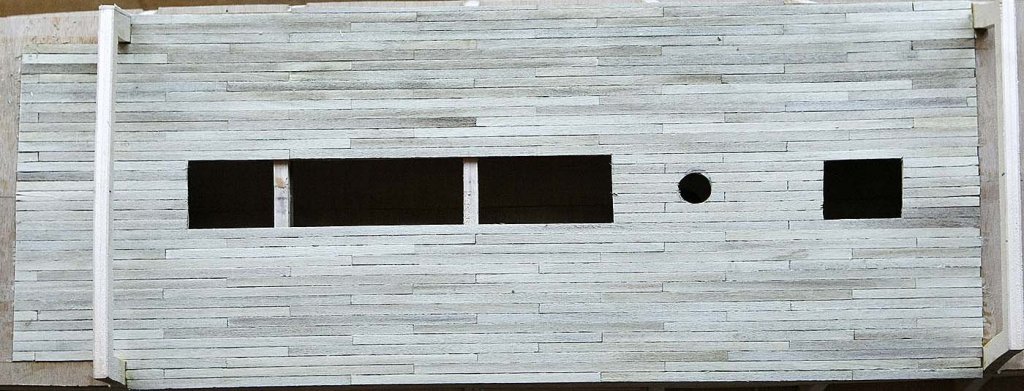
 Hello Everyone. Satisfactory progress on the build is being made. I'm taking a short break whilst the next few planks are soaking so am taking the opportunity to write up the log. Looking over the planking that I had done I could see that a slight hollow was forming around the second frame and that where the bow filler blocks joined the frame the curve had a slight bulge. I think that the hollow relates to the earlier problem of the height of the bulkheads which I corrected, I've added strips to the edges of the 2nd, 3rd, 4th frames and re-profiled them so that should now be ok. I realised that the bulge was because I hadn't been aggressive enough shaping the edge of the bow blocks, I've now taken more off the remaining part and hope that I've done enough to get a good profile. I haven't yet managed to complete a hull without the use of filler and I was hoping that this would be my first. This is not really important but is just a matter of satisfaction, it's still a possibility but it's a close call at the moment. I've now planked to bellow the lower gun deck, I'm happy with the way that the planks are lying with a nice true run. I drew in the centre line of the gun ports, again using Pete's suggested measurement and as before because the deck was covered I pre set my callipers using the previous marked line as a reference. I them marked the centre of each gun port and drilled a hole for a jig to be used later. I took the measurements from the plan, I used the leading edge of the mainmast as my start point and using my callipers marked the distance along the drawn lines of each port centre point forward of the mast. I then again using the main mast, marked the ones towards the stern. I've checked and rechecked the port positions from as many reference points as possible and all seems to be ok. I earlier said that there was a generous amount of planks supplied, yes there is and now I know why!
 -
Hello Again, Pretty rapid and I think successful progress is being made so here's an update. After finishing the initial planking, the upper, I turned my attention to starting from the keel upwards. Initially this caused me problems. The false keel is 10mm, nice and sturdy but the walnut keel to be added later is only 7mm, the bulkheads are set flat and even with the bottom of the false keel except for where they arrive at a steep angle at the front but mainly at the stern. It's difficult to describe in words the problem getting the transition from planks laying flat at the bottom then over what is a shoulder of the wider false keel and lie flat against the side. To overcome this I added a 7mm planking strip along the bottom of the 10mm false keel, and used this to butt my planks up to. It means that I have planked the bottom of the keel as well but it made it easier to get a good flow of the planks and when complete I could always sand it back to near its original dimension. I think you will understand better when you see the pictures. I split the area to be planked in half, worked upwards and downwards letting the planks have as natural a run as I could let them. I've put on sixty planks so far and thing are looking quite good. I'm taking a short break from it at the moment as the repetitive gripping of the many hundreds of small nails has caused cramps in my hand, I knew it wasn't going to be easy but that side of it is nearly complete. Ken

-
Hi Eddie & Blue Ensign, Thank you both for you very fast response to my question. Ah yes I knew there had to be a simple answer but I've been going around in circles trying to get it. Thanks, Ken
-
Hi, I have recently started my first build log, Royal William and I am finding it difficult to add script between pictures. At present I'm writing the log, I then add the relevant picture for that paragraph which I have uploaded but I can't continue with the next paragraph. To continue I have posted the log and must then start again in the reply. Thanks Ken
-
Hi Vince, I've just run through your complete log again and I'm very impressed, you've put so much thought and effort into your build that it's almost taken on a life form of it's own. I want to do an ok build but yours is getting to be a tough act to follow, keep up the nice work. Ken
- 593 replies
-
- 1
-

-
- royal william
- euromodels
- (and 1 more)
-
I put the first plank on as suggested, about 3mm below the finished main deck surface, glued and nailed it. I made sure that everything was well glued to everything else, again I learned the hard way about sprung planks. The curves were quite friendly and it wasn't until the 7th plank that I found it necessary to start tapering. Using Pete's measurements I then marked the line of the upper gun ports 11.7mm above the deck. I knew that this was needed so I had already set my callipers to that height but using the lower deck as the reference as the upper gun deck would now be covered. Later I will take from the plan the centre points of the ports and drill a 2mm hole where the lines meet. I noticed that when I was working the upper deck frames felt vulnerable so as a precaution I put a couple of stringers across the top. They won't save it from a fall but from being handle too roughly. Ken
-
I don't use a holder when I plank, I put an old pillow on my knee to take the shape of the hull and rest it on that. I like to be able to move the hull around so that I can attack it from all angles. I must tell you though that doing it this way with the Royal William is like wrestling with a baby whale. I opened the wood bundle and saw that the quality was again excellent, as good as I could wish for and better than most of what I have had in the past and there appears to a generous amount of it too.
-
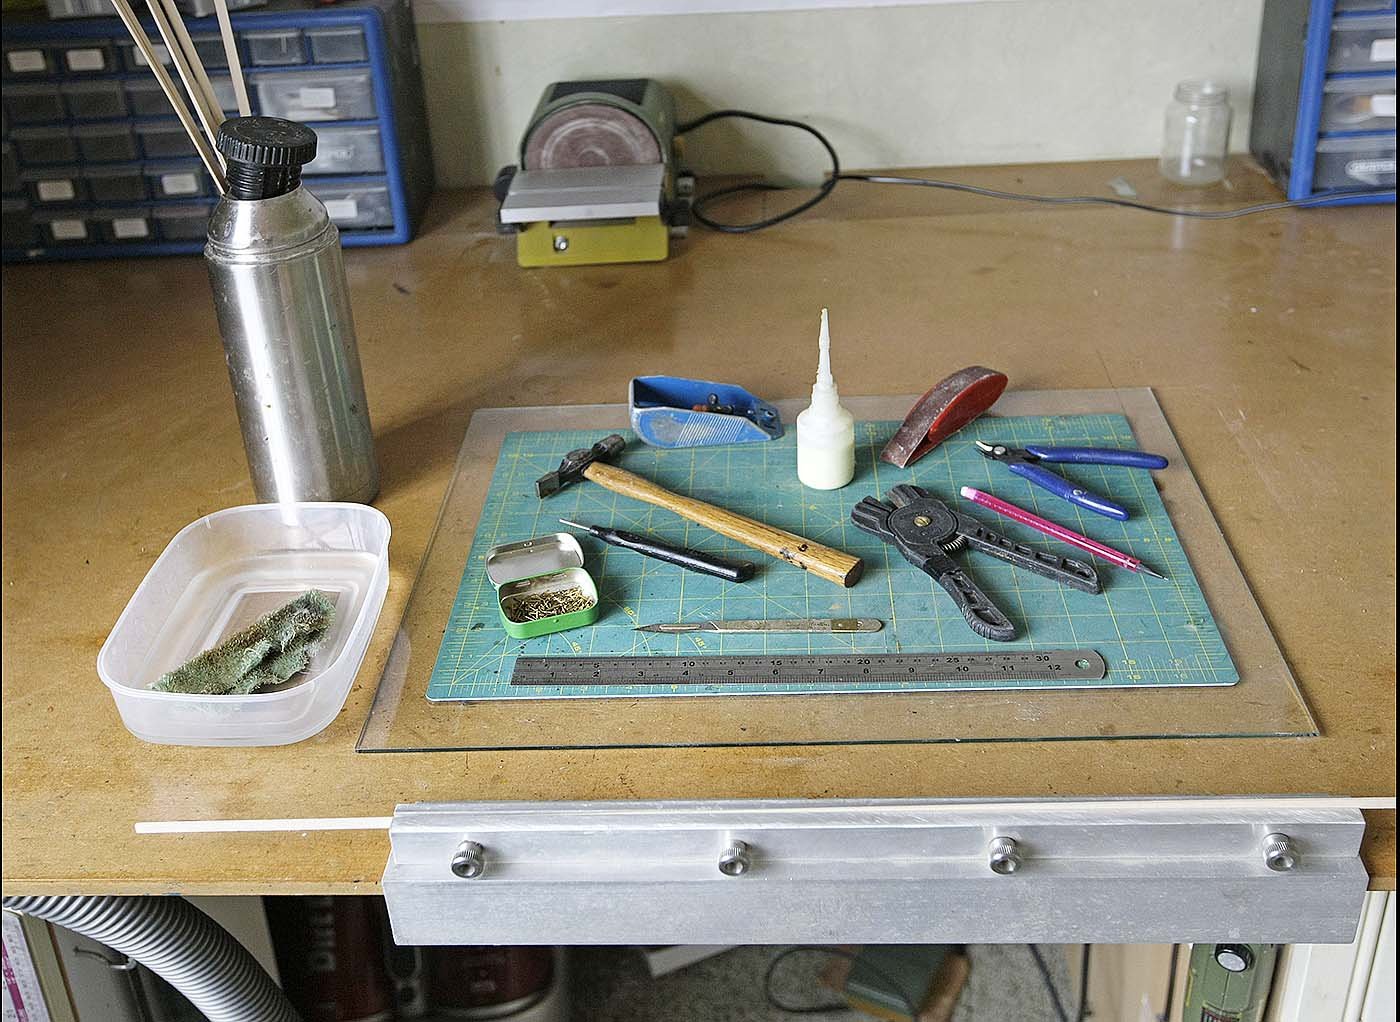
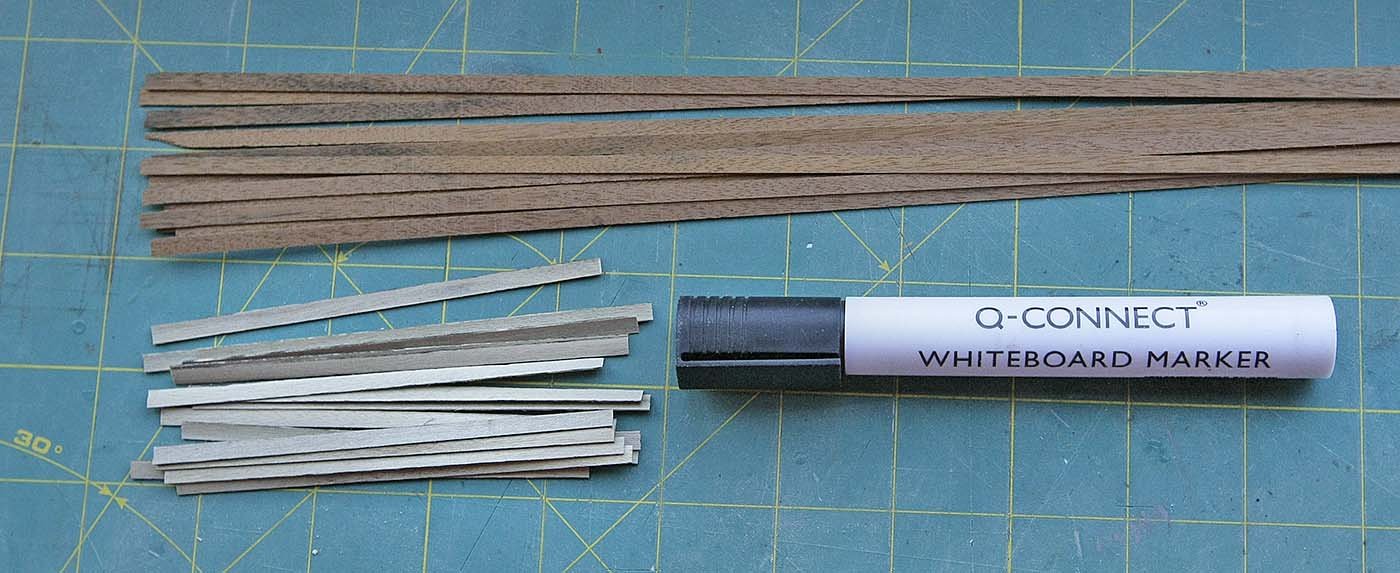
Hello All, Once again thanks to everyone for the likes and kind comments. Welcome aboard Pete, thanks for joining me and for your encouragement. Well the last few days were two steps forward and one step back. The filler that I'd used to simulate the tree nails when fully dried matched the colour of the deck perfectly, even though I knew it was there it was so subtle I could hardly see it. It had been fine on the usual Tanganyika decks but not on this bleached wood so I drilled out the filler and I'll get a slightly different but more noticeable shade of filler. I am now ready for the first planking. I'll show you all the tools that I employ. I use a flask of hot water to let the ends of the planks soak, usually about six at a time, this is probably the reason my tea tastes the way it does. My main bending tool is the Amati bender, I find that this is quick and easy to use on planks and does just about all the bends that I need. Any difficult curves I resort to using the shaft, not the tip of a soldering iron. I like using the Amati pin pusher, again easy to use and a small hammer for finishing some nails off. I use a small David plane, a blade and sander for tapering the planks and I have a home made plank holding vice. I always have a dish of water and cloth on my bench as I like to clean off any excess glue from the surface, I've learnt the hard way about poor varnish results having left traces of glue on the wood.

-
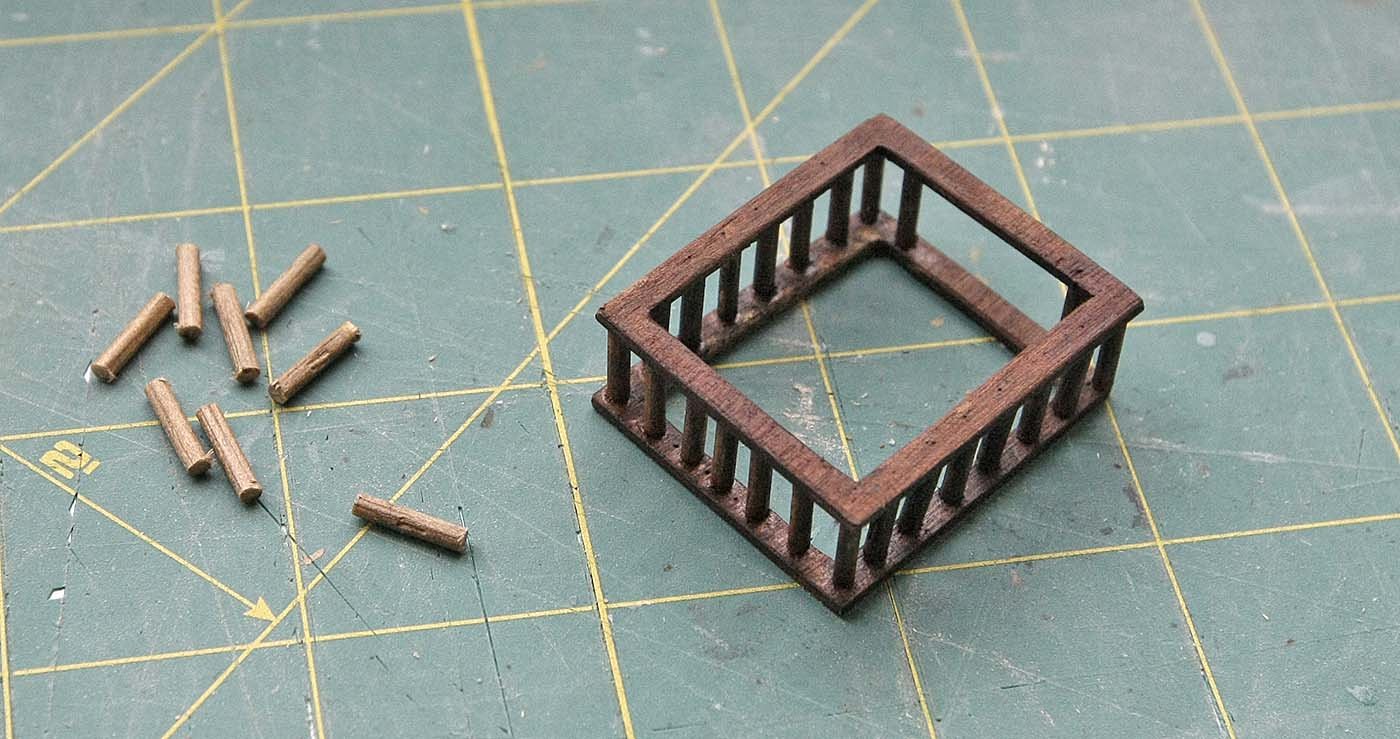
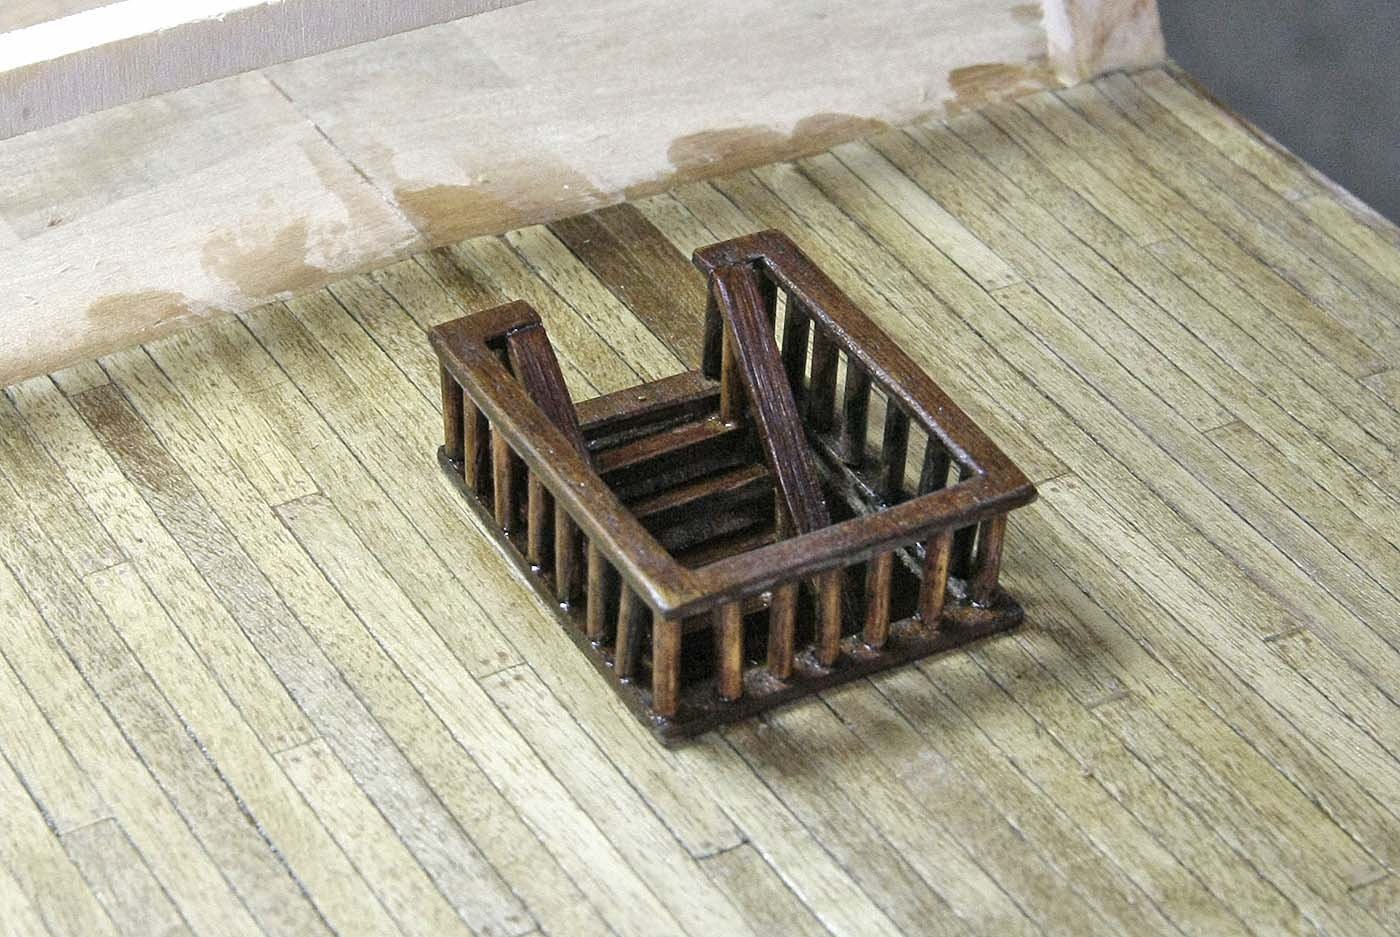
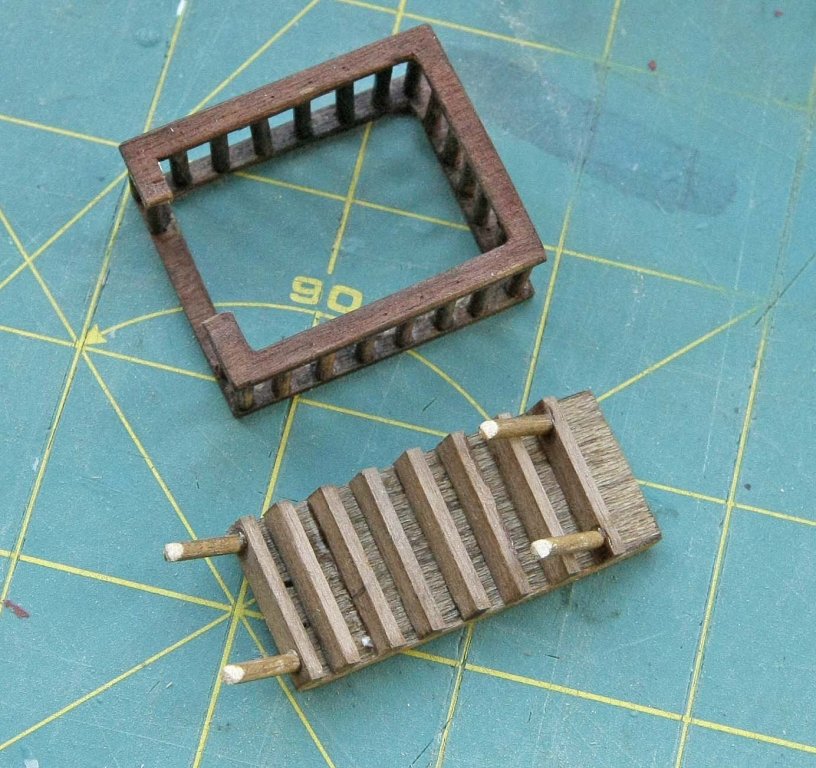
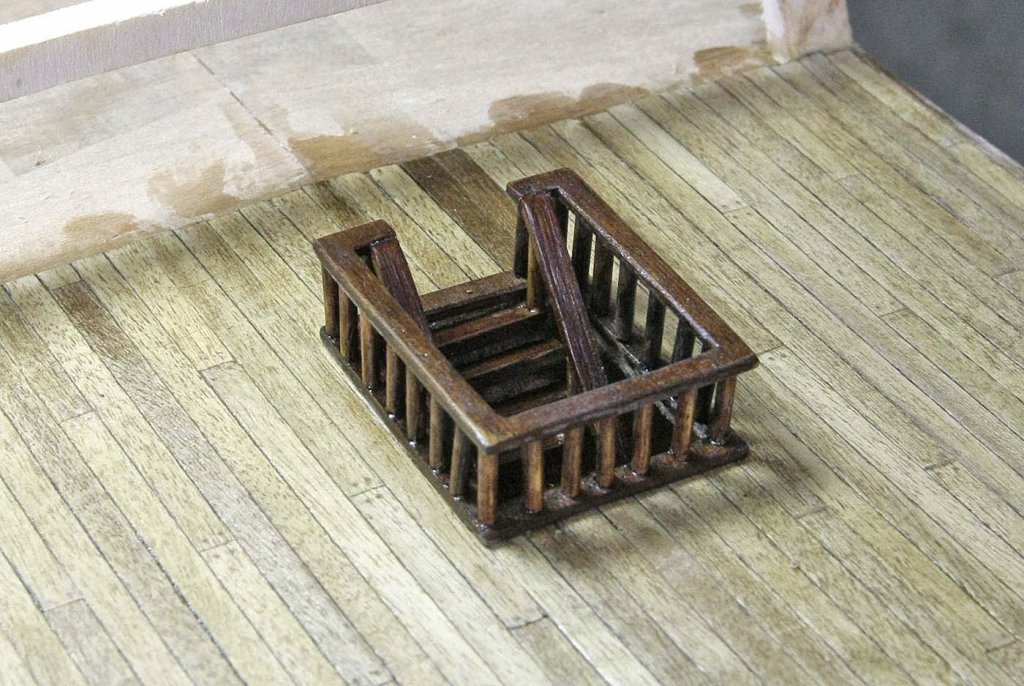
Hello Again, You didn't have to wait long for my staircase, it surprised me just how easy it turned out to be once I put my mind to it, so here's my version. Instead of building it up in sections on the ship I made it on my bench, I cut two identical pieces out of ply, one was for the hand rail the other for the base. I cut several 10mm lengths from 2mm dowel for the stanchions. Using cyno I glued the dowels to the lower piece of ply then I glued the handrail on top, as they were identical the top just dropped into place. I then just cut away the gap in the handrail, sanded and stained, as easy as that, the pics show it better. For the stairs I cut steps from 4mm strip, bevelled the rear edge then glued them onto a strip of ply. Again I stained them and placed them in position, because of the closeness of the steps you can't see the ply. I glued the rails in place then put a hand rail for the stairs and varnished everything. I am very pleased with my simple not too fiddly construction. I have painted the area of the gunports black and am now ready for the first planking. I'm surprised that I have got to this point in just two weeks, everything has gone smoothly so far, may it continue so. Ken

- 424 replies
-
- 11
-
-
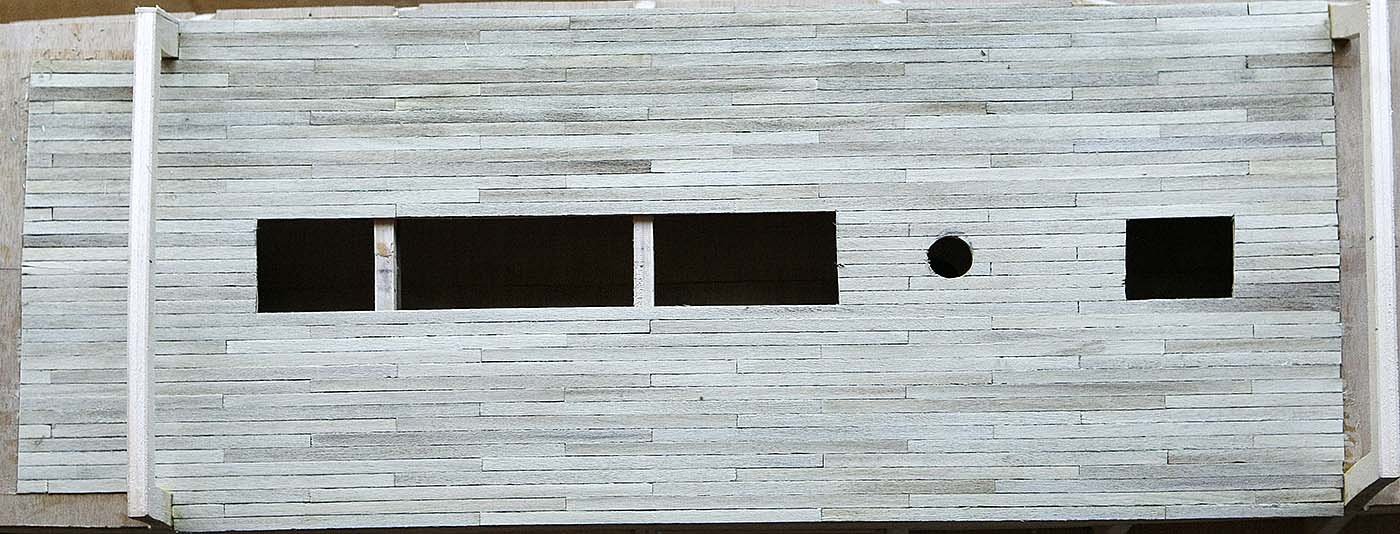
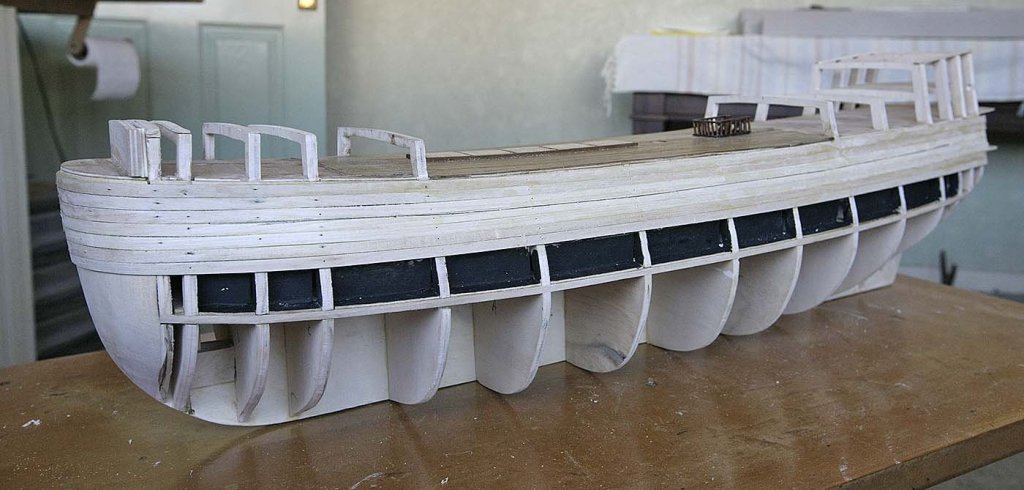
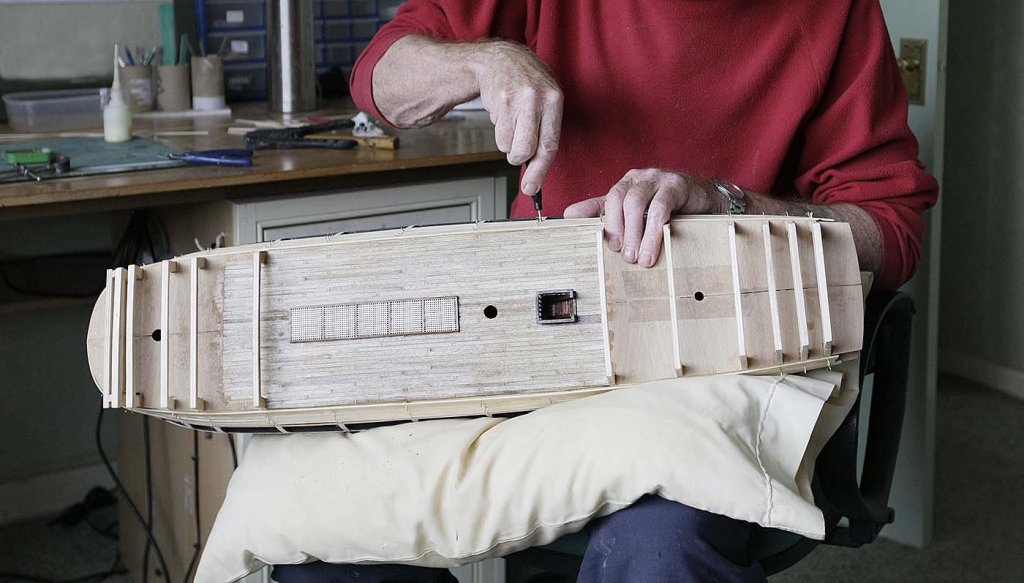
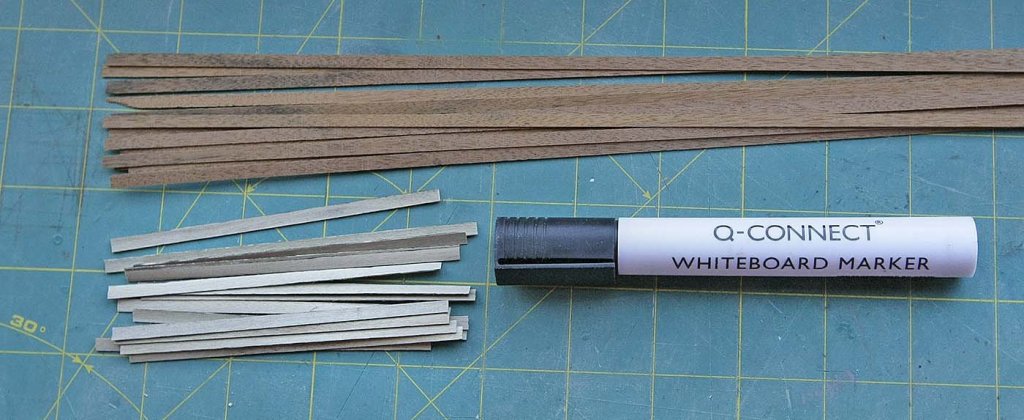
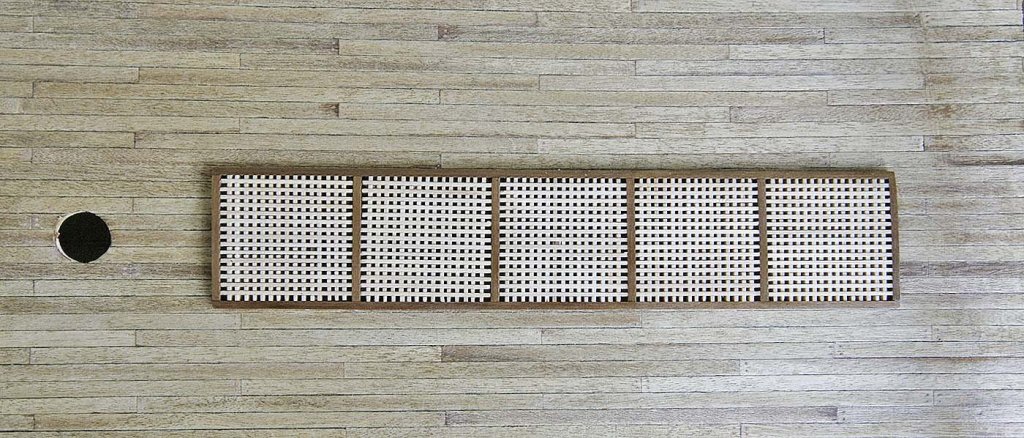
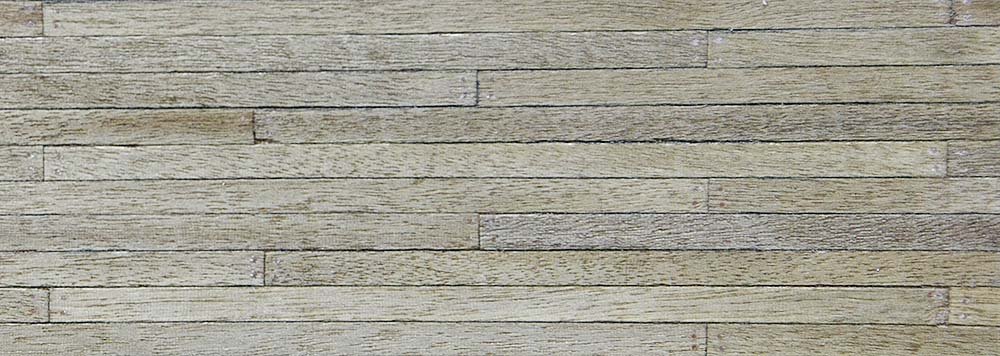
The next job was the deck planking. The wood supplied for this was good quality but it was a darkish walnut, I wasn't happy with the colour, it looked very wrong for a deck so I decided to bleach it. I soaked it in household bleach for about three hours, I then rinsed it through and left it overnight to dry during which time it got even lighter. I used a dry board marker to darken the edges. I find that being a drier medium than felt tip it doesn't leach into the grain and gives just the right amount of edge to the planks. I used Pete's measurements of 100mm for the plank lengths with a four butt shift at 25mm per shift. I marked out the deck and using white alaphatic resin glue I fixed the planks, the middle ones over the hatches I left full length to get the lines straight and scribed them later. I ran a thin line of glue the full length then put a line of planks down, the white glue makes it easy to slide them into position and allows them to be corrected for a couple of minutes, I then rub a damp cloth over the line which firms them down and at the same time cleans the surface of any glue. I find that with this fast grab white glue they bond very well, they don't warp or lift and after you notice any mistakes that you make you can lift them without damage for up to about 15 minutes .I sanded the planks and rubbed in a light oak stain, I gave them a coat of sealer then sanded again before giving them a coat of poly. I have tried a few methods for treenailing and I find that for me the one I prefer is to drill out the holes using a .6mm bit then rub in a water based light walnut wood filler, this is quick and easy. As I had already varnished the deck the colour didn't stain the wood and the excess was easily wiped off with a damp cloth. I gave it another light sand and a final coat of varnish, I am very pleased with the result. I made up the main deck gratings and fixed them into place. I can hear you all saying, " Is he going to make the stairs ?" Initially as they wouldn't be noticed I wasn't going to but as I wouldn't be able to hold my head up if I didn't try I'm going to give them a go, they won't be elaborate but I think that I'll be able to come up with a simple version, watch this space. Ken 038.jpg 200.98 kB
-
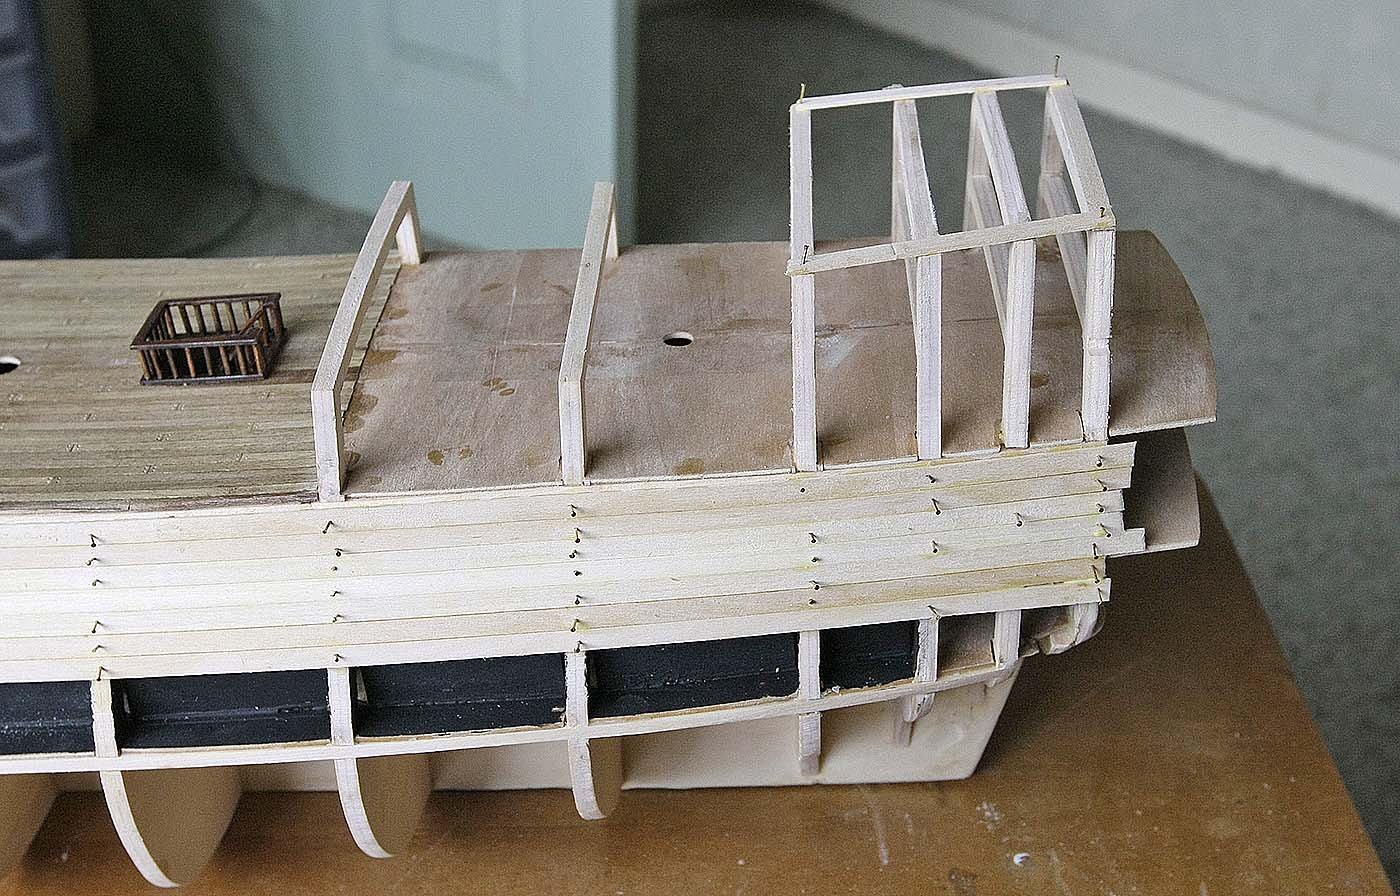
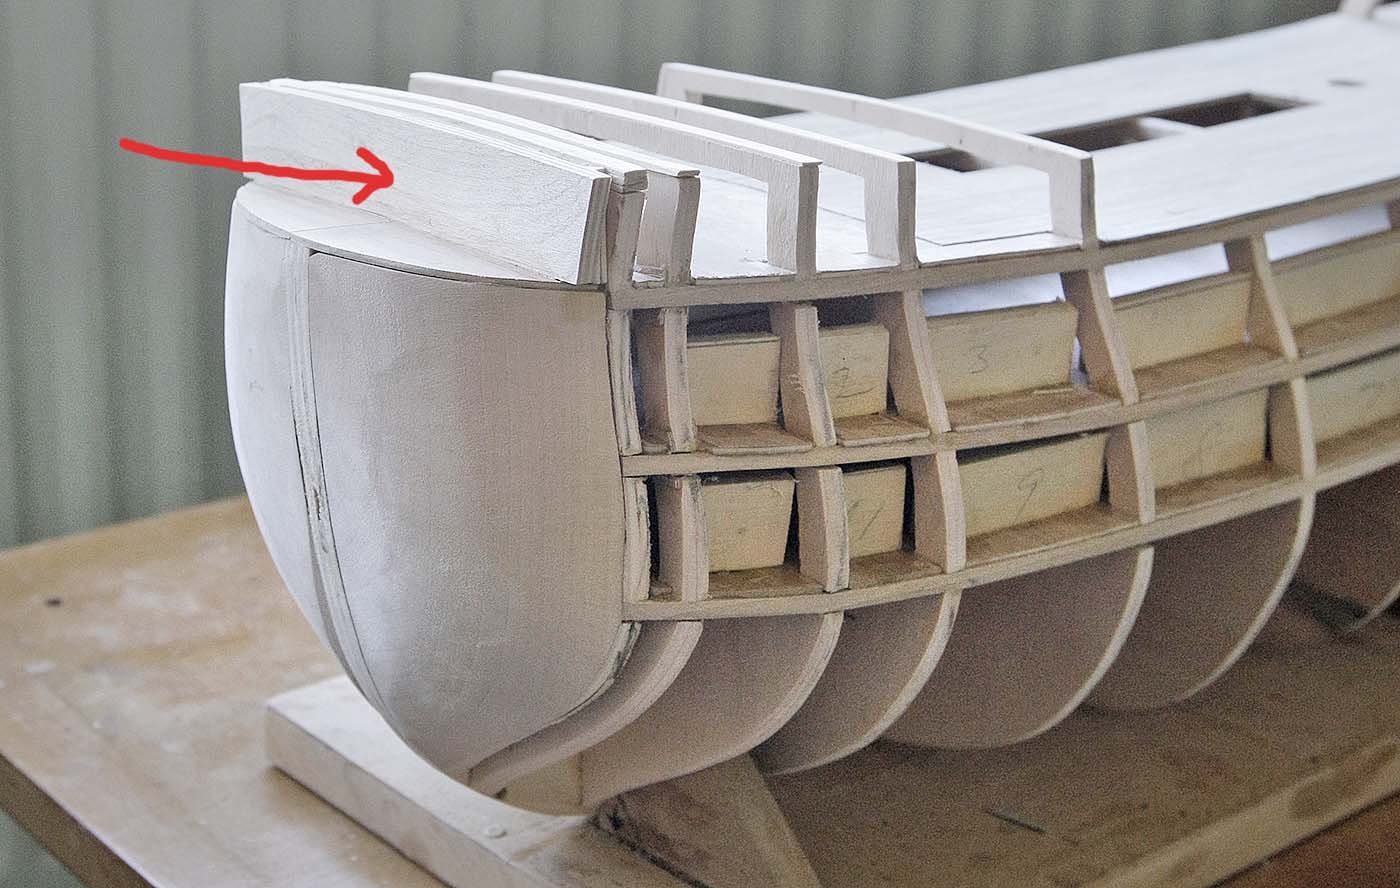
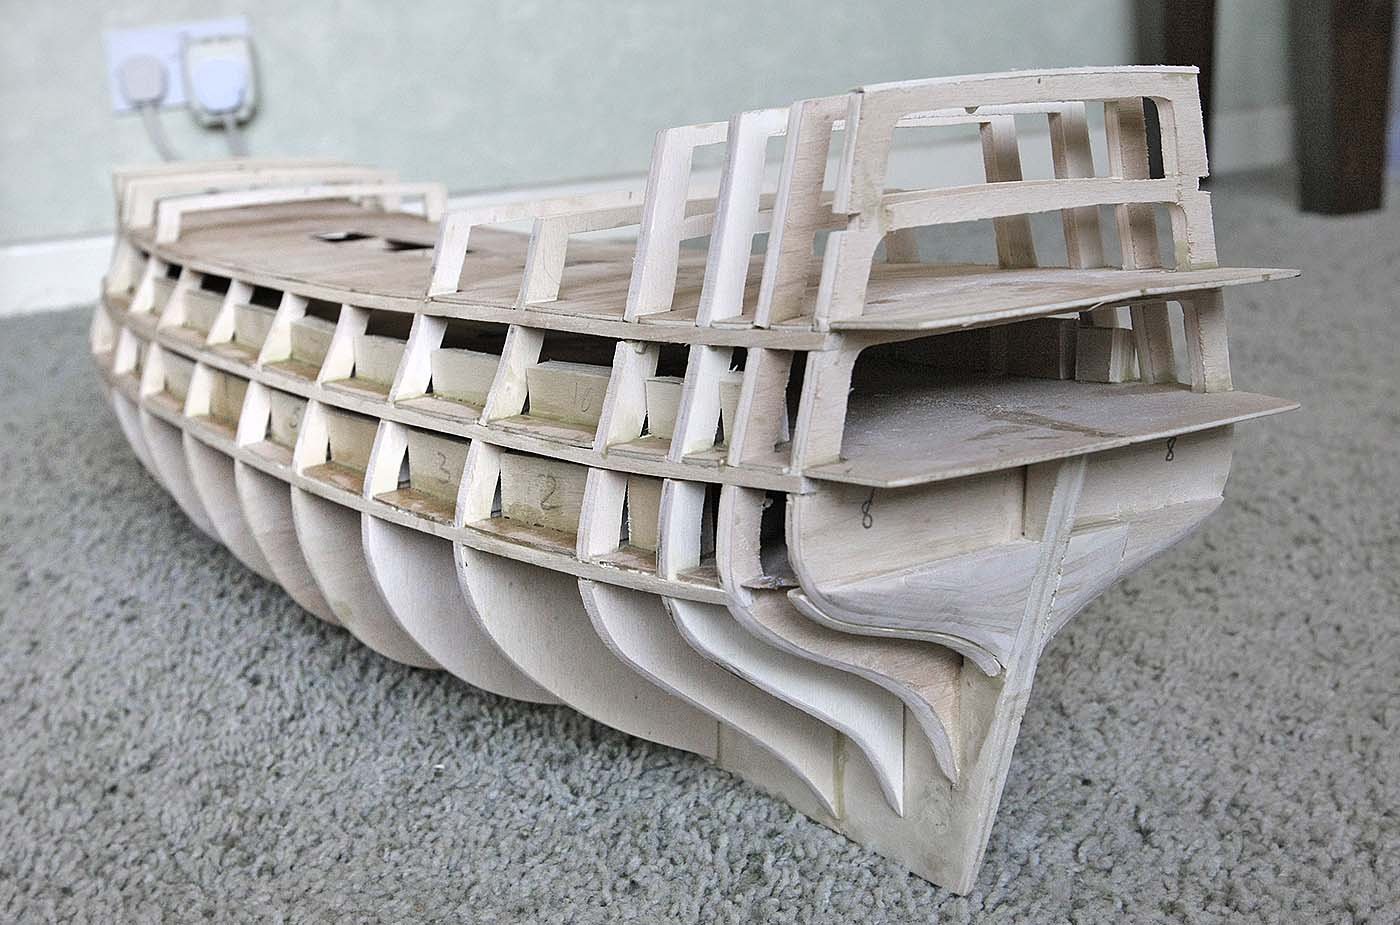
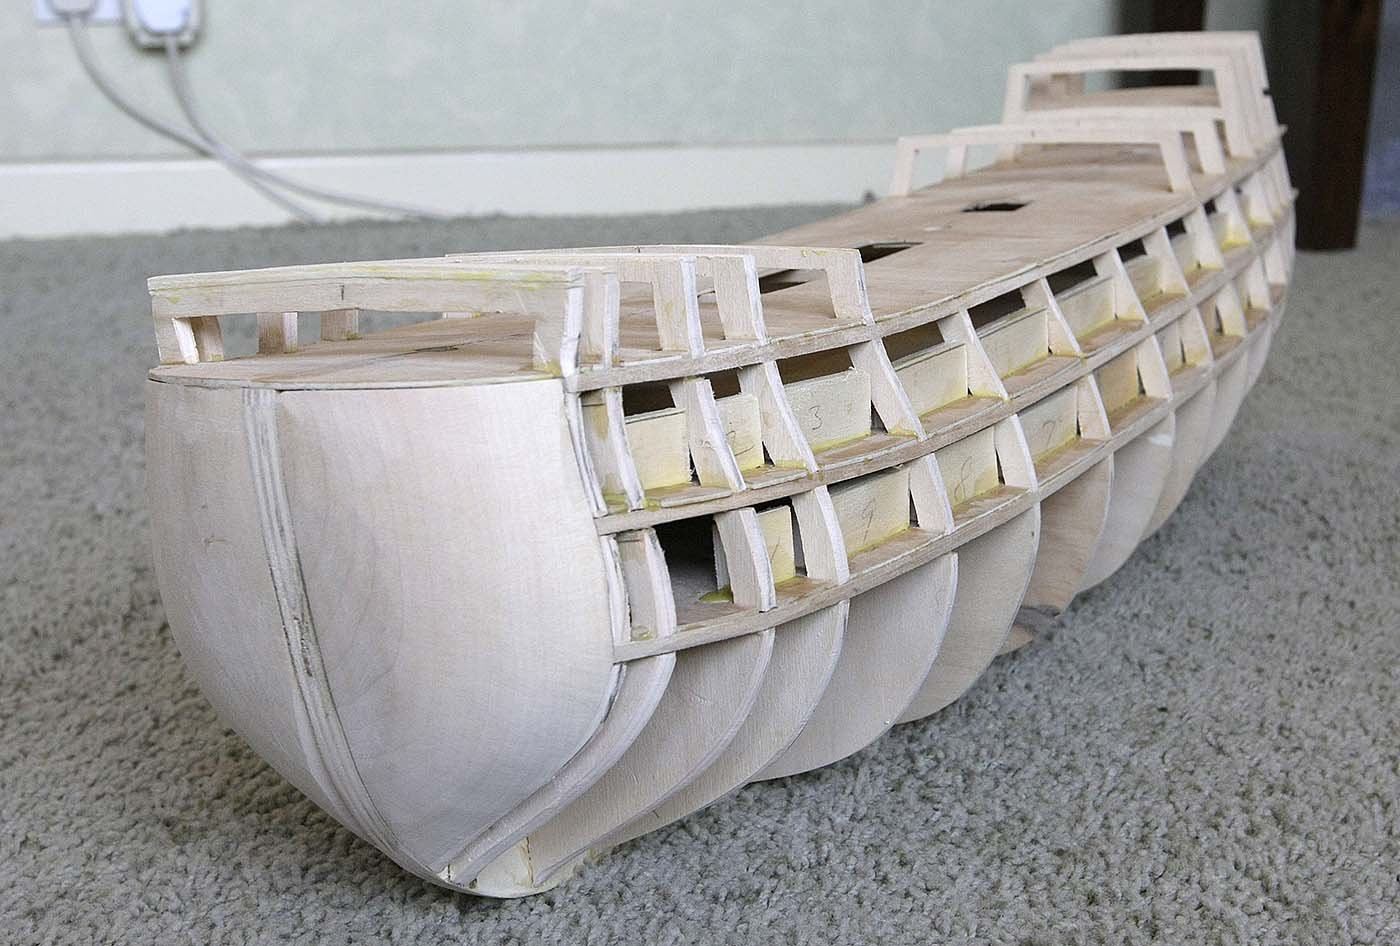
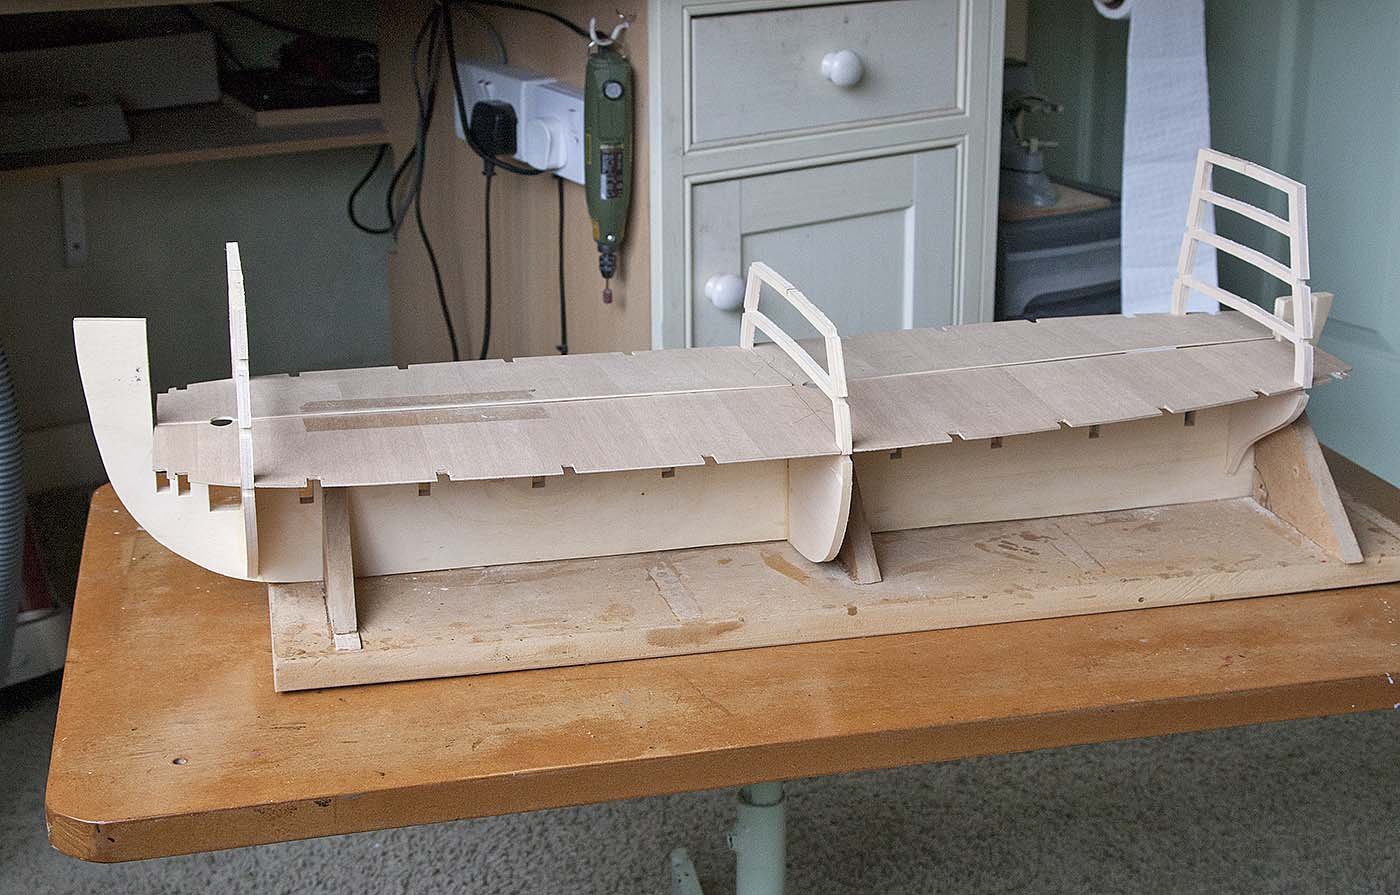
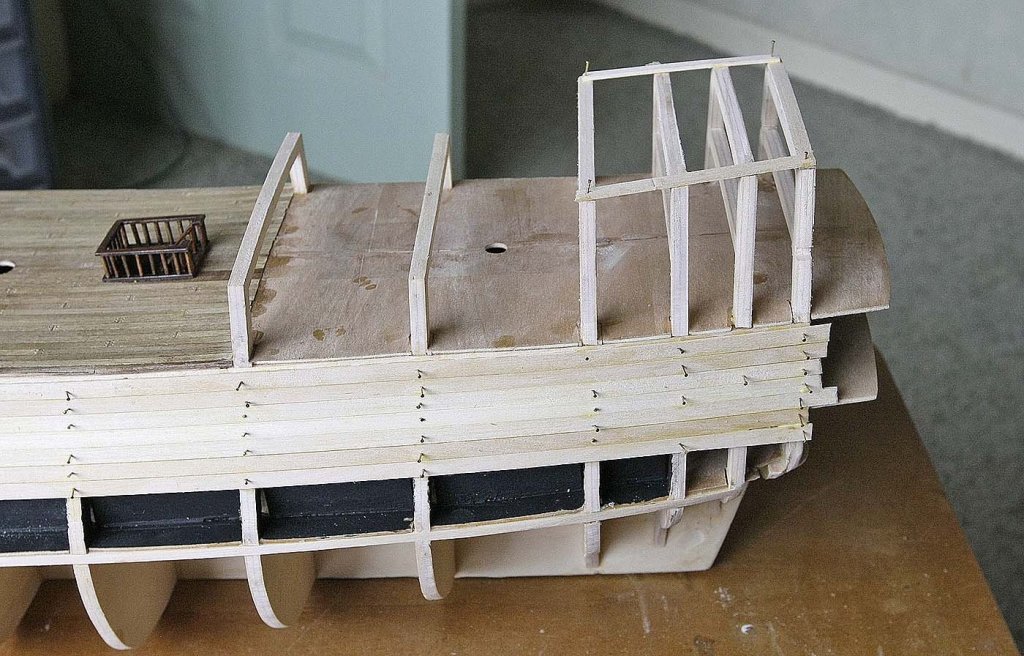
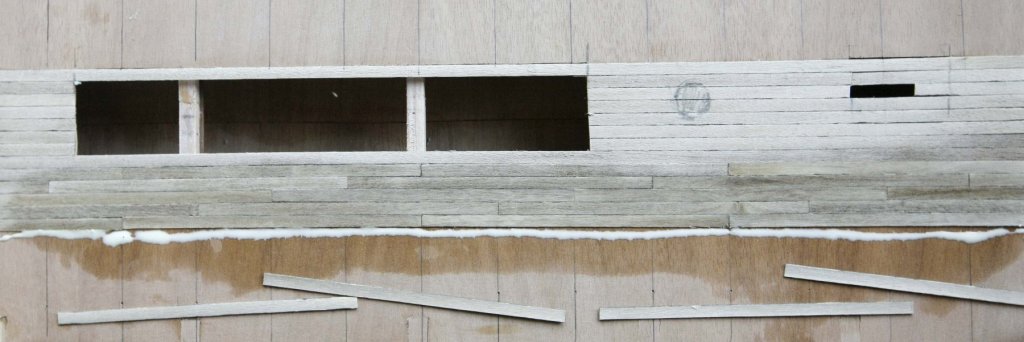
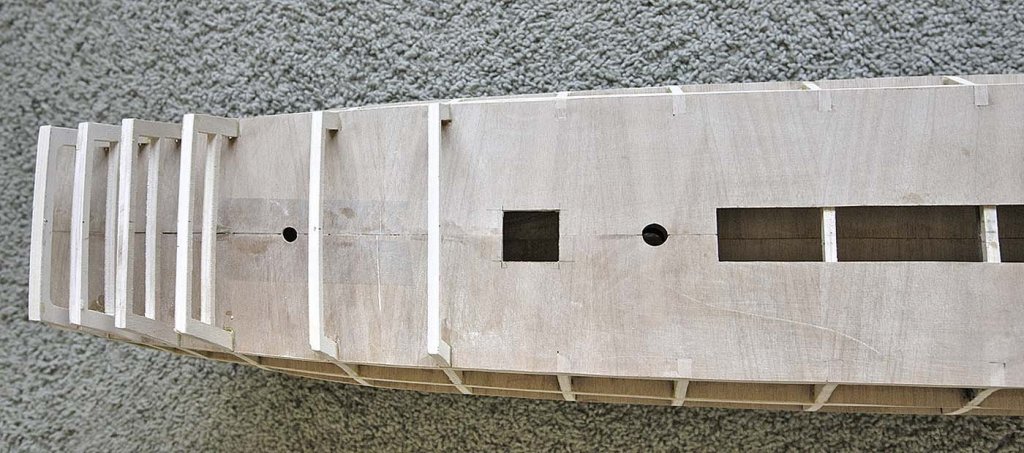
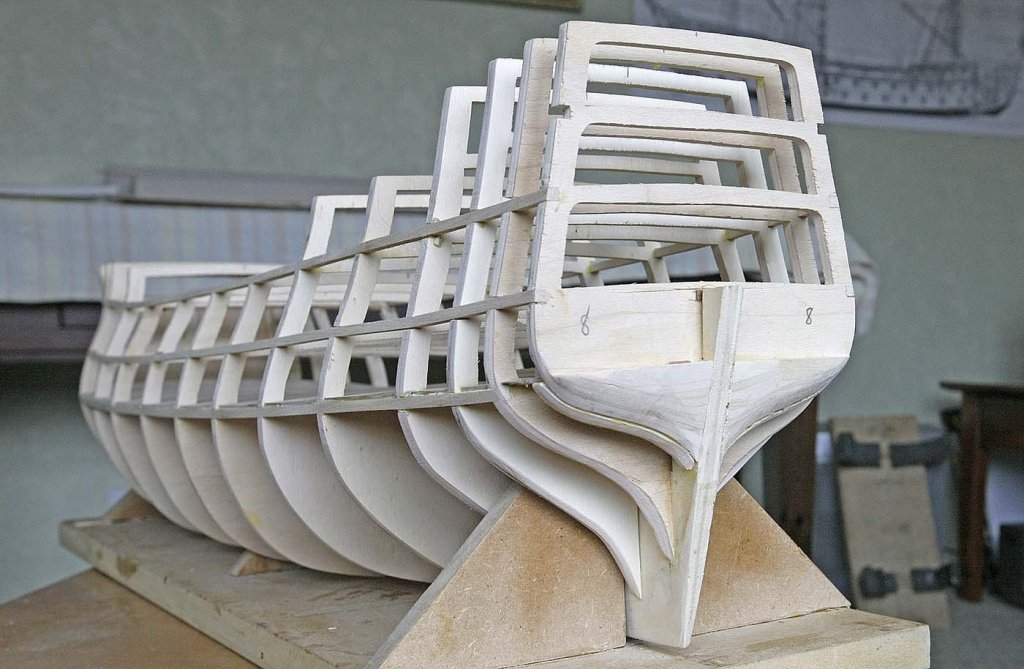
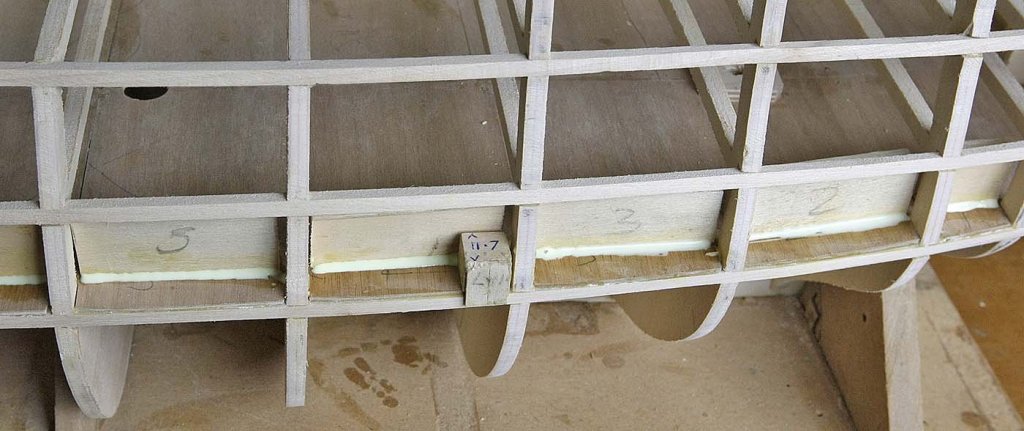
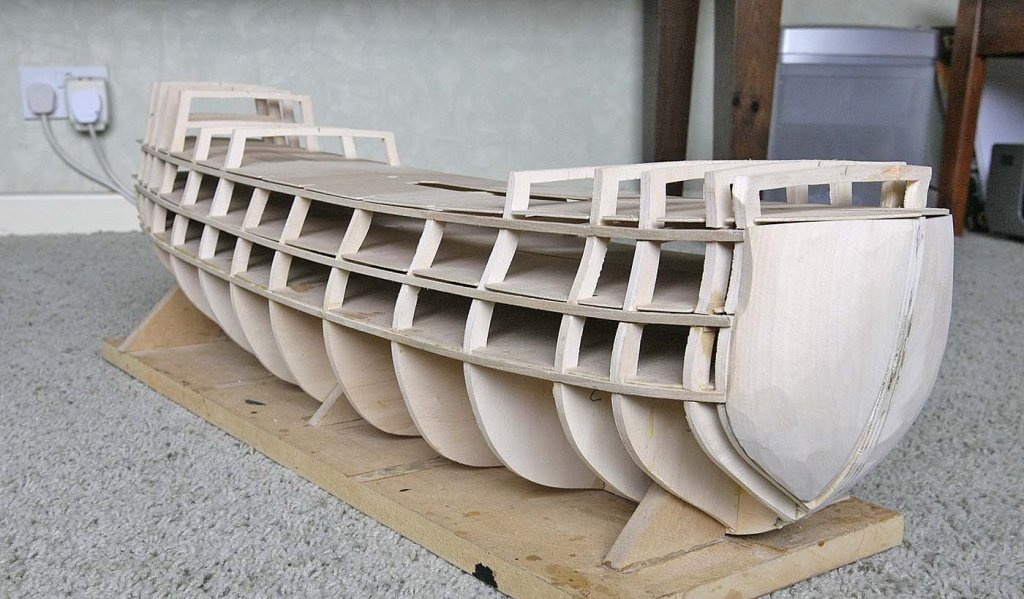
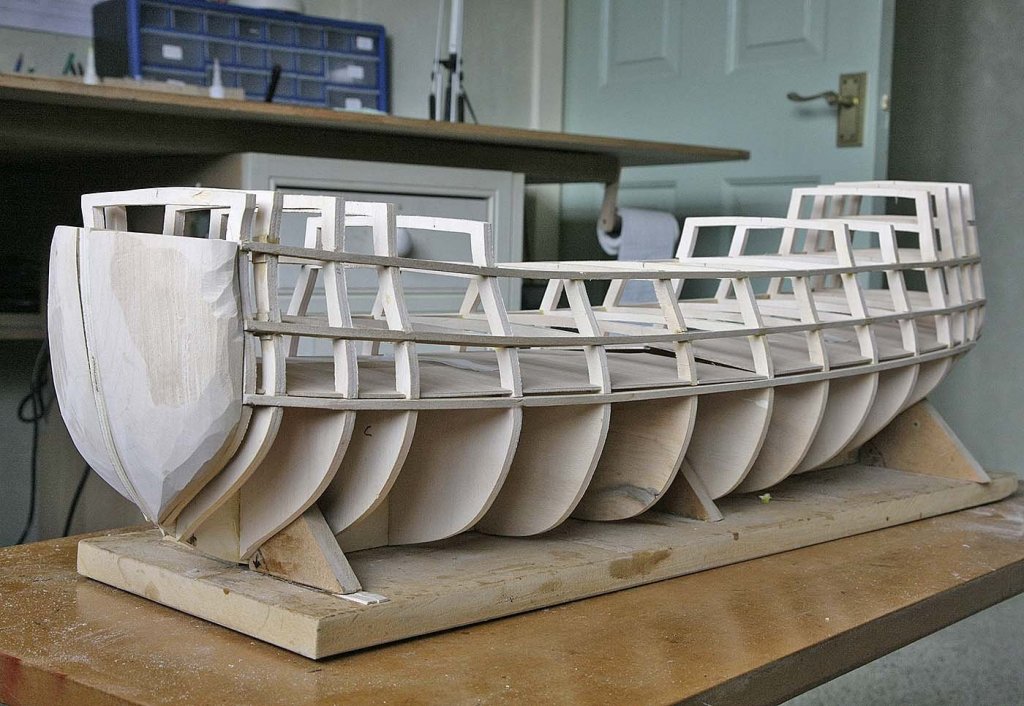
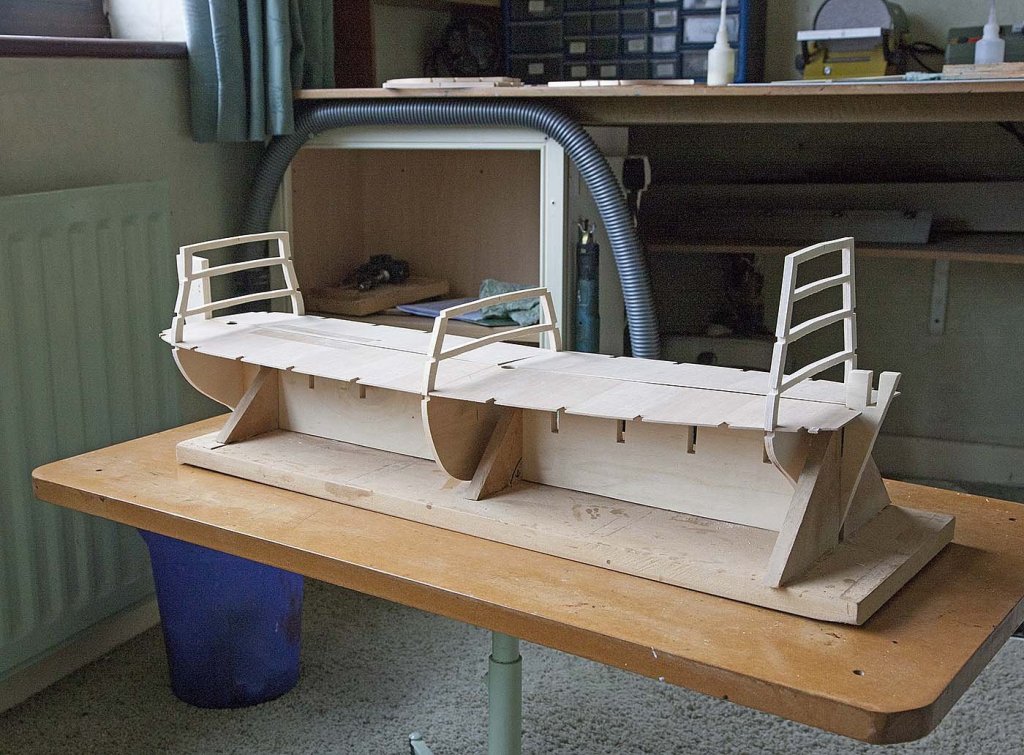
Hi All, The build has been progressing nicely. I added a false bulkhead in front of the foremost one. The planking doesn't terminate at the first bulkhead but goes about 20mm beyond, this new bulkhead is where the planking finishes, it will also provide a surface for the front roundhouses and doors etc to fix to. I can't remember whose log it was but the pitfall around that area was pointed out, I'm glad I saw that log as I too would have finished the planking short, so whoever it was, thanks.

-
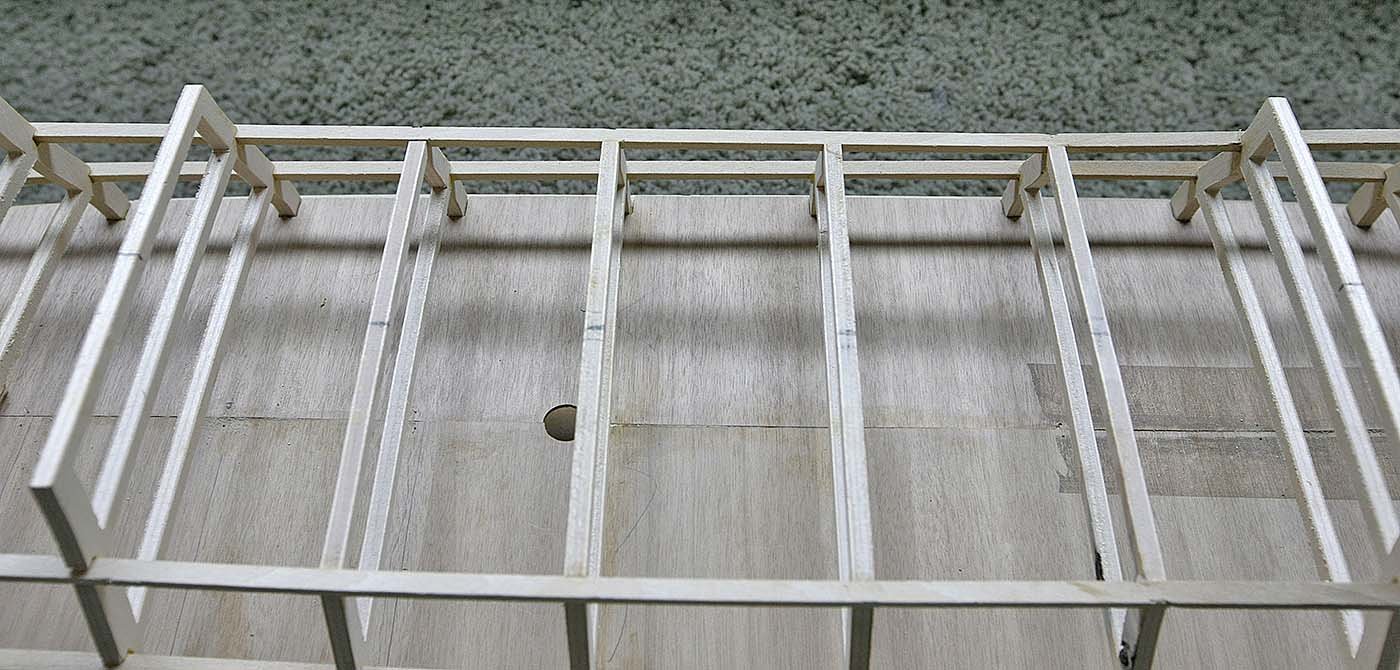
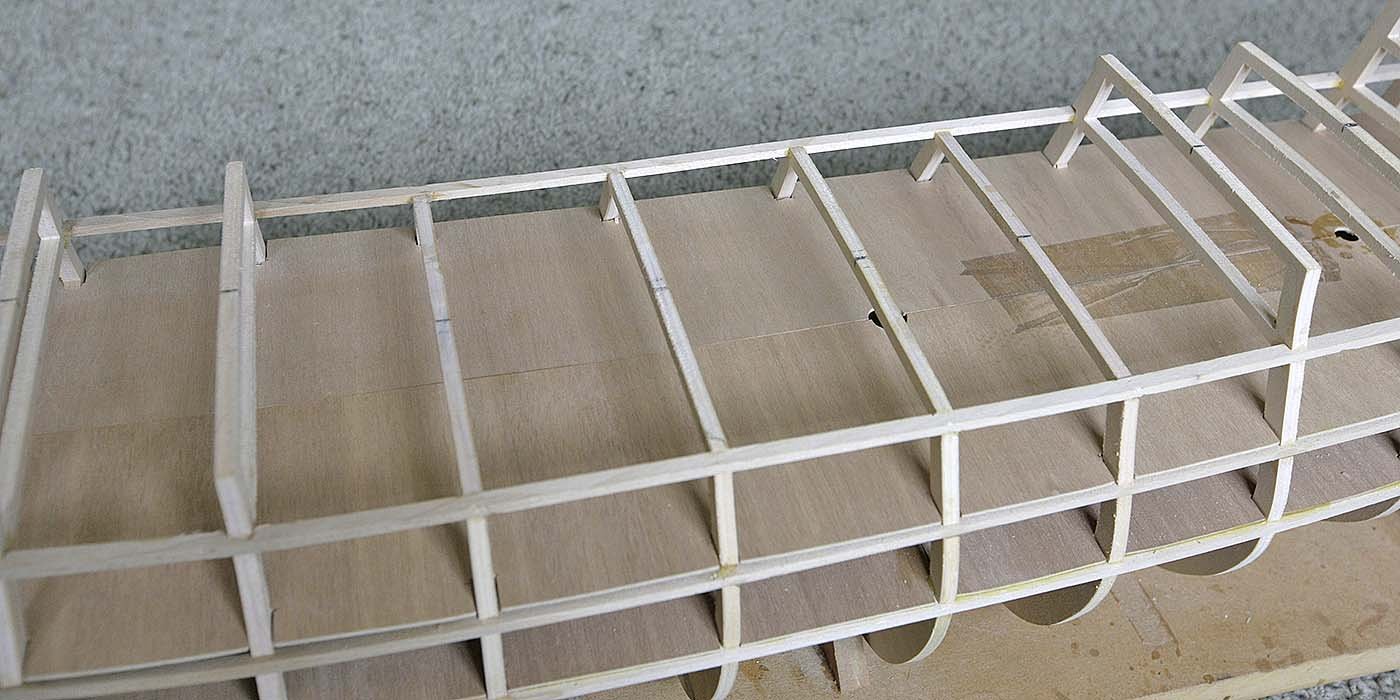
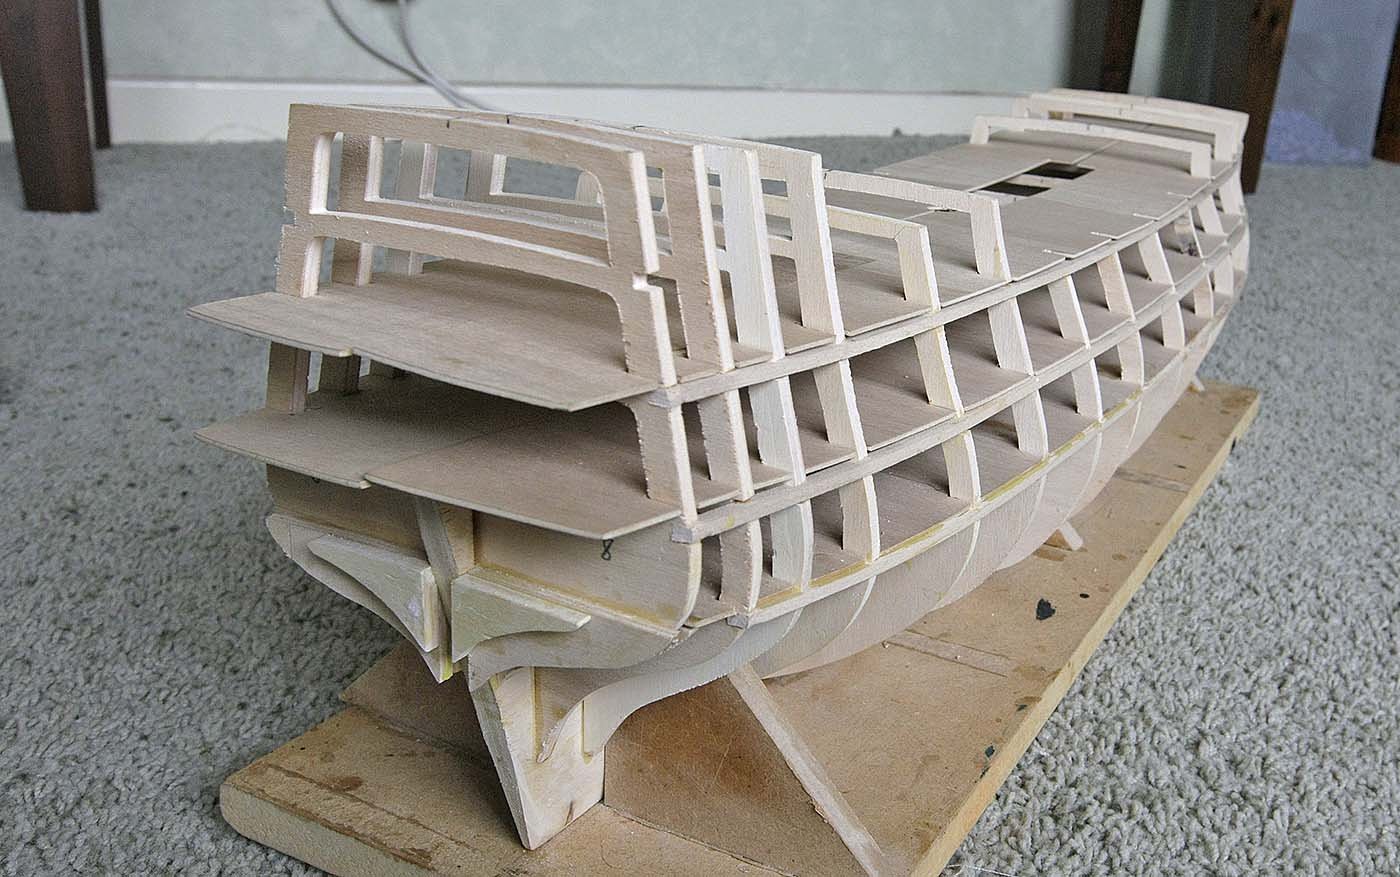
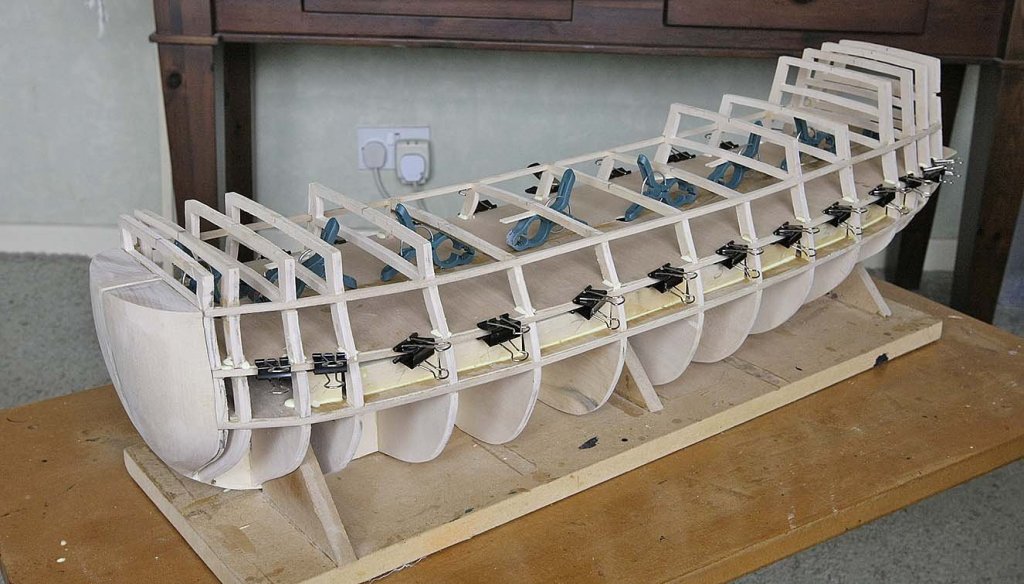
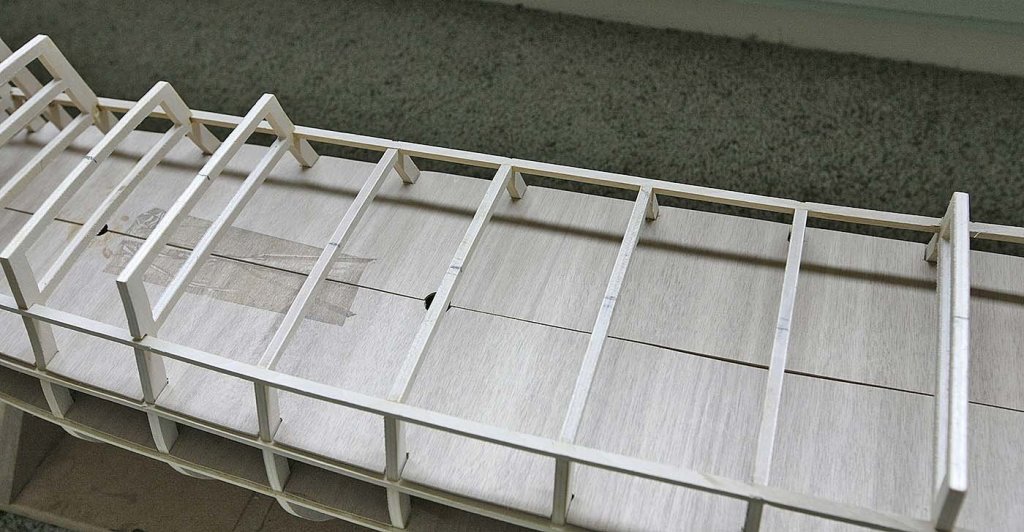
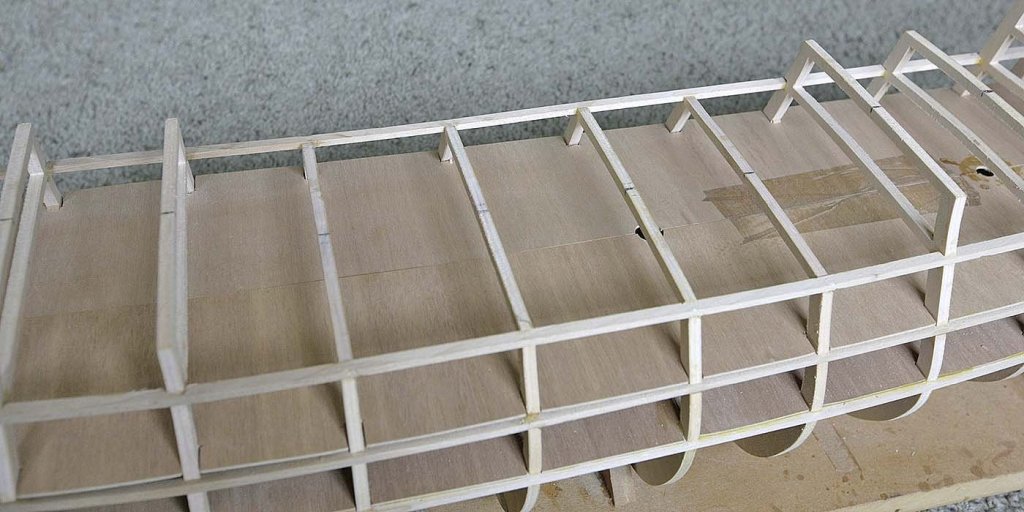
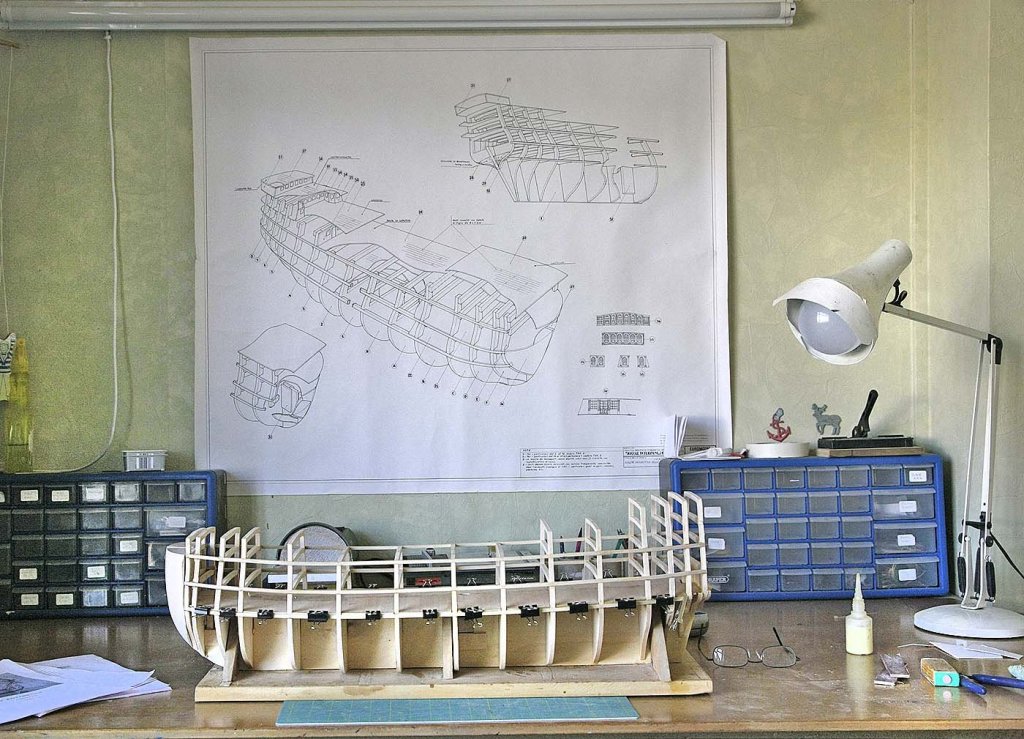
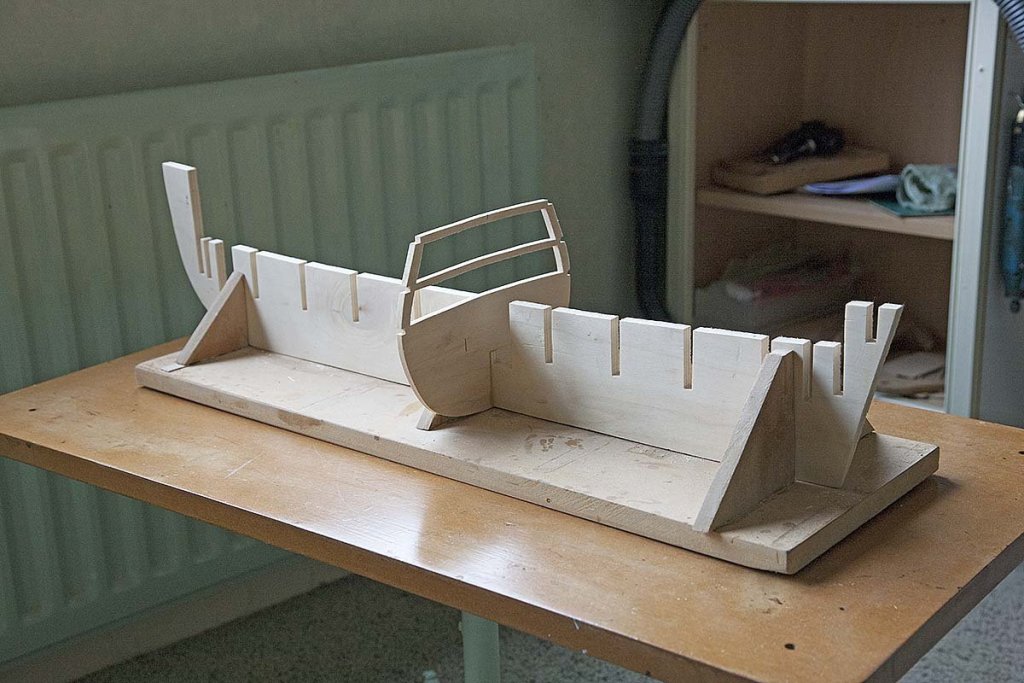
Hello, The latest marathon building session has resulted in the first phase being successfully completed, the framework of the hull. The second gun deck was fitted and glued, again no problems were encountered. I cut to size the dummy gun carriages and fitted them as I had previously done. I said that I wasn't going to get involved with detailing too much but just in case I decided to do a bit I cut out the opening for the ships staircase which I might tackle, I then fitted and glued the main deck. It was then that I noticed a slight error. When I fitted the bulkheads I mentioned that the second one was too high to form an even base for the forecastle deck so I lowered it by 2mm, with the main deck in place I saw that it had been the first bulkhead that was too low not the second being too high. Looking at the plans I now see that there is a marked sweep upwards at the front which I hadn't taken into account, I'm really glad that I noticed it in time. I've now added strips to bring these beams to their correct position, the front needed raising by 4mm. I really must learn how to look and properly interpret the plans. I gave the whole structure a final sanding to shape and unless you think that I've forgotten anything I'm now ready for the first planking. I am now looking at the size of this model and realize just how big a task the planking is going to be. I've put a picture of my last build, "Fly" against the Royal William as a comparison, I hope the planking will be like that only a bit more of it. Ken


-
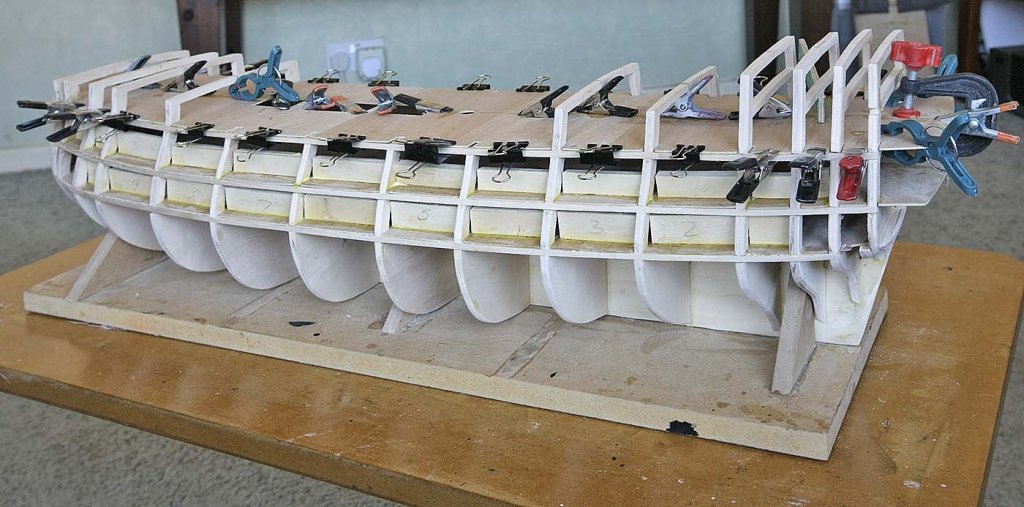
Hello Again, Hi Marc and Sjors, thanks for joining me, the more that people like yourselves follow my build the more I feel that it is worth the extra effort. At first it felt just like doing homework but now I find that I'm actually enjoying putting up a log and I look forward to photographing my work and writing the next post. Because others are going to look at it I am also being more careful and I'm finding that my building is better for it. Sjors, I'm very pleased that you are now following as your Agamemnon was one of the first logs that I started to follow a few years ago so I feel that I know you. I'm afraid that I'm never going to get my wife interested as she has her own craft hobbies that she's seriously into, and do I really want her to know just how much this kit cost! Keith has told you about the lower deck, it came in the kit halved along the middle so by cutting it in half again but across the centre it was then in quarters and manageable. If you look closely at the picture showing the dry fitting of this deck before it was clamped you will see what we mean. Ken
-
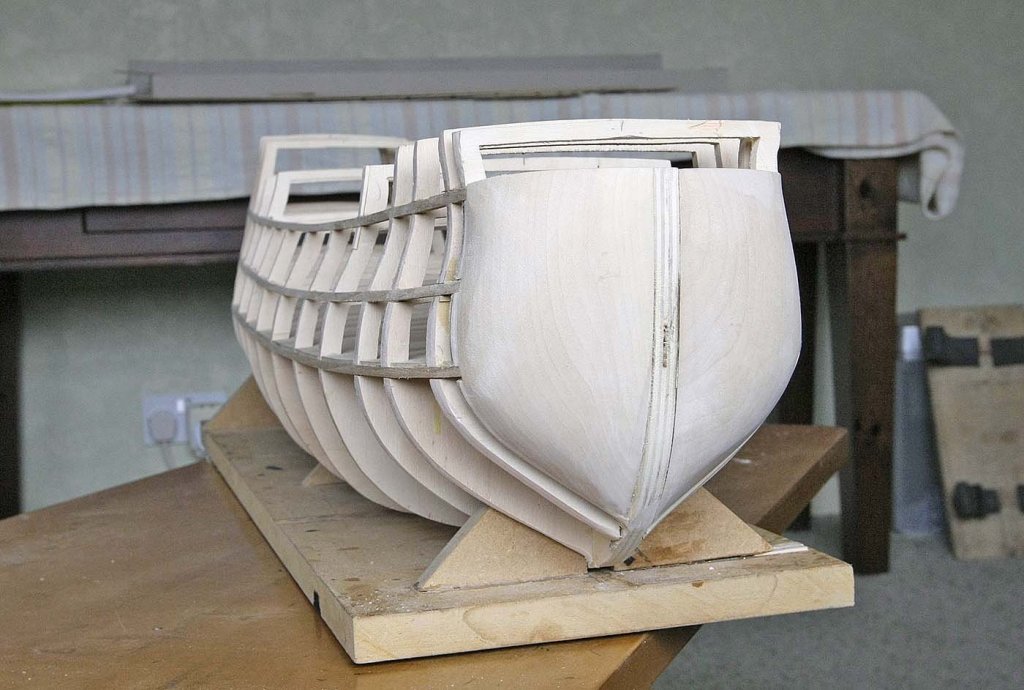
Hello Everyone. I'm still making progress. I did a final shaping of the bow and stern then faired the hull. Again this took quite a bit of time and effort to get it close to satisfactory, I think that any slight imperfections will be be addressed with the first planking. With regards to the dummy gun carriages I decided not to use small single blocks but to use strips in between the ribs with plenty of height so that the barrels would find a home no matter how I messed up my port measurements, it probably wasn't necessary but this is what I am used to and I feel happier this way. I had an old chair that was ready for the tip, I realized that the lathes at the back were of a good quality ply and had a curve that matched that of the hull almost perfectly. I cut these into suitable sized strips, angled the base to allow for the curve of the deck and cut them to length . I used Pete's measurements for fitting them, I made a small gauge to keep them consistent then using plenty of glue fixed them into place.
- 424 replies
-
- 14
-
-
Hi Keith, Keep going, yours was one of the first build logs that inspired me to eventually start my Royal William build. Cycling and the Royal William can go together, here's a couple of pics to inspire you. The first is me crossing the Alps on an extended continental tour a couple of years ago which took in Spain, France and Italy, the second is me still racing at 70. Enjoy.


-
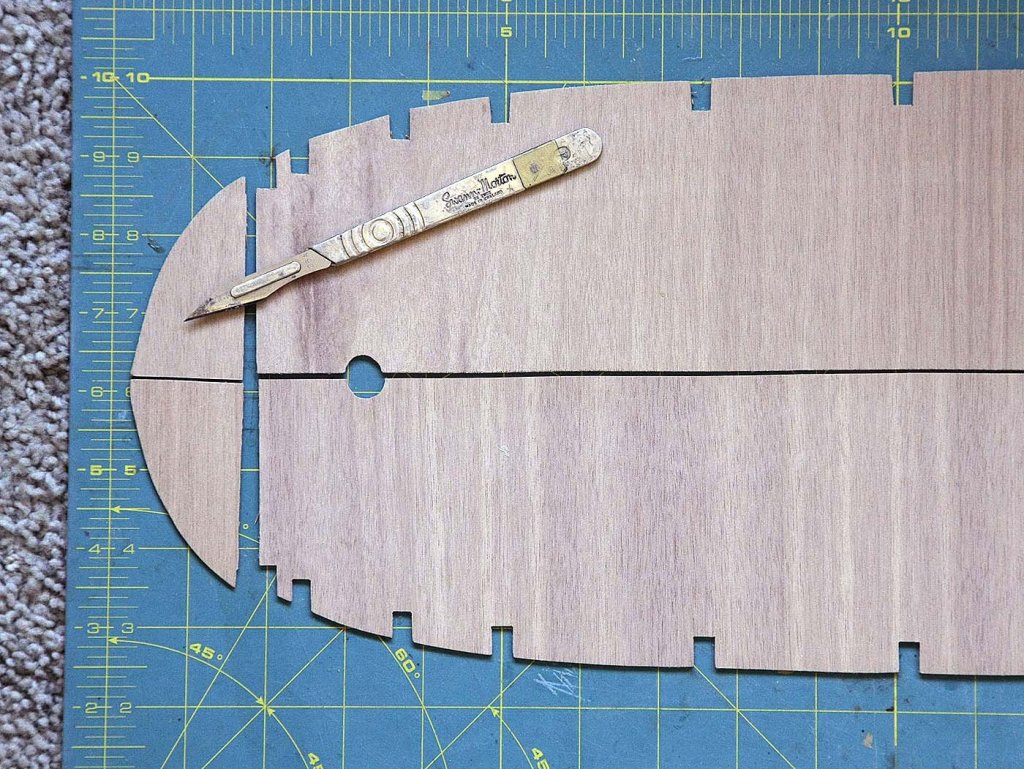
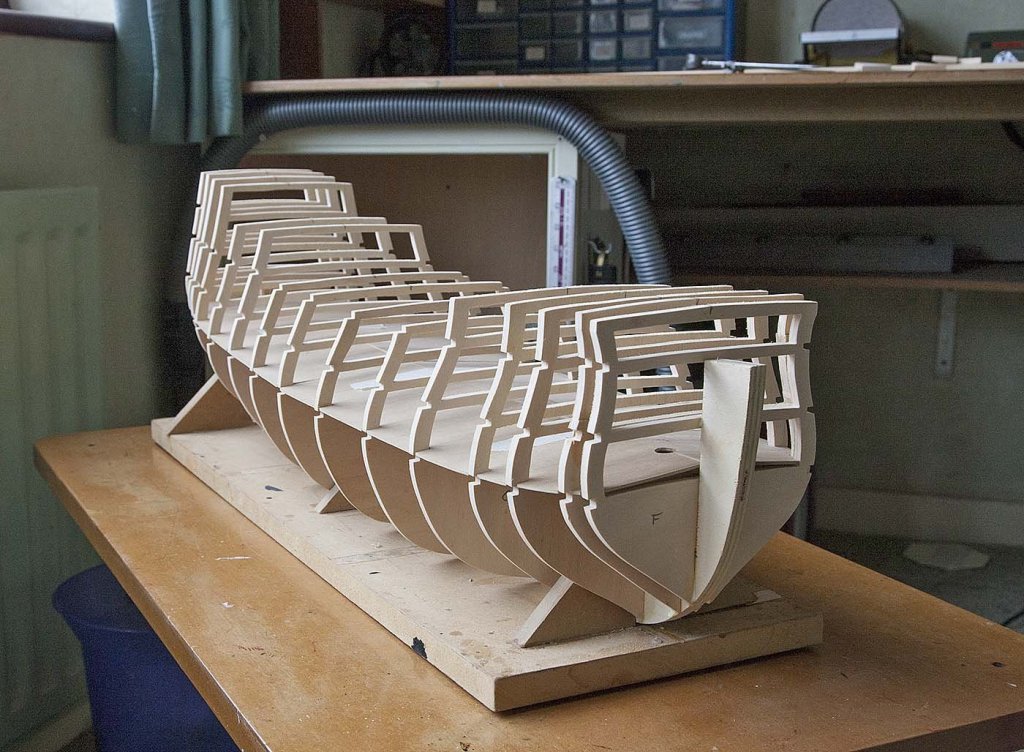
Hello Everyone, The building continues. I've taken Marks advice and dry fitted the upper decks to get the correct placement for the mizzen mast support which fixes onto the lower deck. The middle deck supplied needed the front cut off to fit as it was shaped to go right through to the bow but it should terminate at the first bulkhead, having seen this on other logs it didn't worry me thinking that perhaps I had done something wrong. Other than that both decks which were in halves fitted very well with only some slots needing to be opened a little, the depth of all slots on both decks needed to be about 2mm deeper so that the deck halves didn't overlap in the middle. I've seen this kit get criticised for not being accurate and being difficult to get right, I'll add my bit. I feel that I am competent but not a very experienced builder, I am probably in the honeymoon period of building it and may later change my opinion but so far the basic structure for the hull has gone very smoothly without any issues, everything lines up and fits well and the quality of the materials has been excellent, it gives me confidence for the rest of the build. I am showing quite a few pictures so that you can see for yourselves the fit of the parts, the lower deck is glued, the middle and upper are just dry fitted.


- 424 replies
-
- 11
-
-
Hi, A question about negotiating this site, What is the best way to get to my last build log post to continue. At the moment I click activity/posts I started/Royal William then scroll through all posts to get to my last. There must be an easier way. Being my first log I'm finding the way that the site has been set up is quite intuitive for someone who was only comfortable using a Dickensian style Ledger. I'm photographing as I go along then when I have some spare time I write the script in word then copy and paste into my post, this is okay but I'm finding as they are done at different times the script and the pictures are easy to get out of sync, I would also like to mix the script in with the pictures rather than add them at the end. Any advice on presentation would be appreciated. Ken
-
Hi Anton, I was browsing and came across your build log, I'm interested, and will certainly be following. It looks good and is off to a very rapid start, it looks like we have a race on. A beer for the winner. Ken
- 322 replies
-
- 5
-
-
- sergal
- sovereign of the seas
- (and 5 more)
-
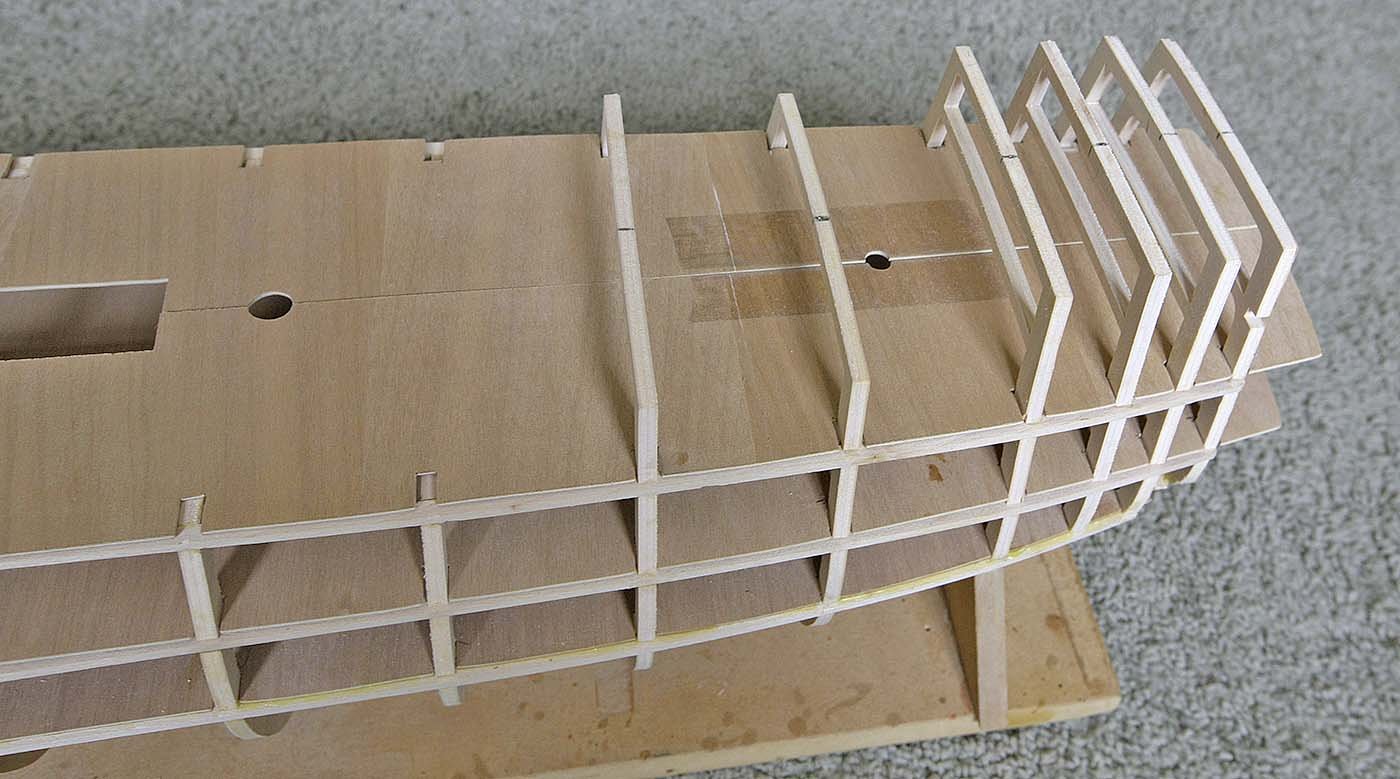
Hello All. Continuing, I cut out the two blocks that are to form the bow and started to shape them according to the plan templates. I used my small Davids plane, a chisel and sanding blocks, I hadn't realised just how much effort this would take and how much dust and wood shavings it would create. I ended up after being strongly advised by my wife finishing the job outside in the garden, but she did make me a cup of tea. When they were near enough to shape I glued them in place. I then glued the four quarters of gun deck into place. I've already mentioned how well this deck fitted but it came as a pleasant surprise, this is the best fit that I've yet had in a kit. After liberally gluing I nailed along the middle and held the outer edge with clips. I made up and attached the fore and main mast steps in the keel then went for a game of bowls. When I returned the glue for the bow blocks had cured so I sanded it further into shape, I'll finish it off when I sand and fair the hull ready for planking. I'm very pleased with the way the build is coming together so far.

- 424 replies
-
- 11
-
-
Thanks for the warning, the printer is now covered. My wife wants a new, very expensive sewing machine and to buy her a replacement laser printer as well would have hurt.
-
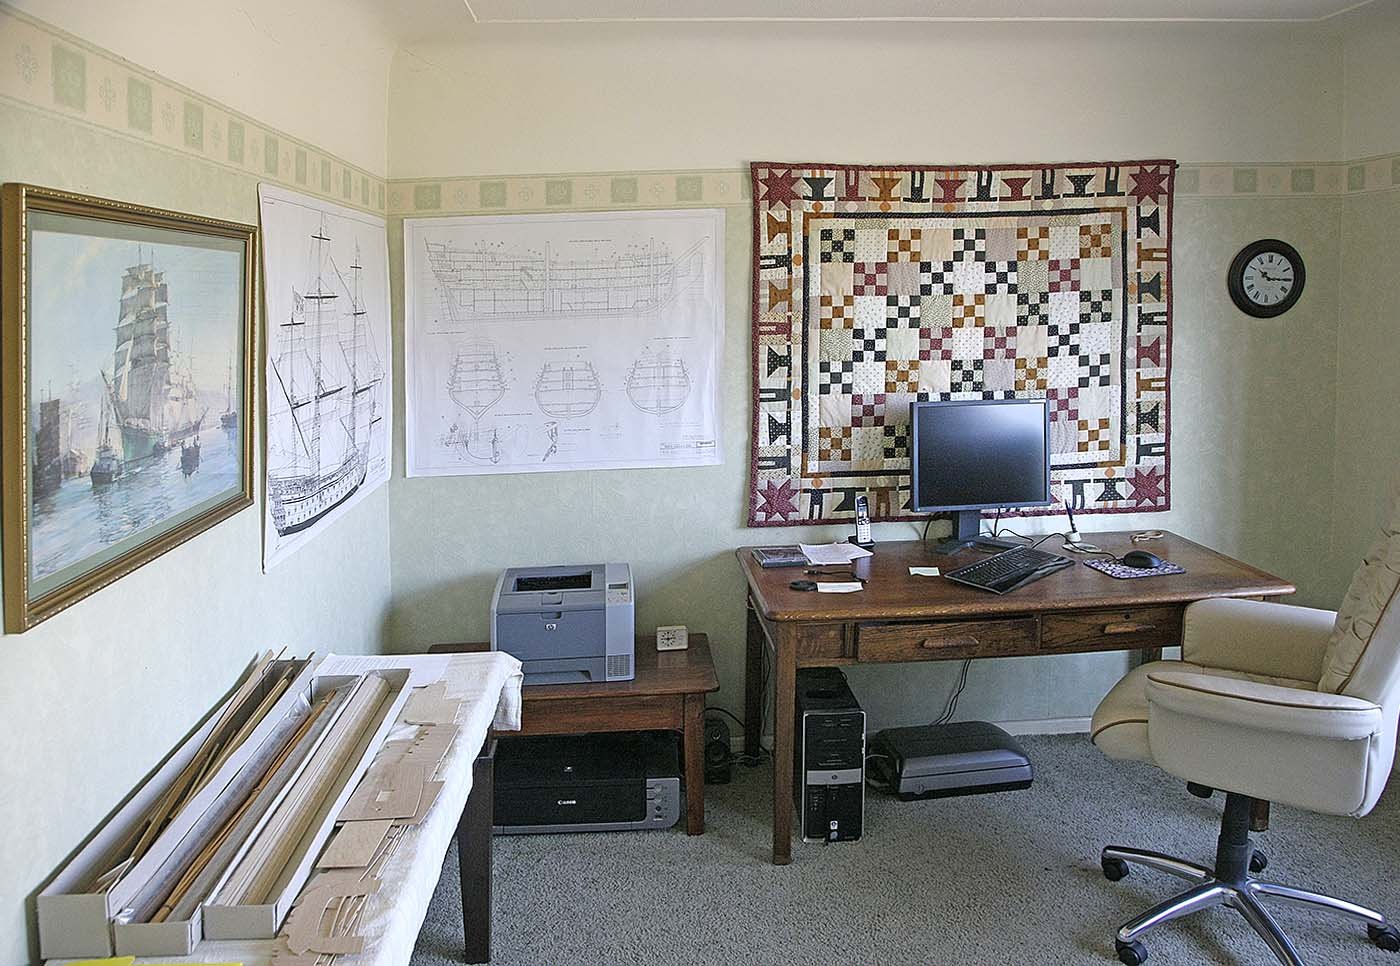
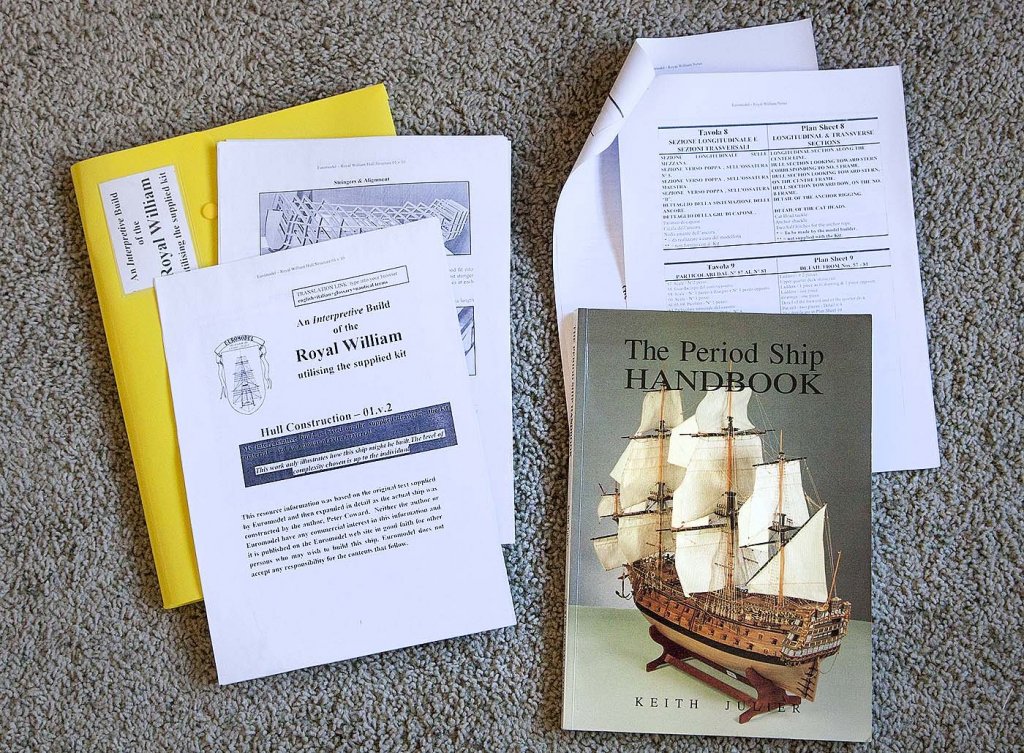
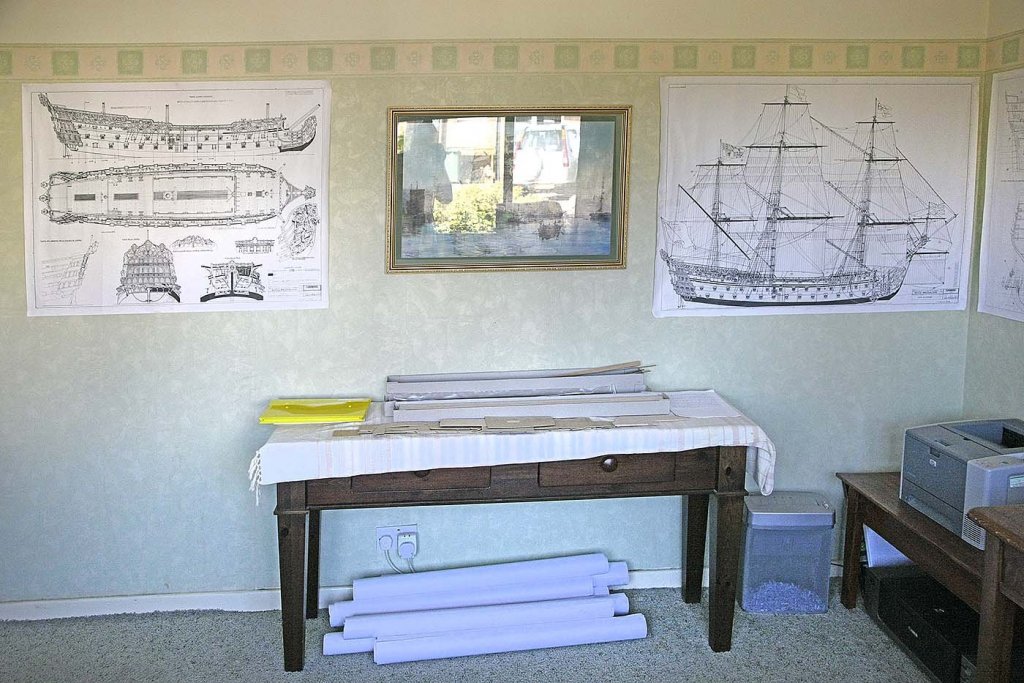
Hello Everyone, Many thanks for your responses to my questions. Mark your suggestion about how I should proceed makes complete sense and is the way to go, I would probably have gone astray there and regretted it later. I downloaded and printed Pete's "An Interpretive Build" along with the English plan translation from the Euromodel web site. Pete should be congratulated for putting such a complete and professionally presented document of this build together and making it readily available. I also managed to get a copy of Keith Jullier's book from EBay. The build continues but more of that later. Perhaps it has happened to others as well but this project is causing a bit of a lifestyle change at home, for good or bad only time will tell. I mentioned earlier that I share a room for modelling with my wife who has the larger half for her office/study, it was a pleasant cosy area, nicely carpeted with pictures and wall hangings. Now the pictures have mostly been removed and every available space has been covered with the plans, it seems that whenever she comes into the room she has to negotiate the plans laid out on the floor. I have a vacuum cleaner permanently set up by my bench as I foolishly promised to keep the area clean and free from sawdust, I really meant to at the time. Today I started carving and sanding the bow blocks, have you seen just how much dust and wood shavings this creates, needless to say I got another yellow card and was sent outside to continue in the garden. I think that I need to factor into the cost of building this model the cost of several meals out buy way of appeasement to keep her onboard .

-
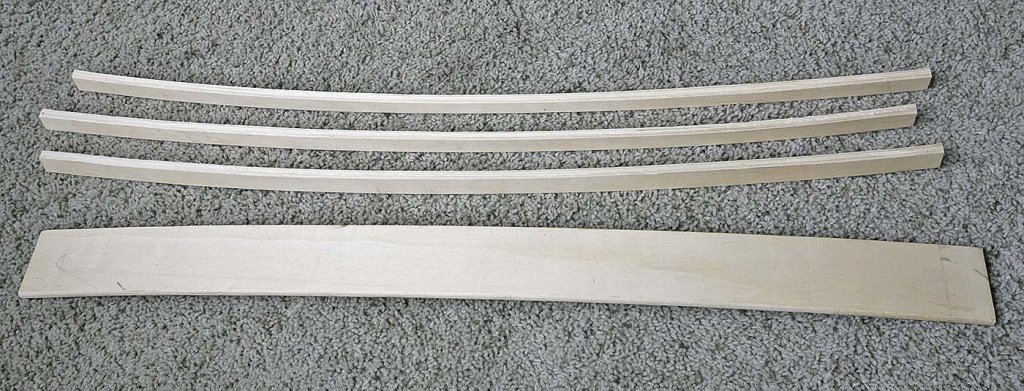
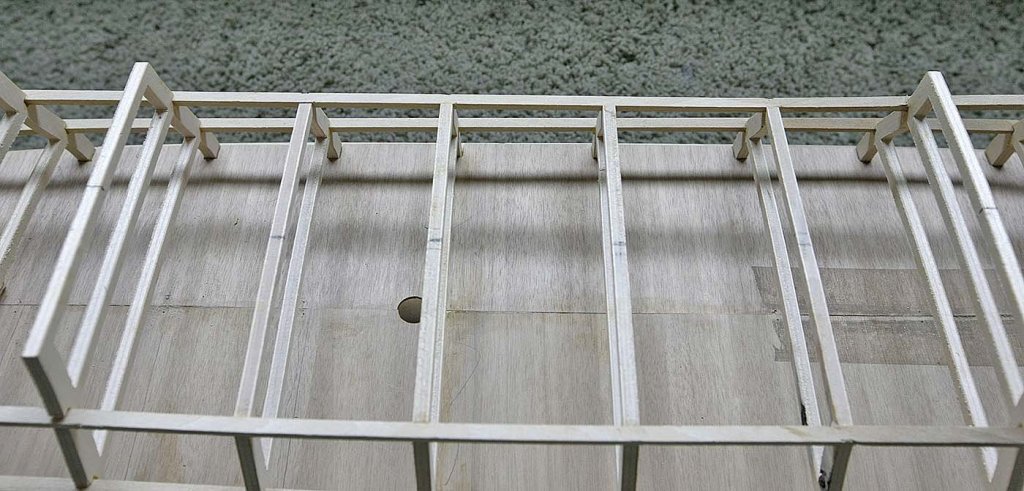
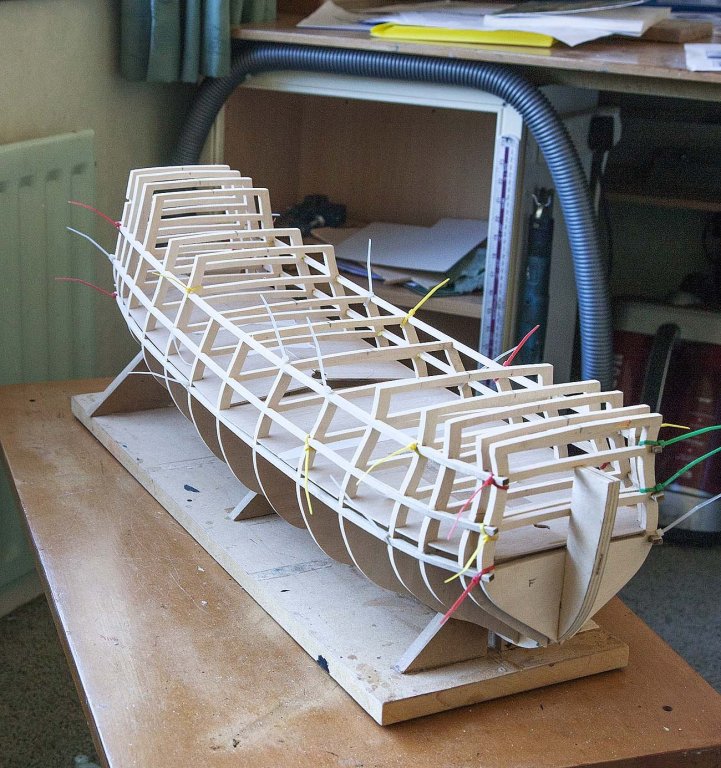
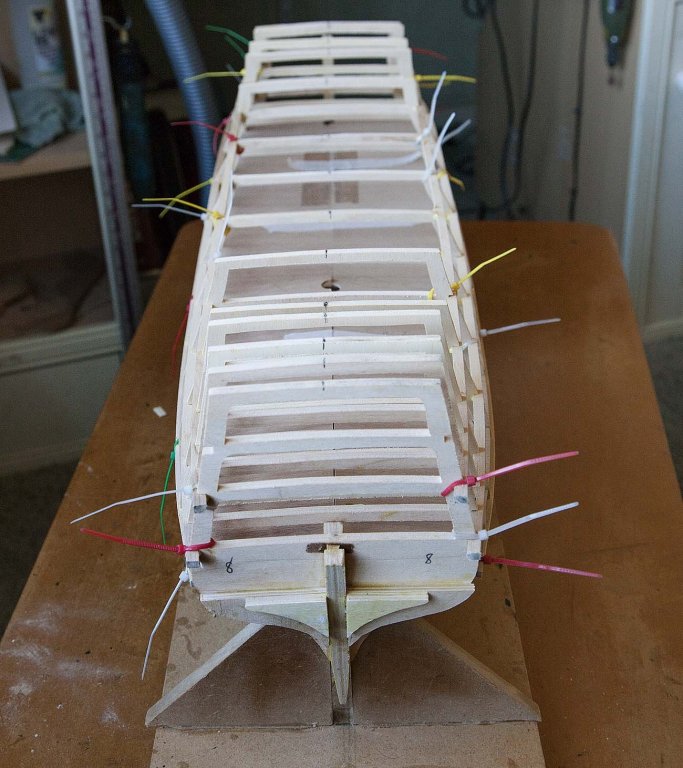
Hello Everyone, First I would like to thank those members that gave me the thumbs up, it's encouraging to feel that someone is out there and following my build. The build continues. After yesterdays successful start today I put the six stringers in and the blocks on the rear bulkhead. The stringers are 4mm x 6mm, they needed to be bent on the 6mm width and the bend at the bow was such that I didn't think that it would be easy. I soaked the front 6" in boiling water for a few hours but the first one that I tried split, fortunately there was plenty left in the length. I had read somewhere that ammonia softens the resins in wood, we had some in the house so I soaked the ends in it for about an hour after which the were quite pliable and bent easily. The next problem was how to hold them firmly in place whilst the glue dried, I thought that the way the deck supports had been made lent the use of small cable ties to be used. I attached the first at the bow and when I attached and tightened the others they pulled the stringers into there respective slots and formed the necessary curve. The stringers went readily into there slots with only the slightest of adjustments, looking along the line of them they appear to run nicely with only one about 1mm out, I think that I've been lucky so far. The filler blocks at the rear at first caused a bit of confusion as to the correct placement, I took note of what Vince did and copied that. I got my first "Yellow Card" from my wife! She objected to the house smelling like the toilets of a pub on a Saturday night, so in future no ammonia in the house. A question. I will be fixing the lower gun deck soon, is there any good reason why I shouldn't fix the middle gun deck at the same time. A previous build used long strips instead of individual ones for the dummy gun carriages and they worked well for me, I was thinking of fitting these at the same time as the decks, your thoughts on this.
-
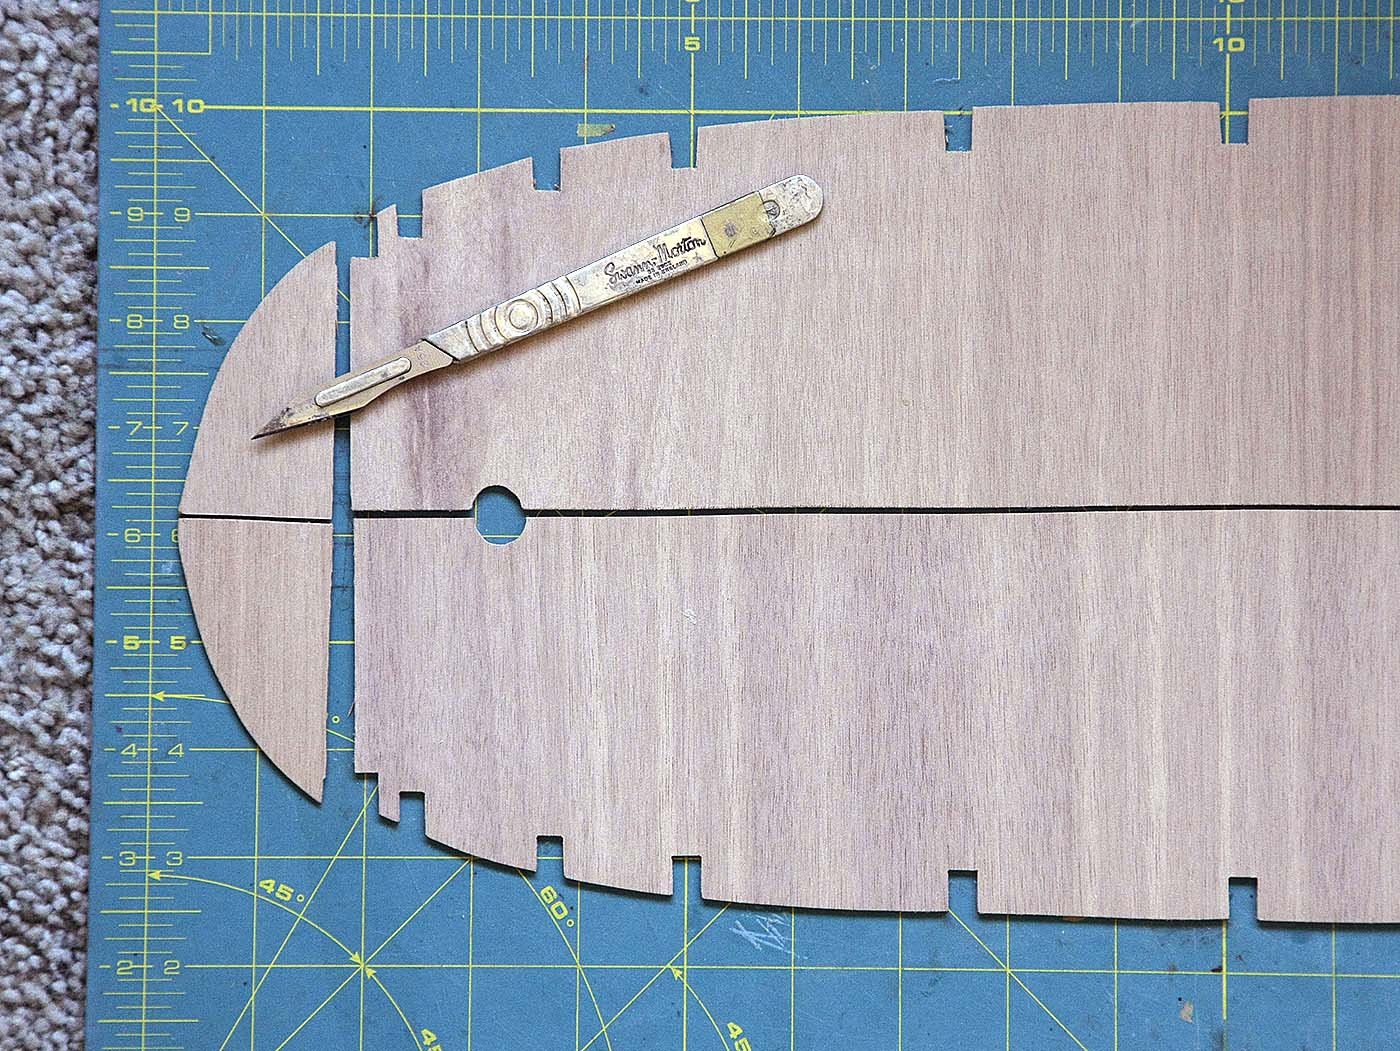
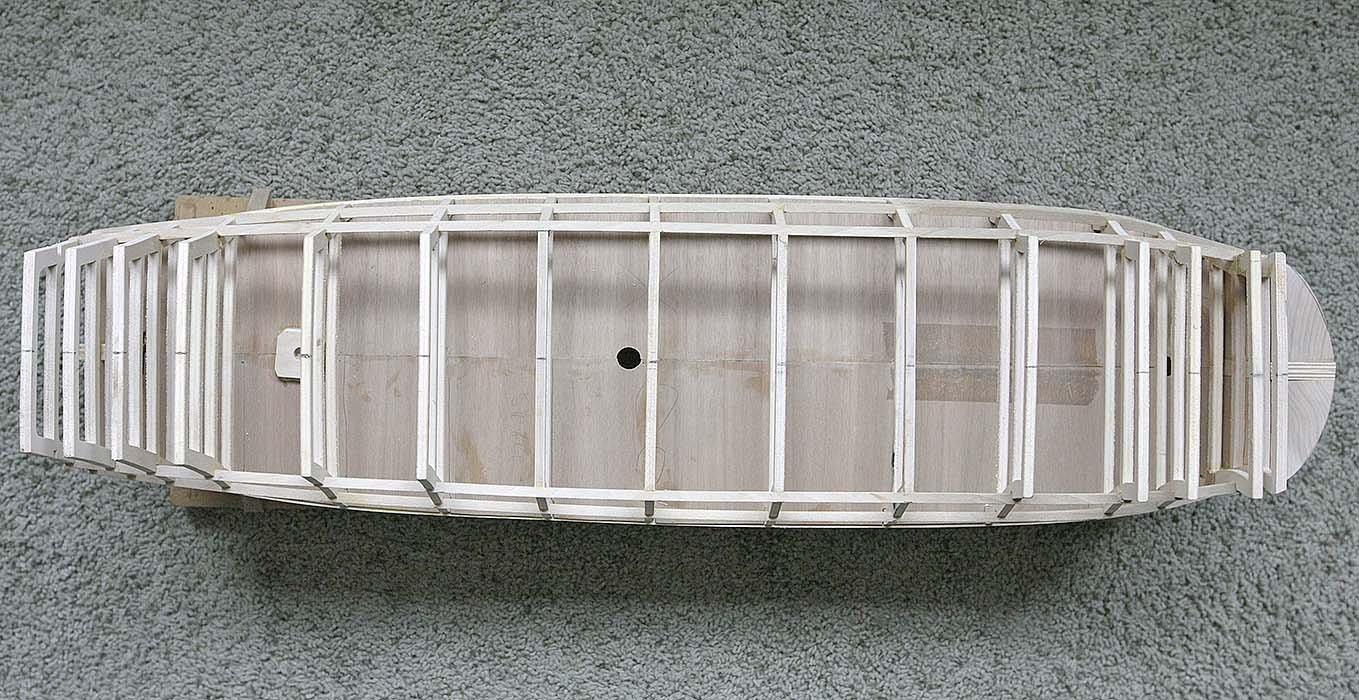
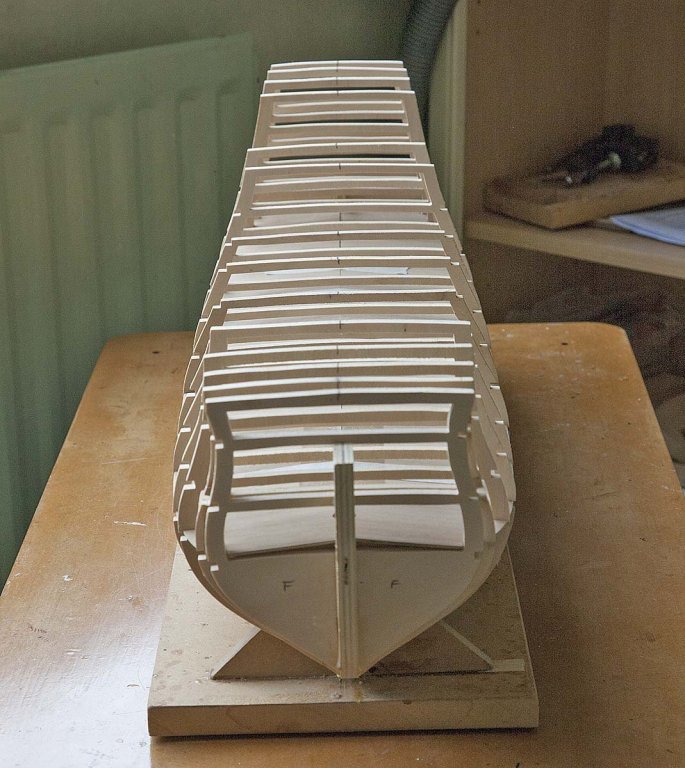
Hello Everyone, Have you ever felt keen to start a new build but apprehensive of actually making that first cut, it's the moment of no turning back, you are committed. Well I find myself in that position now so here goes, wish me luck. I started by cleaning up the bulkheads and the very substantial keel, 10mm thick ply, which was quite true. The ply parts on my kits to date have already been numbered so here is the first difference, I had to identify the parts from the excellent plans, I quite liked that simple difference as I now even at this early stage feel more engaged with the build. I dry fitted the bulkheads and found that as has been said by others they were a very loose fit, the keel slots were about 1.5mm too large and needed packing, the bulkhead slots were a good fit, just a little tight needing a light sand to allow for glue in the joint but I could find no issues at this stage. I tapered the rear of the keel by about 5mm but there is still plenty of wood left. I decided to go about gluing and aligning the bulkheads in a sequence that was slightly different from what others seem to do, it worked out extremely well and is the method that I will use in the future, I'll add pictures but what I did was to take Peters advice from his "Interpretive Build" and carefully mark the centre of each bulkhead at the top, I then glued bulkhead 1 which is the central one into place, I made particular effort to get this first one perfectly square and true then let it cure overnight. This morning I did the same with the front and the rear bulkheads using the centre marks to line them up and making sure that the lower gun deck fitted. After the glue had grabbed but not cured I then did the in-between bulkheads, other than quickly checking that they were square it proved very easy just looking down the centre line to align them perfectly, the eye quickly picked up even a 1mm difference. When the glue had grabbed I slotted the lower gun deck into place and found that it went in perfectly with only a little encouragement, much easier that I had been expecting. I took the pictures quite soon after and on looking at them I noticed that one of the bulkheads was slightly out of true and needed adjusting and that the second one from the front was sitting too high, this seemed strange as it was fully home in the keel, I have adjusted this lower now and hope that there wasn't a reason that I haven't spotted for it being higher. Well the first cut has well and truly been made, no going back now.

- 424 replies
-
- 14
-
-
Hello Everyone, Thanks for all your encouraging remarks it gives me confidence knowing that there's a world of support out there. I know what you mean about putting a little bit of extra into the build and the pleasure that it can add, I did a bit on the Fly, the ships boat was a scratch build, my first attempt. I didn't like the bare look of the waist without one so got I carried away. What I don't want is to get so focused on small detail that the main build grinds to a halt. I have a slight problem with my hand having lost a couple of fingers, it's not really an issue but with small fiddly stuff especially tiny blocks I can get frustrated and annoyed with with myself, it's this that I want to avoid as it might dampen my enthusiasm for the build