HOLIDAY DONATION DRIVE - SUPPORT MSW - DO YOUR PART TO KEEP THIS GREAT FORUM GOING! (Only 27 donations so far out of 49,000 members - C'mon guys!)
×

genericDave
-
Posts
209 -
Joined
-
Last visited
Content Type
Profiles
Forums
Gallery
Events
Everything posted by genericDave
-
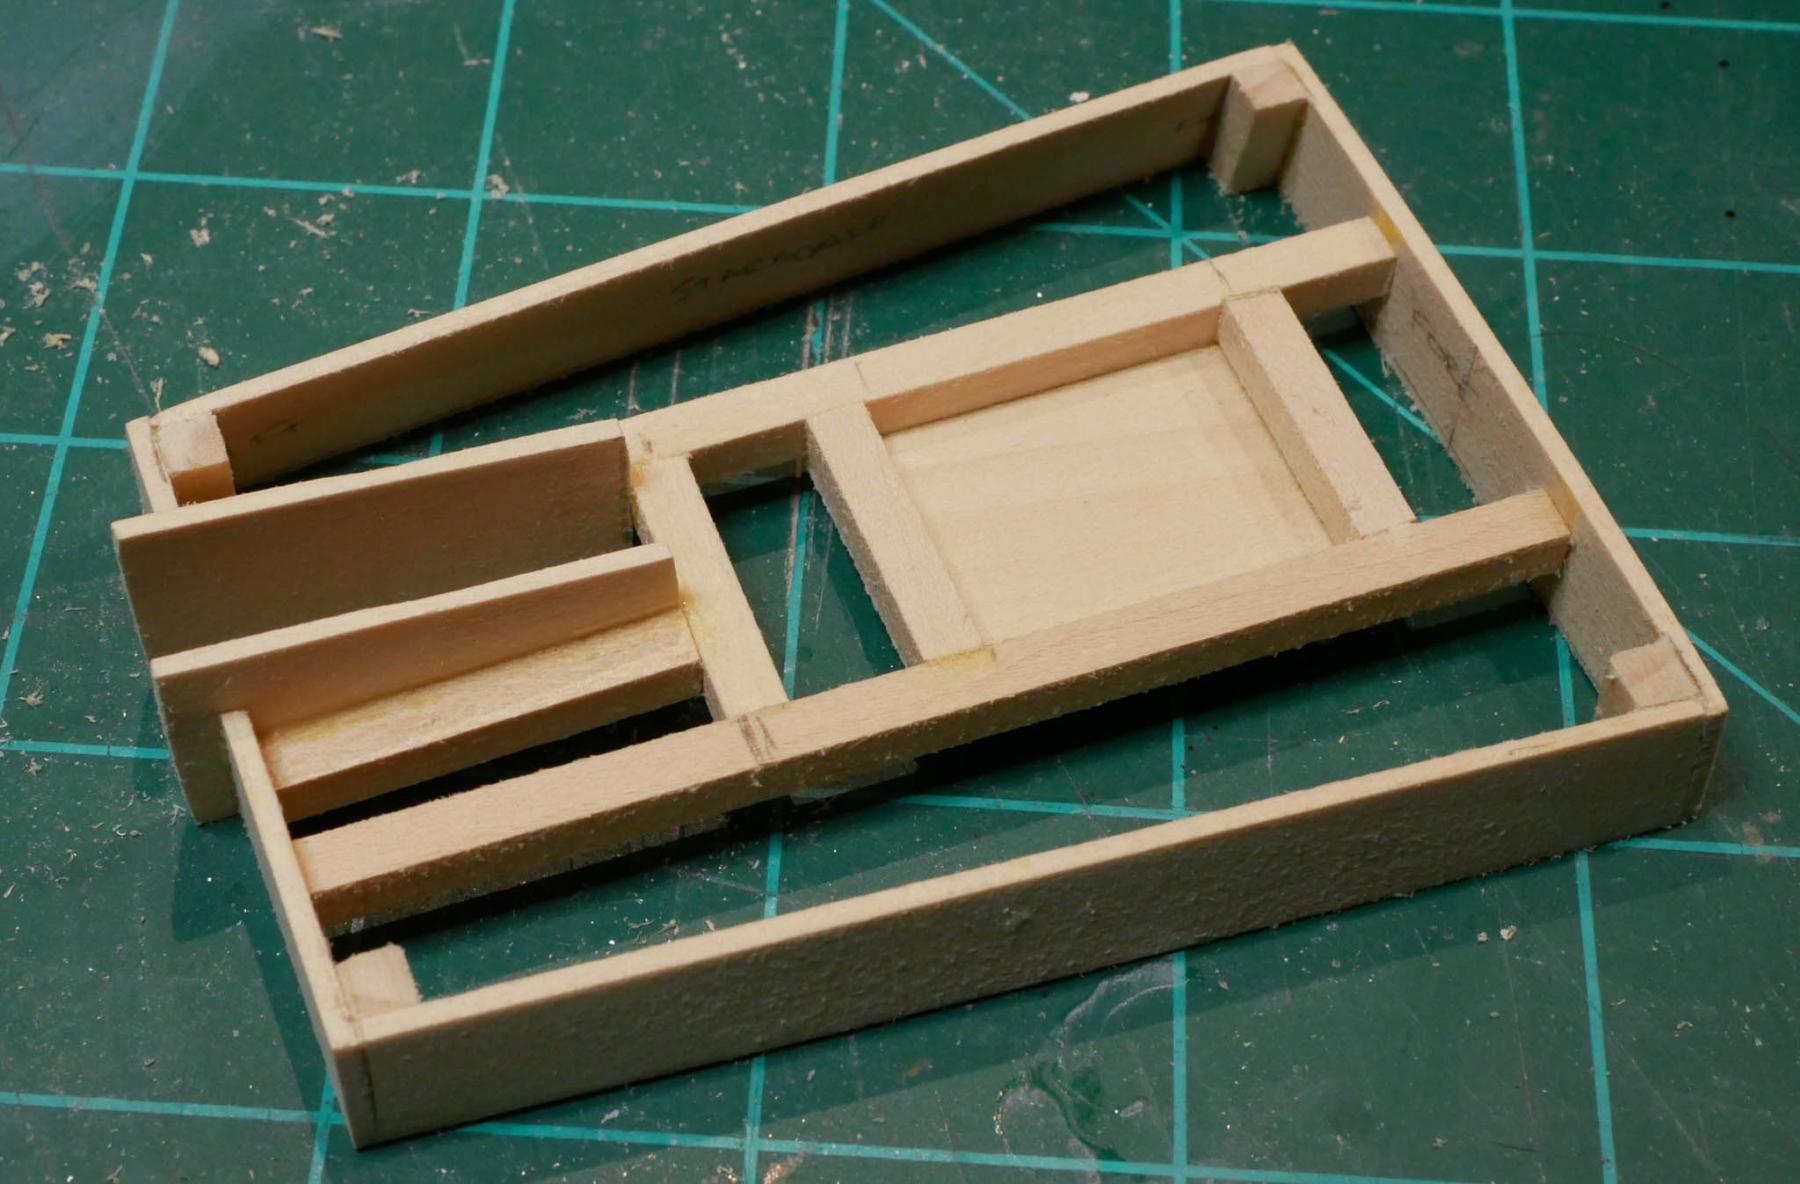
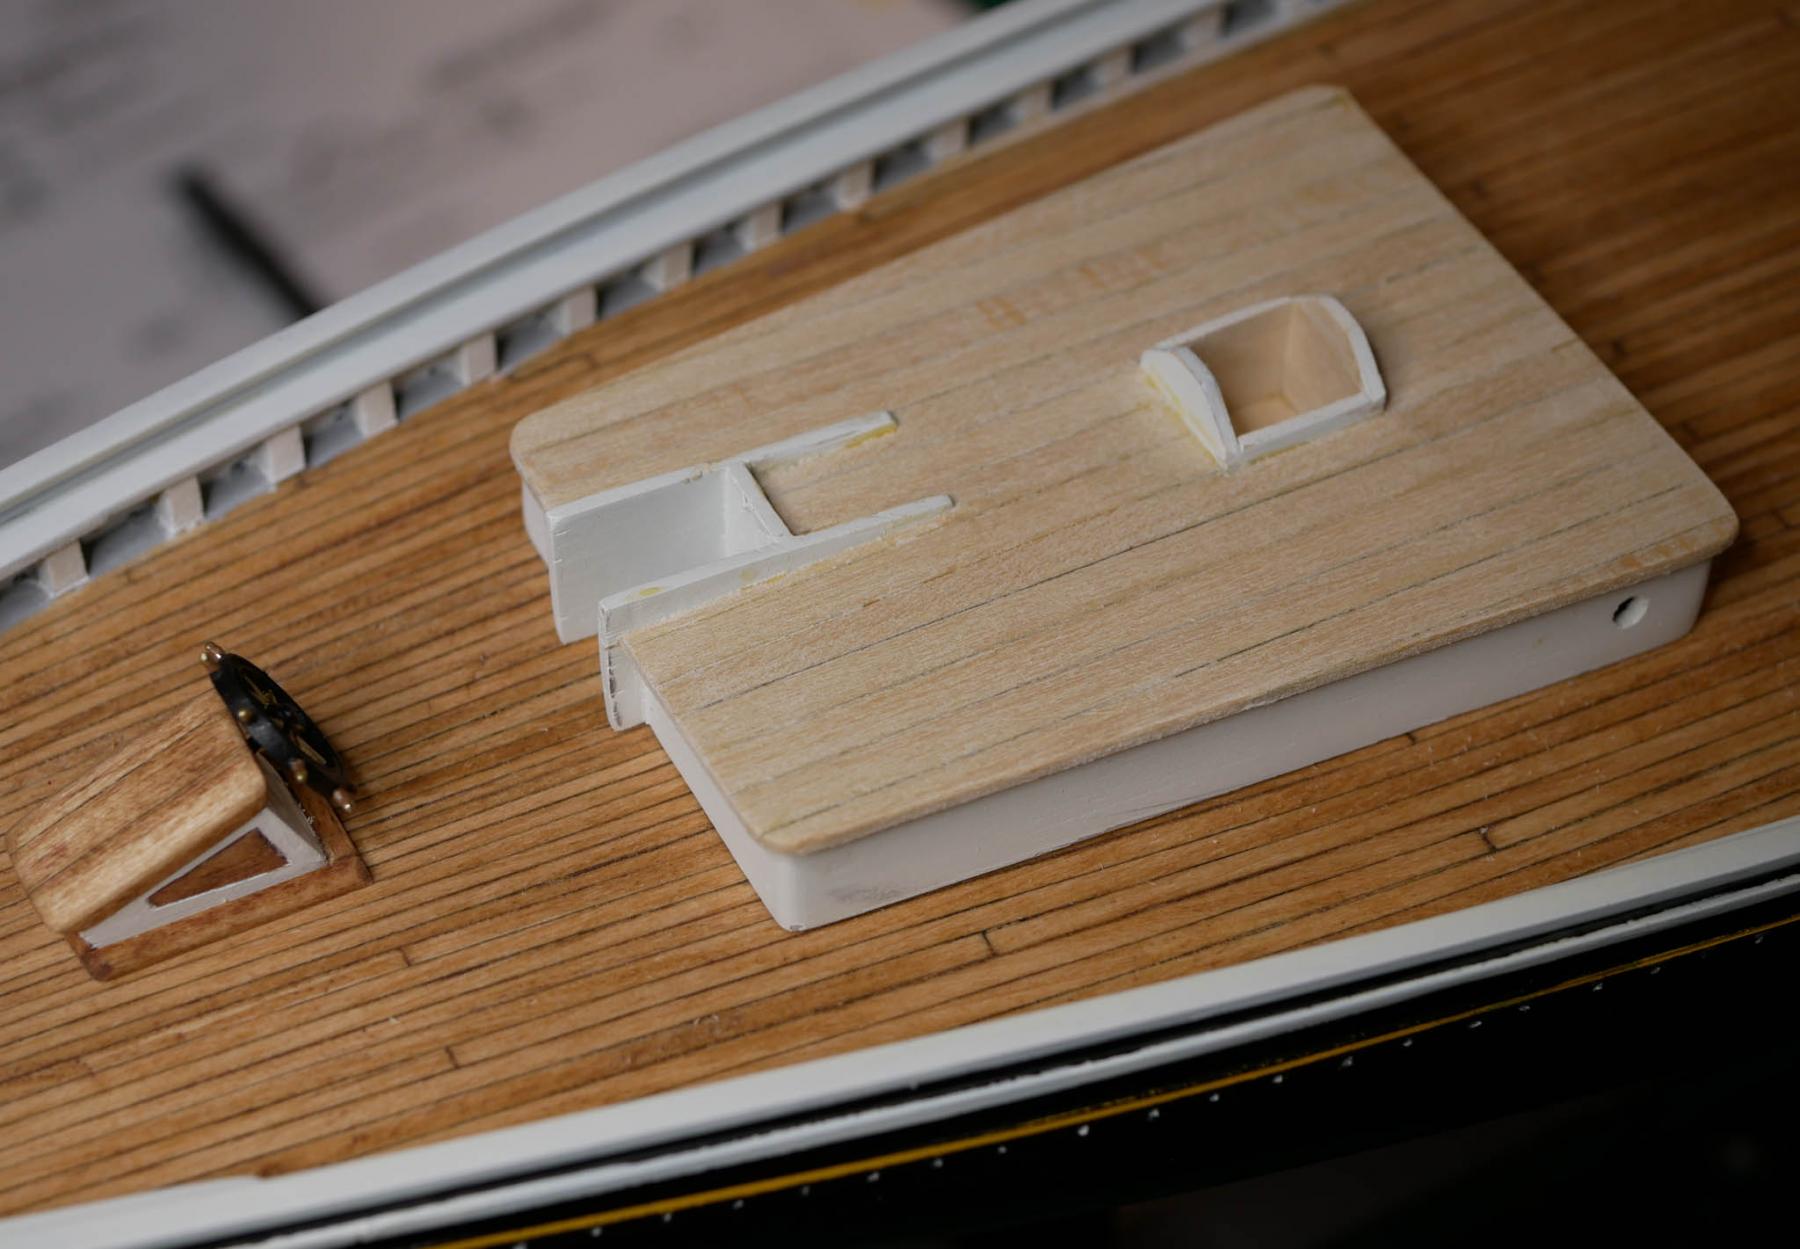
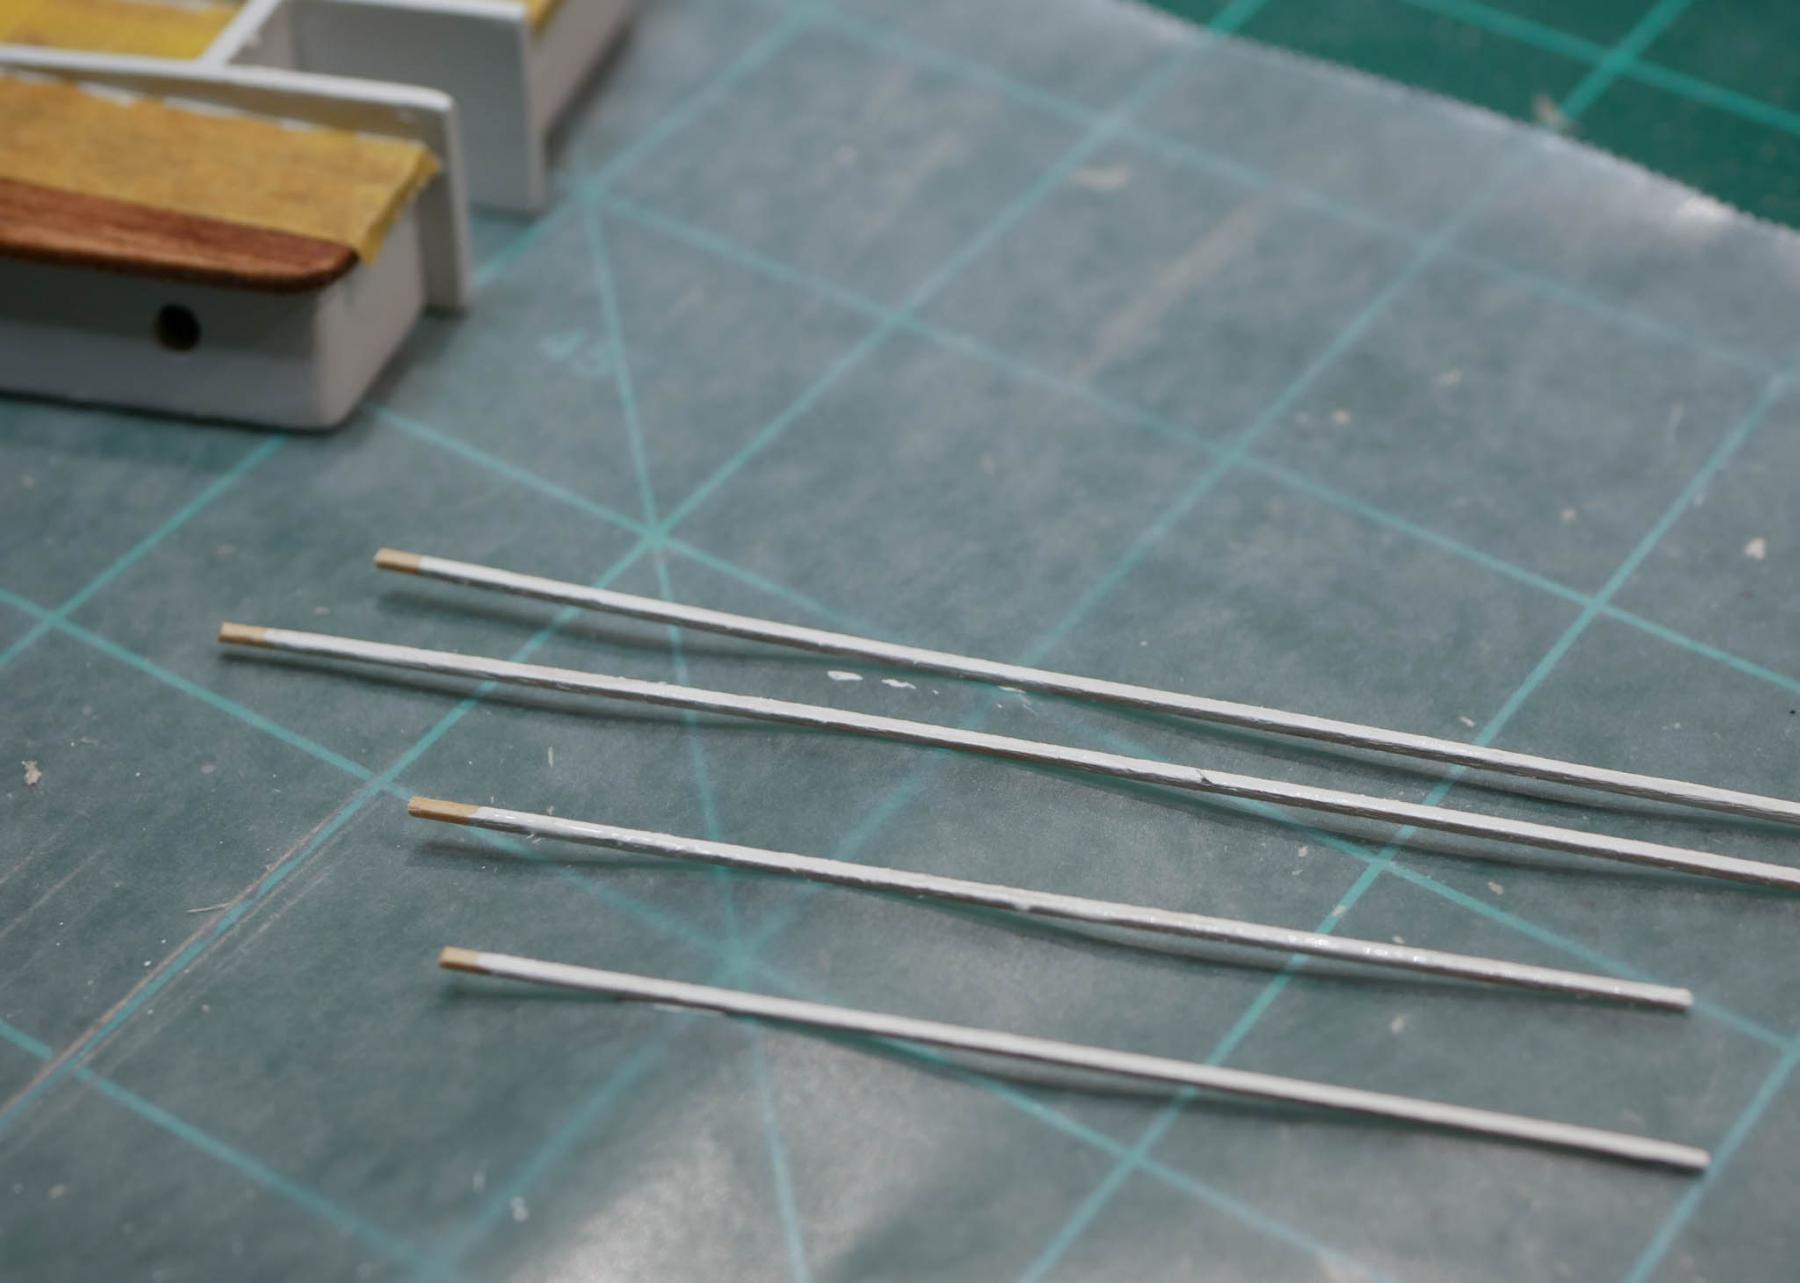
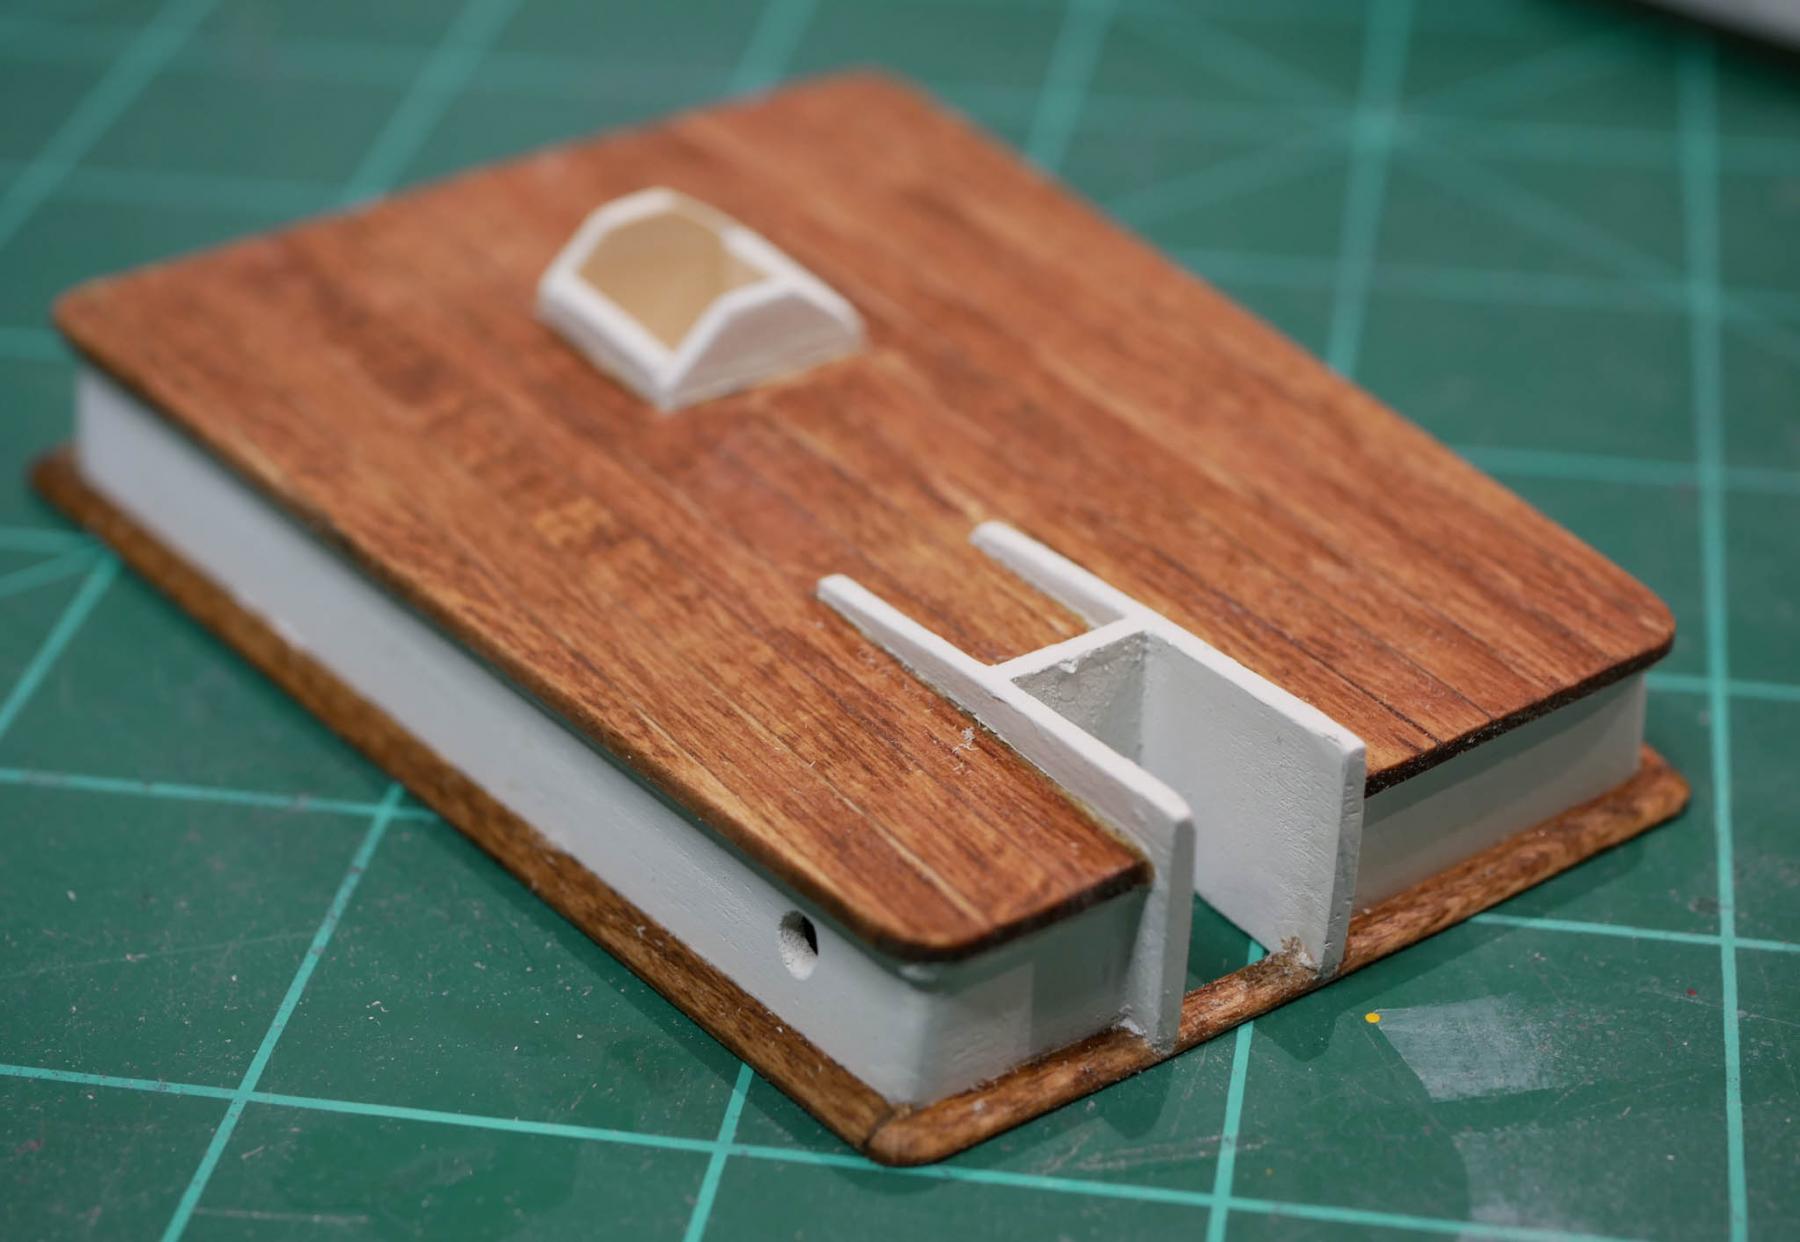
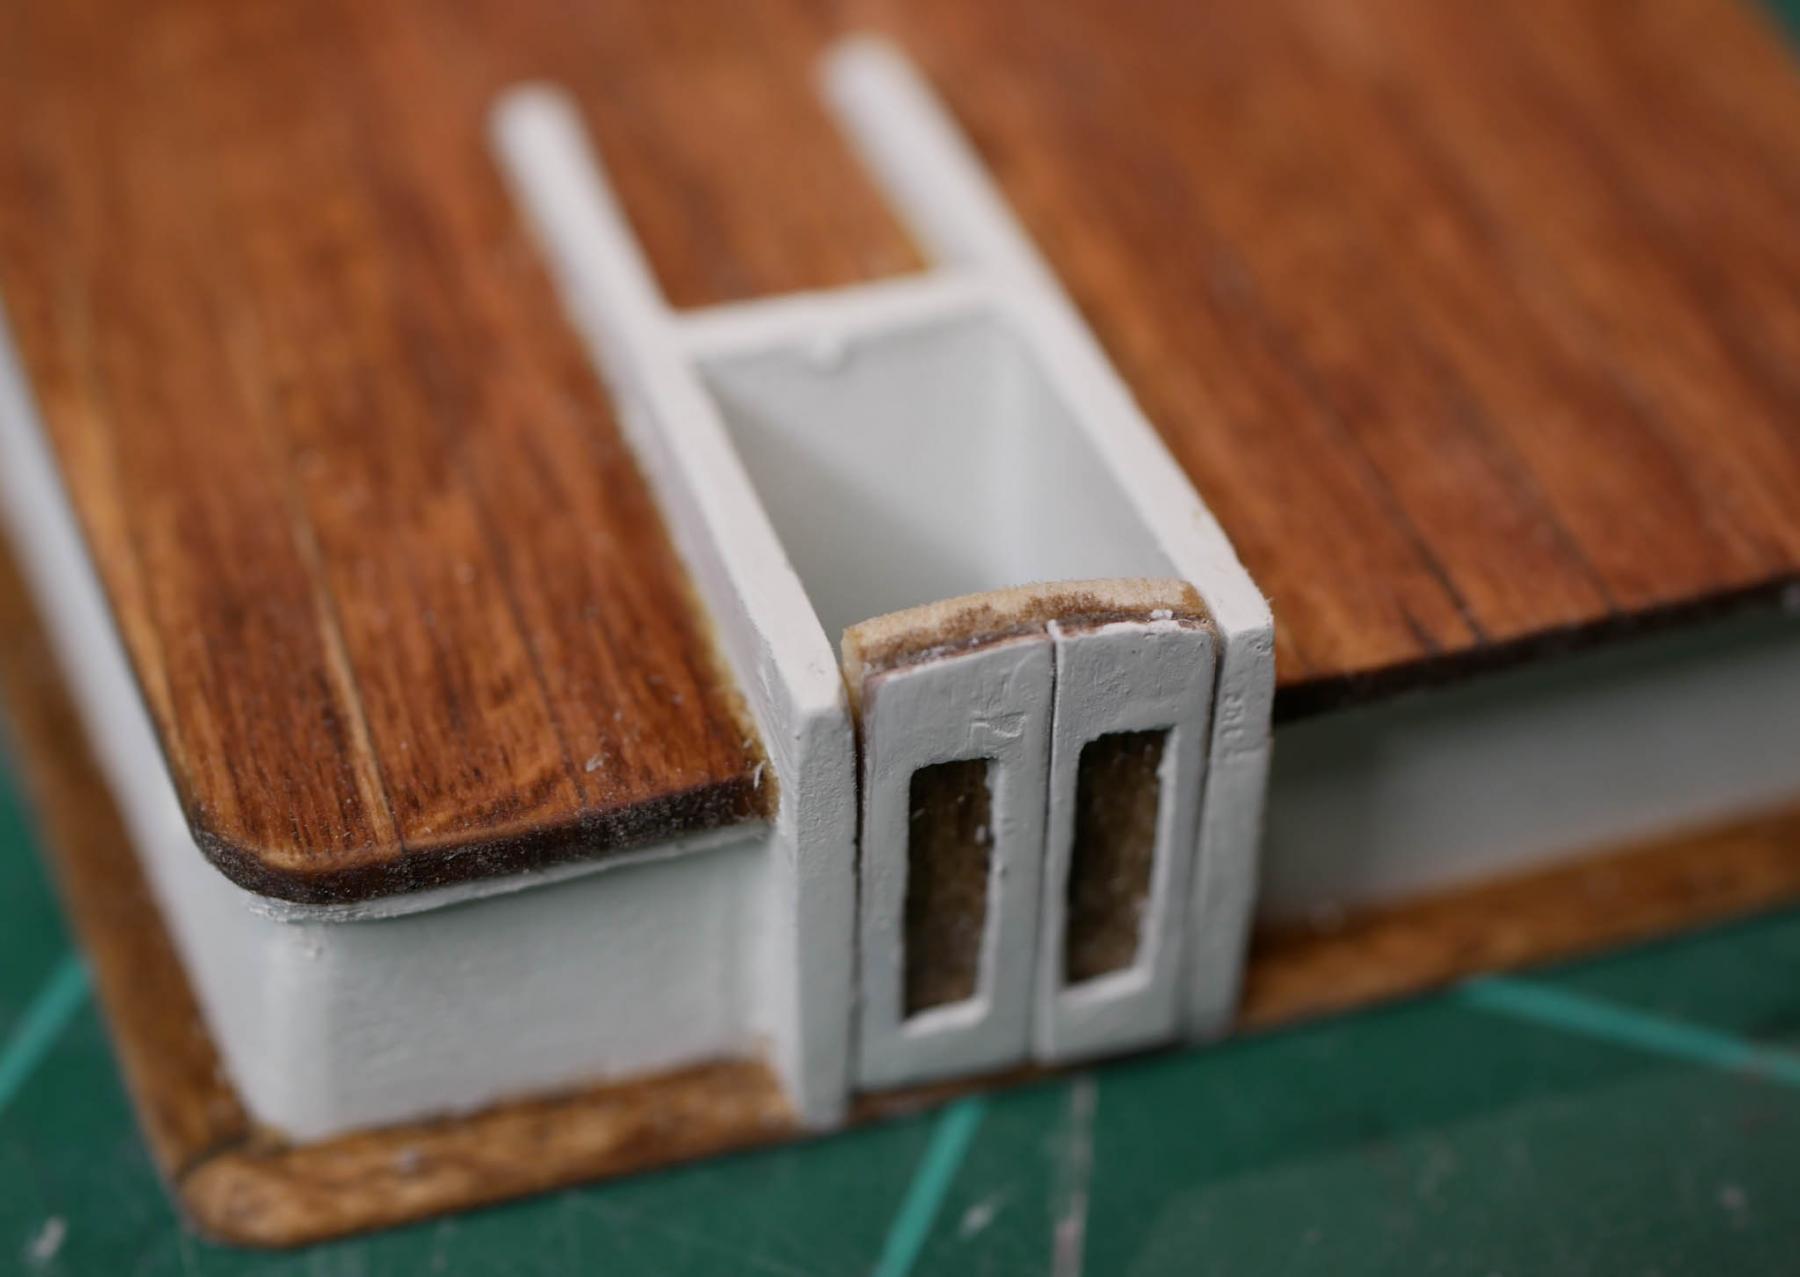
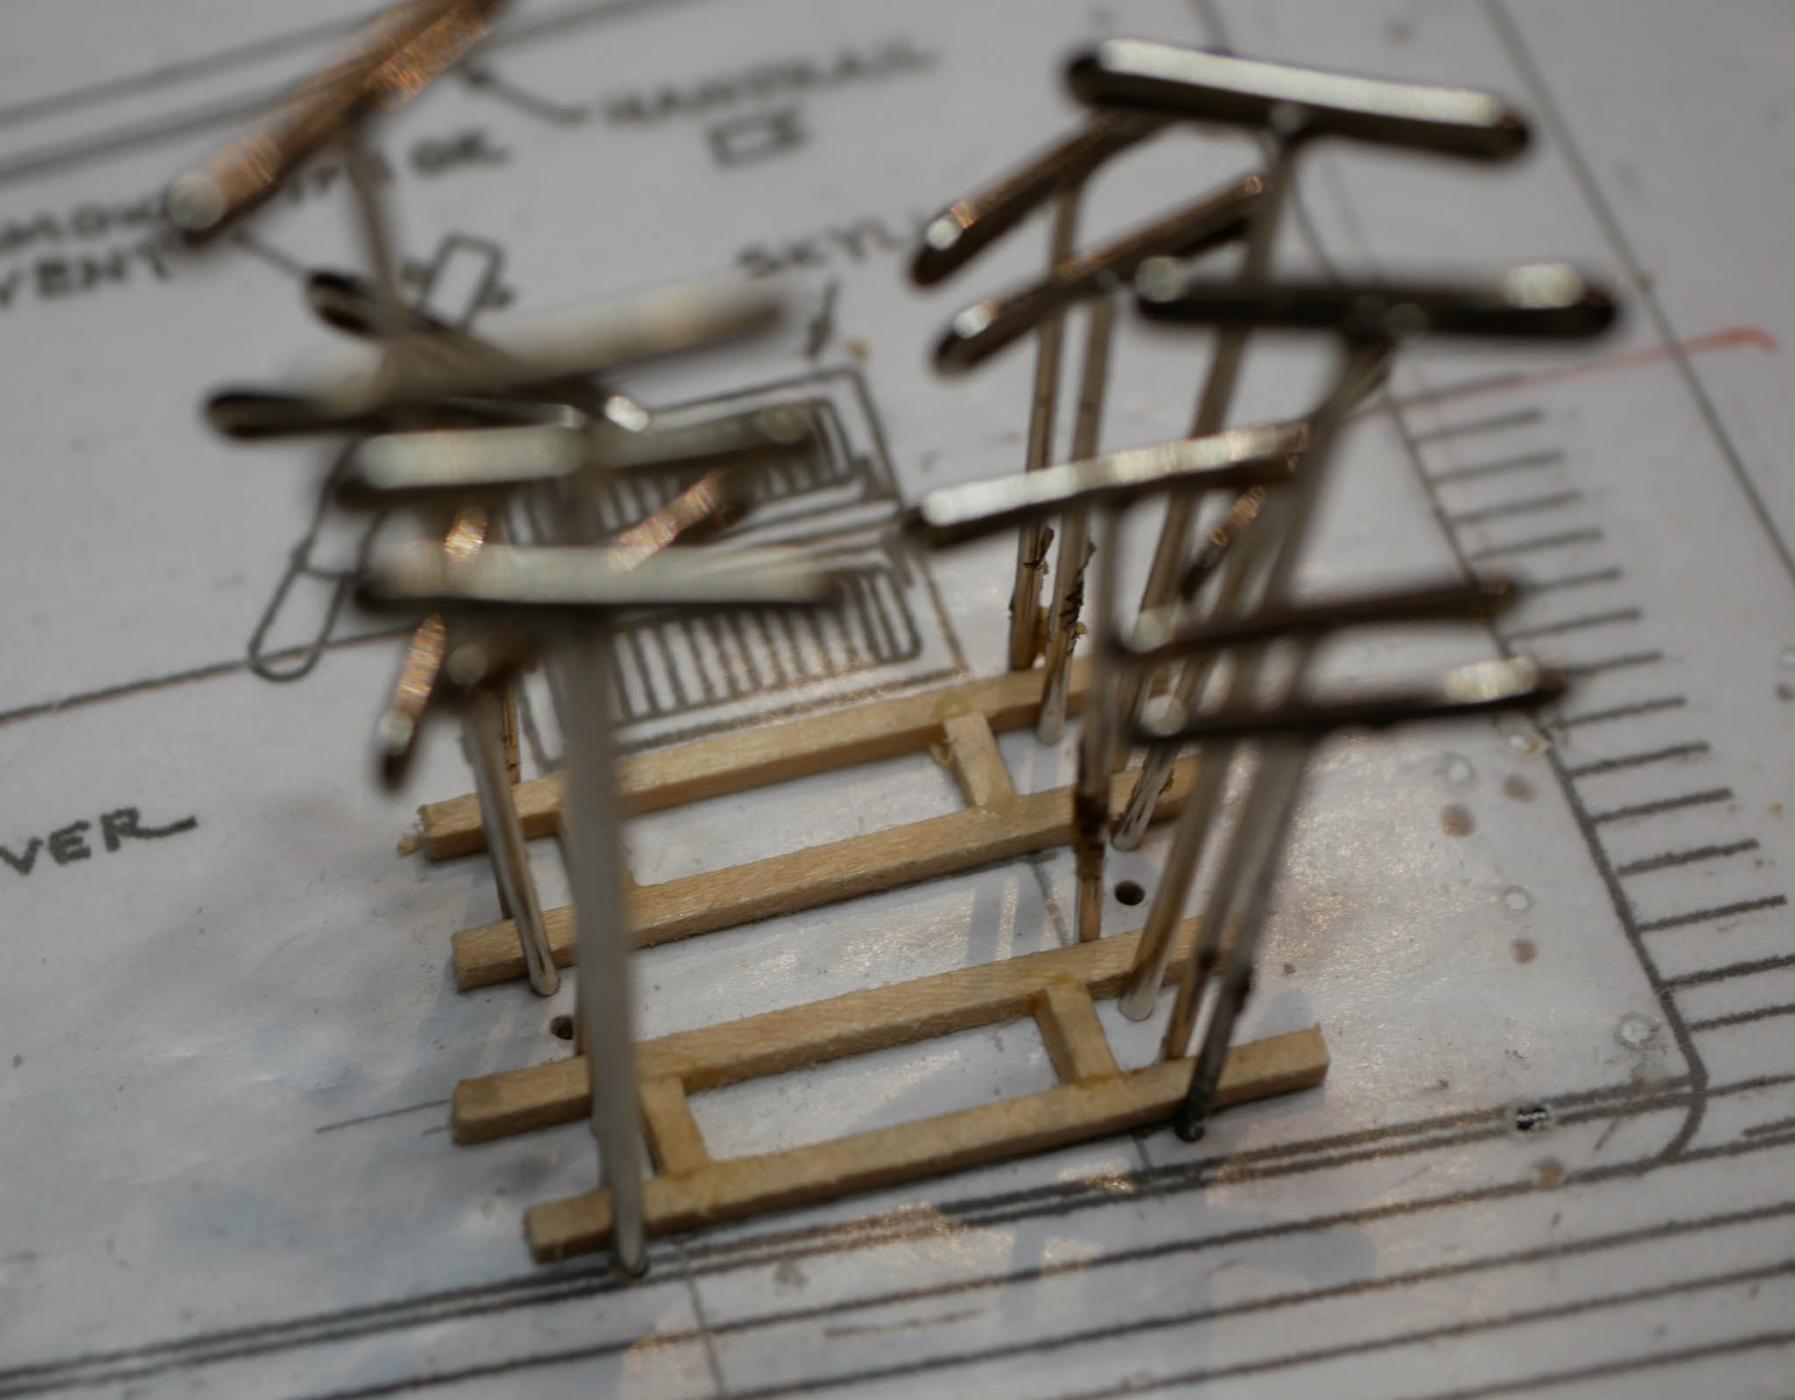
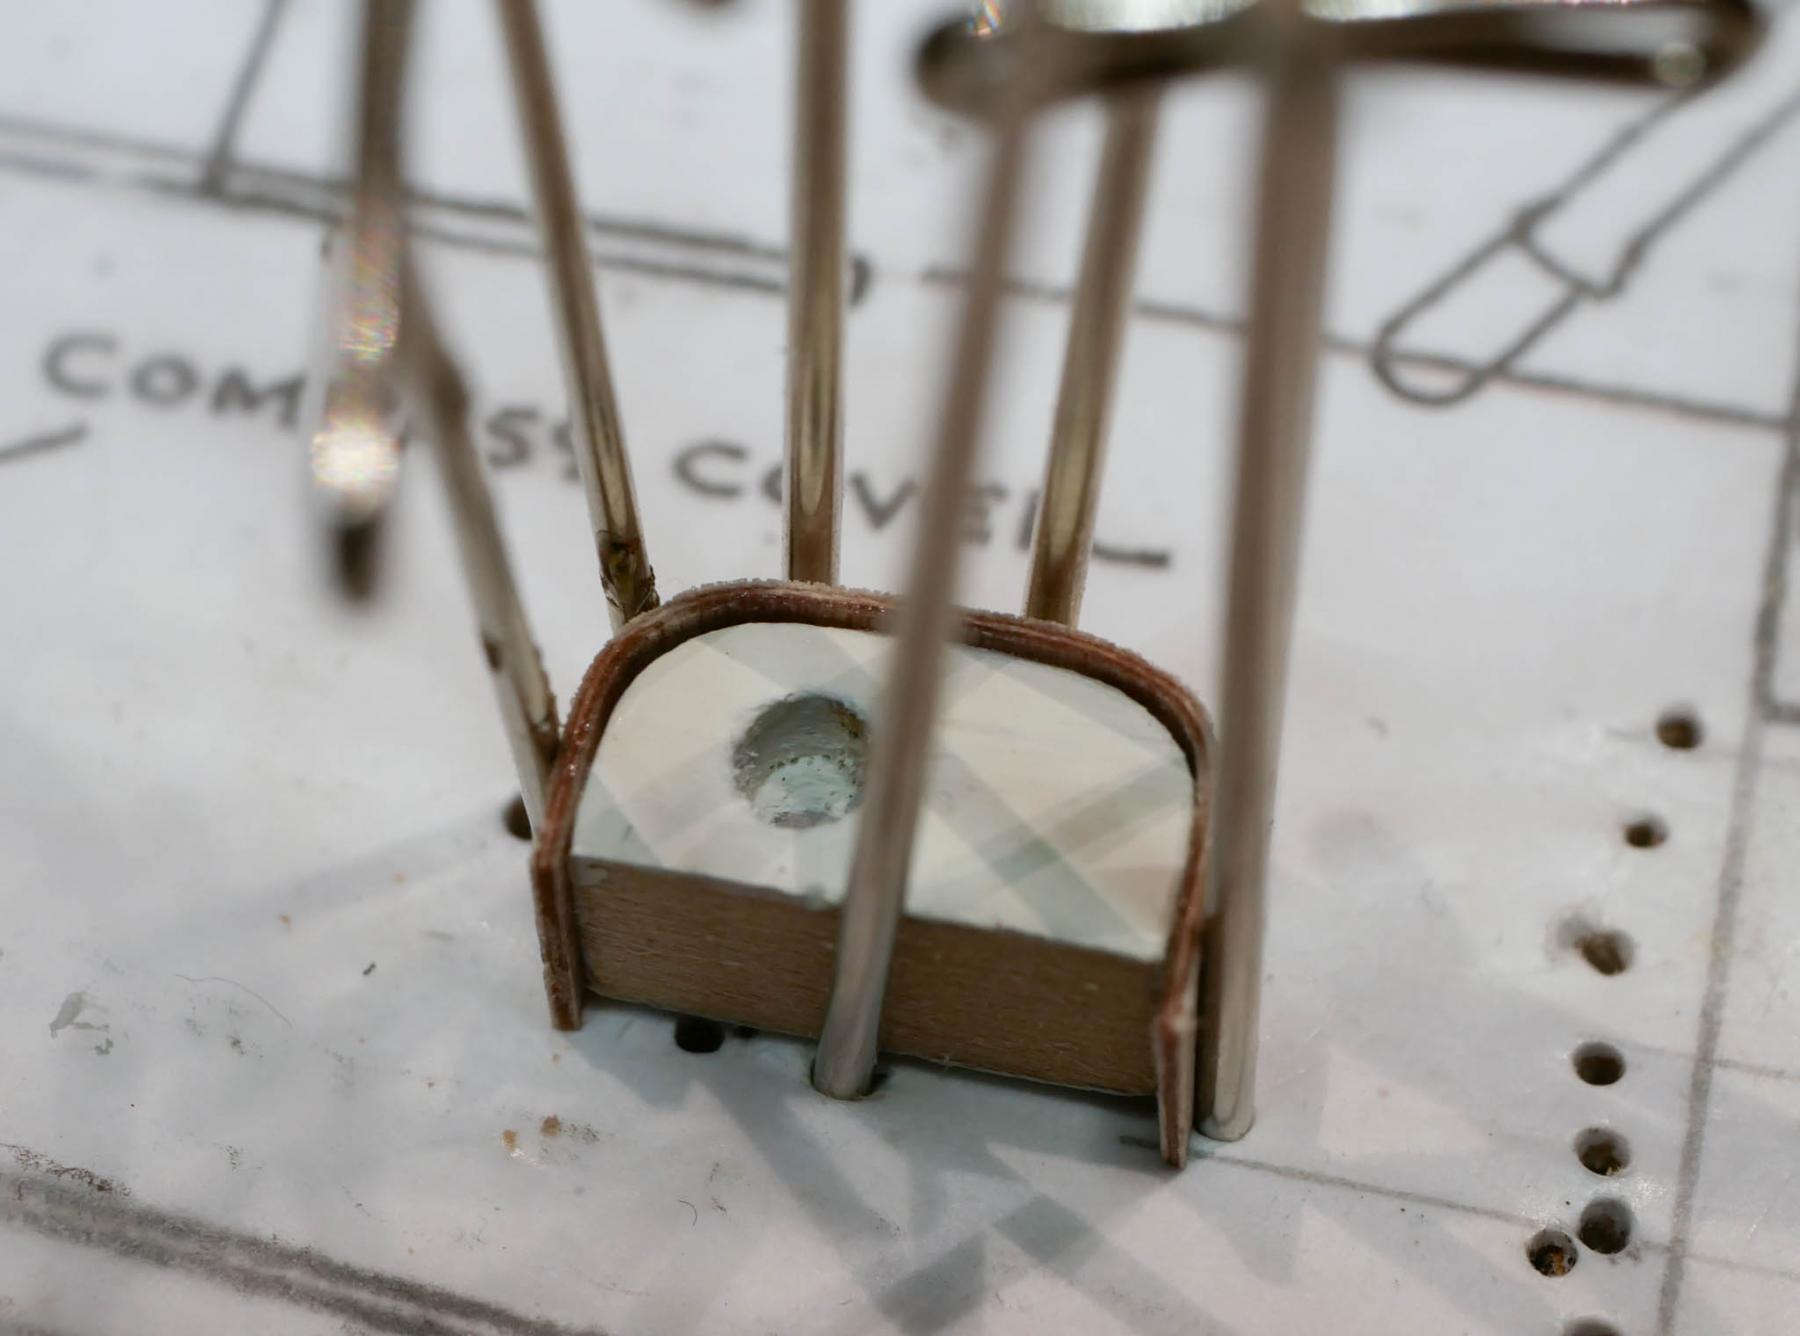
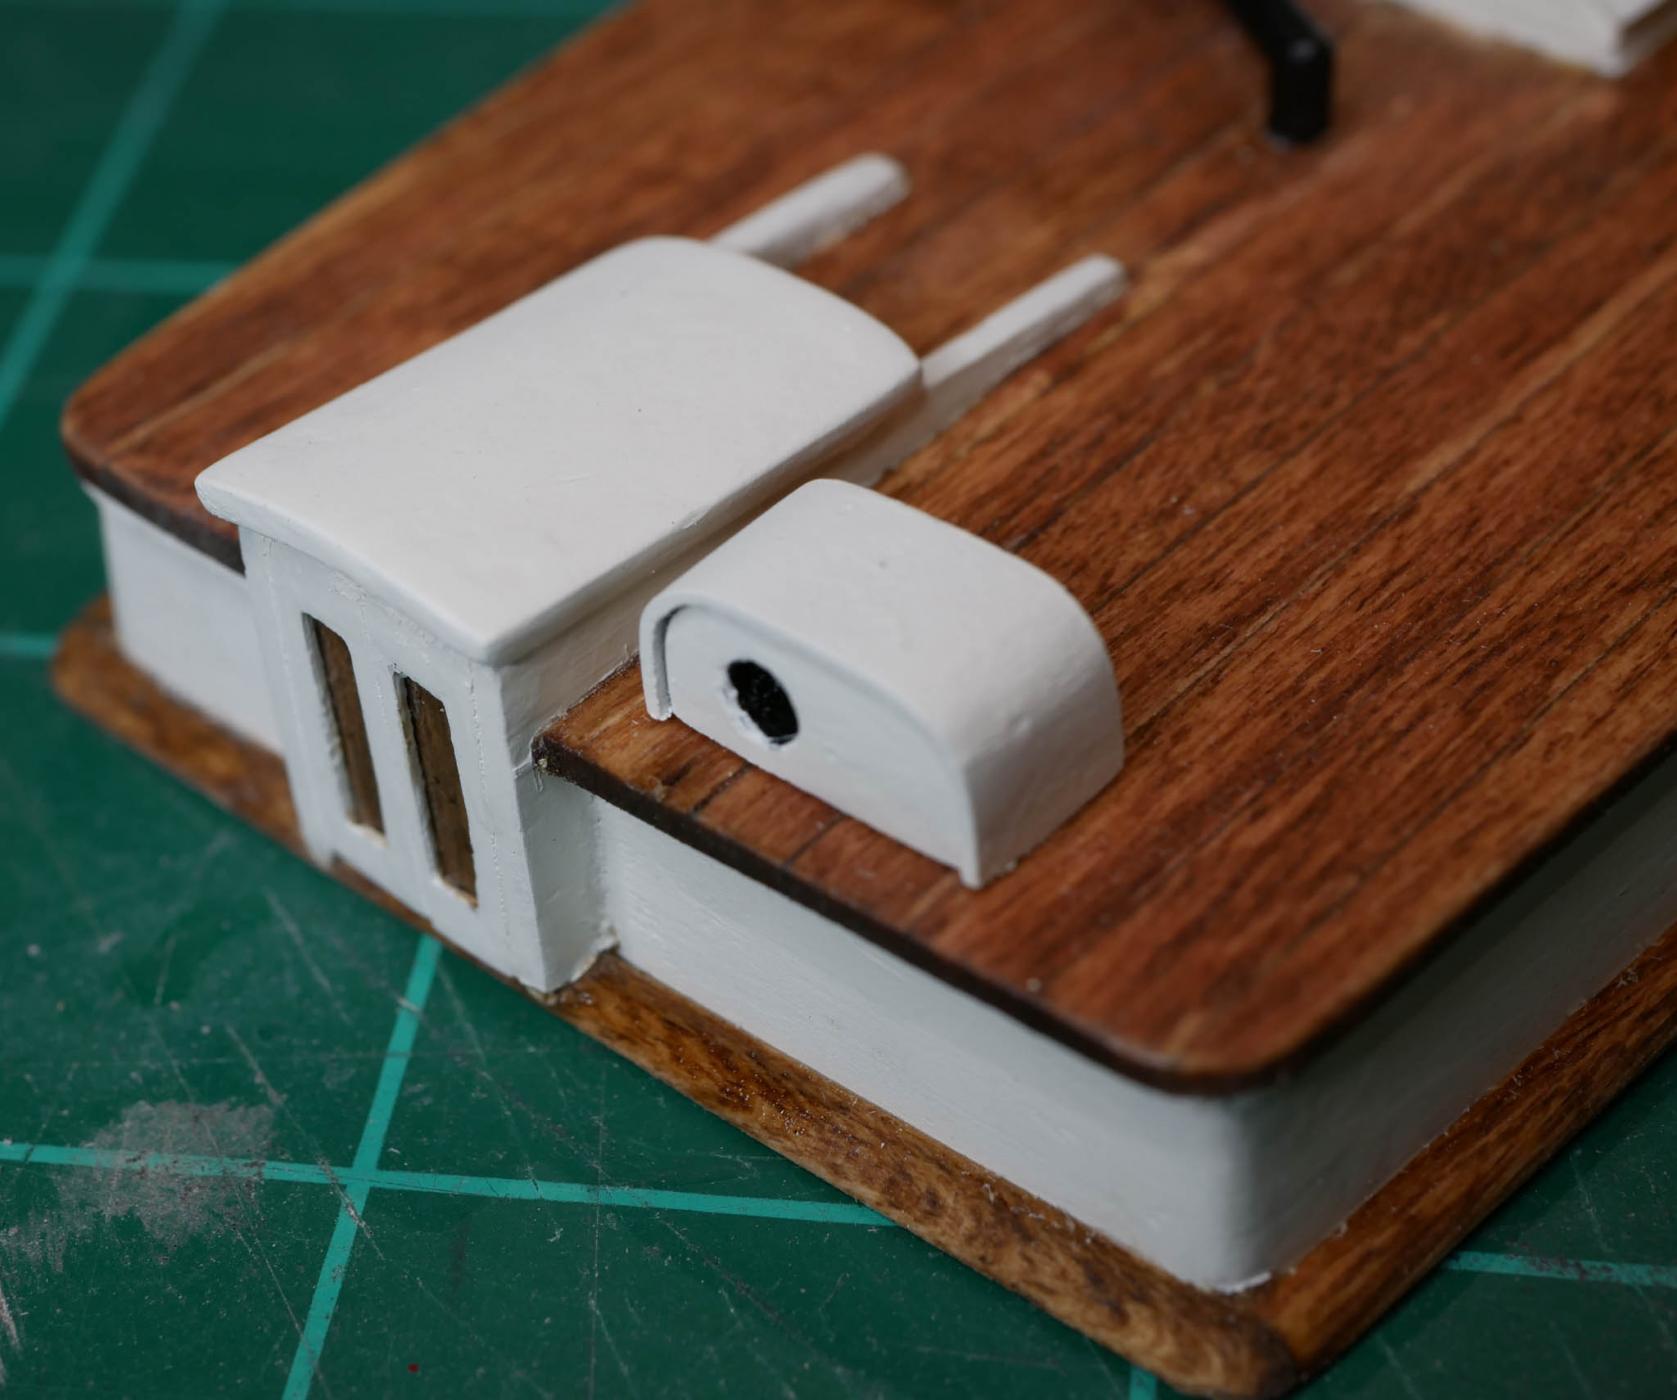
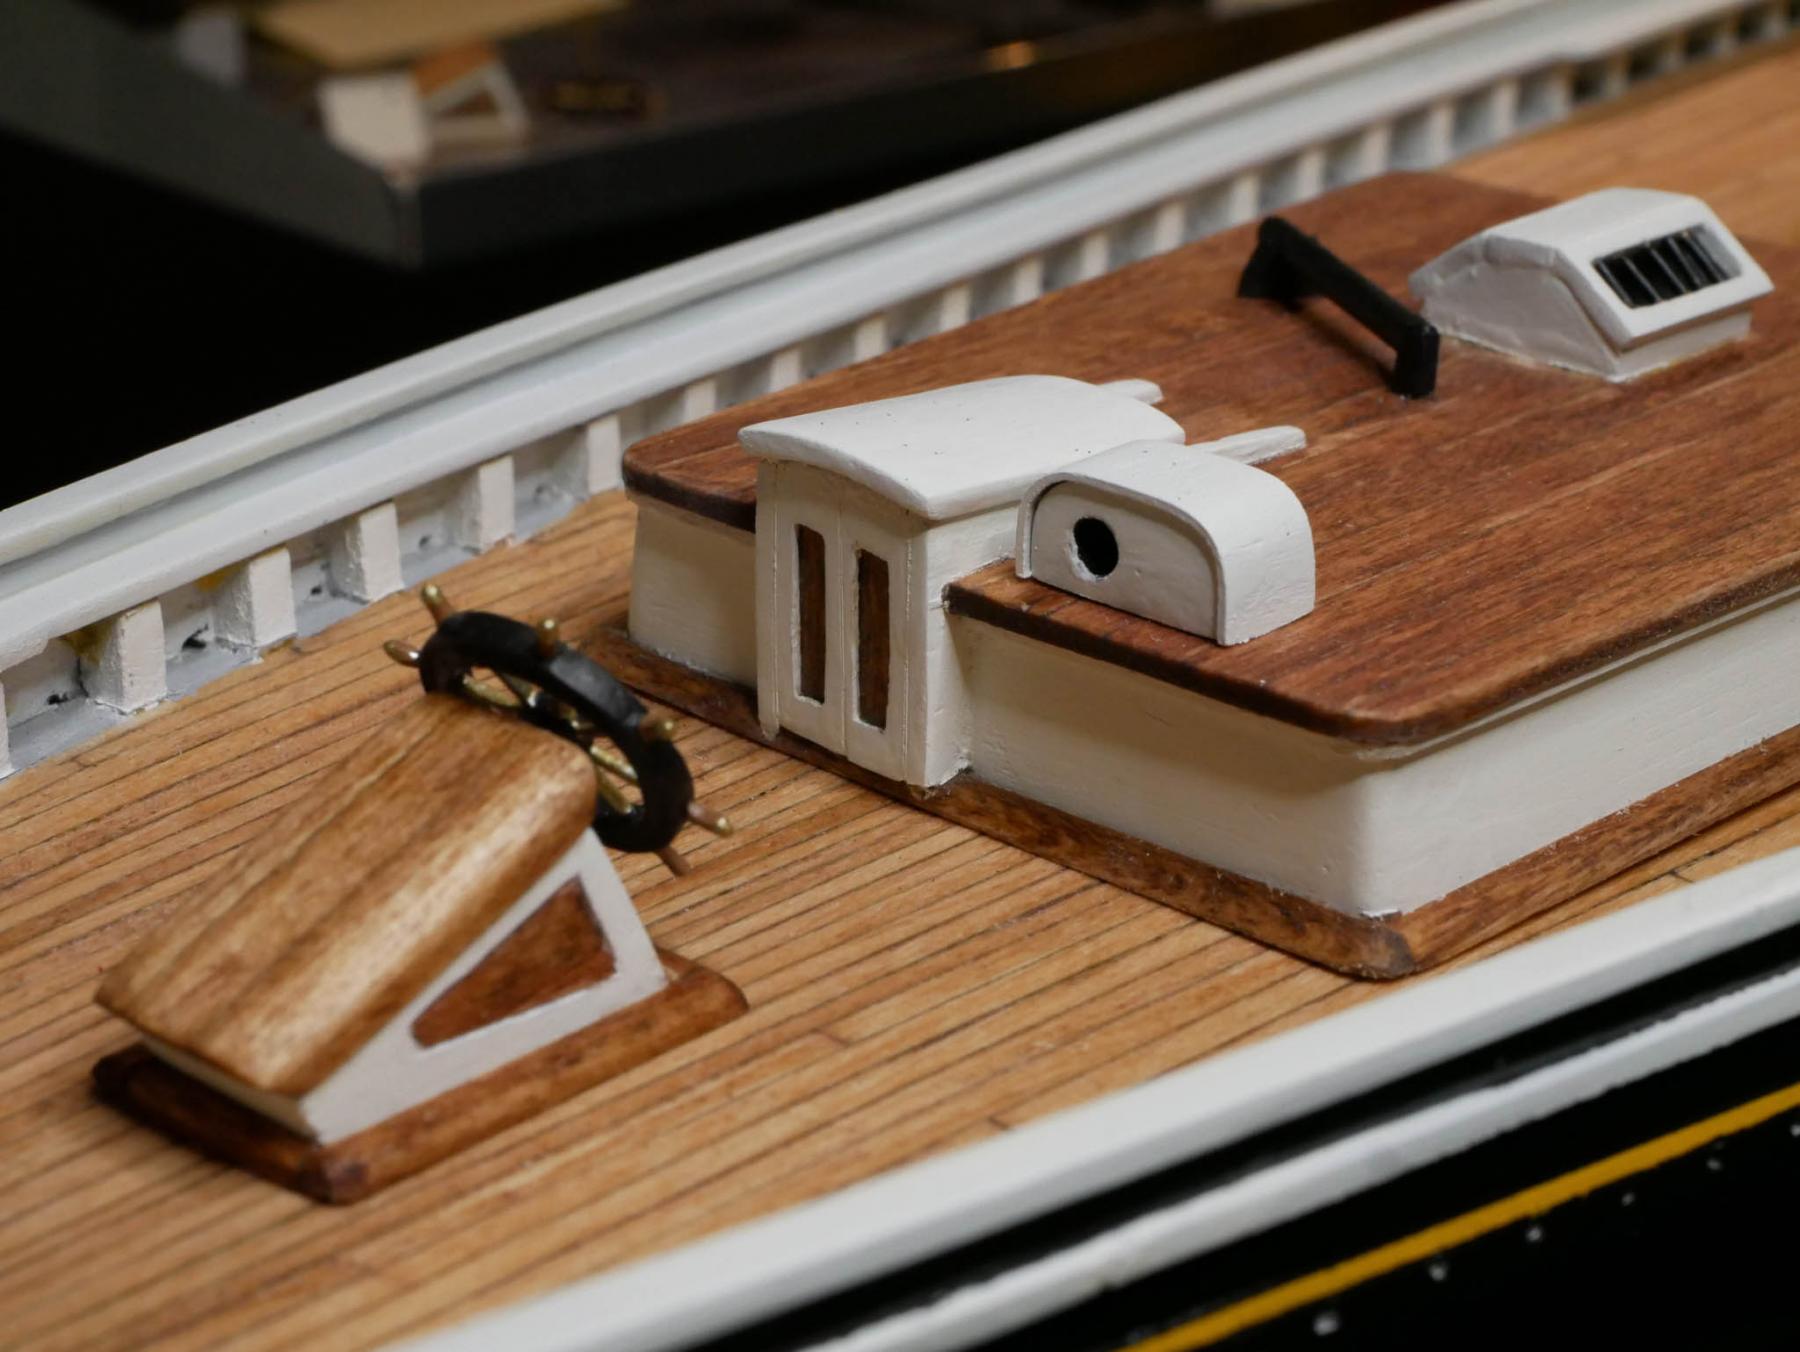
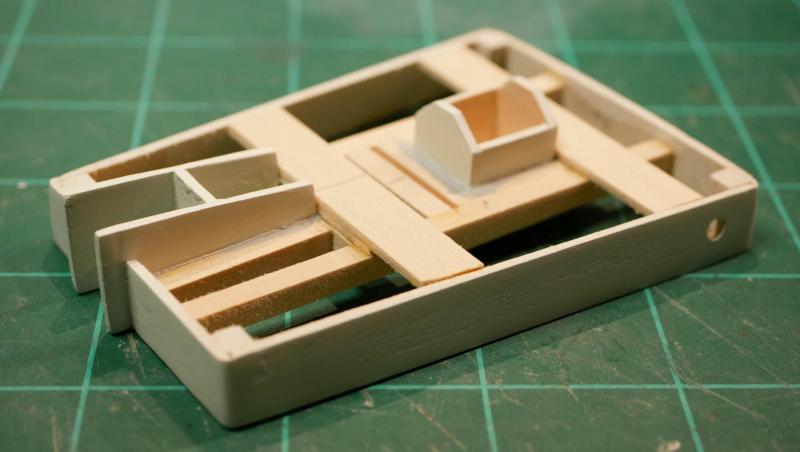
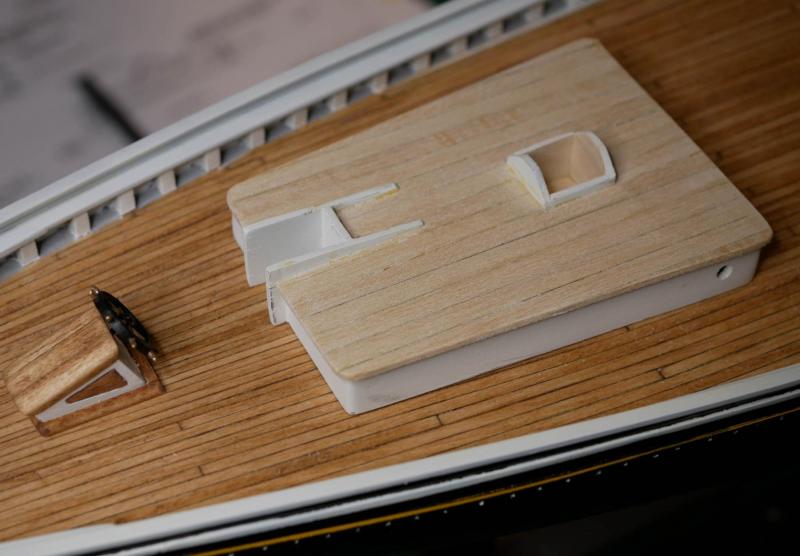
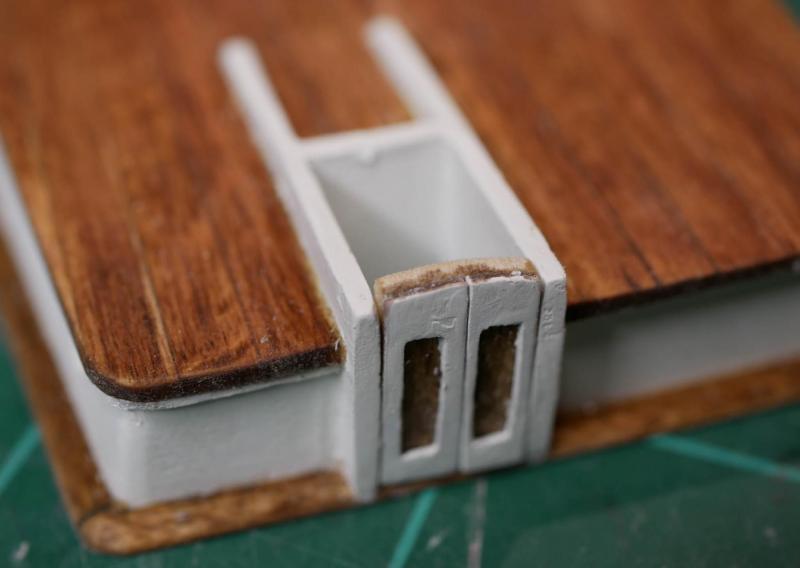
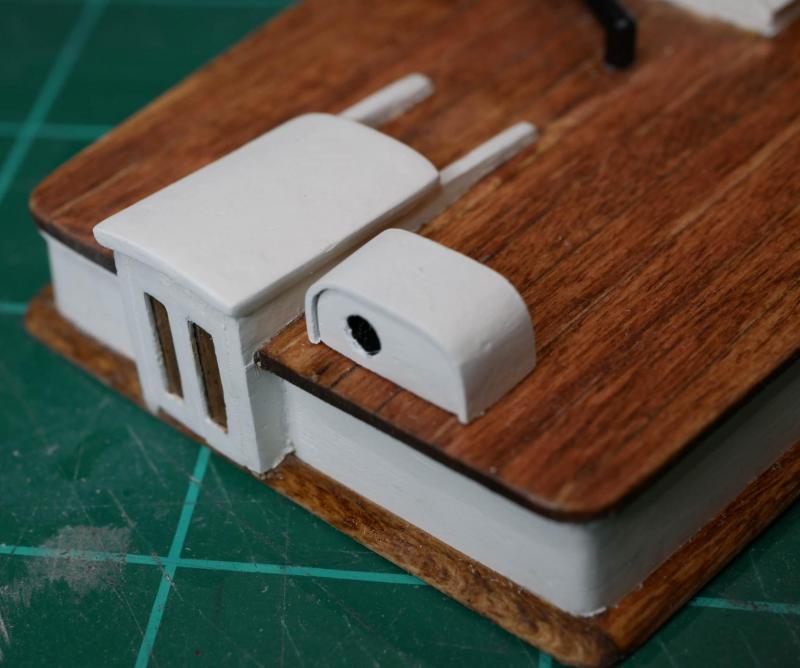
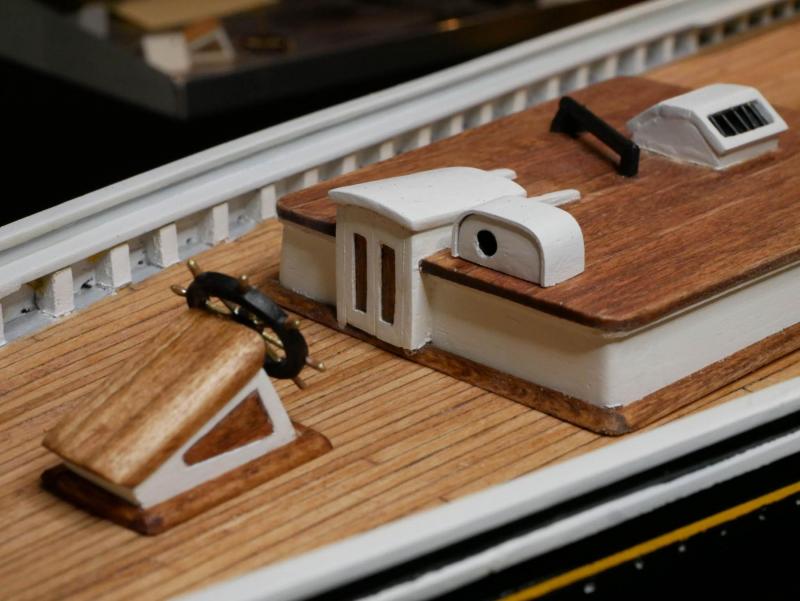
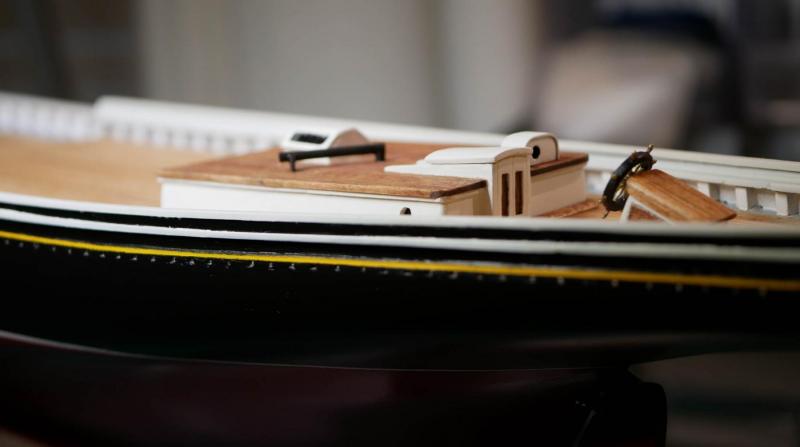
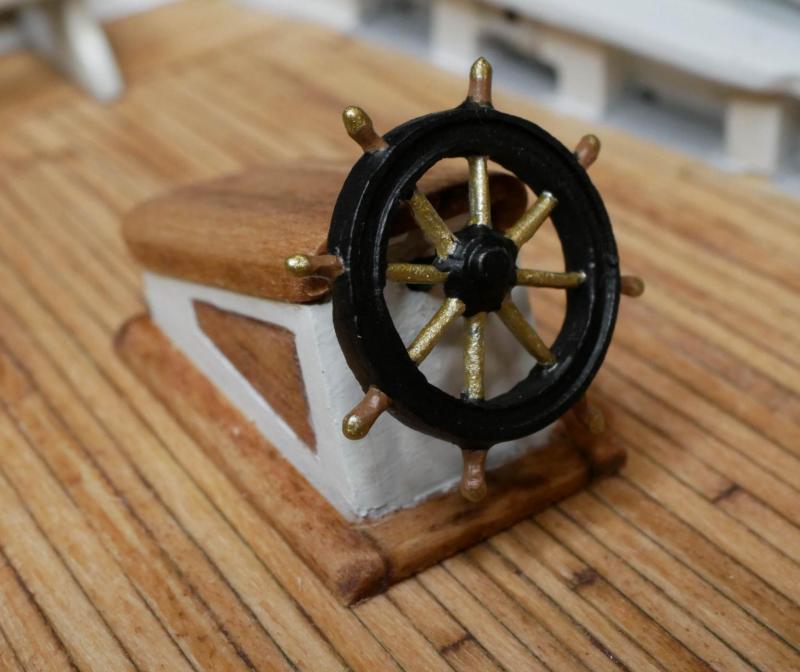
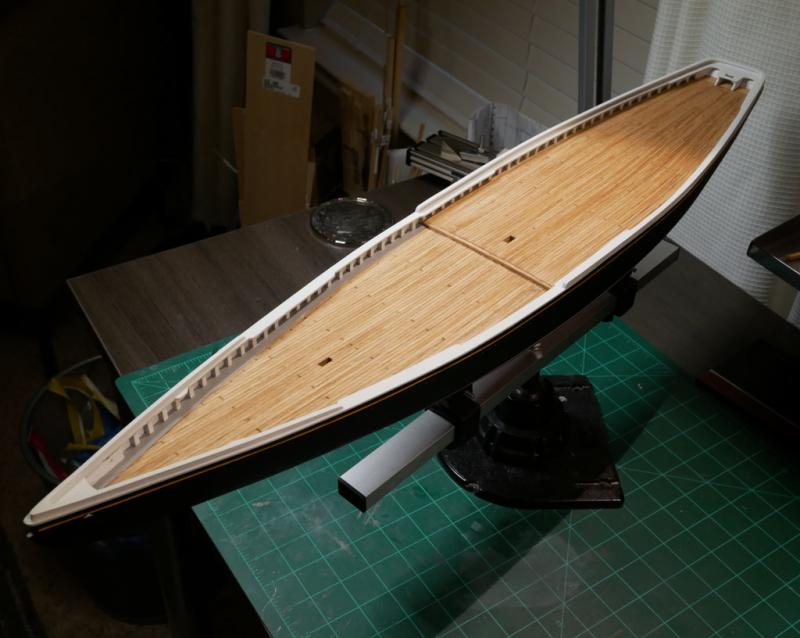
 Cabin Thanks for the compliment John! I'm not sure that I'd agree that my build is the best, but I'll take it. Bob & Dave, thanks! I spent way too much time on the wheel box and wheel, but I wanted to be sure I was happy with the style of the deck structures before I built too many. One thing I didn't show is that I actually tried building a different wheel from the Chuck's kit available from Syren Ship Model Company. It turned out pretty good, but it was a little too big so I went back to the one that came with the kit. The Thanksgiving holiday means I've got a five day weekend, so I decided to dive in on building the cabin. My plan is to build all the bigger deck buildings first and get them installed on the deck. Once those are in, I'll finally get around to applying the clear coat on the deck. I decided to wait to seal the deck until the bigger structures were in place since I opted not to building the coamings in and plank around them. The cabin took about 3 days. I think I made it more complicated than it needed to be, but it was fun. The main structure of the cabin was built from 1/16" thick sheet stock. I used some 5/32" square strips to make some support beams. And here's where I made things more complicated for myself... I decided to build out the skylight and entrance into the structure, rather than adding them onto the completed cabin. I started by framing out a platform to support the skylight. I also cut out the entrance and installed the 'walls'. I added some wide strips to provide support for the roof planking and added in the walls of the skylight. Holes were drilled for the windows. I decided not to try and build all the fancy detail in the corners. I'm not confident I could pull that off. Instead I just rounded off the corners. The roof was then planked from the center out. Since I had built in the structure for the skylight and entrance, there was some work required to plank around those pieces. I decided to add the molding around the roof line, but I kept it simple. Rather than doing anything fancy, I just painted and installed some 1/32" square strips to make the molding. The doors were made in two layers. I cut some 1/64" thick sheet material to the right size, and cut out openings for the panels. This was painted white and glued onto some 1/16" thick material that was stained to match the roof. The skylight's panels were framed out. After being trimmed and painted, I added some short pieces of brass rod to make the bars. For the compass box, I carved the box from a solid piece of basswood. I used more of the 1/64" thick sheet stock for the cover. It was soaked in water then bent around the box. The roof for the entrance was actually planked like the rest of the roof, but painted over in white. For the pipe, I decided to try and actually build it. I cut some 3/32" brass tube to the right size and soldered it together. I made the 'stand' from a piece of brass strip. Everything got a few rounds of cleanup and final painting. I'm pretty happy with how it turned out. There are a few spots where I could have gotten things smoother or painted better, but I don't think it will be noticeable once I've got more stuff on the deck.
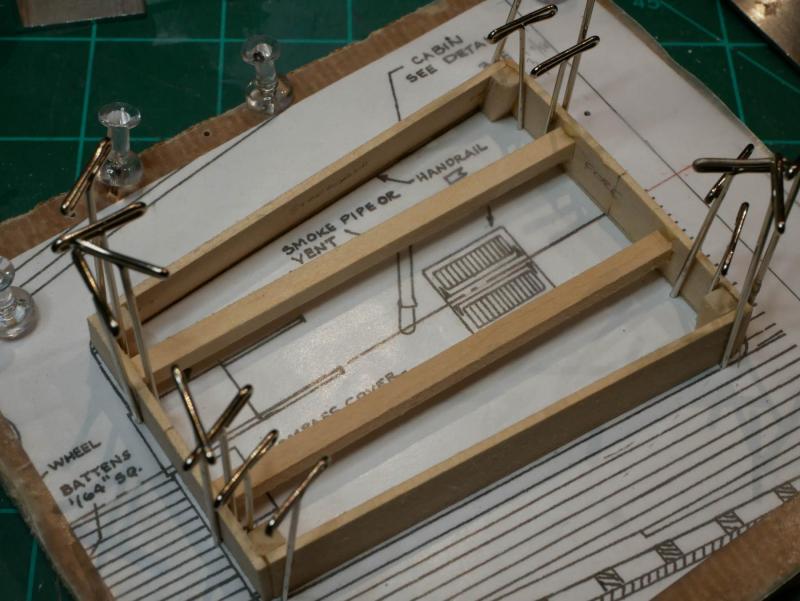


- 245 replies
-
- 9
-

-
- bluenose
- model shipways
- (and 1 more)
-
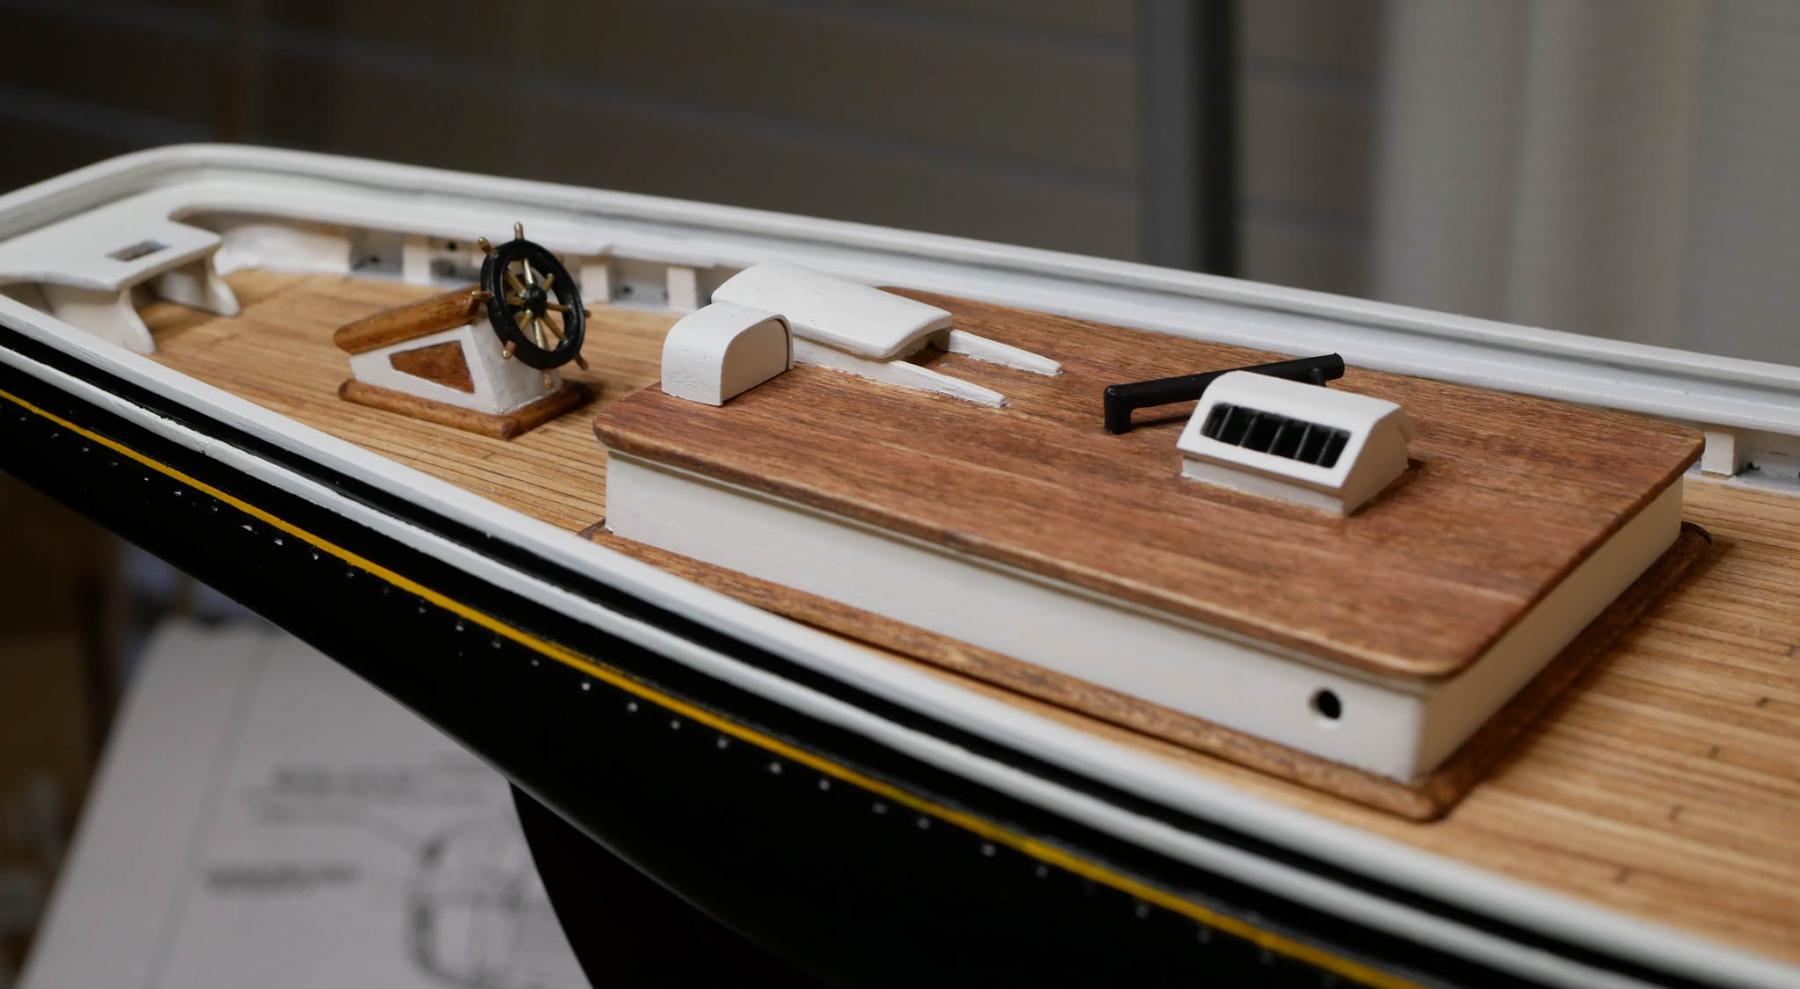
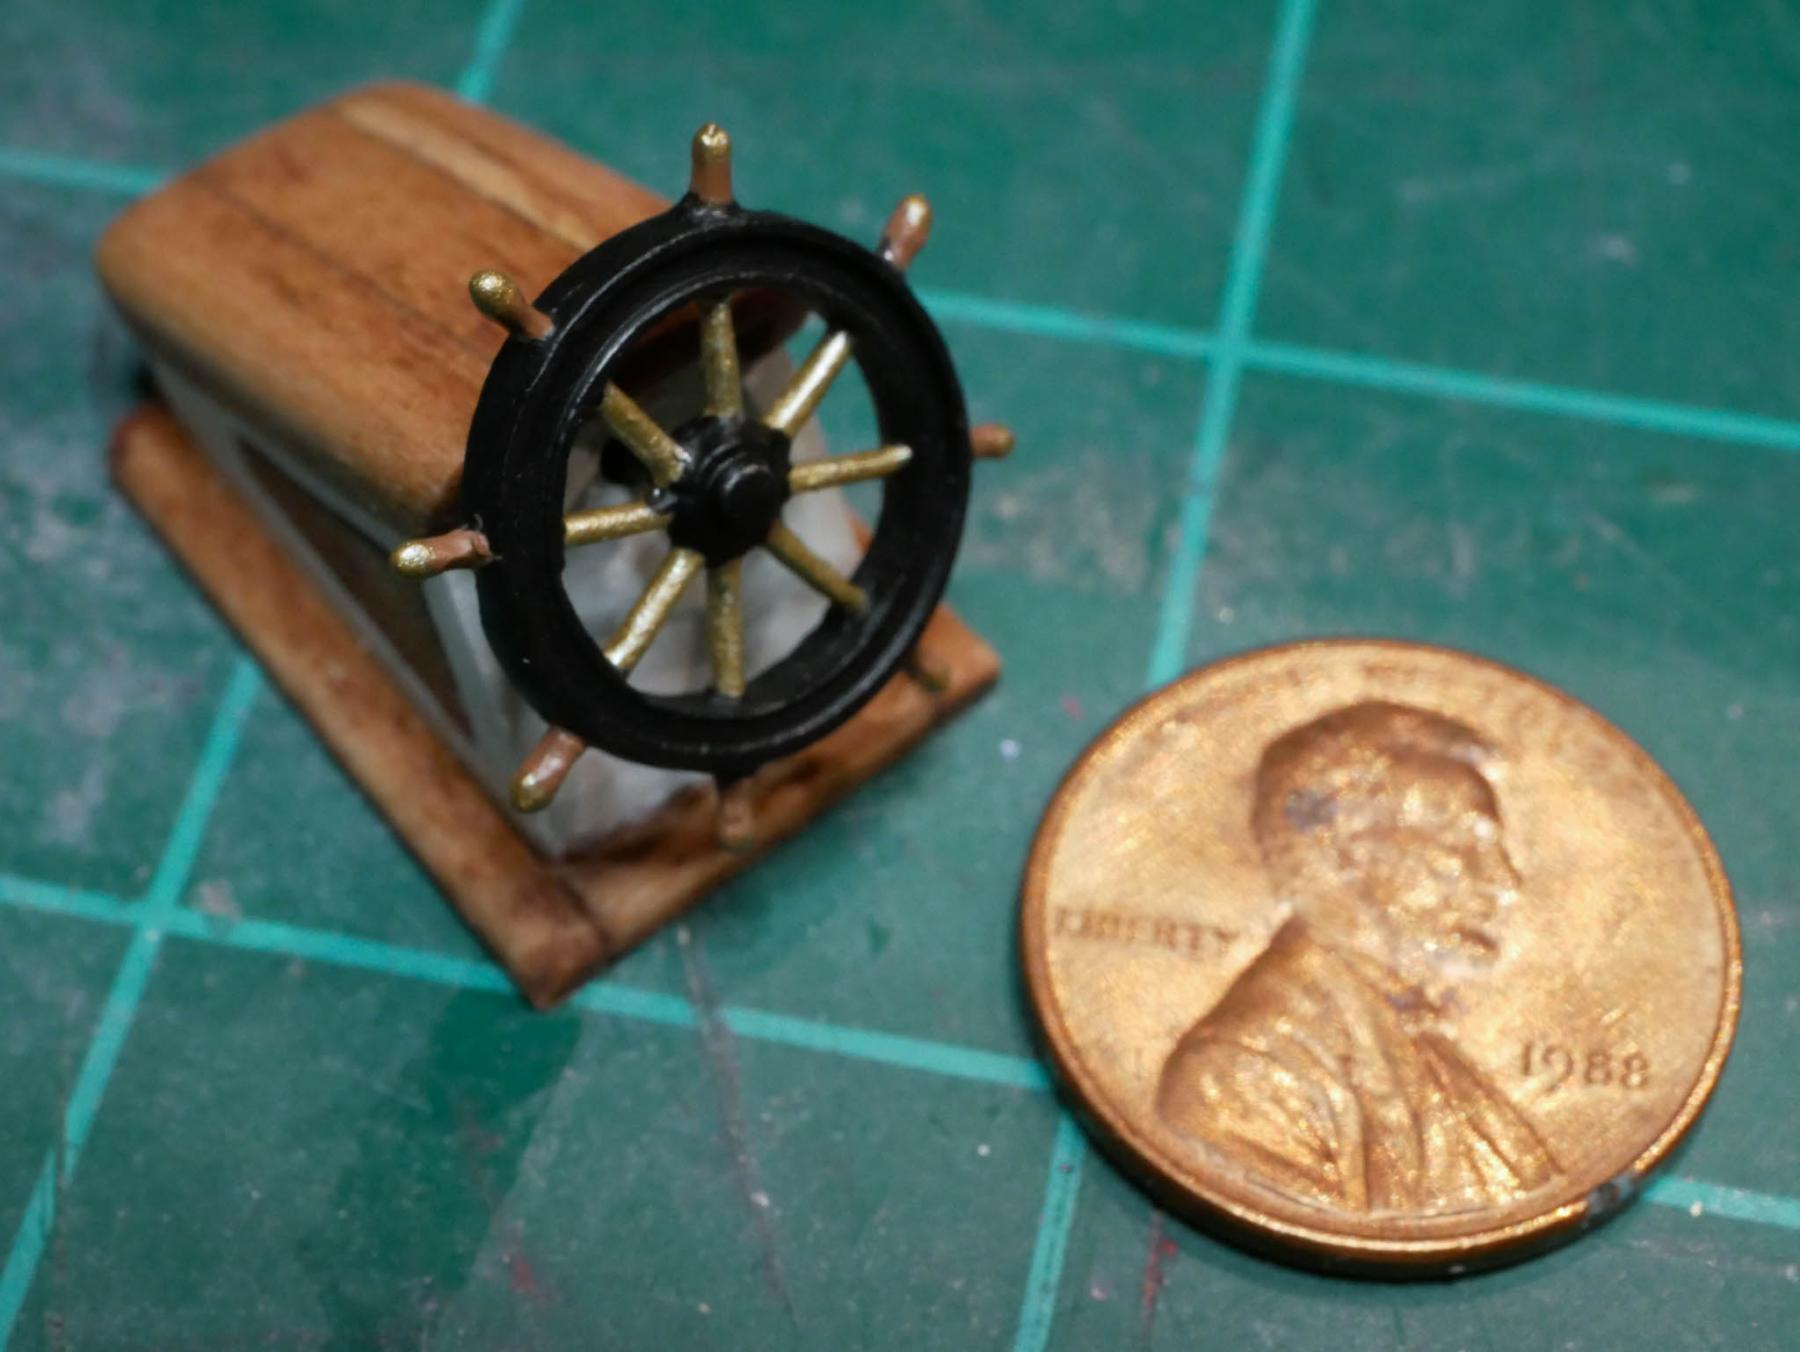
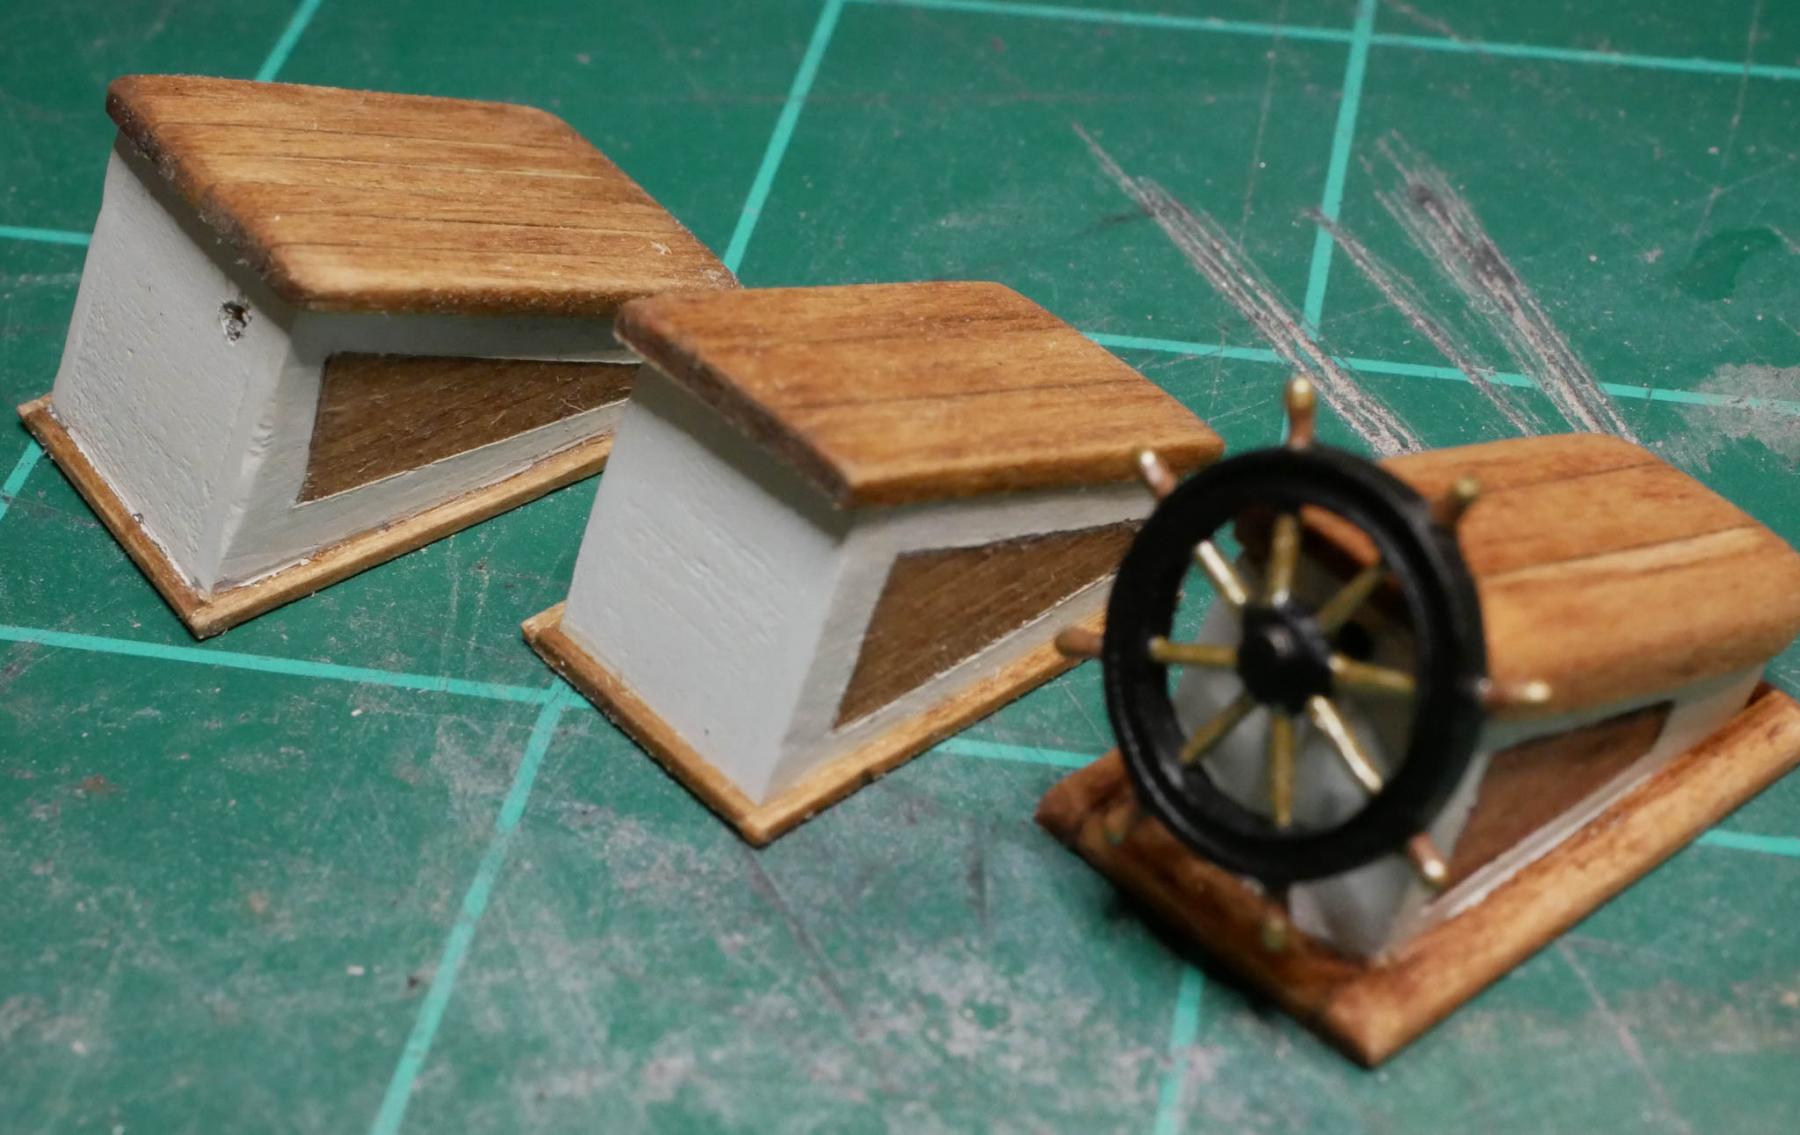
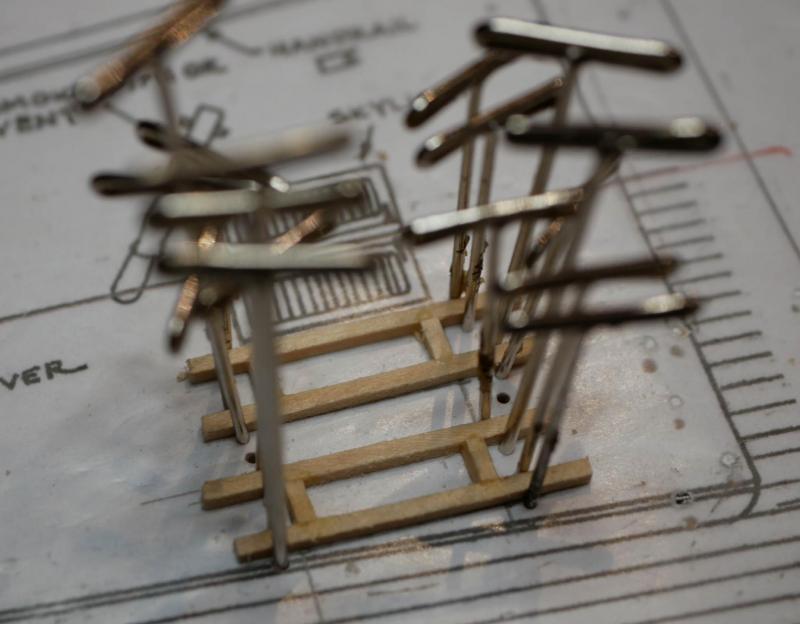
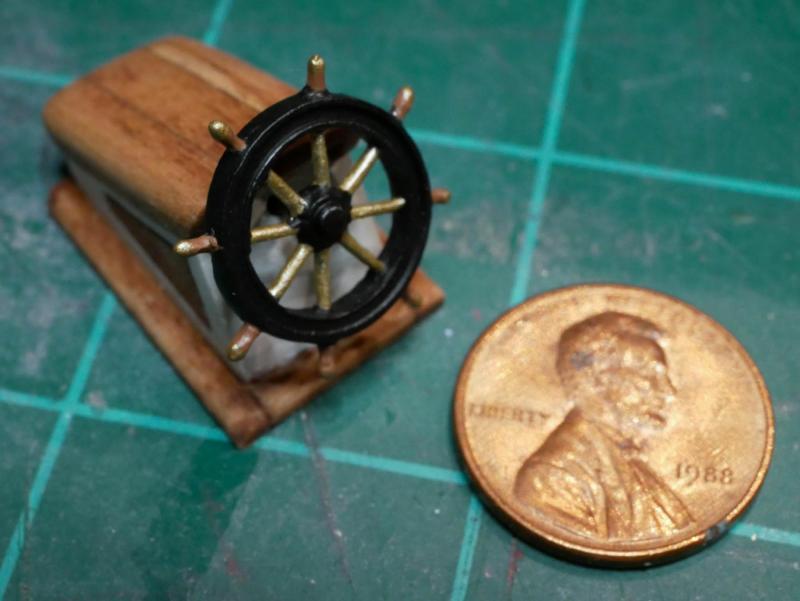
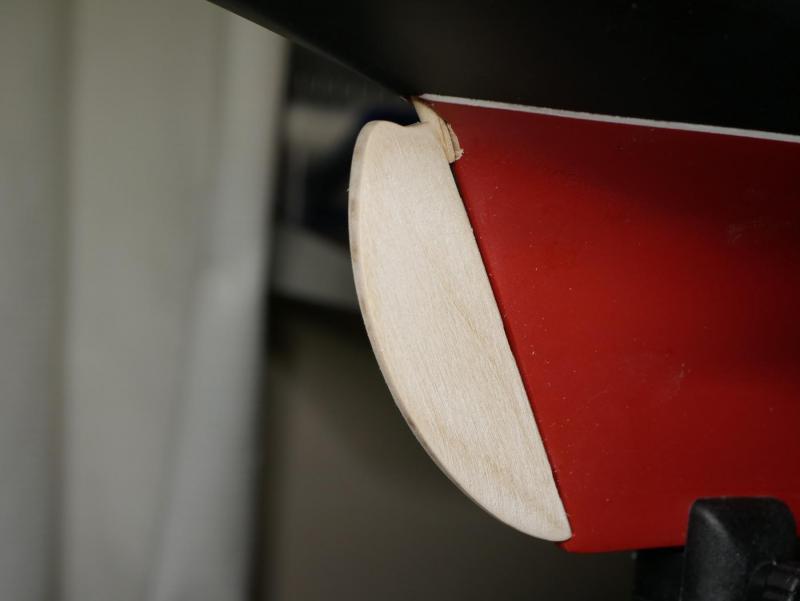
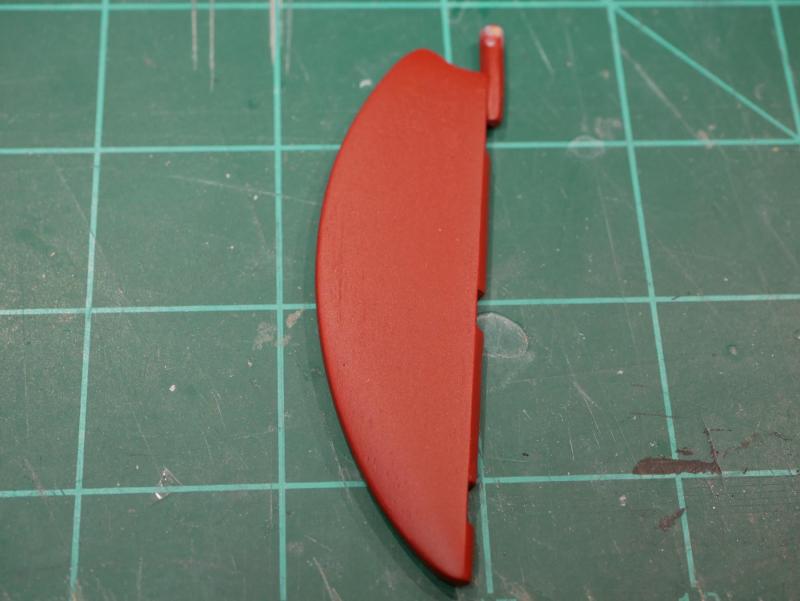
Wheel Box Over the last few weeks I haven't had much time to work on the build, but I did manage to get the wheel box finished. Part of the delay was that I ended up building it three times. Since this was the first structure I built for the deck, I wanted to be sure I liked the look and construction method. My first attempt was too big - I simply measured the plans wrong, and didn't realized it until I was finished. The second attempt was perfectly fine, until I started looking at old photos of the Bluenose. That led me to rebuild it a third time. The final attempt is the one I'm keeping. I ended up going with slightly wider coamings along the base. I also rounded the roof a bit as seen in the photos I found of the Bluenose. I've decided to use stain in place of the 'burnt umber' called for on the plans. This isn't historically accurate, but I like the look. The wheel itself was fun, and set me back a week or so. While cleaning up the casting, I broke one of the handles off. I ended up filing it down, drilling a hole into the wheel's rim, and gluing in a very short piece of brass rod to simulate a handle. Once I got the wheel painted I can't tell which one was repaired. Hopefully the other deck structures don't take this long, or I won't be done for a few years.

- 245 replies
-
- 4
-
-
- bluenose
- model shipways
- (and 1 more)
-
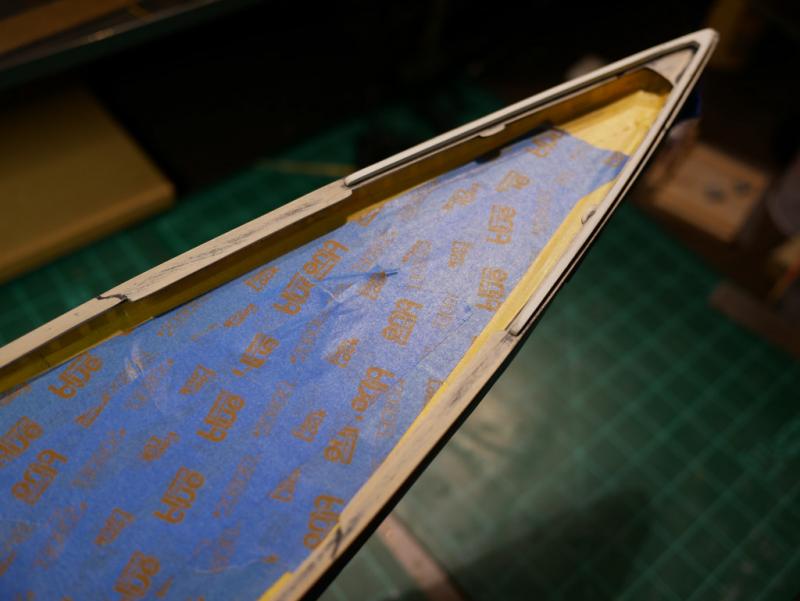
Thanks Dr. Per, Jon and Dave B! That was my first ever attempt at any real metal work so it wasn't surprising it took a couple tries. After a few hours of touch-ups (fixing any paint issues, filing down the bolts on the pintles/gudgeons), the ship is now sitting out in the garage. The final clear coat has been applied, which means I'm officially done with the hull. I'm officially moving on to the deck structures!
- 245 replies
-
- 2
-
-
- bluenose
- model shipways
- (and 1 more)
-
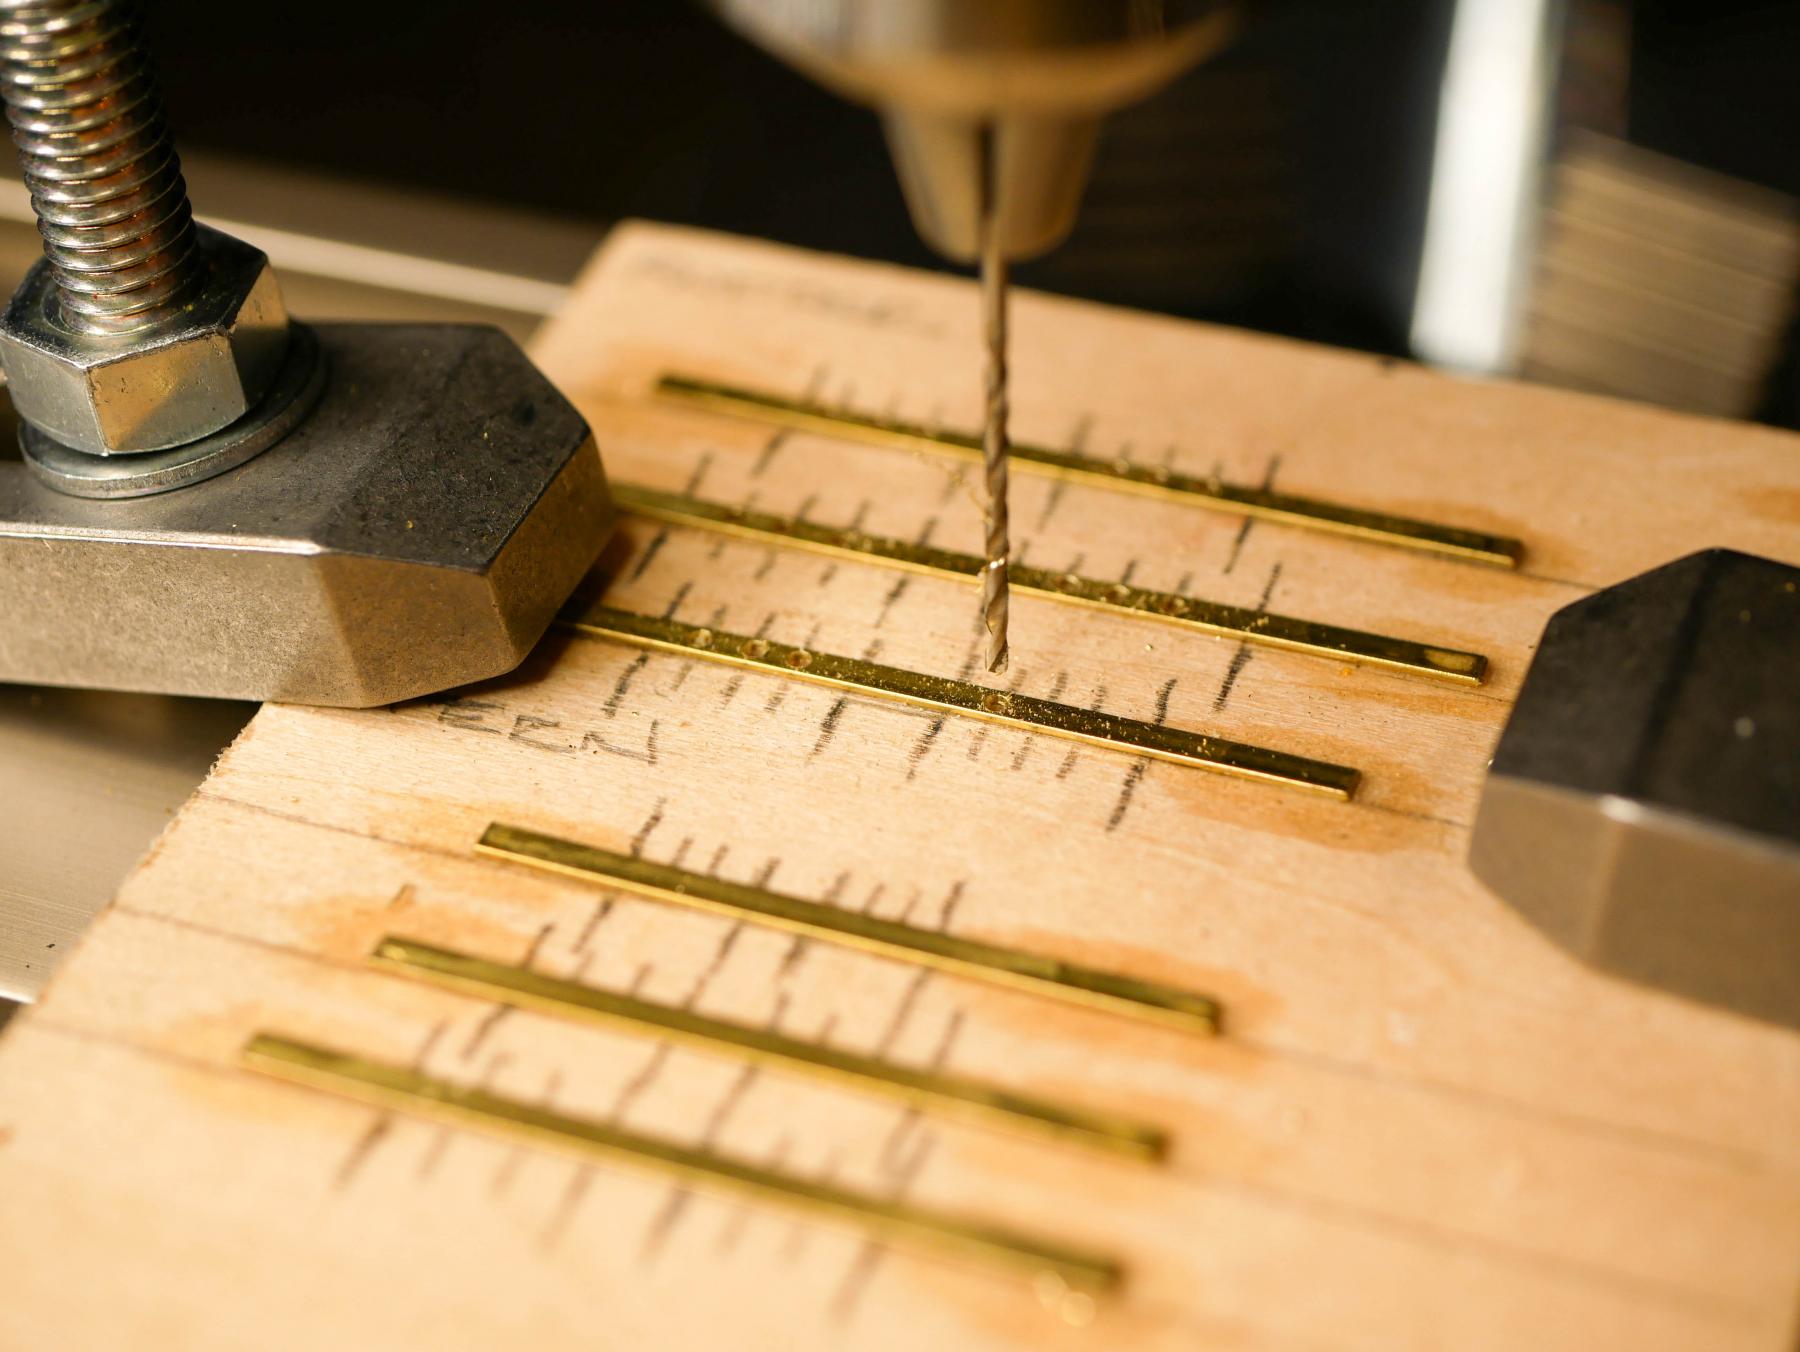
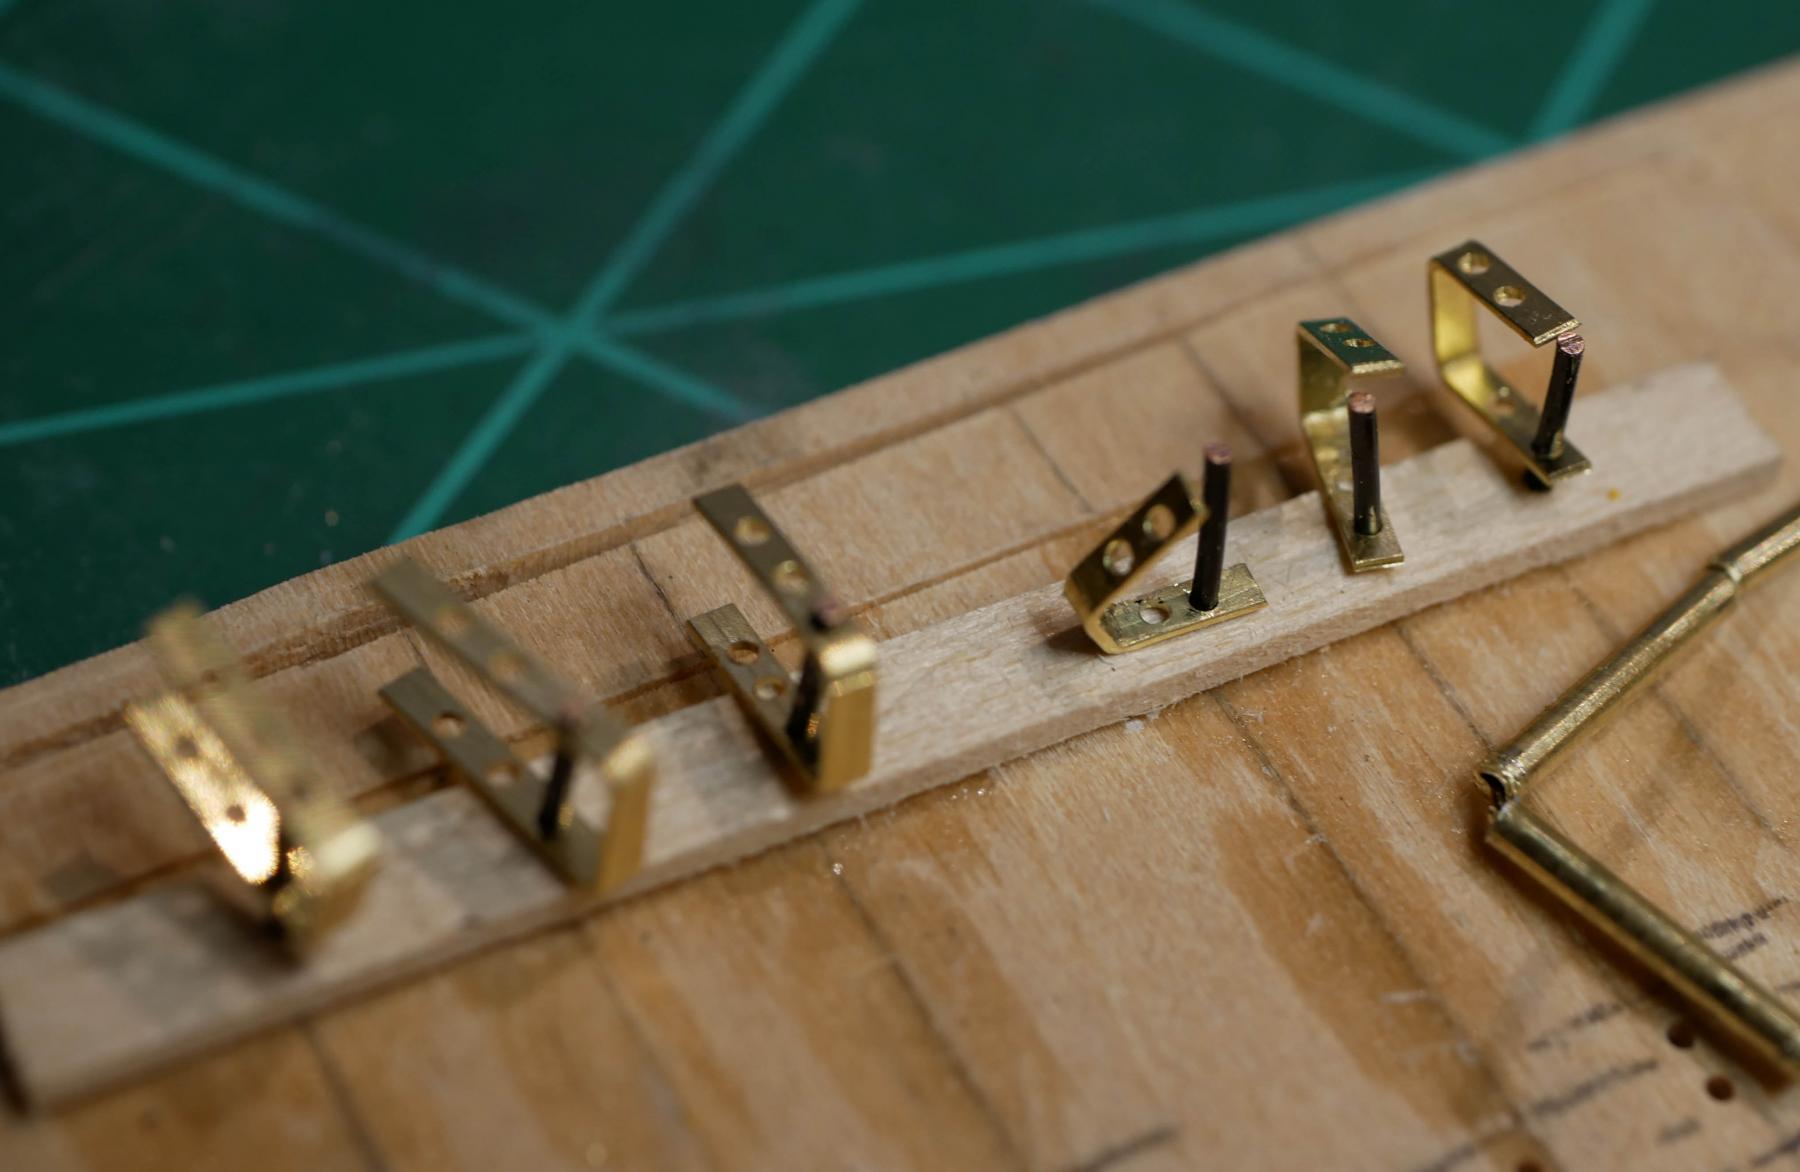
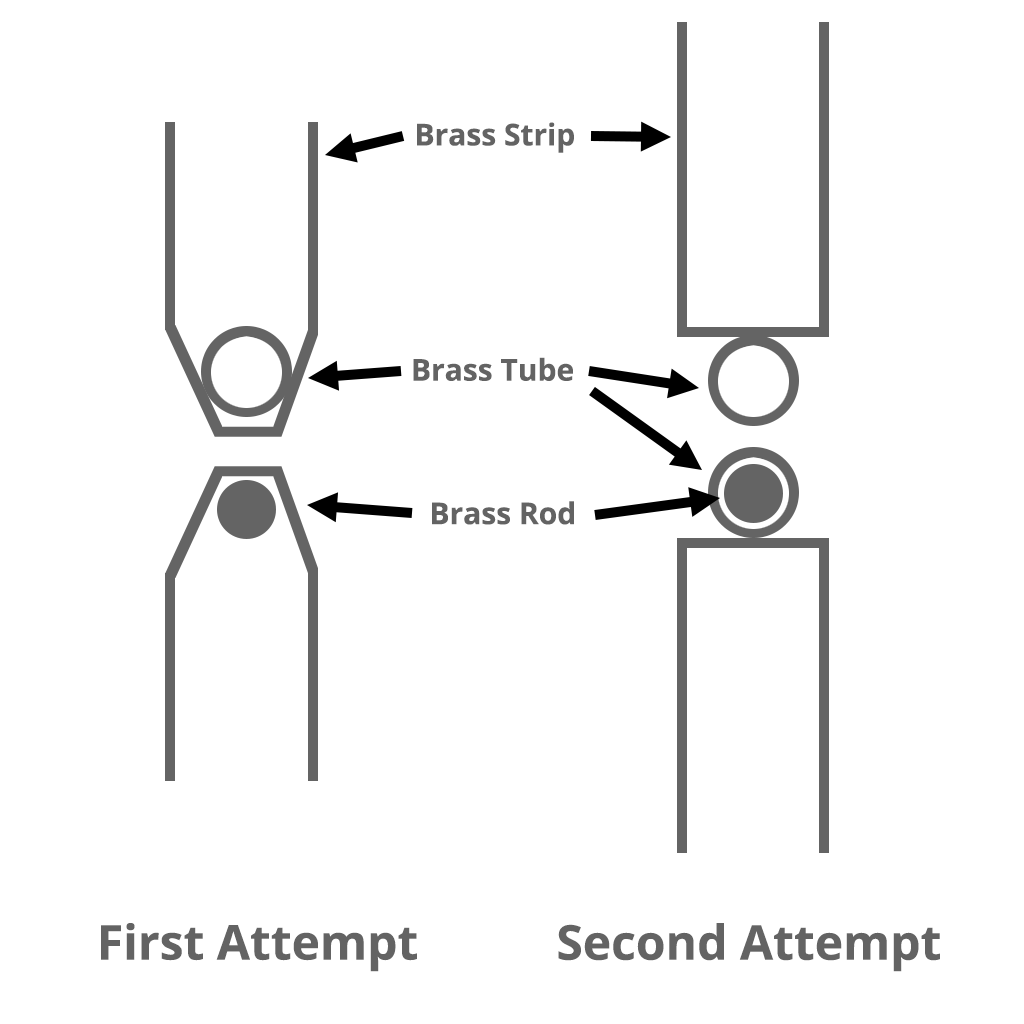
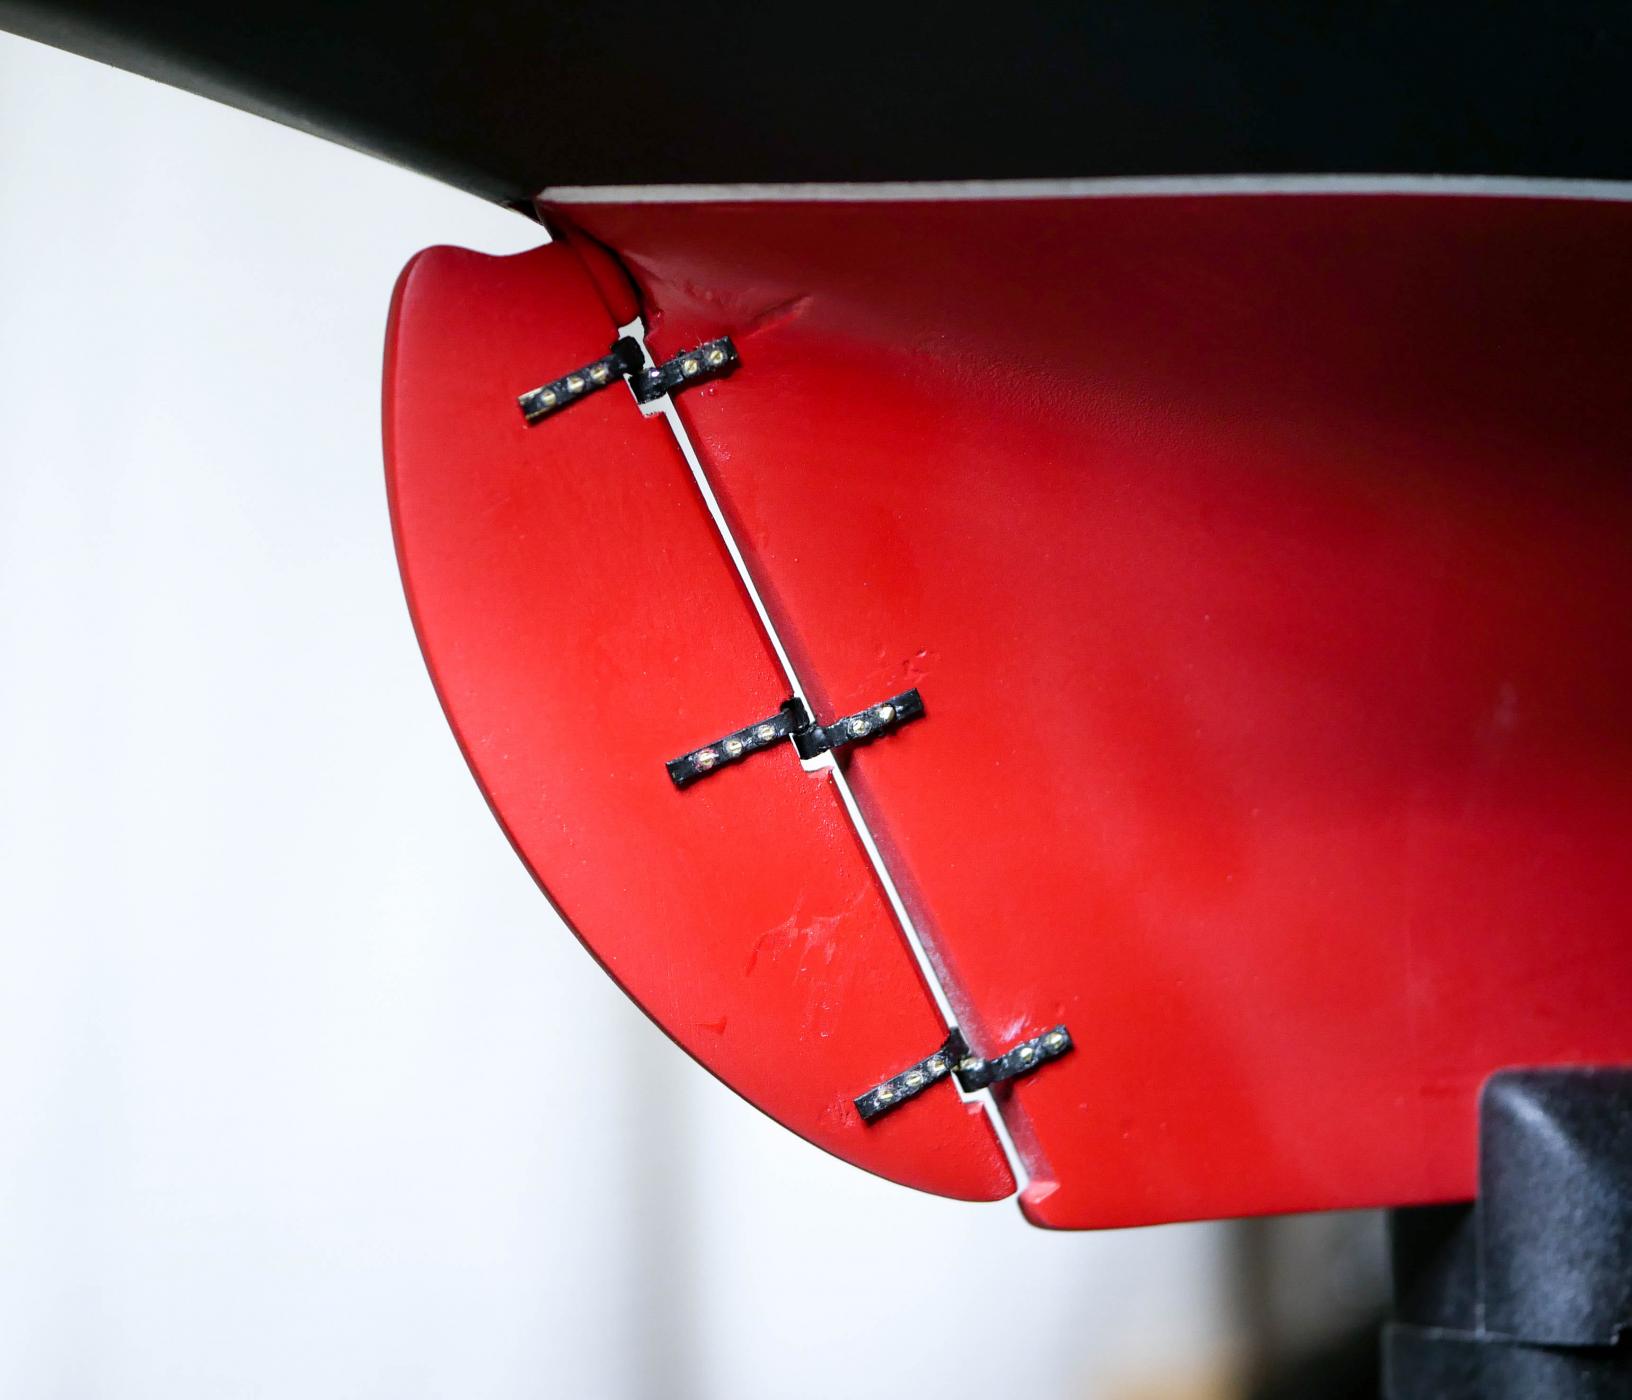
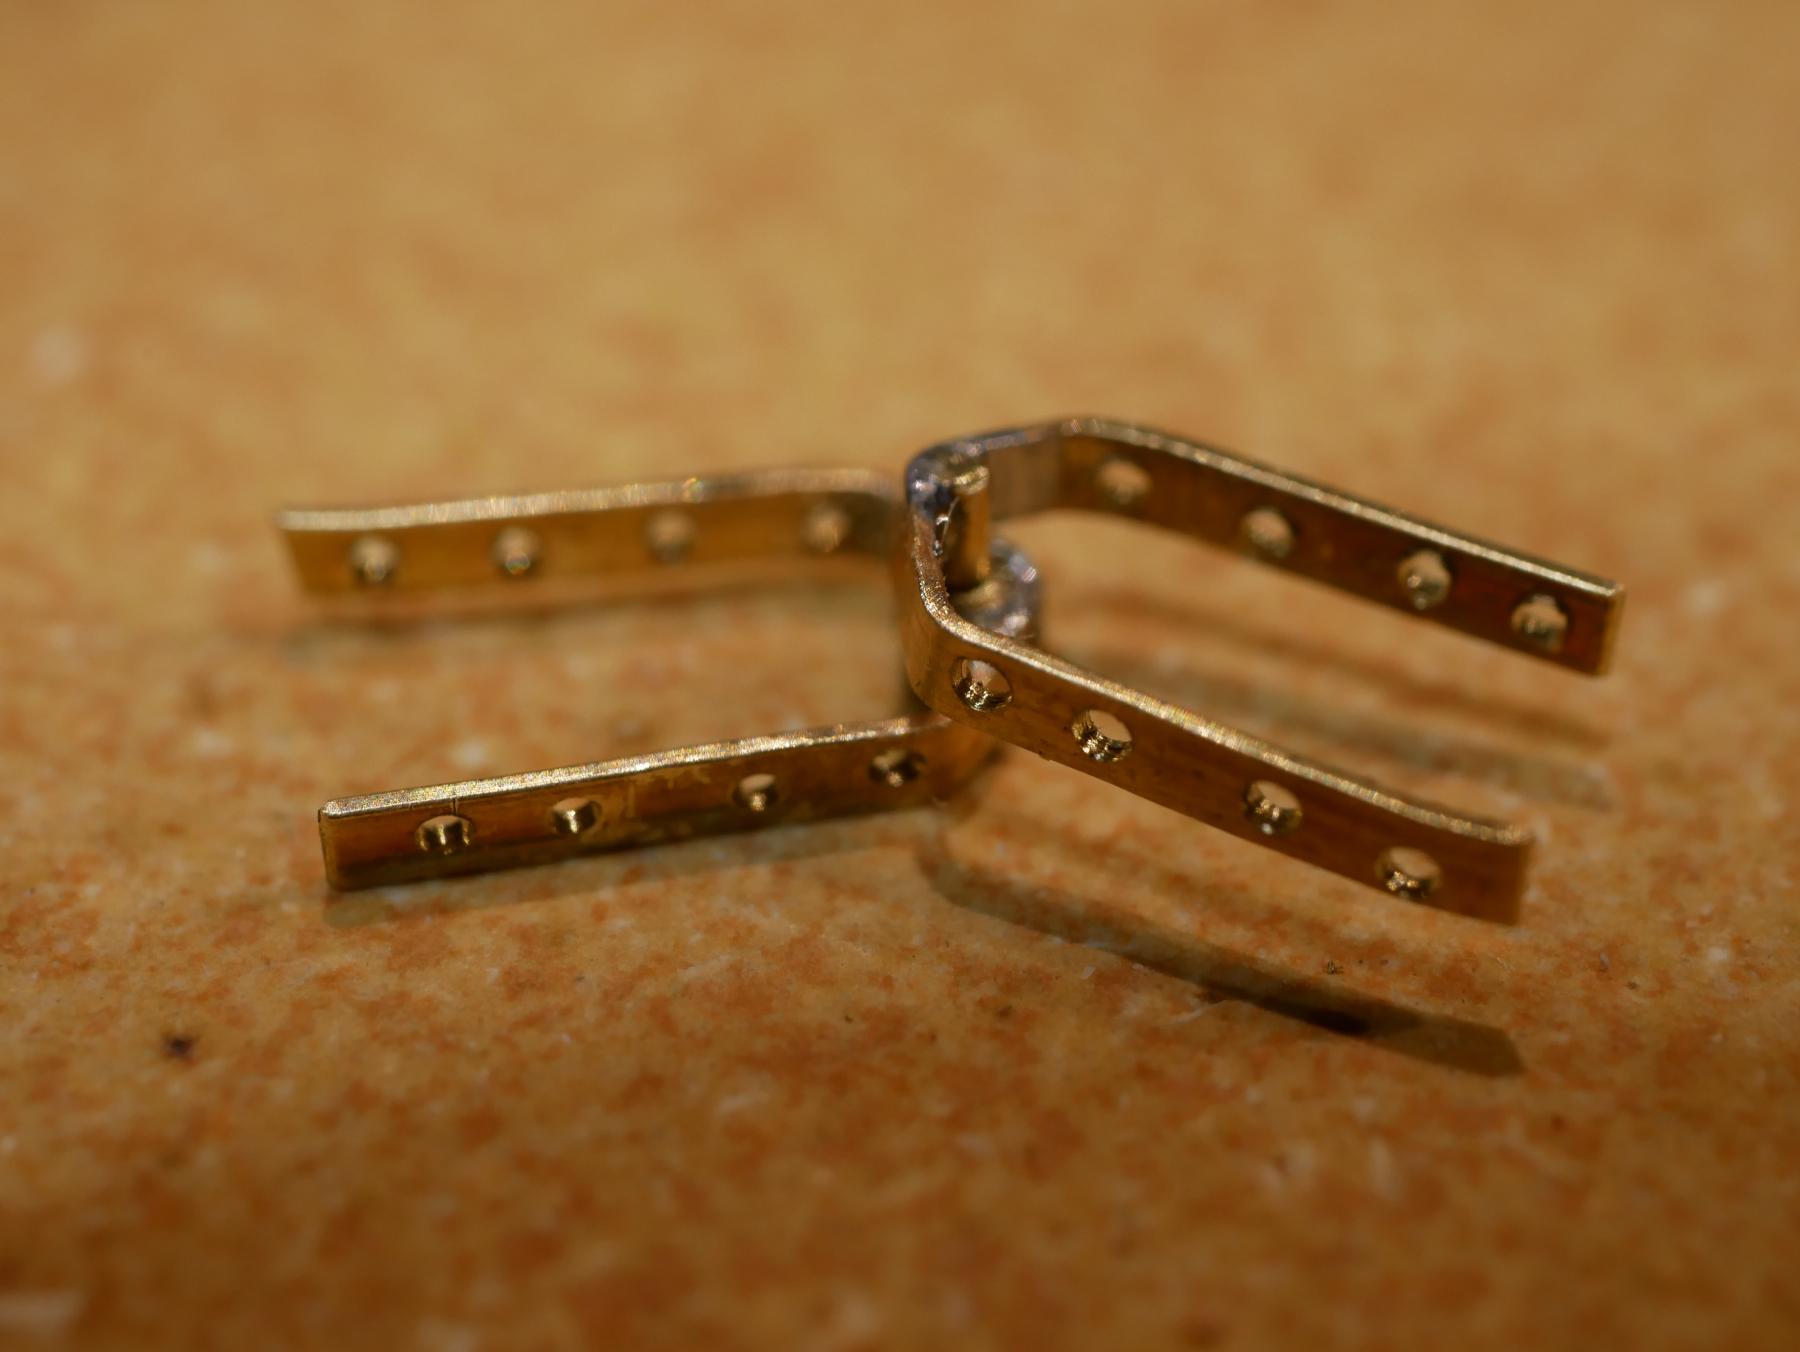
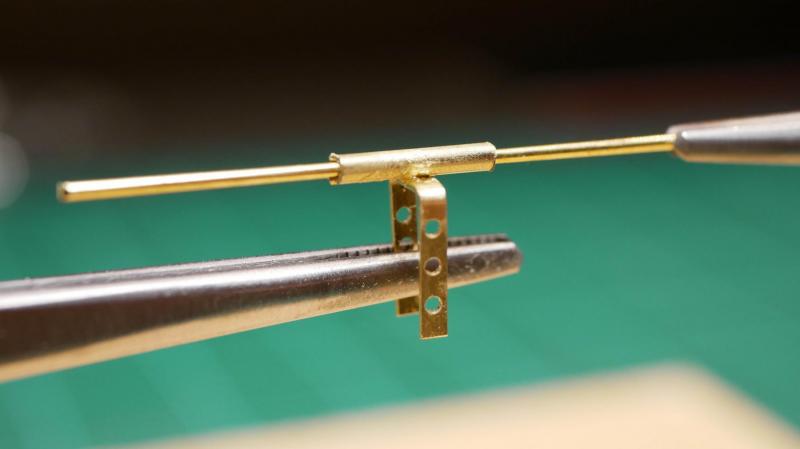
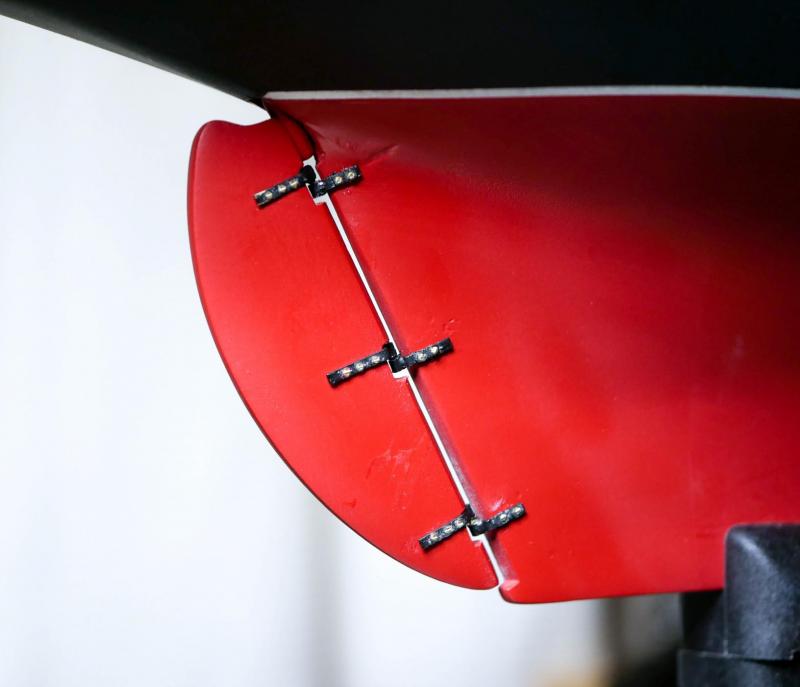
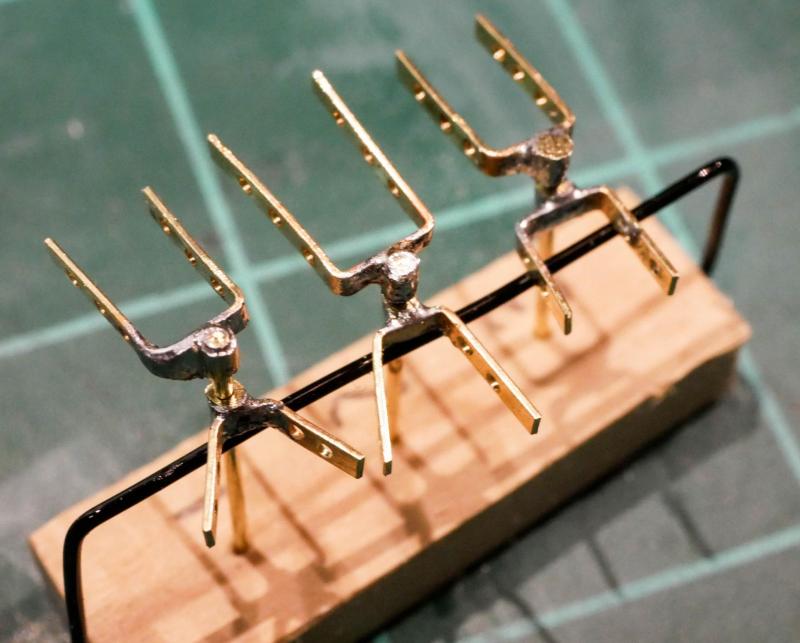
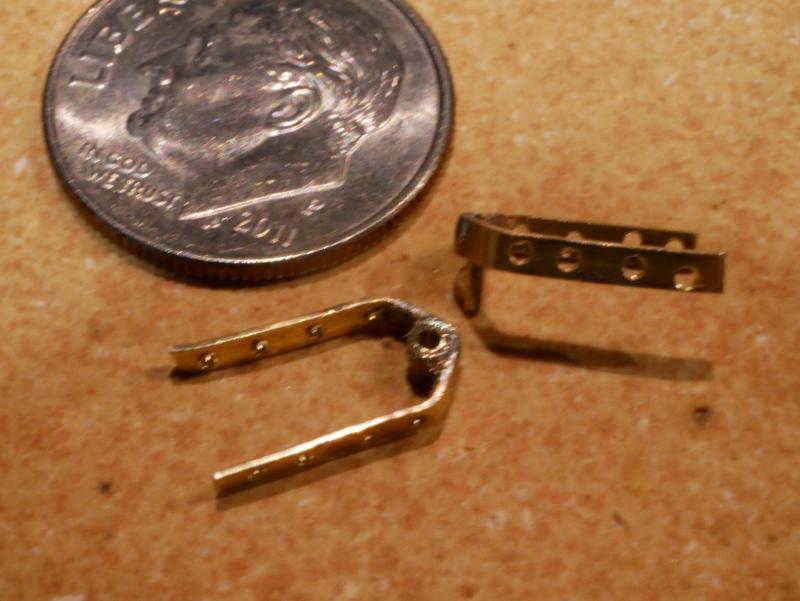
The rudder is installed! My second attempt at building pintles and gudgeons went much more smoothly, and the rudder is now fully installed. The first attempt (a couple weeks ago) failed because as I was gluing the gudgeons onto the sternpost, I wasn't able to get them lined up precisely enough. The pins on the pintles and the holes on the gudgeons are very small (about the size of a #64 bit), so if they are off even a little bit, it is impossible to hang the rudder. That previous attempt ended with pulling the pintles and gudgeons off (scrapping them), and having to repair the paint on both the rudder and hull. So...the second attempt... This time I focused on getting the brass strips sized perfectly for each spot first. (On the first round, I just made all 6 pieces, then bent them to shape during install.) To do this, I measured the thickness of the rudder and sternpost at each location, and transferred that size to a piece of wood. From the plans I transferred the length of the bands on either side to the wood, which gives me a total length for each strip. Next I cut 6 brass strips that were each longer than required. I used the extra length to glue the strips down to the board with CA glue. Gluing them down holds them in place while I drill the holes for the bolts. I marked the locations for the holes on the wood, and got to drilling. I used a Proxxon drill press with a compound X/Y table to do the holes. After the holes were drilled, I scored the strips to mark where they needed to be bent and cut. One by one I removed them from the board, cut them to length, and bent them to match their place on the ship. Since each piece is for a specific spot, I made a simple jig to store them so I wouldn't mix them up. With the strips shaped and sized, the next step is to attach brass rods and tubes. On my first attempt, I tried to bend the strips into an angle, and attach the rod and tube on the inside. This contributed to the alignment problems, since the angles of the bends were a little different on each piece. This time around, I decided to mount the pins and tubes on the outside so I could keep the end of the brass strip flat. I also decided to attach tubing on the pintles as well, and have the pins inside those tubes. I was hoping that using tubing on both the pintles and gudgeons would help keep things lined up. To compare the method I used on the first attempt to the second (top down view)... After cutting some sections of tubing and rod, I got started soldering. My soldering skills aren't great (this is only my second time soldering, and the first was my last attempt at the rudder a couple weeks ago). Despite my lack of skill, I was able to get all the parts soldered together pretty easily. I kept the pins really long to make the pintles easier to handle during painting. I also build another small jig to keep track of the parts while I worked, with each pintle and gudgeon paired up. The pieces were then all painted flat black. So far, so good, but this is where everything started going wrong last time. In my previous attempt, I glued all the pintles onto the rudder, then tried to glue all the gudgeons onto the stern post after marking their positions. That didn't work. This time, since my pieces are shaped already and have a pretty good grip on the wood, I'm going to tape them in place so I can get everything straightened out and lined up before I glue anything. I added a little strip of tape below each gudgeon to keep it from sliding off the pin while I worked. Of course if I want to glue these down, I would need to remove the pieces to apply the glue, and that will almost certainly result in the alignment getting off. So I decided to rely on the bolts to hold the rudder in place (if that worked for the actual ship, it should work here, right?). One by one, I used a small drill bit to drill into the holes on each part. I drilled to about half the depth of the wood. I then took a small piece of brass rod, brushed on some CA glue, and placed it into the hole, pushing it in as far as it would go. This resulted in a little CA glue being squeezed between the wood and the strip. Once all the pieces were attached, I removed the remaining tape and clipped the brass rods to be flush with the strips. Then a quick test to see if the rudder turns...success! I'm now done with the hull stuff, and I'll be able to move onto the deck structures. Feels like a big milestone! The last thing I need to do before starting in above the deck is to give the hull a quick once-over. I need to do some filing/cleanup on the pintles and gudgeons, and touch up paint in a few spots. (In the close-up of the rudder above, you can still see some of the damage from my first rudder attempt - I might go and and fill those in and touch up the paint.) Then I'll finally be ready to apply a clear top coat to the hull. Hopefully by the end of the weekend I'm working on deck structures!


- 245 replies
-
- 8
-
-
- bluenose
- model shipways
- (and 1 more)
-
Thanks Dave B! I'm hoping my wife ends up needing a good 3D printer for her jewelry business - that's how we ended up with a computer controlled engraver that I use for making nameplates for my display stands
- 245 replies
-
- 1
-
-
- bluenose
- model shipways
- (and 1 more)
-
Thanks Bob! I've been referring to your build log quite a bit as I've been going. It was actually your log that led me to using decals for the name plates!
- 245 replies
-
- 3
-
-
- bluenose
- model shipways
- (and 1 more)
-
Thanks Dave B! The printer I'm using is a very, very cheap ($250) consumer model that I impulse-bought a couple years ago. It doesn't handle all the fancier materials that the 'real' printers can use, but it offers a couple different options. I printed this with some basic ABS plastic that I had on hand. Unfortunately, my 3D printer isn't high enough quality to print much thinner without causing problems (it leaves holes and gaps in structure). If I end up doing a decent amount of 3D printing, I might invest in a better printer at some point that can do a better job, but those typically run over $1000, so unless I start doing a lot more printing, that is a ways off...
- 245 replies
-
- 1
-
-
- bluenose
- model shipways
- (and 1 more)
-
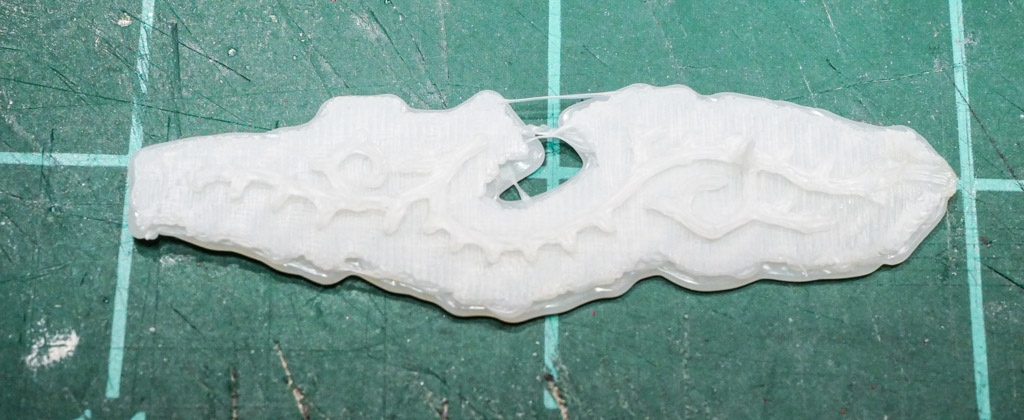
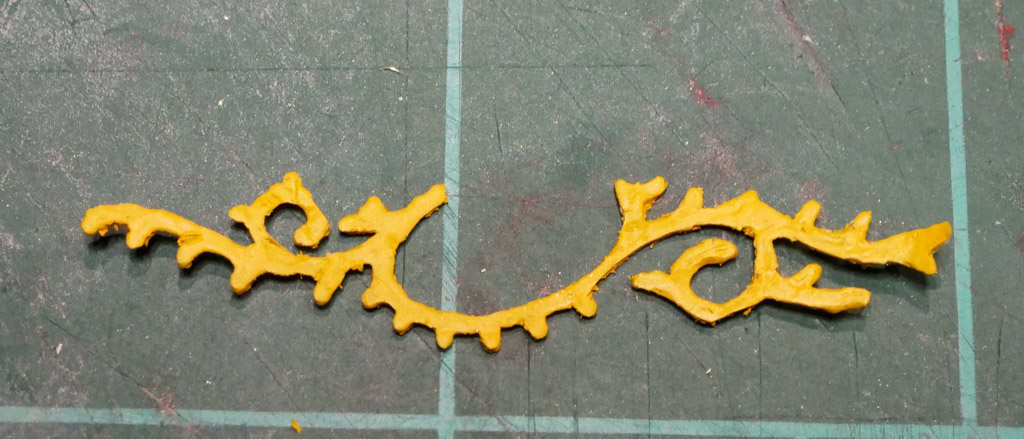
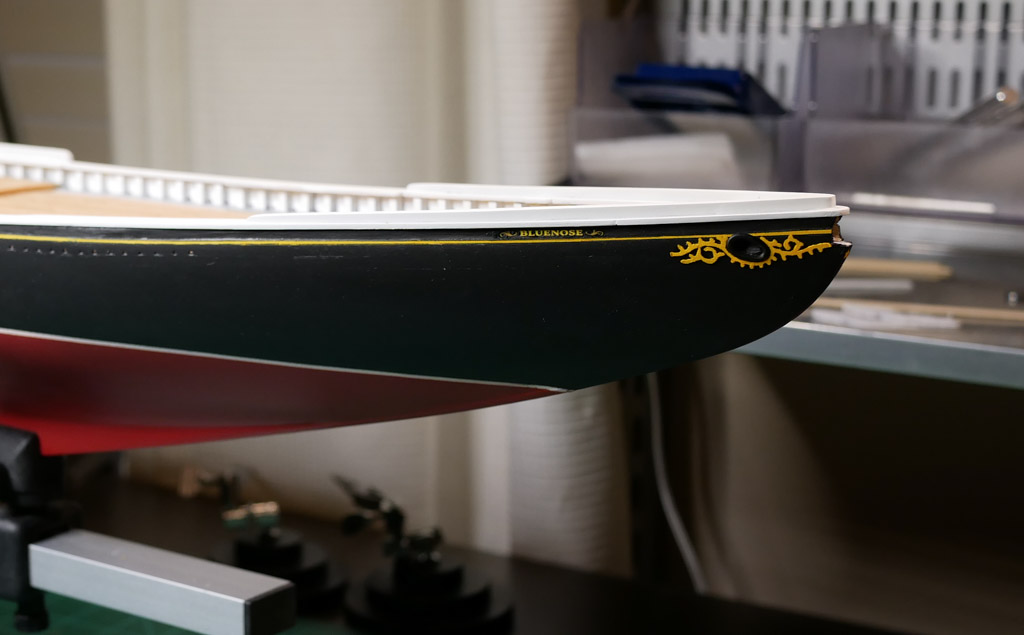
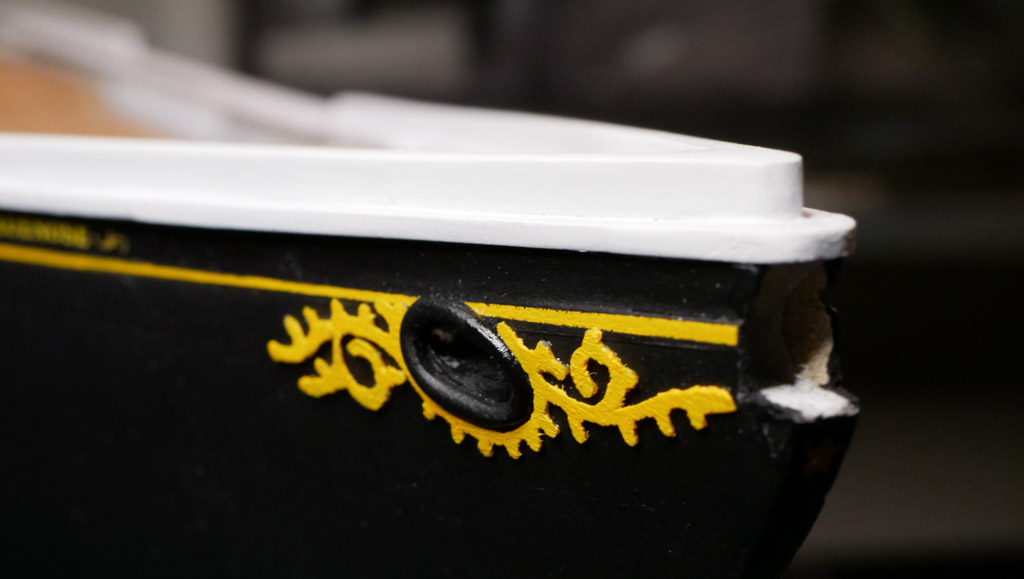
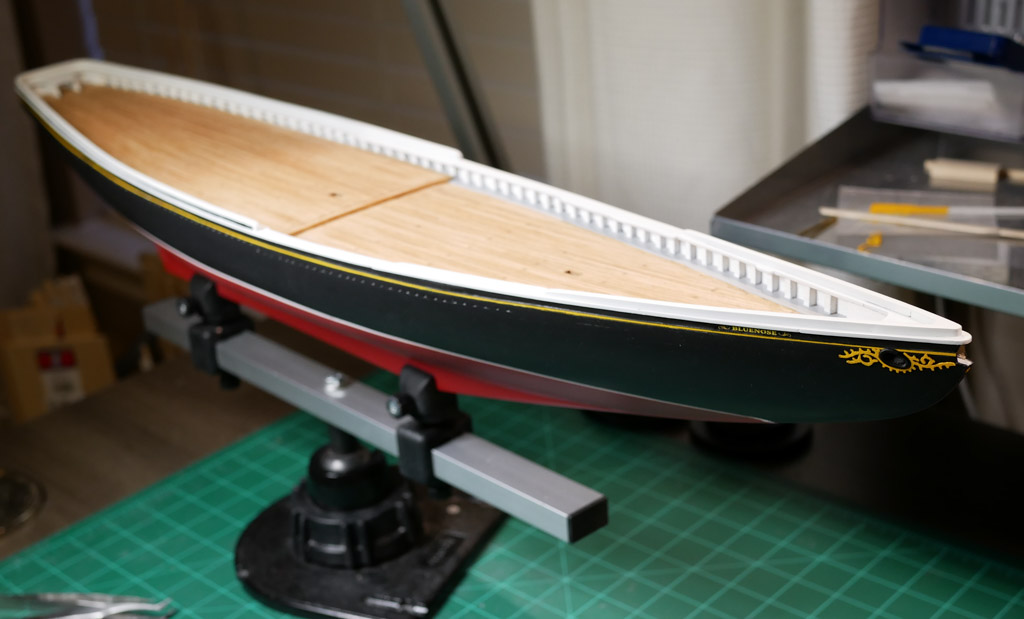
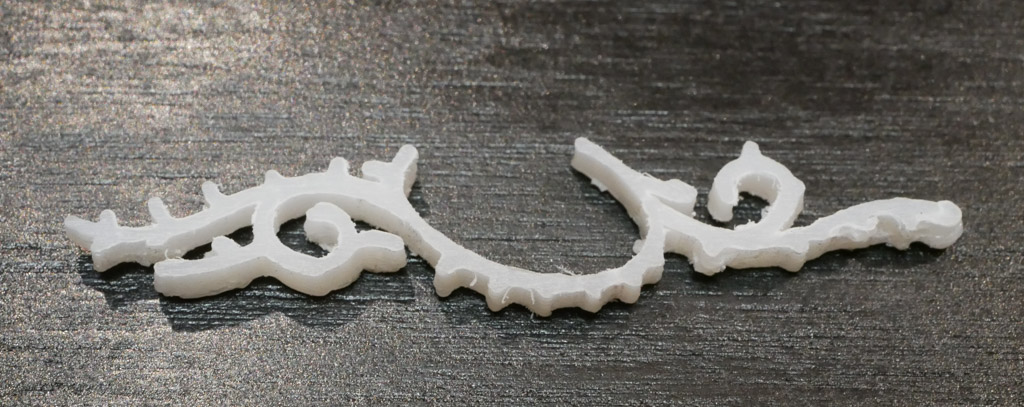
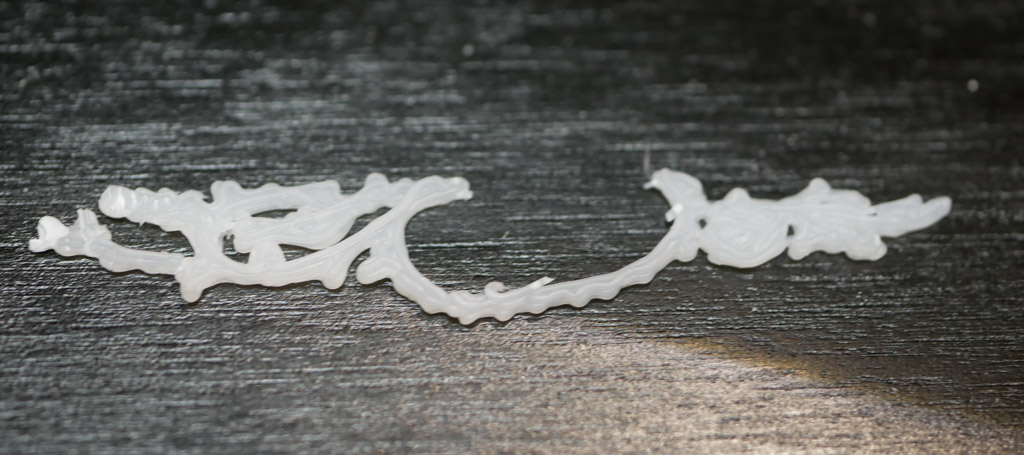
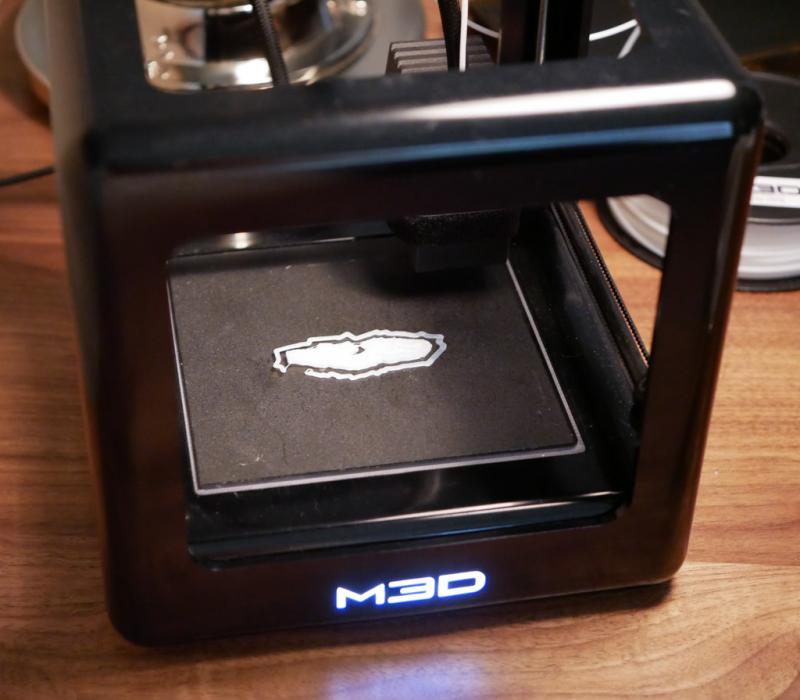
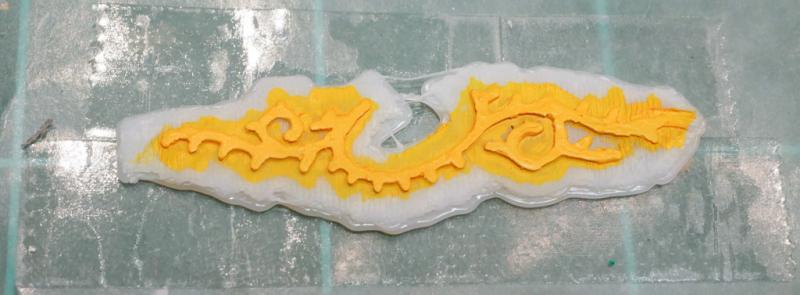
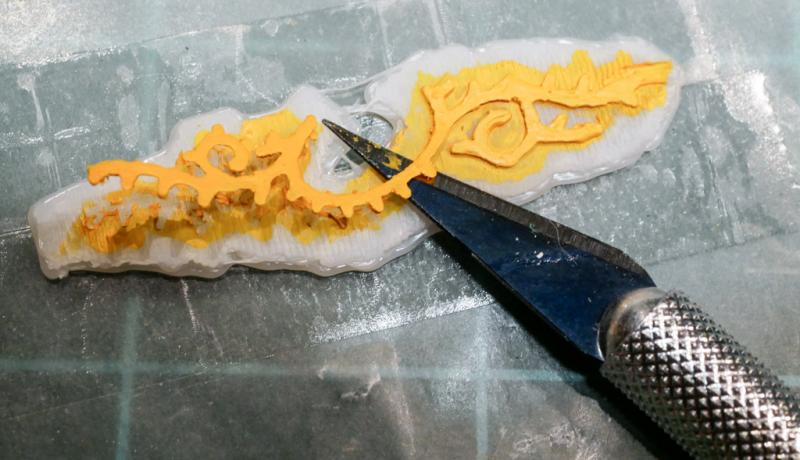
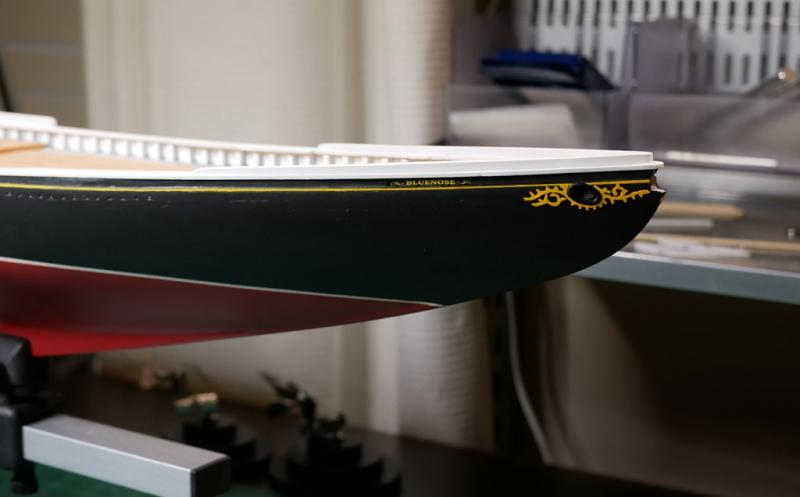
Scroll Work Finished Finally, the scroll work is done! I was able to make the 3D printed pieces work. I ended up doing the prints at 1/64" height. My first few attempts at this size resulted in broken pieces during sanding/painting. Finally I realized that if I left the pieces attached to the 'base' that the printer makes, I can do all the sanding and painting before separating the piece from the base. This keeps things much more stable while I'm working. Here's one of the pieces on the printer... Once the piece comes off the printer, it is still attached to a base of plastic. While it is still attached, I cleaned up the print with a #11 blade, then sanded it down a bit with 220 grit paper. The pieces were then painted, still attached to the base, with the same yellow I used for the cove line. Each piece got a couple of coats. After the paint was dry, the piece was carefully separated using a #11 blade. At 1/64" (before sanding), the pieces are very thin, so I had to be careful not to break them. The pieces were then cleaned up again, using a #11 blade, to remove any bits of dried paint hanging off the edges. Once they looked good enough, they were glued onto the bow. I'm pretty happy with how it turned out. If I had the skill to paint these, it would look better. But since I lack that skill, I think these turned out pretty good. If nothing else, it was a fun project to get the 3D printer up and running and make the models for the scroll work. I've been procrastinating for weeks on the name plates and scroll work, and now both of those are done. I've also been making some progress on re-building all the pintles and gudgeons, and I hope to try attaching the rudder again sometime this week.

- 245 replies
-
- 8
-
-
- bluenose
- model shipways
- (and 1 more)
-
Nice work! Getting everything on the deck finished is a big milestone! The bowsprit goes pretty quick in the Phantom, and before you know it you'll be finishing up rigging!
- 701 replies
-
- 7
-
-
- phantom
- model shipways
- (and 1 more)
-
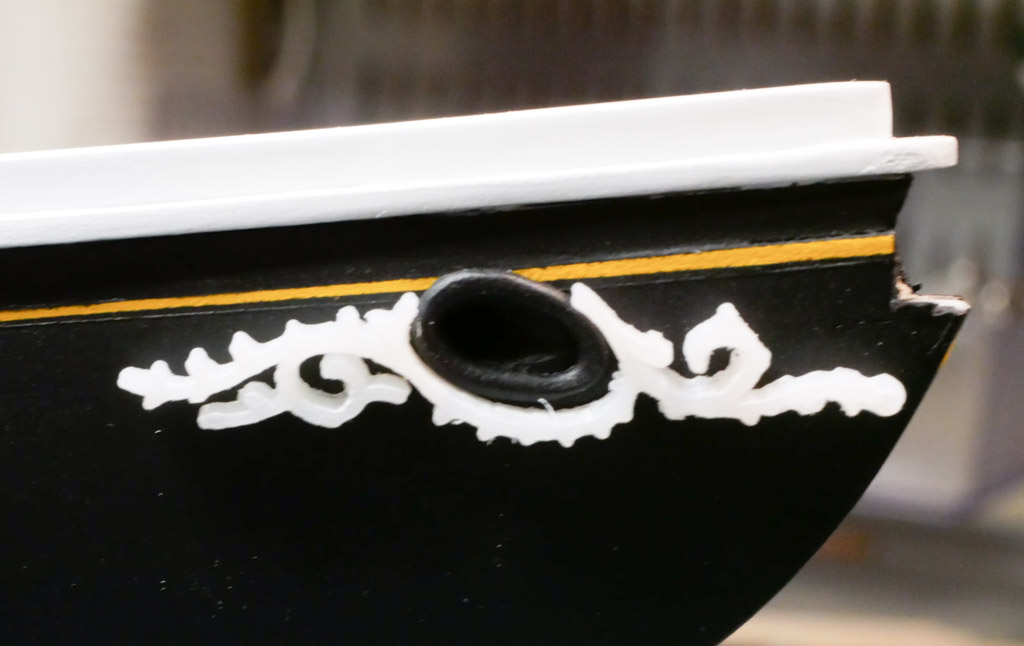
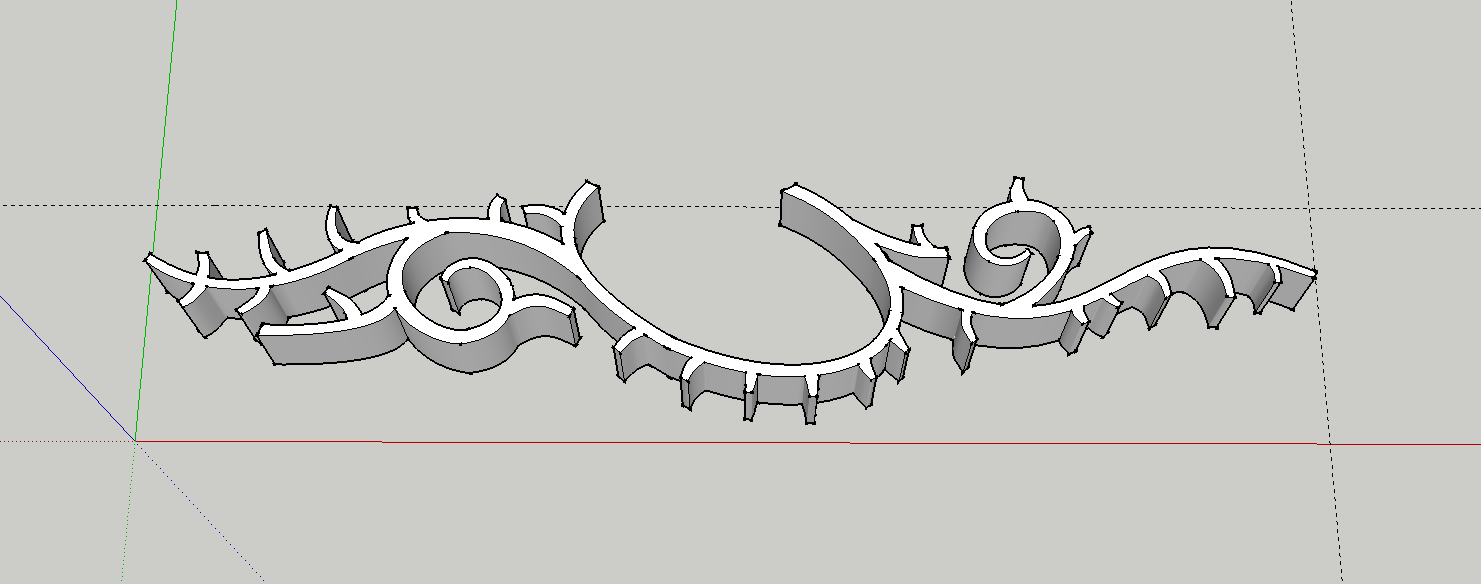
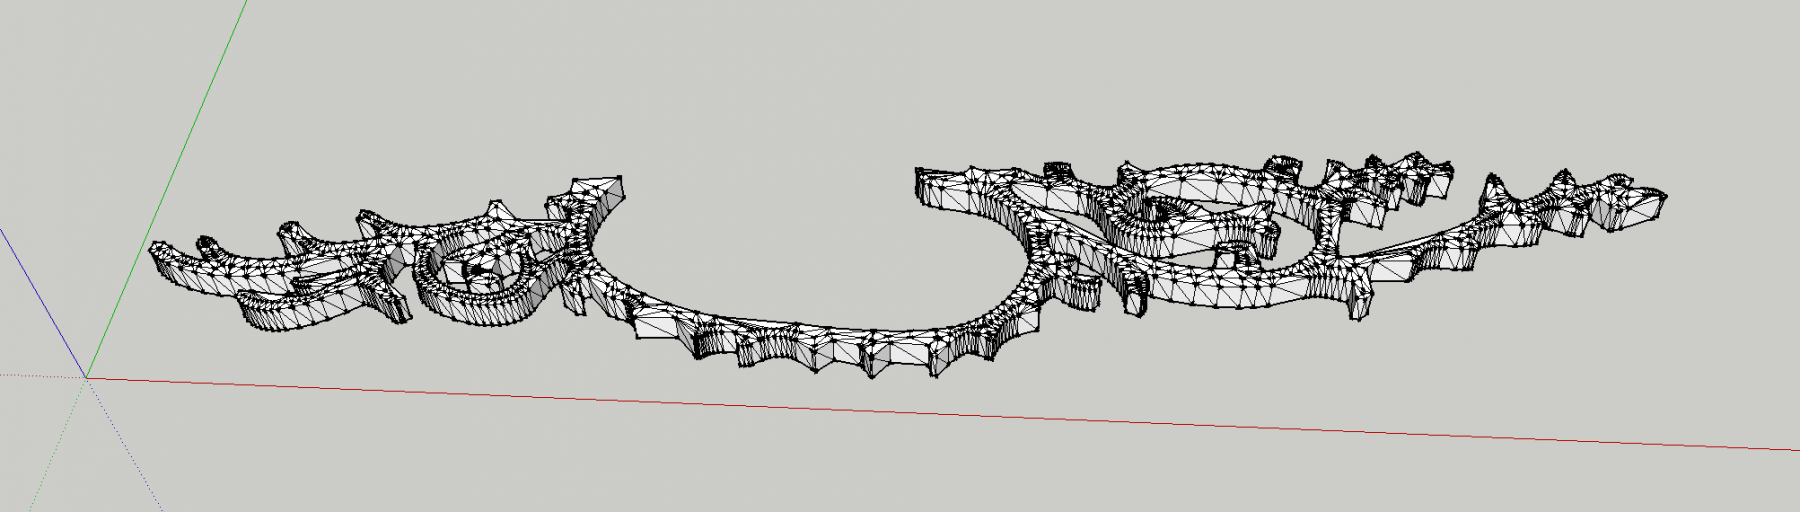
Scroll Work, Continued... Nirvana, your suggestion led me to an option in my version of SketchUp to smooth out curves, which helped a great deal. Thanks! After thinking about the results from my first test run, I decided to go back and start over. The scroll work design I was using came from the plans, and it had some small loops and details that my 3D printer can't handle. I dug up a photo of the scroll work on the original Bluenose (can be seen here). If you zoom in on that photo, the scroll work actually looks a little raised, as though it was shaped wood instead of paint. That makes me feel a little better about not painting it on. This photo also shows the scroll work to be more of a set of curved lines as opposed to a 'floral' kind of design. So, I screen-capped that photo, brought it into Photoshop, and applied some distortions to flatten it out (the ship is at a pretty steep angle in that photo). I used that as a template, and along with some measurements of my hawse pipes, I drew up a new set of scroll work art. This version follows the basic design shown in the photo. I did simplify some elements to remove the tight curves that my printer can't handle. I imported the design into SketchUp, then used that as a template to trace over to create the 3D model. I printed this version a little thicker (1/8") so I could have something a little more substantial to play with. When I print the final version, I'll probably drop that 1/16", then sand it down to get to the right thickness. Here's the results of the second print: This one came out MUCH better. The shape is more clearly defined, and none of the parts ran together. Obviously I didn't spend much time cleaning up this part before I took photos. Much like the cast metal pieces that come with a kit, 3D printed pieces require some detailing by hand (trimming/filing/sanding) to get them into usable shape. Since I'm not intending to actually use this print, I didn't spend the time to clean it up. This version also fits nearly perfectly on the ship. I just need to raise up the right side. So, I think I'm really close! Next steps... Adjust the model to make the right side line up better. Re-print at 1/16" thickness. Spend some quality time cleaning up the print. Sand it down to the desired thickness. With all the time I'm spending on this, I realize I could have just practiced a little and painted it on, but I've been looking for an excuse to play with the 3D printer, so I don't feel bad about wasting all this time!


- 245 replies
-
- 3
-
-
- bluenose
- model shipways
- (and 1 more)
-
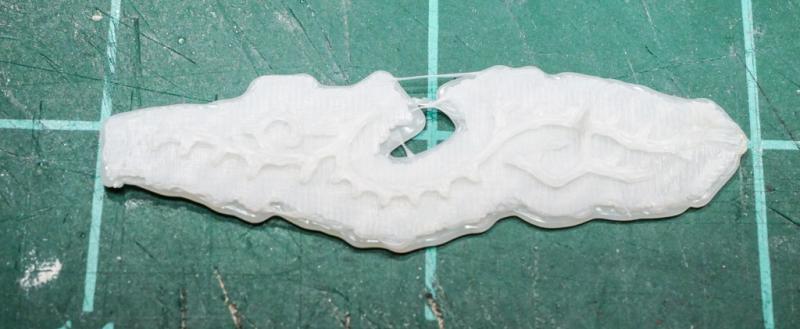
Scroll Work Thanks Dave B! I wish I had the painting skills to free hand the scroll work, but I know that if I go that route, I'm going to spend the next month painting scroll work, sanding it off, repainting the hull, and repeating. Today I was able to do a 'test run' with a 3D printed piece for the scroll work. It isn't 'there' yet, but I've managed to work out several important steps. Here's the piece that just came off the 3D printer.... It looks sorta-kinda-remotely looks like the scroll work, and it is almost the right scale. This test print proves that I can take something all the way from a scan of the plans, to building a 3D model, to printing. (That's quite an accomplishment for me, since I've only used my 3D printer once in the last two years - just to make sure it worked when it arrived.) I should point out that I have ZERO knowledge or understanding of CAD software and modeling. I've very, very technical, but I've just never gotten into 3D stuff. To tackle this, I started with a scan of the plan's drawing of the scroll work. I brought that into Photoshop, and I traced out the design to create a new layer. I used that layer, along with Photoshop's 3D features to 'extrude' a model of the scroll work that had some thickness to it. To help me get the size right, I exported that from Photoshop as an STL file, then imported it into Sketchup (the only 3D software I know how to use. I've used Sketchup to do a bunch of architectural office designs and space planning.) That gave me this... Using Sketchup, I fixed the scale of the model, then saved it back out as an STL file. That STL file was then loaded into my 3D printer's software and printed. Right now, this piece isn't good enough to use, but it gives me some direction on what to fix. I need to simplify some of the curves and designs to avoid things that are too detailed to print. I'm also thinking of making it thicker, so that I can 'shave' off a layer to use on the ship. I also need to adjust the design to fit my specific hull (and the angle of my hawse pipes). Also, I printed this on 'low quality' mode, which prints in lower resolution. That might be the cause of some of the lack of detail. I'm going to do another run in high quality mode to see if the detail is better. (High quality mode just takes 4x the time.) So, I'm not there yet, but I've proved a few parts of the process, and there is hope. Since 3D printing is fairly new, I'll try to document my progress as I go!


- 245 replies
-
- 1
-
-
- bluenose
- model shipways
- (and 1 more)
-
Thanks Robin and Jond! Glad to be done with the nameplates. I'd been stressing over them for a while. Now I'm stressing over the scrollwork! Jond - I can't imagine the precision that has to go into building something that actually works!
- 245 replies
-
- 1
-
-
- bluenose
- model shipways
- (and 1 more)
-
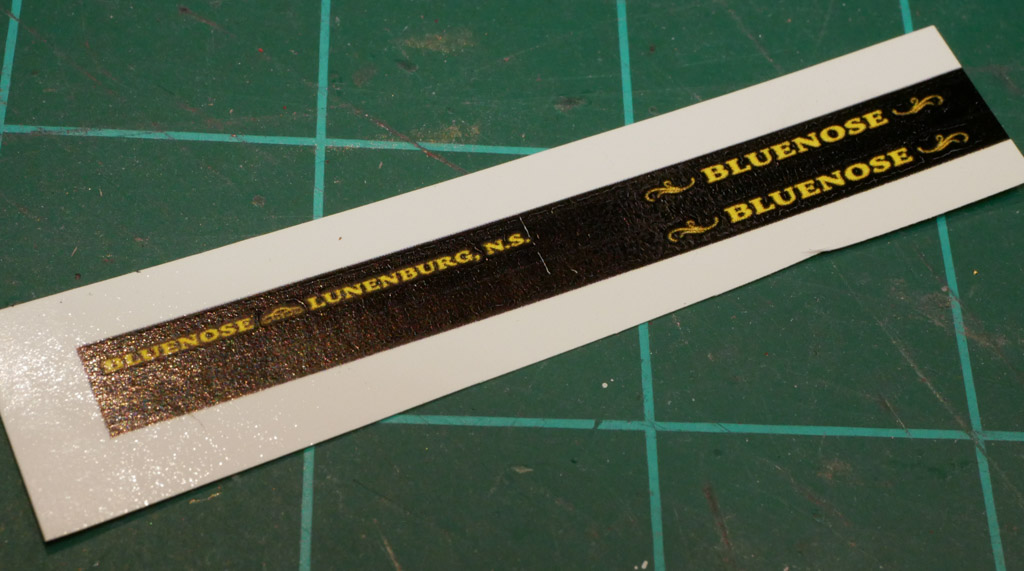
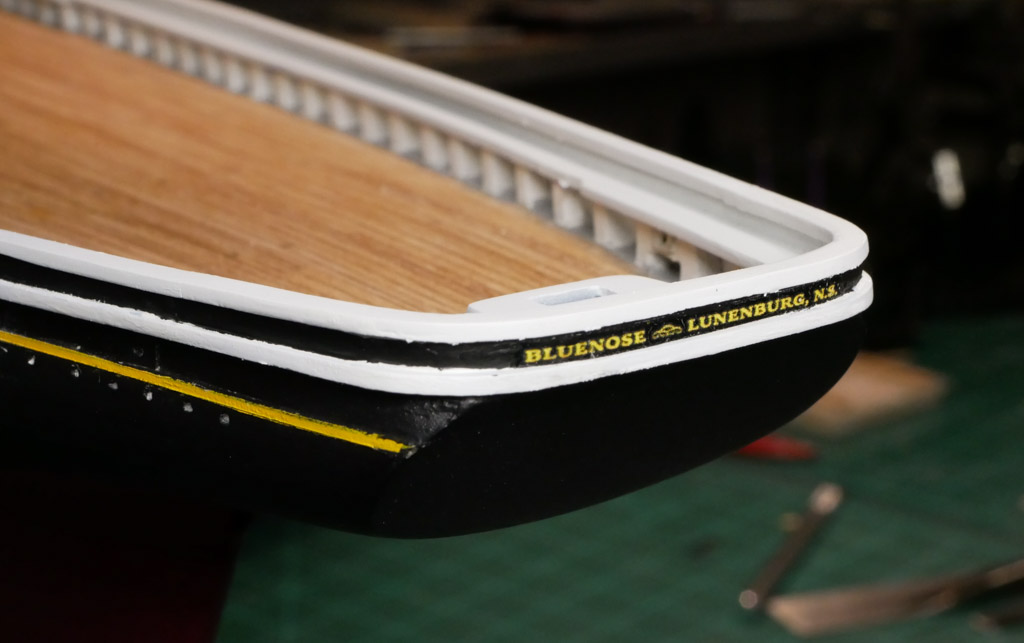
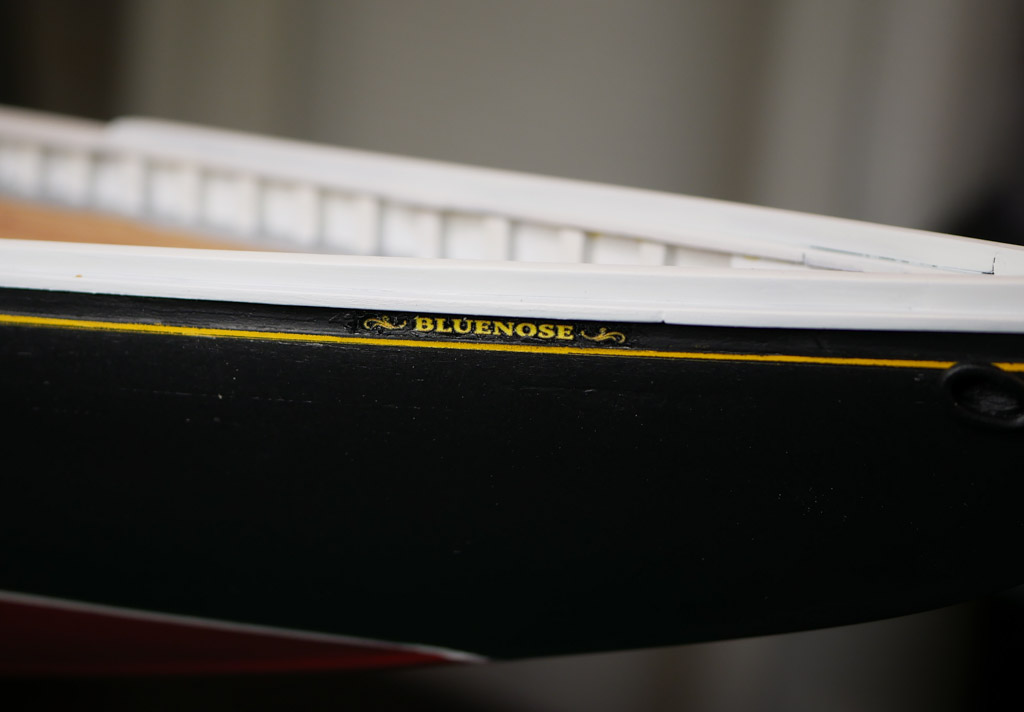
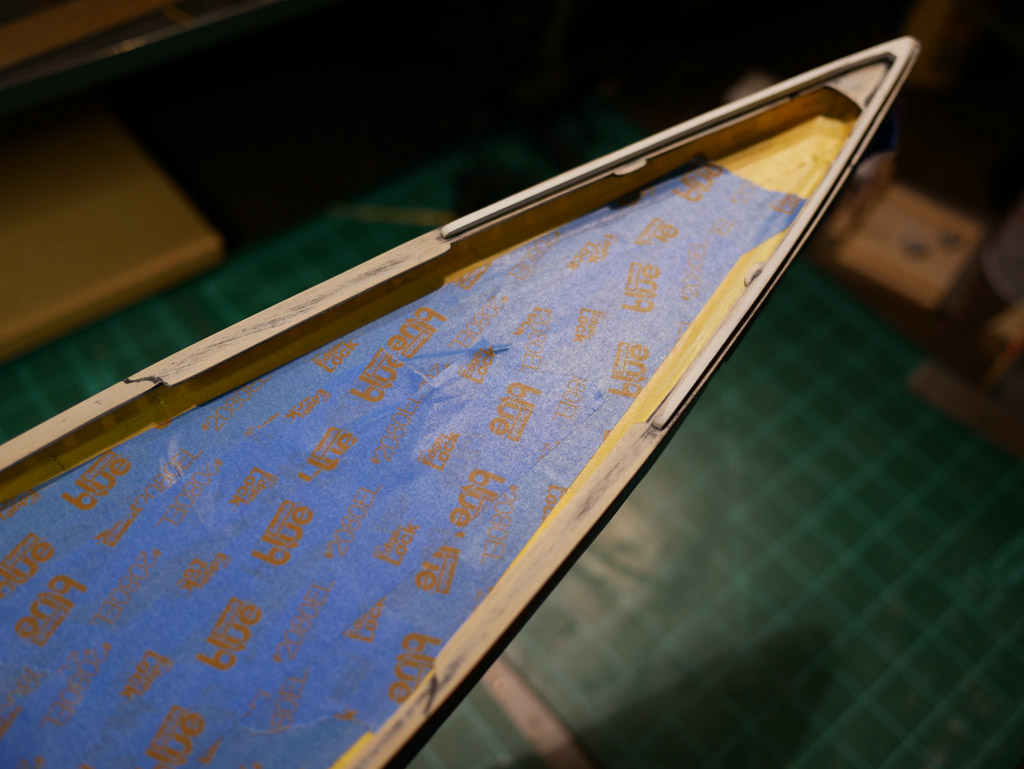
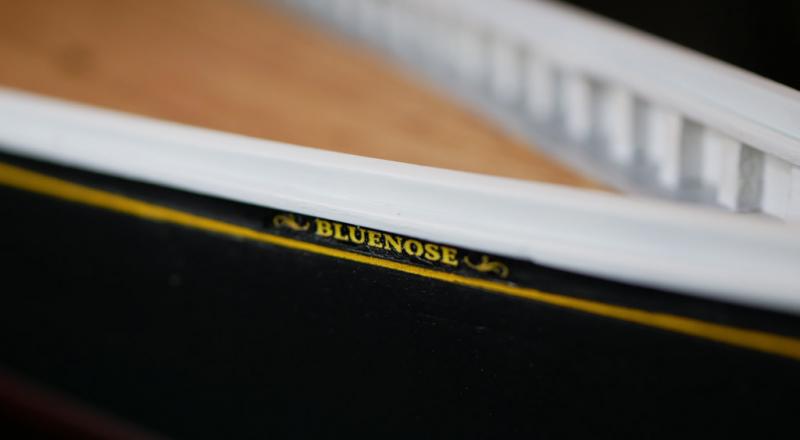
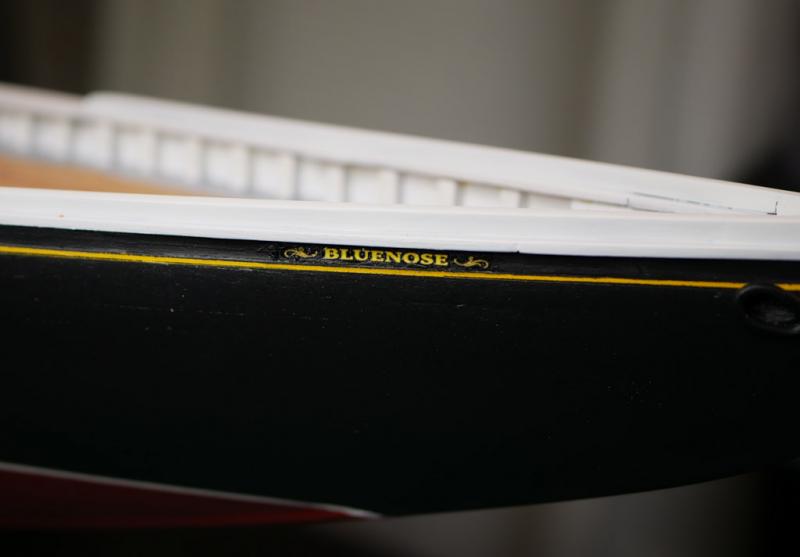
Nameplates I've managed to get the nameplates installed on the bow and stern. I ended up using decals for these. I worked up the art in Photoshop, then printed the art on Micro Mark's 'white' decal paper using an inkjet printer. After the ink dried, I gave the decals a quick coat of clear lacquer to protect the ink. Then I cut the pieces to fit and soaked them in water. The decals slide off the backing and got applied to the hull. After they were positioned, I blotted off the excess water and applied a solvent to soften the decals a bit and make them form to the hull. After everything dried, I touched up the edges with some black paint. I still need to deal with the scroll work on the bow. I'm not sure how to tackle that yet. The decals have some thickness, and I don't think they will work well for the scroll work. I'm not confident that I can hand paint it. I've purchased some transfer paper, so I might do a test run using the transfer paper and see if I can get something decent on my sample sheet. I'm also considering something a little crazy. I've got a 3d printer sitting in the closet that I've only used once (impulse purchase a year or so ago). I'm considering importing a scan of the scroll work into some 3d software, doing all the tracing to make them 3d, then printing out a very thin version of the scroll work using the 3d printer. At scale, it doesn't have to be perfect, just close enough. If that works, I'll paint it yellow and glue it on. We'll see...chances are that I'll procrastinate on the scroll work for another week or two.


- 245 replies
-
- 3
-
-
- bluenose
- model shipways
- (and 1 more)
-
Well, that didn't work. After taking a week off from the build, I spent this past weekend focused on finishing the rudder. I'm determined to make actual pintles and gudgeons, and my previous test run turned out pretty good. So I hunkered down on Saturday and got to work. I ended up with a 'good' set of parts, made from brass strip, brass rod, and brass tubing, all soldered together. I had some nice holes drilled to simulate bolts. I got everything painted (my attempts to use blackening solution didn't pan out). I was even able to use some brass rod to make some fake bolts. Things were looking good. Unfortunately, the install did not go well. Mounting the pintles on the rudder went fine, but getting the gudgeons onto the sternpost was a disaster. It seems like I wasn't precise enough when making all the parts, and it wasn't possible to get all three sets lined up right. The more I tried to get everything lined up, the more I damaged the sternpost and the gudgeons. Glue was getting everywhere. So, I've ripped all the pintles and gudgeons off. I've started sanding things back down, and I'll be fixing the paint over the next few days. I've got some more brass strip on order (I've been burning through the strips provided in the kit at an alarming rate). I'm going to put the rudder on hold for a bit, regroup, and try to make more accurate (and better aligned) pintles and gudgeons next week. I keep telling myself that it is just wood and metal, and anything can be re-built/re-sanded/re-painted. In the meantime, I'm going to try to get past the nameplates and scroll work details, which have been haunting my dreams.

- 245 replies
-
- 2
-
-
- bluenose
- model shipways
- (and 1 more)
-
Jon, It is hard to see in Dave's photo in post #61 because of the angle (and the fact that the waterway on the quarter deck is just between the stanchions), but I believe he went with grey on the waterways. This is a little more obvious from his build log, which has some photos of the waterway on the fore deck. Pretty much every resource I've seen lists grey for the waterways. I think in many older b/w photos, this would likely come off as being a little darker than the white on the bulwarks. I've seen a few references to the roof tops being painted at various times, and sometimes covered with canvas, so I imagine the color there could be open to some artistic interpretation depending on the state you want to model the ship in. The photos I've seen of the current Bluenose II seem to have the roofs planked in wood similar to the deck. I think the most likely case was that these roof tops were painted or covered on the original ship, but I suspect many modelers of the Bluenose I use the 'natural wood' look of the Bluenose II because it looks good. (I'm planning on doing that myself). The other day I was reading through a great write up on the model ship builder website by Philip Eisner that details a lot of what he found during an exhaustive research project to figure out all the details of the original Bluenose. He lists the waterways and cabin tops as grey. My guess is that the original Bluenose, as a working boat, got some occasional paint jobs during the off season over her life, and likely had a few different configurations.
- 245 replies
-
- 2
-
-
- bluenose
- model shipways
- (and 1 more)
-
Jon, I was just looking at your build log yesterday! I've been going through the Nova Scotia archives weekly - seems like I run across some new detail every time I'm in there. The original Bluenose seems to have gone through a number of alterations during her time. And of course the Bluenose II had its own differences (especially after it was basically rebuilt!).
- 245 replies
-
- 2
-
-
- bluenose
- model shipways
- (and 1 more)
-
Thanks Elijah and John! My wife thought I was crazy when I said I was repainting it white...after some discussion I realized she thought I was stripping the entire hull and repainting *everything* white! I'm excited to get going on the next few things. I should be diving into pintles and gudgeons tomorrow!
- 245 replies
-
- 1
-
-
- bluenose
- model shipways
- (and 1 more)
-
Main Rail Repainted Well, I think that worked out. I've now got some nice, bright white rails. I'll need to touch up a few spots, and I still need to paint the outboard side of the monkey board black, but I'm going to give the paint another day to fully cure before I start masking stuff off again.
- 245 replies
-
- 8
-
-
- bluenose
- model shipways
- (and 1 more)
-
Jerry, on the contrary, your Bluenose is looking great and you're making tons of progress, while mine has seemingly been stuck in neutral for months!
- 245 replies
-
- 1
-
-
- bluenose
- model shipways
- (and 1 more)
-
Course Correction There were many things I wasn't happy with on my first build, and since then I've learned that if you don't like something, fix it. Wood can be removed or added. Parts can be re-made. Paint can be stripped and re-applied. When preparing for this build, I was studying a practicum, and that practicum painted the main rail black. Even though I haven't been following that practicum much, I had it in my head that black was OK for the rails. Recently, as I've been staring at old photos of the Bluenose to decide how to tackle the name plates, I decided that black just isn't right. The main rail and the monkey rail were white, and they should be white on my model. So today I've started the process of stripping the paint off the rails. Painting white over black is difficult, so I need to remove as much of the black as possible. I started by masking off everything except the rails, including the entire hull (this took a while, and a lot of tape and plastic sheeting). I've sanded the rails down with different grits to remove as much of the existing paint as possible, while being careful not to over-sand and make things too thin. I've also applied a first coat of grey primer to cover up the bits of black that are left and give me an even surface to work with. I plan to let that dry, sand it lightly, then apply another coat of primer. Once that is sanded, I'll give everything a few good coats of white with my airbrush. My progress may be slowed because it is Saturday, which means there is some college football that needs my attention... I hope this works! Will report back...
- 245 replies
-
- 5
-
-
- bluenose
- model shipways
- (and 1 more)
-
Jerry, looking good! Thanks for posting the details on those lines! I bought a similar machine from Domanoff in anticipation of rigging my Bluenose, so it is really helpful to see how you're putting it to use in such detail. (I skipped over those kinds of details on my first build.) Your log is giving me another great build to refer to!
-
Thanks for the reassurance Dave B! I've been looking at photos of the actual Bluenose and Bluenose II, and it looks to me like the name plates on the bulwarks and the stern were actually separate pieces of wood that were applied. They are actually raised off the hull a bit. So I think you're right - if I'm careful to cut the decals in the shape of those name plate pieces, and I paint the edges black (to hide the white paper), it is probably a pretty good depiction of those being made from wood pieces. The decal paper I was using had a very gloss finish, so I'm going to try some tests with some more normal adhesive paper and perhaps card stock to see if I can get the finish to better match the ship's paint. I'm thinking I'll have to do the scroll work around the hawse pipes by hand though - from what I've seen that appears to be painted directly on the hull. I'm hoping to knock these out over the next couple of days!
- 245 replies
-
- 2
-
-
- bluenose
- model shipways
- (and 1 more)
-
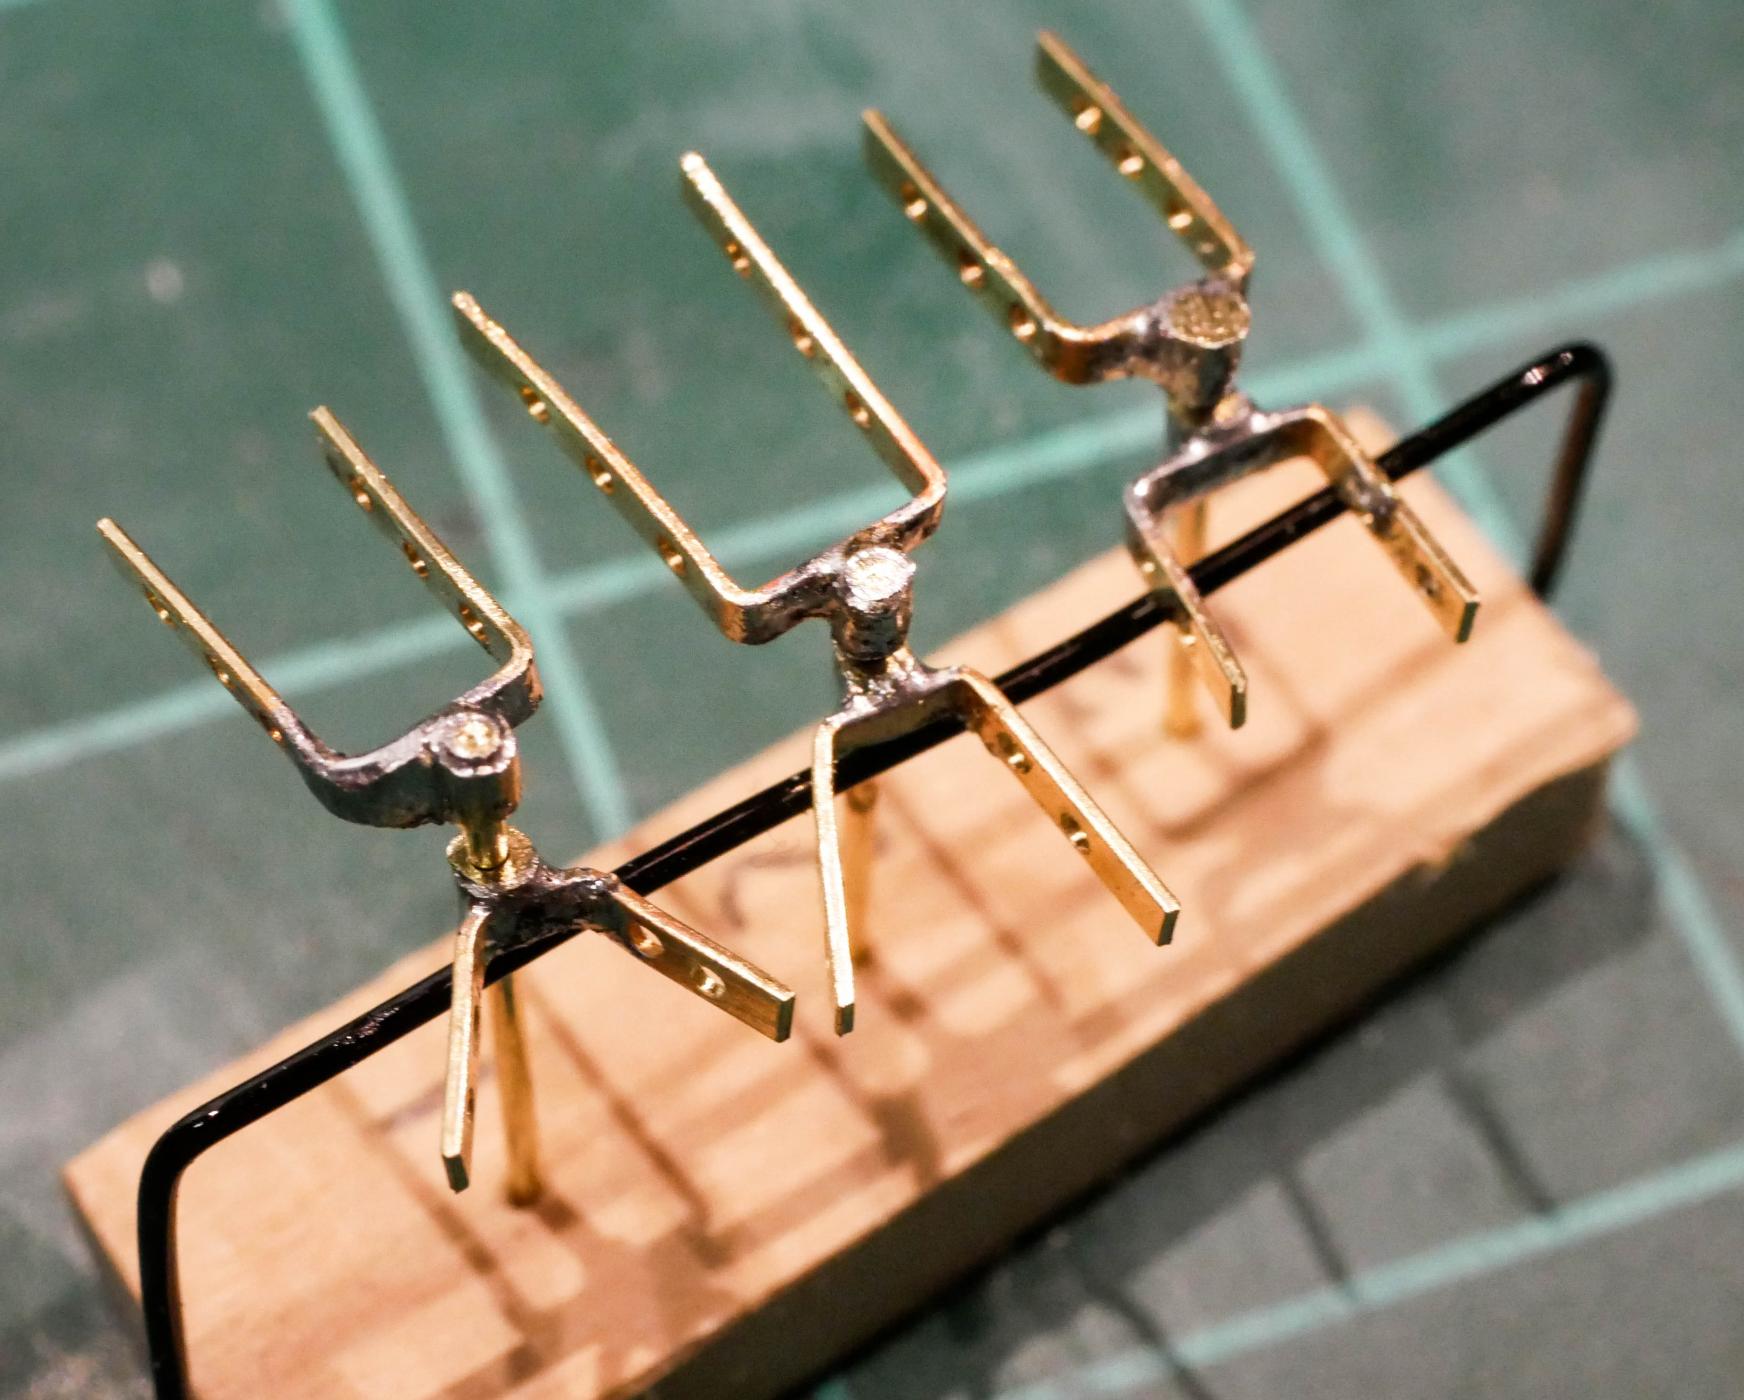
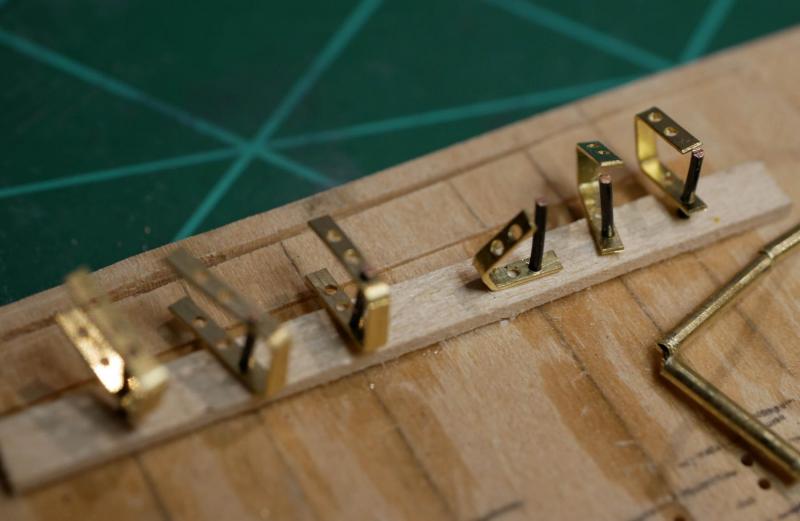
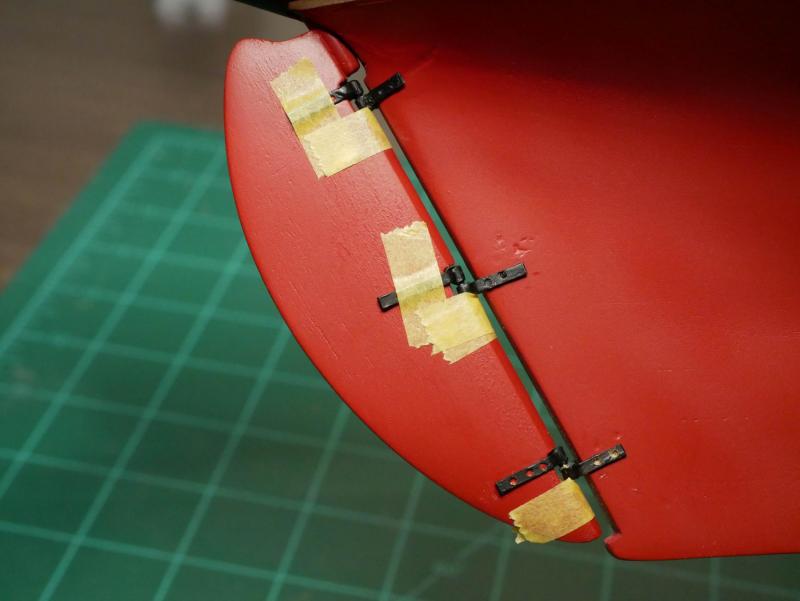
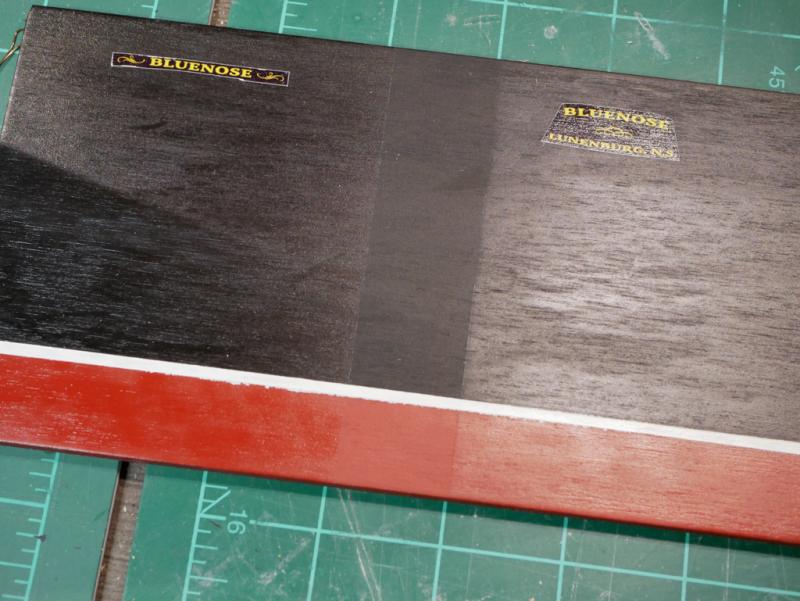
Rudder The last few days have been fun, as I've been able to start working on various random things. I got the hawse pipe lips cleaned up, painted and ready to install. I also built the rudder. This required tapering the provided laser cut piece and installing the post to the top. I also had to widen the hole at the stern to make the post fit, and notch the stern post to accept the rudder. Pintles and Gudgeons On my first build, I faked the pintles and gudgeons. I just glued the rudder in place and used copper tape to simulate the straps. This time I wanted to try and do it properly. I'm not quite there yet, but I'm pretty happy with my test run. I've never soldered in my life. I knew if I kept building ships, I'd have to at some point, so I decided to take the plunge. I cut and shaped some brass strips, drilled some holes, and took a swing at soldering in some brass tubing and rods. It isn't perfect, but I think I've proved I can make this work. Soldering ended up being no big deal - way easier than I was expecting. I'm going to put the pintles and gudgeons on hold for a week though. I'm not happy with my ability to drill the holes (and drilling them by hand with a pin vise is a pain - I can't imaging doing this for all them!) I've ordered a new drill press with a an X/Y table, which hopefully will make drilling these holes easier. Once that comes in, I'll trying making a real set. I also did a test run with some clear coat for the hull. I want to get that on the hull now that I'm done painting, and before I get things too dirty. I painted a scrap piece of wood and tried out a satin finish (right) and a gloss finish (left). I prefer the satin, so I'll probably go with that. Name Board Decals I also used my test board to try out using printed decals for the name boards. I'm not happy with the result, so I'm going to try a few other things there. My painting skill isn't good enough to let me paint those by hand, so I've got to get creative.

- 245 replies
-
- 4
-
-
- bluenose
- model shipways
- (and 1 more)
-
E.J.'s recommendation about making your own eyebolts is a good one. The Phantom kit has *just enough* eyebolts to get the job done, but if you lose or break any, you'll be making your own anyway. Also, if you use the kit-provided rigging line, some of the ropes won't easily fit through the provided eyebolts. I had to make a few myself due to lost/broken pieces, as well as making slightly larger ones to accommodate the rigging. Like E.J. suggested, get an inexpensive roll of black wire and you've solved all the eyebolt issues!
- 701 replies
-
- 3
-
-
- phantom
- model shipways
- (and 1 more)