HOLIDAY DONATION DRIVE - SUPPORT MSW - DO YOUR PART TO KEEP THIS GREAT FORUM GOING! (Only 27 donations so far out of 49,000 members - C'mon guys!)
×

genericDave
-
Posts
209 -
Joined
-
Last visited
Content Type
Profiles
Forums
Gallery
Events
Everything posted by genericDave
-
 Elijah, Your patience and attention to detail on this part of the process is amazing! I rushed through this part on my build - I wish I had your focus! All this work you're putting in now is really going to pay off as the ship progresses!
- 701 replies
-
- 3
-

-
- phantom
- model shipways
- (and 1 more)
-
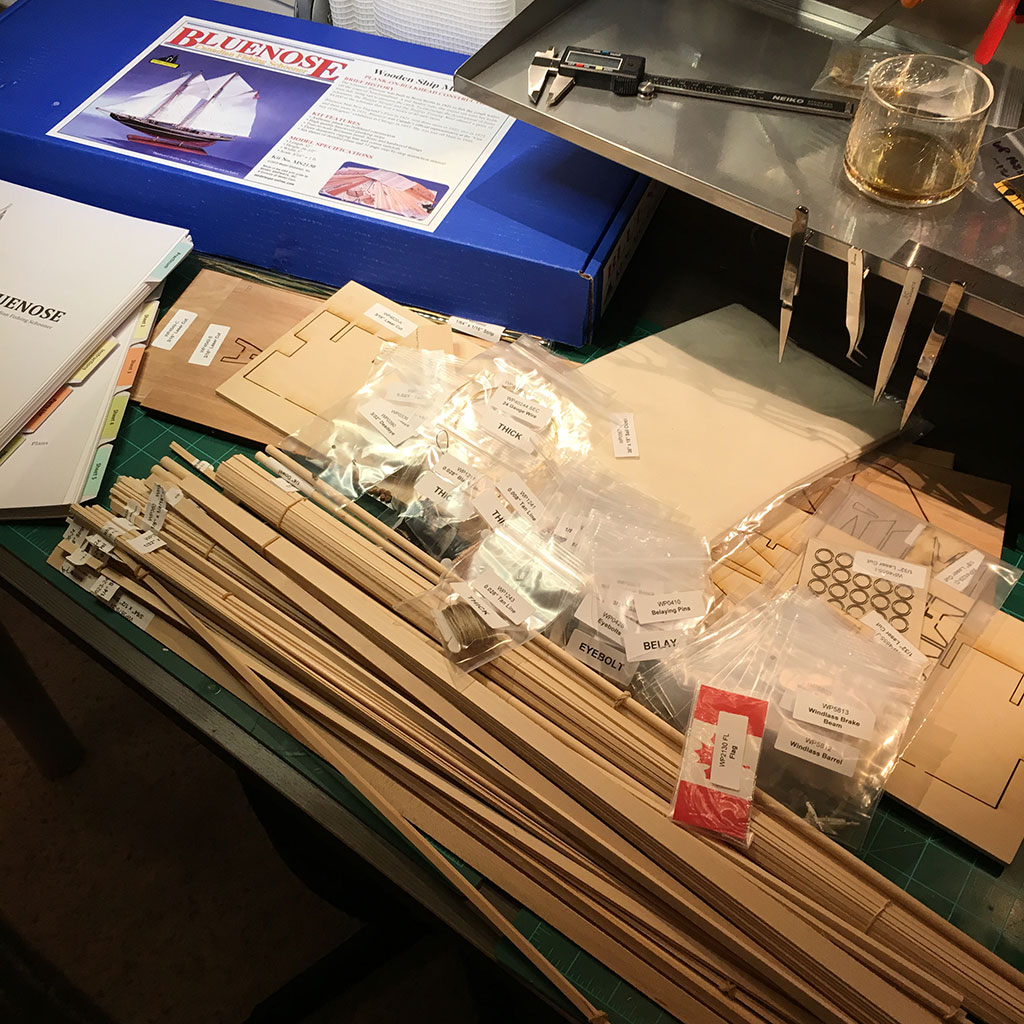
I've started my second build - the Bluenose. I've had this kit for about six months, but didn't even open the box until I finished my Phantom a couple weeks ago. The Phantom was my first build, to get me exposure to basic ship modeling and rigging. I chose solid hull for that one so I wouldn't have to tackle hull planking. I chose the Bluenose for my second build because it still has relatively straight-forward rigging, and the hull planking doesn't require a lot of complex work. It is also a little larger scale, which lets me focus more on detail. I spent about a week 'preparing'. I scanned in all the plans, inventoried and labeled parts, etc. For this build, I've purchased Bob Hunt's practicum, which I'll be following only partly. I got the practicum because sometimes I just want to sit and read how somebody tackled the build - even if I end up going my own way. Knowing this was going to be my next build for some time, I've been following a number of Bluenose builds here on the forum. Build logs from bhermann, darr, jrw1970, dborgens, mrjg, and popjack (among many others) have given me a ton of tips, a lot of inspiration, and a good deal of insecurity (you guys are soooo good at this....). To get started... All the parts were inventoried and labeled. This is my fourth kit from Model Expo (two Model Airways planes, second Model Shipways ship), and this is the first time the wood has come labeled. I had my caliper out ready to start measuring and sorting wood stock. Maybe I was just unlucky the first three times. Keel Assembly The three pieces of the keel were cut out and assembled. This took a few days, because it didn't go smoothly and I knew that messing this up would have repercussions. Two major problems...first, the third piece simply wasn't the right size. It wasn't an issue with the tab - the piece was physically taller (top and bottom) than part #2. So, I drew on the reference lines from the plans (since I guess reference lines are there to refer to) and used those to decide how to line things up. A little sanding, a little shimming, and I've got a keel. It came out straight, so I'm happy. The second problem with the keel was that while sanding off laser char on the top of section 2, I guess I went a little crazy. Ended up with a beveled edge where it meets part #1. I took too much off. Solution? Take more off! I leveled it out, glued on some thing wood stock, and brought everything back into alignment. So, the rabbet... Rabbet It looks days for me to get the nerve to make the first cut. I've read everything I could about cutting the rabbet, but none of it gave me much confidence. With my first POB build, something about carving away at the keel I just spent days aligning didn't make me very comfortable. Most of the stuff I've read is either discussions on what the rabbet is (which was helpful), or it was build logs that mentioned how concerned they were about cutting the rabbet, but that it wasn't much of a big deal. So I guess on the other side of this, I'll be fine... I tried the 'cut out a copy of the plans and trace the lines' method, but I wasn't happy with the result. I had little confidence that it was 100% accurate. So, I measured the distance from the deck to bearding line at each bulkhead, and transferred that to the keel. Then I measured the distance from that to the rabbet and marked that on the keel. I ended up with a series of 'dots' at each bulkhead. Then I used the cut out plans, aligned to these dots, to trace the lines. Doubled checked against the plans, and I'm good to go. Awesome! I've managed to stall cutting the rabbet for a few more days! Finally, I got up the nerve to cut. Here's how I did it (which may be totally wrong, but it worked...) Score both the rabbet line and bearding line with a #11 blade. I started between bulkheads I and J, and I did one bulkhead-space at a time. Take my chisel x-acto blade, and push it into the score on the rabbet line, matching the angle for the bottom of the plank. I cut a small (1" long) piece of plank to help with the process. This gives me a lower 'lip' on the rabbet at the right angle for the plank. Repeat this for the length of the section. Take my chisel and carve down from the bearding line to the rabbet line, where I hit the deeper cut I previously made. Big chunk of wood comes out. After I've 'roughed out' the section, drop the test plank in and slide it along the cut. It should sit at the appropriate angle against the hull, and anywhere that it doesn't seam up with the rabbet line just right gets some touch-up work. Repeat for every section, on both sides. Sand when done. Everyone was right - it isn't hard, and doesn't take that long (maybe 2 hours total spread over 2 days). Maybe there isn't much discussion on how to actually make the cut because after you've done it once, it's no big deal. I added reinforcement blocks over the joints in the keel (just seems like a good idea, and all the cool kids are doing it). Then I started dry-fitting the bulkheads. I've lightly sanded each of the bulkheads - removing just enough laser char to keep me from smudging everything any time I touch the parts. The rest of the laser char should get cleaned up when I fair the hull. Like many others, my bulkheads came as plywood. They seem stronger, but they are a little harder to work with (cut/sand). Each one has been lightly adjusted, along with the slots in the keel so they don't fit too snug. Next steps will be to install the sternpost and trim the tops of the bulkheads. I know some people chop off the tops of the bulkheads and use fake stanchions, others follow the MS instructions and trim them back so the bulkhead tops become some of the stanchions. I'm not 100% sure which way I'll go, but I figure if I trim them before they go on, I won't risk breaking anything, and if I cut them off later all I've lost is time. After all that is done, I might be ready to start gluing in bulkheads...
- 245 replies
-
- 11
-
-
- bluenose
- model shipways
- (and 1 more)
-
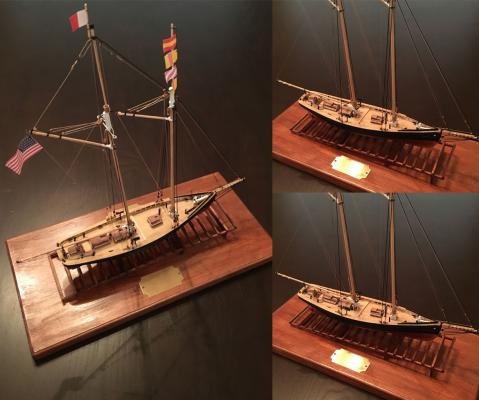
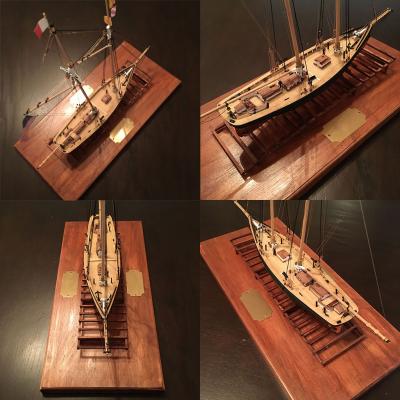
The Phantom is finished and mounted, which just about brings this build to an end. I'll engrave the brass plates this weekend (my wife has a computer controlled engraver for her jewelry business). Still need to pick up some small brass screws too. Overall I'm very happy with how it turned out, being my first ship build. Going in, I was concerned about rigging, but I found that part to be a lot of fun, and it went really quickly (it helped that the Phantom has a pretty simple rigging plan). I was pretty frustrated halfway through the process, but once I pushed through and got to rigging, it really turned the project around for me. Took about 6 months (including a 2 month break), spending most weekends and an hour or so on most weeknights. I certainly learned a LOT - not only technique, but also ways to improve my overall process and workflow. I'll start applying those learnings tomorrow morning when I dive into the next build - the MS 1:64 Bluenose I've had sitting in its box since the fall.
- 28 replies
-
- 2
-
-
- phantom
- model shipways
- (and 1 more)
-
...and DONE. All work on the ship is complete. Building my display stand, then on to the next build...
- 28 replies
-
- 1
-
-
- phantom
- model shipways
- (and 1 more)
-
Tools and Supplies for My "Shipyard"
genericDave replied to daveward's topic in Modeling tools and Workshop Equipment
Be careful with the swing lamp! I have a swing lamp with a magnifier, and it has been great - I love being able to position the light and magnification just where I need it. But... This weekend, on the next-to-last day of my build, I was focused on a last little piece of rigging and swung the lamp down to get a better look. The arm caught the main top mast and snapped it right at the mast cap. Had to step away for a few minutes before I was ready to assess the damage. Fortunately the rigging held, and I was able to glue it back in place. If that didn't work, it was either going to be a serious rebuild of the mast and rigging, or a scrapped project. I've already been checking out the Optivisor for my next build, because after a certain point you don't want to be swinging a lamp (or anything) around your ship. One item that is now on my 'must have' list is dental applicators. I ran across some small brushes for applying glue in a hobby store and fell in love with them, but they run around $0.20 each. After some searching, it turns out they are the exact same thing as 'dental applicators', which you can buy in bulk. I get them from Amazon in qty 400, works out to about $0.03 each. (They come in a variety of tip sizes.) I grab one, brush on a small, controlled amount of glue, use it until the brush gets chunky, then toss it and move on. Since I started using these I'm never over-gluing, and I no longer have to worry about cleaning glue applicator tips. I went through less than 100 of these on my build, so the pack of 400 should last for a while... http://www.amazon.com/Disposable-Easyinsmile-Applicator-Bendable-Ultrafine/dp/B00DQI3FOQ/ref=sr_1_2?ie=UTF8&qid=1459205125&sr=8-2&keywords=dental+applicators -
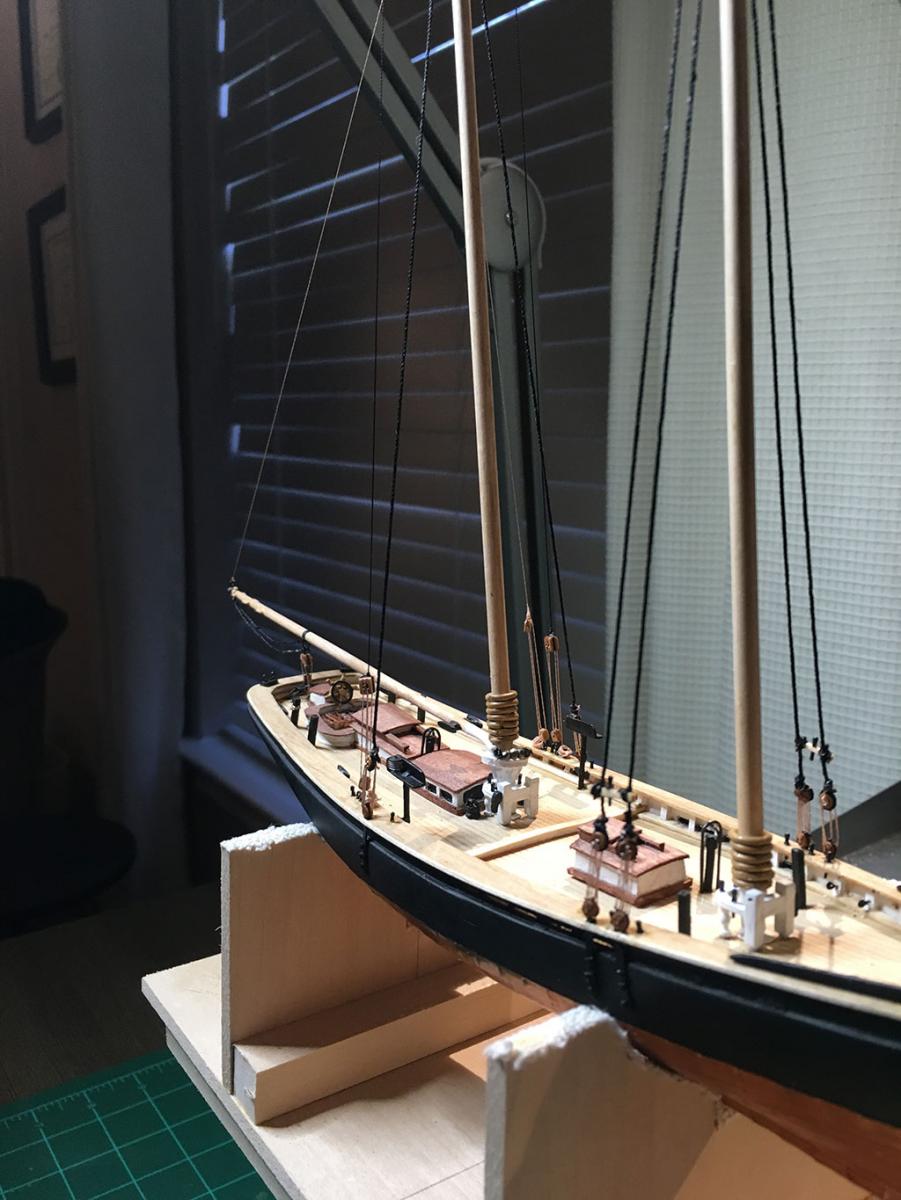
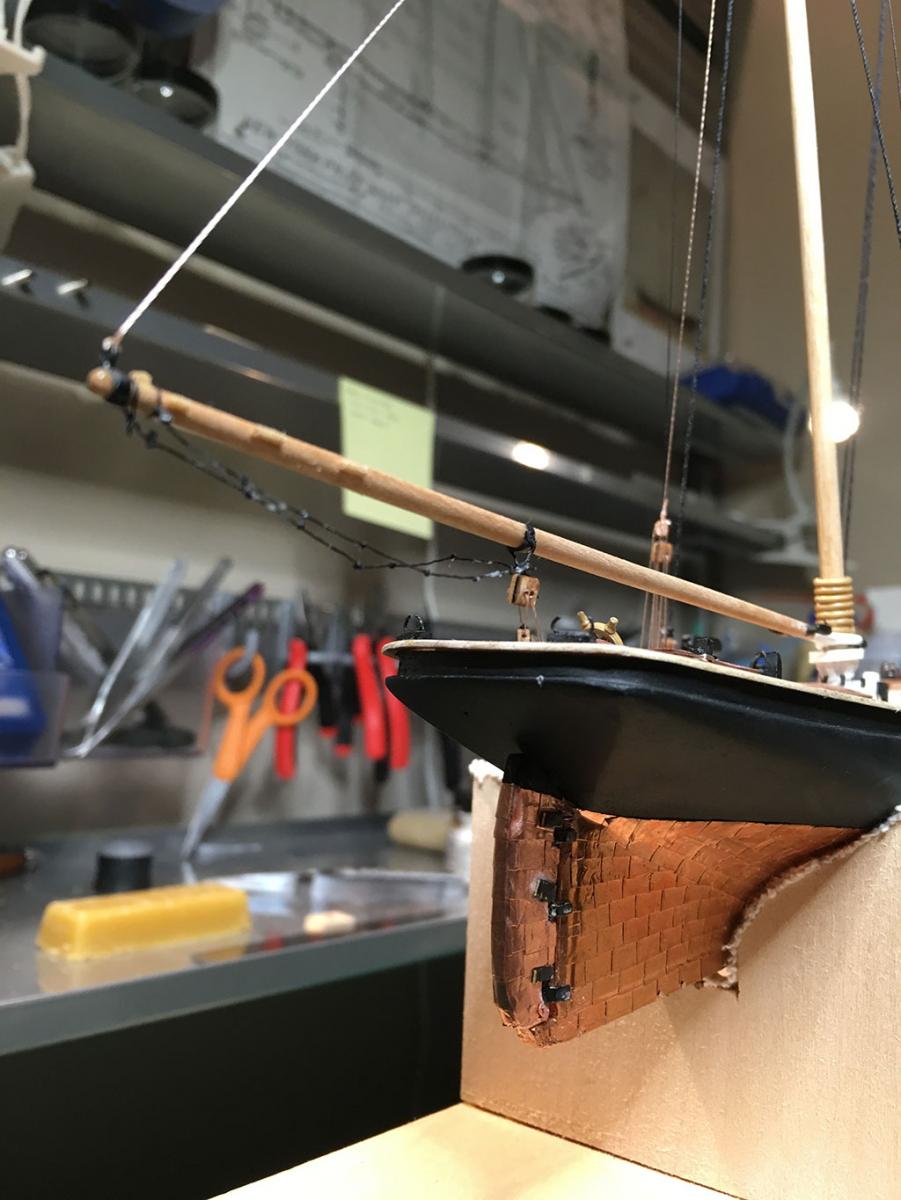
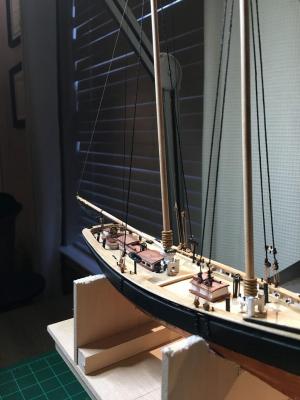
Rigging continues! Shrouds were finished off...pin rails installed. Backstays put in. On to the main boom! Construction of the main boom went well. About 5-6 hours of work. Tying knots for the foot ropes was a pain, and took a couple tries. Got everything done and started the rigging, then hit a major setback. Rigging the main boom requires some work with the single block installed waaaaay back when we built the traveller (before any deck buildings were installed). As I was hooking all that up, I pulled the eyebolt under the traveller loose. To fix this *properly*, i'd need to remove some deck buildings, the traveller, and maybe more. Given that the eyebolt is hidden under the traveller, I decided to go for a faster fix. I drilled the hole larger (passing the bit through the hole in the traveller) - maybe 2x the size of the eyebolt's stem. I then carefully filled it with gap-filling CA glue, and lowered the eyebolt into the hole. It was ugly, but it worked. If this thing were 20% larger scale, I could have gotten tools in there to fix it properly (guide the eyebolt back into a proper hole). But at this size (and with the rear deck finished out), there was no room to maneuver. I am now at about 6 months into my build (with about a 2 month break - so really I've been working for 4 months). Tomorrow I start the main gaff!

- 28 replies
-
- 3
-
-
- phantom
- model shipways
- (and 1 more)
-
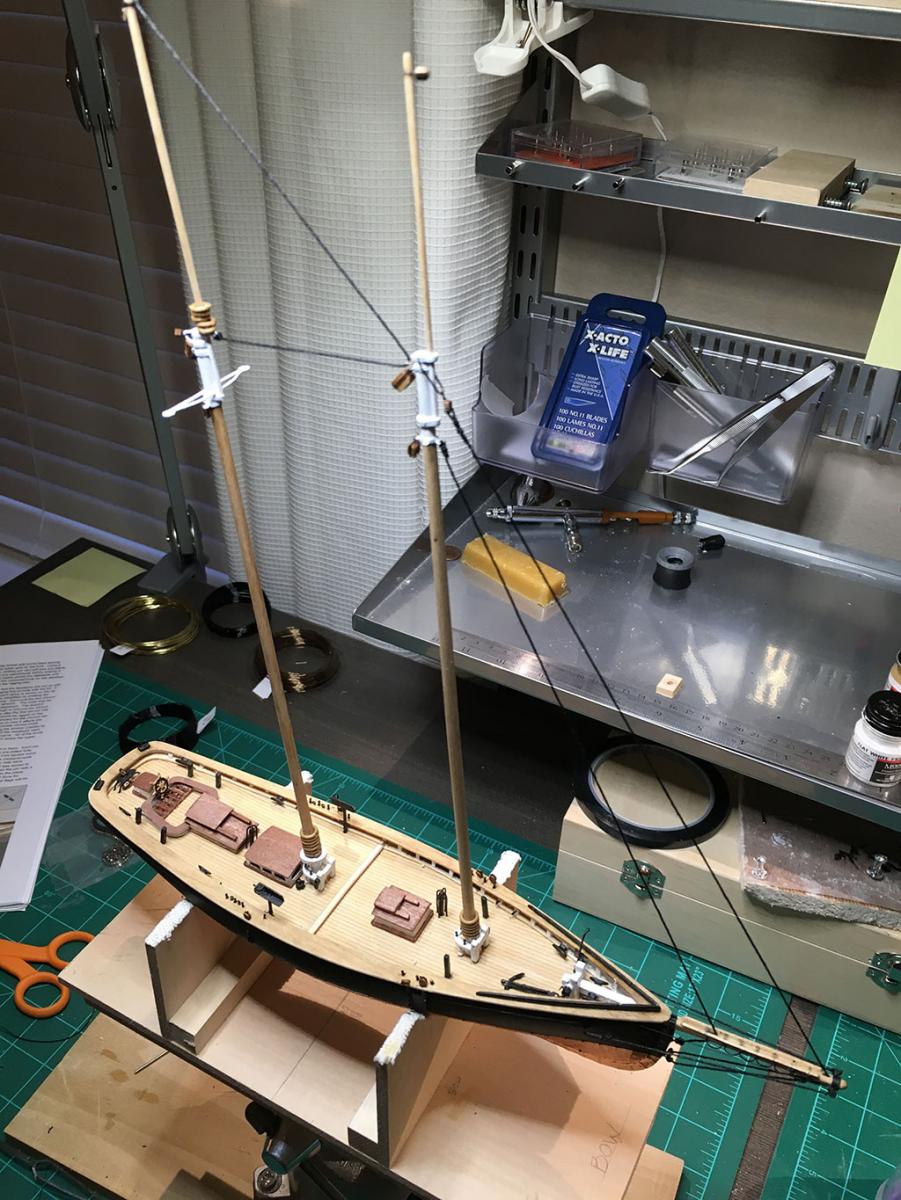
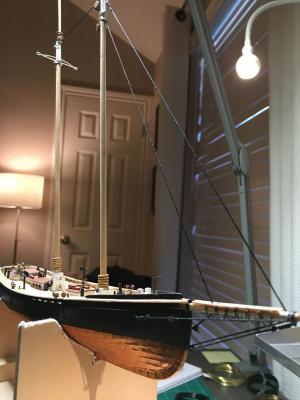
A very productive weekend! After a few weeks of feeling a little frustrated, my hopes were lifted when I got the bowsprit installed. The rigging for that turned out to be very straight-forward, and I was finished within a couple hours. What to do with the rest of my weekend? Masts! I got the fore mast shaped, stained, and painted on Saturday. I was able to assemble the various fittings pretty quickly. Since staining takes place out in the garage, I shaped both the lower and upper fore masts before staining - and stained them both at the same time. So, once the mast cap and bands were installed, it was trivial to mount the top mast. The main mast was assembled on Sunday morning. This one took a bit more work. I encountered a few things that slowed me down. First, I ran out of kit-supplied eyebolts. I think Model Expo included enough, but I've lost a few to glueing mishaps. I've also lost a couple because I didn't have a tight hold while trimming the excess off the stem, and the eyebolt went flying. These things are tiny, and once they go flying, they will never be found. So, I would need to start making eyebolts myself. I used a technique I saw in a post somewhere on here (I'd love to give credit, but I can't find the post now). I wrapped wire around a drill bit of the right diameter, and used pliers to twist the wire until the 'eye' was tight around the bit. They take a moment to make, but making them myself means I can control the size of the 'eye'. This would become important once rigging started. I also had problems with the mast hoops. The instructions recommend wire, and the practicum recommends using bands of manilla folder. I started with the folder technique (I've learned to trust the practicum). However, I couldn't get them looking good enough. Since I had to go buy some wire for eyebolts, I decided to also pick up some larger wire suitable for making mast hoops. They ended up a little thicker than they should be, but they were way easier to make. (It might help that my wife has a jewelry business, and wire mast hoops are basically 'jump rings' in the jewelry biz, so I'm very familiar with them). I went with fewer hoops than suggested because of the size - I didn't want the hoops to be too clunky and I'm already way off the 'historically accurate' path. Additionally, I made several attempts to shape a boom rest for the main mast out of 1/32" thick stock. Every attempt failed with the piece being split or cracked. After some searching around my pile of materials, I found a wooden dowel that was the right diameter, matching what I was trying to cut from 1/32. I cut a 1" long piece, and used my drill press to put a hole for the mast through the center. Then I just cut off a thin piece, and I had my boom rest. I had left the deadeyes on the cap rail the reddish wood color as they came - it matched well with the color I chose for the roofs of the deck buildings. The blocks, however, were an assortment of shades. Single, double and triple blocks were all different colors. The thought of individually brushing stain onto several tiny blocks was just depressing. Instead, I strung them on a length of thread and dipped them in stain. I had to carefully wipe them down, but they turned out great, and with very little effort. I was going to stop Sunday afternoon, but my wife needed a few more hours of jewelry-making (odd that we both have hobbies requiring working with tiny, tiny parts...). So, I went ahead and mounted the masts. It seemed like I could get away with a little more time, so I started in on rigging. For me, the entire project changed once I was the first bit of rigging completed. I'm not sure if was just the significance of moving on to a completely new part of the build, or if it was the way that even a little rigging completely changes the look of the ship. Either way, rigging changed my whole outlook on the ship. Previously I only saw the mistakes, but now I'm seeing the 'ship'. I've had to replace some eyebolts, as the kit eyebolts are little small when they need two lines attached. My new custom eyebolts work great, and I can set the size based on the number of things that need to be tied off. I'm slowly getting better at seizing and working with blocks. I've also gotten the first shroud installed (not shown). I used the method described in the practicum to set the length of the shroud and position the deadeyes. I'm feeling renewed and happy with the build...and the end is in sight!

- 28 replies
-
- 3
-
-
- phantom
- model shipways
- (and 1 more)
-
I should add that I chose photos that don't point out my mistakes
- 28 replies
-
- 2
-
-
- phantom
- model shipways
- (and 1 more)
-
Well, it has been a little over a month since my last update. I've been working constantly, but I've been hesitant to update because I wasn't proud of my progress. I hit some issues, which is something I imagine happens to many first-time ship modelers. Reading build logs on this forum has been invaluable, and I imagine some of the build logs that mysteriously 'stop' are because problems were hit. I'm determined to not stop my log, and even though I'm not proud of the state of my build, I'm going to try and keep this going. Maybe some new modelers can learn from my mistakes My last update saw the cap rail installed. In the last month, I've gotten all the deck furniture installed as well as the bowsprit. So...deck stuff... I built a few of the aft buildings several months ago, but wasn't happy with the results. I rebuilt them. The skylight took 3 tries. The first attempt was just a failure (tried to cut the windows out of sheet stock). The second attempt failed to take the thickness of the window framing into account when shaping the main structure (so it ended up being too large overall). The third try worked. As some other build logs have mentioned, the rear deck is a little crowded, and if dimensions are not exactly right, things don't fit right. I ran into this. So, I decided to stop, and approach it from a different way. I copied the plans for the rear deck and put it on a small build board. This is a hold-over from my days building Model Airways planes, where much of the framing is built on top of plans on a pin-able build board. I used a piece of commercial ceiling tile ($5 at a big-box hardware store). The plans were laid on top, covered with wax paper and pinned down. This let me build each piece and pin it in place to ensure I got all the sizes right. I worked off this until I had everything for the rear deck built and fitted correctly. On a side note, since I mentioned wax paper... I've refined my use of wax paper and CA glue a bit. I use CA glue for cast metal parts and for seating things like belaying pins and cleats. I've tried a variety of special applicator tips for CA bottles that release a 'drop' at a time...but those often get clogged if you don't clean them constantly. I've settled into a routine where I drop a little 'bubble' of CA onto a small square of wax paper, and use dental applicators to brush glue onto the parts. The wax paper keeps the glue off my work surface (and gives me about 30 minutes before the glue dries. The applicators are small, and allow me to brush the glue with precision. They are also cheap ($10-$20 for a case of 400), so I can toss them anytime. Anyway...got all the deck stuff built, and moved on to the bowsprit. Much celebration was had when I read in Chuck's practicum that I was halfway done. The bowsprit was straight-forward and relatively easy to build. Tomorrow morning I'll be diving into the last few pieces necessary to begin running the rigging for bowsprit. I'm excited to finally start in on some rigging. I mentioned that I'm not proud of the results...which comes down to a few things... I haven't been using primer as much as I should. Many pieces would look better if I took the time to properly sand/primer/sand/paint. I didn't pay enough attention to measurements on the plans as I should have. The rear deck wasn't deep enough. Some dimensions are just 'off'. There's just a lack of 'polish' compared to just about every other build I see on the forum. I keep reminding myself that this is my first ship build, and many forum members have been building for a very, very long time. At the end of the day, this build was always about cutting my teeth on ship building. I'm definitely learning. There have been moments where I felt the desire to stop the build and move on to a new ship where I could apply what I've learned, but I'm determined to see this through. I'm sure I'll learn a ton by finishing this out, which will make the next build even better. Plus, my family doesn't notice any of the things I'm freaking out about (and they think what I've done is amazing), so I guess I'm still doing well from the 'non-ship-builder' point of view.
- 28 replies
-
- 3
-
-
- phantom
- model shipways
- (and 1 more)
-
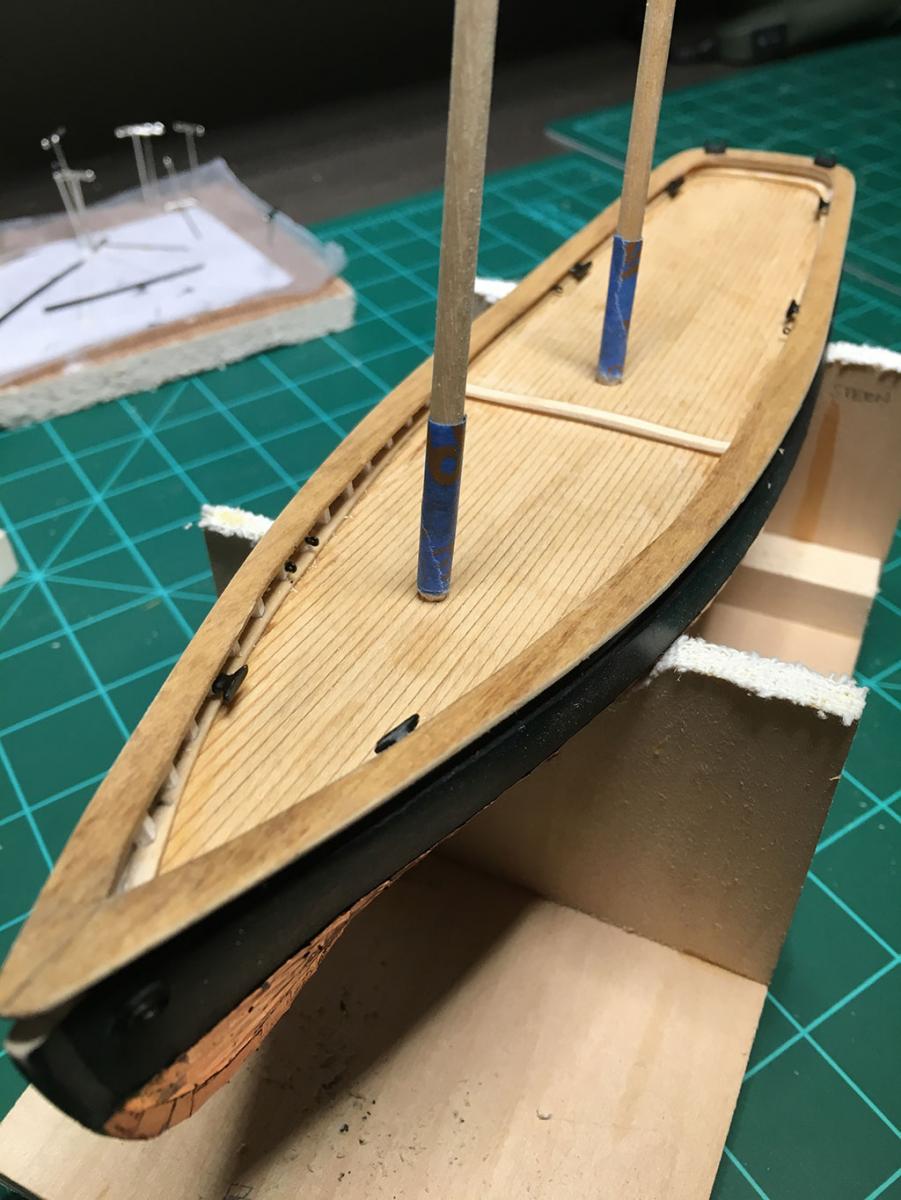
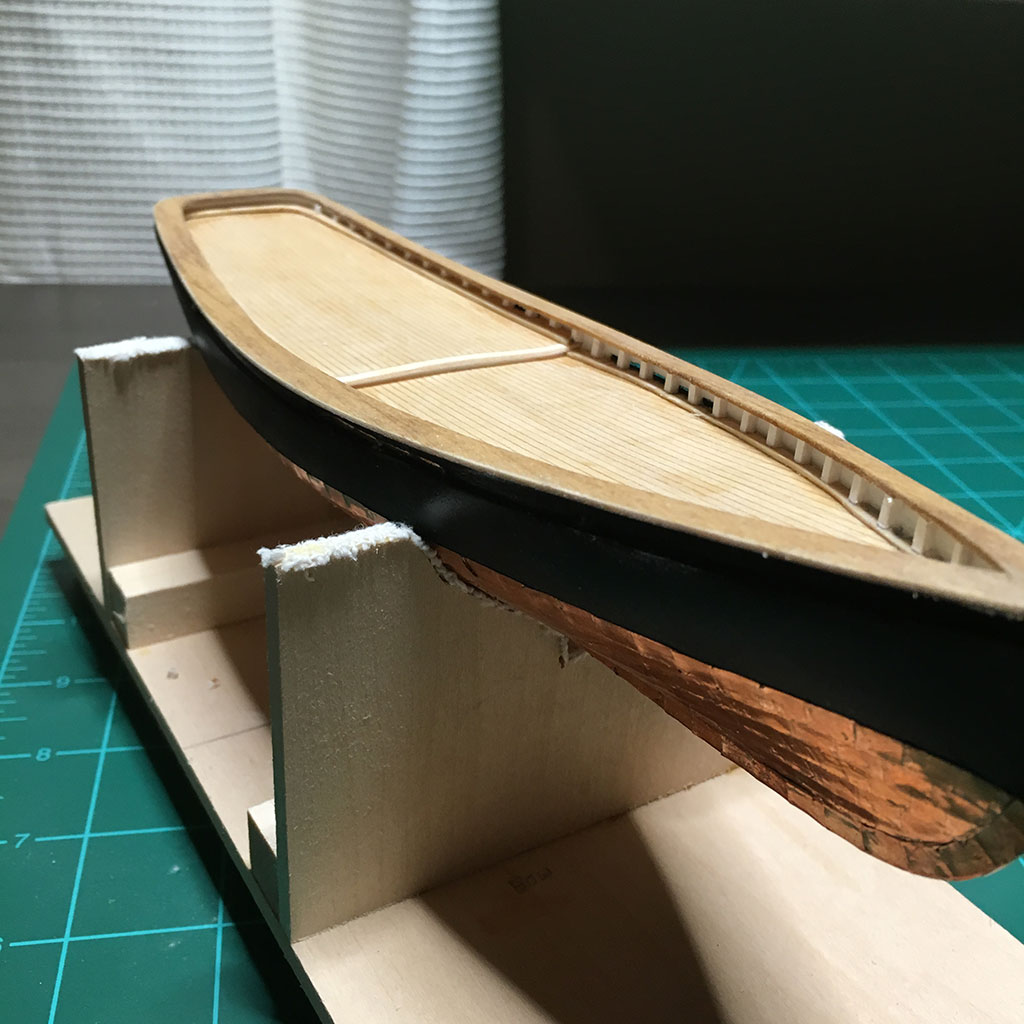
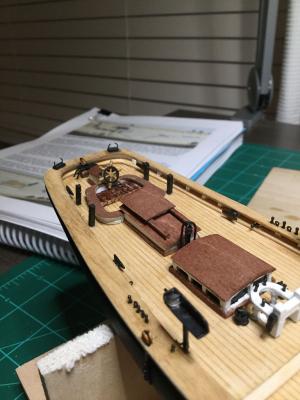
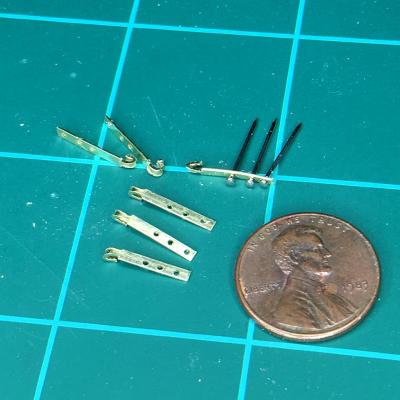
A few more days, a few more bits of progress... Installed the hause pipes, which required a bit of reshaping for the cast parts (they arrived as more 'oval' than round). Got the cleats and eyebolts installed. Made some chain plates, following the practicum's technique. I'm pretty happy with how they turned out. Ended up being much easier than I was expecting. The alignment of the holes isn't perfect, but I think it will be close enough once they are installed and painted. Also got the mast holes put in. To get the angles, I built a wood jig that sat on the deck and had a 'fin' that was cut to the correct angle. I trimmed the base of each mast and stuck them in there just to see the ship with some masts...those are coming out and being set aside for later (when I get to permanently installing them, I'll get the angles just right.) I cut, curved, and painted the splash rails. But I'm not happy with how they turned out, so I'm probably going to start over on those. The paint finish didn't come out the way I wanted. Making progress... - Dave

- 28 replies
-
- 2
-
-
- phantom
- model shipways
- (and 1 more)
-
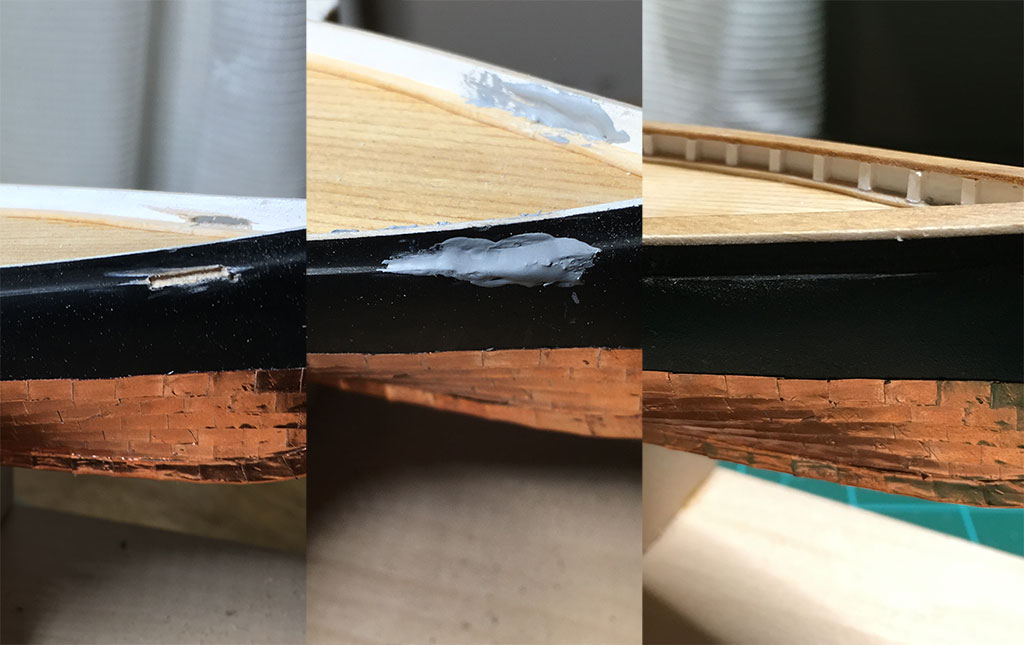
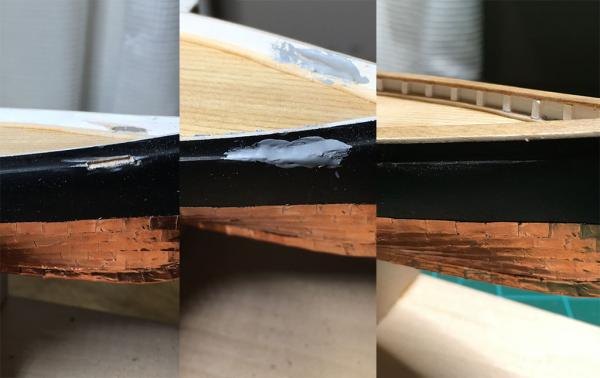
Oops... So, after my progress in my last build log update, I was feeling a little too confident. Monday, after work, I decided to dive right in to cutting out the scuppers. Somehow, I managed to take the completely wrong location/size off the plans. I didn't realize it until afterwards, as I was scrolling through photos of other Phantom builds trying to decide if I should paint the newly cut wood. My scuppers were way to far towards the front. Looking at the plans, I'm not sure how I ended up in this spot. My best guess is that I mistakenly measured the plan markings where the bowsprit guy attaches to the hull. It defies logic - but somehow I ended up cutting scuppers right there. Tuesday, Wednesday, and Thursday were spent filling the cuts with putty, sanding, and repeating. I had to reshape those areas completely. Of course, this means that I need to repaint the hull. Since I originally did the hull with an airbrush, I couldn't get the right finish unless I re-airbrushed the hull. Since I've already coppered and installed the deck, I had to carefully tape everything off before I could paint. Saturday was painting day - a few coats later and I'm back to being in good shape. The photo below shows the mis-placed scuppers, the 'putty phase', and the completed patch job. Despite the setback, I was able to install the stanchions and get the cap rail installed. The stanchions were a bit more of a pain than I expected. My earlier mistake of using 1/32" wood for the waterways came back to bite me. Stanchions in the back were abnormally short. Very tough to cut and get in place. If I hadn't made the waterways too thick I think this would have been a lot easier. I also decided that it would be easier to leave the stanchions a little long, and cut them after the fact (so the height would be precise). However, the pressure from trimming them ripped a few off - so I'm not sure that I saved much time/work compared to just cutting them individually and more precisely. Finally, the cap rail went on. I cut it a little larger than necessary and sanded it down after it was installed. At this point, I'm starting to see the cumulative effects of small errors. Were I to do it again, I'd be sure to either use a manila folder for the waterway or properly do the nibbling on the waterway to avoid the extra height from simply installing a 1/32" waterway. Oh well, first ship...I'm learning.

- 28 replies
-
- 2
-
-
- phantom
- model shipways
- (and 1 more)
-
Elijah - I've seen several people with better build logs than mine here , and it seems like when to copper is really up to the builder - some people do it earlier, some do it later. I chose to copper after finishing the hull shaping and bulwark shaping, but before doing any work on the deck. I painted the entire hull before coppering. Mostly, this was because I didn't want to risk damaging any deck surfaces while I was coppering. Now that I've moved on a bit, I probably could have waited a little longer to copper. Working on the stanchions and scuppers had some issues (for me), and I ended up having to re-paint the hull. This would have been easier if I hadn't already coppered. I spent a good hour or so carefully taping off the copper so I could repaint the hull without risking getting paint on the copper. If I were doing it over again, I'd probably finish all the shaping, add the deck, cut the scuppers, install the stanchions...then paint...then copper. But that's just me, and there are many people here with a lot more experience (and better results )
- 28 replies
-
- 1
-
-
- phantom
- model shipways
- (and 1 more)
-
Elijah - I was just looking at your build log yesterday as I was getting ready for the weekend. You're making great progress! My plan is to the let the copper just 'do its thing'. I've had parts of the copper on the model for about 3 months, and it still looks new. I'm not sure how long before I'll start to see some patina (might vary based on environmental factors?).
- 28 replies
-
- 1
-
-
- phantom
- model shipways
- (and 1 more)
-
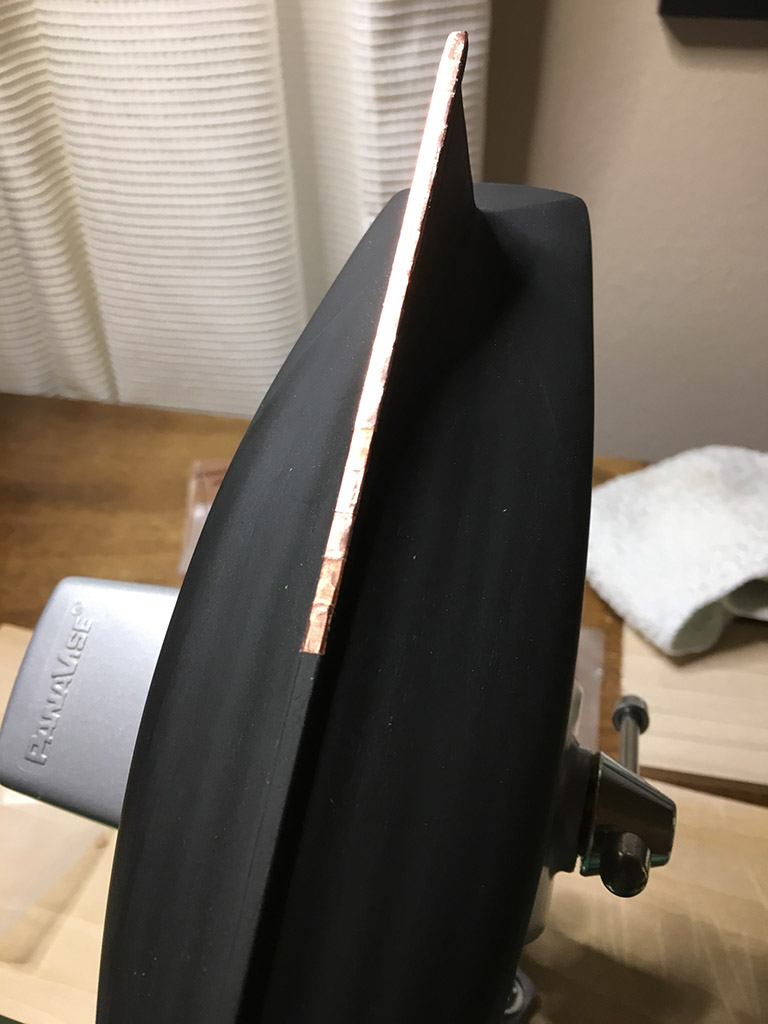
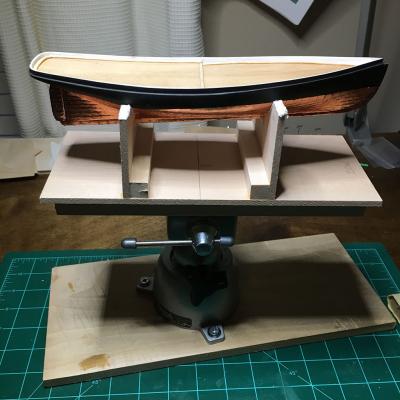
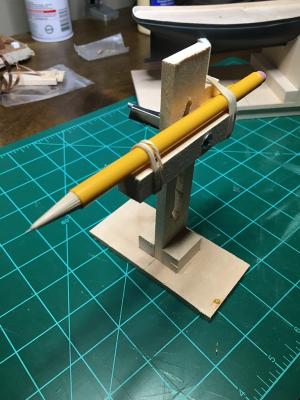
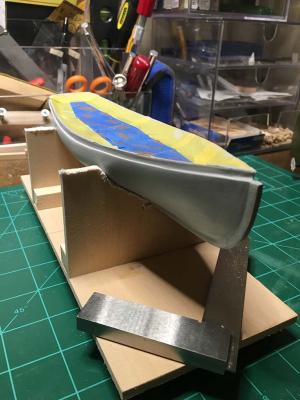
Back in November I finished coppering one side of the hull. Then the project sat idle for 2 months, right there in my office, taunting me daily. This weekend I was finally able to dive back in. On Saturday I was able to completely copper the other side of hull, which finished up the hull coppering. It took several hours, but once I got into a groove, it was pretty painless. Once coppering was complete, I painted the inside of the bulwarks, giving them a few coats of white. Sunday's focus was on the deck. I made a paper cut out to fit the upper and lower parts of the deck, which took an hour or so to get just right. I used these as templates to cut the deck planking. While I love the look of the individual planks I've seen in some other build logs, I went with the sheet of planking included with the kit. (First ship, and I don't want to go too crazy.) In the practicum it is recommended to use a manilla folder for the waterways. I didn't have one, but I had some very thin wood sheets, so I added a waterway made of wood. This was probably not the best choice - even with a lot of sanding they are still too thick. Oh well, first ship... I built the rudder and got it coppered. I followed the general shape, but I had to make some alterations to get the fit just right. I still need to do the pintles and gudgeons - I need to swing by a hobby store to get some materials for those. As I transitioned to working on the deck, my new cradle came in very handy. This is the second one I've built. This one has rails on the bottom so I can mount the cradle in my PanaVise (which is mounted on a small platform). This has made tilting the ship effortless. Things I've noticed during this busy weekend... My waterline is a little off. The coppering is a little to high around the middle of the ship. When a trusted source tells you to use a manilla folder, trust him. I didn't get the waterways lined up well enough with the step in the deck. Hopefully when I get the stanchions and the cap rail on it won't be as noticable. It is tough to get things perfect at this scale. Feels good to make some progress after a couple idle months. Knowing that I've got a Bluenose kit sitting in the closet is providing some motivation.

- 28 replies
-
- 6
-
-
- phantom
- model shipways
- (and 1 more)
-
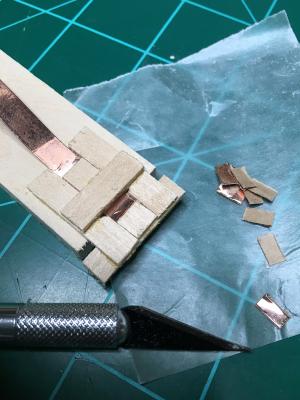
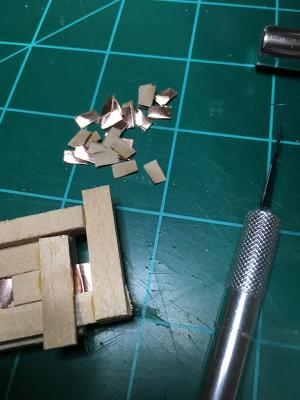
Another week, another little bit of progress (slowed by vacation). The hull painting is finished, ended up with 3 coats. The waterline was marked using a custom waterline marker, based on what I saw others here build. (The slot for moving the pencil up/down is horrible - limited by the tools I had close by, but it works.) So, it was time to start coppering. I've seen a number of small jigs posted by others for cutting the copper strips. I decided to go with the method of cutting the 1/4 tape into 1/8 strips, rather than halfing the tape. My first jig was a small block that holds the tape, provides a spot to cut, with a small hole below the cut piece to let it fall through. This worked fairly well, and let me get started quickly. The tape is held in place by a small 'tongue', that was sanded to reduce its thickness and allow the tape to slide beneath it. It took a few tries to get the thickness just right (so it applies enough pressure to keep the tape in place, but loose enough that I can still slide the tape in). However, after a few minutes of cutting, the cuts were no longer clean, and strips were starting to bend/crease. My jig was set up so that the wood block base was my cutting surface. Turns out that each cut was carving into that base, and after some number of cuts I had actually cut away the base below the tape. So, I built a 2nd version of my jig. The angle of the photo makes the jig look like the cut strips wouldn't be straight, but that' just the photo - in practice things are lined up straight. In this version, there is nothing below the line where I'm cutting. The open space (just above the tape, toward the top of the photo) near the strip lets me put my blade in, press it firmly against the jig, and slice through the tape. This avoids putting any downward pressure, and gives the cut strip a large opening to fall through. As long as I get the blade firmly up against the jig, I can get a clean cut every time. With this jig, I was able to cut about 15 uniform strips a minute. (Assuming that the ballpark of needing around 400 strips mentioned by another poster is right, coppering should require about 30 minutes of cutting total.) The jig is ugly, but it works. I decided not to spend any time cleaning it up since it won't be used for long. Actually laying the copper goes pretty quick. I have the model upside down in a vise (holes in the top are for screwing in the 'handle'). A magnification lamp goes right over the area to be coppered. I found that some very fine point tweezers worked great for picking up a strip, and sliding the tweezer's point between the tape and the backing. Every few strips I stop to smooth them out. For this I've been using the handle for an X-acto knife - it is solid and round, and allows me to roll it along the tape. I haven't yet run into a crease or bend that didn't smooth out. I've already got more copper on than is shown in this photo, but here's an earlier look at the first few pieces... Exciting to be done with the carving and moving on to making something look 'done', and really looking forward to moving on to the top side. Things have gone well enough that I decided to go ahead and order my next kit - the Model Shipways Bluenose while Model Expo was having a big moving sale. It was tough to have a kit arrive, look in the box, then put it in the closet, but I've still got a ways to go on this one. My wife, who has been very supportive of my previous plane builds and the Phantom, is starting to get a little nervous after she saw the size of the Bluenose...might be time to buy a bigger house. - Dave
- 28 replies
-
- 5
-
-
- phantom
- model shipways
- (and 1 more)
-
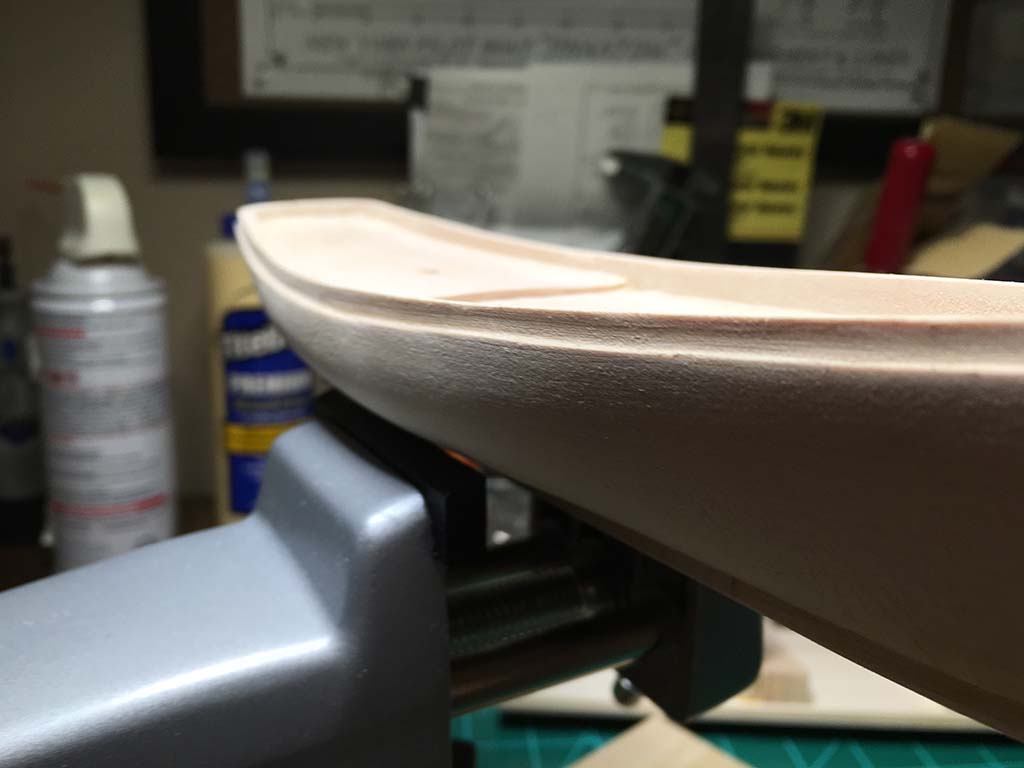
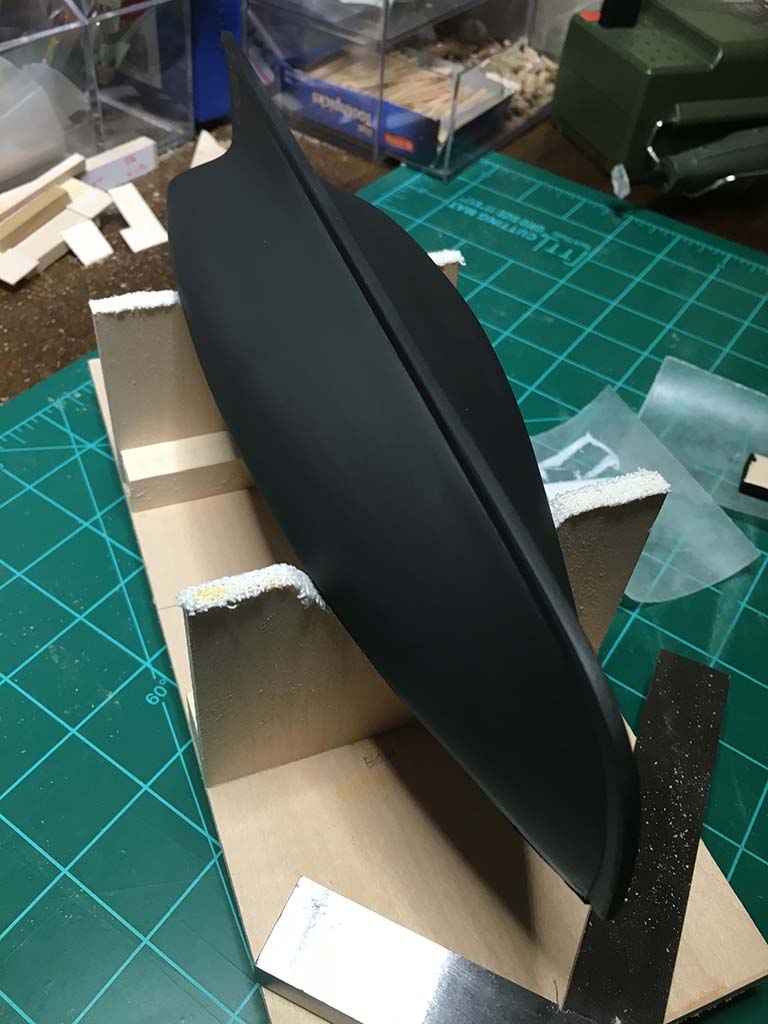
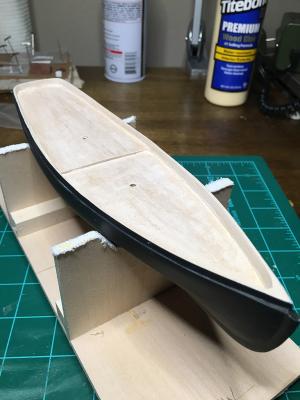
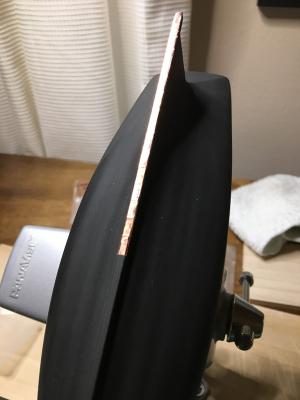
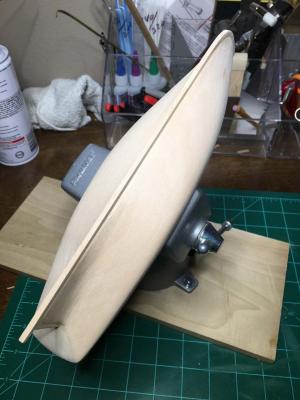
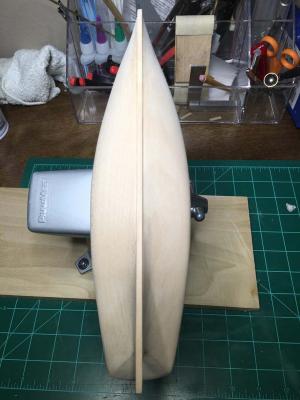
The work continues... Really have not enjoyed carving, sanding, etc., on the hull, but I got it 'good enough' and moved on. I chose to tackle the bulwarks before painting or coppering the hull because I felt that I would likely damage the copper with all the work on the top side. The risk to damage the bulwarks is mitigated by the 'post' I can attach to the deck, allowing me to safely hold the ship upside down in my vise for coppering (a hole where the post screws in can be seen on the rear deck in the first photo). I built a small jig to slide along the top of the bulwarks to aid in marking the depth to carve. That helped a great deal. The outer 'step' was carved first, followed by thinning from the inside. My powered micro-sander was invaluable with the bulwarks. Burned through tons of sanding pads, but it really helped to get things straight and even. The stern gave me a lot of trouble due to the changes in wood grain. I managed to get close to 1/32" all the way around. The hull then got a couple coats of primer. Primer was sanded between each coat, and some minor fills were made with putty when needed. Finally, today I was able to apply the first coat of black to the hull. The black was airbrushed on, which isn't really necessary, but I've had this airbrush sitting idle for a while and wanted to take it for a spin. I decided to ahead and paint the entire lower hull, even though much of it will be covered by copper. No good reason except that it looks nicer until I get the copper on there... While watching paint dry, I've started in on building above deck. These are proving to be tough given the scale - so I will likely end up re-doing them after this first attempt. Next steps are to continue with coats of paint, working on the deck buildings while waiting...


- 28 replies
-
- 3
-
-
- phantom
- model shipways
- (and 1 more)
-
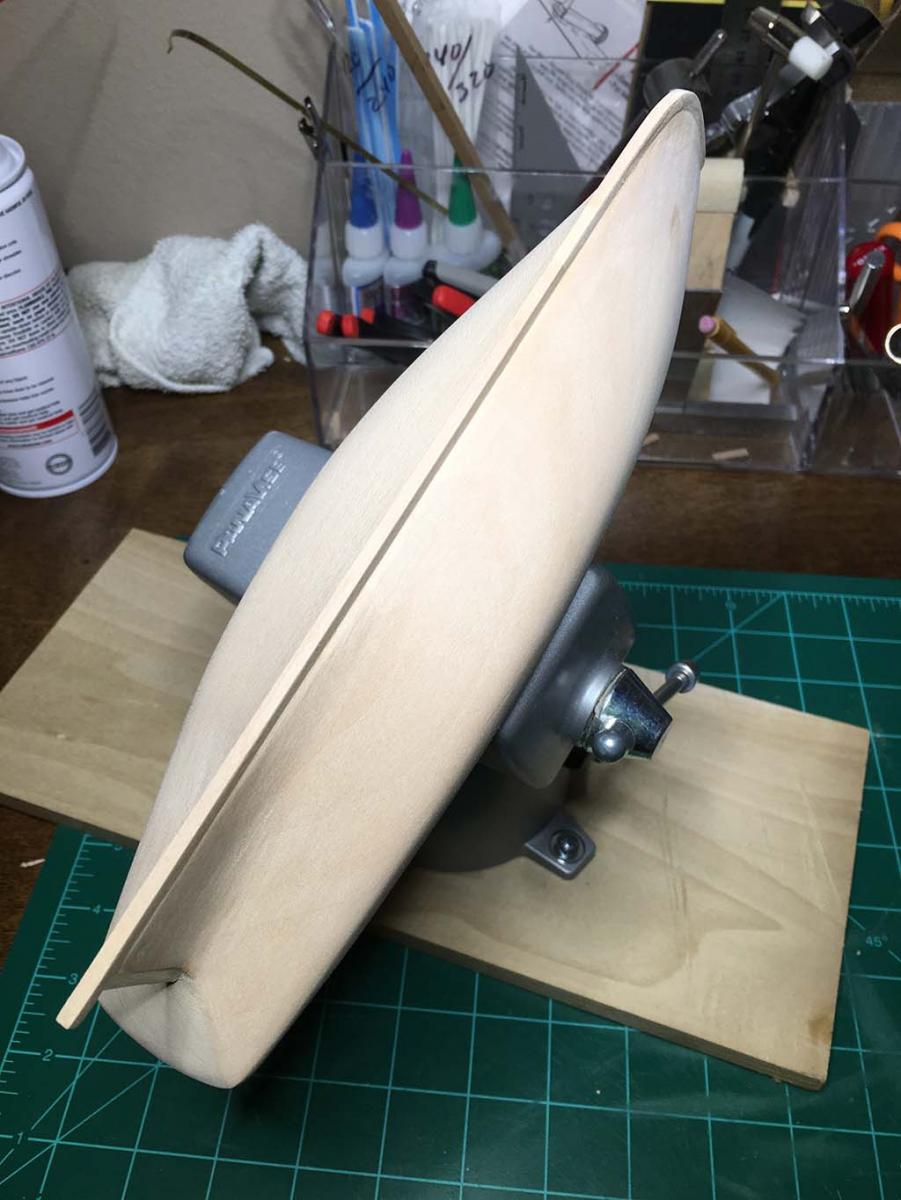
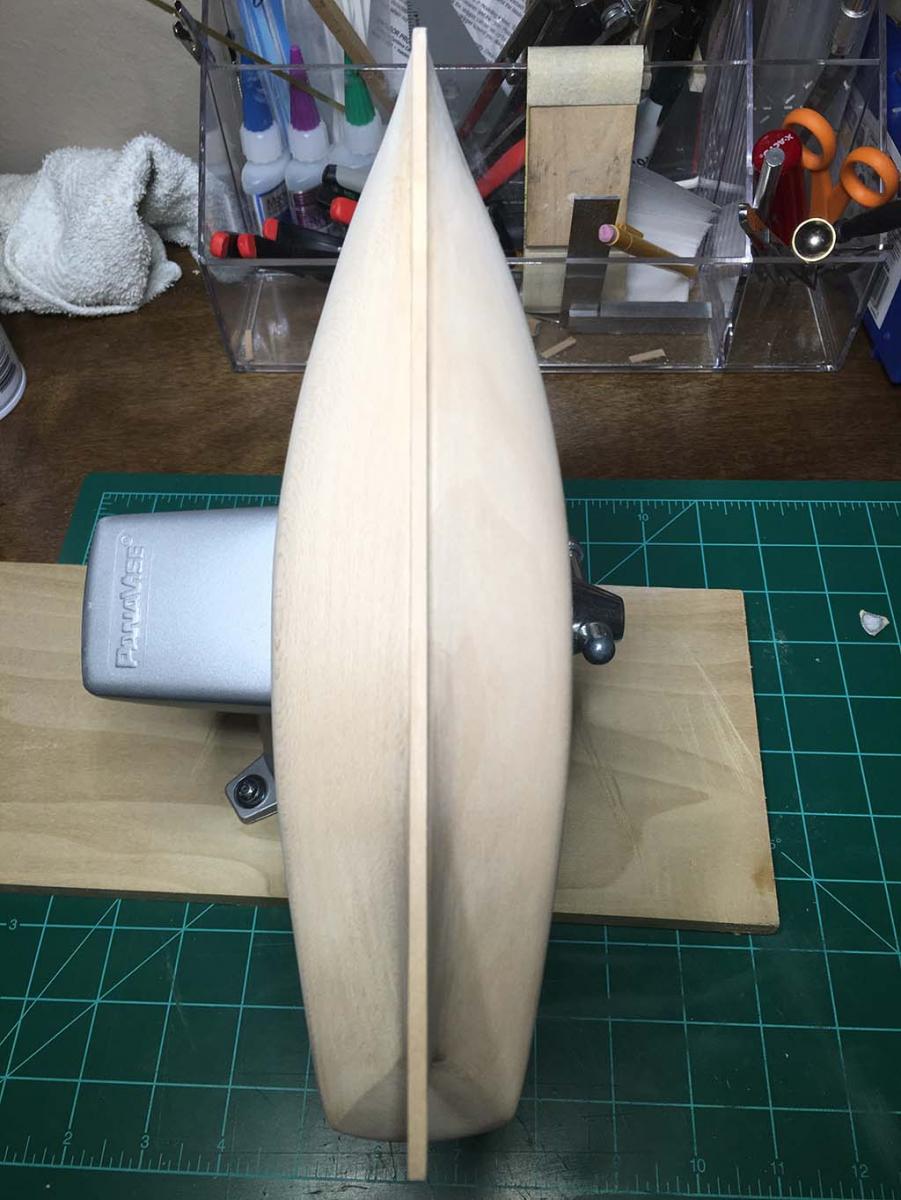
First ship build, first build log, first post...here it goes. All of my experience has been with static plane models like the Sopwith Camel from Model Airways, and I absolutely prefer working with wood models over plastic. Given the relatively small number of plane model kits out there, I thought I'd take the dive into ships. It seems like there are enough ship models out there to keep me busy for years. Since I have no experience with rigging or planking, I thought I'd start with a kit generally regarded as good for beginners. My Model Shipways Phantom kit arrive last Friday. The days leading up to the arrival were spent getting my workspace back in shape (it has been a year since my last plane build), getting some additional tools, etc. I'm generally following Chuck Passaro's excellent practicum, and referring to the kit instructions only as necessary. The first day was spent checking kit contents, labeling the wood, bagging and tagging all the metal bits (I like to have everything really organized before I start). On Saturday I started shaping the bow and stern, with an extended pause for some college football. Sunday I moved on to shaping the rest of the hull. All the hull shaping was done with sanding, since I have limited experience carving and was worried I'd take off too much material too fast. The results were very close to the templates, but not perfect. The evening was spent installing the sternpost, stem, and keel. I left some extra length by the rudder - will trim and shape when I get to installing the rudder. There's a little more sanding to do, but I think I'm getting close. Monday evening was spent working on the deck's step and cleaning up the stern. This required some actual carving, which got considerably easier once I realized I had more than just a standard #11 blade in my toolkit. (Turns out using the right tool makes a huge difference.) But, more work is needed to clean these areas up before I can move on. Impressions so far: I had read that some people find solid hull kits to be tougher than just starting with POB, and I can see why. If I were starting over, I'd probably jump right to a POB build. Setting up the bulkheads would be similar to the work I've done on my planes and I think I'd have an easier time with it. I'm eager to get to the 'fun stuff' and have to keep reminding myself to slow down. I'm already noticing that the scale of this ship is impacting construction. Everything is very small - and I expect I'll notice this even more once I get to all the various fittings. My workspace, which was significantly downsized over the last year (while I had half a wing sitting untouched on a building board) needs an upgrade. I'm already running out of space, and missing the extra few feet of room I had last year. Generally impressed with Model Expo / Model Shipways. I'm very familiar with their Model Airways kits, which made this ship kit feel very familiar. Struggling with all the terminology. Coming from years of plane building and having zero knowledge of ships is proving to be a learning curve. So far I've got about 7-8 hours in this. Next steps are to finish cleaning up the deck, the start in on the 'step' around the top. - Dave
- 28 replies
-
- 7
-
-
- phantom
- model shipways
- (and 1 more)