HOLIDAY DONATION DRIVE - SUPPORT MSW - DO YOUR PART TO KEEP THIS GREAT FORUM GOING! (Only 27 donations so far out of 49,000 members - C'mon guys!)
×

genericDave
-
Posts
209 -
Joined
-
Last visited
Content Type
Profiles
Forums
Gallery
Events
Everything posted by genericDave
-
 I painted eyebolts and belaying pins black on my Phantom, but I found a lot of the paint quickly rubbed off once I started rigging. That might work if you go for a 'dirty' look. If you want it to look cleaner, you'll probably want to leave them natural or use some kind of chemical blackening (I haven't tried that yet). On mine, I was constantly touching up the paint on the brass pieces.
- 701 replies
-
- 1
-

-
- phantom
- model shipways
- (and 1 more)
-
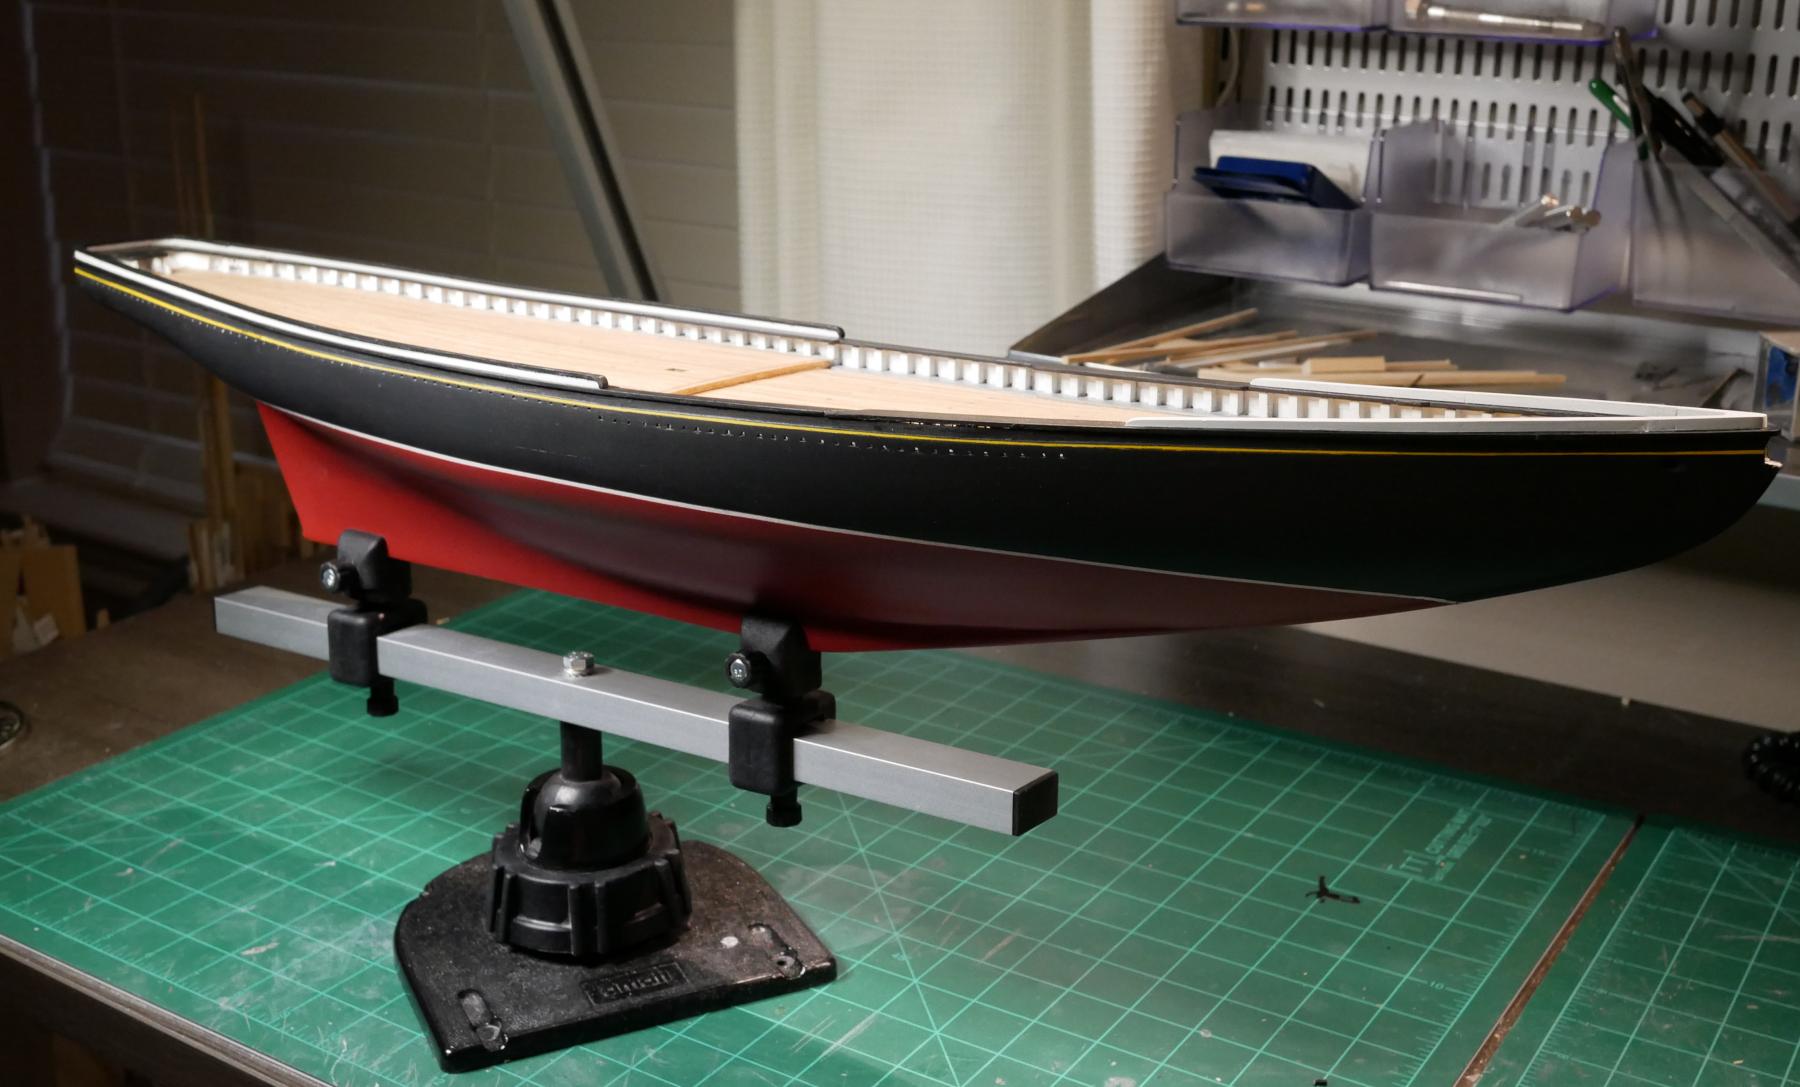
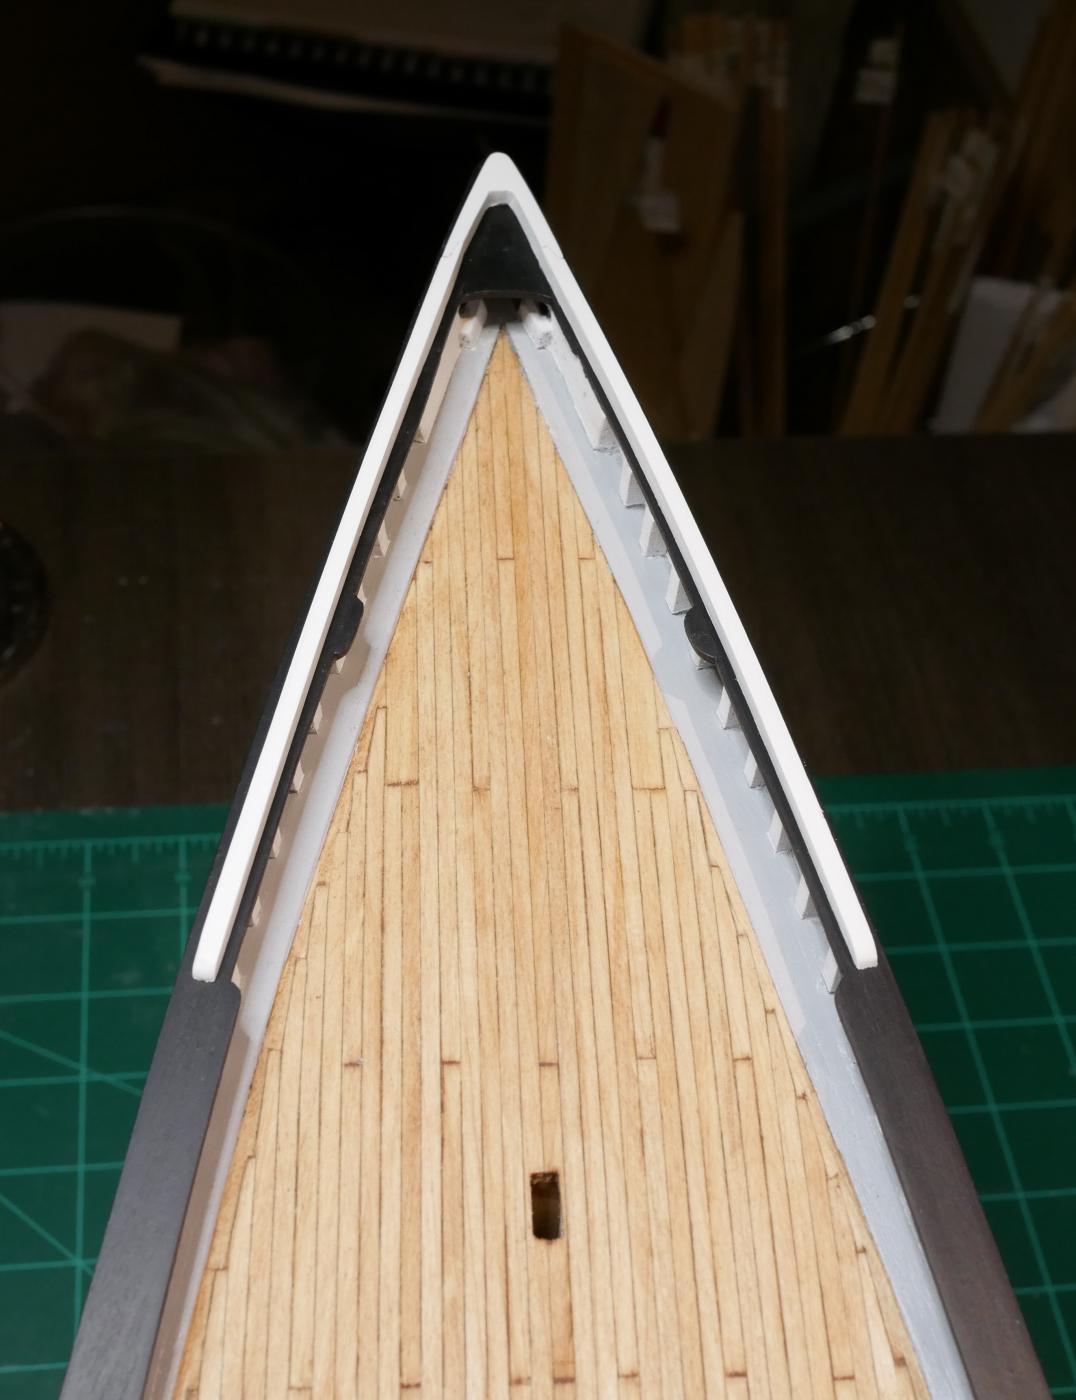
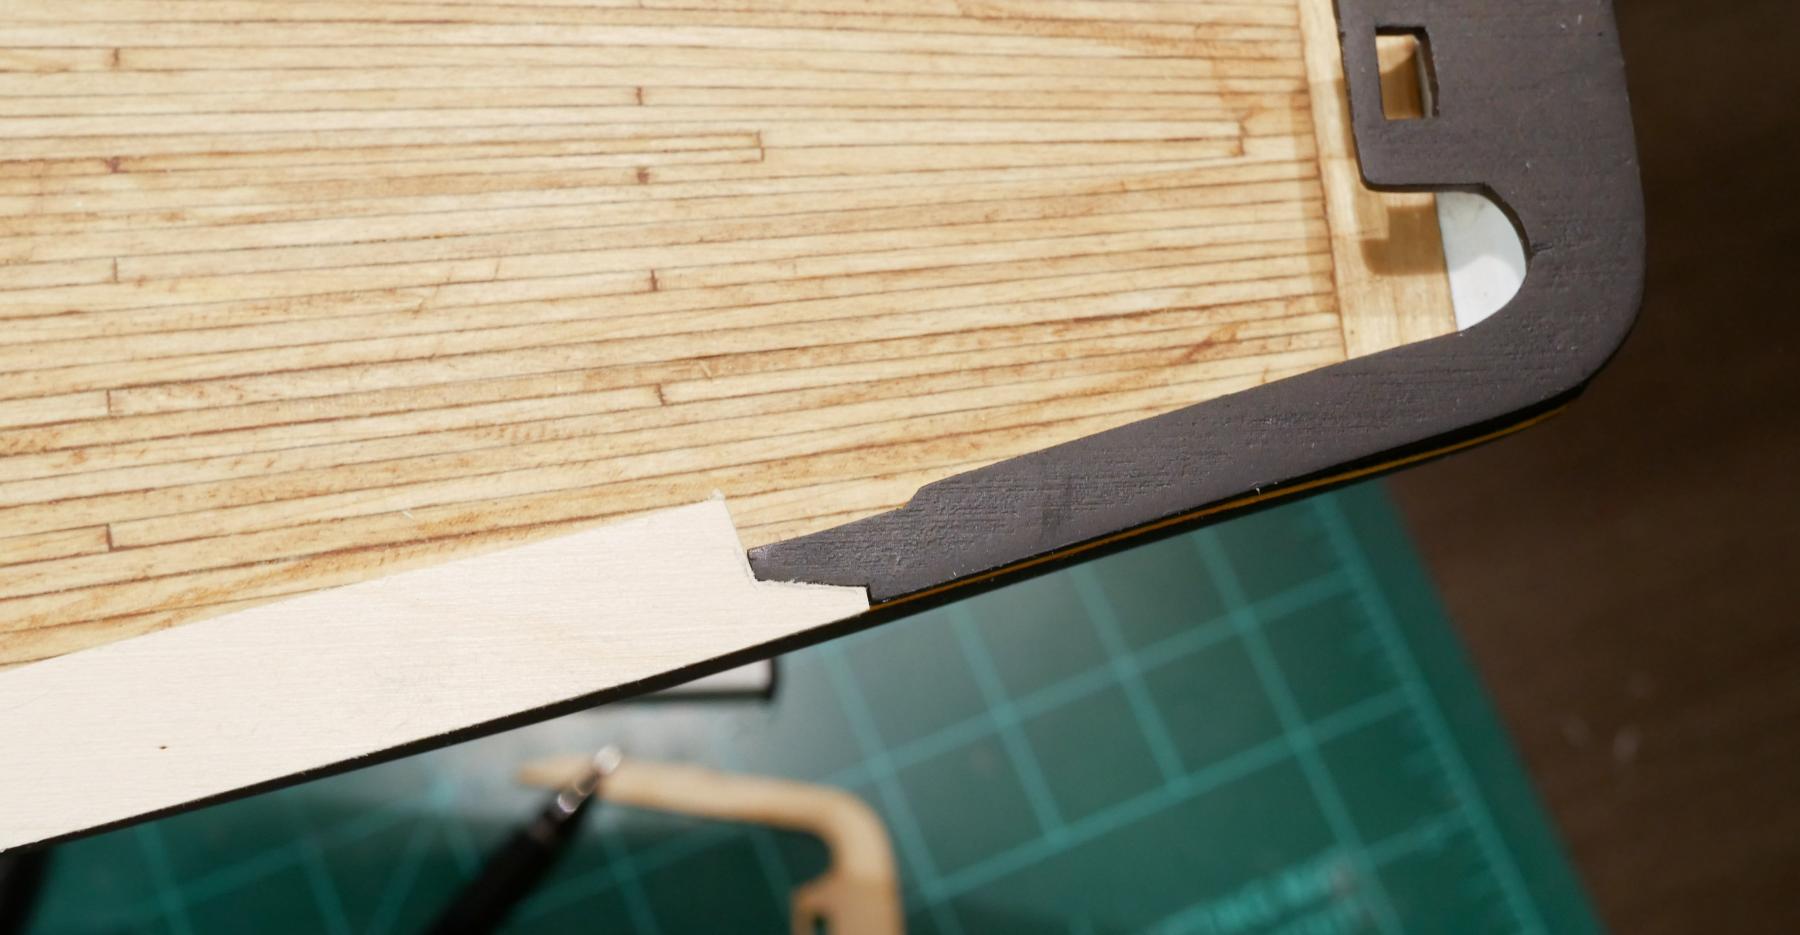
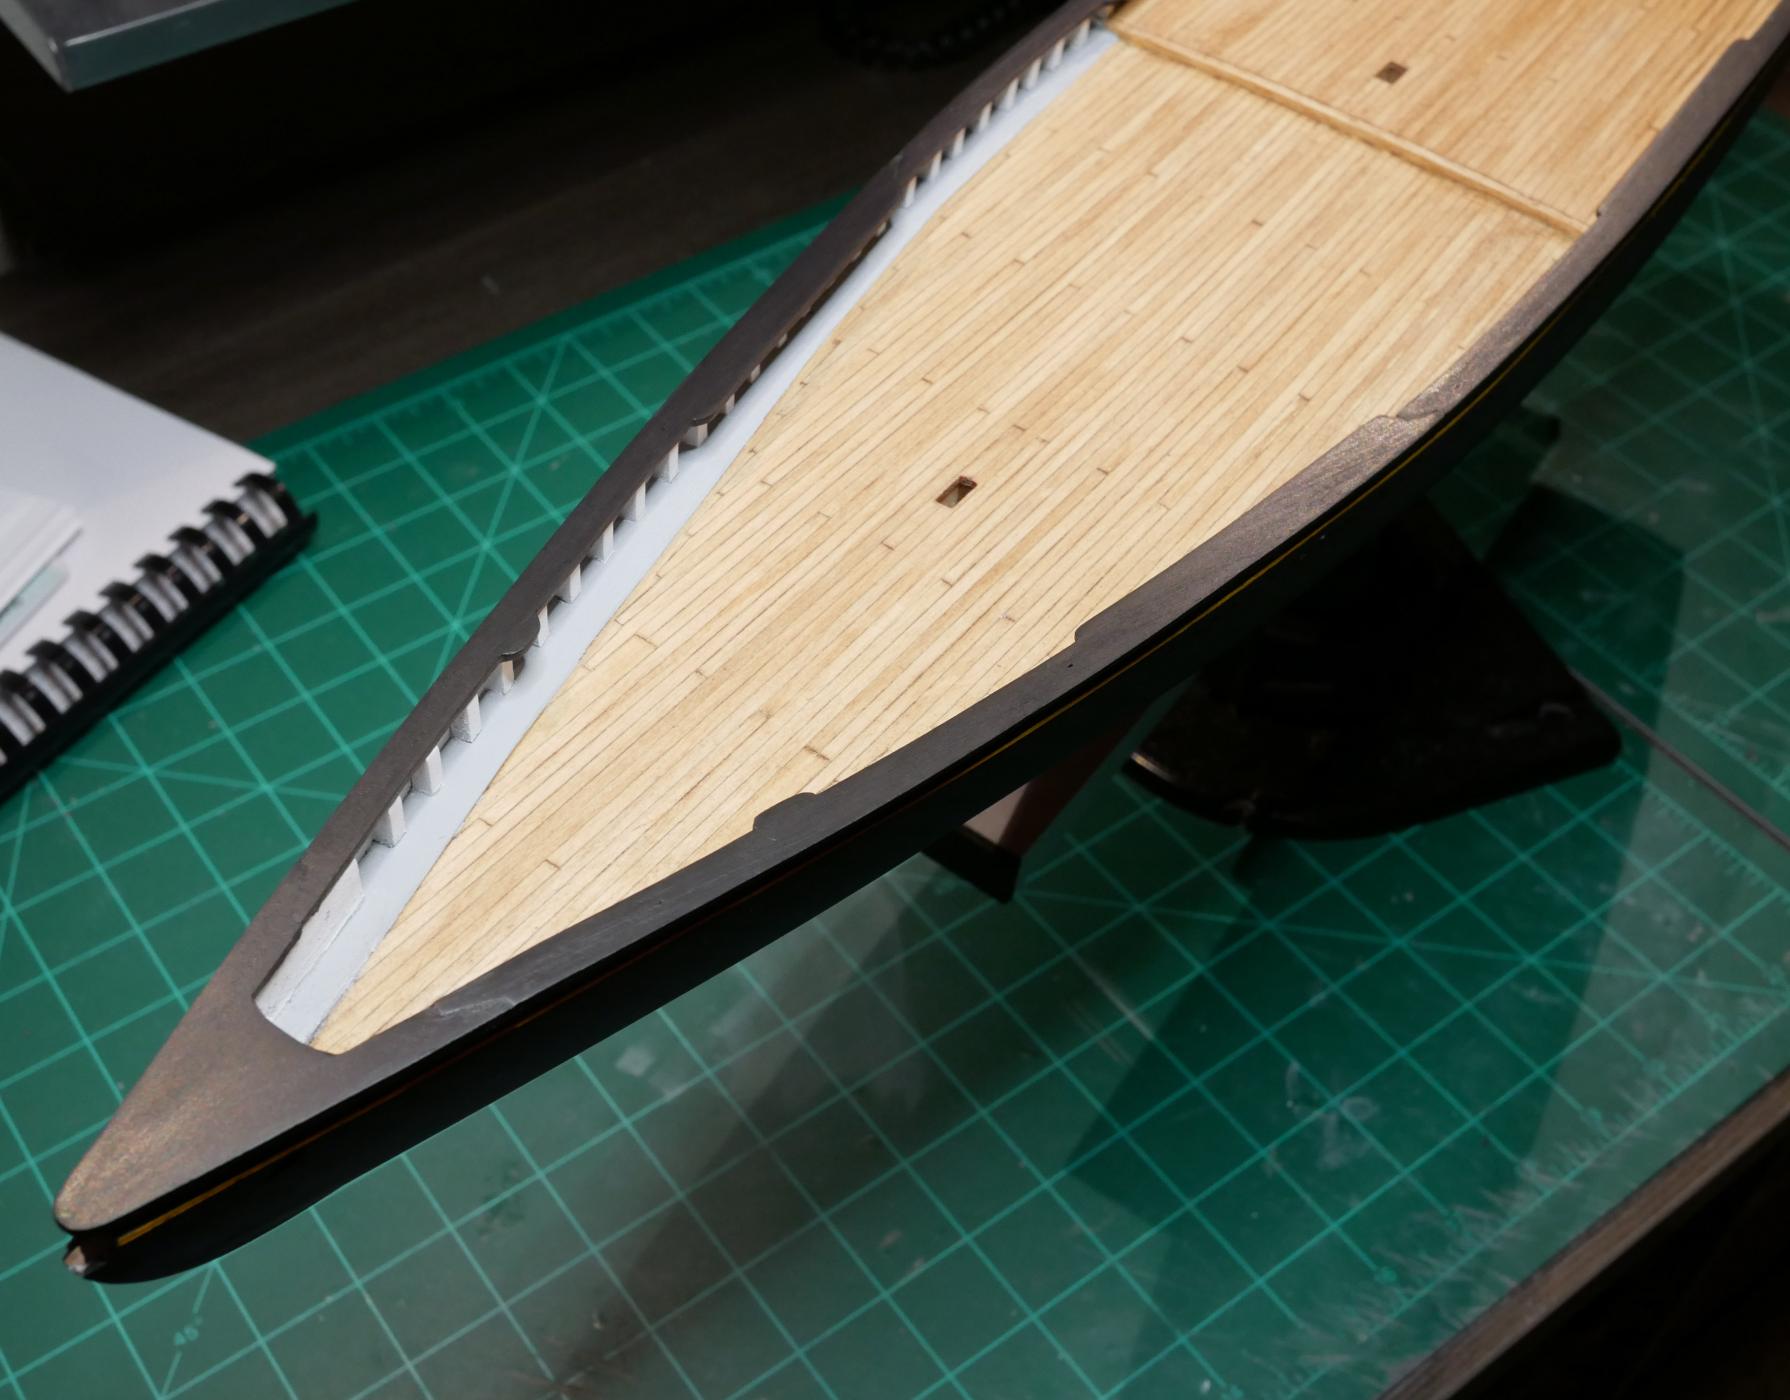
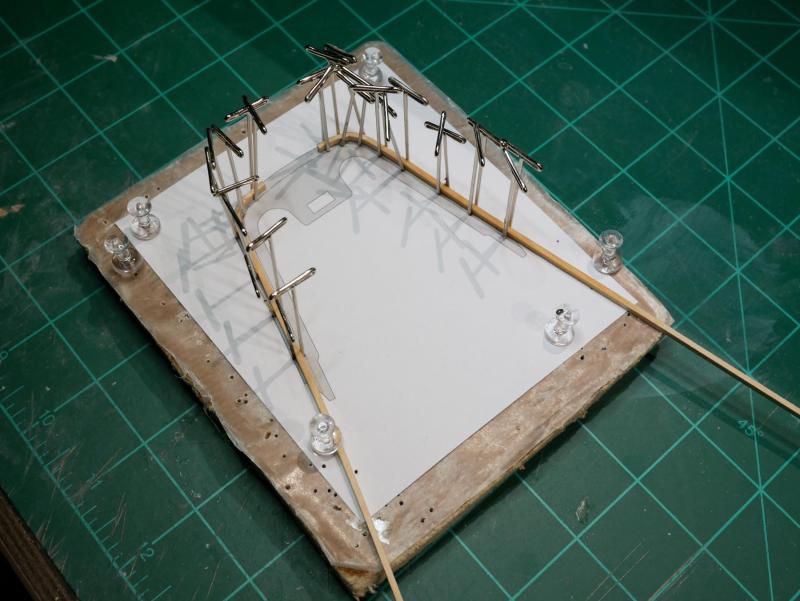
Monkey Rail The monkey rail is finished! I wasn't able to use the laser-cut pieces provided by the kit because my stern has a slightly different shape. I ended up bending some wood strip to make the monkey board. For the monkey rail, I cut a custom piece from some thin wood sheet. The monkey rail's rounded 'caps' near the great beam were cut from some thicker stock, than sanded down to match the wood I was using for the rail. All the pieces were sanded, primered, and painted before anything was installed. Once everything was ready, I cut the scarf joints and sized the long pieces to fit. The end caps were installed first, followed by the stern piece, with the long strips going on last. I sanded the joints a bit, added some wood filler, then did a final sanding and some paint touch ups. I think I'm finally done with the hull structure and ready to move on to other stuff!

- 245 replies
-
- 7
-
-
- bluenose
- model shipways
- (and 1 more)
-
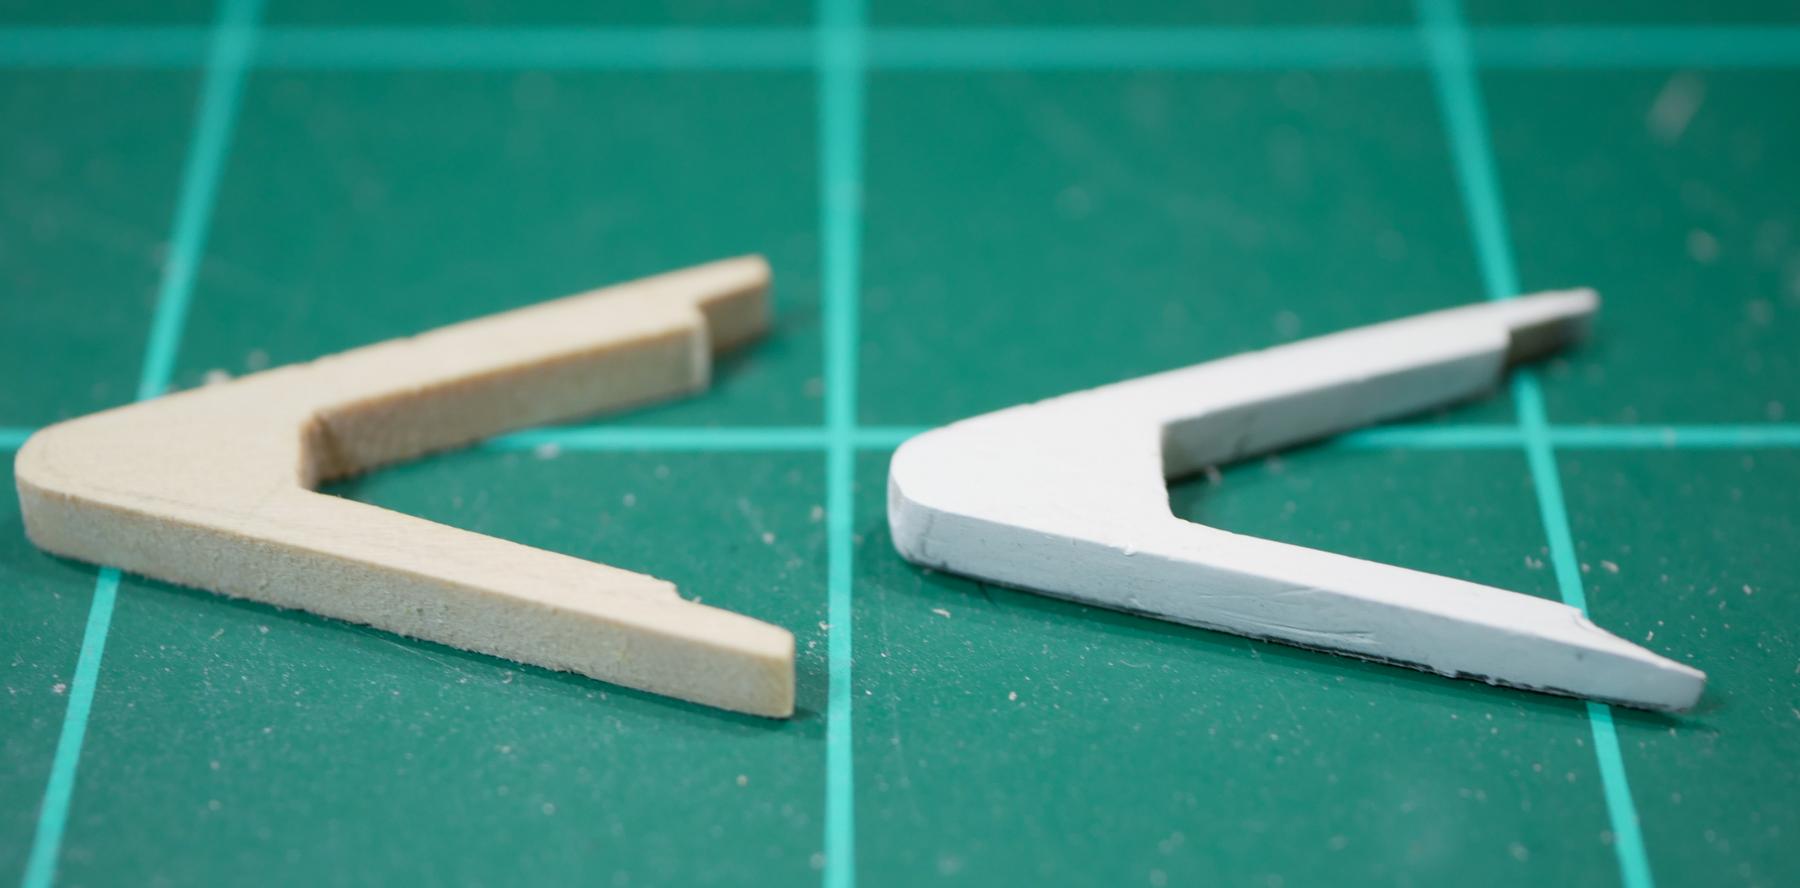
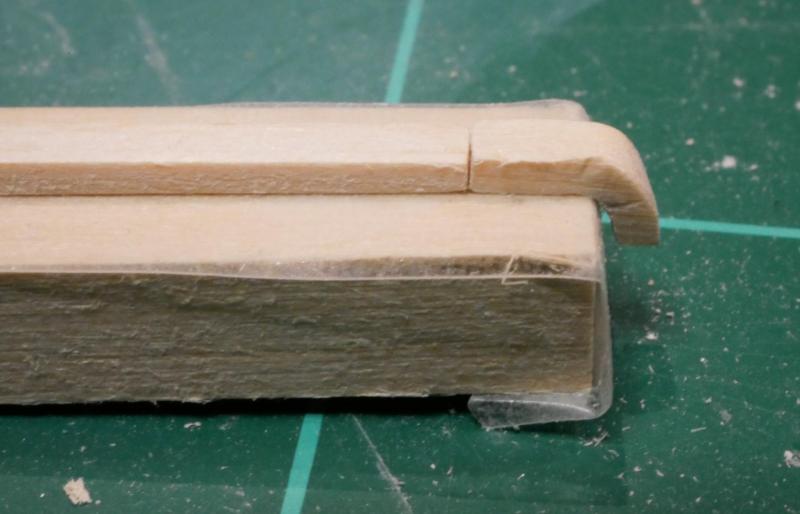
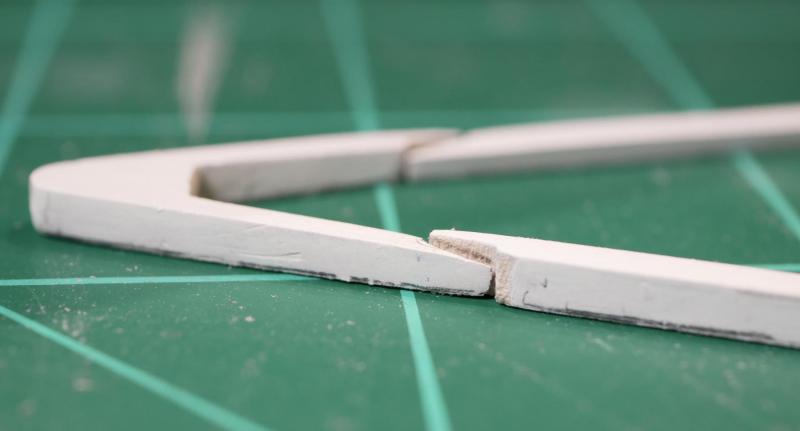
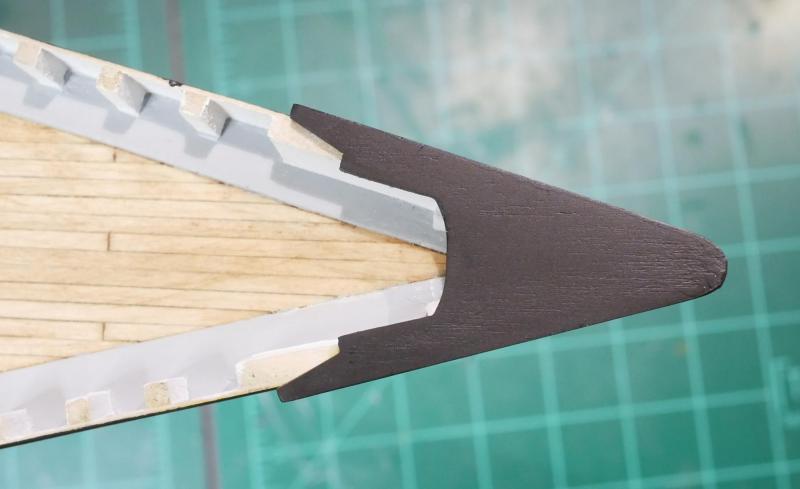
Buffalo Rail Moments after I finished the main rail, I started in on the buffalo rail. The 'tip' is provided as a laser cut piece, and the rest is made from strip stock, so I had it all cut and cleaned up in no time. Then I got a little lazy with painting, and didn't finish getting those parts painted for a few days. I also got distracted with a research project that started by me wondering what the most popular ships/manufacturers/kits are on MSW...which led to writing a bunch of software and researching 75+ kit manufacturers, 370+ ships, 500+ kits, and 1700+ build logs. But that's a story for another day... I finally got around to finishing up the painting and sanding of the buffalo rail parts. That's when I realized I had totally messed up. During my alternating phases of primering, painting, and sanding, I apparently got a little crazy. I ended up sanding the laser cut tip piece too much, and it was now too thin to fit with the other pieces. (Ignore the pencil markings, that was from my repair work...) I spent the next few days trying to cut a new tip piece by hand. That didn't work. So, I ordered the Proxxon scroll saw. That made short work of it, and I had a new piece on the first try. (New piece on left, original piece on right, obviously.) This time, to ensure I didn't sand unevenly, I secured the pieces to a board using double-sided tape for the entire primering, painting, and sanding phase. I covered the board with wax paper to make removal easier. This helped me to sand the entire rail evenly. After painting was done, I got the buffalo rail installed. Buffer Platform Legs I also had to make new pieces for the aft buffer platform legs. Since I had made a custom piece for the aft main rail, the kit provided pieces were too short. I cut these by hand, painted them, and got them installed. Now on to the monkey rail...which should be fun since the thin laser cut piece provided with the kit broke as I was pulling it out of the wood sheet. Not quite sure how I'm going to get the curves around the stern yet...


- 245 replies
-
- 4
-
-
- bluenose
- model shipways
- (and 1 more)
-
Ken, Thanks for the warning! I've read that the decals should go over gloss finish, but it always sounded like that was more of a 'for best results' suggestion. I didn't realize that using a matte finish might actually cause problems with the decals. Over the next week I'm going to be trying out some different finishes, and I'll be sure to try out a decal on each of them!
-
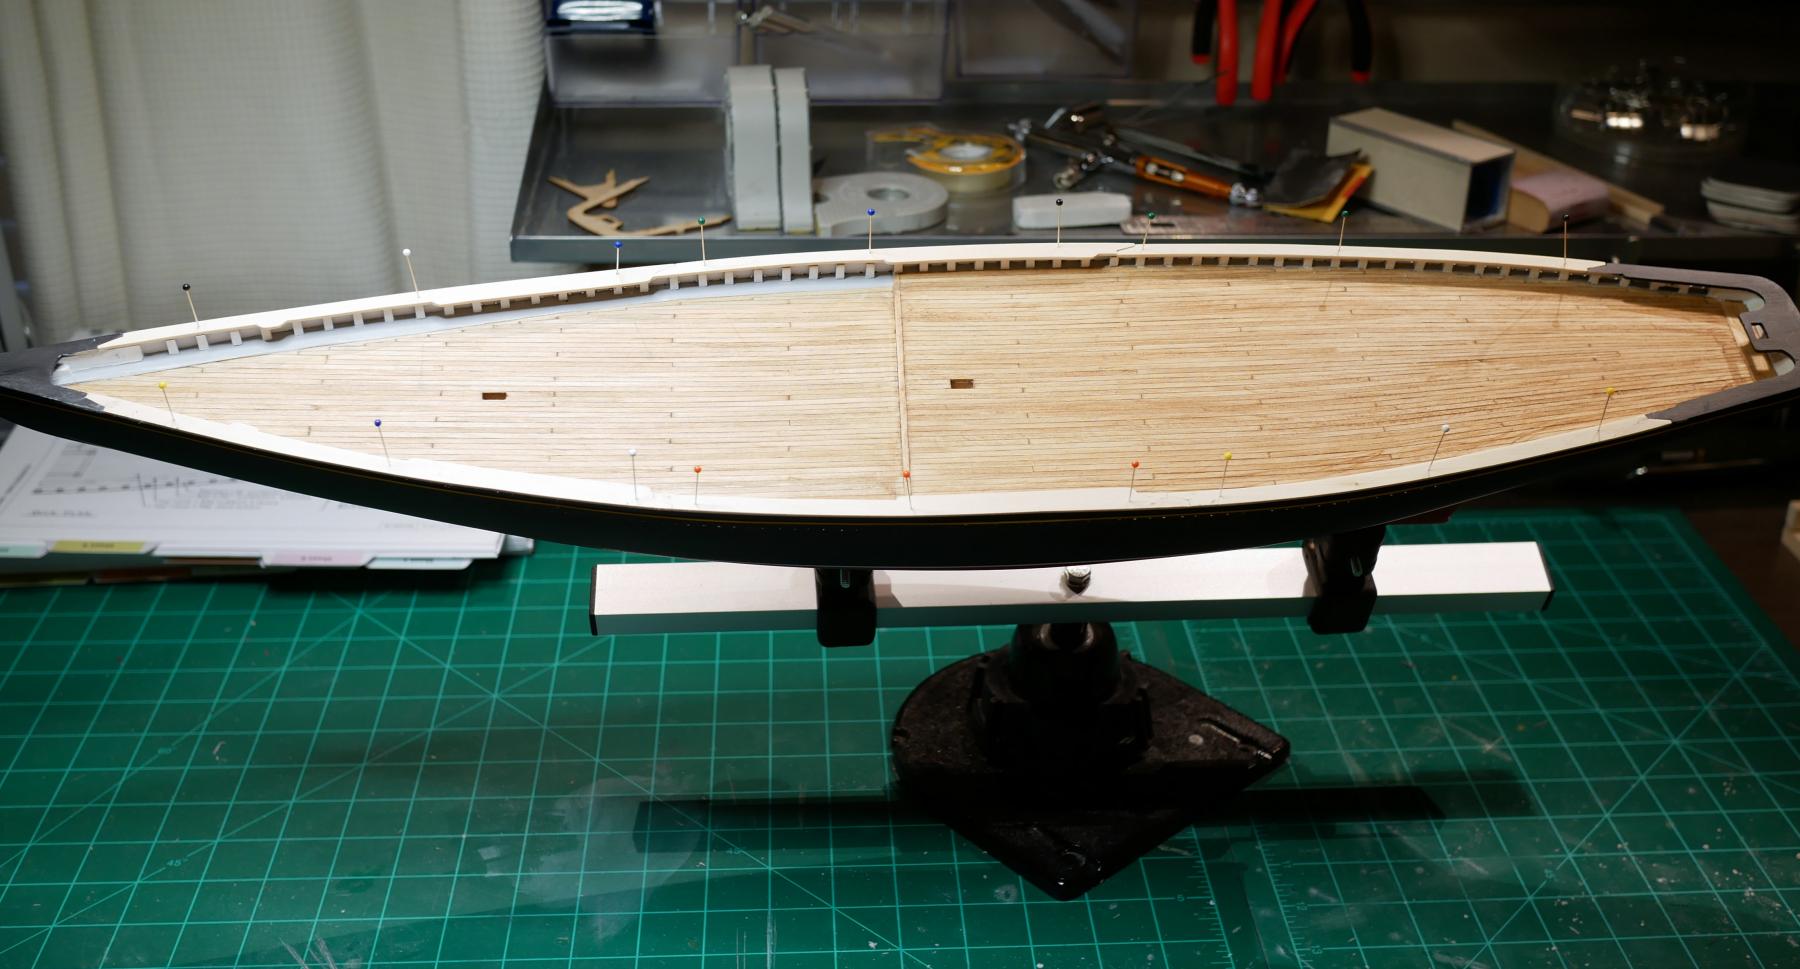
Main Rail The main rail is complete! I ended up using some sheets of 1/16" basswood and tracing the curve of the hull onto the sheet. I used those lines to draw out the shape of the rails, then cut it out so I had one long piece that ran the length of the ship. I added in the joint to match the stern piece that was previously installed, then worked my way forward. Since I was using a single piece to make the rail, creating the scarf joints for the individual sections was easy - I just cut the sections apart in the shape of each joint. I also added in the wider 'ledges' that will hold belaying pins, based on the plans. Each side was done separately, just in case the curve was slightly different. Once all six sections were cut, they got sanded down, primered, and painted. Once they were glued in place, I used a metal file to make sure the joints were even. I used a little wood putty to clean up the joints and fill any gaps, then did a final coat of paint. On the color...the plans call for white on the main rail. My research indicates the rails were almost certainly white (although a couple old b&w photos might show that the rail was black at some point...or those could just be misleading angles). So I know that white would be more 'historically accurate'. But, I've seen a lot of models that use black for the main rail, and I really like the look. So I went with black. At least it was a conscious choice


- 245 replies
-
- 6
-
-
- bluenose
- model shipways
- (and 1 more)
-
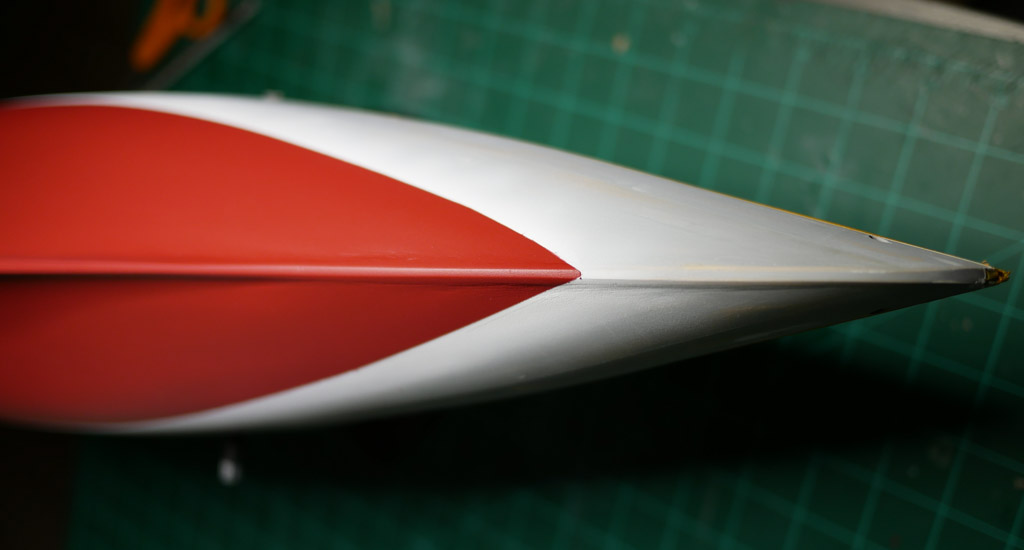
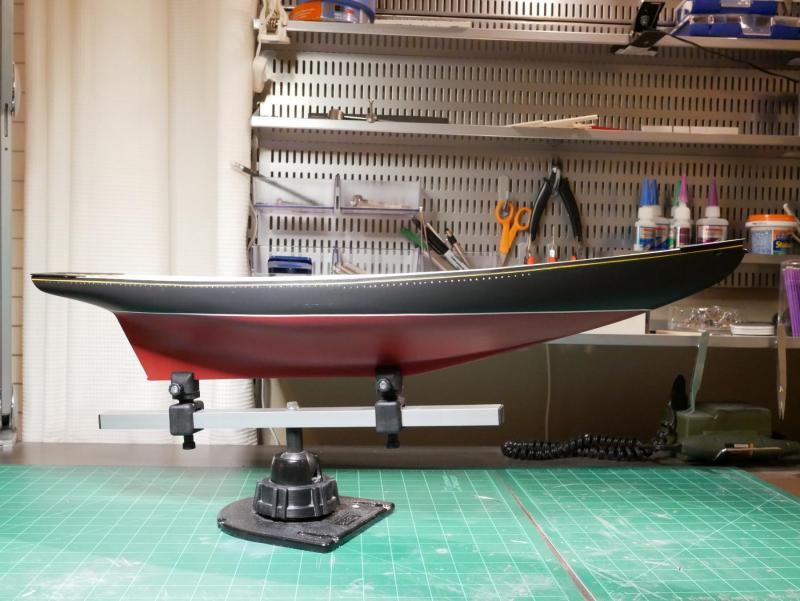
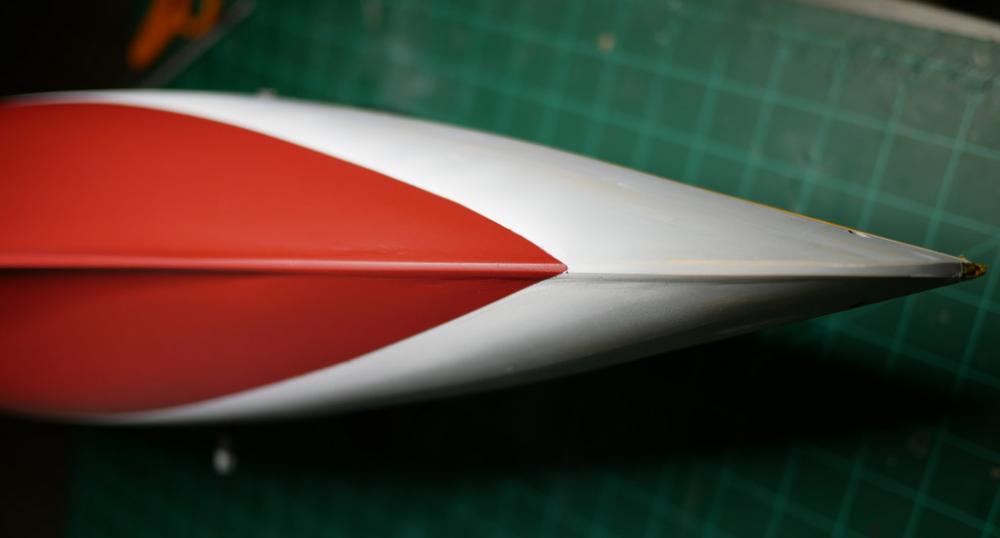
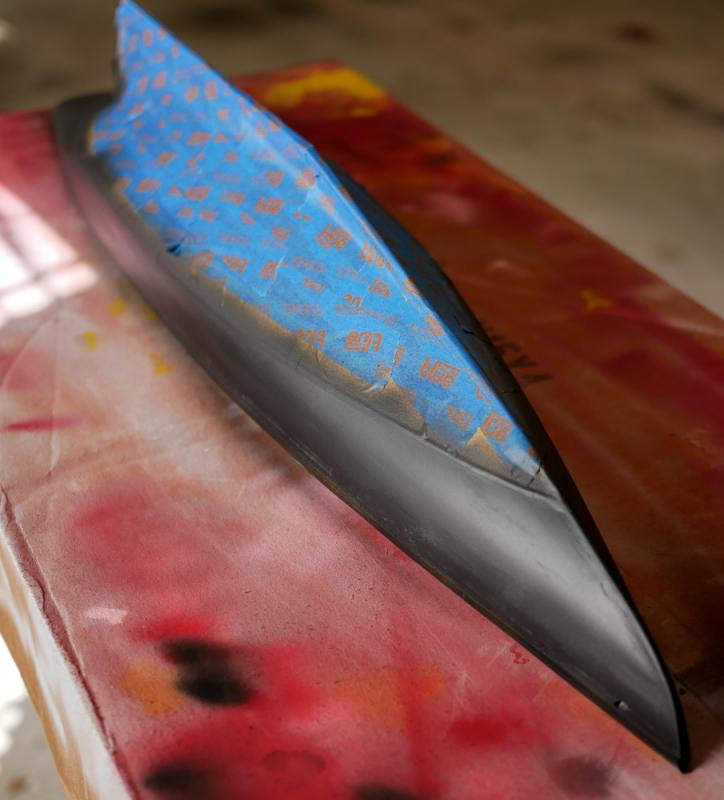
Grant - you're right - it was hard to get the waterline nice and straight using my original approach. What ended up working was using some thin pin striping tape to mask the waterline, then paint the black and red. I tried the more complex approach originally because I was worried about putting white over black, but I should have just kept it simple. Doing it the hard way is why it took me 2 months to finish painting the hull! Mike - thanks! I'm finally happy with the paint job, and ready to get this thing moving again! John - thanks! I've seen other mentions of problems with the rail lining up. If I were smart, I would have test-fit those pieces before I finished building the transom to make sure I had the shape right, but oh well I'm not sure about sails. One of the things that led me to pick the Bluenose for my second build (aside from being POB and the ability to paint the hull and hide my first attempt at hull planking) was the option to add sails. I went into the build fully intending to do the sails. However, the instructions don't cover it in much detail, and the practicum I have doesn't add sails. So, I'm going to hold off until I get the rigging started before I make the final decision. I want to...but it may be a little too much for my second build. I think the Bluenose looks good either way!
- 245 replies
-
- 1
-
-
- bluenose
- model shipways
- (and 1 more)
-
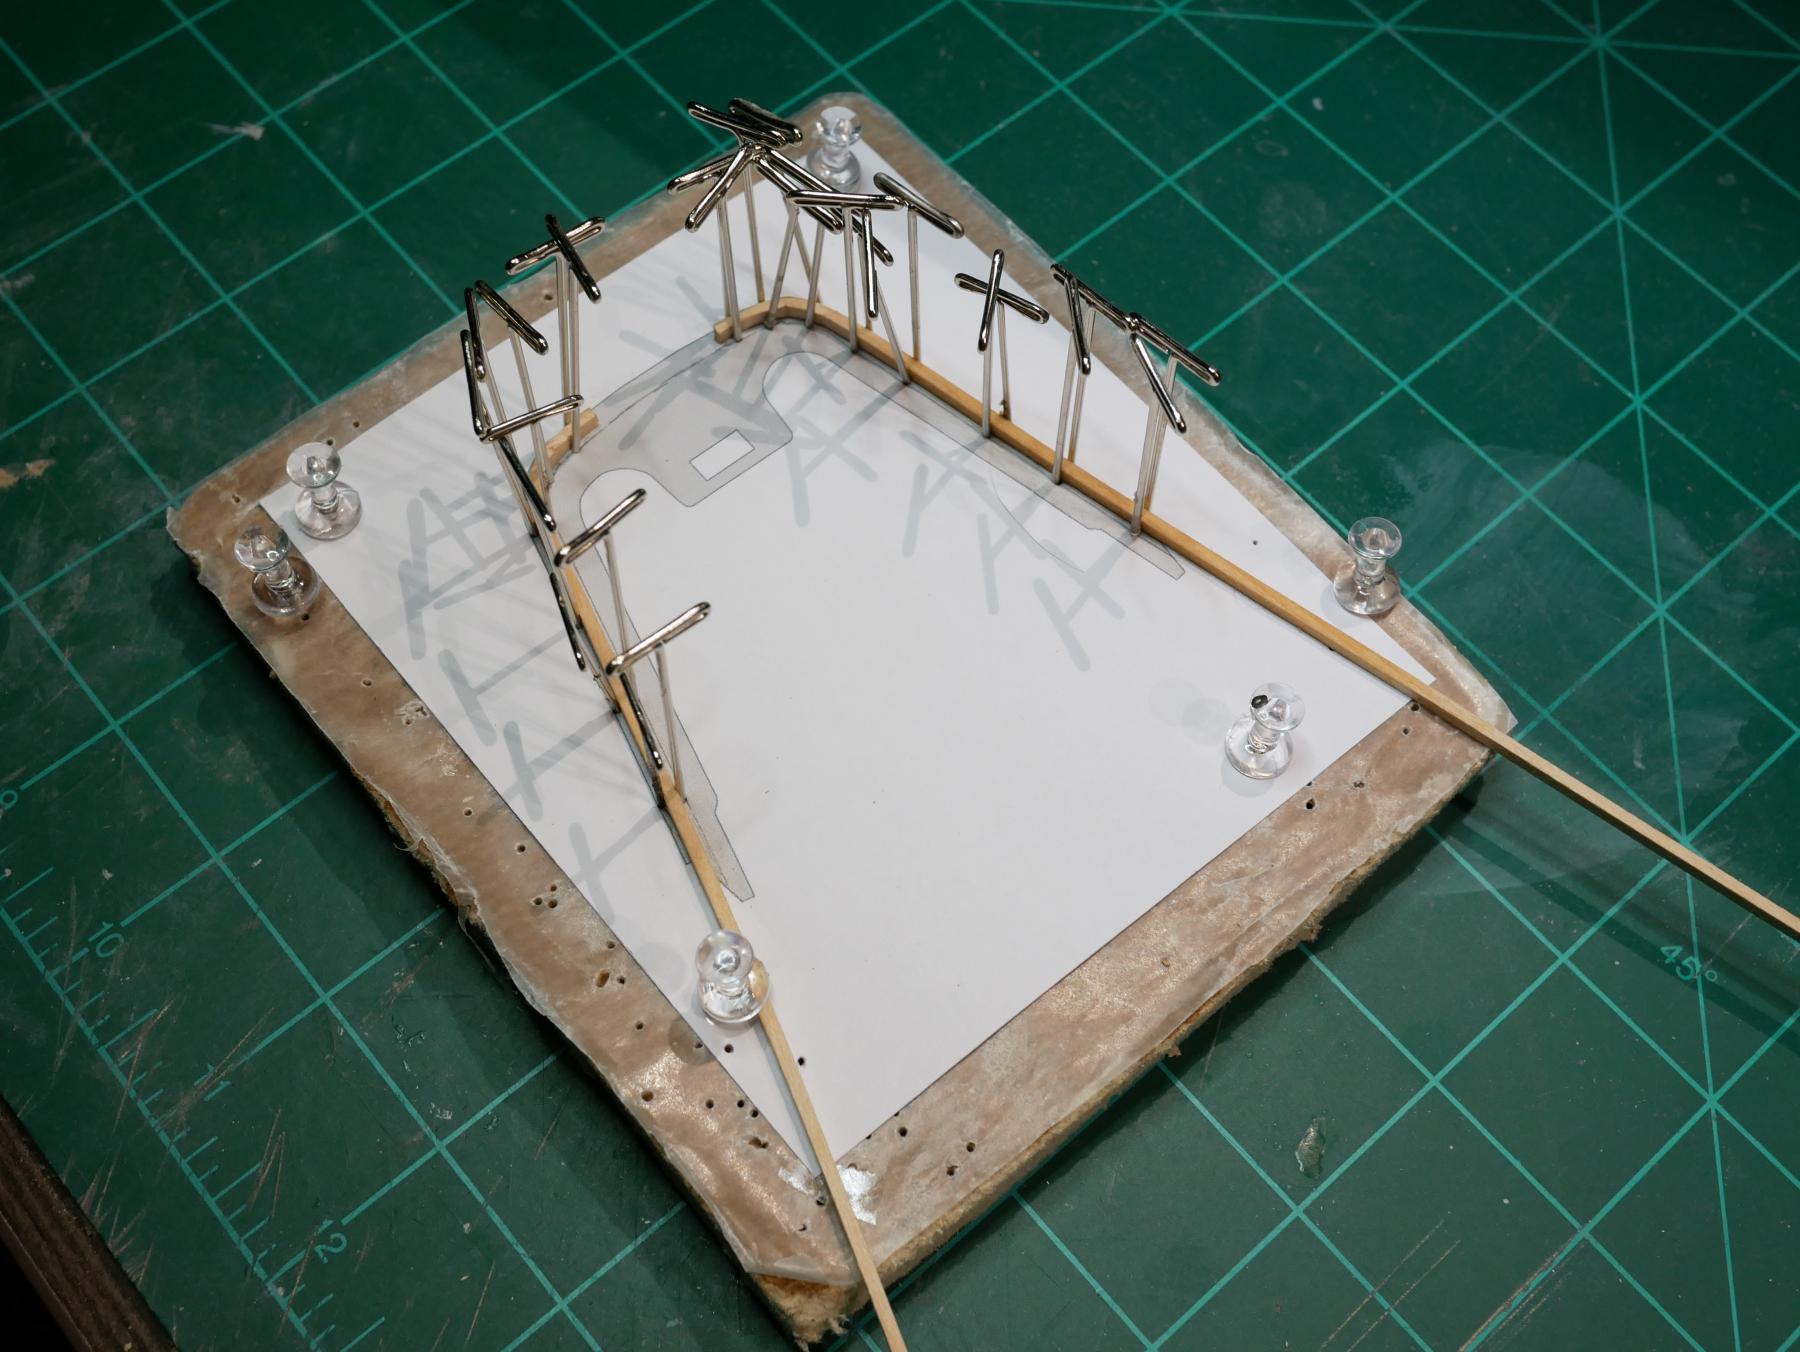
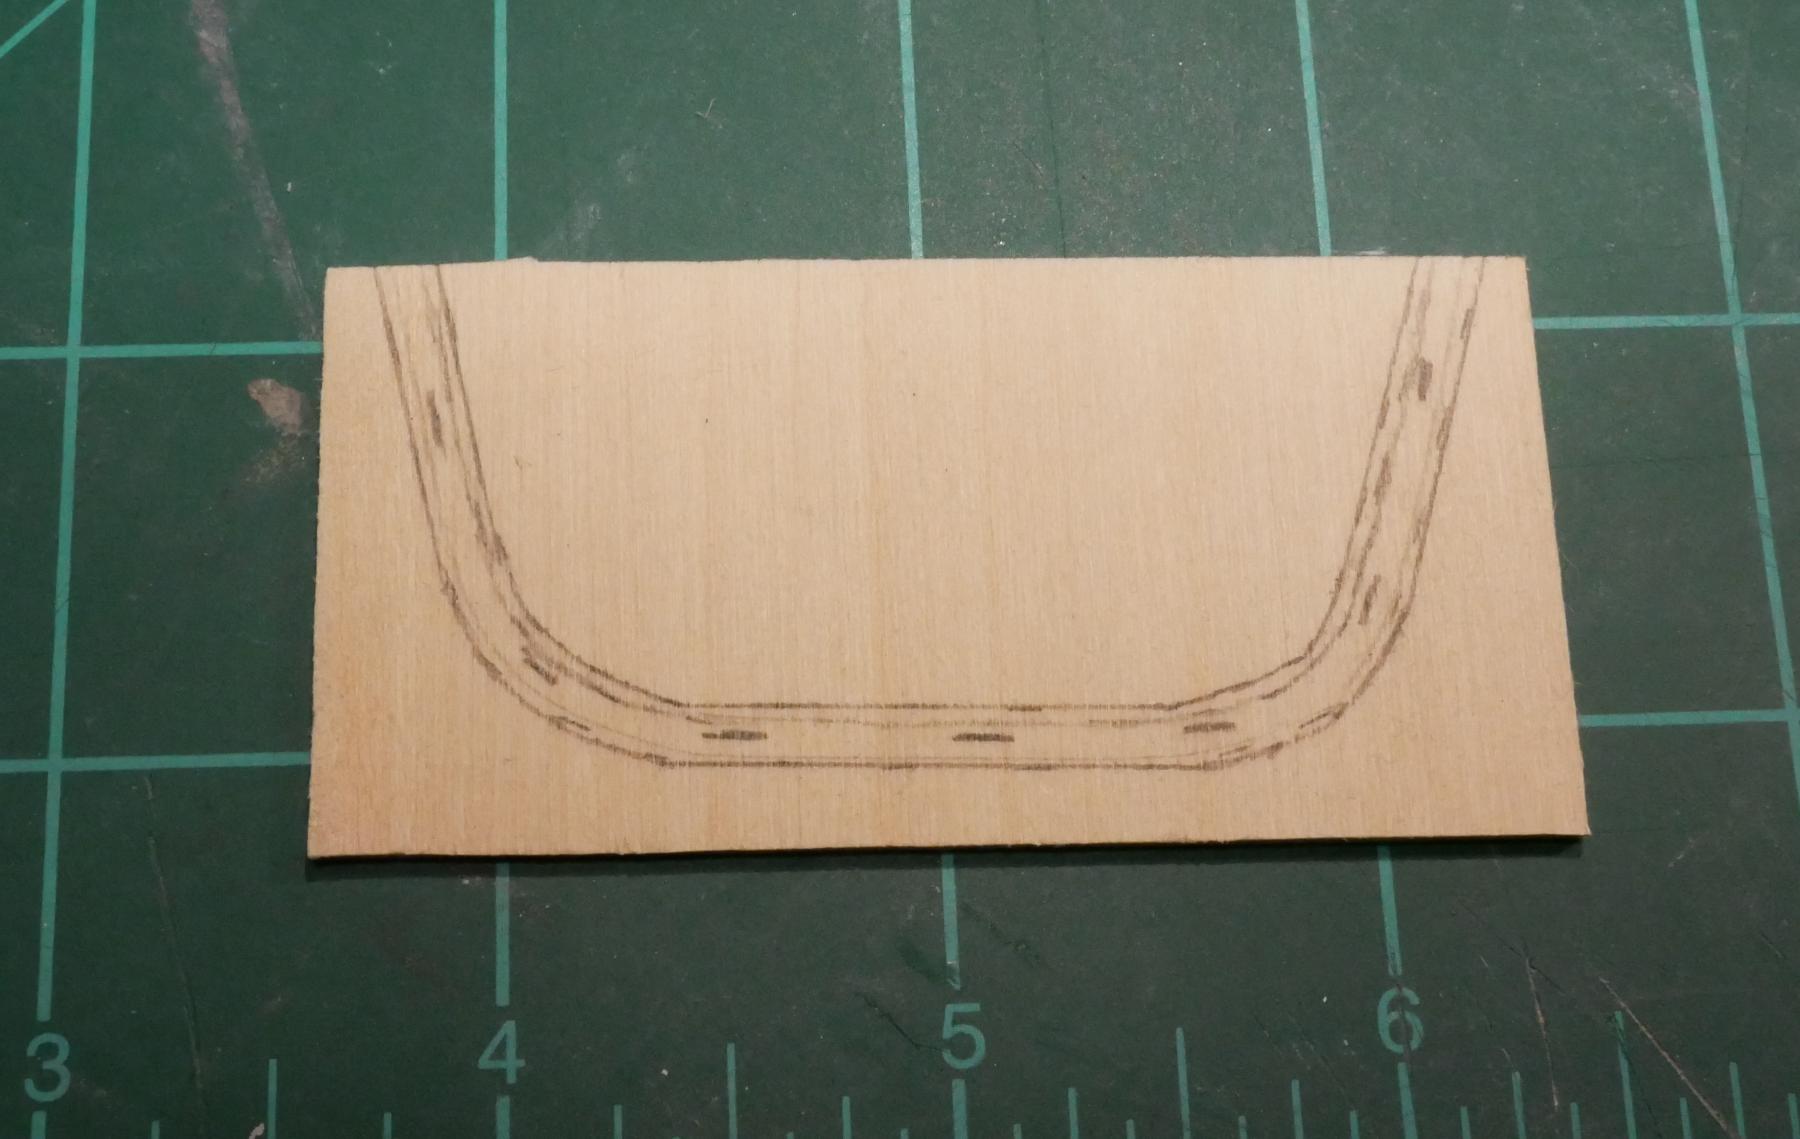
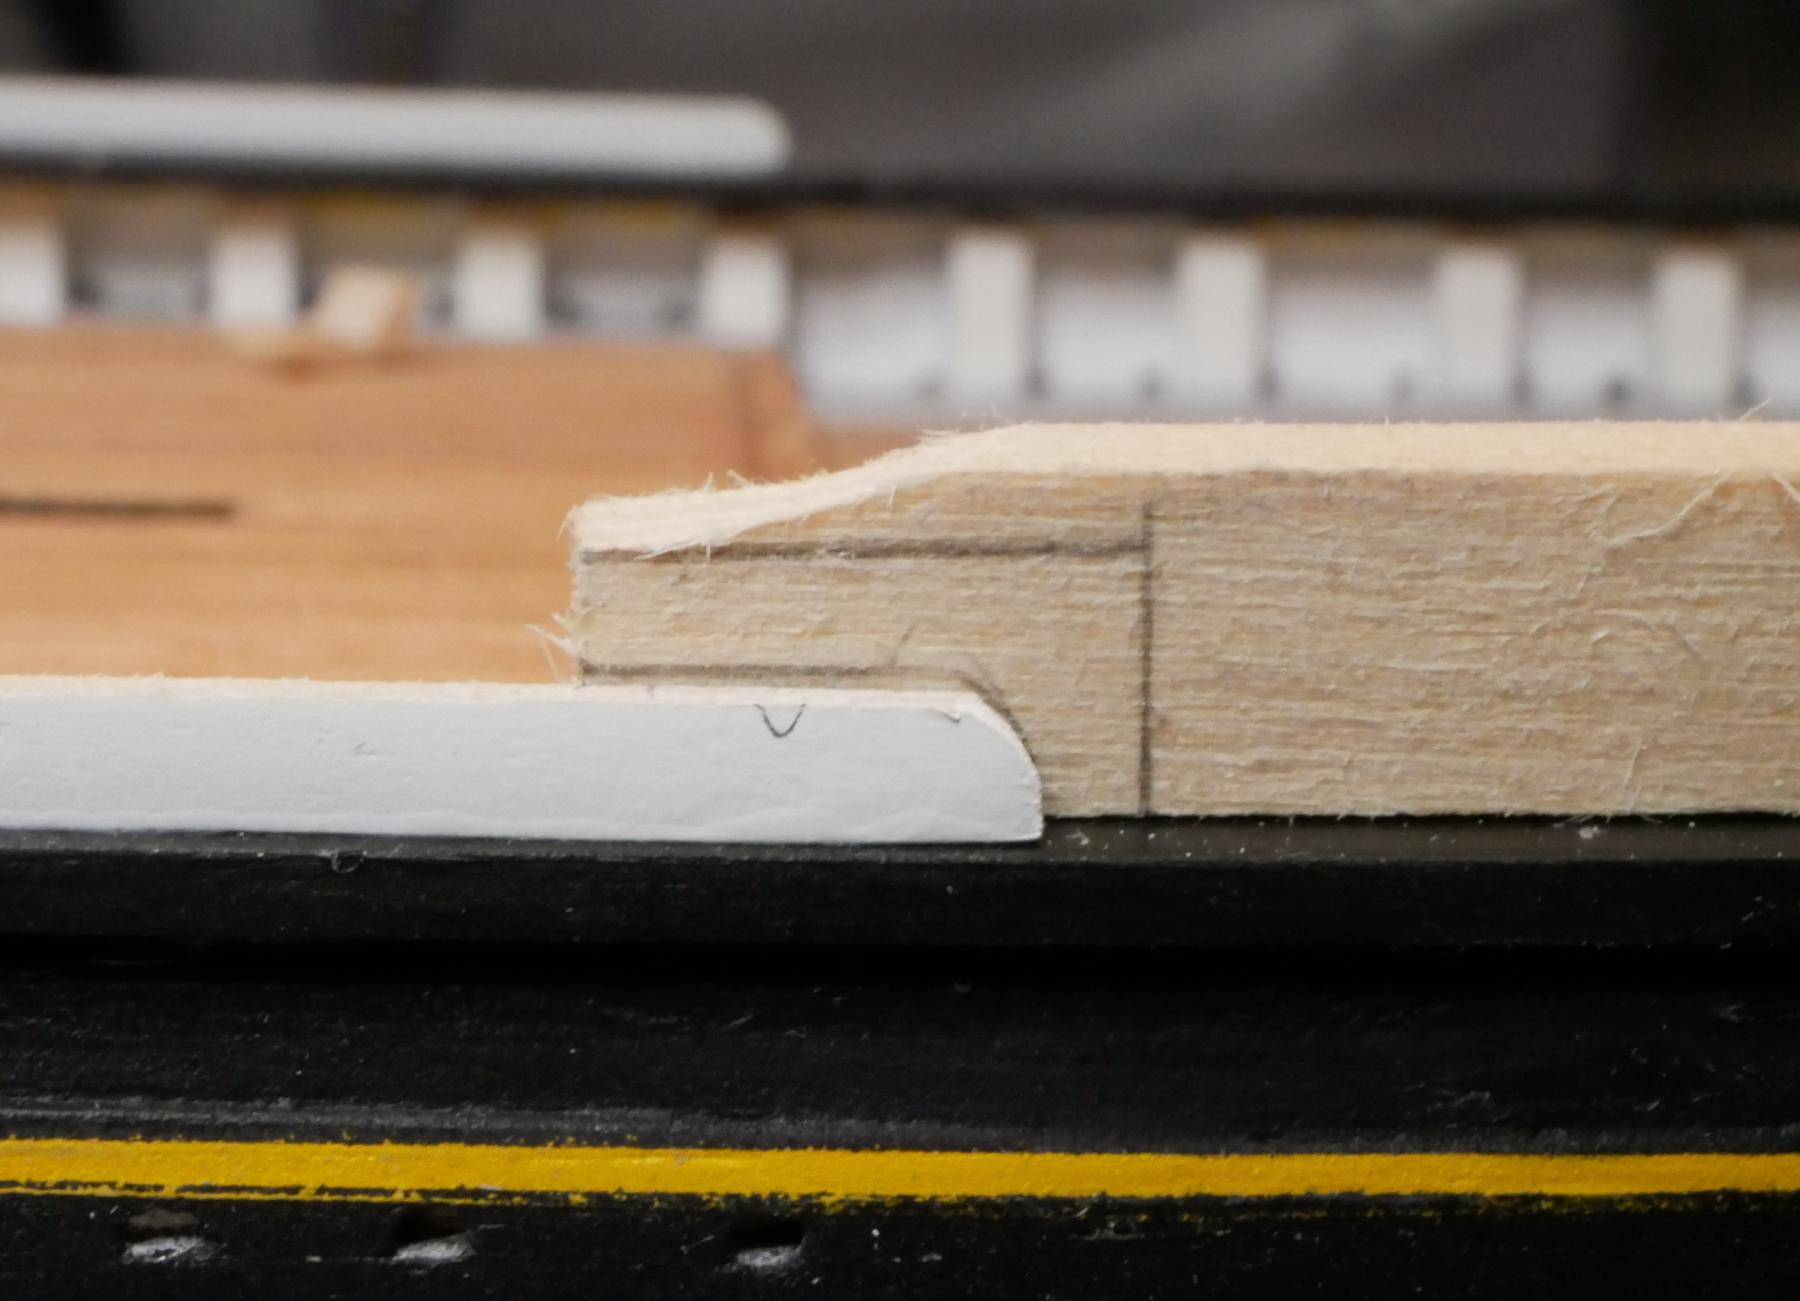
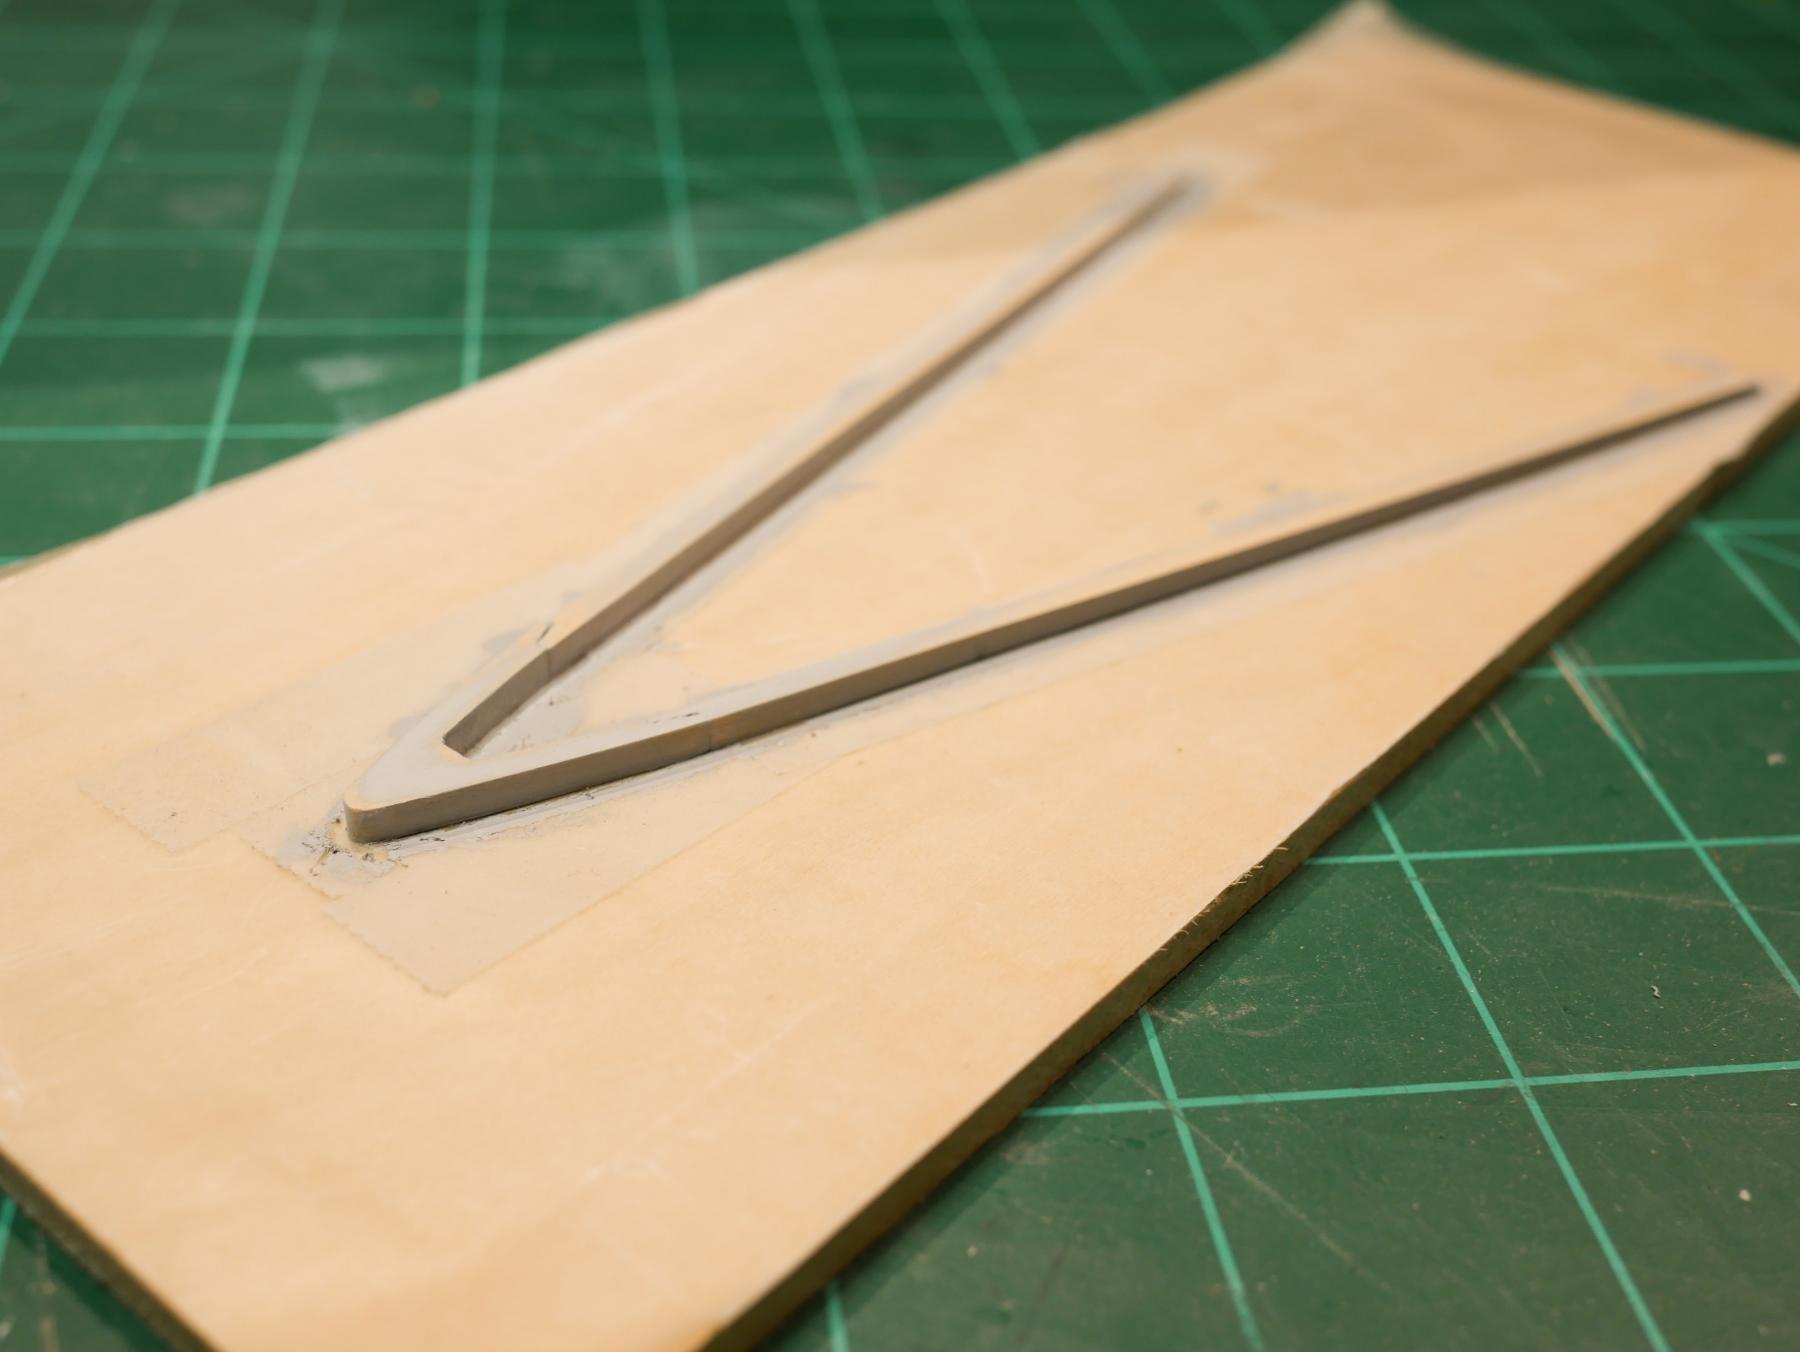
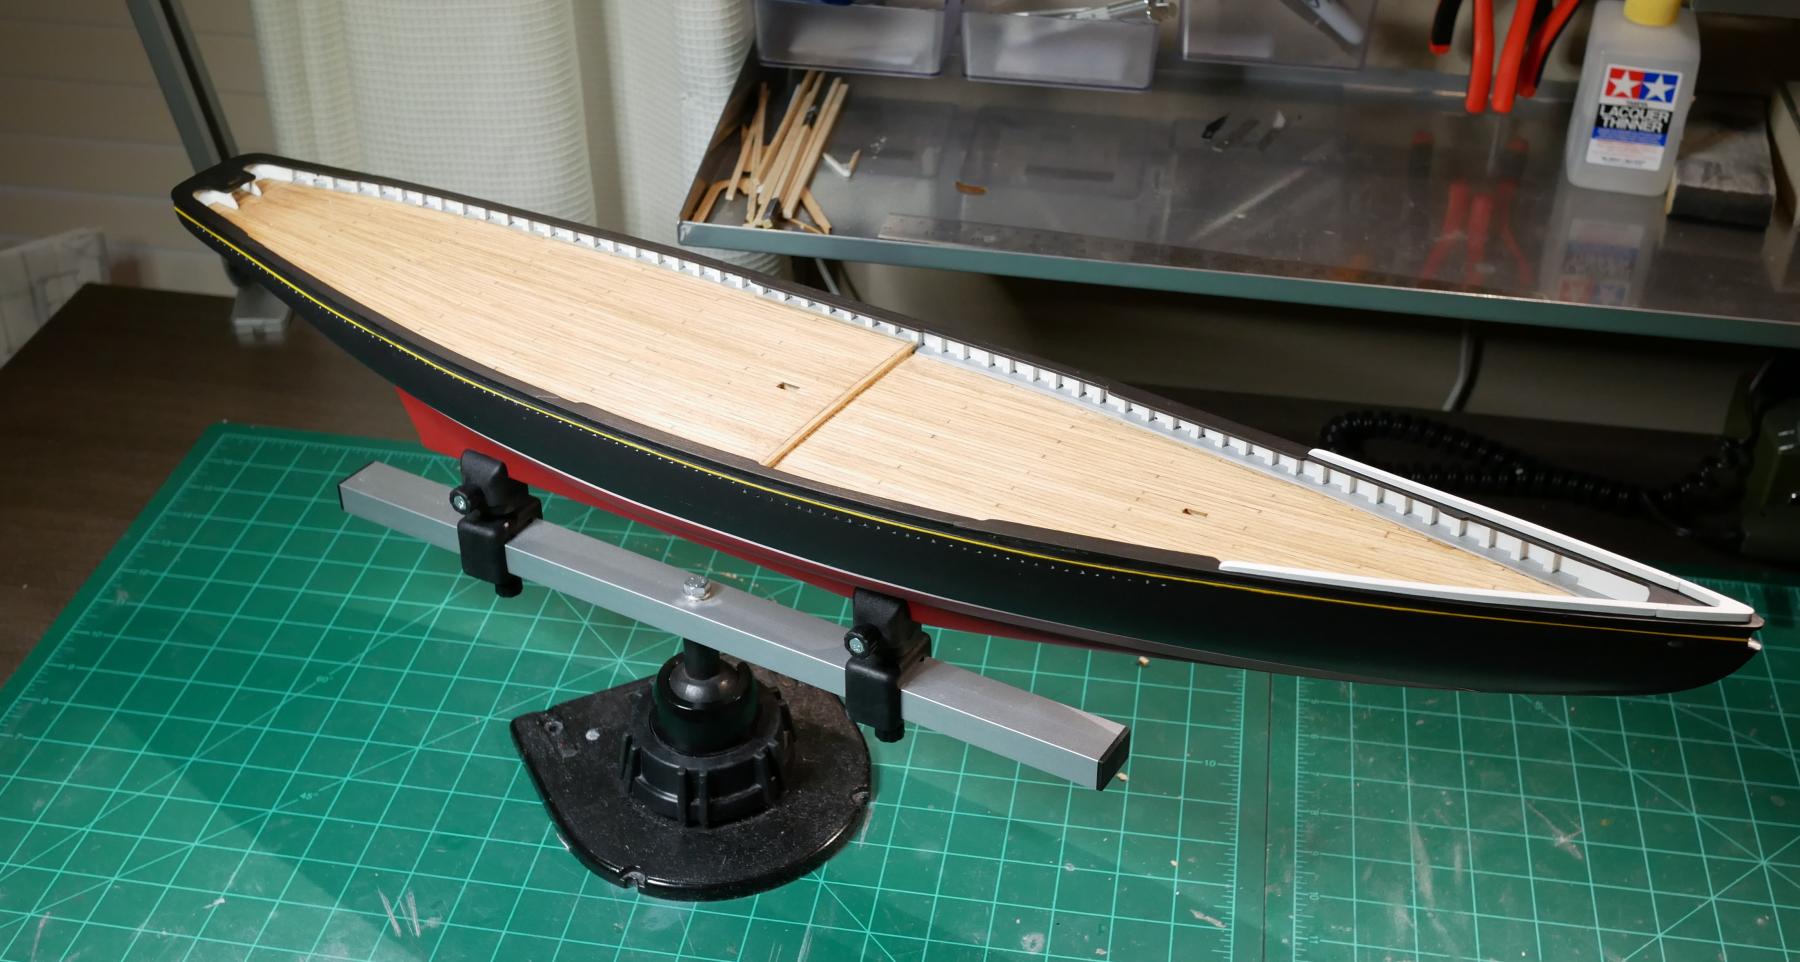
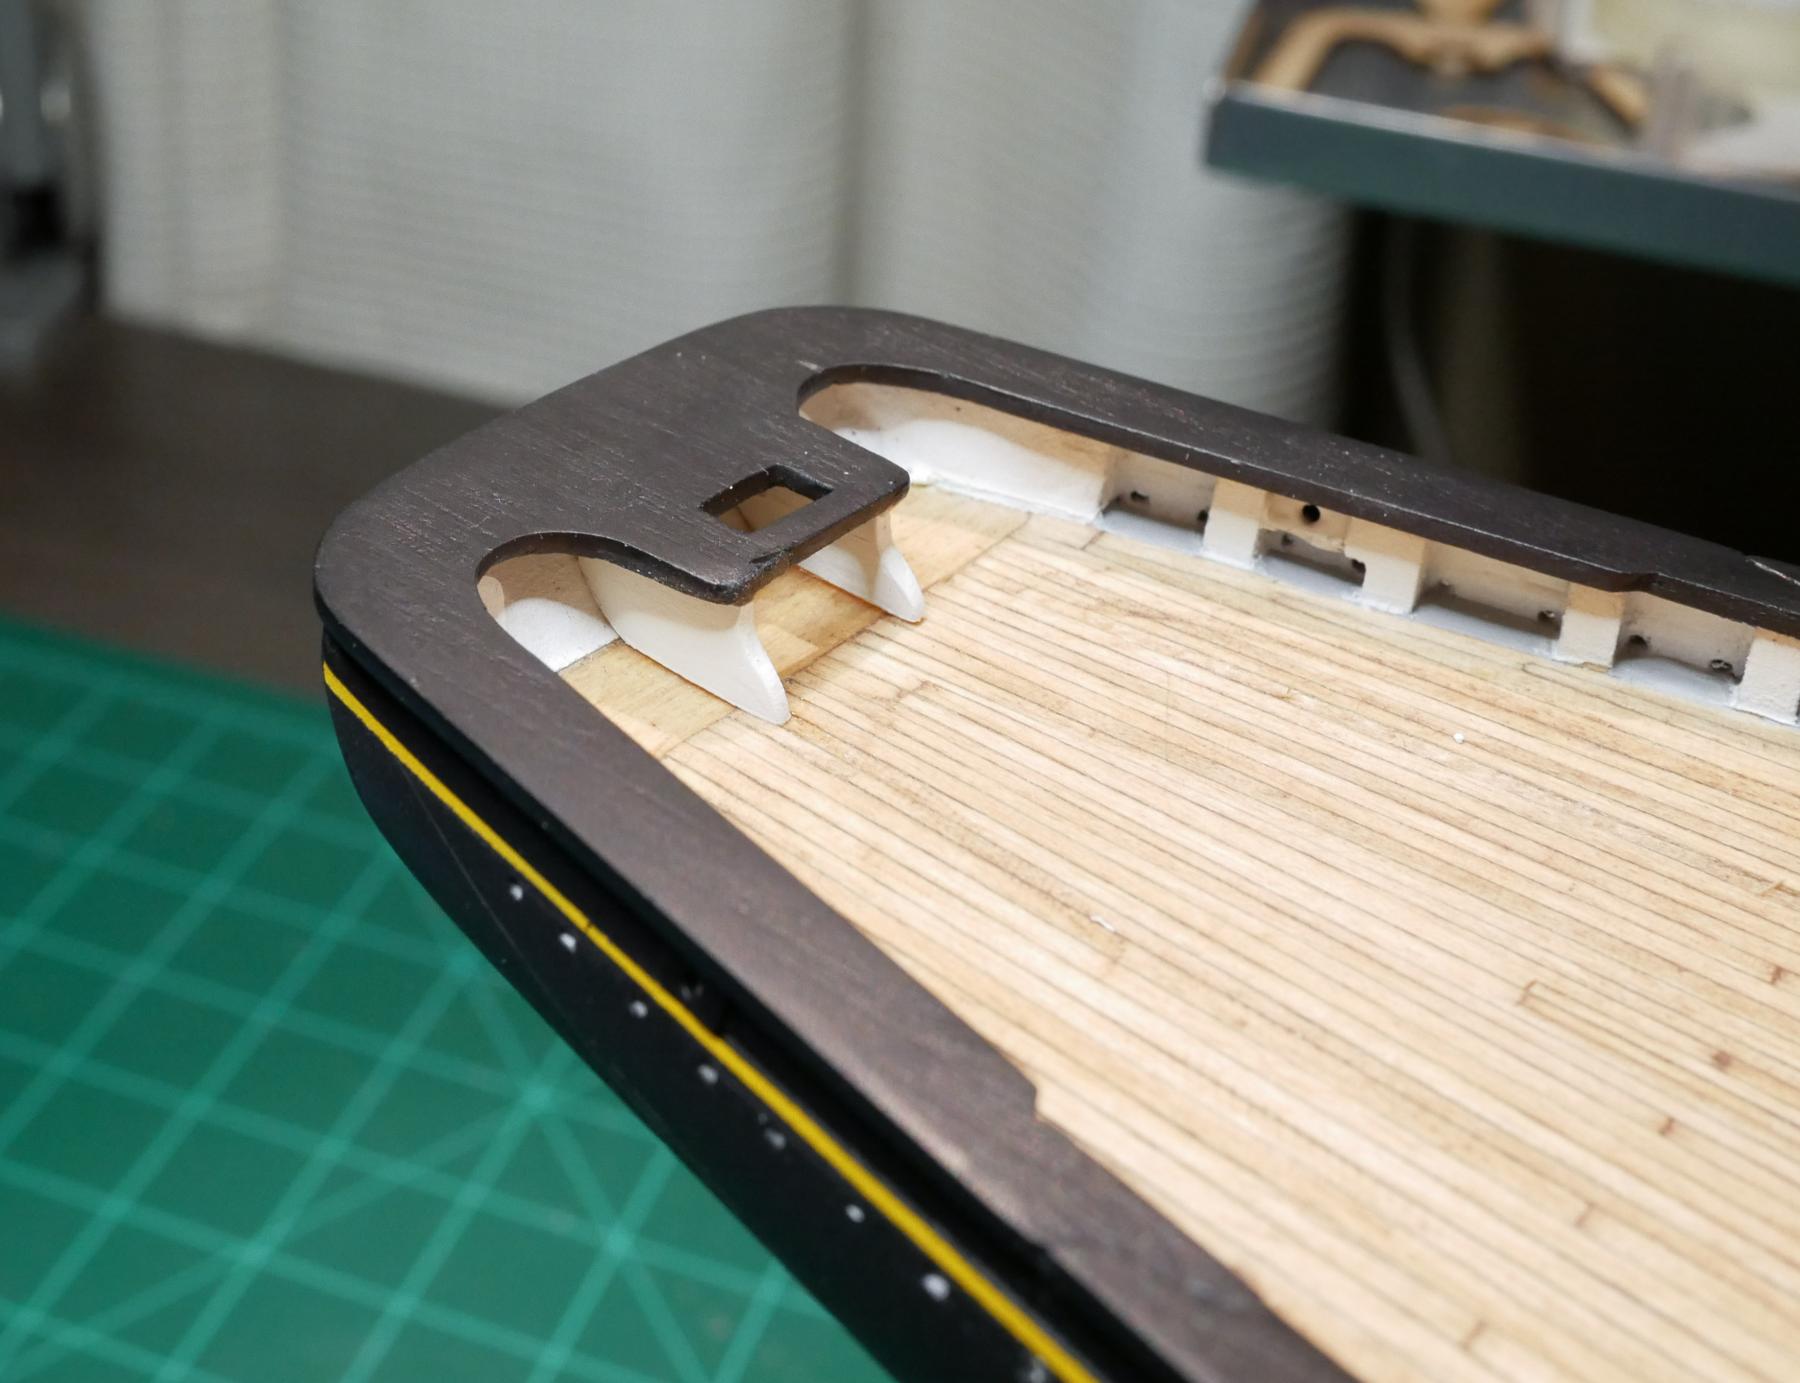
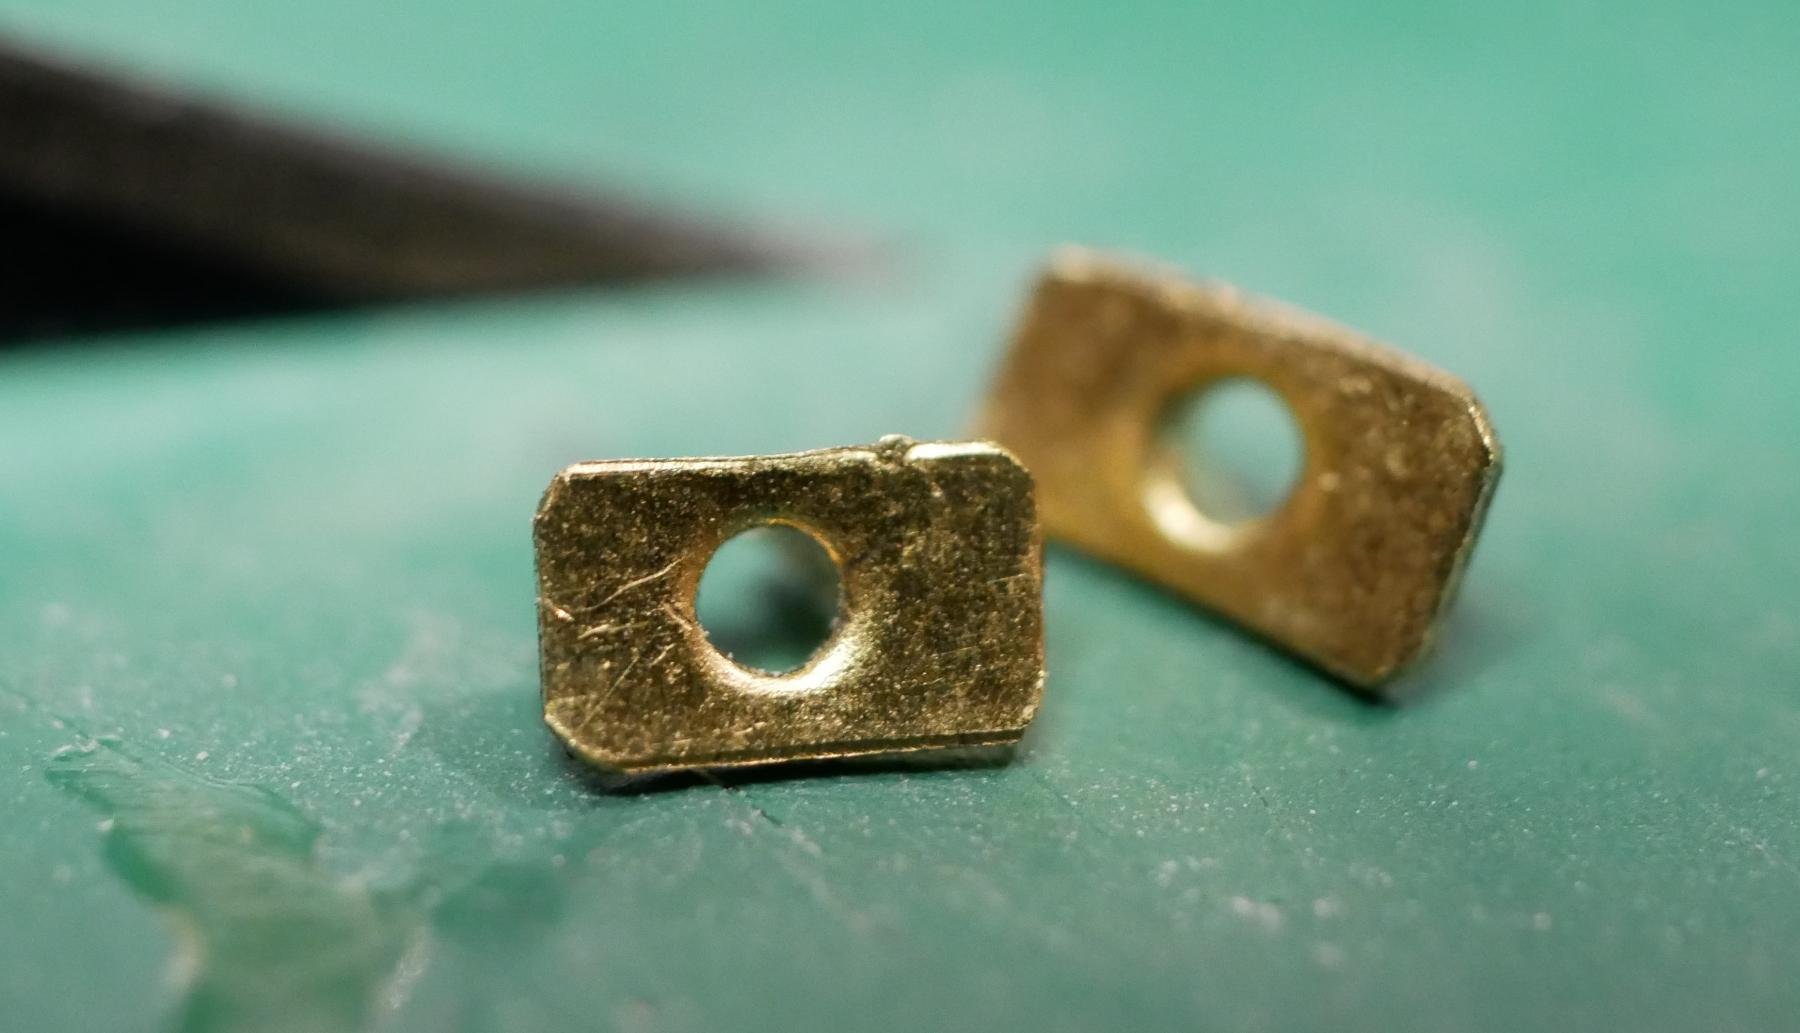
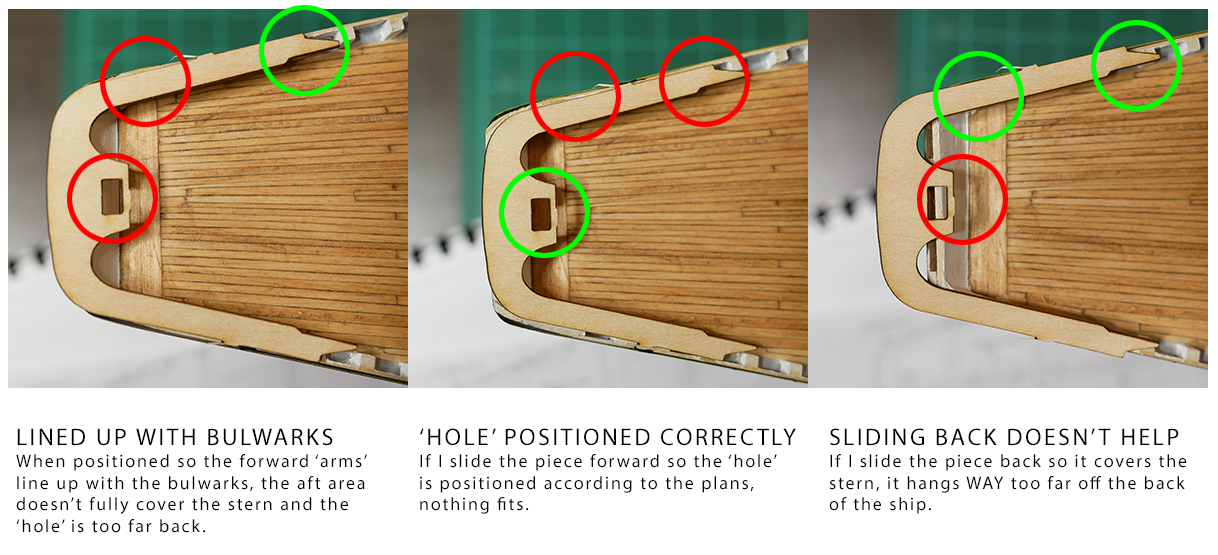
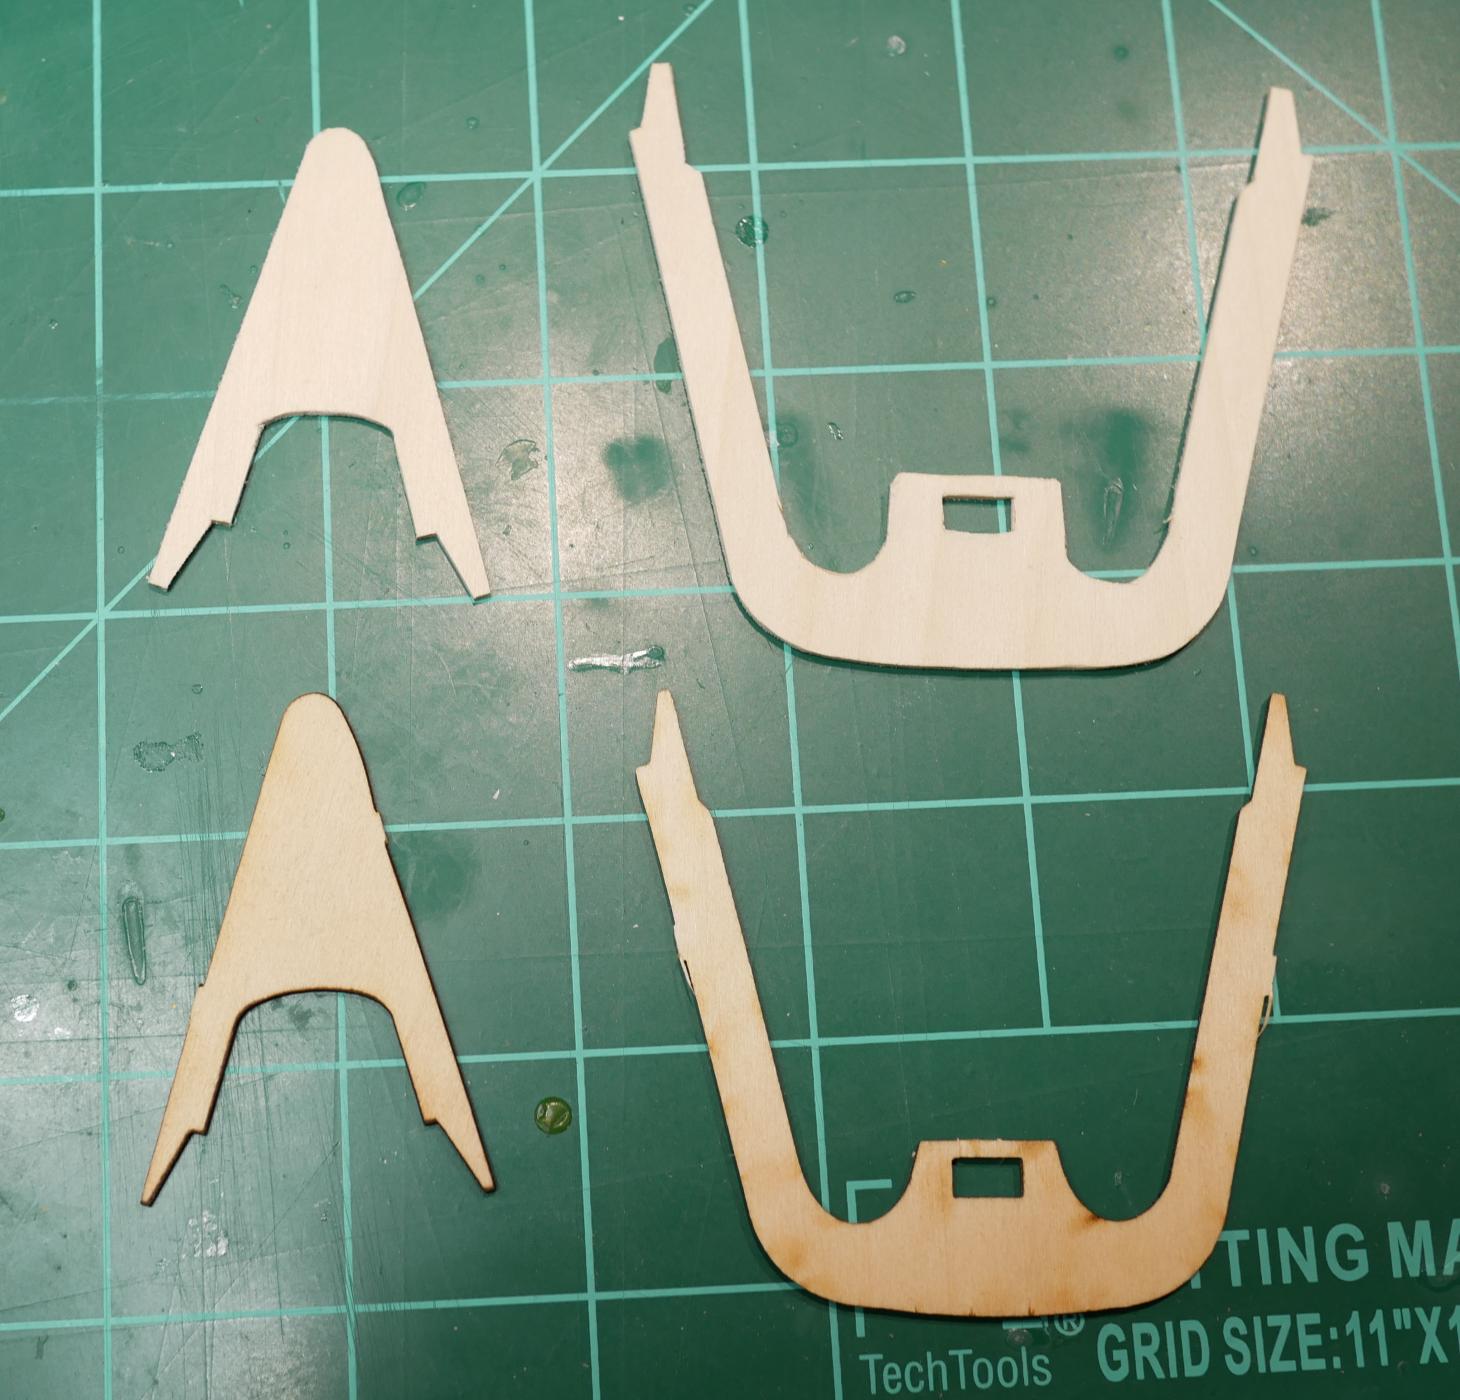
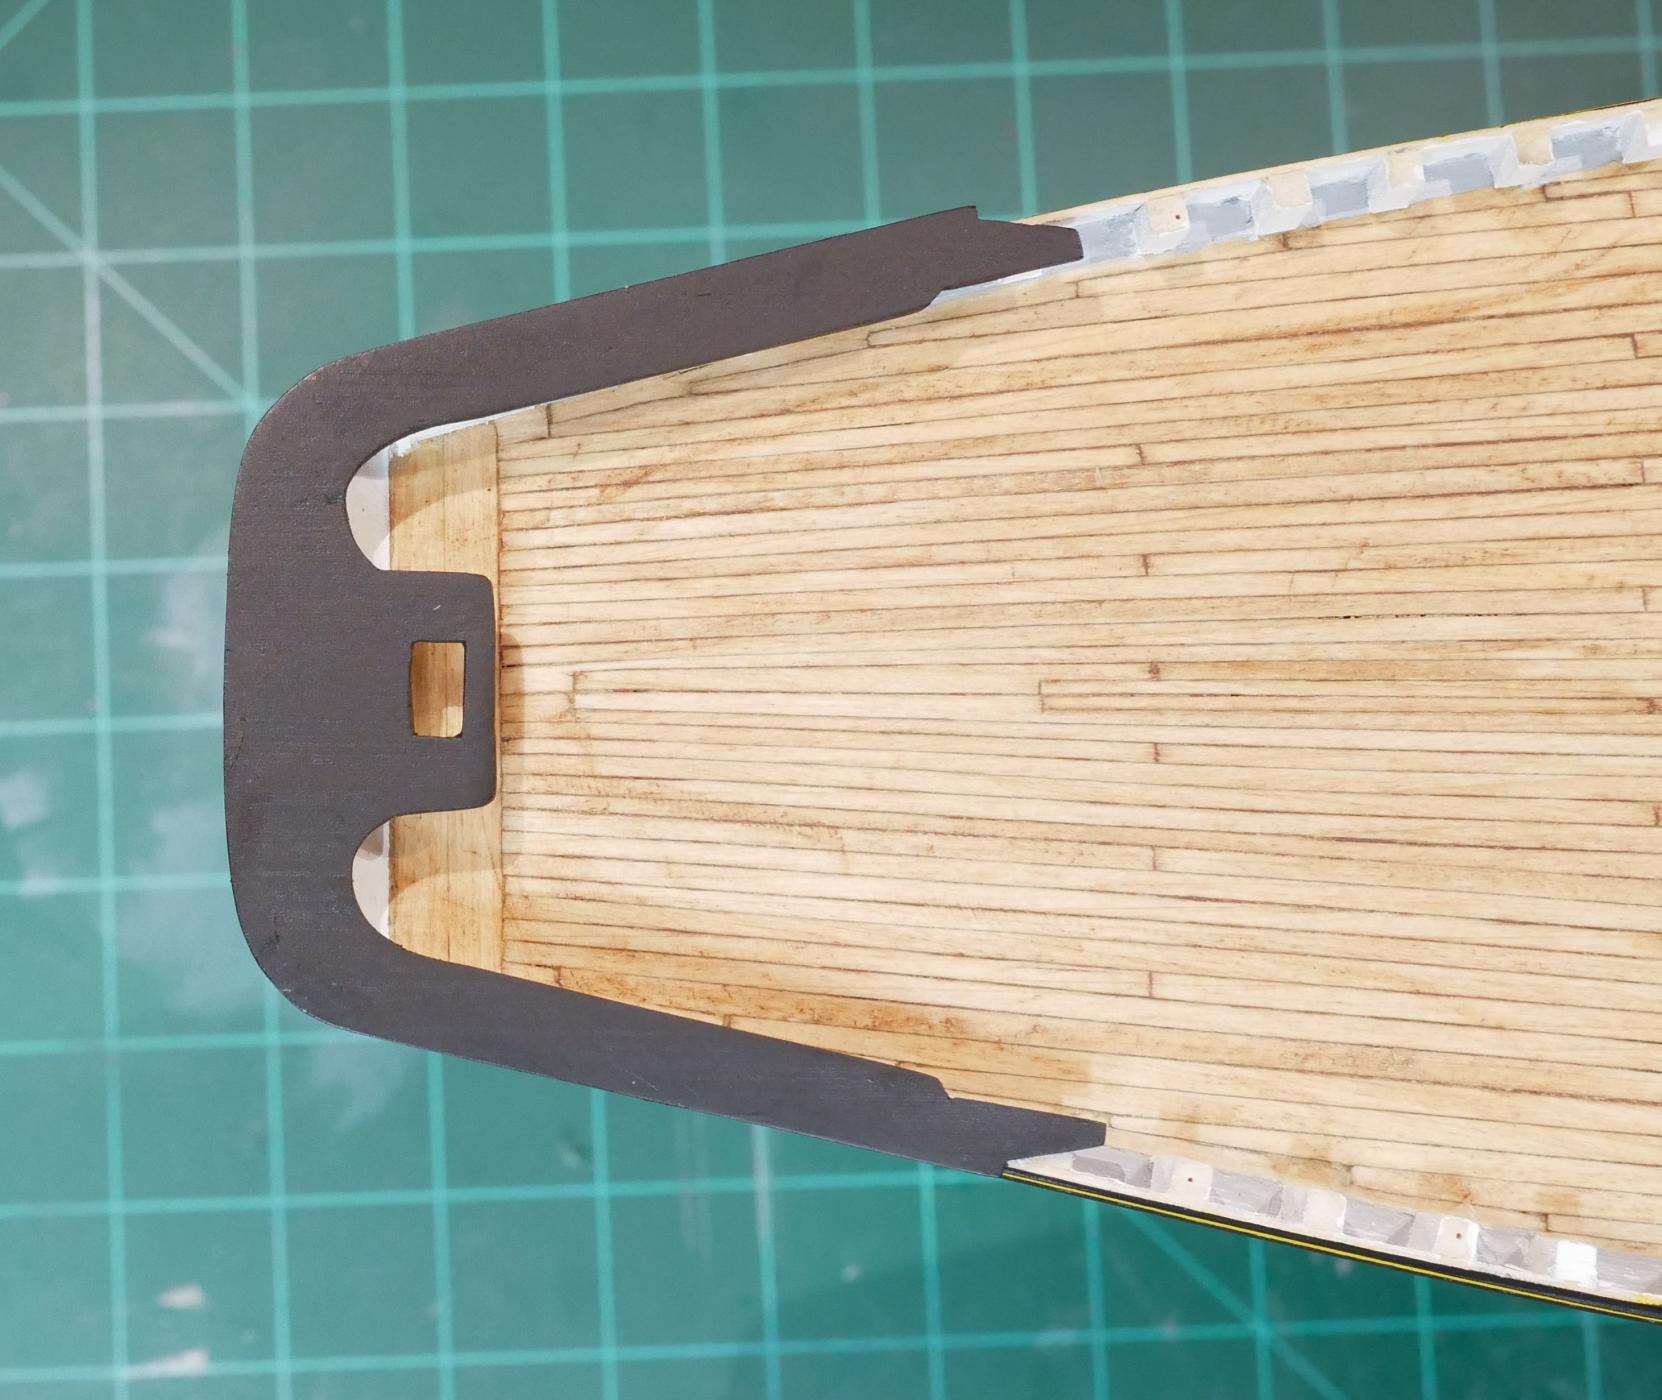
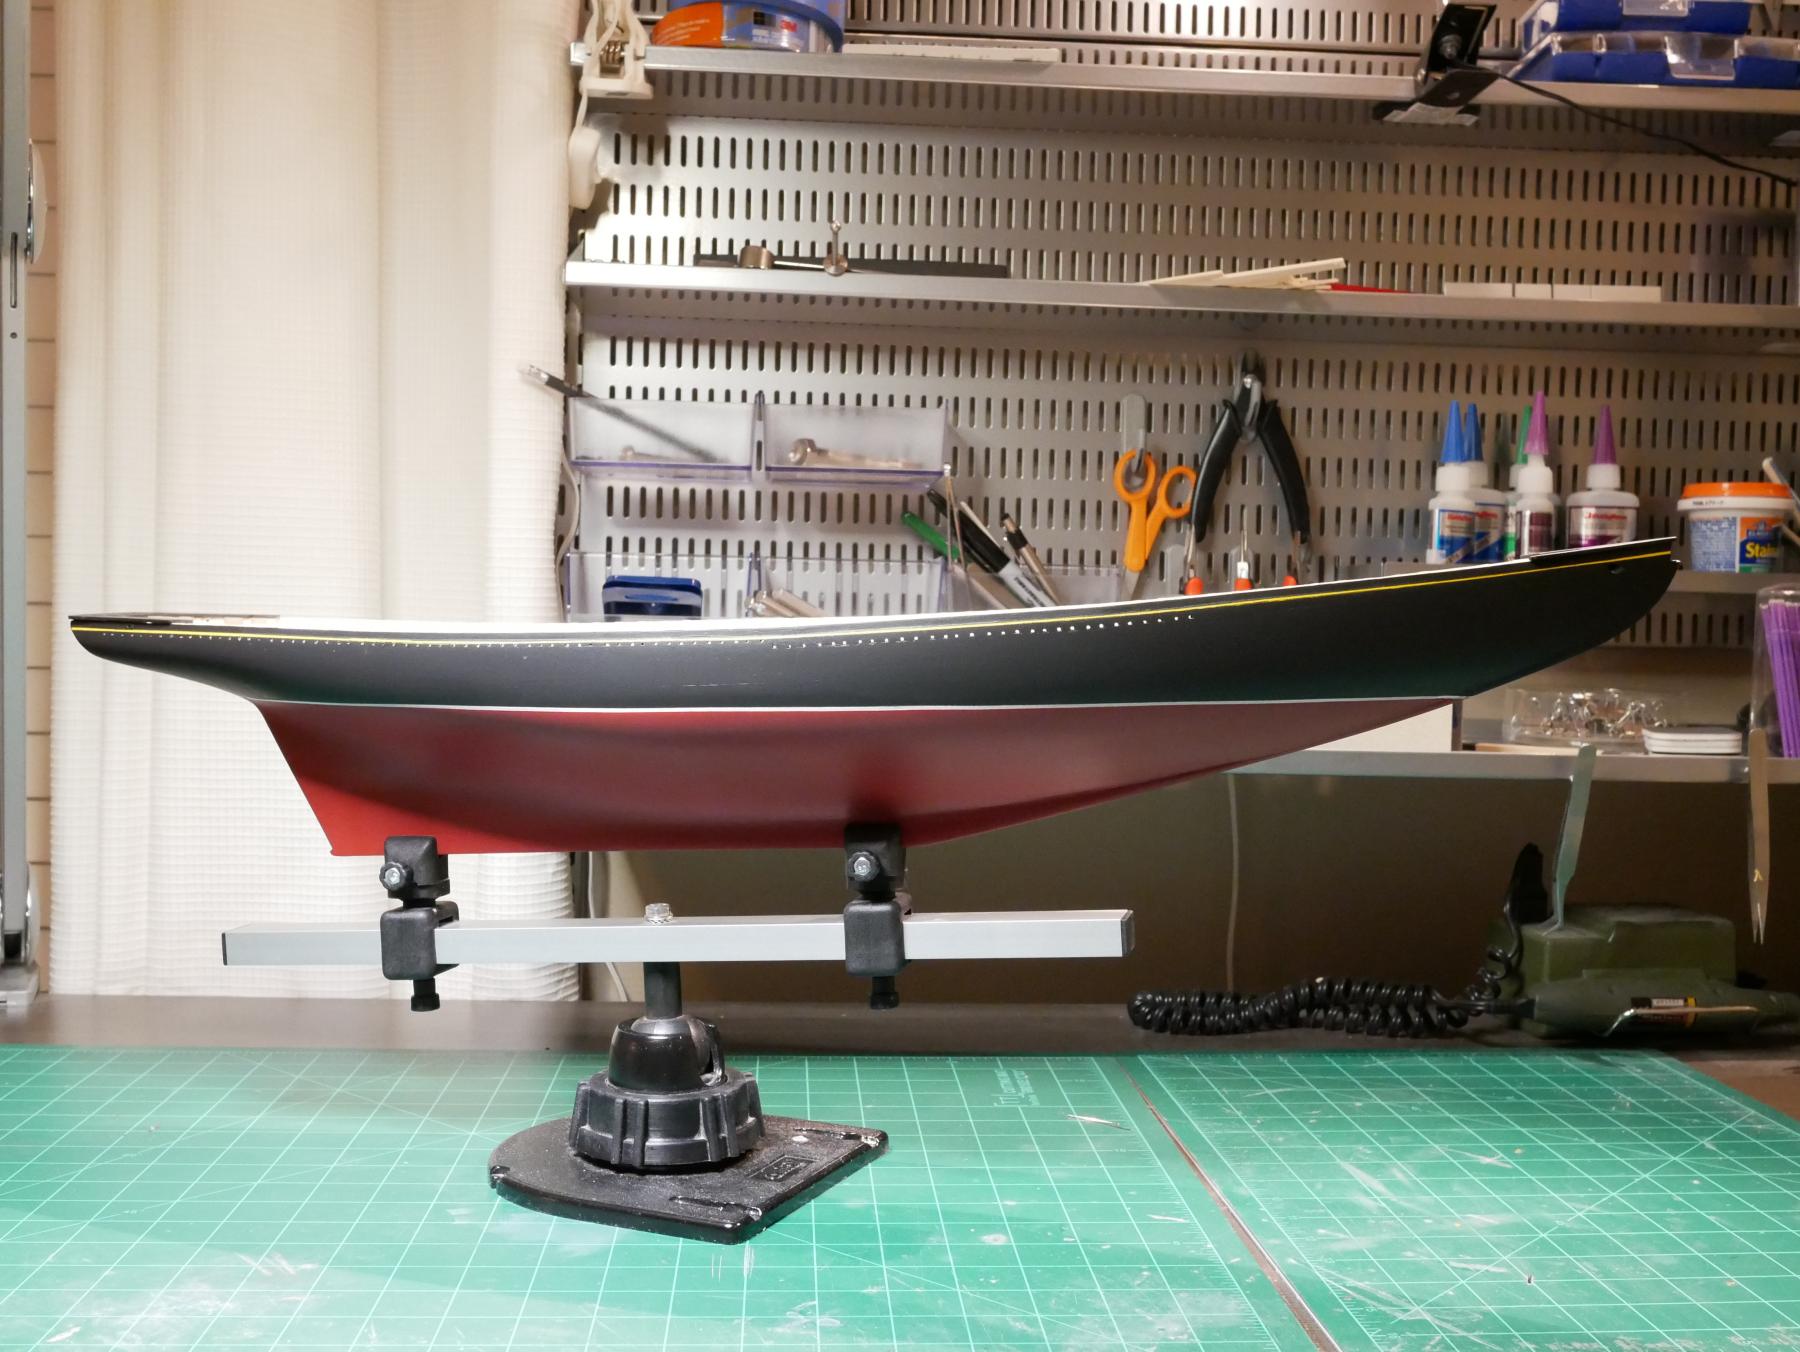
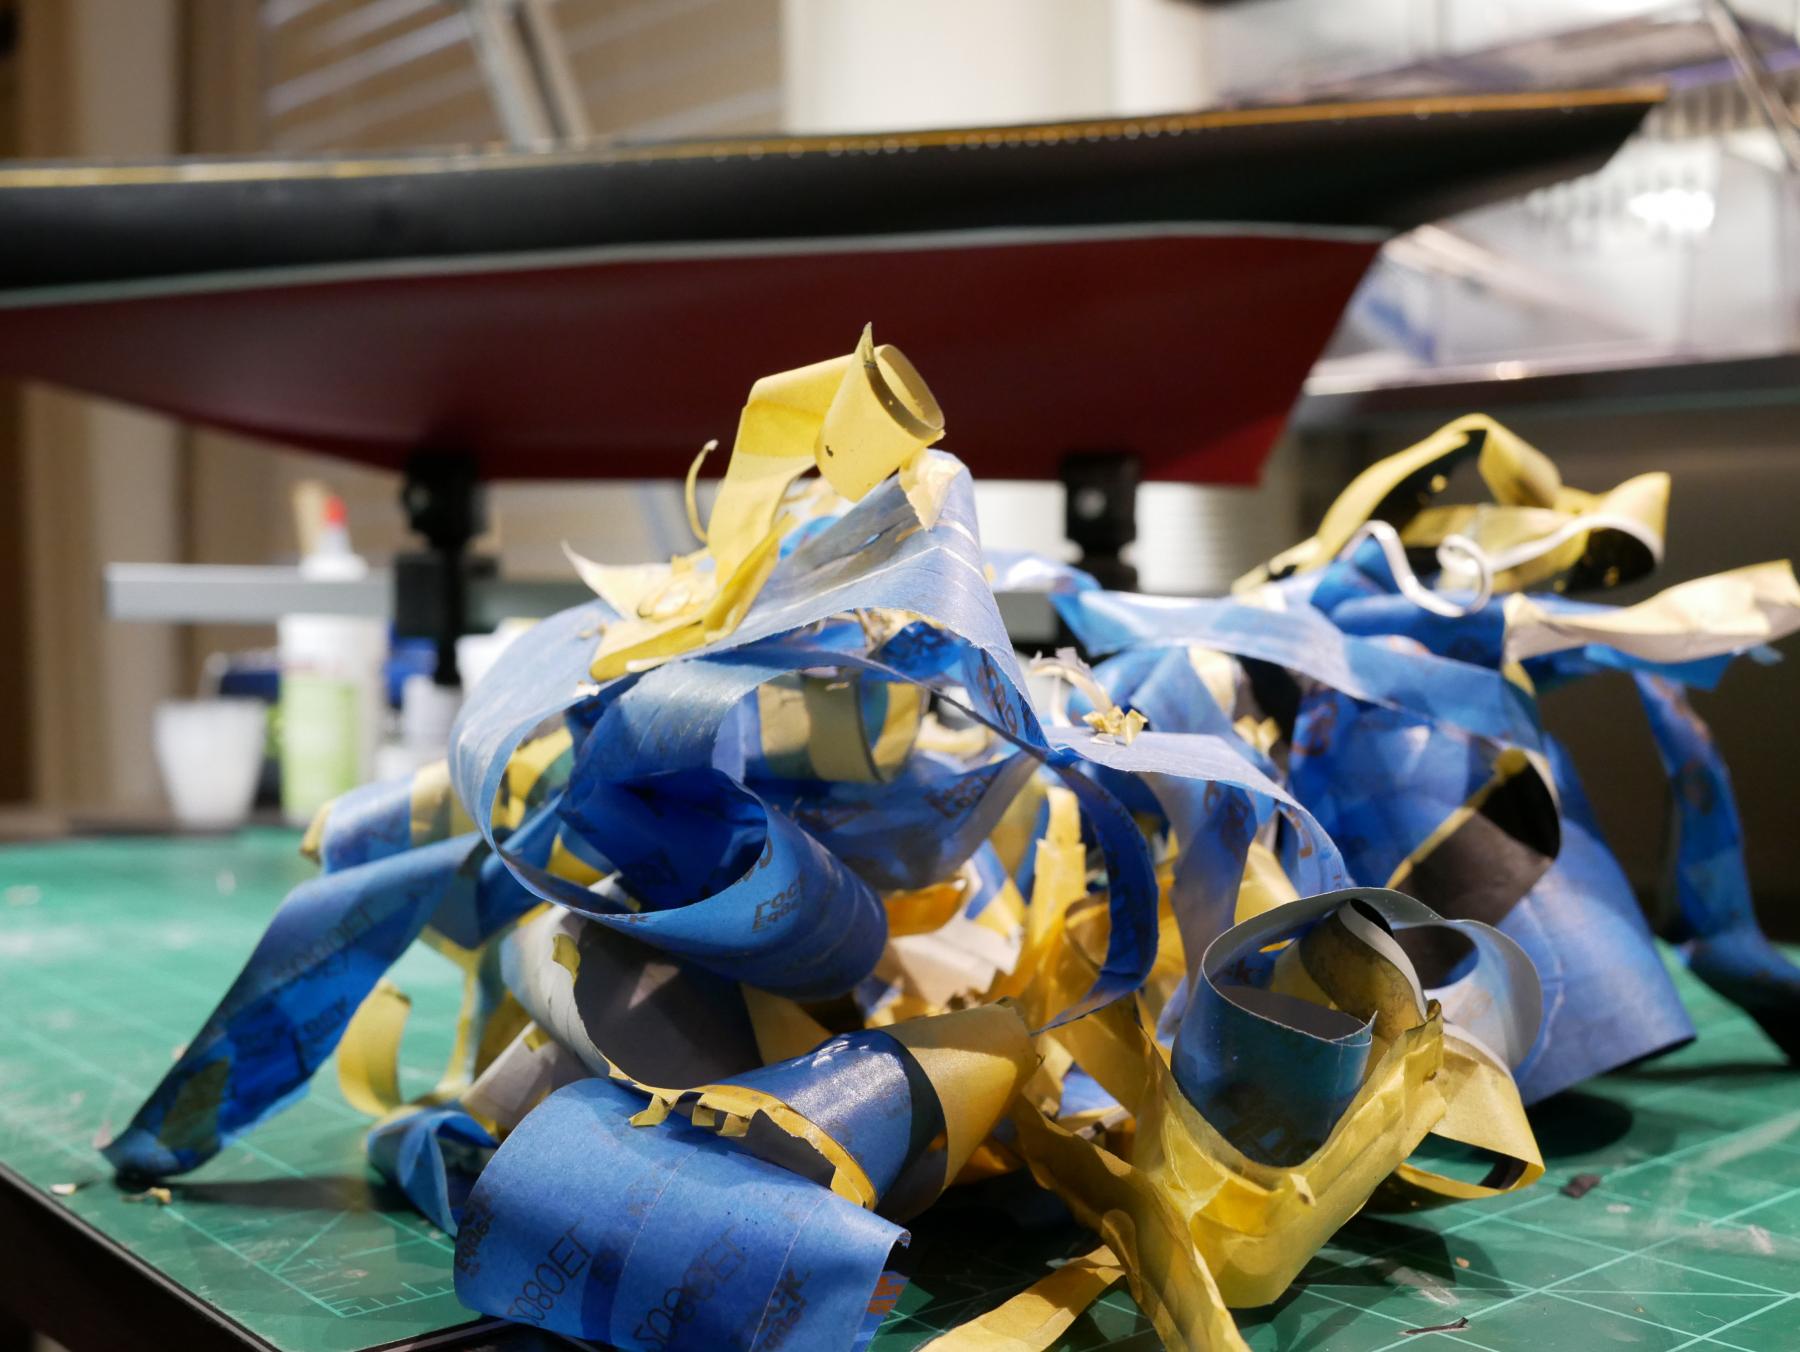
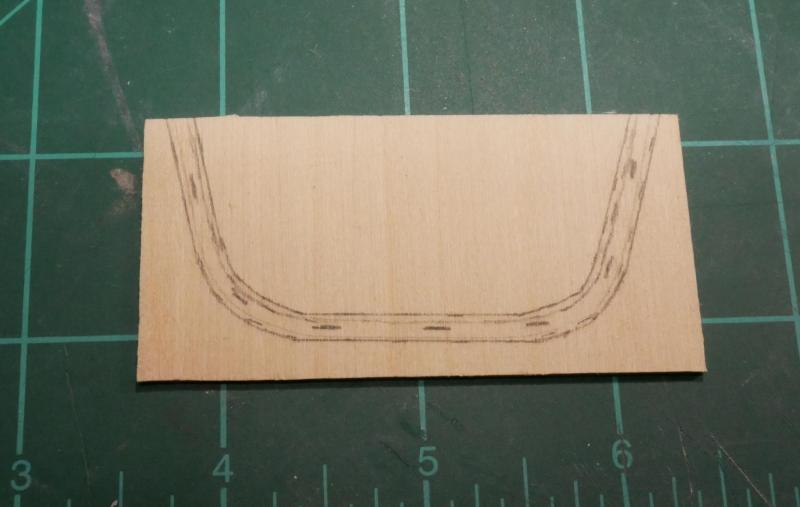
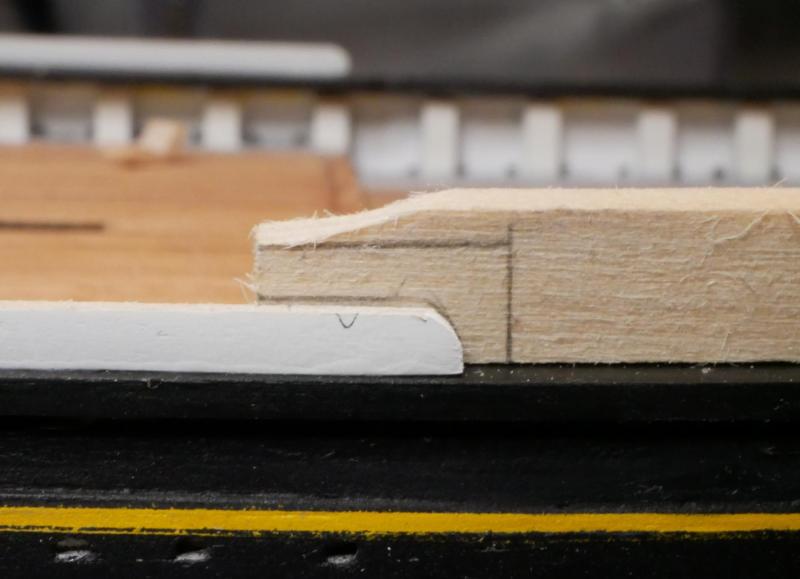
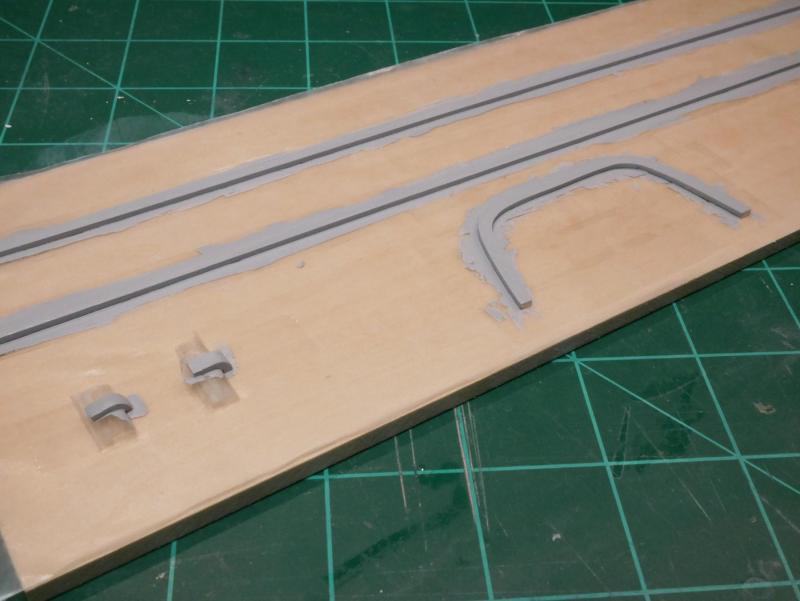
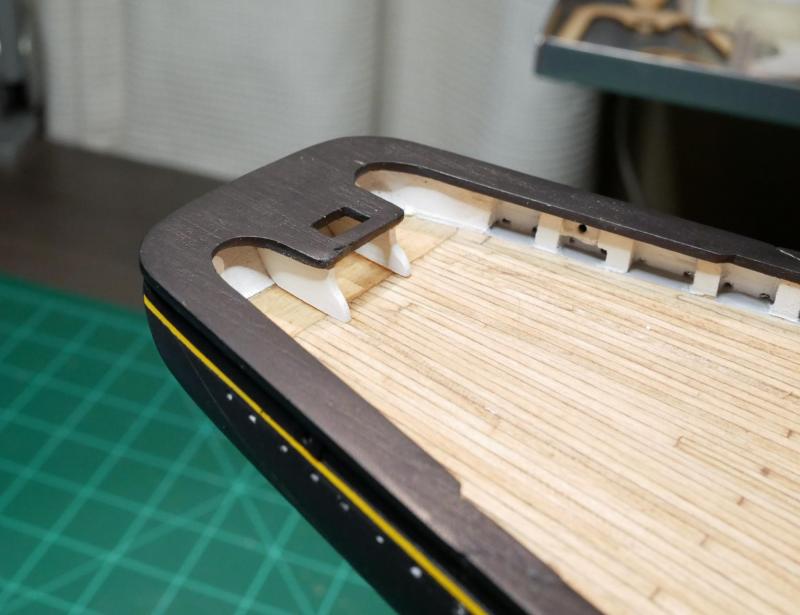
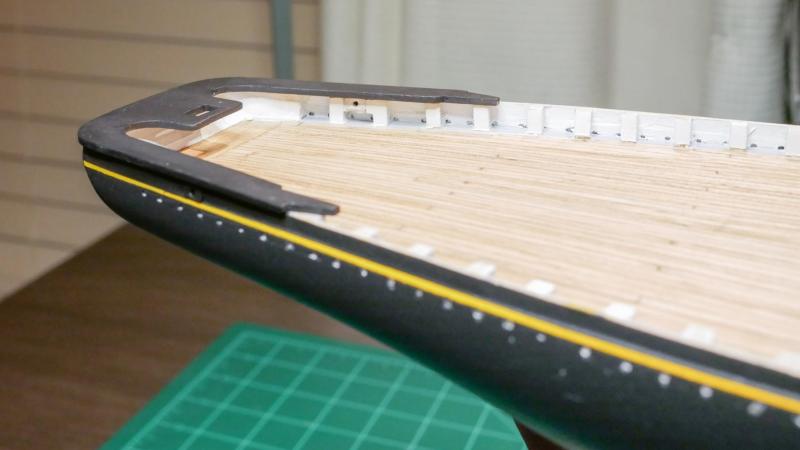
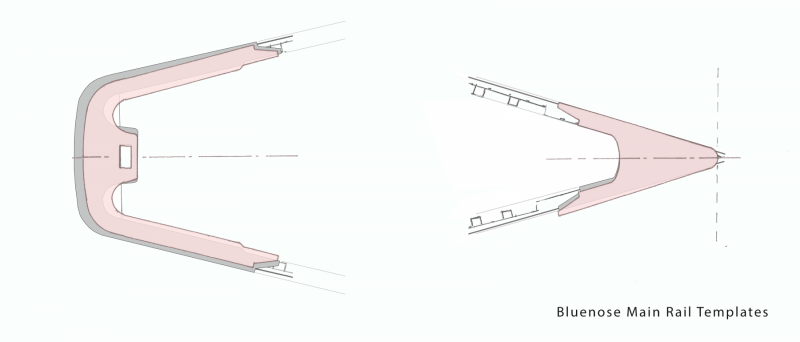
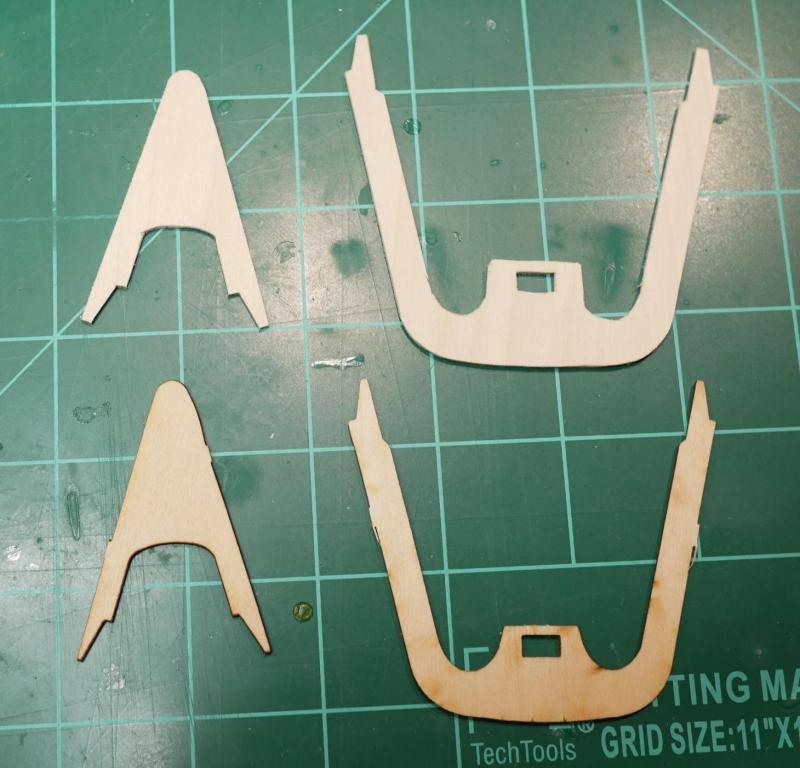
Mooring Chocks and Bow/Stern Main Rail I'm finally done painting and touching up. I finished the bulk of hull painting a few weeks ago, but my waterline wasn't clean enough. I did a pass at touching it up by hand, but wasn't happy with the results. I ended up sourcing some 1/16" tape, re-masked the entire hull, and re-sprayed both the red and black. This finally gave me an even, clean-edged waterline. Finally I can stop masking and painting the hull, and get back to work. A while back, I got some great help on understanding the mooring chocks. I decided that I didn't like the cast metal pieces provided by the kit. They were so small that they lacked detail and didn't clean up well. The kit pieces were basically a tube that runs through the bulwark, with a 'plate' that is visible outside the hull. I decided to only simulate the plate, since the tube/pipe wouldn't really be visible. I measured and cut some small plates from brass, and added holes to simulate the pipe going through the hull. I mounted these on both the outside and inside of the bulwarks, and painted them to match the hull. (Shown here after the cap rails were started...more on that in a bit...). The black one on the outside of the hull is barely visible in this photo, but these were not supposed to stand out on the ship, so I'm OK with these kind of 'disappearing'. I also started work on the main rail. This turned out to require some extra work! The kit provides laser cut pieces for the bow and stern. I cut those out, and did a test fit. Turns out they don't fit my hull. The bow piece wasn't far off, and could be made to work, but the stern piece just doesn't fit at all. I tried sliding it forward and backward, but no luck. It looks like my stern is a little wider than it should have been, so the provided piece doesn't fit. So, I transferred the actual dimensions of the ship to paper, including stanchion locations, etc. I scanned this into the computer. I also scanned in the applicable parts of the plans so I could get the actual shape of these pieces in the computer at the same scale. Using the digital versions, I verified that the pieces had the same problems (in order to verify that my ship dimensions got imported correctly). Next I re-drew the pieces to match my hull shape correctly. I was careful to make sure the width of the rail was the same once it got out over the bulwarks. The image below shows the original pieces (red) compared to my custom pieces (grey). I printed out the templates for my modified pieces, cut them out, and verified the fit. They looked good, so I fixed the templates to some 1/16" basswood sheets and cut out the new pieces. My custom pieces (top) compared to the kit provided pieces (bottom): These were then sanded, primered, painted, and glued in place. I've also started in on the rest of the rail, but I'll post that separately once I get it completed. It is Labor Day weekend, so I've got some extra time to spend in the shop (when I'm not distracted by the start of college football).


- 245 replies
-
- 9
-
-
- bluenose
- model shipways
- (and 1 more)
-
Thanks Allan, John and Ulises! It sounds like a little bit of gloss might be called for! I think I'll pick up some gloss and semi-gloss clear coats next time I'm out, and do some tests. I'm planning on painting a few test boards using the same paint that was used for the hull anyway, so I'll use those to test some different levels of gloss. (I'm going to try using some printed decal paper to do the nameplates and scroll work on the bow, so I was going to do a trial run of that on some test boards. Those boards can double for some tests of different levels of gloss clear coats). We've got a great local hobby shop that carries a lot of the specialty stuff, so I'll probably check in with them to see if they have any top coats that I can spray on. If that doesn't pan out, our local hardware store carries all the normal varnishes and polys. The workspace only looks clean because I haven't been doing much except painting for the last couple months, and that all happens out in the garage! My workbench is in a corner of my home office, so the wife asks that I keep it somewhat clean since it is visible to anyone coming by the house Now that I'm done with painting, it is already starting to get a little messier as I start in on the cap rails. John - I'm envious of your visit to the Bluenose II. My wife and I have talked about the feasibility of a vacation that involves stopping by there, but since we're in Texas, it would be quite a long journey! Since this is only my second build, I'm not quite to the skill level where I'm comfortable trying to reproduce a 'real', 'worn' or 'weathered' look. I ended up using a ton of wood filler and making the hull very smooth - just easier for me than trying to reproduce what the ship would actually look like. This was also my first planked ship, so my hull planks were nowhere near nice enough to leave their lines visible I'm hoping that my next build can go a little lighter on the filler and paint so the seams/grain of the planks can be more visible.
-
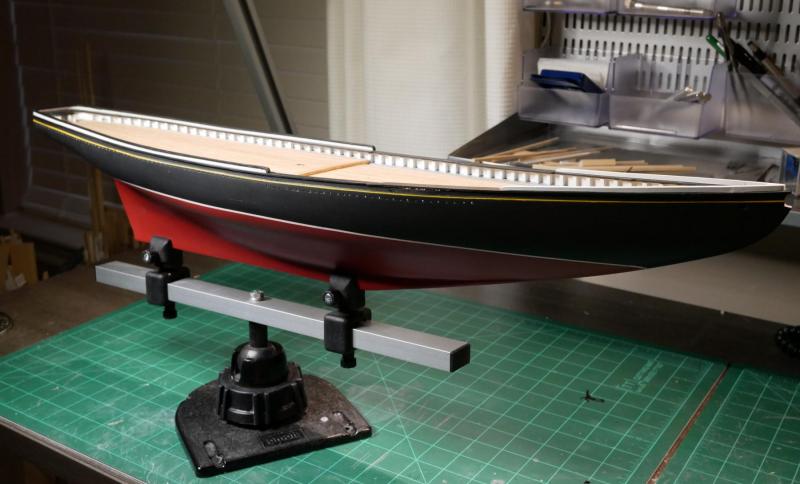
I've finished painting the hull of my Bluenose, and I'd like to get a protective clear coat on top of the paint to help prevent scratches, scuffs, etc. I'm horrible with anything that has to be brushed on, so I'd like to use something that is easy to apply (like wipe on poly), or something that can be airbrushed on. I've read through all the posts I can find, and I see a bunch of different suggestions and opinions, but often the situation is slightly different (no paint on hull, etc.) Would applying Minwax wipe-on poly to my hull work? Or would I get better results with something like Testor's Dullcoat? My hull is fully painted with acrylic paint (Model Master's paint) - multiple coats over primer. I'm looking for a flat or satin finish (nothing too glossy). I tested wipe-on poly over some paint samples on scrap wood last month, and so far the paint has held up. Thanks for any advice! (Here's a quick shot of the ship after painting)
-
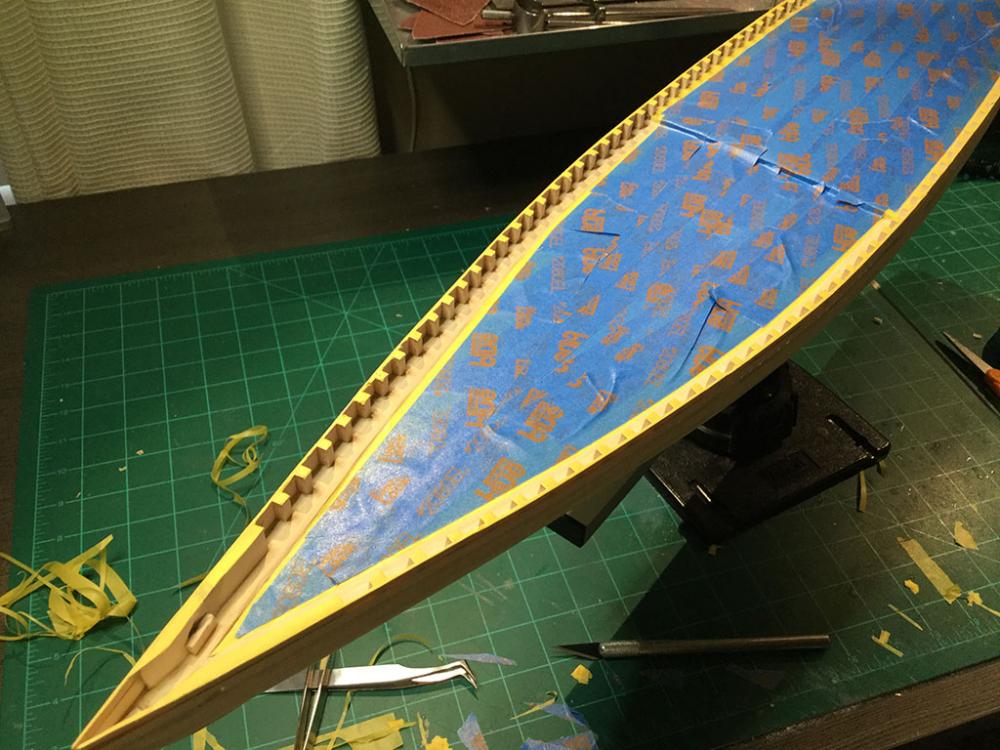
On the launching ways, I'd agree to not actually mount it yet, but I would go ahead and get it built. On my Phantom, I waited to build the launching ways until the ship was finished (I was using a custom-made cradle while I worked, so I didn't see the point in building the stand until I was done). But, the launching ways for the Phantom have two brass 'pins' that need to go into the bottom of the hull. This requires drilling two holes into the keel. I had to carefully flip my ship on its side, with all the masts/rigging in place, and drill those holes. Much easier to drill those before you've got stuff on the deck, but since those pins go into the beams of the launching ways, it would be hard to get those holes lined up 'just right' on the keel unless you had the completed launching ways ready-to-go with the pins in place. My recommendation would be to build the launching ways, complete with the pins. Then get the holes drilled in your keel (much easier to do before you've got deck structures, masts, and rigging!) Then put the launching ways aside until you're done with the build. Plus, building the launching ways is pretty fun, quick side-project that can be done easily with just a few strips of wood.
- 701 replies
-
- 5
-
-
- phantom
- model shipways
- (and 1 more)
-
Jerry, You're waterline turned out great! I'm very jealous! I've been stuck in the 'painting phase' on my Bluenose for about 2 months, because I just can get the waterline right (so I keep sanding it off and re-painting it). You're officially now way ahead of me Cap rails look great, and the deck looks fantastic with that varnish! Now that I'm a few steps behind you, I'm enjoying having another 'further along' Bluenose to refer to!
-
Hey Elijah! It is coming along nicely! Great job on the rudder - I messed mine up so bad I had to build it twice. I love the way your planking turned out. I captures the dark black look of Phantom while also looking 'real'! Looks like you're just about done with the bulk of the hull work, which I remember being a big step. When you move on to the deck structures, it feels like you're working on a completely different project because the kinds of things you're doing completely changes (that happens again when you start rigging). Keep up the great work, I'm really enjoying seeing your Phantom come together!
- 701 replies
-
- 5
-
-
- phantom
- model shipways
- (and 1 more)
-
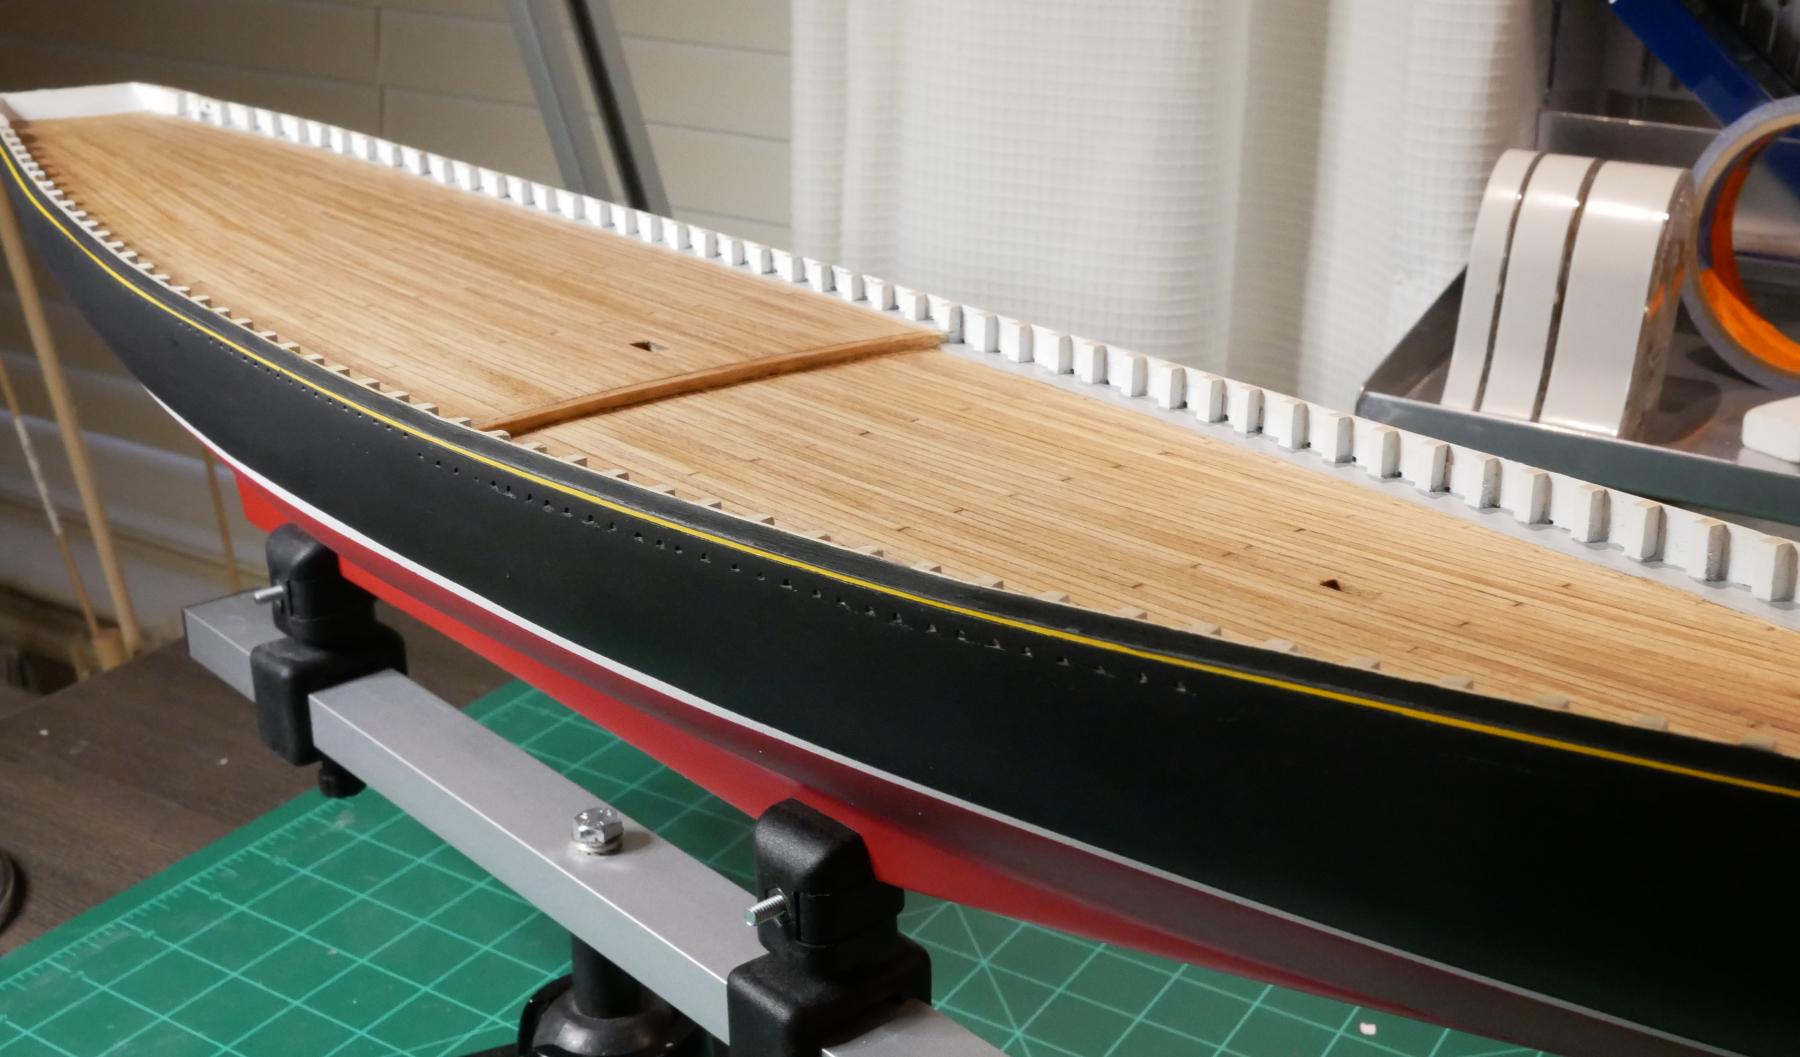
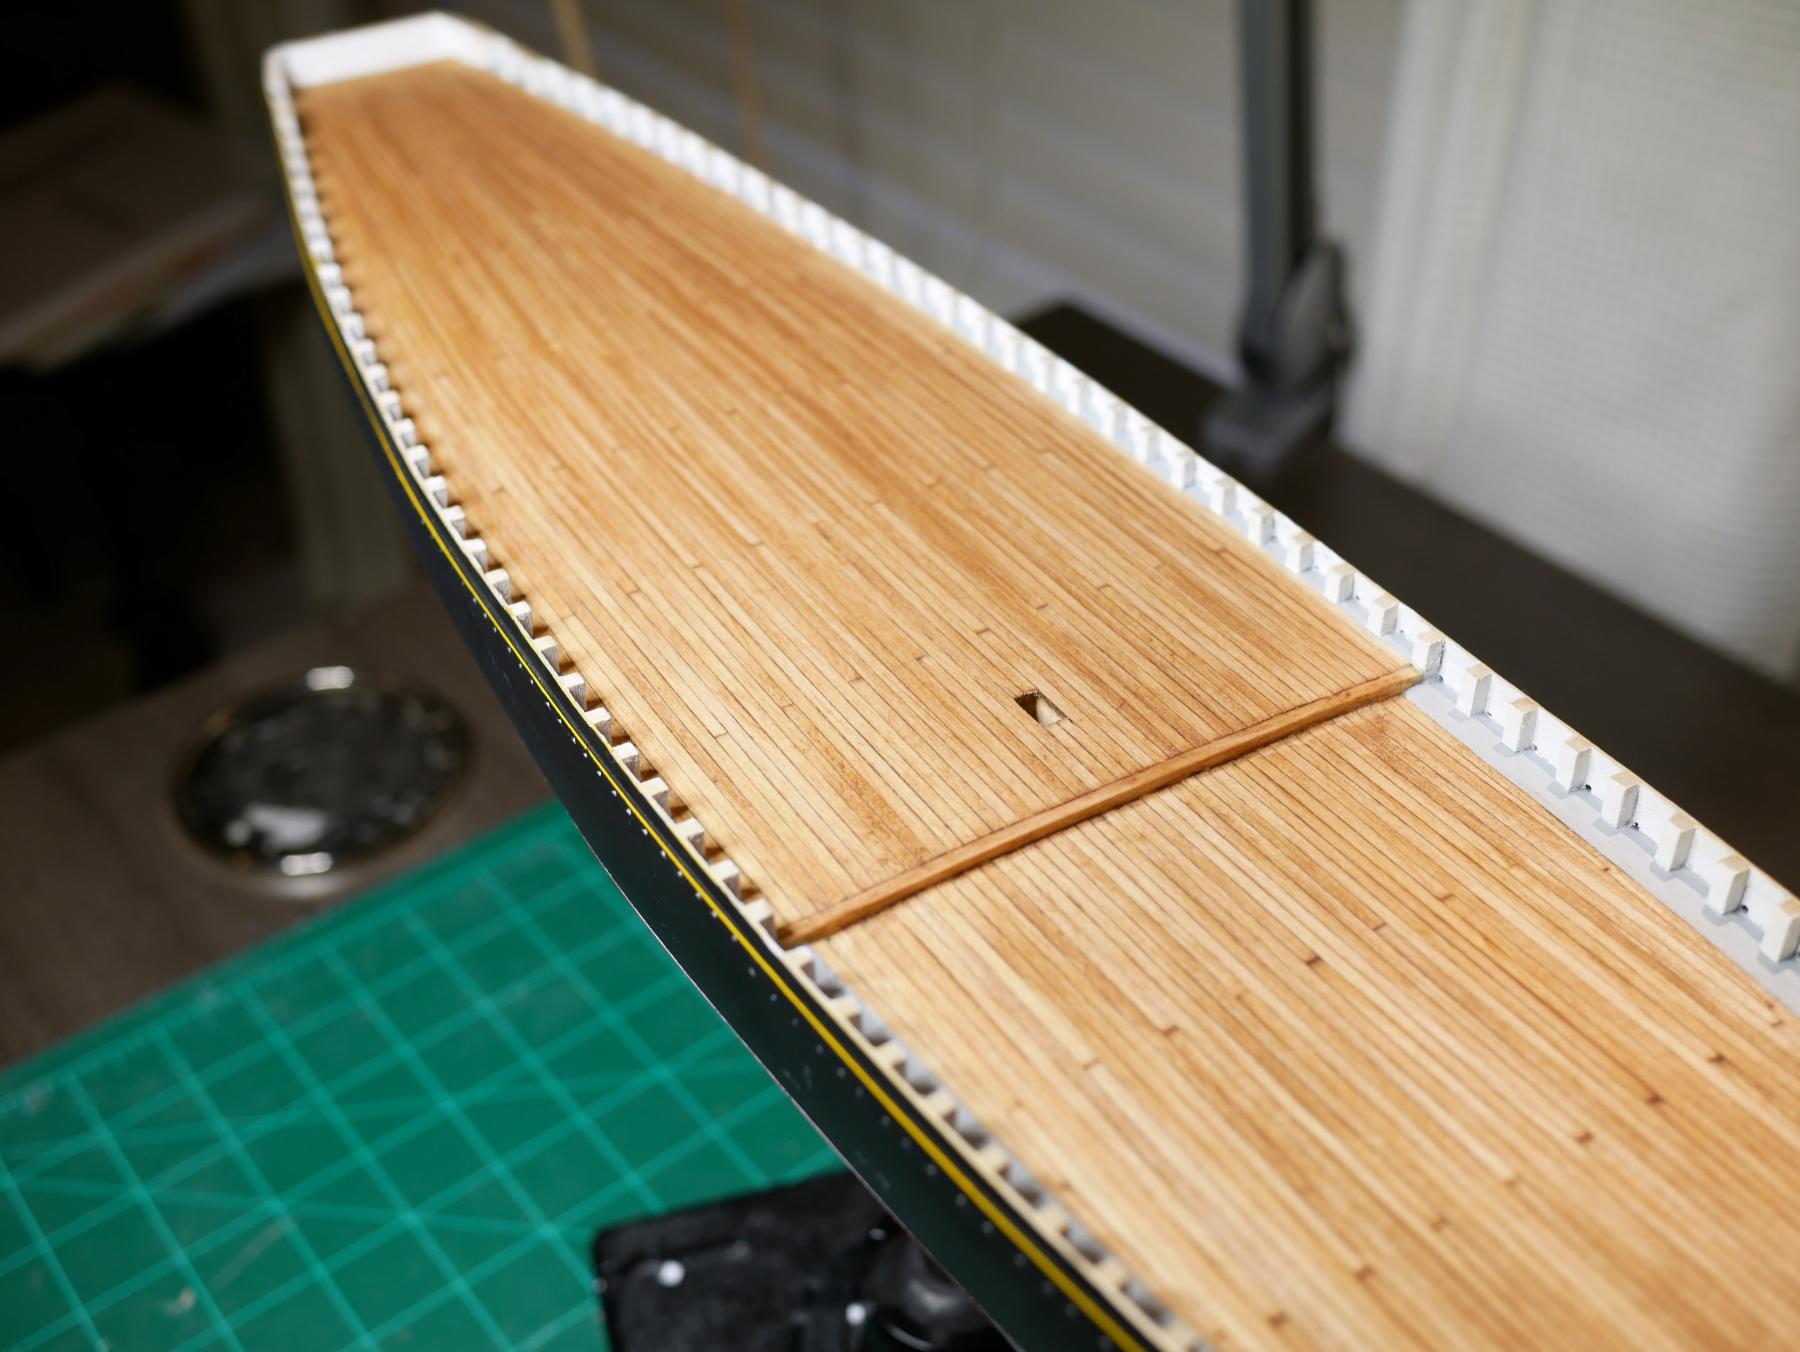
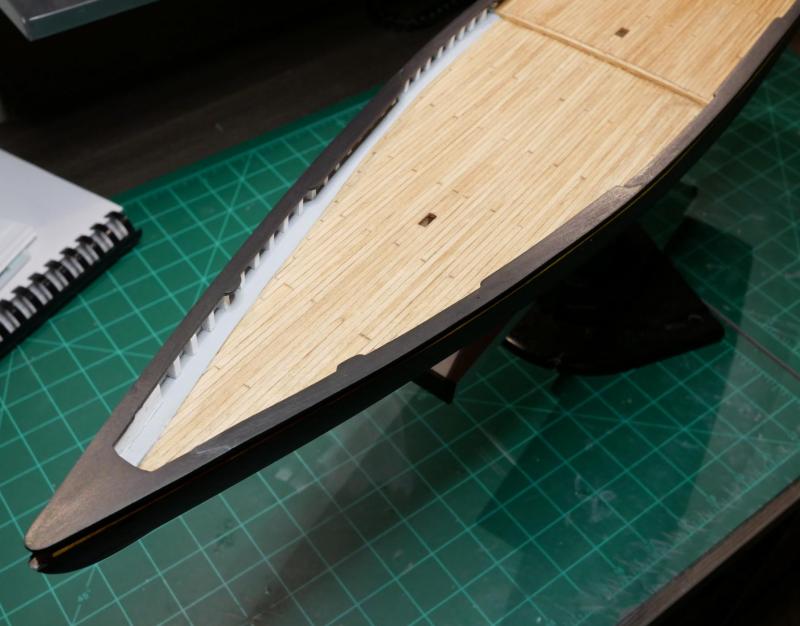
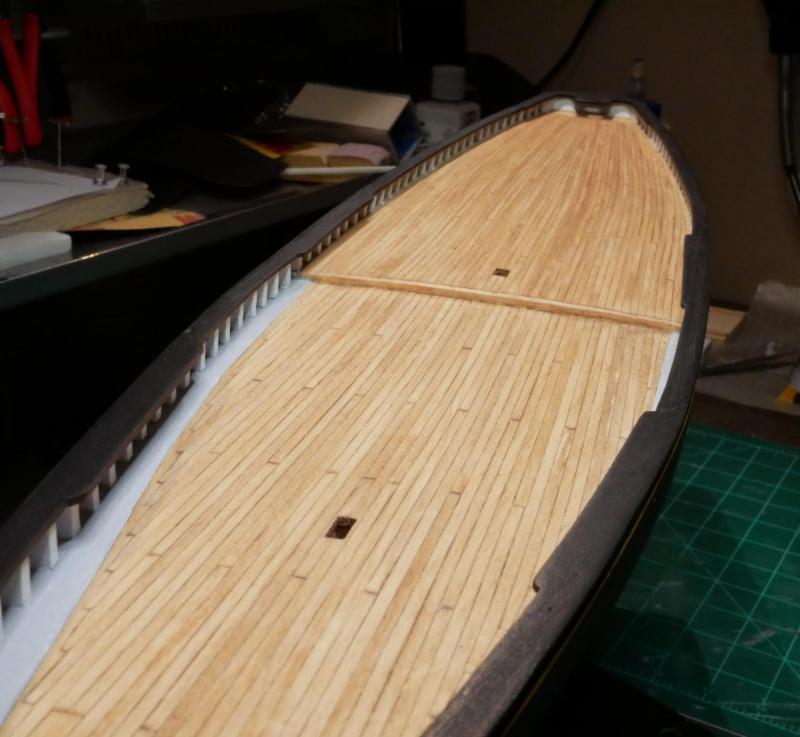
Dave, The deck color in the photo is pretty spot-on. (While waiting for paint to dry, I invested in a new camera since I've been taking hundreds of photos during the build. I finally got my head around correcting white balance to get colors right!) I did the deck in Minwax Cherry. It is darker, and redder than I originally planned. It was a last-minute change I made after seeing some other Bluenose build photos online. I was originally going to go with a 'natural' stain that just slightly darkens the natural color of the deck planking, but after doing a test I wasn't happy with it.
- 245 replies
-
- 1
-
-
- bluenose
- model shipways
- (and 1 more)
-
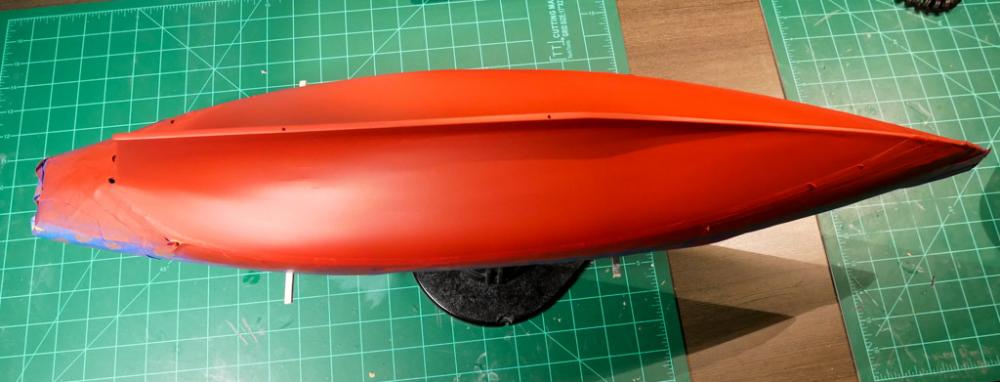
Paint Complete and Deck Staining After weeks of masking, painting, waiting, sanding, and repeating, my Bluenose is painted! It was very, very satisfying to remove the multiple layers of masking tape that I had piled on over the last month. There was a good deal of touching-up required, especially on the waterways and bulwarks. Those had been airbrushed early in the process, but there was some bleeding, so I touched those up by hand. I still need to do some final touch ups on the yellow and white stripes on the outer hull, but I decided to ahead and get the deck stained first. I went with a darker shade than originally planned on (kind of a last minute decision), but I'm really happy with how the deck turned out. Hopefully I'll get those stripes on the hull cleaned up this week. I'm still debating if I should go ahead and get some poly on the deck now, or wait until later. The entire hull was airbrushed, and I decided on the specific colors after doing some tests on a large piece of basswood. For black, I used Model Master's Flat Black (I know that 'midnight blue' is more historically accurate, but I didn't think I would be able to get a good shade of that). The red portion of the hull was Model Master's Insignia Red (probably not the 'right' shade of red, but it was the one I liked the most). For white (both on the stripe and on the bulwarks) I used Humbrol Flat White. The yellow stripe was Model Master's Insignia Red (which wasn't my plan, I was going to use Humbrol Trainer Yellow, but grabbed the wrong bottle without realizing it). The grey was Model Master's Light Grey. After I get things cleaned up with the stripes, I still need to put some kind of clear coat on top, but I'm not sure what I'll use yet. I'm excited to get things moving again!


- 245 replies
-
- 11
-
-
- bluenose
- model shipways
- (and 1 more)
-
Painting... After a month of painting, I'm getting close. I finished the red on the lower hull last week. Since I need to mask that off, I wanted to give it a good amount of time to fully cure so I don't damage the paint when I put tape on it. After several coats of red, it started to look pretty good. Once the tape came off, I was able to see the contrast between the white and red for the first time, and I'm pretty happy with it. There are a few spots that need to be cleaned up manually with a brush, but I'm going to hold off until I get all the paint on, then do a pass to touch things up. This morning I started in with the black. I've masked off the red and the yellow stripe. The first pass of black will paint between the white stripe and the yellow stripe. Once this is done, I'll remove the masking above the yellow line, re-mask the yellow line, then paint the black between the yellow and the tops of the bulwarks. I forget how quickly black goes on compared to other colors...even after two coats it is starting to look pretty good. I probably have another week to go on painting. My progress is slow on this because I can only get time to airbrush on the weekends, and I need time for paint to dry between coats. This means I can typically only get a few coats in on a Saturday, and a few more on a Sunday. Really looking forward to being done with this so I can get back to work!
- 245 replies
-
- 5
-
-
- bluenose
- model shipways
- (and 1 more)
-
Looking great! I really like the color the stain you chose for the deck. I'm building the Bluenose (original), and I'm continually fascinated by the differences between the original ship and the Bluenose II. Spending so much time studying the original ship, it is a little weird to see propellers on the Bluenose! I do envy those building the Bluenose II, since 'real' information is much easier to find. I've been slowly trying to convince the wife that we need to take a trip up to Nova Scotia so I can take some photos! Nice job on the white stripe at the waterline too! I just masked that off this morning on my build, and I don't think I got it quite as clean as you did!
-
Painting... Nothing to see here, just painting. It's been two weeks of painting, waiting, sanding, filling, waiting, sanding, painting, waiting... The entire hull got primered with multiple coats (grey), alternated with tons of sanding and some additional filling. Then I painted the waterways a light grey. Those got masked off, and I painted the bulwarks and waterline with white. I've also painted the yellow stripe. Everything has been airbrushed, mostly because I'm horrible with a normal brush. Just waiting for everything to fully cure so I'm comfortable putting tape over the white waterline area to mask off the lower hull for red paint. This part always goes slow because I have to do airbrushing in the garage, so I have to coordinate with the wife to have both cars moved out. Hopefully I'll be done within the next week. Once all the paint is on I'll get some photos up and list out which paints/colors I used.

- 245 replies
-
- 5
-
-
- bluenose
- model shipways
- (and 1 more)
-
Looking great Jerry! The Bluenose was my first attempt at nibbing too. The practicum was really helpful on this part. Once you do a few, it gets pretty easy. One word of advice - don't cut your planks to length until after you've cut the nibbing strake and tapered the plank to fit (and you are happy with the joint's fit). I had to discard a few cut planks because the fit wasn't good enough. If you wait to cut the plank to length and the joint is bad, you can just cut off that short tapered end and try again with the same strip. The kit includes just enough material to do the deck planking, and the quarter deck requires lots of long strips. Some other posters have noted that they ran short of deck planks. Best to be really protective of your strip material until you get those long planks on the quarter deck in place.
-
Looks great Jerry! Amazing progress - I bet you pass me up in the next week!
-
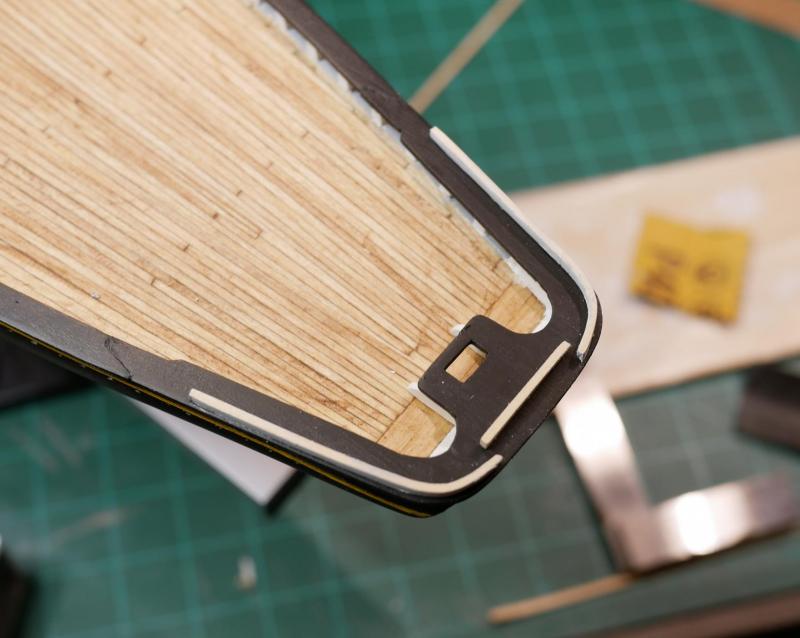
Hull Details and Primer Well, after a flurry of work, I'm running into one of my least favorite parts of a build...waiting for paint to dry. This week I focused on a few remaining details that needed to be resolved before I could paint the hull. I was focused on figuring out the mooring chocks this week, which was complicated by my complete lack of knowledge about actual ships. (Never been on one, or even seen one in person.) With the help of the board, I got my head around the kit's plans, and went to work installing the kit's cast metal mooring chocks. They turned out awful. I think the pieces were just too small to work well as cast pieces. So I ripped them out and tried a different approach. Based on some research, it seems like these would have been some metal pieces to allow mooring lines to pass through without damaging the hull. At 1:64 scale, the inside of the mooring chocks isn't really visible, so I focused on what would be visible on the surfaces of the ship. I ended up fashioning some 'faceplates' out of brass. They are about the right size, and they have holes punched through them. The punch I used gave a nice, smooth, rounded edge that looks like it goes into a tube. I trimmed away some wood on the hull so these will sit flush with the bulwarks, then set them aside. I'll install them after the hull is painted. I also drilled out the hawse pipe holes, and drilled holes in the keel for mounting on the pedestals when I'm done. (I didn't do that on my last ship, and had to flip the thing over after it was fully rigged to drill holes - learned my lesson). So, it is on to painting. I'll be airbrushing the hull. I am horrible at painting with a normal brush, but airbrushing seems to give me a consistently good finish. I'll start by applying a couple coats of primer to everything I need to paint (hull, bulwarks, waterways). In between primer coats I'll be sanding and filling as necessary to get things smoothed out. Once I've got everything primed, I'll start applying the actual colors. So it begins...after a few hours of masking off the deck (and the tops of the bulwarks and stanchions), I'm off to the garage to start spraying on primer. The next week will be slow. Spray on a coat, wait a day, sand/fill, spray on a coat, wait a day...
- 245 replies
-
- 4
-
-
- bluenose
- model shipways
- (and 1 more)
-
Tiny clips to hold lines
genericDave replied to Brucealanevans's topic in Masting, rigging and sails
Zoltan, Thanks for those links! That first link (mini clamps with vinyl grips) looks really interesting! I've spent hours browsing through MicroMark's stuff and never noticed those. I've got tons different clamps and clips, but nothing like that. Looks like they'd be really useful for holding small pieces. Now I just need to find more stuff to buy so I can justify placing an order... -
Looking great Jerry!
-
For Beginners -- A Cautionary Tale
genericDave replied to ccoyle's topic in New member Introductions
Certainly there are many factors (time, ability, etc) that contribute to whether one will 'stick with' this hobby, and many of those can't be quantified until you get going. But I do agree that the choice of kit can sometimes be a 'make or break' decision. I really, really want to build the Syren. But I think it is just a little beyond my reach at the moment, so I'm picking something else for my next build. I'm still new to this - I picked up ship building about 9 months ago. For my first build, I chose the Phantom - solid hull. This meant no hull or deck planking, no square rigging, and no gunports or guns to build. I chose it so that I could focus on basic skills - reading plans, cutting/sanding/shaping, and rigging. I made a lot of mistakes. For my second build, I'm building the Bluenose. This adds basic POB stuff (keel, bulkheads, etc), hull and deck planking, more detail. But I chose this particular ship because the hull is painted - my first attempt at hull planking is likely to turn out a little 'less than great', so I can learn hull planking but still use wood filler and paint to end up with a good build. I was tempted to jump right into the Syren next (even had it in my shopping cart on the Model Expo site at one point), but I decided to do another build before I take that plunge, to get some experience with square rigging and gunports. If you're getting into the hobby for the long haul, it doesn't hurt to spend some time working your way up. You learn valuable skills that will pay off when you finally get to that 'big build'. You also get a great sense of accomplishment from having successfully completed something (and that is much easier to reach with a 'beginner build'). All that being said, you have to be interested in the ship you are building. It has to catch your eye. If honestly nothing catches your eye except the Constitution, you might as well try. Better to try something and have it fizzle out than to not try at all. But if a first time builder is willing to start small, I do think it will pay off in the end.- 241 replies
-
- 13
-
-