


mbp521
-
Posts
1,003 -
Joined
-
Last visited
Content Type
Profiles
Forums
Gallery
Events
Everything posted by mbp521
-
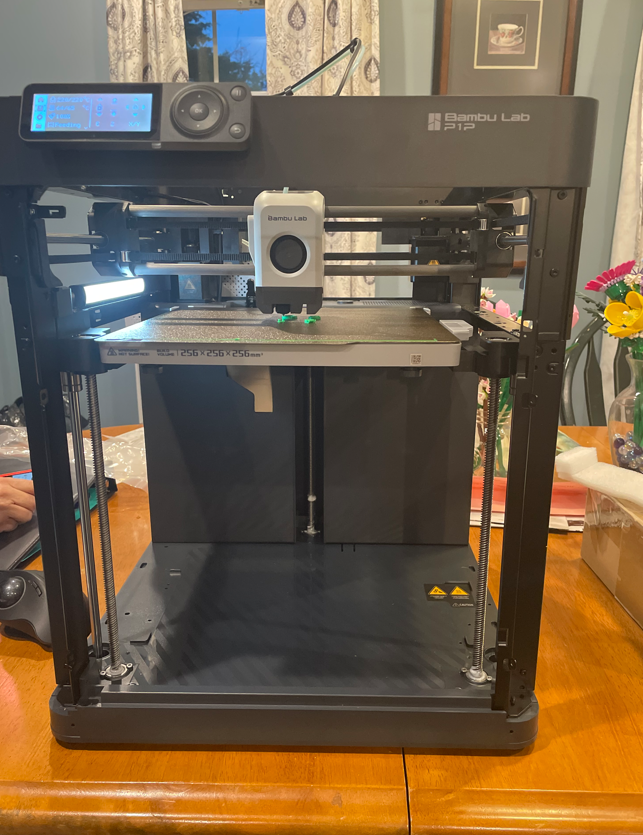
 Thank you Eric! Dabbling away is a perfect way of putting it, it’s definitely been a slow process, but I am making headway. I really hadn’t planned on getting into 3D printing either, but like I said in my post, it was way more cost effective to get a printer and build the pieces myself than ordering them online. The printer was less than $500 and the filament is dirt cheap, a 1000g spool runs about $14 and goes a long way. The grand kids get a kick out of it as well. I think so far we’ve printed several dragons and numerous fidget toys for them. -Brian
 -
Thank you Keith for the kind words. After reading your reply, I realized that I never actually gave it that much thought that many of us are dependent on suppliers for some of the pieces and parts of our builds. I’m just somewhat eliminating the middle man in a way, and the creativity of designing and printing my own pieces is just my own method of building my models. I do appreciate the enlightenment. After purchasing the printer, I now understand that the cost for the 3D printed parts that I have previously ordered online is not so much in the materials, but in the design process (and equipment costs)that goes into the pieces. The quarter that I used for scale in my photo above covered the cost of material for all the pieces I printed with change leftover and only took about 20 minutes to print. So feel free to send me your order any time! 😁 -Brian
-
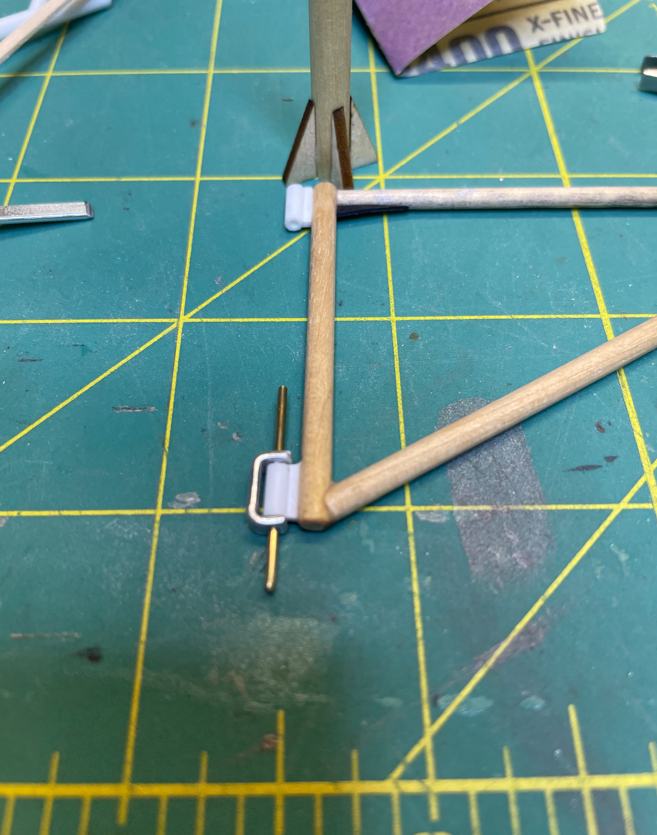
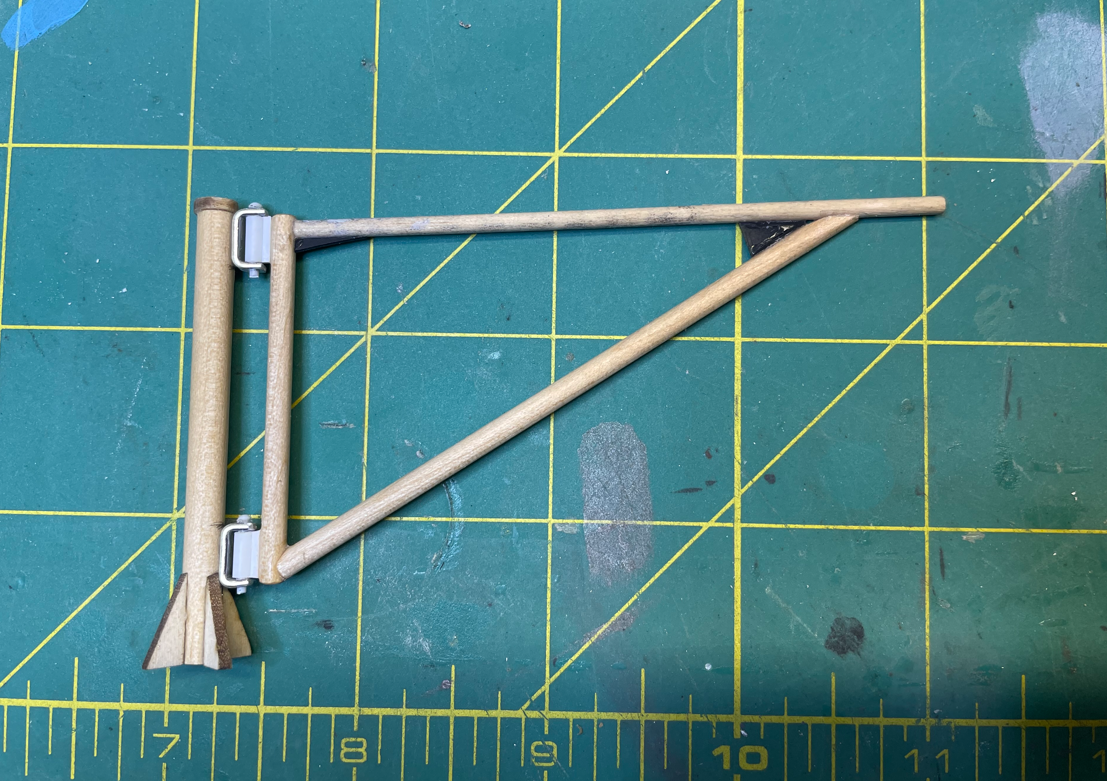
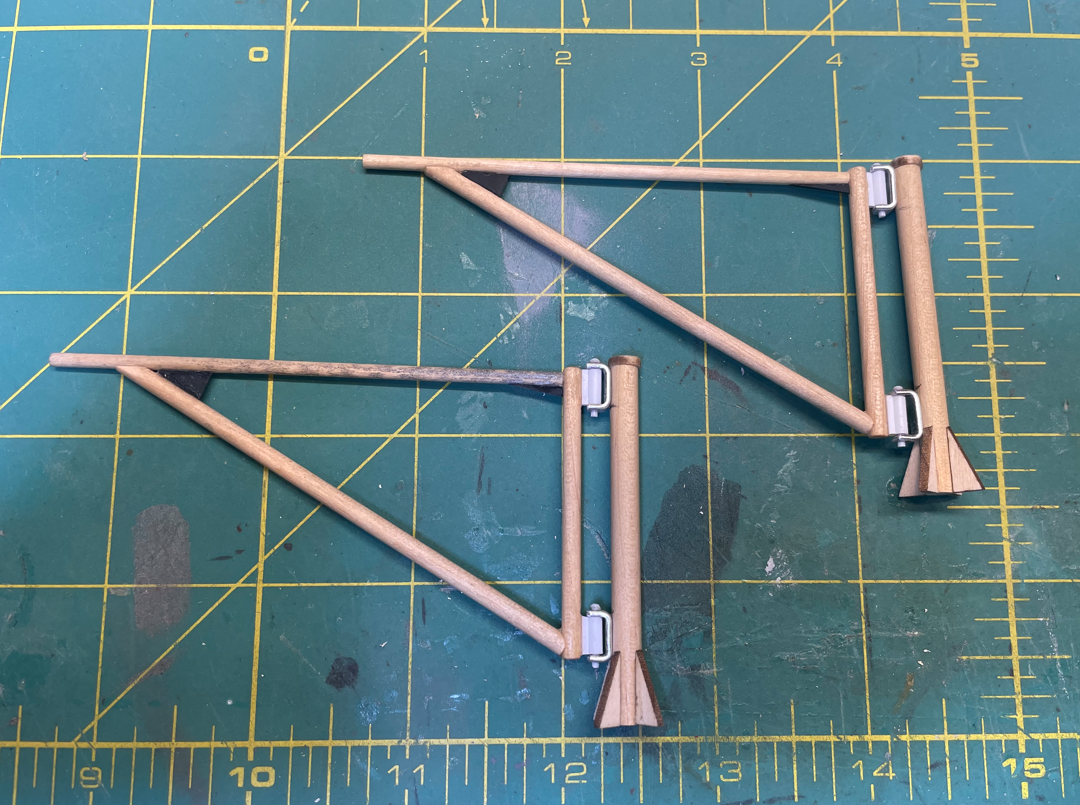
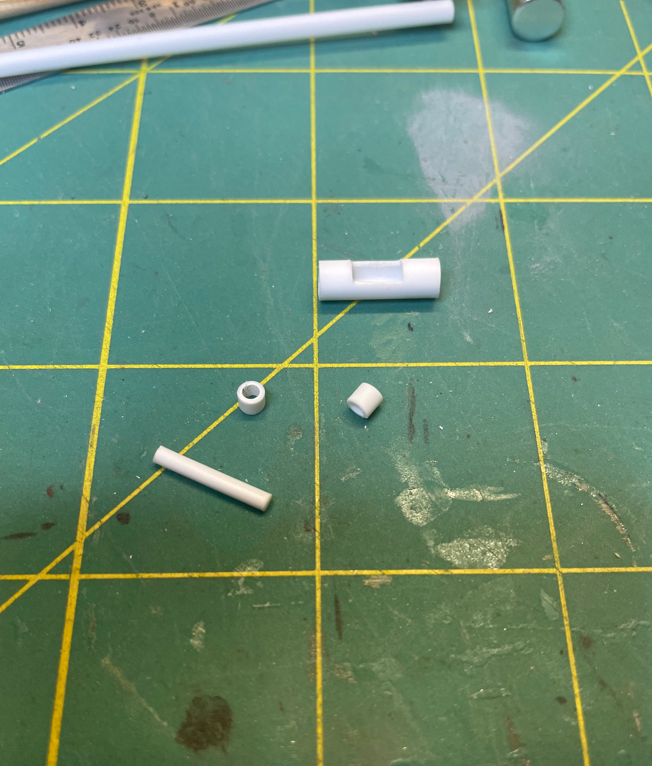
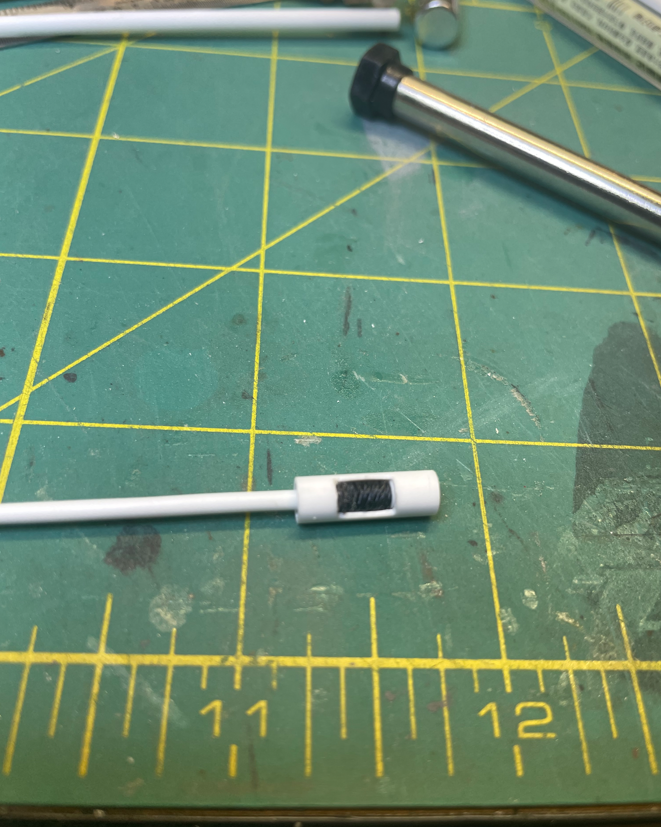
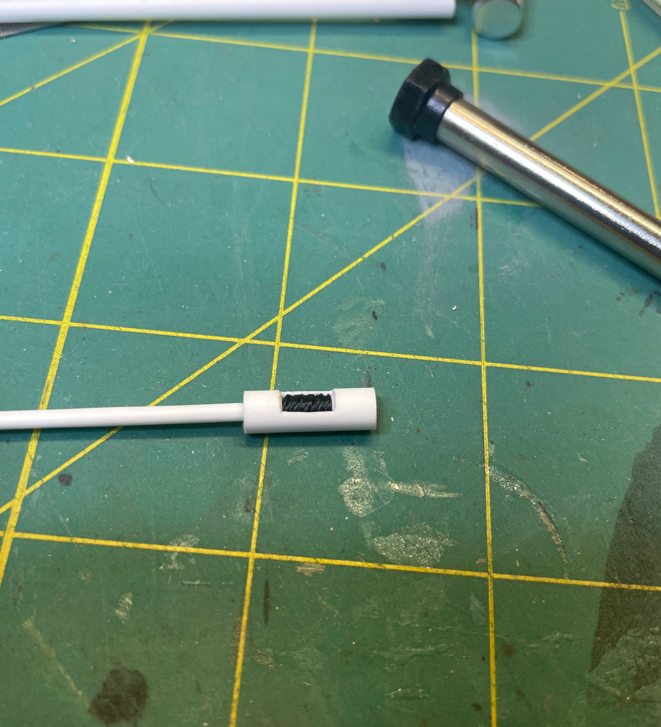
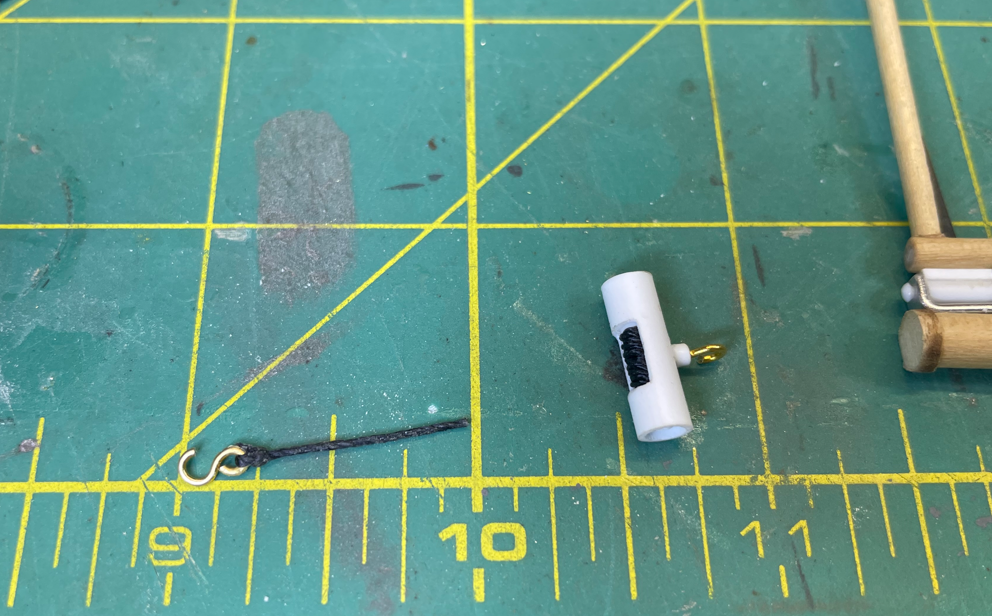
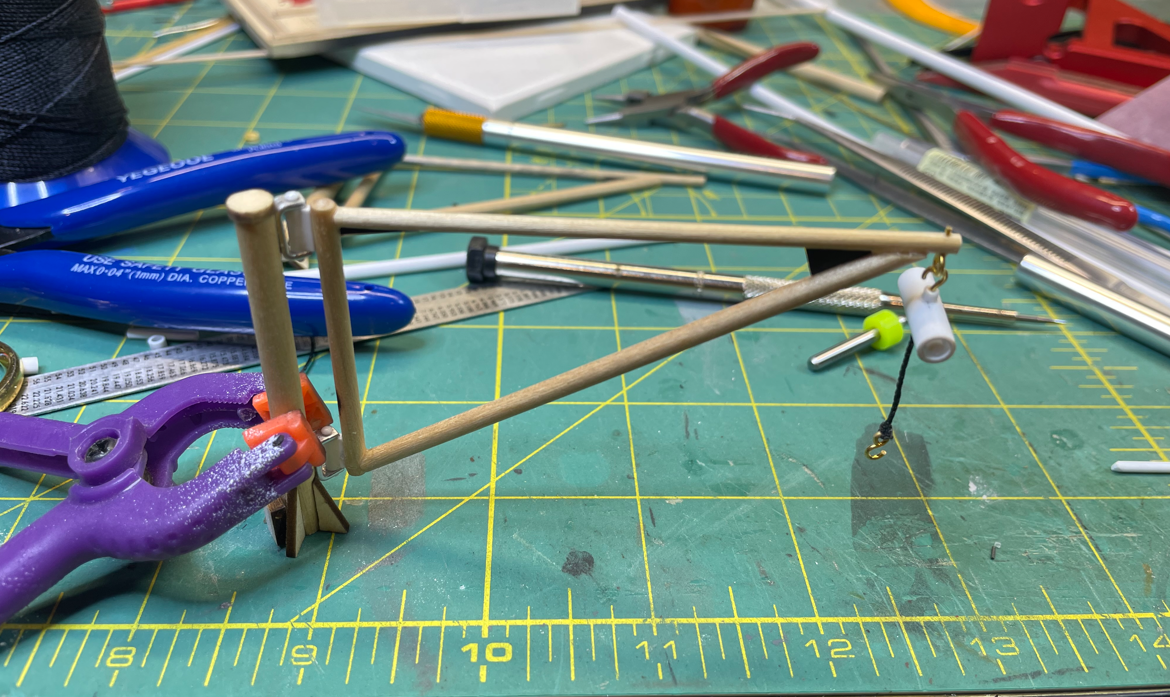
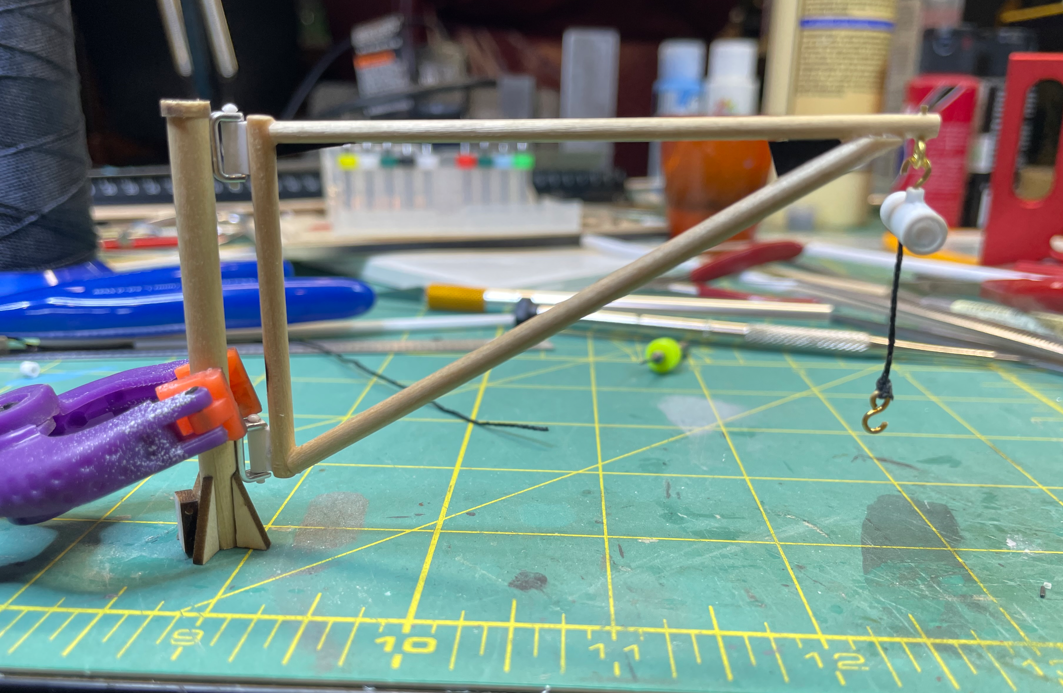
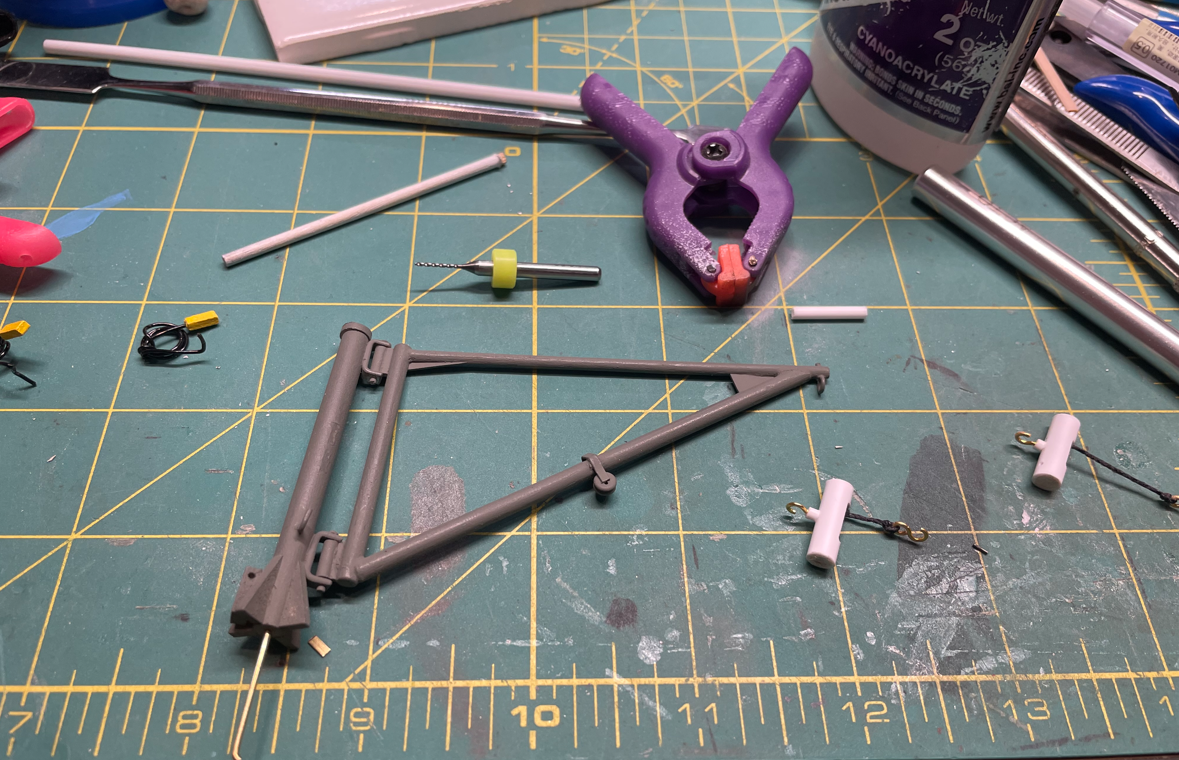
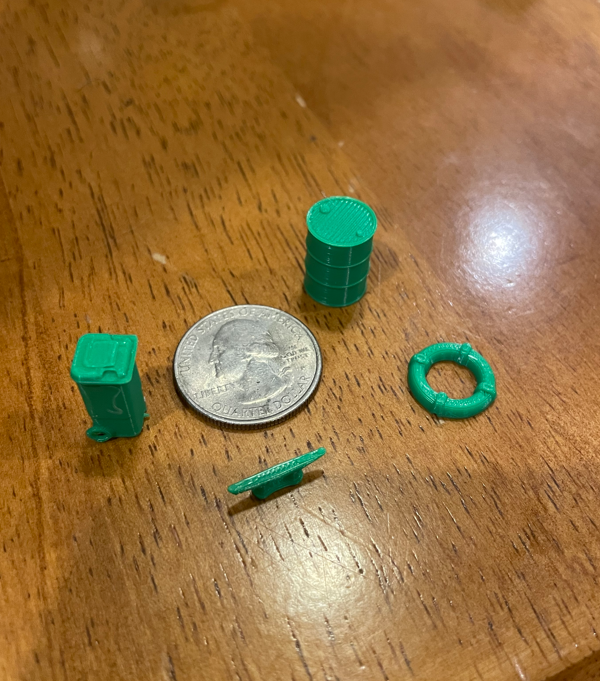
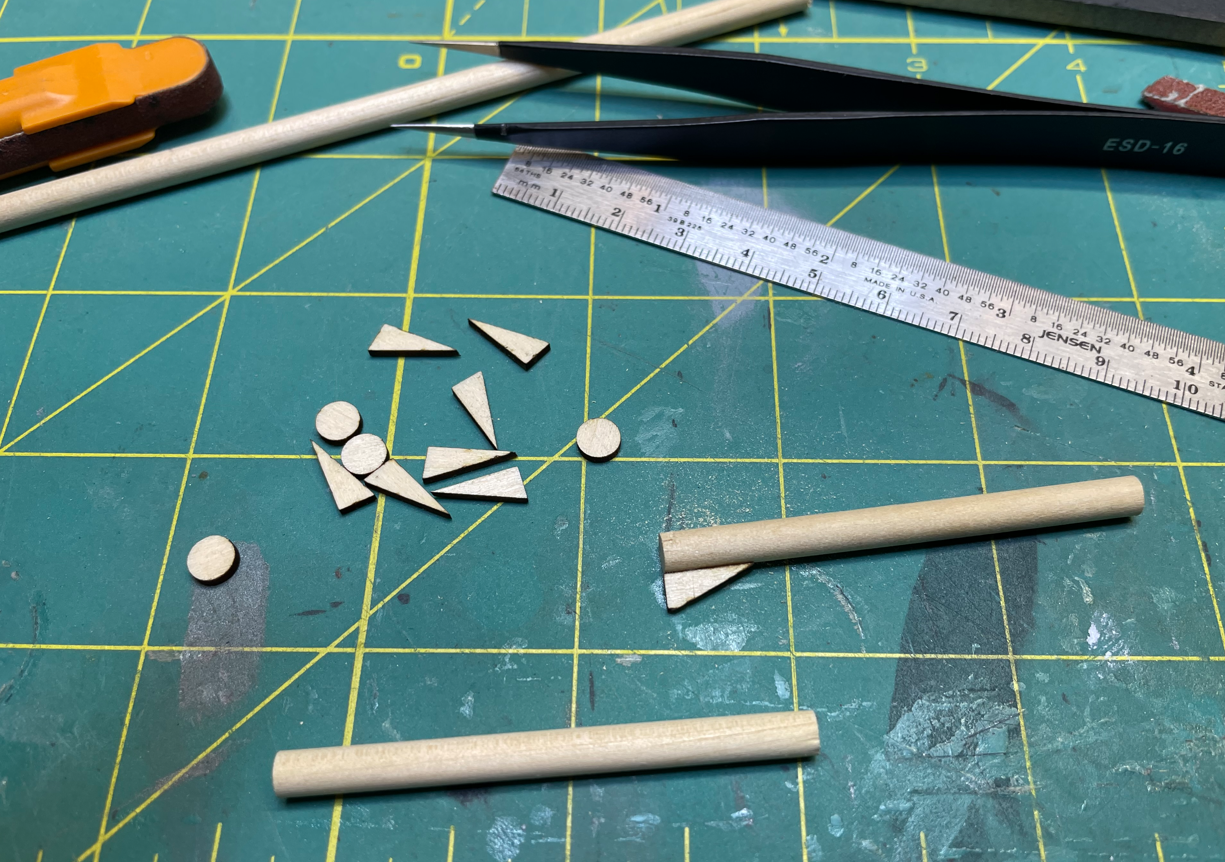
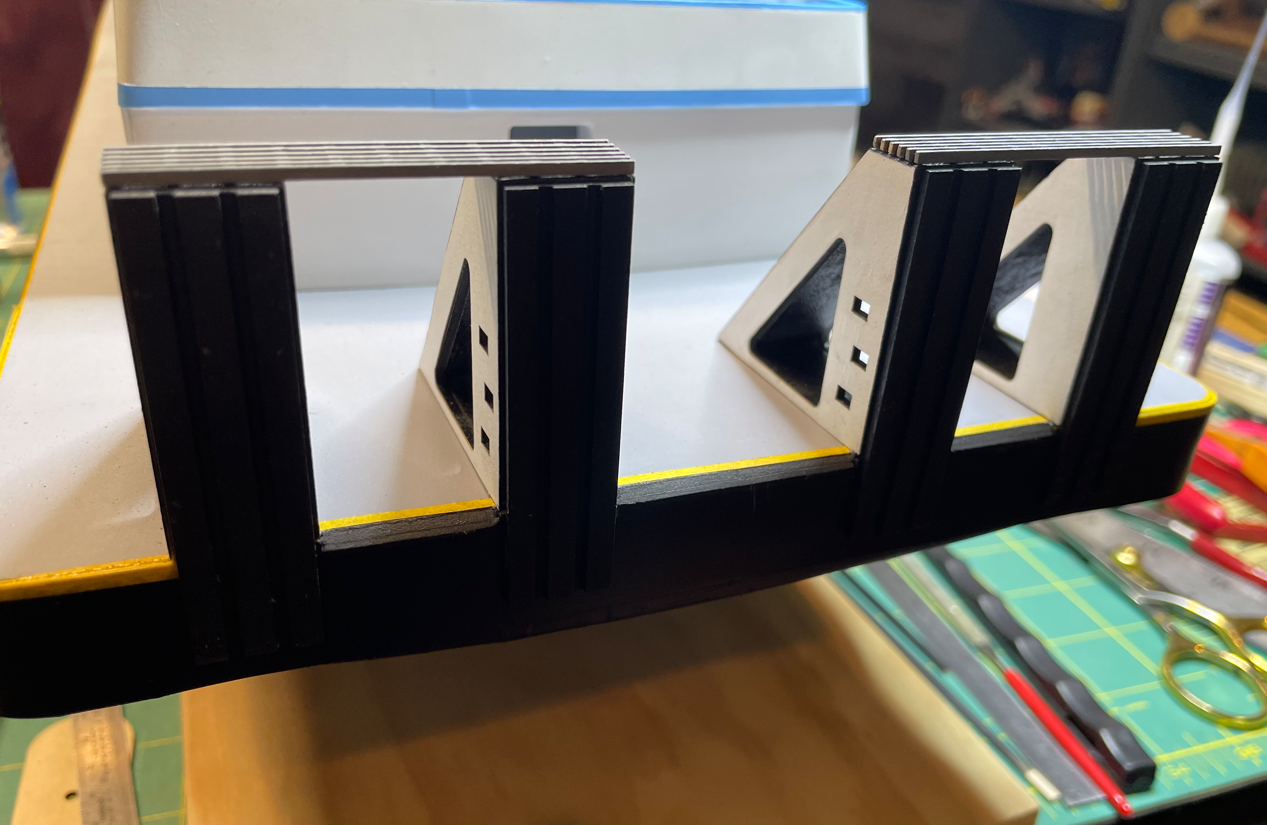
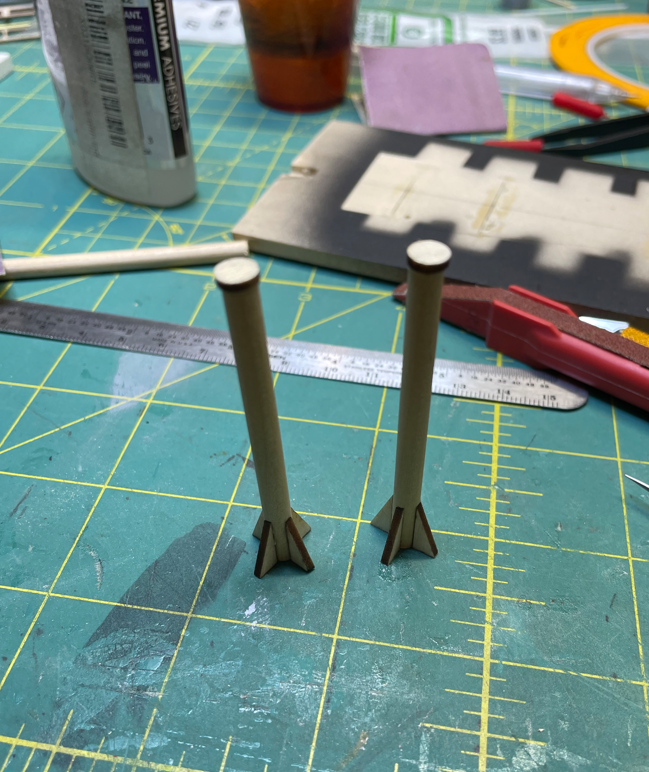
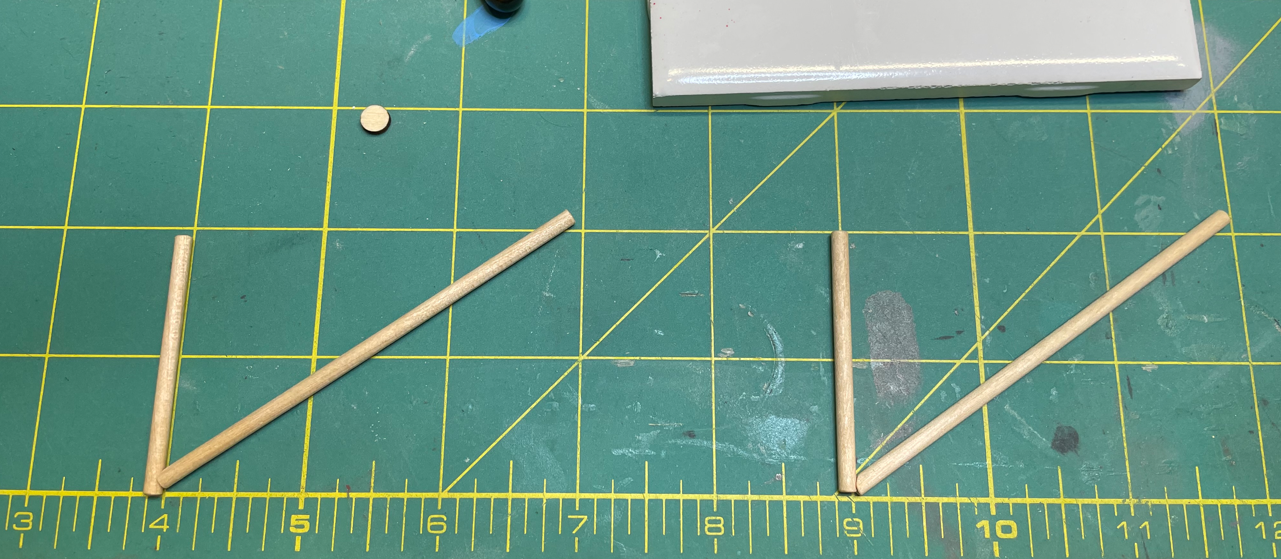
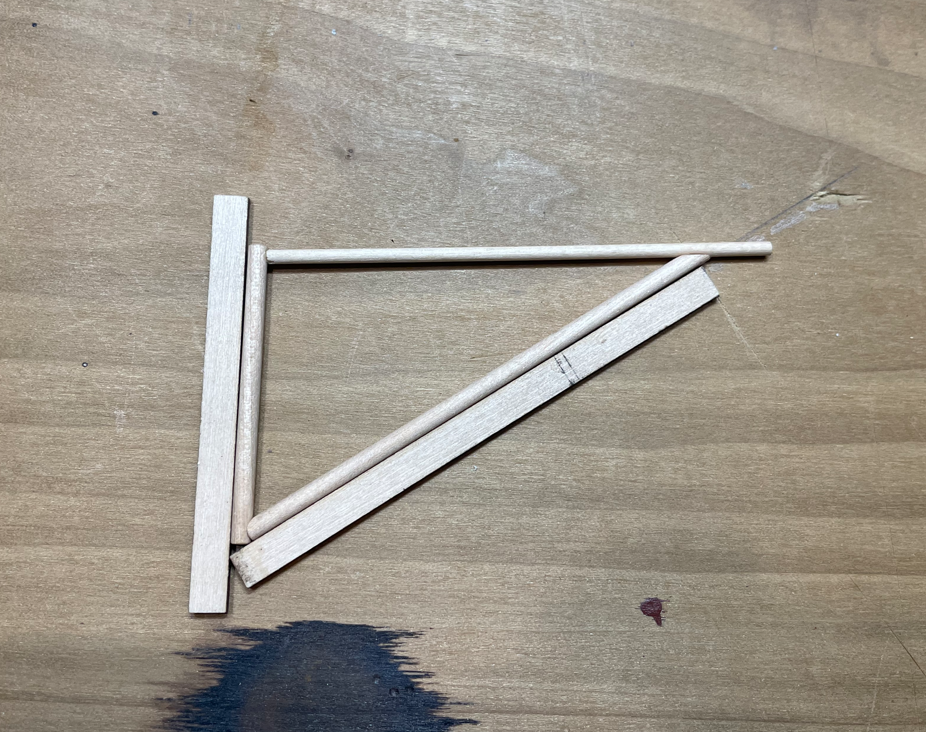
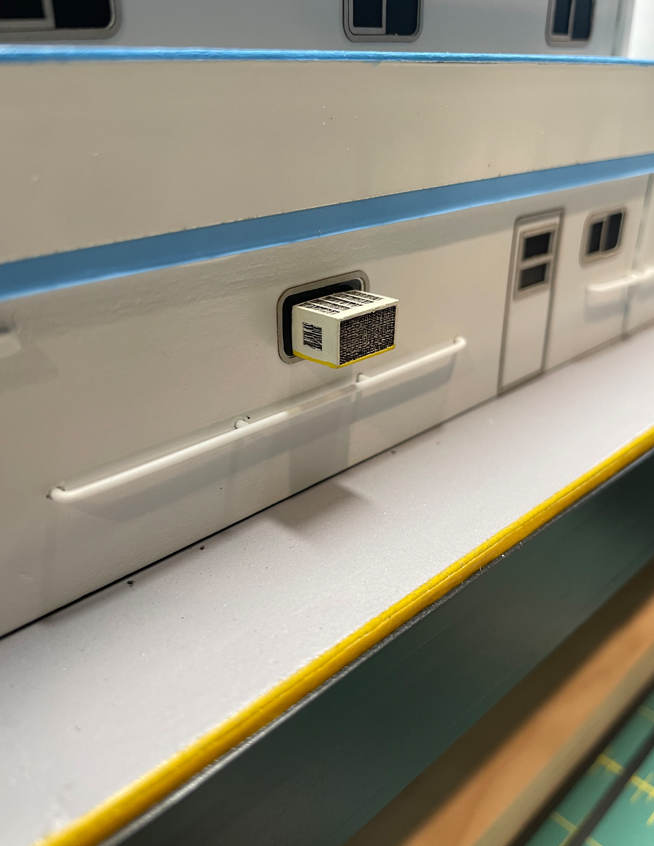
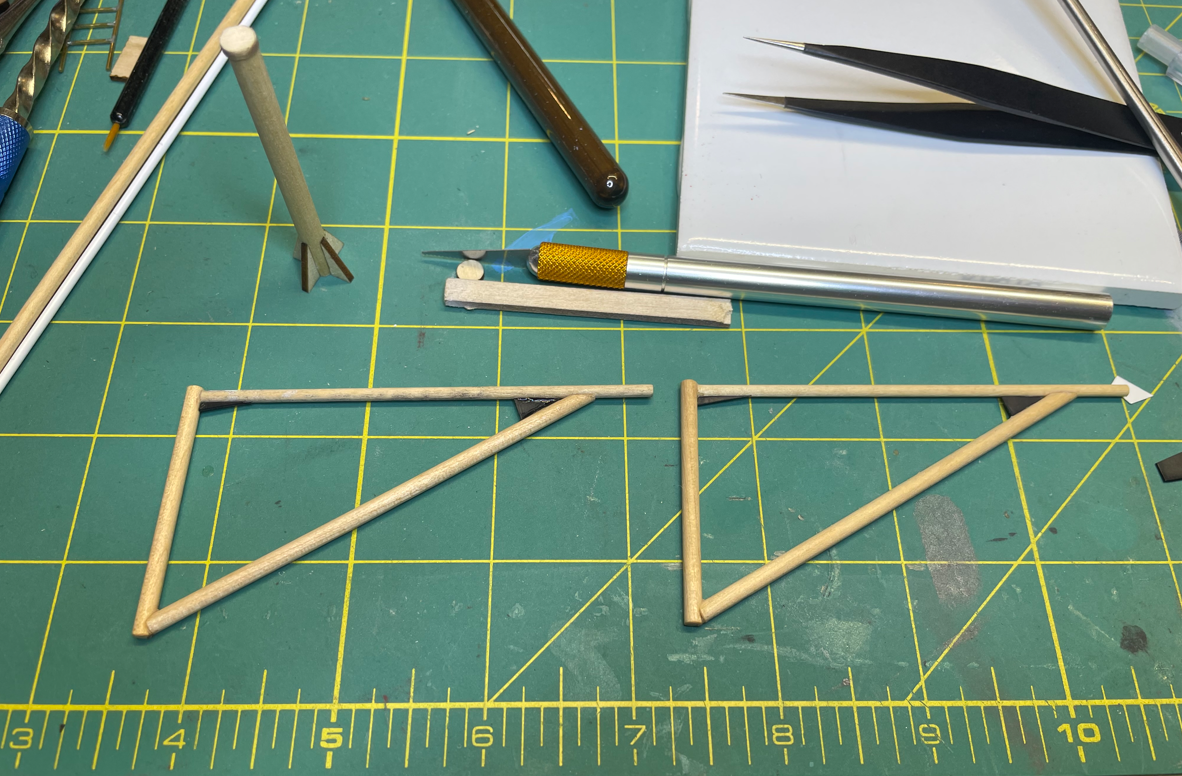
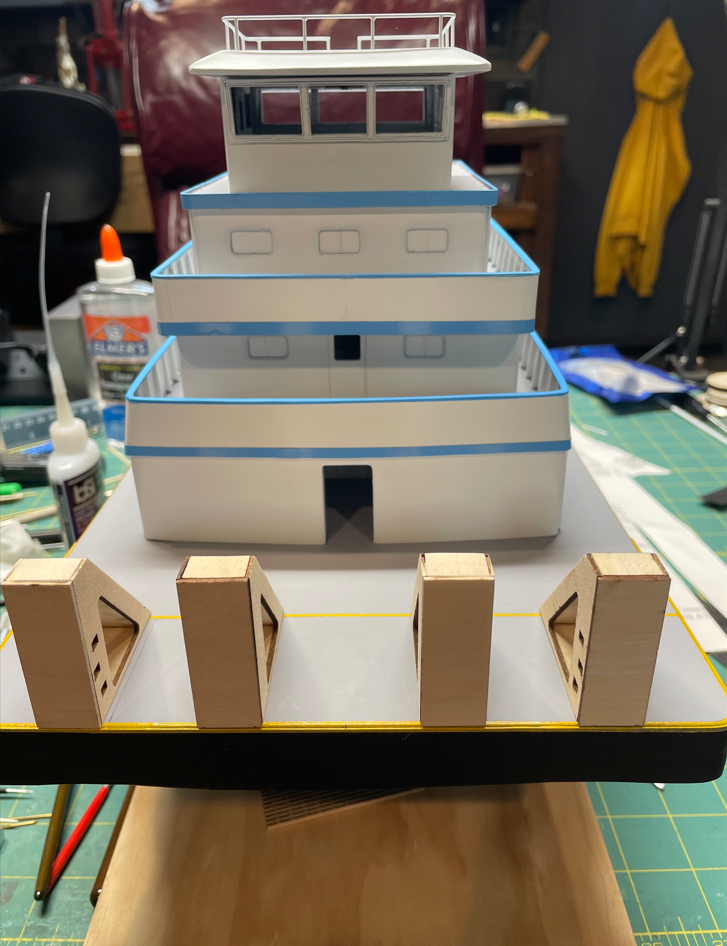
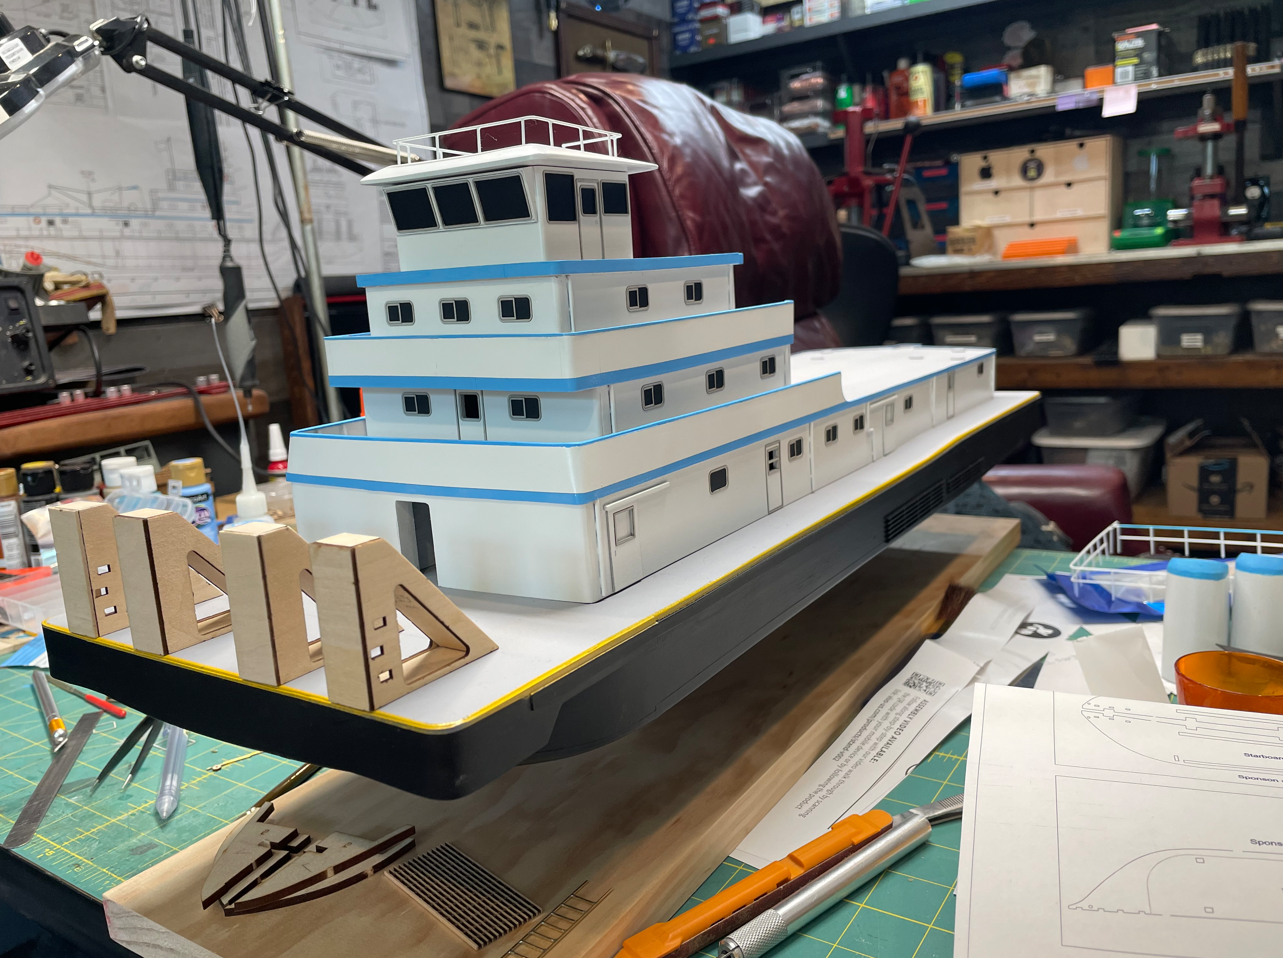
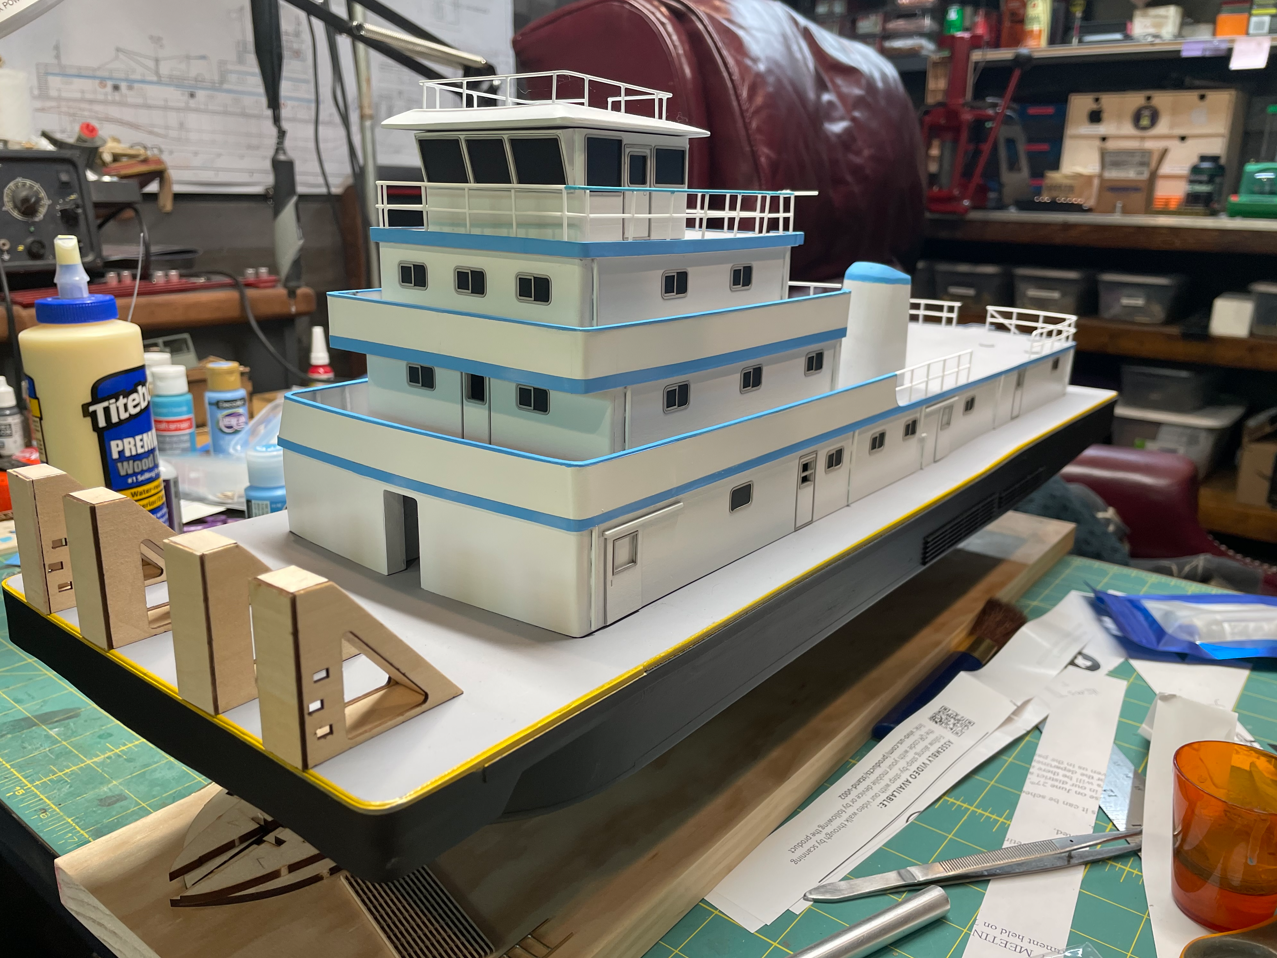
Hello again everyone, Finally back with a small update. This summer has been a crazy busy one on projects other than shipbuilding. I managed to steal away for a few hours over the past couple of months to get some work done, but not a whole lot. First thing that I was able to get completed was the AC unit installed. Not a big step, this part was completed way back when, but I am just now getting around to gluing it in place. I still need to add the support brackets, but it is place for now. Next I was able to get the tow knee bumpers built and installed. It was only until I posted this picture that I realized that you can't really make them out due to the lighting, but they are there. I finally took advantage of a rainy weekend (a rarity here in north Texas during the summer) and did some work on the lift booms. These are used to load and offload equipment, supplies and the Zodiac. For the main support posts I started out with a dowel and cut the gussets and caps on my laser engraver. Next it was on to the booms themselves. I made up a simple jig to get the angles the same on each boom, then glued the pieces together. Then I cut the gussets from some scrap ABS plastic that I had laying around and glued those in place. The hinges were built and installed next. These were made from styrene tubing. The other half of the hinges were made from aluminum materials I had leftover from my Cairo build and the hinge pins were temporarily made from scrap brass rod, leftover from the railing. I used the brass rod to help line up the hinge pieces while they were glued in place. The brass rod was removed and replaced with styrene rod of the same diameter so that I could heat the ends to create the crown on the top and bottom of the hinge pin. Both booms partially completed. Next I stared work on the winches that are attached to the booms. These were made from several different sizes of styrene tubing. The largest tubing was slotted to make the opening for the cable, the smaller two pieces were used to create the winch hub. I wrapped the hub with some rigging thread to simulate the cable wound up on the winch. I coated the thread with CA to hold it in place and give it a more steel cable like look. Then I inserted the hub into the winch housing. Then I made the hanging segment of the cable and used brass wire for the hook. The whole assembly is temp installed on the boom to get an idea of how things will look. It was time to apply a little primer to the boom assembly. And the final product. I made up the wiring harness for the control box from some plastic coated wire and finagled it through all of the attachments on boom. I started working on some of the deck details, such as the bollards and cleats, but I just couldn't get them to look right. While I was having a conversation with my son (while working on one of my other projects around the homestead) he mentioned that wouldn't it be easier to 3D print some of these deck details. Well after mulling it over I decided that he had a good point, that would be much easier. There have been a few build logs where I have read of people using 3D printers to create some of their pieces and I have used 3D printed parts on may past two builds so I looked into websites that sold 3D printed parts. Well, I was able to find a few pieces that I was looking for but I was somewhat worried that the scale wouldn't be just right and after shipping the parts weren't really worth it. So I did the next best thing, we invested in a 3D printer. Now I can make anything and everything that I need for the deck features. Some truest may think this is cheating, but since most of this build has been created on my laser cutter, why stop cheating now. Besides, these printers and filament have gotten so cheap that we could make good use of it making toys for the grandkids along with model parts. My first attempt at making life rings, barrels, cleats and trash bins. So that is as far as I was able to get this time around. I still have a lot of work to finish up with on the property before the weather turns cold, but I'm hoping to find a few hours here and there (or another rainy weekend) to get more work completed. I do appreciated everyone sticking with me on my extremely slow progress of this build. Until next time, thanks for stopping by. -Brian

-
I’m thinking the corrugated roofing might just set it off perfectly. A little silver and rust patina would look great. -Brian
-
Looking good John, getting closer to the finish line. The railing at the stern posed the same problem to me as well and if memory serves me correctly, I ended up cutting the railing to terminate at the posts. Your solution seems to have worked out perfectly, with great results. -Brian
-
I am running out of words to say about this Keith. I just marvel at the amount of detail you are cramming (apologies for the term, but my Thesaurus is limited) into small scale model. I also agree with Glen, the Boxcar Red works perfectly! -Brian
-
Keith, in the past I’ve used clear Elmer’s glue for small window glass. I placed the frame on a piece of glass and taped it down, dripped the glue to fill the frame and let it dry. The glue shrinks down to a thin layer and looks very realistic. It somewhat resembles rain glass which would have been more the style back in the day and the frame can be easily pried off the piece of class with an xacto chisel blade. -Brian
-
Keith, I am loving this build. Each little detail you add increases my amazement. This may have been discussed earlier and forgive me if I totally missed it, but I’m curious, if this is a raft why couldn’t the water tanks just be fed from the river they were floating on with a simple feed pump instead of having a supply boat provide it? I mean how much different is the boiler setup on these rigs compared to those on the steamboats? -Brian
-
Looking good John. Glad to see the aluminum can worked out for you. Nice job on the turnbuckles as well. I think the actually cam out better looking than the ones I made with the slots filed in the sides. -Brian
- 158 replies
-
- 1
-

-
- chaperon
- Model Shipways
- (and 1 more)
-
Keith, I’m with Peter on this one. I don’t see anything wrong with the flywheel. -Brian
-
Amazing work Keith! 3am on those tiny bits! Wow, my eyes wouldn’t be able to focus on my bench at that time of the morning, let alone the small parts. And I just got new eyes last year and still in my 50’s. 🤣 My hats off to you sir! I am a lightweight. -Brian
-
USS Cairo by Zetec - FINISHED - 1/50 scale
mbp521 replied to Zetec's topic in - Build logs for subjects built 1851 - 1900
John, what a beautiful build! Sorry to hear about the loss of all your pictures, but your final product is outstanding. Love the display case as well. Congratulations on getting her done. -Brian -
I’m loving the level of detail that you are putting into this build Keith. Beautiful work as always. -Brian
-
Count me in on this one as well. Looks like a fun build. -Brian
-
Woah, how did I miss out on the start of this build Keith? I guess I got caught napping. I love these odd bits of history and even odder boat builds. I’m definitely going to hop on the journey for this one. -Brian
-
On its side, at the stern gets my vote. It shows off the work you put into the interior. -Brian
- 393 replies
-
- 11
-
-
Thank you Eric. The sunset picture says it all. What a beautiful display of river life. One of the things I truly miss about south Louisiana and living on the Mississippi. -Brian
-
Thank you Keith. The Titanic was a fun project, and at 53” long it’s a monster. I had to put that one inside, my little shipyard just didn’t have the room to display it. I do have to say though, this build was a lot less messy. 😁 Now you’ve got me to thinking. 🤔 I May just have to go buy a bunch of white and light blue bricks and build me an iceberg. Caroline N first. 🤣 -Brian
-
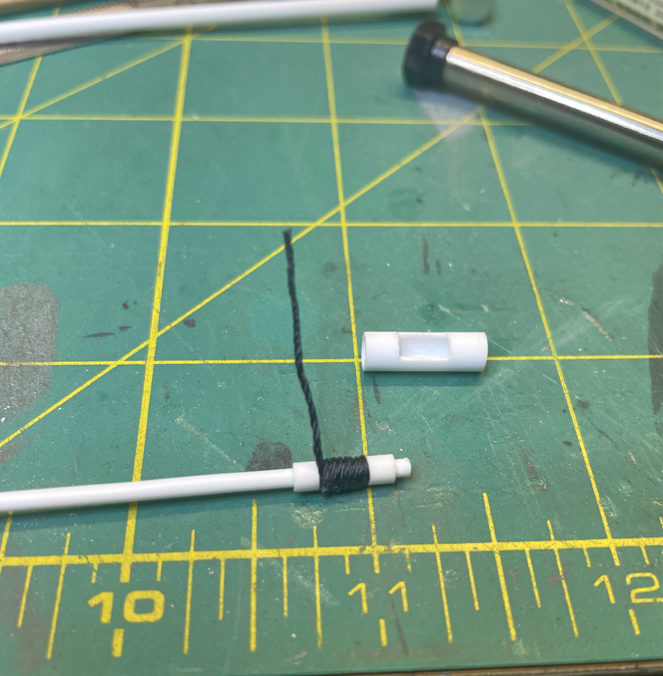
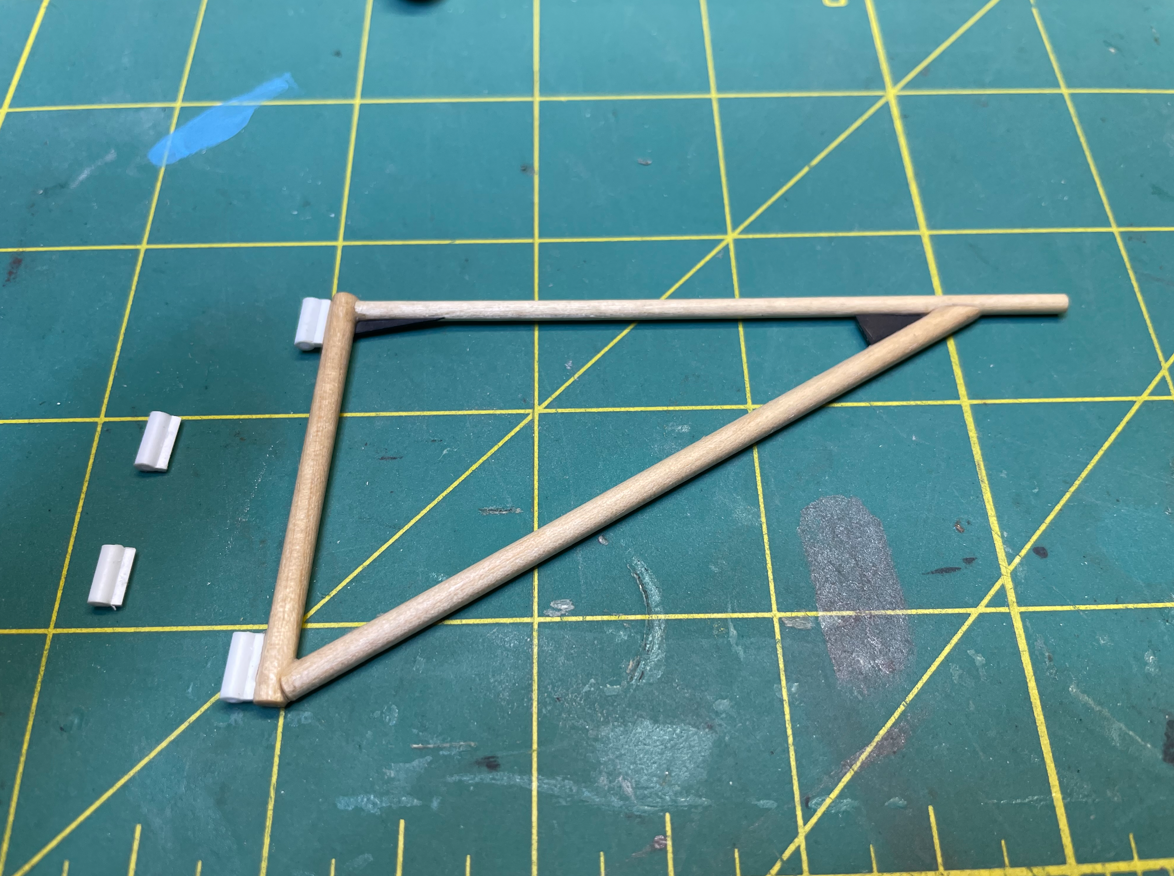
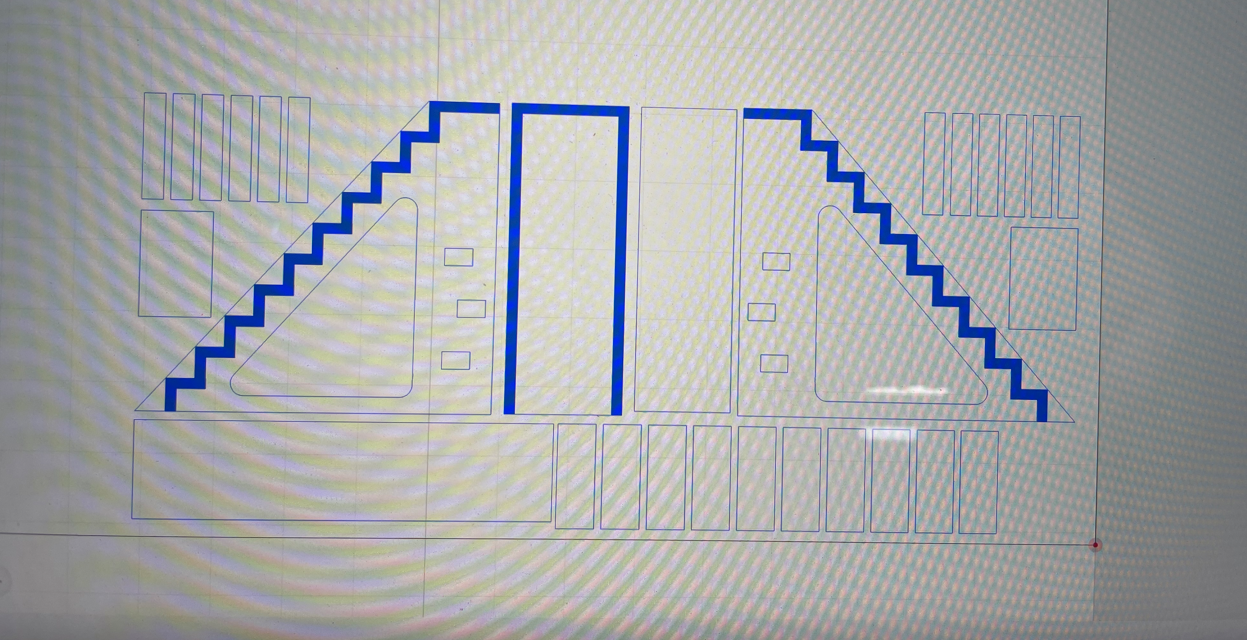
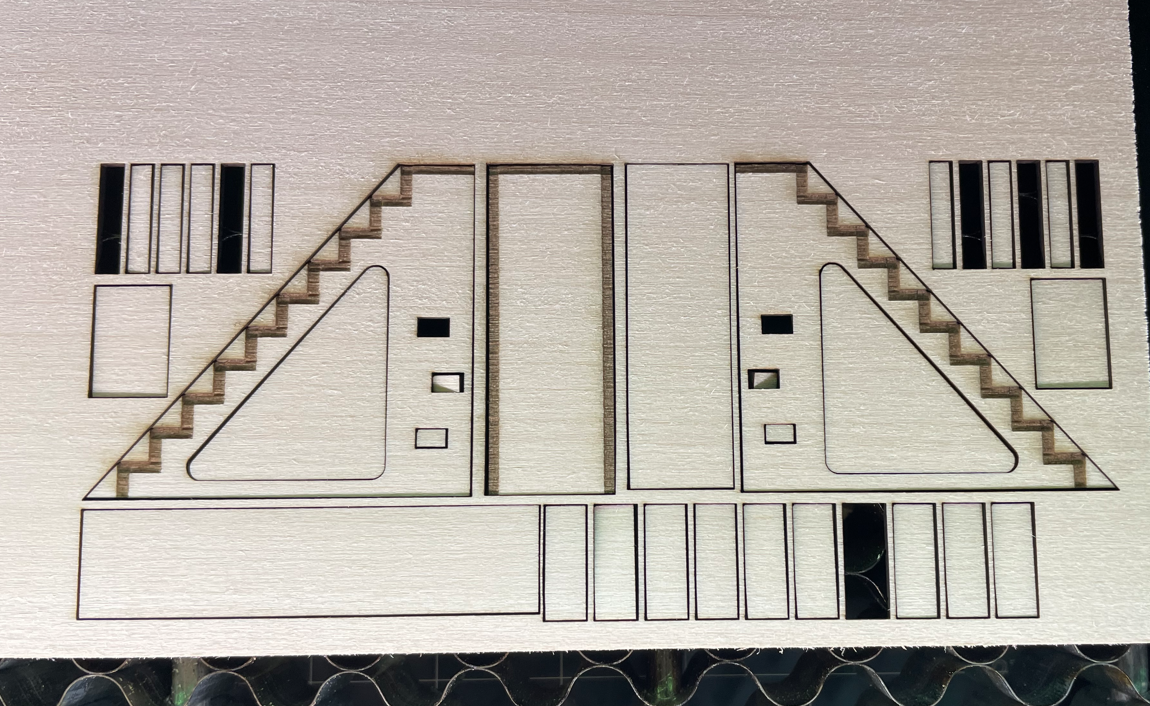
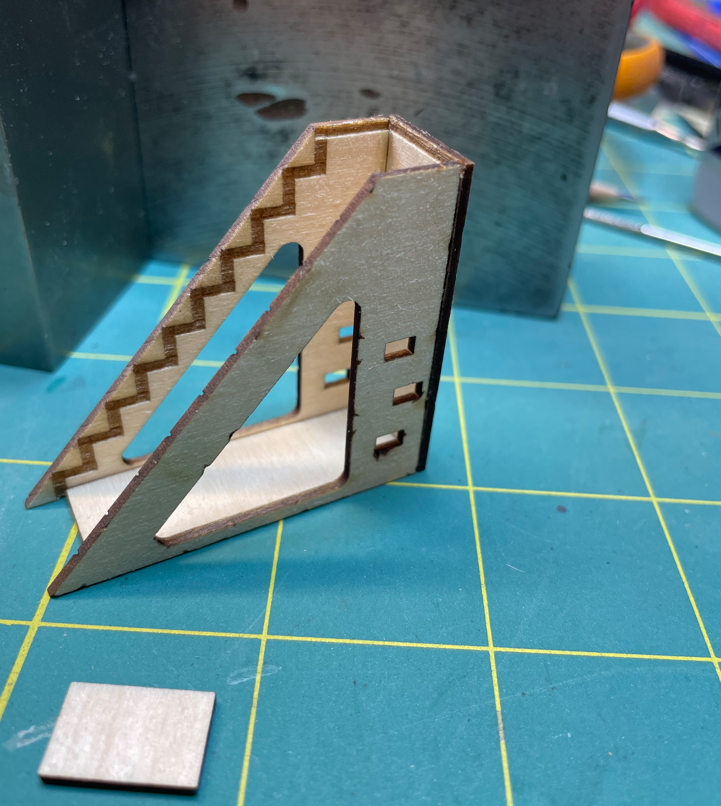
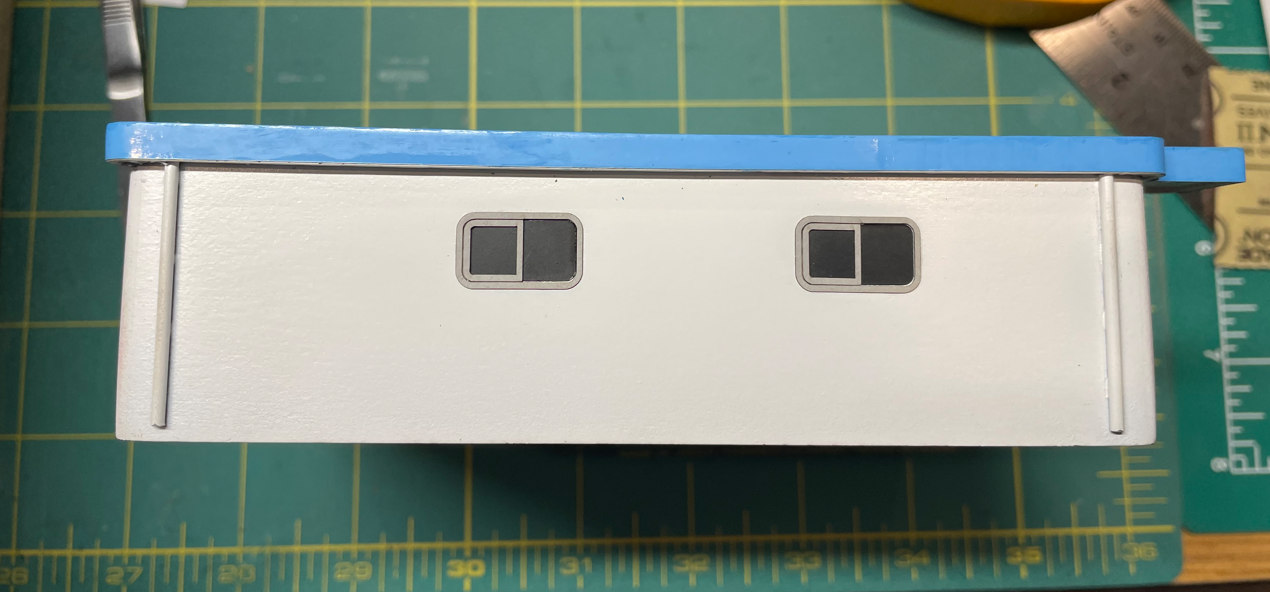
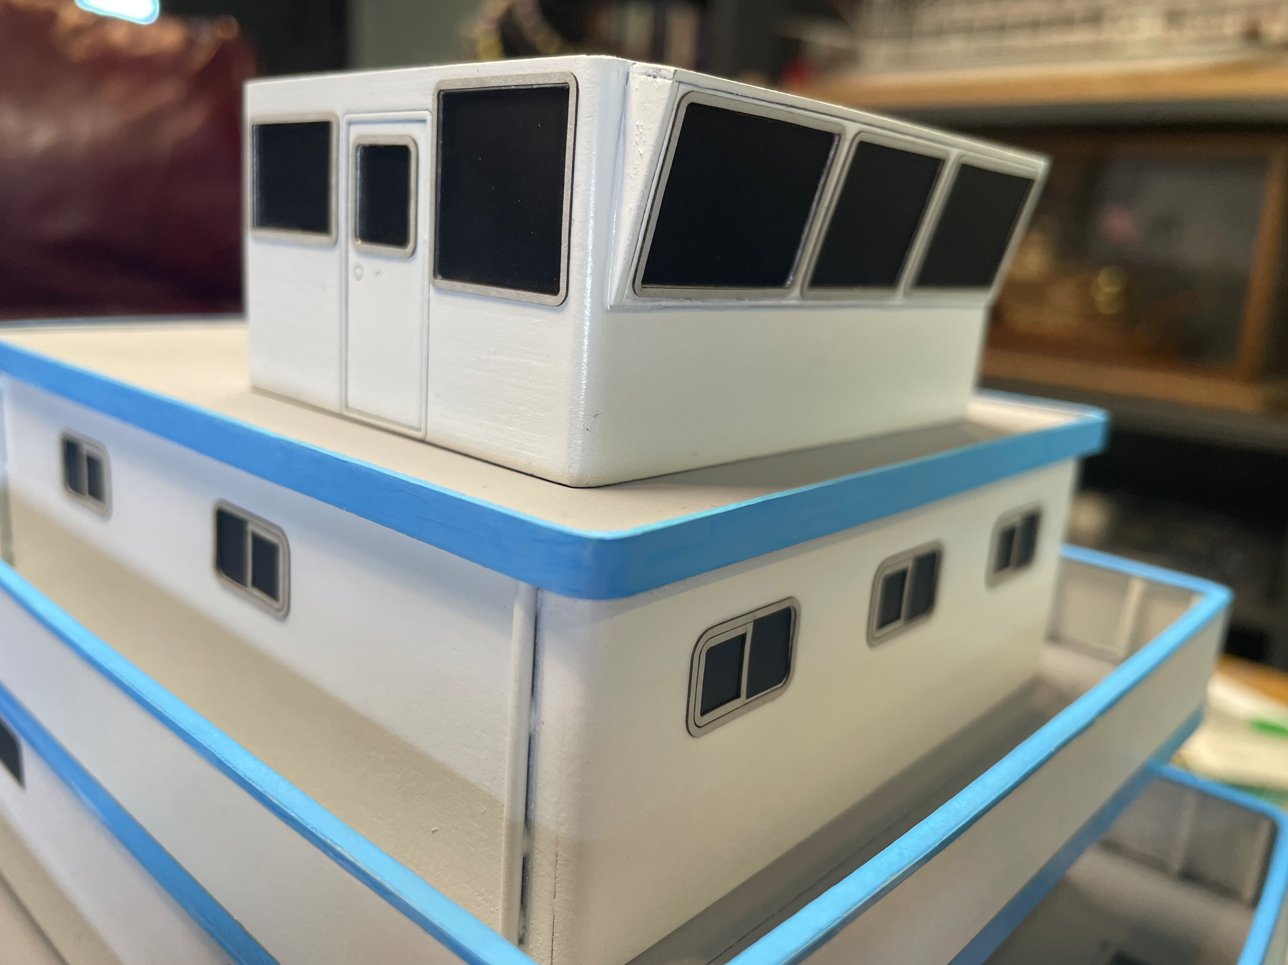
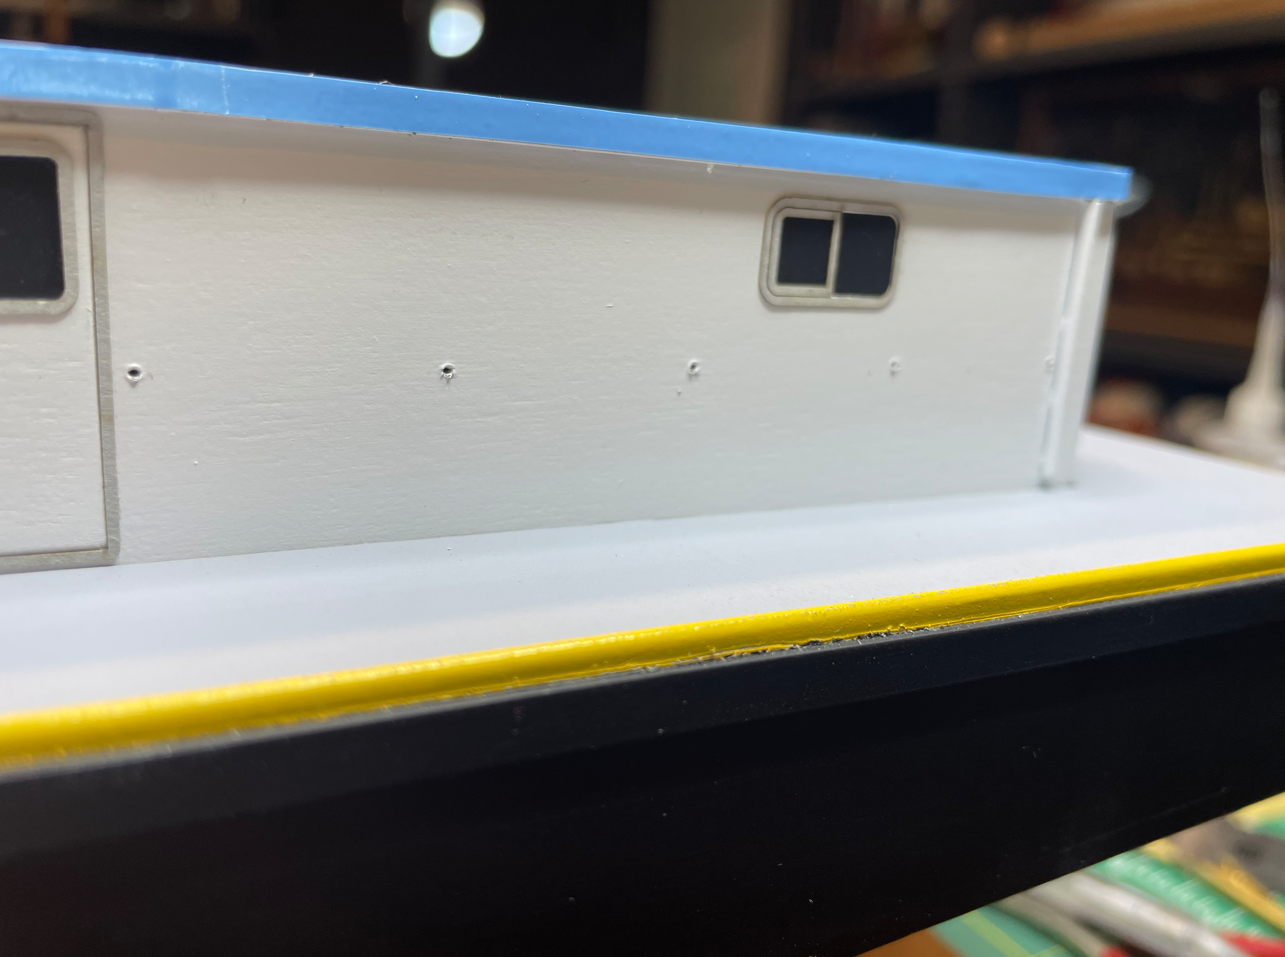
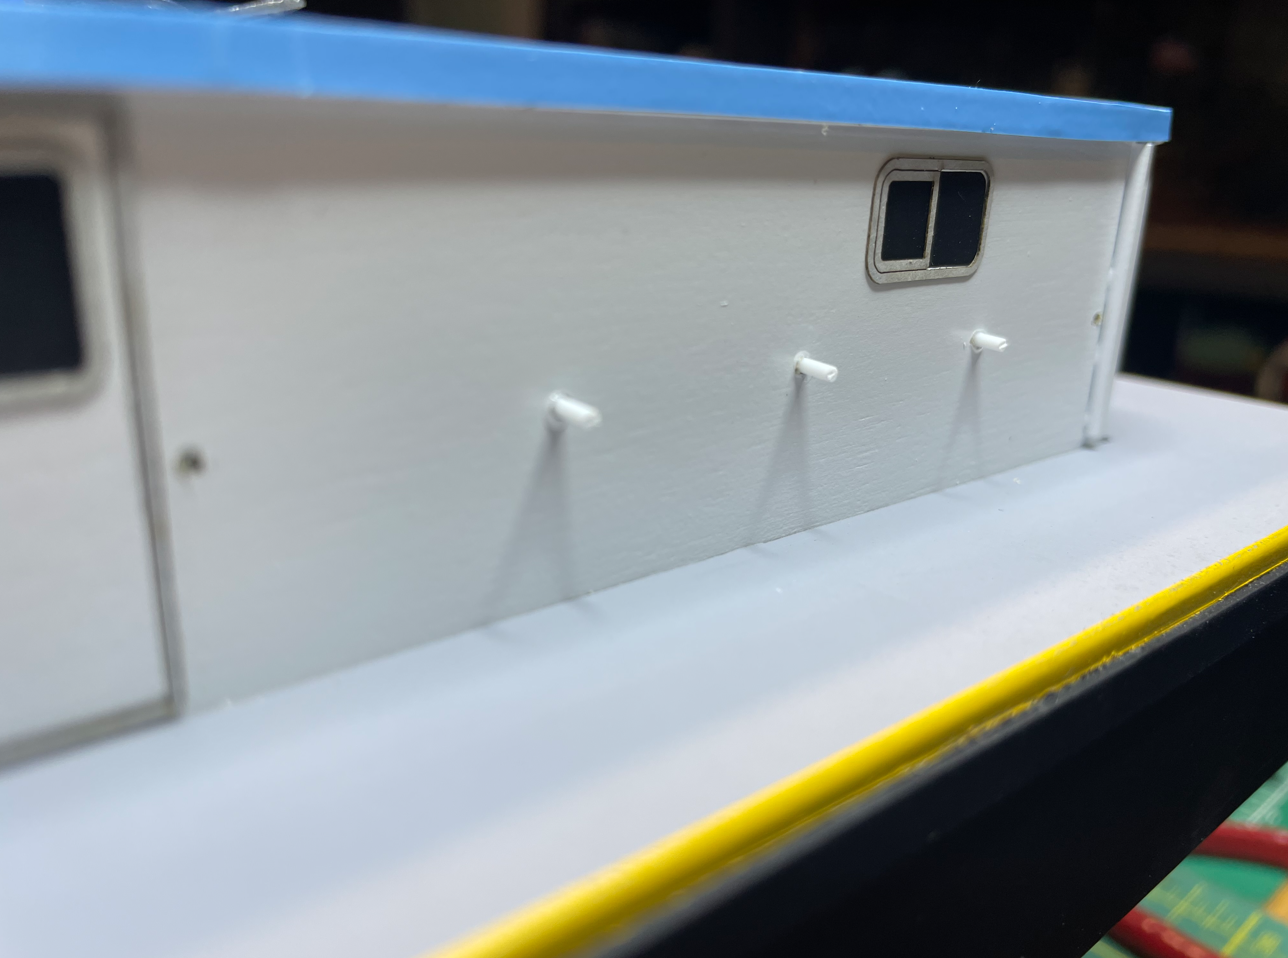
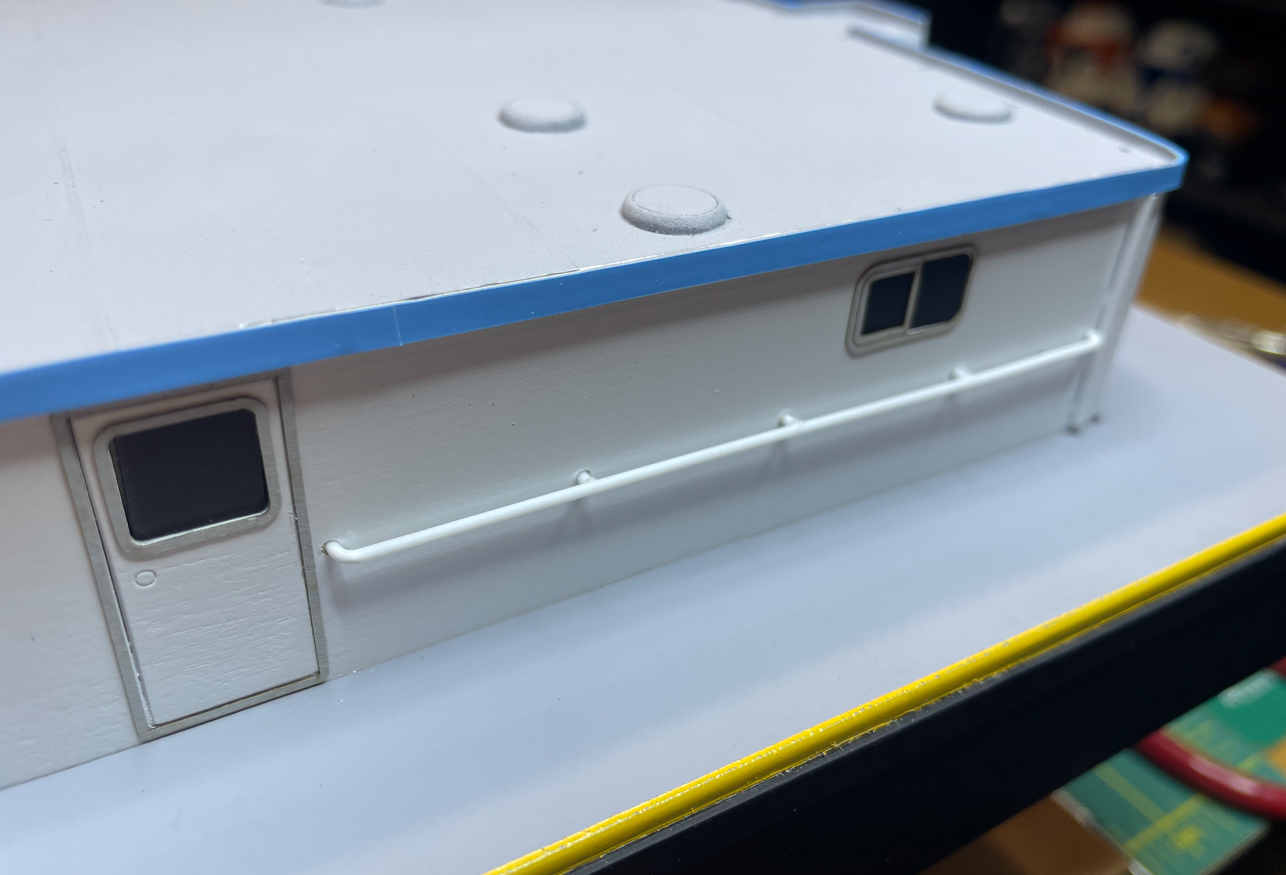
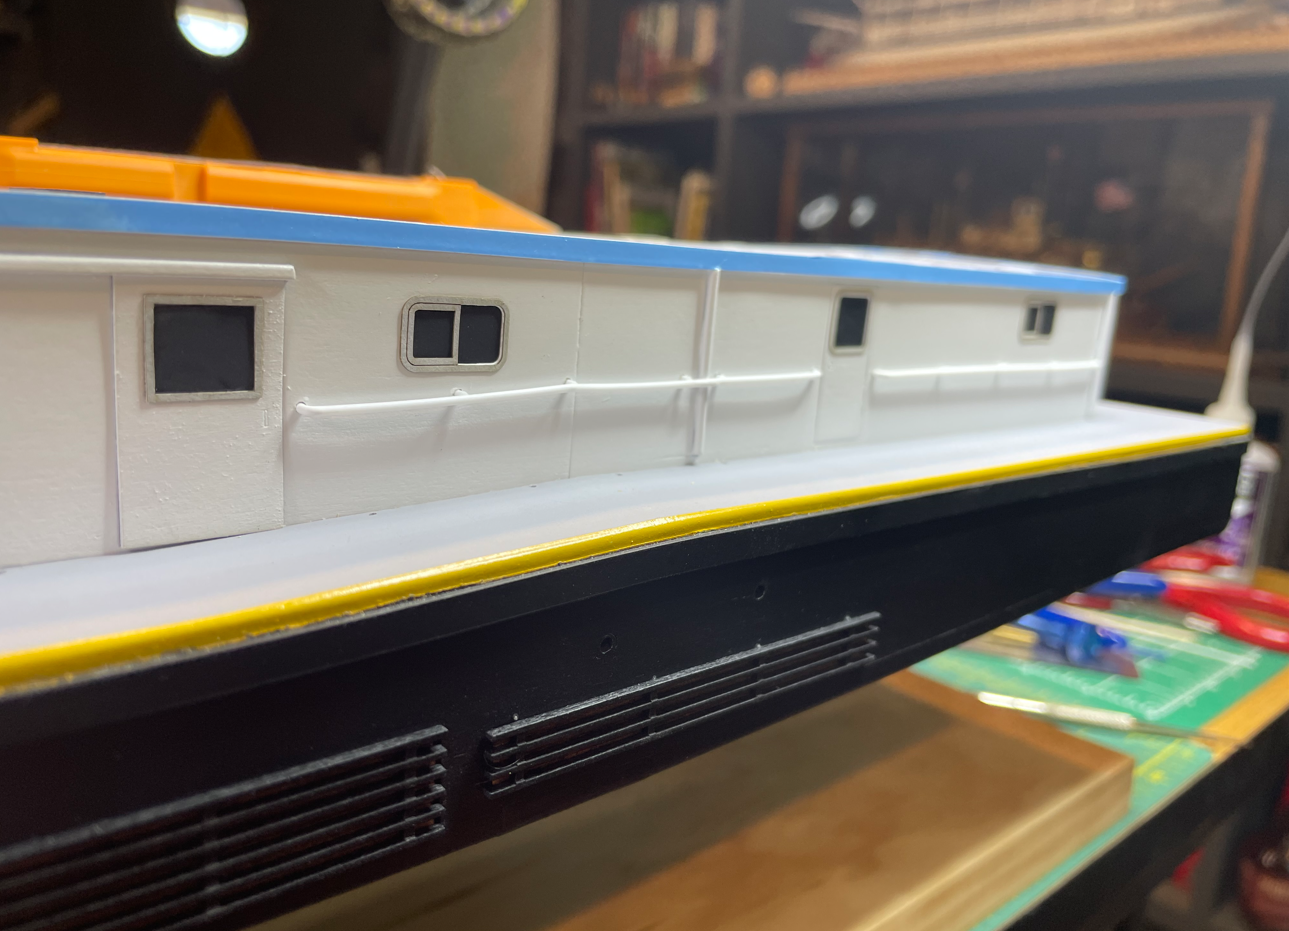
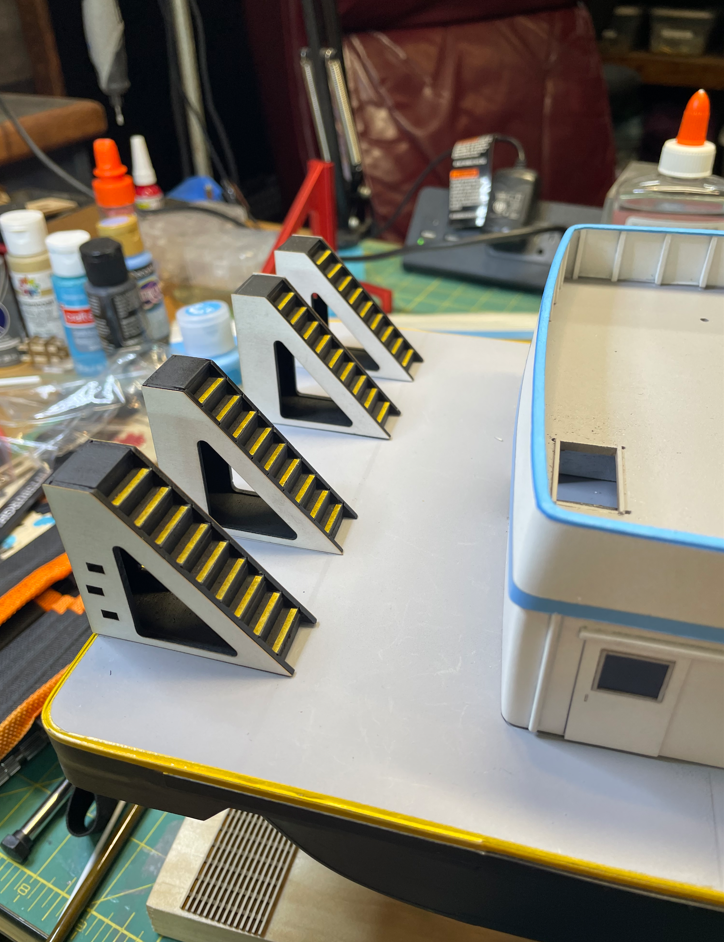
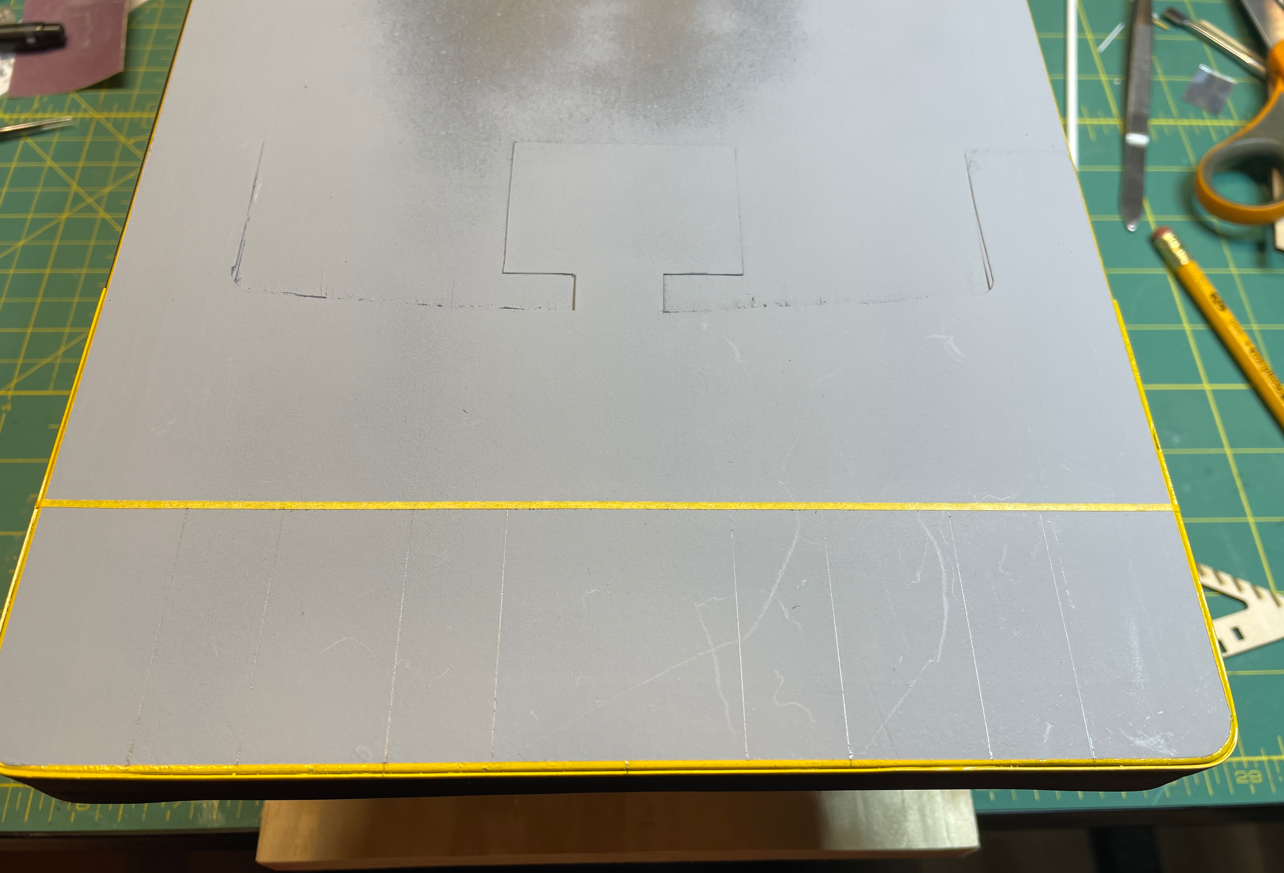
Ha ha Keith, the light saber is still functioning, but the laptop is not. I haven't had a lot of time to devote to the build due to work, life and other projects, but things have not been totally stagnant. My old laptop died on me a couple of months ago so it needed to be replaced. Well after 30 years of being a Windows user I finally had enough and made the change to a MacBook. Needless to say, there is a slight learning curve and it took a bit of retraining my brain, but I think I finally figured it out. My biggest hurdle was trying to figure out how to scale down the file size of the photos so they could be uploaded to MSW. This will be my first attempt, so if things run afoul, please bear with me. I dug through all of my pictures on my phone that I have taken since my last update and I think I'm on track as to where I last left off, so here we go. So starting off, I designed the window and door frames on my "light saber" (sorry Keith, it was too good not to use). These I made from gray card stock. The inner frame is just slightly engraved, to show the separation from the outer frame, but not so much that I had to install two pieces. I'm pretty pleased with the results on this. Pilot house window frames. Next, I drew up the plans for the tow knees. These plans included the stair stringers and risers, sides and bases. I used the engraving feature to allow an easier way to align each step as well as the front panel. It took a couple of tries to get my measurements just right, but I finally got it. Here is the results after they have been cut out. The first tow knee going together. Here I marked the locations of the tow knees on the bow. All of the tow knees constructed and temp installed to get an idea of how they are going to look. While I pondered how to paint the tow knees up (really I just don't like painting that much, so I was looking for an excuse to put it off for as long as possible) I started work on the handrails along the main deck cabin. I struggled to get a good view of these from the pictures and videos that I researched but I think I came pretty close to getting it right. My main hang-up was how they were attached to the walls and how far they were located from the walls. I went with my gut that there was about a two inch gap between the rail and the wall given that on several locations you can see where the railing is bent around the downspouts that run from the deck above. The first picture is drilling the holes for the standoffs for the railing. Here are the standoffs going in. For these and the railings I used 1mm styrene. I cut these a little long at first to give me enough play to trim them to the correct length and allow for some sanding to mate up to the railing a little better. The first railing installed. More of the port side railings. Once all of the railings were installed, it was time to suck it up and start painting the tow knees. I didn't take any pictures of the painting process, because it was just painting. But here are the results. Port view of the knees. Starboard view of the knees, You can also see some of the completed railing on the main deck. Notice how the rail curves around the downspouts. Finally, I did a little side project but didn't do a build log on it (it only took a week). This was a birthday present from the Admiral and our offspring. I'm still a kid at heart and I still love playing with Legos, so I thought I would share with the group. Well that is all for now. My "other projects list" is starting to shrink so hopefully I'll be able to devote some more time to the build. I promise it won't be near as long before my next update. Hopefully this will keep everyone's interest for the time being. Thanks for stopping by. -Brian


-
I thought that was the model shipbuilders motto. 😁 Stairs are my least favorite parts to build along with railings, and on my current build there is plenty of both. That may be the reason I’ve been lagging in the build department. You are really making nice progress! -Brian
- 158 replies
-
- 1
-
-
- chaperon
- Model Shipways
- (and 1 more)
-
I totally forgot to throw my opinion on this one. I’m thinking it looks best on the aft, turned upside down. It’s readily accessible and keeps the rainwater out. -Brian

-
Congratulations Eric. Another fine build that truly shows your love of the old Missouri River vessels, as well as your expert craftsmanship. It’s about time that I light a fire under my backside and sit back down at the bench and get to work on my build, and your completion of Peerless is just the motivation that I need. As always, I look forward with great excitement to the next project to hit your bench, no matter how long you keep us waiting. 😁 -Brian
-
Beautiful work Eric. These details are definitely going to bring the boat to life. Out of curiosity, where did you get the crates and sacks from? -Brian
-
Congratulations Eberhard, what an outstanding build. 18 years, wow! It has been a fantastic adventure following along and can’t wait to jump on board the next one. -Brian
-
Once again you have produced a beautiful work of art. Sometimes giving into peer pressure yields beautiful results. I can’t wait to see the details you have in store to dress it up even more. -Brian

