


mbp521
-
Posts
1,003 -
Joined
-
Last visited
Content Type
Profiles
Forums
Gallery
Events
Everything posted by mbp521
-

Barncave Shipyard by mbp521 - Scale 1:1
mbp521 replied to mbp521's topic in Non-ship/categorised builds
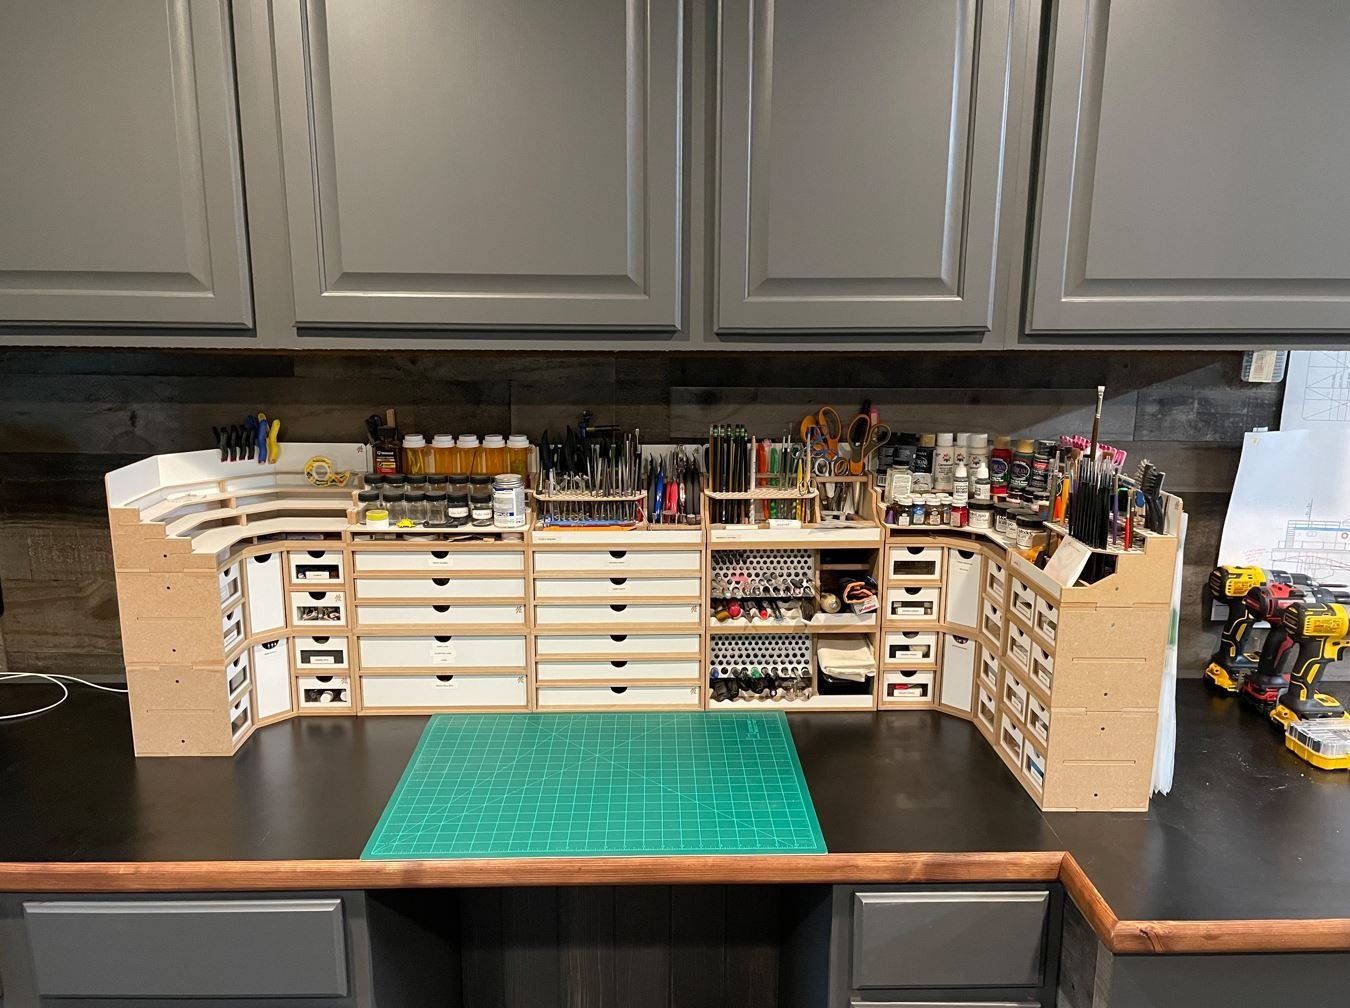
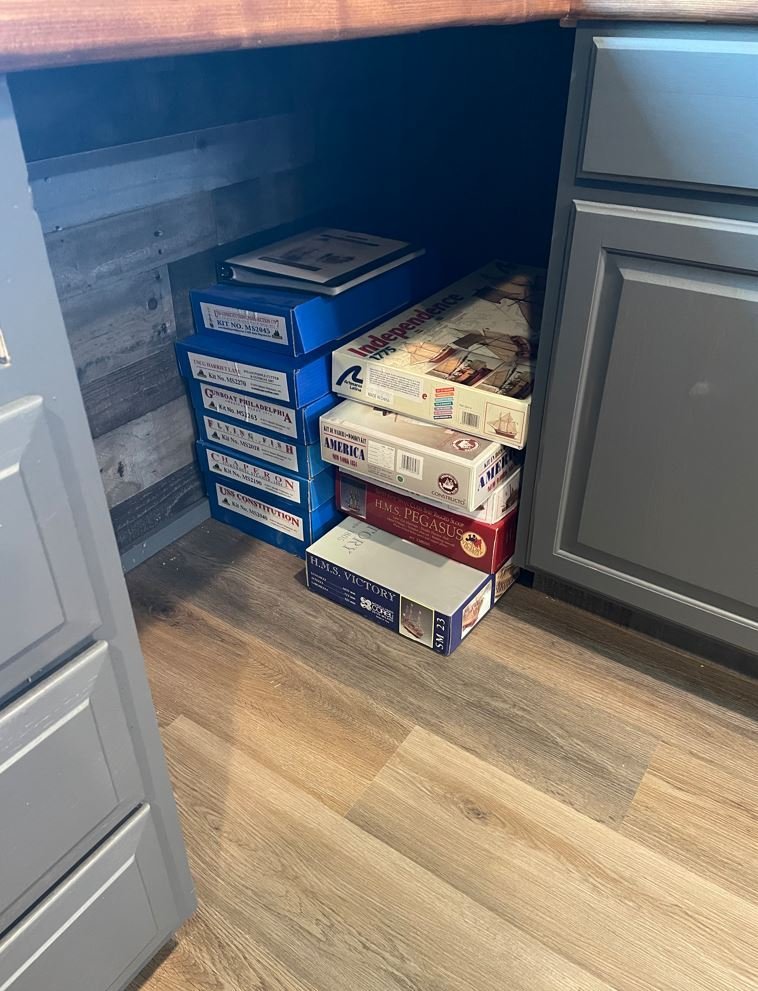
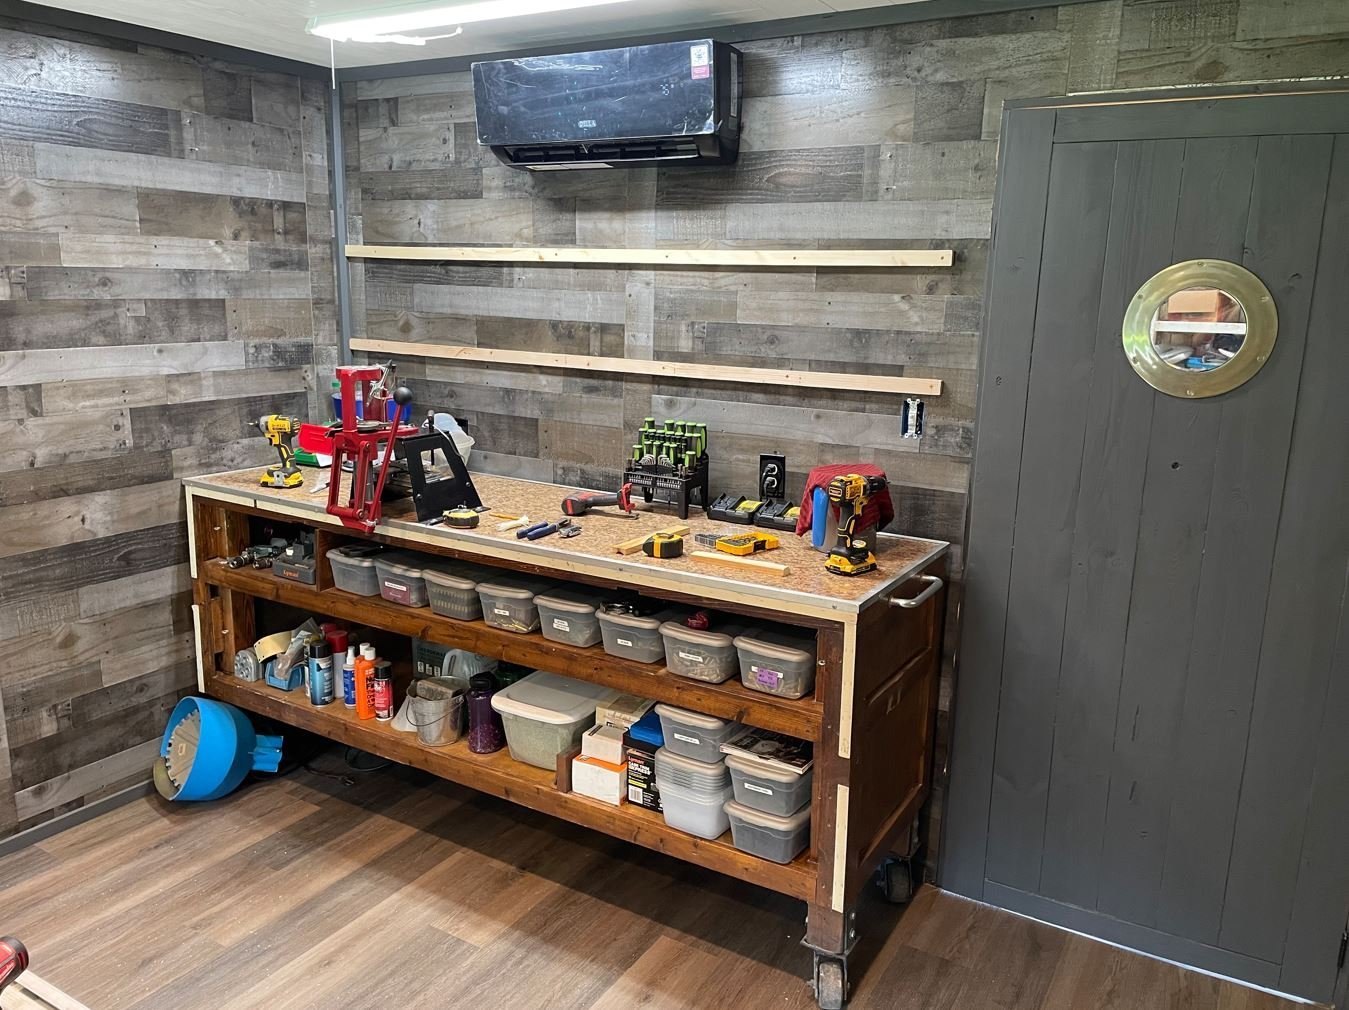
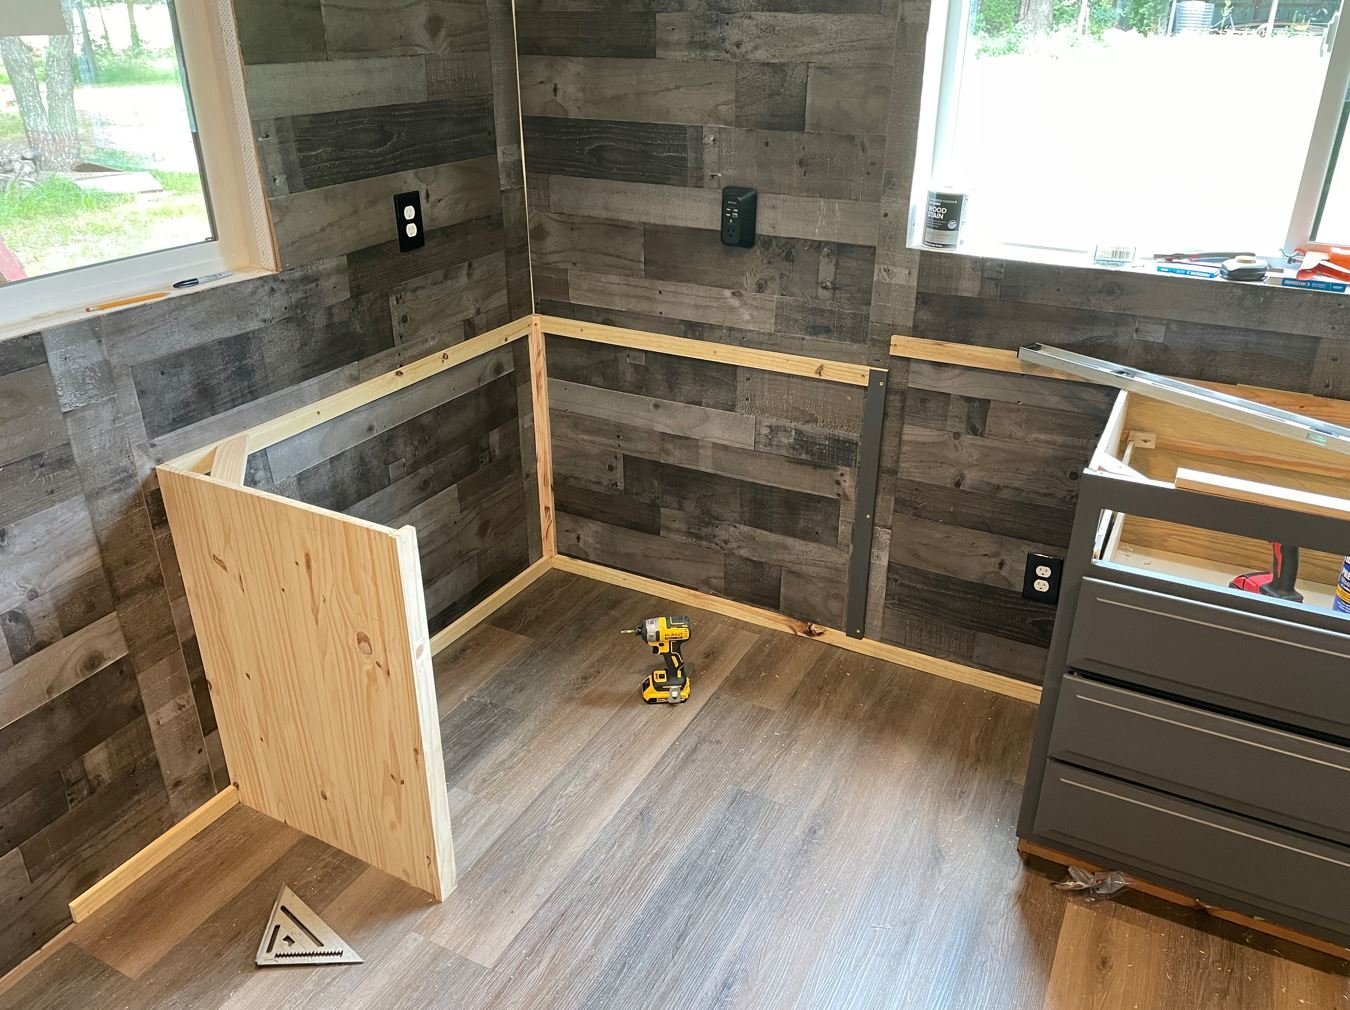
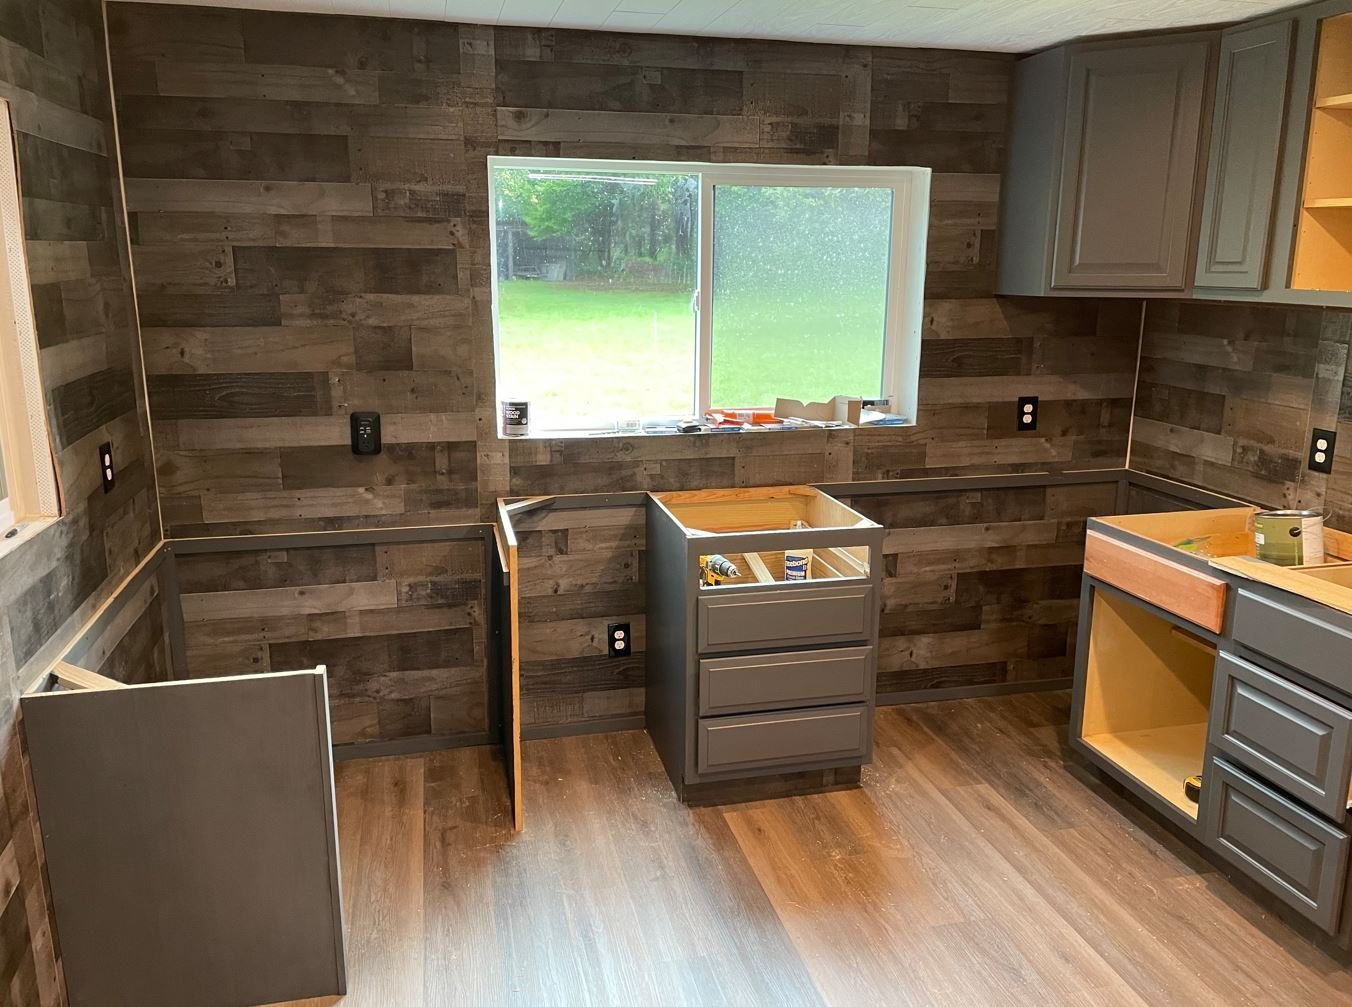
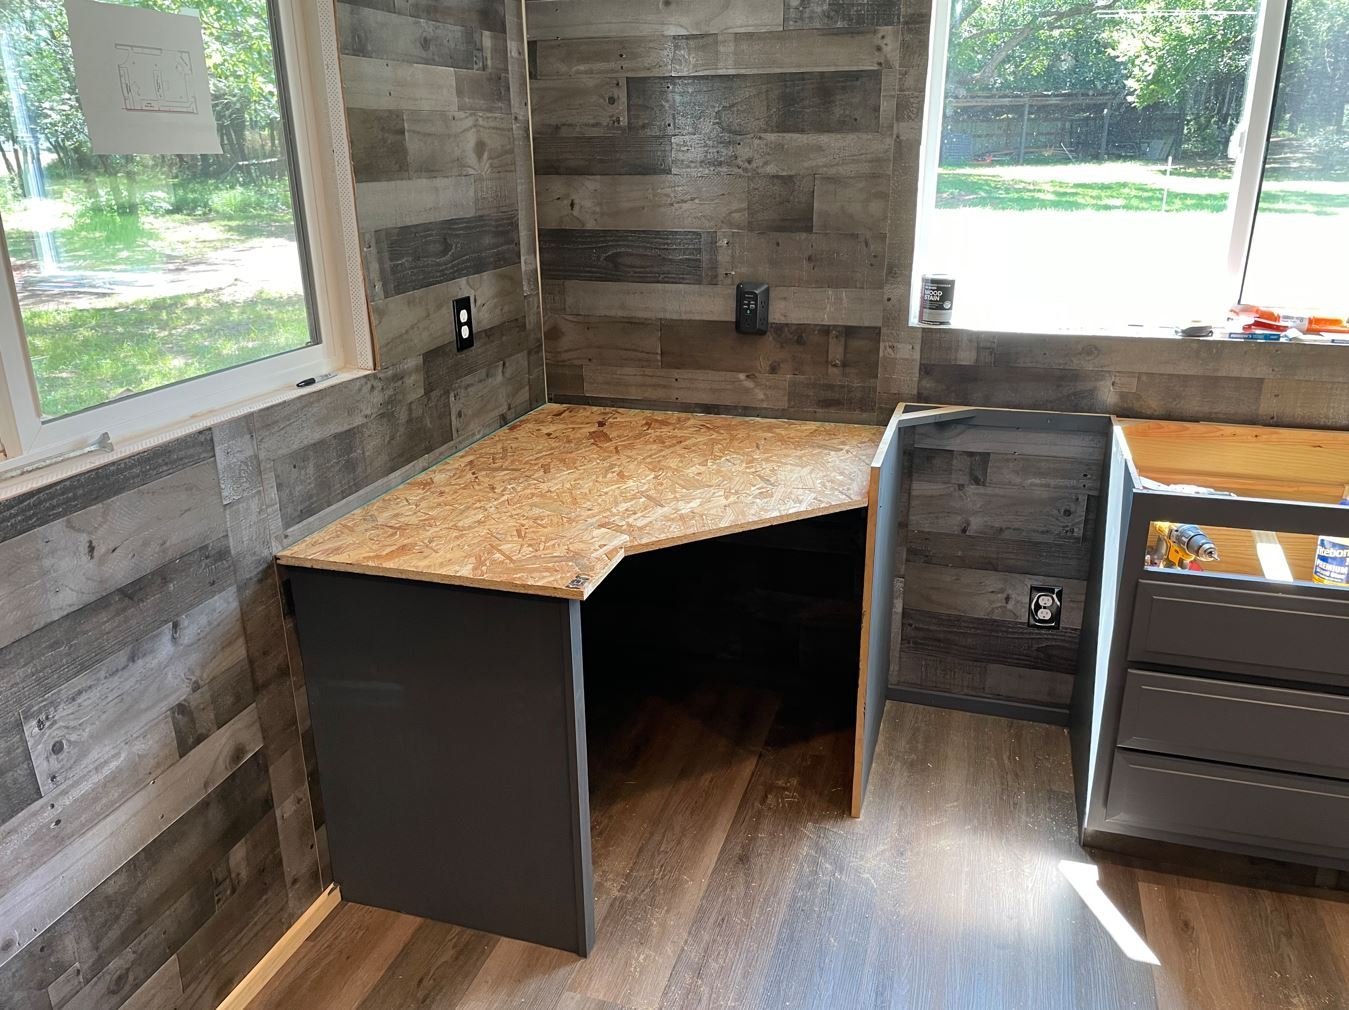
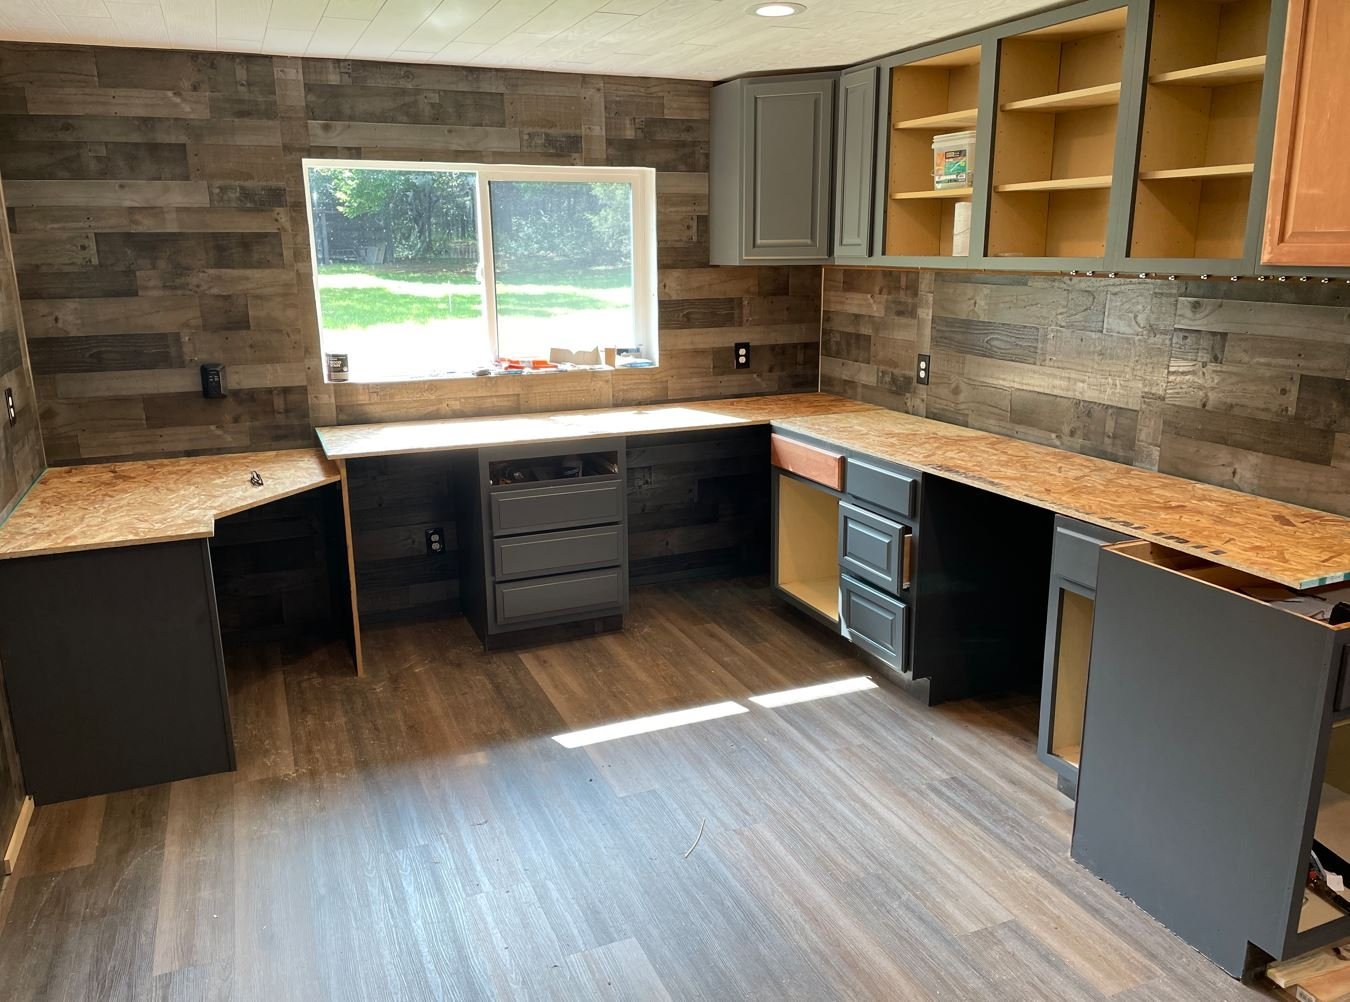
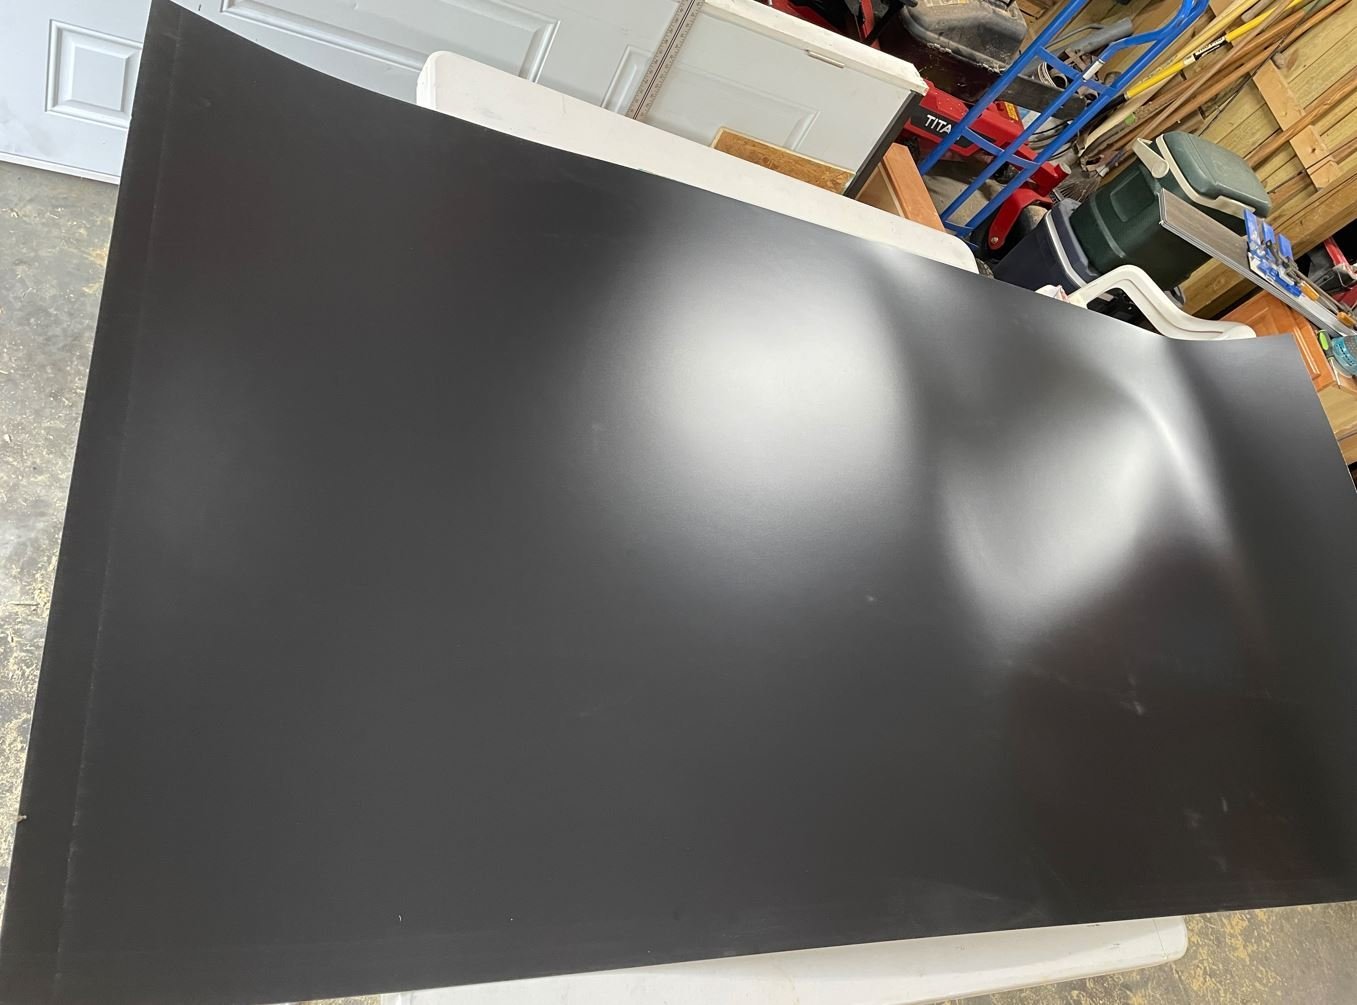
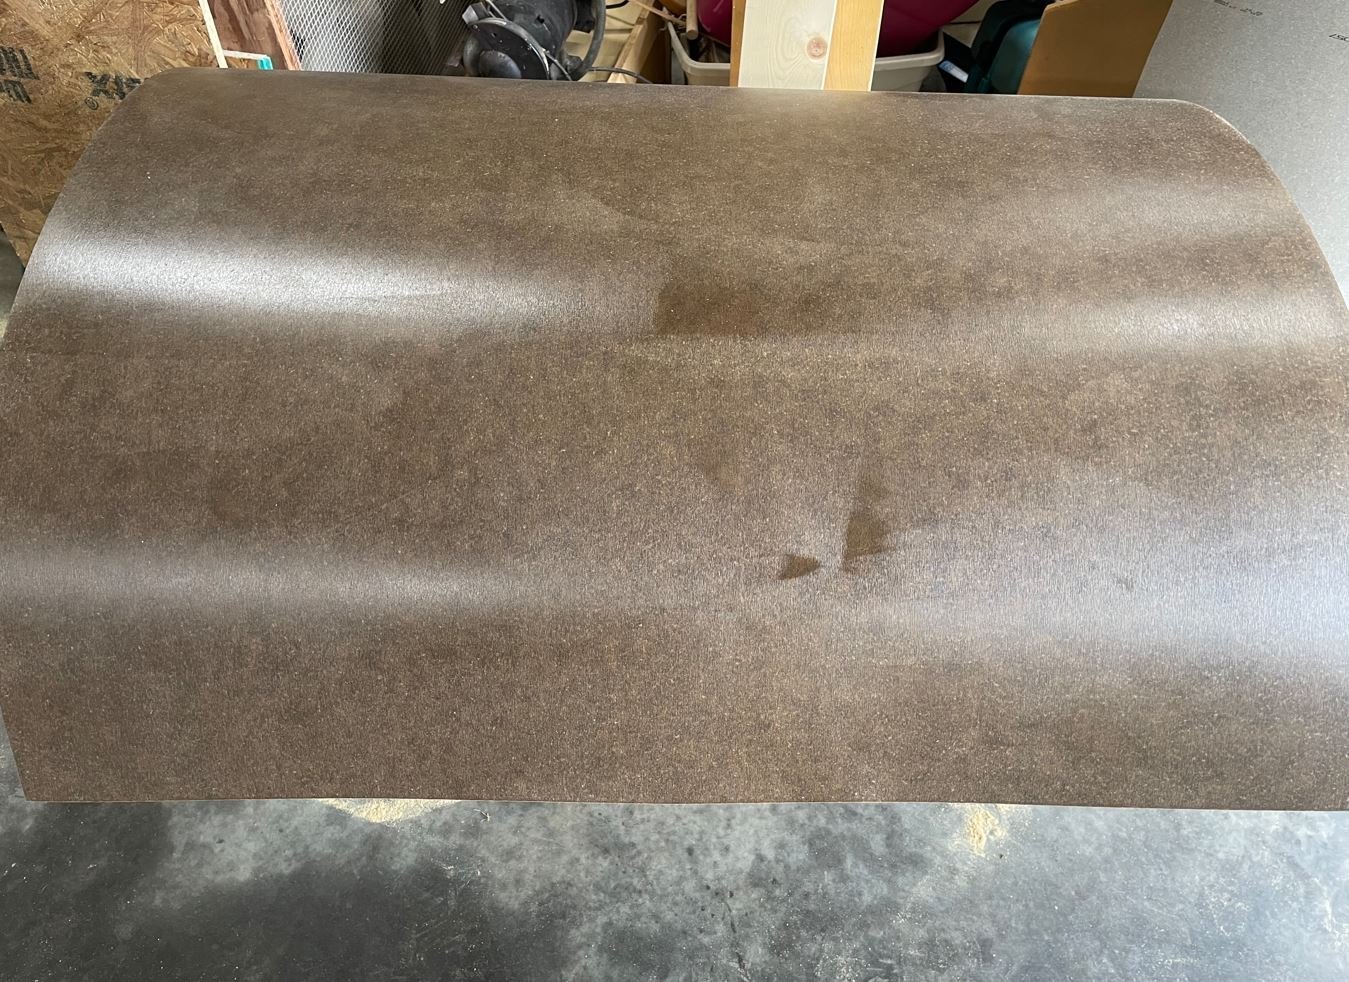
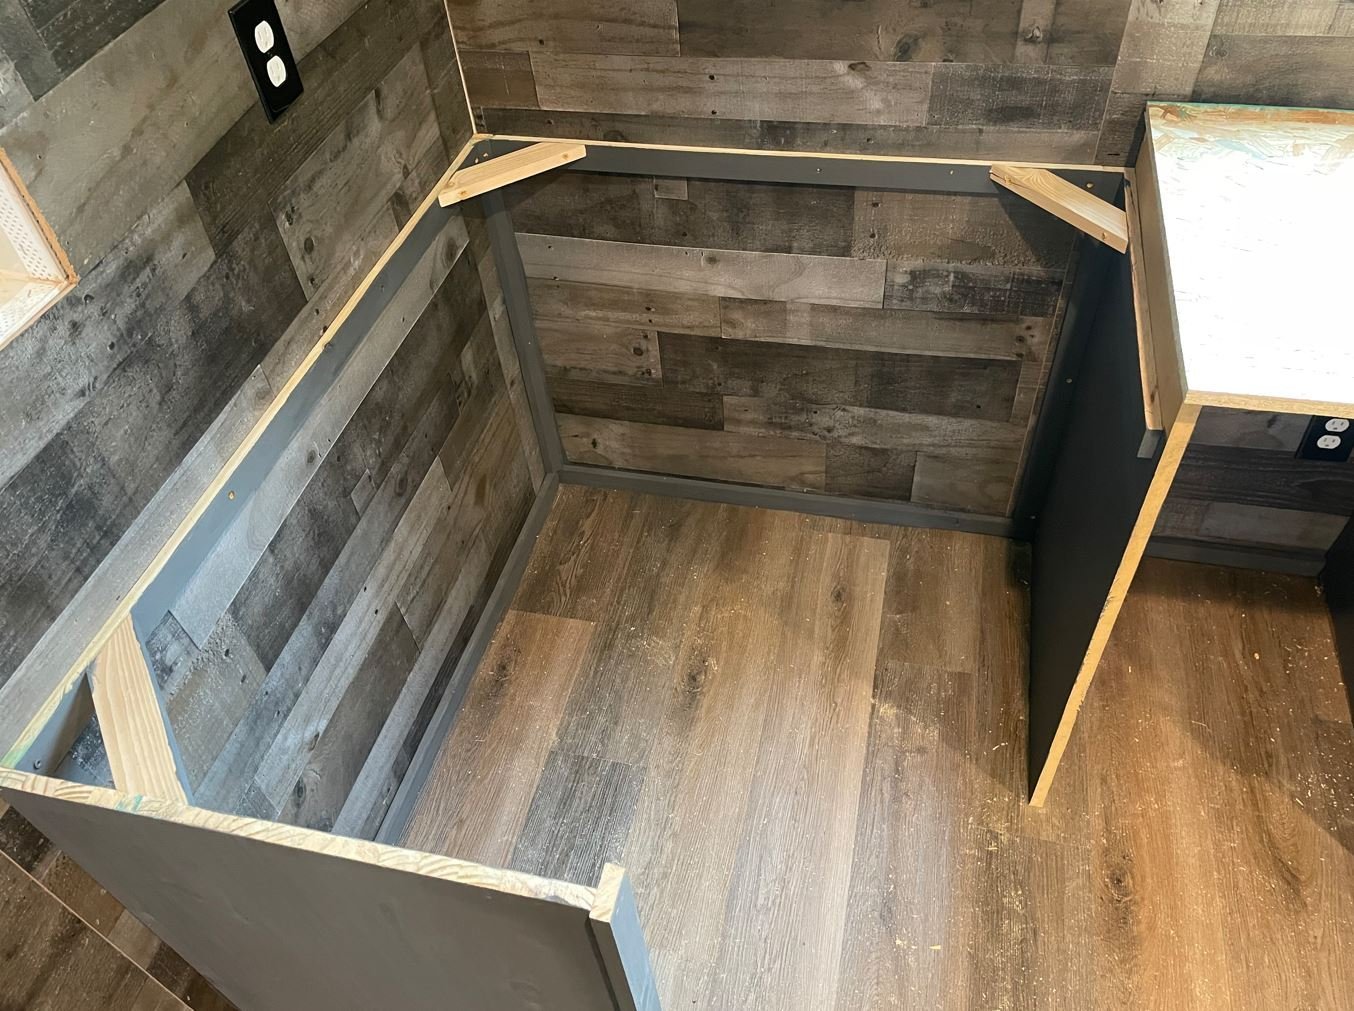
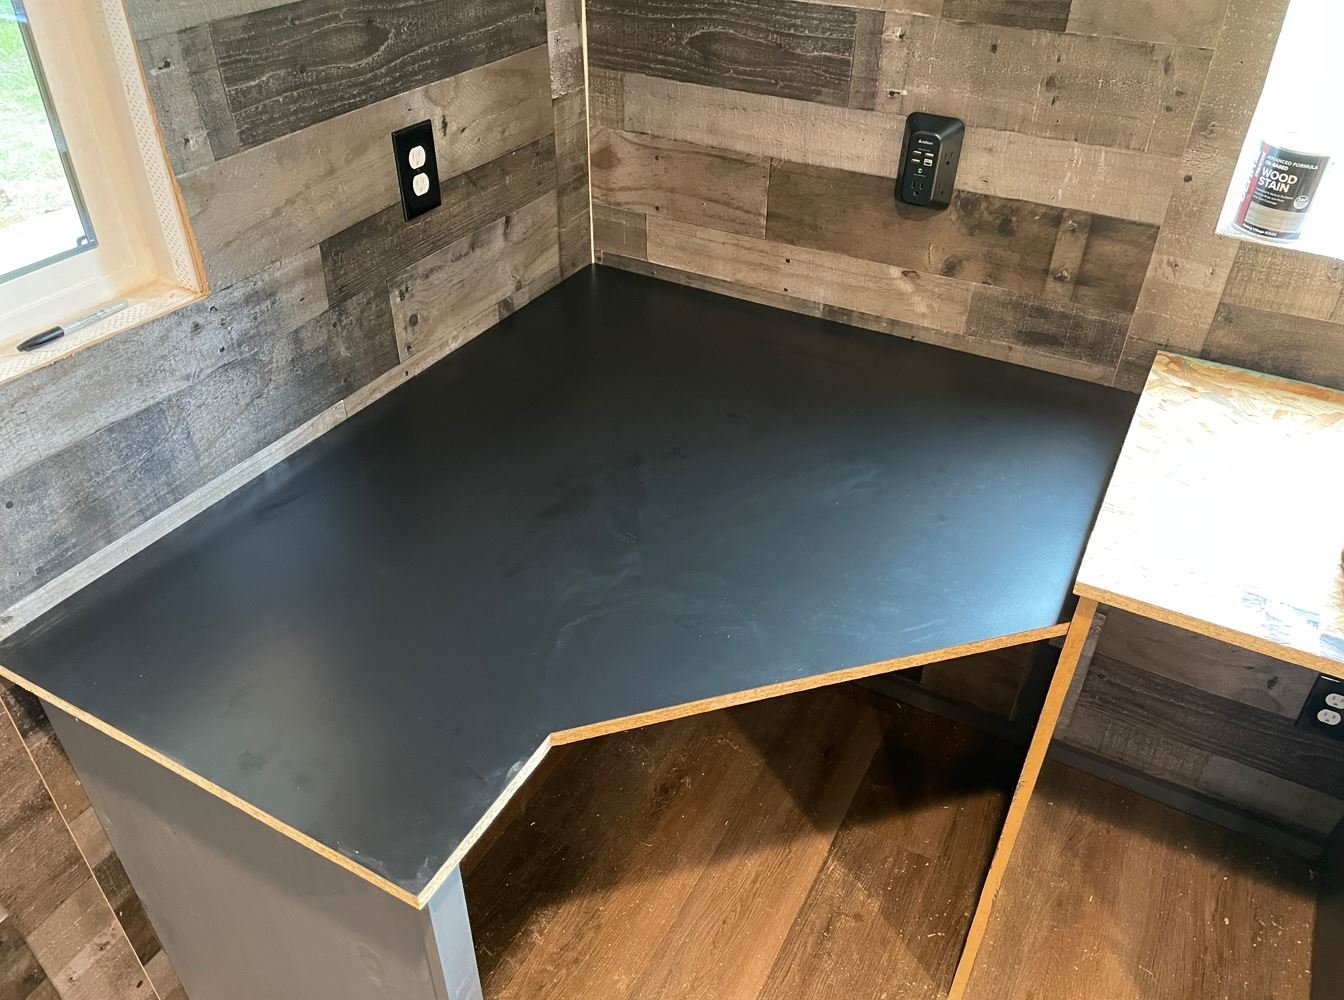
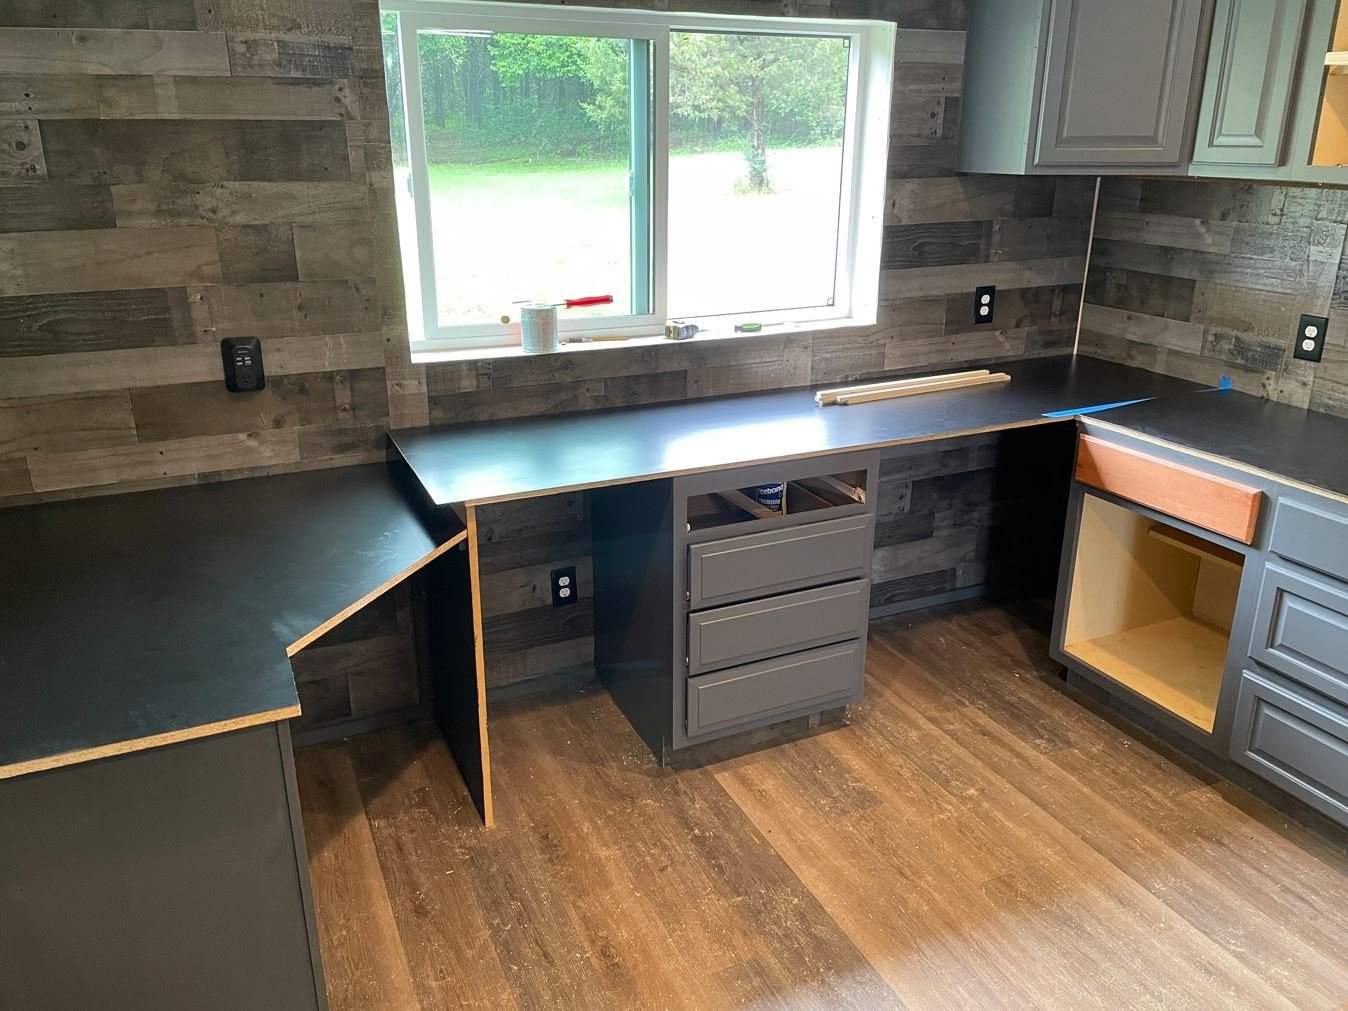
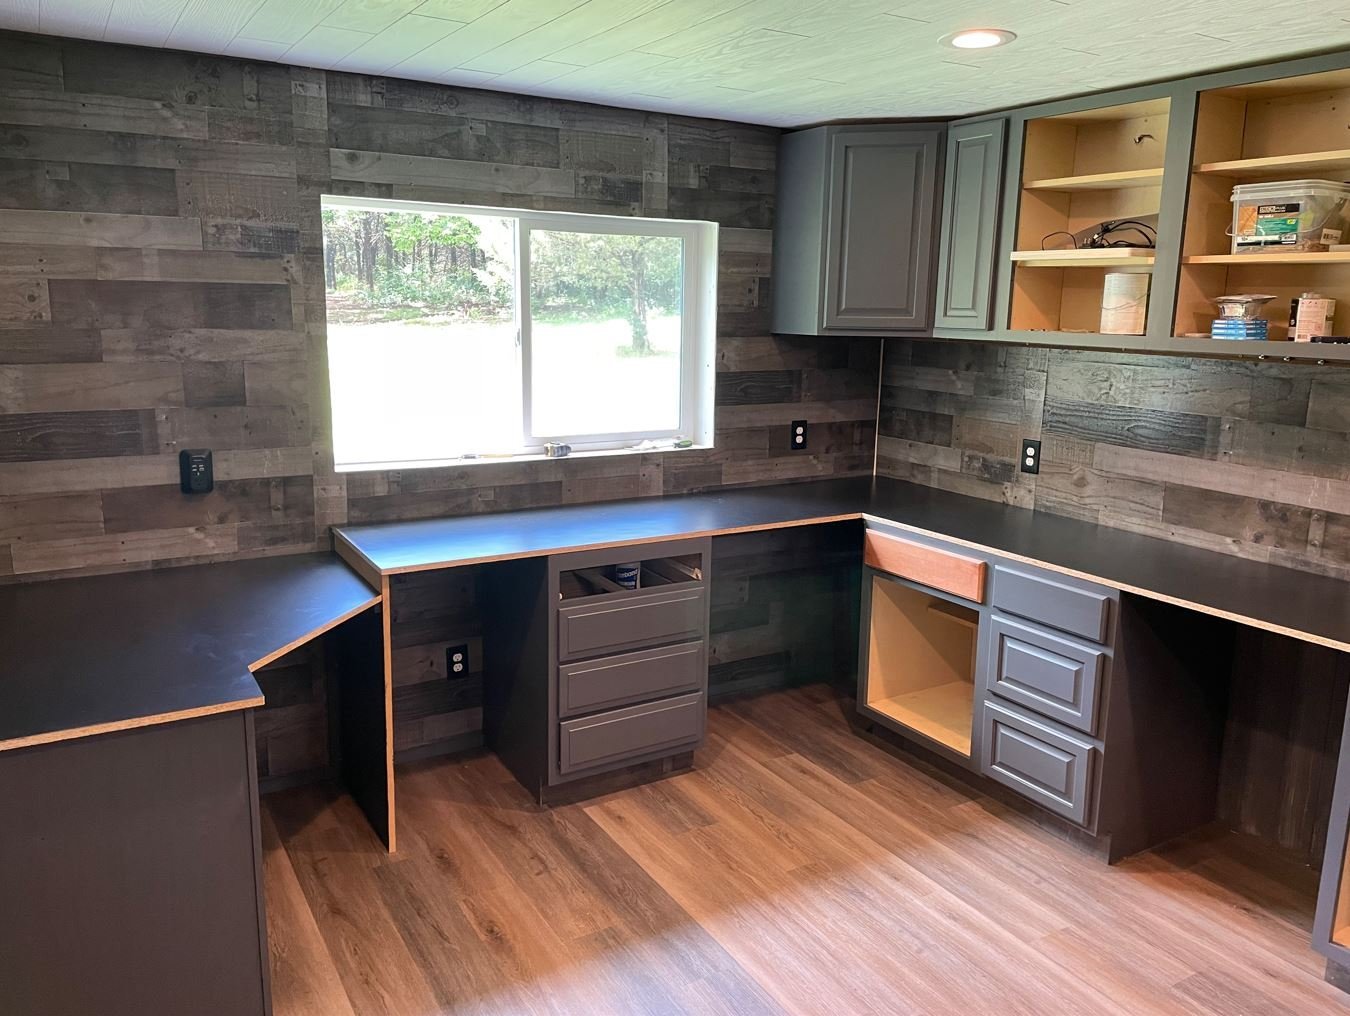
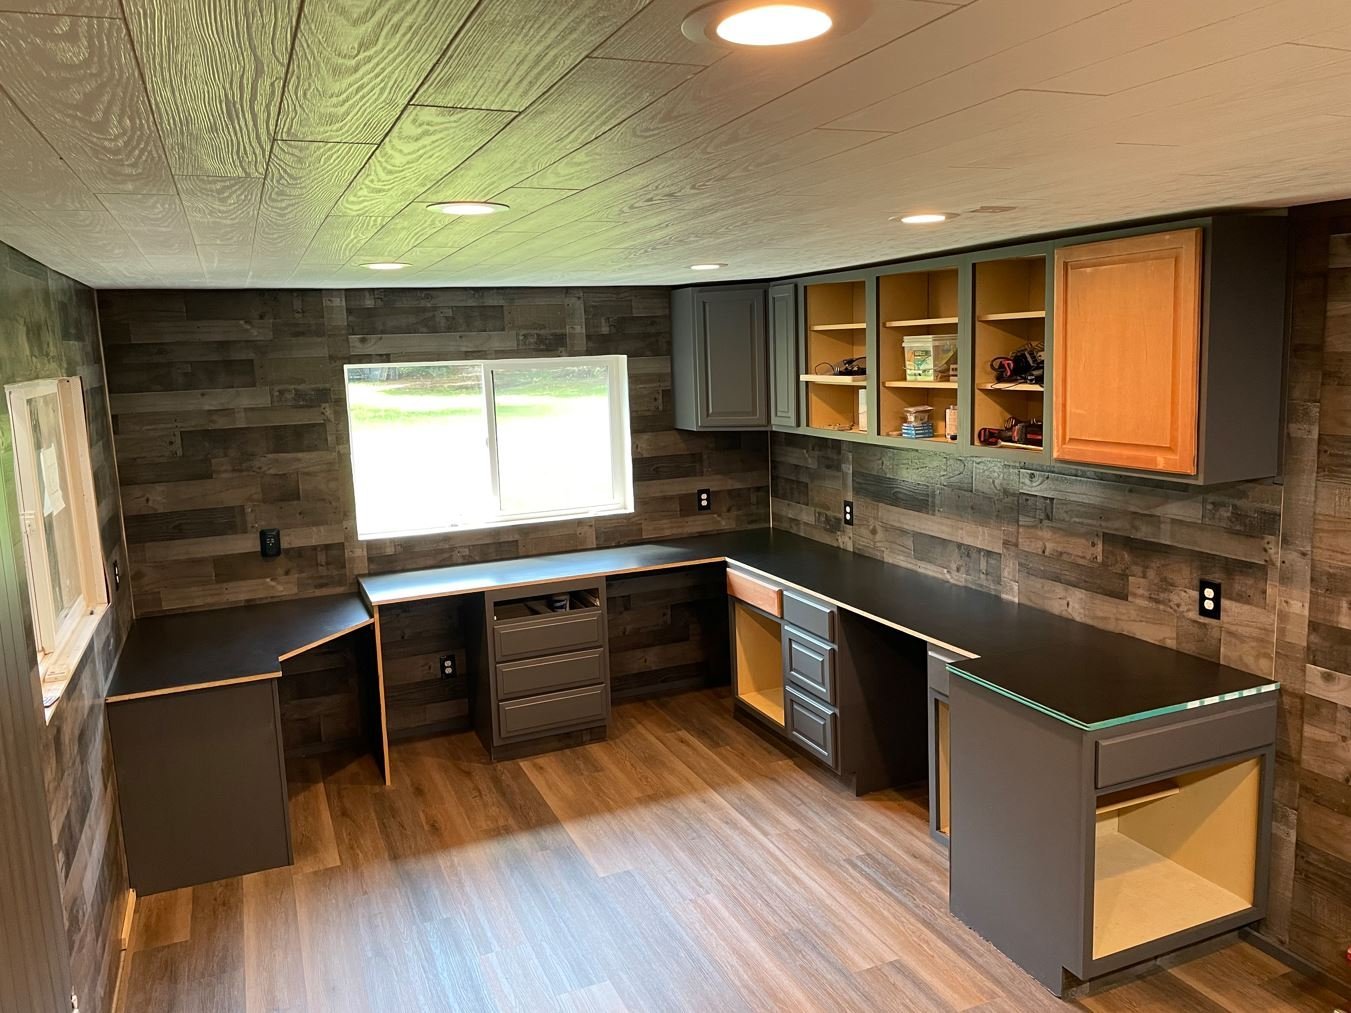
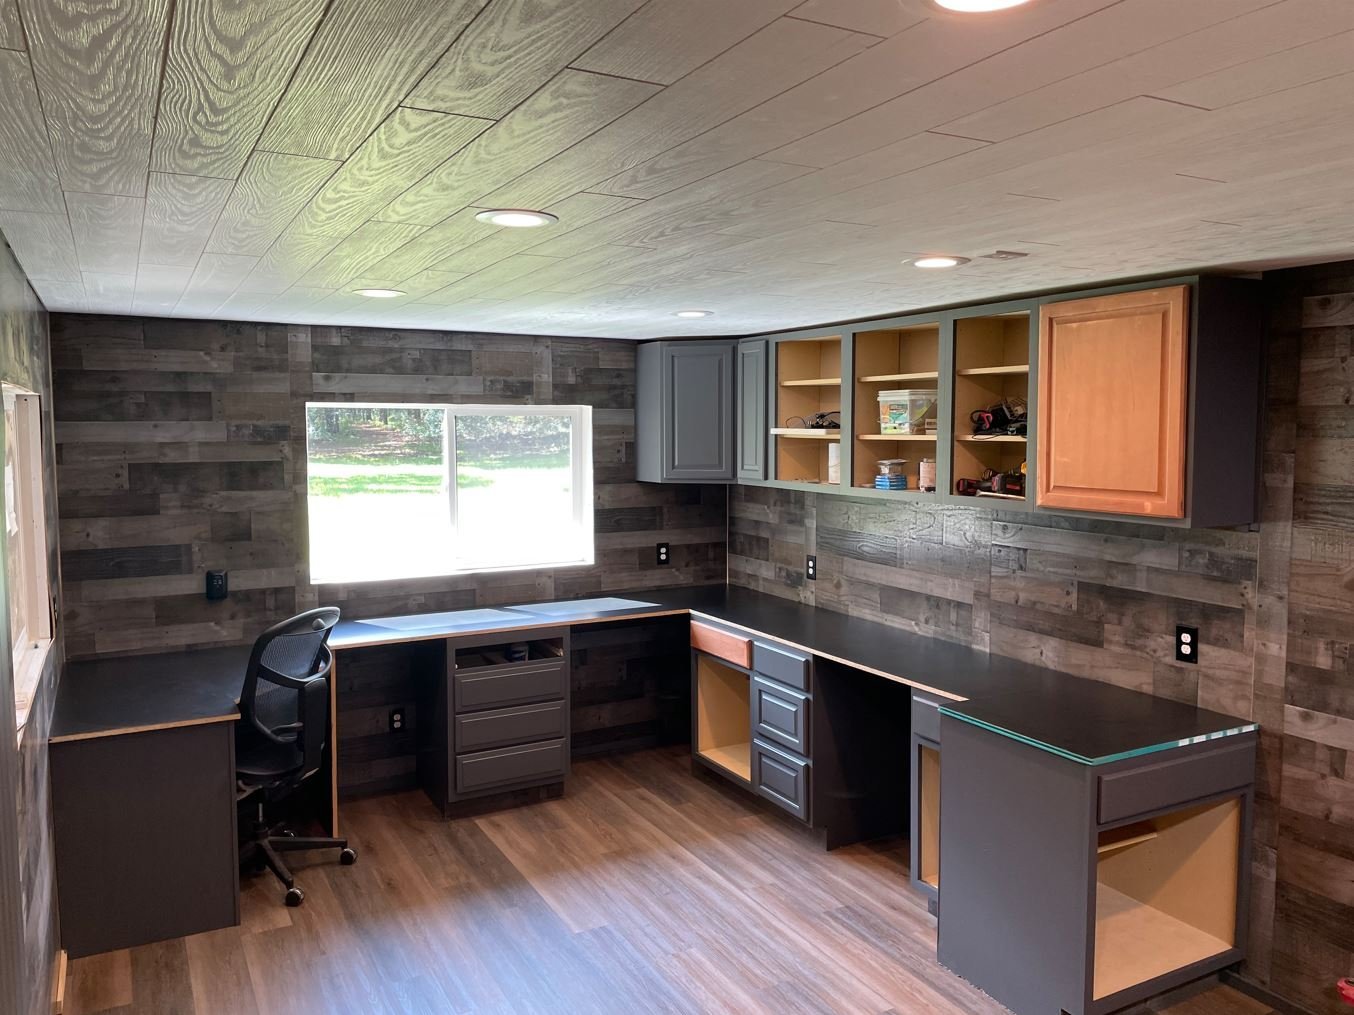
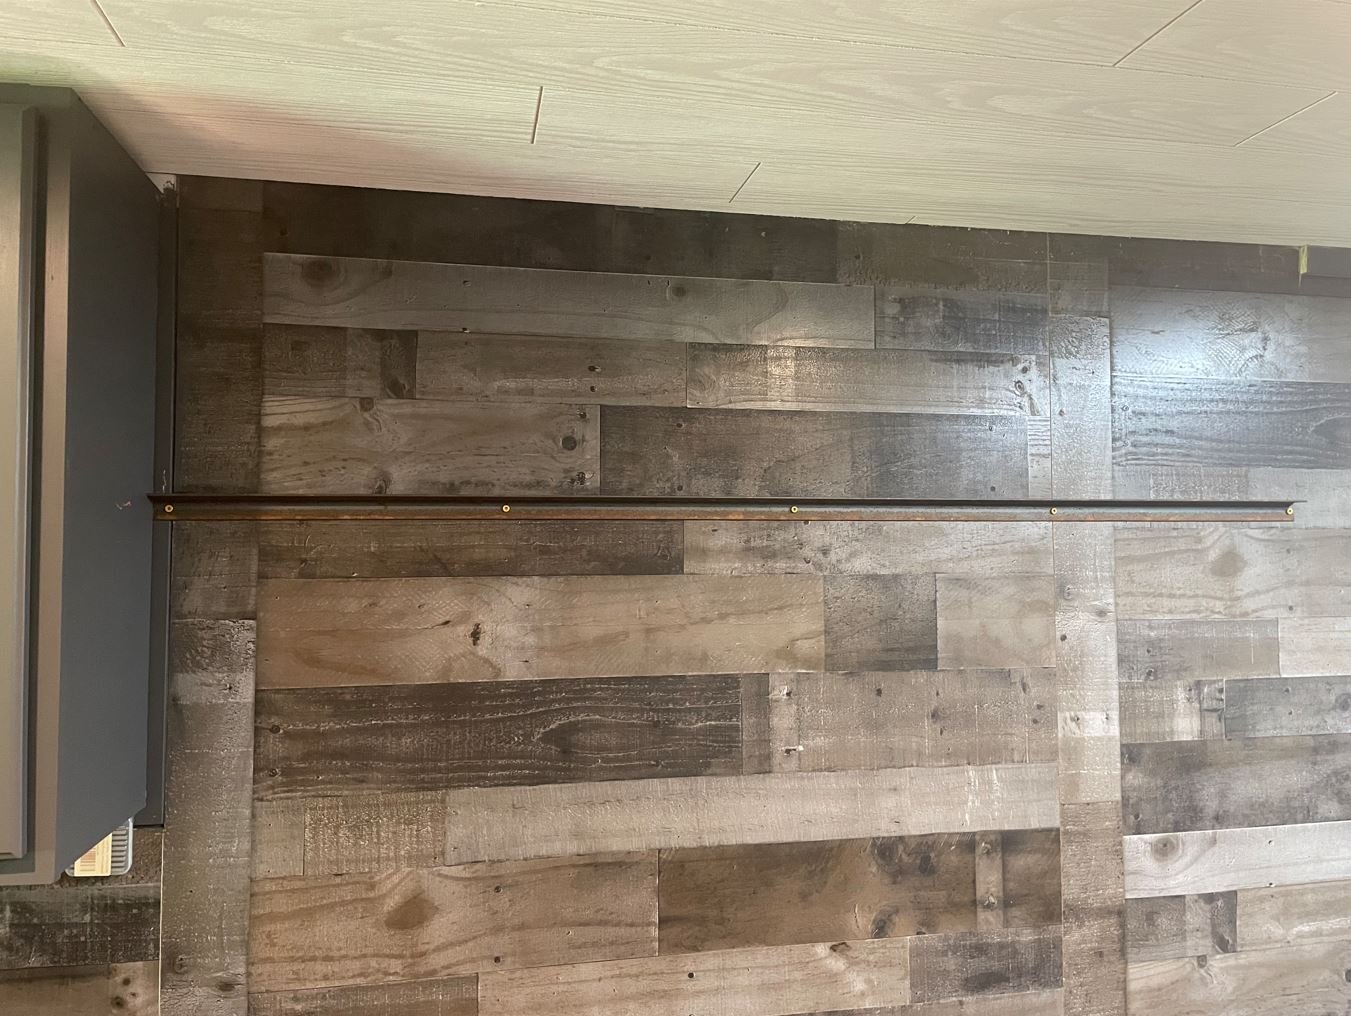
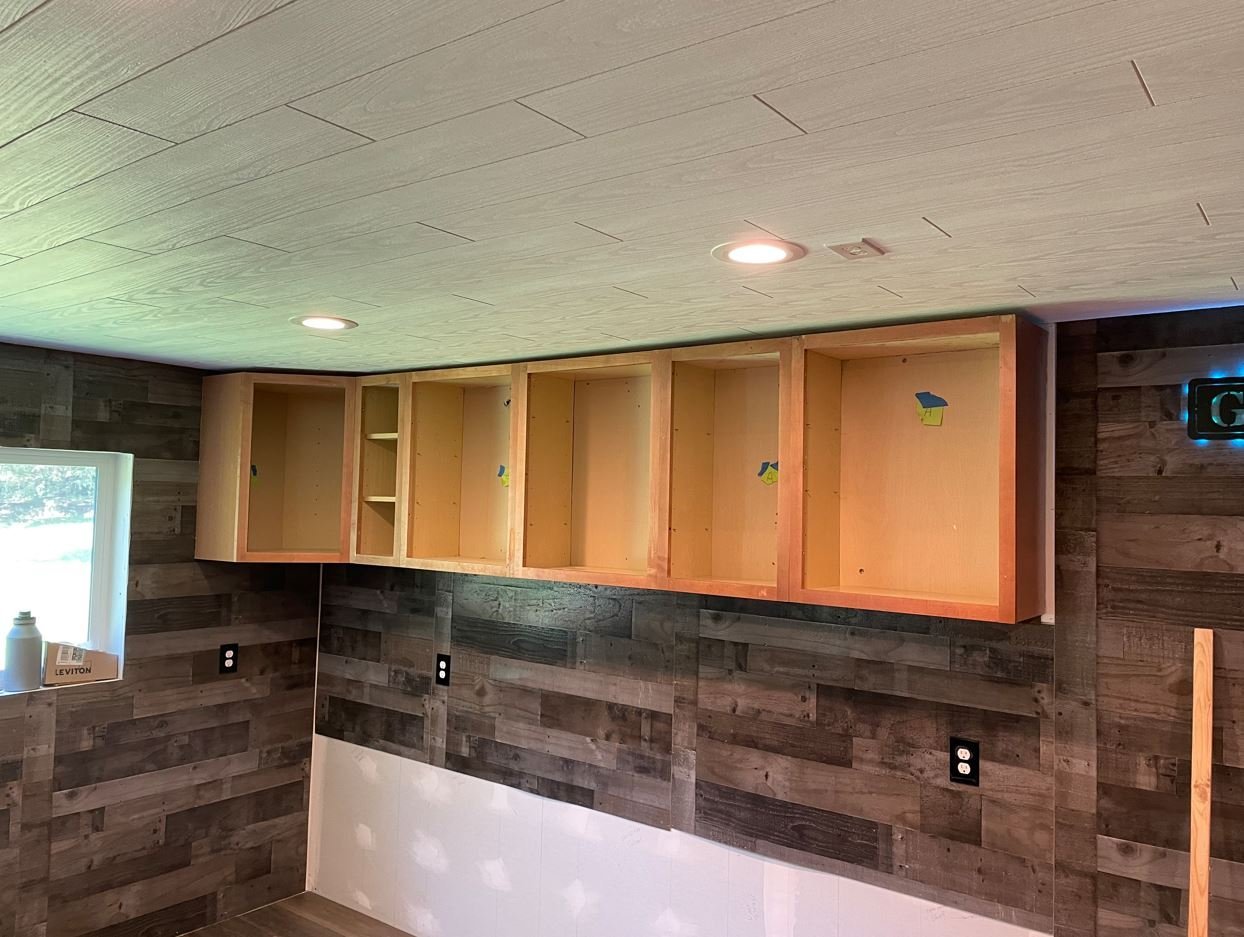
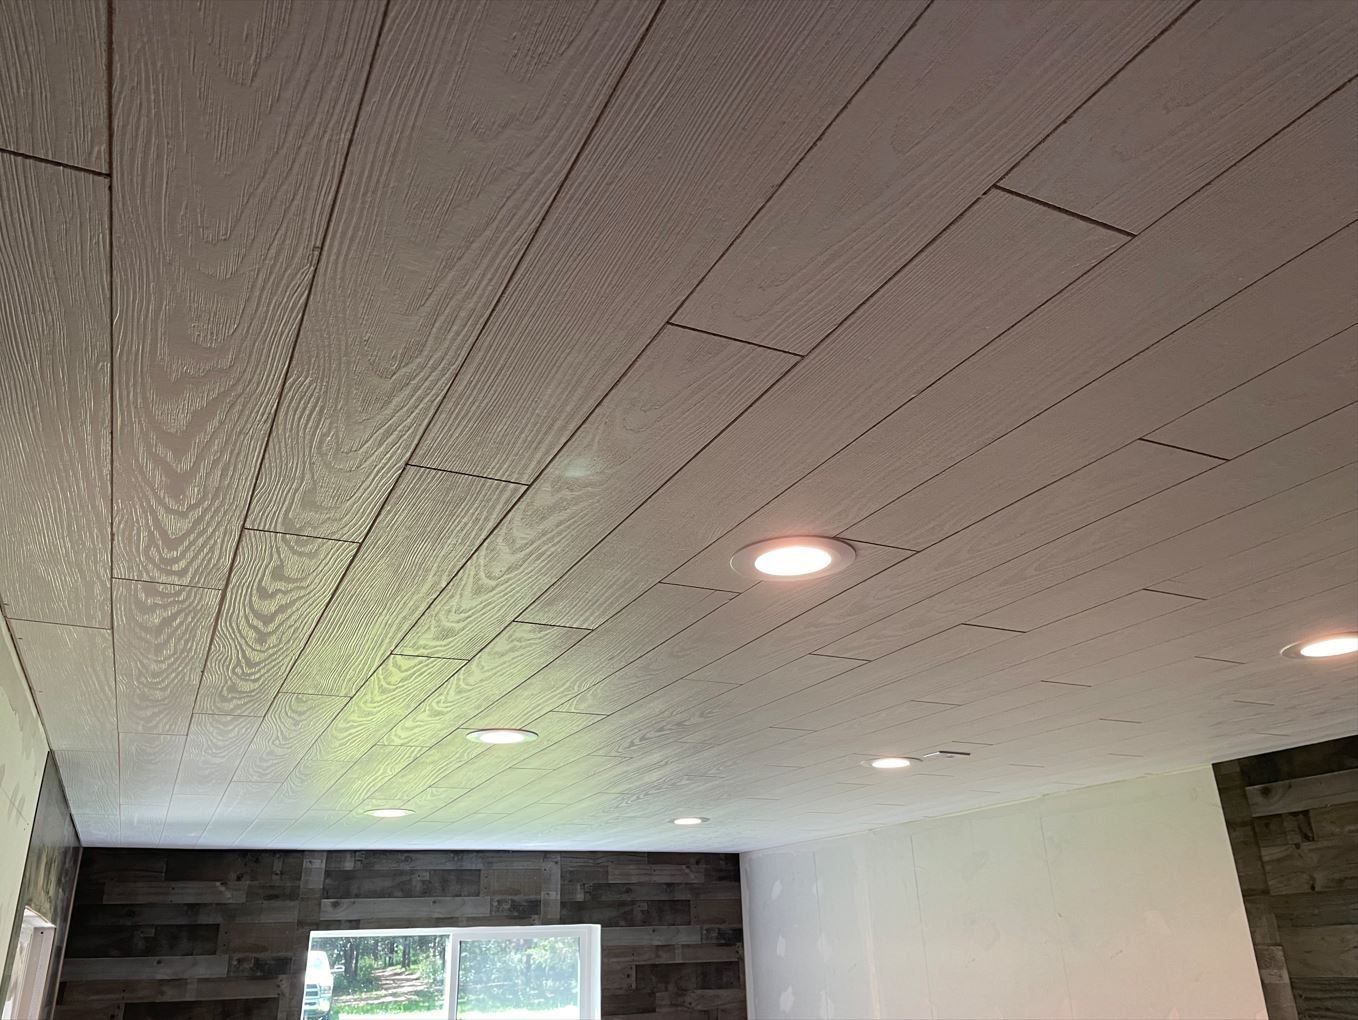
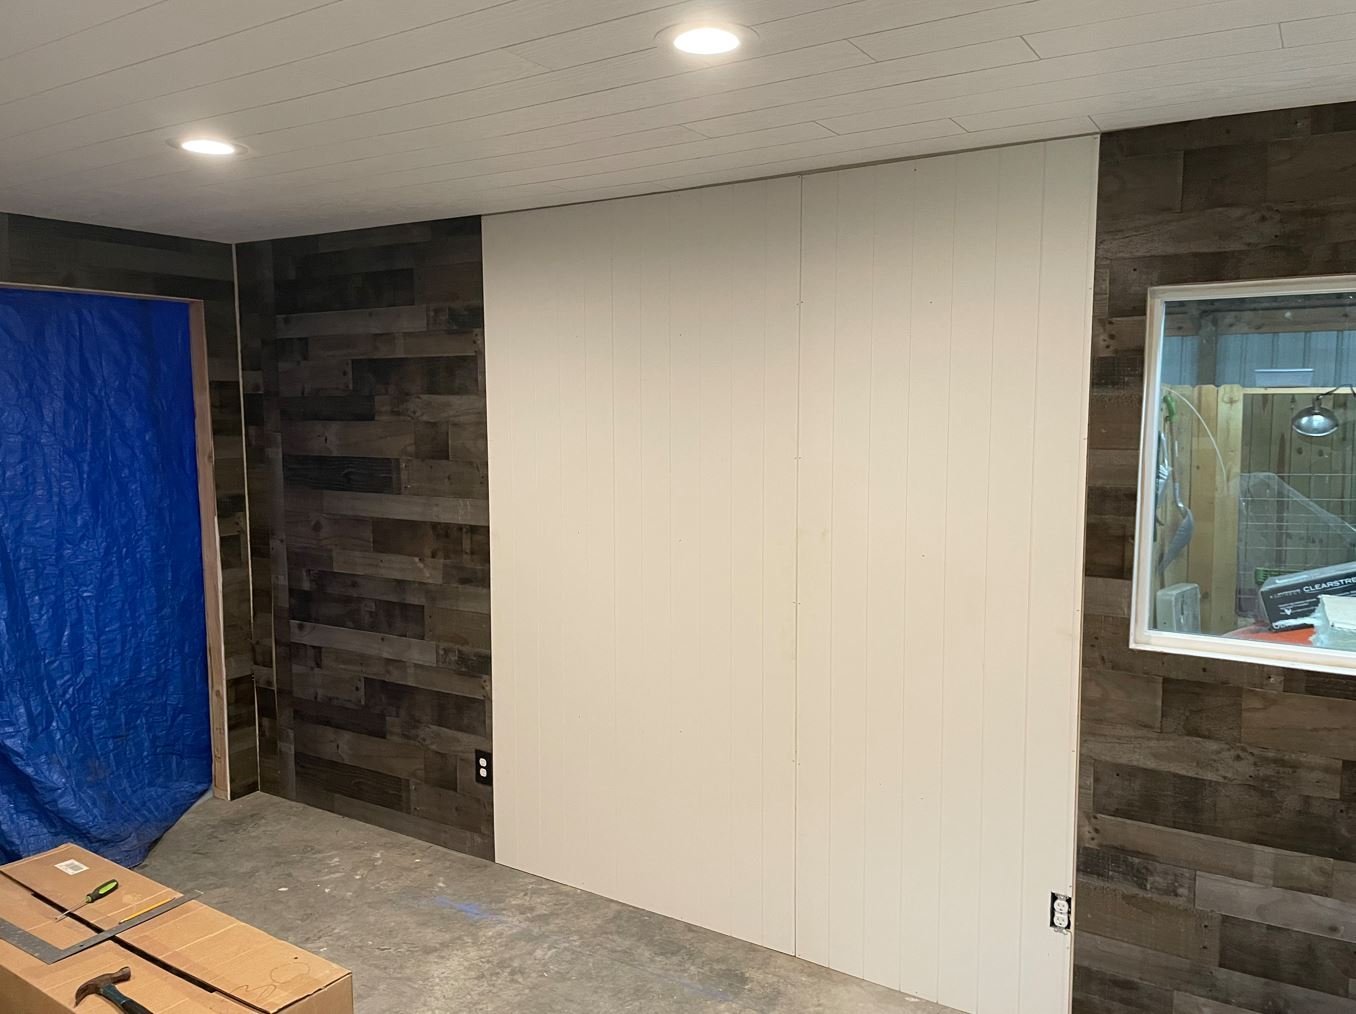
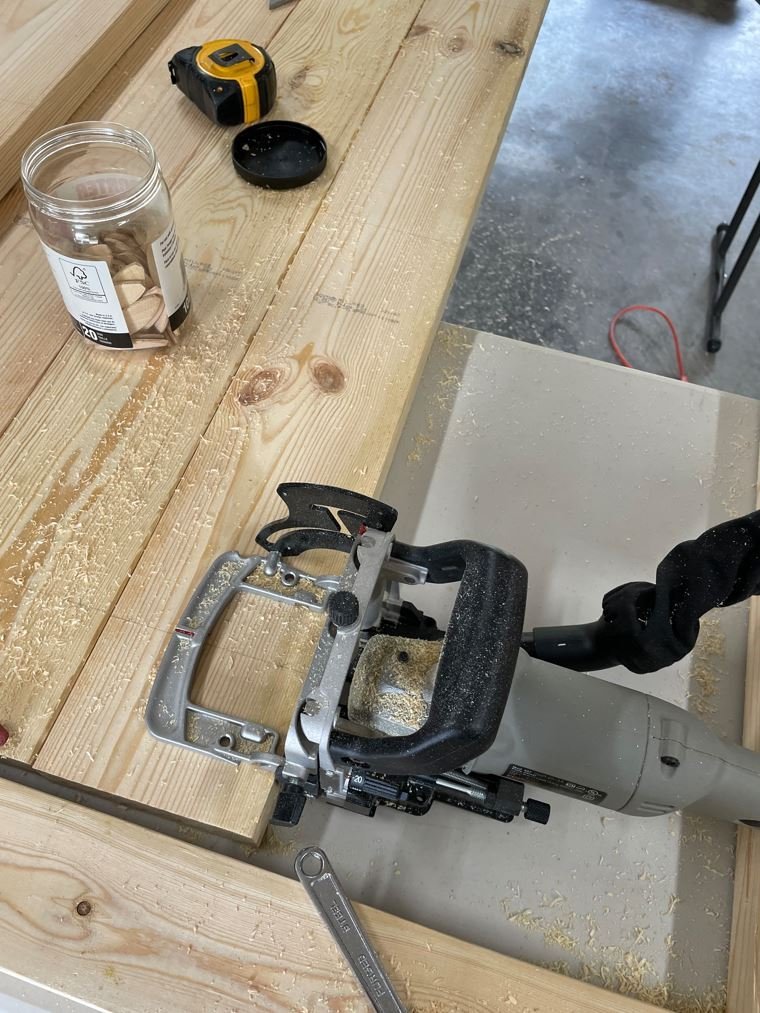
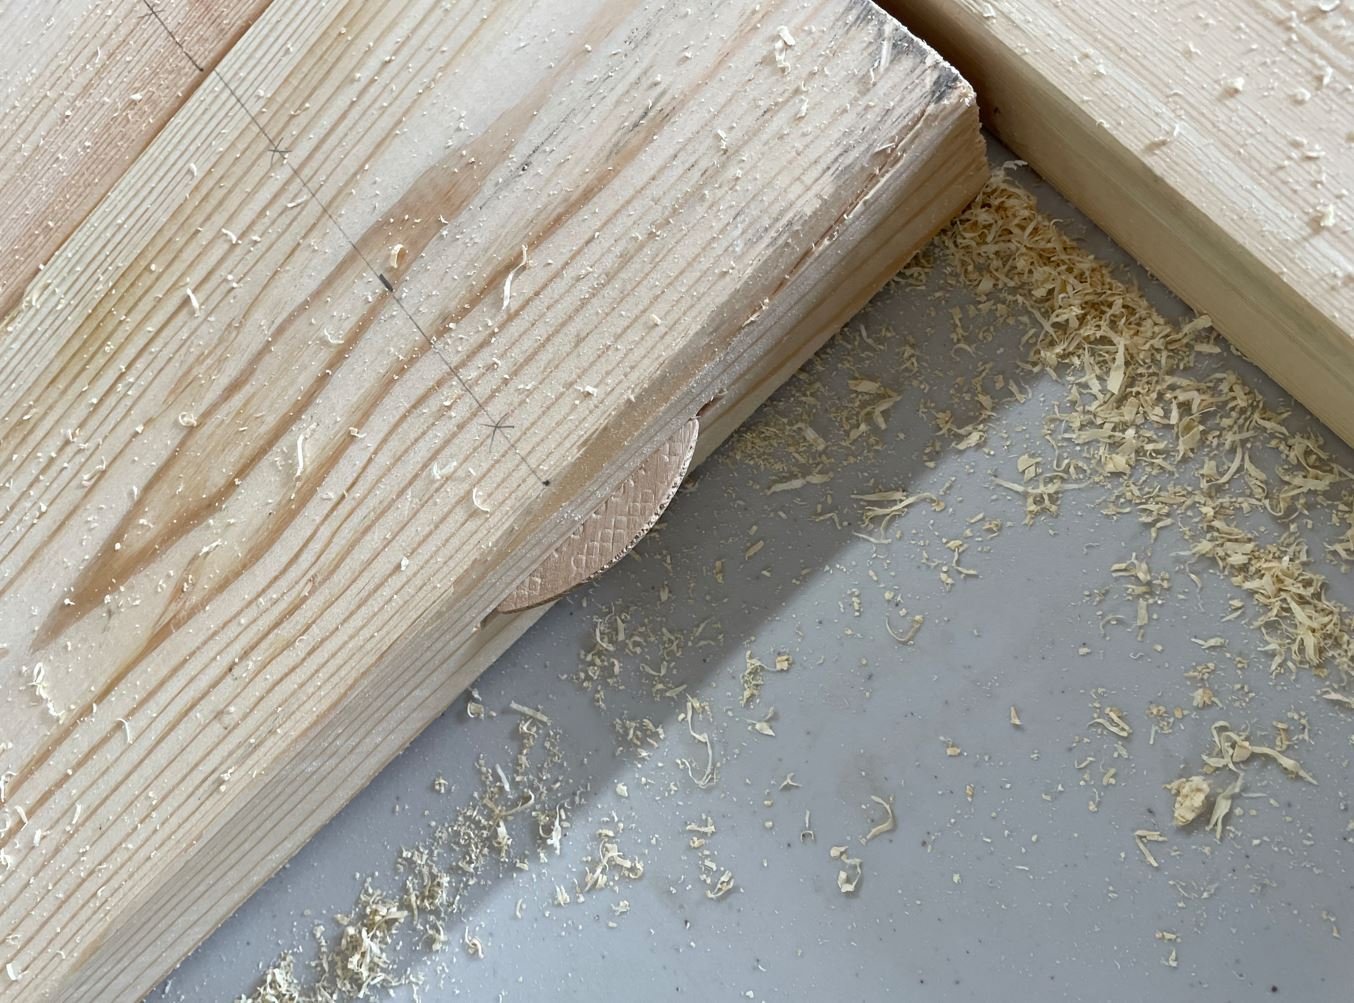
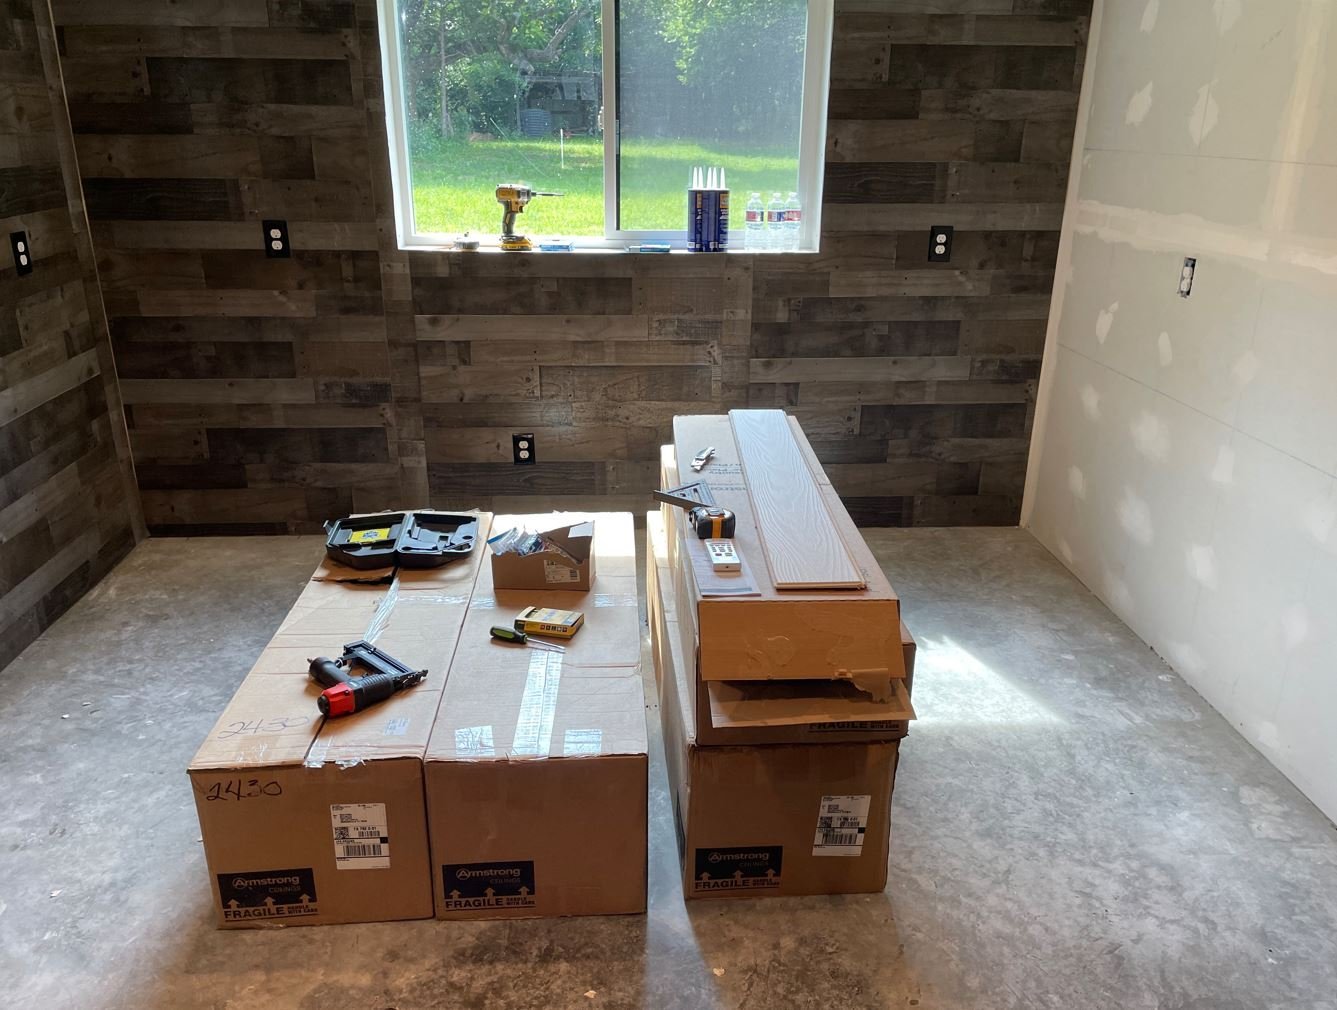
Hello everyone, it's been a while since I last updated my progress on the shipyard but I managed to find some time to get an update in. Day 25 I was able to get most of the cabinets painted up and finally started work on the benchtops. I forgot to take pictures of the painting, but who really wants to watch paint dry anyway? Started off with my workstation area, just a simple corner desk that will hold my monitors and other assorted computer accessories. This section will be a few inches lower than the rest of the bench, for ergonomic reasons. I've found it hard to spend 8-10 hours a day at work on a 36" desktop. All of the bracing up, painted and ready for the tops to be installed. Corner top installed. More of the benchtops cut and installed. Day 26 My original plan for the benchtop was to build it out of MDF, paint it black, then print out a bunch of old ship pictures and plans and glue then to the benchtop, then coat the whole thing in clear epoxy resin. That was until I found out that the price of MDF has just gotten stupid expensive. So I did some re-thinking and decided to go with some OSB and matte black Formica. This cut the benchtop cost in half. Prepping the first piece of Formica for gluing. and the first section is in. Moving along with the Formica. Day 27 With the Formica all installed it was time to trim the edges of the benchtop out. I went the cheap method with this and used 2x4's to make the trim. I ripped the 2x4's and rounded them on both sides to give a nice bullnose edge that is easy on the forearms. Again I forgot to take pictures of the ripping an rounding process, but here is the first piece going in. Day 28 With the trim work in it was time to start moving a few things in. I had to clear off my current adjustable workbench so that I could get it painted up and the top modified to where it will work in my new shipyard. The benchtop edging was given a coat of stain and varnish and I moved my organizers in. Day 29 I had a few short upper cabinets left over that I couldn't figure out what to do with, when it finally hit me. The would provide great overhead storage for my reloading powders and primers. They would be high enough to keep the grandkids from getting into them and still be accessible to my reloading bench. Had planned on installing a piece of 1" flat steel on the wall in this area and use magnets to hold my building plans on. Instead I installed a piece of steel angle iron to help support the uppers and also function as magnetic plan holder. Finally I started moving my stash in. I left this corner open for the sole purpose of storing my future builds. And I moved my reloading bench in as well. There will be additional shelves above the bench mounted to the stringers that are currently on the wall. Just need to get those built. I'm going to also make a few modifications to this bench to help hide some of the clutter, but that will come later on. I've got my adjustable workbench out of the house and is currently waiting on paint and some trim. I'll have photos of that project on my next update. Just a few more items on my to-do list and the room should be ready to start creating some sawdust again. Thank you all for stopping by. -Brian

- 70 replies
-
- 22
-

-

-
USS Cairo by Zetec - FINISHED - 1/50 scale
mbp521 replied to Zetec's topic in - Build logs for subjects built 1851 - 1900
Beautiful work John! Definitely a different approach to building the top, off the hull. Do you plan on making the top open to view the inside gun deck? -Brian -
When doing the research on my Cairo, I studied every picture of the City Class boats I could get my hands on as well as a few other boats that would assist me in getting certain details right. One thing in particular that I noticed is that the Brown Water Navy didn’t adhere to many of the more stricter regulations that the Blue Water Navy had in place at the time as far as appearances went. In fact, in some of the photos that I found, the boats were a bit “rough” for Navy standards. My guess would be that since they were on constant patrol and making repairs when they could, this contributed to that “rough” look. With the civilian boats, many were put together on a river bank where there was an abundance of trees for construction, but very little modern construction facilities. They were built on a shoestring budget, operated under the “time is money” category and also had little downtime to keep them looking pristine. One of the draws that fascinates me with the river boats is their “well used, gritty” appearance in just about every photo you can find on them. Especially with the work boats. Personally I think adding this look to a model brings them to a whole different level. -Brian
-
Looking good! Glad to see you back at it Roger, hope the medical problems are minimal and a speedy return to full health is close at hand. -Brian
-
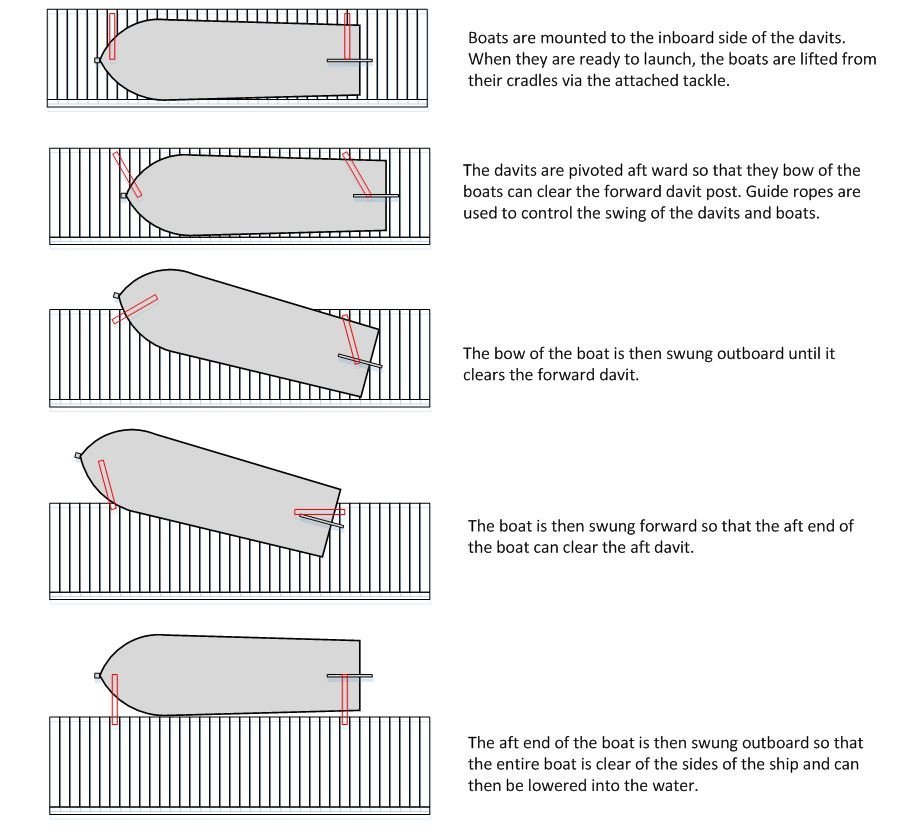
John @Zetec, posed a good question in a PM to me and I figured I would share it here as well, in hopes that it helps future builders of the City Class boats understand how the ships boats were launched. He had asked: "I was looking at the picture of the real boat and the lifeboats on them and how the davits were as they are looking inwards how did they launch the boats I have thought and thought but could not think of a way they done it any ideas." These City Class Ironclads had a unique way of storing and launching their boats, and just by looking at them it can be a bit confusing as to how it was done. I did a lot of research on my build but could never find any info on how it was actually done, but by studying the old photos of these ships I came to get a pretty good idea of how they could have been deployed. I threw together this little drawing that will hopefully help explain how the boats are launched. This may not be exactly how it was done, but given the limited information available it though it was a pretty good stab at their function. If anyone else has a better theory or more info, please feel free to chime in and correct my assumption, it definitely won't hurt my feelings.. -Brian
-
Hello Francis. I sent you a PM with information on the plans. Please consider posting a build log here on MSW, I would love to follow along, as I am sure others would as well. -Brian
-
Timber-framed outdoor kitchen - Cathead - 1:1 scale
mbp521 replied to Cathead's topic in Non-ship/categorised builds
I would be more inclined to use the kit as well instead of DIY, but I have seen videos of DIY people using exercise balls as the form for the dome. They cut a hole in a piece of plywood the size of the dome they want, inflate the ball in the plywood hole around the centerline, wrap the top half of the ball in hardware cloth then form the general shape with concrete. Once the concrete cures, they pop the ball and remove it, then slide the dome off the wood base. The kit version seems to take some of the work out of it. -Brian -
Timber-framed outdoor kitchen - Cathead - 1:1 scale
mbp521 replied to Cathead's topic in Non-ship/categorised builds
This made me think a little more on the topic of insulation. One somewhat eco friendly approach to insulation for your oven could have been the old-school way they used to insulate steamboat boilers. I believe I remember a post way back on either one of either yours or my builds where @kurtvd19 made mention they used horse manure and hay as a form of protection from the heat. This could tie in your passion for steamboats with your love of the outdoors. On second thought, horse manure around food, doesn’t sound so appealing. 😁 -Brian -
Timber-framed outdoor kitchen - Cathead - 1:1 scale
mbp521 replied to Cathead's topic in Non-ship/categorised builds
Loving it! That insulation is some nasty stuff. You’d think with all of today’s technology and regulations they could come up with some sort of fire/heat resistant materials that were more eco & user friendly. -Brian -
Quite the unique idea to save time Eric. It pulls off the effect very nicely. For some reason I have trouble visualizing the scale size until I see something that gives a good comparison. I was thinking that at 1:87 scale it was going to be a tad smaller than your Bertrand and Arabia (something that you did mention previously), but seeing you holding the hull, brings it a little more into perspective. This one is closer to your Cairo in size, that is unless you have insanely massive hands. 😁 -Brian
-
Barncave Shipyard by mbp521 - Scale 1:1
mbp521 replied to mbp521's topic in Non-ship/categorised builds
Too funny Keith, right now I would gladly take a summer snowstorm. Since the floor is somewhat smooth, I am thinking of investing in a nice dust mop. That way, if any tiny pieces do get launched into the void I can at least make a half-hearted attempt at sweeping them up an sifting through the debris. -Brian -
Barncave Shipyard by mbp521 - Scale 1:1
mbp521 replied to mbp521's topic in Non-ship/categorised builds
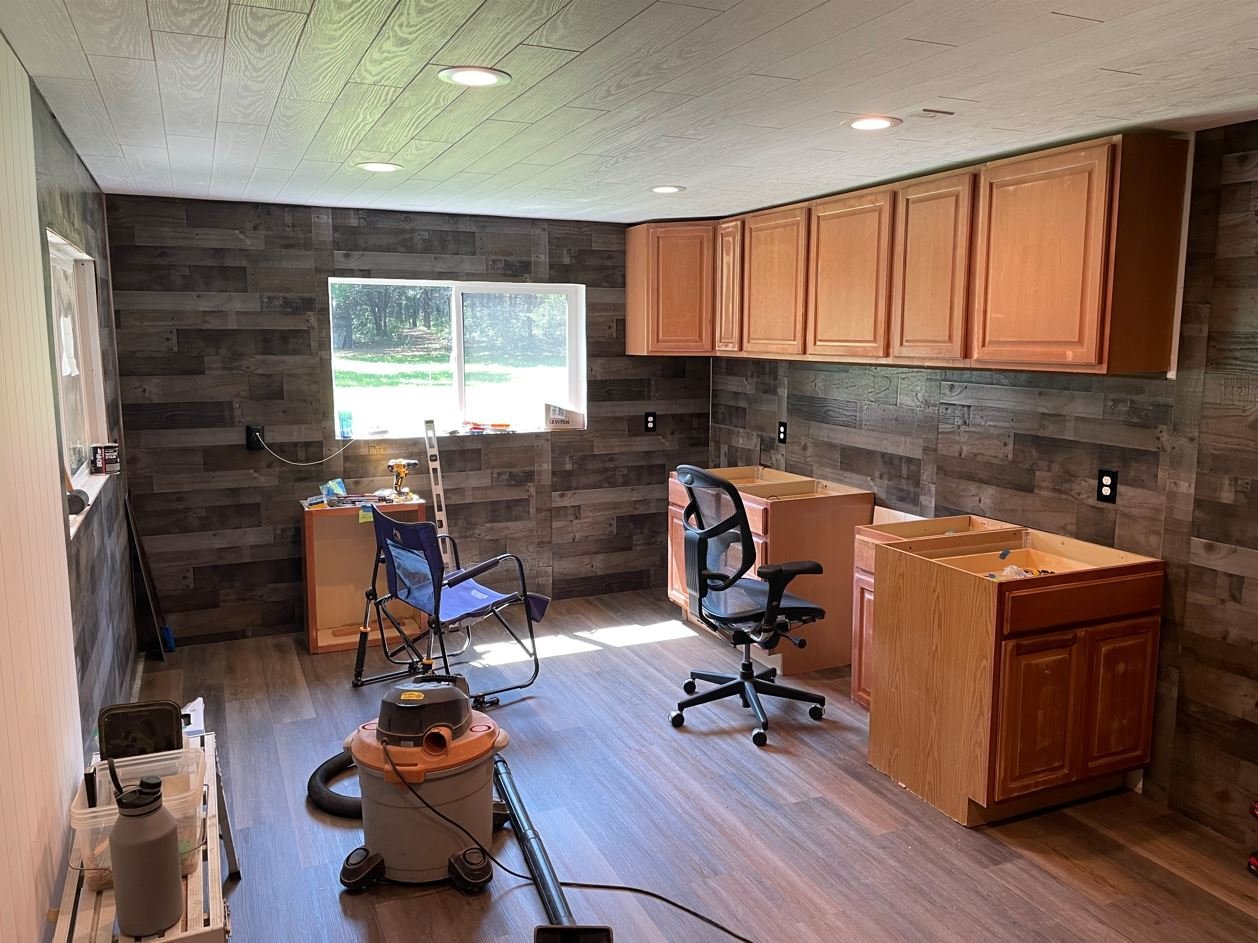
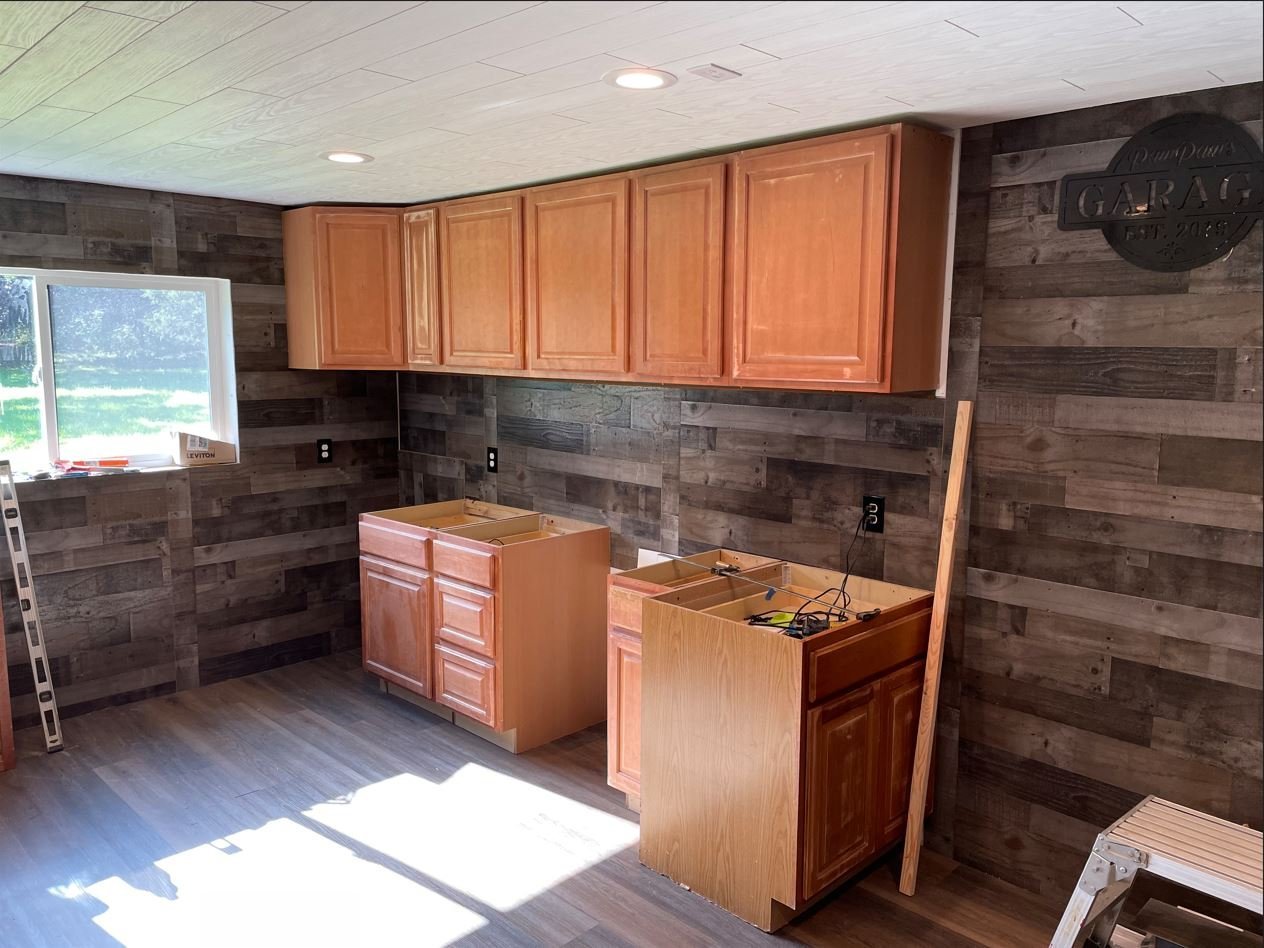
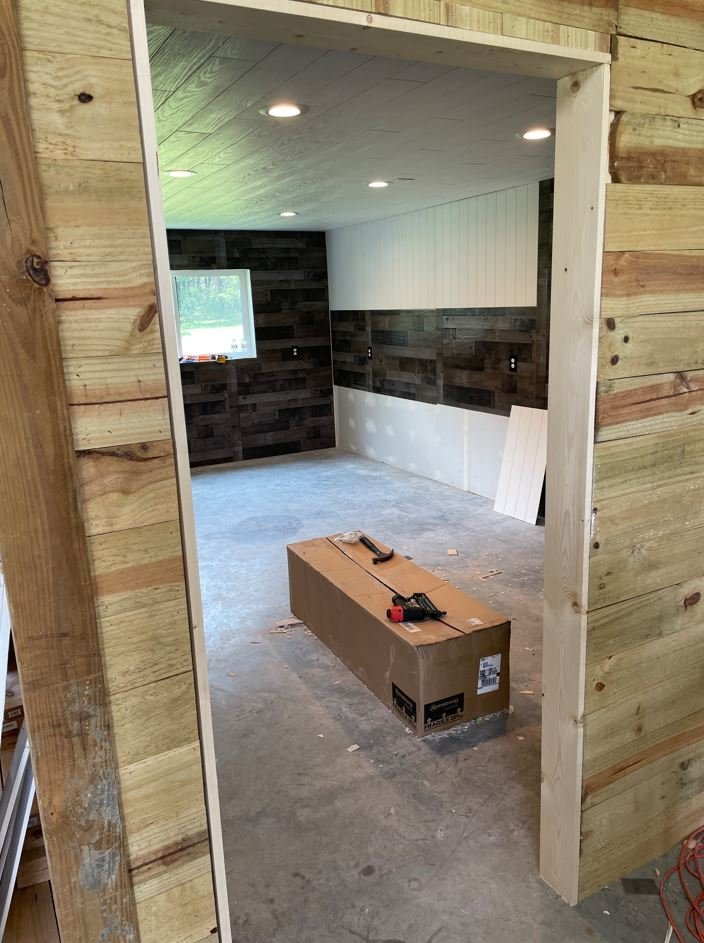
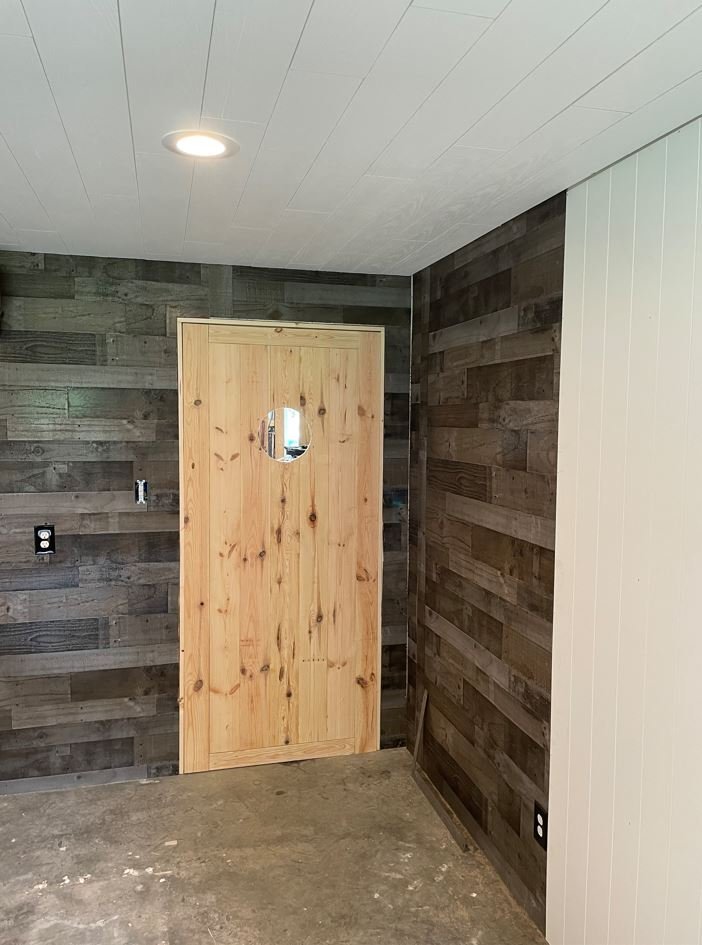
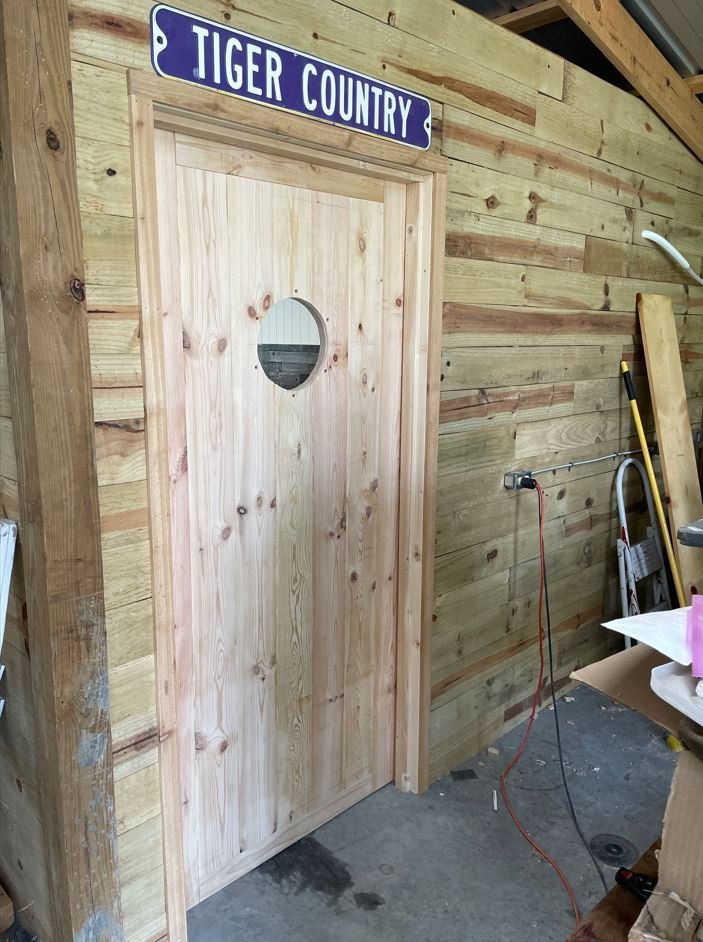
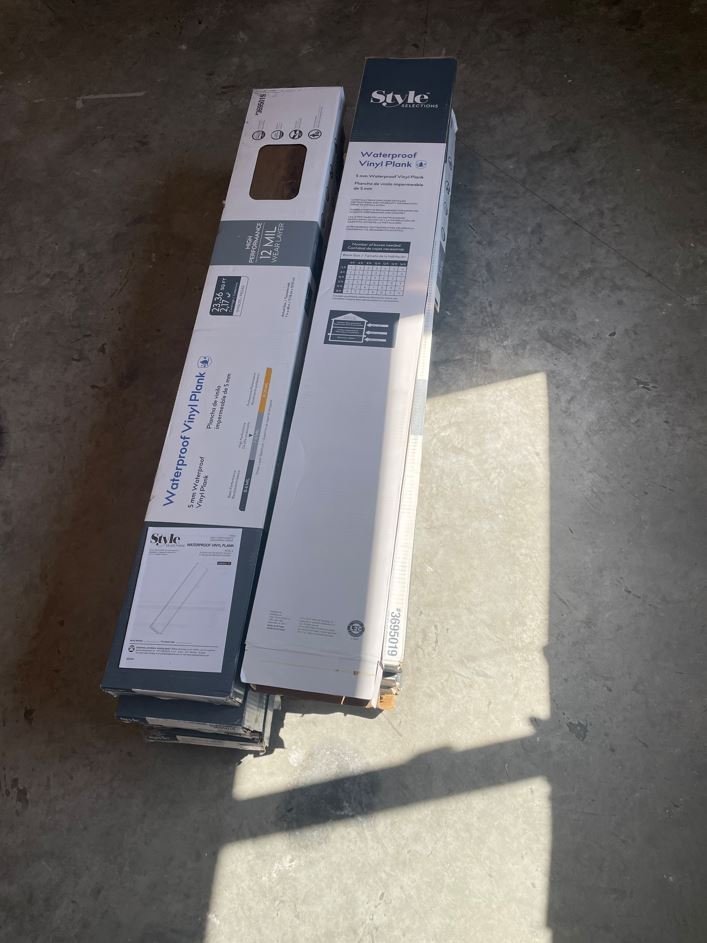
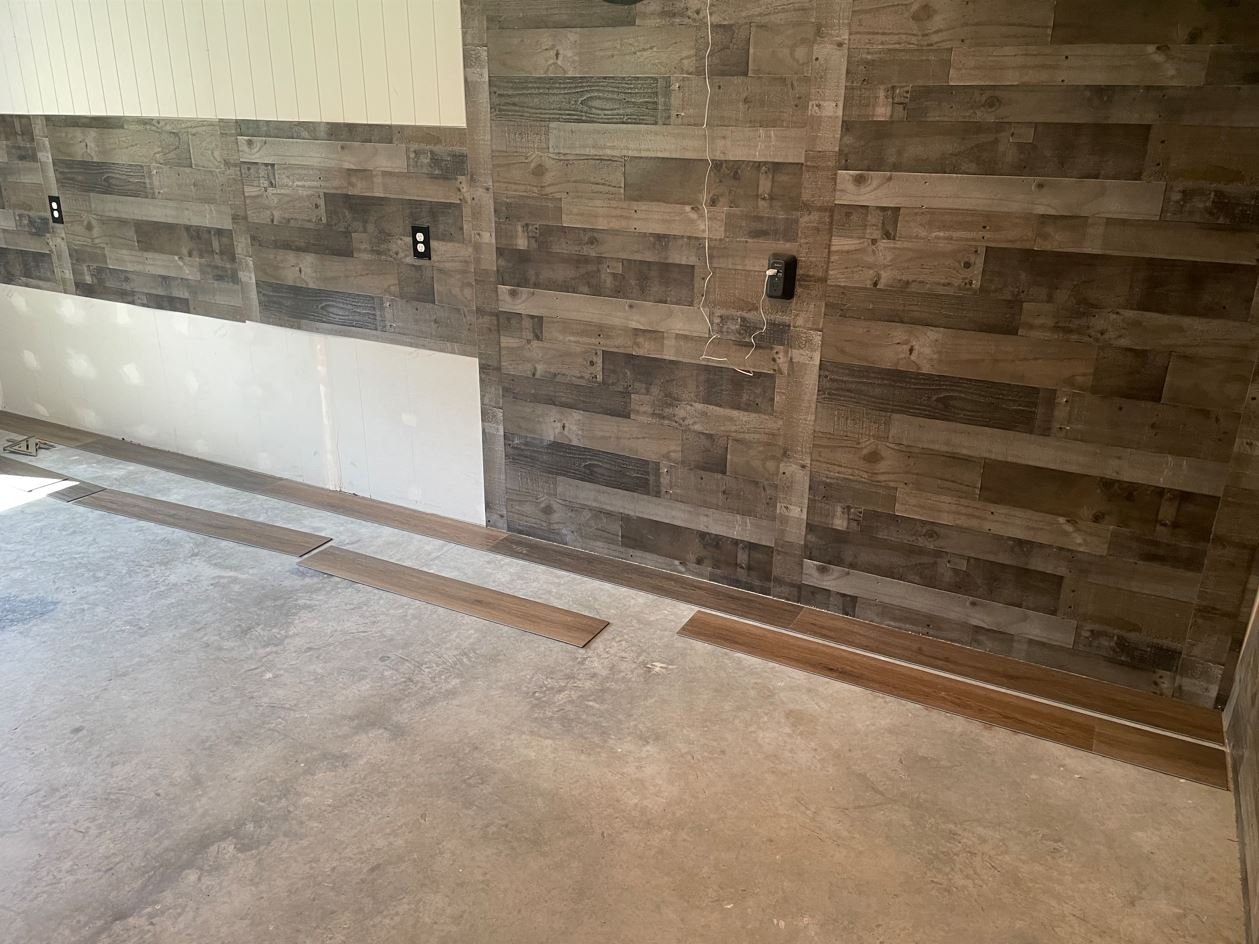
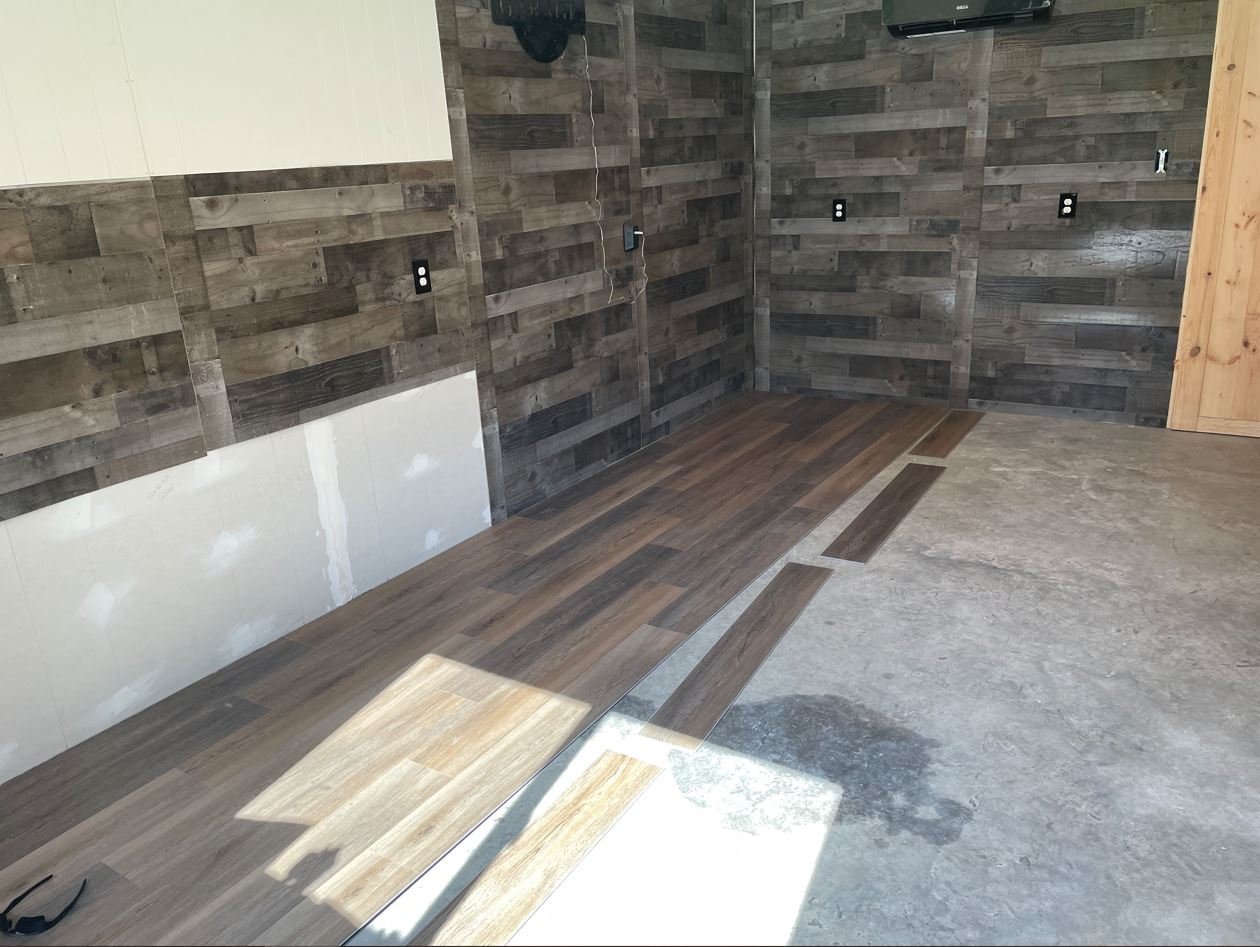
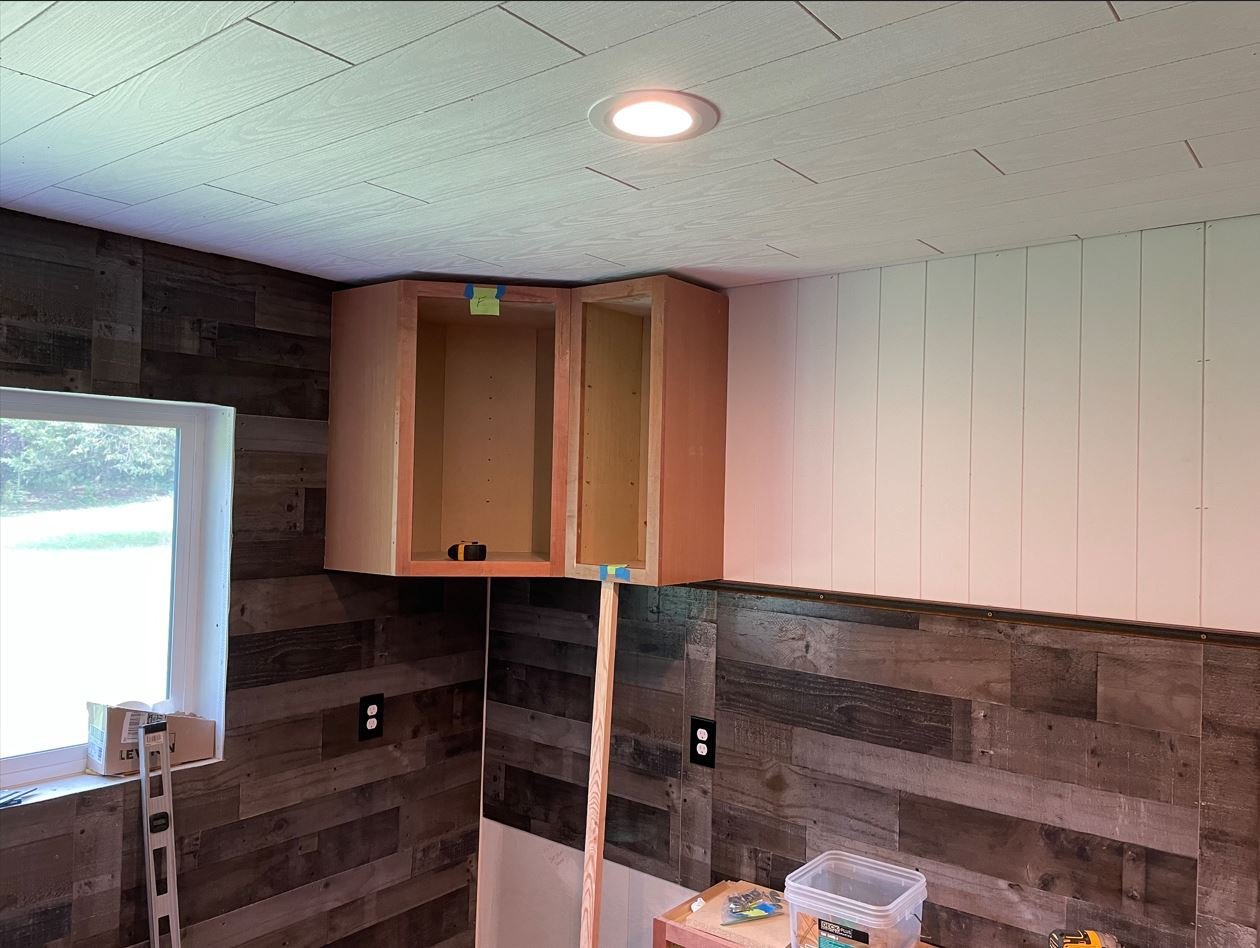
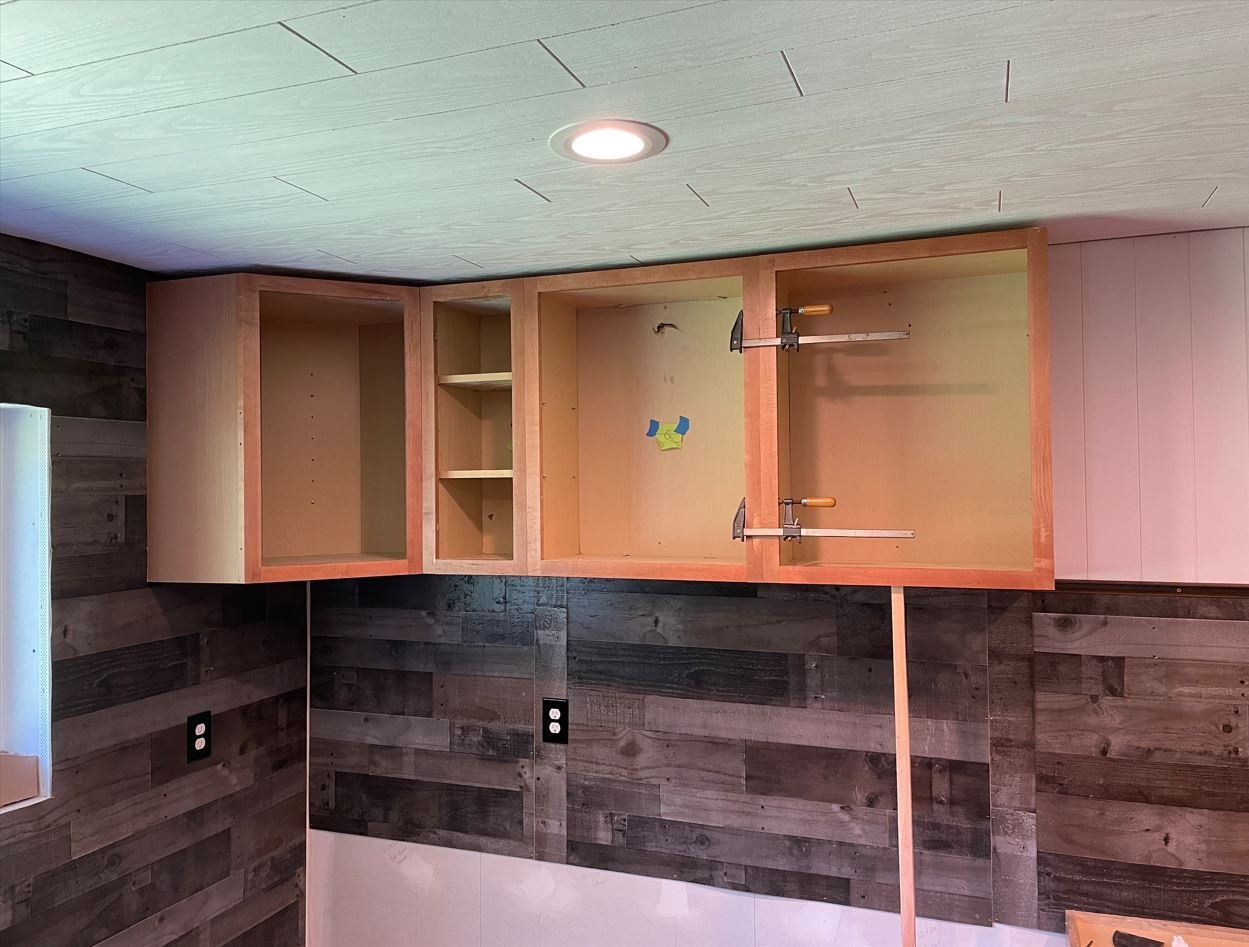
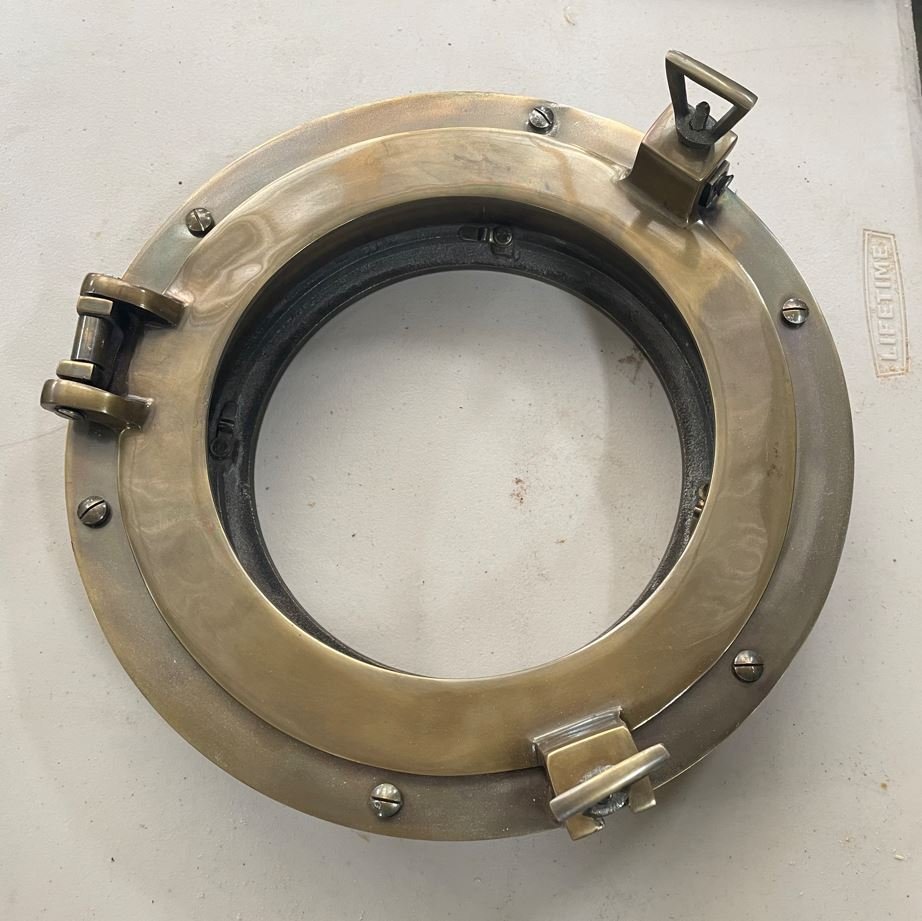
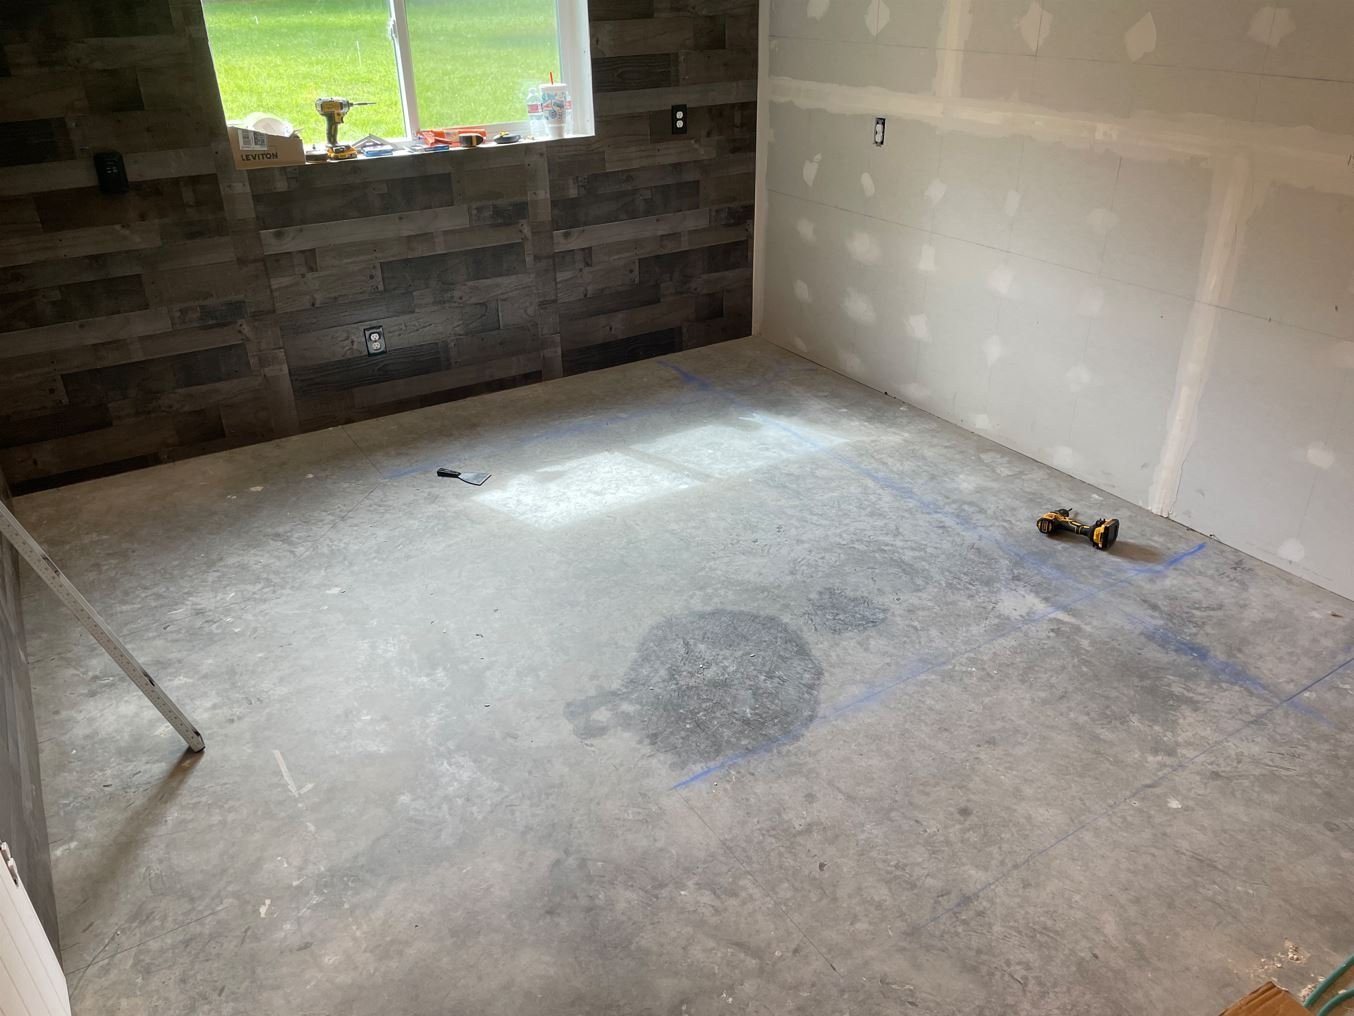
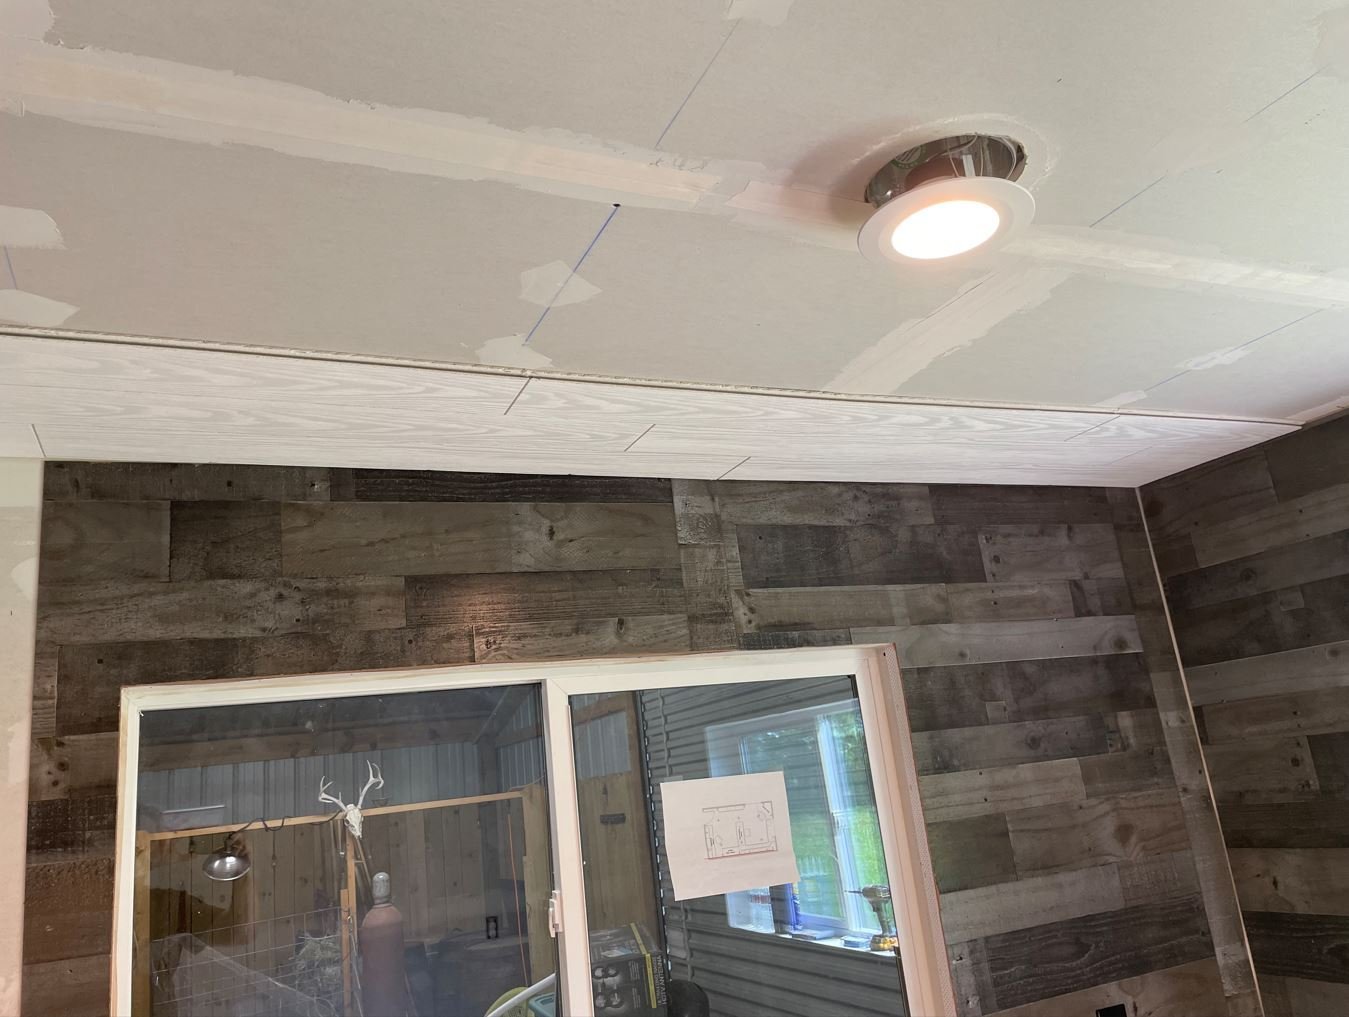
As time permits, I am slowly making progress on my shipyard. Day 21: More paneling going up for the upper cabinets and workbench. Nothing too spectacular here. I got a late start on this day and it was extremely hot in the barn so I wanted to work on something that I could take advantage of the AC. Day 22: Early start while it was somewhat cool, I finished up on the door construction. Still needs to be trimmed down to fit the opening, but it is done for the most part. Trimming out the door opening . I found this little gem on eBay and had to get it. I think it will set the door off nicely. Making way for the port hole. ..and finally the door is hung in place. All that is needed is to trim out the inside with molding, but that will come later, as will the porthole installation. I first need to get the door sanded and stained. I just wanted to get it installed so that I could hold on to as much AC as possible. Day 23: Time to lay down some flooring. Since this room is in the barn, I wanted to put down something that would withstand the major temperature changes that Texas has to offer. When it is rainy it tends to be a bit humid and the concrete floor of the barn tends to sweat. Even though the room is climate controlled, I didn't want to run the risk of the moisture seeping under the walls, so I went with a vinyl tile flooring. The tiles have a built in moisture barrier and since they are made of vinyl, they are waterproof. Shouldn't have to worry too much about the moisture with this product. Day 24: My original plan was to completely build the upper cabinets on the wall as well as the lower ones for the workbench. While the Admiral and I were out buying the flooring, she wanted to stop by the Habitat for Humanity Re-Store and see what they had. Usually you can find some good stuff at this place (and sometimes downright cheap), I am forever running across good deals on trim work and other good items. That is actually where I found the windows for my shipyard as well. So we took a stroll through the store and when I got to the back I found a whole kitchen's worth of cabinetry they had just gotten in. Well needless to say, they had more than enough cabinets to do what I needed, and they were half the price of what I had budgeted to build them. They just need a good wiped down, some sanding a a coat of paint to fit my color scheme and I should be good to go. First set going in. Piecing them together. All of the uppers in place. Door installed. Now the lowers going in. I got lucky with some of the lowers. There were several sections with drawers, which are always handy to have. It's all starting to come together. Next on my to do list is to get the cabinets painted up and start working on the benchtop. Thanks for stopping by. -Brian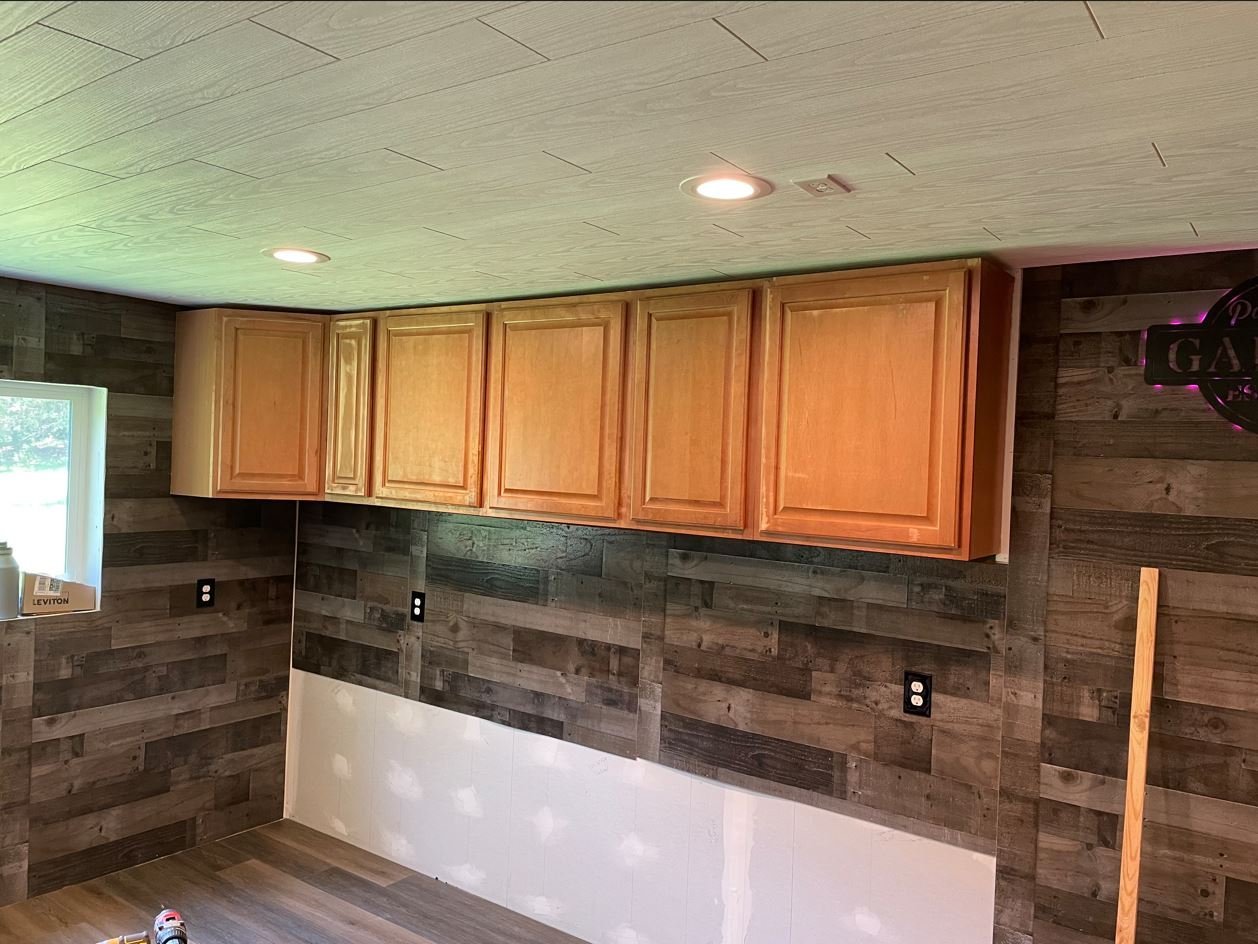

- 70 replies
-
- 20
-
-
-
Great video(s) Eric. I am all too familiar with the Katy RR, its old lines run just east of where we live. And in my line of work, I secure permitting for fiber optic runs along these railroads. Funny the irony of the MK&T's competition with Missouri Pacific ended up with the two RR merging and eventually both being acquired by Union Pacific. -Brian
-
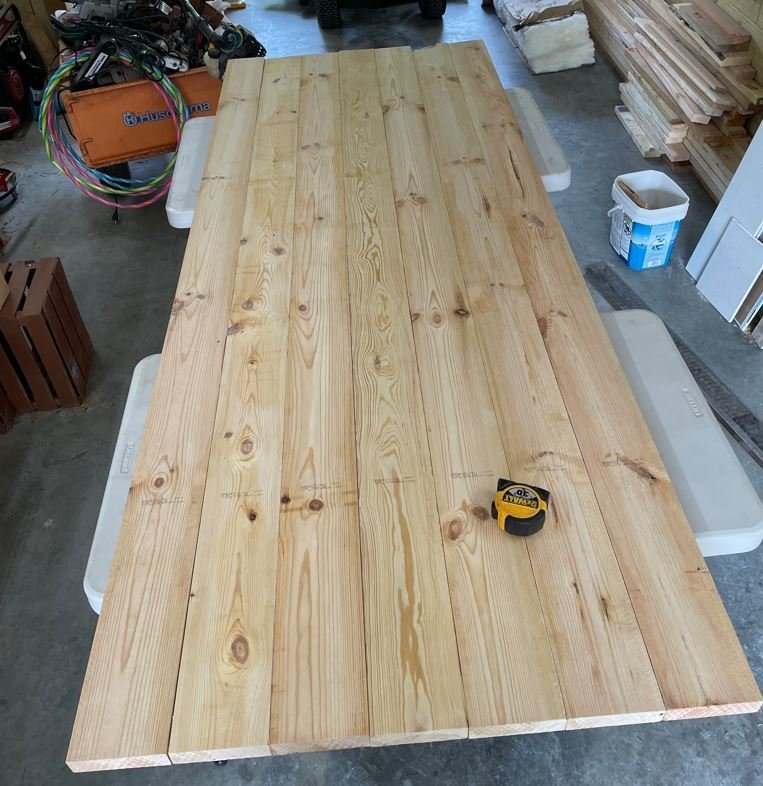
And away you go! So happy to see that you were able to get your spare bedroom finally completed and the work bench setup. Beautiful job, by the way! I love the use of home harvested lumber on your workbench. One of these days I might try my hand at that, but I have way too many projects (and hobbies) to start that now. We, like you and Mrs. Cathead, have an overabundance of lumber on our property that we could start our own sawmill as well, just not the time to do it. While I am having fun building my shipyard, I am chomping at the bit to get back to my build, and now seeing that you have kicked your new build off makes me even more ready to get going. I should hopefully be ready to go in about a month though. This project looks like it is going to be quite the undertaking, especially with the railroad dio included. Not sure of how far you are going to take it, but the RR bridge in the photos looks like it would make a great addition. Just saying -Brian
-
What a fascinating subject. I am all about the more obscure boats out there, and this one fits right in to that category. I am jumping with excitement to see this project progress. Glad to see you back on another scratch build Eric. I’ve got my chair pulled up in the front row! -Brian
-
Timber-framed outdoor kitchen - Cathead - 1:1 scale
mbp521 replied to Cathead's topic in Non-ship/categorised builds
Beautiful work Eric. Another step closer to enjoying that outdoor kitchen. It’s nice to know there are some business owners that still stand behind their products and are willing to make things right. -Brian -
Barncave Shipyard by mbp521 - Scale 1:1
mbp521 replied to mbp521's topic in Non-ship/categorised builds
Thank you Keith. I am definitely anxious to get back to building boats, they don’t wear me out near as much as building this room. 😁 -Brian -
Barncave Shipyard by mbp521 - Scale 1:1
mbp521 replied to mbp521's topic in Non-ship/categorised builds
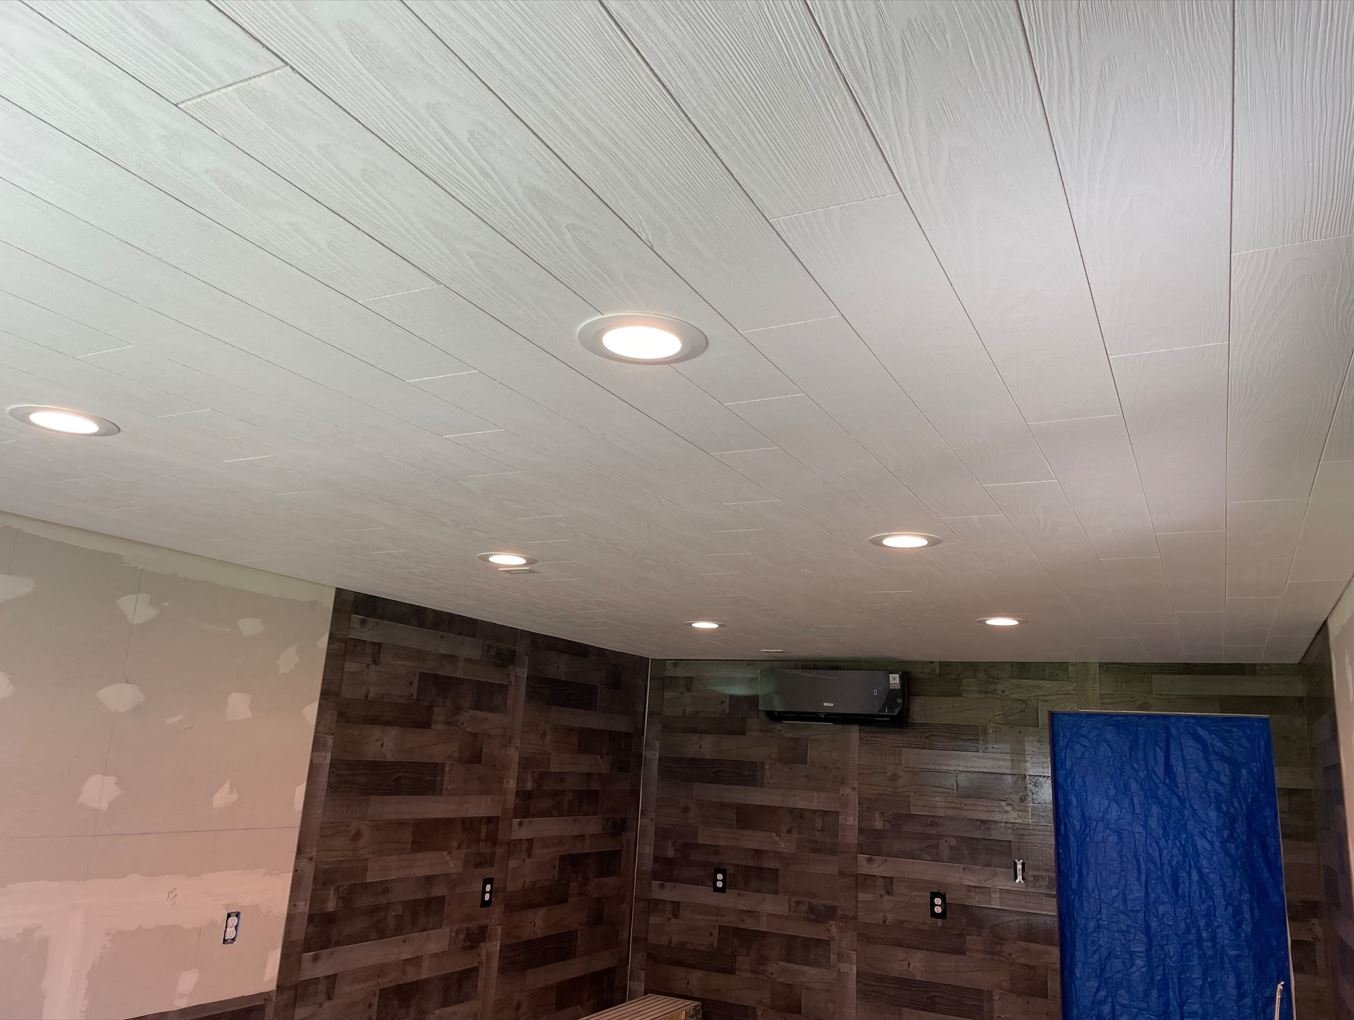
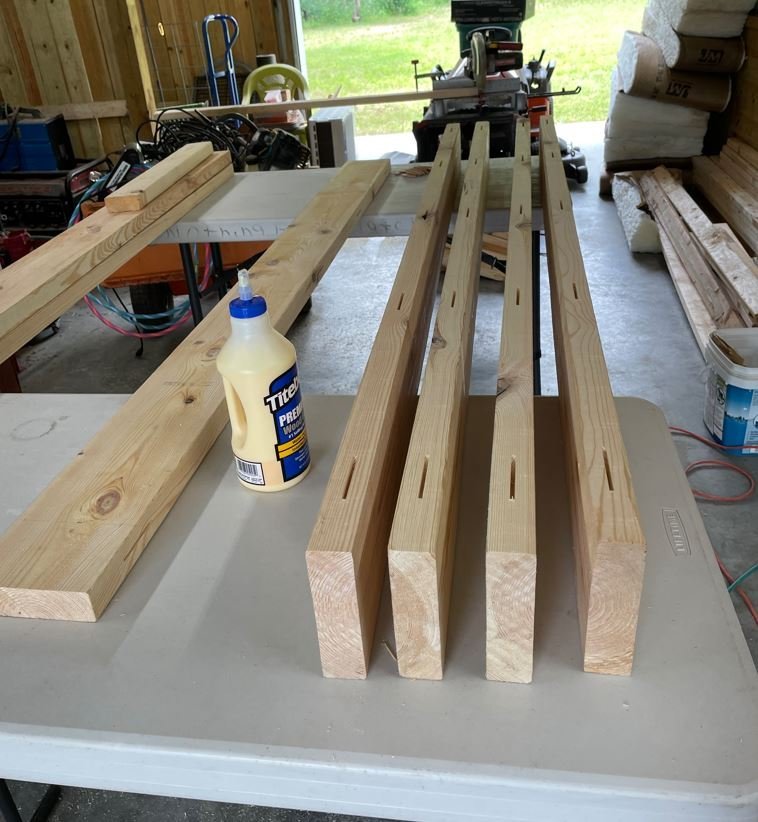
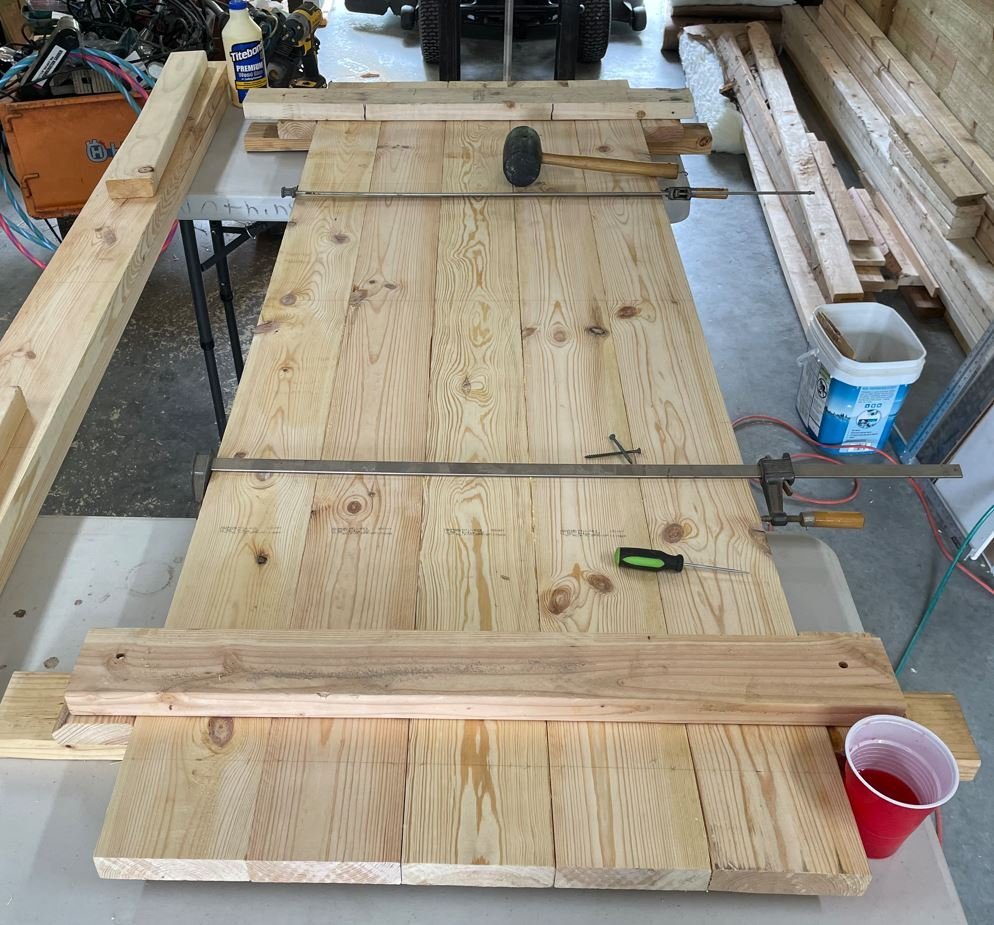
More progress on the shipyard. Day 17: The ceiling tiles arrived right on schedule, beginning the tedious process of getting them installed. Each tile is glued and stapled into place, just to make sure it doesn't come down on me. I decided to forgo the use of the track system to hang the tiles on since they take up an additional 1/2" and my walls are already short enough as it is. First few courses going in. Making sure that they maintain a straight line is the most difficult challenge, but so far so good. End of a long day and I'm halfway there. Day 18: Finally finished with the ceiling. Day 19: Not much work here, but I did get the bead board installed where the bookcase is going. This will eventually be painted either black or a dark gray once the shelves are installed. I will also be using a couple of these shelves as a display case for my Chaperon & KotM kits. Day 20: The AC works great and keeps the room ice cold. It's almost hard to go outside with the comfortable working conditions in here. Unfortunately I am not getting the most efficiency out of the unit with the blue tarp strung up over the door opening, so I decided it was time to get working on the door. I kind of wanted to go with rustic looking "ship-like" door so I figured I'd build it out of 2x6's. Each board will be glued together and held in place with biscuits. Most of the inner part of the door is glued together, I installed some clamps and braces to keep it flat. Now to let the glue dry and setup. While the glue dries, I wanted to get a better idea of the bench layout so I drew everything up on the floor. Hard to see the chalk lines, but I think I'm going to have plenty of room to move around. This is where I am at now. I still need to finish the outside panels of the door and work on the framing. One thing is for sure, this door is going to be heavy. Good thing I pre-planned and beefed up the frame opening. It will definitely be a true test of my engineering skills. Thanks again for stopping by. -Brian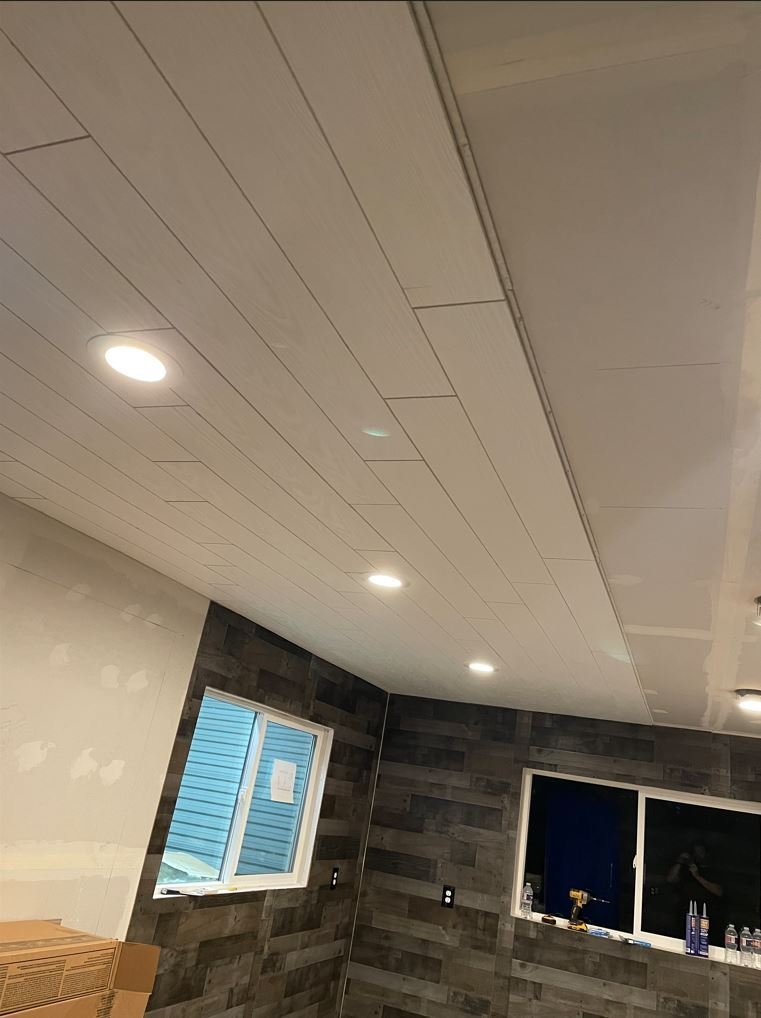
- 70 replies
-
- 12
-
-
Eberhard, my thesaurus of unused adjectives for words to describe your beautiful work is running low. I’ll just have to reuse Amazing. 😁 -Brian
-
Barncave Shipyard by mbp521 - Scale 1:1
mbp521 replied to mbp521's topic in Non-ship/categorised builds
TV yes, recliner unfortunately no. 😁 I will have a min fridge though. The Admiral told me all I needed was a toilet and I wouldn’t have to come in the house anymore. Thinking, thinking…. -Brian -
Barncave Shipyard by mbp521 - Scale 1:1
mbp521 replied to mbp521's topic in Non-ship/categorised builds
Thanks Keith. Paneling definitely wasn’t what I planned to use initially, but since it saved me about $400 in building materials, it was my best option. I wanted to go with more of a brown color for the walls, but when I found this, I couldn’t pass it up. Once all the cabinets, work benches and shelves are in, a lot of it won’t be seen. The Admiral and a few others have already told me that darker colors tend to make a room feel smaller, but I’ve always liked that look. Guess that’s why the Admiral won’t let me decorate the house. 😁 To me the darker colors seem to make it feel more cozy. -Brian -
Barncave Shipyard by mbp521 - Scale 1:1
mbp521 replied to mbp521's topic in Non-ship/categorised builds
Thank you Eric. For now the plan is to just turn the unit off when I’m not in there, but that plan may change. I’ve got the room well insulated so I’m hoping that it will retain some of the heat/cooling, but that remains to be seen, so I’ll play it by ear. It helps that the unit can be controlled via wi-fi so I can monitor things remotely and adjust them as needed when I’m not there. As for the temp settings, I know the AC will go down to 60, not sure of the heat. Since it is a heat pump, I would assume the inside temp would be relative to the outside temp, but all I really need is for it to stay a comfortable 72 in the winter and I’ll be fine. And just like any typical guy, I haven’t read the instructions (and possibly threw them away during my cleaning spree) so can’t say for sure what the temperature range is. -Brian -
Welcome welcome! -Brian

