HOLIDAY DONATION DRIVE - SUPPORT MSW - DO YOUR PART TO KEEP THIS GREAT FORUM GOING! (Only 20 donations so far - C'mon guys!)
×


Gerhardvienna
-
Posts
683 -
Joined
-
Last visited
Content Type
Profiles
Forums
Gallery
Events
Everything posted by Gerhardvienna
-
Hi Lou The jig system for small turned wooden parts is "stolen" from Johann @archjofo. I could not work without a lathe, that is one of the most worthful tools for model building. And useful for some repair works in the houshold too! The patrol boat was my first attempt in scratchbuilding a boat, I must buy two new contollers to bring her back to the pond! Regards Gerhard
-
Thank you! There is a lot more to come, just working on the plans for the ship. There are no infos about her, so I will have to adapt other plans for the hull, maybe the plans to the russian Vladimir. But first comes the Cairo, lots of work on her too! Regards Gerhard
-
Fokker Dr.I by Torbogdan - FINISHED - Model Airways
Gerhardvienna replied to Torbogdan's topic in Non-ship/categorised builds
Now that makes ME cry We have to pay about € 1,11 for only one liter...................... Regards Gerhard -
Hi Lou Thank you, here`s my channel :https://www.youtube.com/channel/UCaAcbBL8UapzflEoUs_fgiw Regards Gerhard
-
Hi Nils She`s alive! RESPECT. All that wires, figures, boats, etc. so well done! Regards Gerhard
- 2,625 replies
-
- 4
-

-
- kaiser wilhelm der grosse
- passenger steamer
- (and 1 more)
-
Hi Carl Thank you! If there are any requests, please dont be shy anyone! Regards Gerhard PS.: If you watch the video on Youtube, there are some more videos I made over the time. Not many, but I`ll keep on with it and make some more.
-
Hi Folks As I wrote in the "What have you done today" thread, I`m working on redrawing the plans for the Lippisch WIG Craft. I use Open Office for the first steps, and later import them into Design Cad 3D Max. This mthod is useful, when the original drawings are not larger than A4 format, larger drawings can not be made with open Office! They must be redrawn directly in the 3D Program, in 2D Mode. Here comes the video! Best regards Gerhard
-
Cutty Sark by NenadM
Gerhardvienna replied to NenadM's topic in - Build logs for subjects built 1851 - 1900
You stunn me! That are fine boats! Regards Gerhard- 4,152 replies
-
- 7
-
-
- cutty sark
- tehnodidakta
- (and 1 more)
-
Cutty Sark by NenadM
Gerhardvienna replied to NenadM's topic in - Build logs for subjects built 1851 - 1900
Hi Nenad Phantastic, how your skills have improved over the time of this build! But as I mentioned a long time ago, I knew that you can do it! Regards Gerhard- 4,152 replies
-
- 6
-
-
- cutty sark
- tehnodidakta
- (and 1 more)
-
Fokker Dr.I by Torbogdan - FINISHED - Model Airways
Gerhardvienna replied to Torbogdan's topic in Non-ship/categorised builds
http://blog.photobucket.com/please-review-latest-changes-photobucket/ http://photobucket.com/pricing Photo Bucket has changed from a hosting service to "robbery"! No external links unless the user pays up to € 40,-- per month, or € 400,-- per Year Regards Gerhard -
Agreed! Perfect work, Nils!

- 2,625 replies
-
- 7
-
-
- kaiser wilhelm der grosse
- passenger steamer
- (and 1 more)
-
Cutty Sark by NenadM
Gerhardvienna replied to NenadM's topic in - Build logs for subjects built 1851 - 1900
Hi Nenad Unless the hardened colours, what a boat! Great job! Regards Gerhard- 4,152 replies
-
- 5
-
-
- cutty sark
- tehnodidakta
- (and 1 more)
-
Not too much progress this week, the heat almost kills me, above 30 degrees here in Vienna But today i will go to the store, and buy some extra materials for the ship! Regards Gerhard
-
Cutty Sark by NenadM
Gerhardvienna replied to NenadM's topic in - Build logs for subjects built 1851 - 1900
Hi Nenad Great job! Regards Gerhard- 4,152 replies
-
- 4
-
-
- cutty sark
- tehnodidakta
- (and 1 more)
-
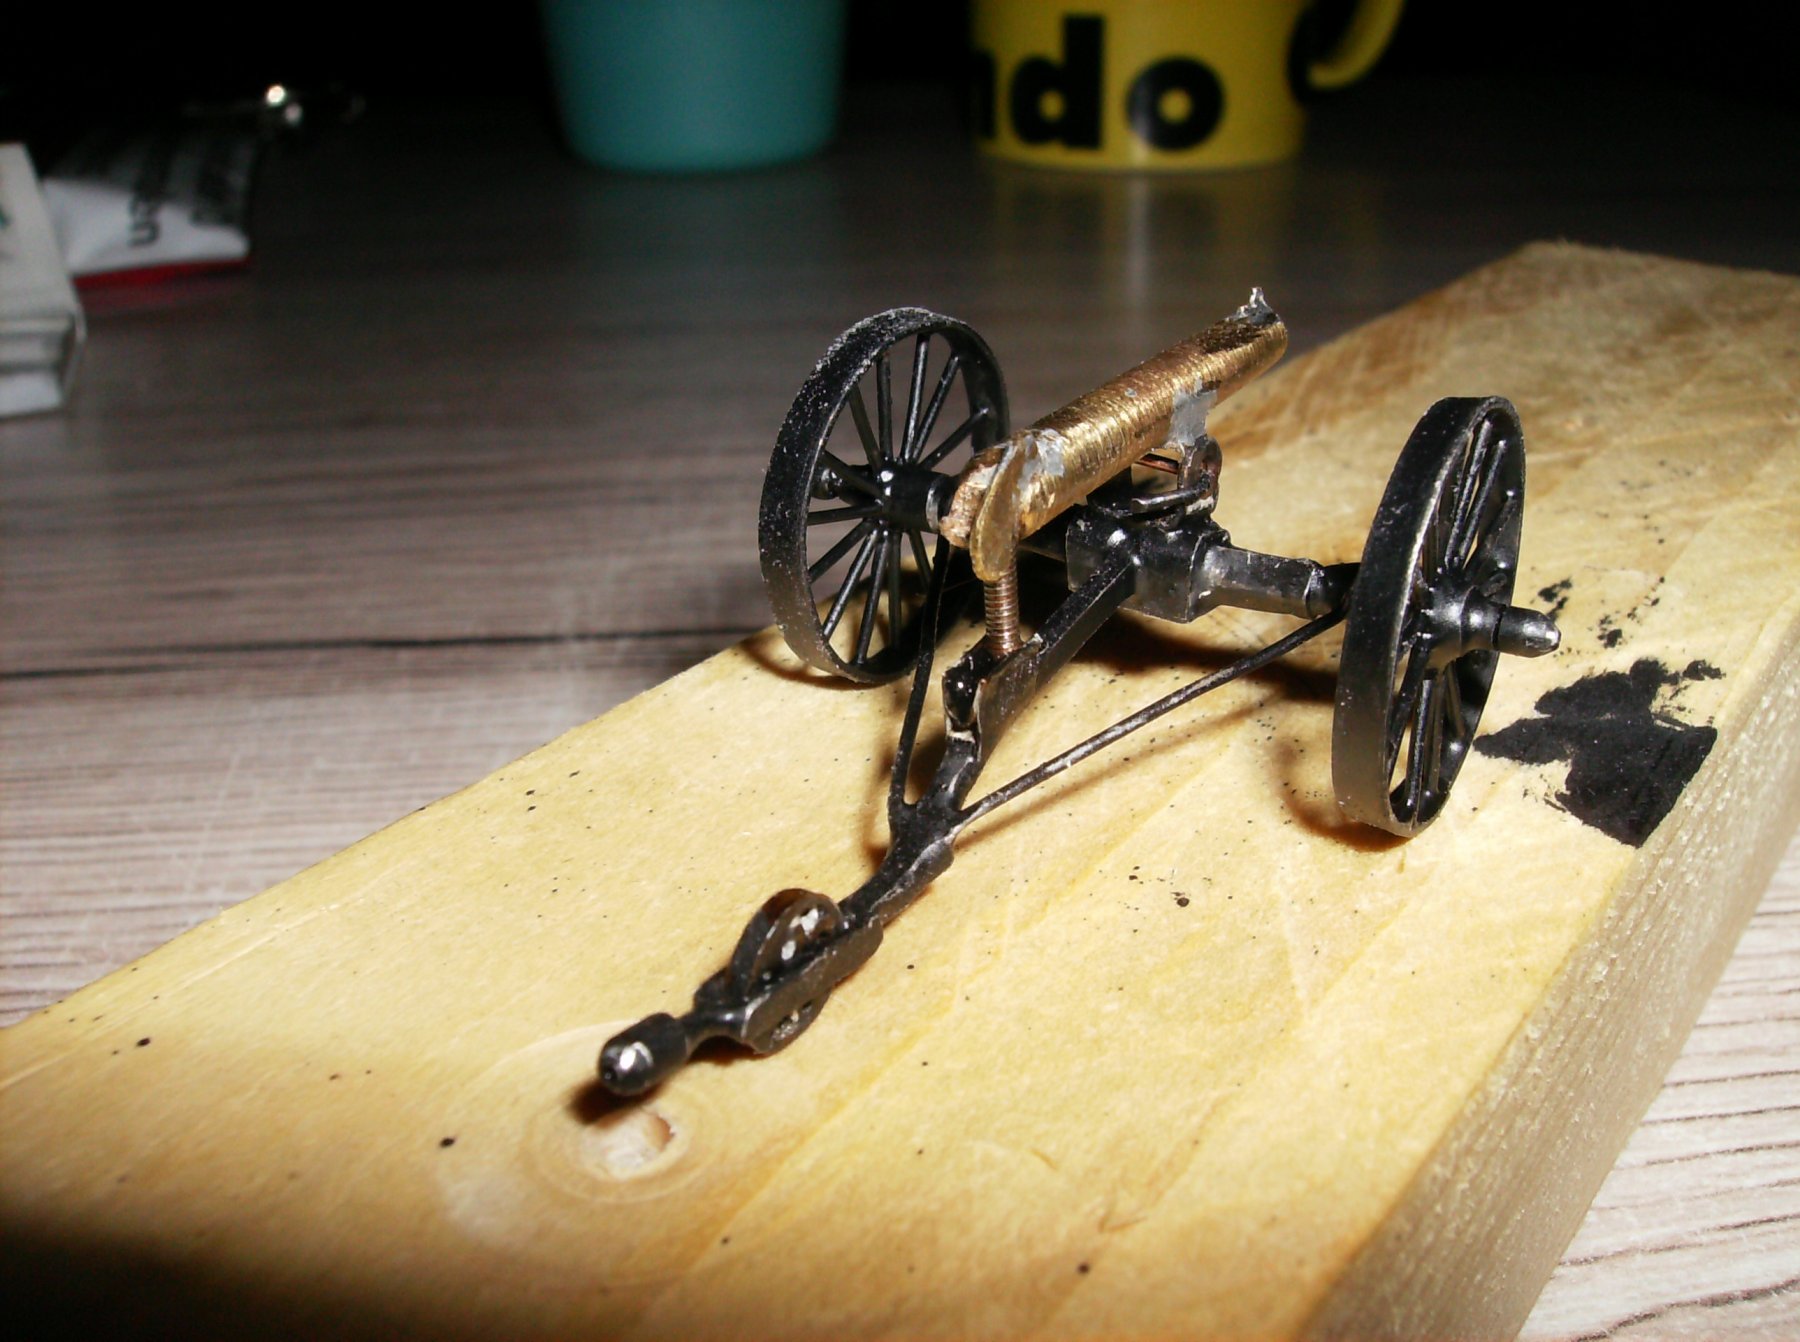
Last thing done on the carriage, elevator screw is set into place. And I could grind the bottom of the hull to shape, just raw at the time, but enough to set the bow and stern blocks to the frames, and then grind all to final shape. Thank you all for your interest Regards Gerhard


- 293 replies
-
- 15
-
-
Hi johnhoward WOW!! Thank you, this is one of the most worthful photos from the engine(s). Regards Gerhard
-
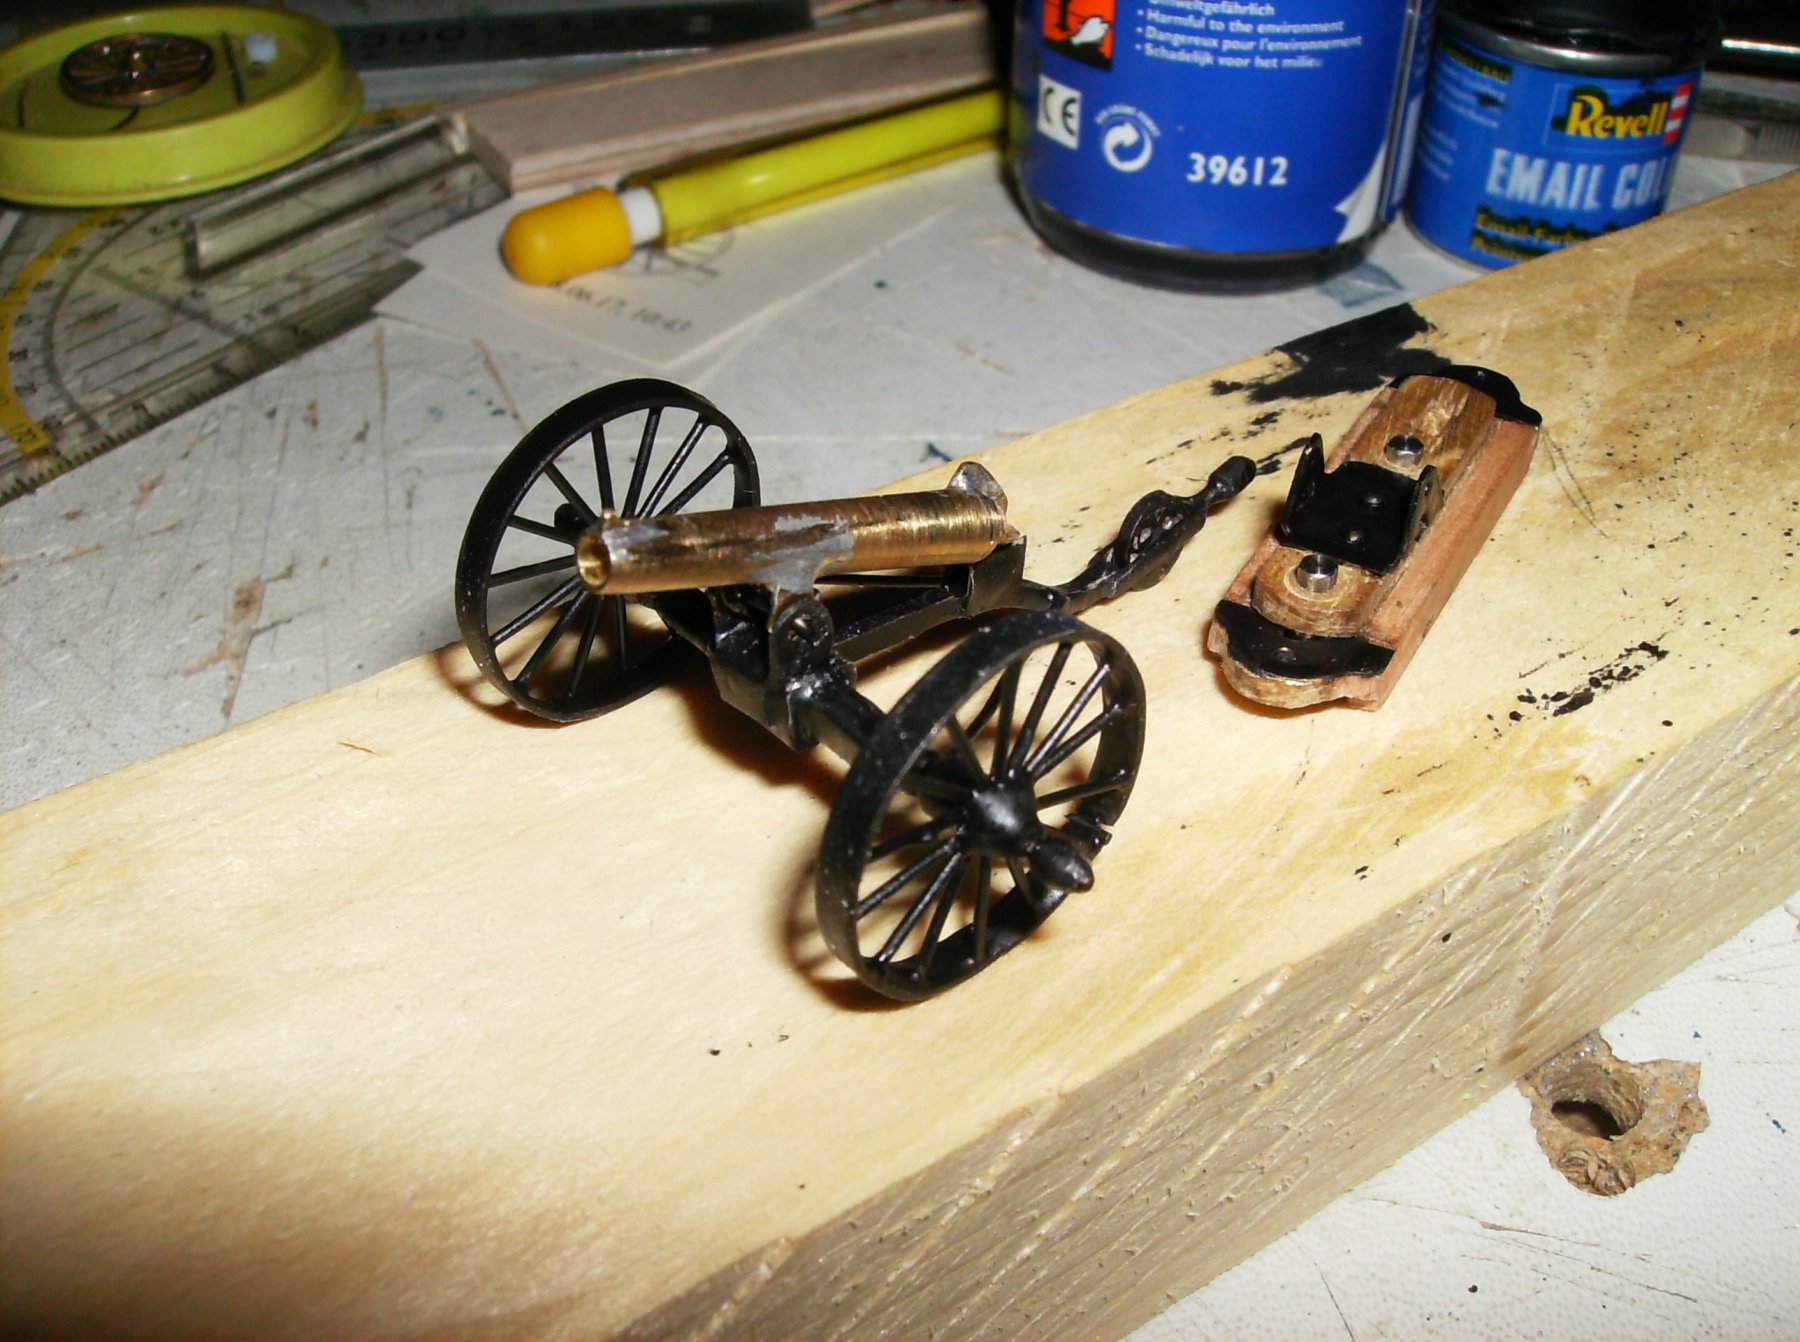
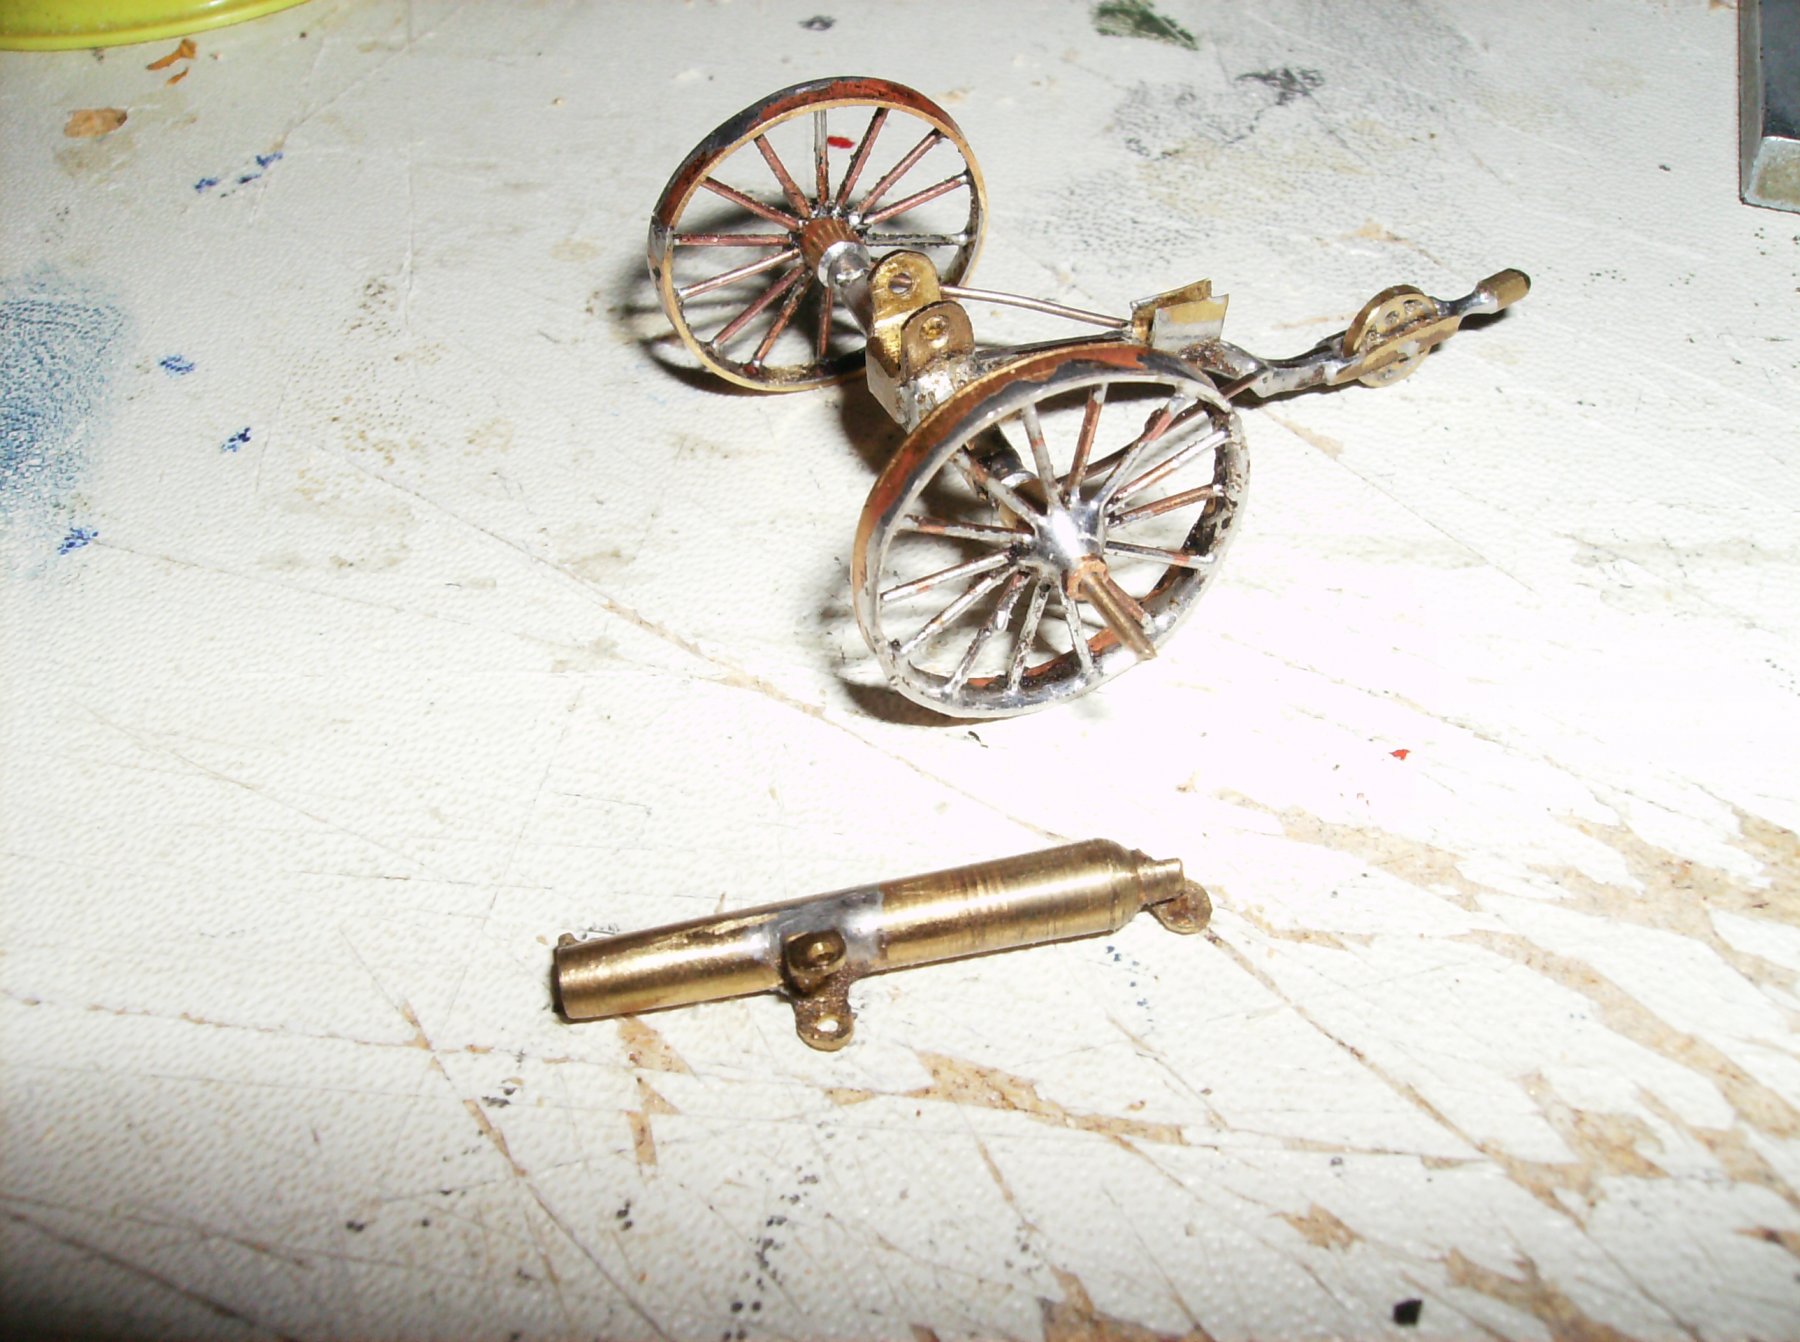
Hi Pat Thanks again! Was not too hard to make the carriage, the wheels were not easy! Hi Gerald If you watch the thread from post #178 on, you will see there is no plastic used, everything is made from brass. I used 0,5mm brass sheet, for all metal parts of both carriages. In 1:36 you will need 0,8 mm brass sheet. Regards Gerhard
-
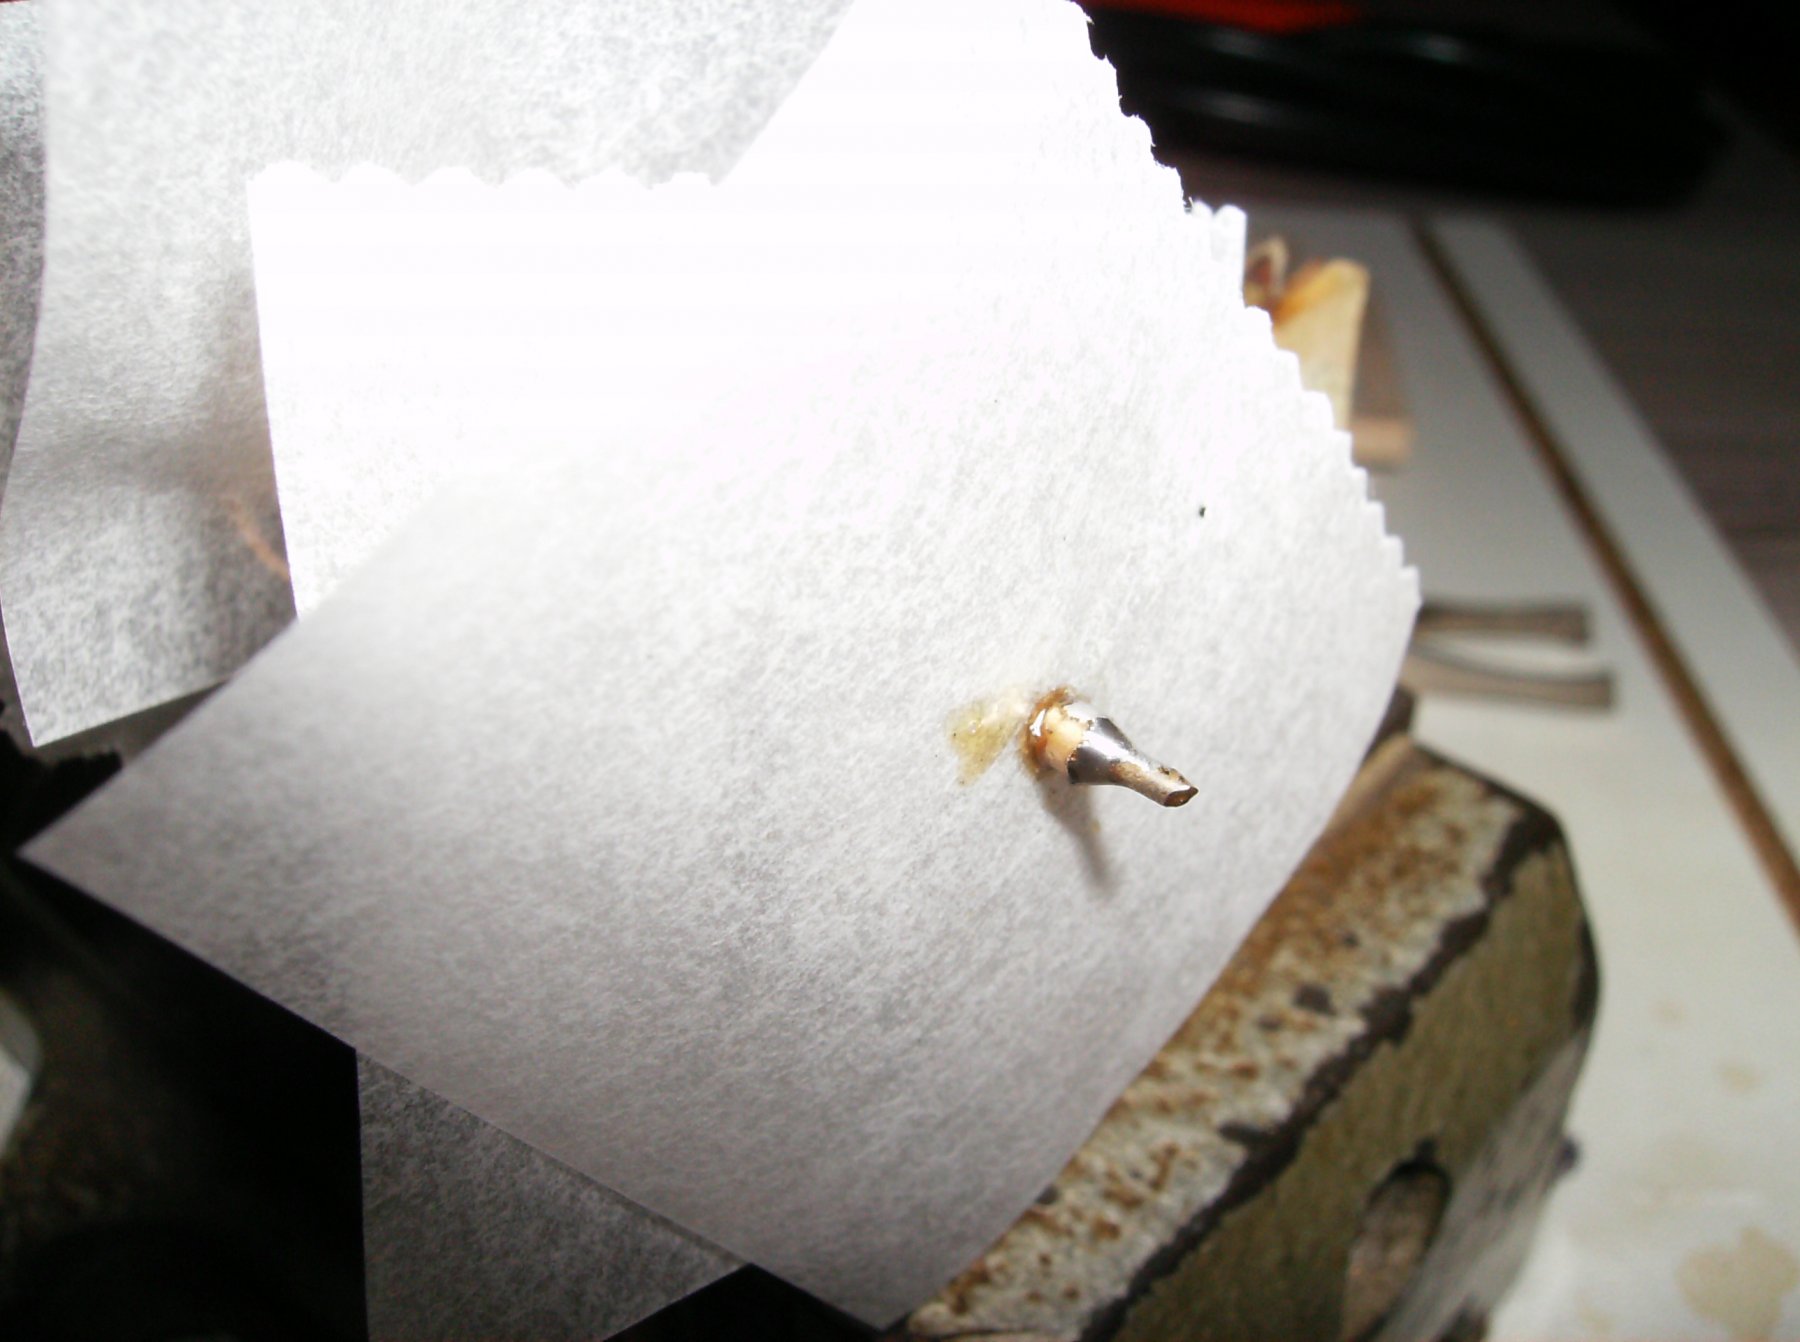
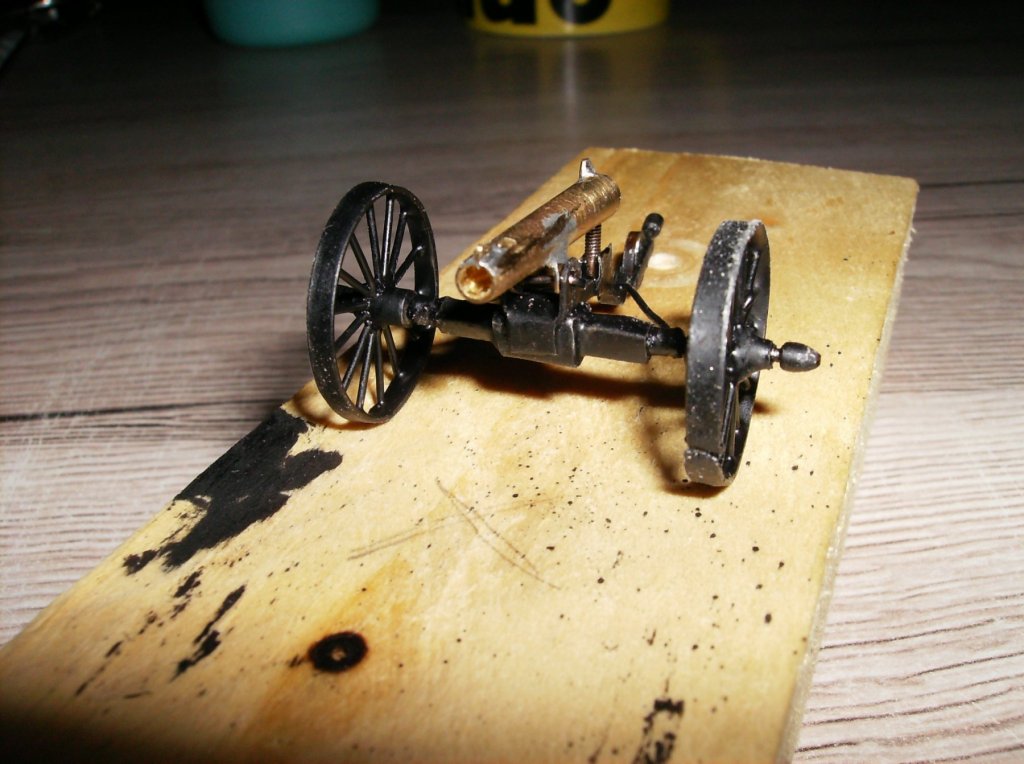
Hi Carl YES, was a bit easier than I thought. Now the endcaps for the axels are soldered, and the whole thing is painted flat black. The blackening fluid did not work on the soldered spots, so I had to use paint instead. I wanted to have the wheels moving, so I had to use baking paper between the endcaps and the wheel, and the same behind the wheels to the carriage. The finished carriage, beneath that lies the boat carriage Just the elevator screw missing, this little part will be set to the carriage with 5-min. epoxi. Soldering would not be good at that place, I`m in fear that the whole carriage would break into parts from the heat! Regards, and thank you all for watching! Gerhard


- 293 replies
-
- 11
-
-
Hi Nils Perfect work on the ship, stunning! And I`m sure, the showcase will be the same quality. Regards Gerhard
- 2,625 replies
-
- 6
-
-
- kaiser wilhelm der grosse
- passenger steamer
- (and 1 more)
-
Cutty Sark by NenadM
Gerhardvienna replied to NenadM's topic in - Build logs for subjects built 1851 - 1900
Hi Nenad It goes on............... Superb work on that boats, keep it going! Regards Gerhard- 4,152 replies
-
- 4
-
-
- cutty sark
- tehnodidakta
- (and 1 more)
-
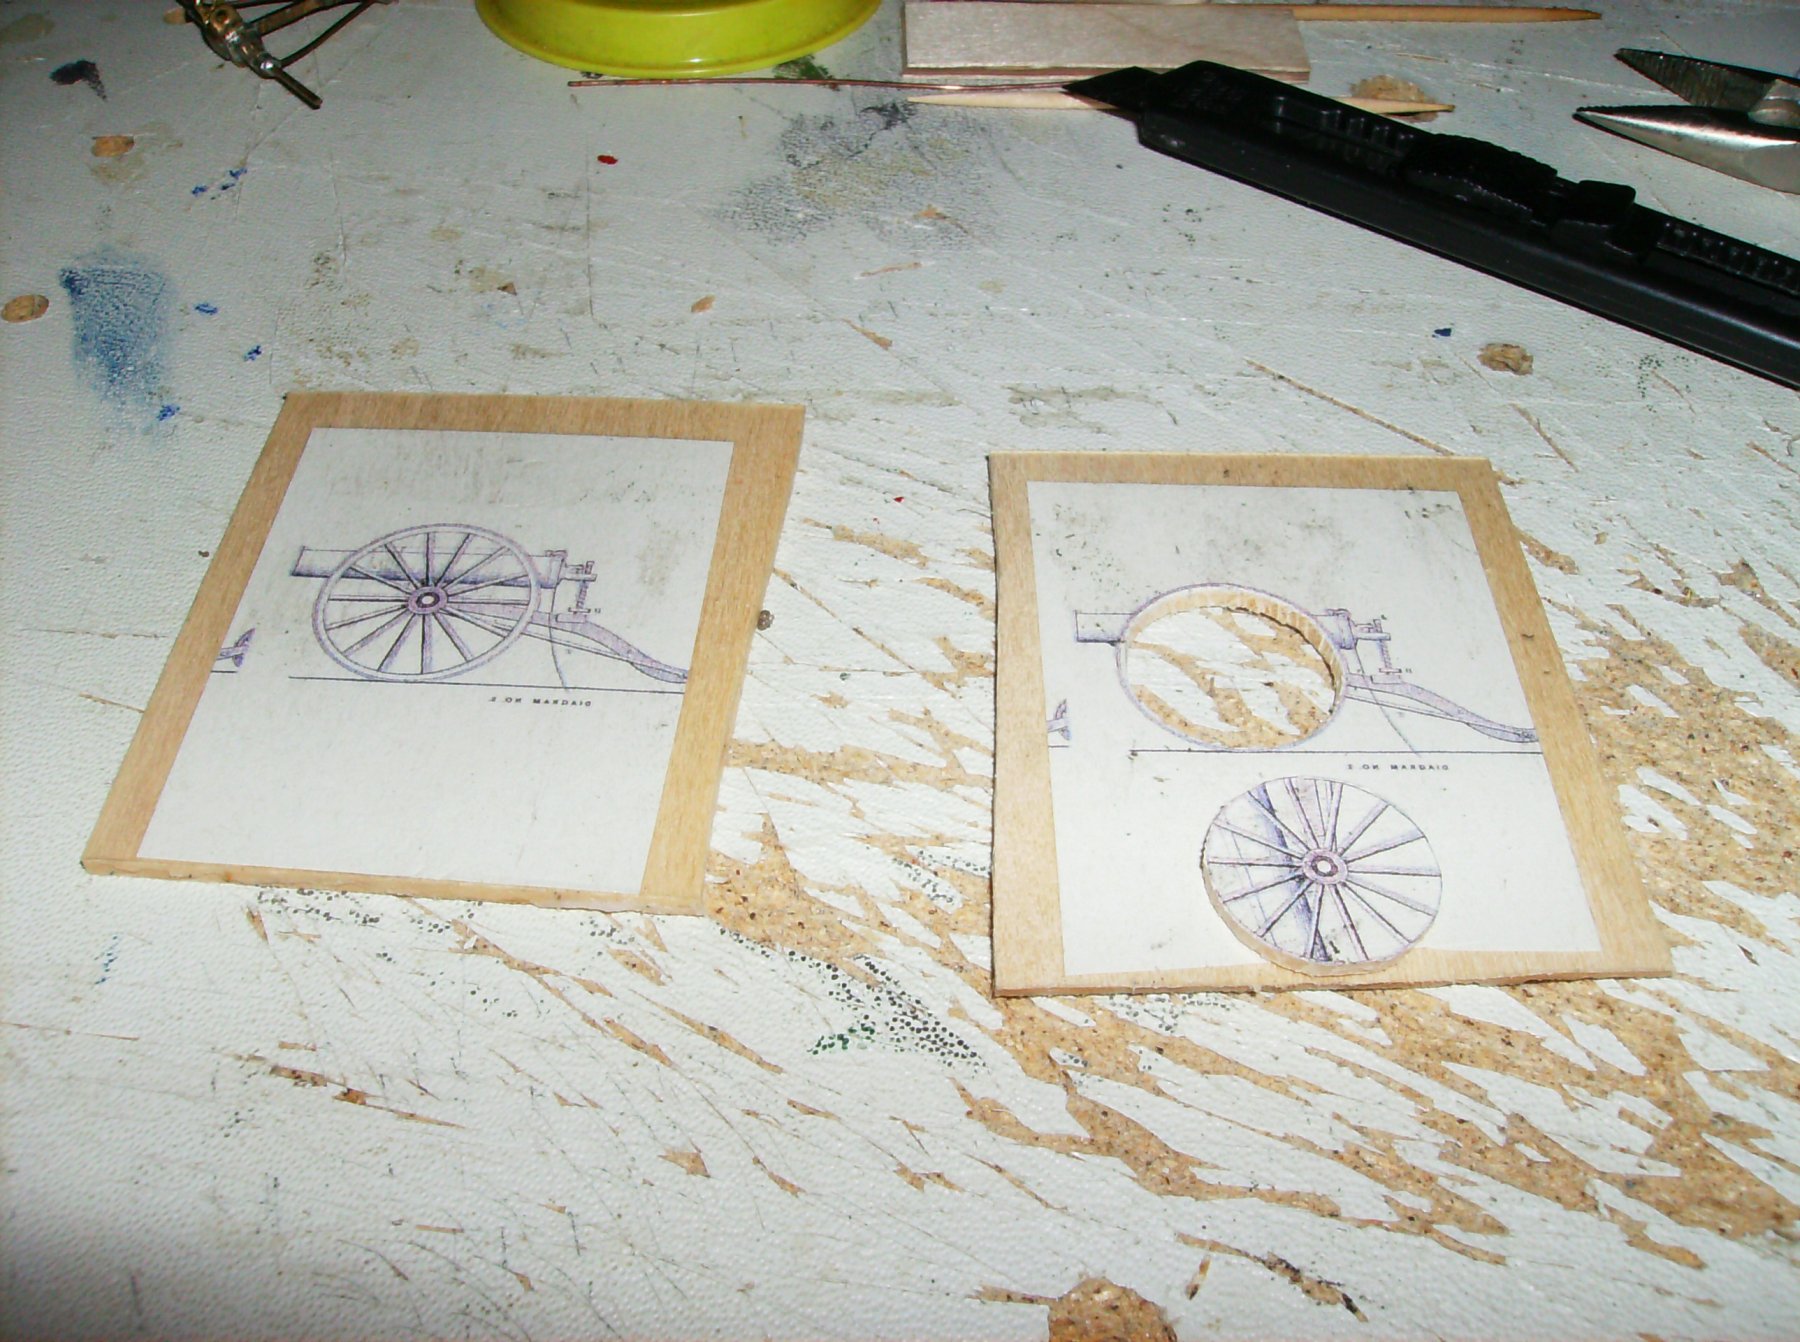
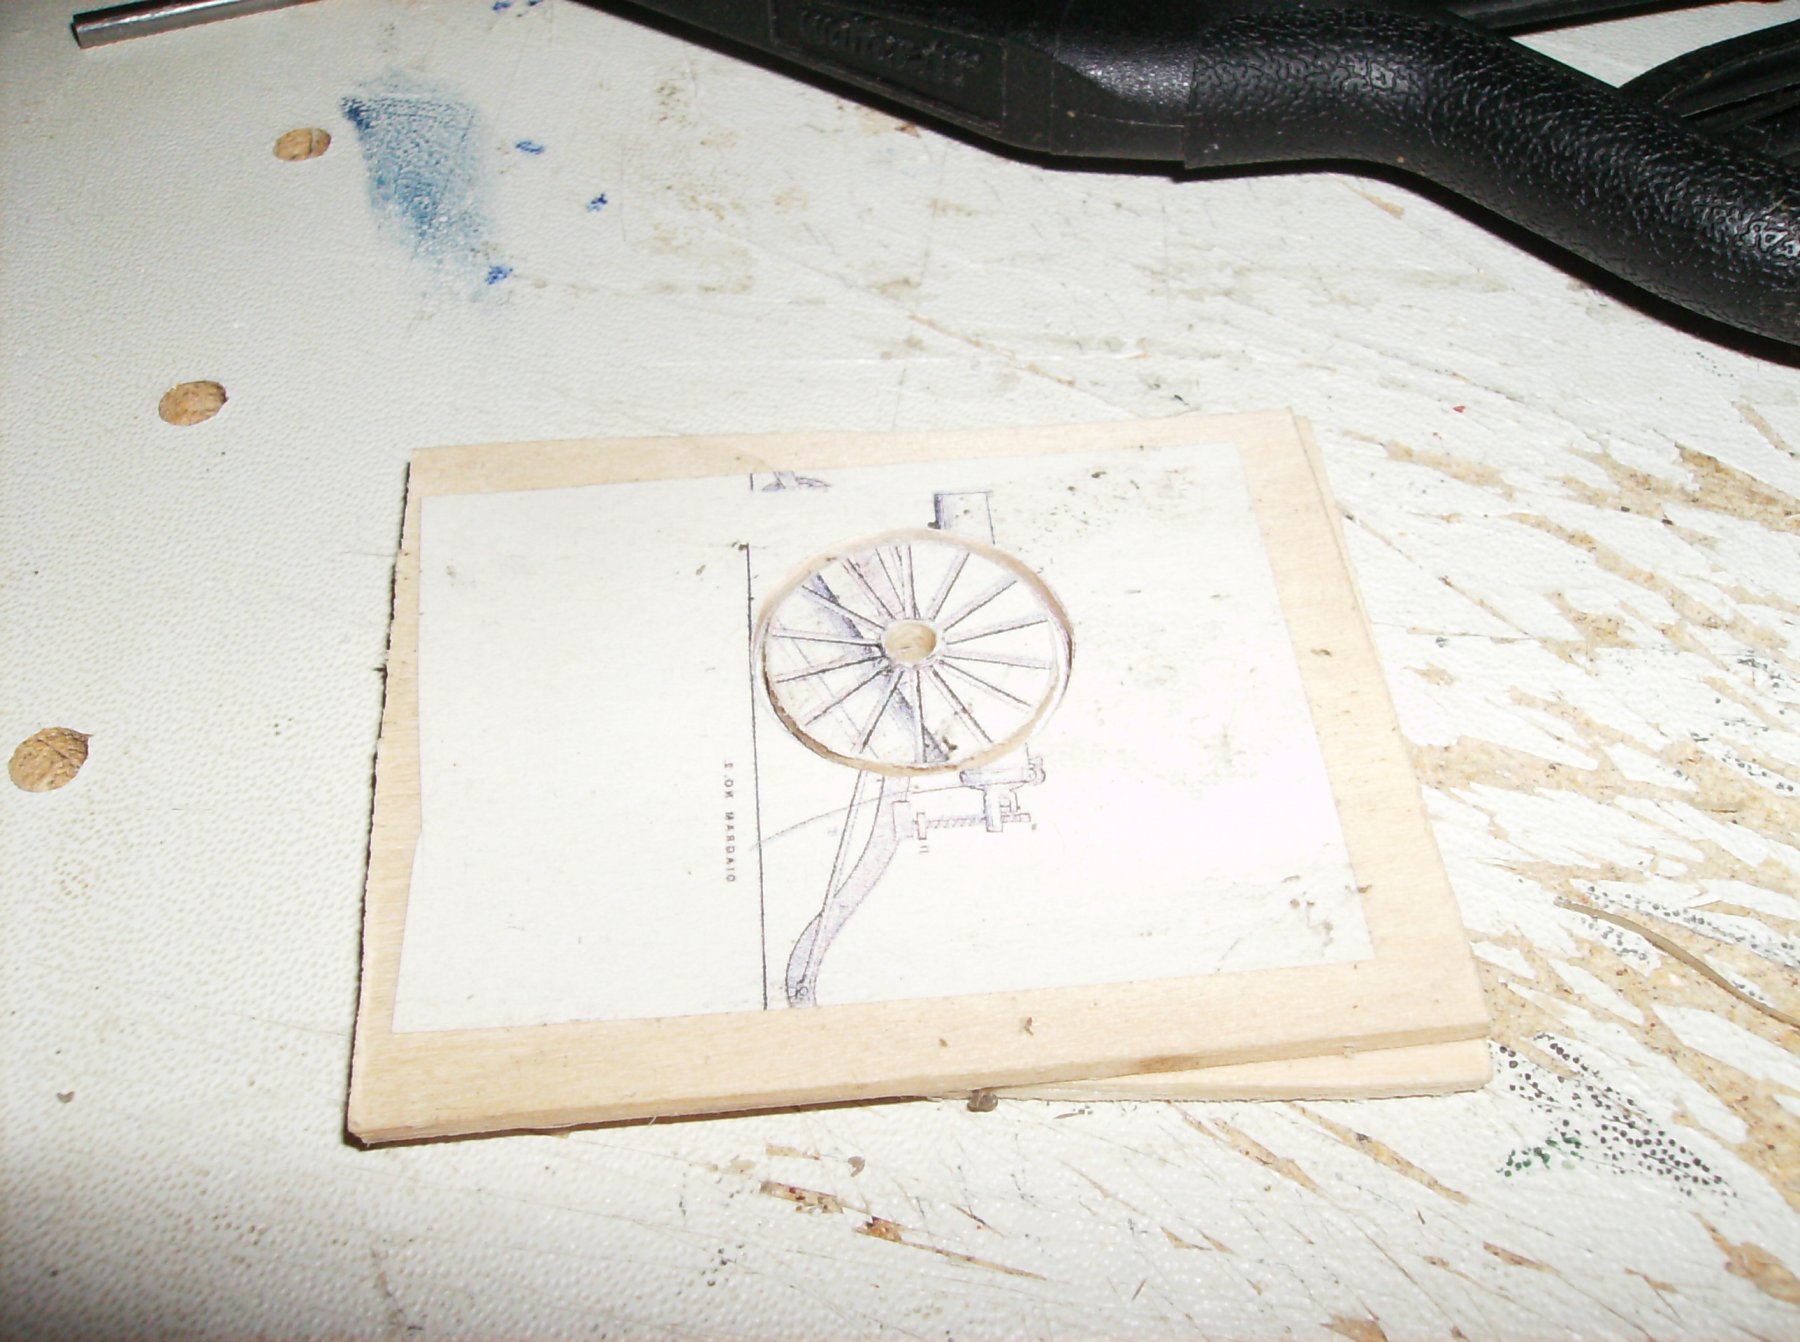
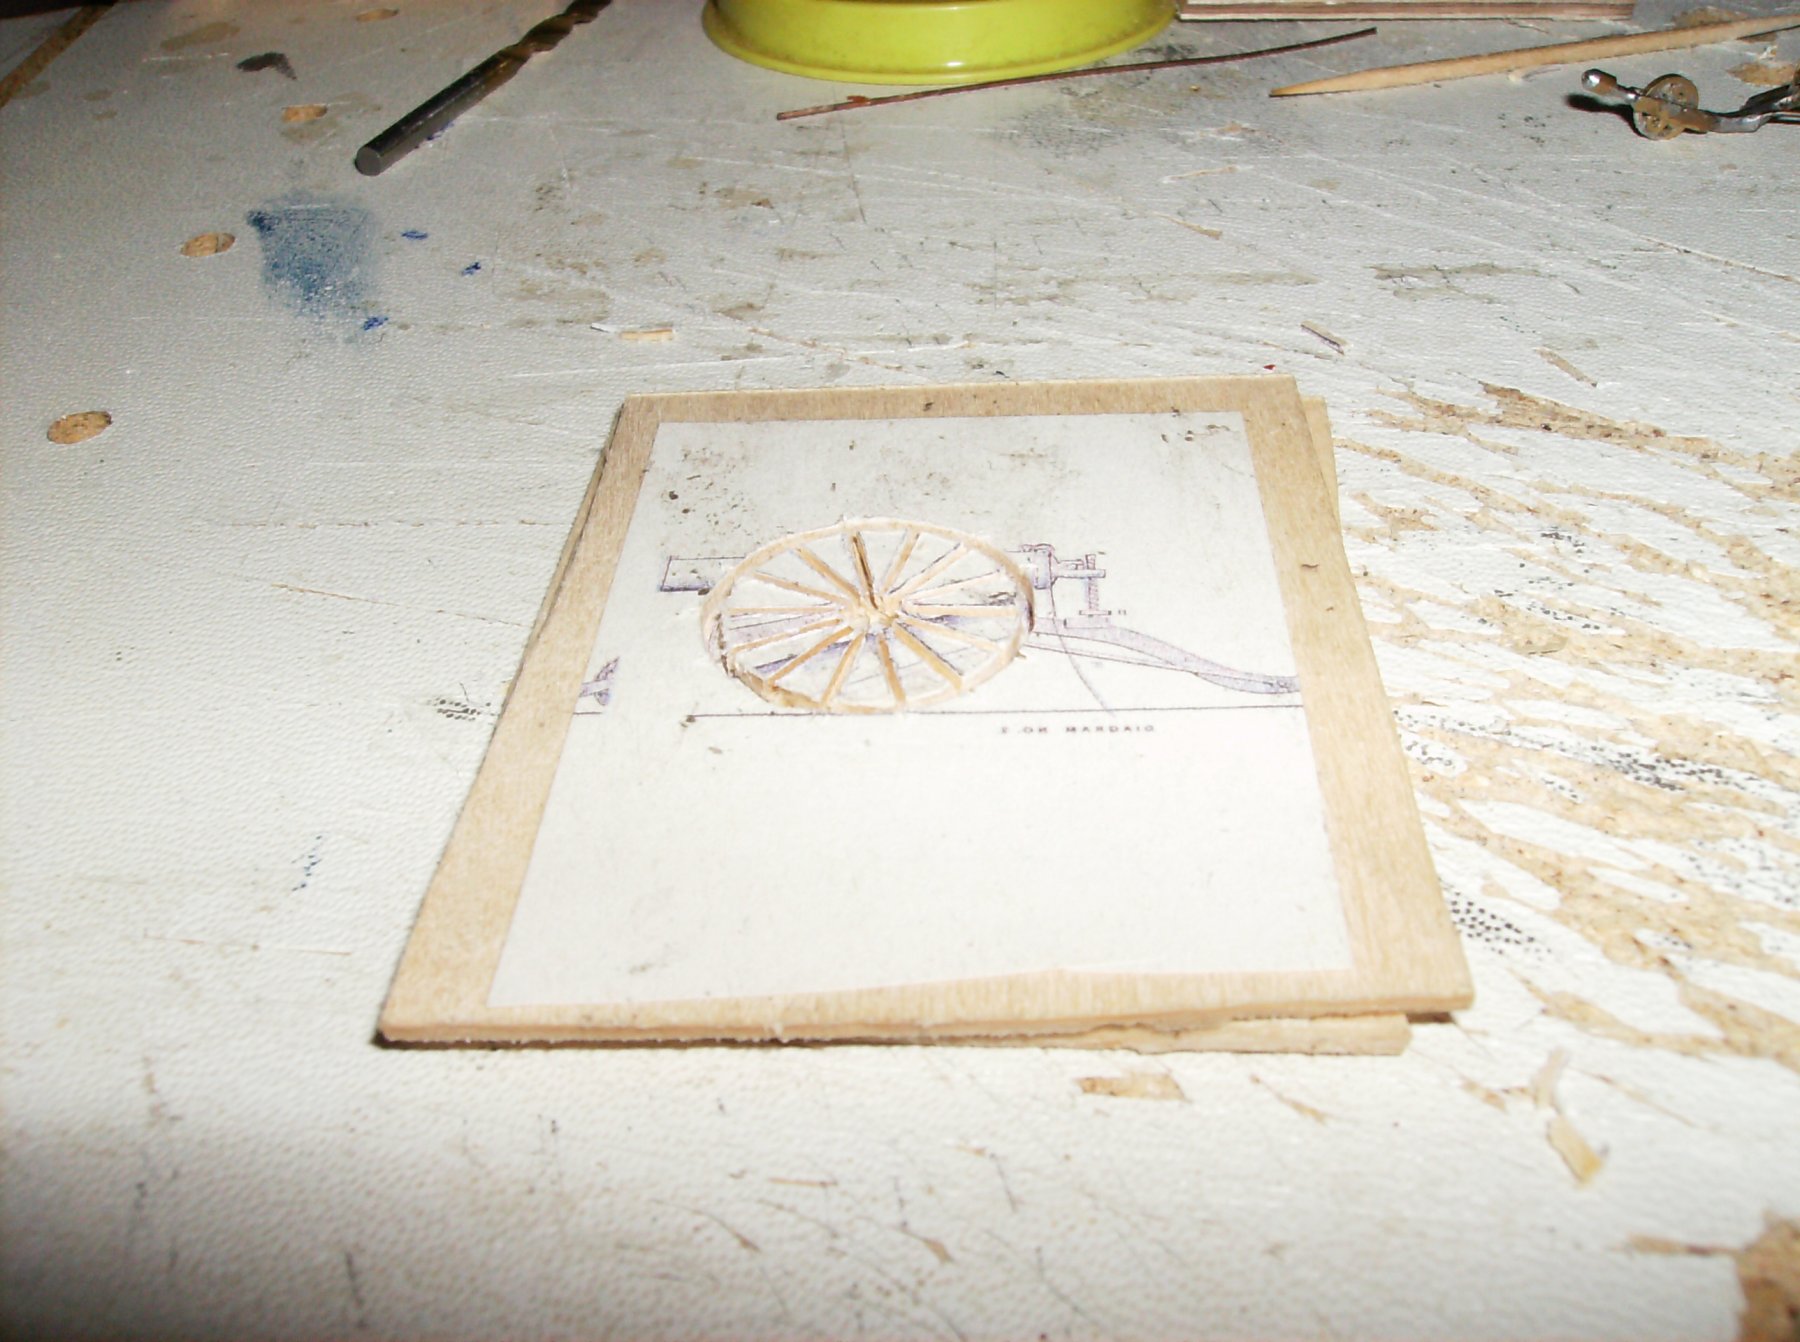
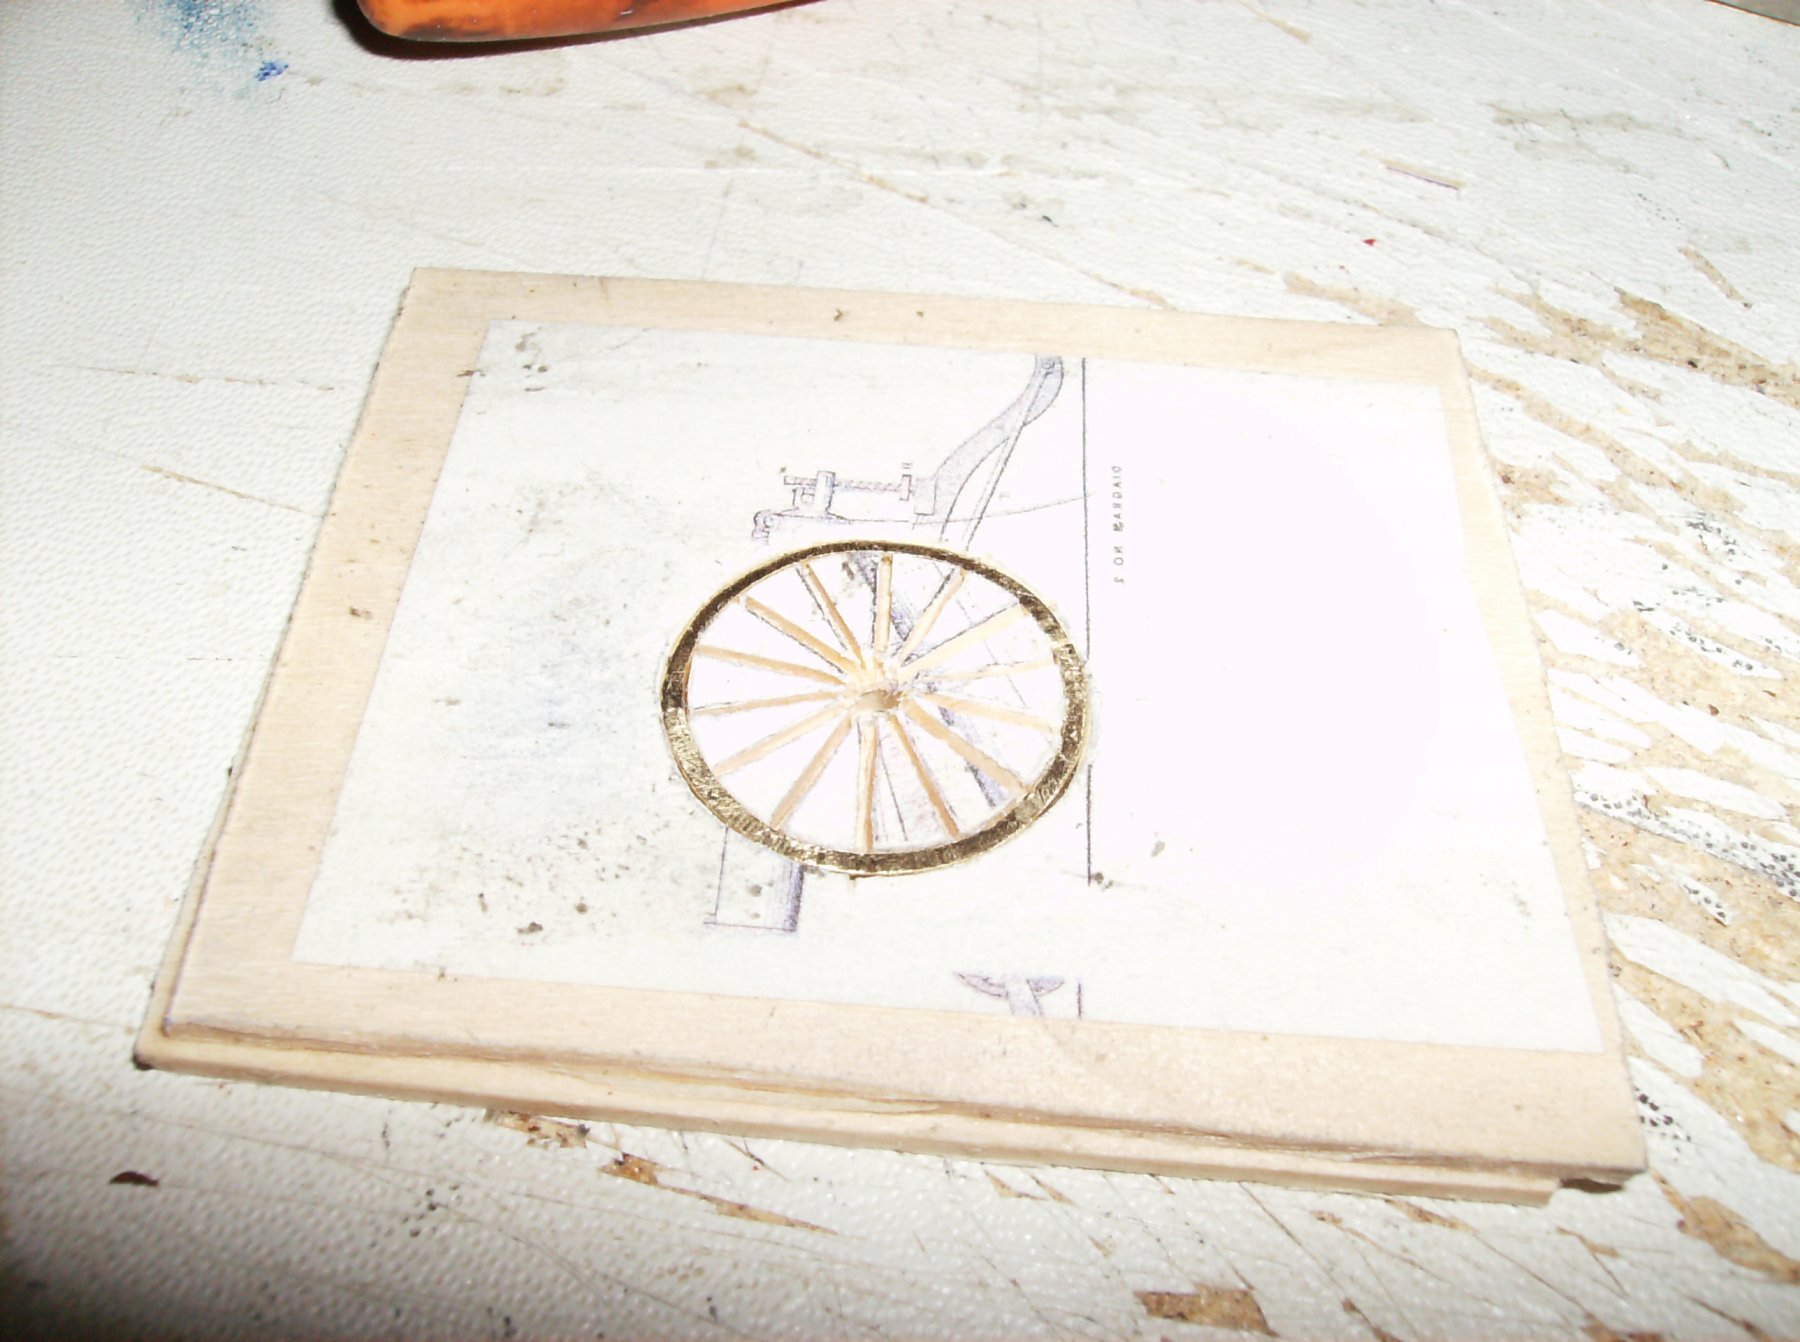
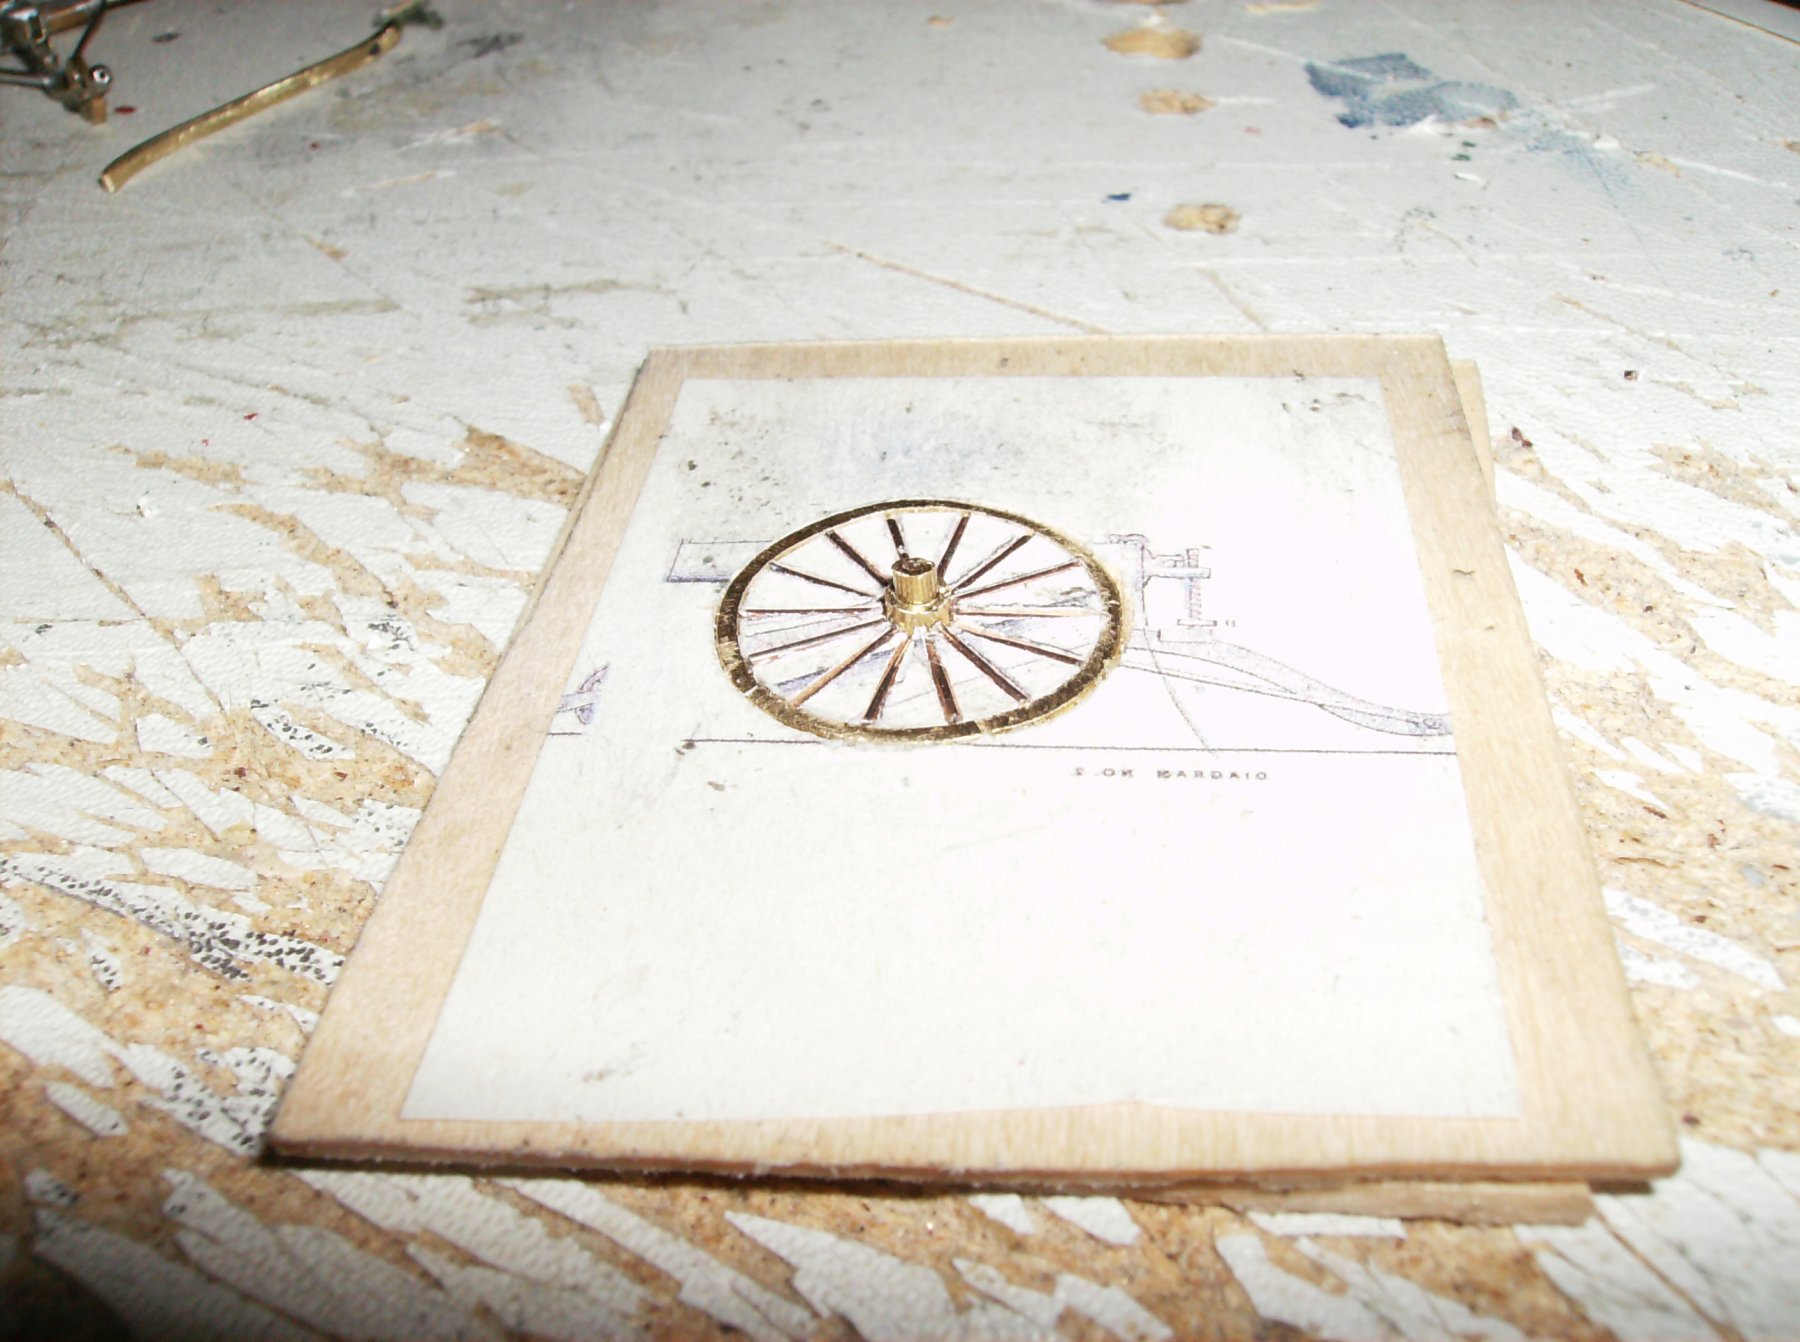
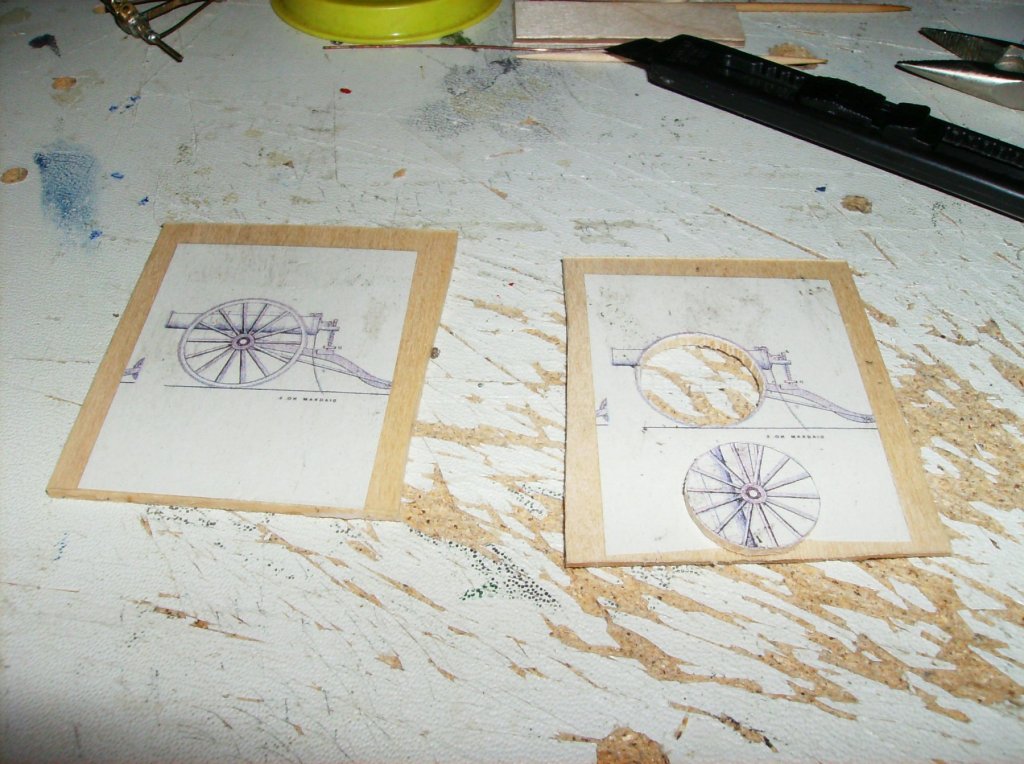
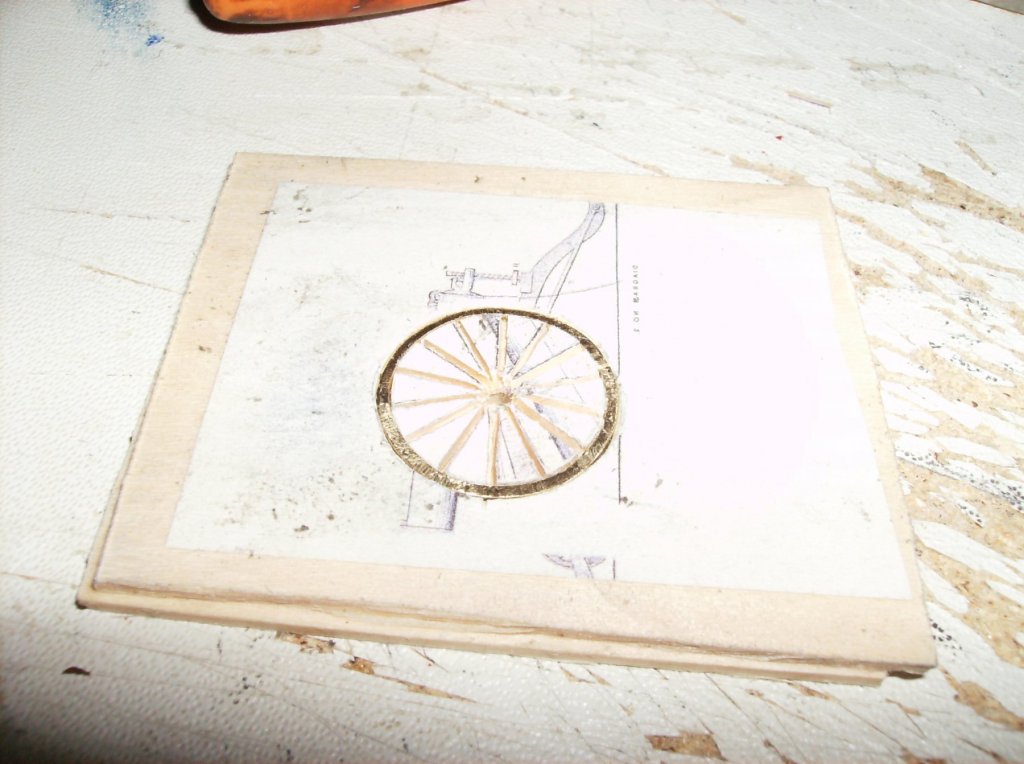
Hi Pat Thank you again And many thanks too for all watching, hit the button, or just enjoying it! The next step I made were the front wheels, just to make some progress. I printed 2 sheets of the scaled carriage for each wheel, glued them to 2 mm balsa wood, and cut the spoked part out from one of them. The inner and outer radius was then sanded to correct size. Then I drilled 3mm holes to the centers of both parts, and glued them together to create the form Then I cut grooves for the spokes As next I made a ring from 1mm brass sheet, 2mm high, and layed it into the form. The 1mm was a bit too thick, so I used 0,5mm sheet later! Some spokes are set to the ring, and a piece of 3mm and 2mm brass tube into the center, the inner 2mm tube is around 1mm longer. First test wheel, a bit too thick I think! The carriage with new wheels from 0,5mm sheet, barrel still not mounted There are still 2 parts missing, the endcaps for the axels. I will make them from 2mm brass tube, 1mm logn, and solder them to the axels. Regards, and thank you for you interest! Gerhard


- 293 replies
-
- 11
-
-
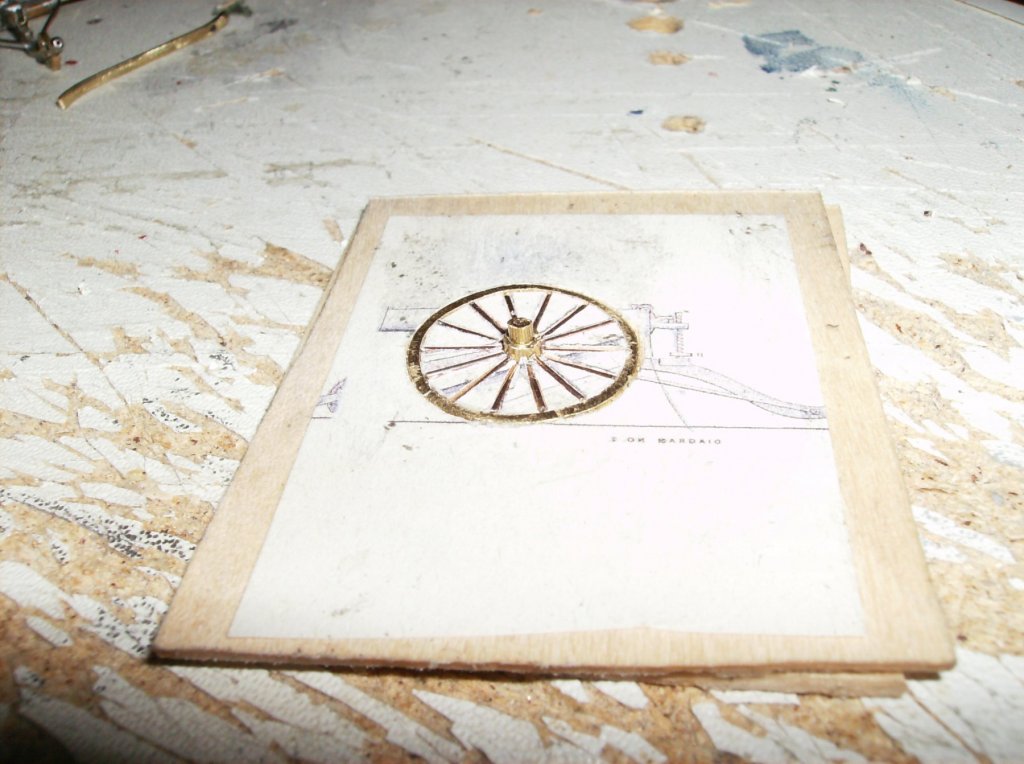
Hi johnhoward Thank you! Have seen it in an earlier post in your build thread, wonderful workpiece! Now I`m working on the soldering form for the front wheels, will take some time to solder 14 spokes as shown in all old drawings to center and outer tyre ring. For the "nonmetric" folks here, the diameter from my rear wheel is 0.2362 inches (6 mm)! Regards Gerhard
-
Hi johnhoward Thank you! But I have only four of these rings , because I had no 1,5mm brass tube. But as this wheel is almost invisible, I will go with it. Regards Gerhard
-
Just working on the bigger front wheels, lets see how many times I will have to make them. But as you said, try and error is what we do until we got it right Regards Gerhard