

bruce d
-
Posts
2,969 -
Joined
-
Last visited
Content Type
Profiles
Forums
Gallery
Events
Posts posted by bruce d
-
-
Thank you, Kevin, I was about to start looking for advice on quartersawing and here it is!
Bruce
-
The bead roller is perfect, but if you don't have one there is a simple method that works on small and large gauges: get it as straight as you can with your fingers and then roll the wire between two pieces of glass. The ruler trick works but the larger surface area of the glass makes it easier to control. You may need to 'feed' the wire in from one end to start but once you get that first part straight it gets easier. A FLAT piece of tile or the kitchen worktop will also work.
Wires come in standard diameters called gauges and any electrical supply shop can provide additional lengths. If it is to be used as, for example, a handrail on a stairwell, a nice effect is to pinch the end slightly to produce a flared handhold.
I used to do this often but for a work-related reason.
HTH
Bruce
- thibaultron, Bob Cleek, Canute and 2 others
-
 5
5
-
Thank you, Paul. I have put the links in my favourites.
Regards,
Bruce
-
18 hours ago, Thunder said:
The only problem you may encounter is getting good quality materials in the uk, unless you have the equipment to produce your own strip material.
Many thanks for the welcome. The subject of ‘change’ is always interesting and I agree absolutely with the observations that once-upon-a-time scratchbuilding was the norm. I am delighted to see the high standards of modern kits and chose to start with a a blank sheet mostly because, based on other events in the past, I enjoy the research and preparation as much as the building.
I imagine one major difference in the working space will be the amount of dust and debris I will create compared to building a similar size kit.
Thunder, you are right but I am lucky enough to be within range of this place: http://www.exotichardwoods.co.uk/
… and Cornwall Model Boats has a mail order service I have been told is very good. Also, I have a stash of fruit woods I can harvest.
Regards,
Bruce
-
Hello, my name is Bruce and I am, at last, beginning a wooden model of a ship. This forum and website have already played a part in the process by showing what others have done, giving answers and ‘de-mystifying’ some of the steps.
It would probably be smarter if I started with a kit but I have decided to scratchbuild. This is not quite as brave as it may sound (or perhaps the experienced readers will not think ‘brave’, rather more like ‘naive’?) but either way I have been fortunate in finding a set of plans for a similar boat which I am adapting to my dimensions. I will post a build thread later and give details as well as the reasoning behind the decision to scratchbuild. For now, I am working on the plans.
About me: I have recently retired and am sorting space in the garage for the build. I am a stickler for details and a newbie, a combination that is guaranteed to produce mistakes, hopefully rectifiable. One thing that has impressed me about this forum is the willingness to pass on honest observations, so if you see me headed for trouble, please go ahead and say so.
I am looking forward to my new hobby.
Bruce
-
Thanks, it is a vast archive and I had hoped for a 'short-cut' to the interesting boat. If I find it I will post it.
Bruce
- mtaylor, popeye the sailor and Canute
-
3
-
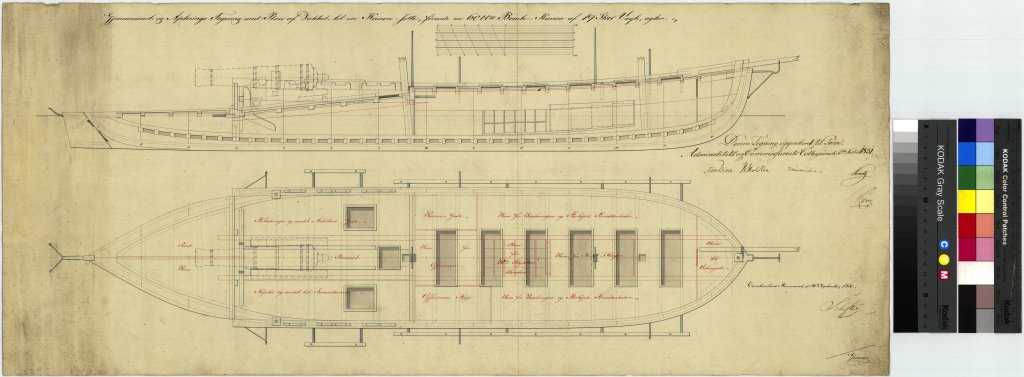
Yes, I see it too. DPK, if you got this image from the Dansk Museum would you mind giving me the Image File Reference (A124c etc.)?
Chris, seeing your build makes me want one.
Regards,
Bruce
- popeye the sailor, Canute and ccoyle
-
3
-
 Chris, I am new to this thread, so maybe this has already been established. Is this the same ship?
Bruce
-
6 hours ago, torpedochief said:
13. Fill one of your 2 plastic tubs with clean cool water.
14. Set both tubs next to each other.
Hi torpedochief, nice explanation. Just a further point for anyone looking at this process: make sure the tub for the etchant is ABSOLUTELY DRY before pouring in the ferric chloride, with no splashed drops of water at all. The acid and the water don't socialize well.
Since this process is for etching thin brass from one side you can seal the back with a good coat of any spray auto paint or primer. Test first if in doubt.
HTH,
Bruce
-
Hello David, I found it on the Games Lab Forum, sadly without a source.
It is near the beginning of the long thread described as '18 Guns Ship'.
Regards,
Bruce
-
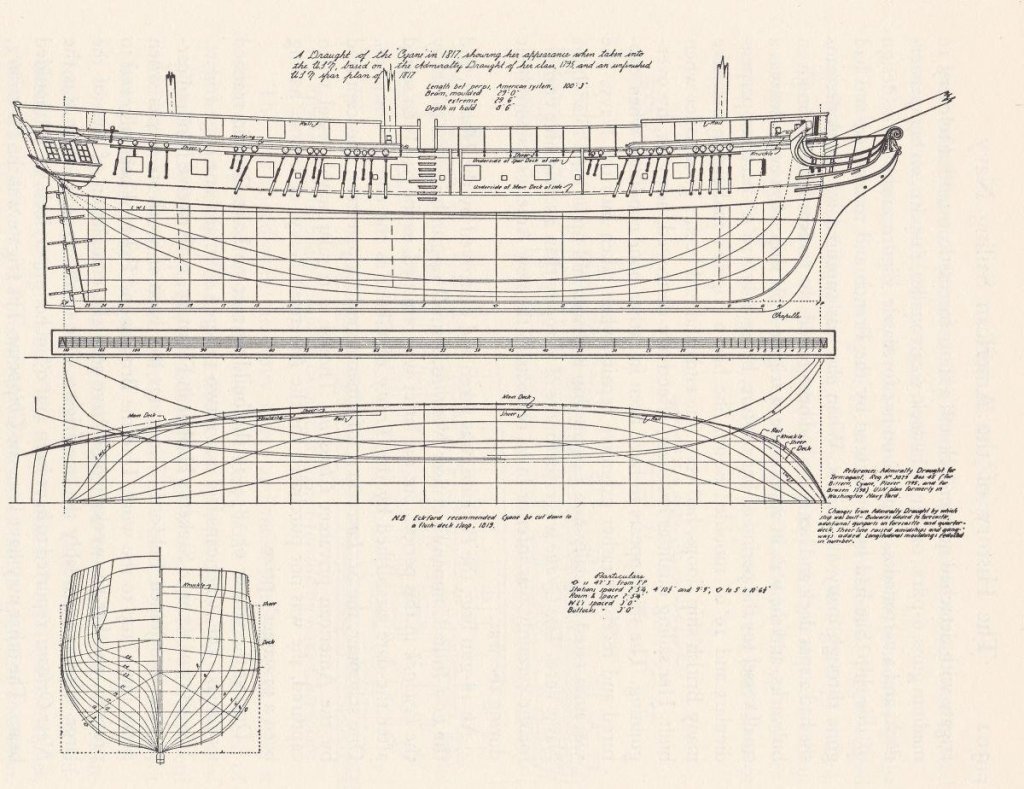
… and here is a plan of CYANE, another sister ship, as she was when captured.
-
David, quite right, sorry about that.
These are for Banterer class craft of the right era although not built at South Shields:
J4309, J4307, J4305 and J4310.
Bruce
-
Hello David,
There are plans for Banterer in the National Maritime Museum, collections ADBB0595, ADRB0126 and ADFB0016.
Regards,
Bruce

Armed Viriginia Sloop by JpR62 - FINISHED - Model Shipways - Scale 1:48 - First wooden ship build
in - Kit build logs for subjects built from 1751 - 1800
Posted
Jean-Paul, I like the look of the different woods and textures. Can I ask what wood are you using for the deck planking?
Bruce