

bruce d
-
Posts
2,969 -
Joined
-
Last visited
Content Type
Profiles
Forums
Gallery
Events
Posts posted by bruce d
-
-
Thomas, John has given good advice. To add my two cents' worth, I cannot emphasize enough how important registration is if etching from both sides. Have a go at etching, there are several good YouTube guides and I suggest you find one that you feel suits your capabilities and facilities: some of the jeweler's processes can look very casual and amateurish but the fact is they work for those people.
However, modellers who need through-etching are not well served by YouTube, and the reason is the difficulty of registering artwork produced without professional equipment. It can be done but the smaller the piece the easier (and the greater the chance of success.)
Brian King's book (in the link in earlier post) is useful but the key to success in 2019 is to use the facilities available in 2019. The etching part of the process is within the grasp of any amateur willing to approach the task methodically, but getting the image onto the workpiece is, and always has been, the 'the trick'. Assuming you are going to use a photoreactive etch resist on your workpiece, finding out how your printer performs when given the task of printing mirror-image versions of an image is the first task. The reason is that you will need two images, exact mirror-images of each other, printed on clear sheet to be placed on either side of the workpiece. The image on these sheets must align perfectly, and this is where home printers may let you down. A slight skew or distortion in most printing jobs is invisible and will never matter at all but in this task any difference in the two images will produce an inferior etching. Also, the image toner must be on the surface that is against the etch resist that will be exposed. If it is not then the light will diffuse through the thickness of the sheet and give a false edge, which translates into a soft/poorly defined edge on the developed resist.
Having an expensive printer is no guarantee of this particular characteristic. This task is not what modern printers were designed to do with great accuracy so it is necessary to test (you may find that the output of the printer is best in one part of the printed page, such as the middle or bottom, and that is where you will have to place the image). It is easy to see why size matters.
There are build logs on the forum that include home etched components. It would be a good idea to study them and see if they match what you want to achieve and are willing to do.
HTH
Bruce
-
1 hour ago, Dziadeczek said:
... I have to etch rather bigger details.
Can you say how big, and what thickness material? One side surface etching or all the way through?
Everything is possible.
Bruce
-
11 minutes ago, ccoyle said:
there is no documentation at all -- not one citation or end note.
That was not uncommon in immediate post-war UK publications. For this subject, the author would have needed permission from His Majesty's government to write it even before it went to publication and it is quite possible that he was forbidden from naming sources.
Bruce
- ccoyle, paulsutcliffe and davyboy
-
 3
3
-
It looks identical to one I got 40 years ago, and yes, it was great and I used it for everything. My one 'improvement' to it was to tape a small bit of wood under the spot where my thumb rested to give a more positive feel to the grip. It lasted for years of heavy use and one day grew wings and vanished.
Bruce
- mtaylor and thibaultron
-
2
-
-
Hello James,
No comment on your main question, more experienced builders will I am sure give good advice: however, if you are in the UK, see ...
... for my version of the hunt for water-based polyurethane varnish.
HTH
Bruce
-
Oh dear. The railing for the steps is 180 degrees out: or perhaps it was an initiative test for the midshipmen?
-
6 hours ago, vossiewulf said:
However, that's only applicable to building furniture or anything else that will take significant stresses.
They are building a house. What could go wrong?
Joking aside, since the original post I have found this glue is used in some furniture restoration where they know there is a possibility the repair will be taken apart in the future.
-
1 hour ago, KeithAug said:
All suggestions are welcome.
Hello Keith,
Maybe you already know the magical material:
My 'go-to' when I scratchbuilt figures and animals decades ago. (tip: buy direct from Milliput, that way it will be fresh)
HTH
Bruce
- Keith Black, Omega1234, mtaylor and 1 other
-
4
-
-
27 minutes ago, wefalck said:
Rigsarkivet-Orlogsvaervet (Danish National Archives - Naval Shipyard): https://www.sa.dk/ao-soegesider/da/other/index-creator/40/3353816/17149179 from No. G 4570 (scroll down) on.
... plus also A1284A to D, some of these are 'English'; and all images in the A1205 series.
I am convinced this archive has everything, the trick is finding it! I stumbled on these A12** images by accident.
Bruce
-
Update: Water based polyurethane varnish is now officially endangered in the UK. Ronseal and, I believe two other big manufacturers, have dropped it from their range in the last year. A chat with someone in an independent shop confirmed my hunch that polyurethane just isn't a sexy branding choice. There are more and more acrylic and spirit branded varnishes on the shelves but it looks like 'poly' is out of vogue. Poor poly.
It is still available in the UK from at least two sources and I have bought what I hope will be a lifetime supply.
The products still available are:
Sadolin Polyurethane Extra Durable Varnish (CAUTION: THERE IS ANOTHER PRODUCT IN THEIR RANGE WITH A SIMILAR NAME)
Johnstone's Durable Quick Dry Polyurethane Varnish
There are probably others but I could not find them.
Bruce
-
6 minutes ago, Stevo79 said:
Out of interest does anyone know if they just used the same framing timber for the false keels or was it a softer wood designed to be easily replaced.
I cannot say what they did in Portsmouth for Triton but in the Caribbean and American yards it was common to use mahogany for the false keel. For example, Bermuda had a wonderful supply of local cedar which was excellent for shipbuilding but they still imported African mahogany for the keel components and American woods for the deck planking.
Nice start on Triton.
Bruce
-
-
3 minutes ago, iMustBeCrazy said:
Let us know which method you think you might use
I have used all of them except CAD in preparing my Pickle. The most promising for a quick result must be photo editing provided the subject has the right proportions to start with. The most reliable must be 'Paper, pencil and ruler (with a little help from French curves) and an eraser.
- mtaylor and Mr. Hornblower
-
2
-
Fantastic. Your build log of Cheerful is my benchmark.
Bruce
- Martin W and Blue Ensign
-
2
-
41 minutes ago, Mr. Hornblower said:
Bruce do you have any advice on how you measured your own bulkheads? I may be looking at at a scale of 1/90.
I will tell you about my process before I offer advice: you may think I am bonkers.
I am nearly finished drawing my plans. This will be my third version. As there were no drawings of the prototype, but her dimensions were known, I researched, compared other ships, studied scantlings, fretted over details and then, with relief, settled on La_Recouvrance as a starting point. She shared many features with my subject AND had been modeled AND was well documented. So I used her lines, distorted the image with PhotoShop to make her the correct beam, painstakingly traced each frame section to scale, drew a keel, blah blah blah... and then realised that La_Recouvrance just could not be stretched/tweaked to look like Pickle. A lot in common, yes, but what I wanted: no.
Next, I tried manually adapting the drawings I had digitally produced to make her lines right. This required a total reboot and after some wasted time I accepted that I would be better off to start again from scratch. So I did.
Now, the silver lining to this cloud is that my first two attempts taught me good lessons in both digital and traditional technique and, more importantly, over time I had refined my 'mind's eye' image of what Pickle should look like and what will and won't work in a scratchbuilt model. The drawings I am producing now are stripped right down to the basics of hull lines, deck levels, mast and gunport positions etc.
So, Caleb, I hope this is useful to you. I have not found a magic wand or a button to push that will produce drawings on demand and I confess there may have been a touch of such silliness in my original decision to scratchbuild a subject that has no existing plans (I can almost hear myself saying 'How hard can it be?), But I am stubborn, or so I have been told.
I know you asked about bulkheads but they are a component in the puzzle so forgive the ramble. If you can find a drawing of a ship with the same lines and sections, you should be able to trace them and make the adjustment for depth of planking. Otherwise, study the excellent articles in MSW and other online sources that show how to read drafts, buttock lines etc and plot your own. I know that sound oversimplified but it is what I had to do in the end.
Other than roll up your sleeves and see what happens when you start, there is only one bit of practical, nuts-and-bolts advice I can pass on. If there is a set of drawings for the ship you are modeling, or one with the same proportions and general lines, great: get it in your head and ignore the differences. Then, find a set of plans for a model of a similar ship that you like. In this case it is not the ship you need to like, it is the PLANS FOR THE MODEL you must like. Use these plans as, shall we say, 'extensive reference' when breaking down the parts needed to make your model. See what the keel, deadwood, fashion pieces etc look like in the model plans, how the stern and stem are shaped, how the bulkheads join up with the centre piece, do they support the deck or is that a job for separate beams, and so on. Then you at least have a starting point for each of the same issues when you go back to the tasks needed to make that ship you have in your head.
Sorry for the long answer, you have given me a soapbox to tell of the experience so far. I will start a build log when there is something to show for all this preparation.
Hope this helps and doesn't scare you off, I have enjoyed it even if I do moan about the learning curve.
Bruce
- mtaylor and Mr. Hornblower
-
2
-
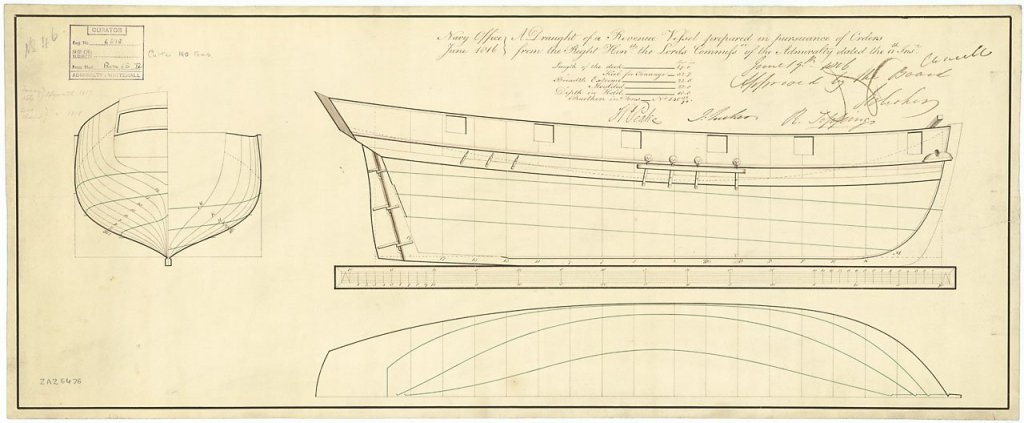
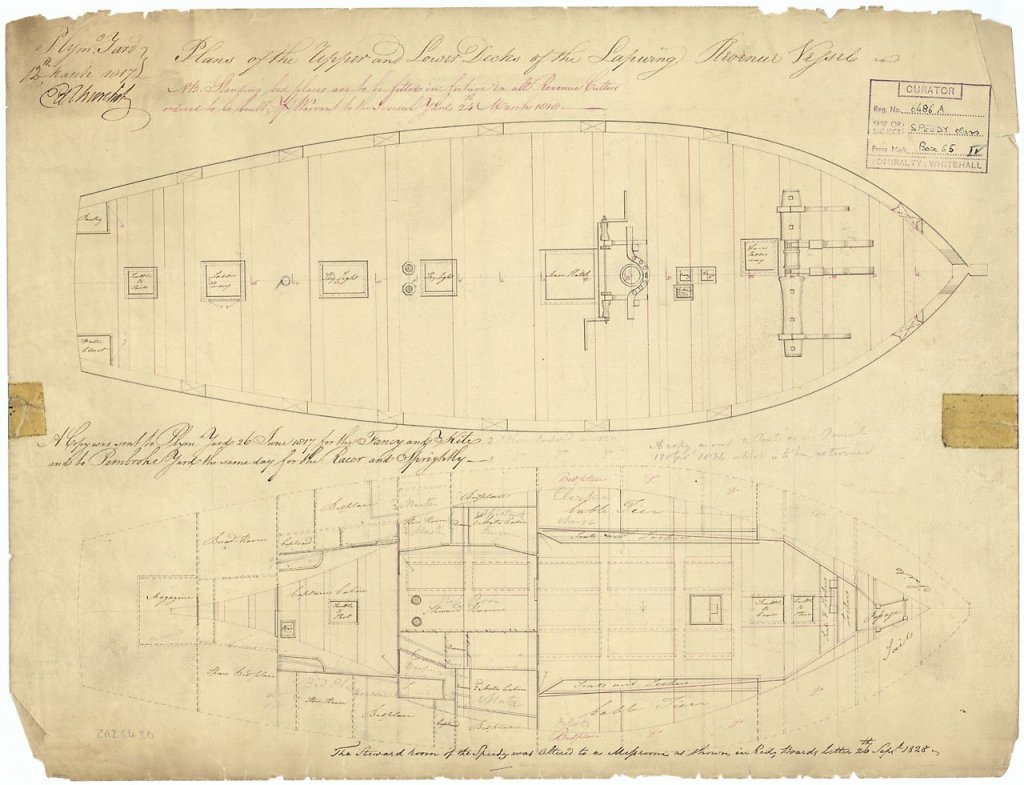
41 minutes ago, iMustBeCrazy said:
Lapwing (1816), one of my ancestors was part of the crew when she sailed to Adelaide.
Despite having four 'sisters' - Kite, Fancy (1817), Racer and Sprightly, three 'half sisters' - Nightingale (1825), Speedy (1828) and Snipe (1828) and six 'nieces' - Vigilant (1821), Swift (1821), Basilisk (1822), Bramble (1822), Skylark and Diligence - I'm still struggling for enough good information for a scratch build.
Have you seen this?
-
On 5/18/2019 at 10:09 AM, bruce d said:
It sounds like we are plotting similar projects.
Back in post #2 I said 'It sounds like we are plotting similar projects.' Little did I know: mine is 'Pickle', which I am sure you know worked with Entreprenante at Trafalgar on rescue work.
Can't help immediately with plans for either of your ships but I will keep my eyes open.
Keep us informed.
Regards,
Bruce
-
Hello Caleb and welcome to MSW. It sounds like we are plotting similar projects. 'SPEEDY' 1828, available online, may be useful to you, also '10-gun Sloop MEDIATOR'. There are others, of course, and there may be some feature of the ship that leads you to one particular set of plans, but I will let the members with more experience speak on that point. Can you tell us the ship?
In my case, I found that the plans I originally wanted to use as a starting point simply were no help because there is a difference between what makes a good laser-cut kit (ease of assembly, good solid joints between keel and bulkheads etc.) and what is best for a scratchbuilt model: also, after a couple of false starts, I realised that any existing plans for a model with different buttock lines would only be useful as inspiration and guidance because I still needed to draw my own bulkheads. This turned out to be more straightforward than I thought and the feeling of accomplishment once I had produced 'my plans' for 'my ship' was pretty good.
You will get knowledgeable support here (I have) and I hope you start a build log.
Regards,
Bruce
- mtaylor, tkay11, Mr. Hornblower and 1 other
-
4
-
Hello Phil,
Very nice work. I discovered your build log when looking for accounts of deck planking and will be duplicating your experiments with different methods of caulking. I will be watching from now on.
Bruce
-
-
52 minutes ago, malachy said:
... which vessel this might be?
It looks like two different ships to me. The scond was a proposal for 'KING CARL' according to the description: here is the Google Translation...
"Drawings by miniature painter Étienne Compardel after Jean Berain, probably 1694.
In 1693 Jean Berain received an order from Tessin to make embellishments for a Swedish naval ship. The vessel would actually be called King Carl, but Berain wanted a ship name that was better suited for allegorical interpretations and the ship came therefore called the Victory. (However, some ship with this name was never launched). Berain delivered the 1694 drawings, which are now available at the War Archives. Compardel was then commissioned to perform detailed, beautifully colored drawings and the colors of blue and gold were adapted to the Swedish national coat of arms. On the stern, the Segergudinnan placed a four-span.
(Source: The exhibition catalog of "The Sun and the North Strait" at Nationalmuseum)
Provenance
Collection: Lieutenant Malmborg
Production 1694 (uncertain date)"- Hubac's Historian, mtaylor and EJ_L
-
3
-
Gerhard,
Wunderbar! Downloaded, many thanks. I have been looking for 'the rules' about the size and position of regal emblems/monograms on English cannons and all arrows point to Peterson. If it is in there I will post the results.
I believe the files were originally hosted and available for downloading by a website promoting tourism and diving in Bermuda. I have contacted them and do not believe they plan to put them back online: they politely offered to sell me a hard copy (vol 1) from their tourist centre bookshop.
Now to get comfortable and view a thousand pages …
Regards,
Bruce
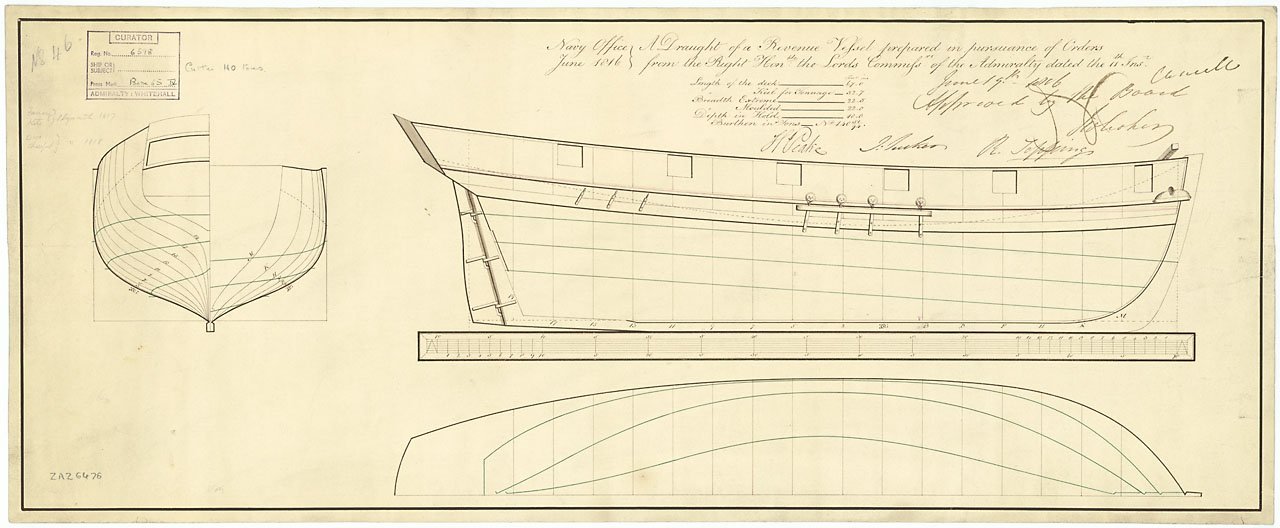

Photo Etching - do it yourself
in Metal Work, Soldering and Metal Fittings
Posted
Absolutely. And be sure to order the two front-and-back images to be printed 'emulsion to emulsion'.
It is worth shopping around as prices vary.