HOLIDAY DONATION DRIVE - SUPPORT MSW - DO YOUR PART TO KEEP THIS GREAT FORUM GOING! (Only 44 donations so far out of 49,000 members - C'mon guys!)
×


gsdpic
-
Posts
823 -
Joined
-
Last visited
Content Type
Profiles
Forums
Gallery
Events
Everything posted by gsdpic
-
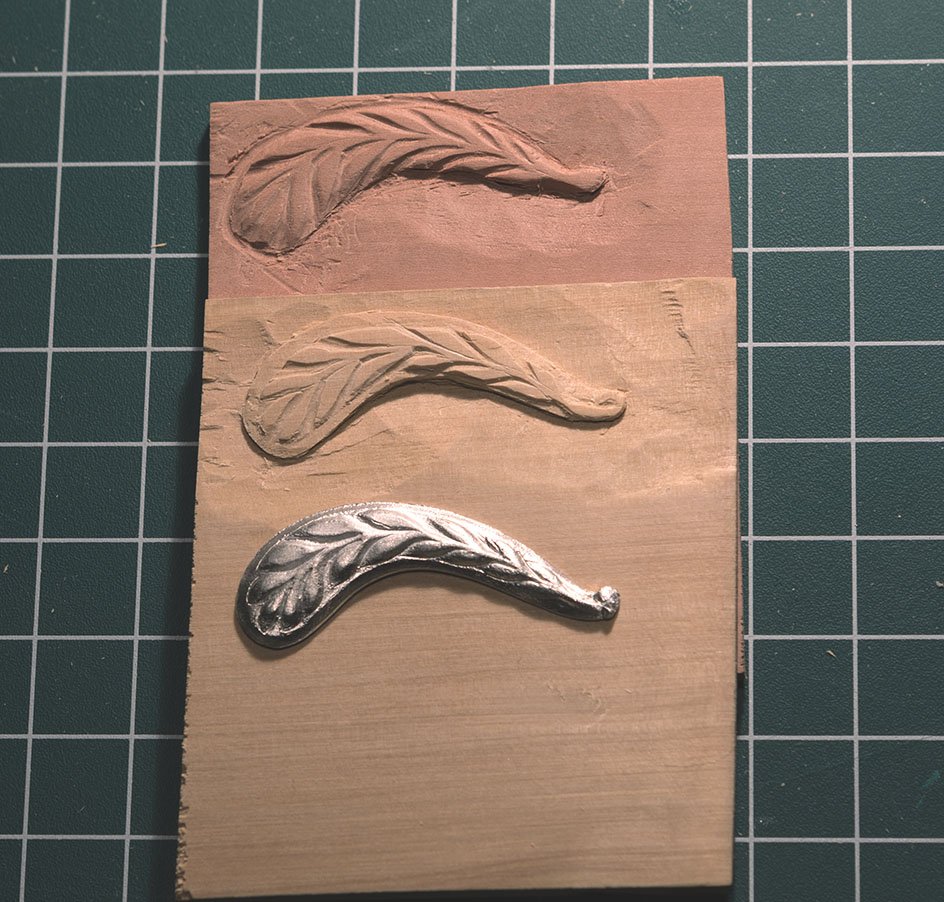
Gregory and Dr Per....thanks for the additional info, and thanks to others for the likes or just for looking in. Gregory...that painting is interesting. There is one in "Low Black Schooner" that is very, very similar but not identical. Perhaps one is "version 1" and the other is "version 2". The one in the book has a more stormy looking sky, more muted colors, and a few more details on the deck. But looking at either one, the lack of some details makes me wonder how accurate the trailboard representation is. In other words, the painter was not too detail-oriented on the deck, did he really pay attention to, and duplicate, the details of the trailboard or did he wing it? We'll likely never know. Regardless, thanks for linking the picture as it was interesting to see. As for my efforts, below is one more attempt. This time I cut out the shape first, using the scroll saw, then glued it to another piece of wood for easier handling, did the carving, then cut it off of the wood. I spread the leaves out a little bit, and tried to leave a raised edge around the outside. And I even managed to photograph it right-side-up. There are some obvious mistakes, places where the wood split or the gouge slipped. I think I'll put this effort to rest now, until I get closer to actually needing these parts.
- 162 replies
-
- 1
-

-
- america
- BlueJacket Shipcrafters
- (and 1 more)
-
Thanks Mr Bluejacket. I figured someone would pipe in with the real name of them. Funny, trailboards sounds like something that should be at the stern, not the bow.
-
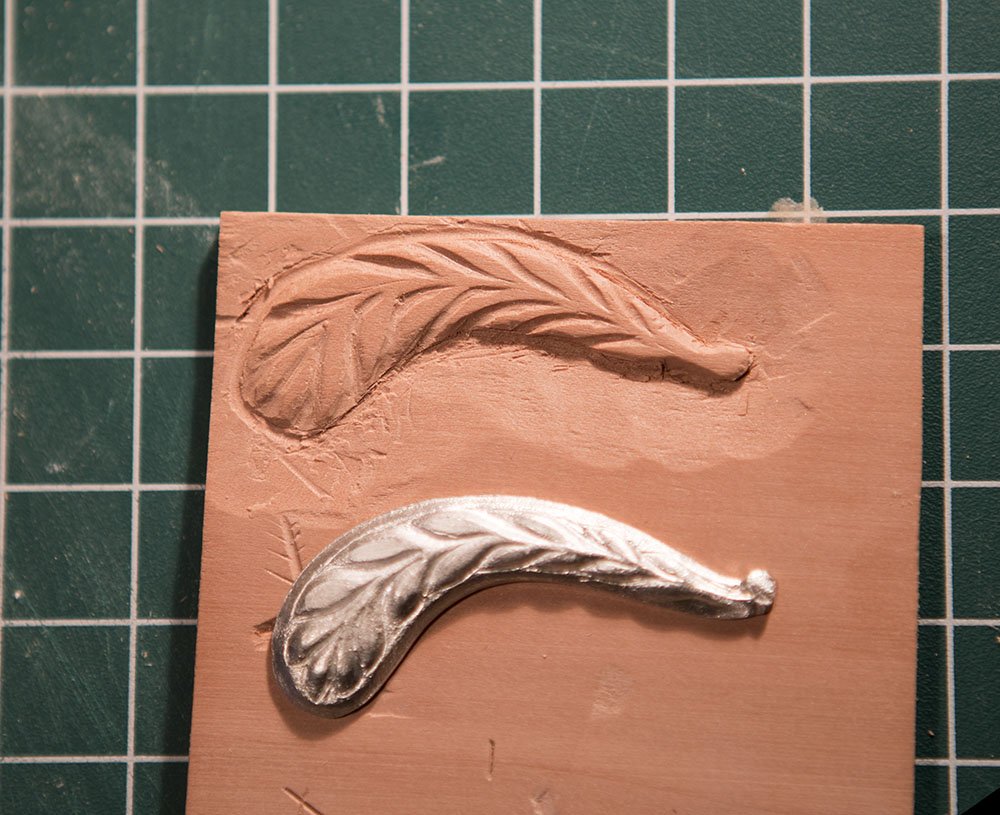
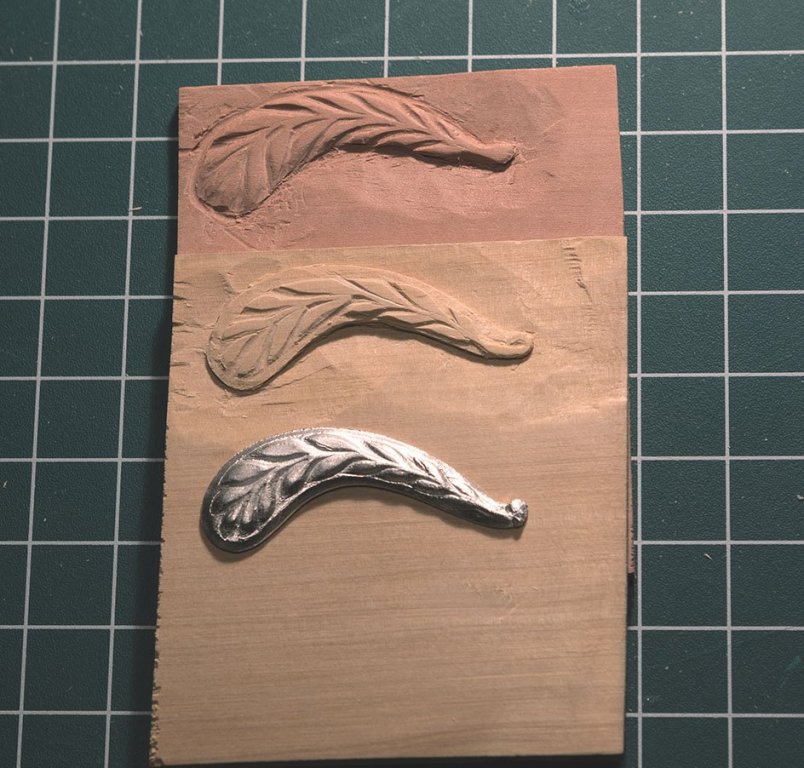
Thanks Dr. Per. Just for fun, tried again, this time using the Castello Boxwood. It was a bit easier to work though I think the pear could provide cleaner, sharper results. From the top: - first attempt, in swiss pear - second attempt in castello boxwood - cast metal part from kit.
- 162 replies
-
- 7
-
-
- america
- BlueJacket Shipcrafters
- (and 1 more)
-
Gregory, thanks for the photos. I have the book "The Low Black Schooner", recommended in one of the other America build logs, which has many paintings and photos, including the two above. But as you say it is hard to tell what this part really looked like. The paintings shown there do not have enough detail to really tell, though none of them really look like that 1940 photo, so like you, I suspect that is a later modification. One can also use google to find photos of the replica America, but again who knows how accurate the replica was in this regard. Here's one of the best pictures of that part that I found, though the leafy design on this one is too detailed to replicate on a 1/48th scale model (well, at least too difficult for me). http://www.scaranoboat.com/america-p42.html And yes, trying to carve the eagle has crossed my mind (the kit also provides a cast metal part). But that is an order of magnitude more difficult than these little leafy things. So I need a lot more practice before I tackle that.
-
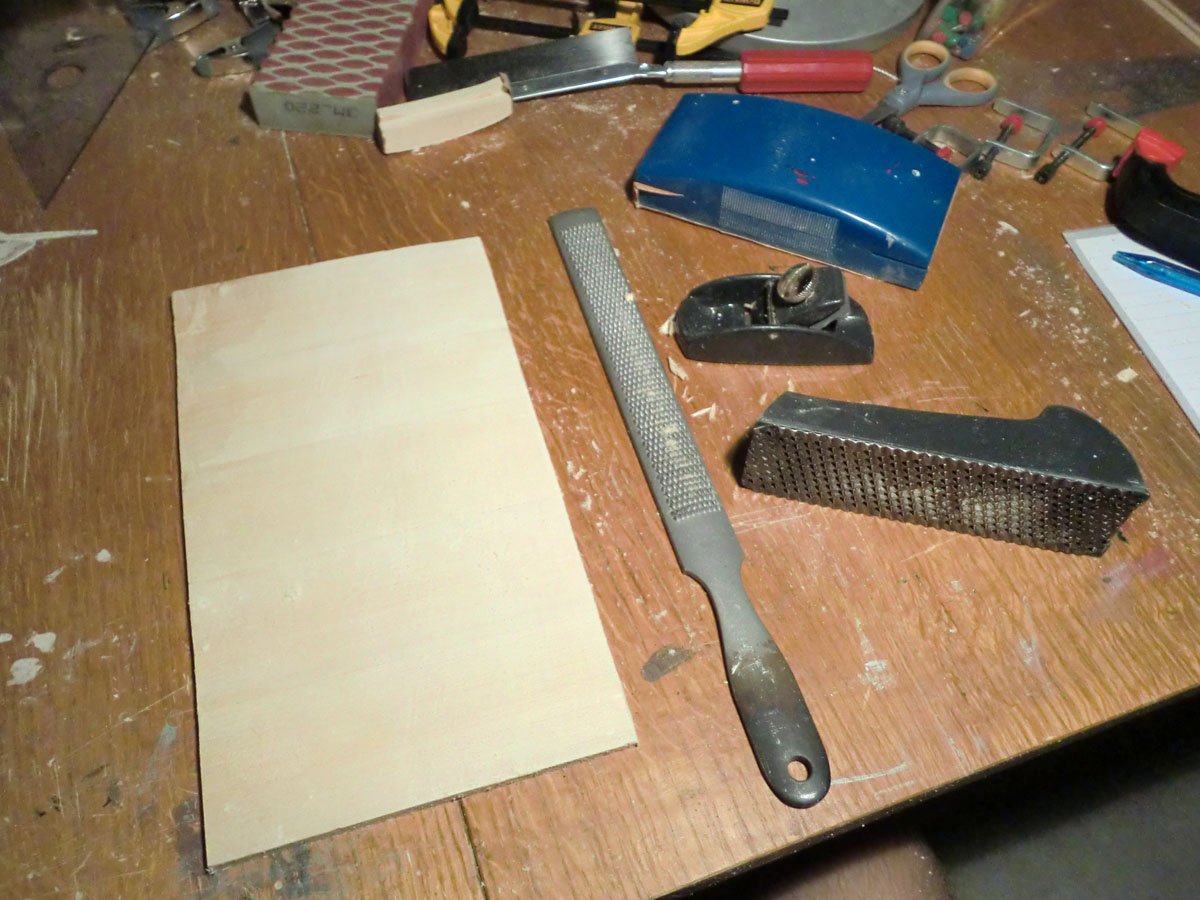
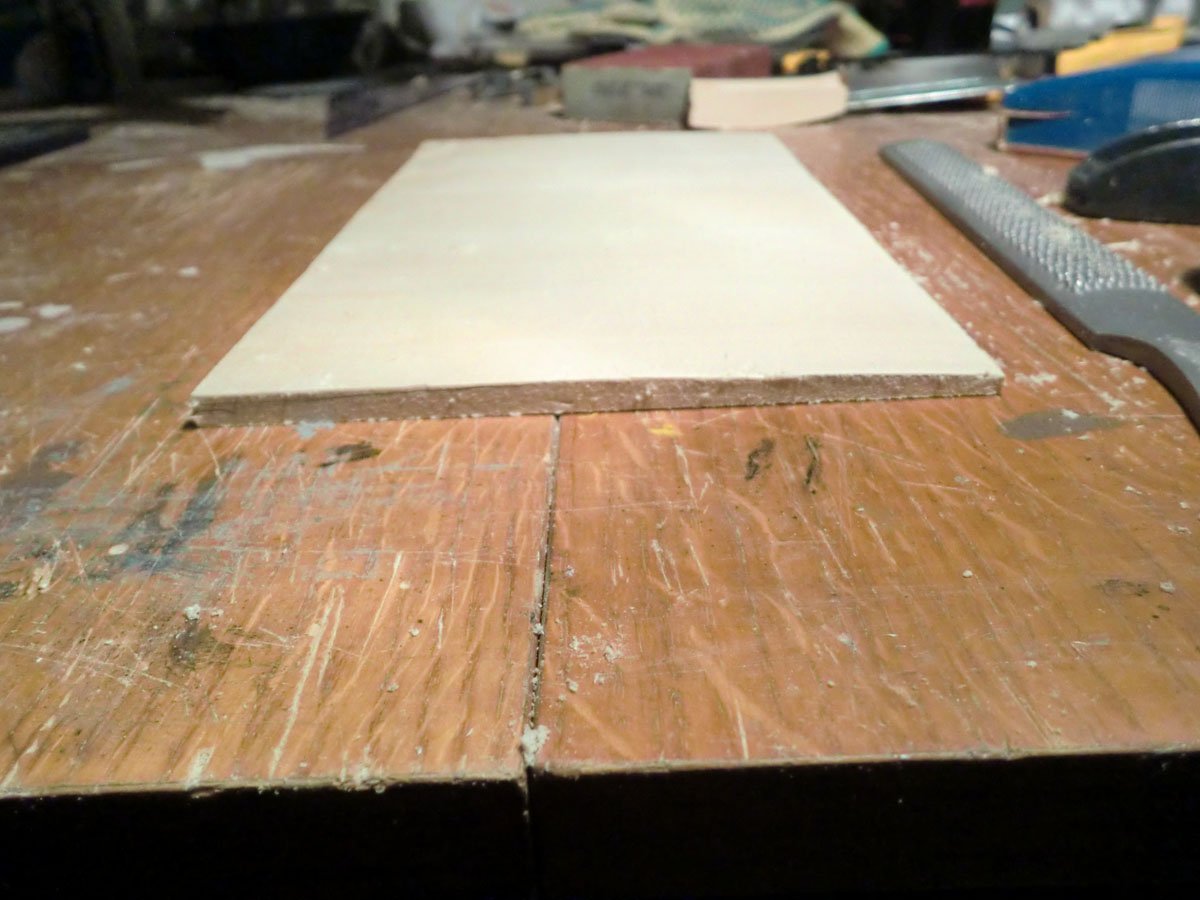
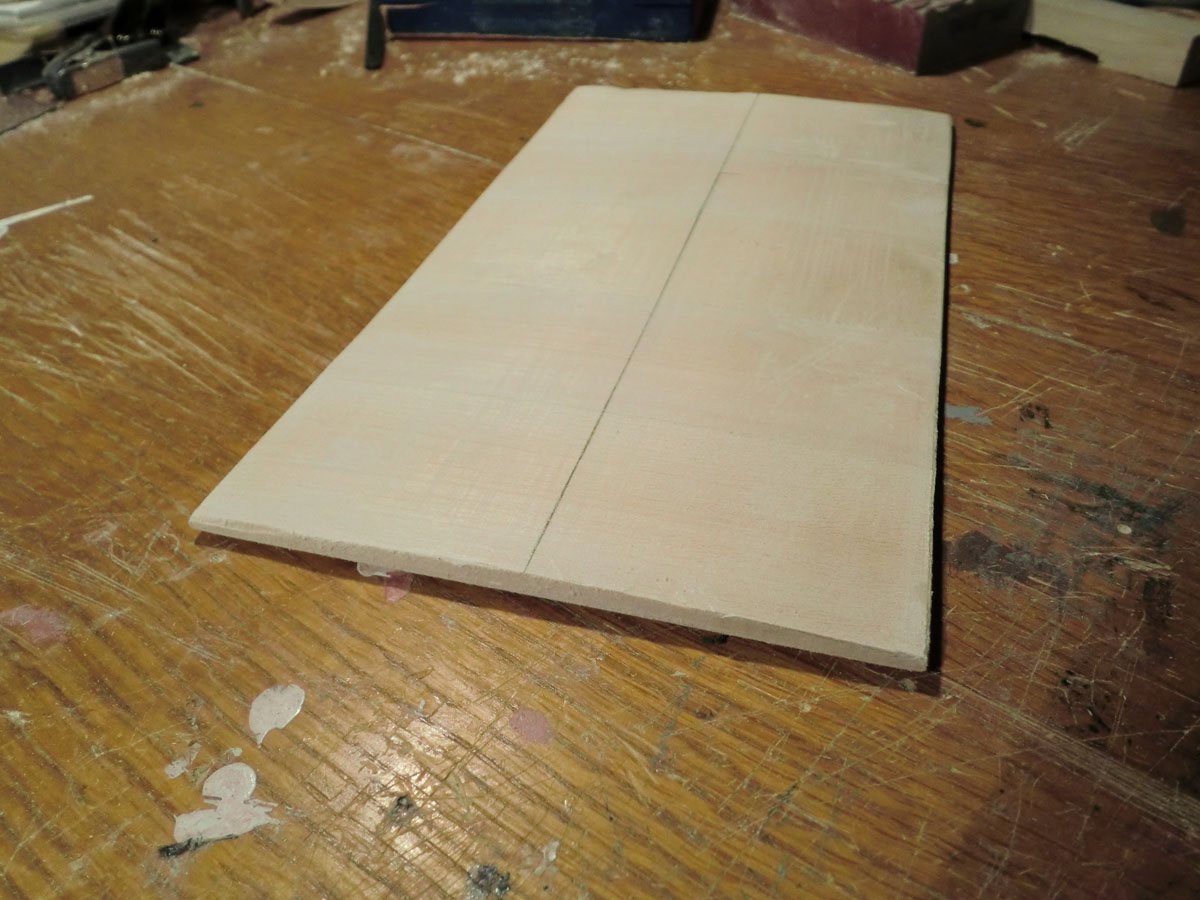
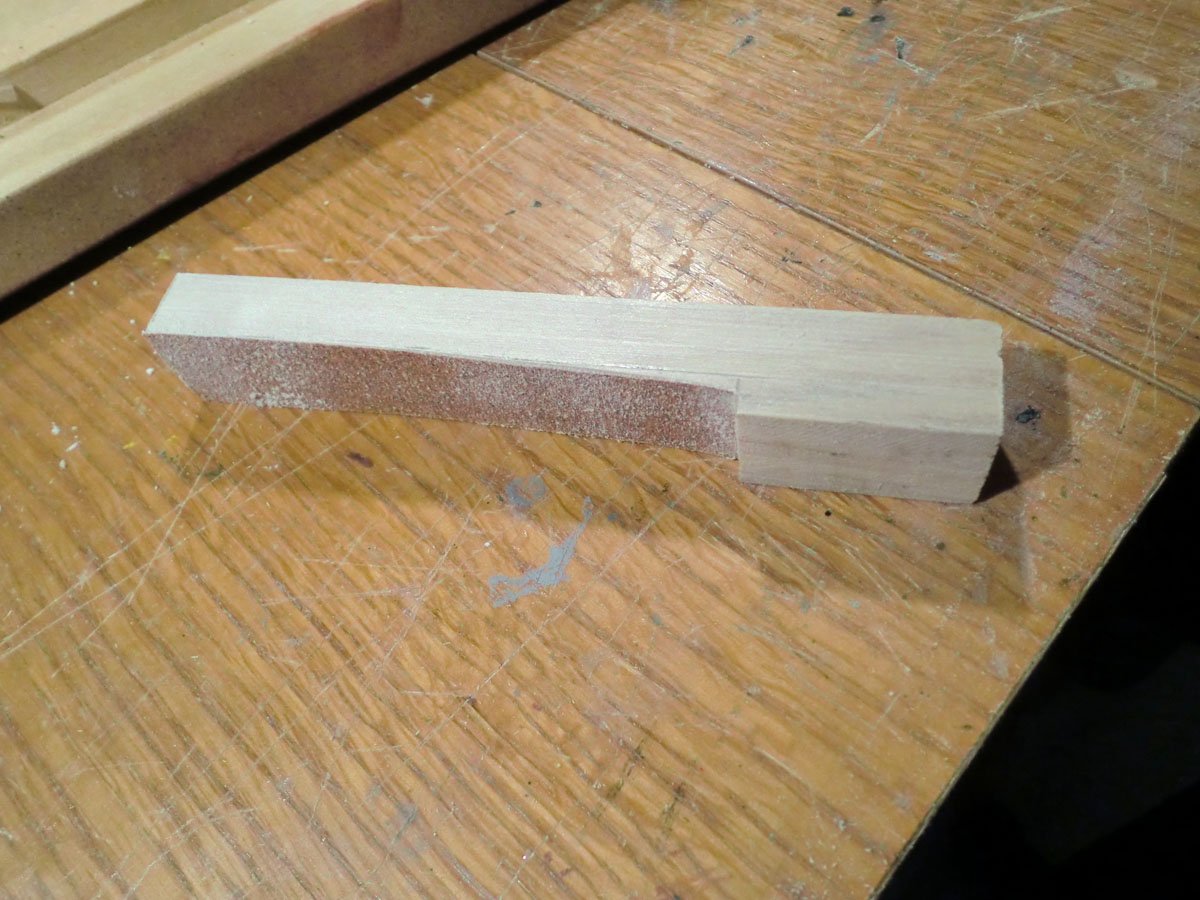
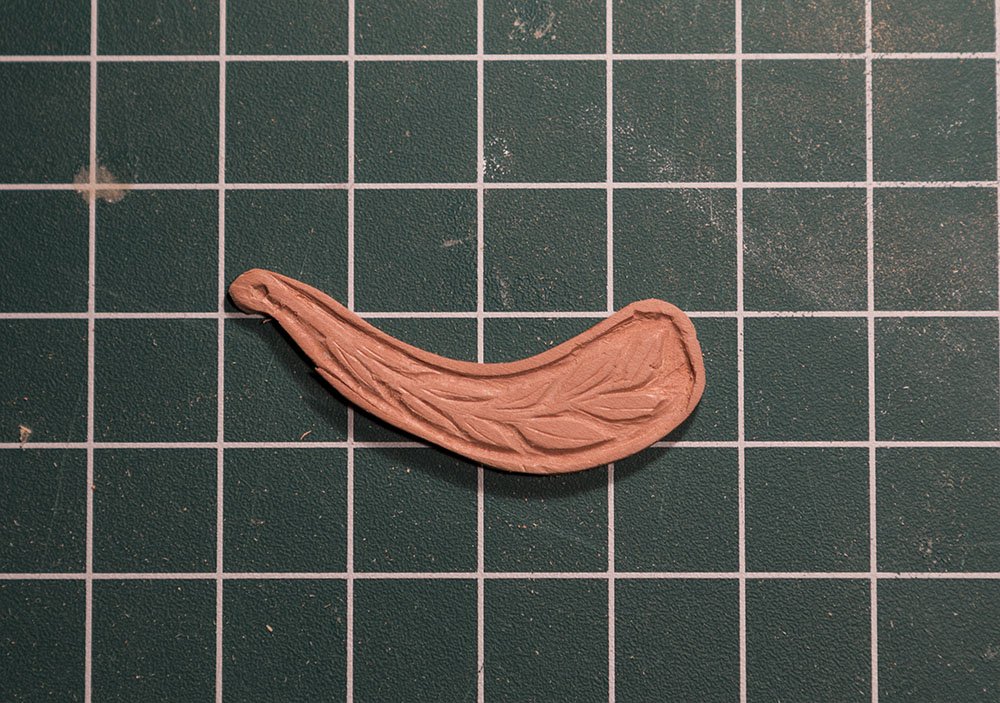
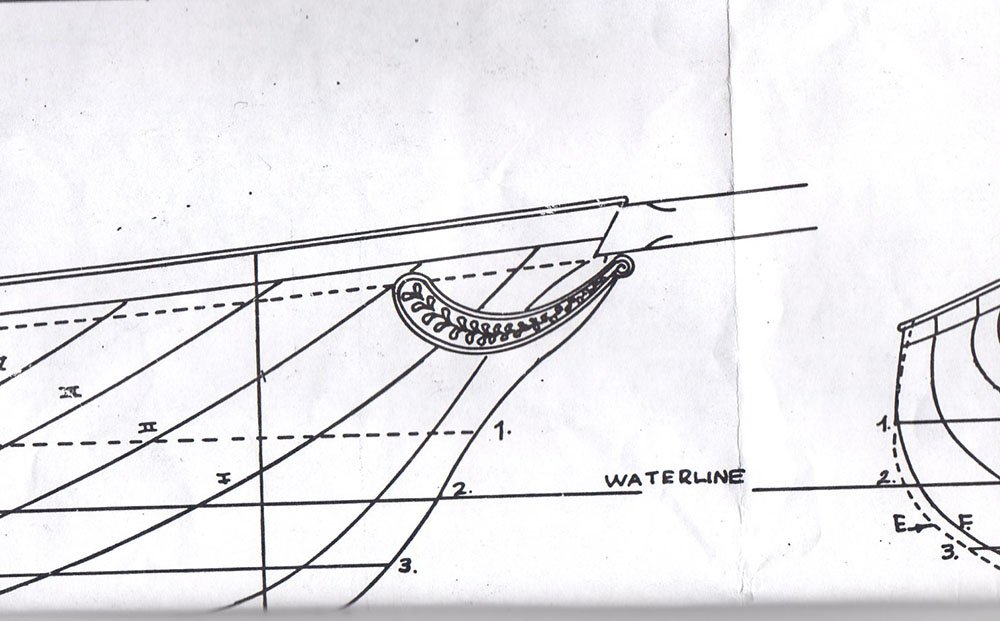
Experiment #1 So I am well into one of the experiments that I had in mind. In the past, I have carved things like bow blocks and the stern part of the America (and enjoyed doing so), but I have never really done any "decorative" carving. I wanted to give that a try here. I messed around a little with some bass wood but it was very quickly apparent that would not be productive. So I ordered some Pear and Boxwood from Wood Project Source, and some very small chisels and gouges from Micro-Mark, and started practicing a bit more. On the America, there are two decorative swooshes near the bow. I am sure these things have a name but I don't know what they are called. The plan shows them like this: The Bluejacket kit includes two cast metal parts to be used for this decorative thingy. I thought this would be a good thing to try to carve a replacement for. Here is my first attempt, next to the metal part from the kit. For scale, the white lines on the green mat are half inch apart, so the carving is about 2 inches long. So it is far from perfect, but for a first try I was pretty pleased with how it came out. I won't use this one on the finished model, but I am encouraged enough that I think with a bit more practice I will be able to produce one that I prefer to the cast metal pieces for the finished model. This was done on the pear wood. This also has me thinking about trying to pick up some better little chisels and gouges. I was not impressed with the ones from Micro-Mark, particularly the flat chisels and the v-shaped one. the rounded gouges were better.

- 162 replies
-
- 7
-
-
- america
- BlueJacket Shipcrafters
- (and 1 more)
-
I'll follow along. I built "version 1" of this kit and the Endeavour some 20 years ago. They still sit in their glass cases on my shelf.
-
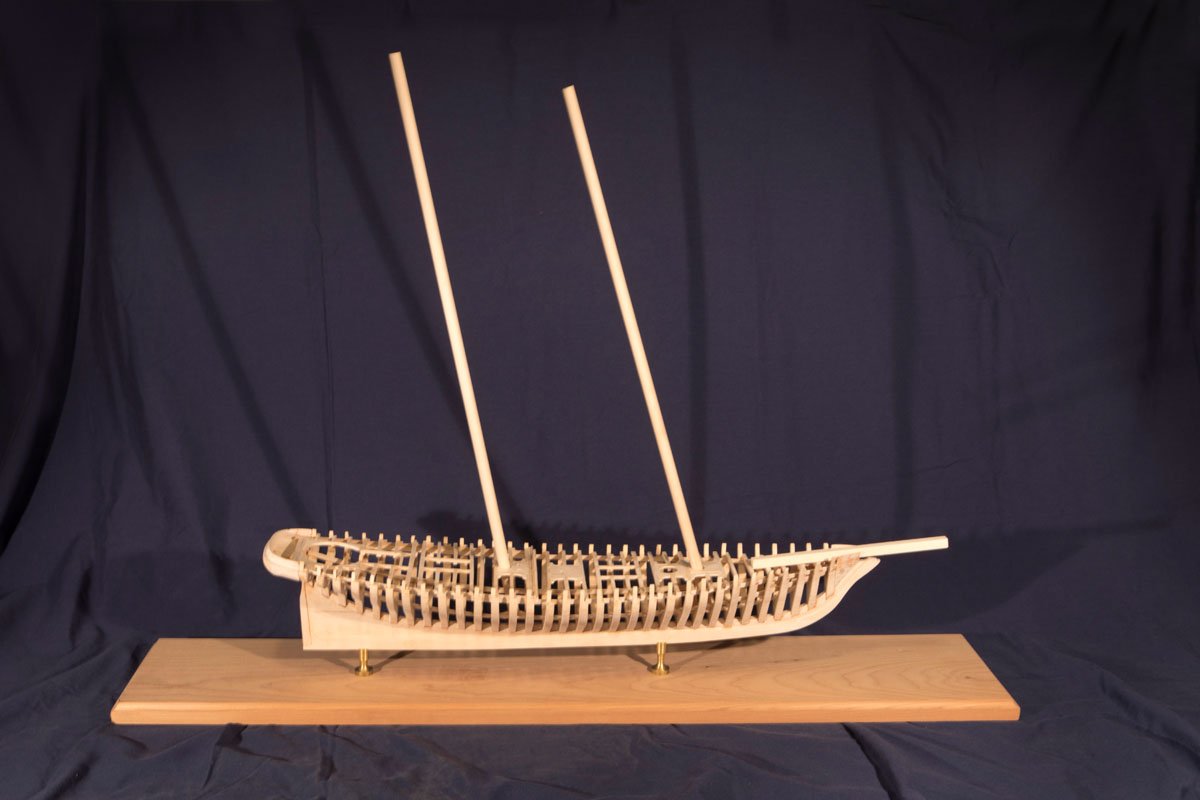
Thanks! Thanks for noticing and commenting. I knew it would not be easy to get things lined up, so the holes in the deck are a bit oversized. When the masts are finally installed, I will put wedges between the edge of the deck and the masts to get them positioned correctly. At this point, the masts are just sitting in there, resting against the edge of the hole. I did not take a picture from the front with the masts in because they also were not both vertical....something else that will be corrected when I permanently install them.
- 162 replies
-
- 3
-
-
- america
- BlueJacket Shipcrafters
- (and 1 more)
-
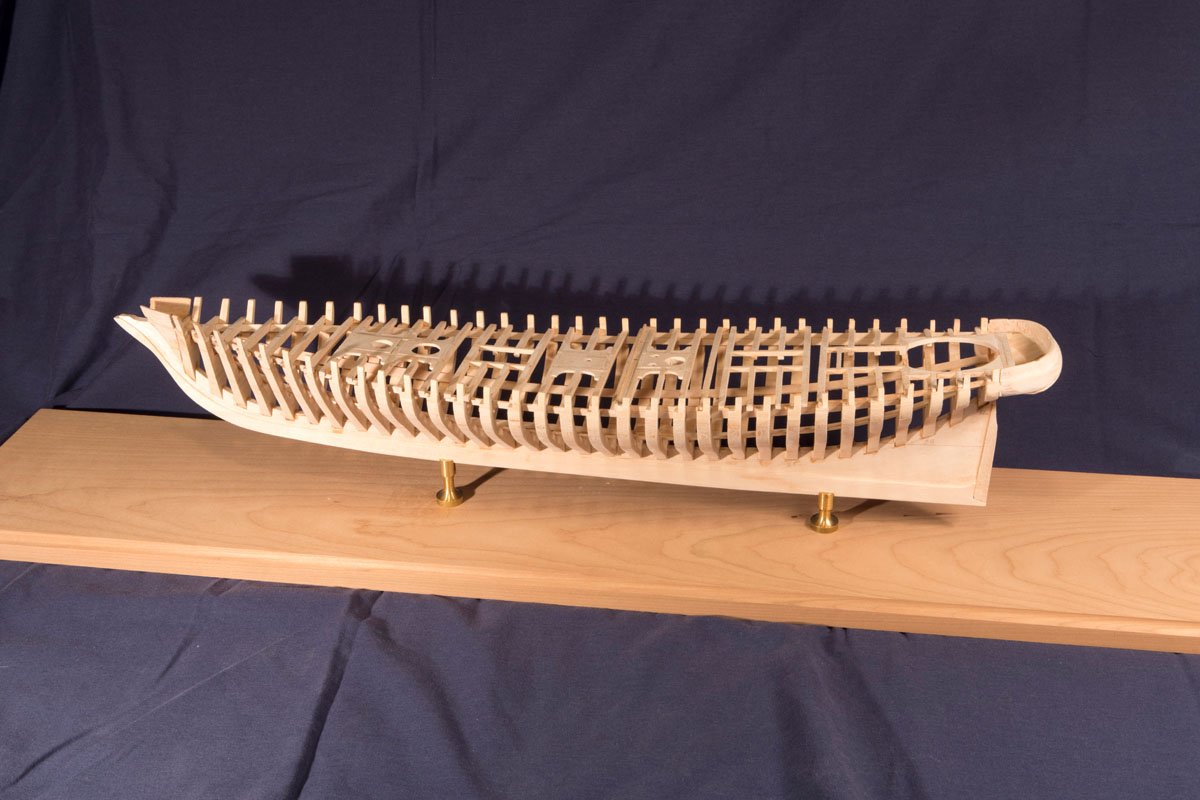
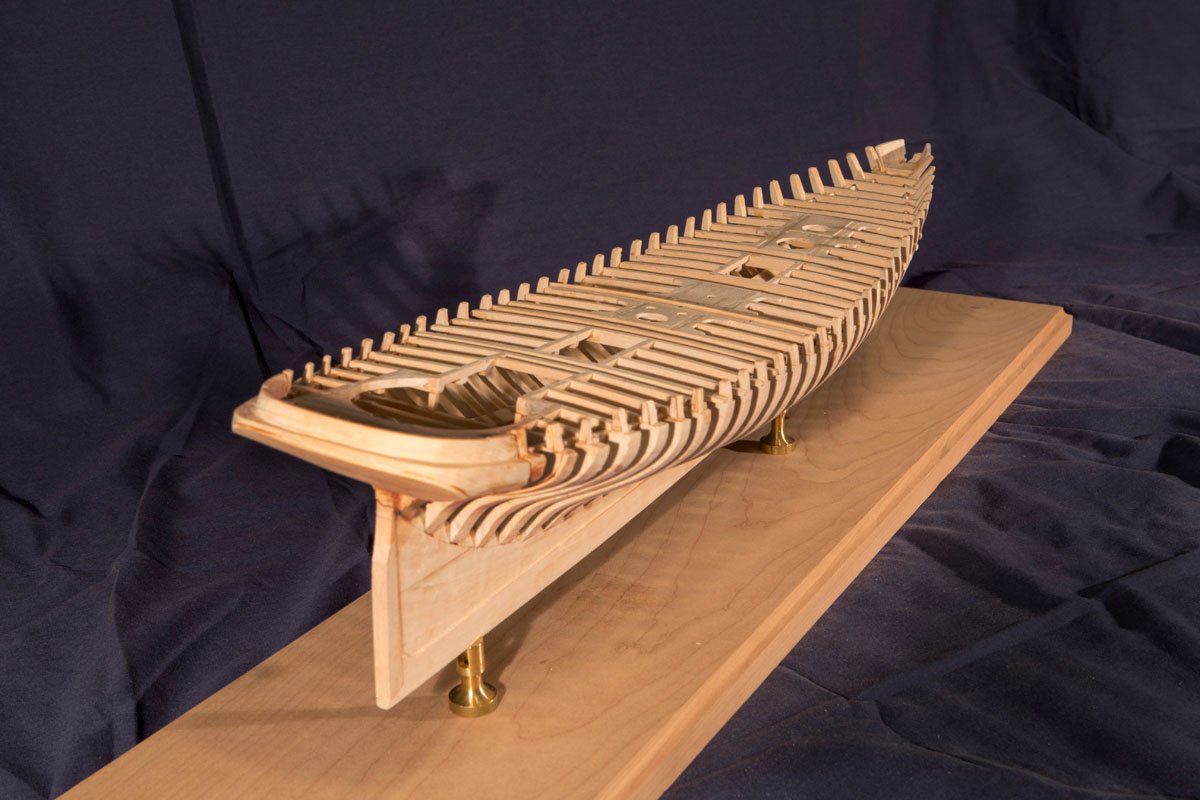
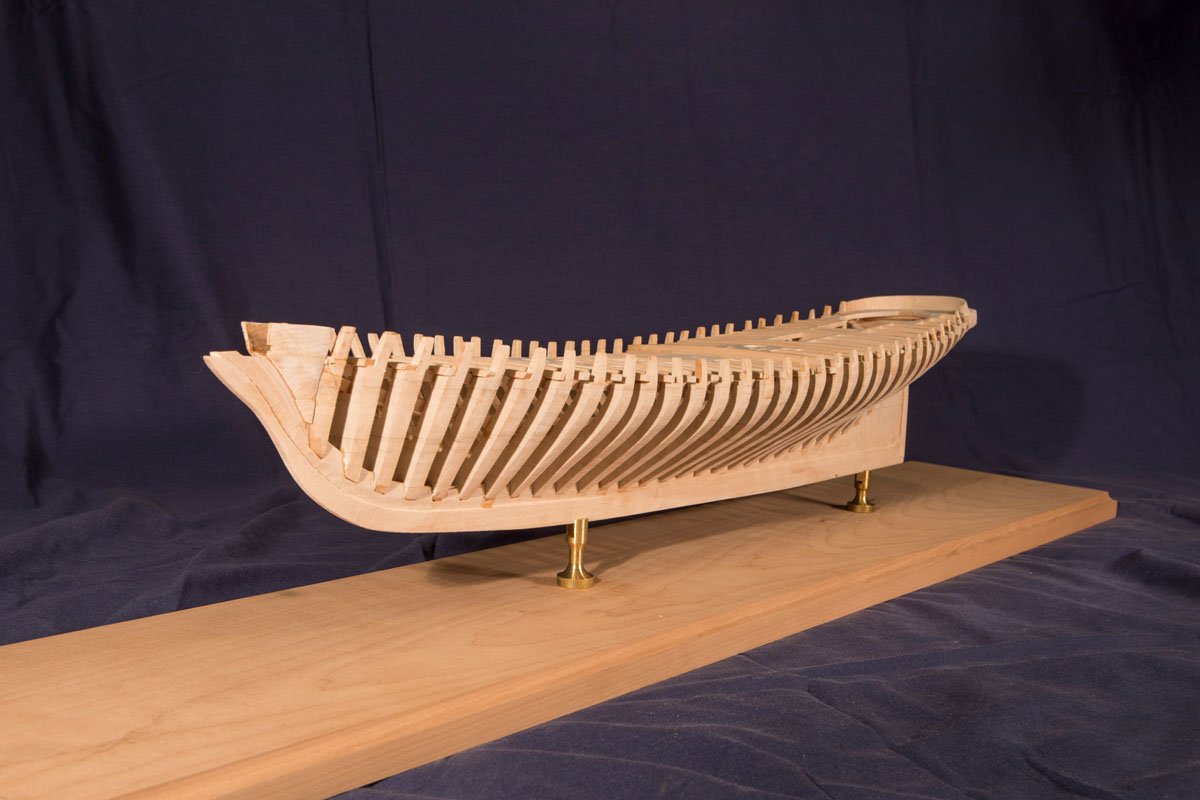
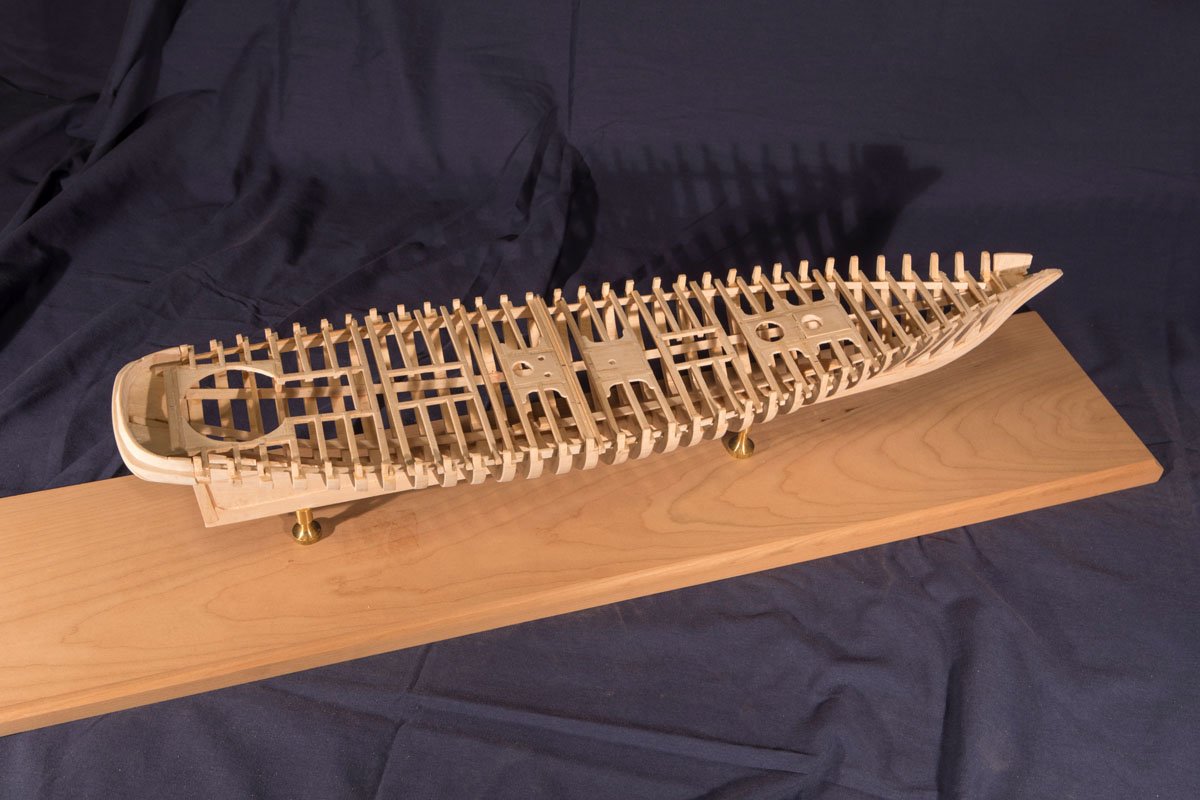
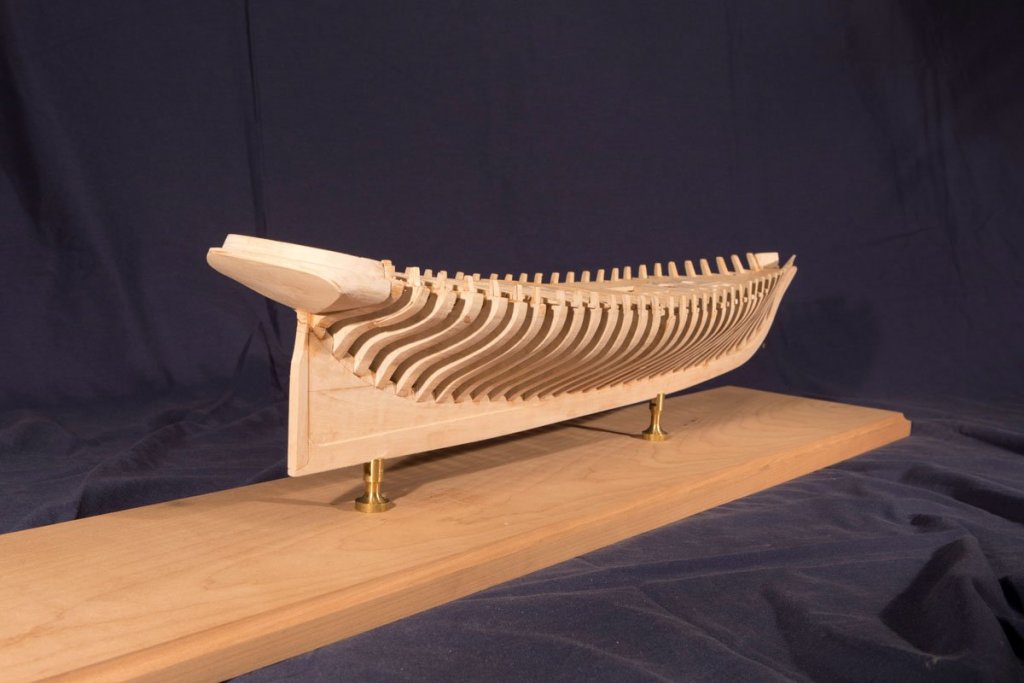
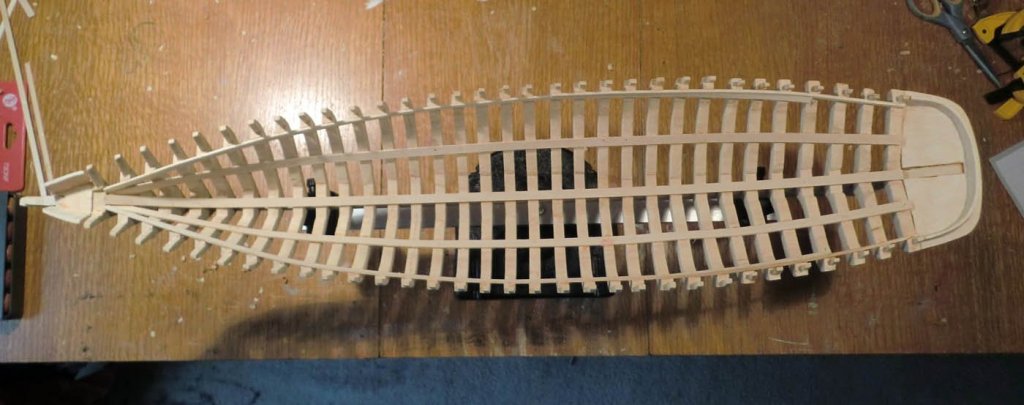
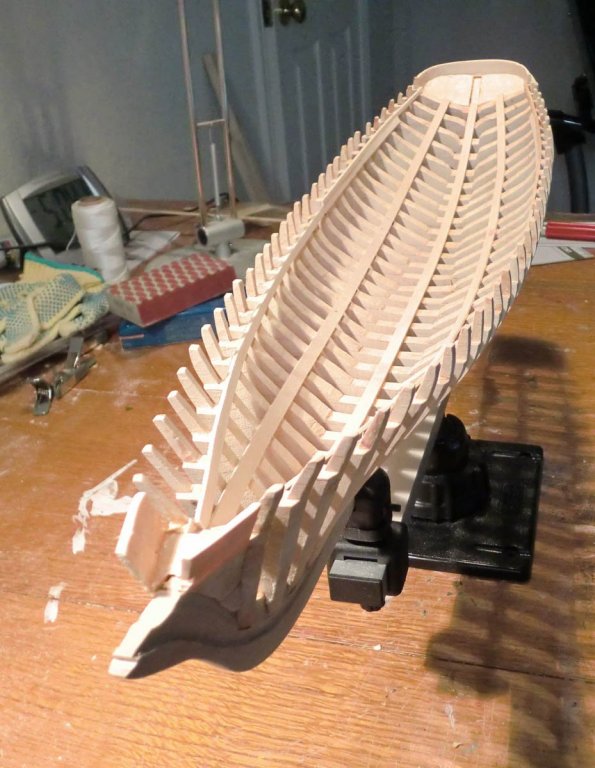
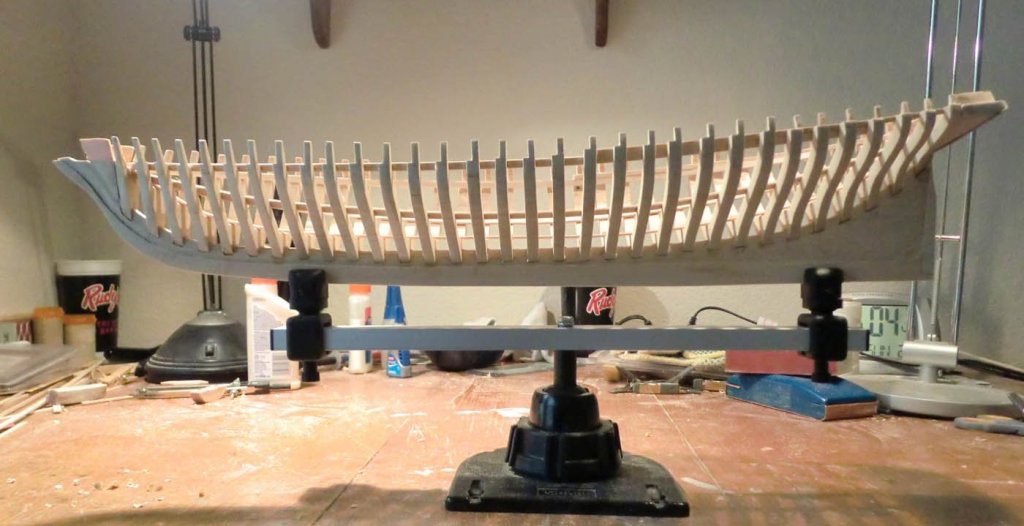
Yay, A Milestone So I now have all of the framing done of both the hull and the deck. I figured that milestone deserved a bit more care with the photos, even getting out the "real" camera. In the photos below, obviously the pedestals are just stuck on the keel and the thing is balanced on the base board. In the last, the masts and bowsprit are just balanced as well, and not trimmed to length or tapered (and yes the holes in the deck have enough wiggle room that I 'll be able to make the masts parallel). This also marks a bit of a turning point....probably 90% of what I have done up to this point won't be directly visible on the finished model, but 90% of what I do from here on will be directly visible. The pressure is on! What's Next The instructions call for cutting and installing the waterways, then planking the hull, doing deck furniture, planking the deck, then masts and rigging. But me? I think I'll likely take a bit of a break from this build, first to clean up the work bench, then maybe do some side experiments to help me decide what finish to use (natural, paint, copper?) and a few other little side projects I have in mind that I'll probably only share if they are successful. Enough boring text, here are the pictures....


- 162 replies
-
- 14
-
-
- america
- BlueJacket Shipcrafters
- (and 1 more)
-
Thanks Tim. I've enjoyed it as well and have been pleased with the kit and how it is going together so far. As for what's next....I have some time to think about it
-
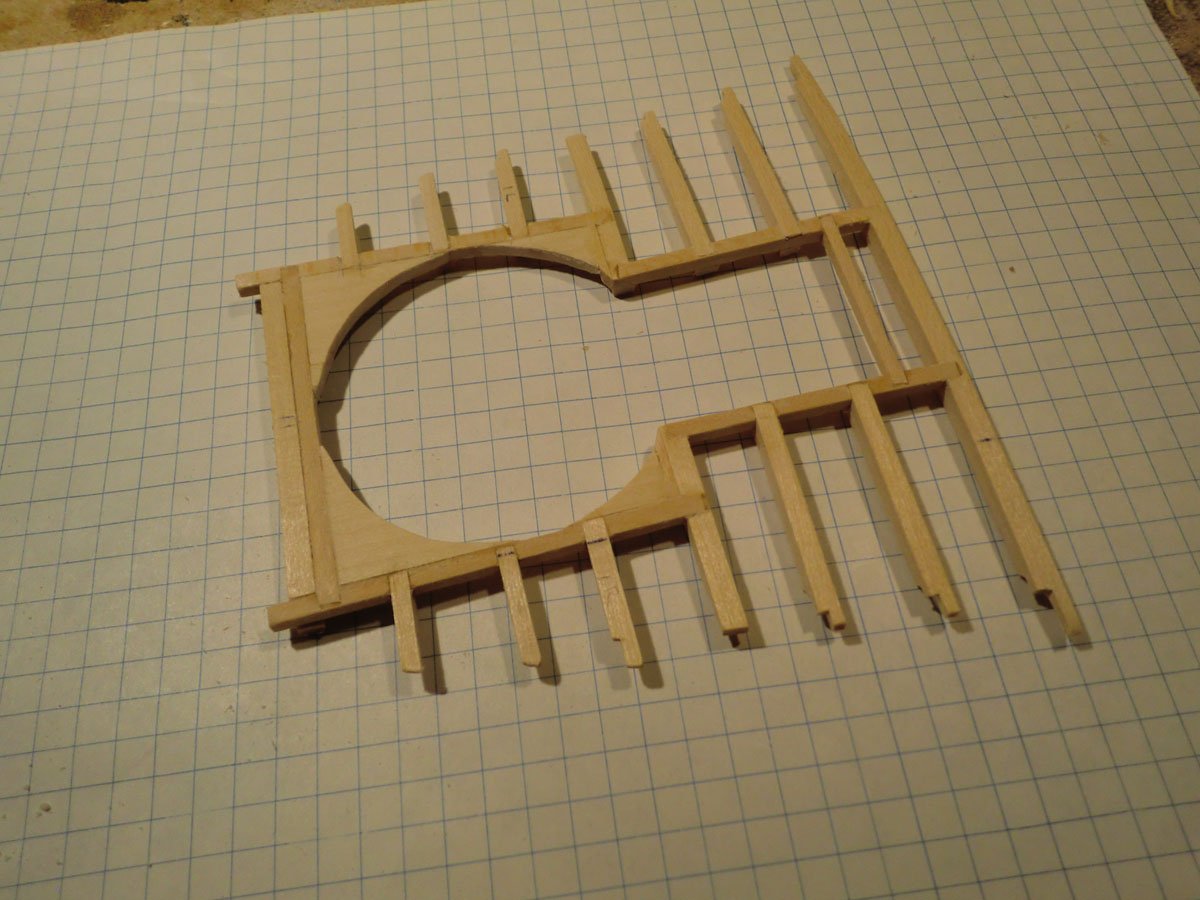
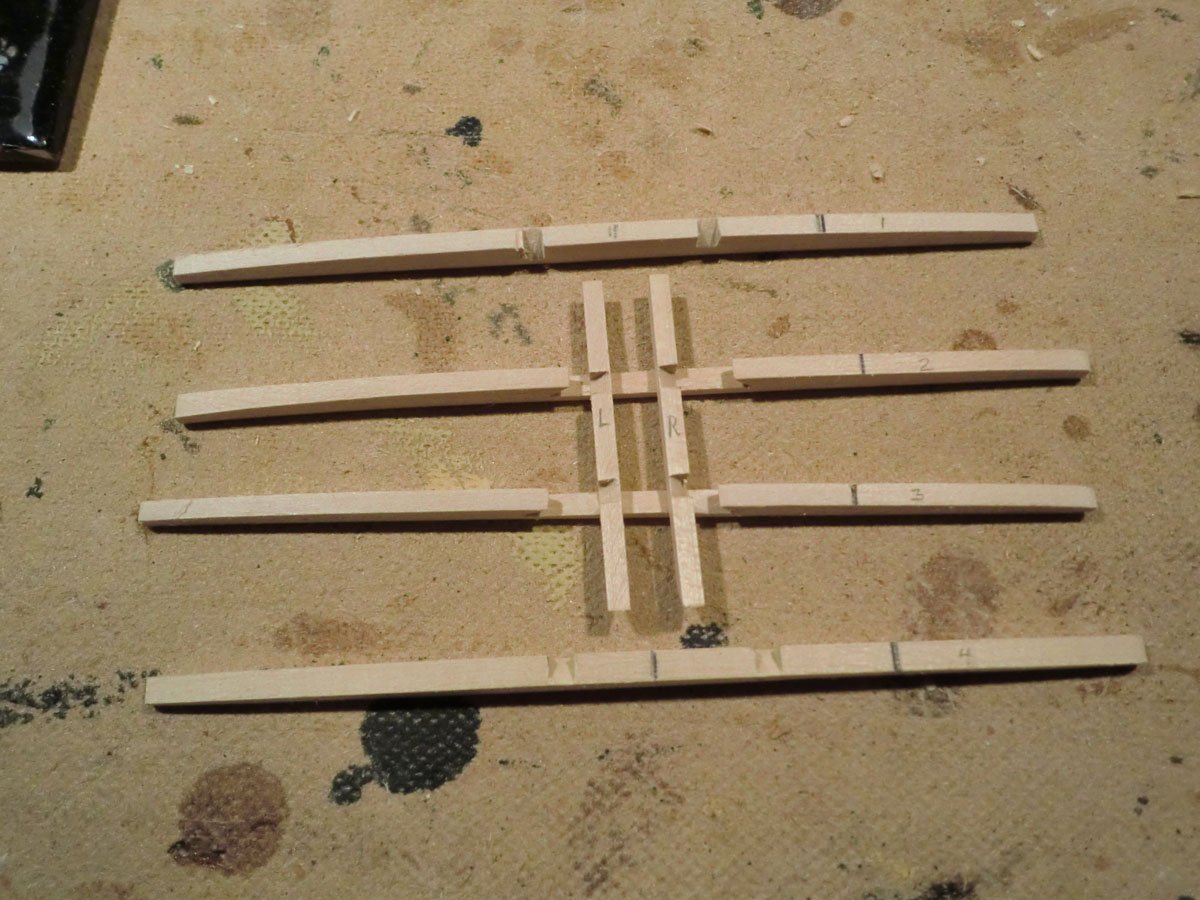
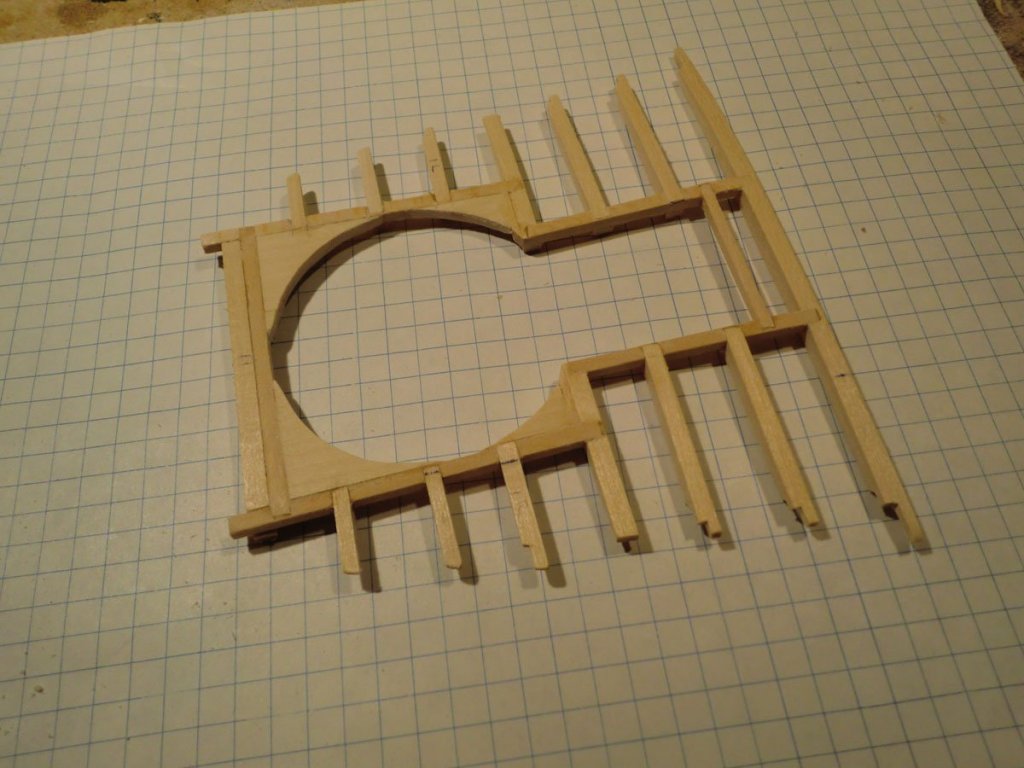
Thanks to all for the likes and for the comment, Brian. The last, and most complex, deck beam assembly is complete. This one surrounds the rear companionway and cockpit area. I also cut and drilled the holes for the masts, capstan, and skylight in the pads on some of the other assemblies. That was more problematic than I expected...not sure if it was technique or tool or dull drill bit but I tended to just tear up the wood. A couple times I had to cut out the pad that had been glued in and replace it with a new one.

- 162 replies
-
- 8
-
-
- america
- BlueJacket Shipcrafters
- (and 1 more)
-
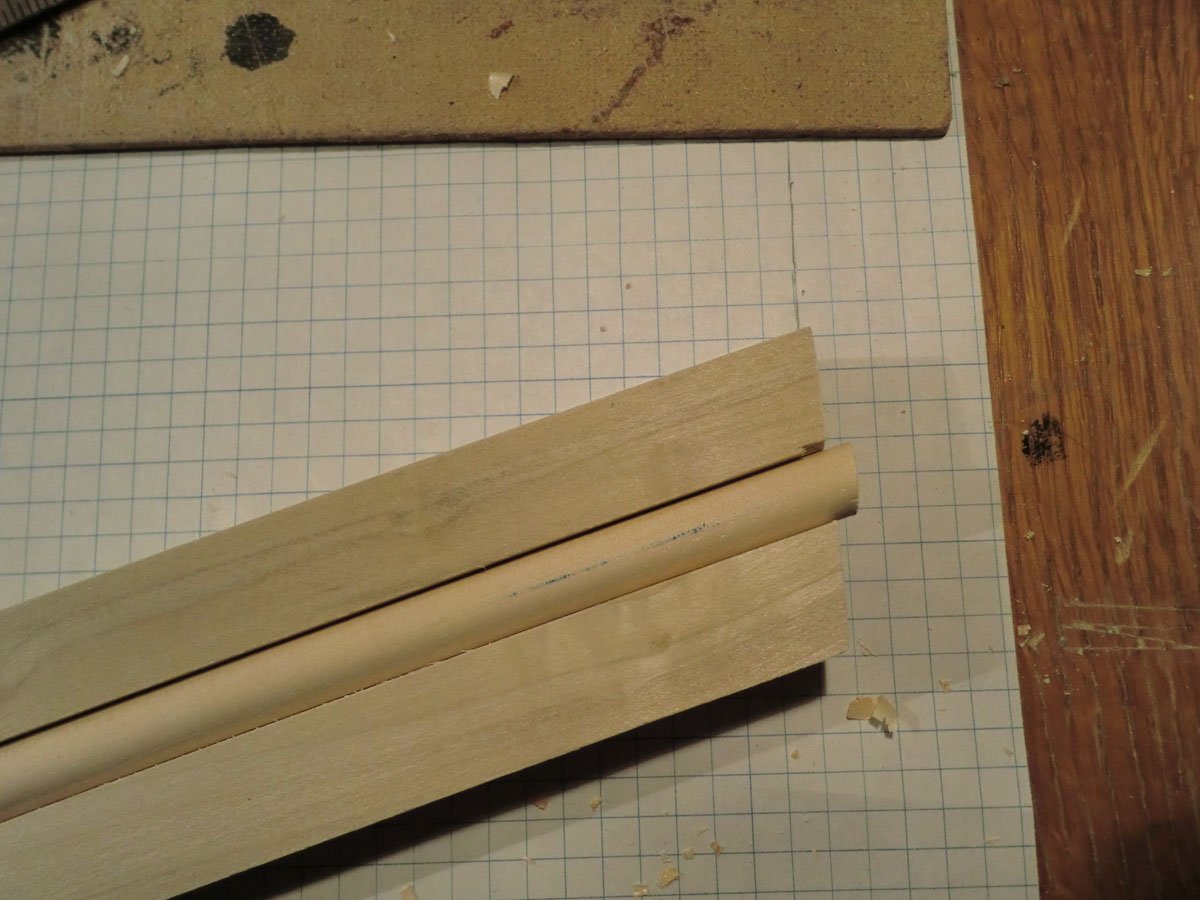
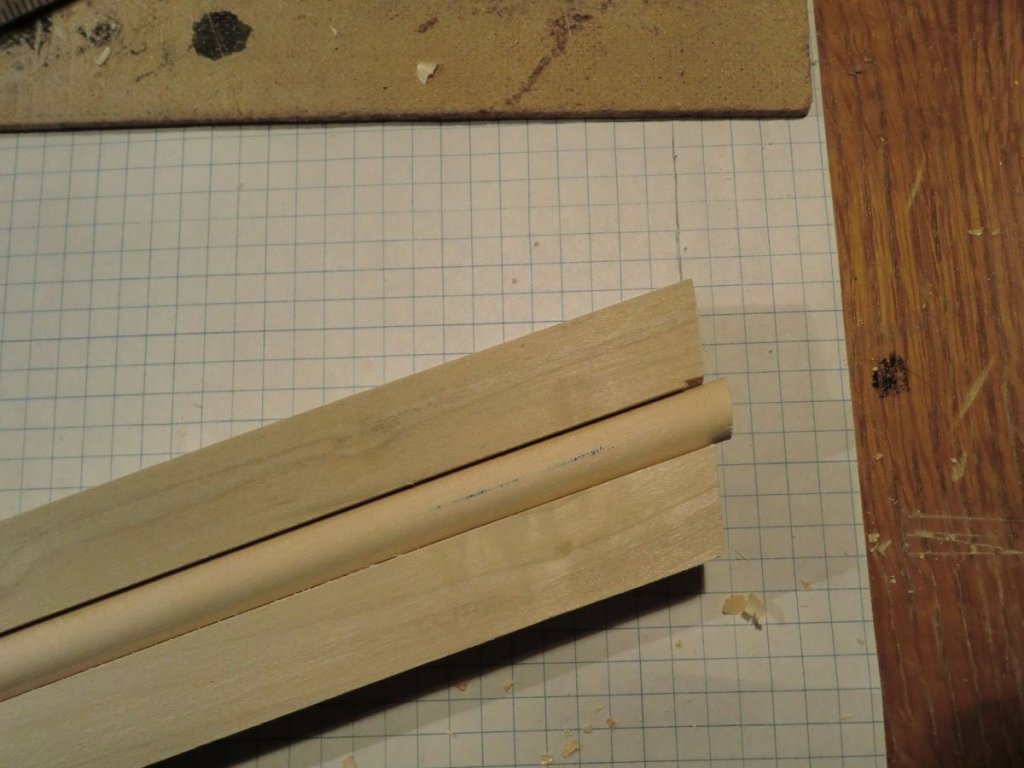
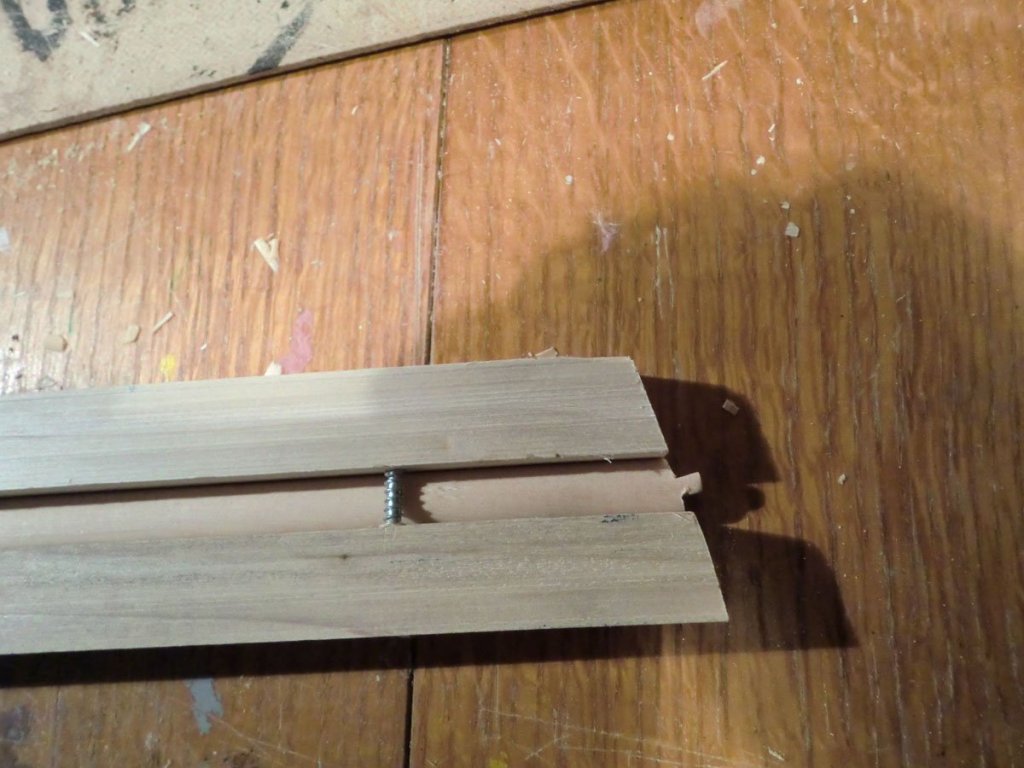
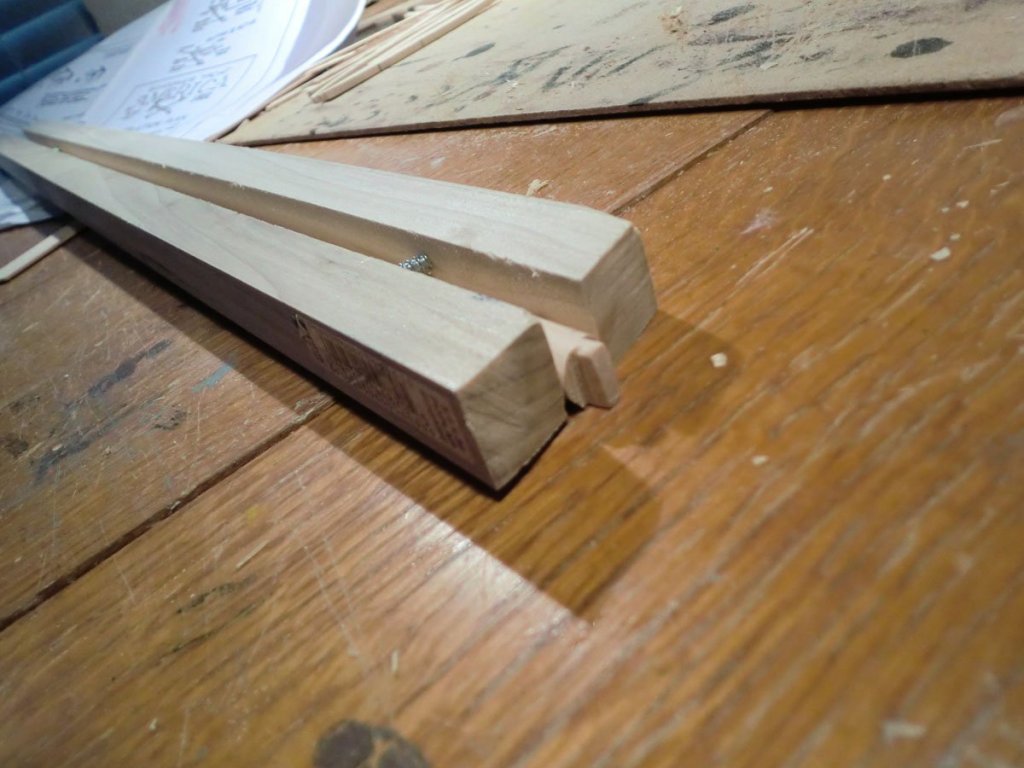
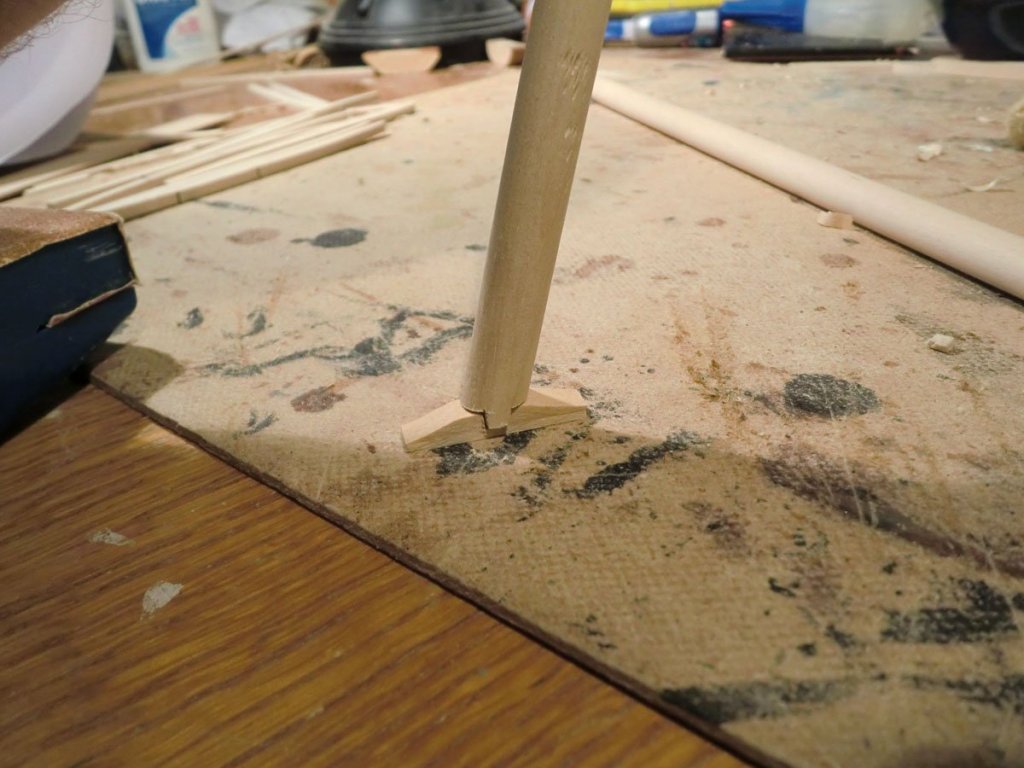
Stepping Forward I have continued to work on the deck beams....more on that in a future post. But first I took a step forward. The plans show a mast step on the keelson, but the instructions do not talk about it until they talk about the masts. That would be fine for someone who leaves large parts of the deck or hull unplanked, but for those who completely or nearly completely plank the hull and deck, it seems it would be problematic to get the mast step in there, and without the step, it seems it might be difficult to secure the masts. So I decided to go ahead with doing the mast steps now, which also meant cutting a tenon in the end of the masts. The old hands here probably have their own (much better) techniques for this, but I'll describe what I did. The masts on the America have a fairly significant rake (2.75 inches per foot), so one needs to cut the bottom of the mast dowel at an angle, then cut again to form a tenon across the width of the mast. Of course after I did this, it struck me that it would have been much easier, and probably just as good, to cut the mast at an angle, then glue on a short 1/8th x 1/8th basswood strip for the tenon. Instead I cut it. To do the cut, I used the 3/4ths square poplar sticks that I had used to hold the keel earlier. They were screwed together to hold a mast, and the end was cut at the proper angle. I used that as a guide to cut the dowel at an angle. I then slid the dowel down the clamp an eighth of an inch or so. I then made two more cuts from the front and back of the mast (from top and bottom of the picture above), along the same angle. Finally I made two cuts up from the bottom of the mast, keeping the saw perpendicular to the angle at the bottom of the mast to form the tenon. Finally I made a couple mast steps to be glued on to the keelson once I know exactly where they go...which depends on the placement of some of the deck beam assemblies shown above. (oops, I see now the mast is a little chewed up, I guess from the screws in my clamp. I hope that is below deck...if not I can fill and sand).

- 162 replies
-
- 6
-
-
- america
- BlueJacket Shipcrafters
- (and 1 more)
-
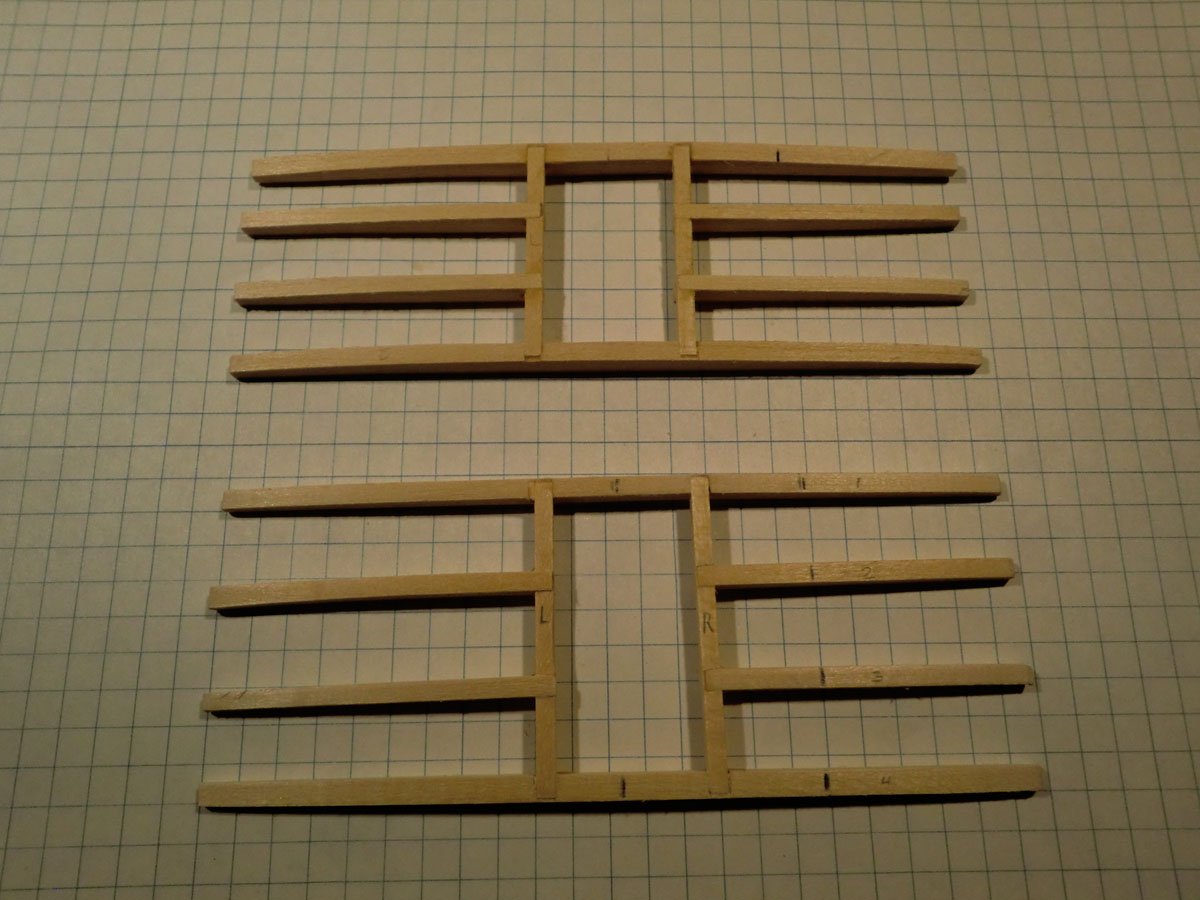
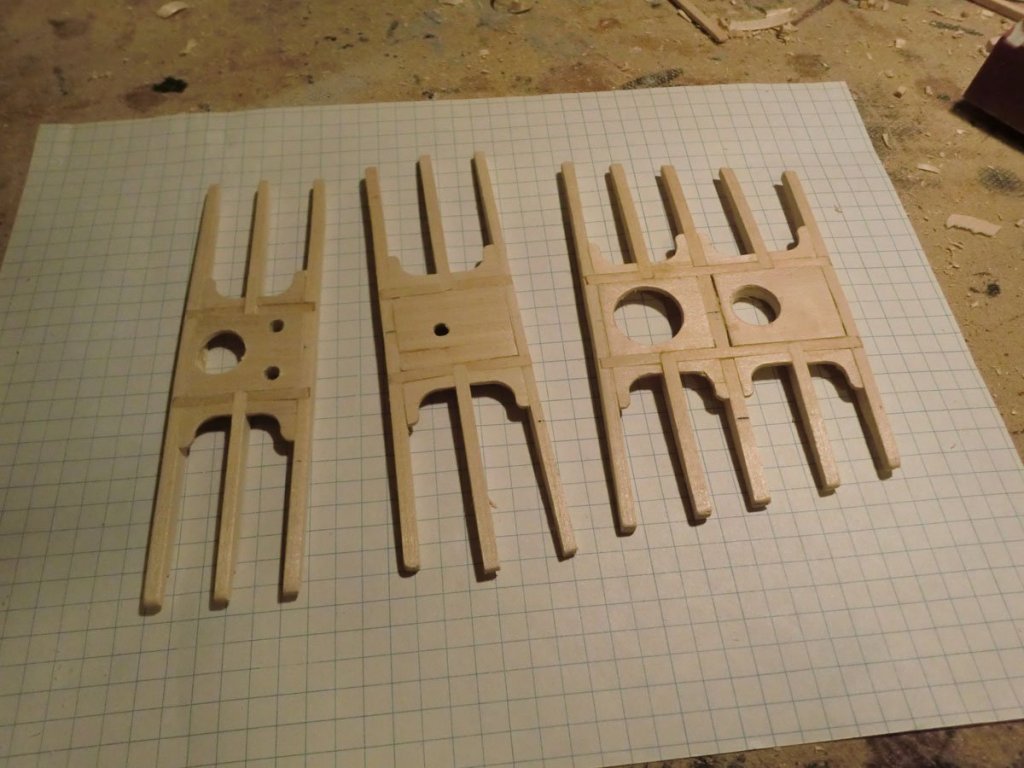
Thanks all for the likes. Two more assemblies done. The top one has the pads for the foremast and skylight; the bottom one is the pad where the capstan goes. I have one more like the bottom one in this picture for the main mast, then i need to figure out the framing around the companionway and cockpit, which looks more complex. These little things are fun to figure out and make, though I am sure progress will slow during the week.
- 162 replies
-
- 8
-
-
- america
- BlueJacket Shipcrafters
- (and 1 more)
-
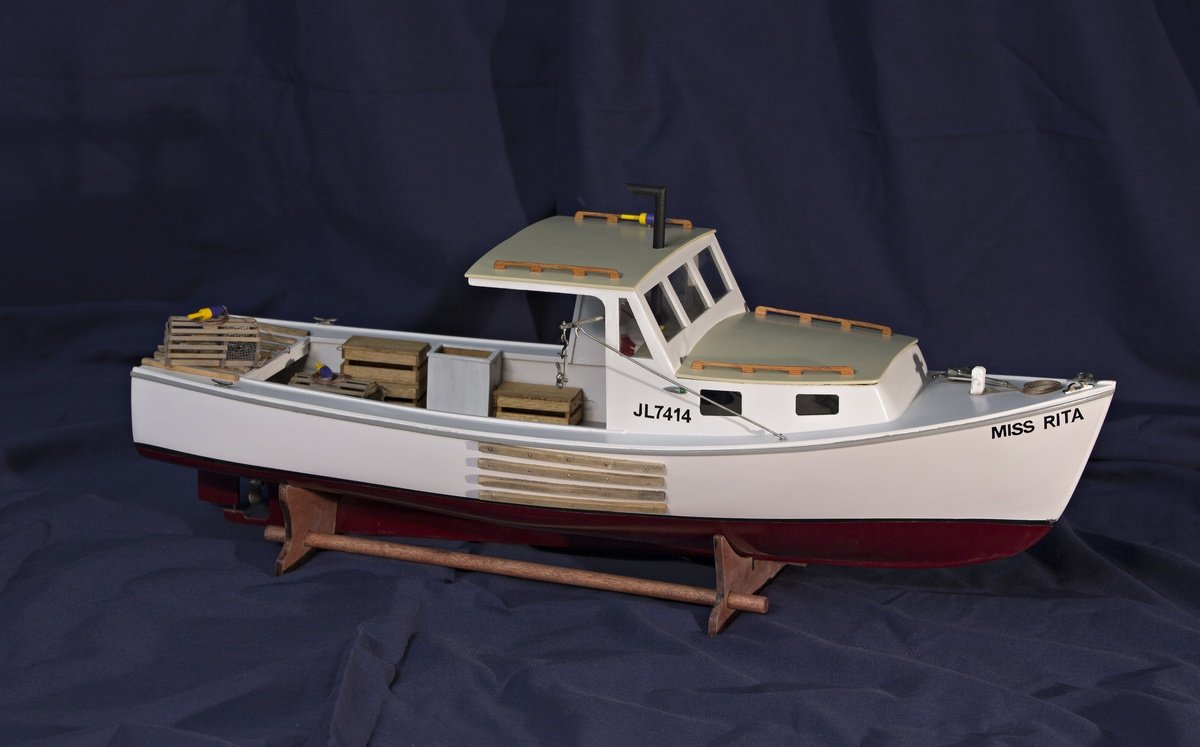
review BlueJacket Shipcrafters Lobster Boat: A Review
gsdpic replied to Cathead's topic in REVIEWS: Model kits
Thanks Eric. I enjoyed building those little accessories....you can see I built three of the boxes, and also eventually built a total of 5 lobster traps. I put a yellow and purple buoy with each trap, plus have a few extra buoys stacked up in the cockpit. -
review BlueJacket Shipcrafters Lobster Boat: A Review
gsdpic replied to Cathead's topic in REVIEWS: Model kits
Nice builds, Eric and Kurt. I also built the bluejacket lobster boat. I built it in the first half of 2016 before I discovered MSW. My experience with the kit was much like Eric's. I agree with pretty much everything in his review. However, I was able to manage carving the bow blocks without any prior carving experience. It took time and patience but ended up working well for me. I purchased some real carving knives for this which helped a great deal. Even with the carved bow blocks, I also ran out of material for planking. I am convinced the kit just did not include enough. I also broke some of those cabin bits that are sticking up during part of the build, but they were easily repaired. Note that bluejacket does rate this model a "6" on their 9-point difficulty scale, so that could, perhaps, be used to justify some of the lacking details in the plans, and some of the assumptions of prior knowledge. Here's a picture of my finished model.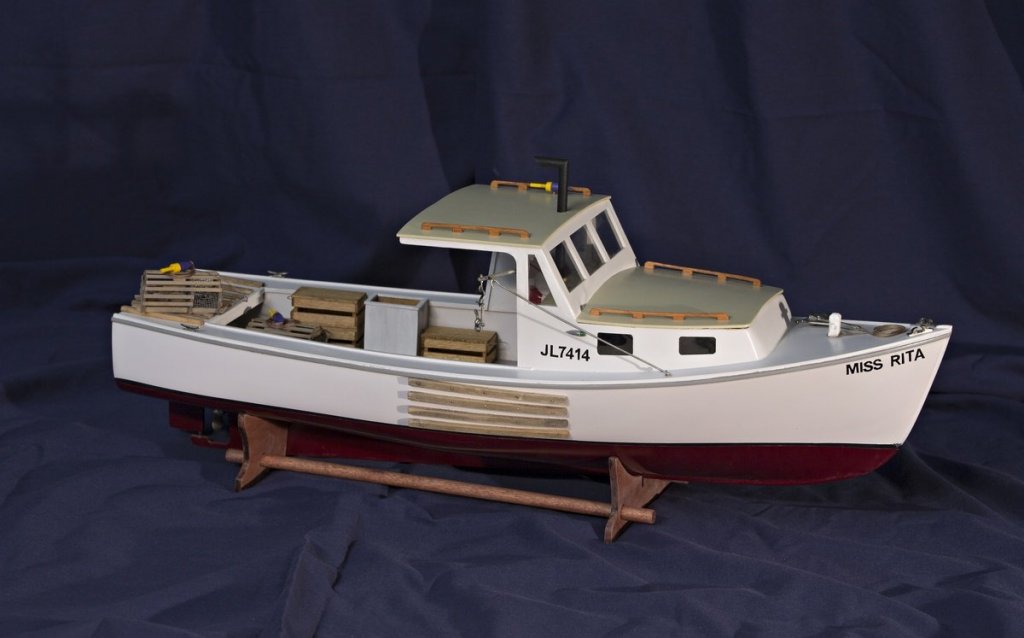
-
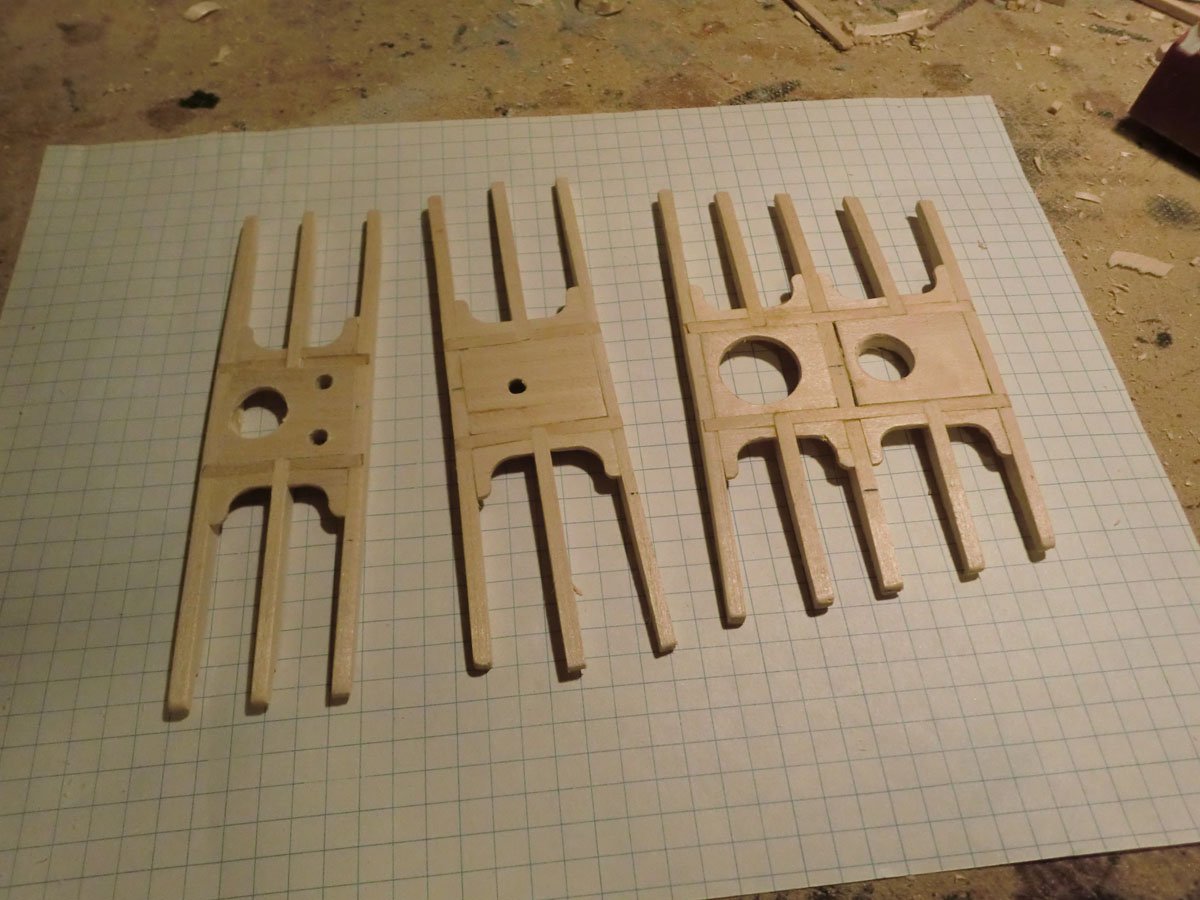
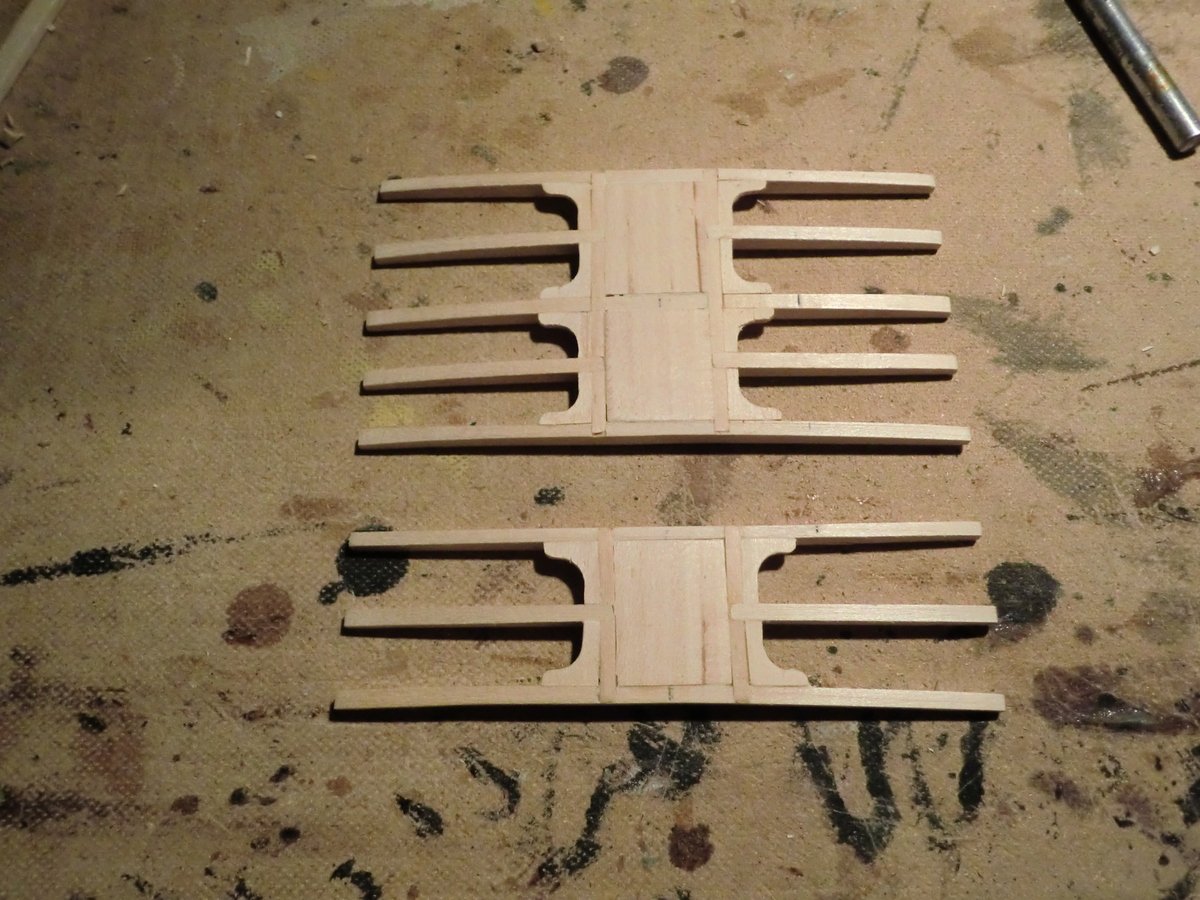
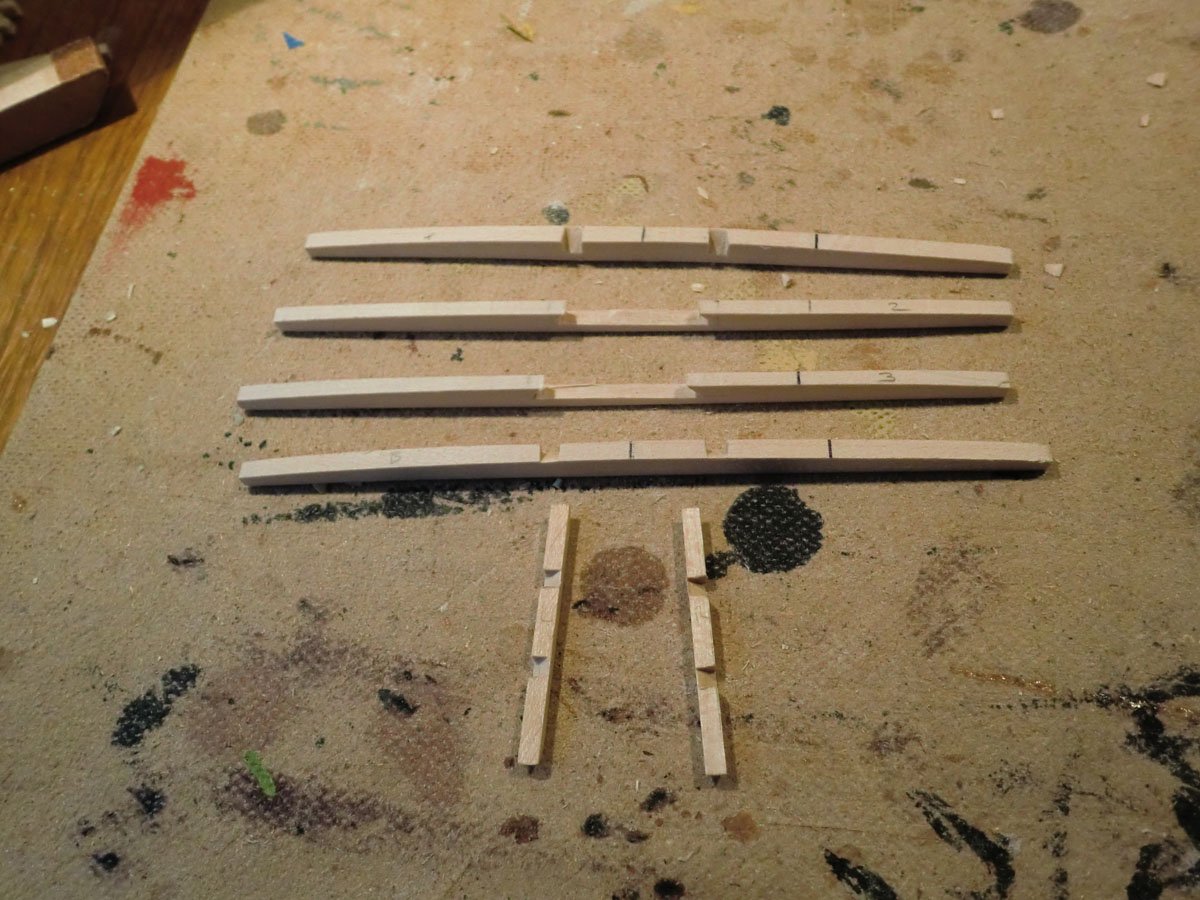
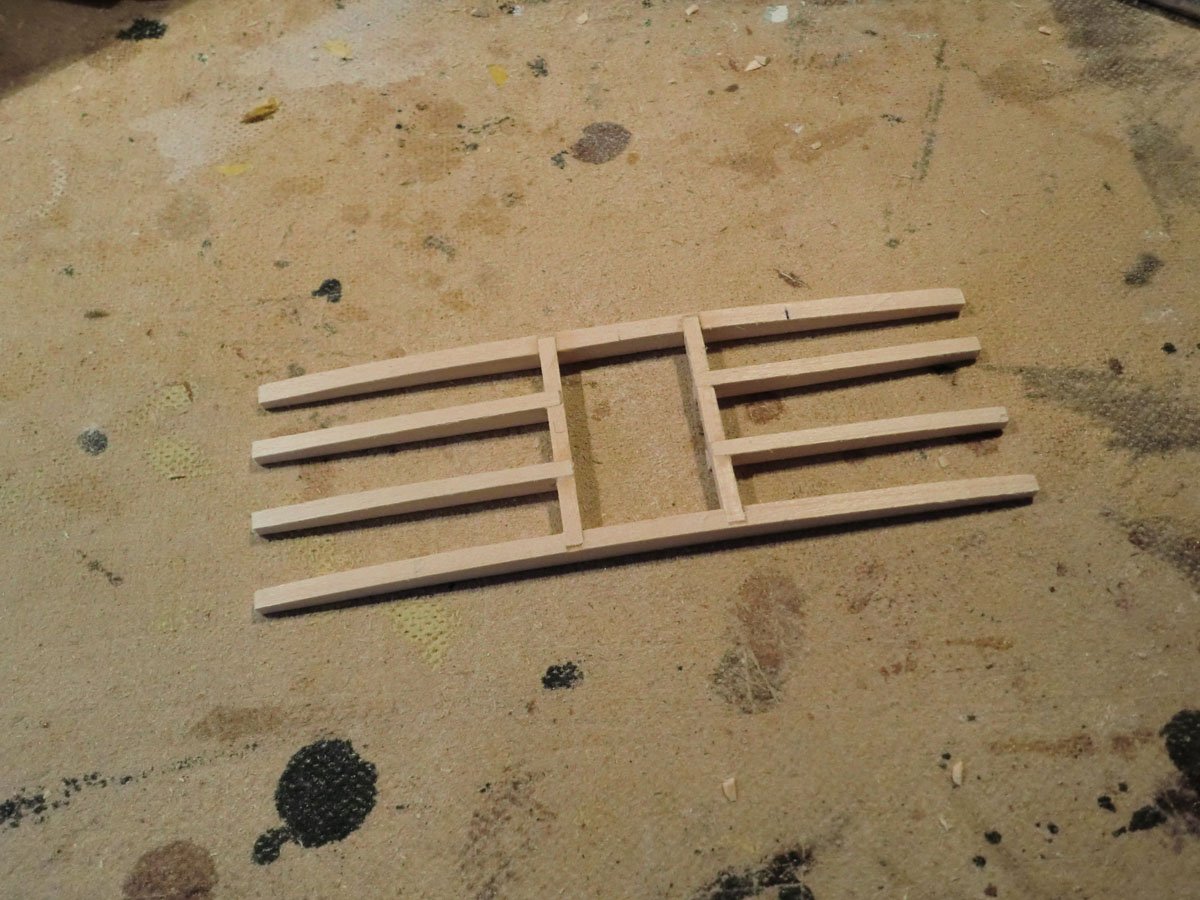
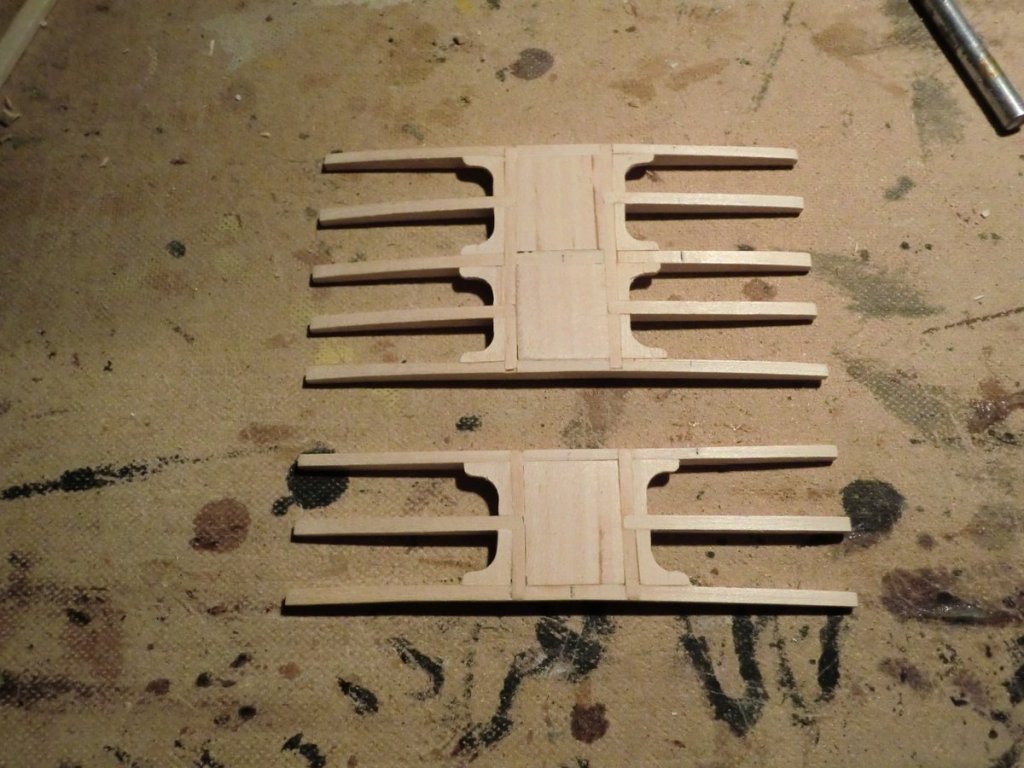
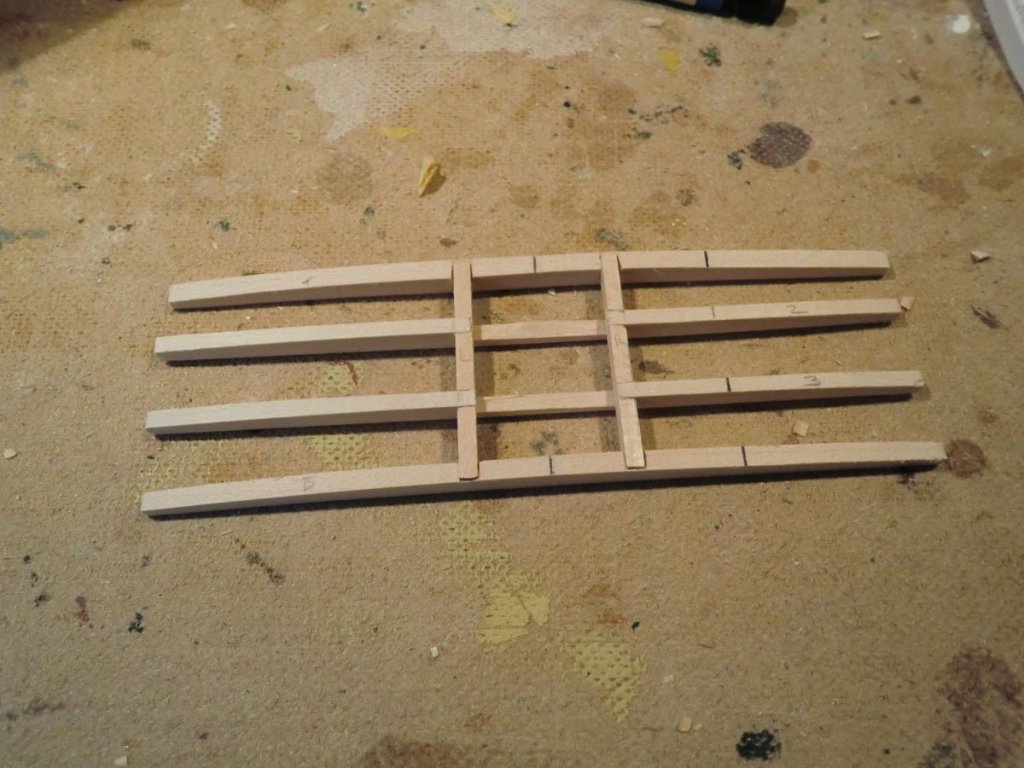
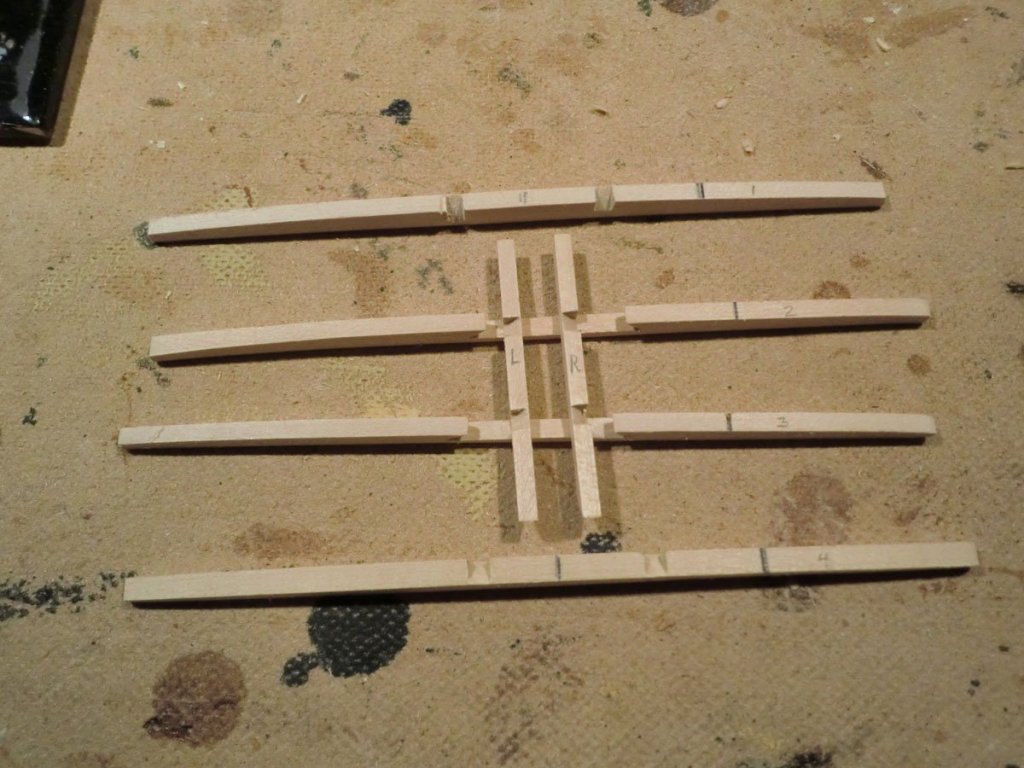
Deck Beam Assemblies In some places, the deck beams cannot go all the way across the deck, because of hatches or masts or whatever. So you make assemblies that link several beams together. I've created two of these assemblies; I have 4 or 5 more to go. Below are some pictures of the construction. The only mildly clever thing I did (which I'd recommend) is to leave the middle beams intact until the assembly is complete and the glue is dry, then cut them out. It just seems like that makes it easier to put together and to keep things in line.


- 162 replies
-
- 7
-
-
- america
- BlueJacket Shipcrafters
- (and 1 more)
-
I'm very late to the party but will follow the rest of the way. The work you've done so far looks fantastic, and as everyone has said, the brass work is really impressive. That is something that intrigues me, and that I have never really tried.
-
I'll follow along as well. I have done a couple Bluejacket kits, and working on the third, but do not have experience with this one. That template and waterline does look strange, but I am not sure what the answer is. The picture you are holding it against does not really look like the bow....the picture above it is more what I would expect but that picture does not appear to match the template either.
-
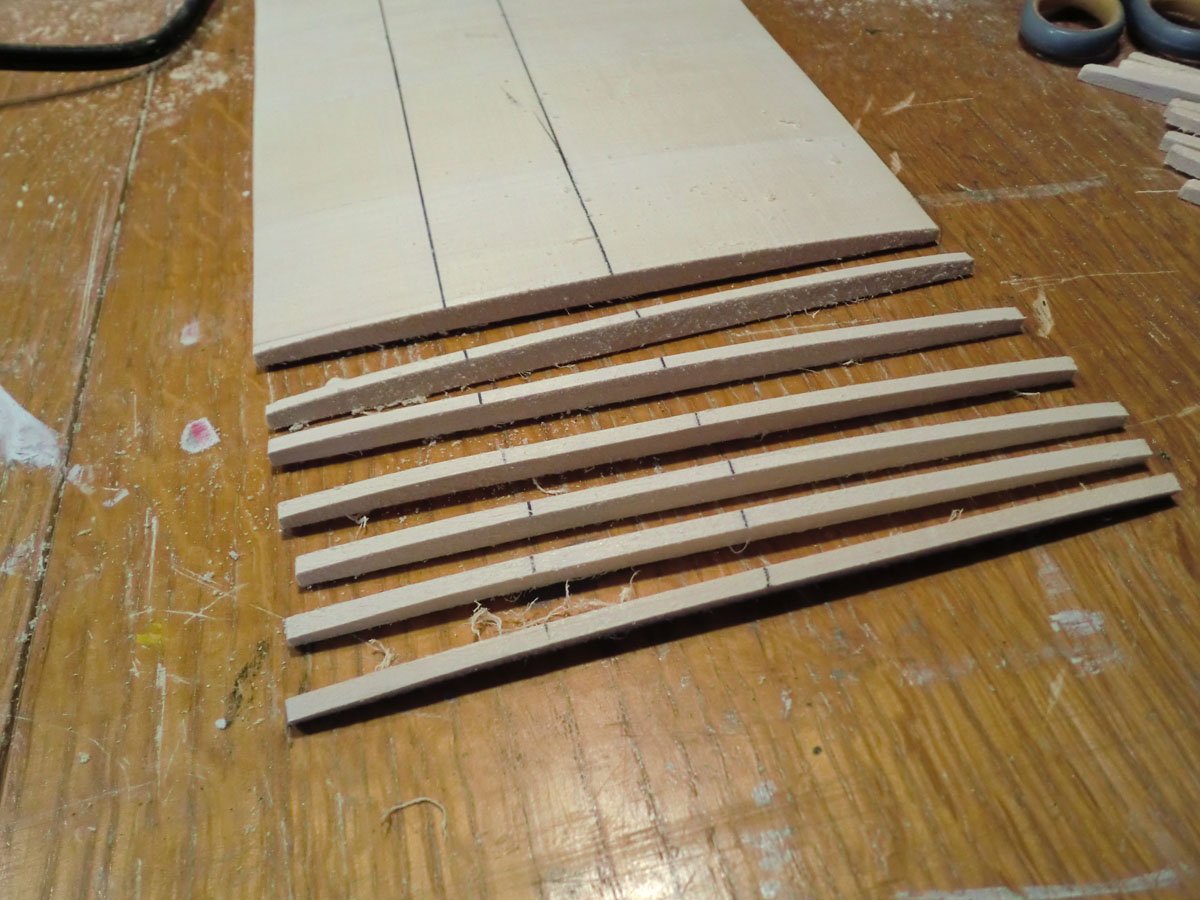
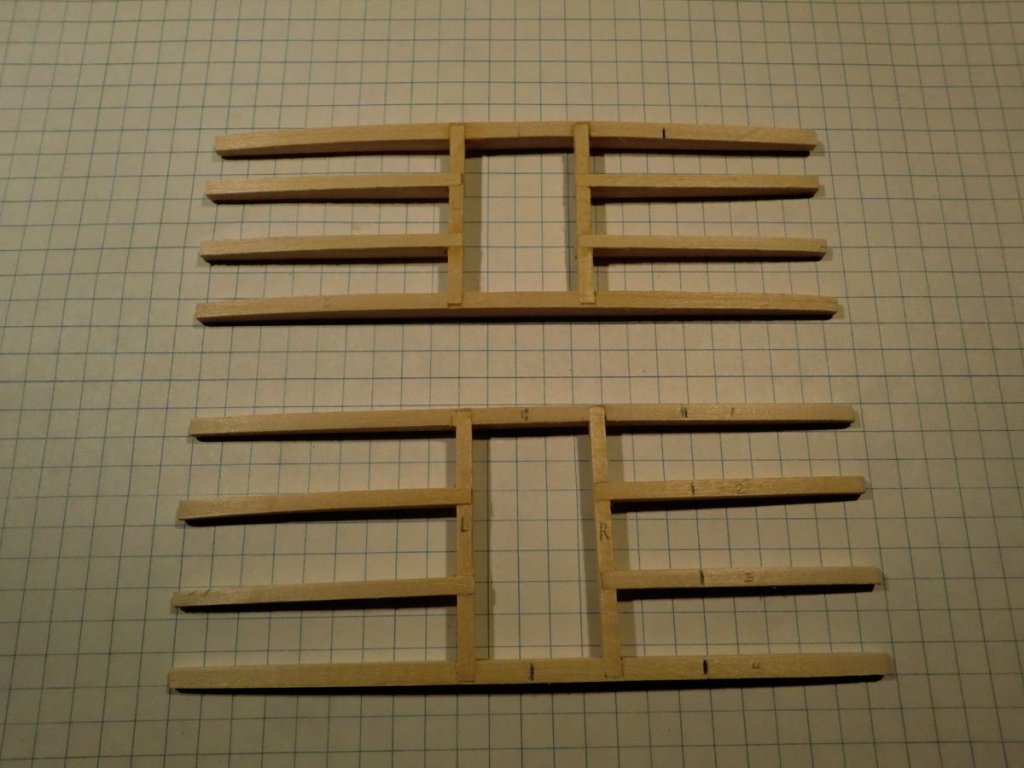
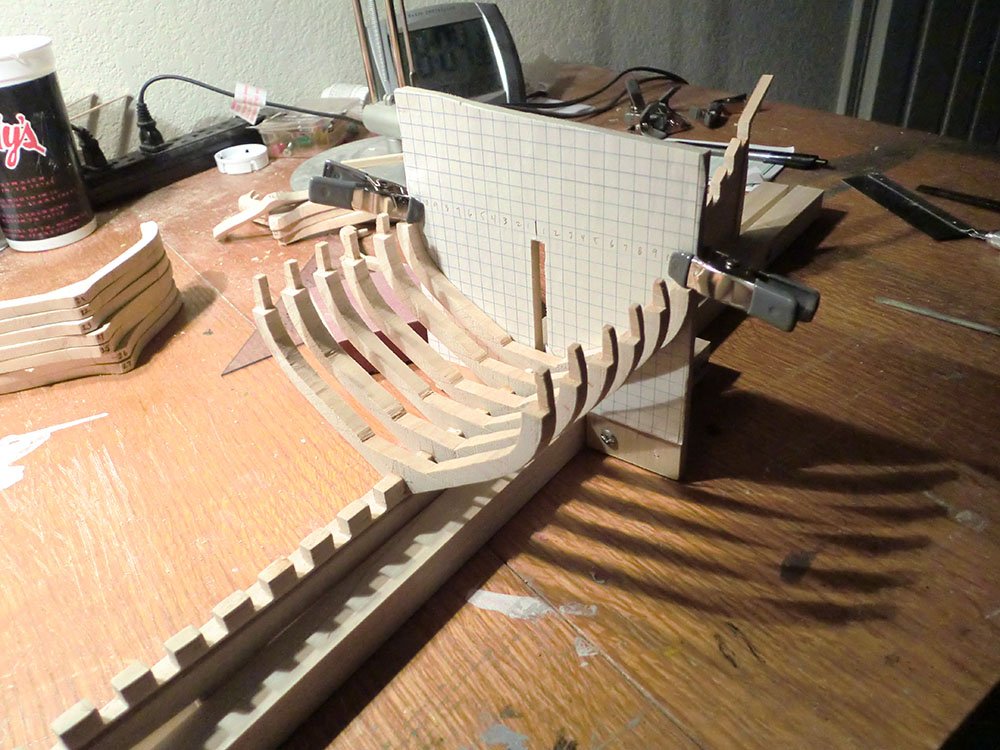
Deck Beams Like the hull, the construction of the deck of this model is very much in keeping with plank-on-frame. The kit calls for making a bunch of deck beams that run across the width of the hull, with the planking then placed on top of the beams. In a detail that I suspect will be almost imperceptible on the finished model, the deck is crowned so that the centerline is about an eighth of an inch higher than the edges. To accomplish this, you first glue edge-to-edge 5 pieces of quarter inch thick basswood, to give a block that is 5.5 inches wide, 10 inches long, and a quarter inch thick. Then using planes, rasps, files, and sandpaper and such, you create the crown on this larger block. Finally, you cut 1/8th inch strips across that block to create the deck beams. Pictures of this process are shown below. To help, I created a special sanding block that also had the shape of the crown, to try to get the curve consistent along the block of wood and from side to side. I also drew a couple reference marks on the block that may help later in construction. The initial 10x5.5x1/4 block and some tools... Initial crown on one side Both sides crowned Special sanding block Block with a few beams cut from it. Clearly I'll need to clean these up a bit with some sandpaper. I suspect that my block may not have quite as much of a crown as intended, but I guess I got tired of shaping it and anxious to cut the beams. Either way, like I said, I don't think this feature will really be noticeable on the finished model. The booklet calls for cutting about 40 beams....I have 15 cut now. I am using a scroll saw with a guide fence, which is probably not optimal, but is what I have available.


- 162 replies
-
- 6
-
-
- america
- BlueJacket Shipcrafters
- (and 1 more)
-
Thanks to all for the likes, comments, tips, etc. I've taken a little break for a photography trip along the coast of Maine and Acadia National Park, but I am back now. And yes I stopped at Bluejacket to check out their finished America and all the other finished models in their store. As for mine, I am working on shaping and cutting the deck beams. Once I get a little farther with that I will do another post with a picture or two. Not sure when though....I am sure I have fallen farther behind at work and I have a ton of pictures from my trip to post process yet.
- 162 replies
-
- 2
-
-
- america
- BlueJacket Shipcrafters
- (and 1 more)
-
Thanks for the comments, replies, clarifications and likes... Tim, I recall your build log is one of the ones here that I looked at when I first got this kit. I am sure that I'll be referencing it and the others more as I get into deck fittings and rigging and finishing. And thanks for the suggestions...I've heard a lot of good about the Syren products so that is a definite possibility. As for painting vs staining vs coppering....I don't have to decide until after I see what my planking looks like and how many mistakes I need to hide. Sails might be interesting, though that decision is even farther down the line.
- 162 replies
-
- 1
-
-
- america
- BlueJacket Shipcrafters
- (and 1 more)
-
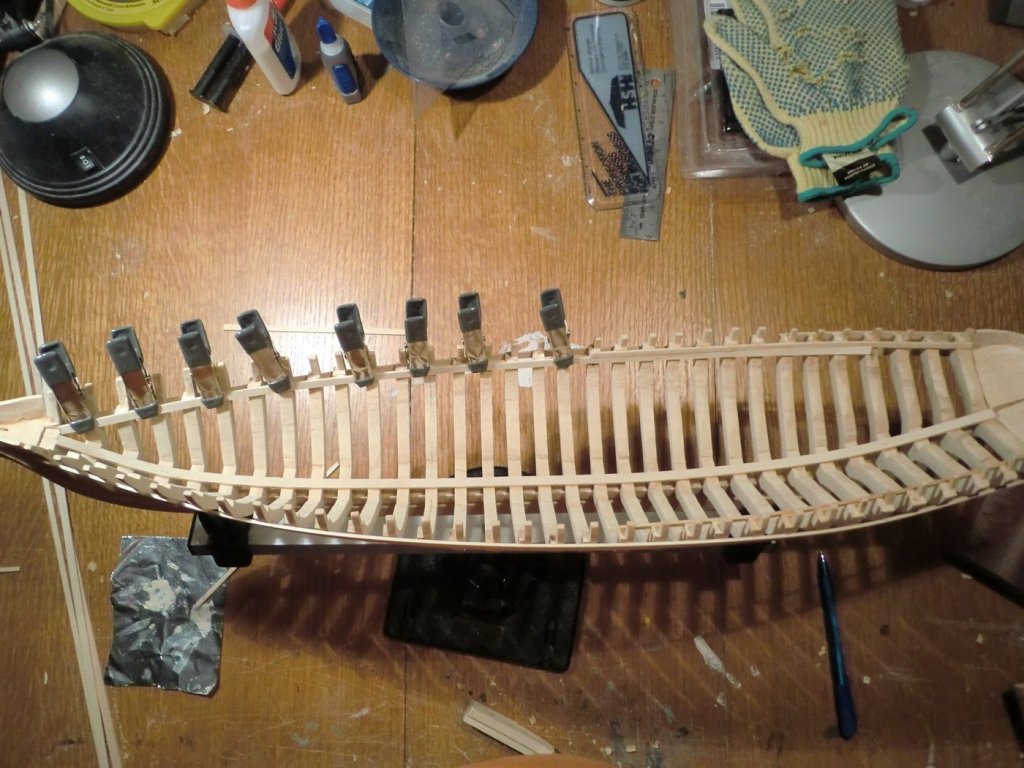
Another quick update....I finished putting in the sheer clamps and bilge clamps. I have done more fairing of the hull, especially the port side, but have a bit more to do. A couple of the frames have some low spots that I need to shim a bit (e.g. in the first photo, you can see that the second to last frame on the starboard side is not wide enough). I also have a bit more trimming and tweaking of some of the timber heads. And I am sure I have a bit more accidentally breaking off and gluing back on some of the timber heads as well. The carved bow piece is pretty rough....I'll have some repairing and filling to do there. According to my log, I am up to about 63 hours of work on this project.

- 162 replies
-
- 11
-
-
- america
- BlueJacket Shipcrafters
- (and 1 more)
-
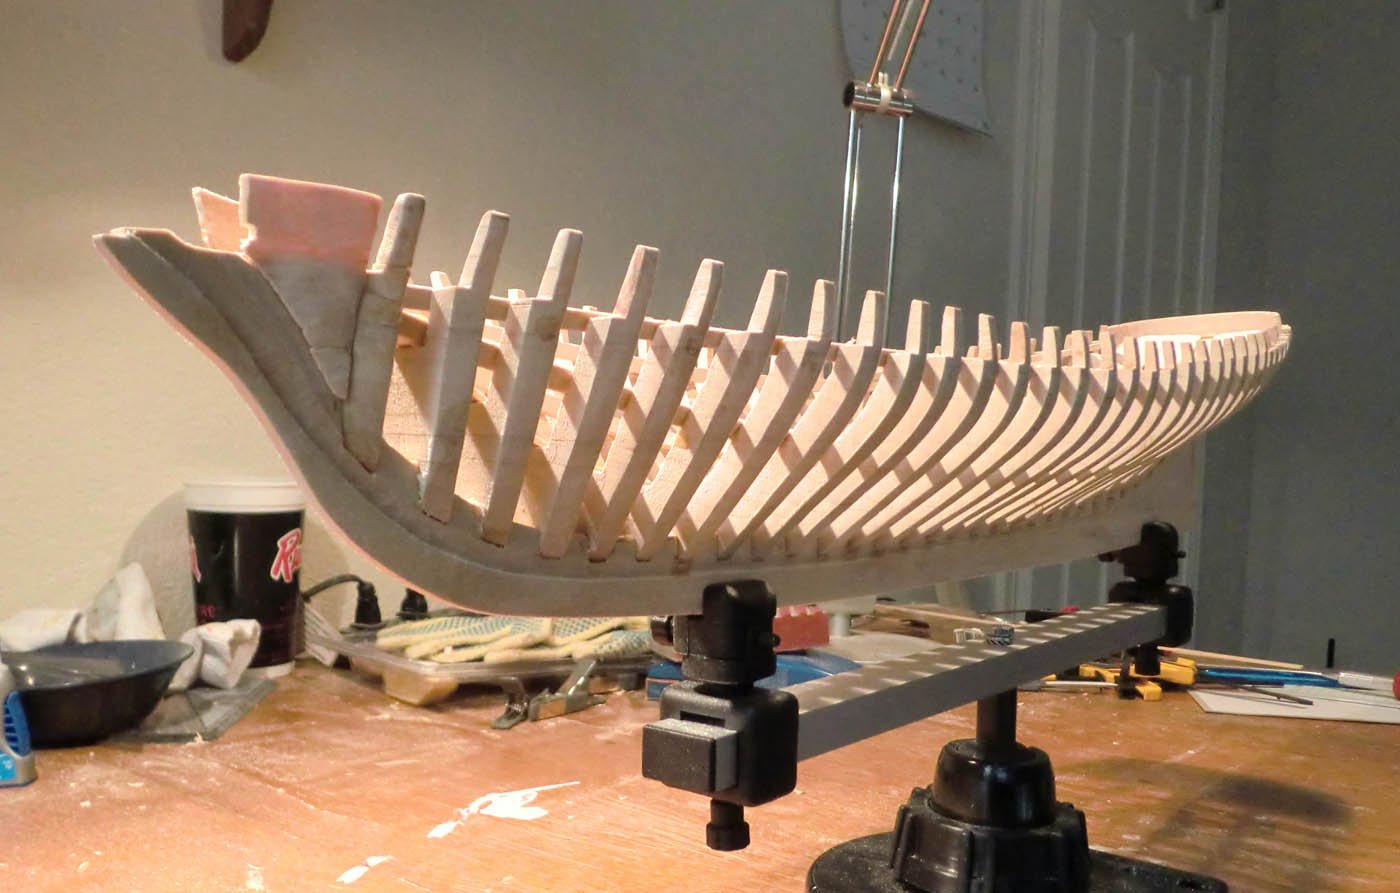
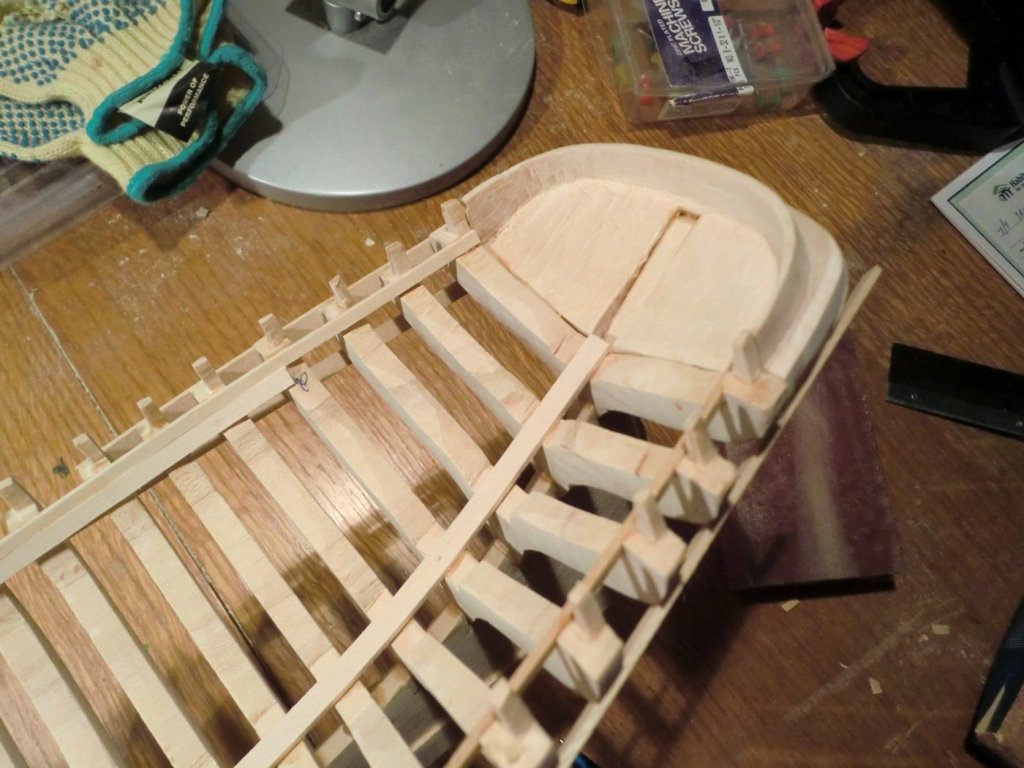
Been a while since I posted. Progress has been very slow, mostly due to not finding much time to spend on this kit. I have finished carving the bow and stern/transom pieces and affixed them to the model. I put a temporary lengthwise stringer on either side on the outside of the frames, attached to about every third or fourth frame, to keep things somewhat aligned, then began working on the permanent ones on the inside of the frames. Here is the mostly complete stern piece. I think I did a bit more carving after this, but it is pretty close here. Compare to the rough shape supplied in the kit shown above. I did deviate a bit from the kit here.....I cut a carefully shaped, symmetrical transom piece from 1/16th inch thick basswood and attached that to the bottom of the carved stern piece, rather than trying to get the shape just by carving it. Can't really see it on this picture though. And here it is attached to the keel and last frame: And finally, this picture shows the keelson (across the bottom of the frames) and the starboard sheer clamp being clamped on. The sheer clamp is made of two pieces...the lower one was supposed to go all the way to the stern but it was difficult to twist in place and seemed a bit pointless so I ended it on the fourth to last frame. I still need to do the second piece of the sheer clamp on the port side, then there are two "bilge clamps" to be put in, one on each side, half way between the keelson and the sheer clamp. Once I have those on, the frame should be more solid and I will likely do a bit more fairing of the outside of the frame, as well as trimming the tops of some of the frames to make sure every thing is level (i.e. some of the tops of the frames stick up slightly from the top edge of the sheer clamp), and the tops of the timberheads are not all perfectly even. Then it is on to making the deck beams.
- 162 replies
-
- 8
-
-
- america
- BlueJacket Shipcrafters
- (and 1 more)
-
Sopwith F.1 Camel by jablackwell - Model Airways - WOOD
gsdpic replied to jablackwell's topic in Non-ship/categorised builds
I continue to enjoy watching this build. Very impressive progress. But I am really posting to compliment the HDR eclipse photo in your blog....one of the best I have seen! -
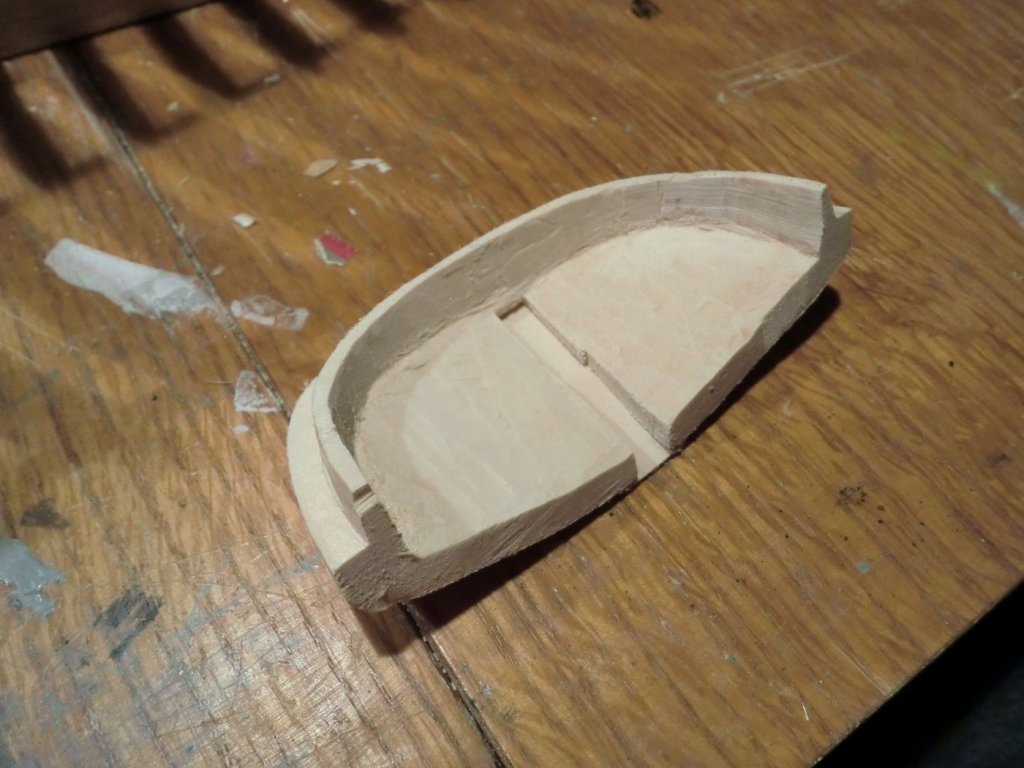
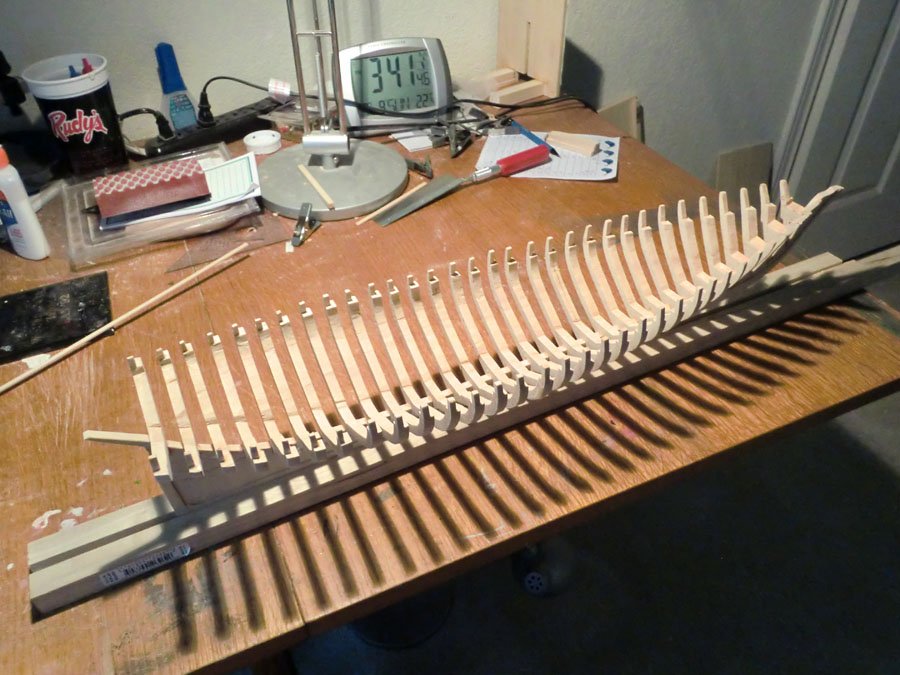
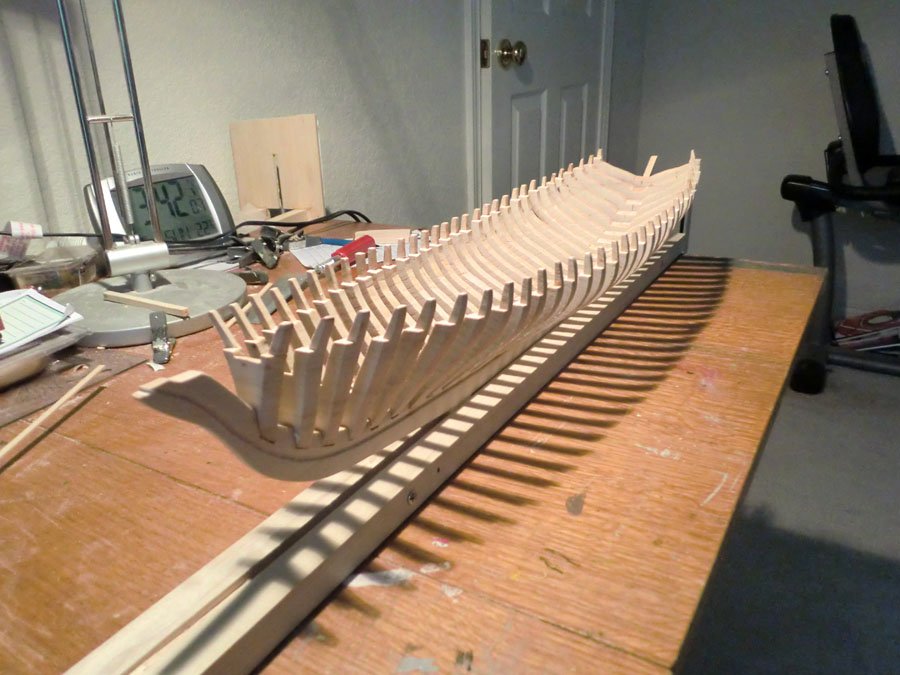
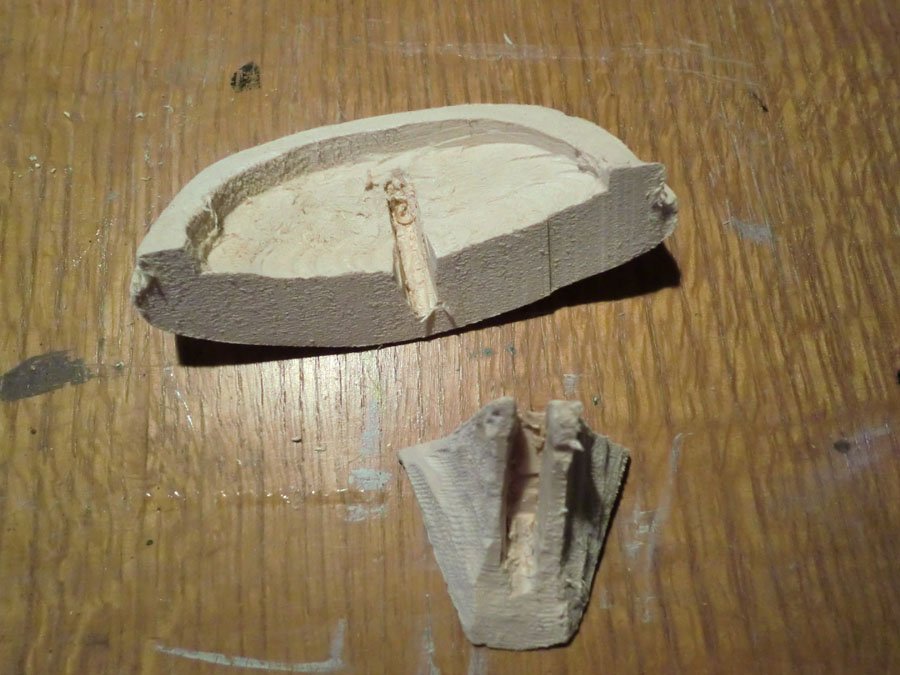
So I have now glued all the frames into the keel. I felt like I spent a lot of time shaping and faring the frames, but now wonder if I should have spent more time doing so, as there are a few zigs and zags and wobbles in the hull, though nothing too bad, I think. I am hoping that as I glue in the lengthwise stringers (keelson, bilge clamp, sheer clamp) that will help to even things out. I might also have to do some shaping of the top part of the frame where it goes from full size to one quarter size to form the timberheads. I generally cut those parallel to the water line but the ones for and aft really should have been angled a bit. None of it is a disaster, but it may make things a bit tricky and take a bit of extra time. The frames are pretty springy and flexible, so doing much cutting or sanding on the frames now is a bit awkward, and can easily lead to the frame snapping (don't ask how I know). Here are two pictures of the current state: Next up is working on shaping the bow filler block and the stern piece/transom. The kit provided these pieces carved very roughly into shape. The pictures below are pretty much what they looked like coming out of the box.....at this point I have done only a little work cleaning up the slots that fit on the stem and stern parts of the keel. For some reason, the bass wood used for these pieces seems to be unusually hard, only making it more difficult to work with. On top of that, the plans and pictures only give a rough idea of what these should look like, especially for the bow piece. On the stern, the top of the carved piece is pretty flat (parallel to waterline) but the plans show the back of it kicking up quite a bit, so that is a bit of a mystery. I guess I'll just wing it and see what happens. And for the curious....my log shows that I have worked about 55 hours on this kit so far.
- 162 replies
-
- 6
-
-
- america
- BlueJacket Shipcrafters
- (and 1 more)
-
Thanks for the likes and follows. Kevin, I have watched some of your videos. I've created my jig for holding the keel and lining up the frames, and have started to glue the frames in. For some reason the instructions suggested starting in the middle, and so I did. Here's an image showing the first few frames glued in. It is a bit nerve-wracking, even with the jig, wondering if things are lined up right and even from side to side.
- 162 replies
-
- 6
-
-
- america
- BlueJacket Shipcrafters
- (and 1 more)