HOLIDAY DONATION DRIVE - SUPPORT MSW - DO YOUR PART TO KEEP THIS GREAT FORUM GOING! (Only 13 donations so far - C'mon guys!)
×


Paddy
-
Posts
371 -
Joined
-
Last visited
Content Type
Profiles
Forums
Gallery
Events
Everything posted by Paddy
-
 Pete, good food for thought and I thank you. It would be a shame to hide that false keel with the African Blackwood. You're absolutly right I think. If one is going to use these beautiful woods then they should be see as much as possible.
 -
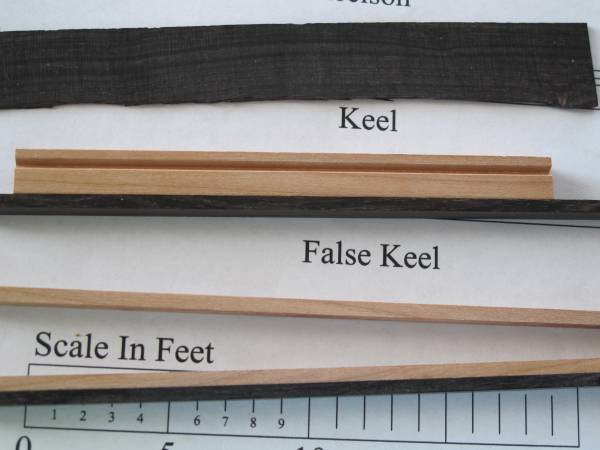
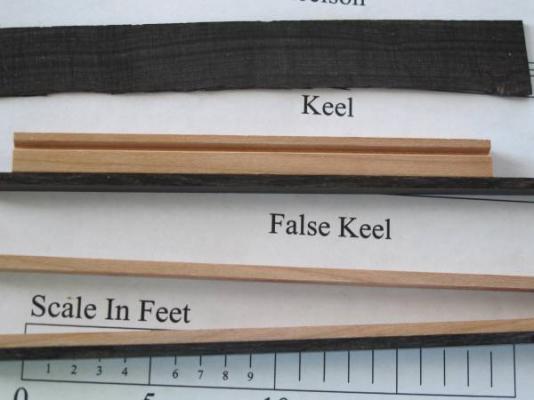
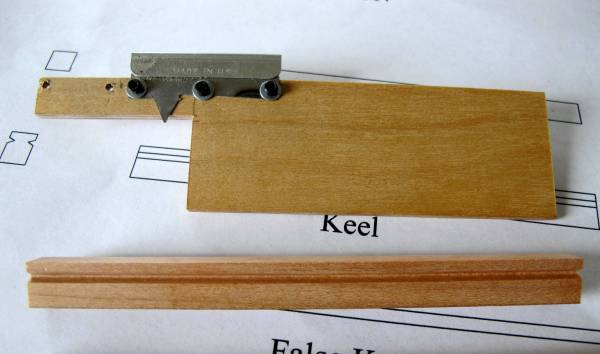
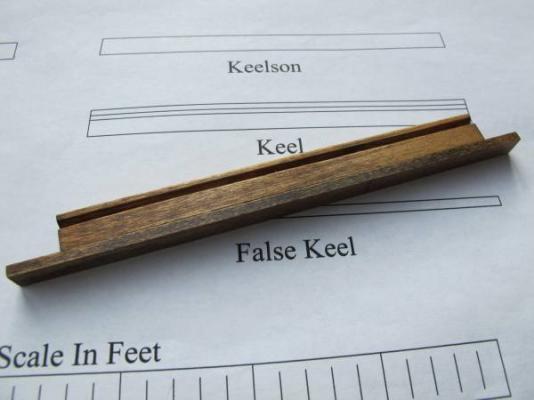
Near the beginning of my log I stated that I wanted to cut the False Keel from African Blackwood. So I thought I would throw it out here and see what may come back. At this time I’m leaning to the African Blackwood since the contrast between the cherry keel and cherry false keel is so slight. The picture layout top to bottom is a slice of the African Blackwood that I milled the false keel from. Next is the cherry keel sitting on the African Blackwood false keel. Third is the cherry false keel and last is a glue up of cherry and African Blackwood to test the bond. The glue I used was Titebond Translucent. Seems to be strong. Comments? Don’t be shy.
-
Hi Daniel, Yes, I used a Dremel Cut-Off disk. As Pete mentioned be sure and place the razor blade in a vise, and wear eye protection. I also wear a full face shield when doing this type of work. It's a great tool.
-
Great progress Larry. Looking very good!
-
Bob: LOL... interesting stuff and I’m really enjoying the education everyone is providing. Grant: Thanks for that and I’ll give it a good go. Joss: First I must thank you for planting the seed and as it turned out was much easier to do than I thought it would be. I kept thinking that cherry is not soft like basswood so I had my doubts about the razor blade working out. It took two razor blades to get the correct angle and then I was amazed at the nice cut it started to produce. I used light pressure in the beginning and then increase that a small amount as the rabbet began to take shape. I’ll not doubt you folks again. You all have been there and obviously know what you’re talking about. Grand teachers!
-
Grant, lovely work and thanks for the detail as you progress. Aye…. a Proxxon Mill, that's one of two items on my wish list and having a time trying to prioritize which should be first. Again, a great build and log. P.S. Extra thank you for the ring making steps. As others have stated its one for the "how to locker".
-
Thanks Mark.
-
Thanks gents. I feel better now. I'll get the keel and false keel mated then mounted to the building board like Bob aka bbrockel and start getting after those frames. Fun!
-
Pete: Thanks for that and I do like the cherry wood much better as you say. I would have been kicking myself if I had try to continue with the basswood. Bag over my head now. :mellow: Having access to the complete drawings now I was looking at the Cross Section Frames page and do I understand correctly that the alpha frame "C" points in the direction of the stem and the numeric frame "5" points in the direction of the stern?
-
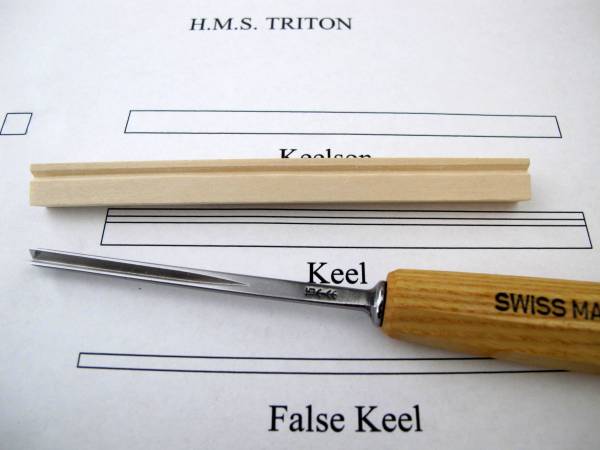
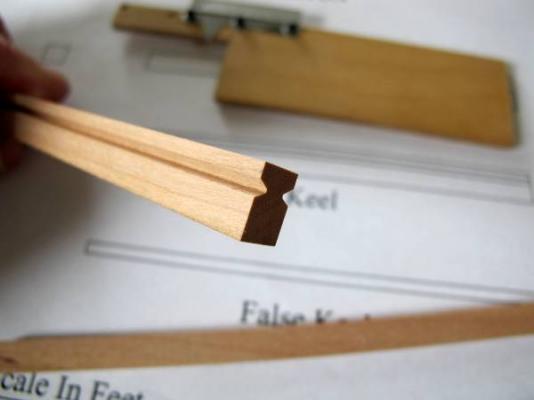
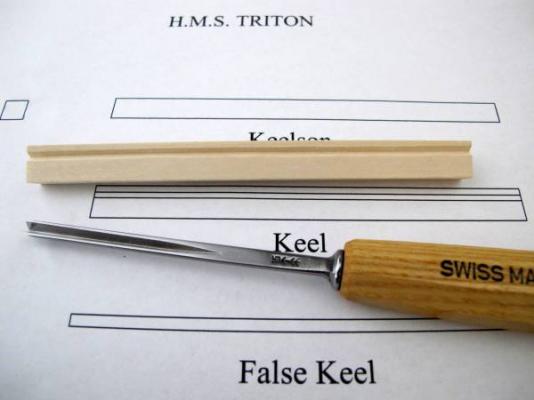
Bob: One of the first things I noticed with Goodwin’s book is there isn’t an entry in the index for tree nails but I quickly learned their under Trennals. Joss: Thanks for that. Also, thanks for giving me access to the plan locker. Larry: I was really getting a twist in my knickers over what wood to use. I appreciate your input very much. Today: I made new progress and after a clean sweep-down fore and aft we’re underway again. With the good description and photos of a rabbet scraper provided by some of you I tried my hand at making one and the following is the result. The wood I used is Cherry which I had a 2” x 2” x 24” stick of. It’s good to be regrouped and working again thanks to you all. P.S. I’ll not be using a V gouge anymore for my rabbets now that you all have shown me the way. A custom made tool can put the depth and location spot on. Thanks again to everyone. Note: The curve you see in these photos is from my lense beinging in wide angle mode at these close views.
-
As Peter Goodwin might say 'look at all those Trennals'. Looking good Ron. BTW, great neighbors you have.
-
I'm a little late but want to thank you for your input concerning the possible wood in the keel structure. My copy of Peter Goodwin's 'The Constuction and Fitting of the Sailing Man OF War 1650 ~ 1850' has arrived now and I'm very please with what I've see so far. Think it's going to be a big help for me in understanding the components we're putting together here and quite interesting too. My thanks to Bob (bbrockel) for bringing the book to my attention.
-
Snowmans, Excellent log and I want to thank you for taking the time to post it for the group. Like the look you’re getting with the Danish oil. Many things for me to remember here as I begin my cross section.
-
After going through a number of logs, I’m not through as yet, and seeing such fine work I’ve decided that I need to restart the keel. Was looking forward to access to the full plan locker but it will have to wait until I’m satisfied that I have the keel constructed that I will wish to move forward with. So, while I’m waiting for a wood order to arrive, I’ll start on making the razor blade scraping tool that Joss mentioned and others use. You see I started off with basswood and have quickly realized it’s not the wood I want to continue with. The following is a photo of my basswood False Keel and Keel with stain applied that was the final straw that started the cookie crumbling. You all have been showing me the way and teaching me that one of the prime directives is patience and not to hurry so, back to prepping for a restart, part of which is more care studying the woods I want to use.
-
Beautiful outstanding work!
-
Beautiful work Scott.
-
Marius, I think you're at an exciting point in the build. Those look like Cracker-Jack frames, top draw as a Brit friend of my would say.
-
Daniel: Thanks very much for the photos of the scrapers at work. Sorry to hear that the Byrnes draw plate shipping is to expensive over there. I think its safe to say its a jewel. Is it the duty that makes the shipping so expensive? Pete: Thanks for your reply and I hear you on the safty issues.
-
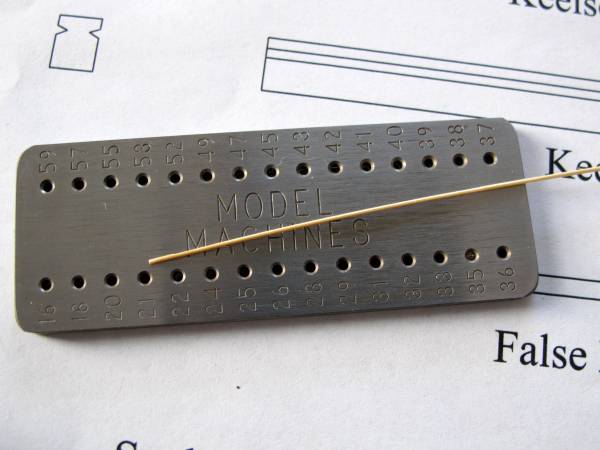
I couldn’t stand it any longer and decided to try out my new Byrnes draw plate. I’ve never used a draw plate before and I had never heard of treenails until the start of this year. Anyway, doing some practicing I was very pleased with how well it cut the bamboo and I didn’t end-up with a hand or fingers that needed to be soaked in liniment. It went so well that I now want to try installing some treenails. I know they will not be see, that maybe a good thing, but are there treenails holding the keel and false keel? In the photo is the bamboo I took from .059 to .033. What a grand tool!

-
Ron: Thanks for that. I’ll feel I have actually started when the keel pieces are mounted together. Daniel: The blade between two pieces of wood for the rabbet cutter that Joss mentioned has my interest and I plan on making one to give a try. Thanks for your comments.
-
Russ and Pete, Thanks gents. Now to get it in gear, finish step one, and get access to the plan locker. I have a feeling I'm going to learn a great deal during this project. Fun!
-
I think I’m getting there now after you all setting me straight. After some practicing today I think I’m in business. I laid out the rabbit with the two stop cuts as Russ suggested and then cleaned out the channel with the V gouge.
-
Alright Marius. Looking forward to watching her take shape.
-
Great input gents on all accounts. It’s grand the way the group supports and encourages all the builders. Off across the river now for lunch with my buddy. Can’t wait to get back and into the shop. Thanks again to you all.
-
Thanks very much for that Russ. I just spent some time going through Rusty's log and did notice his use of a V gouge to cut the rabbet in his keel. So, with your explanation and seeing Rusty's hand work I'm going to give the V gouge a go. Happen to have a small pfeil V-parting tool on hand that I have not used so out it comes tomorrow. You've made my day, thank you.