rwiederrich
-
Posts
5,504 -
Joined
-
Last visited
Content Type
Profiles
Forums
Gallery
Events
Everything posted by rwiederrich
-
The iron windjammers were an entirely different animal...so were the Down Easters...which immediately followed the clippers. The Glory of the Seas was Donald McKay's last Medium clipper and it was considered one of the first Down Easters. From what I gather the windjammers were slightly smaller then the Great Republic...however there are some examples that were larger. 4~5 masted monsters. These were not built for speed but for cargo carrying capabilities to brave the Horn. I have many books in my library on windjammers, I might just look that info up. Thanks for posting and for your interest. Rob
-
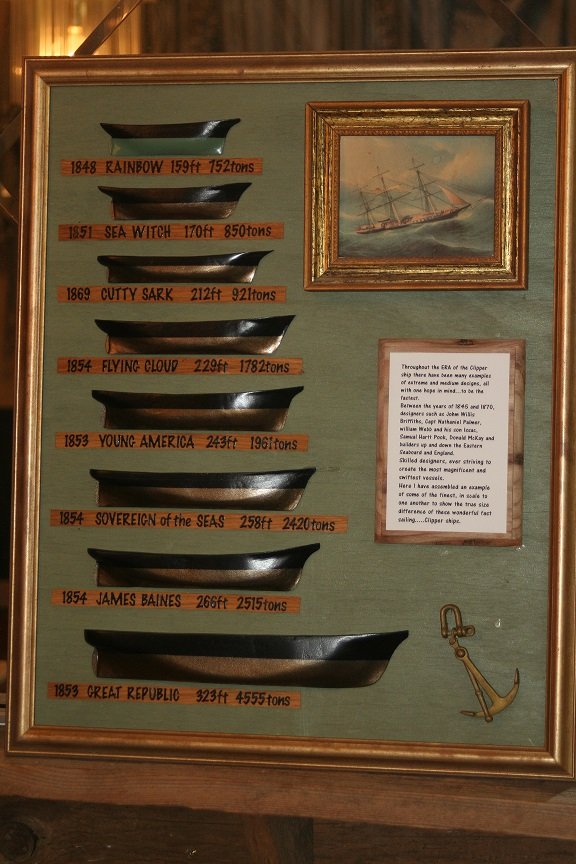
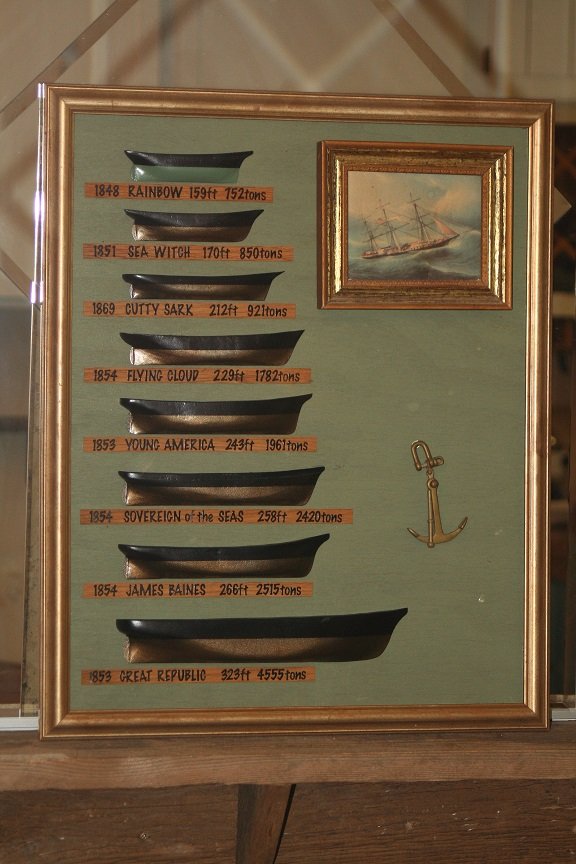
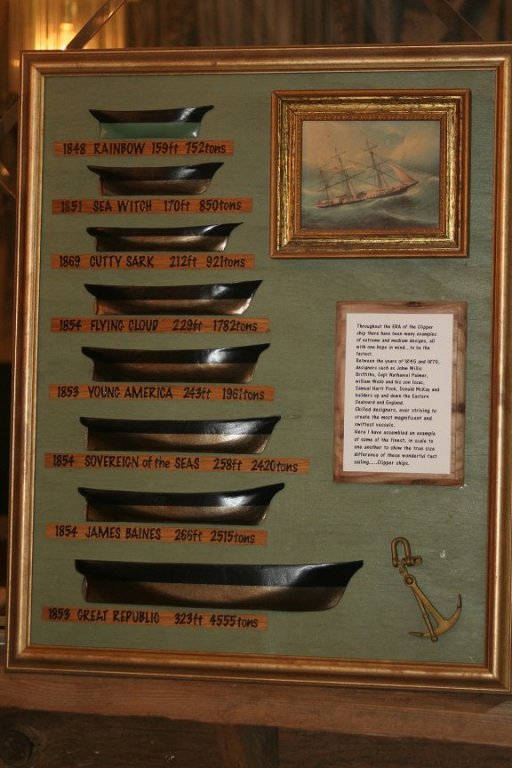
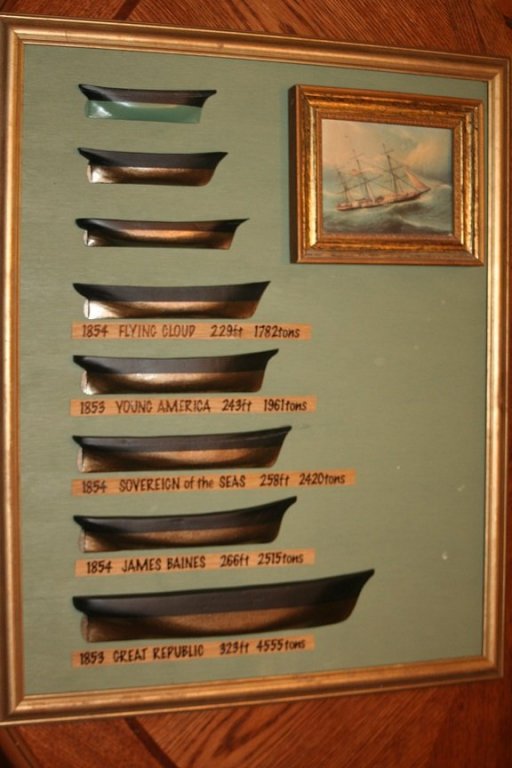
Thanks everyone for the fine comments and compliments. I'm pleased, and now I have a nice tool to illustrate the size difference of many of the most famous Clippers that ever slid down the ways. It is unfortunate that more ships couldn't have been added... there are so many more I would have liked to included. But for such comparisons, most of the average, unknowledgeable would not notice their absence. All in all, I think I've laid out in an evolutionary manner, the progression from early smaller clippers to what has become realized in the mind of the greatest(IMV) Clipper builder...Donald Mckay..the Leviathan...Great Republic. Again...thank you gentlemen, and all who have enjoyed this adventure of mine, that has taken me years to realize and to bring to fruition. Rob
-
Made some final mods to the clipper half hull plaque. I added a short epilogue and description made from a maple tree I cut down in the yard. Relocated the anchor as well. Now were to hang it.....MMMMMM Rob
-
Thanks Pat. I have many scale models of clippers in my library/den/man cave..and about the rest of the home. However, they all tend to be within the same scale....but they are surely NOT in the same scale to one another...lending confusion to those who view them. For years, it troubled me that I had no way of demonstrating the actual size differences between many famous clippers. Not to mention that since the Cutty Sark is the most modeled clipper and by her, many if not most, think she was what could be considered an average, if not typical representation of the clipper model, failing to see the astounding truth of the matter. Clippers are profoundly an American expression...and with wood aplenty, size and luxury was left to the designers(and builders) skill and imagination . Not to be lost in the discussion, is also the fact that clipper designs(for a better and faster model) were being played out as they were being built. Not any two clippers are exactly alike...no two share the same design...for ever better designs were being experimented with in each new clipper sliding down the ways. I just hope I've turned the light on of understanding....of just how different and even drastic, comparing(IN SCALE) the extreme size difference there was within the small and short lived class of vessels that were called CLIPPERS. Thanks for your fine comments. Rob
-
Patrick..it is the wide use of powered tools and mills and lathes and sanders that aids me in my hurried building adventure. It helps me refocus on the 4 other builds I'm currently tackling. A side project motivates me to keep going with the others. Sometimes I wonder if I'm over doing it.. Thanks for the fine compliment and encouragement. Rob
-
Personally I think your metal work is superb and quite phenomenal. With that said, my practice is to paint all my iron work...knowing some form of preservative was actually used on iron ships, and or on their iron accessories..(.ie Cutty Sark)...So I Paint...in much the same manner as was typical. With this being said..it allows me to use what ever medium I choose to replicate the iron work...without the tedium of actually creating real miniature (Copper, brass) iron work. Paint covers a multitude of sins. Rob(love your work and enjoy every minute)
- 3,618 replies
-
- 3
-

-
- young america
- clipper
- (and 1 more)
-
You know...with all that black iron used for banding and bracing..there must have been some painting of it as well..because there would have been an excessive amount of rusty metal on these ships if not. I'd imagine these bands would have been bright orange by the end of a salty voyage...not to mention all of the other metal work aboard on other structures. Any clue on its preservation Ed? Rob
- 3,618 replies
-
- 3
-
-
- young america
- clipper
- (and 1 more)
-
Ed...try Cast Your Anchor.com...they sell 42 lpi and many other sizes. Rob
- 3,618 replies
-
- 2
-
-
- young america
- clipper
- (and 1 more)
-
I worked a bit on the plaque by adding the name plates. I ran out of labeling so I'll get some tomorrow. Rob


- 51 replies
-
- 11
-
-
Oh boy what an experiment that might be. Over the weekend I cut the backing and made the frame for the half hull plaque. Painted the backing green trimmed the frame in antique gold and added the half hulls to it. This week I'll begin making the name plates for each hull. These will be made on maple strips of wood, embellished with some minor carving on the ends. The goal is to then add another small internal framed plaque (off to right in the upper corner)with a short description of the American clipper ship era and note some builders info. Then to finish I will antique the entire plaque by rubbing a very thin layer of stain over the entire surface....in effect edging and detailing(weathering/aging) and finishing the plaque. Images will follow. Rob
-
Indeed...960 tons compared to 4555 tons. And the Great Republic was just as much a fast *Extreme* clipper as was any before or after. The idea of size was McKay's idea that the latitudes of the *Roaring Forties* needed a large stout shipt to endure the extreme weather found in those Souther parts around the horn and off to Australia. Rob
-
I myself can only guess as well..but this image of a steel yard gives a clue. They may have been simply placed and through sail forces simply remained. Rob

- 3,618 replies
-
- 4
-
-
- young america
- clipper
- (and 1 more)
-
Fantastic job Ed. Surprising enough, but I found it interesting that the Stunsails booms in many cases were made from Bamboo. Light and tough. Love your metal work as usual. Rob
- 3,618 replies
-
- 3
-
-
- young america
- clipper
- (and 1 more)
-
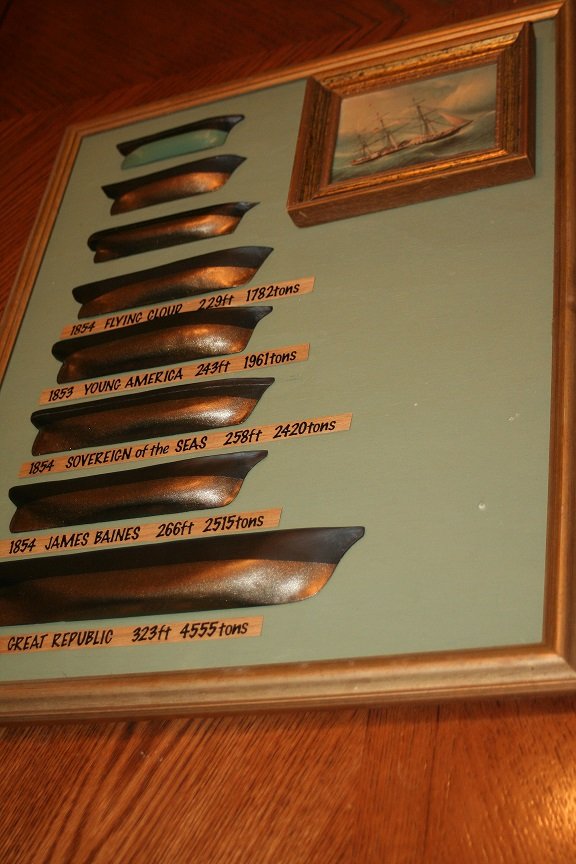
The James Baines and Donald McKay had very long main yards as well. The Cutty Sark is a tiny thing compared to the average American Clipper of the later part of the 1850's. She was more like the early extreme California clippers of the early 1850's. Fast and with little storage capacity...but the Brits wanted their tea..didn't they...and they wanted it now...just like the Americans wanted that gold and they wanted to get to it now. The American fast clipper had come and was nearly gone by the time the little CS was launched in 1869. Do mostly in part by the American civil war. Notice in my last comparative image the Cutty Sark (3rd from bottom). Compare her to the Young America (2 above). Young America was an average sized American Extreme clipper. You can hardly compare the 2. Rob
-
All were 3 masted fully rigged ships..cept the GR as you mentioned.. Just imagine..the average main yards length for most clippers was 80~90ft. the Great Republics main yard was 110ft...20 ft longer then the next longest yard...ever measure out 20 ft? Your reaction is exactly why I wanted to create a plaque showing the actual scale of these vessels to one another. Also the main mast of the Young America was 36in..in Diameter and 92 ft long while the GR's was 44in in diameter and 130 ft long. Scale comparisons makes a big difference I think. Rob
-
I painted the bottoms today...a metallic *Muntz*color..cept the Rainbow had a green bottom.
- 51 replies
-
- 12
-
-
A small plaque beneath each will state the year it was built, Name of ship, Origin of build, tonnage, and length of ship. Off to the right of the listed models will be another plaque stating a brief description of the Era and the builders/designers names. Each half hull will also be painted bellow the waterline and any plank sheer line detailing will be added as well. Rob
-
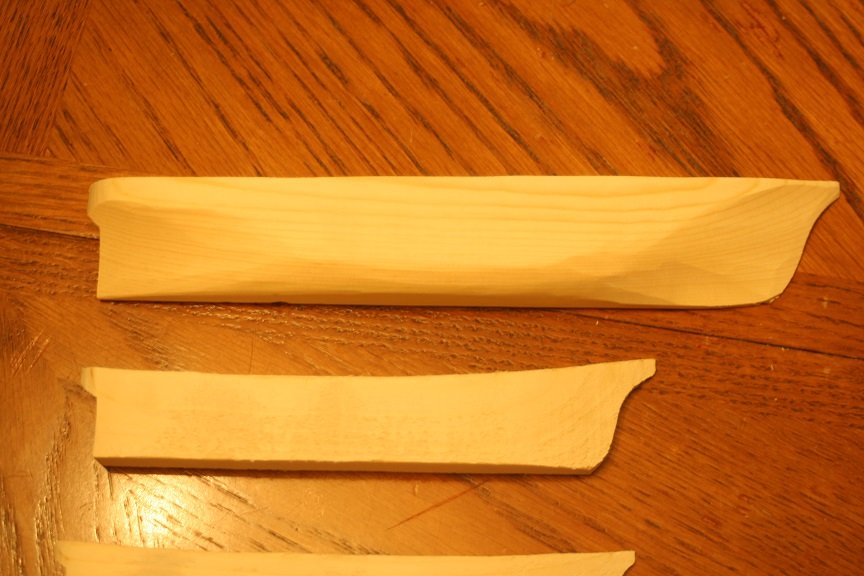
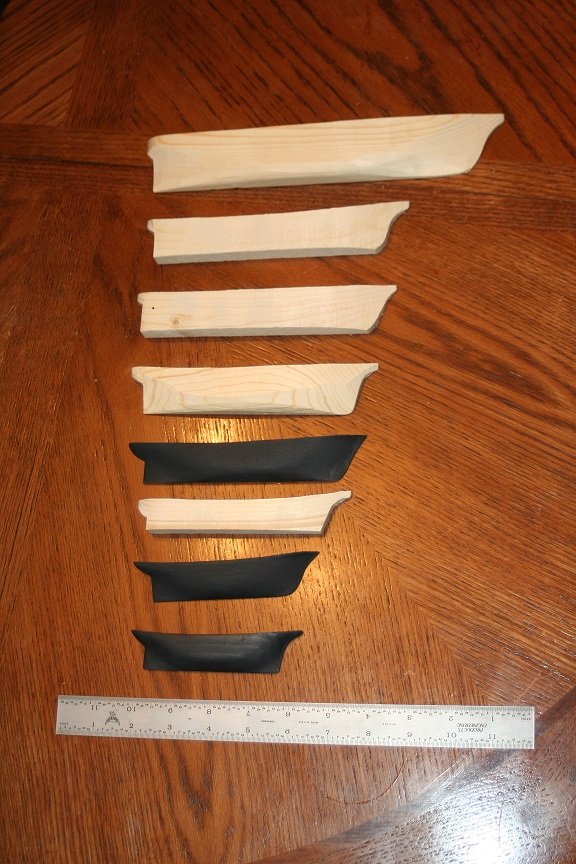
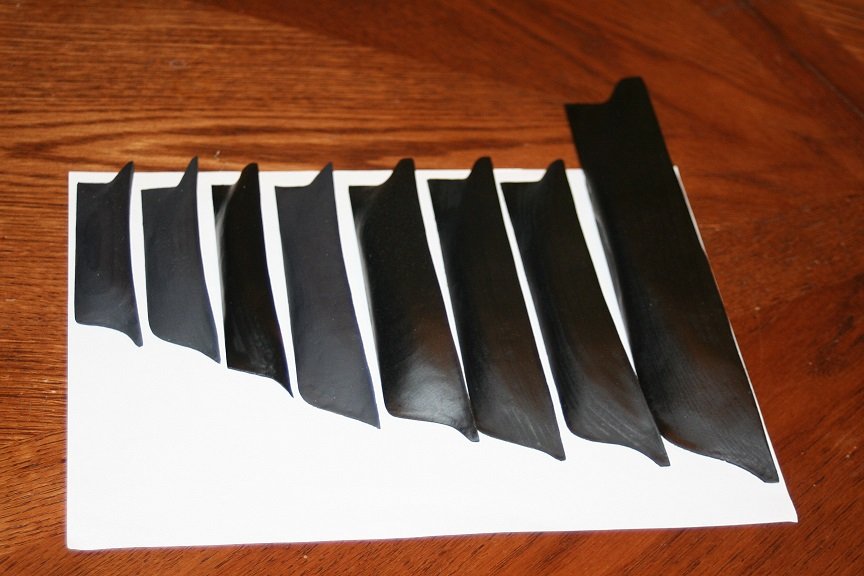
Spent some time finishing up the initial carving of the half hulls. Here are some pix.
- 51 replies
-
- 11
-
-
Jim...your work is masterful. You have control of the depth of field and a good grasp of scale and keeping the ships dimensions correct. I love your grasp of shadow and the ease of the seas roll and elusion of depth. Very nice. This is water color..so you show a very competent application of color...overlapping, and control of hue. I struggled with controlling the natural flow of the color to bleed into other colors...you masterfully controlled your medium. Do you begin with light colors and move to darker or are you introducing acrylic to highlight the darker watercolors? Very impressive work. I love your water...my favorite are the sailing ships...but any good ship representation(within historical context)is my favorite. Rob
-
Yes..so if you compare the Young America(An Ed build log on this vary forum) to the Great Republic you can see the difference. It was ginormous. Rob
-
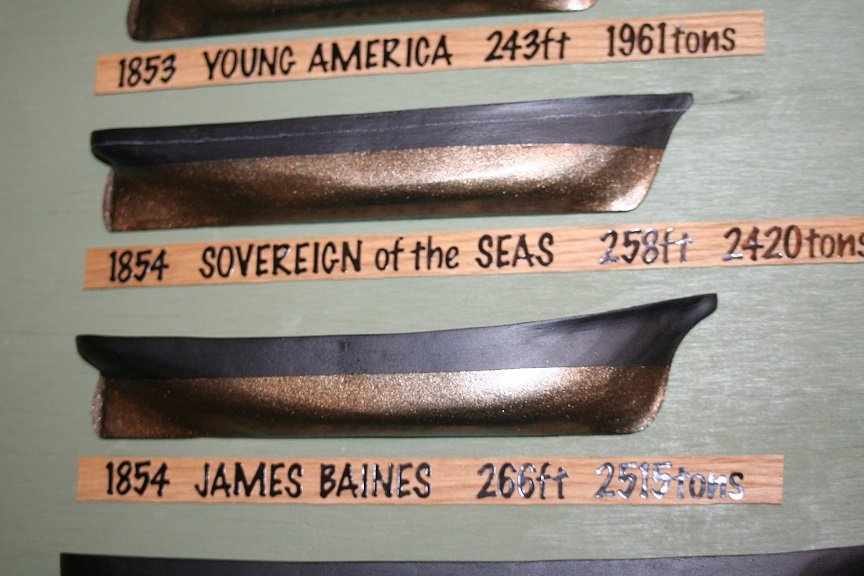
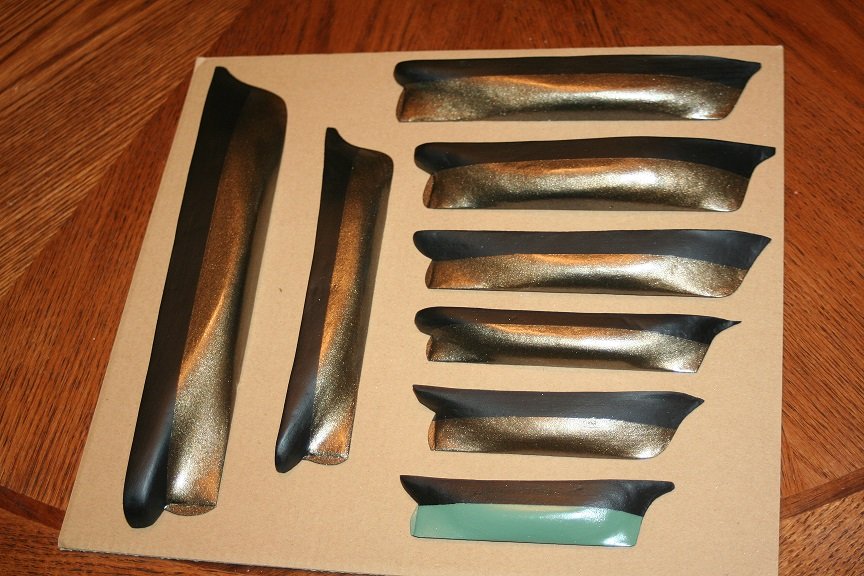
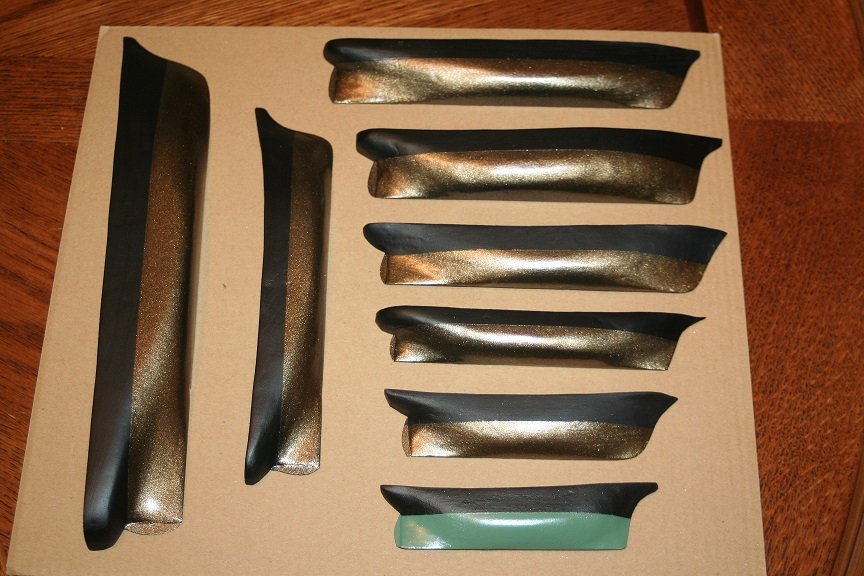
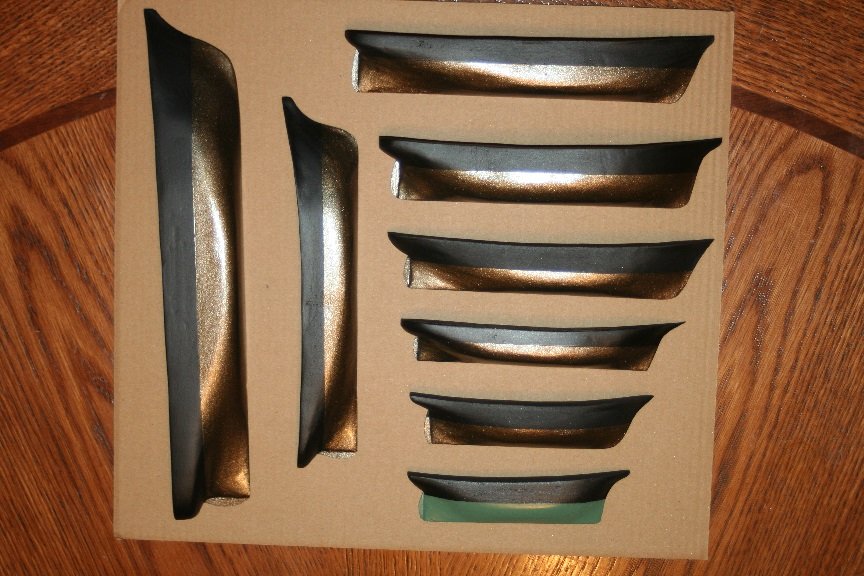
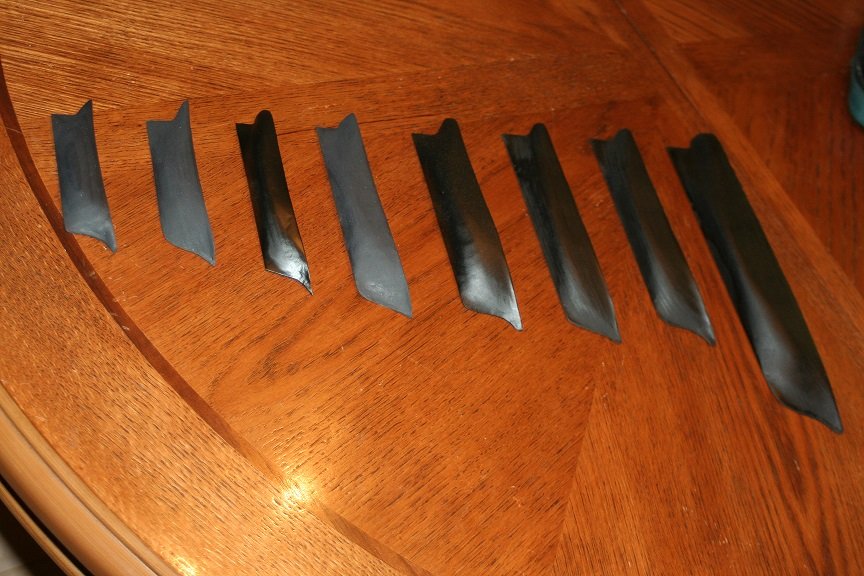
Thanks Steve and Russ. I hope to continue with the step by step construction and explanations of the significance of the project to me. Russ, the smallest half hull model is of the Rainbow..the vessel identified as the first true clipper. From bottom to top....Rainbow, Sea Witch, Cutty Sark, Flying Cloud, Young America, Sovereign of the Sea, James Baines and the Great Republic. NOTE: All the clippers are modeled using the actual builders line drawings of their particular hulls. Thanks for all the likes. Rob
-
Lastly the entire collection in order and in various stages of completion. You can see the significance of the comparison...for if one didn't have such a form of comparison..you will fail to recognize the size difference between famous clippers of the same era. More to follow. Rob

- 51 replies
-
- 10
-
-
Here is the rough carved Great Republic(Top) and the James Baines..the seond larges clipper ever made next to the GR.