DONATION DRIVE - SUPPORT MSW - DO YOUR PART TO KEEP THIS GREAT FORUM GOING!
×


rwiederrich
-
Posts
5,519 -
Joined
-
Last visited
Content Type
Profiles
Forums
Gallery
Events
Everything posted by rwiederrich
-
From what my 40+ years of studying the clipper design has revealed to me, is that, to some degree mask rake coupled with the hulls entry and exit features was part of the experiment in gaining the most speed from the vessel. There are examples of clippers with zero fore and main mast rake and only 1 degree on the mizzen...while other designs employed over 2~3 degrees on the fore and main and more then that on the mizzen. Smaller schooners and Baltimore/Boston clippers had an excess of 5 degree rake. Designers employed these extremes because the forces were balanced between hull design and forward action provided by the energy captured by the sail plan. In many instances rake was perceived by captains/designers as the essence of speed. Coupled this with extreme hull designs and you achieved speed. The commodity bringing the highest dollar value(At the time). Many theories were formulated during the time when speed was the goal and many experiments followed...some with results and some not so much. But as I've mentioned earlier, many forces are acting on the hull to propel it through the water on an even keel, and many forces are acting against that goal as well. I'm sure somewhere, someone has penned the cumulative answered as to why. I've tried to explain some reasons. Rob
-
The clipper Sovereign of the Seas reached the highest daily rate and fastest speed recorded for a sailing vessel of 22 knots. Mast raking was popular with the clipper design. Rob
-
Glad I could help. One other note to mention is that hulls with limited buoyancy due to their lines(ie..clipper hulls) forward and aft tend to resist forward down energy..thus resulting in a condition known as *Hogging*. The hulls shape provides more buoyancy amidships due to width and dead rise..where the stem and stern lack buoyancy due to their sharp lines. So *Plunging* is a greater problem...hence mast rake plays into the calculation....as I mentioned earlier. Yes indeed, there are wonderful people on these pages..... Thanks for piping in Roger...yes *balance* is one of the *Several* forces I eluded too. This is why you can see that the rake of all 3 masts on a fully rigged ship can all be different. Rob(good luck)
-
Matrin is heading you down the right path. Mast Raking is a calculation based on several forces, one of which is the hull design. If large areas of canvas are vertical to the center of gravity...forward and down forces drive the hull forward and down as well...causing the hull to plunge into the oncoming water. Instead of having a *trim* path through the water, the hull is pressed down forward...and the vessel plows instead of drives. Raking the masts several degrees prevents this action and draws the most energy from the sails and translates it forward along the long axis of the hull. Some extreme clippers had extreme rake to the masts and even some schooners had even greater rake...to capture the winds energy and lift and push the hull forward..NOT, cause it to plunge down forward. Good luck. Rob
-
Indeed Daniel, Ed's fine version of the Young America shows the *Extreme* version of the clipper design. There were 3 categories of clippers. Extreme Clipper(as In Ed's example), the Clipper, and Medium clipper. Extreme clippers designs gave little thought to cargo capacity..speed was where they gained a good return for the owners. Clippers and medium clippers were of a fuller body and even achieved speeds equal to or exceeding those of the extreme design. Medium clippers were really sharpened versions of the Cargo carrier(Such as the later models you mentioned). I think the wonderful side effect of this fantastic thread, is that we can explore in greater detail the magnificent construction and beauty of the clipper....and we are further blessed by enjoying Ed's tutorial of the intricacies of their construction. This thread has been a refreshing drink of exploration and discovery. I'm giddy. Rob
- 3,618 replies
-
- 5
-

-
- young america
- clipper
- (and 1 more)
-
Sailor.....The claim was focused upon the wooden Clipper design. When I mention this *Model*, I was referencing the Young American or Yankee Clipper *Model* which was not a composite design or a iron hull design which came later. Iron hulled designs were of European origin. Massive (2000+ tons) wooden hulled, fast clippers (American) and their immediate predecessor, the *Down Easter*. This MODEL was the subject of my claim of strength. I never suggested or said they were the *Ultimate in strength to withstand the punishment their masters gave them*. Up until the advent of the Clipper(American), no other ship design could withstand the grueling requirements of the True clipper (speed and hauling a specialized cargo) and their owners demanded it of them. It has been said and recorded that there are 4 things that qualify or enable a vessel to be considered a clipper. 1) A fine lined Hull, 2) an emphasis on a streamlined appearance, 3) A large sail area, and 4) a Daring and skillful master. I concur with you...no other ship design compared/s to the clipper design. She is the Belle of the Ball, and Ed has demonstrated that here with his Young America. Rob
- 3,618 replies
-
- 4
-
-
- young america
- clipper
- (and 1 more)
-
One thing I want to point out about clippers, is that they were build far and above what was normal practice. From their Massive keel and framing construction to their iron lattice cross bracing and the extensive use of iron and brass frame securing pins. So well built was the clipper design, with their long slender hulls, that new and improved methods were invented to prevent the dreaded *Hogging* effect that plagued long, narrow hulled ships. Not to mention the enormous spread of canvas and towering masts required to sustain them...because the goal was speed and the ship was required to sustainably wisthand the driving of their captains, who were rewarded with substantial bonuses if they *drove* their vessels and crews to near destruction. No other vessel design could meet this grueling requirement. The true simplicity in their overall lack of ornate embellishment was, in one regard, what made them so attractive and said to be the finest creation man could produce that sailed the seas, not to mention the most beautiful Model ever designed. Ed's exemplary reproduction is a marvel in of itself...but more so, demonstrates to us all the attention to strength the builders of these wooden Greyhounds designed into their creations to make their *Clippers* strong against the elements bent on tearing them apart. Not to mention their captains who pushed them to near destruction. Young America is an supreme example of all the elements of construction and design beautifully coming together to produce the best in naval architecture that endured for decades. Ed...I applaud you , not only for your mastery in building such a fine representation of this renowned model, but in demonstrating the same attention to detail that the original builders must have used to produce them. Rob
- 3,618 replies
-
- 12
-
-
- young america
- clipper
- (and 1 more)
-
It may have been mentioned before...but what museum will be enjoying this fine model? Or is it a family room mantle piece? Rob
- 3,618 replies
-
- 6
-
-
- young america
- clipper
- (and 1 more)
-
Man well executed safe/storage preparation for the future. Will miss the log.... Rob
- 1,350 replies
-
- 1
-
-
- constitution
- model shipways
- (and 1 more)
-
Ed...Only 450 to go....... What a champ! Not only is your model exceptional...your use of time management is as well. I don't have the same hours in a day as you do apparently..... Rob
- 3,618 replies
-
- 4
-
-
- young america
- clipper
- (and 1 more)
-
MONTAÑES by Amalio
rwiederrich replied to Amalio's topic in - Build logs for subjects built 1751 - 1800
Every aspect of your build is impeccable. -
Thank the Lord for masking tape....... Great job Ed..fantastic work. Rob
- 3,618 replies
-
- 1
-
-
- young america
- clipper
- (and 1 more)
-
Fantastic work Ed..one question..what is that chain doing in the inside ceiling framing of the deckhouse....? Rob
- 3,618 replies
-
- 2
-
-
- young america
- clipper
- (and 1 more)
-
The iron windjammers were an entirely different animal...so were the Down Easters...which immediately followed the clippers. The Glory of the Seas was Donald McKay's last Medium clipper and it was considered one of the first Down Easters. From what I gather the windjammers were slightly smaller then the Great Republic...however there are some examples that were larger. 4~5 masted monsters. These were not built for speed but for cargo carrying capabilities to brave the Horn. I have many books in my library on windjammers, I might just look that info up. Thanks for posting and for your interest. Rob
-
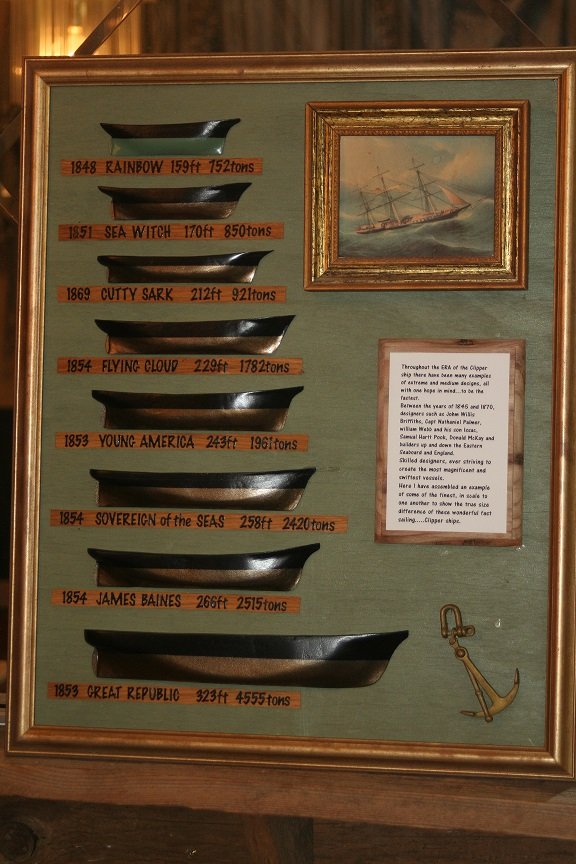
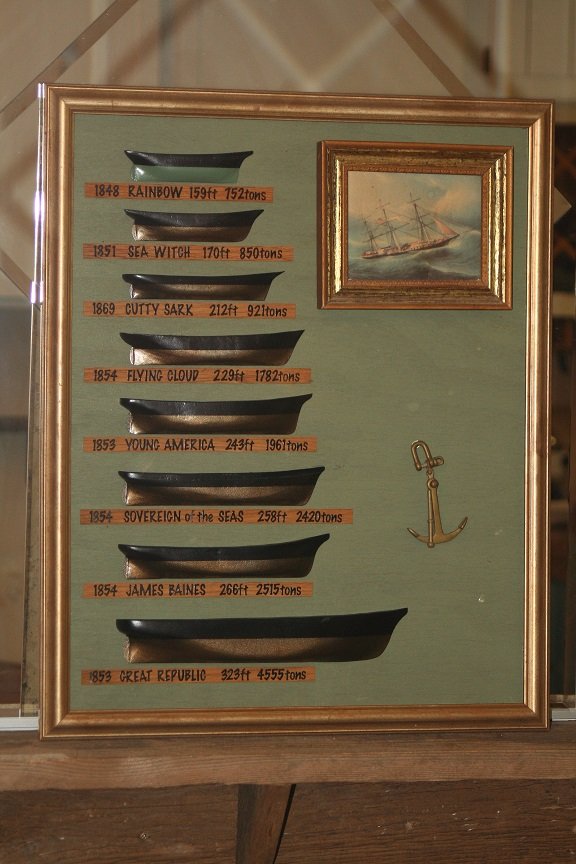
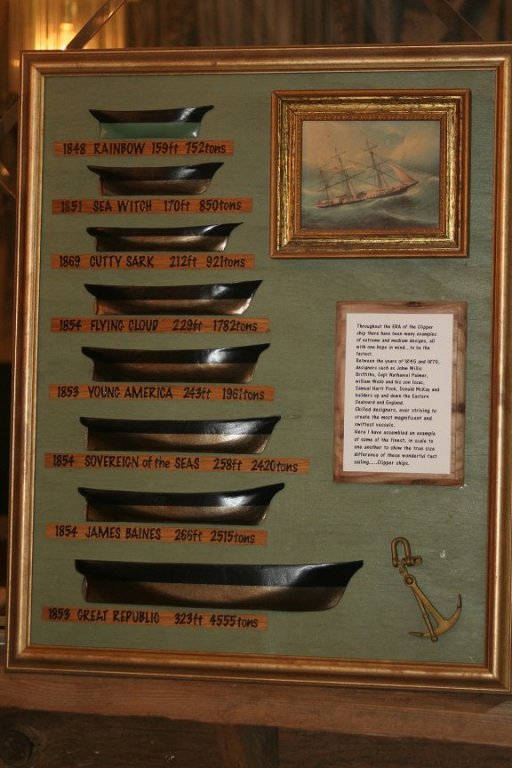
Thanks everyone for the fine comments and compliments. I'm pleased, and now I have a nice tool to illustrate the size difference of many of the most famous Clippers that ever slid down the ways. It is unfortunate that more ships couldn't have been added... there are so many more I would have liked to included. But for such comparisons, most of the average, unknowledgeable would not notice their absence. All in all, I think I've laid out in an evolutionary manner, the progression from early smaller clippers to what has become realized in the mind of the greatest(IMV) Clipper builder...Donald Mckay..the Leviathan...Great Republic. Again...thank you gentlemen, and all who have enjoyed this adventure of mine, that has taken me years to realize and to bring to fruition. Rob
-
Made some final mods to the clipper half hull plaque. I added a short epilogue and description made from a maple tree I cut down in the yard. Relocated the anchor as well. Now were to hang it.....MMMMMM Rob
-
Thanks Pat. I have many scale models of clippers in my library/den/man cave..and about the rest of the home. However, they all tend to be within the same scale....but they are surely NOT in the same scale to one another...lending confusion to those who view them. For years, it troubled me that I had no way of demonstrating the actual size differences between many famous clippers. Not to mention that since the Cutty Sark is the most modeled clipper and by her, many if not most, think she was what could be considered an average, if not typical representation of the clipper model, failing to see the astounding truth of the matter. Clippers are profoundly an American expression...and with wood aplenty, size and luxury was left to the designers(and builders) skill and imagination . Not to be lost in the discussion, is also the fact that clipper designs(for a better and faster model) were being played out as they were being built. Not any two clippers are exactly alike...no two share the same design...for ever better designs were being experimented with in each new clipper sliding down the ways. I just hope I've turned the light on of understanding....of just how different and even drastic, comparing(IN SCALE) the extreme size difference there was within the small and short lived class of vessels that were called CLIPPERS. Thanks for your fine comments. Rob
-
Patrick..it is the wide use of powered tools and mills and lathes and sanders that aids me in my hurried building adventure. It helps me refocus on the 4 other builds I'm currently tackling. A side project motivates me to keep going with the others. Sometimes I wonder if I'm over doing it.. Thanks for the fine compliment and encouragement. Rob
-
Personally I think your metal work is superb and quite phenomenal. With that said, my practice is to paint all my iron work...knowing some form of preservative was actually used on iron ships, and or on their iron accessories..(.ie Cutty Sark)...So I Paint...in much the same manner as was typical. With this being said..it allows me to use what ever medium I choose to replicate the iron work...without the tedium of actually creating real miniature (Copper, brass) iron work. Paint covers a multitude of sins. Rob(love your work and enjoy every minute)
- 3,618 replies
-
- 3
-
-
- young america
- clipper
- (and 1 more)
-
You know...with all that black iron used for banding and bracing..there must have been some painting of it as well..because there would have been an excessive amount of rusty metal on these ships if not. I'd imagine these bands would have been bright orange by the end of a salty voyage...not to mention all of the other metal work aboard on other structures. Any clue on its preservation Ed? Rob
- 3,618 replies
-
- 3
-
-
- young america
- clipper
- (and 1 more)
-
Ed...try Cast Your Anchor.com...they sell 42 lpi and many other sizes. Rob
- 3,618 replies
-
- 2
-
-
- young america
- clipper
- (and 1 more)