HOLIDAY DONATION DRIVE - SUPPORT MSW - DO YOUR PART TO KEEP THIS GREAT FORUM GOING! (Only 20 donations so far - C'mon guys!)
×


Waitoa
-
Posts
243 -
Joined
-
Last visited
Content Type
Profiles
Forums
Gallery
Events
Everything posted by Waitoa
-
Hi Bipper, Thanks for your comments. Be good to see some photos of your build. I have planked the upper deck to make it closer to the real surprise. I have not measured how high I went was basically three of the planks higher than the original plans. On the lower gun deck I used some scrap wood to make the planking thicker inside so it looks more real. Will do the same for the upper deck once I get to it. You can see some of the initial framing for this. Hope this helps Waitoa
-
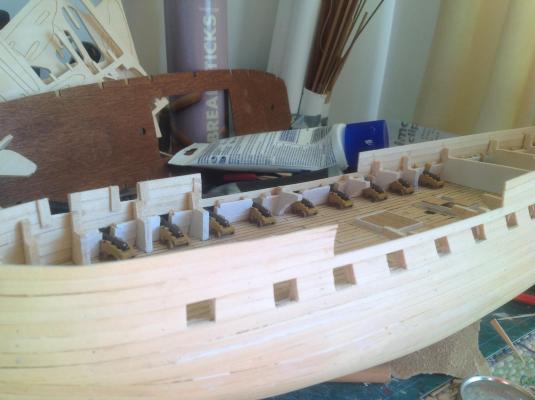
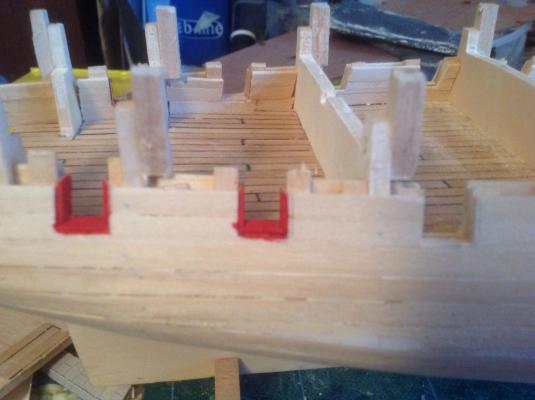
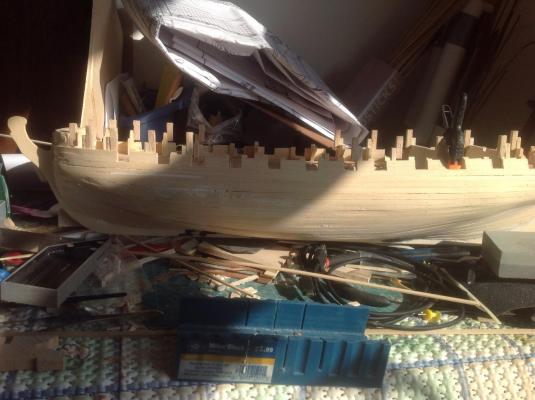
Hi Been struggling a bit with motivation between work and family holidays. Managed to get a few hours in today and finished one side of boxing the gun ports. The cannons are not fixed but just added to show where I am going as a bit of a boost. While it took a lot of time to do the boxing I think the result is worth the energy and when painted sure these will stand out more. Waitoa

-
Hi Just checking in to see how you are getting on. I have been hit with the dreaded motivation blues on my build. Waitoa
-
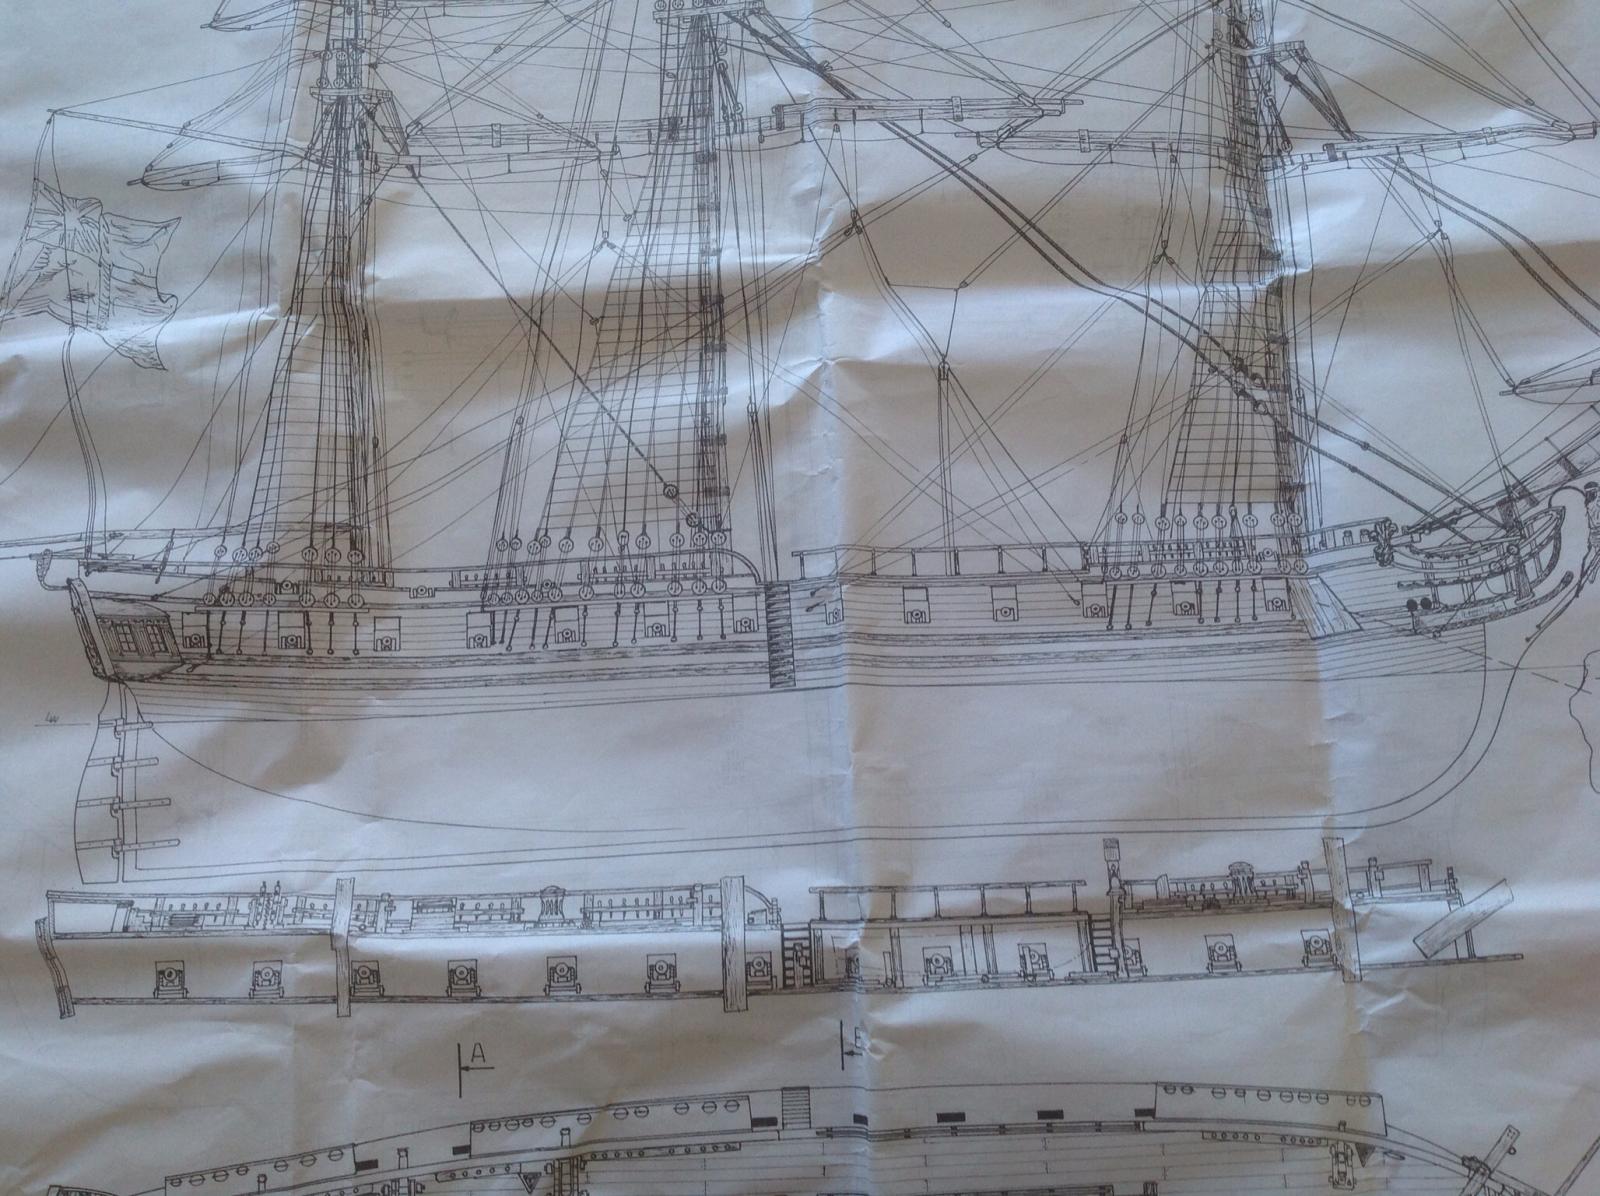
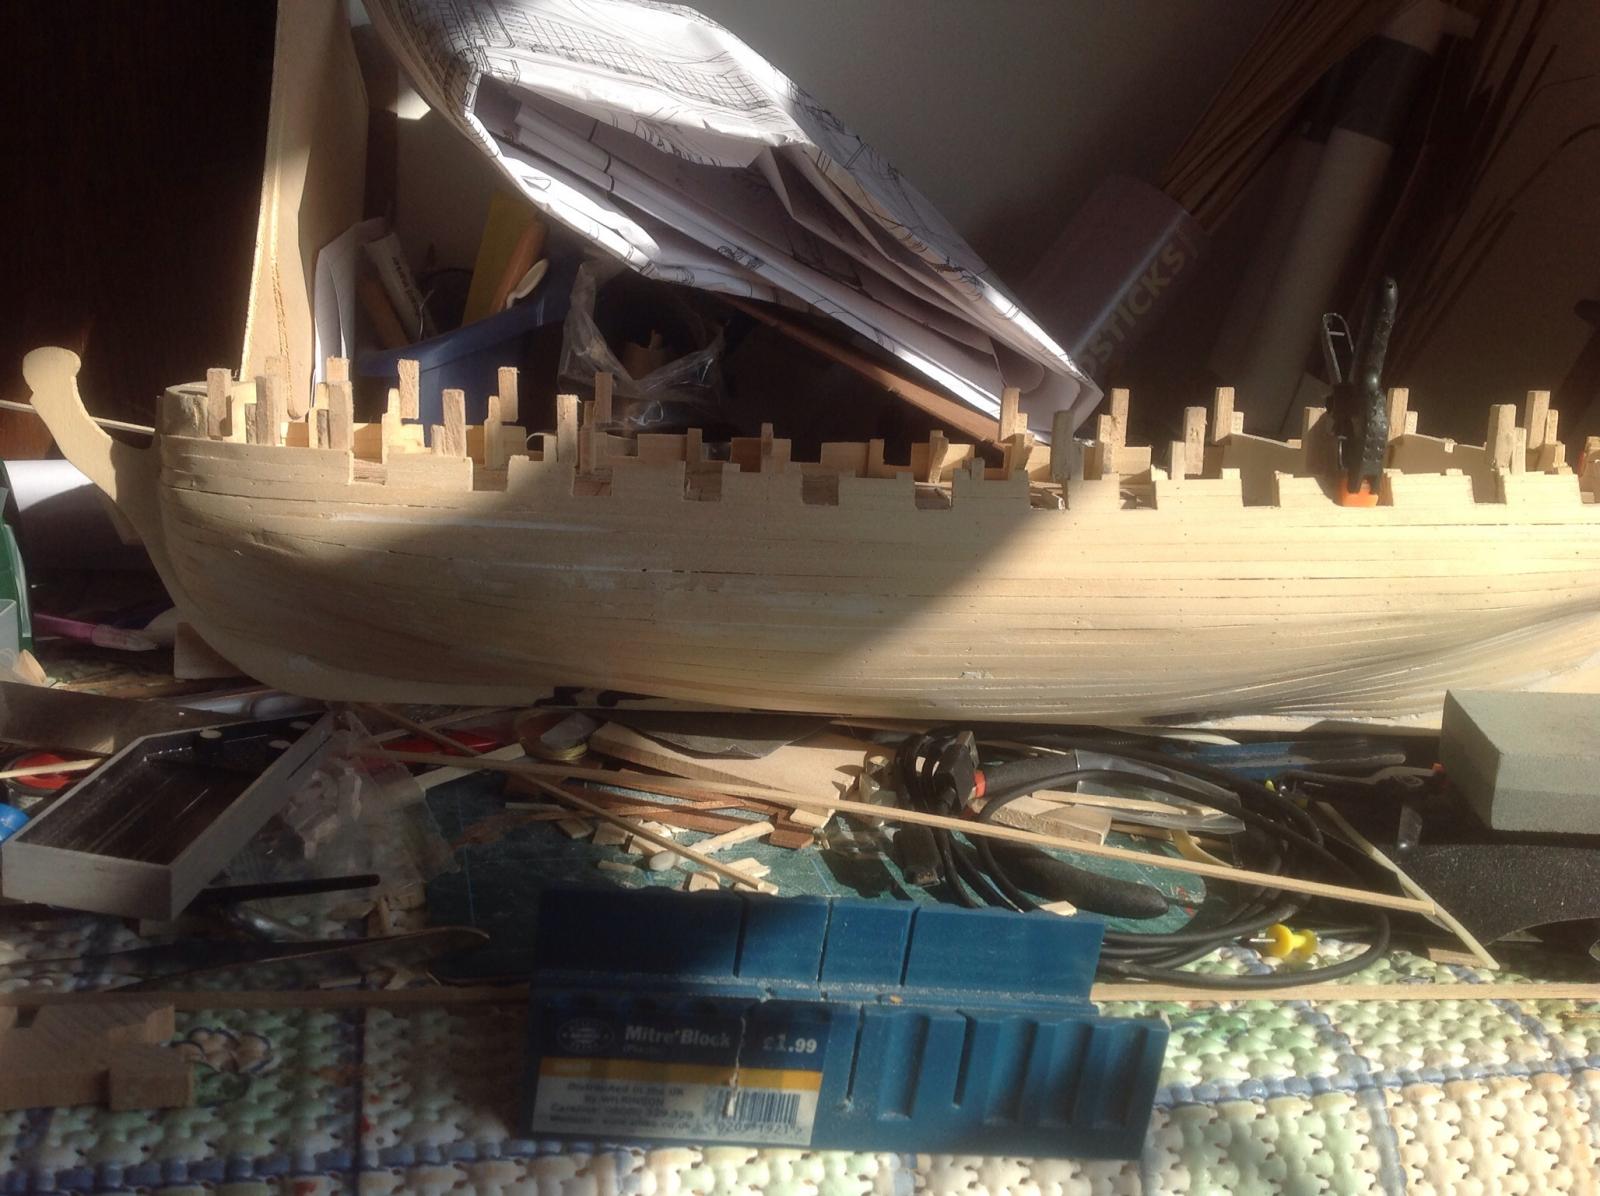
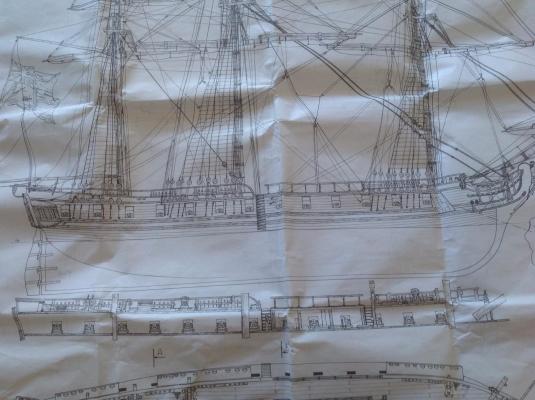
Another short post. As mentioned before the kit is a re-boxing of la Glorie so I have decided to modify it where I can so I can get closer to the Surprise in the books \ movie. I have shown the original plans and profile of the weather deck which is more open. To get closer to the Surprise I have planked up the sides. My challenge now is to decide where to place the gun ports as in marking them out can see I will run into issues with the rigging if not careful. Waitoa
-
Hi Thanks for all the comments. Struggling a bit with motivation so using this log as a way of keeping me going. Small update. I have decided to plank the level of the top deck and then do the boxing. This is to ensure I get a nice fit for the sides of the boxing and also with this planks added looks more like a ship. As the kit is basically the la Glorie re boxed will changing the profile of the sides of the top deck so it looks more like the Surprise. Waitoa

-
Hi Posted some photos on my build log, sorry my skills are not the best but hope it shows how I am approaching this. Waitoa
-
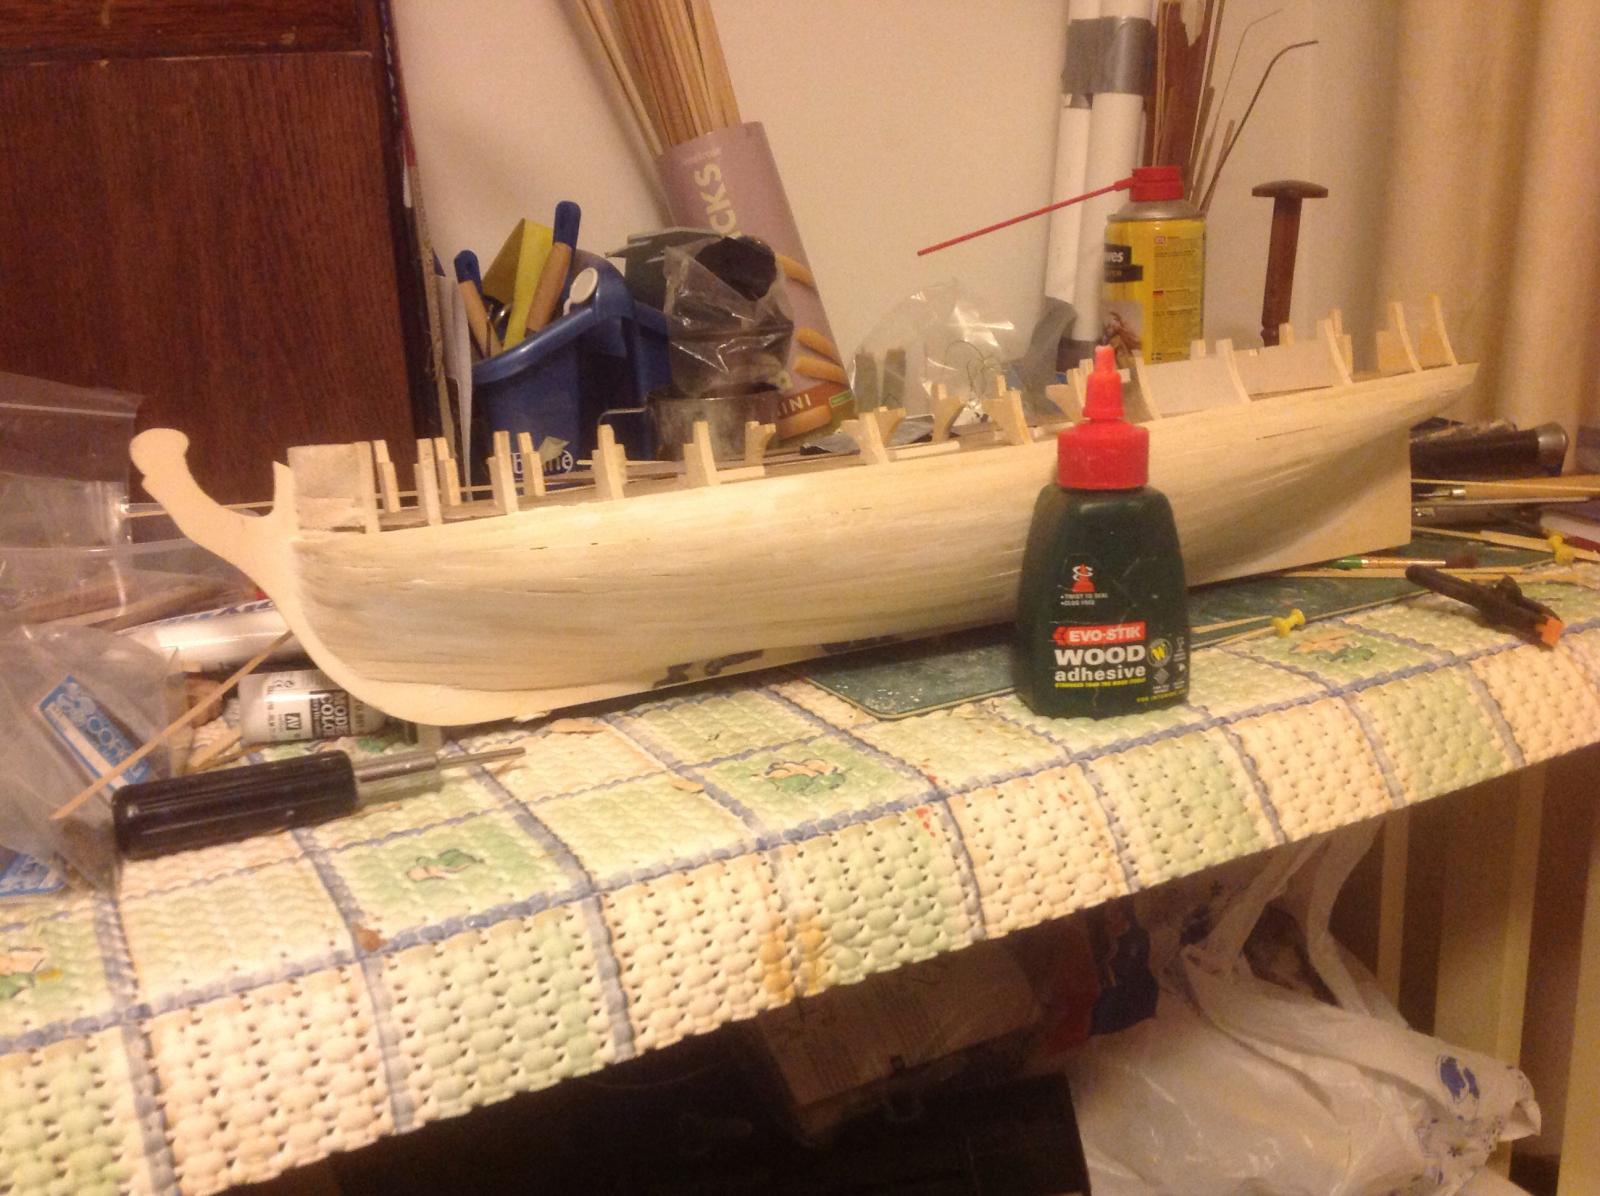
And finally added the boxing around the sides and bottom. I am an amateur at this but hope it helps as my only experience of using these metal brackets -Del Prado -Victory - nearly put me off this hobby for life.
-
Then used more scrap wood to build the inside planking

-
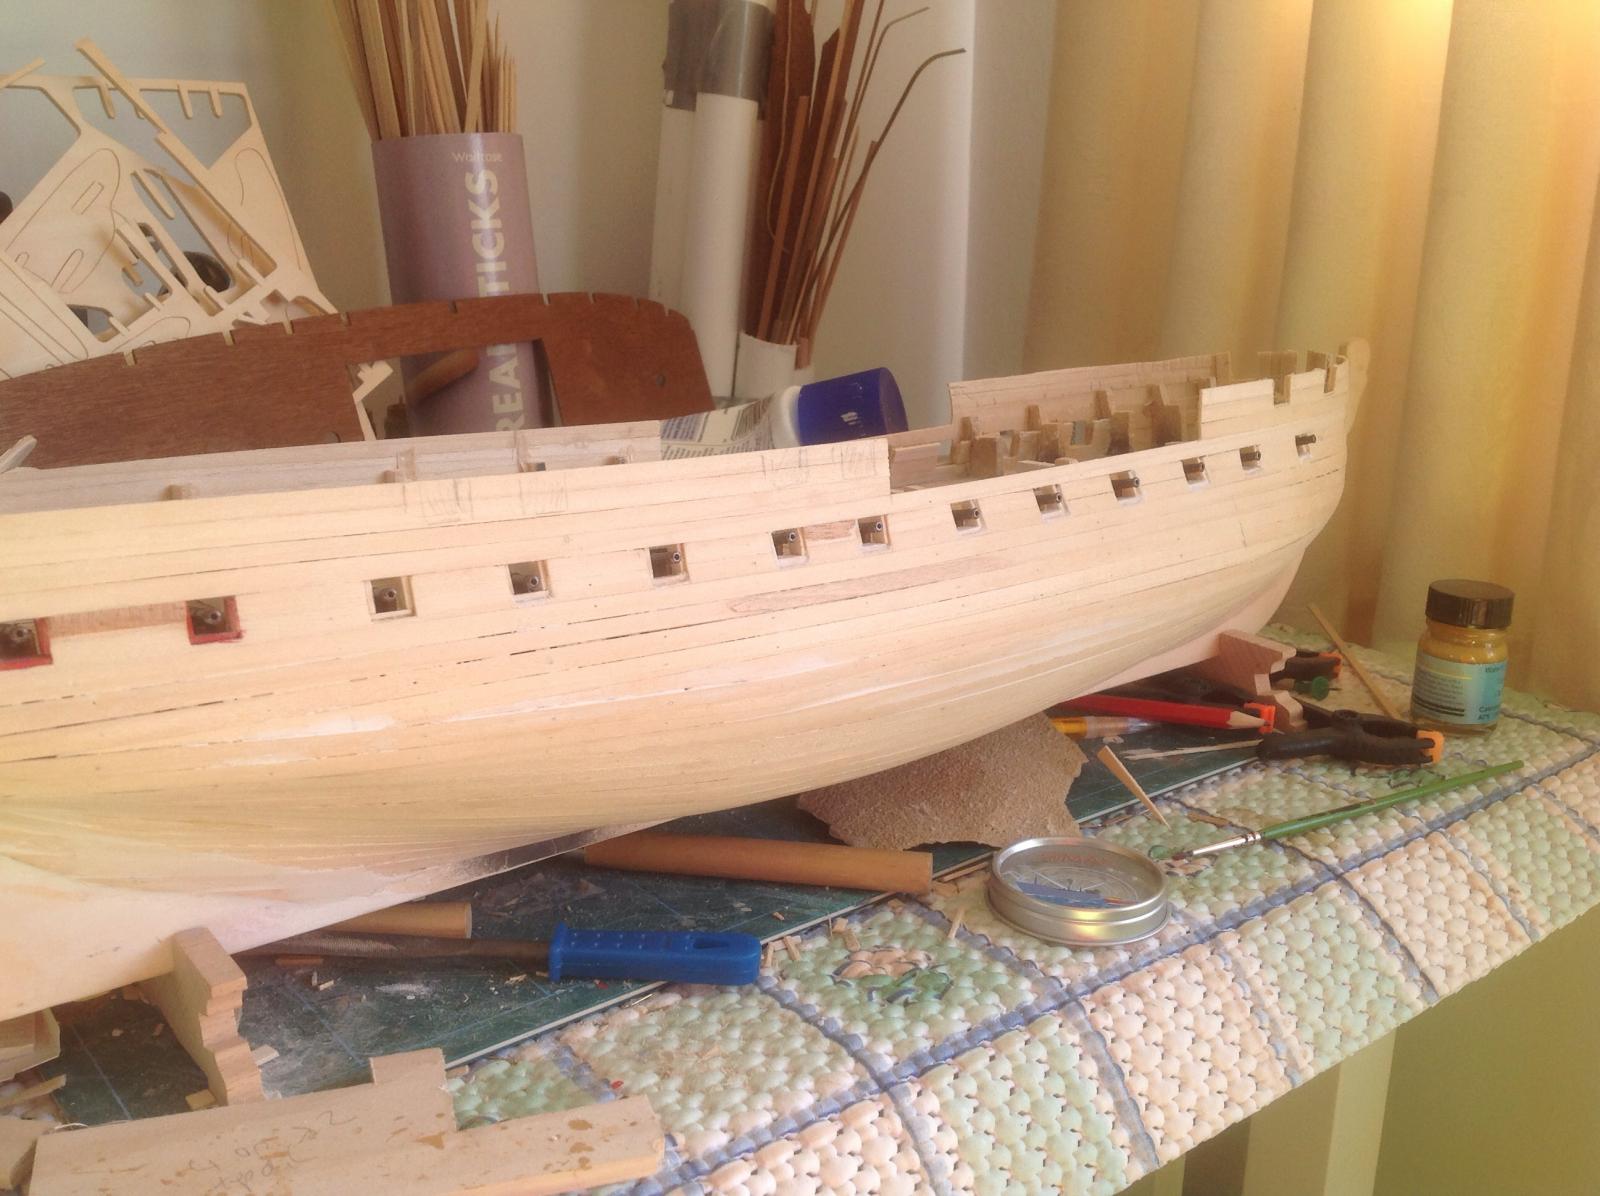
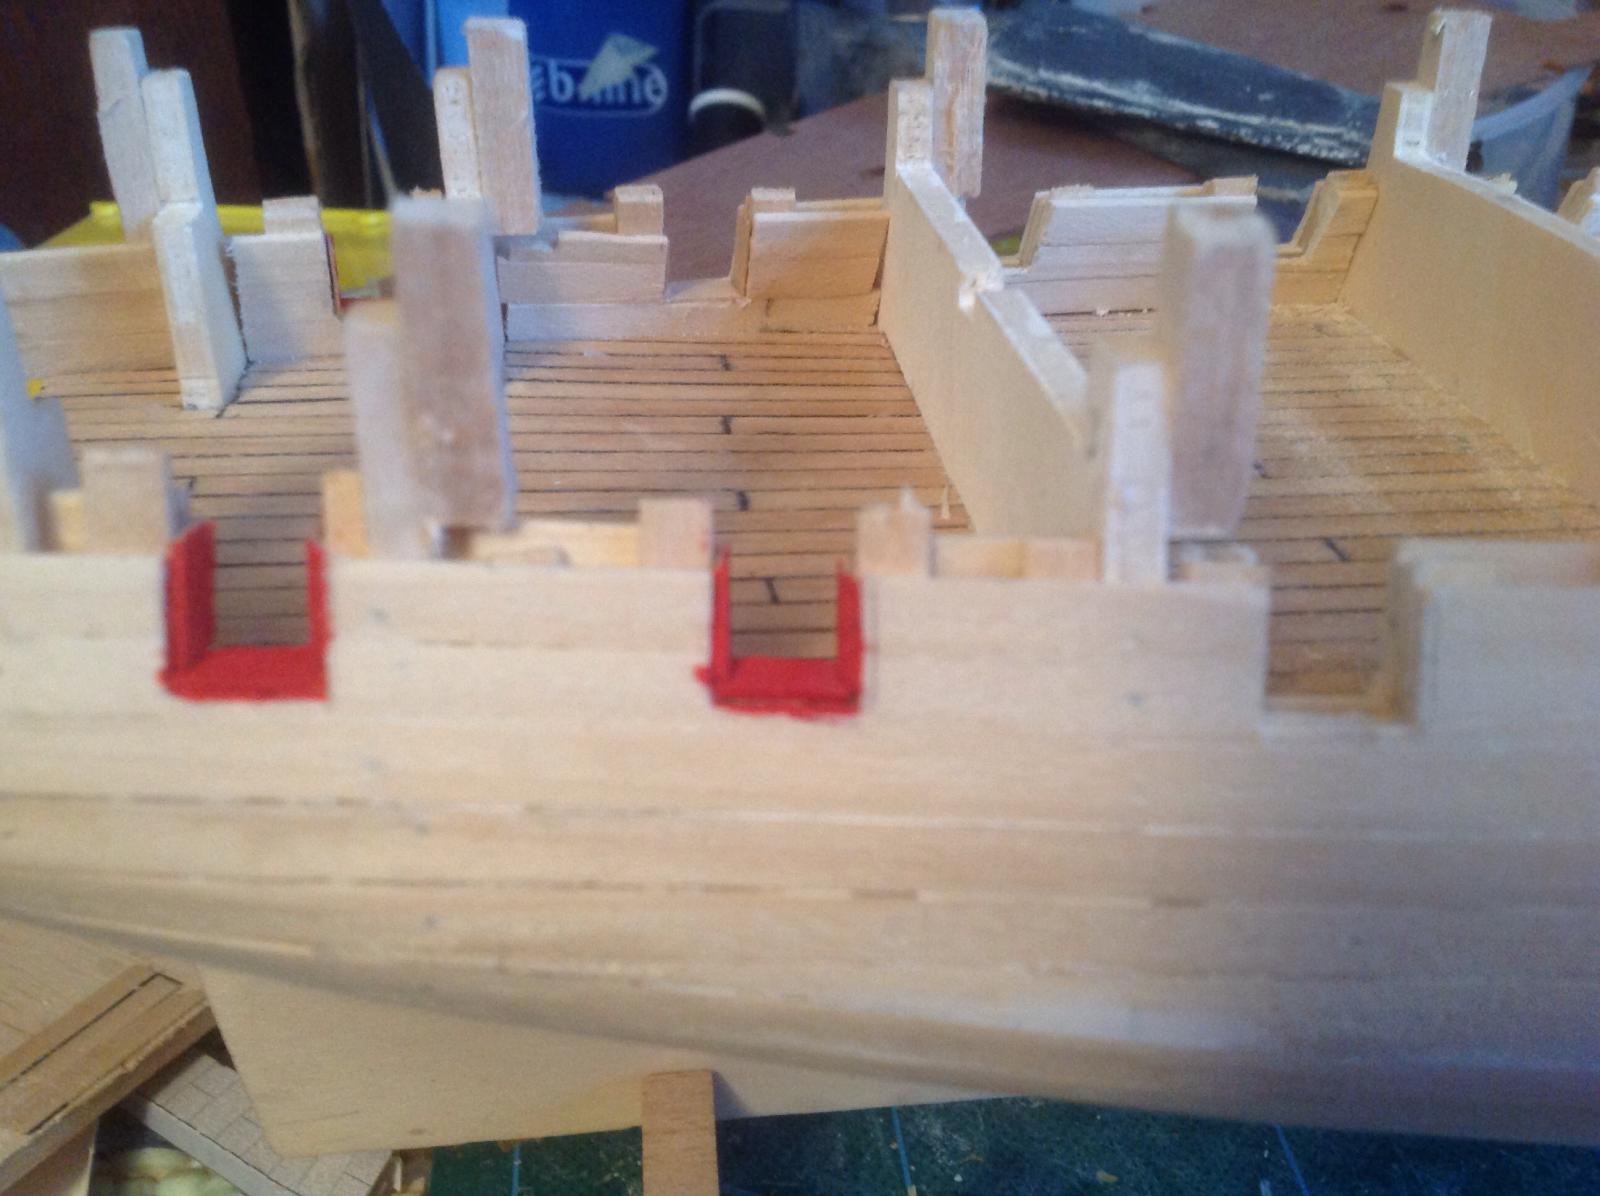
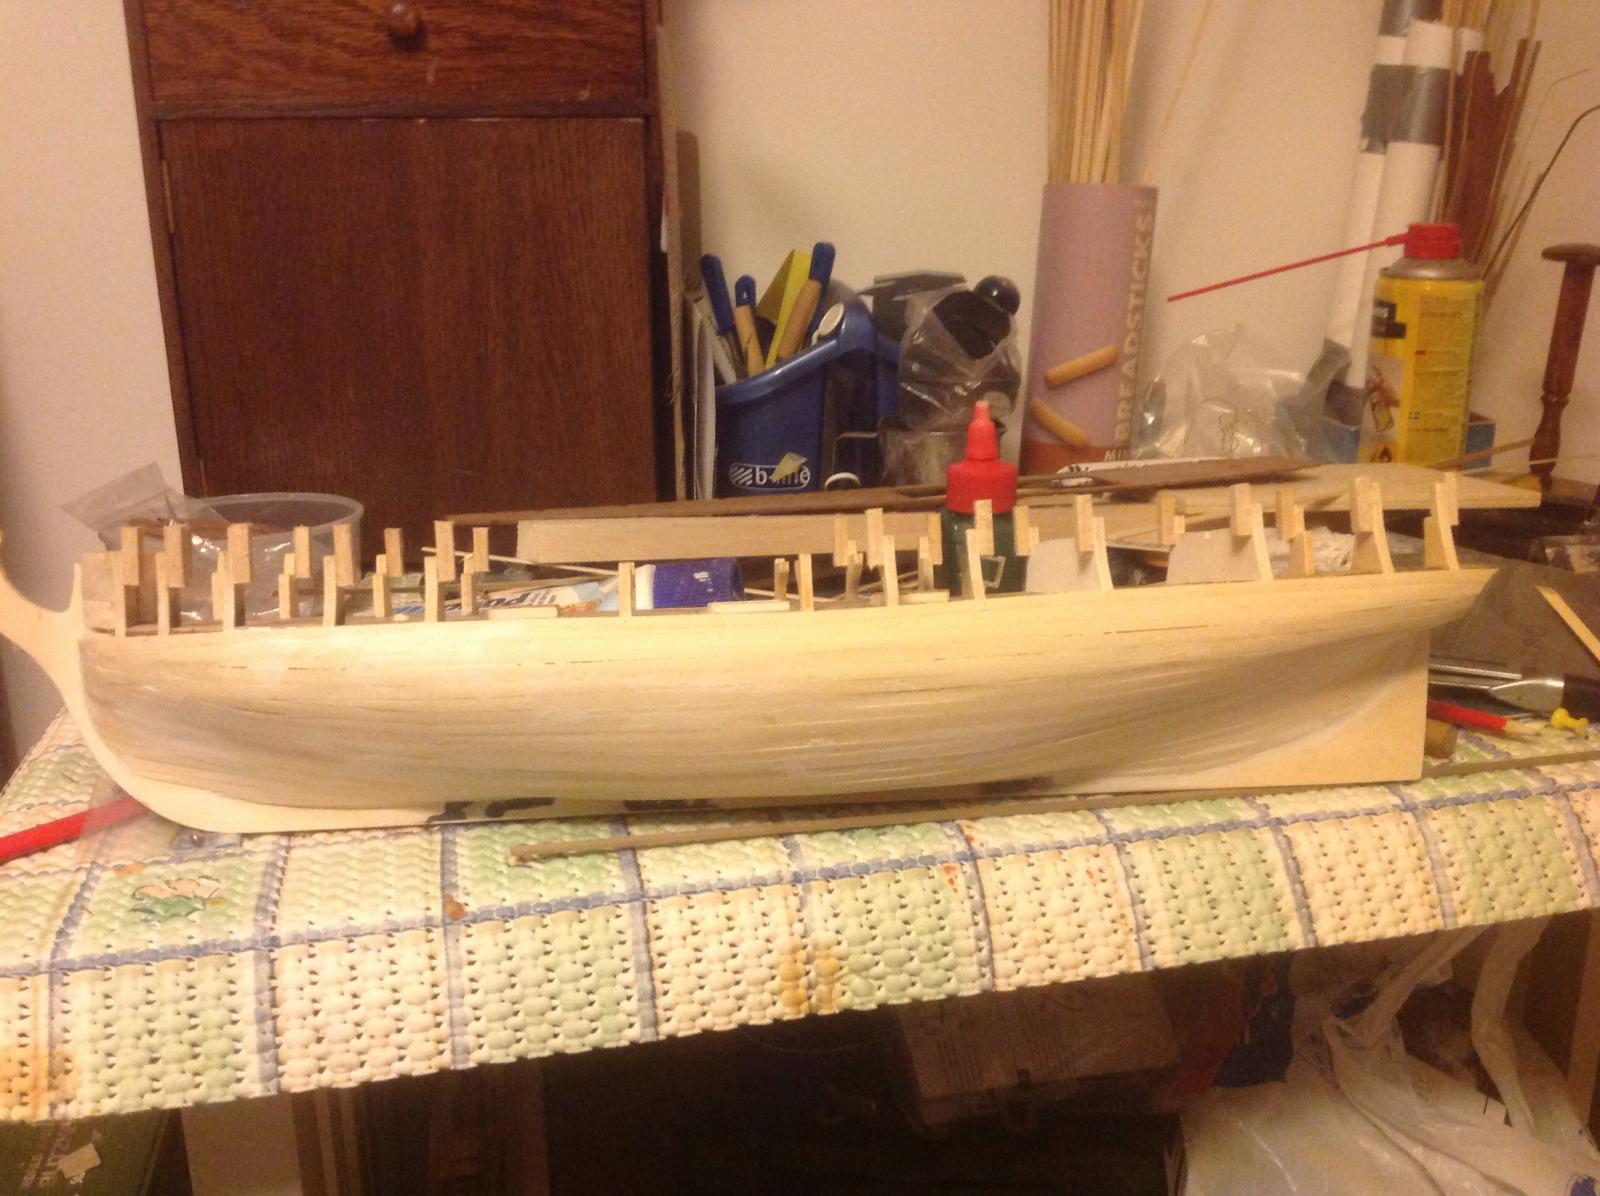
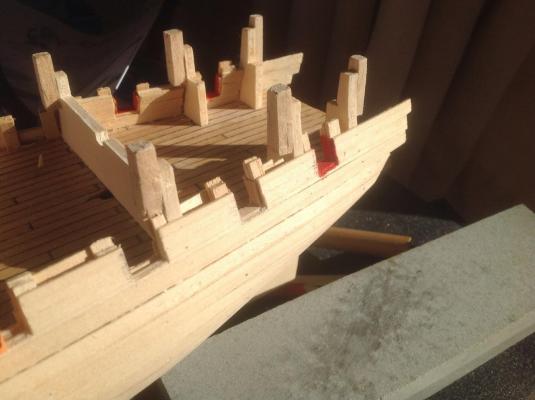
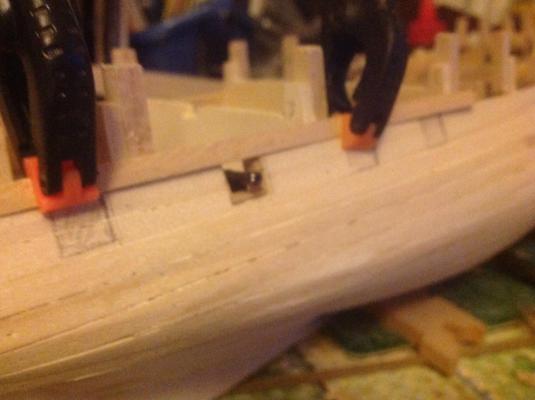
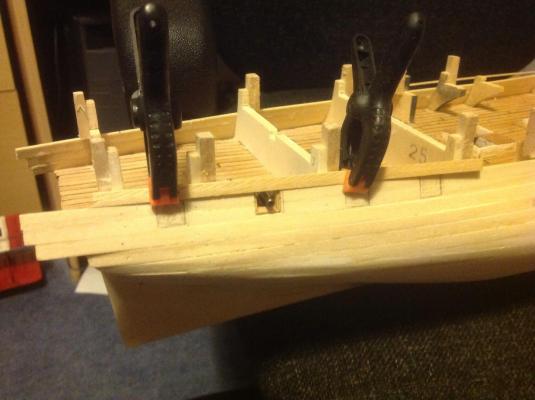
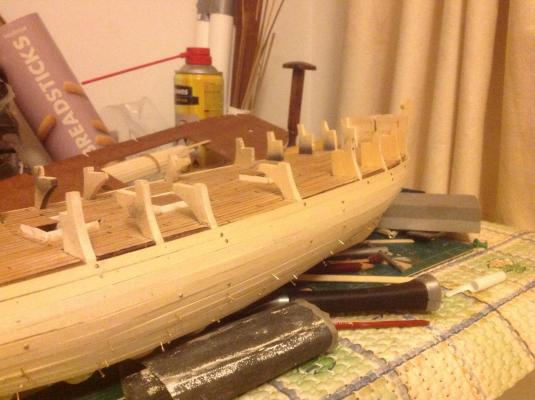
Hi Seen some queries around the use of the metal brackets for the gun ports. I did not use these and have attached some photos that show the stages of boxing I have used. To get the gun ports running along the side in a nice flow I made sure that the top plank was where the top of the gun port was going to be. Once I have finished the boxing in then I will restart the planking and hoping that the net result is a nice line of gun ports. Once I had marked and cut these out I have used some scrap wood to form the sides. Given the depth I need I doubled these up to give the right thickness. I also used some of the waste wood to form a lip on the bottom part of the gun port. This is to give the bottom part of the boxing something firmer to sit on.

-
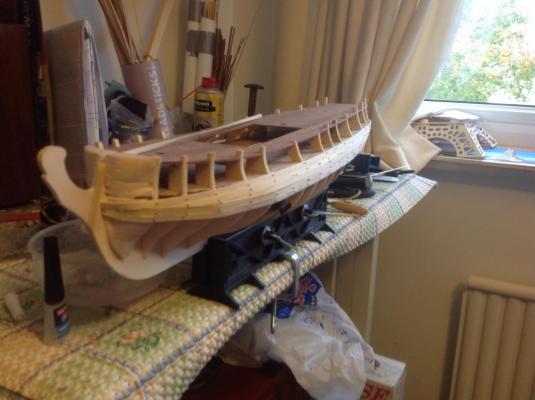
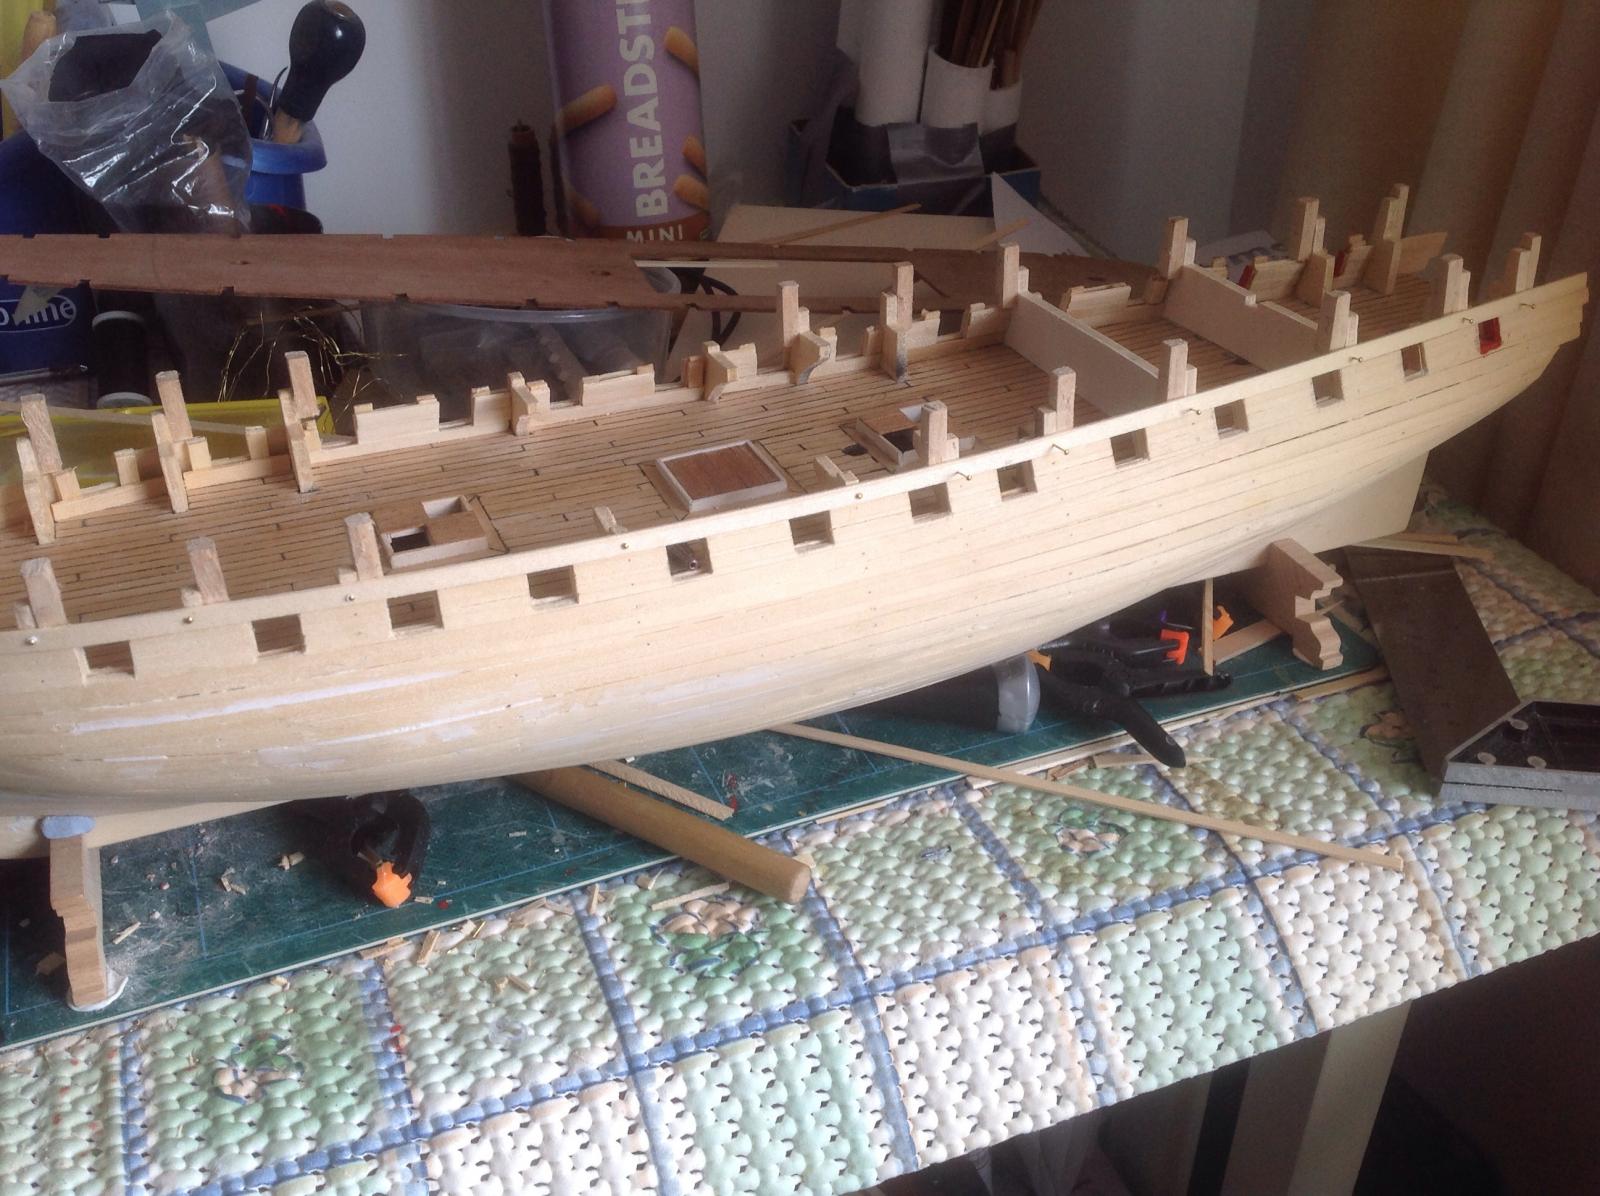
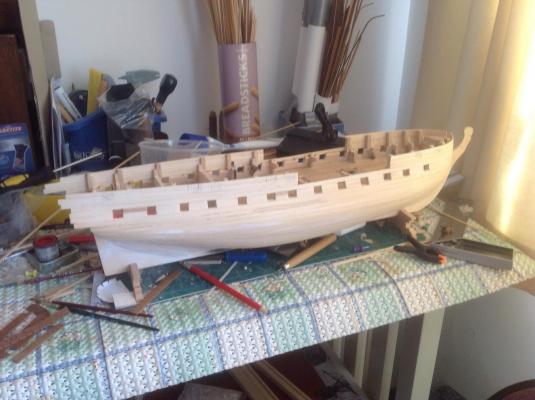
Hi Currently at this point in my build. Ditched the metal brackets for gun ports and boxing them myself. Lots more work but think it looks better. Also not putting on the top deck and transom until I have finished the second planking on the outside. Keen to finish and paint this so I can install the guns first. Did post some progress pictures a few weeks ago and can put some more on if it helps. Waitoa
-
Hi Making very slow progress. Unfortunately work is hotting up and involves travel. I have followed the lay out of the gun ports on the plans. I know these aren't correct but balanced it out with how much other work it would involve. Instead of completing the planking and the cutting the ports decided to only plank part way and then cut downwards. Provides easier access and makes the boxing of the ports easier. All of this involves a lot more work but happy with the results. Waitoa
-
Thanks Mayohoo, agree the extra work really pays off with cutting and boxing your own gun ports. Hi Hipexec, this is the Mamoli version of the Surprise. In purchased it online from the Model Dockyard if I remember right. Waitoa
-
Hi Abandoned the soft metal cannon ports and instead went for my own made ports. Happy with the result and the top plank is only for demo and not fixed down before anyone asks. Waitoa.
-
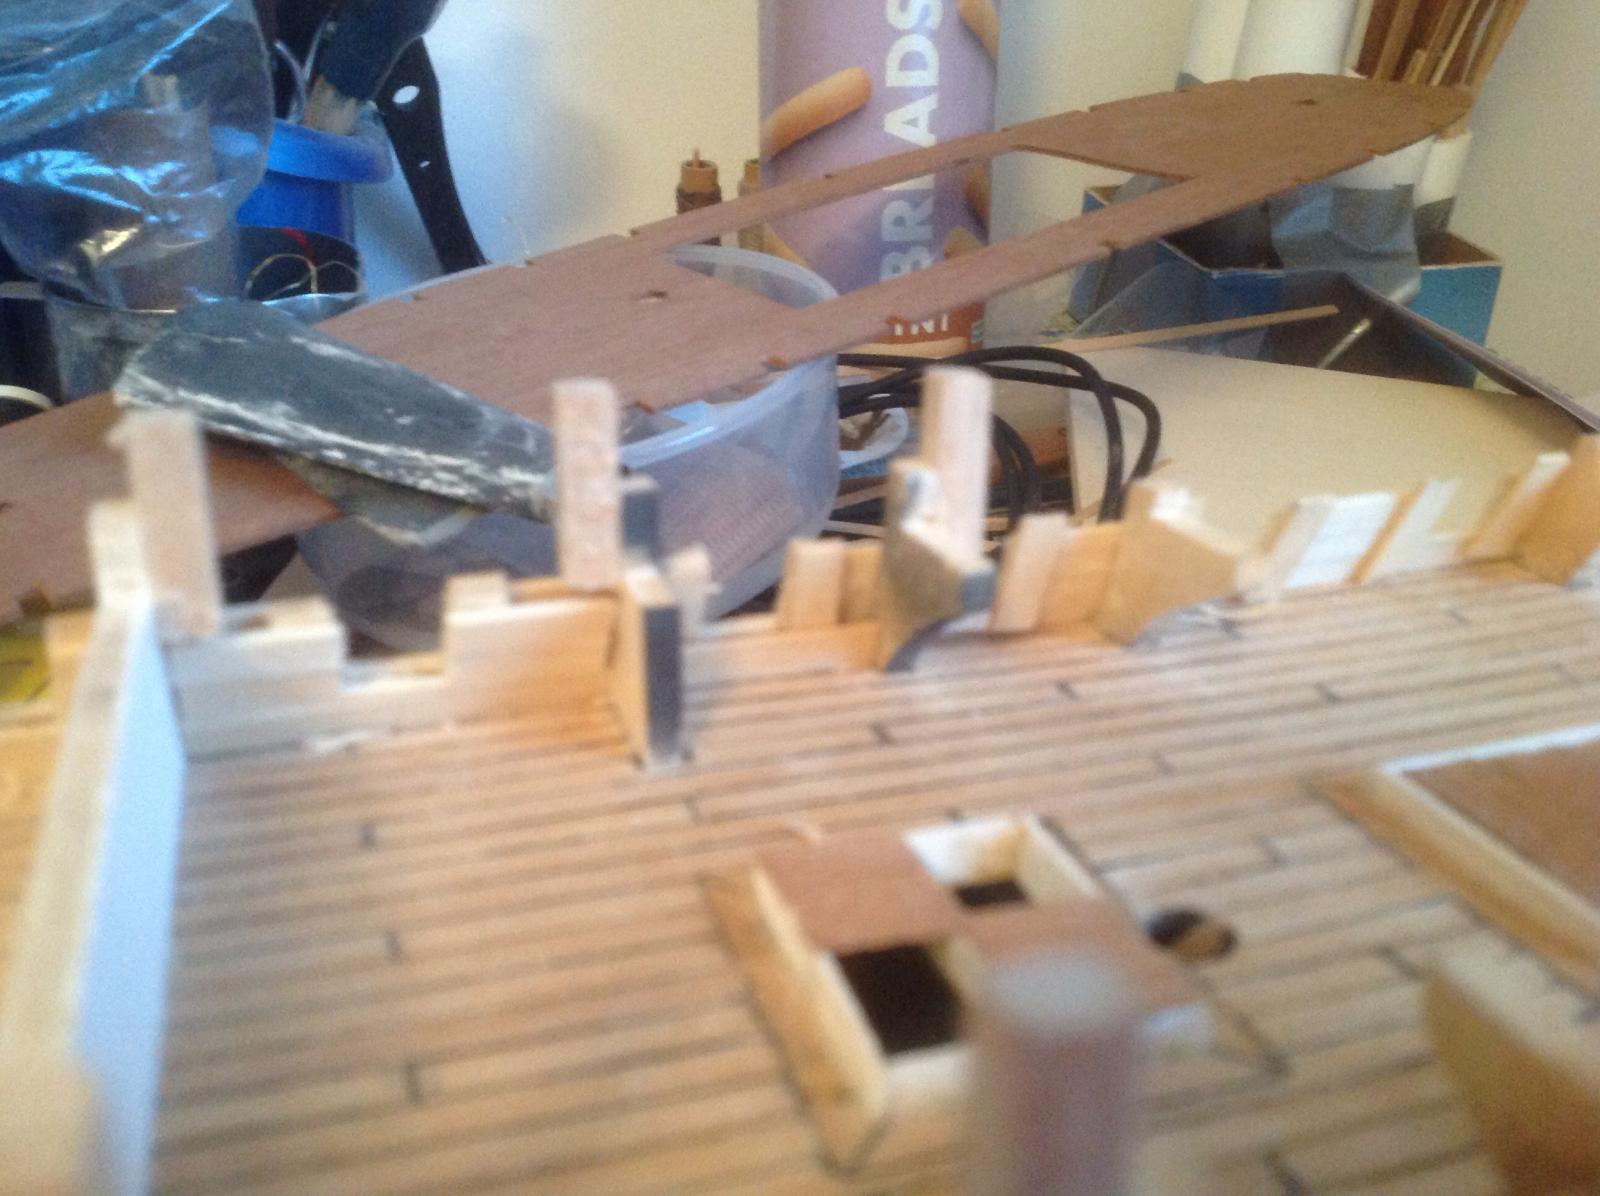
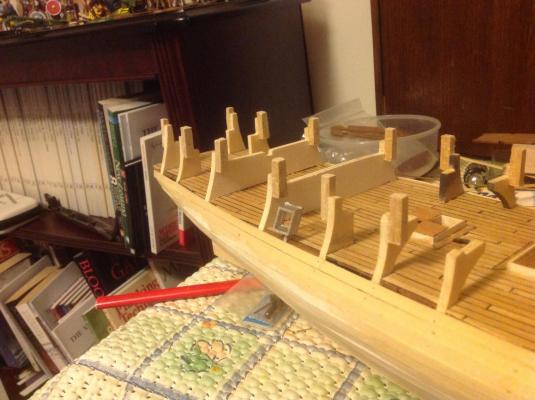
Thanks Mayohoo. Been looking at how I can adapt the look of the hull to be closer to the Surprise as this is basically a re-box of the La Glorie so does not have the same profile on the weather deck. To get closer to this I have added 20 mm wooden pegs to the frames whose tops are 35 mm off the gun deck. I was thinking of cutting away the frames and splicing these inserts into these but felt the end result would be too fragile. The reason for only 20 mm pegs is so the cannons on the gun deck do not get interfered with these. This means the resulting pegs are a bit fragile still so will plank the outer planks up to the weather deck level and then do the final shaping while they are in place. Still not sure what to do about the cannon ports as the kit method I think will be hard to get the right look as i think the metal frames will not sit right and ruin the flow of the planks. Will finish the outer planking and the decide.

-
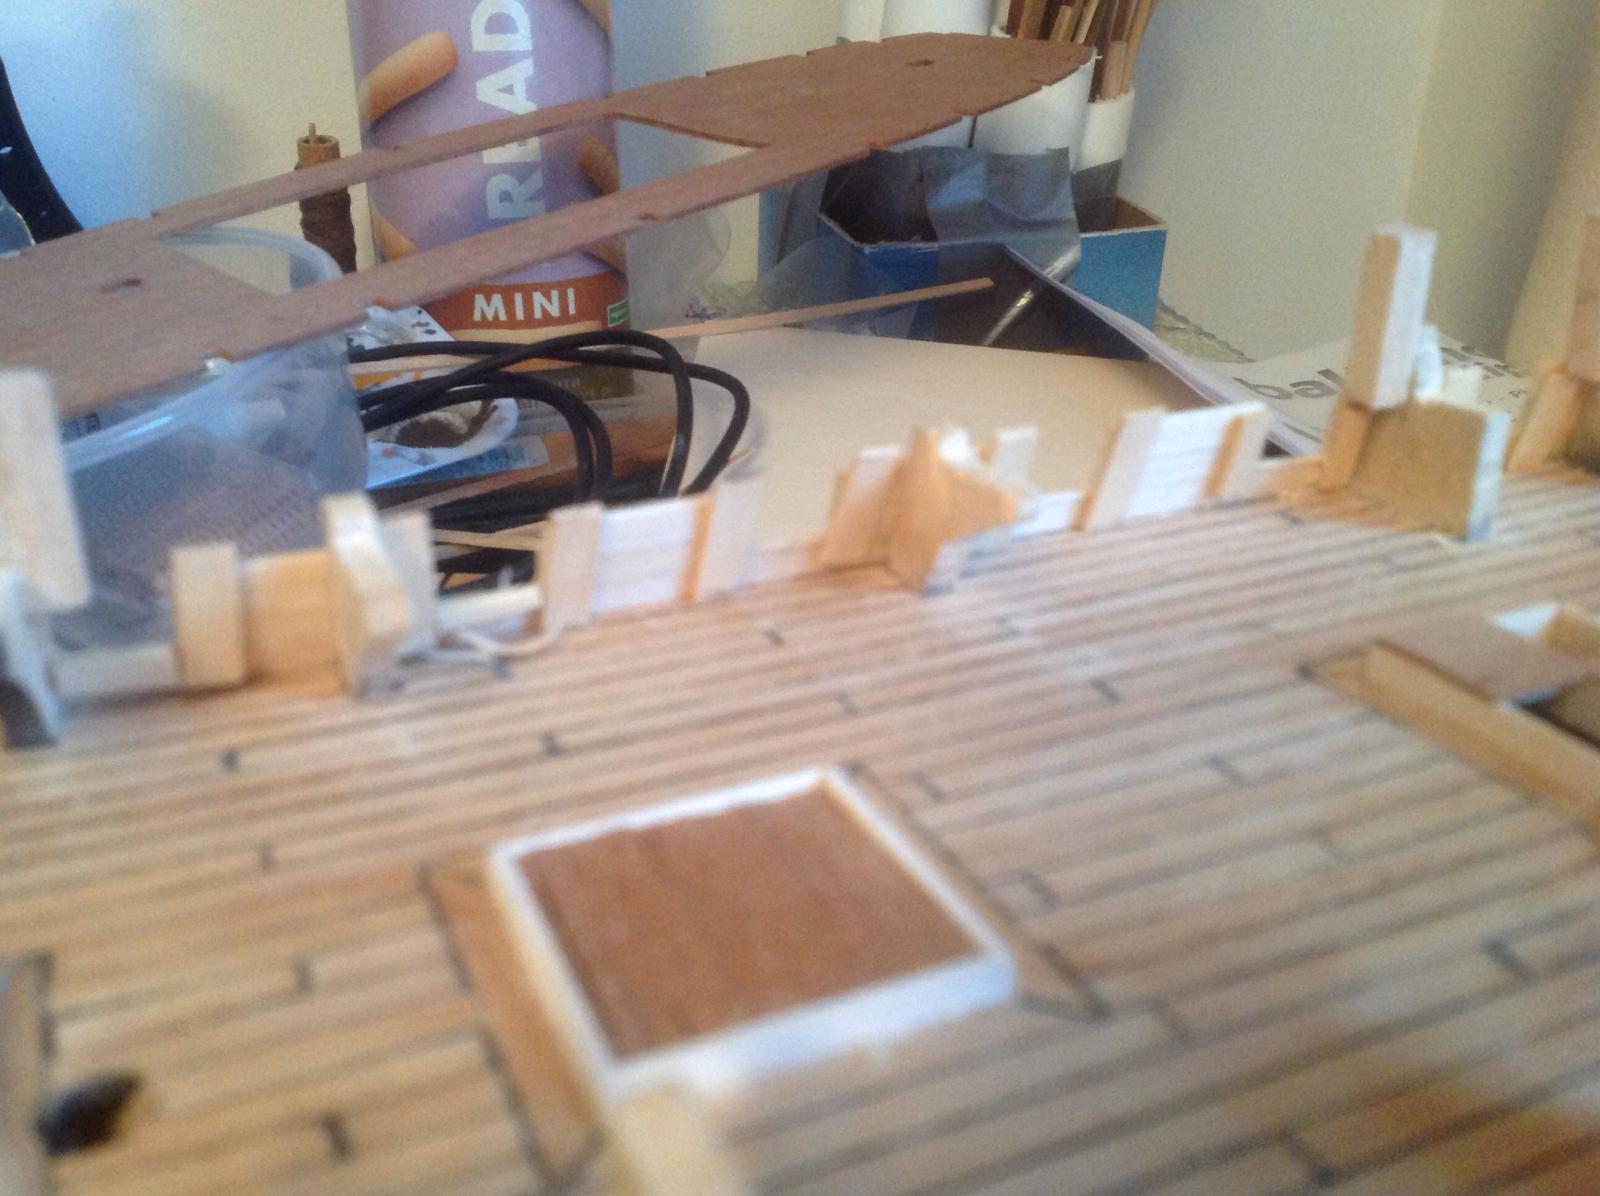
Hi Finished the first planking below the gun deck. Applied a little bit of putty and waiting to dry before I start the process of sanding and cleaning it up as a base for the second planking. Made the mistake of using some spare planks and found that they were not as thick as the others which means a bit more sanding as can see one of the planks dips a bit but should be able to be sanded out. Before I resume planking will alter the height of the frames on the weather deck to bring the look of this deck more closely to the Surprise. Also do not want to use the metal frames provided for the gun ports so want to build wooden frames which will be planked across and then cut into to form these. Wavering on including crew figures but my little boy is insisting so may not have much choice. Waitoa.

-
Hi Think you have done an excellent job in making the metal frames flush with the planking. Have had a bad experience with these so now plank and then cut out the cannon ports later similar to what Jean-Pierre was suggesting. I love filler as well and as this is double planked no one gets you see it. Waitoa
- 786 replies
-
- 2
-

-
- Royal Louis
- Finished
- (and 1 more)
-
Hi I would recommend the Ship to Stern book that Mayohoo has listed. Also found a number of tutorials and recommendations on this website. There was one in particular by Dan Vlads but have tried to relocate but could not find. Found this one really useful. I always get nervous about starting as I don't want to get anything wrong. To be honest I always do get stuff wrong and don't know why I agonised about it in the first place. I am far off achieving the quality of most of the other builders on this site but have found part of the fun is getting around my own self inflicted issues. Each build I am getting better but only through the mistakes I have previous builds so would recommend starting and rolling with it. After all that is what putty, sandpaper and the second planking are for. Waitoa
-
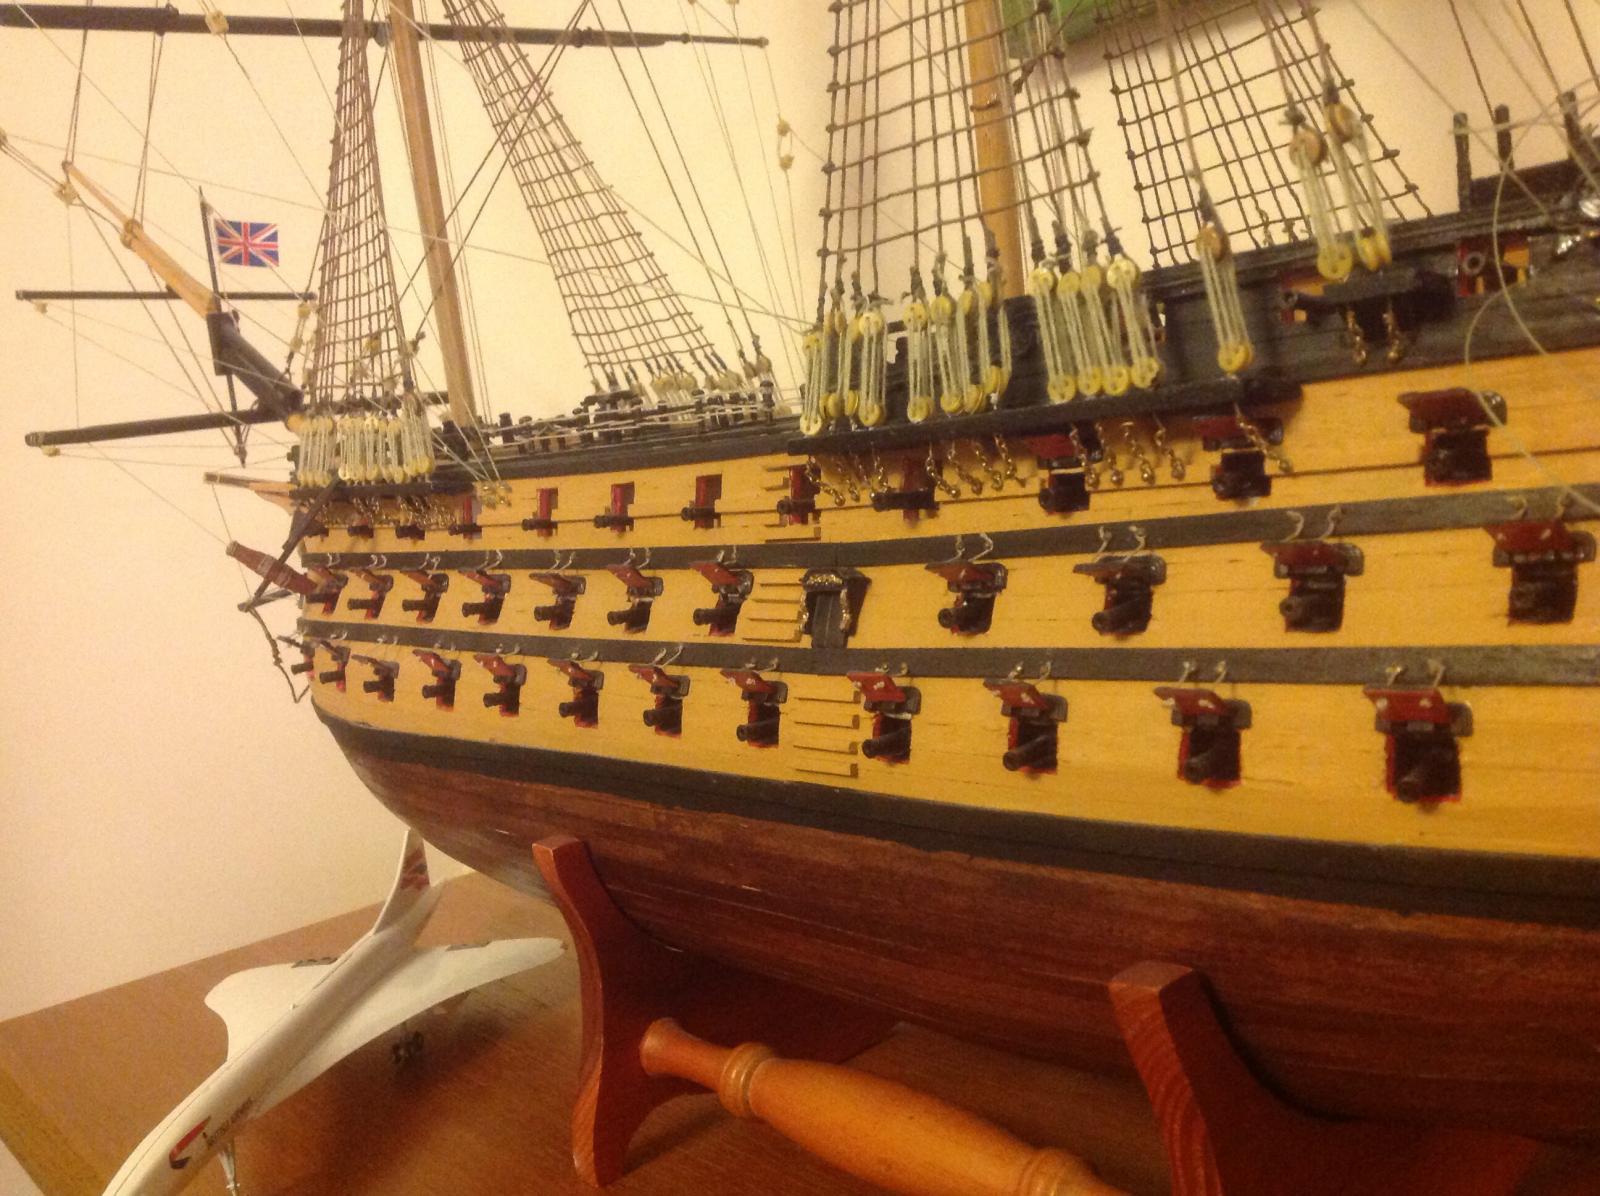
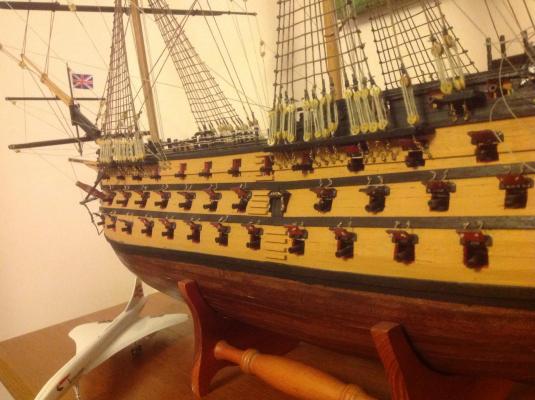
I usually use black thread to seize the stays but leave the rest of the fixed rigging in the dark brown that is supplied by the kit maker. For the running rigging - the rope that moves the sails and spars - I usually leave the more pale colours. Not sure what the rule was on the Royal Navy ships at this period but sure like Mayohoo it did differ and the reference to blacking was more around where the stays were seized. Also the boats I have sailed on the running rigging was deliberately left a different colour so if you need to grab something in an emergency you grab something that was a more secure and not the bits that move around. Waitoa
-
Nice fix, think Bindy ran into the same issue. I took to mine with a hammer which was not the smartest thing to do but got away with it this time. Looking forward to seeing your progress as at this rate you will over take my build. Waitoa
-
Hi Bipper, Welcome aboard and good luck with the build. Everyone on this site has been really supportive and would not be worried about posting a log as no one has yet to point out the many faults in my build but have offered helpful advice. In answering to your question I used a black marker pen for the caulking on the deck planking after reading someone's build log. I did use graphite on my first build and it spread when a scraped the deck so got a bit of marking. Had to shop around a bit to get one that did not bleed into the wood too much so if doing this would advice doing some tests. Finished with Danish oil again due to advice from other members. Waitoa
-
Hi My approach to planking is to be honest a bit strange. I am grateful that sandpaper and putty have been invented and use heavily on the first planking. I am embarrassed to post any photos of this stage as I can already hear the cry's of anguish from others who put my poor efforts into the shade but will give a little sneak peak. I do use pins and clamps but remove the pins before smoothing for the second planking so it looks worse than it ends up. The guide Mayohoo posted is helpful and am plucking up the courage to do this on my second planking. I am not a big fan of the metal brackets that Mamoli use as my first build was the ill-starred Del Prado Victory. While I was able to get a reasonable finish it was frustrating as had to really recess the brackets into the frames and there were gaps between the planks and the frames due to the shape of the brackets. Posted what result I got below. For this build I am planking from the gun deck down and then will frame the gun ports and then plank upwards. The top deck sides need to be raised as well to get closer to the shape of the Surprise that I have in my head. Hope that this helps.
-
Hi Captain71 Looking good and I am treating this deck as a practice as most of it will be covered. My mast holes were not exactly centred and I have used a round file to make them more aligned. I am sure that once I fix the upper deck down I am sure the file will be needed again. I am finding with this kit there are some challenges in alignment etc so am slowing down my build to spend a bit more time on the preparation. I tend to rush things a bit and then spend a longer amount of time using putty and extra detail to hide some avoidable mistakes. Waitoa
-
Hi No worries about asking any questions. To manage your expectations I am pretty bad at building boats but will try to share what limited knowledge - skills I have. The Mamoli kit is pretty much a re-boxing of a previous kit la Glorie. My very basic research shows that there was a 32 gun frigate captured by the British in 1795 and named HMS Glorie. Not sure how accurate the actual kit is as the Glorie but the HMS Surprise was a different design and while I am not a purist I would like to get close to the look of the ship that was the inspiration for the book. To assist with this I am using the book The Frigate Surprise by Brian Lavery and Geoff Hunt. This has some pages of drawings by Karl Heinz Marquardt on what the Surprise would approximately looked like. Navis Factorum has an excellent log in the scratch build section and the other HMS Surprise models out there look more like the drawings in the book. My hatches are a mixture of looking at the book and what I could get away with using the Mamoli model as a base. I am adding hatch covers rather than stairs as when I read the books for some reason I had visions of sliding hatches and it allows me to have these open without having to cut too much into the frames to carve out a creditable false deck. I hope this is of some use.
-
Hi captain71, Welcome aboard. Not 100% sure I got the various woods right as pretty much abandoned there colour chart and guessed on previous experience so fingers crossed I got it right. Saw your log and will follow with interest. Have been taking a bit of a break as in NZ for Christmas but when I get back to England will start working on the Surprise again and hopefully we can bounce off each other's experiences. Look forward to seeing some posted pictures. Waitoa
-
Hi Thought I would post a small update on where I am at. I am not very tidy when I do my first planking and always try to get better. I have found though with sand paper and filler you can usually get a good base for the second and final planking. I never spend enough time on the preparation of the frames so may have to correct one a bit as the planks dip a bit on the unplanned side. Next time really keen to try a rabbet? Think that will help with keeping it tidy. Still addicted to using pins but again want to move away from this on my next build. Using a method I got off this forum where you lay the planks on there natural run and then shape the others to fill in the spaces. I know it is not the 'correct' method but works for me. I hope this is some help. Regards Waitoa