HOLIDAY DONATION DRIVE - SUPPORT MSW - DO YOUR PART TO KEEP THIS GREAT FORUM GOING! (Only 13 donations so far - C'mon guys!)
×

Rcboater Bill
-
Posts
167 -
Joined
-
Last visited
Content Type
Profiles
Forums
Gallery
Events
Everything posted by Rcboater Bill
-
 Steve, Doing the math, your model is going to displace about 36 pounds, when ballasted to float at the waterline. So whatever the finished model weighs, you’ll need to add ballast to get it to 36 pounds. The denser and lower in the hull the ballast is, the better - the more stable the model will be on the water. Lots of people prefer lead shot mixed with epoxy- that can be poured into the hull to get the weight as low as possible. But you don’t want to do this up to the very last ounce- it can be very hard to remove later - say if you decide to go with a larger battery to increase run time. You may want to leave the last pound or two loose, so you can move it about as needed to adjust the model’s trim in the water. Then you can secure in place in a way so it can’t slide around, but still be removeable later if desired. As I said, lead is a great choice, but can be hard to find. Birdshot or buckshot can be found at gun shops, but not all will have it. ( There is a growing movement to ban the use in hunting and fishing because lead is considered to be a toxic substance.). If you find yourself needing several pounds, exercise weights might be an option. Another option is tire weights- most tire shops have buckets full of old wheel weights that are just trash to them. FYI , Here’s how I came up with the displacement estimate of 36 pounds: Take the displacement of the real ship, convert to pounds, then divide by the scale, cubed. I found the data online for Liberty Ships as 14,425 long tons. Multiply that by 2240 pounds per ton, then divide by 96 three times. The result is a little over 36 pounds. Note that getting the actual displacement can be tricky, especially for cargo ships. Lots of references list the cargo capacity, and not the gross tonnage. (The first value I found for Vance listed 7700 tons.). Also US ships are usually listed in “long tons” which are 2240 pounds, not 2000. This page gave both: https://en.m.wikipedia.org/wiki/Liberty_ship Hope this helps.... -Bill
- 446 replies
-
- 4
-

-
- zebulon b vance
- deans marine
- (and 3 more)
-
Steve, Glad to hear all is well in the lifeboat dept- I should have realized that with the repainted hull, the boats would also lose the stripes! But, like I said, it is easy to get ahead of yourself and miss a step, at least for me! My hall of fame moment here was when I was building a WW1 Bristol Fighter plastic kit. I got so fixated on closing up the fuselage and eliminating any sign of a seam, that I forgot to put the engine in first! Figured it out when I looked at my perfect fuselage and realized there was nowhere to attach the exhausts and prop! D’oh!!! Going back on topic: Steve, your receiver should be fine where you put it. I have installed some just above the waterline in small models, and had no issues. The 2.4 GHz RC units are great- the days of one model per frequency are gone. Each receiver binds with its transmitter, and ignores signals from anyone else. But the signal can’t penetrate water, so you want the Rex above the water line. Even in a pool, where you’re likely no more than 50 feet away, you’ll lose control of a sub after a foot or so down on 2.4GHz. I don’t do subs anymore, but I was able to sell all my old 75MHz RC gear to other sub skippers... -Bill
- 446 replies
-
- 2
-
-
- zebulon b vance
- deans marine
- (and 3 more)
-
I think the steel wire to support the man ropes looks great. (We called them “Monkey ropes”) Question: did you miss a step? Are there decals for the green stripes and red crosses on the lifeboats that would be easier to apply before gluing the boats in place? Or were those gone from the time period your model represents? I ask because I have “Been there, done that, have a drawer full of tee shirts”! -Bill
- 446 replies
-
- 4
-
-
- zebulon b vance
- deans marine
- (and 3 more)
-
Steve, You needn’t have any concerns about the range of your RC set- You could sail the model far enough out that you can’t tell which way it is going, and still have control. Having said that, the 2.4Ghz signal is line of sight- so don’t sail behind the boathouse or other big solid structure. It is is also a good idea to mount your receiver above the waterline- 2.4GHz signals don’t penetrate water much beyond a couple of inches. (That’s why RC sub sailors use the old 72MHz radio gear— so they can go 5-6 feet down.) -Bill
- 446 replies
-
- 3
-
-
- zebulon b vance
- deans marine
- (and 3 more)
-
Steve, One of the great things about building scale RC ships (compared to aircraft) is that you don’t have to wait until the model is finished to take it out for a sail. In fact, I usually put my models in the water as soon as possible, just the bare hull— to verify the running gear, stability, etc. Might be a little late to tell you this now, but even now you may discover something you want to change before completing the detail work..... -Bill
- 446 replies
-
- 6
-
-
- zebulon b vance
- deans marine
- (and 3 more)
-
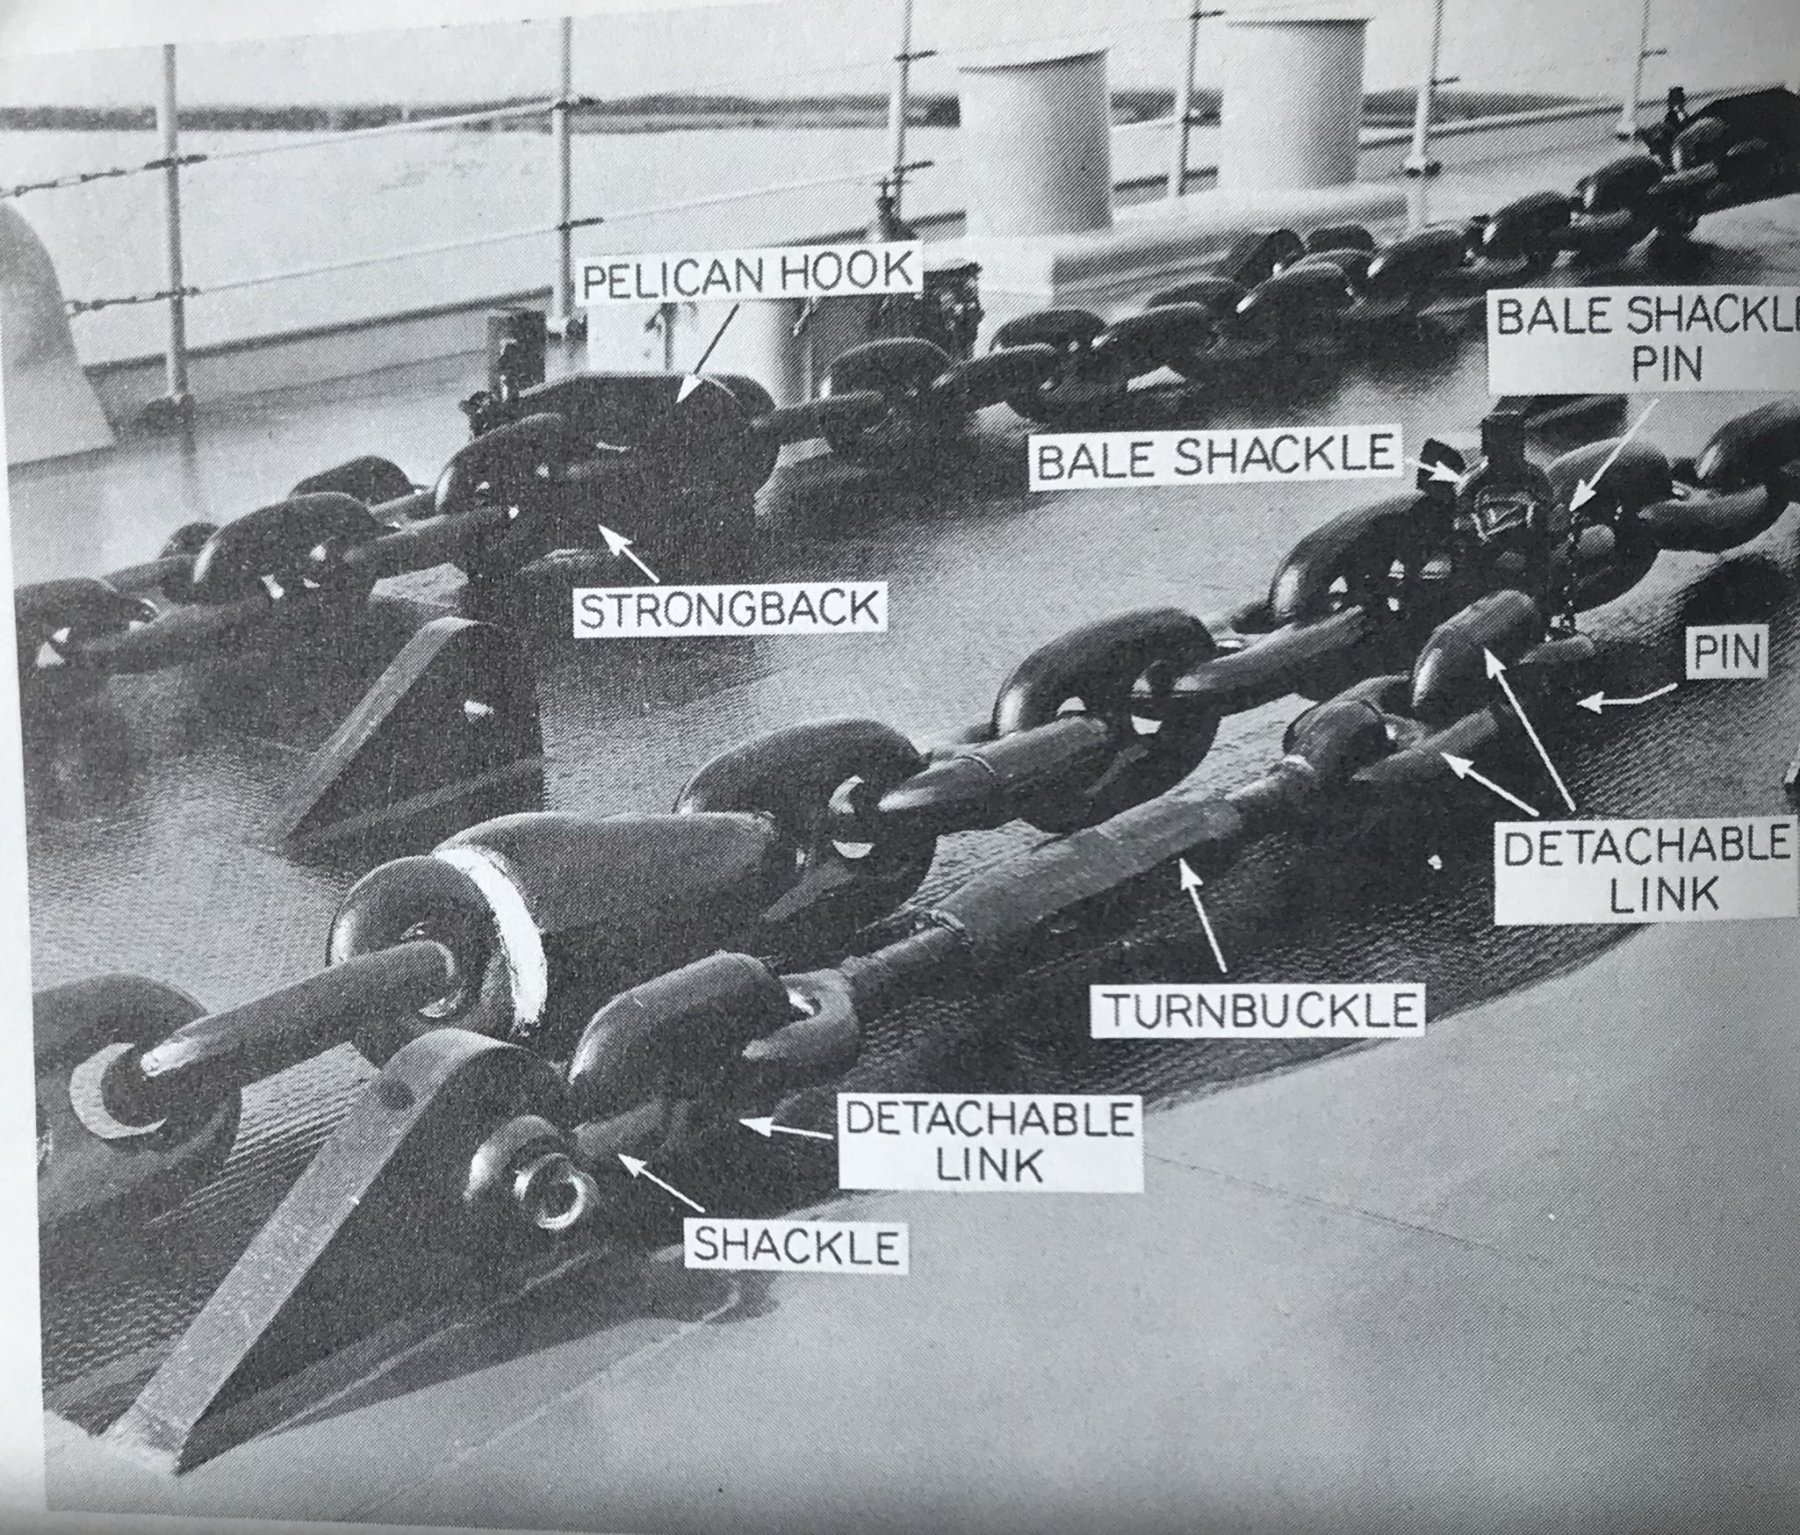
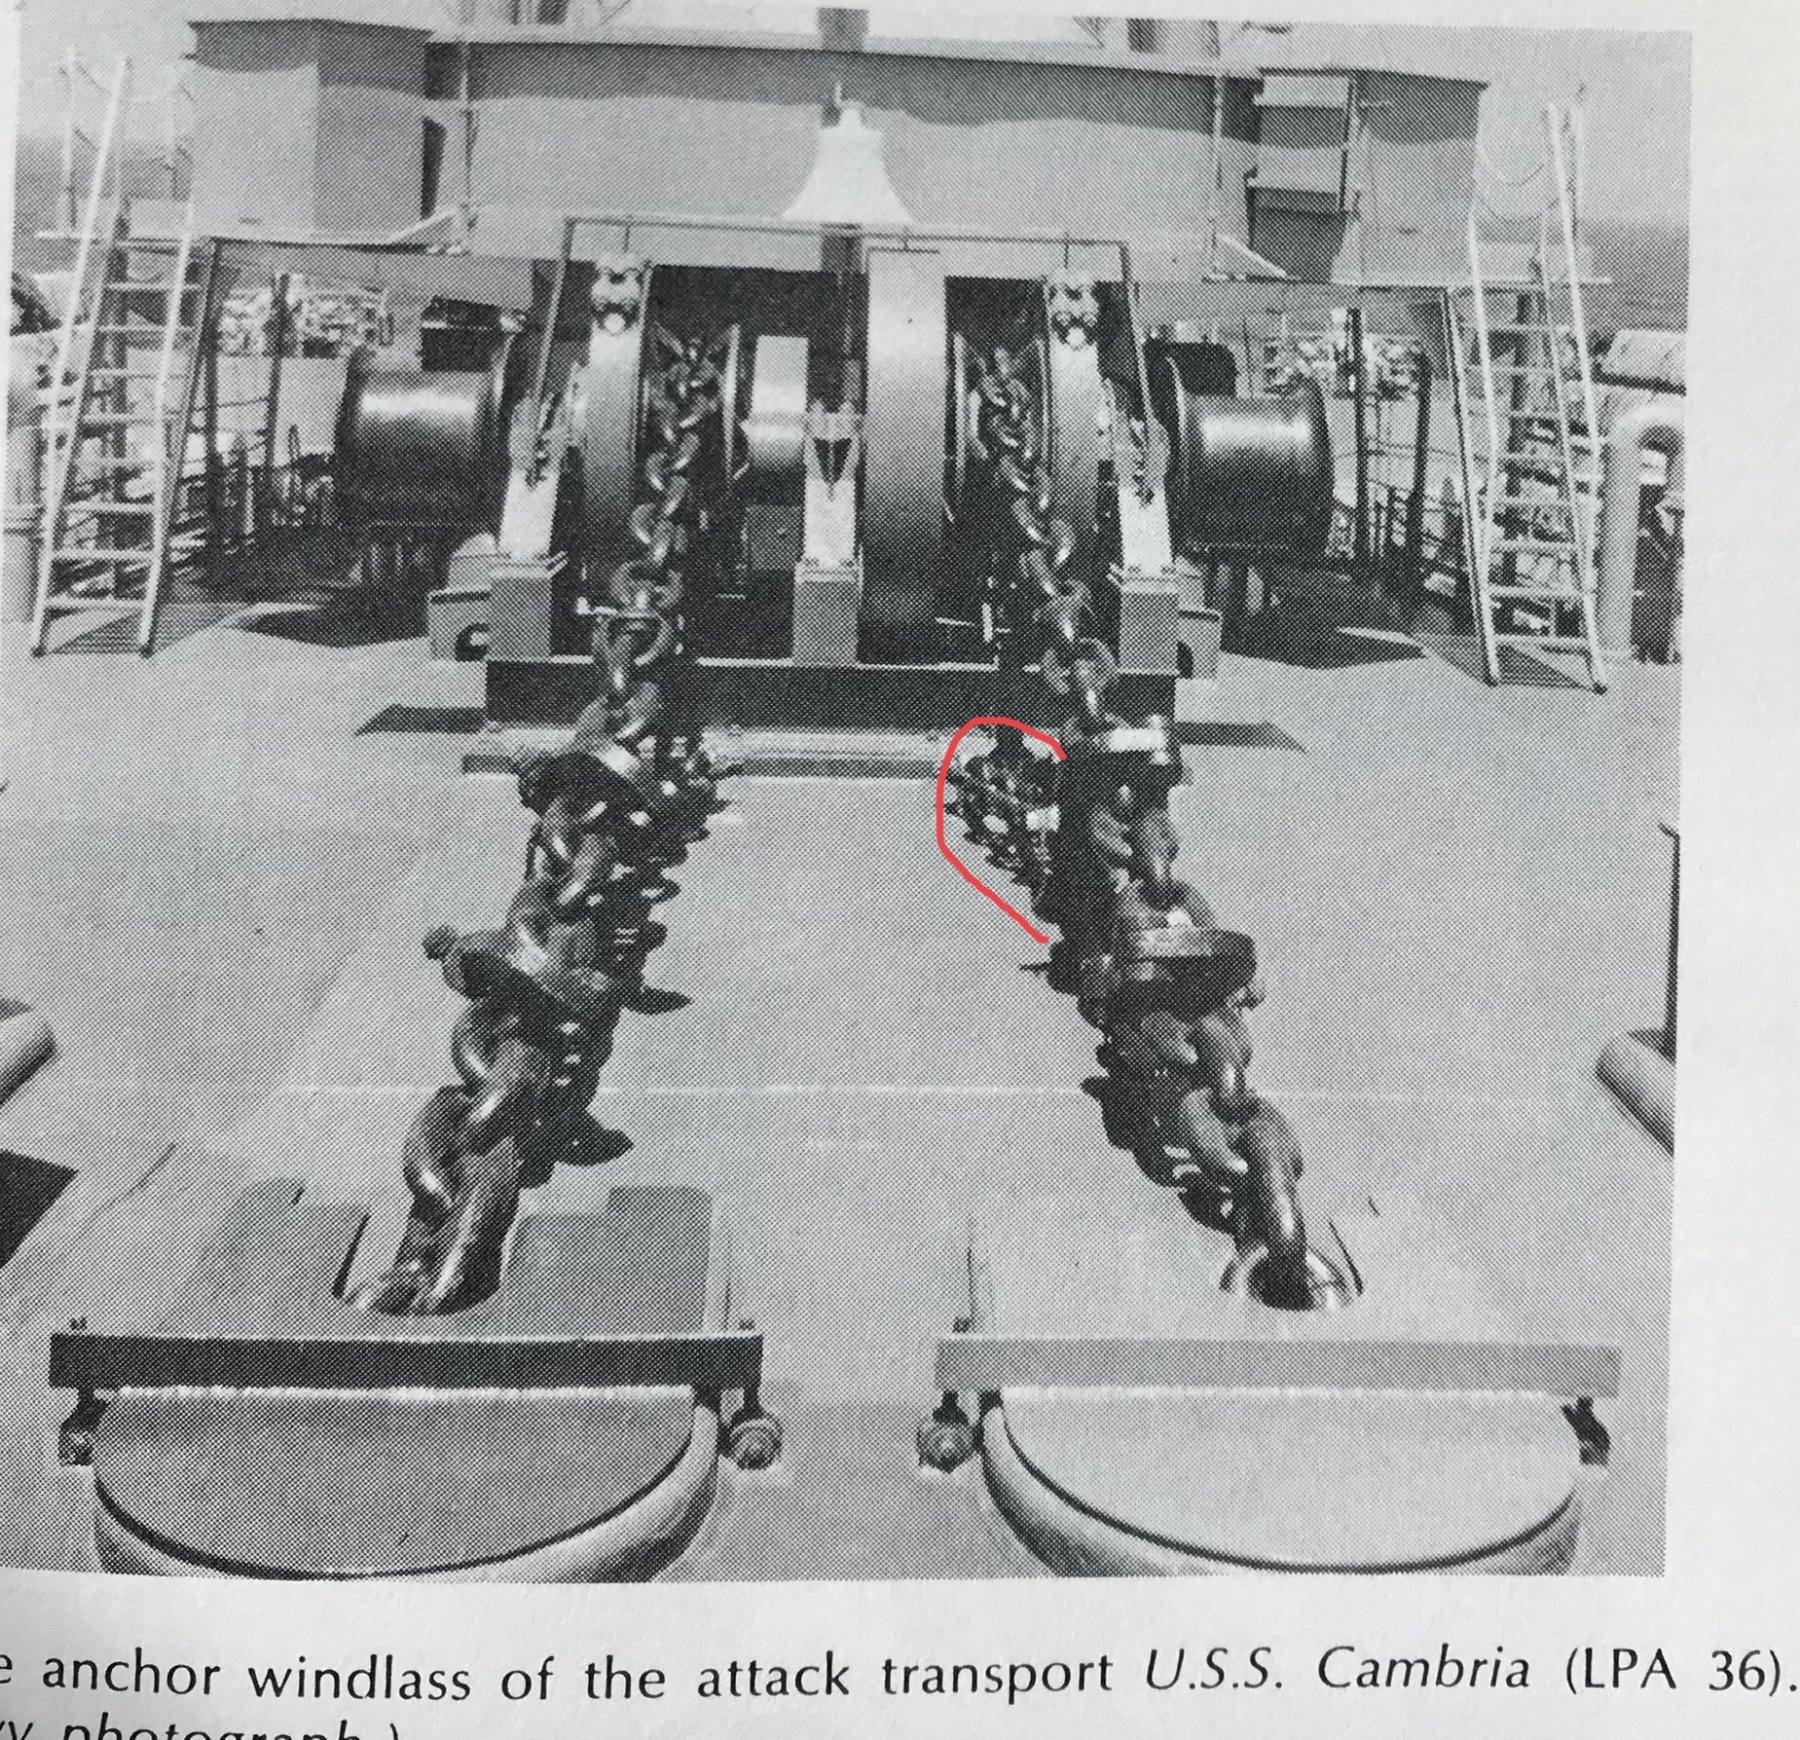
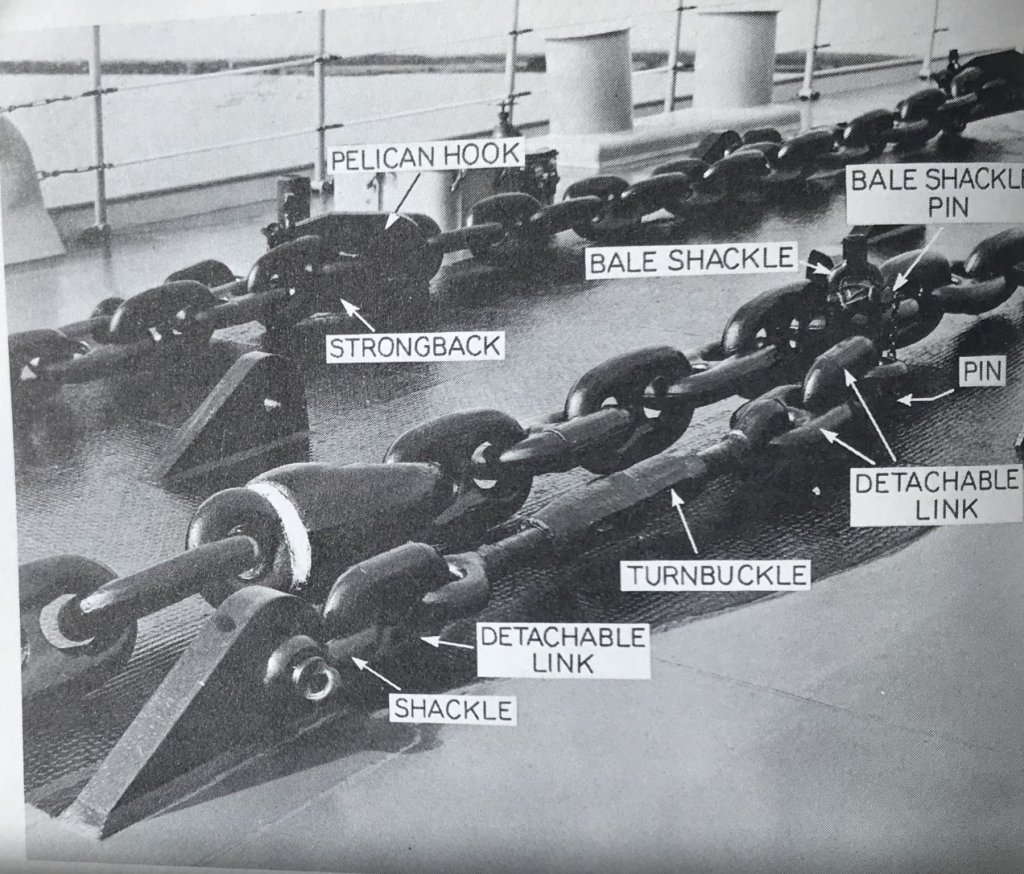
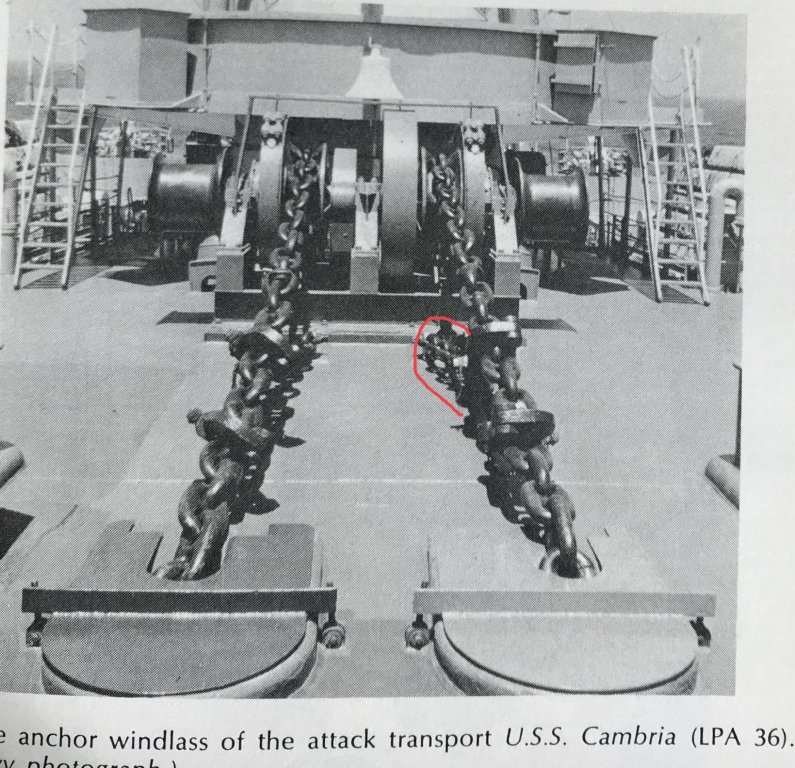
Steve, Here are a couple of photos from “Modern Seamanship”.... In the foreground of the first photo, you can see the chain stopper. This takes the load of holding the anchor securely in the hawsepipe. The Pelican Hook is basically a big clamp that fits around a link in the chain.
- 446 replies
-
- 5
-
-
- zebulon b vance
- deans marine
- (and 3 more)
-
Steve, The kit supplied ground tackle is missing a few details, including one that may solve the hawsepipe issue.... On all the ships I’ve been aboard, there is a removeable metal cover that fits over the opening where the chain comes on deck. This serves two purposes- one to to keep people from accidentally stepping there when underway, and two to cut down on the water shooting out when the ship buries the bow in a large wave. Adding this detail would hide the fact that the chain isn’t going into the hawsepipe... An item missing on many models is the chain stopper- it is a separate item that hold the weight of the anchor when it is hawsed. I’ll try to post a couple of photos from Knight’s “Modern Seamanship” later tonight.... -Bill
- 446 replies
-
- 4
-
-
- zebulon b vance
- deans marine
- (and 3 more)
-
I am still working on the model, when I have the time. It was a long cold spring, so I didn't spend much time working on the model in my basement shop. But I am still slowly planking the hull-- sometimes only a plank or two a week. Now that it is getting warmer, I can spend more time.... The hull is planked is planked from the deck down, and from the keel up. About the a third of the planking remains-- the hard part at the turn of the bilge. I have also given the interior surfaces of the bulkheads a coat of epoxy resin, to waterproof them in case water ever gets in. No pictures now-- I am committing all sorts of planking sins, tapering planks to a point, etc. I can get away with it because I will be fiberglassing and painting the hull. (And because there will be no photographic evidence!) -Bill
- 41 replies
-
- 1
-
-
- muscongus bay lobster smack
- BlueJacket Shipcrafters
- (and 1 more)
-
Simply put, you'll need a motor, an ESC (reversible electronic speed controller), a battery, and a radio control set. What specifically you'll need will depend a lot on what type of model you're looking at................ What kind of boat-- Scale, speed, sail? -Bill
- 1 reply
-
- 1
-
-
Steve, I think your picture of the Meany answers the question about the rudder&tiller— looks like they aren’t installed in that photo..? -Bill
- 446 replies
-
- 4
-
-
- zebulon b vance
- deans marine
- (and 3 more)
-
Once again, I’m a little late with comments- In my haste to reply about the white lettering, I totally missed the post a few spots higher up about the boat falls. Regarding the PE falls- the upper block is usually fixed to the end of the davit, not hanging lower from a pendant. That might account for why the PE parts seemed to be too long? If they are still too long, I’d suggest sending Ron Dean a note to let him know about the problem. You are right about the lower end, the falls are never attached to the bottom of the boat- it would be dangerously unstable. In any case, I think your replacement looks better than the PE. PE can’t do justice to round items- they just come out too flat. In 1/350 scale the PE boat falls look good- but 1/96 scale is too big to hide the faults in shape and depth. One thing about your replacement- generally, the lower block is attached to the boat’s lift point with some sort of quick release fitting. The most dangerous time in a small boat launch is when the boat is in the water with the falls still attached. As the ship rolls and the boat rises and falls in the waves, the falls go from having lots of slack which can easily get caught on things (including body parts) to suddenly snapping tight as the boat drops away in a trough. In regards to color, I’d expect the blocks to be painted, probably the same color as the davits. I’m not familiar with Vance’s specific configuration, but I’d expect the lower block to be close to the eye on the boat. I wouldn’t bother trying to replicate the quick release mechanism, I’d probably just go with a simple loop. This is probably more info than you were looking for, but I figure that sometimes it helps to understand how things were used when trying to model them... -Bill
- 446 replies
-
- 4
-
-
- zebulon b vance
- deans marine
- (and 3 more)
-
Steve, The topic of custom white decals came up again on one of the plastic model forums I frequent. Here’s a link to a post on a variety of suppliers: https://www.tapatalk.com/groups/hyperscale/custom-decal-company-enthusiast-recommendations-t505171.html Draft numbers are generally 6” high on a real ship. It makes it easy to tell the vessel’s draft at a glance— if the waterline is at the bottom of the number, that is the draft in feet, if it is at the top, that’s another half foot. Draft markings are available from a couple of suppliers- 1/96 is a popular scale for warships in the US. -Bill
- 446 replies
-
- 2
-
-
- zebulon b vance
- deans marine
- (and 3 more)
-
Steve, I wouldn’t worry about the awning on the pond - you’ll only be sailing on nice days, after all! I used painted (acrylic) printer paper for the covers on the lifeboats on my 1/96 Lightship, and they’ve held up well for years. I have seen PE boat falls on smaller scale models, but not in 1/96 before. The issue with PE for stuff like this is that there is no depth to the part- the blocks should be thicker than the line. If I had 2 or boats to rig, I would replace the brass parts. But 16 boats??? I think I’d try painting them first, to see if that helps. Another option might be to add a small disk of plastic to the top pulley to make it thicker than the line- maybe just on the side facing out would deceive the eye...? -Bill
- 446 replies
-
- 4
-
-
- zebulon b vance
- deans marine
- (and 3 more)
-
Sale Pending....
-
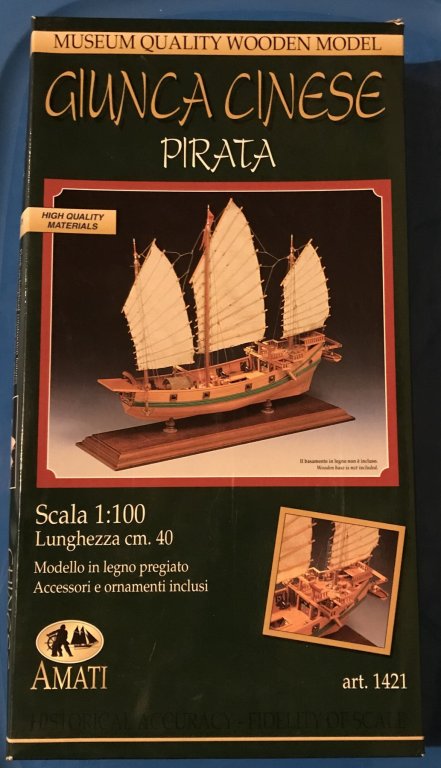
This kit came to me as part of a larger bundle, and it is something I personally have no interest in, so I’m offering it at a heavily discounted price. Kit is unstarted, all the inner packages are unopened, so I’m pretty sure it is complete. (I’m not going to open the inner packages to inventory them. ) I’ll also toss in a couple of books. One is a big (heavy) hardbound Naval Institute Press book “The Junks And Sampans of the Yangtze”. The other is a trade paperback “Junks of Central China”. Both are a bit shelfworn, but in decent shape. Everything is from a smoke-free home. New ones are available on Amazon for $169. I am asking $50, plus shipping from NH, USA.
-
I’m really interested in your build- fabulous work so far! I’m curious- how well do the BlueJacket plans match up with the Revell hull? The reason I ask is that on some of the plastic modeling sites, the Revell Alabama is rather poorly regarded in terms of accuracy. They say the Revell Alabama was just the Revell Kearsarge hull, with some different topside parts, and the two ships were not the same length. (Bluejacket’s kit is much more accurate, I understand.) But I don’t think many of the critics had access to the BJ plans, because the BJ kit was released long after most of the reviews of the Revell kit were written.... -Bill
-
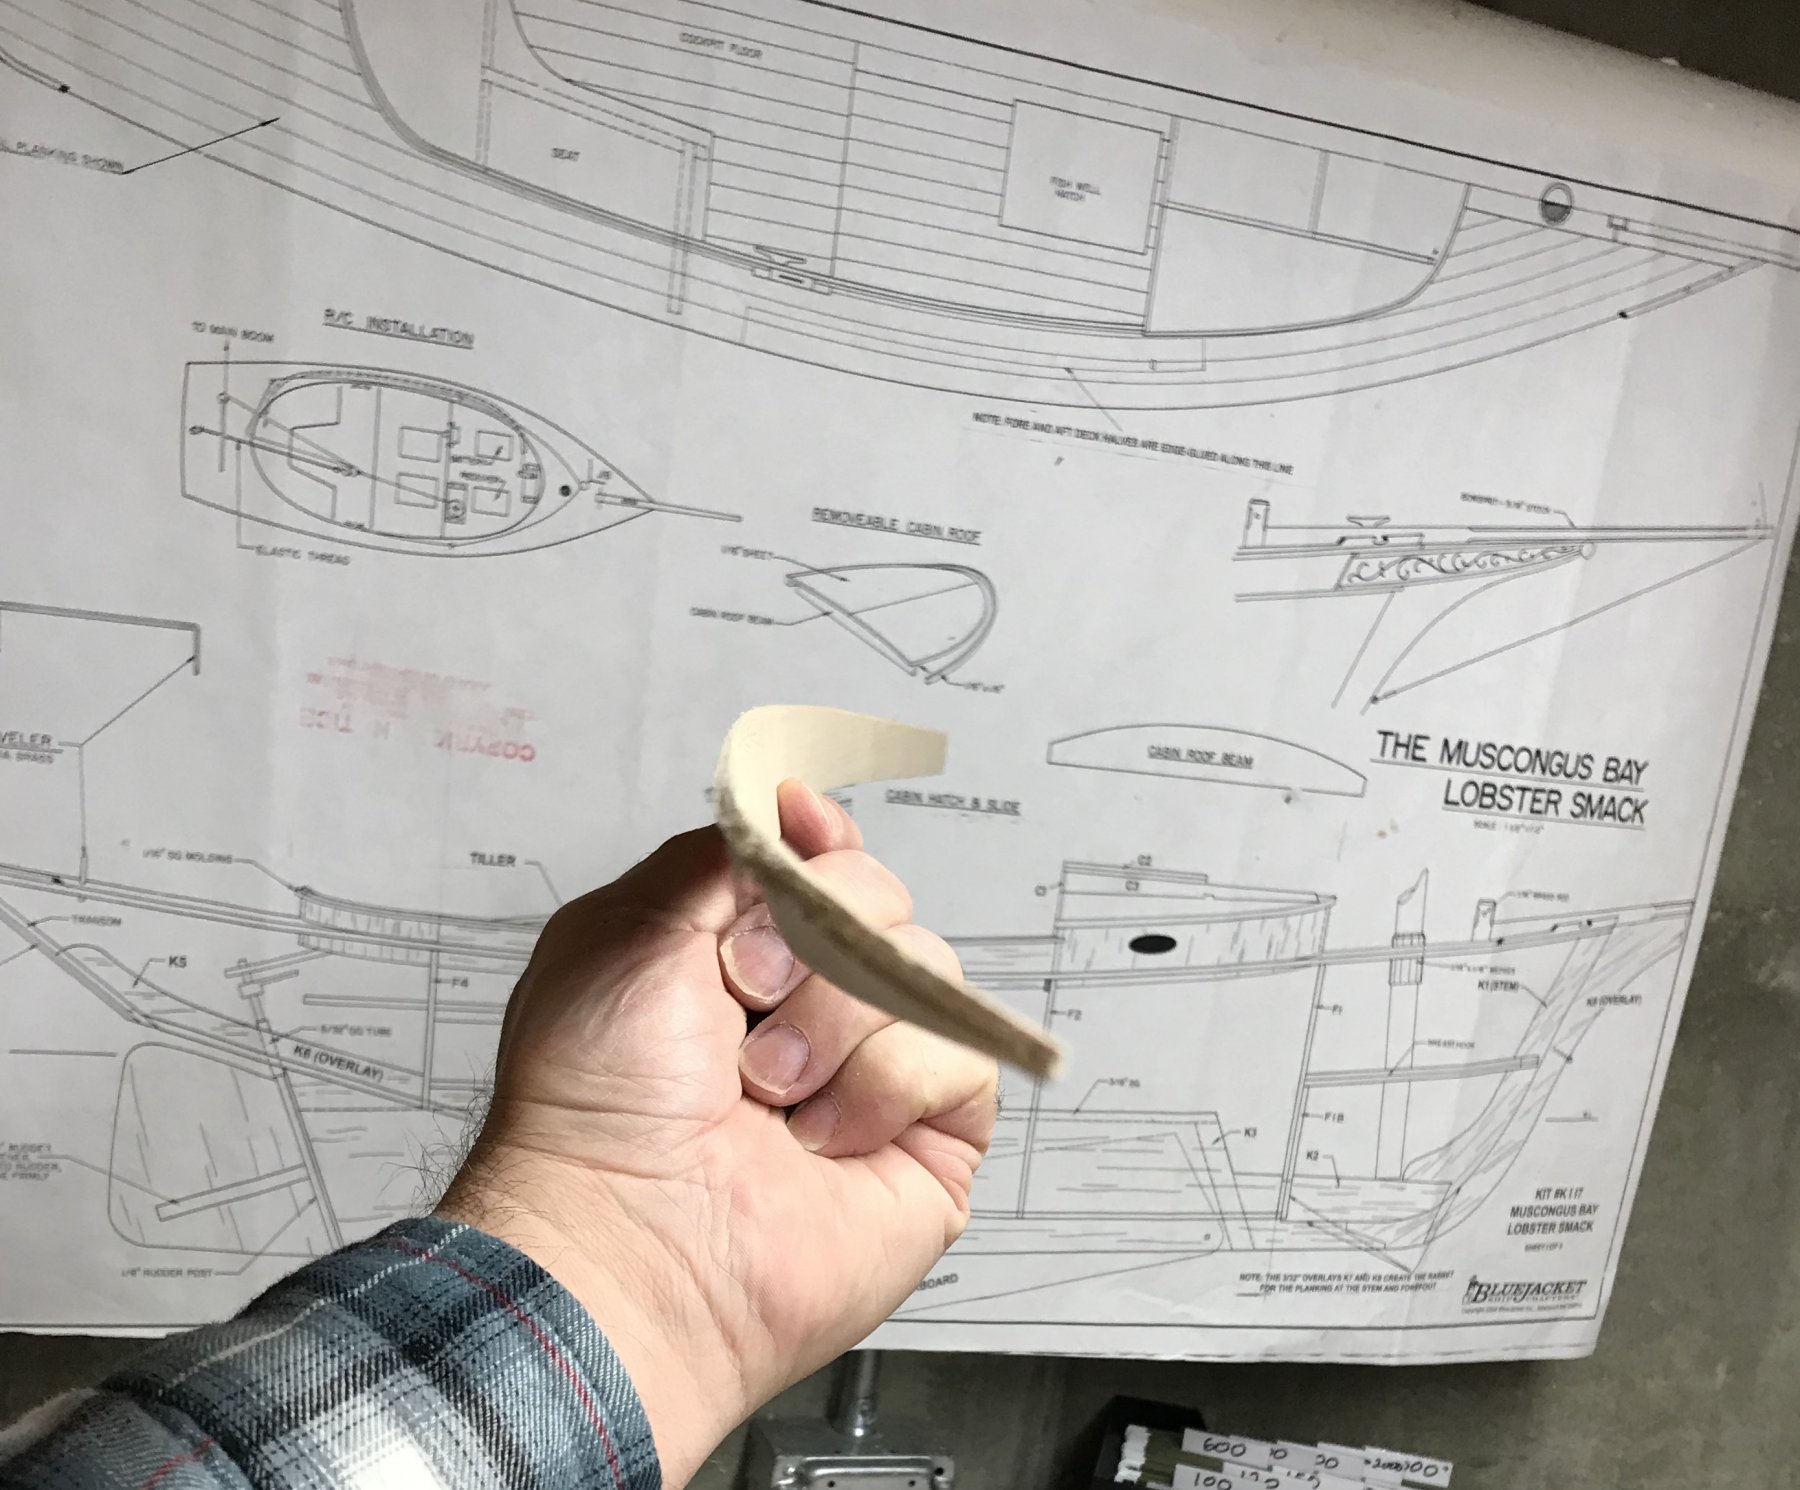
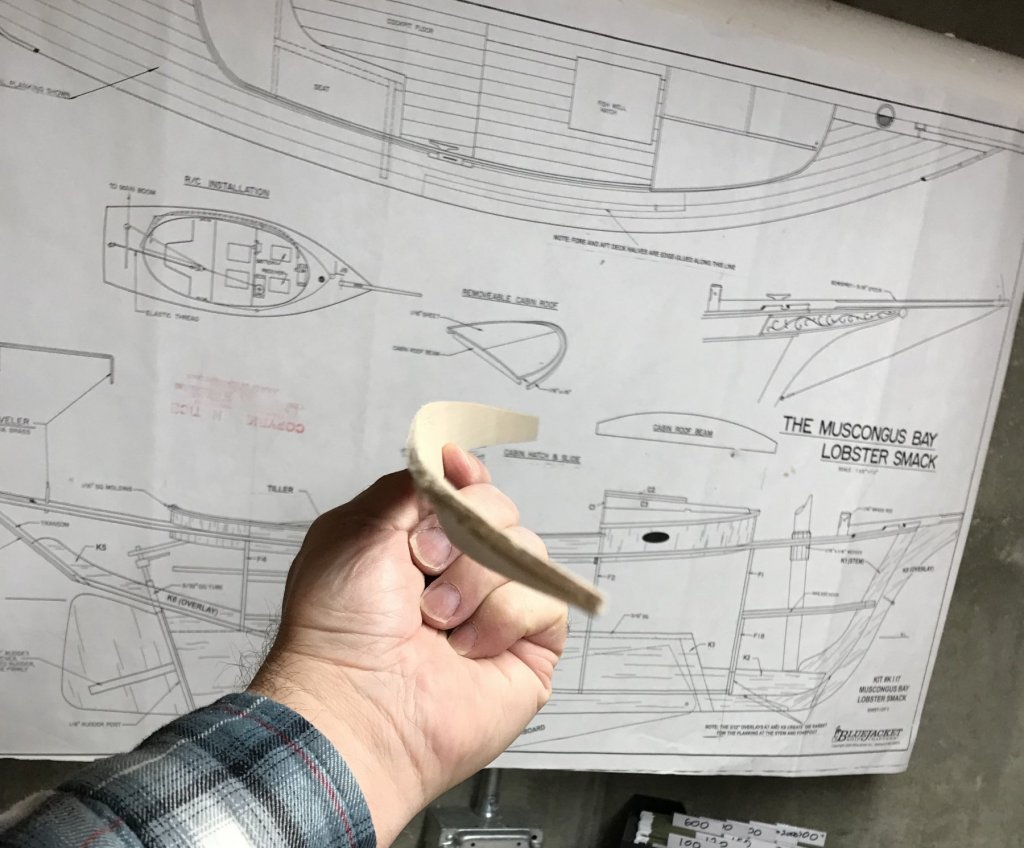
I checked my build log- I have recorded exactly three one-hour sessions working on this model in the shop in the last 30 days! I spent most of my time doing a full cleanup and re-organization of my space. Now that is done, so I returned to working on the garboard planks. The kit provides two more of the one-inch wide basswood planks for this step. I was dreading installing these at first, given how hard it was to bend the sheer planks. But it turns out the garboard planks mostly need twisting, and not the curving the sheer ones did. A good overnight soak made it reasonably easy to clamp a wet plank in place to dry. Here’s a shot of how the garboard plank looked after it dried:

- 41 replies
-
- 5
-
-
- muscongus bay lobster smack
- BlueJacket Shipcrafters
- (and 1 more)
-
Bump... updated to include Free CONUS shipping!
-
Sale is pending, and I have an alternate. Pav, I didn’t do anything on my end to fix your ability to see the picture- I suspect it was an issue on your end, or in the forum, maybe?
-
Steve, Another RC tip: Build your model so that it can roll 60 degrees (or more) and nothing moves or shifts- especially batteries and ballast! Story time: Many years ago, at a club sailing event, I saw a 3+ foot long steam- style tug almost founder on a flat calm pond. The model was sailing along fine, when it was “T-boned” amidships by an inattentive skipper’s model. The collision did no damage to the Tug’s sturdy hull. But the force of the impact rolled the tug to port a good 45 degrees or so. This caused the (unsecured) main battery, a big 12volt gel cell, to fall over against the side of the hull. The shift of the weight caused the tug to not recover- it continued to list a good 35-40 degrees to port. This extreme list put the seam where the removeable cabin met the deck under water. Water started to seep in, and the flooding made the list worse. The model made it back close enough to shore that the skipper was able to grab it in thigh-deep water just as it foundered. I know you still have a lot work ahead of you, but do make time to install some method of keeping the heavy stuff secured! -Bill
- 446 replies
-
- 3
-
-
- zebulon b vance
- deans marine
- (and 3 more)
-
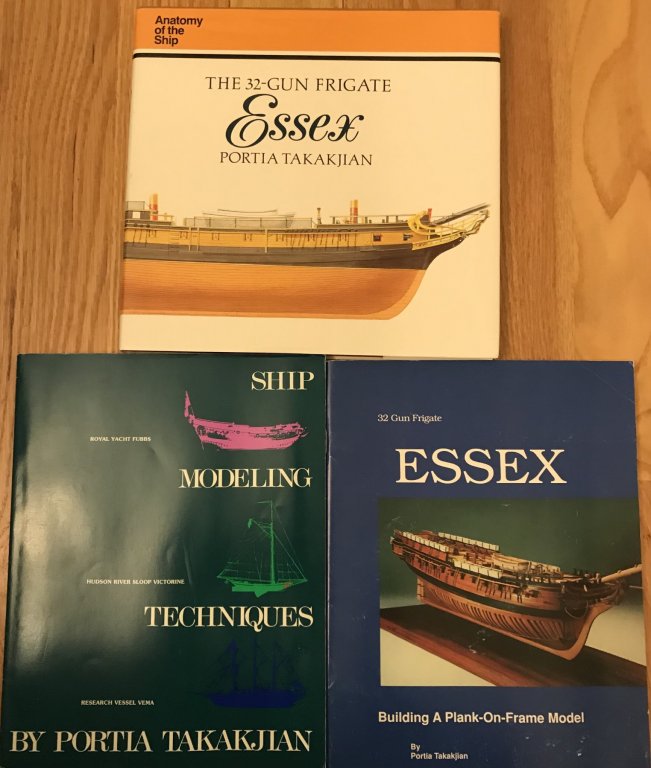
1. The Anatomy of the Ship: The 32 gun ship Essex 2. Ship Modeling Techniques 3. 32-Gun Frigate Essex- Building a plank on frame model
-
Steve, I wouldn’t worry about de-watering the open boats. You aren’t going to be sailing her on a rainy day, after all- it isn’t much fun, nor is it good for the transmitter! If you do get a little water in there, I think you’ll find a turkey baster is overkill for those small boats. An eye dropper or a small syringe might be small enough to reach into the bilges more easily. But the easiest way to get water out is to wick it out with the corner of a dry paper towel. (Evaporation works, too!) The turkey baster or a large syringe is handy to have if you get some water in the hull, but that should be an unusual condition. If something is leaking, fix it. Regarding the misplaced porthole: I think it looks a bit odd there. If it were my model, I’d just cover it up with a thin square of plastic - like a patch or a doubler for a mount for some long-since-removed piece of gear. Ships are constantly changing throughout their lifetimes- no ship 100% matches the “official” plans or any of her sisters. -Bill
- 446 replies
-
- 2
-
-
- zebulon b vance
- deans marine
- (and 3 more)
-
I have three books for sale, all by the late Portia Takakjian. All are in good to very good condition, from a smoke-free home. One hardback, two soft covers. Looking online, it seems these books are rather expensive on the used book market. They all seem to go for $35 or more each! I’m offering all three as a bundle for $60, plus shipping from New Hampshire. I estimate that US shipping will be $12-$15 via Priority Mail, or $3 - $5 via Media Mail. I’ll compute an actual cost once I have a buyer. PayPal is preferred, other options can be discussed. I would prefer to sell them as a bundle... if that doesn’t sell, I’ll price them individually later... Questions? -Bill
-
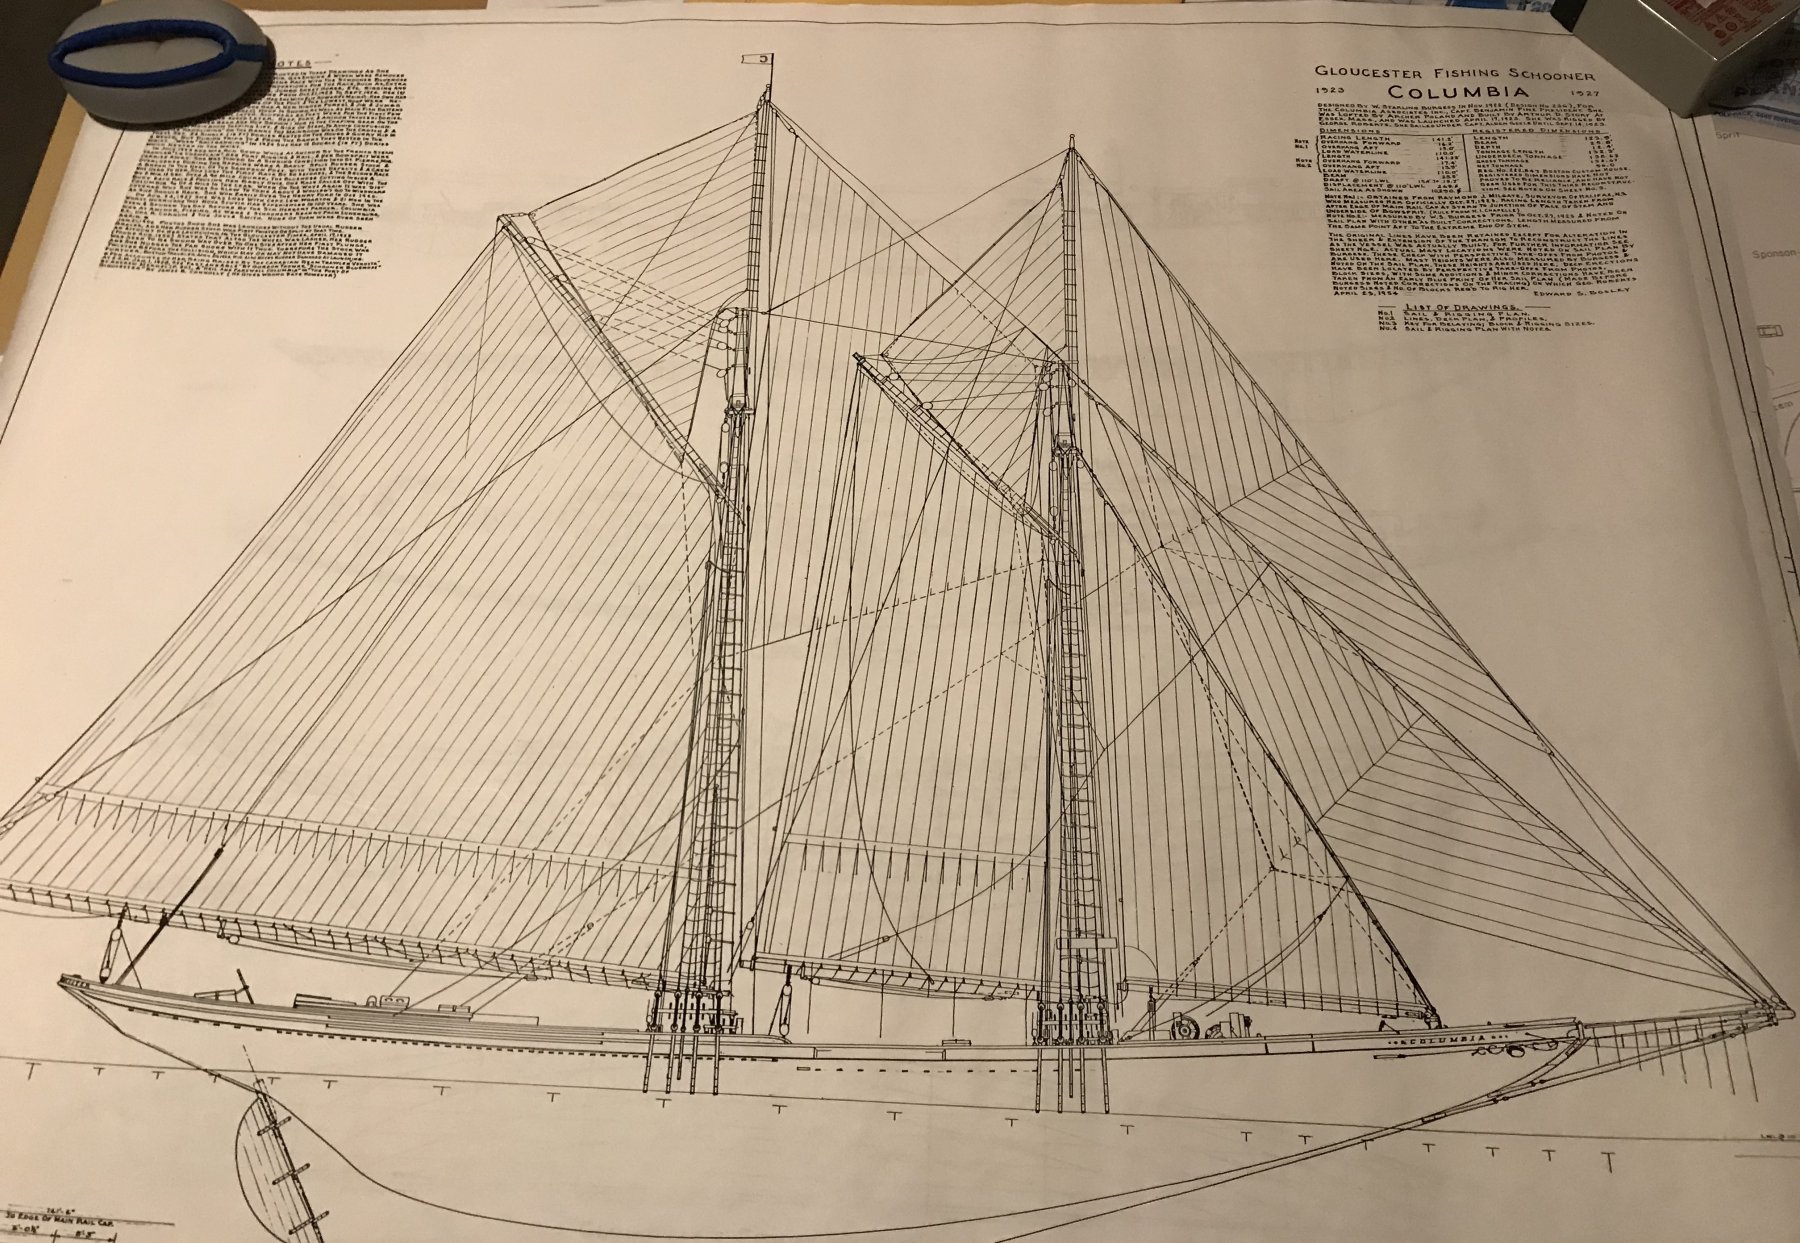
Gone! Gloucester Fishing Schooner Columbia 1923 - 1927 Four large Sheets: 1. Sail and Rigging plan 2. Lines, deck plan, and profiles 3. Key for belaying; block and rigging sizes 4. Sail and Rigging plan with notes $15 for the set. Plans will be shipped rolled in a tube. Buyer to pay shipping. For a US buyer, I guesstimate the cost to be around $10 if sent via Priority Mail, or $4 if sent via Media Mail (2-3 week delivery).