JerseyCity Frankie
-
Posts
1,338 -
Joined
-
Last visited
Content Type
Profiles
Forums
Gallery
Events
Everything posted by JerseyCity Frankie
-
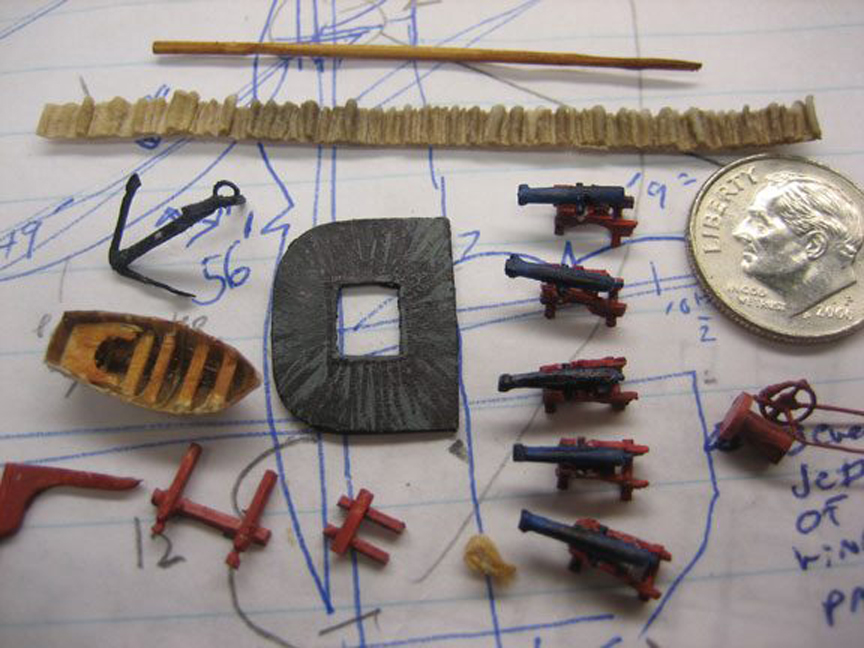
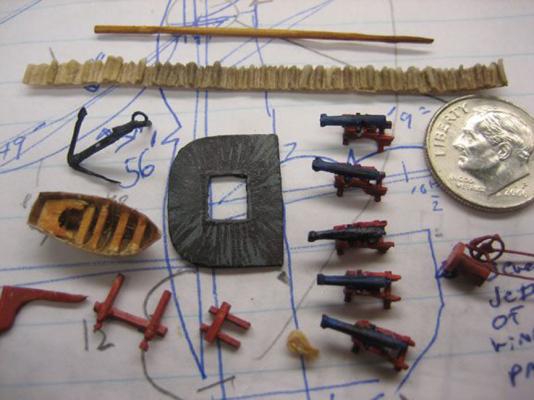
Details. and sub assemblies. I tend to build all the details ahead of time and attach them as the build progresses and they are needed. Others point out the logic of building them as needed, since there may be unforeseen factors that require alteration when the time comes to install them. At the top of the photo is a strip of “hammocks” which is glue stiffened tissue paper formed into ridges with a razor blade on a piece of glass from which these strips are cut when dry and painted. Not obvious is a blond colored object at the bottom center of the photo, this is a rope coil made on a jig.
-
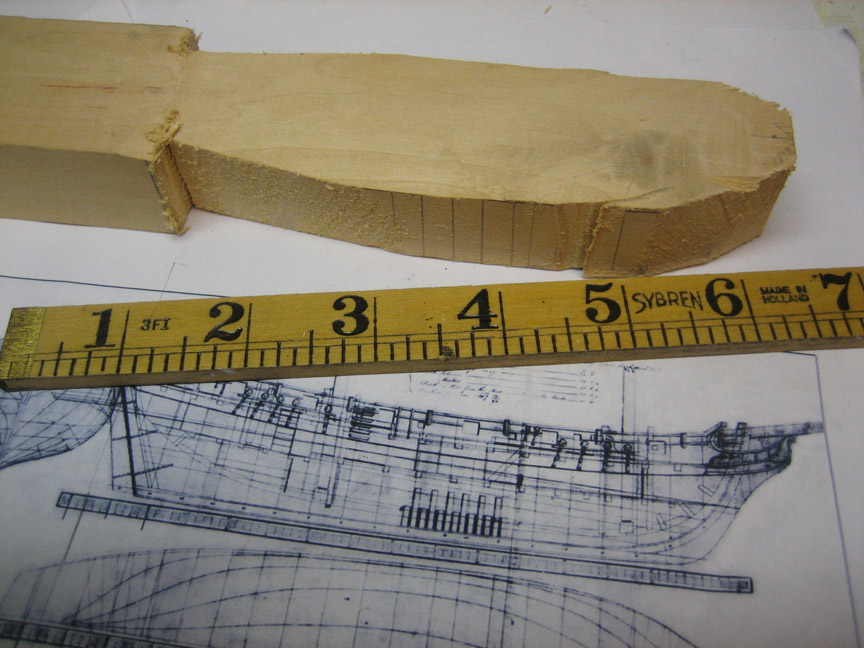
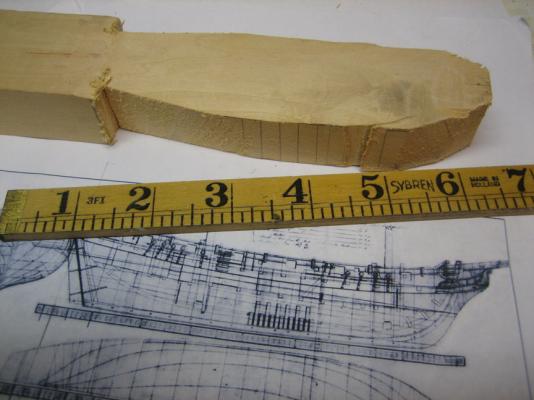
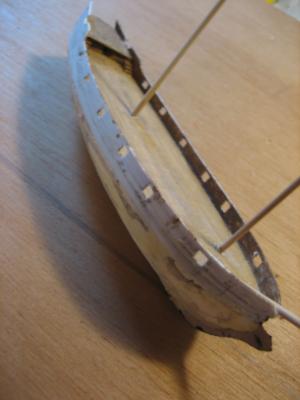
I finished this model four years ago and I have had some trouble finding the photo documentation since I had a computer die on me and files were all over. Likely I will add more as I find them. This is a scratch built solid basswood hull model of a fictional ship based on the actual brig H.M.S. Speedy made famous by Lord Cochrane and fictionalized by Patrick O’Brian. Drawings were found on the web and the novel itself gives a great deal of useful information including measurements.
-
Coppering wear
JerseyCity Frankie replied to drtrap's topic in Building, Framing, Planking and plating a ships hull and deck
I once lost an argument about what color the copper below the waterline should be. Then as now I prefer the beautiful verdigris green color of the Statue of Liberty. I used to argue that the color of the coppered bottom of a sailing ship would be this delicate light green color. Facts proved me wrong however when photos of the Constitution in dry dock emerged showing the mottled brown color of her copper. Something about the underwater nature of the oxidation at work did NOT result in the pale green color I was sure must exist on a coppered hull. To add to confusion, Pride of Baltimore II has a pale green bottom paint that matches what I had expected actual copper to look like and if you google her you may find photos of her in drydock showing this more lovely color. I support your decision to go with a mirror bright polished finish though. You are making a statement about the materials used in the model and showing an honesty about those materials. -
Niagara from Model Shipways - move by moderator
JerseyCity Frankie replied to rogerpf's topic in Wood ship model kits
Not to mention the real Niagara is afloat and there are hundreds if not thousands of photographs of her on the internet for reference. She sails often and is in excellent condition. There are even youtube videos of her. -
Has any one here Built theThomas W Lawson?
JerseyCity Frankie replied to J Haines's topic in Nautical/Naval History
I worked up some drawings for a ship in a bottle model of her once but never built it. Her long hull with all those sails would have really filled the inside of a long bottle but all that rigging! I have seen models of her, shes famous so there are models of her out there. I can not imagine what it was like going about on a breezy day aboard her, all that canvas shivering and sheets slatting around, it must have been pandimonium. My understanding is that they named the masts after the days of the week. -
There WERE preservatives used on natural fiber sails. If you have ever seen red sails on a vessel those are Tanbark sails. Tanic acid from tree bark has been used traditionally as a means of preventing or delaying rot in cotton canvas. This was more common in Europe but some sailors today still use the sails on traditional rigs. Also you can get dacron in a red color that mimics Tanbark. If you goggle "tanbark sails" you get this: http://www.google.com/search?client=safari&rls=en&q=tanbark%20sails&oe=UTF-8&um=1&ie=UTF-8&hl=en&tbm=isch&source=og&sa=N&tab=wi
-
Some day, a day far off in the future, I can imagine myself building the sails from individual cloths two scale feet wide. I picture doing this over a pre made form of the shape the sail would be in when it is set and drawing. maybe by then I will have rejected woven fabric entirely in favor of paper? I imagine that going to this degree of trouble would allow for more realistic sails, less of a compromise we come to when we try to make miniature sails out of full scale woven cloth. I draw my panel lines on with colored pencil, others sew parallel seams with the sewing machine set to the smallest stitch, but still those stitches are way out of scale and cause the material to pucker too. But on the other hand my drawn on seams don't do enough to deform the surface they are drawn on, to suggest the varying elasticity of the individual panels, they are flat lines drawn on a flat plane. In actual practice the cloths were sewn edge to edge in a double row of stitches, the two rows about three or four inches apart. Filed with wind, worn thinner sails in some lights take on a subtle corrugated appearance as the two foot wide panels between the seams billow out a bit farther than the seamed areas of the sails do. And on a level above that, the entire sail a compound curve, a beautiful convexity. I can imagine at some future date coming to the conclusion that each panel must have its own set camber. Would I burnish this into the paper strips before assembling them? Would my mold I build the sails over have subtle ribs in it to create this effect? I know that if I live long enough I will eventual fall to doing all these things I'm describing here. I'm pretty passionate about canvas. An excellent book on real world traditional hand made canvas sails is The Sailmakers Apprentice by Emiliano Marino. Full of well done illustrations of sails in all their varieties. Any questions you ever had about any part of a traditional canvas sail is answered, every variation on every sort of rig is described from the point of view of the sail maker. Its intended to teach you how to make your own sails so it goes into lofting and theory, but there is a good bit of historical background for a ship modeler to bite their teeth into. And its well written warm and humorosus.
-
I sail as crew on a schooner with a horse on the staysail sheet. The horse on the schooner Pioneer (1885) is a steel bar about 2" thick that runs athwartship all the way to the bullwarks- it doesn't bend at the ends, its got a slight camber in it to match that of the deck. Its about 9" above deck level. When we put the boat about on a new tack, this sort of sheet arrangement tacks itself with no tending other than an occasional kick to encourage the sheet block outboard in light winds. Advantages are that the entire sail needs no adjusting throughout any sail evolution and the sheet tackle is always off to one side, providing a better lead and sail shape than a center lead sheet would while at the same time freeing up all that deck space forward of the foremast.
-
I made the sails for my model of Le Renard from old bed sheets and they were built up with glue, not sewn. The only sewing involved was to lace them to the spars. I stained them overnight in a thin coffee and water solution. I ironed them flat and I drew the vertical seams with light grey colored pencil this is a bit more difficult than it sounds). The tableing -the edges of the sails and the reef band- was made thus: more of the same sail material was soaked in starch ( mix dry starch into boiling water, turn off flame and dunk the fabric just long enough to soak it) and ironed flat which also dried them. With enough starch the resulting material is hard enough to be easily and neatly cut with an xacto and a straight edge. If you use enough starch ( you have to experiment a little but I doubt you could over-starch) the knife cut is smooth and no stray threads poke out and the starch prevents it from freying. Cut strips of the correct width and glue them to the sails with white glue. I later shaped the sails and hardened them into their curves by spraying them with a commercial product called Stiffen Stuff, available at fabric and craft stores.
-
Tools That Are a Waste.
JerseyCity Frankie replied to fish's topic in Modeling tools and Workshop Equipment
Hey there Dan Vedes, what kind of wood are you using in your drawplate? Sorry if I gave the impression I was trying to taper spars in the Drawlplate, thats not what I was trying to describe. I contrasted the dremmel turning method, and its ability to taper, with the drawplate which can only produce untapered spars or perhaps treenails. -
Tools That Are a Waste.
JerseyCity Frankie replied to fish's topic in Modeling tools and Workshop Equipment
Never having made a treenail I am not qualified to opine about using the draw plate but I bet it would work and provide consistent results but SLOW going. Hey there Vern, as I said above, to use the Draw Plate you shove or pull a very small dowel through the largest hole, which shaves off a bit of wood. You usually have to repeat this trip through the hole a few times before you get off enough wood for your now slimmer dowel to fit through the next smaller hole. My Draw Plate has 26 holes. You keep doing this till you get to the last hole and you have what amounts to a .020" diameter dowel. I have been working to a small scale so I was using my Draw Plate to make the lighter spars on square rigged ship models, but as I said I found it was actually better not to use the Draw Plate for this, for me it was more trouble than it was worth. -
Tools That Are a Waste.
JerseyCity Frankie replied to fish's topic in Modeling tools and Workshop Equipment
The Draw Plate. For those unfamiliar a Draw Plate is a piece of metal with a series of tiny holes of diminishing size. You pull a piece of wood through each hole in succession and each hole makes the wood that much thinner until you reach the diameter your after.I almost hesitate to include my Draw Plate on the list of tools that are not worth the trouble. It could well be that I simply had unrealistic expectations for what it would allow me to do. It certainly can be used to make small spars smaller. But I was disappointed in that I had expected the tool to allow me to work faster and turn out spars quicker than my old method. The old method was to plane down a bit of square or round stock with a handheld block plane to a rough approximation of an octagonal cross section, then chuck this into my dremmel and pinch the turning spar with a handheld fold of sandpaper until I got the smoothness and thinness I was after. In trying to achieve the same result with the draw plate, I still have to prep the wood with the block plane and moving the wood from one drawplate opening to the next is very slow going. This may have more to do with poor technique on my part? But I find I’m often snapping my little spars before I get them to the size I am after. Its true I mangle a lot of spars I turn in my Dremmel, but not as many. Plus the dremmel allows me to put in some taper. I suppose the Draw Plate allows a degree of repeatable consistency but I find that for what I am doing the “old method” is better and I doubt I would have bought the draw plate if I had known what I know now. -
"overhead-square seasaw brittels" ?!
-
16" doesn't seem too out of place. The collective amount of strain on the entire pin rail was surely formidable, erring on the size of large and robust sounds logical to me. I do not have any sources to quote but in practical terms the pin would have to be far enough away from the inner bulkhead or spirketing to allow the turns of the line on the under side of the pin AND the sailors hands to get up and behind when belaying the line. With a two inch line and a sailors hand I would want at least 6 inches behind the pin. And the hole for the pin can't be too close to the inboard edge of the rail either or you risk it tearing out- so another 5 to 8 inches in front of the pin maybe. 13 to 16" sounds just right to me.
-
Why are yards painted black?
JerseyCity Frankie replied to rameyke's topic in Masting, rigging and sails
An argument in favor of varnish on the spars instead of opaque paint is that varnish, being transparent, allows for visual inspection of the spar. Paint could be hiding a spot that the rot has got to. -
Fabric stores have a product called tulle. It comes in many colors and is a very fine mesh often used in veils. http://www.google.com/search?hl=en&q=tule%20fabric&gbv=2&um=1&ie=UTF-8&tbm=isch&source=og&sa=N&tab=wi
-
Common practice on actual ships with laid wooden decks, at least on the ones I have seen, is to cover the heads of the bolts with bungs- wooden plugs that cover the hardware and keep the weather off of them. From a short distance away you can't make out the bungs at all.
-
Decided to build the USS Constitution 1/96 Scale Model
JerseyCity Frankie replied to kmgreene's topic in Plastic model kits
Its a great kit and I wish I had one. But expect to spend a lot of time. Be aware also that there are smaller plastic kits of Constitution out there that are less expensive, smaller and which will go together faster. A lot of the ones I see have pretty poor details but its a trade off for speed of construction. It may not be a bad idea to buy a small one and throw it together with no intention of displaying it, just to see if you enjoy the process. Its a bit different than building aircraft kits. You will only be out twenty dollars or so and a few nights of construction. The large model you have will present a challenge to glue together and then a whole new world of rigging the ship will await you after the plastic parts are together.I don't want to put you off the big Constitution model though, its a great kit -
Where do flag halliards go? Deck or top?
JerseyCity Frankie replied to Modeler12's topic in Masting, rigging and sails
Aye tear her tattered ensign down long has it waved on high, And many an eye has danced to see That banner in the sky; -
Hi Roger. You said " I can see I need to bone up on all the terms".It seams there are two languages for ships: common english and nautical. You can have a kitchen on dry land but at sea its a galley. You can have a right and left side on land but at sea it is port and starboard. Its daunting to jump into a world where something can be describes as "abaft the portside trestle tree on the mizzen" but once you get used to it you will find that the sea language is the most efficient way of describing parts of the vessel. There are two books that I used to get up to speed. The first is A Sea of Words by Dean King, which is the best for a quick study, it was written to help readers of the Patrick O'Brian sea novels: http://books.google.com/books/about/A_Sea_of_Words_Third_Edition.html?id=JKY8yZFChX4C My favorite though, and most comprehensive is The Oxford Companion to Ships and the Sea, which is 80% nautical dictionary and 20% sea encyclopedia with biographies of famous nautical persons and historic sea events. An extremely useful book to have, it even includes some rigging information and describes most of the sailor knots.
-
On page 44 of James Lees's Masting and Rigging of English Ships of War he has a paragraph about wooldings. He says they were rope until 1800, after which iron bands came into fashion. He says there was a wooden edge, a sort of shallow fence, at the edges of the wooldings and that the rope wooldings went OVER the Front Fish ( if there was one) and the iron wooldings went under in a notch cut in the back of the fish. The rope was nailed to the mast. He makes no mention of how the ends were treated and I can't imagine any other way for them to end on the real ship but for the ends to be simply nailed into place or perhaps the last two or three turns were hitched. A method I like to use is the "common whipping" which is intended for use on the ends of ropes to keep them from unlaying but which is a great way to make your two ends vanish: http://www.surreyknots.org.uk/images/8_Common_Whipping_Variations.jpg I use the variation at the bottom.
-
You could have your cake and eat it too if you present the sails as furled, then you can include all the running rigging. The hauling yards will be in the lowered position. Furled sails are relatively easy to portray on the model since all you have to make look convincing is bundles of sailcloth in neatly folded packages- tissue paper or light fabric tamed with some diluted white glue.
-
There are some modern schooners with no ratlines, but the ones I know also have rod rigging, Bermuda riggs, or mast furling systems in which the sail rolls up INTO the mast, forsooth. FAR from traditional rigs. There is a schooner in New York harbor called America 2.0, which has carbonfiber masts and NO SHROUDS AT ALL, which is just weird to look at but she is the fastest boat in the harbor.
-
Here is a photo of the Fore on Pride of Baltimore II. You can see the foresail, which is loose footed, is brailed to the gaff and yard. http://farm4.staticflickr.com/3594/3629456516_d33b6d3575_z.jpg?zz=1 I just deleted a paragraph I had written about how to furl the sails aloft ( two guys standing on the crosstrees furl the sails into neat packages lashed abaft the masthead) when I did a google image search for Phantom and I see photos of Phantom models with NO RATLINES on the lower shrouds. I am EXTREMELY skeptical that this was ever a practice on a schooner with topsails or staysails, or any schooner for that matter. I'm willing to keep an open mind though, maybe it was possible? With no knowledge of the Phantom I have to hold my tongue I guess but I can't believe anyone would trade the dubious extra 1/20th of a knot speed advantage removing ratlines from the rig would give you against the certain maintenance and safety issues not having safe access to your rig would cause. I would love to learn more about this apparent impossibility.
-
Brion Toss has an excellent book on rigging for actual sail vessels and devotes several pages to ratlines and how to install them. He claims a spacing of 16" is "standard". His book is called The Complete Riggers Apprentice and covers modern and traditional rigging. I checked Darcy Lever but he doesn't appear to give a spacing. William Brady says "15" is a good distance between the ratlines" on page 70 of The Kedge-Anchor(1847). Nares Seamanship (1862) asks "haw far are the ratlines apart? Fifteen or Sixteen inches" on page 55. Harold Underhill, in Masting and Rigging of the Clipper Ship and Ocean Carrier(1946) gives "About 15" apart" on page 83. Finally Lees, in Masting and Rigging of English Ships of War (1979) says ratlines "were spaced 13" to 15" apart. Its funny. Before I went back and checked my references I would have said it was 16" to 18". Its also funny that none of the experts I sited were exactly specific, except Brion Toss who's book is more about present day real world rigging and is certainly not intended for the model builder. Its still a great well written book with something of interest for anyone who is at all nautical.