HOLIDAY DONATION DRIVE - SUPPORT MSW - DO YOUR PART TO KEEP THIS GREAT FORUM GOING! (Only 20 donations so far - C'mon guys!)
×


JerseyCity Frankie
-
Posts
1,338 -
Joined
-
Last visited
Content Type
Profiles
Forums
Gallery
Events
Everything posted by JerseyCity Frankie
-
I spoke with a licensed captain who knows people on Bluenose II and she found out through facebook that there is a similar small scuttle in the exact same location on the replica and its a small hatch just large enough to squeeze through.
-
Help with question regarding HMS Victory at Trafalgar
JerseyCity Frankie replied to AllanP's topic in Nautical/Naval History
I couldn't get into that website either although not for lack of trying. I believe I tried emailing people on the site too but never got anywhere with it. if you get through to them, tell them their verification needs work. -
Dan I suppose Ralph Preston got to be one of the top U.S. ship-in-a-bottle modelers by pulling a few strings......
-
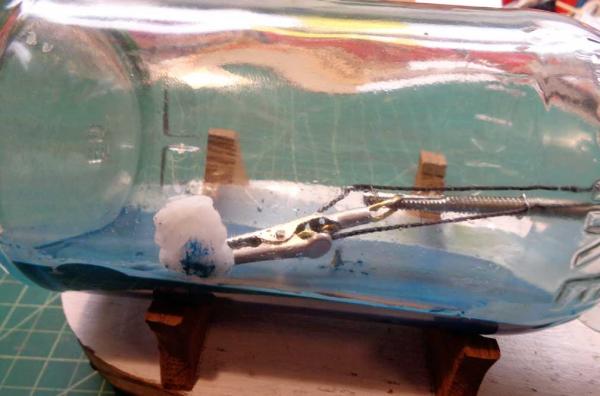
With the water in place and the wooden base built, the ship itself constructed and painted and now a new useful tool to use I guess there is no excuse but to proceed with getting the Kraken inside the bottle.

-
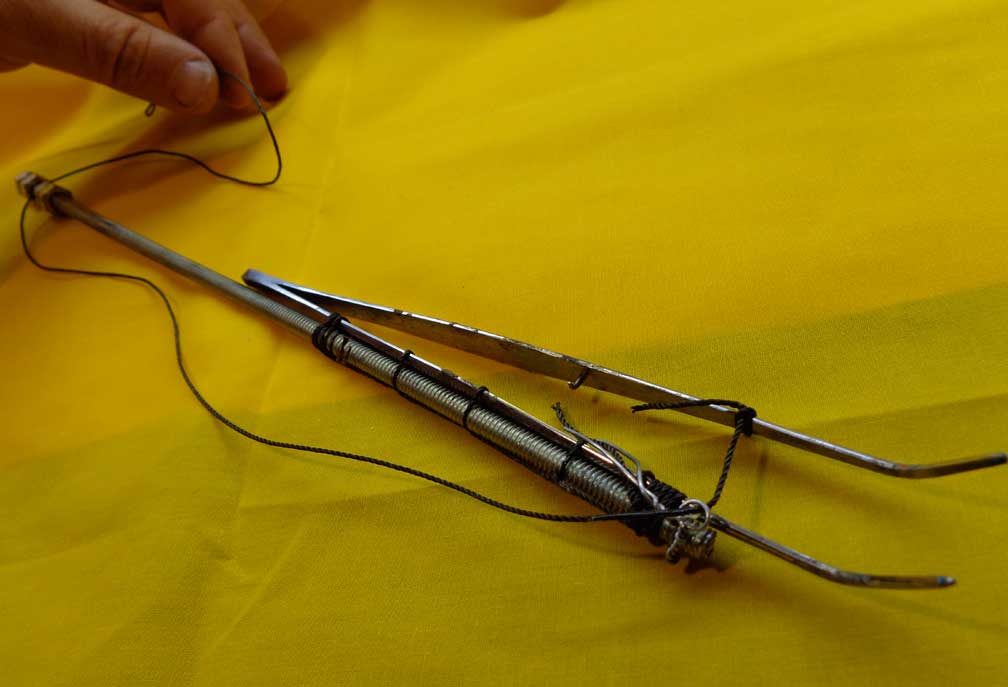
Here is the tool in use within the bottle. Its holding a cotton swab dipped in rubbing alcohol and its making short work of the glommed on clay residue at the “water line”. The tool with the tweezers on the end could not reach the waters edge and when I tried to hold a Q-tip and use that to swab the inside it simply wasn't effective.
-
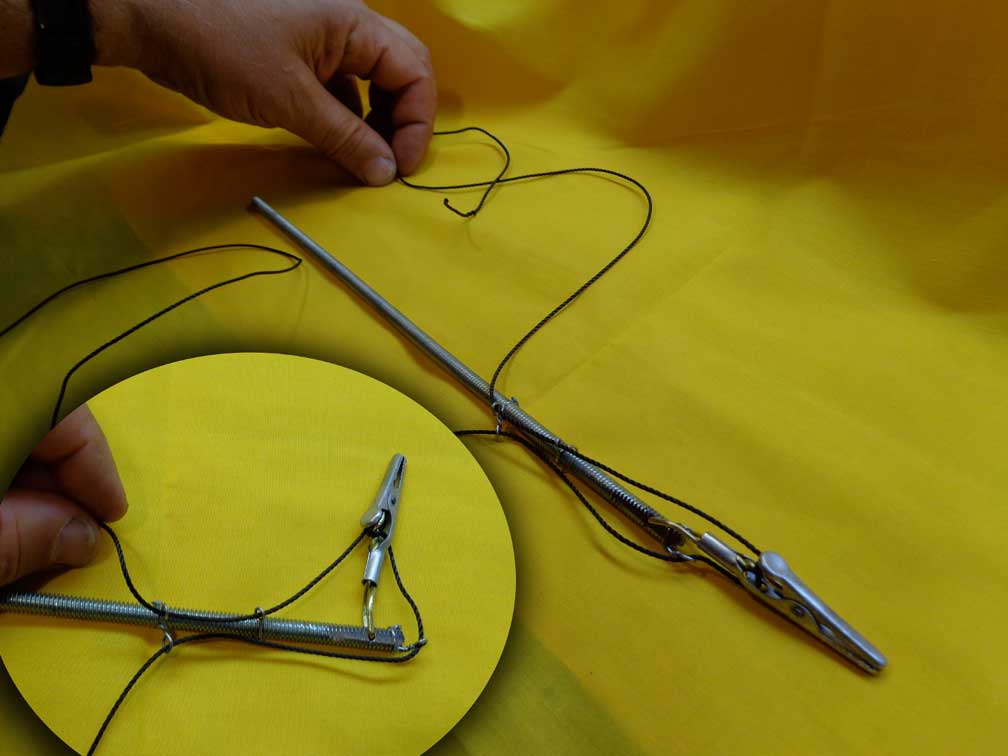
I had hoped to avoid building an articulated tool but it has become apparent that with all those tentacles I will have to manipulate I was going to have to make something I could bend around inside the bottle. It turns out it was very easy to make this elbow tool and I was done and using it a lot sooner than I imagined, I had set aside the whole night to cobble something together and really all I had to do was drill a hole and bend some wire. There is no glue or solder in use here at all its just bent wire and knots on the string. The inset photo is the tool in its bent mode. It swings through 120 degrees roughly when I pull on one string and ease the other. I’m sure anyone reading this could build one of these and a lot of you could build a more elegant tool, based on some of the build logs and evident competence I see on this site.

-
Making tools to get at stuff on the inside of the bottle need not be a huge challenge if you select a bottle with the right ratio of neck diameter to neck width. The inside diameter of the bottle also plays a roll and some geometries won’t allow you to have an influence anywhere inside the bottle. Usually you don’t need anything more than a bit of wire twisted over the end of a wooden dowel or bamboo skewer and up till now I had not needed to build special tools more complex than a piece of razor blade attached to a stick. But this project has had some special challenges. This tool is simply a tweezers tied to a threaded rod. I use metal rod since the leverage you put onto the end of the tool that you can grasp has a strong effect within the bottle and wood can break or bend more often than you would think.

-
The liquid plasticine lapped up the side of the bottle and left a film of goop and the tool I had been using so far (my largest tweezers on a threaded rod) could not reach around to the inside sides of the bottle so I had to make a new tool that could get into the nooks and crannies.
-
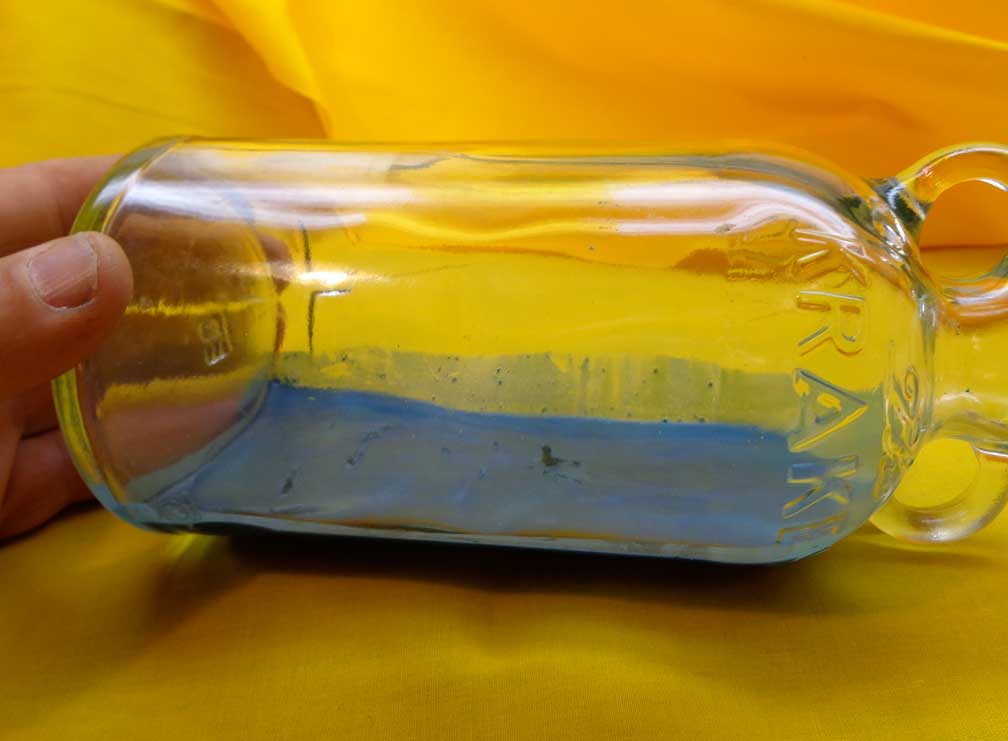
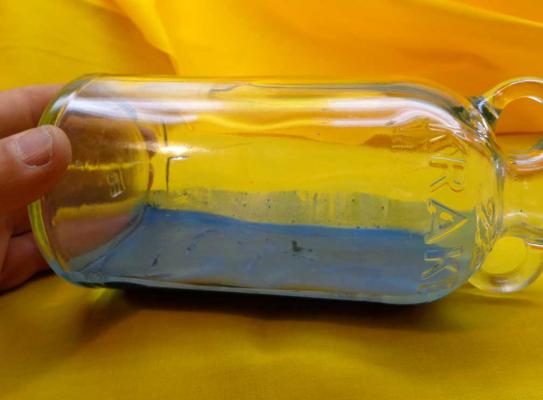
I put the brass foundation with its pin through the neck of the bottle and then I pile up the plastecine snakes inside. I no longer try to press the clay down smooth, instead I heat an oven to some point near 100 degrees and then turn it off. I put the bottle in there and HOPE I don't hear the glass shatter due to temperature change. The hot oven melts the plastecine into a liquid and when I see the transformation has taken place I open the oven door and wait a long while to allow everything to cool down and solidify. The finished sea is flat with just the brass pin sticking out in the spot where I want to have the Kraken.

-
I use plastecine to make the water. I put some effort into the color of the clay before I put it all in the bottle. You can buy "blue" plastecine clay but its a sort of neon blue color, far too bright and garish. I tone the color down by mixing in a little bit of red and a lot of green and grey and even a little black. I kneed the clay to mix the colors and then I roll them into "snakes" which are about the same length as the inside flat surface of the bottle.

-
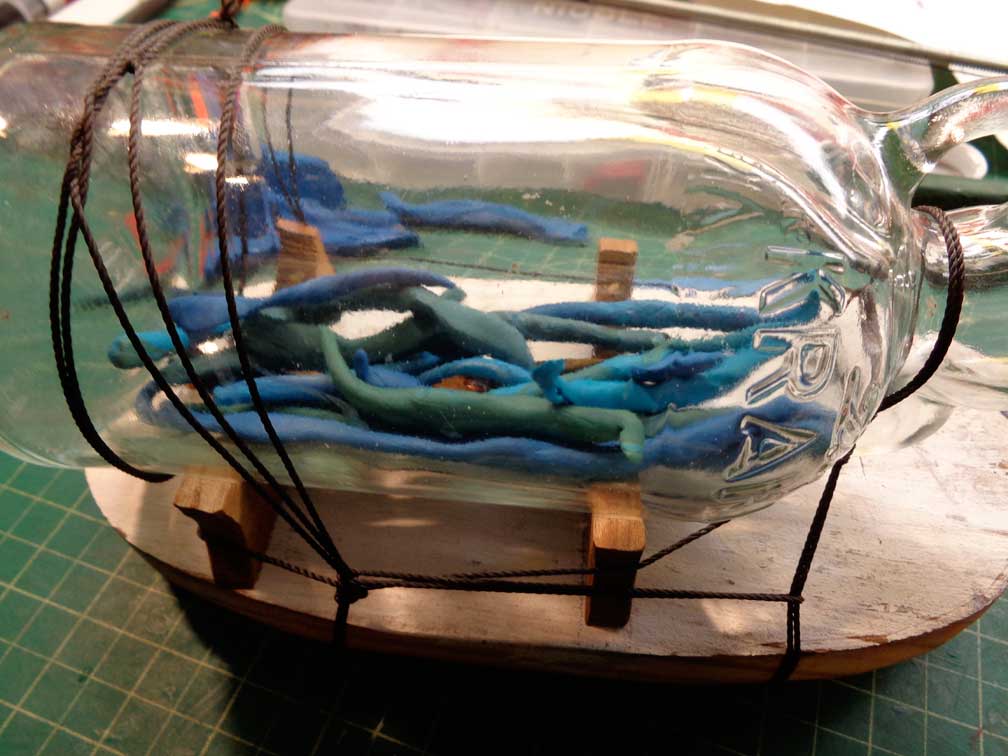
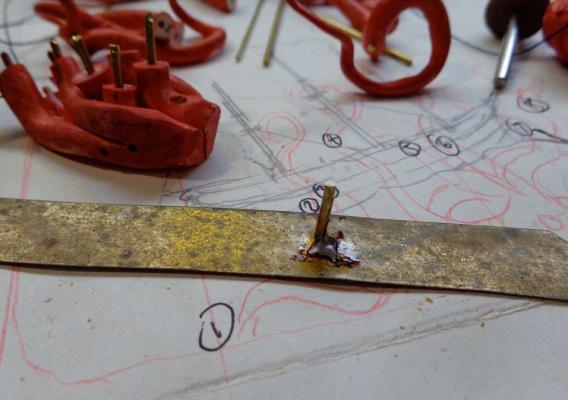
Thinking ahead to getting the creature AND the ship into the bottle and letting them exist in there when I seal it up at the end. I realized the ship and the creatures arms are an inch above the surface of the sea and I started to worry about the high center of gravity. All my other ships in bottles are seated IN the clay, not hovering above it, so I never gave much thought to keeping those other ships from rolling over onto their sides. But I can imagine a hot day in the summer and the clay softening and the ship slowly toppling over onto its side within the bottle. So before I put in the clay "sea" I determined to put in a foundation. I cut piece of brass strip and soldered a brass pin into it. Onto this brass pin I will glue the creatures body and with the brass strip under the clay "Sea" I hope I will have provided enough support for the ship and the Kraken arms raised aloft.
-
The Constrictor Knot
JerseyCity Frankie replied to JerseyCity Frankie's topic in Masting, rigging and sails
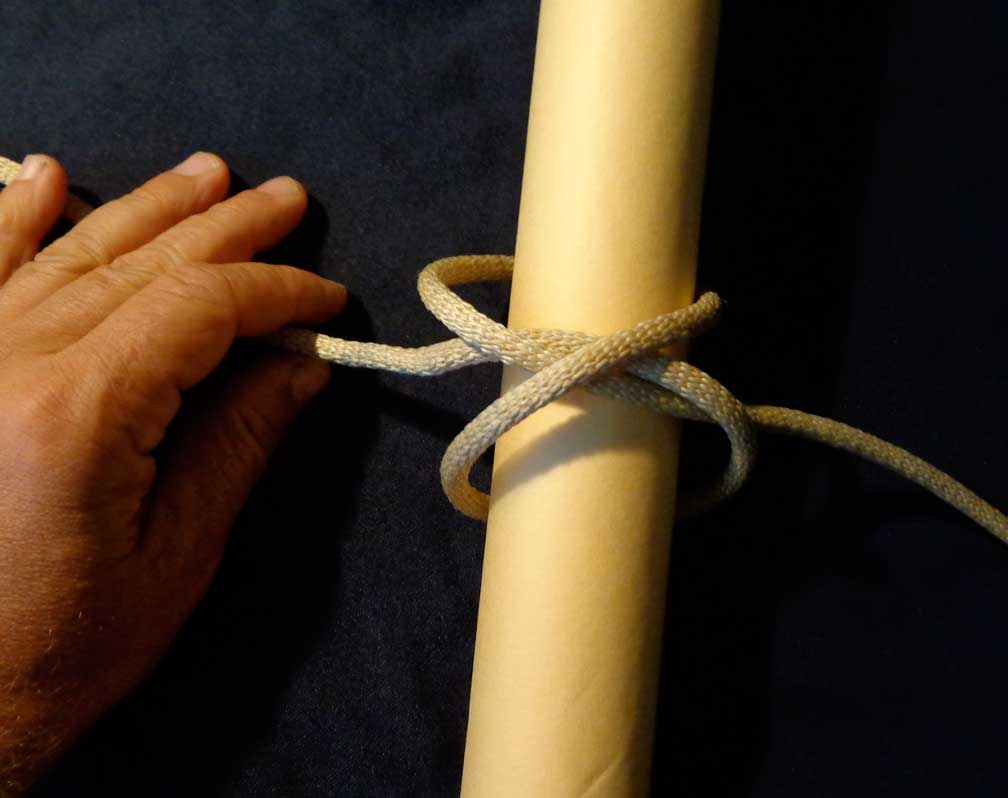
Here is the finished knot drawn up on a cylinder. Its nearly the same knot as the Clove Hitch but it stays tight when you pull on the ends and I actually find it easier to tie. If your tying a pair of shrouds or backstays you can tie it in the center of the line and the ends can lead port and starboard.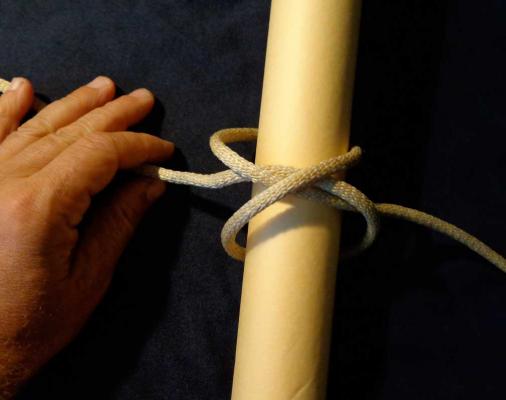
-
The Constrictor Knot
JerseyCity Frankie replied to JerseyCity Frankie's topic in Masting, rigging and sails
The final move is to fold the right hand lobe down OVER the bar using the twist you put in the original loop as the hinge. So you form a loop, twist it once, and each side of the loop is folded over each sides of the “bar”. Now you have the finished knot and you can drop it over the end of whatever spar you want to tie it around. Tighten by pulling on both ends of the "bar" at the same time.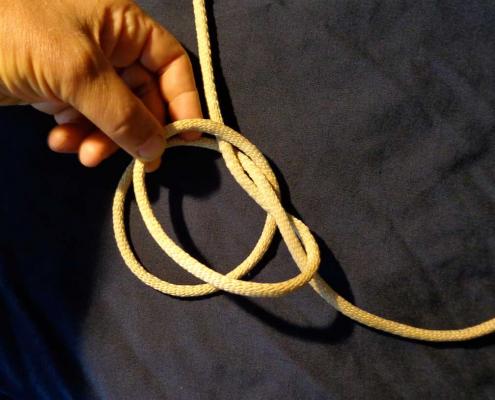
-
The Constrictor Knot
JerseyCity Frankie replied to JerseyCity Frankie's topic in Masting, rigging and sails
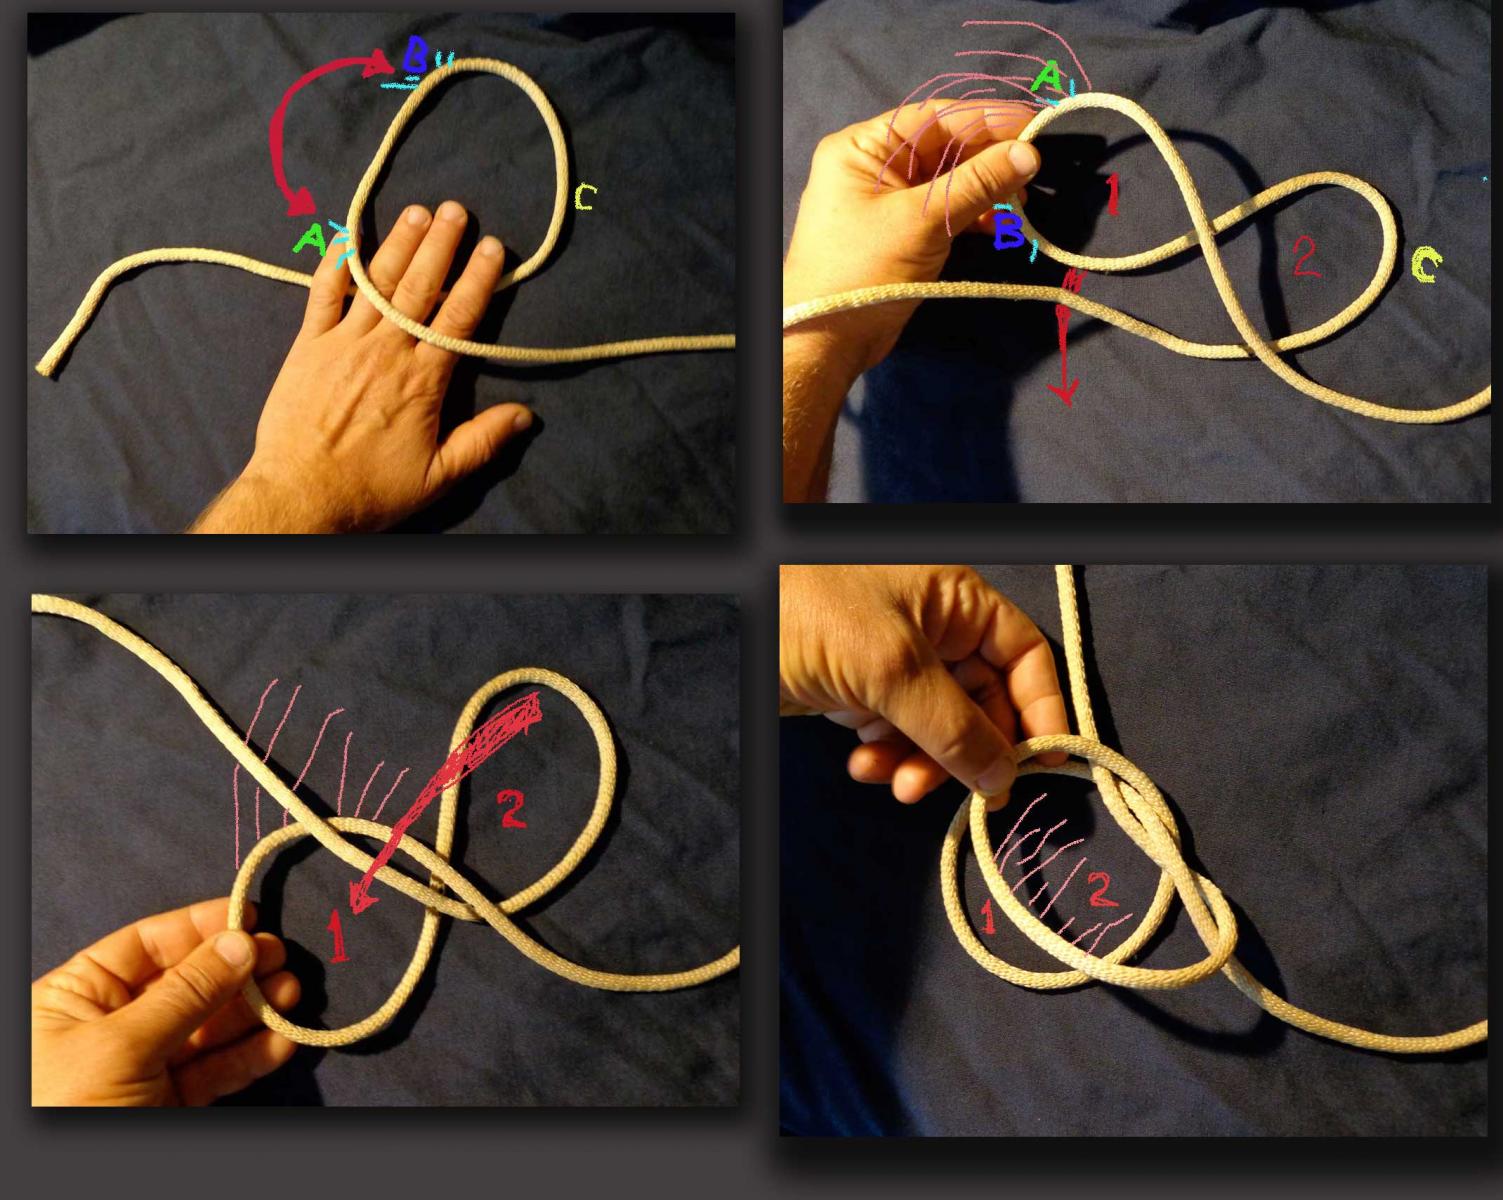
Pull the left hand lobe under the bar leaving the right hand lobe over the bar.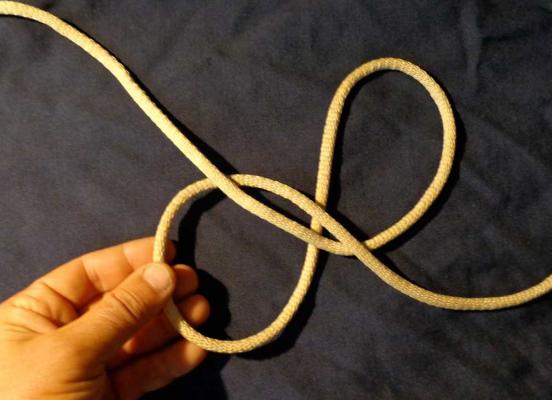
-
The Constrictor Knot
JerseyCity Frankie replied to JerseyCity Frankie's topic in Masting, rigging and sails
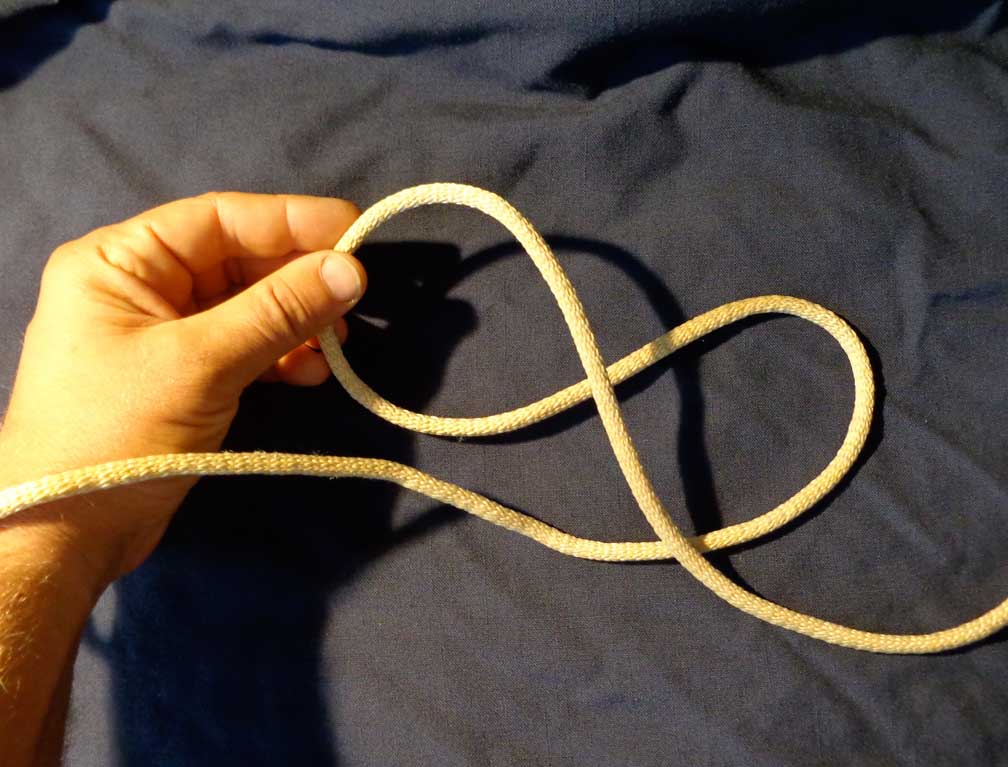
The hardest part of tying the knot: twist the loop into a figure eight. With the left hand you flip the bottom left part of the loop, say 7:00 on a clock face, up to the 11:00 position which forms two lobes. Note that the left hand is "under" the "bar".
-
The Constrictor Knot
JerseyCity Frankie replied to JerseyCity Frankie's topic in Masting, rigging and sails
It’s a natural for ship model builders in that you can tie it in your hands even in very small line. In these photos I’m using heavier line in order to make it visible. First form an overhand loop. Note that in the photo there is a prominent loop and the two ends of the line. For the purposes of this demonstration you should think of the two ends of the line as a horizontal bar that will always remain straight. This imaginary bar is never manipulated with the fingers, only the loop is involved in tying the knot.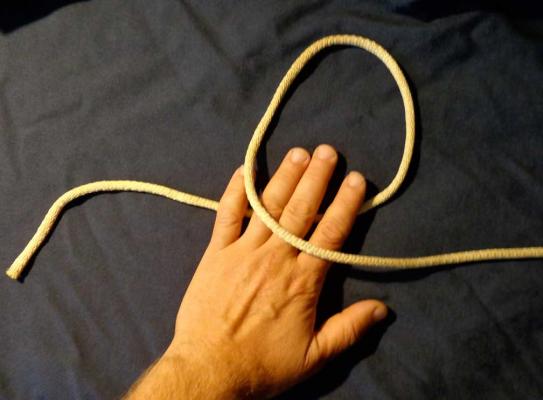
-
I’m a big fan of the Constrictor Knot. It’s a very useful knot for fixing a line to a spar such as in the case of a stay or backstay attaching to a topgallant masthead on small models or on lighter lines on larger models. Its got a low profile and its easy to tie and when tightened it constricts as advertised. Clifford Ashley apparently invented it and its number 1249 in his book. It’s also mentioned in the original Ship Modelers Shop Notes in a Merritt Edson essay on page 187. Unfortunately the illustration included in Shop Notes tends to make the knot look difficult to tie. In fact most descriptions of the knot fail to show how easily it can be tied. Its litterly just a loop that is twisted once into a figure eight and the two lobes thus created are folded together to form the knot which can be slipped over the end of the spar in question. If the knot has a drawback it is that once tightened it can be very difficult, if not impossible, to untie. This photo shows the steps involved in tying it and below I will break down the individual steps. It may appear complex but it really boils down to a few simple hand moves.

-
How to make sails look 'full'
JerseyCity Frankie replied to SteamWake's topic in Masting, rigging and sails
Since your in the mood to improve the sails you have, why not spend an extra hour or so and try making some fabric sails of your own? You can use the vac-u-form plastic sails you already have as templates and cut out new ones from any thin white cloth you have. "Hem" the edges of the sails with glue. If you want to go the deluxe rout, my favorite method gives you the billowing sails you want. You need some white fabric, some cornstarch from the supermarket, some cardboard and a knife. To make one sail here is what you do: using your existing plastic sail as a template, trace a hole on the cardboard --but make the hole you cut an inch bigger in all directions. Now boil two cups of water and put in five or six tablespoons of cornstarch. Turn off the heat and let it cool a bit and while that is happening, cut out a pice of fabric that is four or five inches bigger than the hole in the cardboard. Plop your fabric in the hot water/cornstarch and swish it around. Pull it out and drape the wet fabric into the hole in the cardboard so it droops through the hole a bit. Pin the edges of the fabric with push pins well back from the edge of the cardboard hole and set the piece of cardboard to dry horizontal with its four corners resting on something like soup cans or whatever overnight. After it dries the starch will have made the fabric rigid and you can remove the hardened fabric from the cardboard. Use your plastic sail as a template and cut the stiffened fabric with a scissors, this time the exact same size. The edges should not fray but if it is a problem you can run a bead of white glue along the edge and smear it in. If you want to get fancy you can make up a second pice of starched fabric at the same time you made the first but allow that one to dry flat. Use a ruler and an exacto knife to cut out VERY thin strips of fabric to form long thin ribbons. Glue these onto the dried cut out sail you made to form tableings ( along the outside edges of the sails) and reef bands ( as indicated on a sail plan, these go horizontally across the body of a lot of sails). If you want to get EVEN MORE FANCY you can prepare the fabric before you starch it in a couple of ways that will give added realism: Draw thin light parallel lines in very light pencil every 20" or 24" scale inches onto both sides of the fabric. This will represent the individual cloths the actual sails were sen together from- be sure to check your sail plan to see you configure them in the right direction since it can vary from sail to sail. The other super simple thing to do is soak all your sail material ahead of time in a solution of coffee and water and let it dry, this stains the fabric and gives it a more realistic creamy appearance in contrast to the perfect stark whiteness you so often see. -
Great work Dan, your an amazing ship model builder!
-
I use acrylic "artist" paint on basswood and I never prime the wood with anything and it appears to be going well in terms of longevity. I don't see any inclination to flake or blister on any of my models. I believe the nature of acrylic paint, that it is a plastic emulsion, won't let it soak into the wood since it dries so fast. It dries as fast as the water that is in it dries and once that film is formed, its not going anywhere. As to how well it clings to the surface it is dried on, that will depend on the surface and you would think that a non porous surface wouldn't give this kind of paint much to cling to. But when I was younger I built plastic model aircraft and I used the same sort of acrylic paint to paint them and then, as now, I did not use a primmer. Some of those twenty year old aircraft models are still in a box in my mom's attic ( hot in summer, cold in winter- a bad environment for any paint) and the paint looks exactly the same as I remember it. A determined person could probably scrape off some of that paint but it would take some effort and this is acrylic on a smooth plastic surface. Its my opinion that acrylic paint is the wonder of the age and hard to beat at anything it does. Painting it on metal would most likely require a primer to keep it from flaking off easy but it would still stick initially. It wouldn't hurt to test whatever paint you have on some scrap and then torture test it by abrading it with sandpaper or heat it over a flame and see how it behaves. I think you will be surprised.
-
Not to add to the complexity, but I would have guessed Bluenose would have used chain. Some schooners had a wooden open toped box on deck in which the chain was flaked out, standing after the windlass. But I do not know the Bluenose or her layout and maybe she used a rope cable and not chain at all.
-
As much as I love wooden ships and tar and three stranded line I have to admit our hobby does not have enough modern sail vessels being represented. Dan I think yours is the ONLY fiberglass sloop on Model Ship World and I see no kits available for them out there either. Which is amazing since there is a WORLD of modern sailing vessels of every size and shape on ever lake river and sea the world over. There are kits and builds of modern motor vessels aplenty but where are the recreational sail models? I can see you have "invented the wheel" on this model, with no aftermarket parts available. For each part you had to invent the process then build the part, over and over again! I'm impressed with the whole project.
-
I put this photo up on a facebook historic ship page and nobody hit the ball out of the park with a good answer so far. One guy pointed out that the schooner in the background of the photo appears to have the exact same object on it's deck. One person felt it was a retrofitted hatch for an after compartment. I have trouble believing that though since the object looks like wood to me and a watertight hatch would have dogs and a handle of some sort, and if it isn't watertight why is it round? All the other schooner openings I have seen have been square. Others feel its an elaborate case for a log line or deep sea line. This makes marginally more sense but I am still skeptical. Its a great mystery and I can't wait to hear back from some other experts I presented the photo to. Thanks for putting up the photo Jack Tar!
-
I was really pleased to read these words "...I work in multi mediums to achieve my goals...and am not ashamed to admit...I will re-engineer anything and everything to achieve these goals....." I think this point bears repeating. I understand and salute the ship models that show some sort of "purity" of materials but I think it can go too far sometimes. For instance I wouldn't think it was fair to exclude a mixed media ship model from a juried competition on the basis of a given models list of ingredients. Why can't a navy board model be made of cheese? It shouldn't be held against it if it is. I think of ship models as works of art and I often use the quote " in Art, the ends justify the means".
-
Hey there Popee I have not read your whole log but I have been admiring parts of it and I noticed your Reversed Cloths Pins. What a great idea! I hope somewhere in your build you mention them, its like you made a hot rod clothspin, I'm going to use the idea on some of my pins now.