JerseyCity Frankie
-
Posts
1,338 -
Joined
-
Last visited
Content Type
Profiles
Forums
Gallery
Events
Everything posted by JerseyCity Frankie
-
You bring up an interesting topic concerning restoration of a model one has not built themselves. If your tasked with restoring it, to what degree do you make corrections when you find the original builder had included inaccuracies? I just finished two weeks of work restoring damage and cleaning grime off a well made and otherwise accurate square rigged ship model that apparently never had backstays or lifts rigged. Tempted as I was to put them on, they were not part of the model to begin with and thus I decided it was not for me to put the stamp of my personality on the model. It made the job somewhat less satisfying but on the other hand I could imagine the ghost of the original builder nodding approval that I hadn't changed what he had done.
-
cable laid vs rope (left vs right twist)
JerseyCity Frankie replied to davec's topic in Masting, rigging and sails
Congratulations on even CARING about the lay of the rope. I think more modelers should pay attention to that sort of detail. I know that when you start down that road of looking for the proper rigging you open a pandora's box but clearly worrying about the line you use makes you a better model builder. Every garage sale I visit I have my eye out for thread or string. It appears that there were more options for threads of different diameters in days gone by than there are today and finding a box of old thread is always fun, but you have to make sure the stuff is reasonably sound. I prefer to use an existing thread but I do have a home made rope walk and turn to that when I need it. I have never had great success trying to remove the lay from some material in order to lay it up in the opposite direction though, I can do it to some extent but its a messy process with a lot of hockles. -
O'Brian. What a writer. People that haven't read him may mistake him for being less of a writer since he's known as a writer of sea stories, genre fiction. But I often tell people that his work can be judged alongside any literature, not as mere sea stories but as really well written novels with amazing characters. His vocabulary, his knowledge of ships and the sea and the England of the day are astonishing. I never came across a nautical detail in any of his books that didn't ring true. Except for maybe the H.M.S. Polychrest but that ship was worth what little suspension of disbelief was called for.I never read the last three novels, I didn't want the narrative to end. I have gone back and re-read them again and again though, the ones I have read. Toward the end of the narrative I think the stories were getting weaker, he was publishing them one a year by then and they were getting just a bit far-fetched but I love them anyway.
-
Lets not forget that Chapelle was also a ship model builder!
-
I have been enjoying your build log. I built a cutter too and I find them fascinating. So much sail on such a small hull. With all that canvas the small crew would have had a very difficult and dangerous time of it I think, more so than the larger crews of larger vessels. The margin for error when handling the lines would have been very narrow with the tremendous forces involved. The bowsprit has to be the most dangerous bowsprit on any vessel, so complex an arrangement, so many lines converging upon its tip, so much at stake if it breaks. I get the strong feeling that if any one line parted the whole rig would go by the board in an instant. As for the comfort of life aboard? Imagine off watch life below decks on one of these vessels, even on the nicest of days the interior must have been very uncomfortable.
-
I too am working on a model of the H.M.S. Leopard, although mine is to a much smaller scale and a solid hull. Still, working so intently from the same reference material I have fully absorbed the shape of her hull and the sweep of her lines and now know them intimately. The sense of dejavue one gets while looking at photos of someone else’s build of the same model one is also working on is striking.
-
I'm putting in my two cents for Acrylic artist paint. Thined with water. When I stain line, I soak the line first by dunking it in water then wiping it off. The thinned acrylic paint penetrates better if the line is wet first. To apply the color I just put a dab of thinned acrylic paint of the proper color on my fingertip and pull the line through my pinched fingers, then I wipe the line with a damp rag until I get off enough of the paint to suit my color need. The rag itself can be used as an applicator. The color I use is Burnt Umber with a little bit of Ultramarine Blue. Those two colors can be adjusted for a nice tan color, a pale grey color or even a nearly black color.
-
Naval History On This Day, Any Nation
JerseyCity Frankie replied to Kevin's topic in Nautical/Naval History
May 7th 1895. According to his personal narrative Sailing Alone Around the World, it was on this day in 1895 that Joshua Slocum departed from Gloucester Massachusetts in his sloop Spray on what would be the first documented solo circumnavigation of the globe. ://en.wikipedia.org/wiki/Joshua_Slocum -
Today (May 6th 2013) is the 212 year anniversary of the battle that made the H.M.S. Speedy famous. https://en.wikipedia.org/wiki/Action_of_6_May_1801 This wikipedia article covers the details of the battle but it can't convey the mindset of Cochrane, setting his tinny 54 man 14 gun brig Speedy against a Spanish Xebec frigate three times his size. Patrick O'Brian gets every drop of action and drama onto the page though as he uses this real world engagement as the climax of his novel.
-
Wow the Marquardt book is pricey. Amazon has it at $65., for a used one. Still, from the looks of it its pretty clear it is my kind of book.
-
The schooner I sail on in the real world has "Rudder Straps" which are 1/4" steel cables port and starboard on the top of the end of the rudder that run inboard at the stern and are not in use when we are underway but when we put the boat to bed at night we move the rudder amidships then belay the rudder straps. This prevents the rudder from being flapped back and forth by the wakes of passing ships or the tide or whatever and prevents wear and tear. It also keeps the wheel from suddenly spinning while at the dock. I once saw a person get their shin banged awful hard by the wheel suddenly turning three spokes when a wake hit the ship
-
Glue Recommendations
JerseyCity Frankie replied to leehound's topic in Modeling tools and Workshop Equipment
While sourcing materials for a ship model restoration project I came across this website for an outfit that supplies the bookbinding and Fine Art restoration community. They have a retail store in Brooklyn N.Y. and also sell online. They deal in a lot of glues intended for the Fine Art business that would work perfectly for ship modelers, particularly those worried about archival longevity. http://talasonline.com/ is their URL. Under "adhesives" they have TWELVE subcategories! Most of these are for the chemist who will be mixing his or her own goo for whatever reason, but its nice to know where you can find, should you ever need it, what appears to be every sort of sticky substance under the sun all in one location. No Cyano though, this stuff is decidedly Old School. Under the category "Animal Adhesives" there are eight different products including hide glue fish glue and gelatin. Including Isinglass! http://apps.webcreate.com/ecom/catalog/product_listing.cfm?ClientID=15&CategoryFullID=106 Since were on the subject I should mention that when I first got a bottle of PVA glue intended for bookbinders, I never looked back at any Elmer's product. In New York City the art supply stores carry this glue, but for no good reason I can fathom they don't stock it in the "glue" section with all the other adhesives. Its always off by itself in the "bookbinding" section. Which is a shame since if Elmer's is a "6" (and that is being generous) the PH neutral P.V.A. bookbinding glue is a "10" and only costs about a dollar more. Why is it better? Hard to say. It just works better and you notice the difference when you use it. -
I have enjoyed reading your build log. If you are on facebook, the Brig Niagara has a nice facebook page with a lot of photographs. Facebook photos are small and don't show too much detail, but there are tons of photos on Niagara's page, some showing deck details.
-
Thanks Wayne/trippwj thats really helpful. If a book has that sort of information in it I want to own it!
-
I’m a big fan of the Anatomy of the Ship series of books from Conway Maritime Press although I don’t have all the ones I would like to have. Two of the volumes I have, The Pandora Frigate and Transport Bounty, have detailed rigging charts. The one for the Pandora is particularly comprehensive, giving lengths and diameters of every line. I notice though that some of the other Anatomy of the Ship books that cover sailing vessels do not include much description of rigging. I would like to collect more of the Anatomy of the Ship books and I would be most interested in owning those that include the detailed rigging tables. Can I ask members of this website to suggest which volumes would include the detailed rigging information? I have the standard rigging only type books: Steel Lees Lever ect. I’m interested in the Conway books. Thanks guys!
-
Speaking of adding photos: I think the quality of a lot of the photos I see could be improved with some really easy steps that can be taken on the day a modeler takes the photos. Consider that the photos posted HERE represent the only view most of the world is ever likely to get of your model, so why not take the best possible photo? WHAT IS BEHIND THE MODEL? We shouldn’t even have a clue. Drape some neutral fabric behind the model to block the view of your living room or workbench. A white sheet should be your last choice as the white, in my opinion, is too stark and tends to make the photo look like a mug shot. Still, a piece of plywood, a blank wall or a white sheet is better than your living room, against which very little of the rigging is going to be visible. Even fabric can be a bit wrong since if it has even one wrinkle in it, it will draw your eye. The best choice, in my opinion, is some grey or tan colored paper. But if you have a larger model this will be difficult. At the very least, put the model against a blank wall in your home when you take the photo. DON’T USE THE CAMERAS FLASH. This lends a stark “mug shot” aspect to the photo as the harsh flash eliminates all shadows. Subtly curved surfaces appear flat under the cameras flash. Textured surfaces appear smooth. Better to set up one two or three table lamps off to one side of the model and out of view of the camera. Take the shade off the lamps. In this way the light strikes your model from the side and brings out all the detail and textures. Curved shapes (like the hull itself) will have their subtleties revealed by the light and shadow. Not using the flash necessitates some other precautions though, since in lower light the camera has to take a longer exposure and this means the camera has to be absolutely immobile, you can’t hold it in your hand to take the shot. I stack up some books to the right height and put the camera on the books. Even pressing the button on the camera will cause the camera to jiggle slightly and blur the photo. Use the cameras Self Timer to trigger the photo, that way the camera is as still as possible since you are not touching the camera when it triggers. In my opinion the very worst scenario is taking a flash photo of a model in a glass case with the living room visible in the background. The flash bounces right off the glass and there is a big white spot in the center of the photo and off in the back I see a couch. At the very least you should, in my opinion, take the model out of the case.
-
You don't often see Mast Boots on models either. They were canvas coverings painted or tarred that girded the mast at the partners, covering the mast wedges and keeping water from flowing down the mast into the hull. They don't come up the mast more than a foot or so.
-
Glue Recommendations
JerseyCity Frankie replied to leehound's topic in Modeling tools and Workshop Equipment
My local art supply store sells dry Rabbit Skin glue flakes. Apparently you have to whip it up in a double boiler when you want to use it. I understand its the traditional glue of violin makers. This fact alone encourages me to give it a try one day event though it sounds like it could be smelly and nasty to prepare- its made of real rabbits after all. Has anyone given this glue a try and have some observations? -
Glue Recommendations
JerseyCity Frankie replied to leehound's topic in Modeling tools and Workshop Equipment
Speaking of glue I have a question for you guys. I have read Donald McNarry's books and he never fails to mention a glue called Secotine. I THINK its a fish glue. Anyone here ever get their hands on any of it? I think Secotine is a brand name and maybe its available in the U.S. under a different name? Anyone ever use any sort of fish glue? -
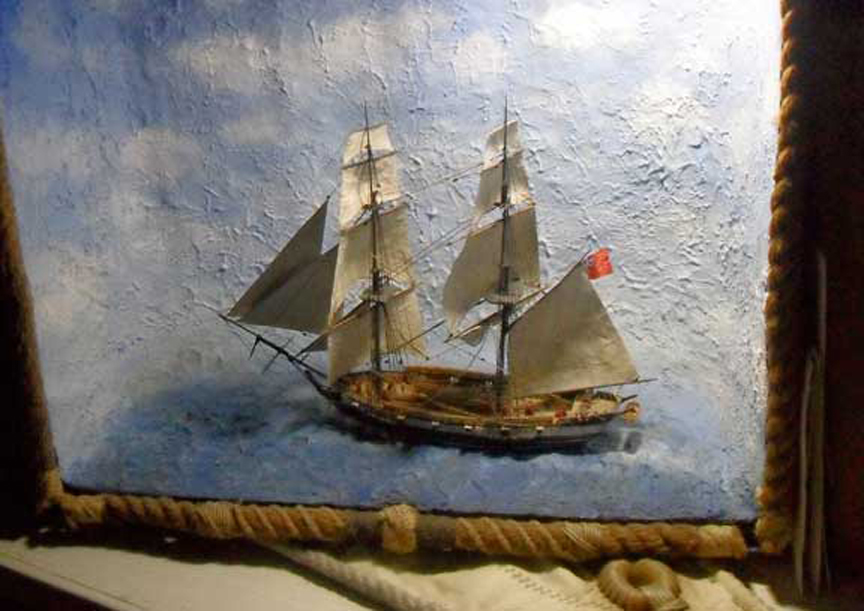
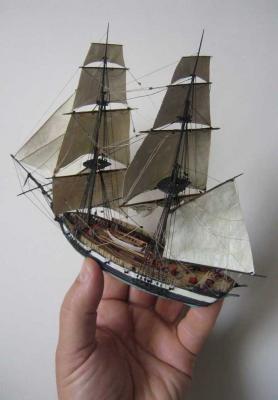
I wish I had better photo coverage of the intervening stages of this build. I made the sails out of two or three layers of tissue paper that was dipped in Minwax water soluble polyurethane called Pollycrilic which dries fast and transparent. I made forms of clay in the shape of the billowing sails and draped the wet tissue over them. When they hardened they had the belly shape I was after and I painted them and cut them to size and glued them to the model. The inner face of the sails were too smooth since they were in contact with the forms and there were some air bubbles but I disguised them with “patches” of more tissue.
-
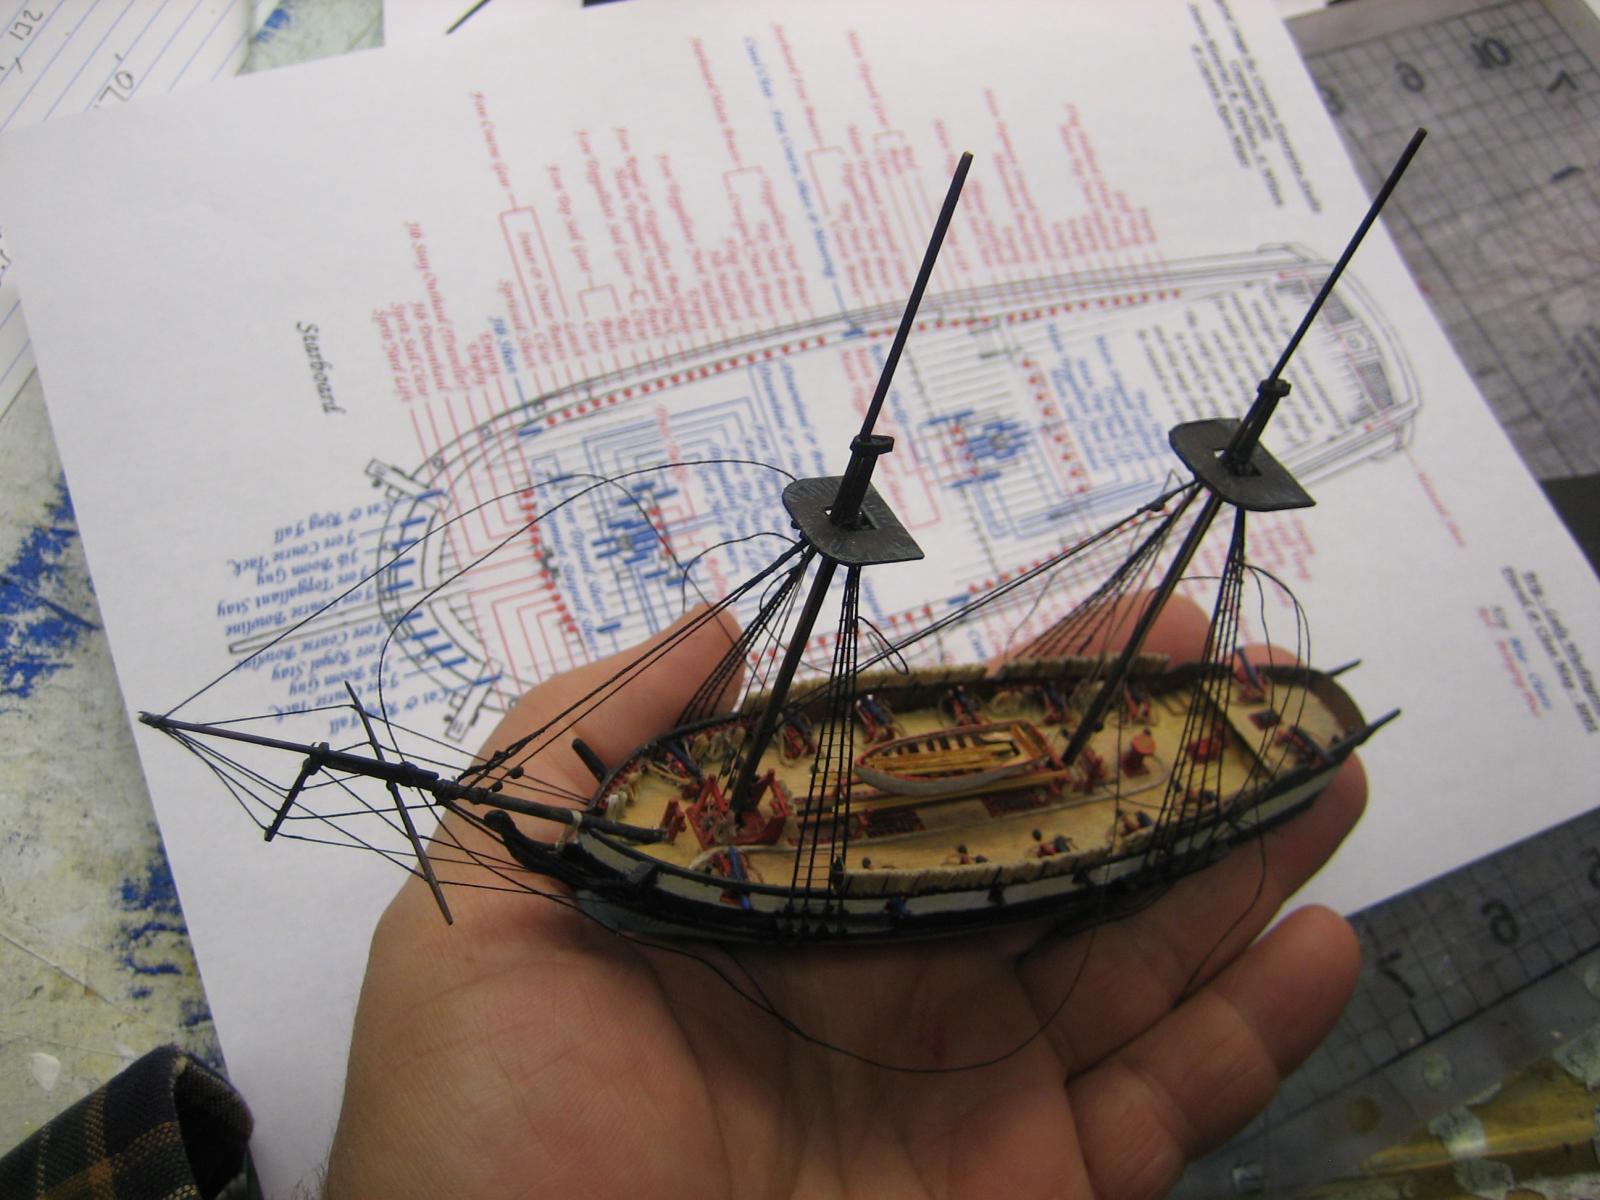
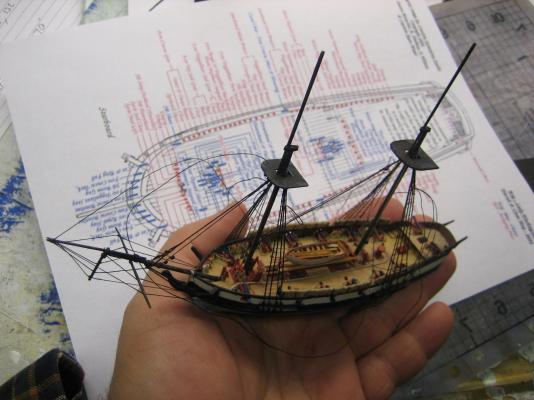
I live in an apartment and a normal sized cased model would take up too much space so I went with a smaller scale. I was never good at math. The scale of this model is 1” = 17’. This odd scale was set during a previous model (H.M.S. Surprise) when I held my hands apart from each other at about the width I wanted that model to be and stuck with that scale. It made perfect sense to me at the time. At first I just wanted an H.M.S. Surprise but when that was done I turned next to the Sophie. A simple drawing of the H.M.S. Speedy was available online. I have always liked the concept of multiple models all in the same scale so I stuck with my nameless scale and I plan to turn out more ships to it. I'm currently working on the 50 gun H.M.S. Leopard and seeing how much larger she is than the other ships is an education.
-
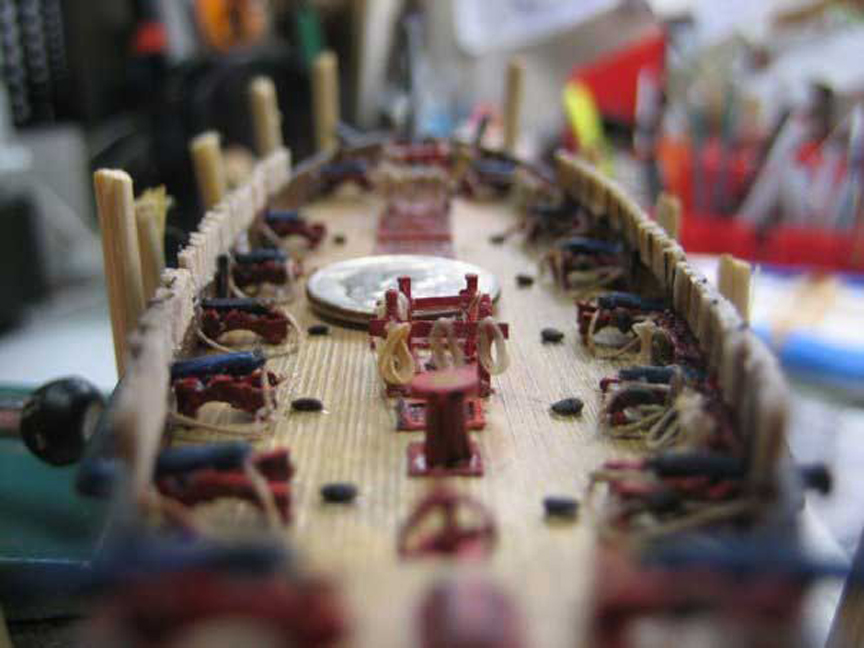
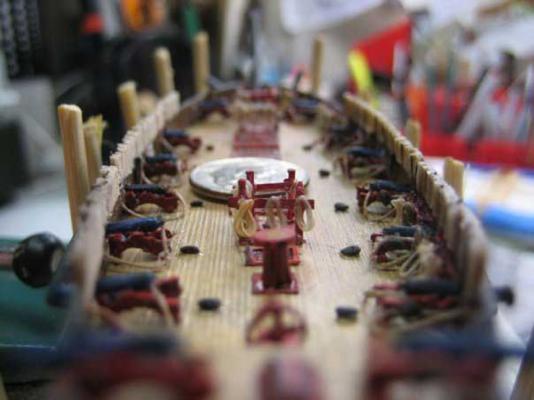
Canons were made of wood tooth picks. Gun carriages are made of sheet styrene. Trucks were stretched sprue. The pommelion is brass rod inserted in a hole I drilled in the end. The swelling at the muzzle end and the ogee aft the trunion are each made of one turn of wire twisted on the underside. Fortunately there are only 14 of them. At this scale the breaching rope is going to be carpet or button thread.

-
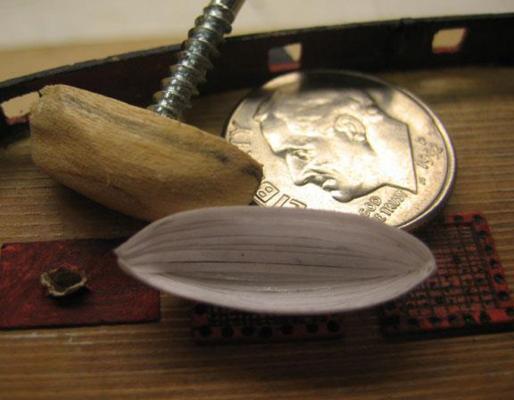
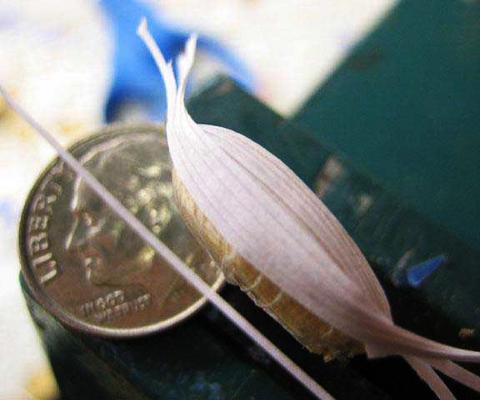
Sophie deck. My favorite ship model photo. You can see the scribed deck in this shot. The black football shaped objects are the smallest seeds I could find. I hope they never get wet and start to sprout one day since they are all over the rigs of a lot of my ship models! Donald Mcnarry describes using "Lobelia" seeds on his miniatures but I have never had any luck finding them. The cannons have a very slight blue color drybrushed onto them. I was watching a film and the cannons in the movie had a bluish cast to them so I said "why not"? It plays off the red nicely and to me it doesn't leap out at you and offend the eye but at the same time it suggests (to me anyway) the reflectivity of a glossy black surface. The coils of line are deliberately all different shades of grey and pale tan to suggest lines of various age and use. .
-
I'm a big believer in planking your own boats over a wooden form. Its not that difficult. I had gone through the process of whittling solid wooden boats. I was dissatisfied with the "covered with a tarp" school of thought and gouging out the interior was difficult when the boat is this small. I tried the "squash" method with heated plastic. I tried the lift method. If your making a wooden boat of the correct shape anyway, why not plank over it? Then discard the wood form. With actual planks you get something more in scale in terms of hull thickness AND you get authentic clinker built texture. The planks in this photo are just thin strips of printer paper cut straight with no spauling. I have saran wrap over the form as a resist and white glue on the edge of each plank. Like an actual boat these paper boats are light and strong. Some of the other boats get a transome.