HOLIDAY DONATION DRIVE - SUPPORT MSW - DO YOUR PART TO KEEP THIS GREAT FORUM GOING! (Only 20 donations so far - C'mon guys!)
×


JerseyCity Frankie
-
Posts
1,338 -
Joined
-
Last visited
Content Type
Profiles
Forums
Gallery
Events
Everything posted by JerseyCity Frankie
-
With a bit of twisted wire I propped the unfinished hull, freshly rigged with temporary toothpick masts, into the proper attitude of foundering. The unfired floppy arms are then draped over and around the hull and rig. After only ten minutes in the oven at 250 to 300 degrees, the kraken's embrace is made more firm as the sculpy hardens. Now the ship is snared within the hardened arms. I will next have to cut the arms in strategic places in order to free the ship, but not tonight. Until next time.


-
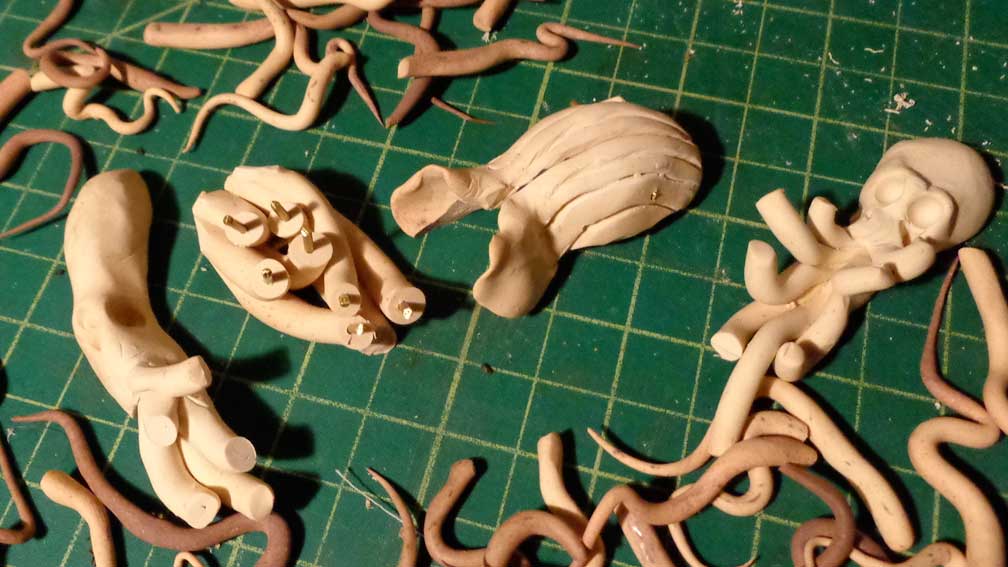
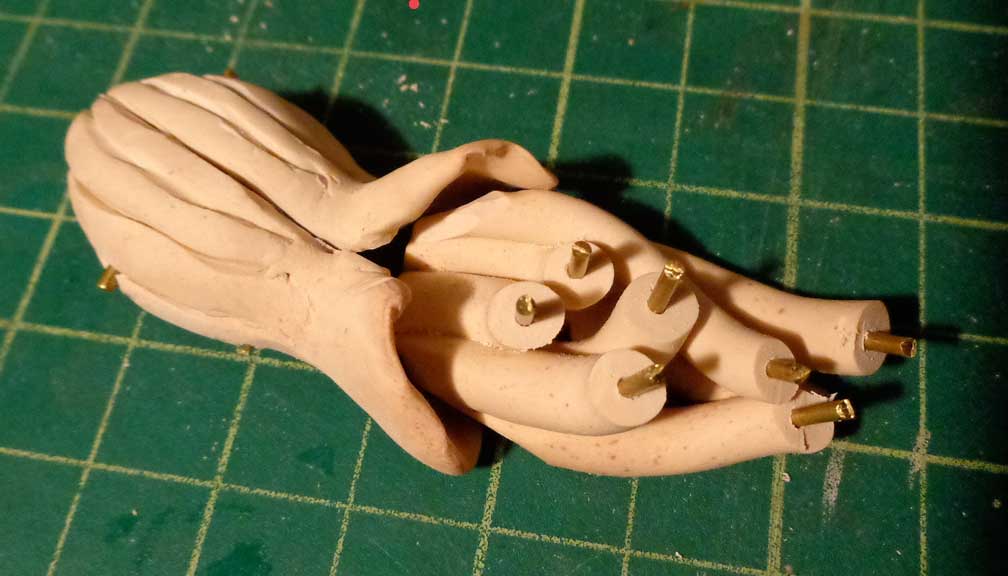
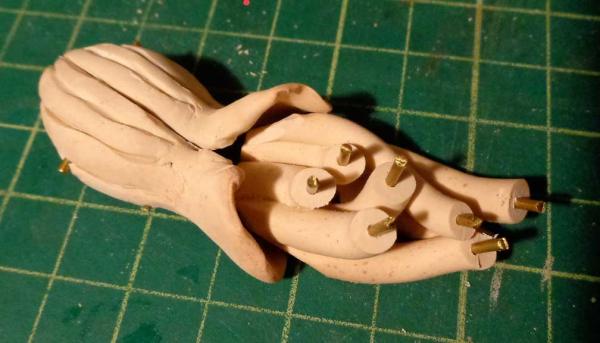
More work on the Kraken, I’m working on the tentacles. I have made a base consisting of four parts, two head parts and two tentacle base parts, each with crosswise pins. The four parts were “fired” and have pins inserted. Coins are included in the photos to help give scale. Onto the pins sticking out of the previously fired “tentacle base” I have squished fresh unfired sculpy arms, they are quite floppy.


-
I too want to put in a word for "artist" acrylic paint. In tubes or in small jars, manufactured by Golden, Liquitex or whatever. All of them are water based and can be mixed with other brands. Full strength or thinned to nearly nothing at all, acrylic can be anything from a stain to an thick opaque coating. Water is all you need to thin or clean up. The paint dries as fast as water dries and when its dry its no longer water soluble and will stand up to U.V. light, changing humidity and who knows what else? Acrylic artists paint is available in nearly any size, from a very small tube the size of your pinkie on up to gallons, and in every color. Its possible to find "student grade" acrylic colors and these will have a "hamburger helper" dumbed down pigment content but the artist grade paint will contain the best sorts of pigments available anywhere and the pigment content is listed on the container- something I suspect other hobby paints won't do for you. Note that the use of the finest pigments includes poisonous ones like cobalt and cadmium which should NEVER be used with a sprayer. Sometimes the "student grade" colors are better for what you have in mind and they cost about 1/3 less than the Artist Grade ones. You can't use Acrylic over unprimed metal though, nor any sort of smooth ceramic like surface. But it will stick fairly well to plastic. The shelf life of the paint is pretty good. If you leave a tube of acrylic paint sealed it will still be fine a year later.
-
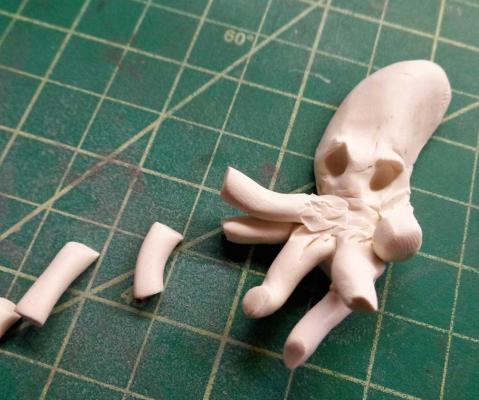
I decided I would have the head of the kraken as one phase of the construction, the hull of the ship as another. The eight arms would be another phase. The Kraken and the arms of the Kraken will be segmented and have brass pins to aid their reattachment inside the bottle. The first two Kraken heads I made would have fit into the neck of the bottle but they would have made for a small Kraken of reduced grandeur, so I am electing to make a larger more fearsome Kraken with a head that is in two pieces, to be joined with pins within the bottle. The eight arms of the Kraken emerge from the head and I have decided to make THIS element a separate piece too, a piece made up of eight tentacle bases. This piece too will be in two sections in order to fit the bottle, and this part tucks into the “neck” of the Kraken- this is viewed in the second photo below. The rest of the legs and the hull of the ship will likely be suspended in the air above this assembly, which in turn will be bedded in the plastecine clay “sea”. The stumps of the legs will all have brass pins to allow the rest of the arms to fit into place. I anticipate a lot of confusion, multiplied by the number eight.
-
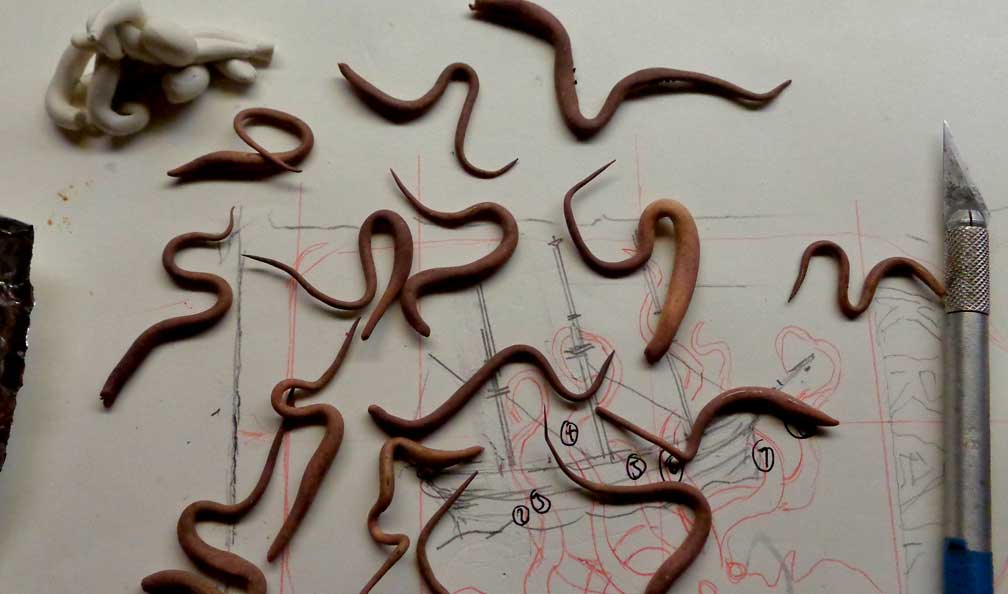
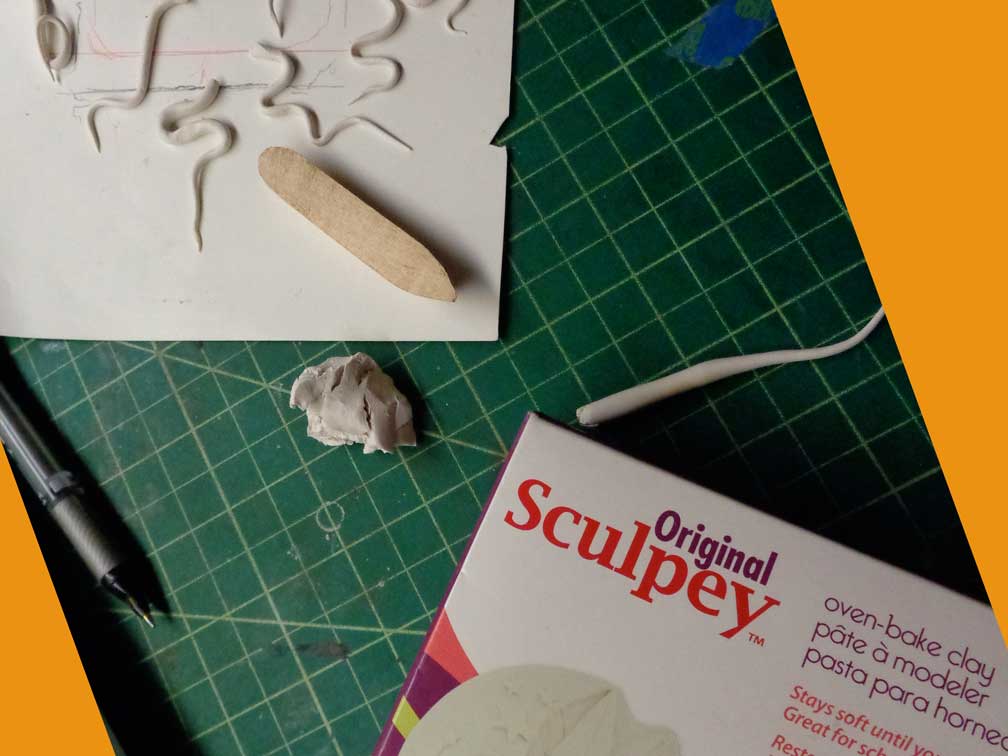
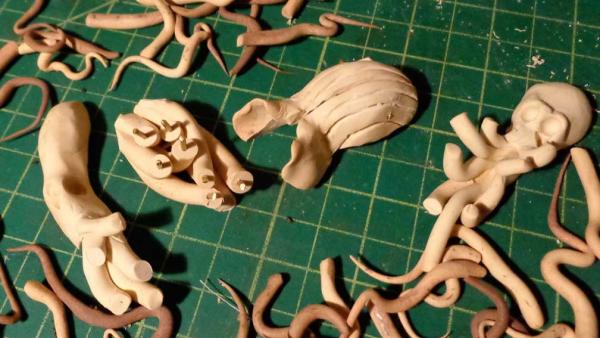
Sculpy is a lot like plastecine clay but it’s a bit softer. It can be made into shapes and then “fired” in your kitchen’s oven, fifteen minutes at 275 degrees Fahrenheit transforms it into a harder more ridged material. Not hard like ceramic, when fired it turns into something with the consistency of a red rubber eraser. It can flex a tiny bit and you can easily cut it with a blade. But you can also sand it with sandpaper or take off material with a file. I began by rolling “snakes” like children have been doing with clay since forever, tapering them to points to make tentacles. Here is a shot of the first Kraken head I attempted. As you will see I have made three so far. Next to the unfired head are segments of tentacle. These are still very soft. Too soft as it turns out. The tentacles were too floppy to support their own weight and I realized I was not going to be able to make a creature, wrap its arms around the model, then fire the whole thing. I was going to have to make the arms one at a time and assemble them all later. Anyway this is the rabbit hole I am now descending into.

-
Looking at the future, I realized the difficult thing about this project will NOT be making the ship and getting it into the bottle. That will be relatively straightforward. No for me the hard part will be engineering the creature. All those tentacles wreathed around the ship. So I break it down into logical stages. You have to get everything through the neck of the bottle so I decided the creature will have to be made in segments small enough to fit the neck and then be reassembled inside the bottle. The print shows an octopus like creature with eight limbs. Someone suggested I use rubber tenticals, and this would certainly solve a lot of problems since they could be stuffed whole through the bottles neck. But I wory about rubber pieces aging badly, becoming brittle and breaking. So I am going with Sculpy. (www.sculpy.com) a product I used a few times on some other non-ship related projects. I have always had sculpy in the back of my mind as a material that could come in handy for ship model building, I bought a pack a year ago thinking I would use it to make caryatids for the base of my H.M.S. Leopard.

-
My advice is try Craigs List. There are apparently more than a score of British Columbia craigs list pages: http://www.craigslist.org/about/sites#CA If your not familiar with Craigs List, its an online, bigger, version of a newspapers classified ad section. I bet if you keep searching Craigs List you will find someone has a kit they are never going to build/finish and they may be trying to unload it on Craigs list. I can't guarantee anything but that is what I would try. You must be persistent though, checking the listings every day or so over the span of weeks, but I bet you will come up with something. Also you can post your own ad on Craigs List, you can put up a request for kits. I guarantee you someone in all the Great White North has an unbuilt kit in their closet.
-
Looks like a SHIP now!
-
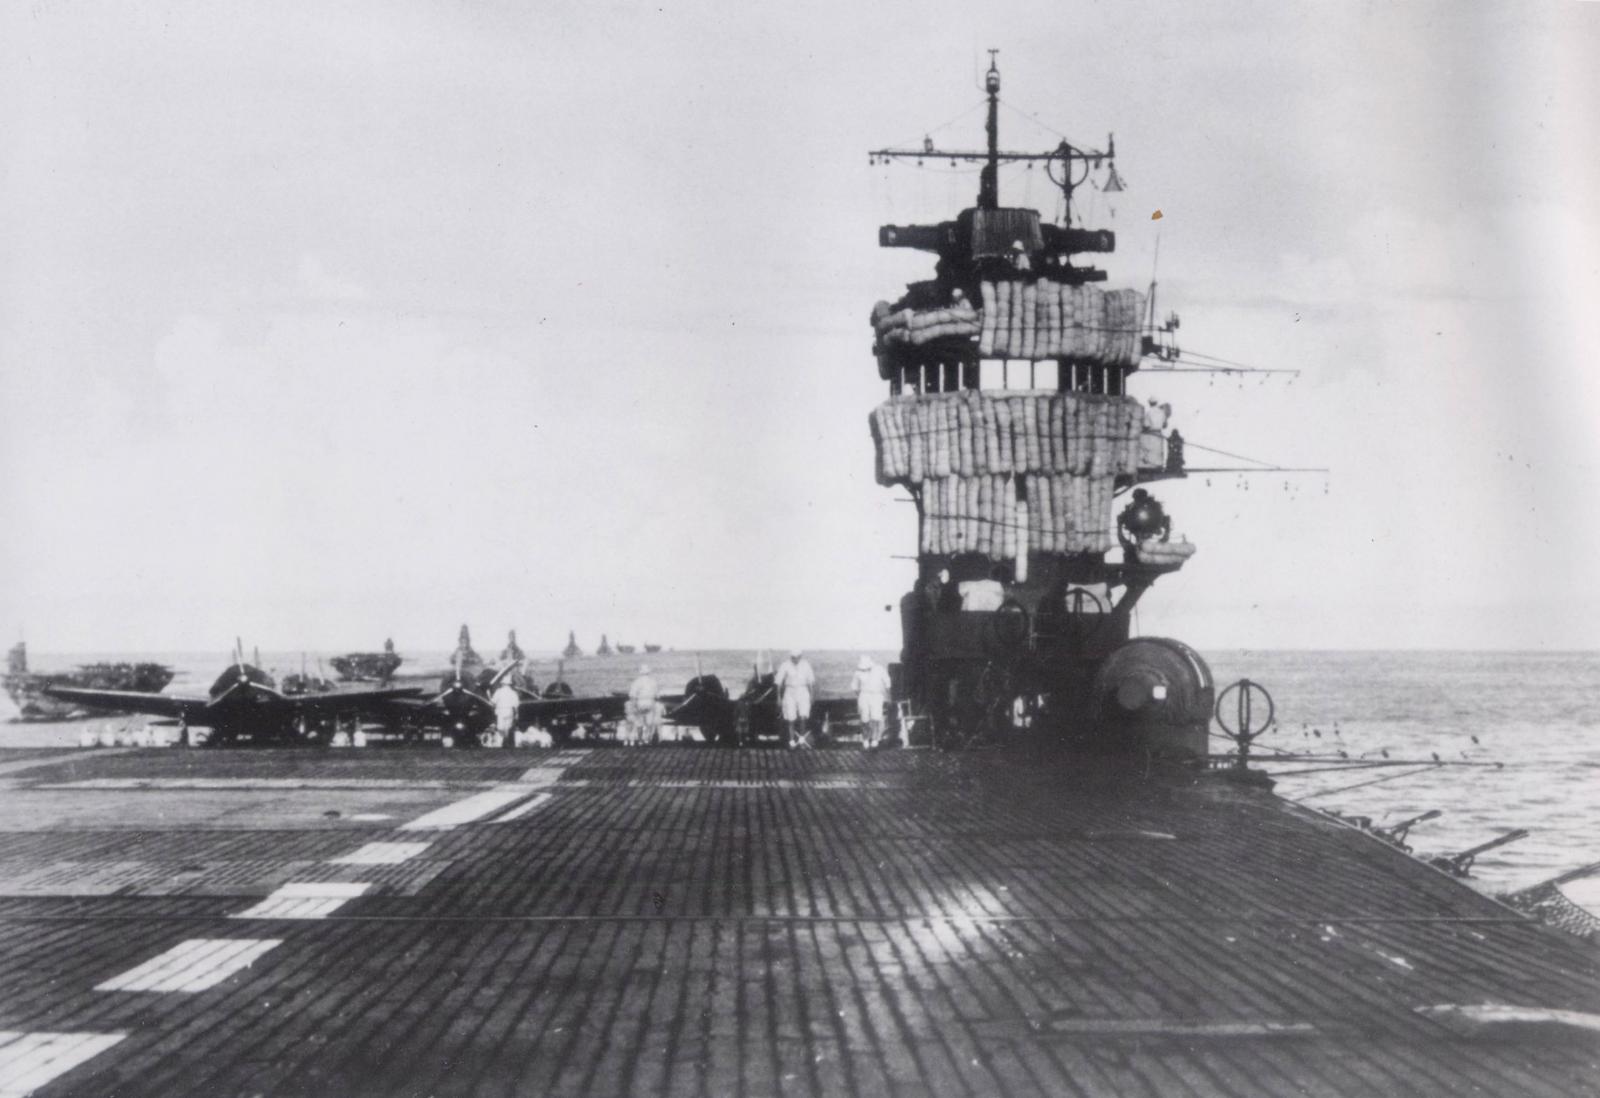
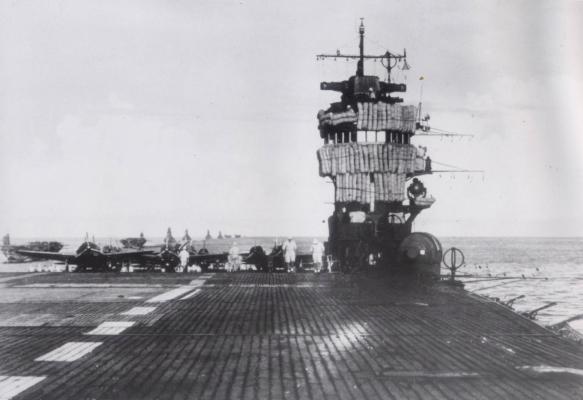
Well certainly they are in use as splinter shielding, as were the hammocks we have been discussing on this thread, the ones from an earlier age. I am wondering if the objects in the photo are also hammocks. Did the Imperial Japanese Navy pipe up hammocks in WWII? The objects in the photo look to be the proper size and shape. My understanding also is that the early Japanese Navy used the English Navy as a template for their ship design, crew training and procedures, so perhaps this is the last use of hammocks as splinter shielding. Again I apologize for taking this side trip into WWII but it appeared to fit the subject just a bit, and as I said I have always wondered if these were hammocks.
-
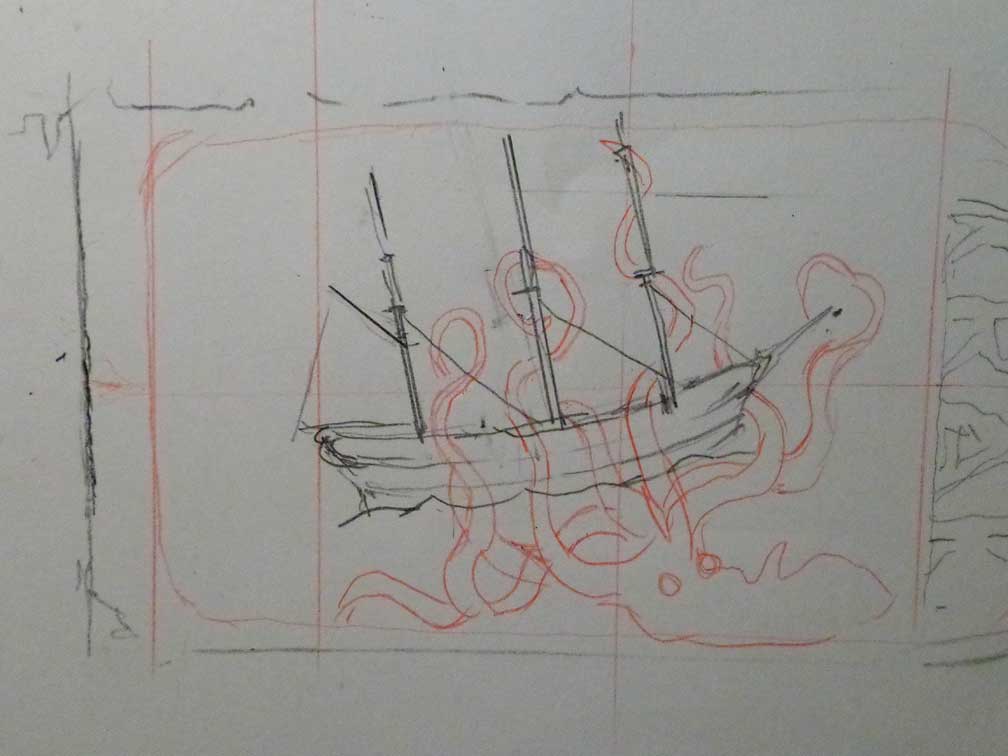
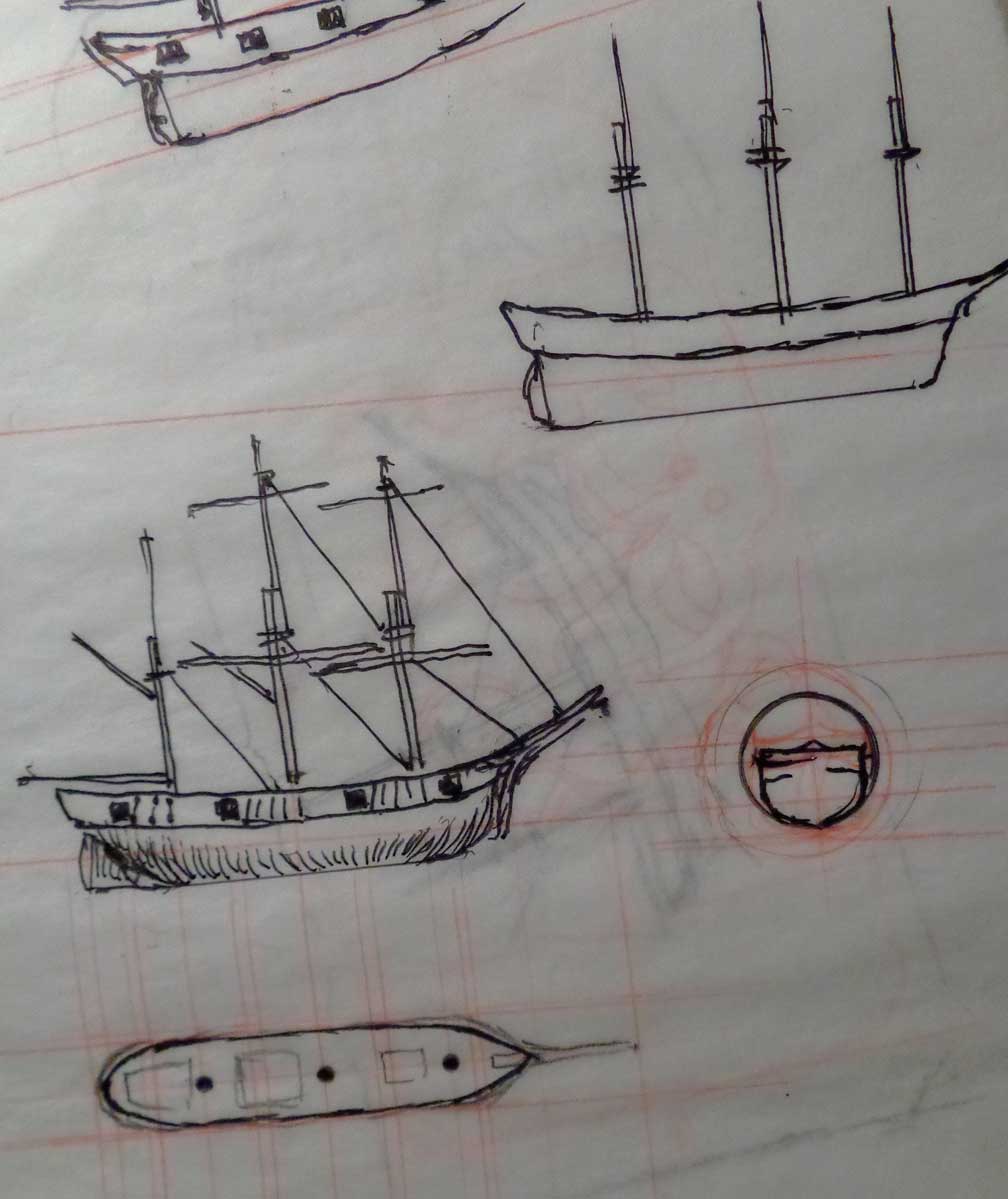
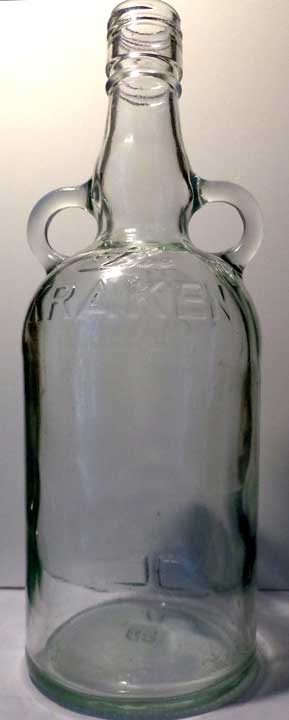
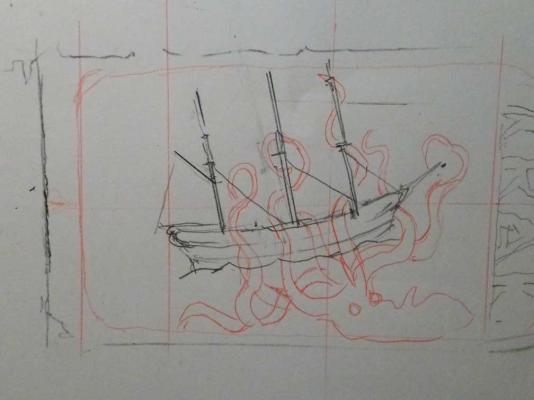
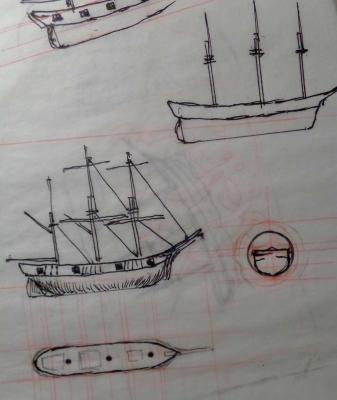
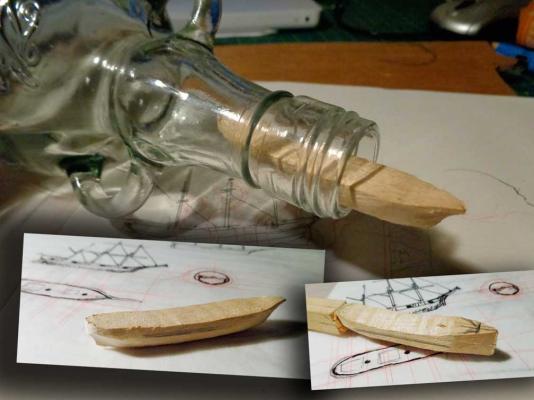
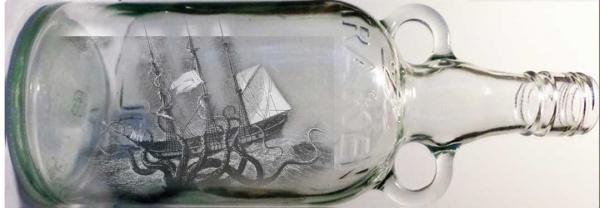
To determine the size of the ship I traced the bottle and freehand drew the ship into the bottles outline. Then I traced the hull from that drawing onto tracing paper. I repeated that step three times trying to adjust for the perspective view in the original print AND have a hull that looked like a plausible ship. usually I do the scaling and drawing in photoshop on the computer, but then again usually I already have a nice plan to work from whereas in this case I had to make my own. So then I drew in a rig, omitting the t'galants as I had imagined I would. If I had included the loftier spars the entire ship would have been scaled that much smaller, and I want the ship to take up as much interior volume of the bottle as possible. Note that in my tracing paper sketch I drew a circle representing the diameter of the inside of the neck of the bottle- this dimension should NEVER be far from your mind when you are laying out a bottle model! Next I got a chunk of basswood out and carved away at it with an x-acto. After a few passes I plugged in The Jersey Heartbreaker, chucked in a sanding drum, and took it down to the shape you see here. It will next get some more sanding and grinding around the stern and the deck will get taken down a bit too. But at this stage I was happy to see that I have a hull size I can live with and that it fits into the bottle.
-
Apologies for taking us off topic a bit into the wrong navy, wrong ocean and wrong century. But I have always been curious about these objects on Japanese warships from WWII. I have always took them to be hammocks. Anyone know?
-
Since its a black and white print, I will have to make decisions about the color of things. I guess its liberating not to have color references since now I will not be constrained. Color is important on any model since it will have a great effect on the way a model is perceived, I want to put color into and onto the model wherever an opportunity presents itself. The sea is an angry stormy sea so I imagine it must be dark and grey with a lot of foam and spray, but I will be sure to put flecks of blue and green in with the grey, overall a perception of cold water. The ship sports a nifty painted whale, I could go with buff or yellow, maybe red or red orange, some warm tone to play off the cool dark sea colors? But the real question is about the creature. What color is the kraken? None who have laid eyes on the monster have lived to tell of it. Thanks Thanasis for including that color photo of the other guys Kraken model, he demonstrates that the modeler is free to interpret color as they wish. I think of the Kraken as being green though.
-
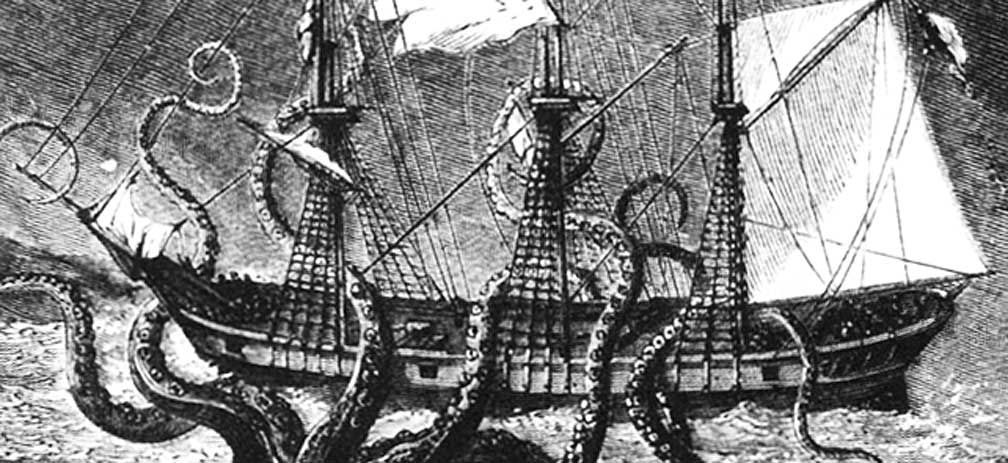
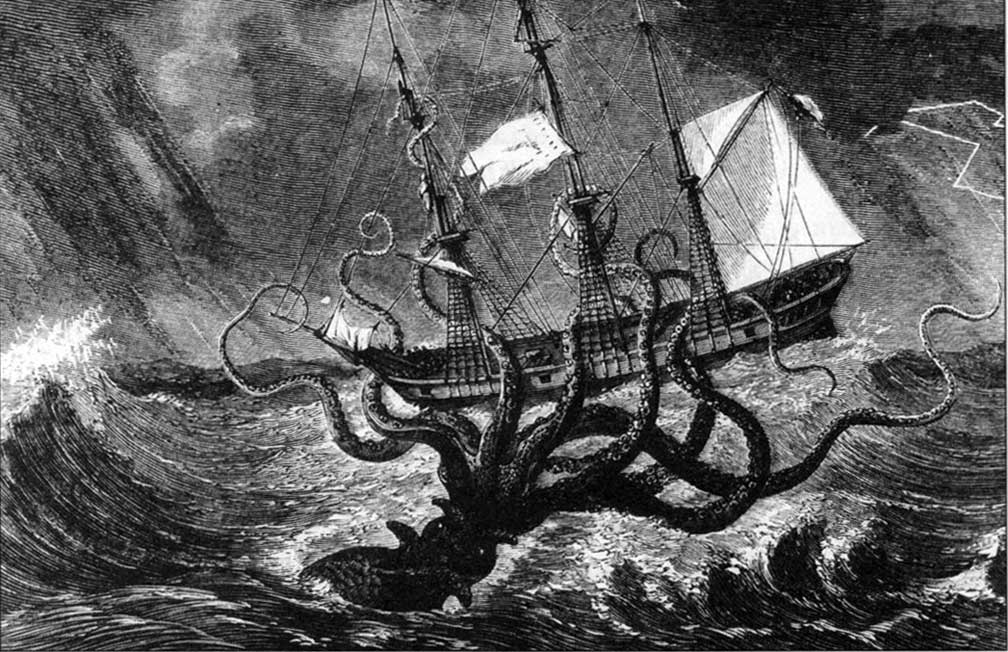
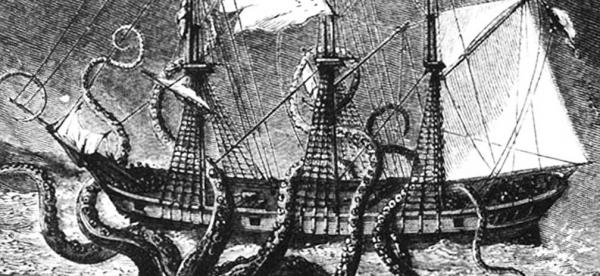
The ship depicted in the print has a decent amount of detail showing. The version of the print I have has the ships tgalent masts cropped off at the top of the image. I am leaning towards leaving these spars off the model in order to have the largest possible hull within the bottle. I will try to document the entire process in this build log. The neck of the bottle presents some difficulties and I may have to come up with some interesting solutions to achieve what I want. I imagine the Kraken’s powerful arms will have to be inserted individually or in pairs. I plan on making the monster from Sculpy and I imagine I will have to segment its arms and connect them together with pins. We will see.
-
I did some photoshop work on the print, trying to find a good fit between the tableau and the inside of the glass bottle. The sea depicted in the print is NOT going to want to fit into the bottle. If you had asked me to sketch the print I would have drawn the ship being held in the air above the sea by the Kraken. But in the print the ship sits on the surface of the sea and the waterline is in a conventional place. I may wind up using artistic license and depict the ship lifter right out of the water by the angry Kraken.

-
I have always been a fan of this print. Who knows when I first saw it? I am sure it is familiar to many of you too. Like all things that achieve a level of ubiquity, nobody wonders where it came from, they just accept that it has always been there. Like the Kraken itself? I got the file for this photo I am posting from Wikipedia, but there was little helpful information. I don’t know who made the print or when. I don’t know in which museum the original prints are located. I don’t know the original intent of the artist. Was the print a book illustration? I would like to know any information any of you ship model builders have on the print if you can shed any light.

-
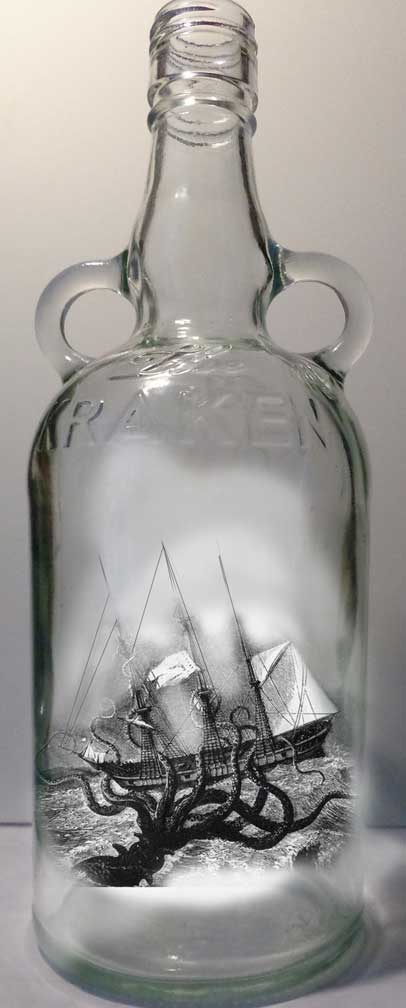
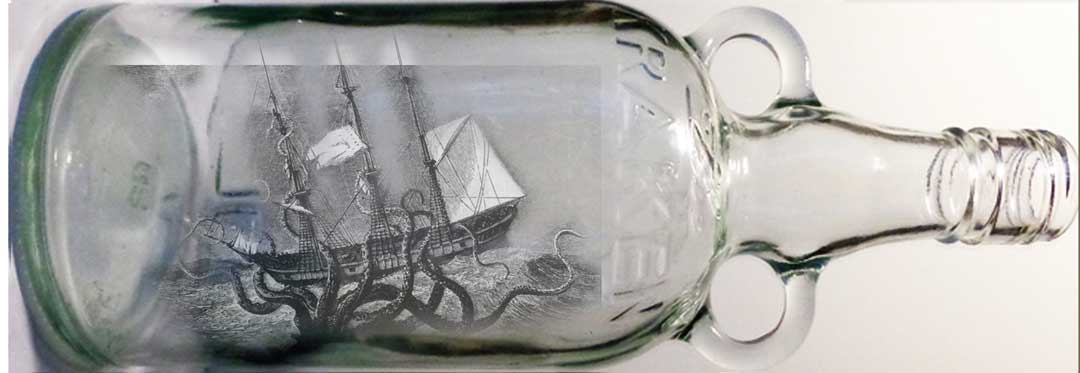
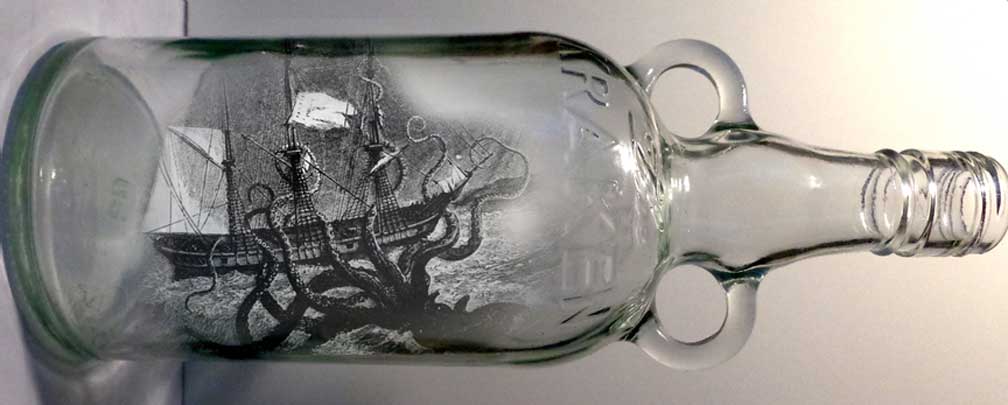
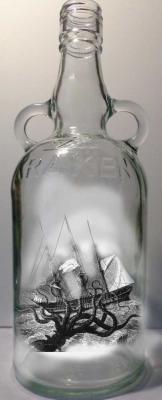
In a dumpster at Liberty Landing Marina in Jersey City, on the banks of the mighty Hudson River, I found a nice bottle. Seldom in life is ambiguity avoided so cleanly. The moment I saw that bottle lying there in the dumpster I knew what it was meant for, I knew what I would put into it, there was no question in my mind. As I retrieved the bottle from within the dumpster I reckoned it already had a pretty salty provenance. No doubt the rum that was in it had been consumed at sea by sailors. I took it home and cleaned it and there it sat with my other bottles, waiting for its destiny.
-
In the fine arts they think of painting over oil with acrylic as being akin to crossing the streams in Ghostbusters. Don't do it, they say. Thinking about what I know about wood and paint though, I bet you can get away with it if you follow the advice everyone is giving above. But if a guy from a museum wants to buy your model some day, NEVER MENTION this issue.
-
There is a thread on here "latest full side view of your current build". How about a thread for "photo of your discarded parts bin"? I know I have some oddities in mine.
-
Sails! I vote for sails too. What a great opportunity to experiment with depicting an unusual point of sail. I see you are in Lewiston, a lovely place. I grew up in Buffalo.
-
Model Shipways Ropewalk
JerseyCity Frankie replied to cdogg's topic in Rope Making/Ropewalks's Discussions about Rope Making
You can never have enough thread string twine or line and there never seems to be the EXACT thing you want for the line you are making. I have had a lot of success stopping at every garage sale, lawn sale, stoop sale and gate sale I pass. Apparently everyone has a collection of sewing stuff sitting around and a certain percentage of these people are trying to get rid of it and I am usually happy to oblige them. I have found some amazing stuff that is not available at fabric stores. Also while I think of it, a well stocked shoe repair place usually will have some very heavy thread for the shoe repair business. -
Actual practice should be fairly easy to follow. On a full scale ship the stirrups are unambiguous, they are lengths of line with an eye splice in the end. The end without the eye is nailed (nailed!) to the yard and three or four turns are taken around the yard and the rest of the stirrup just hangs down on the after side of the yard. it its a steel spar the stirrups are bent to the jackstay. The footrope is led through all the eyes. The footrope is free to slide this way and that through the eyes, there is no lashing. The outboard end of the footrope has an eye splice just the right size to fit over the yard arm, other rigging goes over the yard arm too but the footropes go on first. The inboard end also has an eye splice but is lashed to the yard near the slings. On your model you should be able to mimic eye splices by simply gluing the end of your footopes and stirrups back onto themselves and form a tiny eye that way. Or, if its a small scale model you can just glue the stirrups ends onto the footropes. If you have a decent drawing of the yard in your plans you can glue the whole thing up directly over the plan to make sure the fit is right then put the completed assembly on the model. Footropes were tarred so use the right color.
-
Great Leopard Bluto! Hey you know, I think I found some very old vintage cinema footage of a distant ancestor of yours at work on an old sailing vessel. I THINK its a distant relative, the resemblance is striking: http://omgif.gosedesign.net/wp-content/popeye.gif
-
I think those hooks look great. But those coils on that most recent photo of Constitution are a disgrace!
-
sail and rigging help
JerseyCity Frankie replied to shawn32671's topic in Masting, rigging and sails
Congratulations, you’ve discovered the best hobby in the world. And, lucky for you, you have also discovered a great website where you can ask questions and make comments in a like minded knowledgeable community. If you narrow down what information your looking for and ask specific questions about one aspect or another, you can get good answers about anything you are likely to want to know. The short answer I would give to your question about sails and rigging is: get some books on the subject. The Neophyte Shipmodeller’s Jackstay is inexpensive and very helpful on the steep end of the learning curve of ship model building, it was one of the first books I got when I started. Three other books I got in my first year of ship model building, which I still recommend, are Ship Modeling From Stem to Stern by Milton Roth, Ship Modelers Shop Notes by Merrit Edson (and there is an updated version of it now too) and Historic Ship Models by Wolfram Mondfeld.