lraymo
Members-
Posts
297 -
Joined
-
Last visited
-
 yvesvidal reacted to a post in a topic:
Phantom by lraymo - Model Shipways - 1:96 scale - New York Pilot Boat
-
 Canute reacted to a post in a topic:
Kentoshi-sen by Glen McGuire - FINISHED - 1/400 - Bottle
-
 FriedClams reacted to a post in a topic:
Lula by Keith Black - FINISHED - 1:120 Scale - 1870s Sternwheeler Supply Boat for Floating Pile Driver
-
 Canute reacted to a post in a topic:
Lula by Keith Black - FINISHED - 1:120 Scale - 1870s Sternwheeler Supply Boat for Floating Pile Driver
-
 Canute reacted to a post in a topic:
Lula by Keith Black - FINISHED - 1:120 Scale - 1870s Sternwheeler Supply Boat for Floating Pile Driver
-
 Glen McGuire reacted to a post in a topic:
Kentoshi-sen by Glen McGuire - FINISHED - 1/400 - Bottle
-
 Keith Black reacted to a post in a topic:
Lula by Keith Black - FINISHED - 1:120 Scale - 1870s Sternwheeler Supply Boat for Floating Pile Driver
-
 Keith Black reacted to a post in a topic:
Lula by Keith Black - FINISHED - 1:120 Scale - 1870s Sternwheeler Supply Boat for Floating Pile Driver
-
 Keith Black reacted to a post in a topic:
Kentoshi-sen by Glen McGuire - FINISHED - 1/400 - Bottle
-
From this impressive build, its hard to believe that you're impatient! It looks amazing, and the bonsai driftwood is very cool!
- 106 replies
-
- Kentoshi-Sen
- bottle
-
(and 1 more)
Tagged with:
-
 lraymo reacted to a post in a topic:
Kentoshi-sen by Glen McGuire - FINISHED - 1/400 - Bottle
-
 lraymo reacted to a post in a topic:
Lula by Keith Black - FINISHED - 1:120 Scale - 1870s Sternwheeler Supply Boat for Floating Pile Driver
-
 lraymo reacted to a post in a topic:
Lula by Keith Black - FINISHED - 1:120 Scale - 1870s Sternwheeler Supply Boat for Floating Pile Driver
-
 lraymo reacted to a post in a topic:
Lula by Keith Black - FINISHED - 1:120 Scale - 1870s Sternwheeler Supply Boat for Floating Pile Driver
-
 Canute reacted to a post in a topic:
Kentoshi-sen by Glen McGuire - FINISHED - 1/400 - Bottle
-
Once again, I go away for a few days and come back to see more AWESOME work you've done on Lula. It's looking really great (and i'm so happy there's a cat onboad!) Good luck on the handrails! Your attention to detail is fantastic!
- 732 replies
-
- Lula
- sternwheeler
-
(and 1 more)
Tagged with:
-
Wow, just amazing! I can't believe how much patience you must have, to do something like this... and it turns out looking fantastic!
- 106 replies
-
- Kentoshi-Sen
- bottle
-
(and 1 more)
Tagged with:
-
 lraymo reacted to a post in a topic:
Kentoshi-sen by Glen McGuire - FINISHED - 1/400 - Bottle
-
I love all the detail you've put into this ship! It looks great! And I'm glad you are back in your daily rhythm, but from someone who dropped out for more than a year, I know how hard it is to return. Glad you did!
- 732 replies
-
- Lula
- sternwheeler
-
(and 1 more)
Tagged with:
-
 lraymo reacted to a post in a topic:
Phantom by lraymo - Model Shipways - 1:96 scale - New York Pilot Boat
-
 lraymo reacted to a post in a topic:
Phantom by lraymo - Model Shipways - 1:96 scale - New York Pilot Boat
-
 lraymo reacted to a post in a topic:
Lula by Keith Black - FINISHED - 1:120 Scale - 1870s Sternwheeler Supply Boat for Floating Pile Driver
-
@Glen McGuire - @Keith Black thank you both for your encouragement and kind words! There's so many mistakes and errors in this build so far, and it's messy at best, but your encouragement makes me think it will look fine (from a distance!) when its finally done! I am ok with its current state, giving myself alot of "grace"! But I am absolutely terrified of working with the remaining blocks and deadeyes, simply because they are SO SMALL! (even tho you both have worked with much smaller items!) So I'm going to muddle thru, and I appreciate your words and your support! (It also helps that the other model is out of stock, so I can't get it anyway!) I am going to work on it a little at a time, since golf is in full swing, and I've got some other commitments, but I have to tell myself it isn't a "race" to the finish line, but a "stroll" through an activity that I enjoy, that I can work on a bit at a time! Not only that, it occurs to me that each new difficult task is helping me learn and improve my limited skill set! So I thank you both again for your wonderful encouraging support!
-
 lraymo reacted to a post in a topic:
Phantom by lraymo - Model Shipways - 1:96 scale - New York Pilot Boat
-
 lraymo reacted to a post in a topic:
Phantom by lraymo - Model Shipways - 1:96 scale - New York Pilot Boat
-
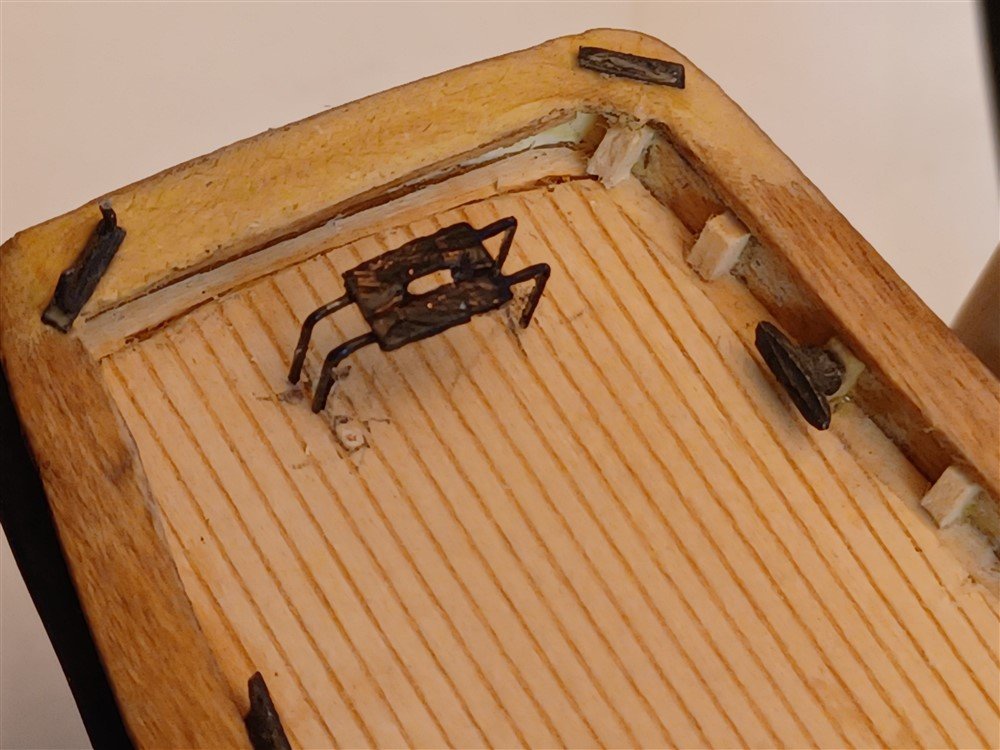
I worked a bit more on the Traveler, trying to make it look a little better and straightening the legs (staples!), and painting it black. It needs another coat, but this is ok for now. This has not been glued in, I just wanted to see it in position. Disregard the pencil marks, and all the other blemishes! I'm seriously considering going back to the 3rd ship in the Shipwright series (I had only done numbers 1 and 2). The 3rd ship is at a 1:24 scale, which might help me become more experienced, before trying to finish up the Phantom.
-
Keith, this sounds like very good news! And glad you are back with Lula! I am sending healing thoughts for your appointment on the 19th!
- 732 replies
-
- Lula
- sternwheeler
-
(and 1 more)
Tagged with:
-
Glen, thanks for the kind words. I am awed by the talent in MSW, and love watching what everyone is building. Obviously, i am a rank beginner, and at the moment, having a very hard time with the small scale of this ship... but I'll forge ahead for now. Meanwhile, I jumped over to your Kentoshi build. Wow! Incredible!
-
Glen, this is a fantastic ship! It looks so amazing! Thanks to your very kind comment on my build, I had to come over to see what you were building. I am awestuck, and will follow to see it installed in its bottle!
- 106 replies
-
- Kentoshi-Sen
- bottle
-
(and 1 more)
Tagged with:
-
I vote for Glen's story as well. My Dad used to make our family car trips really long because he didn't like to ask for directions and also didn't like to turn around! So we might've ended up on a ferry trying to return to where we were supposed to be! As for women in pants, I cringe now at the memory of having to wear skirts and dresses into the office. Ugh, so happy that I no longer have to put up with that!
- 732 replies
-
- Lula
- sternwheeler
-
(and 1 more)
Tagged with:
-
Thinking of you today, Keith, and sending healing thoughts! Hope all goes well!
- 732 replies
-
- Lula
- sternwheeler
-
(and 1 more)
Tagged with:
-
Thanks Keith! I consider myself one of the gang, and seeing all the friends you've got here, you have a wealth of support getting through these next challenges!
- 732 replies
-
- Lula
- sternwheeler
-
(and 1 more)
Tagged with:
About us
Modelshipworld - Advancing Ship Modeling through Research
SSL Secured
Your security is important for us so this Website is SSL-Secured
NRG Mailing Address
Nautical Research Guild
237 South Lincoln Street
Westmont IL, 60559-1917
Model Ship World ® and the MSW logo are Registered Trademarks, and belong to the Nautical Research Guild (United States Patent and Trademark Office: No. 6,929,264 & No. 6,929,274, registered Dec. 20, 2022)
Helpful Links
About the NRG
If you enjoy building ship models that are historically accurate as well as beautiful, then The Nautical Research Guild (NRG) is just right for you.
The Guild is a non-profit educational organization whose mission is to “Advance Ship Modeling Through Research”. We provide support to our members in their efforts to raise the quality of their model ships.
The Nautical Research Guild has published our world-renowned quarterly magazine, The Nautical Research Journal, since 1955. The pages of the Journal are full of articles by accomplished ship modelers who show you how they create those exquisite details on their models, and by maritime historians who show you the correct details to build. The Journal is available in both print and digital editions. Go to the NRG web site (www.thenrg.org) to download a complimentary digital copy of the Journal. The NRG also publishes plan sets, books and compilations of back issues of the Journal and the former Ships in Scale and Model Ship Builder magazines.


