MORE HANDBOOKS ARE ON THEIR WAY! We will let you know when they get here.
×


realworkingsailor
-
Posts
3,206 -
Joined
-
Last visited
Content Type
Profiles
Forums
Gallery
Events
Everything posted by realworkingsailor
-
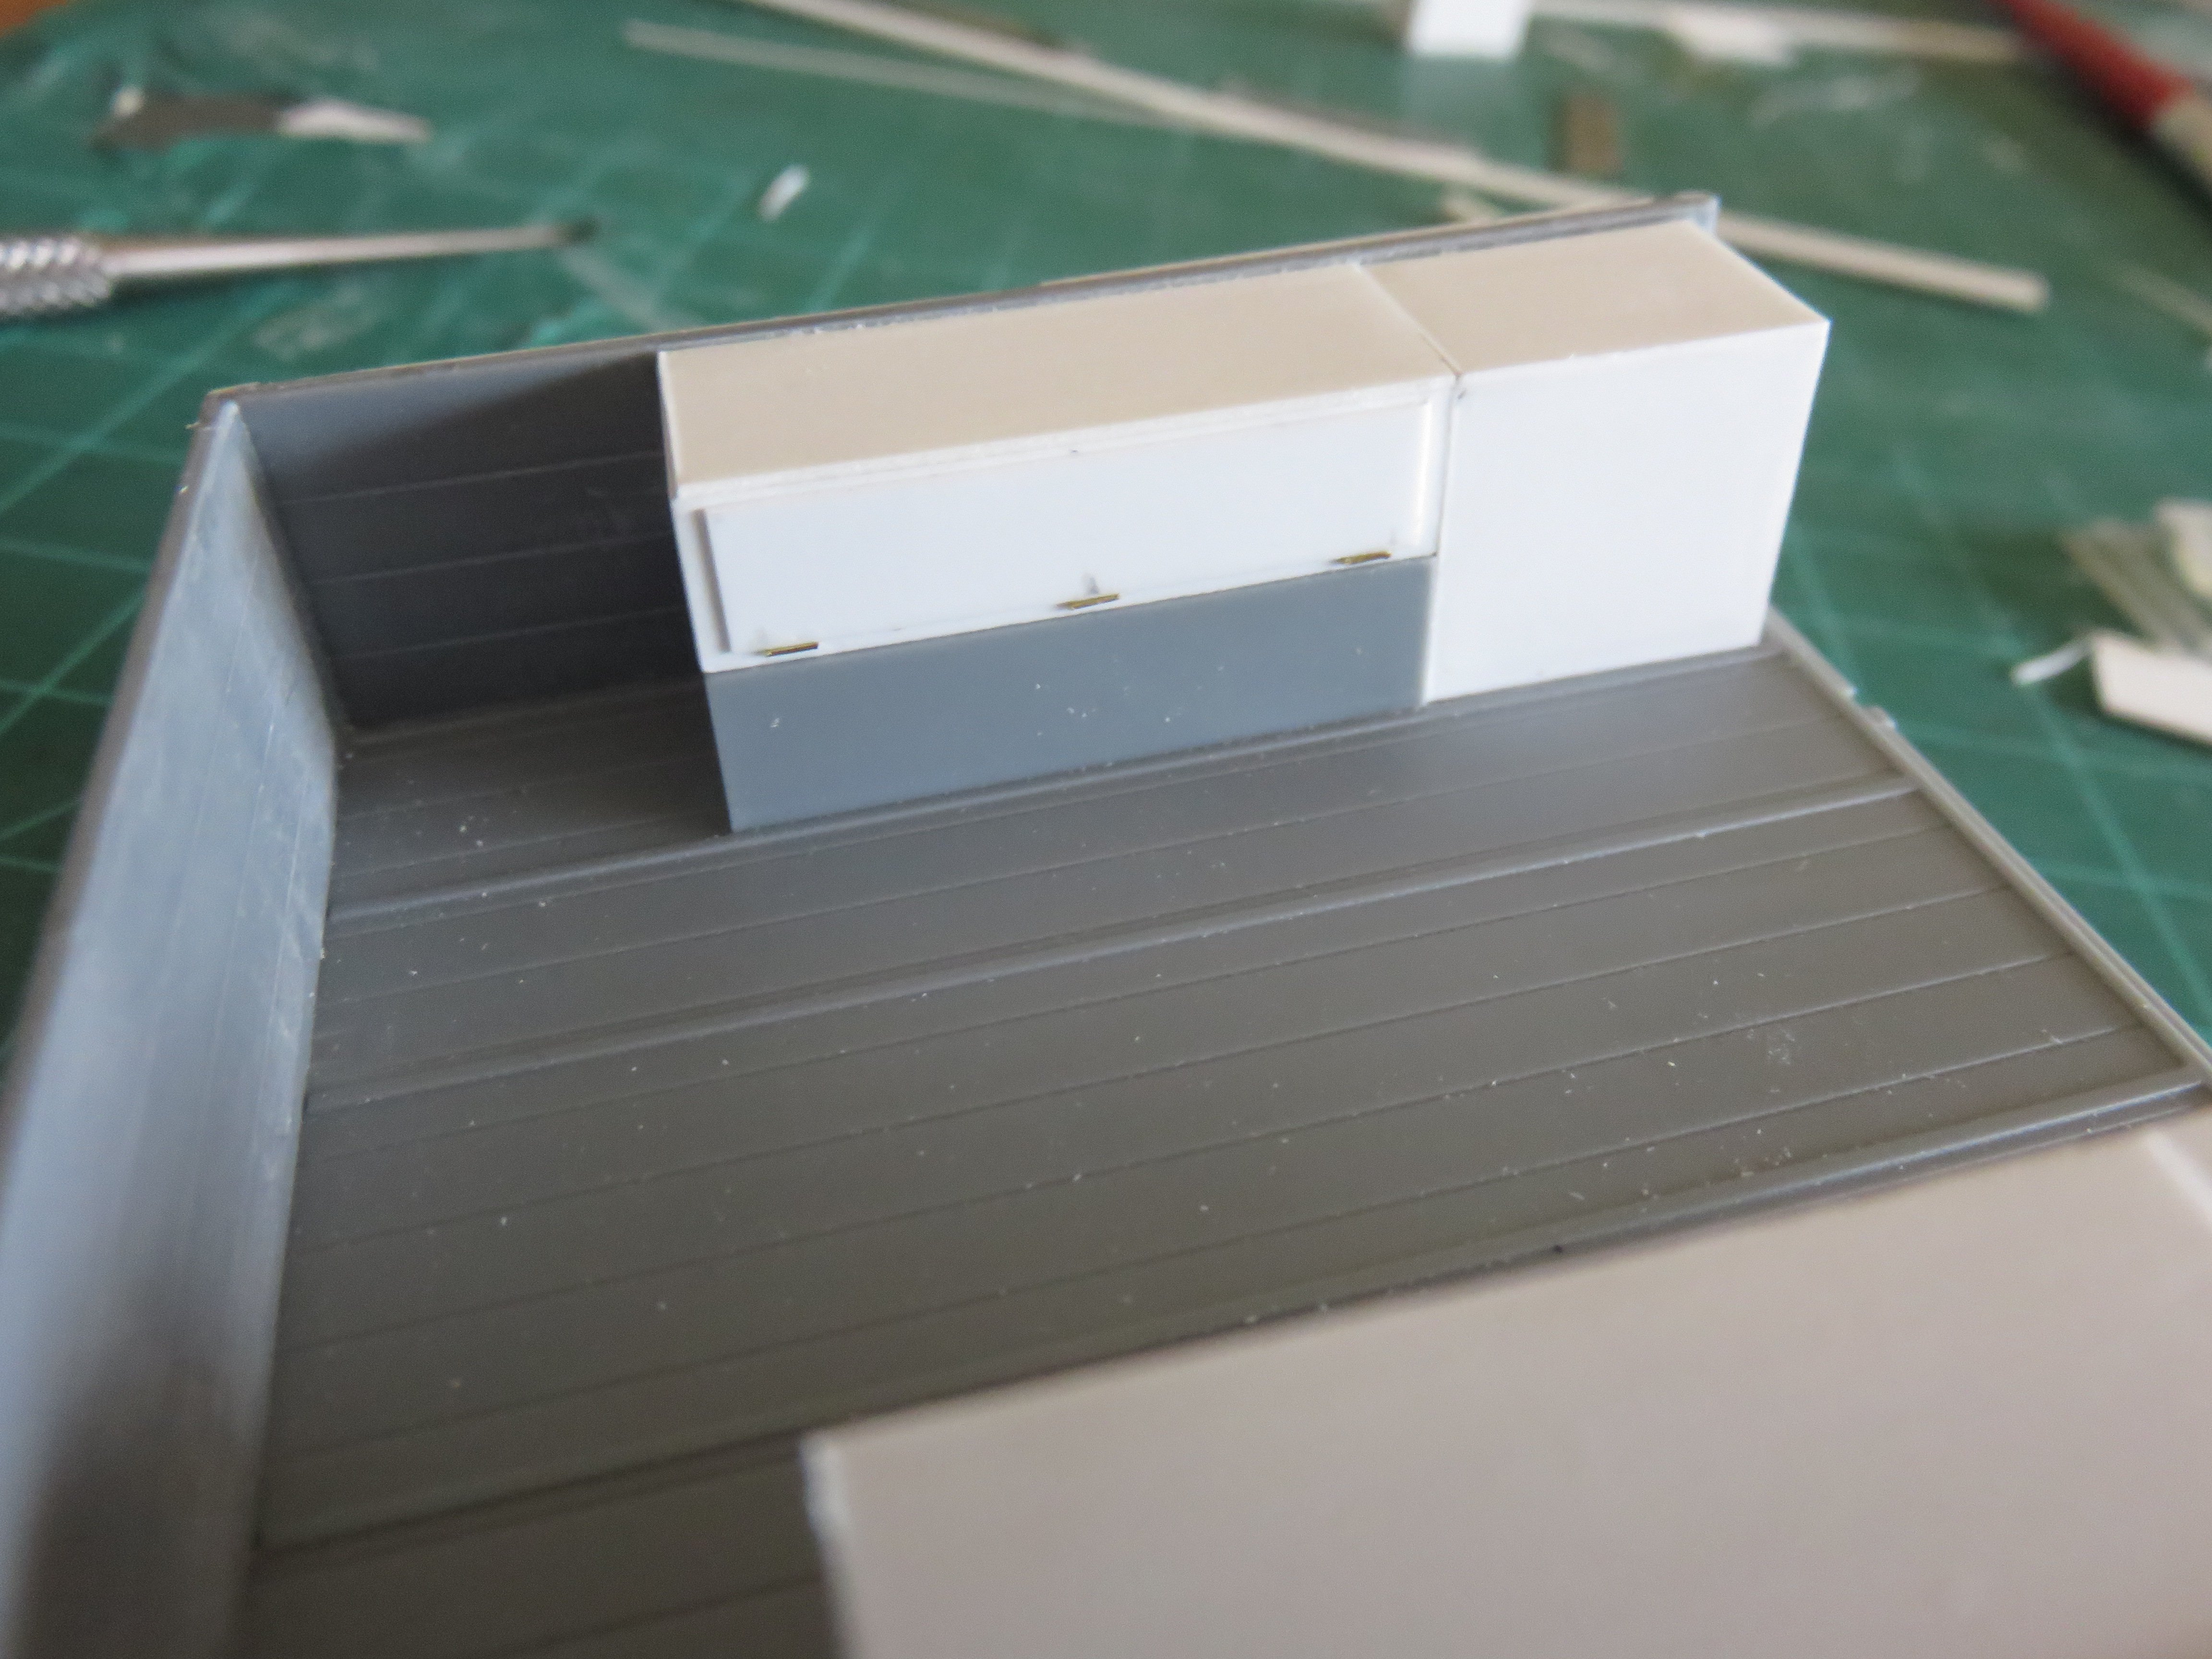
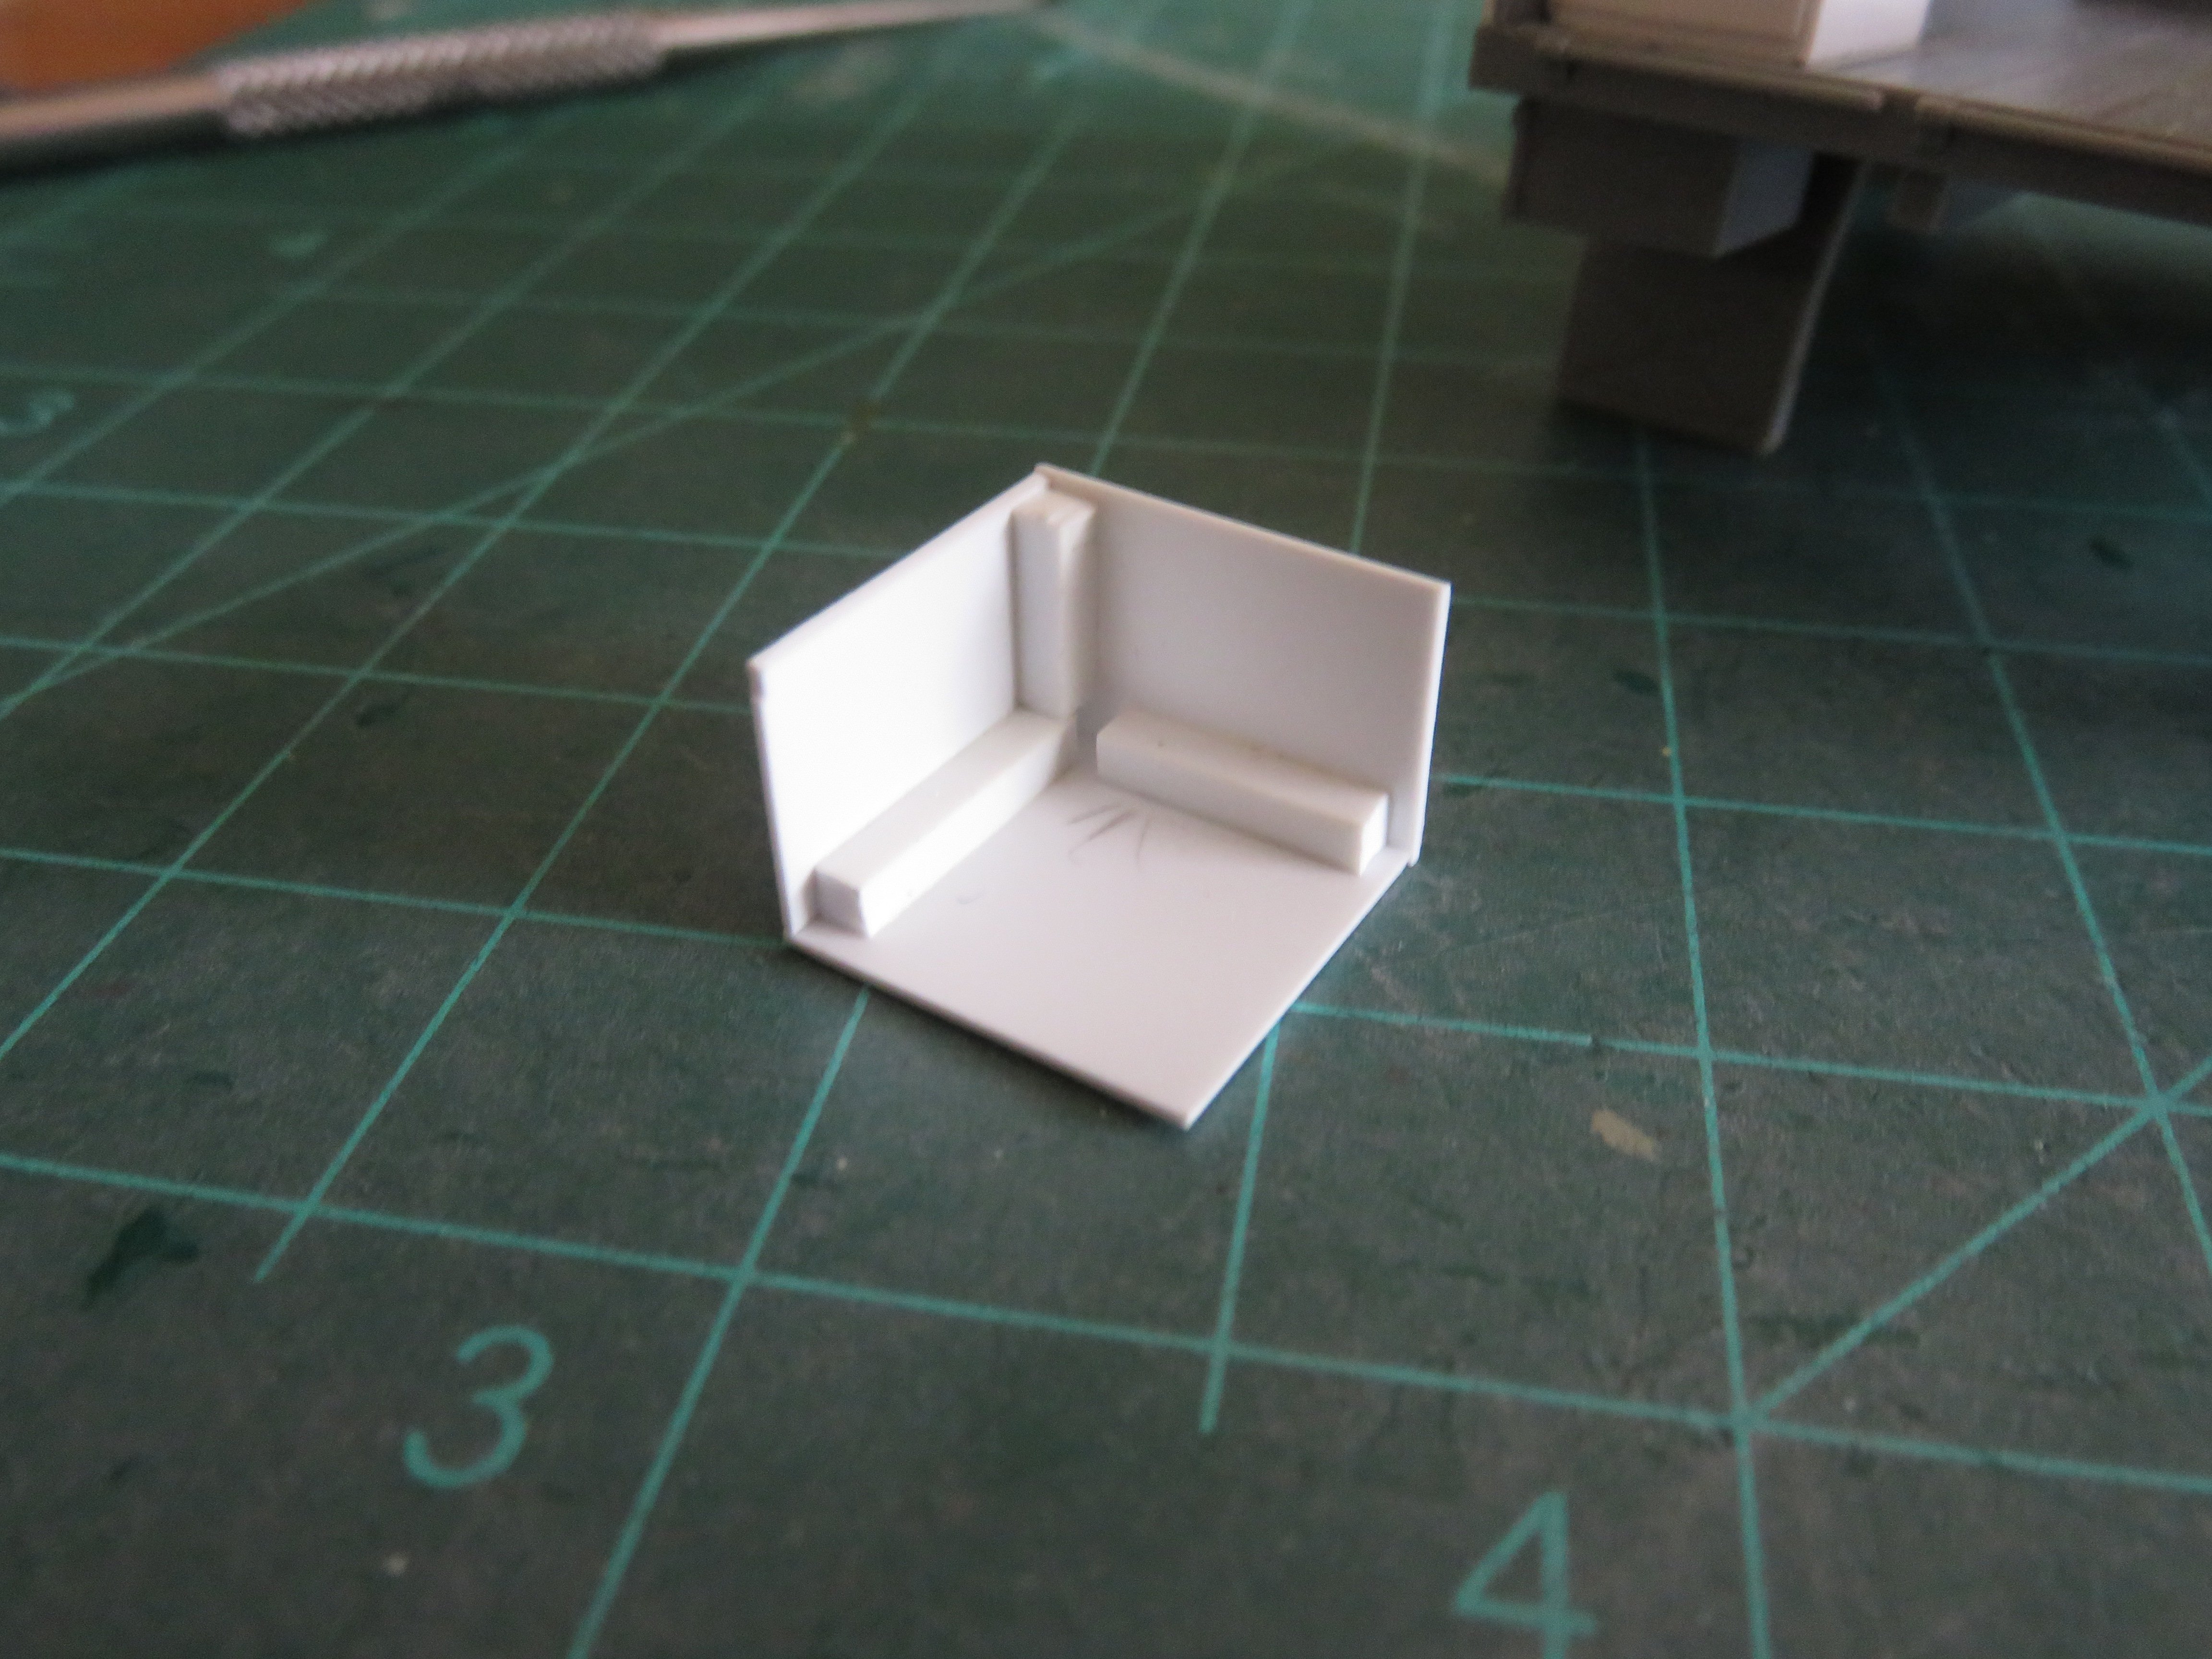
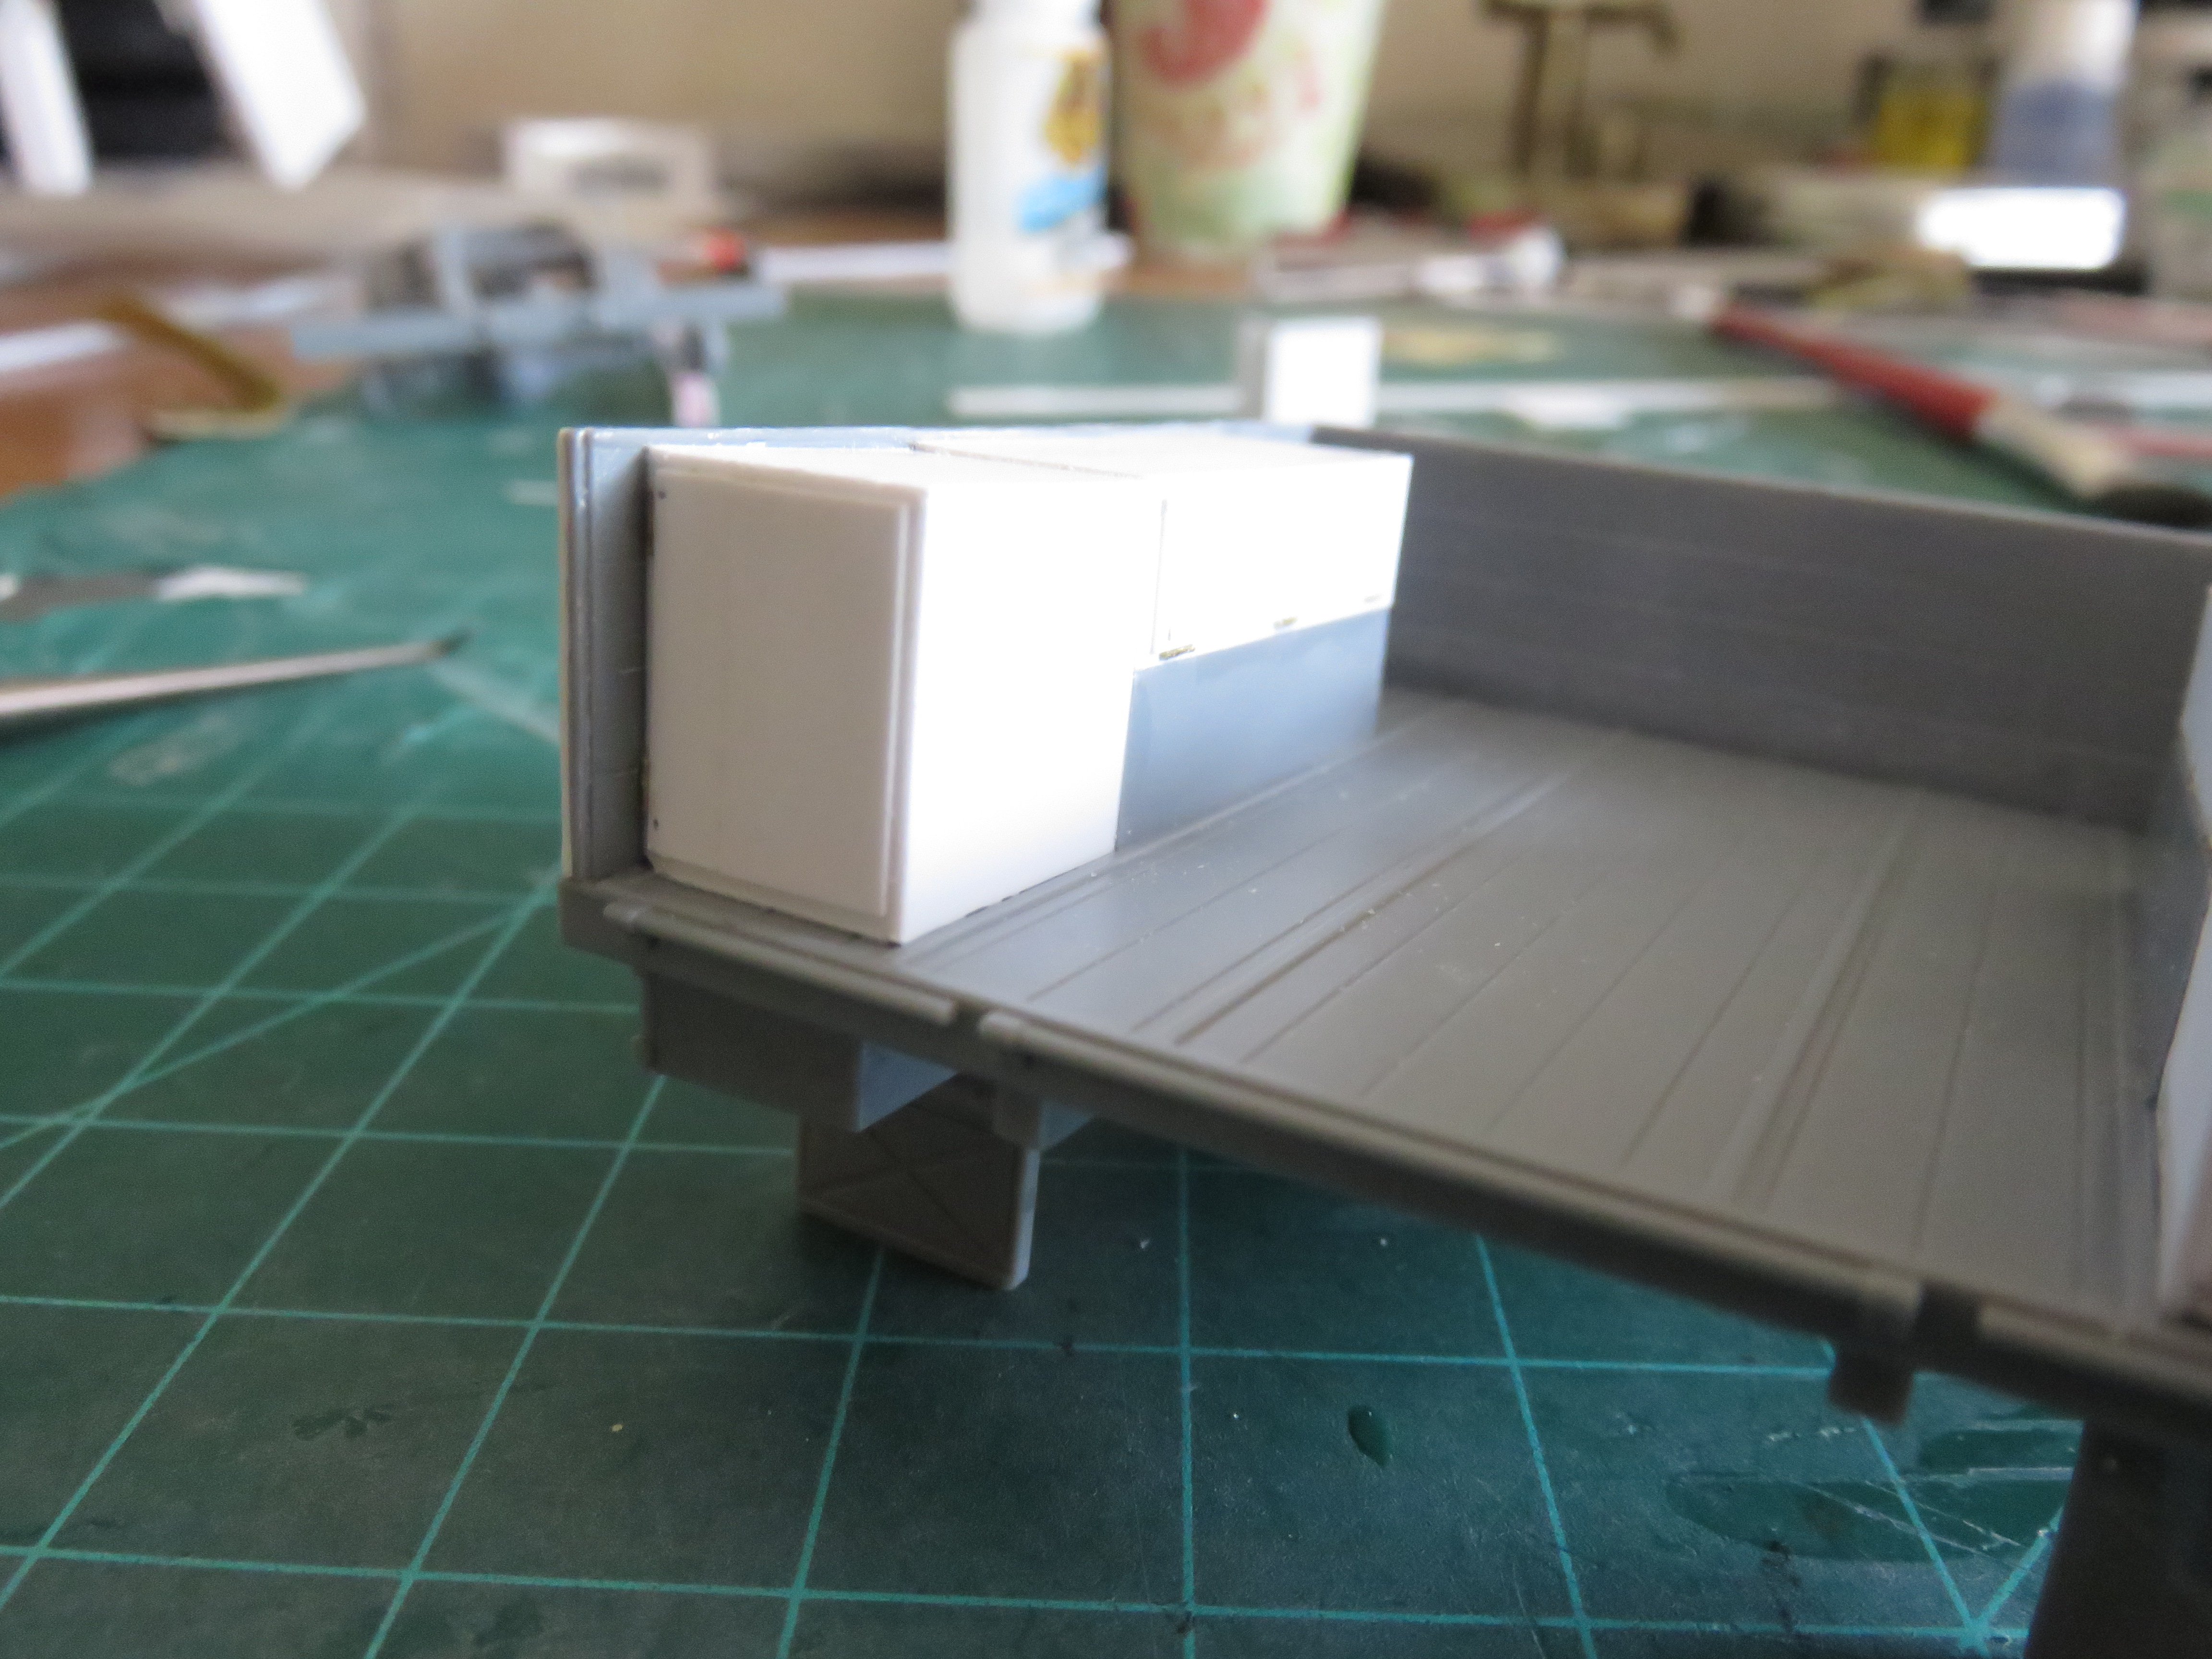
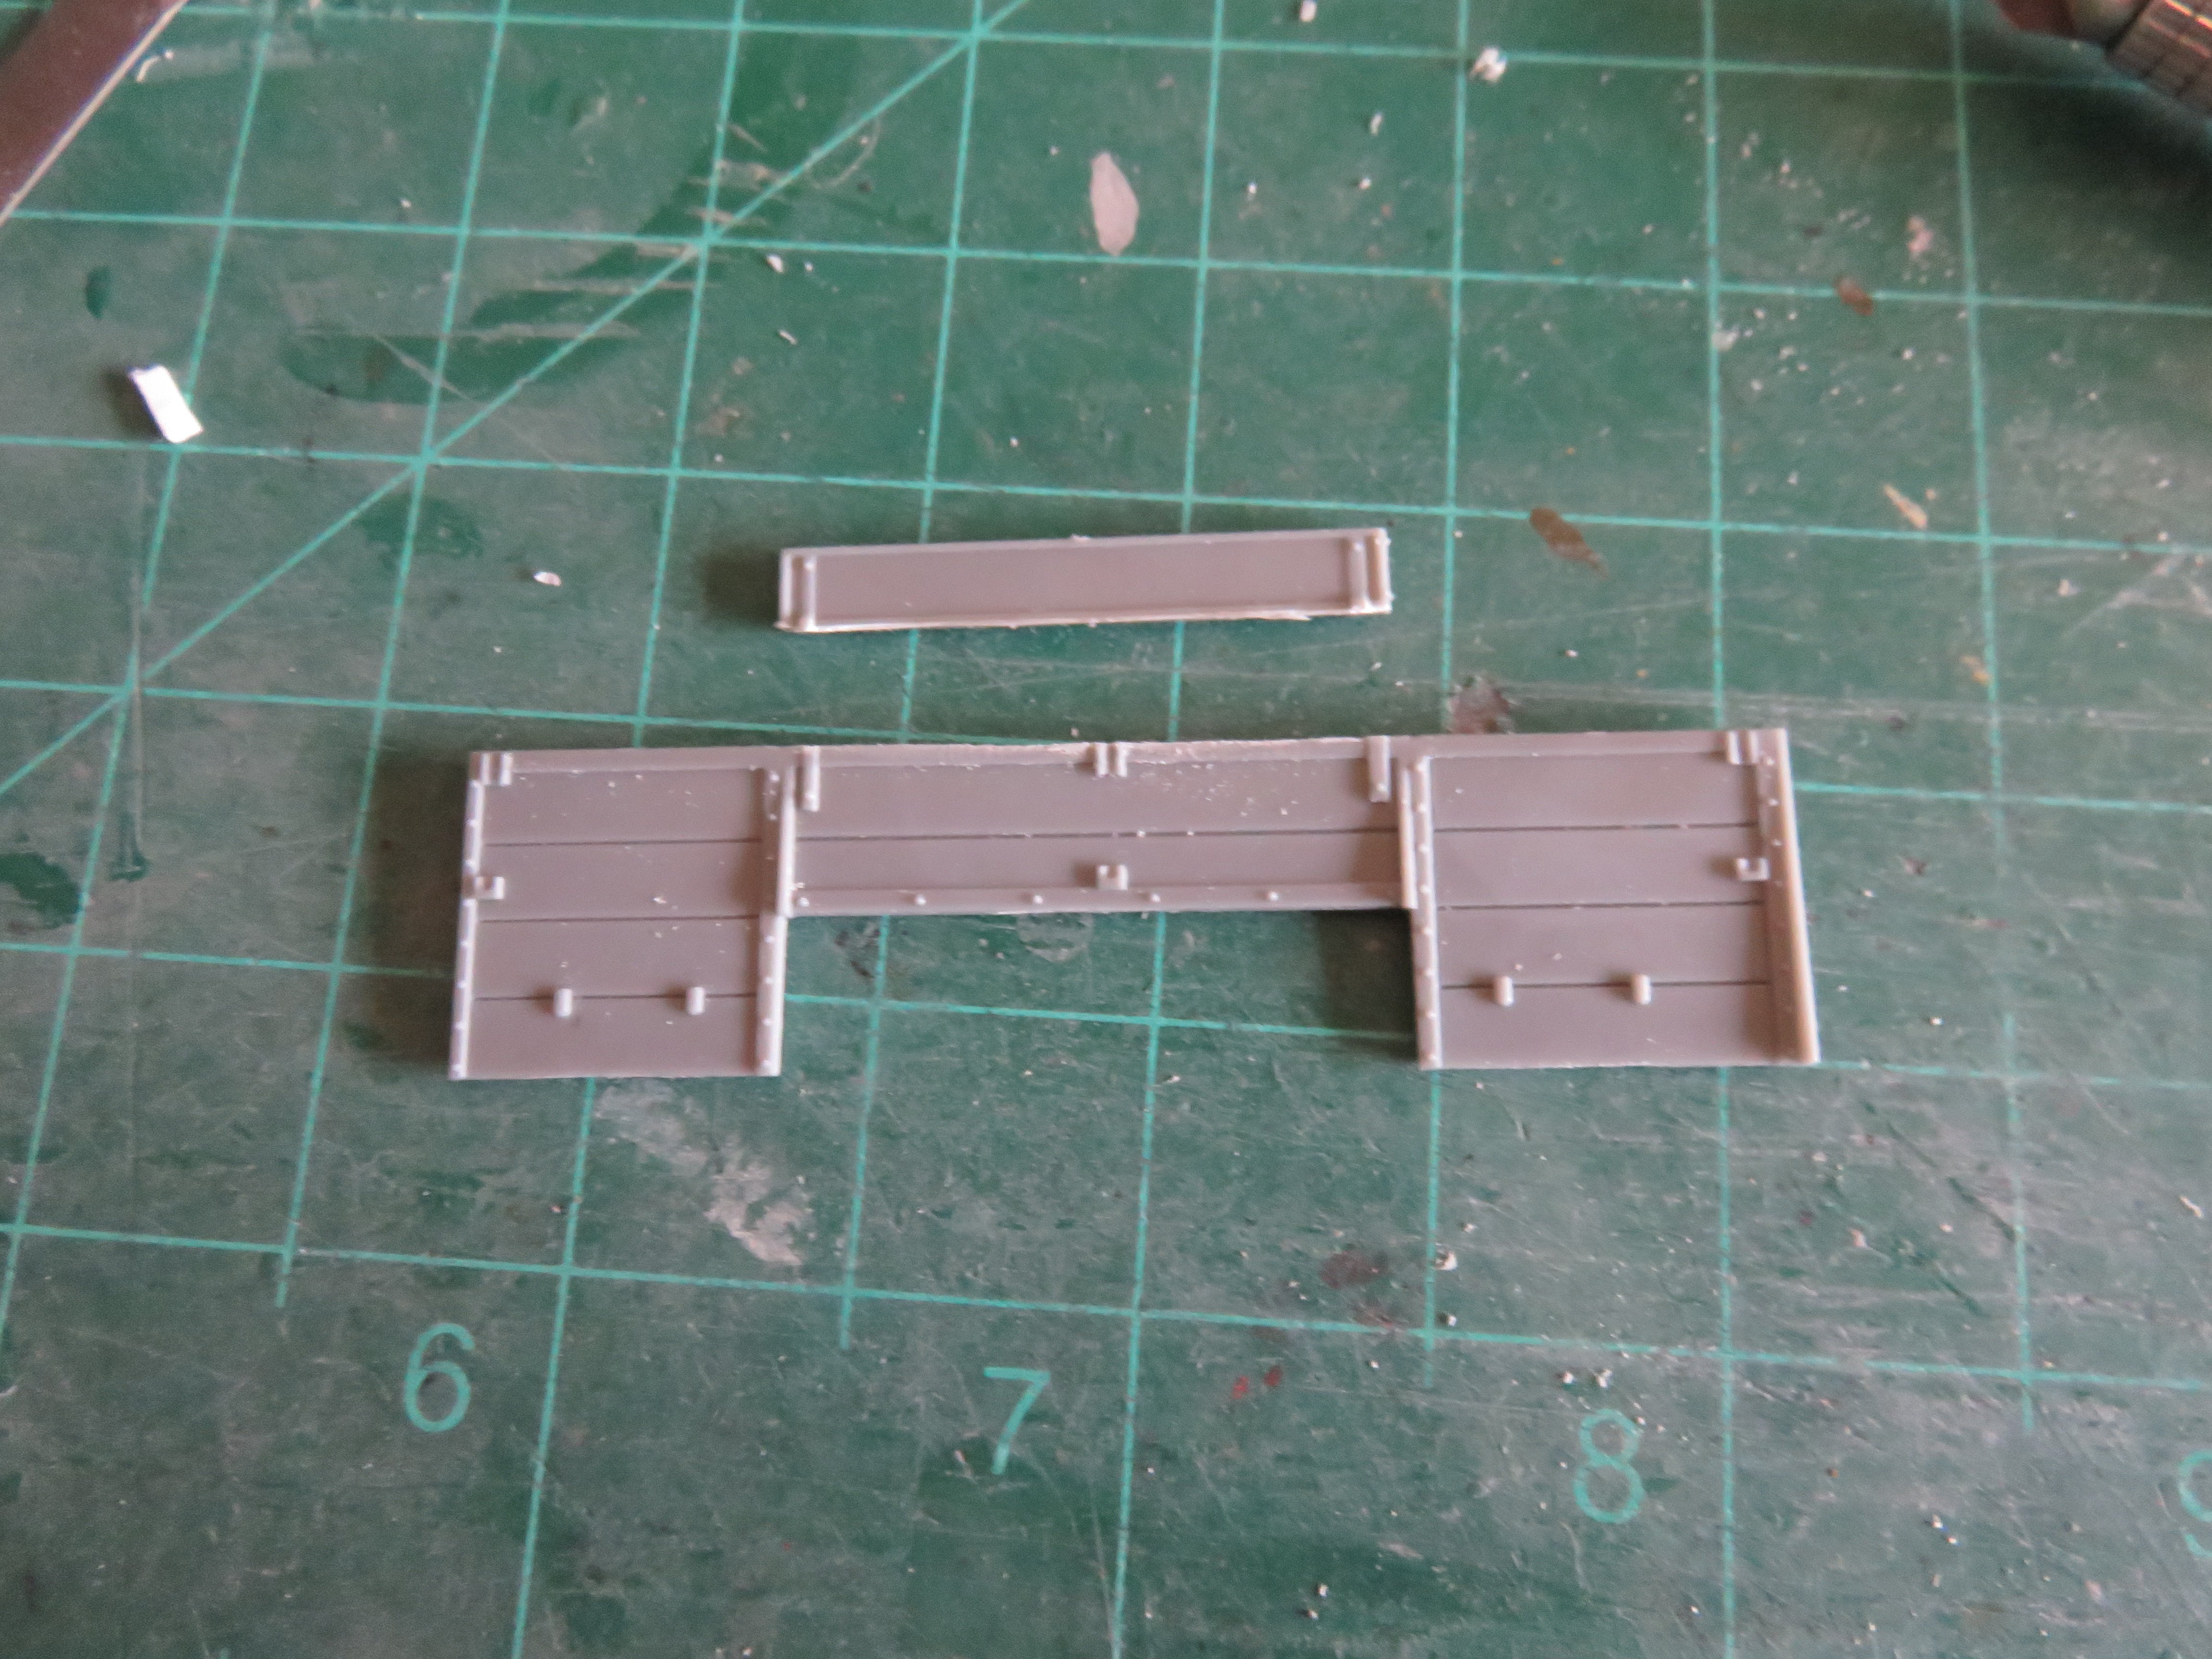
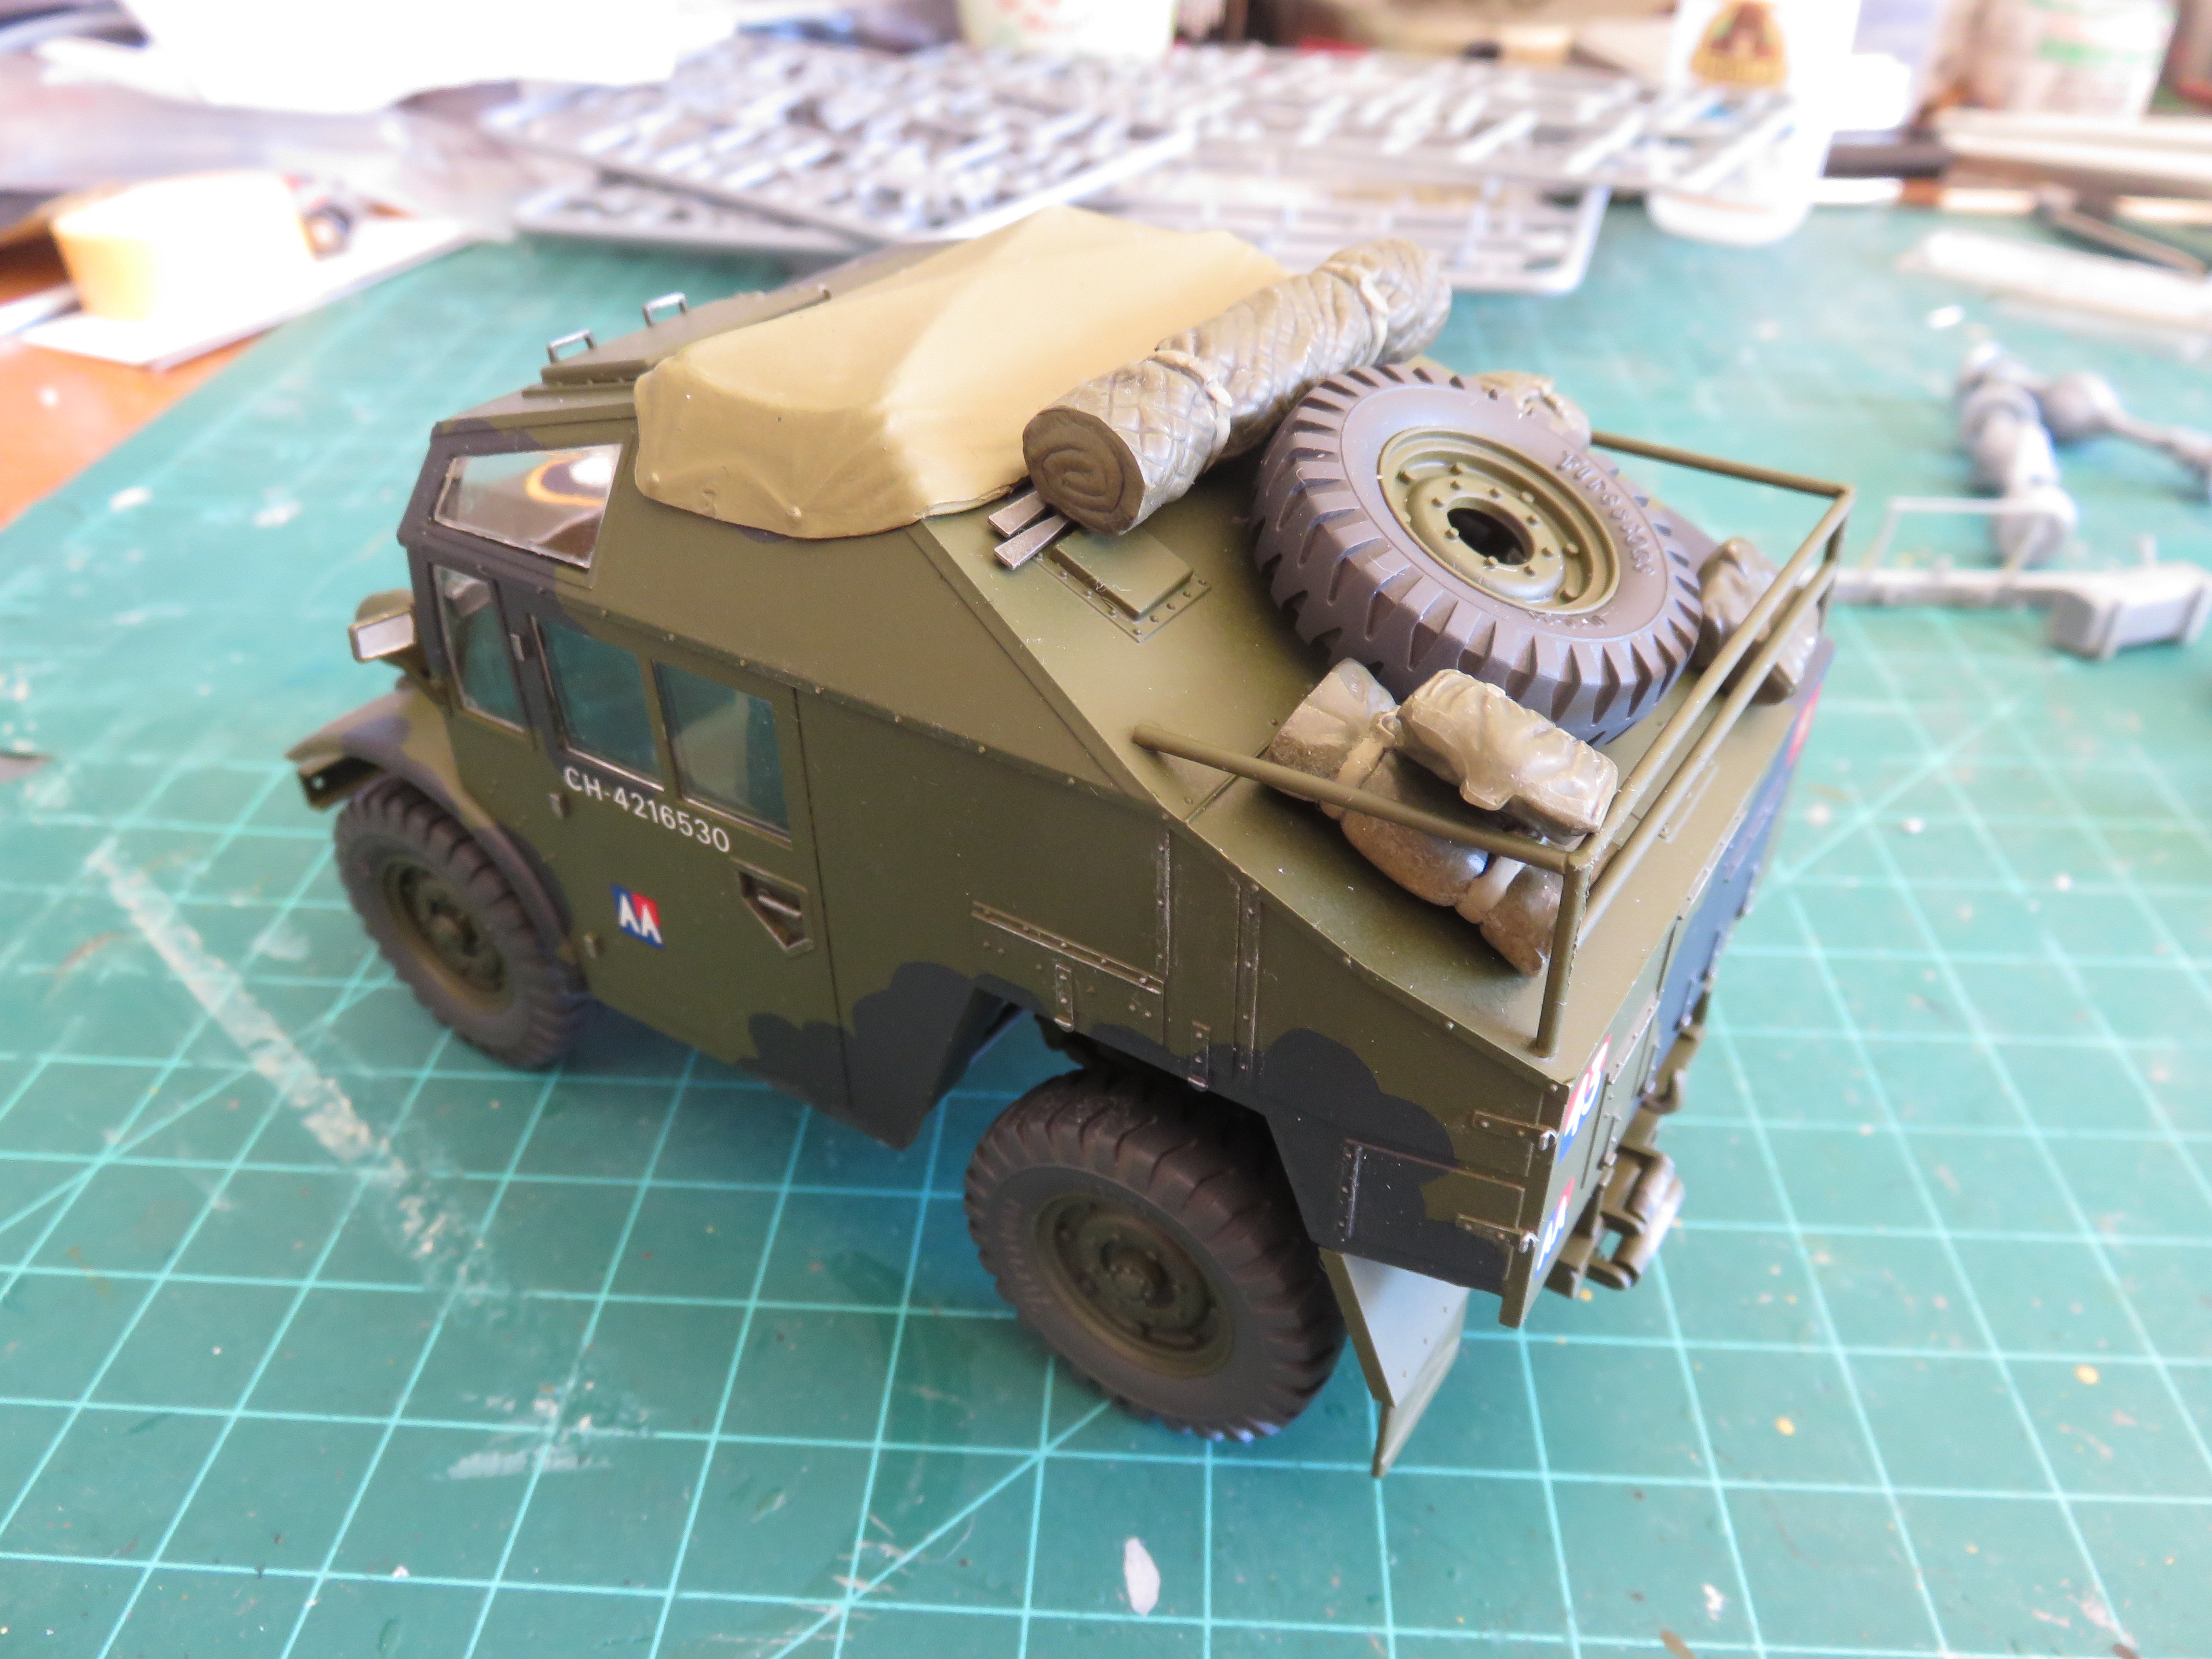
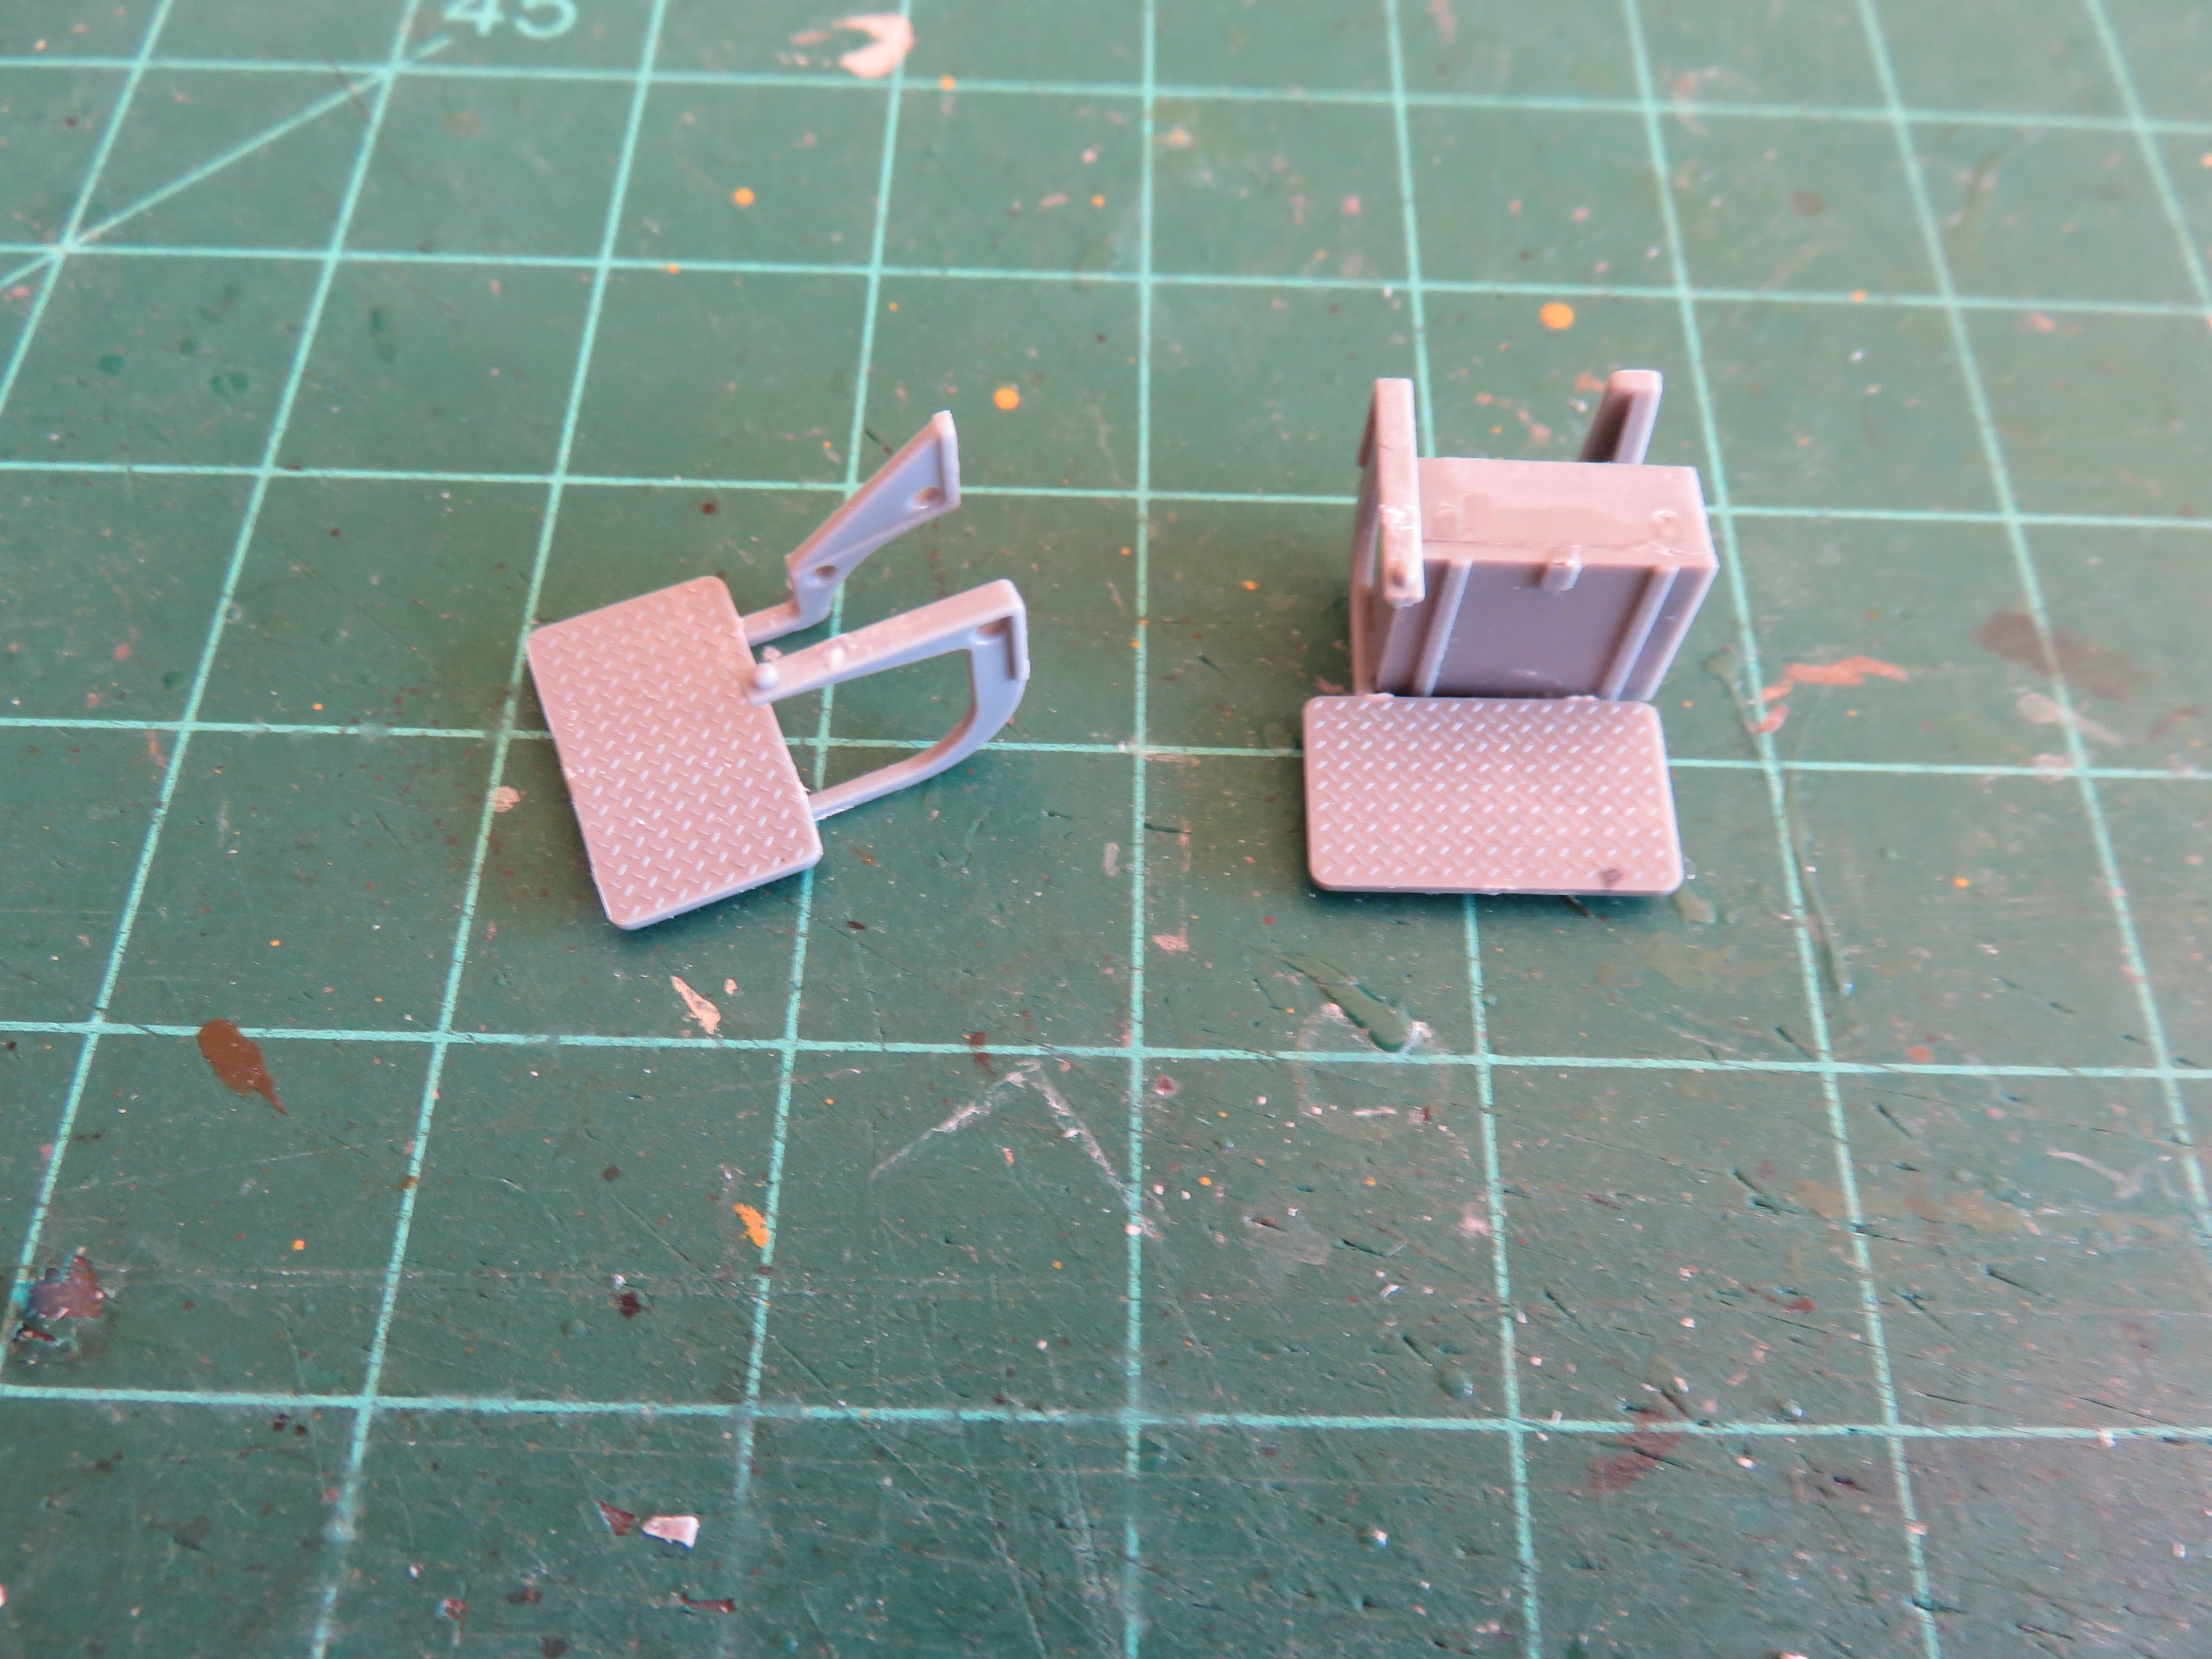
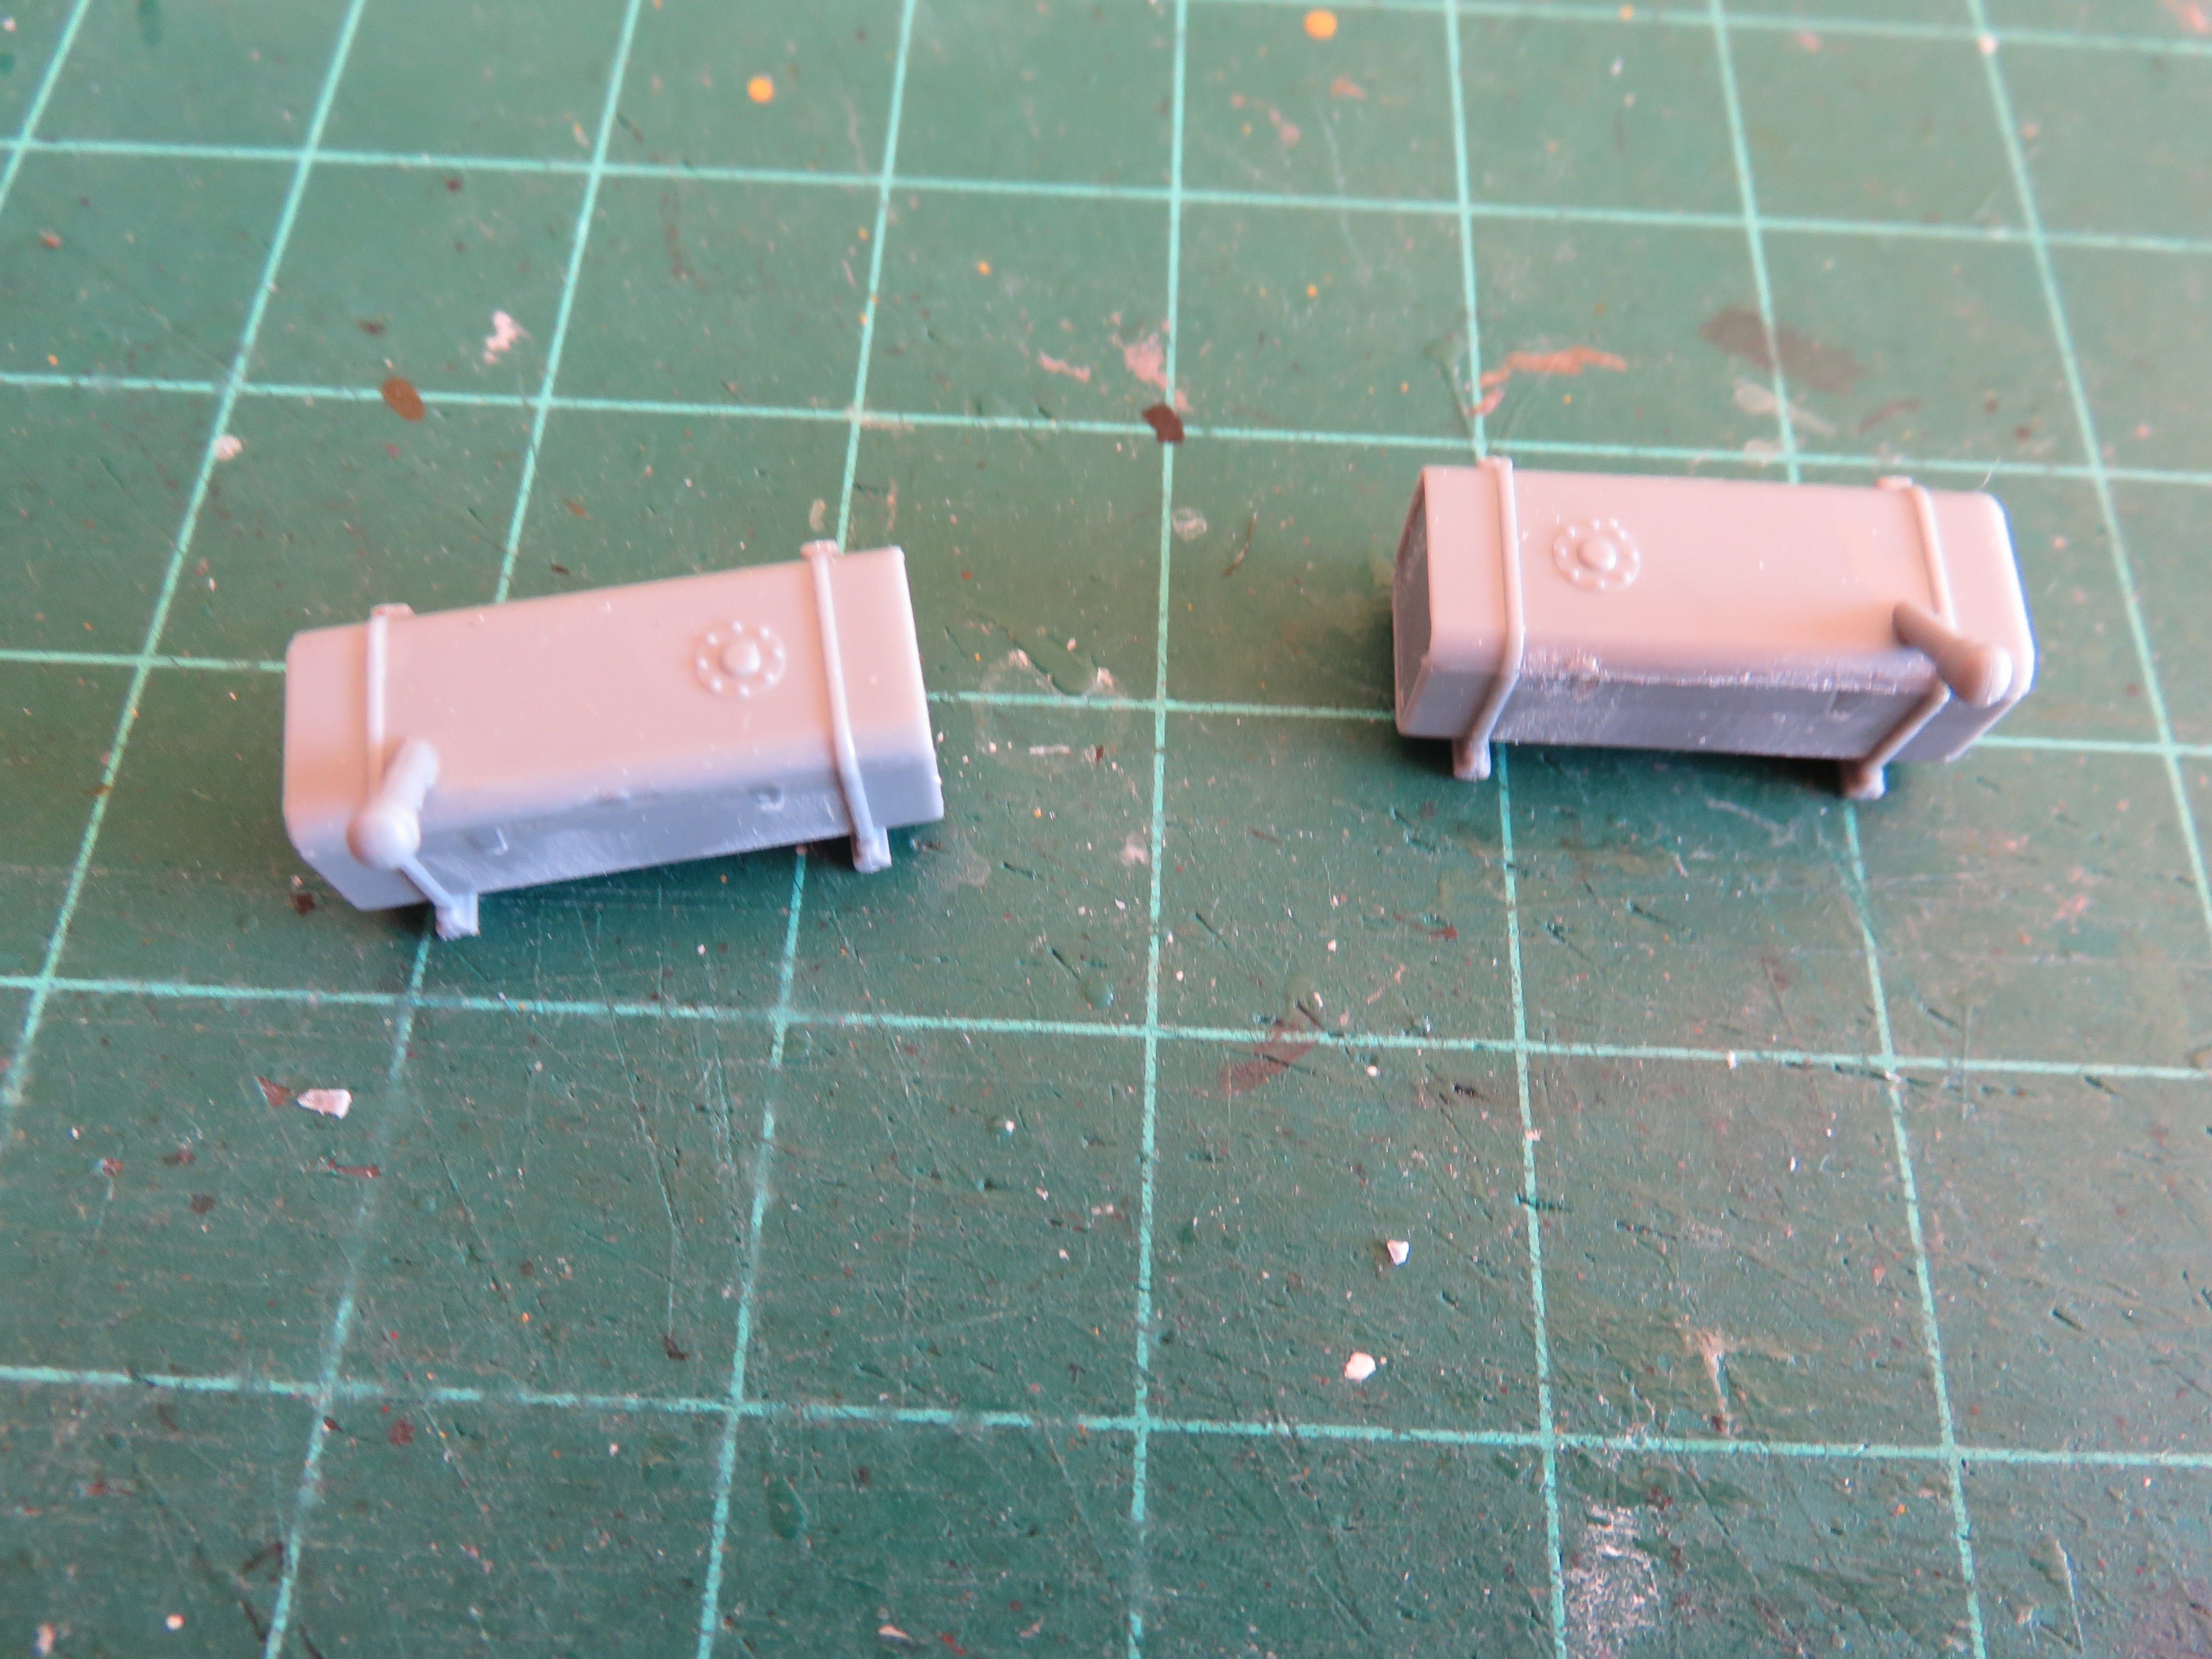
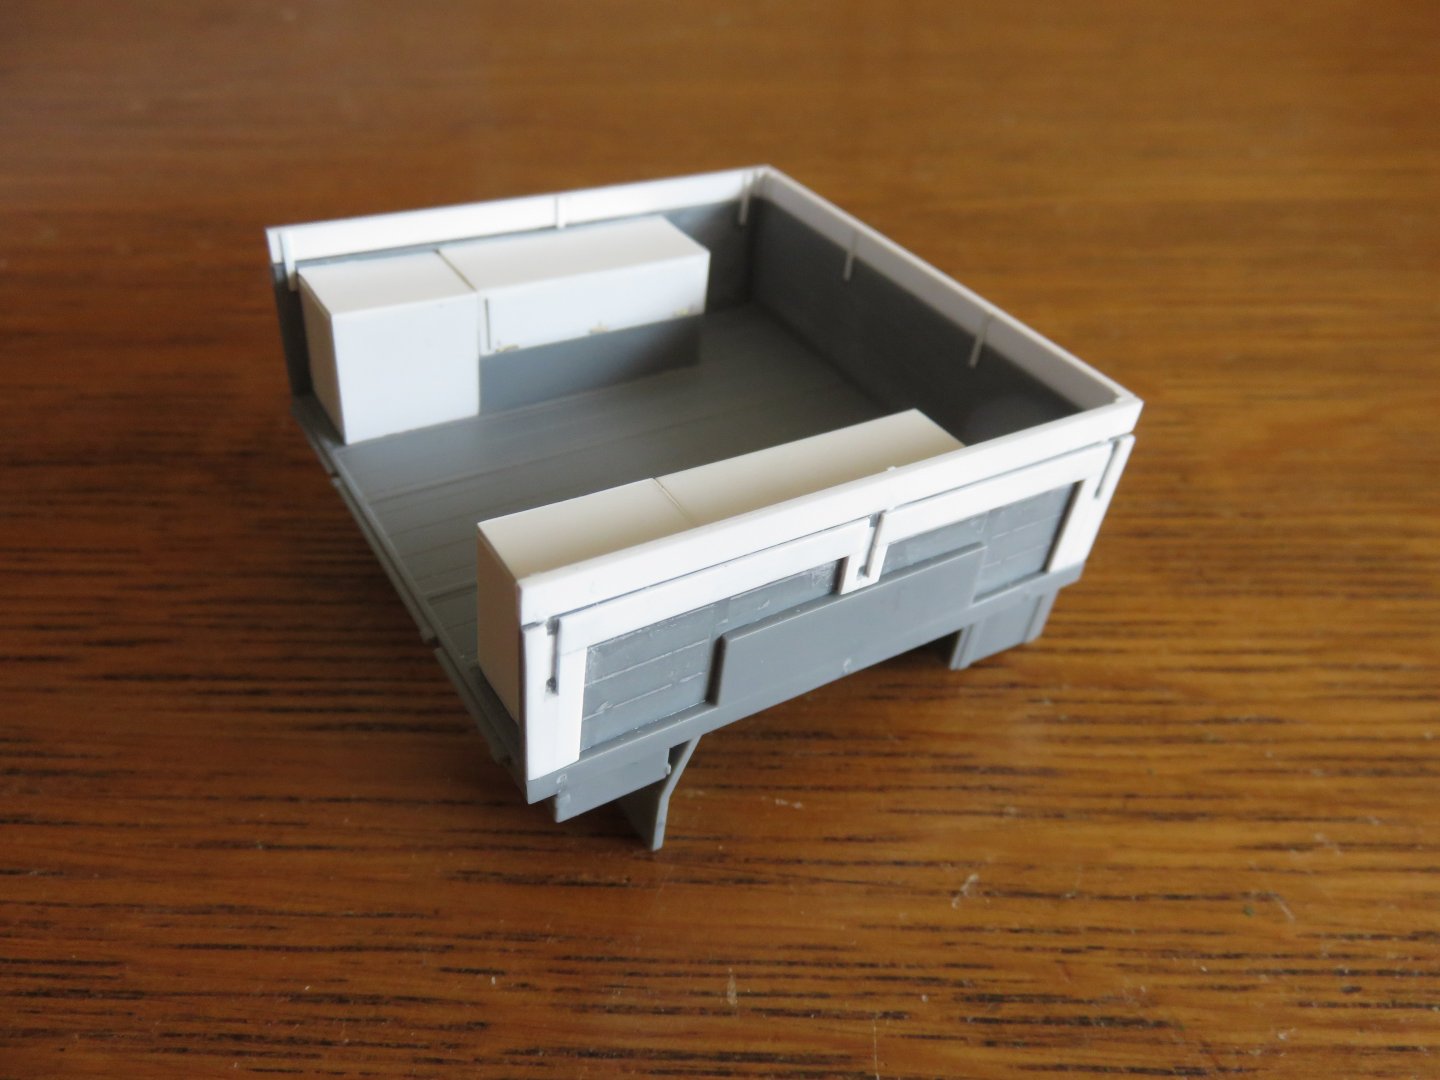
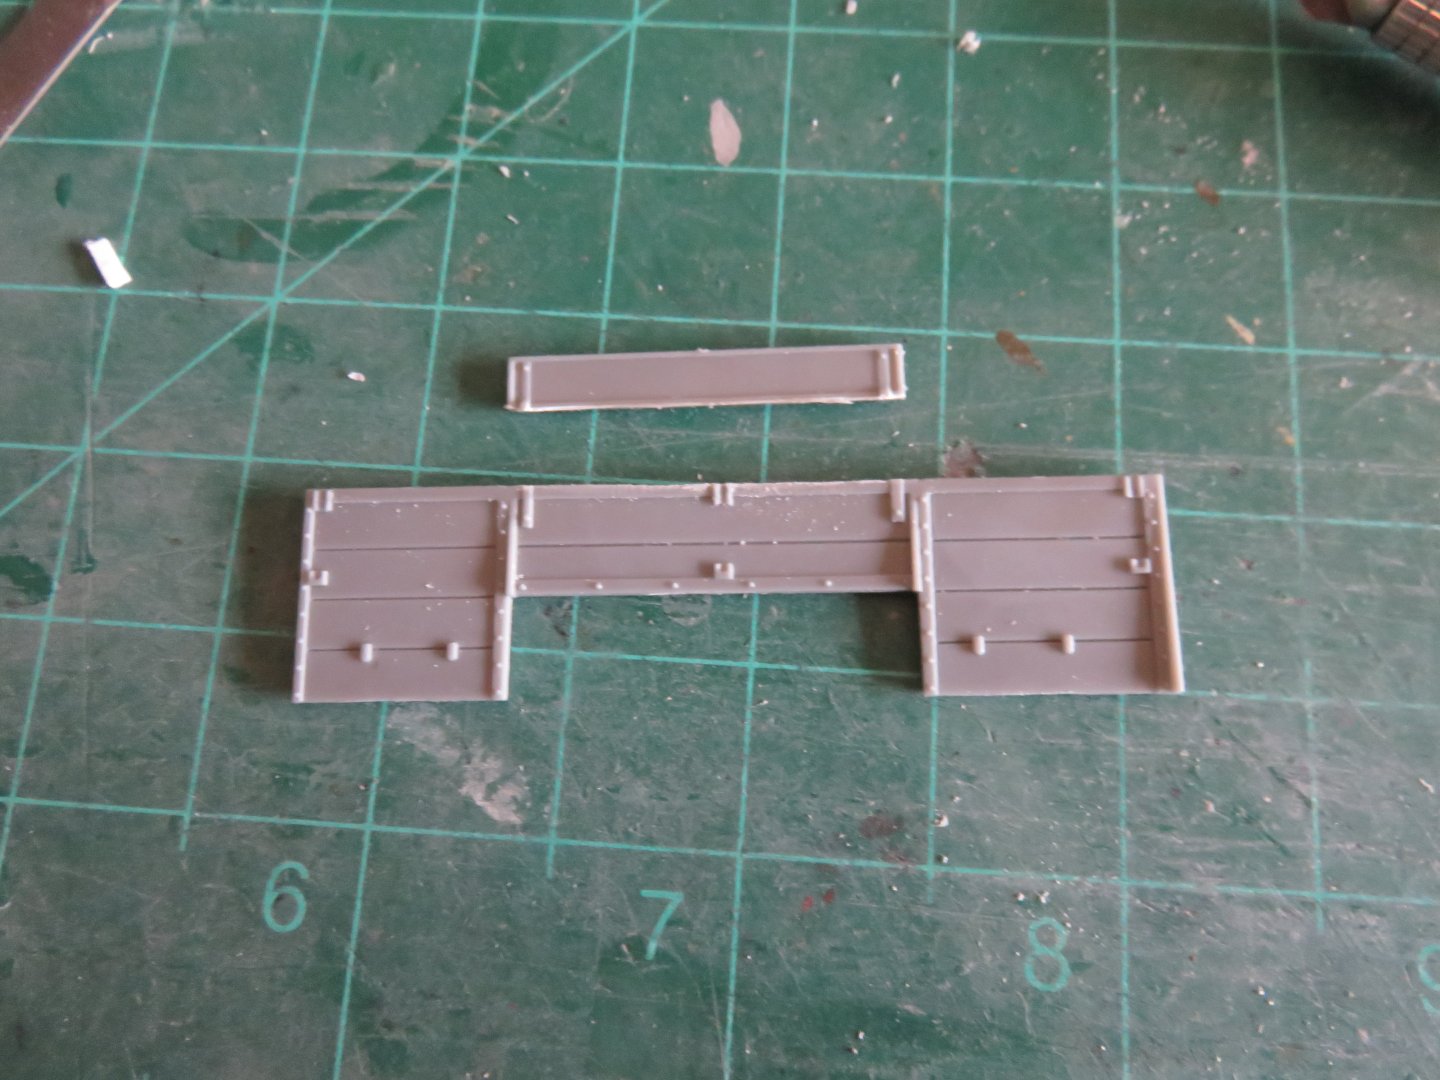
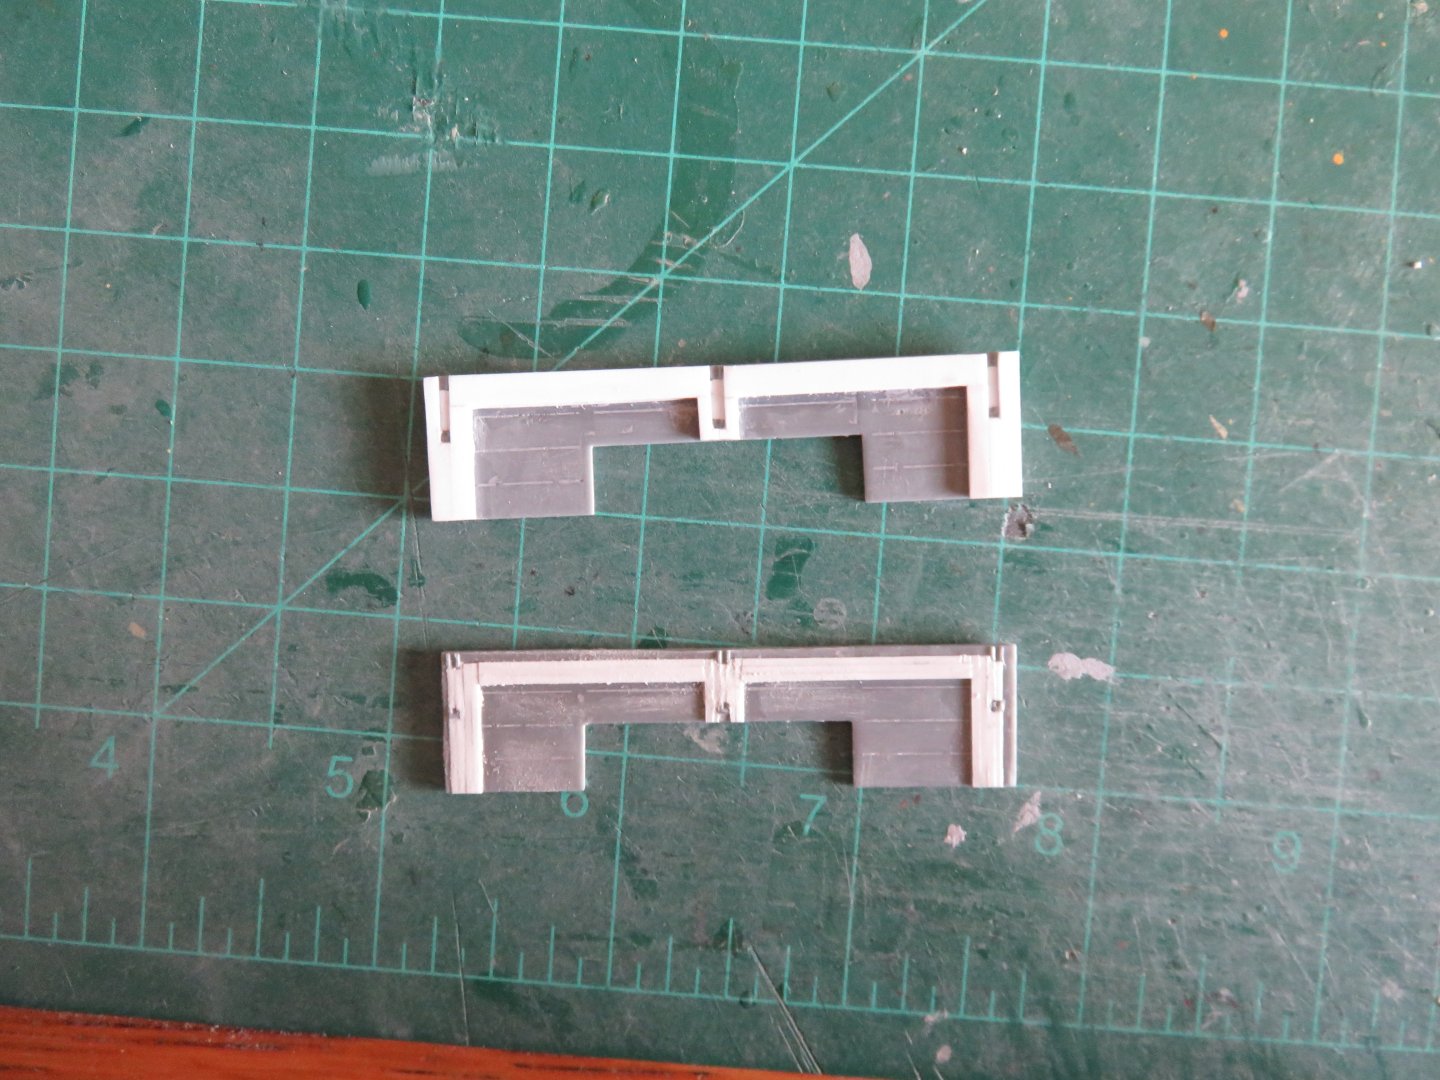
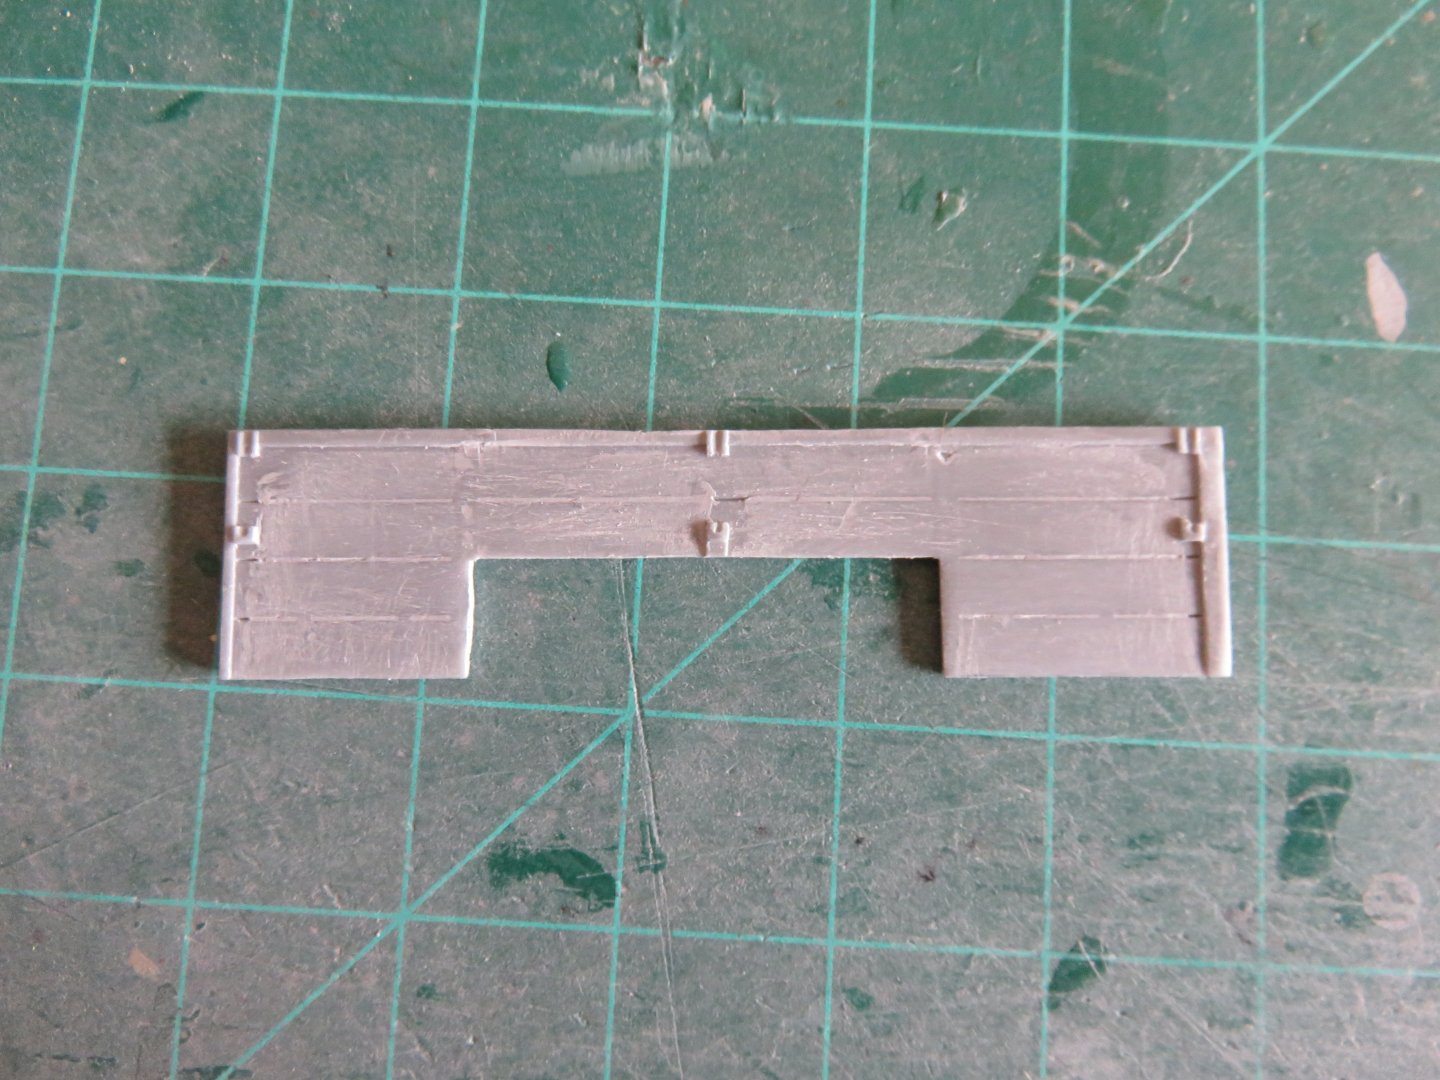
 A little bit of weekend progress to report! I've managed to sort out most of the rear stowage lockers and bins for the cargo area. This required a little bit of estimation, seeing as my primary reference photos are grainy little thumbnail images, so while the measurements might not be perfectly spot on, it's close enough and resembles the prototype well enough. First up there are four storage lockers to be built. I used some 0.020" styrene sheet, reinforced with some 1/16" square stock for strength: The first two lockers were fairly easy to sue out, as they were mounted above the wheel wells, and from the looks of things, were just a hair shorter than the side sheets of the cargo bed. These had one long door, hinged on the bottom. Behind this was another set of lockers. These lockers had rear opening doors and were as tall as the wheel well lockers. It looks like they stopped just short of the tailgate. The hinges were located to the outside. In reality, all of the locker doors were recessed, but for the sake of visibility I made them stand a little bit proud. To simulate the hinges I used some short lengths of 0.015" brass wire. I will be adding the latches too, later on. After the lockers, I need to add the bed side extensions: These were made using laminated lengths of 0.020" x 0.125" styrene strip. Some 0.010" x 0.030" strip was used for the joining straps as well as a spacer between the "boards" and the bed sides. A short length of 1.5mm styrene angle was used to connect the from end and sides. Last to be added were two large bins that mount above the lockers. It took me a while to figure out how exactly they were built. Some careful study of the thumbnail photos and I realized they were open topped bins, with a canvas cover. I'm assuming they were to hold the radio batteries. These were also fabricated using 0.020" styrene sheet. Two more items remain to be built for the cargo bed. first on the front left corner there was a small panel that had some switches on it. I assume that was the control panel that connected the Johnson Chorehorse motor (on the left cab step), to the battery banks. Finally there is a table with a drawer upon which the No. 19 radio set was mounted. This sat at the forward end of the cargo bed. I think things might be improving with the postal service situation, so I may be able to order a resin radio and antenna set soon. Thanks for all the likes and kind comments! Andy


-
I could have managed a fix, but I would rather see what kind of support I get from the kit maker first (So far I’ve got a response, so I think I’m just waiting on the post office to get itself sorted). I’ve had to go the same route with a couple of Airfix kits, and by being a little patient, replacement parts are obtainable. If it was my mistake, then it is mine to fix. If there’s an error in the product, then the company should fix it. At the very least I hope it alerts their QC to look a little more closely for errors. Andy
-
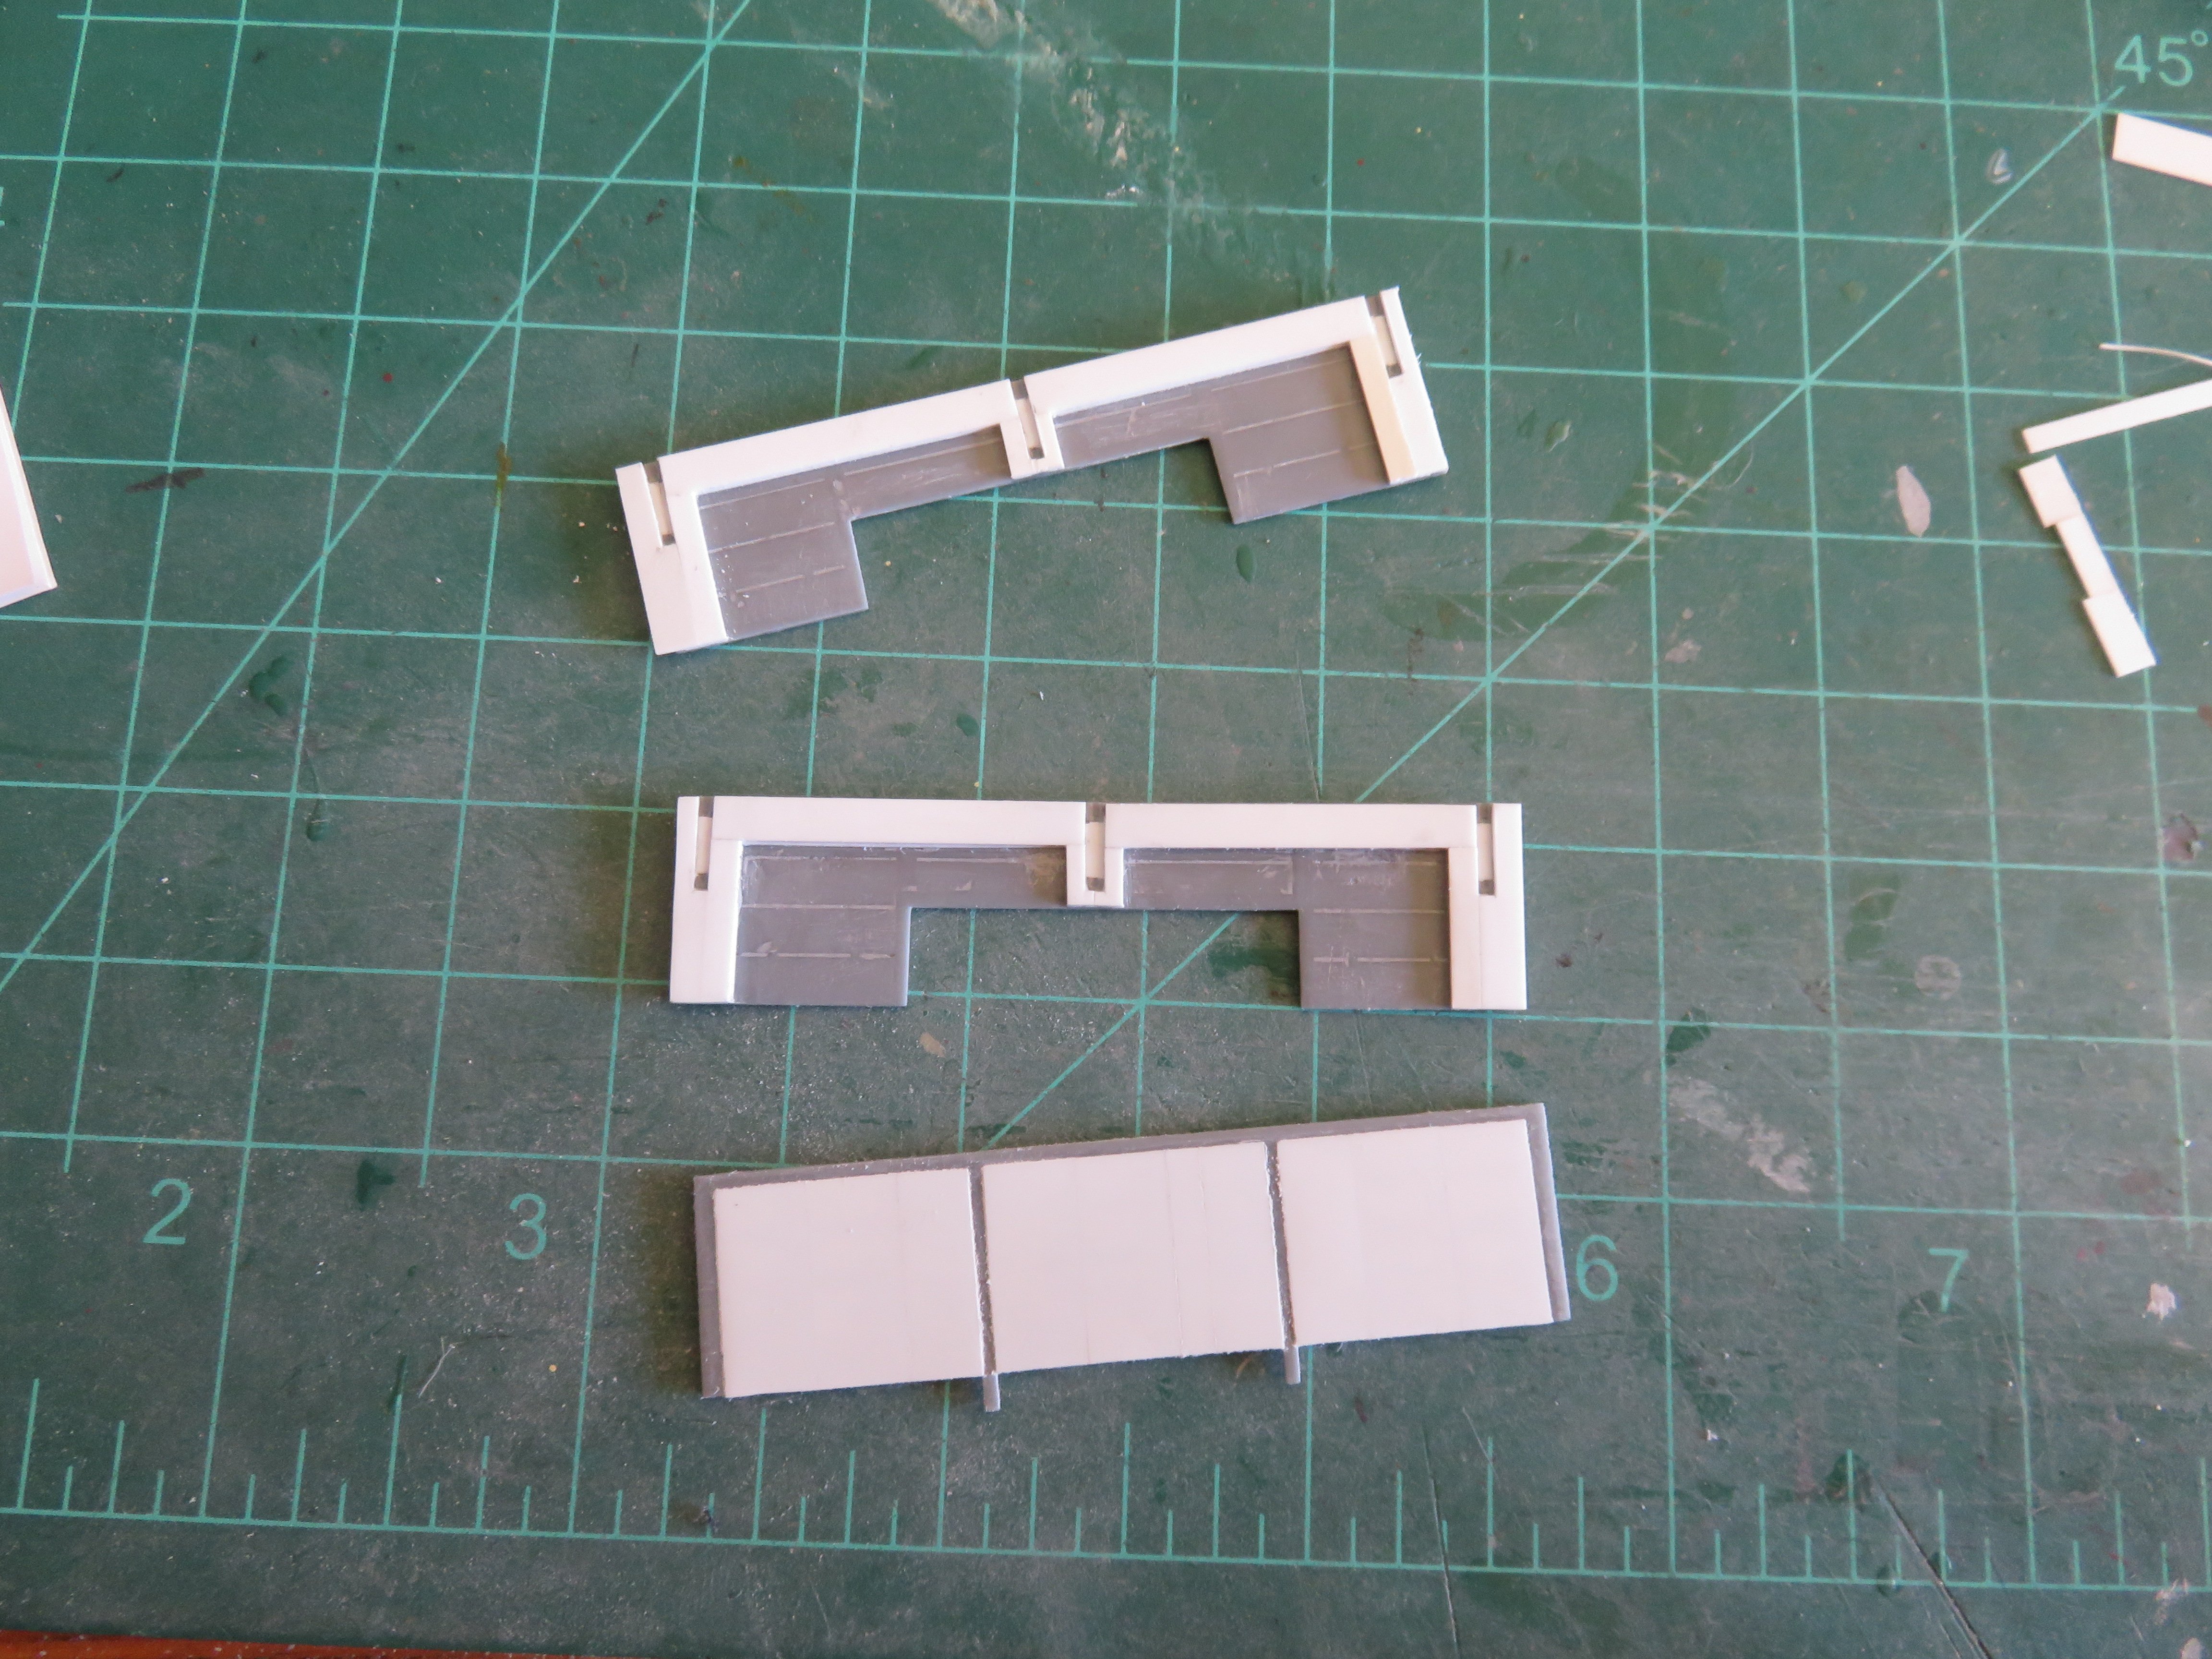
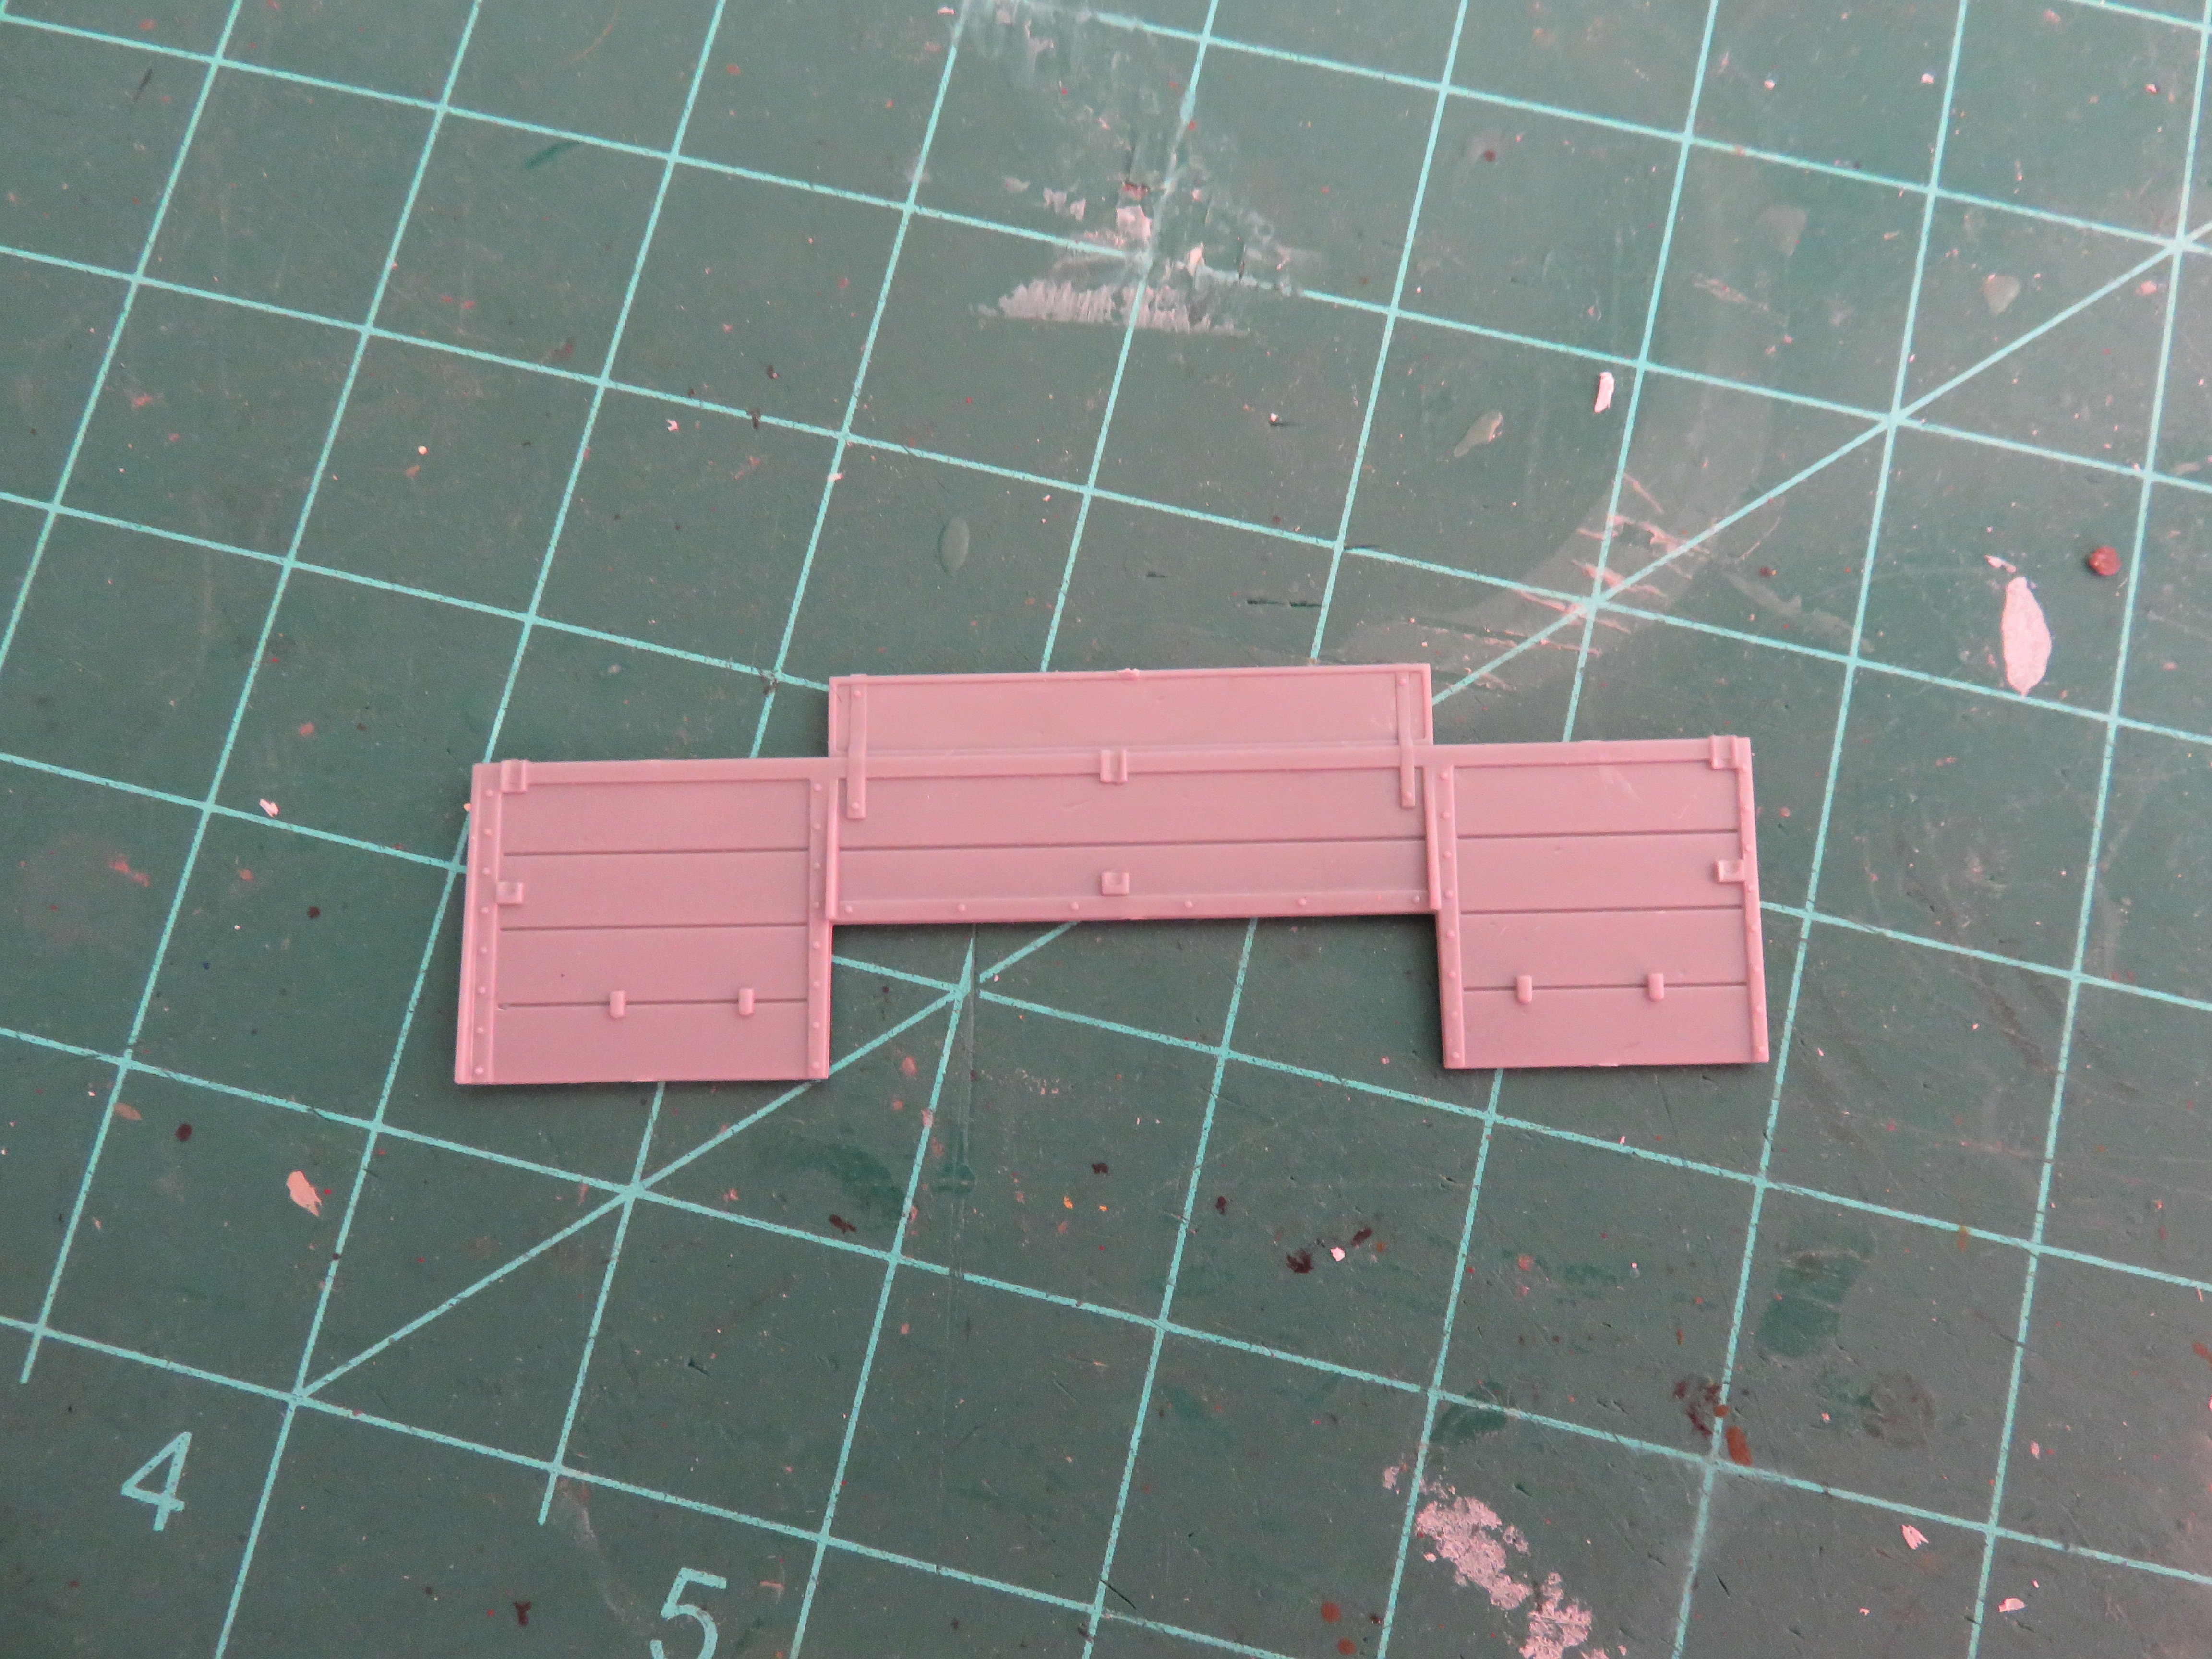
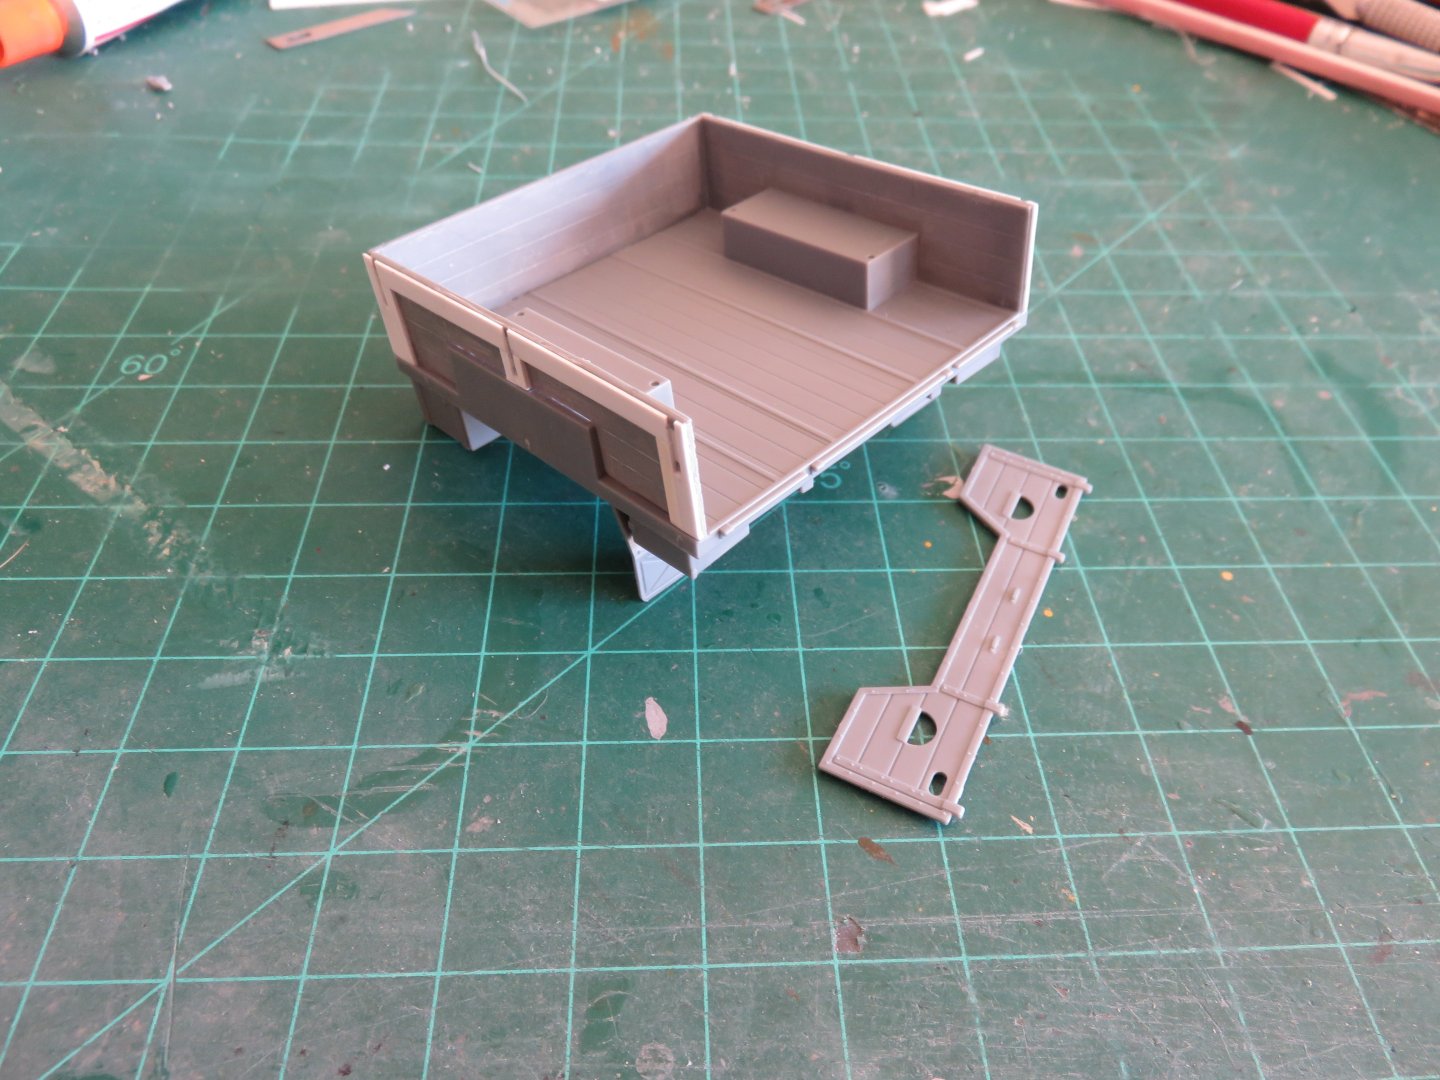
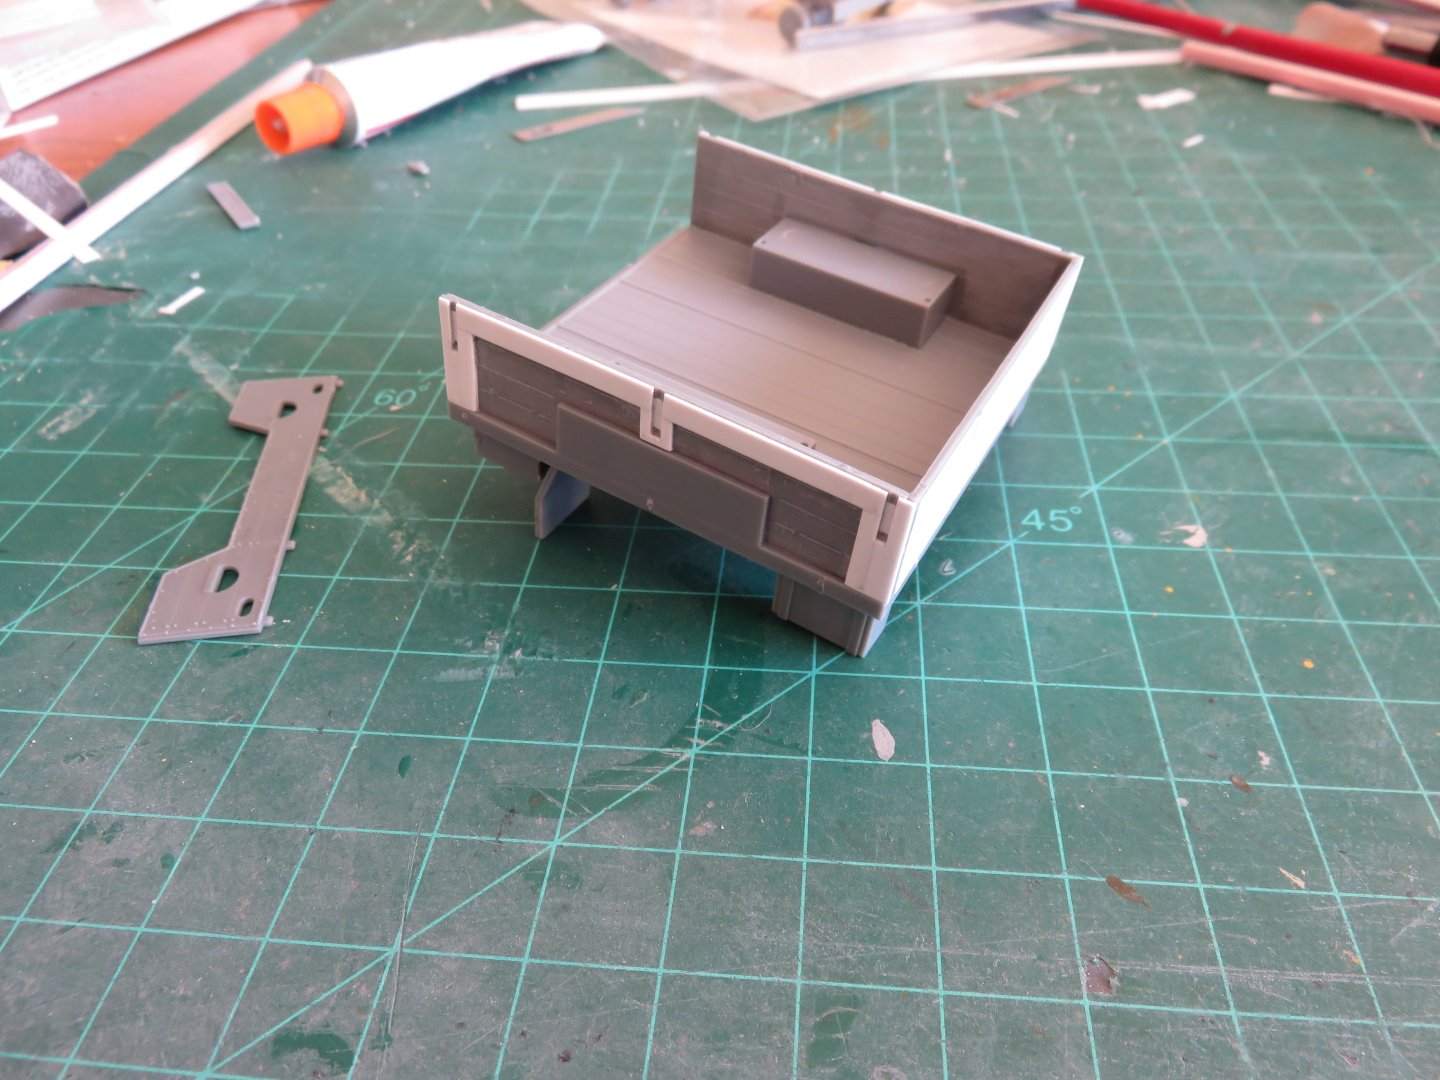
Thanks for the kind comment sand likes, everyone! I've been working on the cargo bed for the last little while, specifically, modifying the side panels. The kit supplies a very nice rendering of the early war composite style bed. These were built in anticipation of a steel shortage during the war, so aside from steel frames, the rest of the cargo bed was wooden boards. The kit pieces also include the raised seat back for the wheel well seats. Unfortunately most of this nice detail had to go as the C15a FFW had a fully steel cargo bed. First up the back rest had to be removed: Quick work with a sharp hobby blade and that was gone. This was followed by remove most of the remainder of the moulded on details with a chisel blade: Not much left! I kept the brackets for the support hoops for the canvas cover, and a little bit of the perimeter "framing". The gloves between the "boards" was filled with putty and sanded (eventually a lot smoother than in the above photo!). I suspect the main steel paneling was quite thin, as the steel framing was rather thick. I first added some 0.010" styrene strip to fill around the hoop brackets up to the level of the cast on frame detail. I then added another layer of 0.020" styrene strips to bring it to the final thickness: The top piece has the steel frame finished, the bottom has only the 0.010" layer added. Ultimately some compromise was required; in reality, the hoop frames were mounted outside the heavy steel frame, which tapered inwards slightly from bottom to top. Once the hoops are added later on, the slots shouldn't pose too much of a visual problem. For the front panel, I simply sanded off the rivet detail and filled in the space between the uprights with some 0.010" styrene and most of this part will not be easily visible on the finished model. From pictures, it appears to be a single sheet of steel anyway, so not much detail to note. After working on modifying the sides, the cargo bed could be assembled: I have decided to not modify the tail gate for my model, and leave it as the kit supplied wooden version. The "D" shaped foot holes should be lower on the steel version, and while I could remake one from scratch, I'd like to keep something of the original kit, as the detail is really nice. My excuse will be the original tail gate was damaged and replaced in theatre with whatever spare the RCEME unit had on hand! Next up I will be building all the internal stowage lockers, and then adding side extensions to the sides. Thanks again to everyone following along or just looking in! Andy


-
In the legal sense, payment of any tariff is the responsibility of the importer (buyer) not the exporter (seller). Some companies are electing to absorb part or all of this additional cost in order to keep their products competitive, but they don’t have to. In this case the company is paying some or all of the tariff for the buyer. In Canada, if an item is taxable (remember tariff=tax), and the fee has not been pre-paid, once the tariff has been calculated by the CBSA (Customs), the shipping company or postal service will invoice the receiver for the amount owing. Once payed, these fees collected are remitted to the relevant government agency (in Canada that would be the Receiver General). I’m sure the process is similar in many other countries. Prior to the current global trade situation, if I had to pay any extra on an imported item it was usually only Federal sales tax. Interestingly, in the past both Model Expo and Micro-Mark were registered with the Canadian government to collect and remit the GST (Federal sales tax), so even a big order from them would not be subject to extra fees at the border. Andy
-
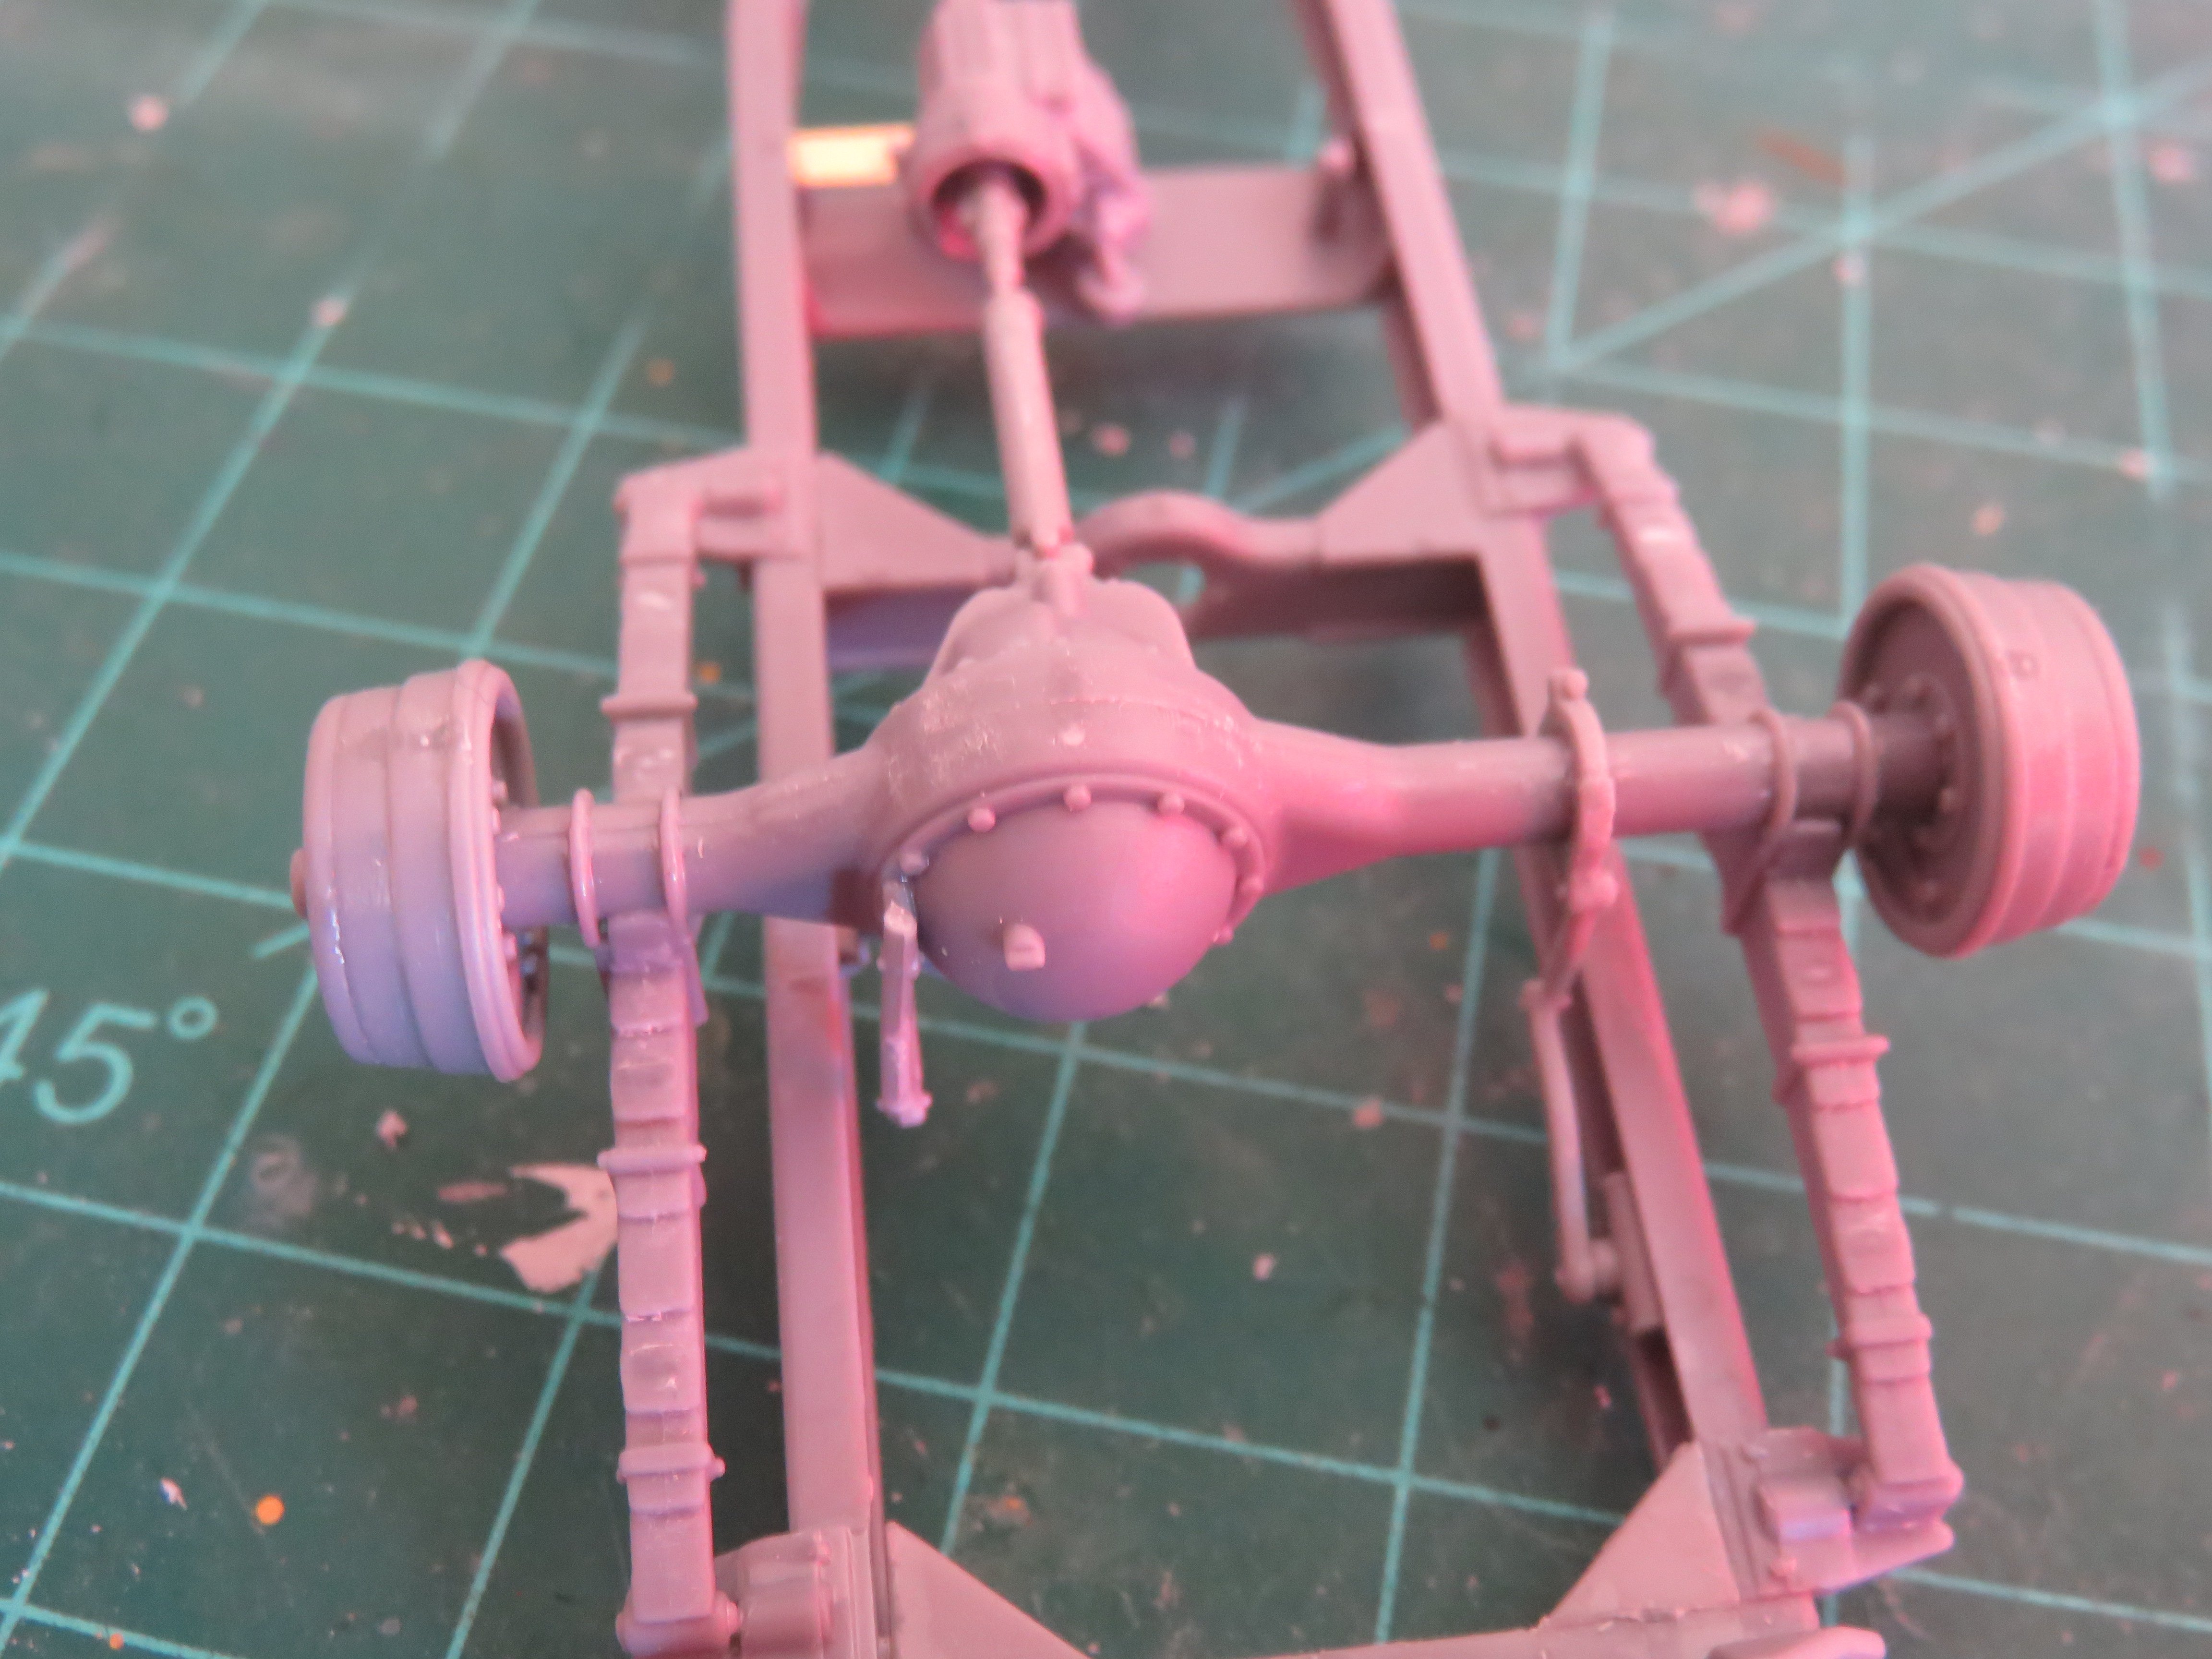
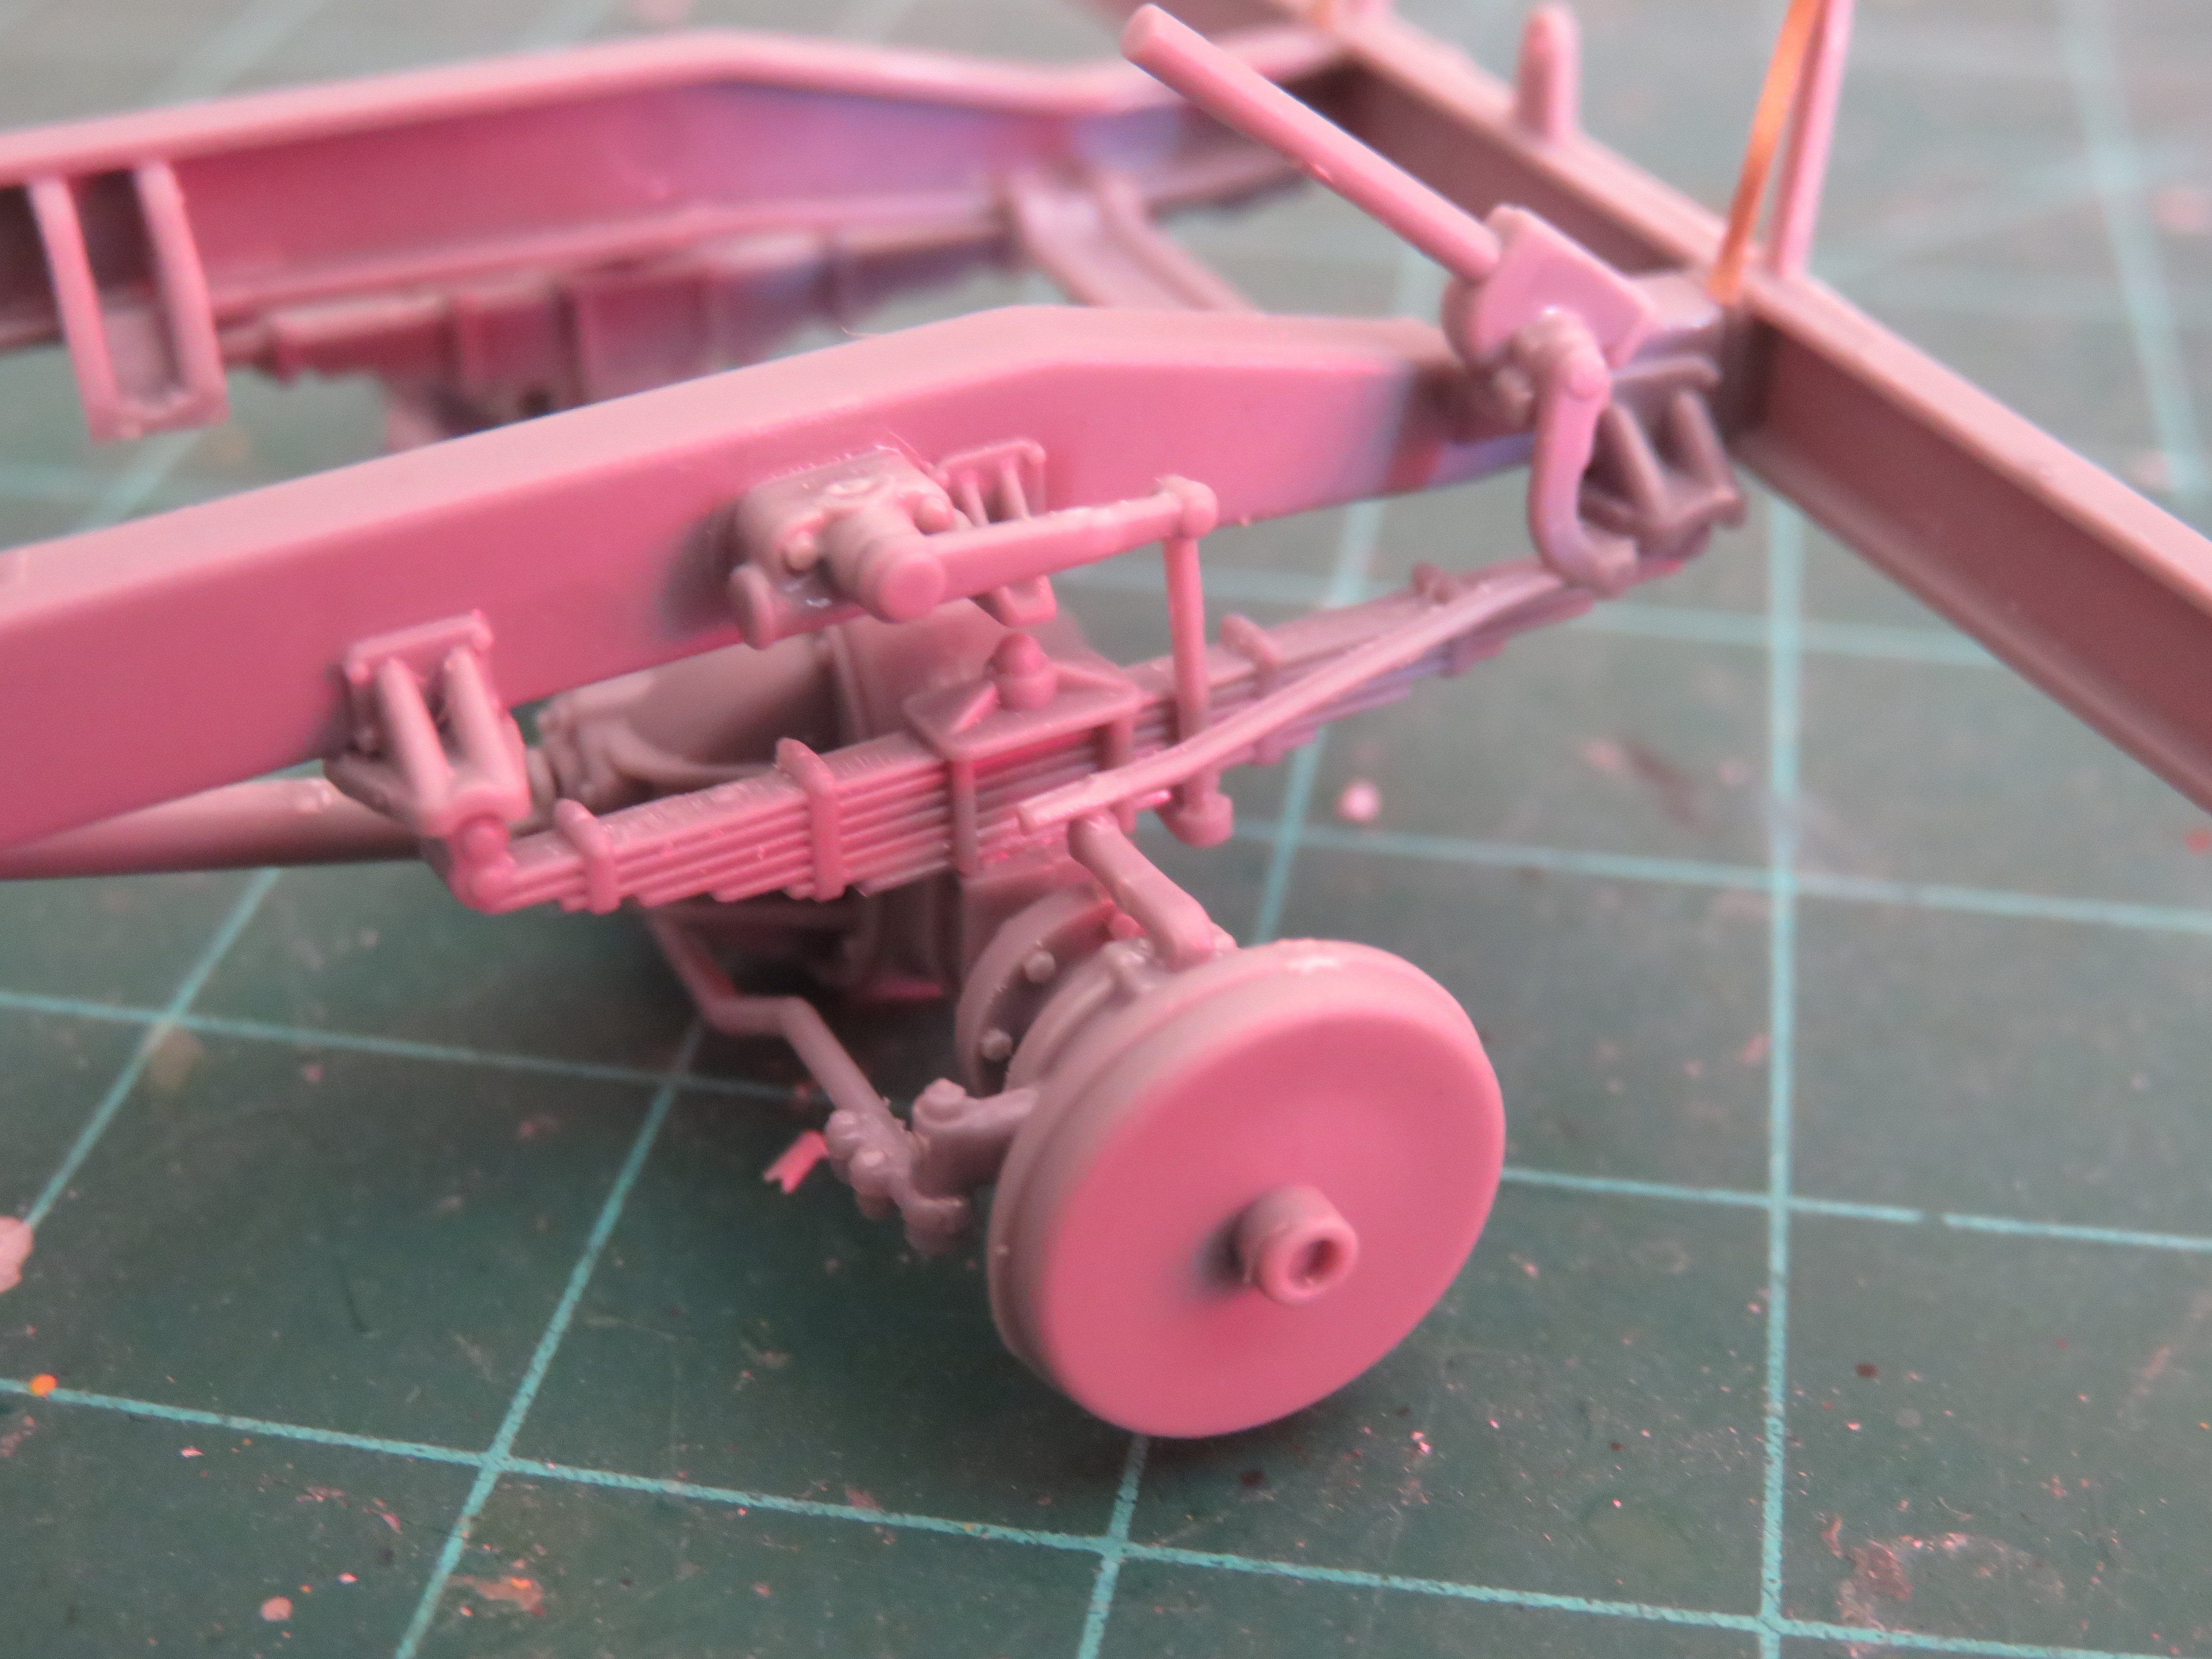
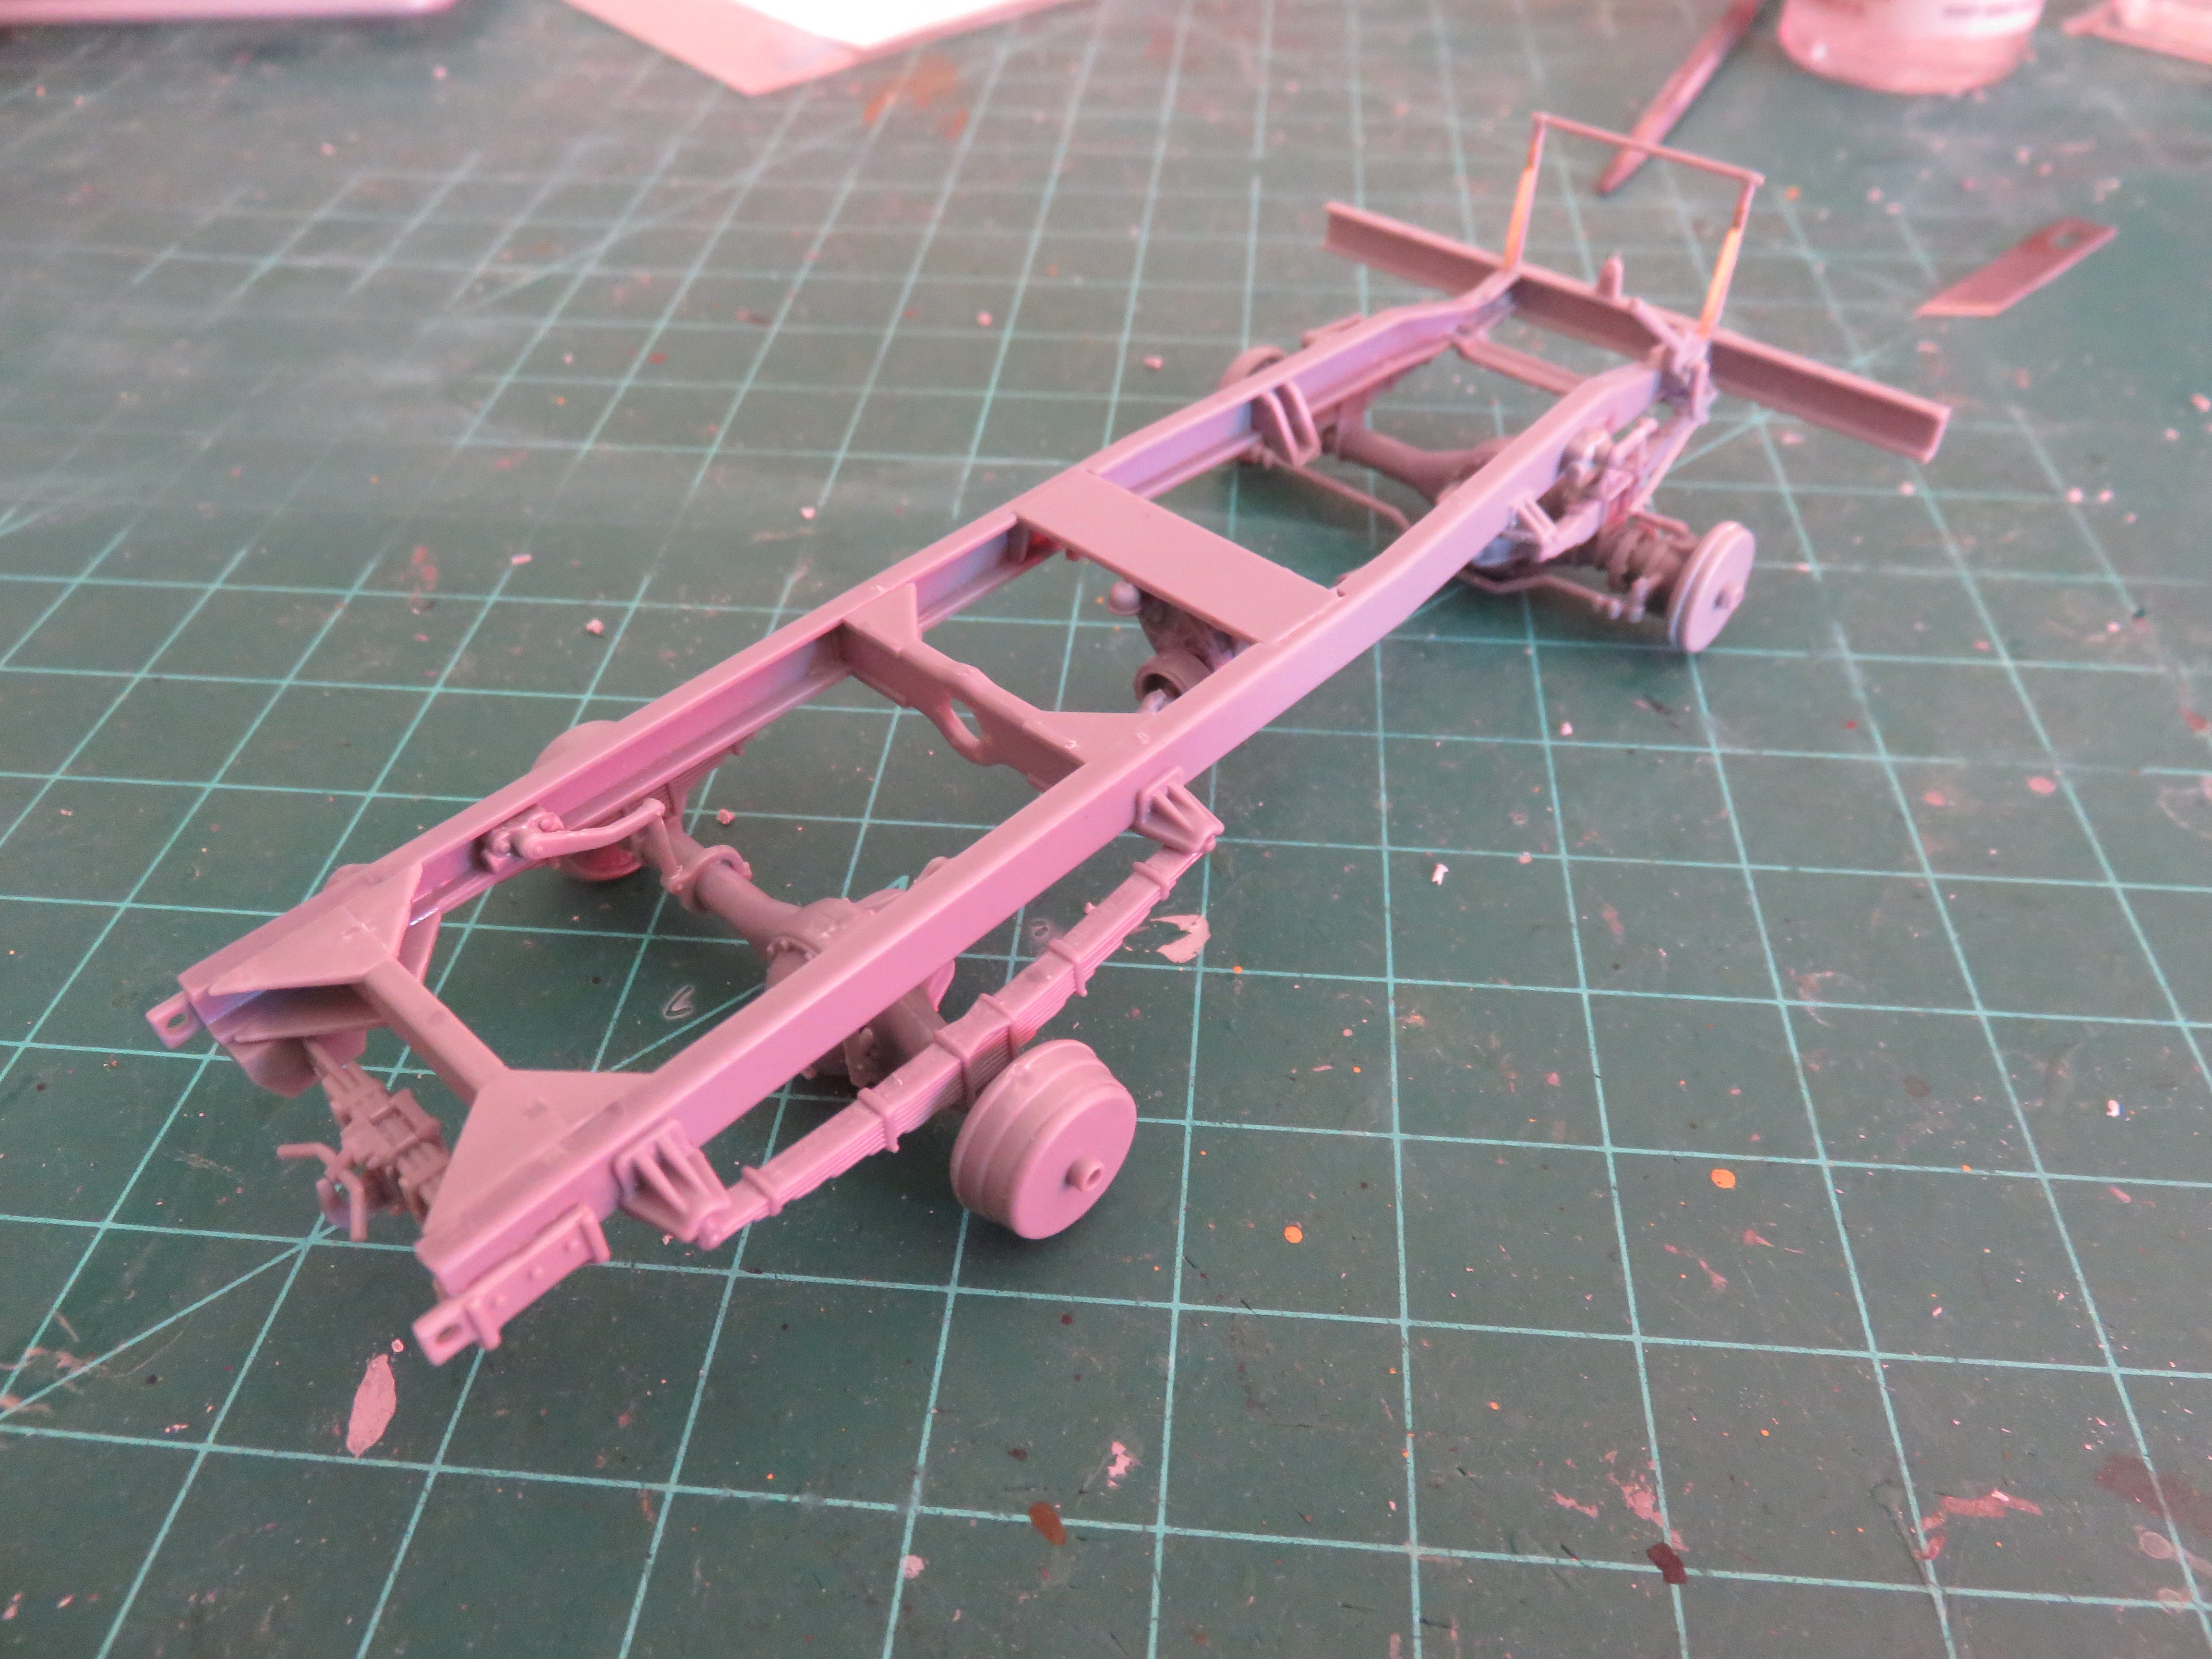
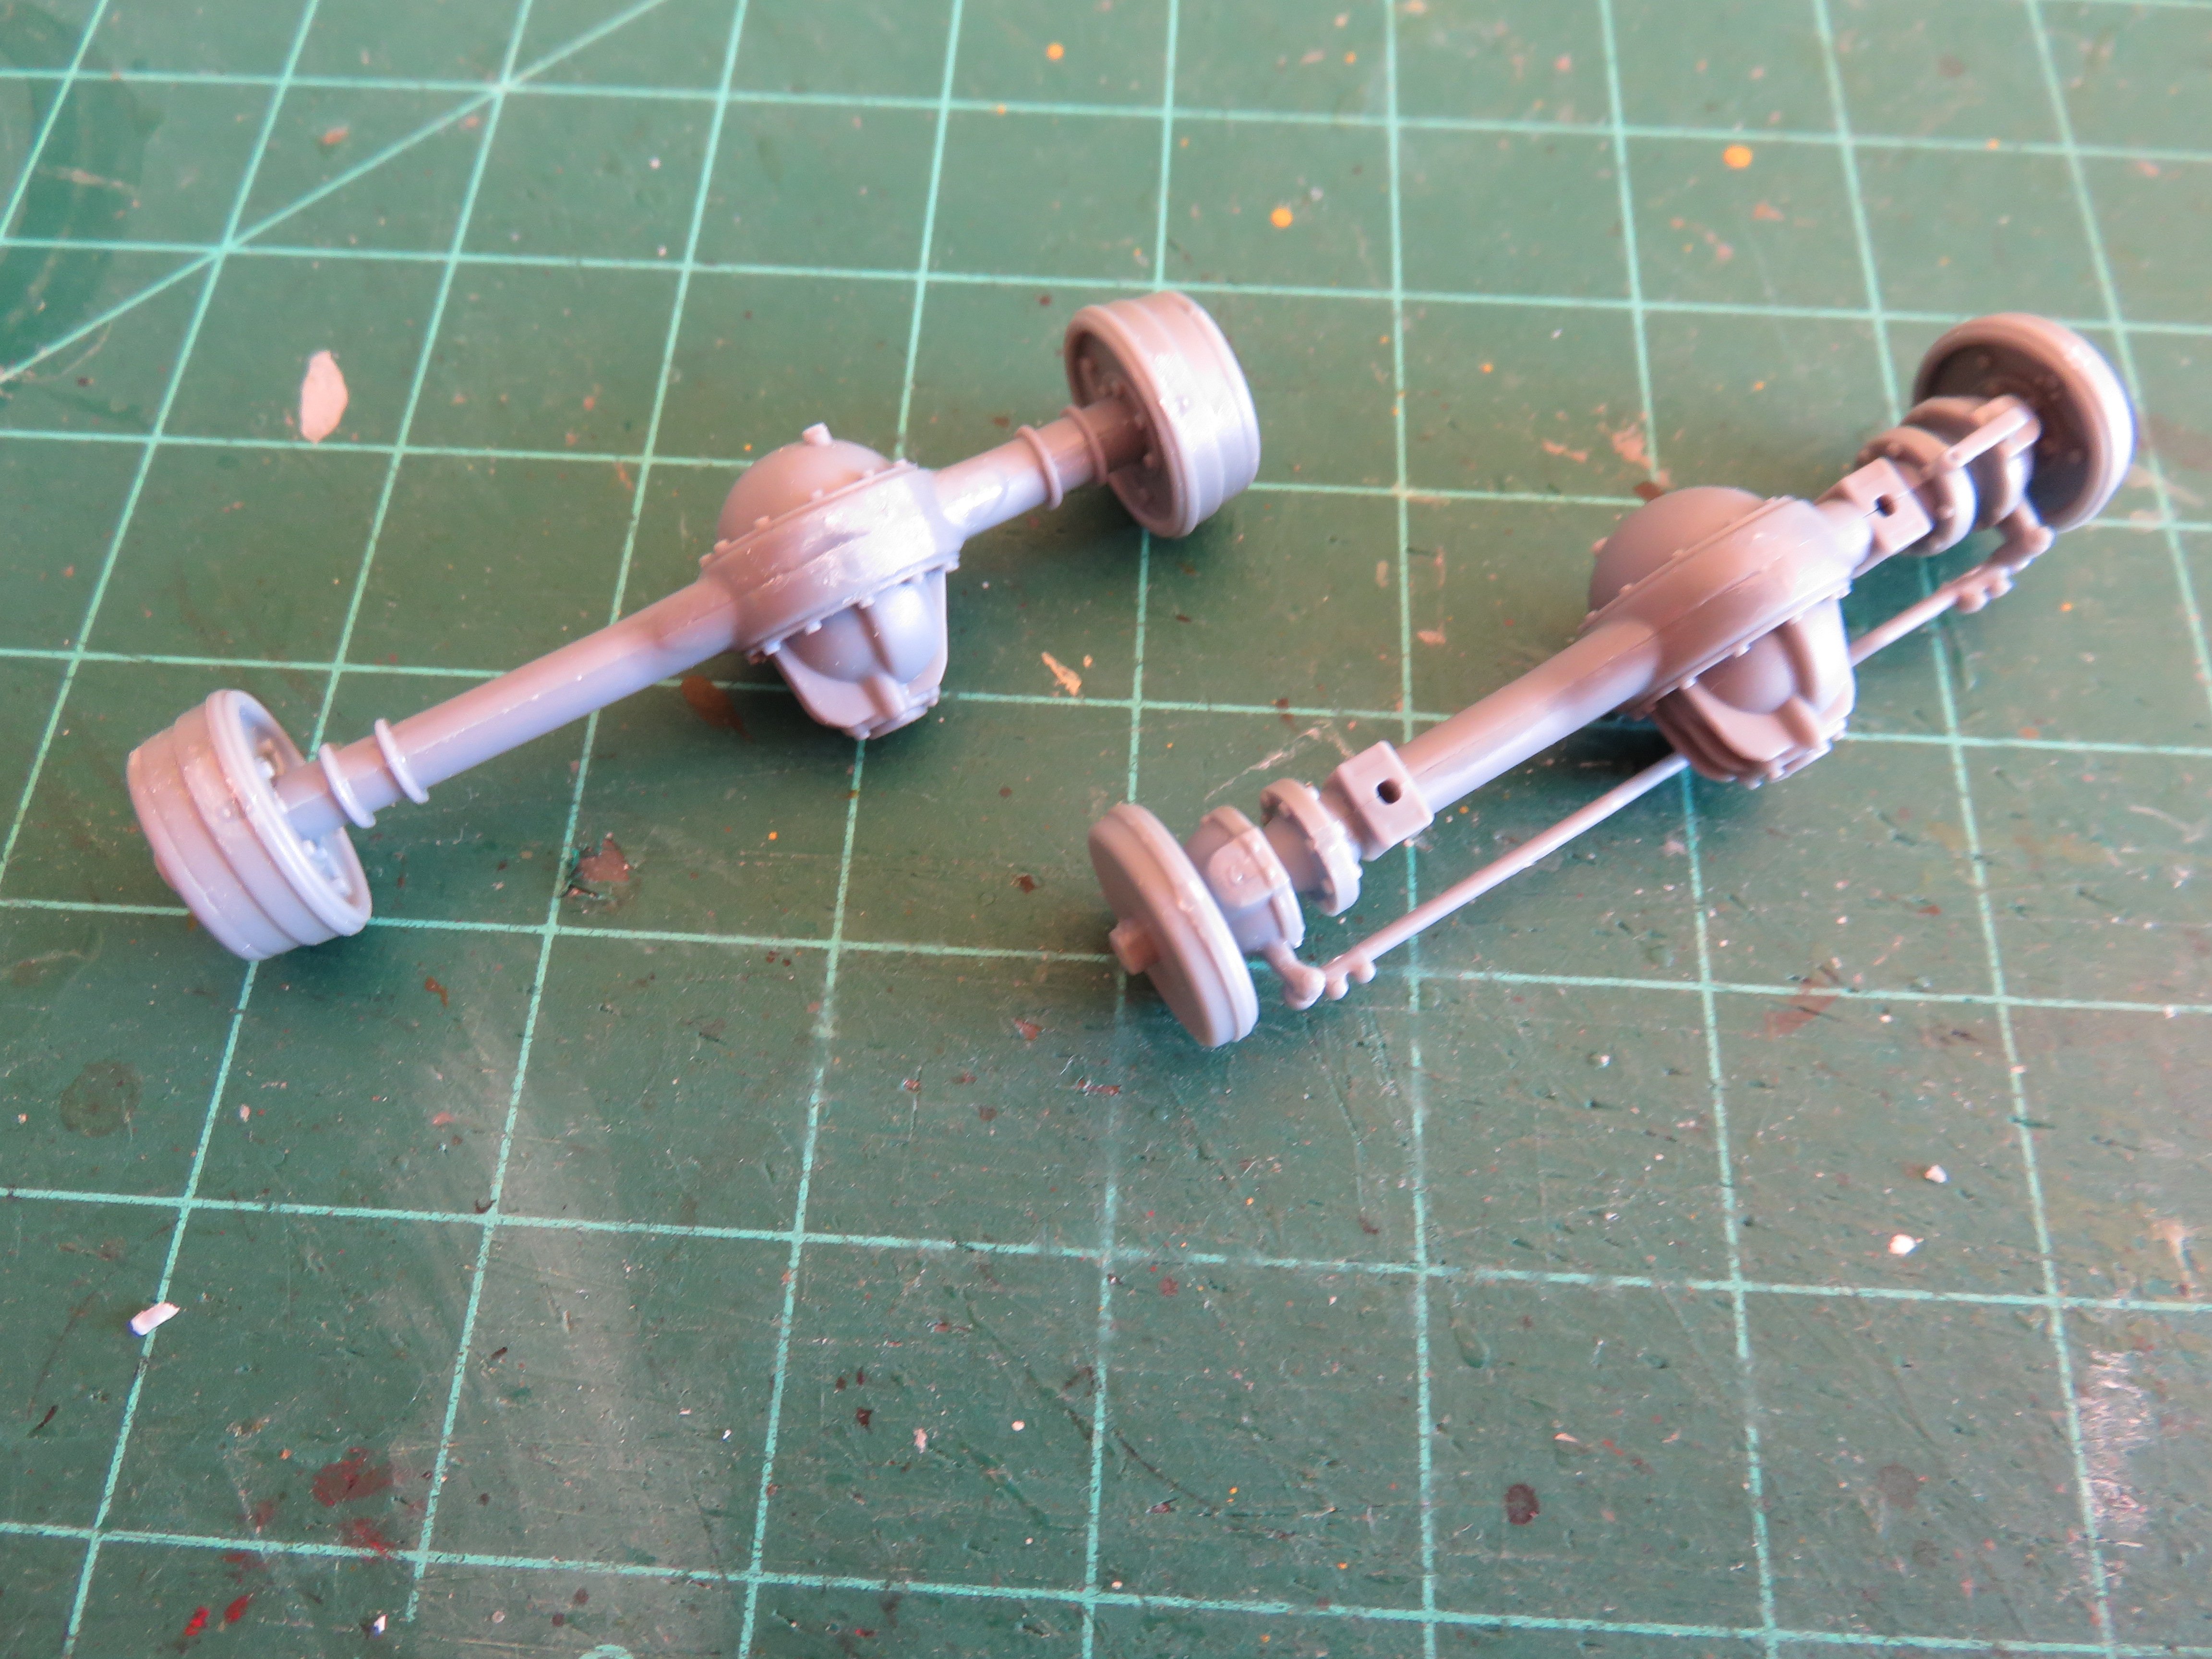
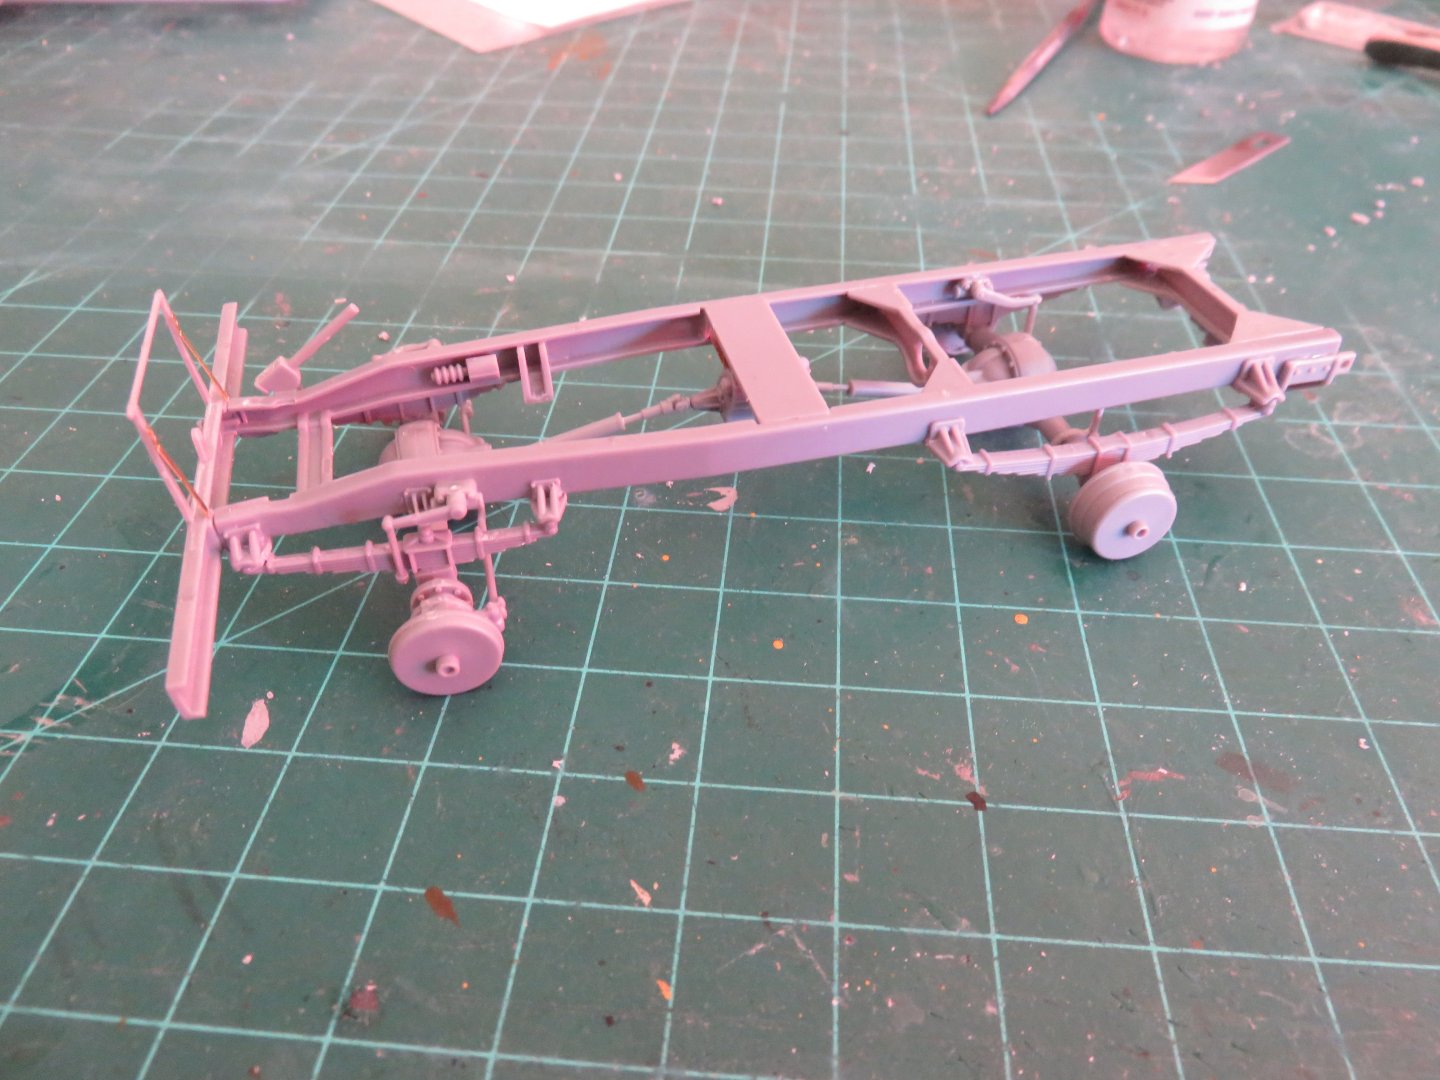
Ok, so things aren't totally paused. I was able to move forward with some other parts of the build while I wait for the replacement cab parts to arrive. Following the cab assembly (which I have skipped for now), the next part of the build involves building up the chassis. Other than brake lines and electrical cabling, I don't think IBG missed very much in terms of details. I didn't take any photos of the sub-assemblies as that would have gotten very tedious. The chassis starts with the assembly of the right frame rails, followed by the left. The rails are the correct "C" channel and include a multitude of added on details. The only moulded on details are the rear leaf spring brackets and the front spring stops. The frames are brought together with two crossmembers at the rear, a plate to which the transfer case will later attach, the front radiator support, the rear hitch spring and front bumper. A little care is needed to make sure everything stays square, but by and large assembly was fairly straight forward. If I had to do it again, I would leave off the steering gear box and front bumper so the frame could be placed, inverted, on a flat surface during assembly, this would have made it easier to keep things square, and then added these components afterwards. The front axle was added next. All the appropriate linkages for the steering are included, and everything lined up as it was supposed to. Im assuming the other linkage is the shock absorber. A quick word of note, the plastic has that distinct reddish tinge as it is quite sunny today, and the roll-down awnings on my house are bright red canvas. In reality the plastic is a medium grey colour. After the front axle, I then tackled the transfer case. This is partially glued to the support plate, and partially to an "L" shaped PE bracket. This was followed by the rear axle and shock absorbers and finally the drive shafts to connect everything together. I can probably keep going with a few more bits before I will really have to stop. I can begin to tackle the cargo bed, and the modifications I need to do to change it from personnel to FFW. Still missing the radio details, though as the postal strike has kiboshed a lot of things, but I can scratch build the various compartments and the support tables etc. Thanks to everyone who has posted a comment or clicked a "like"! Andy


-
Good to see you back hanging around this quaint little part of the internet! You gotta love the peace and quiet! I think in the grand scheme of things, even though it’s showing its age, Tamiya have taken good care of their old toolings. The IBG kit, on the other hand, is light years ahead in terms of the level of detail. Some of the parts are incredibly fine in cross section. The body and fender panels are about as close to scale thickness as you can reasonably expect to get using injection moulded plastic. It remains to be seen how robust these toolings will be in the long run. I think that’s probably why I ended up with the short shot on the cab floor part, so thin that the plastic cooled too quickly before it could fill all of the mould cavities. Anyway, welcome back! Andy
-
Not trying to dismiss Patton, more that he wasn’t alone in his thinkings on how to use mechanized armour effectively in combat. Look at the development and use of the Whippet tank (at the Battle of Amiens, which occurred a month before Patton’s first tank actions at Saint Mihiel). After the first world war, many veteran officers were writing and theorizing about the use of armour in the future battlefield. JFC Fuller and Plan 1919, the development of the Experimental Mechanized Force in 1927, and many others in many other countries. Patton was arguably the heaviest influence in the development and usage of armour in the US, and is deserving of a decent amount of credit in general, but he certainly wasn’t alone in his thinking. Andy
-
Probably just a shortcut. If you look at the photos of both kits, there are differences. The new kit has an extra fender strake, wash boards at the bow, a different hatch arrangement for the fish hold, different lee-boards, etc. Andy
-
Maybe, but the first ever armoured troops to deploy anywhere was the Canadian Motor Machine Gun Brigade, led, and equipped with armoured vehicles designed, by Major Raymond Brutinel, in 1915. Brutinel was a pioneer in the concept of mobile armour. The static nature of the war, and the need for roads prevented their envisioned usage of spearheading advances. Andy
-
Knowing a little bit about Dutch flat bottom boats, they’re not all the same size, even though they share the same design (the Lemsteraak, for example can be built anywhere from 8.5m long to well in excess of 16m long). Likely AL used a different size “prototype” for the 1/35 scale kit. Andy
-
Well, a positive sign from IBG! Got an email reply from them overnight, so maybe they will send me a replacement part! Now all that has to happen is for Canada Post to get back to work…. Andy
-
Kinda Bob Semple-ish…. But with bigger guns…
-
Aaaand, we’re on pause…. I was beginning to work on the first cab parts, and I noticed that areas of the cab floor part looked a little… well… melty… Comparing the part to the diagram in the instructions, looks like I have a short shot… Looks like Airfix is not the only company to suffer QC issues… Time to put IBG’s customer service to the test. Hopefully they can send me a replacement part, but with the postal strike, who knows when it might show up… sigh… Andy
-
Yeah... 25 pdr... silly fingers.... 🤪
-
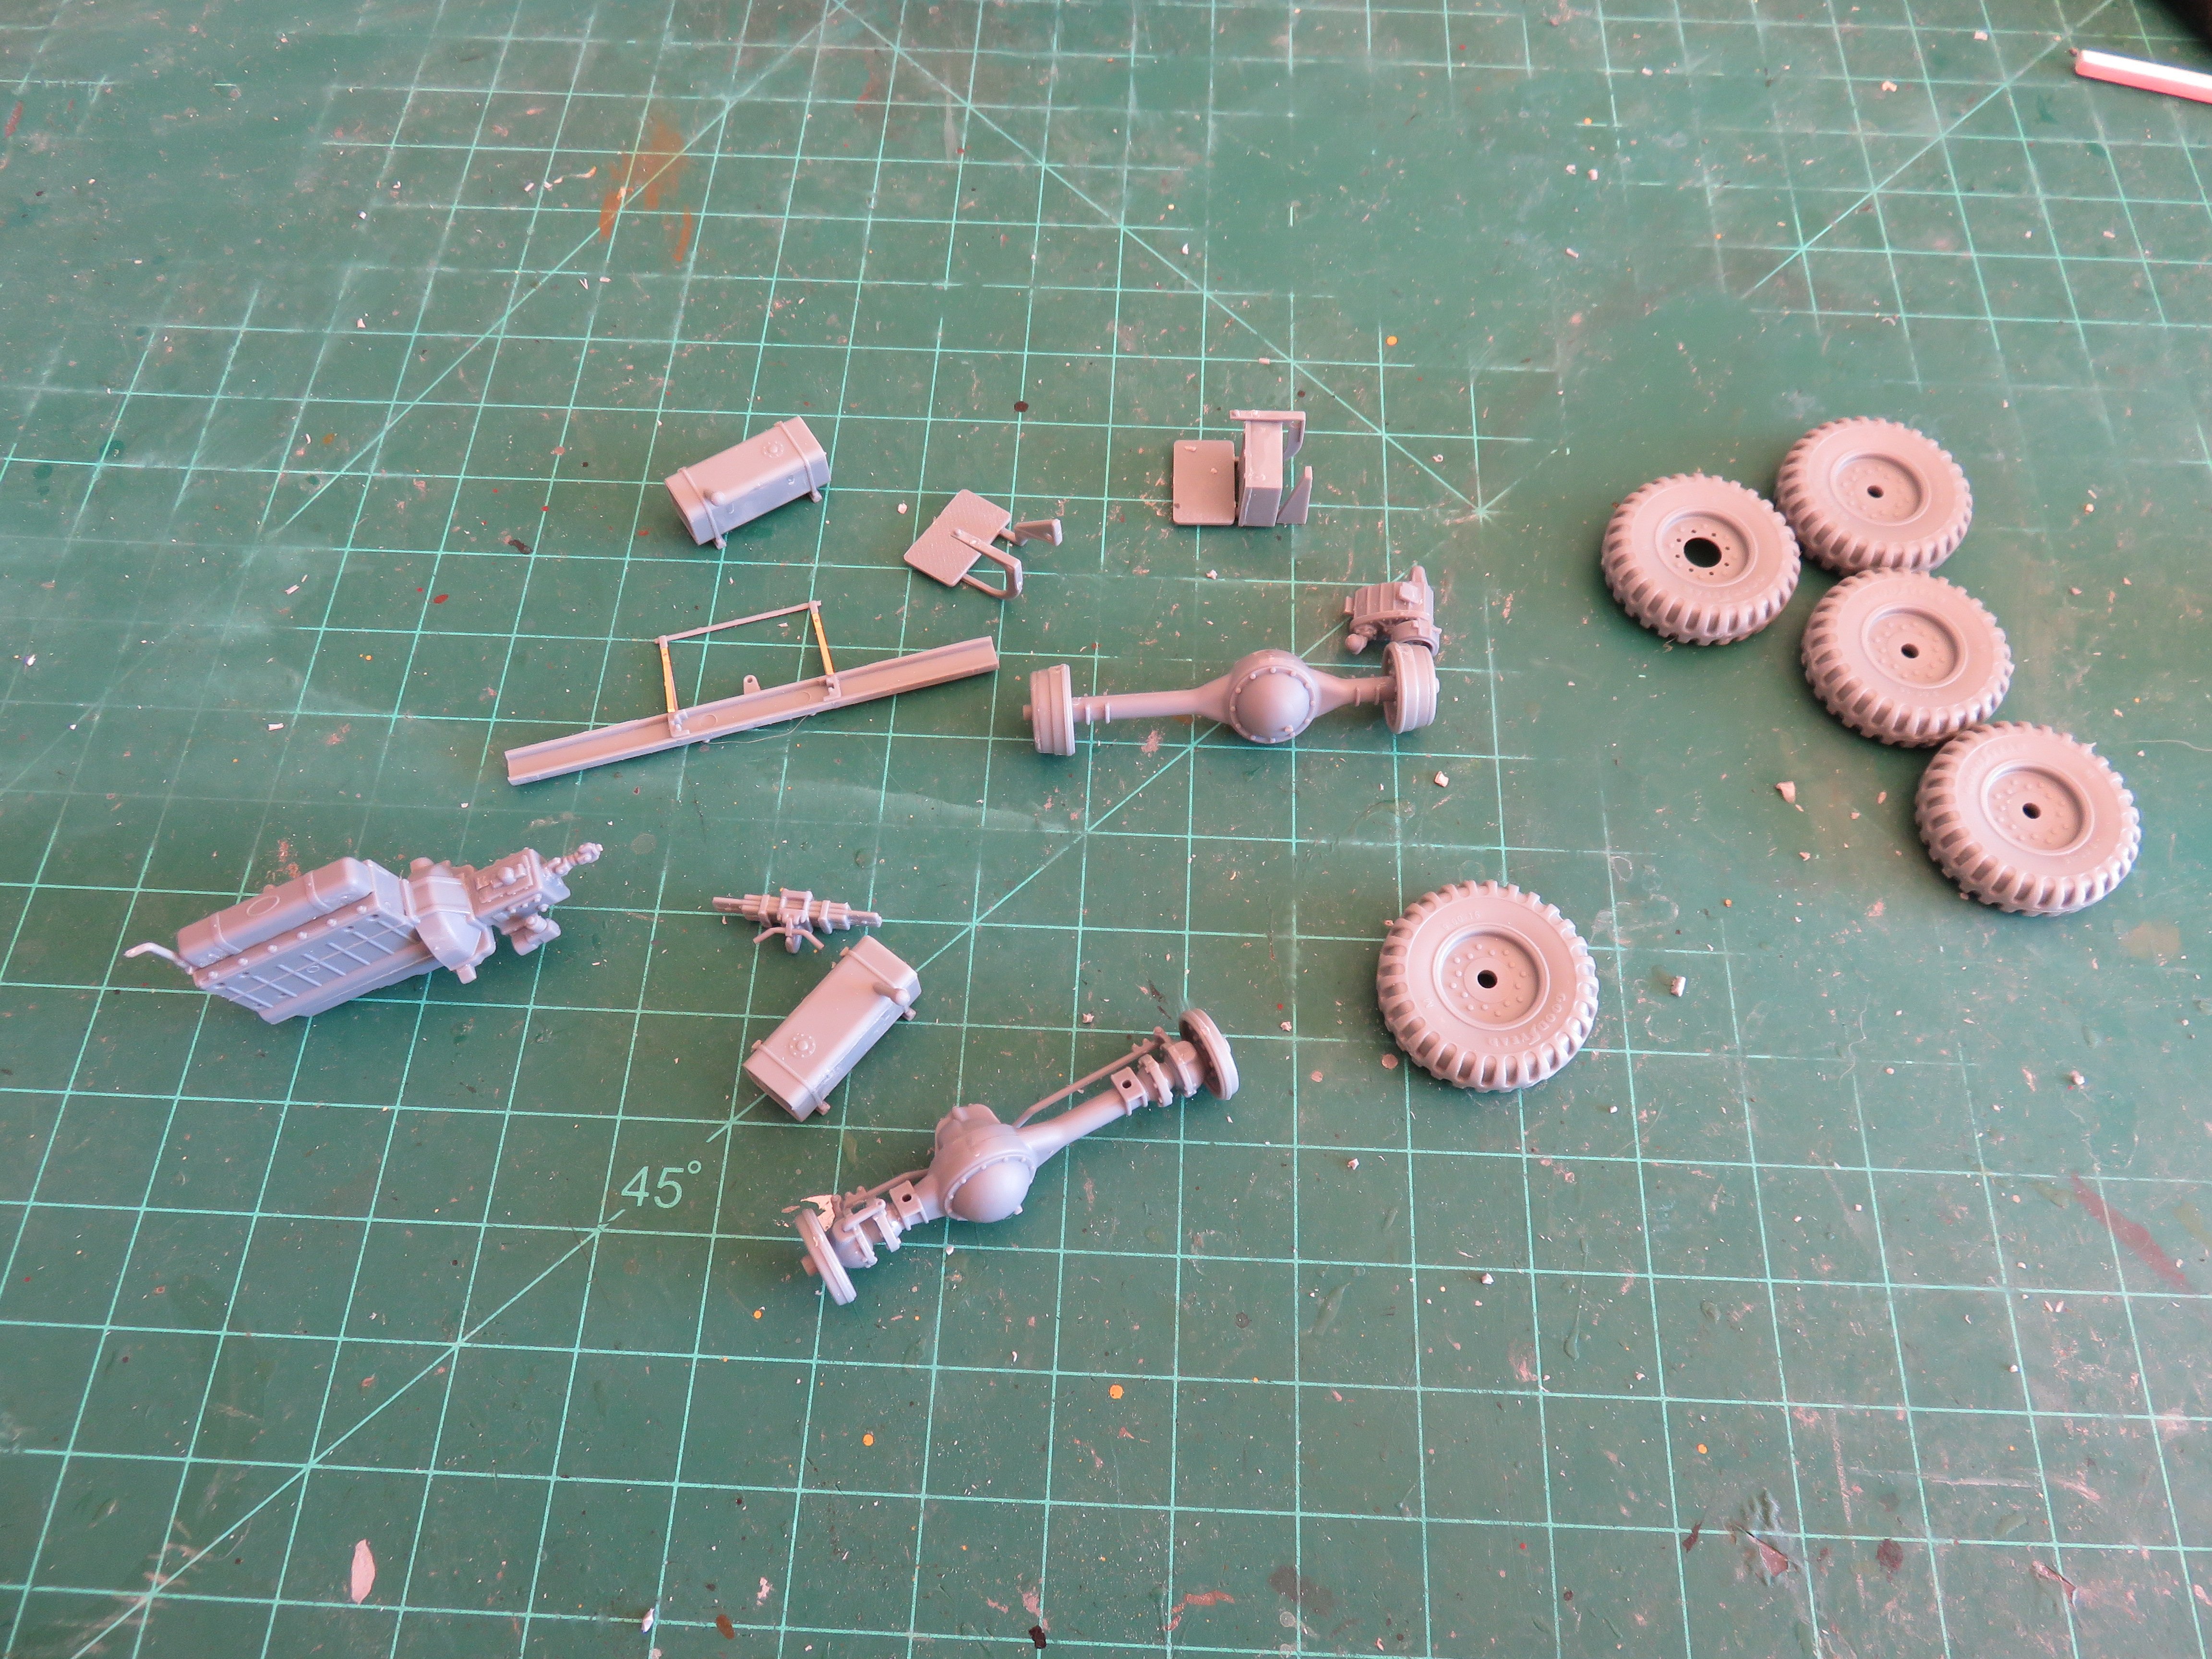
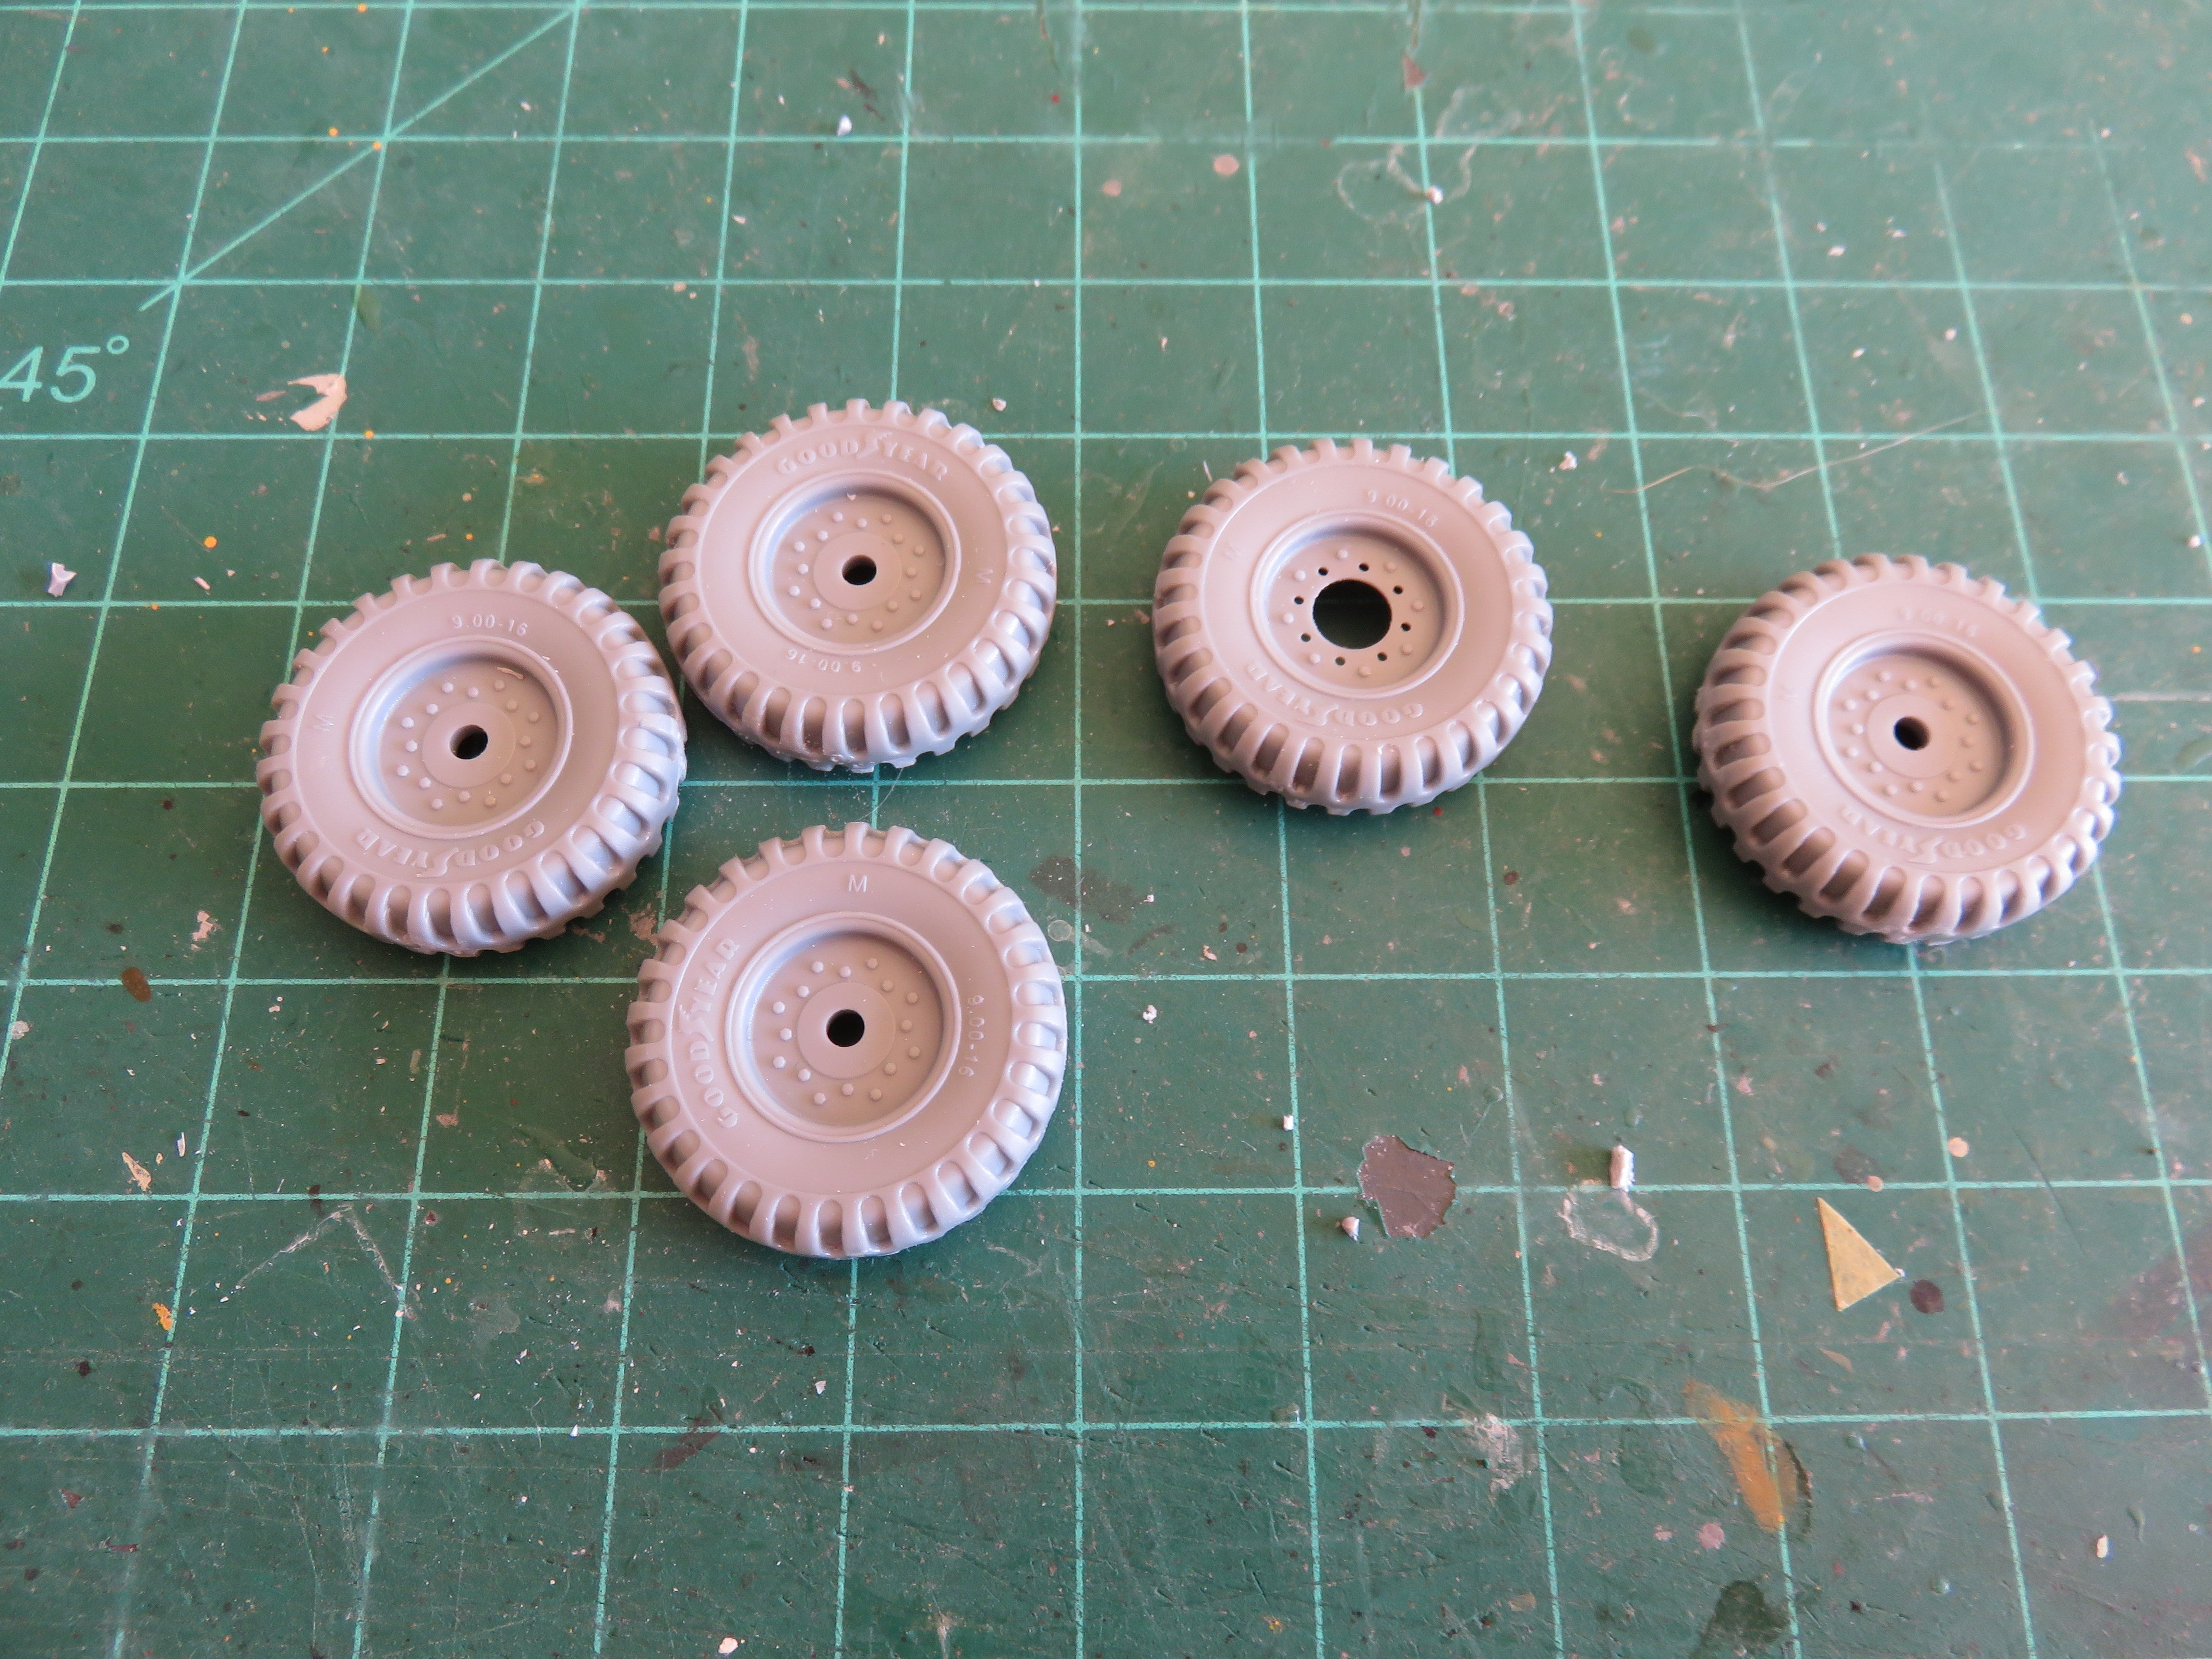
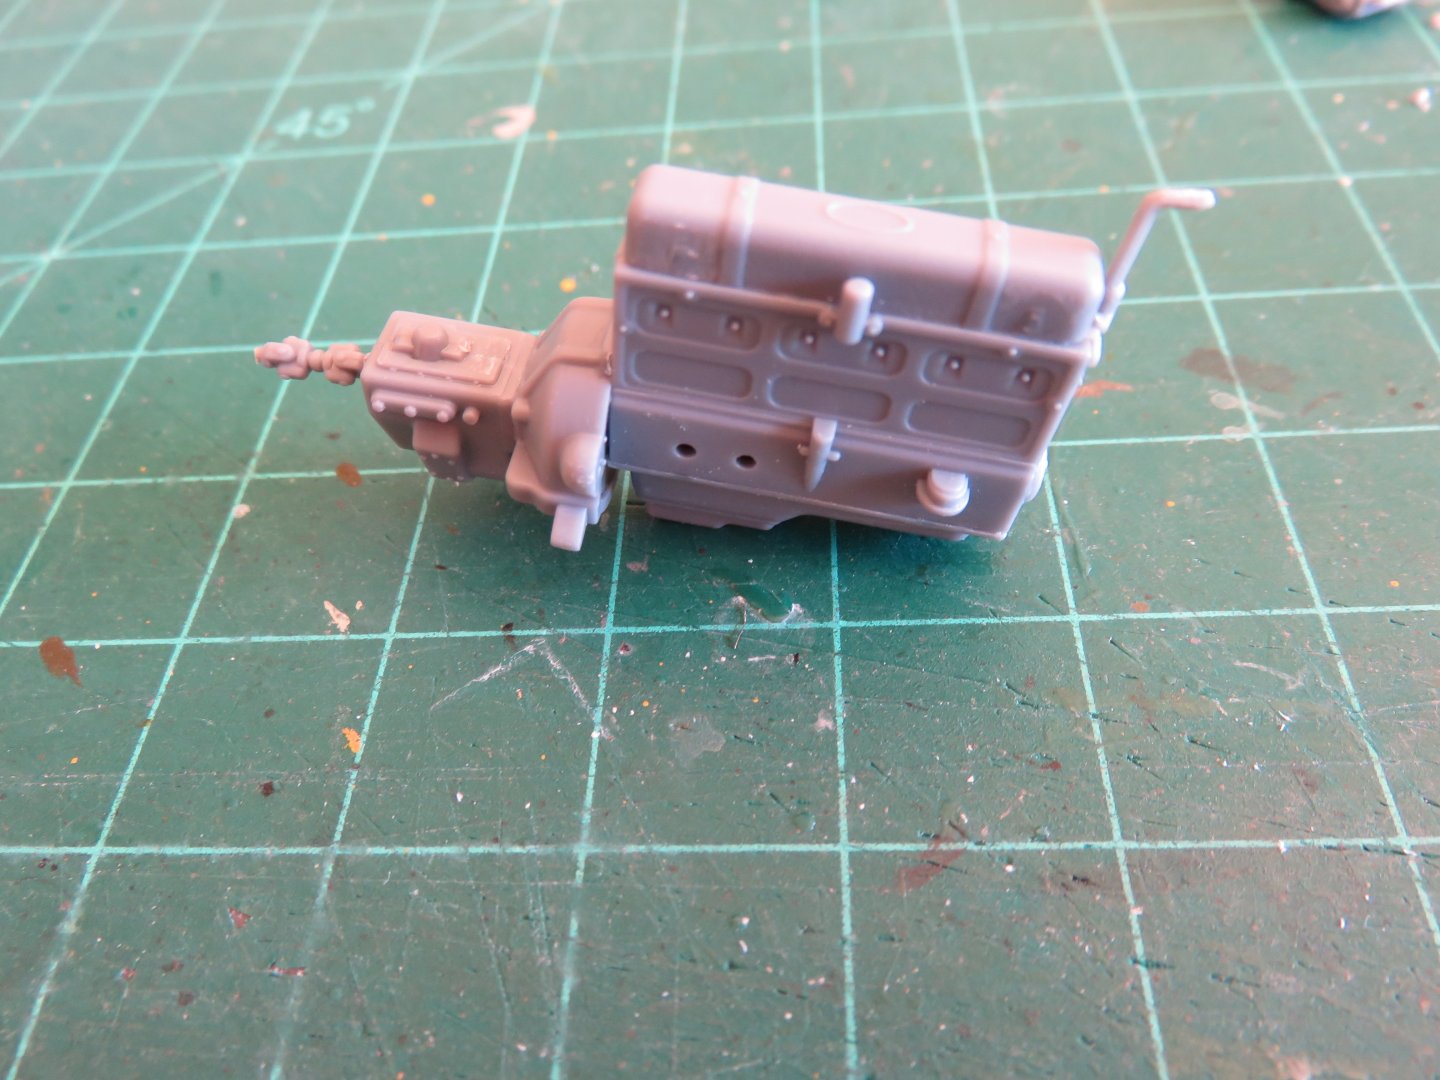
Thanks everyone! To get my feet into this facet of the hobby, as well as get myself out of the summer doldrums, I picked up the Tamiya 25 pounder and Quad FGT kit. While this kit went together fairly well, and has reasonably good detail, the tooling is definitely showing its age! With a tooling date of 1974, there are plenty of mould seam lines and small amounts of flash all over. It still builds up nice, and I would recommend it to anyone, as it is fairly inexpensive. I did add an an extra roof rack out of some styrene rod and I improved the grab handles by the roof hatch (I think they were stirrup steps from a 1/87th Tichy freight car kit I had leftover in the spares box). As the prototype Quad was build on the same chassis as the C15a, it should provide some interesting comparisons. Anyway, it was enough kit to get me motivated and somewhat educated, so I'm not going into the C15 build completely ignorant.... I think.... Moving on with the main subject of this build log, the IBG instructions has the builder start off assembling a number of components that will be needed later on. There is definitely a generational shift between the IBG and Tamiya kits. Lots more parts, and much finer mouldings. The results of a few days work! The instructions start off with the wheels and tires: Ok so far, not bad, decent introduction. There are locating pins, but they are not centred so the wheel halves can only go together one way. The tire branding and size is all clearly legible. Only a small cleanup to do around the joining seam. Following the wheels, we jump to the rear buffer and tow hook assembly. Five separate parts in that little assemble. Ooo... this is going to be a slow build... Then the two cab side steps: One with a box, the other without. The one without I will eventually have to cobble together the cover for a little Johnson Chorehorse engine that was used to charge the radio batteries. On the hard body Wire-5 models, this auxiliary engine had its own little compartment, but on the canvas covers Wire-3, it sat on the front running board, hanging out in the open. Then came the two fuel tanks, handed left and right, so be careful removing parts from the sprue. Do one at a time! The transfer case. Interestingly, the Quad had an underslung PTO winch that ran off the same transfer case. The unused extra drive outlet for the C15a appears to have a grease cup in its place. The Front bumper was next. The towing shackles are separate parts and we get our first taste of PE! The brush guard features PE braces on the rear. A small locating nub helps with their alignment. The axles come next, starting with the front. 12 separate parts go into its assembly, and watch out as some of them are handed! The steering linkage needs to go on the shorter side. Also, move reasonably quickly into attaching the tie rod, as it will help ensure your front wheels are, at least, aligned. Doing this before the plastic cement has fully cured leaves enough play to get things looking right. Now for the part that goes vroom! Six parts for the engine bloc alone, front, rear, sides, oil pan and head cover. This is one of those steps where the instructions could have been a little more helpful. The exploded cad drawing does little to advise the builder of the order in which the parts should be assembled. As it turned out, through dry-fit trial and error, it works if you join the front page and one side, followed by the back and then the remaining side. After that, the oil pan can be added, which should square everything up before adding the head cover. I have added the transmission, but I won't complete the engine assembly at this time. I have left a number of detail parts off to paint them separately. So that's where things stand at the moment. This kit is way up there on the detail level. The fit of the parts is good, although the instructions are not the greatest, as I noted above. Some of the parts seem to suffer from an excess of sprue gates, so cleaning them up can be a bit of a chore. Also, there seems to be no sense in the part layout on the sprues. The front axle use parts off three different sprues, for example, and given the large number of sprues in the kit, it feels a little like 52-card pickup trying to to locate all the parts needed for the next step in the instructions! Next up is some cab assembly, so there might be something vaguely truck-like for my next update. Thanks, everyone for your likes! Andy


-
Question for Mods/Admins regarding build log titles. I’m just curious why the log titles are now being amended to include kit material for non-wood kits (Plastic, card, etc)? I noticed no change in the naming policy: Again, I’m just curious, as the official policy includes no such provision. Andy
-
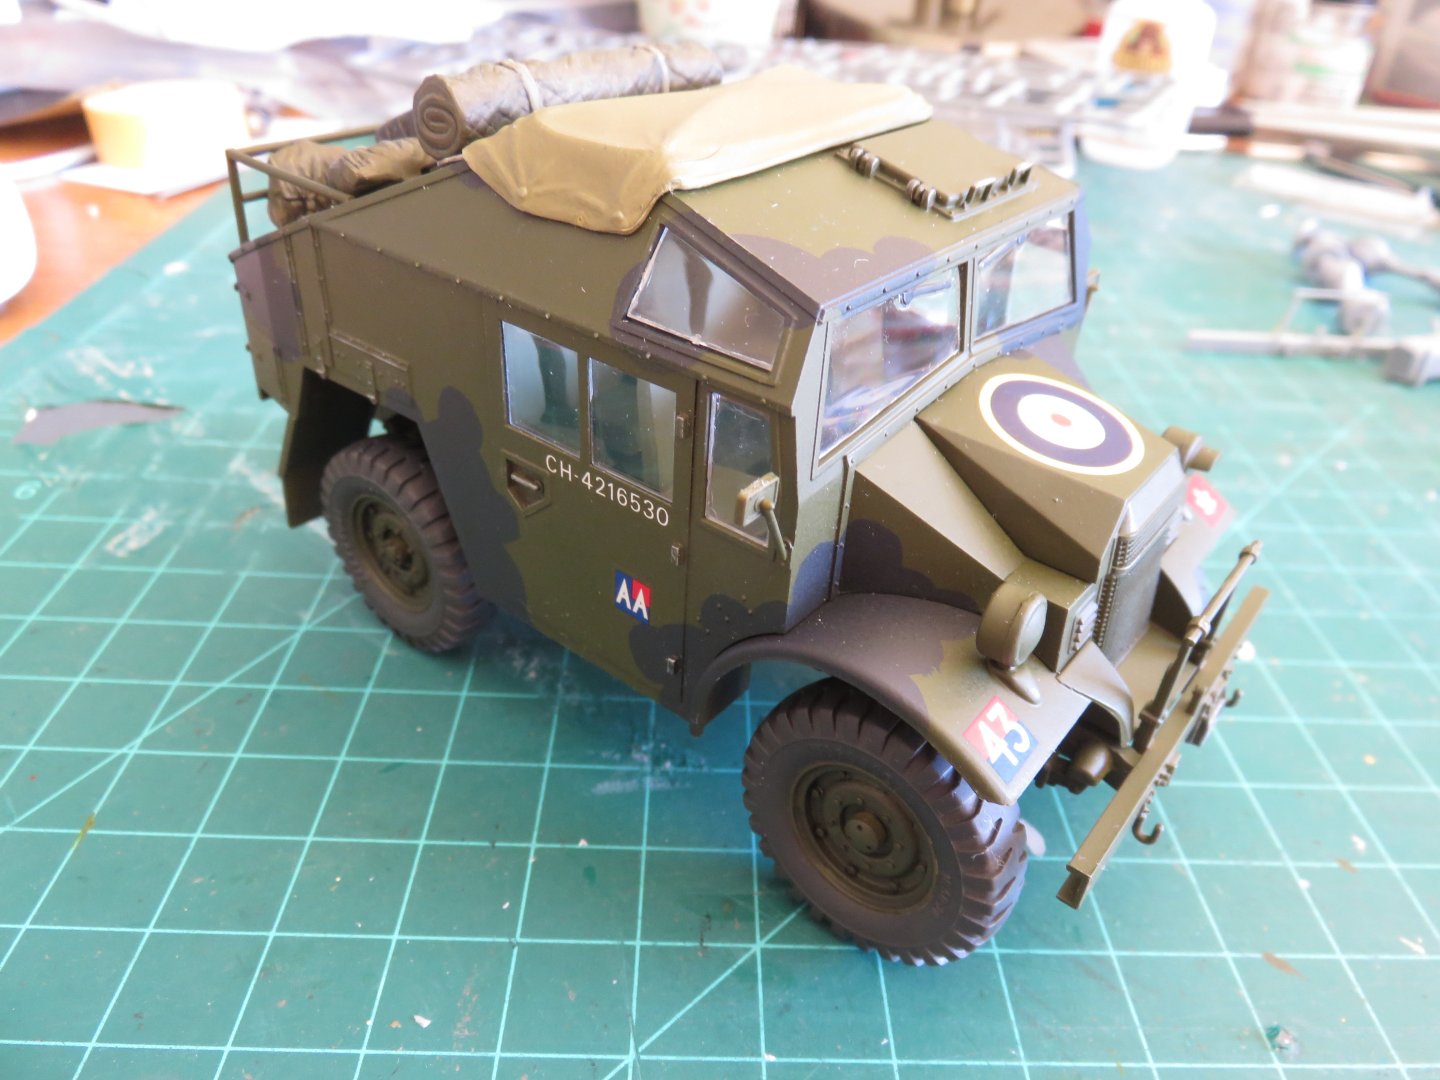
So for those who missed it, I recently picked up a 1/35 model of a Chevrolet C15a Personnel Lorry from IBG Models (shipped all the way from Australia, and arrived on the afternoon before Canada Post went on strike...again.... As I may have referenced in a previous build (see my P-40 Kittyhawk build), my great uncle was an artillery officer during the second world war. I have, naturally, been doing a lot of research into what his regiment did during the war, and also the technical details, things such as vehicles and equipment used, etc. My great uncle was a Lieutenant in the 2nd Medium Regiment, RCA. He was assigned to "Q" battery as a Section Leader. A medium artillery regiment was comprised of 16 4.5" or 5.5" guns. The 16 guns were divided into two batteries of 8. In the case of the 2 Meds, the batteries were "P" and "Q" (formerly the 18th and the 25th batteries, when they were called up at the start of the war). Each battery would be subdivided further into 2 troops of 4 guns ("A", "B","C","D"). After late '42 or early '43, each troop was further subdivided down to a section of 2 guns. Each section would be led by a lieutenant, or a senior NCO. The division of the gun troops into sections was more a formality than anything. It didn't increase the regiment's wartime establishment in terms of personnel. Likely this was done to improve communications and therefore response times and accuracy of artillery fire. An artillery section leader was assigned a 15 Cwt (cwt=hundredweight for the uninitiated,) vehicle fitted for wireless (FFW), along with, I assume, a driver and signaller (15cwt would be about 3/4 ton). During the war, there were many different options for what type of vehicle was used. A few possible options I've been able to uncover so far include the British Bedford MW, the American built White Scout Car, the Canadian Military Pattern (CMP) Chevrolet C15a, or the Dodge D15 (also Canadian built, but known as Modified Conventional Pattern, MCP). Of these four (so far) possibilities, I am somewhat confident in excluding the Bedford MW, as I can find no reference to it in the 1944 Canadian Army Overseas Vehicle Data Book. The Dodge also does not appear in that book, however it looks to have been in use by the Canadian army in the Italian campaign. Many of these Dodges were inherited leftovers from the 8th Army's desert campaign, handed over to the Canadian 5th Armoured division and artillery troops who arrived in Italy in November '43 sans equipment (there was a lot of wheeling and dealing done by the Canadian government to get more Canadian troops sent to Italy in the fall of '43). Anyway, the 3rd possible option I was looking at, the White Scout car was used in some artillery regiments, but it seems from my research that armoured vehicles would have been used closer to the front line. As the medium artillery regiments where more rearward (not totally out of danger, but there were definitely fewer bullets flying around), I don't think that they would have been equipped with many armoured vehicles, and those would have been saved for use by the Forward Observation Officers (FOOs) or other more front-line adjacent uses. Which has left by with the Chevy C15a as the most likely candidate for the type of vehicle my great uncle would have been riding around in for a good chunk of his time. One of Canada's greatest, and least known, contributions to the second world war (as far as mechanization is concerned), was the production of some 850,000 trucks in various sizes. More vehicles than were produced by Germany during the same time period. A quite remarkable achievement considering the population differences! The CMP trucks came in a variety of sizes, but all featured standardized and interchangeable parts. Even the cabs were of a standard design (for the most part, Dodge did its own thing, hence the MCP designation). The only way to tell a Ford CMP from a Chevy CMP (from the outside, if the emblem had been shot off) was the front grill. Ford used a square pattern mesh, while the Chevy was a diamond pattern mesh. Under the hood was the only true difference, the Chevy used an 85hp inline 6 cylinder engine, while Ford stuck with its tried and true flathead V8, producing 95hp, although the performance ratings for each are identical. The IBG Models Chevrolet C15a is a 2016 tooling. IBG produced a number of CMP variants, as the use of standardized parts in the prototype makes this an easy proposition. I managed to snag my kit from BNA in Australia and the shipping was not too bad, which was surprising given the distance (the same kit from Hannants in the UK would have cost slightly less, but the shipping was double). The box is absolutely crammed full of plastic. As highlighted on the box, there are two different cab options, but each cab has the option of two different roofs. As the spruces are common to other releases, there are two different sets of frames rails (one for the 15cwt and one for the larger 30 cwt version), as well as options to display the cargo area with the tarp (as on the box), or open with the just the bows in place. A multitude of bags keeps the plethora of sprues safe and sound. After cleaning, I can say that the mould quality is quite good, no visible flash, or seam lines anywhere. One frame was slightly warped, but I don't foresee that being too much of a problem down the road. The decals look decent, printed by Techmod, as you can see. I will be hunting for the correct markings, so the Formation signs and Arm Of Service (AOS) numbers won't be used for this build, only the WD numbers and the bridge rating. There is a small sheet of photo etch included. Oddly enough, the grill for the No 12 cab is a Ford grill (note the square mesh), so small whoopsie for IBG there. The No 13 cab mesh is the correct diamond pattern, along with the Chevy bowtie. The instructions are of a 3D Cad type rendering, including the painting instructions. I think this is the only real downside to the kit. It would have been nice to see a little bit of colour to help differentiate things a bit better, especially for the paint colour callouts, although on the plus side, they do show what each step should look like after completion. Going forward on this build, I intend to model this as the Wire-3 model. The later Wire-5 had a solid rear cabin. I will need to get a few aftermarket goodies yet. Archer Transfers makes decals sets for most of the markings I will need, formation signs and tactical signs. I will be doing a little further digging to get the correct AOS number for the 2 Meds. I will also need to get a No 19 wireless set for the back. All of these I have located, but can't do a thing about until the postal strike is over. I won’t need them for a while yet, so I can commence building at any rate. Wish me luck with this one! Andy


-
I get the health and environment issues, and these regulations have been in effect for some time (not a political issue as some commentators I’ve seen would have us believe), with a considerable window for compliance, but it is still a nuisance when products disappear. Andy
-
Looks like Mr Hobby just “made the list”: Andy
-
The control stick must have been used by the pilot to whack the navigator across the shins when he got them all lost. 😜
- 57 replies
-
- 10
-

-

-
Or, drive only as far as Burlington, and take the GO Train from there in to the city. Much less headache. Andy
-
A not uncommon practice. Most of what we know today as the large automobile manufacturers were behind many other consumer products. Off the top of my head, the appliance brand “Frigidaire” (in North America, was developed and eventually spun off from General Motors. Kubota (known for farm tractors and light industrial equipment) got their start as a manufacturer of steel pipes. Closer to home (for me) CCM is known now more for their sporting goods (especially hockey equipment), but CCM actually stands for “Canadian Cycle and Motor company…. They made cars! Andy
-
If I’m not mistaken the “Casey” who posted the colour mixes on Britmodeller worked with Alex Mann (Mann’s Model Moments on YouTube), to create a whole plethora of (relatively) simple mixes using ICMs Acrylic paints for WW2 subjects. The videos Alex made are worth checking out as he covers everything in detail: https://m.youtube.com/@MannsModelMoments Andy
-
Roadless supplied the crawler kit as,(what we would call now, an aftermarket kit for a standard Fordson N tractor. While some may have been used in farming, I believe the intention was more for industrial applications such as roadwork, logging and the like. Andy
-
5. All of the above 😁