realworkingsailor
-
Posts
3,274 -
Joined
-
Last visited
Content Type
Profiles
Forums
Gallery
Events
Everything posted by realworkingsailor
-
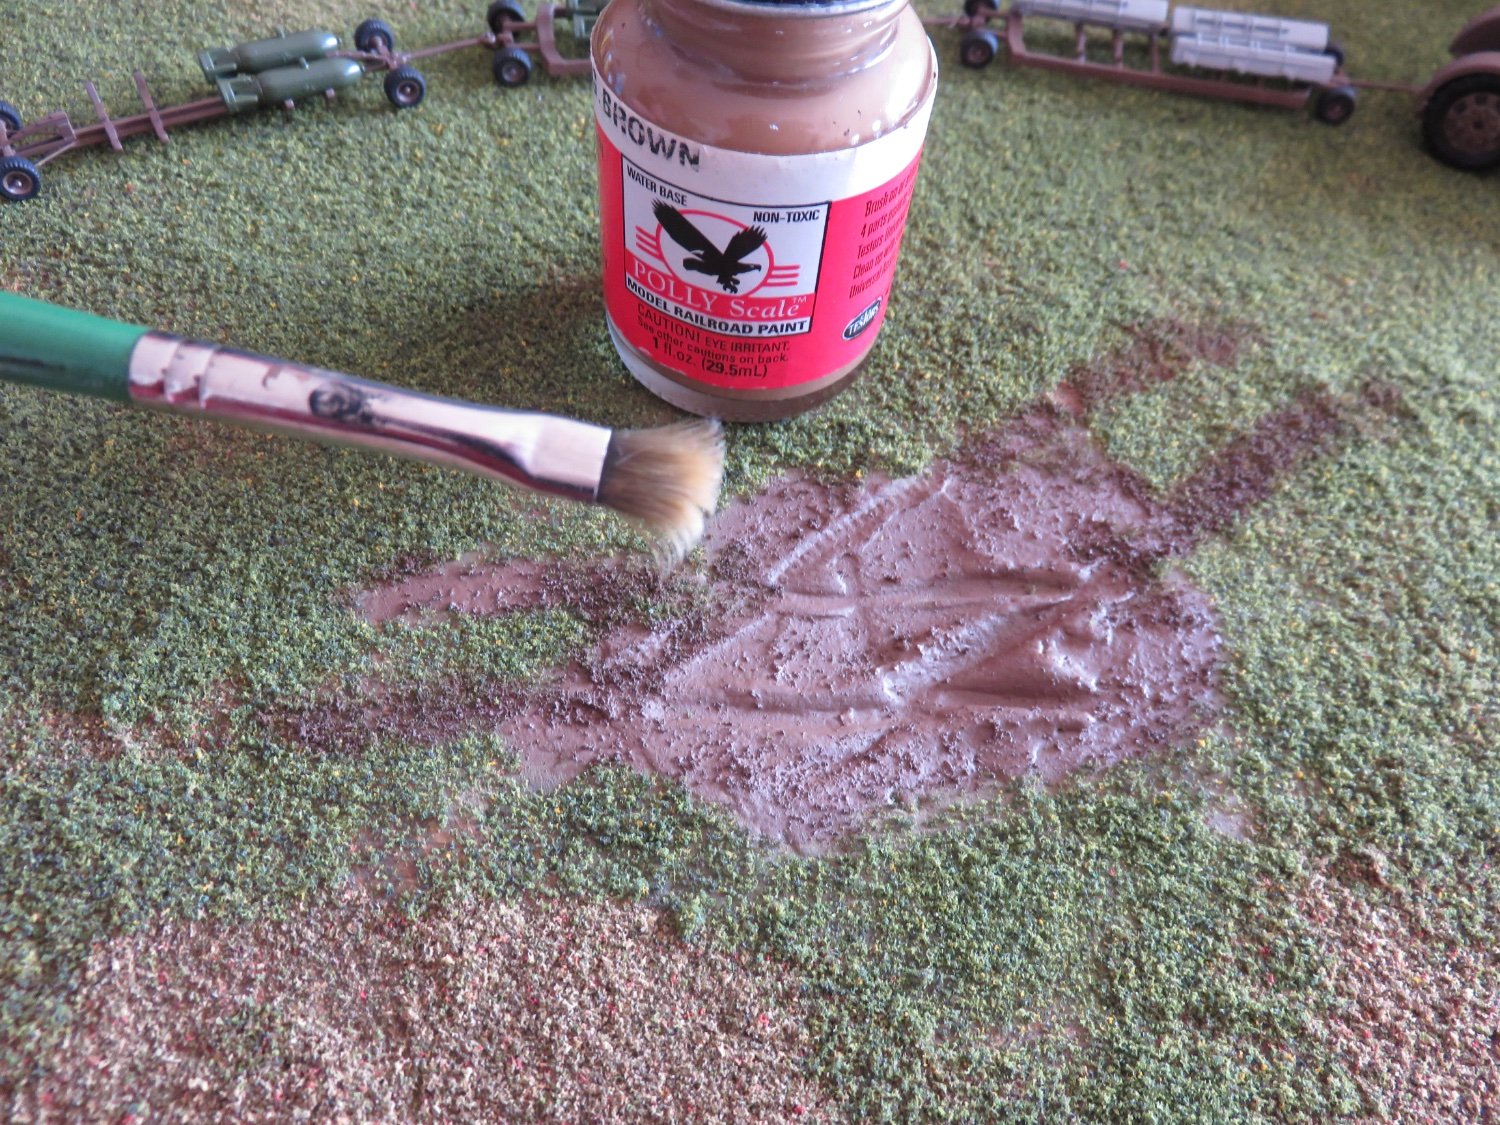
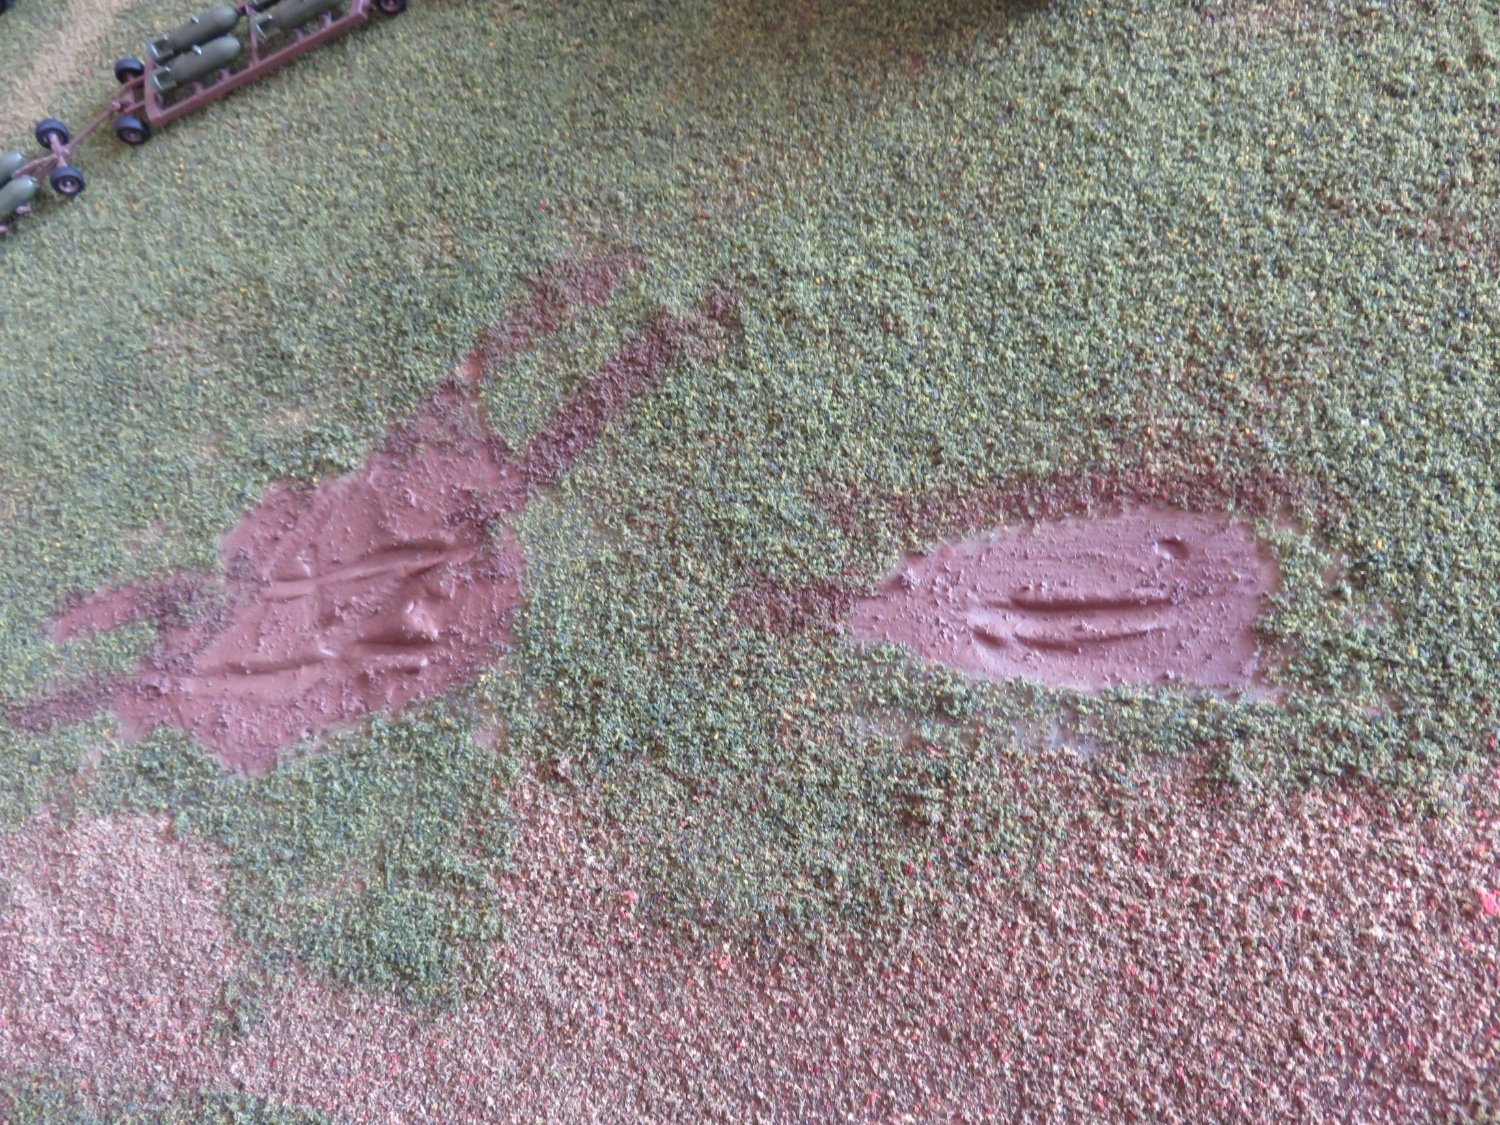
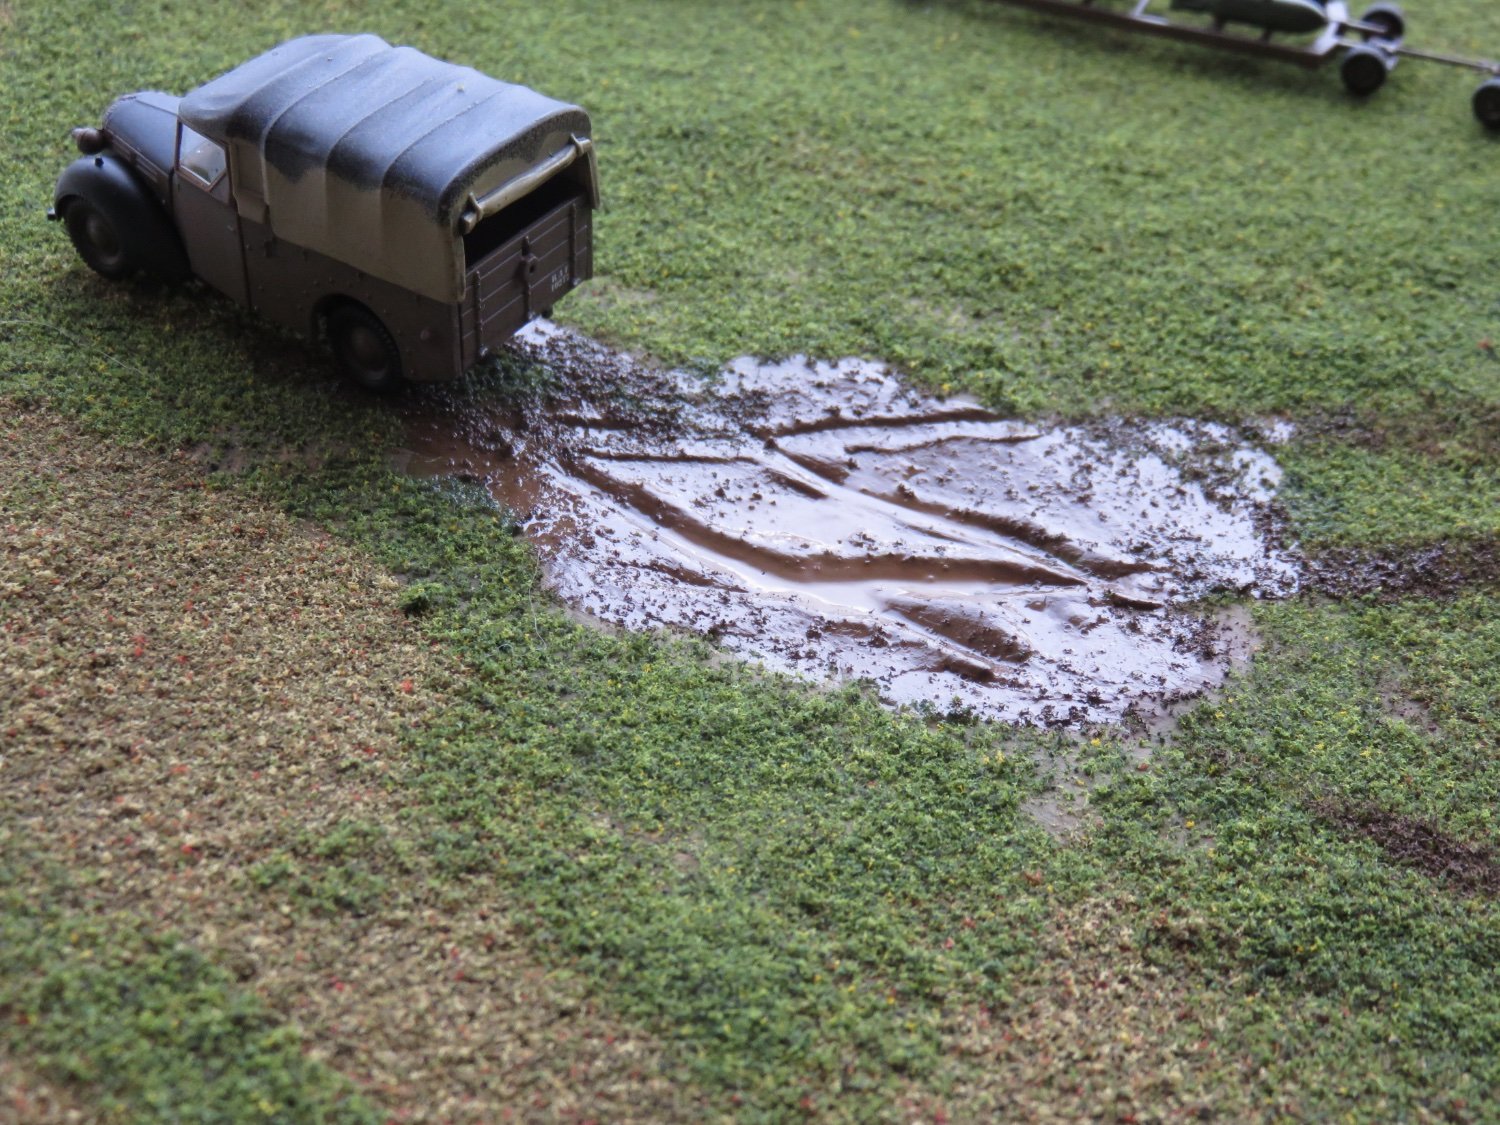
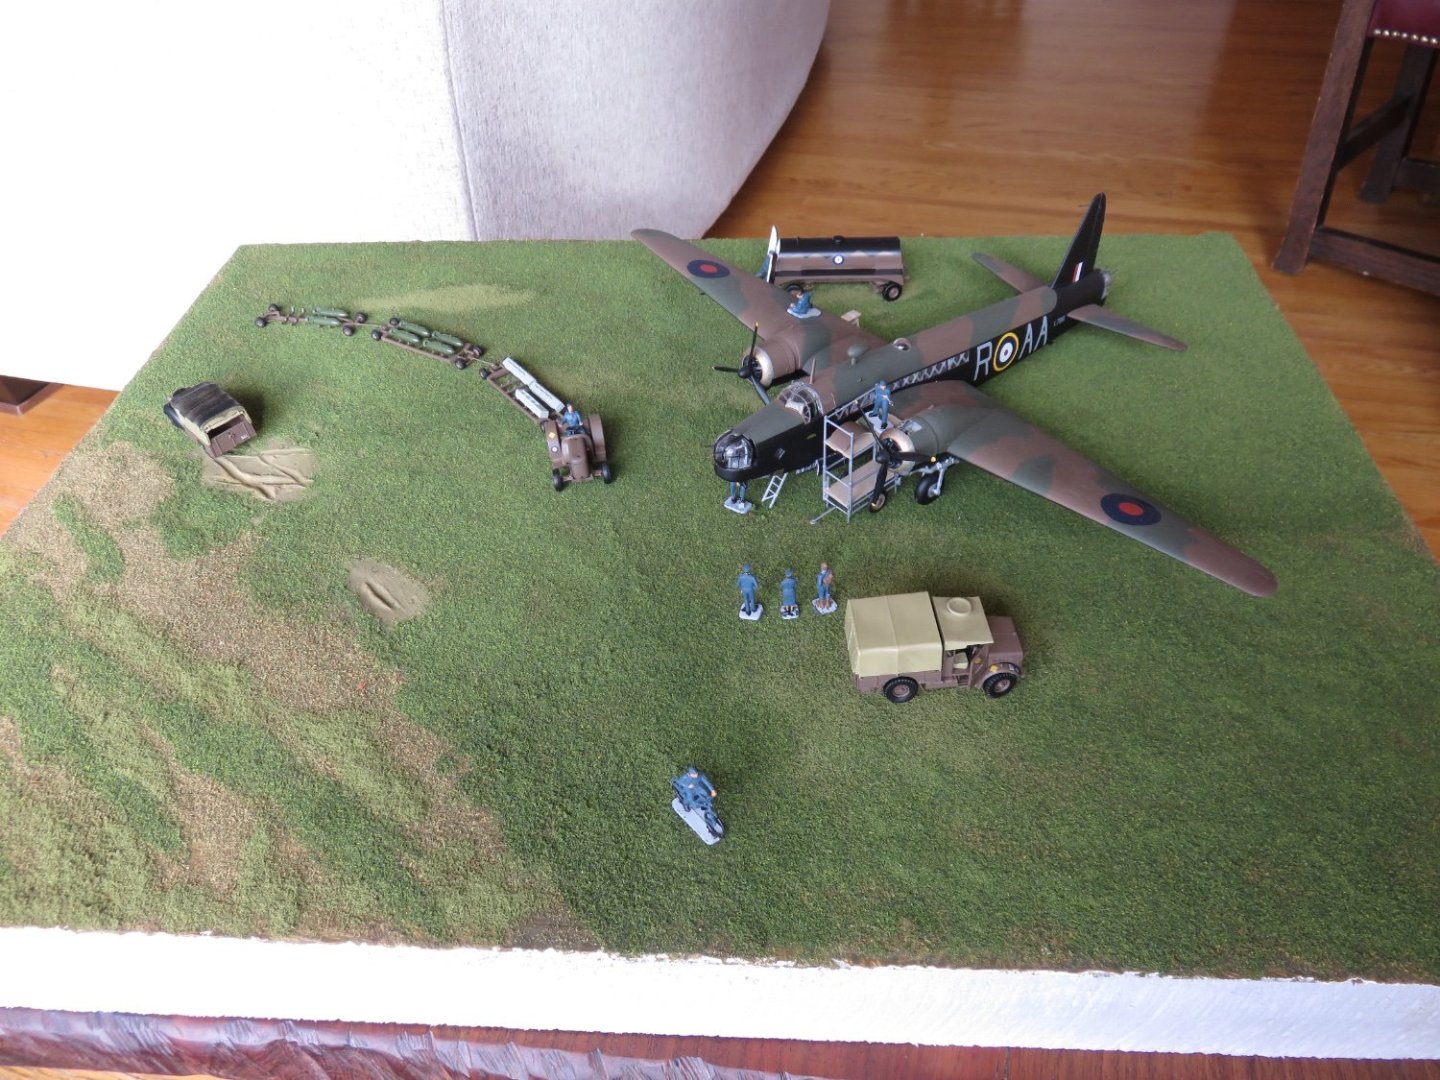
 Mud, mud glorious mud.... I think I've managed to create a reasonably convincing miniature mud puddle! No small feat considering there's nothing even remotely close to dirt or water even involved.... I first painted on a couple of coats of acrylic paint. I think it's important to stipulate, that I've had this paint for a while, and it has thickened up noticeably in the bottle. Which is good for what I'm going after here. The paint was dabbed and stippled on in the "muddy" area, and in areas where vehicle wheels would have shed any mud they picked up as they drove through. I applied a couple layers of this thickened brown paint until I had something of a desired texture. When the brown paint had dried, I then added a coat of clear acrylic gloss to the muddy area, in order to convey wetness. This was spread out in most places to the edge of the "grass", but in a couple small places I left it back a bit in order to hint of a slight amount of drying. For the final (?) layer, I made a mixture of about 6 parts gloss to 1 part brown paint. This was dribbled into the lowest areas of the puddle to simulate a bit of standing, muddy water. I was looking at the options the WS provides to make water and they're all a little pricey for the amount I need (~$40CAD for a bottle of "water", plus another ~$15 for colour tint). I think my budget "water" works perfectly well! How that Tilly made it through that sloppy mess, I'll never know! Anyone else for a bit of mudding? Andy

- 58 replies
-
- 13
-

-

-
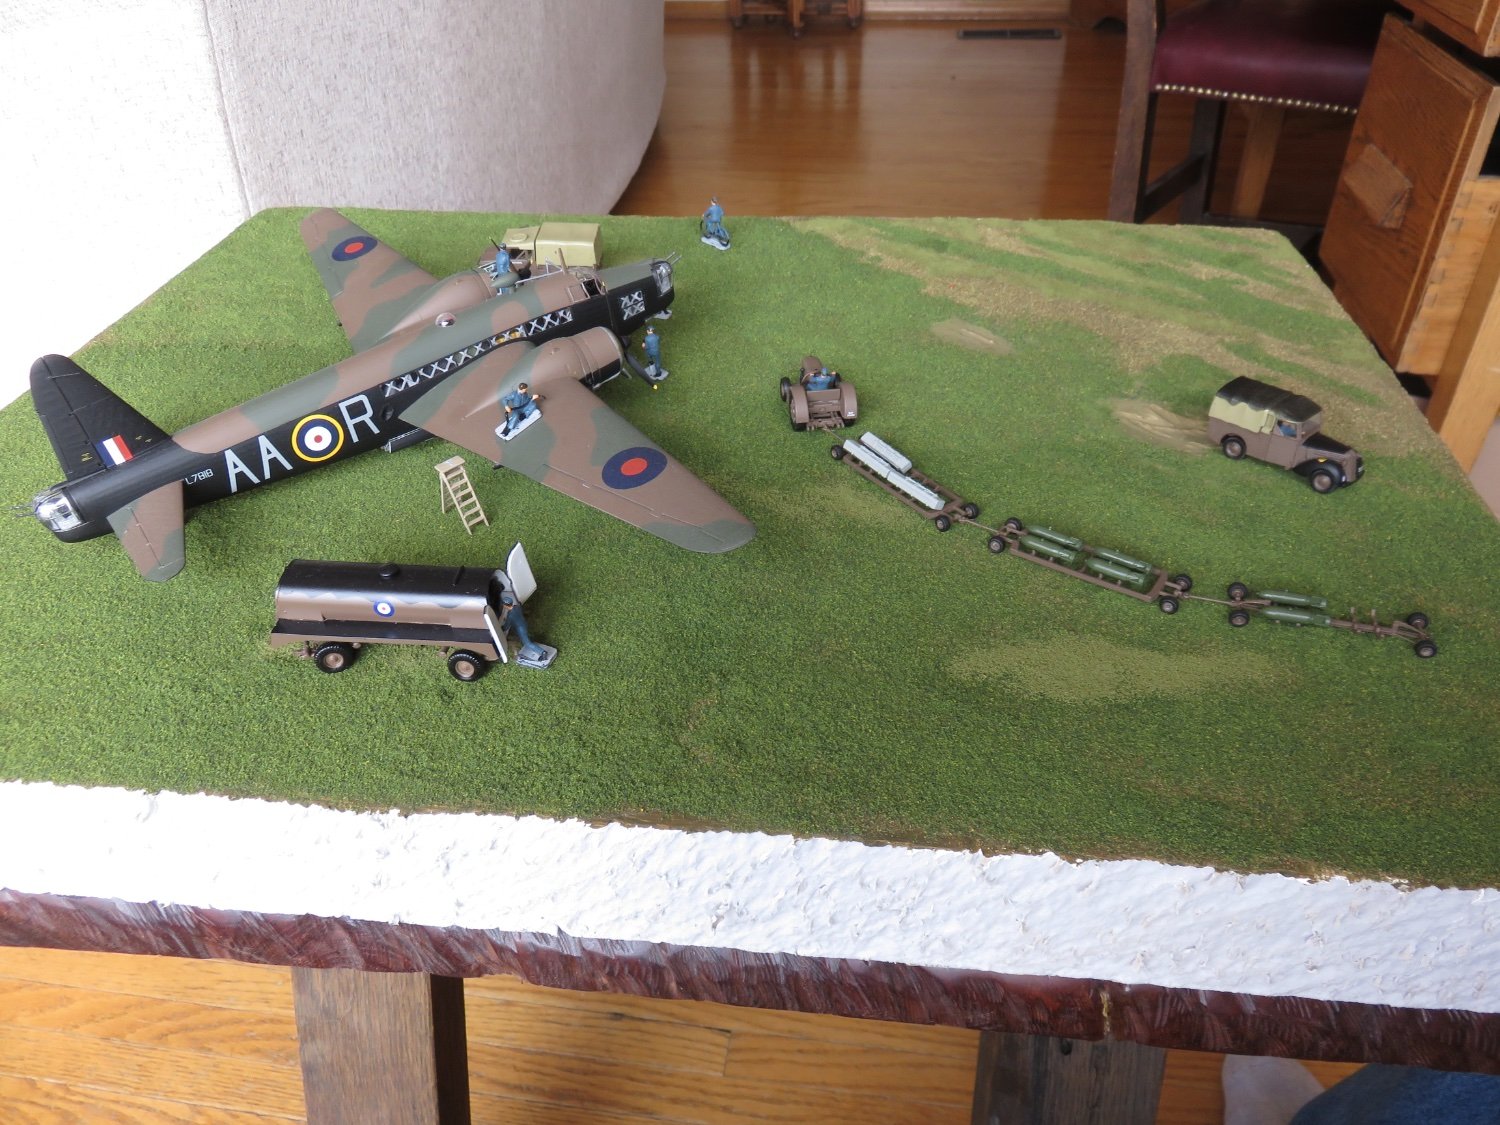
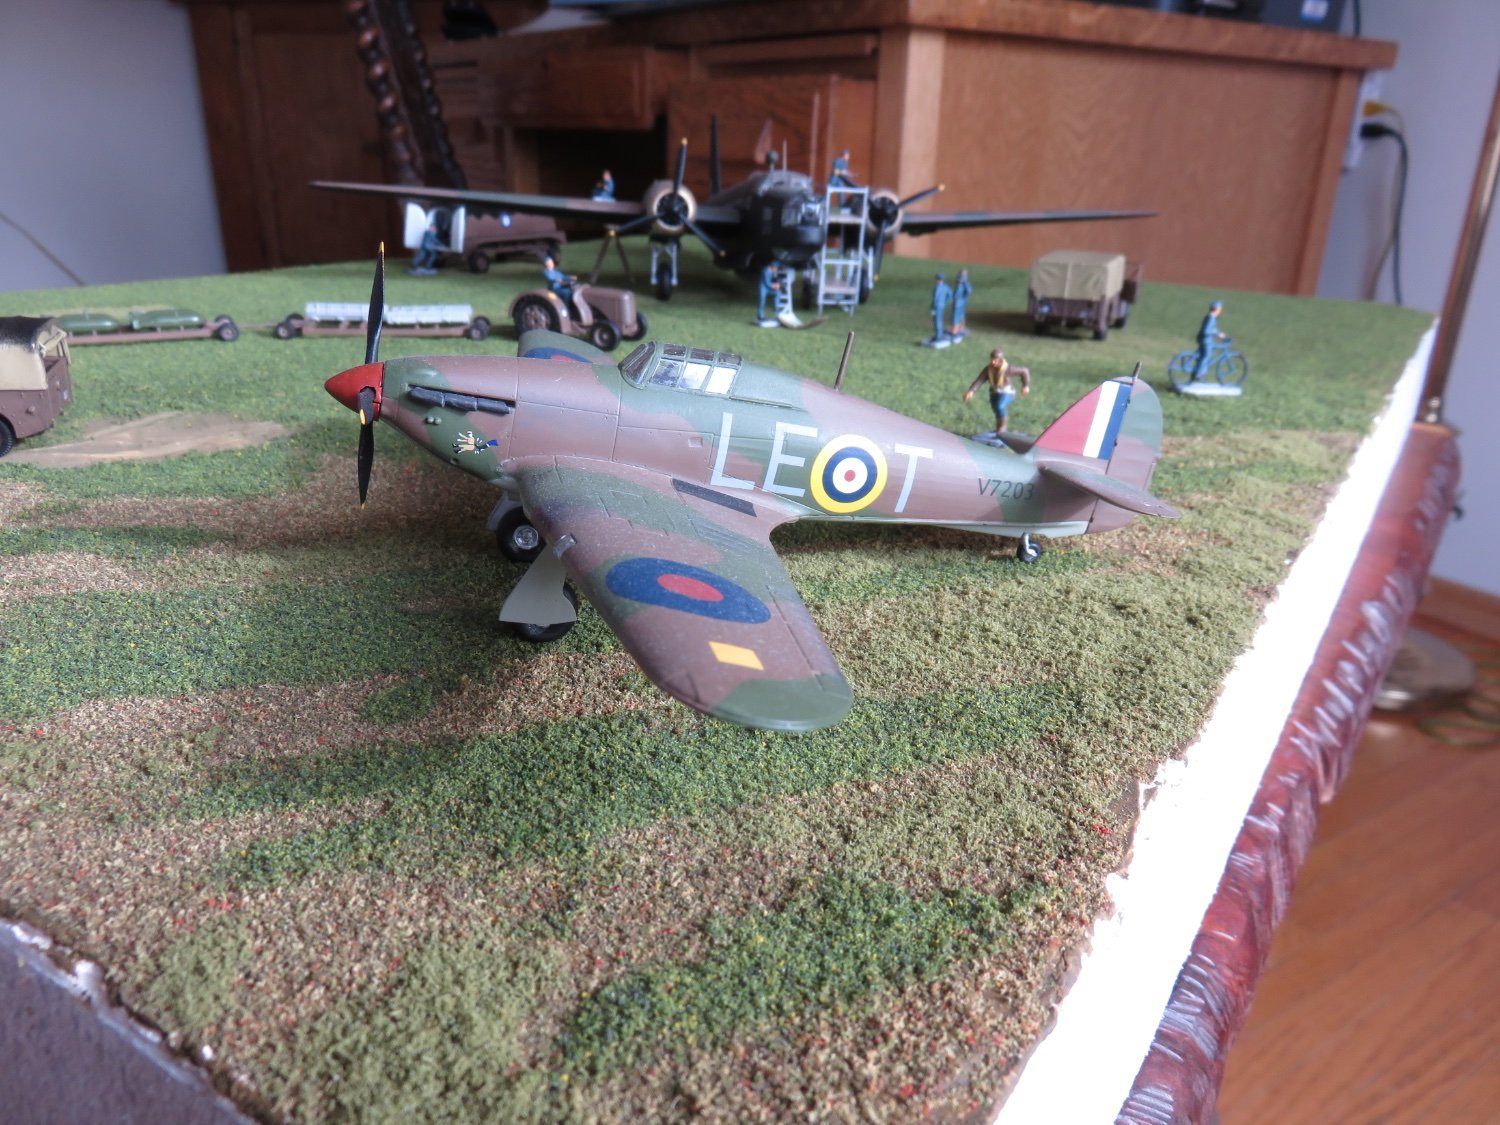
Thanks guys, I’m glad you’re finding reasons for me to justify adding the Hurricane! I think, though, @Egilman you’ve hit the nail on the head with your last remark, about giving the scene that sense of space. While the Hurricane does look good, I really think it makes it look too busy, and it takes away that sense of space. I’ll probably build a separate (and smaller) base just for it on its own (with a figure or two for fun). Also, the Hurricane is from 1940, and the Bomber from 1941… must have been some pretty rough weather to divert that pilot a year forward in time…😜 Andy
-
I keep looking around my house wondering where the heck am I going to put this thing!
-
I wonder if the black demarcation, that makes the cover boards appear to be in pairs, is not a channel for a securing batten? The hatch coamings appear to be nothing more than a toe rail, so perhaps this would allow the battens to be even height with the coamings. If you look at the forward “pair”, they appear to be leaning at an odd angle that doesn’t appear to lend itself to two individual boards being stacked in such a manner. Andy
-
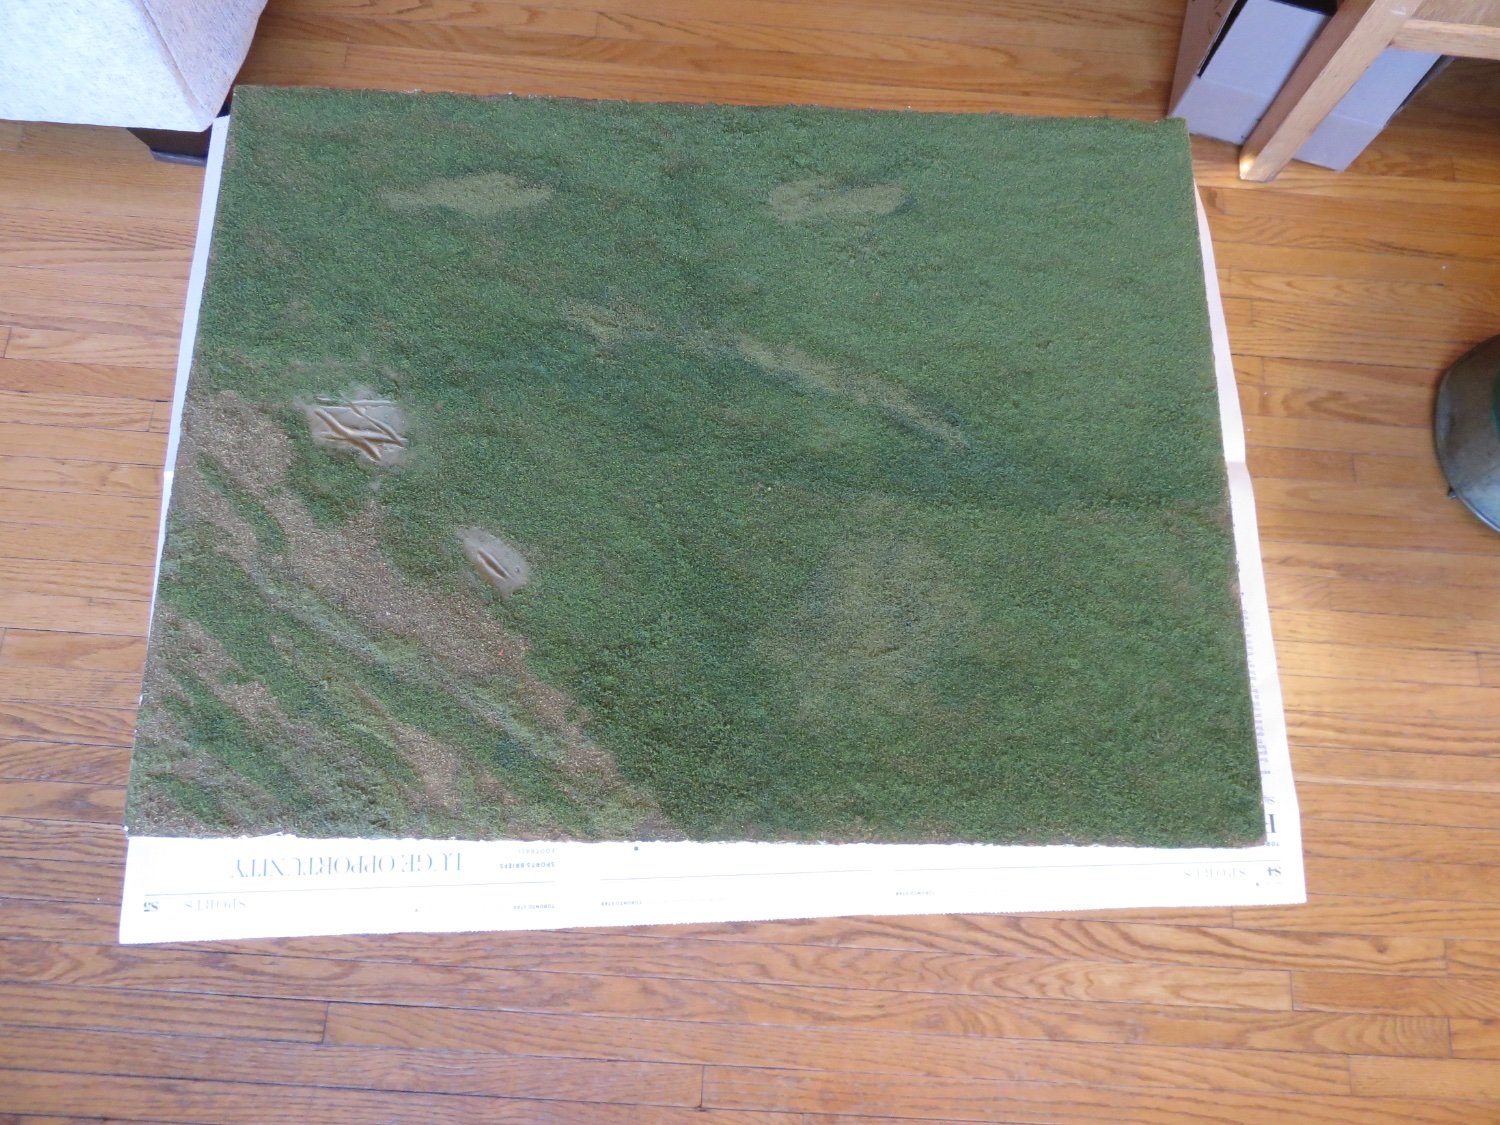
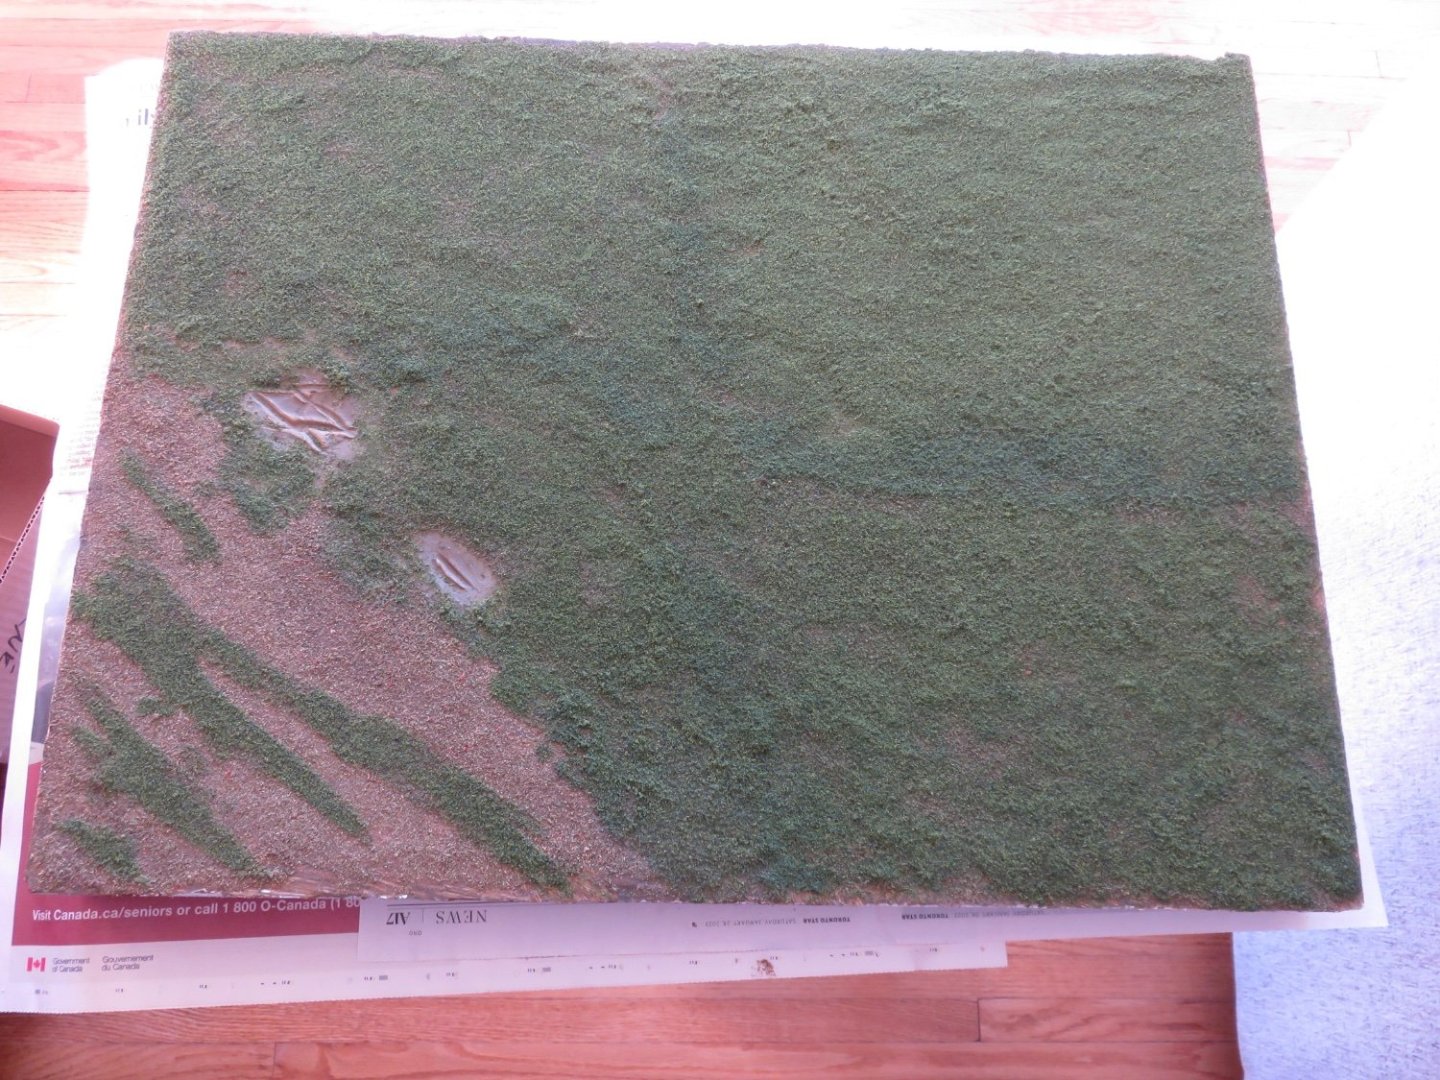
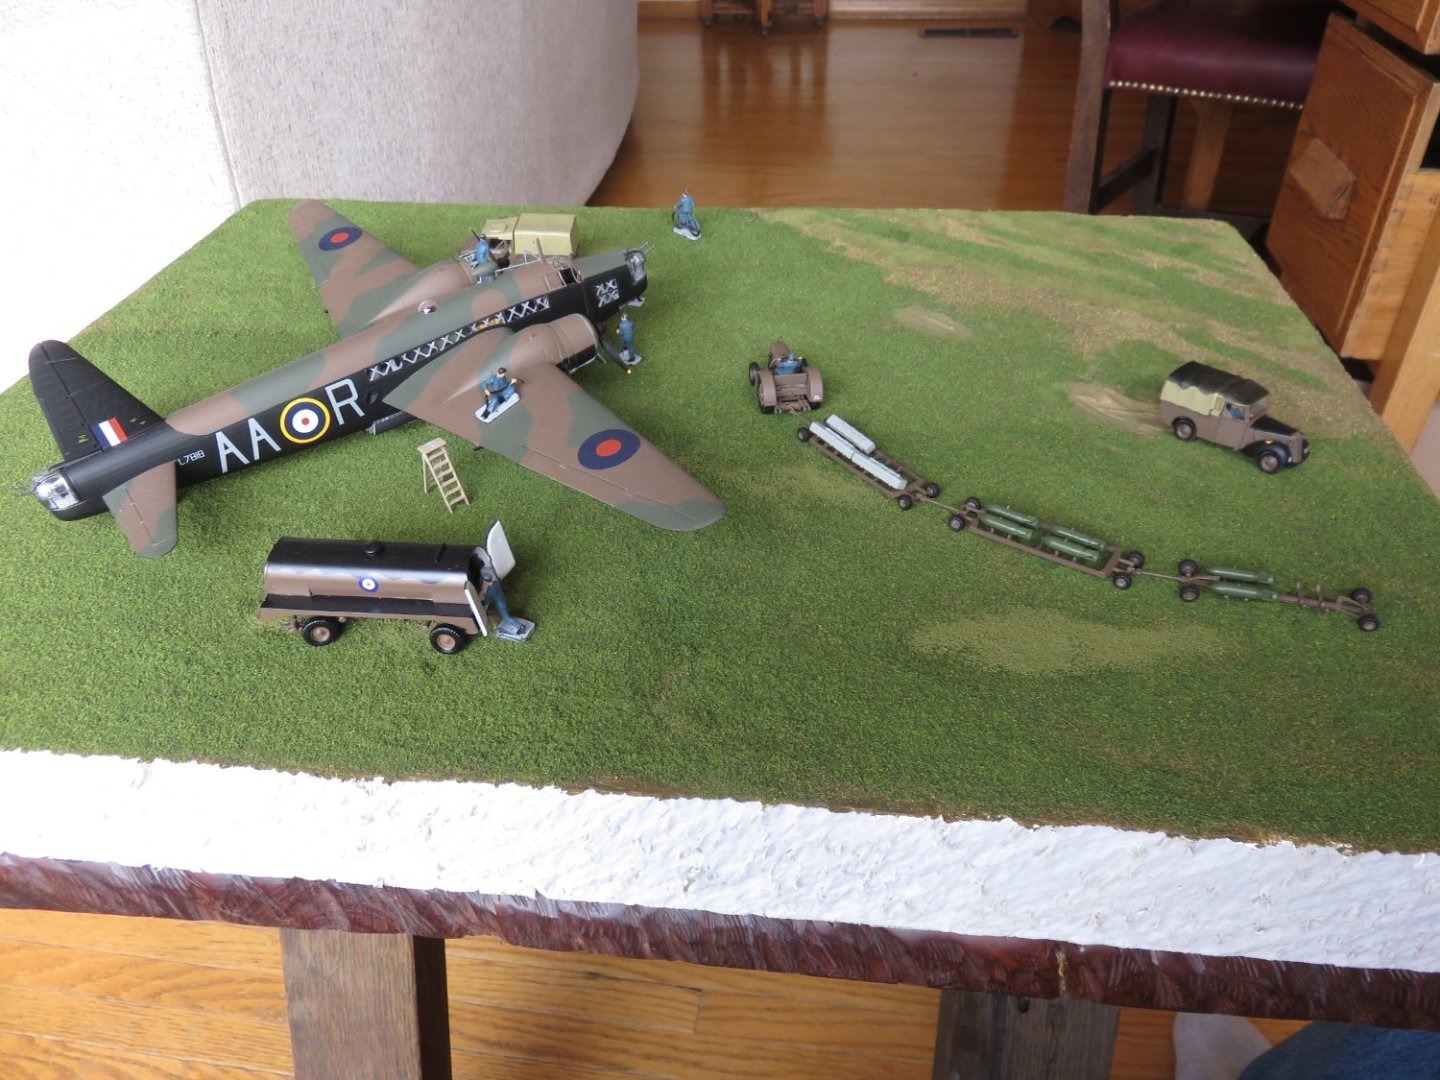
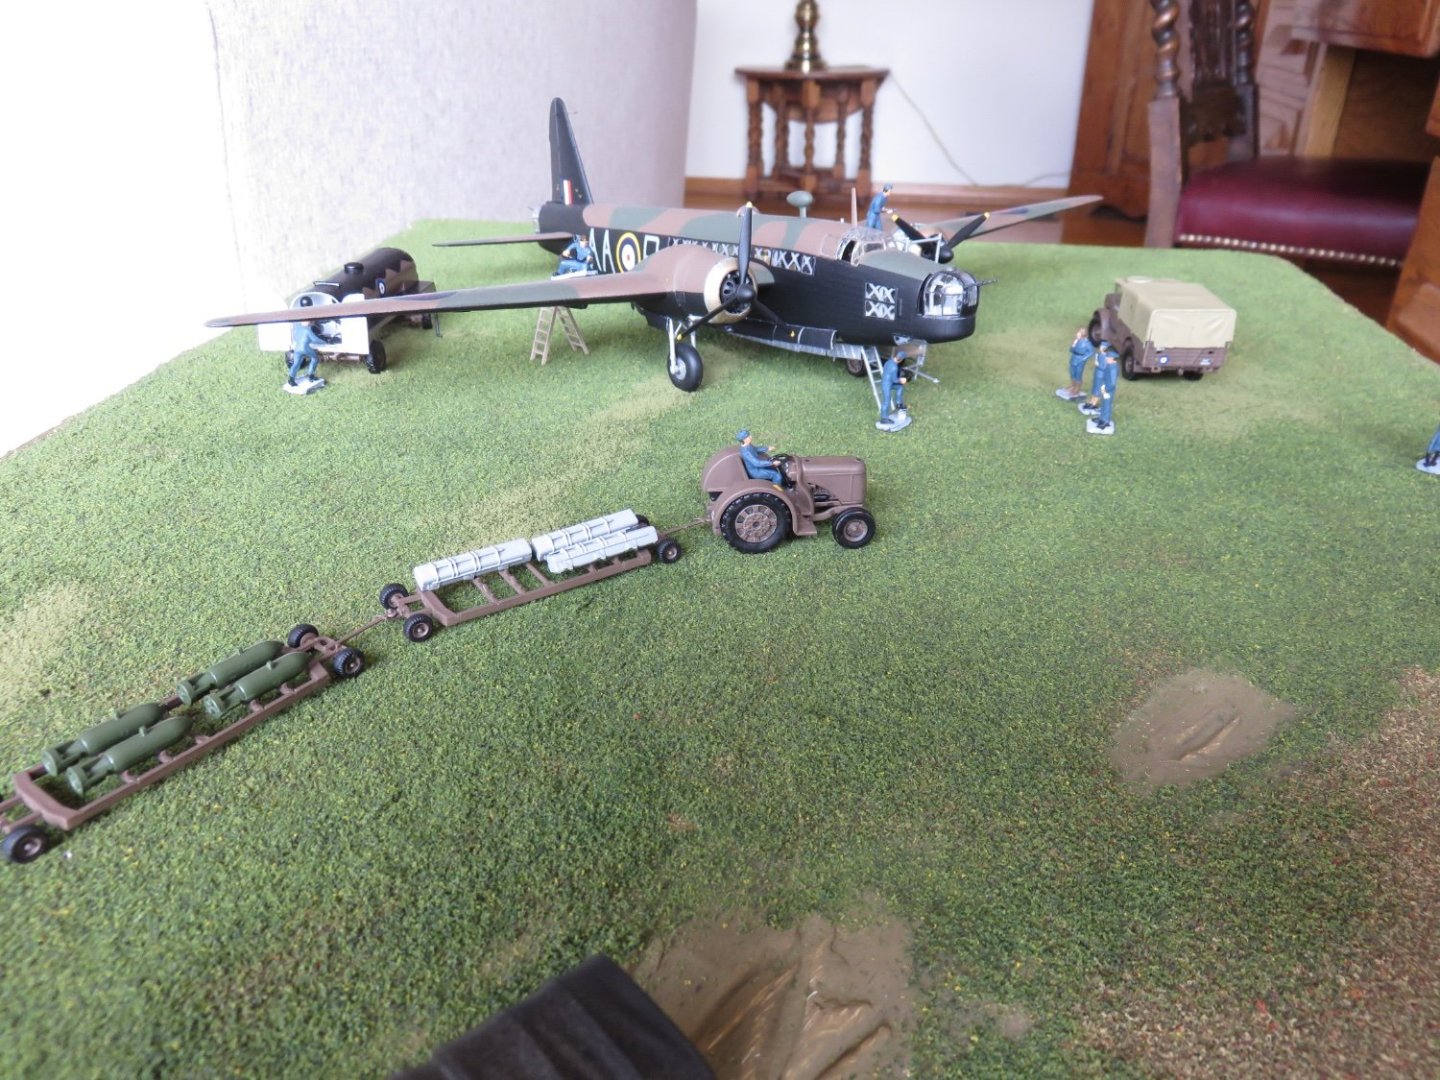
Thanks for all the "likes" everyone! Rather quick progress has been made, and a lot of matte medium has been consumed in the process! After painting, the first layer of ground cover was added. This consisted of a mostly uniform layer of Woodland Scenics "Earth Blend" Sealed for freshness! The end result: When the matte medium had dried, I began adding WS "Green Blend": A key trick to scenery is to work in small areas, it helps too keep things from getting out of hand, and you don't end up with areas that don't adhere properly as the glue has begun to set For the "runway" area I applied only a few streaks of green blend to simulate dried/dead patches of grass interspersed with greener grass. This was then followed up with some additional blotches of "burnt grass" to add some variation to the uniform green layer: Once all the matte medium had dried, I couldn't wait to see how things looked: I know if I wanted to, I could stop here and be mostly satisfied (the mud puddles still need some work, though), but I intend to take this up a level and I will come back and apply some layers of static grass to really make the ground cover "pop". For now I'm really happy with the way things are looking. And just for fun, I placed my Hurricane on the runway to see what it would look like: Likely an improbable scenario, but....... Andy


- 58 replies
-
- 16
-
-

-
Mysterious shipwreck washes up on Canadian coast
realworkingsailor replied to Kevin's topic in Nautical/Naval History
Probably something like "What's most people's concerns is, dey don't waants it to back out to sea. If it do go back to sea dey's not gunna know nuttin" -
Very nice Alan, well done! The night shots still look pretty amazing, and the figures give it a nice hint of “life”. Congratulations on completing your project! Andy
-
“McGregor” hatches are more correctly called hydraulic folding hatches. MacGregor is a trade name, although it can be considered in the same vein as “Kleenex” is to bathroom tissues. The Mark W Barker has a type of self-stacking/rolling hatches, whether these were built by MacGregor I don’t know. In the Barker’s case, one pontoon is equipped with jacks, while the adjacent is equipped with rollers. Once the first is raised by the jacks, the second pontoon is rolled underneath. The first pontoon is then lowered and the combined stack can be positioned about the hatch opening as required. Andy
-
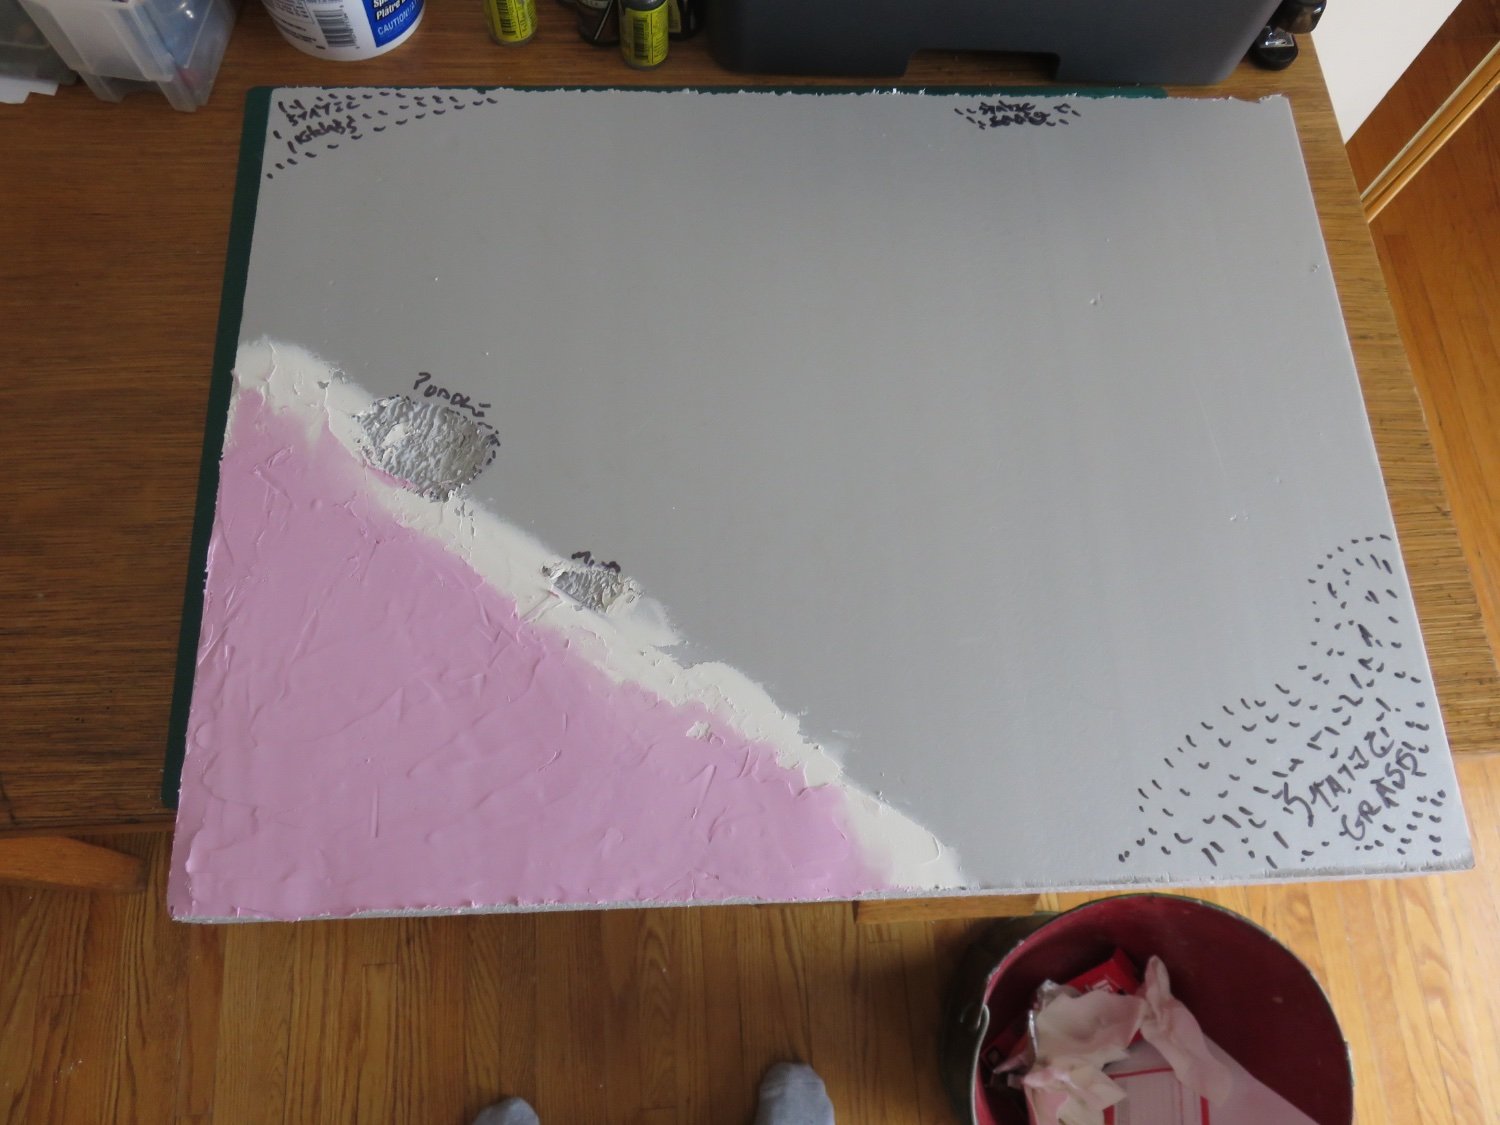
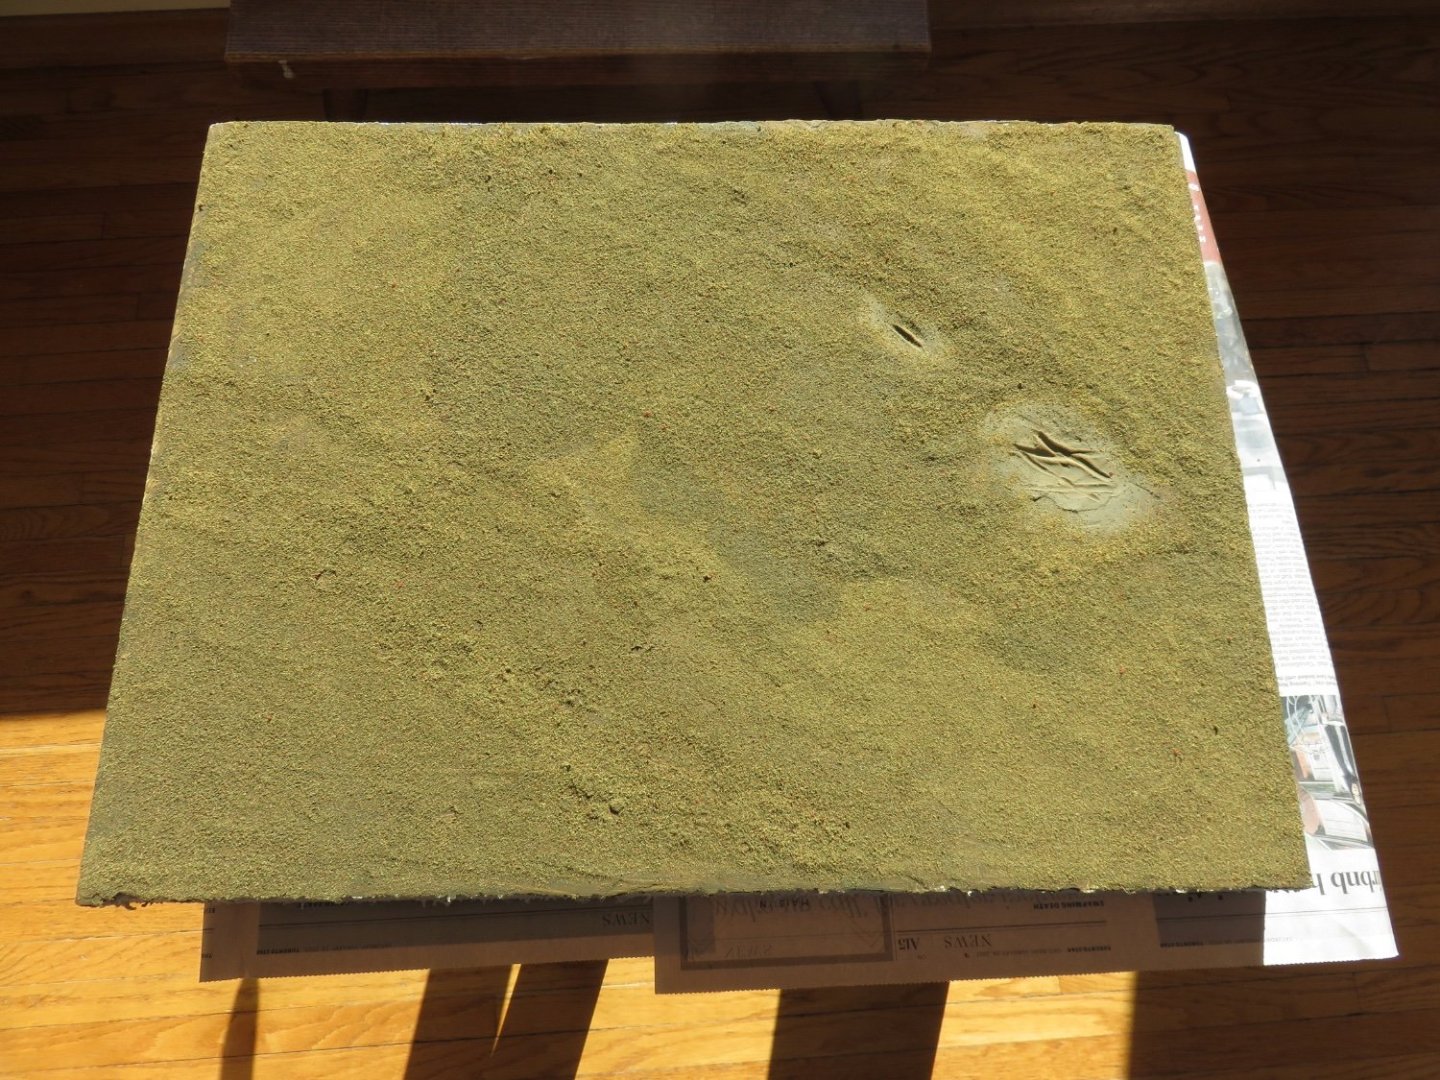
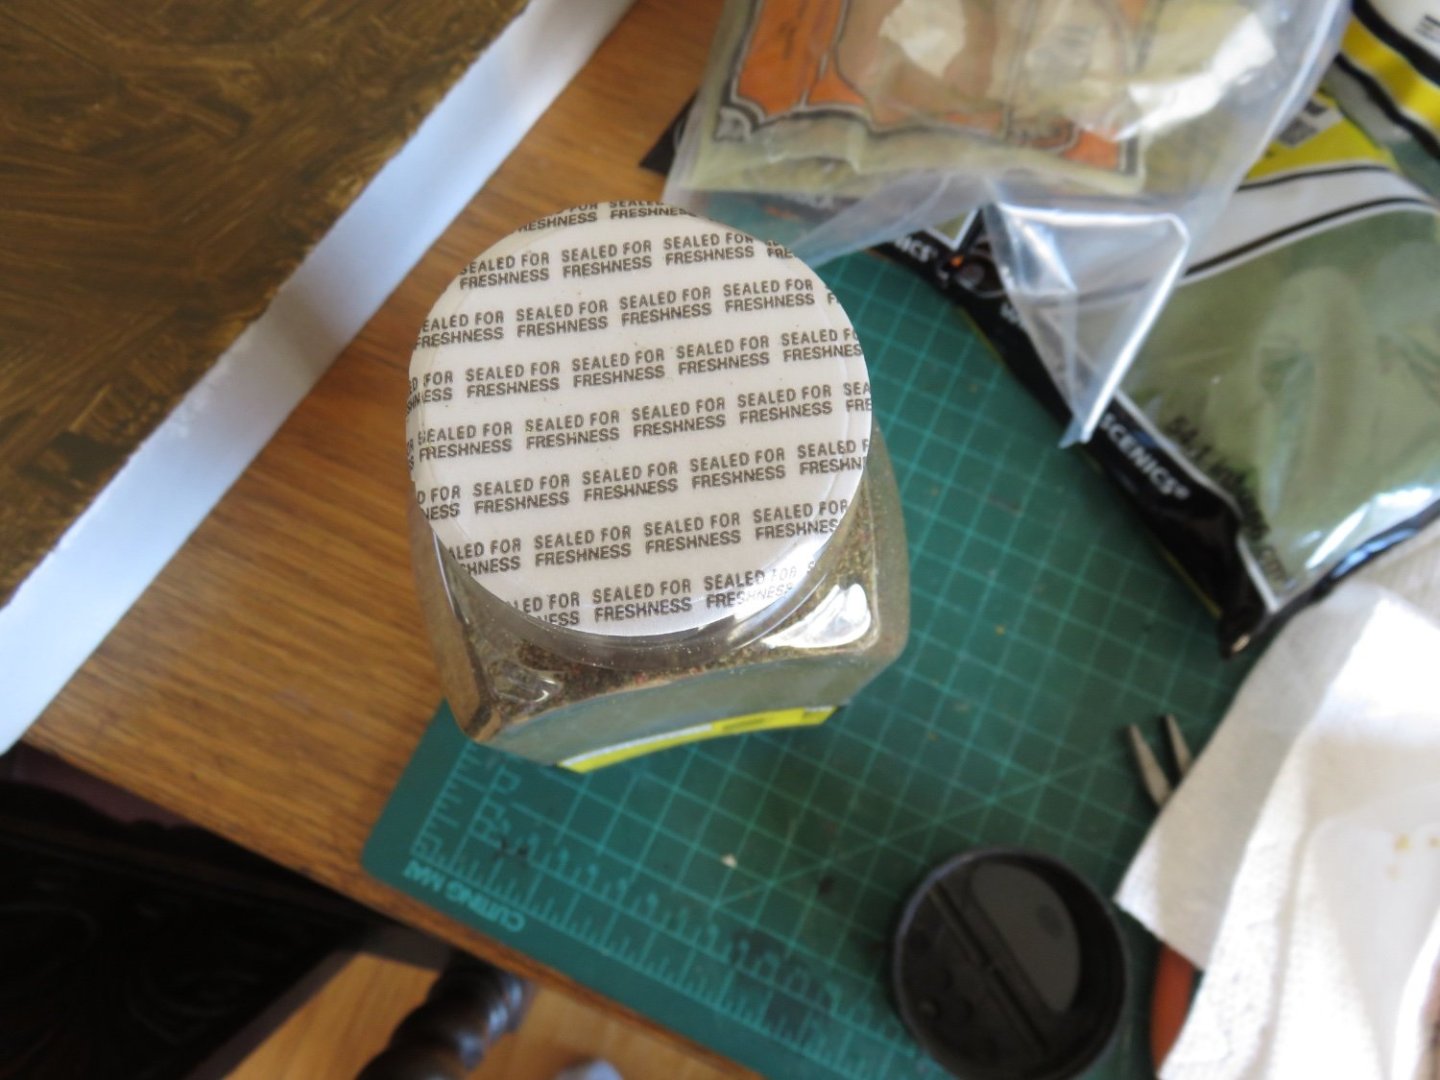
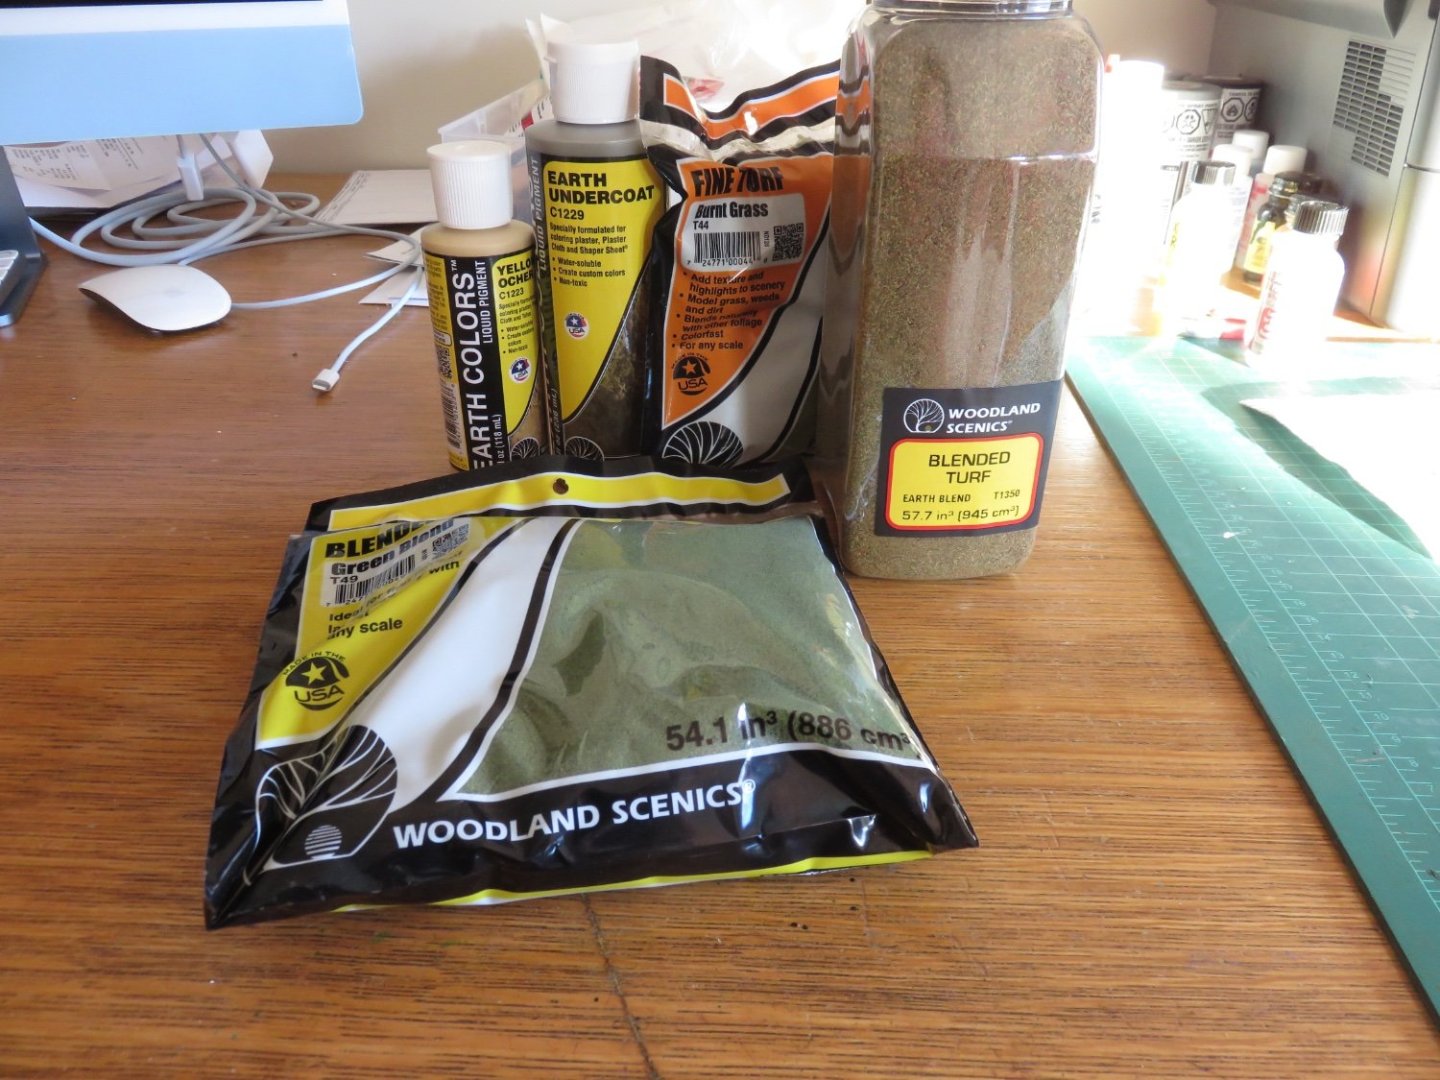
So I finally received my order of scenery supplies. These will form the base layers of the diorama: Three varieties of ground foam as well as some earth tone paints. Of course I couldn't wait to get things going. Starting with the paint. This was brushed on straight from the bottle. There's no point standing on ceremony, the object is simply to cover the white of the plaster, so any voids will be hidden as later layers of scenery are added. The end result: The photo makes it look greener than it is. Anyway, this is more than adequate, brush marks and all. Next up will be the paint for the "mud" puddles. I have some yellow ochre coloured paint that I will blend with the "earth" paint until I get a nice muddy colour. Shouldn't be too hard! Following this, the first layers of fine ground foam will be applied. Andy
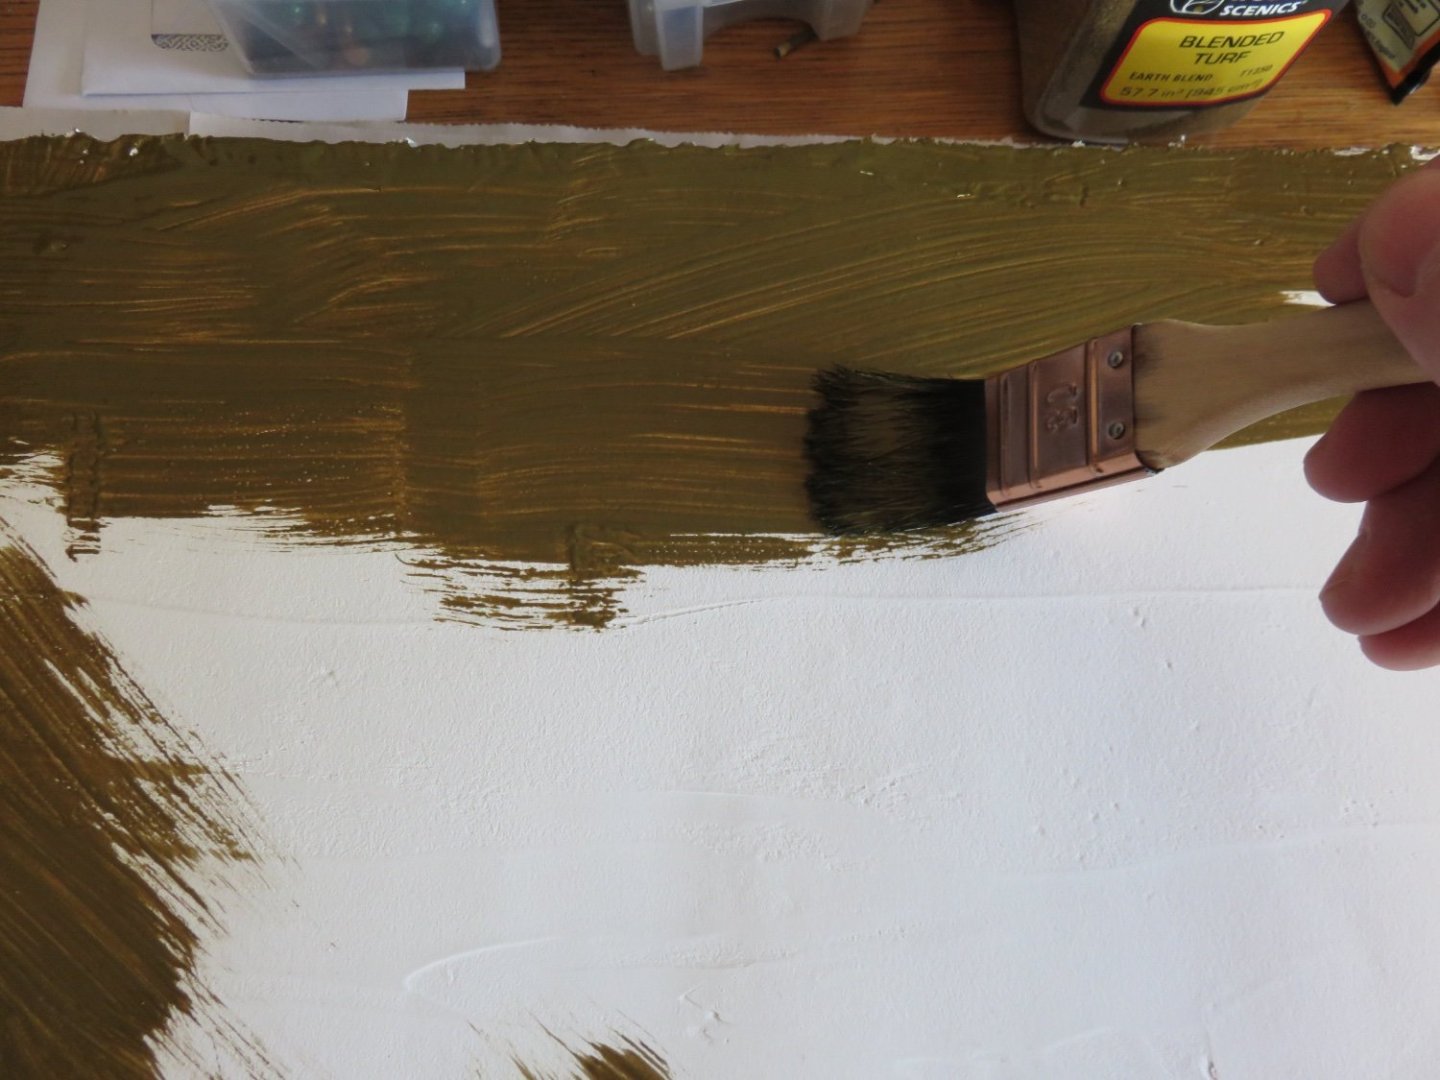

- 58 replies
-
- 13
-
-
Nicely done! The paint job and the chrome work turned out amazing! Andy
-
Don’t quote me on this as I’m really no expert, but I don’t know of any amphibious aircraft that are fully capable of landing on the open ocean in anything more than almost calm conditions. From what I’ve read, a seaplane is a catch all term for any type of water capable airplane. A flying boat is a seaplane in which the fuselage is boat shaped and provides the primary floatation. A float plane being the other option. Andy
-
Mysterious shipwreck washes up on Canadian coast
realworkingsailor replied to Kevin's topic in Nautical/Naval History
I have to laugh, you can just hear the Newfanese: "A lot of people's concern is we don't want it to go back out to sea," he told the Canadian news outlet. "If it goes back out to sea, we're not going to know nothing." I wonder what the editors at the BBC thought of that sentence…. Andy -
From what I’ve been able to dig up, the 3rd Anti Tank didn’t receive their Archers until much later in the War. Photos of them after D-day show them using American M-10s or Universal (Bren) Carriers towing 6 pounders. As for when they may have crossed paths, the most plausible would be Operation Totalize, Aug 7 - 10 1944. In that operation 2nd Can Infantry Div And British 51st H Infantry Div broke out over Verrieres ridge along the Caen-Falaise highway. And from the looks of it, Tamiya really botched the instructions as 2nd Anti Tank RCA was attached to 2nd Can Infantry Div, not 3rd. So far all that means that the Division identifier on the Archer should be a gold maple leaf on a blue background as opposed to a gold maple leaf on a grey background. Andy
-
Regarding the 2nd or 3rd Anti-tank, it’s possible that an earlier issue of the kit contained markings for the latter, they just neglected to update that part of the instructions. And just to note regarding your figures, the Canadian uniforms, while they followed the same pattern as the British ones, the material was more of a greenish colour. If you do a couple of google searches for Canadian or British battledress there are lots of colour photo examples. Anyway, can’t wait to see this build! Andy
-
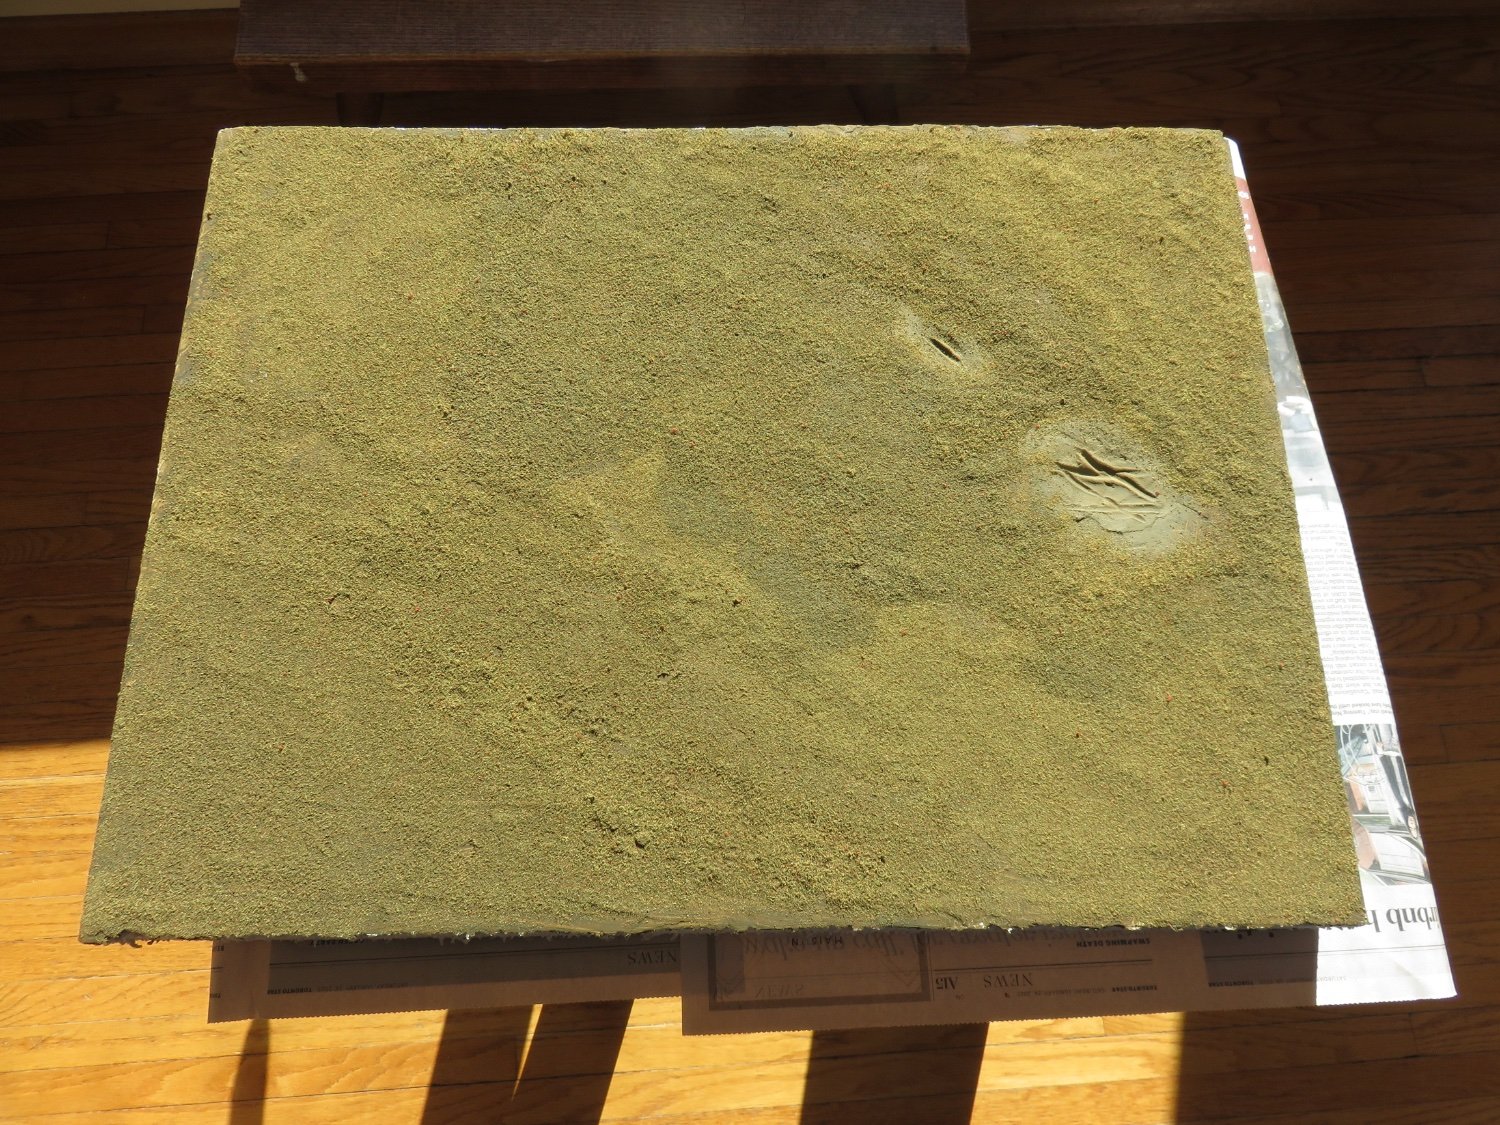
Thanks Alan, it’s a useful technique any time you need to leave an impression in plaster without messing up that which you are using to impress. Footprints, tire tracks, or even the keel imprint from a boat on a muddy riverbank. I had hoped to be able to do further work on my diorama this weekend, I had ordered the scenery supplies for the first layers, however it appears that someone in the postal service put my parcel on the wrong truck: Feb. 2 11:09 am Item re-routed due to processing error; Possible delay 😡😡 So I shall now have to find something else to do this weekend…. I was so hoping to turn that white plaster field into various shades of fuzzy green ground foam… Andy
-
I’ll let you know when I get notified of your response… 🤪 Edit: 12 minutes.
-
It was still lagging earlier today, for me. I have noticed that for quoted posts, “likes” or “@“ tagged responses the notifications have been instantaneous. Andy
-
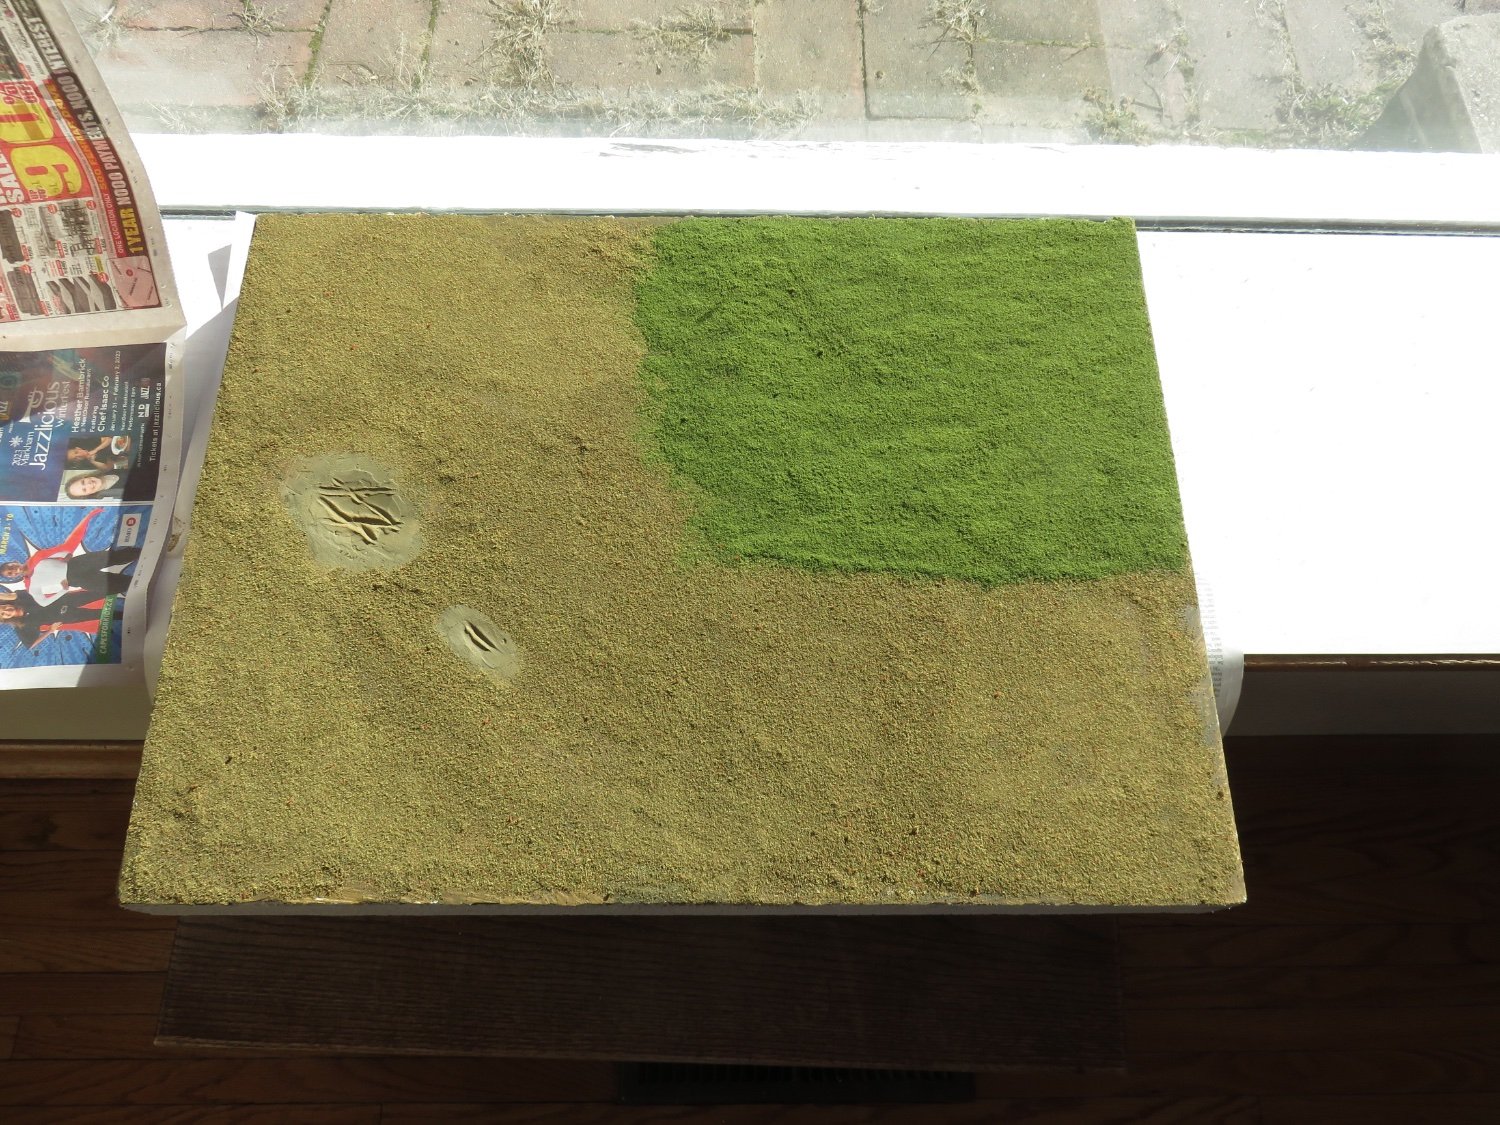
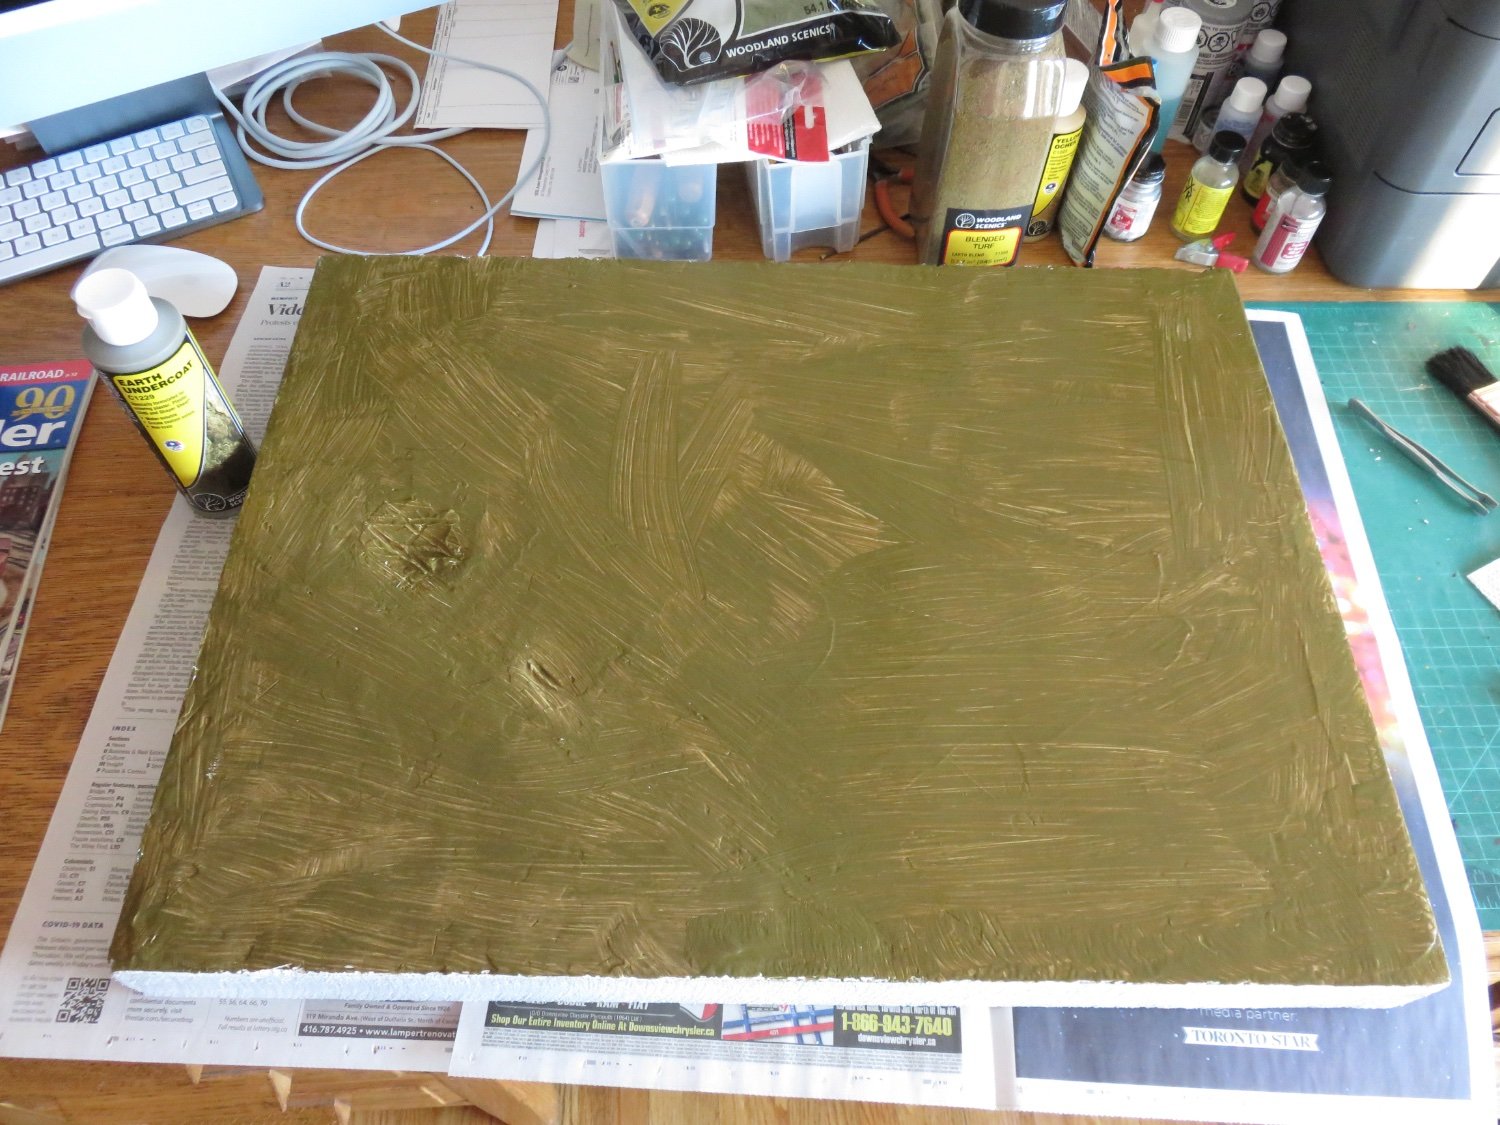
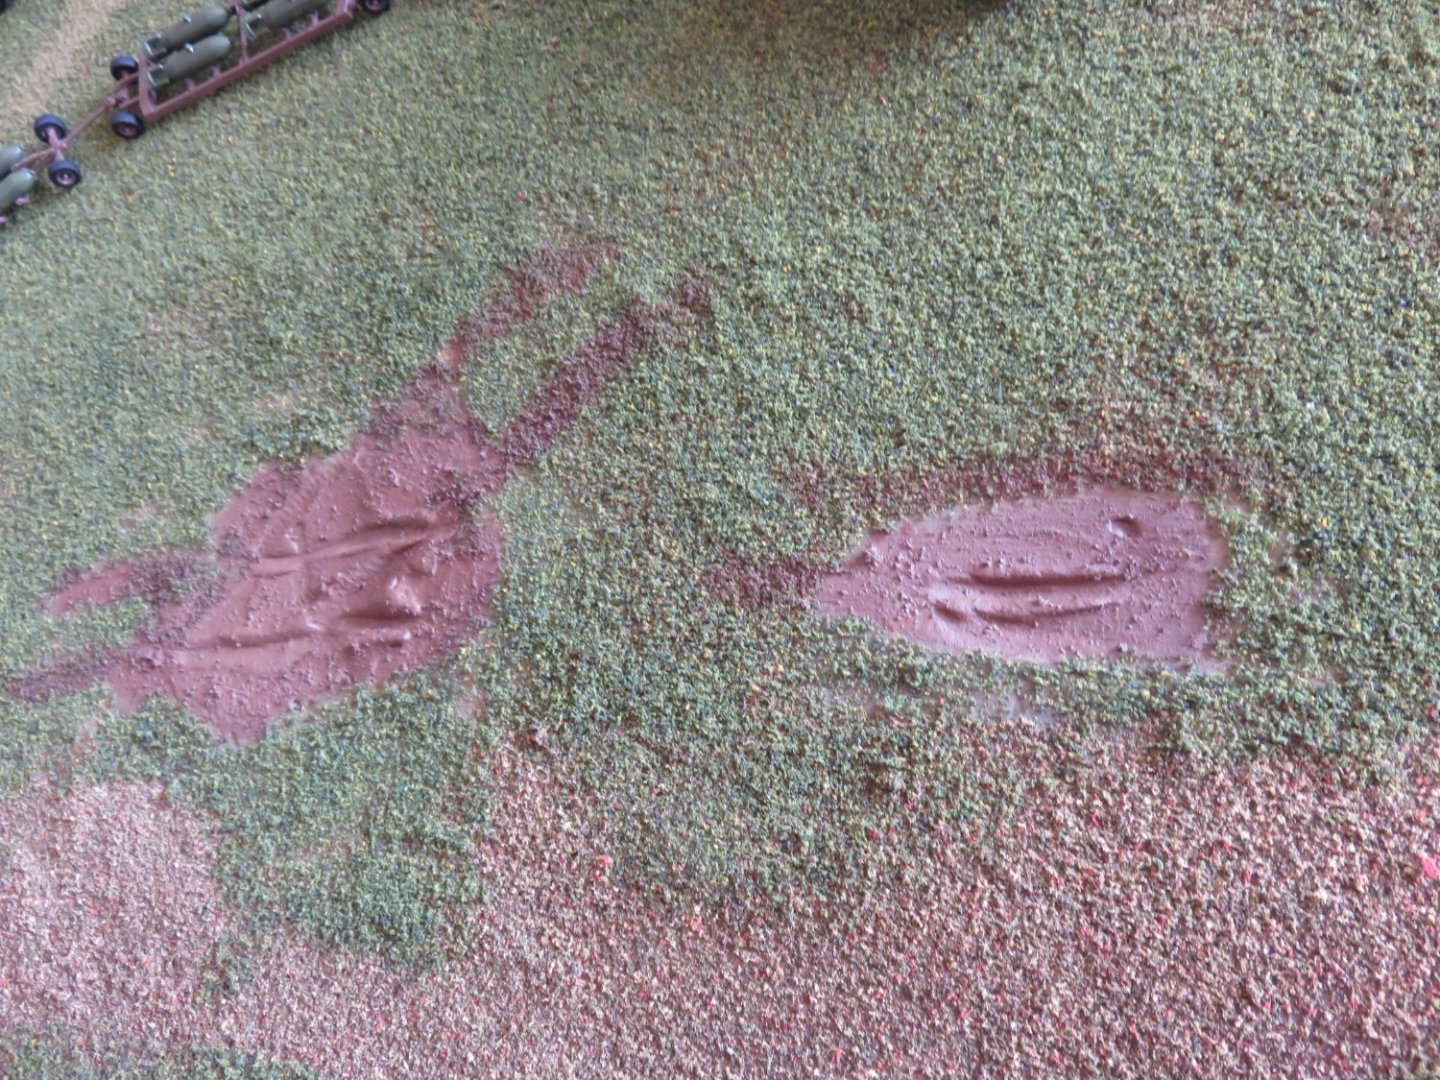
Thanks for the likes and kind comments! As predicted, adding the spackling compound took a good portion of the weekend. First step was to add another layer to the raised "runway" area: I did get a little bit of cracking, I suspect this was partly due to the underlying layer absorbing some of the moisture from the top layer, causing it to cure too quickly. Not a big deal as I just went over with a small amount to fill in any blemishes afterwards. I then put on a skim coat over the entire board. This was a very thin layer that will provide a nice base to which paint and scenery can adhere. Unfortunately, the only photo I have of this step turned out blurry and dark. Too much of a rush with the camera (the dog wanted to go walkies... right now!). Anyway, once that was dry I needed to take care of the "muddy" areas. I first applied a dollop of spackling compound into the recessed areas and smoothed it out with my putty knife. I wanted to create some wheel ruts and signs of travel. To do this I first covered the area with a layer of cling film (Saran Wrap). I then took a couple of "spare tires" from the Airfix kit that I hadn't yet glued to their respective vehicles (planning ahead here!), and stuck them on the end of a bamboo skewer with a bit of blue tack. Using the matching vehicle to gauge track width, I rolled the wheel through the wet blob of spackling compound. The cling film kept the compound from adhering to the wheels. By applying a bit of pressure as I rolled the wheels along, I could accurately reproduce the effects of a wheel, or a few wheels passing through mud: After leaving my impressions, I carefully lifted off the Saran Wrap to allow the spackling to dry. Resulting in a couple of rather stark looking mud holes! As things stand now, I have a nice white base ready for an undercoat of paint: I was able to get things fairly smooth with the putting knife as I applied the spackling, there were only a couple of spots where I needed to go over with a little bit of sand paper. I'm not fussed about having it completely flat. Even the most "level" ground has subtle undulations and bumps. Most of the ones noticeable on my board will disappear under the scenery anyway. Time to get an order in for some scenery supplies! Andy


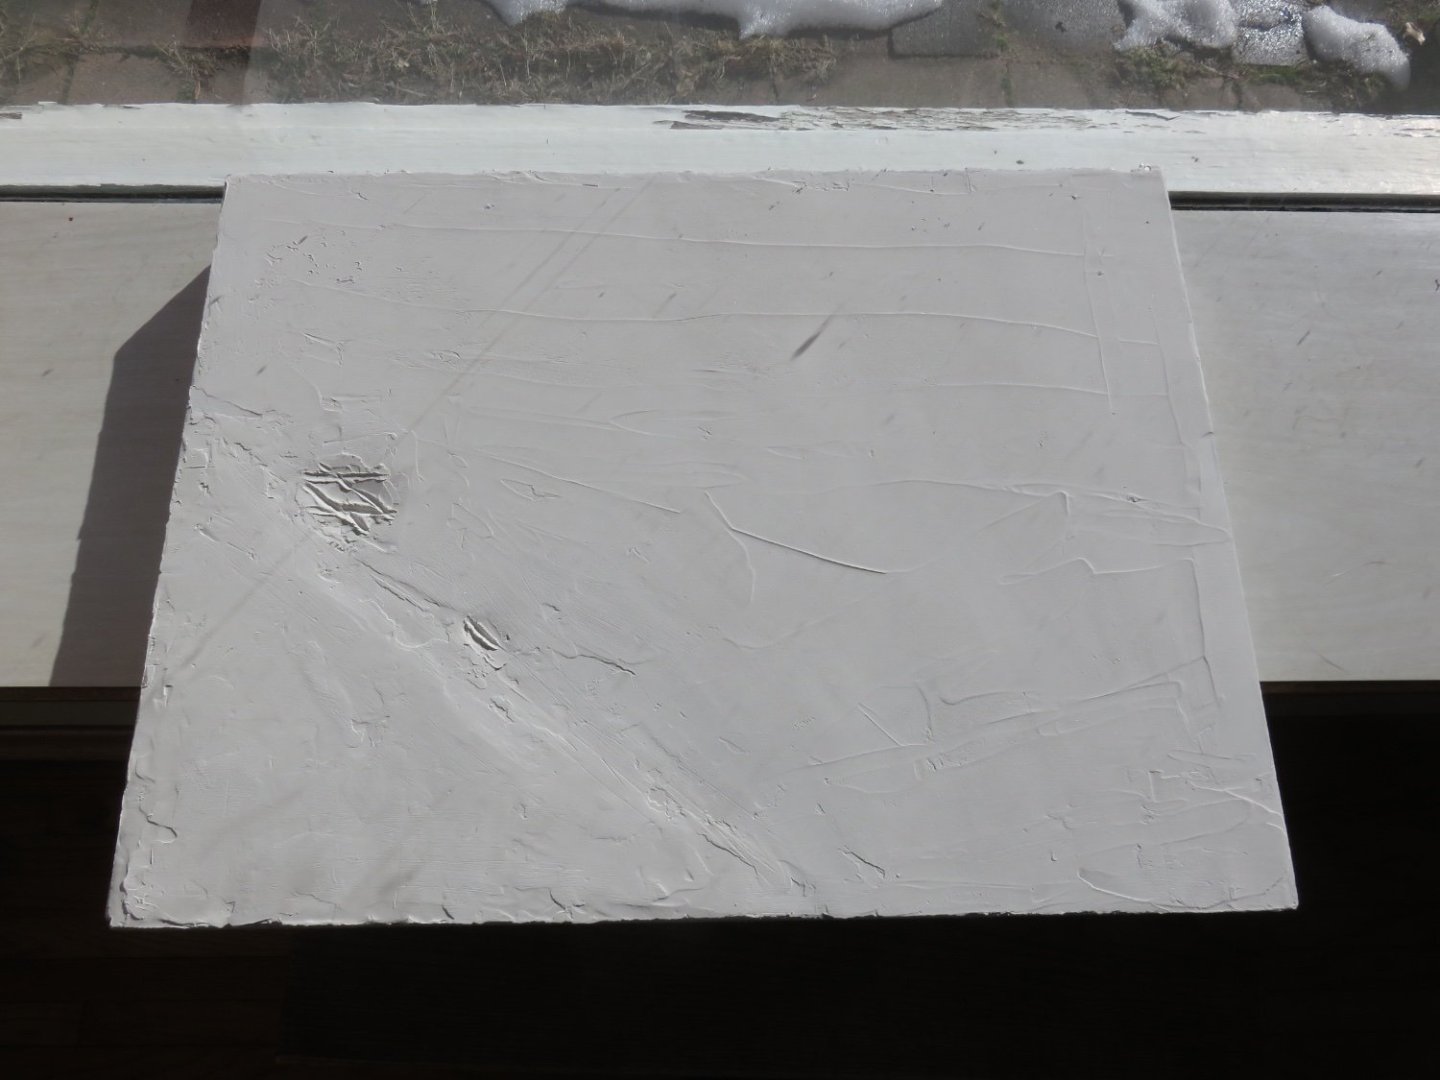

- 58 replies
-
- 13
-
-
Hmm… there was no lag for this post, but I haven’t received any notification for your earlier replies.
-
Hi Chris, are you also getting delayed notifications too? @James H I’ve gone through and thinned down the number of topics I follow, but I don’t think that helped. Andy
-
Still seems to be lagging: 20 minutes so far and no notification. Andy


-
As of this morning I’m showing a one hour lag between your last post and notification. I’ll keep an eye out for more recent activity and let you know if there’s still a time lag. Andy


-
Sure. It’s been 11 minutes and no notification. Andy
-
@James H i am starting this post 7 minutes after you posted your reply. Still no notification (I manually opted to follow this topic when I first posted). Maybe it is the second issue you mentioned. (I’m only randomly guessing). Andy Edit: notification arrived at 13:01 EST, 13 minutes after your post, advising that you had replied “Just Now”