HOLIDAY DONATION DRIVE - SUPPORT MSW - DO YOUR PART TO KEEP THIS GREAT FORUM GOING! (Only 72 donations so far out of 49,000 members - Can we at least get 100? C'mon guys!)
×


realworkingsailor
-
Posts
3,267 -
Joined
-
Last visited
Content Type
Profiles
Forums
Gallery
Events
Everything posted by realworkingsailor
-
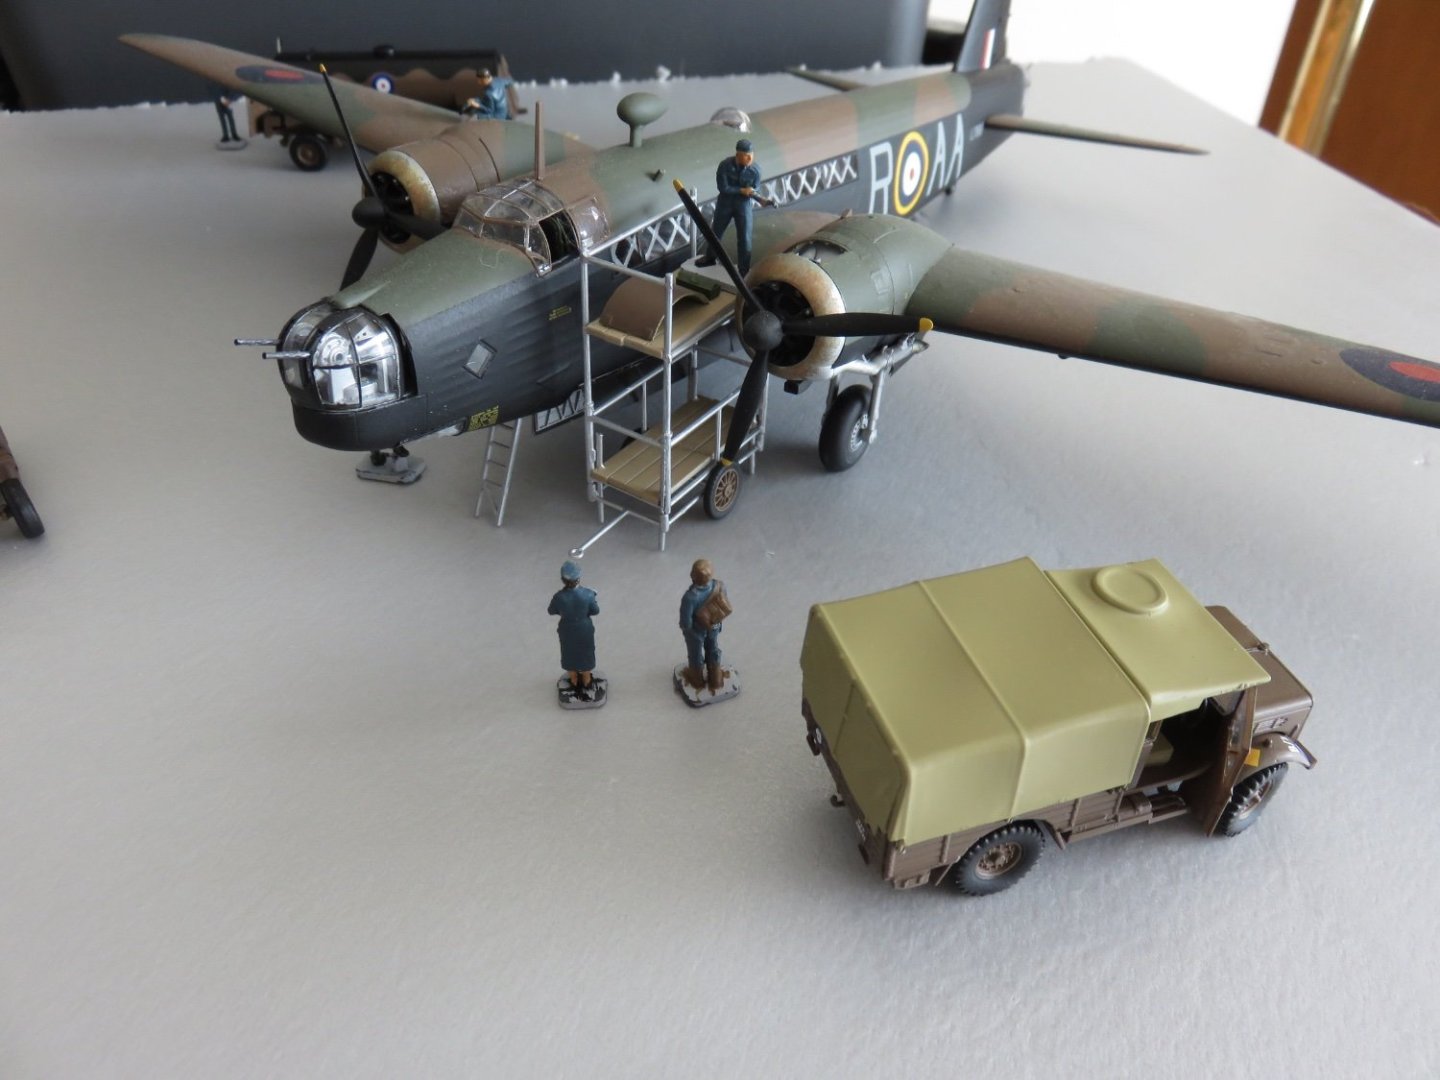
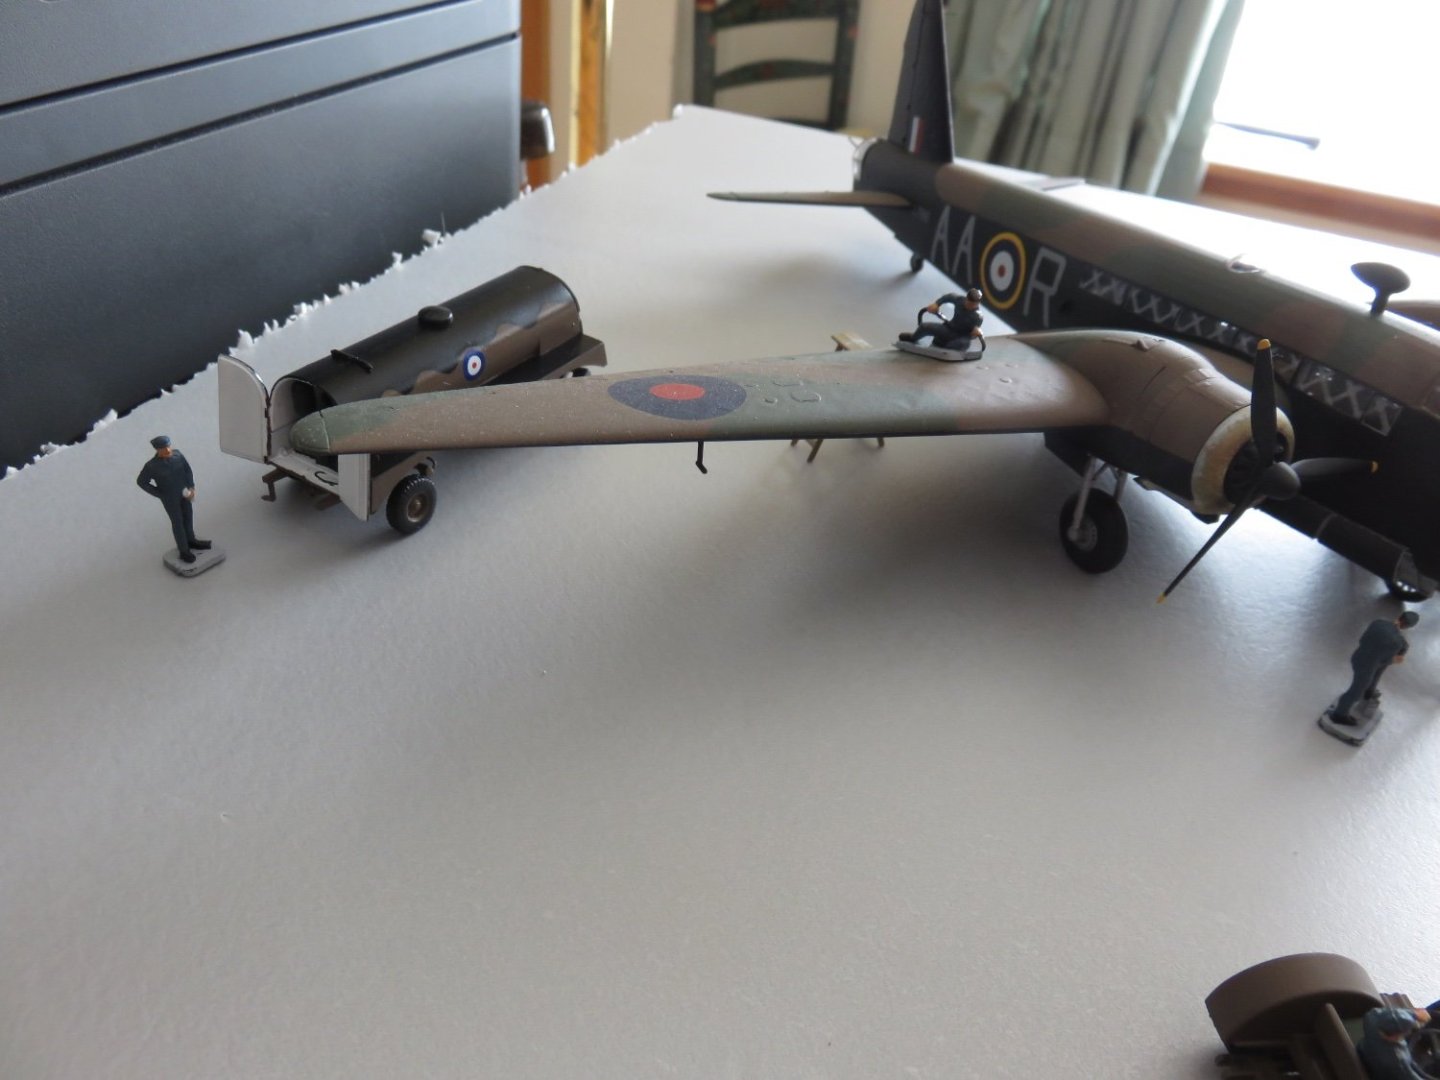
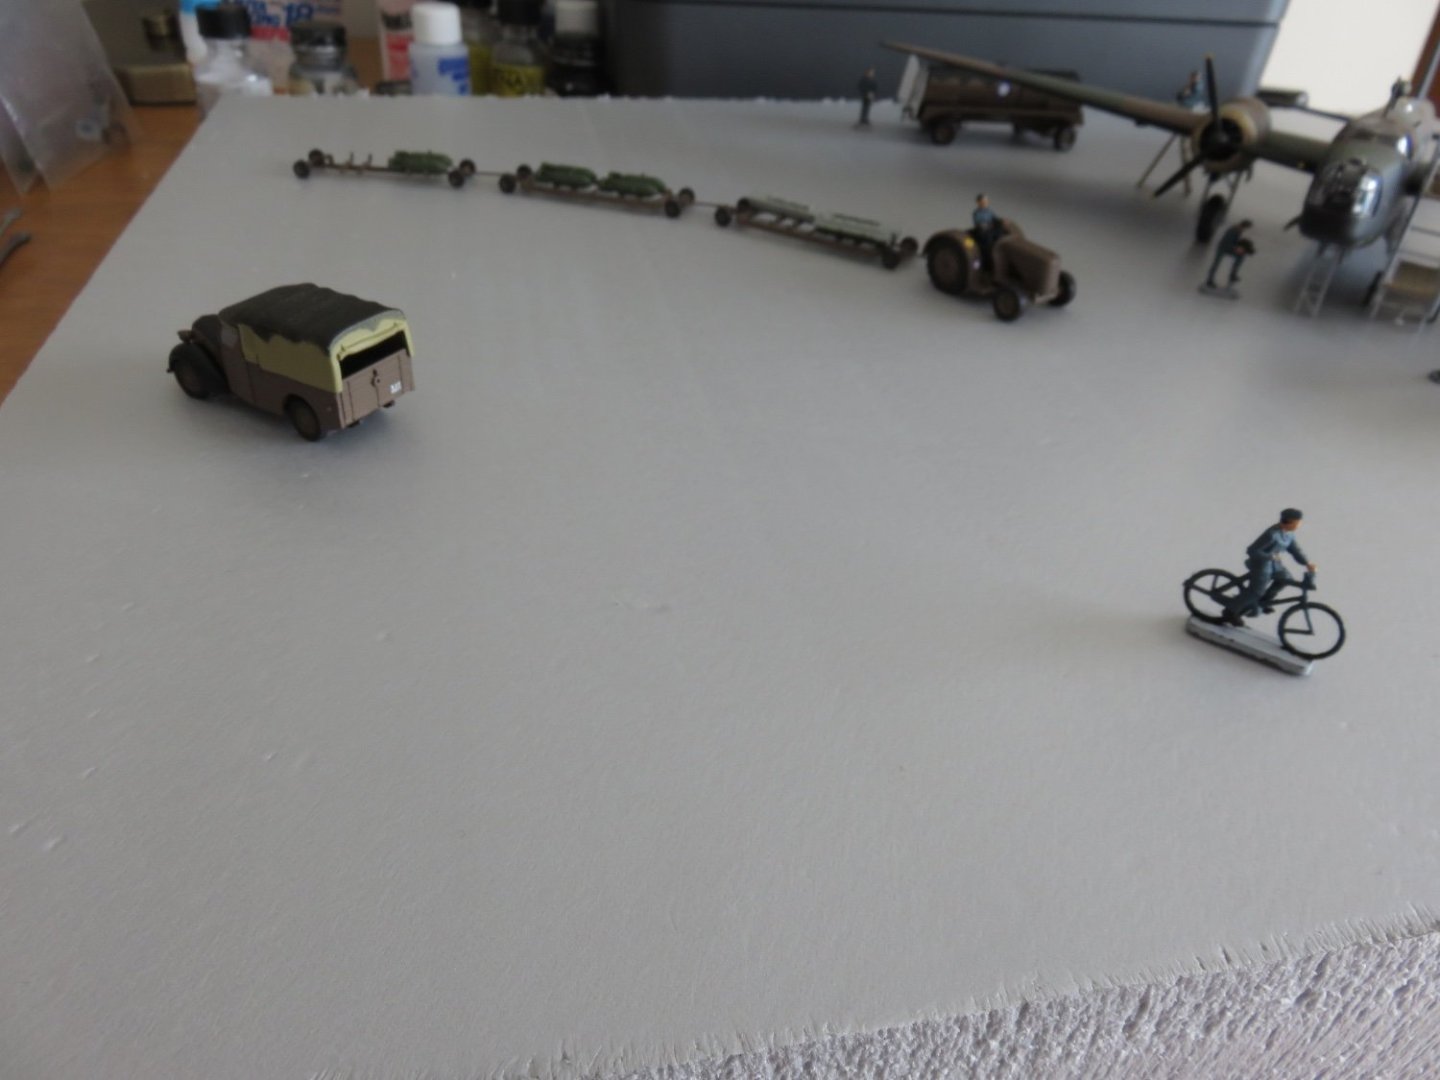
 One thing is for certain, when you have momentum, things can happen quickly! I stopped by my local hardware store this morning and picked up a piece of foam insulation board. It's not pink, or white, or green, but a neutral grey colour.... anyway, it's the good high density foam board perfect for my needs. It's a 2" thick board so it is more than rigid enough for my purposes. Of course, I couldn't wait to cut off a chunk of that 2' x 8' board and try out some ideas on how I want to see everything arranged. I started off with a piece 18" x 24", which worked out to be about the same size as my cutting mat. I am a big fan of empty space in a scene. I think a subject needs space to breathe in its surroundings, and the more things that are "happening" in a scene, the more space it should have. Rest assured the "empty" space won't be entirely empty, nor will the ground be a generic green carpet of "grass". I will endeavour to make the landscape look suitably trodden and driven over, maybe even a mud puddle or two (England is stereotypically known for being a damp country, accurate or not). To bring the viewers attention to the exposed engine, I figured this "maintenance" scene would be enough to draw people in. While on the other wing, refuelling is underway. Out in front a bomb train with the night's payload is getting into position while some other airfield traffic is passing by on the verge of the grass runway/taxiway. Realistically, if you follow the film I previously posted, the incendiary bombs would travel, and be loaded separately from the conventional bombs, but I've only enough parts for one bomb train. The figures will loose their bases when it comes time to place them about the finished scene, so they will shrink by about a scale foot. Time to make a shopping list for the scenery items! Andy
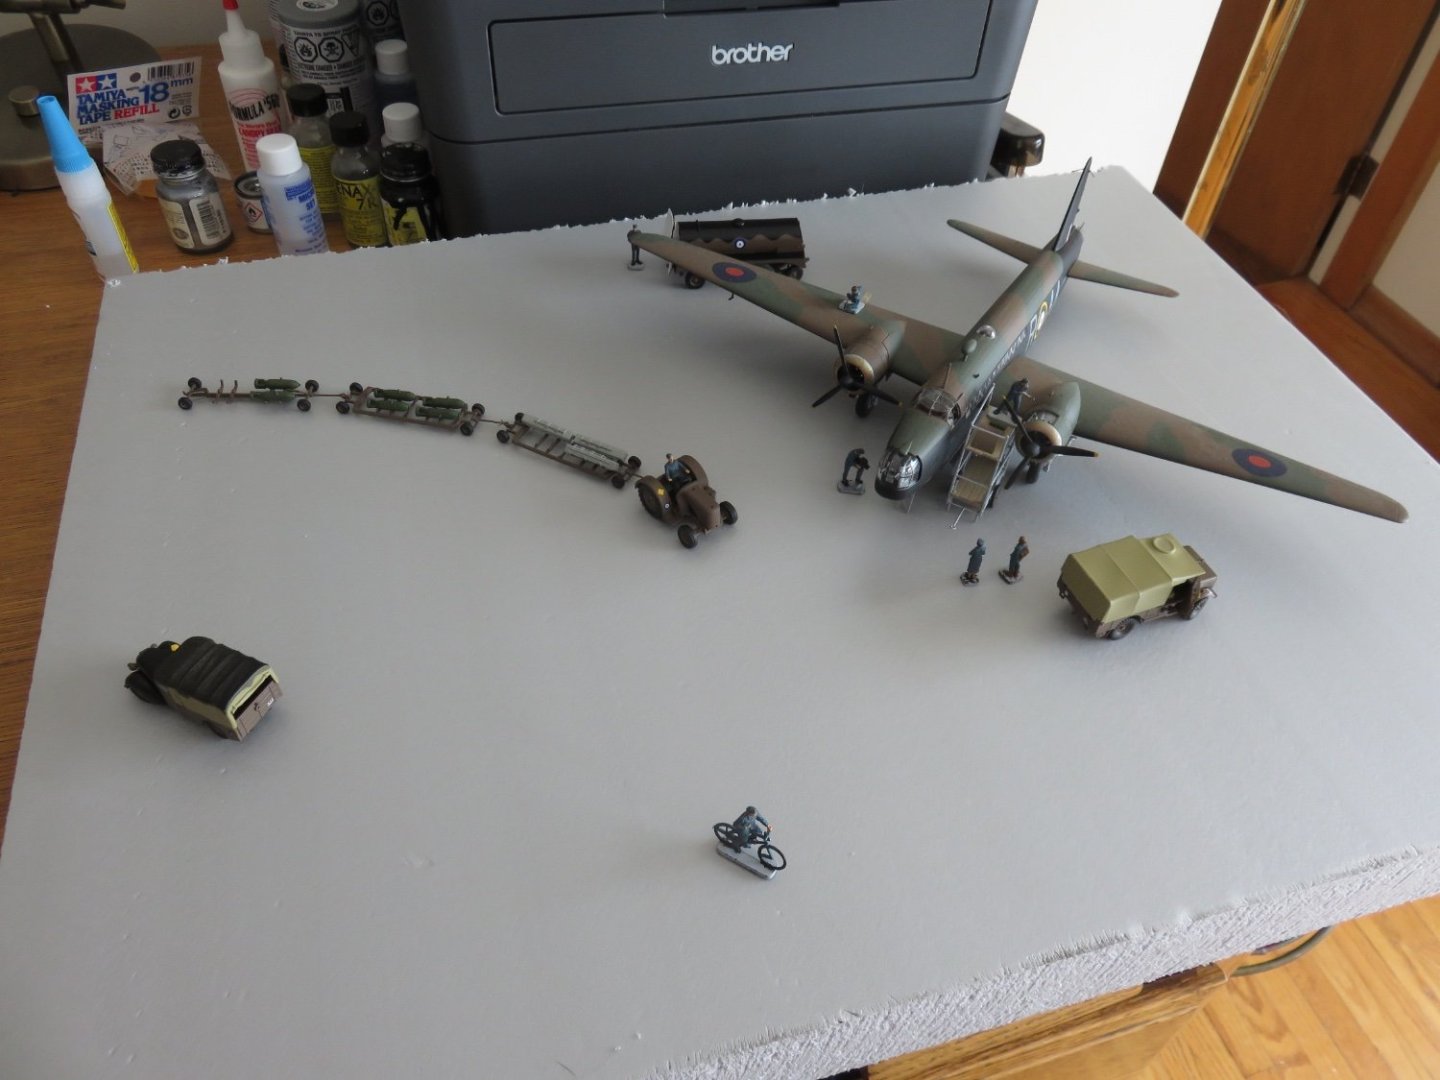
- 58 replies
-
- 15
-

-
Oh yes, not to worry! 😁 Any of the pellet-y stuff (white or whatever colour) is only good for coffee cups. I’ve been around the pink board in a model railway situation and it seemed to work well enough (but yeah, it didn’t take impacts very well). A layer of hydrocal plaster on top can hide a lot of incidental divots. Andy
-
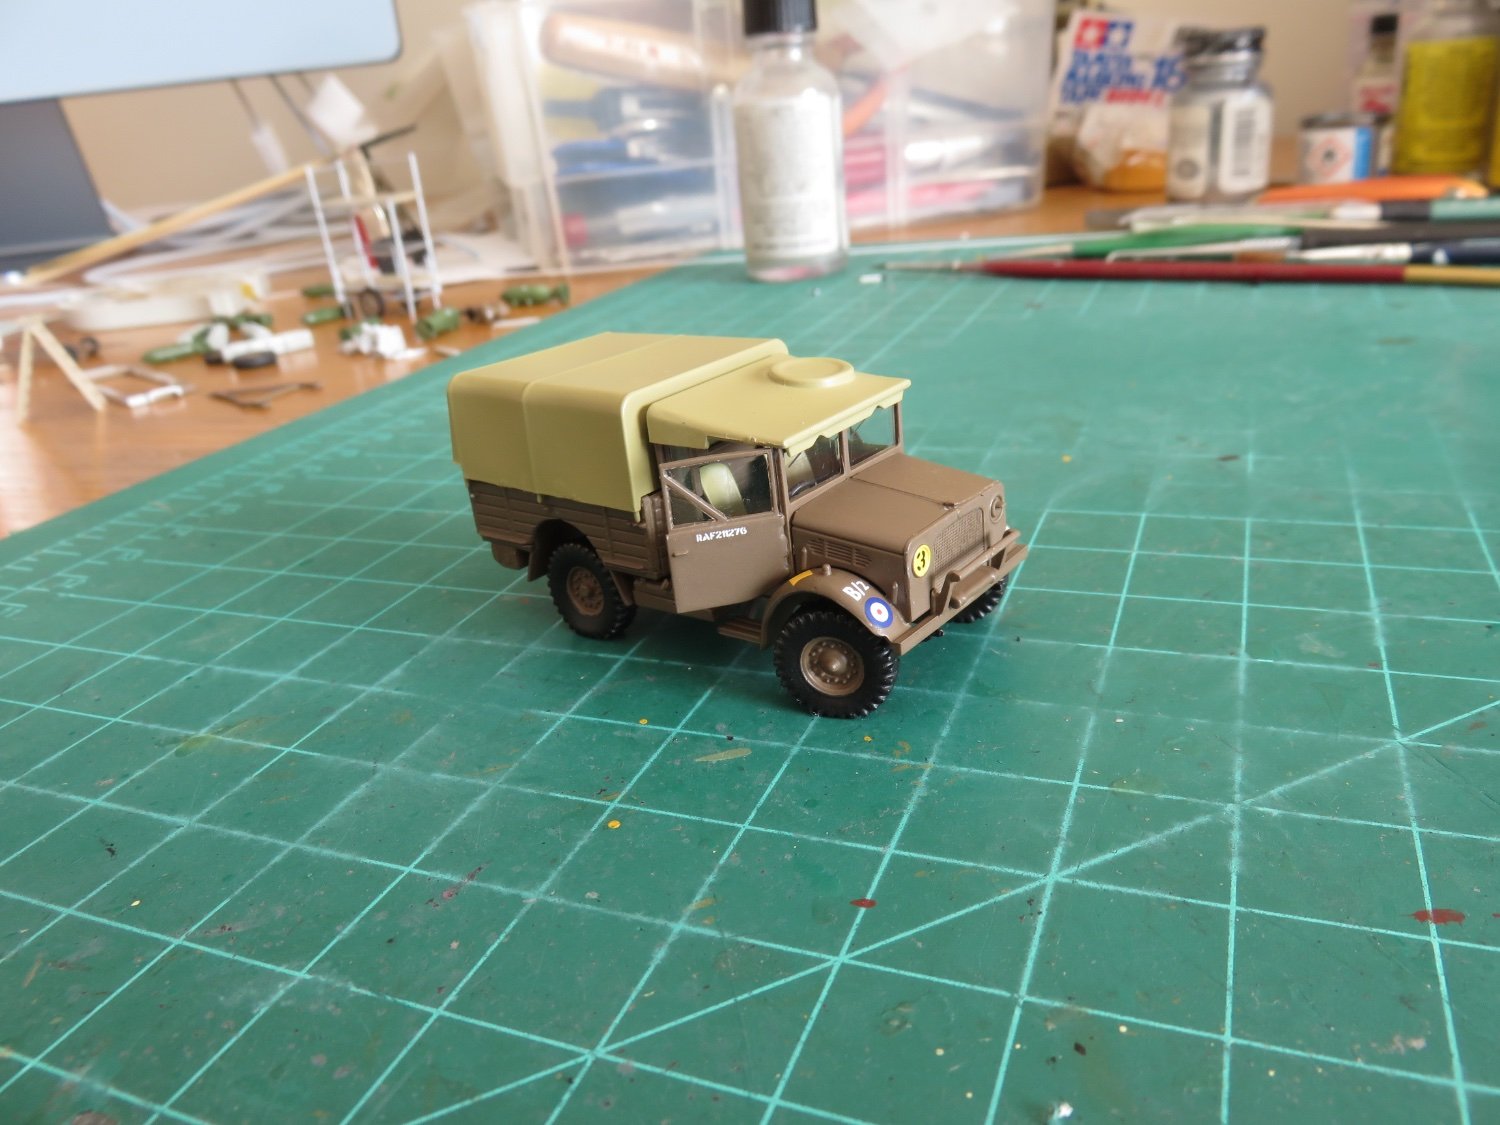
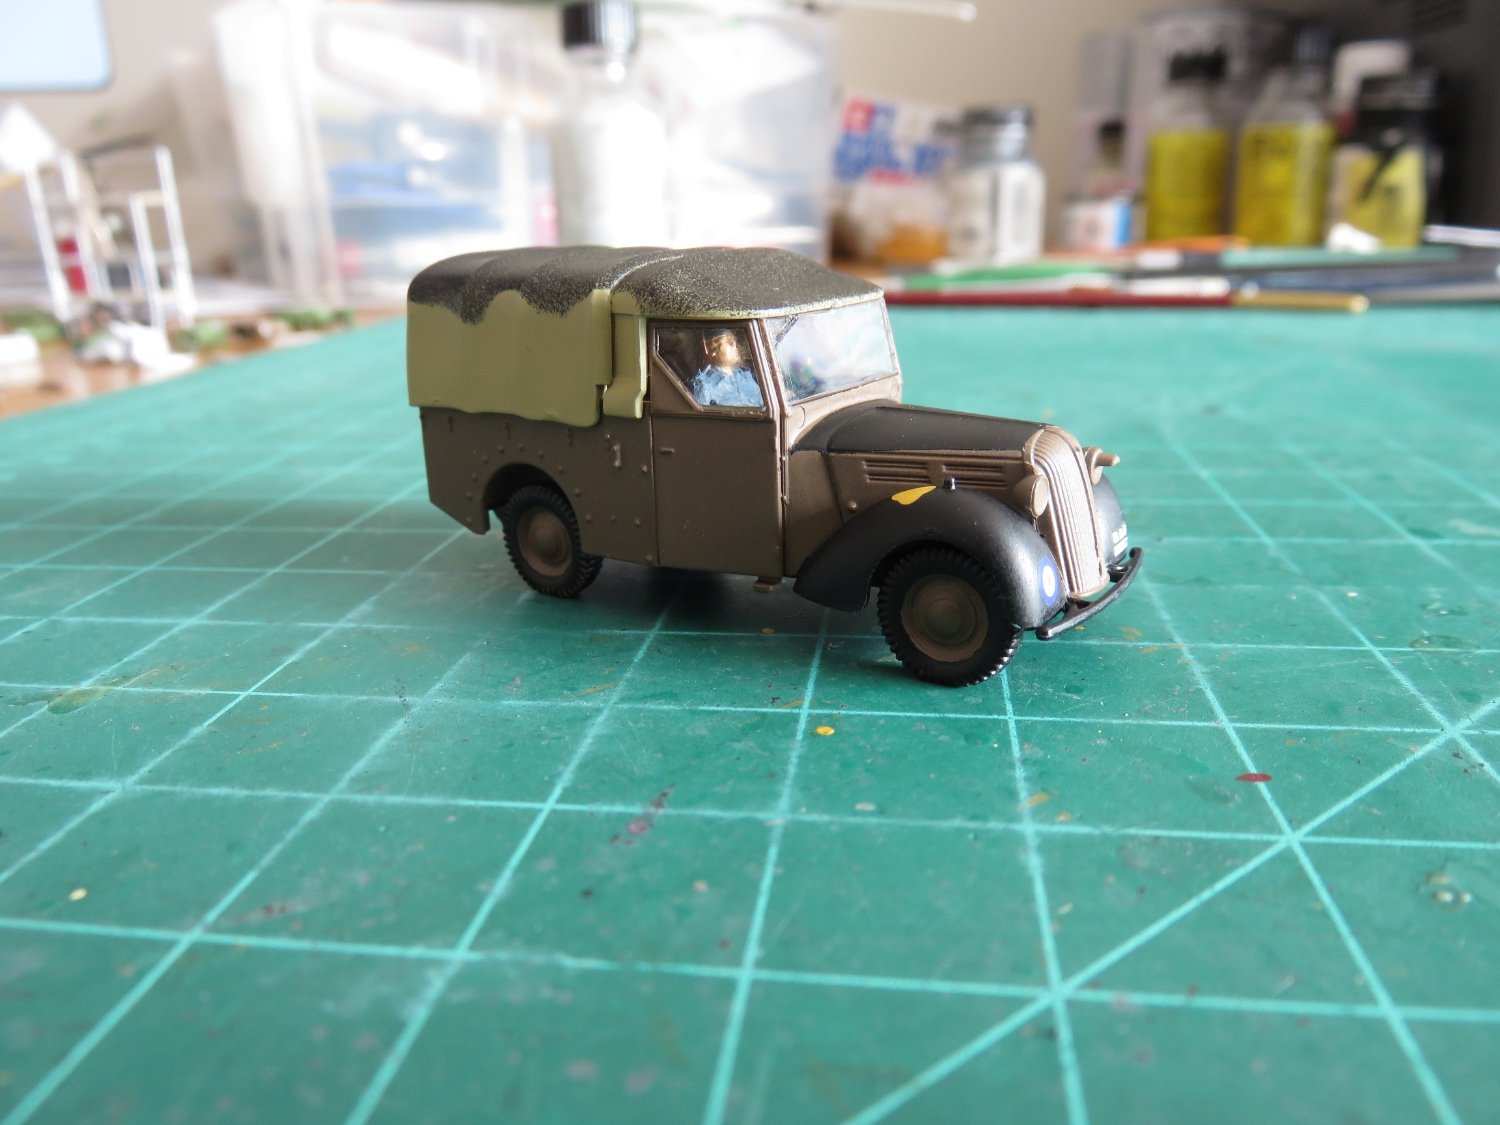
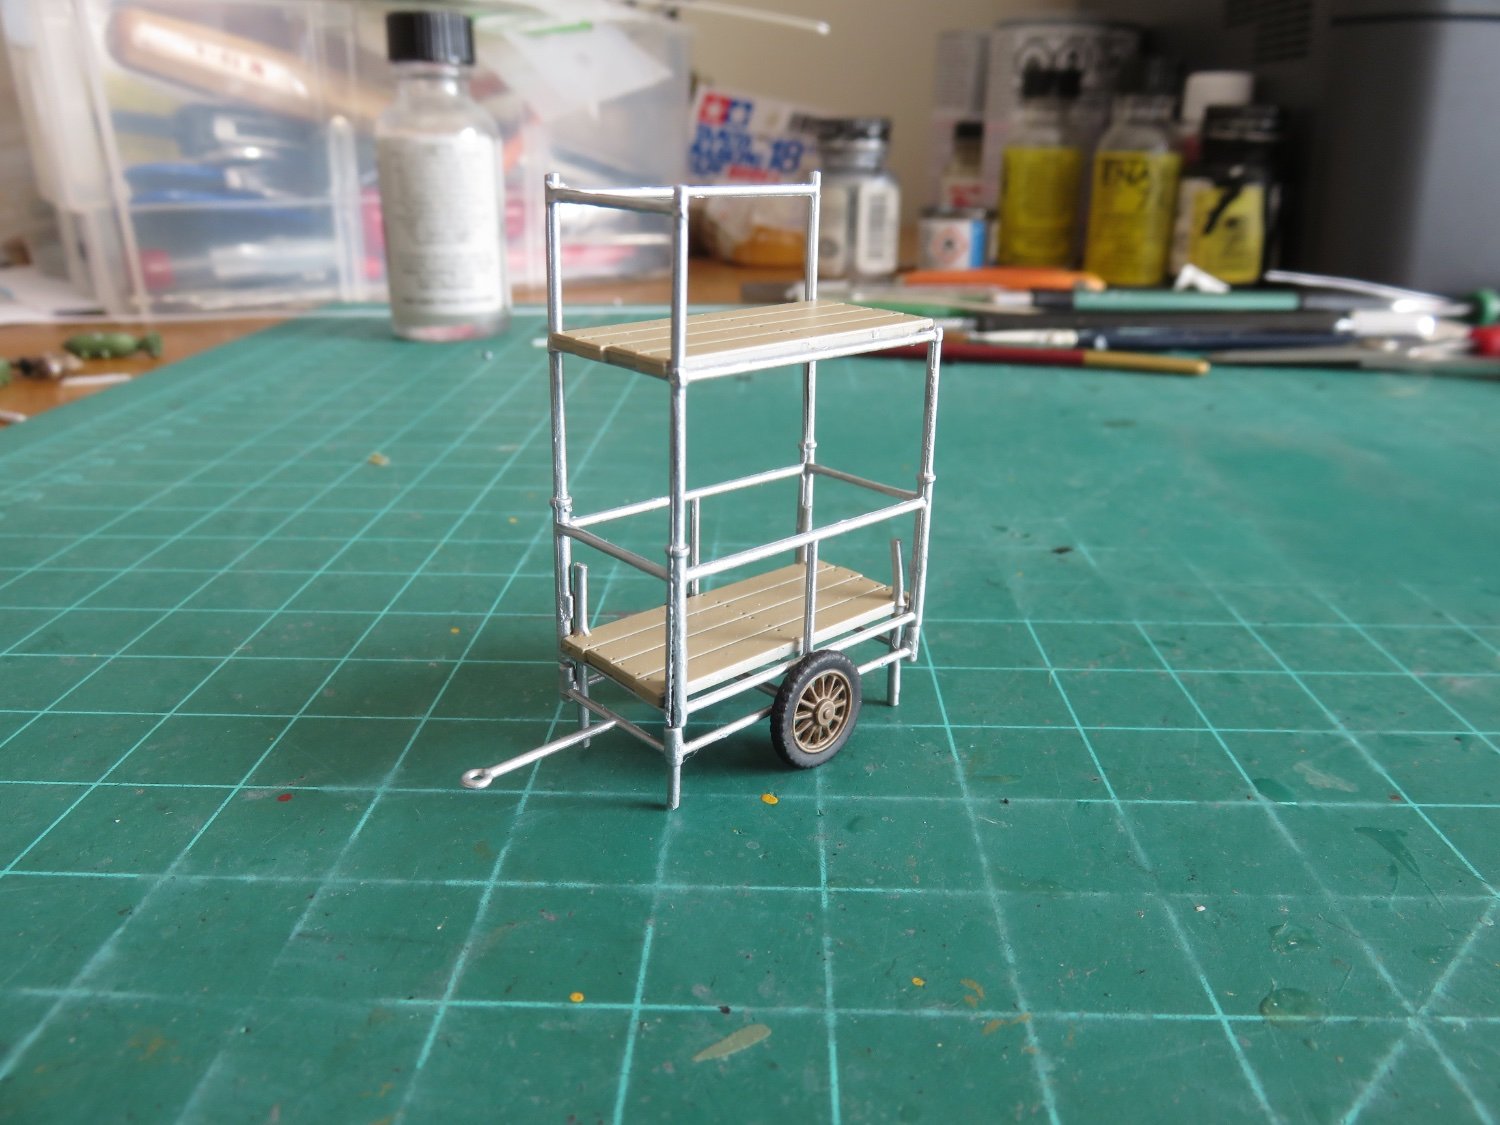
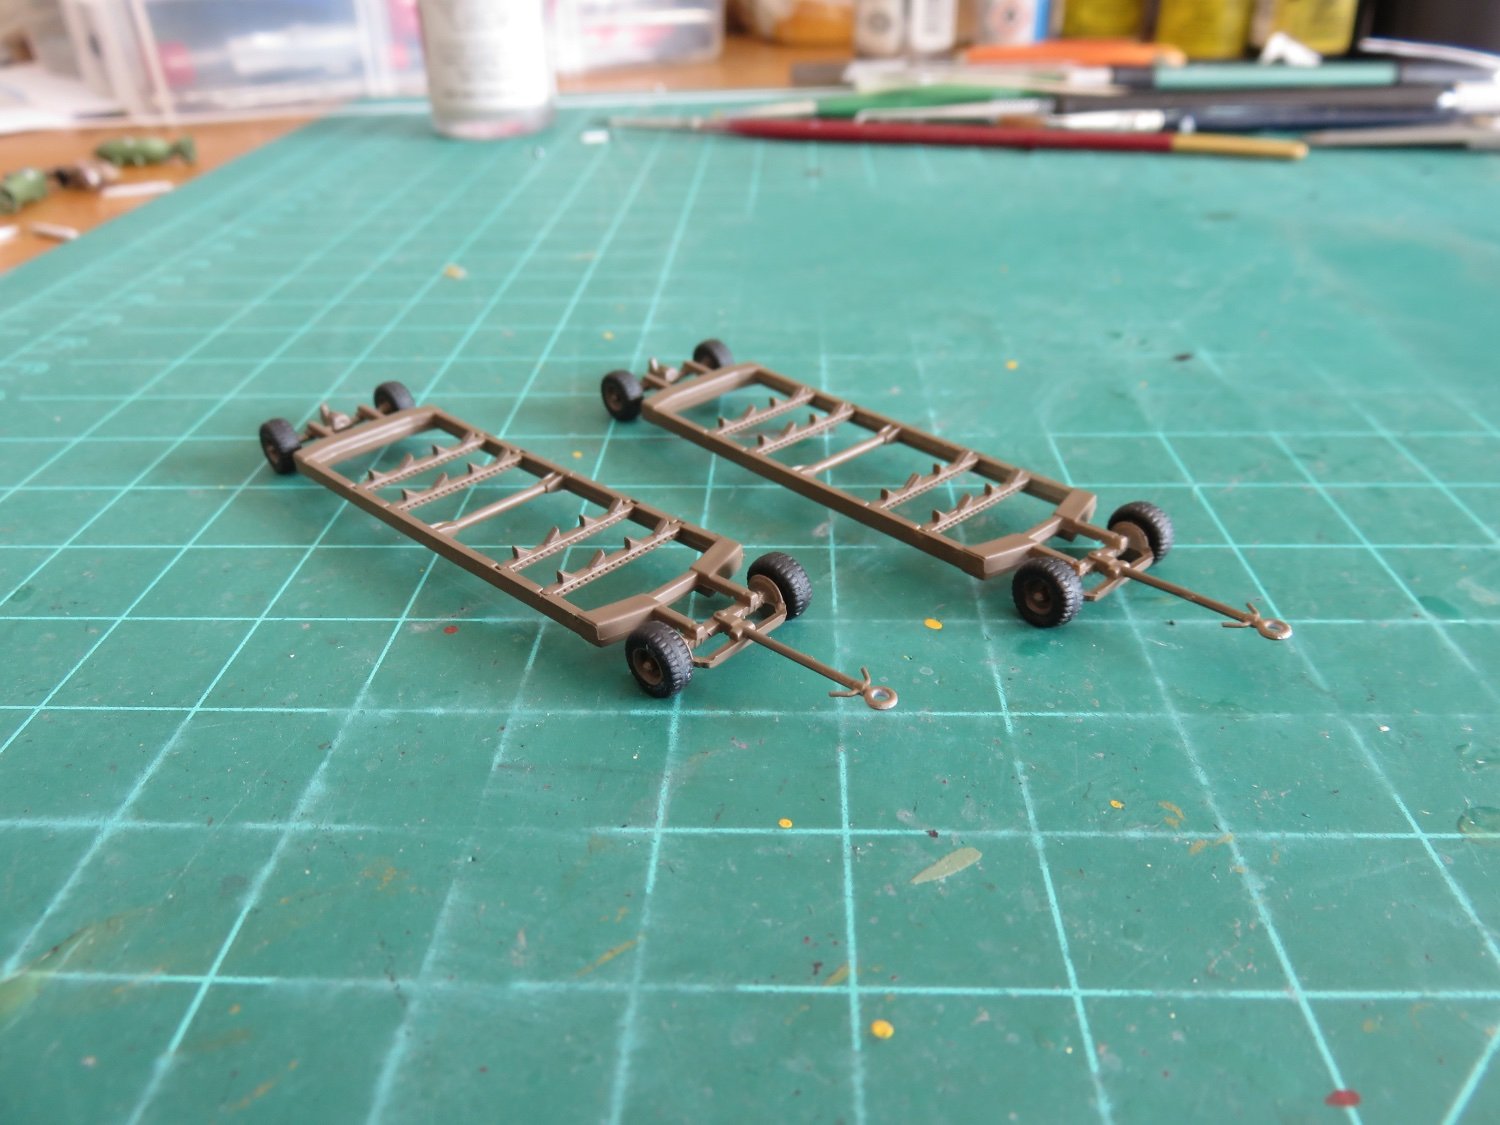
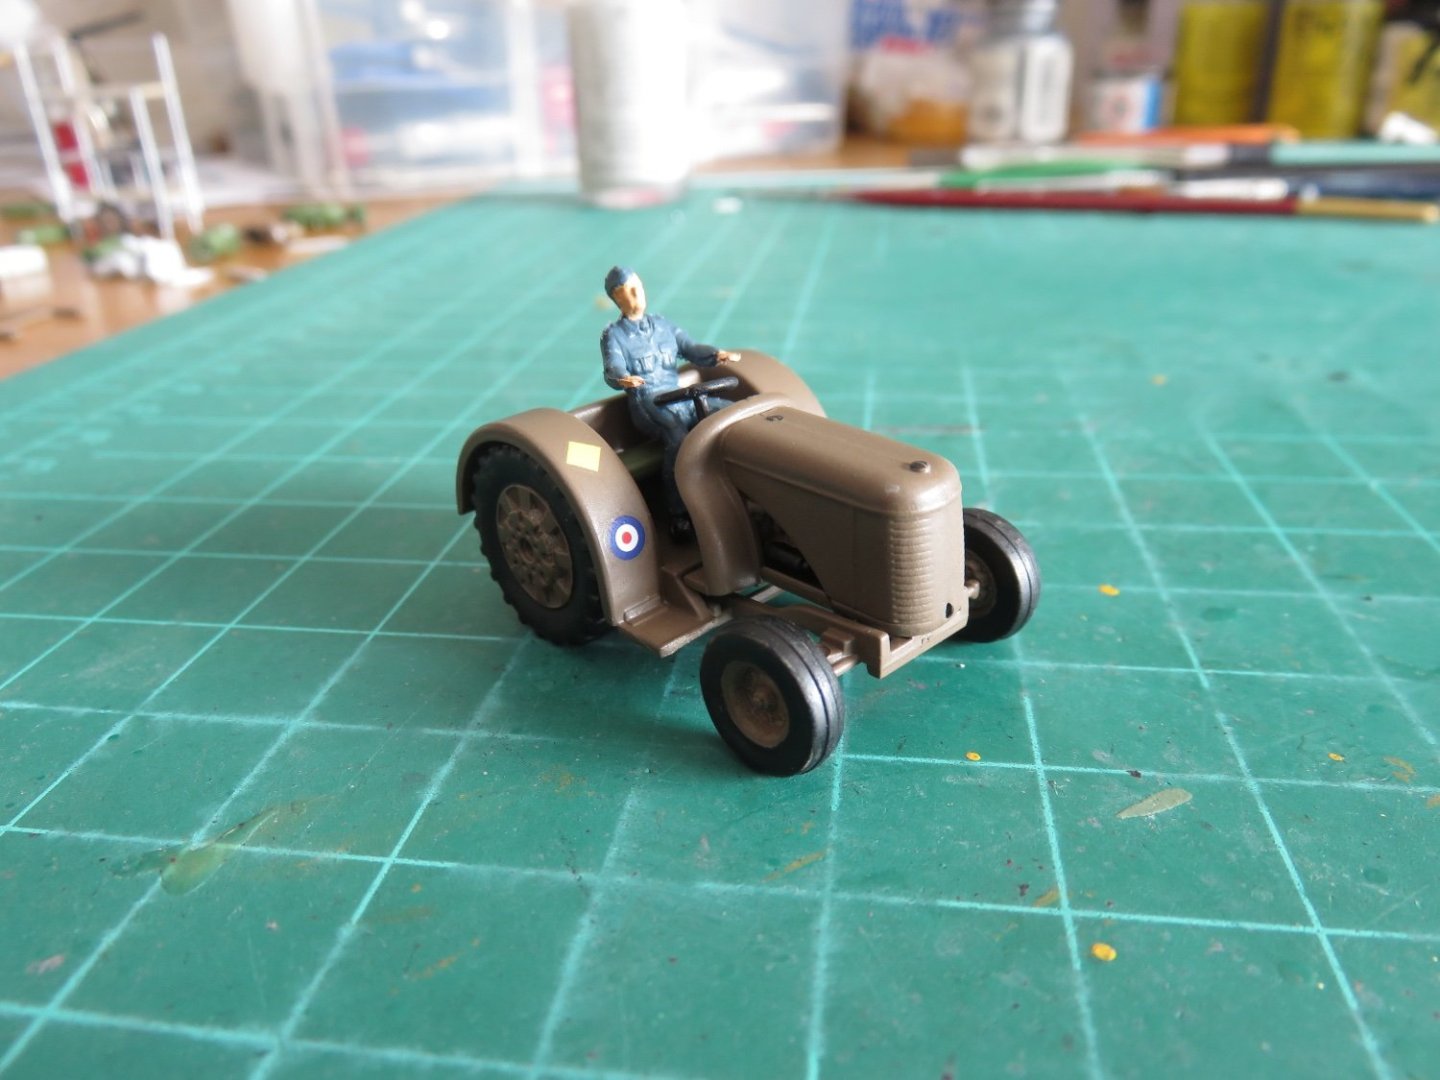
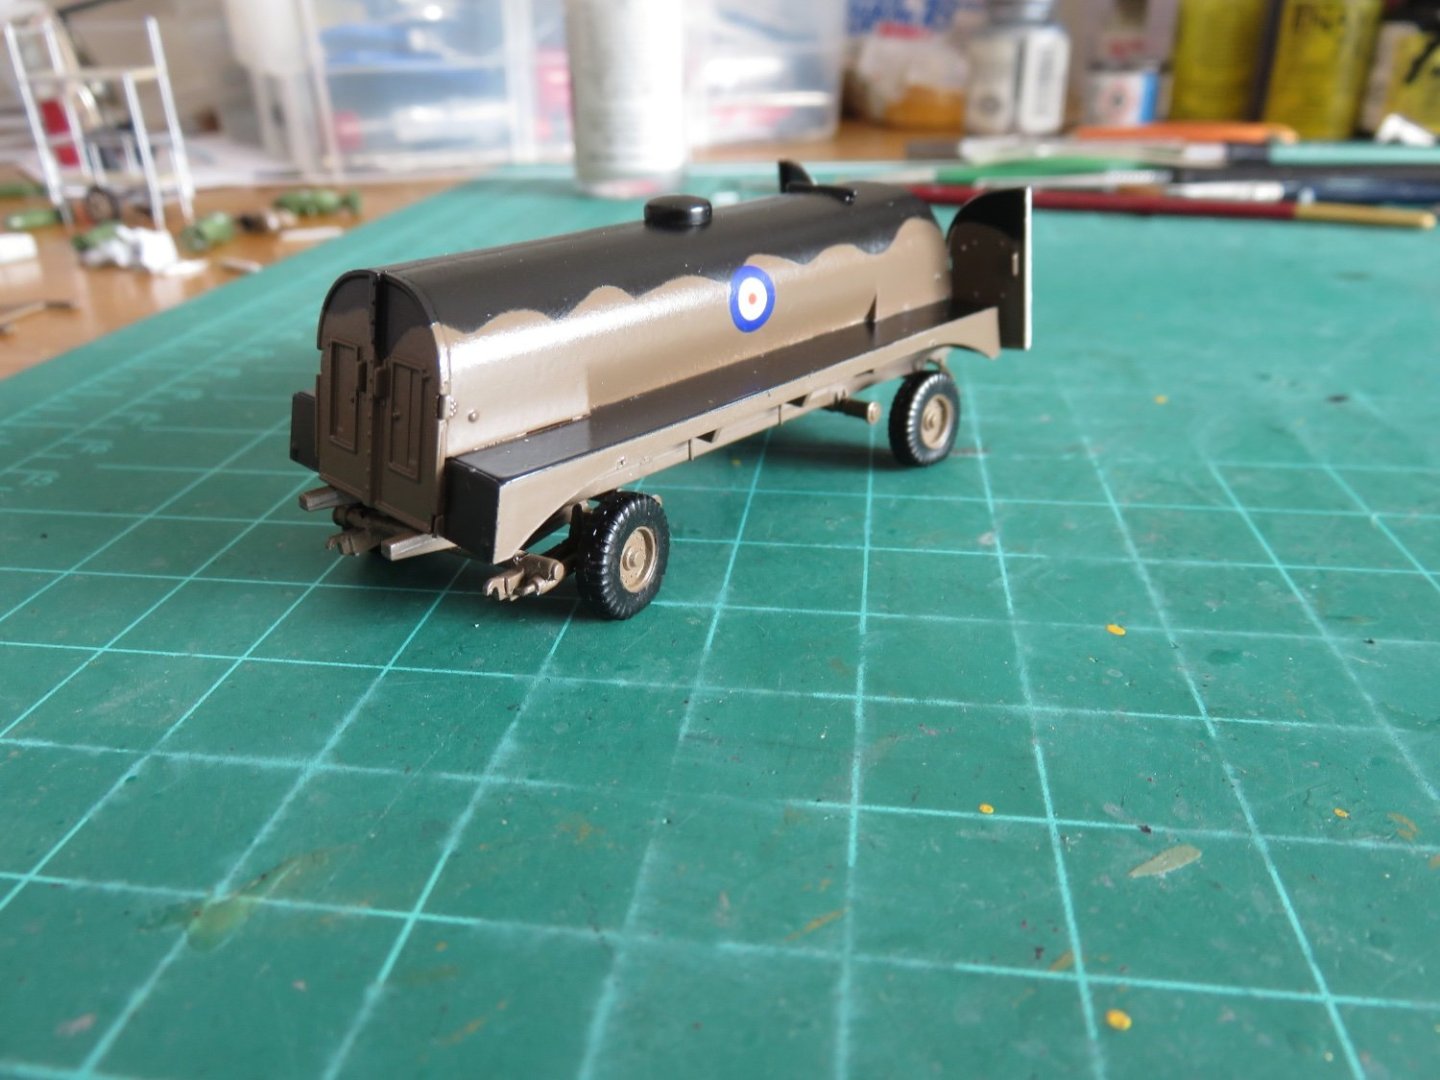
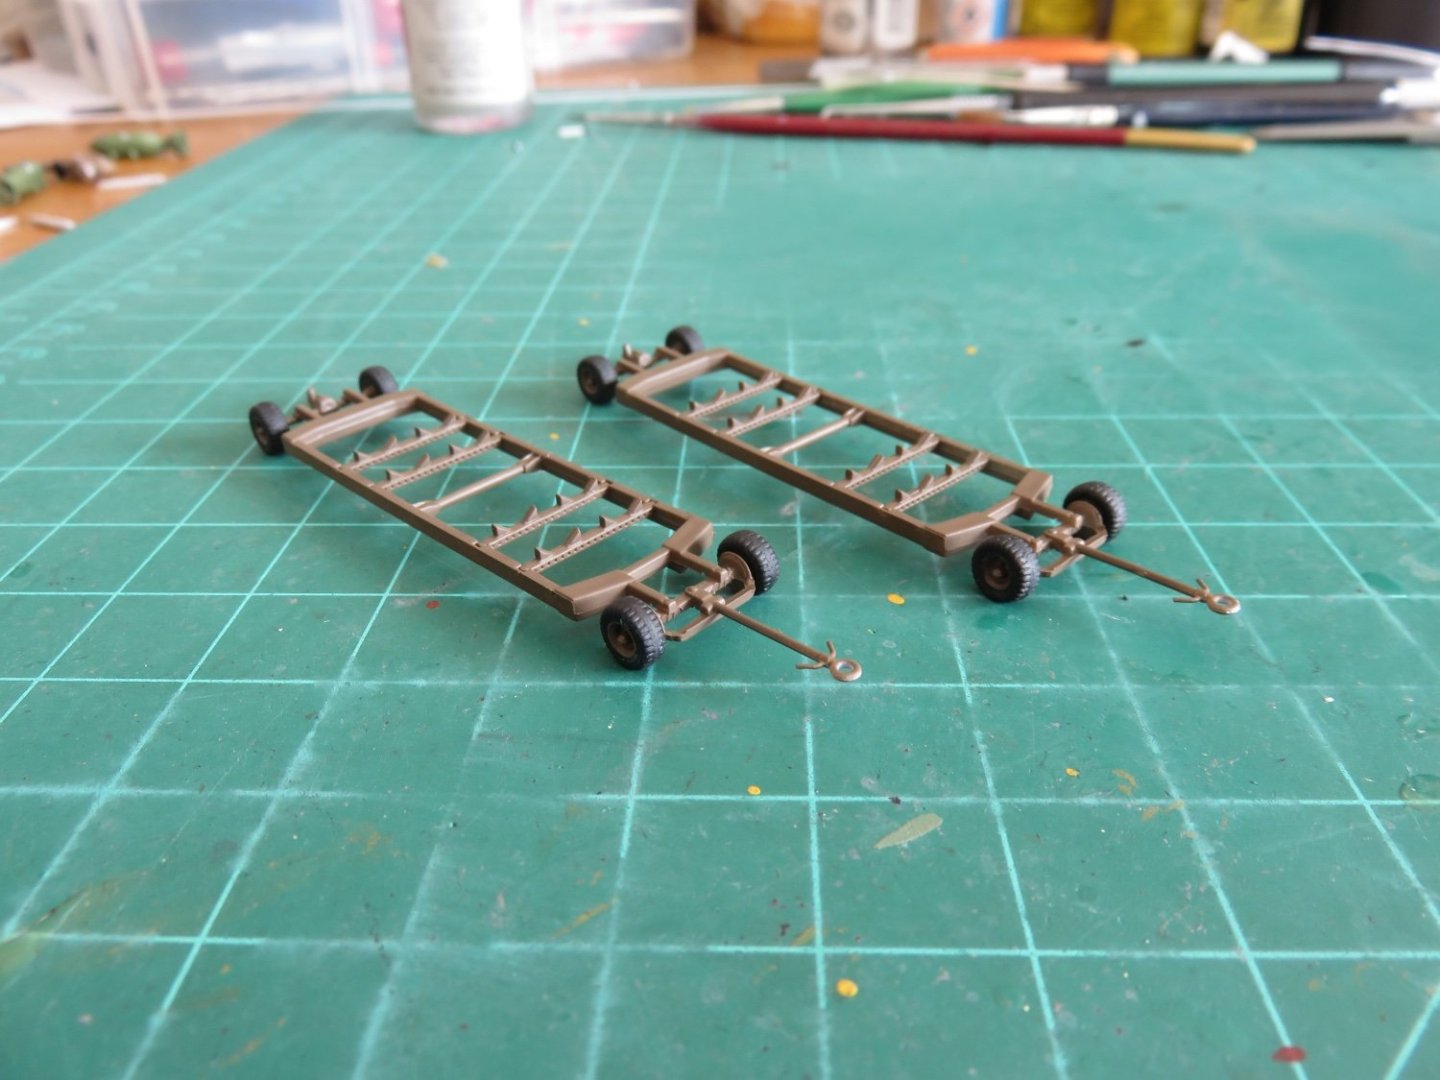
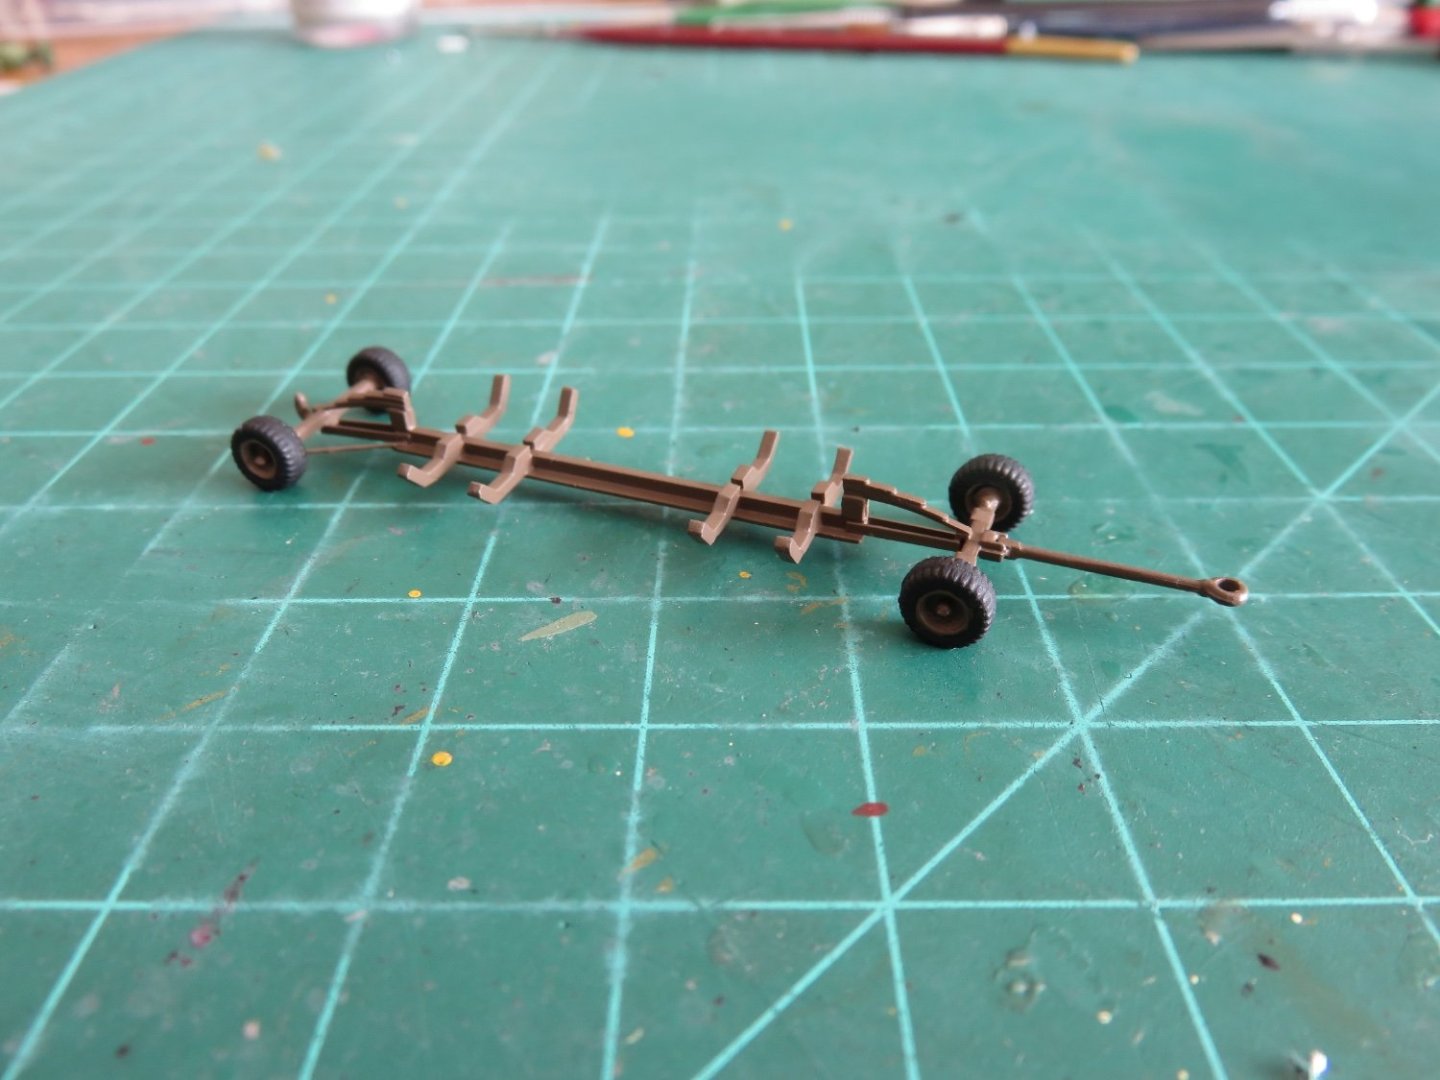
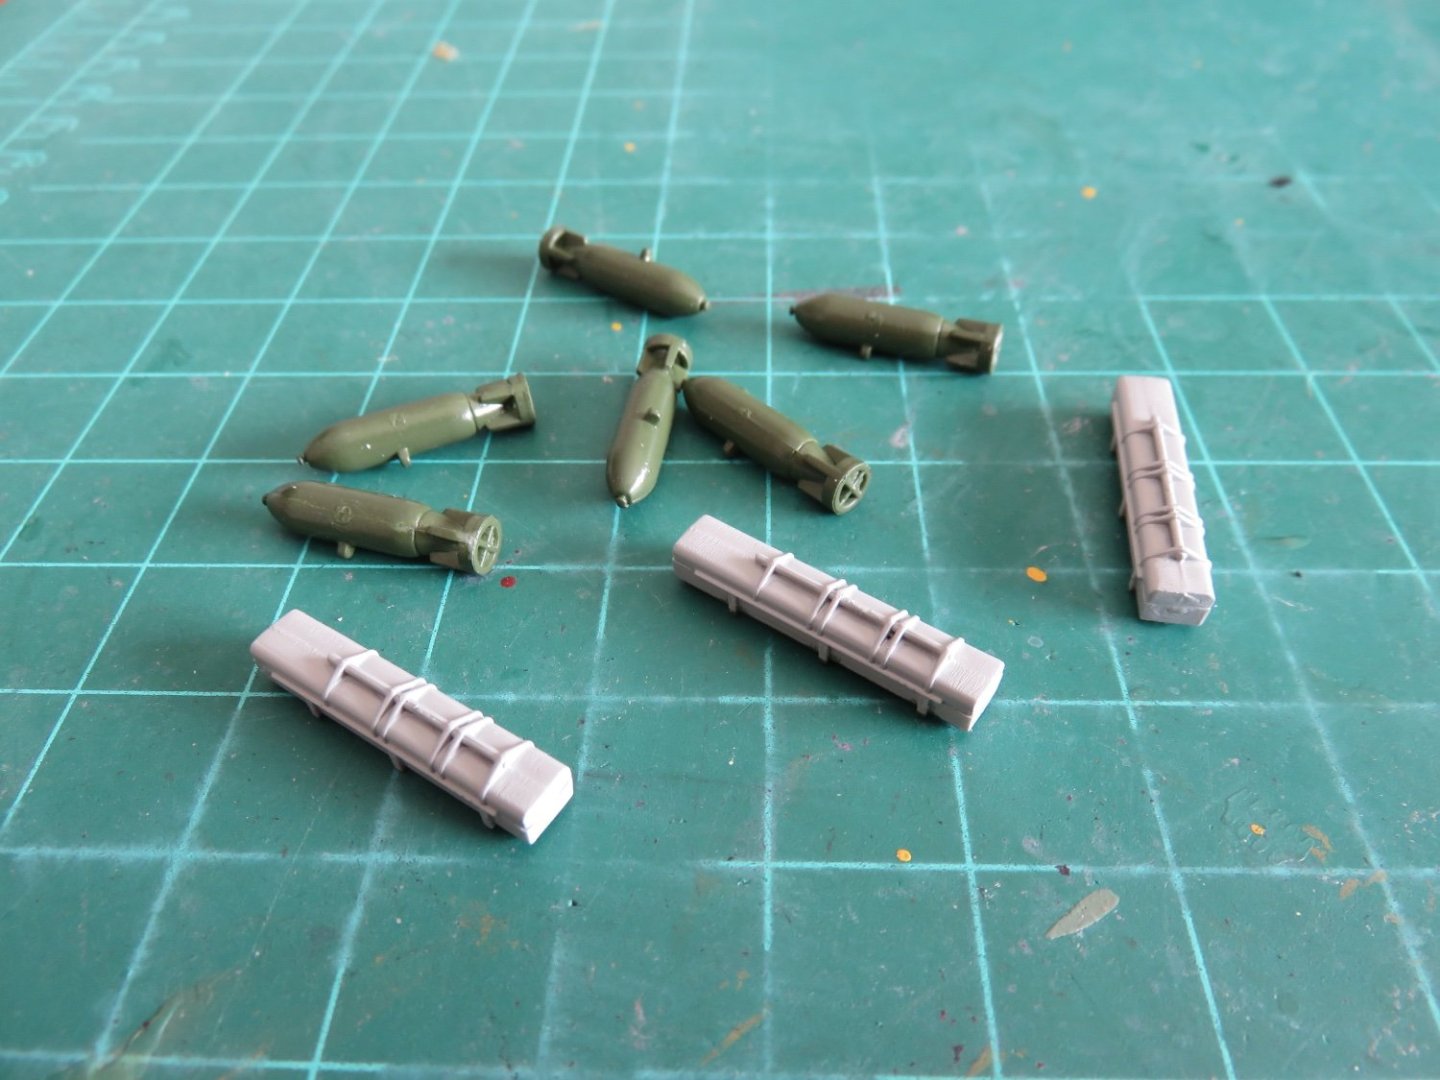
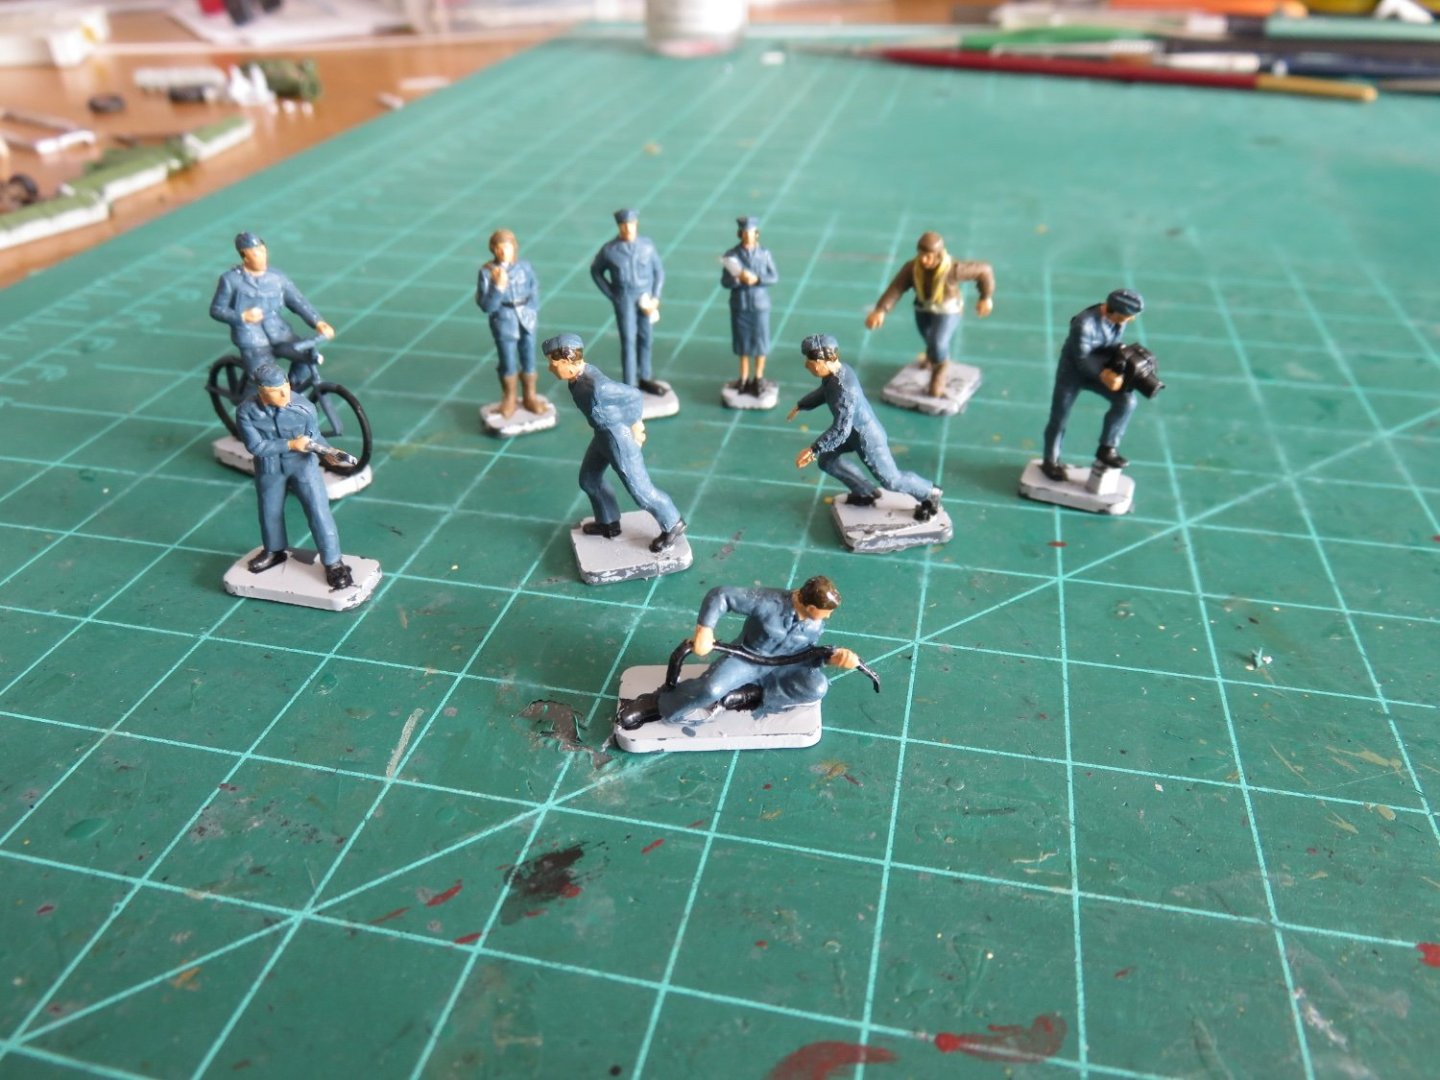
So I've been kicking around this diorama idea since I started working on my Vickers Wellington bomber. Although I haven't yet begun construction of the diorama, I've been busy messing around building the little detail bits that will add to my fictional scene. Airfix provides a couple of useful kits for this purpose. The largest being their WW2 RAF Bomber Resupply kit, which I picked up back in November last year. This kit includes a variety of appropriate vehicles and other paraphernalia that would have been right found on many airfields. I have been slowly picking away at building these elements over the last little while. I don't have any in-progress shots as I found this kit a bit of an annoying one to build. I can't quite put my finger on why I feel that way about this particular kit, but there it is. It's not like it was particularly challenging to build, it is somewhat repetitive (hand painting the tyres on 32 different wheels), maybe that's why it begin to feel like more of a grind.... but I am happy with the results. Over a year ago, I also bought a set of RAF figures, also from Airfix). I will be using these to populate my scene as well as a couple of the vehicles. They are marked as being 1/76 scale, but they don't seem to be out of proportion for the 1/72 vehicles. I had some fun before Christmas painting this gang of miscreants. Not sure how many I'm actually going to use, but I feel I have a nice selection to choose from. For whatever reason, they were moulded in a soft acetyl plastic. It was a bit of a pain to remove the flash, and although the paint seems to have adhered, it won't stand up to too much abuse. The first vehicle in the bomber resupply set is a Bedford MW: The kit comes with provisions to build the Bedford as either the MWD cargo version or the MWC water carrier (some people think it is a fuel truck, but it is not). I elected to build the cargo version, as the water truck was for refilling the radiators of liquid cooled engines (Merlins, or Napier-Sabers). Since my bomber has a nice set of air-cooled Bristol Pegasus radials, the water truck was pointless. The next vehicle in the kit is a 12Hp Austin Utility (Tilly): Another pretty straight forward vehicle. I performed some surgery on one of the Airfix figures, so I could show the Tilly being "driven". My Tilly doesn't exactly follow the Airfix prescribed paint scheme, but I think it still looks good. Following the Tilly is a tractor/tug: The kit tractor is a David Brown VIG1, but I made some non-prototypical modifications. I thought the front fenders on the VIG1 looked kinda hokey, so I cut them off to make my tractor look more tractor-ish with the open front wheels. The kit also supplies parts for a recovery winch and anchor spades, but I left those parts off as my tractor will only be hauling bomb trolleys. I suppose I could have hunted around for a 1/72 Fordson. But I'm going with my version. As the tractor was an open vehicle, a figure also had to be surgically modified to fit. He kind of looks like he's driving, although he's a bit casual looking, leaning back staring up at the sky. Speaking of bomb trolleys, the kit provides 3: There are two Type "C" trolleys. I built these as per the instructions. Nothing too fancy. The remaining kit supplied trolley is a Type "D". This trolley was designed to carry the HC 4000lb and 8000lb bombs, both of which are too big (and too late) for my Wellington (the later Wellington Mk III and Mk X could carry the 4000lb "Cookie", but that required changes to the internal framing of the bomb bay). In most photos I've seen of Wellingtons being re-armed in the earlier part of the war, the bombs were hauled on a Type "B" trolley. This consisted of a suspended centre beam with the bomb cradles sticking out like ribs. To be able to show a more complete load out for my Wellington, I decided to try my luck at scratch building one of these types of trolleys: I found a few useful photos on the internet to help get the basic structure. I did keep a couple of parts from the Type "D" trolley, the front and rear axles, the wheels and the draw bar, the rest was styrene strip and a little bit of brass wire. There is a fair selection of other bombs included in the set I have yet to add the decals to these yet. The grey boxes are Small Bomb Containers, these contained the incendiary (thermite) bombs used by the RAF. Getting back to the maintenance side of things, the last large "vehicle" is a 450 gallon Brockhouse bowser: For reasons I can't fathom, Airfix supplied decals for this as a lube oil bowser (boring). I would have much rather seen this as a fuel bowser instead. These were typically marked with "100 Octane" in large white letters on each side (rather than "OIL" stencilled on one end). As I wanted a fuel bowser, I left the "OIL" stencil off, but snagged the roundels from the Bedford water carrier that I didn't need. The final item build is this rather spindly maintenance tower: It will fit nicely beside the engine that I left open to view on my Wellington. For the rest, there is an assortment of other items like oil drums, fuel canisters, tool boxes, chocks, that will be added later when things get going. I will revisit this log when I finally get underway with building my diorama. I need to purchase some scenery materials as well as a base. I am planning to build on a slab of 2" thick insulation foam. This is common in the model railroad community, as it provides a lightweight, stable substrate. Andy


- 58 replies
-
- 17
-
-

-
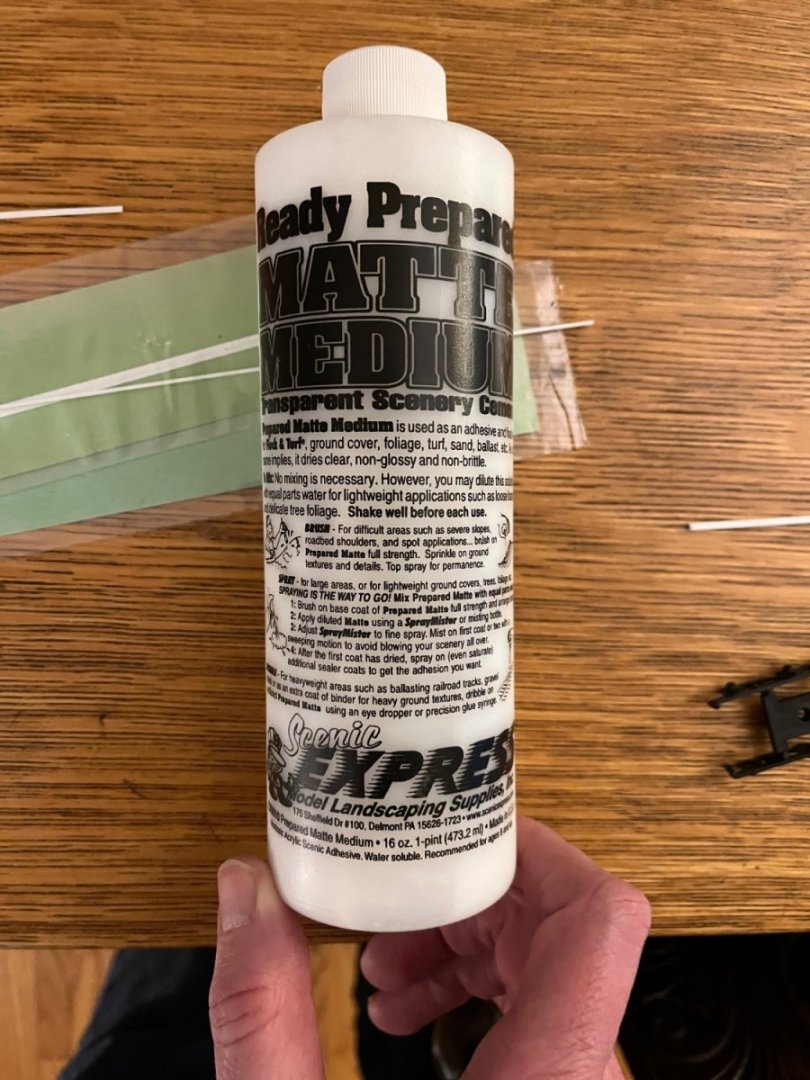
Another option, if you can get it, is acrylic matte medium: The stuff I have comes from Scenic Express, it can be used as is, or diluted, and as advertised, dries to a matte finish. (You can kinda read the instructions on the bottle in the above photo). Andy
-
Very nice Kevin! Looking forward to when you do get around to building the carriages. I know the feeling when you want to build something, but not the project you’re working on. A much needed mental reset! Andy
-
It’s worth pointing out that polyurethane resin is not UV stable. Over a relatively short period of time, when exposed to UV light, “white” resin will yellow drastically (to a rather familiar pale yellow colour), and become very brittle. I’m not sure what colour would result from unpainted grey or black resin, but it won’t be good. Painting resin will eliminate any UV induced colour change, as well as helping to reduce any brittleness. Andy
-
If I recall correctly, a large number of the Churchill tanks used by the Canadians at that time were either AVREs (Fascine tanks, petards etc), or Crocodile (flame thrower) variants. Most of the main armoured regiments were using Shermans or Sherman Fireflies Andy
-
I agree with you, I’m under no illusions In O scale you’re pretty much limited to making the rotary spin, but that’s about all (maybe some sound effects). You’d never get enough weight in it to keep it on the tracks let alone be able to add a motor and batteries etc. (even the G scale rotary derailed at the end of the above video). Andy
-
Saw this, thought you might be interested: Looks like fun! And it works pretty well too! Andy
-
Happy New Year Kevin! You’re doing a great job, but it’s a shame Occre made the kit wheels with those oversized “pizza-cutter” flanges. For a display model they could have been made a bit more prototypical. Regardless, your efforts will result in a great model. Is there any track included in the kit for display? Andy
-
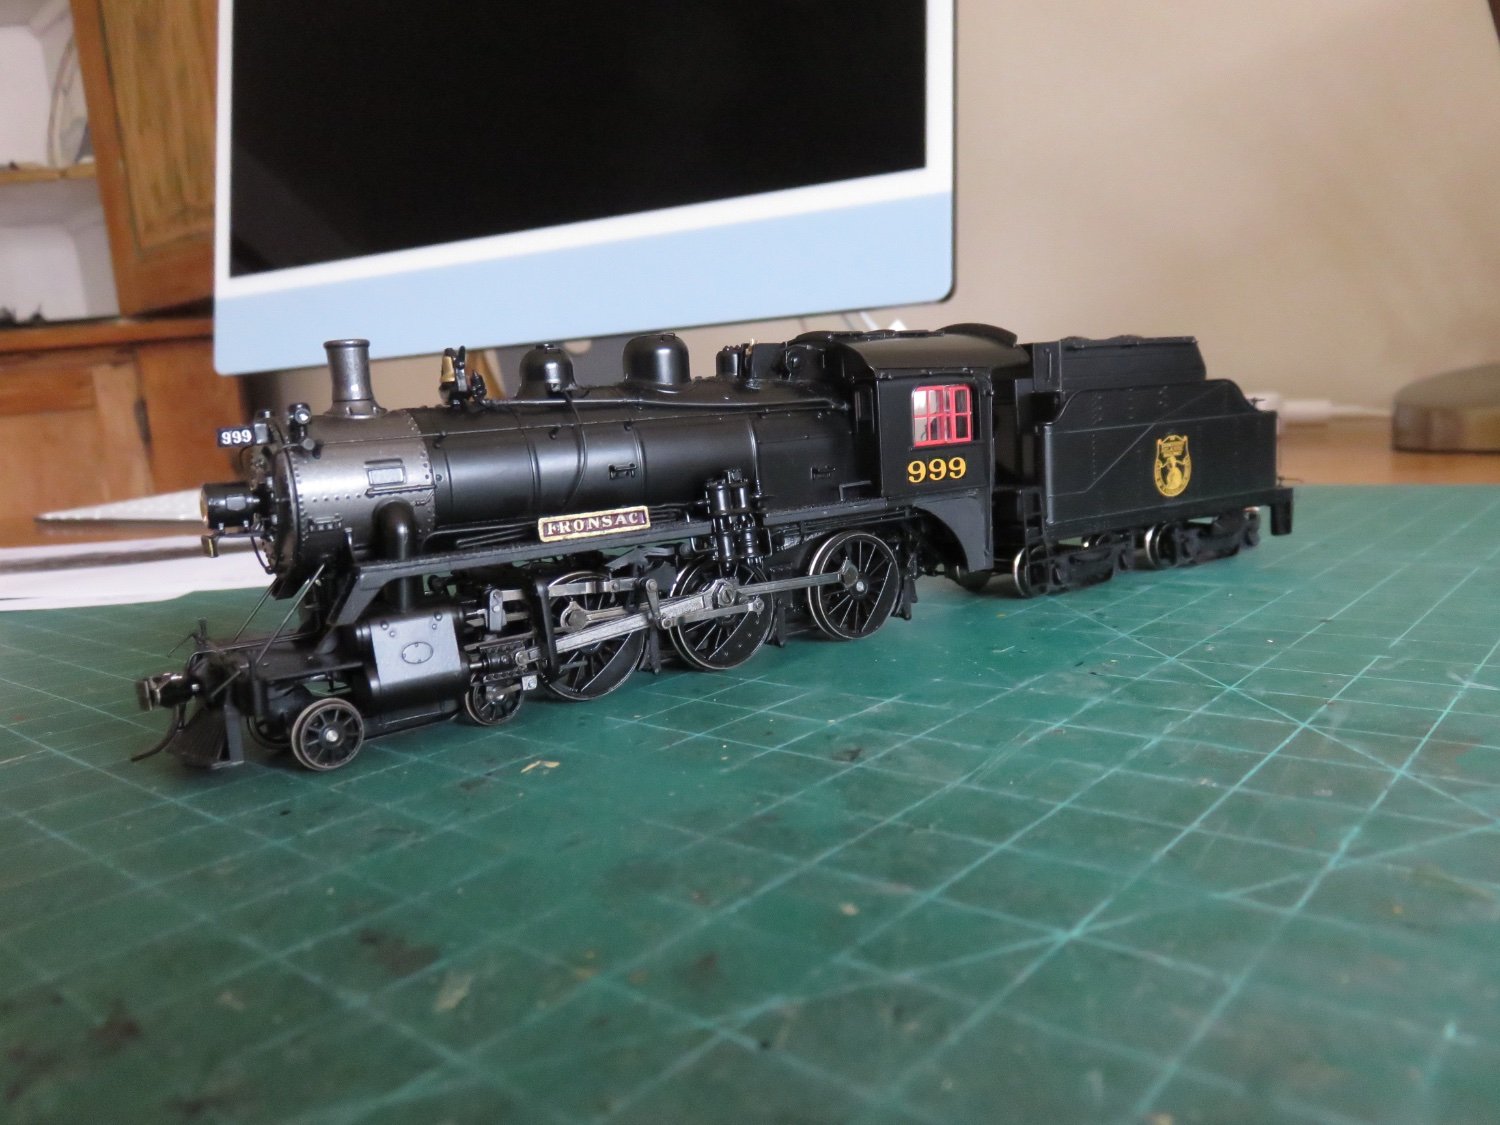
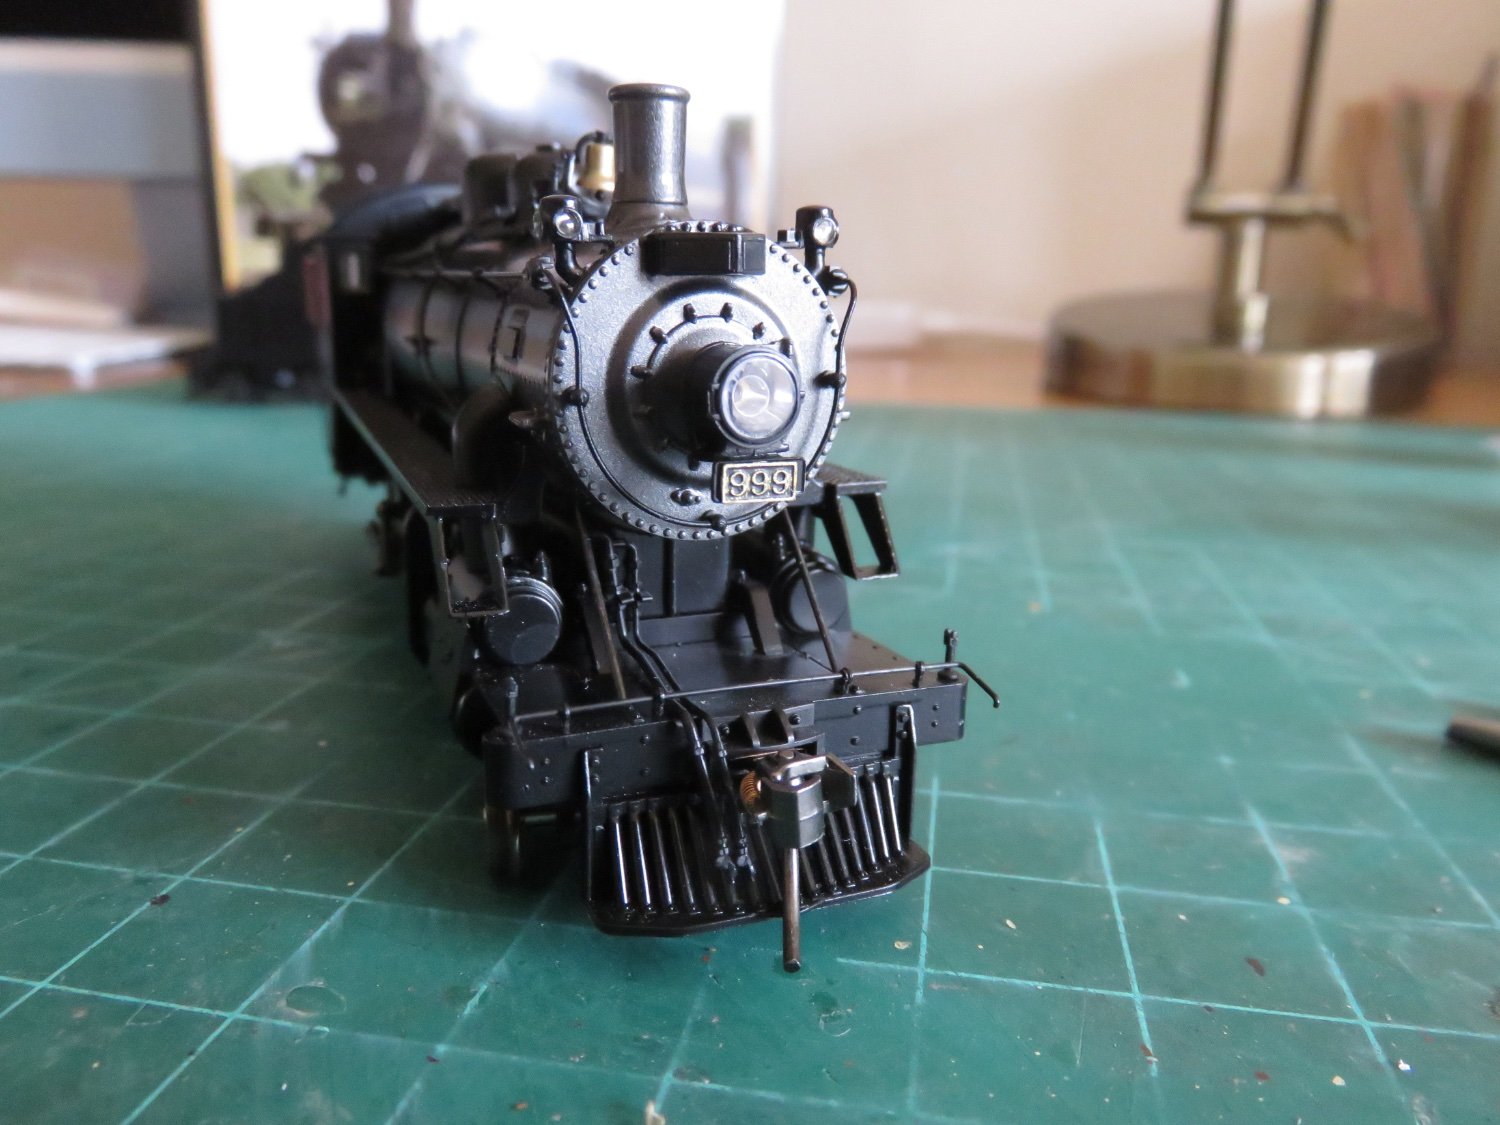
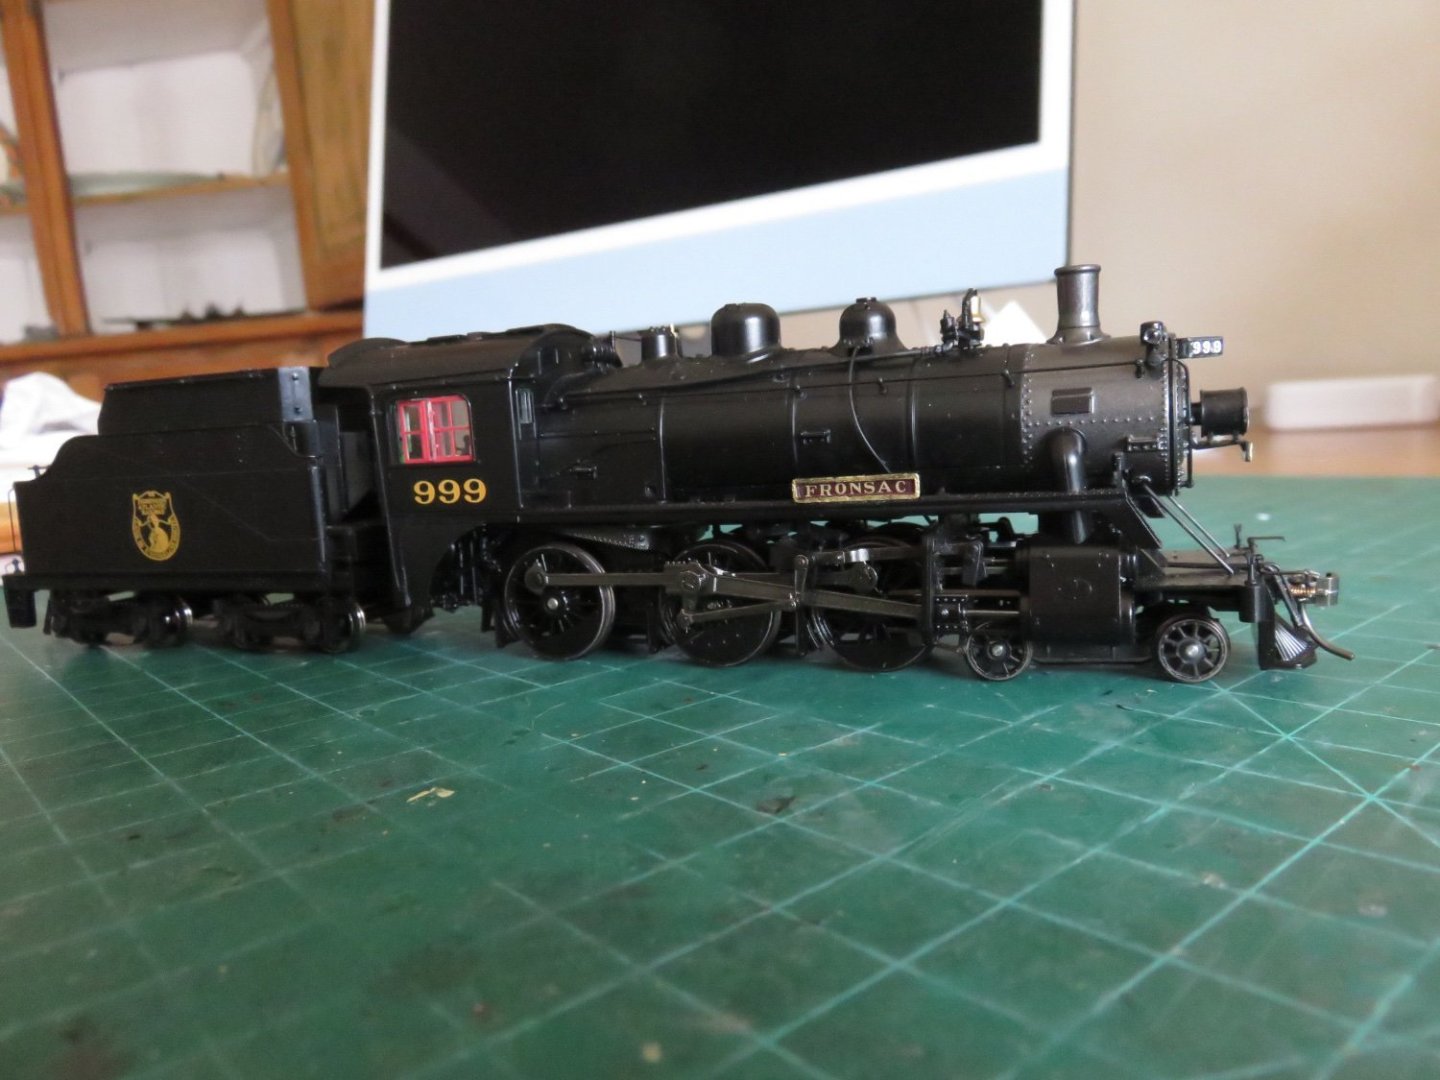
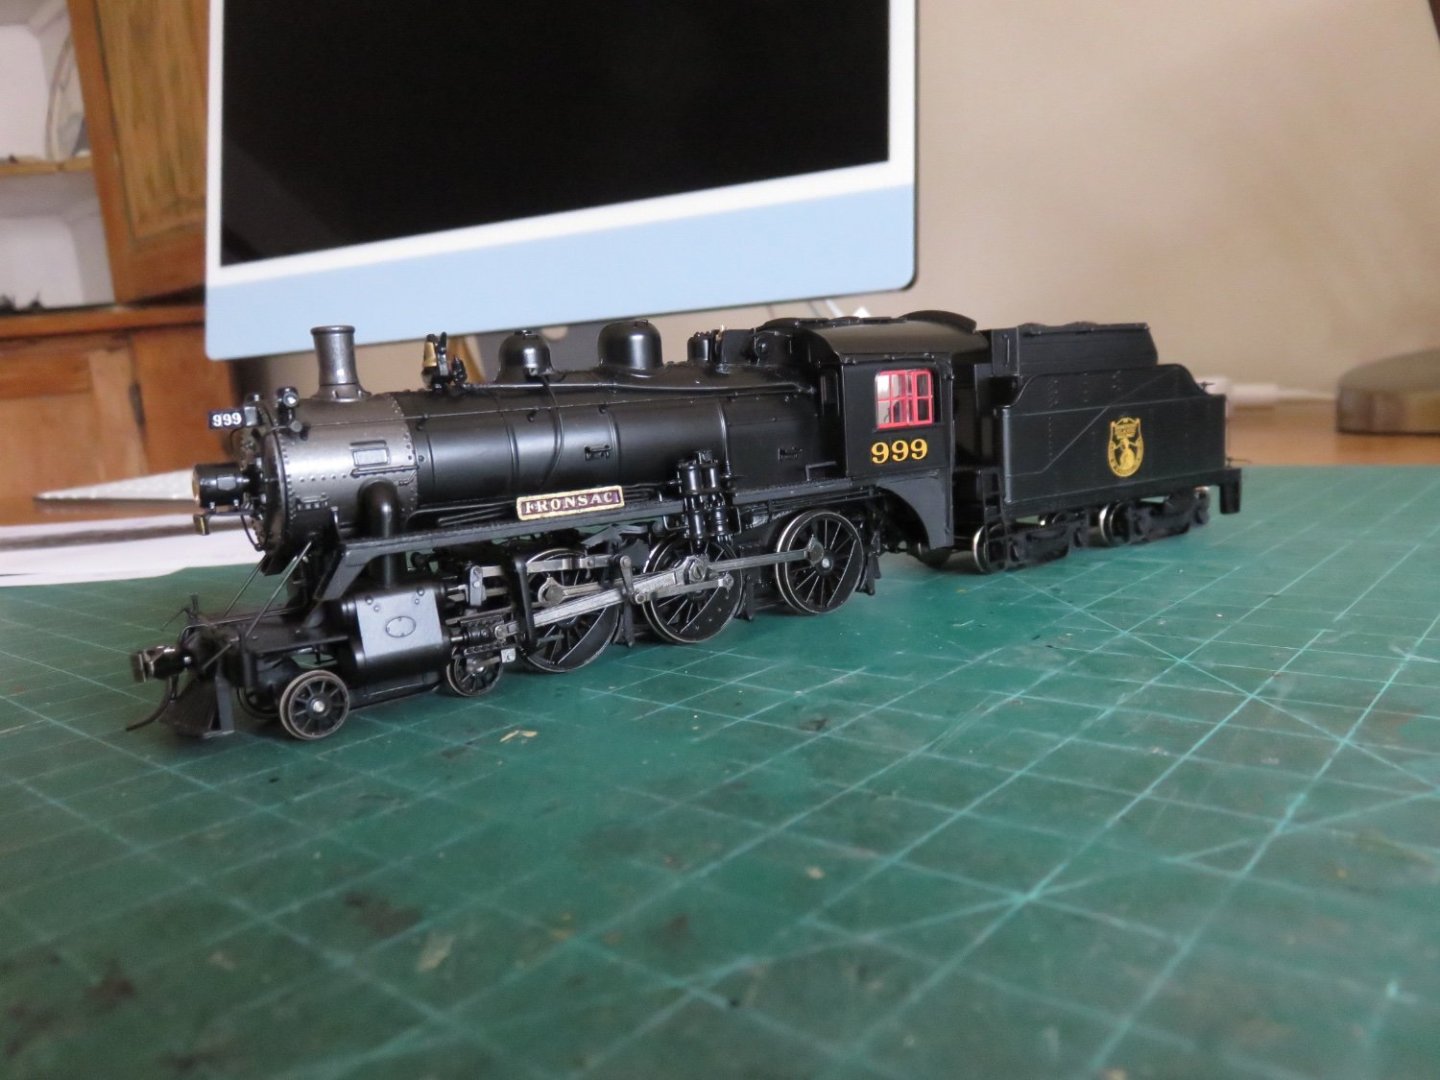
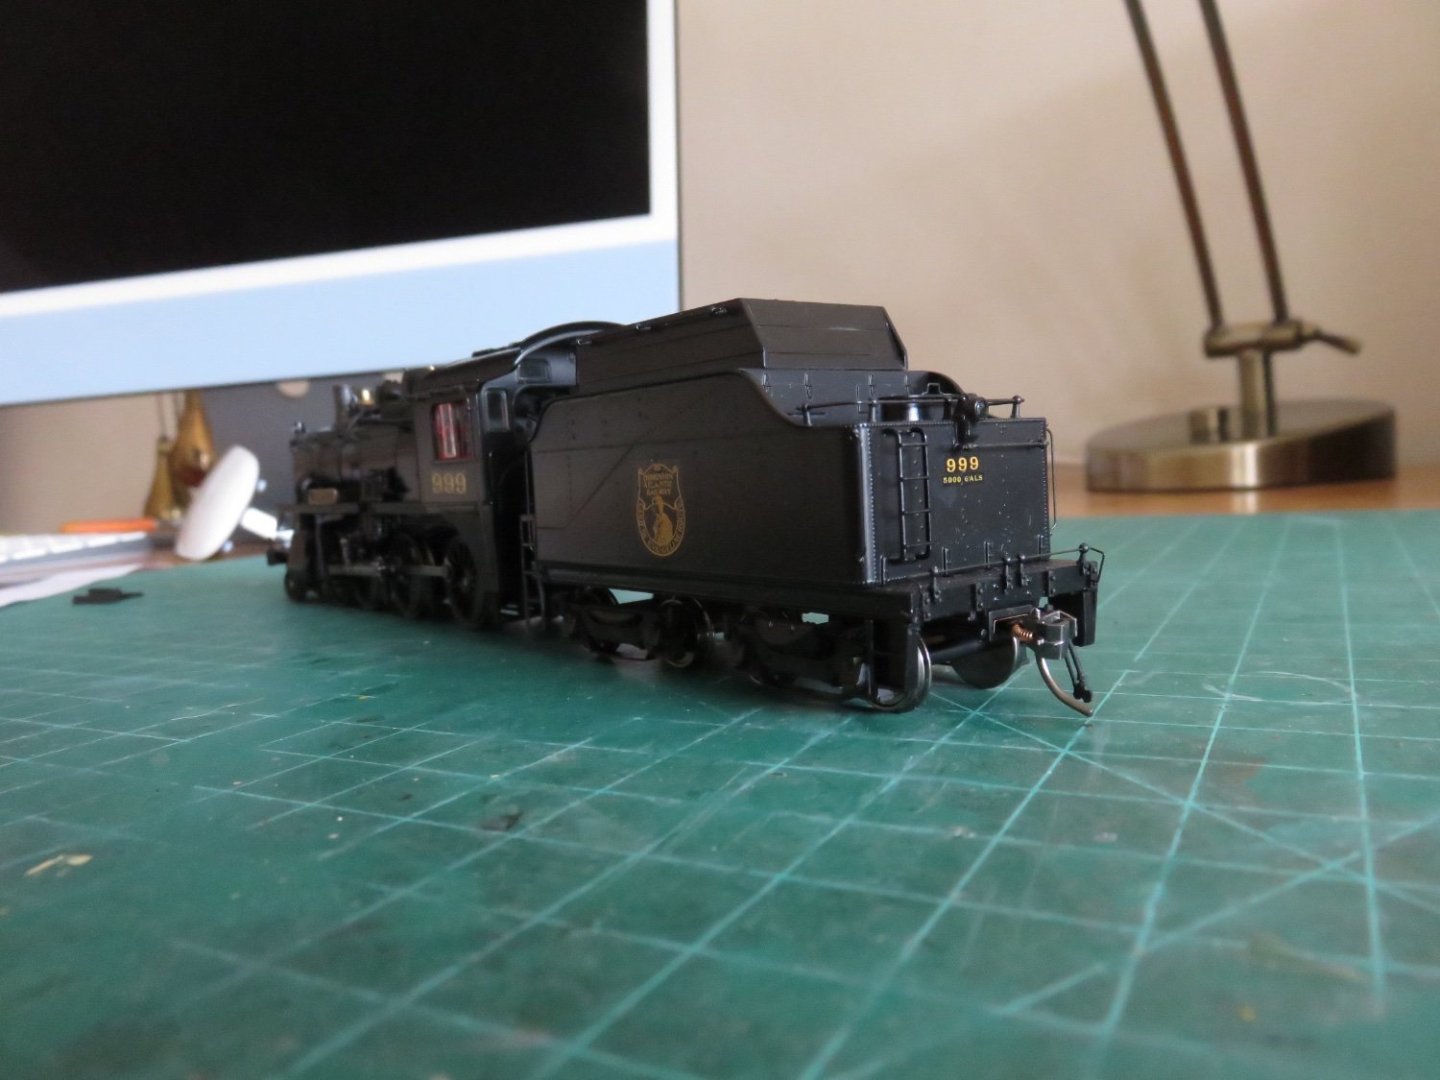
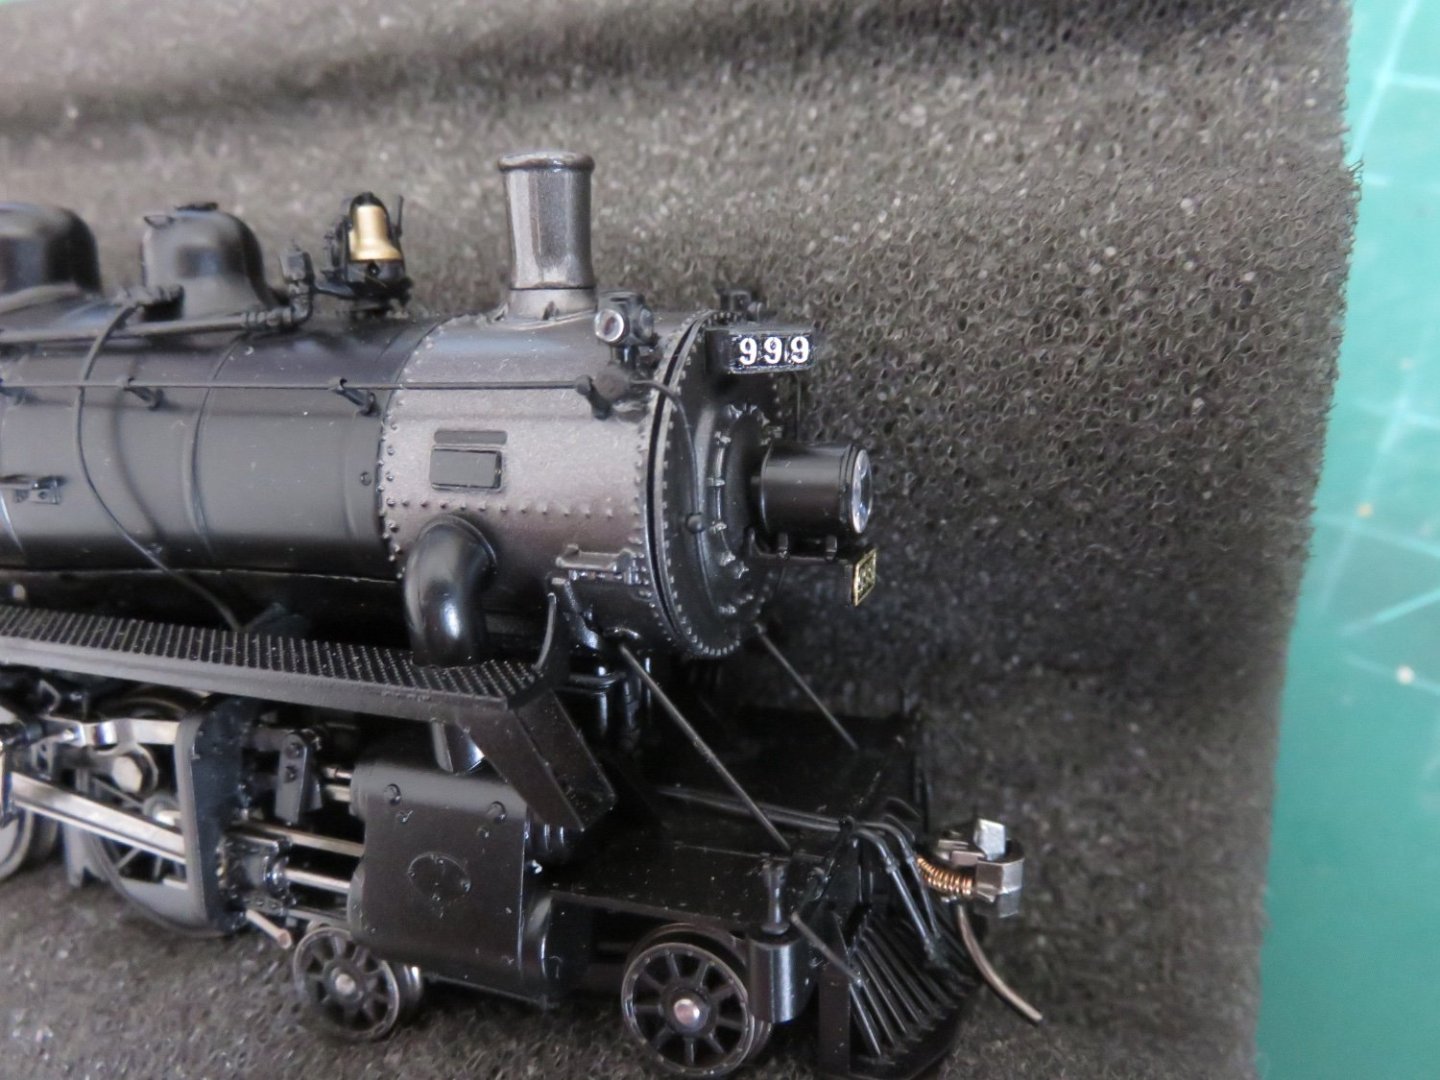
Thanks for all the well wishes and "likes"! I hope everyone had a great Christmas. I was the unlucky recipient of the Christmas Cold this year. Started feeling a little off on Christmas morning, and things didn't get any better as the day wore on. So while all you lucky folks were unwrapping your new model kits and fancy tools, I was downing copious amounts of cold medicine and getting really friendly with a rapidly depleting box of Kleenex. Fortunately things passed relatively quickly and I'm feeling much better now, the residual inflammation and general stuffiness are subsiding as each day passes. Through it all, I have managed to get the lettering done a little ahead of my anticipated schedule. I even had time to add a little bonus detail too. The Dominion Atlantic was one of the few railways to maintain a roster of named locomotives well into the 20th century. The names were drawn from important figures in Nova Scotia's history (the DAR originated as a regional line in Nova Scotia, running through the picturesque Annapolis Valley, before it was bought by the CPR in 1912) as well as from Longfellow's Poem. The nameplates were cast brass and mounted above the running boards. According to DAR records #999 was assigned the name "Fronsac", and although there is no photographic record of the locomotive ever having been actually equipped with the name board, I couldn't resist. "Fronsac" refers to Nicholas Denys, Sieur de Fronsac a merchant in Acadia in 1632. During the Second World War, most if not all DAR locomotives lost their brass nameplates, for obvious reasons. Ultimately, I would have really liked to have the nameplate made from PE, alas there are no commercial suppliers for such a specialized detail part, so I had to make my own. I kept it as simple as I could. The plate consists of a strip of 0.125" styrene with a raised surround of 0.020" square styrene strip. I sanded the raised strip down to about 1/2 thickness. The name lettering is from a CPR passenger car "gold leaf" lettering set (the variety of car names gave a wide selection of letters to choose from). I initially wanted to add some "gold leaf" pin striping to the surround, but this proved a little too fiddly to get to look right, so I settled for brass coloured paint. The recessed area of the nameplate was painted in CPR tuscan red, but I left the back side flat black. As you can see in the above photo, the front number boards have been completed as well. The final little bit of lettering was the locomotive number on the rear of the tender, along with the water capacity. The model also came equipped with footboards on the rear of the tender. This feature is appropriate for locomotives assigned to switching duties, but were not found on locomotives serving in road duties. A few quick slices with my X-acto knife saw the end of these unneeded features. This pretty much brings this little project to its conclusion. I'm overall happy with my results, and I have to commend Rapido Trains for continuing to offer un-numbered/un-lettered versions of their products, it certainly makes my life easier! Thanks again to everyone who's followed along, or just stopped by out of curiosity, I hope to see you all for my next project... whatever that may be! Andy
- 15 replies
-
- 10
-
-
Kev makin’ a choo-choo train? I’m in!! Great start so far! Andy
-
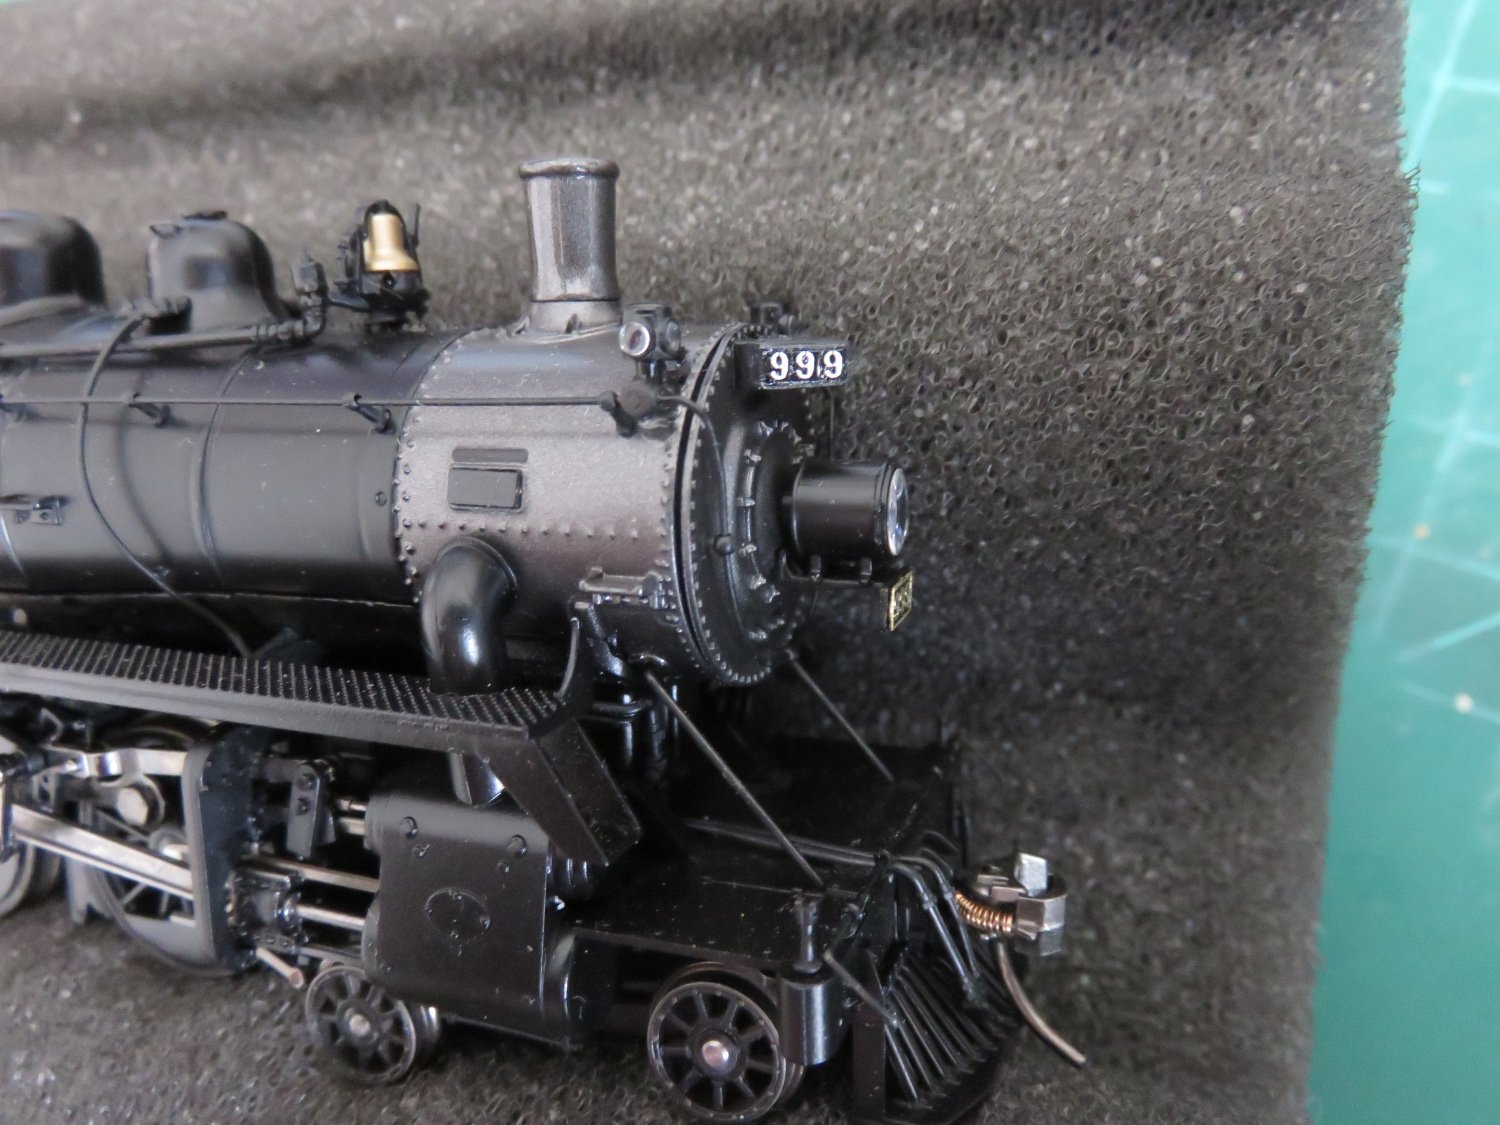
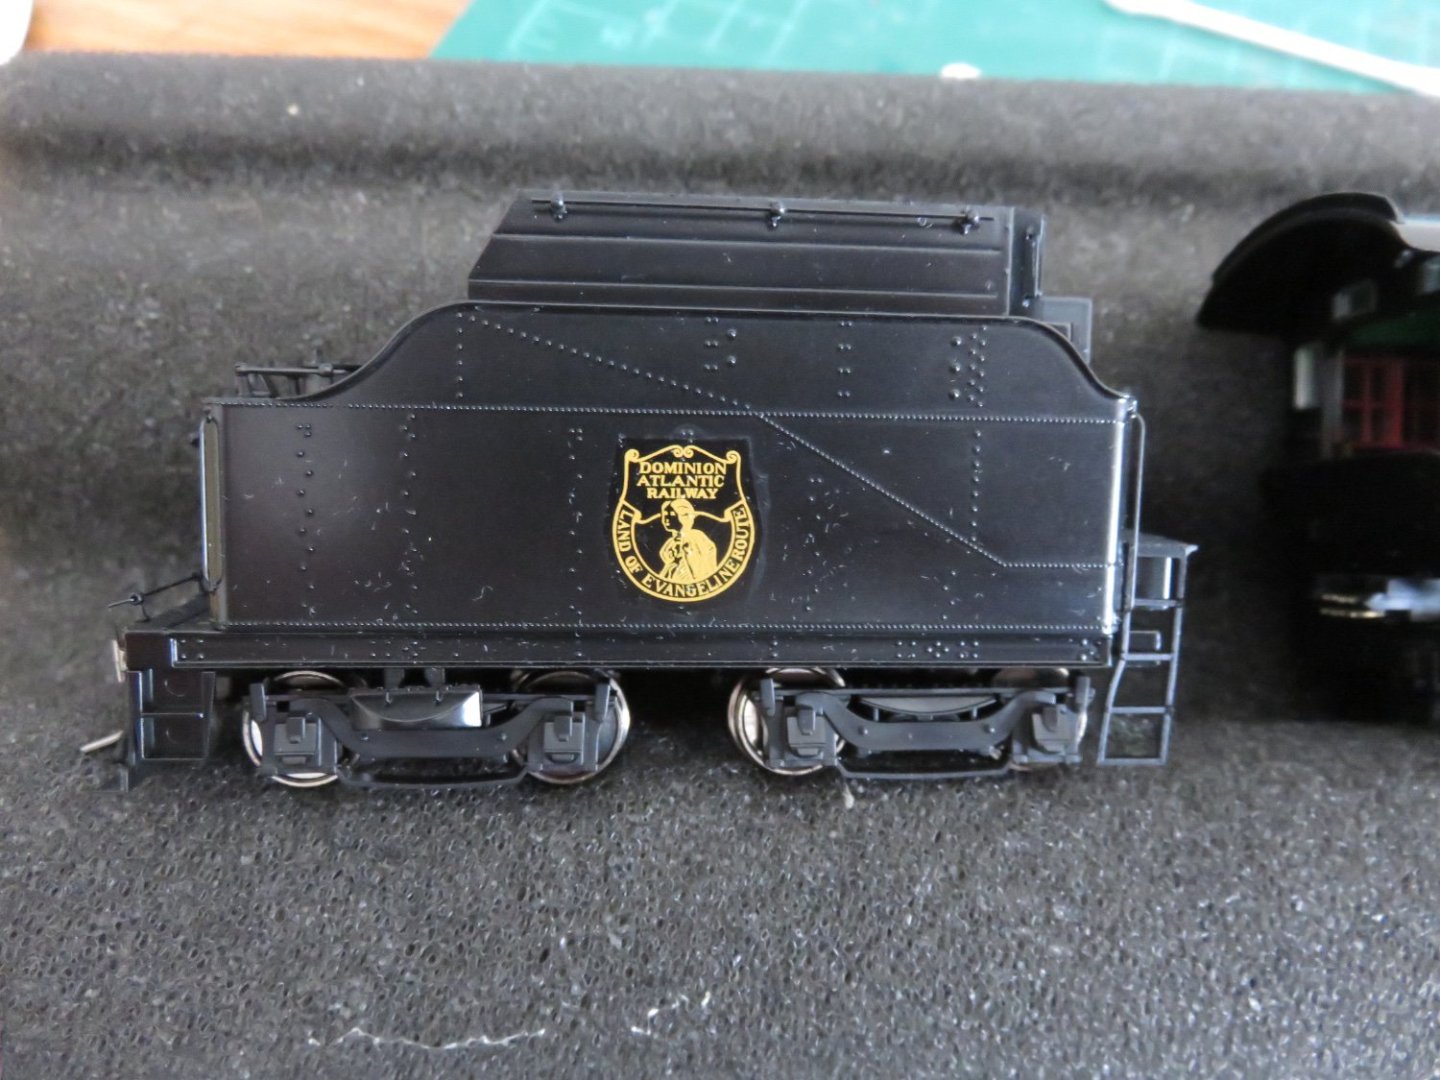
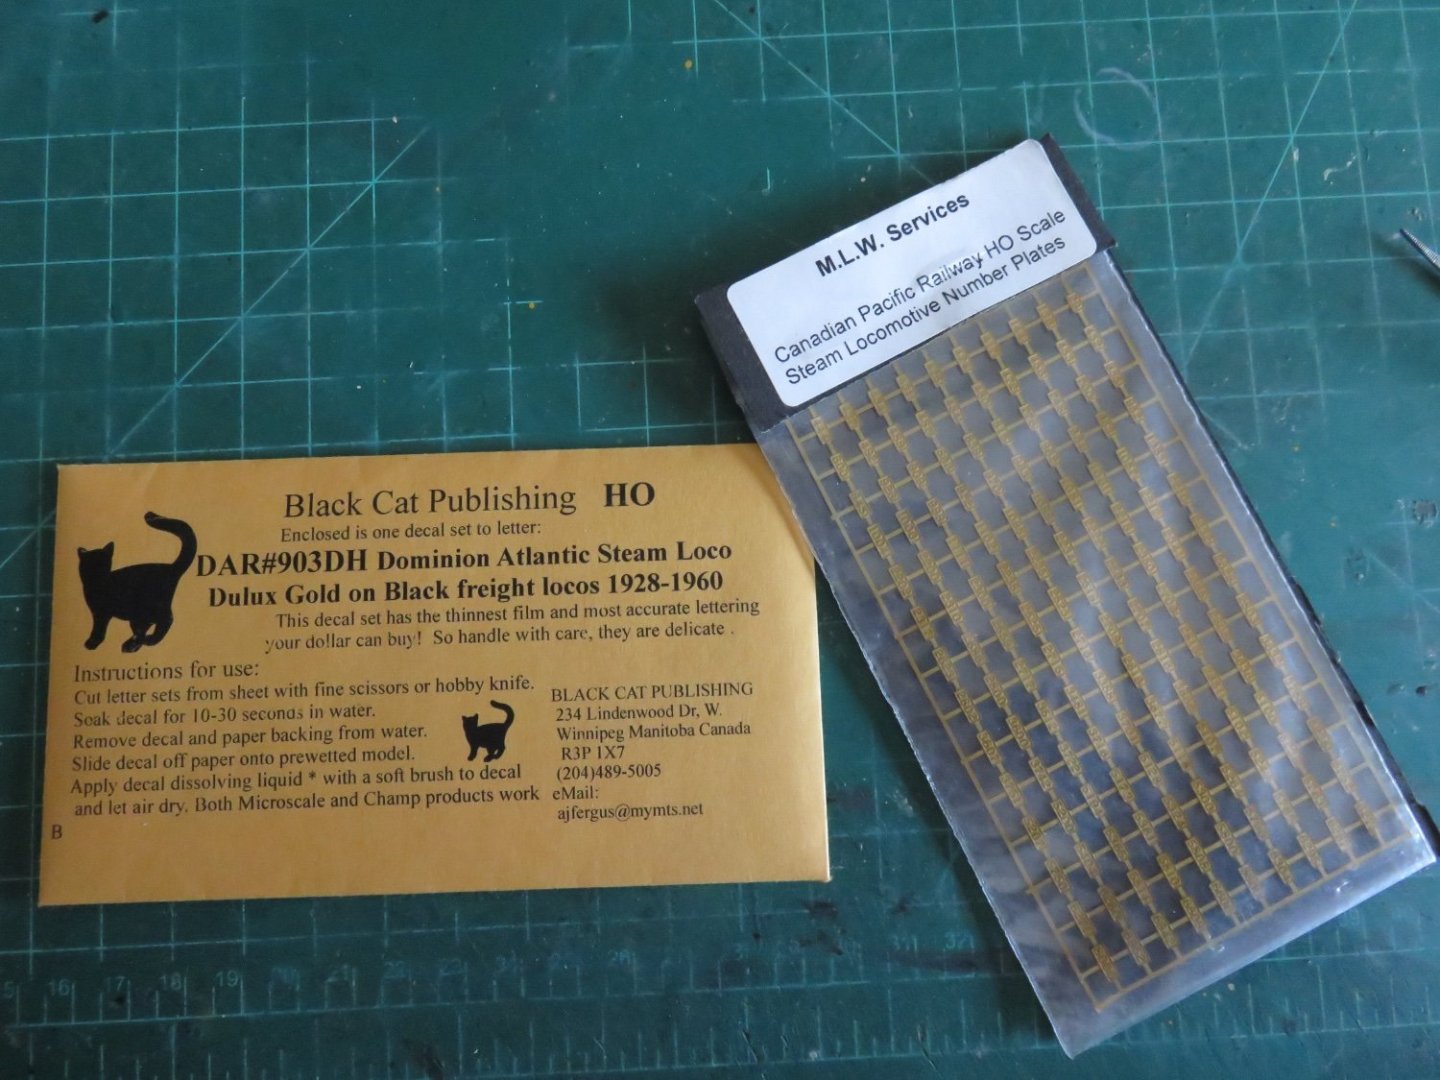
I suppose before things get even more busier with the holiday season crazies, I should, at the very least provide a bit of an update on the status of things as they now stand. I have been slowly picking away at the lettering, in the grand scheme of things, there really isn't a lot to be applied, but it's not without its challenges. With any model locomotive, the number is always the part of the lettering that requires the most care. Decal companies usually provide a range of numbers in their lettering sets, but unless you're lucky, the numbers are not found in the order you need them. Black Cat Publishing is no different. Having said that, their Dominon Atlantic steam loco set does include a number set for #999, but the spacing is incorrect, which means I still had to cut out each number individually for application to the locomotive cab side: The standard CPR painting scheme required the locomotive number, when applied to the cab, to be applied in the centre of cab panel (between the front corner and the vertical handrail) located below the window. For a loco with a three digit number, this meant starting with the middle digit, and moving outwards. As I didn't want things shifting, this meant applying one number at a time and waiting for things to set fully before proceeding to the next number, until all were applied. The Rapido model includes many lighting features, including a lit front number board (prototypically accurate). For the undecorated model, this is left as a white panel. I had to do some serious digging in my stash of decals to find some appropriately sized white numbers printed on a black background. (I had hoped for clear numbers, but this is the next best thing). It's easier to find white numbers on a clear background, as most earlier steam locomotive models (read: brass models) do not include lit number boards, so the numbers would be applied over an inert black painted background. One of the things that really piqued my interest in the Dominion Atlantic was the quaint, unique, tender herald applied to many of its steam locomotives. The herald celebrates Henry Wadsworth Longfellow's epic poem. There are still a few more decals to be applied, but that may have to wait until after Christmas. Thanks to everyone for the "likes" and comments, and my gratitude to those who followed and are following along with this and my other builds this past year. Your support and kind remarks have been a source of endless encouragement and I can't thank you all enough. I wish you all the best through this coming holiday season (however you celebrate). Andy
- 15 replies
-
- 13
-
-
There’s a great story about a group of Canadian soldiers from the Royal Regiment of Canada, in the summer of ‘44, taking some rest in the shade of a Normandy orchard. One of the soldiers, as he was stretching out under a tree, accidentally kicked something with his heel. Upon investigation, it turned out to be the slightly protruding neck of a buried bottle. Further investigation/excavation unearthed, much to the soldier’s delight, that it was a full bottle of Calvados. Word quickly spread of the discovery, and in short order the Canadians had unearthed an enormous stash of buried bottles throughout the orchard. Of course hot weather, and thirsty soldiers saw short work of the alcoholic windfall. The poor farmer was heard to lament that for over four years he had managed to safely hide his entire stash from the occupying Germans, but in a little less that half an hour the Canadians came through and cleaned him out! Andy
-
Unless it’s well aged Calvados… (yum!) Andy
-
At least Tangent and Moloco only produce rolling stock… so far… Thankfully Scale Trains are, for now, out of my chosen era…. 😏
-
CPR D-10 Before going further with this log, I thought it wise to present a brief history and description of the D-10 class of steam locomotives. The most numerous single class of steam locomotive in Canada, 502 examples of the type were built, that first rolled out in 1905. To really study steam locomotives, is to also delve into the history of the men who occupied the role of mechanical chief engineer (or whatever particular title the railway bestowed upon the head of locomotive design and development). It’s worth taking a brief step backwards to the beginning of the 20th century to briefly look at the dawn of the superheated steam locomotive. Superheating is the process whereby saturated steam is passed through a heat source in order to raise its temperature above that at which the water from whence it came had boiled. This process induces more potential energy into the steam, thus allowing the steam to perform more work for a minimal expenditure of extra fuel. Prior to the development of the superheater, locomotives were either simple saturated steam engines (steam used once in each cylinder before being exhausted), or compounded (stream was used first in a high pressure cylinder, passed into a larger lower pressure cylinder, and then exhausted). Steam formed at the boiling point is known as saturated steam. In 1898 the first practical application of a superheater was developed by Wilhelm Schmidt, in Germany. The fuel efficiency increased by approximately 25% in locomotives fitted with Schmidt’s superheater, over their non-superheated equivalent, and also dramatically increased their available power. Later experiments on the CPR showed a fuel efficiency of 11% in favour of superheated equipped engines, over compound locomotives, without, it should be noted, the added mechanical complexity, and cost, required by the compounding system. These developments were watched very closely by mechanical engineers around the world, but in particular by the mechanical department of the Canadian Pacific Railway. The CPR dispatched one of its mechanical engineers, A.W. Horsey to monitor Schmidt’s progress and learn as much as he could. Often Canadian railway companies are overlooked, and in many cases have been considered to be un-innovative, quaint, or otherwise unimportant in their contribution to steam locomotive design and development (we never had the large fleets of gigantic articulated locomotives that roamed the US, and most Canadian designs of established types tended to be smaller than their American counterparts). Counter to this perception, the CPR rolled out the first superheated steam locomotive in North America in the summer of 1901 and by 1906 acquired 197 superheated locomotives (at the time there was fewer than 20 other superheated locomotives in the entirety of the remainder of North American railroading). Most of these early locomotives were conversions of existing types, and allowed the CPR to perform side by side comparisons. Subsequently as many locomotives became due for servicing/rebuilding, a superheater was included in the programme. In February 1904, the CPR appointed a man who was to become one of its most dominant figures in steam locomotive history, Henry Hague Vaughan. He was to be responsible for more new locomotive types than any other mechanical chief employed by the CPR, as well as building fully 45% of the total number of new steam locomotives ever owned by the railway (nearly 1500 locomotives). He was also behind a fleet wide locomotive reclassification and renumbering, a system, it should be noted, is still in effect to this day! Vaughan was single handedly responsible for introducing the 4-6-2, 2-8-2, 4-8-2, and 0-10-0 types to the CPR as well as Canada’s only mainline articulated locomotives, a half-dozen 0-6-6-0 locomotives destined for service in the mountains. Incidentally, the last of these shares with the Pennsylvania railroad the honour of being the first simple articulated locomotives ever put in service. Under Vaughan, the CPR produced its first full class of superheated locomotives built new in late 1904, a group of 40 2-8-0s. This was followed up in 1905 with the first ten D10 4-6-0s. The D10, although a new design, was based on the earlier D9 (originally class S.T.11), designed by Vaughan’s predecessor Edward Williams. While dimensionally similar, the D10s came from the erecting halls fully equipped with superheaters. The first four subclasses of D10 (a through d) were delivered with Stephenson’s valve gear, the latter subclasses e through k were equipped with Walschaert’s valve gear. The D10 class proved to be one of the most versatile 4-6-0 type locomotives ever built. They would be found in every type of operating service to be found on the CPR. Equally at home working freight or passenger trains, yard or helper service, D10s were found in every corner of the CPR system. It could be said that no other locomotive fulfilled its role as thoroughly as the D10 until the arrival of the first diesel road switchers. It’s also worth noting that in 1912, the Algoma Central Railway ordered five 4-6-0s that were, for all intents and purposes, exact copies of the CPR D10 (imitation and flattery and all that). D10s were built by all the major builders in Canada, with orders being produced by Montreal Locomotive Works, the Canadian Locomotive Company in Kingston, ON, and by CPR’s own Angus shops. Orders were also built by Alco’s Schenectady works in the US. Rapido Trains model D10 represents some of the later classes of the type (g, h, k). Built between 1910 and 1913, these D10s featured 21”x28” cylinders and 63” drive wheels. The locomotives had a length over the couplers of 63’ 3”. These locomotives also introduced some visual features that would become hallmarks of CPR stream power; straight valanced running boards (although at this stage more of an extended flange), smaller cab windows compared to their predecessors. Originally equipped with a single stage air pump and a manual reverse lever, many would be upgraded with cross compound (two stage) air pumps and power reversers. The D10 carried a 200psi boiler pressure and had a firebox grate area of 49 sq ft. They were hand bombers throughout their careers (no mechanical stokers) and they could exert a tractive effort of a little over 33,000 lbs. The Vaughan era at the CPR has been referred to as the “Periclean Age” of CPR steam power. His innovations and adaptations of contemporary trends firmly launched the CPR motive power into the 20th century. Had Vaughan not left the CPR in 1915 (due to a disagreement in priorities), there is little doubt that the CPR would have been firmly in the forefront of steam locomotive development in the 1920s, era that saw the development of “Super Power” steam locomotives. Bibliography Lavallee, Omer, “Canadian Pacific Steam Locomotives”, Railfare Enterprises Ltd, 1985 Bain, Donald and Leslie, Jack, “Canadian Pacfic’s Mighty No. 8000”, British Railway Modellers of North America, 2004
-
Thanks for the “likes” everyone! @Canute Rapido have really set the bar high, I remember some of their earliest offerings, while extremely detailed, they suffered from a host of issues. This was in the early oughts (‘03 or ‘04). It really took them the better part of the decade to hit their stride, but leaving their early teething troubles behind, they’ve carved out a sizeable piece of the the market with an almost uninterrupted stream of fantastic models. I’m kinda thankful they’re full swing into developing products for the US market (as well as their core Canadian market), as it has taken a lot of heat off of my wallet trying to keep up! Andy
-
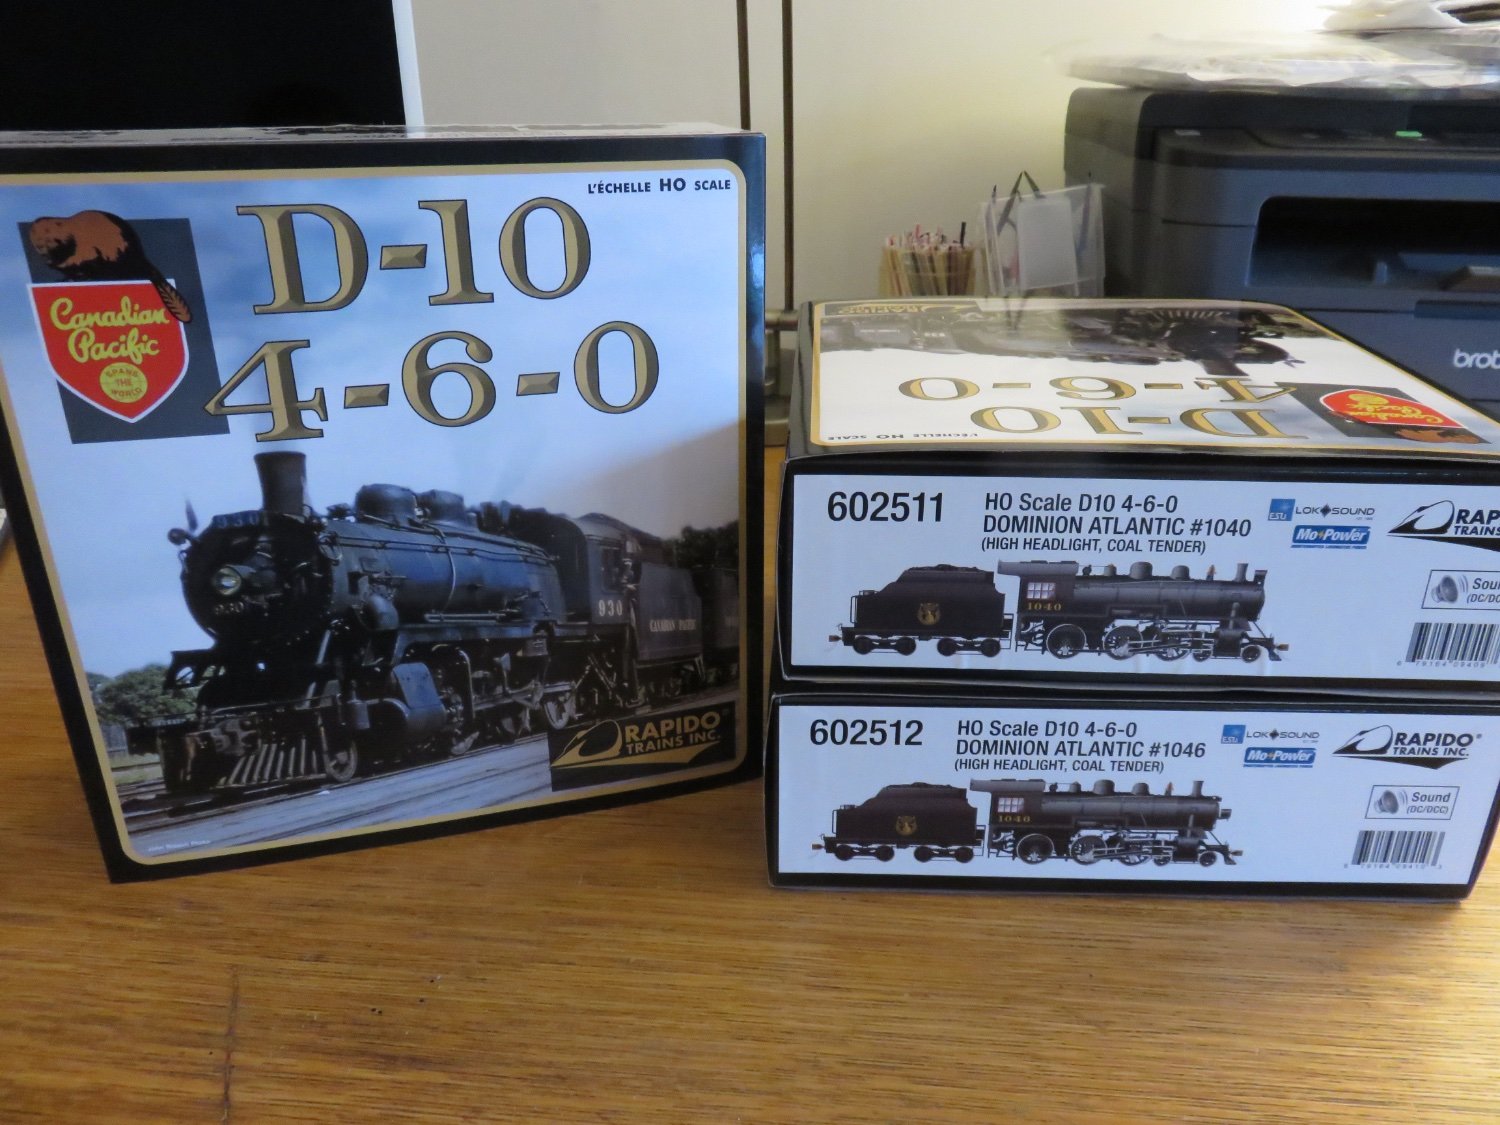
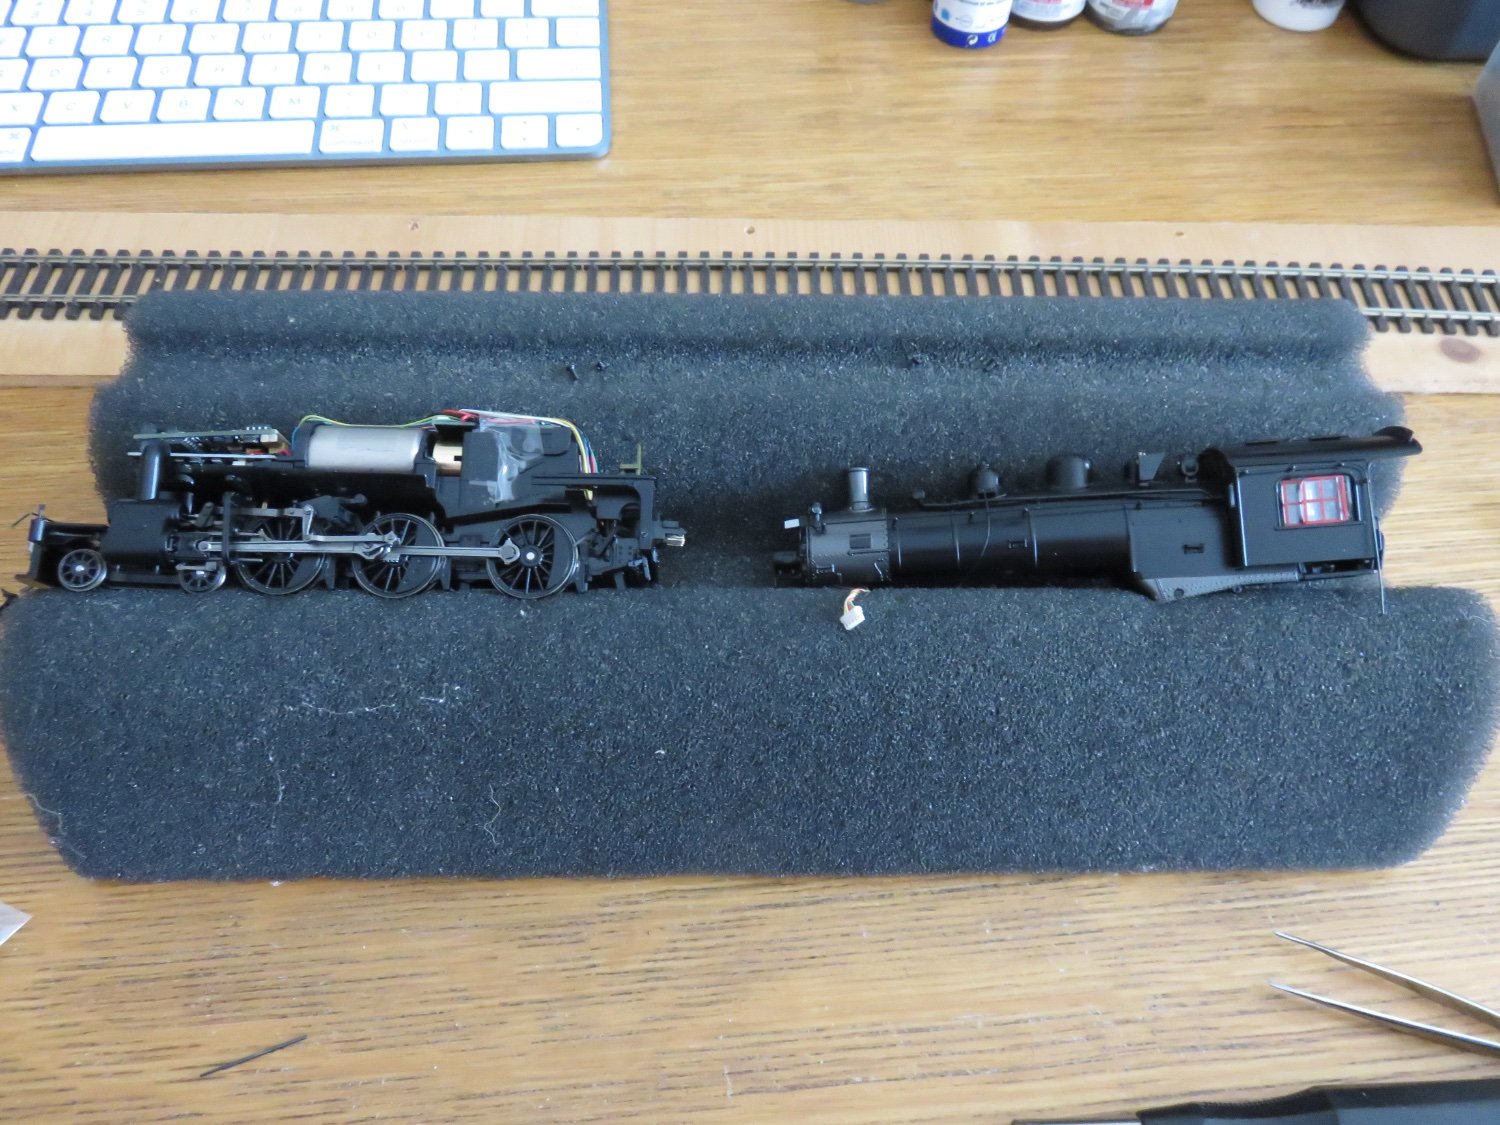
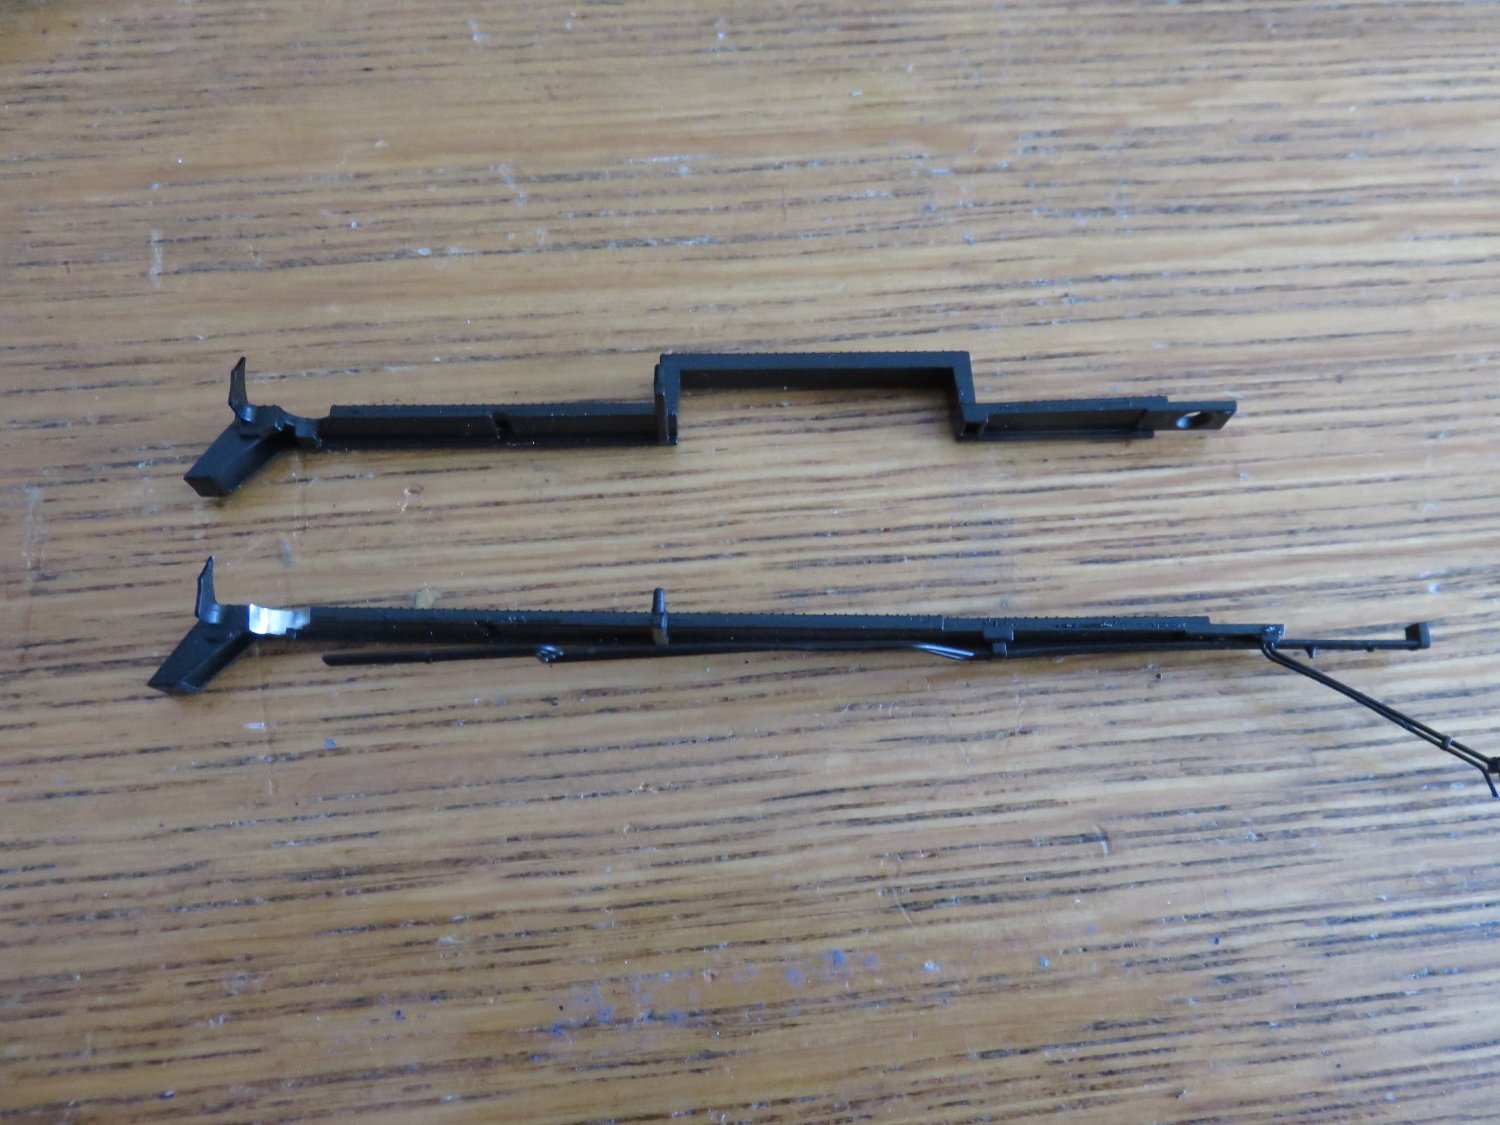
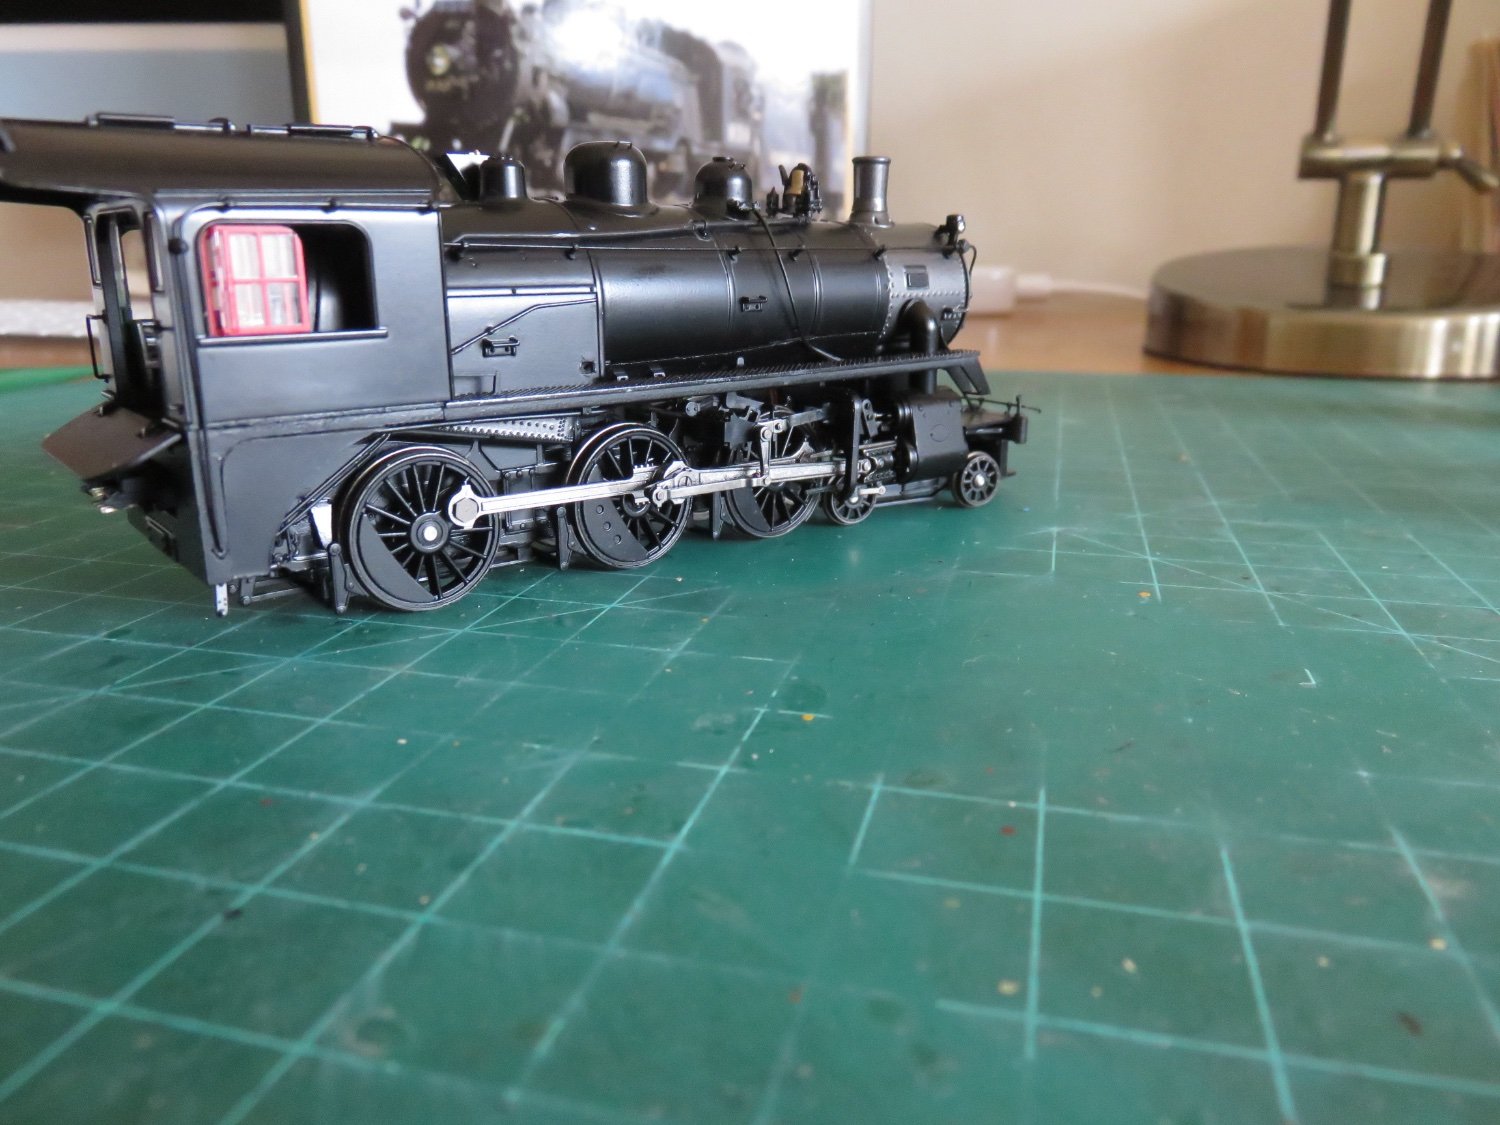
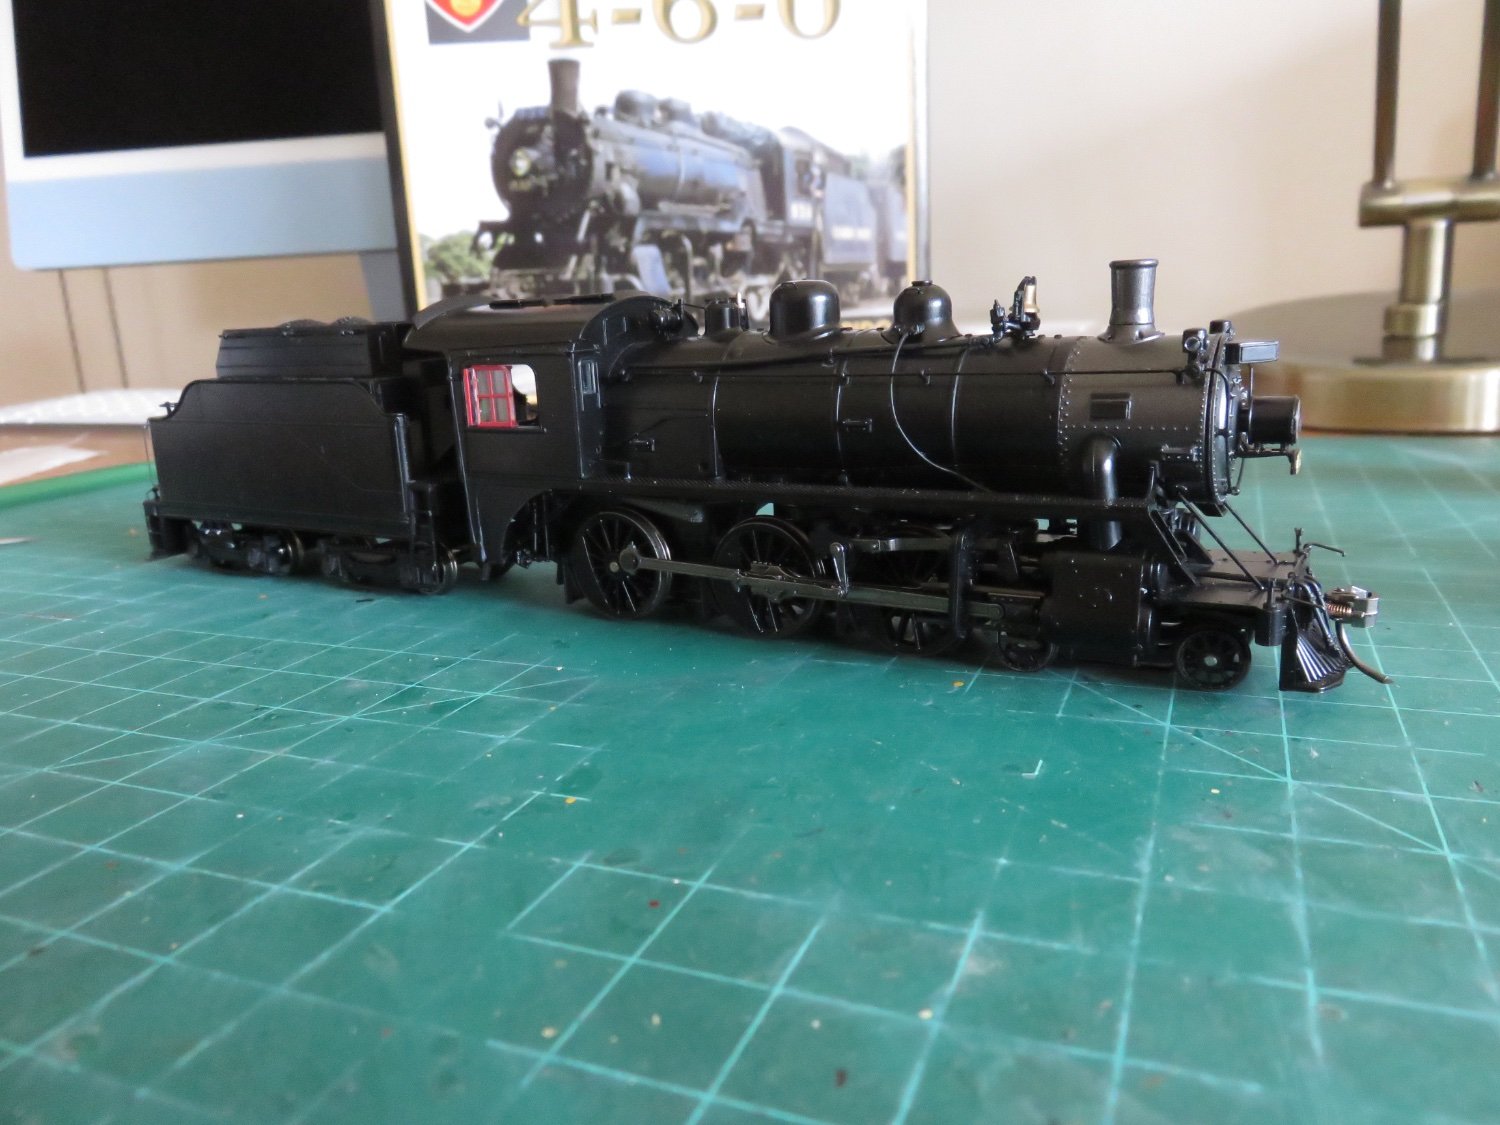
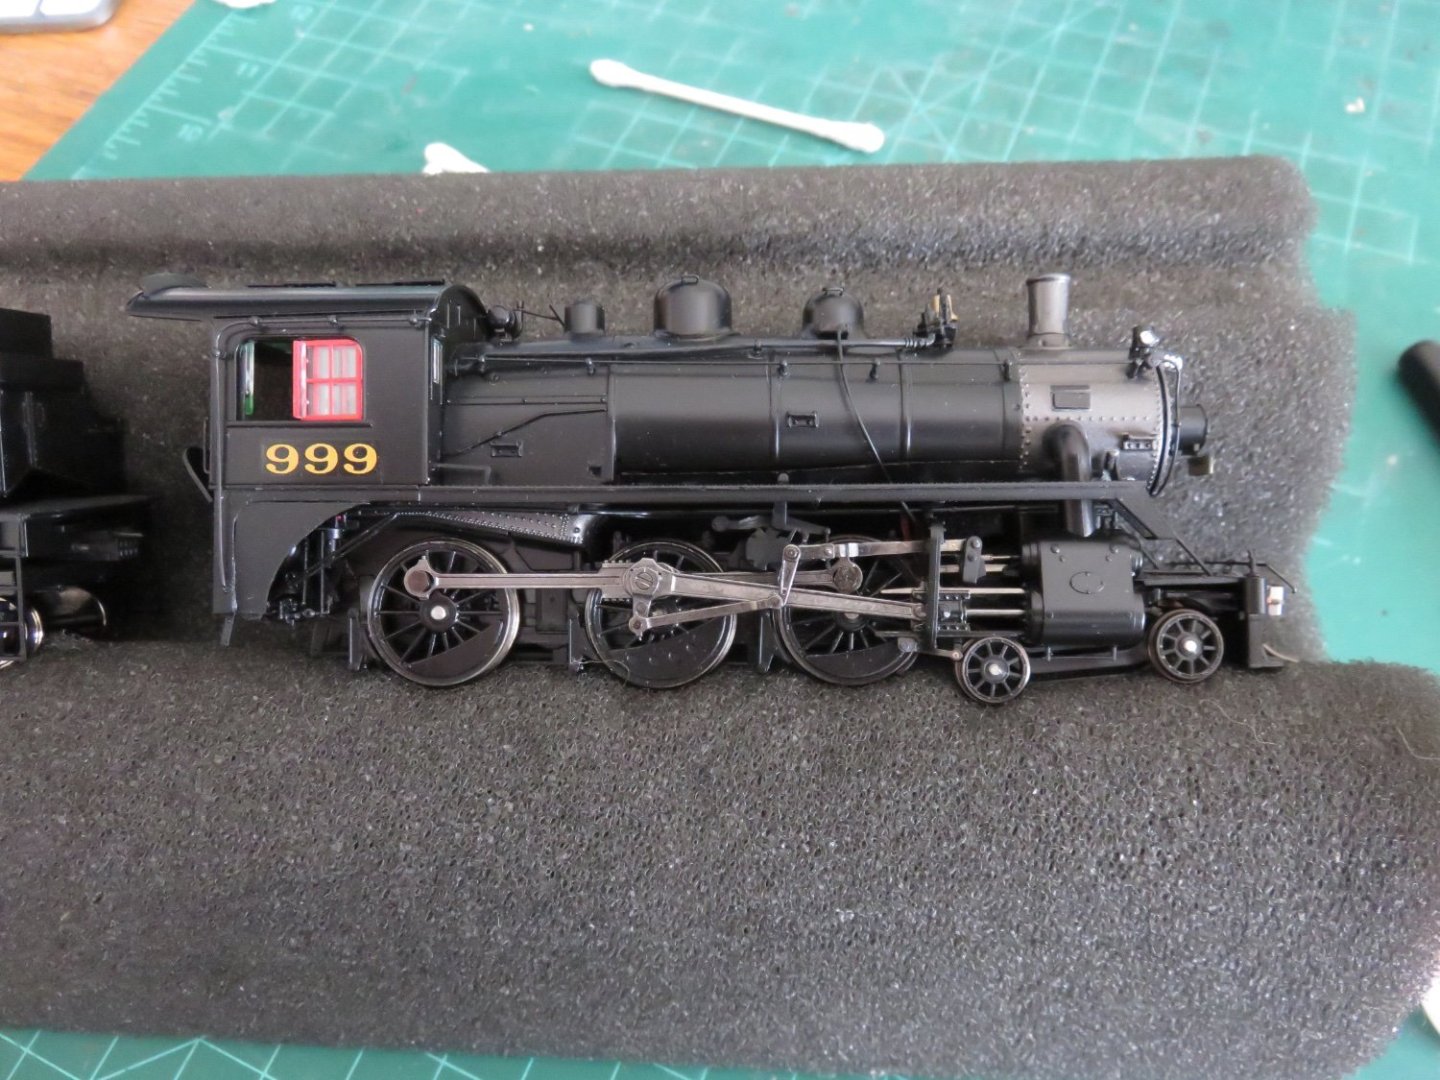
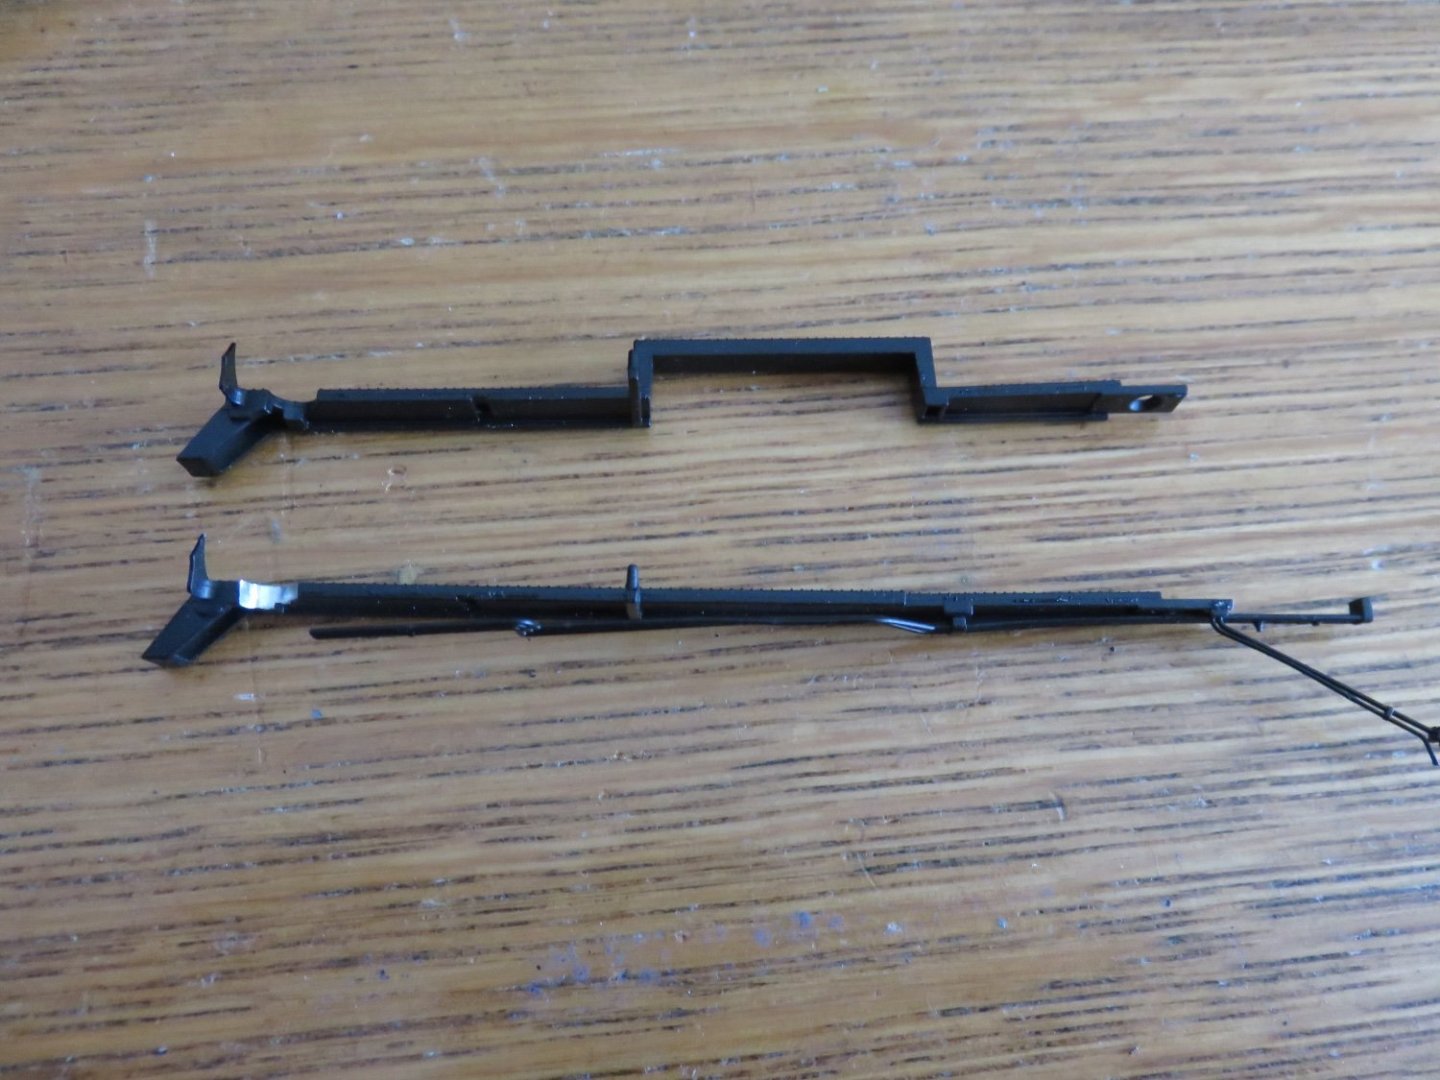
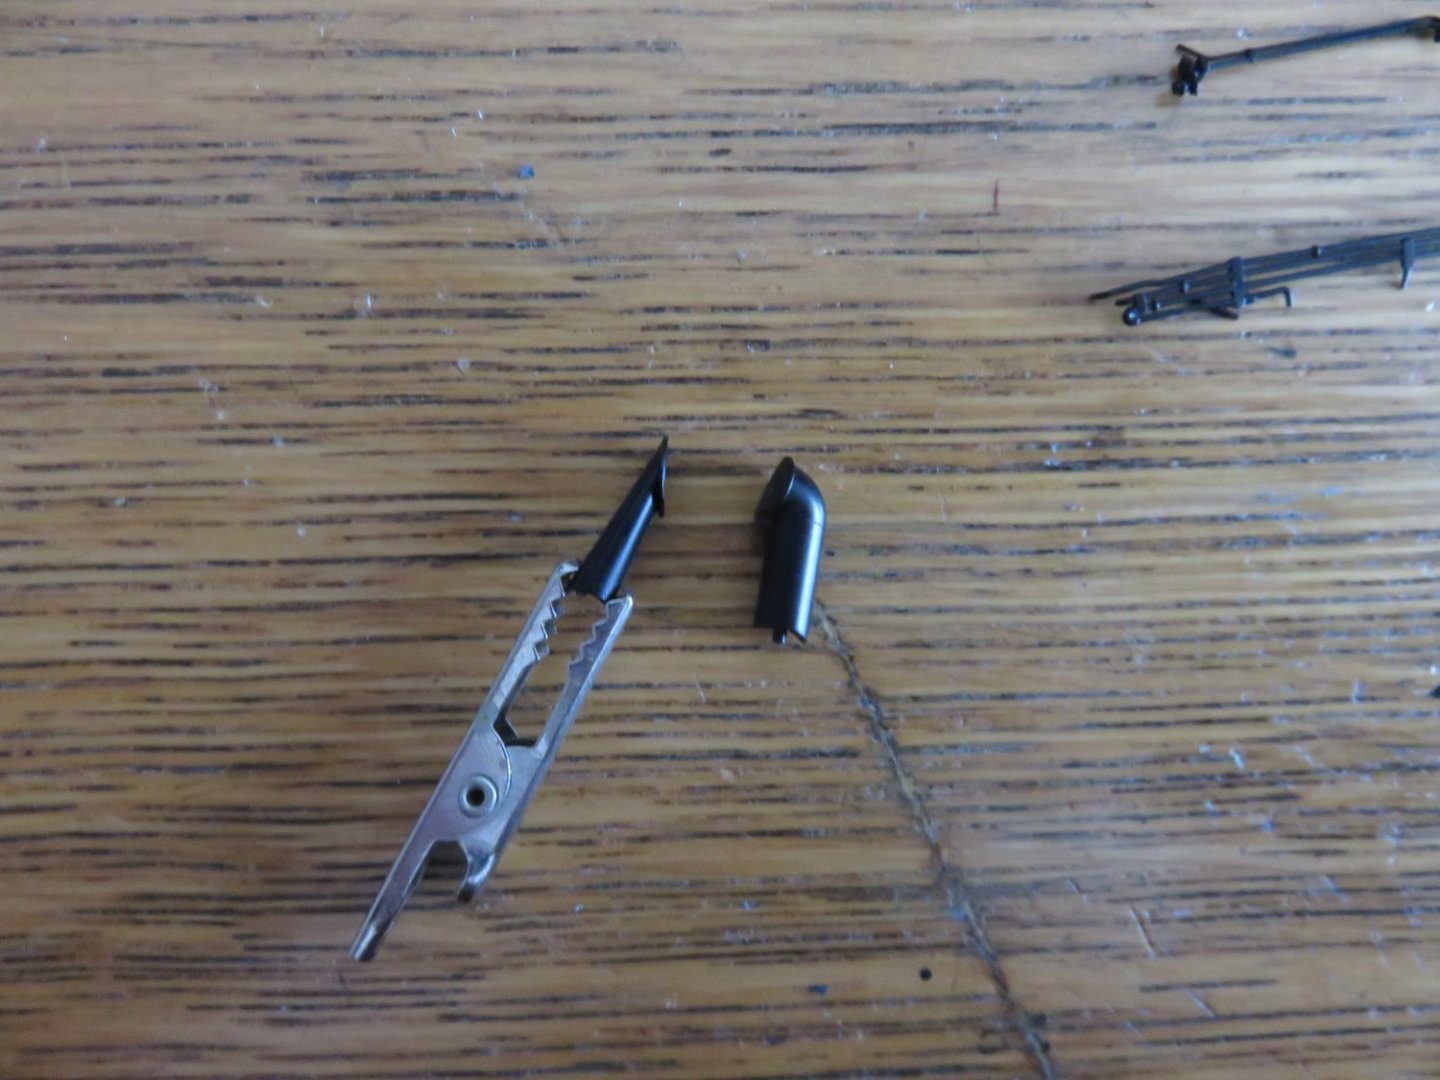
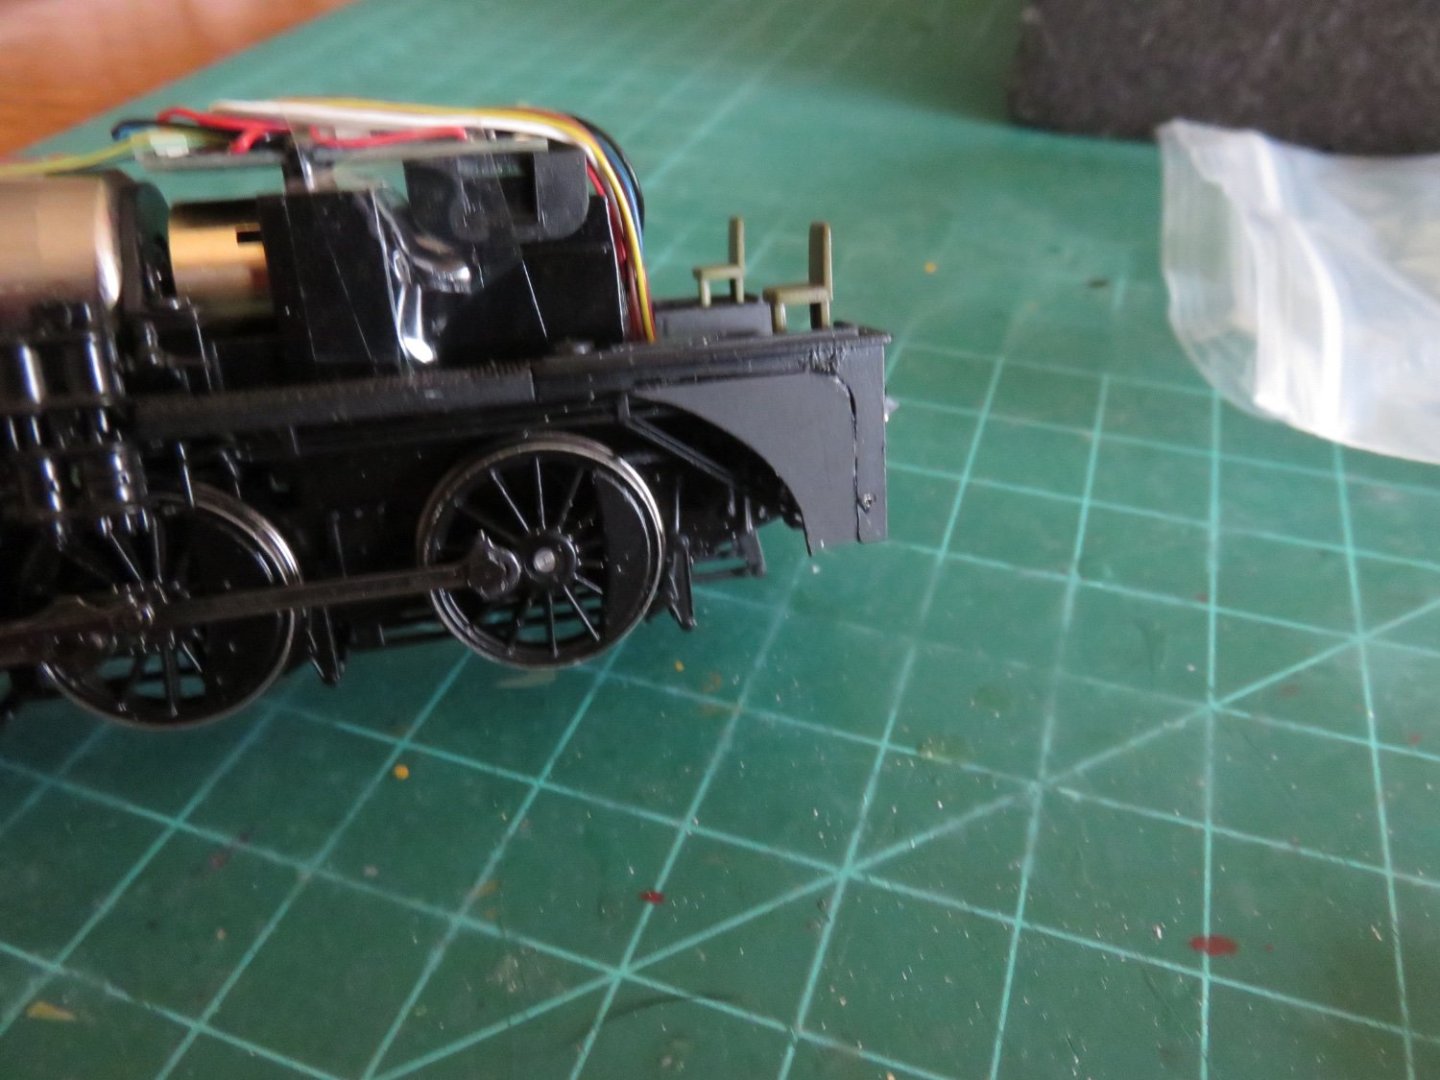
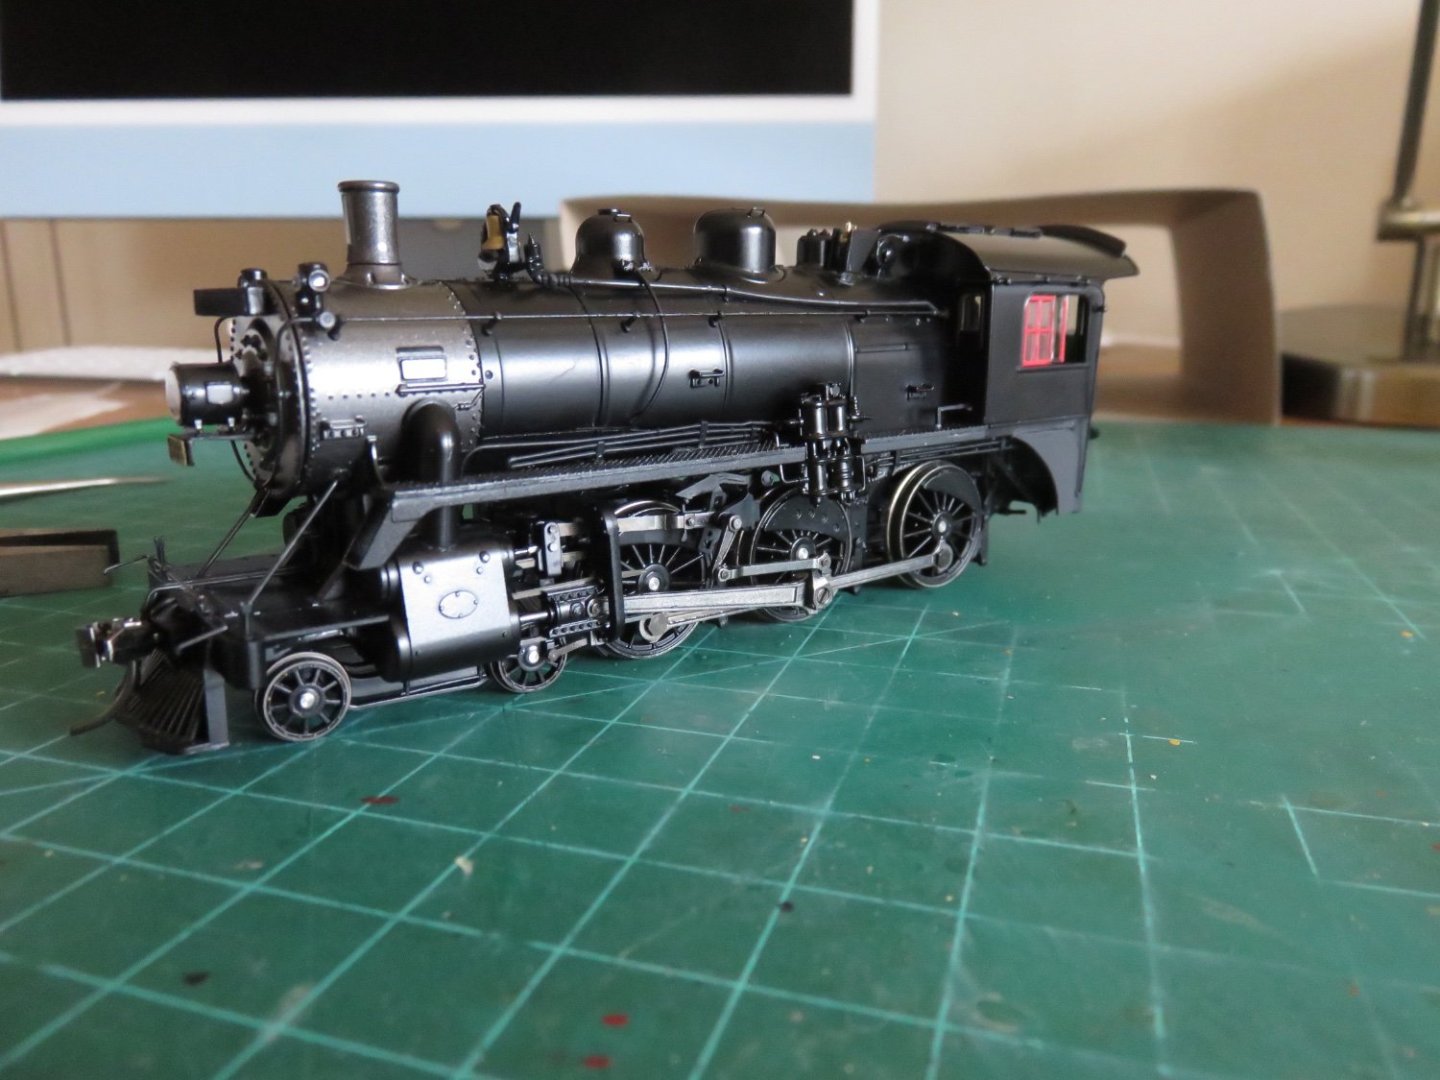
For those who missed it, I recently picked up three 1/87th scale CPR D-10 4-6-0 steam locomotives, recently released by Rapido Trains. All three come equipped with DCC and Sound. If you haven't "played with trains" in a while, you'd be astounded at the technological leaps the hobby has taken! These are absolute jewels of models, the level of detail is almost unsurpassed (I have noted a few small errors, but nothing that detracts from the overall appearance of the models). In my case I received 2 locos that came factory lettered for Canadian Pacific subsidiary Dominion Atlantic, as well as one unlettered version, which will also be lettered up for the DAR. My third D-10 would also require some detail changes to more accurately reflect on my chosen prototype. Thankfully, Rapido has included a small bag of extra parts, so scratch building, or otherwise sourcing replacement fittings has been thus far kept to a minimum. My chosen prototype is D10h #999. This locomotive served on the DAR from the late 1930s until the mid 1950s, when it was transferred to Ontario, until the end of the steam era. As luck would have it, #999 was donated to the Canadian Railway Museum (Exporail) in Delson, Quebec (just outside of Montreal), where it remains to this day. This makes #999 the only DAR steam locomotive to have been preserved. Much information about the DAR and its locomotives, rolling stock, structures and history can be found at the Dominion Atlantic Railway Digital Preservation Initiative. The website includes numerous prototype photos of many subjects, including many of #999 throughout its service life: I was able to make most of the desired changes to my model based of the above and other photographs sourced from the DAR DPI. The first step in my conversion required careful disassembly of the model. Extreme care is needed, there are numerous small, fragile, detail parts, as well as the strong admonishment to follow the instructions included in the manual! After a lot of cursing, and only one or two damaged parts, I managed to get the locomotive broken down into its major sub assemblies: This was necessary in order to access the steam pipes coming from the cylinders, and make modifications to the running boards. I would rather not have had to disassemble the locomotive, but things are as they are. As stated, the first change to be made was to the steam pipes. These are exhaust pipes and they came in two main types on the prototype D-10s. One version had the pipes angled, meeting the smoke box directly, the other had them coming vertically from the cylinder chest before curving in to the smokebox. The model came with the former, so the pipes had to be changed. You can see the difference in the pipes in the above photo, the (supplied) replacements are on the right. The changing of the steam pipes, necessitated a change in the running boards to ones that had notches cut in them to clear the pipes. The left side running board was easily replaced with a supplied part, it only required the shifting over of some detail parts from the "as delivered" part to the supplied replacement. The right side running board required a little work. The supplied replacement had a raised step, found on some D-10s, that carried the walkway over a power reverse mechanism. On my prototype, there was no power reverse, it likely had only a hand operated "Johnson" bar, and therefore a straight running board. This meant I didn't need to remove the details, but I did need to create the notch for the steam pipes. You can see in the above photo, the replacement supplied with the model and my modification. For weight, as many of the model's parts as possible were die cast. I have messed around with other model manufacturers, so I have some experience in the area. It should be noted that different model makers use different alloys. Some are very hard, and some are quite soft. Rapido's alloys are quite hard, so power tools are needed! Some careful Dremel work, but in relatively short order, the running board was modified to fit. The next small modification was found under the cab. For most of her career on the DAR, #999 had a large valance that curved down from the running board flange to the back plate. The model had only a thin flange on the backplate. This was common to most D-10s late in their careers, so I can understand the choice to only make this version for the sake of mass production. I made my valances out of 0.020" styrene sheet that I had on hand, as it closely matched the thickness of the locomotive castings. There is a bit of a visible seam where the plastic and metal meet, but I would rather not mess around with too much sanding and filler near the delicate mechanism. In less than ideal lighting, the seam is hardly visible anyway. After all the modifications, it was time to reassemble and test the model, as well as repair any damaged detail parts. Thankfully there was only one piece of pipework that suffered from my abuse, but a little CA and the damage was put to right. A test run proved that I hadn't caused any harm to any of the mechanism. Whew, breathing again. The next steps will involve a little more cleaning of the model, as it arrived from the factory rather generously lubricated, and some oil has found its way onto the surface of the model. Not a big deal, I would rather have the mechanism functioning properly than having it come out of the box squeaking like a mouse the first time it was put on the track. For lettering, I dug deep into my stash and pulled out a set of decals from Black Cat publishing (I was worried I might have to order a set, but I found I still had one left). They are very nice decals to use, I've had a lot of success with them in the past. I also pulled out a set of PE number boards from Andy Mallet at MLW Services. I got them a long time ago, so despite the presence of a web site, I'm not sure if he's still in business. Since I had the paint and glue at hand, I didn't waste too much time getting the number board on: In the past I've used gold coloured decals to replicate the number board, but the opportunity presented itself to use PE instead. To prepare it I simply painted the board black, followed by dry brushing brass paint on the frame and numbers. The project as it stands now: My next update should have all the lettering applied, and sealed in, ready for a little bit of weathering. Andy


- 15 replies
-
- 16
-
-
-
No doubt the parts in question on the prototype received their fair share of dings and dents from pebbles tossed up by the propeller, a heavy handed mechanic, or a glancing blow from an incoming bullet. Can’t really see anything in the way of doggy damage in your photo, looks pretty good! Andy
- 54 replies
-
- 11
-
-
Nice! Glad to see it arrived. Can’t wait to see you get after it, or will you be waiting on any aftermarket goodies that might show up? Andy
-
You’re gonna need a bigger garage…. Andy
-
Looks like a good sized backdrop. Have you considered perhaps doing one in all black (floor and walls)? I noticed in your previous photos, the colours of your car models looked really vibrant against the black “floor”. Andy
-
I think it depends on what the goal is. For a diorama, sure, it’s very void of the details that would be found in any typical shop. But for a photo background, I think it works, as there is no extraneous detail to distract from the actual subject. The colour scheme may be a bit stark (the white walls and black floor probably plays havoc with the camera), so perhaps some improvement could be made in that respect, but I wouldn’t go crazy adding details. Andy
-
The difference is how the stairwell is constructed. The modern requirement is for the stairwell to be sealed by A60 bulkheads and automatic self closing fire doors. This is to prevent the vertical spread of a fire, and it also allows the stairwell to qualify as a secondary exit. Many ships up until the 1990s were built with open stairwells, and accommodation blocks didn’t require the same degree of internal fire separation. Although regulations still differ from country to country, the number of smoke detectors has increased (In Canadian ships, for example, every cabin is required to have a smoke detector). All insulation and panels inside the accommodation must be non-flammable material. The likelihood of a passageway becoming completely filled with smoke is significantly low, far lower than it used to be. You would have to be able to sleep through an extremely loud fire alarm for a significant amount of time before smoke becomes a problem (the alarm sirens are required to be “temporal”, ie they hurt your ears). I have, somewhere in my files, a digital copy of the LSA and FFA plans for a ship built in 2012. I’ll have a search and post some screenshots for you, so you can see the modern arrangement. Andy