
Bruma
-
Posts
179 -
Joined
-
Last visited
Content Type
Profiles
Forums
Gallery
Events
Everything posted by Bruma
-
Thank you every one for answering! Well, it turns out that I have the very same book! It is from that reading (and from the Campbell's sail plan) that my question came out. Interestingly enough, at pag 142 I have, under the chapter "Downhaul": "... leads down the luff trough one or more lizards...", not mentioning the "seized to the hanks". Well, this is the answer I was looking for, thank you again!
-
 Apologies are not needed! I really enjoy this wonderful conversation, and I'm glad to be the humble host! Please keep going! 🖖
- 399 replies
-
- 3
-

-
- cutty sark
- revell
- (and 2 more)
-
Well, you are right Kirill, this portion of the bow is not well represented by the kit. The space on top and below the middle rail seems to be too small. And I should have used hearts instead of deadeyes. The problem was that I wasn't able to build small enough hearts, so I decided to use deadeyes instead. They are about 2 millimeters on diameter. I should have mentioned my poetic licence. Sorry. That being said, the position is correct in my opinion. Can you please tell me something more about your doubt? Since I am a bit ahead in the build compared to what I'm showing now, I doubt I can fix It, but still I am interested! I really need to run and post more frequently to keep up with the build and fully benefit from the community feedback.
- 399 replies
-
- 2
-
-
- cutty sark
- revell
- (and 2 more)
-
Hello everyone, in my understanding, the dawnhaul of jib, outer jib, fore topmast stay and so on, pass through one or more lizards in order to avoid chafing. What I don't understand is where the lizards are attached. It makes sense to me to splice them to the relative stays, in order to let them free to run up and down when the sails are taken in or out. Is this correct? Another option could be to attach them to the sails rope on the luff. Another question is: which side is preferred to let the dawnhaul fall free? Is there a rule? The question is referred to a clipper, since the method might have changed during centuries. Thank you!
-
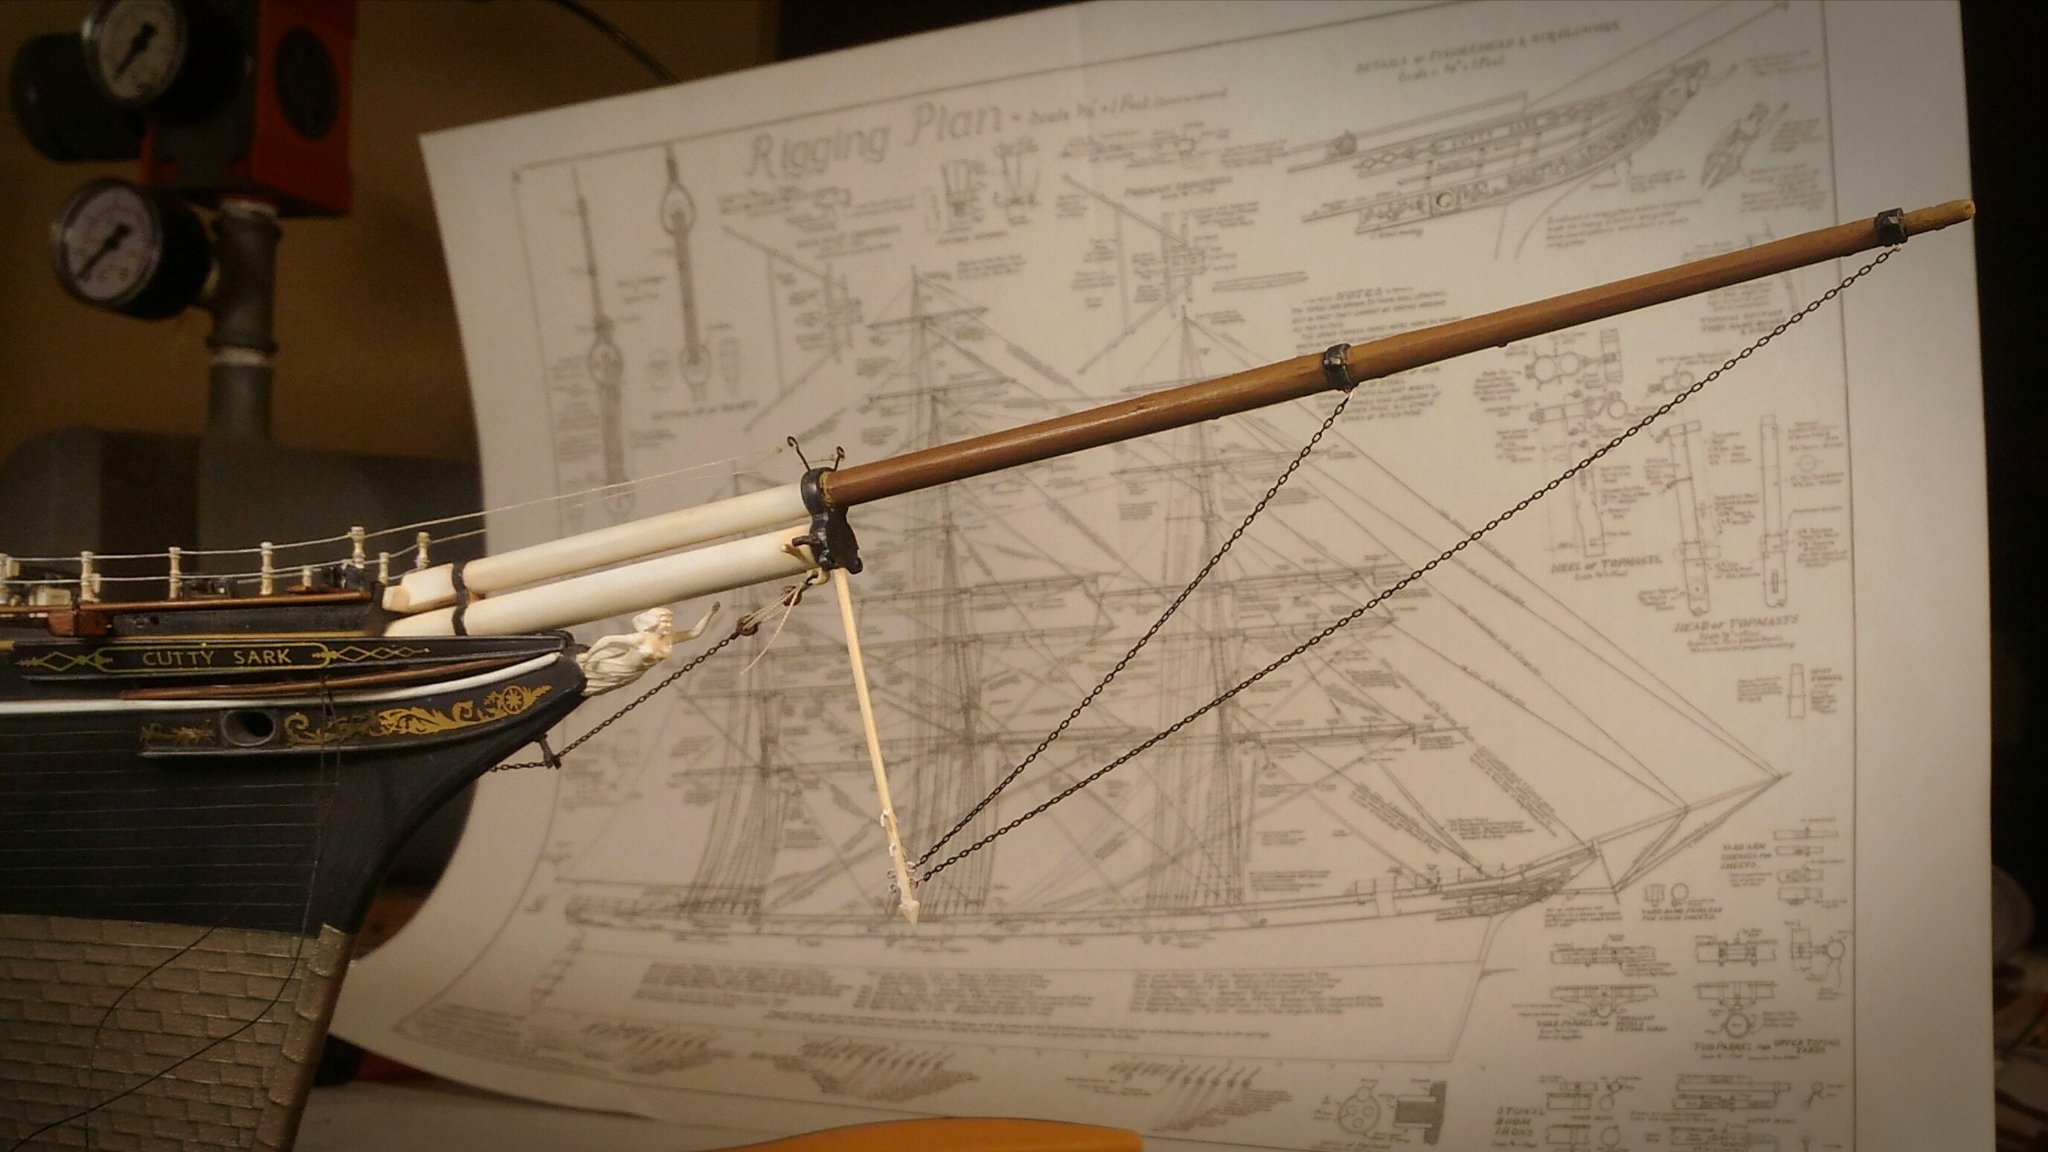
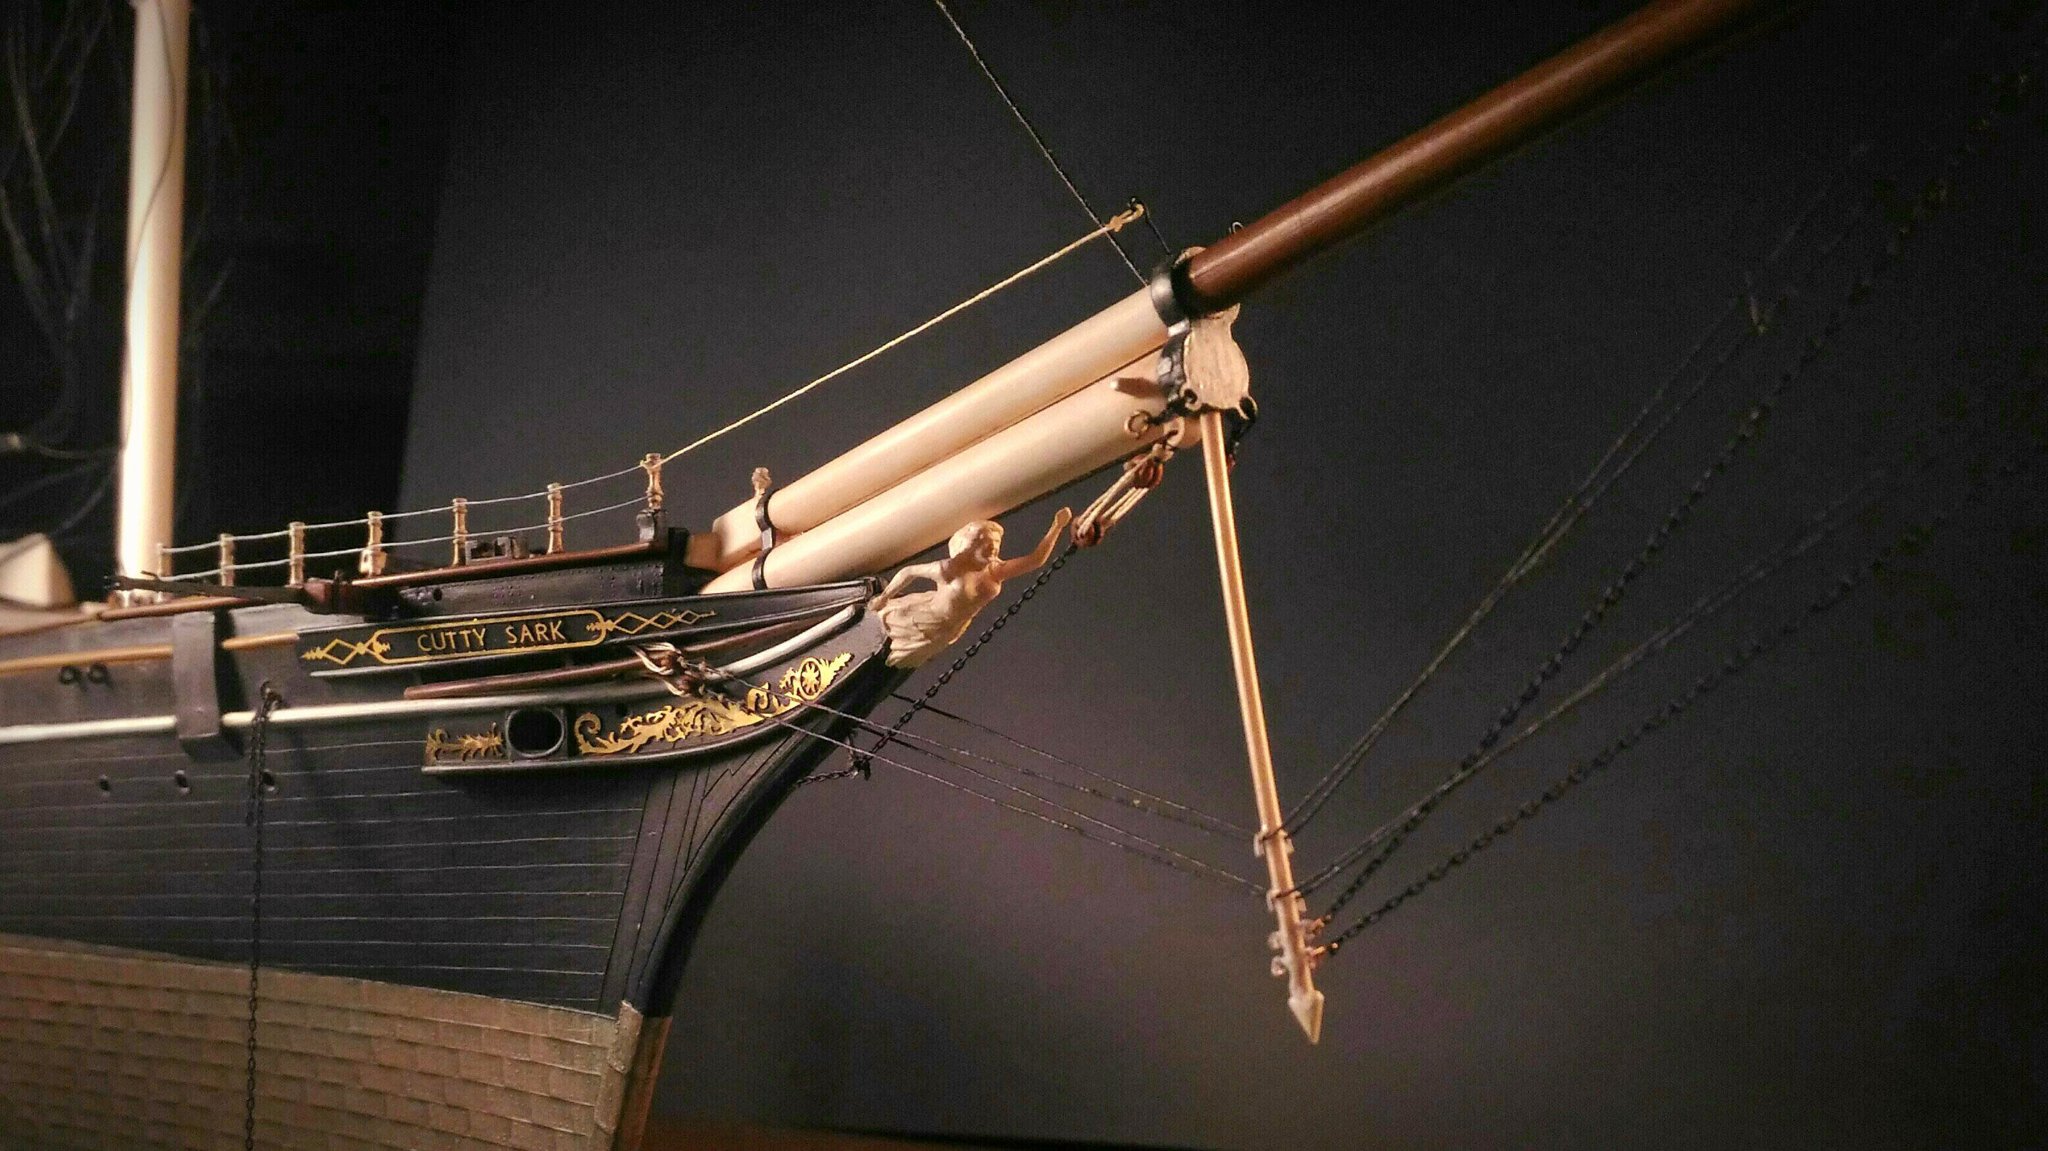
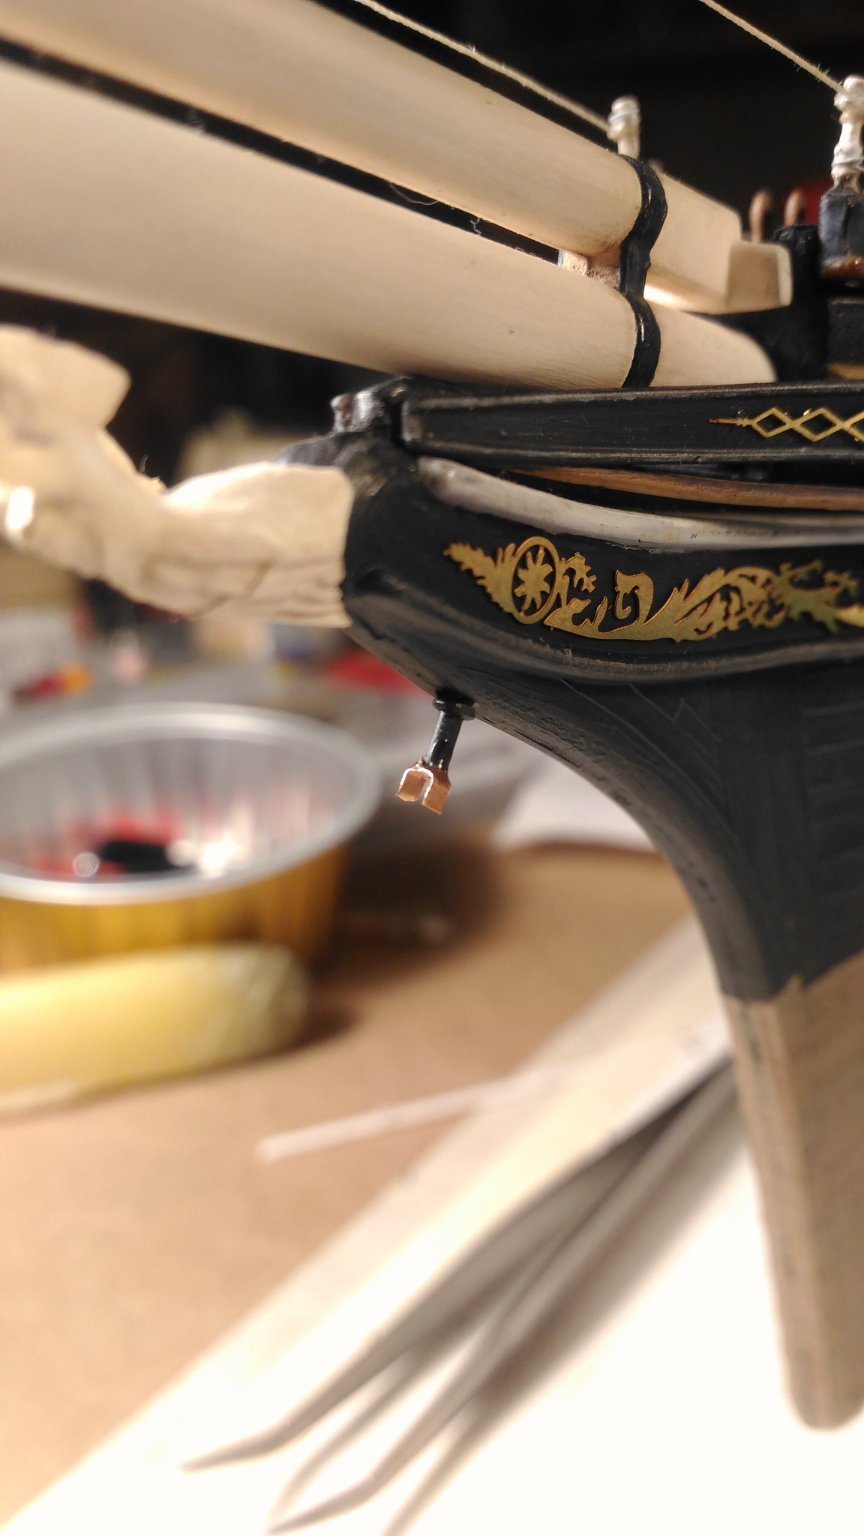
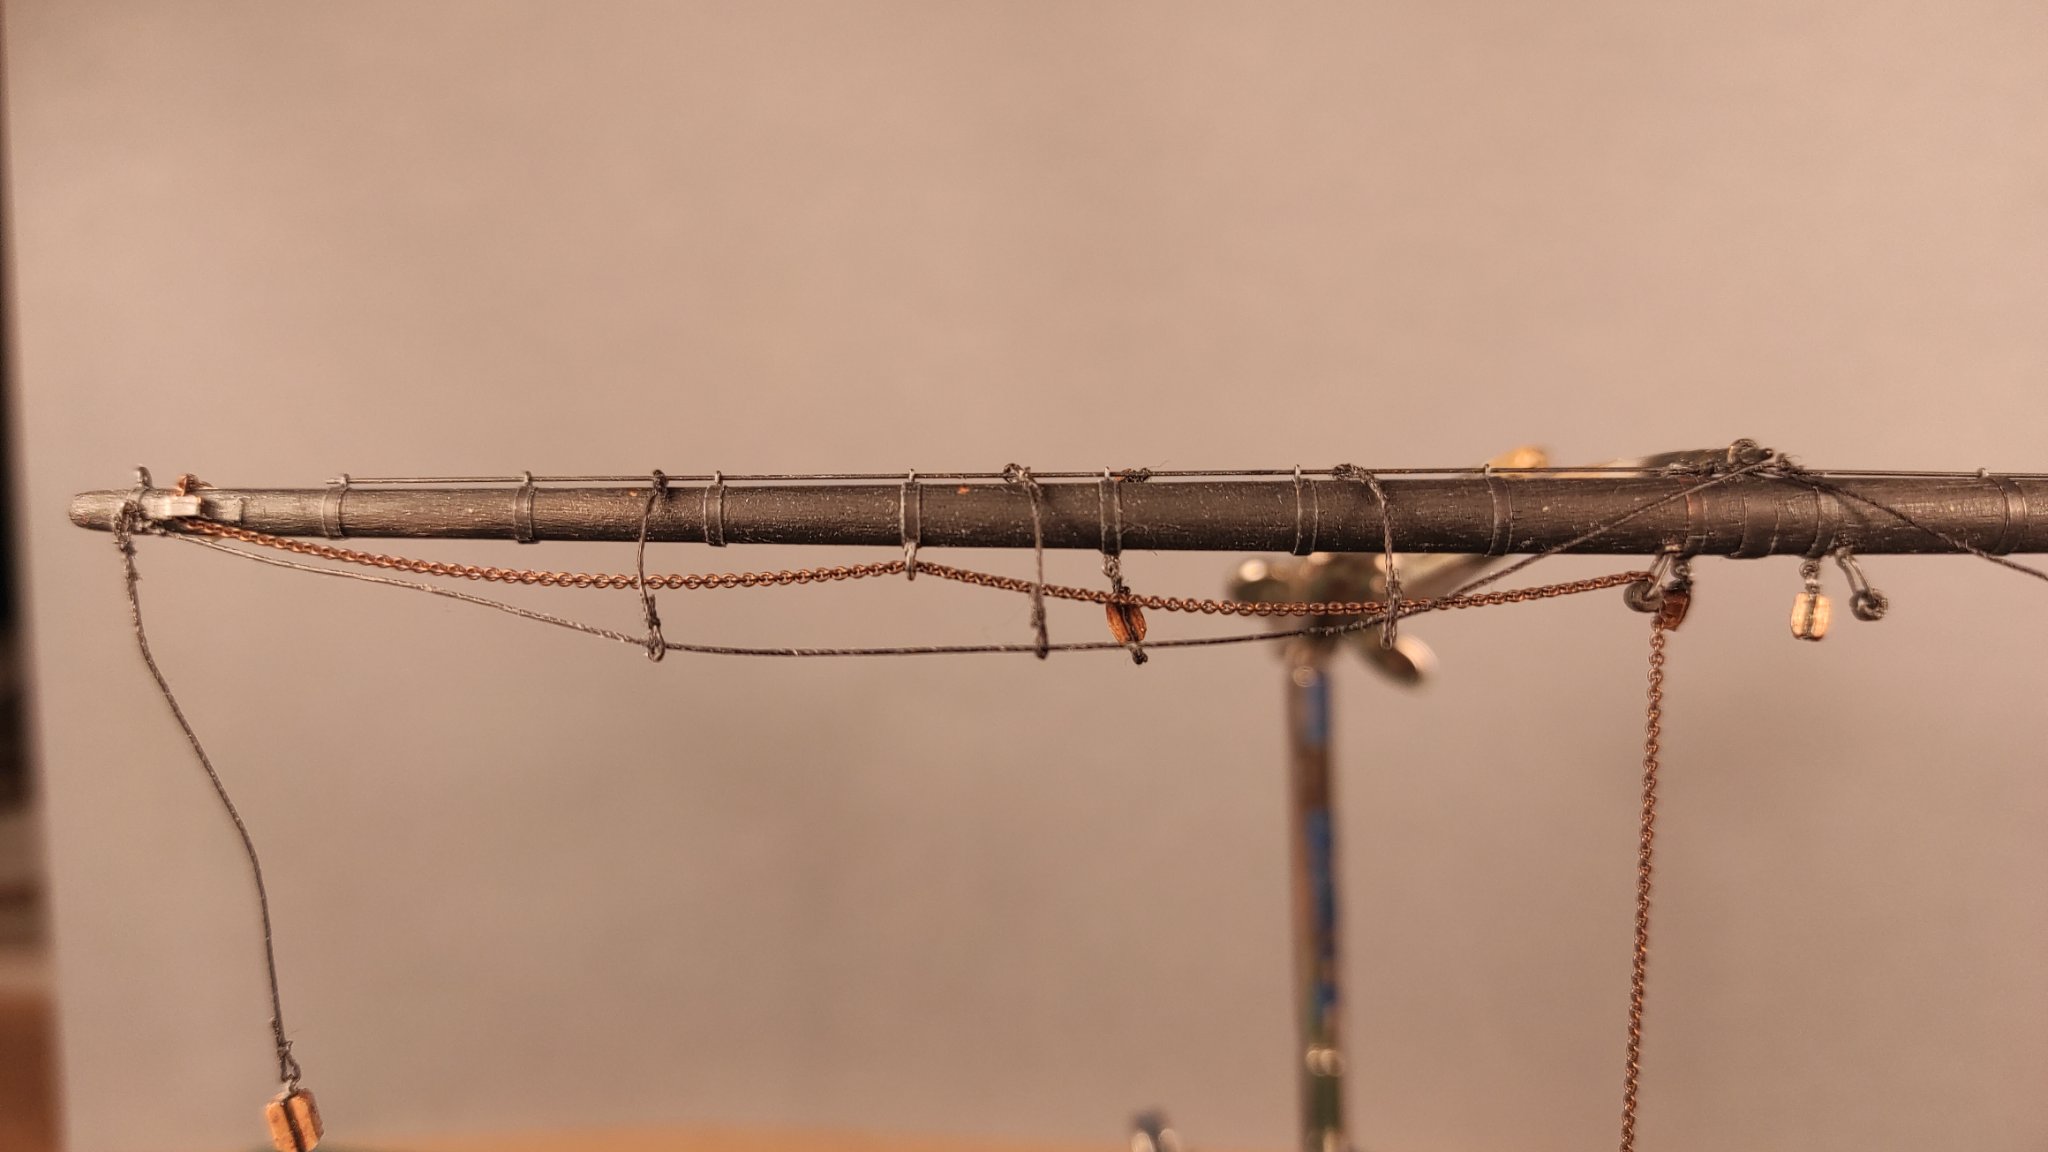
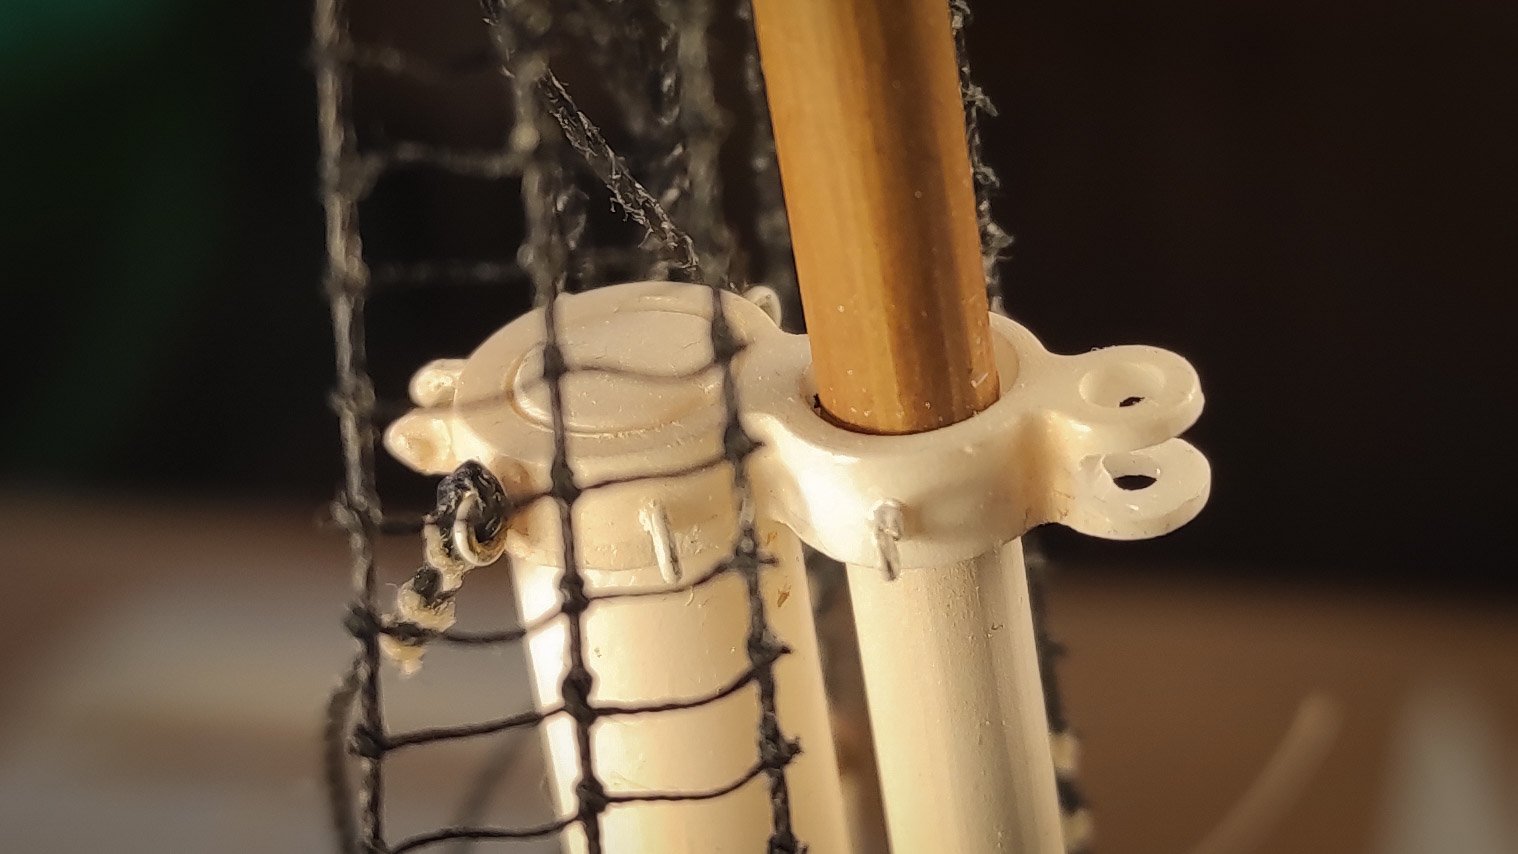
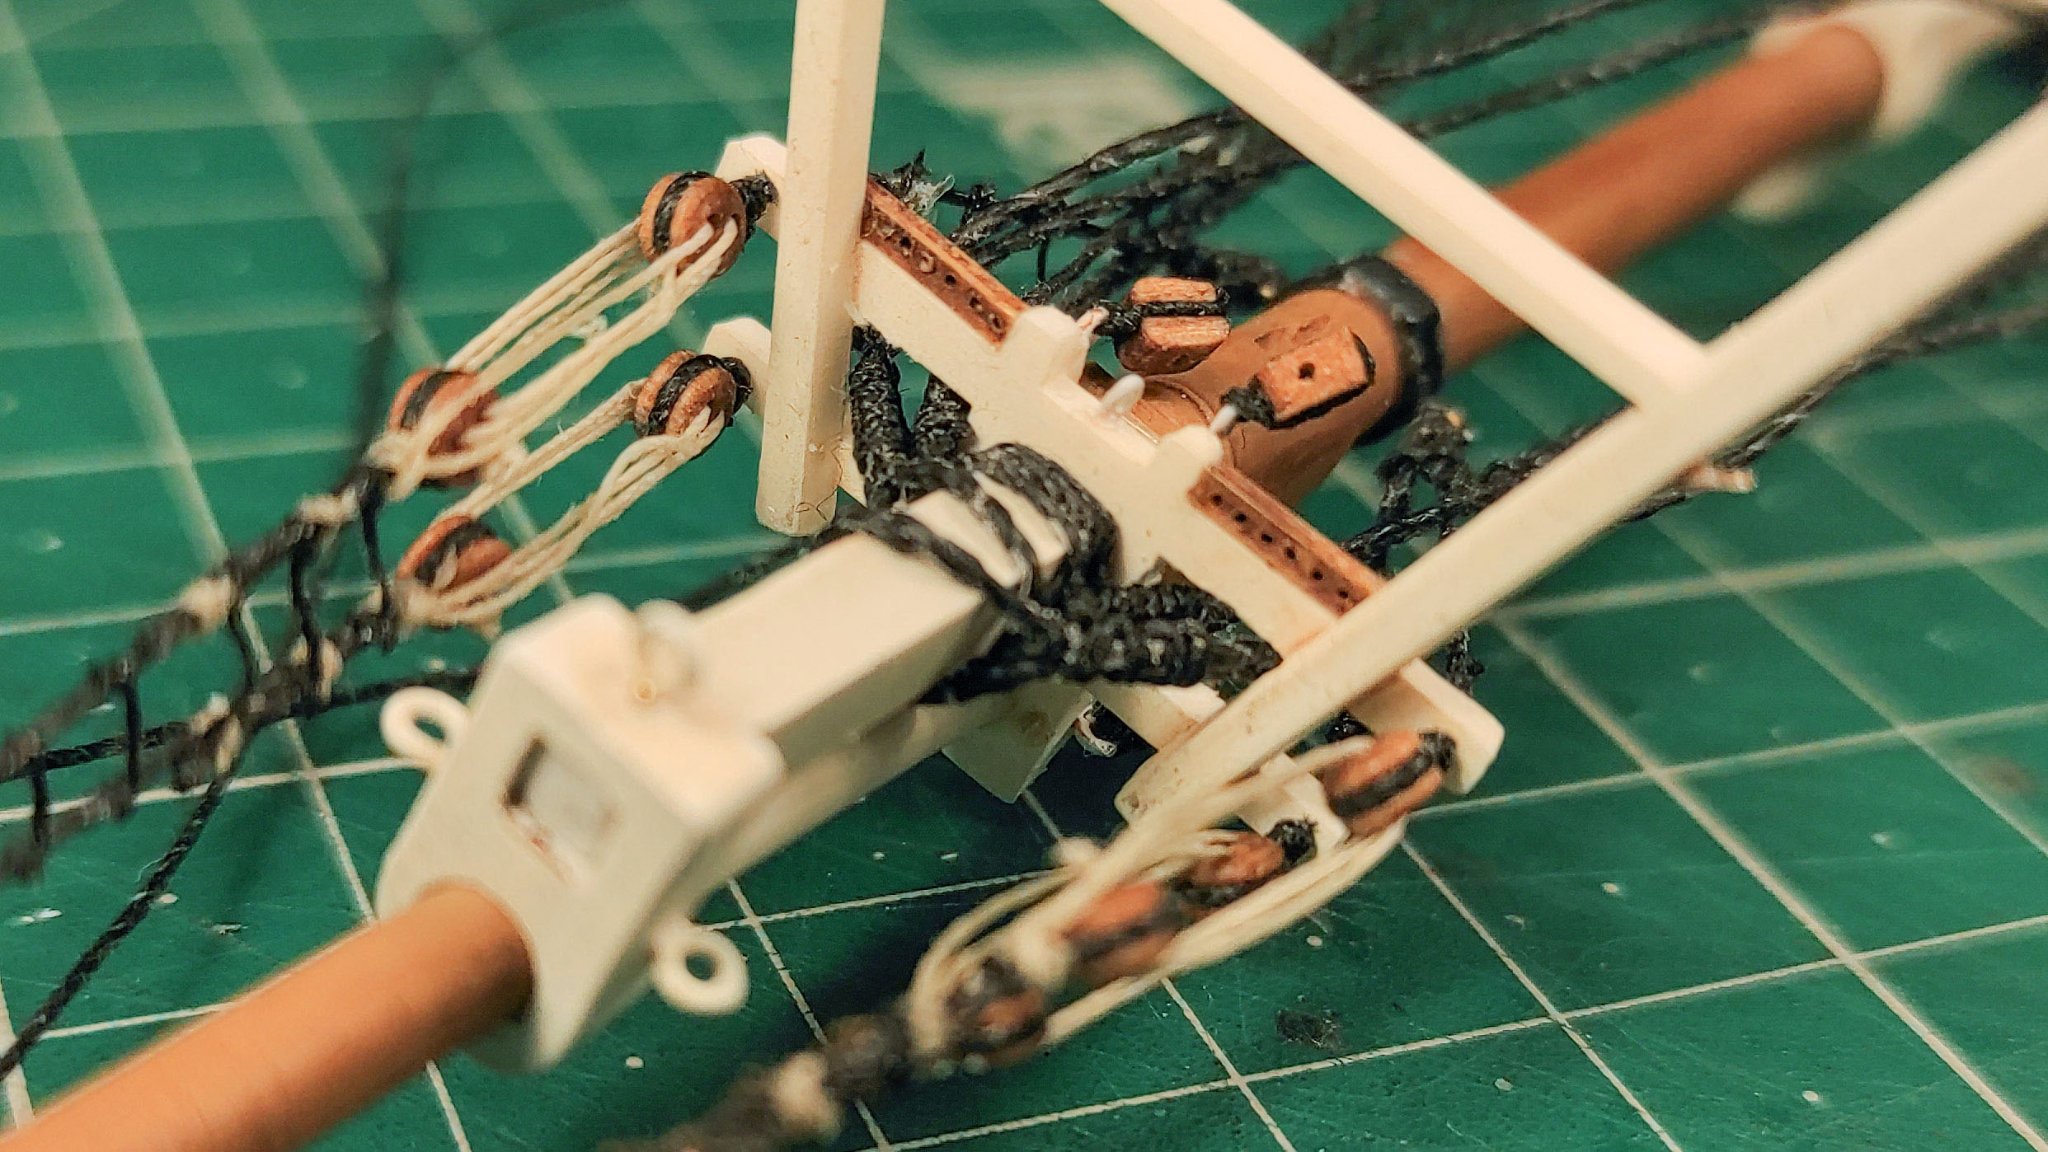
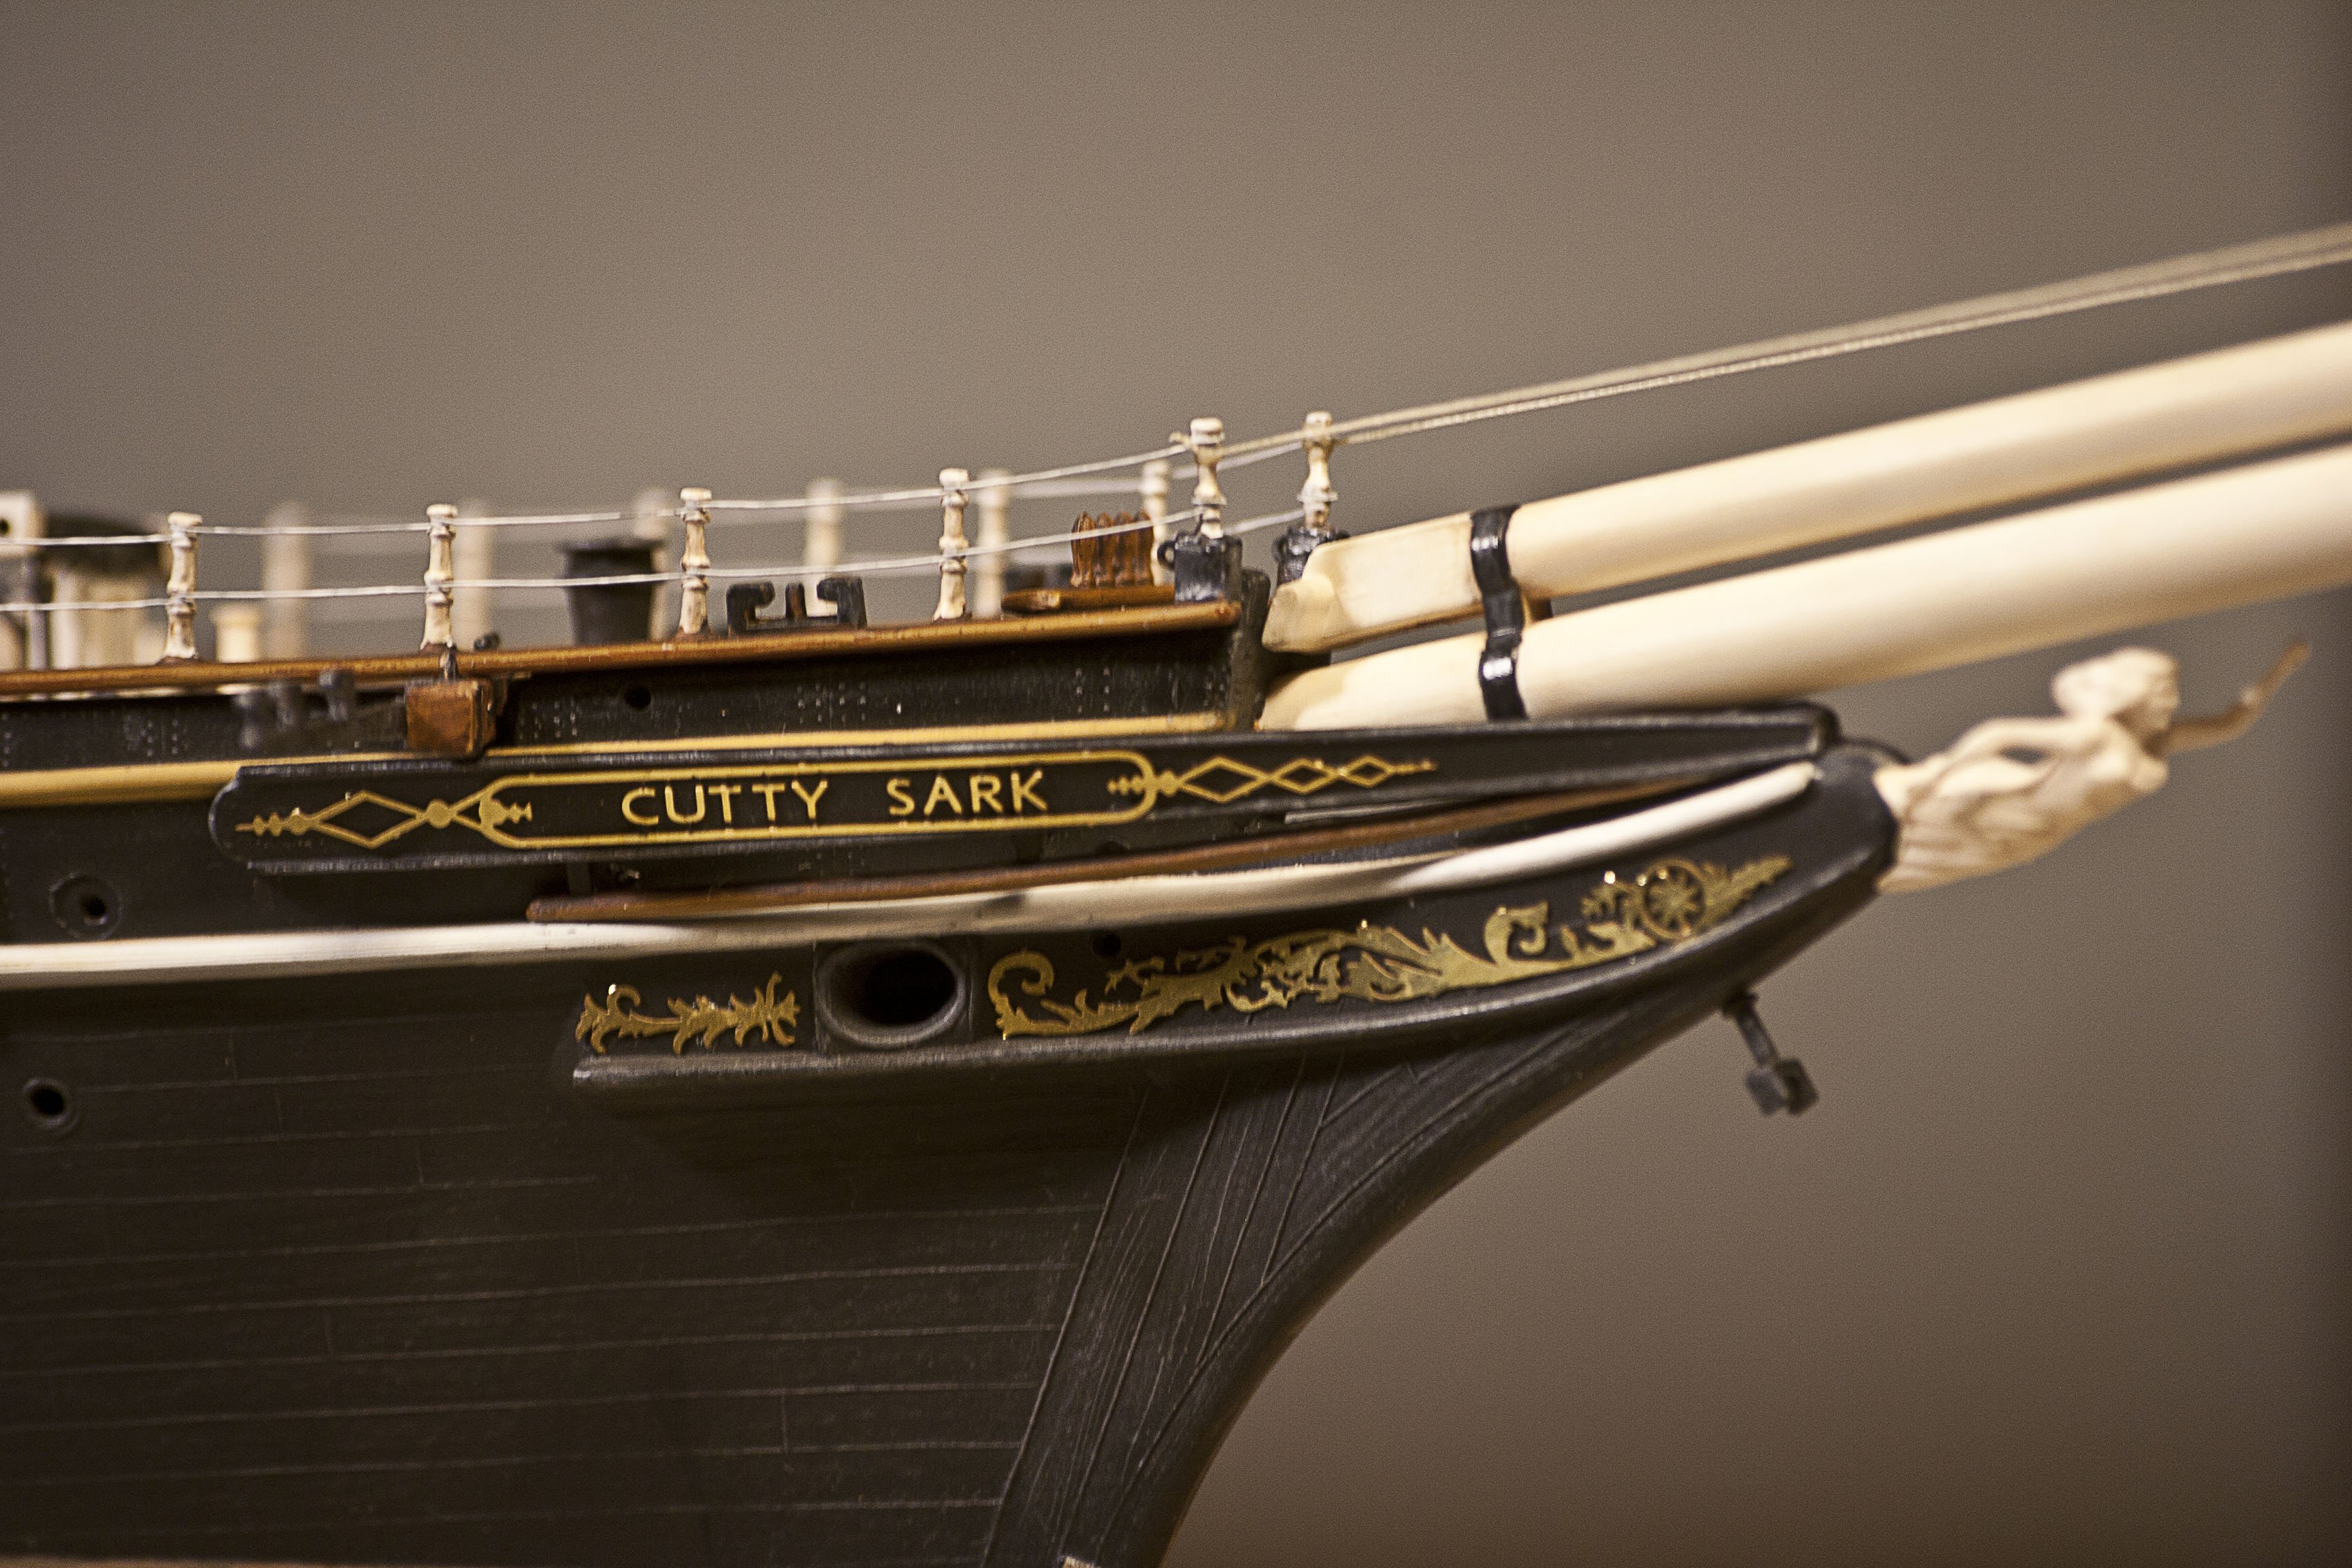
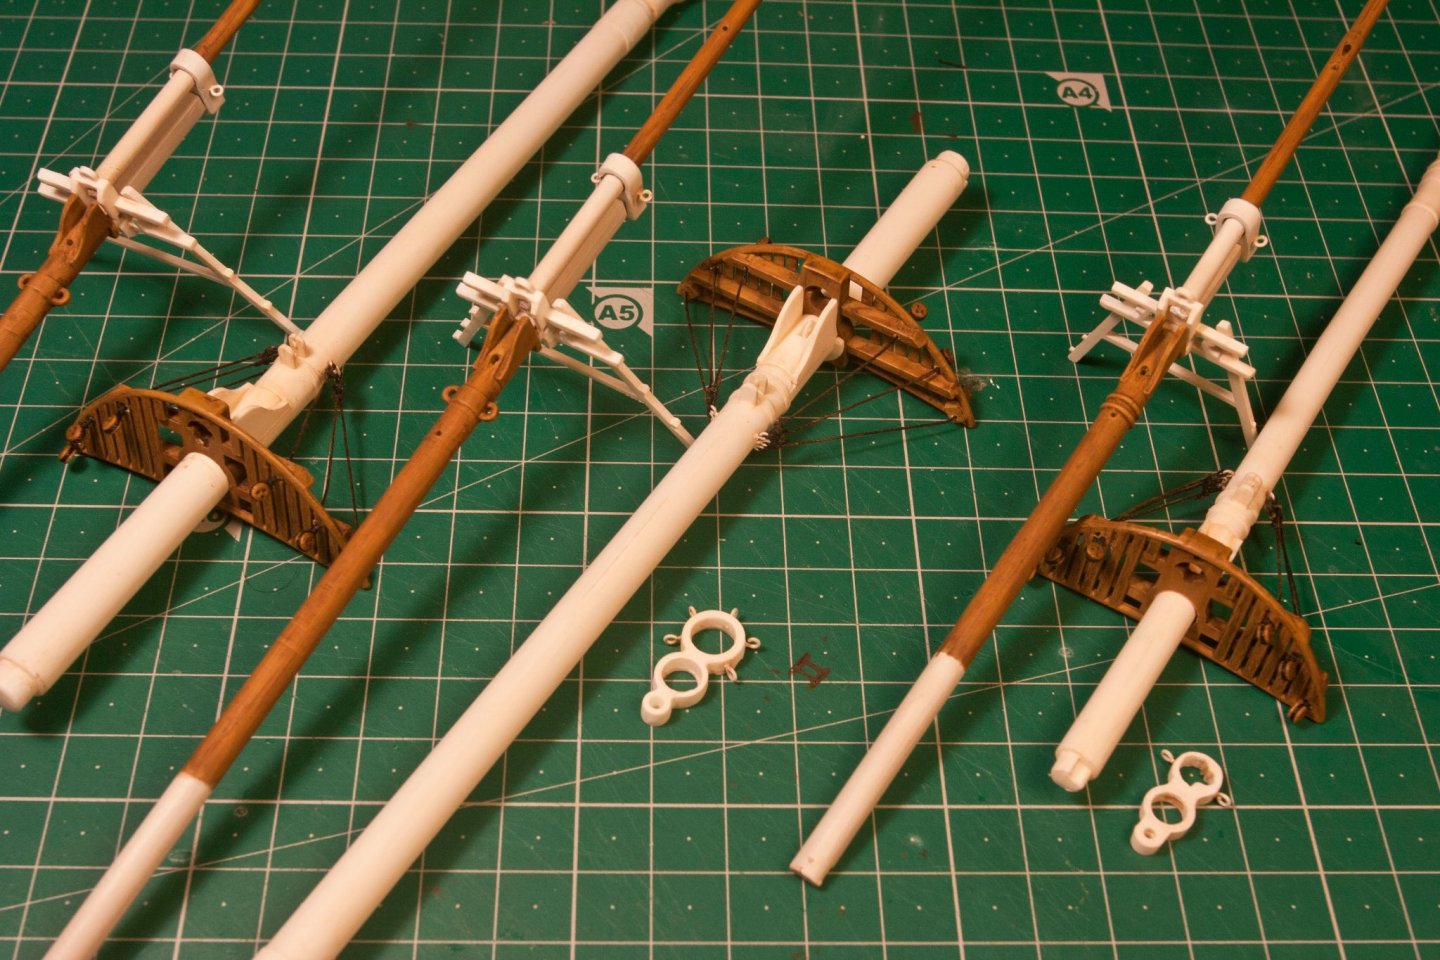
Let's hope someone can tell us the proper name for this "spreader". I'm not prepared to admit the existence of a part of a ship without a proper name! 🤪 Time for updates: Ratlines and bowsprit rigging. The ratlines were a big question mark for me... I have never tried to do something similar before, and I tried different methods. I build myself a jig to make as many tests as I want, in order to find the best solution and to practice as much as possible. I ended up with the clove hitch. It is a time-consuming solution, but it seemed to be the better one. So after a lot of practice on the jig, I started on the fore mast. Many times during the build I tested for the first time solution and techniques on the fore mast. Sometimes there are no other options, but in this case it would have been smarter to start with the mizzen mast. There the eventual mistakes are less visible... Anyway, with a bit of luck, I made it! And this is the result: The distance between each line is in scale, taken from the Campbell’s plans resized to fit the real size of the model. I’m quite happy. My goal was to make them evenly tensioned, without distorting the shrouds. Next I started the rigging of the bowsprit. This area is quite complex. A lot of planning needs to be made in order to rig everything without going crazy… I started with the inner and outher martingale stays and the bobstay. The are chains by trumpeter, see the discussion above about the chains, they are the third one on post #61. The eyebolts on the lower side of the bowsprit need to be built too, they are not present in the kit. While working on the eyebolts, I also make the original ones a bit thinner, drilling a bigger hole in the plastic ones. The bobstay is a bit more complex: it has deadeyes, and it is made fast to the bowsprit with a ring. I tried to replicate this feature, but it was not an easy task. I wanted to have the correct distance between the deadeyes, and so the chain needs to be cut of the precise length. It was an interesting process overall and this is the result: The picture above shows also the martingale completely painted and the handropes and relative poles. They are not present on the kit, and they need to be added. Next I moved to the jib stay, the fore topgallant stay, flying jib stay and fore royal stay. Instead of starting to rig them from the mast (which is not yet glued in place), I started from the hull. They are attached by deadeyes and the innermost ones are under the bow decoration. Again it was not that easy to make them… New holes need to be drilled in the hull to fit the eyebolts and the location has to be so that the lines can pass through the decorations without zigzaging. And here they are: The bowsprit is nowhere near the end, but it starts to take shape!


- 399 replies
-
- 8
-
-
- cutty sark
- revell
- (and 2 more)
-
Congratulation for your wonderful Cutty Sark! Looking at your sails there are details that catches my eyes. Your yards seem to have the jackstays, as the real Cutty Sark have. However, your sails are bent on the yards, and not on the jackstays, which is, in my understanding, the correct way of bend them. Secondly, the chains going up from the edge of the lower yards should be the sheets. If so, they should be shackled to the sheet point of the upper sails, not to a block below an upper yard. Please take this lines only as an open discussion, I have in no way the intention of criticize your model, which is beautiful. I'm myself building a Cutty Sark , I know how complex it can get to follow the rigging, and I would like to discover any eventual mistakes as soon as possible to correct them. That's why I'm writing you. I am in no way an expert, so take my advices as they are, just a guess, and if you like your model as it is please ignore them!
- 48 replies
-
- 1
-
-
- Cutty Sark
- Artesania Latina
- (and 1 more)
-
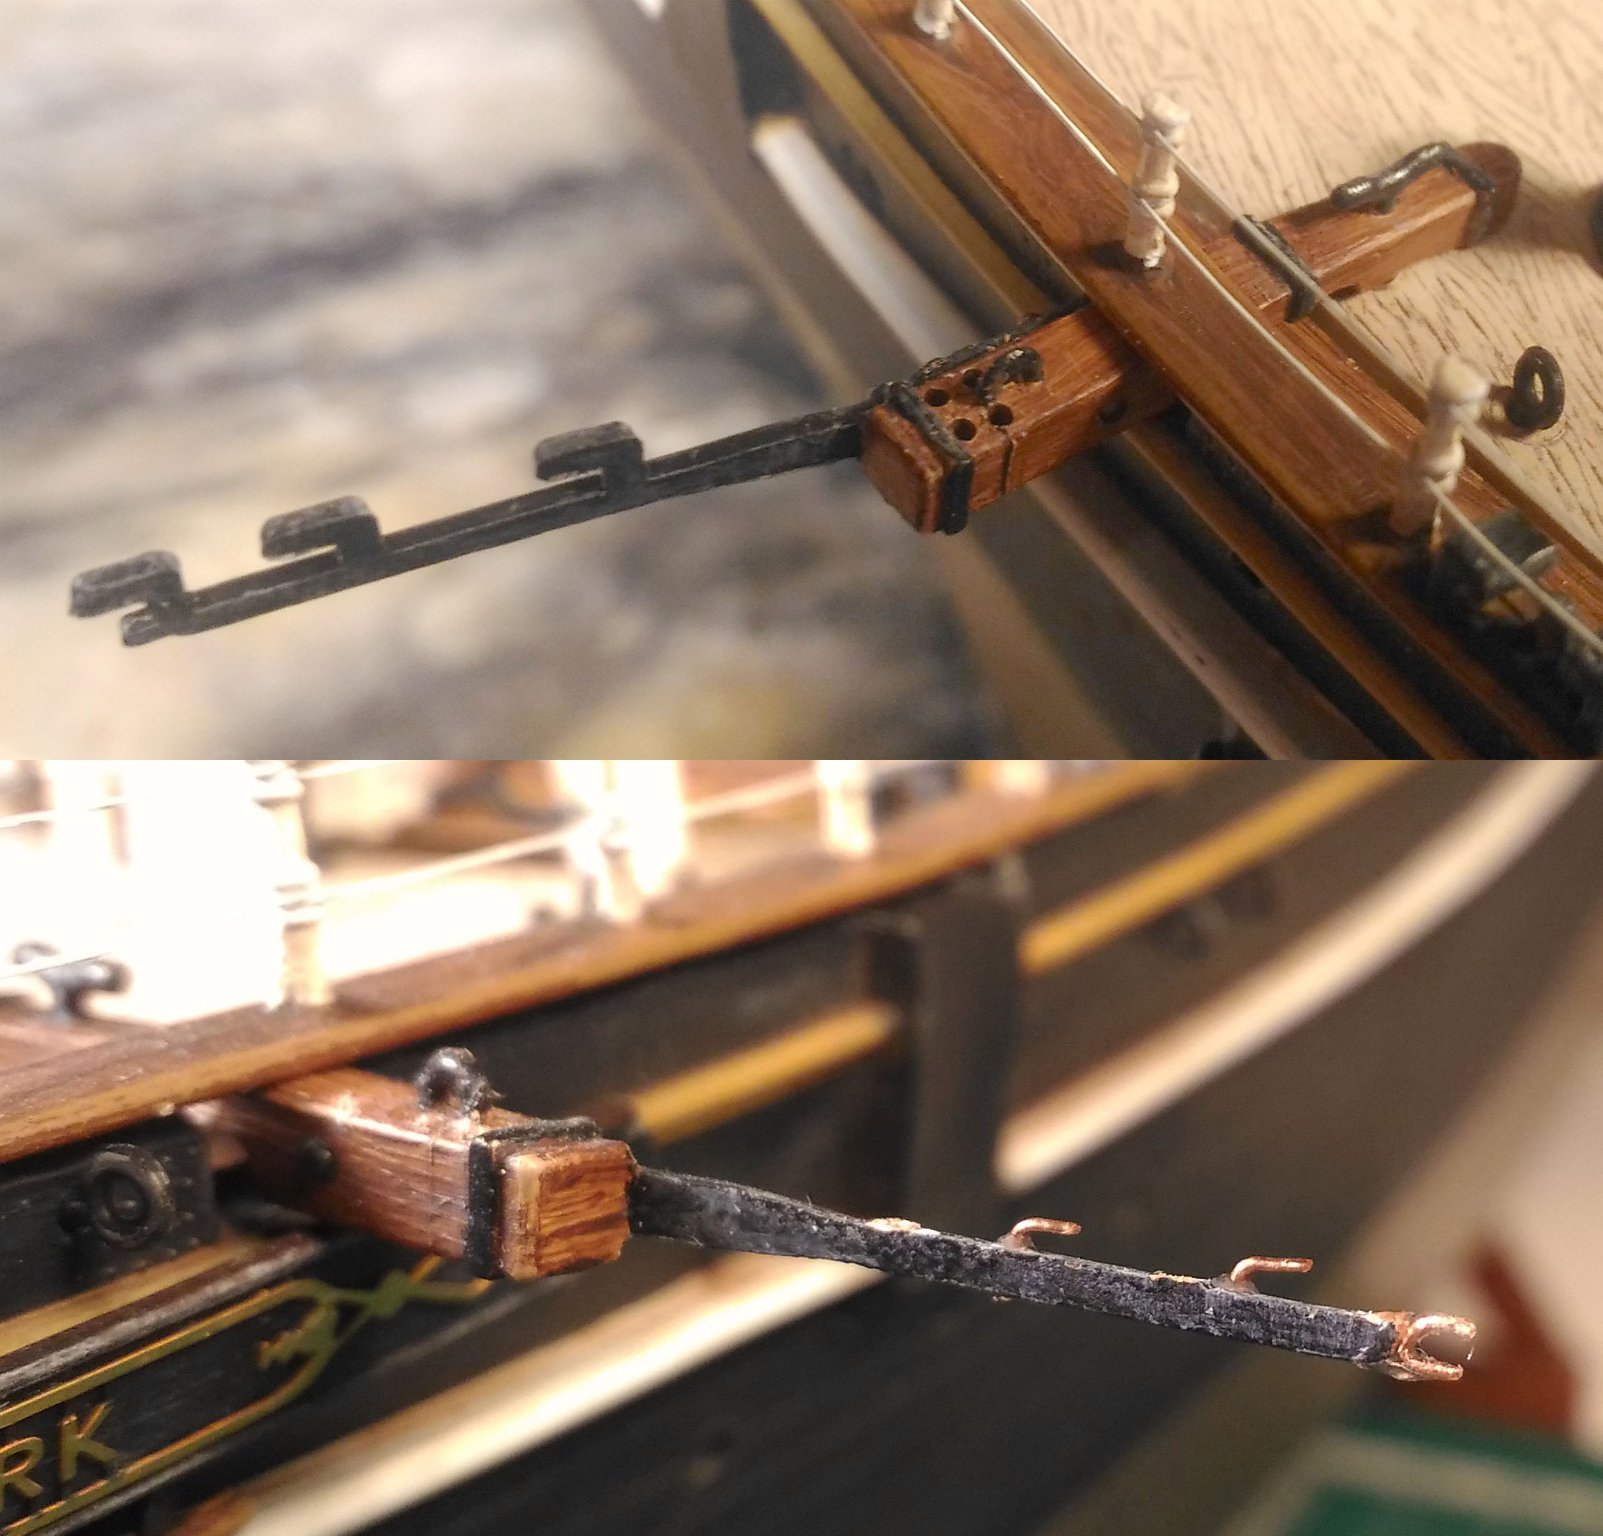
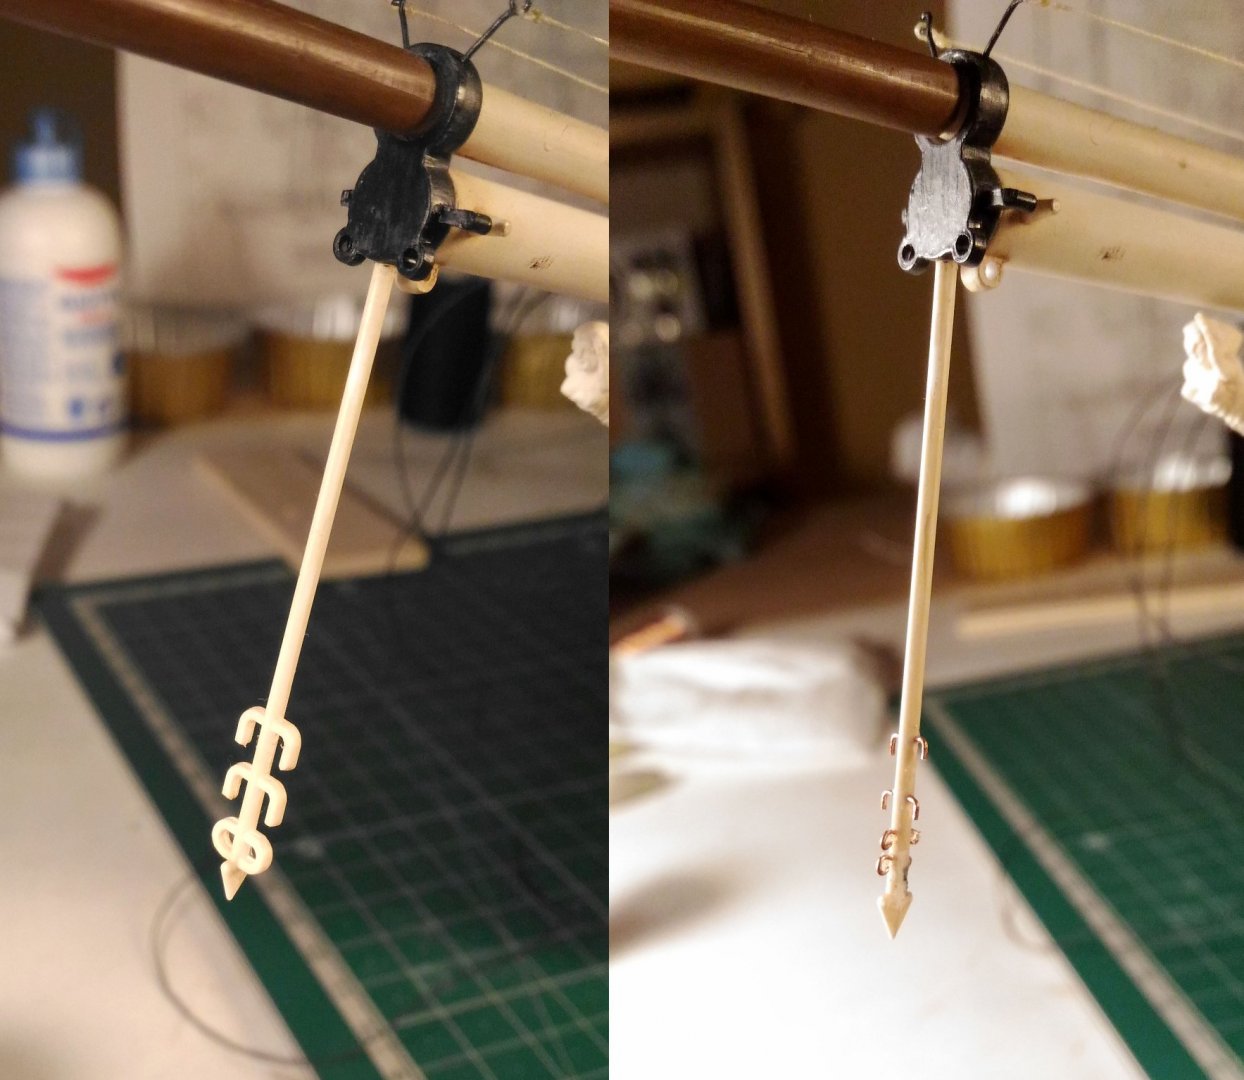
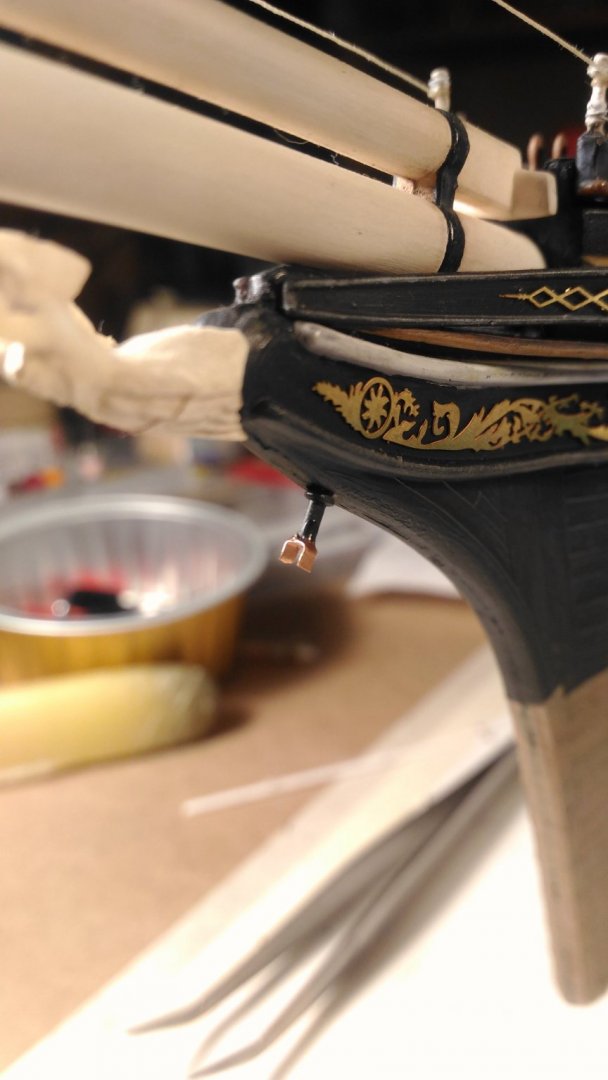
Thank you, Shipman! They seem to be quite small indeed. Kirill. I’m sure you'll be successful! I have just realised who you are by looking at the link in your signature and I invite everyone to do the same. Your spanish galleon is a true marvel, an inspiring work and an example of what can be achieved starting from a humble plastic kit. I’m glad to have you aboard! Some small updates: Martingale and whisker booms. I decided to try to improve those areas. They are quite visible and due to the restriction of plastic, Revell made them quite big and bulky. Replacing them was a delicate decision… After some tests I decided to go ahead, and I removed completely the original cleats and lugs. The new one are made out of copper wire, pressed where needed to obtain a flat surface. Almost all of them are secured by small holes inside the plastic part and then glued. Only the outermost cleats of the whisker are secured only with ca glue. I used the gel version, which is denser, and it dries slowly. I use the CA glue not only as a glue but also as a filler and the result is a quite strong bond. The following pictures show this two parts before and after my attempt to improve them They are still unpainted to better notice the added parts. Please note that the catheads are still a work in progress… For the same reasons I decided to make a new spreader under the bow (I’m sure it has a proper name, but I can’t find it)

- 399 replies
-
- 10
-
-
- cutty sark
- revell
- (and 2 more)
-
Hi Kirill4. For the main I use 3 mm deadeyes, top and topgallant are 2 mm. They are simply the smallest I was able to find on the market at reasonable cost. I don't have the tools to make them by myself with the needed precision and uniformity. They are from Amati and even if they are the smallest available for me, they are still too big, unfortunately... Edit: I was answering the first post while you wrote the second one. The answer given to shipman should be good enough but if you need more information you have just to wite me!
- 399 replies
-
- 3
-
-
- cutty sark
- revell
- (and 2 more)
-
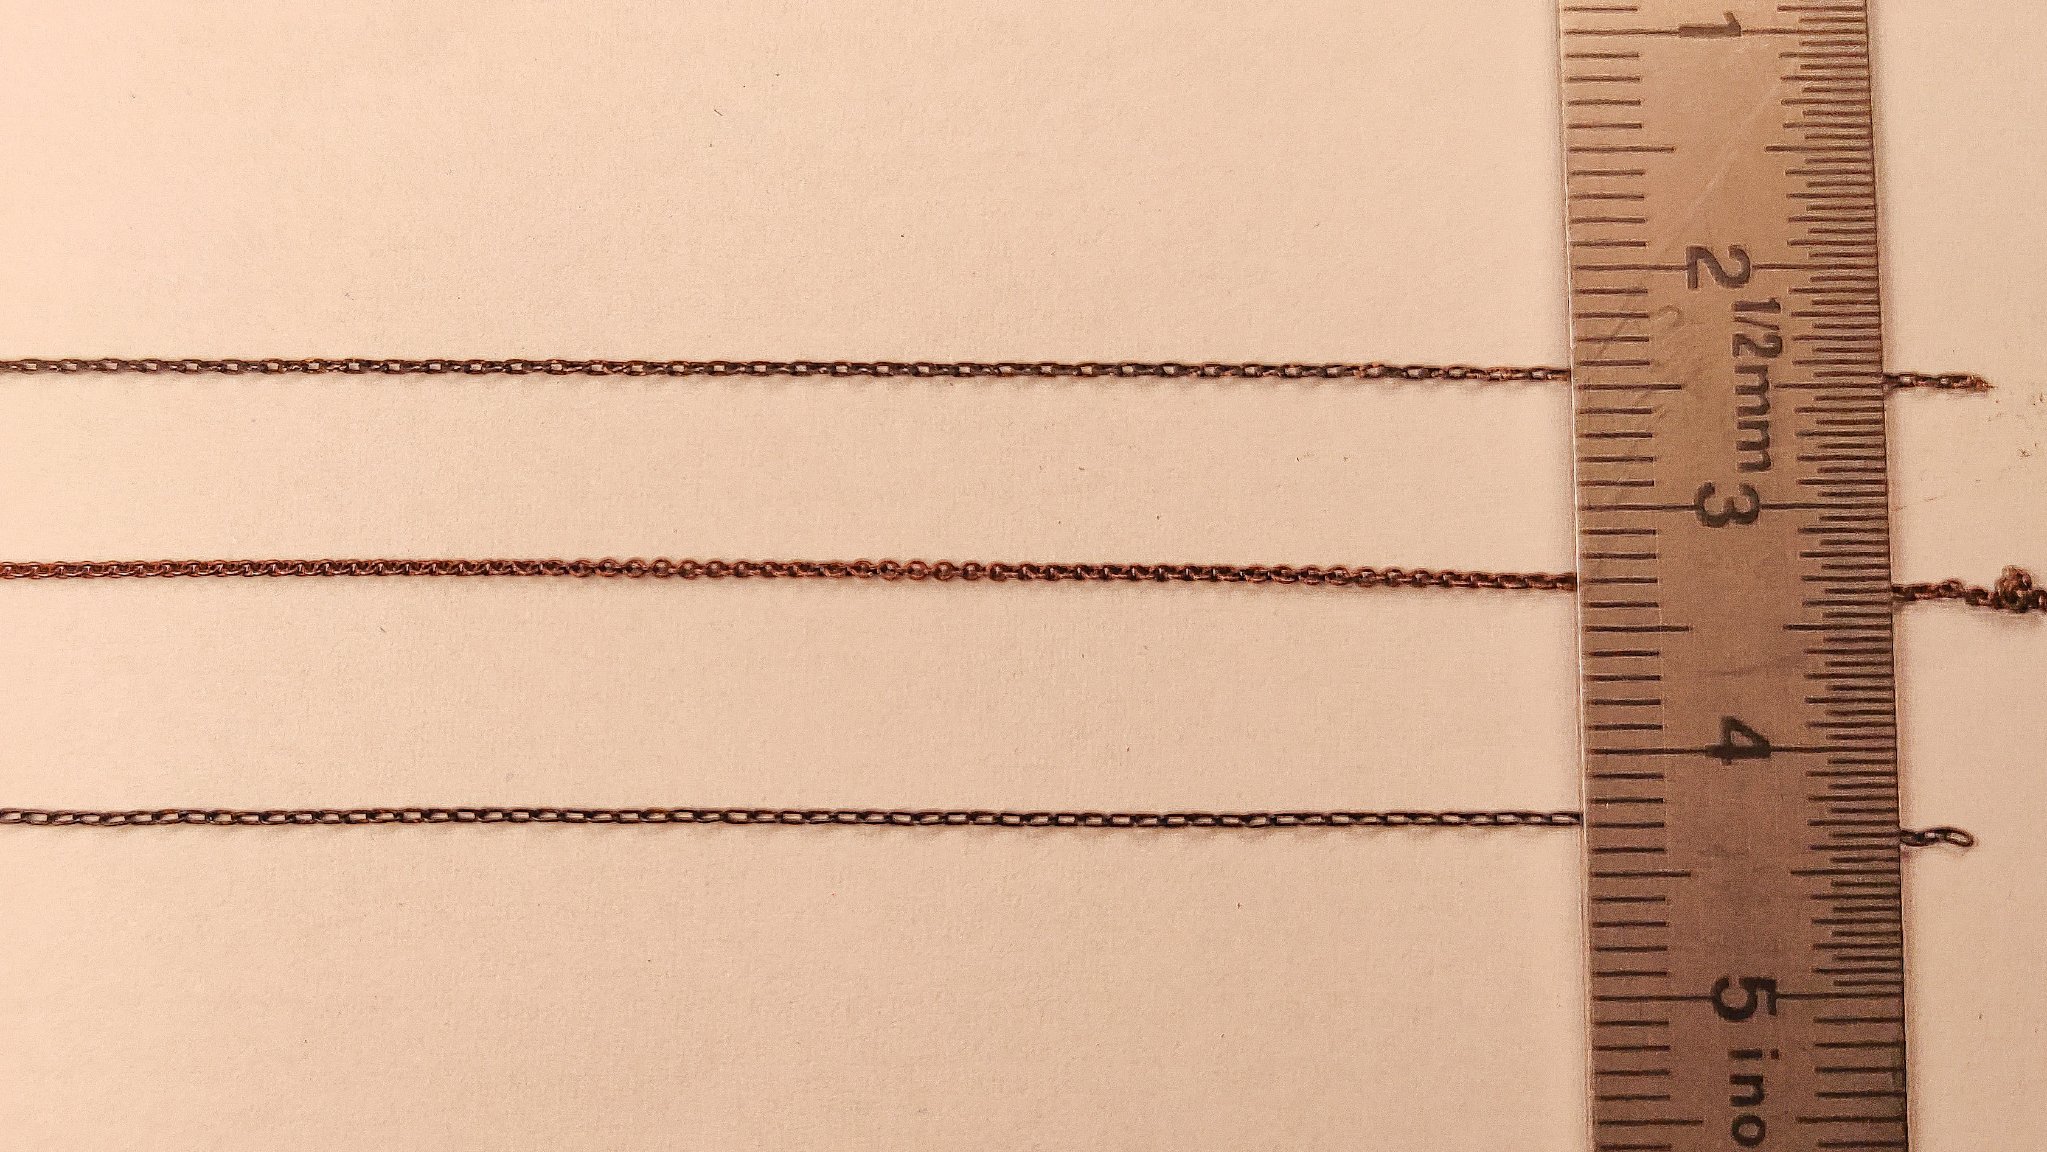
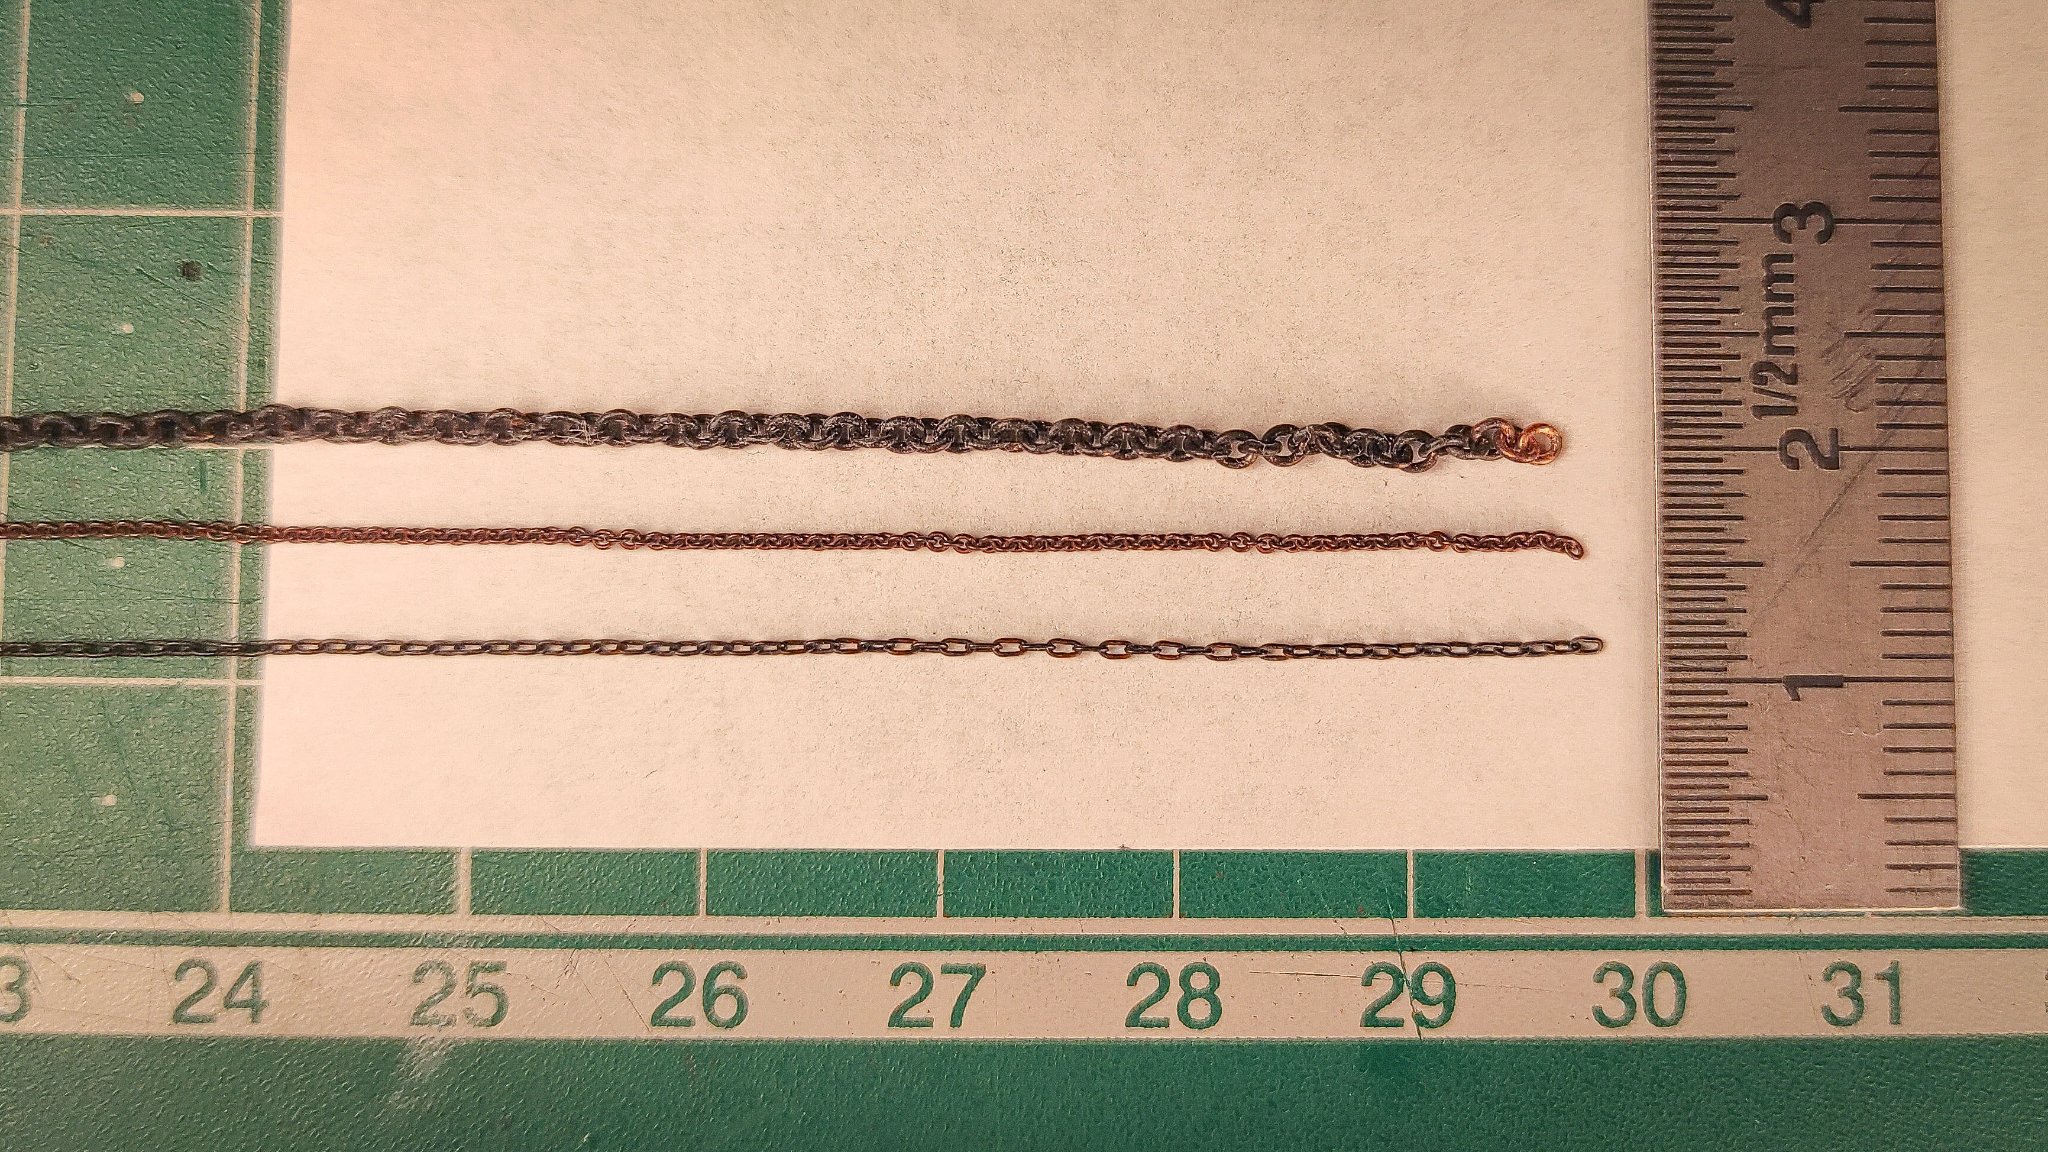
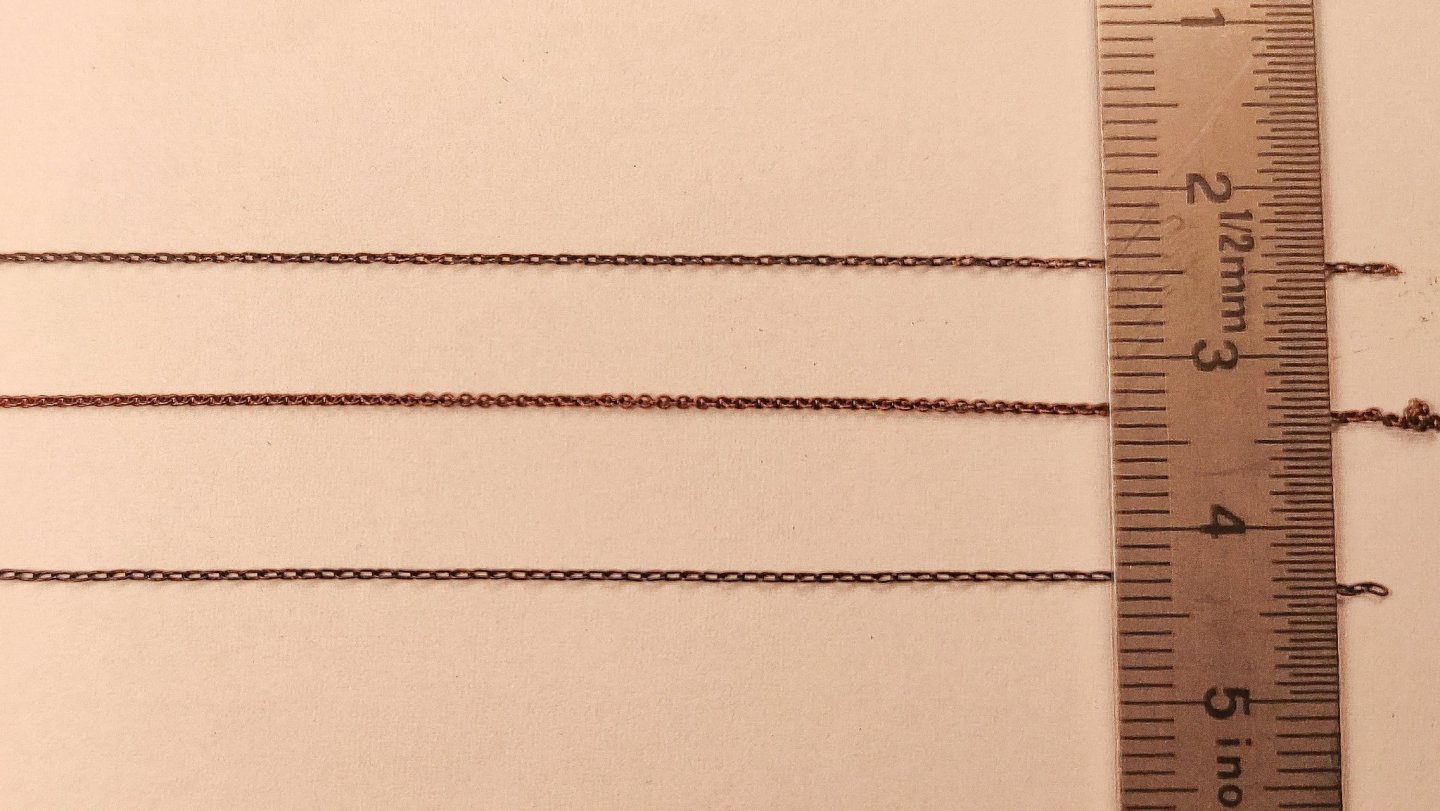
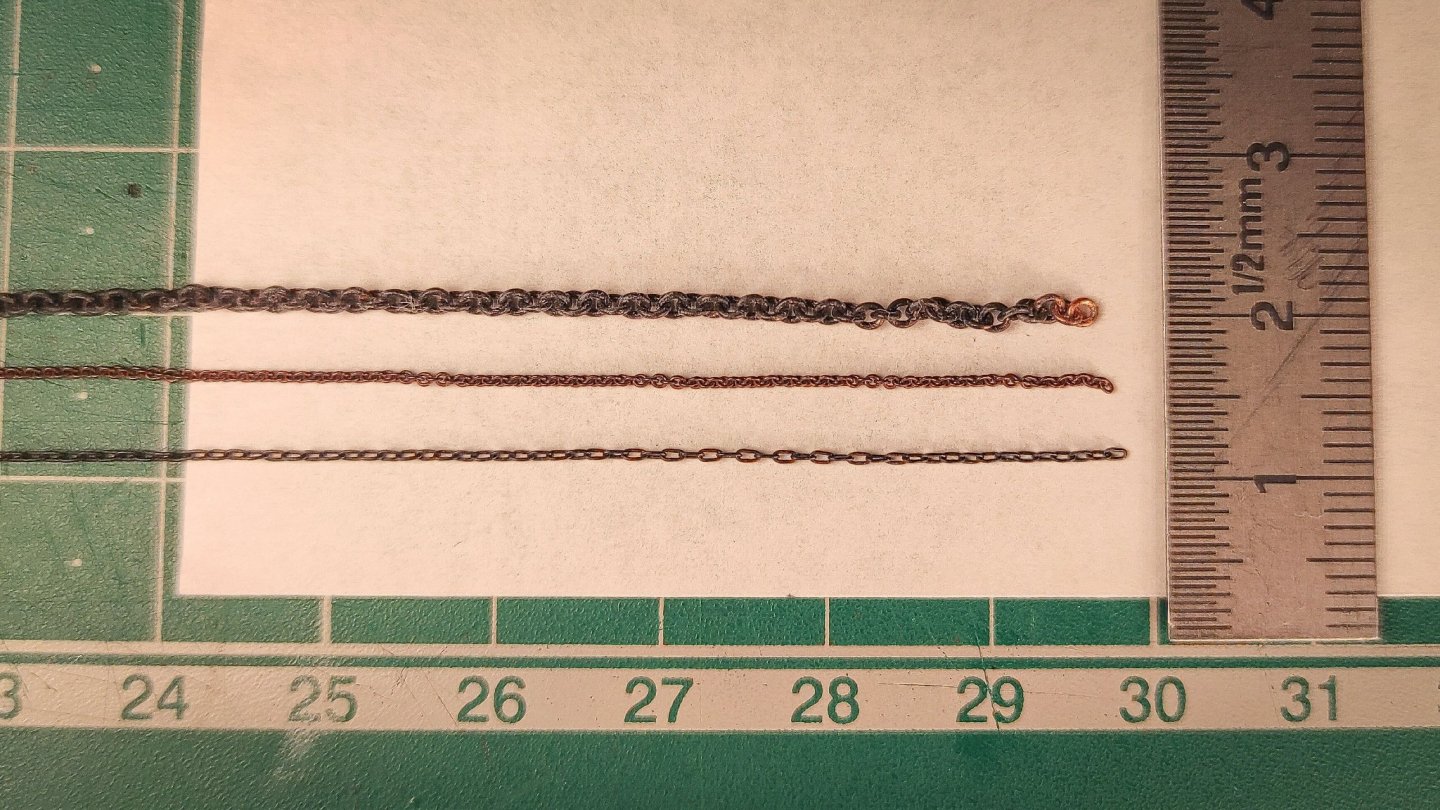
12 links/cm for the first one 16 links/cm for the second one 8-9 links/cm for the third one. But even if the firs one has fewer link As you can see, even if the first one has fewer links per centimeters, the thickness in slightly smaller due to the more elongate shape of each link. This is the exact article: https://www.amazon.com/Master-Tools-Universal-Chain-0-6mmX1-0mm/dp/B08FF8KZ4G on the front the logo is "master tools" but on the back they are labelled "trumpeter". Thank you for your kind words!
- 399 replies
-
- 2
-
-
- cutty sark
- revell
- (and 2 more)
-
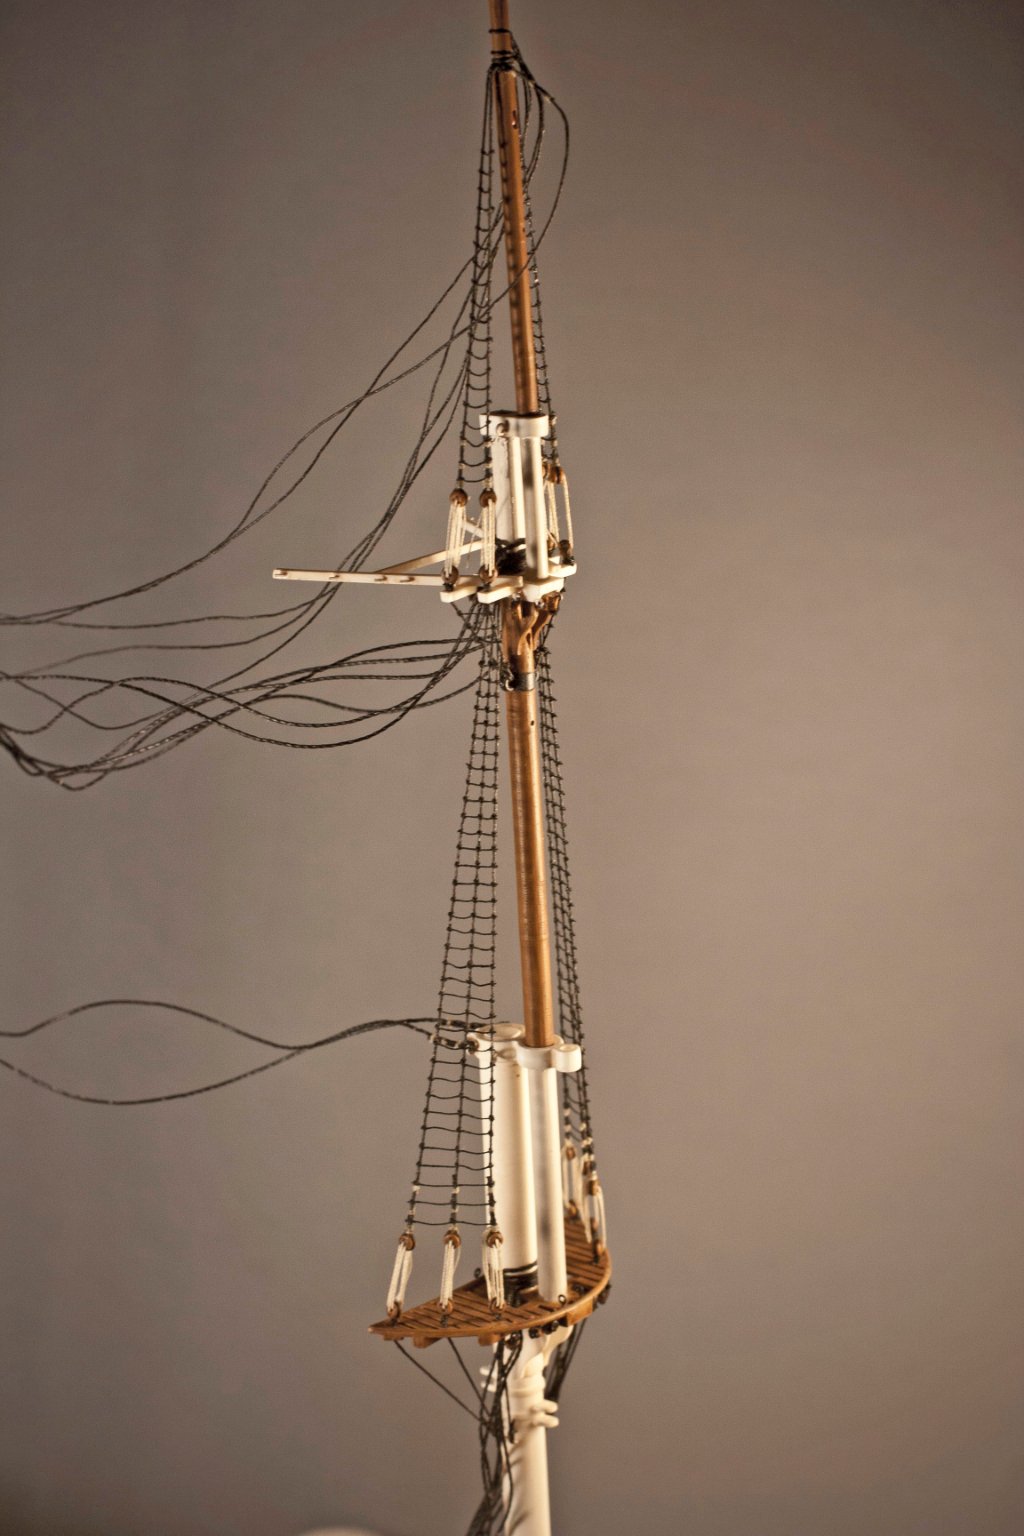
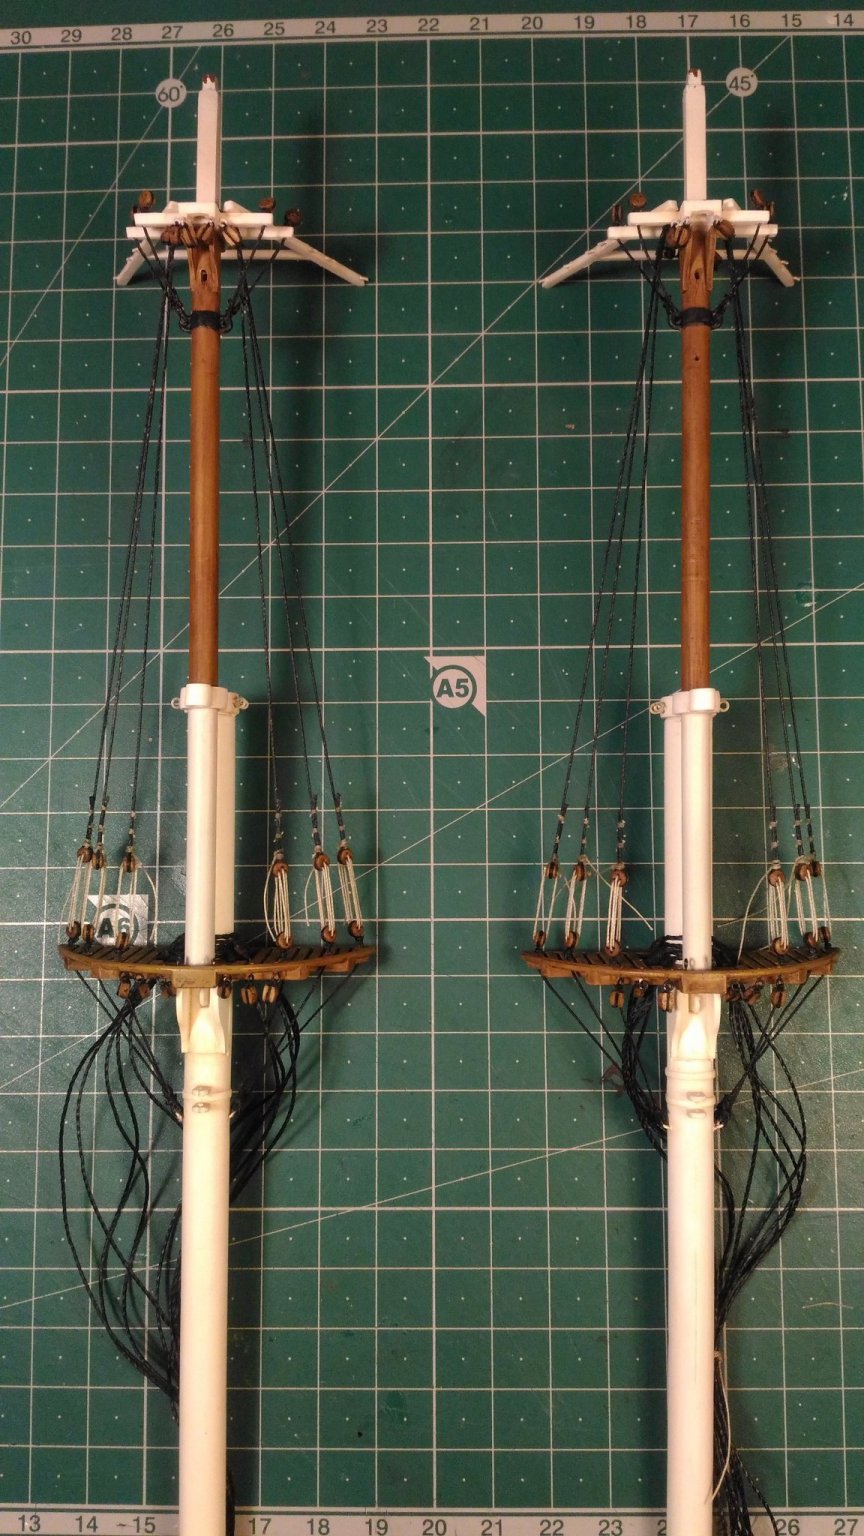
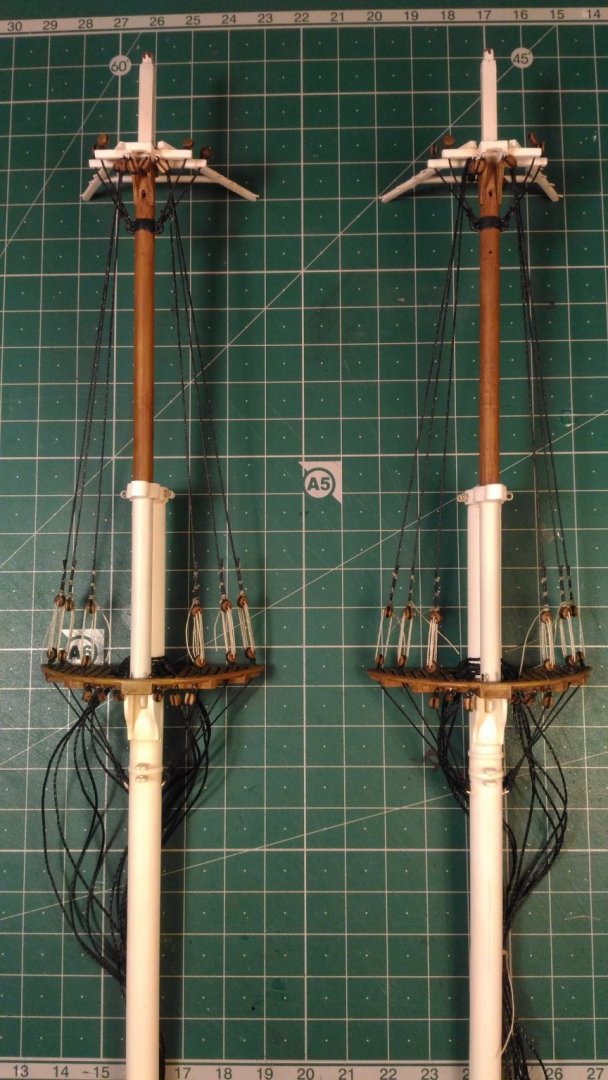
Hello everyone and thank you for your great support! Kirill4, you are right: the chain shown in my previous post, the smallest one, has exactly 16 links per centimeter, thank you for dedicating your time trying to help me. I really appreciate it! They are indeed available around the world, but not so easily in the EU. The problem is the customs fees, which can vary a lot and raise significantly the price. If anyone of you is interested in this kind of chain from the UK, here you have a link: https://www.langleymodels.co.uk/awd1/index.php?route=product/category&path=207 But now, like any good story, I have my own dramatic turn! Yesterday I visited my trusted model shop, not more than 10 kilometers away from my house. I asked them for such a small chain all the previous times and the answer was always the same: we have nothing so small. Well, yesterday I was almost at the point of avoiding the question, but in the end I tried and… They have them! They started to resell them just some weeks ago, and they are a real small marvel! You can see them in this picture, they are the first one on top: The second one is the one you already saw in the previous post and the third is the slightly bigger one I already have. They are again from Trumpeter. They are not so cheap, but it is affordable for such a great look! As you can see they are as small as the previous one, but the shape is more like a real chain. So, after all this digression, I can continue the build! Thank you all again! And now, it’s time for some updates! Masts assembly and upper rigging In this picture the masts are glued and painted. Only the futtock shrouds are in place. With the masts assembled but still nor glued to the deck I started to rig the upper shrouds, the stays and the backstays. Here the topmast shrouds are also visible. They are almost completed, only the free end of the lanyards need to be fixed in place. And here a close up view: All the lower shrouds are altredy installed and labelled in order to avoid misplacements in the future. In this last picture, the mizzen mast is almost completed, with the topgallant shrouds and realive futtock shrouds already in place. Topgallantstay and backstays are also vible. Note the cap band still not modified, the final version is visible in one of the previous posts, the number 57. This shows perfectly how many times I have had to come back revisiting some detail when it was more difficult to get the job done. And still I'm satisfied by the the final result on the cap bans but now it is too late to add the needed details... I spent almost half the time of this build studying the ship and planning my next move but still I make so many mistakes and afterthought. But I’m enjoying the process a lot! Thank you all and see you next time!

- 399 replies
-
- 8
-
-
- cutty sark
- revell
- (and 2 more)
-
Ok, a funny tale now: I agree with you, the chain, even if a little bigger than needed, are better than line of thread. I checked the online store where I bought them the first time, I need many more of them, about 7 meters should be ok. It is a French shop, but now they don't have them anymore, probably they will have them back in April, probably... So I started again to search for this damn chains, I found them in a UK shop, checked the size and the availability, all ok, ready to place the order (about 50 euros...) Then I remember: today is January 13! Since the first of January UK is out of the UE. It turns out that I might be paying from 15 to 40 euro more at customs authorities! So I start again to look for other sellers based in EU and found nothing! This is a wonderful hobby, but sometimes it can get so frustrating....
- 399 replies
-
- 3
-
-
- cutty sark
- revell
- (and 2 more)
-
Thank you for commenting, Jim. I was almost sure that the smallest chains would fit for the sheets too, but your post makes me less confident. So I decided to make a quick fit test on the fore lower topsail yard, and this is the result: They are indeed too big, here is a pic of the actual size: Their size is similar to the footrope… So now I have to decide: is it better to have an oversized chain or a small black line of thread? I’ll be glad to hear your opinion and eventually other options. I have made also some tests with twisted copper wire, but the looks more like a rope than a chain in my opinion…


- 399 replies
-
- 4
-
-
- cutty sark
- revell
- (and 2 more)
-
Thank you! After many hours spent on the model it's sometimes difficult to look at the build with fresh eyes and keep some degrees of objectivity. You may start to like something just because you are used to it. That's why it's important for me to have an external opinion such as yours. Bringing back memories about your grandfather and the time you have spent together is the best use one can think of this hobby. That's a great question! I spent a great deal of time looking for a proper chain in 1/96 scale and this is what I was able to find: From top to bottom: - the smallest Amati chain: completely unusable for the rigging, they are too big, - 16 loops/cm chain from a French shop: quite small, I will use them for halliards, still have to decide if to use them for the sheets or to use twisted copper, - trumpeter chain set number 06624 (each set contains two different chains, this one is the smallest one). I have used this one for the bowsprit rigging, and I'm really happy with the result! I will soon post some picture so that you can judge for yourself. The shape and the size are almost perfect for this purpose. If you have any suggestion I'll be glad to hear your thoughts! Thank you and, by the way, even if I like the name "Vlad", mine is actually Marco 🤣
- 399 replies
-
- 3
-
-
- cutty sark
- revell
- (and 2 more)
-
Hello Bob, I didn't know this wonderful barque. I really like the lines and the overall appearance. I'm looking forward to seeing more progress!
-
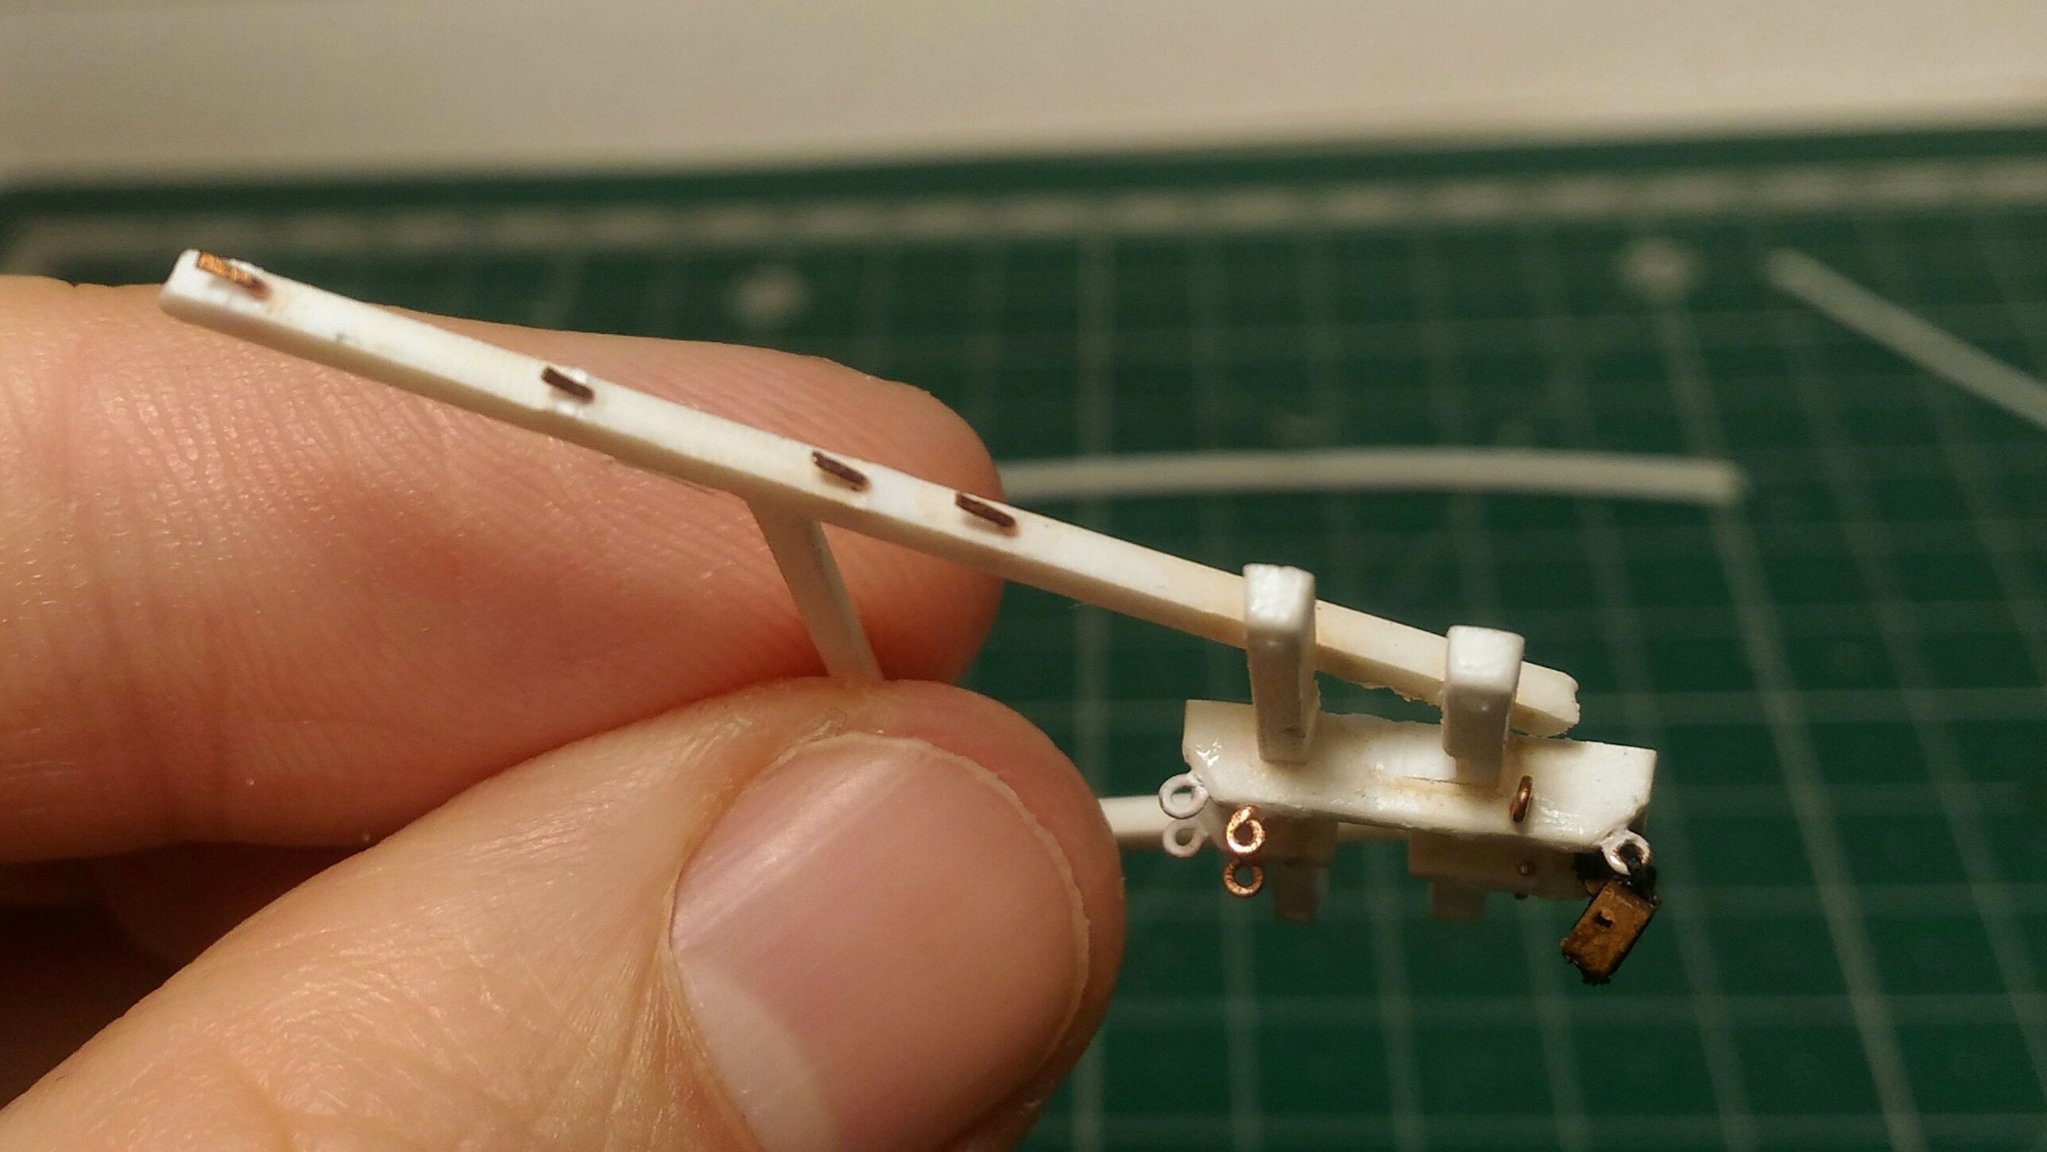
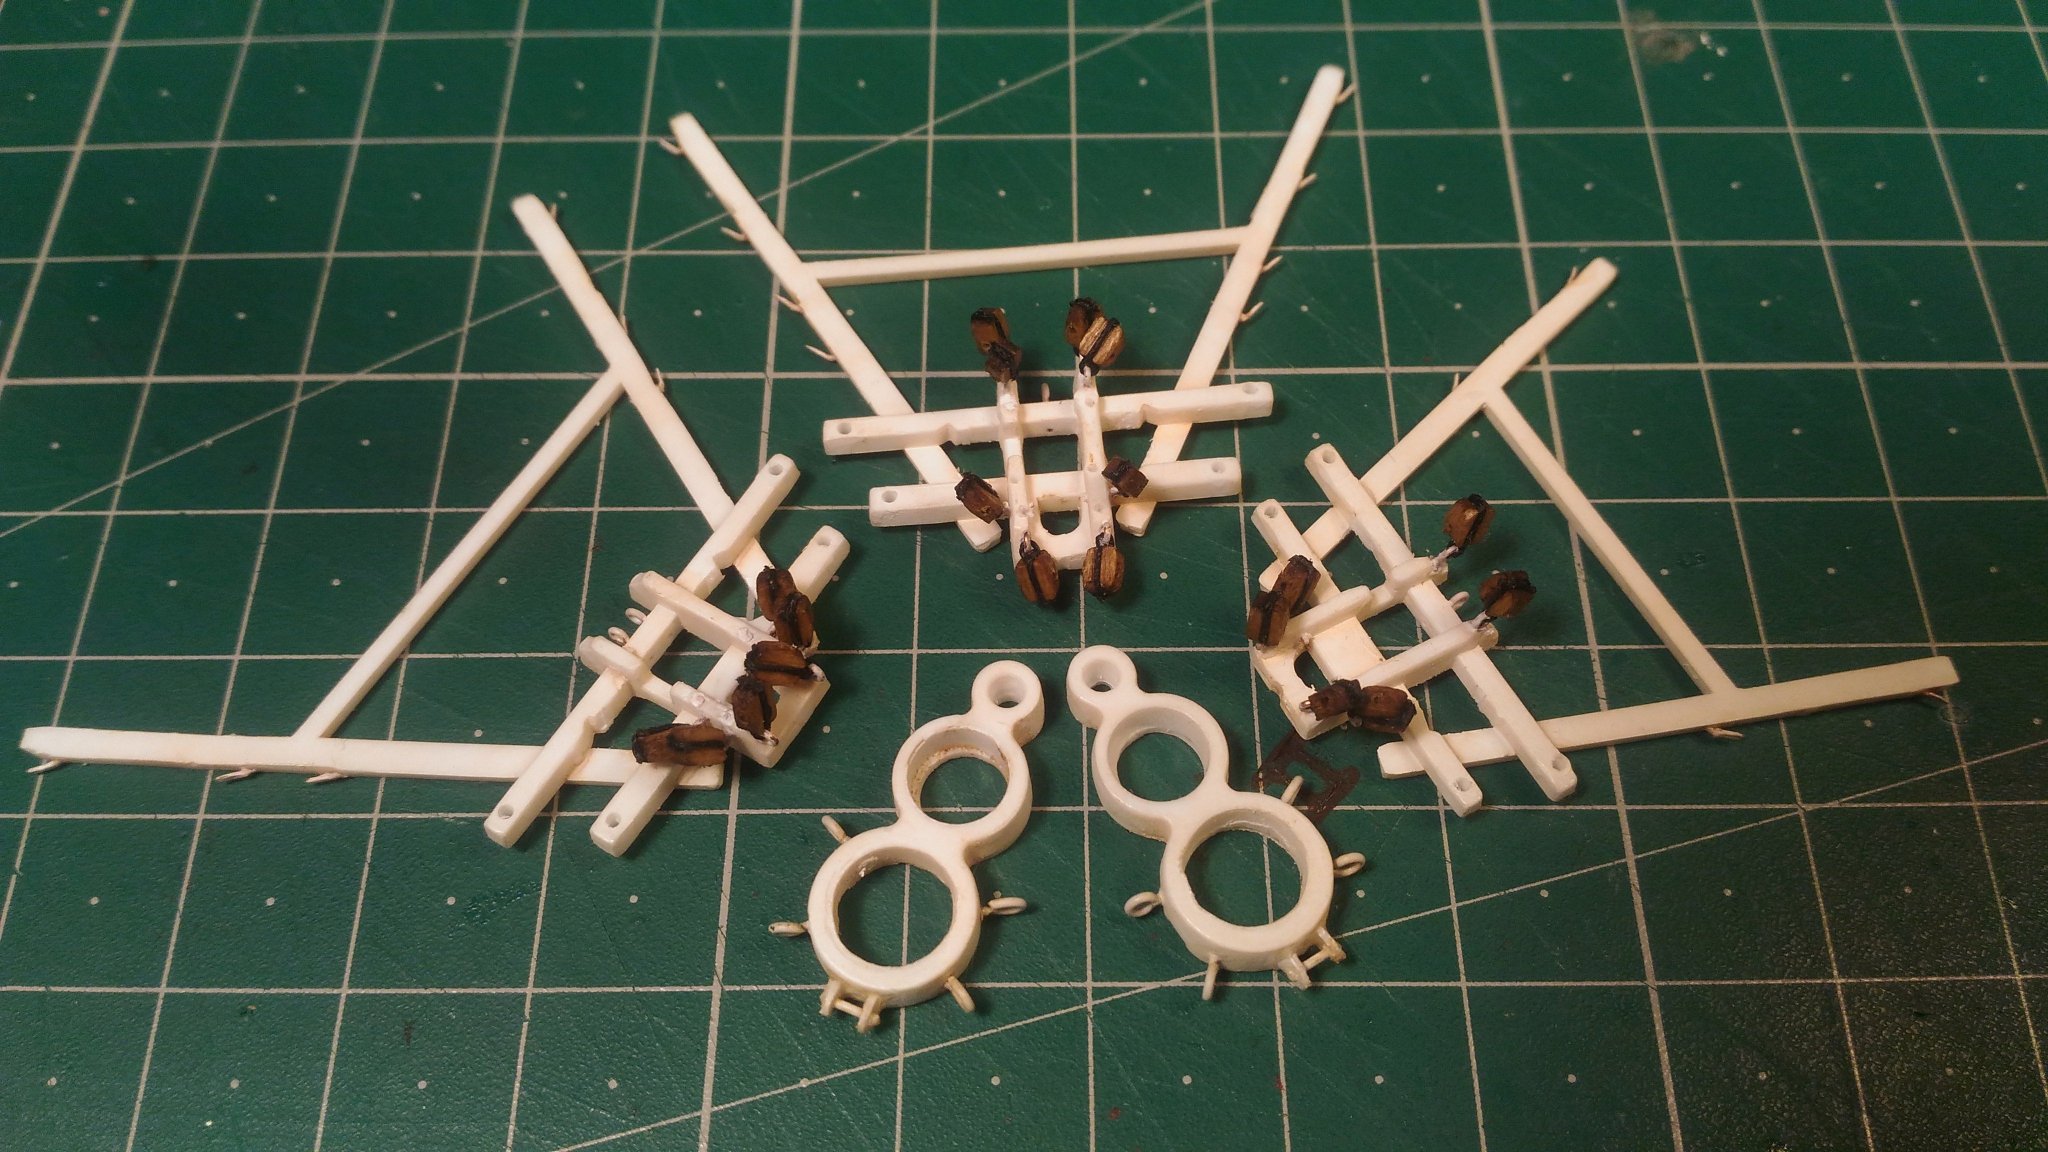
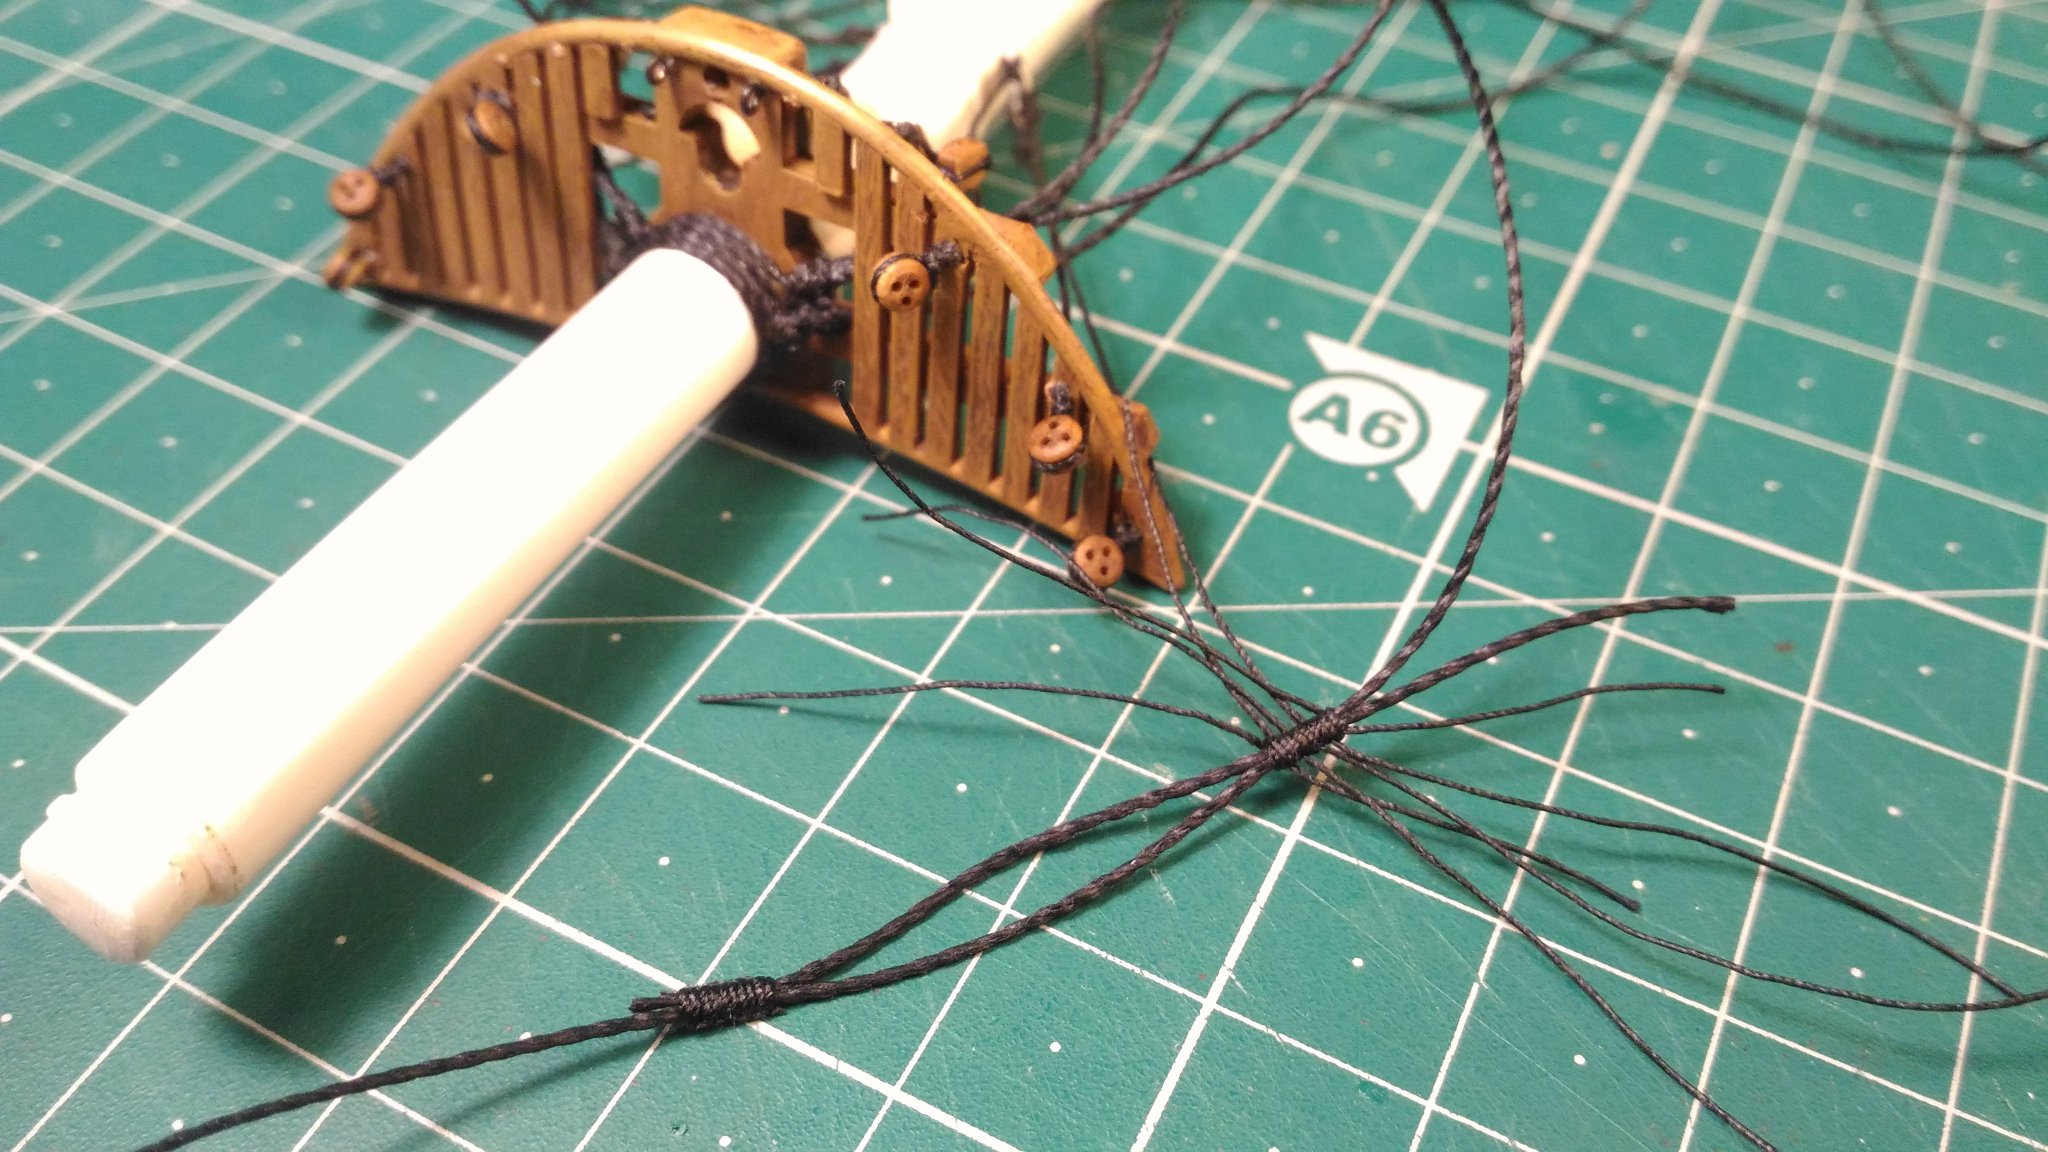
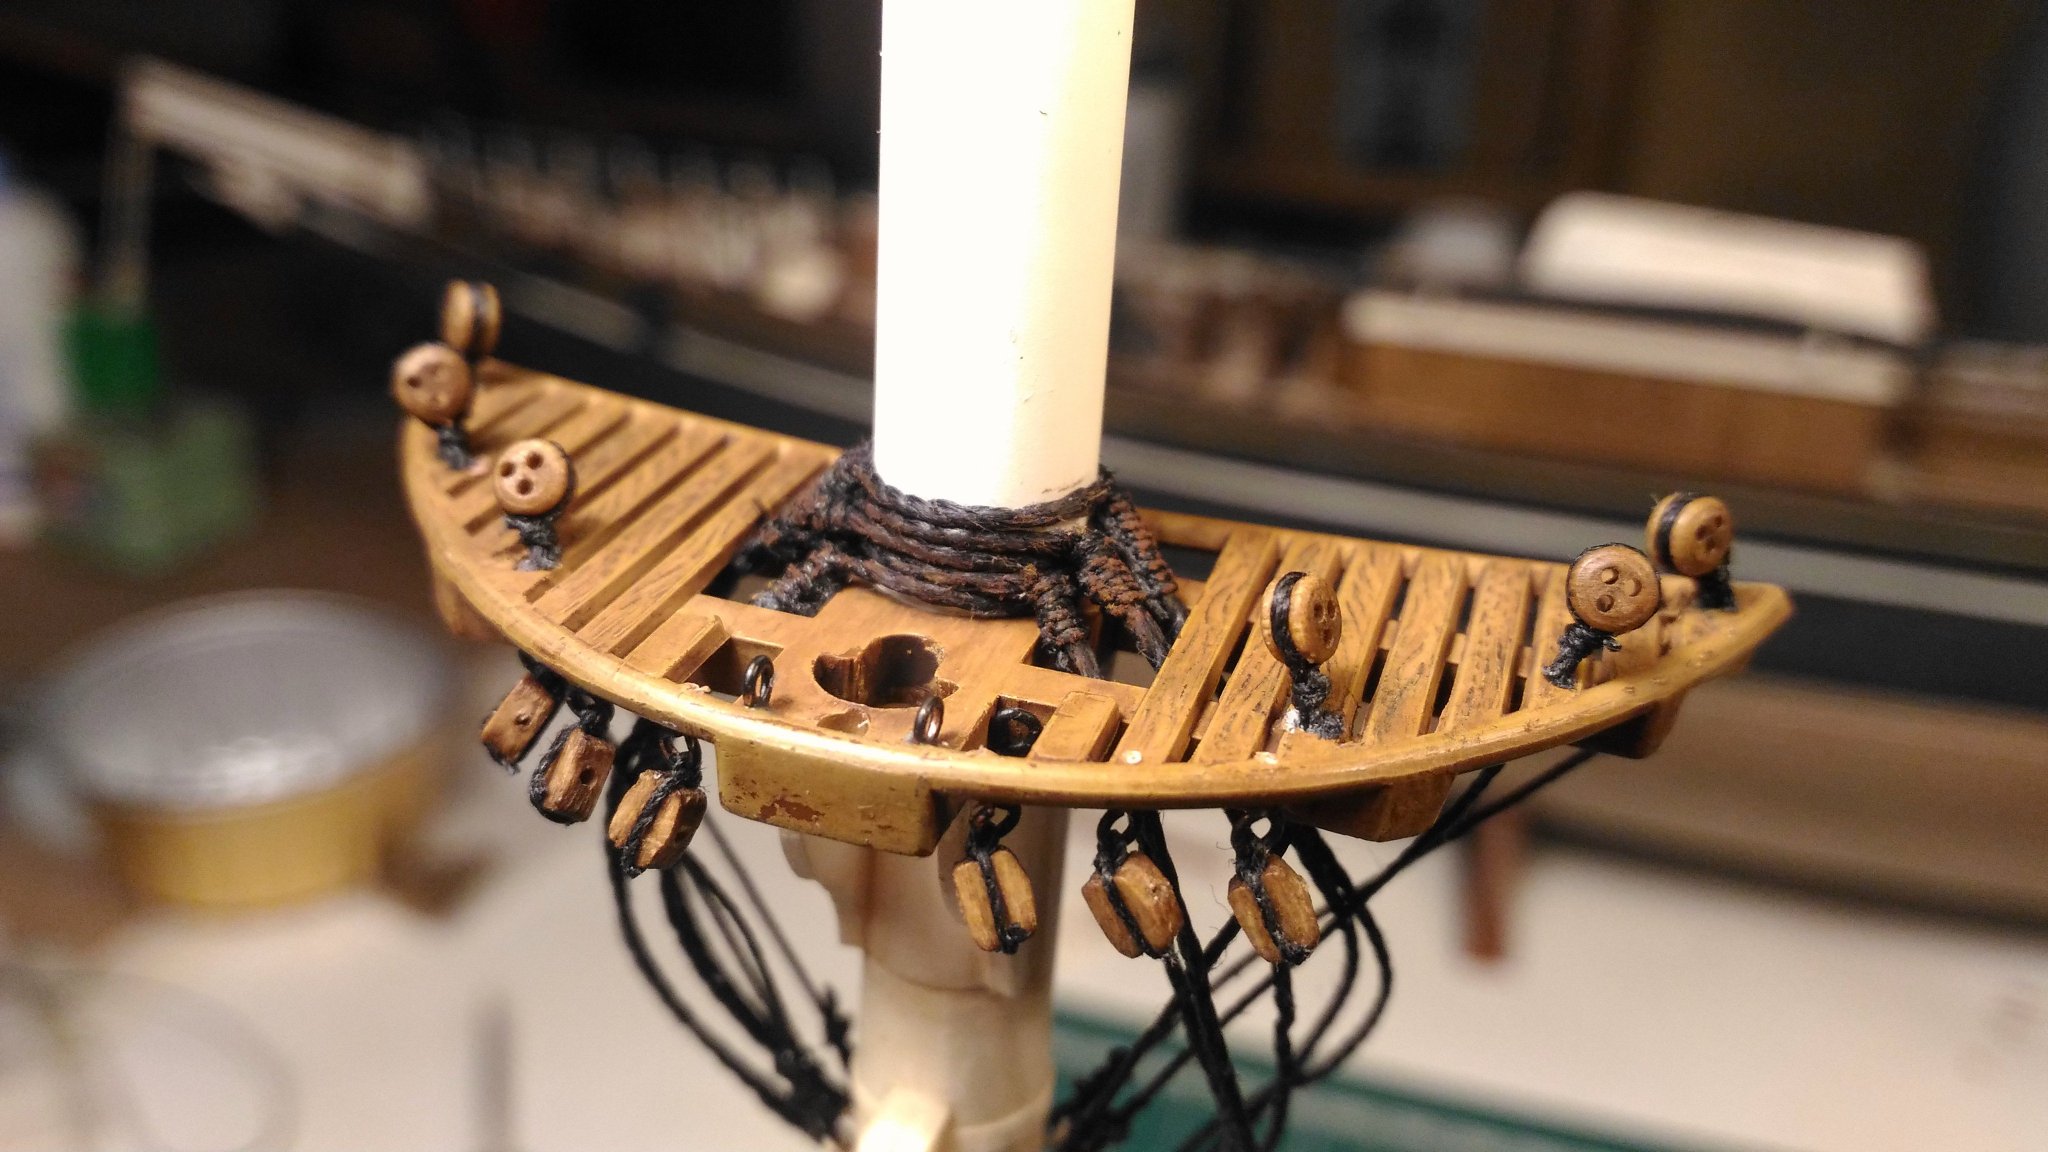
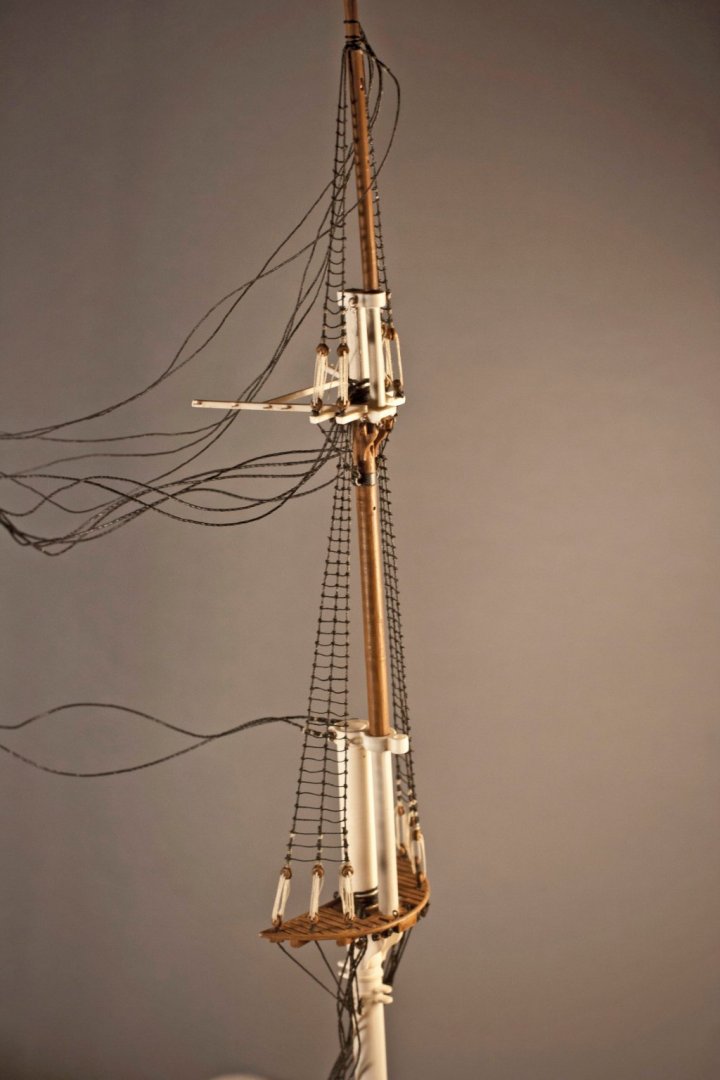
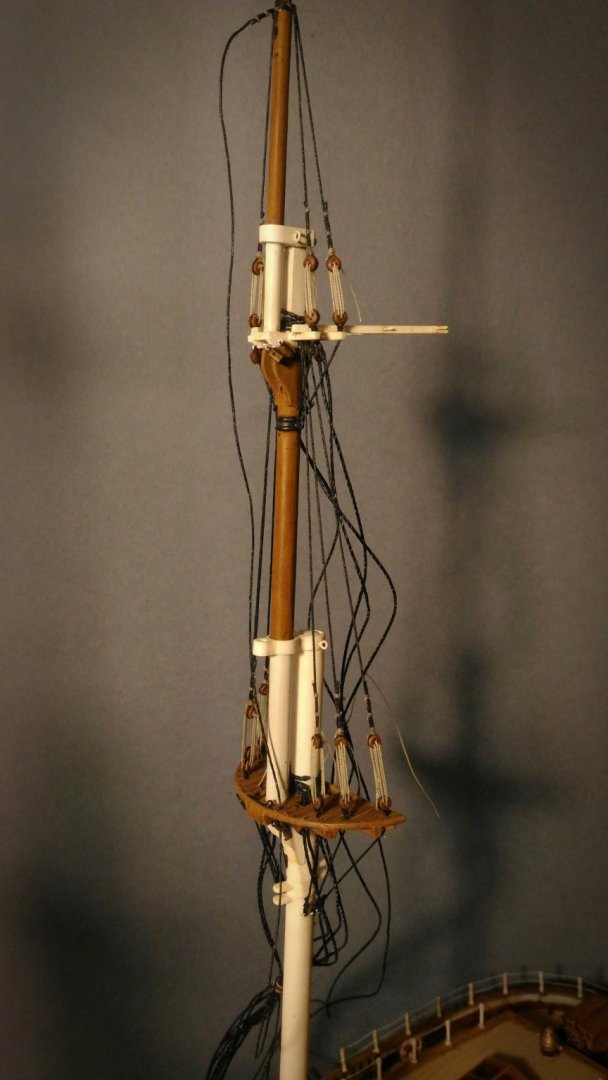
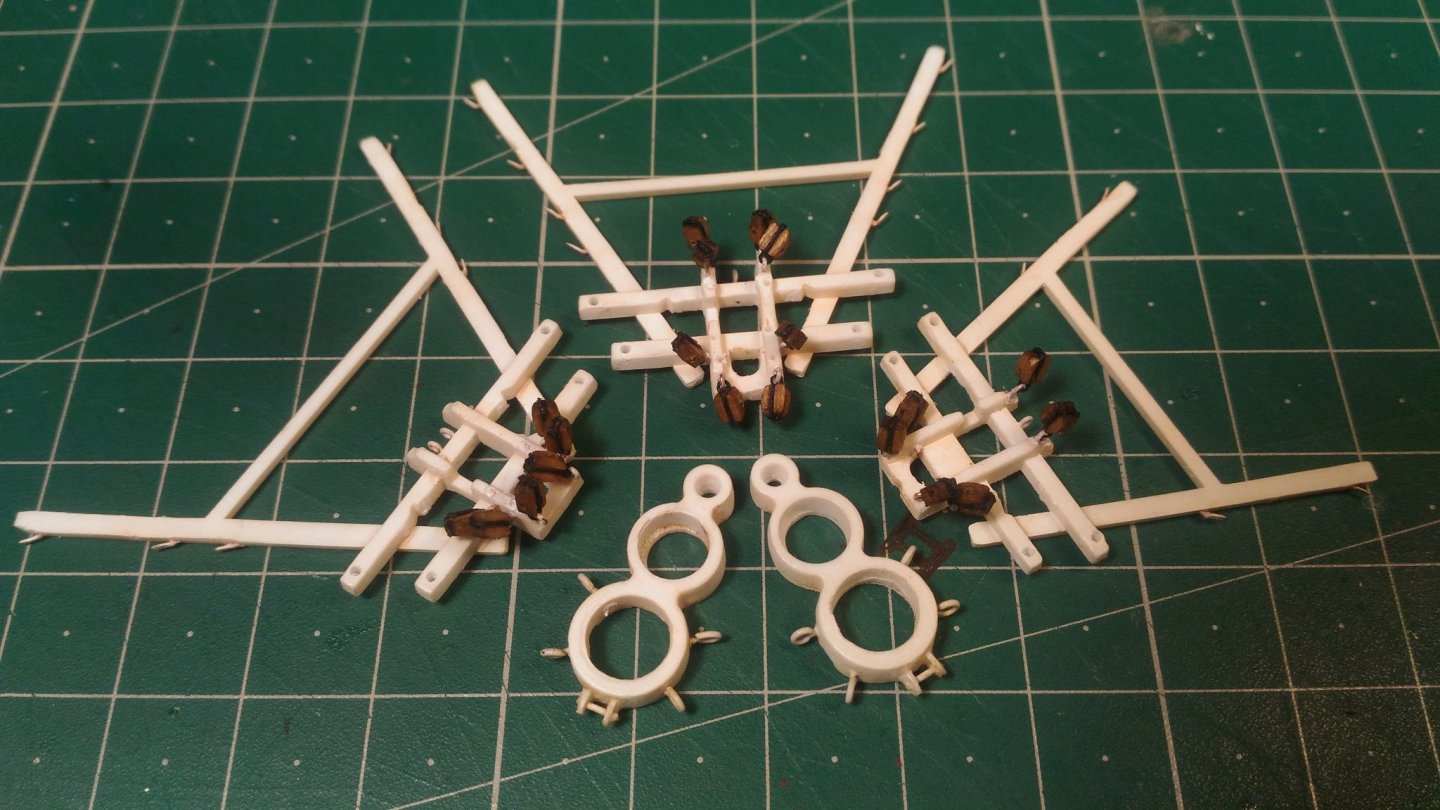
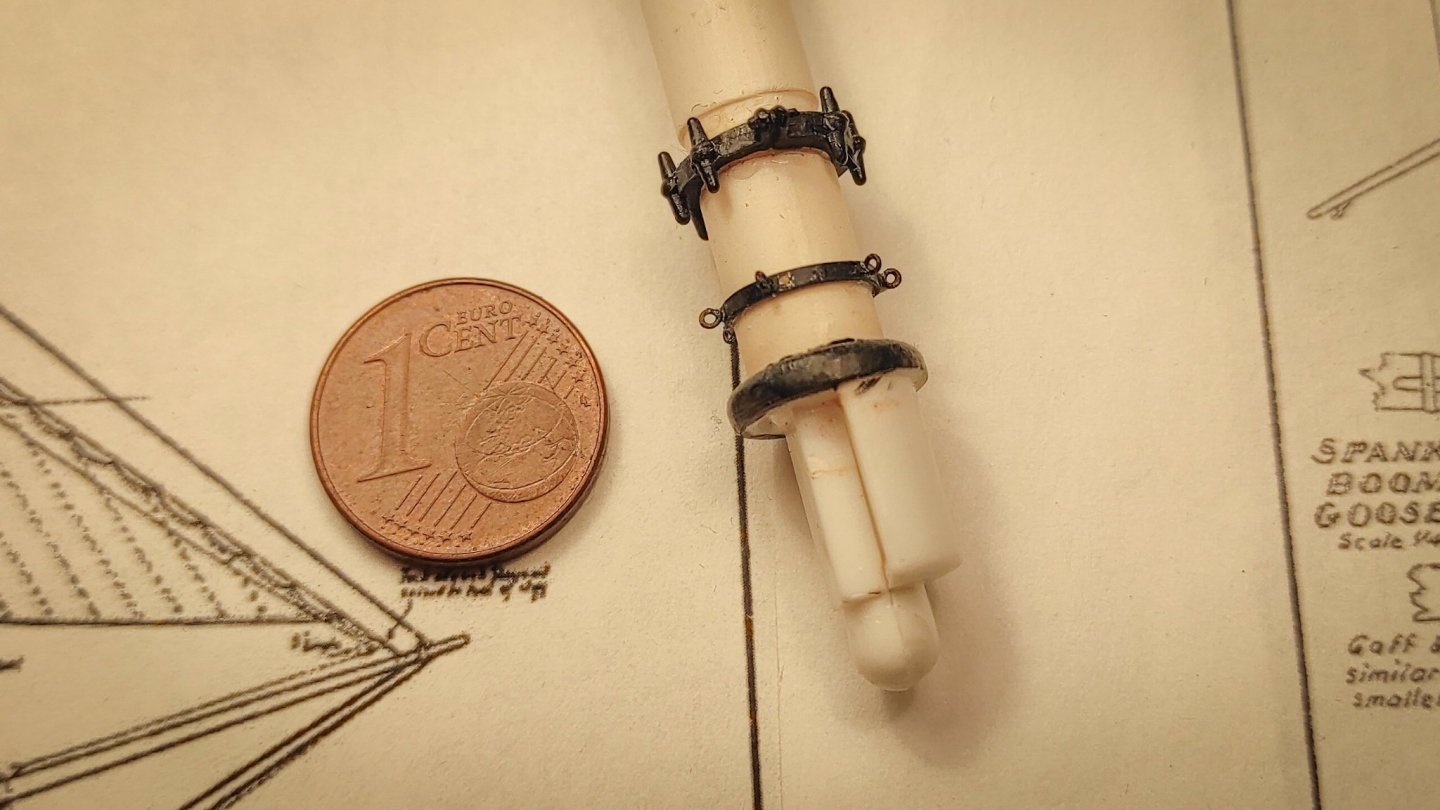
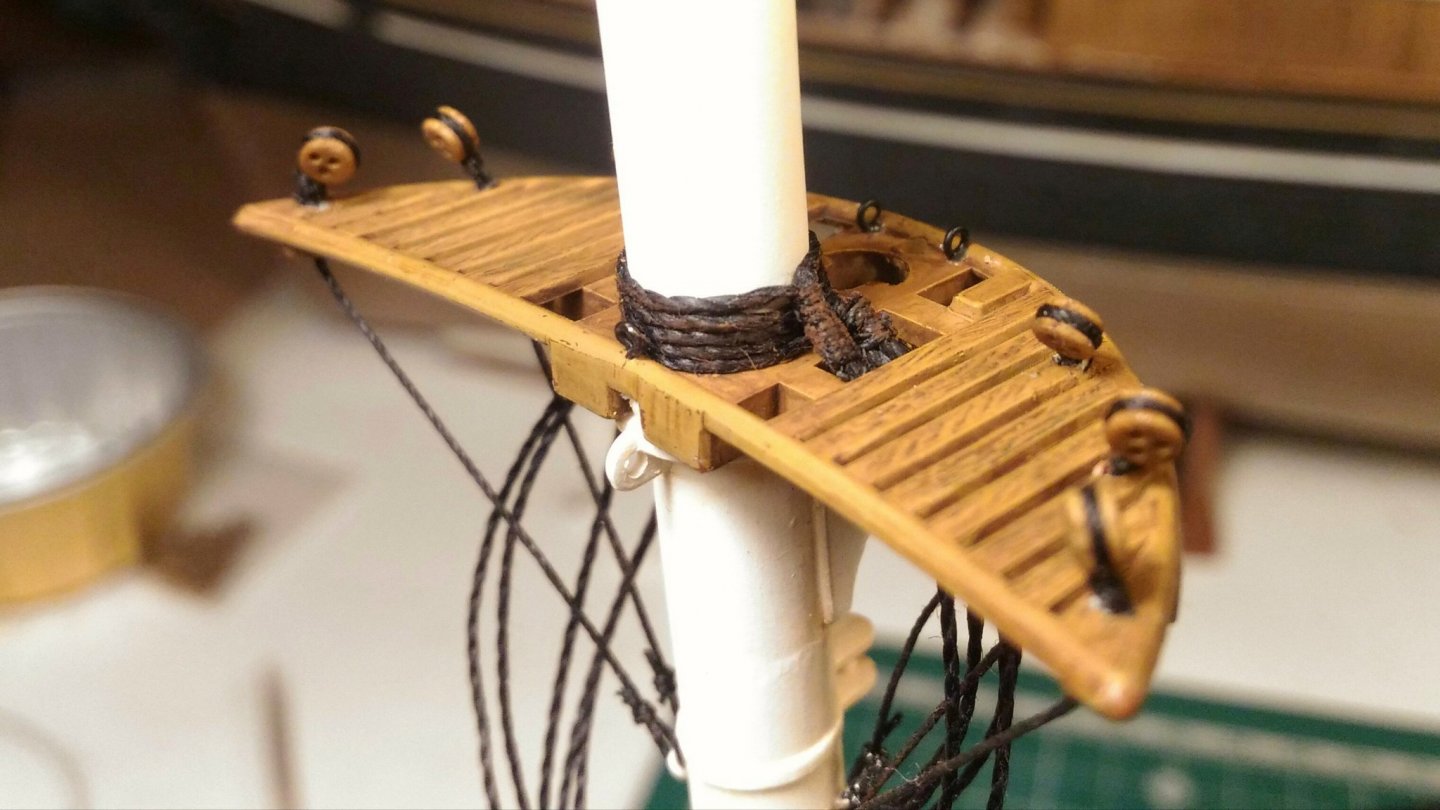
Crosstrees and mast caps The provided cross trees have holes for the plastic rat lines that have to be filled. There is also some plastic to be removed to clear the space between the fore and the after cross tree. I removed the plastic thumb cleats and rebuilt them out of a small brass rod. The original ones are bulky, fragile and misplaced. To make the new one, one end of the rod was made flat with flat pliers and bended backward to form the thumb cleat, while the rounded one is inserted inside pre drilled holes in the spreaders. Here you can see a work in progress image: Each crosstree has many eyebolts. Luckily the number, position and function of each of them is detailed in Campbell's plans. New holes were also drilled to accommodate the futtock shrouds. Drilling the holes, making custom eyebolts, painting them and fitting each of them with relative blocks for all the three crosstrees is a quite time consuming and tedious operation, but it has to be done and it’s better to do it now than later. I’m quite happy with the final result: In this image the mast caps are also visible. They are still in an interim stage. I removed the original plastic eyebolts and replaced them with custom made ones. The plastic ones are oriented horizontally instead of vertically, misplaced and bulky. The rolley are also hand made, I did some preliminary tests and they seem to be quite tough, I hope they will endure the stress test of the rigging. In the final version, visible here, I also grooved the front structure to make it more similar to the original one and moved the lift block more forward. Back to the crosstrees, later on I decided to add another small detail: the fairleads. They are made out of plastic, shaped properly to fit the final position and drilled with micro drill bits. All the parts are painted in the usual way: base acrylic coat and oil washes. That’s the final result: See you next time!


- 399 replies
-
- 6
-
-
- cutty sark
- revell
- (and 2 more)
-
Thank you for the detailed information. I think I will stick with this last version, now I know that it is at least plausible. You guys are really a great resource!
- 399 replies
-
- 2
-
-
- cutty sark
- revell
- (and 2 more)
-
Thank you, Shipman I use both copper and brass, depending on what I have at disposal. The small eyebolts made in the video are mainly used for the jackstay bars, so really low tension applied. The only tensioned eyebolt made in this way are the one on the davids and on the fish tackle, and they seem to stay in place till now, but I will add a drop of glue to be sure. Twisting the end together doesn't work for me because they become too bulky and they need big holes to be fitted in.
- 399 replies
-
- 3
-
-
- cutty sark
- revell
- (and 2 more)
-
Thank you, Dave. I considered this wooden deck, but they were too expensive for my firs ship build. They cost almost like the entire kit. But they seem to be good, maybe next time! Thank you Cirdan, I have made a small video to show you the eyebolt making process. Bear in mind that this is not the best way but just my own way. It is relatively easy and fast, but after a while it start to wipe out the last bit of mental sanity I still have ... I have made more than two hundred of this small guys and many more are needed... I hope the video will be useful even with my bad English. If you need further details, please write me!
- 399 replies
-
- 4
-
-
- cutty sark
- revell
- (and 2 more)
-
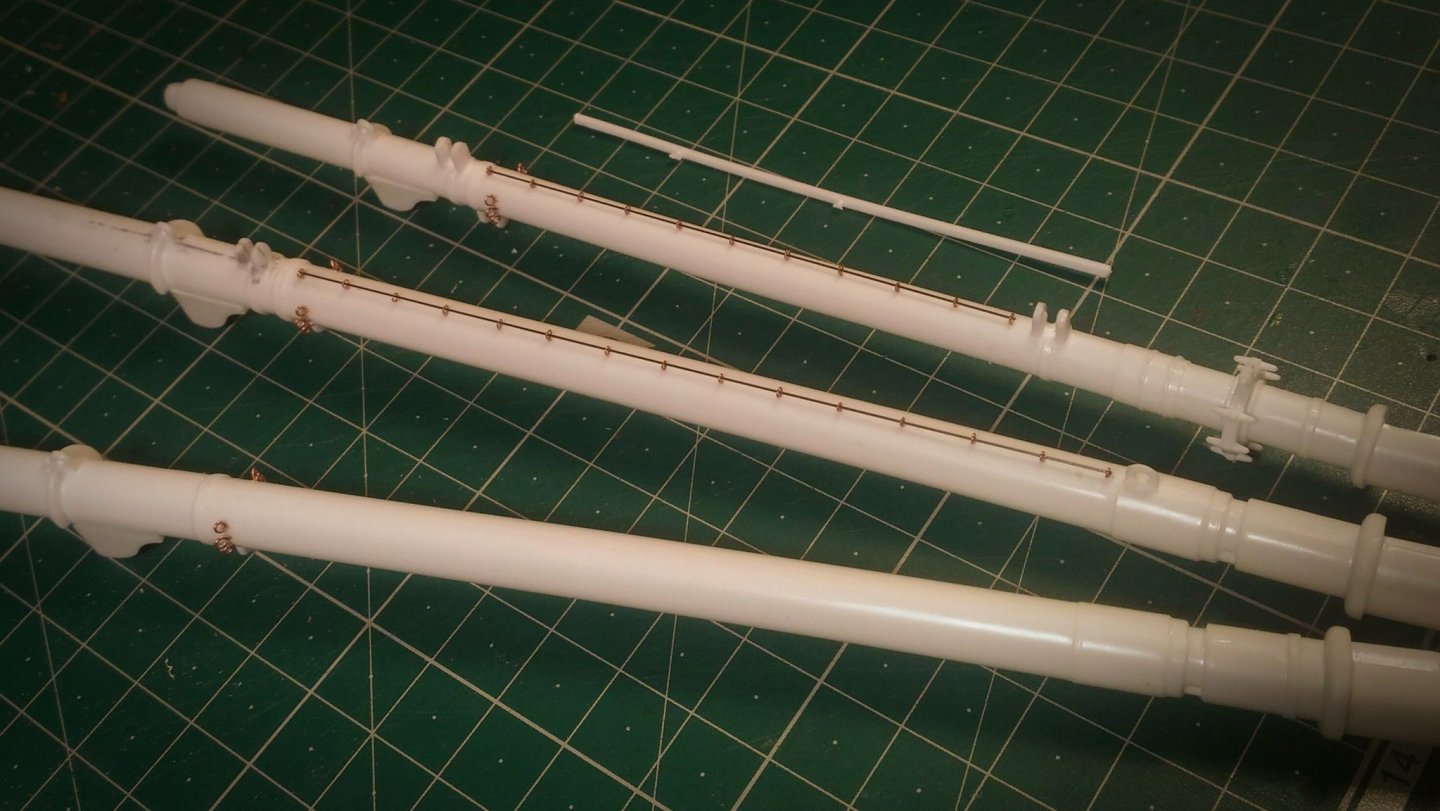
Mast detailing, painting and assembly. All the lower masts are divided into two shells. I glued them together, filled the gaps along the seams with putty and sanded the juncture in order to have a smooth surface. The kit provides a good detail in this area but some parts are missing or simplified. There are no futtock shrouds, for instance, so I placed hand made eyebolts for them on both sides of all three masts. Position, size and orientation are taken from Campbell’s plans. The jackstay on main and mizzen masts are simplified and oversized, so I removed the original one (visible in the picture down below, close to the mizzen mast) and I recreate my own version. Homemade eyebolts are fitted in predrilled holes (mini drills bits proved to be really useful along the entire build), glued in place and fitted with relative bars. The bars are made of spring steel (I hope it is the proper name in English). They maintained their shape and are perfect for the job. I have also added the eyebolts at the mast base, they were absent in the kit. In the above picture it’s also visible the painting job: a first coat of matte white was followed by brown oil filters in order to enhance the shadow and break the white monotone. The blacks are all tire black, whit gray dry brush. All the tops were modified. The kit provide plastic shrouds and to fit them the tops have dedicated holes. They need to be filled with putty, sanded e prescribed. The excess of plastic around the holes needs to be removed. New holes were drilled for the futtock shrouds, following the right position indicated by Campbell’s plans. Even if I think this part was improved by my effort, I now think that I should have done more. They are still too thick and the lower metal frame should be added. But now it's too late. Many times along the build I have had to decide if “it was good enough”, and usually I made the wrong decision. Anyway, I thought it was easier to rig the shrouds with the masts not glued on the hull, so I started with the futtock shrouds and the main shrouds. After many tests (I had no experience in rigging at all...) I found my way, here you can see the process in the making: And here is the final result: The black of the shrouds was attenuated by brown pastels. In the last images eyebolts and blocks are also visible. I decided to install them now, with plenty of space to operate. Enough for today. I hope you like the updates and I wish you happy holidays!


- 399 replies
-
- 8
-
-
- cutty sark
- revell
- (and 2 more)
-
Another Cutty Sark! You are going pretty fast and the hull seems to be nice and smooth, good job!
- 48 replies
-
- 1
-
-
- Cutty Sark
- Artesania Latina
- (and 1 more)
-
Thank you again Cirdan, really nice image! As usual, one question answered, two or many more opens. The forecastle is the same as the one shown by Campbell, but the bowsprit is completely different. Stays number and placement, footropes arrangement are similar to longridge version. The Revell kit is on the other hand seems to follow Campbell's plan, at least for the bowsprit shape and fittings. Oh, and the lifeboats location with relatives davits, moved forward in the picture... 😵
- 399 replies
-
- 2
-
-
- cutty sark
- revell
- (and 2 more)
-
Yes Shipman, you are absolutely right. They needed some standard and they surely apply them on the Cutty Sark too. Jhon, thank you for the link, those images are really great! Unfortunately they confirm once more the many lives of the Cutty Sark: the fore topgalland stay is not as indicated by Cambpbell's. Another strange fact (at list at my inexperienced eyes) is the famous picture taken by Woodget: https://viewer.slv.vic.gov.au/?entity=IE930286&mode=browse The main mast is not equipped with skysail! Even the relative yard is missing and the mast itself seems to be shorter than expected. On the other and, the royal sail seems to be slightly bigger than the one visible in the Campbell's plan. What a mess... And the stairs are clearly visible, but no pin rails! I'm impressed by this old kit, it is really good in so many regards. Thank you again to everyone, it is great to know I'm not alone in this endeavor!
- 399 replies
-
- 3
-
-
- cutty sark
- revell
- (and 2 more)
-
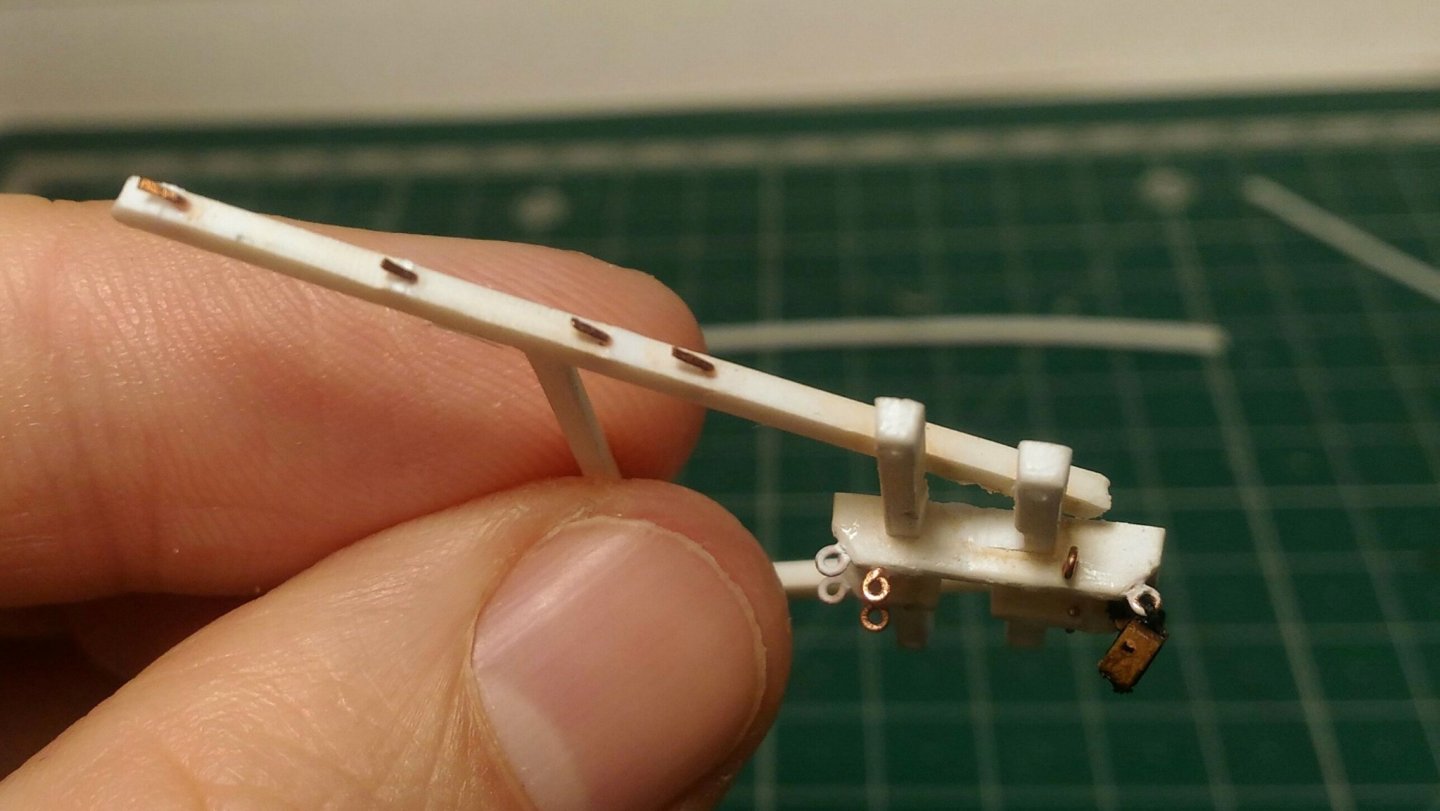
Thank you Cirdan for sharing all this great information! The first link shows a forecastle similar to the one shown in the Longridge's book. It seems indeed to be an early version of the Cutty, as you pointed out. And it is different from the one outlined by Campbell and proposed by Revell. For the others models it is impossible to say, even if the arrangement of the fore topgalland stay in the second one is not the one suggested by Campbbell's plans. The website might be the answer, and the fun fact is that I already visited it, but then I completely forgot it! Thank you! The author suggest to use three pins located on the foremost part of the side rails. The nice news is that they are depicted in the Revell model too! The only difference is that Revell put four of them instead of three. But, in the end, I think I will use them, it seems to be completely reasonable! Thank you so much Cirdan, I was really stuck, this is a great turning point!
- 399 replies
-
- 3
-
-
- cutty sark
- revell
- (and 2 more)
-
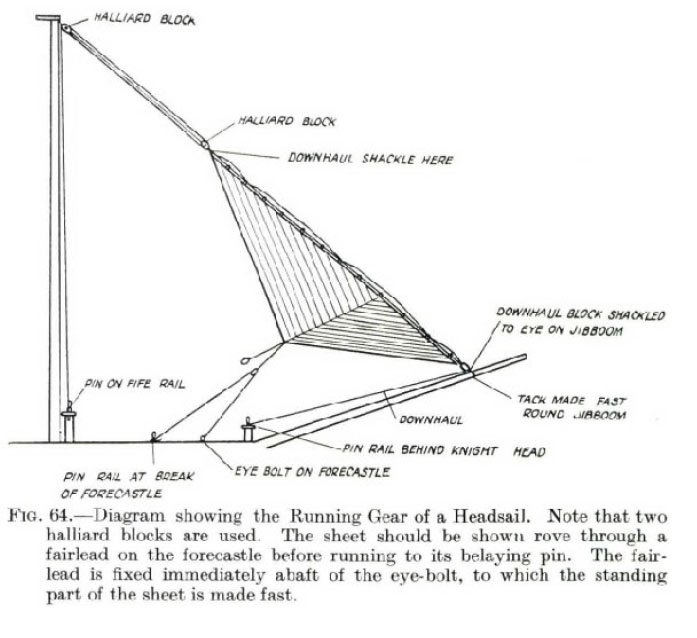
Thank you, Shipman! I know the color of the yards and the forecastle arrangement now, but the question was related to the original Cutty Sark. Longridge refers to "pinrail at the break of forecastle": (I hope it is ok to put part of the book's page, if not just tell me and I will remove the image immediately) So I guessed they were the curved pinrails visible in the Campbell's plans. Since I would like to put billowing headsail on my Cutty, I need to a belay pin for the sheets...
- 399 replies
-
- 4
-
-
- cutty sark
- revell
- (and 2 more)
-
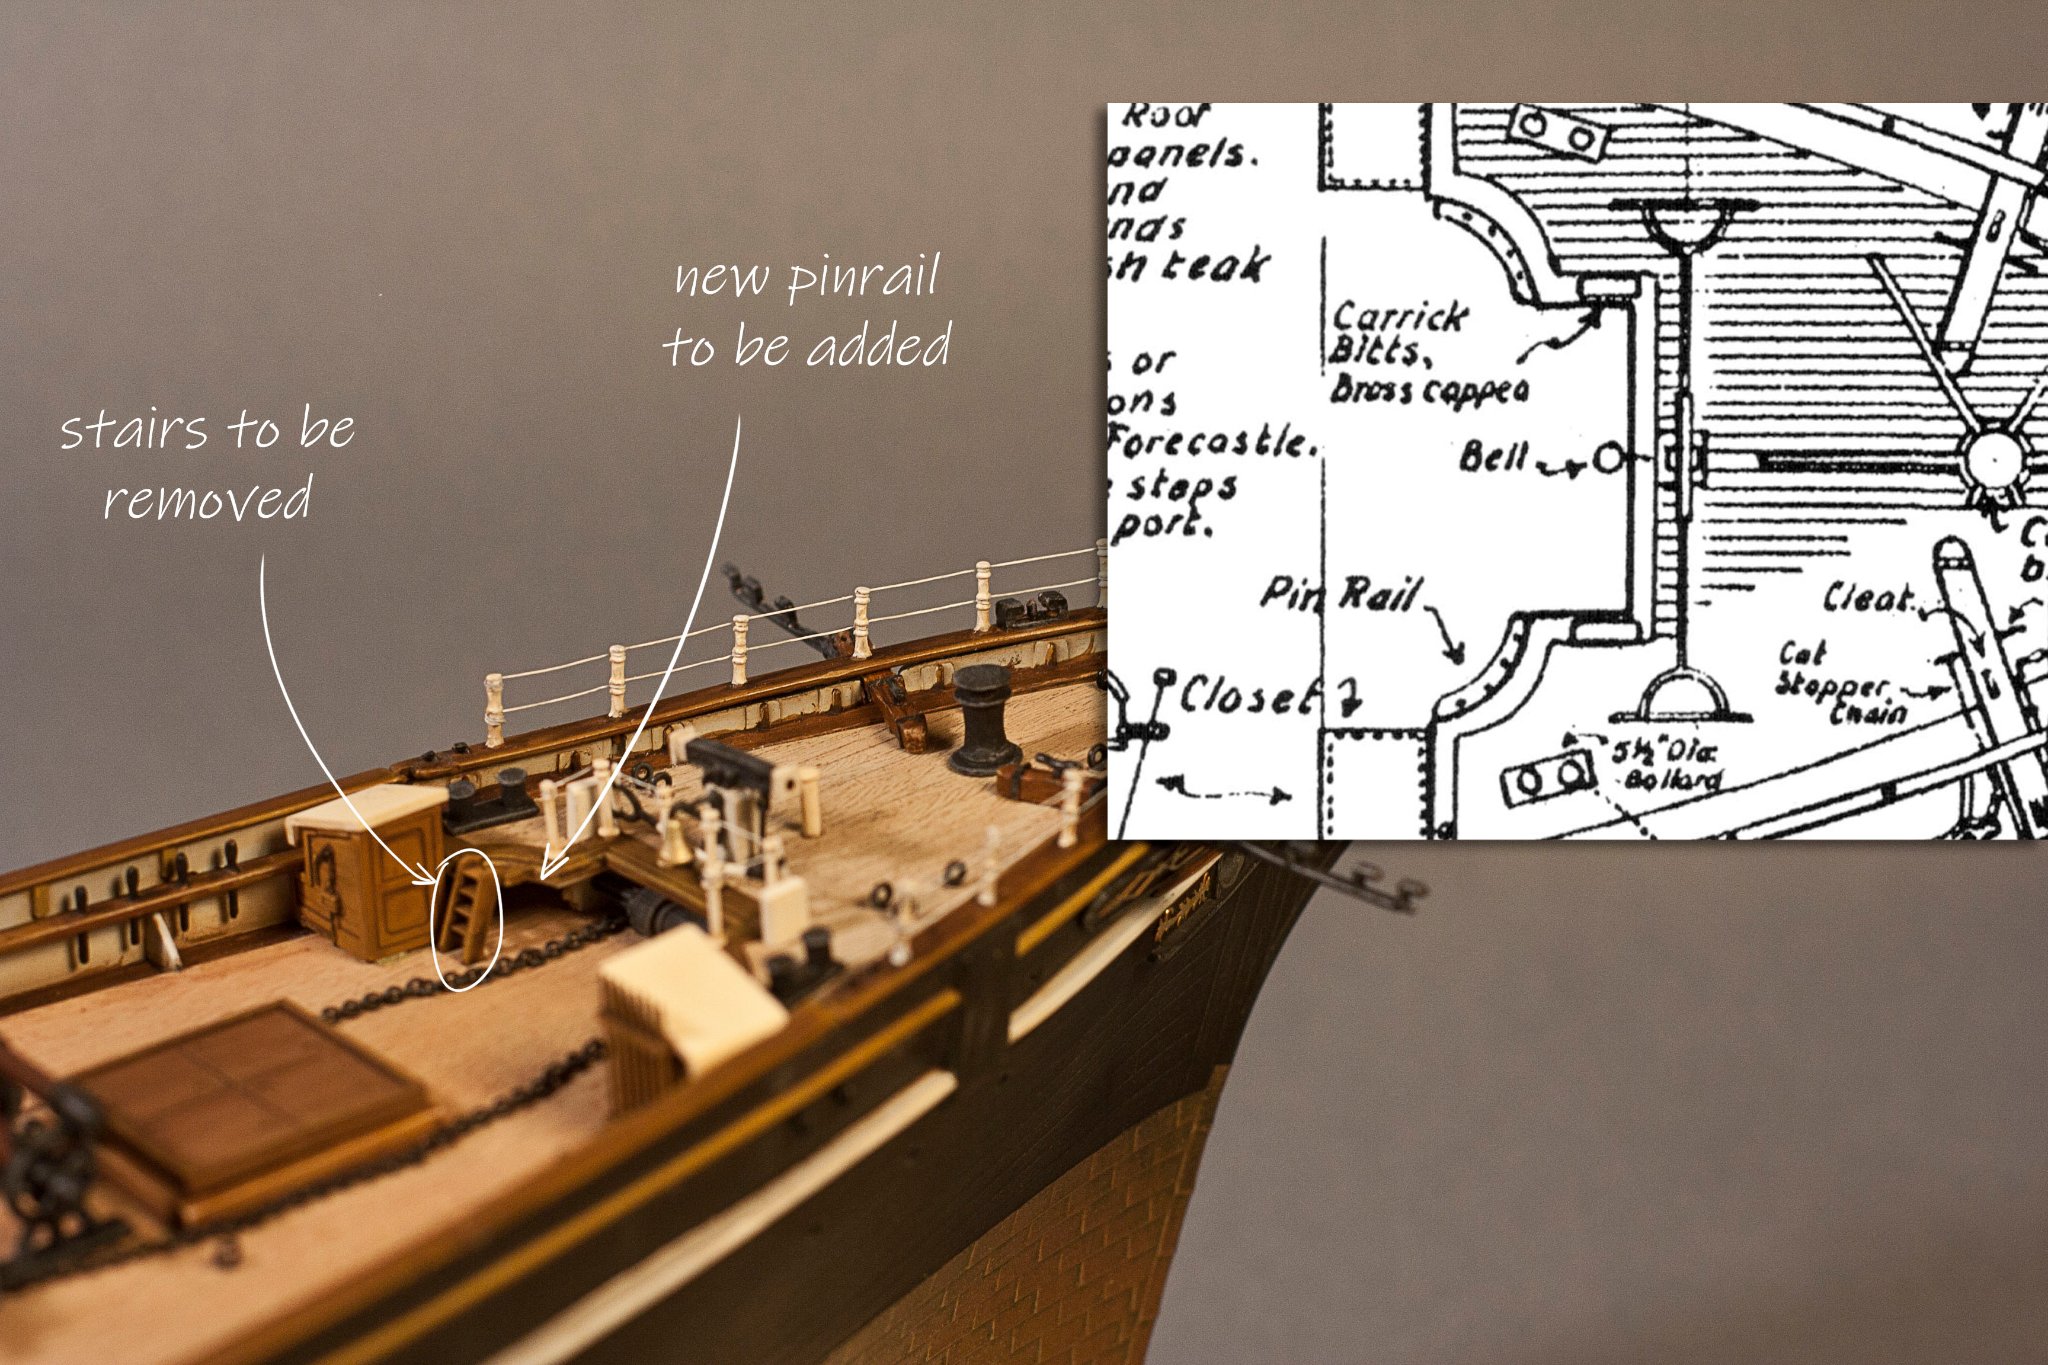
Thank you everyone for this great conversation! Indeed, we don’t know enough. That’s why I try to do my best to have a plausible version of the Cutty and not an exact replica. Too many things are missing or uncertain, at least to my eye. If you don’t mind I would like to take advantage of your knowledge for two other questions: - what is the color of the yards? Is full black ok? - in the forecastle of the revell Cutty Sark, pin rails are missing (at least according to Campbell's plans). In that area Revell placed two access stairs. See the image below to clarify: What do you think should I do? I surely need pin rails for the headsail sheets, but I don’t know where to put them. My idea is to remove the stairs and create brand new, rounded pin rails. But before committing myself in that regard it would be nice to have some wise opinion. Thank you again!

- 399 replies
-
- 4
-
-
- cutty sark
- revell
- (and 2 more)