


gulfmedic1
-
Posts
187 -
Joined
-
Last visited
Content Type
Profiles
Forums
Gallery
Events
Posts posted by gulfmedic1
-
-
On 6/8/2015 at 9:28 PM, Gahm said:
I treated myself to Chuck’s new serving machine. Not that I need to serve anything at the current point in my Syren build
 , but I always like to get acquainted with new techniques early on so that I don’t run into too many problems when I really need to apply these techniques later.
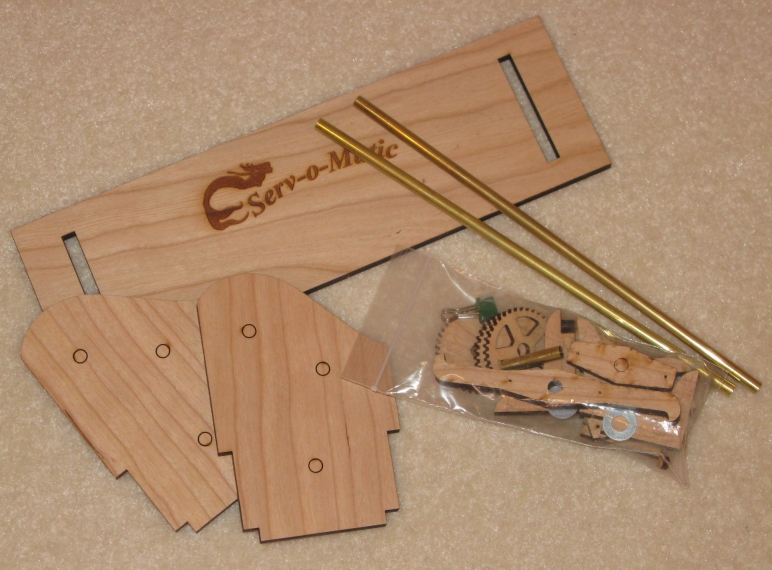
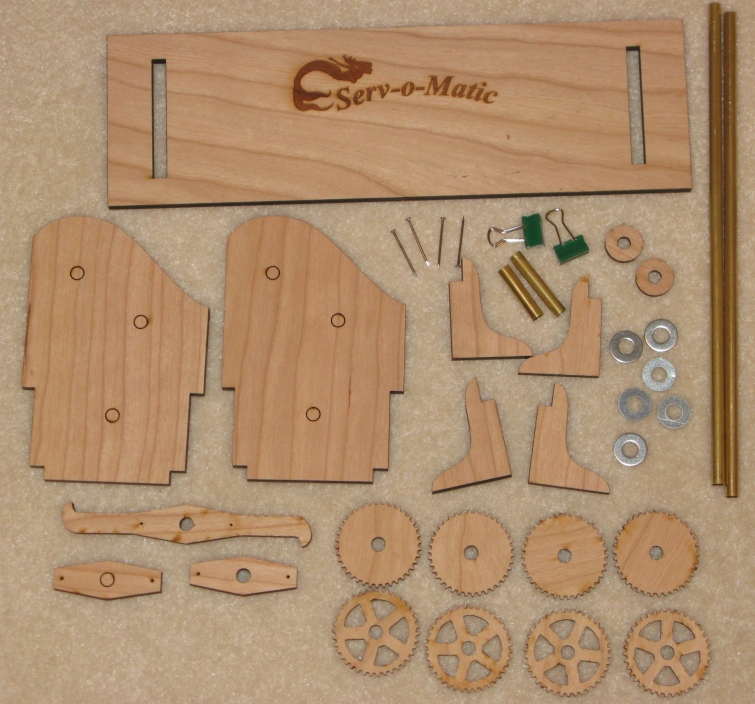
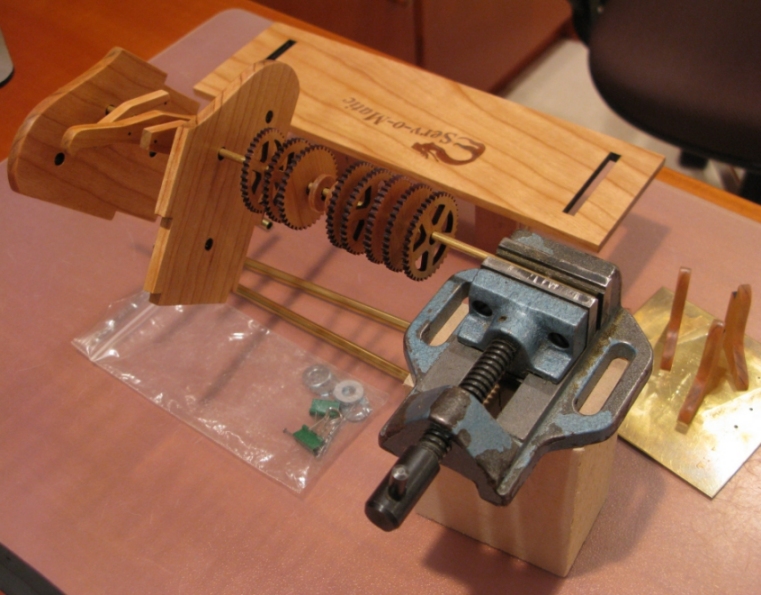
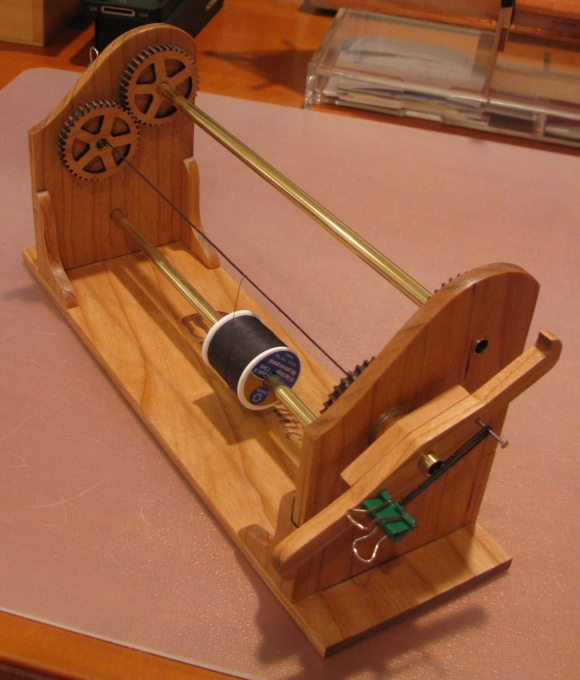
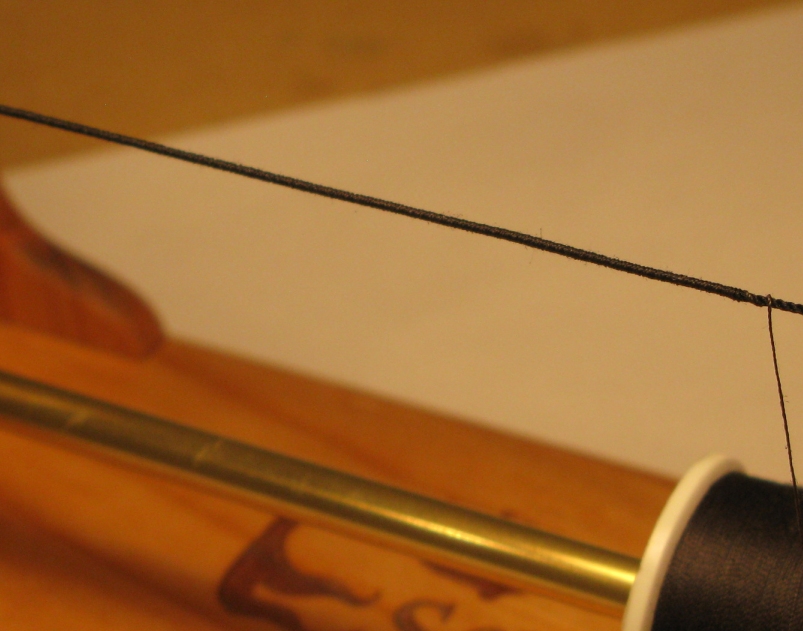
During the last few months I had thought about a suitable design for my own serving machine. It is not really difficult to find good examples in the internet. However, when I looked at the amount of work, which would go into the design and the material, especially suitable gears, Chuck’s new ‘Serv-O-Matic’ kit along with the reasonable price tag quickly changed my mind. Images 1 and 2 show the content of the kit. As all of Chuck’s products the kit is high quality (solid Cherry wood) and easy to assemble – basically only the laser burn marks need to be removed (to have a nice looking machine) and the wood sealed with rub on poly (image 3). The end result is a beautiful, very sturdy, and nicely functioning serving machine (images 4, 5, 6). Image 7 shows the result of a test run with a thread, which was not really suited for serving, but was conveniently ‘available’. It may give a little idea what kind of results can be achieved with a little practice and the right serving thread.
This was the 3rd time I bought products from Chuck’s Syren company. I know I am repeating what other fellow modelers have already written in their build blogs. But each time I ordered something I was amazed about the excellent service, the reasonable pricing, and above all the outstanding quality of the products.
Thomas
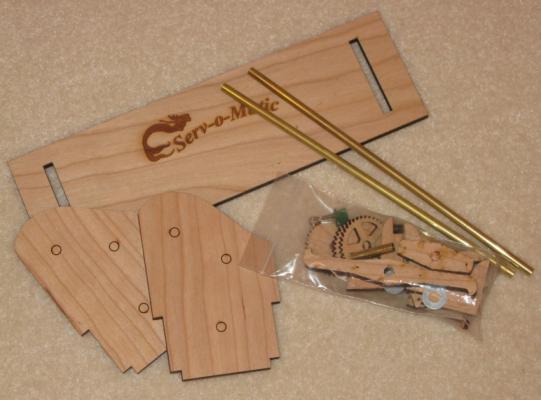
Image 1
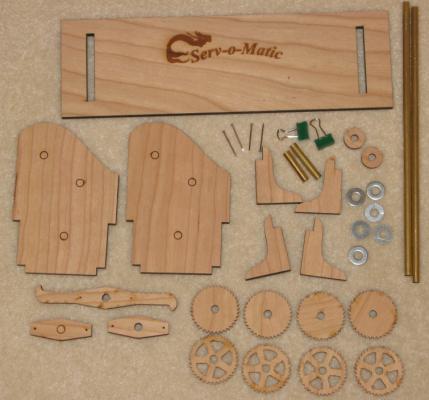
Image 2
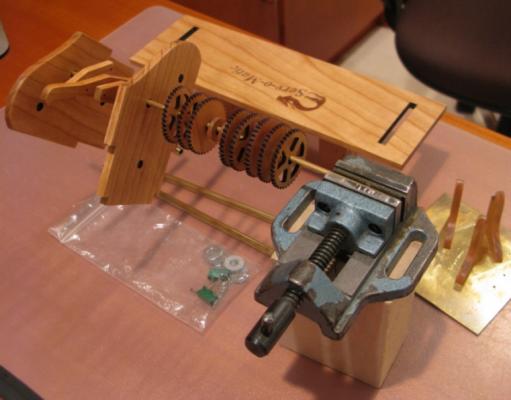
Image 3
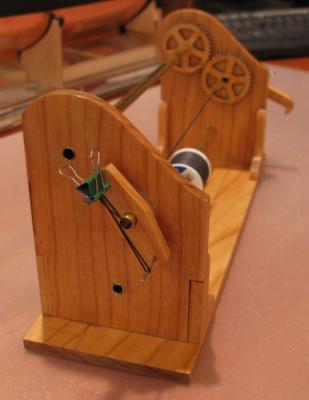
Image 4
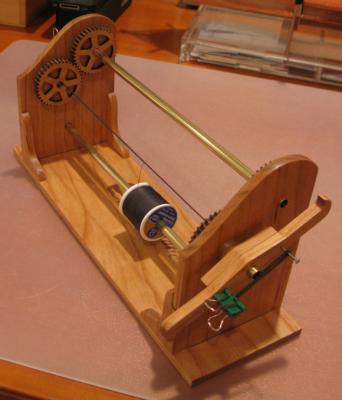
Image 5
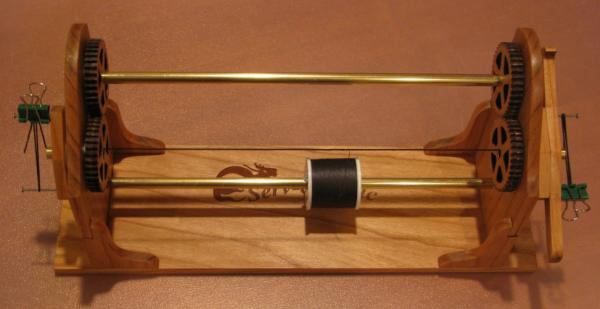
Image 6
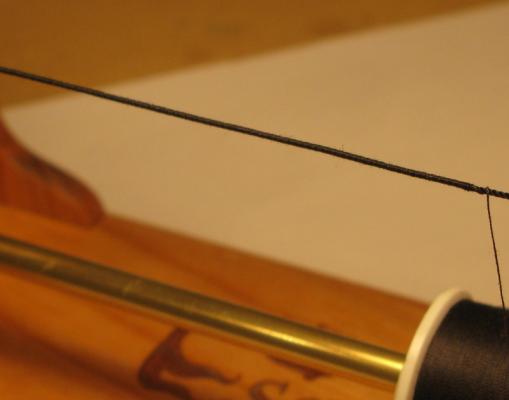
Image 7
Sorry for the questions, Its been a while since Ive been on the site. What is Chucks syren company is there a link
-
On 2/18/2013 at 7:18 PM, Gahm said:
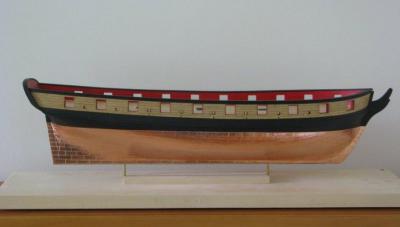
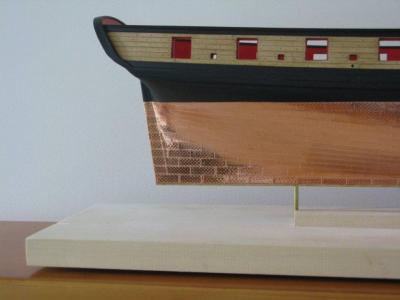
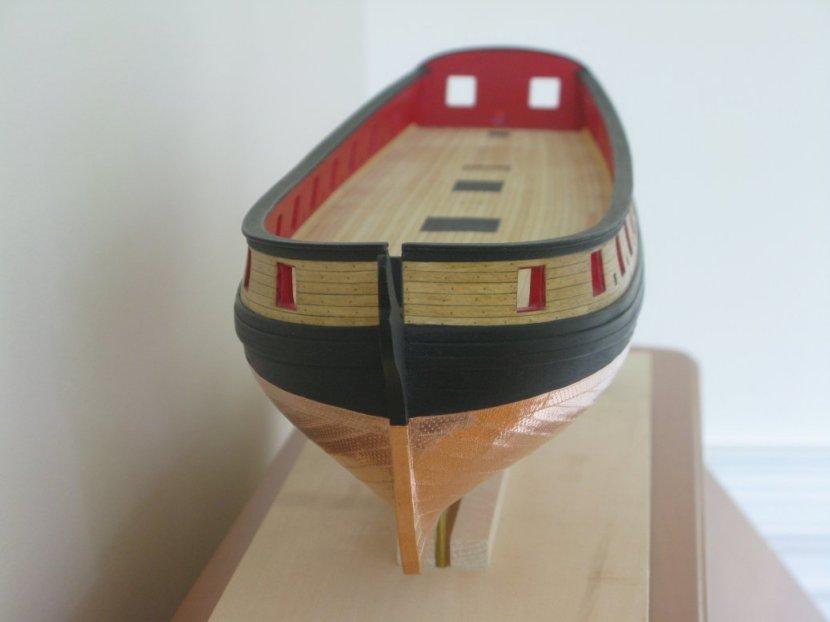
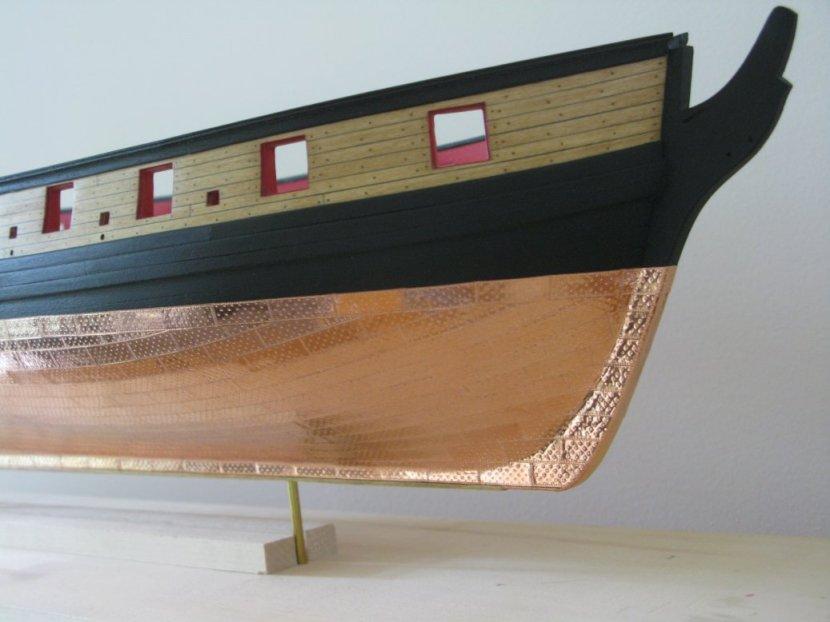
The copper plating of the hull is finished. After
experimenting with different nail patterns I finally settled for one. The
following images show the hull preparation, the production of the nail head using a variation of
Alan’s method with the diabetes needles, and the resulting copper plating.
I first prepared the hull by filling every hole with wood
filler, treating the hull with MinWax Sanding Sealer and sanding it down to a
very smooth finish.
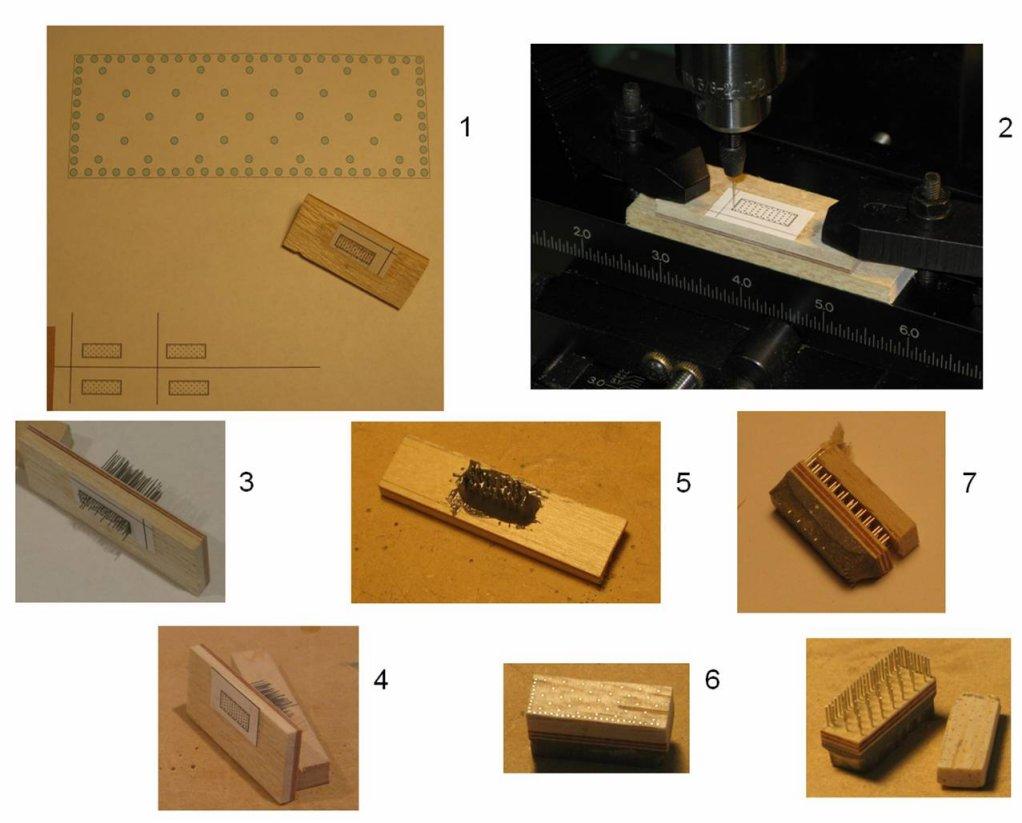
To produce the nail head I designed the desired pattern with
MS PowerPoint, shrank it to the right scale and printed it out (image 2.1). I
glued the image of the nail pattern on a piece of 3mm thick balsa wood which in
turn was glued to a thin piece of plywood. I made sure that no glue was between
the balsa and the plywood under the area where the printed image of the nail
pattern resided. Using a #80 drill (~0.3 mm diameter; Micro-Mark) and a micro
pin chuck (Micro-Mark) mounted in my drill press I drilled the holes for the
nail pattern (image 2.2). The soft balsa wood allows the thin drill to proceed
without bending. Once the drill hits the hard plywood the drill channel in the balsa
wood acts as a guide for the thin drill ensuring that it enters the plywood
without being deflected or bent. Next I removed the metal needles (~0.3mm
diameter) from the plastic heads of the diabetes needles bought at Wallmart
with a pair of pliers and inserted the needles into the drilled holes (image
2.3). Pushing the balsa wood surface against a flat piece of metal ensures that
all needles end in the same plane (image 2.4). The needle ends sticking out of
the plywood side were glued together with JB Weld (image 2.5). Now the nail
head can be cut out according to the drawing glued on top of the balsa wood.
The balsa wood surface is then sanded down until all needles show a complete
diameter perfectly aligned in the balsa wood plane (image 2.6). As a next step
the balsa wood can be separated from the plywood (for this reason it is
important to have no glue between balsa and ply wood underneath the nail
pattern drawing, see image 2.7) and the nail head is finished.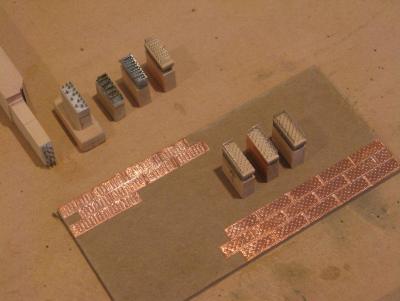
Experimenting with different nail patterns. The 3 nail heads
in the front were used for my model – one for starboard, one for backboard, and
a symmetric one for the dress belt.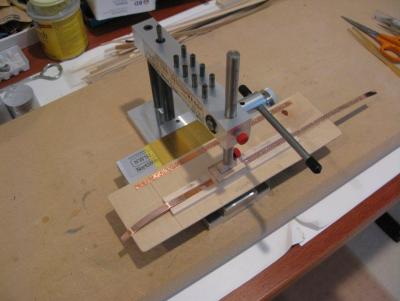
The “Sensipress” (Micro-Mark) came in handy for the copper
plate mass production.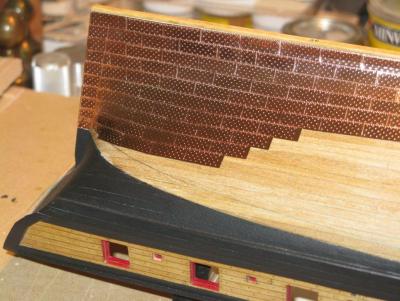
Resulting copper plate pattern.
Here are some additional views of the copper plated hull:


Your jigs for making the rivit heads on the copper look like they are nails or pin but when I look at the copper plates they have outward rivits but your tool you used to mass produce them look like your stamping on the copper side not the tape side so wouldnt the rivits be indented sorry if im looking at it wrong
-
beautiful work Sal, Im learning a lot of tricks from you
-
Yeah I should have done that but saw a sale and got it I'll finish it and give it a try after I fix my goof up
-
I purchased the fair a fame from model expo I did see the pages that showed the deminsion changes and ended up getting to note 4 now I see that the long coss pieces are a little short but will still work
Has anyone built this item and do I have to take the rzails off and reglue for it to work right
Scott
-
-
-
got it thanks guysThey are a regular paper clips, of the minimum size I could find.
It is a brilliant idea from Floyd, see http://modelshipworld.com/index.php?/topic/611-easy-planking-clamps for details
They are very useful for planking!
-
silly question what kind of clamps are those, i know the basic name binder clips but i cant find the ones with the extra metal piece on the sideFloyd, unfortunately I do not have lots of pictures, all of them are in that log, but there are some on page 4 and 5 of this log.
I clamp rear ends of first planks together, with a strong plastic clamp (see page 4), that helps to keep the bend. When plank is drying, it keeps that bend perfectly.
Also take a look on a grain direction, plank is twisted easier in one direction than another.
At the bow, I fix the end of the plank with another clamp, that is attached to the stem and pressing plank to the false keel:
-
Where did you get the L blocksNow the fun part starts to happen. I am finally starting to assemble the kit.
I used some one inch "L" blocks to keep my frames square and at right angles to the keel. These pictures show how I assembled the bulkheads to the keel.
 IMG_2769.JPGP1000015.JPGP1000018.JPG
Here you can see the bow filler blocks that I installed per the instructions.
One good thing about this build is my old camera gave out. I had pictures of each bulkhead being installed but they were blurred. They said that my sensors had given out in the old camera, so I bought a new one. The last three photos were taken by the new camera.
Great looking build by the way
Scott
- Stuntflyer and Ryland Craze
-
 2
2
-
Well I got one, end result I purchaed a Master G233 pro kit.
came with the gun, .2,.3 and .5 size needles with control valve. Hooked it up to my 2.5 gal aircompressor and put an inline moisture trap on it.
seems to work great. just started using it and it seems to work great
O it is a gravity fed system
-
David B,
The brand name of the sealer I got from Michaels is - Decort Multi Purpose Sealer.
Dave
Dave so you can either use a sand sealer or use a primer or do they do two different things
-
not sure if this would work on Acrylic but i found this formula for water based paint on an airbrush site,,,any input?
12oz Distilled water
4oz Denatured Alcohol
4oz Amonia free window cleaner
10 drops Glycerine -
They can mix, but take care because of the volatility of alcohol, the paint may cure en-route from the spray gun to the surface, resulting in a chalky finish. Distilled water will slow the drying time, which may seem ok, but you'll need to keep the coats thin in order to avoid weeping.
Ultimately, water and alcohol or ammonia all have different specific gravities, and in large concentrations can break down the paint matrix all together. matching the paint's solvent with a thinner of the same substance is ultimately the most ideal route.
I know Model Expo paints, and they are almost as thick as peanut butter, but they hold up well using an ammonia based thinner, and can be stored for long periods of time thinned. The yellow ochre I used on my Pegasus build has been stored in a thinned state for over 6 months and has not shown any signs of breakdown or degradation. A quick stir, and we're back in business. I don't know if you could get away with that using water or alcohol.
Andy
Andy
what did you use to thin your paint for storage, and what ratio did you use
-
Jack
where can I get the sanding sealer from modelexp I didnt see it
Scott
-
Thanks Patrick, hope your feeling better.
Decking is complete.
I first tried cutting individual planks, 1/16” wide with the intention of planking the deck with them. This proved, however, a bit beyond my current skill level. What I opted to do was use scribed planking. Not the one that came with the kit but one I made myself. First I made two planking templates, one of the fore deck and one of the aft deck.
I then finished a sheet of basswood ,1/32” thick by 4” wide x 12” long with 4 coats of polyurethane. After the sheet had dried completely I taped the deck planking patterns onto the basswood and using a steel point, traced over the lines to score the wood. Next I painted the decks with a dark brown acrylic paint and them immediately wiped the paint off. The paint came off the polyurethaned areas but stayed in the scored lines. Finally I cut out each deck section.
I like the results but I think I may have scored the wood a little too deep because the caulking lines appear a bit too thick, or maybe I should have used a lighter color paint so they don’t stand out so much. I can't take credit for this method because I did read how to do it in a book whose title and author escapes me right now. Amended 5/28/14 - the book is 'The Built-up Ship Model' by Charles G. Davis pages 106 to 107.
I also chose to cut in the cockpit area and made a template for that planking as well.
Sal
where did you get the pattern from it doesnt look like the one on the kit
-
-
-
Sal
I noticed on my copper roll that there is a little glue on the copper itself, did you use the glue on the copper roll or did you add another glue to make it hold
-
-
-
well hello everyone thanks for the comments on this thread, well i got the 18th century long boat for my step dad he was very excited when he got it, i didn't know that he had done model ship building when he was younger
unfortunately many years of being a butcher and blacksmith has taken its toll on his hands and arthritis wont allow him to do small detailed work, so he gave me the boat to build so ill build it and give it to him when I'm done
in the mean time i still wanted to give him something so i made this sign for his blacksmith shop its the first wood project i have ever done and completed. i used my dremel to carve out the silhouette and hand wrote the phrases then used the dremel to carve the words, ill give it to him this weekend i have to get it sealed first. so it turned out good anyway
thanks for all the kind words

-
Max thanks for the info. I would really like to see what you do for a mini lathe, i have been researching that side project for some time now
-
Mike
I agree with you since this is my first model though i would like it to be great realistically i jsut want it to look nice and be able to finish it
i only made a comment about the size to try to better understand scale and real world sizes, i wasnt being critical
as i build my Phantom im trying to picture the actual size of some of these pieces to help me learm more about model ship building,
you build is looking great


Hello from Louisiana
in New member Introductions
Posted
Where at in La are you located Zach, Im in central La