HOLIDAY DONATION DRIVE - SUPPORT MSW - DO YOUR PART TO KEEP THIS GREAT FORUM GOING! (83 donations so far out of 49,000 members - C'mon guys!)
×


mcb
-
Posts
150 -
Joined
-
Last visited
Content Type
Profiles
Forums
Gallery
Events
Everything posted by mcb
-
Outstanding mcb
-
Very nice work on the interior. Its good to see you back. mcb
-
Nice work Wefalck. First time I saw those types of cleats. Always something different in your posts. And machining styrene instead of the clear acrylic? because of available sizes? or perhaps strength? Thanks for posting this. mcb
-
Nice start Keith, it looks like there are quite a few colors on that thing. mcb
-
Hello Keith, Belated congratulations for your latest completed sternwheeler and barge. They show the appropriate character for the hard worked vessels shown in your photos. mcb
- 457 replies
-
- 2
-

-

-
- sternwheeler
- Hard Coal Navy
- (and 1 more)
-
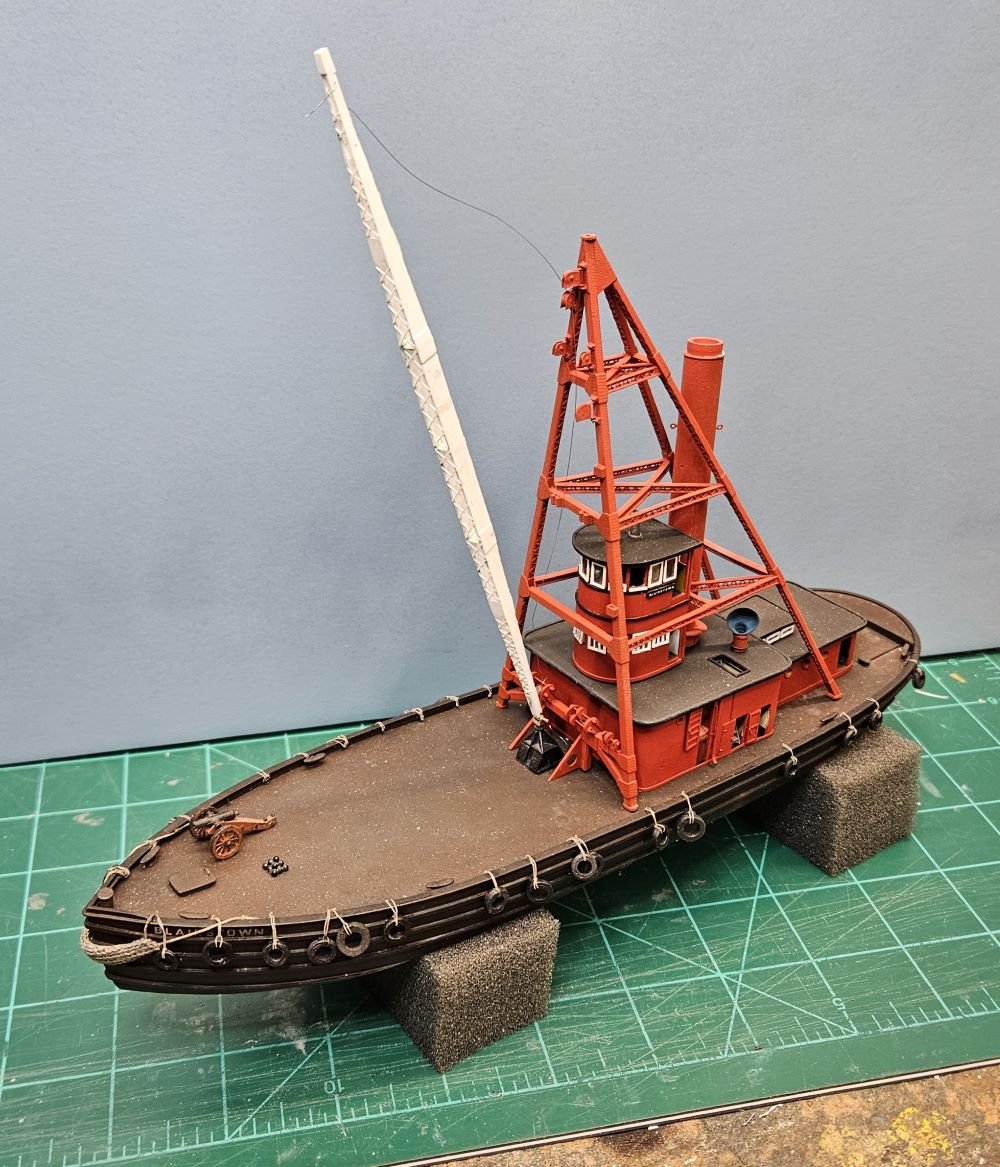
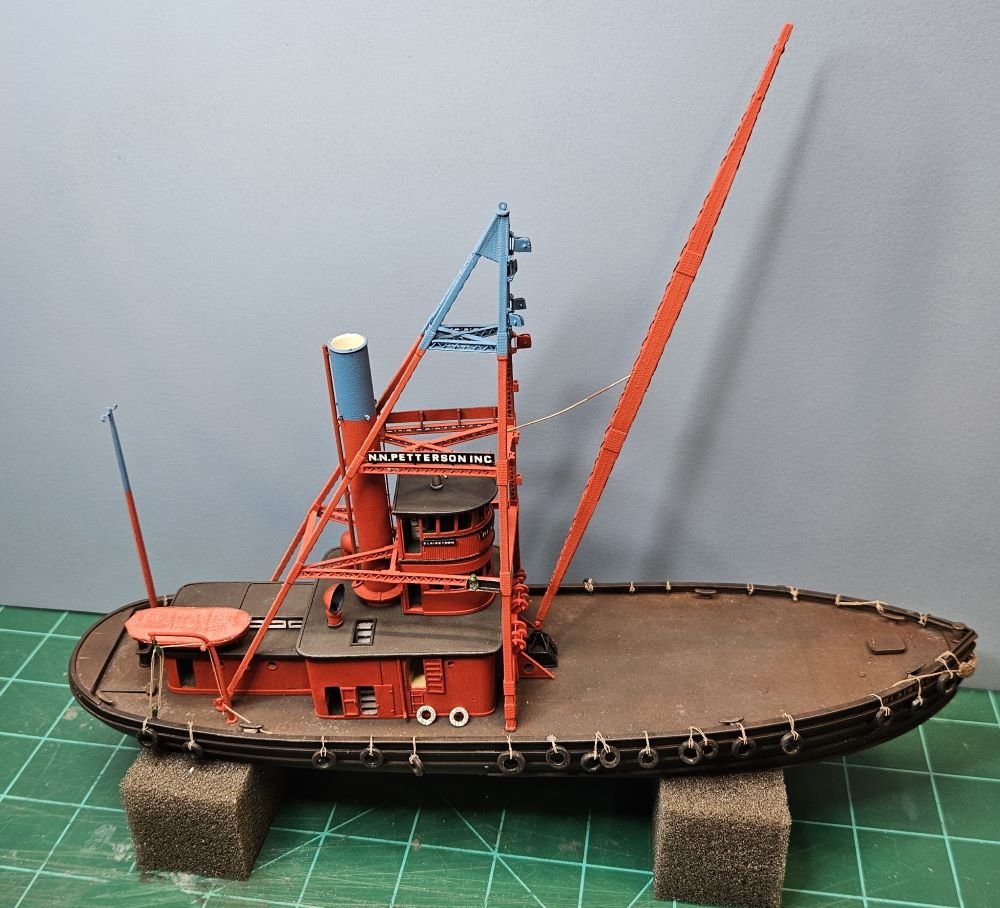
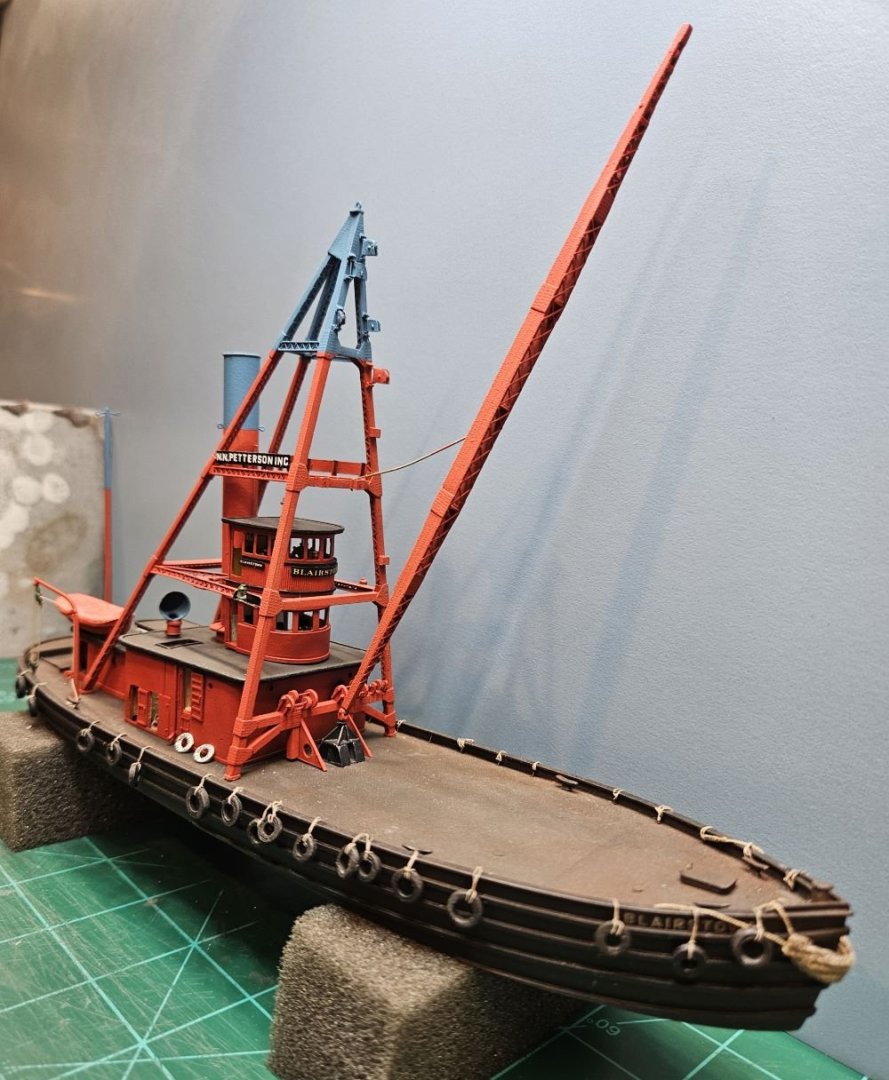
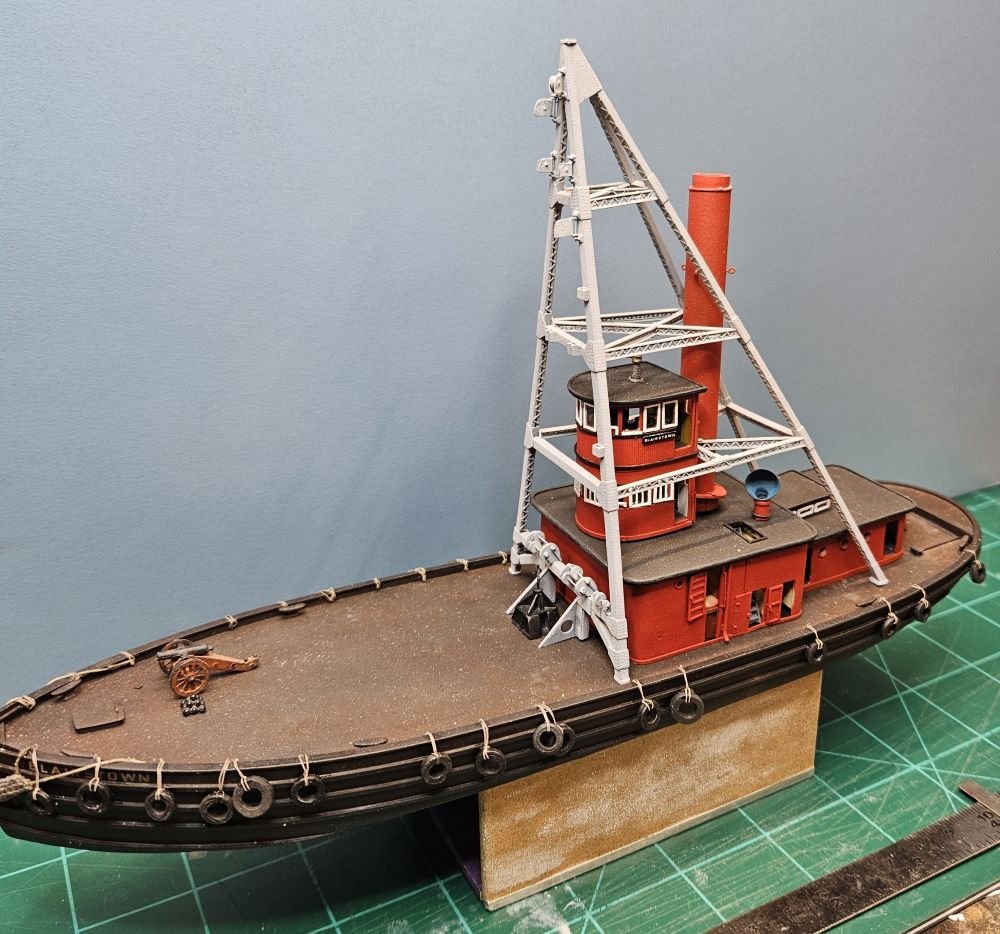
Hello All, Thanks, Keith, for the comment and thanks everyone for the likes. It has been a while since the last post here. Not much is going on with (the dusty) Blairstown at the moment as I peeled the windows off the superstructure and have not yet found a suitable method to get a closer to scale look. Working on plan 'D' for the windows this week. I did paint the derrick tower, stack etc. into their final appearance though and put on some name boards and navigation lights. Thanks for Looking, mcb
-
Hi Keith, You have captured the 'mood' of the thing. Well done, you are going to have a fleet of these soon! Thanks for posting, mcb
- 457 replies
-
- 3
-
-
-
- sternwheeler
- Hard Coal Navy
- (and 1 more)
-
Hi Keith, As wefalck said you sure didn't waste any time getting to this one. I really like the choice of these interesting, slightly dilapidated subjects. In the first 2 photos it looks like there may be some sag in the stern😮. The pic in post 29 looks like you will get a lot of useful information from it though the boat appears newer and not so beat-up. I agree that its: Pennsylvania Water and Power, If its not too late you may be able to contact The Hagley Museum in Wilmington DE, as it seems they have some of the company archives and photos. Perhaps you could get some more info (photos) that way. Thanks for posting this, mcb
- 457 replies
-
- 6
-
-
-
- sternwheeler
- Hard Coal Navy
- (and 1 more)
-
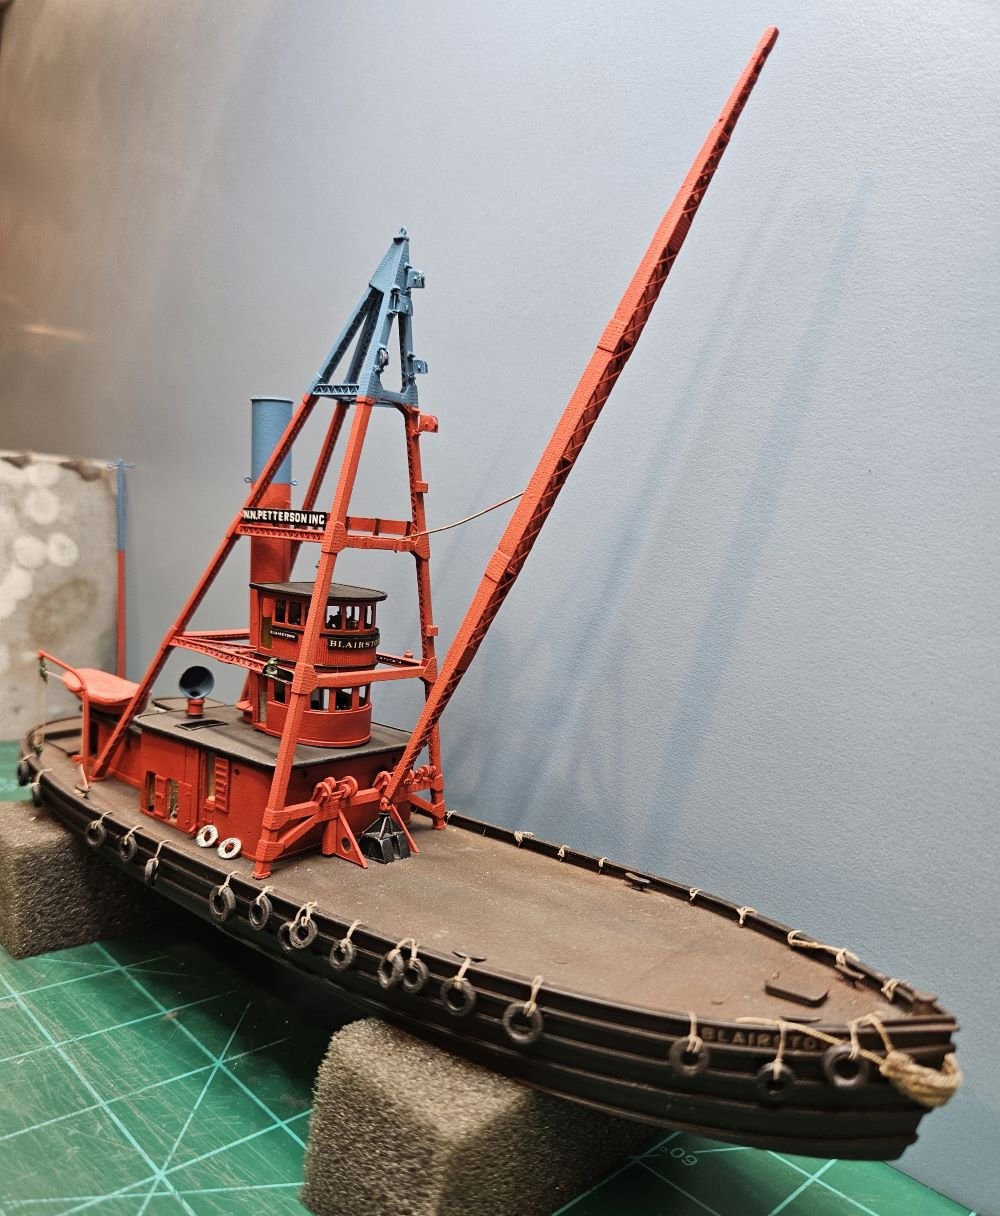
Hello Again, Thanks for the comments, Keith Black, Jim Lad and Canute. Thanks all for the likes. A small update: I have been working on the boat crane of which I can only see the top 1/3 in the pics that I have, so I must 'imagineer' the lower parts. It is made of a tapered brass rod with roller, hand crank winch, etc. soldered to it. First picture is under construction, second is with rigging temporarily attached. Last pic is 'Blairstown' as it is now with all the superstructure and dust sitting roughly in place. Nothing is permanently attached except the boom pedestal. Next, I will have to make a list of all the remaining items to be made and/or attached. Soon I will remove the windows on the pilot house and winch house and make better scale replacements. Last difficult task (I think) will be the railings and stairs which I believe should consume the summer months. Thanks for looking, mcb


-
Hello Keith, Lula is almost finished now I suppose, looking good with all the details and a crew to liven things up. Thanks for posting about the 'Hard Coal Navy', very interesting, I never heard of that before. Now I'm off to scrape the broom off my grain elevator.😀 Thanks for posting, mcb
- 732 replies
-
- 4
-
-
-
- Lula
- sternwheeler
- (and 1 more)
-
Looking good with all the details, I especially like the bell. Take care, mcb
- 732 replies
-
- 3
-
-
-
- Lula
- sternwheeler
- (and 1 more)
-
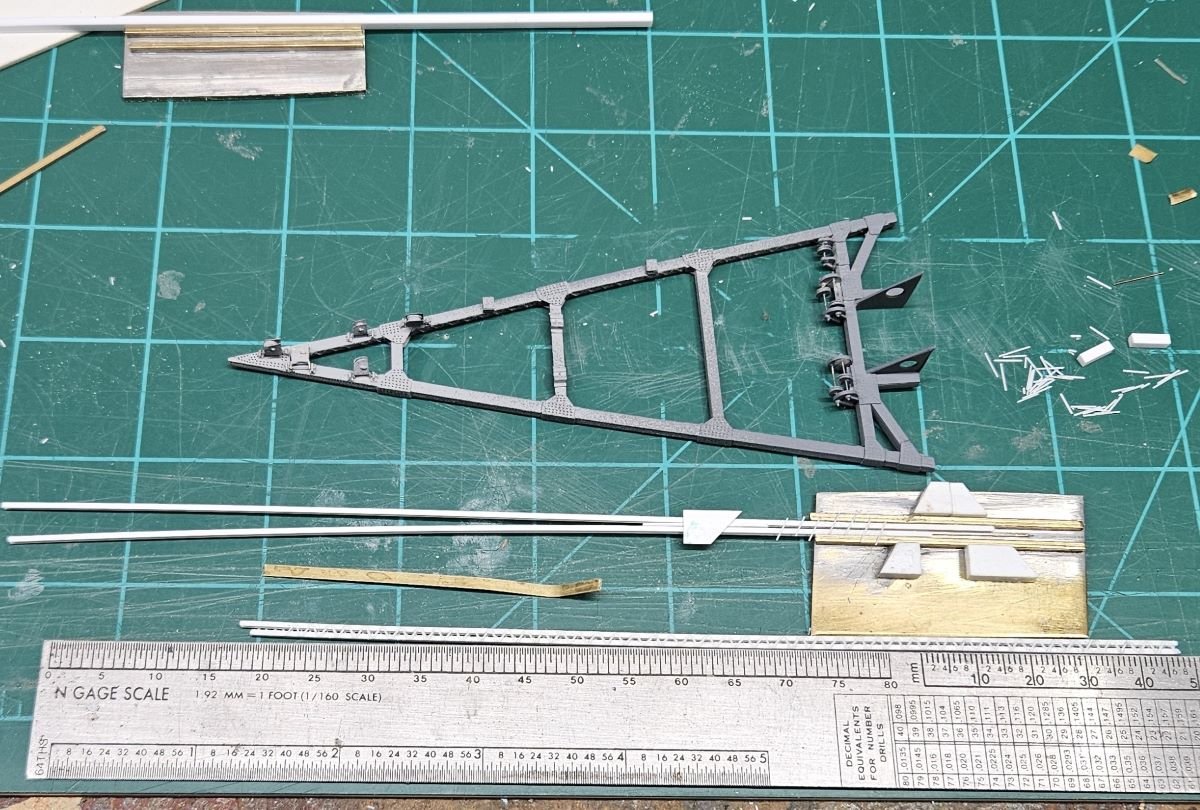
Hello again, Its time for another update. Thanks wefalck, Keith Black, Jim Lad, Canute and FriedClams for the comments and thanks to everyone for the likes. I am working on the boom now, it progresses much more quickly than the derrick as it is made of far fewer pieces. I made a brass pivoting hinge for the base of the boom which sits on the pedestal built previously. Last pic is the boom temporarily in place on the boat. After a little clean-up, I will start rivets next. Thanks for looking, mcb

-
Hello Wefalck, I have been following your progress on this build for a while, and I find as usual, that your work is excellent and very informative. I suppose that this Bakelite is the same as circuit board material or similar, as opposed to the old 'plastic' of the '30s and '40s? Do you need to use anything special to bond it? I think I will order a sheet or two to have on hand so that I can expand my toolset beyond the usual styrene Thanks for posting, mcb
-
This is great. I have been looking in on the progress of this model from time to time and its quite impressive. It must add to the enjoyment of building a beautiful model when you send it out on patrol not 100% certain it will return. Thanks for posting, mcb
-
Hello Keith, Lula is looking fine, almost finished now. Ready for the crew. The letters are quite a good match to the original. Well worth adding them. Hoping you make out alright with your troubles. mcb
- 732 replies
-
- 2
-
-
-
- Lula
- sternwheeler
- (and 1 more)
-
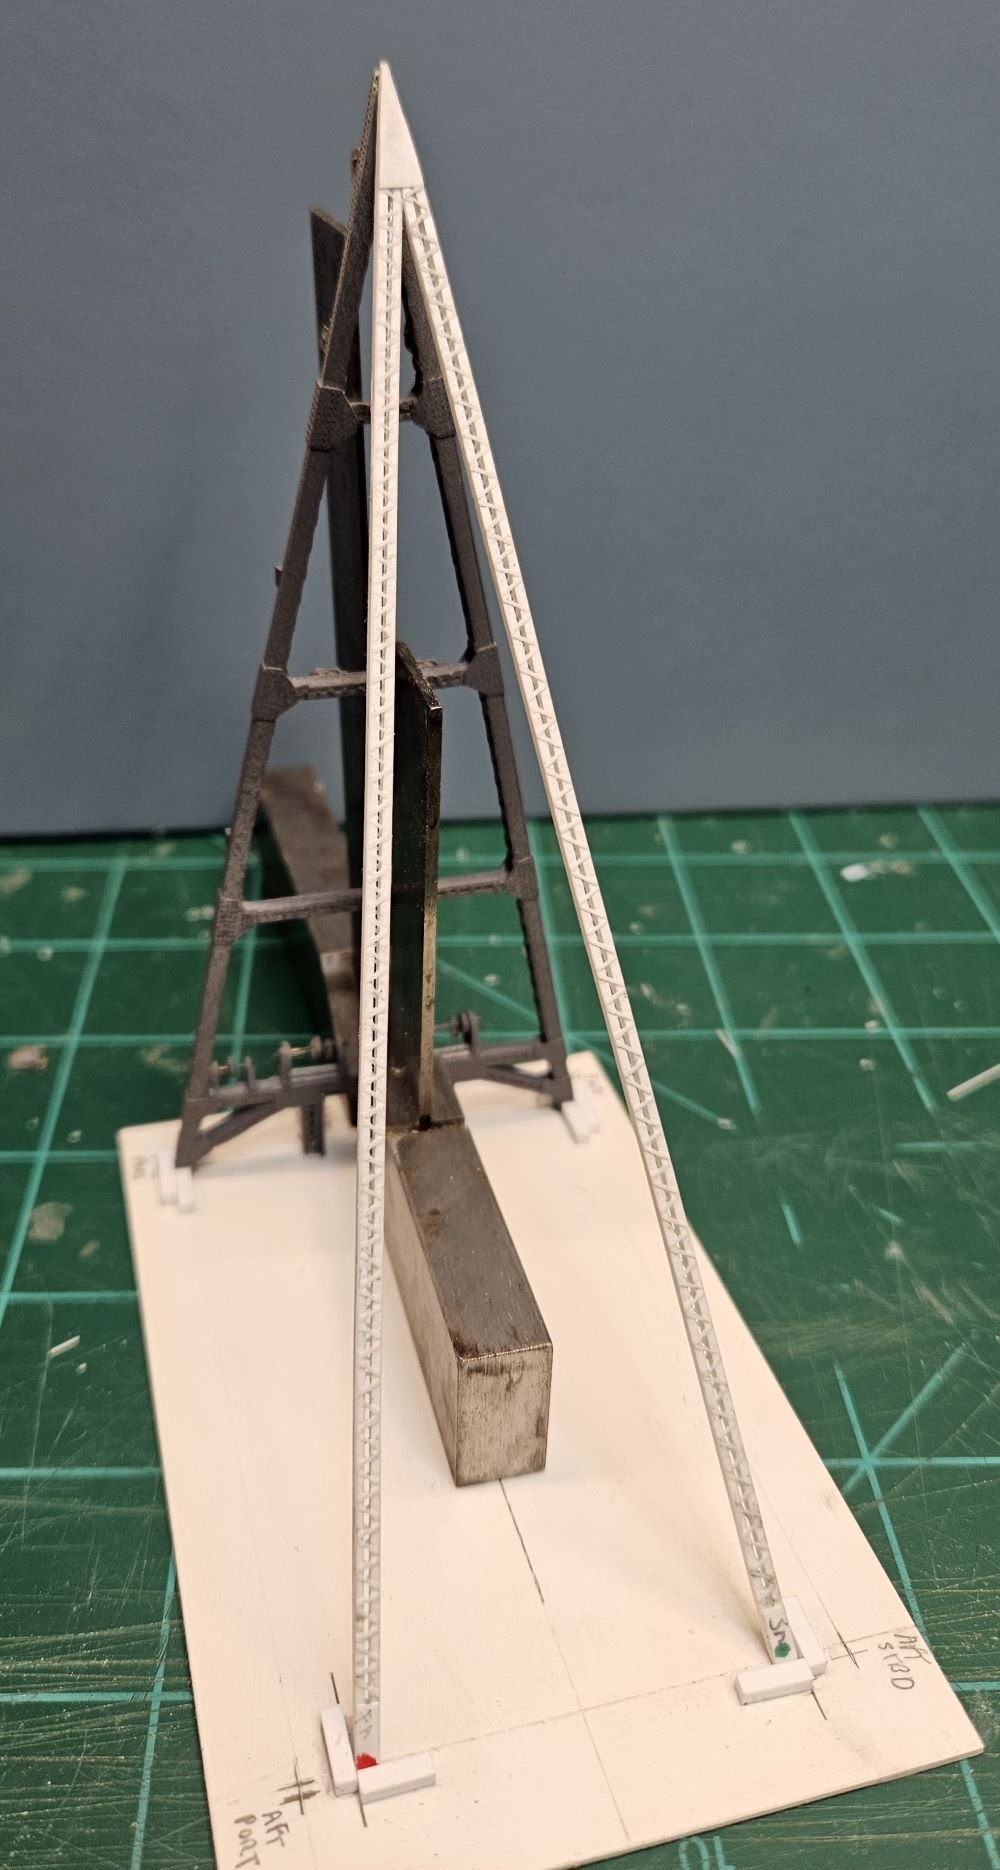
Hello all, Thanks for the comment, Jim Lad. Thanks everyone for the likes. I have finished the derrick tower and will probably put the red paint on it today. It comprises a lot of pieces. I am happy that it actually fits around the rest of the superstructure. Starting on the boom now. Thanks for looking, mcb
-
Looks good to me. I think too small beats too big for this work. mcb
- 32 replies
-
- 3
-
-
- St Louis
- 3D Printing
- (and 2 more)
-
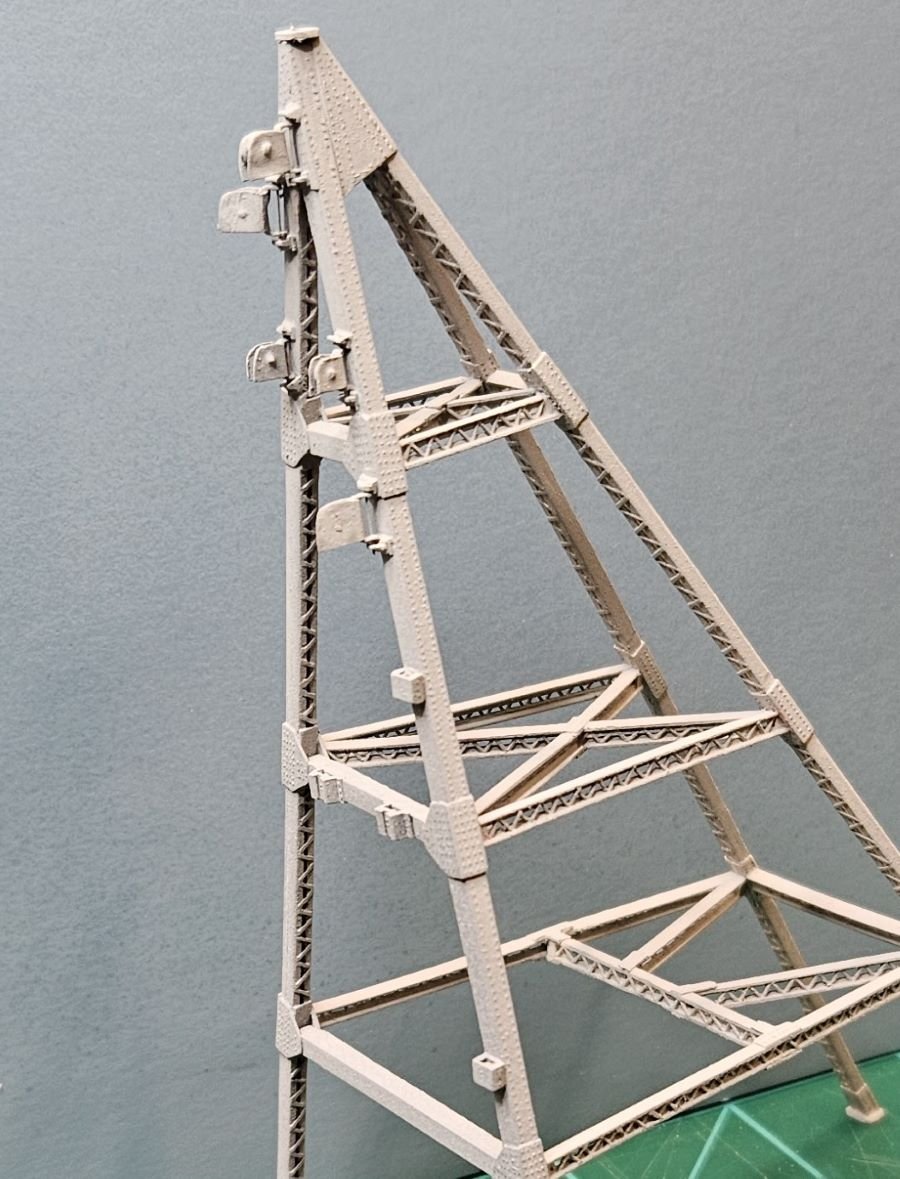
Hello All, Thanks for the comments Wefalck, Keith Black, Canute and Jim Lad. Thanks everyone for the likes. A short update: About halfway through cross braces for the derrick assembly. I think I have to make about seven more, then touch up /repair and hopefully paint. Thanks for looking, mcb

-
Hi Keith, Lula is looking good, especially with the pile driver along. Weren't you thinking of a diorama? Thanks for posting. mcb
- 732 replies
-
- 5
-
-
-
- Lula
- sternwheeler
- (and 1 more)
-
Hi Keith, The model is looking excellent. I think it may be best with black trim as it probably should match the lettering. Otherwise, I would have liked dark green. Nice photo of Great Falls, pre traffic jams. Thanks for posting, mcb
- 732 replies
-
- 6
-
-
-
- Lula
- sternwheeler
- (and 1 more)
-
Beautiful hull there Keith. Thanks for posting, mcb
-
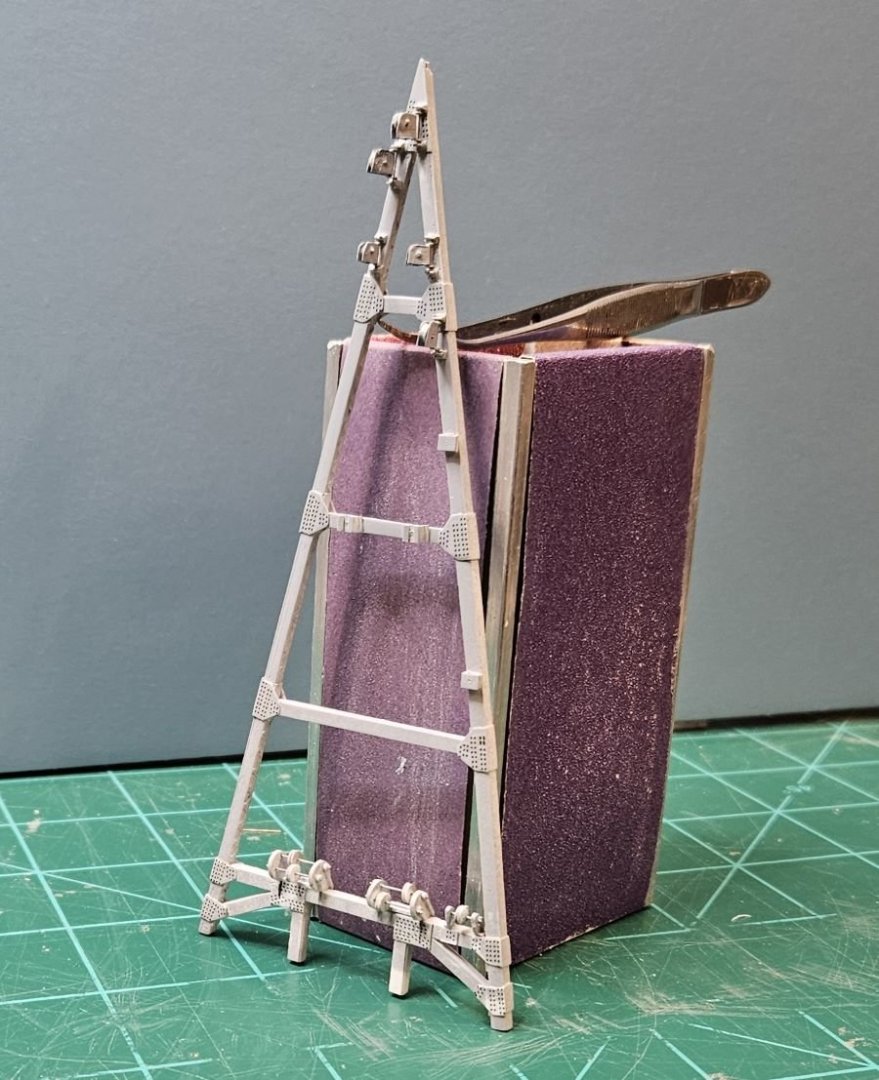
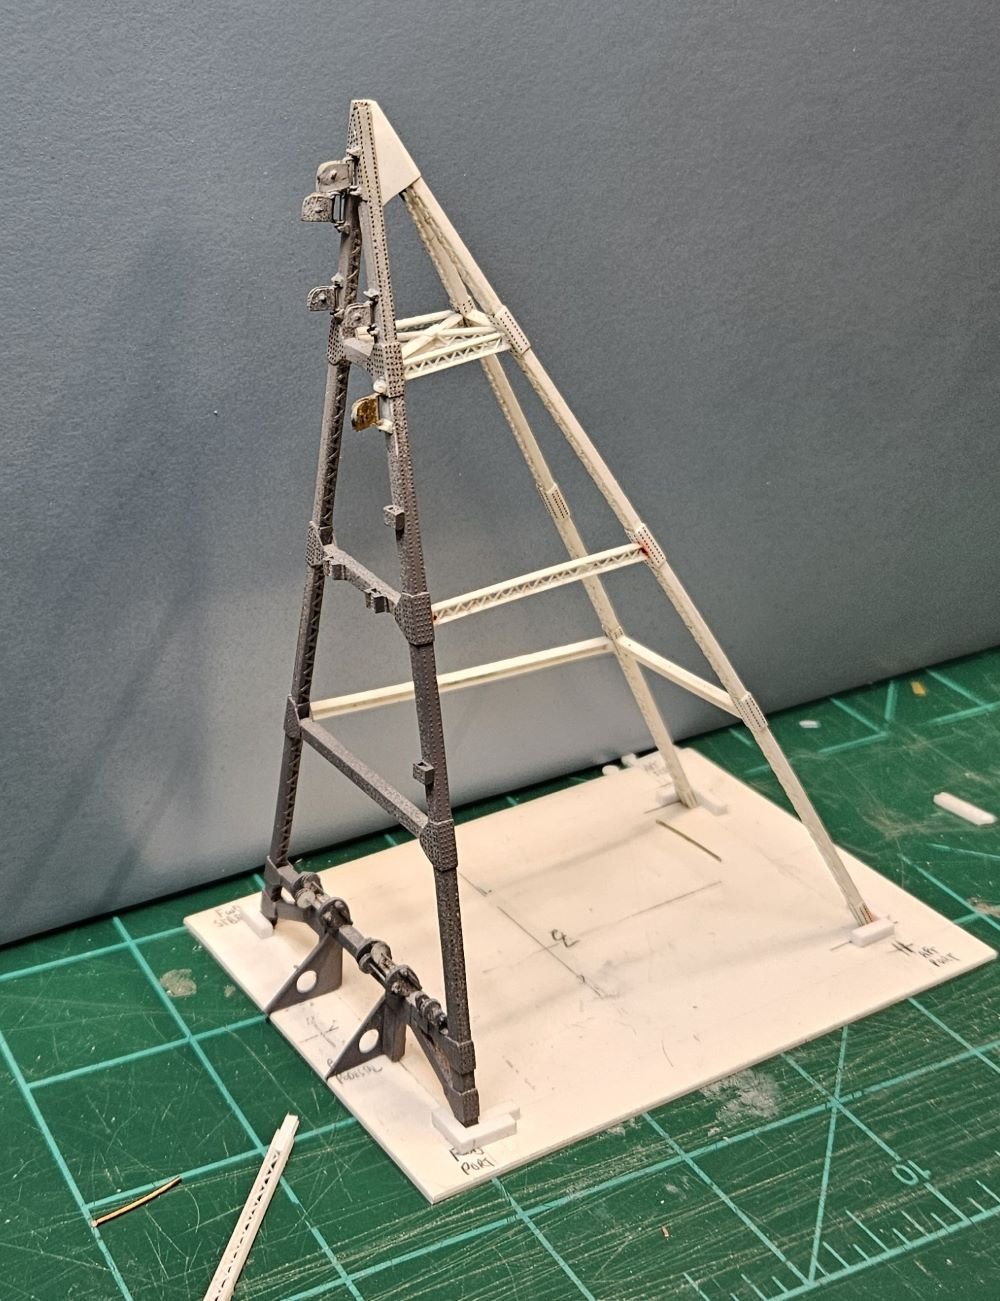
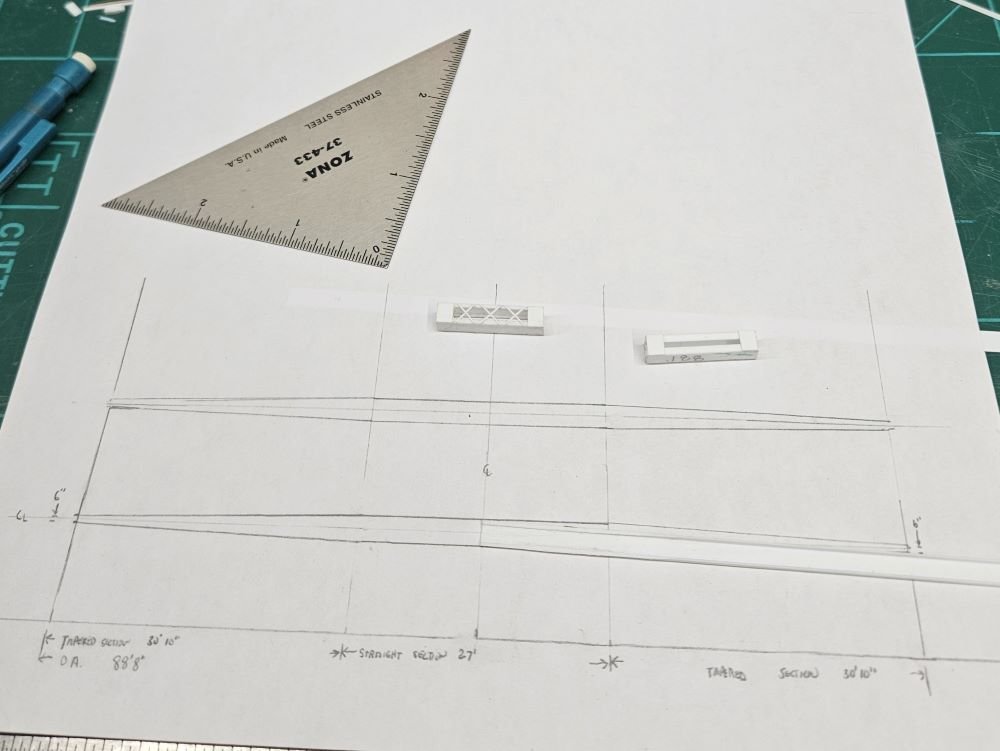
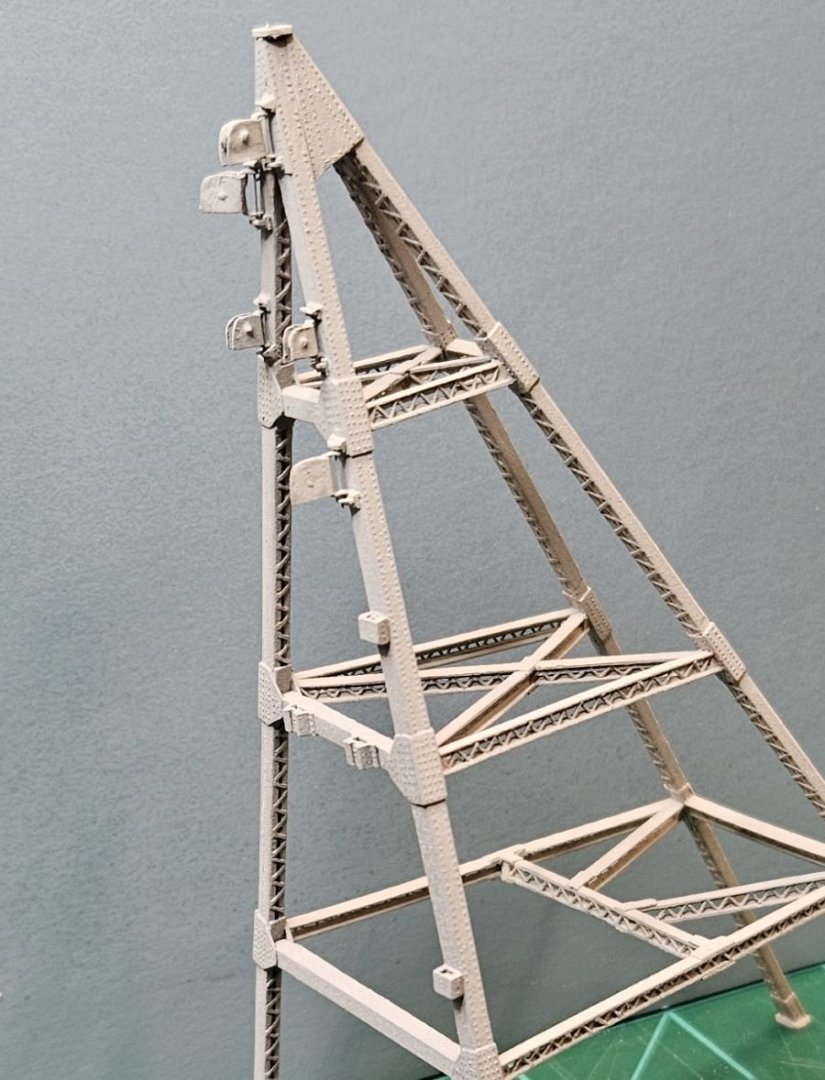
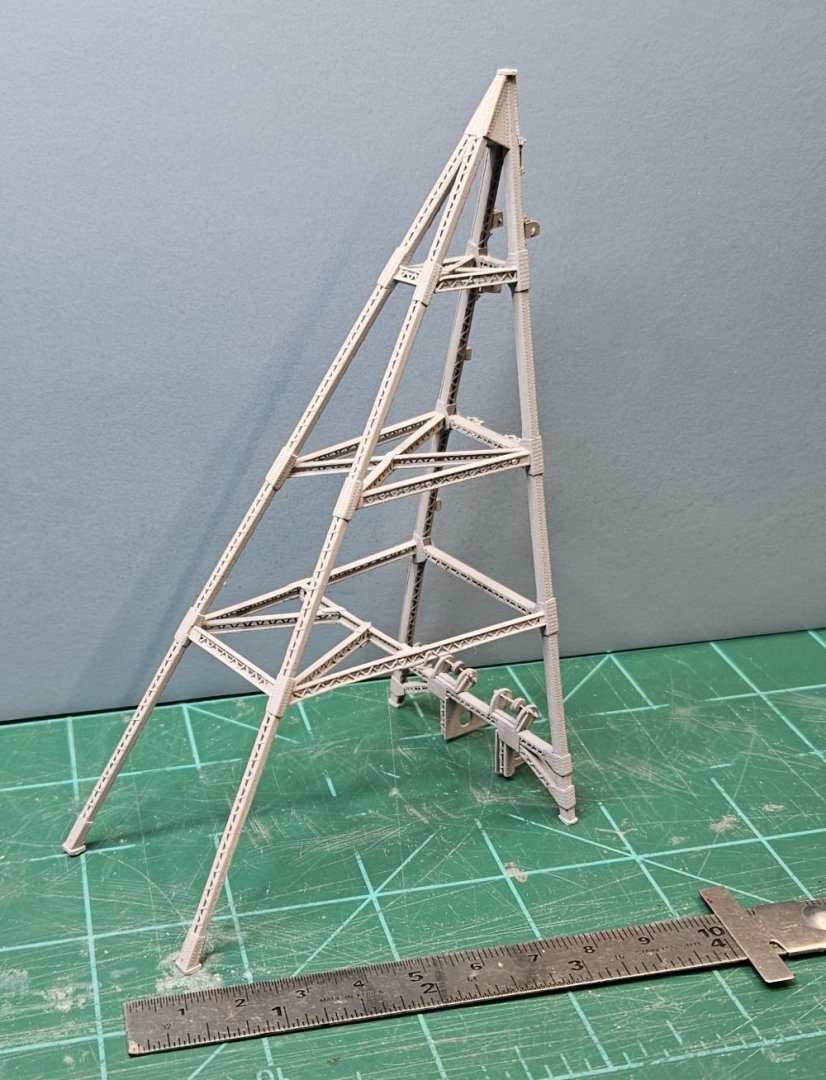
Hello All, Thank You to Keith Black, Canute, Fried Clams and Wintergreen for your comments and thanks to all for the likes. Here is a brief report as this build moves slowly along. The rear derrick legs are built up and resting temporarily in the fixture. I will now have to build the three sets of cross braces between the front and rear legs. All these legs and cross braces are of different sizes and constructions. I hope that it will be apparent in the final product. Before long I should check clearance on the actual model, so I don't have any nasty surprises. Last night I brushed the front leg assembly knocking it over gently onto the cutting mat. One of the guide sheaves went flying to the floor, I was an hour finding it. At least I don't have to make another. Thanks for Looking in, mcb

-
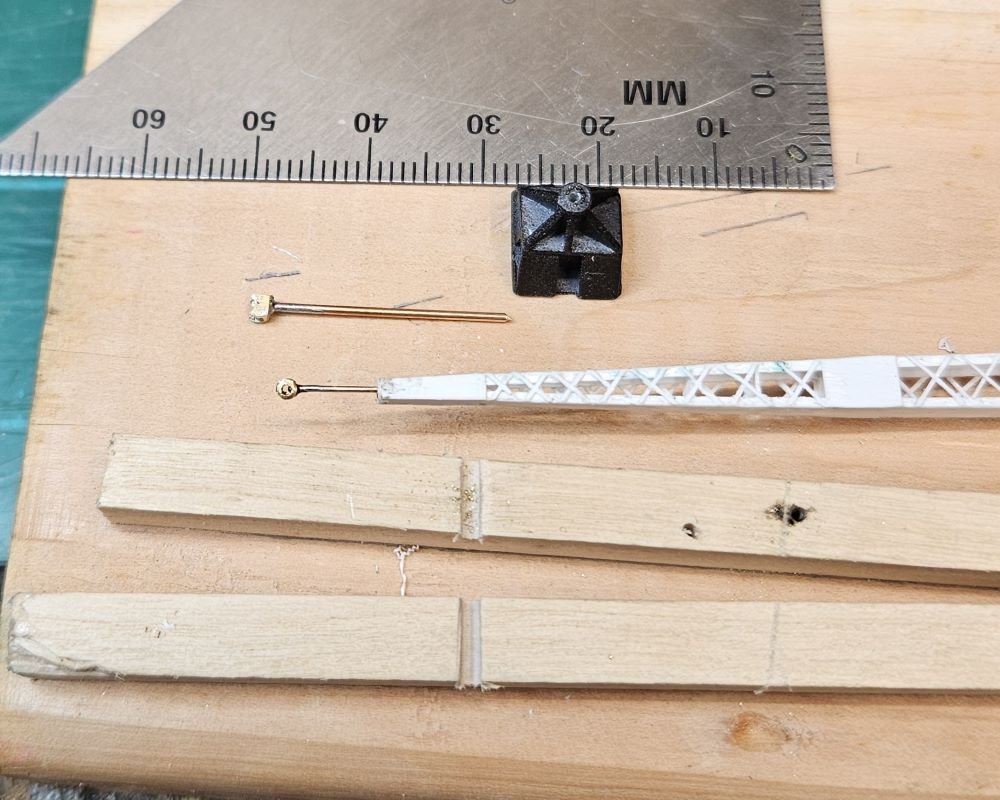
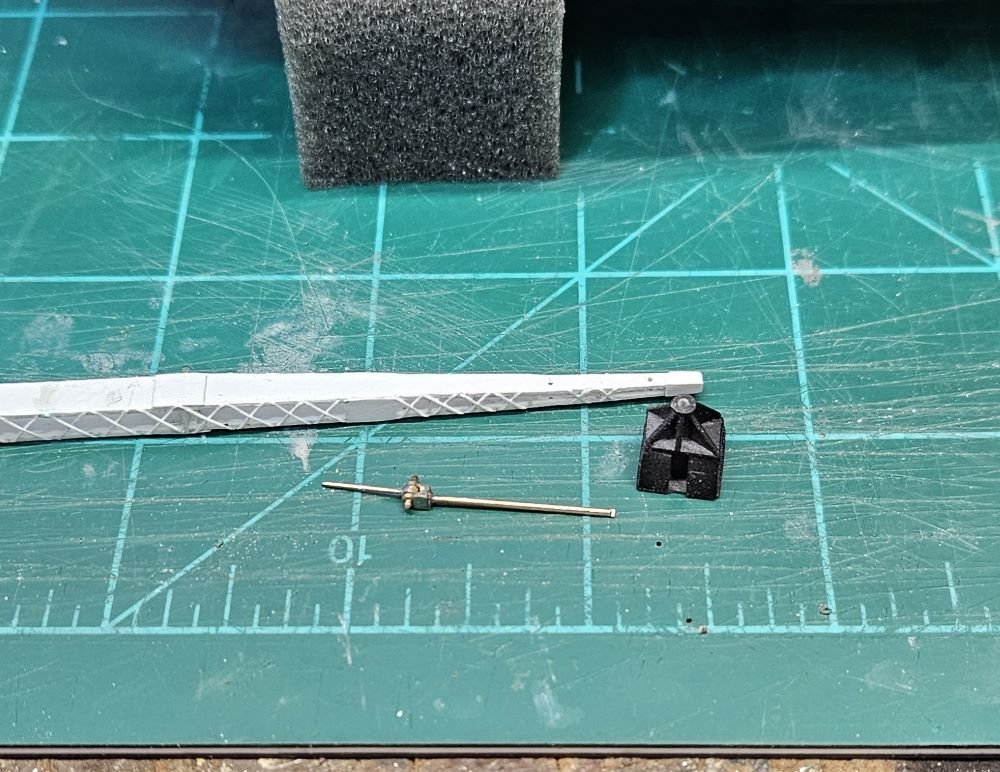
Hello All, Thanks for the comments, Wintergreen, Keith Black, Jim Lad and Canute. Thanks everyone for the likes. I just want to put up a pic of where things are now on the forward derrick leg. I mounted the pivoting guide sheaves (3 larger and 2 smaller) high up on the derrick. I am not sure of the proper name for these, please correct me if I am wrong. I also put rivets on the gusset plates, I think they will look alright after paint, and I will be using more on the remaining parts of the derrick and boom. After viewing the latest pictures, I see more touch up, clean-up and corrections are needed. Thanks for looking, mcb