
HOLIDAY DONATION DRIVE - SUPPORT MSW - DO YOUR PART TO KEEP THIS GREAT FORUM GOING! (Only 75 donations so far out of 49,000 members - C'mon guys!)
×


Egilman
-
Posts
4,377 -
Joined
-
Last visited
Content Type
Profiles
Forums
Gallery
Events
Everything posted by Egilman
-
 Thanks Dennis and you too Carl, It was a learning experience. I think with the help of some of Craig's research I've got the answer to doing it in Rub n Buff..... Plans are in progress for Blue Jay Four #2 as we speak..... We will see that shiny Winged Cigar eventually.... But right now getting organized and I have a coors beer runner to finish..... EG
 -
Not slow brother, tedious is the word, we understand..... multiple repetitive tasks..... Been there, done that, used to doing that...... {chuckle} Take your time my friend we will still be here...
-
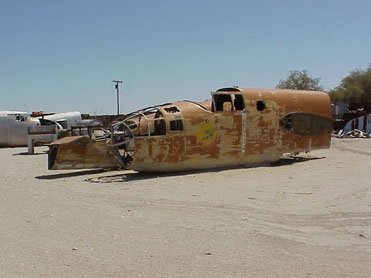
The raiders aircraft were modified B-25B-NA's (the B-25 painted up like Doolittle's at the USAF Museum is actually RB-25D 43-3374) there is only one surviving B-25B and although possible to make her fly, her wing spars have been cut which makes it unlikely... That is B-25B-NA SN 40-2347 the second to the last B-25B NA built and only three aircraft behind Doolittle's 40-2344 If there was one B-25 that could be rebuilt to match a Doolittle's Raiders plane this one is it.... The Bendix retractable belly turret was removed for an extra fuel tank...... The tail gun was removed, as was most of the armament. The latter half of the bomb bay, had a removable fuel tank installed.... they only had two bombs each... one for the primary and one for the secondary targets... Also they each loaded five jerry cans of extra fuel just before they took off... they knew before they ever took off the deck that they probably wouldn't make China... they went anyway..... Fuel was the real limiting factor with the raiders...... they modified enough for the raid with a little reserve I believe it was 32 aircraft. The Aircraft that were remaining after they left were sent back to North American and restored into true "B" models...... A standard production aircraft could not have done it....
-
Pullin up a chair here..... Nice work Ray.... Engine/prop looks like the real deal.... will be following the rest of the build.... EG
-
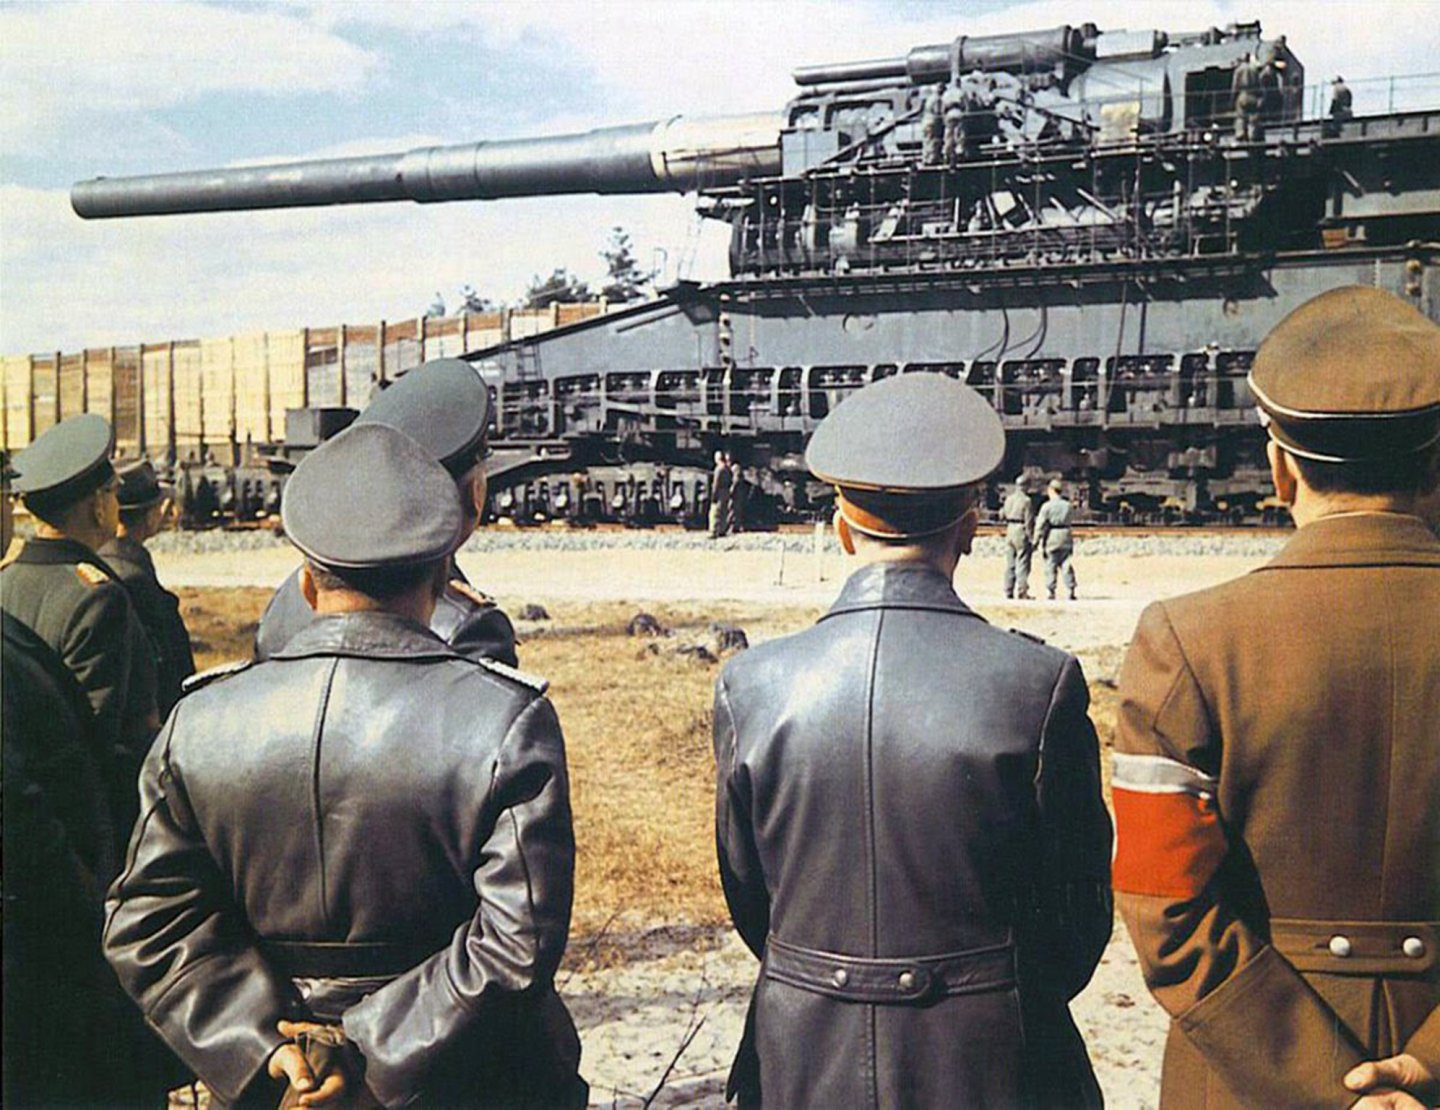
No, the Versailles treaty required the Germans to turn over a complete "Paris Gun" to the allies but they never complied with it. And the allies, with the occupation of Germany, never found one.... all that was discovered/captured was the mount for one near Chateau Thierry. searches of the government archives never came up with the plans either... The Germans very effectively destroyed almost everything about those guns.... They did build a couple of updated versions which they used in WWII to shell southern England across the channel several times, they were captured by american forces shortly after D-Day... (that might be what you saw but I can find no record of them ever being put on display) And Atomic Annie was on display at Aberdeen for many many years....
-
True in a broad sense, at various points when needed in a specific campaign or battle some units were equipped with pikes to serve as assault troops..... but very rarely..... The "official" US Cavalry has a long as storied history starting in 1776, but there were local units formed prior to the actual date of creation by Congress... During the Revolution most cavalry was of the light horse type, (although the British did have and use Lancers, a form of heavy cavalry during the revolution) the Dragoons type of cavalry came along just before the Civil War and were extensively used during the Indian Wars... The US military prized the ability to fight both ways... On horseback and dis-mounted..... So no, we really didn't get the division of cavalry known as "Heavy". (although during the Civil War, there were a few instances of calvary being used in the role of heavy shock troops to break lines, but with the improvements of artillery to that point made it clear that the use of cavalry in the shock role was not a very good way to use excellent troopers) An excellent history of the US Cavalry is in the US Army's Lineage series... History of the Organization of the Armor and Cavalry Also goes into detail on how the Cavalry branch became the Armored branch which also has a long and storied history.... The period OC is modeling is when heavy Cavalry was at it's peak and most advanced and a very powerful force on the battlefield.....
-
You are correct Roger, the largest gun used by the Artillery corps was a 14" railroad gun, they had five battalions of them two were attached to the French Army and the other three to the AEF.... The largest gun we ever actually built and deployed was a seacoast weapon. 16" Bore and it was installed on the western approaches to the Panama Canal..... There was consideration and plans made to build an 18" weapon but it never came to fruition cause it became readily apparent after WWI that the airplane's ability to range hundreds of miles behind the lines delivering bombs really made railway artillery practically useless... (but we had them until the late '30's) Here is the 1917 manual of what the Army had in 1917..... the largest being that aforesaid 16"er... Description of 8, 10, 12, 14 and 16 Inch Seacoast Guns and Their Breach Mechanisms US Army Ordnance Department--pdf There are a bunch of links on the web about the Navy and their service in France during the war with the Railroad Artillery Battalions.... A very interesting read.... (and some short videos as well) EG
-
1/35th scale? Gustav A real shame they don't have one in stock..... {chuckle}
-
Good lookin' aircraft.... (couldn't help but notice "Really George" back there in the background, it's a good looker also) B-25B's are one of my favorites, but the heavy gun nosed ones are fun also.... Nice Work!
-
Actually yes it was... Schwerer Gustav 31.5" gun... (Schwerer Dora was the second one built) Designed in the '30's to be used for the destruction of the heavy forts of the Maginot line.... Very impressive piece... Gustav was used in several locations during WWII and was destroyed by the germans to prevent it from falling into soviet hands. Dora was used during the siege of Leningrad along with "Gustav". ("Dora" was also set up at Stalingrad and ready to fire when it was abruptly withdrawn to prevent it's capture by the encircling Russians) They are the largest and heaviest artillery ever used in combat.... (both the British and Americans had 36" mortars during WWII but they were test pieces and never actually deployed) Dora fired a 7 ton shell to 54 miles and was capable of piercing 7 meters of reinforced concrete or 1 meter of face hardened armor steel. The design's greatest success I read from a book a fail to remember the title of, was destroying a concrete underground ammo bunker that was 92 ft underground..... (and an underwater ammo depot under 32 ft of water and 10 ft of reinforced concrete) They were building an even larger gun called the "Langer Gustav" which was abandoned after RAF bombing of it's Essen building yard damaged it. Reminds me of the railroad guns the US Army Artillery Corps used during WWI.... (the largest of which was an 18" bore)
- 36 replies
-
- 10
-

-

-
To give a little note about what the Army was like between the wars (1919 to 1936) Patton didn't regain the rank he held at the end of 1918 (Brig. General) until 1937 after the 3rd army maneuvers in La... Eisenhower did not regain the rank of Colonel until 1938 when he became COS of the First army and did so well that he soon was reassigned to Plans at the pentagon under GC Marshall where he received the brevet rank of Brig General.... The Army was lucky to retain them, both had received their notices of reaching mandatory retirement age before the 3rd Army maneuvers.... Patton as a Colonel and Eisenhower as a Major..... And, if it had been left up to McNair, neither would have been part of the Army when we got involved in WWII.... Such was the politics of the day.... McNair was a MacArthur guy and Eisenhower and Patton were GC Marshal men... (although both had served under General MacArthur at various points in their careers)
-
A pleasure truly... Wonderful work as well...
-
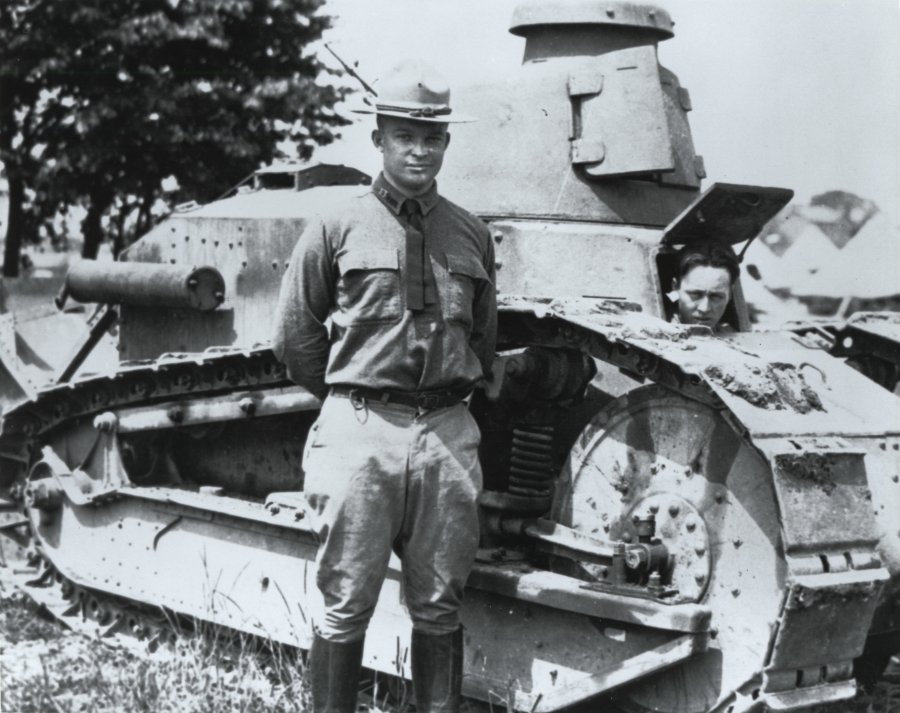
Yep and here a proud Captain Eisenhower in front of an FT-17 at Camp Colt around 1921. He commanded the Tank school there and was the first stateside officer to learn to drive an FT-17 cause he needed to know how to instruct the officers and men underneath him... During the War (WWI) he rose to the rank of Lt Colonel commanding the school and the FT-17 he learned to drive was sent home by direct order of Lt Colonel Patton from his allotment of french issued tanks so the stateside school would have an actual tank to train with..... Patton and Eisenhower formed American tank doctrine and battlefield tactics during and after WWI until the Tank corps was disbanded in the '20's. Patton going back to the Calvary and Eisenhower back to the Engineers/GSC..... Patton rose to the rank of Brig. General during the war and Eisenhower to Colonel, after the war, they stayed in the army and were demoted to Major and Captain respectively..... They were together at Camp Colt for 8 years Eisenhower commanding the school and Patton holding Unit command... Technically, even though at a lower rank Eisenhower was Patton's commander. The real strange thing is although both were well qualified as the best and most experienced armored officers we had between the wars, neither ever rose to command the Tank Corps... but that was the Army back then, it was more who you knew rather than what you knew..... Thankfully, they were both recognized for what they were and rose to appropriate rank when they were really needed...
-
General Mess is his son, General Order is his wife and the mother of General Mess.... {slinking away quietly as well}
-
I agree Craig.... Given that I put it over fine grey tamiya primer on the fin and tanks tells me that a flat primer is the way to go, a micro rough surface for the wax to grab ahold of..... I wouldn't use Tamiya acrylics though good old Testors flat black would be my choice there is no chalky residue with it and it's the darkest black model paint I know of and sprays very thinly as well... Jean Paul used nitrile gloves after applying the RnB specifically to avoid the fingerprint issue...... the 24 hours drying time was new for me so that is now something I will do also. He did the fuselage and wings separate and filled any space with styrene, custom mating the joints before painting them to remove any gaps. I know from my own experimentation that you can put a gloss coat over the RnB after it is down, but since his experience is that the decals will go directly over the RnB without issue, that is probably how I will do it as well and save the gloss coat till the final finishing... But I will test it before I ruin another model..... Anyway, it's all in the experience file now... and I think I have a course on how to do it... that article at least went into some of the details of how he did it unlike the first two..... Thank you that article was a great find.... EG
-
Yeah, they do tell you the way it's going to be, do it right or go home.... {chuckle}
-
Craig... I looked up the article the question was based upon, Finescale Modelers December 2014 issue... I read the article.... Build a Canadian Starfighter; By Jean Paul Poisseroux.... It does explain his technique... He built an Italeri #2502 1/32 F-104A/C into a CF-104 and yeah the BMF was overall RnB Silver Leaf & Pewter for the aft dark metal over Tamiya Acrylic Flat Black as primer to give the RnB some bite on the surface.... no other finishes were used.. The decals were set right over the RnB using Micro Sol.... He states that there was no problem with the RnB coming off the model like I had.... And checking it out, I have no problems with the RnB coming off the wing tanks and horizontal stabilizer also... But it clearly comes off the fuselage.... I think I know what my problem is... . I'm putting it on over clearcoat..... That's my error right there in a nutshell... Being an ultra smooth surface, there is nothing for the wax to bite into hence making it easy to just pull off or for hand oils to loosen... Another thing, he masked and waxed the dark panels first before metalizing the fuselage.... Then once metalized he allowed it to dry 24 hours before buffing it up..... I don't know how I could of forgotten that since that is why I did the tanks and tail fin first.... I wish I have seen that article before I did the fuselage.... The tanks and fin buff up into the prettiest shine you would ever want to see... I tried some full strength 3M masking tape, the full automotive grade, and burnished it down across the fin.... It pulled off without lifting anything.... I guess it was time for a break anyway..... As I mentioned when I started, since this was a first time attempt, if there was a way to flub it, I would find it..... (apparently even after hitting on the correct way of doing it) Live and learn..... I think next time it will turn out a bit different..... EG
-
I saw the second one, and yeah thinning it and spraying it only gives you the same as a rattle can aluminum finish not bad but not great... I did read the one from finescale and yeah they are really looking for a finish that is put it on and your done... There is no BMF like that and there never will be... so yeah they treated RnB like they would any other finish..... And there's a lot of them, I think when I get one done I'll post it to that 6 year old thread.. There was one poster that said it has been done and named another modeler that used it, another Paul over in France... If I can figure out how they finish it off then I'll be in like flint... Cause there is no other finish that can match it... And of course my brothers here will know how to do it also..... I want that finish that says metal, not painted look alike for metal...
-
Well, I'll be starting this one back up in the near future... Got to get a little organizing done over the next few days.... EG
-
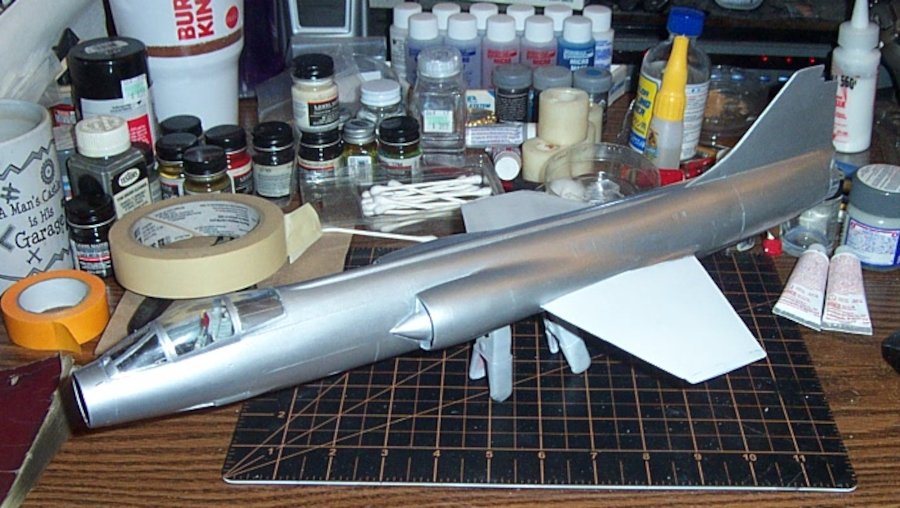
Yeah I had a hard time Ed arguing that logic myself... (she can be pretty persuasive when she wants to be, especially when she is right) But she does understand.... I don't know about a Floaty Thingy right now, I have the Bandit to re-start/finish.... and get my build space cleaned up and organized...... But I will be back with another Zipper... a much better kit I understand...... Final picture, where I finally wound up... (I pulled the canopy masks not bad but I'm rusty) She does look good I have to admit, it's not the look that is stopping this build, it's the overapplication of finishes preventing any further advance on finishes... So it can't be finished properly... But I have learned how to get the metal finish on the plane... that's the take off from this hobbying road trip.... I learned what I needed to know even if I didn't arrive at the end of the journey... I found the silver lining so to speak.... {chuckle}
-
Definitely test it first my friend, the clear coats are not adhering to the metalized finish is the problem, they cover, they dry and work as expected as long as nothing else is required of them... it's not like putting it down over primer or even paint... It has nothing to grab onto... So the metal finishes have to be the last part of the build then the clear coat for sealing leading into the decals and you only get one shot at it.... My problem is too many coats and not enough grab to them.... My pleasure on sharing, at least everyone got a good idea of what not to do........ And I'm not giving up, Blue Jay Four will be sitting on my shelf eventually... just not this time.....
-
This was a lady that didn't want to be consummated.... I'm sure you know what they are like.... Always more fish in the sea... and for every non-success, there is another success just around the corner... Plans are already being laid for Blue Jay Four #2..... I never quit, just sometimes it is best to make a strategic withdrawal...... And thank you my friends for all the support..... It's means a lot.... It really does....
-
Amen Brother... {chuckle}
-
Thanks Nick for the vote of confidence... The work isn't being throw away my friend, all of what was learned will be applied to the next one....
-
Outstanding representation my friend.... A lot of work went into that.... Very impressive.....
