
Geam
-
Posts
67 -
Joined
-
Last visited
Content Type
Profiles
Forums
Gallery
Events
Everything posted by Geam
-
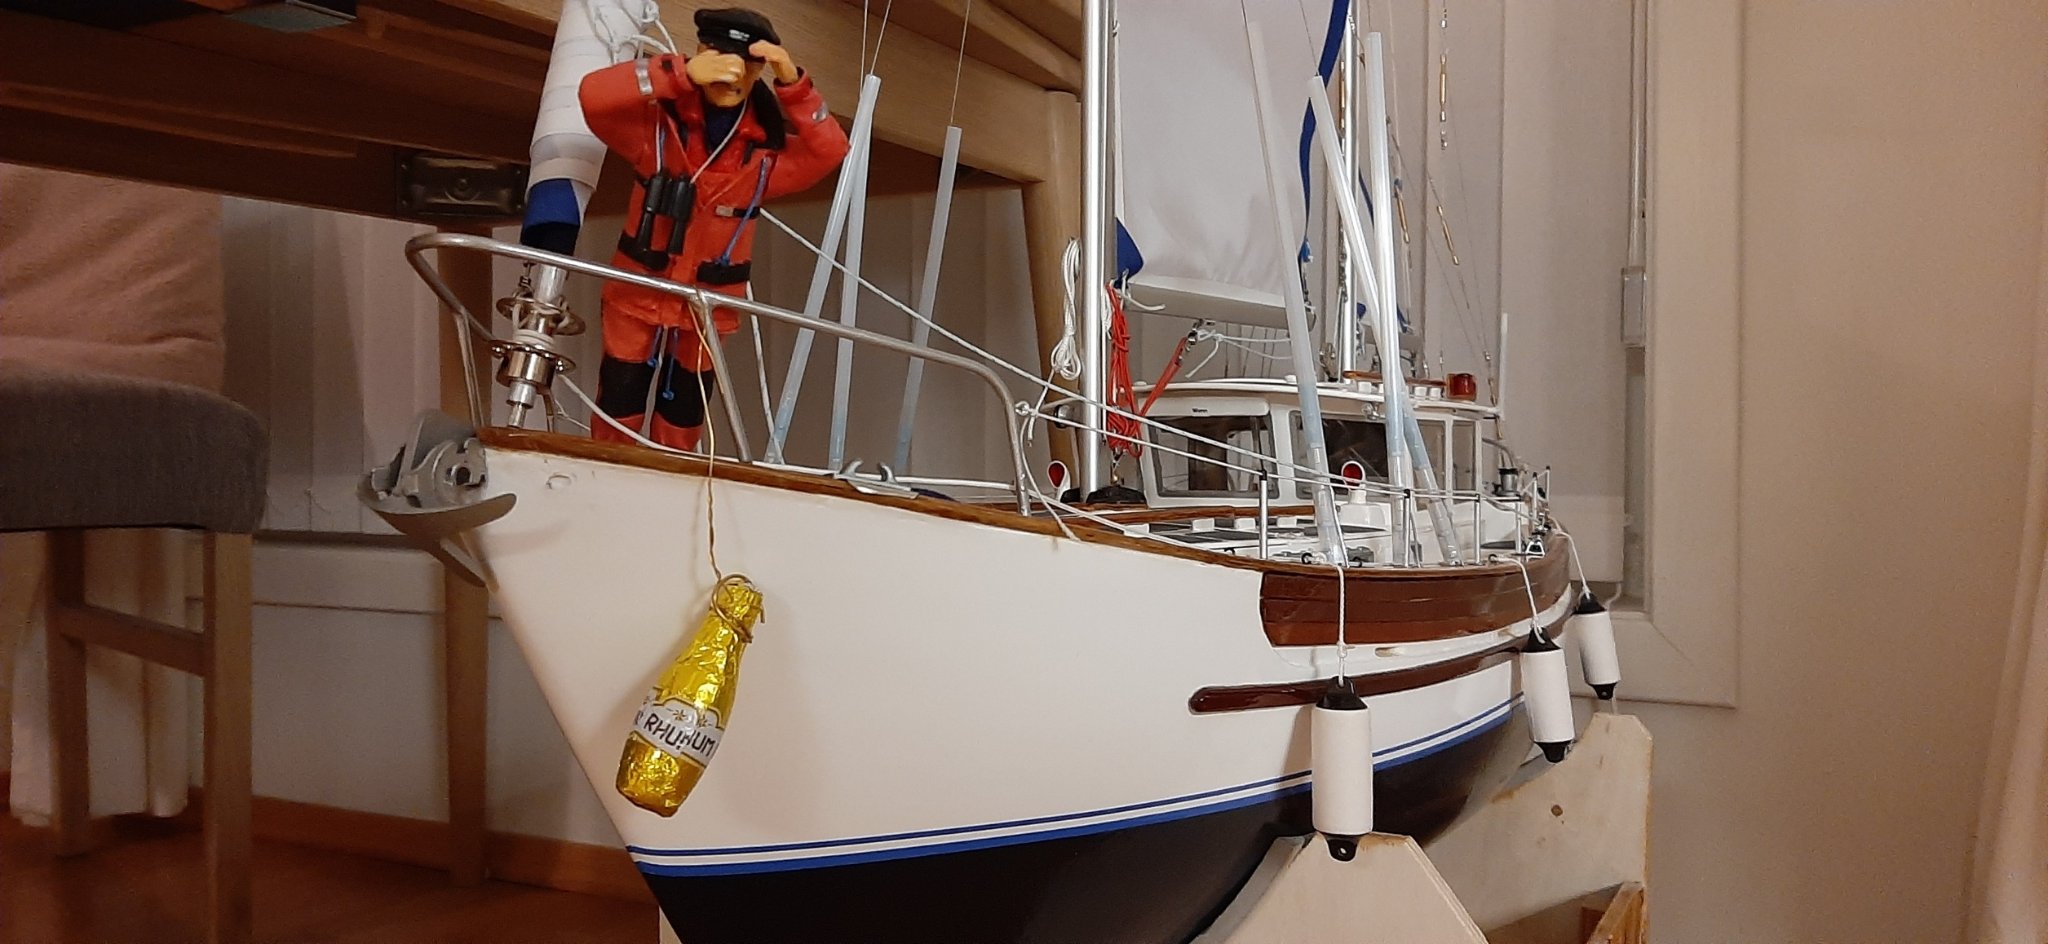
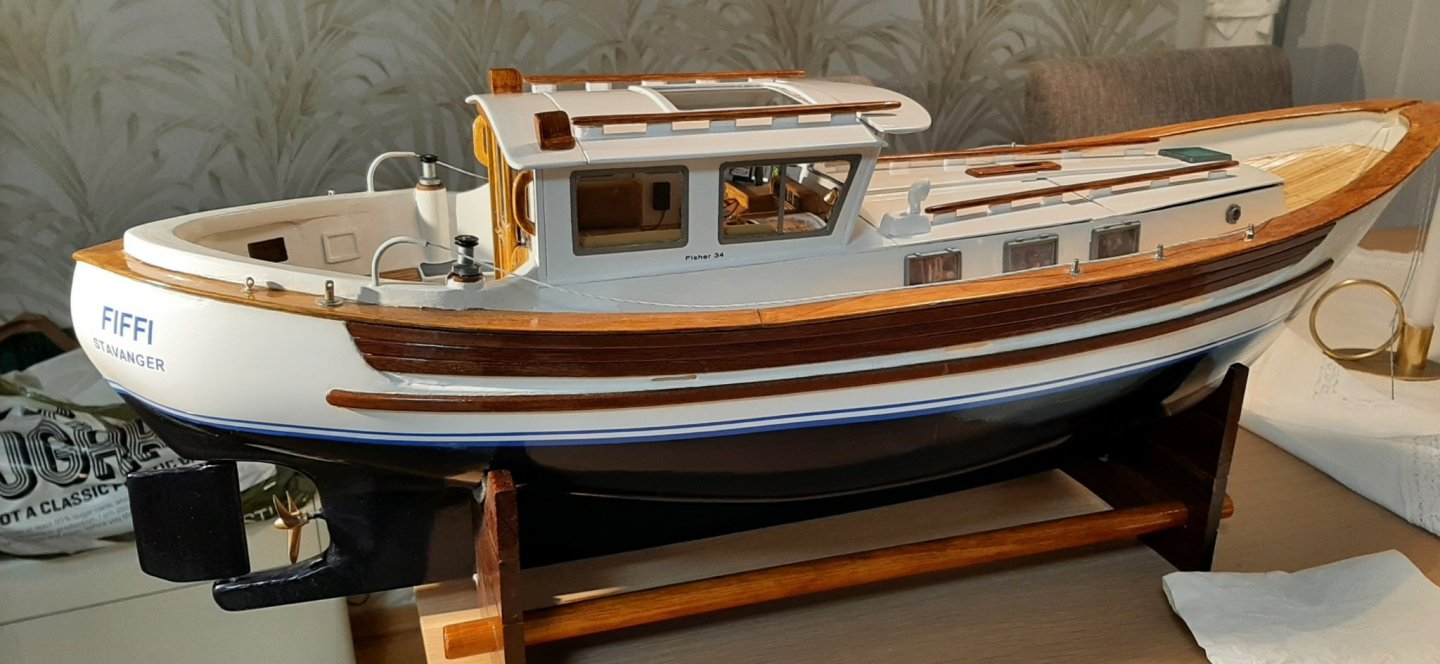
Ready for launch. Couldn't find 1/12th scale champagne so had to use the crew's supplies. A magnum of 'RHUM' (it says on the bottle) was located below decks .

-
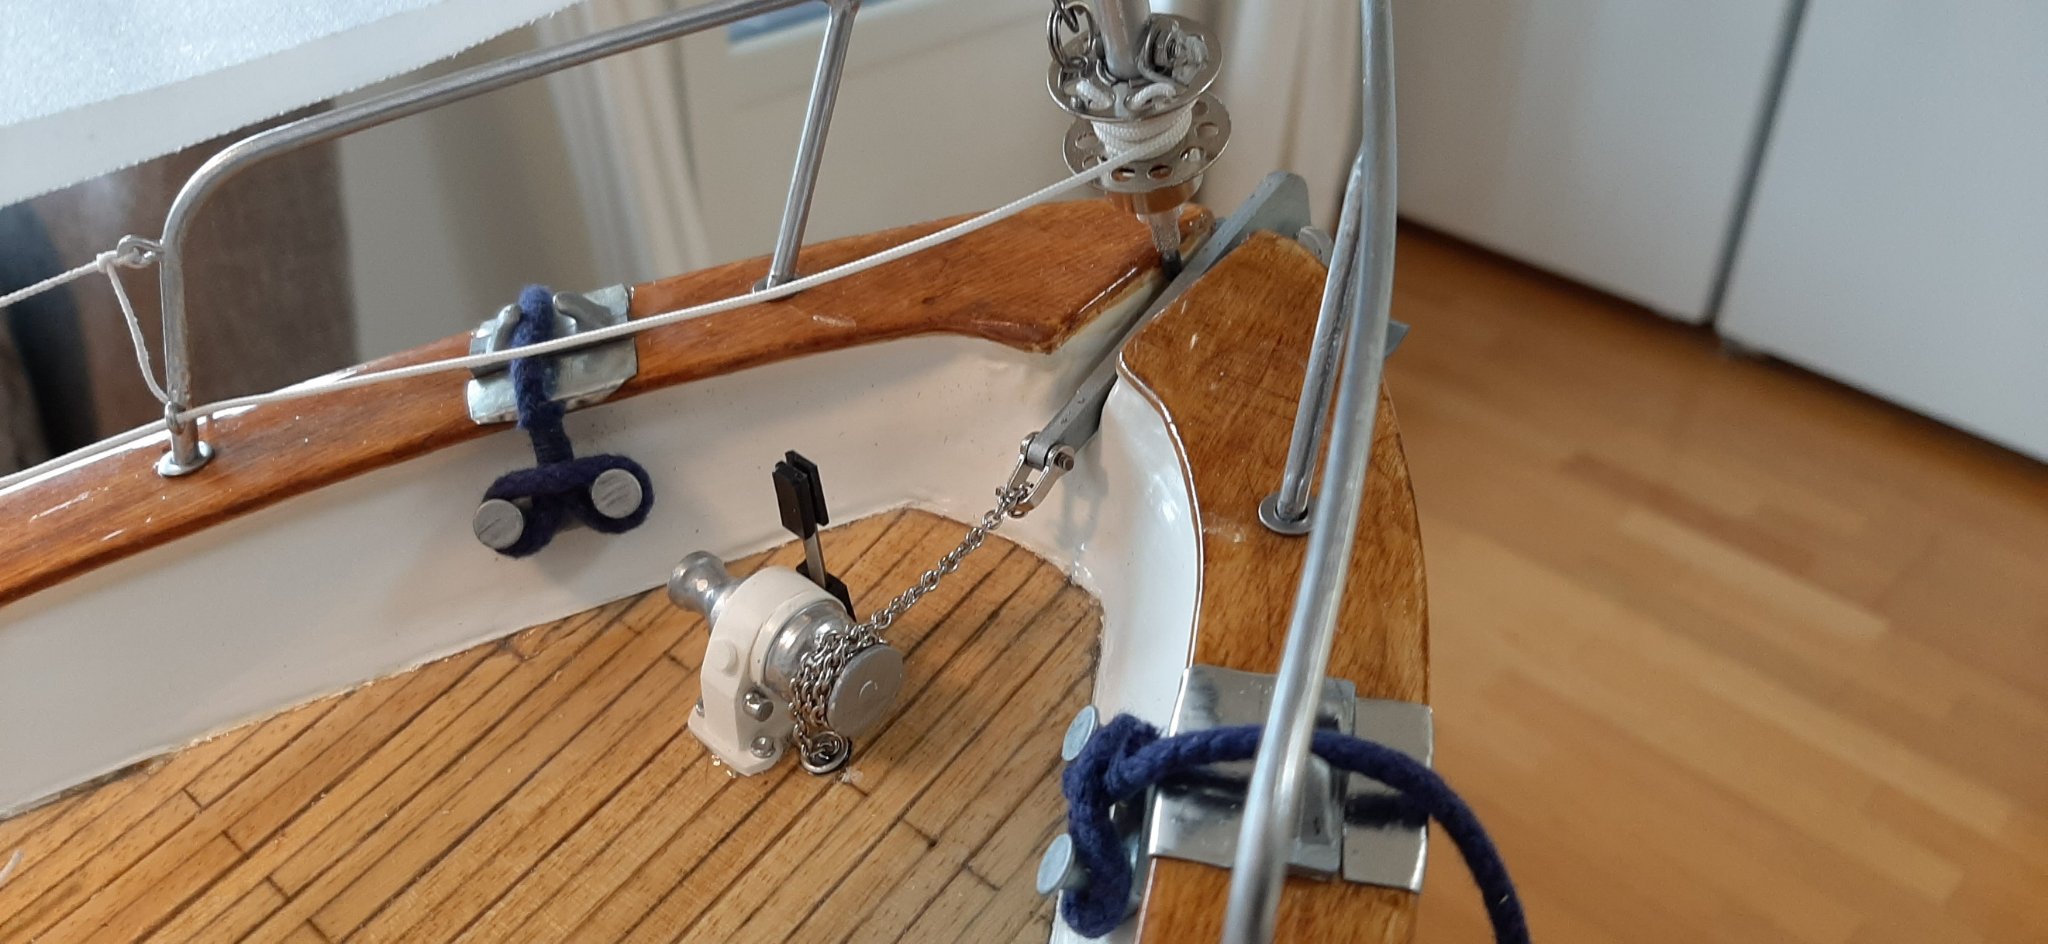
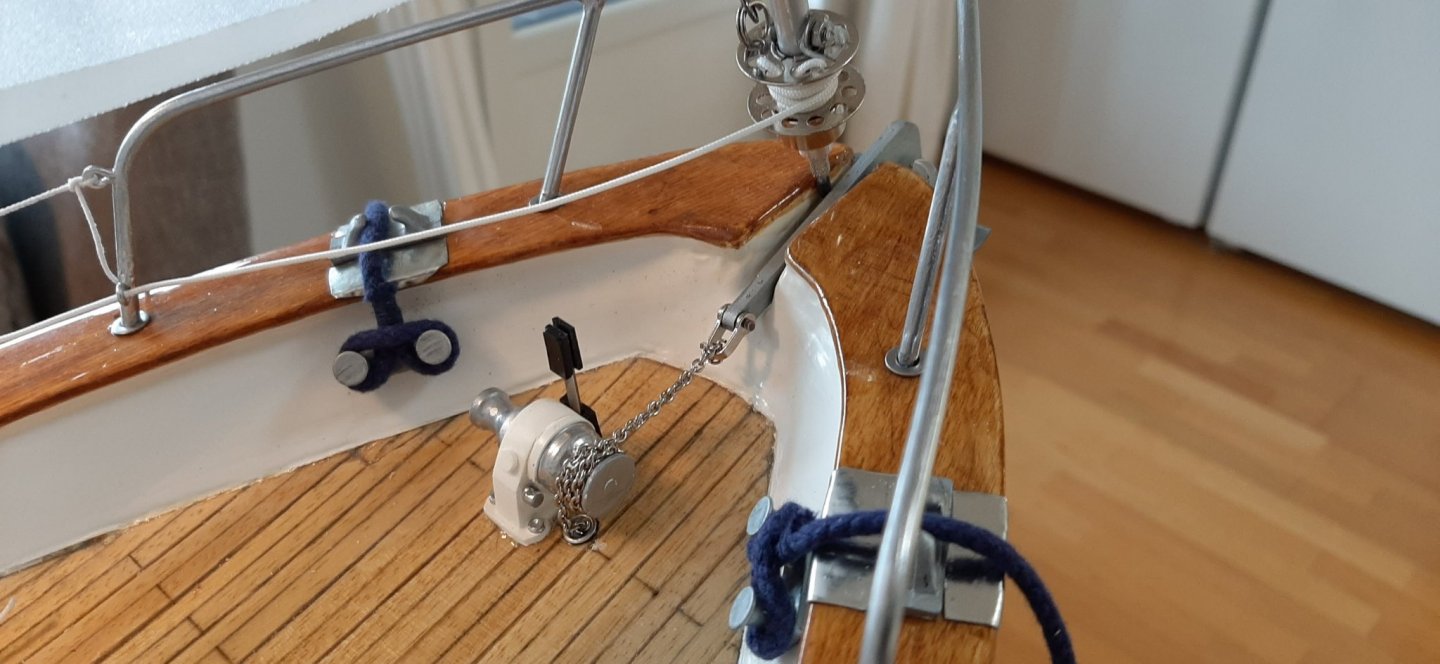
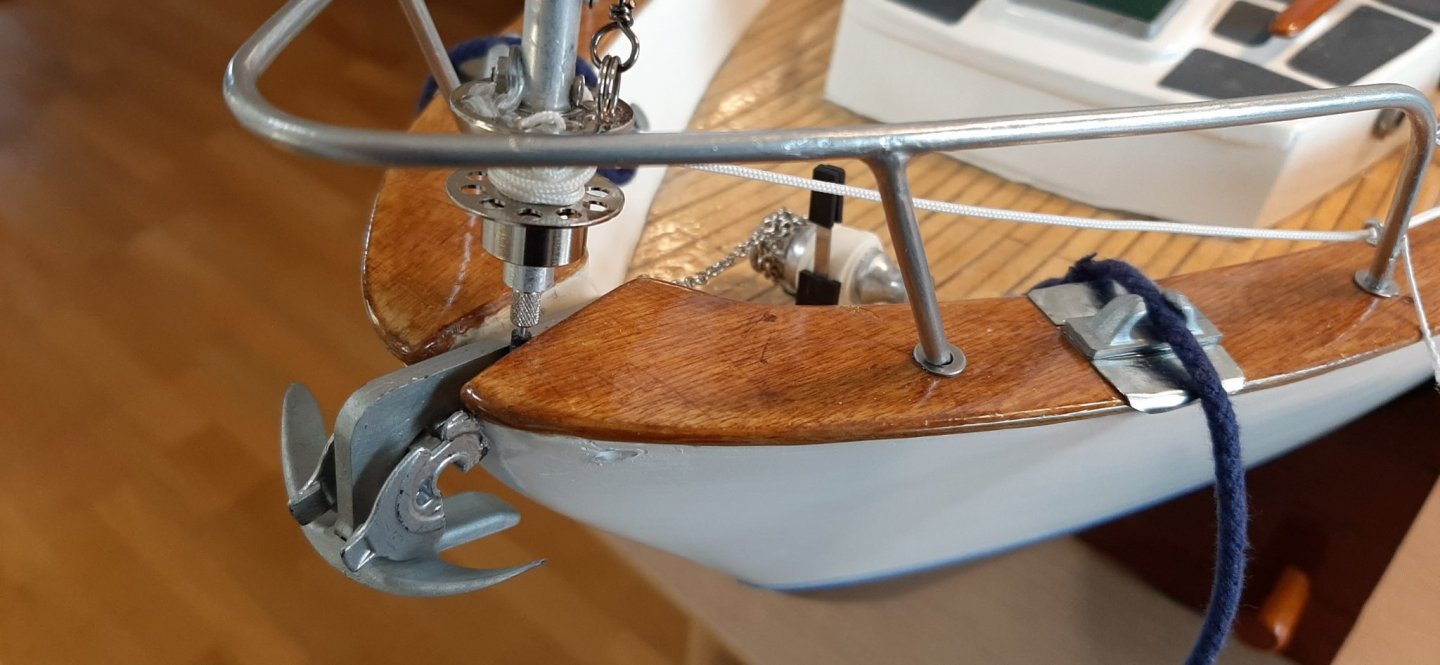
Added anchor windlass and manual operating handle. Also produced a stemhead fitting to hold the bruce anchor on the 'stemhead roller' -which is only a bolt, not a roller!
Trying to revive my old Roam3 action cam to get some on-board photos for the launch and first sail. Weather report is OK for Thursday and Friday. Setting up for automatic still photos only, don't think the stabilisation is good enough for video and have to open a You Tube a/c which I don't know how to do....yet.

-
Have now 'doctored' the sliders to work in the mast slot. Not the smoothest action but good enough. All three sails can now be hoisted. Still many small jobs to get done before launch.
George
-
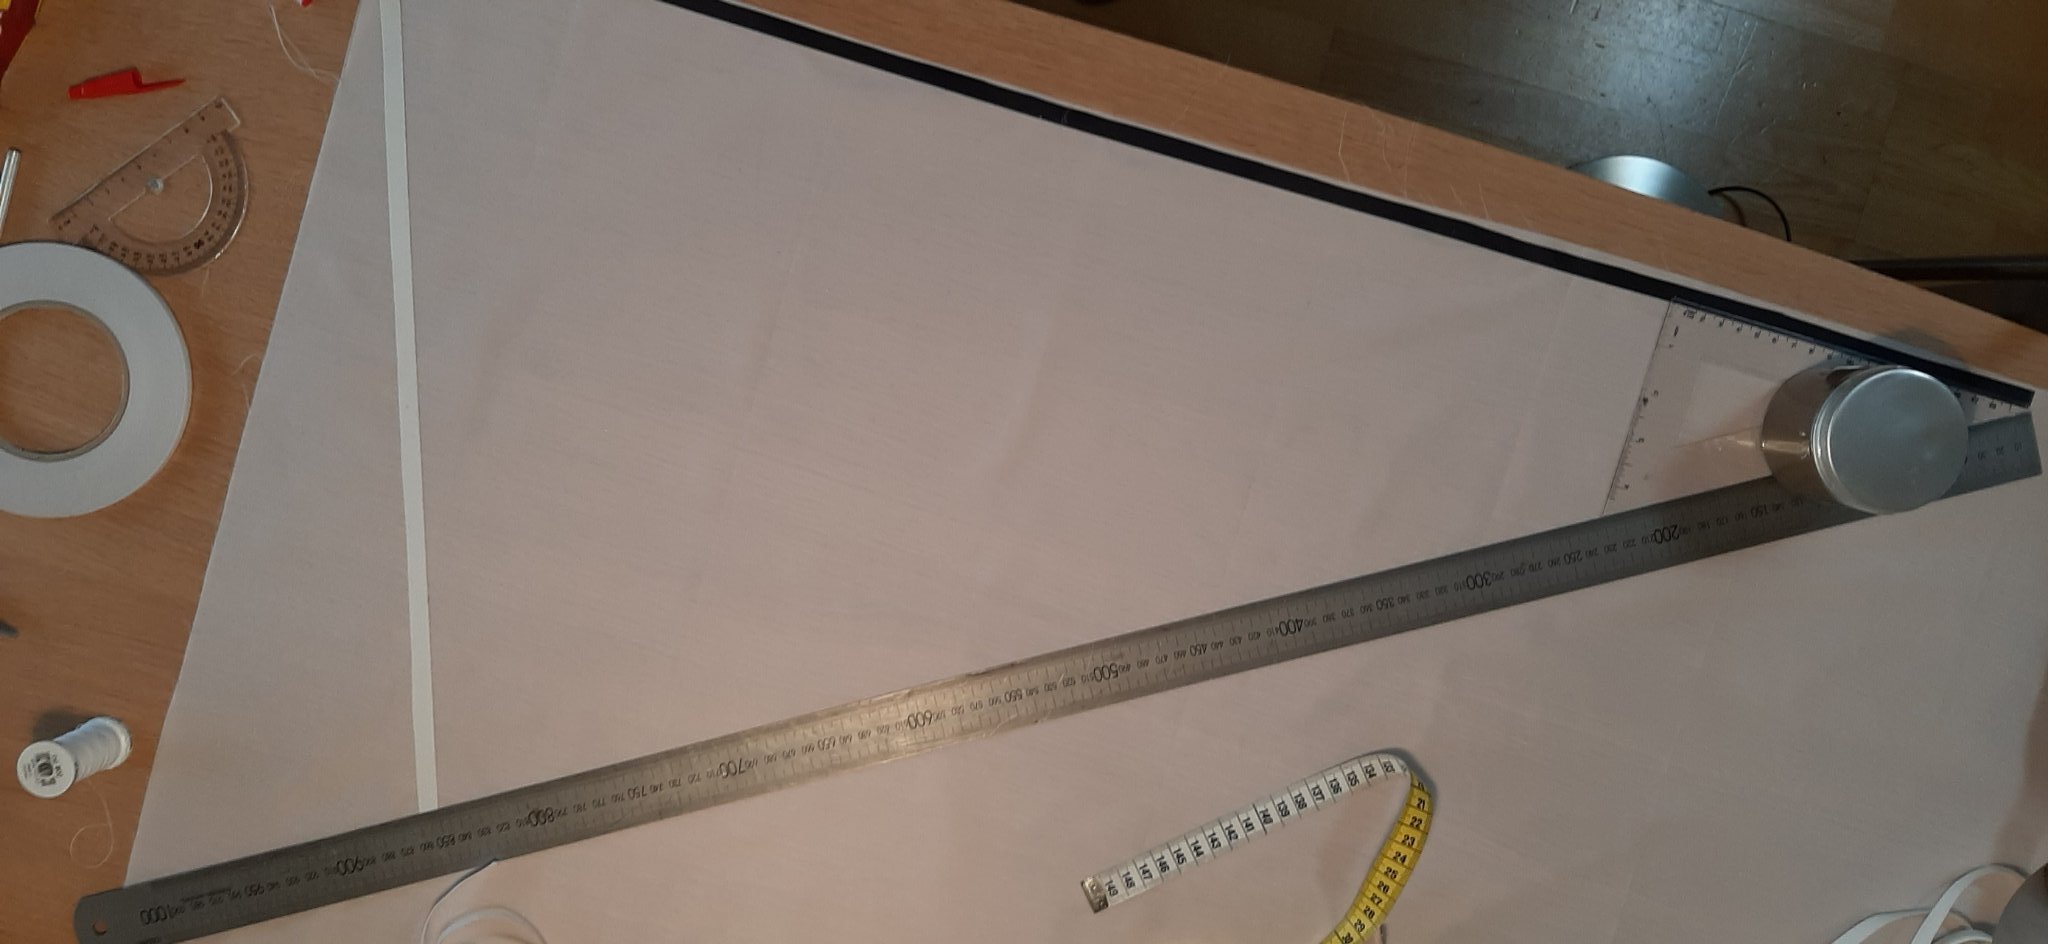
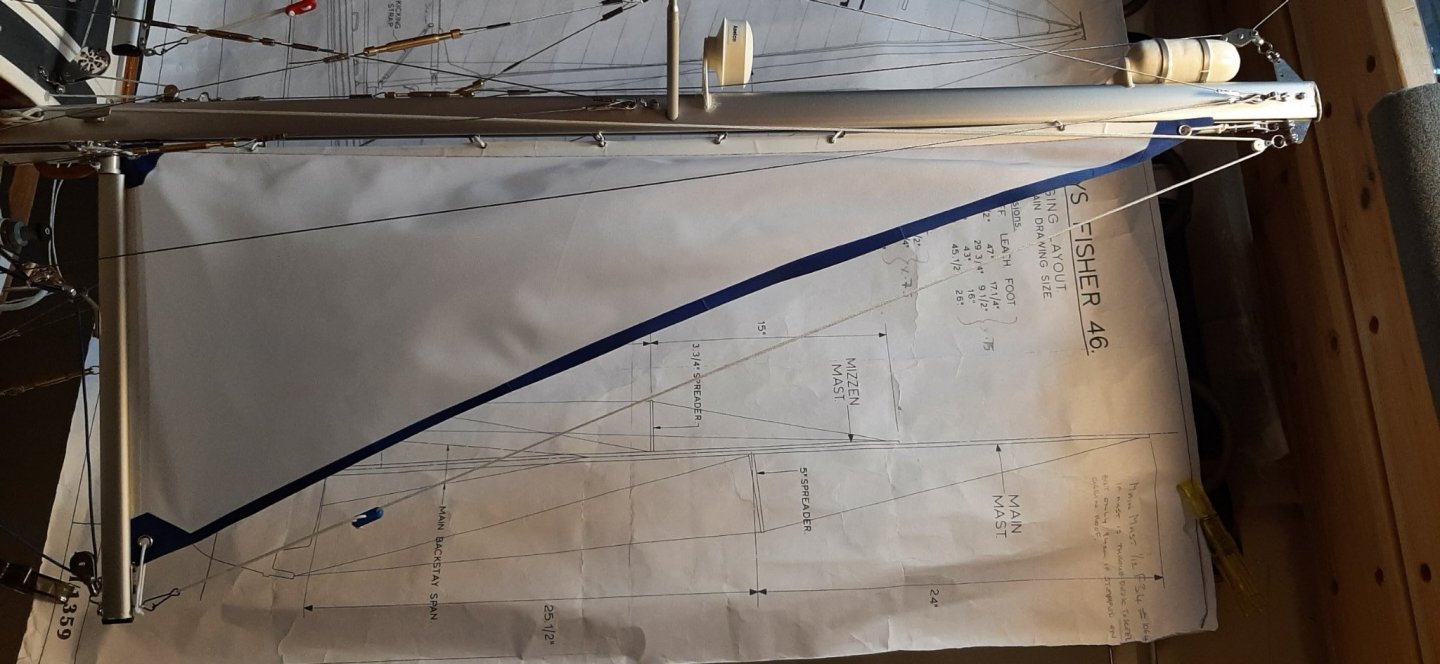
Mizzen sail has been produced and hoisted. Had some trouble with the sliders. I did not notice when I bought them last year that they were boom sliders and they do not stay put in the larger slot of the mast! I had to solder some brass wire onto the base plate of each slider -which fits into the mast slot- so that it did not simply fall out again! Didn't look too good after soldering but it is not noticeable -hidden inside the slot of the mast.
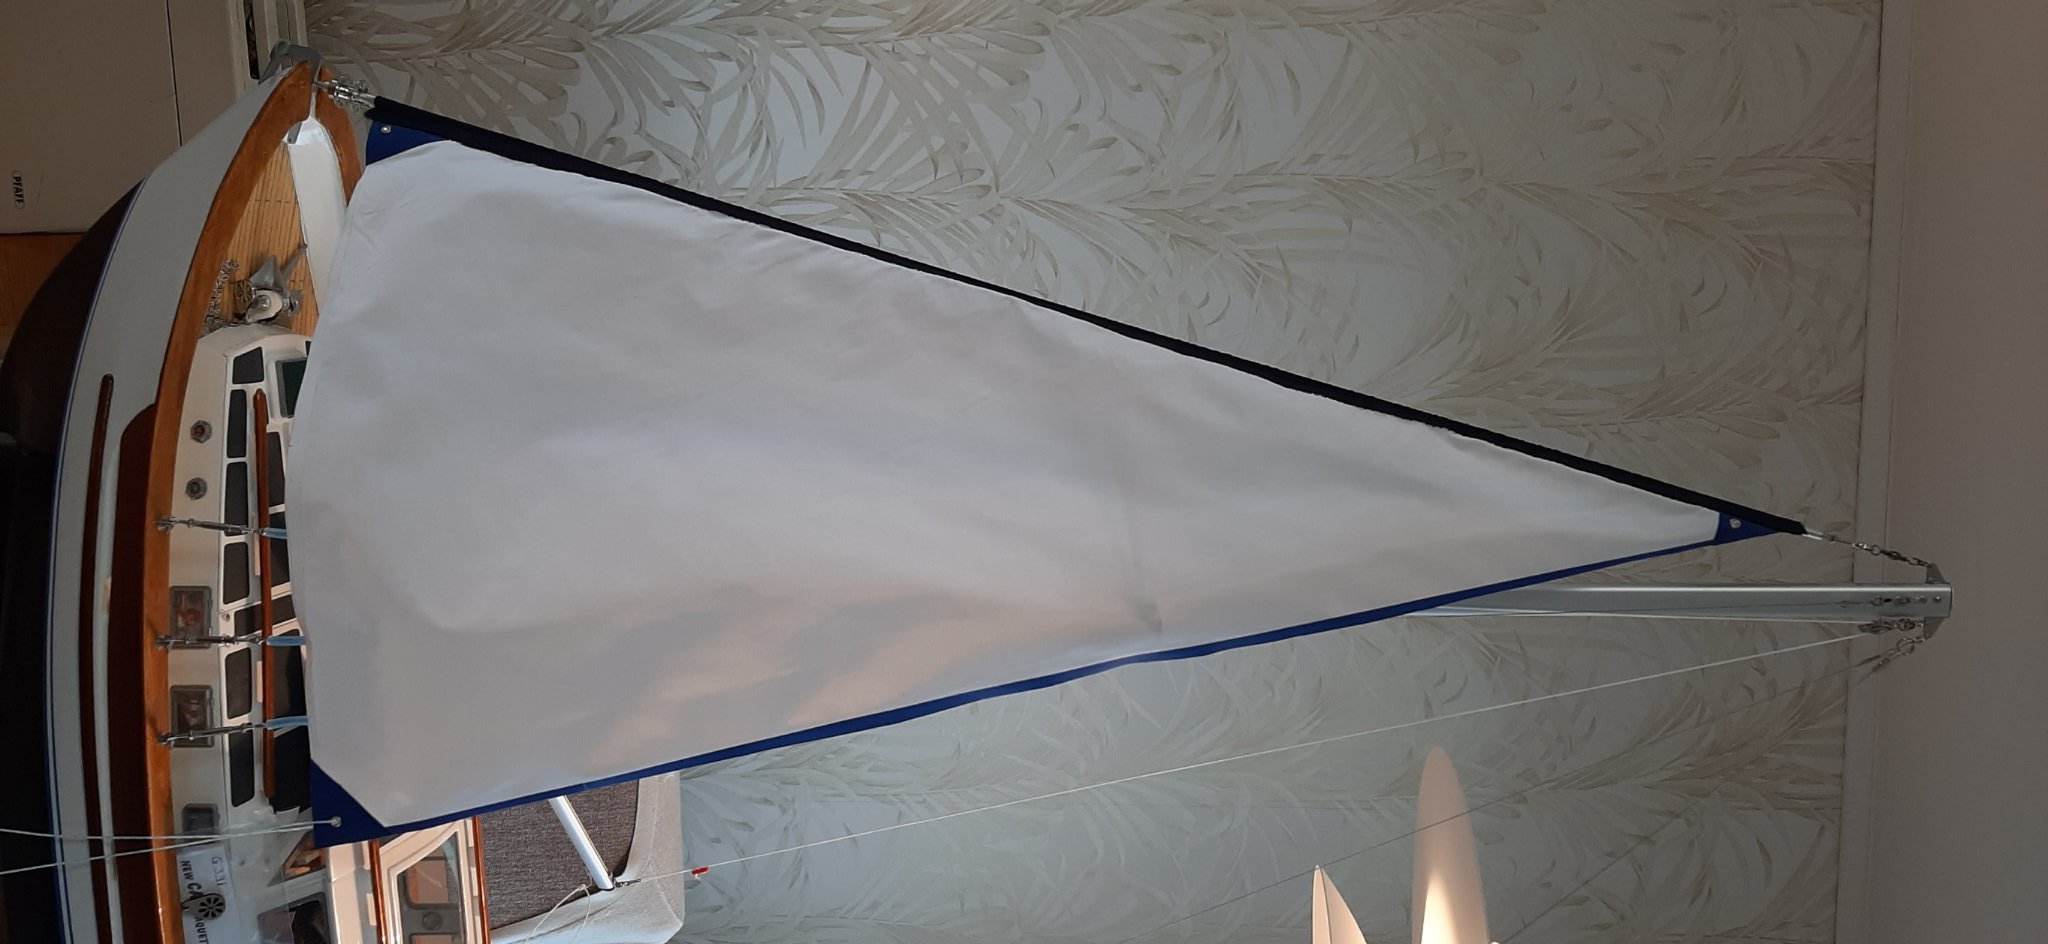
Mainsail to be done during the weekend. The sails are very lightweight nylon so I have not made them with a large (scale) roach area. Could use battens but I think that the sail will still curl in at the leech if the leech allowance (or roach area) is too large.
These are the first sails I have ever made in my life so I will not be surprised if I end up making a new sett.
First I will check that the whole thing floats before getting into advanced sails!
George
-
I had problems with my Humbrol enamel (silver 11). I thought it was dry and after 2 days started fitting the pulpits to the yacht. Ended up with fingerprints all over the pulpits. Everything has been sanded down again and after waiting 3days I thinned the (very old ) paint by about 5% and applied again -with a brush as before.
I have in the meantime 'googled' about Humbrol metallic paint and 'long drying times' are mentioned all over the place! Pity I did not google first. The instructions on the tin say 6 hours recoat but not 6-10 DAYS drying/cureing time. It has also been stored below 0*C for many days this winter and I read that that is also a NO-NO.
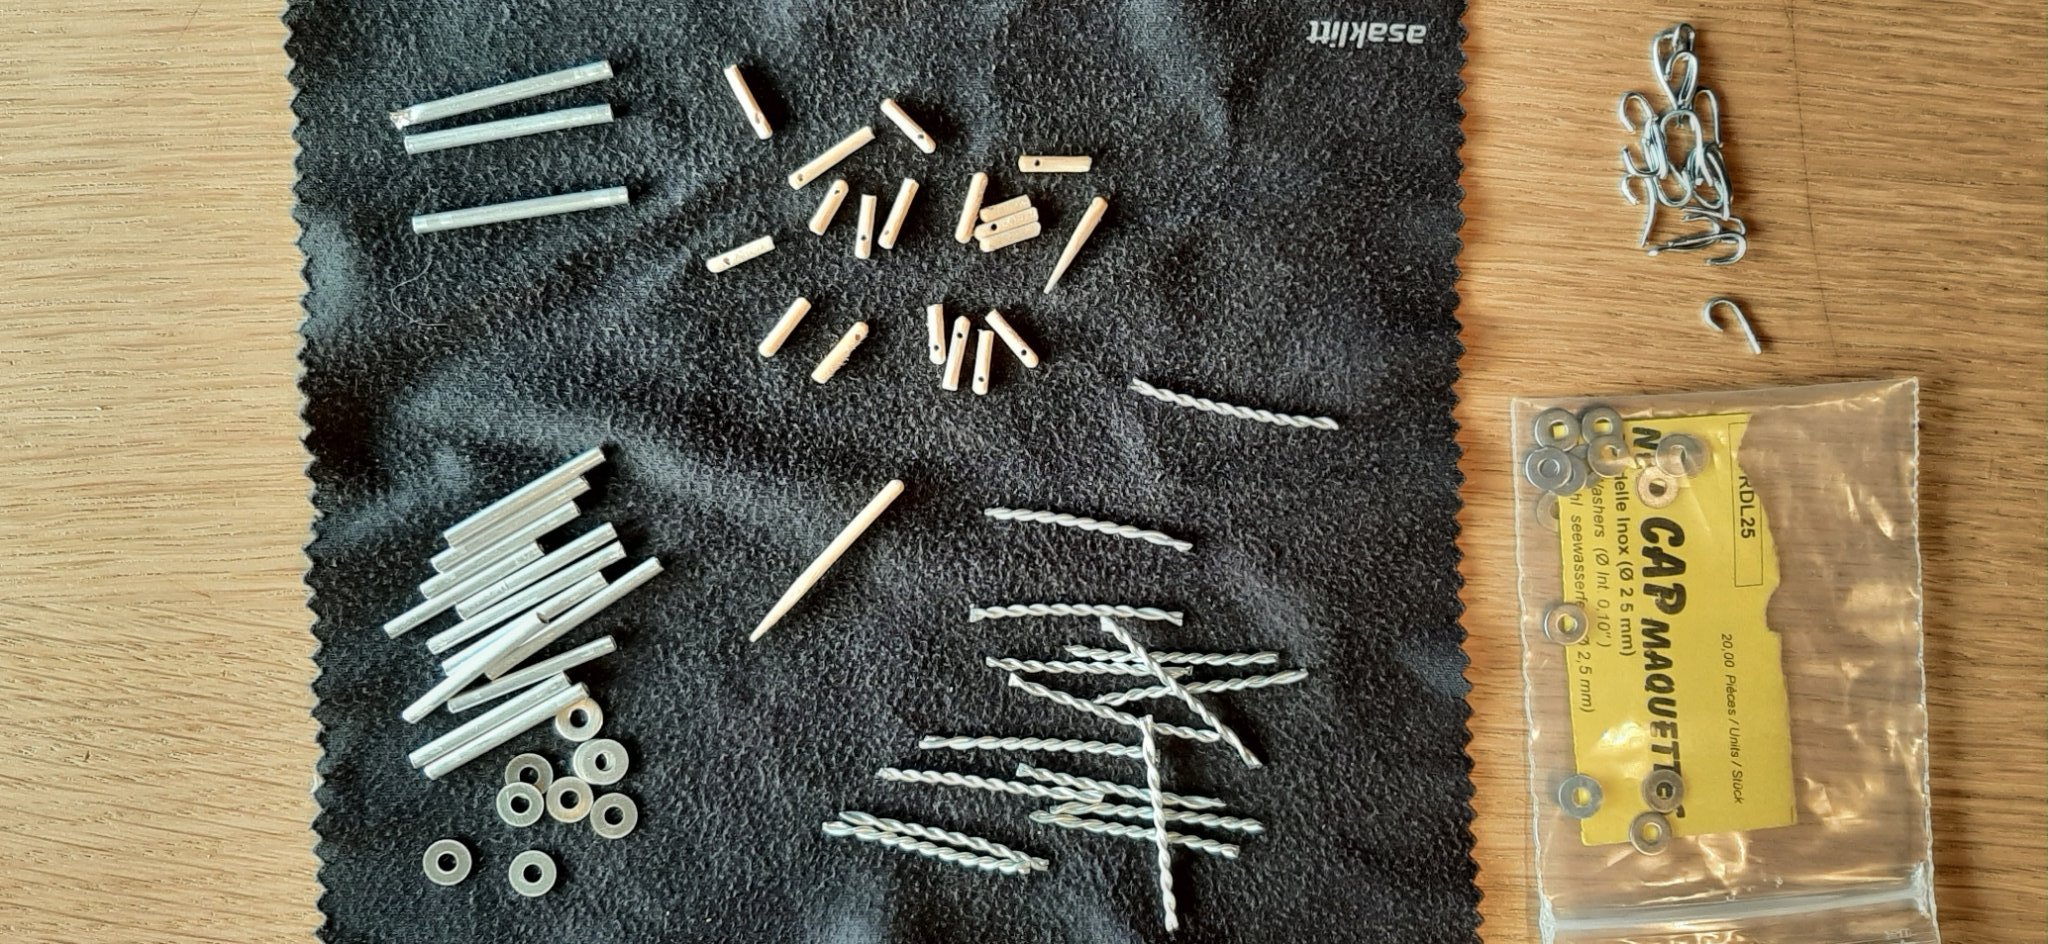
It may be that my paint was miles too thick -due to being about 20 years old- and simply should have been thinned prior to application. The second attempt at painting seems to be much better, but I'll wait a week before the pulpits get handled and fitted. I have also ordered in some 3mm brass and also some 3mm aluminium tube - just in case I have to make them again -without paint- in polished brass or aluminium.
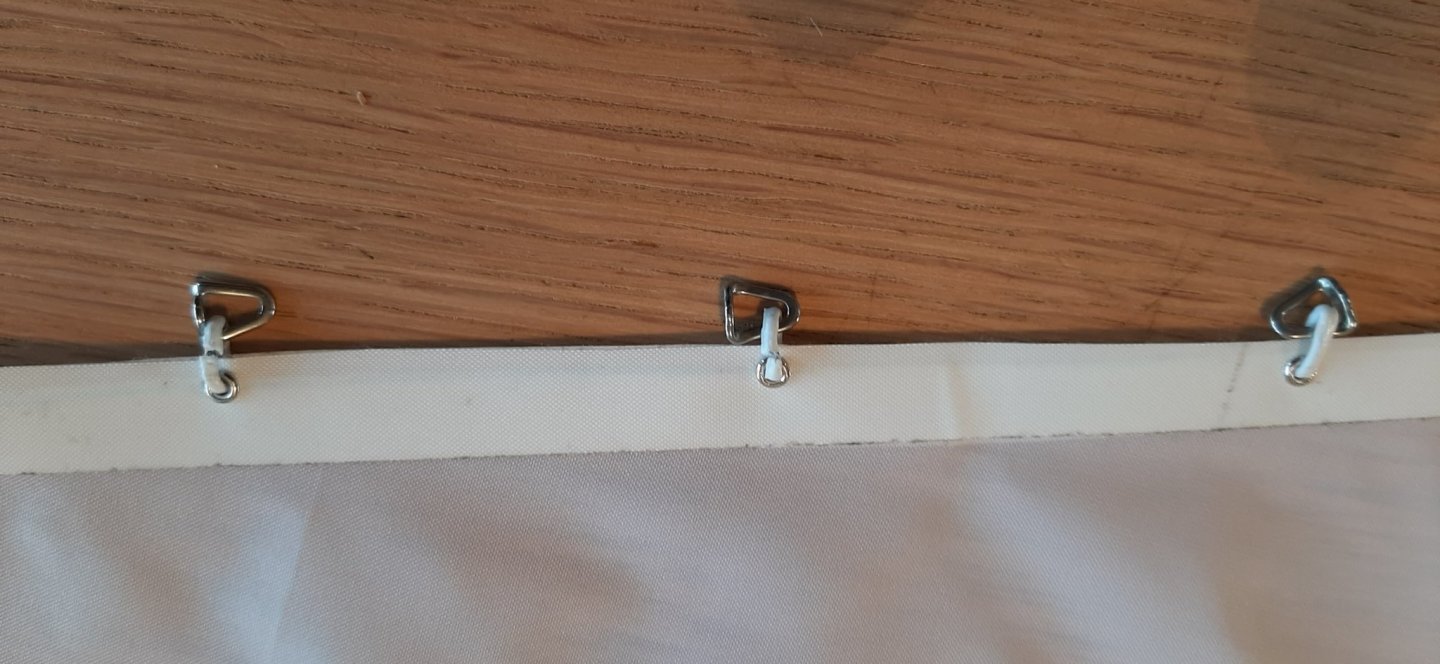
In the meantime, the main and mizzen sails have been produced and are ready to be punched for eyelets and sliders before hoisting.
Also the assembled stanchions have been test fitted and will be epoxied in place later this week.
I see that I've been spelling "stantions" wrongly for months now...sorry!
George

-
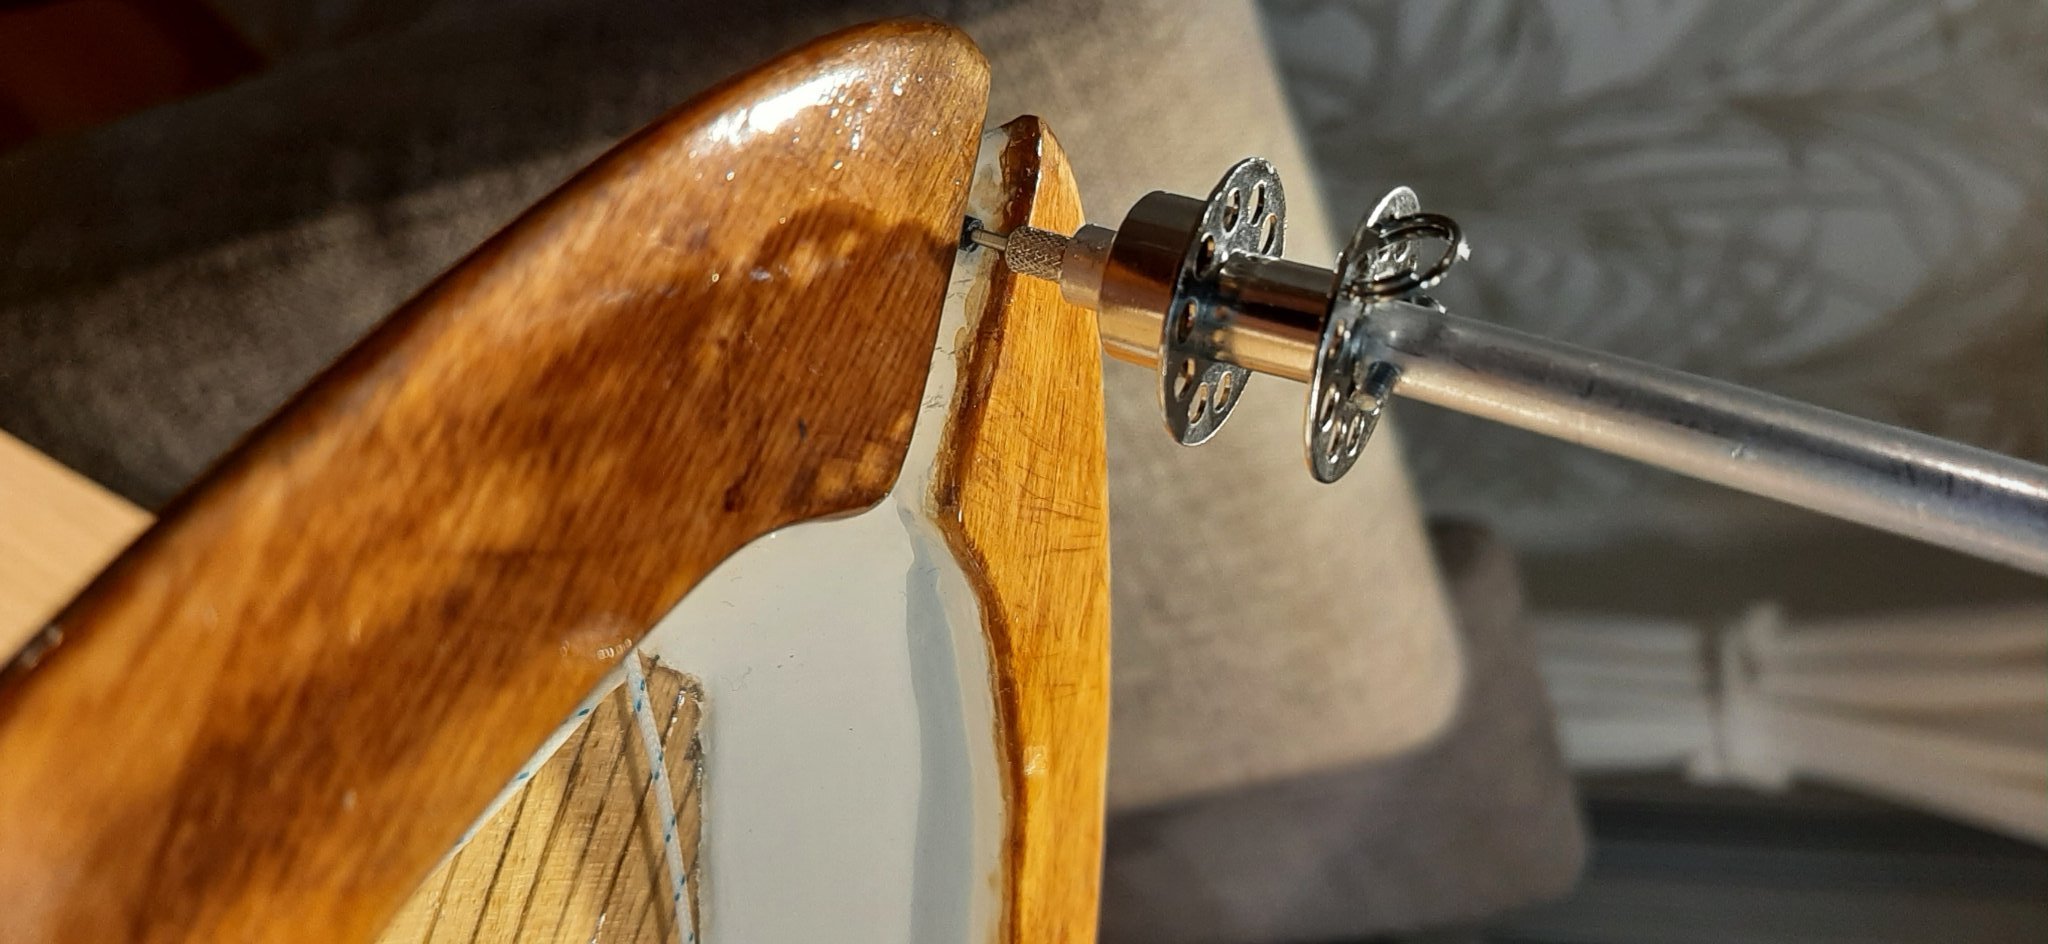
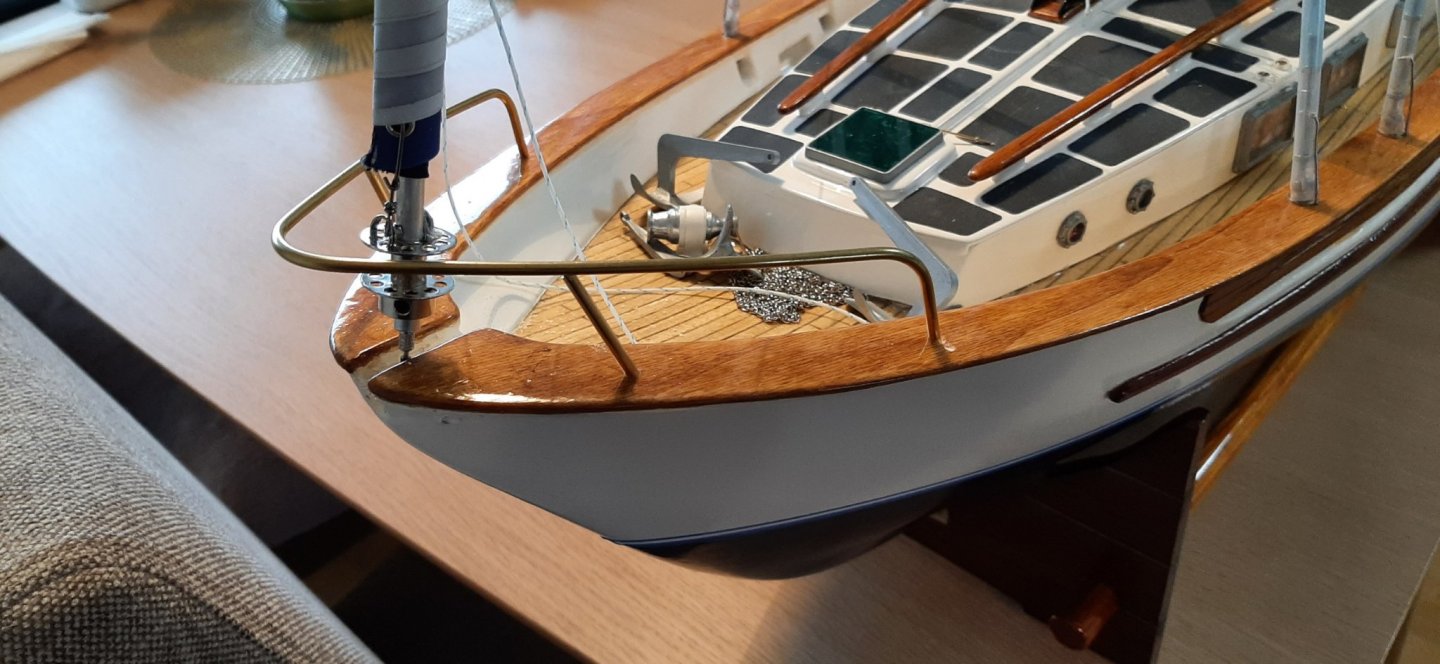
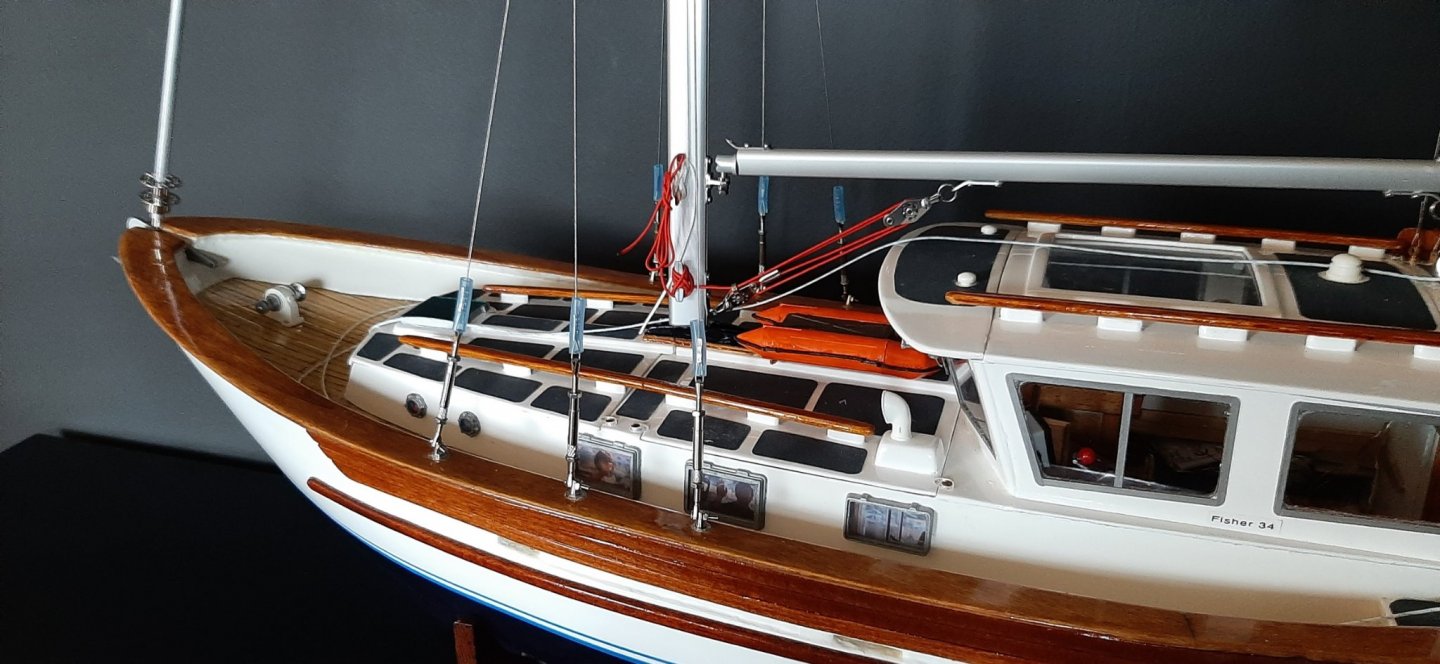
Fore and aft pulpits have now been soldered and given Humbrol undercoat matt 01. Will be painted Humbrol 11 silver or Tamiya Titanium silver acrylic -not sure which yet. After fitting the pulpits, the stantions will be strategically placed to not foul the genoa sheets -I hope.
-
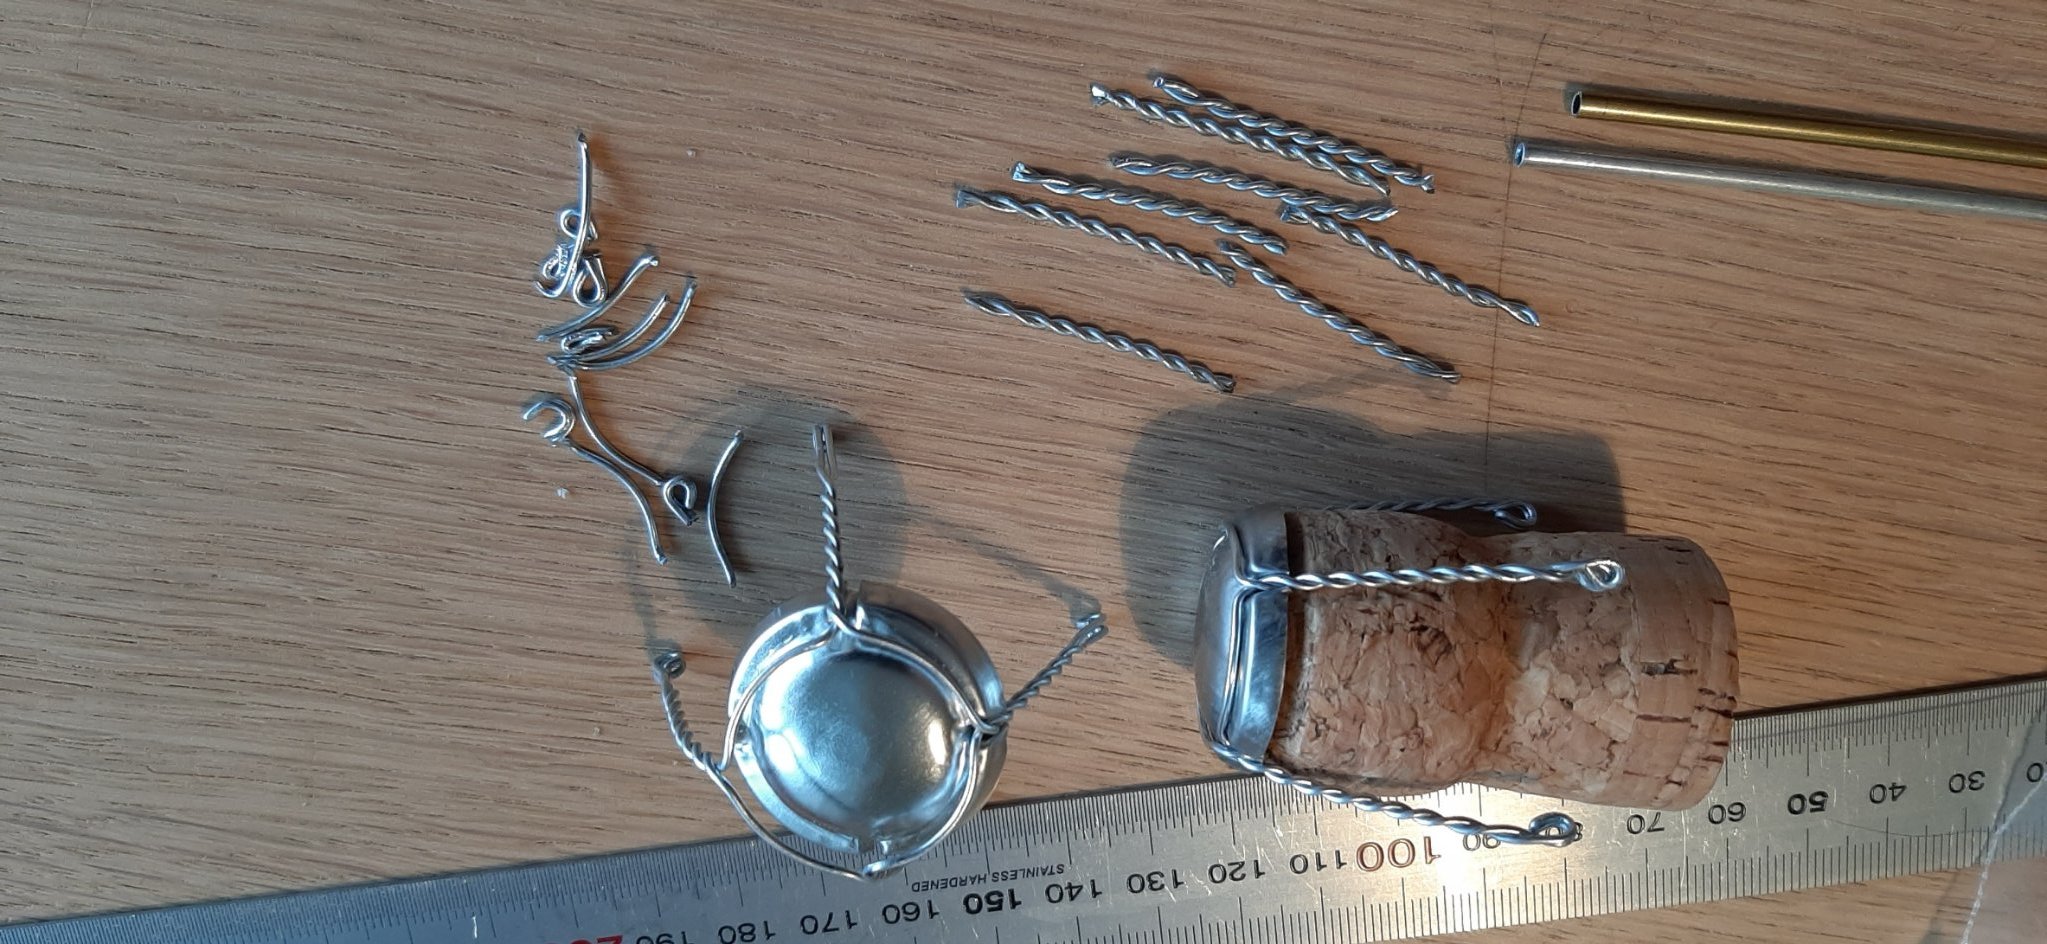
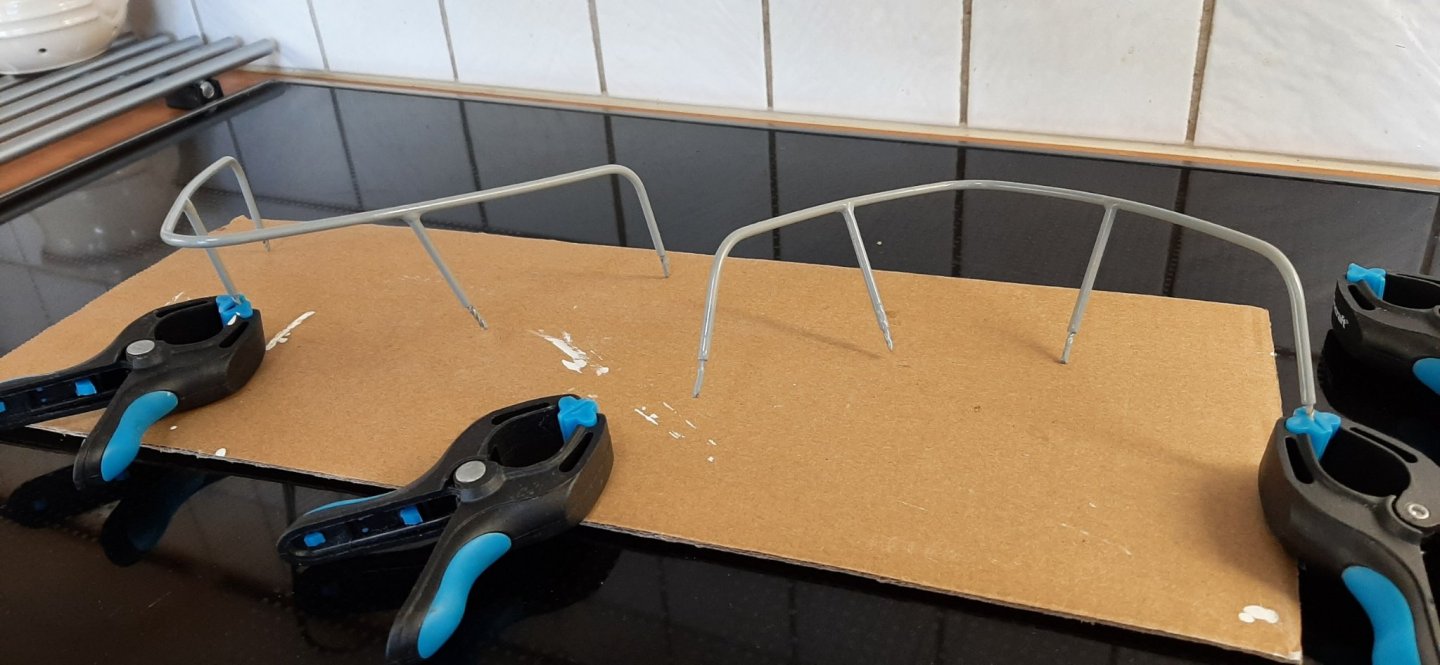
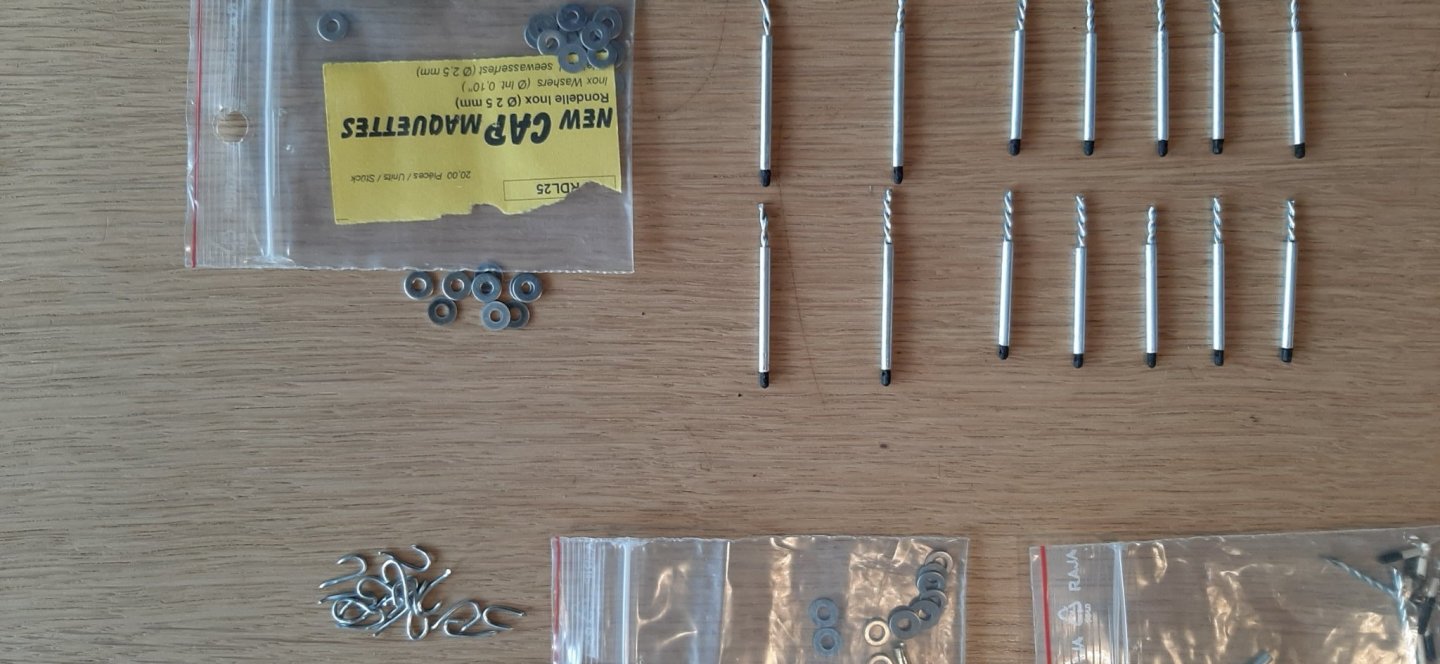
Produced a 'kit' for the stantions. 7 each side. Made
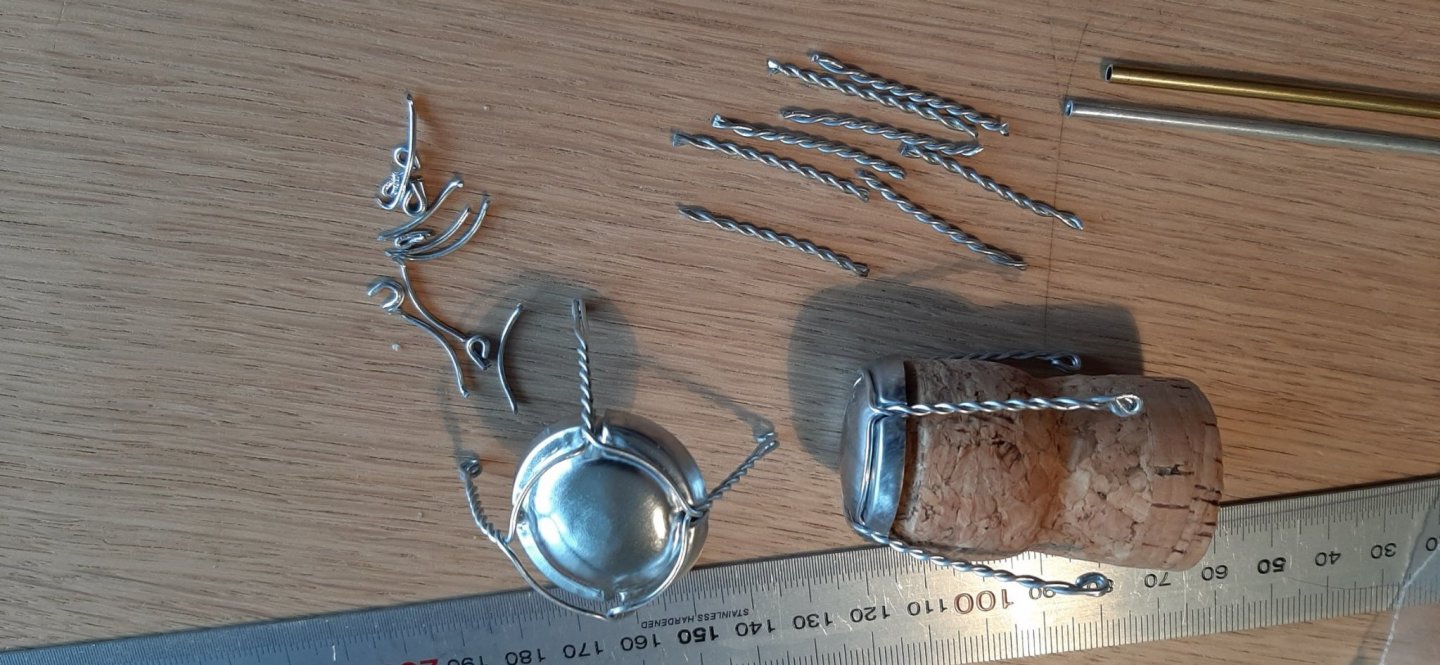
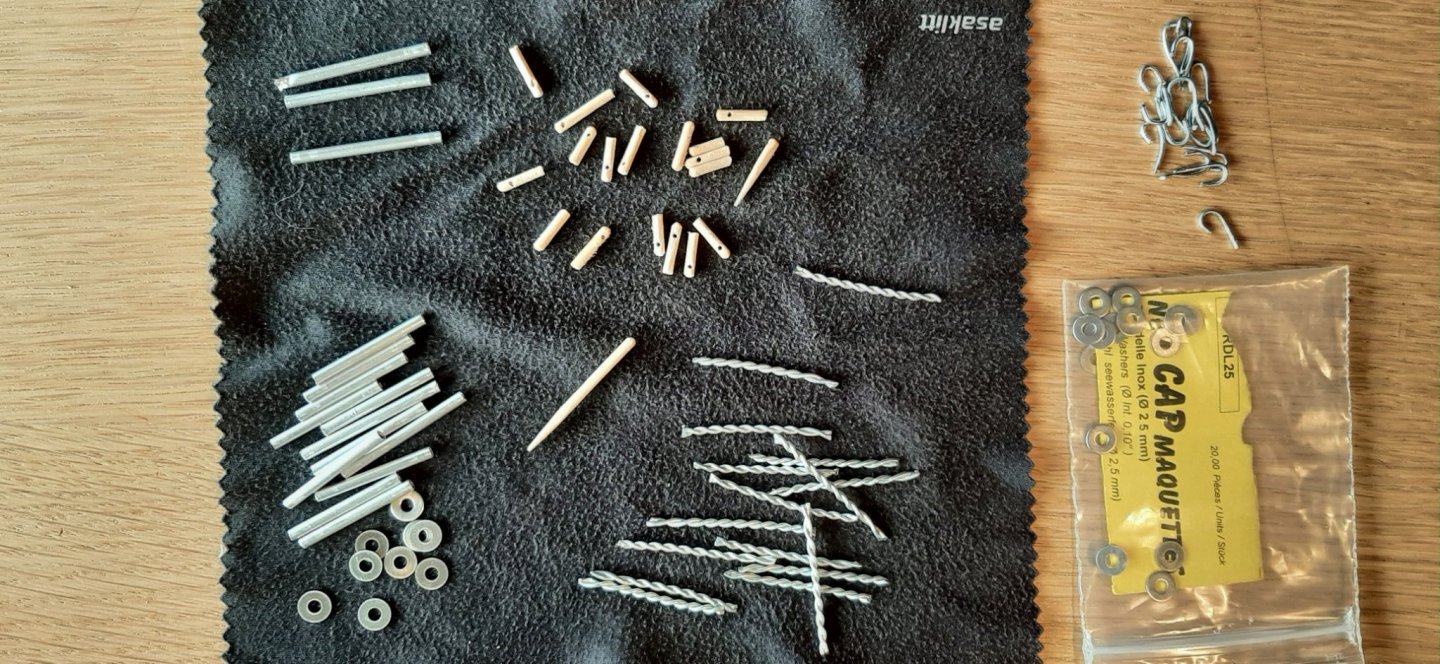 from 2.5mm alu' tube + wire from Crémant corkholders (!) + cocktail sticks. I bought some ready made brass stantions when I started the build but they were too thin and simply did not look right at all. Don't know why photos are upside-down, sorry. George
-
Once again, a post has appeared in duplicate. Sorry but don't know why this happens -nor how I manage to do it!
I thought I would be cutting the rest of the sails, main and mizzen, as the next stage but I've ended up bending brass wire for the fore and aft pulpits. Was going to just keep them in brass to avoid all the painting but have been advised by the learned to paint them in look-alike 'steel'.
Posting photos of pulpits prior to painting -parts are just pushed into place as a test.

 George
-
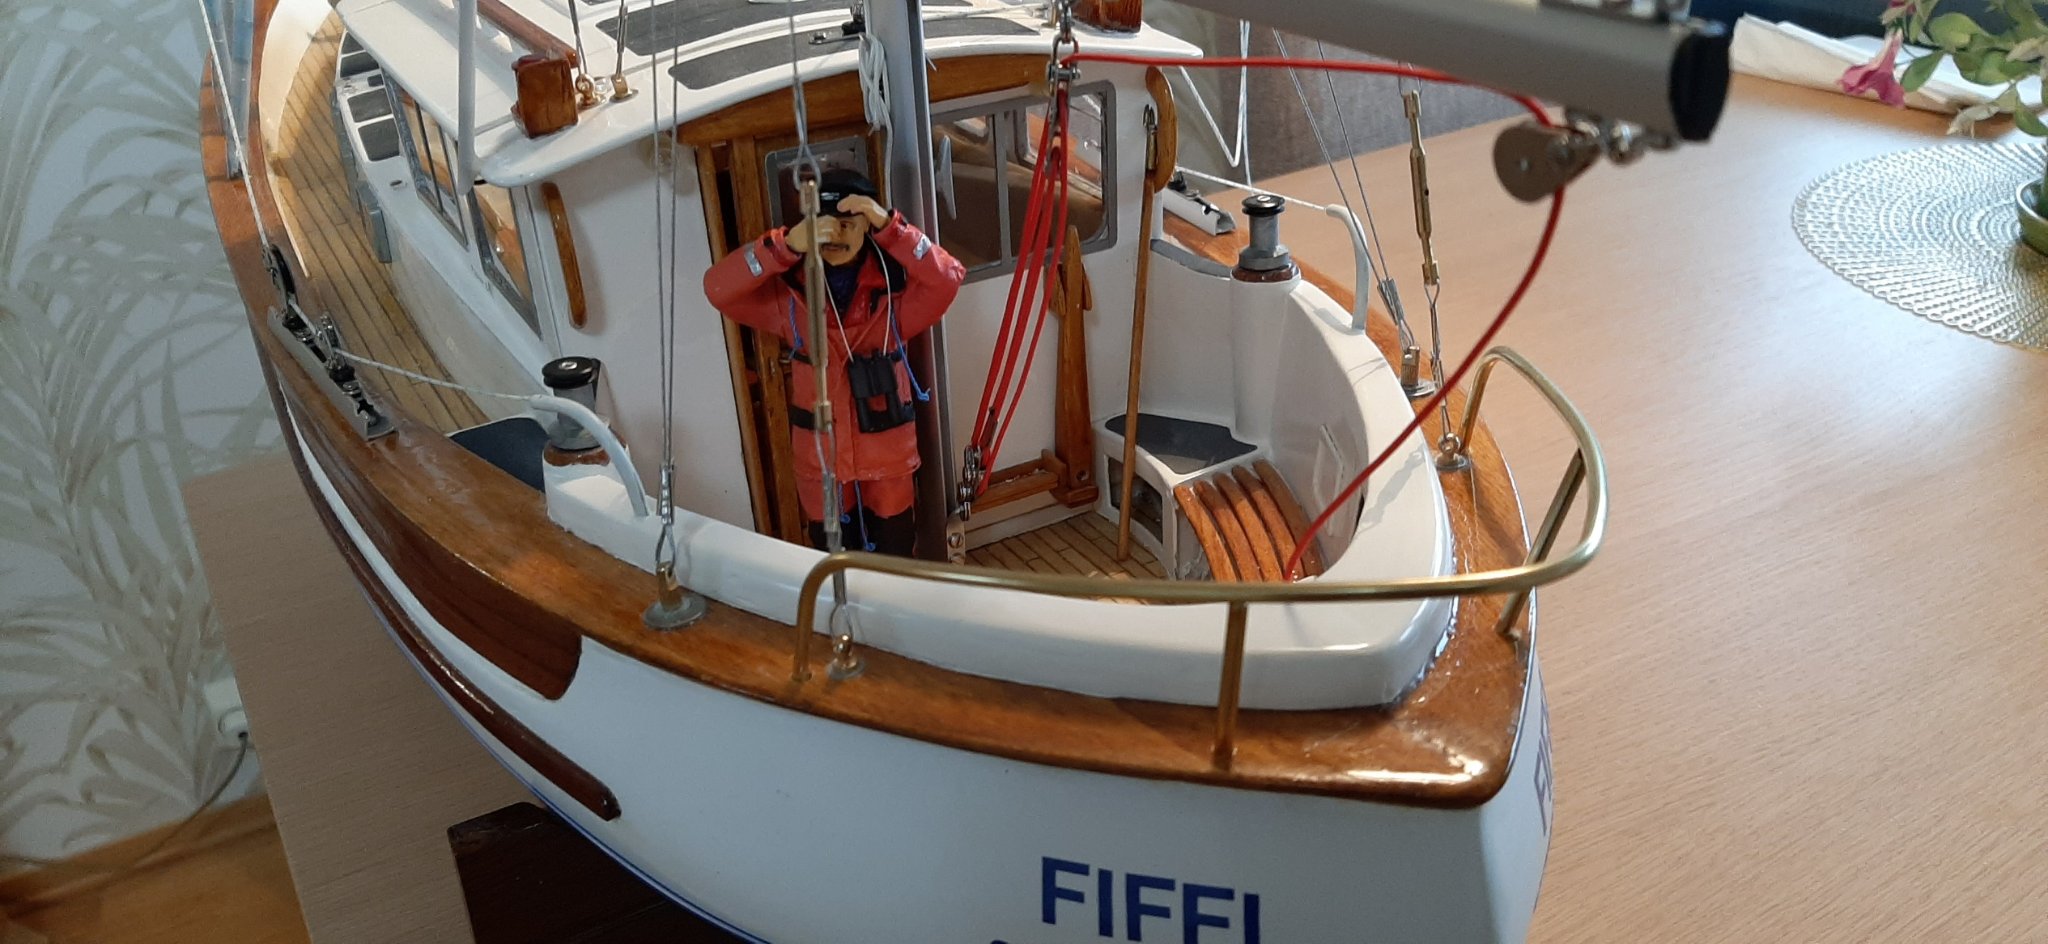
Did some more genoa control testing yesterday. I may have made the genoa slightly too big for the available winch/sheet-length movement. The available internal hull-length only gave me 38cm of sheet length movement. It'll mean too much internal re-working to get the full 6 turns of the drum available so I'll just have to stick with what I've got. I expect that the Fisher will not sail closer to the wind than a broad reach, so the set-up may still work OK. Will try it out on the water/in the breeze, before doing any more adjustments.
Meanwhile the watchman and his son made a sneak visit last night to check the nav lights and wheelhouse nav- instruments -iimmagination running a bit wild these days, sorry!
-
Did some more genoa control testing yesterday. I may have made the genoa slightly too big for the available winch/sheet-length movement. The available internal hull-length only gave me 38cm of sheet length movement. It'll mean too much internal re-working to get the full 6 turns of the drum available so I'll just have to stick with what I've got. I expect that the Fisher will not sail closer to the wind than a broad reach, so the set-up may still work OK. Will try it out on the water/in the breeze, before doing any more adjustments.
Meanwhile the watchman and his son made a sneak visit last night to check the nav lights and wheelhouse nav- instruments -iimmagination running a bit wild these days, sorry!


-
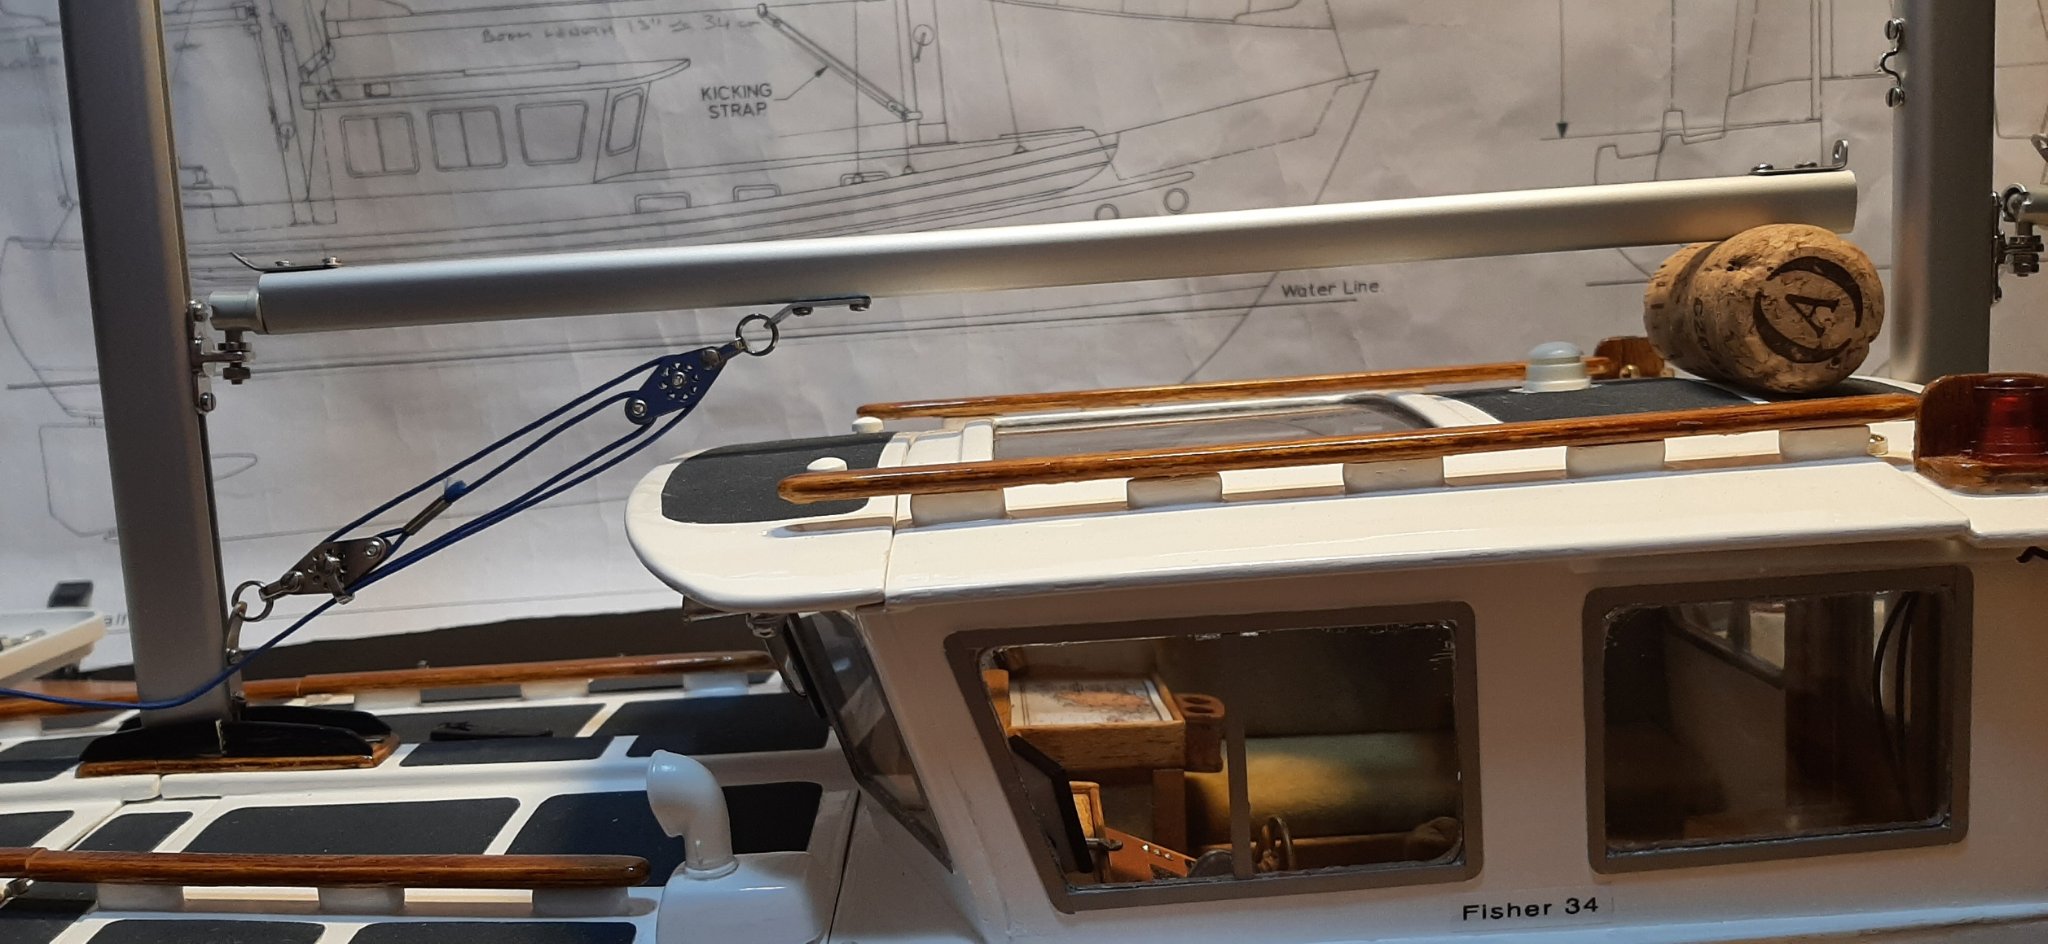
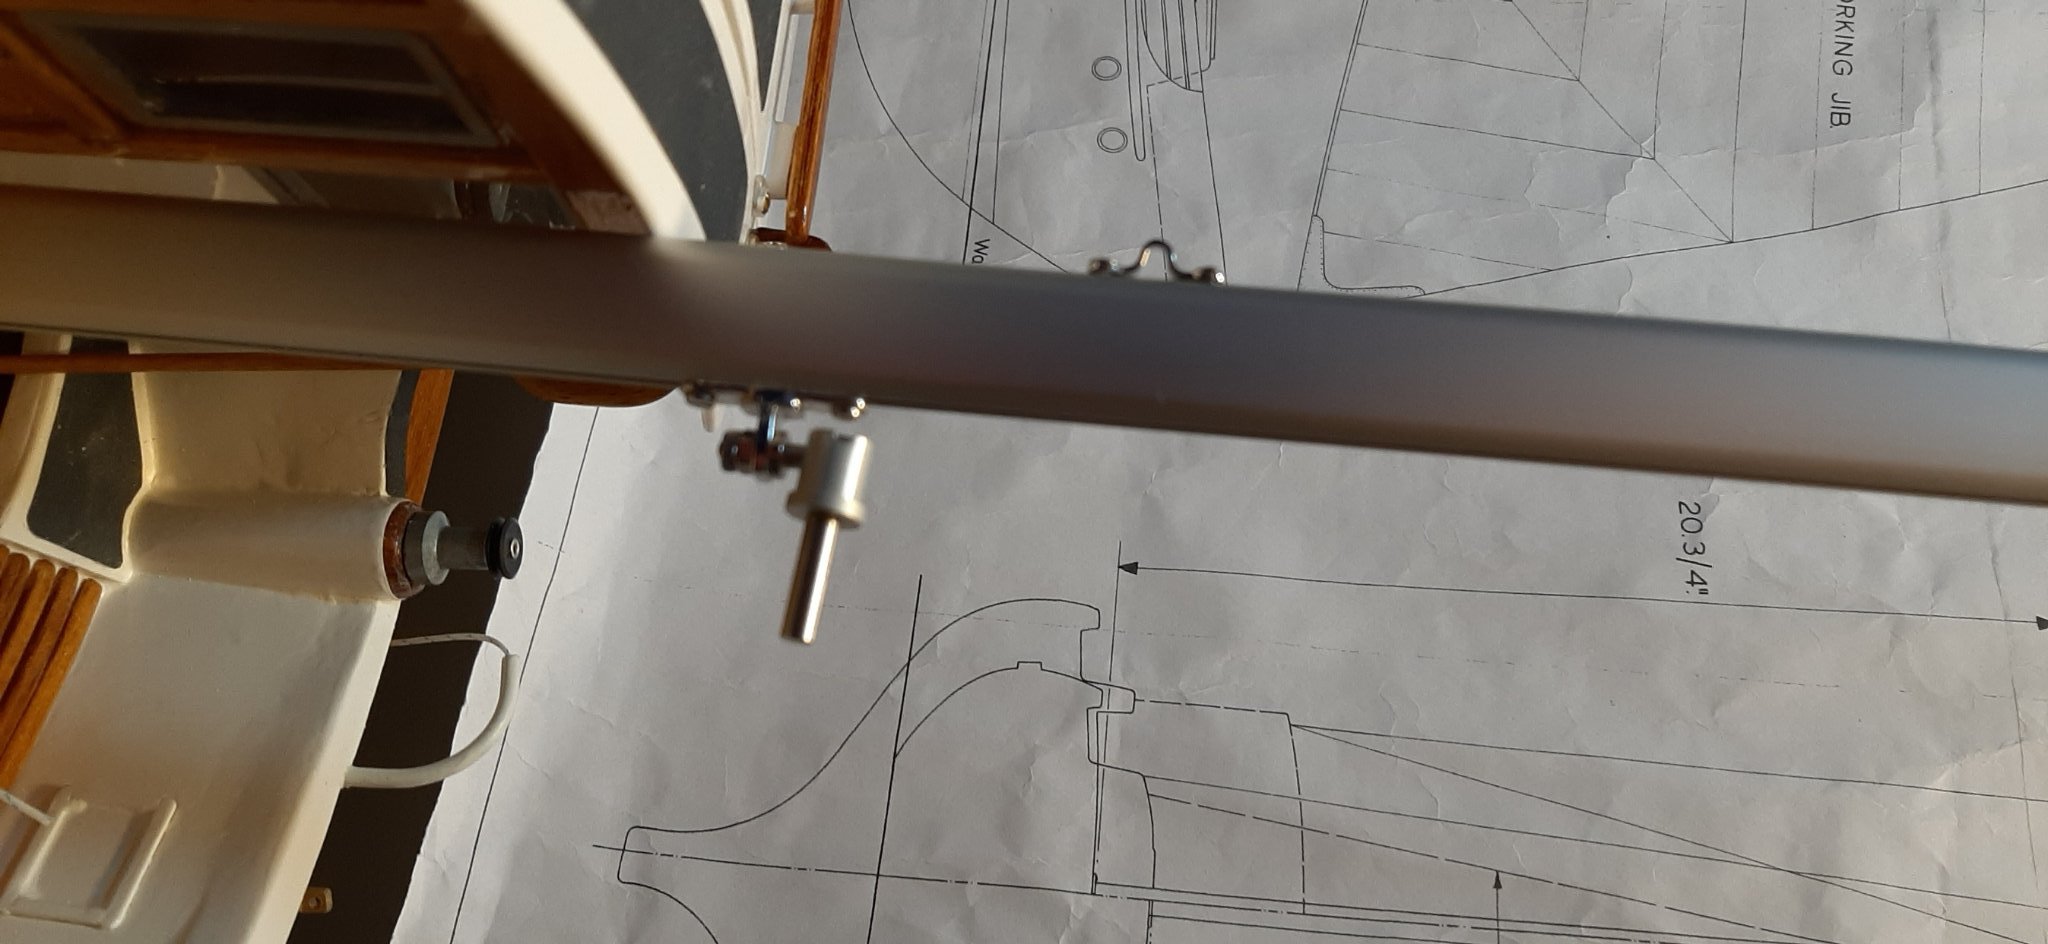
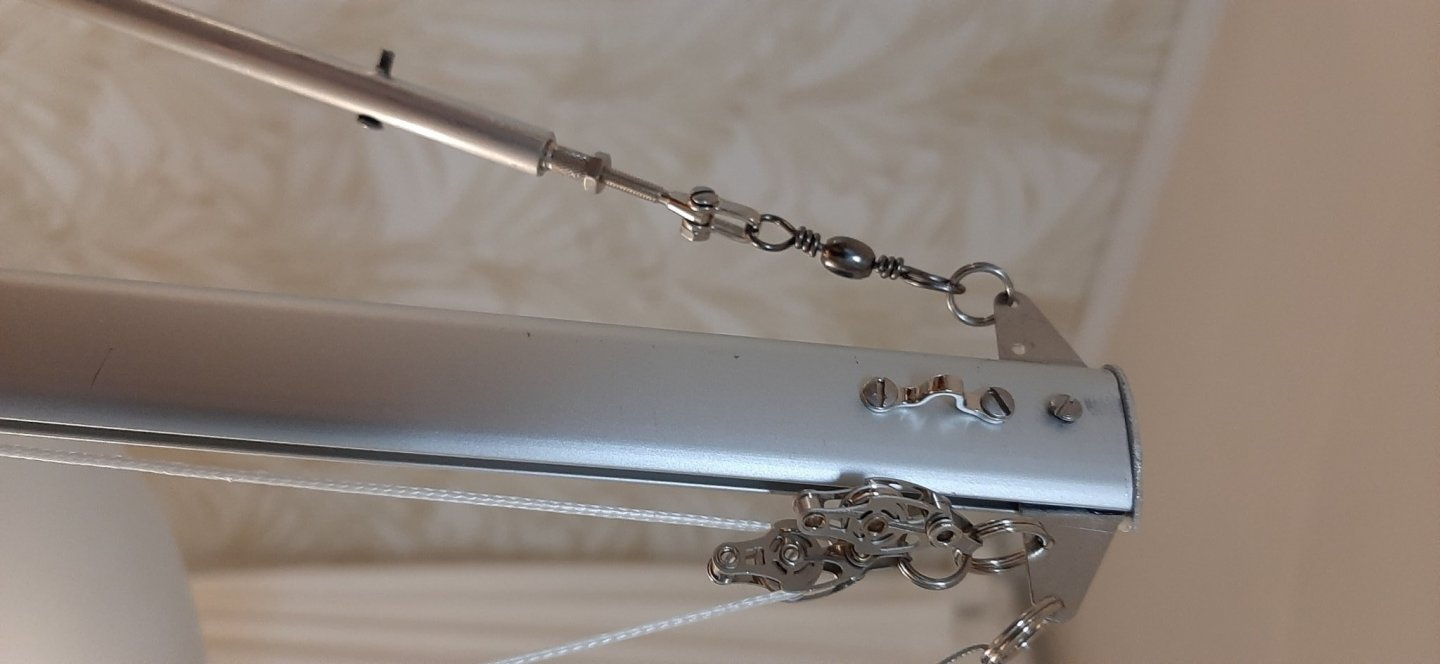
I have added some shroud rollers/covers to try to prevent the genoa sheets snagging on the chain plates/bottle screws when changing tack. Fishers do not sail 'close hauled' so changing tack will be a motorised turning-maneouvre through about 150* I suspect!
-
-
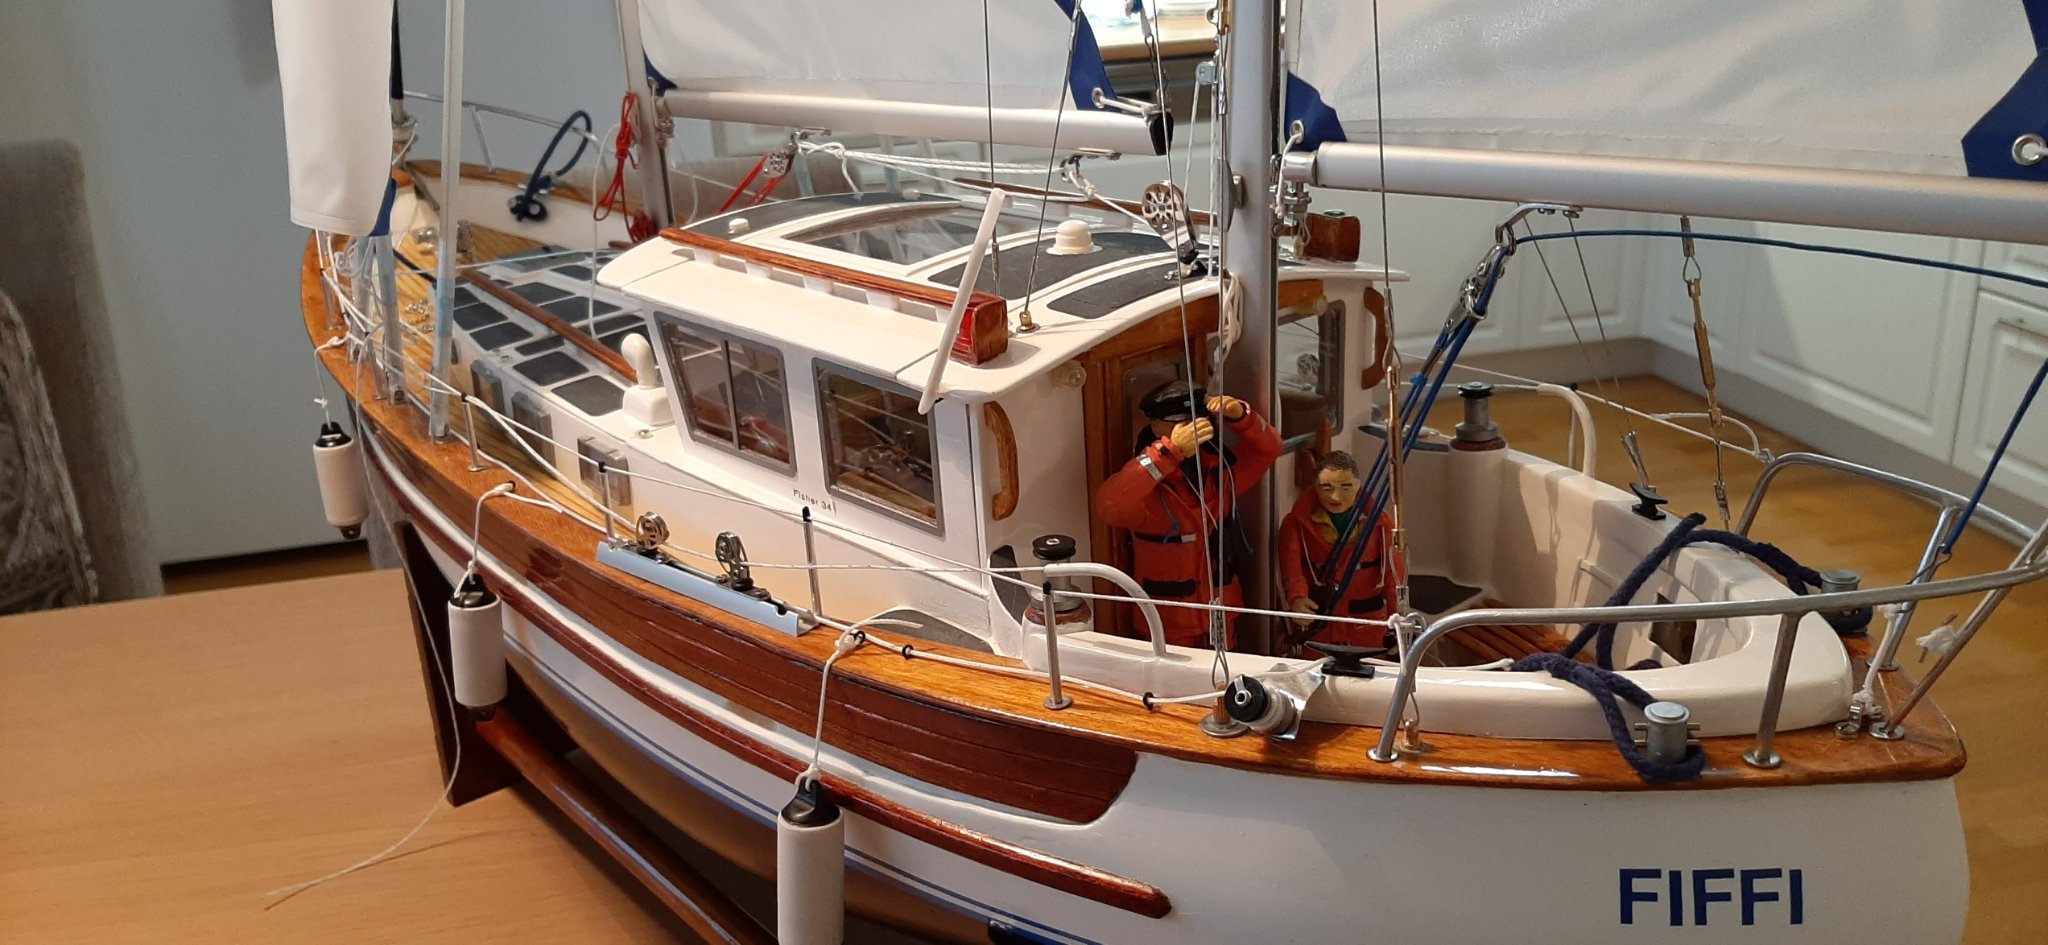
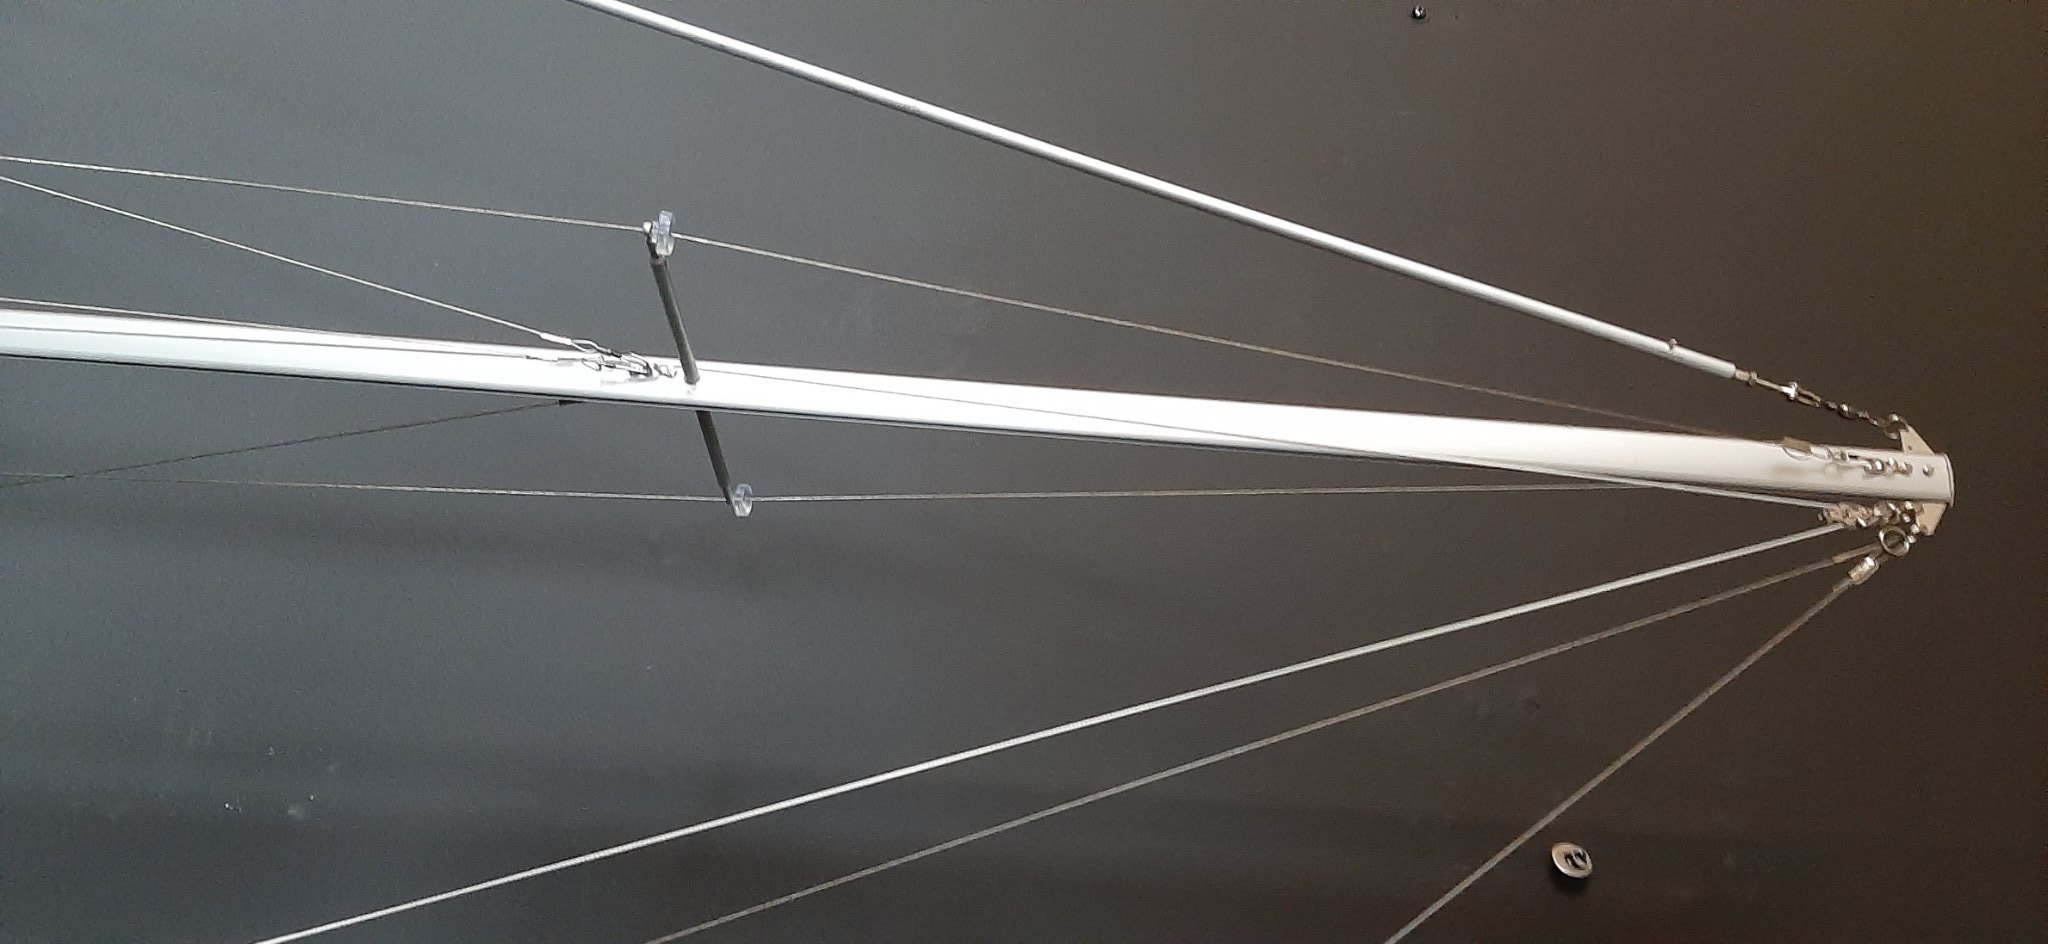
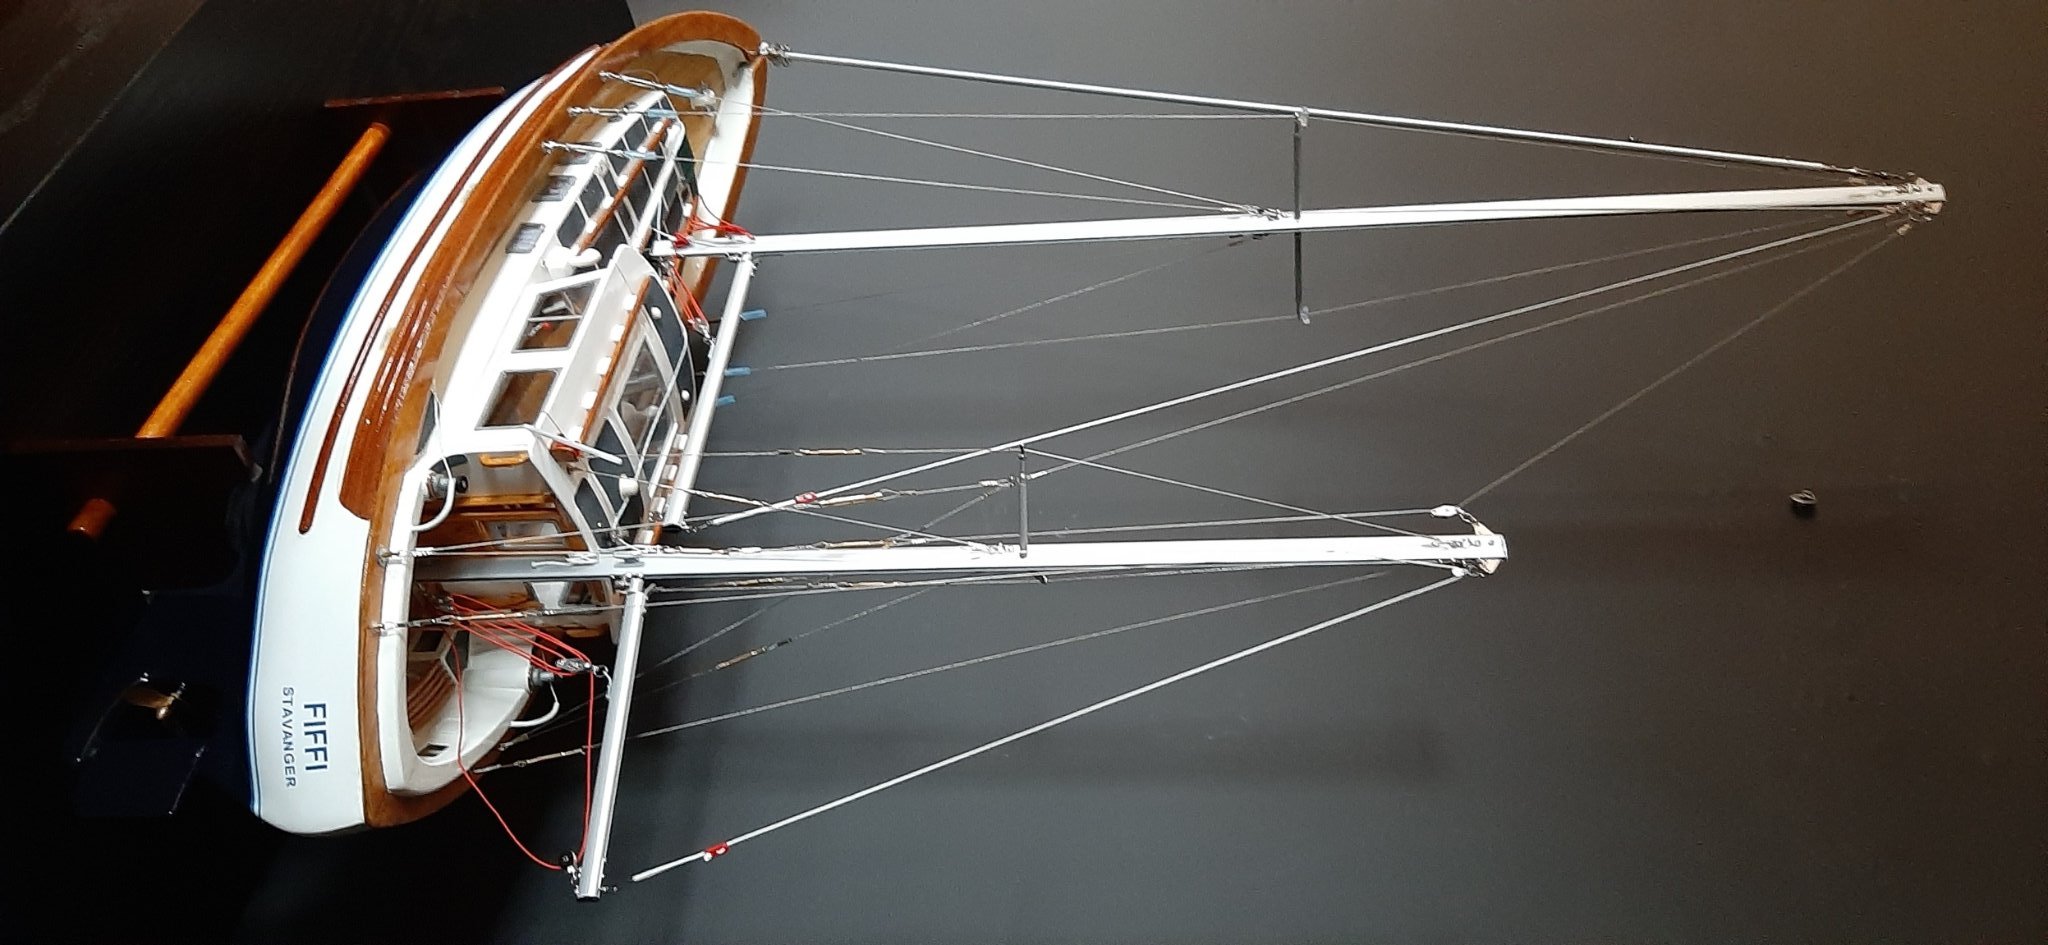
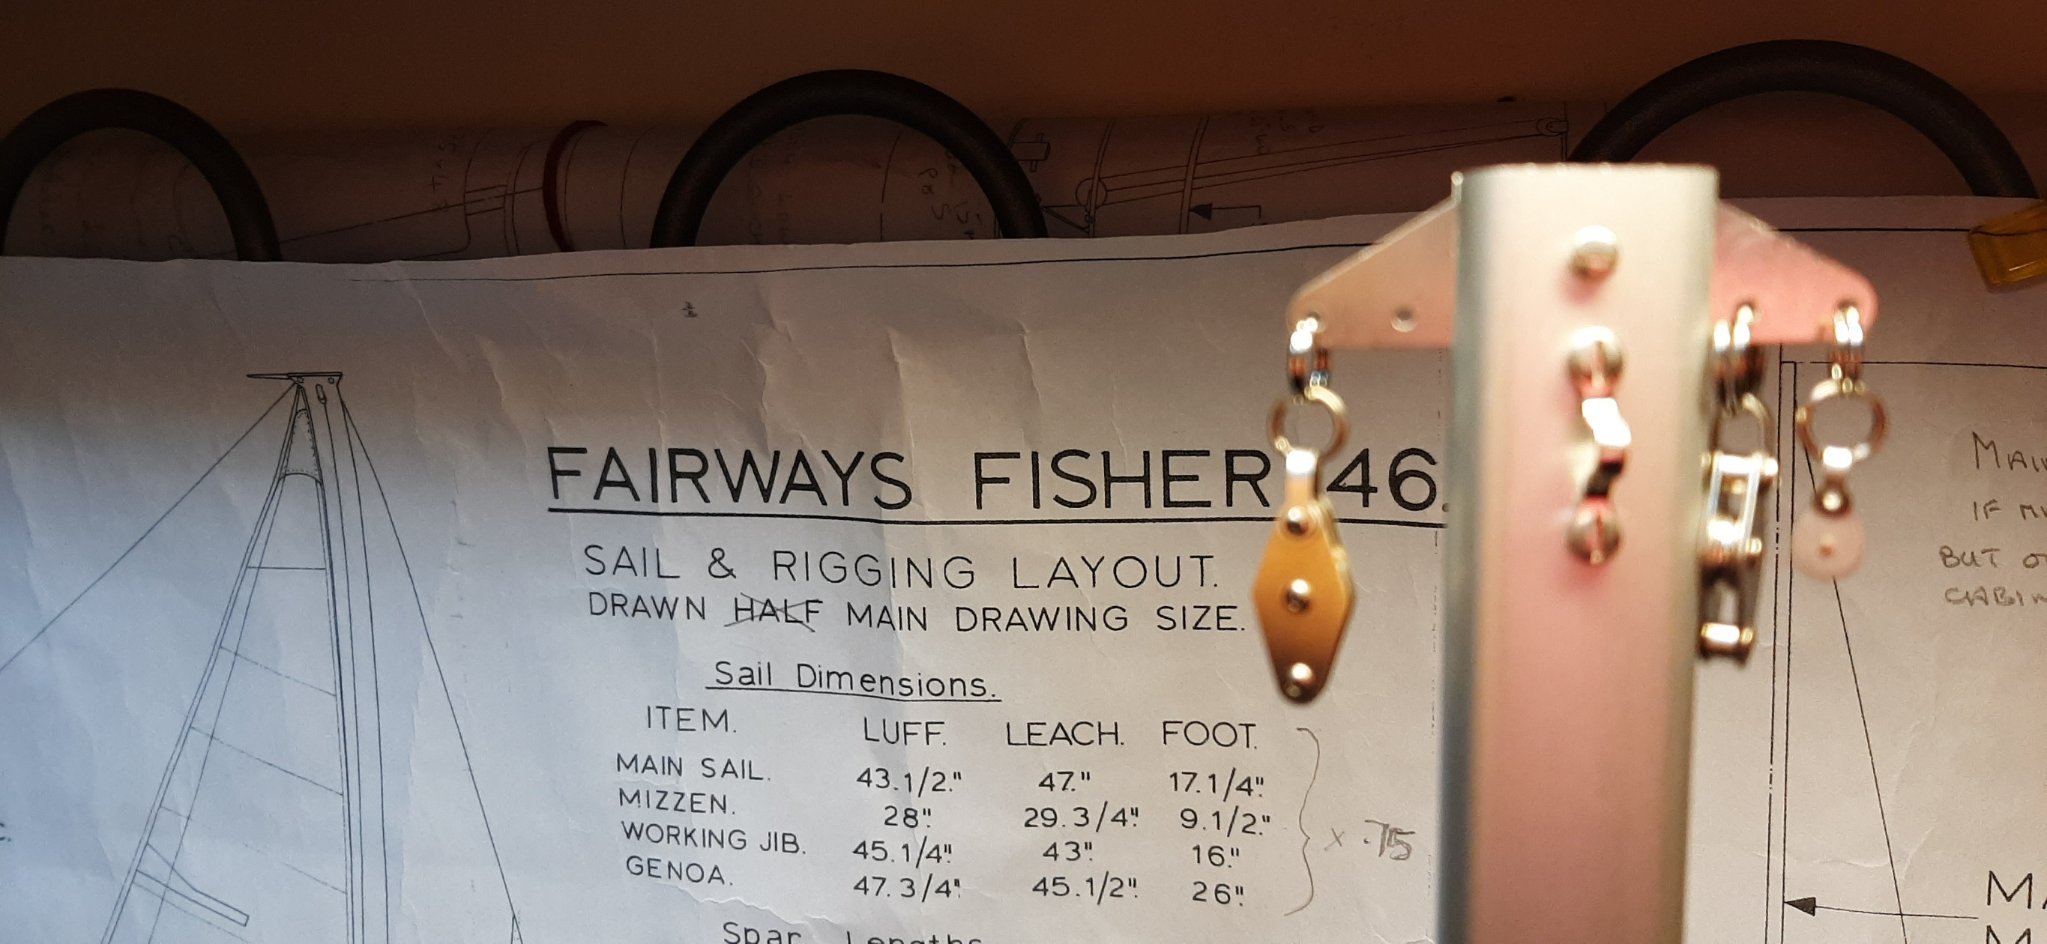
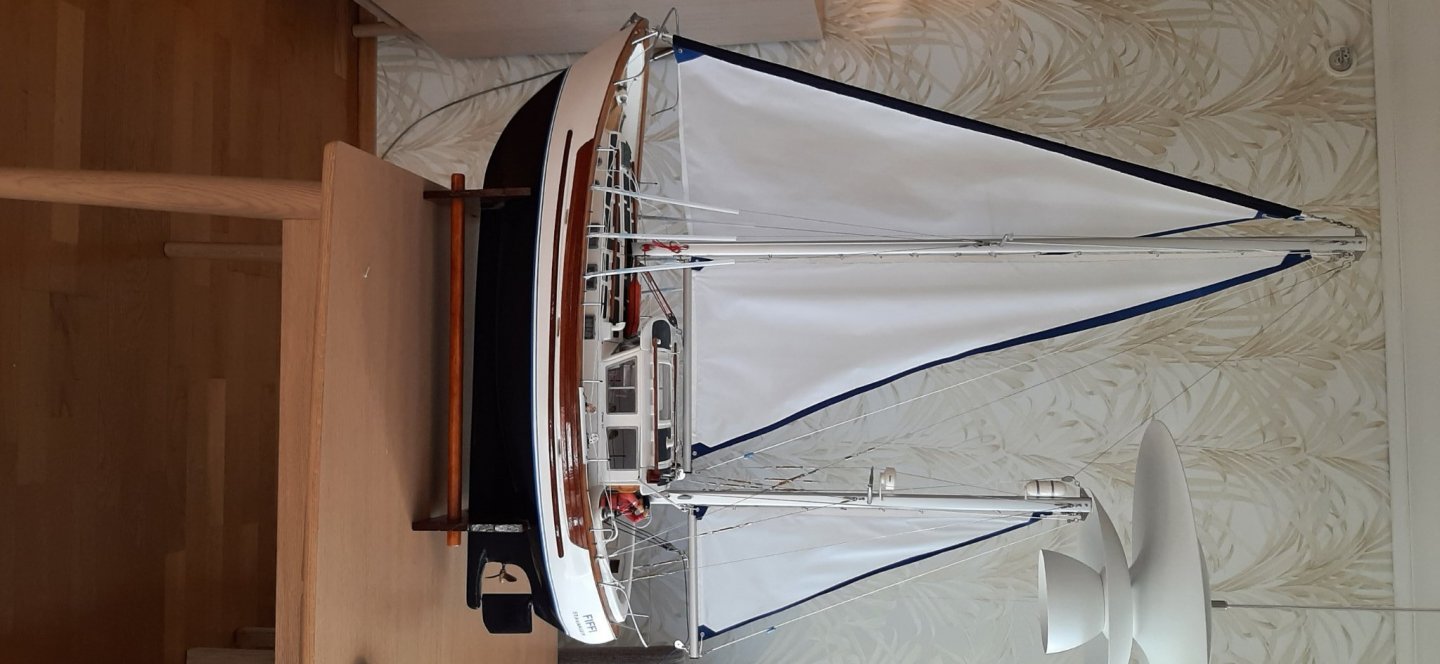
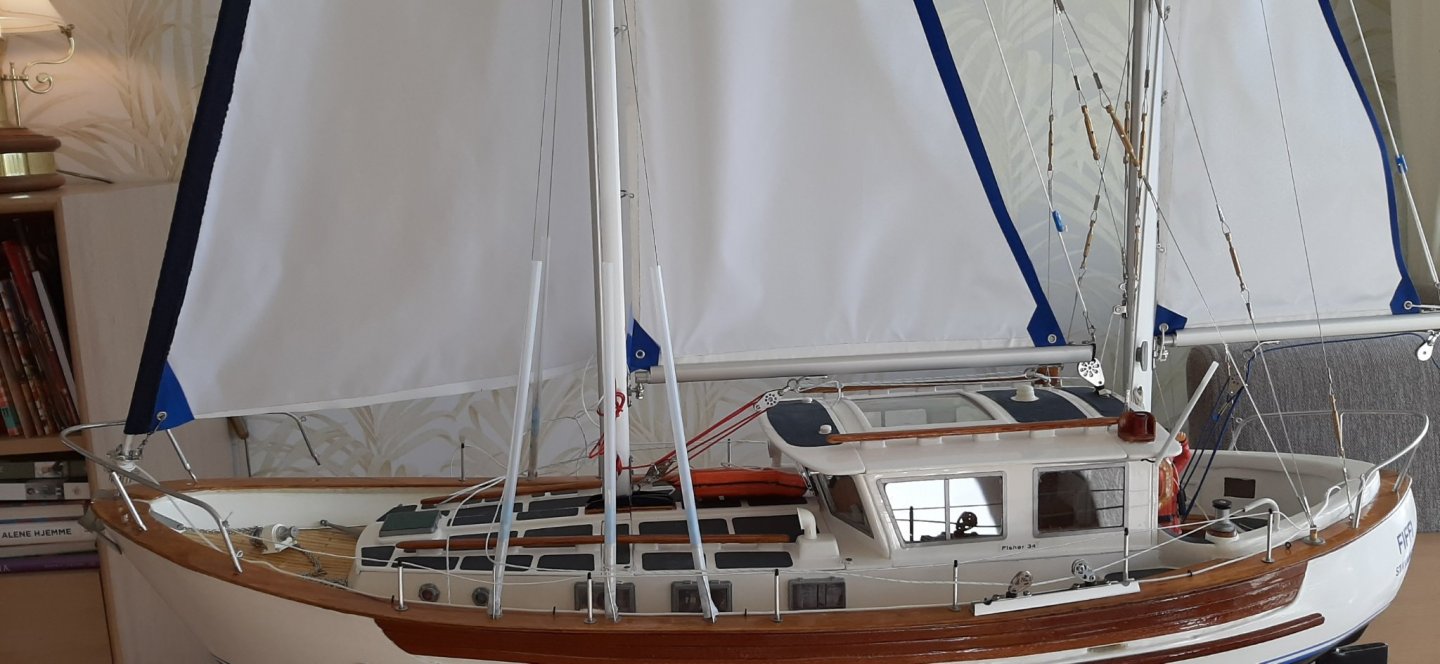
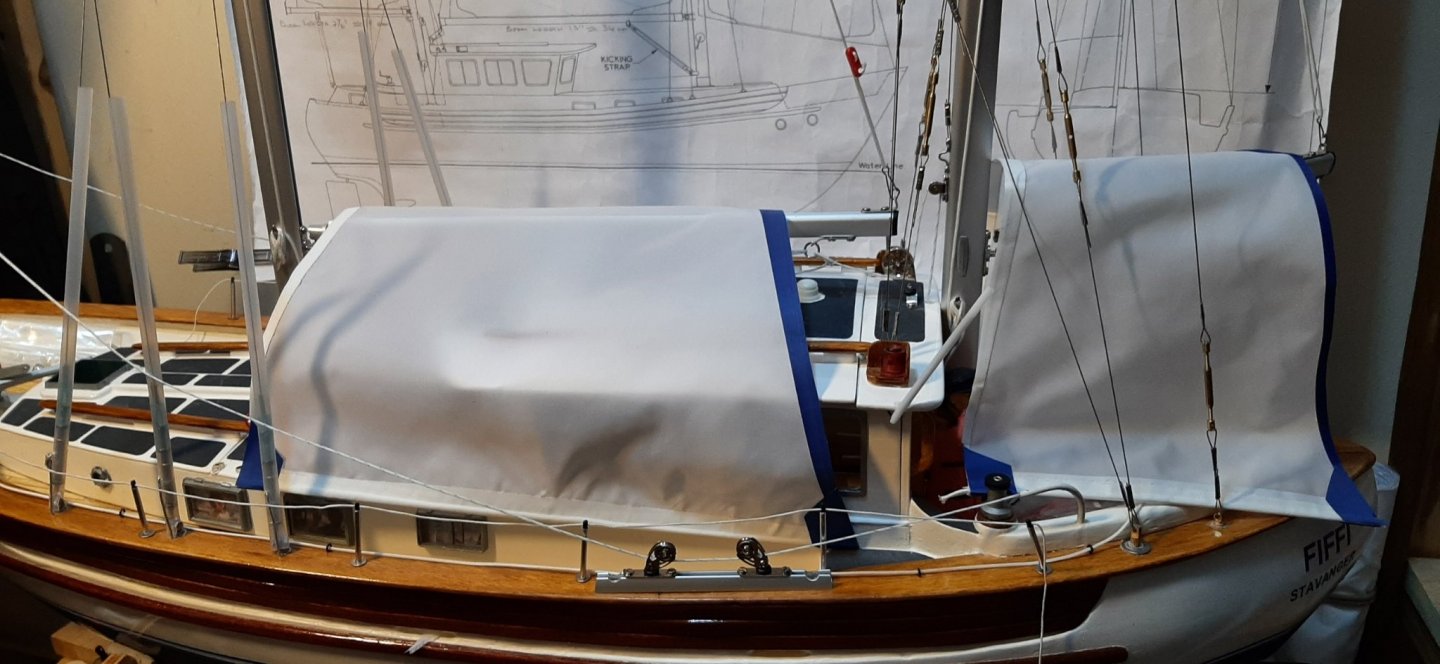
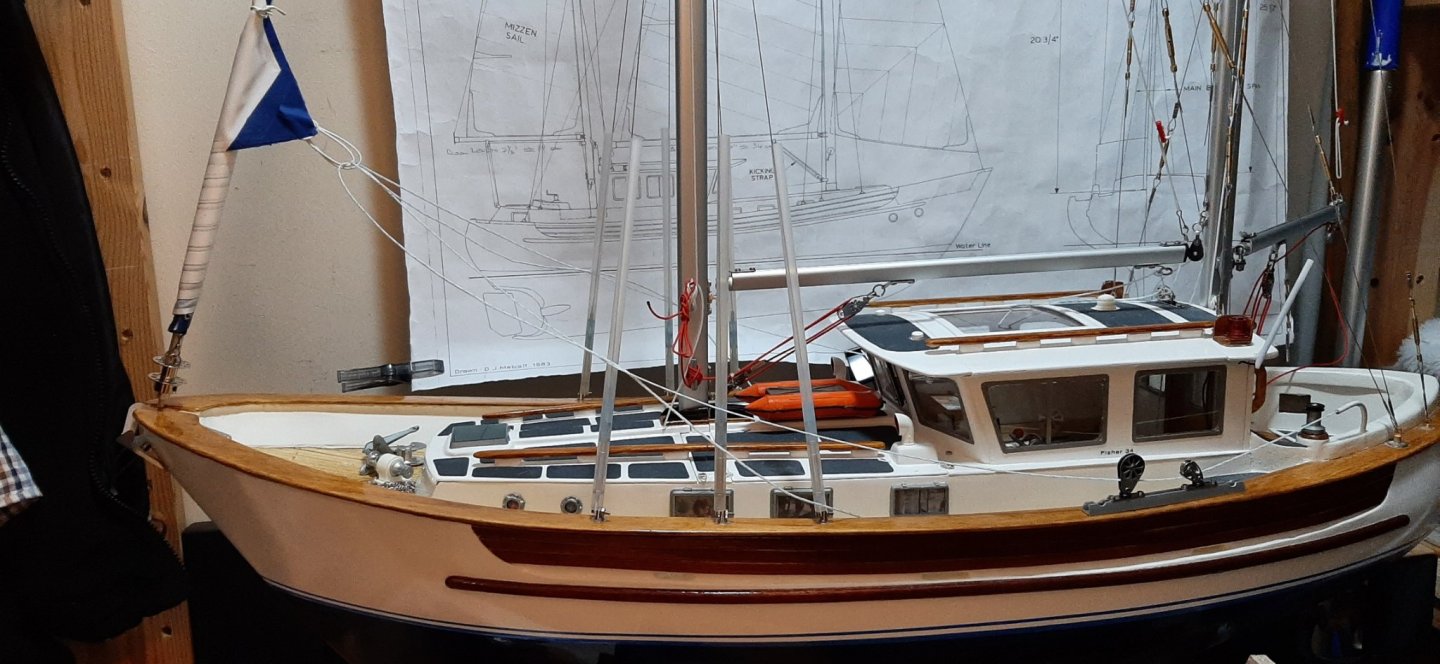
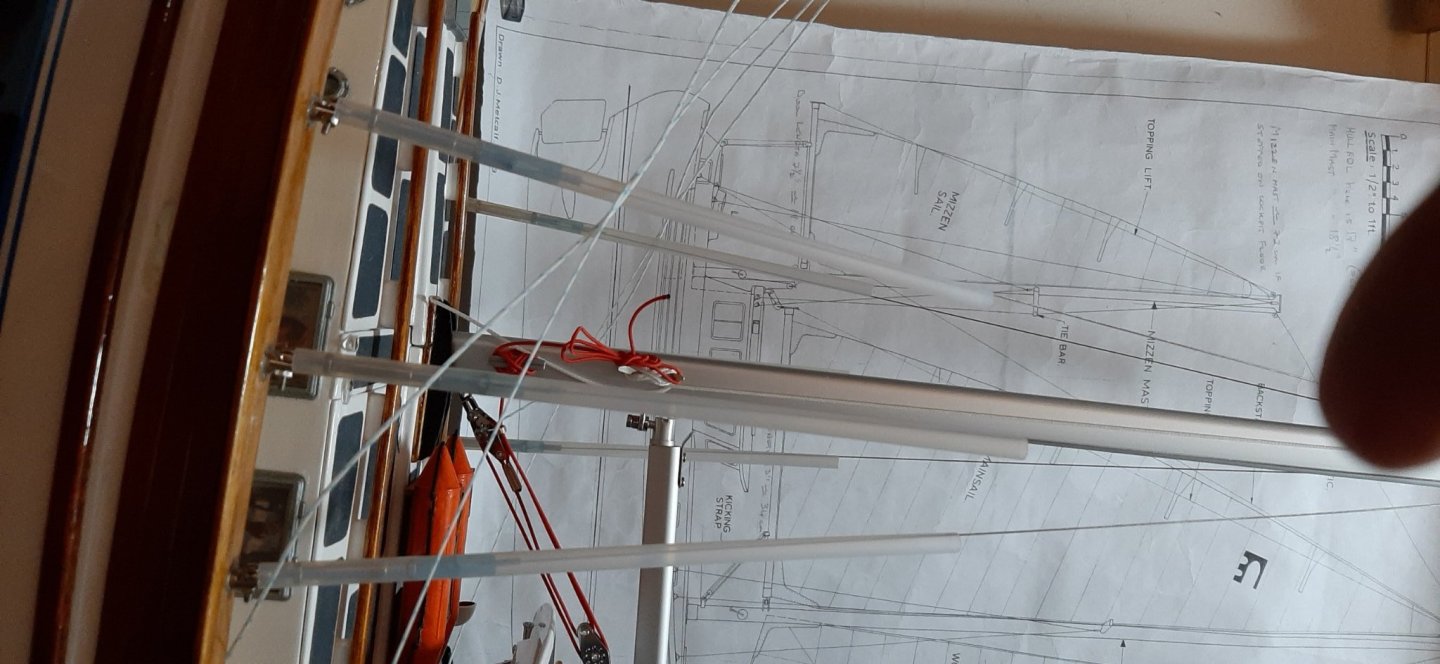
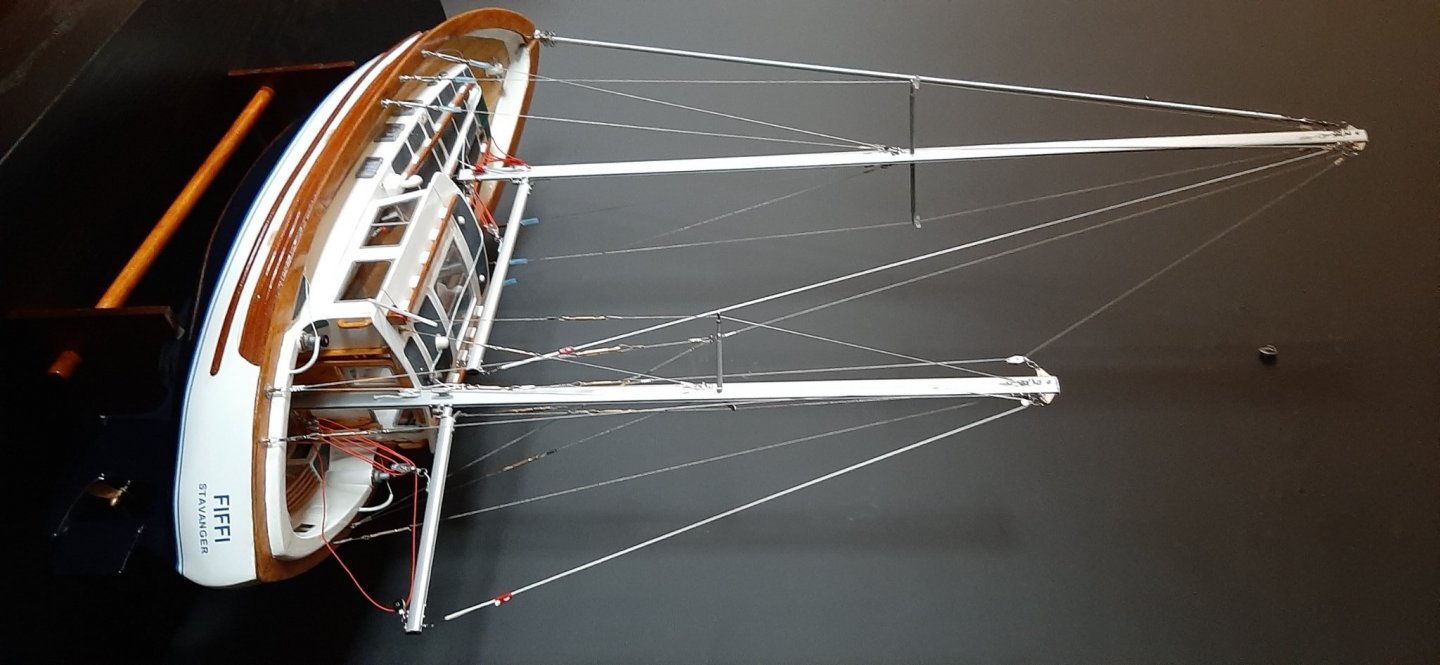
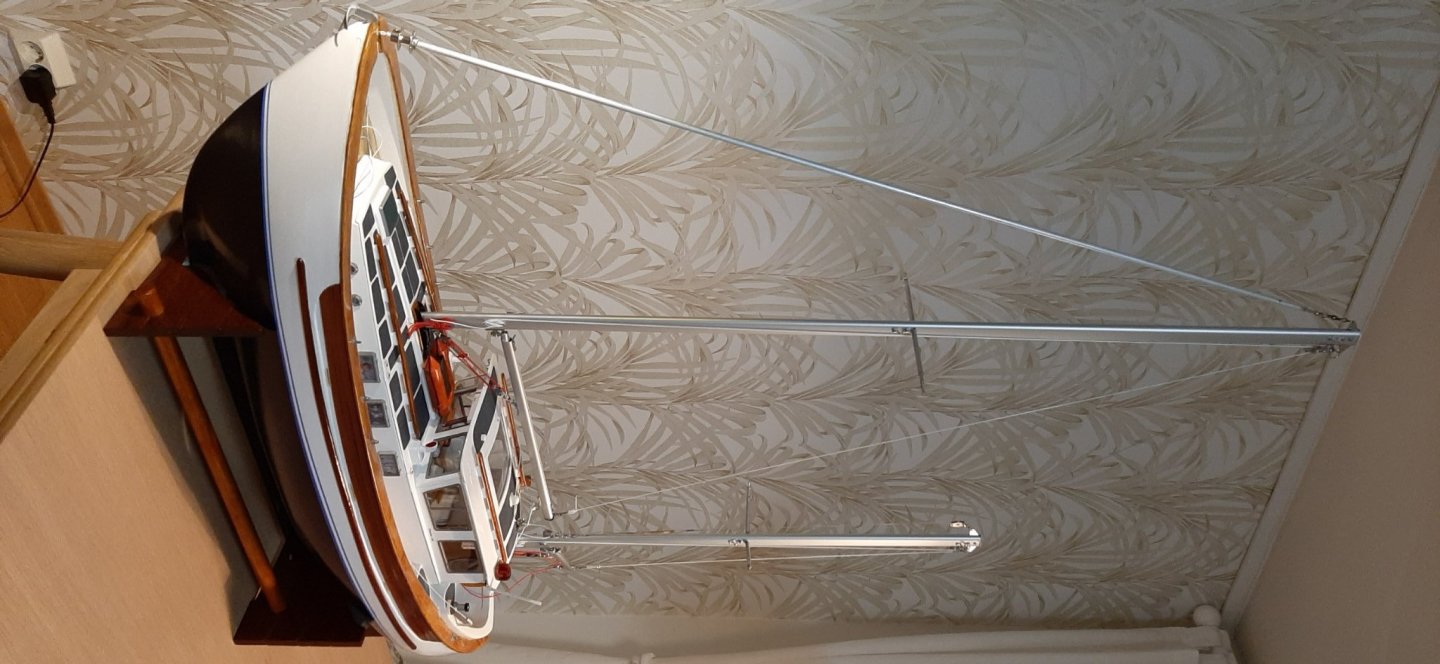
Time to post a new update. Rigging now complete. Had to re-do a few runs due to lack of pre-planning. New 'fails' may be found as inspection of the detail work is carried out but so far I'm please with overall look of the yacht. The light blue fuel tubing covering the crimp tubes will be replaced by clear when I find some. May try white plastic tape as in full size practice!
Radar and reflector still to be mounted on the mizzen mast. Then it'll be time to cut the sailcloth!
Was allowed to use a background black wall in the dinning room ( for 15 minutes!) to enhance the visibility of the rigging.
George

-
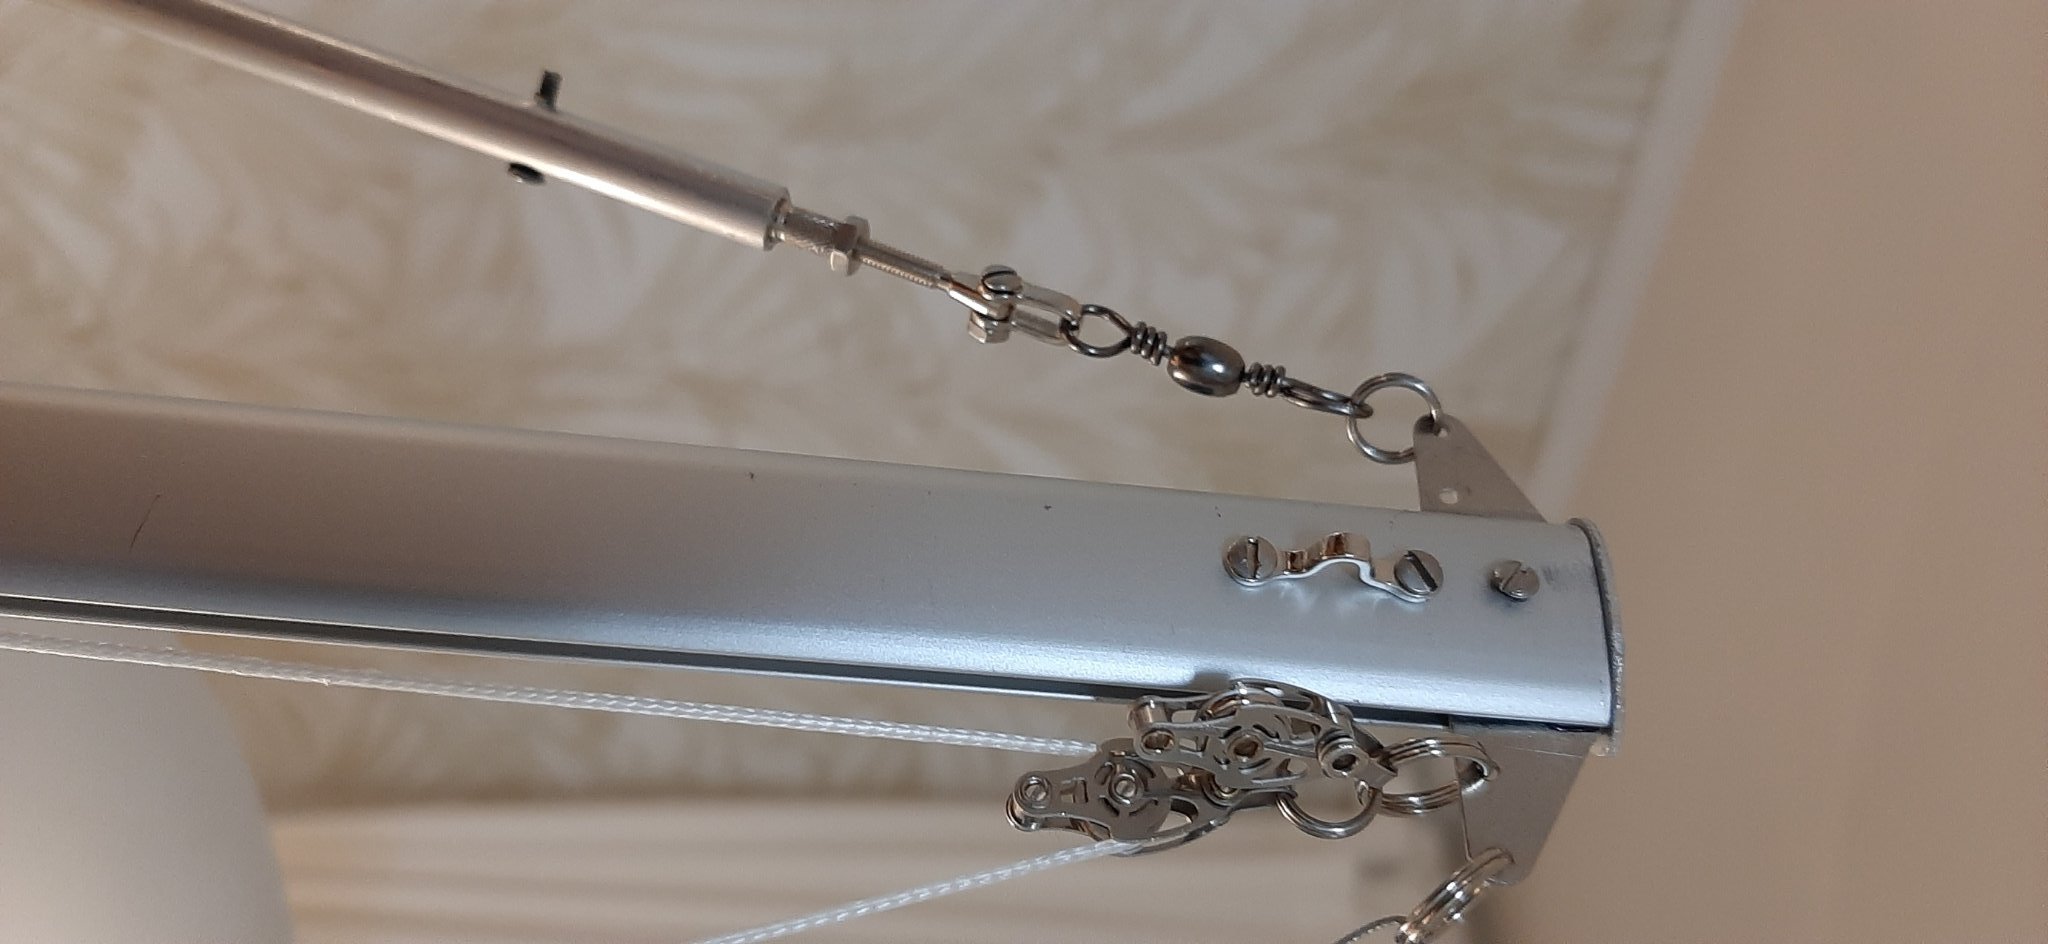
Managed to make a roller furling unit. Don't know if it will stand up to the forces but it does revolve!
Rigging the masts in what I think is a sensible order. Should be done by the weekend.
See that the photos need to revolve too!
George

-
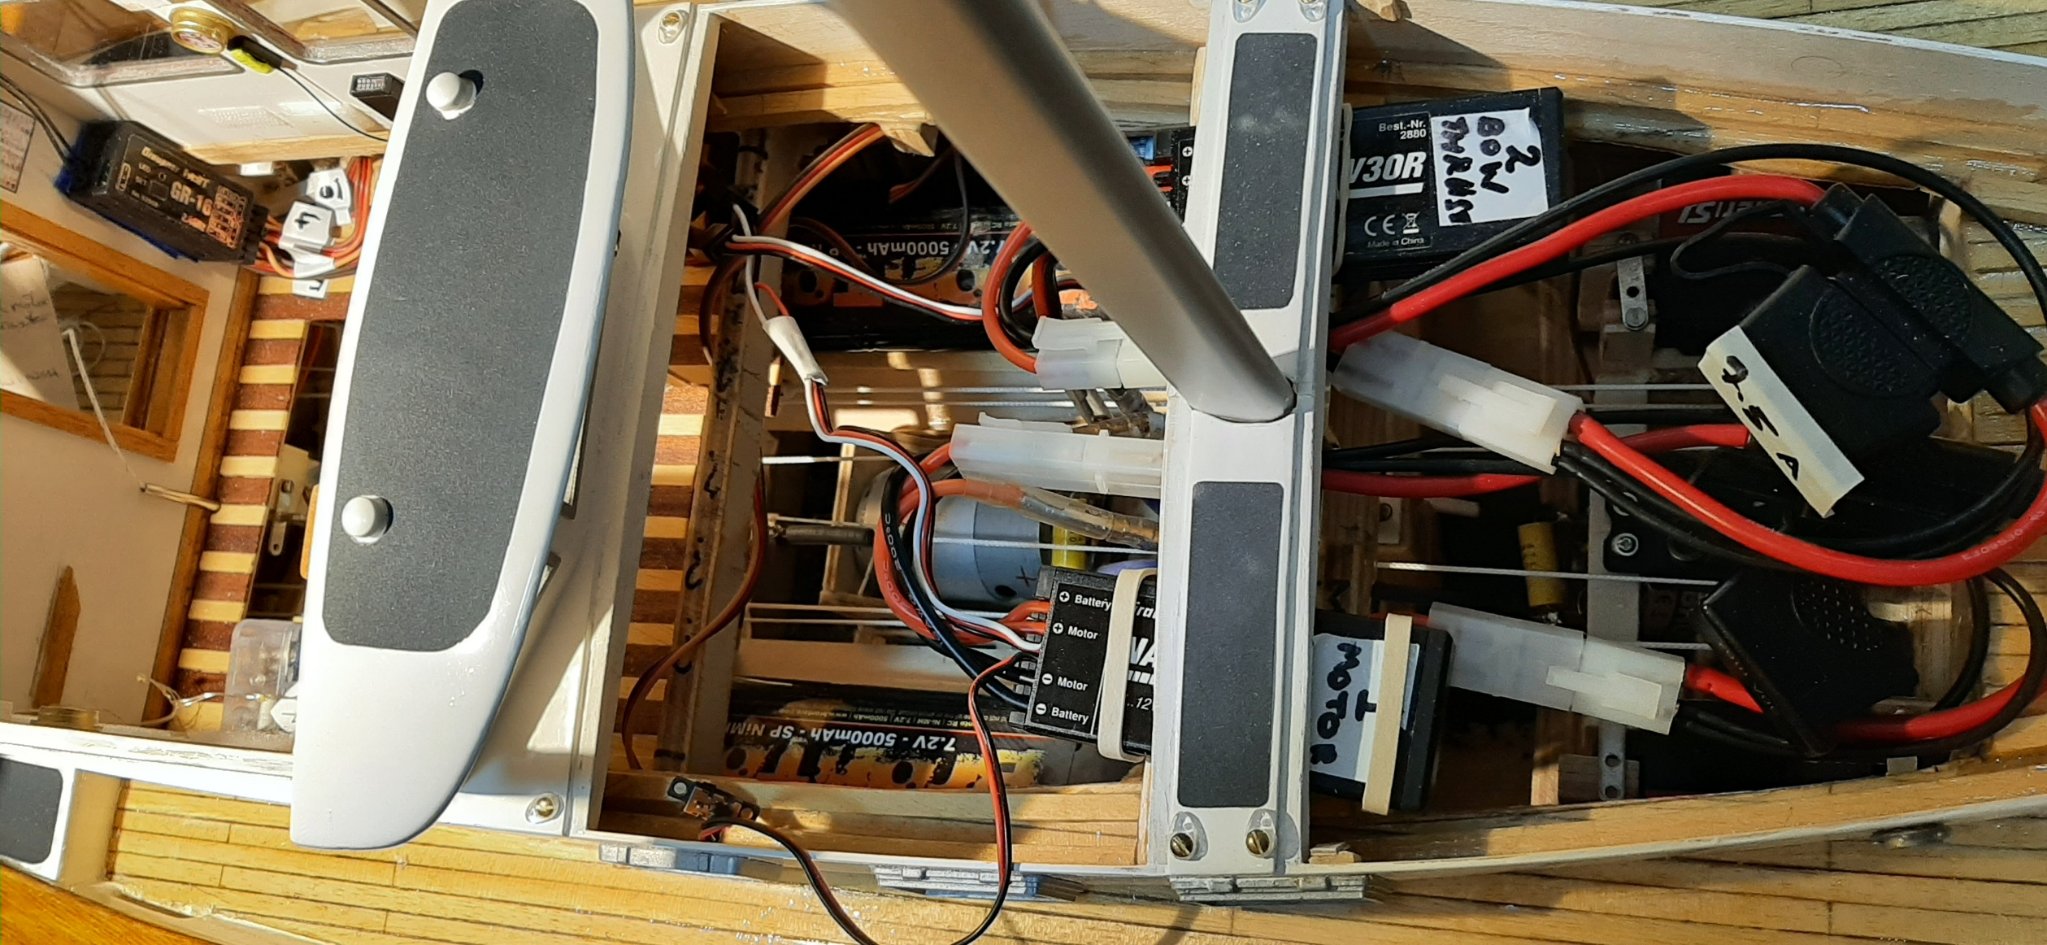
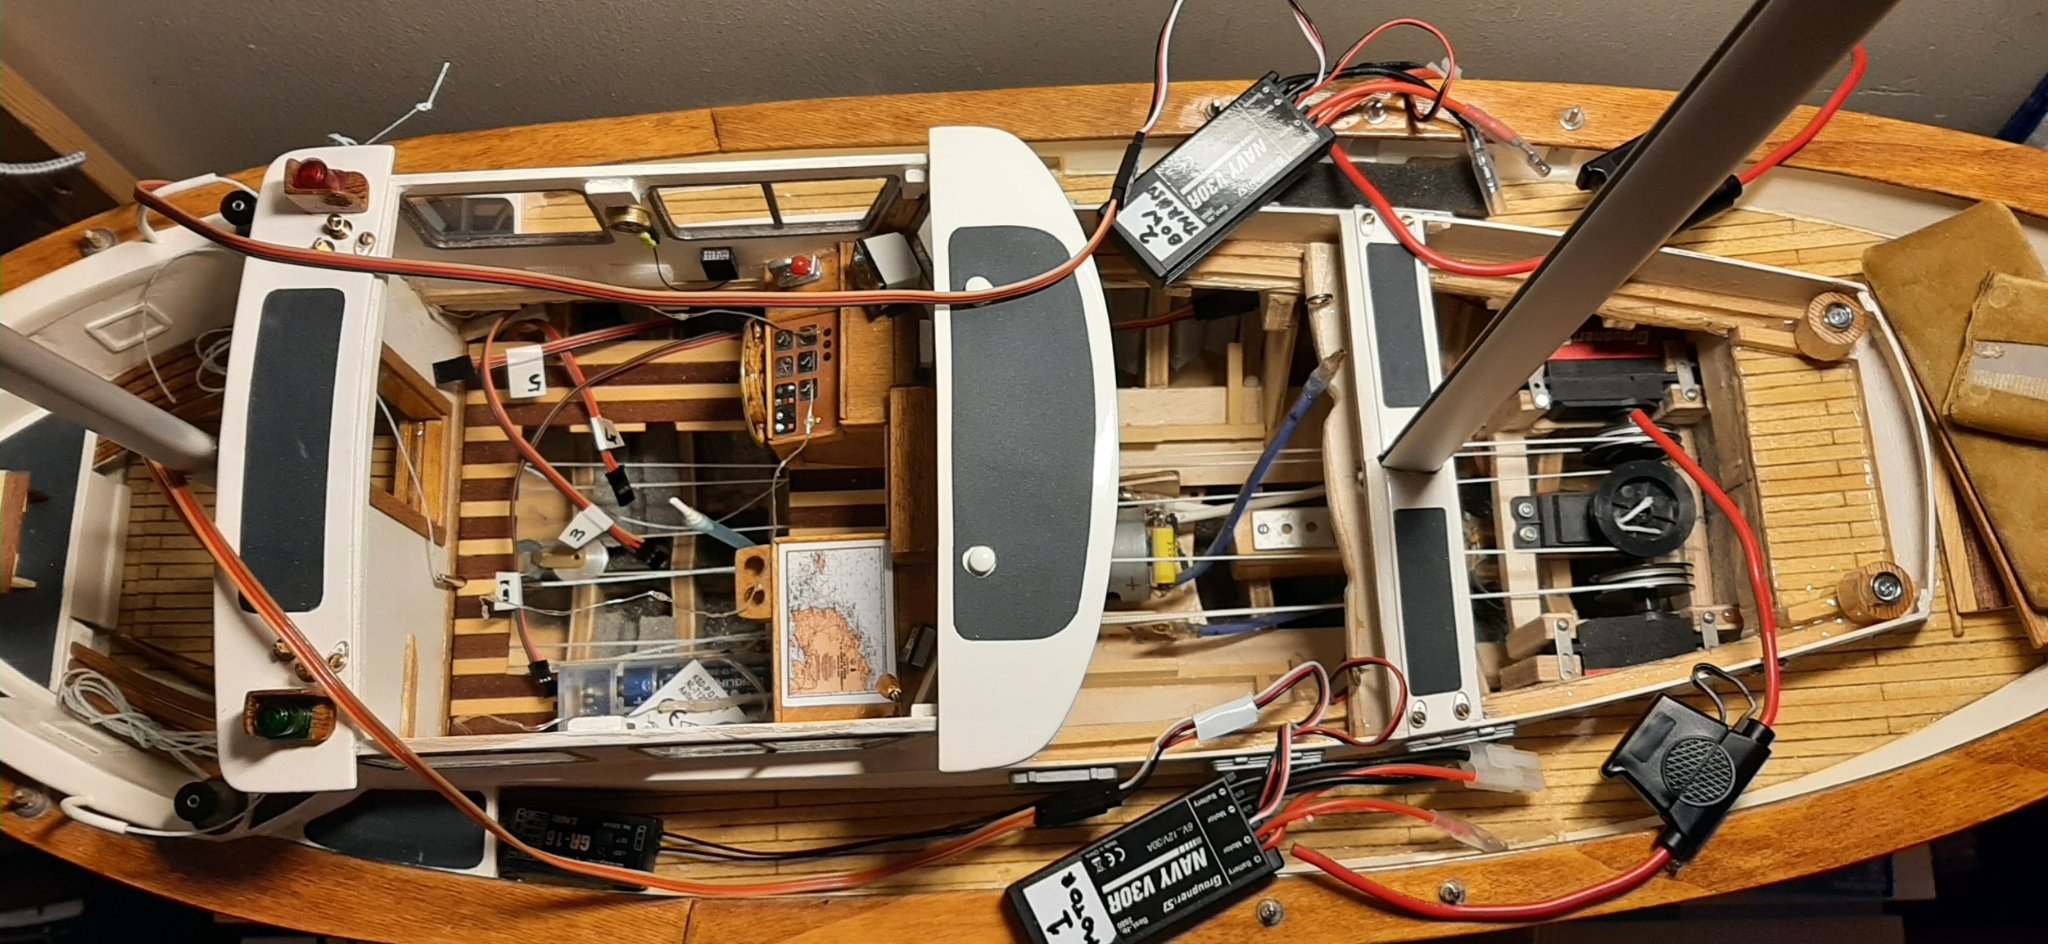
I wrote earlier that the Speed 400 bow-thruster motor would not work. Found that the wires from a large filter across the terminals were touching! - below the filter body and out of sight. So the volts were actually going straight from '+' to '-' terminals of the battery. Not sure that these filters are even needed with 2.4ghz R/C ?
I am however sure that FUSES are needed!! Burned out three during fault-finding tests!
George
-
Well, fittings are going onto the masts at last. Another slow process. I spend as much time looking for small screws which I drop onto the floor as I do actually fitting the them. I will have to adopt a smarter way of working on the masts. Planning on 4 weeks to step and rig the masts. Another 2-4 weeks to make the sails. Assistance from the Admiralty and her sewing machine will be needed.
Still planning for an Easter launch... April 1st! April fool ?
George
-
info:
I was intending to use the fuse/fuse holder as a 'switch' to isolate each battery from the speed controller. I have been advised by some 'electrified' people that the fuse and holder will be quickly damaged by removal/replacement of the fuse ie. using it as a switch. The fuse will not actually be cycled very often in my view but, better safe than sorry.
So....off to buy two 30A rated switches for each battery '+' wire. It's really getting crowded in the cabin so I hope this is the last piece of gear to go in before I can start on the masts and standing rigging.
George
-
I'm looking forward to starting the Colin Archer...only 1 speed controller and 1 motor👆 There's a lot of wire in this Fisher 34! I hope the R/C signals get through!
George


-
Decided that the R/C gear should be installed before the standing rigging. All that string would make it difficult to access the interior. Hope all this wire (inside and outside) won't
 interfere with the R/C signals!
I think I have worked out how to make a roller furling gear for the genoa. Ordered in some bits for that yesterday.
George
-
Rigging start has been delayed until sunday/monday. Took much longer to cut out coach roof treadmaster than expected. Needed a few extra scissor-breaks to ease the
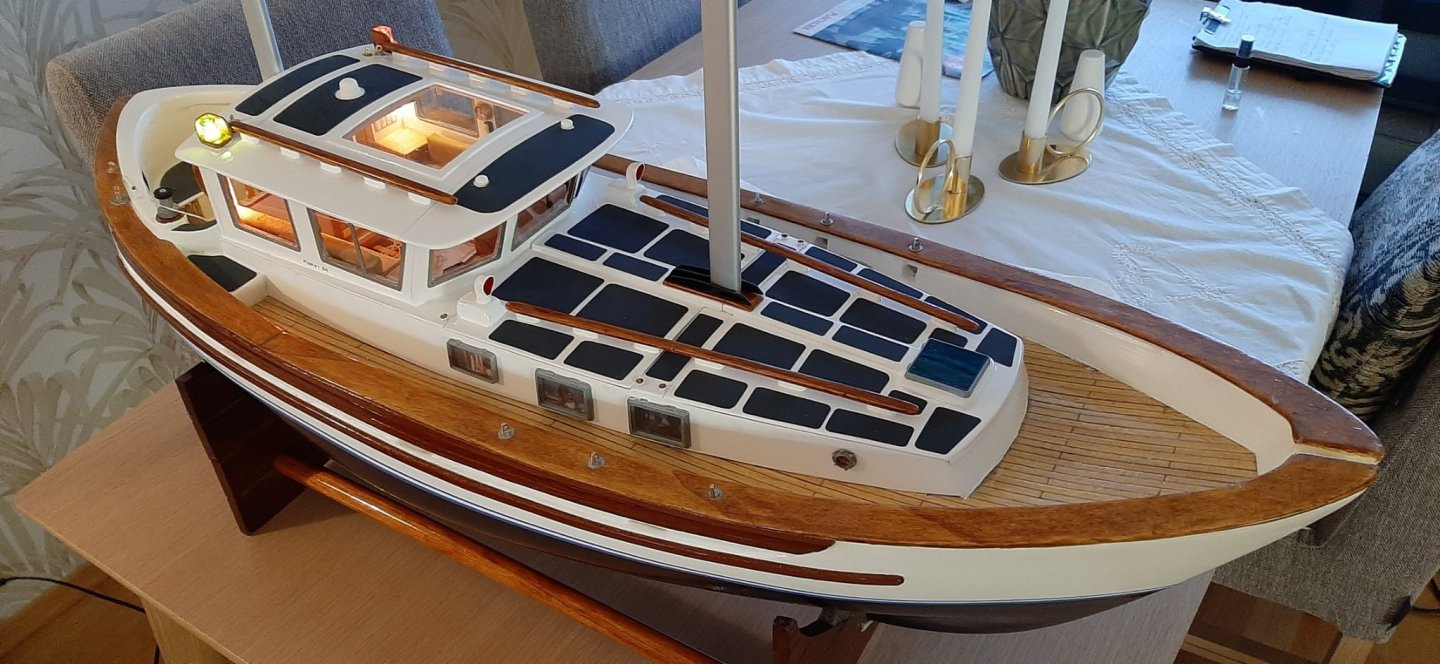
brain cellsbrain cell so it didn't go on strike.I think the dark-ish grey contrast colour makes the coach roof look a bit too busy, The full-size Fishers usually have a lighter shade. I could try to paint it with thinned acrylic but I think I'll wait to see if it fades a bit in the summer!
George
-
Been 'wielding' the scissors for two days now and cutting out all the 'treadmaster' patches for the coach roof sections. Stepped the masts this afternoon just to give myself some inspiration to keep cutting. Should be ready as planned to start the standing rigging for the masts by saturday. Friday afternoon is when we 'close shop' for a while and make something 'exotic' in the kitchen (to eat!) So one hour more with the scissors and ...I wish all a pleasant
 , safe weekend!
George -
Hello Arjan, very nice photos..and very helpfull for people like me who have started a CA RS1 from Billing. Seems that many people have given up building when they have just done a few first steps. I have now have TWO 414 kits. Both are abandoned projects by guys living in Stavanger. Billing instructions are not for the inexperienced and when guys like you and Andreas Sundt post many build sequences it helps to inspire others (like me) to get going! I have started the RS1 but will not be building at full speed until my Fisher 34 is finished. I have also bough the books about CA RS1 by Knut Von Trepka who sails the full size RS1 in Norway. George
-
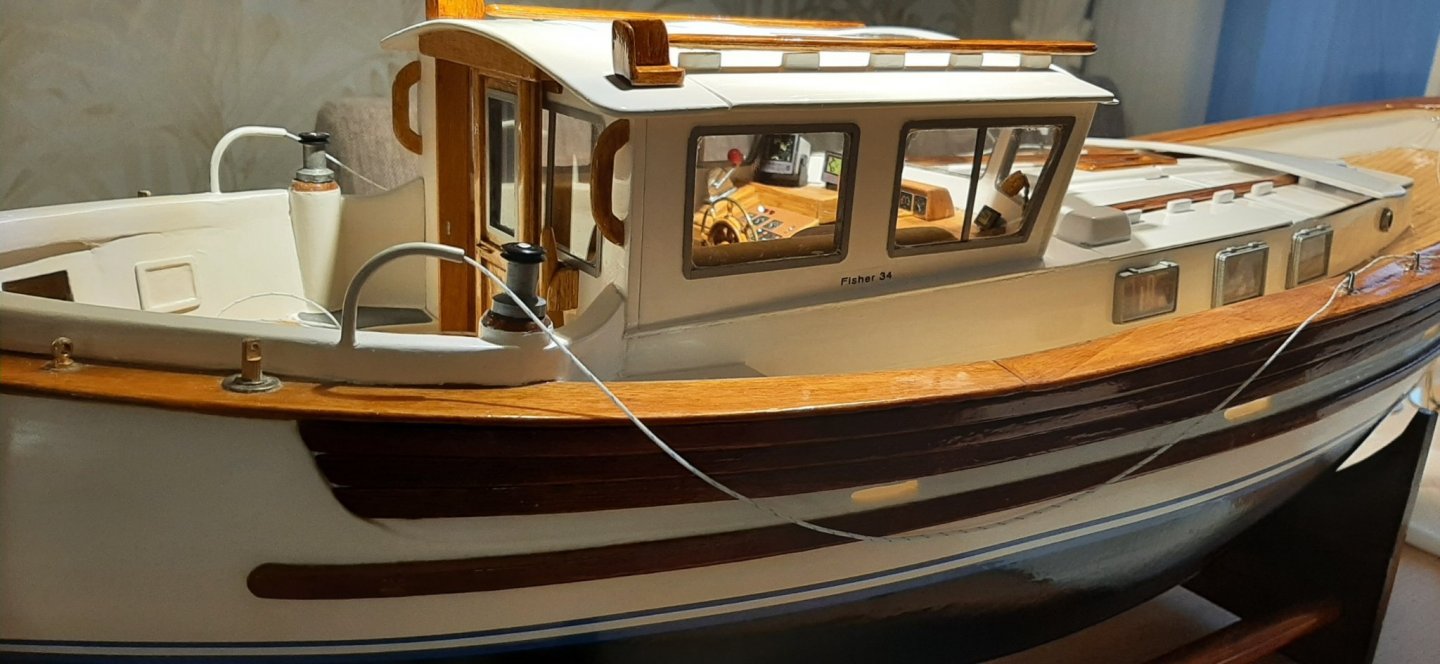
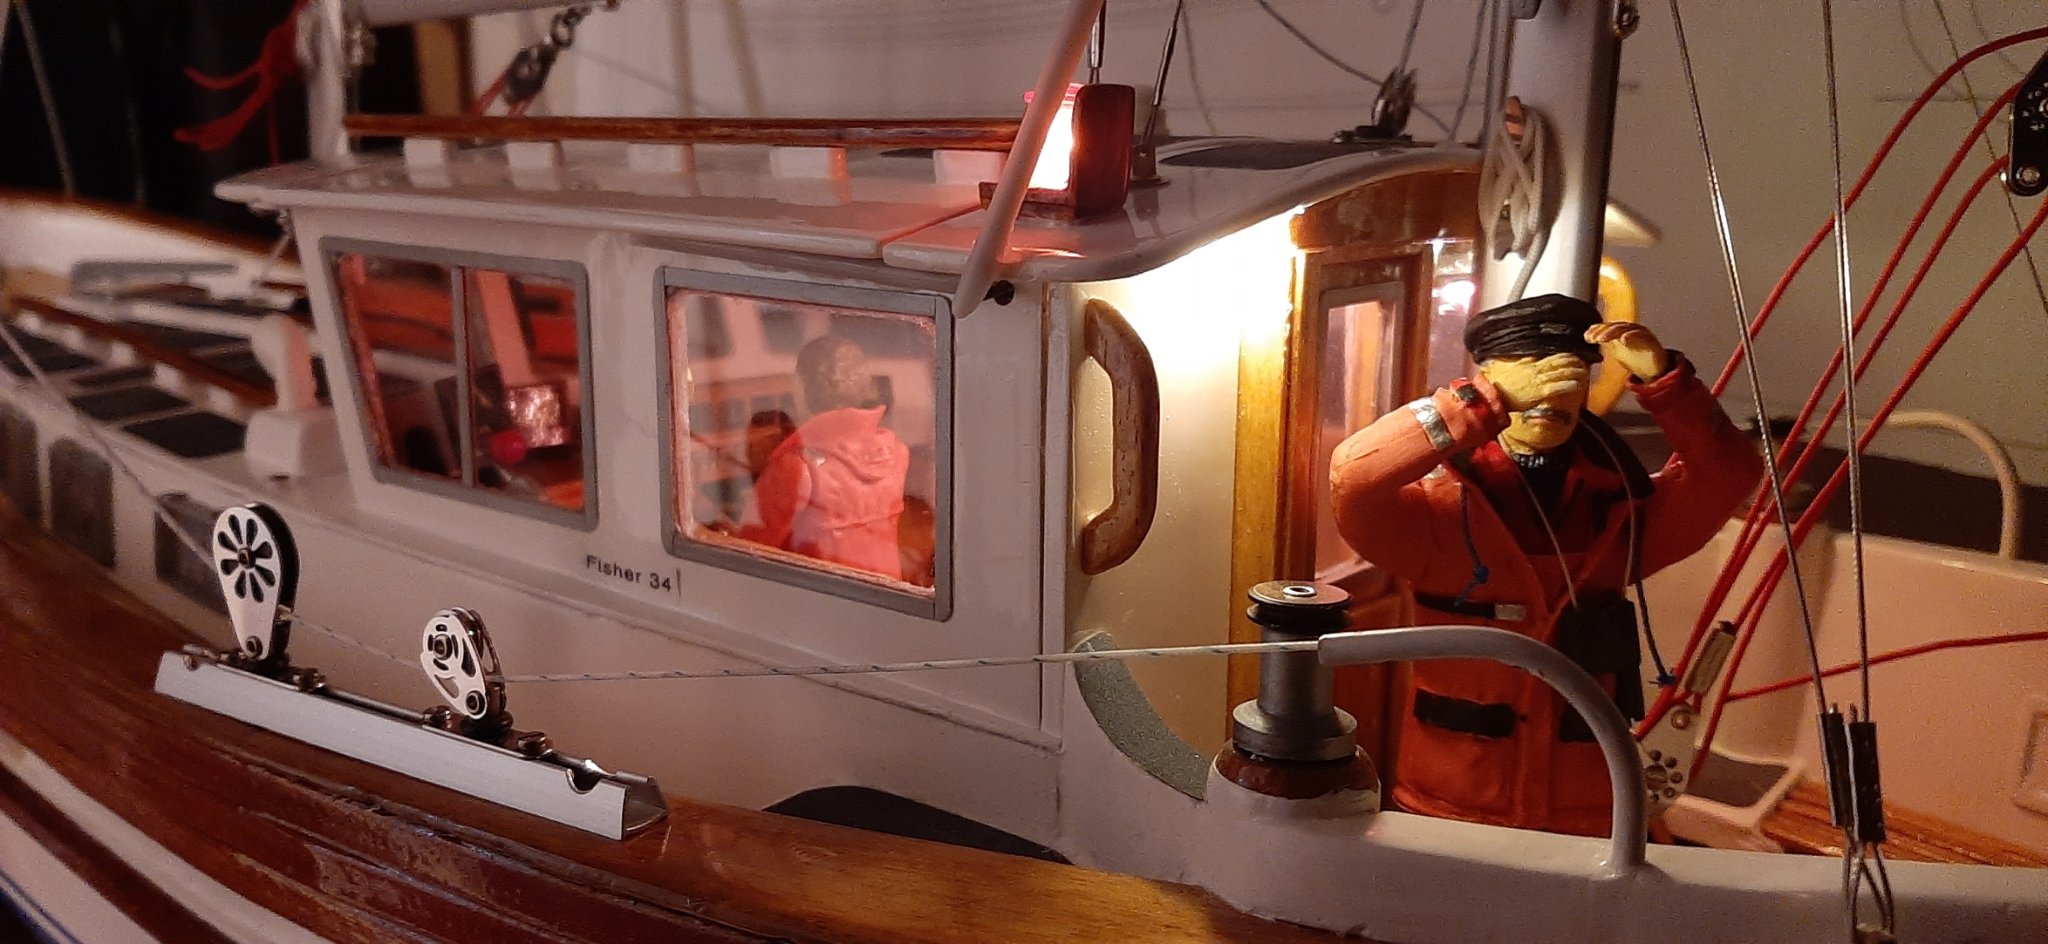
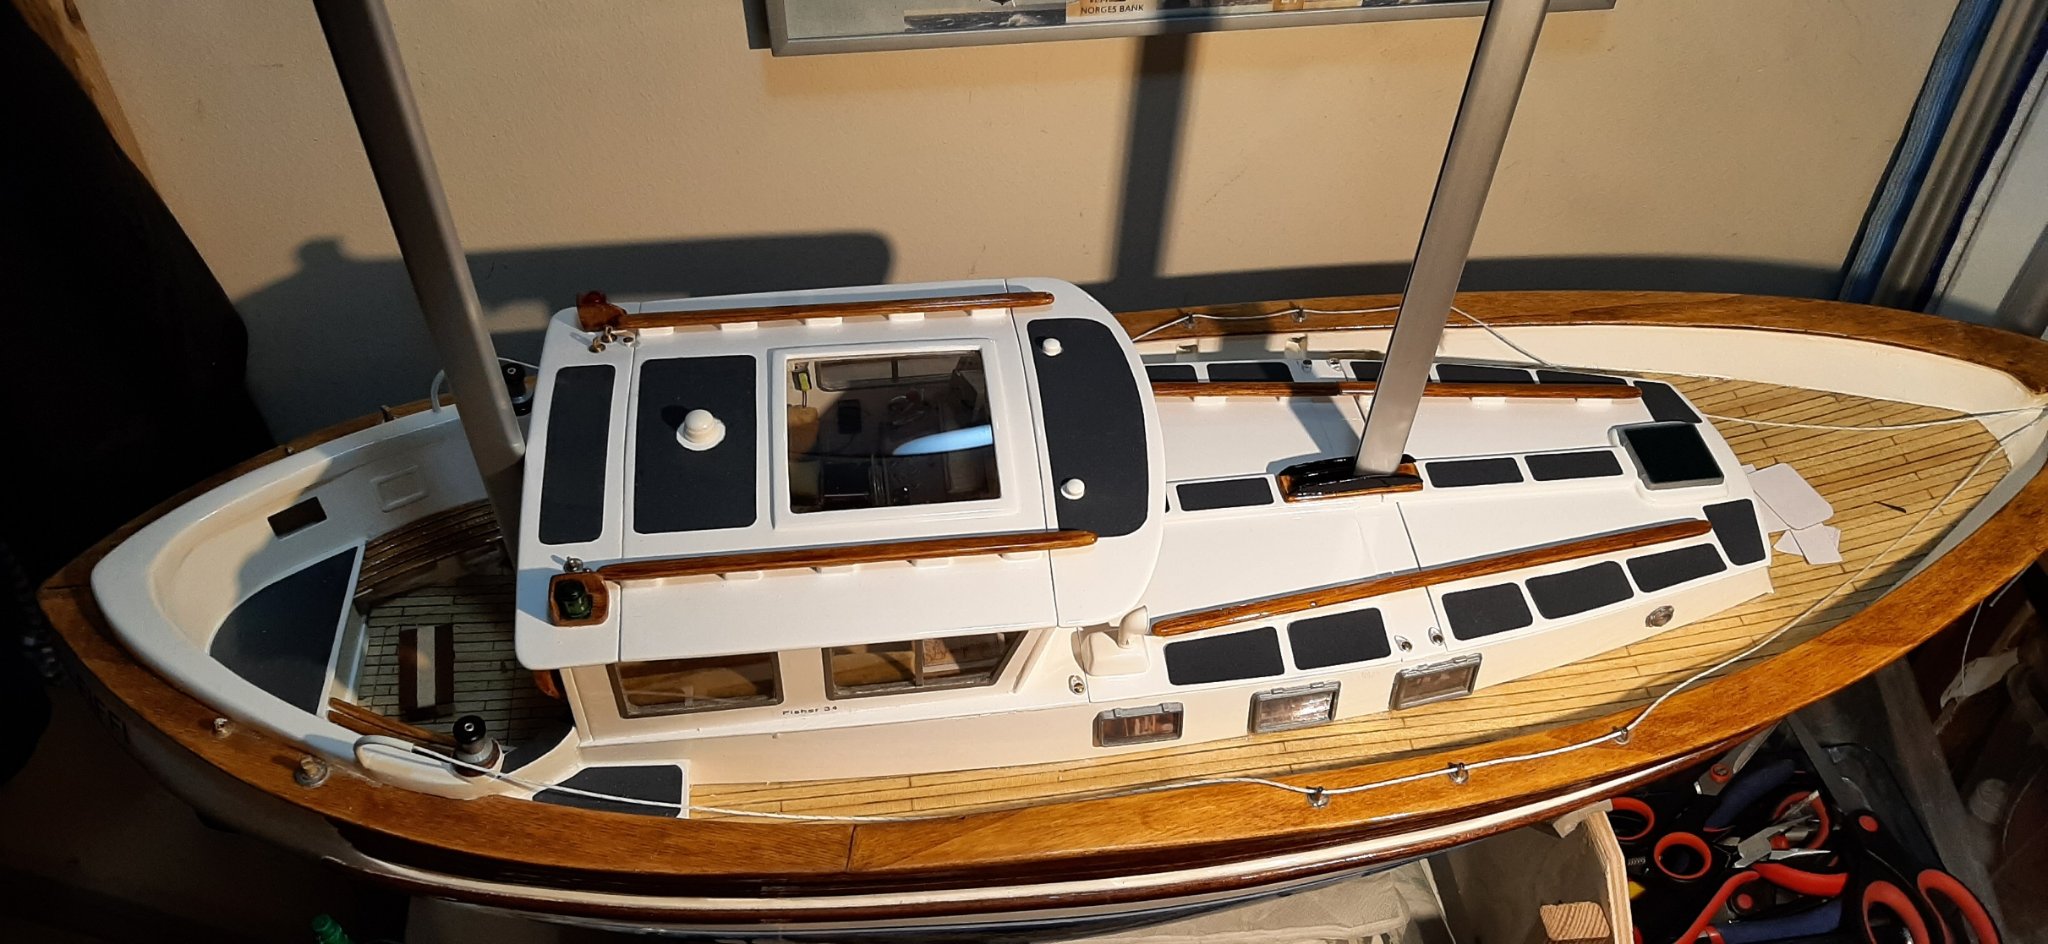
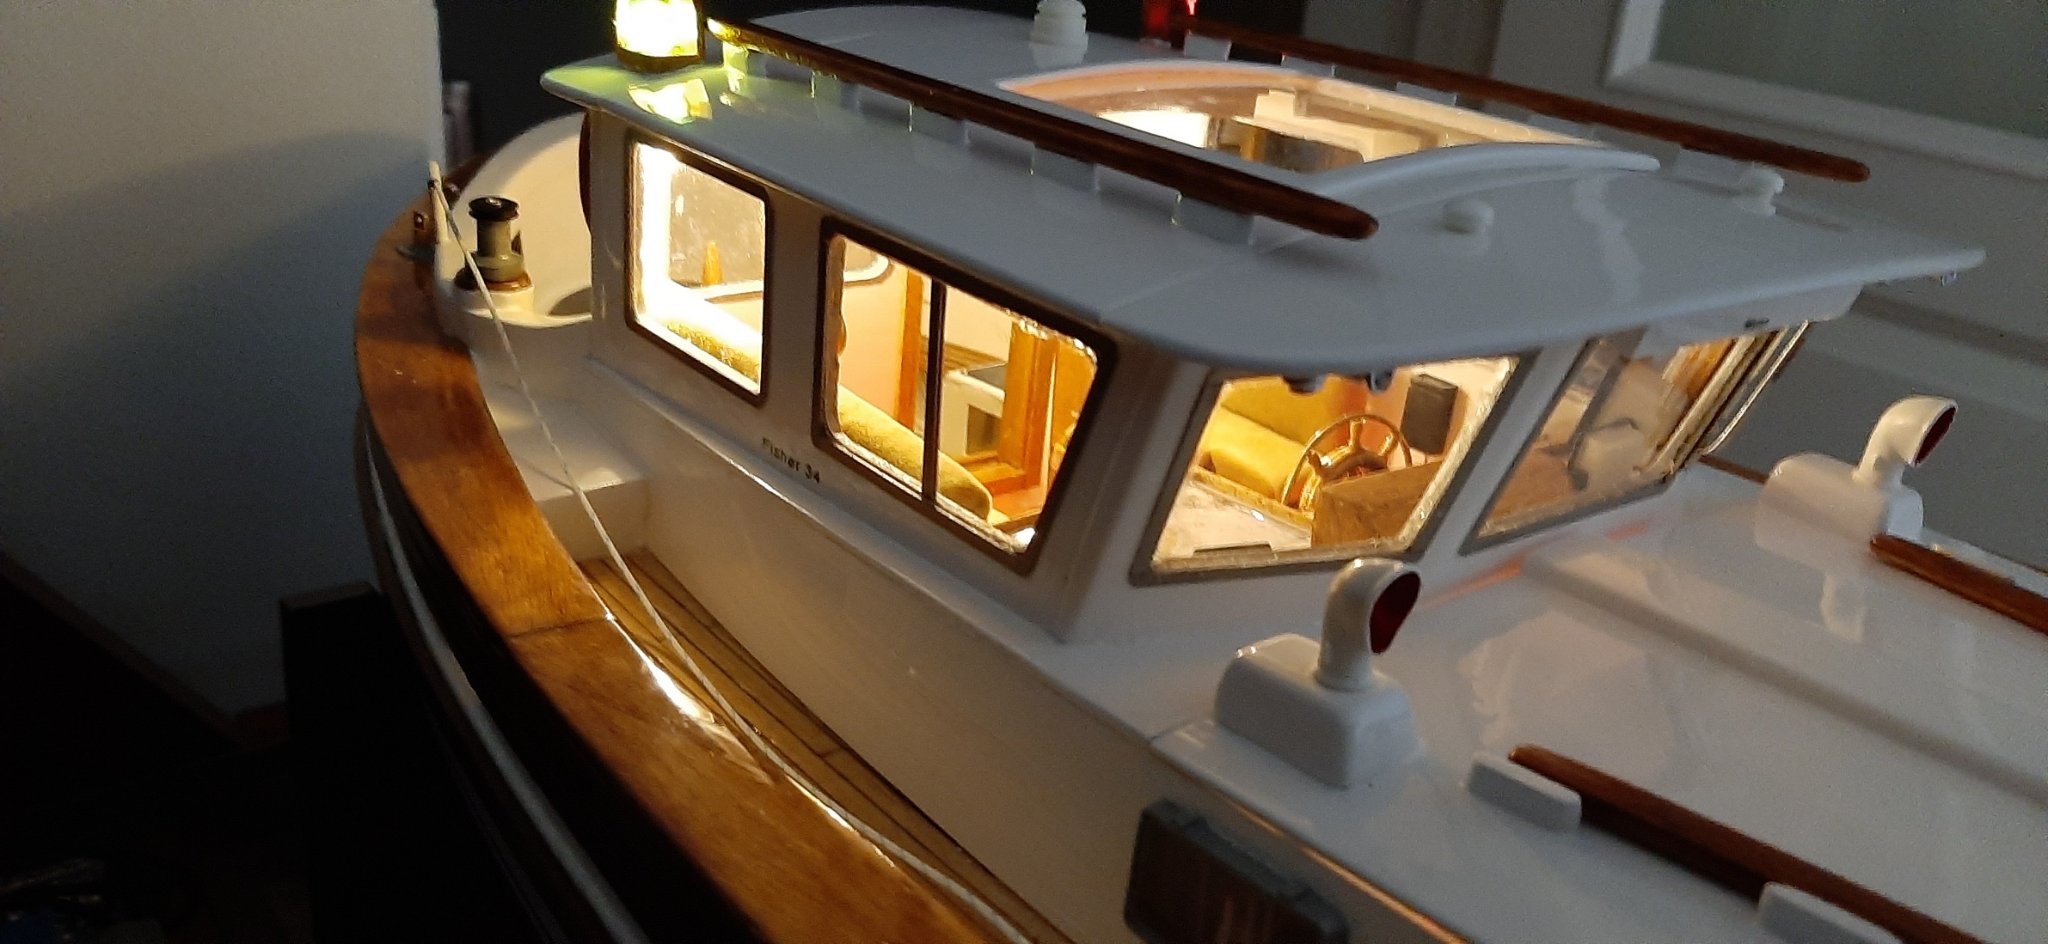
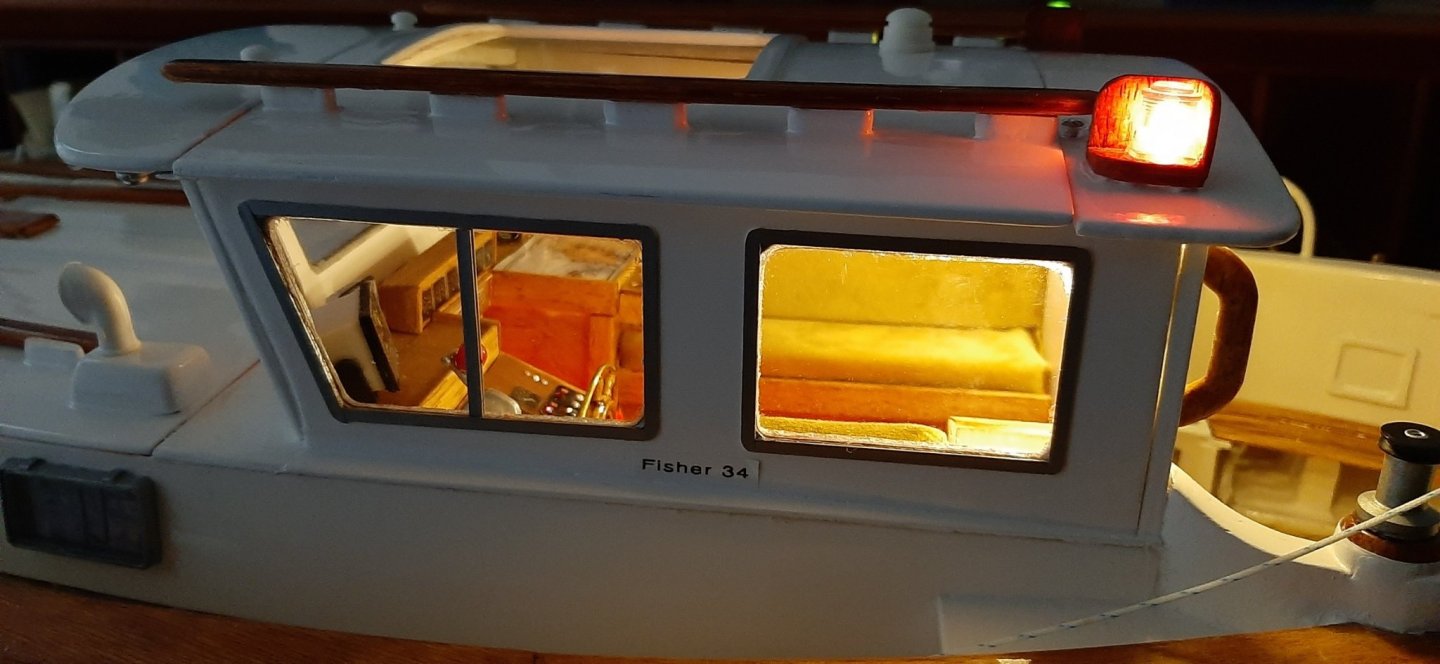
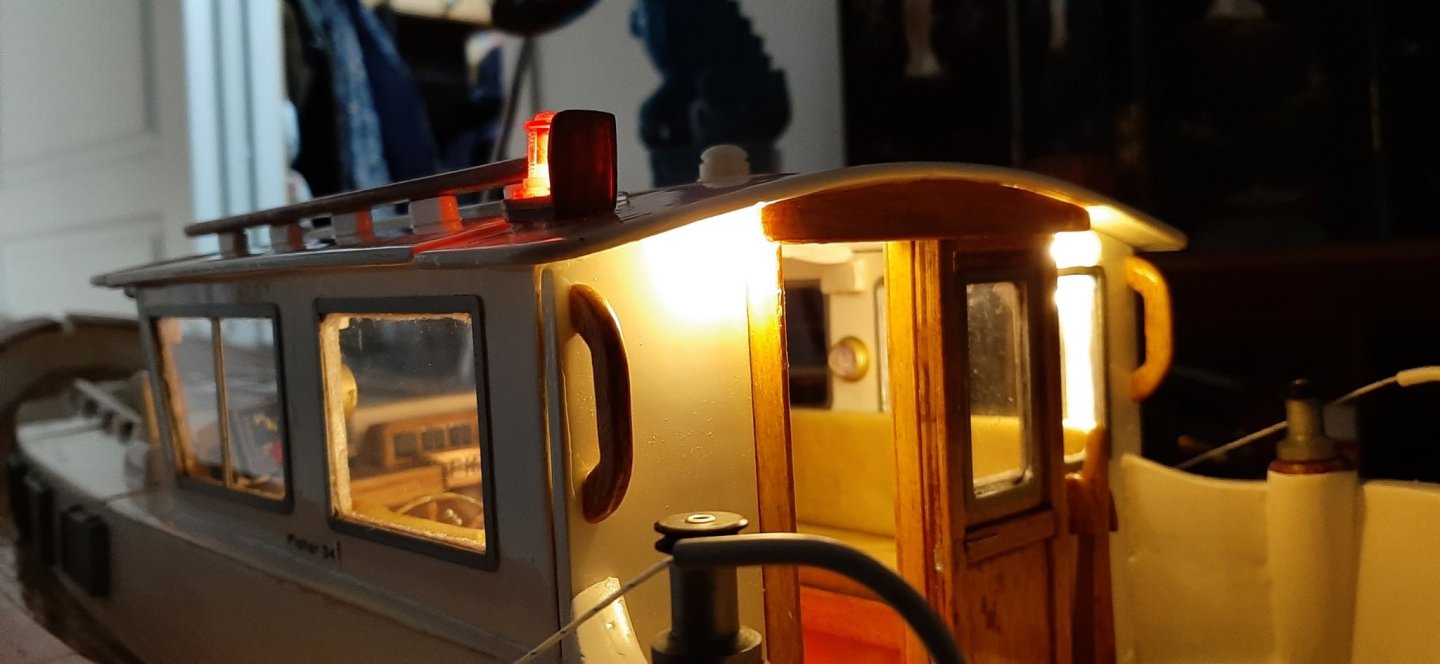
Just for my amusement I added navigation and cabin lights during the weekend. Working lights were not part of the original plan and because of this, I could not find a decent way to route the wires for a white stern light. Of course I could probably have found a way, but as this yacht will certainly only be used in daylight there was not much point in overdoing it! The upper lights -inside the wheelhouse- need to be subdued by painting the bulbs red although some of them (at deck level) have been routed through red plastic milk-skake straws! There is also some light 'leaking' through the epoxy joins so that will also need attention.

-
.thumb.jpeg.ee4d205046163acd786c8b7e92026d43.jpeg)
-
Thanks Andreas, I was impressed too when I switched them on!
I have now (last night) painted bright red acrylic paint on the white bulbs in the wheelhouse to reduce the brightness and make a sort of 'night-light' effect.
I think I will plan for working navigation lights on the Colin Archer. It will be easier to fit if I plan for it early in the build. I will at least put in wiring for a stern light this time! Also under deck to the shrouds for P&S lights. Maybe I will be allowed to have the boat on show in the sitting room with lights 'on' during the winter evenings! I seem to remember you wrote about installing lights in your Colin?? Any tips for choice of lighting Andreas / Carsten ?
On the Fisher I did not originally plan for having working lights. so I have used lights for Christmas decoration! Small 'grain of wheat' LED bulbs -about 10 small bulbs- on 1 meter of wire!! I just just threaded them through to the nav-lights in the wheelhouse roof and then down to the floor level. Not very professional 🥴 but very cheap! Works on 3 AA batteries in a battery box. I am not sure if these will affect the operation of the R/C equipment but they will not be switched 'on' when sailing the Fisher. I will buy dedicated model boat lights for the Colin Archer I think -but don¨t know what to buy yet. I think Krick Ro-Marine make good light sets.
George
-
-
-
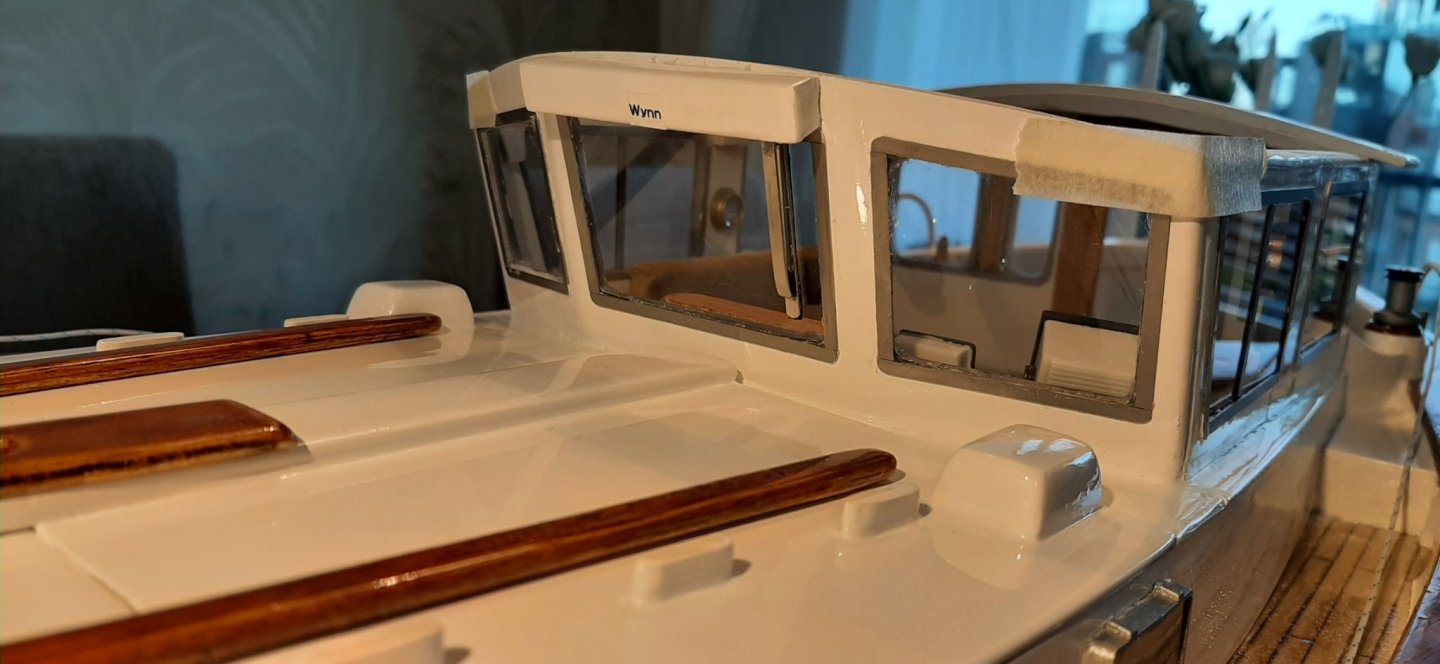
 Forward window frame now in place. Used silicon, thinking it would give best waterproof seal but wood glue would have been just as good. Photos show other parts just loose fitted in approx positions. Will try to install working nav-lights in due course.
George