
HOLIDAY DONATION DRIVE - SUPPORT MSW - DO YOUR PART TO KEEP THIS GREAT FORUM GOING! (Only 20 donations so far - C'mon guys!)
×

Jim Cricket
-
Posts
53 -
Joined
-
Last visited
Content Type
Profiles
Forums
Gallery
Events
Everything posted by Jim Cricket
-
Can't be THAT different from knitting... (New Member)
Jim Cricket replied to Grisha's topic in New member Introductions
Good luck with the Swampscott! That's a boat type with a rich and varied history throughout New England. If you have an interest in the many variations, John Gardner is a great source of information. His several books, including The Dory Book, are great places to start. Cricket -
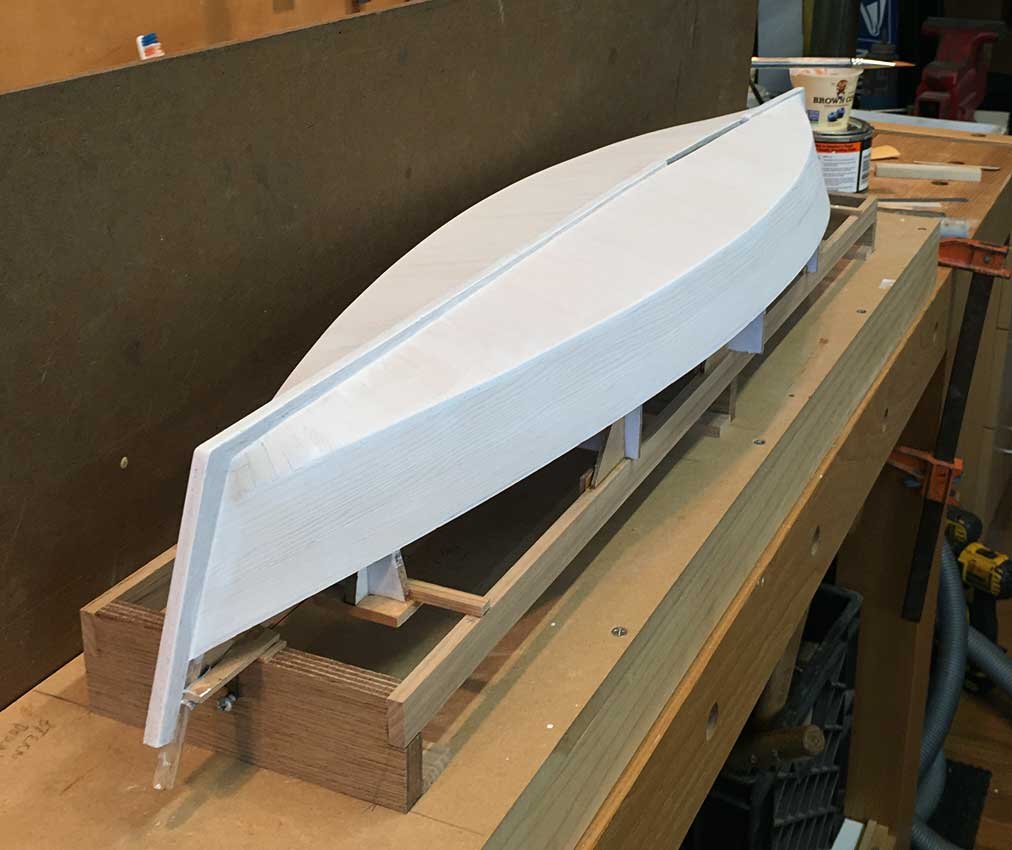
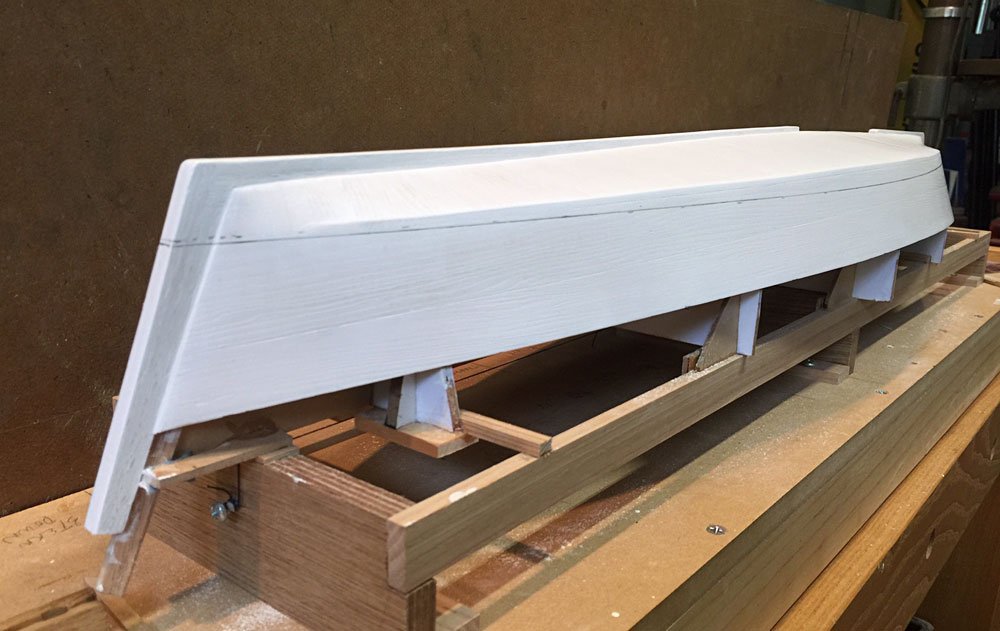
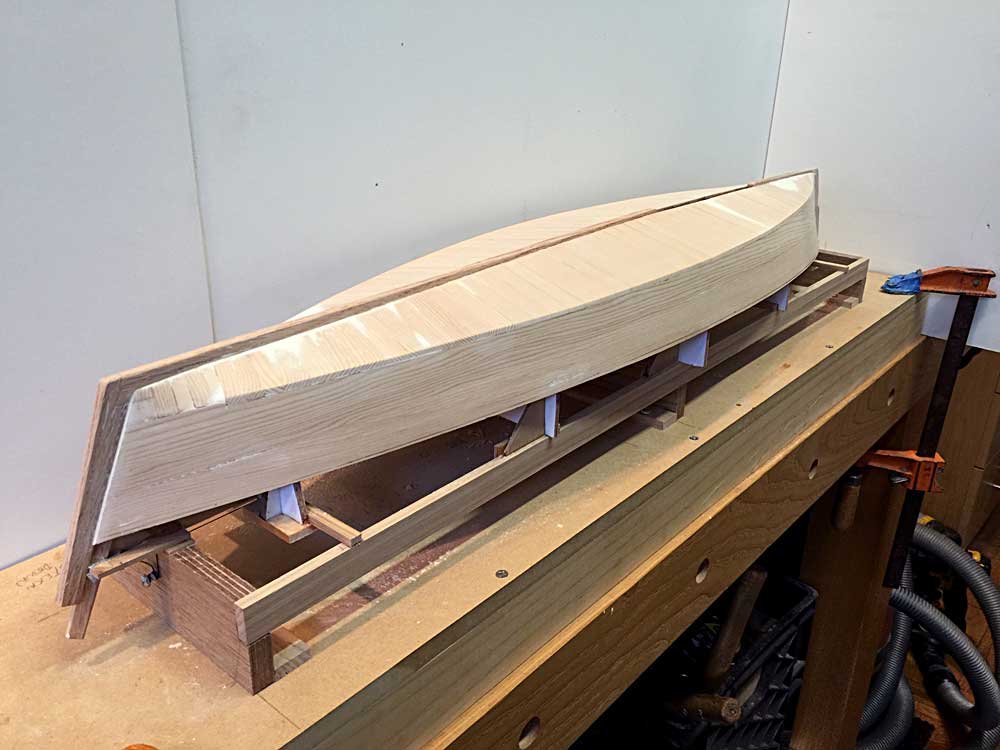
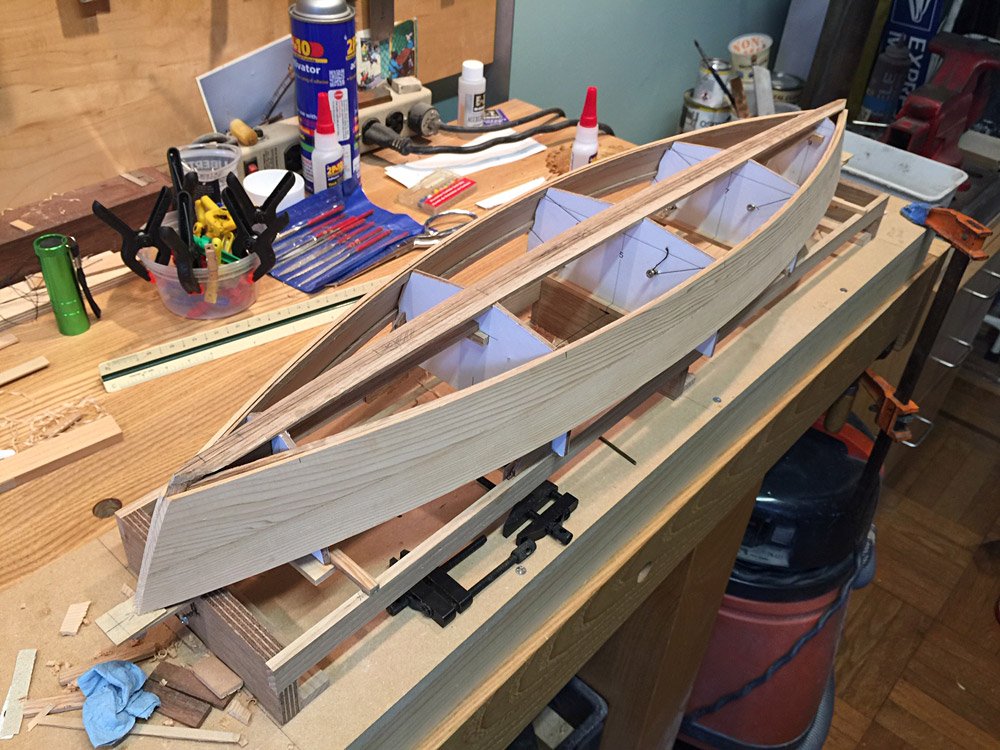
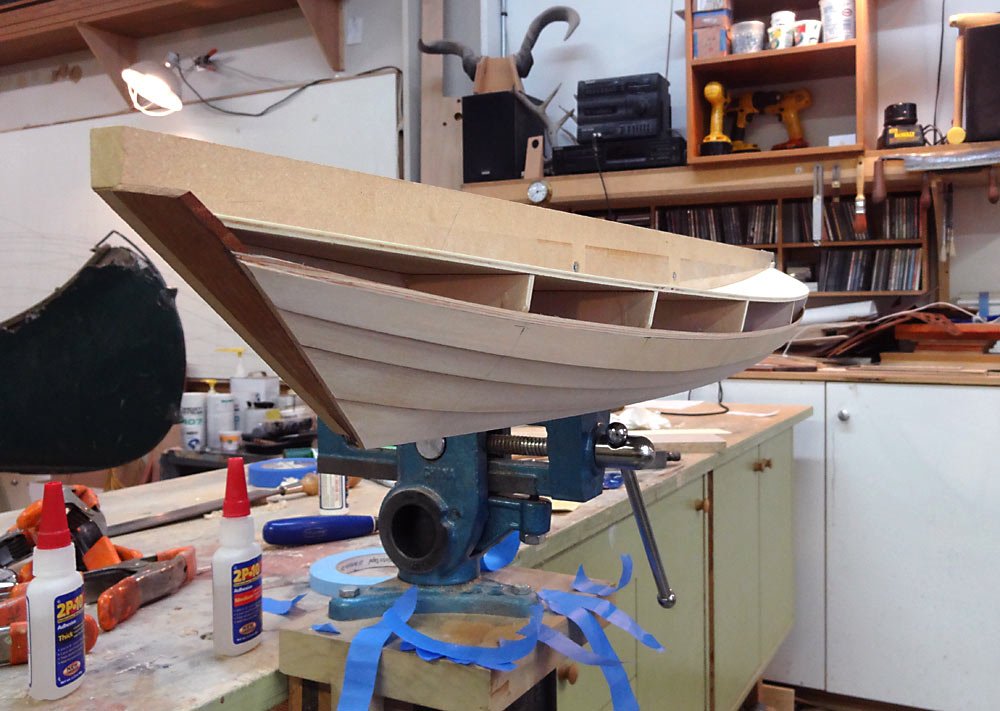
Flipping the model is a bit less of a project than rolling a full size boat upright. Before pulling it off of the jig, I fitted a pair of cradles to set the boat into, which will get screwed down to the platform. The boat popped right off, though it must have been stuck in one place, as there was a loud pop as it came free. But no problems anywhere, and the model is rigid, and holds it’s shape. I left the jig intact, so that once the inside is sanded, I can put it back in to mark station locations from which to measure my interior frames and bulkheads, etc. There is the inevitable squeeze out between bottom planks, but hopefully it won’t be too hard to clean up. Except for the area either side of the centerboard trunk, there is either a deck, or a cockpit sole, so the interior bottom is not real visible. I’ll clean it up, but not get too crazy with it. Now the real work begins.

-
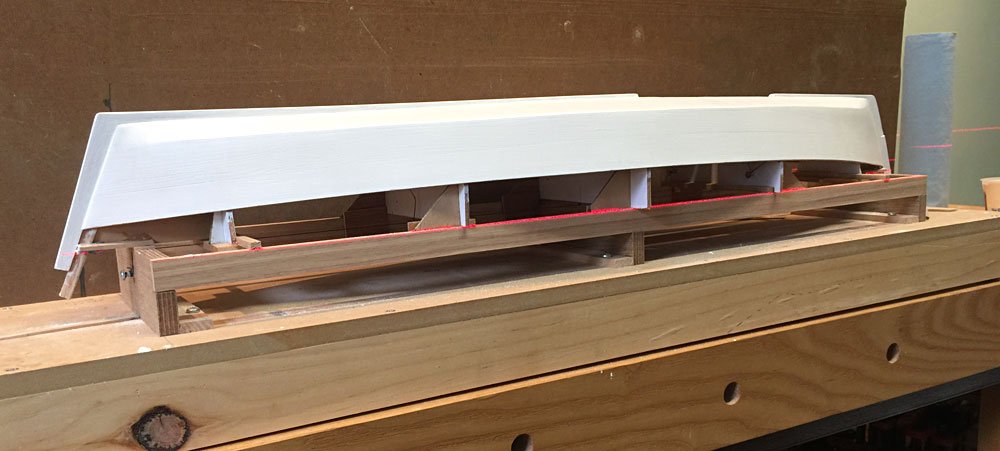
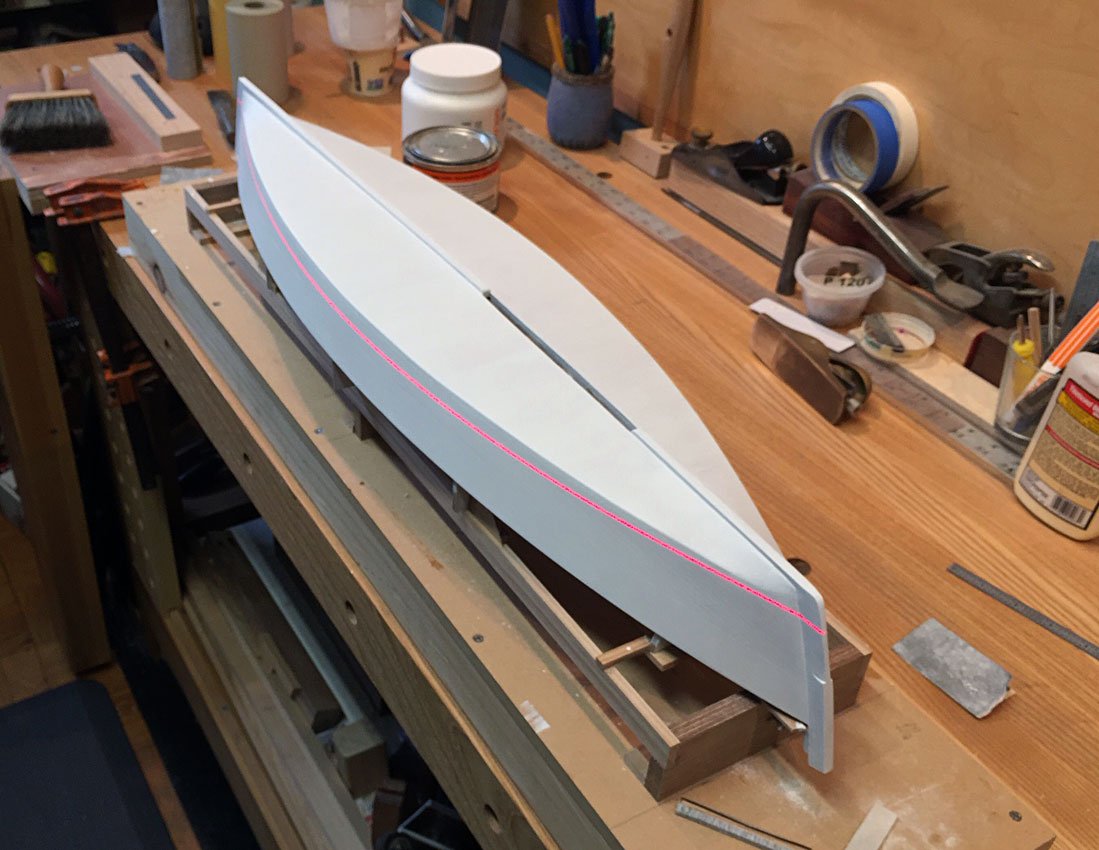
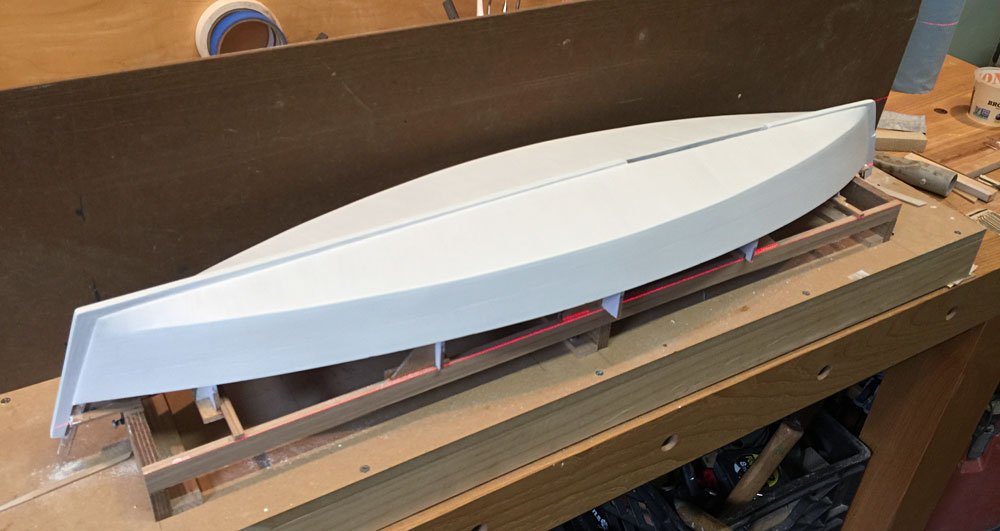
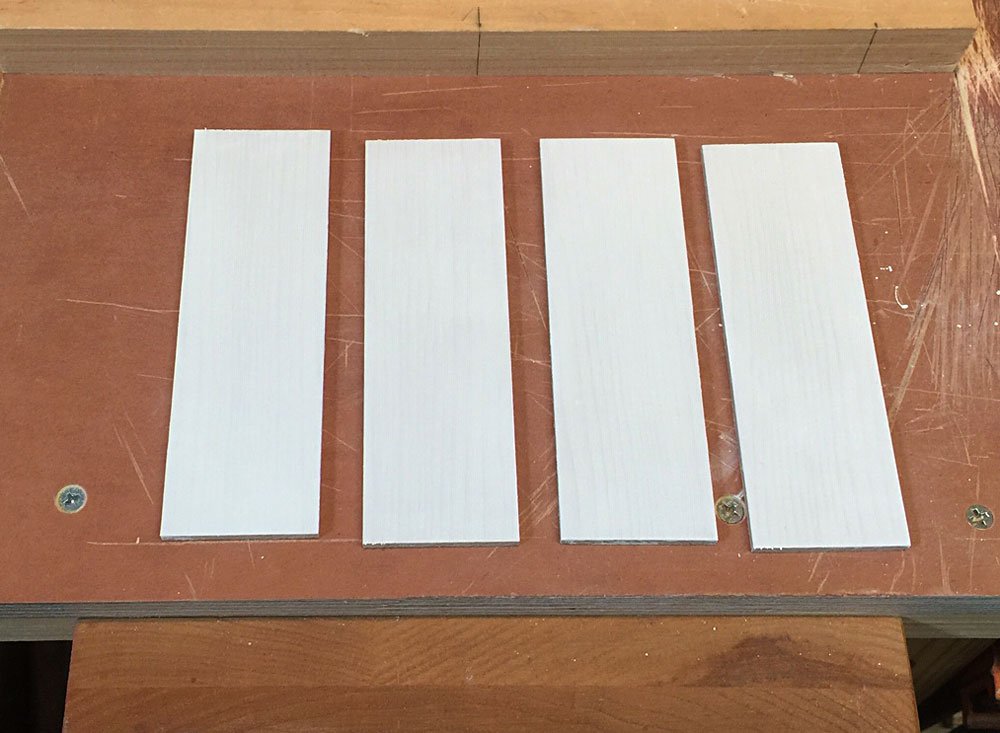
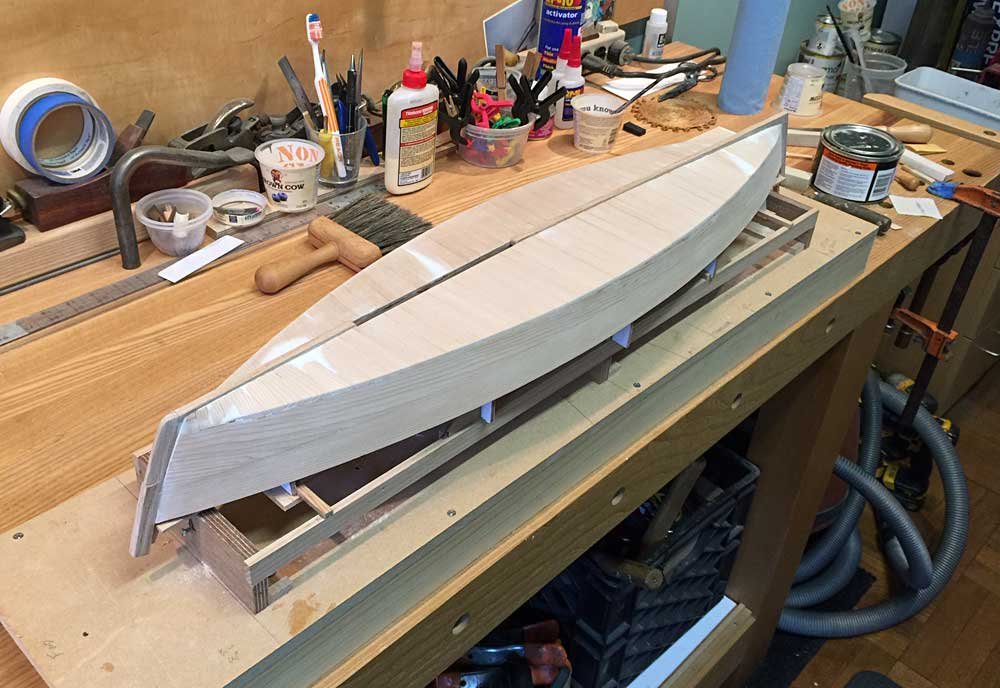
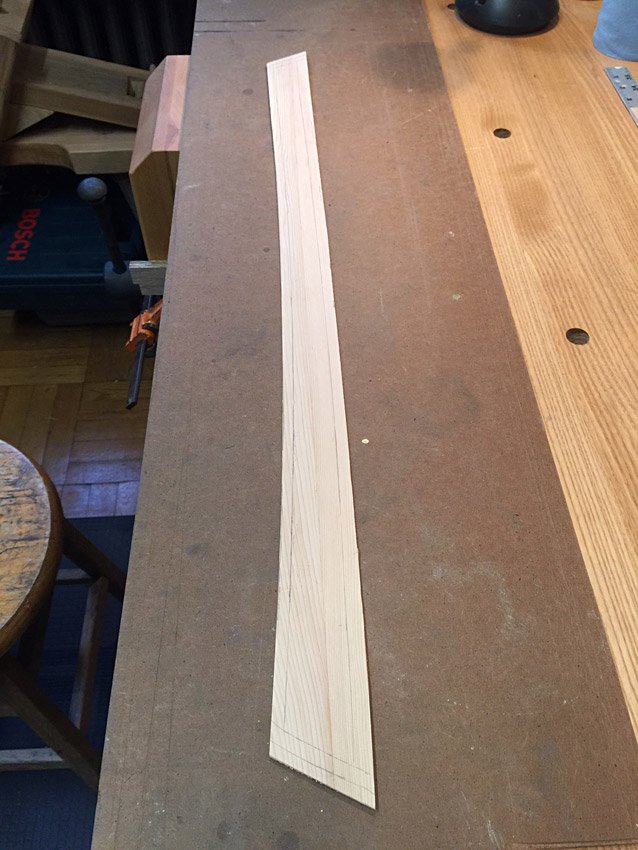
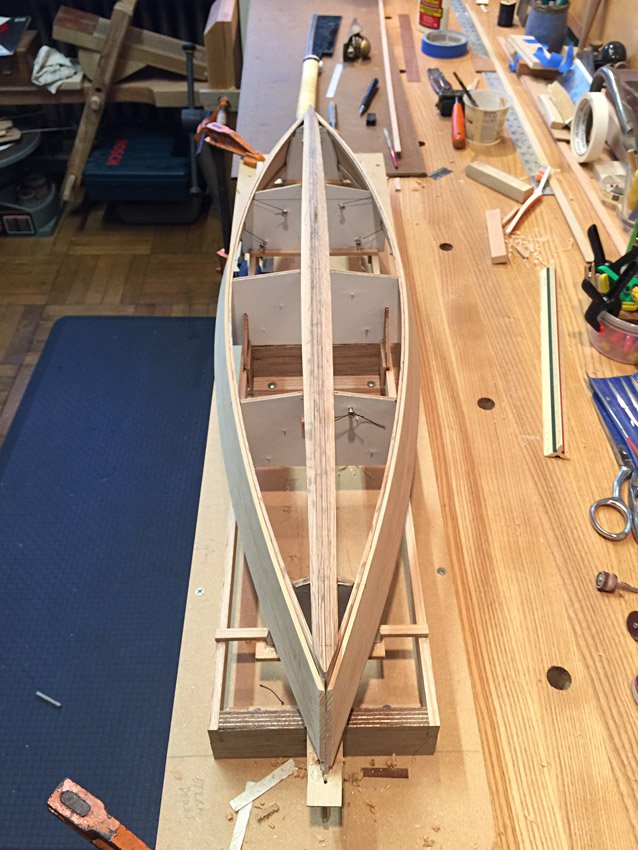
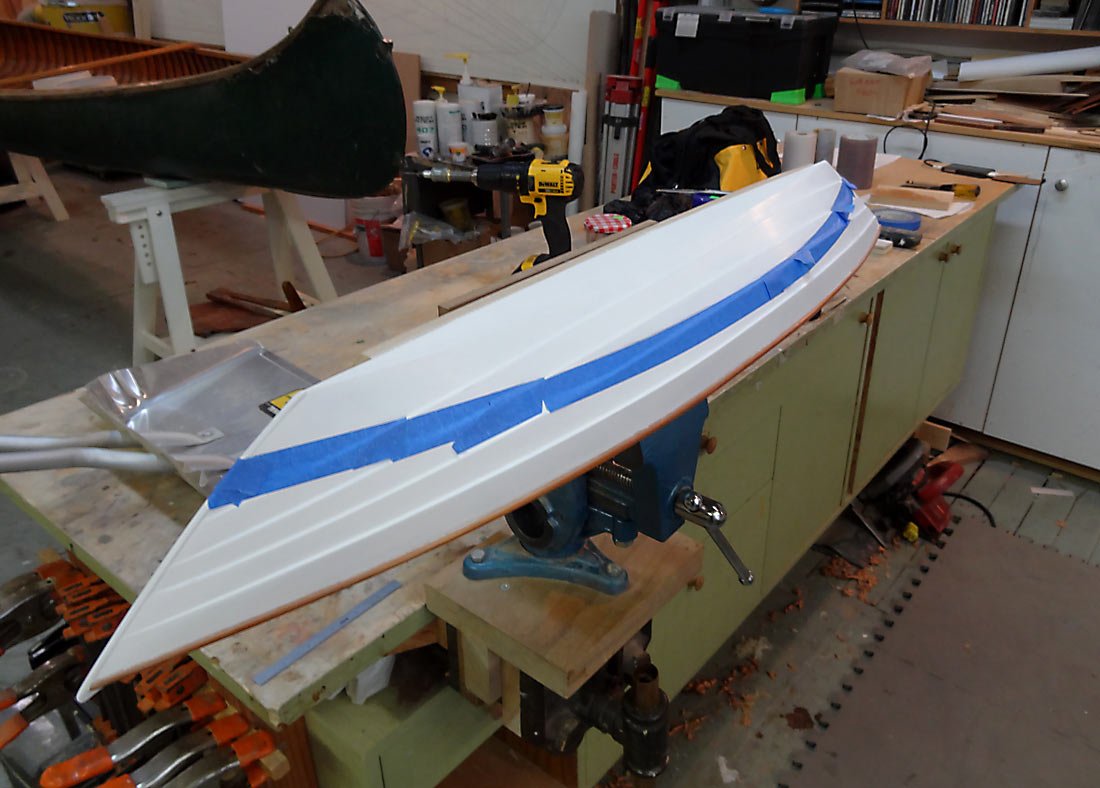
We are primed, and the waterline marked. First pic below shows 1 coat, before sanding. I added more filler in places after this coat. I set up my laser to shoot the waterline, blocking it up until I was even with the building strongback on the bench. Then I shimmed the strongback up level with the laser line. At that point, I just measured up from the strongback to a point on the hull that corresponded to the designed waterline, and then added blocks and paper shims under the laser to get us up to the marked DWL, and put a row of pencil ticks along the hull, repeated on the other side. I used a batten to mark the line, sheering the line slightly at the ends, about a scale 3/4”. Just enough to give a little lift, so it doesn’t appear to droop. I won’t paint the bottom yet. I need to get some paints together and make some test panels. To that end, I prepped a few boards. I think I’ll be using Golden acrylics, because I have a good collection of colors, and I think we have some matte medium and retarder, etc. around the house. I’d like to try the Vallejo paint, but don’t want to spend the $ right now. Golden is pretty good paint. I have some tube, and some liquid acrylics. At any rate, first it’s time to flip and work on the interior!

-
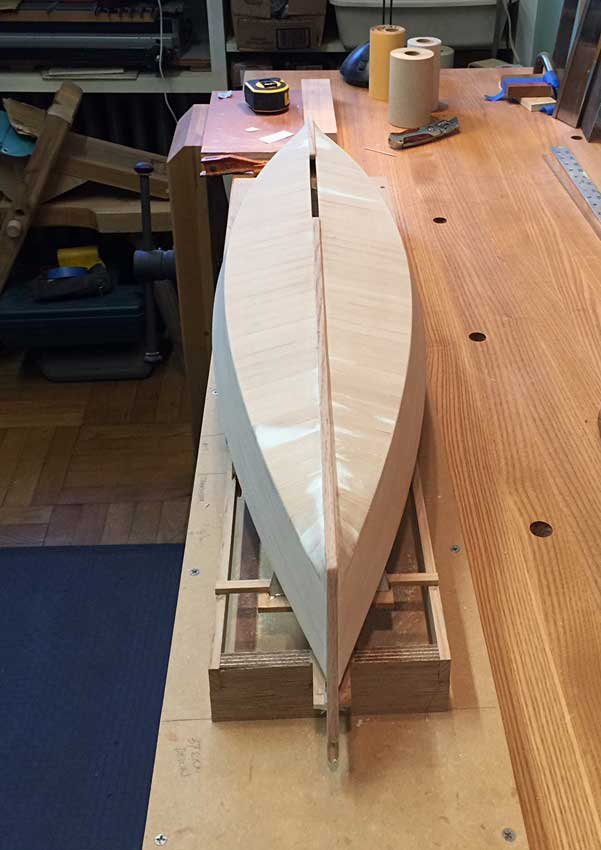
We are all planked up. That was a lot of work, for a relatively simple boat. I believe that I could build a full size boat in about the same amount of time. Same number of parts, anyway. There are 120 planks in the bottom of this 20’ crab skiff! The nice flat run of planking was pretty easy, but as I got near the ends there was a bit of twist, so I had to rip some thicker planking stock, and carve a little relief in the undersides so the planks would sit flat on the chines and keelson. I planked all 4 corners with staving, then planked the bottom to within one plank, and cut a tapered “shutter” that was a tight fit. That was satisfying, driving the last one of those up tight. There was quite a bit of shaping to do on the outside in the ends, to fair in the thicker staving, and to maintain a clean, fair rabbet and chine. For the chine, I connected the line at the stem to the fair run of planking with a batten, and penciled in a line, then with a sharp chisel, pared the planks down to the line. I had to resort to some filler, but I thought it more important to have a fair hull. I think that I will scribe a line at the plank seams so they will show up under paint. For the bottom planking, I’ll let a little darker paint fill the scribed lines to show them up. Most deadrise boats that I’ve looked at up close show pretty pronounced plank seams, where the bottom paint is worn but the seams have stayed dark red copper. For sure I don’t want the boat to look like plywood, after I’ve gone to the trouble of laying traditional plank! At this point, I need to finish sanding all over, and I’ll go ahead and use gesso primer on the hull, before I flip her over. Plus, I’ll get my waterline scribed while I have the boat all leveled on the jig. Thanks for tuning in.

-
Thanks for the info. I'll check out the Aleene's. My sharpie is HERE.
- 69 replies
-
- 1
-

-
- canoe
- restoration
- (and 1 more)
-
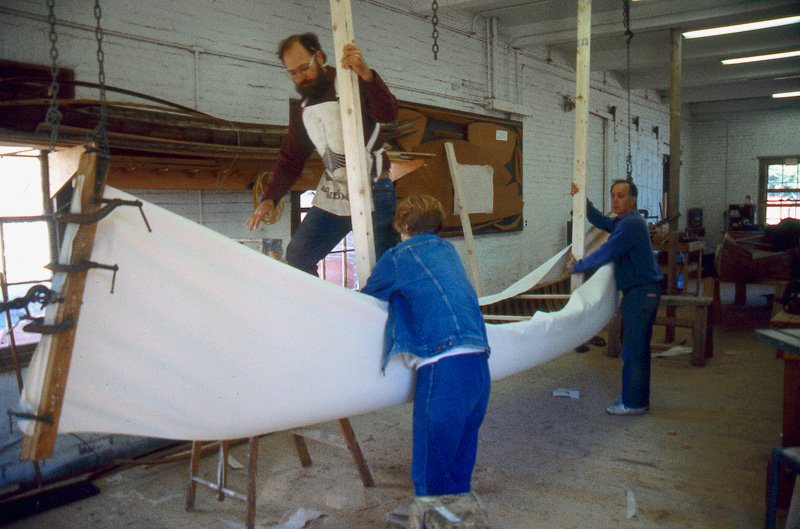
That looks very nice, VG. What kind of fabric is that? That might work nicely for canvasing traditional painted decks, like on the sharpie I'm building. I've been thinking ahead to what I might do on the deck. Is your spray adhesive 3M Super 76? Roger mentioned the upside down canvas method. Though I know of Joe Seliga, I've never seen that. In case anyone is wondering, the "right side up" method is pictured below. From a Rollin Thurlow workshop. Cheers, Cricket
- 69 replies
-
- 5
-
-
- canoe
- restoration
- (and 1 more)
-
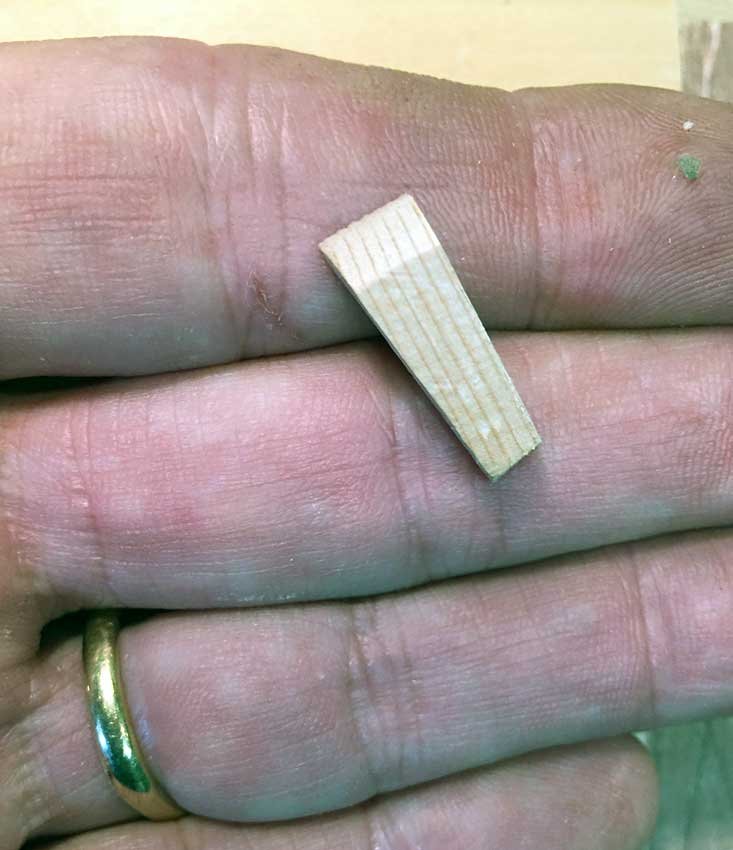
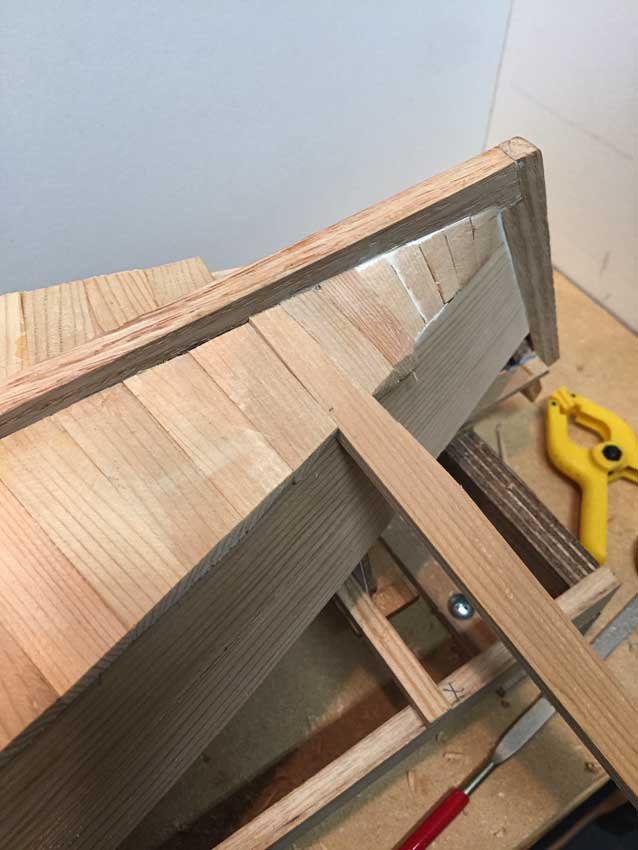
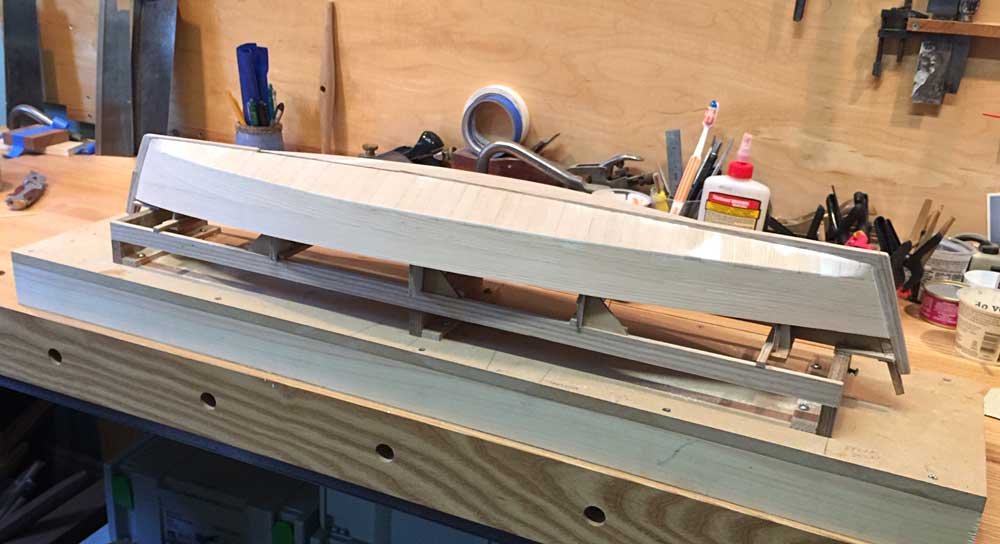
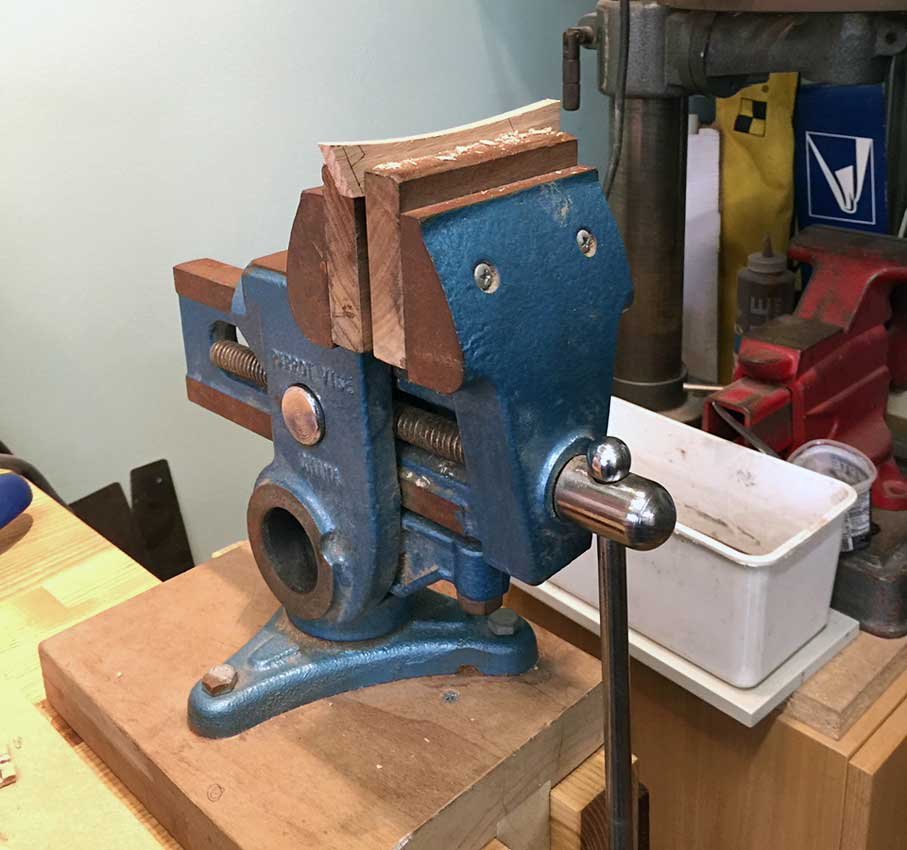
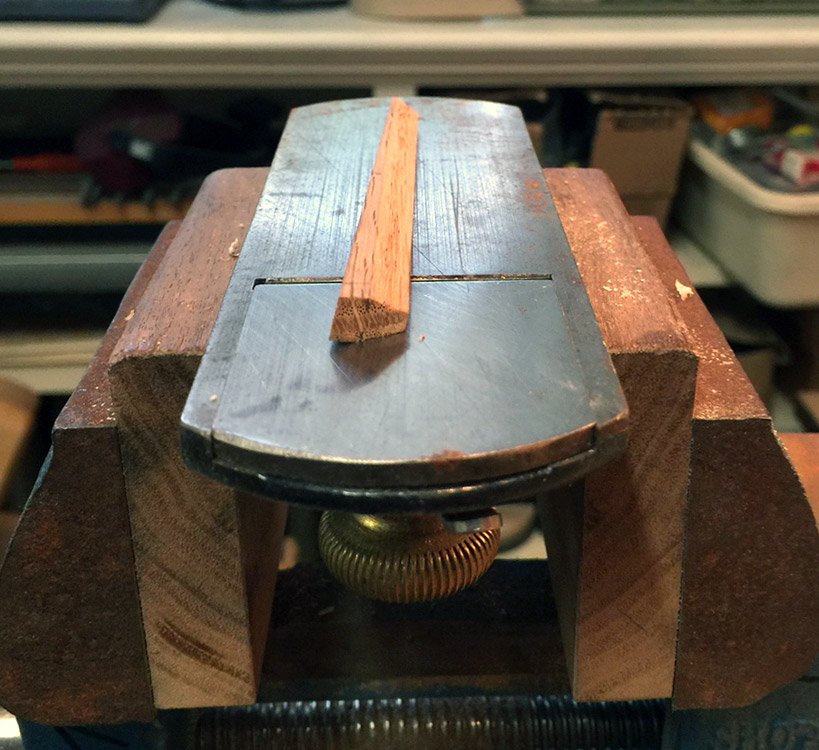
Skeg, foregripe, and stems are fitted and glued on. That was a bit of a chore, when I’m anxious to get planked up, but its done. I use this Versa Vise knockoff above quite a bit. It's an import, but works well. The bowstem is clamped up here to tune up the fit. While I was staring at the ends of the boat, and thinking about the staving to come, I started cutting and fitting staves to see how it might go. Boy, this is difficult. Way harder than any lapstrake planking I’ve done. I’m almost reluctant to show the pictures, because the difficulty is so apparent. I like the process of boat building to at least appear like it was no sweat, but not so here. I know I can make things look good in the end, but seeing how the sausage is made can be brutal (and photography at this scale is pretty unflattering). Anyway, I’m having to resort to a little filler. I think I’ll get better at it. I’ve got 3 more quadrants to go. The staving in a deadrise boat has to be worked thick, and hewn out on the inside to address the twist, then dubbed off on the outside as well. The pieces are so tiny that they are hard to grip, plus the bevels on each end make them get too short real quick. I think I’ll try chunks rather than staving next time. But, I’m clear to finish planking the bottom now, working from amidship towards each end. There’s a lot of easy, repetitive planking to accomplish. I can switch back and forth from that, to hair pulling at the ends of the boat. Thanks for looking.

-
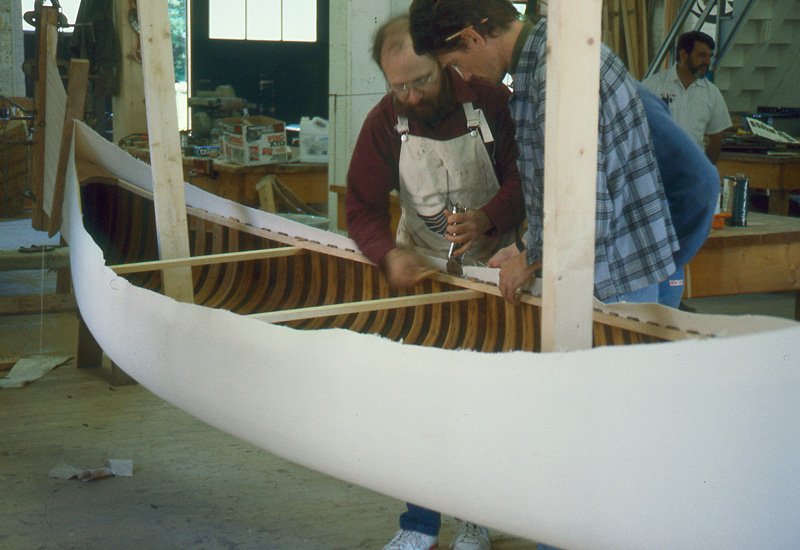
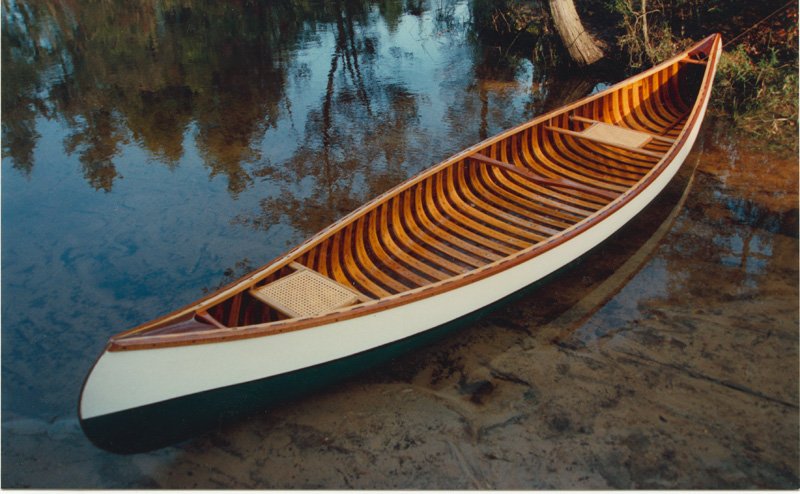
Roger, that is an Old Town lightweight "Guide" model. 15' with 1/8" plank and 3/16" ribs, if I remember correctly, about 50lbs. I restored that boat back in the early 90's and sold it several years ago. Below is a pic before restoration. I have a 1938 HW now in need of restoration. Voyageur, I got the two color idea from Rollin Thurlow, who I took a restoration class from. On the back cover of his and Jerry's book, mentioned above, is one with a two color finish. The outer gunwale covers just the planking (and canvas, of course). Rib ends are left exposed

- 69 replies
-
- 1
-
-
- canoe
- restoration
- (and 1 more)
-
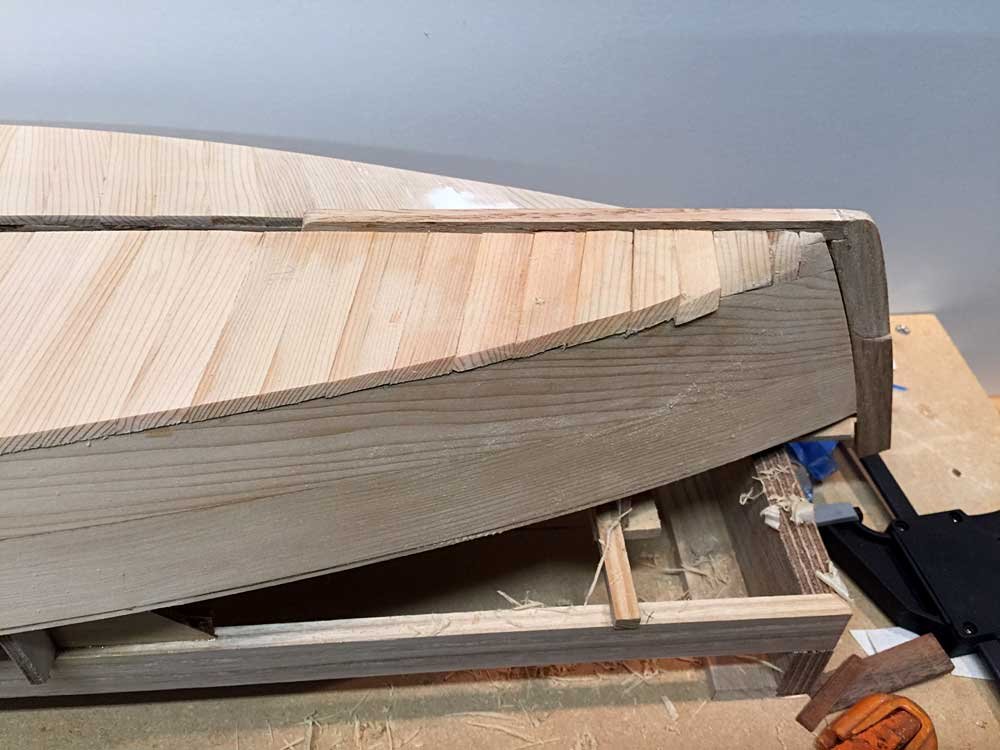
Quick post today. I got the centerboard slot cut. Basically burned my way through with a Dremel metal cutoff wheel (I don’t have the little sawblade kit yet), and cleaned up with a sharp chisel. I then started bottom planking with the typical Chesapeake herringbone pattern. This allows the planks, at least away from the extreme ends, to lie nicely on the chine and keelson. The faying surface is nice and flat, and I’m making good contact with the planks. I started roughly amidship, and I’m working towards each end simultaneously. I put on a temporary keel (skeg and fore gripe) to butt the planking against, then realized that is probably a mistake, so I’ve stopped planking and I’m getting out the skeg, gripe, and outer stems now, which I’ll go ahead and fasten in permanently before I continue. I'll still have to fit a temporary piece in the centerboard slot to butt the planks against, but there's less risk of gluing that in by mistake, which is what I was worried about before. I’ve been busy as well with other distractions, but I’m free now for a few days to concentrate again on the model. I’ll continue the bottom planking later. Its getting more fun now, and as always, thanks for looking in.

-
Nice job on the seats. I'll echo what Roger said above, and include a pic of an Old Town of mine that shows the seats relative heights, and the little posts that the seat bolts pass through on the bow seat. Again, nice work!
- 69 replies
-
- 5
-
-
- canoe
- restoration
- (and 1 more)
-
Gary, thanks for looking in. Your reply made my day! I'm just starting in on your salmon wherry log, and I'm finding your approach similar to mine. a fan of John Gardner as well. Thanks again, Cricket
-
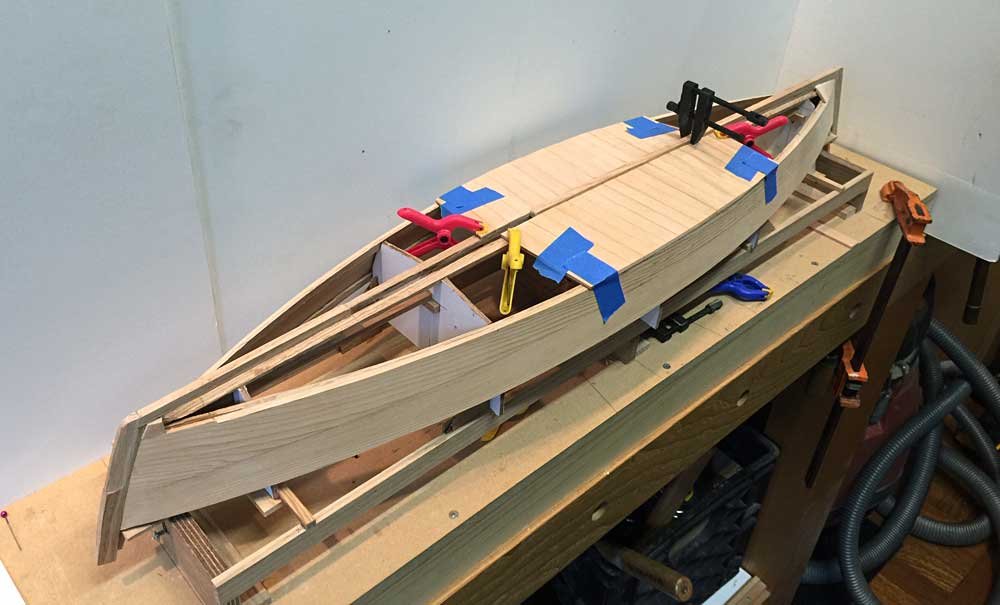
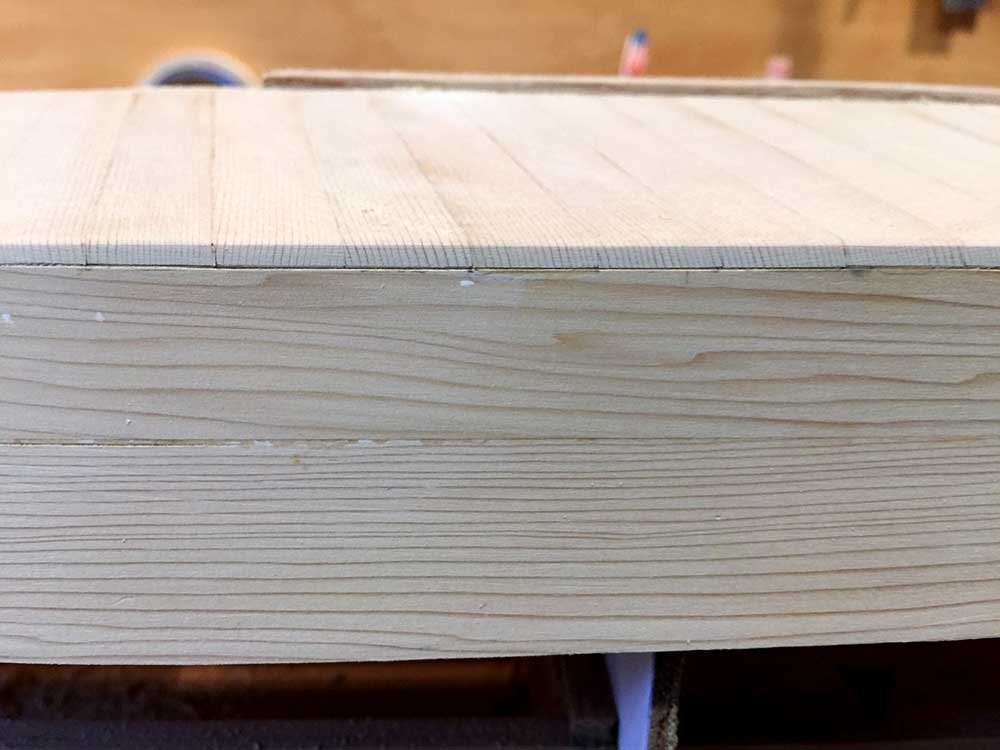
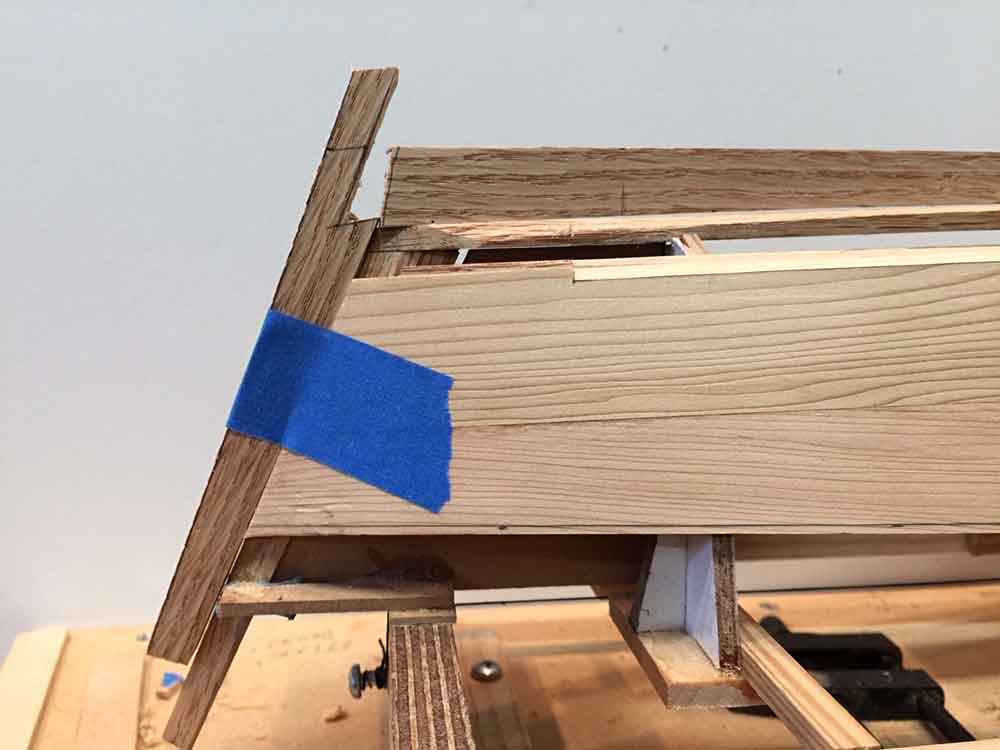
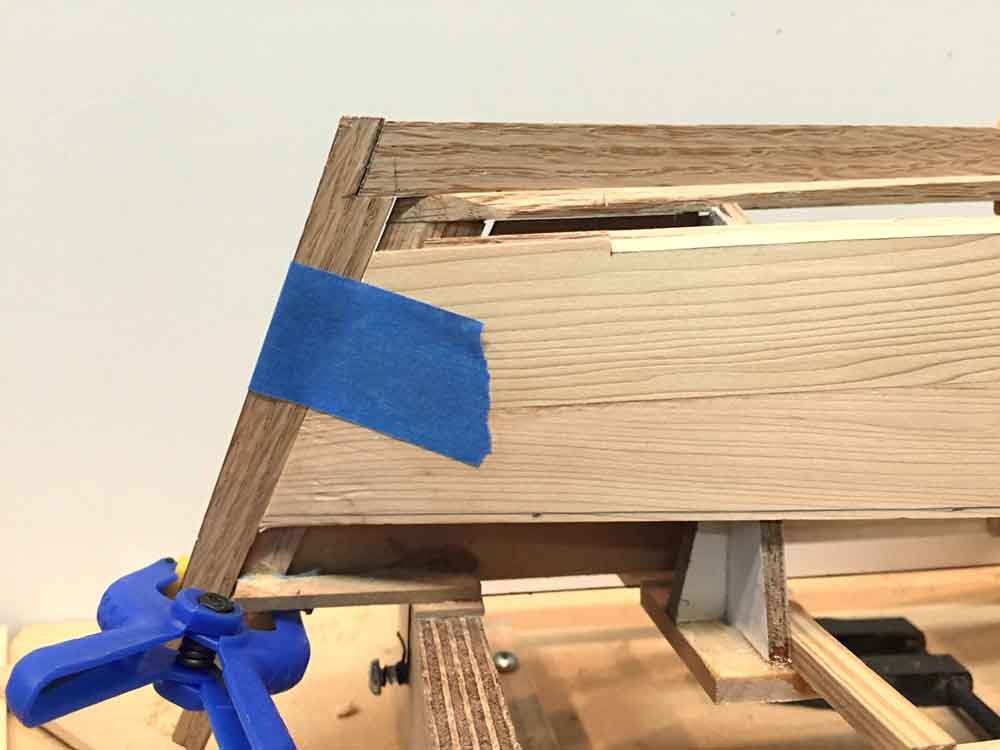
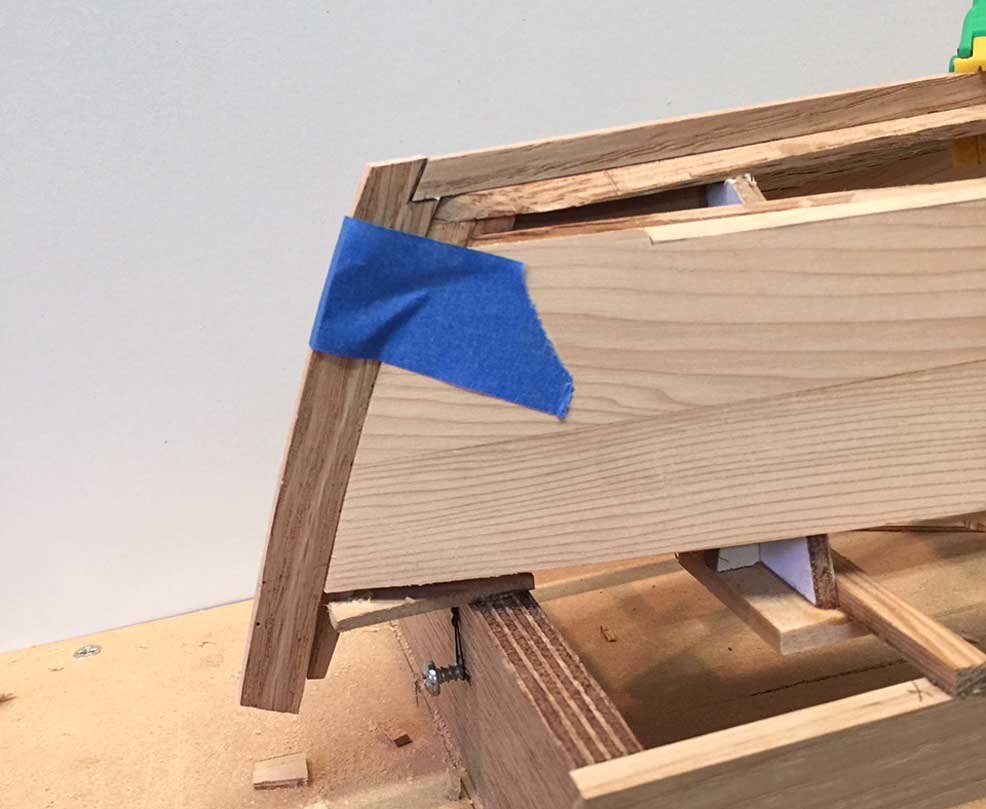
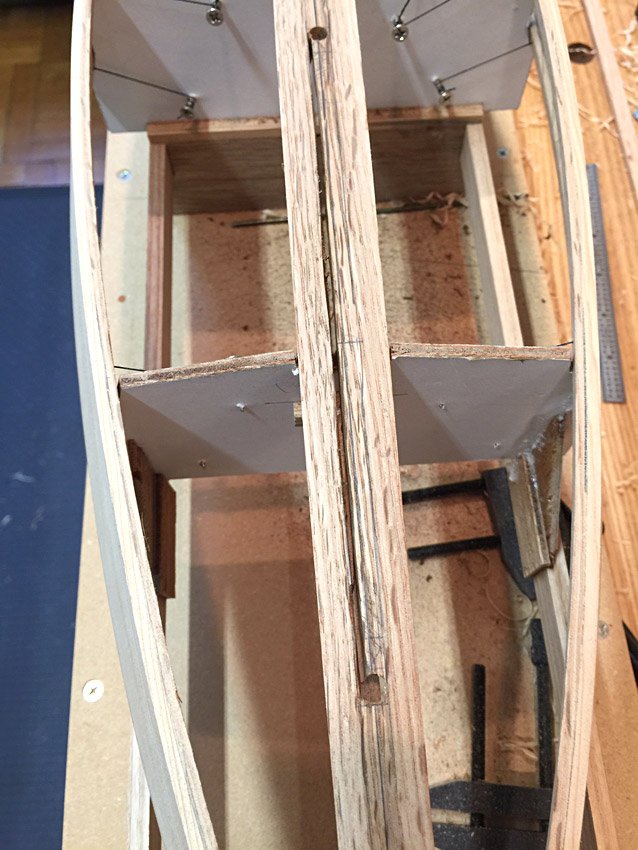
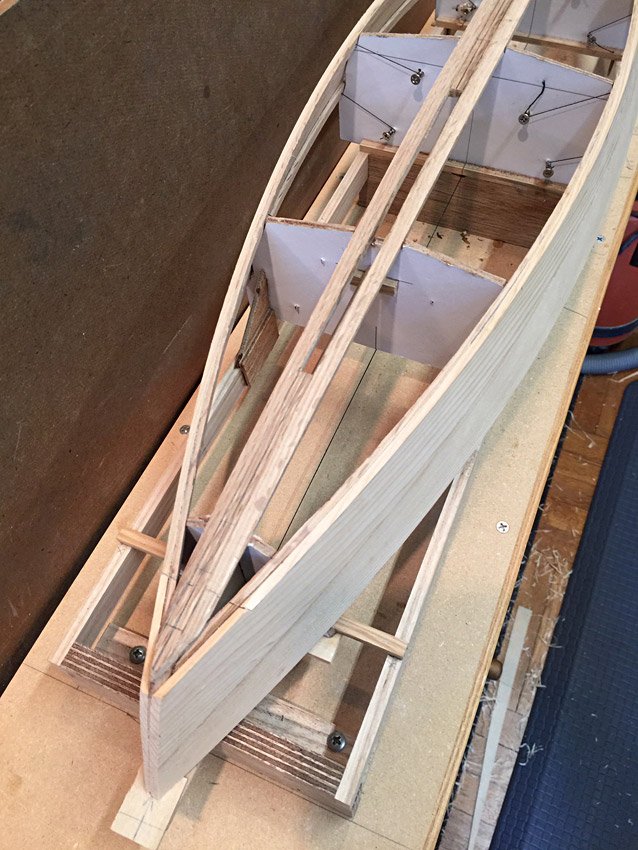
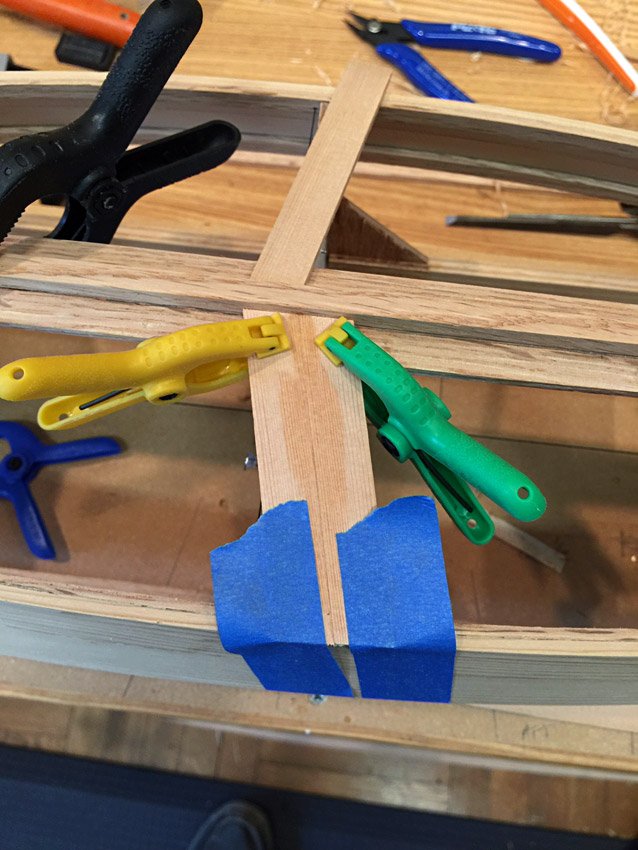
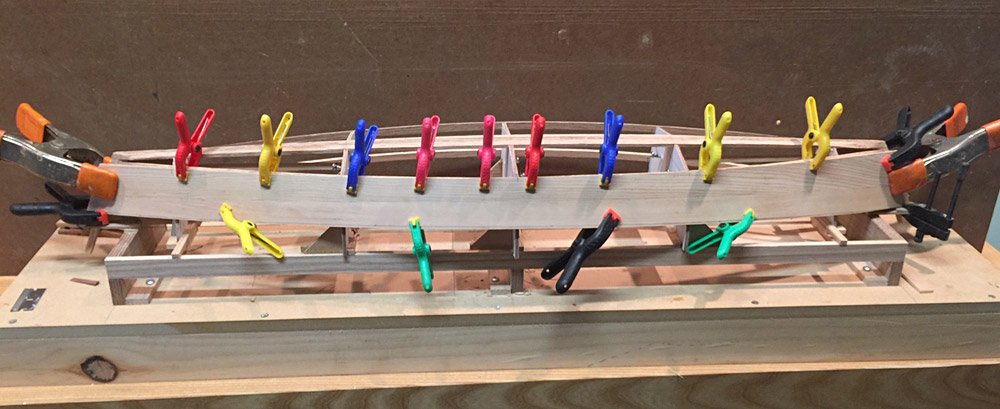
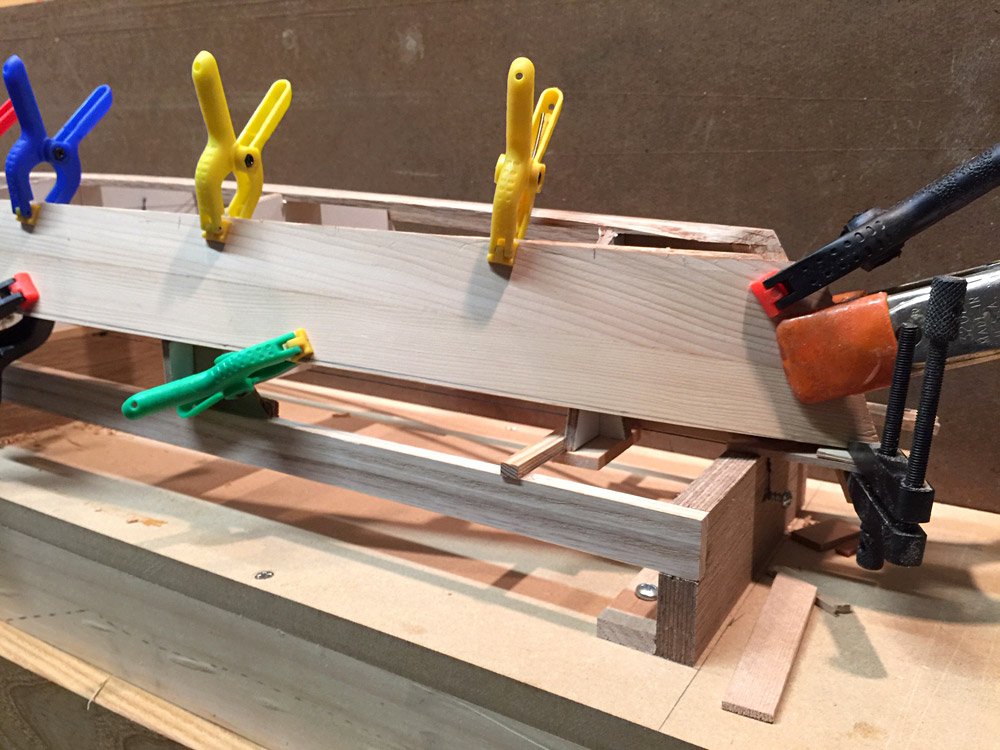
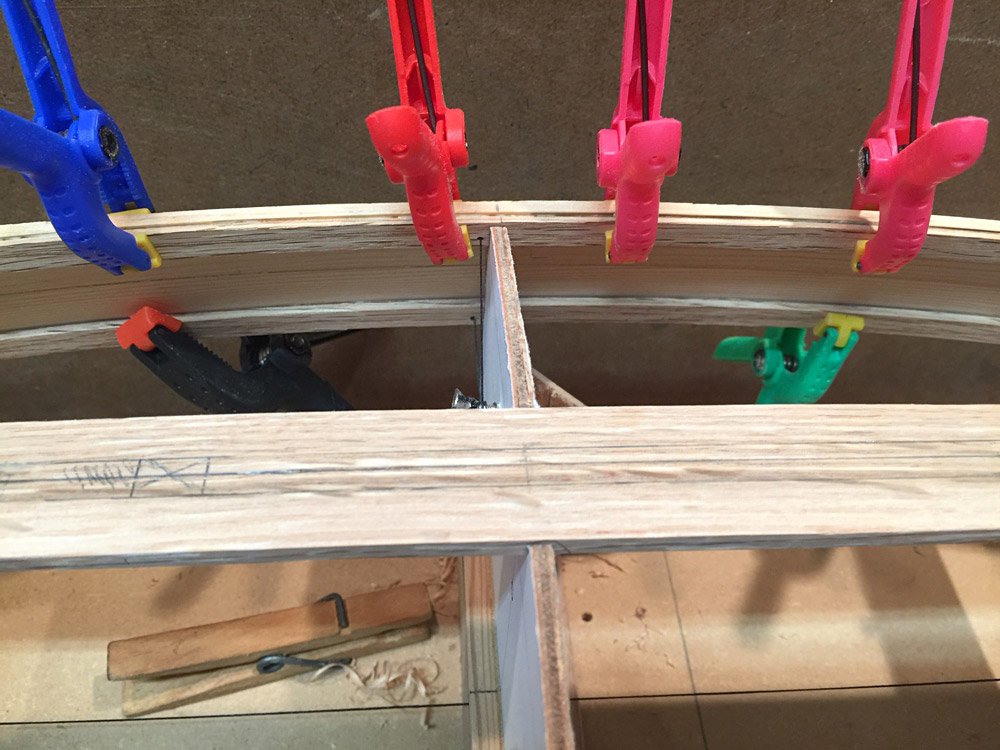
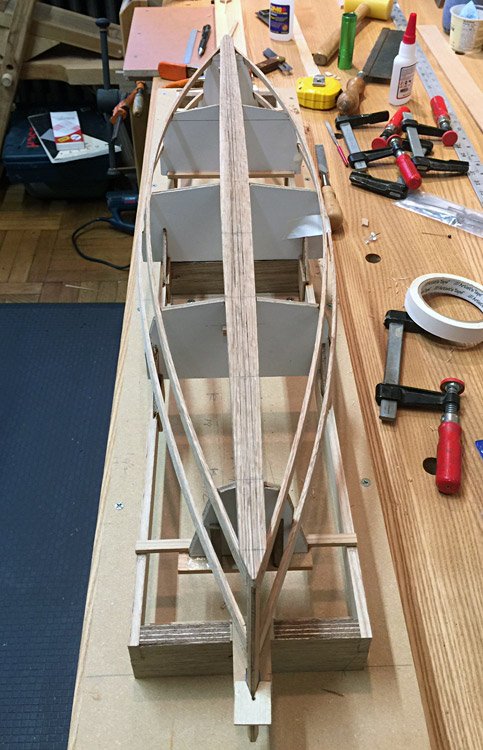
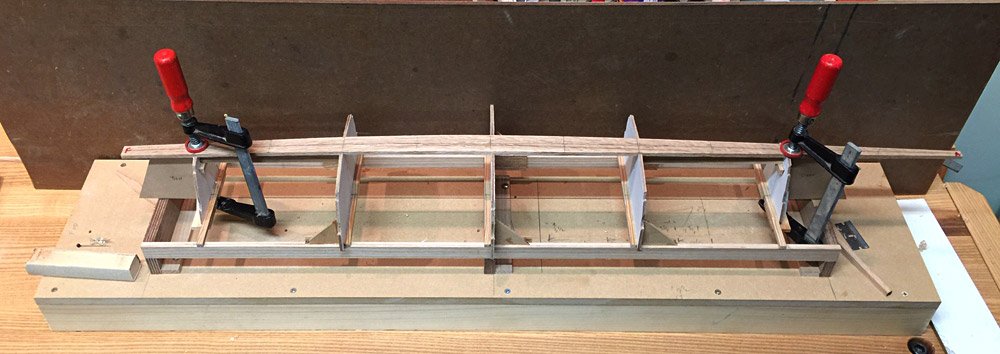
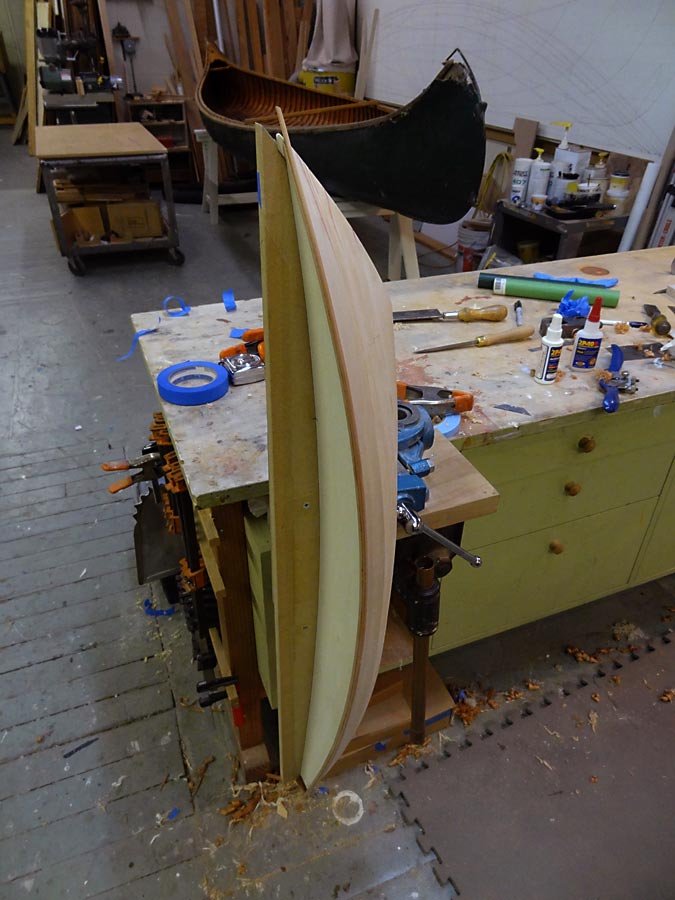
Got the side planks glued on today. This is a two plank per side boat, being low of freeboard, like all traditional sharpies, and from a time where wide, flitch sawn boards were available. I did the same thing with the model, but rather than hang two, separate planks, I got out the lower plank (not really called a garboard plank in a vee bottom hull) with the chine edge cut to shape and the upper edge left straight, then glued another straight edge plank to the first, and cut the sheer shape on the upper edge of that. I then was able to install the whole thing like a sheet of plywood. I was careful however, to make the sheer plank a sensible width, and keep both sides the same in case the seam shows up, or I decide to express the seam somehow. The lower plank sweeps up pretty high on the stem and stern post with the two planks nearly equal in width amidship. I’m pretty sure this is how the boat would have been planked. The lower plank can be cut from a 12”-14” wide board. No sweat in them days. And even now, clear eastern white pine can be found that wide. At any rate, I think the plank seam is visible in some of the pics. I left the planks a tad wide, rehung them on the boat, and marked them out again, marking also the other edges of the chine, sheer clamps, and stems, so I would know where to put the glue. I used Titebond for gluing them on, as I wanted enough working time to get everything just right, and the clamps on. I found these little plastic spring clamps at Harbor Freight. Six for $1.99. Bought a bag full of various clamps for $12.00. The ends of the planks are tricky to clamp, just like on full size boats, and the second one is worse than the first. I used sticky back sandpaper on little cauls to grab the planking, and it worked well enough. A better solution would be tapered cauls with sandpaper glued on with Titebond. I This is a milestone of sorts, and I finally think I’m making some progress. Bottom planking is next, Chesapeake style. Stay tuned.

-
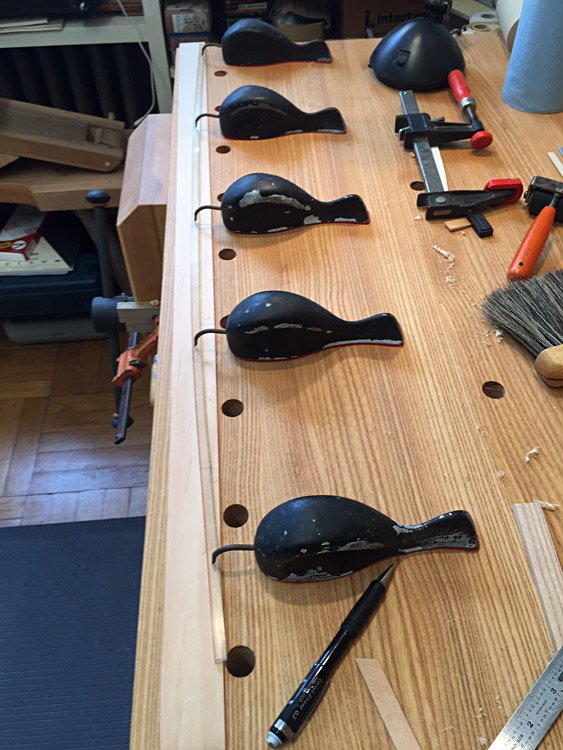
That's a plastic flexible spline, and a set of spline weights sometimes called "ducks" though they look like whales. They are used for drawing curves on the drafting table. In this case, the spline is turned on it's side because it is stiffer that way, but they are normally used flipped up 90 deg. There is a little groove in the top of the spline that takes the nose of the duck. Splines used to be wood, of course, and were sometimes tapered for variable flexibility. These tools are used in conjunction with a set of ships curves. Here's a pretty good blog entry about the drafting from designer Robert Perry.
-
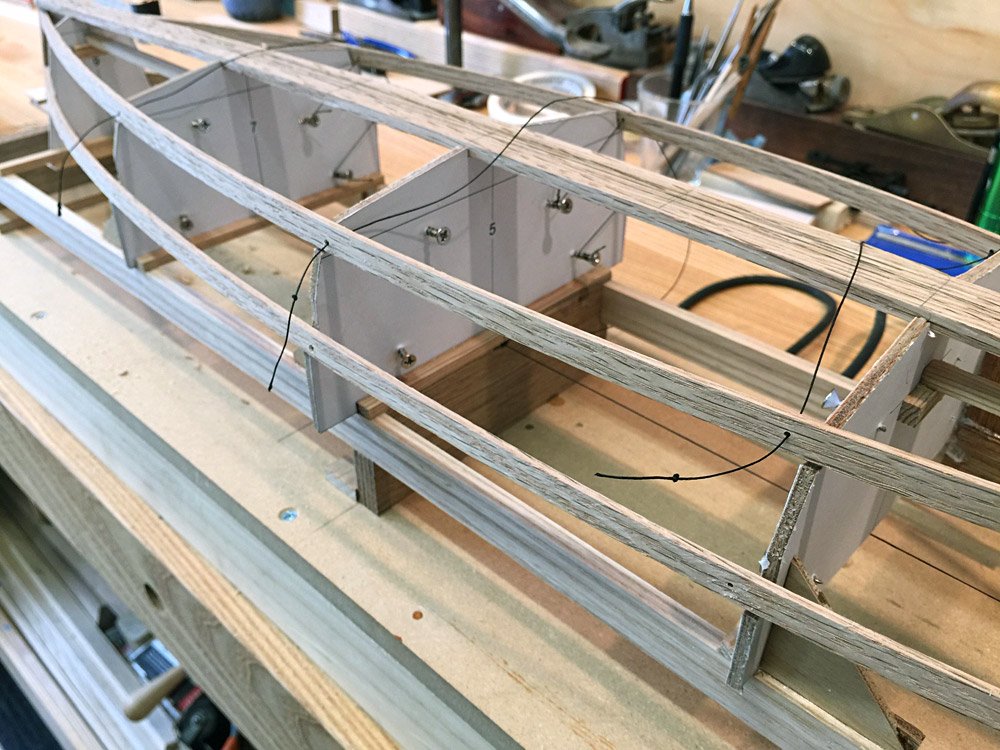
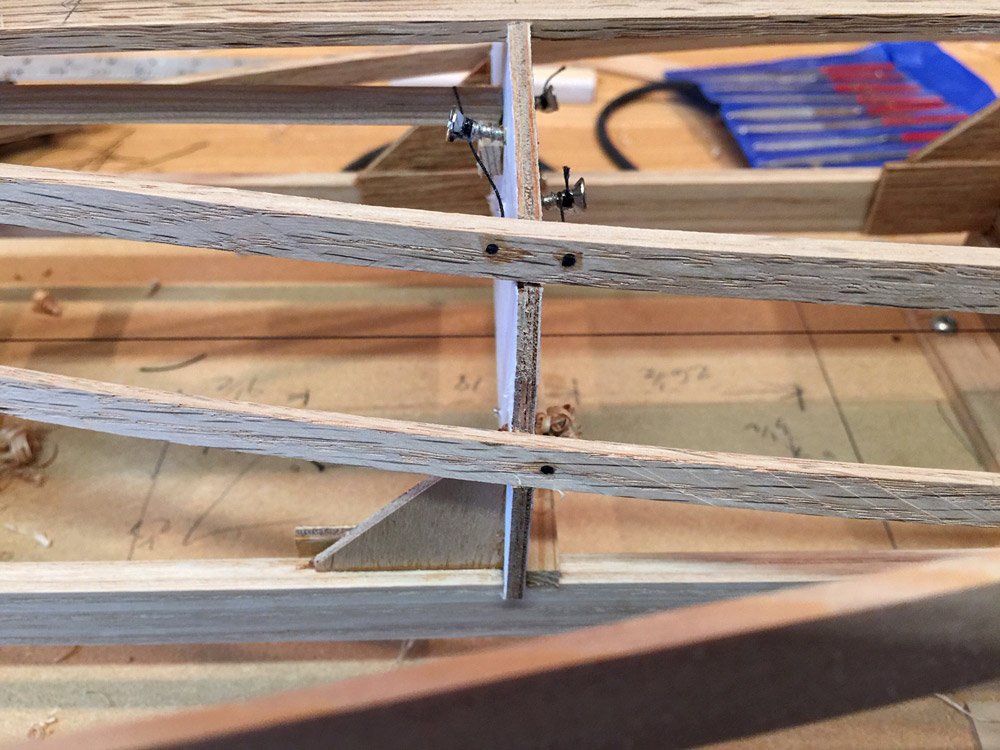
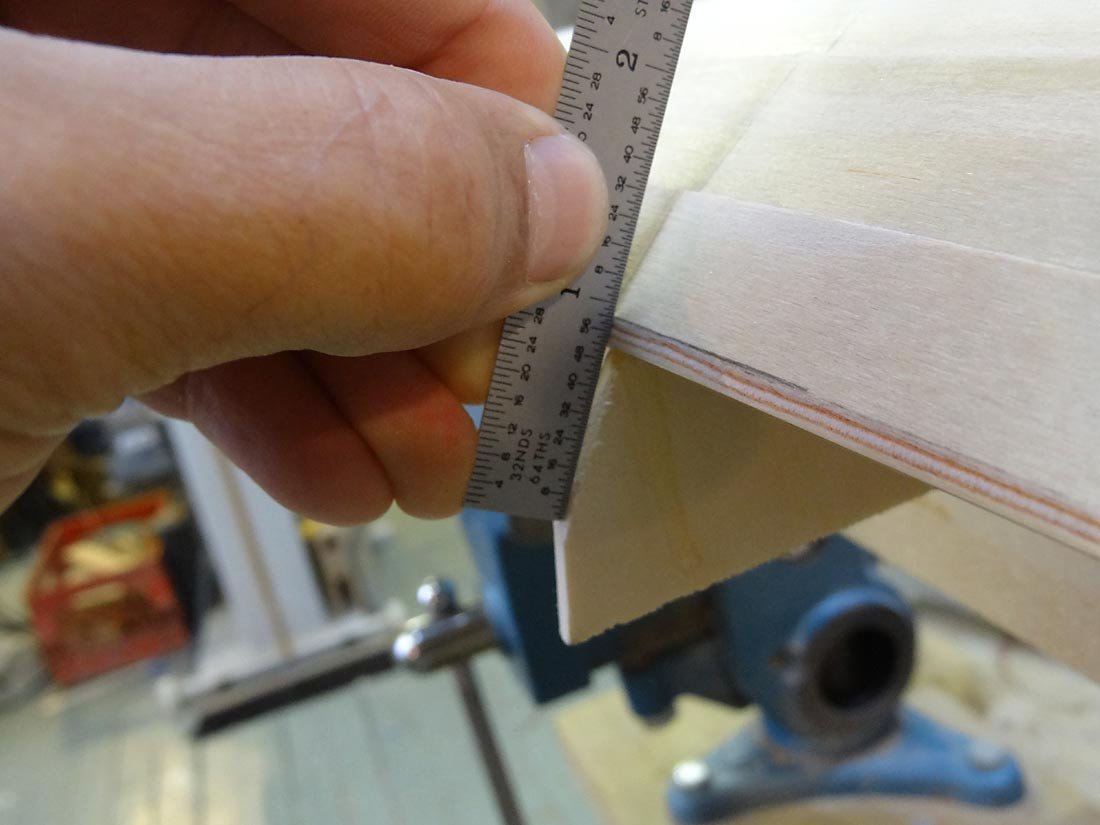
I mentioned before that my chine and sheer clamps are a little “floaty” in their notches, which makes it frustrating for fairing. I suppose I could have laminated those parts from 2, thinner pieces which might help them retain the necessary twist. Is this common practice? At any rate, in an attempt to stabilize them, I drilled little holes in the parts close to the moulds, knotted a thread, and pulled the knot, with glue, into the hole. I then wrapped the loose end around a screw driven into the mould, pulling in and down at the same time. It helps, but doesn’t completely solve the problem. After rigging the threads, I went ahead and beveled/faired the chines and sheer. I’m still futzing with the bevels on the keelson and chines up in the very ends, and likely won’t resolve those spots until after the side planks are on. I have to establish the point of transition from overlap to butt at the sides, too. With most of the beveling done, I spiled the first side plank. This I did with a spare piece of planking stock, clamping it on the boat with no edge set, letting the ends drop where they naturally wanted to lay. I put a tick mark on the mould centers, then used a 3/4” wide rule with the top edge set up to the chine line, and marked the bottom edge on the spile board at several locations along the hull. I then layed the spile board on a piece of planking, and repeated the process in reverse, marking location, and span with the same rule. Then I laid out a fair curve with spline and ducks, as usual. In cutting the plank out on my jigsaw table, I split the plank (the jigsaw is a little brutal). But I glued the split back together, and will use that as a pattern for both sides. That’s where I’m at right now. Today I hope to get the side planks installed. These descriptions are, I’m sure, old hat for you builders with tons of experience. I’m hoping that other scratch build beginners like me might find some of it useful. Particularly the mistakes! Thanks for looking.
-
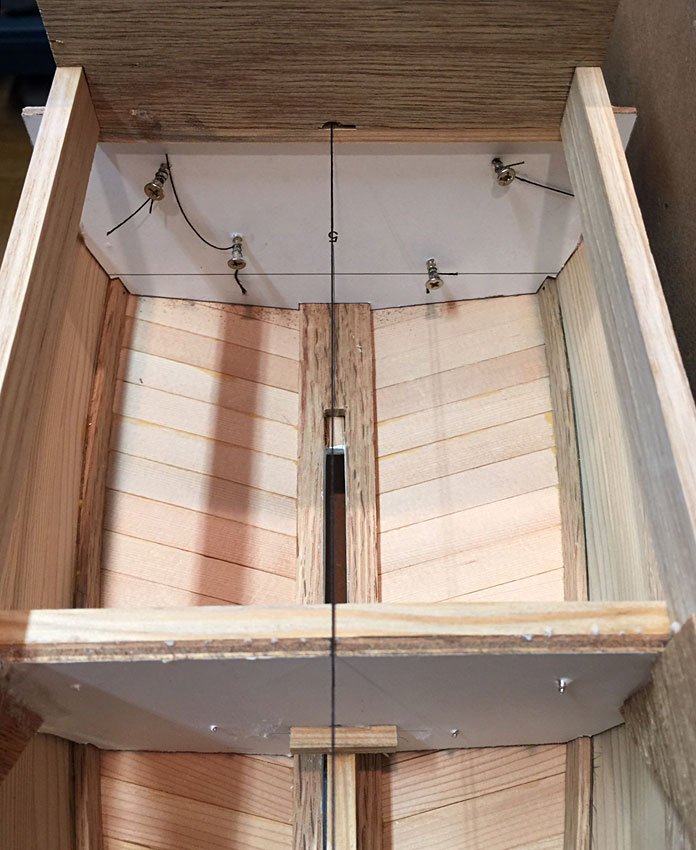
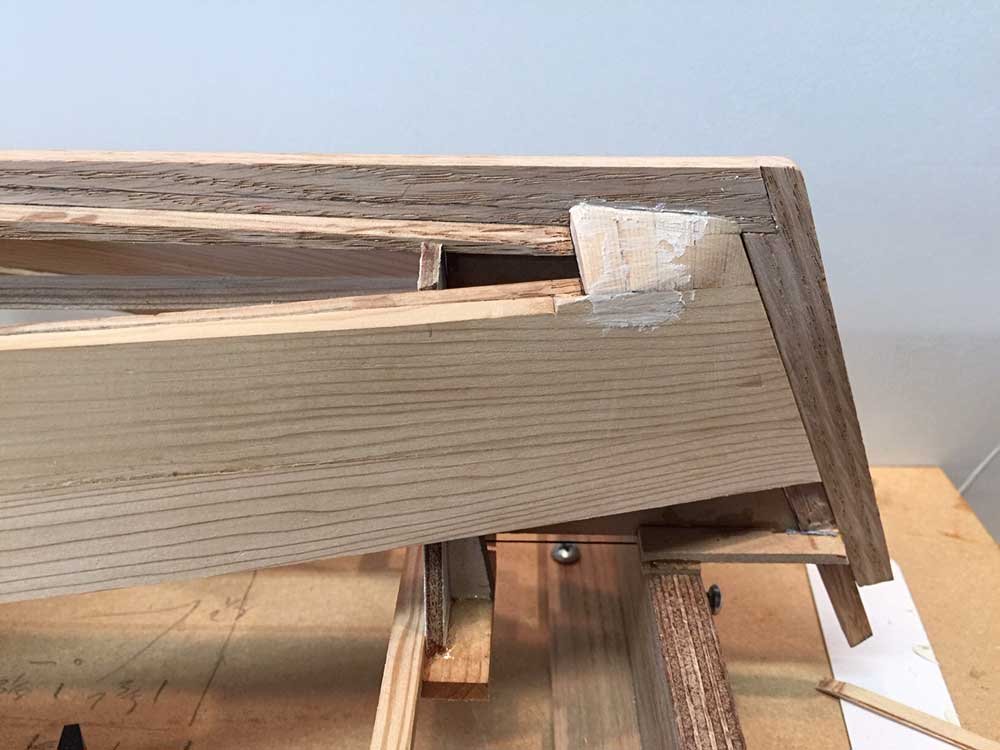
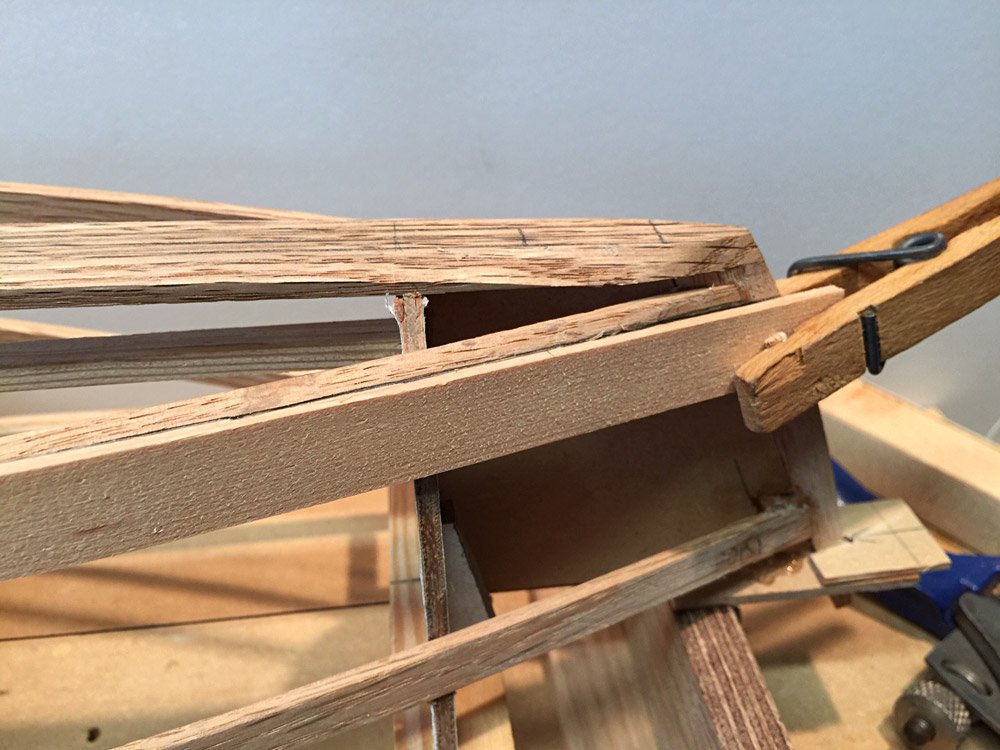
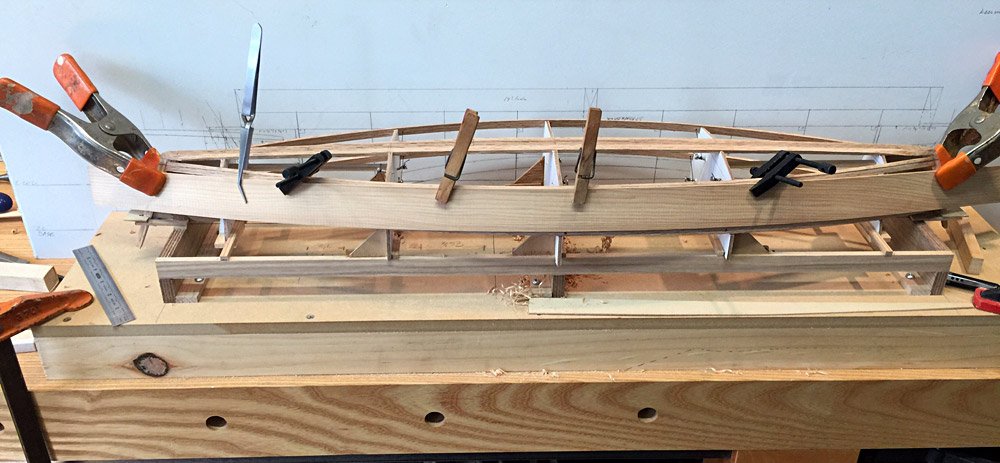
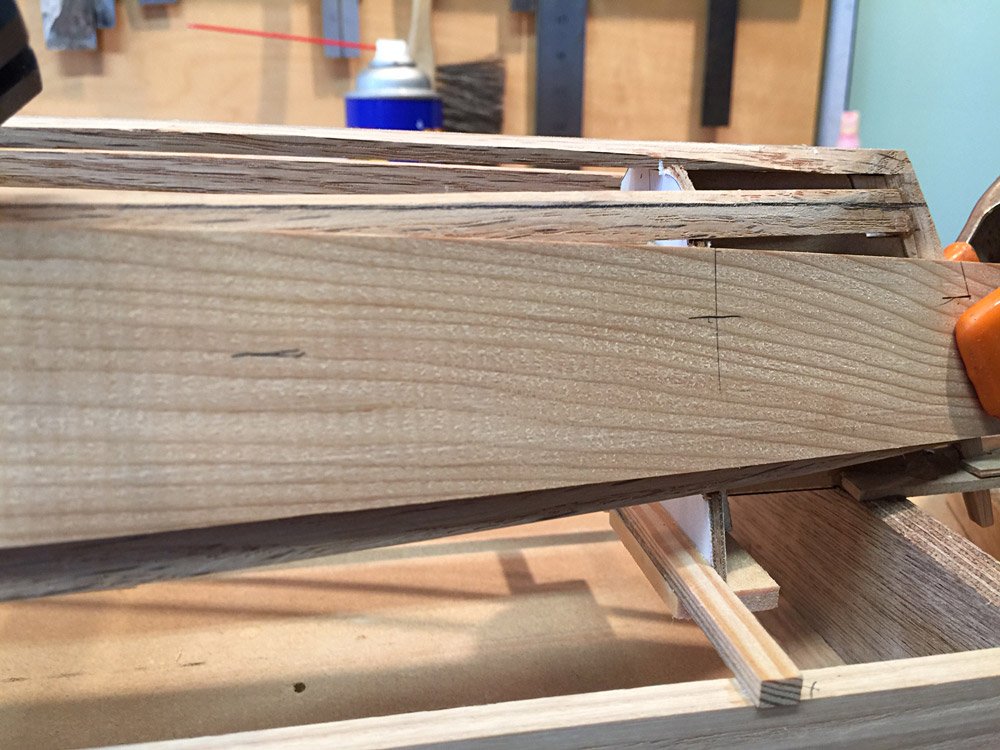
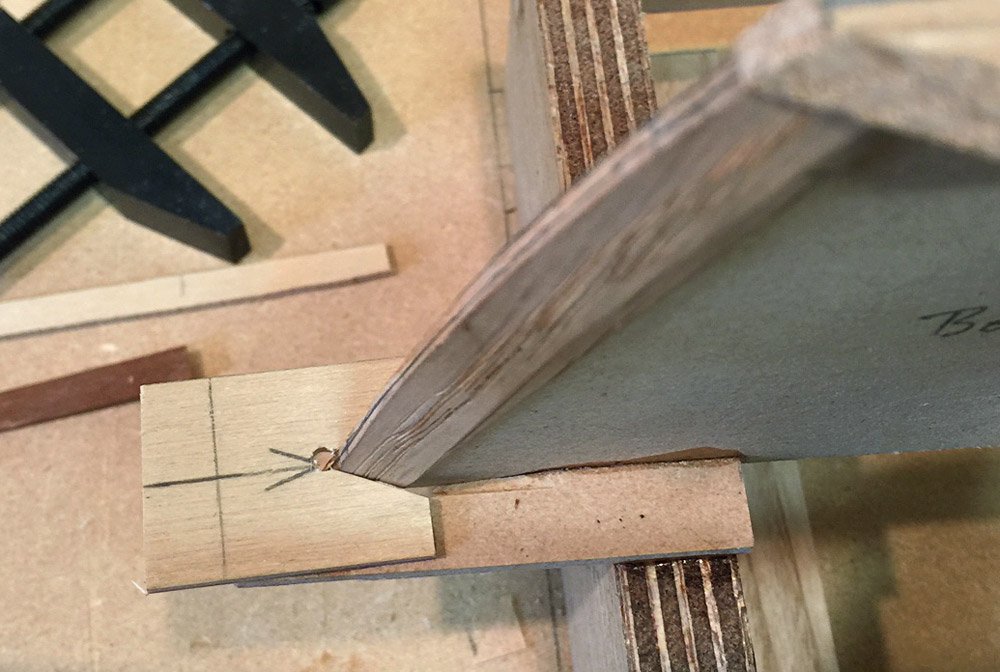
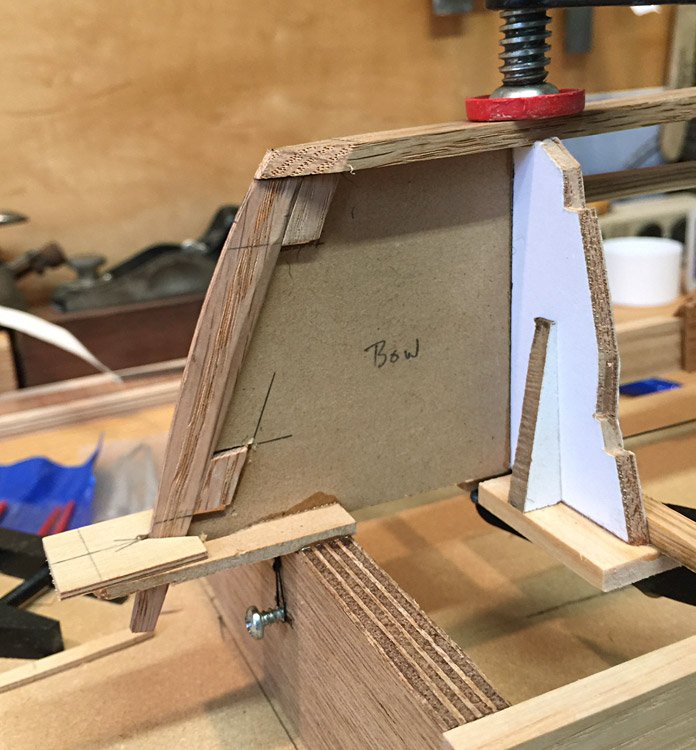
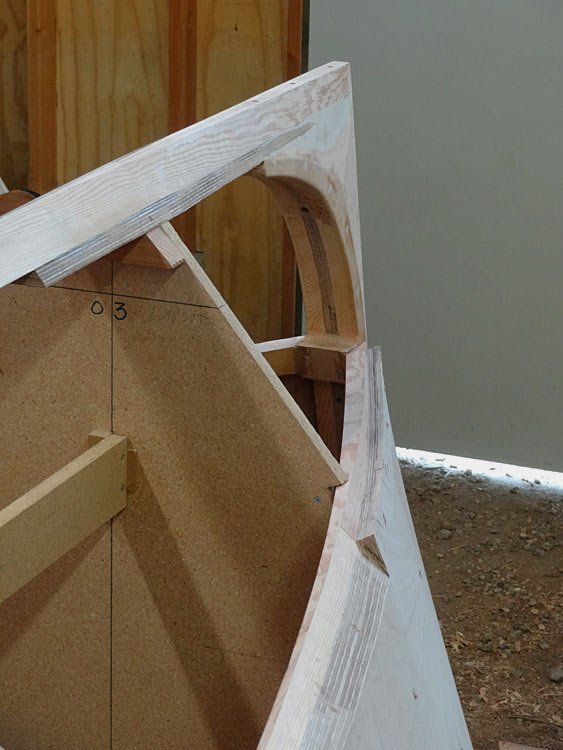
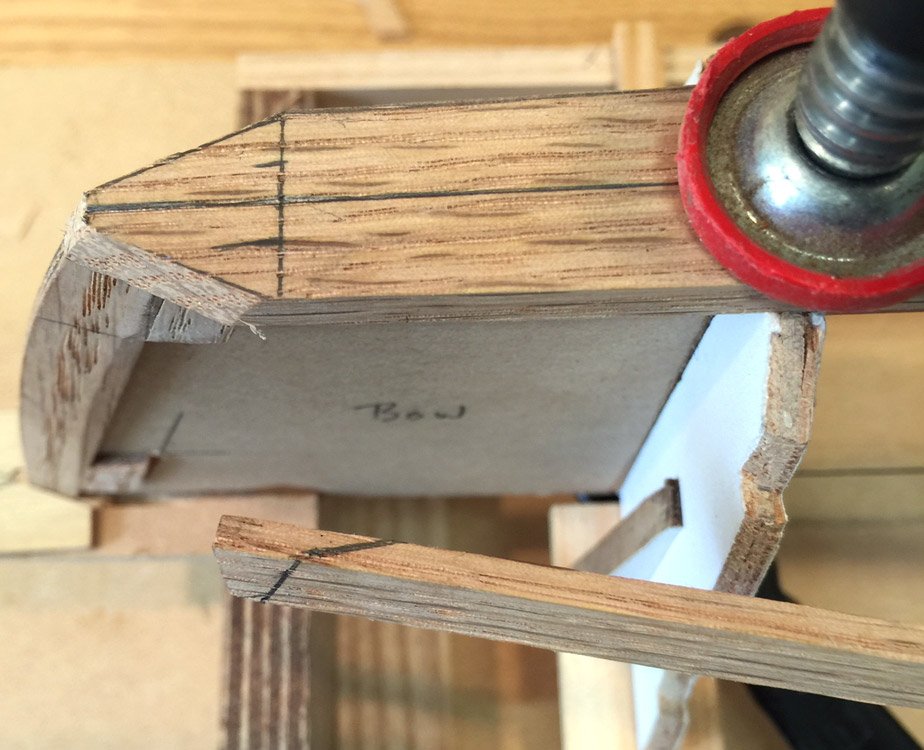
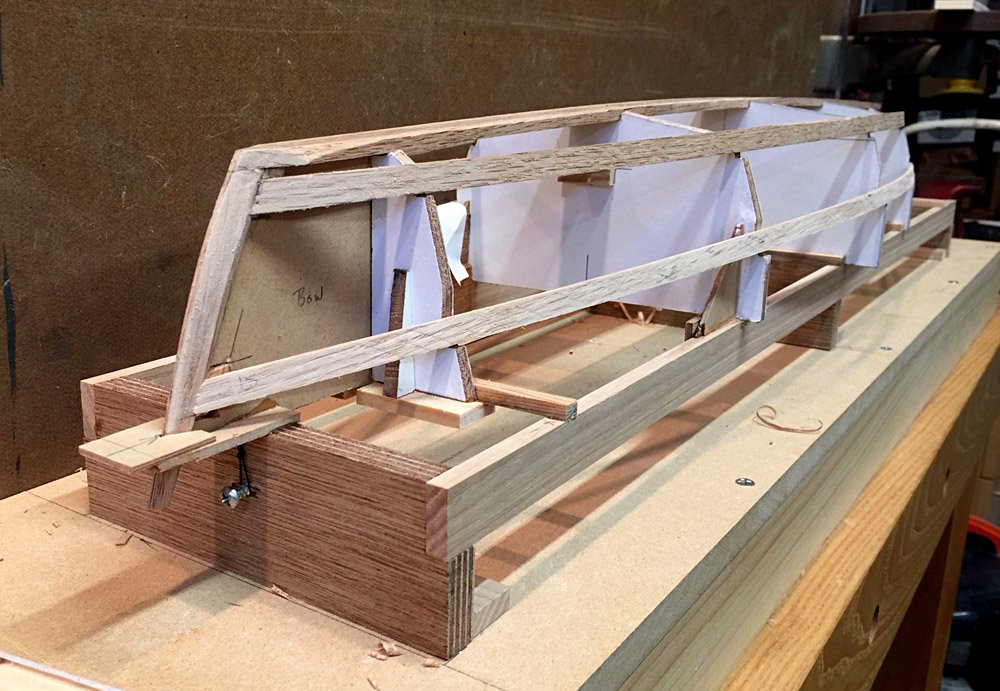
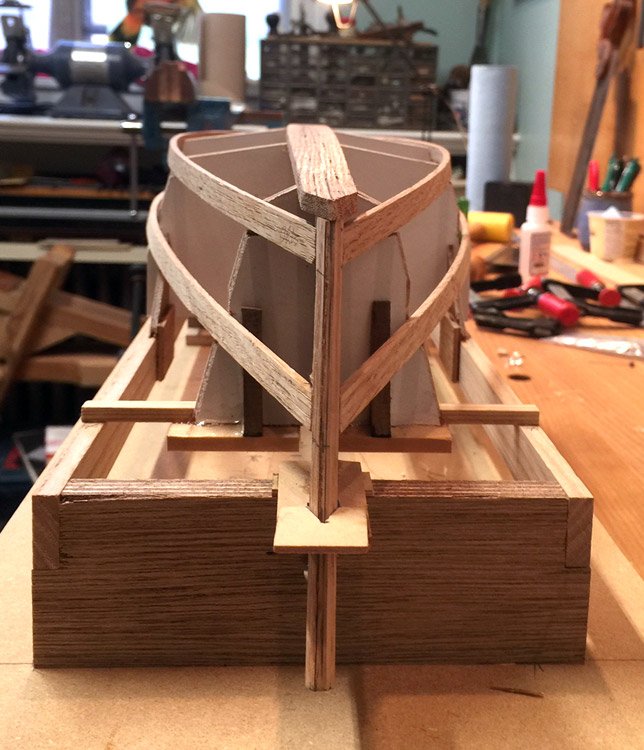
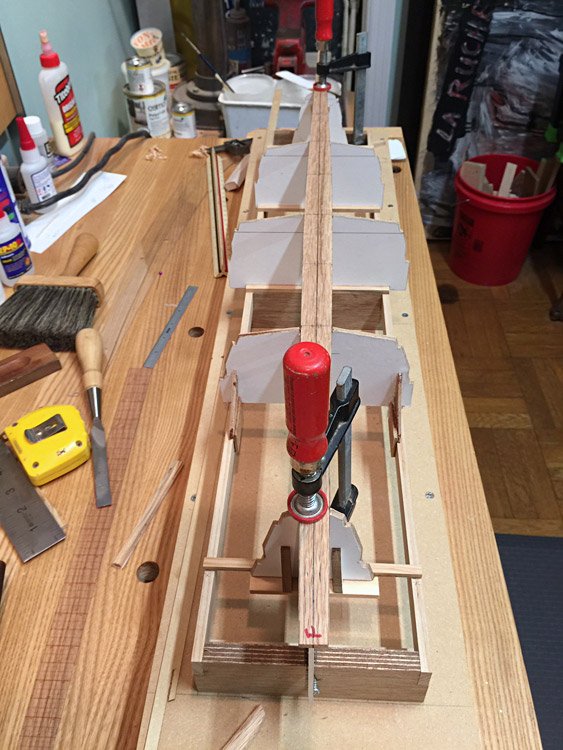
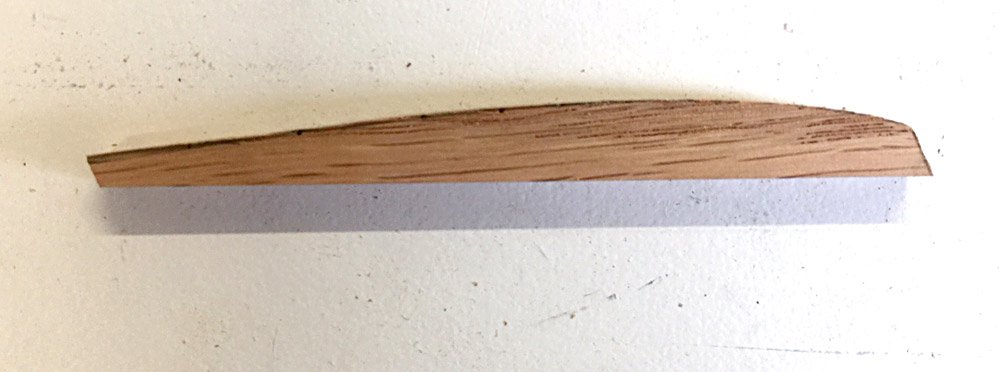
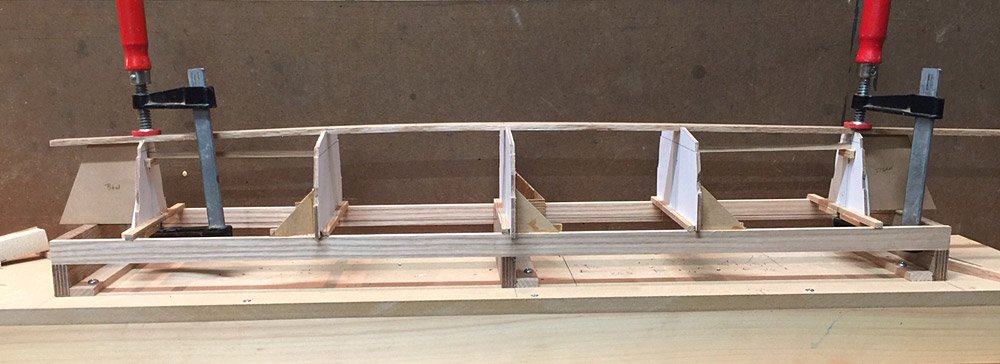
First, I want to thank Chris and Ron for their replies earlier. I appreciate it! I finally seem to be making a little visible progress. I lofted the stem bevels in Vectorworks, and also came up with at least a preliminary shape for the keelson ends. For the stem bevels, I tried clamping them a couple of different ways so I could plane or chisel them, but finally just clamped a block plane in the vise and used it like a jointer, running the stems over the blade at a skewed angle which worked very well, even for the bow stem which has some curvature. After some fooling around, I got the stem and stern post anchored well enough that I could glue the keelson down to them. I made little forks that lock them in place at the strongback, but had to add a little birdsmouth jig to fit the stem bevels. I split the first one, and had to drill little relief holes at the vee, which solved the problem. After realizing that the stems were not wide enough to land the chine logs and sheer clamps on, I added small blocks on the stems’ inboard edges to give a good gluing surface for the long, compound bevels on the chines and clamps. I did this as well on the 23’ deadrise skiff we recently built (see the pics below). On the model, I could just as well have made the stems wider to start with. They will be hidden under the decks. Then I had to notch the stem moulds for the add-ons, and now I’ll have to figure out how to cut those molds out of the way so I can lift the hull off later. BTW, I’m making the stems in two pieces, inner and outer, which was fairly typical Chesapeake construction according to Chapelle. I always do my full size boats that way, too. The 3 pics directly above are the from the Point Comfort 23 construction log. Stem "blips" as I call them were added to provide bearing surface for the chines. The first pic also shows a widening at the sheer for the clamps, and the last pic above shows the transition from overlap of bottom plank to butt, at about station 1. The compound bevels on the chines and clamps were relatively easy to cut. I’ve cut enough of those in real life that I can go about it without much back and forth. Getting those pieces to lay flat in the mould notches is another story. I think I’ve come up with a method for that, which I’ll try before beveling and fairing begins. At any rate, the chines and clamps are glued on, and the backbone is complete. I have not yet cut the centerboard slot. I probably should do that before the bottom planking goes on. But that’s later. I know this a fairly simple simple project, compared to many. But I am challenged! I’ve already realized a dozen things I would do differently next time. That’s progress, I guess. Thanks for looking.

-
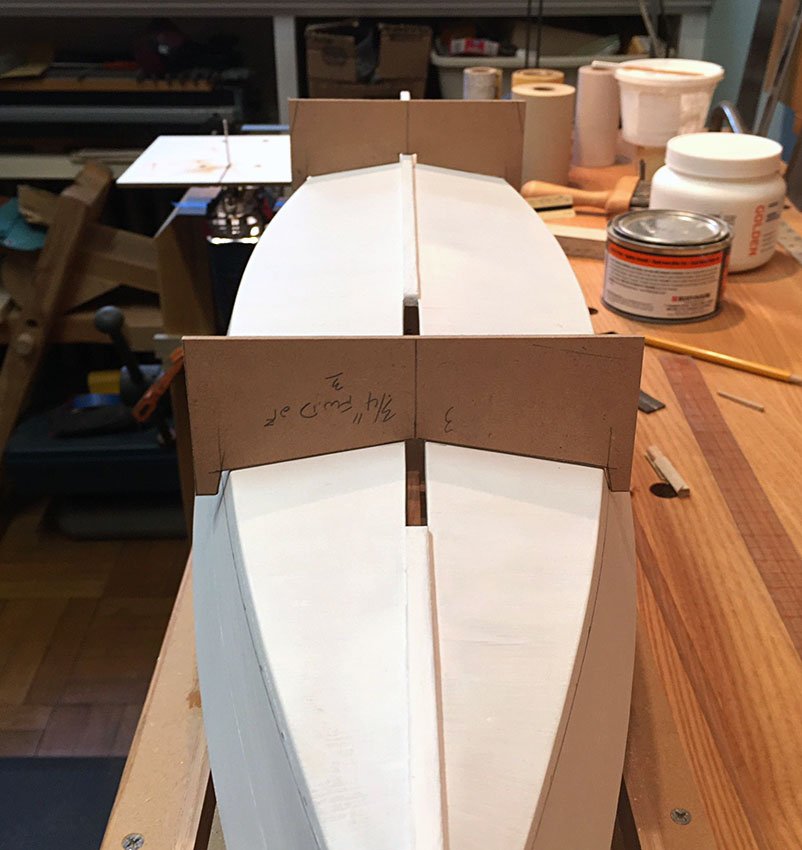
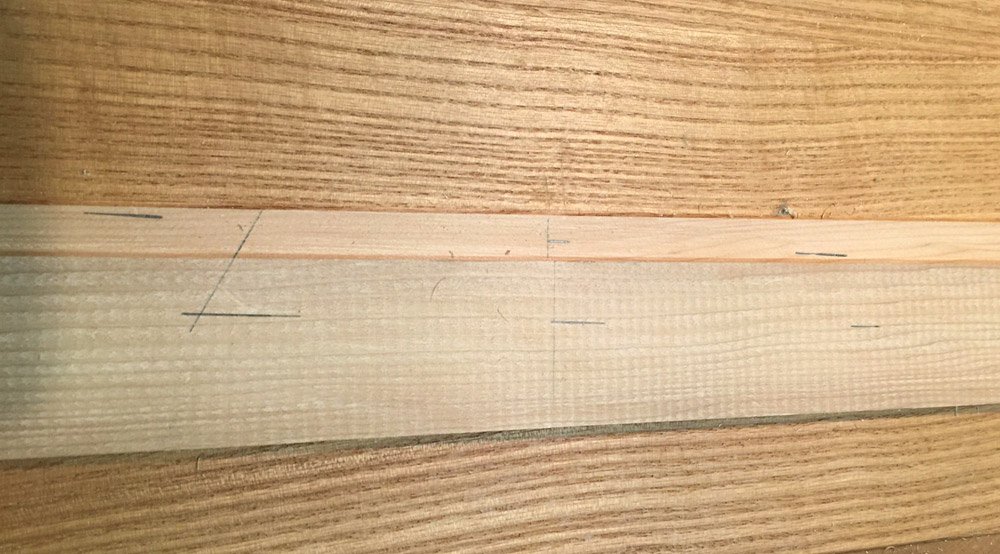
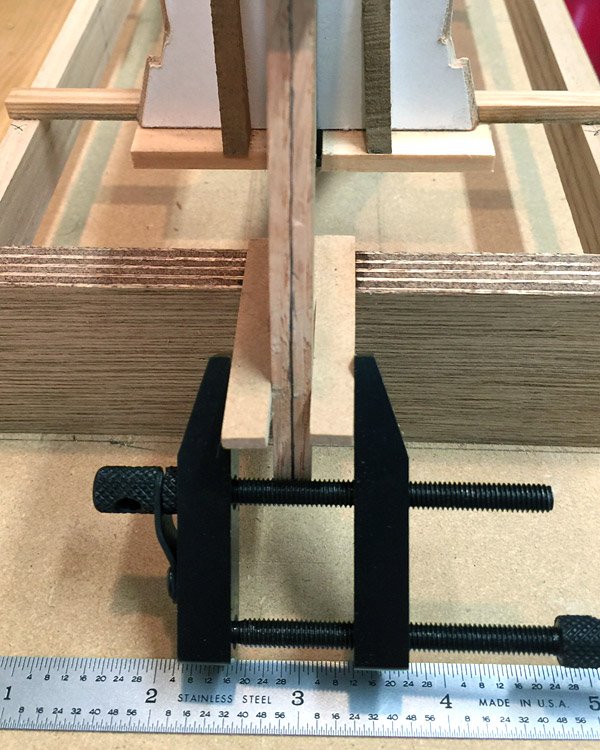
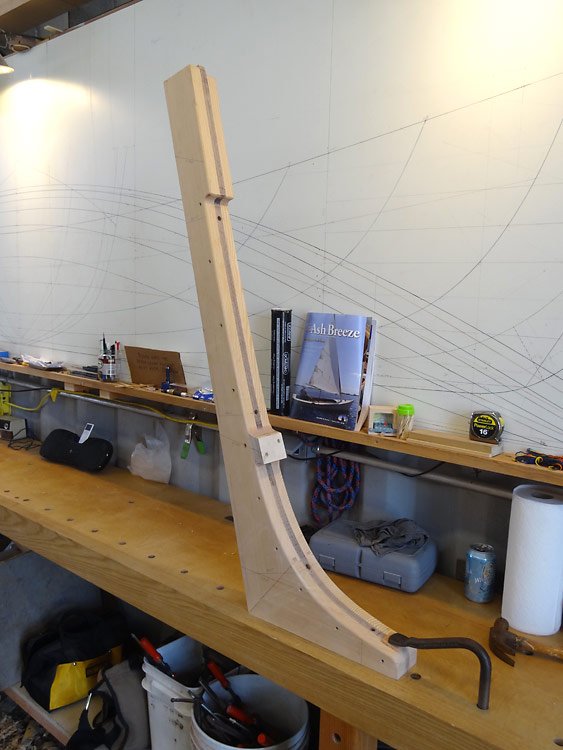
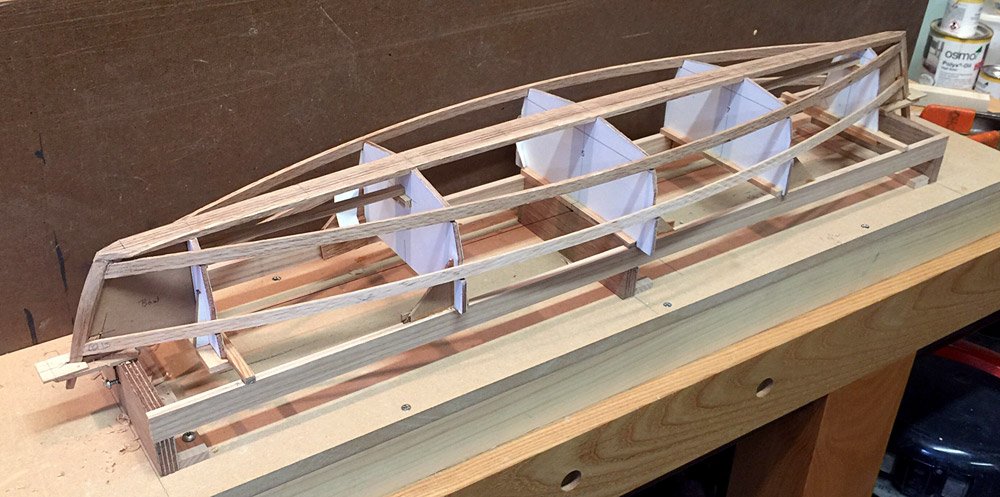
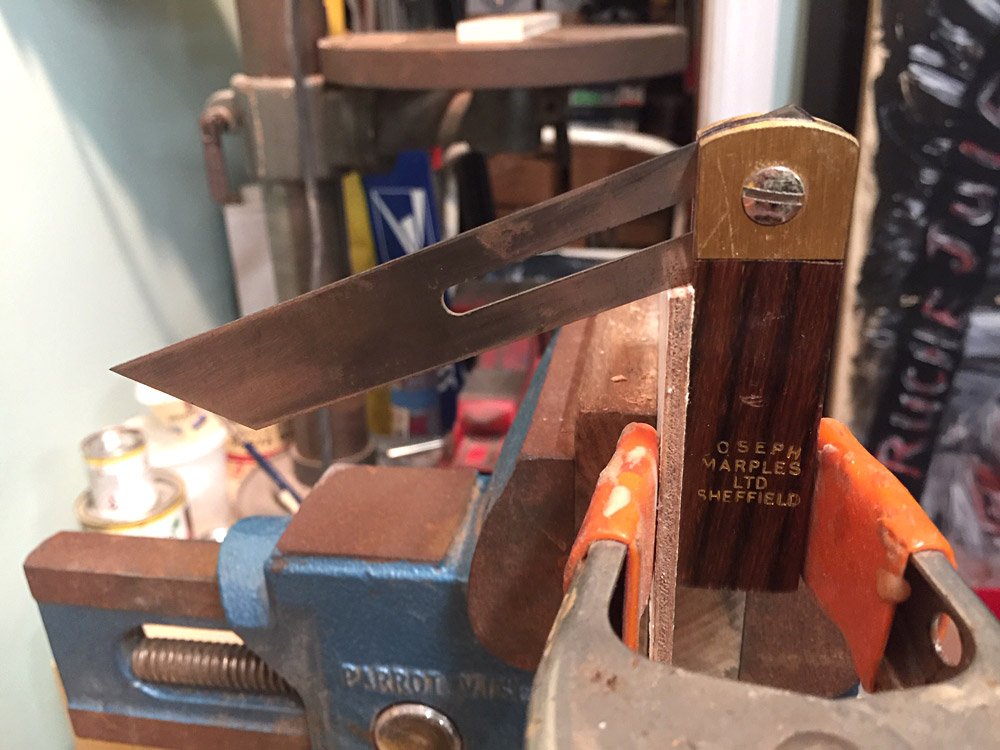
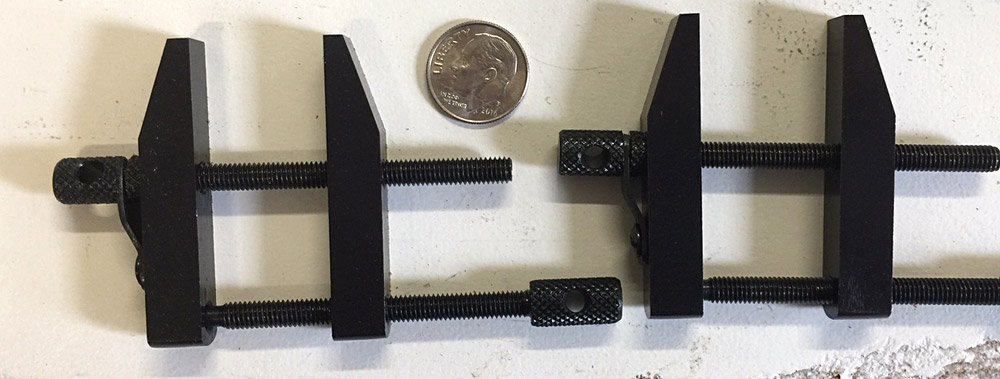
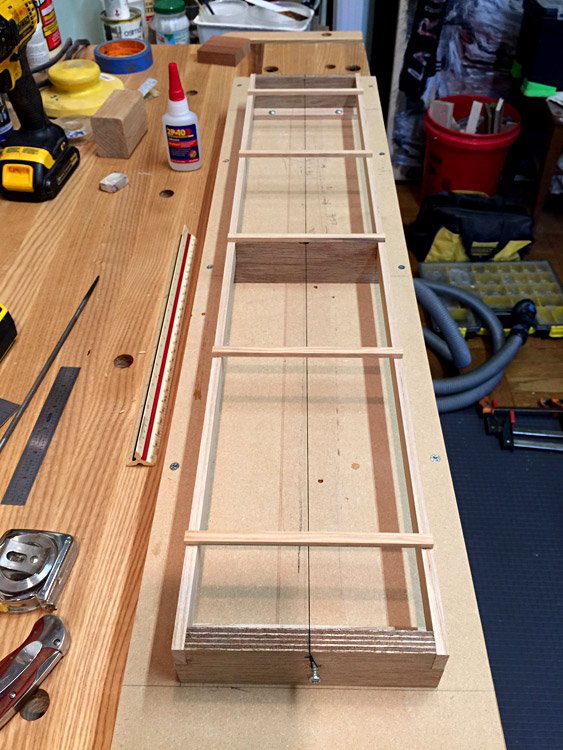
I’ve got all the molds cut out now and beveled, and I’ve set them up on the strong back. I probably could just as well have left them unbeveled, and set them up on the other side of their respective station lines. I usually do this with full size boats, but for some reason I decided to bevel them for better contact with the planking. I also decided to make a plumb cut on the moulds from the sheer clamp notch, to hopefully facilitate lifting the model straight up off the moulds after planking. we’ll see how this pans out. I’m gluing the moulds to the strong back, and installing braces after carefully squaring them up plumb from the base. Another thing I like to do with full size boats, is to erect a fore and aft stem mould. This puts the stem (and stern post in a double ender) in the correct position, and helps fair the keelson at the very ends of the boat. It’s a little bit in the way for some operations, but I think it’s worth holding the stem steady. We’ll see. I like to trace parts on mylar or vellum from the lofting, and then use a push pin to transfer the lines to the stock. For linear parts, this is simple. Curved parts require more pin pricks. I find this method to be accurate. You can just see some of the pin pricks in this photo of the bow stem. I’ll probably regret it, but I’m cutting the backbone pieces out of oak. A mix of red and white, whatever I could find in the scrap pile. We’ll see how hard it is to bevel. I can lay out some of the bevels and cut them on the bench before installing them on the strong back. The keelson has been sawn out and faired, but I have to cut the ends where it fairs into stem and stern. I think I will loft the ends a little more carefully in Vectorworks, so I can see better what is going on. It’s a bit of a muddle on the lofting. I can isolate specific views in the computer. i’m trying to get bevel info on the stems in particular. Anyway, moving onward. Oh, and I received my first model specific tools today. A pair of machinist’s clamps. I call them handscrews. These are 2”ers. Still to come are tweezers and a set of diamond files. Thanks for looking. Cricket


-
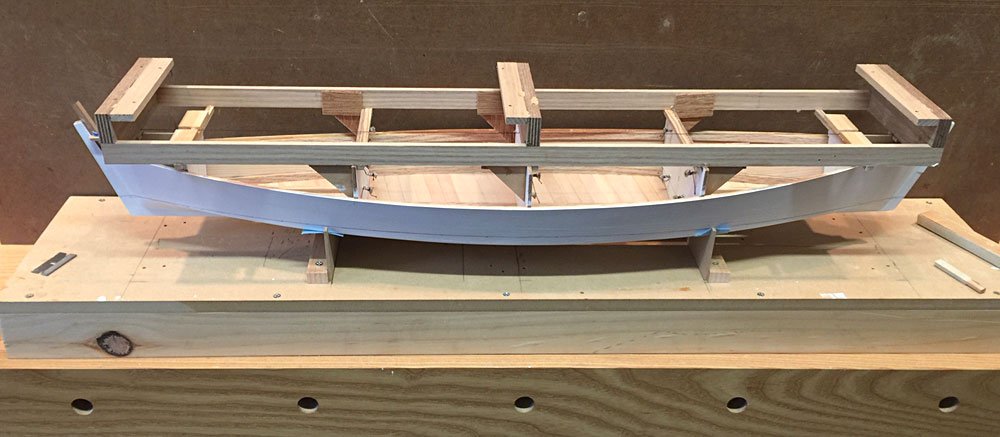
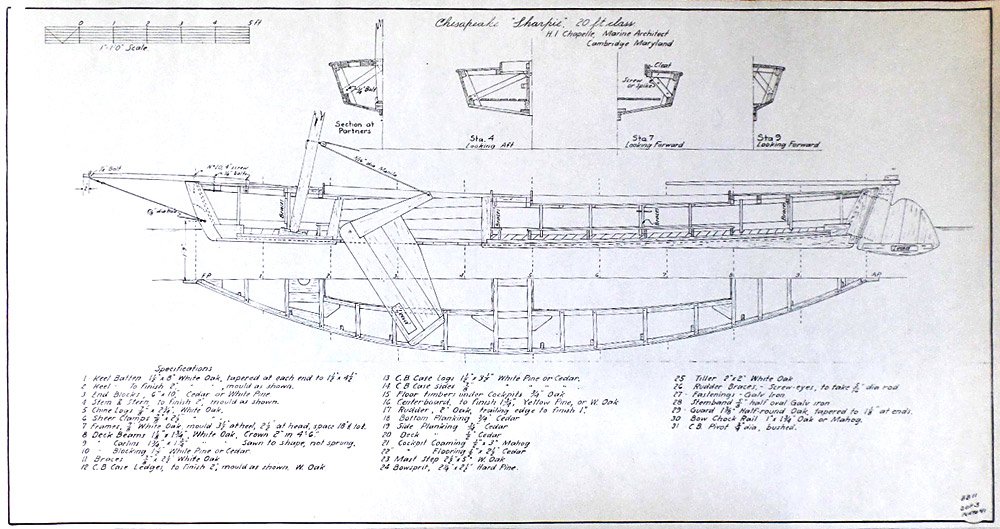
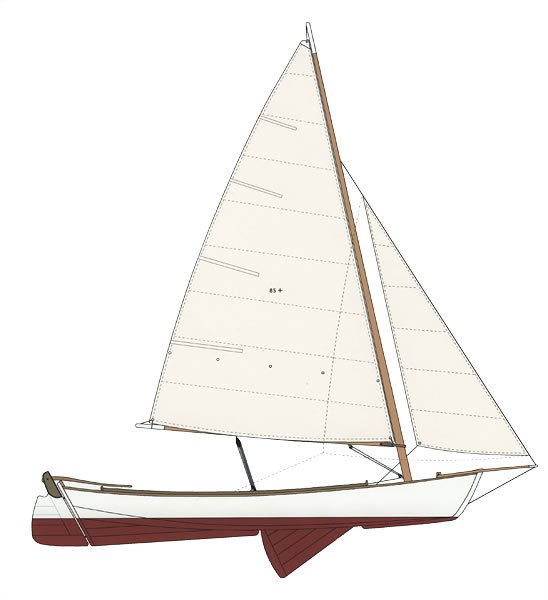
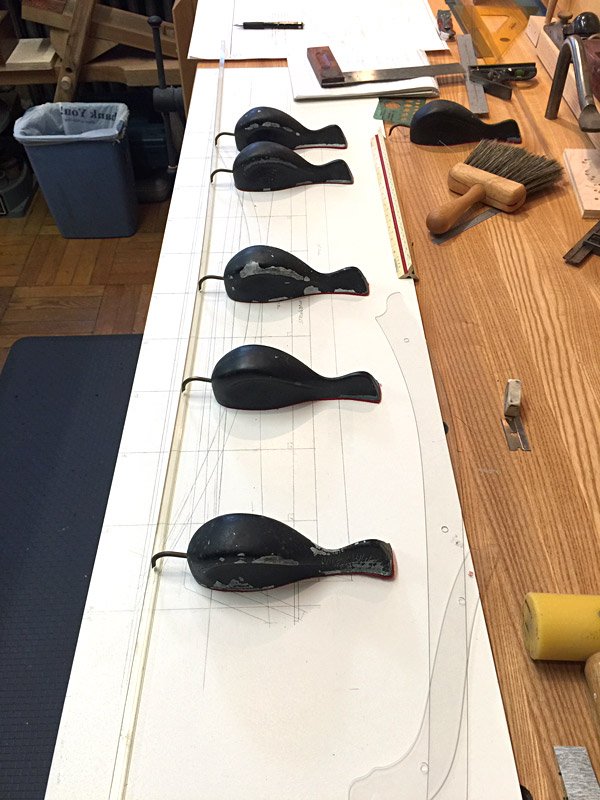
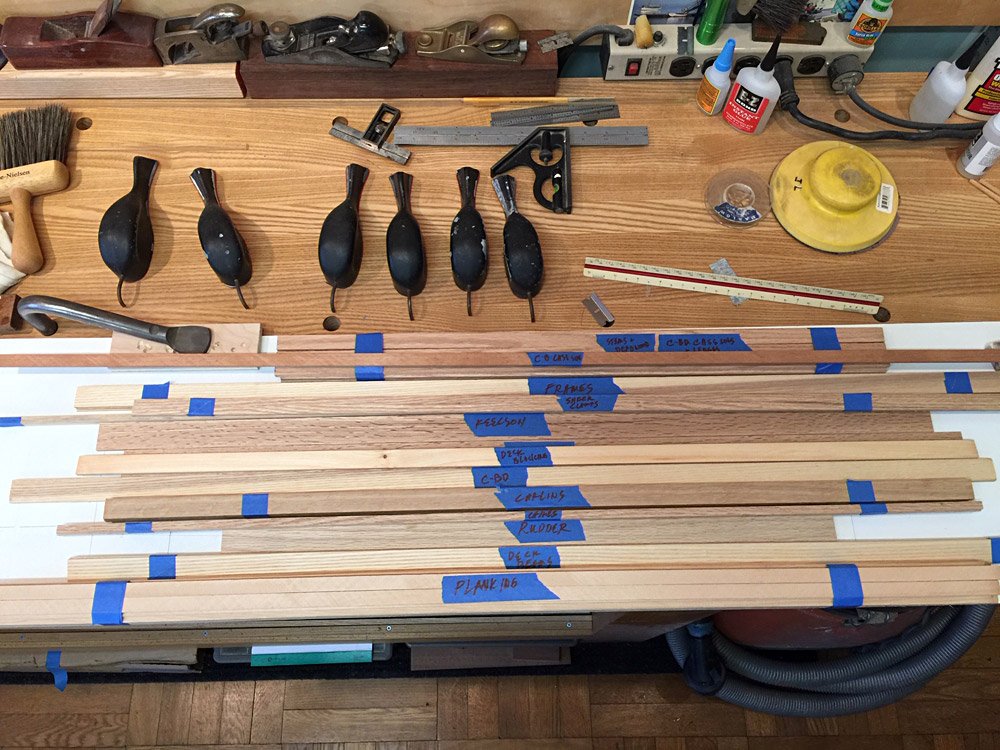
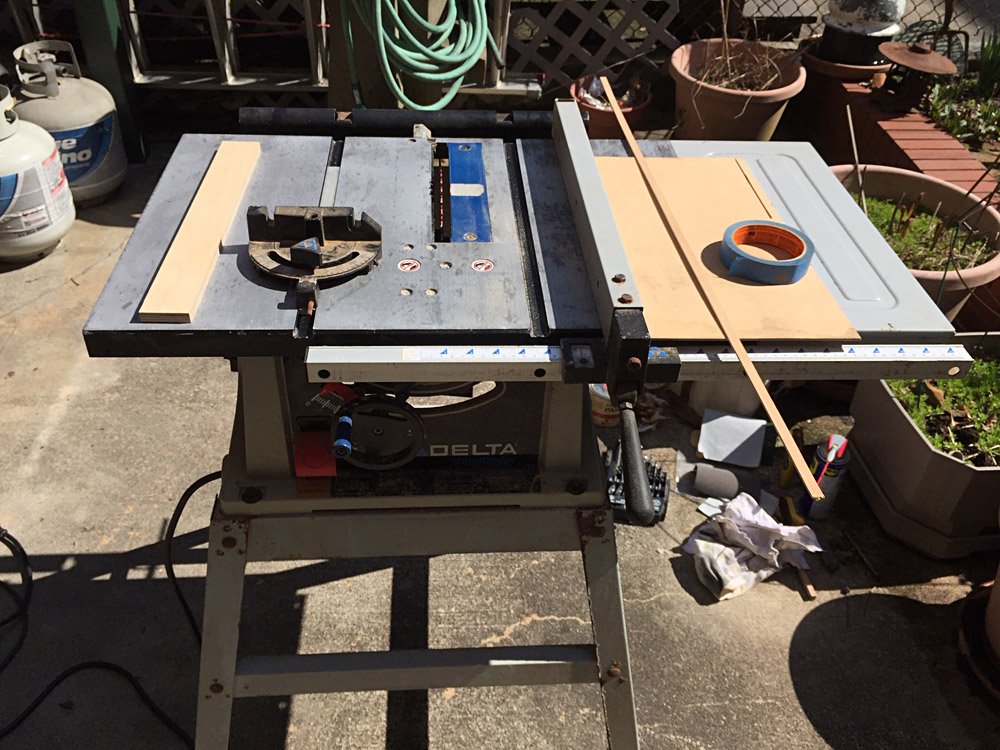
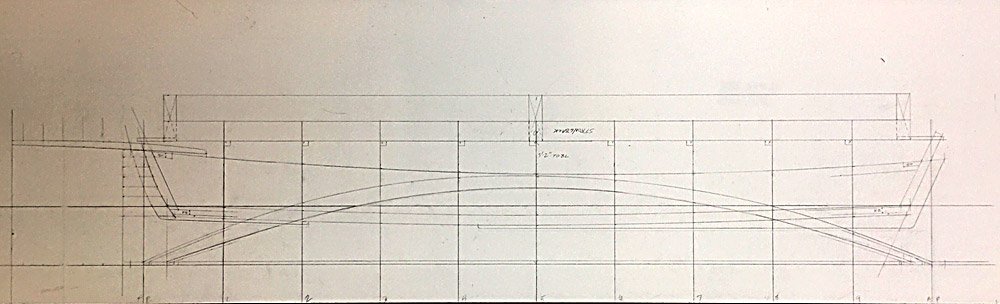
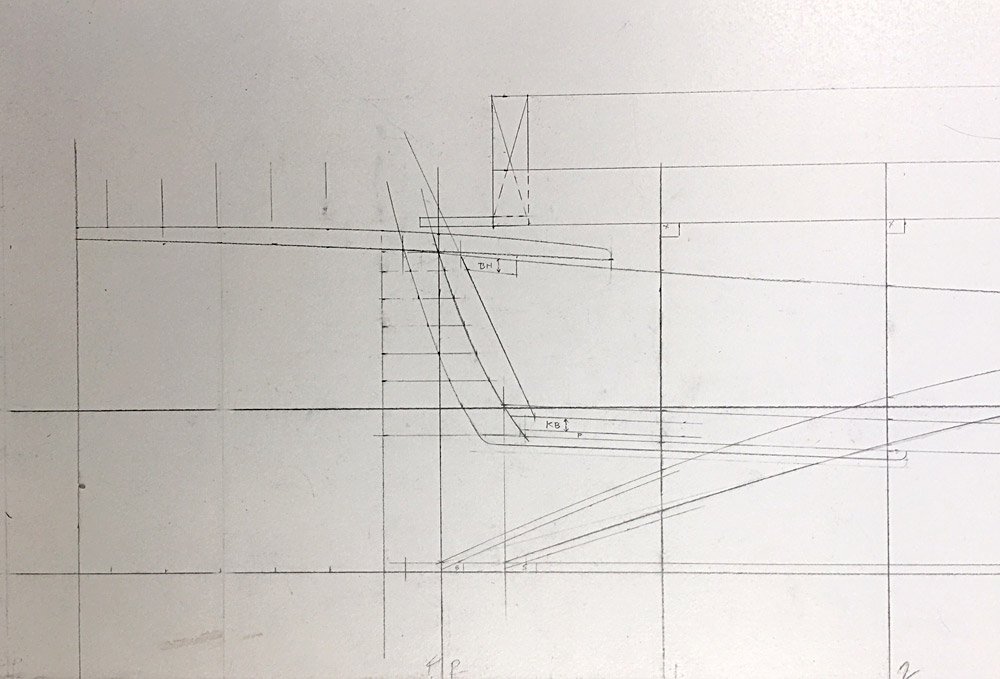
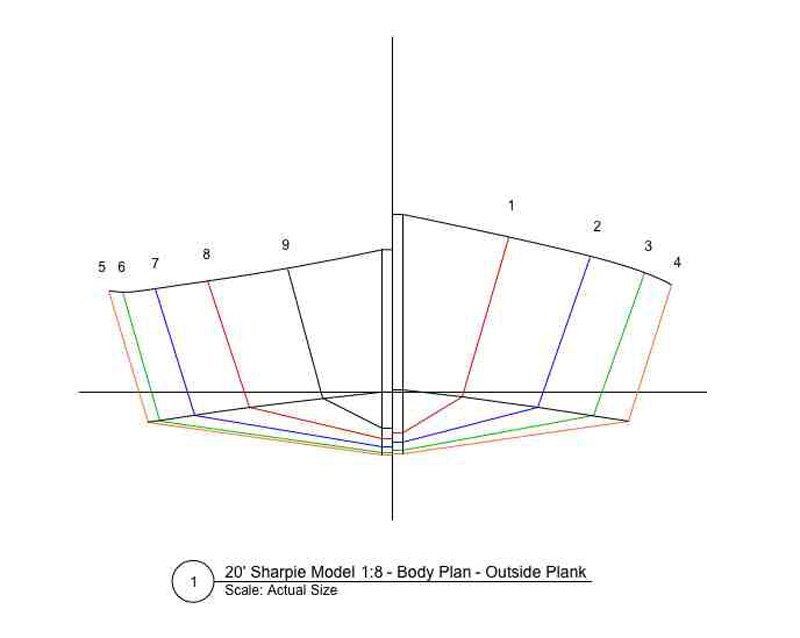
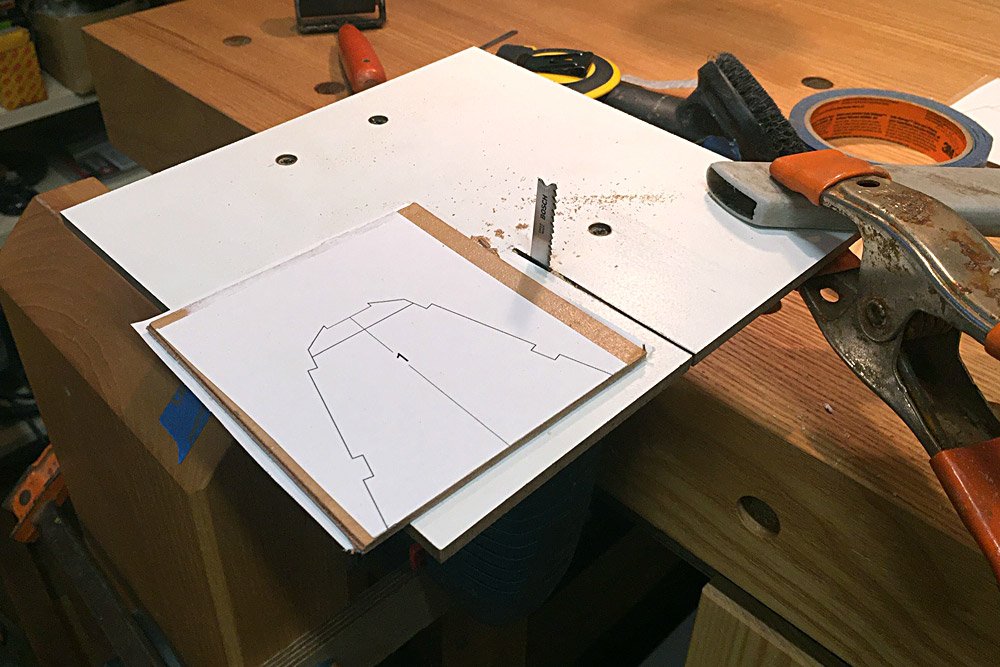
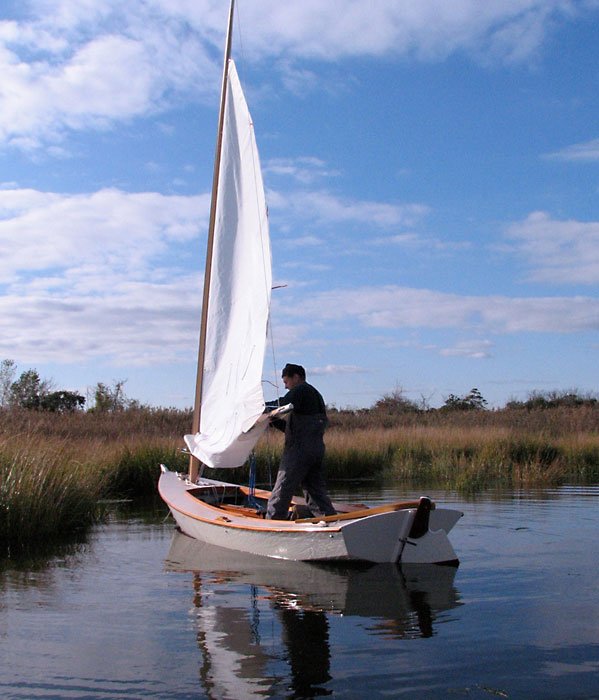
Here’s a new model project I’ve started while sequestered at home, and locked out of our commercial millwork shop, and the boat shop. I’m building the Chesapeake Sharpie-20’ Class, designed by H. I. Chapelle, and found in “Boatbuilding, pg. 291. This particular boat was designed as a pleasure boat, but modeled closely after the Hooper Island double ended crab skiffs. These boats were also used as gunning skiffs, and of course were raced with big summer rigs as well. I’ve long been interested in working smallcraft, power and sail, and have built quite a few full size boats for myself. The latest is a 23’ deadrise outboard power skiff. I also have built and sailed extensively, a 16’ crab skiff, though not a double ender like the model I’m presenting. I drew a sloop rig for Cricket, which is very similar to the Chapelle double ender, but in the end I used the cat rig. I’ve always loved the double ended Chesapeake sharpies, and chose this model from Chapelle’s “Boatbuilding”. I ordered the 3 sheet plan set from the Smithsonian a few years ago, and the drawings have been tucked away in a flat file until now. The lines and construction set are at a 1:12 scale, but I like bigger models, so I have re-lofted the lines at 1:8 which will give me a model nearly 40” long from bow sprit to rudder tip. I will spar the boat, for sure, but haven’t decided about making a set of sails yet. I’m fortunate to have bought a set of ships curves, splines, and lead ducks (as well as a planimeter) back in the pre-computer days. That stuff is gold these days. I use them all the time. Before the NYC lockdown, I ran out to the boat shop and milled up a boat’s worth of scale parts from oak, ash, pine, and WR cedar. I would use juniper if I had some, but I have a pile of the WR stuff, so I’ll plank with that. I also managed to scare up a small job site table saw, which I tuned up and have stashed under the back porch. I could use more tiny tools, but I do have some small Japanese back saws, detail chisels, and files. I lofted the lines on a sheet of white-painted masonite. I’ve drawn the body plan in Vector Works on the computer, because the sections are all straight lines. I made some very small corrections to the stations after laying down the longitudinals, and corrected the table of offsets. These are very minor tweaks for fairness. You’ll notice a little unfairness in the sheer on the body plan, but I know the half breadths are correct and fair, and I can adjust the heights of the sheer clamp on the set up. I approach models just like I do a full size boat, so I made a strong back with cross spalls to carry the molds or frames. The strong back is lofted right on the lines layout, as can be seen in my murky pictures. Normally, a cross planked boat is set up on molds, and the chines, sheer clamps, and keelson are sprung over the molds and temporarily fastened. After planking, the molds are released from underneath, and the boat is turned over then framed out. This presents a dilemma in a model with a full interior. It’s not easy to fasten the longitudinals without gluing. There is a lot of force from beveling and planking which can move the pieces around. But after some thought and help from John Earl, I went ahead with mold construction. I brought home a cheap little Delta benchtop table saw, cleaned it up, and put a fine toothed skilsaw blade on. I have to say it works great, and much better than expected. I also made a table for my upside down Bosch jig saw, used as a poor man’s scroll saw. It’s a little rough, but adequate for now. I’ve ordered some diamond files, machinist’s clamps, and spring tweezers. I’m just getting going on this, so I may be a little slow in posting. Forgive my wordiness. I love writing about this stuff!

-
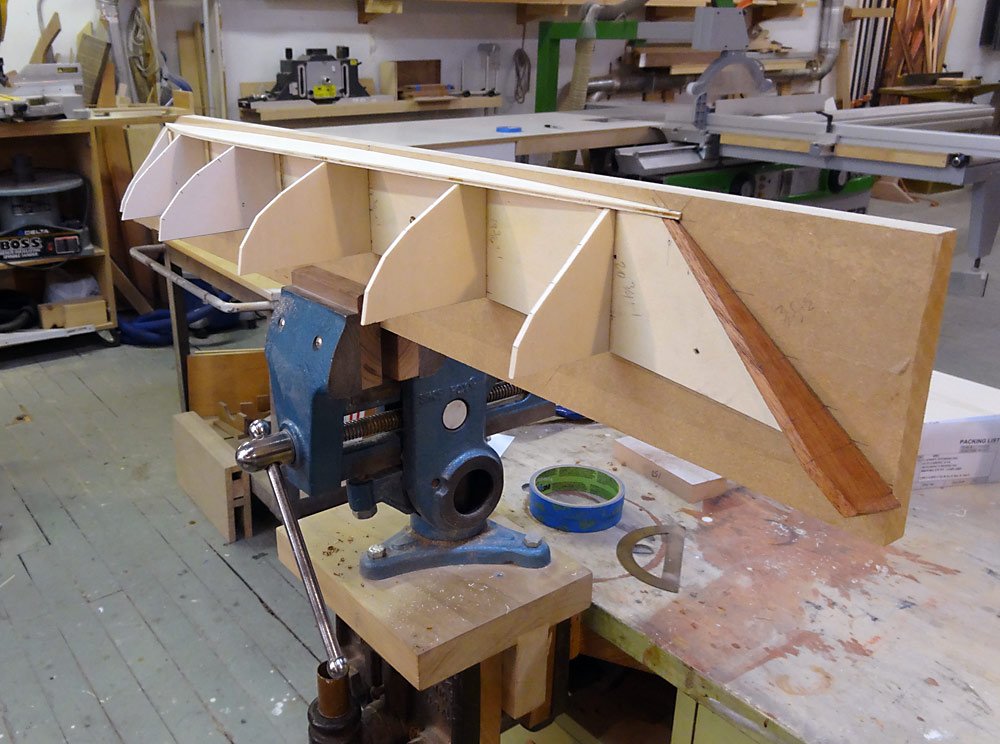
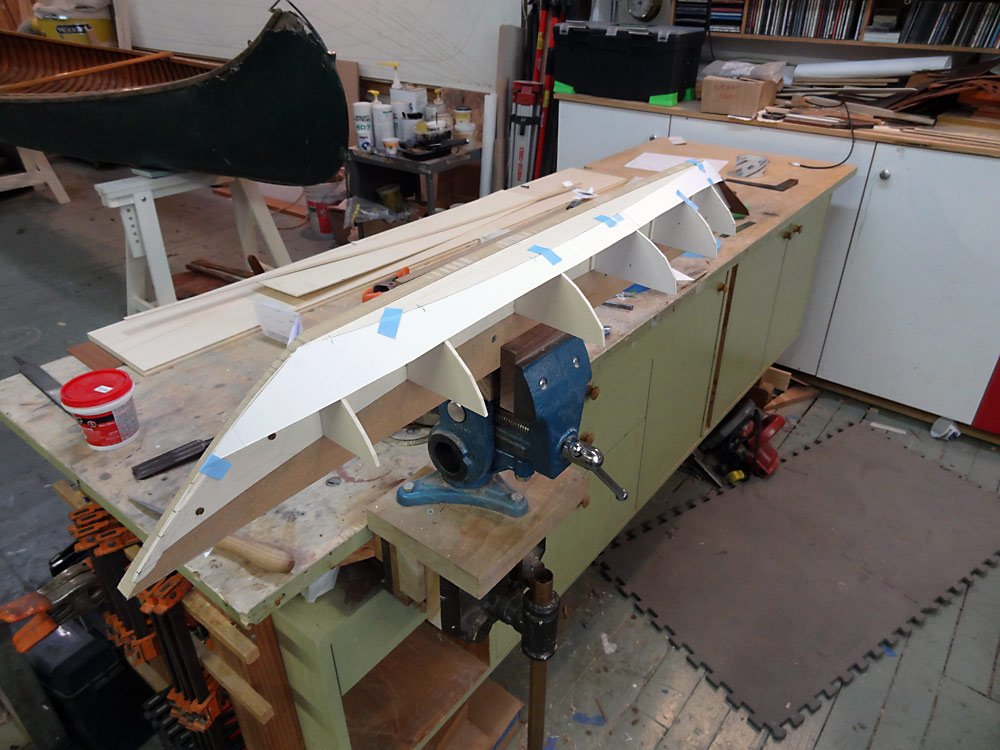
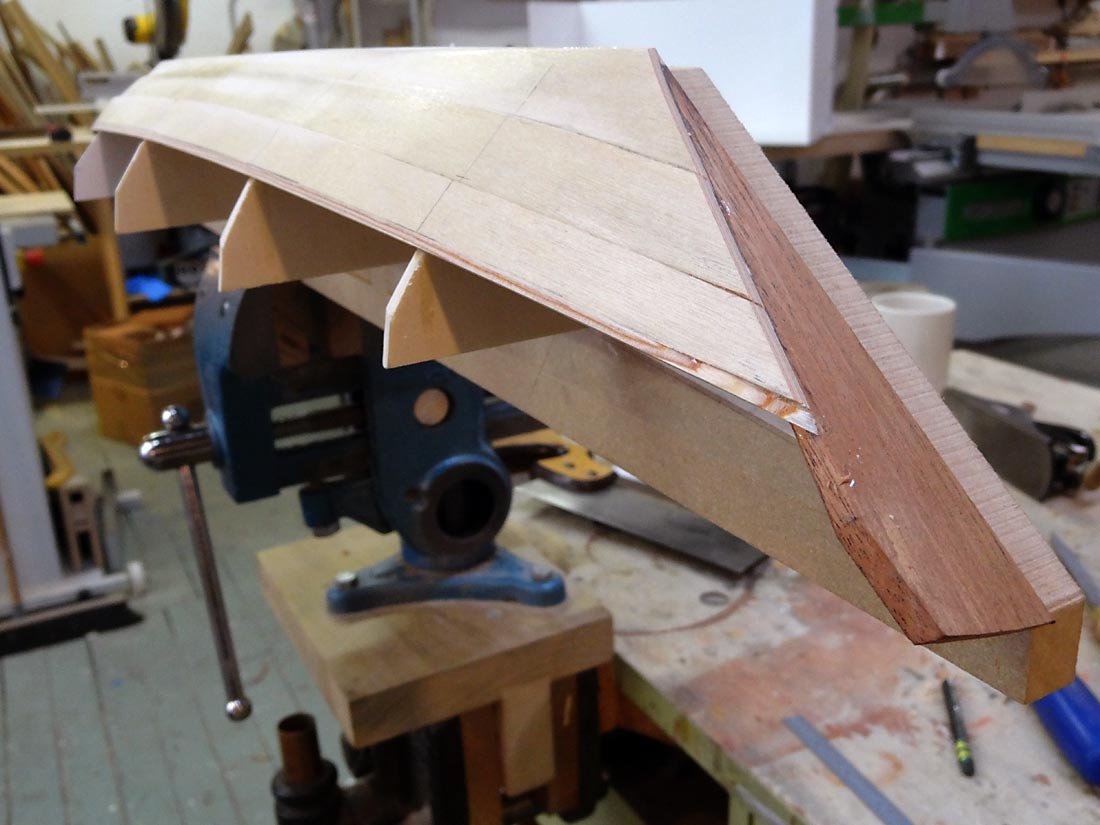
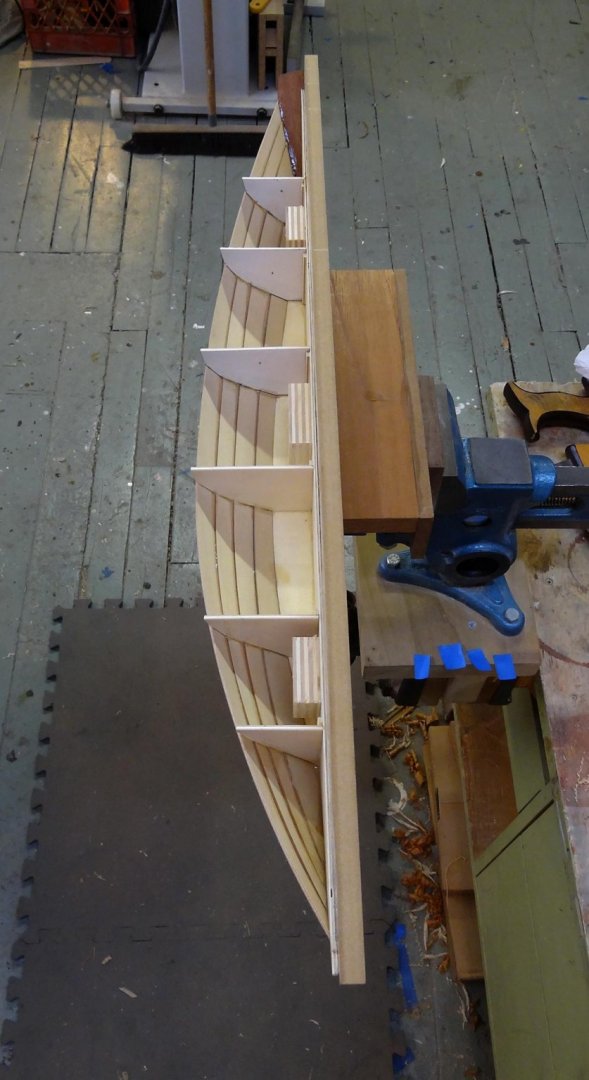
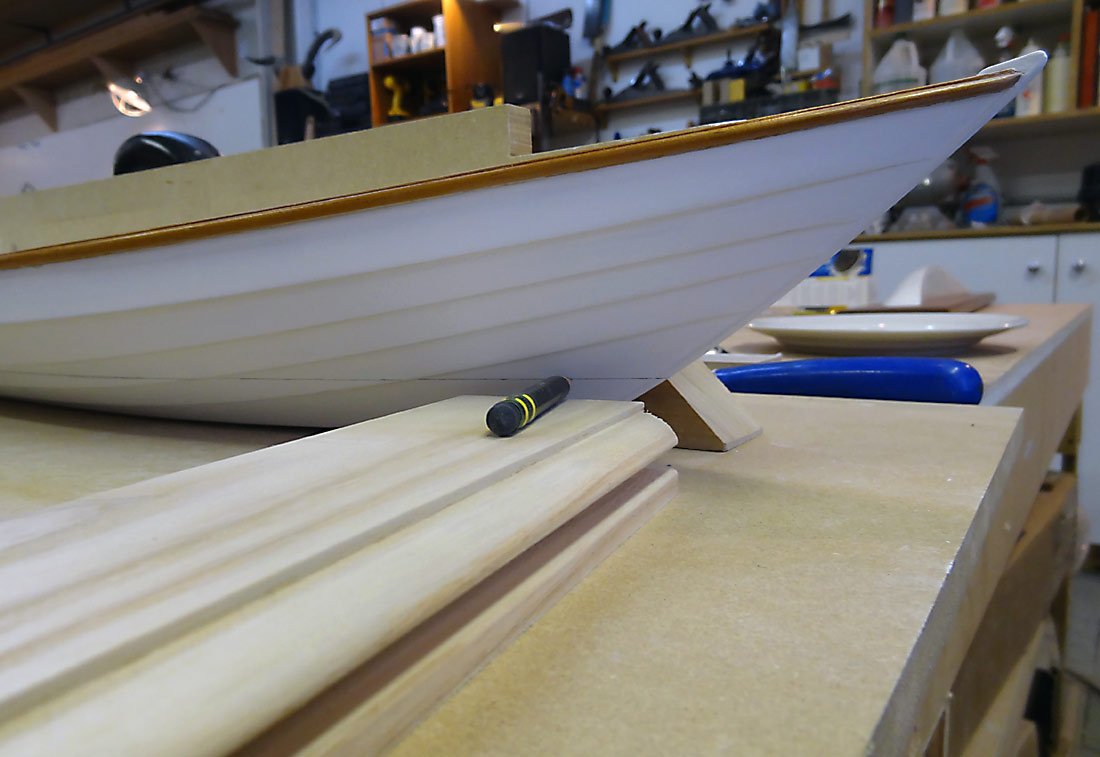
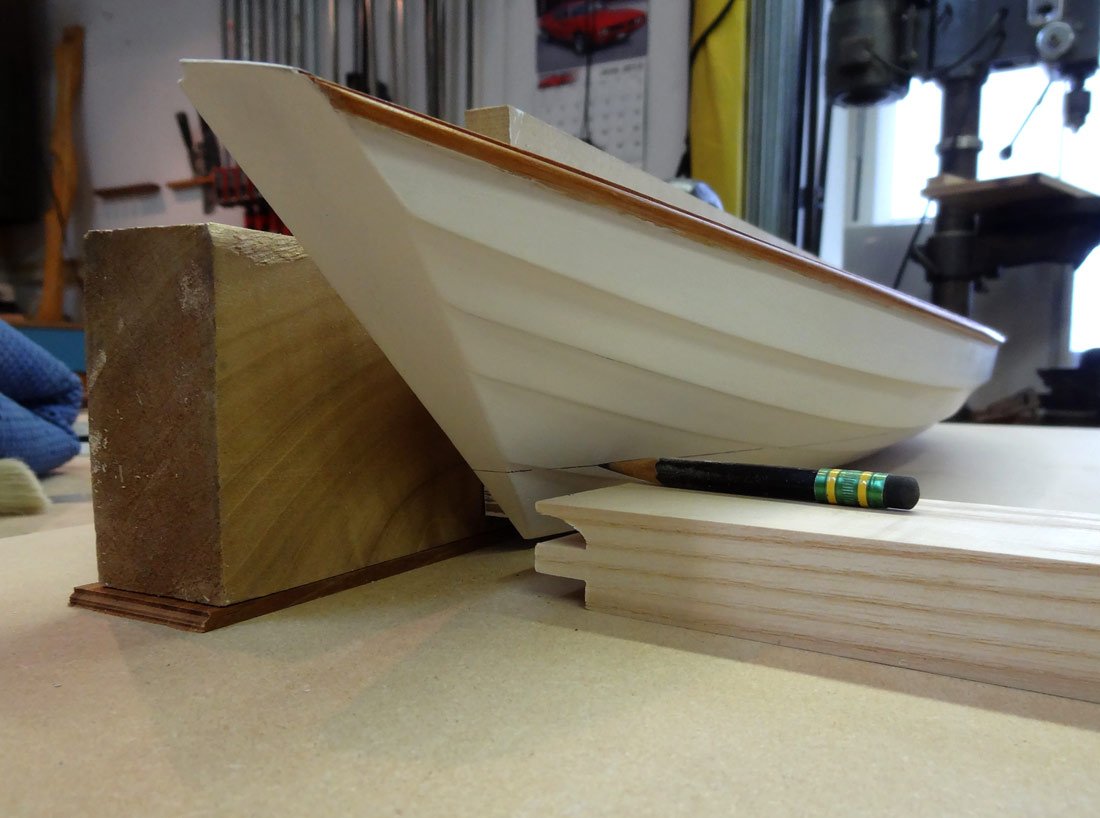
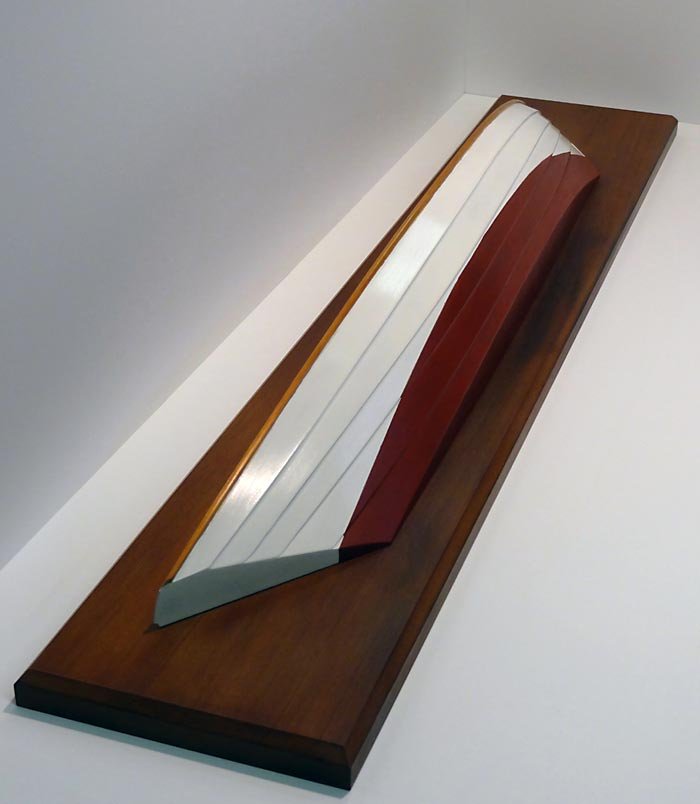
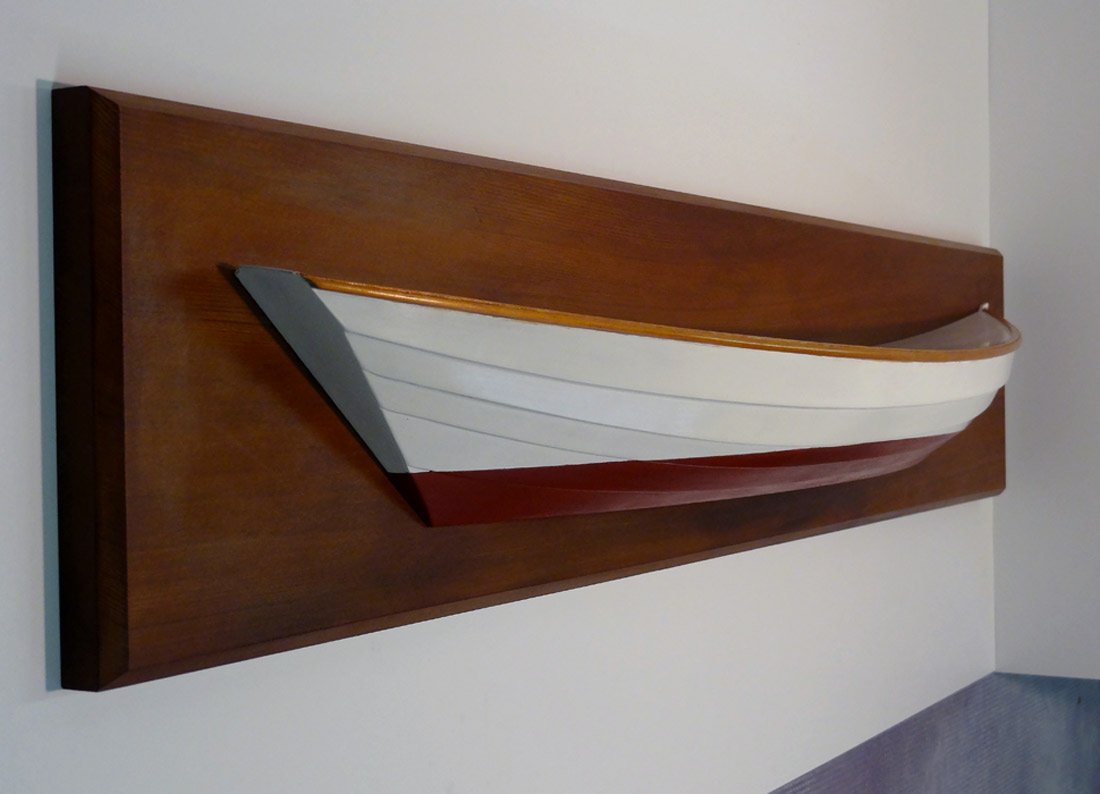
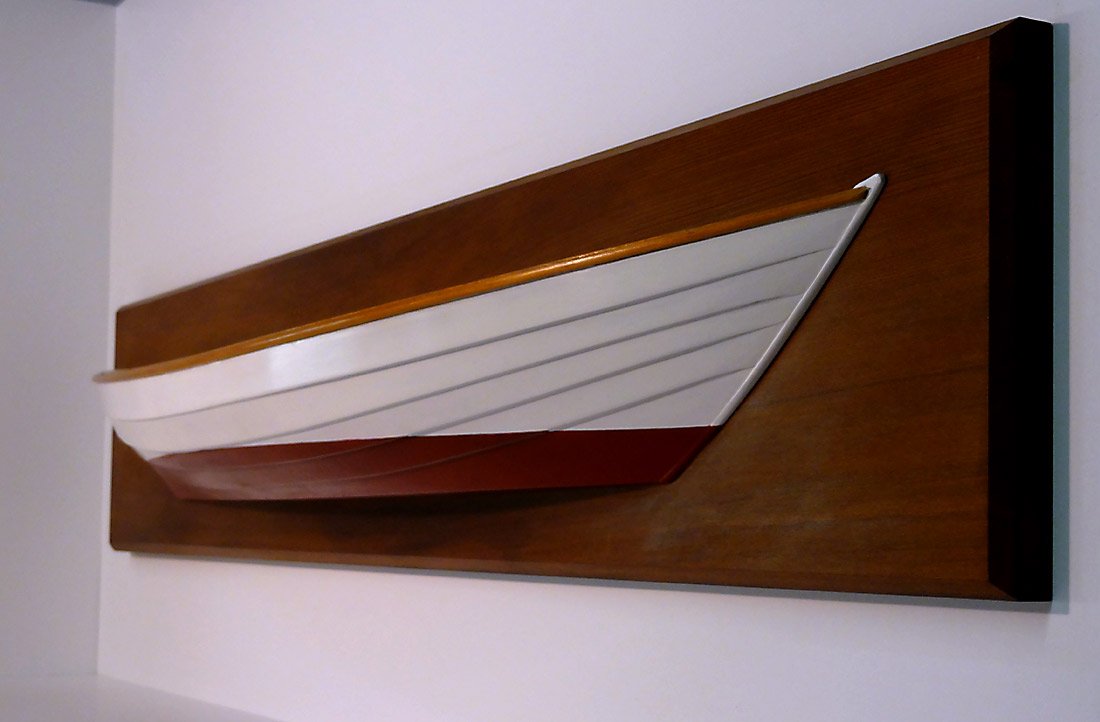
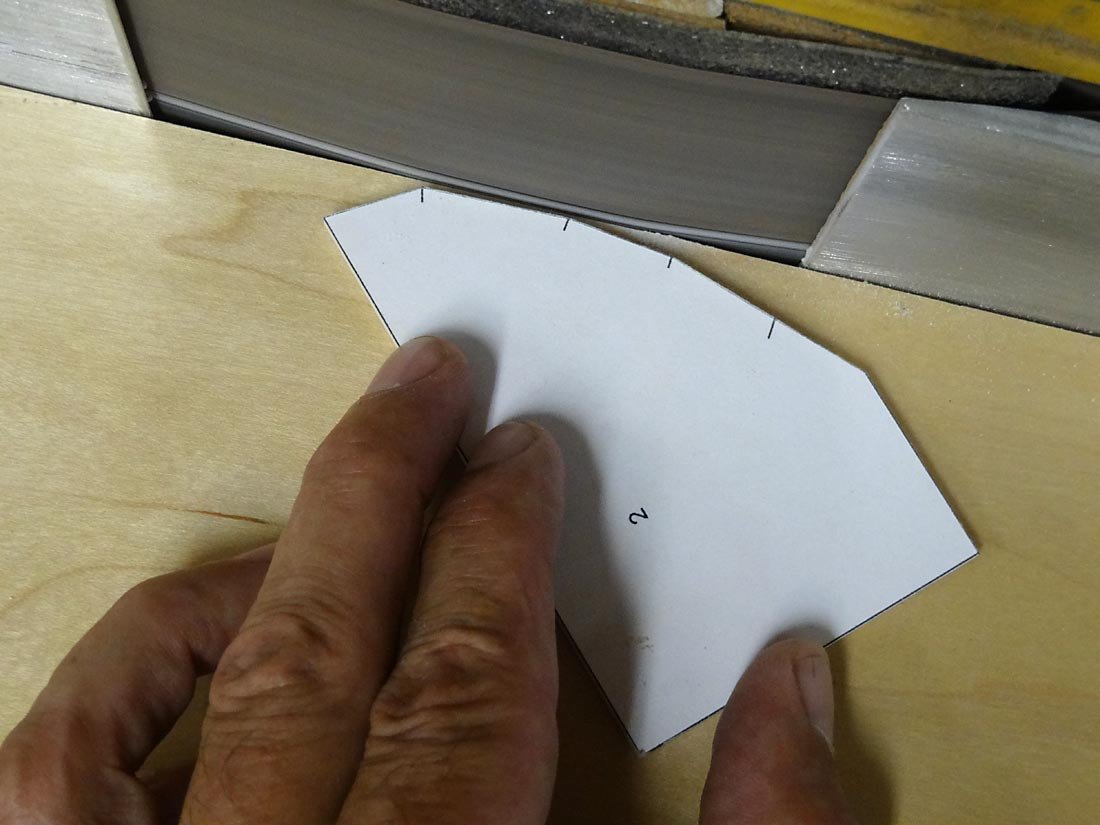
Dories have a narrow, flat bottom, usually about an inch thick. I used the 1/8" poplar again for that, gluing it onto the molds and then fairing the edge in a long, winding bevel to match the angle at each mold. This is just like it would be done on the full size boat. Once the bottom is on and faired, the planking can start. I used bristol board to make plank patterns, wrapping a strip around the molds and marking off the knuckle locations from underneath. You have to be careful not edge set the pattern. It must lay flat and "normal" on all the molds. After marking the knuckles, I measured the widths to the inside bevel of the bottom at each mold, then faired the lines with my spline and ducks. The expanded shapes of boat planks can be surprising. Once happy with the pattern, I traced it onto my planking stock, cut it out, faired it with a block plane, and glued it on the molds. It's a challenge working this small, trying to figure out ways of clamping things to a small, fragile setup. I ended up just starting amidship, and gluing a little bit at a time, holding it all with my hands til the glue set, then moving on. I've lost quite a bit of skin so far to the cyanoacrylate. Each plank is beveled once on the boat so the plank above lies fair, with a close fit, making contact with 100% of the bevel. In the extreme ends, gains are cut to let the planking lie flush at the stem and transom. This was done with a knife and small chisel. My rabbet plane is too big to do any good here. This was my first model, and I was surprised at how thick and workable a 1/16” plank actually was. Each plank was patterned, cut out, then glued on the boat. I installed small blocks inside the model, so I had something solid to screw into to mount on the presentation board. Before the sheer plank went on, I fit a deck cap to close the model off. I fit a spanish cedar rubrail, tapering it in height and thickness in the ends, to lighten the sheer visually. As with full size boats, I sealed the rail with shellac before installing. This keeps the bright work cleaner while gluing and painting the model. Once fitted and trimmed, I painted the hull with white casein paint. I like the soft surface it imparts. Then, with the model propped up exactly level and parallel with the waterplane, I made a little jig of blocks at the right height, and scribed a waterline on the boat. The bottom was painted with red casein, and when all was dry and sanded, I waxed the hull, and mounted it on the presentation board. That piece of oak was a curbside dumpster find. An old oak dresser was being thrown out, so I nabbed parts of it. Nice flaky quartersawn oak. These planked half models are relatively quick to make, and look good. I think there is potential for a good exploration of hull types. It’s also a good exercise in lining planks.
- 1 reply
-
- 5
-
-
- beachcomber
- dory
- (and 2 more)
-
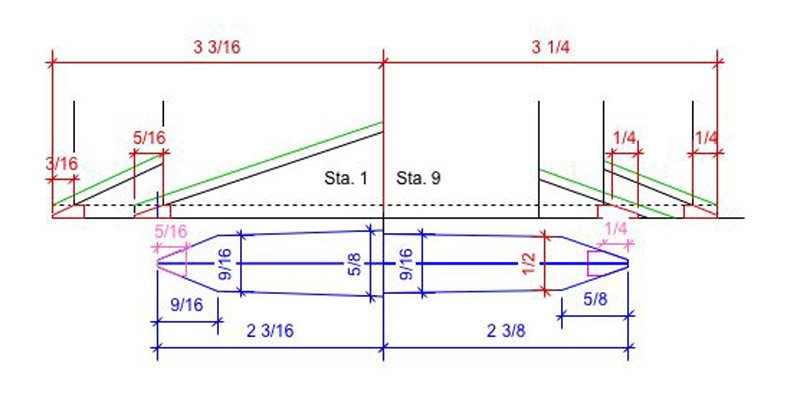
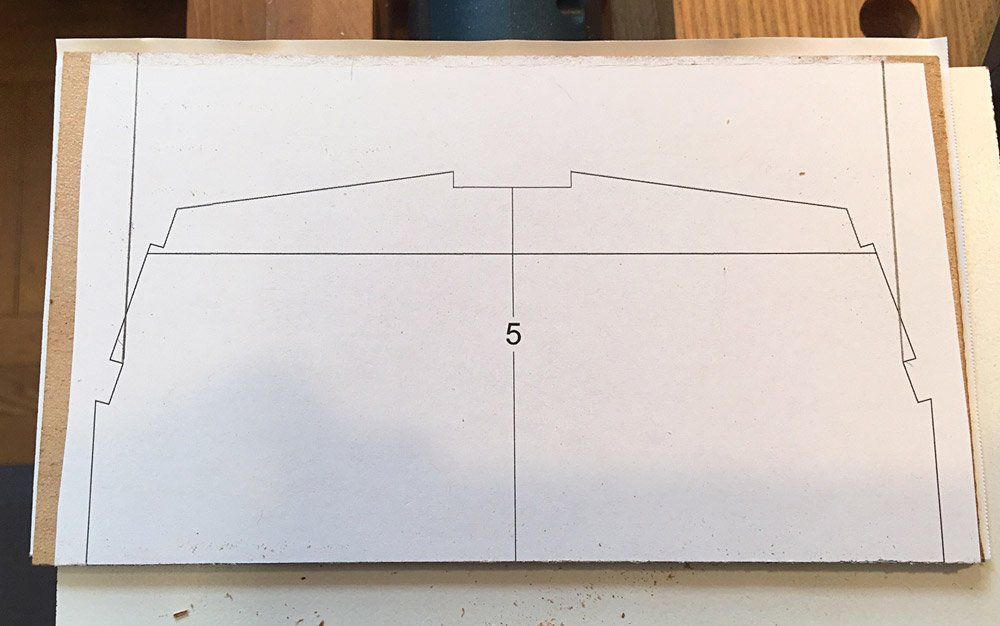
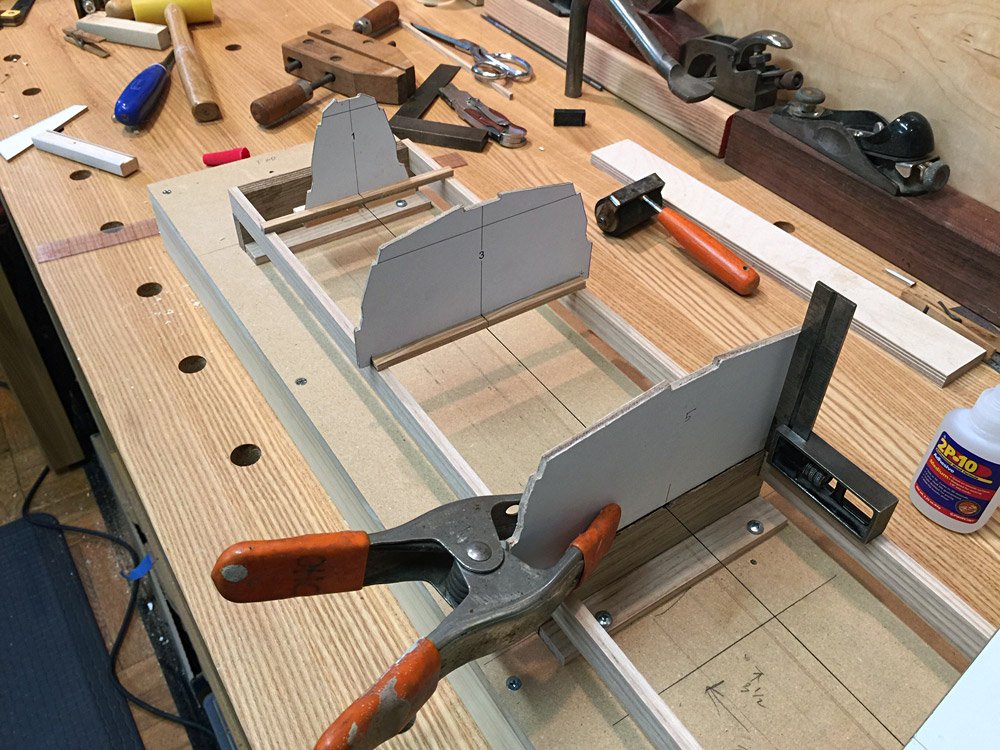
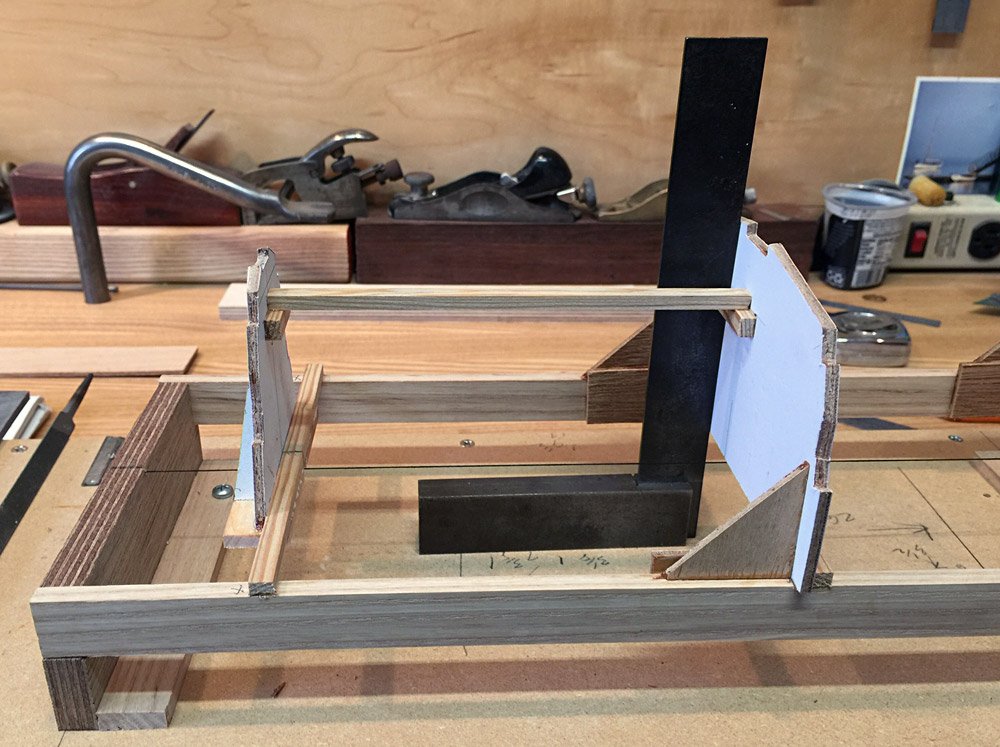
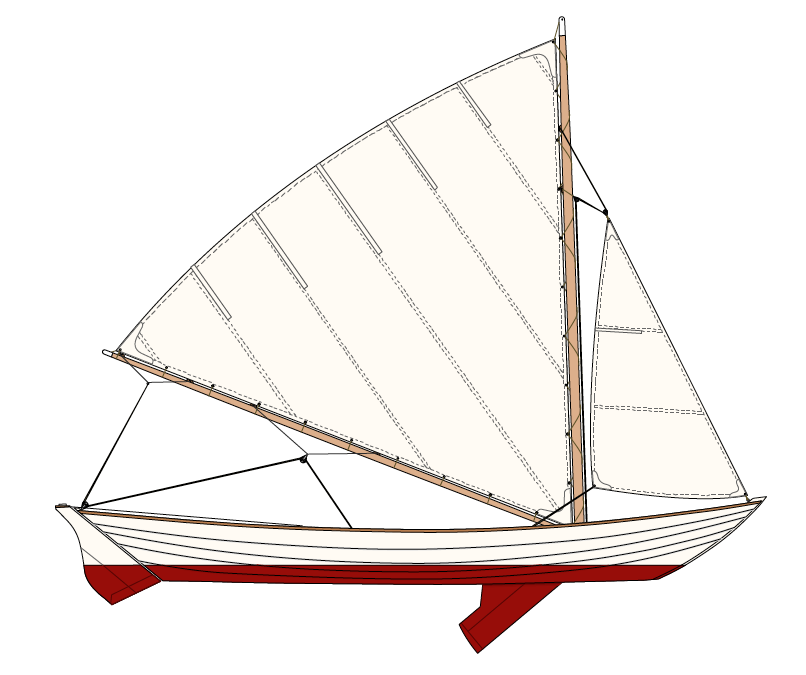
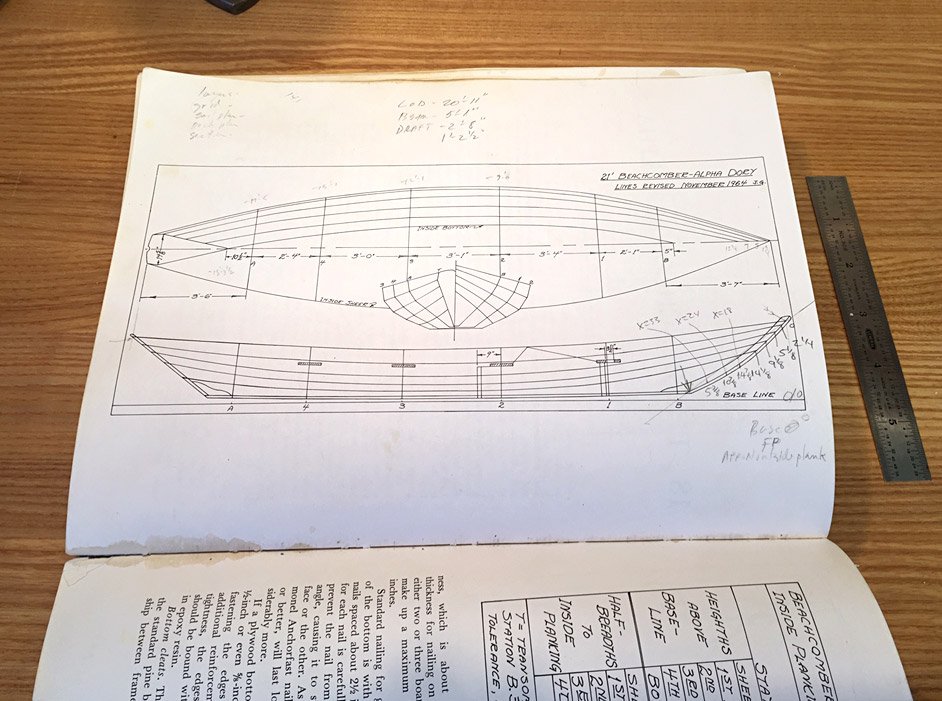
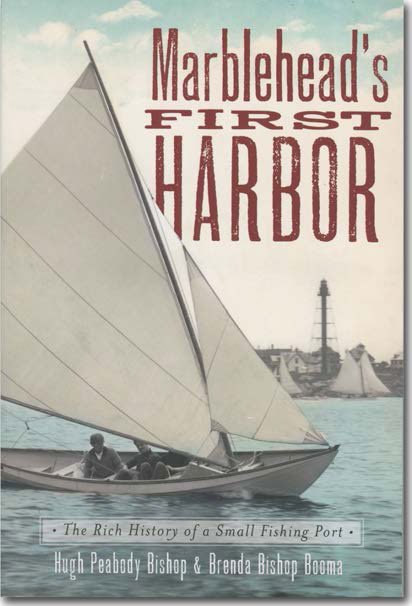
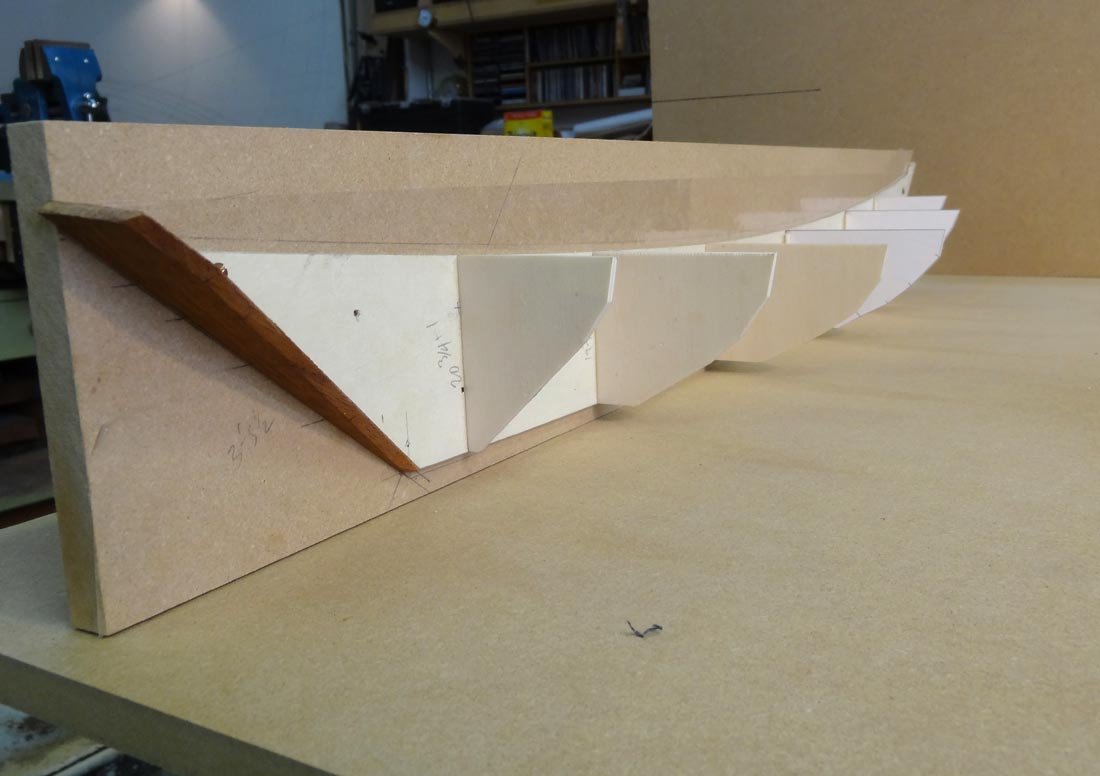
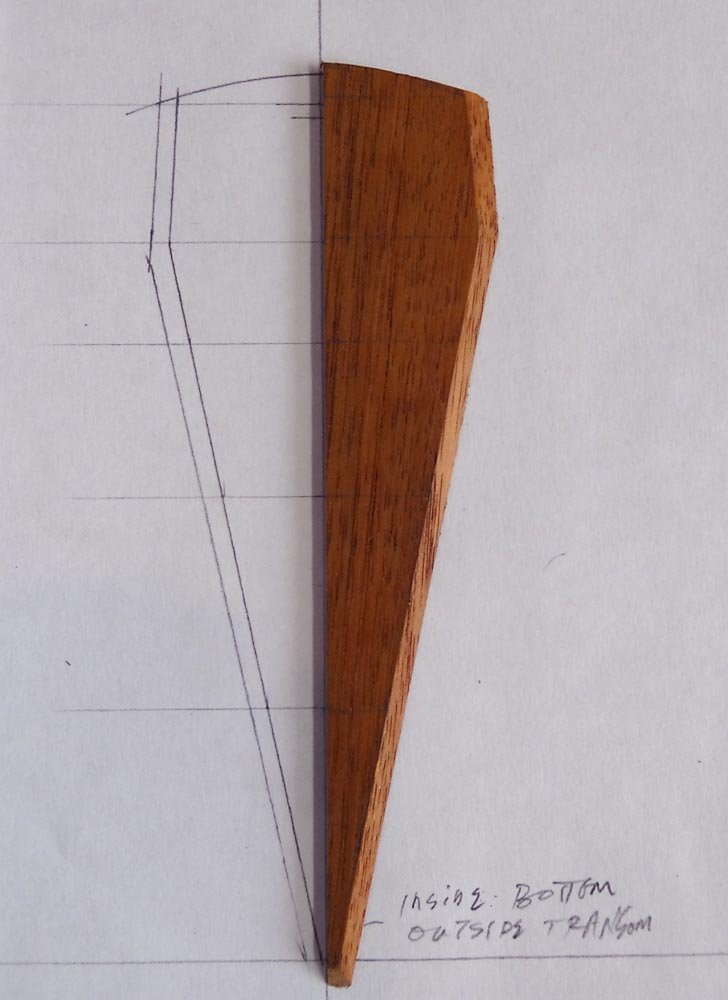
I’d like to recreate the build log for a planked half model that I posted a few years ago on another forum (not a model forum). I’m rewriting some of the text, and copying and pasting some of the text from the previous post. Pardon me if it sometimes appears a little disjointed. I've long been fascinated with the Swampscott type dories of Boston's North Shore, and I have considered building one out at my boat club. Years ago, I drew up a portrait of the sail plan for the Beachcomber, an exceptional boat from William Chamberlain's shop in Marblehead. I'll get bogged down if I try to describe it all here, so I will refer you to an article I wrote for my club newsletter. http://jimluton.com/dorymod/beachcomberarticle.pdf Below is the cover of a nice book, with Chamberlain's beachcomber on the cover. The lines, table of offsets, and construction plans for this boat are published in John Gardner’s “The Dory Book”. The half model is set up with half molds on a flat board (1/8" poplar ply), sawn to the boat’s profile shape, that represents the hull centerline. That profile shape is then mounted to a piece of MDF to keep it flat. I used 1-1/2" = 1'-0" as a convenient scale. The model is a manageable size (the 21' boat is about 32" long), and scale planking is relatively easy to come up with. 1/2" planking translates to 1/16". For this I used a sheet of 1/32" aircraft birch, which I cut in half and vacuum bagged together to make a 1/16", six ply sheet. The molds are cut from 1/8" Italian Poplar ply. The 1" thick transom is 1/8" mahogany, etc. etc. I already had the body plan drawn to scale in the computer, so I printed out the individual sections and glued them to the 1/8" ply mold stock, then cut them out and faired them on a little belt sander table. The molds and transom are each glued to the profile board in their respective positions, corresponding to their position on the lines plan. I used cyanoacrylate for this, as for the whole project. I mounted the profile board to a piece of MDF with an "L" shaped block on the back to facilitate clamping in the vise in various positions. I I'llI I'll stop here for now, and pick this up tomorrow. Time to work on the sharpie. Thanks for looking! Cricket
- 1 reply
-
- 3
-
-
- beachcomber
- dory
- (and 2 more)
-
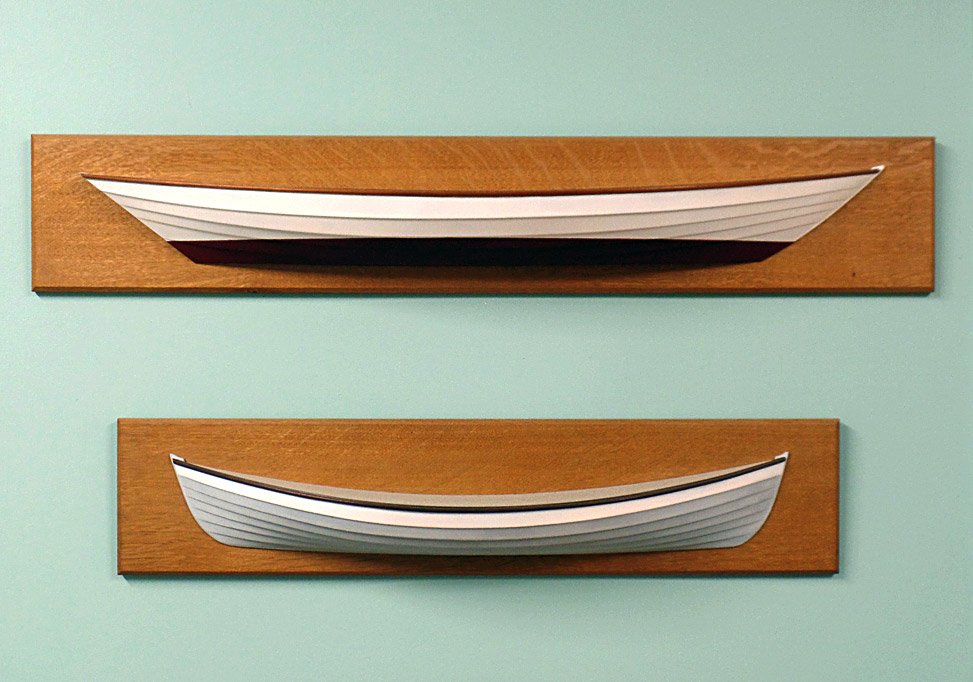
Hi Crow, new here myself. I've built a couple of planked half models, both lapstrake, planked on molds with stringers backing the laps. My intro shows pics of a couple. It may not be what you're looking for, but I plan to retro-post those projects in the coming days, as I work myself on some new model projects. Cheers, Cricket

-
Thanks Eric, I do shop at Tools For Working Wood, the distributor for Gramercy tools. Their store is close to my house. Cricket.
-
Nice Flattie, Eric! You asked in an early post about books or references to Chesapeake working craft. Besides Chapelle (who also published a small booklet on Chesapeake Bay Crabbing Skiffs), one of the nicest work boat references is Larry Chowning's "Deadrise and Cross Planked". There are quite a few others on Log Canoes, Bugeyes and Skipjacks, etc, etc. Reuel Parker included the Hampton Flattie in his "The Sharpie Book". That's worth getting if you'd like to try your hand at a few scratch built models. There are small drawings with offset tables for 15 of his adapted sharpie designs. Parker, by the way, is a powerhouse boatbuilder, now on his 7th large liveaboard vessel. He is a champion of rugged engineering and practical adaptations of traditional working sail. Cheers, Cricket
- 72 replies
-
- 2
-
-
- Chesapeake Bay Flattie
- Midwest Products
- (and 1 more)
-
Nice job bending the frames. The canoe looks great, and I'm sure you'll be anxious to varnish. Have you thought about an Adirondack guide boat? There are quite a few published lines in various books. Thanks for sharing your projects. Cricket
-
Windsor Terrace. I can see your old house from here.
