DaveBaxt
-
Posts
1,324 -
Joined
-
Last visited
Content Type
Profiles
Forums
Gallery
Events
Everything posted by DaveBaxt
-
Thank you Lyle for your input. I did exactly the same for the Bounty using a heating Iron and Chucks method of marking off and bending edge ways and as you say takes a bit more time but turned out quite good in the end. I will take a look at your log and compare notes haha. For the record the Bounty's first layer of planking is also Walnut where as the Endeavour is lime. The Bounty's first layer was also 6mm wide x 1.5mm thick which wasn,t without issue but I ended up soaking overnight as this seemed to be the only way to bend the planks on their edge. I did not need to do this with the second planking as it was only 0.5mm thick.The Endeavour's second planking 1mm thick so I might have to soak this too for sometime. Bestregards Dave
-
I already did a few days ago. I will of coarse add any question I may have, as they arise. I will eventually start another blog once I have purchased the Endeavour kit which should be sometime next month. I am also planning on buying either a drill press or even a milling m/c at some stage before I start building in the hope of producing better elements of the model . I also have a thread running on this subject too.
-
Funny you should mention that. I already have a few questions and I haven't seen the kit yet!.
-
Thank you guys you are both very kind and it gives me confidence to proceed with the HMS endeavour. Best regards Dave
-
Yes I have been looking at the Endeavour by Caldercraft due to local interest. However I understand it is quite a difficult model to build for a beginner. I won,t be starting my next model until October/November when the autumn begins to settle in.
-
Thank you Gregory for all your help and keeping an eye on my progress. Best regards Dave
-
Thank you Tim for all your help, especially with the rigging
-
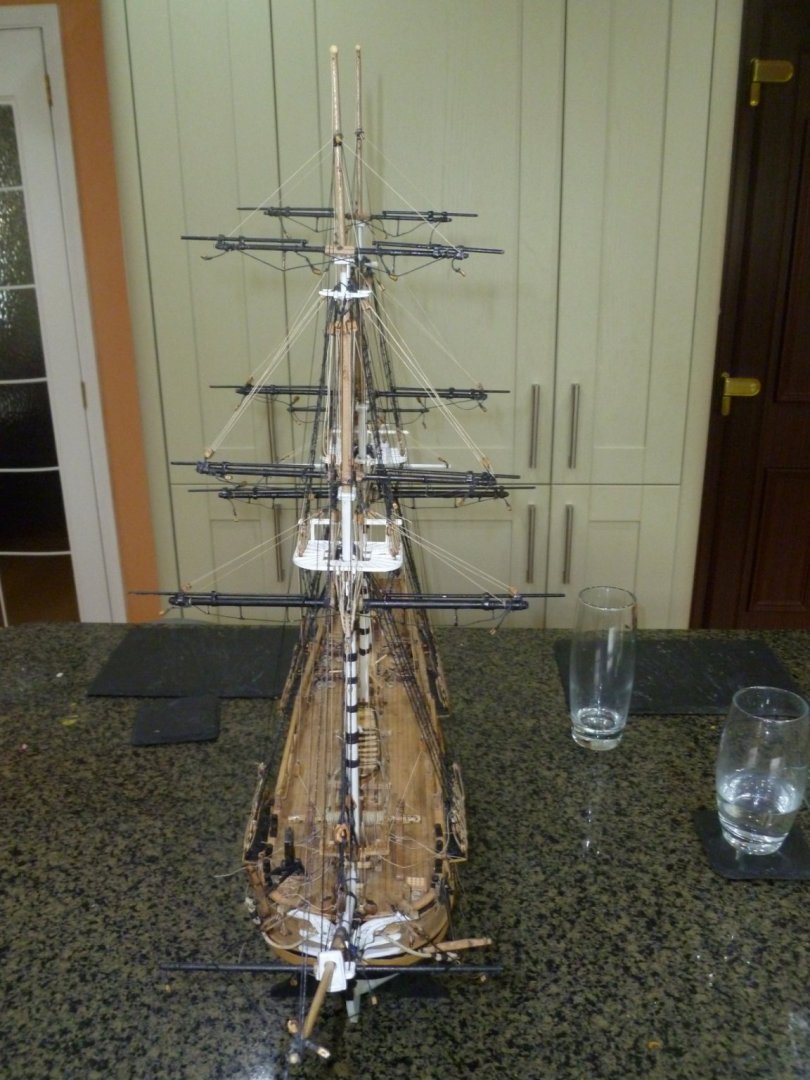
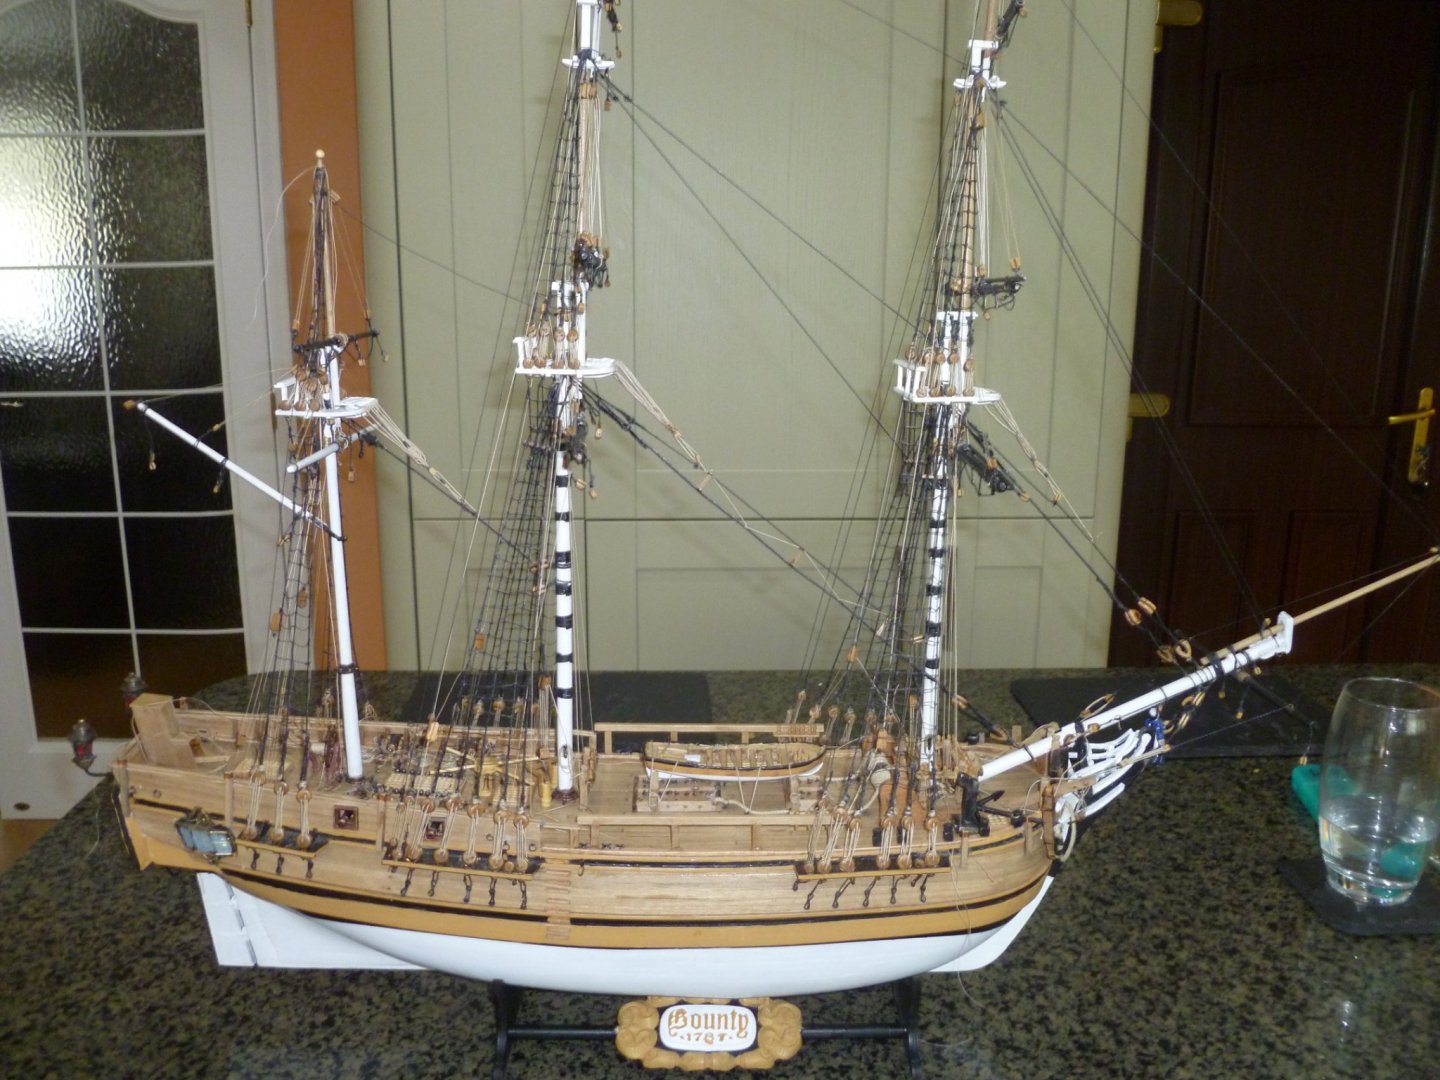
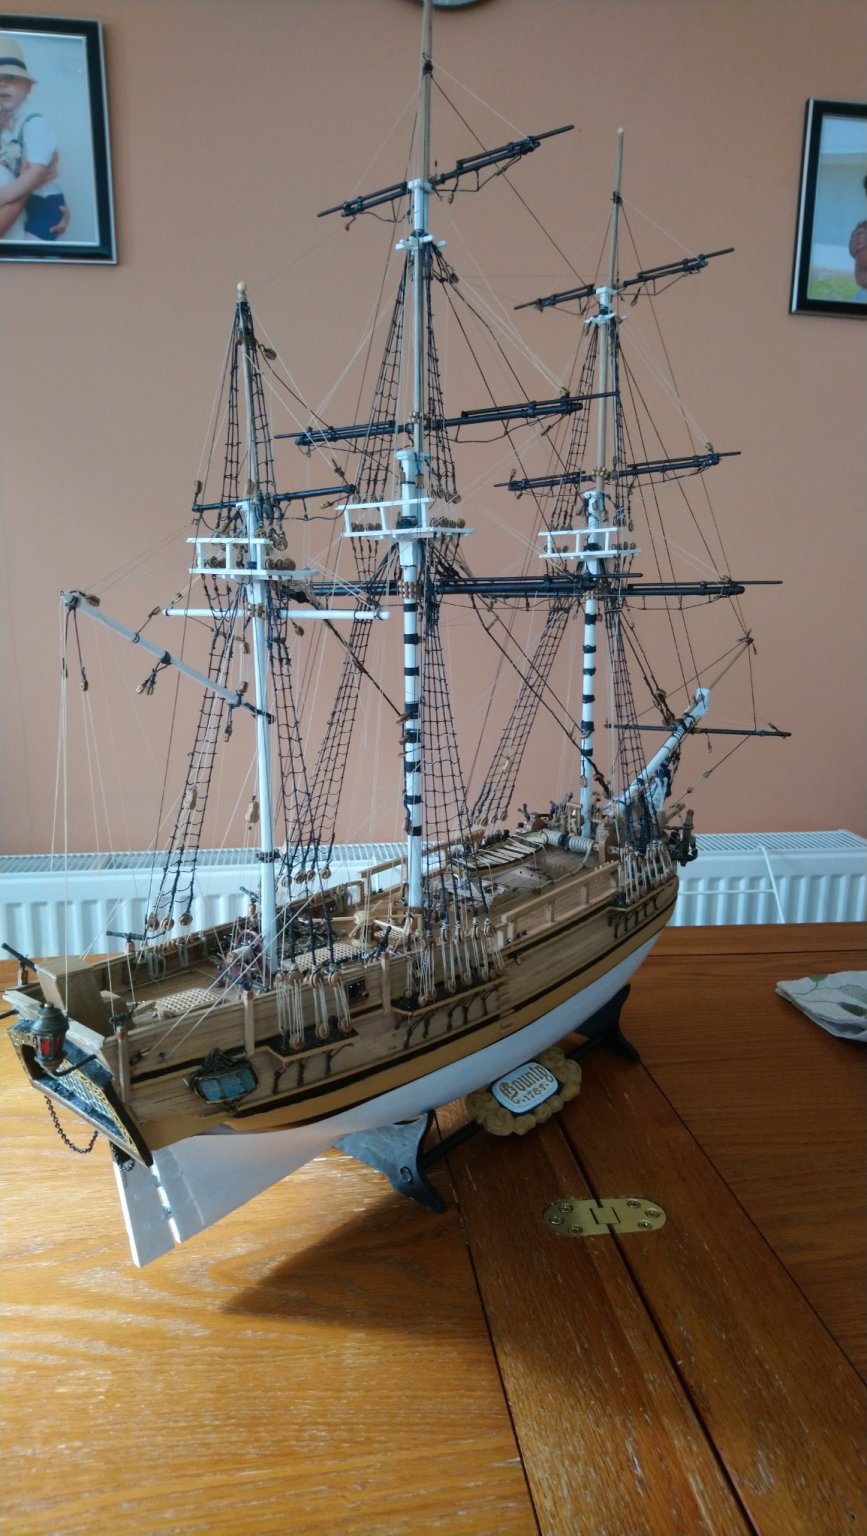
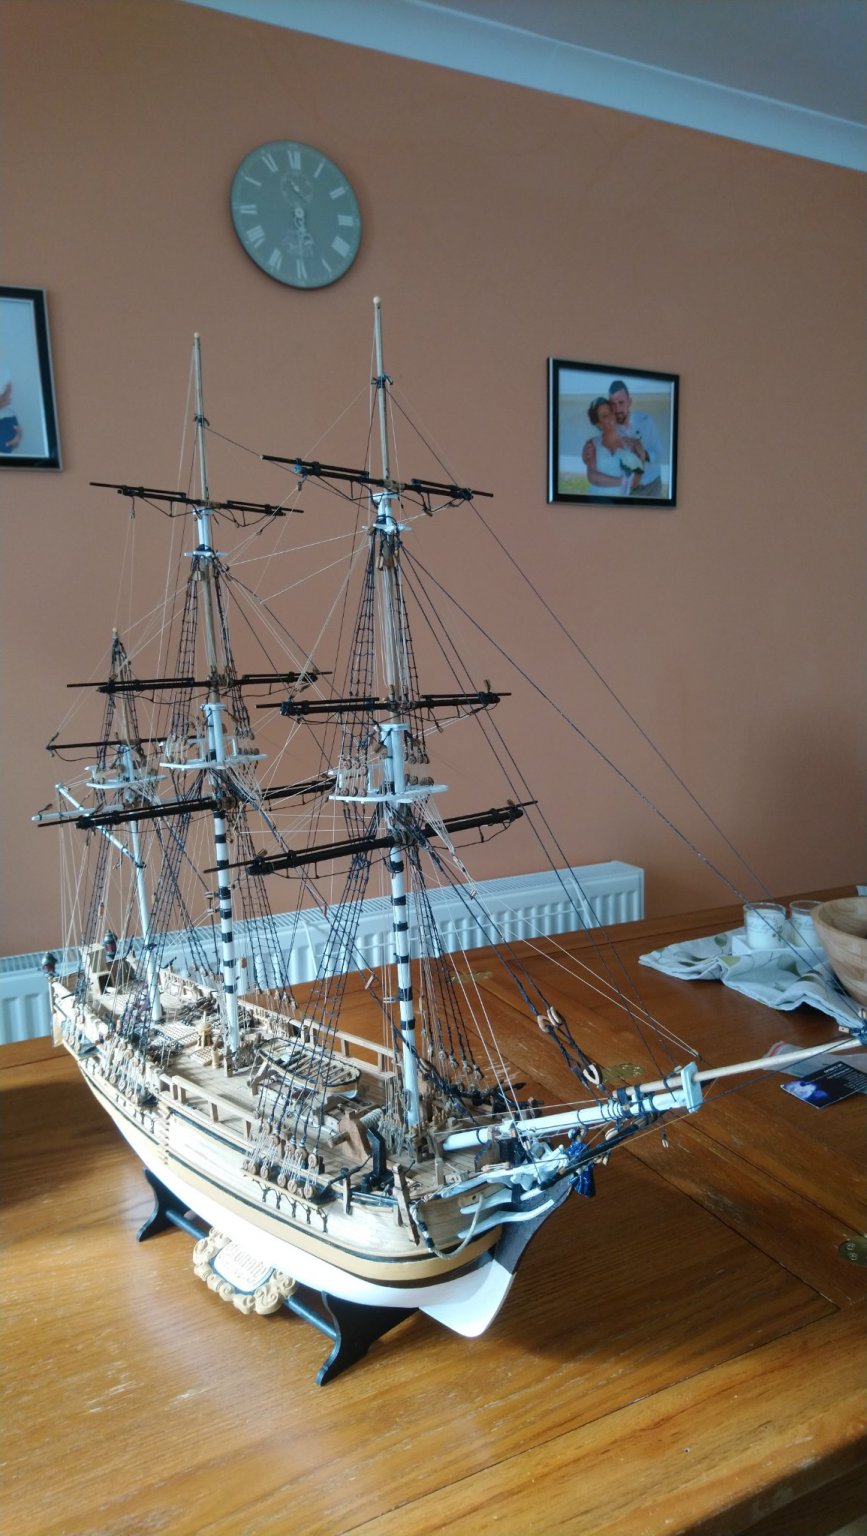
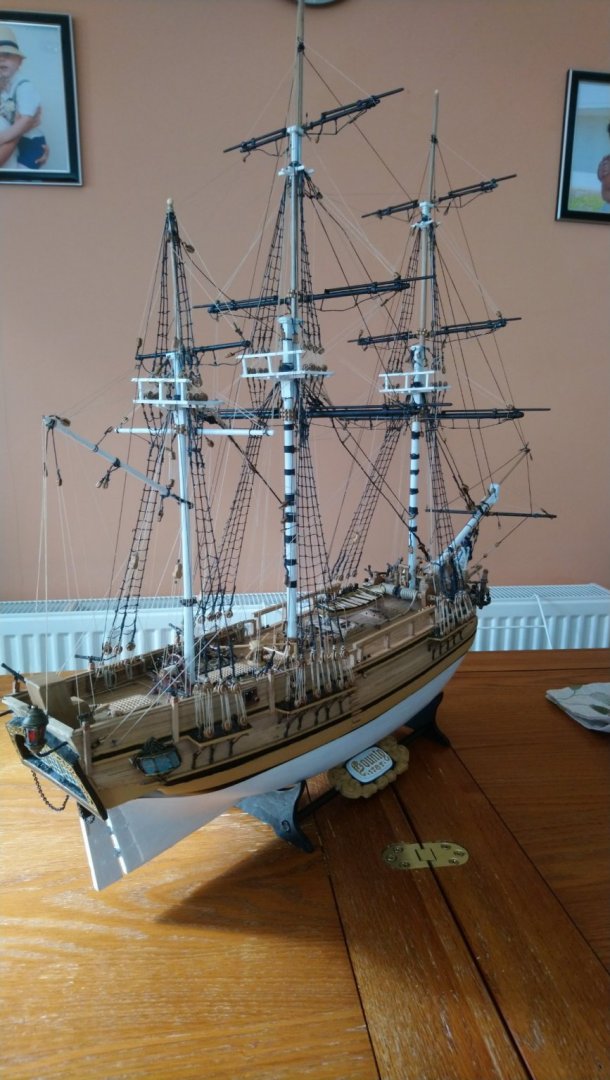
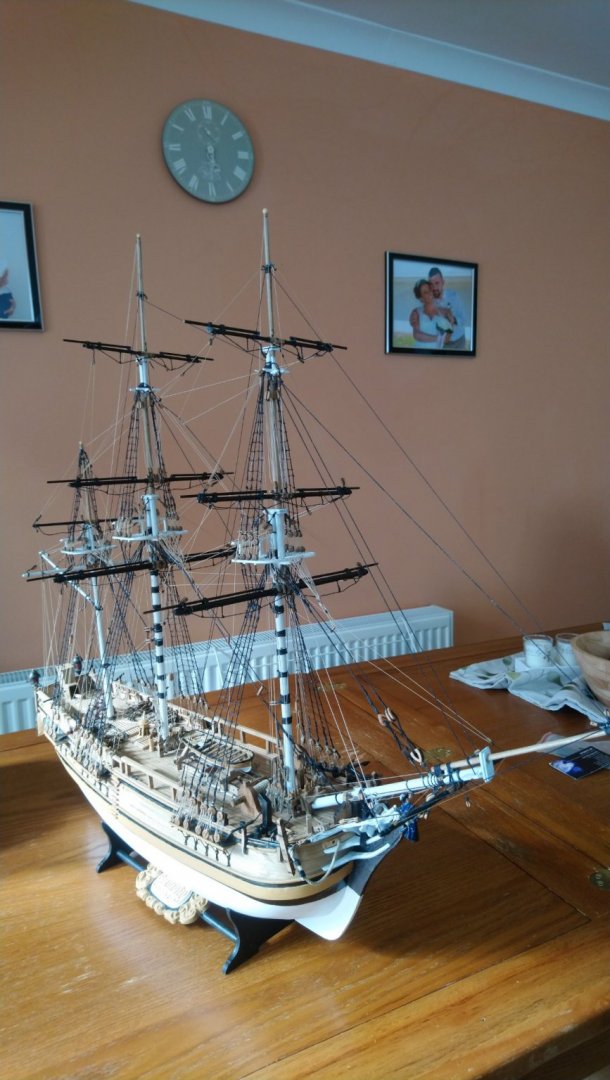
Well I think I am done. Just the flags to attach to there lanyards and then pop over a display case ( hopefully arriving next week). I made a jig which made about 10 rope hanks for the ropes over the belay pins. After attaching the ropes to the belaying pins I had to slacken off and re adjust the ropes a few times to get what I thought made the yards parallel . Did I make any mistakes, lots and had to do them again several times. Could I have done better than what is my first time building a period ship. Most definately and I probably rushed some parts in the hope of getting it finished in time before the good weather arriving and didn,t want to leave it until the winter. So after 7 mths and probably over 1000 hrs working on her, here she is. I hope you like it guys. It has been a huge learning curve,especially with the rigging. Having started using the Amati drawings but then changing the rigging as I continued ti learned to do it more accurately. So ended up using a few extra lines and blocks( so a good job I had lots of spares which I thought I would need) I also made a mess of the supplied flags so decided to order some cloth ones which hopefully will arrive soon. Unfortunately I have lost my lead for my camera so have taken these from my phone II I would just like to thank the many people on the this site for all the help and patience and for the many questions that I asked over the last several months. I would also like to make a special thanks to Jerry and his wife Marlene for there fantastic blog of their Amati version of the Bounty and also for the encouragment Jerry has given me. I am now considering the HMS Endeavour by Caldercraft whhich I beleive is a bit of an upgrade on the Bounty and will present me with a few more problems. However I am now armed with a good few books especially on rigging and therefore will be able to do it some justice. I have also learned how to be more patient and work slower in the hope of improving the workmanship , especially on the rigging on the cannons and better securing those lower deadeyes.. I also now have a better understanding of the rigging for at least a ship without sails. perhaps the next one will be with furled sails. Best regards Dave.


-
Flags supplied by Amati look to be too big
DaveBaxt replied to DaveBaxt's topic in Masting, rigging and sails
Thank you for your input and I think you are correct. Since starting this thread I have looked at quite a few photos of period ships and there flags and I am incorrect in my first thoughts on this subject. Please forgive me for my ignorence to everyone for not doing more research first . You also mentioned the smaller ensigns being used as well but only the Union Jack has been supplied in the smaller flags ,unless this is classed as a ensign? Best regards Dave -
Flags supplied by Amati look to be too big
DaveBaxt replied to DaveBaxt's topic in Masting, rigging and sails
Yeah I seen them. Looks really nice. I assume the line is to tie it to a lanyard rather than glue it. Do you reckon the 75mm one is the one to get.I also see there is a nice video on the Beccs sight which shows how to fold them too. I think I will get this at some stage, the next time I order something from them. THanks again for your help.Best regards Dave. -
Flags supplied by Amati look to be too big
DaveBaxt replied to DaveBaxt's topic in Masting, rigging and sails
Thanks guys. No I haven,t tried printing them but I am sure I could if needs arise. At the moment I am not sure if I did it would turn out any better than what is supplied however printing on silkspan might be an option. I havd a look on cornwall ship models which as you saind supply some flas made out of a cloth type material and look very good however at a fairly high price for what they are. Thank you every one for helping out here .Best regards Dave -
Flags supplied by Amati look to be too big
DaveBaxt replied to DaveBaxt's topic in Masting, rigging and sails
Thanks for that ! I will take a look and see what they have. -
As it says above. i think the flags red ensign and white ensign are too big as is the one in the middle which i think is for the reserves . the Union Jack looks to be ok. Of coarse I could be wrong. Ensigns are aproximately 110mm x 55mm and the union jack is 65mm x 30 mm.Scale is 1:60 . Best regards Dave
-
Thank you Thunder for the heads up on the different kits. It is all information which I need to digest. Best regards Dave
-
Wow 20. Do you have a favourite? The one you got the most joy from, or are they all equal?
-
Still can,t make my mind up and as you say, if I /we make any mistakes I can always do it again. I will definately do the Bounty again sometime in the future and perhaps attempt the one with the open hull. The amount of mistakes I have made on my current Bounty is numerous to say the least and was a steep learning curve as they say. However to the untrained eye she still looks inpressive. My wife likes it and it has warranted a display case so thats good enough for me. Ha ha. My main problem is I sometimes try to do too much all n one go and I need to understand when to say 'I have done enough for today and need a break' Perhaps I will take more time with my second period ship and understand what exactly needs doing before I proceed. Thanks guys for your input and trying to help me decide the best way forward. Best regards Dave
-
Thank you Thunder and you are might be correct in saying the difficulty in planking the hull compared to the Bounty would be more difficult and your advice as to choosing another one would be more appropriate, However I have been interested in Captain Cook for a while as I don,t live too far from where he was born and brought up. Also being a recently retired marine engineer I totally admired the man. However this does not really give me any advantage, more of a disadvantage if anything as taking things for granted comes into play rather than working with a clean slate.I have also been looking at the Snake as somewhere it has been listed as beginner/intermediate kit. Decisions decisions!
-
Not wishing to put you off in anywau as I am sure you would do a fantastic job.However I have heard that the HMS Snake can also be a challenge. I do like the look of Walnut and as I have a few pieces of the 0.4mm thick planks so perhaps I could get some more as it is not too expensive and fairly easy to work with and use this in stead of the 1 mm think planks supplied by Caldercraft. However I don,t know how this ties in with the copper plates as this will be the first attempt at copper tiles on the bottom.
-
Thanks for that in depth reply and for the photographs. So there is a big jump in the the amount of work involve. I am surprised that you say it was difficult bending the second planking as it is in walnut .What size is it ? The Bounty I have just build was Walnut for both first and second planking ,although time consuming I found it not too difficult ,the second layer being much thinner though and only 0.5 mm thick. The first coat layer was was 1.5mm x 6 mm and I ended up using brass nails to get the right shape and soaking them overnight prior to using them. I was told that walnut does not expand too much when wet and then leave gaps when dried.I believe the Endeavour has lime strips for the first plankng which I believe is easier to work with. Good here that the wood is good and hopefully the kit comes with everything in it. I agree ir will be interesting to hear what the other peoples views are and hope we have got the ball rolling. Best regards Dave
-
I am currently building the HMS Bounty and almost completed . What I hope is a reasonable effort for what is only my second model ship and first period ship. The model was made by Amati and although the instruction were vague and toatally wrong in some areas the parts and wood were generally good and only one or two parts were missing. I have been looking at several different models for my next ship to build but I have been mainly looking at Caldercraft and specifically The Endeavour but this time thinking of adding the furled sails. I understand that Caldercraft supply good quality plans and also believe they are very accurate and true to their period. Although the Endeavor is similar to the Bounty I though I really need to hone my skills in the hope of eventually building one of the larger Caldercraft models such as the Diana or the Argamemnon . I also like the scale of the Bounty 1:60 and beleive that 1:64 is about as small as I would like to go, mainly down to an age thing. Therefore I would like to know what peoples thoughts are on The Endeavor and any other makers who manufacture this ship. Also what are peoples thoughts on Caldercraft in General. Thank you and Best regards Dave
-
Thanks for that . You have put in a lot of work into that but clearly worth it as the end product looks very neat and tidy. Something worth considering for the future. Best regards Dave
-
Thank you and what a relief to think I am getting the hang of this .Every bit of the rigging in the instructions I am having to double check to see if the instructions are correct some of which would clearly not work others are ok but over simplified. I just wanted to make sure that the cross jack wasn,t a yard from a different time period or specific to a different country. Thank you for clearing this up for me . Best regards Dave
-
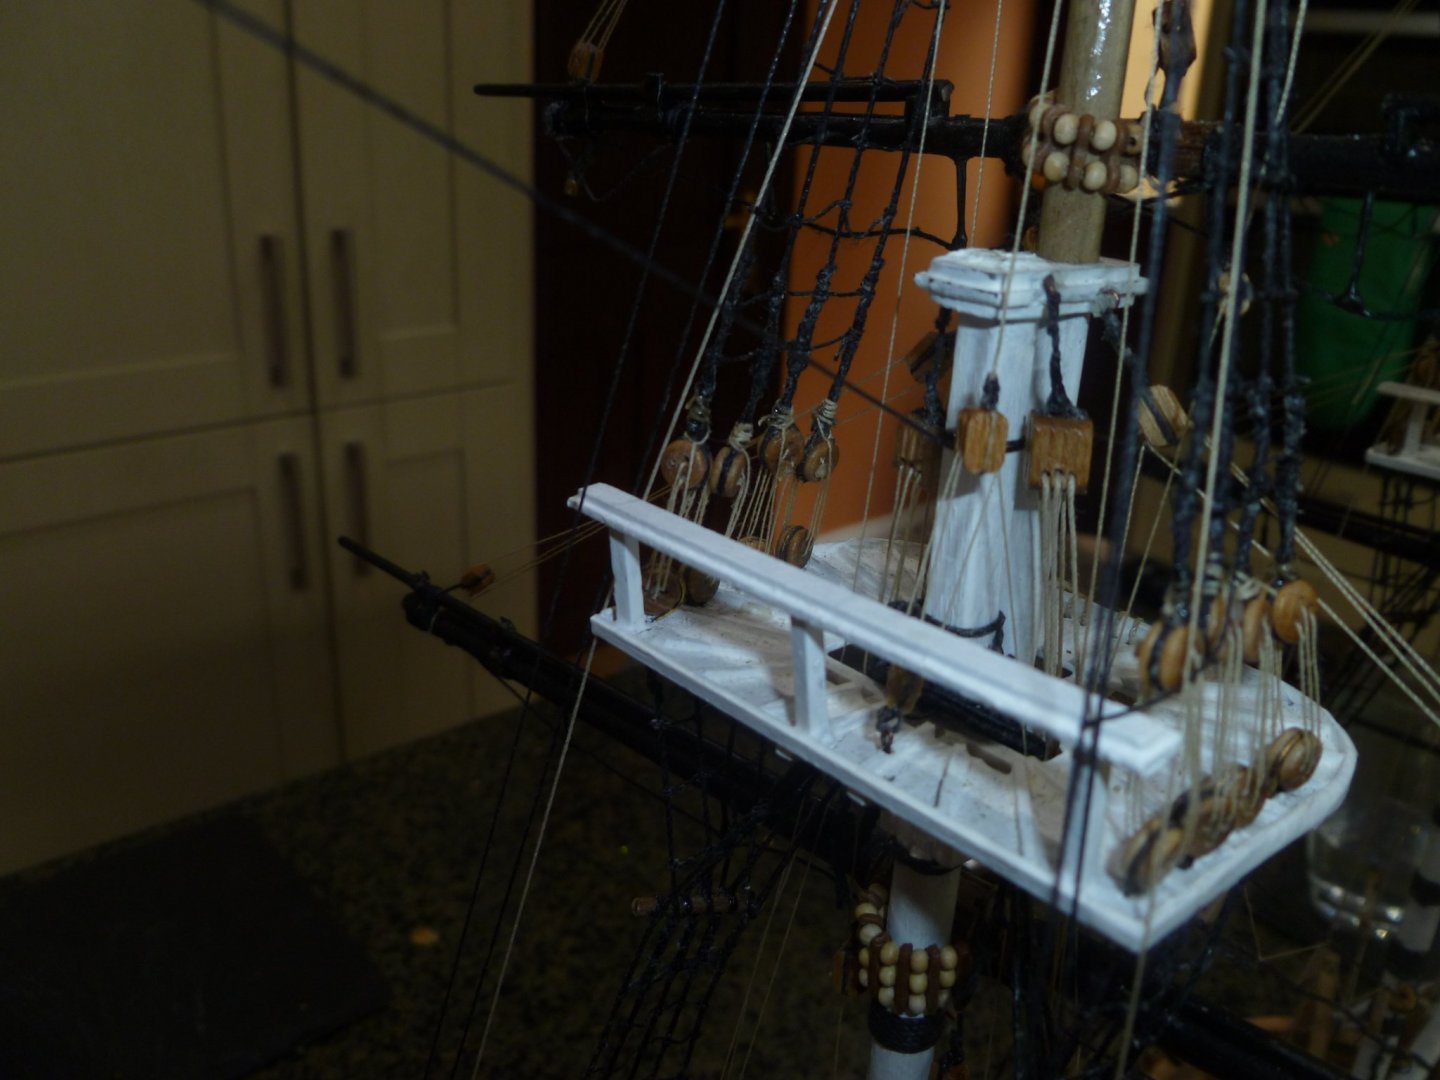
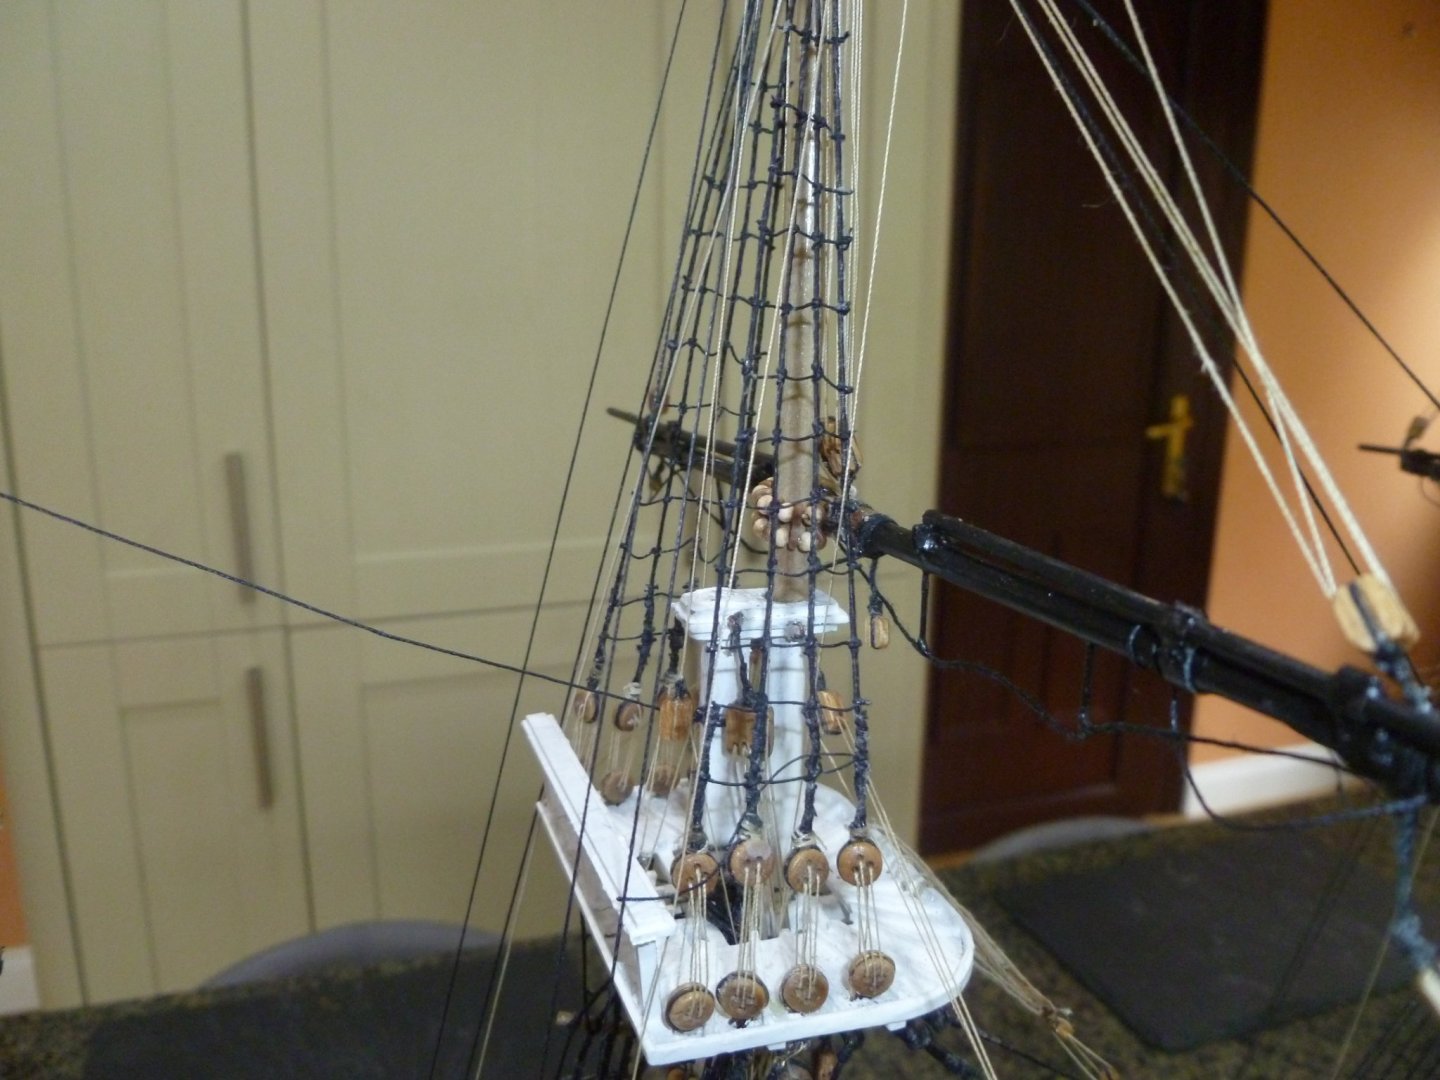
I am assuming that the above is the lower yard on the mizzen mast . My Bounty instructions suggest it does not have braces on the lower yard, only on the Topsail yard. I have now read 3 books and all suggest that the braces have not changed much over the years but all three books all say that the cross jack yard has single blocks on the yards ,and a rope is lead from the aft shroud on the main mast on the opposite side through this block on the yard, back to another block secured on the same shroud and then secured at a belaying pin. Hope might explanation is accurate enough. Before I make these changes to my model, I just wanted to ensure that the lower yard on the mizzen mast is definately the cross jack and I should carry out this exra rigging.I have looked at a number of online sources and another blog on MSW and they too have missed out this rigging so its a bit confusing. Best regards Dave
-
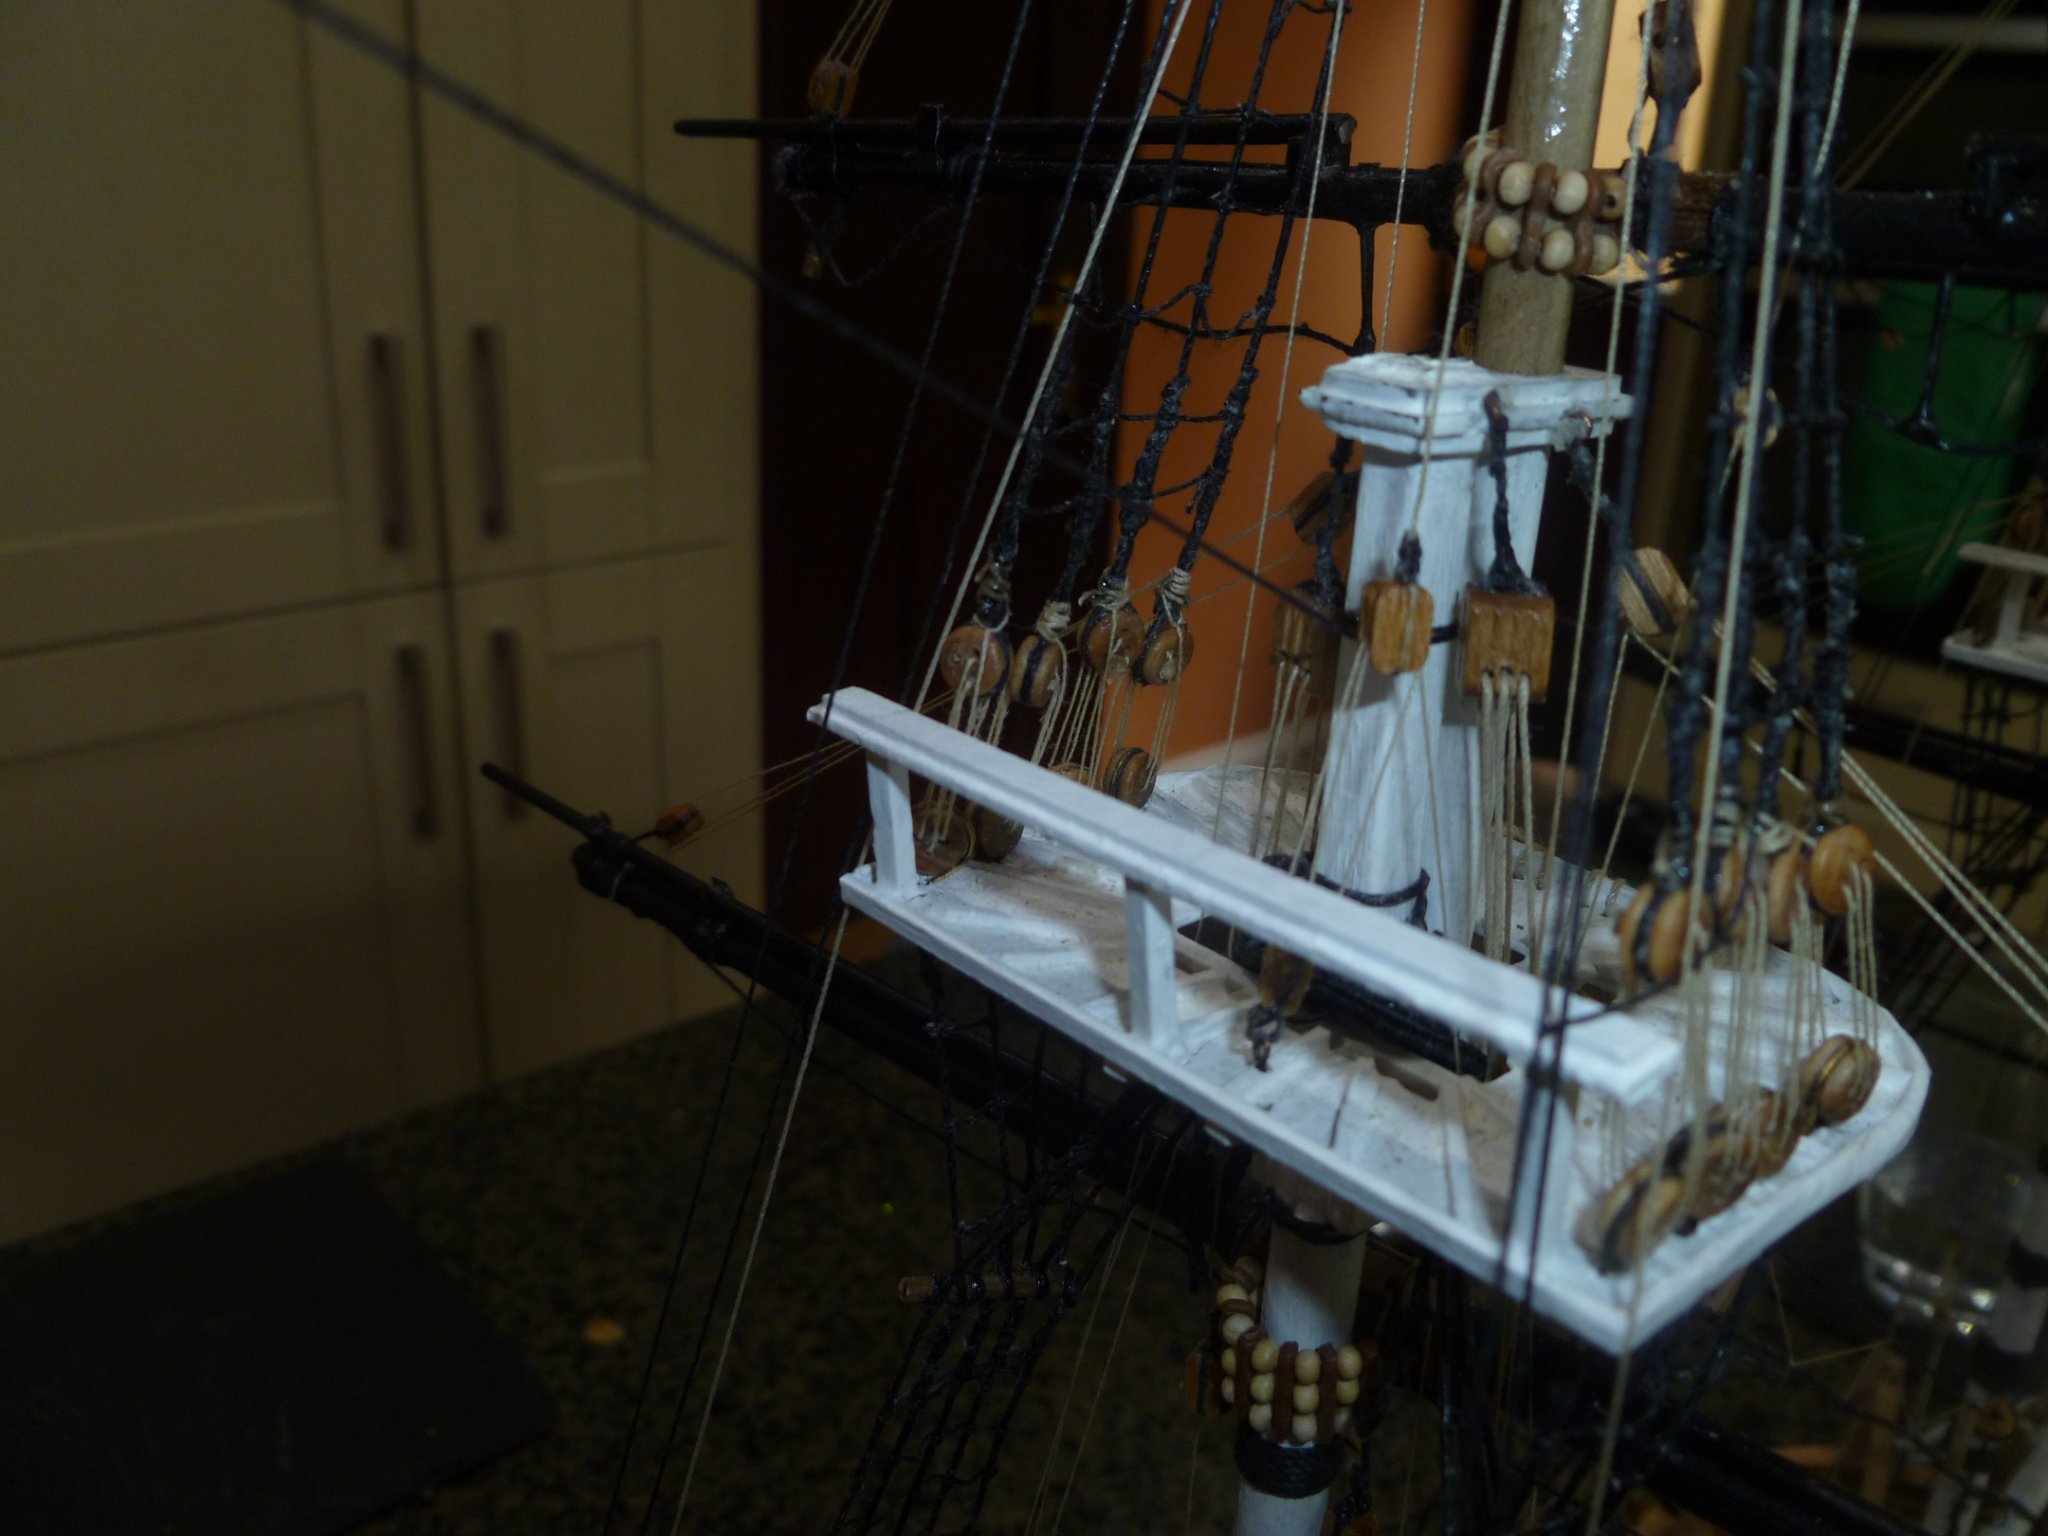
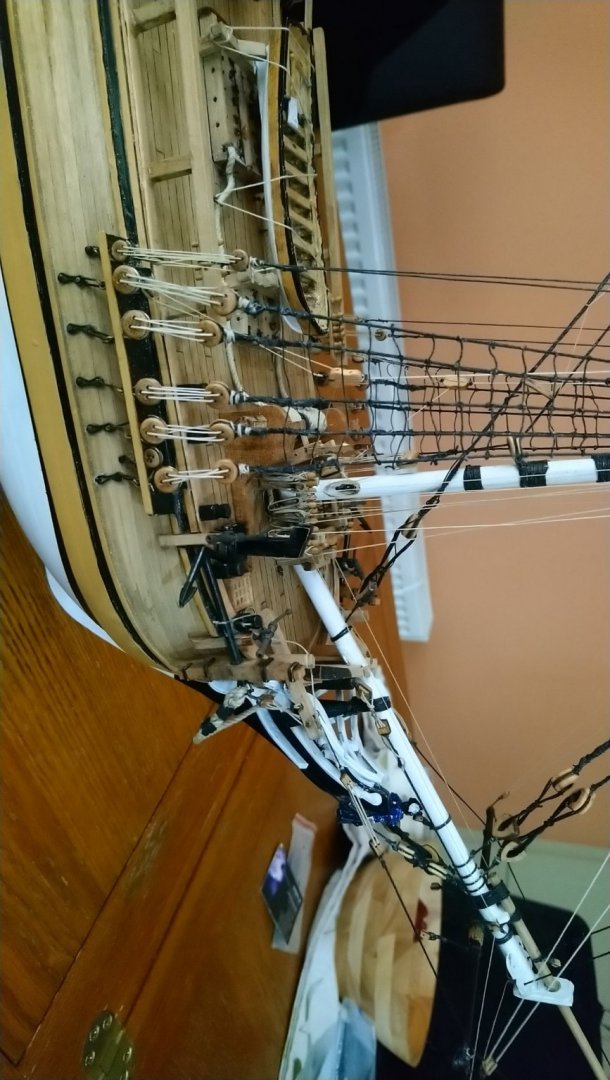
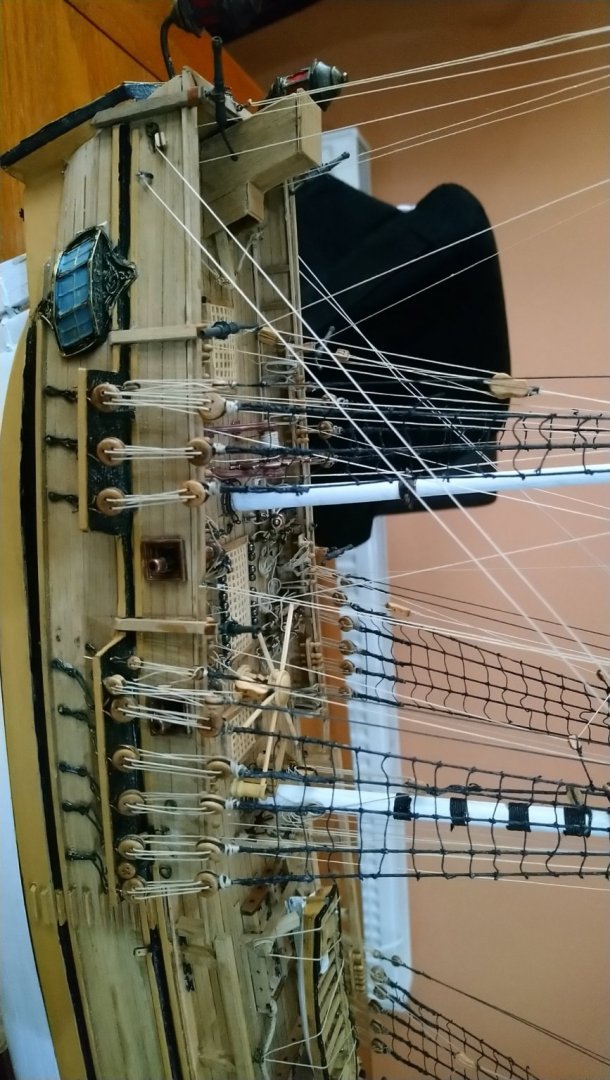
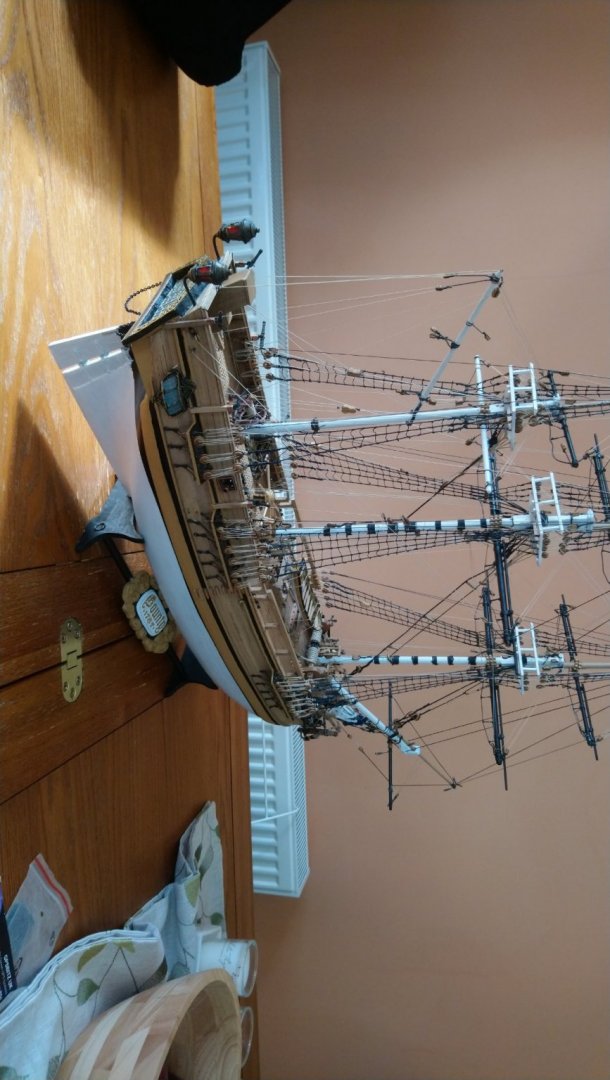
I think it has taken me as long to do the rigging as the rest of the ship. Lots of it I had to do again.The one thing I regret is not doing a better job of the chain plates and securing the lower deadeyes. I really should have replaced the upper chain plate links as the Amati ones were useless. It was just about impossible to get my upper dead eyes in the same plain as using a link (jig) between the two dead eyes was useless. I will definately take more care in this area on my next model. Best regards Dave
-
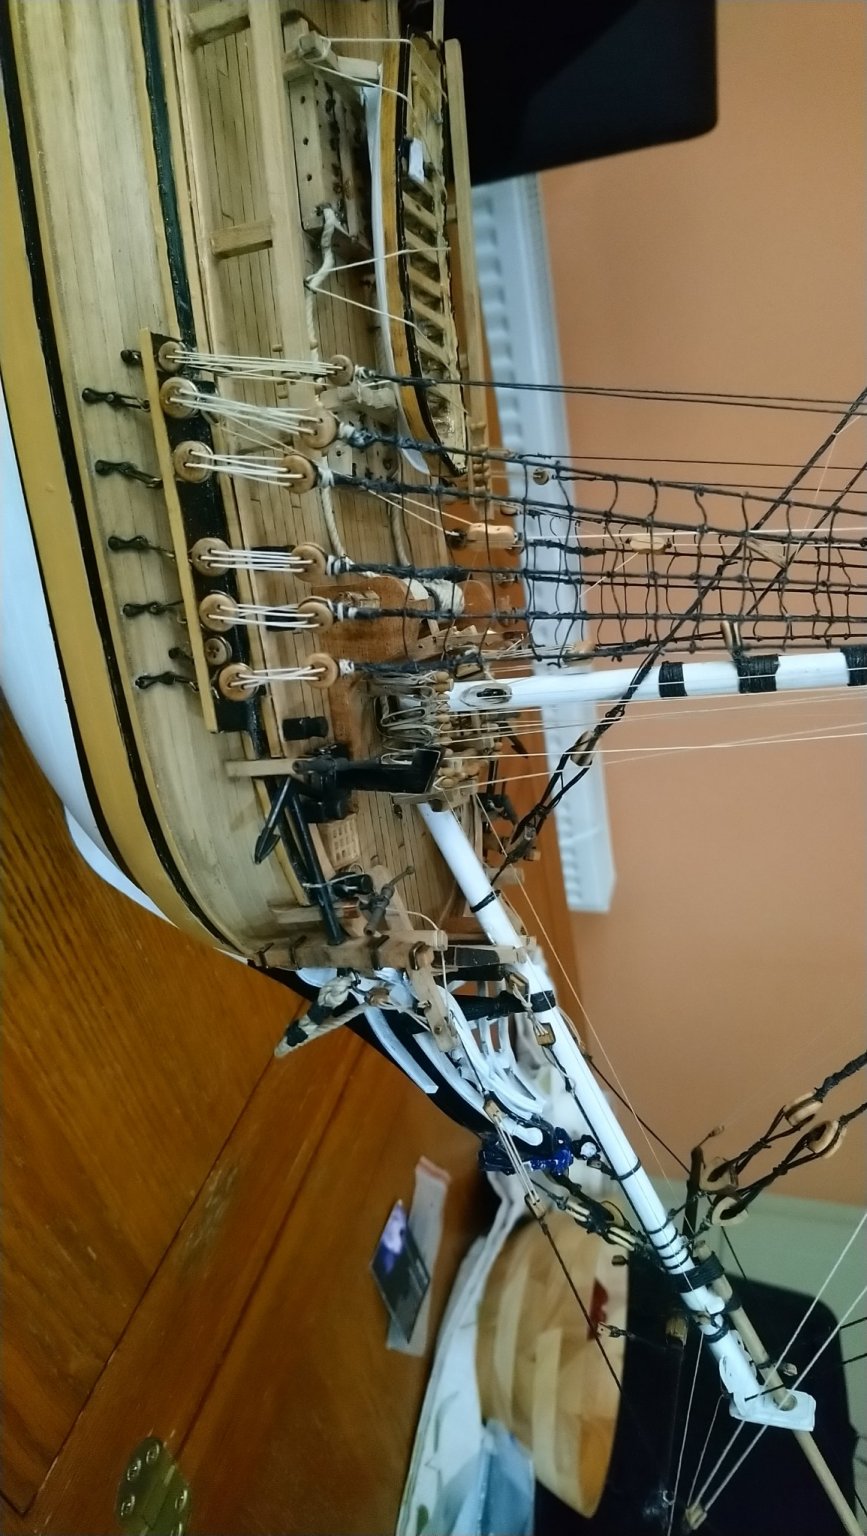
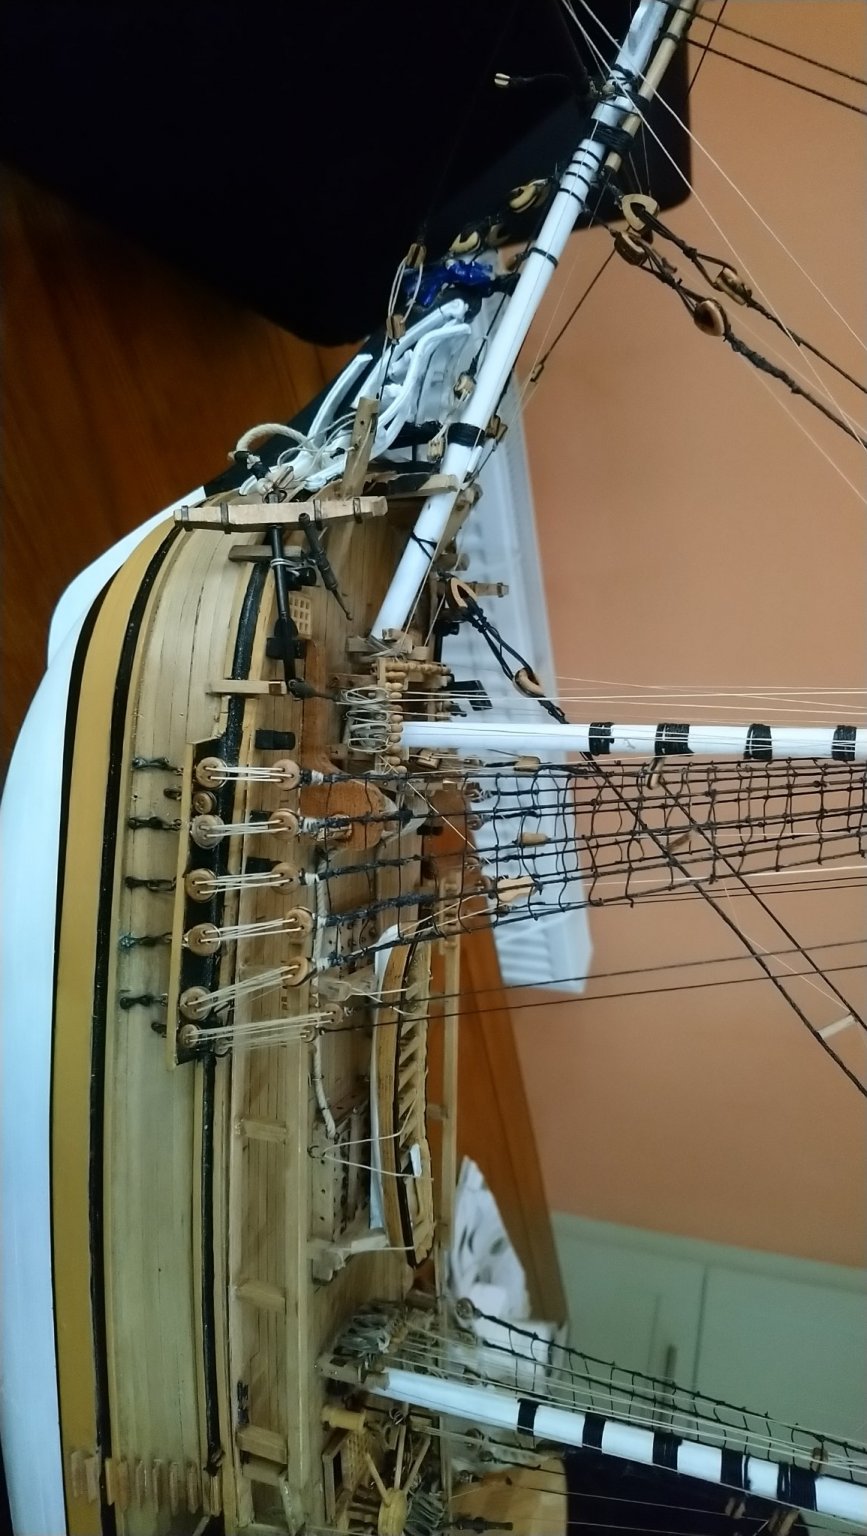
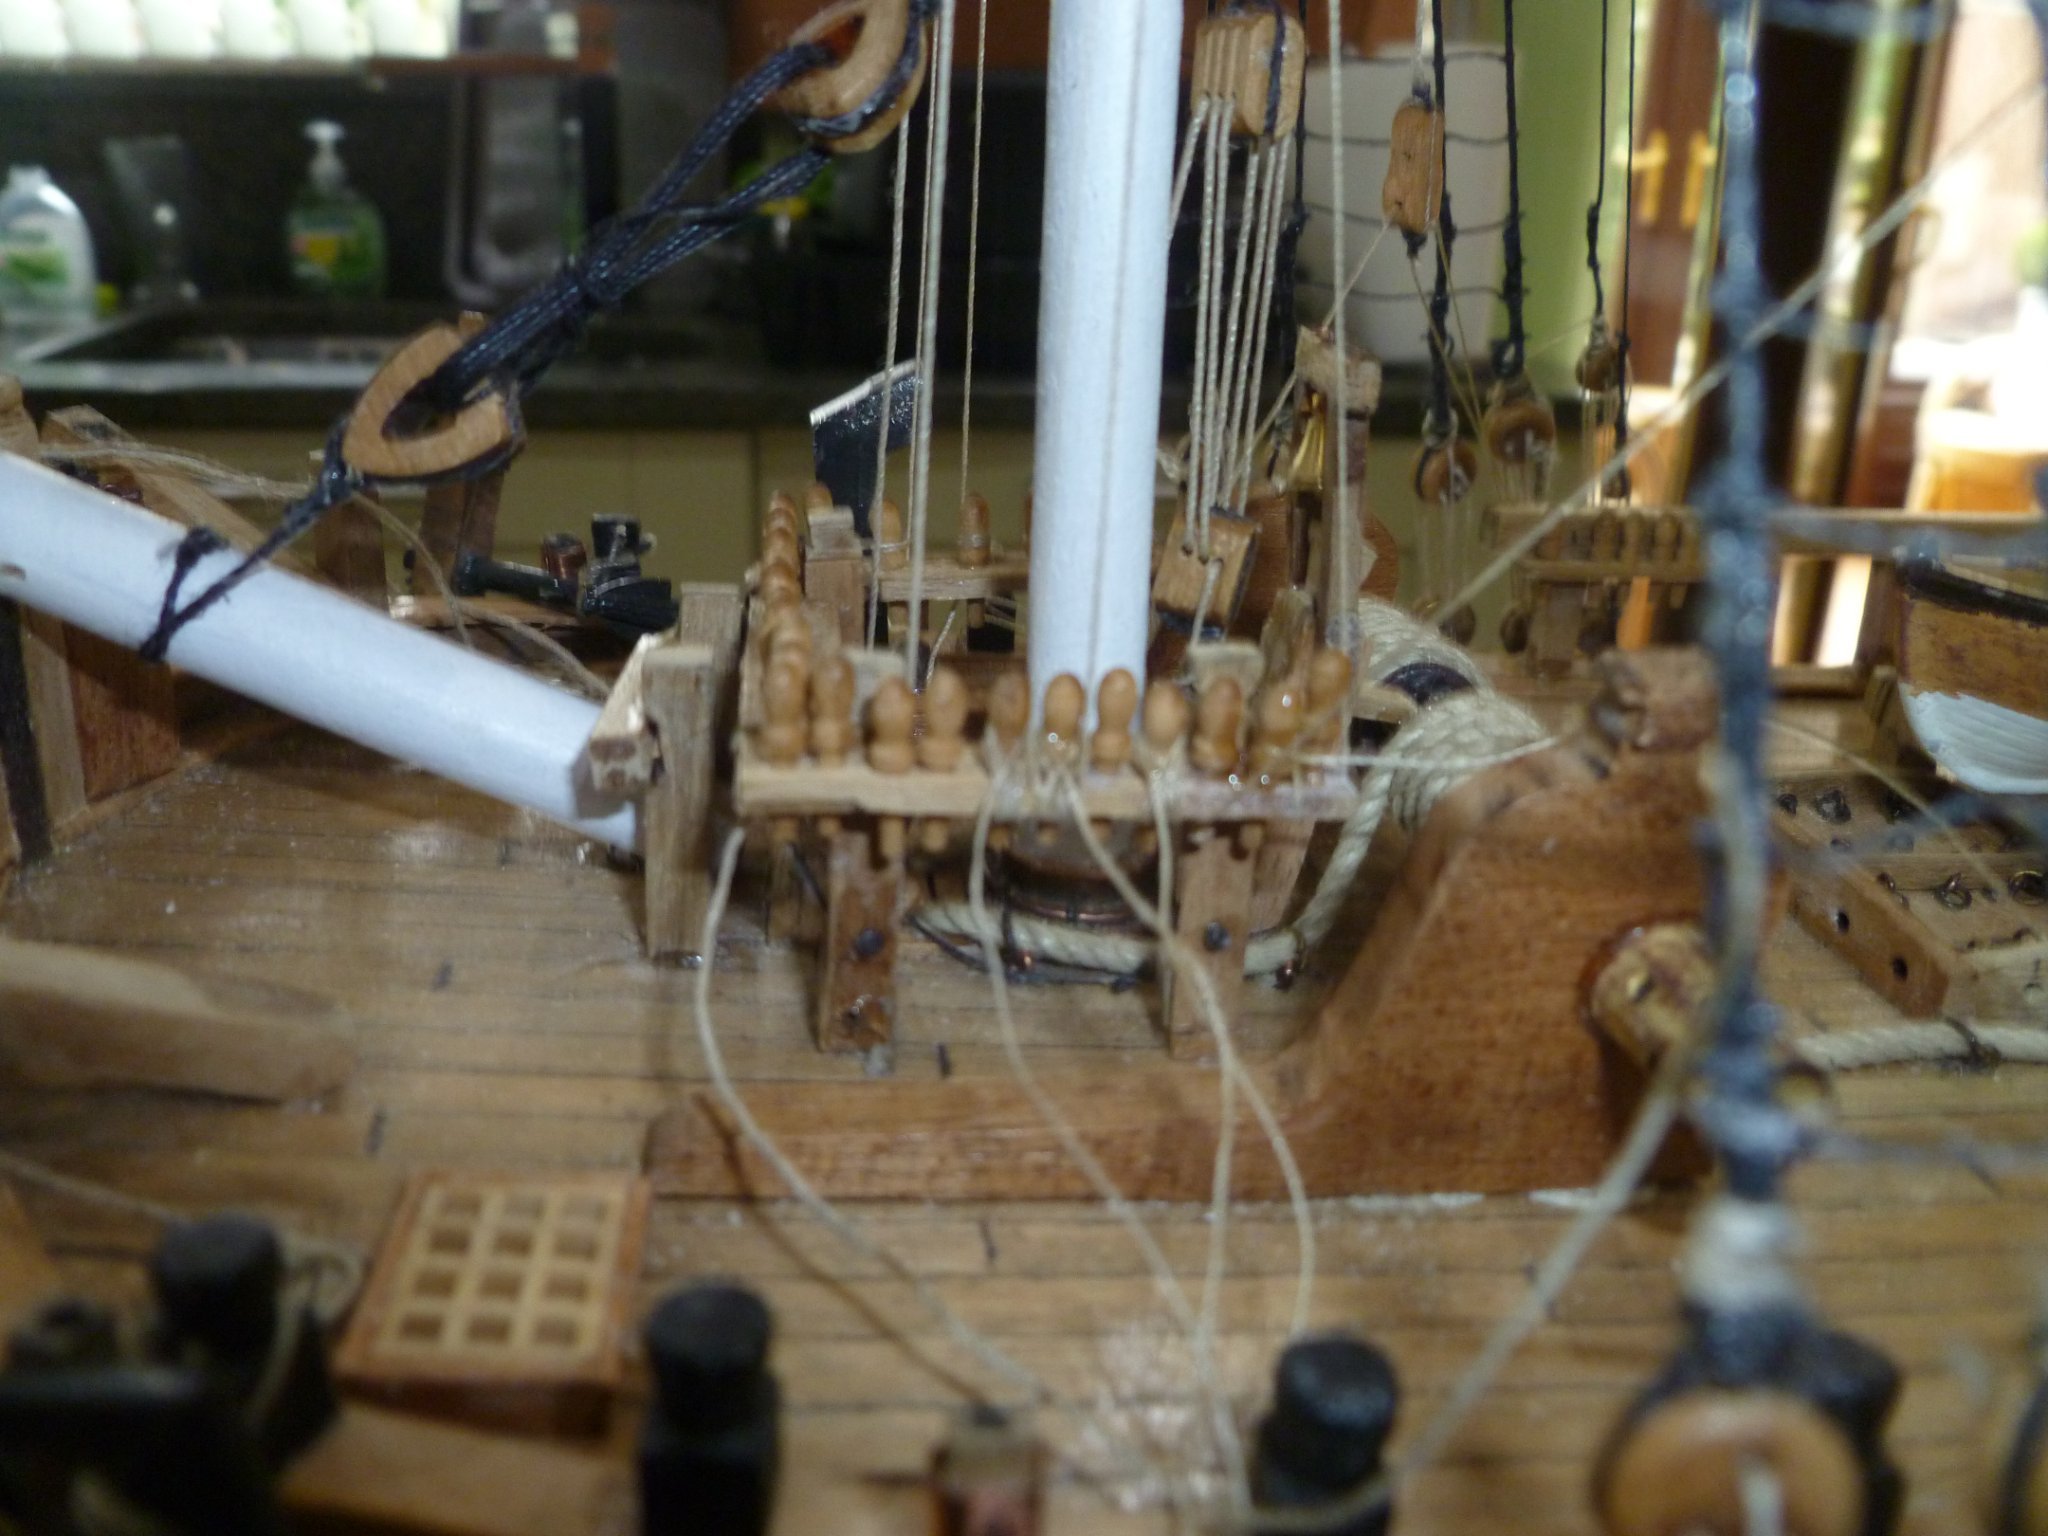
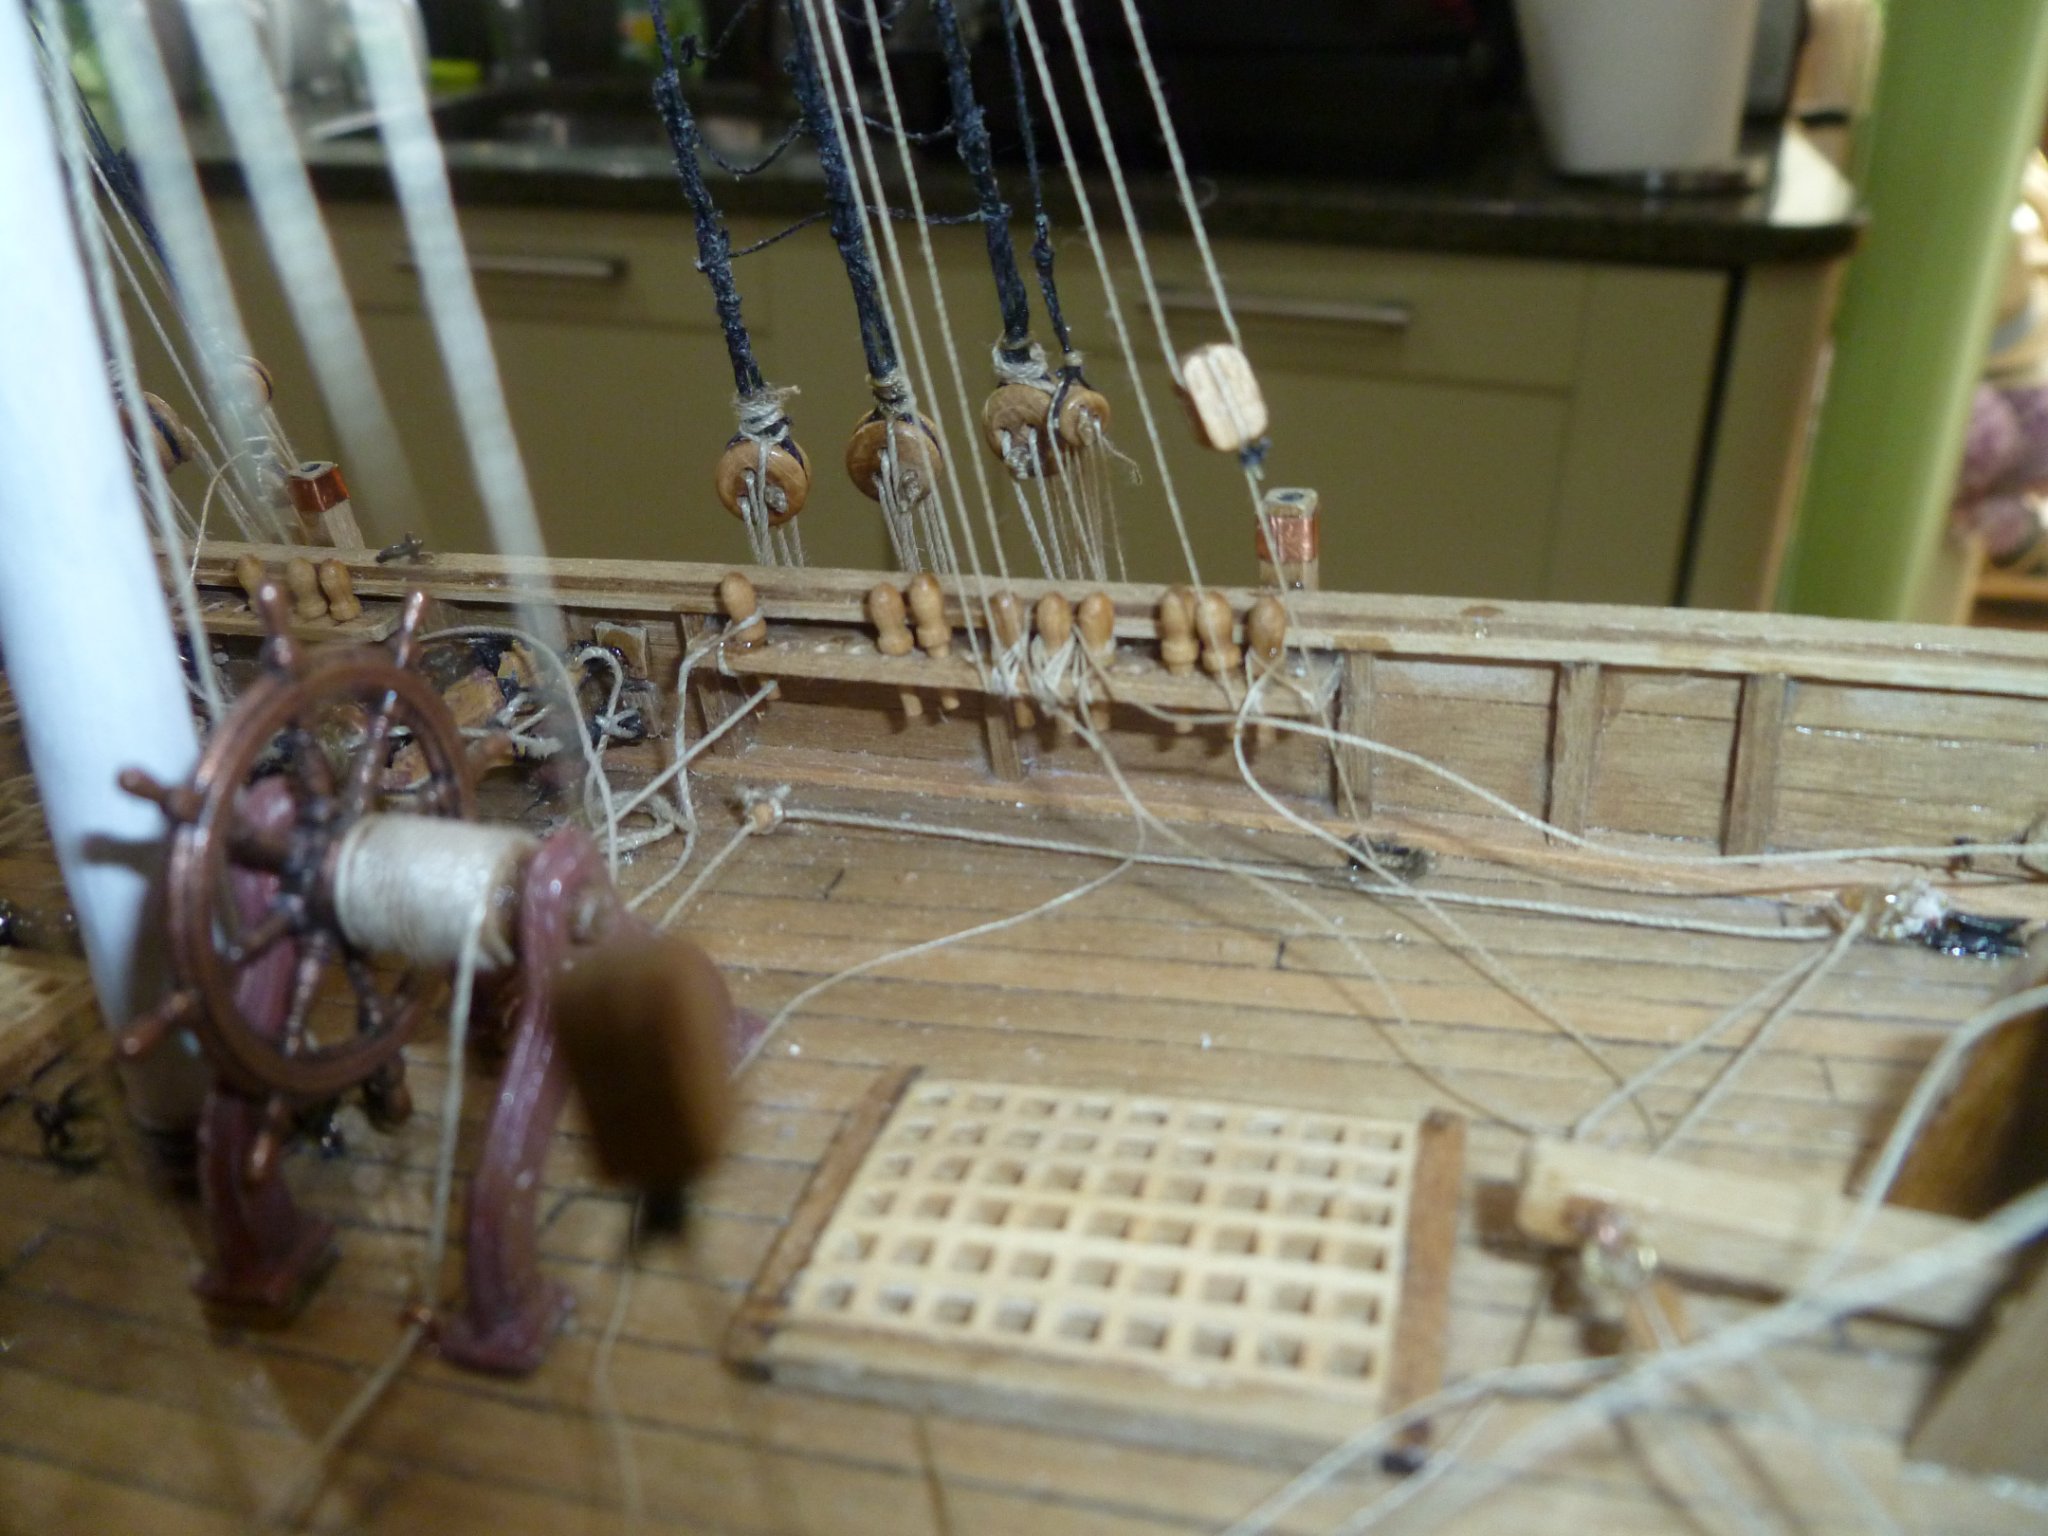
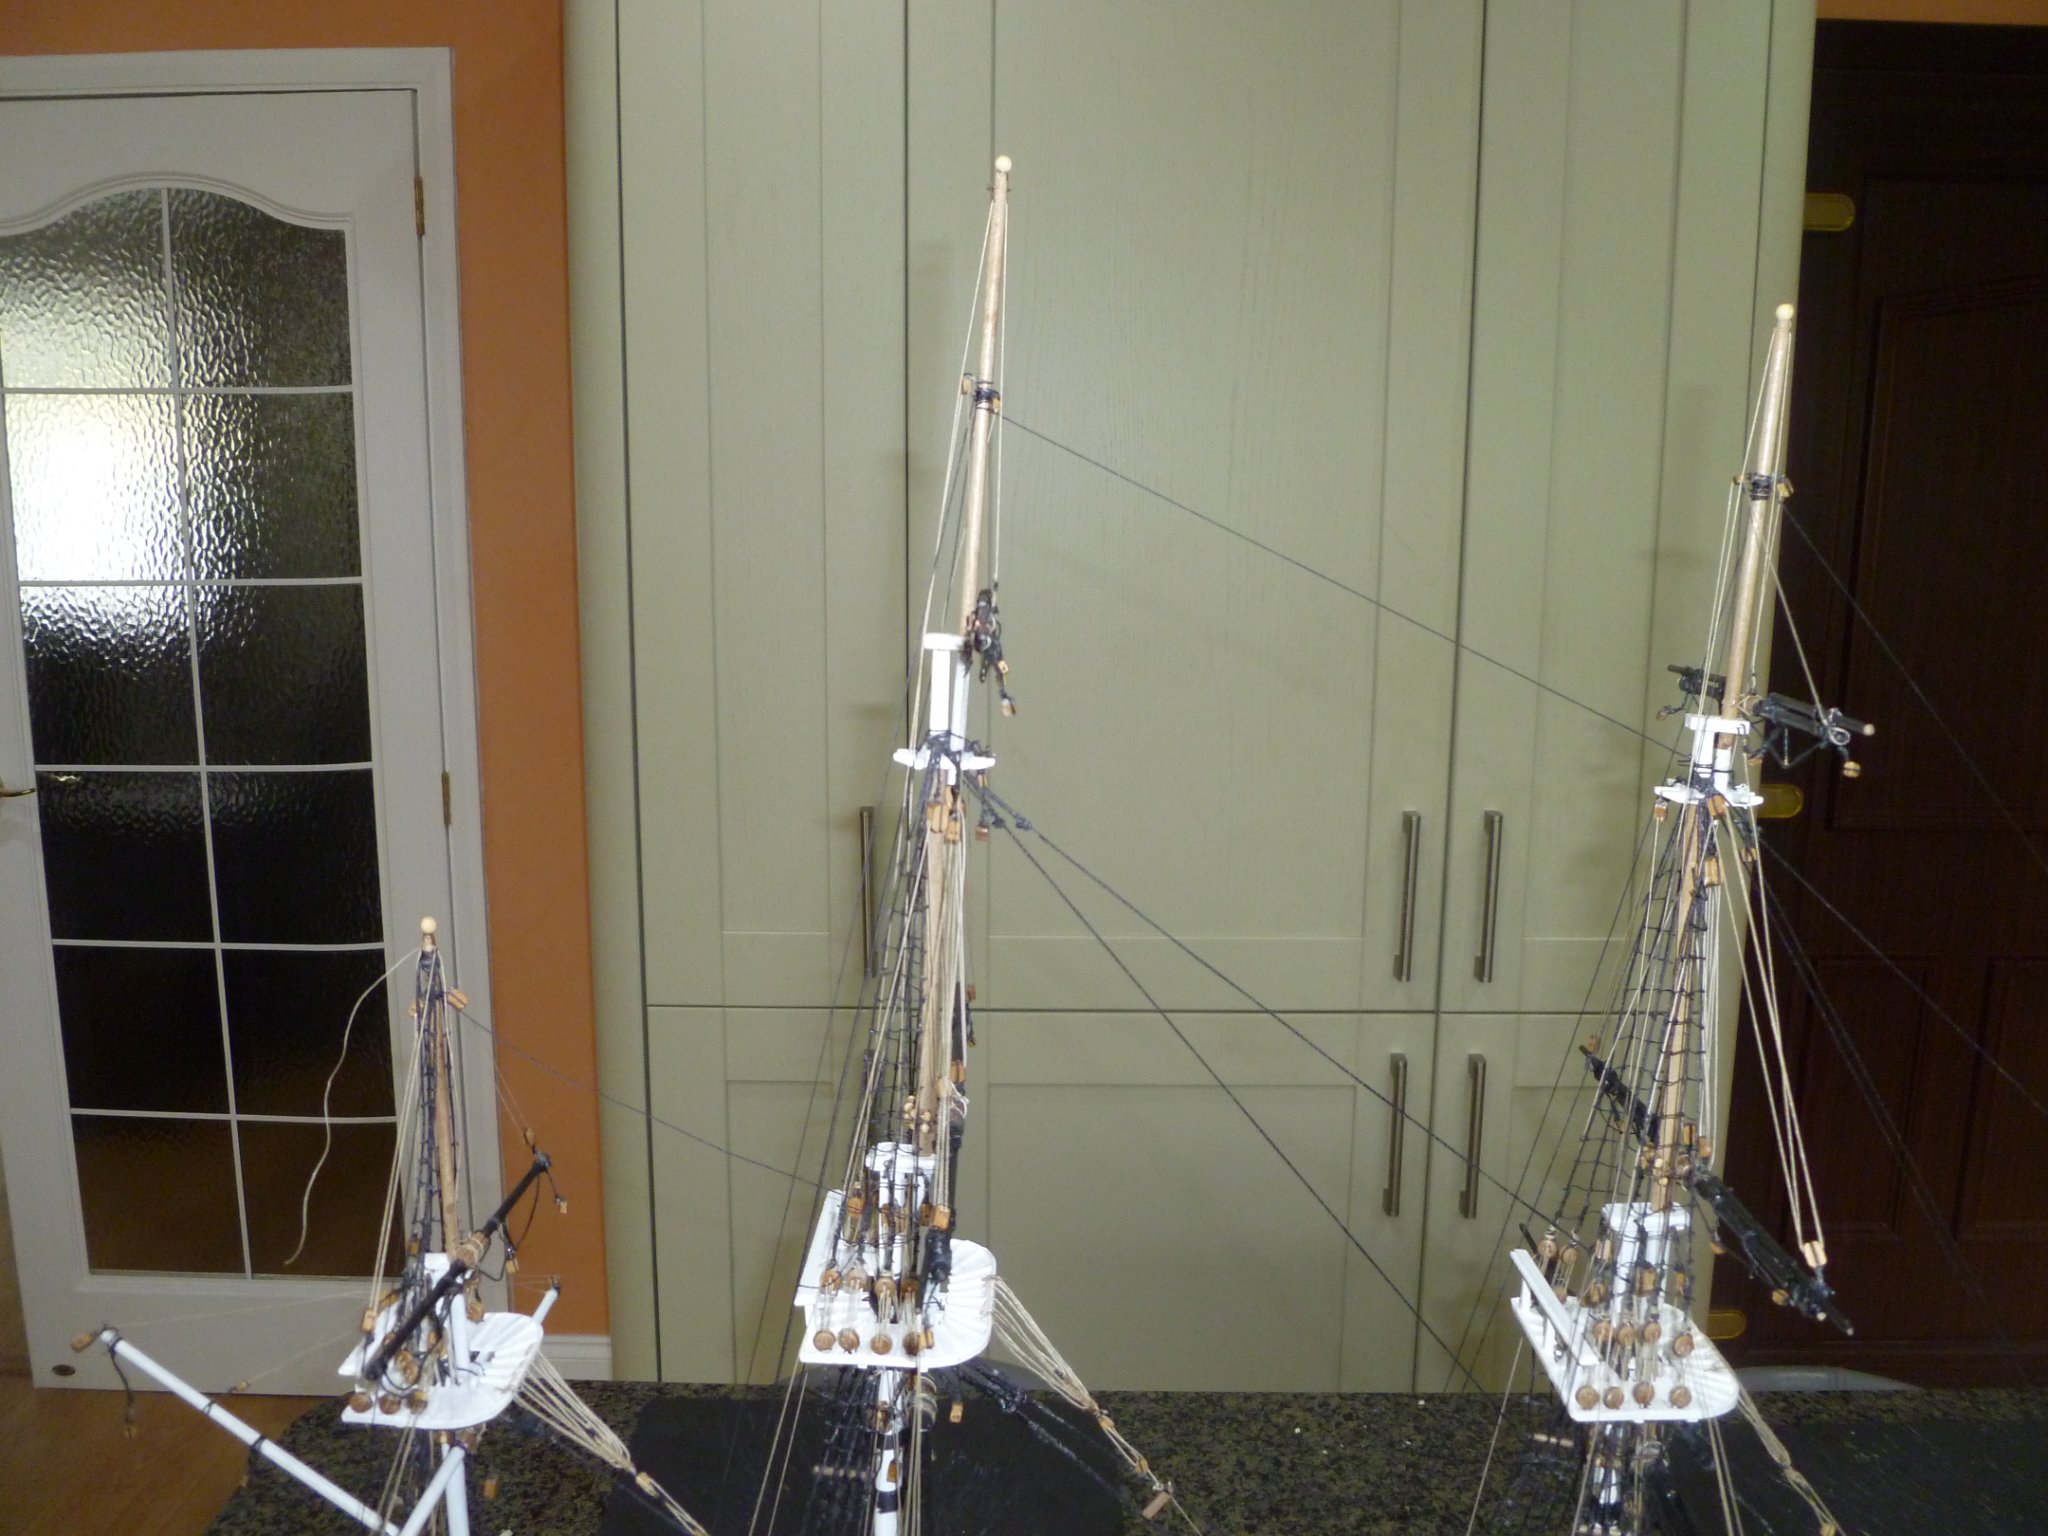
Continued with the running rigging. Parrels completed on lower and top yards and slings on topgallant yards. tyes completed on all yards and lifts on all yards except for the spritsail yard. I have still got some adjustments to the ropes to secure the yards in a more level position. Just for the recond I managed to get by with the belaying pis supplied by the kit although I still nead to add some coils to the pins. I made a few changes to the topgallant tyes as looking on the drawing they were fixed at the top crosstrees and therefore the yard would be in a fixed position.Everything I have managed to find about this has suggested that this should lead to a purchase ie block and tackle secured on the lower cross trees. I have done this but as there was no allocated for a belaying pin I picked a couple close to the other pins used for the other tyes for the other yards and were not being used. Hope this makes sense. The braces are up next and once these are done I will see where I am at and what is needed. Here are a few photos and sorry about the quality. I am moving the model to different locations hoping to catch the model in the best light.