


DaveBaxt
-
Posts
1,303 -
Joined
-
Last visited
Content Type
Profiles
Forums
Gallery
Events
Posts posted by DaveBaxt
-
-
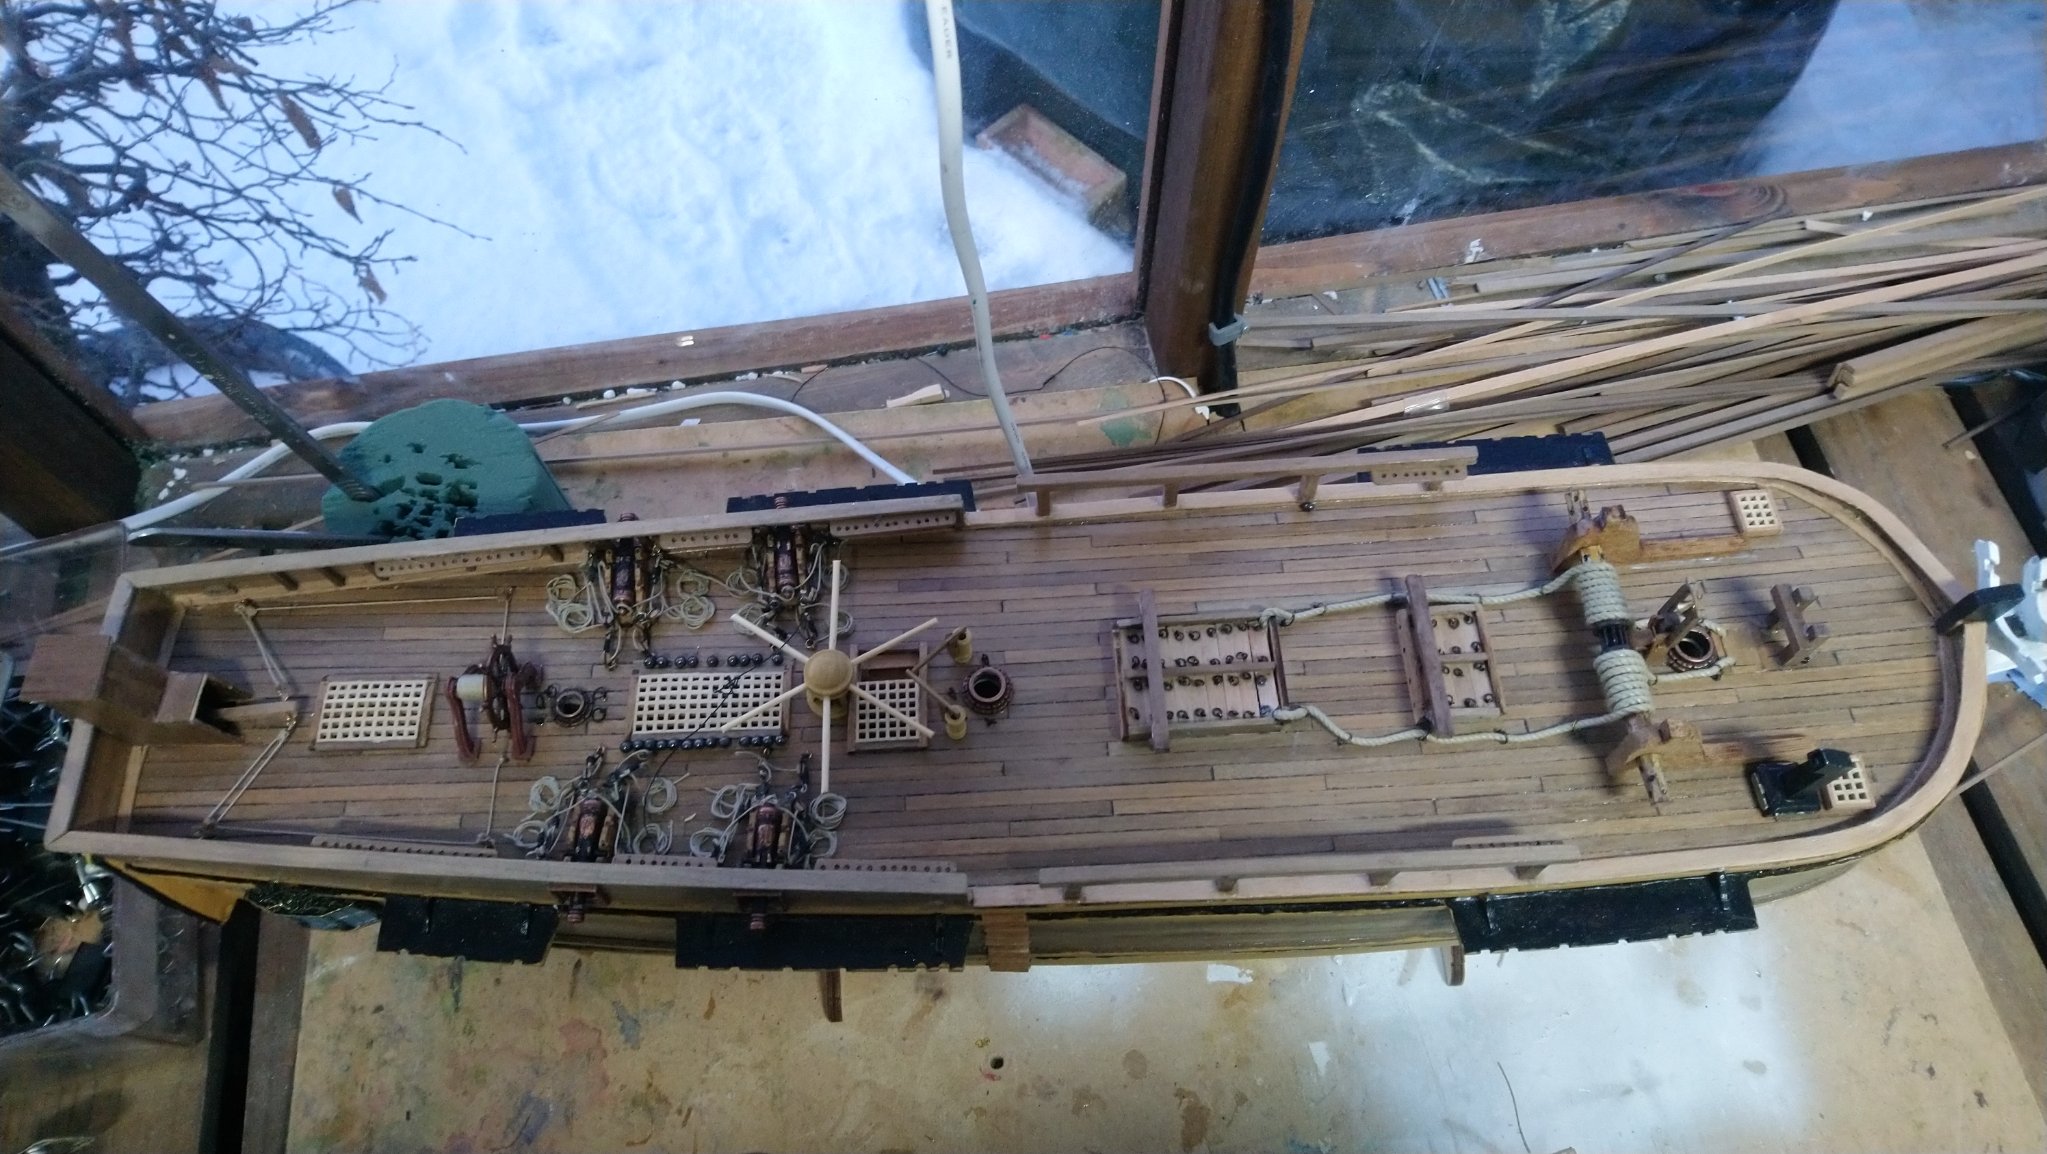
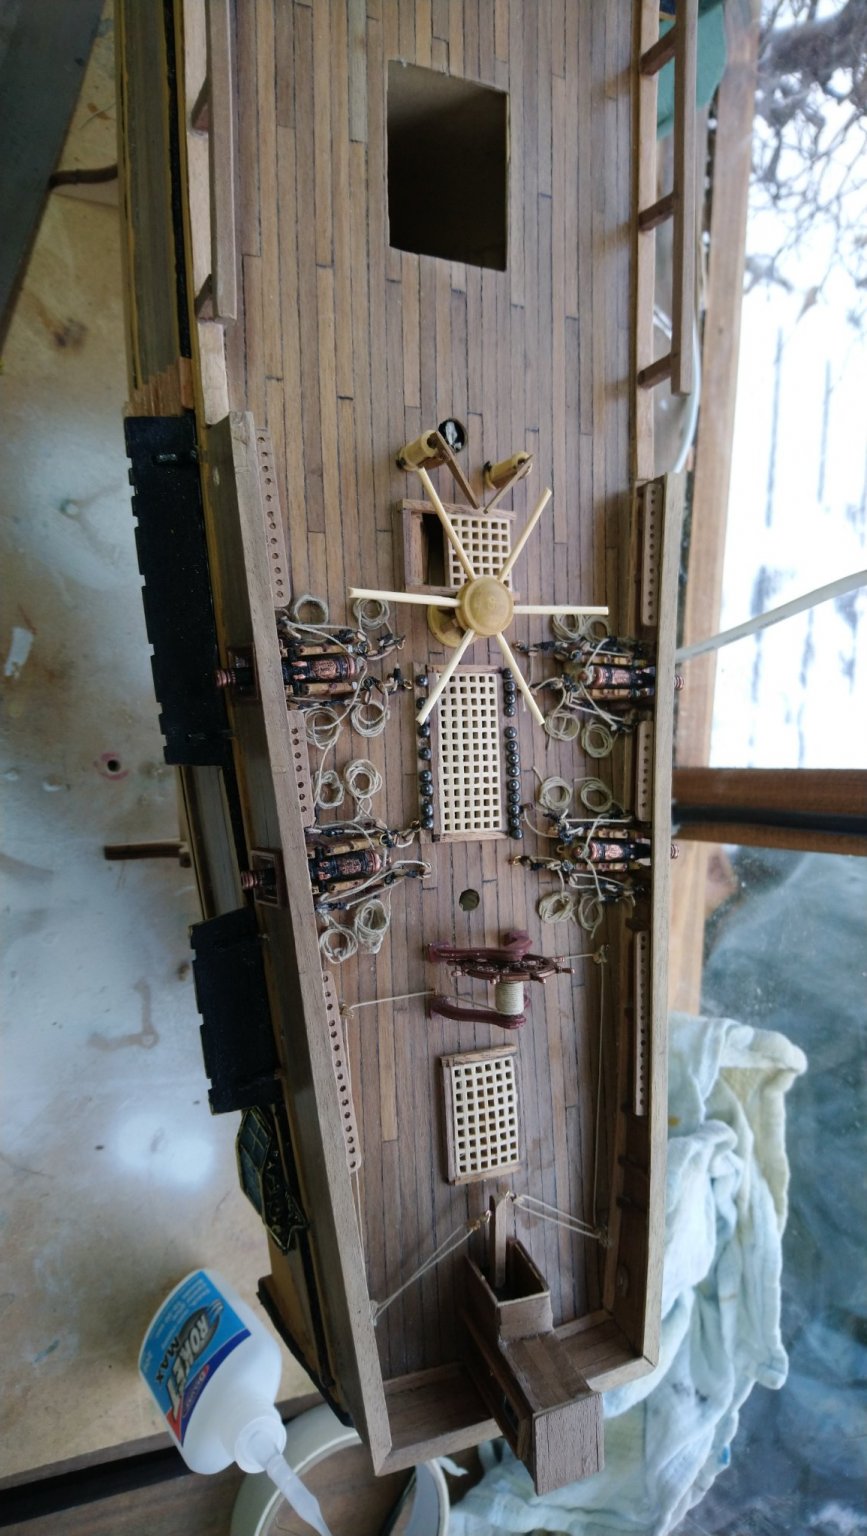
Several attempts at pin racks in the centre, The kit says 1 mm x 5 mm walnut but I kept splitting the wood when drilling . Eventually tried 1 mm ply and got away with that for the single pin rack as you can see in the photo. Unfortunately I did not have enough for the square pin rack that fits around the forward mast so have used 1.5 mm x 6 mm and used overlapping joints as in "Ship Modelling simplified" by Mastini.

-
Thanks guys for clearing that up. and I now see where you are coming from . If I can get my money back I will. Until then I will have to make do with a power drill and sand paper or perhaps a mini plane as I have one of them. I do have some spare dowel to practice on so hopefully I will be able get the hang of it at some stage.
-
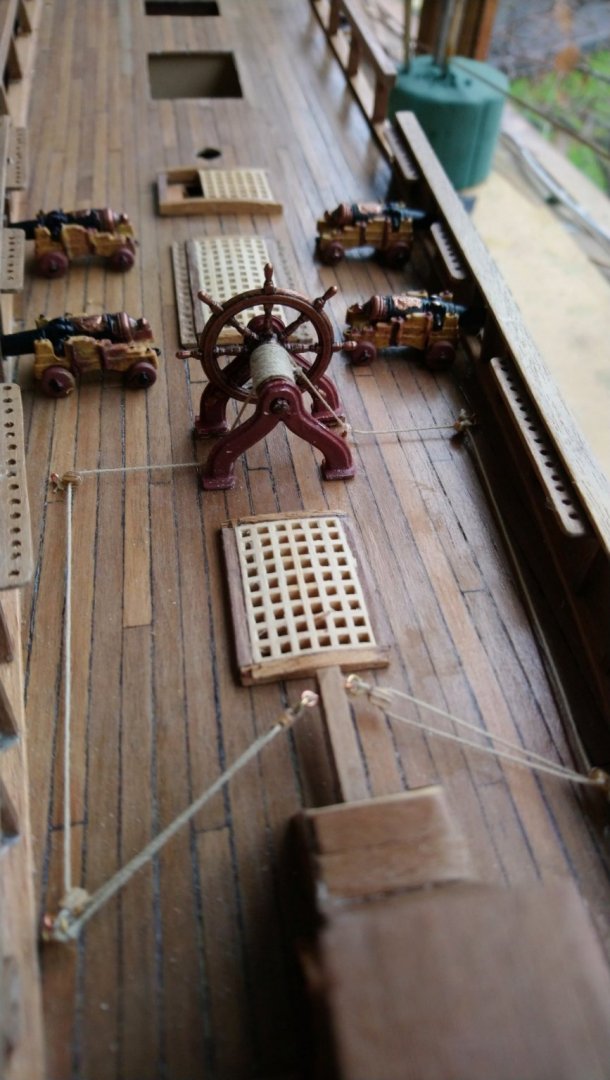
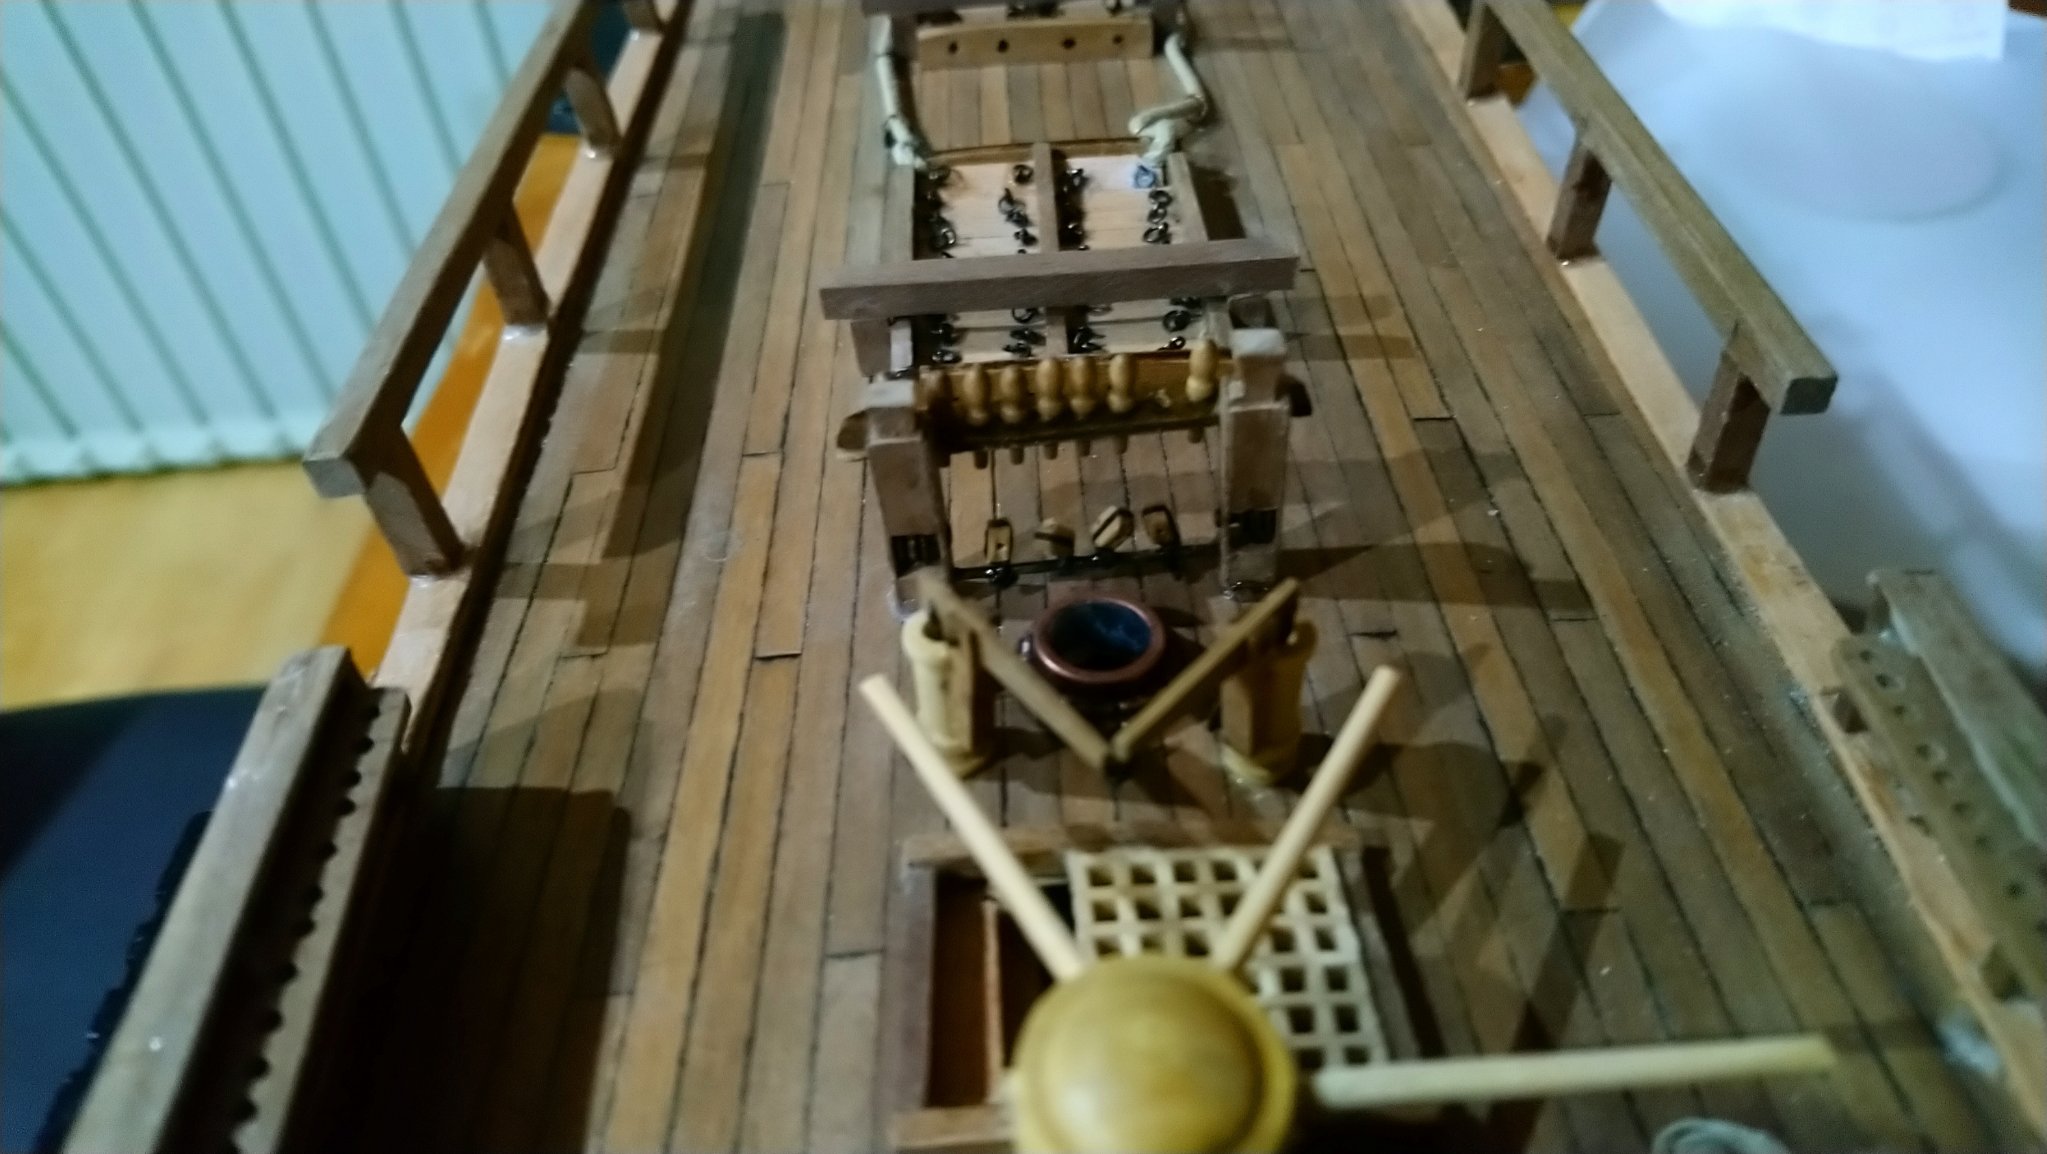
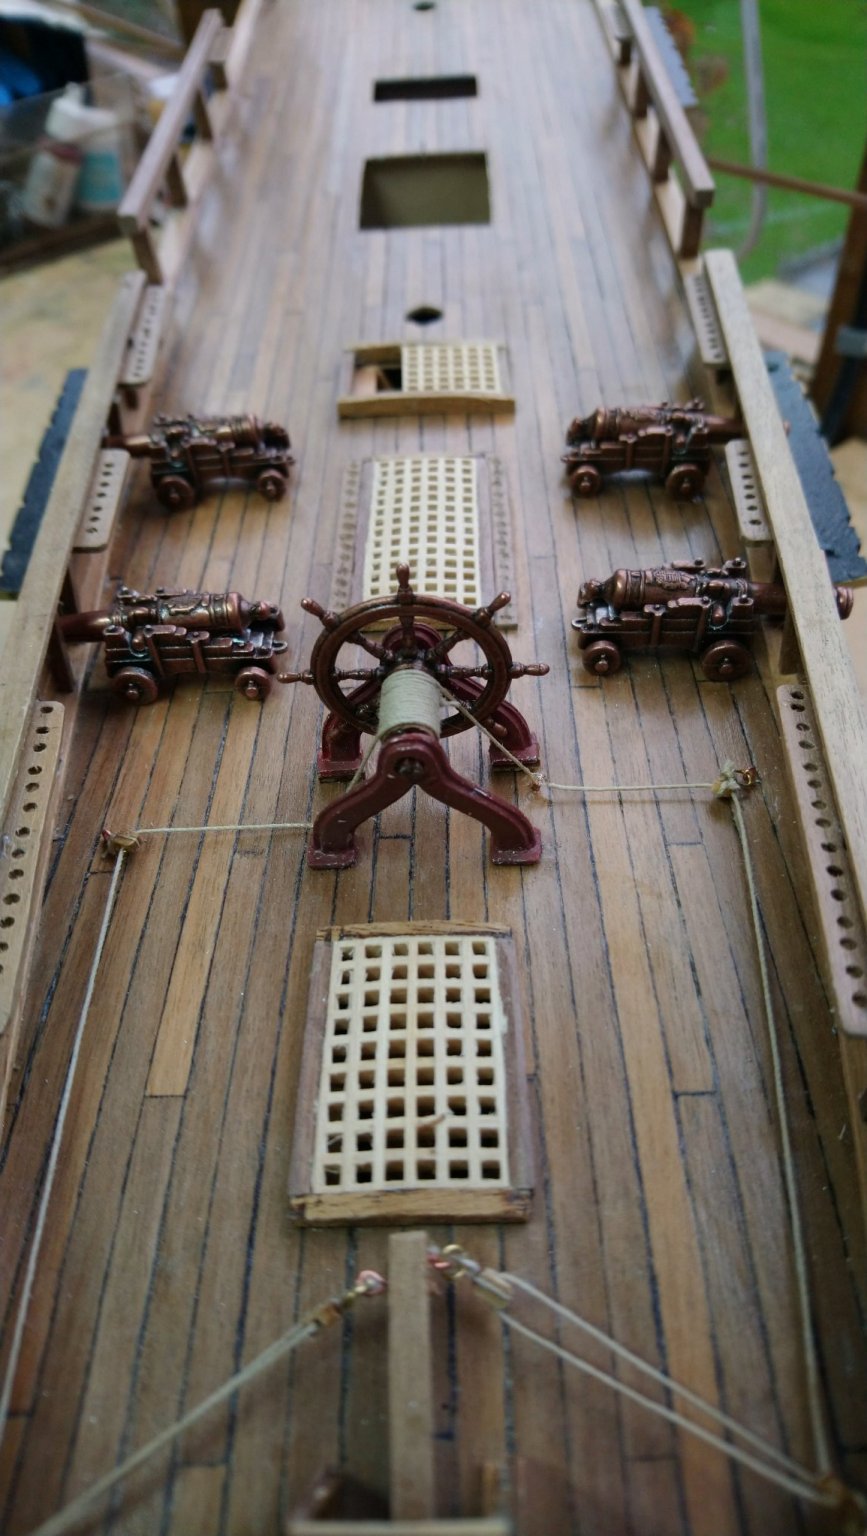
Continued with deck fittings forward including the ratchet mechanism on the windlass and the windlass itself. All in all a very enjoyable part of the build especially after rigging the Cannons. After checking the diameter of the masts were what they should be it was necessary to remove material from the glands at the bottom where the mast go through the deck .Sorry I do not know what the name of this is. I am pretty much ready now for the Anchor rope from the forcastle to the hold. I also tried painting the windlass drum and give it a weathered look.
.thumb.JPG.c16dbdac814dc82f881037f4cc3ec354.JPG)
-
Thanks every one I clearly did not think this through properly. I also need to try this out and hope that as it is made by Dremmel, I should at least be able to use it for drilling. As regards the making of masts it was not my idea to hold the mast in the Demmel but to hold some kind of small rotary sanding tool and hold the mast in my hand. I suppose it would be just as well to hold the mast in an ordinary electric drill and use the Dremmel in your hand with one of Dremmel's sanding attachments.
- mtaylor, Keithbrad80 and Canute
-
 3
3
-
Not sure if this should be under tools or masts and rigging. AS the title says I am now the proud owner of a stand for my cordless dremmel in the hope it will make life easy when drilling those rails for the belaying pins. What I was delighted to see was that you can swing the stocck 90 degrees so the dDemmel is in the horizontal position. I am shortly approaching the time when I will be tapering the masts and spars and wondering if anyone uses their Dremmel to taper masts in some way and if so how do they achieve this? Just for the record I am starting with Walnut Dowel
- Canute, Keithbrad80, mtaylor and 1 other
-
4
-
6 hours ago, shipman said:
Hi Alen.
Liver of sulfur DOES have a shelf life.
I bought some, it was light pink. Put it in a drawer untouched for a year. By then it had turned clear, with 2 or 3 black specs floating around. And useless, hence my questions about shelf life.
Thanks shipman for letting us know about that. Interesting to know if that happens even when unopened.
-
6 hours ago, allanyed said:
For blackening copper, liver of sulfur works very well and can be applied to parts that are already attached to the model without staining the wood. See Ed Tosti's Young America clipper build log as he goes into some good detail on doing this. I have not found it to work on brass though.
Allan
I think we discussed this earlier and I ordered some liver of sulfur then which is before I ordered the Brass black I think I will have to chase up ebay. Should have been here before now. Thanks again for your input.
-
9 hours ago, allanyed said:
Dave
If the mast is the correct diameter where it pierces the deck, file the ring. If the mast is larger in diameter than it should be, sand the mast. I have no idea what the mast diameter is supposed to be, but lacking information for colliers launched in 1784, you might be close using the formulas in Lees' Masting and Rigging for Royal Navy vessels launched between 1773 and 1794 on page 183.
Allan
I Thanks Allan. I will check the diameter of the mast just in case they are bigger than 8mm as I have no idea. I only read something about reducing the mast diameter where it enters the deck Ship Modeling Simplified by Mastini but I think that was if the holes in the deck required drilling. For the record the mast were quite tight in the holes in the deck certainly after planking the deck so I filed out the holes in the deck to make a loose fit. Not slack so just hoping this would be ok. Best regards Dave
-
5 hours ago, bartley said:
Dave,
My experience is that if it is bare wood there is usually some staining (depending on the timber and how long you leave it in contact). However, if the timber is painted there is no problem. These bolt heads were blackened after installation.
.thumb.jpg.50a9d609754803d9f108b9765040aa96.jpg)
John
John Thank you for your reply and sending that photo ( nice job by the way) That looks like its worked great on the painted area. Fortunately most of the areas I have done so far have been painted. I have started dipping all of my eye bolts and rings in Brass Black and it even works on the copper although takes a bit longer. I also found out that this stuff is pretty deadly on any tools that are not stainless steel. Shouldn't have used those pliers for lifting things out of the blacking solution.
-
2 hours ago, allanyed said:
If you are going to use wood, you might want to consider something close grained in place of the type of walnut found in kits which will likely fall apart before you are finished. American black walnut is an exception in my experience. Even a softer species such as basswood or poplar will work, but any close grained hard wood is probably a better choice. You can start with a small block that is perhaps three or four times larger than the OD of the ring. Clamp it in a vice and drill a hole to match the diameter of the mast at the deck. Then take off a slice that would be the right thickness of the ring above the deck. Then you can cut a circle with a scroll saw close to the OD or take of individual sections with a hand saw and then round it with sanding sticks. Another thing you can do is sand and taper a small piece of dowel rod that will fit snugly into the ring you just rough cut once it is close to the final OD. Chuck the dowel in a drill and sand the OD while it is spinning. Once it is to size you can remove it from the dowel and cut the slits and voila, it is done. If you are going to have it represent the canvas cover, you can forgo the slits and paint it gray.
Allan
Thanks for that Allan and I think I will make sure I have the required marerial before tackling the work. I will see if I can get my hands on some close grained wood for my next model. In the mean time I will probably go for the cast ring and just paint them. Do I need to file out the holes or can I just narrow the mast slightly to fit through the ring?
I must thank you once again for all your help. I really do want to eventually do things the correct way but at present just want to continue with the basics and eventually get more involved with my second and hopefully more models of this type. Best regards Dave
-
8 hours ago, allanyed said:
Dave,
The above recommendations are good ones. If you want to leave off the canvas to show the wedges you can make a wooden ring and then with a very thin coping saw or jeweler's saw blade cut slits to represent individual wedges. There are some excellent photos of this method on one of the current build logs, I just cannot remember which one. A search of wedges should get you there or a member here may recall where this is.
There was no metal ring and as said above is just a cheap and easy way out for the kit builder, ornate or not. The rings really have no bearing on what the cannons look like. If you are shooting for historical accuracy the advice above should be something to seriously consider.
Allan
Ok Alannanyed I get what you mean and I understand what everyone is telling me and I appreciate all the help and advice I have been given. So How to I make a ring large enough to fit over the mast without a lathe. Is this something I need to make out of a block of Walnut ( not supplied with the kit and do not have at hand) I still think as this is my first model of this kind and only my second model ever I am jn two minds whether or not to take the easy option and just try and get her built The guy in the Amati video just used the rings supplied in the kit and he had some pretty cool ideas and as far as I can see made a excellent job of building the Bounty.
-
Wonder why they didn't have some kind of gland with heavy greased packing rapped around the mast as that would be the easiest way to keep the water out .Pretty much how they had internal glands on shaft,valves etc. Just a thought but could br way off base.
-
1 hour ago, Gregory said:
You might consider dropping the metal ring, which is just a kit convention, and using wedges, once you are ready to step the mast.
( you can make the wedges look a lot neater than this )
Or fashion a wooden fabrication that you will find on a lot of models..

( Chuck's Cheerful )
On the actual boat, this area would have a canvas cover, which isn't seen often on models..
Does using the wedges make it easier to step the masts. The rings are very ornate and although not acurate they kind of go with the Cannons.
-
Sorry I don't know what the metal ring fitted to the deck where the mast goes through the deck. I am currently in the process of fitting everything to the deck ,working my way from aft to forward and from inside to outside. Before I go onto surrounding the areas such as more racks for the belaying pins I thought I would now add these mast rings as I think the access would be easier doing these now. The mast fits snug through the deck but is too tight on the mast and it will be necessary to taper the mast to fit into the ring. If I fit the ring now should I taper the mast first or can I do it later after the ring is fitted to the deck. Will fitting the ring now have any effect on stepping the mast later on.Hope this makes sense. Best regards Dave
-
Including painting and correcting lots of mistakes and also left quite a few I have eventually completed the fitting and rigging of the cannons. Altogether it has probably taken me almost a week to completed. Today I have also moved onto the bilge pumps and capstan. I have also started blackening some of the brass work before fitting to try and make it a bit more realistic.
Photos to follow.

-
-
-
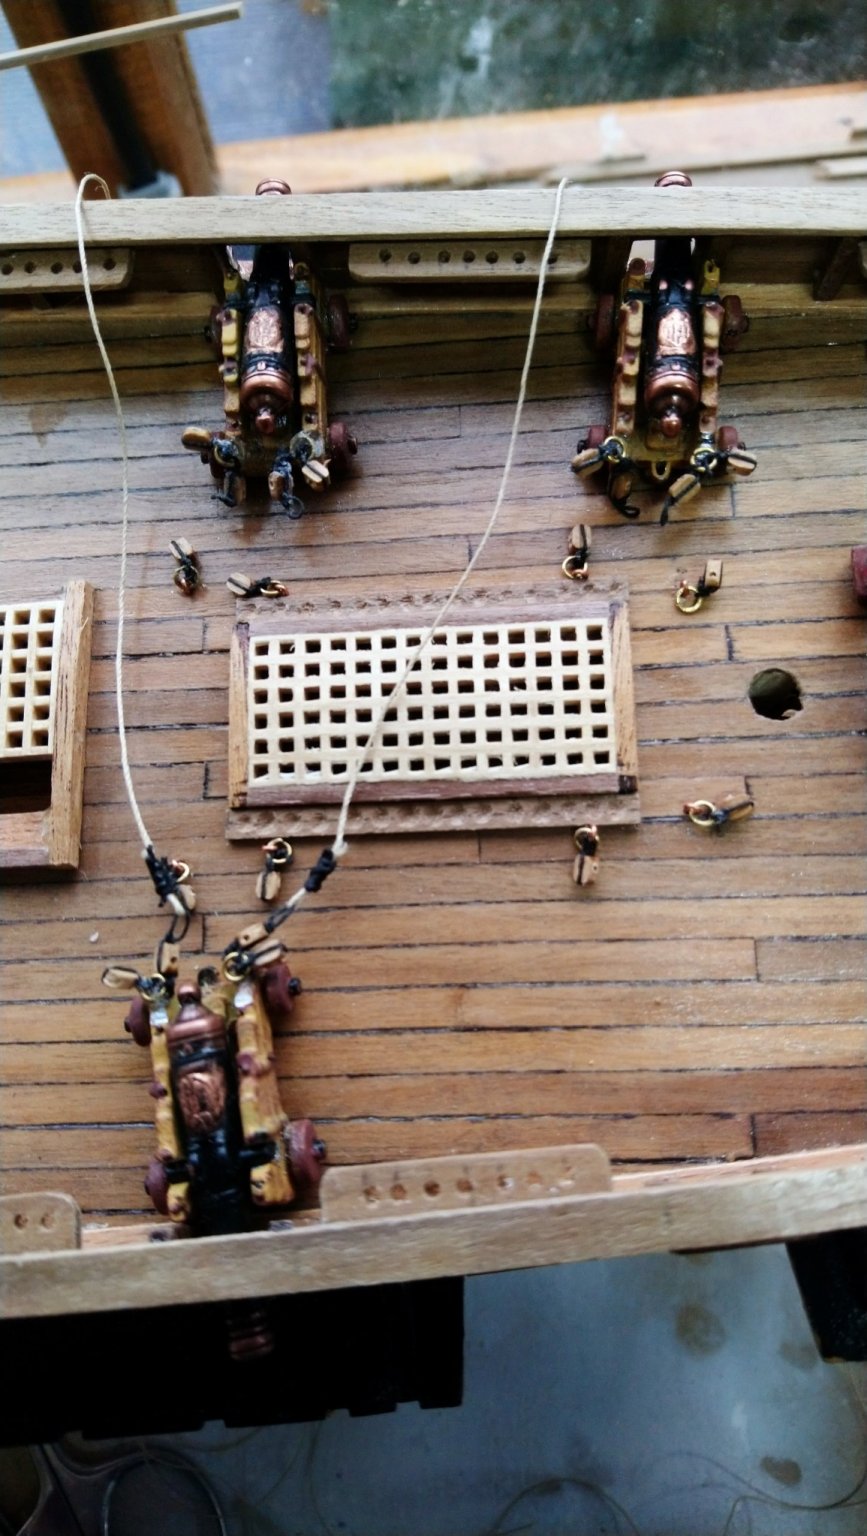
After 3 days working on the blocks and rigging for the Cannon I can actually see the light on at the end of the tunnel. All the work is completed off the ship and now ready to attach the ropes to the bulwarks. As the instructions say the attachment is actually on the bulwark and not the stantions .I think I will make pad eyes instead of eye bolts as I don,t want to accidently drill through the planking I will add another 1 mm so a total thickness of 3 mm before going through the otherside. I will cut the eye bolts to 2mm which should be long enough to be secure.I could just use the stantions next to the Cannons but this will give me very little room for the blocks. here is the work so far. Just for the record I wasted lots of blocks and tried several times to seize the ends onto the rings using black thread before I eventually got the hang of it but it has served me well so should make a better job of the larger blocks on the rigging. Any thought or comments would be welcome.

-
Hello guys.What a coincidence I just ordered some of this the other day and just received this yesterday and have only just noticed this post. I have started fitting some blocks to the cannons and have already used some brass rings and copper eye pins. my question is can this stuff be added to parts which have already be fitted. I don,t mean the rigging just one or to places using a cotton bud stick. Would there be any staining to surrounding areas? Best regards Dave
-
37 minutes ago, Blue Ensign said:
That knob is known as the button, and the whole fitting on the end of the gun as the cascable.
Before the advent of the Breeching ring atop the cascable on Blomefield pattern guns, the rope was simply looped around the button, or spliced around the button.
No knots as such are involved.
B.E.
So no knot it is then .Just looped around. Thanks for a prompt reply.. Best regards Dave
-
I have taken the plunge and decided to paintsthe cannons Iron black and the gun carriges yellow orcre as this the colour which came with the kit. I was also supplied red orcre but I believe is used on the carrages fn the Bounty but think this a bit dark for my needs .I thought I would try a bit of weathering by using some brown acrylic paint and applying using a very stiff brush with very littlle paint on itth the yellow orcre. I don,t believe it is perfect by any means but I am satisfied enough not to have regretted painting the cannons in the first place. I have also ordered some brass blackening for the numerous brass rings with the kit. Here is a photo of the completed paint job and looking at it closely I can see there are one or two places need touch up.
Any comments would be appreciated. Best regards Dave
-
I don't know the correct term fot the round thing at the back end of the Cannon but what is the correct knot tied around the ball to secure the cannon to the bulwarks.
-
After much deliberation on whether to paint the cannons or not,in the end I decided to paint them. Also I have been reading the art of weathering the wood work but as yet I don't have any such kit so decided to try doing it by painting first using metal primer and then yellow orcre for the gun carrage and iron black for the cannons. I also used a brown similar to raw sienna for weathering. I also added a few touches of copper to the cannon badge or crest what ever it is called. I am not sure if this is in anyway authentic or even better than if I had left them int there origonal state. Here is the end product.
I have now done about 50% of the blocks and have run out of them. I did not realise how many I ruined when trying to drill them or being satisfied . I also did about 4 with light thread and then decided I wanted the siezings to be dark. Fortunately I antisapated this and have some on order and hopefully will get them soon. In the mean time I can continue with the hatch comings and covers so will not be idle.


-
Slight change of tack here. Regarding the use of copper wire to acheive that extra loop was a bit of a failure. I really couldn't get it to work somehow. Perhaps it was trying this on such small blocks. I also tried the above method of tying a loop and then just tying it to the block and then a drop of CA, This seemed to work betterat least for me it did. I intend to put all my make up all my blocks and thread it all together before gluing everything to the ship. Hope this is the best way forward.. In the meantime I thought about how I am going to paint the cannons and have been thinking about the weathering at would like to go down this route. However I was wondering about the carriages and wondered about weathering wood. I have done some water colours in the past and made a pretty good job of painting old boats and barns and harbour buildings and that sort of thing and with reasonable success. I know acrylic is not the same as watercolour but wondered if the same technique of wet in wet could not be applied to acrylic paint and then perhaps sealed some how. Just for the record anyone who has done water colours will know what wonderfull effects can be acheived by wet in wet .
Sorry if this is going off the subject somewhat and your continued input would be much appreciated. Best regards Dave

.JPG.784f62c338fd2dbfc75c93853f419094.JPG)
.jpg.2c38353e4c67fd550b98d45afb394cf0.jpg)


Brass rings for rigging on HMS Bounty
in Masting, rigging and sails
Posted
Although I am currently still a way off rigging. I have noticed the brass rings that secure the ropes to the deck are very soft and would not take much to open them up again as you do when attaching them to the copper eye pins. It has occurred to me do they need a drop of CA glue to prevent this or should the lines not be too taught to make this happen ? I do read on here though that some people do not like to use CA glue anywhere.