
HOLIDAY DONATION DRIVE - SUPPORT MSW - DO YOUR PART TO KEEP THIS GREAT FORUM GOING! (Only 64 donations so far out of 49,000 members - C'mon guys!)
×


GGibson
-
Posts
1,042 -
Joined
-
Last visited
Content Type
Profiles
Forums
Gallery
Events
Everything posted by GGibson
-
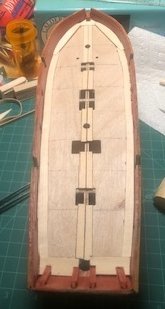
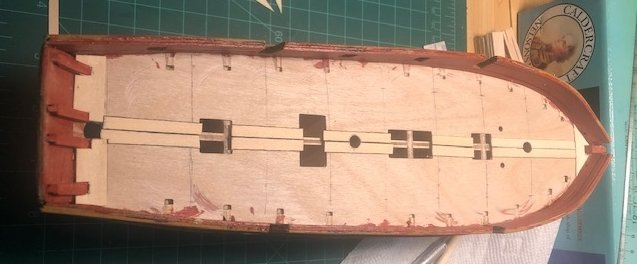
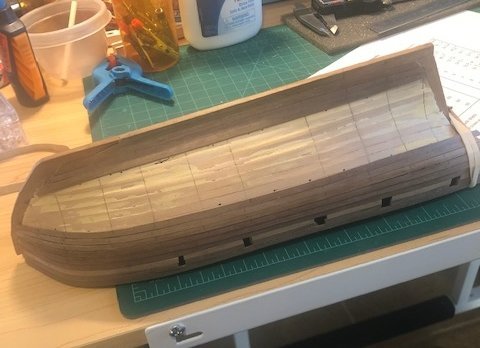
 Worked more today on the margin planking, and think I landed on the planks I am going to work with. Started with some 10mm wide strips, and cut, shaped and sanded them down to 6mm widths so they ran pretty tightly along the edge of the inner bulwarks. On the more severe curve at the bow, I am leaving the "working planks" at 10mm widths in order to give room for the nibbing. As you can probably tell, I have not glued any of this margin planking down yet. My intent is to dry-fit as much of the deck planks as I can, determining where I need to trim and nib to make it fit right and look right. Other than the two center planks that I previously discussed that are too short due to the various breaks down the center, I intend to employ a four-butt shift system on the remaining deck planks. We'll see how everything goes! Appreciate the comments, suggestions and criticism. Thanks... Gregg
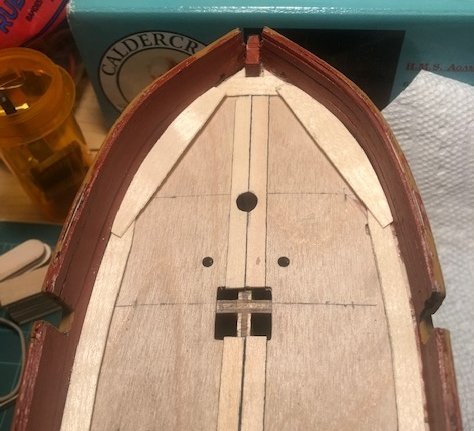
- 65 replies
-
- 2
-

-
- Ballahoo
- Caldercraft
- (and 1 more)
-
Hello Steve! I was actually doing a search on the term "nibbing", and your post popped up, so was reading it. Hope your knee surgeries went well! I had both knees replaced at same time back in 2012. Rehab was hell, but was definitely worth it. Best wishes on your USS Niagra restart... and I love your motto! Gregg
-
Thanks, Bob! I've been following your Harriet Lane build, as well. Doing awesome!
-
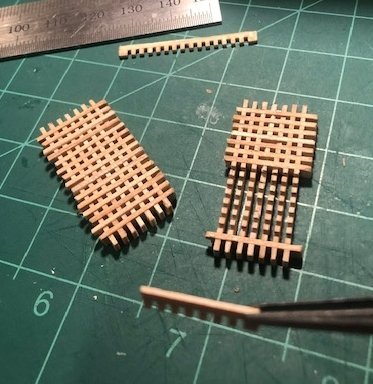
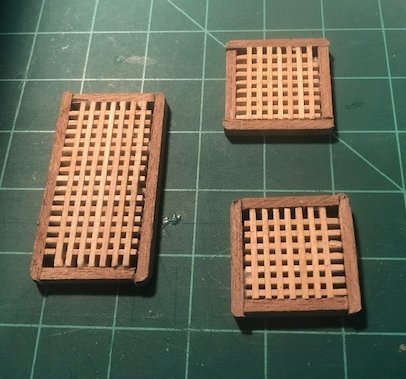
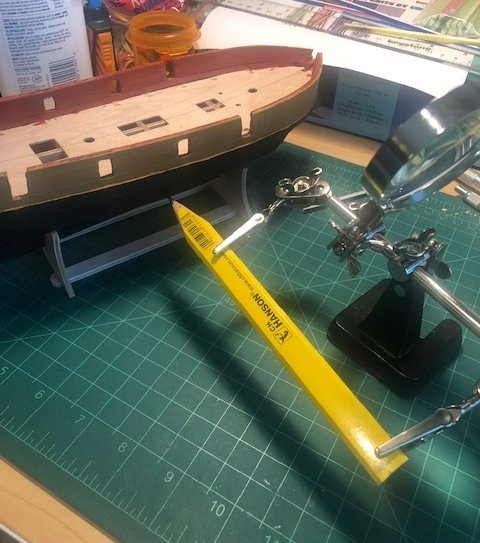
Several of the grating pieces had "teeth" missing from the shipment, and I wasn't sure if I had enough to make the three grates needed. So, while I had a bit of a break before tackling the deck planking, I decided to work on the gratings, in case I needed to order replacements. As it turns out, though, I had enough and, although there were a few visible gaps due to missing teeth, I was able to keep them on the same side so they shouldn't be visible in placement on the completed deck. These were, though, a bit harder to make up than I thought they'd be. But, I think they came out ok. I need to work a bit more on rounding the corners a touch more before placement, but we'll work on that at the time. I even notice in this picture the lower right one needs some more sanding! Now to the deck planking! I have been looking over and over again at some of the completed build logs to better understand how to tackle this project, and the ones I've reviewed have been tremendous help. Hopefully, I can do as well on this one. Perhaps not totally realistic, but made some cross plank pieces at both stern and bow for the main deck planking to butt up to. Knew that the deck planking was going to begin at the center line and work outwards, so decided to measure, place and secure the planks on either side of the center line. These are now glued in place and I will work outward. Still haven't settled on how to complete the margin planking. I've been practicing on different lengths and widths to see how they'll best fit and look, and have the inner deck planking fit, as well. A lot of nibbling practice! And, as you can see from the center planks, I am replicating the caulking, too, with a black sharpie. If anyone sees anything I am doing wrong, or may lead to issues down the road, please speak up! Appreciate the comments and criticism. Gregg
- 65 replies
-
- 2
-
-
- Ballahoo
- Caldercraft
- (and 1 more)
-
Thanks to all for the suggestions/advice. Feel a bit better in how to approach this task now.
-
I am sure this question has been asked multiple times, so apologize in advance for asking again. I reviewed through about three pages on this sub-topic, did some basic searches, and still a bit unclear, so here goes... I have some 0.5mm x 4mm limewood strips to glue to a false deck. In order to avoid any curling, etc., would it be good to use some watered-down PVA glue? Get it to that milk-looking consistency? Would that allow the planks to adhere better and more consistently? Any other proven gluing methods for deck planks? Are we doing anything to hold down the strips while they dry? Maybe pushpins like what is done on hull planks, not only to hold them down but also firmly against the adjoining plank? Still learning and taking all the advice I can get! Thanks in advance for comments, advice and criticism. Gregg
-
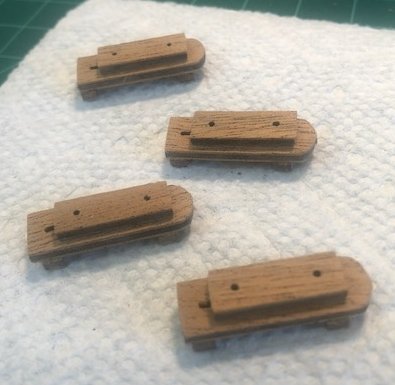
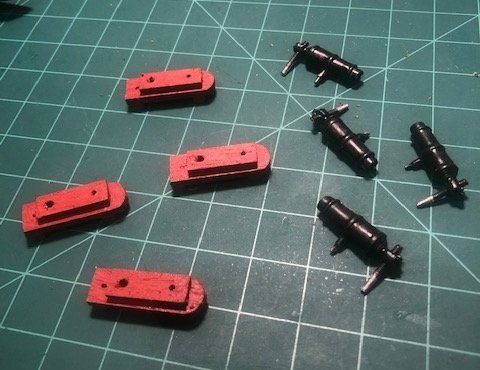
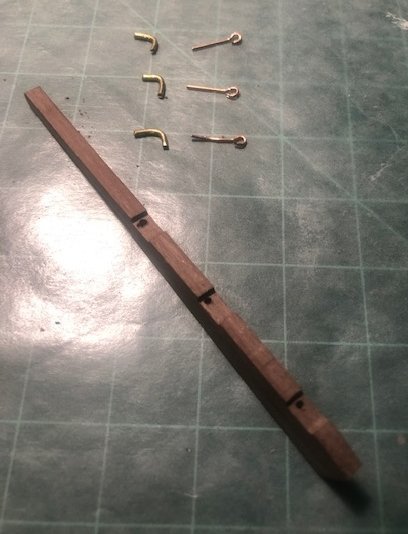
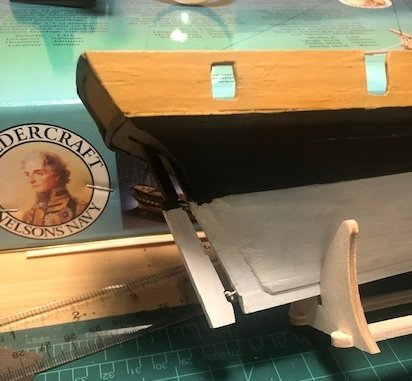
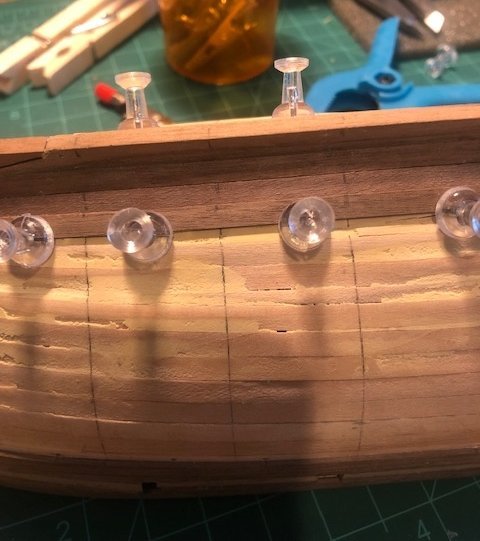
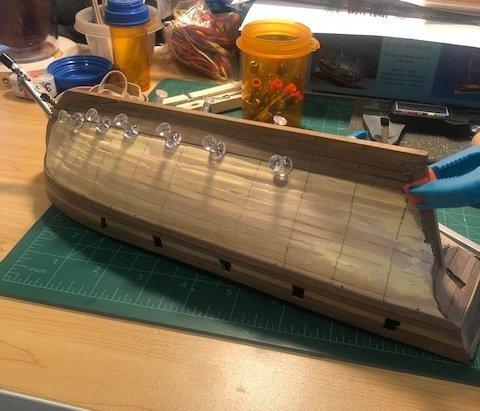
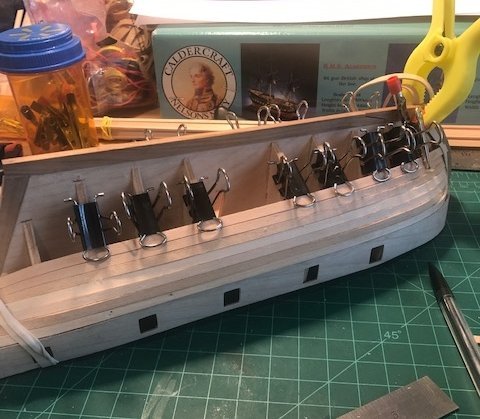
I am waiting on some additional wood strips to begin work on the deck planking. I'm also waiting on some new grating pieces, as several of the "teeth" on the ones included in the kit were broken. While I am waiting on those to be delivered this week, I began working on the carronades and on the rudder. Read some other build logs on how they prepared their carronades. Some were quite detailed, but I opted to keep mine fairly basic. Once I get the deck planking done, though, and am ready to set these on the deck, I may choose to get a bit more detailed in how they are secured to the bulwark. As you can see in the 2nd picture above, though, you will see that I needed to make the back hole where the carronade sits on the base slightly larger in order for each to fit properly. Also worked on the rudder. Determined where the eyelets needed to be placed on the rudder post, created the hinge pegs using brass wire, few drops of CA glue here and there, and after a bit of adjustments and manipulation, the rudder slid into the hinges. The picture makes it look like there is a fair distance between the rudder and the rudder post, but the distance isn't that great. Should be receiving the deck planking shipment this week, and will begin on the margin planking, nibbing, etc. that others have shown so well in their build logs. Oh, and build the gratings, as well. Appreciate your reads and comments for improvements. Gregg

- 65 replies
-
- 1
-
-
- Ballahoo
- Caldercraft
- (and 1 more)
-
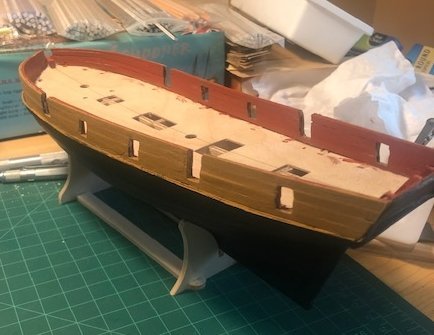
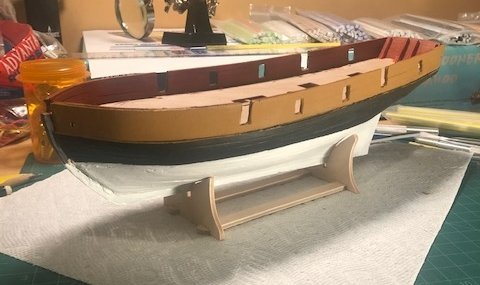
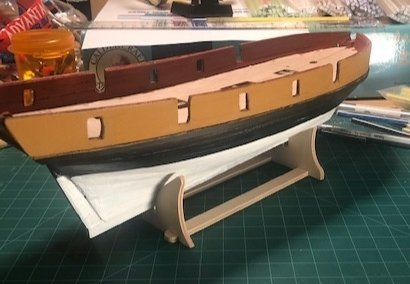
Well, I have continued moving forward on this version of the Ballahoo, despite the poor 2nd planking. Sanding, filling and painting have hidden a decent share of the booboo's. In addition to sanding and filling the hull multiple times, I also completed the bulwark inner planking using walnut strips and sanded the inner planking to a smooth finish, as well. Once satisfied with the sanding, I painted the hull exterior and the inner planking. I put six coats of black paint on the exterior. I started with a coat of the dull black Admiralty Paint that I ordered with the Ballahoo kit, but wasn't really happy with the way it was going on, so I changed to the Vallejo black paint (in a 70/30 mixture with their Vallejo Medium Thinner)) and was happier with the finish. I used an Arteza Paint Yellow Ochre color for above the main wale, and a Windsor & Newton Red Ochre color for the inner bulwark... again multiple coats. I then measured and drew a waterline mark and, using the tamiya tape, masked and painted below the waterline. I used the Admiralty Matt White paint that came with the kit. Not sure if it meets the 'white stuff' criteria... it may be a little brighter than what it would be in reality, but seems to look good, so we'll stick with it. I thought about dropping a bit of the yellow ochre in the mix, but was concerned about a consistent coverage, so opted for the Matt White by itself. In retrospect, I'm thinking it would have probably been easier to paint the yellow above the wale and the white below the waterline if I hadn't given the entire exterior hull multiple coats of the black. If I knew I was going to be painting those sections those colors, the respective paints would have certainly covered better than they did having to go over the black that I had laid down previously. Will remember that in future builds and paint sessions. If you get up close to the ship, yes, you can see some of the imperfections, but... it's my 3rd build, and I am getting better in certain areas and will continue to improve in my planking skills on my 4th build, and my 5th build, and... well, you get the idea. Will do a few more touch-ups on the hull and bulwark painting as I continue on, but it's now on to the deck planking and the bulwark capping rail. Have been looking a lot at past builds, such as jim_smits and egkb, for guidance and inspiration. Thanks to all for suggestions and encouragement. Gregg

- 65 replies
-
- 6
-
-
- Ballahoo
- Caldercraft
- (and 1 more)
-
Boom and mast both look really good, Dan! Yeah, I only used my little plane for a couple of swipes on the four square, and then limited my shaping to just placing a piece of sandpaper in the palm of my hand... kinda like a taco shell... and sliding the boom, mast and gaff in between the paper. And, yes, I did much better on this one than I did on my first boat, as well. Keep on moving forward! Gregg
- 90 replies
-
- 2
-
-
- Model Shipways
- muscongus bay lobster smack
- (and 1 more)
-
Yeah, you sorta did! But, looking forward to following both of your build logs. Best wishes to both! I'm sure you are familiar with it, but there is an interesting 34-part YouTube series on the OcCre Titanic construction...
-
Looks great, Dan! Yeah, I did a much better job with my Lobster Smack mast, bowspirit, boom and gaff than I did with the mast on the Sailing Pran. Was careful to just knock the four corners down a bit (didn't even try to do the octagon) and then just sanded them round where needed. That way, I was much more in control of just how much I was taking off, especially with the mast, in order for it to fit snuggly in its position. Interesting decision on whether to paint, stain or leave natural the spars. I decided to paint the bowspirit the same white as the hull, but did a light stain on the mast, boom and gaff, and was pleased how they looked when the rigging was complete. Keep up the great work! The sails and rigging work are approaching quickly! Gregg
-
Thanks Dan and George for the feedback and the encouragement. Yeah, the more I look at it now, and keep working some on sanding and filling where needed, it should be pretty decent once it gets several coats of paint on the hull. And yes, George, was planning on the 'white stuff' look below the waterline. Moving forward! Thanks again, gentlemen, for peeking in and sharing your comments! Oh, and for those of you following the NCAA Men's Tournament... Rock Chalk Jayhawk!! Gregg
-
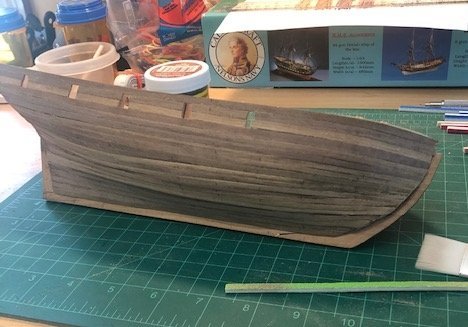
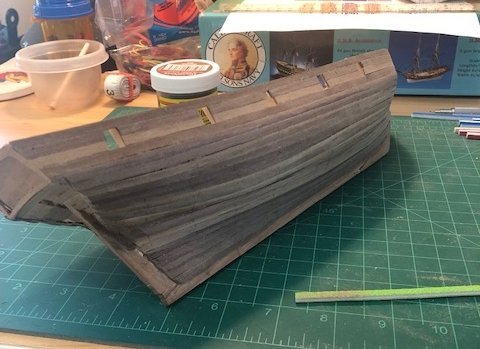
Well, I have trudged forward on the 2nd planking of my Ballahoo. I am really disappointed in the way I miscalculated and misplaced the planks with poor tapering. I posted a question on another thread with suggestions and I got several "take planks off and/or start over" comments. I am still keeping the "start over" option on the table, but decided to see what I can salvage out of some decent sanding/filling/sanding/filling exercises. I keep thinking that, since I'm painting the hull anyways, perhaps much of my imperfections and horrible plank tapering work will not be noticeable. Anyways, enough beating myself up. As I just stated, I am now working on some serious sanding, filling a few spots with walnut wood filler where needed. Starting with 100/120 grit sand sticks. Will work up to 240 grit as we continue to smooth out a few bumps. Still referring back to previous build logs for guidance and inspiration. The one from jim_smits has been really helpful, even as I look ahead to deck planking, etc. Still, though, keeping my options open on starting a new Ballahoo. Let's see how this sanding/finishing process looks. Gregg
- 65 replies
-
- 2
-
-
- Ballahoo
- Caldercraft
- (and 1 more)
-
Bought this OcCre Titanic kit when it was on sale a few months back. Couldn't help myself. It's in the shipyard queue for building, but realistically probably 9-12 months before starting. I need to learn a lot on some other builds before tackling this classic. With that said, I will be following your progress, Dean! Hope all goes well and excited to see it come together. Gregg
-
Thanks to allanyed, Gregory, and Katsumoto for each of your pictures, links and suggestions on how to fix/proceed. I am continuing to learn, even if there are a few failures along the way. I appreciate your input. I'll let you know how it turns out. Thank you all.
-
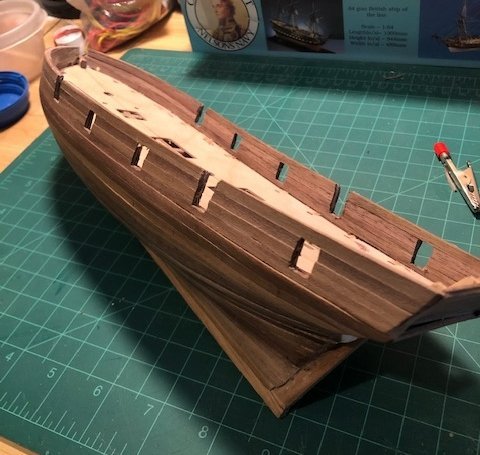
Hi all - Pretty novice shipbuilder here, on my 3rd build (the Ballahoo), and always learning and trying to research as much as I can. With that said, I am working on the 2nd planking on the Ballahoo and have a question on how to finish with the best look (the hull will be painted). I have learned a lot in reading info here on MSW, as well as on tutorials from experts like Chuck Passaro. I am getting much better, for example, in the edge-wise plank bending process. I am sanding strips close to what is needed at certain points of the plank depending on where it hits each of the beams. I am still, though, going to have to add some stealers on this exterior planking to finish. Here's what it looks like so far... So, if I am going to add stealers, should they be staggered in different locations on the hull? When I started the 2nd planking, the width of the planks at the bow needed to be in the 2.00-2.69mm range. Didn't quite get there on some, so as I recalculate, the widths are getting even narrower. Suggestions on how to finish, where to put stealers, etc. I appreciate any input, criticism, etc. Thanks... Gregg
-
Looks really sharp, Dan. All that priming/sanding work has paid off. Looking forward to seeing you progress. Gregg
- 90 replies
-
- 2
-
-
- Model Shipways
- muscongus bay lobster smack
- (and 1 more)
-
Well, after a lot of research and worry, I have begun the 2nd planking on the Ballahoo. I did a couple of strakes at the garboard strake and also over and just past the bulwarks. At this point, I have measured the distance between top and bottom at each bulkhead to determine how much I will need to taper each of the walnut strips, especially at the bow. I was contemplating whether to have full length strakes from bow to stern or to do shorter planks and butt them in a shift pattern that I saw examples of. If I were going to be staining the hull, I think the butt shift pattern would look really nice, but since I am going to be painting, I didn’t think it would be that noticeable, anyways. So, going the full length on the planking. We will see how my measurements and calculations progress as I work on the hull. As I said, the strips are being sanded/tapered on the bow end down to between 2.15-2.4mm on the 4mm wide strips (thank you digital caliper!), so they are pretty narrow. I plan on re-measuring periodically as I progress to see if the numbers change. So, it is definitely slow-going! I hope I have described the process accurately. If anyone has any comments/suggestions on what to do differently or better, I appreciate the input. Thanks! Gregg
- 65 replies
-
- 3
-
-
- Ballahoo
- Caldercraft
- (and 1 more)
-
Looks great, Dan! The coaming and cabin sides fit nicely. Great work! Gregg
-
Well, I have completed the first planking to about the best of my ability, still in my "newbie learning" stage. I have done plenty of sanding, filing with bits of putty here and there, and more sanding to the point it all feels pretty smooth and consistent for the 2nd set of planks to adhere to. I really love the Keystone sanding sticks. Started with the 80 grit and moved to the 120 and 180 grit twigs as the look and feel improved. Tried to minimize the use of putty (definitely less than I did on the Lobster Smack), but still has a noticeable putty residue in spots. As I am planning on painting the hull, this shouldn't be an issue, though. I read in one of the Ballahoo build logs where the entire exterior was given a coat of diluted PVA glue at this point to give it a bit of strength before the 2nd planking. For the 2nd planking using the walnut strips, I was planning on having full strakes on the bulwark (except at the gunport positions) and a full garboard strake. But then for the planking in between, I was going to use Chuck Passaro's method of lining off and measuring planks for tapering where necessary, etc. Hope it all comes out as well as some of the recent build logs I have been reading and referring to for guidance so far! If anyone has any guidance/suggestions... any "don't forget to do's"... I appreciate your advice! After several days of Mother Nature teasing us in the Kansas City area with mild late Feb/early March temperatures, it's back down in the 30's-40's for a few days, so it's good to spend some quality time in the shipyard. Thanks for listening! Gregg

- 65 replies
-
- 3
-
-
- Ballahoo
- Caldercraft
- (and 1 more)
-
Appreciate your input/advice, George! I will carry on! And, yes, I can see where I'll need a few "gap-filling stealers" at the stern as I progress. I'll let you know how it comes out! Thanks... Gregg
-
Hi Dan! It all looks really good so far. Congrats on your success and in managing the challenges. Believe me, there are more challenges ahead on this boat, but you will learn from them so the on the next build, you'll think "easy peasy!" Regarding the toe rails and rub rails, one comment I was going to make (but may be too late in looking at your updated picture) is determining how you are going to paint/stain the rails and to do that before gluing them onto the boat. If they are going to be different than the hull, the small detailed painting was really hard to keep from bleeding onto other places. I had similar difficulty with my samson post, as well. Mine split when attempting to insert the small rod and... super glue came to the rescue! I painted the deck prior to placing the coaming and the cabin sides (I painted those prior to placement, as well). Speaking of which, when curving and placing the coaming and the cabin sides, make sure they fit together nicely , but don't cut anything until they both dry, as they will shrink some in place prior to gluing. Looking great, Dan!
-
Hi All - OK, so now I am looking for some more experienced advice/guidance. I am at the seventh (7th) plank working down from the bulwarks (or up from them, as I have been working with the ship upside down), and about to work my way along the rudder post. At this point, should I now place the garboard strakes and work down from them in order to determine where I may have to do some major tapering, or some "stealer placement" as @jim_smits did, for example, in his Ballahoo build? Or should I continue where I am at, and be concerned with the tapering as I get closer to the garboard? Hope my question makes sense. Appreciate everyone's advice. Thanks.
- 65 replies
-
- 1
-
-
- Ballahoo
- Caldercraft
- (and 1 more)
-
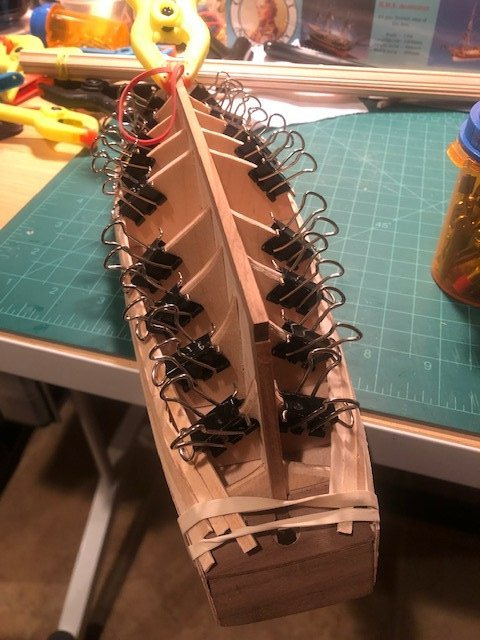
Haven't gotten very far in the planking process. Taking my time and doing what I can to avoid gaps, etc. (and took a break over the weekend). Not really worthy of an updated post, but I had to share a new technique I picked up. It was either on another thread in this Model Ship World site, or on a YouTube video. I revised some Acco binder clips to hold the plank tight against each of the bulkheads as well as the plank next to it. I am so excited! Anyways, I am continuing to work on the planking!

- 65 replies
-
- 4
-
-
- Ballahoo
- Caldercraft
- (and 1 more)
-
Hi Dan - The hull looks great. As you said, a little more sanding, some fill here and there, and it will look awesome when painted. Anxious to see you progress. Enjoy! Gregg